macromedia flash - actionscript...
TRANSCRIPT

Macromedia Flash - ActionScript tutorial
Home > Products > Flash > Support > Using ActionScript
ActionScript tutorial
ActionScript is the scripting language of Macromedia Flash. A scripting language is a way to communicate with a program; you can use it to tell Flash what to do and to ask Flash what is happening as a movie runs. This two-way communication lets you create interactive movies. In this tutorial, you will examine the tasks involved in creating an interactive puzzle.
To complete the ActionScript tutorial, you'll take advantage of Flash 5 features beyond what you learned in the lessons and the Using Flash tutorial, and you'll learn more about creating an interactive movie. The tutorial is designed for Flash users who are ActionScript beginners but who want to work towards advanced abilities. You should already be familiar with basic actions and know how to assign them in the Actions panel. To get the most out of this tutorial, you should first complete the tutorial in the Using Flash manual. You should also be comfortable with the concepts presented in the chapter "Creating Interactive Movies" in the Using Flash manual.
To complete the Using Flash tutorial, in Flash choose Help > Using Flash and select the Tutorial.
Before you begin, you will need to download either of the following files:
Download the Windows source file actionscript_tutorial.zip (1.7MB)
Download the Macintosh source file actionscript_tutorial.sea.hqx (2.4MB)
The tutorial takes approximately 1 hour to complete, depending upon your experience, and focuses on the following tasks:
View the completed movie Initialize the movie Set movie clip properties Save and retrieve information Declare a variable and assign it a value Display information in a dynamic text box Write an expression Control the flow of the movie Write a conditional statement Create commands and reuse code Write a function Call a function Use a built-in object Test the movie The next steps
http://www.macromedia.com/support/flash/action_scripts/actionscript_tutorial/ (1 of 2) [11.7.2002 20:42:58]
Macromedia Flash - ActionScript tutorial
Jody Bleyle
Jody Bleyle writes instructional documentation for Macromedia Flash and has served as the Flash Technical Support team lead.
-------------------------------------------------------------------------------------------------
10 September 2001
-------------------------------------------------------------------------------------------------
ActionScript, tutorial, expression, object, actions, variables, properties, code, value, functions
-------------------------------------------------------------------------------------------------
9840
©1995-2002 Macromedia, Inc. All rights reserved.
Use of this website signifies your agreement to the Terms of Use.
Privacy | Site Map | Contact us | Accessibility | Report Piracy
http://www.macromedia.com/support/flash/action_scripts/actionscript_tutorial/ (2 of 2) [11.7.2002 20:42:58]
Macromedia Flash - ActionScript tutorial: View the completed movie
Home > Products > Flash > Support > Using ActionScript
View the completed movie
Before you start to work on your own movie, view a completed version of this tutorial to get an idea of what you'll create. Additionally, the completed tutorial lets you examine the Timeline, Movie Explorer, Stage, and Actions panel to understand authoring practices.
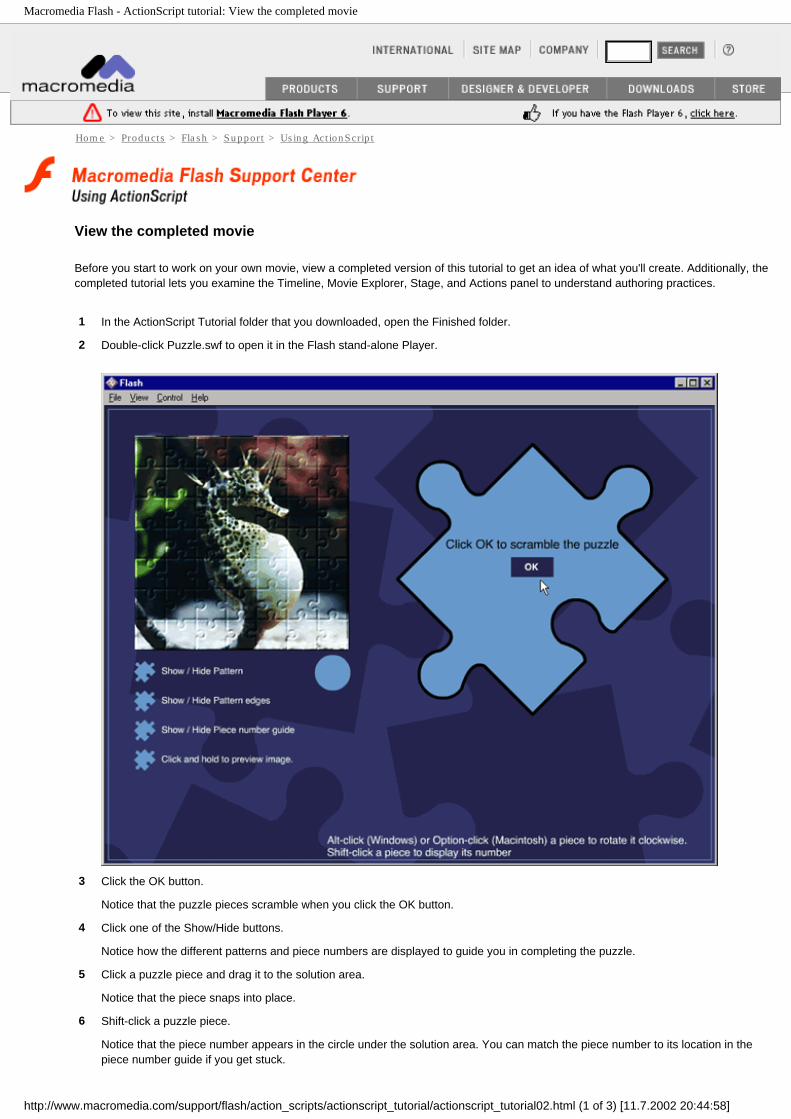
1 In the ActionScript Tutorial folder that you downloaded, open the Finished folder.
2 Double-click Puzzle.swf to open it in the Flash stand-alone Player.
3 Click the OK button.
Notice that the puzzle pieces scramble when you click the OK button.
4 Click one of the Show/Hide buttons.
Notice how the different patterns and piece numbers are displayed to guide you in completing the puzzle.
5 Click a puzzle piece and drag it to the solution area.
Notice that the piece snaps into place.
6 Shift-click a puzzle piece.
Notice that the piece number appears in the circle under the solution area. You can match the piece number to its location in the piece number guide if you get stuck.
http://www.macromedia.com/support/flash/action_scripts/actionscript_tutorial/actionscript_tutorial02.html (1 of 3) [11.7.2002 20:44:58]
Macromedia Flash - ActionScript tutorial: View the completed movie
7 When you finish viewing the SWF file, you can either close the window or leave it open to serve as a reference.
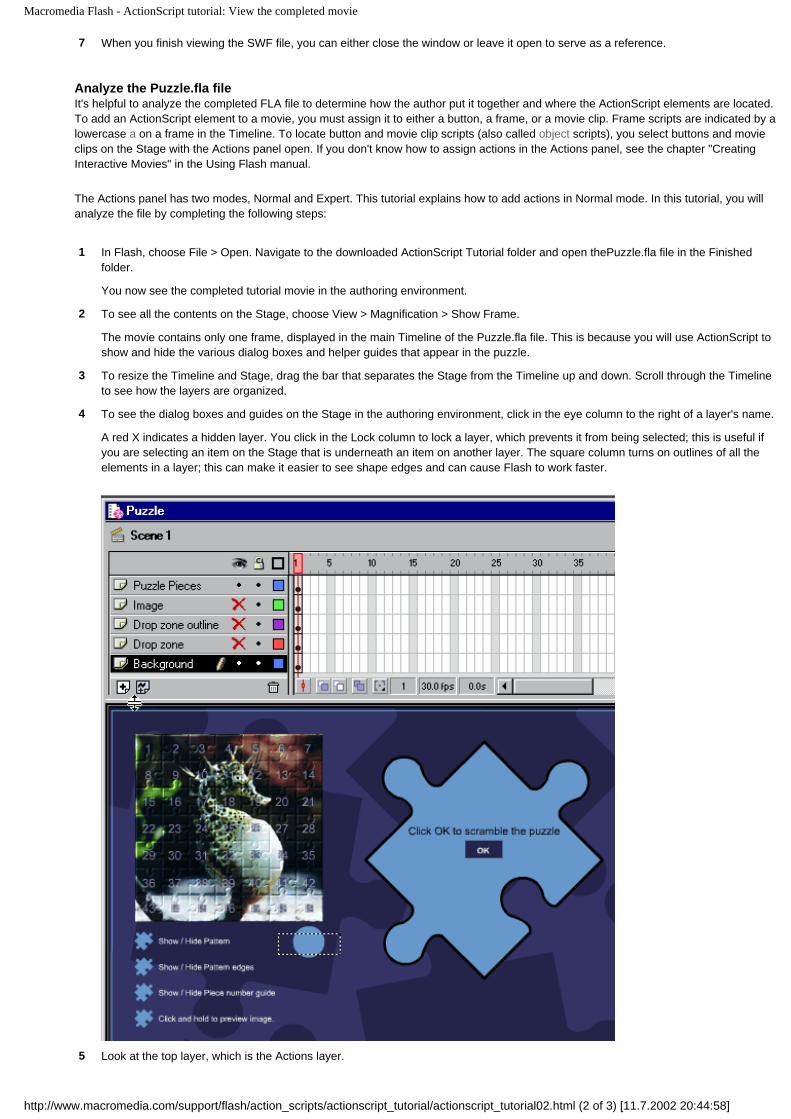
Analyze the Puzzle.fla fileIt's helpful to analyze the completed FLA file to determine how the author put it together and where the ActionScript elements are located. To add an ActionScript element to a movie, you must assign it to either a button, a frame, or a movie clip. Frame scripts are indicated by a lowercase a on a frame in the Timeline. To locate button and movie clip scripts (also called object scripts), you select buttons and movie clips on the Stage with the Actions panel open. If you don't know how to assign actions in the Actions panel, see the chapter "Creating Interactive Movies" in the Using Flash manual.
The Actions panel has two modes, Normal and Expert. This tutorial explains how to add actions in Normal mode. In this tutorial, you will analyze the file by completing the following steps:
1 In Flash, choose File > Open. Navigate to the downloaded ActionScript Tutorial folder and open thePuzzle.fla file in the Finished folder.
You now see the completed tutorial movie in the authoring environment.
2 To see all the contents on the Stage, choose View > Magnification > Show Frame.
The movie contains only one frame, displayed in the main Timeline of the Puzzle.fla file. This is because you will use ActionScript to show and hide the various dialog boxes and helper guides that appear in the puzzle.
3 To resize the Timeline and Stage, drag the bar that separates the Stage from the Timeline up and down. Scroll through the Timeline to see how the layers are organized.
4 To see the dialog boxes and guides on the Stage in the authoring environment, click in the eye column to the right of a layer's name.
A red X indicates a hidden layer. You click in the Lock column to lock a layer, which prevents it from being selected; this is useful if you are selecting an item on the Stage that is underneath an item on another layer. The square column turns on outlines of all the elements in a layer; this can make it easier to see shape edges and can cause Flash to work faster.
5 Look at the top layer, which is the Actions layer.
http://www.macromedia.com/support/flash/action_scripts/actionscript_tutorial/actionscript_tutorial02.html (2 of 3) [11.7.2002 20:44:58]
Macromedia Flash - ActionScript tutorial: View the completed movie
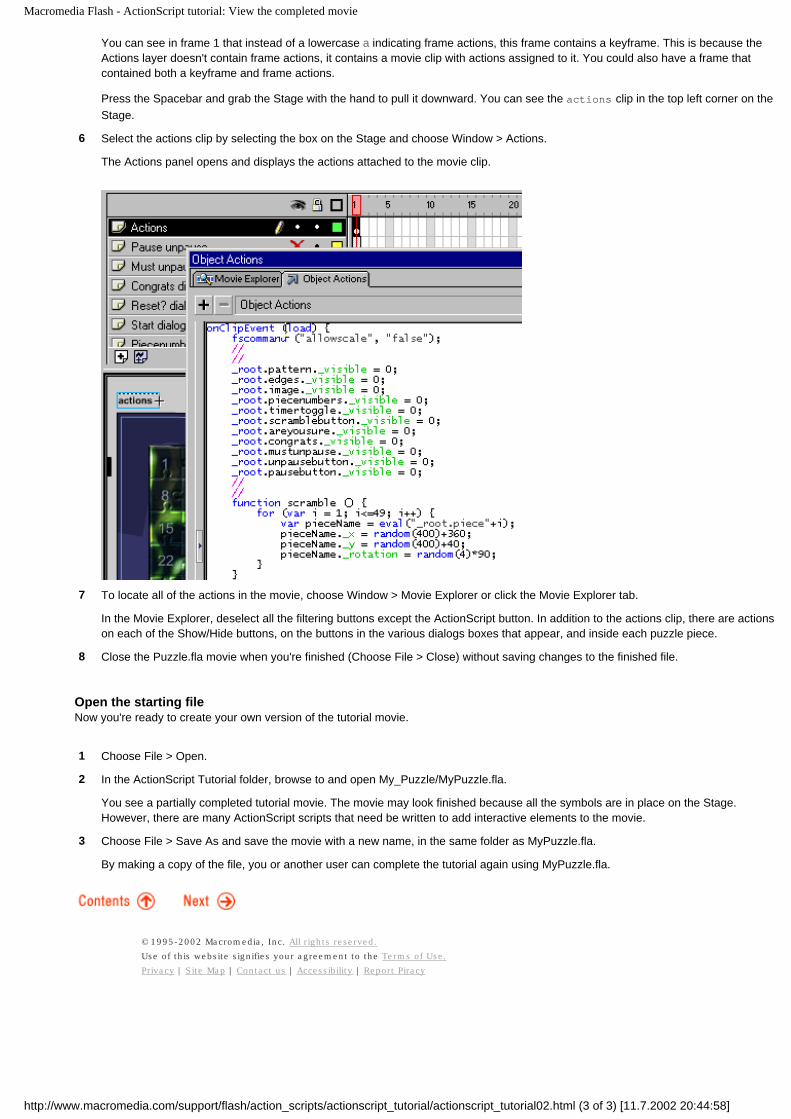
You can see in frame 1 that instead of a lowercase a indicating frame actions, this frame contains a keyframe. This is because the Actions layer doesn't contain frame actions, it contains a movie clip with actions assigned to it. You could also have a frame that contained both a keyframe and frame actions.
Press the Spacebar and grab the Stage with the hand to pull it downward. You can see the actions clip in the top left corner on the Stage.
6 Select the actions clip by selecting the box on the Stage and choose Window > Actions.
The Actions panel opens and displays the actions attached to the movie clip.
7 To locate all of the actions in the movie, choose Window > Movie Explorer or click the Movie Explorer tab.
In the Movie Explorer, deselect all the filtering buttons except the ActionScript button. In addition to the actions clip, there are actions on each of the Show/Hide buttons, on the buttons in the various dialogs boxes that appear, and inside each puzzle piece.
8 Close the Puzzle.fla movie when you're finished (Choose File > Close) without saving changes to the finished file.
Open the starting fileNow you're ready to create your own version of the tutorial movie.
1 Choose File > Open.
2 In the ActionScript Tutorial folder, browse to and open My_Puzzle/MyPuzzle.fla.
You see a partially completed tutorial movie. The movie may look finished because all the symbols are in place on the Stage. However, there are many ActionScript scripts that need be written to add interactive elements to the movie.
3 Choose File > Save As and save the movie with a new name, in the same folder as MyPuzzle.fla.
By making a copy of the file, you or another user can complete the tutorial again using MyPuzzle.fla.
©1995-2002 Macromedia, Inc. All rights reserved.
Use of this website signifies your agreement to the Terms of Use.
Privacy | Site Map | Contact us | Accessibility | Report Piracy
http://www.macromedia.com/support/flash/action_scripts/actionscript_tutorial/actionscript_tutorial02.html (3 of 3) [11.7.2002 20:44:58]
Macromedia Flash - ActionScript tutorial: Initialize the movie
Home > Products > Flash > Support > Using ActionScript
Initialize the movie
All movies have an initial state; this is how a movie looks before it runs and anyone interacts with it. There may be variables and movie clip properties that must be set to establish this first state. For example, in the Puzzle.fla file, certain dialog boxes and pattern guides must be hidden in the initial state. To hide a movie clip, you use ActionScript to set its _visible property to false .
Each movie clip in a Flash movie has a set of qualities, or properties, that you can manipulate with ActionScript. Each of those properties is identified by a name preceded by an underscore ( _ ) character. For example, each movie clip has an _xscale property, a _yscale property, and a _rotation property, among others.
ActionScript uses variables to store information. For example, the variable myName might hold the value "The Grape One" . Variables are discussed in the next section "Save and retrieve information."
You initialize properties and variables in the first frame of a movie. You can assign a frame action on the Timeline, or attach an object action to a movie clip. In the Puzzle movie, the properties of the pattern guide and dialog box movie clips are initialized on a movie clip in the first frame of the main Timeline.
©1995-2002 Macromedia, Inc. All rights reserved.
Use of this website signifies your agreement to the Terms of Use.
Privacy | Site Map | Contact us | Accessibility | Report Piracy
http://www.macromedia.com/support/flash/action_scripts/actionscript_tutorial/actionscript_tutorial03.html [11.7.2002 20:45:23]
Macromedia Flash - ActionScript tutorial: Set movie clip properties
Home > Products > Flash > Support > Using ActionScript
Set movie clip properties
The Puzzle.fla movie has three dialog boxes: one alerts you when the puzzle is completed, the other two ask if you want to scramble the puzzle pieces. There are also several patterns and guides that overlay the solution area to help you solve the puzzle. Each of these dialog boxes, patterns, and guides is a movie clip.
To initialize the movie, you must hide several of the movie clips so that only the start dialog box and the puzzle pieces are showing. You'll do this by setting their _visible properties to false .
1 Choose File > Open and choose the version of the MyPuzzle.fla file that you saved in the previous procedure.
2 Select the actions clip on the Stage in frame 1 and choose Window > Actions.
The Object Actions panel opens.
3 Select the pop-up menu in the upper right corner and choose GoTo Line. Enter 3 and click OK.
4 From the Actions category in the Toolbox list on the left, double-click the evaluate action to add an empty line of code ending with a semicolon.
A semicolon (;) in an ActionScript statement is like a period (.) in an ordinary sentence.
5 With the insertion point in the Expression box, choose the Insert Target Path button from the bottom right of the Actions panel.
http://www.macromedia.com/support/flash/action_scripts/actionscript_tutorial/actionscript_tutorial04.html (1 of 2) [11.7.2002 20:46:21]
Macromedia Flash - ActionScript tutorial: Set movie clip properties
Select the edges movie clip from the movie clip tree. Choose Dots notation and Absolute path and click OK. The following code appears in the Expression text box:
_root.edges
A target path tells ActionScript the location of a movie clip within the overall structure of a Flash movie. The _root property refers to the main Timeline and the edges movie clip lives on the Stage of the main Timeline. Any target path that begins with _root is called an absolute path because it gives the complete path to a movie clip from the main Timeline.
6 With the insertion point in the Expression text box after _root.edges , enter ._visible=false.
You can enter the code manually, or you can choose ActionScript items from the Properties and Operators folders in the Toolbox list.
7 Repeat steps 2-4 choosing the pattern , image , piecenumbers , scramblebutton , areYouSure , and congrats movie clips in the Insert Target Path dialog box.
These lines of code make each of these movie clips invisible on the Stage.
8 Choose File > Save As and enter a new filename. For example, if your file is called Jean_Puzzle.fla, you could name it Jean_Puzzle1.fla. This allows you to revert to earlier versions of the file.
©1995-2002 Macromedia, Inc. All rights reserved.
Use of this website signifies your agreement to the Terms of Use.
Privacy | Site Map | Contact us | Accessibility | Report Piracy
http://www.macromedia.com/support/flash/action_scripts/actionscript_tutorial/actionscript_tutorial04.html (2 of 2) [11.7.2002 20:46:21]
Macromedia Flash - ActionScript tutorial: Save and retrieve information
Home > Products > Flash > Support > Using ActionScript
Save and retrieve information
To create a complex interactive Flash movie, you need a way for Flash to keep track of information and user activity: buttons that have been pressed, a user's name, a score, or what sections a user has visited. ActionScript uses variables to store pieces of information that you can retrieve and use again. You can declare a variable in a script on any Timeline and use it in any other Timeline in the same movie. You must write a target path to a variable in order to use the variable, just as you must write a target path to use a movie clip.
In the Puzzle.fla movie, ActionScript uses the dialog variable to keep track of whether or not a dialog box is visible. When a dialog box appears, the dialog variable is set to true ; when a user clicks a button on a dialog box, the dialog variable is set to false . This variable doesn't affect the visibility of the dialog boxes themselves, it is simply a container that holds information which you can use in scripts throughout the movie. In the Puzzle.fla file, if dialog is set to true , a user cannot move a puzzle piece.
©1995-2002 Macromedia, Inc. All rights reserved.
Use of this website signifies your agreement to the Terms of Use.
Privacy | Site Map | Contact us | Accessibility | Report Piracy
http://www.macromedia.com/support/flash/action_scripts/actionscript_tutorial/actionscript_tutorial05.html [11.7.2002 20:51:16]
Macromedia Flash - ActionScript tutorial: Declare a variable and assign it a value
Home > Products > Flash > Support > Using ActionScript
Declare a variable and assign it a value
When you need a variable, you must name it, or declare it. You must also assign it a value. You can either do both things at once, or you may declare a variable in one statement and then assign it a value in a later statement.
There are two ways you can declare a variable in ActionScript: you can use the var action or the set variable action. You can declare a variable and assign it a value with either action. However, the var action also allows you to declare a variable without assigning it a value, which is useful for organizing your variables in a script. You can also use the var action inside a block of code (designated by curly brackets {} ) to create a "local" variable, which disappears when the code block is finished running. The Puzzle.fla movie uses the var action and the set variable action depending on the situation. When a variable is only needed within a block of code, the var action is used. The dialog variable is set and assigned using the set variable action.
Now you'll declare and assign a value to the dialog variable:
1 Choose File > Open and choose the version of MyPuzzle.fla that you last saved.
2 Select the actions clip on the Stage and choose Window > Actions.
The Object Actions panel opens.
3 Select the last line of code in the Initialize section and double-click the set variable action in the Action category in the Toolbox list.
4 Enter dialog in the Variable text box.
5 Enter true in the Value text box and select its Expression check box.
In the movie's initial state a dialog box is visible on the Stage. Therefore, the dialog variable must be set to true at the start of the movie, otherwise a user can move the puzzle pieces before they are scrambled.
http://www.macromedia.com/support/flash/action_scripts/actionscript_tutorial/actionscript_tutorial06.html (1 of 2) [11.7.2002 20:51:56]

Macromedia Flash - ActionScript tutorial: Declare a variable and assign it a value
6 Choose File > Save As and enter a new filename. Use a consecutive naming scheme so you can revert to earlier versions of the file.
©1995-2002 Macromedia, Inc. All rights reserved.
Use of this website signifies your agreement to the Terms of Use.
Privacy | Site Map | Contact us | Accessibility | Report Piracy
http://www.macromedia.com/support/flash/action_scripts/actionscript_tutorial/actionscript_tutorial06.html (2 of 2) [11.7.2002 20:51:56]

Macromedia Flash - ActionScript tutorial: Display information in a dynamic text box
Home > Products > Flash > Support > Using ActionScript
Display information in a dynamic text box
Dynamic text boxes are windows that display the value of a variable in a Flash movie. You use the Text Options panel to create a dynamic text box and assign it a variable name. This allows you to display changing content to users.
In the Puzzle.fla movie, a dynamic text box is used to display puzzle piece numbers when a user Shift-clicks on a piece.
Now you'll create a dynamic text box and assign it a variable name.
1 Choose File > Open and choose the version of the MyPuzzle.fla file that you last saved.
2 Unlock the Piece numbers guide layer if it is locked.
3 Double-click the Piece number circle button on the Stage under the bottom right corner of the puzzle solution area.
This opens the Piece number circle in symbol-editing mode.
4 Select the text layer in the Timeline. You should see a pencil next to the layer name, this selects the text field on the Stage.
5 Choose Window > Panels > Text Options to open the Text Options panel.
6 Select Dynamic Text from the pop-up menu. Choose Single Line.
7 Enter _root.actions.pieceNumber in the Variable text box.
All variables, like functions and movie clips, must be referenced by their path. By entering the path as the variable name, the value of the pieceNumber variable that lives in the actions movie clip is displayed in the text box. The pieceNumber variable is declared and updated in the RotateDisplayOrDrag function in the actions movie clip.
8 Close the Text Options panel.
9 Click Scene 1 at the top of the document window to return to the main Timeline.
10 Choose Edit > Edit Movie to return to the main Timeline.
11 Choose File > Save As and enter a new filename. Use a consecutive naming scheme so you can revert to earlier versions of the file.
http://www.macromedia.com/support/flash/action_scripts/actionscript_tutorial/actionscript_tutorial07.html (1 of 2) [11.7.2002 20:53:31]
Macromedia Flash - ActionScript tutorial: Display information in a dynamic text box
©1995-2002 Macromedia, Inc. All rights reserved.
Use of this website signifies your agreement to the Terms of Use.
Privacy | Site Map | Contact us | Accessibility | Report Piracy
http://www.macromedia.com/support/flash/action_scripts/actionscript_tutorial/actionscript_tutorial07.html (2 of 2) [11.7.2002 20:53:31]
Macromedia Flash - ActionScript tutorial: Write an expression
Home > Products > Flash > Support > Using ActionScript
Write an expression
If you have added two numbers together in a math equation, you have used an operator. An operator is a symbol that performs a task, or operation, on a piece, or pieces, of data, or operands. For example, in the expression 2 + 2 , the plus sign ( +) is the operator and each number is an operand.
An expression is any ActionScript code that can be evaluated to produce a single value. For example, the code myAge + 17 is an expression because when the code runs, ActionScript looks up the value of the myAge variable, adds it to the number 17 , and produces a new single value. If the value of myAge is 47 , the new value would be 64 .
Operators allow you to take the information you collect and store in variables and manipulate it in expressions to create or determine other values. For example, you may know that a user has dropped a puzzle piece onto the solution area, but how do you determine if the piece is in the correct place? And if the piece is in the correct place, how do you determine if the puzzle has been solved? To examine expressions built with arithmetic operators in such a scenario, select the actions clip on the Stage, open the Actions panel, and look at the IsItDone function.
ActionScript has numeric, or arithmetic, operators but it also has other types of operators that perform different types of operations. For example, a comparison operator compares values to determine if one operand is greater than, less than, or equal to the other, and a logical operator calculates a true or false value, also called a Boolean value, for an expression.
Now you'll use an operator called the logical NOT operator to write an expression that shows and hides the puzzle pattern. The logical NOT operator, which is represented by an exclamation mark ( ! ), calculates the opposite Boolean value of its operand. For example, the expression !true yields the value false .
1 Choose File > Open and choose the version of the MyPuzzle.fla file that you last saved.
2 Click the Show/Hide pattern edges button on the Stage and open the Actions panel.
3 Select the following line of code in the Actions list:
// ENTER code here
4 Select the evaluate action from the Action category in the Toolbox and drag it to the Actions list.
When the action is added, it is enclosed in an piece of code called an event handler. The code looks like this:
on (release) { ;}
5 Select the evaluate action again to add another empty line of code.
The code looks like this:
on (release) { ; ;}
6 Select the first empty line and place the insertion point in the Expression box.
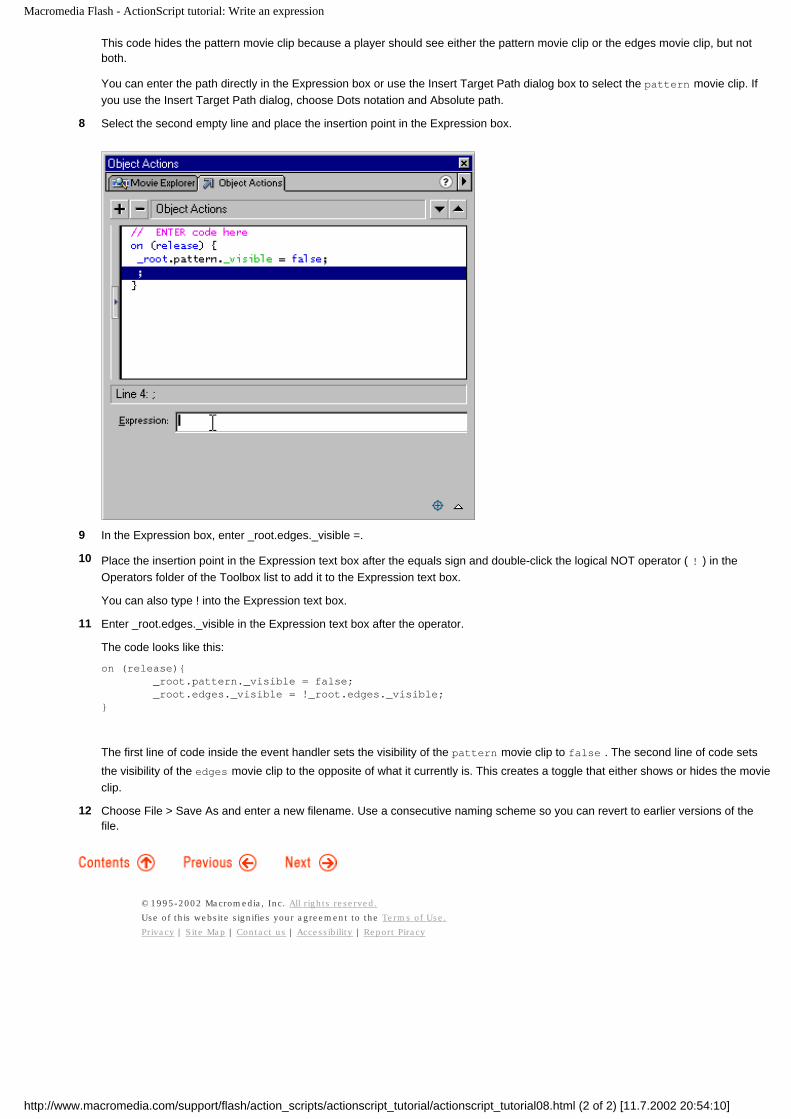
7 In the Expression box, enter _root.pattern._visible = false.
http://www.macromedia.com/support/flash/action_scripts/actionscript_tutorial/actionscript_tutorial08.html (1 of 2) [11.7.2002 20:54:10]
Macromedia Flash - ActionScript tutorial: Write an expression
This code hides the pattern movie clip because a player should see either the pattern movie clip or the edges movie clip, but not both.
You can enter the path directly in the Expression box or use the Insert Target Path dialog box to select the pattern movie clip. If you use the Insert Target Path dialog, choose Dots notation and Absolute path.
8 Select the second empty line and place the insertion point in the Expression box.
9 In the Expression box, enter _root.edges._visible =.
10 Place the insertion point in the Expression text box after the equals sign and double-click the logical NOT operator ( ! ) in the Operators folder of the Toolbox list to add it to the Expression text box.
You can also type ! into the Expression text box.
11 Enter _root.edges._visible in the Expression text box after the operator.
The code looks like this:
on (release){ _root.pattern._visible = false; _root.edges._visible = !_root.edges._visible;}
The first line of code inside the event handler sets the visibility of the pattern movie clip to false . The second line of code sets the visibility of the edges movie clip to the opposite of what it currently is. This creates a toggle that either shows or hides the movie clip.
12 Choose File > Save As and enter a new filename. Use a consecutive naming scheme so you can revert to earlier versions of the file.
©1995-2002 Macromedia, Inc. All rights reserved.
Use of this website signifies your agreement to the Terms of Use.
Privacy | Site Map | Contact us | Accessibility | Report Piracy
http://www.macromedia.com/support/flash/action_scripts/actionscript_tutorial/actionscript_tutorial08.html (2 of 2) [11.7.2002 20:54:10]
Macromedia Flash - ActionScript tutorial: Control the flow of the movie
Home > Products > Flash > Support > Using ActionScript
Control the flow of the movie
Without ActionScript, a movie plays from frame 1 to the last frame and either repeats from frame 1, or stops. You can use ActionScript to control the progression of a movie more precisely; you can also use it to give the user control. For example, you could place an action on frame 5 that stops the movie until a user presses a play button. This is a simple example of controlling the flow of a movie.
You can use the if , else , and else if actions (also called statements) to create a more complex movie flow called logic. These three actions perform the following tasks:
The if action lets Flash check a condition in the movie and run certain actions if that condition is true.
The else statement tells Flash to run a different set of actions if the if condition is false.
The else if statement lets Flash checks for another condition before running yet a different set of actions.
©1995-2002 Macromedia, Inc. All rights reserved.
Use of this website signifies your agreement to the Terms of Use.
Privacy | Site Map | Contact us | Accessibility | Report Piracy
http://www.macromedia.com/support/flash/action_scripts/actionscript_tutorial/actionscript_tutorial09.html [11.7.2002 20:54:36]

Macromedia Flash - ActionScript tutorial: Write a conditional statement
Home > Products > Flash > Support > Using ActionScript
Write a conditional statement
You've already used an operator to show and hide a movie clip. Now you'll use an if statement to create logic that shows and hides the piece numbers movie clip. For the sake of learning, this example uses a different ActionScript element to achieve the same result.
1 Choose File > Open and choose the version of the MyPuzzle.fla movie that you last saved.
2 Click the Show/Hide Piece number guide button and Choose Window > Actions.
3 Double-click the if action in the Actions category in the Toolbox list. The following code appears in the Actions panel:
on (release) { if (<not set yet>) { }}
4 Select the second line of code (the line that contains the if action) and double-click the else action in the Toolbox list.
The code looks like the following:
on (release) { if (<not set yet>) { } else { }}
5 Select the second line of code and, with the insertion point in the Condition text box, click the Insert Target Path button. Choose the piecenumbers movie clip, Dots notation and Absolute path and click OK. The following code appears in the Condition text box:
_root.piecenumbers
6 With the insertion point in the Condition text box, enter ._visible.
You can enter the code manually, or you can choose _visible from the Properties category in the Toolbox list.
7 From the Actions category in the Toolbox list, double-click the evaluate action to add an empty line of code.
8 Enter _root.piecenumbers._visible = false in the Expression text box.
You can use the Insert Target Path button or enter the code manually. The code now looks like the following:
on (release) { if (_root.piecenumbers._visible) { _root.piecenumbers._visible = false; } else { }}
When the movie plays, Flash evaluates the expression inside the condition parentheses. The expression must equal one of the Boolean values: true or false . This example uses the condition of the if action to check if the piecenumbers movie clip is visible on the Stage. If the _visible property is true , ActionScript runs the code inside the curly brackets and sets the _visible property to false , which hides the movie clip on the Stage.
9 Select the line of code with the else action and double-click the evaluate action.
10 In the Expression text box, enter _root.piecenumbers._visible = true.
http://www.macromedia.com/support/flash/action_scripts/actionscript_tutorial/actionscript_tutorial10.html (1 of 2) [11.7.2002 20:56:13]
Macromedia Flash - ActionScript tutorial: Write a conditional statement
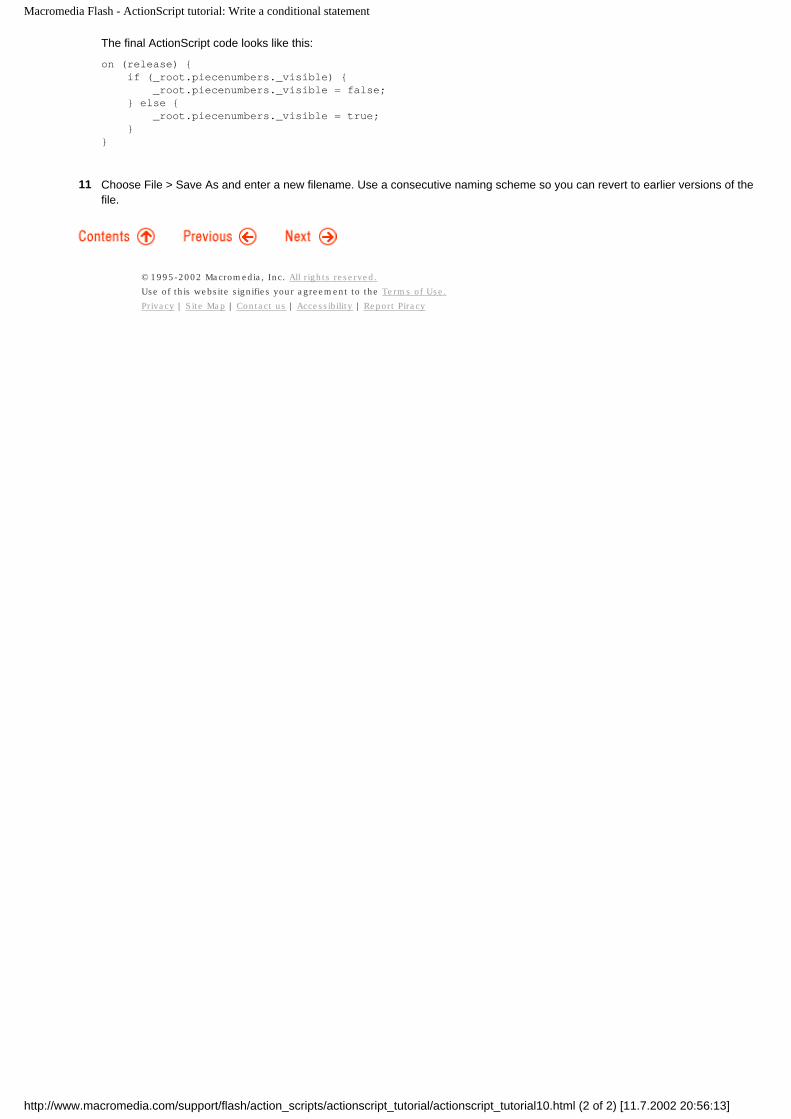
The final ActionScript code looks like this:
on (release) { if (_root.piecenumbers._visible) { _root.piecenumbers._visible = false; } else { _root.piecenumbers._visible = true; }}
11 Choose File > Save As and enter a new filename. Use a consecutive naming scheme so you can revert to earlier versions of the file.
©1995-2002 Macromedia, Inc. All rights reserved.
Use of this website signifies your agreement to the Terms of Use.
Privacy | Site Map | Contact us | Accessibility | Report Piracy
http://www.macromedia.com/support/flash/action_scripts/actionscript_tutorial/actionscript_tutorial10.html (2 of 2) [11.7.2002 20:56:13]
Macromedia Flash - ActionScript tutorial: Create commands and reuse code
Home > Products > Flash > Support > Using ActionScript
Create commands and reuse code
ActionScript has actions that let you control a movie in specific ways. For example, the play action moves the playhead forward in the Timeline and the loadMovie action loads another Flash movie into the Flash player. Each of these actions instructs Flash to perform a certain task. In your movies, you may want to create your own commands. For example, in Puzzle.fla, you need a command to scramble the puzzle pieces. To figure out how to write such a command with ActionScript, you must determine each step required to scramble the puzzle pieces and determine which ActionScript elements can be used to achieve those goals.
First, the pieces must be spread out within a certain area on the Stage; each movie clip has an _x and _y property that you can use to set its position and a _rotation property that you can use to set its rotation. To place and rotate each piece randomly, you need to generate a random number to use in an expression. ActionScript has a built-in Math object with a random method that you can use for this purpose.
A command in ActionScript is called a function. A function is a script that you can use over and over again in a movie to perform a certain task. For example, in Puzzle.fla, every time a user clicks a Scramble Pieces button, the function Scramble is run, or called. This function places the puzzle pieces in random positions on the Stage. Instead of re-writing that same script on each of the two Scramble Pieces buttons, the function is written, or declared, once and called from each button. To examine the Scramble function, select the actions clip on the Stage and open the Actions panel. Scroll down the actions list until you see the Scramble function.
You can think of a function as a machine that does extra work for you. The machine can produce different results depending on what you put into it. For example, if you put bananas in a blender, you get mashed bananas, not mashed peaches. The elements you pass a function to work on are called parameters or arguments. Parameters are passed inside the parentheses that follow the function. For example, the function RotateDisplayOrDrag(whichOne) is passed the name of a puzzle piece and it operates only on that piece. Parameters allow you to reuse functions in many different situations.
Functions are usually declared on the first frame of a movie; either as a frame action or on an actions clip. In the Puzzle.fla movie, the functions are declared on the actions clip in frame 1.
©1995-2002 Macromedia, Inc. All rights reserved.
Use of this website signifies your agreement to the Terms of Use.
Privacy | Site Map | Contact us | Accessibility | Report Piracy
http://www.macromedia.com/support/flash/action_scripts/actionscript_tutorial/actionscript_tutorial11.html [11.7.2002 20:56:37]
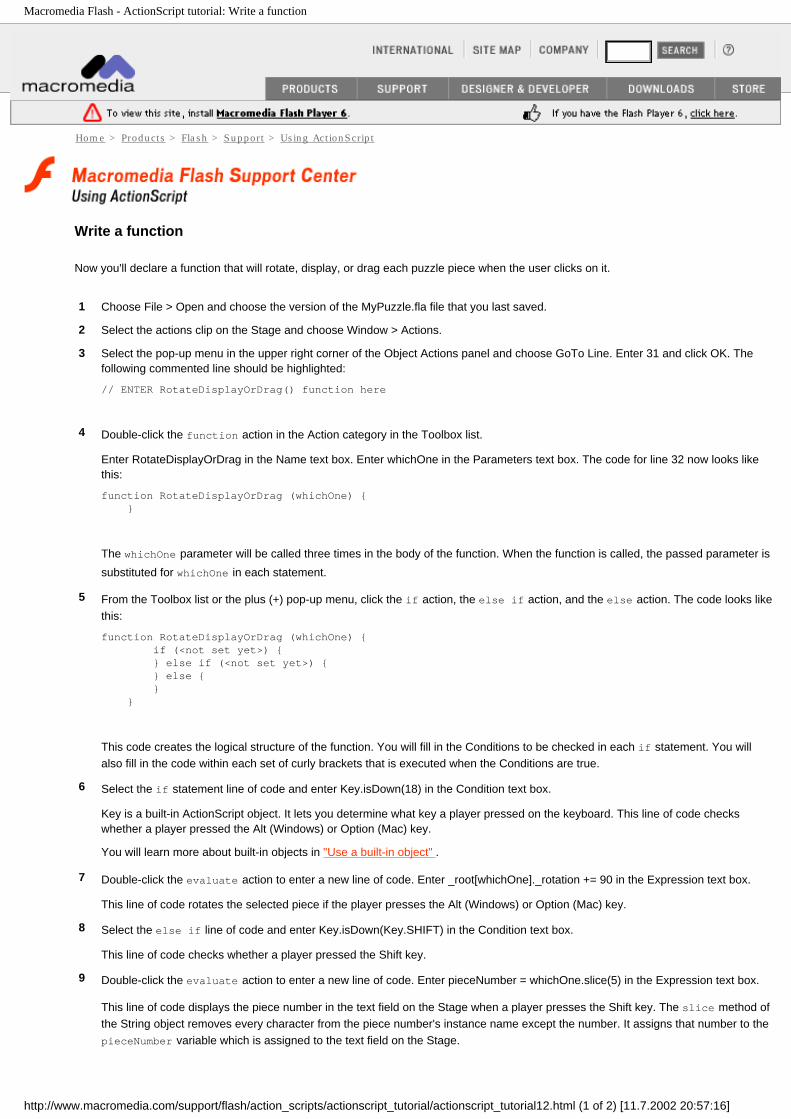
Macromedia Flash - ActionScript tutorial: Write a function
Home > Products > Flash > Support > Using ActionScript
Write a function
Now you'll declare a function that will rotate, display, or drag each puzzle piece when the user clicks on it.
1 Choose File > Open and choose the version of the MyPuzzle.fla file that you last saved.
2 Select the actions clip on the Stage and choose Window > Actions.
3 Select the pop-up menu in the upper right corner of the Object Actions panel and choose GoTo Line. Enter 31 and click OK. The following commented line should be highlighted:
// ENTER RotateDisplayOrDrag() function here
4 Double-click the function action in the Action category in the Toolbox list.
Enter RotateDisplayOrDrag in the Name text box. Enter whichOne in the Parameters text box. The code for line 32 now looks like this:
function RotateDisplayOrDrag (whichOne) { }
The whichOne parameter will be called three times in the body of the function. When the function is called, the passed parameter is substituted for whichOne in each statement.
5 From the Toolbox list or the plus (+) pop-up menu, click the if action, the else if action, and the else action. The code looks like this:
function RotateDisplayOrDrag (whichOne) { if (<not set yet>) { } else if (<not set yet>) { } else { } }
This code creates the logical structure of the function. You will fill in the Conditions to be checked in each if statement. You will also fill in the code within each set of curly brackets that is executed when the Conditions are true.
6 Select the if statement line of code and enter Key.isDown(18) in the Condition text box.
Key is a built-in ActionScript object. It lets you determine what key a player pressed on the keyboard. This line of code checks whether a player pressed the Alt (Windows) or Option (Mac) key.
You will learn more about built-in objects in "Use a built-in object" .
7 Double-click the evaluate action to enter a new line of code. Enter _root[whichOne]._rotation += 90 in the Expression text box.
This line of code rotates the selected piece if the player presses the Alt (Windows) or Option (Mac) key.
8 Select the else if line of code and enter Key.isDown(Key.SHIFT) in the Condition text box.
This line of code checks whether a player pressed the Shift key.
9 Double-click the evaluate action to enter a new line of code. Enter pieceNumber = whichOne.slice(5) in the Expression text box.
This line of code displays the piece number in the text field on the Stage when a player presses the Shift key. The slice method of the String object removes every character from the piece number's instance name except the number. It assigns that number to the pieceNumber variable which is assigned to the text field on the Stage.
http://www.macromedia.com/support/flash/action_scripts/actionscript_tutorial/actionscript_tutorial12.html (1 of 2) [11.7.2002 20:57:16]
Macromedia Flash - ActionScript tutorial: Write a function
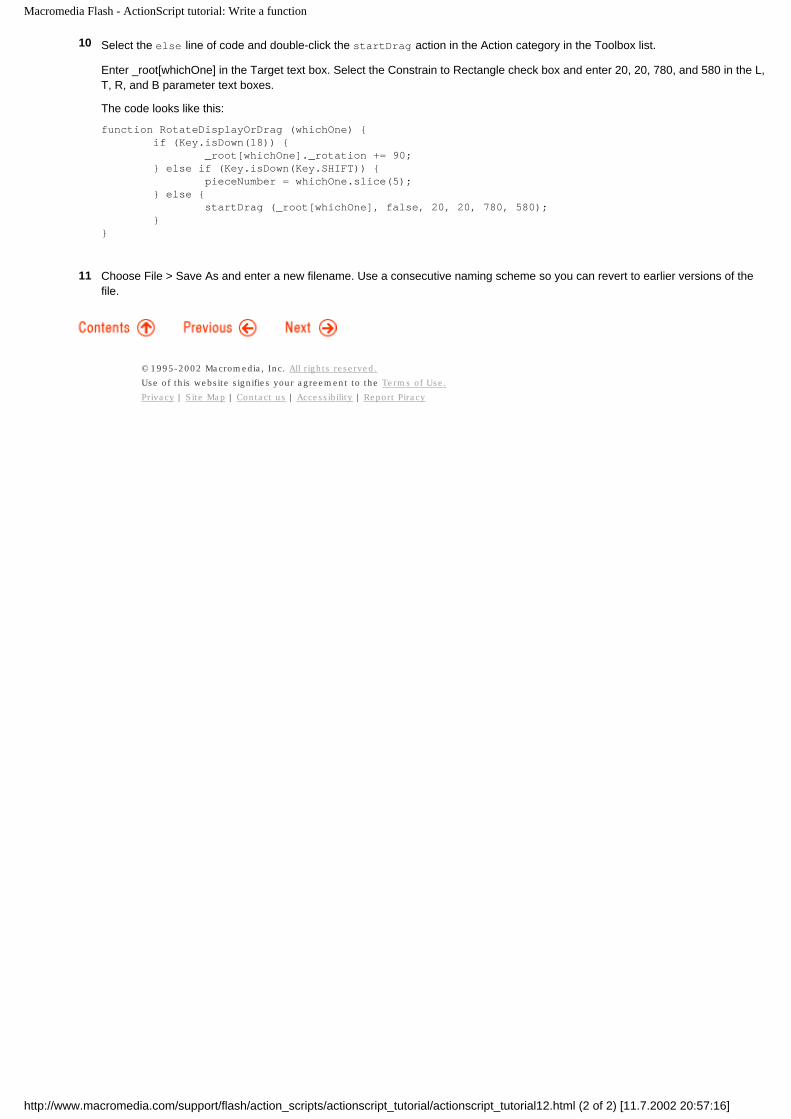
10 Select the else line of code and double-click the startDrag action in the Action category in the Toolbox list.
Enter _root[whichOne] in the Target text box. Select the Constrain to Rectangle check box and enter 20, 20, 780, and 580 in the L, T, R, and B parameter text boxes.
The code looks like this:
function RotateDisplayOrDrag (whichOne) { if (Key.isDown(18)) { _root[whichOne]._rotation += 90; } else if (Key.isDown(Key.SHIFT)) { pieceNumber = whichOne.slice(5); } else { startDrag (_root[whichOne], false, 20, 20, 780, 580); }}
11 Choose File > Save As and enter a new filename. Use a consecutive naming scheme so you can revert to earlier versions of the file.
©1995-2002 Macromedia, Inc. All rights reserved.
Use of this website signifies your agreement to the Terms of Use.
Privacy | Site Map | Contact us | Accessibility | Report Piracy
http://www.macromedia.com/support/flash/action_scripts/actionscript_tutorial/actionscript_tutorial12.html (2 of 2) [11.7.2002 20:57:16]
Macromedia Flash - ActionScript tutorial: Call a function
Home > Products > Flash > Support > Using ActionScript
Call a function
Functions can be called from any frame in a movie where you need a task completed. You must use a target path to call a function, just as you must use a path to access a variable or a movie clip. All functions in the Puzzle.fla movie are declared in the actions clip so the absolute path to each begins with _root.action .
Now you'll call the function that scrambles the puzzle pieces on the Stage.
1 Choose File > Open and choose the version of the MyPuzzle.fla file that you last saved.
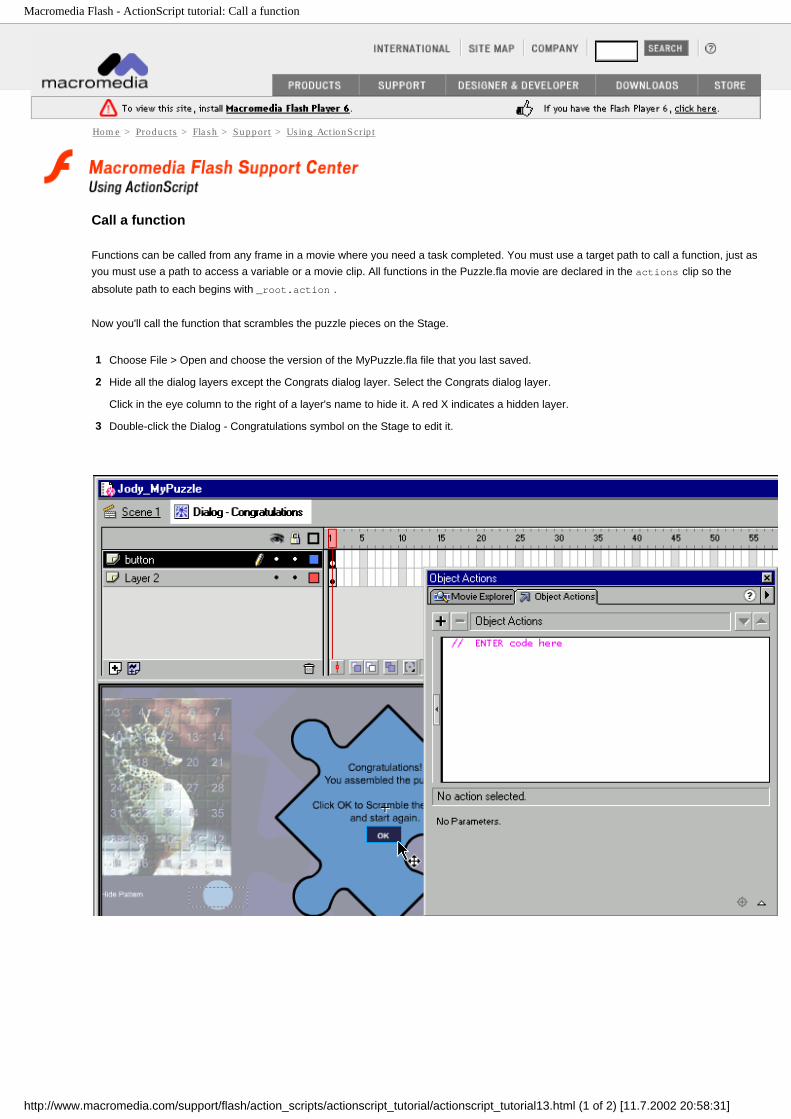
2 Hide all the dialog layers except the Congrats dialog layer. Select the Congrats dialog layer.
Click in the eye column to the right of a layer's name to hide it. A red X indicates a hidden layer.
3 Double-click the Dialog - Congratulations symbol on the Stage to edit it.
http://www.macromedia.com/support/flash/action_scripts/actionscript_tutorial/actionscript_tutorial13.html (1 of 2) [11.7.2002 20:58:31]
Macromedia Flash - ActionScript tutorial: Call a function
4 Select the OK button and choose Window > Actions to open the Actions panel.
5 Double-click the evaluate action in the Toolbox list to add an empty line to the Actions list.
6 With the insertion point in the Expression box, click the Insert Target Path button and select the actions clip. Select Dots notation and Absolute path and click OK.
7 In the Expression text box after _root.actions , enter .Scramble().
The Scramble function doesn't require any parameters so you can leave the parentheses empty.
The code now looks like this:
on (release) { _root.actions.Scramble();}
This is the ActionScript that calls the function. You'll also need to add a few additional lines of code that belong inside the on(release) handler. You'll do that in the next step.
8 Add two evaluate actions to add the following two lines of code under the function call. The first line shows the scramble button on the bottom right of the Stage and the second line sets the dialog variable to indicate that there are no dialog boxes currently open on the Stage:
_root.scramblebutton._visible = true; _root.actions.dialog=false;
The final code appears as follows:
on (release) { _root.actions.Scramble(); _root.scramblebutton._visible = true; _root.actions.dialog=false;}
9 Select Scene 1 at the top of the document window to return to the main Timeline.
10 Choose File > Save As and enter a new filename. For example, if your file is called Jean_Puzzle6.fla, you could name it Jean_Puzzle7.fla. This allows you to revert to earlier versions of the file.
Note: As you complete the tutorial, remember to save your work frequently.
©1995-2002 Macromedia, Inc. All rights reserved.
Use of this website signifies your agreement to the Terms of Use.
Privacy | Site Map | Contact us | Accessibility | Report Piracy
http://www.macromedia.com/support/flash/action_scripts/actionscript_tutorial/actionscript_tutorial13.html (2 of 2) [11.7.2002 20:58:31]

Macromedia Flash - ActionScript tutorial: Use a built-in object
Home > Products > Flash > Support > Using ActionScript
Use a built-in object
ActionScript has variables that let you store information; it has functions that let you create special commands and reuse code; it has actions that let you control the flow of a movie; and it has movie clips with properties that you can change.
ActionScript also has another type of element called built-in objects. Objects provide a way of grouping information so that you can use it in a script. Objects can have properties, methods (which are like functions), and constants (for example the numeric value of Pi). To view a list of ActionScript objects, look in the Objects folder in the Toolbox in the Actions panel.
In the RotateDisplayOrDrag function that you created in "Create commands and reuse code," you used the Key object to determine the last key a user pressed on the keyboard. If the key pressed was Shift while a piece was clicked, a dynamic text box displays the puzzle piece number; if the key pressed was Alt (Windows) or Option (Mac), the puzzle piece rotates 90 degrees. The Key object is built into ActionScript to allow you to access information about the keyboard.
Another ActionScript object is the MovieClip object. The MovieClip object is a collection of methods that you can use to manipulate movie clips, which are the most fundamental and powerful elements of Flash. To learn more about the special characteristics of the MovieClip object and using movie clips, see the chapter "Working with Movie Clips" in the ActionScript Reference Guide.
You will now use a method of the MovieClip object to check if the mouse is touching a puzzle piece.
1 Choose File > Open and choose the version of the MyPuzzle.fla file that you last saved.
2 Click the Symbols button in the upper right corner of the Timeline and choose Misc > Piece actions.
The Piece actions movie clip opens in symbol-editing mode.
3 Choose Window > Actions to open the Actions panel.
4 In the Actions panel, select the following line of code:
// ENTER code here
5 Double-click the onClipEvent action in the Action category. Choose the Mouse down event.
The onClipEvent action is a special type of action called an event handler, or just handler. A handler allows you to write code that runs when a certain event occurs. For example, when the mouse button is pressed, the playhead enters a frame, and a movie clip loads.
http://www.macromedia.com/support/flash/action_scripts/actionscript_tutorial/actionscript_tutorial14.html (1 of 3) [11.7.2002 20:59:08]
Macromedia Flash - ActionScript tutorial: Use a built-in object
In this procedure, the code within the curly brackets that follow the onClipEvent handler runs when a user presses the mouse button in the movie.
6 Double-click the with action in the Action category in the Toolbox to add it to the script.
The with action allows you to specify a movie clip and write actions as if you were on the Timeline of that movie clip.
7 Enter whichOne in the Object box.
The whichOne variable is set within the onClipEvent(load) handler. The value of whichOne is _parent._parent . The property _parent refers to the instance name of the movie clip within which the current clip is nested. The code _parent._parent points to the movie clip two levels above the current clip. The _parent property allows you to reuse this script in each of the 50 puzzle pieces because it acts on movie clips relative to it and doesn't require you to know the instance name of each clip. For this purpose, the _parent property allows you to create relative paths.
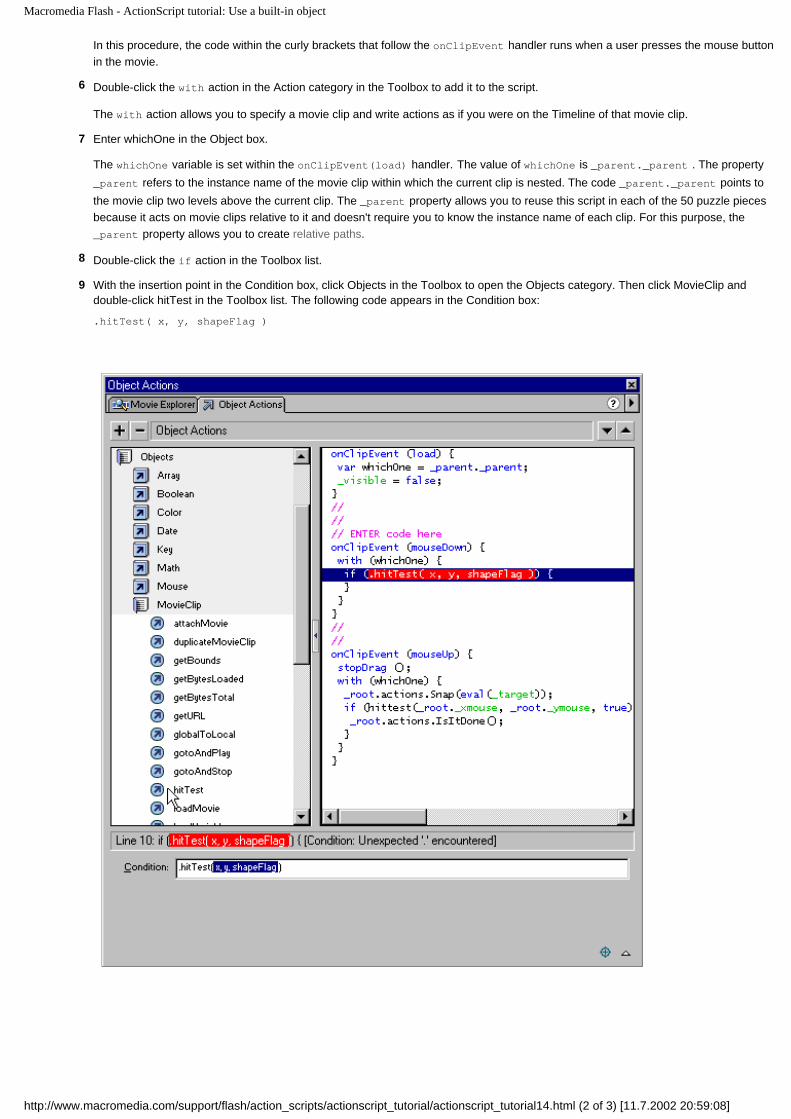
8 Double-click the if action in the Toolbox list.
9 With the insertion point in the Condition box, click Objects in the Toolbox to open the Objects category. Then click MovieClip and double-click hitTest in the Toolbox list. The following code appears in the Condition box:
.hitTest( x, y, shapeFlag )
http://www.macromedia.com/support/flash/action_scripts/actionscript_tutorial/actionscript_tutorial14.html (2 of 3) [11.7.2002 20:59:08]
Macromedia Flash - ActionScript tutorial: Use a built-in object
The hitTest method determines whether a movie clip has collided with either a specific point or another movie clip. In this example, you will use the current mouse position as the specific point in order to test whether the mouse is over a puzzle piece.
10 Remove the dot ( . ) from hitTest .
Often, you would specify an instance name before the dot of the hitTest method. However, because you used the with action to specify a movie clip, you don't need to do this.
11 Select the x in the Condition box and enter _root._xmouse. Select the y and enter _root._ymouse.
The hitTest method (just like a function) takes certain arguments. Two of these are x and y , which specify the x and y coordinates of a point. You use the _xmouse and _ymouse properties to determine the location of the mouse in the movie. If the mouse collides with the movie clip, the hitTest method returns the value true and the actions inside the if statement will run.
12 Select shapeFlag and substitute it with the value true. The code looks like this:
onClipEvent (mouseDown) { with (whichOne) { if (hitTest( _root._xmouse, _root.ymouse, true )) { } }}
13 Place the insertion point after the parentheses that enclose the hitTest arguments and enter && _root.actions.dialog == false.
You need to check that the dialog variable is false because you don't want this function to be called if a dialog box is visible on the Stage. Players shouldn't be able to rotate or drag a piece, or display its piece number if a dialog box is showing.
14 Double-click the evaluate action in the Action category in the Toolbox list to add it inside the curly brackets of the if statement.
15 In the Expression box, enter _root.actions.RotateDisplayOrDrag(_name). The final code looks like this:
onClipEvent (mouseDown) { with (whichOne) { if (hittest(_root._xmouse, _root._ymouse, true) && _root.actions.dialog == false) { _root.actions.RotateDisplayOrDrag(_name); } }}
16 Choose Edit > Movie to return to the main Timeline.
17 Choose File > Save As and enter a new filename. For example, if your file is called Jean_Puzzle7.fla, you could name it Jean_Puzzle8.fla. This allows you to revert to earlier versions of the file.
©1995-2002 Macromedia, Inc. All rights reserved.
Use of this website signifies your agreement to the Terms of Use.
Privacy | Site Map | Contact us | Accessibility | Report Piracy
http://www.macromedia.com/support/flash/action_scripts/actionscript_tutorial/actionscript_tutorial14.html (3 of 3) [11.7.2002 20:59:08]

Macromedia Flash - ActionScript tutorial: Test the movie
Home > Products > Flash > Support > Using ActionScript
Test the movie
Test early and test often is a mantra for Web developers. The sooner you test your movie, the easier it is to determine the cause of unexpected results. It's a good idea to save multiple versions of your file using sequential names, for example, My_Puzzle1.fla, My_Puzzle2.fla, and so on, as you've been doing in this tutorial. This way, the highest numbered file is always the newest and it's easy to go back to an earlier version.
The most common reason for unexpected results in a Flash movie is an incorrect path to a variable, function, object or movie clip. This can cause a variable to contain the wrong value, prevent a function from being called, or prevent a movie clip from loading. The Flash authoring tool has a special version of the Flash Player built-in; this mode is called test movie. This version of the Player has several commands and tools to help you troubleshoot. To enter test movie mode, choose Control > Test Movie anytime while working.
The trace action allows you to write notes and expressions in your ActionScripts whose results are sent to a window in test movie mode called the Output window.
Now you'll add a trace action to test if a function was successfully called. You'll also use the Test Movie command to generate a list of variables and objects to check target paths in the movie.
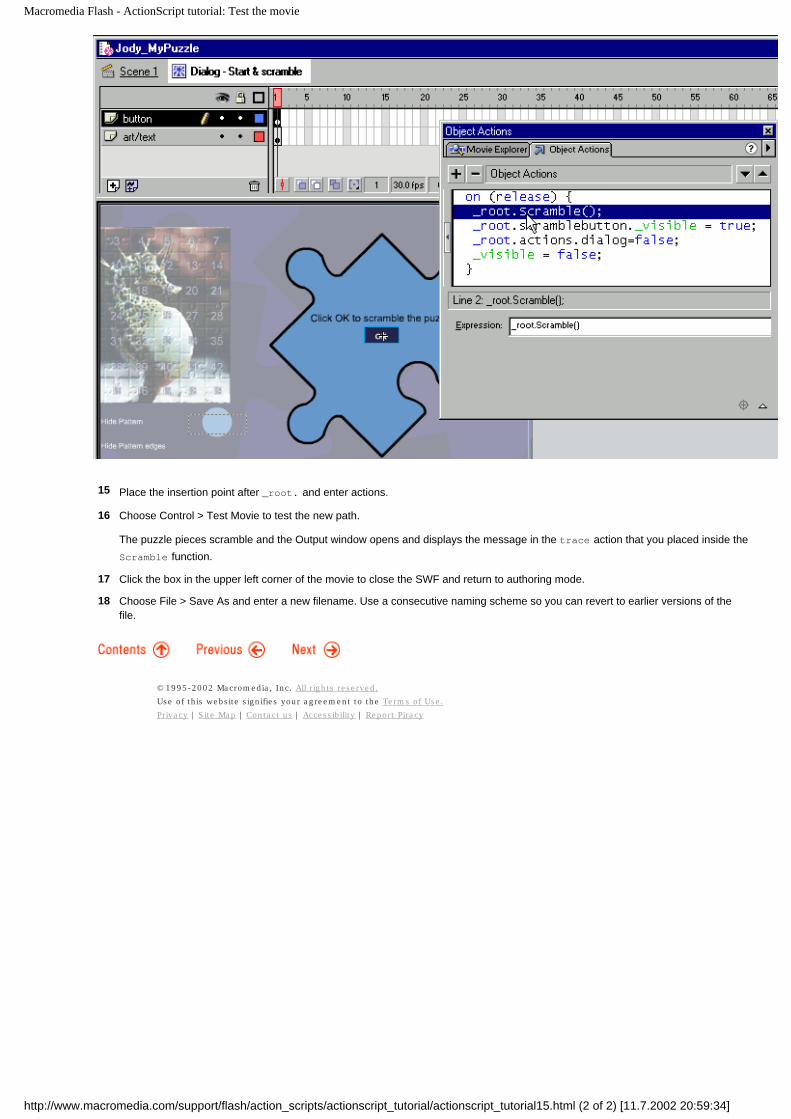
1 Choose File > Open and choose the version of the MyPuzzle.fla file that you last saved.
2 Choose Control > Test Movie and click the OK button.
The ActionScript that calls the Scramble function is attached to the OK button but the puzzle pieces don't scramble as the dialog says they should.
3 Click the box in the upper left corner of the movie to close the SWF file and return to authoring mode.
You can add a trace action to figure out whether the Scramble function is being called but doesn't work, or if it isn't being called at all.
4 Select the actions clip on the Stage in the main Timeline and open the Actions panel.
5 Choose GoTo Line from the pop-up menu and enter 19.
A commented line that says // enter trace action here is selected.
6 Double-click the trace action from the Toolbox list.
7 In the Message text box, enter Scramble function has been called.
8 Choose Control > Test Movie.
9 Click the OK button when asked to start the puzzle.
The message in the trace action does not appear in the Output window. Now you know that the function is not being called and you must determine the reason. Since the most likely reason is an incorrect path, return to the OK button and check the path to the Scramble function.
10 Click the box in the upper left corner of the movie to close the SWF and return to authoring mode.
11 Click in the eye column to the right of a layer's name to hide the Congrats dialog layer and show the Start dialog layer.
12 Double-click the Dialog - Start & Scramble symbol on the Stage to edit the Symbol.
13 Select the OK button and open the Actions panel if it isn't already open.
14 Look at the line of code that contains the function call; it looks like this:
_root.Scramble();
This path indicates that the function was declared on the main Timeline. However, all the functions in Puzzle.fla are declared in the actions movie clip which has the instance name actions .
http://www.macromedia.com/support/flash/action_scripts/actionscript_tutorial/actionscript_tutorial15.html (1 of 2) [11.7.2002 20:59:34]
Macromedia Flash - ActionScript tutorial: Test the movie
15 Place the insertion point after _root. and enter actions.
16 Choose Control > Test Movie to test the new path.
The puzzle pieces scramble and the Output window opens and displays the message in the trace action that you placed inside the Scramble function.
17 Click the box in the upper left corner of the movie to close the SWF and return to authoring mode.
18 Choose File > Save As and enter a new filename. Use a consecutive naming scheme so you can revert to earlier versions of the file.
©1995-2002 Macromedia, Inc. All rights reserved.
Use of this website signifies your agreement to the Terms of Use.
Privacy | Site Map | Contact us | Accessibility | Report Piracy
http://www.macromedia.com/support/flash/action_scripts/actionscript_tutorial/actionscript_tutorial15.html (2 of 2) [11.7.2002 20:59:34]
Macromedia Flash - ActionScript tutorial: The next steps
Home > Products > Flash > Support > Using ActionScript
The next steps
By completing the tutorial, you've accomplished a great deal in a relatively short amount of time. You've learned how to use ActionScript to set up a Flash movie's starting point, how to create commands and reuse code to make actions recur, and how to precisely control the flow of the movie. Using ActionScript variables and expressions, you know how to keep track of user activity in your movie and how to display changing content to your users. Finally, you've learned how to test your movie and identify trouble spots.
In meeting the main objectives, you also learned how to complete a variety of related tasks.
To continue learning about ActionScript, read the ActionScript Reference Guide and refer to articles in the Flash Support Center. You can also view an advanced version of the Puzzle.fla movie and deconstruct the ActionScript that was used to create a timer and animated piece rotation. Open the ActionScriptTutorial/Puzzle_Advanced/ folder that you downloaded at the beginning of the tutorial for the advanced version.
©1995-2002 Macromedia, Inc. All rights reserved.
Use of this website signifies your agreement to the Terms of Use.
Privacy | Site Map | Contact us | Accessibility | Report Piracy
http://www.macromedia.com/support/flash/action_scripts/actionscript_tutorial/actionscript_tutorial16.html [11.7.2002 21:01:56]