mail guide - blackbaud, inc
TRANSCRIPT

TheEducationEdge™
Mail Guide

102111
©2011 Blackbaud, Inc. This publication, or any part thereof, may not be reproduced or transmitted in any form or by any means, electronic, or mechanical, including photocopying, recording, storage in an information retrieval system, or otherwise, without the prior written permission of Blackbaud, Inc.
The information in this manual has been carefully checked and is believed to be accurate. Blackbaud, Inc., assumes no responsibility for any inaccuracies, errors, or omissions in this manual. In no event will Blackbaud, Inc., be liable for direct, indirect, special, incidental, or consequential damages resulting from any defect or omission in this manual, even if advised of the possibility of damages.
In the interest of continuing product development, Blackbaud, Inc., reserves the right to make improvements in this manual and the products it describes at any time, without notice or obligation.
All Blackbaud product names appearing herein are trademarks or registered trademarks of Blackbaud, Inc.
All other products and company names mentioned herein are trademarks of their respective holder.
EE-MailGuide-102111
Contents
MAIL BASICS . . . . . . . . . . . . . . . . . . . . . . . . . . . . . . . . . . . . . . . . . . . . . . . . . . . . . . . 1
Accessing Mail Tasks . . . . . . . . . . . . . . . . . . . . . . . . . . . . . . . . . . . . . . . . . . . . . . . . . . . . . . . . . . . . . . . . . . 2Mail Tabs . . . . . . . . . . . . . . . . . . . . . . . . . . . . . . . . . . . . . . . . . . . . . . . . . . . . . . . . . . . . . . . . . . . . . . . . . . . 3Mail Categories . . . . . . . . . . . . . . . . . . . . . . . . . . . . . . . . . . . . . . . . . . . . . . . . . . . . . . . . . . . . . . . . . . . . . . 8Mail Tasks . . . . . . . . . . . . . . . . . . . . . . . . . . . . . . . . . . . . . . . . . . . . . . . . . . . . . . . . . . . . . . . . . . . . . . . . . . 9
REPORT CARDS. . . . . . . . . . . . . . . . . . . . . . . . . . . . . . . . . . . . . . . . . . . . . . . . . . . . . 15
Overview of Report Cards . . . . . . . . . . . . . . . . . . . . . . . . . . . . . . . . . . . . . . . . . . . . . . . . . . . . . . . . . . . . 16Report Cards Tabs . . . . . . . . . . . . . . . . . . . . . . . . . . . . . . . . . . . . . . . . . . . . . . . . . . . . . . . . . . . . . . . . . . . 18Report Card Sections . . . . . . . . . . . . . . . . . . . . . . . . . . . . . . . . . . . . . . . . . . . . . . . . . . . . . . . . . . . . . . . . 35Creating Report Cards . . . . . . . . . . . . . . . . . . . . . . . . . . . . . . . . . . . . . . . . . . . . . . . . . . . . . . . . . . . . . . . . 92
TRANSCRIPTS . . . . . . . . . . . . . . . . . . . . . . . . . . . . . . . . . . . . . . . . . . . . . . . . . . . . . 125
Overview of Transcripts . . . . . . . . . . . . . . . . . . . . . . . . . . . . . . . . . . . . . . . . . . . . . . . . . . . . . . . . . . . . . 126Transcript Tabs . . . . . . . . . . . . . . . . . . . . . . . . . . . . . . . . . . . . . . . . . . . . . . . . . . . . . . . . . . . . . . . . . . . . 127Transcript Sections . . . . . . . . . . . . . . . . . . . . . . . . . . . . . . . . . . . . . . . . . . . . . . . . . . . . . . . . . . . . . . . . . 148Creating Transcripts . . . . . . . . . . . . . . . . . . . . . . . . . . . . . . . . . . . . . . . . . . . . . . . . . . . . . . . . . . . . . . . . 195
XAP TRANSCRIPTS . . . . . . . . . . . . . . . . . . . . . . . . . . . . . . . . . . . . . . . . . . . . . . . . . 227
Overview of XAP Transcripts . . . . . . . . . . . . . . . . . . . . . . . . . . . . . . . . . . . . . . . . . . . . . . . . . . . . . . . . . 228Defining Attributes . . . . . . . . . . . . . . . . . . . . . . . . . . . . . . . . . . . . . . . . . . . . . . . . . . . . . . . . . . . . . . . . . 228XAP Transcript Tabs . . . . . . . . . . . . . . . . . . . . . . . . . . . . . . . . . . . . . . . . . . . . . . . . . . . . . . . . . . . . . . . . 229XAP Transcript Sections . . . . . . . . . . . . . . . . . . . . . . . . . . . . . . . . . . . . . . . . . . . . . . . . . . . . . . . . . . . . . 236Exporting XAP Transcripts . . . . . . . . . . . . . . . . . . . . . . . . . . . . . . . . . . . . . . . . . . . . . . . . . . . . . . . . . . . 244
LABELS . . . . . . . . . . . . . . . . . . . . . . . . . . . . . . . . . . . . . . . . . . . . . . . . . . . . . . . . . 245
Label Tabs . . . . . . . . . . . . . . . . . . . . . . . . . . . . . . . . . . . . . . . . . . . . . . . . . . . . . . . . . . . . . . . . . . . . . . . . 246Creating Labels . . . . . . . . . . . . . . . . . . . . . . . . . . . . . . . . . . . . . . . . . . . . . . . . . . . . . . . . . . . . . . . . . . . . 257
LABEL TRUNCATION REPORTS. . . . . . . . . . . . . . . . . . . . . . . . . . . . . . . . . . . . . . . . . . 265
Label Truncation Report Tabs . . . . . . . . . . . . . . . . . . . . . . . . . . . . . . . . . . . . . . . . . . . . . . . . . . . . . . . . . 266Creating Label Truncation Reports . . . . . . . . . . . . . . . . . . . . . . . . . . . . . . . . . . . . . . . . . . . . . . . . . . . . . 275

ENVELOPES . . . . . . . . . . . . . . . . . . . . . . . . . . . . . . . . . . . . . . . . . . . . . . . . . . . . . . 281
Envelope Tabs . . . . . . . . . . . . . . . . . . . . . . . . . . . . . . . . . . . . . . . . . . . . . . . . . . . . . . . . . . . . . . . . . . . . . 282Creating Envelopes . . . . . . . . . . . . . . . . . . . . . . . . . . . . . . . . . . . . . . . . . . . . . . . . . . . . . . . . . . . . . . . . . 293
LETTERS . . . . . . . . . . . . . . . . . . . . . . . . . . . . . . . . . . . . . . . . . . . . . . . . . . . . . . . . 299
Action Letters . . . . . . . . . . . . . . . . . . . . . . . . . . . . . . . . . . . . . . . . . . . . . . . . . . . . . . . . . . . . . . . . . . . . . 300Checklist Letters . . . . . . . . . . . . . . . . . . . . . . . . . . . . . . . . . . . . . . . . . . . . . . . . . . . . . . . . . . . . . . . . . . . 310Using the Word Merge Process in Mail . . . . . . . . . . . . . . . . . . . . . . . . . . . . . . . . . . . . . . . . . . . . . . . . . 319
INDEX . . . . . . . . . . . . . . . . . . . . . . . . . . . . . . . . . . . . . . . . . . . . . . . . . . . . . . . . . . 343

1chapter
Mail Basics
Accessing Mail Tasks . . . . . . . . . . . . . . . . . . . . . . . . . . . . . . . . . . . . . . . . . . . . . . . . . . . . . . . . . . . . . . . . . . . . . . . . . . 2Mail Tabs . . . . . . . . . . . . . . . . . . . . . . . . . . . . . . . . . . . . . . . . . . . . . . . . . . . . . . . . . . . . . . . . . . . . . . . . . . . . . . . . . . . 3Mail Categories . . . . . . . . . . . . . . . . . . . . . . . . . . . . . . . . . . . . . . . . . . . . . . . . . . . . . . . . . . . . . . . . . . . . . . . . . . . . . . 8Mail Tasks . . . . . . . . . . . . . . . . . . . . . . . . . . . . . . . . . . . . . . . . . . . . . . . . . . . . . . . . . . . . . . . . . . . . . . . . . . . . . . . . . . 9Finding and Opening a Saved Mailing . . . . . . . . . . . . . . . . . . . . . . . . . . . . . . . . . . . . . . . . . . . . . . . . . . . . . . . . . . . . . 10Previewing a Mailing . . . . . . . . . . . . . . . . . . . . . . . . . . . . . . . . . . . . . . . . . . . . . . . . . . . . . . . . . . . . . . . . . . . . . . . . . . . 11Exporting a Mailing . . . . . . . . . . . . . . . . . . . . . . . . . . . . . . . . . . . . . . . . . . . . . . . . . . . . . . . . . . . . . . . . . . . . . . . . . . . . 12Sending a Mailing as Email . . . . . . . . . . . . . . . . . . . . . . . . . . . . . . . . . . . . . . . . . . . . . . . . . . . . . . . . . . . . . . . . . . . . . . . 13

2 CH A PT E R
Mail is the central location for all mail tasks in The Education Edge. With Mail you can use the information stored in your Education Edge database to create items for mailing or electronic transmission. The types of mail you can create depend on the program in which you are working. Output from Mail is distinguished from Reports in that it is intended to be sent to parties outside of the organization.
This chapter explains the basic tools used in Mail and tab functions for each mail task in The Education Edge. This guide also contains procedures for accessing Mail and finding, opening, previewing, sending as email, and exporting a mailing.Mail Basics is intended to provide only an overview of each mailing and mail task. For detailed information, see that mail category in its respective chapter.
Accessing Mail TasksYou access the Mail page by clicking Mail on the navigation bar. The Mail page appears, displaying links to mail categories. Admissions Office — Labels and Envelopes and LettersRegistrar’s Office — Labels and Envelopes, Forms, and Letters
To select a mailing, click the link for the category of mail tasks you need from the Mail page, for example, Labels and Envelopes.
Note: Visit our Web site at www.blackbaud.com for the latest documentation and information.
Note: We offer high-quality, customized report card and transcript forms that are specifically designed for use with our software. Our report card and transcript forms feature state-of-the-art, tamper-proof backgrounds. For more information, visit our Web site at http://forms.blackbaud.com or call us toll-free at 866-4-BB-FORMS (866-422-3676).
Glossary: A mail task is a specific mailing process, such as printing report cards or envelopes. Fields and options for a mail task are arranged on tabs so you can access all the information quickly and easily.

M A I L B AS I C S 3
On the Labels and Envelopes page, select Labels in the list on the left. If any labels have been saved, they appear on the right of the screen. You can either open one of the saved labels or create new labels. For more information about creating or opening labels, see the Labels chapter.
Mail TabsWhether you create a new mailing or open a saved mailing, a screen appears with tabs to specify how the mailing should look and the information included in the mailing. Each tab helps you enter information in an easy and logical manner. The tabs that appear depend on the mailing you are creating. You move among the tabs by clicking Back or Next at the bottom of the screen or by selecting the tab itself. Once you learn to run one mailing, it is easy to run other mailings because the tabs have similar features. General tab. On the General tab, you set parameters specific to the mailing you have open. You can make
selections for the format and information in the mailing. The General tab appears on all mail tasks.

4 CH A PT E R
Filters tab. On the Filters tab, you can select criteria that determines which records to include in the mail run. The Filters tab appears on all mail tasks. For more information about filtering, see the Program Basics Guide.
Glossary: A filter is a requirement records must meet to be included in a query, report, mailing, template, or other grouping. For more information about filtering, see the Program Basics Guide.

M A I L B AS I C S 5
Relationship Filters tab. For labels, label truncation reports, envelopes, and letters, if you select a relationship record type in the Create <mailing> for field on the General tab, the Relationship Filters tab appears. On this tab, you select filters to determine which relationship types to include in the mail run. For more information about filtering, see the Program Basics Guide.
Glossary: An attribute is a tool used to group information based on a common theme. With attributes defined, you can filter information to your specifications.

6 CH A PT E R
Attributes tab. The Attributes tab appears for all mail tasks. On this tab, you can add, update, or delete attributes for records included in the mailing. You define attribute types in Configuration.
Address tab. Use the Address tab to specify which addresses to use for mailings. The program compares parameters you define on this tab with address information entered on the Addresses tab of the student/applicant/relationship record to identify the appropriate address to use. The Address tab appears for all mail tasks.

M A I L B AS I C S 7
Format tab. On the Format tab, you designate the format of the mailing. The settings on this tab determine the appearance of the mailing. The list on the left of the screen displays formatting options for the mailing. When you select an item in the list, the right side of the screen changes to present selections for that section of the mailing. The Format tab appears for all mail tasks.
Fields to Include tab. On the Fields to Include tab, you can select the fields to print on a label, envelope, or letter and format how the information will appear. Certain fields have options associated with them. Options generally exist for attributes, user-defined messages, and phone numbers. The Fields to Include tab appears for labels, label truncation reports, envelopes, and letters.
Details tab. On the Details tab, you select the detail sections to include on report cards and transcripts and formatting options for those sections. The Details tab appears only for report cards and transcripts.
Note: The fields you select appear on the labels or envelopes in the order you select. Use the up and down arrows to change the order of the fields.

8 CH A PT E R
Summary/Notes tab. On the Summary/Notes tab you select the summary sections to include on report cards and transcripts and formatting options for those sections. The Summary/Notes tab appears only for report cards and transcripts.
Mail Categories
The mail tasks in each mail category serve very different purposes. The following is a brief description of each Mail category and its corresponding mail tasks. For detailed descriptions, see that mail category in its respective chapter.
Forms
Forms are documents similar to reports, but intended for an audience outside of your organization. You can create forms in Registrar’s Office.Report Cards. You can use the Report Cards mail task to create a comprehensive statement of a student’s
academic performance for a single academic year.Transcripts. . You can use the Transcripts mail task to create a comprehensive statement of a student’s
academic performance for multiple academic years.XAP Transcripts. You can use the XAP Transcripts mail task to create a file to upload to XAP’s Transcript
Exchange for release to participating colleges.
Note: We offer high-quality, customized report card and transcript forms that are specifically designed for use with our software. Our report card and transcript forms feature state-of-the-art, tamper-proof backgrounds. For more information, visit our Web site at http://forms.blackbaud.com or call us toll-free at 866-4-BB-FORMS (866-422-3676).

M A I L B AS I C S 9
Labels and Envelopes
You can use mail tasks in the Labels and Envelopes category to print labels and envelopes for Admissions Office and Registrar’s Office.
Labels. You can use the Labels mail task to print labels with student, applicant, faculty/staff, individual, organization, person, or relation information.
Label Truncation Reports. You can create label truncation reports to identify which labels have information that does not fit on the label. It tests both the vertical and horizontal formatting.
Envelopes. You can print envelopes for students, applicants, faculty/staff, individuals, organizations, persons, or relations. You can also filter to select certain addresses for vendors and clients with multiple addresses in the database.
Letters
You can use mail tasks in the Letters category to print action letters for Admissions Office and Registrar’s Office and checklist letters for Admissions Office. Using Letters, you create export files to merge with merge letters set up in a word processor. When you link the export file with the merge letter template, a separate letter is created for each exported record. For more information about creating Word merges, see “Using the Word Merge Process in Mail” on page 319.
Action Letters. You can print action letters about actions assigned to students, applicants, individuals, faculty/staff, and organizations.
Checklist Letters. If you have Admissions Office, you can create checklist letters to notify applicants and their relations about items they need to complete for the admissions process.
Mail TasksYou can use a variety of parameters to define the output for mailings in The Education Edge. Saving these parameters also makes creating future mailings more efficient. Once you create and save mailings, you can open and edit them at any time. You can also preview a mailing prior to printing to make sure the information is accurate and that the mailing is formatted as you want it. For information about creating specific mailings, see the chapter for that mail category.
Other mail tasks available include exporting mail information for use in another software application and sending as email. You can also delete a mailing to permanently remove it from the program.The following procedures include finding and opening, previewing, sending as email, and exporting mailings. While these procedures are written specifically for labels, you can use these same basic steps as a model for all mailings in The Education Edge. For information about creating specific mailings, see the chapter for that mail category.
Note: If you installed both Admissions Office and Registrar’s Office and have security rights to both programs, you can create labels, label truncation reports, and envelopes for student, applicant, faculty/staff, individual, organization, person, or relation records from either program.
Note: If you installed both Admissions Office and Registrar’s Office and have security rights to both programs, you can create action and checklist letters for student, applicant, faculty/staff, individual, or organization records from either program.
Note: A mail task is a specific mailing process, such as printing report cards or envelopes. Fields and options for a mail task are arranged on tabs so you can access all the information quickly and easily.

10 CH A PT E R
Finding and Opening a Saved Mailing
You can edit the parameters of a mailing saved in The Education Edge. For this procedure we focus on opening and editing labels.
Finding and opening a mailing1. From the Mail page, click Labels and Envelopes. The Labels and Envelopes page appears.
2. In the list on the left, select Labels. A list of saved labels appears in a grid on the right.
3. Select the labels you want to open.4. On the action bar, click Open. The <Selected Labels> screen opens on the General tab.
Note: While these procedures are written specifically for labels, you can use these same basic steps as a model for all mailings in The Education Edge. For procedures for another mailing, see the chapter for that mail category.

M A I L B AS I C S 11
Previewing a Mailing
You can preview the format and information in a mailing without opening the mailing. We recommend previewing a mailing before printing or sending it to another person. By previewing, you can make sure the information is accurate and that the mailing is formatted as you want it.
Previewing a mailing1. From the Mail page, click Labels and Envelopes. The Labels and Envelopes page appears.
2. In the list on the left, select Labels. A list of saved labels appears in a grid on the right.
3. In the grid, select the labels to preview.4. From the menu bar, select File, Print Preview.
5. A processing screen appears. Once processing is complete, the <Selected Labels> Preview screen appears.
Note: While these procedures are written specifically for labels, you can use these same basic steps as a model for all mailings in The Education Edge. For procedures for another mailing, see the chapter for that mail category.
Tip: You can also print the labels from the preview screen by clicking the Print button on the toolbar.

12 CH A PT E R
6. When you finish previewing the labels, click the red X to close the screen. You return to the Labels page.
Exporting a Mailing
To use mail information in another software application, for example, Microsoft Excel or Crystal Reports, you can export the mailing. When you export a mailing, you send mail information from the database to another software application using a data file. You can export a mailing without opening the mailing.
Exporting a mailing1. From the Mail page, click Labels and Envelopes. The Labels and Envelopes page appears.
2. In the list on the left, select Labels. A list of saved labels appears in a grid on the right.
3. In the grid, select the labels to export.4. From the menu bar, select File, Export. 5. A processing screen appears. Once processing is complete, the Export screen appears.
6. In the Format field, select a format (such as Crystal Reports or Microsoft Excel) for the data file.7. In the Destination field, select where you want the information exported.8. Click OK. The Choose Export File screen appears.
Note: While these procedures are written specifically for labels, you can use these same basic steps as a model for all mailings in The Education Edge. For procedures for another mailing, see the chapter for that mail category.
M A I L B AS I C S 13
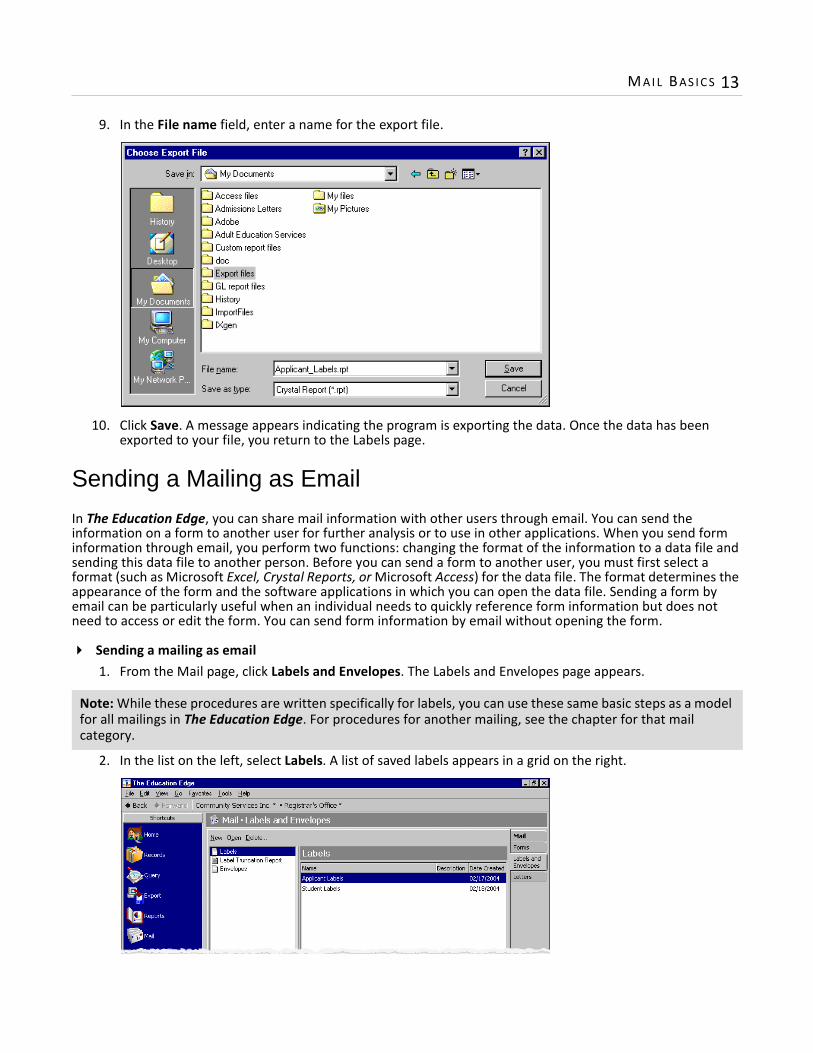
9. In the File name field, enter a name for the export file.
10. Click Save. A message appears indicating the program is exporting the data. Once the data has been exported to your file, you return to the Labels page.
Sending a Mailing as Email
In The Education Edge, you can share mail information with other users through email. You can send the information on a form to another user for further analysis or to use in other applications. When you send form information through email, you perform two functions: changing the format of the information to a data file and sending this data file to another person. Before you can send a form to another user, you must first select a format (such as Microsoft Excel, Crystal Reports, or Microsoft Access) for the data file. The format determines the appearance of the form and the software applications in which you can open the data file. Sending a form by email can be particularly useful when an individual needs to quickly reference form information but does not need to access or edit the form. You can send form information by email without opening the form.
Sending a mailing as email1. From the Mail page, click Labels and Envelopes. The Labels and Envelopes page appears.
2. In the list on the left, select Labels. A list of saved labels appears in a grid on the right.
Note: While these procedures are written specifically for labels, you can use these same basic steps as a model for all mailings in The Education Edge. For procedures for another mailing, see the chapter for that mail category.

14 CH A PT E R
3. In the grid, select the labels you want to send as email.4. From the menu bar, select File, Send as Mail. 5. A processing screen appears. Once processing is complete, the Export screen appears.
6. In the Format field, select a format for the data file.7. In the Destination field, select “Microsoft Mail (MAPI)”.8. Click OK. The Send Mail screen appears.
9. In the To field, enter an email address.10. In the Subject field, enter a subject for the email.11. In the Message box, enter a message to the recipient. 12. Click Send. The form is sent as an attachment to your message. You return to the Labels page.
2chapter
Report Cards
Overview of Report Cards . . . . . . . . . . . . . . . . . . . . . . . . . . . . . . . . . . . . . . . . . . . . . . . . . . . . . . . . . . . . . . . . . . . . . 16Report Cards Tabs . . . . . . . . . . . . . . . . . . . . . . . . . . . . . . . . . . . . . . . . . . . . . . . . . . . . . . . . . . . . . . . . . . . . . . . . . . . 18General Tab . . . . . . . . . . . . . . . . . . . . . . . . . . . . . . . . . . . . . . . . . . . . . . . . . . . . . . . . . . . . . . . . . . . . . . . . . . . . . . . . . . . 19Details Tab . . . . . . . . . . . . . . . . . . . . . . . . . . . . . . . . . . . . . . . . . . . . . . . . . . . . . . . . . . . . . . . . . . . . . . . . . . . . . . . . . . . . 20Summary/Notes Tab . . . . . . . . . . . . . . . . . . . . . . . . . . . . . . . . . . . . . . . . . . . . . . . . . . . . . . . . . . . . . . . . . . . . . . . . . . . . 22Filters Tab. . . . . . . . . . . . . . . . . . . . . . . . . . . . . . . . . . . . . . . . . . . . . . . . . . . . . . . . . . . . . . . . . . . . . . . . . . . . . . . . . . . . . 23Attributes Tab . . . . . . . . . . . . . . . . . . . . . . . . . . . . . . . . . . . . . . . . . . . . . . . . . . . . . . . . . . . . . . . . . . . . . . . . . . . . . . . . . 25Address Tab . . . . . . . . . . . . . . . . . . . . . . . . . . . . . . . . . . . . . . . . . . . . . . . . . . . . . . . . . . . . . . . . . . . . . . . . . . . . . . . . . . . 25Format Tab. . . . . . . . . . . . . . . . . . . . . . . . . . . . . . . . . . . . . . . . . . . . . . . . . . . . . . . . . . . . . . . . . . . . . . . . . . . . . . . . . . . . 27Report Card Sections . . . . . . . . . . . . . . . . . . . . . . . . . . . . . . . . . . . . . . . . . . . . . . . . . . . . . . . . . . . . . . . . . . . . . . . . . 35Courses Detail Section . . . . . . . . . . . . . . . . . . . . . . . . . . . . . . . . . . . . . . . . . . . . . . . . . . . . . . . . . . . . . . . . . . . . . . . . . . 35Credits Detail Section . . . . . . . . . . . . . . . . . . . . . . . . . . . . . . . . . . . . . . . . . . . . . . . . . . . . . . . . . . . . . . . . . . . . . . . . . . . 46GPAs Detail Section . . . . . . . . . . . . . . . . . . . . . . . . . . . . . . . . . . . . . . . . . . . . . . . . . . . . . . . . . . . . . . . . . . . . . . . . . . . . . 50Performance Detail Section . . . . . . . . . . . . . . . . . . . . . . . . . . . . . . . . . . . . . . . . . . . . . . . . . . . . . . . . . . . . . . . . . . . . . . 54Ranks Detail Section . . . . . . . . . . . . . . . . . . . . . . . . . . . . . . . . . . . . . . . . . . . . . . . . . . . . . . . . . . . . . . . . . . . . . . . . . . . . 58Academic Summary Section. . . . . . . . . . . . . . . . . . . . . . . . . . . . . . . . . . . . . . . . . . . . . . . . . . . . . . . . . . . . . . . . . . . . . . 62Activities Section . . . . . . . . . . . . . . . . . . . . . . . . . . . . . . . . . . . . . . . . . . . . . . . . . . . . . . . . . . . . . . . . . . . . . . . . . . . . . . . 67Test Scores Section . . . . . . . . . . . . . . . . . . . . . . . . . . . . . . . . . . . . . . . . . . . . . . . . . . . . . . . . . . . . . . . . . . . . . . . . . . . . . 73Attendance Section. . . . . . . . . . . . . . . . . . . . . . . . . . . . . . . . . . . . . . . . . . . . . . . . . . . . . . . . . . . . . . . . . . . . . . . . . . . . . 79Conduct Section . . . . . . . . . . . . . . . . . . . . . . . . . . . . . . . . . . . . . . . . . . . . . . . . . . . . . . . . . . . . . . . . . . . . . . . . . . . . . . . 84Student Notes Section . . . . . . . . . . . . . . . . . . . . . . . . . . . . . . . . . . . . . . . . . . . . . . . . . . . . . . . . . . . . . . . . . . . . . . . . . . 89Freeform Notes Section . . . . . . . . . . . . . . . . . . . . . . . . . . . . . . . . . . . . . . . . . . . . . . . . . . . . . . . . . . . . . . . . . . . . . . . . . 91Creating Report Cards . . . . . . . . . . . . . . . . . . . . . . . . . . . . . . . . . . . . . . . . . . . . . . . . . . . . . . . . . . . . . . . . . . . . . . . . 92Step 1: General Formatting . . . . . . . . . . . . . . . . . . . . . . . . . . . . . . . . . . . . . . . . . . . . . . . . . . . . . . . . . . . . . . . . . . . . . . 93Step 2: Adding Detail Sections . . . . . . . . . . . . . . . . . . . . . . . . . . . . . . . . . . . . . . . . . . . . . . . . . . . . . . . . . . . . . . . . . . . . 95Step 3: Adding Summary/Notes Sections . . . . . . . . . . . . . . . . . . . . . . . . . . . . . . . . . . . . . . . . . . . . . . . . . . . . . . . . . . 114Step 4: Formatting the Header . . . . . . . . . . . . . . . . . . . . . . . . . . . . . . . . . . . . . . . . . . . . . . . . . . . . . . . . . . . . . . . . . . 117Step 5: Formatting the Footer . . . . . . . . . . . . . . . . . . . . . . . . . . . . . . . . . . . . . . . . . . . . . . . . . . . . . . . . . . . . . . . . . . . 121Step 6: Running Report Cards . . . . . . . . . . . . . . . . . . . . . . . . . . . . . . . . . . . . . . . . . . . . . . . . . . . . . . . . . . . . . . . . . . . 123

16 CH A PT E R
You can use Report Cards in Mail to create a statement of a student’s academic performance for a session of a single academic year. You can create report cards customized for your school’s needs by selecting the academic information to include and the level of detail. You can also include student activities, attendance, performance, and notes. You can run report cards only if you have security rights established in Administration.
To access Report Cards, from the Mail page, click Forms. Select Report Cards in the list on the left of the page and a grid appears on the right displaying saved report cards. On this page you can create new report cards, open saved report cards, and delete report cards.
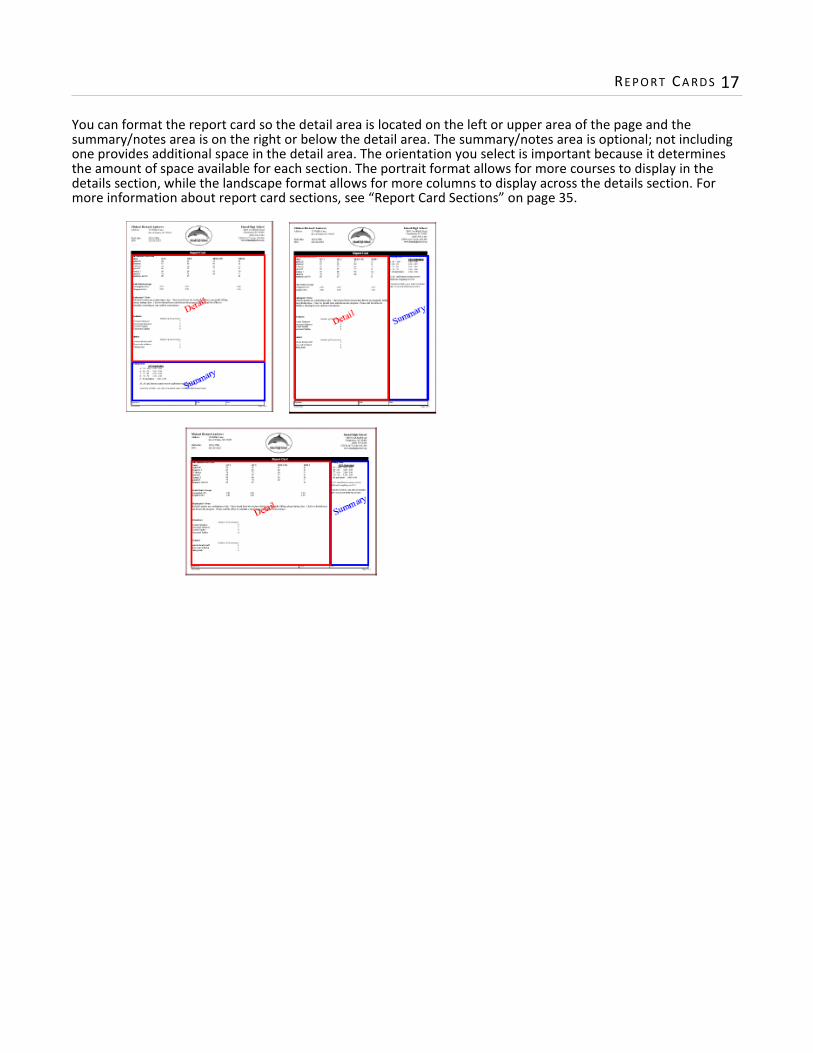
Overview of Report CardsReport cards contain two main areas of information — the detail area and summary/notes area. The detail area presents course information in rows. You can add columns that list details for courses such as the teacher, section, and attendance. You can also add columns to display grades, credits, or comments in the marking column in which they occurred. The summary/notes area lists summarized academic information and any additional notes you create to appear on the report card.
Note: Visit our Web site at www.blackbaud.com for the latest documentation and information.
Note: We offer high-quality, customized report card and transcript forms that are specifically designed for use with our software. Our report card and transcript forms feature state-of-the-art, tamper-proof backgrounds. For more information, visit our Web site at http://forms.blackbaud.com or call us toll-free at 866-4-BB-FORMS (866-422-3676).
RE P O R T CA RD S 17
You can format the report card so the detail area is located on the left or upper area of the page and the summary/notes area is on the right or below the detail area. The summary/notes area is optional; not including one provides additional space in the detail area. The orientation you select is important because it determines the amount of space available for each section. The portrait format allows for more courses to display in the details section, while the landscape format allows for more columns to display across the details section. For more information about report card sections, see “Report Card Sections” on page 35.

18 CH A PT E R
Report Cards Tabs
When you create new report cards, you specify parameters for report cards on the General, Details, Summary/Notes, Filters, Attributes, Address, and Format tabs. Once you define parameters for a report card, you can save these to print report cards using the same parameters easily. To move among the tabs, click Next and Back at the bottom of the screen or select the tab.
Note: For basic report card procedures, such as finding and opening, previewing, printing, sending as email, and exporting report cards, see “Mail Basics” on page 1.

RE P O R T CA RD S 19
General Tab
Use the General tab to select the school, academic year, and sessions to include on the report card. You can also select general formatting options, such as the paper size and orientation.
Report card for. If you have more than one school, you can select for which school to print the report card. The school you select determines the information printed in the header.
Academic year. In the Academic year field, select for which academic year to print the report card.Session. In the Session field, select for which session to print the report card.Term(s). In the Term(s) field, select for which terms to print the report card.Include students on hold that should not receive report cards. To include students on hold with a
restriction against receiving report cards, mark Include students on hold that should not receive report cards.
Paper size. In the Paper Size field, select to print the report card on letter, legal, or A4 sized paper.Orientation. In the Orientation field, select to print in portrait or landscape.Font. In the Font field, select a font for text on the report card.Font size. In the Font size field, select a font size for text in the details and summary areas. Create an output query of students. To create a query of students for which you run report cards, mark
Create an output query of students. You can save and use an output query later for reports or other mailings.
Note: If a student has classes for more than one school, for example middle school and high school, courses from both schools print on the report card.

20 CH A PT E R
Details Tab
On the Details tab you select the detail sections to include on report cards and whether to include information from outside schools attended during the year. For more information about formatting detail sections, see “Report Card Sections” on page 35.
Borders. In the Borders field, select which separators to use for the detail area. You can select None, Box around area, Lines above and below area, Line above area, or Line below area.
Section. In the Section column, select Courses, Academic Summary, Activities, Credits, GPAs, Performance, Ranks, Test Scores, Attendance, Conduct, or Student Notes. The Courses section is always listed first in the grid by default and should be formatted first because its settings affect the formatting of other sections.When you select a section, the screen for that section type appears so you can define the columns, headings, and details that appear in that section. For more information about formatting report card sections, see “Report Card Sections” on page 35.
Heading. The Heading column displays the section headings entered on the General tab for each section. You must open a section to edit its heading.
Section Width. After you define the columns, headings, and details for a section and return to the Details tab, the Section Width column displays the sum of all column widths and spaces between columns for that section. This column is for informational purposes only.
Open. To open a detail section in the grid, select the section and click Open.Delete. To delete a detail section from the grid, select the section and click Delete.Up/Down. To change the order of detail sections in the grid, select a section and click the up or down arrow.
Note: You can include all summary sections in the detail area except Freeform notes.

RE P O R T CA RD S 21
Include information from outside schools attended during the year. Mark Include information from outside schools attended during the year to include information for other schools a student attended during the selected academic year.
Format. If you mark Include information from outside schools attended during the year, you can click Format to access the Outside Schools Format screen. On this screen you can format how information for outside schools appears on the report card.
Heading for outside school information — In this field, enter a heading for the outside school information.Show school name — Mark this checkbox to group the information under each outside school name. If you do not mark this checkbox, information is grouped together under the outside school heading and sorted as a group. Append years attended to school name — If you mark Show school name, you can also mark Append years attended to school name to add the years the student attended the outside school to the school’s name on the report card.Include comment after outside school information — Mark this checkbox to enter a comment in the Comment field and select a font style and font size. Print a horizontal line after outside school information — Mark this checkbox to add a horizontal line as a divider between outside schools and your school.Heading for current school information — In this field, enter a heading to appear before information for your school.

22 CH A PT E R
Summary/Notes Tab
On the Summary/Notes tab you select the summary sections to include on report cards and formatting options for those sections. For more information about formatting summary sections, see “Report Card Sections” on page 35.
Show the summary/notes area. Mark Show the summary/notes area to include a summary/notes area on the report card. If you do not mark this option, all fields and options on this tab are disabled.
Position. In the Position field, select to position the summary area below or to the right of the detail area.Width/Height. This field depends on your selection in the Position field. If you select Right, you can enter a
width. If you select Bottom, you can enter a height. You can increase and decrease the width or height in increments of 0.1 inch. The minimum width/height is 0.1 inch and the maximum is 10.25 or 7.75 inches depending on whether you print in landscape or portrait format.
Show summary/notes sections in [ ] columns. In the Show summary/notes sections in [ ] columns, select the number of columns sets for the summary/notes section. If you position the summary/notes area to the right of the detail area, this field is 1 by default and is not editable. Information displays in one column. If you position the summary/notes area to the bottom of the detail area, you can select up to four columns. If you select more than one, information prints in the first column and then wraps to the second column rather than breaking to a new page. You can also add column breaks after each summary/notes section (on the General tab for that section) so that information for each section prints in a separate column.
Column width. The Column width field displays a calculated width based on the selected position of the summary area, the page orientation, and the paper size (from the General tab).
Borders. In the Borders field, select which separators to use for the summary/notes area. You can select None, Lines above and below area, Line above area, Line below area, Box around area, or Box around each column. If the summary/notes section’s position is to the right of the detail area, there is an additional option, Detail separator only, which prints a vertical line between the detail and summary/notes sections.

RE P O R T CA RD S 23
Summary/Notes Section GridIn the grid, select the sections of information to appear in the summary/notes area of the report card.Section. In the Section column, select Academic Summary, Activities, Student Notes, Test Scores, Attendance,
Conduct, or Freeform Notes. When you select a section, the screen for that section type appears so you can define related columns, headings, and details. For more information about formatting summary sections, see the “Report Card Sections” on page 35.
Heading. After you define the columns, headings, and details for a summary section and return to the Summary/Notes tab, the Heading column displays the heading you typed in the Section Heading field on the section’s General tab. This column is for informational purposes only.
Section Width. After you define the columns, headings, and details for a summary section and return to the Summary/Notes tab, the Section Width column displays the sum of all column widths and spaces between columns for that section. This column is for informational purposes only.
Open. To open a summary section in the grid, select the section and click Open.Delete. To delete a summary section from the grid, select the section and click Delete.Up/Down. To change the order of summary sections in the grid, select a section and click the up or down arrow.
Filters Tab
On the Filters tab, you select criteria that determines which students report cards print for and the courses included in the report. For more information about filtering in The Education Edge, see the Program Basics Guide.
Tip: You can also double-click a filter in the grid to open the selection screen.

24 CH A PT E R
Open. To open a selection screen to designate specific filters for the report card, select a filter in the grid and click Open on the action bar.
Clear All Filters. To reset each filter to include all, you can click Clear All Filters.
Filters. The Filters column lists all the filters for the report card. You cannot edit this column.Include. By default, in the Include column, each filter is set to All. To open a selection screen to designate
specific filters for the report card, choose Selected.Selected Filters. Filters you specify on the selection screen appear in the Selected Filters column.
Selected Filters Screen
From the Filters tab, you can open a selection screen for a filter in several ways: by double-clicking the filter in the grid, selecting the filter in the grid and clicking Open on the action bar, or choosing Selected in the Include column for the filter.
Include. For each filter, you can select to include all or select specific filters. Depending on the filter, you may also be able to filter by a range or query.
All. If you mark Include: All, you cannot designate specific filters.Selected or Range. If you mark Include: Selected or Range, a grid appears in which you can specify filters. In a
field, you can click the binoculars to search for information.Query. If you mark Include: Query, the Query name field appears for you to enter the name of the query by
which to filter the report card. In the field, you can click the binoculars to search for the query name.To create a new query, click the binoculars. Then click Add a New Query on the Open Query screen. For more information about creating queries, see the Query Guide.
Previous Filter. To view or edit the previous filter without returning to the Filters tab, click Previous Filter.Next Filter. To view or edit the next filter without returning to the Filters tab, click Next Filter.
Note: A filter is a requirement items must meet to be included in report card run.

RE P O R T CA RD S 25
Attributes Tab
You can use the Attributes tab to add, delete, or update attributes for students when you print report cards. For example, to track the number of report cards you print for students, you can add a “Report card printed” attribute to each student included in a report card run. Later, you can filter a report or query using this attribute to calculate the total number of report cards printed. For more information about creating attributes, see the Configuration Guide for Registrar’s Office.
Action. In the Action column, you can add, delete, or update attributes on the records when you print report cards. Attribute Type. In the Attribute Type column, you can select an attribute type. Description. In the Description column, you can enter or select a description for the attribute type. Short Description. In the Short Description column, a brief description of the attribute type appears when you
select a type in the Attribute Type column. Date. In the Date column, select the date you add, delete, or update the attribute. Required. If the attribute type you select is required, the program automatically marks the checkbox in the
Required column. Comments. In the Comments column, you can enter additional information about the attribute type.
Address Tab
Use the Address tab to specify which addresses to use for report cards. The program compares the parameters you define on this tab with address information entered on the Addresses tab of the student/relationship record to identify the appropriate address to use.

26 CH A PT E R
On the Address tab, you select a validation date and then define the order in which the program evaluates address types. The program first checks the validation date, then seasonal addresses, other address types (in the order you determine), and attributes. The first address found on the student/relationship record that meets the defined parameters is used on the report card. You can also specify what to do if no valid address is found.
Step 1. In the Use address from field, select whether to print the address from the student or relationship record.If you select Relationship, we recommend that before printing you review the individuals marked to receive report cards to ensure they are correct.
Step 2. In the Validate addresses as of [ ] field, select a date to determine which address to use. Any address that is valid on this date is considered for use on the report card. Any addresses that are not valid on this date are automatically excluded from consideration.
Step 3. Determine whether to include seasonal addresses as possible addresses. If you mark Consider seasonal addresses, the program uses the first valid seasonal address found on the student/relationship record and does not consider any other addresses.If the seasonal address has the Send no mail attribute, the seasonal address is excluded automatically as a possible address. If a valid seasonal address is not found, the program considers the address types selected in Step 4.
Step 4. In the If no seasonal addresses are found, consider these addresses frame, select which address types to use if no valid seasonal addresses exist. In the Addresses box, select an address type and click the right arrow to move it into the Addresses to consider, in order of importance box. The first address type in the list that matches the validation date is used on the report card. You can change the order addresses are considered by selecting an address type and clicking the up and down arrows next to the list.
Note: Any address with No mail selected in the Send [ ] to this address field on the Address Attributes tab is automatically excluded as a possible address.

RE P O R T CA RD S 27
If a valid address is not found from these address types, the program considers the attributes selected in Step 5.
Step 5. In the grid, you can select address attribute types to consider. For example, you have a “Report card address” attribute you use to flag addresses for report cards. When you select Include in the Action column and Report card address in the Attribute column of the grid, the program automatically uses any valid addresses assigned this attribute.
Step 6. In the If no address is found field, select what to do if a valid address is not found. You can select Print with no address, Remove record from run, or Print specific address. If you select to print a specific address, the Use field appears so you can select the address type to use when a student/relationship does not have an address of the types you added to the Addresses to consider, in order of importance list.
Format Tab
On the Format tab, you designate the format and appearance of the report card. The list on the left of the screen displays formatting options for the report card. When you select an item in the list, the right side of the screen changes to present selections for that section of the report card.
Student SortWhen you print many report cards at one time, you can use Student Sort to group report cards by a selected option and arrange them in ascending or descending order.
Sort by. In the Sort by column, select items for grouping report cards. For example, you can group report cards by advisors or grade levels.
Category. If you select to sort by an attribute in the Sort by column, you can select the attribute in the Category column. Otherwise the field is disabled.
Order by. In the Order by column, select the sort order of report cards. Select Ascending to sort sequentially or alphabetically. Select Descending to sort in reverse sequential or reverse alphabetical order.

28 CH A PT E R
Form AlignmentYou can use Form Alignment to specify vertical and horizontal alignment of printed information on report card forms.
Vertical Alignment. In the Vertical alignment field, you can select to use the default alignment or to move printed information up or down and how much to move the information. For example, if you select Move printed information up and enter 2, the information prints .02 inch higher on the page.
Horizontal alignment. In the Horizontal alignment field, you can select to use the default alignment or to move printed information left or right and how much to move the information. For example, if you select Move printed information left and enter 2, the information prints .02 inch more to the left on the page.

RE P O R T CA RD S 29
Name FormatsUsing Name Formats, you can format how names appear for students, faculty/staff, and relations in the address and body sections of the report card. In the tree view on the left, select Student, Faculty/Staff, or Relationship to format names for that record type.
The formatting selections you make in the Report Card Address frame affect the address that prints when Address with addressee is selected in the Type column on the Student Information Header screen of the Format tab. The formatting selections you make in the Report Card Body frame appear in the body area of the report card and the header. Select addressee/salutation from [ ]. In the Select addressee/salutation from [ ] field, select Record or
Configuration. Use. If you select Record, in the Use field, select the full name, primary addressee, primary salutation, directory
name, diploma name, informal addressee, or informal salutation as defined on the student/faculty/staff/relationship record. If you select Configuration, in the Use field, select from one of the formats defined in Configuration.
If not present...Select addressee/salutation from. In the If not present...Select addressee/salutation from field, you can select a second name format for situations where the first selection is not present on student or relationship records. For example, if you select to use the Primary salutation, and you have students without a defined Primary salutation on the Addressees/Salutations tab, the second name format is used. If you select <Full name> or Configuration in the Use field, this field is disabled.
HeaderUse the Header options to select a template that determines the layout and position of school and student information in the header. You can include a logo and notes in the header.

30 CH A PT E R
General
Select General in the tree view to select the layout and position of items included in the header.
Template layout. In the Template layout field, select Side by side or Stacked. When you select a layout, a preview of the header layout appears. Side by side — Select this option to display school information next to student information.Stacked — Select this option to display school information above the student information. Both sets of information are left-aligned by default.
Print report card title. Mark Print report card title to print a title on the report card. Title. If you mark Print report card title, in the Title field, you can use the default title “Report Card” or enter a
different title.Position. In the Position field, select where to print the report card title. If you select Title bar, the title prints in
white font on a thick black line between the header and body of the report card. If you select Label, the title prints in the top right corner of the page.
Print school logo. Mark Print school logo to print a logo on the report card. File name. If you mark Print school logo, in the File name field, you must browse to the logo graphic file.
Graphic files must be in bitmap (*.bmp) or jpeg (*.jpg) format. You may need to resize the width and height of the logo in your graphics program.
Placement. You can use the Indent, Height, and Width fields to adjust the placement of the logo within the header.
Print notes. To add a note to the header, mark Print notes and enter text in the box. If you selected Side by side in the Template layout field, the note prints at the bottom right of the header. If you selected Stacked, the note prints at the bottom left of the header.

RE P O R T CA RD S 31
Format
Select Format in the tree view to format the placement, font size and style, and number of columns for fields in the school and student information sections.
Name/Address. In the Indent and Width fields of the School Fields frame, enter the amount to indent and the width allowed for fields in the school information section.
Additional lines. In the Indent and Width fields of the School Fields frame, enter the amount to indent and the width allowed for additional lines added to the school information section.
Font size. In the Font size field of the Student Name frame, select the size of the student name.Font style. In the Font style field of the Student Name frame, select the font style (regular, bold, italics, or bold
italics) for the student name.Font size. In the Font size field of the Student Fields frame, select the size of the student fields in the student
information section.Label: Font style. In the Label: Font style field of the Student Fields frame, select Regular, Bold, Italics, or Bold
Italics for the labels of student fields in the student information section.Alignment. In the Alignment field of the Student Fields frame, select the alignment for the labels of student
fields.Show student fields in [ ] column(s). In the Show student fields in [ ] column(s) field of the Student Fields
frame, select the number of columns for the student fields. You can select up to three columns.
Note: You select the student fields and field formats in the Student Information section of the Format tab.

32 CH A PT E R
# of Fields in Column. If you select to use columns for the student fields, you can select the number of fields (up to eight) to include in each column. A row appears for each field. For example, if you select 2 in the Show student fields in [ ] column(s) field and 3 in the # of Fields in Column column, the student information section appears as shown here.
Indent (in). In the Indent column, enter the amount to indent the column from the section’s left edge. Label Width (in). In the Label Width (in) column, select the maximum width for field labels in each column. Field Width (in). In the Field Width (in) column, select the maximum width for fields in each column.
School Information
Select School Information in the tree view to format the school information section of the header.
Section height. In the Section height field, enter the height of the School information section in inches. The minimum height is 0 inches and the maximum is 10.25 inches for portrait layout and 7.75 for landscape. If you select Side by side in the Template layout field, the Section height entered here is used for the Student Information section as well.
Borders. In the Borders field, select which separators to use for the school information section. You can select None, Lines above and below section, Line below section, or Box around section.
RE P O R T CA RD S 33
School name. The School Name box displays the school selected in the Report card for field on the General tab. You can use this name or enter a different one. You can use the buttons below the School Name box to format the alignment, font size, and style of school name text.
Address. The Address box displays the address and phone number of the school selected in the Report card for field on the General tab. You can use this address or enter a different one. You can use the buttons below the Address box to format the alignment, font size, and style of address text.
Additional lines. You can enter additional information for the header in the Additional lines box. If you selected Side by side in the Template layout field, the lines print at the bottom right of the header. If you selected Stacked, the line print in the top left of the header. You can use the buttons below the Additional lines box to format the alignment, font size, and style of additional lines text.
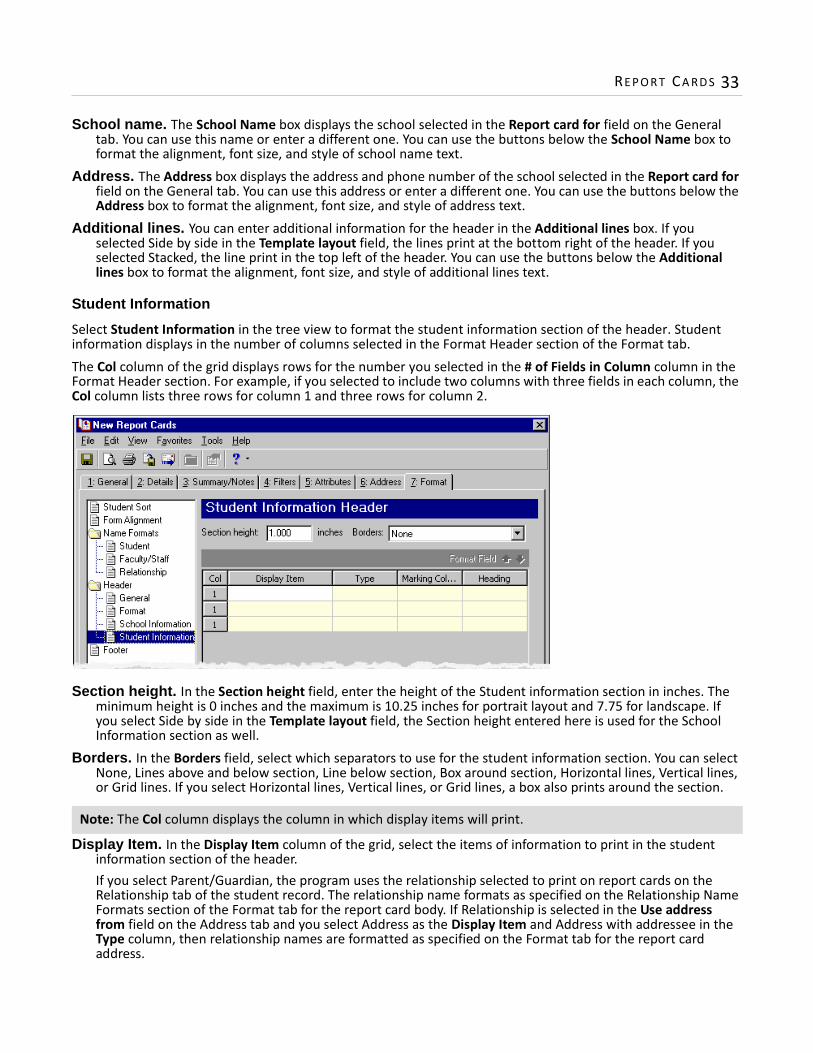
Student Information
Select Student Information in the tree view to format the student information section of the header. Student information displays in the number of columns selected in the Format Header section of the Format tab.The Col column of the grid displays rows for the number you selected in the # of Fields in Column column in the Format Header section. For example, if you selected to include two columns with three fields in each column, the Col column lists three rows for column 1 and three rows for column 2.
Section height. In the Section height field, enter the height of the Student information section in inches. The minimum height is 0 inches and the maximum is 10.25 inches for portrait layout and 7.75 for landscape. If you select Side by side in the Template layout field, the Section height entered here is used for the School Information section as well.
Borders. In the Borders field, select which separators to use for the student information section. You can select None, Lines above and below section, Line below section, Box around section, Horizontal lines, Vertical lines, or Grid lines. If you select Horizontal lines, Vertical lines, or Grid lines, a box also prints around the section.
Display Item. In the Display Item column of the grid, select the items of information to print in the student information section of the header. If you select Parent/Guardian, the program uses the relationship selected to print on report cards on the Relationship tab of the student record. The relationship name formats as specified on the Relationship Name Formats section of the Format tab for the report card body. If Relationship is selected in the Use address from field on the Address tab and you select Address as the Display Item and Address with addressee in the Type column, then relationship names are formatted as specified on the Format tab for the report card address.
Note: The Col column displays the column in which display items will print.

34 CH A PT E R
Type. For some items you select in the Display Item column, such as Attribute, Address, or Rank, you must also select a type in the Type column of the grid.
Marking Column. For some items you select in the Display Item column, such as Cumulative GPA or Rank, you must also select a marking column in the Marking Column column of the grid.
Heading. In the Heading column of the grid, you can use the default heading that appears for the item selected in the Display Item column or enter a different one.
Format Field. If you select Cumulative GPA, Total credits, Birth date, Print date, Date entered, Date left, Standard/Mandatory credits, Transfer credits, or Graduation date in the Display Item column, select the item and click Format Field to format the decimal places or date format for those items.
Up/Down. To change the order of items in the grid, select an item and click the up or down arrow.
FooterUse the Footer options to print footer information at the bottom of every page in the report card. You can print a signature line, the print date, and the page number in the footer.
Print signature line in footer. Mark the Print signature line in footer to add a signature box to the report card. Marking this option enables other fields on this screen.
Height. In the Height field, enter the height of the signature box in inches. The minimum is 0.1 inch and the maximum is 3 inches.
Font size. In the Font size field, select the font size for text used in the signature line. Font style. In the Font style field, select Regular, Bold, Italics, or Bold Italics.
Signature Line Grid
Use the Signature Line grid to select and format the items that appear in boxes in the signature line.

RE P O R T CA RD S 35
Display Item. In the Display Item column, you can include boxes on the report card for the signature, the title of the person signing, and the date the report card is signed.
Heading. In the Heading column, you can use the default heading for the display items you selected, enter different headings, or leave it blank. Headings print on the left side of the box.
Populate With. In the Populate With column, select the items to appear in the Title and Date boxes by default. For the Title box, you can select <Blank> to leave the box blank for the signer to complete or select Specific Text to enter a default title in the Value column. For the Date box, you can select <Blank> to leave the box blank for the signer to complete or select Today, Tomorrow, or Specific Date. If you select Specific Date, you can enter a date in the Value column.
Value. If you selected Specific Text or Specific Date in the Populate With column, in the Value column, you can enter values for the title and date boxes.
Width. In the Width field, enter the width for each item. The report card’s page layout determines the width of the box in the first row of the grid (3.75 if portrait, 6.25 if landscape). This value is uneditable and increases or decreases as you increase or decrease the widths in the other rows.
Print report card date in footer. Mark Print report card date in footer to print the date at the bottom of each page of the report card. In the Format field, select a format for the date or time. In the Align field, select where the date should print within the footer — left, center, or right.
Print page number in footer. Mark the Print page number in footer to print page numbers at the bottom of each page. In the Format field, select a page number format. In the Align field, select where the page number should print within the footer — left, center, or right.
Report Card SectionsOn the Details and Summary/Notes tabs, you select the sections of information to include on the report card. The sections you select on the Details tab appear in the detail area of the report card and those you select on the Summary/Notes tab appear in the summary/notes area. The possible sections are Courses, Credits, GPAs, Performance, Ranks, Academic Summary, Activities, Test Scores, Attendance, Conduct, Student Notes, and Freeform Notes. Several report card sections can be added to both the detail and the notes/summary areas. On the Details and Summary/Notes tabs, when you select a section to add, a screen appears for that section type. Using the tabs on this screen, you can format the size and appearance of the section, the information and details included, and how the information is organized in columns.
Courses Detail Section
The courses section in the detail area displays course information in rows. You can add columns that list details for courses such as the teacher, section, and attendance. You can also add columns to display grades, credits, comments, or class notes in the marking column in which they occurred. When you add certain detail sections, such as GPAs, performances, credits, or ranks, these break down automatically by the marking columns you added for the courses section. To format the courses section, on the Details tab, select Courses in the Section column of the grid. The Courses Section screen appears. This screen has tabs you use to format the courses section and the information included.
Note: If course information or comments do not print as expected (for example, grades or comments are missing), make sure the Print on report card checkbox is marked for the missing items on the student record and on the Grading tab for the course.

36 CH A PT E R
General TabOn the General tab, you can define a heading for the courses section, include transfer courses and add lines to divide columns and courses.
Section heading. In the Section heading field, select an academic year/grade format or select “Custom” to enter a heading.
Show column header row. Mark Show column header row to display column headings. Unmark the checkbox to hide the headings.
Print a box around the column heading row. If you mark Show column header row, you can mark Print a box around the column heading row to print a box around column headings and multiple column heading rows.
Include a [ ] after each course. Mark this option to add a blank line, horizontal line, or blank line and horizontal line after each course row.
If showing a total credits row, print a horizontal line after the last course. Mark this option to add a dividing line between the last course and the total credits row.
Print a vertical line between columns. Mark Print a vertical line between columns to print vertical lines between each column in the section. If you include skills or comments in the courses section, the vertical lines end at the border selected for those subsections on the Skills or Comments tab.
Print courses from outside schools. Mark Print courses from outside schools to print the course names of transfer courses. This option appears only if you marked Include information from outside schools on the Details tab.
Show grades. If you marked Print courses from outside schools, the Show grades option is enabled. Mark Show grades to print grades for courses taken at outside schools for the marking columns selected on the Columns tab.
Note: If you add horizontal lines after courses and vertical lines between columns, a grid forms in this section.

RE P O R T CA RD S 37
Show credits. If you marked Print courses from outside schools, the Show credits option is enabled. Mark Show credits to print credits for courses taken at outside schools for the marking columns selected on the Columns tab.
Include a [ ] after this section. Mark Include a [ ] after this section to add a blank line or horizontal line after the courses section. These options print only when a section is positioned directly below the courses section.
Columns TabOn the Columns tab, you define columns of information for the courses section. Once you add course columns, the grid displays the column’s heading, description, and width. You cannot add a marking column as the first column.
New Column. To add a new column to the courses section, click New Column. The Column <#> screen appears.Open Column. To open a courses column in the grid, select the column and click Open Column.
Repeat Column. To add a copy of an existing column in the grid, select the column and click Repeat Column. Delete Column. To delete a courses column in the grid, select the column and click Delete Column.Up/Down. To change the order of courses columns in the grid, select a column and click the up or down arrow.Heading. Once you define a column, the Heading column displays the heading entered in the Column heading
field of the Column <#> screen. You can edit the heading by typing directly in the row.Description. Once you define a column, the Description column displays the item selected in the Field to show
field of the Column <#> screen. If you selected Marking column in the Field to show field, it is the marking column and item selected in the Display field.
Width. Once you define a column, the Width column displays the width entered in the Column width field of the Column <#> screen. You can edit the width by typing directly in the row.
Tip: When creating report cards with similar columns, you can use the Repeat Column button to quickly add columns using the same width, alignment, and font style.

38 CH A PT E R
The Column <#> Screen
To add a new column to the courses section, click New Column. The Column <#> screen appears. The <#> is the position of the column in the list. For example, if the number is 2, the column is the second from the left on the report card.
Field to show. In the Field to show column, select the item of information to display in the column. The item you select changes the fields that appear on this screen. If you select Marking column, Total attendance, or Total credits, additional fields appear.
Marking column. If you select Marking column in Field to show, the Marking column and Display fields appear as well as other formatting options. In the Marking column field, select the marking column and in the Display field, select the information from the marking column to display, such as grades, credits, or comment codes. If you select Comment codes in the Display field, comment codes print only if grade comments entry is defined as Numeric for the academic year in Configuration.
Note: You cannot add a marking column for the first column.

RE P O R T CA RD S 39
Credits. If you select Total credits in Field to show, the Credits field appears as well as other formatting options. In the Credits field, select to display the credits awarded or credits attempted.
Attribute. If you select Course attribute in Field to show, the Attribute field appears. In the Attribute field, select the attribute to display for courses.
Column width. In the Column width field, enter a width for the column. The minimum width is 0.1 inch and the maximum is 7.75 inches if printing in portrait layout, 10.25 inches if landscape.
Column start. The Column start field displays where the column will start printing. The value is the sum of widths for all other columns positioned before it in the section.
Section width. The Section width field displays the sum of widths for all columns in the section (including the current column) and the space between columns. If the section width exceeds the amount allowed for this section, the number is red.
Column heading. The Column heading box displays the item selected in Field to show or Marking column fields. You can use this heading or enter a different one.
Format buttons. You can use the buttons below the Column heading box to format the alignment and style of heading text.
Wrap text if needed. If you select any item in Field to show besides Marking column, Withdrawal date, Total credits, Total attendance, or <Blank>, the Wrap text if needed checkbox appears. Mark this option to continue information to the next line for text that is too long to fit on one row within the column width.
Detail alignment. If you select Marking column, Total credits, or Total attendance in Field to show, the Detail alignment field appears. In this field you can select how items align in the column. If you select Default, text prints on the left and numbers print on the right.
Detail indention. If you select Marking column, Total credits, or Total attendance in the Field to show field, and Right or Left in the Detail alignment field, the Detail indention field appears. You can increase and decrease the indention in increments of 0.1 inch to a maximum of 7.75 inches if printing in portrait layout, 10.25 inches if landscape. If the detail alignment is right, the indention is from the right side and if the detail alignment is left, the indention is from the left side. If the indention amount is set large enough to cause the information to print over the next column, then the information is truncated. If the indention is so large that all the information is truncated, then the program will not indent the information.
Letter/Number. If you select Marking column in Field to show and Grade in the Display field, the Letter/Number field appears. In this field, select the format for grades in the column. If you select a format that contains a number, the Decimal places field appears.
Decimal places. If you select Marking column, Total credits, or Total attendance in Field to show, the Decimal places field appears. In this field, enter the number of places after the decimal to print numbers.
Show trailing zeros. If you select to use one or more decimal places, mark Show trailing zeros to ensure there are always the same number of numerals to the right of the decimal. For example, a student earns 3.5 and 3.75 credits for two courses. If you mark this option, the program adds a zero after 3.5 and prints 3.50.
Show grades/credits/comment codes for marking columns that do not award credit. If you select Marking column in Field to show and Grade, Credits attempted, Credits awarded or Comment codes, in the Display field, the Show grades/credits/comment codes for marking columns that do not award credit checkbox appears for that item. Mark this option to display grades/credits/comment codes for marking columns that do not award credits.
Show grades entered as 'NG'. If you select Marking column in Field to show and Grade in the Display field, the Show grades entered as 'NG' checkbox appears. Mark this option to print grades entered as ‘NG’ (for blank or missing grades) in the marking column.
Note: You can select <Blank> in the Field to show field to add a blank column providing extra space between columns.

40 CH A PT E R
Show column total. If you select Total Credits or Marking column in Field to show and Credits attempted or Credits awarded in the Display or Credits fields, the Show column total checkbox appears. Mark this option to add a row for credit totals at the bottom of each course section for the credits in the column.
Show total cumulative credits. If you select Total Credits or Marking column in Field to show and Credits attempted or Credits awarded in the Display or Credits fields, the Show total cumulative credits checkbox appears. Mark this option to add a row for credit totals at the bottom of each course section for the cumulative credits for all years up to and including that column.
Translate tardies to absences. If you select Total attendance in Field to show, the Translate tardies to absence checkbox appears. If you defined tardy code translations in Configuration (for example, five tardies equals an absence), you can mark this option to print translated tardies as absences. Only class attendance is considered for this column, so if your school tracks attendance in days only, the column is blank.
Terms to include. If you select Total attendance in Field to show, the Terms to include checkbox appears. In this field, you can select for which terms to include attendance.
Include these attendance codes. If you select Total attendance in Field to show, the Include these attendance codes box appears. Mark the checkbox for each attendance code to include in the attendance column.
Include credits from [ ] to [ ]. If you select Total credits in Field to show, the Include credits from [ ] to [ ] field appears. In this field, select a first and last marking column to define a time period for credits to include in totals. The program uses the order of marking column table entries in Configuration to determine which marking columns to include within the range. In this field, you can select marking columns that span different marking column sets, but only credits for the marking columns included in the set associated with the session selected on the General tab appear on the report card.For example, Marking Column Set #1 includes marking columns MC1A, MC1B, and MC1C and Marking Column Set #2 includes marking columns MC2A, MC2B, and MC2C. When you are printing a report card for the Regular session, which is associated with Marking Column Set #1, if you define the credits range as MC1A to MC2A, only those marking columns included in Marking Column Set #1 (MC1A, MC1B, and MC1C) are included in the credits totals.
Date format. If you select Withdrawal date in Field to show, the Date format field appears. In this field, select the month/date/year combination for formatting dates.

RE P O R T CA RD S 41
Skills TabUse the Skills tab to add skills information for courses. Skills always print immediately after their associated course row. All skills for courses appear on report cards, even those for marking columns not included for the section.
Show skills for each course. Mark Show skills for each course to print associated skills below courses. If you do not mark this option, all fields and options on this tab are disabled.
Section heading. In the Section heading field, you can enter a heading for the skills section or leave it blank. Heading text is bold on the report card.
Indent section [ ] inches. Mark Indent section [ ] inches to increase and decrease the indention of the skill category and name in increments of 0.1 inch to a maximum of 7.75 inches if printing in portrait layout, 10.25 inches if landscape. If the indention amount is set large enough to cause the information to print over the next column, then the information is truncated. If the indention is so large that all the information is truncated, then the program will not indent the information.
Borders. In the Borders field, select which separators to use for the skills section. You can select None, Lines above and below section, Line below section, Box around section, Horizontal lines, Vertical lines, or Grid lines.
Show ratings by. In the Show ratings by field, select to use the short or long description for skill ratings.Sort skills by. In the Sort skills by field, select the item by which to sort the skills list.
Note: The skill name prints in the space available before the first marking column. Make sure to allow for enough space in the course column(s) for the skill name.
Note: You can create a freeform note with a legend to explain short descriptions. For more information about creating freeform notes, see “Freeform Notes Section” on page 91

42 CH A PT E R
Show skill category. Mark Show skill category to print the categories for skills. Marking this option enables other category options.
Break by category. If you mark Show skill category, you can mark Break by category to group skills by category and to print the category name in bold type. The category name appears in a column above or beside the skills depending on your selection in the Position field.If you unmark Break by category, the category lists in a second column.
Position. If you mark Break by category, in the Position field, select the placement of the category name. If you select Row above skill rows, the skills and categories print in a single column.
If you select Column beside skills rows, the categories and skills print in two separate columns.
Use [ ] inches of the [ ] inches of the available space for the category description. If you mark Show skill category, you must enter the amount of space to allow for the category description and skill name. The amount of space available is the total width of all columns before the first marking column minus the indention amount.
Wrap skill name if necessary. Mark Wrap skill name if necessary to continue skill names on a new line rather than truncating the skill name when it runs out of room.

RE P O R T CA RD S 43
Print skills from outside schools. If you marked Include information for outside schools attended on the Details tab, you can include skills for transfer courses.
Comments TabOn the Comments tab, you can print comments listed for a course below the course row. For courses assigned default comments, the actual comment prints, not the comment number. Comments print in the font style and size defined on the comment notepad, regardless of what is selected for the report card on the General tab.
Show comments for each course. Mark Show comments for each course to print comments below courses. If you do not mark this option, all fields and options on this tab are disabled.
Section heading. In the Section heading field, you can enter a heading for the comments section or leave it blank. Heading text is bold on the report card.
Indent section [ ] inches. Mark Indent section [ ] inches to increase and decrease the indention of the section in increments of 0.1 inch to a maximum of 7.75 inches if printing in portrait layout, 10.25 inches if landscape. If the indention amount is set large enough to cause the information to print over the next column, then the information is truncated. If the indention is so large that all the information is truncated, then the program will not indent the information.
Print a horizontal line before comments. Mark this option to add a horizontal line as a divider before comments.
Suppress blank comment rows. Mark Suppress blank comment rows to prevent blank rows for courses with no comments.
Label comments with marking column [ ]. Mark Label comments with marking column [ ] to add a column before the comment listing the marking column in which the comment was assigned. You can label the marking column with the short or long description.
Use [ ] inches of the [ ] inches of the available space for the marking column description. If you mark Label comments with marking column, you must enter the amount of space to allow for the marking column description. The amount of space available is the total section width.

44 CH A PT E R
Print comments for transfer courses. If you marked Include information for outside schools attended during the year on the Details tab, you can include comments for transfer courses.
Include these marking columns. In the Include these marking columns frame, mark the marking columns for which you want to include comments. You can print comments for marking columns not included in the courses columns.
Class Notes TabOn the Class Notes tab, you can print class notes listed for a course below the course row. Class notes appear before comments.Keep in mind that class notes are different from student notes. Student notes have a Print on report card checkbox to control which student notes are included, but any class notes entered for the selected marking columns are included.
Show class notes for each course. Mark Show class notes for each course to print class notes below courses. If you do not mark this option, all fields and options on this tab are disabled.
Section heading. In the Section heading field, you can enter a heading for the class notes section or leave it blank. Heading text is bold on the report card.
Indent section [ ] inches. Mark Indent section [ ] inches to increase and decrease the indention of the section in increments of 0.1 inch to a maximum of 7.75 inches if printing in portrait layout, 10.25 inches if landscape. If the indention amount is set large enough to cause the information to print over the next column, then the information is truncated. If the indention is so large that all the information is truncated, then the program will not indent the information.
Print a horizontal line before class notes. Mark this option to add a horizontal line as a divider before class notes.
Suppress blank class note rows. Mark Suppress blank class note rows to prevent blank rows for courses with no class notes.

RE P O R T CA RD S 45
Label class notes with marking column [ ]. Mark Label class notes with marking column [ ] to add a column before the class note listing the marking column in which the class note was assigned. You can label the marking column with the short or long description.
Use [ ] inches of the [ ] inches of the available space for the marking column description. If you mark Label class notes with marking column, you must enter the amount of space to allow for the marking column description. The amount of space available is the total section width.
Include these marking columns. In the Include these marking columns frame, mark the marking columns for which you want to include class notes. You can print class notes for marking columns not included in the courses columns.
Multiple Column Headings TabOn the Multiple Column Headings tab, you can create a heading that appears over one or more of the individual column headers.
Heading. In the Heading column, enter text for the heading.Start. In the Start column, select the first column over which the multiple column heading appears. End. In the End column, select the last column over which the multiple column heading appears. Align. In the Align column, select left, center, or right alignment for the heading.
Note: If you marked Print a box around the column heading row on the General tab, when you add multiple column headings, vertical lines print in the box to separate each of the column groupings.

46 CH A PT E R
Sort/Break TabUse the Sort/Break tab to select the order of information in the course section and where breaks fall between sets of information.
Sort by. To order the information, select a sorting category in the Sort by column Order by. In the Order by column, select to sort in ascending or descending order.Break? Mark the checkbox in the Break? column to create breaks between sections. A break divides sets of
information by adding space between each section and text. For example, if you sort and break by Course name, information for each course is set apart by a blank line and the course name heading. If you mark Break?, other fields are enabled so you can define a break header and break footer for that sort category.
Text before value. In the Text before value field, you can enter text to appear directly before the value for the selected sorting category, which is now the heading for the subsections.
Text after value. In the Text after value field, you can enter text to appear directly after the value for the selected sorting category, which is now the heading for the subsections.
Page break on each new <Sort Category>. Mark Page break on each new <Sort Category> to print each sort category subsection on a new page.
Credits Detail Section
The credits section in the detail area displays total attempted or awarded credits for the selected marking columns. You can designate whether to display the total credits for a marking column or the cumulative credits for all marking columns up to that marking column. If you define credit columns in the courses section, adding a credits section is not necessary. You should add a credit section rather than credit columns in the courses section if you want credit information to appear in its own section, separate from the courses information.
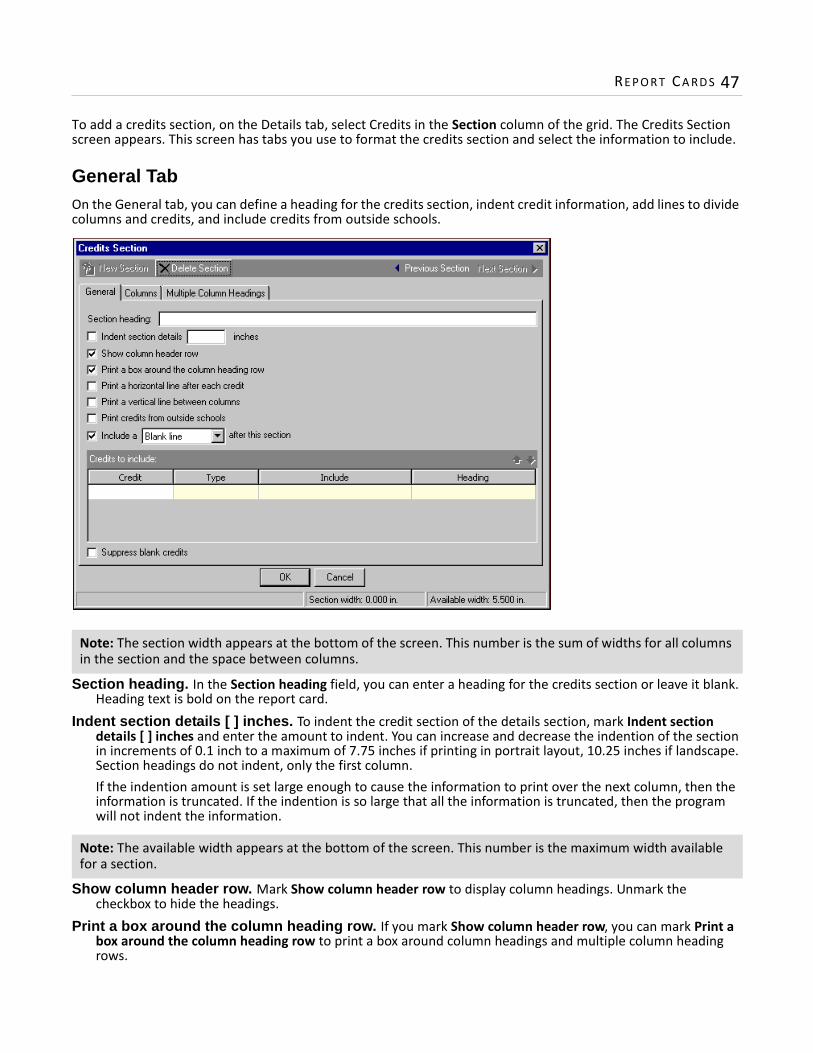
RE P O R T CA RD S 47
To add a credits section, on the Details tab, select Credits in the Section column of the grid. The Credits Section screen appears. This screen has tabs you use to format the credits section and select the information to include.
General TabOn the General tab, you can define a heading for the credits section, indent credit information, add lines to divide columns and credits, and include credits from outside schools.
Section heading. In the Section heading field, you can enter a heading for the credits section or leave it blank. Heading text is bold on the report card.
Indent section details [ ] inches. To indent the credit section of the details section, mark Indent section details [ ] inches and enter the amount to indent. You can increase and decrease the indention of the section in increments of 0.1 inch to a maximum of 7.75 inches if printing in portrait layout, 10.25 inches if landscape. Section headings do not indent, only the first column.If the indention amount is set large enough to cause the information to print over the next column, then the information is truncated. If the indention is so large that all the information is truncated, then the program will not indent the information.
Show column header row. Mark Show column header row to display column headings. Unmark the checkbox to hide the headings.
Print a box around the column heading row. If you mark Show column header row, you can mark Print a box around the column heading row to print a box around column headings and multiple column heading rows.
Note: The section width appears at the bottom of the screen. This number is the sum of widths for all columns in the section and the space between columns.
Note: The available width appears at the bottom of the screen. This number is the maximum width available for a section.

48 CH A PT E R
Print a horizontal line after each credit. Mark Print a horizontal line after each credit to print horizontal lines between rows.
Print a vertical line between columns. Mark Print a vertical line between columns to print vertical lines between each column in the section.
Print credits from outside schools. Mark Print credits from outside schools to print the credits earned at outside schools. This option appears only if you marked Include information from outside schools attended on the Details tab.
Include a [ ] after this section. Mark Include a [ ] after this section to add a blank line or horizontal line after the credits section. These options print only when another section is positioned directly below the credits section.
Suppress blank credits. Mark Suppress blank credits to exclude credits with no values assigned for the selected marking columns.
Credits To Include Grid
In the Credits to Include grid, you select which credit types to include.
Credit. In the Credit column, select Attempted or Awarded credits.Type. In the Type column, select Column total or Cumulative total.Include. In the Include column, select All courses, Standard and mandatory courses, or Transfer courses.Heading. The Heading column displays default headings based on the selections made in the Credit and Type
columns. You can use these headings, enter different headings, or leave them blank.
Columns TabOn the Columns tab, the grid displays the marking column columns defined in the courses section with Grade selected in the Display field and a heading column for credits. These columns appear by default but you can exclude any of them from appearing in the credits section by unmarking the checkbox in the Include column.
Include. Columns appear by default for the heading and any marking columns with Grade selected in the Display field defined for the courses section. Unmark the checkbox in the Include column for any column in which you do not want credit information to display.
Note: If you mark Print a horizontal line after each credit and Print a vertical line between columns, a grid forms in this section.
Note: You can select the items in the Credit and Type columns more than once.

RE P O R T CA RD S 49
Heading. The Heading column displays the heading entered in the Column heading field of the Column <#> screen. You can edit the heading by typing directly in the row.
Description. The Description column displays the type of column. You cannot edit this column.Width. The Width column displays the width of columns defined for the courses section. You cannot edit this
column.
The Column <#> Screen
To define the credit details that appear and the format of the column, select the column in the grid and click Open Column. The Column <#> screen appears.
Field to show. The Field to show field is disabled and displays Heading (for the heading column) or Marking column (for a marking column column) by default.
Marking column. The Marking column field displays the marking column selected in the courses section for this column. This field is disabled.
Column heading. The Column heading box displays the default heading. You can use this heading or enter a different one.
Format buttons. You can use the buttons below the Column heading box to edit the alignment and style of heading text.
Wrap text if needed. If Heading appears in the Field to show field, the Wrap text if needed checkbox appears. Mark this option to continue information to the next line for text that is too long to fit on one row within the column width.
Detail alignment. In the Detail alignment field, you can select how items align in the column. If you select Default, text prints on the left and numbers print on the right.
Detail indention. If you select Right or Left in the Detail alignment field, you can select the amount to indent in the Detail indentation field. You can increase and decrease the indention in increments of 0.1 inch to a maximum of 7.75 inches if printing in portrait layout, 10.25 inches if landscape. If the detail alignment is right, the indention is from the right side and if the detail alignment is left, the indention is from the left side. If the indention amount is set large enough to cause the information to print over the next column, then the information is truncated. If the indention is so large that all the information is truncated, then the program will not indent the information.
Decimal places. If Marking column appears in the Field to show field, the Decimal places field appears. In this field, enter the number of decimal places to use for credit.

50 CH A PT E R
Show trailing zeros. If you select to use one or more decimal places, mark Show trailing zeros to ensure there are always the same number of numerals to the right of the decimal. For example, a student earns 3.5 and 3.75 credits for two courses. If you mark this option, the program adds a zero after 3.5 and prints 3.50.
Multiple Column Headings TabOn the Multiple Column Headings tab, you can create a heading that appears over one or more of the individual column headers.
Heading. In the Heading column, enter text for the heading.Start. In the Start column, select the first column over which the multiple column heading appears. End. In the End column, select the last column over which the multiple column heading appears. Align. In the Align column, select left, center, or right alignment for the heading.
GPAs Detail Section
The GPAs section in the detail area displays GPA calculations for the selected marking columns. To add a GPAs section, on the Details tab, select GPAs in the Section column of the grid. The GPAs Section screen appears. This screen has tabs you use to format the GPAs section and select the information to include.
Note: If you marked Print a box around the column heading row on the General tab, when you add multiple column headings, vertical lines print in the box to separate each of the column groupings.

RE P O R T CA RD S 51
General TabOn the General tab, you can define a heading for the GPAs section, indent GPA information, add lines to divide columns and calculations, and include GPAs from outside schools.
Section heading. The Section heading field displays a default heading for the GPAs section. You can use this heading, enter a different one, or make it blank. Heading text is bold on the report card.
Indent section details [ ] inches. To indent the GPAs section, mark Indent section details [ ] inches and enter the amount to indent. You can increase and decrease the indention of the section in increments of 0.1 inch to a maximum of 7.75 inches if printing in portrait layout, 10.25 inches if landscape. Section headings do not indent, only the first column.If the indention amount is set large enough to cause the information to print over the next column, then the information is truncated. If the indention is so large that all the information is truncated, then the program will not indent the information.
Show column header row. Mark Show column header row to display column headings. Unmark the checkbox to hide the headings.
Print a box around the column heading row. If you mark Show column header row, you can mark Print a box around the column heading row to print a box around column headings and multiple column heading rows.
Print a horizontal line after each GPA. Mark Print a horizontal line after each GPA to print horizontal lines between rows.
Note: The section width appears at the bottom of the screen. This number is the sum of widths for all columns in the section and the space between columns.
Note: If you mark Print a horizontal line after each GPA and Print a vertical line between columns, a grid forms in this section.

52 CH A PT E R
Print a vertical line between columns. Mark Print a vertical line between columns to print vertical lines between each column in the section.
Print GPAs from outside schools. Mark Print GPAs from outside schools to print the GPAs earned at outside schools. This option appears only if you marked Include information from outside schools attended on the Details tab.
Include a [ ] after this section. Mark Include a [ ] after this section to add a blank line or horizontal line after the GPAs section. These options print only when another section is positioned directly below the GPAs section.
Suppress blank GPAs. Mark Suppress blank GPAs to exclude GPAs with no values assigned for the selected marking columns.
GPAs To Include Grid
In the GPAs to include grid, you select which GPA calculations to include in the section.
Calculation. In the Calculation column, select a GPA calculation. GPA calculations are defined in Configuration.Type. In the Type column, select GPA, Year to Date GPA, or Cumulative GPA.Heading. The Heading column displays default headings based on the selections made in the Calculation and
Type columns. You can use these headings, enter different headings, or leave them blank.
Columns TabOn the Columns tab, the grid displays the marking column columns defined for the courses section with Grade selected in the Display field and a heading column for GPAs. These columns appear by default but you can exclude any of them from appearing in the GPAs section by unmarking the checkbox in the Include column.
Include. Columns appear by default for the heading and any marking columns with Grade selected in the Display field defined for the courses section. Unmark the checkbox in the Include column for any column in which you do not want GPA information to display.
Heading. The Heading column displays the heading entered in the Column heading field of the Column <#> screen. You can edit the heading by typing directly in the row.
Description. The Description column displays the type of column. You cannot edit this column.
Note: The available width appears at the bottom of the screen. This number is the maximum width available for a section.
Note: You can select the items in the Calculation and Type columns more than once.

RE P O R T CA RD S 53
Width. The Width column displays the width of columns defined for the courses section. You cannot edit this column.
The Column <#> Screen
To define the GPA details that appear and the format of the column, select the column in the grid and click Open Column. The Column <#> screen appears.
Field to show. The Field to show field is disabled and displays Heading (for the heading column) or Marking column (for a marking column column) by default.
Marking column. The Marking column field displays the marking column selected in the courses section for this column. This field is disabled.
Column heading. The Column heading box displays the default heading. You can use this heading or enter a different one.
Format buttons. You can use the buttons below the Column heading box to edit the alignment and style of heading text.
Wrap text if needed. If Heading appears in the Field to show field, the Wrap text if needed checkbox appears. Mark this option to continue information to the next line for text that is too long to fit on one row within the column width.
Detail alignment. In the Detail alignment field, you can select how items align in the column. If you select Default, text prints on the left and numbers print on the right.
Detail indention. If you select Right or Left in the Detail alignment field, you can select the amount to indent in the Detail indentation field. You can increase and decrease the indention in increments of 0.1 inch to a maximum of 7.75 inches if printing in portrait layout, 10.25 inches if landscape. If the detail alignment is right, the indention is from the right side and if the detail alignment is left, the indention is from the left side. If the indention amount is set large enough to cause the information to print over the next column, then the information is truncated. If the indention is so large that all the information is truncated, then the program will not indent the information.
Decimal places. If Marking column appears in the Field to show field, the Decimal places field appears. In this field, enter the number of decimal places to use for numbers.
Show trailing zeros. If you select to use one or more decimal places, mark Show trailing zeros to ensure there are always the same number of numerals to the right of the decimal. For example, a student earns 3.5 and 3.75 credits for two courses. If you mark this option, the program adds a zero after 3.5 and prints 3.50.

54 CH A PT E R
Round result up at [ ]. To round up your GPAs, mark the checkbox and enter the GPA round up number. The GPA round up number depends on the selection you made in the Decimal places field.
Multiple Column Headings TabOn the Multiple Column Headings tab, you can create a heading that appears over one or more of the individual column headers.
Heading. Text entered into the Heading column appears as a heading above one or more of the individual column headers.
Start. In the Start column, select the first column the multiple column heading will cover. End. In the End column, select the last column the multiple column heading will cover. The End column must be
greater than or equal to the Start column. Align. In the Align column, select a left, center, or right alignment for the heading.
Performance Detail Section
The performance section in the detail area displays the performance categories for the selected marking columns. You can also print comments for performance categories.To add a performance section, on the Details tab, select Performance in the Section column of the grid. The Performance Section screen appears. This screen has tabs you use to format the performance section and select the information to include.
Note: If you marked Print a box around the column heading row on the General tab, when you add multiple column headings, vertical lines print in the box to separate each of the column groupings.

RE P O R T CA RD S 55
General TabOn the General tab, you can define a heading for the performance section, indent performance information, add lines to divide columns and categories, and include performances from outside schools.
Section heading. The Section heading field displays a default heading for the performance section. You can use this heading, enter a different one, or leave it blank. Heading text is bold on the report card.
Indent section details [ ] inches. To indent the performance section, mark Indent section details [ ] inches and enter the amount to indent. You can increase and decrease the indention of the section in increments of 0.1 inch to a maximum of 7.75 inches if printing in portrait layout, 10.25 inches if landscape. Section headings do not indent, only the first column.If the indention amount is set large enough to cause the information to print over the next column, then the information is truncated. If the indention is so large that all the information is truncated, then the program will not indent the information.
Show column header row. Mark Show column header row to display column headings. Unmark the checkbox to hide the headings.
Print a box around the column heading row. If you mark Show column header row, you can mark Print a box around the column heading row to print a box around column headings and multiple column heading rows.
Print a horizontal line after each category. Mark Print a horizontal line after each category to print horizontal lines between rows.
Note: The section width appears at the bottom of the screen. This number is the sum of widths for all columns in the section and the space between columns.
Note: The available width appears at the bottom of the screen. This number is the maximum width available for a section.

56 CH A PT E R
Print a vertical line between columns. Mark Print a vertical line between columns to print vertical lines between each column in the section.
Print performance from outside schools. Mark Print performance from outside schools to print the performance level earned at outside schools. This option appears only if you marked Include information from outside schools attended on the Details tab.
Include a [ ] after this section. Mark Include a [ ] after this section to add a blank line or horizontal line after the performances section. These options print only when another section is positioned directly below the performances section.
Suppress blank categories. Mark Suppress blank categories to exclude performance categories with no values assigned for the selected marking columns.
Performance Categories To Include Grid
In the Performance categories to include grid, you select which performance categories to include.Category. In the Category column, select a performance category. Performance categories are defined in
Configuration. You can select each category only once.Details Format. In the Details Format column, select Short description or Long description.Heading. The Heading column displays default headings based on the selections made in the Category column.
You can use these headings or enter different headings.Print Comment. Mark Print Comment to print the comment for the performance level earned by the student.Comment Marking Column. If you mark Print Comment, in the Comment Marking Column column, select
the marking column for which you want to print performance comments.
Columns TabOn the Columns tab, the grid displays the marking column columns defined for the courses section with Grade selected in the Display field and a heading column for performances. These columns appear by default but you can exclude any of them from appearing in the performances section by unmarking the checkbox in the Include column.
Include. Columns appear by default for the heading and any marking columns defined for the courses section with Grade selected in the Display field. Unmark the checkbox in the Include column for any column in which you do not want performance information to display.
Heading. The Heading column displays the heading entered in the Column heading field of the Column <#> screen. You can edit the heading by typing directly in the row.
Note: If you mark Print a horizontal line after each category and Print a vertical line between columns, a grid forms in this section.

RE P O R T CA RD S 57
Description. The Description column displays the type of column. You cannot edit this column.Width. The Width column displays the width of columns defined for the courses section. You cannot edit this
column.
The Column <#> Screen
To define the performance details that appear and the format of the column, select the column in the grid and click Open Column. The Column <#> screen appears.
Field to show. The Field to show field is disabled and displays Heading (for the heading column) or Marking column (for a marking column column) by default.
Marking column. The Marking column field displays the marking column selected in the courses section for this column. This field is disabled.
Column heading. The Column heading box displays the default heading. You can use this heading or enter a different one.
Format buttons. You can use the buttons below the Column heading box to edit the alignment and style of heading text.
Wrap text if needed. If Heading appears in the Field to show field, the Wrap text if needed checkbox appears. Mark this option to continue information to the next line for text that is too long to fit on one row within the column width.
Detail alignment. In the Detail alignment field, you can select how items align in the column. If you select Default, text prints on the left and numbers print on the right.
Detail indention. If you select Right or Left in the Detail alignment field, you can select the amount to indent in the Detail indentation field. You can increase and decrease the indention in increments of 0.1 inch to a maximum of 7.75 inches if printing in portrait layout, 10.25 inches if landscape. If the detail alignment is right, the indention is from the right side and if the detail alignment is left, the indention is from the left side. If the indention amount is set large enough to cause the information to print over the next column, then the information is truncated. If the indention is so large that all the information is truncated, then the program will not indent the information.
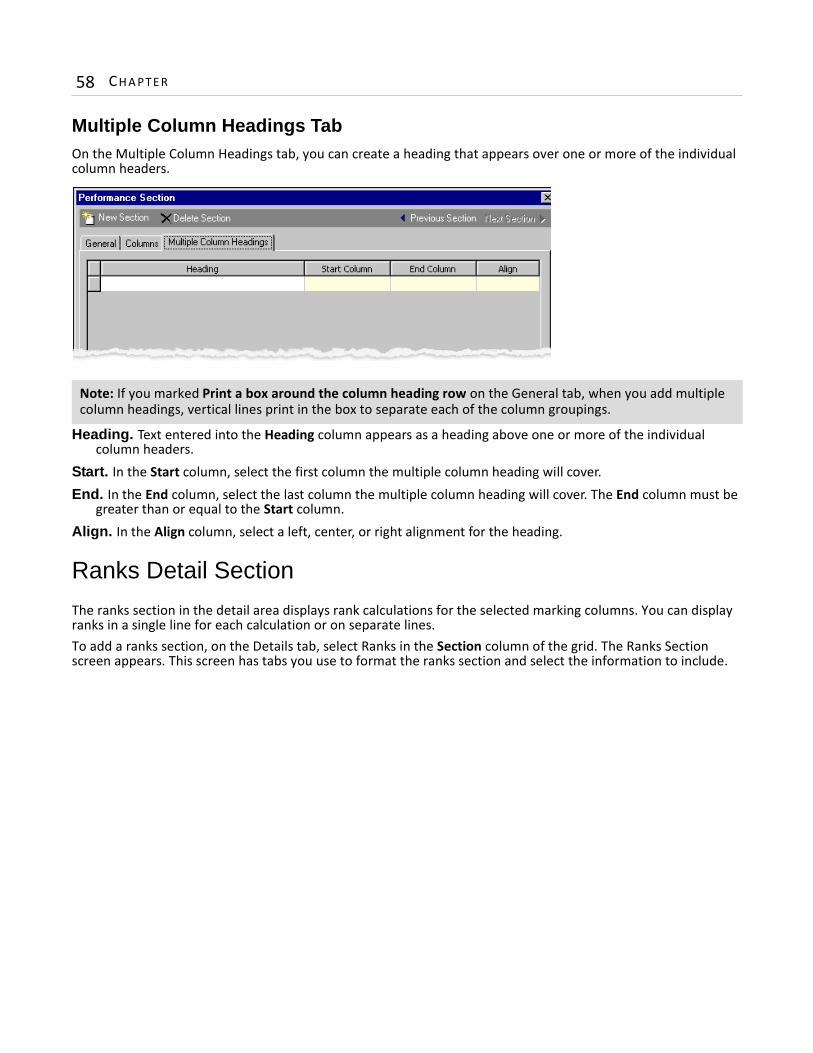
58 CH A PT E R
Multiple Column Headings TabOn the Multiple Column Headings tab, you can create a heading that appears over one or more of the individual column headers.
Heading. Text entered into the Heading column appears as a heading above one or more of the individual column headers.
Start. In the Start column, select the first column the multiple column heading will cover. End. In the End column, select the last column the multiple column heading will cover. The End column must be
greater than or equal to the Start column. Align. In the Align column, select a left, center, or right alignment for the heading.
Ranks Detail Section
The ranks section in the detail area displays rank calculations for the selected marking columns. You can display ranks in a single line for each calculation or on separate lines. To add a ranks section, on the Details tab, select Ranks in the Section column of the grid. The Ranks Section screen appears. This screen has tabs you use to format the ranks section and select the information to include.
Note: If you marked Print a box around the column heading row on the General tab, when you add multiple column headings, vertical lines print in the box to separate each of the column groupings.

RE P O R T CA RD S 59
General TabOn the General tab, you can define a heading for the ranks section, indent ranks information, add lines to divide columns and rank calculations, include ranks from outside schools, and select whether to display ranks on one line or two.
Section heading. The Section heading field displays a default heading for the ranks section. You can use this heading, enter a different one, or leave it blank. Heading text is bold on the report card.
Indent section details [ ] inches. To indent the ranks section, mark Indent section details [ ] inches and enter the amount to indent. You can increase and decrease the indention of the section in increments of 0.1 inch to a maximum of 7.75 inches if printing in portrait layout, 10.25 inches if landscape. Section headings do not indent, only the first column.If the indention amount is set large enough to cause the information to print over the next column, then the information is truncated. If the indention is so large that all the information is truncated, then the program will not indent the information.
Show column header row. Mark Show column header row to display column headings. Unmark the checkbox to hide the headings.
Print a box around the column heading row. If you mark Show column header row, you can mark Print a box around the column heading row to print a box around column headings and multiple column heading rows.
Print a horizontal line after each rank. Mark Print a horizontal line after each rank to print horizontal lines between rows.
Note: The section width appears at the bottom of the screen. This number is the sum of widths for all columns in the section and the space between columns.
Note: The available width appears at the bottom of the screen. This number is the maximum width available for a section.

60 CH A PT E R
Print a vertical line between columns. Mark Print a vertical line between columns to print vertical lines between each column in the section.
Print ranks from outside schools. Mark Print ranks from outside schools to print the ranks earned at outside schools. This option appears only if you marked Include information from outside schools attended on the Details tab.
Include a [ ] after this section. Mark Include a [ ] after this section to add a blank line or horizontal line after the ranks section. These options print only when another section is positioned directly below the ranks section.
Show rank and total ranks values on [ ]. In the Show rank and total ranks values on [ ] field, select Same line or Separate lines. If you select Same line, the rank appears in a combined format on one line.
If you select Separate lines, the rank appears on two lines. The first line displays the rank and the second line displays the number of ranks possible.
Suppress blank ranks. Mark Suppress blank ranks to exclude ranks with no values assigned for the selected marking columns.
Ranks To Include Grid
In the Ranks to include grid, you select which ranks to include in the detail section.Calculation. In the Calculation column, select a rank calculation. Rank calculations are defined in Configuration.
You can select each ranks calculation only once.Heading. The Heading column displays default headings based on the selections made in the Calculation
column. You can use these headings or enter different headings.
Columns TabOn the Columns tab, the grid displays the marking column columns defined for the courses section with Grade selected in the Display field and a heading column for ranks. These columns appear by default but you can exclude any of them from appearing in the ranks section by unmarking the checkbox in the Include column.
Note: If you mark Print a horizontal line after each rank and Print a vertical line between columns, a grid forms in this section.
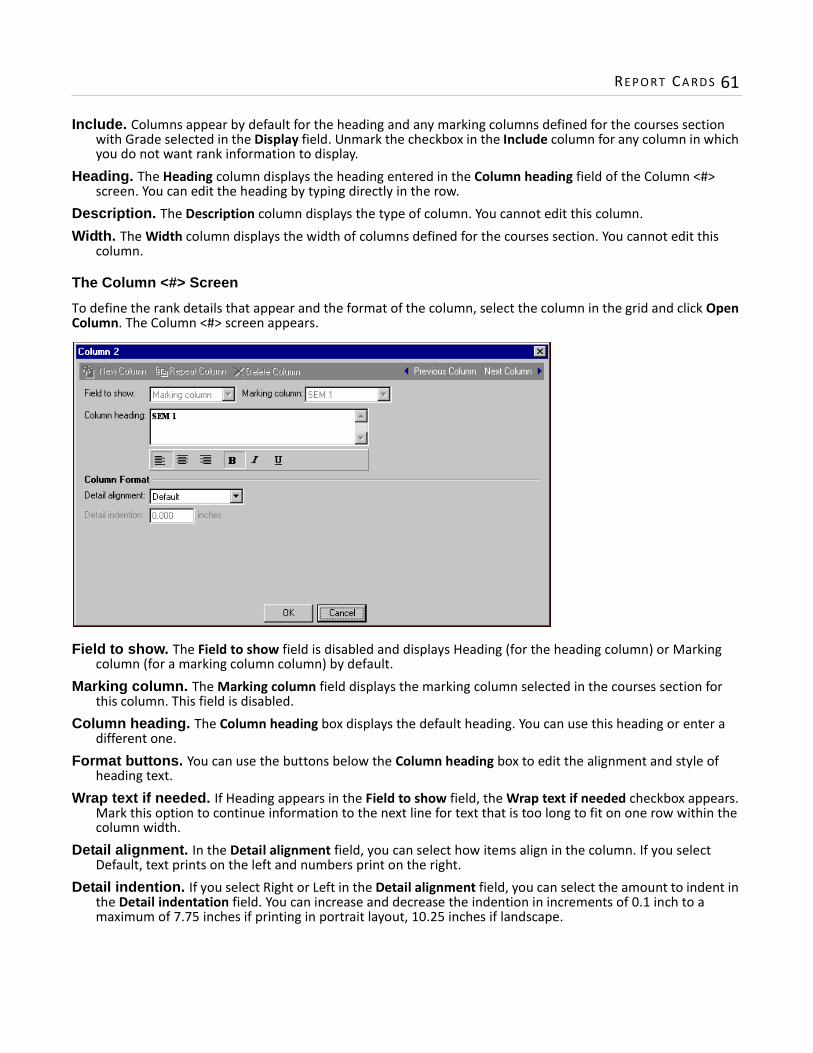
RE P O R T CA RD S 61
Include. Columns appear by default for the heading and any marking columns defined for the courses section with Grade selected in the Display field. Unmark the checkbox in the Include column for any column in which you do not want rank information to display.
Heading. The Heading column displays the heading entered in the Column heading field of the Column <#> screen. You can edit the heading by typing directly in the row.
Description. The Description column displays the type of column. You cannot edit this column.Width. The Width column displays the width of columns defined for the courses section. You cannot edit this
column.
The Column <#> Screen
To define the rank details that appear and the format of the column, select the column in the grid and click Open Column. The Column <#> screen appears.
Field to show. The Field to show field is disabled and displays Heading (for the heading column) or Marking column (for a marking column column) by default.
Marking column. The Marking column field displays the marking column selected in the courses section for this column. This field is disabled.
Column heading. The Column heading box displays the default heading. You can use this heading or enter a different one.
Format buttons. You can use the buttons below the Column heading box to edit the alignment and style of heading text.
Wrap text if needed. If Heading appears in the Field to show field, the Wrap text if needed checkbox appears. Mark this option to continue information to the next line for text that is too long to fit on one row within the column width.
Detail alignment. In the Detail alignment field, you can select how items align in the column. If you select Default, text prints on the left and numbers print on the right.
Detail indention. If you select Right or Left in the Detail alignment field, you can select the amount to indent in the Detail indentation field. You can increase and decrease the indention in increments of 0.1 inch to a maximum of 7.75 inches if printing in portrait layout, 10.25 inches if landscape.

62 CH A PT E R
If the detail alignment is right, the indention is from the right side and if the detail alignment is left, the indention is from the left side. If the indention amount is set large enough to cause the information to print over the next column, then the information is truncated. If the indention is so large that all the information is truncated, then the program will not indent the information.
Multiple Column Headings TabOn the Multiple Column Headings tab, you can create a heading that appears over one or more of the individual column headers.
Heading. Text entered into the Heading column appears as a heading above one or more of the individual column headers.
Start. In the Start column, select the first column the multiple column heading will cover. End. In the End column, select the last column the multiple column heading will cover. The End column must be
greater than or equal to the Start column. Align. In the Align column, select a left, center, or right alignment for the heading.
Academic Summary Section
The academic summary section displays academic information (such as GPAs, performances, ranks, or credits) in a summary format for the current academic year on the report card. For example, you can create an academic summary section that lists the ranks earned. You can also add columns for marking columns to add additional detail. For example, you can add semesters to the ranks academic summary section so the ranks are broken down by semester. You can add academic summary sections to the summary/notes and detail areas. To add an academic summary section, on the Details or Summary/Notes tab, select Academic Summary in the Section column of the grid. The Academic Summary Section screen appears. This screen has tabs you use to format the academic summary section and select the information to include.
Note: If you marked Print a box around the column heading row on the General tab, when you add multiple column headings, vertical lines print in the box to separate each of the column groupings.

RE P O R T CA RD S 63
General TabOn the General tab, you can define a heading for the academic summary section, indent academic summary information, and add lines to divide columns and years.
Section heading. In the Section heading field, you can enter a heading for the academic summary section or leave it blank. Heading text is bold on the report card.
Indent section details [ ] inches. To indent the academic summary section, mark Indent section details [ ] inches and enter the amount to indent. You can increase and decrease the indention of the section in increments of 0.1 inch to a maximum of 7.75 inches if printing in portrait layout, 10.25 inches if landscape. Section headings do not indent, only the first column.
Show column header row. Mark Show column header row to display column headings. Unmark the checkbox to hide the headings.
Print a box around the column heading row. If you mark Show column header row, you can mark Print a box around the column heading row to print a box around column headings and multiple column heading rows.
Print a horizontal line after each year. Mark Print a horizontal line after each year to print horizontal lines between rows.
Note: The section width appears at the bottom of the screen. This number is the sum of widths for all columns in the section and the space between columns.
Note: The available width appears at the bottom of the screen. This number is the maximum width available for a section.
Note: If you mark Print a horizontal line after each year and Print a vertical line between columns, a grid forms in this section.
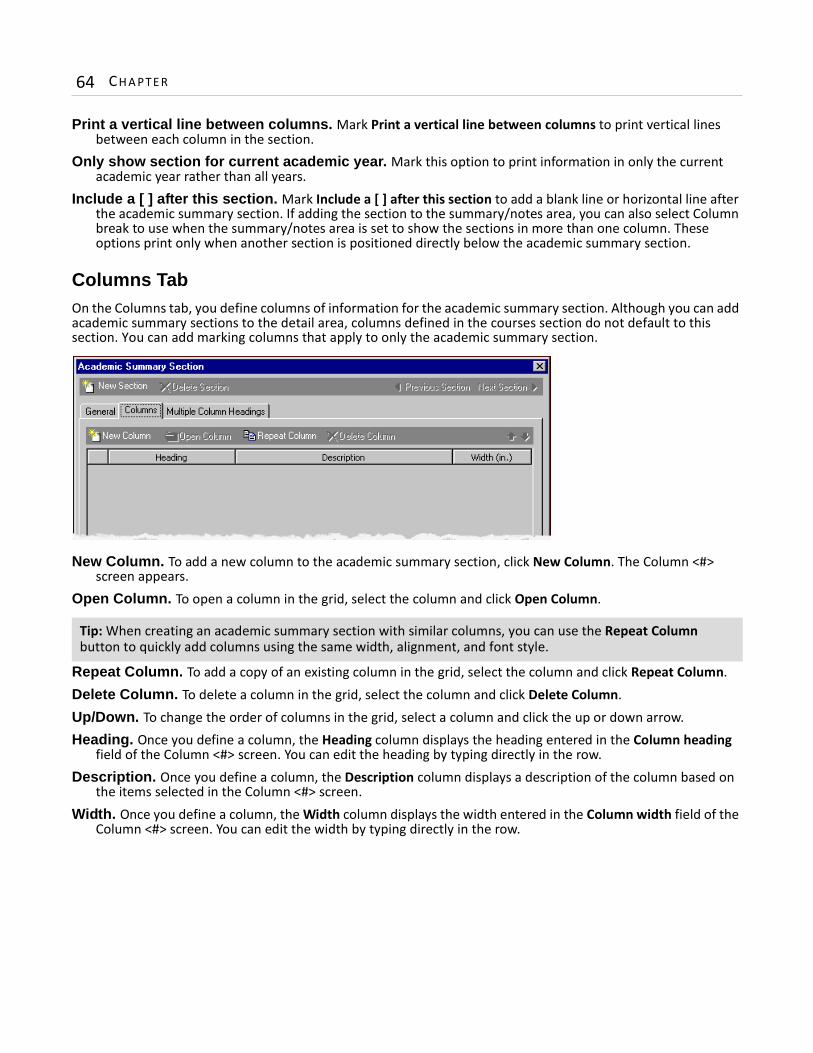
64 CH A PT E R
Print a vertical line between columns. Mark Print a vertical line between columns to print vertical lines between each column in the section.
Only show section for current academic year. Mark this option to print information in only the current academic year rather than all years.
Include a [ ] after this section. Mark Include a [ ] after this section to add a blank line or horizontal line after the academic summary section. If adding the section to the summary/notes area, you can also select Column break to use when the summary/notes area is set to show the sections in more than one column. These options print only when another section is positioned directly below the academic summary section.
Columns TabOn the Columns tab, you define columns of information for the academic summary section. Although you can add academic summary sections to the detail area, columns defined in the courses section do not default to this section. You can add marking columns that apply to only the academic summary section.
New Column. To add a new column to the academic summary section, click New Column. The Column <#> screen appears.
Open Column. To open a column in the grid, select the column and click Open Column.
Repeat Column. To add a copy of an existing column in the grid, select the column and click Repeat Column. Delete Column. To delete a column in the grid, select the column and click Delete Column.Up/Down. To change the order of columns in the grid, select a column and click the up or down arrow.Heading. Once you define a column, the Heading column displays the heading entered in the Column heading
field of the Column <#> screen. You can edit the heading by typing directly in the row.Description. Once you define a column, the Description column displays a description of the column based on
the items selected in the Column <#> screen.Width. Once you define a column, the Width column displays the width entered in the Column width field of the
Column <#> screen. You can edit the width by typing directly in the row.
Tip: When creating an academic summary section with similar columns, you can use the Repeat Column button to quickly add columns using the same width, alignment, and font style.

RE P O R T CA RD S 65
The Column <#> Screen
To add a new column to the academic summary section, click New Column. The Column <#> screen appears.
Column type. In the Column type field, select the item of information to display in the column. The item you select changes the fields that appear on this screen.
Marking column. If you select GPA, Performance, or Rank in the Column type field, you must select a marking column in the Marking column field.
Calculation. If you select GPA or Rank in the Column type field, you must select a GPA or rank calculation in the Calculation field.
Type. If you select GPA in the Column type field, you must select a GPA type in the Type field.Category. If you select Performance in the Column type field, you must select a performance category in the
Category field.Show. If you select Biographical in the Column type field, you can select Advisor, Homeroom Teacher, or Grade
Level Advisor in the Show field. If you select Attendance in the Column type field, you can select Sum of units or Number of occurrences.
Credit. If you select Credit or Cumulative Credit in the Column type field, you can select Attempted or Awarded in the Credit field.
Column width. In the Column width field, enter a width for the column. The minimum width is 0.1 inch and the maximum is 7.75 inches if printing in portrait layout, 10.25 inches if landscape.
Column start. The Column start field displays where the column will start printing. The value is the sum of widths for all other columns that precede it in the section.
Section width. The Section width field displays the sum of widths for all columns in the section (including the current column) and the space between columns. If the section width exceeds the amount allowed for this section, the number is red.
Column heading. The Column heading box displays the item selected in the Column type, Marking column, or Show fields. You can use this heading, enter a different one, or leave it blank.
Format buttons. You can use the buttons below the Column heading box to format the alignment and style of heading text.
Note: Fields and options change depending on whether you are adding the academic summary section to the summary/notes area or detail area.

66 CH A PT E R
Detail alignment. In the Detail alignment field, you can select how items align in the column. If you select Default, text prints on the left and numbers print on the right.
Detail indention. If you select Right or Left in the Detail alignment field, you can select the amount to indent in the Detail indentation field. You can increase and decrease the indention in increments of 0.1 inch to a maximum of 7.75 inches if printing in portrait layout, 10.25 inches if landscape. If the detail alignment is right, the indention is from the right side and if the detail alignment is left, the indention is from the left side. If the indention amount is set large enough to cause the information to print over the next column, then the information is truncated. If the indention is so large that all the information is truncated, then the program will not indent the information.
Decimal places. If you select Credit, Cumulative Credit, GPA, or Attendance in the Column type field, the Decimal places field appears. In this field, enter the number of decimal places to use for credits, GPAs, or attendance.
Show trailing zeros. If you select to use one or more decimal places, mark Show trailing zeros to ensure there are always the same number of numerals to the right of the decimal. For example, a student earns 3.5 and 3.75 credits for two courses. If you mark this option, the program adds a zero after 3.5 and prints 3.50.
Details format. If you select Performance in the Column type field, the Details format field appears. In this field, you can select to use the long or short description for performance categories.When adding an academic summary section to the summary/notes area and you select Heading in the Column type field, the Details format field appears. In this field, you can select a year or grade format, <None>, or <Custom>. If you select <Custom>, enter text for the row heading in the Column text field that appears.
Column text. When adding an academic summary section to the detail area, if you select Heading in the Column type field, the Column text field appears. You can use the default heading, enter a different heading, or make it blank. This field also appears when you select <Custom> in the Details format field.
Include these attendance codes. If you select Attendance in the Column type field, the Include these attendance codes box appears. In this box, mark the checkbox for each attendance code to include in the column.
Include these infractions. If you select Conduct in the Column type field, the Include these infractions box appears. In this box, mark the checkbox for each infraction to include in the column.
Session to report. If you select GPA, Performance, Rank, Credit, or Cumulative Credit in the Column type field, the Session to report field appears. In this field, select which sessions to include.
Include credits up to [ ]. If you select Cumulative Credit in the Column type field, the Include credits up to [ ] field appears. In this field, select the last marking column to include in the total.
Include credits from [ ] to [ ]. If you select Credit in the Column type field, the Include credits from [ ] to [ ] field appears. In this field, select a first and last marking column to define a time period for credits to include in totals. The program uses the order of marking column table entries in Configuration to determine which marking columns to include within the range. In this field, you can select marking columns that span different marking column sets, but only credits for the marking columns included in the set associated with the session selected on the General tab appear on the report card.For example, Marking Column Set #1 includes marking columns MC1A, MC1B, and MC1C and Marking Column Set #2 includes marking columns MC2A, MC2B, and MC2C. When you print a report card for the Regular session, which is associated with Marking Column Set #1, if you define the credits range as MC1A to MC2A, only those marking columns included in Marking Column Set #1 (MC1A, MC1B, and MC1C) are included in the credits totals.
Include. If you select Credit or Cumulative Credit in the Column type field, the Include field appears. In this field, select which course types to include.

RE P O R T CA RD S 67
Multiple Column Headings TabOn the Multiple Column Headings tab, you can create a heading that appears over one or more of the individual column headers.
Heading. Text entered into the Heading column appears as a heading above one or more of the individual column headers.
Start. In the Start column, select the first column the multiple column heading will cover. End. In the End column, select the last column the multiple column heading will cover. The End column must be
greater than or equal to the Start column. Align. In the Align column, select a left, center, or right alignment for the heading.
Activities Section
The activities section displays the activities in which a student participated during the academic year, session, or term. You can add activity sections to both the summary/notes and the detail areas.
To add an activities section, on the Details or Summary/Notes tab, select Activities in the Section column of the grid. The Activities Section screen appears. This screen has tabs you use to format the activities section and select the information to include.
Note: If you marked Print a box around the column heading row on the General tab, when you add multiple column headings, vertical lines print in the box to separate each of the column groupings.
Note: If activities do not print as expected, make sure the Print on report card checkbox is marked for the activity on the student record.

68 CH A PT E R
General TabOn the General tab, you can define a heading for the activities section, indent activities information, add lines to divide columns and activities, include only those activities marked Participated on the student record, and print activity comments.
Section heading. The Section heading field displays the default heading for the activities section. You can use this heading, enter a different one, or make it blank. Heading text is bold on the report card.
Indent section details [ ] inches. To indent the activities section of the details section, mark Indent section details [ ] inches and enter the amount to indent. You can increase and decrease the indention of the section in increments of 0.1 inch to a maximum of 7.75 inches if printing in portrait layout, 10.25 inches if landscape. Section headings do not indent, only the first column.
Show column header row. Mark Show column header row to display column headings. Unmark the checkbox to hide the headings.
Print a box around the column heading row. If you marked Show column header row, you can mark Print a box around the column heading row to print a box around column headings and multiple column heading rows.
Print a horizontal line after each activity. Mark Print a horizontal line after each activity to print horizontal lines between rows.
Note: The section width appears at the bottom of the screen. This number is the sum of widths for all columns in the section and the space between columns.
Note: The available width appears at the bottom of the screen. This number is the maximum width available for a section.
Note: If you mark Print a horizontal line after each activity and Print a vertical line between columns, a grid forms in this section.

RE P O R T CA RD S 69
Print a vertical line between columns. Mark Print a vertical line between columns to print vertical lines between each column in the section.
Include a [ ] after this section. Mark Include a [ ] after this section to add a blank line or horizontal line after the activities section. These options print only when another section is positioned directly below the activities section.
Show only activities marked as participated. Mark Show only activities marked as participated to include only those activities for which Participated is marked on the student record. If you mark this option and activities do not print as expected, make sure the Participated checkbox is marked for the activity on the student record.Unmark this option if you want to include activities a student wanted to participate in but did not.
Show activity comments on a separate line. Mark Show activity comments on a separate line to print activity comments underneath the activity row.
Activities Filters Grid
In the grid, you select which activities to include in the activities section.Filters. The Filters column lists all the filters for the activities section. You can filter by activity category,
description, and grade level.Include. By default, in the Include column, each filter is set to All. To open a selection screen to designate
specific filters for the section, choose Selected.Selected Filters. Filters you specify on the selection screen appear in the Selected Filters column.
Selected Filters Screen
When you choose Selected in the Include column for the filter, the <Selected Filter> screen appears.
Include. For each filter, you can select to include all or select specific filters. All. If you mark Include: All, you cannot designate specific filters.Selected. If you mark Include: Selected, the boxes below are enabled so you can select filters.Find. Using the Find field, you can locate specific fields or items in the list.Include these <filters>. Select a filter from the box on the left and click the single right arrow button. The filter
appears in the Include these <filters> box. To select all the filters at one time, click the double arrow.

70 CH A PT E R
Columns TabOn the Columns tab, you define columns of information for the activities section. Once you define columns, the grid lists the columns and their characteristics, including the heading, description, and width.
New Column. To add a new column to the activities section, click New Column. The Column <#> screen appears.
Open Column. To open a column in the grid, select the column and click Open Column.
Repeat Column. To add a copy of an existing column in the grid, select the column and click Repeat Column. Delete Column. To delete a column in the grid, select the column and click Delete Column.Up/Down. To change the order of columns in the grid, select a column and click the up or down arrow.Heading. The Heading column displays the heading entered in the Column heading field of the Column <#>
screen. You can edit the heading by typing directly in the row.Description. Once you define a column, the Description column displays a description of the column based on
the items selected in the Column <#> screen.Width. Once you define a column, the Width column displays the width entered in the Column width field of the
Column <#> screen. You can edit the width by typing directly in the row.
Tip: When creating an activities section with similar columns, you can use the Repeat Column button to quickly add columns using the same width, alignment, and font style.

RE P O R T CA RD S 71
The Column <#> Screen
To add a new column to the activities section, click New Column. The Column <#> screen appears.
Field to show. In the Field to show column, select the item of information to display in the column. The item you select changes the fields that appear on this screen.
Column width. In the Column width field, enter a width for the column. The minimum width is 0.1 inch and the maximum is 7.75 inches if printing in portrait layout, 10.25 inches if landscape.
Column start. The Column start field displays where the column will start printing. The value is the sum of widths for all other columns preceding it in the section.
Section width. The Section width field displays the sum of widths for all columns in the section (including the current column) and the space between columns. If the section width exceeds the amount allowed for this section, the number is red.
Column heading. The Column heading box displays the value in the Field to show field. You can use this heading, enter a different heading, or delete it.
Format buttons. You can use the buttons below the Column heading box to format the alignment and style of heading text.
Detail alignment. In the Detail alignment, you can select how items align in the column. If you select Default, text prints on the left and numbers print on the right.
Detail indention. If you select Right or Left in the Detail alignment field, you can select the amount to indent in the Detail indentation field. You can increase and decrease the indention in increments of 0.1 inch to a maximum of 7.75 inches if printing in portrait layout, 10.25 inches if landscape. If the detail alignment is right, the indention is from the right side and if the detail alignment is left, the indention is from the left side. If the indention amount is set large enough to cause the information to print over the next column, then the information is truncated. If the indention is so large that all the information is truncated, then the program will not indent the information.
Date format. If you select Date from or Date to in the Field to show field, you can select a date format in the Date format field.
Note: You can select <Blank> in the Field to show field to add a blank column providing extra space between columns.

72 CH A PT E R
Wrap text if needed. If you select Activity or Comments in the Field to show field, the Wrap text if needed checkbox appears. Mark this option to continue information to the next line for text that is too long to fit on one row within the column width.
Suppress repeated values. Mark Suppress repeated values to print the field name once for each group of activities.
If you unmark this checkbox, the field name repeats for each with the same value in that field.
Multiple Column Headings TabOn the Multiple Column Headings tab, you can create a heading that appears over one or more of the individual column headers.
Heading. Text entered into the Heading column appears as a heading above one or more of the individual column headers.
Start. In the Start column, select the first column the multiple column heading will cover. End. In the End column, select the last column the multiple column heading will cover. The End column must be
greater than or equal to the Start column. Align. In the Align column, select a left, center, or right alignment for the heading.
Note: If you marked Print a box around the column heading row on the General tab, when you add multiple column headings, vertical lines print in the box to separate each of the column groupings.

RE P O R T CA RD S 73
Sort/BreakUse the Sort/Break tab to select the order of information in the activities section and where breaks fall between sets of information.
Sort by. To order the information, select a sorting category in the Sort by column Order by. In the Order by column, select to sort in ascending or descending order.Break? Mark the checkbox in the Break? column to create breaks between activities sections. A break divides
sets of information by adding space between each section and text. For example, if you sort and break by Category, information for each category is set apart by a blank line and the category section heading. If you mark Break?, other fields are enabled so you can define a break header and break footer for that sort category.
Text before value. In the Text before value field, you can enter text to appear directly before the value for the selected sorting category, which is now the heading for the subsections.
Text after value. In the Text after value field, you can enter text to appear directly after the value for the selected sorting category, which is now the heading for the subsections.
Show count for each new <Sort category>. Mark Show count for each new <Sort category> to add a footer at the section break displaying the total number of activities for that category in which the student participated.
Test Scores Section
The test scores section displays test score information from the student’s Tests tab for the academic year, session, or term. You can add test scores sections to both the summary/notes and the detail areas.To add a test scores section, on the Details or Summary/Notes tab, select Test Scores in the Section column of the grid. The Test Scores Section screen appears. This screen has tabs you use to format the test scores section and select the information to include.

74 CH A PT E R
General TabOn the General tab, you can define a heading for the test scores section, indent test score information, and add lines to divide columns and test scores.
Section heading. The Section heading field displays the default heading for the test scores section. You can use this heading or enter a different one. Heading text is bold on the report card.
Indent section details [ ] inches. To indent the test scores section, mark Indent section details [ ] inches and enter the amount to indent. You can increase and decrease the indention of the section in increments of 0.1 inch to a maximum of 7.75 inches if printing in portrait layout, 10.25 inches if landscape. Section headings do not indent, only the first column.
Show column header row. Mark Show column header row to display column headings. Unmark the checkbox to hide the headings.
Print a box around the column heading row. If you marked Show column header row, you can mark Print a box around the column heading row to print a box around column headings and multiple column heading rows.
Print a horizontal line after each test score. Mark Print a horizontal line after each test score to print horizontal lines between rows.
Note: The section width appears at the bottom of the screen. This number is the sum of widths for all columns in the section and the space between columns.
Note: The available width appears at the bottom of the screen. This number is the maximum width available for a section.
Note: If you mark Print a horizontal line after each test score and Print a vertical line between columns, a grid forms in this section.

RE P O R T CA RD S 75
Print a vertical line between columns. Mark Print a vertical line between columns to print vertical lines between each column in the section.
Include a [ ] after this section. Mark Include a [ ] after this section to add a blank line or horizontal line after the test scores section. These options print only when another section is positioned directly below the test scores section.
Test Scores Filters Grid
In the grid, you select which test scores to include in the test scores section.Filters. The Filters column lists all the filters for the test scores section. You can filter by test types and subtest
types.Include. By default, in the Include column, each filter is set to All. To open a selection screen to designate
specific filters for the section, choose Selected.Selected Filters. Filters you specify on the selection screen appear in the Selected Filters column.
Selected Filters Screen
When you choose Selected in the Include column for the filter, the Selected <Filters> screen appears.
Include. For each filter, you can select to include all or select specific filters. All. If you mark Include: All, you cannot designate specific filters.Selected. If you mark Include: Selected, the boxes below are enabled so you can select filters.Find. Using the Find field, you can locate specific fields or items in the list.Include these <filters>. Select a filter from the box on the left and click the single right arrow button. The filter
appears in the Include these <filters> box. To select all the filters at one time, click the double arrow.
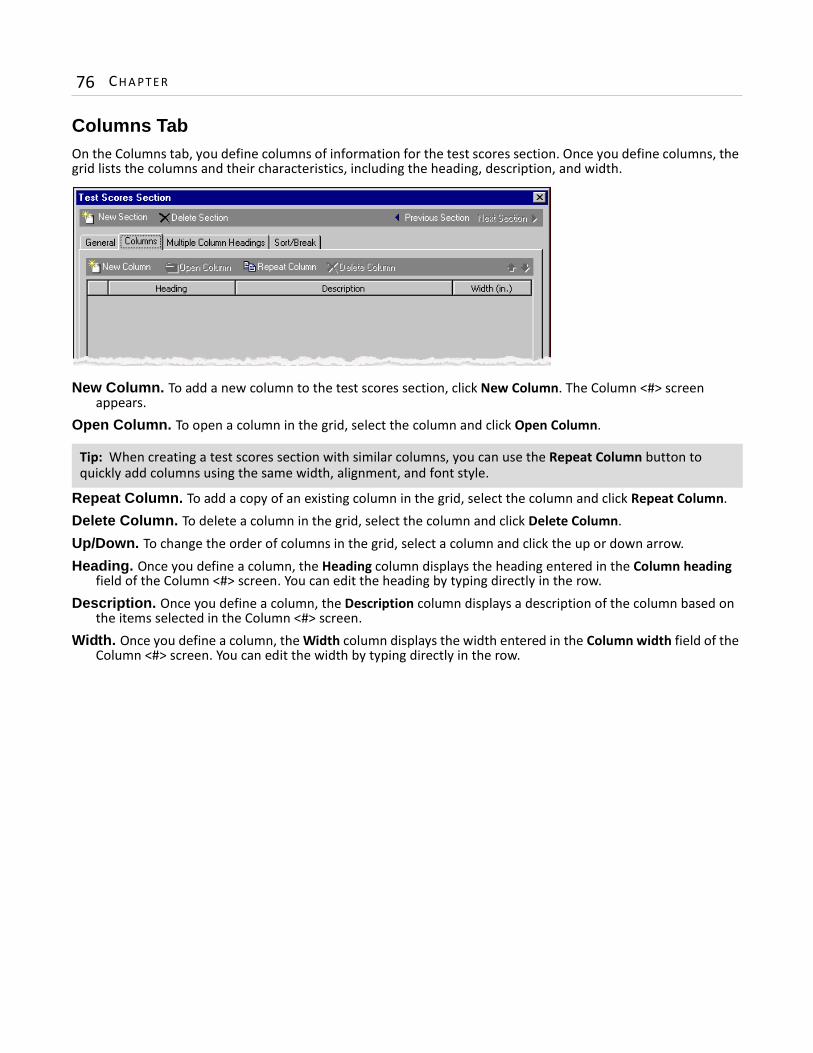
76 CH A PT E R
Columns TabOn the Columns tab, you define columns of information for the test scores section. Once you define columns, the grid lists the columns and their characteristics, including the heading, description, and width.
New Column. To add a new column to the test scores section, click New Column. The Column <#> screen appears.
Open Column. To open a column in the grid, select the column and click Open Column.
Repeat Column. To add a copy of an existing column in the grid, select the column and click Repeat Column. Delete Column. To delete a column in the grid, select the column and click Delete Column.Up/Down. To change the order of columns in the grid, select a column and click the up or down arrow.Heading. Once you define a column, the Heading column displays the heading entered in the Column heading
field of the Column <#> screen. You can edit the heading by typing directly in the row.Description. Once you define a column, the Description column displays a description of the column based on
the items selected in the Column <#> screen.Width. Once you define a column, the Width column displays the width entered in the Column width field of the
Column <#> screen. You can edit the width by typing directly in the row.
Tip: When creating a test scores section with similar columns, you can use the Repeat Column button to quickly add columns using the same width, alignment, and font style.
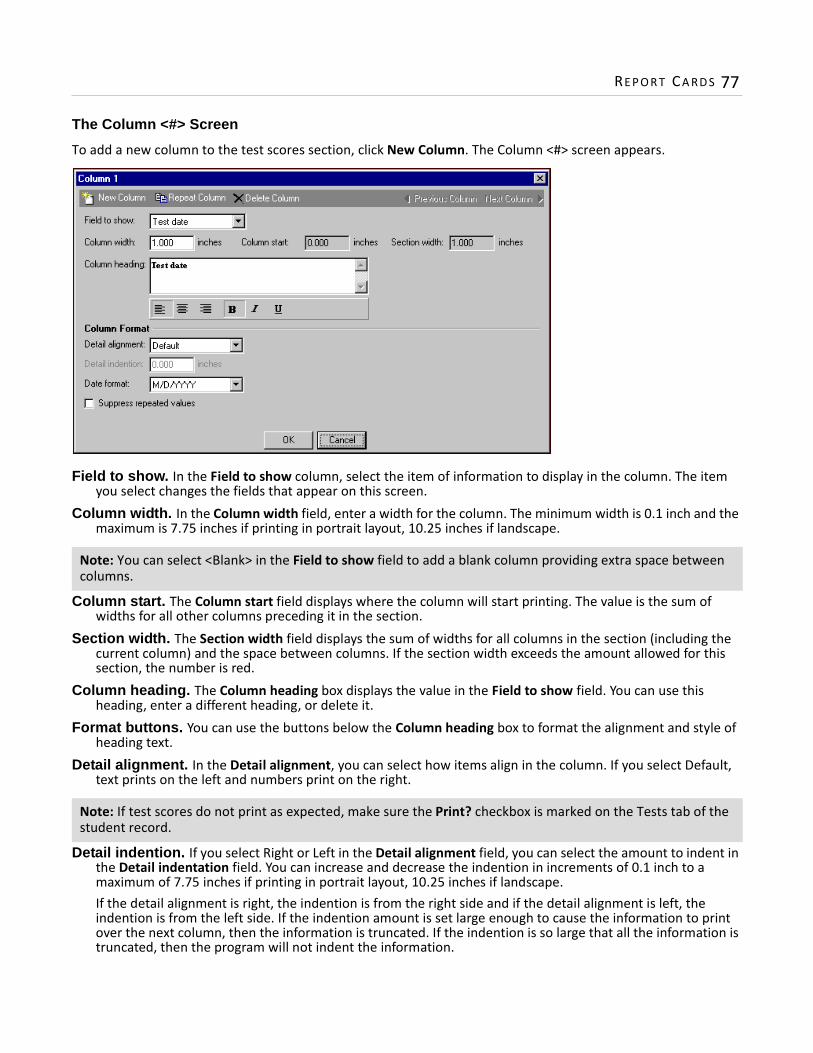
RE P O R T CA RD S 77
The Column <#> Screen
To add a new column to the test scores section, click New Column. The Column <#> screen appears.
Field to show. In the Field to show column, select the item of information to display in the column. The item you select changes the fields that appear on this screen.
Column width. In the Column width field, enter a width for the column. The minimum width is 0.1 inch and the maximum is 7.75 inches if printing in portrait layout, 10.25 inches if landscape.
Column start. The Column start field displays where the column will start printing. The value is the sum of widths for all other columns preceding it in the section.
Section width. The Section width field displays the sum of widths for all columns in the section (including the current column) and the space between columns. If the section width exceeds the amount allowed for this section, the number is red.
Column heading. The Column heading box displays the value in the Field to show field. You can use this heading, enter a different heading, or delete it.
Format buttons. You can use the buttons below the Column heading box to format the alignment and style of heading text.
Detail alignment. In the Detail alignment, you can select how items align in the column. If you select Default, text prints on the left and numbers print on the right.
Detail indention. If you select Right or Left in the Detail alignment field, you can select the amount to indent in the Detail indentation field. You can increase and decrease the indention in increments of 0.1 inch to a maximum of 7.75 inches if printing in portrait layout, 10.25 inches if landscape. If the detail alignment is right, the indention is from the right side and if the detail alignment is left, the indention is from the left side. If the indention amount is set large enough to cause the information to print over the next column, then the information is truncated. If the indention is so large that all the information is truncated, then the program will not indent the information.
Note: You can select <Blank> in the Field to show field to add a blank column providing extra space between columns.
Note: If test scores do not print as expected, make sure the Print? checkbox is marked on the Tests tab of the student record.

78 CH A PT E R
Wrap text if needed. If you select Comments in the Field to show field, the Wrap text if needed checkbox appears. Mark this option to continue information to the next line for text that is too long to fit on one row within the column width.
Date format. If you select Test date in Field to show, the Date format field appears. In this field, select the month/date/year combination for formatting dates.
Suppress repeated values. Mark Suppress repeated values to print the test category once for each group of test scores.
If you unmark this checkbox, the field to show repeats for each test in that category.
Multiple Column Headings TabOn the Multiple Column Headings tab, you can create a heading that appears over one or more of the individual column headers.
Heading. Text entered into the Heading column appears as a heading above one or more of the individual column headers.
Start. In the Start column, select the first column the multiple column heading will cover. End. In the End column, select the last column the multiple column heading will cover. The End column must be
greater than or equal to the Start column. Align. In the Align column, select a left, center, or right alignment for the heading.
Note: If you marked Print a box around the column heading row on the General tab, when you add multiple column headings, vertical lines print in the box to separate each of the column groupings.

RE P O R T CA RD S 79
Sort/BreakUse the Sort/Break tab to select the order of information in the test scores section and where breaks fall between sets of information.
Sort by. To order the information, select a sorting category in the Sort by column Order by. In the Order by column, select to sort in ascending or descending order.Break? Mark the checkbox in the Break? column to create breaks between test scores sections. A break divides
sets of information by adding space between each section and text. For example, if you sort and break by Test type, information for each test type is set apart by a blank line and the section category heading. If you mark Break?, other fields are enabled so you can define a break header and break footer for that sort category.
Text before value. In the Text before value field, you can enter text to appear directly before the value for the selected sorting category, which is now the heading for the subsections.
Text after value. In the Text after value field, you can enter text to appear directly after the value for the selected sorting category, which is now the heading for the subsections.
Show count for each new <Sort category>. Mark Show count for each new <Sort category> to add a footer at the section break displaying the total number of tests the student took for that category.
Attendance Section
The attendance section displays attendance information for the academic year, session, or term. You can add attendance sections to both the summary/notes and the detail areas. To add an attendance section, on the Details or Summary/Notes tab, select Attendance in the Section column of the grid. The Attendance Section screen appears. This screen has tabs you use to format the attendance section and select the information to include.

80 CH A PT E R
General TabOn the General tab, you can define a heading for the attendance section, indent attendance information, and add lines to divide columns and attendance categories.
Section heading. In the Section heading field, you can enter a heading for the attendance section or leave it blank. Heading text is bold on the report card.
Indent section details [ ] inches. To indent the attendance section, mark Indent section details [ ] inches and enter the amount to indent. You can increase and decrease the indention of the section in increments of 0.1 inch to a maximum of 7.75 inches if printing in portrait layout, 10.25 inches if landscape. Section headings do not indent, only the first column.
Show column header row. Mark Show column header row to display column headings. Unmark the checkbox to hide the headings.
Print a box around the column heading row. If you mark Show column header row, you can mark Print a box around the column heading row to print a box around column headings and multiple column heading rows.
Print a horizontal line after each category. Mark Print a horizontal line after each category to print horizontal lines between rows.
Note: The section width appears at the bottom of the screen. This number is the sum of widths for all columns in the section and the space between columns.
Note: The available width appears at the bottom of the screen. This number is the maximum width available for a section.
Note: If you mark Print a horizontal line after each category and Print a vertical line between columns, a grid forms in this section.

RE P O R T CA RD S 81
Print a vertical line between columns. Mark Print a vertical line between columns to print vertical lines between each column in the section.
Print attendance from outside schools. Mark Print attendance from outside schools to print the attendance earned at outside schools. This option appears only if you marked Include information from outside schools attended on the Details tab.
Include a [ ] after this section. Mark Include a [ ] after this section to add a blank line or horizontal line after the attendance section. These options print only when another section is positioned directly below the attendance section.
Suppress blank categories. Mark Suppress blank categories to exclude attendance categories with no values assigned for the selected marking columns.
Attendance Categories Filters Grid
In the grid, you select which attendance codes to include in the attendance section and how to group them into categories.Category Heading. In the Category Heading column, enter the row heading for a category type. Include. Once you enter a heading in the Category Heading column, you can select the attendance codes to
include for that row. To open a selection screen to designate specific codes for the row, choose Selected. The Selected Attendance Codes screen appears.
Selected Attendance Codes. Filters you specify on the selection screen appear in the Selected Filters column.
Translate tardies to absences. If you defined tardy code translations in Configuration (for example, five tardies equals an absence), you can mark this option to print translated tardies as absences. Only class attendance is considered, so if your school tracks attendance in days only, no translations print.
Selected Attendance Codes Screen
When you choose Selected in the Include column for the category, the Selected Attendance Codes screen appears.
Include. For each filter, you can select to include all or select specific filters. All. If you mark Include: All, you cannot designate specific filters.Selected. If you mark Include: Selected, the boxes below are enabled so you can select filters.Find. Using the Find field, you can locate specific fields or items in the list.

82 CH A PT E R
Include these attendance codes. Select a filter from the box on the left and click the single right arrow button. The filter appears in the Include these attendance codes box. To select all the filters at one time, click the double arrow.
Columns TabOn the Columns tab, you define columns of information for the attendance section. Once you define columns, the grid lists the columns and their characteristics, including the heading, description, and width.
New Column. To add a new column to the attendance section, click New Column. The Column <#> screen appears.
Open Column. To open a column in the grid, select the column and click Open Column.
Repeat Column. To add a copy of an existing column in the grid, select the column and click Repeat Column. Delete Column. To delete a column in the grid, select the column and click Delete Column.Up/Down. To change the order of columns in the grid, select a column and click the up or down arrow.Heading. Once you define a column, the Heading column displays the heading entered in the Column heading
field of the Column <#> screen. You can edit the heading by typing directly in the row.Description. Once you define a column, the Description column displays a description of the column based on
the items selected in the Column <#> screen.Width. Once you define a column, the Width column displays the width entered in the Column width field of the
Column <#> screen. You can edit the width by typing directly in the row.
Tip: When creating an attendance section with similar columns, you can use the Repeat Column button to quickly add columns using the same width, alignment, and font style.

RE P O R T CA RD S 83
The Column <#> Screen
To add a new column to the attendance section, click New Column. The Column <#> screen appears.
Field to show. In the Field to show column, select Heading, Sum of units, or Number of occurrences. The item you select changes the fields that appear on this screen.
Column width. In the Column width field, enter a width for the column. The minimum width is 0.1 inch and the maximum is 7.75 inches if printing in portrait layout, 10.25 inches if landscape.
Column start. The Column start field displays where the column will start printing. The value is the sum of widths for all other columns preceding it in the section.
Section width. The Section width field displays the sum of widths for all columns in the section (including the current column) and the space between columns. If the section width exceeds the amount allowed for this section, the number is red.
Column heading. In the Column heading box, enter a heading for the column.Format buttons. You can use the buttons below the Column heading box to format the alignment and style of
heading text. Wrap text if needed. If Heading appears in the Field to show field, the Wrap text if needed checkbox appears.
Mark this option to continue information to the next line for text that is too long to fit on one row within the column width.
Detail alignment. In the Detail alignment, you can select how items align in the column. If you select Default, text prints on the left and numbers print on the right.
Detail indention. If you select Right or Left in the Detail alignment field, you can select the amount to indent in the Detail indentation field. You can increase and decrease the indention in increments of 0.1 inch to a maximum of 7.75 inches if printing in portrait layout, 10.25 inches if landscape. If the detail alignment is right, the indention is from the right side and if the detail alignment is left, the indention is from the left side. If the indention amount is set large enough to cause the information to print over the next column, then the information is truncated. If the indention is so large that all the information is truncated, then the program will not indent the information.
Include these terms. If you select Sum of units or Number of occurrences in the Field to show field, the Include these terms box appears. Mark the checkbox for each term to include.

84 CH A PT E R
Multiple Column Headings TabOn the Multiple Column Headings tab, you can create a heading that appears over one or more of the individual column headers.
Heading. Text entered into the Heading column appears as a heading above one or more of the individual column headers.
Start. In the Start column, select the first column the multiple column heading will cover. End. In the End column, select the last column the multiple column heading will cover. The End column must be
greater than or equal to the Start column. Align. In the Align column, select a left, center, or right alignment for the heading.
Conduct Section
The conduct section displays conduct information for the academic year, session, or term. You can add conduct sections to both the summary/notes and the detail areas. To add a conduct section, on the Details or Summary/Notes tab, select Conduct in the Section column of the grid. The Conduct Section screen appears. This screen has tabs you use to format the conduct section and select the information to include.
Note: If you marked Print a box around the column heading row on the General tab, when you add multiple column headings, vertical lines print in the box to separate each of the column groupings.

RE P O R T CA RD S 85
General TabOn the General tab, you can define a heading for the conduct section, indent conduct information, and add lines to divide columns and conduct categories.
Section heading. In the Section heading field, you can enter a heading for the conduct section or leave it blank. Heading text is bold on the report card.
Indent section details [ ] inches. To indent the conduct section, mark Indent section details [ ] inches and enter the amount to indent. You can increase and decrease the indention of the section in increments of 0.1 inch to a maximum of 7.75 inches if printing in portrait layout, 10.25 inches if landscape. Section headings do not indent, only the first column.
Show column header row. Mark Show column header row to display column headings. Unmark the checkbox to hide the headings.
Print a box around the column heading row. If you mark Show column header row, you can mark Print a box around the column heading row to print a box around column headings and multiple column heading rows.
Print a horizontal line after each category. Mark Print a horizontal line after each category to print horizontal lines between rows.
Note: The section width appears at the bottom of the screen. This number is the sum of widths for all columns in the section and the space between columns.
Note: The available width appears at the bottom of the screen. This number is the maximum width available for a section.
Note: If you mark Print a horizontal line after each category and Print a vertical line between columns, a grid forms in this section.

86 CH A PT E R
Print a vertical line between columns. Mark Print a vertical line between columns to print vertical lines between each column in the section.
Print conduct from outside schools. Mark Print conduct from outside schools to print infractions from outside schools. This option appears only if you marked Include information from outside schools attended on the Details tab.
Include a [ ] after this section. Mark Include a [ ] after this section to add a blank line or horizontal line after the conduct section. These options print only when another section is positioned directly below the conduct section.
Suppress blank categories. Mark Suppress blank categories to exclude infraction categories with no values assigned for the selected marking columns.
Conduct Categories Filters Grid
In the grid, you select which infractions to include in the conduct section and how to group them into categories.Category Heading. In the Category Heading column, enter the row heading for a category type. Include. Once you enter a heading in the Category Heading column, you can select the infractions to include for
that row. To open a selection screen to designate specific categories for the row, choose Selected. The Selected Infractions screen appears.
Selected Infractions. Filters you specify on the selection screen appear in the Selected Infractions column.
Selected Infractions Screen
When you choose Selected in the Include column for the filter, the Selected Infractions screen appears.
Include. For each filter, you can select to include all or select specific filters. All. If you mark Include: All, you cannot designate specific filters.Selected. If you mark Include: Selected, the boxes below are enabled so you can select filters.Find. Using the Find field, you can locate specific fields or items in the list.Include these infractions. Select a filter from the box on the left and click the single right arrow button. The
filter appears in the Include these infractions box. To select all the filters at one time, click the double arrow.

RE P O R T CA RD S 87
Columns TabOn the Columns tab, you define columns of information for the conduct section. Once you define columns, the grid lists the columns and their characteristics, including the heading, description, and width.
New Column. To add a new column to the conduct section, click New Column. The Column <#> screen appears.Open Column. To open a column in the grid, select the column and click Open Column.
Repeat Column. To add a copy of an existing column in the grid, select the column and click Repeat Column. Delete Column. To delete a column in the grid, select the column and click Delete Column.Up/Down. To change the order of columns in the grid, select a column and click the up or down arrow.Heading. Once you define a column, the Heading column displays the heading entered in the Column heading
field of the Column <#> screen. You can edit the heading by typing directly in the row.Description. Once you define a column, the Description column displays a description of the column based on
the items selected in the Column <#> screen.Width. Once you define a column, the Width column displays the width entered in the Column width field of the
Column <#> screen. You can edit the width by typing directly in the row.
Tip: When creating conduct sections with similar columns, you can use the Repeat Column button to quickly add columns using the same width, alignment, and font style.

88 CH A PT E R
The Column <#> Screen
To add a new column to the conduct section, click New Column. The Column <#> screen appears.
Field to show. In the Field to show column, select Heading or Number of infractions. The item you select changes the fields that appear on this screen.
Column width. In the Column width field, enter a width for the column. The minimum width is 0.1 inch and the maximum is 7.75 inches if printing in portrait layout, 10.25 inches if landscape.
Column start. The Column start field displays where the column will start printing. The value is the sum of widths for all other columns preceding it in the section.
Section width. The Section width field displays the sum of widths for all columns in the section (including the current column) and the space between columns. If the section width exceeds the amount allowed for this section, the number is red.
Column heading. In the Column heading box, enter a heading for the column.Format buttons. You can use the buttons below the Column heading box to format the alignment and style of
heading text. Detail alignment. In the Detail alignment, you can select how items align in the column. If you select Default,
text prints on the left and numbers print on the right.Detail indention. If you select Right or Left in the Detail alignment field, you can select the amount to indent in
the Detail indentation field. You can increase and decrease the indention in increments of 0.1 inch to a maximum of 7.75 inches if printing in portrait layout, 10.25 inches if landscape. If the detail alignment is right, the indention is from the right side and if the detail alignment is left, the indention is from the left side. If the indention amount is set large enough to cause the information to print over the next column, then the information is truncated. If the indention is so large that all the information is truncated, then the program will not indent the information.
Include these terms. If you select Number of infractions in the Field to show field, the Include these terms box appears. Mark the checkbox for each term to include.
Wrap text if needed. If Heading appears in the Field to show field, the Wrap text if needed checkbox appears. Mark this option to continue information to the next line for text that is too long to fit on one row within the column width.
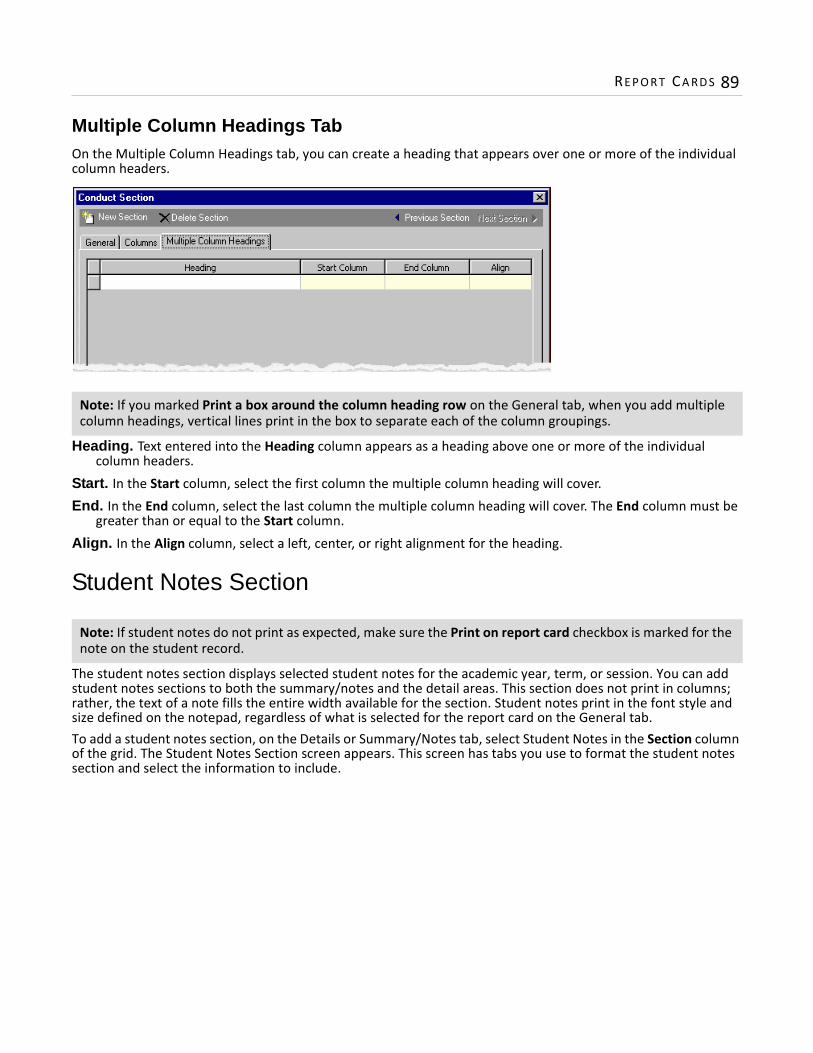
RE P O R T CA RD S 89
Multiple Column Headings TabOn the Multiple Column Headings tab, you can create a heading that appears over one or more of the individual column headers.
Heading. Text entered into the Heading column appears as a heading above one or more of the individual column headers.
Start. In the Start column, select the first column the multiple column heading will cover. End. In the End column, select the last column the multiple column heading will cover. The End column must be
greater than or equal to the Start column. Align. In the Align column, select a left, center, or right alignment for the heading.
Student Notes Section
The student notes section displays selected student notes for the academic year, term, or session. You can add student notes sections to both the summary/notes and the detail areas. This section does not print in columns; rather, the text of a note fills the entire width available for the section. Student notes print in the font style and size defined on the notepad, regardless of what is selected for the report card on the General tab.To add a student notes section, on the Details or Summary/Notes tab, select Student Notes in the Section column of the grid. The Student Notes Section screen appears. This screen has tabs you use to format the student notes section and select the information to include.
Note: If you marked Print a box around the column heading row on the General tab, when you add multiple column headings, vertical lines print in the box to separate each of the column groupings.
Note: If student notes do not print as expected, make sure the Print on report card checkbox is marked for the note on the student record.

90 CH A PT E R
General TabOn the General tab, you can define a heading for the student notes section, indent student notes information, add lines to divide student notes from the following section, select the items of information to include in the note header and the notepad types to include.
Section heading. In the Section heading field, you can enter a heading for the student notes section. Heading text is bold on the report card.
Indent section details [ ] inches. To indent the student notes section, mark Indent section details [ ] inches and enter the amount to indent. You can increase and decrease the indention of the section in increments of 0.1 inch to a maximum of 7.75 inches if printing in portrait layout, 10.25 inches if landscape. Section headings do not indent, only the header and details.If the indention is larger than the section width, the program will not indent the information.
Include a [ ] after this section. Mark Include a [ ] after this section to add a blank line or horizontal line after the student notes section. These options print only when another section is positioned directly below the student notes section.
Fields to include in notes header. In the Fields to include in notes header box, mark the items of information to include in the note header.
Notepad types to include. In the Notepad types to include box, mark the checkbox for each notepad type to include.
Note: The section width appears at the bottom of the screen. This number is the sum of widths for all columns in the section and the space between columns.
Note: The available width appears at the bottom of the screen. This number is the maximum width available for a section.

RE P O R T CA RD S 91
Sort/BreakUse the Sort/Break tab to select the order of information in the student note section and where breaks fall between sets of information.
Sort by. To order the information, select a sorting category in the Sort by column Order by. In the Order by column, select to sort in ascending or descending order.Break? Mark the checkbox in the Break? column to create breaks between student notes sections. A break
divides sets of information by adding space between each section and text. For example, if you sort and break by Note type, information for each note is set apart by a blank line and the note heading. If you mark Break?, other fields are enabled so you can define a break header and break footer for that sort category.
Text before value. In the Text before value field, you can enter text to appear directly before the value for the selected sorting category, which is now the heading for the subsections.
Text after value. In the Text after value field, you can enter text to appear directly after the value for the selected sorting category, which is now the heading for the subsections.
Freeform Notes Section
The freeform notes section displays notes you create specifically for the report card. This area is ideal for entering legends for short descriptions, number/letter grade translations, or any other special notes. You can add freeform notes sections to only the summary/notes area. This section does not print in columns; rather, the text of a note fills the entire width available for the section.
Tip: To add tabs to note text, press CTRL + the tab key.

92 CH A PT E R
In the text box, enter text to print in the freeform notes section. The font type and size default to those selected on the General tab but you can use the formatting options on the toolbar to format the alignment, type, size, and style of note text. You can also check the spelling or use the thesaurus to find a synonym.
Section heading. In the Section heading field, you can enter a heading for the freeform notes section. Heading text is bold on the report card.
Indent section details [ ] inches. To indent the freeform notes section, mark Indent section details [ ] inches and enter the amount to indent. The section heading does not indent.
Include a [ ] after this section. Mark Include a [ ] after this section to add a blank line, horizontal line, or column break after the freeform notes section. These options print only when another section is positioned directly below the freeform notes section.
Creating Report CardsMail is flexible so you can design report cards that meet your school’s needs. This section guides you through the steps necessary to create a basic report card that includes sections for courses, GPAs, student notes, attendance, conduct, and freeform notes. Each section is broken down into individual procedures. For example, in Step 2: Adding Detail Sections, there are procedures for formatting the details area and adding sections for courses and GPAs. The fields and options included in the procedures are those used to create this particular report card. For information about fields and options not addressed in these procedures, see “Report Cards Tabs” on page 18 and “Report Card Sections” on page 35.
Note: For basic report card procedures, such as finding and opening, previewing, printing, sending as email, and exporting report cards, see “Mail Basics” on page 1.

RE P O R T CA RD S 93
You can follow these steps using the sample database to replicate this report card. Hands-on experience will familiarize you with the formatting options available and help you plan your own report cards and the information you need to include.
Step 1: General Formatting
The first step when creating a report card is to make general formatting selections on the General tab. If you have more than one school, you can select for which school to print the report card. The school you select determines the information printed in the header.Using the options, you can select the paper size, orientation, font and font size. The orientation and paper size you select are important because they determine the amount of space available for each area. The portrait format allows for more sections to print in the details area on one page, while landscape allows for more columns to print across the width of the page.
For our example, we create a report card for Island High School in portrait format that includes information for the fall term of the current academic year.
Note: The set of parameters described for this sample report card represents a single report card solution. For information about fields and options not addressed in these procedures, see “Report Cards Tabs” on page 18 and “Report Card Sections” on page 35.
Michael Richard AndrewsAddress: 12 Pebble Lane
Isle of Palms, SC 29451
Birth date: 10/16/1986SSN: 222-22-2222
Island High School3460 Creekfield RoadCharleston, SC 29492
(843) 555-1234CEEB-ACT Code 123-456
www.islandhighschool.org
Report Card
Course QT 1 QT 2 SEM 1 EX SEM 1
Fall Semester 2003-2004
English III 65 67 57 D
Chemistry I 87 85 80 B
US History 76 72 69 C-
Algebra II 89 87 77 B
Ceramics I 90 80 95 B+
Spanish II 79 74 68 C
Chemistry Lab 101 85 87 B
Grade Point Average
2.30 2.00 2.30Unweighted GPA
3.30 3.00 3.30Weighted GPA
Headmaster's Notes
Michael's grades are continuing to slip. I have heard from his teachers that he is repeatedly falling
asleep during class. I feel we should meet and discuss his progress. Please call the office to
schedule a meeting at your earliest convenience.
Number of Occurrences
Attendance
7Excused Absences7Unexcused Absences0Excused Tardies0Unexcused Tardies
Number of Occurrences
Conduct
1Assisted faculty/staff1Dress code violation2Talking back
Grading Scale
GPA Equivalent
A: 93 - 100+ 4.00 - 5.00
B: 85 - 92 3.00 - 3.99
C: 77 - 84 2.00 - 2.99
D: 70 - 76 1.00 - 1.99
F: 69 and below 0.00 - 0.99
IB, AP, and Honors courses receive
additional weighting on GPA.
UNLESS NOTED, ALL IHS COURSES
ARE COLLEGE PREPARATORY.
Signature: Title: Date:
Page 1 of 108/10/2004

94 CH A PT E R
Formatting general information1. From the Mail page in Registrar’s Office, click Forms or select the Forms tab. The Forms page appears.2. In the list on the left, select Report Cards and click New on the action bar. The New Report Cards screen
opens on the General tab.
3. In the Report Card for field, select “Pepperworth Upper School”.4. In the Academic year field, select “<This academic year>”.5. In the Session field, select “Regular”.6. In the Terms field, choose “<Selected terms>”, mark Fall and unmark Spring.7. In the Paper size field, select “Letter”.8. In the Orientation field, select “Portrait”.

RE P O R T CA RD S 95
9. In the Font field select “Times New Roman” and “9” in the Font size field.
10. Select the Details tab to format the details area and select the sections of information to include.
Step 2: Adding Detail Sections
The second step when creating a report card is to select which sections of information to include in the detail area and how information appears. On the Details tab, you specify whether to include borders around sections and whether to include information from outside schools.For this example, we add sections for courses and GPAs and add marking column columns to display the grades earned in the first and second quarters, semester one exam grades, and semester averages. The GPAs section shows the weighted and unweighted final GPAs for each marking column.
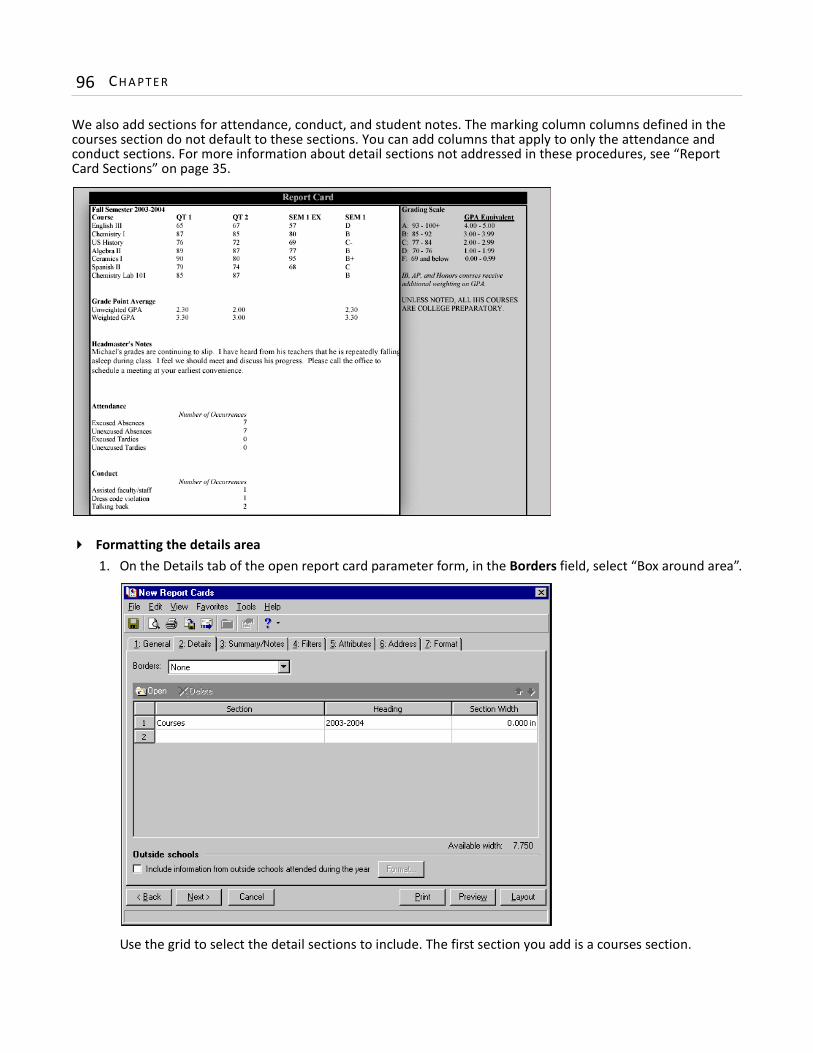
96 CH A PT E R
We also add sections for attendance, conduct, and student notes. The marking column columns defined in the courses section do not default to these sections. You can add columns that apply to only the attendance and conduct sections. For more information about detail sections not addressed in these procedures, see “Report Card Sections” on page 35.
Formatting the details area1. On the Details tab of the open report card parameter form, in the Borders field, select “Box around area”.
Use the grid to select the detail sections to include. The first section you add is a courses section.

RE P O R T CA RD S 97
Adding a courses section to the detail area1. In the grid on the Details tab, select “Courses” in the Section column and click Open. The Courses Section
screen appears displaying the General tab.
2. In the Section heading field, select “<Custom>” and enter “Fall Semester 2006-2007”.3. Mark Show column header row. 4. Unmark Print a box around the column heading row.5. Unmark If showing a total credits row, print a horizontal line after the last course.

98 CH A PT E R
6. Mark Include a [ ] after this section and select “Blank line” in the field.
7. Select the Columns tab.
8. Click New Column. The Column 1 screen appears.

RE P O R T CA RD S 99
9. In the Field to show field, select “Course name”. 10. In the Column width field, enter “1.5”. 11. In the Column heading field, use the default heading, “Course” and leave the text left aligned and bold.12. Mark Wrap text if needed.
13. Click OK. You return to the Columns tab and the Course name column appears in the grid.
14. Click New Column. The Column 2 screen appears.
15. In the Field to show field, select “Marking column”. The Marking column and Display fields appear.

100 CH A PT E R
16. In the Marking column field, select “QT 1”.17. In the Display field, select “Grade”.18. In the Column width field, enter “1.0”.19. In the Column heading field, use the default heading “QT 1” and leave the text left aligned and bold.20. In the Detail alignment field, select “Default”.21. In the Letter/Number field, select “<As entered>”.22. Mark Show grades for marking columns that do not award credit.
23. Click OK. You return to the Columns tab and the QT 1; Grade column appears in the grid.
24. Select the QT 1; Grade column row and click Repeat Column. A copy of the column appears directly in the row below it.

RE P O R T CA RD S 10
25. Select the column copy and click Open Column. The Column 3 screen appears.
26. In the Marking column field, select “QT 2”. Do not change any other settings.
27. Click OK. You return to the Columns tab and the QT 2; Grade column appears in the grid.
28. Select the QT 2; Grade column row and click Repeat Column. A copy of the column appears directly in the row below it.

102 CH A PT E R
29. Select the column copy and click Open Column. The Column 4 screen appears.
30. In the Marking column field, select “SEM 1 EX”.31. Mark Show grades entered as ‘NG’. Do not change any other settings.
32. Click OK. You return to the Columns tab and the SEM 1 EX; Grade column appears in the grid.
33. Select the SEM 1 EX; Grade column row and click Repeat Column. A copy of the column appears directly in the row below it.

RE P O R T CA RD S 10
34. Select the column copy and click Open Column. The Column 5 screen appears.
35. In the Marking column field, select “SEM 1”. Do not change any other settings.
36. Click OK. You return to the Columns tab and the SEM 1; Grade column appears in the grid.
37. Click OK. You return to the Details tab.

104 CH A PT E R
The next section you add to the detail area is a GPAs section.
Adding a GPAs section to the detail area1. On the Details tab, in the second row of the grid, select “GPAs” in the Section column. The GPAs Section
screen appears displaying the General tab.
2. In the Section heading field, enter “Grade Point Average”.3. Unmark Show column header row.4. Mark Include a [ ] after this section and select “Blank line”.5. In the first row of the GPAs to include grid, select “Unweighted GPA” in the Calculation column and
“GPA” in the Type column.6. Enter “Unweighted GPA” in the Heading column.7. In the second row of the GPAs to include grid, select “Weighted GPA” in the Calculation column and
“GPA” in the Type column.8. Enter “Weighted GPA” in the Heading column.

RE P O R T CA RD S 10
9. Mark Suppress blank GPAs.
10. Select the Columns tab. 11. Unmark the Include checkbox for the SEM 1 EX column.
12. Click OK. You return to the Details tab and the GPAs section appears in the grid.

106 CH A PT E R
The next section you add to the detail area is a Student Notes section.
Adding a student notes section to the detail area1. On the Details tab, in the third row of the grid, select “Student Notes” in the Section column. The Student
Notes Section screen appears displaying the General tab.
2. In the Section heading field, enter “Headmaster’s Notes”.3. Mark Include a [ ] after this section and select “Blank line” in the field.4. In the Fields to include in notes header box, unmark all checkboxes.

RE P O R T CA RD S 10
5. In the Notepad types to include box, mark Headmaster’s Notes.
6. Click OK. You return to the Details tab and the Student Notes section appears in the grid.The next section you add to the detail area is an Attendance section.
Adding an attendance section to the detail area1. On the Details tab, in the fourth row of the grid, select “Attendance” in the Section column. The
Attendance Section screen appears displaying the General tab.
2. In the Section heading field, enter “Attendance”.

108 CH A PT E R
3. Mark Show column header row.4. Unmark Print a box around the column heading row.5. Mark Include a [ ] after this section and select “Blank line”.6. In the first row of the Attendance categories to include grid, enter “Excused Absences” in the Category
Heading column. 7. Choose “Selected” in the Include column. The Selected Attendance Codes screen appears.
8. Select the ABS-X field and click the right arrow button. The field moves to the Include these attendance codes box.
9. Click OK. You return to the General tab and ABS-X appears in the Selected Attendance Codes column.10. Repeat these steps to add attendance categories for unexcused absences, excused tardies, and
unexcused tardies.

RE P O R T CA RD S 10
11. Select the Columns tab.
12. Click New Column. The Column 1 screen appears.13. In the Field to show field, select “Heading”. 14. In the Column width field, enter “1.250”. 15. Leave the Column heading field blank.16. In the Detail alignment field, select “Right”.
17. Click OK. You return to the Column tab and the Heading column appears in the grid.
18. Click New Column. The Column 2 screen appears.19. In the Field to show field, select “Number of occurrences”. 20. In the Column width field, enter “1.5”.
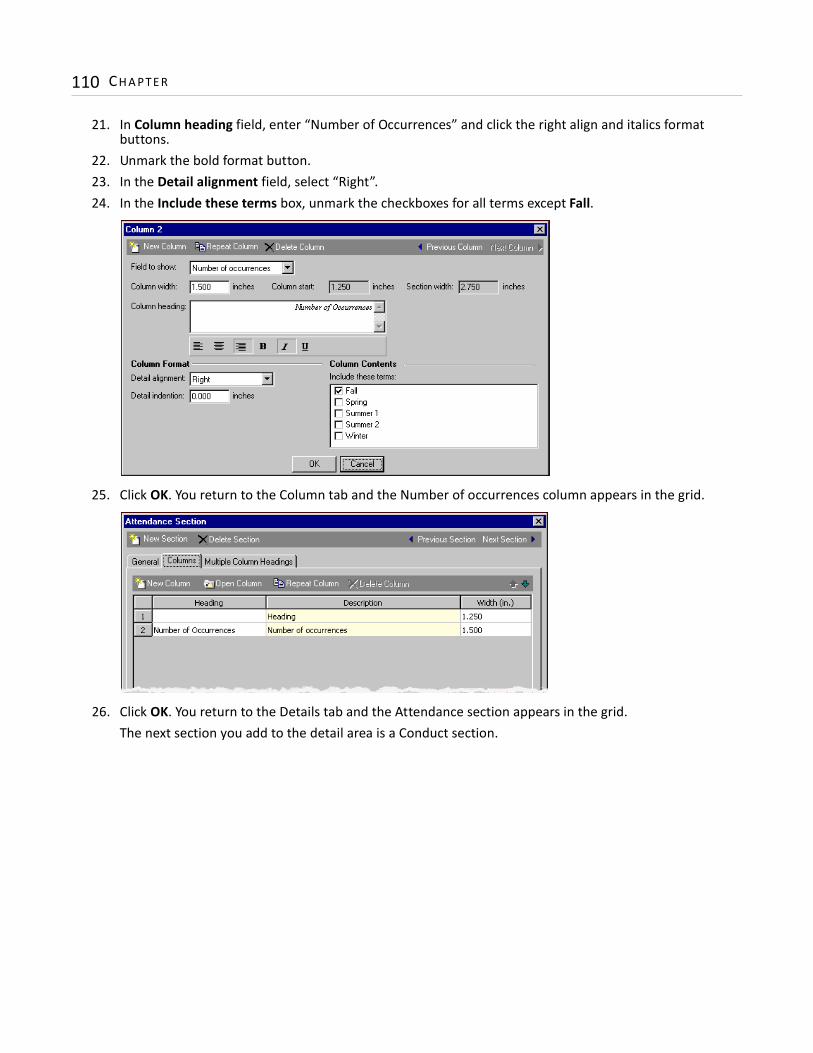
110 CH A PT E R
21. In Column heading field, enter “Number of Occurrences” and click the right align and italics format buttons.
22. Unmark the bold format button.23. In the Detail alignment field, select “Right”.24. In the Include these terms box, unmark the checkboxes for all terms except Fall.
25. Click OK. You return to the Column tab and the Number of occurrences column appears in the grid.
26. Click OK. You return to the Details tab and the Attendance section appears in the grid.The next section you add to the detail area is a Conduct section.

RE P O R T CA RD S 11
Adding a conduct section to the detail area1. On the Details tab, in the fifth row of the grid, select “Conduct” in the Section column. The Conduct
Section screen appears displaying the General tab.
2. In the Section heading field, enter “Conduct”.3. Mark Show column header row.4. Unmark Print a box around the column heading row.5. Mark Include a [ ] after this section and select “Blank line”.6. In the first row of the Conduct categories to include grid, enter “Dress code violation” in the Category
Heading column. 7. Choose “Selected” in the Include column. The Selected Infractions screen appears.
8. Select the Dress code violation field and click the right arrow button. The field moves to the Include these infractions box.

112 CH A PT E R
9. Click OK. You return to the General tab and Dress code violation appears in the Selected Infractions column.
10. Repeat these steps to add conduct categories for talking back and assisting faculty/staff.11. Mark Suppress blank categories.
12. Select the Columns tab.
13. Click New Column. The Column 1 screen appears.14. In the Field to show field, select “Heading”. 15. In the Column width field, enter “1.250”. 16. Leave the Column heading field blank.

RE P O R T CA RD S 11
17. In the Detail alignment field, select “Right”.
18. Click OK. You return to the Column tab and the Heading column appears in the grid.
19. Click New Column. The Column 2 screen appears.20. In the Field to show field, select “Number of infractions”. 21. In the Column width field, enter “1.5”. 22. In Column heading field, enter “Number of Occurrences” and click the right align and italics format
buttons. Unmark the bold format button.23. In the Detail alignment field, select “Right”.

114 CH A PT E R
24. In the Include these terms box, unmark the checkboxes for all terms except Fall.
25. Click OK. You return to the Column tab and the Number of infractions column appears in the grid.
26. Click OK. You return to the Details tab and the Conduct section appears in the grid.Select the Summary/Notes tab to format the summary/notes area and select the sections of information to include.
Step 3: Adding Summary/Notes Sections
The third step when creating a report card is to specify whether or not to include a summary/notes area. If you decide to include a summary/notes area, you must select a position (below or to the right of the detail area) and the sections of information to include.

RE P O R T CA RD S 11
For this example, we add a summary/notes area to the right side of the report card. We include a freeform notes section that displays the grading scale. For more information about summary/notes sections not addressed in these procedures, see “Report Card Sections” on page 35.
Formatting the summary/notes area1. On the Summary/Notes tab of the open report card parameter form, mark Show the summary/notes
area.2. In the Position field, select “Right”.3. In the Height field, use the default value “2.25”.4. In the Borders field, select “Box around area”.
Use the grid to add a freeform notes section.

116 CH A PT E R
Adding a freeform notes section to the summary/notes area1. On the Summary/Notes tab, in the first row of the grid, select “Freeform Notes” in the Section column.
The Freeform Notes Section screen appears.
2. In the Section heading field, enter “Grading Scale”.3. Mark Include a [ ] after this section and select “Blank line” in the field.
4. In the text box, enter your school’s grading scale.
Tip: To add tabs to note text, press CTRL + the tab key.
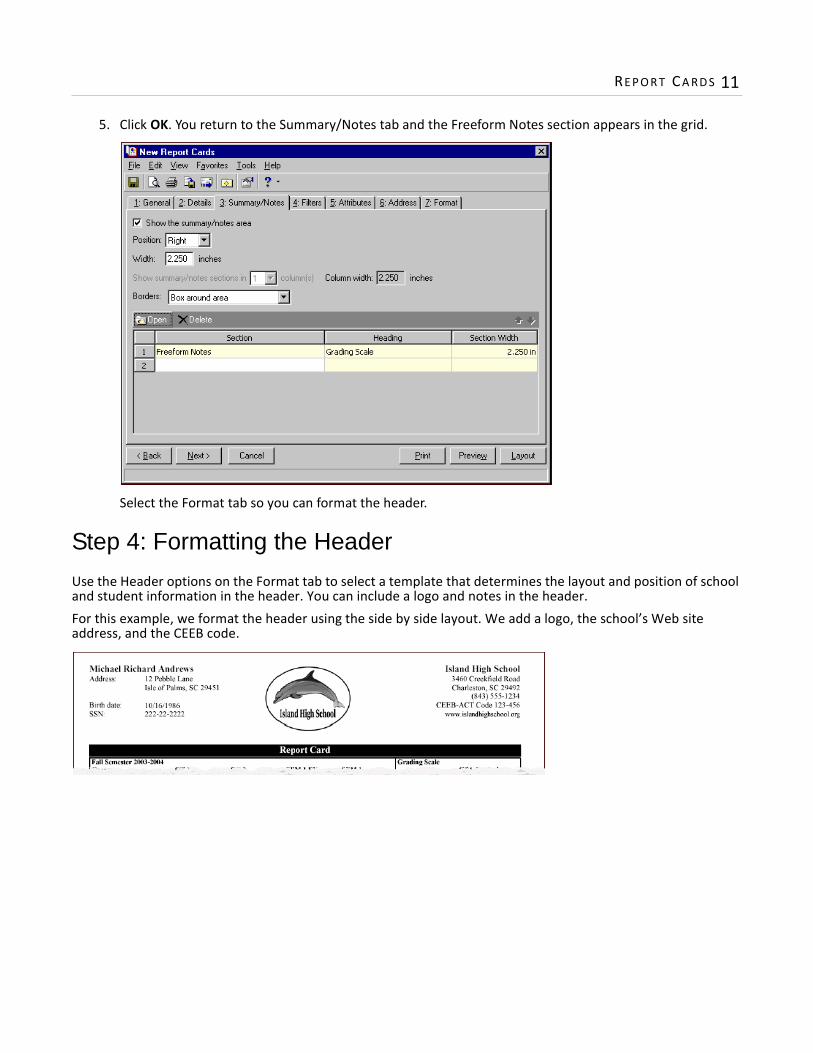
RE P O R T CA RD S 11
5. Click OK. You return to the Summary/Notes tab and the Freeform Notes section appears in the grid.
Select the Format tab so you can format the header.
Step 4: Formatting the Header
Use the Header options on the Format tab to select a template that determines the layout and position of school and student information in the header. You can include a logo and notes in the header. For this example, we format the header using the side by side layout. We add a logo, the school’s Web site address, and the CEEB code.

118 CH A PT E R
Formatting the report card header1. On the Format tab of the open report card parameter form, select General in the tree view on the left.
General Header fields and options appear on the tab.
2. In the Template layout field, select “Side by side”.3. Mark Print report card title. 4. In the Title field, enter “Report Card”. 5. In the Position field, select “Title bar”.6. Mark Print school logo and in the File name field browse to a logo graphic file.7. In the Indent field, enter “3.125” and enter “1.25” in the Height field.

RE P O R T CA RD S 11
8. Mark Print notes and enter “www.islandhighschool.org” in the field.
9. Select Format in the tree view on the left. Format Header fields and options appear on the tab.10. In the Student Name frame, select “12” in the Font size field.11. In the Font style field, select “Bold”.12. In the Student Fields frame, select “10” in the Font size field.
13. Select School Information in the tree view. School Information Header fields and options appear on the Format tab.
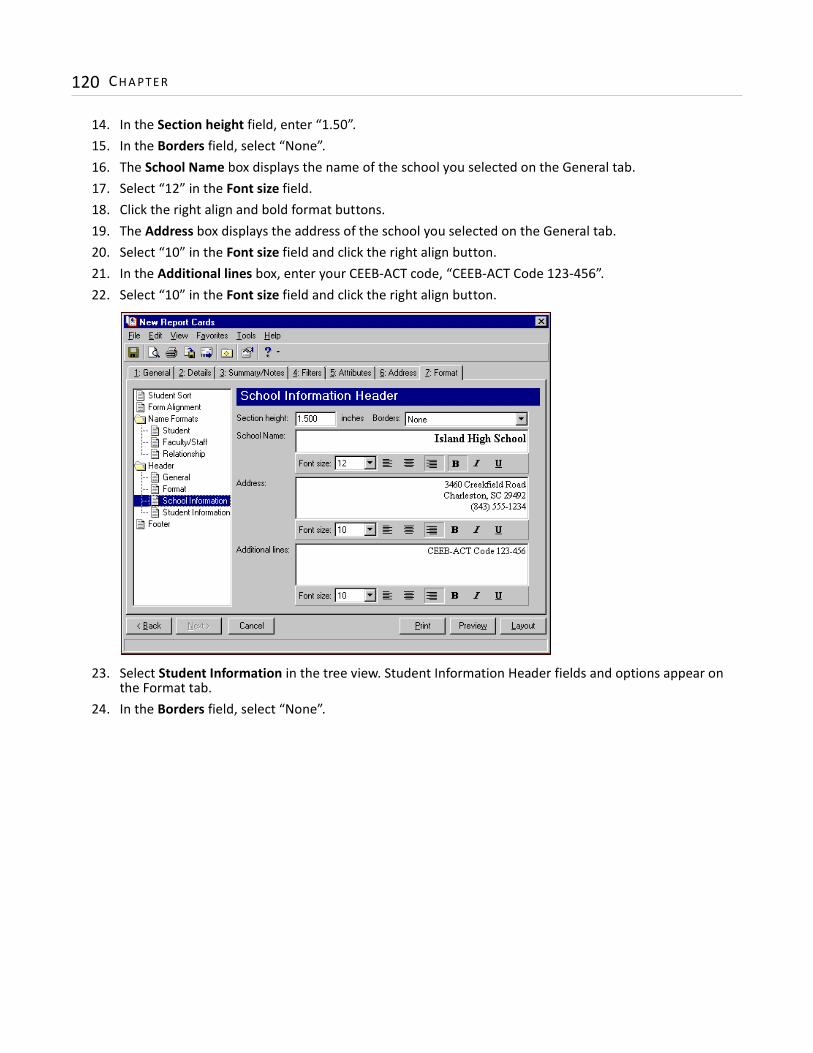
120 CH A PT E R
14. In the Section height field, enter “1.50”.15. In the Borders field, select “None”.16. The School Name box displays the name of the school you selected on the General tab. 17. Select “12” in the Font size field.18. Click the right align and bold format buttons.19. The Address box displays the address of the school you selected on the General tab. 20. Select “10” in the Font size field and click the right align button.21. In the Additional lines box, enter your CEEB-ACT code, “CEEB-ACT Code 123-456”. 22. Select “10” in the Font size field and click the right align button.
23. Select Student Information in the tree view. Student Information Header fields and options appear on the Format tab.
24. In the Borders field, select “None”.
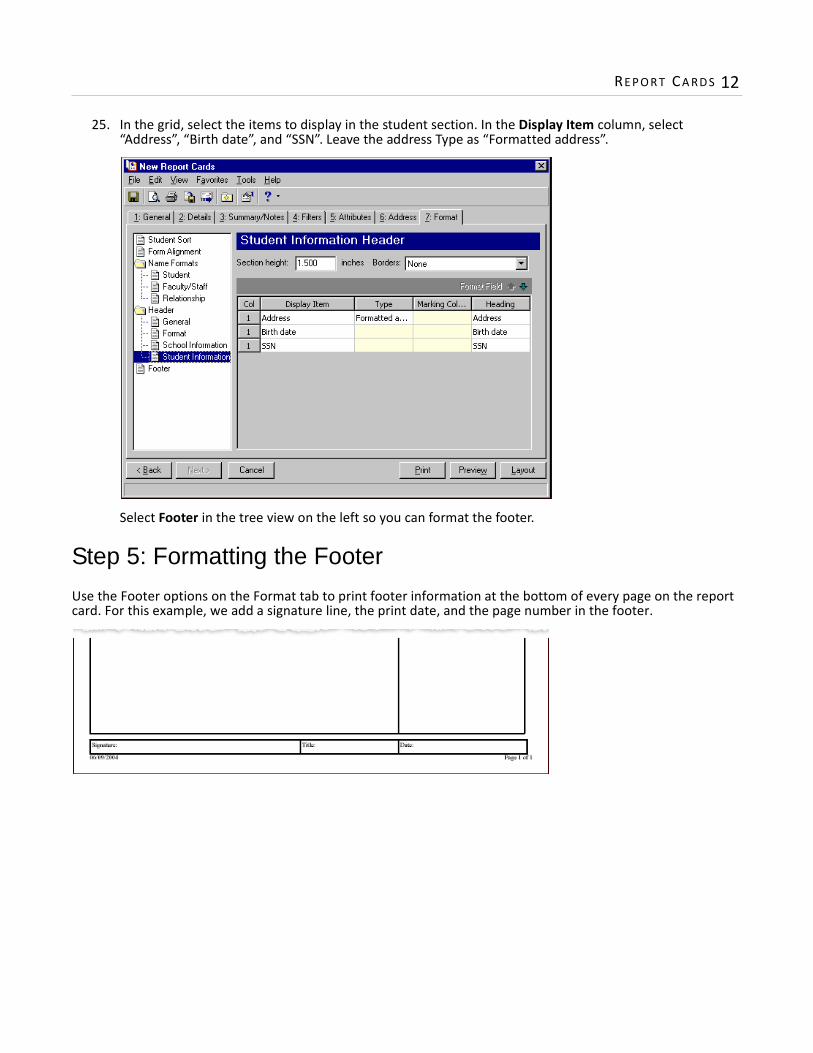
RE P O R T CA RD S 12
25. In the grid, select the items to display in the student section. In the Display Item column, select “Address”, “Birth date”, and “SSN”. Leave the address Type as “Formatted address”.
Select Footer in the tree view on the left so you can format the footer.
Step 5: Formatting the Footer
Use the Footer options on the Format tab to print footer information at the bottom of every page on the report card. For this example, we add a signature line, the print date, and the page number in the footer.

122 CH A PT E R
Formatting the report card footer1. On the Format tab of the open report card parameter form, select Footer in the tree view on the left.
Footer fields and options appear on the tab.
2. Mark Print signature line in footer.3. In the Height field enter “.2”.4. In the Font size field, select “8”.5. In the Font style field, select “Regular”.6. Mark Print report card date in footer and select “Short Date” in the Format field and “Left” in the Align
field.

RE P O R T CA RD S 12
7. Mark Print page number in footer and select “Page 1 of 1” in the Format field and “Right” in the Align field.
The report card is now complete and ready to process.
Step 6: Running Report Cards
Once you format the report card and select the sections of information to include, you can click Preview to preview the results to find any changes or adjustments you need to make. When you are satisfied with the results, click Print to run the report cards. Click the Save button on the toolbar to save the report card parameter form.

124 CH A PT E R

3chapter
Transcripts
Overview of Transcripts. . . . . . . . . . . . . . . . . . . . . . . . . . . . . . . . . . . . . . . . . . . . . . . . . . . . . . . . . . . . . . . . . . . . . . 126Transcript Tabs. . . . . . . . . . . . . . . . . . . . . . . . . . . . . . . . . . . . . . . . . . . . . . . . . . . . . . . . . . . . . . . . . . . . . . . . . . . . . 127General Tab . . . . . . . . . . . . . . . . . . . . . . . . . . . . . . . . . . . . . . . . . . . . . . . . . . . . . . . . . . . . . . . . . . . . . . . . . . . . . . . . . . 128Details Tab . . . . . . . . . . . . . . . . . . . . . . . . . . . . . . . . . . . . . . . . . . . . . . . . . . . . . . . . . . . . . . . . . . . . . . . . . . . . . . . . . . . 129Summary/Notes Tab . . . . . . . . . . . . . . . . . . . . . . . . . . . . . . . . . . . . . . . . . . . . . . . . . . . . . . . . . . . . . . . . . . . . . . . . . . . 132Filters Tab. . . . . . . . . . . . . . . . . . . . . . . . . . . . . . . . . . . . . . . . . . . . . . . . . . . . . . . . . . . . . . . . . . . . . . . . . . . . . . . . . . . . 134Attributes Tab . . . . . . . . . . . . . . . . . . . . . . . . . . . . . . . . . . . . . . . . . . . . . . . . . . . . . . . . . . . . . . . . . . . . . . . . . . . . . . . . 137Address Tab . . . . . . . . . . . . . . . . . . . . . . . . . . . . . . . . . . . . . . . . . . . . . . . . . . . . . . . . . . . . . . . . . . . . . . . . . . . . . . . . . . 137Format Tab. . . . . . . . . . . . . . . . . . . . . . . . . . . . . . . . . . . . . . . . . . . . . . . . . . . . . . . . . . . . . . . . . . . . . . . . . . . . . . . . . . . 139Transcript Sections. . . . . . . . . . . . . . . . . . . . . . . . . . . . . . . . . . . . . . . . . . . . . . . . . . . . . . . . . . . . . . . . . . . . . . . . . . 148Courses Detail Section . . . . . . . . . . . . . . . . . . . . . . . . . . . . . . . . . . . . . . . . . . . . . . . . . . . . . . . . . . . . . . . . . . . . . . . . . 148Credits Detail Section . . . . . . . . . . . . . . . . . . . . . . . . . . . . . . . . . . . . . . . . . . . . . . . . . . . . . . . . . . . . . . . . . . . . . . . . . . 159GPAs Detail Section . . . . . . . . . . . . . . . . . . . . . . . . . . . . . . . . . . . . . . . . . . . . . . . . . . . . . . . . . . . . . . . . . . . . . . . . . . . . 163Performance Detail Section . . . . . . . . . . . . . . . . . . . . . . . . . . . . . . . . . . . . . . . . . . . . . . . . . . . . . . . . . . . . . . . . . . . . . 167Ranks Detail Section . . . . . . . . . . . . . . . . . . . . . . . . . . . . . . . . . . . . . . . . . . . . . . . . . . . . . . . . . . . . . . . . . . . . . . . . . . . 171Academic Summary Section. . . . . . . . . . . . . . . . . . . . . . . . . . . . . . . . . . . . . . . . . . . . . . . . . . . . . . . . . . . . . . . . . . . . . 176Activities Section . . . . . . . . . . . . . . . . . . . . . . . . . . . . . . . . . . . . . . . . . . . . . . . . . . . . . . . . . . . . . . . . . . . . . . . . . . . . . . 180Test Scores Section . . . . . . . . . . . . . . . . . . . . . . . . . . . . . . . . . . . . . . . . . . . . . . . . . . . . . . . . . . . . . . . . . . . . . . . . . . . . 186Student Notes Section . . . . . . . . . . . . . . . . . . . . . . . . . . . . . . . . . . . . . . . . . . . . . . . . . . . . . . . . . . . . . . . . . . . . . . . . . 192Freeform Notes Section . . . . . . . . . . . . . . . . . . . . . . . . . . . . . . . . . . . . . . . . . . . . . . . . . . . . . . . . . . . . . . . . . . . . . . . . 195Creating Transcripts . . . . . . . . . . . . . . . . . . . . . . . . . . . . . . . . . . . . . . . . . . . . . . . . . . . . . . . . . . . . . . . . . . . . . . . . . 195Step 1: General Formatting . . . . . . . . . . . . . . . . . . . . . . . . . . . . . . . . . . . . . . . . . . . . . . . . . . . . . . . . . . . . . . . . . . . . . 196Step 2: Adding Detail Sections . . . . . . . . . . . . . . . . . . . . . . . . . . . . . . . . . . . . . . . . . . . . . . . . . . . . . . . . . . . . . . . . . . . 198Step 3: Adding Summary/Notes Sections . . . . . . . . . . . . . . . . . . . . . . . . . . . . . . . . . . . . . . . . . . . . . . . . . . . . . . . . . . 207Step 4: Formatting Academic Year Information . . . . . . . . . . . . . . . . . . . . . . . . . . . . . . . . . . . . . . . . . . . . . . . . . . . . . 219Step 5: Formatting the Header . . . . . . . . . . . . . . . . . . . . . . . . . . . . . . . . . . . . . . . . . . . . . . . . . . . . . . . . . . . . . . . . . . 221Step 6: Formatting the Footer . . . . . . . . . . . . . . . . . . . . . . . . . . . . . . . . . . . . . . . . . . . . . . . . . . . . . . . . . . . . . . . . . . . 225Step 7: Running Transcripts . . . . . . . . . . . . . . . . . . . . . . . . . . . . . . . . . . . . . . . . . . . . . . . . . . . . . . . . . . . . . . . . . . . . . 226

126 CH A PT E R
You can use Transcripts in Registrar’s Office Mail to create comprehensive statements of student academic performance over several years. The flexibility in Transcripts allows you to create transcripts customized to meet your school’s needs. You can select the academic information to include and the level of detail. You can also format the layout and appearance.
To access Transcripts, from the Mail page, click Forms. Select Transcripts in the list on the left of the page and a grid appears on the right displaying saved transcripts. On this page you can create new transcripts, open saved transcripts, and delete transcripts.
Overview of TranscriptsTranscripts contain two main areas of information — the detail area and summary/notes area. The detail area presents detailed academic information in columns grouped by the academic year or grade level. The summary/notes area lists summarized academic information and any additional notes you create to appear on the transcript.
Note: Visit our Web site at www.blackbaud.com for the latest documentation and information.
Note: We offer high-quality, customized report card and transcript forms that are specifically designed for use with our software. Our report card and transcript forms feature state-of-the-art, tamper-proof backgrounds. For more information, visit our Web site at http://forms.blackbaud.com or call us toll-free at 866-4-BB-FORMS (866-422-3676).
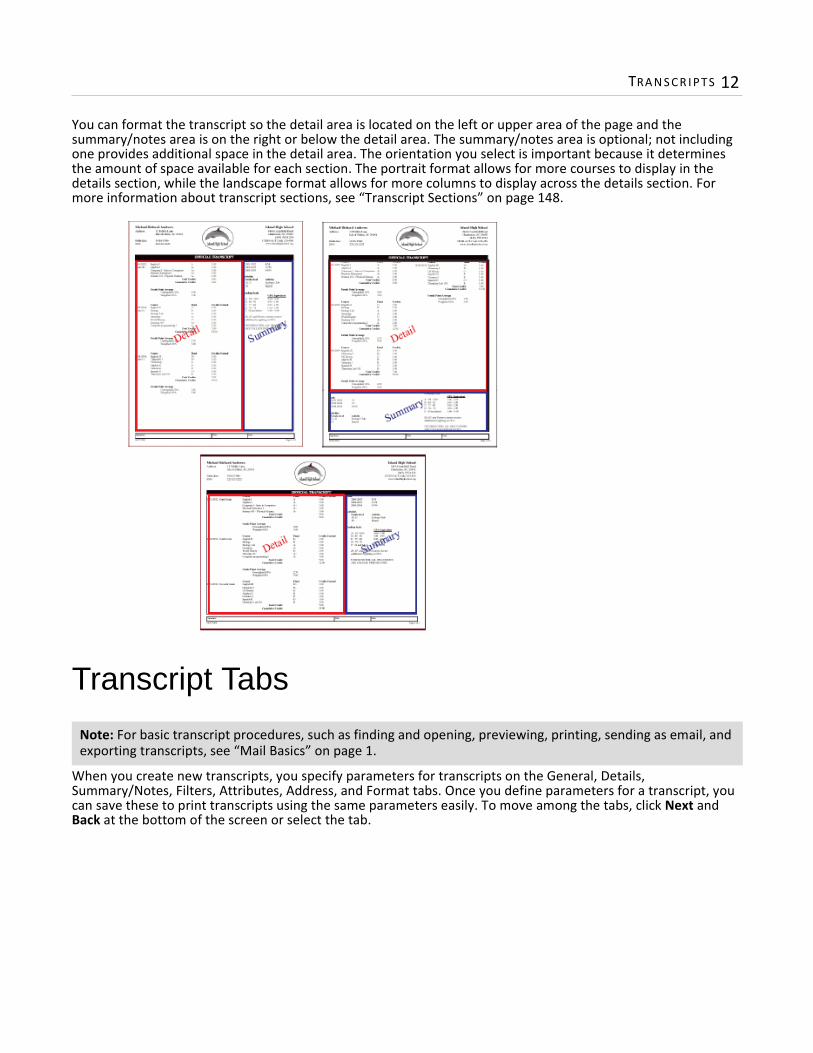
TRA N S C R I P T S 12
You can format the transcript so the detail area is located on the left or upper area of the page and the summary/notes area is on the right or below the detail area. The summary/notes area is optional; not including one provides additional space in the detail area. The orientation you select is important because it determines the amount of space available for each section. The portrait format allows for more courses to display in the details section, while the landscape format allows for more columns to display across the details section. For more information about transcript sections, see “Transcript Sections” on page 148.
Transcript Tabs
When you create new transcripts, you specify parameters for transcripts on the General, Details, Summary/Notes, Filters, Attributes, Address, and Format tabs. Once you define parameters for a transcript, you can save these to print transcripts using the same parameters easily. To move among the tabs, click Next and Back at the bottom of the screen or select the tab.
Note: For basic transcript procedures, such as finding and opening, previewing, printing, sending as email, and exporting transcripts, see “Mail Basics” on page 1.

128 CH A PT E R
General Tab
Use the General tab to select the school, grade levels, academic years, and sessions to include on the transcript. You can also select general formatting options, such as the paper size and orientation.
Transcript for. If you have more than one school, you can select for which school to print the transcript. The school you select determines the information printed in the header.
Filters Grid. Using the filters grid, you can filter the coursework and academic information that appears in transcript results by grade levels, academic years, and sessions.
Include information from future years. To include existing information from future academic years, mark Include information from future years.
Include students on hold that are not supposed to be able to send transcripts. To include students on hold with a restriction against sending transcripts, mark Include students on hold that are not supposed to be able to send transcripts.
Paper size. In the Paper Size field, select to print the transcript on letter, legal, or A4 sized paper.Orientation. In the Orientation field, select to print in portrait or landscape.Font. In the Font field, select a font for text on the transcript.Font size. In the Font size field, select a font size for text in the details and summary areas. Create an output query of students. To create a query of students for which you run transcripts, mark
Create an output query of students. You can save and use an output query later for reports or other mailings.
Note: If a student has classes for more than one school, for example middle school and high school, courses from both schools print on the transcript.

TRA N S C R I P T S 12
Details Tab
On the Details tab, you select the sections to include in the detail area of transcripts, as well as formatting options for those sections. You can include both detail and summary/notes sections in the detail area. For more information about formatting detail sections, see “Transcript Sections” on page 148.
Show detail sections in [ ] column(s). In the Show detail sections in [ ] columns field, select the number of column sets for the details section. You can select up to four columns. If you select 1, information for all academic years displays in one column.

130 CH A PT E R
If you select more than one, information prints in more than one column. For example, if you select 2, the information prints in the first column and then wraps to the second column rather than breaking to a new page. You can also create breaks by academic year so that each academic year prints in a separate column. For more information, see “Academic Year” on page 139.
Column width. The Column width field displays the calculated width of the columns based on the selected paper size, orientation, margins, number of columns, width of the right summary/notes panel, and whether the heading is in a row above or column along the side of the course section.
Borders. In the Borders field, select which separators to use for the detail area. You can select None, Box around area, Lines above and below area, Line above area, Line below area, or Box around each column.
Include information from outside schools attended. Mark Include information from outside schools attended to include information for schools a student previously attended. Outside school information appears only if the Print education on transcript checkbox is marked for that school on the Education tab of the student record and if the student’s enrollment dates for that school fall within the academic years selected for the transcript.
Format. If you mark Include information from outside schools attended, you can click Format to access the Outside Schools Format screen. On this screen you can format how information for outside schools appears on the transcript.
Print outside school information — To choose how other courses display on the transcript, select “with current school”, “as a separate section above current school”, or “as a separate section below current school”.

TRA N S C R I P T S 13
Heading for outside school information — In this field, enter a heading for the outside school information.Show school name — Mark this checkbox to group the information under each outside school name. If you do not mark this checkbox, information is grouped together under the outside school heading and sorted as a group. Append years attended to school name — If you mark Show school name, you can also mark Append years attended to school name to add the years the student attended the outside school to the school’s name on the transcript.Include comment after outside school information — Mark this checkbox to enter a comment in the Comment field and select a font style and font size. Print a horizontal line after outside school information — Mark this checkbox to add a horizontal line as a divider between outside schools and your school information.Heading for current school information — In this field, enter a heading to appear before information for your school.
Detail Sections GridIn the grid, select the sections of information to include in the detail area of the transcript.
Section. In the Section column, select Courses, Academic Summary, Activities, Credits, GPAs, Performance, Ranks, Test Scores, or Student Notes. The Courses section is always listed first in the grid and should be formatted first because its settings affect the formatting of other sections.When you select a section, the screen for that section type appears so you can define the columns, headings, and details that appear in that section. For more information about formatting transcript sections, see “Transcript Sections” on page 148.
Heading. The Heading column displays the section headings entered on the General tab for each section. You must open a section to edit its heading.
Section Width. The Section Width column displays the sum of all column widths and spaces between columns.Open. To open a detail section in the grid, select the section and click Open.Delete. To delete a detail section from the grid, select the section and click Delete.Up/Down. To change the order of detail sections in the grid, select a section and click the up or down arrow.
Note: You can include all summary sections in the detail area except Freeform notes.

132 CH A PT E R
Summary/Notes Tab
On the Summary/Notes tab, you select the sections to include in the summary/notes area of transcripts and formatting options for those sections. For more information about formatting summary sections, see “Transcript Sections” on page 148.
Show the summary/notes area. Mark Show the summary/notes area to include a summary/notes area on the transcript. If you do not mark this option, all fields and options on this tab are disabled.
Position. In the Position field, select to position the summary area below or to the right of the detail area. If you select more than one column in the Show detail sections in [ ] columns field on the Details tab, this field is Bottom by default and is not editable.
Width/Height. This field depends on your selection in the Position field. If you select Right, you can enter a width. If you select Bottom, you can enter a height. You can increase and decrease the width or height in increments of 0.1 inch. The minimum width/height is 0.1 inch and the maximum is 10.25 or 7.75 inches depending on whether you print in landscape or portrait format.
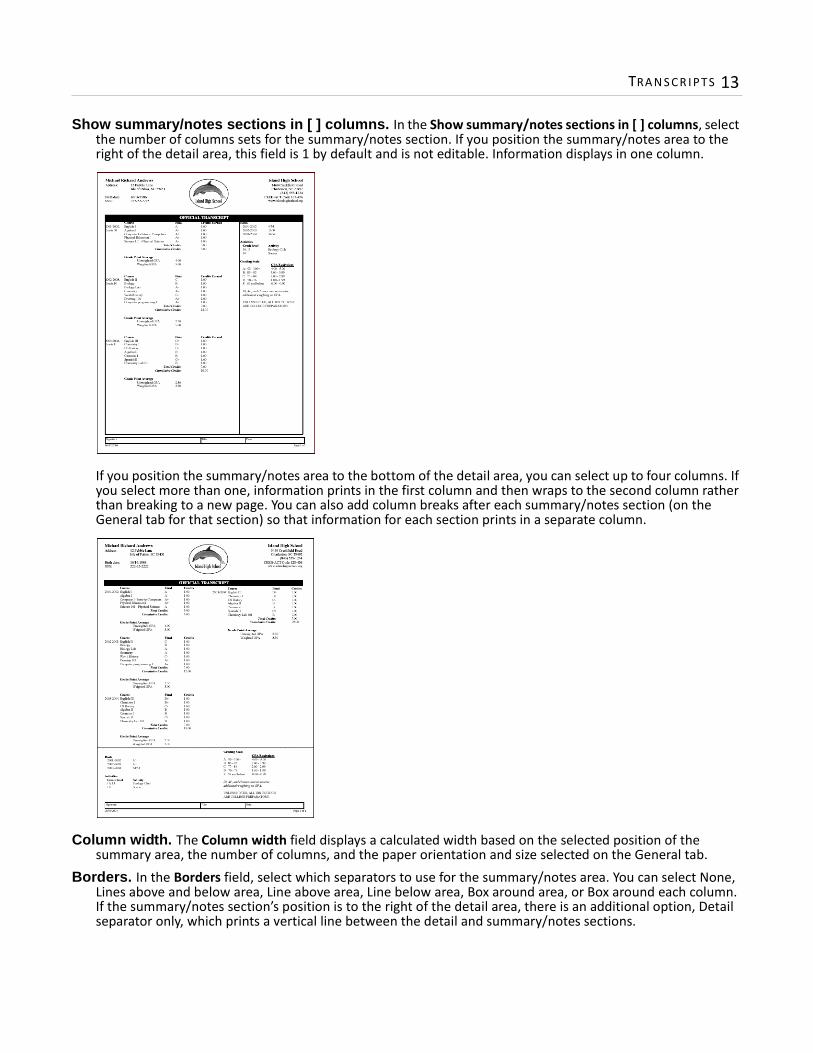
TRA N S C R I P T S 13
Show summary/notes sections in [ ] columns. In the Show summary/notes sections in [ ] columns, select the number of columns sets for the summary/notes section. If you position the summary/notes area to the right of the detail area, this field is 1 by default and is not editable. Information displays in one column.
If you position the summary/notes area to the bottom of the detail area, you can select up to four columns. If you select more than one, information prints in the first column and then wraps to the second column rather than breaking to a new page. You can also add column breaks after each summary/notes section (on the General tab for that section) so that information for each section prints in a separate column.
Column width. The Column width field displays a calculated width based on the selected position of the summary area, the number of columns, and the paper orientation and size selected on the General tab.
Borders. In the Borders field, select which separators to use for the summary/notes area. You can select None, Lines above and below area, Line above area, Line below area, Box around area, or Box around each column. If the summary/notes section’s position is to the right of the detail area, there is an additional option, Detail separator only, which prints a vertical line between the detail and summary/notes sections.

134 CH A PT E R
Summary/Notes Section GridIn the grid, select the sections of information to appear in the summary/notes area of the transcript. An academic summary section for GPAs appears by default. The GPAs section is not required so you can edit it, add additional columns to it, or delete it altogether. For more information about the academic summary section, see “Academic Summary Section” on page 176.
Section. In the Section column, select Academic Summary, Activities, Student Notes, Test Scores, or Freeform Notes. When you select a section, the screen for that section type appears so you can define related columns, headings, and details. For more information about formatting summary sections, see “Transcript Sections” on page 148.
Heading. The Heading column displays the section headings entered on the General tab for each section. You must open a section to edit its heading.
Section Width. The Section Width column displays the sum of all column widths and spaces between columns.Open. To open a summary section in the grid, select the section and click Open.Delete. To delete a summary section from the grid, select the section and click Delete.Up/Down. To change the order of summary sections in the grid, select a section and click the up or down arrow.
Filters Tab
Note: When printing high school transcripts, you can also include grade information for high school courses taken in middle school by selecting your high school’s name for the Course Schools filter.

TRA N S C R I P T S 13
On the Filters tab, you select criteria that determines the students for which transcripts print and the courses included. You can specify a time frame for the coursework and academic information included on the transcripts by selecting Grade Levels, Academic years, or Sessions in the Filters grid on the General tab. For more information about filtering in The Education Edge, see the Program Basics Guide.
Open. To open a selection screen to designate specific filters for the transcript, select a filter in the grid and click Open on the action bar.
Clear All Filters. To reset each filter to include all, you can click Clear All Filters.
Filters. The Filters column lists all the filters for the transcript. You cannot edit this column.Include. By default, in the Include column, each filter is set to All. To open a selection screen to designate
specific filters for the transcript, choose Selected.Selected Filters. Filters you specify on the selection screen appear in the Selected Filters column.
Tip: You can also double-click a filter in the grid to open the selection screen.
Note: A filter is a requirement items must meet to be included in transcript run. For example, if you apply the Student Grade Levels filter, transcripts print for only students in the selected grade level.

136 CH A PT E R
Selected Filters Screen
From the Filters tab, you can open a selection screen for a filter in several ways: by double-clicking the filter in the grid, selecting the filter in the grid and clicking Open on the action bar, or choosing Selected in the Include column for the filter.
Include. For each filter, you can select to include all or select specific filters. Depending on the filter, you may also be able to filter by a range or query.
All. If you mark Include: All, you cannot designate specific filters.Selected or Range. If you mark Include: Selected or Range, a grid appears in which you can specify filters. In a
field, you can click the binoculars to search for information.Query. If you mark Include: Query, the Query name field appears for you to enter the name of the query by
which to filter the transcript. In the field, you can click the binoculars to search for the query name.To create a new query, click the binoculars. Then click Add a New Query on the Open Query screen. For more information about creating queries, see the Query Guide.
Previous Filter. To view or edit the previous filter without returning to the Filters tab, click Previous Filter.Next Filter. To view or edit the next filter without returning to the Filters tab, click Next Filter.

TRA N S C R I P T S 13
Attributes Tab
You can use the Attributes tab to add, delete, or update attributes for students when you print transcripts. For example, to track the number of transcripts you print for students, you can add a “Transcript printed” attribute to each student included in a transcript run. Later, you can filter a report or query using this attribute to calculate the total number of transcripts printed. For more information about creating attributes, see the Configuration Guide for Registrar’s Office.
Action. In the Action column, you can add, delete, or update attributes on the records when you print transcripts. Attribute Type. In the Attribute Type column, you can select an attribute type. Description. In the Description column, you can enter or select a description for the attribute type. Short Description. In the Short Description column, a brief description of the attribute type appears when you
select a type in the Attribute Type column. Date. In the Date column, select the date you add, delete, or update the attribute. Required. If the attribute type you select is required, the program automatically marks the checkbox in the
Required column. Comments. In the Comments column, you can enter additional information about the attribute type.
Address Tab
Use the Address tab to specify which addresses to use for transcripts. The program compares the parameters you define on this tab with address information entered on the Addresses tab of the student/relationship record to identify the appropriate address to use.

138 CH A PT E R
On the Address tab, you select a validation date and then define the order in which the program evaluates address types. The program first checks the validation date, then seasonal addresses, other address types (in the order you determine), and attributes. The first address found on the student/relationship record that meets the defined parameters is used on the transcript. You can also specify what to do if no valid address is found.
Step 1. In the Use address from field, select whether to print the address from the student or relationship record.
Step 2. In the Validate addresses as of [ ] field, select a date to determine which address to use. Any address that is valid on this date is considered for use on the transcript. Any addresses that are not valid on this date are automatically excluded from consideration.
Step 3. Determine whether to include seasonal addresses as possible addresses. If you mark Consider seasonal addresses, the program uses the first valid seasonal address found on the student/relationship record and does not consider any other addresses.If the seasonal address has the Send no mail attribute, the seasonal address is excluded automatically as a possible address. If a valid seasonal address is not found, the program considers the address types selected in Step 4.
Step 4. In the If no seasonal addresses are found, consider these addresses frame, select which address types to use if no valid seasonal addresses exist. In the Addresses box, select an address type and click the right arrow to move it into the Addresses to consider, in order of importance box. The first address type in the list that matches the validation date is used on the transcript. You can change the order addresses are considered by selecting an address type and clicking the up and down arrows next to the list.If a valid address is not found from these address types, the program considers the attributes selected in Step 5.
Note: Any address with No mail selected in the Send [ ] to this address field on the Address Attributes tab is automatically excluded as a possible address.
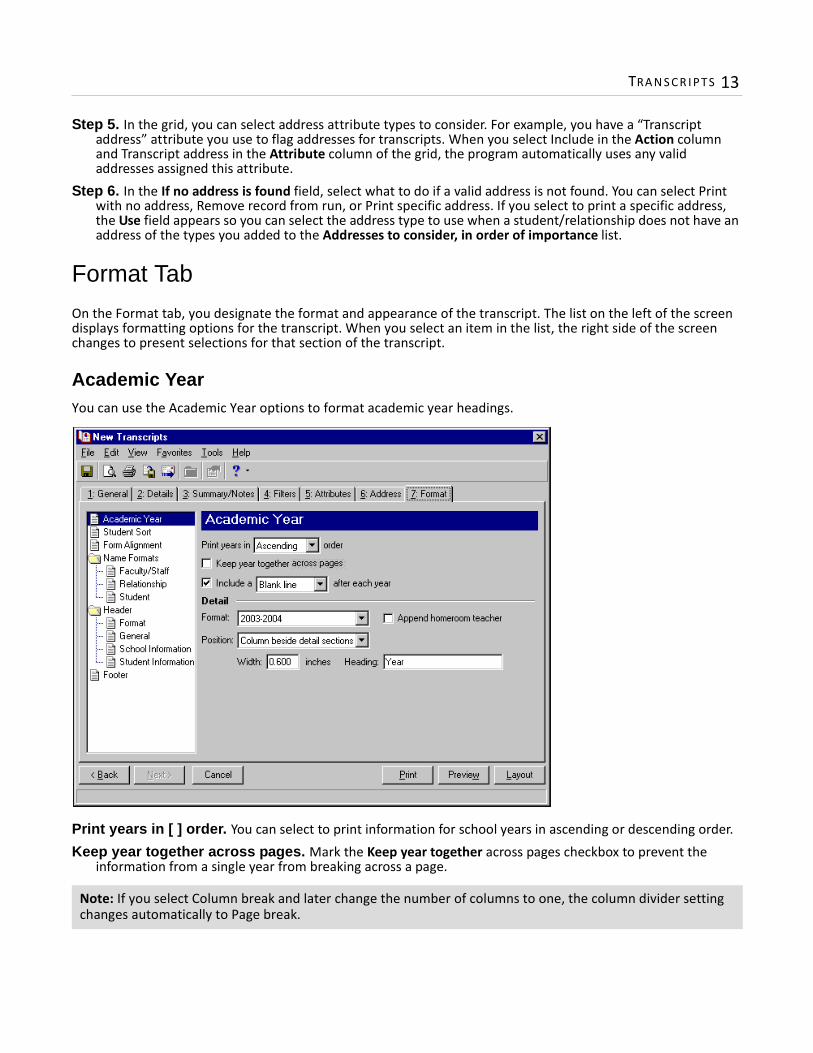
TRA N S C R I P T S 13
Step 5. In the grid, you can select address attribute types to consider. For example, you have a “Transcript address” attribute you use to flag addresses for transcripts. When you select Include in the Action column and Transcript address in the Attribute column of the grid, the program automatically uses any valid addresses assigned this attribute.
Step 6. In the If no address is found field, select what to do if a valid address is not found. You can select Print with no address, Remove record from run, or Print specific address. If you select to print a specific address, the Use field appears so you can select the address type to use when a student/relationship does not have an address of the types you added to the Addresses to consider, in order of importance list.
Format Tab
On the Format tab, you designate the format and appearance of the transcript. The list on the left of the screen displays formatting options for the transcript. When you select an item in the list, the right side of the screen changes to present selections for that section of the transcript.
Academic YearYou can use the Academic Year options to format academic year headings.
Print years in [ ] order. You can select to print information for school years in ascending or descending order. Keep year together across pages. Mark the Keep year together across pages checkbox to prevent the
information from a single year from breaking across a page.
Note: If you select Column break and later change the number of columns to one, the column divider setting changes automatically to Page break.

140 CH A PT E R
Include a [ ] after each year. Mark Include a [ ] after each year and select to divide academic years using a blank line, horizontal line, page break, or column break. If you select Page break, information for each academic year prints on its own page. If you select Column break each academic year appears in its own column. You can use a column break only when you select to use more than one column in the Show detail sections in [ ] column(s) field.
Format. In the Format field, select a format for the heading of the Year column. The format is the school year, the grade level, or a combination of the two. For example, “2004-2005” , “9th Grade”, or “2004-2005, 9th Grade”.
Append homeroom teacher. Mark Append homeroom teacher to add the student’s homeroom teacher to the selected year format. For example, “9th Grade, Miller”. The teacher’s name format is defined in the faculty/staff section of Name Formats.
Position. In the Position field, select to position the heading in the row above detail sections or in the column beside detail sections. If you select Column beside detail sections, the Width and Column heading fields appear.
Width. In the Width field, enter a width for the column. You can increase and decrease the width in increments of 0.1 inch. The minimum width is 0.1 inch and the maximum is 7.75 inches if using a portrait page format or 10.25 if using landscape.
Heading. In the Heading field, you can use Year as the column heading or enter a different column heading.
Student SortWhen you print many transcripts at one time, you can use Student Sort to group transcripts by a selected option and arrange them in ascending or descending order.
Sort by. In the Sort by column, select items for grouping transcripts. For example, you can group transcripts by advisors or grade levels.
Category. If you select to sort by an attribute in the Sort by column, you can select the attribute in the Category column. Otherwise the field is disabled.
Order by. In the Order by column, select the sort order of transcripts. Select Ascending to sort sequentially or alphabetically. Select Descending to sort in reverse sequential or reverse alphabetical order.

TRA N S C R I P T S 14
Form AlignmentYou can use Form Alignment to specify vertical and horizontal alignment of printed information on transcript forms.
Vertical Alignment. In the Vertical alignment field, you can select to use the default alignment or to move printed information up or down and how much to move the information. For example, if you select Move printed information up and enter 2, the information prints .02 inch higher on the page.
Horizontal alignment. In the Horizontal alignment field, you can select to use the default alignment or to move printed information left or right and how much to move the information. For example, if you select Move printed information left and enter 2, the information prints .02 inch more to the left on the page.

142 CH A PT E R
Name FormatsUsing Name Formats, you can format how names appear for students, faculty/staff, and relations in the address and body sections of the transcript. In the tree view on the left, select Student, Faculty/Staff, or Relationship to format names for that record type.
The formatting selections you make in the Transcript Address frame affect the address that prints when Address with addressee is selected in the Type column on the Student Information Header screen of the Format tab. The formatting selections you make in the Transcript Body frame appear in the body area of the transcript and the header.
Select addressee/salutation from [ ]. In the Select addressee/salutation from [ ] field, select Record or Configuration.
Use. If you select Record, in the Use field, select the full name, primary addressee, primary salutation, directory name, diploma name, informal addressee, or informal salutation as defined on the student/faculty/staff/relationship record. If you select Configuration, in the Use field, select from one of the formats defined in Configuration.
If not present...Select addressee/salutation from. In the If not present...Select addressee/salutation from field, you can select a second name format for situations where the first selection is not present on student or relationship records. For example, if you select to use the Primary salutation, and you have students without a Primary salutation defined on the Addressees/Salutations tab, the second name format is used. If you select <Full name> or Configuration in the Use field, this field is disabled.
Note: You must have the appropriate security rights to output an addressee/salutation with Social Security numbers. If you do not have security rights, the numbers are masked. For more information, see the Security chapter of the Administration Guide for The Education Edge.

TRA N S C R I P T S 14
HeaderUse the Header options to select a template that determines the layout and position of school and student information in the header. You can include a logo and notes in the header.
Format
Select Format in the tree view to format the placement, font size and style, and number of columns for fields in the school and student information sections.
Name/Address. In the Indent and Width fields of the School Fields frame, enter the amount to indent and the width allowed for fields in the school information section.
Additional lines. In the Indent and Width fields of the School Fields frame, enter the amount to indent and the width allowed for additional lines added to the school information section.
Font size. In the Font size field of the Student Name frame, select the size of the student name.Font style. In the Font style field of the Student Name frame, select Regular, Bold, Italics, or Bold Italics for the
student name.Font size. In the Font size field of the Student Fields frame, select the size of the student fields in the student
information section.Label: Font style. In the Label: Font style field of the Student Fields frame, select Regular, Bold, Italics, or Bold
Italics for the labels of student fields in the student information section.Alignment. In the Alignment field of the Student Fields frame, select the alignment for the labels of fields in the
student information section.Show student fields in [ ] column(s). In the Show student fields in [ ] column(s) field of the Student Fields
frame, select the number of columns for the student fields. You can select up to three columns.
Note: You select the student fields and field formats in the Student Information section of the Format tab.

144 CH A PT E R
# of Fields in Column. If you select to use columns for the student fields, you can select the number of fields (up to eight) to include in each column. A row appears for each field. For example, if you select 2 in the Show student fields in [ ] column(s) field and 3 in the # of Fields in Column column, the student information section appears as shown here.
Indent (in). In the Indent column, enter the amount to indent the column from the section’s left edge. Label Width (in). In the Label Width (in) column, select the maximum width for field labels in each column. Field Width (in). In the Field Width (in) column, select the maximum width for fields in each column.
General
Select General in the tree view to select the layout and position of items included in the header.
Template layout. In the Template layout field, select Side by side or Stacked. When you select a layout, a preview of the header layout appears.Side by side — Select this option to display school information next to student information.Stacked — Select this option to display school information above the student information. Both sets of information are left-aligned by default.
Print transcript title. Mark Print transcript title to print a title on the transcript.

TRA N S C R I P T S 14
Title. If you mark Print transcript title, in the Title field, you can use the default title “Official Transcript” or enter a different title.
Position. In the Position field, select where to print the transcript title. If you select Title bar, the title prints in white font on a thick black line between the header and body of the transcript. If you select Label, the title prints in the top right corner of the page.
Print school logo. Mark Print school logo to print a logo on the transcript.File name. If you mark Print school logo, in the File name field, you must browse to the logo graphic file.
Graphic files must be in bitmap (*.bmp) or jpeg (*.jpg) format. You may need to resize the width and height of the logo in your graphics program.
Placement. You can use the Indent, Height, and Width fields to adjust the placement of the logo within the header.
Print notes. To add a note to the header, mark Print notes and enter text in the box. If you selected Side by side in the Template layout field, the note prints at the bottom right of the header. If you selected Stacked, the note prints at the bottom left of the header.
School Information
Select School Information in the tree view to format the school information section of the header.
Section height. In the Section height field, enter the height of the School information section in inches. The minimum height is 0 inches and the maximum is 10.25 inches for portrait layout and 7.75 for landscape. If you select Side by side in the Template layout field, the Section height entered here is used for the Student Information section as well.
Borders. In the Borders field, select which separators to use for the school information section. You can select None, Lines above and below section, Line below section, or Box around section.
School Name. The School Name box displays the school selected in the Transcript for field on the General tab. You can use this name or enter a different one. You can use the buttons below the School Name box to format the alignment, font size, and style of school name text.

146 CH A PT E R
Address. The Address box displays the address and phone number of the school selected in the Transcript for field on the General tab. You can use this address or enter a different one. You can use the buttons below the Address box to format the alignment, font size, and style of address text.
Additional lines. You can enter additional information for the header in the Additional lines box. If you selected Side by side in the Template layout field, the lines print at the bottom right of the header. If you selected Stacked, the line print in the top left of the header. You can use the buttons below the Additional lines box to format the alignment, font size, and style of additional lines text.
Student Information
Select Student Information in the tree view to format the student information section of the header. Student information displays in the number of columns selected in the Format Header section of the Format tab.The Col column of the grid displays rows for the number you selected in the # of Fields in Column column in the Format Header section. For example, if you selected to include two columns with three fields in each column, the Col column lists three rows for column 1 and three rows for column 2.
Section height. In the Section height field, enter the height of the Student information section in inches. The minimum height is 0 inches and the maximum is 10.25 inches for portrait layout and 7.75 for landscape. If you select Side by side in the Template layout field, the Section height entered here is used for the School Information section as well.
Borders. In the Borders field, select which separators to use for the student information section. You can select None, Lines above and below section, Line below section, Box around section, Horizontal lines, Vertical lines, or Grid lines. If you select Horizontal lines, Vertical lines, or Grid lines, a box also prints around the section.
Display Item. In the Display Item column of the grid, select the items of information to print in the student information section of the header. If you select Parent/Guardian, the program uses the relationship selected to print on transcripts on the Relationship tab of the student record. The relationship name formats as specified on the Relationship Name Formats section of the Format tab for the transcript body. If Relationship is selected in the Use address from field on the Address tab and you select Address as the Display Item and Address with addressee in the Type column, then relationship names are formatted as specified on the Format tab for the transcript address.You can select to display up to three advisors per student. The order you choose on the student progression entry determines which three display.
Type. For some items you select in the Display Item column, such as Attribute, Address, or Rank, you must also select a type in the Type column of the grid.
Note: The Col column displays the column in which display items will print.

TRA N S C R I P T S 14
Marking Column. For some items you select in the Display Item column, such as Cumulative GPA or Rank, you must also select a marking column in the Marking Column column of the grid.
Heading. In the Heading column of the grid, you can use the default heading that appears for the item selected in the Display Item column or enter a different one.
Format Field. If you select Cumulative GPA, Total credits, Birth date, Print date, Date entered, Date left, Standard/Mandatory credits, Transfer credits, or Graduation date in the Display Item column, select the item and click Format Field to format the decimal places or date format for those items.
Up/Down. To change the order of items in the grid, select an item and click the up or down arrow.
FooterUse the Footer options to print footer information at the bottom of every page in the transcript. You can print a signature line, the print date, and the page number in the footer.
Print signature line in footer. Mark Print signature line in footer to add a signature box to the transcript. Marking this option enables other fields on this screen.
Height. In the Height field, enter the height of the signature box in inches. The minimum is 0.1 inch and the maximum is 3 inches.
Font size. In the Font size field, select the font size for text used in the signature line. Font style. In the Font style field, select Regular, Bold, Italics, or Bold Italics.
Signature Line Grid
Use the Signature Line grid to select and format the items that appear in boxes in the signature line. Display Item. In the Display Item column, you can include boxes on the transcript for the signature, the title of
the person signing, and the date the transcript is signed.

148 CH A PT E R
Heading. In the Heading column, you can use the default heading for the display items you selected, enter different headings, or leave it blank. Headings print on the left side of the box.
Populate With. In the Populate With column, select the items to appear in the Title and Date boxes by default. For the Title box, you can select <Blank> to leave the box blank for the signer to complete or select Specific Text to enter a default title in the Value column. For the Date box, you can select <Blank> to leave the box blank for the signer to complete or select Today, Tomorrow, or Specific Date. If you select Specific Date, you can enter a date in the Value column.
Value. If you select Specific Text or Specific Date in the Populate With column, in the Value column, you can enter values for the title and date boxes.
Width. In the Width field, enter the width for each item. The transcript’s page layout determines the width of the box in the first row of the grid (3.75 if portrait, 6.25 if landscape). This value is uneditable and increases or decreases as you increase or decrease the widths in the other rows.
Print transcript date in footer. Mark Print transcript date in footer to print the date at the bottom of each page of the transcript. In the Format field, select a format for the date or line. In the Align field, select where the date should print within the footer — left, center, or right.
Print page number in footer. Mark the Print page number in footer to print the page numbers at the bottom of each page. In the Format field, select a page number format. In the Align field, select where the page number should print within the footer — left, center, or right.
Transcript SectionsOn the Details and Summary/Notes tabs, you select the sections of information to include on the transcript. Sections selected on the Details tab appear in the detail area of the transcript and those selected on the Summary/Notes tab appear in the summary/notes area. The possible sections are Courses, Credits, GPAs, Performance, Ranks, Academic Summary, Activities, Test Scores, Student Notes, and Freeform Notes. Several transcript sections can be added to both the detail and the summary/notes areas. On the Details and Summary/Notes tabs, when you select a section to add, a screen appears for that section type. Using the tabs on this screen, you can format the size and appearance of the section, the information and details included, and how the information is organized in columns.
Courses Detail Section
The courses section in the detail area displays course information in rows. You can include columns that list details for courses such as the teacher, section, and department. You can also add columns to display grades, credits, comments, or class notes in the marking column in which they occurred. Several columns appear in this section by default: Course ID, Course Name, Final Grade, Credits Attempted and Credits Awarded. For the Final Grade, Credits Attempted and Credits Awarded columns, the marking column defaults to Final (if available) or to the last marking column defined in the Marking Columns table.When you add certain detail sections, such as GPAs, ranks, performances, or credits, these break down automatically by the marking columns you added for the courses section. You can add only one courses section.To format the courses section, on the Details tab, select Courses in the Section column of the grid. The Courses Section screen appears. This screen has tabs you use to format the courses section and the information included.
Note: If course information or comments do not print as expected (for example, grades or comments are missing), make sure the Print on transcript checkbox is marked for the missing items on the student record and on the Grading tab for the course.

TRA N S C R I P T S 14
General TabOn the General tab, you can define a heading for the courses section, include transfer courses, add lines to divide columns and courses, and select which terms to include for the current year.
Section heading. In the Section heading field, you can enter a heading for the courses section or leave it blank. Heading text is bold on the transcript.
Repeat column headings for each year. Mark Repeat column heading for each year to print column headings and multiple column headings for each grade level or academic year. If you do not mark this option, column headings appear above the first section heading and repeat only where columns or pages break.
Print a box around the column heading row. If you mark Show column header row, you can mark Print a box around the column heading row to print a box around column headings and multiple column heading rows.
Include a [ ] after each course. Mark this option to add a blank line, horizontal line, or blank line and horizontal line after each course row.
If showing a total credits row, print a horizontal line after the last course. Mark this option to add a dividing line between the last course and the total credits row.
Print a vertical line between columns. Mark Print a vertical line between columns to print vertical lines between each column in the section. If you include skills or comments in the courses section, the vertical lines end at the border selected for those subsections on the Skills or Comments tab.
Print courses from outside schools. Mark Print courses from outside schools to print the course names of courses from outside schools. This option appears only if you marked Include information from outside schools attended on the Details tab.
Note: If you add horizontal lines after courses and vertical lines between columns, a grid forms in this section.

150 CH A PT E R
Show grades. If you marked Print courses from outside schools, the Show grades option is enabled. Mark Show grades to print grades for courses taken at outside schools for the marking columns selected on the Columns tab.
Show credits. If you marked Print courses from outside schools, the Show credits option is enabled. Mark Show credits to print credits for courses taken at outside schools for the marking columns selected on the Columns tab.
Print courses through [ ] of the current year. Mark this option to include on the transcript only courses in the current year occurring before or during the term you select in the field.
Include a [ ] after this section. Mark this option to add a blank line, horizontal line, or column break after the course section for each academic year. The column break option only works when you select to use more than one column for the detail area. These options print only when another section is positioned directly below the courses section. If there are no other sections, the program uses the item selected in the Include a [ ] after each year field in the Academic Year section of the Format tab.
Columns TabOn the Columns tab, you define columns of information for the courses section. Several columns appear in this section by default: Course ID, Course Name, Final Grade, Credits Attempted and Credits Awarded. For the Final Grade, Credits Attempted and Credits Awarded columns, the marking column defaults to Final (if available) or to the last marking column defined in the Marking Columns table in Tables Configuration. You can delete or move any of these columns except Column 1. If you do not want the Course ID as the first column, open Column 1 and change its settings.
New Column. To add a new column to the courses section, click New Column. The Column <#> screen appears.Open Column. To open a courses column in the grid, select the column and click Open Column.

TRA N S C R I P T S 15
Repeat Column. To add a copy of an existing column in the grid, select the column and click Repeat Column. Delete Column. To delete a courses column in the grid, select the column and click Delete Column.Up/Down. To change the order of courses columns in the grid, select a column and click the up or down arrow.Heading. Once you define a column, the Heading column displays the heading entered in the Column heading
field of the Column <#> screen. You can edit the heading by typing directly in the row.Description. Once you define a column, the Description column displays the item selected in the Field to show
field of the Column <#> screen. If you selected Marking column in the Field to show field, it is the marking column and item selected in the Display field.
Width. Once you define a column, the Width column displays the width entered in the Column width field of the Column <#> screen. You can edit the width by typing directly in the row.
The Column <#> Screen
To add a new column to the courses section, click New Column. The Column <#> screen appears. The <#> is the position of the column in the list. For example, if the number is 2, the column is the second from the left on the transcript.
Field to show. In the Field to show field, select the item of information to display in the column. The item you select changes the fields that appear on this screen and adds additional fields for certain items.
Tip: When creating transcripts with similar columns, you can use the Repeat Column button to quickly add columns using the same width, alignment, and font style.
Note: You cannot add a marking column for the first column.

152 CH A PT E R
Marking column. If you select Marking column in Field to show, the Marking column and Display fields appear as well as other formatting options. In the Marking column field, select the marking column and in the Display field, select the information from the marking column to display, such as grades, credits, or comment codes. If you select Comment codes in the Display field, comment codes print only if grade comments entry is defined as Numeric for the academic year in Configuration.
Credits. If you select Total credits in Field to show, the Credits field appears as well as other formatting options. In the Credits field, select to display the credits awarded or credits attempted.
Attribute. If you select Course attribute or Class attribute in Field to show, the Attribute field appears. In the Attribute field, select the attribute to display for courses.
Column width. In the Column width field, enter a width for the column. The minimum width is 0.1 inch and the maximum is 7.75 inches if printing in portrait layout, 10.25 inches if landscape.
Column start. The Column start field displays where the column will start printing. The value is the sum of widths for all other columns positioned in the section before it.
Section width. The Section width field displays the sum of widths for all columns in the section (including the current column) and the space between columns. If the section width exceeds the amount allowed for this section, the number is red.
Column heading. The Column heading box displays the item selected in Field to show or Marking column fields. You can use this heading or enter a different one.
Format buttons. You can use the buttons below the Column heading box to format the alignment and style of heading text.
Wrap text if needed. If you select any item in Field to show besides Marking column, Withdrawal date, Total credits, Total attendance, or <Blank>, the Wrap text if needed checkbox appears. Mark this option to continue information to the next line for text that is too long to fit on one row within the column width.
Detail alignment. If you select Marking column, Total credits, or Total attendance in Field to show, the Detail alignment field appears. In this field you can select how items align in the column. If you select Default, text prints on the left and numbers print on the right.
Detail indention. If you select Marking column, Total credits, or Total attendance in the Field to show field, and Right or Left in the Detail alignment field, the Detail indention field appears. You can increase and decrease the indention in increments of 0.1 inch to a maximum of 7.75 inches if printing in portrait layout, 10.25 inches if landscape.
Note: You can select <Blank> in the Field to show field to add a blank column providing extra space between columns.

TRA N S C R I P T S 15
If the detail alignment is right, the indention is from the right side and if the detail alignment is left, the indention is from the left side. If the indention amount is set large enough to cause the information to print over the next column, then the information is truncated. If the indention is so large that all the information is truncated, then the program will not indent the information.
Letter/Number. If you select Marking column in Field to show and Grade in the Display field, the Letter/Number field appears. In this field, select the format for grades in the column. If you select a format that contains a number, the Decimal places field appears.
Decimal places. If you select Marking column, Total credits, or Total attendance in Field to show, the Decimal places field appears. In this field, enter the number of places after the decimal to print numbers.
Show trailing zeros. If you select to use one or more decimal places, mark Show trailing zeros to ensure there are always the same number of numerals to the right of the decimal. For example, a student earns 3.5 and 3.75 credits for two courses. If you mark this option, the program adds a zero after 3.5 and prints 3.50.
Show grades/credits/comment codes only for student's current academic year. If you select Marking column or Total credits in Field to show and Grade, Credits attempted, Credits awarded or Comment codes, in the Display field, the Show grades/credits/comment codes only for student's current academic year checkbox appears for that item. Mark this option to display grades/credits/comment codes for only the most recent year for which the student has grades.
Show grades/credits/comment codes for marking columns that do not award credit. If you select Marking column in Field to show and Grade, Credits attempted, Credits awarded or Comment codes, in the Display field, the Show grades/credits/comment codes for marking columns that do not award credit checkbox appears for that item. Mark this option to display grades/credits/comment codes for marking columns that do not award credits.
Show grades entered as 'NG'. If you select Marking column in Field to show and Grade in the Display field, the Show grades entered as 'NG' checkbox appears. Mark this option to print grades entered as ‘NG’ (for blank or missing grades) in the marking column.
Show column total. If you select Total Credits or Marking column in Field to show and Credits attempted or Credits awarded in the Display or Credits fields, the Show column total checkbox appears. Mark this option to add a row for credit totals at the bottom of each course section for the credits in the column.
Show total cumulative credits. If you select Total Credits or Marking column in Field to show and Credits attempted or Credits awarded in the Display or Credits fields, the Show total cumulative credits checkbox appears. Mark this option to add a row for credit totals at the bottom of each course section for the cumulative credits for all years up to and including that column.
Translate tardies to absences. If you select Total attendance in Field to show, the Translate tardies to absence checkbox appears. If you defined tardy code translations in Configuration (for example, five tardies equals an absence), you can mark this option to print translated tardies as absences. Only class attendance is considered for this column, so if your school tracks attendance in days only, the column is blank.
Terms to include. If you select Total attendance in Field to show, the Terms to include checkbox appears. In this field, you can select for which terms to include attendance.
Include these attendance codes. If you select Total attendance in Field to show, the Include these attendance codes box appears. Mark the checkbox for each attendance code to include in the attendance column.
Include credits from [ ] to [ ]. If you select Total credits in Field to show, the Include credits from [ ] to [ ] field appears. In this field, select a first and last marking column to define a time period for credits to include in totals. The program uses the order of marking column table entries in Configuration to determine which marking columns to include within the range. For example, if you select Quarter 1 and Semester 2 in this field, all marking columns listed in the table between Quarter 1 and Semester 2 are included in the credit totals.
Date format. If you select Withdrawal date in Field to show, the Date format field appears. In this field, select the month/date/year combination for formatting dates.

154 CH A PT E R
Skills TabUse the Skills tab to add skills information for courses. Skills always print immediately after their associated course row. All skills for courses appear on transcripts, even those for marking columns not included for the section.
Show skills for each course. Mark Show skills for each course to print associated skills below courses. If you do not mark this option, all fields and options on this tab are disabled.
Section heading. In the Section heading field, you can enter a heading for the skills section or leave it blank. Heading text is bold on the transcript.
Indent section [ ] inches. Mark Indent section [ ] inches to increase and decrease the indention of the skill category and name in increments of 0.1 inch to a maximum of 7.75 inches if printing in portrait layout, 10.25 inches if landscape. If the indention amount is set large enough to cause the information to print over the next column, then the information is truncated. If the indention is so large that all the information is truncated, then the program will not indent the information.
Borders. In the Borders field, select which separators to use for the skills section. You can select None, Lines above and below section, Line below section, Box around section, Horizontal lines, Vertical lines, or Grid lines.
Show ratings by. In the Show ratings by field, select to use the short or long description for skill ratings.Sort skills by. In the Sort skills by field, select the item by which to sort the skills list.
Note: The skill name prints in the space available before the first marking column. Make sure to allow for enough space in the course column(s) for the skill name.
Note: You can create a freeform note with a legend to explain short descriptions. For more information about creating freeform notes, see “Freeform Notes Section” on page 195

TRA N S C R I P T S 15
Show skill category. Mark Show skill category to print the categories for skills. Marking this option enables other category options.
Break by category. If you mark Show skill category, you can mark Break by category to group skills by category and to print the category name in bold type. The category name appears in a column above or beside the skills depending on your selection in the Position field.If you unmark Break by category, the category lists in a second column.
Position. If you mark Break by category, in the Position field, select the placement of the category name. If you select Row above skill rows, the skills and categories print in a single column.
If you select Column beside skills rows, the categories and skills print in two separate columns.
Use [ ] inches of the [ ] inches of the available space for the category description. If you mark Show skill category, you must enter the amount of space to allow for the category description. The amount of space available is the total width of all columns before the first marking column minus the indention amount.
Wrap skill name if necessary. Mark Wrap skill name if necessary to continue skill names on a new line rather than truncating the skill name when it runs out of room.

156 CH A PT E R
Print skills from outside schools. If you marked Include information from outside schools attended on the Details tab, you can include skills for transfer courses.
Comments TabOn the Comments tab, you can print comments for a course below the course row. For courses assigned default comments, the actual comment prints, not the comment number. Comments print in the font style and size defined on the comment notepad, regardless of what is selected for the transcript on the General tab.
Show comments for each course. Mark Show comments for each course to print comments below courses. If you do not mark this option, all fields and options on this tab are disabled.
Section heading. In the Section heading field, you can enter a heading for the comments section or leave it blank. Heading text is bold on the transcript.
Indent section [ ] inches. Mark Indent section [ ] inches to increase and decrease the indention of the section in increments of 0.1 inch to a maximum of 7.75 inches if printing in portrait layout, 10.25 inches if landscape. If the indention amount is set large enough to cause the information to print over the next column, then the information is truncated. If the indention is so large that all the information is truncated, then the program will not indent the information.
Print a horizontal line before comments. Mark this option to add a horizontal line as a divider before comments.
Suppress blank comment rows. Mark Suppress blank comment rows to prevent blank rows for courses with no comments.
Label comments with marking column [ ]. Mark Label comments with marking column [ ] to add a column before the comment listing the marking column in which the comment was assigned. You can label the marking column with the short or long description.
Use [ ] inches of the [ ] inches of the available space for the marking column description. If you mark Label comments with marking column, you must enter the amount of space to allow for the marking column description. The amount of space available is the total section width.
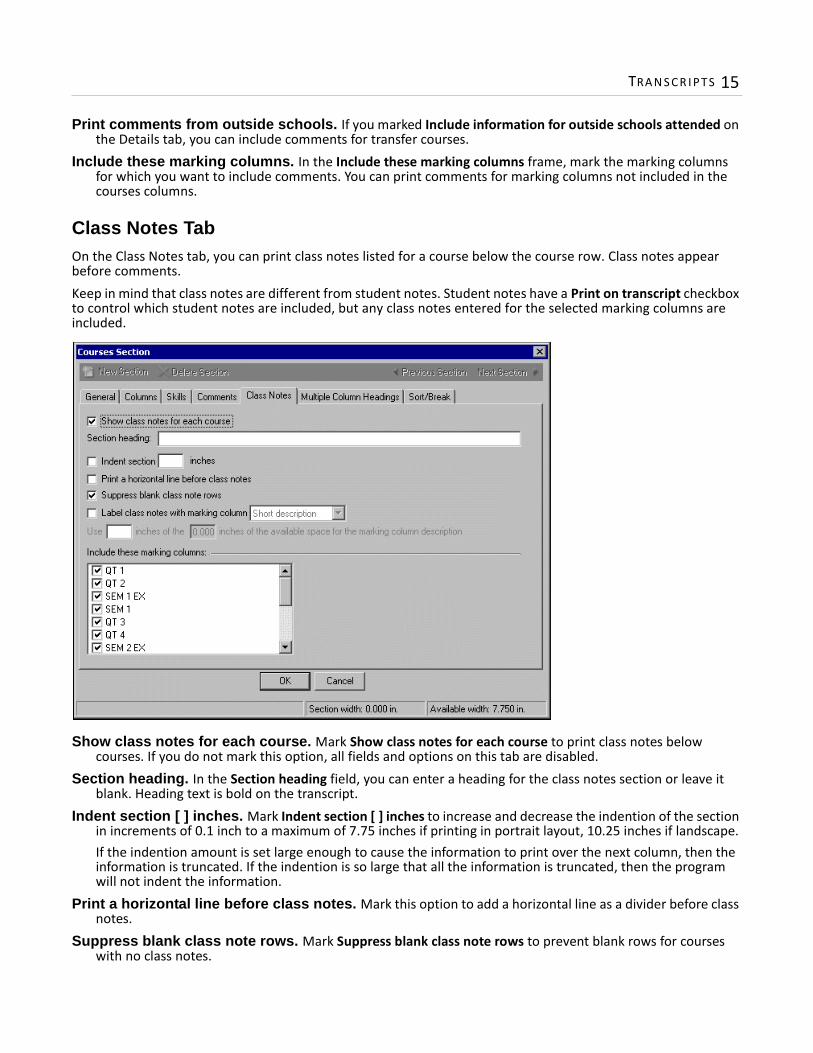
TRA N S C R I P T S 15
Print comments from outside schools. If you marked Include information for outside schools attended on the Details tab, you can include comments for transfer courses.
Include these marking columns. In the Include these marking columns frame, mark the marking columns for which you want to include comments. You can print comments for marking columns not included in the courses columns.
Class Notes TabOn the Class Notes tab, you can print class notes listed for a course below the course row. Class notes appear before comments.Keep in mind that class notes are different from student notes. Student notes have a Print on transcript checkbox to control which student notes are included, but any class notes entered for the selected marking columns are included.
Show class notes for each course. Mark Show class notes for each course to print class notes below courses. If you do not mark this option, all fields and options on this tab are disabled.
Section heading. In the Section heading field, you can enter a heading for the class notes section or leave it blank. Heading text is bold on the transcript.
Indent section [ ] inches. Mark Indent section [ ] inches to increase and decrease the indention of the section in increments of 0.1 inch to a maximum of 7.75 inches if printing in portrait layout, 10.25 inches if landscape. If the indention amount is set large enough to cause the information to print over the next column, then the information is truncated. If the indention is so large that all the information is truncated, then the program will not indent the information.
Print a horizontal line before class notes. Mark this option to add a horizontal line as a divider before class notes.
Suppress blank class note rows. Mark Suppress blank class note rows to prevent blank rows for courses with no class notes.

158 CH A PT E R
Label class notes with marking column [ ]. Mark Label class notes with marking column [ ] to add a column before the class note listing the marking column in which the class note was assigned. You can label the marking column with the short or long description.
Use [ ] inches of the [ ] inches of the available space for the marking column description. If you mark Label class notes with marking column, you must enter the amount of space to allow for the marking column description. The amount of space available is the total section width.
Include these marking columns. In the Include these marking columns frame, mark the marking columns for which you want to include class notes. You can print class notes for marking columns not included in the courses columns.
Multiple Column Headings TabOn the Multiple Column Headings tab, you can create a heading that appears over one or more of the individual column headers.
Heading. In the Heading column, enter text for the heading.Start. In the Start column, select the first column over which the multiple column heading appears. End. In the End column, select the last column over which the multiple column heading appears. Align. In the Align column, select left, center, or right alignment for the heading.
Note: If you marked Print a box around the column heading row on the General tab, when you add multiple column headings, vertical lines print in the box to separate each of the column groupings.

TRA N S C R I P T S 15
Sort/Break TabUse the Sort/Break tab to select the order of information in the course section and where breaks fall between sets of information.
Sort by. To order the information, select a sorting category in the Sort by column Order by. In the Order by column, select to sort in ascending or descending order.Break? Mark the checkbox in the Break? column to create breaks between sections. A break divides sets of
information by adding space between each section and text. For example, if you sort and break by Course name, information for each course is set apart by a blank line and the course name heading. If you mark Break?, other fields are enabled so you can define a break header and break footer for that sort category.
Text before value. In the Text before value field, you can enter text to appear directly before the value for the selected sorting category, which is now the heading for the subsections.
Text after value. In the Text after value field, you can enter text to appear directly after the value for the selected sorting category, which is now the heading for the subsections.
Page break on each new <Sort Category>. Mark Page break on each new <Sort Category> to print each sort category subsection on a new page.
Credits Detail Section
The credits section in the detail area displays total attempted or awarded credits for the selected marking columns. You can designate whether to display the total credits for a marking column or the cumulative credits for all years up to and including that marking column. You can add the credits section only once. If you define credit columns in the courses section, adding a credits section is not necessary. You should add a credit section rather than credit columns in the courses section if you want credit information to appear in its own section, separate from the courses information.

160 CH A PT E R
To add a credits section, on the Details tab, select Credits in the Section column of the grid. The Credits Section screen appears. This screen has tabs you use to format the credits section and select the information to include.
General TabOn the General tab, you can define a heading for the credits section, indent credit information, add lines to divide columns and credits, and include credits from outside schools.
Section heading. In the Section heading field, you can enter a heading for the credits section or leave it blank. Heading text is bold on the transcript.
Indent section details [ ] inches. To indent the credit section of the details section, mark Indent section details [ ] inches and enter the amount to indent. You can increase and decrease the indention of the section in increments of 0.1 inch to a maximum of 7.75 inches if printing in portrait layout, 10.25 inches if landscape. Section headings do not indent, only the first column.If the indention amount is set large enough to cause the information to print over the next column, then the information is truncated. If the indention is so large that all the information is truncated, then the program will not indent the information.
Show column header row. Mark Show column header row to display column headings. Unmark the checkbox to hide the headings.
Print a box around the column heading row. If you mark Show column header row, you can mark Print a box around the column heading row to print a box around column headings and multiple column heading rows.
Note: The section width appears at the bottom of the screen. This number is the sum of widths for all columns in the section and the space between columns.
Note: The available width appears at the bottom of the screen. This number is the maximum width available for a section.

TRA N S C R I P T S 16
Print a horizontal line after each credit. Mark Print a horizontal line after each credit to print horizontal lines between rows.
Print a vertical line between columns. Mark Print a vertical line between columns to print vertical lines between each column in the section.
Print credits from outside schools. Mark Print credits from outside schools to print the credits earned at outside schools. This option appears only if you marked Include information from outside schools attended on the Details tab.
Include a [ ] after this section. Mark Include a [ ] after this section to add a blank line, horizontal line, or column break after the credits section for each academic year. The column break option only works when you select to use more than one column for the detail area. These options print only when another section is positioned directly below the credits section. If there are no other sections, the program uses the item selected in the Include a [ ] after each year field in the Academic Year section of the Format tab.
Suppress blank credits. Mark Suppress blank credits to exclude credits with no values assigned for the selected marking columns.
Credits To Include Grid
In the Credits to Include grid, you select which credit types to include.
Credit. In the Credit column, select Attempted or Awarded credits.Type. In the Type column, select Column total or Cumulative total.Include. In the Include column, select All courses, Standard and mandatory courses, or Transfer courses.Heading. The Heading column displays default headings based on the selections made in the Credit and Type
columns. You can use these headings, enter different headings, or leave them blank.
Columns TabOn the Columns tab, the grid displays the marking column columns defined in the courses section with Grade selected in the Display field and a heading column for credits. These columns appear by default but you can exclude any of them from appearing in the credits section by unmarking the checkbox in the Include column.
Note: If you mark Print a horizontal line after each credit and Print a vertical line between columns, a grid forms in this section.
Note: You can select the items in the Credit and Type columns more than once.

162 CH A PT E R
Include. Columns appear by default for the heading and any marking columns defined for the courses section with Grade selected in the Display field. Unmark the checkbox in the Include column for any column in which you do not want credit information to display.
Heading. The Heading column displays the heading entered in the Column heading field of the Column <#> screen. You can edit the heading by typing directly in the row.
Description. The Description column displays the type of column. You cannot edit this column.Width. The Width column displays the width of columns defined for the courses section. You cannot edit this
column.
The Column <#> Screen
To define the credit details that appear and the format of the column, select the column in the grid and click Open Column. The Column <#> screen appears.
Field to show. The Field to show field is disabled and displays Heading (for the heading column) or Marking column (for a marking column column) by default.
Marking column. The Marking column field displays the marking column selected in the courses section for this column. This field is disabled.
Column heading. The Column heading box displays the default heading. You can use this heading or enter a different one.
Format buttons. You can use the buttons below the Column heading box to edit the alignment and style of heading text.
Wrap text if needed. If Heading appears in the Field to show field, the Wrap text if needed checkbox appears. Mark this option to continue information to the next line for text that is too long to fit on one row within the column width.
Detail alignment. In the Detail alignment field, you can select how items align in the column. If you select Default, text prints on the left and numbers print on the right.
Detail indention. If you select Right or Left in the Detail alignment field, you can select the amount to indent in the Detail indentation field. You can increase and decrease the indention in increments of 0.1 inch to a maximum of 7.75 inches if printing in portrait layout, 10.25 inches if landscape.

TRA N S C R I P T S 16
If the detail alignment is right, the indention is from the right side and if the detail alignment is left, the indention is from the left side. If the indention amount is set large enough to cause the information to print over the next column, then the information is truncated. If the indention is so large that all the information is truncated, then the program will not indent the information.
Decimal places. If Marking column appears in the Field to show field, the Decimal places field appears. In this field, enter the number of decimal places to use for credits.
Show trailing zeros. If you select to use one or more decimal places, mark Show trailing zeros to ensure there are always the same number of numerals to the right of the decimal. For example, a student earns 3.5 and 3.75 credits for two courses. If you mark this option, the program adds a zero after 3.5 and prints 3.50.
Show values only for student's current academic year. If Marking column appears in the Field to show field, the Show grades only for student's current academic year checkbox appears. Mark this option to display credits for only the most recent year for which the student has courses.
Multiple Column Headings TabOn the Multiple Column Headings tab, you can create a heading that appears over one or more of the individual column headers.
Heading. In the Heading column, enter text for the heading.Start. In the Start column, select the first column over which the multiple column heading appears. End. In the End column, select the last column over which the multiple column heading appears. Align. In the Align column, select left, center, or right alignment for the heading.
GPAs Detail Section
The GPAs section in the detail area displays GPA calculations for the selected marking columns. To add a GPAs section, on the Details tab, select GPAs in the Section column of the grid. The GPAs Section screen appears. This screen has tabs you use to format the GPAs section and select the information to include.
Note: If you marked Print a box around the column heading row on the General tab, when you add multiple column headings, vertical lines print in the box to separate each of the column groupings.

164 CH A PT E R
General TabOn the General tab, you can define a heading for the GPAs section, indent GPA information, add lines to divide columns and calculations, and include GPAs from outside schools.
Section heading. The Section heading field displays a default heading for the GPAs section. You can use this heading, enter a different one, or make it blank. Heading text is bold on the transcript.
Indent section details [ ] inches. To indent the GPAs section, mark Indent section details [ ] inches and enter the amount to indent. You can increase and decrease the indention of the section in increments of 0.1 inch to a maximum of 7.75 inches if printing in portrait layout, 10.25 inches if landscape. Section headings do not indent, only the first column.If the indention amount is set large enough to cause the information to print over the next column, then the information is truncated. If the indention is so large that all the information is truncated, then the program will not indent the information.
Show column header row. Mark Show column header row to display column headings. Unmark the checkbox to hide the headings.
Print a box around the column heading row. If you mark Show column header row, you can mark Print a box around the column heading row to print a box around column headings and multiple column heading rows.
Print a horizontal line after each GPA. Mark Print a horizontal line after each GPA to print horizontal lines between rows.
Note: The section width appears at the bottom of the screen. This number is the sum of widths for all columns in the section and the space between columns.
Note: The available width appears at the bottom of the screen. This number is the maximum width available for a section.

TRA N S C R I P T S 16
Print a vertical line between columns. Mark Print a vertical line between columns to print vertical lines between each column in the section.
Print GPAs from outside schools. Mark Print GPAs from outside schools to print the GPAs earned at outside schools. This option appears only if you marked Include information from outside schools attended on the Details tab.
Include a [ ] after this section. Mark Include a [ ] after this section to add a blank line, horizontal line, or column break after the GPAs section for each academic year. The column break option only works when you select to use more than one column for the detail area. These options print only when another section is positioned directly below the GPAs section. If there are no other sections, the program uses the item selected in the Include a [ ] after each year field in the Academic Year section of the Format tab.
Suppress blank GPAs. Mark Suppress blank GPAs to exclude GPAs with no values assigned for the selected marking columns.
GPAs To Include Grid
In the GPAs to include grid, you select which GPA calculations to include in the section.
Calculation. In the Calculation column, select a GPA calculation. GPA calculations are defined in Configuration.Type. In the Type column, select GPA, Year to Date GPA, or Cumulative GPA.Heading. The Heading column displays default headings based on the selections made in the Calculation and
Type columns. You can use these headings, enter different headings, or leave them blank.
Columns TabOn the Columns tab, the grid displays the marking column columns defined in the courses section with Grade selected in the Display field and a heading column for GPAs. These columns appear by default but you can exclude any of them from appearing in the GPAs section by unmarking the checkbox in the Include column.
Include. Columns appear by default for the heading and any marking columns defined for the courses section with Grade selected in the Display field. Unmark the checkbox in the Include column for any column in which you do not want GPA information to display.
Heading. The Heading column displays the heading entered in the Column heading field of the Column <#> screen. You can edit the heading by typing directly in the row.
Note: If you mark Print a horizontal line after each GPA and Print a vertical line between columns, a grid forms in this section.
Note: You can select the items in the Calculation and Type columns more than once.

166 CH A PT E R
Description. The Description column displays the type of column. You cannot edit this column.Width. The Width column displays the width of columns defined for the courses section. You cannot edit this
column.
The Column <#> Screen
To define the GPA details that appear and the format of the column, select the column in the grid and click Open Column. The Column <#> screen appears.
Field to show. The Field to show field is disabled and displays Heading (for the heading column) or Marking column (for a marking column column) by default.
Marking column. The Marking column field displays the marking column selected in the courses section for this column. This field is disabled.
Column heading. The Column heading box displays the default heading. You can use this heading or enter a different one.
Format buttons. You can use the buttons below the Column heading box to edit the alignment and style of heading text.
Wrap text if needed. If Heading appears in the Field to show field, the Wrap text if needed checkbox appears. Mark this option to continue information to the next line for text that is too long to fit on one row within the column width.
Detail alignment. In the Detail alignment field, you can select how items align in the column. If you select Default, text prints on the left and numbers print on the right.
Detail indention. If you select Right or Left in the Detail alignment field, you can select the amount to indent in the Detail indentation field. You can increase and decrease the indention in increments of 0.1 inch to a maximum of 7.75 inches if printing in portrait layout, 10.25 inches if landscape. If the detail alignment is right, the indention is from the right side and if the detail alignment is left, the indention is from the left side. If the indention amount is set large enough to cause the information to print over the next column, then the information is truncated. If the indention is so large that all the information is truncated, then the program will not indent the information.
Decimal places. If Marking column appears in the Field to show field, the Decimal places field appears. In this field, enter the number of decimal places to use for numbers.

TRA N S C R I P T S 16
Show trailing zeros. If you select to use one or more decimal places, mark Show trailing zeros to ensure there are always the same number of numerals to the right of the decimal. For example, a student earns 3.5 and 3.75 credits for two courses. If you mark this option, the program adds a zero after 3.5 and prints 3.50.
Show values only for student's current academic year. If Marking column appears in the Field to show field, the Show values only for student's current academic year checkbox appears. Mark this option to display GPA information for only the most recent year for which the student has courses.
Round result up at [ ]. To round up your GPAs, mark the checkbox and enter the GPA round up number. The GPA round up number depends on the selection you made in the Decimal places field.
Multiple Column Headings TabOn the Multiple Column Headings tab, you can create a heading that appears over one or more of the individual column headers.
Heading. Text entered into the Heading column appears as a heading above one or more of the individual column headers.
Start. In the Start column, select the first column the multiple column heading will cover. End. In the End column, select the last column the multiple column heading will cover. The End column must be
greater than or equal to the Start column. Align. In the Align column, select a left, center, or right alignment for the heading.
Performance Detail Section
The performance section in the detail area displays the performance categories for the selected marking columns. You can also print comments for performance categories.To add a performance section, on the Details tab, select Performance in the Section column of the grid. The Performance Section screen appears. This screen has tabs you use to format the performance section and select the information to include.
Note: If you marked Print a box around the column heading row on the General tab, when you add multiple column headings, vertical lines print in the box to separate each of the column groupings.

168 CH A PT E R
General TabOn the General tab, you can define a heading for the performance section, indent performance information, add lines to divide columns and categories, and include performances from outside schools.
Section heading. The Section heading field displays a default heading for the performance section. You can use this heading, enter a different one, or make it blank. Heading text is bold on the transcript.
Indent section details [ ] inches. To indent the performance section, mark Indent section details [ ] inches and enter the amount to indent. You can increase and decrease the indention of the section in increments of 0.1 inch to a maximum of 7.75 inches if printing in portrait layout, 10.25 inches if landscape. Section headings do not indent, only the first column.If the indention amount is set large enough to cause the information to print over the next column, then the information is truncated. If the indention is so large that all the information is truncated, then the program will not indent the information.
Show column header row. Mark Show column header row to display column headings. Unmark the checkbox to hide the headings.
Print a box around the column heading row. If you mark Show column header row, you can mark Print a box around the column heading row to print a box around column headings and multiple column heading rows.
Print a horizontal line after each category. Mark Print a horizontal line after each category to print horizontal lines between rows.
Note: The section width appears at the bottom of the screen. This number is the sum of widths for all columns in the section and the space between columns.
Note: The available width appears at the bottom of the screen. This number is the maximum width available for a section.

TRA N S C R I P T S 16
Print a vertical line between columns. Mark Print a vertical line between columns to print vertical lines between each column in the section.
Print performance from outside schools. Mark Print performance from outside schools to print the performance level earned at outside schools. This option appears only if you marked Include information from outside schools attended on the Details tab.
Include a [ ] after this section. Mark Include a [ ] after this section to add a blank line, horizontal line, or column break after the performance section for each academic year.The column break option only works when you select to use more than one column for the detail area. These options print only when another section is positioned directly below the performances section. If there are no other sections, the program uses the item selected in the Include a [ ] after each year field in the Academic Year section of the Format tab.
Suppress blank categories. Mark Suppress blank categories to exclude performance categories with no values assigned for the selected marking columns.
Performance Categories To Include Grid
In the Performance categories to include grid, you select which performance categories to include.Category. In the Category column, select a performance category. Performance categories are defined in
Configuration. You can select each category only once.Details Format. In the Details Format column, select Short description or Long description.Heading. The Heading column displays default headings based on the selections made in the Category column.
You can use these headings, enter different headings, or leave them blank.Print Comment. Mark Print Comment to print the comment for the performance level earned by the student.Comment Marking Column. If you mark Print Comment, in the Comment Marking Column column, select
the marking column for which you want to print performance comments.
Columns TabOn the Columns tab, the grid displays the marking column columns defined for the courses section with Grade selected in the Display field and a heading column for performances. These columns appear by default but you can exclude any of them from appearing in the performance section by unmarking the checkbox in the Include column.
Note: If you mark Print a horizontal line after each category and Print a vertical line between columns, a grid forms in this section.

170 CH A PT E R
Include. Columns appear by default for the heading and any marking columns defined for the courses section with Grade selected in the Display field. Unmark the checkbox in the Include column for any column in which you do not want performance information to display.
Heading. The Heading column displays the heading entered in the Column heading field of the Column <#> screen. You can edit the heading by typing directly in the row.
Description. The Description column displays the type of column. You cannot edit this column.Width. The Width column displays the width of columns defined for the courses section. You cannot edit this
column.
The Column <#> Screen
To define the performance details that appear and the format of the column, select the column in the grid and click Open Column. The Column <#> screen appears.
Field to show. The Field to show field is disabled and displays Heading (for the heading column) or Marking column (for a marking column column) by default.
Marking column. The Marking column field displays the marking column selected in the courses section for this column. This field is disabled.
Column heading. The Column heading box displays the default heading. You can use this heading or enter a different one.
Format buttons. You can use the buttons below the Column heading box to edit the alignment and style of heading text.
Wrap text if needed. If Heading appears in the Field to show field, the Wrap text if needed checkbox appears. Mark this option to continue information to the next line for text that is too long to fit on one row within the column width.
Detail alignment. In the Detail alignment field, you can select how items align in the column. If you select Default, text prints on the left and numbers print on the right.
Detail indention. If you select Right or Left in the Detail alignment field, you can select the amount to indent in the Detail indentation field. You can increase and decrease the indention in increments of 0.1 inch to a maximum of 7.75 inches if printing in portrait layout, 10.25 inches if landscape.
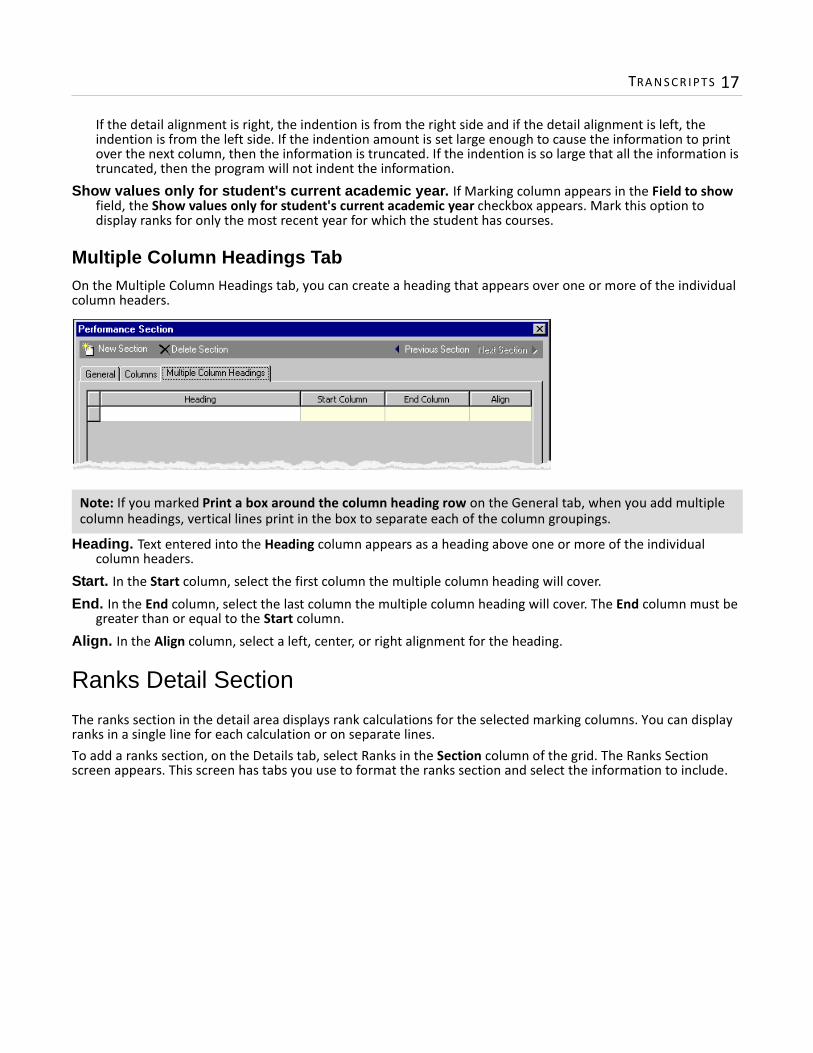
TRA N S C R I P T S 17
If the detail alignment is right, the indention is from the right side and if the detail alignment is left, the indention is from the left side. If the indention amount is set large enough to cause the information to print over the next column, then the information is truncated. If the indention is so large that all the information is truncated, then the program will not indent the information.
Show values only for student's current academic year. If Marking column appears in the Field to show field, the Show values only for student's current academic year checkbox appears. Mark this option to display ranks for only the most recent year for which the student has courses.
Multiple Column Headings TabOn the Multiple Column Headings tab, you can create a heading that appears over one or more of the individual column headers.
Heading. Text entered into the Heading column appears as a heading above one or more of the individual column headers.
Start. In the Start column, select the first column the multiple column heading will cover. End. In the End column, select the last column the multiple column heading will cover. The End column must be
greater than or equal to the Start column. Align. In the Align column, select a left, center, or right alignment for the heading.
Ranks Detail Section
The ranks section in the detail area displays rank calculations for the selected marking columns. You can display ranks in a single line for each calculation or on separate lines. To add a ranks section, on the Details tab, select Ranks in the Section column of the grid. The Ranks Section screen appears. This screen has tabs you use to format the ranks section and select the information to include.
Note: If you marked Print a box around the column heading row on the General tab, when you add multiple column headings, vertical lines print in the box to separate each of the column groupings.

172 CH A PT E R
General TabOn the General tab, you can define a heading for the ranks section, indent ranks information, add lines to divide columns and rank calculations, include ranks from outside schools, and select whether to display ranks on one line or two.
Section heading. The Section heading field displays a default heading for the ranks section. You can use this heading, enter a different one, or make it blank. Heading text is bold on the transcript.
Indent section details [ ] inches. To indent the ranks section, mark Indent section details [ ] inches and enter the amount to indent. You can increase and decrease the indention of the section in increments of 0.1 inch to a maximum of 7.75 inches if printing in portrait layout, 10.25 inches if landscape. Section headings do not indent, only the first column.If the indention amount is set large enough to cause the information to print over the next column, then the information is truncated. If the indention is so large that all the information is truncated, then the program will not indent the information.
Show column header row. Mark Show column header row to display column headings. Unmark the checkbox to hide the headings.
Print a box around the column heading row. If you mark Show column header row, you can mark Print a box around the column heading row to print a box around column headings and multiple column heading rows.
Print a horizontal line after each rank. Mark Print a horizontal line after each rank to print horizontal lines between rows.
Note: The section width appears at the bottom of the screen. This number is the sum of widths for all columns in the section and the space between columns.
Note: The available width appears at the bottom of the screen. This number is the maximum width available for a section.

TRA N S C R I P T S 17
Print a vertical line between columns. Mark Print a vertical line between columns to print vertical lines between each column in the section.
Print ranks from outside schools. Mark Print ranks from outside schools to print the ranks earned at outside schools. This option appears only if you marked Include information from outside schools attended on the Details tab.
Include a [ ] after this section. Mark Include a [ ] after this section to add a blank line, horizontal line, or column break after the ranks section for each academic year. The column break option only works when you select to use more than one column for the detail area. These options print only when another section is positioned directly below the ranks section. If there are no other sections, the program uses the item selected in the Include a [ ] after each year field in the Academic Year section of the Format tab.
Show rank and total ranks values on [ ]. In the Show rank and total ranks values on [ ] field, select Same line or Separate lines. If you select Same line, the rank appears in a combined format on one line.
If you select Separate lines, the rank appears on two lines. The first line displays the rank and the second line displays the number of ranks possible.
Suppress blank ranks. Mark Suppress blank ranks to exclude ranks with no values assigned for the selected marking columns.
Ranks To Include Grid
In the Ranks to include grid, you select which ranks to include in the detail section.Calculation. In the Calculation column, select a rank calculation. Rank calculations are defined in Configuration.
You can select each rank calculation only once.Heading. The Heading column displays default headings based on the selections made in the Calculation
column. You can use these headings, enter different headings, or leave them blank.
Note: If you mark Print a horizontal line after each rank and Print a vertical line between columns, a grid forms in this section.

174 CH A PT E R
Columns TabOn the Columns tab, the grid displays the marking column columns defined for the courses section with Grade selected in the Display field and a heading column for ranks.These columns appear by default but you can exclude any of them from appearing in the ranks section by unmarking the checkbox in the Include column.
Include. Columns appear by default for the heading and any marking columns defined for the courses section with Grade selected in the Display field. Unmark the checkbox in the Include column for any column in which you do not want rank information to display.
Heading. The Heading column displays the heading entered in the Column heading field of the Column <#> screen. You can edit the heading by typing directly in the row.
Description. The Description column displays the type of column. You cannot edit this column.Width. The Width column displays the width of columns defined for the courses section. You cannot edit this
column.
The Column <#> Screen
To define the rank details that appear and the format of the column, select the column in the grid and click Open Column. The Column <#> screen appears.
Field to show. The Field to show field is disabled and displays Heading (for the heading column) or Marking column (for a marking column column) by default.

TRA N S C R I P T S 17
Marking column. The Marking column field displays the marking column selected in the courses section for this column. This field is disabled.
Column heading. The Column heading box displays the default heading. You can use this heading or enter a different one.
Format buttons. You can use the buttons below the Column heading box to edit the alignment and style of heading text.
Wrap text if needed. If Heading appears in the Field to show field, the Wrap text if needed checkbox appears. Mark this option to continue information to the next line for text that is too long to fit on one row within the column width.
Detail alignment. In the Detail alignment field, you can select how items align in the column. If you select Default, text prints on the left and numbers print on the right.
Detail indention. If you select Right or Left in the Detail alignment field, you can select the amount to indent in the Detail indentation field. You can increase and decrease the indention in increments of 0.1 inch to a maximum of 7.75 inches if printing in portrait layout, 10.25 inches if landscape. If the detail alignment is right, the indention is from the right side and if the detail alignment is left, the indention is from the left side. If the indention amount is set large enough to cause the information to print over the next column, then the information is truncated. If the indention is so large that all the information is truncated, then the program will not indent the information.
Show values only for student's current academic year. If Marking column appears in the Field to show field, the Show values only for student's current academic year checkbox appears. Mark this option to display ranks for only the most recent year for which the student has courses.
Multiple Column Headings TabOn the Multiple Column Headings tab, you can create a heading that appears over one or more of the individual column headers.
Heading. Text entered into the Heading column appears as a heading above one or more of the individual column headers.
Start. In the Start column, select the first column the multiple column heading will cover. End. In the End column, select the last column the multiple column heading will cover. The End column must be
greater than or equal to the Start column. Align. In the Align column, select a left, center, or right alignment for the heading.
Note: If you marked Print a box around the column heading row on the General tab, when you add multiple column headings, vertical lines print in the box to separate each of the column groupings.

176 CH A PT E R
Academic Summary Section
The academic summary section displays academic information (such as GPAs, performances, ranks, or credits) in a summary format for the current academic year or for all academic years included on the transcript. For example, you can create an academic summary section that lists the ranks earned for each year. You can also add columns for marking columns to add additional detail. For example, you can add semesters to the ranks academic summary section so that each year shows the ranks broken down by semester. You can add academic summary sections to the summary/notes and detail areas. On the Summary/Notes tab, an academic summary section for GPAs is included by default. The section displays the student’s cumulative GPA for each GPA calculation. The GPAs are listed according to the marking column selected in the Courses section. For example, if you use the “FINAL” marking column in the Courses section, the GPAs academic summary section lists the GPA based on the student’s final grade for each academic year. The GPAs section is only a default and not required so you can edit it, add additional columns to it, or delete it altogether.You can add multiple academic summary sections to the summary/notes and detail areas. When you add an academic summary section to the detail area, the columns defined in the courses section do not apply to the academic summary section. Instead, you can define marking columns that apply to just the academic summary section.To add an academic summary section, on the Details or Summary/Notes tab, select Academic Summary in the Section column of the grid. The Academic Summary Section screen appears. This screen has tabs you use to format the academic summary section and select the information to include.
General TabOn the General tab, you can define a heading for the academic summary section, indent academic summary information, and add lines to divide columns and years.
Section heading. In the Section heading field, you can enter a heading for the academic summary section or leave it blank. Heading text is bold on the transcript.
Indent section details [ ] inches. To indent the academic summary section, mark Indent section details [ ] inches and enter the amount to indent. You can increase and decrease the indention of the section in increments of 0.1 inch to a maximum of 7.75 inches if printing in portrait layout, 10.25 inches if landscape. Section headings do not indent, only the first column.
Note: The section width appears at the bottom of the screen. This number is the sum of widths for all columns in the section and the space between columns.

TRA N S C R I P T S 17
Show column header row. Mark Show column header row to display column headings. Unmark the checkbox to hide the headings.
Print a box around the column heading row. If you mark Show column header row, you can mark Print a box around the column heading row to print a box around column headings and multiple column heading rows.
Print a horizontal line after each year. Mark Print a horizontal line after each year to print horizontal lines between rows.
Print a vertical line between columns. Mark Print a vertical line between columns to print vertical lines between each column in the section.
Only show section for current academic year. Mark this option to print information only in the current academic year rather than all years included in the transcript.
Include a [ ] after this section. Mark Include a [ ] after this section to add a blank line, horizontal line, or column break after the academic summary section for each academic year. The column break option only works when you select to use more than one column for the area. These options print only when another section is positioned directly below the academic summary section. In the detail area, if the next section is an academic year, the program uses the item selected in the Include a [ ] after each year field in the Academic Year section of the Format tab.
Columns TabOn the Columns tab, you define columns of information for the academic summary section. Although you can add academic summary sections to the detail area, columns defined in the courses section do not default to this section. You can add marking columns that apply to only the academic summary section.
New Column. To add a new column to the academic summary section, click New Column. The Column <#> screen appears.
Open Column. To open a column in the grid, select the column and click Open Column.
Repeat Column. To add a copy of an existing column in the grid, select the column and click Repeat Column. Delete Column. To delete a column in the grid, select the column and click Delete Column.Up/Down. To change the order of columns in the grid, select a column and click the up or down arrow.
Note: The available width appears at the bottom of the screen. This number is the maximum width available for a section.
Note: If you mark Print a horizontal line after each year and Print a vertical line between columns, a grid forms in this section.
Tip: When creating transcripts with similar columns, you can use the Repeat Column button to quickly add columns using the same width, alignment, and font style.
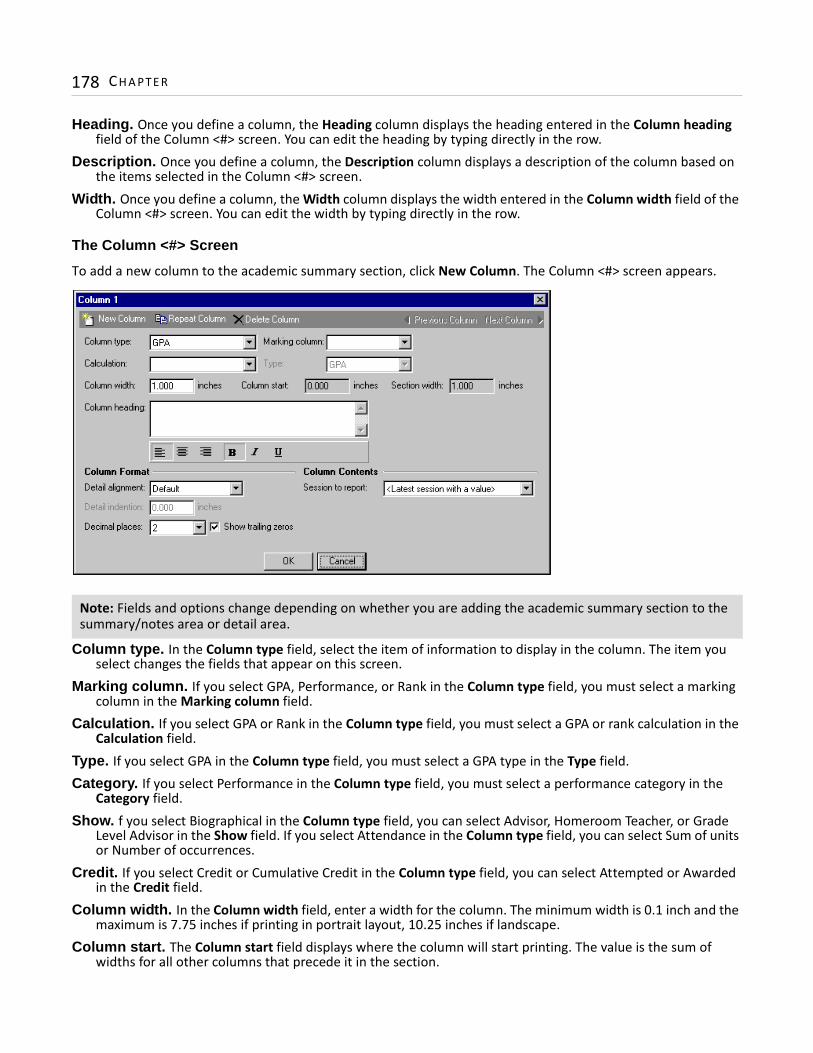
178 CH A PT E R
Heading. Once you define a column, the Heading column displays the heading entered in the Column heading field of the Column <#> screen. You can edit the heading by typing directly in the row.
Description. Once you define a column, the Description column displays a description of the column based on the items selected in the Column <#> screen.
Width. Once you define a column, the Width column displays the width entered in the Column width field of the Column <#> screen. You can edit the width by typing directly in the row.
The Column <#> Screen
To add a new column to the academic summary section, click New Column. The Column <#> screen appears.
Column type. In the Column type field, select the item of information to display in the column. The item you select changes the fields that appear on this screen.
Marking column. If you select GPA, Performance, or Rank in the Column type field, you must select a marking column in the Marking column field.
Calculation. If you select GPA or Rank in the Column type field, you must select a GPA or rank calculation in the Calculation field.
Type. If you select GPA in the Column type field, you must select a GPA type in the Type field.Category. If you select Performance in the Column type field, you must select a performance category in the
Category field.Show. f you select Biographical in the Column type field, you can select Advisor, Homeroom Teacher, or Grade
Level Advisor in the Show field. If you select Attendance in the Column type field, you can select Sum of units or Number of occurrences.
Credit. If you select Credit or Cumulative Credit in the Column type field, you can select Attempted or Awarded in the Credit field.
Column width. In the Column width field, enter a width for the column. The minimum width is 0.1 inch and the maximum is 7.75 inches if printing in portrait layout, 10.25 inches if landscape.
Column start. The Column start field displays where the column will start printing. The value is the sum of widths for all other columns that precede it in the section.
Note: Fields and options change depending on whether you are adding the academic summary section to the summary/notes area or detail area.

TRA N S C R I P T S 17
Section width. The Section width field displays the sum of widths for all columns in the section (including the current column) and the space between columns. If the section width exceeds the amount allowed for this section, the number is red.
Column heading. The Column heading box displays the item selected in the Column type, Marking column, or Show fields. You can use this heading, enter a different one, or make it blank.
Format buttons. You can use the buttons below the Column heading box to format the alignment and style of heading text.
Detail alignment. In the Detail alignment field, you can select how items align in the column. If you select Default, text prints on the left and numbers print on the right.
Detail indention. If you select Right or Left in the Detail alignment field, you can select the amount to indent in the Detail indentation field. You can increase and decrease the indention in increments of 0.1 inch to a maximum of 7.75 inches if printing in portrait layout, 10.25 inches if landscape. If the detail alignment is right, the indention is from the right side and if the detail alignment is left, the indention is from the left side. If the indention amount is set large enough to cause the information to print over the next column, then the information is truncated. If the indention is so large that all the information is truncated, then the program will not indent the information.
Decimal places. If you select Credit, Cumulative Credit, GPA, or Attendance in the Column type field, the Decimal places field appears. In this field, enter the number of decimal places to use for credits, GPAs, or attendance.
Show trailing zeros. If you select to use one or more decimal places, mark Show trailing zeros to ensure there are always the same number of numerals to the right of the decimal. For example, a student earns 3.5 and 3.75 credits for two courses. If you mark this option, the program adds a zero after 3.5 and prints 3.50.
Details format. If you select Performance in the Column type field, the Details format field appears. In this field, you can select to use the long or short description for performance categories.When adding an academic summary section to the summary/notes area and you select Heading in the Column type field, the Details format field appears. In this field, you can select a year or grade format, <None>, or <Custom>. If you select <Custom>, enter text for the row heading in the Column text field that appears.
Column text. When adding an academic summary section to the detail area, if you select Heading in the Column type field, the Column text field appears. You can use the default heading, enter a different heading, or make it blank. This field also appears when you select <Custom> in the Details format field.
Include these attendance codes. If you select Attendance in the Column type field, the Include these attendance codes box appears. In this box, mark the checkbox for each attendance code to include in the column.
Include these infractions. If you select Conduct in the Column type field, the Include these infractions box appears. In this box, mark the checkbox for each infraction to include in the column.
Session to report. If you select GPA, Performance, Rank, Credit, or Cumulative Credit in the Column type field, the Session to report field appears. In this field, select which sessions to include.
Include credits up to [ ]. If you select Cumulative Credit in the Column type field, the Include credits up to [ ] field appears. In this field, select the last marking column to include in the total.
Include credits from [ ] to [ ]. If you select Credit in the Column type field, the Include credits from [ ] to [ ] field appears. In this field, select a first and last marking column to define a time period for credits to include in totals. The program uses the order of marking column table entries in Configuration to determine which marking columns to include within the range. In this field, you can select marking columns that span different marking column sets, but only credits for the marking columns included in the set associated with the session selected on the General tab appear on the transcript.

180 CH A PT E R
For example, Marking Column Set #1 includes marking columns MC1A, MC1B, and MC1C and Marking Column Set #2 includes marking columns MC2A, MC2B, and MC2C. When you are printing a transcript for the Regular session, which is associated with Marking Column Set #1, if you define the credits range as MC1A to MC2A, only those marking columns included in Marking Column Set #1 (MC1A, MC1B, and MC1C) are included in the credits totals.
Include. If you select Credit or Cumulative Credit in the Column type field, the Include field appears. In this field, select which course types to include.
Multiple Column Headings TabOn the Multiple Column Headings tab, you can create a heading that appears over one or more of the individual column headers.
Heading. Text entered into the Heading column appears as a heading above one or more of the individual column headers.
Start. In the Start column, select the first column the multiple column heading will cover. End. In the End column, select the last column the multiple column heading will cover. The End column must be
greater than or equal to the Start column. Align. In the Align column, select a left, center, or right alignment for the heading.
Activities Section
The activities section displays activities in which a student participated for each academic year. You can add activity sections to both the summary/notes and the detail areas. To add an activities section, on the Details or Summary/Notes tab, select Activities in the Section column of the grid. The Activities Section screen appears. This screen has tabs you use to format the activities section and select the information to include.
Note: If you marked Print a box around the column heading row on the General tab, when you add multiple column headings, vertical lines print in the box to separate each of the column groupings.
Note: If activities do not print as expected, make sure the Print on transcript checkbox is marked for the activity on the student record.

TRA N S C R I P T S 18
General TabOn the General tab, you can define a heading for the activities section, indent activities information, add lines to divide columns and activities, include only those activities marked Participated on the student record, and print activity comments.
Section heading. The Section heading field displays the default heading for the activities section. You can use this heading, enter a different one, or make it blank. Heading text is bold on the transcript.
Indent section details [ ] inches. To indent the activities section, mark Indent section details [ ] inches and enter the amount to indent. You can increase and decrease the indention of the section in increments of 0.1 inch to a maximum of 7.75 inches if printing in portrait layout, 10.25 inches if landscape. Section headings do not indent, only the first column.
Show column header row. Mark Show column header row to display column headings. Unmark the checkbox to hide the headings.
Print a box around the column heading row. If you marked Show column header row, you can mark Print a box around the column heading row to print a box around column headings and multiple column heading rows.
Print a horizontal line after each activity. Mark Print a horizontal line after each activity to print horizontal lines between rows.
Note: The section width appears at the bottom of the screen. This number is the sum of widths for all columns in the section and the space between columns.
Note: The available width appears at the bottom of the screen. This number is the maximum width available for a section.
Note: If you mark Print a horizontal line after each activity and Print a vertical line between columns, a grid forms in this section.
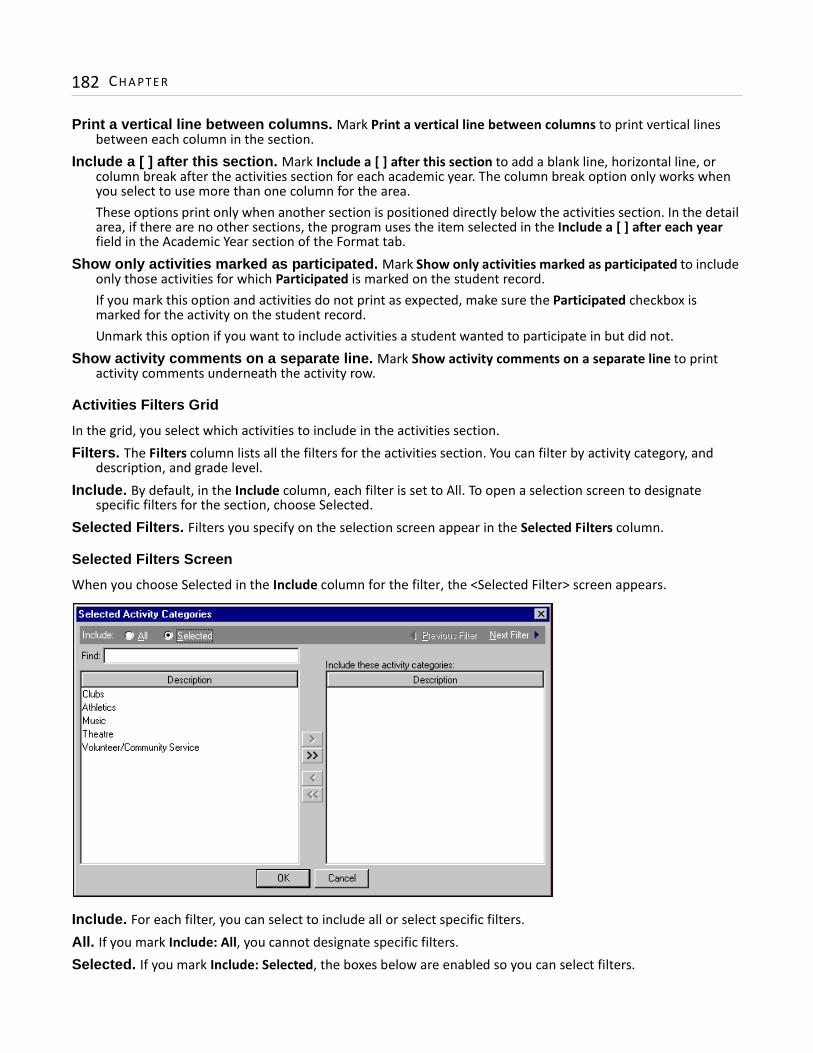
182 CH A PT E R
Print a vertical line between columns. Mark Print a vertical line between columns to print vertical lines between each column in the section.
Include a [ ] after this section. Mark Include a [ ] after this section to add a blank line, horizontal line, or column break after the activities section for each academic year. The column break option only works when you select to use more than one column for the area. These options print only when another section is positioned directly below the activities section. In the detail area, if there are no other sections, the program uses the item selected in the Include a [ ] after each year field in the Academic Year section of the Format tab.
Show only activities marked as participated. Mark Show only activities marked as participated to include only those activities for which Participated is marked on the student record. If you mark this option and activities do not print as expected, make sure the Participated checkbox is marked for the activity on the student record.Unmark this option if you want to include activities a student wanted to participate in but did not.
Show activity comments on a separate line. Mark Show activity comments on a separate line to print activity comments underneath the activity row.
Activities Filters Grid
In the grid, you select which activities to include in the activities section.Filters. The Filters column lists all the filters for the activities section. You can filter by activity category, and
description, and grade level.Include. By default, in the Include column, each filter is set to All. To open a selection screen to designate
specific filters for the section, choose Selected.Selected Filters. Filters you specify on the selection screen appear in the Selected Filters column.
Selected Filters Screen
When you choose Selected in the Include column for the filter, the <Selected Filter> screen appears.
Include. For each filter, you can select to include all or select specific filters. All. If you mark Include: All, you cannot designate specific filters.Selected. If you mark Include: Selected, the boxes below are enabled so you can select filters.

TRA N S C R I P T S 18
Find. Using the Find field, you can locate specific fields or items in the list.Include these <filters>. Select a filter from the box on the left and click the single right arrow button. The filter
appears in the Include these <filters> box. To select all the filters at one time, click the double arrow.
Columns TabOn the Columns tab, you define columns of information for the activities section. Once you define columns, the grid lists the columns and their characteristics, including the heading, description, and width.
New Column. To add a new column to the activities section, click New Column. The Column <#> screen appears.
Open Column. To open a column in the grid, select the column and click Open Column.
Repeat Column. To add a copy of an existing column in the grid, select the column and click Repeat Column. Delete Column. To delete a column in the grid, select the column and click Delete Column.Up/Down. To change the order of columns in the grid, select a column and click the up or down arrow.Heading. Once you define a column, the Heading column displays the heading entered in the Column heading
field of the Column <#> screen. You can edit the heading by typing directly in the row.Description. Once you define a column, the Description column displays a description of the column based on
the items selected in the Column <#> screen.Width. Once you define a column, the Width column displays the width entered in the Column width field of the
Column <#> screen. You can edit the width by typing directly in the row.
Tip: When an activities section with similar columns, you can use the Repeat Column button to quickly add columns using the same width, alignment, and font style.

184 CH A PT E R
The Column <#> Screen
To add a new column to the activities section, click New Column. The Column <#> screen appears.
Field to show. In the Field to show column, select the item of information to display in the column. The item you select changes the fields that appear on this screen.
Column width. In the Column width field, enter a width for the column. The minimum width is 0.1 inch and the maximum is 7.75 inches if printing in portrait layout, 10.25 inches if landscape.
Column start. The Column start field displays where the column will start printing. The value is the sum of widths for all other columns preceding it in the section.
Section width. The Section width field displays the sum of widths for all columns in the section (including the current column) and the space between columns. If the section width exceeds the amount allowed for this section, the number is red.
Column heading. The Column heading box displays the value in the Field to show field. You can use this heading, enter a different heading, or delete it.
Format buttons. You can use the buttons below the Column heading box to format the alignment and style of heading text.
Detail alignment. In the Detail alignment, you can select how items align in the column. If you select Default, text prints on the left and numbers print on the right.
Detail indention. If you select Right or Left in the Detail alignment field, you can select the amount to indent in the Detail indentation field. You can increase and decrease the indention in increments of 0.1 inch to a maximum of 7.75 inches if printing in portrait layout, 10.25 inches if landscape. If the detail alignment is right, the indention is from the right side and if the detail alignment is left, the indention is from the left side. If the indention amount is set large enough to cause the information to print over the next column, then the information is truncated. If the indention is so large that all the information is truncated, then the program will not indent the information.
Date format. If you select Date from or Date to in the Field to show field, you can select a date format in the Date format field.
Note: You can select <Blank> in the Field to show field to add a blank column providing extra space between columns.

TRA N S C R I P T S 18
Wrap text if needed. If you select Activity or Comments in the Field to show field, the Wrap text if needed checkbox appears. Mark this option to continue information to the next line for text that is too long to fit on one row within the column width.
Suppress repeated values. Mark Suppress repeated values to print the field name once for each group of activities.
If you unmark this checkbox, the field name repeats for each with the same value in that field.
Multiple Column Headings TabOn the Multiple Column Headings tab, you can create a heading that appears over one or more of the individual column headers.
Heading. Text entered into the Heading column appears as a heading above one or more of the individual column headers.
Start. In the Start column, select the first column the multiple column heading will cover. End. In the End column, select the last column the multiple column heading will cover. The End column must be
greater than or equal to the Start column. Align. In the Align column, select a left, center, or right alignment for the heading.
Note: If you marked Print a box around the column heading row on the General tab, when you add multiple column headings, vertical lines print in the box to separate each of the column groupings.

186 CH A PT E R
Sort/BreakUse the Sort/Break tab to select the order of information in the activities section and where breaks fall between sets of information.
Sort by. To order the information, select a sorting category in the Sort by column Order by. In the Order by column, select to sort in ascending or descending order.Break? Mark the checkbox in the Break? column to create breaks between activities sections. A break divides
sets of information by adding space between each section and text. For example, if you sort and break by Category, information for each category is set apart by a blank line and the category section heading. If you mark Break?, other fields are enabled so you can define a break header and break footer for that sort category.
Text before value. In the Text before value field, you can enter text to appear directly before the value for the selected sorting category, which is now the heading for the subsections.
Text after value. In the Text after value field, you can enter text to appear directly after the value for the selected sorting category, which is now the heading for the subsections.
Show count for each new <Sort category>. Mark Show count for each new <Sort category> to add a footer at the section break displaying the total number of activities for that category in which the student participated.
Test Scores Section
The test scores section displays test score information from the student’s Tests tab for each academic year. You can add test scores sections to both the summary/notes and the detail areas. Test scores list in the academic year in which they were taken. When adding a test scores section to the detail area, any tests that fall outside or between academic years do not print on the transcript.

TRA N S C R I P T S 18
To add a test scores section, on the Details or Summary/Notes tab, select Test Scores in the Section column of the grid. The Test Scores Section screen appears. This screen has tabs you use to format the test scores section and select the information to include.
General TabOn the General tab, you can define a heading for the test scores section, indent test score information, and add lines to divide columns and test scores.
Section heading. The Section heading field displays the default heading for the test scores section. You can use this heading or enter a different one. Heading text is bold on the transcript.
Indent section details [ ] inches. To indent the test scores section, mark Indent section details [ ] inches and enter the amount to indent.
Show column header row. Mark Show column header row to display column headings. Unmark the checkbox to hide the headings.
Print a box around the column heading row. If you marked Show column header row, you can mark Print a box around the column heading row to print a box around column headings and multiple column heading rows.
Print a horizontal line after each test score. Mark Print a horizontal line after each test score to print horizontal lines between rows.
Note: The section width appears at the bottom of the screen. This number is the sum of widths for all columns in the section and the space between columns.
Note: The available width appears at the bottom of the screen. This number is the maximum width available for a section.

188 CH A PT E R
Print a vertical line between columns. Mark Print a vertical line between columns to print vertical lines between each column in the section.
Include a [ ] after this section. Mark Include a [ ] after this section to add a blank line, horizontal line, or column break after the test scores section for each academic year. The column break option only works when you select to use more than one column for the area. These options print only when another section is positioned directly below the test scores section. In the detail area, if there are no other sections, the program uses the item selected in the Include a [ ] after each year field in the Academic Year section of the Format tab.
Test Scores Filters Grid
In the grid, you select which test scores to include in the test scores section.Filters. The Filters column lists all the filters for the test scores section. You can filter by test types and subtest
types.Include. By default, in the Include column, each filter is set to All. To open a selection screen to designate
specific filters for the section, choose Selected.Selected Filters. Filters you specify on the selection screen appear in the Selected Filters column.
Selected Filters Screen
When you choose Selected in the Include column for the filter, the Selected <Filters> screen appears.
Include. For each filter, you can select to include all or select specific filters. All. If you mark Include: All, you cannot designate specific filters.Selected. If you mark Include: Selected, the boxes below are enabled so you can select filters.Find. Using the Find field, you can locate specific fields or items in the list.
Note: If you mark Print a horizontal line after each test score and Print a vertical line between columns, a grid forms in this section.
Note: If test scores do not print as expected, make sure the Print? checkbox is marked on the Tests tab of the student record.

TRA N S C R I P T S 18
Include these <filters>. Select a filter from the box on the left and click the single right arrow button. The filter appears in the Include these <filters> box. To select all the filters at one time, click the double arrow.
Columns TabOn the Columns tab, you define columns of information for the test scores section. Once you define columns, the grid lists the columns and their characteristics, including the heading, description, and width.
New Column. To add a new column to the test scores section, click New Column. The Column <#> screen appears.
Open Column. To open a column in the grid, select the column and click Open Column.
Repeat Column. To add a copy of an existing column in the grid, select the column and click Repeat Column. Delete Column. To delete a column in the grid, select the column and click Delete Column.Up/Down. To change the order of columns in the grid, select a column and click the up or down arrow.Heading. Once you define a column, the Heading column displays the heading entered in the Column heading
field of the Column <#> screen. You can edit the heading by typing directly in the row.Description. Once you define a column, the Description column displays a description of the column based on
the items selected in the Column <#> screen.Width. Once you define a column, the Width column displays the width entered in the Column width field of the
Column <#> screen. You can edit the width by typing directly in the row.
Tip: When adding a test scores section with similar columns, you can use the Repeat Column button to quickly add columns using the same width, alignment, and font style.

190 CH A PT E R
The Column <#> Screen
To add a new column to the test scores section, click New Column. The Column <#> screen appears.
Field to show. In the Field to show column, select the item of information to display in the column. The item you select changes the fields that appear on this screen.
Column width. In the Column width field, enter a width for the column. The minimum width is 0.1 inch and the maximum is 7.75 inches if printing in portrait layout, 10.25 inches if landscape.
Column start. The Column start field displays where the column will start printing. The value is the sum of widths for all other columns preceding it in the section.
Section width. The Section width field displays the sum of widths for all columns in the section (including the current column) and the space between columns. If the section width exceeds the amount allowed for this section, the number is red.
Column heading. The Column heading box displays the value in the Field to show field. You can use this heading, enter a different heading, or delete it.
Format buttons. You can use the buttons below the Column heading box to format the alignment and style of heading text.
Detail alignment. In the Detail alignment, you can select how items align in the column. If you select Default, text prints on the left and numbers print on the right.
Detail indention. If you select Right or Left in the Detail alignment field, you can select the amount to indent in the Detail indentation field. You can increase and decrease the indention in increments of 0.1 inch to a maximum of 7.75 inches if printing in portrait layout, 10.25 inches if landscape. If the detail alignment is right, the indention is from the right side and if the detail alignment is left, the indention is from the left side. If the indention amount is set large enough to cause the information to print over the next column, then the information is truncated. If the indention is so large that all the information is truncated, then the program will not indent the information.
Wrap text if needed. If you select Comments in the Field to show field, the Wrap text if needed checkbox appears. Mark this option to continue information to the next line for text that is too long to fit on one row within the column width.
Note: You can select <Blank> in the Field to show field to add a blank column providing extra space between columns.
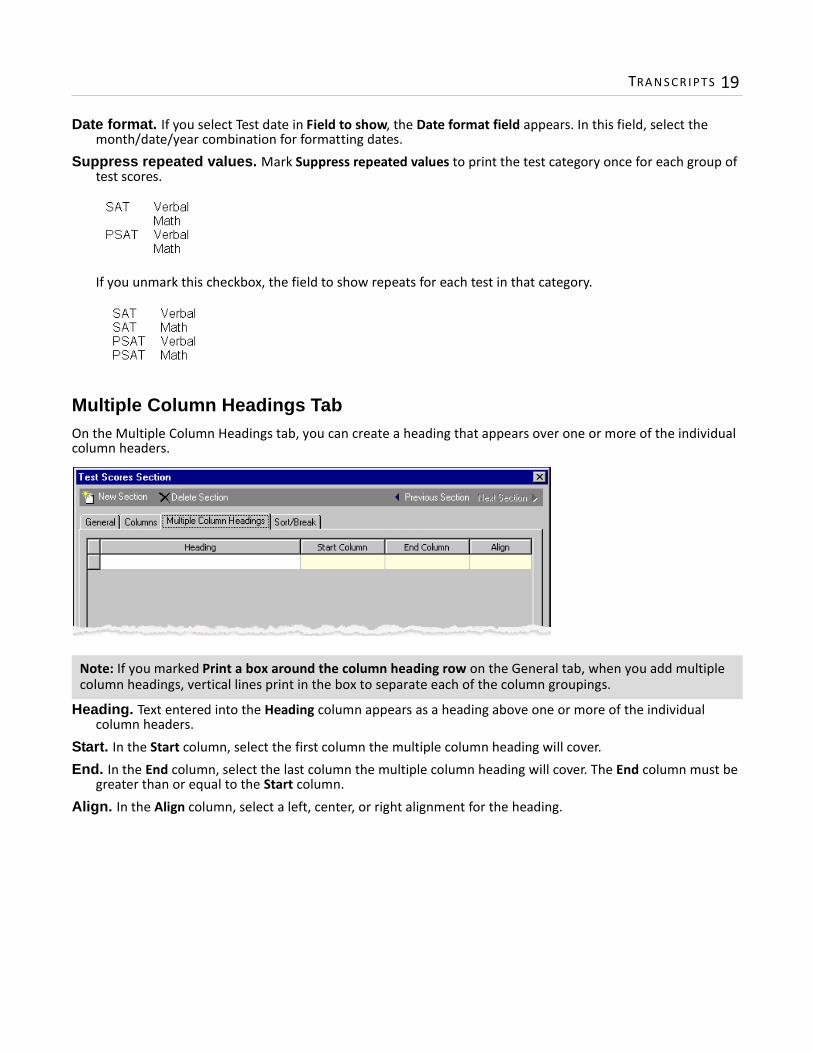
TRA N S C R I P T S 19
Date format. If you select Test date in Field to show, the Date format field appears. In this field, select the month/date/year combination for formatting dates.
Suppress repeated values. Mark Suppress repeated values to print the test category once for each group of test scores.
If you unmark this checkbox, the field to show repeats for each test in that category.
Multiple Column Headings TabOn the Multiple Column Headings tab, you can create a heading that appears over one or more of the individual column headers.
Heading. Text entered into the Heading column appears as a heading above one or more of the individual column headers.
Start. In the Start column, select the first column the multiple column heading will cover. End. In the End column, select the last column the multiple column heading will cover. The End column must be
greater than or equal to the Start column. Align. In the Align column, select a left, center, or right alignment for the heading.
Note: If you marked Print a box around the column heading row on the General tab, when you add multiple column headings, vertical lines print in the box to separate each of the column groupings.
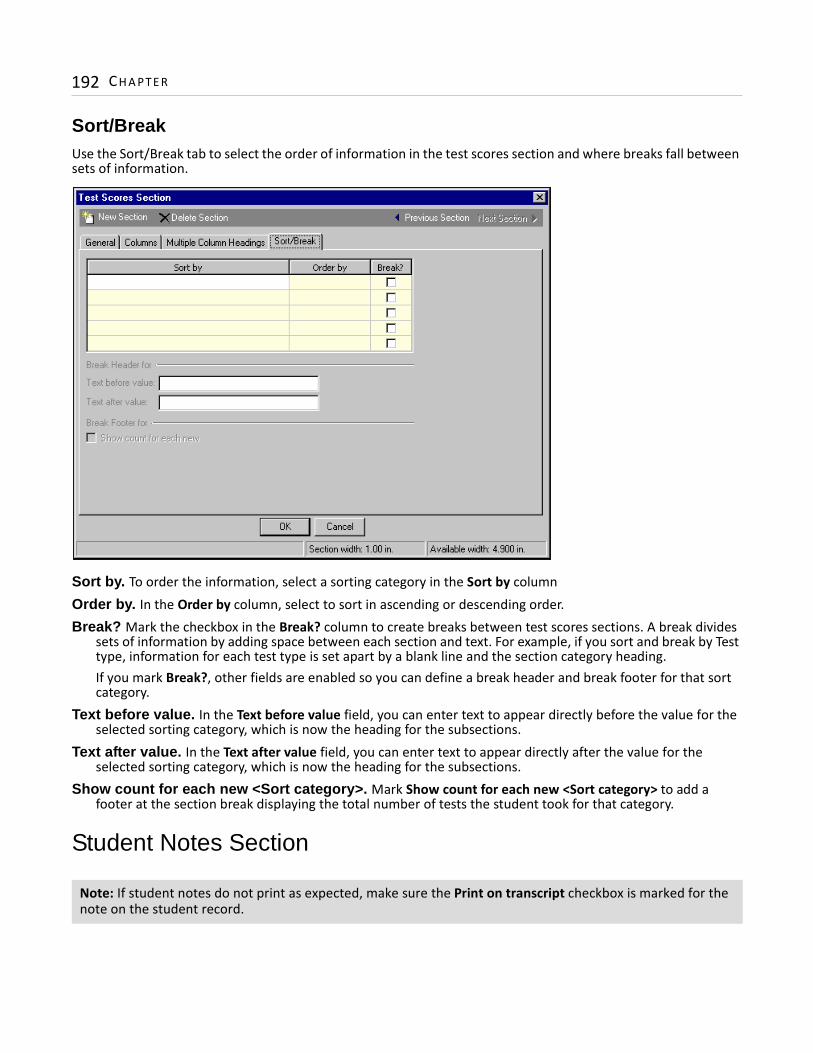
192 CH A PT E R
Sort/BreakUse the Sort/Break tab to select the order of information in the test scores section and where breaks fall between sets of information.
Sort by. To order the information, select a sorting category in the Sort by column Order by. In the Order by column, select to sort in ascending or descending order.Break? Mark the checkbox in the Break? column to create breaks between test scores sections. A break divides
sets of information by adding space between each section and text. For example, if you sort and break by Test type, information for each test type is set apart by a blank line and the section category heading. If you mark Break?, other fields are enabled so you can define a break header and break footer for that sort category.
Text before value. In the Text before value field, you can enter text to appear directly before the value for the selected sorting category, which is now the heading for the subsections.
Text after value. In the Text after value field, you can enter text to appear directly after the value for the selected sorting category, which is now the heading for the subsections.
Show count for each new <Sort category>. Mark Show count for each new <Sort category> to add a footer at the section break displaying the total number of tests the student took for that category.
Student Notes Section
Note: If student notes do not print as expected, make sure the Print on transcript checkbox is marked for the note on the student record.

TRA N S C R I P T S 19
The student notes section displays selected notes from the student record’s Notes tab by academic year. You can add student notes sections to both the summary/notes and the detail areas. This section does not print in columns; rather, the text of a note fills the entire width available for the section. Student notes print in the font style and size defined on the notepad, regardless of what is selected for the transcript on the General tab. Student notes print in the academic year in which they were created. When adding a student notes section to the detail area, any notes that fall outside or between academic years do not print on the transcript.To add a student notes section, on the Details or Summary/Notes tab, select Student Notes in the Section column of the grid. The Student Notes Section screen appears. This screen has tabs you use to format the student notes section and select the information to include.
General TabOn the General tab, you can define a heading for the student notes section, indent student notes information, add lines to divide student notes from the following section, select the items of information to include in the note header and the notepad types to include.
Section heading. In the Section heading field, you can enter a heading for the student notes section. Heading text is bold on the transcript.
Indent section details [ ] inches. To indent the student notes section, mark Indent section details [ ] inches and enter the amount to indent. You can increase and decrease the indention of the section in increments of 0.1 inch to a maximum of 7.75 inches if printing in portrait layout, 10.25 inches if landscape. Section headings do not indent, only the header and details.If the indention is larger than the section width, the program will not indent the information.
Note: The section width appears at the bottom of the screen. This number is the sum of widths for all columns in the section and the space between columns.
Note: The available width appears at the bottom of the screen. This number is the maximum width available for a section.

194 CH A PT E R
Include a [ ] after this section. Mark Include a [ ] after this section to add a blank line, horizontal line, or column break after the student notes section for each academic year. The column break option only works when you select to use more than one column for the area. These options print only when another section is positioned directly below the student notes section. In the detail area, if there are no other sections, the program uses the item selected in the Include a [ ] after each year field in the Academic Year section of the Format tab.
Fields to include in notes header. In the Fields to include in notes header box, mark the items of information to include in the note header.
Notepad types to include. In the Notepad types to include box, mark the checkbox for each notepad type to include.
Sort/BreakUse the Sort/Break tab to select the order of information in the student note section and where breaks fall between sets of information.
Sort by. To order the information, select a sorting category in the Sort by column Order by. In the Order by column, select to sort in ascending or descending order.Break? Mark the checkbox in the Break? column to create breaks between student notes sections. A break
divides sets of information by adding space between each section and text. For example, if you sort and break by Note type, information for each note is set apart by a blank line and the note heading. If you mark Break?, other fields are enabled so you can define a break header and break footer for that sort category.
Text before value. In the Text before value field, you can enter text to appear directly before the value for the selected sorting category, which is now the heading for the subsections.
Text after value. In the Text after value field, you can enter text to appear directly after the value for the selected sorting category, which is now the heading for the subsections.

TRA N S C R I P T S 19
Freeform Notes Section
The freeform notes section displays notes you create specifically for the transcript. This area is ideal for entering legends for short descriptions, number/letter grade translations, or any other special notes. You can add freeform notes sections to only the summary/notes area. This section does not print in columns; rather, the text of a note fills the entire width available for the section.
In the text box, enter text to print in the freeform notes section. The font type and size default to those selected on the General tab but you can use the formatting options on the toolbar to format the alignment, type, size, and style of note text. You can also check the spelling or use the thesaurus to find a synonym.
Section heading. In the Section heading field, enter a heading for the freeform notes section. Heading text is bold on the transcript.
Indent section details [ ] inches. To indent the freeform notes section, mark Indent section details [ ] inches and enter the amount to indent. The section heading does not indent.
Include a [ ] after this section. Mark Include a [ ] after this section to add a blank line, horizontal line, or column break after the freeform notes section.
Creating Transcripts
Mail is flexible so you can design transcripts that meet your school’s needs. This section guides you through the steps necessary to create a basic transcript that includes sections for courses, GPAs, summarized rank information, activities, and freeform notes. Each section is broken down into individual procedures. For example, in Step 2: Adding Detail Sections, there are procedures for formatting the details area and adding sections for courses and GPAs. The fields and options included in the procedures are those used to create this particular transcript. For information about fields and options not addressed in these procedures, see “Transcript Tabs” on page 127 and “Transcript Sections” on page 148.
Tip: To add tabs to note text, press CTRL + the tab key.
Note: You can run transcripts only if you have security rights established in Administration.

196 CH A PT E R
You can follow these steps using the sample database to replicate this transcript. Hands-on experience will familiarize you with the formatting options available and help you plan your own transcripts and the information you need to include.
Step 1: General Formatting
The first step when creating a transcript is to make general formatting selections on the General tab. If you have more than one school, you can select for which school to print the transcript. The school you select determines the information printed in the header.You also define the time frame for the transcript and select which grade levels or academic years to include. If you select grade levels, the program uses the student progression entries to determine which academic years of information to display for the students. Using the options below the grid, you can select the paper size, orientation, font and font size. The orientation and paper size you select are important because they determine the amount of space available for each area. The portrait format allows for more sections to print in the details area on one page, while landscape allows for more columns to print across the width of the page.
Note: For basic transcript procedures, such as finding and opening, previewing, printing, sending as email, and exporting transcripts, see “Mail Basics” on page 1.
Michael Richard AndrewsAddress: 12 Pebble Lane
Isle of Palms, SC 29451
Birth date: 10/16/1986SSN: 222-22-2222
Island High School3460 Creekfield RoadCharleston, SC 29492
(843) 555-1234CEEB-ACT Code 123-456
www.islandhighschool.org
OFFICIAL TRANSCRIPT
Course Final Credits Earned
2001-2002,
Grade 09
English I A 1.00
Algebra I A- 1.00
Computer I - Intro to Computers A+ 1.00
Physical Education I A+ 1.00
Science 101 - Physical Science A- 1.00
5.00Total Credits:
5.00Cumulative Credits:
Grade Point Average
4.00Unweighted GPA
5.00Weighted GPA
Course Final Credits Earned
2002-2003,
Grade 10
English II C- 1.00
Biology B 1.00
Biology Lab A- 1.00
Geometry A- 1.00
World History C- 1.00
Drawing 101 A+ 1.00
Computer programming I A- 1.00
7.00Total Credits:
12.00Cumulative Credits:
Grade Point Average
2.70Unweighted GPA
5.00Weighted GPA
Course Final Credits Earned
2003-2004,
Grade 11
English III D+ 1.00
Chemistry I B+ 1.00
US History C- 1.00
Algebra II B 1.00
Ceramics I B 1.00
Spanish II C+ 1.00
Chemistry Lab 101 B 1.00
7.00Total Credits:
19.00Cumulative Credits:
Grade Point Average
2.30Unweighted GPA
3.30Weighted GPA
Rank
2001-2002 4/542002-2003 12/542003-2004 34/54
Grade level Activity
Activities
10, 11 Ecology Club
10 Soccer
Grading Scale
GPA Equivalent
A: 93 - 100+ 4.00 - 5.00
B: 85 - 92 3.00 - 3.99
C: 77 - 84 2.00 - 2.99
D: 70 - 76 1.00 - 1.99
F: 69 and below 0.00 - 0.99
IB, AP, and Honors courses receive
additional weighting on GPA.
UNLESS NOTED, ALL IHS COURSES
ARE COLLEGE PREPARATORY.
Signature: Title: Date:
Page 1 of 106/07/2004

TRA N S C R I P T S 19
For our example, we create a transcript for Island High School that includes information for ninth through twelfth grades in portrait format.
Formatting general information1. From the Mail page in Registrar’s Office, click Forms or select the Forms tab. The Forms page appears.2. In the list on the left, select Transcripts and click New on the action bar. The New Transcripts screen
opens on the General tab.
3. In the Transcript for field, select “Pepperworth Upper School ”. 4. In the Show the following coursework and academic information grid, choose “Selected” in the Include
column for the Grade Levels filter. The Selected Grade Levels screen appears.5. Select Ninth Grade, Tenth Grade, Eleventh Grade, and Twelfth Grade and click OK. You return to the
General tab and the selected grade levels appear in the grid.6. In the Paper size field, select “Letter”.7. In the Orientation field, select “Portrait”.
Note: The set of parameters described for this sample transcript represents a single transcript solution. For information about fields and options not addressed in these procedures, see “Transcript Tabs” on page 127 and “Transcript Sections” on page 148.

198 CH A PT E R
8. In the Font field select “Times New Roman” and “9” in the Font size field.
9. Select the Details tab to format the details area and select the sections of information to include.
Step 2: Adding Detail Sections
The second step when creating a transcript is to select which sections of information to include in the detail area and how information appears. On the Details tab, you specify how many column sets to display for the detail area, whether to include borders around sections, and whether to include information from outside schools.

TRA N S C R I P T S 19
For this example, we organize detail sections in one column and add a box around the detail area. We add sections for courses and GPAs and add marking column columns to display the final grades and credits awarded for each course. The GPAs section shows the weighted and unweighted final GPAs for each academic year. For more information about detail sections not addressed in these procedures, see “Transcript Sections” on page 148.
Formatting the details area1. On the Details tab of the open transcript parameter form, in the Show details sections in [ ] columns,
select “1”.2. In the Borders field, select “Box around area”.

200 CH A PT E R
3. Use the grid to select the detail sections to include. The first section you format is a courses section.
Adding a courses section to the detail area1. In the grid on the Details tab, select “Courses” in the Section column and click Open. The Courses Section
screen appears displaying the General tab.
2. Mark Repeat column headings for each year.3. Unmark Print a box around the column heading row.4. Unmark If showing a total credits row, print a horizontal line after the last course.
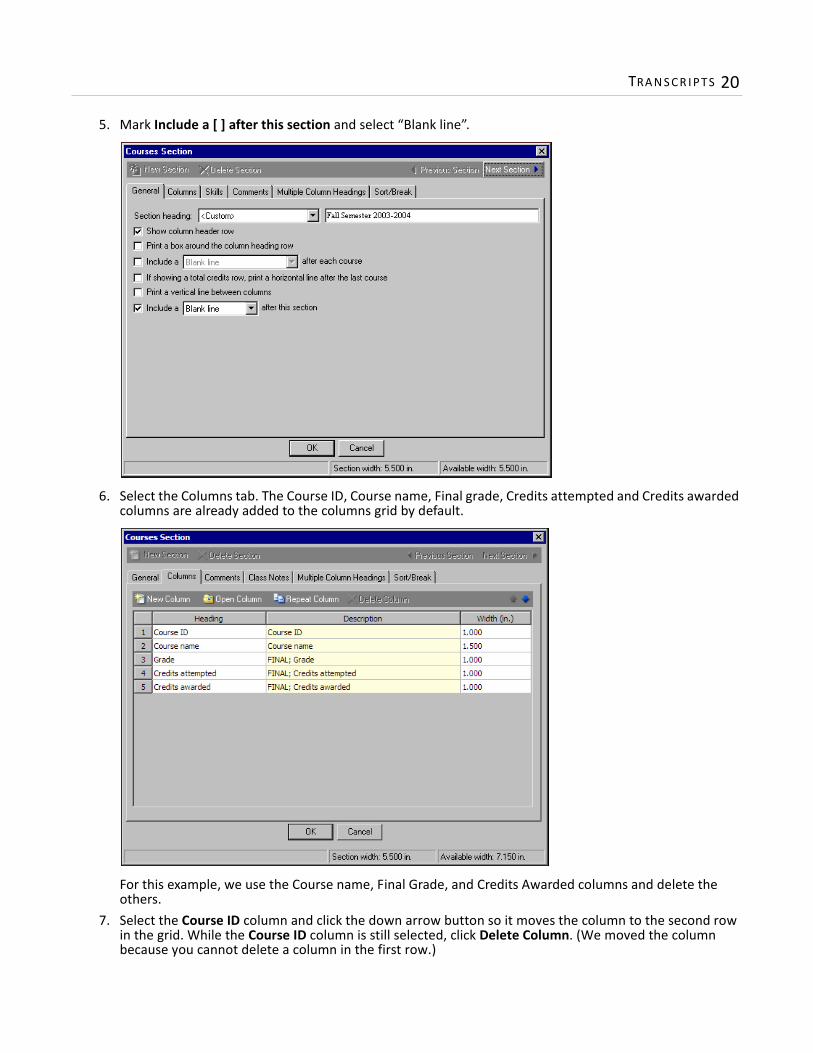
TRA N S C R I P T S 20
5. Mark Include a [ ] after this section and select “Blank line”.
6. Select the Columns tab. The Course ID, Course name, Final grade, Credits attempted and Credits awarded columns are already added to the columns grid by default.
For this example, we use the Course name, Final Grade, and Credits Awarded columns and delete the others.
7. Select the Course ID column and click the down arrow button so it moves the column to the second row in the grid. While the Course ID column is still selected, click Delete Column. (We moved the column because you cannot delete a column in the first row.)

202 CH A PT E R
8. Select the Credits Attempted column and click Delete Column.
9. Select the Course name column and click Open Column. The Column 1 screen appears.10. In the Column width field, enter “2.0”. 11. In the Column heading field, enter “Course” and leave the text left aligned and bold.12. Mark Wrap text if needed.
13. Click OK. You return to the Columns tab.14. Select the Grade column and click Open Column. The Column 2 screen appears.15. In the Column width field, enter “1.0”.16. In the Column heading field, enter “Final” and leave the text left aligned and bold.

TRA N S C R I P T S 20
17. In the Detail alignment field, select “Left”.
18. Click OK. You return to the Columns tab.19. Select the Credits awarded column and click Open Column. The Column 3 screen appears.20. In the Column width field, enter “1.5”.21. In the Column heading field, enter “Credits Earned” and make the text left aligned and bold.22. In the Detail alignment field, select “Left”.23. Mark Show column total, Show total cumulative credits, and Show credits for marking columns that do
not award credit.
24. Click OK. You return to the Columns tab.25. Click OK. You return to the Details tab.
The next section you add to the detail area is a GPAs section.

204 CH A PT E R
Adding a GPAs section to the detail area1. On the Details tab, in the second row of the grid, select “GPAs” in the Section column. The GPAs Section
screen appears displaying the General tab.
2. In the Section heading field, enter “Grade Point Average”.3. Mark Include a [ ] after this section and select “Blank line”.4. In the first row of the GPAs to include grid, select “Unweighted GPA” in the Calculation column and
“GPA” in the Type column.5. Leave the default heading, “Unweighted GPA”, in the Heading column.6. In the second row of the GPAs to include grid, select “Weighted GPA” in the Calculation column and
“GPA” in the Type column.7. Leave the default heading, “Weighted GPA”, in the Heading column.

TRA N S C R I P T S 20
8. Mark Suppress blank GPAs.
9. Select the Columns tab. 10. Select the Heading column in the first row and click Open Column. The Column 1 screen appears.
11. Leave the Column heading field blank.12. Mark Wrap text if needed. 13. In the Detail alignment field, select “Left”.

206 CH A PT E R
14. In the Detail indention field, enter “.50” to offset this section from the courses information.
15. Click OK. You return to the Columns tab. 16. In the row second, delete “Final” in the Heading column to prevent the column heading repeating for this
section.

TRA N S C R I P T S 20
17. Click OK. You return to the Details tab and the GPAs section appears in the grid.
18. Select the Summary/Notes tab to format the summary/notes area and select the sections of information to include.
Step 3: Adding Summary/Notes Sections
The third step when creating a transcript is to specify whether or not to include a summary/notes area. If you decide to include a summary/notes area, you must select a position (below or to the right of the detail area), the number of columns for the area and the sections of information to include.

208 CH A PT E R
For this example, we add an academic summary section for ranks, an activities section, and a freeform notes section that displays the grading scale. The summary/notes section is positioned beside the details area. For more information about summary/notes sections not addressed in these procedures, see “Transcript Sections” on page 148.
Formatting the summary/notes area1. On the Summary/Notes tab of the open transcript parameter form, mark Show the summary/notes
area.2. In the Position field, select “Right”.3. In the Width field, enter “2.50”.4. In the Borders field, select “Box around area”.

TRA N S C R I P T S 20
5. Use the grid to select the summary/notes sections to include. An academic summary section for GPAs appears in the grid by default. We delete this section because we already added a GPAs section to the details area. Instead we add an academic summary section for ranks.
Adding an academic summary section for ranks to the summary/notes area1. On the Summary/Notes tab, delete the default academic summary section from the grid. Then select
“Academic Summary” in the Section column. The Academic Summary Section screen appears displaying the General tab.
2. In the Section heading field, enter “Rank”.3. Mark Indent section details [ ] inches and enter “.10” in the field.4. Mark Show column header row.5. Unmark Print a box around the column heading row.6. Mark Include a [ ] after this section and select “Blank line” in the field.
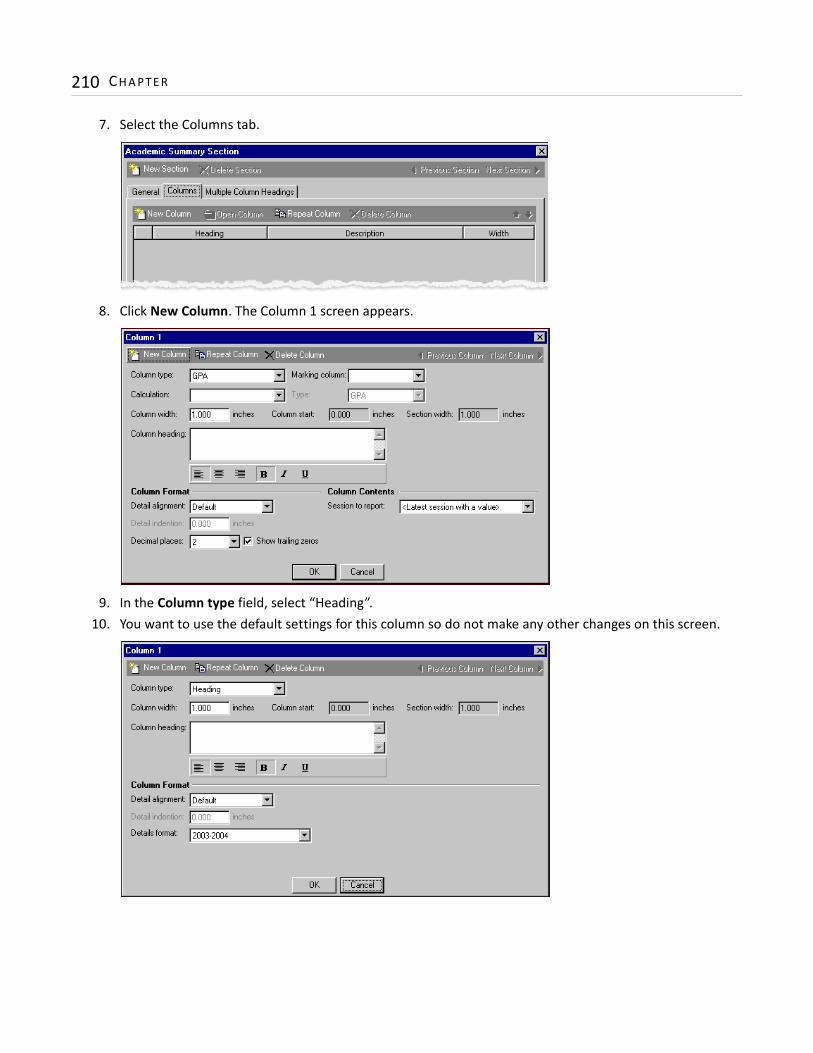
210 CH A PT E R
7. Select the Columns tab.
8. Click New Column. The Column 1 screen appears.
9. In the Column type field, select “Heading”.10. You want to use the default settings for this column so do not make any other changes on this screen.

TRA N S C R I P T S 21
11. Click OK. You return to the Columns tab and the Heading column appears in the grid.
12. Click New Column. The Column 2 screen appears.
13. In the Column type field, select “Rank”.14. In the Marking column field, select “FINAL”.15. In the Calculation field, select “Straight Rank”.16. In the Column heading field, delete “FINAL”.17. In the Detail alignment field, select “Left”.

212 CH A PT E R
18. In the Session to report field, select “<Latest session with a value>”.
19. Click OK. You return to the Columns tab and the Rank: FINAL, Straight Rank column appears in the grid.

TRA N S C R I P T S 21
20. Click OK. You return to the Summary/Notes tab and the Academic Summary section appears in the grid.
The next section you add to the summary/notes area is an activities section.
Adding an activities section to the summary/notes area1. On the Summary/Notes tab, in the second row of the grid, select “Activities” in the Section column. The
Activities Section screen appears displaying the General tab.
2. Mark Indent section details [ ] inches and enter “.10” in the field.3. Mark Show column header.

214 CH A PT E R
4. Unmark Print a box around the column heading row.5. Mark Include a [ ] after this section and select “Blank line” in the field.6. Mark Show only activities marked as participated.
7. Select the Columns tab.

TRA N S C R I P T S 21
8. Click New Column. The Column 1 screen appears.
9. In the Field to show field, select “Grade level”.10. In the Column width field, enter “1”.11. In the Column heading field, use the default heading “Grade level”. Leave it left aligned and bold.12. In the Detail alignment field, select “Left”.13. Mark Suppress repeated values.

216 CH A PT E R
14. Click OK. You return to the Columns tab and the Grade level column appears in the grid.
15. Click New Column. The Column 2 screen appears.
16. In the Field to show field, select “Activity”.17. In the Column width field, enter “1”.18. In the Column heading field, use the default heading “Activity”. Leave it left aligned and bold.19. In the Detail alignment field, select “Left”.20. Mark Wrap text if needed.

TRA N S C R I P T S 21
21. Mark Suppress repeated values.
22. Click OK. You return to the Columns tab and the Activity column appears in the grid.
23. Click OK. You return to the Summary/Notes tab and the Activities section appears in the grid.

218 CH A PT E R
The next section you add to the summary/notes area is a freeform notes section.
Adding a freeform notes section to the summary/notes area1. On the Summary/Notes tab, in the third row of the grid, select “Freeform Notes” in the Section column.
The Freeform Notes Section screen appears.
2. In the Section heading field, enter “Grading Scale”.3. Mark Indent section details [ ] and enter “.10” in the field.4. Mark Include a [ ] after this section and select “Blank line” in the field.
5. In the text box, enter your school’s grading scale.
Tip: To add tabs to note text, press CTRL + the tab key.

TRA N S C R I P T S 21
6. Click OK. You return to the Summary/Notes tab and the Freeform Notes section appears in the grid.
7. Select the Format tab so you can format academic year information.
Step 4: Formatting Academic Year Information
Use the Academic Year options on the Format tab to format and position the academic years heading for the details section.For this example, we place the academic year headings in a column next to the details section.

220 CH A PT E R
Formatting academic year information1. On the Format tab of the open transcript parameter form, select Academic Year in the tree view on the
left. Academic Year fields and options appear on the tab.
2. Mark Keep year together across pages. 3. Mark Include a [ ] after each year and select “Blank line”.4. In the Format field, select “2003-2004, Grade 09”.5. In the Position field, select “Column beside detail sections”.6. In the Width field, enter “.75”.

TRA N S C R I P T S 22
7. In the Heading field, delete “Year”.
8. Select Format in the tree view on the left so you can format the header.
Step 5: Formatting the Header
Use the Header options on the Format tab to select a template that determines the layout and position of school and student information in the header. You can include a logo and notes in the header. For this example, we format the header using the side by side layout. We add a logo, the school’s Web site address, and the CEEB code.
Formatting the transcript header1. On the Format tab of the open transcript parameter form, select Format in the tree view on the left.
Format Header fields and options appear on the tab.2. In the Student Name frame, select “12” in the Font size field.3. In the Font style field, select “Bold”.

222 CH A PT E R
4. In the Student Fields frame, select “10” in the Font size field.
5. Select General in the tree view on the left. General Header fields and options appear on the tab.6. In the Template layout field, select “Side by side”.7. Mark Print transcript title. 8. In the Title field, enter “OFFICIAL TRANSCRIPT”. 9. In the Position field, select “Title bar”.
10. Mark Print school logo and in the File name field browse to the logo graphic file.11. In the Indent field, enter “3.25” and enter “1.25” in the Height field.

TRA N S C R I P T S 22
12. Mark Print notes and enter “www.islandhighschool.org” in the field.
13. Select School Information in the tree view. School Information Header fields and options appear on the Format tab.
14. In the Section height field, enter “1.50”.15. In the Borders field, select “None”.16. The School Name box displays the name of the school you selected on the General tab. 17. Select “12” in the Font size field.18. Click the right align and bold format buttons.19. The Address box displays the address of the school you selected on the General tab. 20. Select “10” in the Font size field and click the right align button.21. In the Additional lines box, enter your CEEB-ACT code, “CEEB-ACT Code 123-456”.

224 CH A PT E R
22. Select “10” in the Font size field and click the right align button.
23. Select Student Information in the tree view. Student Information Header fields and options appear on the Format tab.
24. In the Section height field, enter “1.50”.25. In the Borders field, select “None”.26. In the grid, select the items to display in the student section. In the Display Item column, select
“Address”, “Birth date”, and “SSN”. Leave the address type as “Formatted address”.
27. Select Footer in the tree view on the left so you can format the footer.
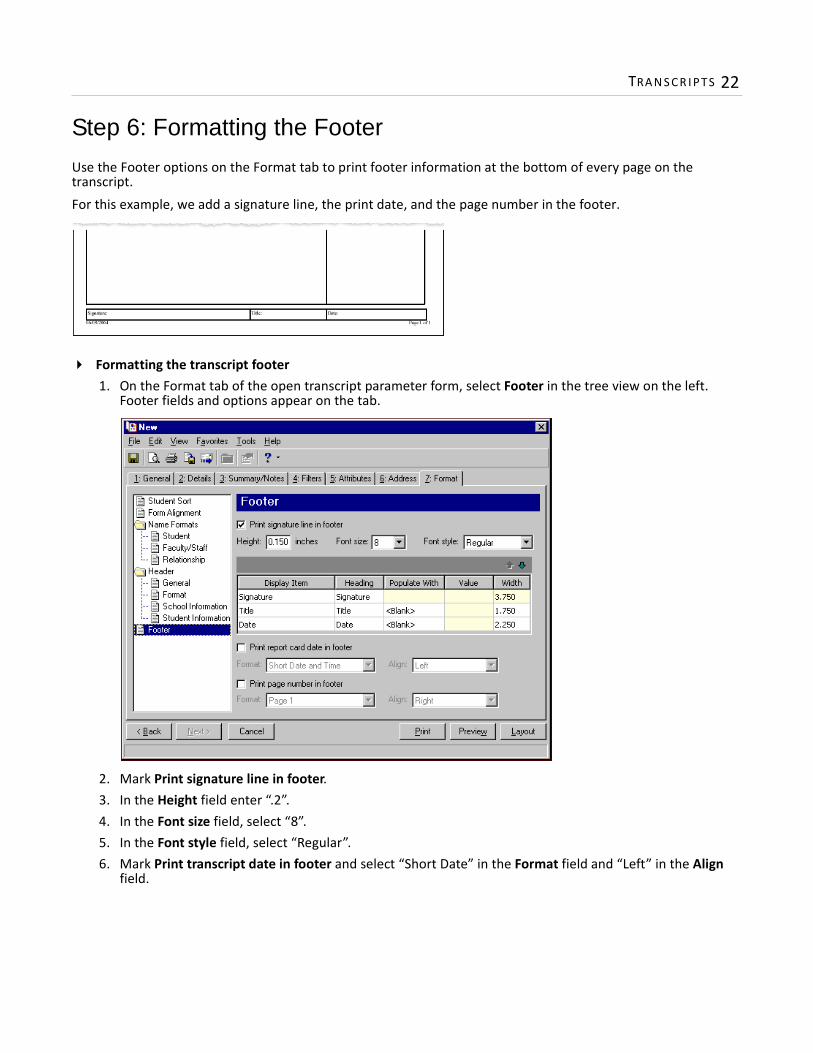
TRA N S C R I P T S 22
Step 6: Formatting the Footer
Use the Footer options on the Format tab to print footer information at the bottom of every page on the transcript. For this example, we add a signature line, the print date, and the page number in the footer.
Formatting the transcript footer1. On the Format tab of the open transcript parameter form, select Footer in the tree view on the left.
Footer fields and options appear on the tab.
2. Mark Print signature line in footer.3. In the Height field enter “.2”.4. In the Font size field, select “8”.5. In the Font style field, select “Regular”.6. Mark Print transcript date in footer and select “Short Date” in the Format field and “Left” in the Align
field.
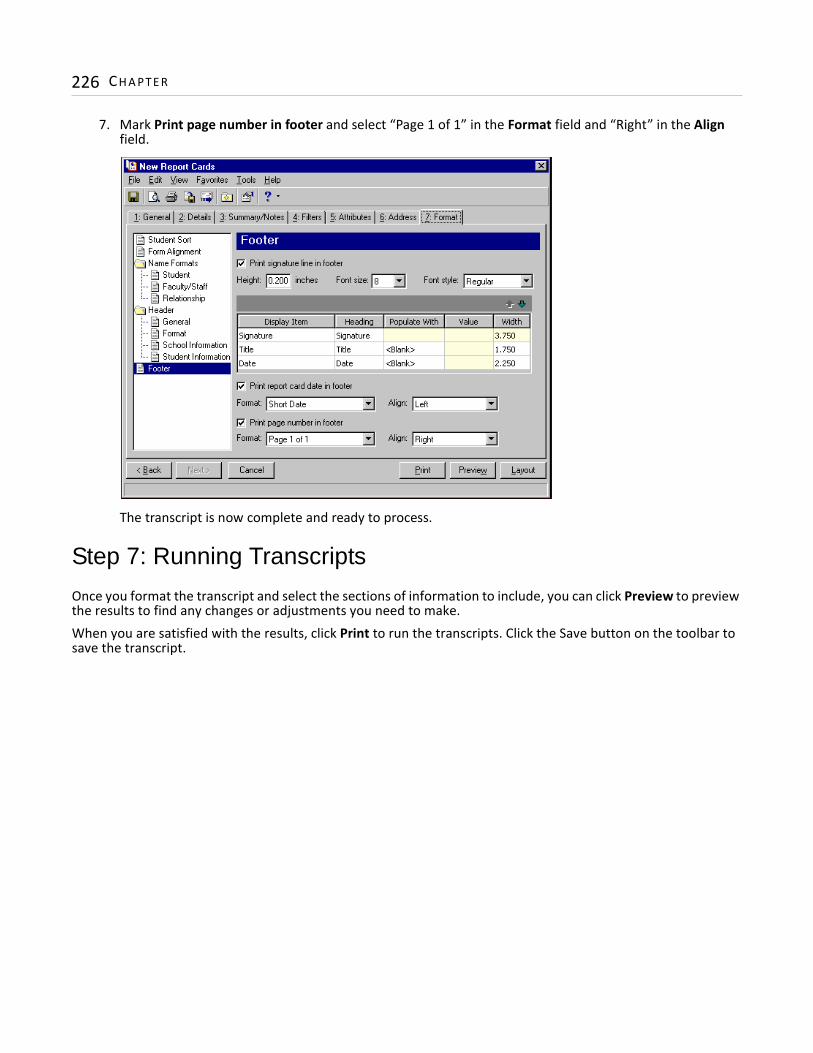
226 CH A PT E R
7. Mark Print page number in footer and select “Page 1 of 1” in the Format field and “Right” in the Align field.
The transcript is now complete and ready to process.
Step 7: Running Transcripts
Once you format the transcript and select the sections of information to include, you can click Preview to preview the results to find any changes or adjustments you need to make.When you are satisfied with the results, click Print to run the transcripts. Click the Save button on the toolbar to save the transcript.

4chapter
XAP Transcripts
Overview of XAP Transcripts. . . . . . . . . . . . . . . . . . . . . . . . . . . . . . . . . . . . . . . . . . . . . . . . . . . . . . . . . . . . . . . . . . 228Defining Attributes . . . . . . . . . . . . . . . . . . . . . . . . . . . . . . . . . . . . . . . . . . . . . . . . . . . . . . . . . . . . . . . . . . . . . . . . . 228XAP Transcript Tabs . . . . . . . . . . . . . . . . . . . . . . . . . . . . . . . . . . . . . . . . . . . . . . . . . . . . . . . . . . . . . . . . . . . . . . . . . 229General Tab . . . . . . . . . . . . . . . . . . . . . . . . . . . . . . . . . . . . . . . . . . . . . . . . . . . . . . . . . . . . . . . . . . . . . . . . . . . . . . . . . . 229Details Tab . . . . . . . . . . . . . . . . . . . . . . . . . . . . . . . . . . . . . . . . . . . . . . . . . . . . . . . . . . . . . . . . . . . . . . . . . . . . . . . . . . . 230Filters Tab. . . . . . . . . . . . . . . . . . . . . . . . . . . . . . . . . . . . . . . . . . . . . . . . . . . . . . . . . . . . . . . . . . . . . . . . . . . . . . . . . . . . 231Address Tab . . . . . . . . . . . . . . . . . . . . . . . . . . . . . . . . . . . . . . . . . . . . . . . . . . . . . . . . . . . . . . . . . . . . . . . . . . . . . . . . . . 232Format Tab. . . . . . . . . . . . . . . . . . . . . . . . . . . . . . . . . . . . . . . . . . . . . . . . . . . . . . . . . . . . . . . . . . . . . . . . . . . . . . . . . . . 234XAP Transcript Sections. . . . . . . . . . . . . . . . . . . . . . . . . . . . . . . . . . . . . . . . . . . . . . . . . . . . . . . . . . . . . . . . . . . . . . 236Courses Section . . . . . . . . . . . . . . . . . . . . . . . . . . . . . . . . . . . . . . . . . . . . . . . . . . . . . . . . . . . . . . . . . . . . . . . . . . . . . . . 236Academic Summary Section. . . . . . . . . . . . . . . . . . . . . . . . . . . . . . . . . . . . . . . . . . . . . . . . . . . . . . . . . . . . . . . . . . . . . 239Test Scores Section . . . . . . . . . . . . . . . . . . . . . . . . . . . . . . . . . . . . . . . . . . . . . . . . . . . . . . . . . . . . . . . . . . . . . . . . . . . . 241Medical Section . . . . . . . . . . . . . . . . . . . . . . . . . . . . . . . . . . . . . . . . . . . . . . . . . . . . . . . . . . . . . . . . . . . . . . . . . . . . . . . 242Exporting XAP Transcripts . . . . . . . . . . . . . . . . . . . . . . . . . . . . . . . . . . . . . . . . . . . . . . . . . . . . . . . . . . . . . . . . . . . . 244

228 CH A PT E R
You can use XAP Transcripts in Registrar’s Office Mail to create a file to upload to XAP’s Transcript Exchange for release to participating colleges.
Overview of XAP TranscriptsTo access XAP Transcripts, from the Mail page, click Forms. Select XAP Transcripts in the list on the left of the page and a grid appears on the right displaying saved XAP transcript files. On this page you can create new XAP transcript files, open saved XAP transcript files, and delete XAP transcript files.
Creating a XAP transcript file entails selecting the parameters for information to include from Registrar’s Office. You then export the information as a text (*.txt) file that you can upload to XAP.
Defining AttributesBefore creating XAP transcript files, you should define certain attributes that you will need when selecting your parameters.Course attributes. You need to define the following course attributes in Configuration and associate them
with course records: • Honors Indicator• College Prep Indicator• Program of Study• Weighting IndicatorYou should define Honors Indicator and College Prep Indicator with a data type of Yes/No. We recommend you define Program of Study and Weighting Indicator with a Data Type of Table for easy data entry.
Note: Visit our Web site at www.blackbaud.com for the latest documentation and information.

XAP TRA N S C R I P T S 22
Student attributes. You need to define the following student attributes in Configuration and associate them with student records:• Diploma Type• Program of StudyWe recommend you define Diploma Type and Program of Study with a data type of Table for easy data entry.
For more information about defining attributes, see the Configuration Guide for Registrar’s Office. For more information about adding attributes to records, see the Records Guide for Registrar’s Office.
XAP Transcript TabsWhen you create a new XAP transcript file, you specify parameters on the General, Details, Filters, Address, and Format tabs. Once you define parameters for a XAP transcript, you can save these to later export XAP transcript text files using the same parameters easily. To move among the tabs, click Next and Back at the bottom of the screen or select the tab.
General Tab
Use the General tab to select the school, grade levels, academic years, and sessions to include on the XAP transcript.
Transcript for. If you have more than one school, you can select which school to create the export for.
Note: If a student has classes for more than one school, for example middle school and high school, courses from both schools are included.

230 CH A PT E R
Filters grid. Using the filters grid, you can filter the coursework and academic information to include by grade levels, academic years, and sessions. For information about how to use filters, see “Filters Tab” on page 231.
Create an output query of students. To create a query of students included in the export, mark Create an output query of students. You can save and use an output query later for reports or other mailings.
Output to. In the Output to field, you must select the file name and location of the export file. Export files are in text (*.txt) formats. If you select an existing text file to use, that file will be overwritten with the newly exported information.
Details Tab
On the Details tab, you make selections about the details to export.
Include information from outside schools attended. Mark Include information from outside schools attended to include information for schools a student previously attended. Outside school information appears only if the Print education on transcript checkbox is marked for that school on the Education tab of the student record and if the student’s enrollment dates for that school fall within the academic years selected for the XAP transcript.
Section grid. Sections include Courses, Academic Summary, Test Scores, and Medical. To open a section, select the section in the grid and click Open. For more information about each section, see “XAP Transcript Sections” on page 236.

XAP TRA N S C R I P T S 23
Filters Tab
On the Filters tab, you select criteria that determines the students and courses included within the grade levels, academic years, and sessions you selected on the General tab.
Open. To open a selection screen to designate specific filters for the XAP transcript, select a filter in the grid and click Open on the action bar.
Clear All Filters. To reset each filter to include all, you can click Clear All Filters.
Filters. The Filters column lists all the filters for the XAP transcript. You cannot edit this column.Include. By default, in the Include column, each filter is set to All. To open a selection screen to designate
specific filters for the XAP transcript, choose Selected.Selected Filters. Filters you specify on the selection screen appear in the Selected Filters column.
Tip: You can also double-click a filter in the grid to open the selection screen.
Note: A filter is a requirement items must meet to be included in a XAP transcript run. For example, if you apply the Student Attributes filter, the XAP transcript includes only students with the specified attributes.

232 CH A PT E R
Selected Filters Screen
From the Filters tab, you can open a selection screen for a filter in several ways: by double-clicking the filter in the grid, selecting the filter in the grid and clicking Open on the action bar, or choosing Selected in the Include column for the filter.
Include. For each filter, you can select to include all or select specific filters. Depending on the filter, you may also be able to filter by a range or query.
All. If you mark Include: All, you cannot designate specific filters.Selected or Range. If you mark Include: Selected or Range, a grid appears in which you can specify filters. In a
field, you can click the binoculars to search for information.Query. If you mark Include: Query, the Query name field appears for you to enter the name of the query by
which to filter the XAP transcript. In the field, you can click the binoculars to search for the query name.To create a new query, click the binoculars. Then click Add a New Query on the Open Query screen. For more information about creating queries, see the Query Guide.
Previous Filter. To view or edit the previous filter without returning to the Filters tab, click Previous Filter.Next Filter. To view or edit the next filter without returning to the Filters tab, click Next Filter.
Address Tab
Use the Address tab to specify which addresses to export for XAP transcripts. The program compares the parameters you define on this tab with address information entered on the Addresses tab of the student/relationship record to identify the appropriate address to use. These parameters determine both the student address and the parent/guardian address used by XAP.

XAP TRA N S C R I P T S 23
On the Address tab, you select a validation date and then define the order in which the program evaluates address types. The program first checks the validation date, then seasonal addresses, other address types (in the order you determine), and attributes. The first address found on the student/relationship record that meets the defined parameters is used on the XAP transcript. You can also specify what to do if no valid address is found.
Step 1. In the Validate addresses as of [ ] field, select a date to determine which address to use. Any address that is valid on this date is considered for use on the XAP transcript. Any addresses that are not valid on this date are automatically excluded from consideration.
Step 2. Determine whether to include seasonal addresses as possible addresses. If you mark Consider seasonal addresses, the program uses the first valid seasonal address found on the student/relationship record and does not consider any other addresses.If the seasonal address has the Send no mail attribute, the seasonal address is excluded automatically as a possible address. If a valid seasonal address is not found, the program considers the address types selected in Step 4.
Step 3. In the If no seasonal addresses are found, consider these addresses frame, select which address types to use if no valid seasonal addresses exist. In the Addresses box, select an address type and click the right arrow to move it into the Addresses to consider, in order of importance box. The first address type in the list that matches the validation date is used on the XAP transcript. You can change the order addresses are considered by selecting an address type and clicking the up and down arrows next to the list.If a valid address is not found from these address types, the program considers the attributes selected in Step 4.
Note: Any address with No mail selected in the Send [ ] to this address field on the Address Attributes tab is automatically excluded as a possible address.

234 CH A PT E R
Step 4. In the grid, you can select address attribute types to consider. For example, you have a “Transcript address” attribute you use to flag addresses for transcripts. When you select Include in the Action column and Transcript address in the Attribute column of the grid, the program automatically uses any valid addresses assigned this attribute.
Step 5. In the If no address is found field, select what to do if a valid address is not found. You can select Print with no address, Remove record from run, or Print specific address. If you select to print a specific address, the Use field appears so you can select the address type to use when a student/relationship does not have an address of the types you added to the Addresses to consider, in order of importance list.
Format Tab
On the Format tab, you make selections regarding school and student information to include in the XAP transcript file. The list on the left of the screen displays options for the XAP transcript. When you select an item in the list, the right side of the screen changes to present selections for that section of the XAP transcript.
Student Current StatusesSelect Student Current Statuses to select which statuses export as E for enrolled and which statuses export as G for graduated.
To move a status from the Export these statuses as E box to the Export these statuses as G box, select the status and click the right arrow.

XAP TRA N S C R I P T S 23
School InformationSelect School Information in the tree view to enter school information.
School Name. The School Name field displays the school selected in the Transcript for field on the General tab. You can use this name or enter a different one.
Address. The Address field displays the address of the school selected in the Transcript for field on the General tab. You can use this address or enter a different one.
Phone. The Phone field displays the phone number of the school selected in the Transcript for field on the General tab. You can use this number or enter a different one.
Fax. In the Fax field, you can enter the fax number for your school.CEEB. In the CEEB field, you can enter the College Entrance Examination Board code for your school.
Student InformationSelect Student Information in the tree view to select specific student information to export to XAP. The items of information from Registrar’s Office appear in the Display Item column. In the Type column, select what information to display for each display item. The XAP Description column displays how the column appears in XAP.

236 CH A PT E R
The following items are automatically exported: Birth date, Date entered, SSN, Student status, Class of, Graduation date, Parent/Guardian, Student ID, Gender, Advisor, Date left, Last name, First name, Middle name, Address lines, City, State, Zip, Ethnicity, Parent address, Parent city, Parent state, and Parent zip.
Student phone. Select the phone type of the phone numbers to export for students.Current grade level. Select whether to export the short or long description of the current grade level.Parent/Guardian phone. Select the phone type of the phone numbers to export for parent/guardians.Student attribute for Diploma Type. Select the student attribute used for Diploma Type. The program tries
to automatically match with an attribute with a name of Diploma if it exists.Student attribute for Program of Study. Select the student attribute used for Program of Study. The
program tries to automatically match with an attribute with a name of POS or Program if it exists.
XAP Transcript SectionsSections include Courses, Academic Summary, Test Scores, and Medical.
Courses Section
To access the courses section, on the Details tab, select Courses in the Section column of the grid and click Open. The Courses Section screen appears.
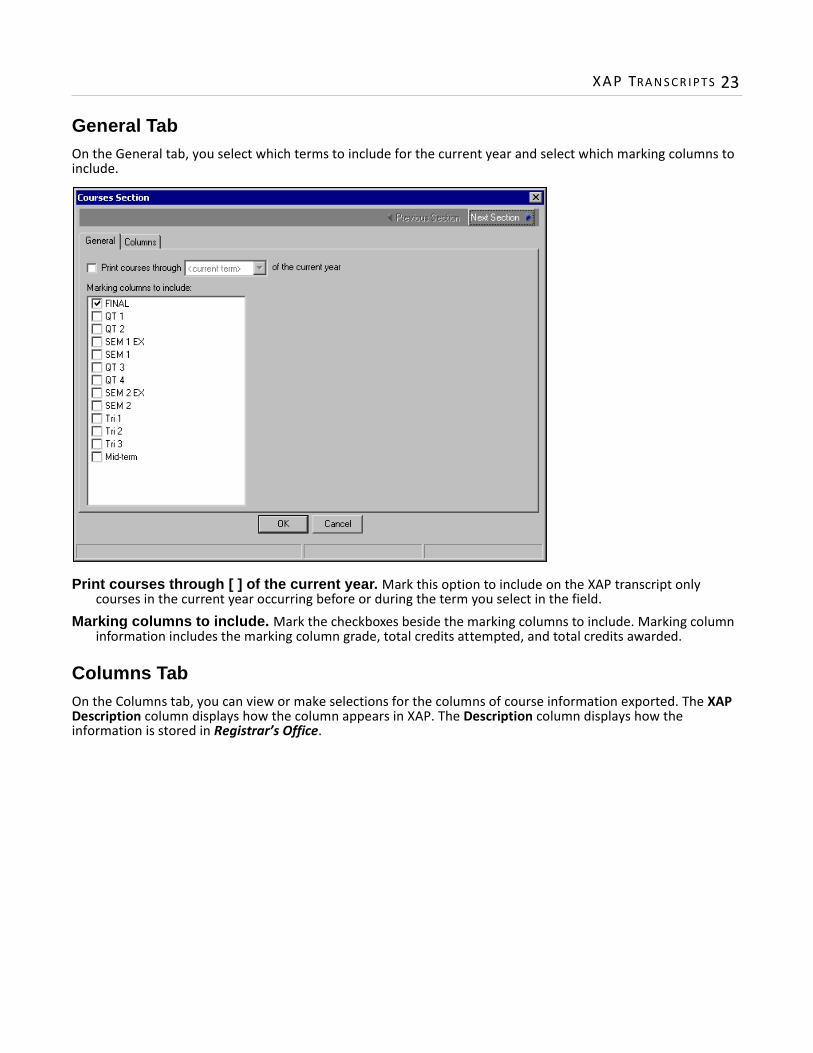
XAP TRA N S C R I P T S 23
General TabOn the General tab, you select which terms to include for the current year and select which marking columns to include.
Print courses through [ ] of the current year. Mark this option to include on the XAP transcript only courses in the current year occurring before or during the term you select in the field.
Marking columns to include. Mark the checkboxes beside the marking columns to include. Marking column information includes the marking column grade, total credits attempted, and total credits awarded.
Columns TabOn the Columns tab, you can view or make selections for the columns of course information exported. The XAP Description column displays how the column appears in XAP. The Description column displays how the information is stored in Registrar’s Office.

238 CH A PT E R
To open a column, select the column in the grid and click Open Column.
Credits attempted. In the Field to show field, the item of information to export appears— Marking Column. In the Display field, the information from the marking column that is exported appears— Credits attempted.
Credits awarded. In the Field to show field, the item of information to export appears— Marking Column. In the Display field, the information from the marking column that is exported appears— Credits awarded.
Grade. In the Field to show field, the item of information to export appears— Marking Column. In the Display field, the information from the marking column that is exported appears— Grade.In the Letter/Number field, select whether to export the marking column grade as a letter grade or numeric grade. Grades entered as ‘NG’ (for blank or missing grades) are not included.
Honors Indicator. In the Field to show field, the item of information to export appears— Course attribute. The program tries to automatically match with an attribute with a name of Honor if it exists. Otherwise, in the Attribute field, select the course attribute used for Honors Indicator.
College Prep Indicator. In the Field to show field, the item of information to export appears— Course attribute. The program tries to automatically match with an attribute with a name of College if it exists. Otherwise, in the Attribute field, select the course attribute used for College Prep Indicator.
Course name. In the Field to show field, the item of information to export appears— Course name.Course ID. In the Field to show field, the item of information to export appears— Course ID.Subject area. In the Field to show field, the item of information to export appears— Department.Credit qualifier. In the Field to show field, the item of information to export appears— Marking Column. In the
Display field, the information from the marking column that is exported appears— Credit qualifier. This exports a Yes or No value depending on whether the Use in Calculations checkbox is marked for the marking column grade in Registrar’s Office.
Note: If course information or comments do not export as expected (for example, grades or comments are missing), make sure the Print on transcript checkbox is marked for the missing items on the student record and on the Grading tab for the course.

XAP TRA N S C R I P T S 23
In the Calculate value using field, select whether to use the existing calculation ‘Use in clacluations’ designation on each grade or select Grade levels and then in the Courses taken in the following grade levels should have the credit qualifer set to ‘N’ box, mark the grade levels that should have the credit qualifer specified.
Program of study. In the Field to show field, the item of information to export appears— Course attribute. The program tries to automatically match with an attribute with a name of POS or Program if it exists. Otherwise, in the Attribute field, select the course attribute used for Program of study.
Weighting Indicator. In the Field to show field, the item of information to export appears— Course attribute. The program tries to automatically match with an attribute with a name of Weighting if it exists. Otherwise, in the Attribute field, select the course attribute used for Weighting Indicator.
Academic Summary Section
To access the Academic Summary section, on the Details tab, select Academic Summary in the Section column of the grid and click Open. The Academic Summary Section screen appears.
General TabOn the General tab, you see that the GPA and rank information you include is only for the current academic year rather than all years.
Columns TabOn the Columns tab, you can view and make selections for the columns of GPA and Rank information exported. The XAP Description column displays how the column appears in XAP. The Description column displays how the information is stored in Registrar’s Office.

240 CH A PT E R
You can export two GPA rows (GPA 1 and GPA 2) and two Rank rows (Class rank 1 and Class rank 2). GPA 1 defaults to the Hope GPA calculation, if you have one. Otherwise it defaults to the first GPA calculation found. Rank 1 defaults to the Hope Rank calculation, if you have one. Otherwise it defaults to the first straight rank calculation found. GPA 2 and Class_rank 2 are blank by default.
To open a column, select the column in the grid and click Open Column.
Column type. In the Column type field, select GPA, Rank, or <Blank>. If you select <Blank>, no other options appear.
Marking column. In the Marking column field, select the marking column.

XAP TRA N S C R I P T S 24
Calculation. In the Calculation field, depending on your selection in Column type, select a GPA or Straight Rank calculation.
Type. If you select a GPA calculation, you can select the type of GPA in the Type field: GPA, Year to date GPA, or Cumulative GPA.
Session to report. In the Session to report field, select which sessions to include. You can select a specific session or select “<Latest session with a value>”.
Test Scores Section
To access the Test Scores section, on the Details tab, select Test Scores in the Section column of the grid and click Open. The Test Scores Section screen appears.
General TabOn the General tab, you can filter the tests to include by test type and subtest type. Test scores are included for all dates. For information about how to use filters, see “Filters Tab” on page 231.

242 CH A PT E R
Columns TabOn the Columns tab, you can view the columns of test score information exported. The XAP Description column displays how the column appears in XAP. The Description column displays how the information is stored in Registrar’s Office.
Medical Section
To access the Medical section, on the Details tab, select Medical in the Section column of the grid and click Open. The Medical Section screen appears.

XAP TRA N S C R I P T S 24
General TabOn the General tab, you select which immunization records to include in the medical section. Immunization records are included for all dates. For information about how to use filters, see “Filters Tab” on page 231.

244 CH A PT E R
Columns TabOn the Columns tab, you can view the columns of medical information exported. The XAP Description column displays how the column appears in XAP. The Description column displays how the information is stored in Registrar’s Office.
Exporting XAP Transcripts
After you have finished selecting your parameters, click the Export button to create the export file. Remember that you specified the file name and location and General tab.
Note: You can export XAP transcripts only if you have security rights established in Administration.

5chapter
Labels
Label Tabs . . . . . . . . . . . . . . . . . . . . . . . . . . . . . . . . . . . . . . . . . . . . . . . . . . . . . . . . . . . . . . . . . . . . . . . . . . . . . . . . 246General Tab . . . . . . . . . . . . . . . . . . . . . . . . . . . . . . . . . . . . . . . . . . . . . . . . . . . . . . . . . . . . . . . . . . . . . . . . . . . . . . . . . . 246Fields to Include Tab . . . . . . . . . . . . . . . . . . . . . . . . . . . . . . . . . . . . . . . . . . . . . . . . . . . . . . . . . . . . . . . . . . . . . . . . . . 248Filters Tab . . . . . . . . . . . . . . . . . . . . . . . . . . . . . . . . . . . . . . . . . . . . . . . . . . . . . . . . . . . . . . . . . . . . . . . . . . . . . . . . . . . 249Relationship Filters Tab . . . . . . . . . . . . . . . . . . . . . . . . . . . . . . . . . . . . . . . . . . . . . . . . . . . . . . . . . . . . . . . . . . . . . . . . 250Attributes Tab . . . . . . . . . . . . . . . . . . . . . . . . . . . . . . . . . . . . . . . . . . . . . . . . . . . . . . . . . . . . . . . . . . . . . . . . . . . . . . . . 252Address Tab . . . . . . . . . . . . . . . . . . . . . . . . . . . . . . . . . . . . . . . . . . . . . . . . . . . . . . . . . . . . . . . . . . . . . . . . . . . . . . . . . . 253Format Tab . . . . . . . . . . . . . . . . . . . . . . . . . . . . . . . . . . . . . . . . . . . . . . . . . . . . . . . . . . . . . . . . . . . . . . . . . . . . . . . . . . 254Creating Labels . . . . . . . . . . . . . . . . . . . . . . . . . . . . . . . . . . . . . . . . . . . . . . . . . . . . . . . . . . . . . . . . . . . . . . . . . . . . 257

246 CH A PT E R
The Mail page is the central location for generating labels in The Education Edge. If you installed both Admissions Office and Registrar’s Office, you can create labels for applicants, students, faculty/staff, individuals, organizations, persons, or relations. To access Labels, from the Mail page, click Labels and Envelopes. Select Labels in the list on the left of the page and a grid appears on the right displaying saved labels. On this page you can create new labels, open saved labels, and delete labels. When you create new labels, you specify parameters for labels on the General, Fields to Include, Filters, Relationship Filters, Attributes, Address, and Format tabs. Whether you create new labels or open saved labels, the screen opens to the General tab. You can use a variety of parameters to define the output for labels in The Education Edge. Saving these parameters also makes future label preparation easier.
Label Tabs
In Labels, you select parameters on tabs: General, Fields to Include, Filters, Attributes, and Format. To move among the tabs, click Next and Back at the bottom of the screen or select the tab. On these tabs, you specify records, fields, and formatting options for the labels. Each tab helps you enter information in an easy and logical manner.
General Tab
You can use the General tab to select parameter settings specific to labels.
Note: Visit our Web site at www.blackbaud.com for the latest documentation and information.
Note: A mail task is a specific mailing process, such as printing report cards or envelopes. Fields and options for a mail task are arranged on tabs so you can access all the information quickly and easily.
LA B E L S 24
Create labels for. In the Create labels for field, select the record type for which to print labels. The available record types depend on the programs installed. If you have Admissions Office, you can create labels for applicants, applicant relationships, faculty/staff, faculty/staff relationships, individuals, individual relationships, organizations, organization relationships, persons, and person relationships. If you have Registrar’s Office, you can create labels for students, student relationships, faculty/staff, faculty/staff relationships, individuals, individual relationships, organizations, organization relationships, persons, and person relationships. If you have both, you can create labels for all of these record types from either program.
Exclude deceased? If you select an applicant, student, or relationship in the Create labels for field, the Exclude deceased? option appears. Mark this option to omit deceased and deceased relations from the run of labels.
Label type. In the Label type grid, you can select the type of label to use. The Type and Size columns list label types and dimensions compatible with The Education Edge. The Across column displays the number of labels across the width of a sheet of labels, and the Down column displays the number of labels down the length of a sheet. The Description column provides additional details about each label type.The Education Edge is compatible with many standard label types. If the label size you use is not available, you can export a data file with the information so you can print labels using another application. Also, keep in mind The Education Edge is compatible only with laser printers. For more information about exporting, see the Mail Basics chapter.
Label font. In the Label font field, select a text type to use on the labels.Font size. In the Font size field, select a size for the text on the labels.Start printing in row/column. You can start printing labels at any location on a sheet of labels. For example, if
you have a sheet that is partially used, you can use the Start printing in row/column fields to indicate the location of the first unused label on the sheet.
Create an output query of [ ]. To create a query of the records for which you run labels, mark Create an output query of [ ]. If you selected a relationship record type in the Create labels for field, you can select Related Records to create a query of all relation records included in run of labels.
Note: If you select Persons or Person Relationships in the Create labels for field, you can select a query on the Filters tab that includes multiple record types, such as applicants and students or parents of applicants and students.
Note: The Type column also displays a graphic representation for the label type. For example, labels that print on a laser printer display a printer graphic next to the label type.
Warning: The font type and size you select may impact the amount of information you can print on the labels.
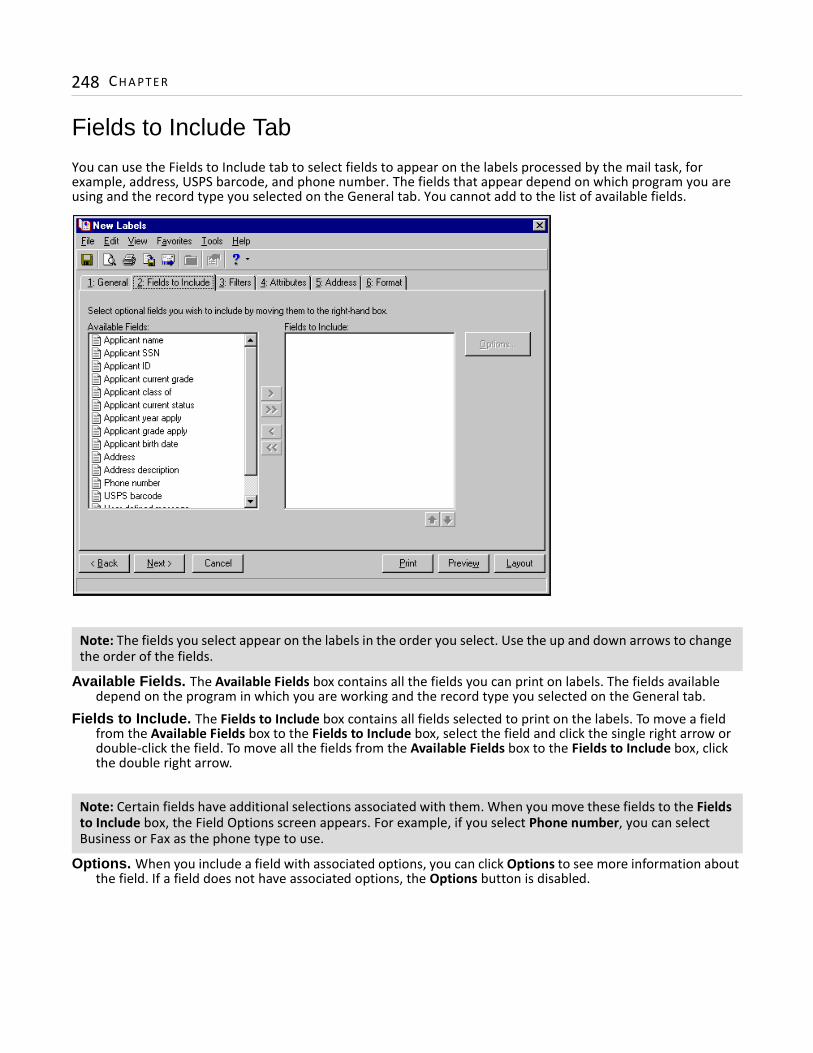
248 CH A PT E R
Fields to Include Tab
You can use the Fields to Include tab to select fields to appear on the labels processed by the mail task, for example, address, USPS barcode, and phone number. The fields that appear depend on which program you are using and the record type you selected on the General tab. You cannot add to the list of available fields.
Available Fields. The Available Fields box contains all the fields you can print on labels. The fields available depend on the program in which you are working and the record type you selected on the General tab.
Fields to Include. The Fields to Include box contains all fields selected to print on the labels. To move a field from the Available Fields box to the Fields to Include box, select the field and click the single right arrow or double-click the field. To move all the fields from the Available Fields box to the Fields to Include box, click the double right arrow.
Options. When you include a field with associated options, you can click Options to see more information about the field. If a field does not have associated options, the Options button is disabled.
Note: The fields you select appear on the labels in the order you select. Use the up and down arrows to change the order of the fields.
Note: Certain fields have additional selections associated with them. When you move these fields to the Fields to Include box, the Field Options screen appears. For example, if you select Phone number, you can select Business or Fax as the phone type to use.

LA B E L S 24
Filters Tab
You can use the Filters tab to select criteria that determines which records to include in the run of labels. The items by which you can filter depend on the program you are using. For example, in Admissions Office, you can select to include only accepted applicants in the run of labels. Applicants with any other status, such as denied or waitlisted, are excluded from the run. For more information about filtering, see the Program Basics chapter of the Program Basics Guide.
Open. To open a selection screen to designate specific filters for the report, select a filter in the grid and click Open on the action bar.
Clear All Filters. To reset each filter to include all, you can click Clear All Filters.Filters. The Filters column lists all the filters for the report. You cannot edit this column.Include. By default, in the Include column, each filter is set to All. To open a selection screen to designate
specific filters for the report, choose Selected.Selected Filters. Filters you specify on the selection screen appear in the Selected Filters column.
Tip: You can also double-click a filter in the grid to open the selection screen.

250 CH A PT E R
Selected Filters Screen
From the Filters tab, you can open a selection screen for a filter in several ways: by double-clicking the filter in the grid, selecting the filter in the grid and clicking Open on the action bar, or choosing Selected in the Include column for the filter.
Include. For each filter, you can select to include all or select specific filters. Depending on the filter, you may also be able to filter by a range or query.
All. If you mark Include: All, you cannot designate specific filters.Selected or Range. If you mark Include: Selected or Range, a grid appears in which you can specify filters. In a
field, you can click the binoculars to search for information.Query. If you mark Include: Query, the Query name field appears for you to enter the name of the query by
which to filter the report. In the field, you can click the binoculars to search for the query name.To create a new query, click the binoculars. Then click Add a New Query on the Open Query screen. For more information about creating queries, see the Query Guide.
Previous Filter. To view or edit the previous filter without returning to the Filters tab, click Previous Filter.Next Filter. To view or edit the next filter without returning to the Filters tab, click Next Filter.
Relationship Filters Tab
If you select a relationship record type in the Create label for field on the General tab, the Relationship Filters tab appears. On this tab you select filters to determine which relationship types to include in the label run. For example, to address labels to the father and mother of students, you select Father and Mother for the Relationship Type filter.

LA B E L S 25
If you use a Related <Record Type> filter, such as Related Applicants, you can select specific applicants or use a query. If you use more than one of the Related <Record Type> filters, the label run includes a combination of the filters results. For example, if you select a query of related Applicants and a query of Related Students, the records included in the label run include the selected Related Applicants in addition to the selected Related Students.
Using the options below the filters grid, you can define additional criteria for including or excluding relations. If you select “Ignore” for a criterion, the program does not consider it when processing.[ ] emergency contacts. If you selected Applicant Relationships, Student Relationships, or Person
Relationships as the record type on the General tab, you can select to include, exclude, or ignore relations designated as the emergency contact.
[ ] relations that receive a report card. If you selected Student Relationships or Person Relationships as the record type on the General tab, you can select to include, exclude, or ignore relations designated to receive report cards.
[ ] relations the applicant/student/person lives with. If you selected Applicant Relationships, Student Relationships, or Person Relationships as the record type on the General tab, you can select to include, exclude, or ignore relations who live with the applicant, student, or person.
[ ] relationships that show on transcripts. If you selected Student Relationships or Person Relationships as the record type on the General tab, you can select to include, exclude, or ignore relations designated to receive transcripts.
[ ] spousal relationships. If you selected Faculty/Staff Relationships, Individual Relationships, or Person Relationships as the record type on the General tab, you can select to include, exclude, or ignore relations that are spouses.
Note: The Related Individuals query does not filter out related applicants and students. To filter out other relationship types, you must select “None” in the Include column for the student relationships you do not want in the labels.

252 CH A PT E R
Attributes Tab
You can use the Attributes tab to add, delete, or update attributes for records when you print labels. For example, you may want to print labels for parents who are also volunteers at your school. You can add the attribute to relationship records when you print the labels.
Action. In the Action column, you can add, delete, or update attributes on the records when you print labels.
Attribute Type. In the Attribute Type column, you can select an attribute type.Description. In the Description column you can enter or select a description for the attribute type.Short Description. In the Short Description column, a brief description of the attribute type appears when you
select a type in the Attribute Type column.Date. In the Date column, select the date you add, delete, or update the attribute.
Required. If the attribute type you select is required, the program automatically marks the checkbox in the Required column.
Comments. In the Comments column, you can enter additional information about the attribute type.
Note: Attribute types are established in Configuration. For more information about defining attributes, see the Configuration Guide that program.
Note: An attribute is a tool used to group information based on a common theme. With attributes defined, you can filter information to your specifications.

LA B E L S 25
Address Tab
Use the Address tab to specify which addresses to use for labels. The program compares the parameters you define on this tab with address information entered on the Addresses tab of records to identify the appropriate address to use. On the Address tab, you select a validation date and then define the order in which the program evaluates address types. The program first checks the validation date, then seasonal addresses, other address types (in the order you determine), and attributes. The first address found on the record that meets the defined parameters is used on the label. You can also specify what to do if no valid address is found.If you selected Organizations in the Create labels for field on the General tab, the Mail to field appears. In this field, select the organization address to use.
Step 1. In the Validate addresses as of [ ] field, select a date to determine which address to use. Any address that is valid on this date is considered for use on the label. Any addresses that are not valid on this date are automatically excluded from consideration.
Step 2. Determine whether to include seasonal addresses as possible addresses. If you mark Consider seasonal addresses, the program uses the first valid seasonal address found on the student/relationship record and does not consider any other addresses.If the seasonal address has the Send no mail attribute, the seasonal address is excluded automatically as a possible address. If a valid seasonal address is not found, the program considers the address types selected in Step 3.
Step 3. In the If no seasonal addresses are found, consider these addresses frame, select which address types to use if no valid seasonal addresses exist.
Note: Any address with No mail selected in the Send [ ] to this address field on the Address Attributes tab is automatically excluded as a possible address.

254 CH A PT E R
In the Addresses box, select an address type and click the right arrow to move it into the Addresses to consider, in order of importance box. The first address type in the list that matches the validation date is used on the label. You can change the order addresses are considered by selecting an address type and clicking the up and down arrows next to the list.If a valid address is not found from these address types, the program considers the attributes selected in Step 4.
Step 4. In the grid, you can select address attribute types to consider. For example, you have a “Holiday greetings” attribute you use to flag addresses to use for holiday cards. When you select Include in the Action column and Holiday greetings in the Attribute column of the grid, the program automatically uses any valid addresses assigned this attribute.
Step 5. In the If no address is found field, select what to do if a valid address is not found. You can select Print with no address, Remove record from run, or Print specific address. If you select to print a specific address, the Use field appears so you can select the address type to use when a record does not have an address of the types you added to the Addresses to consider, in order of importance list.If you selected Organizations in the Create labels for field on the General tab, the If no contact is found field appears. You can select Print organization name with no address, Remove record from run, or Print specific organization address.
Format Tab
You can use the Format tab to designate the format of the labels. Settings on this tab determine the appearance of the labels. You can sort the labels and make selections for truncation reports. When you select a formatting area from the list on the left, selections appear on the right.You can print a truncation report to determine the records whose information does not fit on the label as you designed it to print. The report displays truncation information for a variety of font sizes so you can determine the best options for the labels. When you print a truncation report from Labels, the program checks settings entered on the labels tabs to determine records whose information does not fit on the label. For more information about label truncation reports, see the Label Truncation Report chapter.Detail. You can use Detail to make printing selections for the labels.
Omit punctuation from mailing — Mark this checkbox to print no punctuation on the labels.Print address in ALL CAPS — Mark this checkbox to print the address in all capital letters.Number of lines to skip before printing the first line — Mark this checkbox to leave space before the first row of printing on the labels.

LA B E L S 25
Number of spaces to include before each line — To leave space at the beginning of each line on the labels, enter a number in the row.Include total number of labels — Mark this checkbox to print the total number of labels processed in the run immediately after the last label.Include message on the same line as [ ] — To print a message before a selected field on the same line, select a field in this row. The available fields are those you selected on the Fields to Include tab. You define the message to print by selecting the User-defined message field on the Fields to Include tab and entering the message on the Field Options screen that appears. Combine labels for each spouse pair — Mark this checkbox to print one label for each married couple. This option appears only if you selected a relationship record type in the Create labels for field on the General tab.For example, when printing labels for student relationships, if you mark this option, one label prints for both the mother and father of a student. The address and name used for the spousal pair is the first of the spouses listed on the record’s Relationship tab. If this option is unmarked, two labels print— one for each parent.Combine labels for <record type> with the same related record — Mark this checkbox to print one label for each relationship. This option appears only if you selected a relationship record type in the Create labels for field on the General tab. For example, when two students have the same father, if this option is marked, only one label prints for the father. If the option is unmarked, two labels print for the father — one for each student. If you mark this option and also mark Combine labels for each spouse pair, one label prints for the mother and father of the two students. If you mark Combine labels for <record type> with the same related record and include the <Record type> name field on the Fields to Include tab, the name for each record related to the relation prints as a separate line on the label.Print a label for each contact — Mark this checkbox to print a label for each contact for an organization. This option appears only if you selected Organizations in the Create labels for field on the General tab. You must include the Contact name field on the Field to Include tab to use this option. If you include the Contact name field and leave this option unmarked, a label prints for only the organization’s primary contact.Print organization name in place of contact name if no contact is defined — If you include the Contact name field on the Field to Include tab and an organization has no contacts defined, mark this checkbox to use the organization name in place of the contact’s name. This option appears only if you selected Organizations in the Create labels for field on the General tab.
Sort. You can use Sort to select the order to print labels. When you select Sort, a grid displays the categories you can sort for the labels.
Note: We recommend you preview the run before printing to help minimize errors in printing the labels.

256 CH A PT E R
In the first row in the Sort by column, select the category by which to sort the labels. The categories available depend on the record type you selected in the Create labels for field on the General tab.In the Order by column, select Ascending to sort labels alphabetically or Descending to sort them in reverse alphabetical order.
Truncation Reports. You can use Truncation Reports to determine the records whose information does not fit on the label as you designed it to print.
To preview or print a truncation report before printing labels, mark Print Truncation reports before label run. The truncation report compares information selected on the tabs with the font size and label type selected. If you preview the labels, you can also preview the report. When you print, export, or send the labels as email, the report prints.To check for horizontal and vertical truncations, mark Check for horizontal truncations and Check for vertical truncations.To create a static query of records for which labels truncate, mark Create exception query.
After the program prints the truncation report, you get a message asking if you want to print the labels. If you mark Exclude record from label run, truncated labels do not print.
Note: If you mark Exclude record from label run, we recommend you also mark Create exception query so you have a record of labels that do not print.

LA B E L S 25
Name Formats. Using Name Formats, you can format how names appear on labels.
In the Select addressee/salutation from [ ] field, select Record or Configuration. If you select Record, in the Use field, select the full name, primary addressee, or primary salutation as defined on the record. If you select Configuration, in the Use field, select from one of the formats defined in Configuration. In the If not present...Select addressee/salutation from field, you can select a second name format for situations where the first selection is not present on records. For example, if you select to use the Primary salutation, and you have students without a defined Primary salutation on the Addressees/Salutations tab, the second name format is used. If you select <Full name> in the Use field, this field is disabled.
Creating LabelsUsing Labels, you can create labels with Education Edge record information. Labels created in Mail are compatible with many standard label sizes; however, if the label size you use is not compatible, you can export the information gathered by the mail task to another application compatible with the label type you want to use. For more information about exporting in Mail, see the Mail Basics chapter.
Creating labelsFor the following example, we create labels for student relationships. Specific entries and selections may be different, but you can follow the same procedure for creating labels for other record types.1. From the Mail page in Registrar’s Office, click Labels or select the Labels navigation tab. The Labels page
appears.
Note: You must have the appropriate security rights to output an addressee/salutation with Social Security numbers. If you do not have security rights, the numbers are masked. For more information, see the Security chapter of the Administration Guide for The Education Edge.
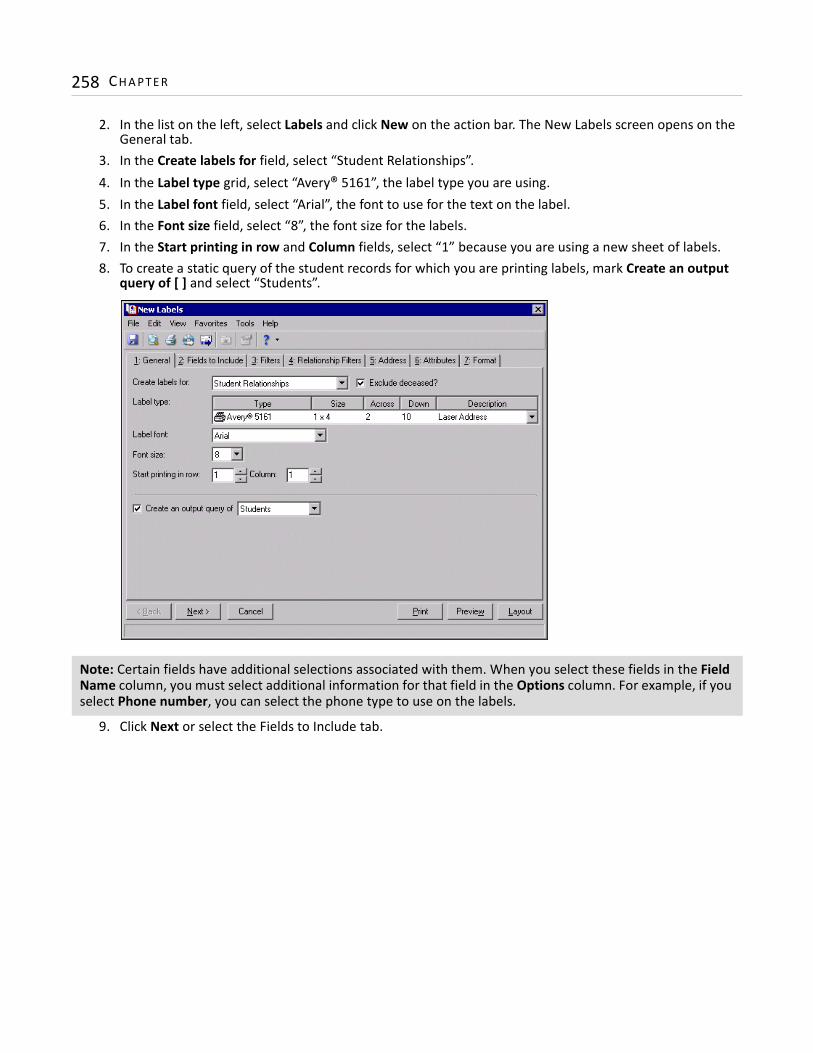
258 CH A PT E R
2. In the list on the left, select Labels and click New on the action bar. The New Labels screen opens on the General tab.
3. In the Create labels for field, select “Student Relationships”.4. In the Label type grid, select “Avery® 5161”, the label type you are using.5. In the Label font field, select “Arial”, the font to use for the text on the label.6. In the Font size field, select “8”, the font size for the labels.7. In the Start printing in row and Column fields, select “1” because you are using a new sheet of labels.8. To create a static query of the student records for which you are printing labels, mark Create an output
query of [ ] and select “Students”.
9. Click Next or select the Fields to Include tab.
Note: Certain fields have additional selections associated with them. When you select these fields in the Field Name column, you must select additional information for that field in the Options column. For example, if you select Phone number, you can select the phone type to use on the labels.

LA B E L S 25
10. In the Available Fields box, select Student name and Address as fields to print on the labels.
11. Click Next or select the Filters tab. In the Student Current Grade Levels row, choose “Selected” in the Include column. The Selected Student Current Grade Levels screen appears.
12. Select Tenth Grade and click the right arrow to move the field to the Include these student current grade levels box.
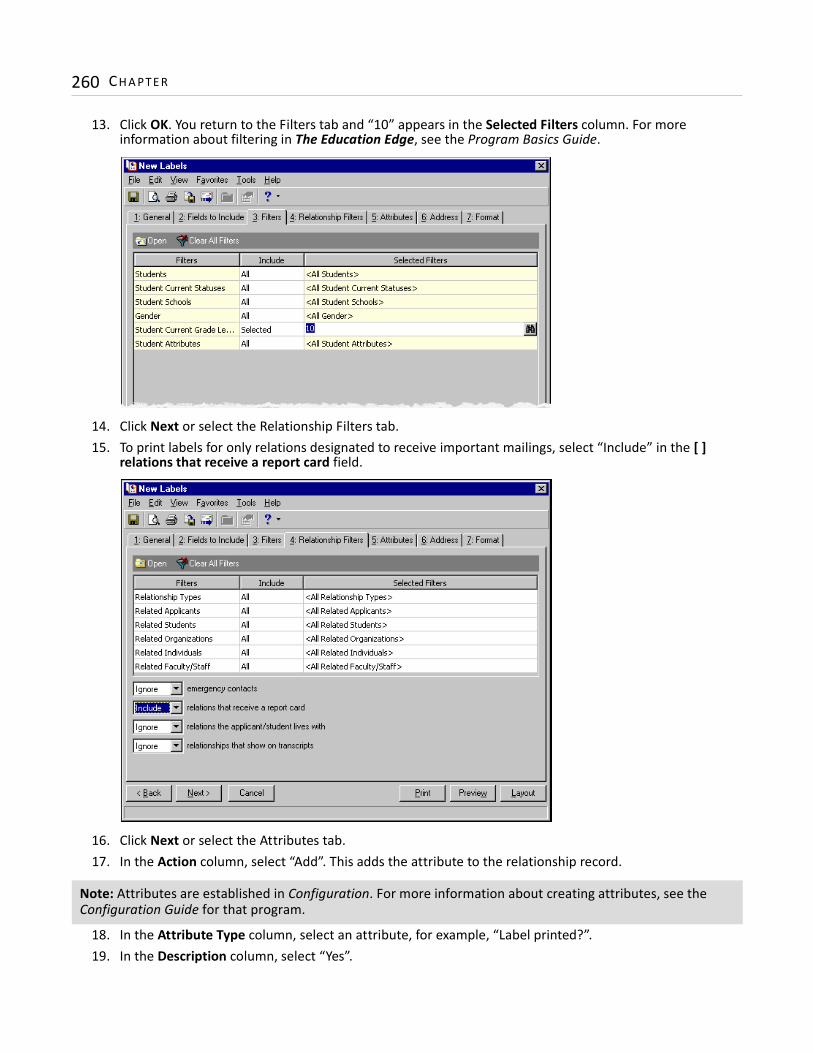
260 CH A PT E R
13. Click OK. You return to the Filters tab and “10” appears in the Selected Filters column. For more information about filtering in The Education Edge, see the Program Basics Guide.
14. Click Next or select the Relationship Filters tab.15. To print labels for only relations designated to receive important mailings, select “Include” in the [ ]
relations that receive a report card field.
16. Click Next or select the Attributes tab.17. In the Action column, select “Add”. This adds the attribute to the relationship record.
18. In the Attribute Type column, select an attribute, for example, “Label printed?”.19. In the Description column, select “Yes”.
Note: Attributes are established in Configuration. For more information about creating attributes, see the Configuration Guide for that program.

LA B E L S 26
20. In the Date column, enter 05/06/2008, the date you add the attribute.
21. Click Next or select the Address tab.22. In the Validate addresses as of field, select “Last day of this week”. 23. Mark Consider seasonal addresses.24. In the If no seasonal addresses are found, consider these addresses frame, move “<Primary address>”
and “<First address found>” to the Addresses to consider, in order of importance box.
25. Click Next or select the Format tab.26. In the list on the left, select Detail. 27. In the Combine labels for each spouse pair row, mark the checkbox so one label prints for married
couples.

262 CH A PT E R
28. In the Combine labels for Students with the same related record row, mark the checkbox so one label prints for each relationship.
29. In the list on the left, select Sort. In the Sort by and Order by columns on the first row, select “Student Name” and “Ascending” to sort the labels alphabetically by student name.
30. In the list on the left, select Truncation Reports and mark Print Truncation reports before label run to print a truncation report using the settings you selected on the tabs. To be sure labels print correctly, mark both Check for horizontal truncations and Check for vertical truncations.
31. To have a record of labels not printed in the run, mark Create exception query.

LA B E L S 26
32. Because you do not want labels in this run to print truncated, mark Exclude record from label run.
33. Click Preview. A message appears telling you the program is processing the mailing, and the preview screen for the labels appears. We recommend you preview the run before printing to help minimize errors in printing the labels.
34. Close the preview and return to the Format tab. For more information about how to preview, see “Previewing a mailing” on page 11.
35. Click the Save button on the action bar to save the labels. The Save Mailing as screen appears.
36. In the Mailing name and Description fields, enter a name and description for the parameter file.
37. Click Save to save the labels. You return to the Format tab.38. Close the screen. You return to the Labels page, and the labels file appears in the grid.
Note: If you mark Create an output query of vendors on the General tab, you get a message asking if you want to save the query.
Note: A parameter is any field, option, or filter that narrows information included in an import, mailing, report, or global change. By specifying parameters, you define the output of the process. You can save parameter files to use again.

264 CH A PT E R

6chapter
Label Truncation Reports
Label Truncation Report Tabs . . . . . . . . . . . . . . . . . . . . . . . . . . . . . . . . . . . . . . . . . . . . . . . . . . . . . . . . . . . . . . . . 266General Tab . . . . . . . . . . . . . . . . . . . . . . . . . . . . . . . . . . . . . . . . . . . . . . . . . . . . . . . . . . . . . . . . . . . . . . . . . . . . . . . . . . 267Fields to Include Tab . . . . . . . . . . . . . . . . . . . . . . . . . . . . . . . . . . . . . . . . . . . . . . . . . . . . . . . . . . . . . . . . . . . . . . . . . . 268Filters Tab . . . . . . . . . . . . . . . . . . . . . . . . . . . . . . . . . . . . . . . . . . . . . . . . . . . . . . . . . . . . . . . . . . . . . . . . . . . . . . . . . . . 269Relationship Filters Tab . . . . . . . . . . . . . . . . . . . . . . . . . . . . . . . . . . . . . . . . . . . . . . . . . . . . . . . . . . . . . . . . . . . . . . . . 270Address Tab . . . . . . . . . . . . . . . . . . . . . . . . . . . . . . . . . . . . . . . . . . . . . . . . . . . . . . . . . . . . . . . . . . . . . . . . . . . . . . . . . . 271Format Tab . . . . . . . . . . . . . . . . . . . . . . . . . . . . . . . . . . . . . . . . . . . . . . . . . . . . . . . . . . . . . . . . . . . . . . . . . . . . . . . . . . 273Creating Label Truncation Reports . . . . . . . . . . . . . . . . . . . . . . . . . . . . . . . . . . . . . . . . . . . . . . . . . . . . . . . . . . . . 275

266 CH A PT E R
The Mail page is the central location for creating label truncation reports in The Education Edge. On the navigation bar, click Mail to access the Mail page. To create a Label Truncation Report in Admissions Office or Registrar’s Office, click Labels and Envelopes. Then you can create new reports, open saved reports, and delete reports. The Label Truncation Report provides the information that does not fit on a selected label type. When the program checks for horizontal truncation, it determines which labels have too many characters on a single line using the selected font or font size. You can use this report to test label formatting selections before printing the labels. When creating a Label Truncation Report, we recommend you use the same options, fields, and checkboxes you use in Labels.
When you select Label Truncation Report in the list on the left of the page, a grid appears on the right displaying saved reports. You can specify parameters for a Label Truncation Report on the General, Fields to Include, Filters, and Format tabs. Whether you create a new report or open a saved one, the screen opens to the General tab. You can use a variety of parameters to define the output for the Label Truncation Report in The Education Edge. Saving these parameters also makes future report preparation easier.
Label Truncation Report TabsWith the Label Truncation Report, you select parameters on tabs: General, Fields to Include, Filters, Relationship Filters, Attributes, Address, and Format. To move among the tabs, click Next and Back at the bottom of the screen or select the tab. On these tabs, you specify records, fields, and formatting options for the labels. Each tab helps you enter information in an easy and logical manner.
Note: Visit our Web site at www.blackbaud.com for the latest documentation and information.

LA B E L TR U N C AT I O N RE P O R T S 26
General Tab
You can use the General tab to select parameters specific to the Label Truncation Report. When you create labels, fields you select may not fit on the label type you use.
Truncations based on. In the Truncations based on field, select the record type for which to check the truncation of addresses on labels. If you have both Admissions Office and Registrar’s Office installed and you have the appropriate security rights, you can run a truncation report for any Education Edge record type from either program.
Exclude deceased? If you select an applicant, student, or relationship in the Truncations based on field, the Exclude deceased? option appears. Mark this option to omit deceased and deceased relations from the truncation report.
Label type. In the Label type grid, you can select the type of label for which to check truncation. The Type and Size columns list label types and dimensions compatible with The Education Edge. The Across column displays the number of labels across the width of a sheet of labels, and the Down column displays the number of labels down the length of a sheet. The Description column provides additional details about each label type.The Education Edge is compatible with many standard label types; however, if the label size you use is not available, you can export a data file with the information so you can print labels using another application. For more information about exporting, see the Mail Basics chapter.
Label font. In the Label font field, select a text type to use on the labels.
Note: If you select Persons or Person Relationships in the Truncations based on field, you can select a query on the Filters tab that includes multiple record types, such as applicants and students or parents of applicants and students.
Note: The Type column also displays a graphic representation for the label type. For example, labels that print on a laser printer display a printer graphic next to the label type.

268 CH A PT E R
From size. In the From size field, select the smallest size text for the program to check.To size. In the To size field, select the largest size text for the program to check.Check for vertical truncations. To determine whether fields you select fit on the label, mark Check for
vertical truncations.Check for horizontal truncations. To determine whether characters fit on a single line on the label, mark
Check for horizontal truncations.Create an output query. To create a query of the records for which you run the label truncation report, mark
Create an output query of [ ]. If you selected a relationship record type in the Truncations based on field, you can select Related Records to create a query of all relation records included in the report.
Report orientation. The Label Truncation Report automatically prints in portrait orientation.
Fields to Include Tab
You can use the Fields to Include tab to select fields to appear on the label truncation report, for example, address, USPS barcode, or a user-defined message. The fields that appear depend on which program you are using and the record type you selected on the General tab. You cannot add to the list of available fields.
Available Fields. The Available Fields box contains all the fields you can print on labels. The fields available depend on the program in which you are working and the record type you selected on the General tab.
Note: Based on selections in the From size and To size fields, the report displays the number of characters for each font size that fit vertically on the label type you select. You can check 10 font sizes at a time, ranging from size 6 to 19.
Note: The fields you select appear on the label truncation report in the order you select. Use the up and down arrows to change the order of the fields.

LA B E L TR U N C AT I O N RE P O R T S 26
Fields to Include. The Fields to Include box contains all fields selected to print on the labels. To move a field from the Available Fields box to the Fields to Include box, select the field and click the single right arrow. To move all the fields from the Available Fields box to the Fields to Include box, click the double right arrow.
Options. When you include a field with associated options, you can click Options to see more information about the field. If a field does not have associated options, the Options button is disabled.
Filters Tab
You can use the Filters tab to select criteria that determines which records to include in the run of labels. The items by which you can filter depend on the record type you selected on the General tab. For example, if you selected Applicants or Applicant Relationships, filter options such as Applicants, Applicant Current Statuses, and Applicant Years Apply appear on the Filters tab. For more information about filtering in The Education Edge, see the Program Basics chapter of the Program Basics Guide.
Open. To open a selection screen to designate specific filters for the report, select a filter in the grid and click Open on the action bar.
Clear All Filters. To reset each filter to include all, you can click Clear All Filters.Filters. The Filters column lists all the filters for the report. You cannot edit this column.Include. By default, in the Include column, each filter is set to All. To open a selection screen to designate
specific filters for the report, choose Selected.Selected Filters. Filters you specify on the selection screen appear in the Selected Filters column.
Note: Certain fields have additional selections associated with them. When you move these fields to the Fields to Include box, the Field Options screen appears. For example, if you select Phone number, you can select Business or Fax as the phone type to use.
Tip: You can also double-click a filter in the grid to open the selection screen.

270 CH A PT E R
Selected Filters Screen
From the Filters tab, you can open a selection screen for a filter in several ways: by double-clicking the filter in the grid, selecting the filter in the grid and clicking Open on the action bar, or choosing Selected in the Include column for the filter.
Include. For each filter, you can select to include all or select specific filters. Depending on the filter, you may also be able to filter by a range or query.
All. If you mark Include: All, you cannot designate specific filters.Selected or Range. If you mark Include: Selected or Range, a grid appears in which you can specify filters. In a
field, you can click the binoculars to search for information.Query. If you mark Include: Query, the Query name field appears for you to enter the name of the query by
which to filter the report. In the field, you can click the binoculars to search for the query name.To create a new query, click the binoculars. Then click Add a New Query on the Open Query screen. For more information about creating queries, see the Query Guide.
Previous Filter. To view or edit the previous filter without returning to the Filters tab, click Previous Filter.Next Filter. To view or edit the next filter without returning to the Filters tab, click Next Filter.
Relationship Filters Tab
If you select a relationship record type in the Create label for field on the General tab, the Relationship Filters tab appears. On this tab you select filters to determine which relationship types to include in the label run. For example, to address labels to the father and mother of students, you select Father and Mother for the Relationship Type filter.

LA B E L TR U N C AT I O N RE P O R T S 27
If you use a Related <Record Type> filter, such as Related Applicants, you can select individuals or use a query. If you use more than one of the Related <Record Type> filters, the label run includes a combination of the filters results. For example, if you select a query of related Applicants and a query of Related Students, the records included in the label run include the selected Related Applicants in addition to the selected Related Students.
Using the options below the filters grid, you can define additional criteria for including or excluding relations. If you select “Ignore” for a criterion, the program does not consider it when processing.[ ] emergency contacts. If you selected Applicant Relationships, Student Relationships, or Person
Relationships as the record type on the General tab, you can select to include, exclude, or ignore relations designated as the emergency contact.
[ ] relations that receive a report card. If you selected Student Relationships or Person Relationships as the record type on the General tab, you can select to include, exclude, or ignore relations designated to receive report cards.
[ ] relations the applicant/student/person lives with. If you selected Applicant Relationships, Student Relationships, or Person Relationships as the record type on the General tab, you can select to include, exclude, or ignore relations who live with the applicant, student, or person.
[ ] relationships that show on transcripts. If you selected Student Relationships or Person Relationships as the record type on the General tab, you can select to include, exclude, or ignore relations designated to receive transcripts.
[ ] spousal relationships. If you selected Faculty/Staff Relationships, Individual Relationships, or Person Relationships as the record type on the General tab, you can select to include, exclude, or ignore relations that are spouses.
Address Tab
Use the Address tab to specify which addresses to use for labels. The program compares the parameters you define on this tab with address information entered on the Addresses tab of records to identify the appropriate address to use.

272 CH A PT E R
On the Address tab, you select a validation date and then define the order in which the program evaluates address types. The program first checks the validation date, then seasonal addresses, other address types (in the order you determine), and attributes. The first address found on the record that meets the defined parameters is used on the label. You can also specify what to do if no valid address is found. If you selected Organizations in the Truncations based on field on the General tab, the Mail to field appears. In this field, select the organization address to use.
Step 1. In the Validate addresses as of [ ] field, select a date to determine which address to use. Any address that is valid on this date is considered for use on the label. Any addresses that are not valid on this date are automatically excluded from consideration.
Step 2. Determine whether to include seasonal addresses as possible addresses. If you mark Consider seasonal addresses, the program uses the first valid seasonal address found on the student/relationship record and does not consider any other addresses.If the seasonal address has the Send no mail attribute, the seasonal address is excluded automatically as a possible address. If a valid seasonal address is not found, the program considers the address types selected in Step 3.
Step 3. In the If no seasonal addresses are found, consider these addresses frame, select which address types to use if no valid seasonal addresses exist. In the Addresses box, select an address type and click the right arrow to move it into the Addresses to consider, in order of importance box. The first address type in the list that matches the validation date is used on the label. You can change the order addresses are considered by selecting an address type and clicking the up and down arrows next to the list.If a valid address is not found from these address types, the program considers the attributes selected in Step 4.
Note: Any address with No mail selected in the Send [ ] to this address field on the Address Attributes tab is automatically excluded as a possible address.

LA B E L TR U N C AT I O N RE P O R T S 27
Step 4. In the grid, you can select address attribute types to consider. For example, you have a “Holiday greetings” attribute you use to flag addresses to use for holiday cards. When you select Include in the Action column and Holiday greetings in the Attribute column of the grid, the program automatically uses any valid addresses assigned this attribute.
Step 5. In the If no address is found field, select what to do if a valid address is not found. You can select Print with no address, Remove record from run, or Print specific address. If you select to print a specific address, the Use field appears so you can select the address type to use when a record does not have an address of the types you added to the Addresses to consider, in order of importance list.If you selected Organizations in the Truncations based on field on the General tab, the If no contact is found field appears. You can select Print organization name with no address, Remove record from run, or Print specific organization address.
Format Tab
You can use the Format tab to designate the format and sorting order of the labels in the report. When you select a formatting area from the list on the left, selections appear on the right.Detail. You can use Detail to make printing selections for the labels.
Omit punctuation from mailing — Mark this checkbox to print no punctuation on the labels.Print address in ALL CAPS — Mark this checkbox to print the address in all capital letters.Number of lines to skip before printing the first line — Mark this checkbox to leave space before the first row of printing on the labels.Number of spaces to include before each line — To leave space at the beginning of each line on the labels, enter a number in the row.Include total number of labels — Mark this checkbox to print the total number of labels processed in the run immediately after the last label.Include message on the same line as [ ] — To print a message before a selected field on the same line, select a field in this row. The available fields are those you selected on the Fields to Include tab. You define the message to print by selecting the User-defined message field on the Fields to Include tab and entering the message on the Field Options screen that appears. Combine labels for each spouse pair — Mark this checkbox to print one label for each married couple. This option appears only if you selected a relationship record type in the Create labels for field on the General tab.For example, when printing labels for student relationships, if you mark this option, one label prints for both the mother and father of a student. The address and name used for the spousal pair is the first of the spouses listed on the record’s Relationship tab. If this option is unmarked, two labels print— one for each parent.

274 CH A PT E R
Combine labels for <record type> with the same related record — Mark this checkbox to print one label for each relationship. This option appears only if you selected a relationship record type in the Create labels for field on the General tab. For example, when two students have the same father, if this option is marked, only one label prints for the father. If the option is unmarked, two labels print for the father — one for each student. If you mark this option and also mark Combine labels for each spouse pair, one label prints for the mother and father of the two students. If you mark Combine labels for <record type> with the same related record and include the <Record type> name field on the Fields to Include tab, the name for each record related to the relation prints as a separate line on the label.Print a label for each contact — Mark this checkbox to print a label for each contact for an organization. This option appears only if you selected Organizations in the Create labels for field on the General tab. You must include the Contact name field on the Field to Include tab to use this option. If you include the Contact name field and leave this option unmarked, a label prints for only the organization’s primary contact.Print organization name in place of contact name if no contact is defined — If you include the Contact name field on the Field to Include tab and an organization has no contacts defined, mark this checkbox to use the organization name in place of the contact’s name. This option appears only if you selected Organizations in the Create labels for field on the General tab.
Sort. You can use Sort to select the order to print labels. When you select Sort, a grid displays the categories you can sort for the labels.
In the first row in the Sort by column, select the category by which to sort the labels. The categories available depend on the record type you selected in the Create labels for field on the General tab.In the Order by column, select Ascending to sort labels alphabetically or Descending to sort them in reverse alphabetical order.

LA B E L TR U N C AT I O N RE P O R T S 27
Name Formats. Using Name Format, you can format how names appear on labels.
In the Select addressee/salutation from [ ] field, select Record or Configuration. If you select Record, in the Use field, select the full name, primary addressee, or primary salutation as defined on the record. If you select Configuration, in the Use field, select from one of the formats defined in Configuration. In the If not present...Select addressee/salutation from field, you can select a second name format for situations where the first selection is not present on records. For example, if you select to use the Primary salutation, and you have students without a defined Primary salutation on the Addressees/Salutations tab, the second name format is used. If you select <Full name> in the Use field, this field is disabled.
Creating Label Truncation ReportsWith the Label Truncation Report, you can run a report and easily determine the information that does not fit on the label you create. This can save you time running labels because you can make sure everything fits on the labels before printing them. The Education Edge is compatible with many standard label sizes; however, if the label size you use is not available, you can export the information gathered by the mail task to another application compatible with the label type you use. For more information about exporting in Mail, see the Mail Basics chapter.
Creating a label truncation reportIn this example, we create a Label Truncation Report for a run of labels for applicants. 1. From the Mail page, click Labels and Envelopes. The Labels and Envelopes page appears.
Note: You must have the appropriate security rights to output an addressee/salutation with Social Security numbers. If you do not have security rights, the numbers are masked. For more information, see the Security chapter of the Administration Guide for The Education Edge.

276 CH A PT E R
2. In the list on the left, select Label Truncation Report and click New on the action bar. The New Label Truncation Report screen opens on the General tab.
3. In the Truncations based on field, select “Applicants”.4. In the Label type grid, select “Avery® 5161”, a label type you use. 5. In the Label font and Barcode font fields, select “Arial”, the font to use for the text and barcode on the
label.6. In the From size field, select “10”, the smallest font size to check. In the To size field, select “19”, the
largest font size to check.7. To determine whether selected fields fit on the label, mark Check for vertical truncations.
To determine whether characters in the selected font and size fit on a single line on the label, mark Check for horizontal truncations.
8. To create a static query of the applicant records for which you are testing truncations, mark Create an output query of applicants.
9. Click Next or select the Fields to Include tab.
Note: The items that appear in the Available Fields box depends on the program you are using.

LA B E L TR U N C AT I O N RE P O R T S 27
10. Select Applicant name, Address, and USPS barcode as fields to appear in the report.
11. Click Next or select the Filters tab. In the Applicant Current Grade Levels row, choose “Selected” in the Include column. The Selected Applicant Current Grades screen appears.
12. Select Tenth Grade and click the right arrow to move the field to the Include these applicant current grades box.
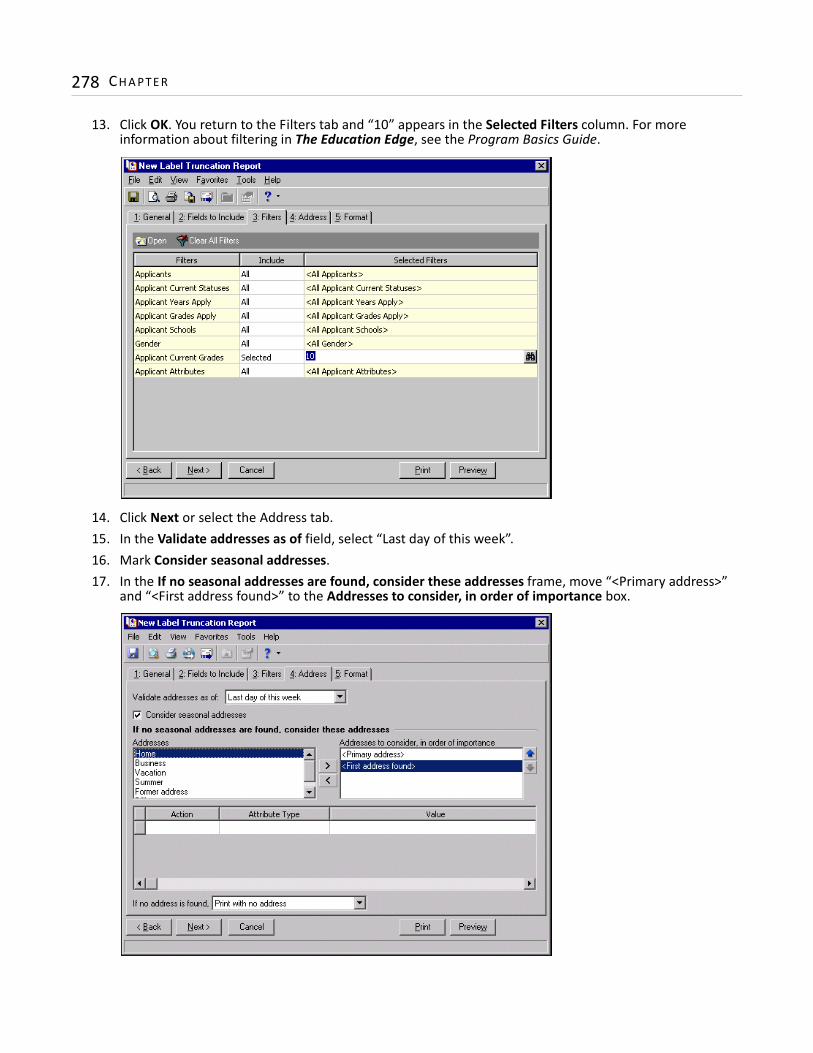
278 CH A PT E R
13. Click OK. You return to the Filters tab and “10” appears in the Selected Filters column. For more information about filtering in The Education Edge, see the Program Basics Guide.
14. Click Next or select the Address tab.15. In the Validate addresses as of field, select “Last day of this week”. 16. Mark Consider seasonal addresses.17. In the If no seasonal addresses are found, consider these addresses frame, move “<Primary address>”
and “<First address found>” to the Addresses to consider, in order of importance box.

LA B E L TR U N C AT I O N RE P O R T S 27
18. Click Next or select the Format tab.19. In the list on the left, select Detail. To create the report with no punctuation marks, mark Omit
punctuation from mailing.To see if all capital letters fit on the label, mark the checkbox in the Print address in ALL CAPS row.
20. In the list on the left, select Sort. In the Sort by and Order by columns on the first row, select “Applicant Name” and “Ascending” to sort the labels alphabetically by the applicants’ last names.

280 CH A PT E R
21. Click Preview. A message appears telling you the program is processing the mailing, and the preview screen for the Label Truncation Report appears.
22. Close the preview and return to the Format tab.23. Click the Save button on the action bar to save the report. The Save Mailing as screen appears.24. In the Mailing name and Description fields, enter a name and description for the report.
25. Click Save to save the Label Truncation Report. You return to the Format tab.26. Close the screen. You return to the Label Truncation Report page, and the report appears in the grid.
Note: If you mark Create an output query of on the General tab, the Save Static Query screen appears so you can name and save the query.

7chapter
Envelopes
Envelope Tabs . . . . . . . . . . . . . . . . . . . . . . . . . . . . . . . . . . . . . . . . . . . . . . . . . . . . . . . . . . . . . . . . . . . . . . . . . . . . . 282General Tab . . . . . . . . . . . . . . . . . . . . . . . . . . . . . . . . . . . . . . . . . . . . . . . . . . . . . . . . . . . . . . . . . . . . . . . . . . . . . . . . . . 283Fields to Include Tab . . . . . . . . . . . . . . . . . . . . . . . . . . . . . . . . . . . . . . . . . . . . . . . . . . . . . . . . . . . . . . . . . . . . . . . . . . 284Filters Tab . . . . . . . . . . . . . . . . . . . . . . . . . . . . . . . . . . . . . . . . . . . . . . . . . . . . . . . . . . . . . . . . . . . . . . . . . . . . . . . . . . . 285Relationship Filters Tab . . . . . . . . . . . . . . . . . . . . . . . . . . . . . . . . . . . . . . . . . . . . . . . . . . . . . . . . . . . . . . . . . . . . . . . . 286Attributes Tab . . . . . . . . . . . . . . . . . . . . . . . . . . . . . . . . . . . . . . . . . . . . . . . . . . . . . . . . . . . . . . . . . . . . . . . . . . . . . . . . 288Address Tab . . . . . . . . . . . . . . . . . . . . . . . . . . . . . . . . . . . . . . . . . . . . . . . . . . . . . . . . . . . . . . . . . . . . . . . . . . . . . . . . . . 288Format Tab . . . . . . . . . . . . . . . . . . . . . . . . . . . . . . . . . . . . . . . . . . . . . . . . . . . . . . . . . . . . . . . . . . . . . . . . . . . . . . . . . . 290Creating Envelopes . . . . . . . . . . . . . . . . . . . . . . . . . . . . . . . . . . . . . . . . . . . . . . . . . . . . . . . . . . . . . . . . . . . . . . . . . 293
282 CH A PT E R
The Mail page in Admissions Office and Registrar’s Office is the central location for generating envelopes. On the navigation bar, click Mail to access the Mail page. This page contains a link to the Labels and Envelopes page. From here, you can create new envelopes, open saved envelopes, and delete envelopes. If you installed both Admissions Office and Registrar’s Office, you can create envelopes for applicants, students, faculty/staff, individuals, organizations, persons, or relations from either program. You can use a variety of parameters to define the output for envelopes. Saving these parameters also makes future envelope preparation easier.
When you select Envelopes in the list on the left of the page, a grid appears on the right displaying saved envelopes. You can specify parameters for envelopes on the General, Fields to Include, Filters, Relationship Filters, Attributes, Address, and Format tabs.
Envelope TabsIn Envelopes, you select parameters on tabs: General, Fields to Include, Filters, Relationship Filters, Attributes, Address, and Format. To move among the tabs, click Next and Back at the bottom of the screen or select the tab. On these tabs, you specify records, fields, and formatting options for the envelopes. Each tab helps you enter information in an easy and logical manner.
Note: Visit our Web site at www.blackbaud.com for the latest documentation and information.
Note: We offer high-quality, customized report card and transcript forms that are specifically designed for use with our software. Our report card and transcript forms feature state-of-the-art, tamper-proof backgrounds. For more information, visit our Web site at http://forms.blackbaud.com or call us toll-free at 866-4-BB-FORMS (866-422-3676).

E NVE L O P ES 28
General Tab
You can use the General tab to select parameter settings specific to envelopes.
Create envelopes for. In the Create envelopes for field, select the record type for which to print envelopes. The available record types depend on the programs installed. If you have Admissions Office installed, you can create envelopes for applicants, applicant relationships, faculty/staff, faculty/staff relationships, individuals, individual relationships, organizations, organization relationships, persons, and person relationships. If you have Registrar’s Office installed, you can create envelopes for students, student relationships, faculty/staff, faculty/staff relationships, individuals, individual relationships, organizations, organization relationships, persons, and person relationships. If you have both installed, you can create envelopes for all of these record types from either program.
Exclude deceased? If you select an applicant, student, or relationship in the Create envelopes for field, the Exclude deceased? option appears. Mark this option to omit deceased and deceased relations from the run of envelopes.
Envelope type. In the Envelope type grid, you can select the type of envelope to use. The Envelope Type and Size columns list available envelope types and dimensions. The Description column provides additional details about each envelope type.The Education Edge is compatible with many standard envelope types; however, if the envelope size you use is not available, you can export a data file with the information so you can print envelopes using another application. For more information about exporting, see the Export Guide.
Envelope font. In the Envelope font field, select a text type to use on the envelopes.
Note: If you select Persons or Person Relationships in the Create envelopes for field, you can select a query on the Filters tab that includes multiple record types, such as applicants and students or parents of applicants and students.

284 CH A PT E R
Font size. In the Font size field, select a size for the text on the envelopes.Create an output query of [ ]. To create a query of the records for which you run envelopes, mark Create an
output query of [ ].To create a query of the records for which you run envelopes, mark Create an output query of [ ]. If you selected a relationship record type in the Create labels for field, you can select Related Records to create a query of all relation records included in the run of envelopes.
Fields to Include Tab
You can use the Fields to Include tab to select fields to appear on the envelopes processed by the mail task, for example, address, USPS barcode, or a user-defined message. The fields that appear depend on which program you are using. You cannot add to the list of available fields.
Available Fields. The Available Fields box contains all the fields you can include on envelopes. The fields available depend on the program in which you are working.
Fields to Include. The Fields to Include box contains all fields included on the envelopes. To move a field from the Available Fields box to the Fields to Include box, select the field and click the single right arrow or double-click the field. To move all the fields from the Available Fields box to the Fields to Include box, click the double right arrow.
Warning: The font type and size you select may impact the amount of information you can print on the envelopes.
Note: The fields you select appear on the envelopes in the order you select. Use the up and down arrows to change the order of the fields.

E NVE L O P ES 28
Options. When you include a field with associated options, you can click Options to see more information about the field. If a field does not have associated options, the Options button is disabled.
Filters Tab
You can use the Filters tab to select criteria that determines which records to include in the run of envelopes. The items you can filter by depend on the record type you selected on the General tab. For example, if you selected Applicants or Applicant Relationships, the Applicants, Applicant Current Statuses, and Applicant Years Apply filters appear as filter options on the Filters tab.
Open. To open a selection screen to designate specific filters for the report, select a filter in the grid and click Open on the action bar.
Clear All Filters. To reset each filter to include all, you can click Clear All Filters.Filters. The Filters column lists all the filters for the report. You cannot edit this column.Include. By default, in the Include column, each filter is set to All. To open a selection screen to designate
specific filters for the report, choose Selected.Selected Filters. Filters you specify on the selection screen appear in the Selected Filters column.
Note: Certain fields have additional selections associated with them. When you move these fields to the Fields to Include box, the Field Options screen appears. For example, if you select Phone number, you can select the phone type to use.
Tip: You can also double-click a filter in the grid to open the selection screen.

286 CH A PT E R
Selected Filters Screen
From the Filters tab, you can open a selection screen for a filter in several ways: by double-clicking the filter in the grid, selecting the filter in the grid and clicking Open on the action bar, or choosing Selected in the Include column for the filter.
Include. For each filter, you can select to include all or select specific filters. Depending on the filter, you may also be able to filter by a range or query.
All. If you mark Include: All, you cannot designate specific filters.Selected or Range. If you mark Include: Selected or Range, a grid appears in which you can specify filters. In a
field, you can click the binoculars to search for information.Query. If you mark Include: Query, the Query name field appears for you to enter the name of the query by
which to filter the report. In the field, you can click the binoculars to search for the query name.To create a new query, click the binoculars. Then click Add a New Query on the Open Query screen. For more information about creating queries, see the Query Guide.
Previous Filter. To view or edit the previous filter without returning to the Filters tab, click Previous Filter.Next Filter. To view or edit the next filter without returning to the Filters tab, click Next Filter.
Relationship Filters Tab
If you select a relationship record type in the Create envelope for field on the General tab, the Relationship Filters tab appears. On this tab you select filters to determine which relationship types to include in the envelope run. For example, to address envelopes to the father and mother of students, you select Father and Mother for the Relationship Type filter.

E NVE L O P ES 28
If you use a Related <Record Type> filter, such as Related Applicants, you can select individuals or use a query. If you use more than one of the Related <Record Type> filters, the envelope run includes a combination of the filters results. For example, if you select a query of related Applicants and a query of Related Students, the records included in the envelope run include the selected Related Applicants in addition to the selected Related Students.
Using the options below the filters grid, you can define additional criteria for including or excluding relations. If you select “Ignore” for a criterion, the program does not consider it when processing.[ ] emergency contacts. If you selected Applicant Relationships, Student Relationships, or Person
Relationships as the record type on the General tab, you can select to include, exclude, or ignore relations designated as the emergency contact.
[ ] relations that receive a report card. If you selected Student Relationships or Person Relationships as the record type on the General tab, you can select to include, exclude, or ignore relations designated to receive report cards.
[ ] relations the applicant/student/person lives with. If you selected Applicant Relationships, Student Relationships, or Person Relationships as the record type on the General tab, you can select to include, exclude, or ignore relations who live with the applicant, student, or person.
[ ] relationships that show on transcripts. If you selected Student Relationships or Person Relationships as the record type on the General tab, you can select to include, exclude, or ignore relations designated to receive transcripts.
[ ] spousal relationships. If you selected Faculty/Staff Relationships, Individual Relationships, or Person Relationships as the record type on the General tab, you can select to include, exclude, or ignore relations that are spouses.

288 CH A PT E R
Attributes Tab
You can use the Attributes tab to add, delete, or update attributes on the records for which envelopes print. For example, you may want to print envelopes for parents who are also volunteers at your school. You can add the attribute to relationship records when you print the envelopes.
Action. In the Action column, you can add, delete, or update attributes on records when you print envelopes.
Attribute Type. In the Attribute Type column, you can select an attribute type.Description. In the Description column you can enter or select a description for the attribute type.Short Description. In the Short Description column, a brief description of the attribute type appears when you
select a type in the Attribute Type column.Date. In the Date column, select the date you add, delete, or update the attribute.Required. If the attribute type you select is required, the program automatically marks the checkbox in the
Required column.Comments. In the Comments column, you can enter additional information about the attribute type.
Address Tab
Use the Address tab to specify which addresses to use for envelopes. The program compares the parameters you define on this tab with address information entered on the Addresses tab of records to identify the appropriate address to use.
Note: Attribute types are established in Configuration. For more information about defining attributes, see the Configuration Guide for that program.
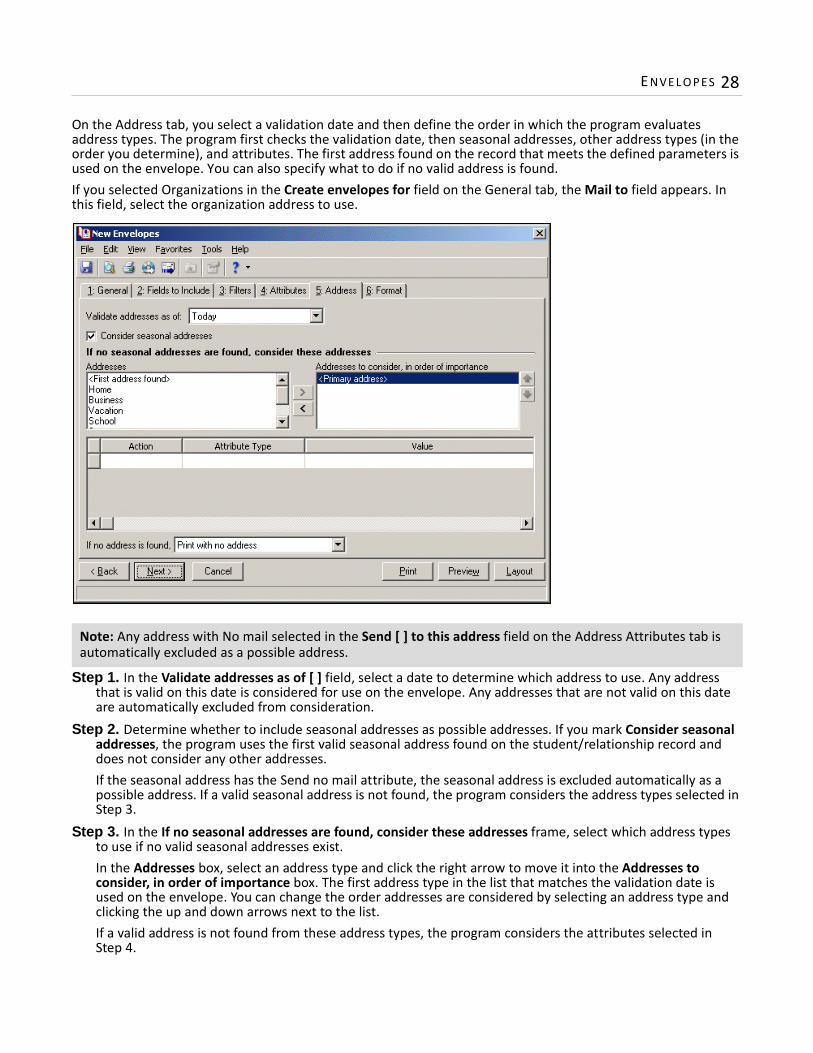
E NVE L O P ES 28
On the Address tab, you select a validation date and then define the order in which the program evaluates address types. The program first checks the validation date, then seasonal addresses, other address types (in the order you determine), and attributes. The first address found on the record that meets the defined parameters is used on the envelope. You can also specify what to do if no valid address is found. If you selected Organizations in the Create envelopes for field on the General tab, the Mail to field appears. In this field, select the organization address to use.
Step 1. In the Validate addresses as of [ ] field, select a date to determine which address to use. Any address that is valid on this date is considered for use on the envelope. Any addresses that are not valid on this date are automatically excluded from consideration.
Step 2. Determine whether to include seasonal addresses as possible addresses. If you mark Consider seasonal addresses, the program uses the first valid seasonal address found on the student/relationship record and does not consider any other addresses.If the seasonal address has the Send no mail attribute, the seasonal address is excluded automatically as a possible address. If a valid seasonal address is not found, the program considers the address types selected in Step 3.
Step 3. In the If no seasonal addresses are found, consider these addresses frame, select which address types to use if no valid seasonal addresses exist. In the Addresses box, select an address type and click the right arrow to move it into the Addresses to consider, in order of importance box. The first address type in the list that matches the validation date is used on the envelope. You can change the order addresses are considered by selecting an address type and clicking the up and down arrows next to the list.If a valid address is not found from these address types, the program considers the attributes selected in Step 4.
Note: Any address with No mail selected in the Send [ ] to this address field on the Address Attributes tab is automatically excluded as a possible address.

290 CH A PT E R
Step 4. In the grid, you can select address attribute types to consider. For example, you have a “Holiday greetings” attribute you use to flag addresses to use for holiday cards. When you select Include in the Action column and Holiday greetings in the Attribute column of the grid, the program automatically uses any valid addresses assigned this attribute.
Step 5. In the If no address is found field, select what to do if a valid address is not found. You can select Print with no address, Remove record from run, or Print specific address. If you select to print a specific address, the Use field appears so you can select the address type to use when a record does not have an address of the types you added to the Addresses to consider, in order of importance list.If you selected Organizations in the Create envelopes for field on the General tab, the If no contact is found field appears. You can select Print organization name with no address, Remove record from run, or Print specific organization address.
Format Tab
You can use the Format tab to designate the format of the envelopes. Settings on this tab determine the appearance of the envelopes. You can sort the envelopes and make selections for the return address. When you select a formatting area from the list on the left, selections appear on the right.Detail. You can use Detail to make printing selections for the envelopes.
Omit punctuation from mailing — Mark this checkbox to print no punctuation on the envelopes.Print address in ALL CAPS — Mark this checkbox to print the address in all capital letters.Include message on the same line as [ ] — To print a message before a selected field on the same line, select a field in this row. The available fields are those you selected on the Fields to Include tab. You define the message to print by selecting the User-defined message field on the Fields to Include tab and entering the message on the Field Options screen that appears. Combine envelopes for each spouse pair — Mark this checkbox to print one envelope for each married couple. This option appears only if you selected a relationship record type in the Create envelopes for field on the General tab.

E NVE L O P ES 29
For example, when printing envelopes for student relationships, if you mark this option, one envelope prints for both the mother and father of a student. The address and name used for the spousal pair is the first of the spouses listed on the record’s Relationship tab. If this option is unmarked, two envelopes print— one for each parent.Combine envelopes for <record type> with the same related record — Mark this checkbox to print one envelope for each relationship. This option appears only if you selected a relationship record type in the Create envelopes for field on the General tab. For example, when two students have the same father, if this option is marked, only one envelope prints for the father. If the option is unmarked, two envelopes print for the father — one for each student. If you mark this option and also mark Combine envelopes for each spouse pair, one envelope prints for the mother and father of the two students. If you mark Combine envelopes for <record type> with the same related record and include the <Record type> name field on the Fields to Include tab, the name for each record related to the relation prints as a separate line on the envelope.Print an envelope for each contact — Mark this checkbox to print an envelope for each contact for an organization. This option appears only if you selected Organizations in the Create envelopes for field on the General tab. You must include the Contact name field on the Field to Include tab to use this option. If you include the Contact name field and leave this option unmarked, a envelope prints for only the organization’s primary contact.Print organization name in place of contact name if no contact is defined — If you include the Contact name field on the Field to Include tab and an organization has no contacts defined, mark this checkbox to use the organization name in place of the contact’s name. This option appears only if you selected Organizations in the Create envelopes for field on the General tab.
Sort. You can use Sort to select the order to print envelopes. When you select Sort, a grid displays the categories you can sort for the envelopes.
In the first row in the Sort by column, select the item by which to sort the envelopes. The categories available depend on the record type you selected in the Create envelopes for field on the General tab.In the Order by column, select Ascending to sort envelopes alphabetically or numerically. Select Descending to sort them in reverse alphabetical or numeric order.

292 CH A PT E R
Return Address. You can use Return Address to make selections for the return address on the envelopes.
To print a return address on the envelopes, mark Print return address on envelope. Your organization’s address, as recorded in Configuration, appears in the box. You can edit the address for the mailing.In the Font field, select a text type to use on the envelopes.
In the Font size field, select a size for the text on the envelopes.
Warning: The font type and size you select may impact the amount of information you can print on the envelopes.

E NVE L O P ES 29
Name Formats. Using Name Formats, you can format how names appear on envelopes.
In the Select addressee/salutation from [ ] field, select Record or Configuration. If you select Record, in the Use field, select the full name, primary addressee, or primary salutation as defined on the record. If you select Configuration, in the Use field, select from one of the formats defined in Configuration. In the If not present...Select addressee/salutation from field, you can select a second name format for situations where the first selection is not present on records. For example, if you select to use the Primary salutation, and you have students without a defined Primary salutation on the Addressees/Salutations tab, the second name format is used. If you select <Full name> in the Use field, this field is disabled.
Creating EnvelopesYou can print envelopes with Education Edge record information. Envelopes created in Mail are compatible with many standard envelope sizes; however, if the envelope size you use is not compatible, you can export the information gathered by the mail task to another application compatible with the envelope type you want to use. For more information about exporting in Mail, see the Mail Basics chapter.
Creating envelopesFor the following example, we create envelopes addressed to faculty and staff members. You will sort the envelopes by last names. While this procedure demonstrates how to create envelopes in Admissions Office, the process is essentially the same for Registrar’s Office. 1. From the Mail page in Admissions Office, click Labels and Envelopes or select the Label and Envelopes
navigation tab. The Labels and Envelopes page appears.
Note: You must have the appropriate security rights to output an addressee/salutation with Social Security numbers. If you do not have security rights, the numbers are masked. For more information, see the Security chapter of the Administration Guide for The Education Edge.

294 CH A PT E R
2. In the list on the left, select Envelopes and click New on the action bar. The New Envelopes screen opens on the General tab.
3. In the Create envelopes for field, select “Faculty/Staff”.4. In the Envelope type grid, select “Size 10”, a business envelope you are using.5. In the Envelope font and Font size fields, select “Times New Roman” and “12”, the font and size to use
for the text on the envelopes.6. To create a static query of the faculty/staff records for which you are printing envelopes, mark Create an
output query of faculty/staff.
7. Click Next or select the Fields to Include tab.
Note: If a field has associated options, you can click Options for additional selections related to the field. If a field has no associated options, the Options button is disabled.

E NVE L O P ES 29
8. Select Faculty/Staff name, Address, and USPS barcode as fields to print on the envelopes.
9. Click Next or select the Filters tab. In the Faculty/Staff Departments row, choose “Selected” in the Include column. The Selected Faculty/Staff Departments screen appears.
10. Select English and click the right arrow to move the field to the Include these student current grade levels box.

296 CH A PT E R
11. Click OK. You return to the Filters tab and “English” appears in the Selected Filters column. For more information about filtering in The Education Edge, see the Program Basics Guide.
12. Click Next or select the Attributes tab.13. In the Action column, select “Add”. This adds the attribute to the faculty/staff record.
14. In the Attribute Type column, select “Attended training”.15. In the Description column, select “Yes”.16. In the Date column, enter the date you add the attribute.
17. Click Next or select the Address tab.18. In the Validate addresses as of field, select “Last day of this week”. 19. Mark Consider seasonal addresses.
Note: Attributes are established in Configuration. For more information about creating attributes, see the Configuration Guide for that program.

E NVE L O P ES 29
20. In the If no seasonal addresses are found, consider these addresses frame, move “<Primary address>” and “<First address found>” to the Addresses to consider, in order of importance box.
21. Click Next or select the Format tab.22. In the list on the left, select Detail. Leave Omit punctuation from mailing and Print address in ALL CAPS
unmarked so the addresses print with punctuation marks and in a standard format.23. In the list on the left, select Sort. In the Sort by and Order by columns on the first row, select “Faculty
Name” and “Ascending” to sort the envelopes from A to Z.

298 CH A PT E R
24. On the left, select Return Address. Mark Print return address on envelope so that your organization’s return address prints on the envelopes.
25. In the Font field, select “Times New Roman”26. In the Font size field, select “8”.
27. If you marked Create an output query of faculty/staff on the General tab, the Save Static Query screen appears so you can name and save the query.
28. Click Preview. A message appears telling you the program is processing the mailing, and the preview screen for the envelopes appears.
29. Close the preview and return to the Format tab.30. Click the Save button on the action bar to save the envelopes. The Save Mailing as screen appears.
31. In the Mailing name and Description fields, enter a name and description for the parameter file.
32. Click Save to save the envelopes. You return to the Format tab.33. Close the envelopes screen. You return to the Labels and Envelopes page, and the parameter file for the
envelopes appears in the grid.
Note: A parameter is any field, option, or filter that narrows information included in an import, mailing, report, or global change. By specifying parameters, you define the output of the process. You can save parameter files to use again.

8chapter
Letters
Action Letters . . . . . . . . . . . . . . . . . . . . . . . . . . . . . . . . . . . . . . . . . . . . . . . . . . . . . . . . . . . . . . . . . . . . . . . . . . . . . . 300Action Letters Tabs . . . . . . . . . . . . . . . . . . . . . . . . . . . . . . . . . . . . . . . . . . . . . . . . . . . . . . . . . . . . . . . . . . . . . . . . . . . . 300Checklist Letters . . . . . . . . . . . . . . . . . . . . . . . . . . . . . . . . . . . . . . . . . . . . . . . . . . . . . . . . . . . . . . . . . . . . . . . . . . . . 310Checklist Letter Tabs . . . . . . . . . . . . . . . . . . . . . . . . . . . . . . . . . . . . . . . . . . . . . . . . . . . . . . . . . . . . . . . . . . . . . . . . . . . 310Using the Word Merge Process in Mail . . . . . . . . . . . . . . . . . . . . . . . . . . . . . . . . . . . . . . . . . . . . . . . . . . . . . . . . . 319Creating a Simple Word Merge . . . . . . . . . . . . . . . . . . . . . . . . . . . . . . . . . . . . . . . . . . . . . . . . . . . . . . . . . . . . . . . . . . 319Creating a Conditional Word Merge . . . . . . . . . . . . . . . . . . . . . . . . . . . . . . . . . . . . . . . . . . . . . . . . . . . . . . . . . . . . . . 330

300 CH A PT E R
Mail is integrated with Microsoft Word features so you can use information exported from your Education Edge database to create custom letters.Using Letters, you create export files to merge with form letters set up in a word processor. When you link the export file with the form letter, a separate letter is created for each exported record. This process produces documents with the same basic format and text, yet each individual document is customized with specific Education Edge information. To access Letters, from the Mail page, click Letters. The list on the left of the page lists the types of letters you can create. You can create action letters in Admission’s Office and Registrar’s Office. In Admissions Office, you can also create checklist letters. The grid on the right displays saved letters. On this page you can create new letters, open saved letters, and delete letters.
Action LettersYou can create action letters about actions assigned to students, applicants, individuals, faculty/staff, and organizations. For example, you can send letters to students listing tasks they need to complete before the upcoming school year or you can create memos for faculty members telling them when they have lunch duty that week.
Action Letters Tabs
You select parameters for action letters on tabs: General, Fields to Include, Filters, Relationship Filters, Attributes, Address, and Format. On these tabs, you specify the records and fields to include in the export file and formatting options for the information in the letters. To move among the tabs, click Next and Back at the bottom of the screen or select the tab.
Note: Visit our Web site at www.blackbaud.com for the latest documentation and information.

LET TE RS 30
General TabYou can use the General tab to select parameter settings specific to action letters.
Create letters for. In the Create letters for field, select the record type to print letters for. The available record types depend on the programs installed. If you have Admissions Office, you can create letters for applicants, faculty/staff, individuals, and organizations. If you have Registrar’s Office, you can create letters for students, faculty/staff, individuals, and organizations. If you have both, you can create letters for all of these record types from either program.
Send letters to. If you select Applicants or Students in the Create letters for field, you can select also the recipient for the letter in the Send letters to field. If you select Applicants or Students in the Send letters to field, the letter is addressed to the applicant or student it was created for. If you select Applicant Relationships or Student Relationships, the letter is addressed to the relations specified on the Relationship Filters tab.
Exclude deceased? If you select an applicant or student in the Create letters for field or select a relationship in the Send letters to field, the Exclude deceased? option appears. Mark this option to omit deceased and deceased relations from the run of letters.
Action date. In the Action date field, select a date or date range for actions to include.Include actions with these action priorities. In the Include actions with these priorities frame, mark the
checkboxes for the priorities to include. Include [ ] actions. In this field, select the type of actions to include — Complete, Incomplete, or Complete and
Incomplete.Include actions for which letters have been sent. Mark Include actions for which letters have been sent
to include actions with Action Letter sent marked on the action record. Mark included actions as letter sent [ ]. Mark this option to mark the Action Letter sent on checkbox
automatically on action records included in the letter run. In the field, select the sent date to enter on the action record.

302 CH A PT E R
Mark included actions complete [ ]. Mark this option to mark the Action completed on checkbox automatically on action records included in the letter run. In the field, select the completed on date to enter on the action record.For actions set to update the student or applicant status when the action is marked completed, depending on the action’s settings, marking this option could add additional checklist items, tracks, or actions to students or applicants. For more information, see the Tracks section of the Configuration Guide for Admission’s Office.When you mark Mark included actions as letter sent [ ] and Mark included actions as complete [ ], if you also marked Include [Complete] actions, the sent on and completed on dates on the action record are overwritten with the dates you select for these options.
Create a letter for each [ ]. In the Create a letter for each [ ] field, select to create letters based on the record, action, or action types included in the export. For example, a student has multiple actions that meet the specified criteria. If you select Student in this field, you create one letter for the student that includes multiple actions, or if you select Action, you create multiple letters for the student — one for each action.
Create an output query of [ ]. To create a query of the records for which you create letters, mark Create an output query of [ ].
Fields to Include Tab
You can use the Fields to Include tab to select the fields exported to create letters, for example, record name, address, and phone number. The fields available to depend on the record type you selected on the General tab. You cannot add to the list of available fields.
Note: You must have the appropriate security rights to output Social Security numbers. If you do not have security rights, the numbers are masked. For more information, see the Security chapter of the Administration Guide for The Education Edge.

LET TE RS 30
Available Fields. The Available Fields box contains all the fields you can print on letters. The fields available depend on the program in which you are working and the record type you selected on the General tab.
Fields to Include. The Fields to Include box contains all fields selected to print on the letters. To move a field from the Available Fields box to the Fields to Include box, select the field and click the single right arrow or double-click the field. To move all the fields from the Available Fields box to the Fields to Include box, click the double right arrow.
Options. When you include a field with associated options, you can click Options to see more information about the field. If a field does not have associated options, the Options button is disabled.
Field Options screen. When you include a field for which several values exist in your database, the Field Options screen appears. For example, fields in the Actions group are considered “one-to-many” fields because a record may have more than one action assigned to him. On the Field Options screen, you can define additional characteristics records must meet to be included in the export. For example, for the Academic year field in the Student Progression group, you can select the number of academic years to export for each student and set the sort order of the export results. On the Filters tab, you can filter by school, student grade levels, and student statuses. For more information about exporting one-to-many items, see “Output Criteria Screens” on page 10 of the Export Guide.
Note: The fields you select appear in the drop-down list for the Insert The Education Edge field on the merge document. Use the up and down arrows to change the order of the fields in the list.
Note: Certain fields have additional selections associated with them. When you move these fields to the Fields to Include box, the Field Options screen appears.

304 CH A PT E R
Filters TabYou can use the Filters tab to select criteria that determines which records to include in the export file for letters. The items you can filter by depend on the program you are using. For example, in Admissions Office, you can select to include only accepted applicants in the run of letters. Applicants with any other status, such as denied or waitlisted, are excluded from the run. For more information about filtering, see the Program Basics chapter of the Program Basics Guide.
Open. To open a selection screen to designate specific filters for the report, select a filter in the grid and click Open on the action bar.
Clear All Filters. To reset each filter to include all, you can click Clear All Filters.Filters. The Filters column lists all the filters for the report. You cannot edit this column.Include. By default, in the Include column, each filter is set to All. To open a selection screen to designate
specific filters for the report, choose Selected.Selected Filters. Filters you specify on the selection screen appear in the Selected Filters column.
Tip: You can also double-click a filter in the grid to open the selection screen.

LET TE RS 30
Selected Filters Screen
From the Filters tab, you can open a selection screen for a filter in several ways: by double-clicking the filter in the grid, selecting the filter in the grid and clicking Open on the action bar, or choosing Selected in the Include column for the filter.
Include. For each filter, you can select to include all or select specific filters. Depending on the filter, you may also be able to filter by a range or query.
All. If you mark Include: All, you cannot designate specific filters.Selected or Range. If you mark Include: Selected or Range, a grid appears in which you can specify filters. In a
field, you can click the binoculars to search for information.Query. If you mark Include: Query, the Query name field appears for you to enter the name of the query by
which to filter the report. In the field, you can click the binoculars to search for the query name.To create a new query, click the binoculars. Then click Add a New Query on the Open Query screen. For more information about creating queries, see the Query Guide.
Previous Filter. To view or edit the previous filter without returning to the Filters tab, click Previous Filter.Next Filter. To view or edit the next filter without returning to the Filters tab, click Next Filter.

306 CH A PT E R
Relationship Filters TabIf you select a relationship record type in the Create letter for field on the General tab, the Relationship Filters tab appears. On this tab you select filters to determine which relationship types to include in the letter run. For example, to address letters to the father and mother of students, you select Father and Mother for the Relationship Type filter.
Using the options below the filters grid, you can define additional criteria for including or excluding relations. If you select “Ignore” for a criterion, the program does not consider it when processing.[ ] emergency contacts. If you selected Applicant Relationships or Student Relationships as the record type to
send letters to on the General tab, you can select to include, exclude, or ignore relations designated as the emergency contact.
[ ] relations that receive a report card. If you selected Student Relationships as the record type to send letters to on the General tab, you can select to include, exclude, or ignore relations designated to receive report cards.
[ ] relations the applicant/student lives with. If you selected Applicant Relationships or Student Relationships as the record type to send letters to on the General tab, you can select to include, exclude, or ignore relations who live with the applicant or student.
[ ] relationships that show on transcripts. If you selected Student Relationships as the record type to send letters to on the General tab, you can select to include, exclude, or ignore relations designated to receive transcripts.
[ ] spousal relationships. If you selected Faculty/Staff Relationships or Individual Relationships as the record type to send letters to on the General tab, you can select to include, exclude, or ignore relations that are spouses.
Note: On the Format tab, you can mark Combine letters for each spouse pair or Combine letters for <record type> with the same related record to print one letter for a married couple or related records. For more information, see “Format Tab” on page 309.

LET TE RS 30
Attributes TabYou can use the Attributes tab to add, delete, or update attributes for records when you print letters. For example, each student is required to volunteer at a school event during the year so it assigned as an action. You can print letters for all students without the volunteer action completed, telling them about an upcoming event. When you run the letters, you can add an attribute to those student records that a letter was mailed to them about the event.
Action. In the Action column, you can add, delete, or update attributes on the records when you print letters.
Attribute Type. In the Attribute Type column, you can select an attribute type.Description. In the Description column you can enter or select a description for the attribute type.Short Description. In the Short Description column, a brief description of the attribute type appears when you
select a type in the Attribute Type column.Date. In the Date column, select the date you add, delete, or update the attribute.
Required. If the attribute type you select is required, the program automatically marks the checkbox in the Required column.
Comments. In the Comments column, you can enter additional information about the attribute type.
Note: Attribute types are established in Configuration. For more information about defining attributes, see the Configuration Guide that program.
Note: An attribute is a tool used to group information based on a common theme. With attributes defined, you can filter information to your specifications.

308 CH A PT E R
Address TabUse the Address tab to specify which addresses to use for letters. The program compares the parameters you define on this tab with address information entered on the Addresses tab of records to identify the appropriate address to use. On the Address tab, you select a validation date and then define the order in which the program evaluates address types. The program first checks the validation date, then seasonal addresses, other address types (in the order you determine), and attributes. The first address found on the record that meets the defined parameters is used on the letter. You can also specify what to do if no valid address is found.
Step 1. In the Validate addresses as of [ ] field, select a date to determine which address to use. Any address that is valid on this date is considered for use on the letter. Any addresses that are not valid on this date are automatically excluded from consideration.
Step 2. Determine whether to include seasonal addresses as possible addresses. If you mark Consider seasonal addresses, the program uses the first valid seasonal address found on the student/relationship record and does not consider any other addresses.If the seasonal address has the Send no mail attribute, the seasonal address is excluded automatically as a possible address. If a valid seasonal address is not found, the program considers the address types selected in Step 3.
Step 3. In the If no seasonal addresses are found, consider these addresses frame, select which address types to use if no valid seasonal addresses exist. In the Addresses box, select an address type and click the right arrow to move it into the Addresses to consider, in order of importance box. The first address type in the list that matches the validation date is used on the letter. You can change the order addresses are considered by selecting an address type and clicking the up and down arrows next to the list.
Note: Any address with No mail selected in the Send [ ] to this address field on the Address Attributes tab is automatically excluded as a possible address.

LET TE RS 30
If a valid address is not found from these address types, the program considers the attributes selected in Step 4.
Step 4. In the grid, you can select address attribute types to consider. For example, you have a “Holiday greetings” attribute you use to flag addresses to use for holiday letters. When you select Include in the Action column and Holiday greetings in the Attribute column of the grid, the program automatically uses any valid addresses assigned this attribute.
Step 5. In the If no address is found field, select what to do if a valid address is not found. You can select Print with no address, Remove record from run, or Print specific address. If you select to print a specific address, the Use field appears so you can select the address type to use when a record does not have an address of the types you added to the Addresses to consider, in order of importance list.If you selected Organizations in the Create letters for field on the General tab, the If no contact is found field appears. You can select Print organization name with no address, Remove record from run, or Print specific organization address.
Format TabYou can use the Format tab to designate the format of the letters. Settings on this tab determine the appearance of the letters. When you select a formatting area from the list on the left, selections appear on the right.Detail. You can use Detail to make printing selections for the letters.
Omit punctuation from mailing — Mark this checkbox to print no punctuation on the letters.Print address in ALL CAPS — Mark this checkbox to print the address in all capital letters.Combine letters for each spouse pair — Mark this checkbox to print one letter for each married couple. This option appears only if you selected a relationship record type in the Create letters for field on the General tab.For example, when printing letters for student relationships, if you mark this option, one letter prints for both the mother and father of a student. The address and name used for the spousal pair is the first of the spouses listed on the record’s Relationship tab. If this option is unmarked, two letters print— one for each parent.Combine letters for <record type> with the same related record — Mark this checkbox to print one letter for each relation. This option appears only if you selected a relationship record type in the Create letters for field on the General tab. For example, when two students have the same father, if this option is marked, only one letter prints for the father. If the option is unmarked, two letters print for the father — one for each student. If you mark this option and also mark Combine letters for each spouse pair, one letter prints for the mother and father of the two students.

310 CH A PT E R
If you mark Combine letters for <record type> with the same related record and include the <Record type> name field on the Fields to Include tab, the name for each record related to the relation prints as a separate line on the letter.
Sort. You can use Sort to select the order to print letters. When you select Sort, a grid displays the categories you can sort for the letters.
In the first row in the Sort by column, select the category by which to sort the letters. The categories available depend on the record type you selected in the Create letters for field on the General tab.In the Order by column, select Ascending to sort letters alphabetically or Descending to sort them in reverse alphabetical order.
Checklist LettersIf you have Admissions Office, you can create checklist letters to notify applicants and their relations about items they need to complete for the admissions process. You can create one letter for an applicant listing multiple checklist items he needs to complete or you can create a separate letters for each checklist item assigned to the applicant.
Checklist Letter Tabs
You select parameters for checklist letters on tabs: General, Fields to Include, Filters, Relationship Filters, Attributes, Address, and Format. On these tabs, you specify the records and fields to include in the export file and formatting options for the information in the letters. To move among the tabs, click Next and Back at the bottom of the screen or select the tab.

LET TE RS 31
General TabYou can use the General tab to select parameter settings specific to checklist letters.
Send letters to [ ]. In the Send letters to field, select Applicants or Applicant Relationships in the Send letters to field, the letter is addressed to the applicant it was created for. If you select Applicant Relationships, the letter is addressed to the relations specified on the Relationship Filters tab.
Create a letter for each [ ]. In the Create a letter for each [ ] field, select to create letters based on the applicant, checklist item, or tracks included in the export. For example, an applicant has multiple checklist items that meet the specified criteria. If you select “each applicant” in this field, you create one letter for the applicant that includes multiple checklist items, or if you select “each checklist item record”, you create multiple letters for the applicant — one for each checklist item assigned to him.
Exclude deceased? If you select an applicant or a relationship in the Send letters to field, the Exclude deceased? option appears. Mark this option to omit deceased and deceased relations from the run of letters.
Date requested [ ]. In the Date requested field, enter a date or date range to determine which checklist items are included in the export file for letters.
Include checklist items with no date requested. Mark Include checklist items with no date requested to include checklist items with no date entered in the Date Requested column on the Checklist tab.
Completion date [ ]. In the Completion date [ ] field, select a date or date range to determine which completed checklist items are included in the export file.
Include. In the Include box, mark the checkboxes for the checklist item statuses to include. You can mark Pending, Completed, or Waived.
Include only pending items [ ] [ ] days. If you include pending checklist items, you can mark this option to specify which pending items to include. In the fields, select Overdue by or Due within and the number of days.

312 CH A PT E R
Mark included checklist items completed on [ ]. Mark this option to change the status of checklist items to Complete automatically for checklist items included in the export file. In the field, select the completion date to enter on the Checklist tab of the applicant record.Depending on the checklist item’s settings, marking this option could update the applicant’s status or add additional checklist items, tracks, or actions to the applicant when the checklist item is marked complete. For more information, see the Tracks section of the Configuration Guide for Admission’s Office.
Mark included checklist items as letter sent on [ ]. Mark this option to mark the Letter sent? checkbox automatically for checklist items included in the export file for letters. In the field, select the sent date to enter on the Checklist tab of the applicant record.
Create an output query of applicants. To create a query of the applicants for which you create letters, mark Create an output query of [ ].
Fields to Include TabYou can use the Fields to Include tab to select the fields exported to create letters, for example, applicant name, address, and phone number. The fields available to depend on the record type you selected on the General tab. You cannot add to the list of available fields.
Available Fields. The Available Fields box contains all the fields you can export for letters. Additional fields appear if you selected Applicant Relationships in the Send letters to field on the General tab.
Fields to Include. The Fields to Include box contains all fields selected to export. To move a field from the Available Fields box to the Fields to Include box, select the field and click the single right arrow or double-click the field. To move all the fields from the Available Fields box to the Fields to Include box, click the double right arrow.
Note: The fields you select appear in the drop-down list for the Insert The Education Edge field on the merge document. Use the up and down arrows to change the order of the fields in the list.

LET TE RS 31
Options. When you include a field with associated options, you can click Options to see more information about the field. If a field does not have associated options, the Options button is disabled.
Field Options screen. When you include a field for which several values exist in your database, the Field Options screen appears. For example, fields in the Other Schools Applied to group are considered “one-to-many” fields because an applicant may have applied to multiple schools. On the Field Options screen, you can define additional characteristics records must meet to be included in the export. For example, for the School field, you can select the number of schools to export for each applicant and set the sort order of the export results. On the Filters tab, you can filter by school, student grade levels, and student statuses. For more information about exporting one-to-many items, see “Output Criteria Screens” on page 10 of the Export Guide.
Filters TabYou can use the Filters tab to select criteria that determines which records to include in the run of letters. The items you can filter by depend on the program you are using. For example, you can select to include only accepted applicants in the run of letters. Applicants with any other status, such as denied or waitlisted, are excluded from the run. For more information about filtering, see the Program Basics chapter of the Program Basics Guide.
Open. To open a selection screen to designate specific filters for the report, select a filter in the grid and click Open on the action bar.
Clear All Filters. To reset each filter to include all, you can click Clear All Filters.Filters. The Filters column lists all the filters for the report. You cannot edit this column.
Note: Certain fields have additional selections associated with them. When you move these fields to the Fields to Include box, the Field Options screen appears.
Tip: You can also double-click a filter in the grid to open the selection screen.

314 CH A PT E R
Include. By default, in the Include column, each filter is set to All. To open a selection screen to designate specific filters for the report, choose Selected.
Selected Filters. Filters you specify on the selection screen appear in the Selected Filters column.
Selected Filters Screen
From the Filters tab, you can open a selection screen for a filter in several ways: by double-clicking the filter in the grid, selecting the filter in the grid and clicking Open on the action bar, or choosing Selected in the Include column for the filter.
Include. For each filter, you can select to include all or select specific filters. Depending on the filter, you may also be able to filter by a range or query.
All. If you mark Include: All, you cannot designate specific filters.Selected or Range. If you mark Include: Selected or Range, a grid appears in which you can specify filters. In a
field, you can click the binoculars to search for information.Query. If you mark Include: Query, the Query name field appears for you to enter the name of the query by
which to filter the report. In the field, you can click the binoculars to search for the query name.To create a new query, click the binoculars. Then click Add a New Query on the Open Query screen. For more information about creating queries, see the Query Guide.
Previous Filter. To view or edit the previous filter without returning to the Filters tab, click Previous Filter.Next Filter. To view or edit the next filter without returning to the Filters tab, click Next Filter.
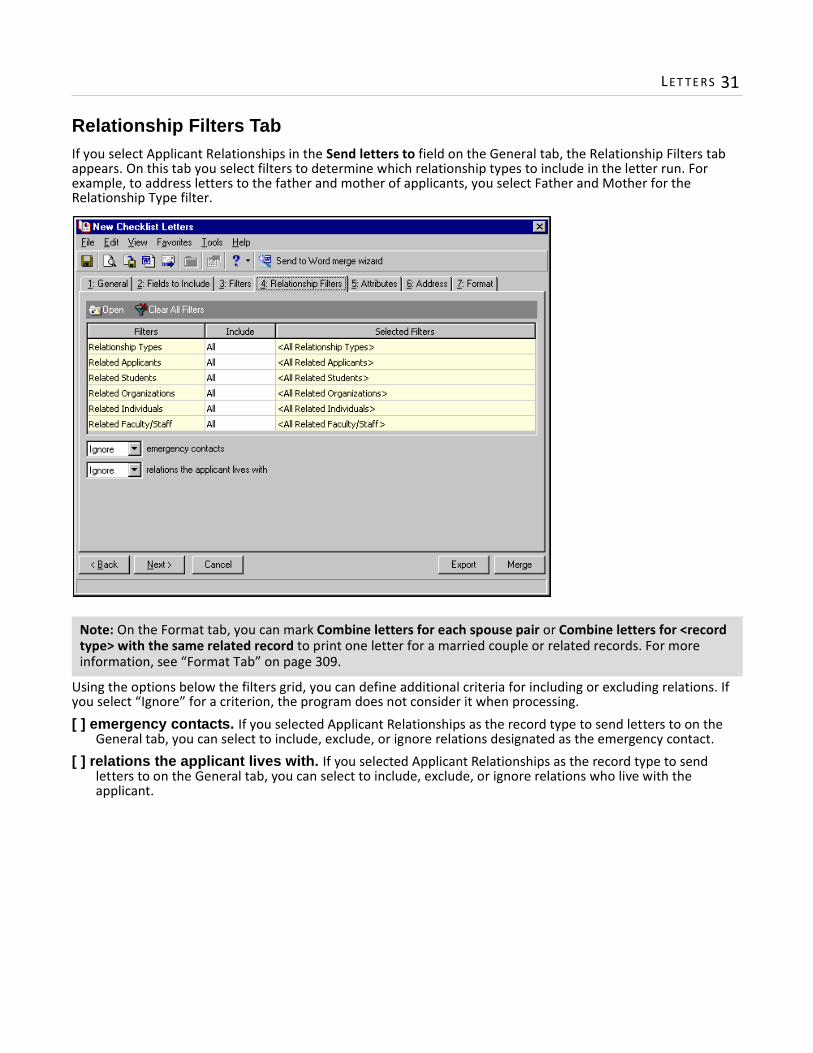
LET TE RS 31
Relationship Filters TabIf you select Applicant Relationships in the Send letters to field on the General tab, the Relationship Filters tab appears. On this tab you select filters to determine which relationship types to include in the letter run. For example, to address letters to the father and mother of applicants, you select Father and Mother for the Relationship Type filter.
Using the options below the filters grid, you can define additional criteria for including or excluding relations. If you select “Ignore” for a criterion, the program does not consider it when processing.[ ] emergency contacts. If you selected Applicant Relationships as the record type to send letters to on the
General tab, you can select to include, exclude, or ignore relations designated as the emergency contact.[ ] relations the applicant lives with. If you selected Applicant Relationships as the record type to send
letters to on the General tab, you can select to include, exclude, or ignore relations who live with the applicant.
Note: On the Format tab, you can mark Combine letters for each spouse pair or Combine letters for <record type> with the same related record to print one letter for a married couple or related records. For more information, see “Format Tab” on page 309.

316 CH A PT E R
Attributes TabYou can use the Attributes tab to add, delete, or update attributes for records when you print letters. For example, each applicant is required to attend an open house so it is assigned as a checklist item. You can print letters for all applicants without the open house checklist item completed, asking them to attend next month’s open house. When you run the letters, you can add an attribute to those applicant records that a letter was mailed to them about the open house.
Action. In the Action column, you can add, delete, or update attributes on the records when you print letters.
Attribute Type. In the Attribute Type column, you can select an attribute type.Description. In the Description column you can enter or select a description for the attribute type.Short Description. In the Short Description column, a brief description of the attribute type appears when you
select a type in the Attribute Type column.Date. In the Date column, select the date you add, delete, or update the attribute.
Required. If the attribute type you select is required, the program automatically marks the checkbox in the Required column.
Comments. In the Comments column, you can enter additional information about the attribute type.
Note: Attribute types are established in Configuration. For more information about defining attributes, see the Configuration Guide that program.
Note: An attribute is a tool used to group information based on a common theme. With attributes defined, you can filter information to your specifications.

LET TE RS 31
Address TabUse the Address tab to specify which addresses to use for letters. The program compares the parameters you define on this tab with address information entered on the Addresses tab of records to identify the appropriate address to use. On the Address tab, you select a validation date and then define the order in which the program evaluates address types. The program first checks the validation date, then seasonal addresses, other address types (in the order you determine), and attributes. The first address found on the record that meets the defined parameters is used on the letter. You can also specify what to do if no valid address is found.
Step 1. In the Validate addresses as of [ ] field, select a date to determine which address to use. Any address that is valid on this date is considered for use on the letter. Any addresses that are not valid on this date are automatically excluded from consideration.
Step 2. Determine whether to include seasonal addresses as possible addresses. If you mark Consider seasonal addresses, the program uses the first valid seasonal address found on the student/relationship record and does not consider any other addresses.If the seasonal address has the Send no mail attribute, the seasonal address is excluded automatically as a possible address. If a valid seasonal address is not found, the program considers the address types selected in Step 3.
Step 3. In the If no seasonal addresses are found, consider these addresses frame, select which address types to use if no valid seasonal addresses exist. In the Addresses box, select an address type and click the right arrow to move it into the Addresses to consider, in order of importance box. The first address type in the list that matches the validation date is used on the letter. You can change the order addresses are considered by selecting an address type and clicking the up and down arrows next to the list.
Note: Any address with No mail selected in the Send [ ] to this address field on the Address Attributes tab is automatically excluded as a possible address.

318 CH A PT E R
If a valid address is not found from these address types, the program considers the attributes selected in Step 4.
Step 4. In the grid, you can select address attribute types to consider. For example, you have a “Welcome packet” attribute you use to flag addresses to use for new applicants. When you select Include in the Action column and Welcome packet in the Attribute column of the grid, the program automatically uses any valid addresses assigned this attribute.
Step 5. In the If no address is found field, select what to do if a valid address is not found. You can select Print with no address, Remove record from run, or Print specific address. If you select to print a specific address, the Use field appears so you can select the address type to use when a record does not have an address of the types you added to the Addresses to consider, in order of importance list.
Format TabYou can use the Format tab to designate the format of the letters. Settings on this tab determine the appearance of the letters. When you select a formatting area from the list on the left, selections appear on the right.Detail. You can use Detail to make printing selections for the letters.
Omit punctuation from mailing — Mark this checkbox to print no punctuation on the letters.Print address in ALL CAPS — Mark this checkbox to print the address in all capital letters.Include total number of letters — Mark this checkbox to print the total number of letters processed in the run immediately after the last letter.Combine letters for each spouse pair — Mark this checkbox to print one letter for each married couple. This option appears only if you selected Applicant Relationships in the Send letters to field on the General tab.For example, when printing letters for applicant relationships, if you mark this option, one letter prints for both the mother and father of an applicant. The address and name used for the spousal pair is the first of the spouses listed on the record’s Relationship tab. If this option is unmarked, two letters print— one for each parent.Combine letters for <record type> with the same related record — Mark this checkbox to print one letter for each relation. This option appears only if you selected Applicant Relationships in the Send letters to field on the General tab. For example, when two students have the same father, if this option is marked, only one letter prints for the father. If the option is unmarked, two letters print for the father — one for each student. If you mark this option and also mark Combine letters for each spouse pair, one letter prints for the mother and father of the two students. If you mark Combine letters for <record type> with the same related record and include the <Record type> name field on the Fields to Include tab, the name for each record related to the relation prints as a separate line on the letter.

LET TE RS 31
Sort. You can use Sort to select the order to print letters. When you select Sort, a grid displays the categories you can sort for the letters.
In the first row in the Sort by column, select the category by which to sort the letters. The categories available depend on the record type you selected in the Create letters for field on the General tab.In the Order by column, select Ascending to sort letters alphabetically or Descending to sort them in reverse alphabetical order.
Using the Word Merge Process in Mail
Mail is integrated with Microsoft Word features so you can use information exported from your Education Edge database to create custom letters.The merge process consists of merging a form letter, with variable information exported from The Education Edge. This process produces documents with the same basic format and text, yet each individual document is customized with specific Education Edge information. You can create two types of Word merges, simple and conditional:• Simple merges produce a series of documents using the same form letter, customized with information
exported from The Education Edge.• Conditional merges create a series of documents using multiple text formats, customized with fields of
information exported from The Education Edge, which differ based on specified conditions.The procedures in this section guide you through creating simple and conditional merges in Mail.
Creating a Simple Word Merge
Use the simple merge process to merge an export file with a single form letter to produce a group of documents customized with fields of information exported from The Education Edge. For example, using Action Letters, you can send memos to teachers telling them which week they have bus duty next month. While the text and format of the memos are essentially the same, each contains the specific bus duty assignment for the recipient.
Overview of the Process
This is an overview of the process you would use to create the letters described in the previous example:
Warning: You must have Word 2000 or Word XP installed on your computer to create Word document merges in The Education Edge.

320 CH A PT E R
Step 1. In Word, create the form letter for the memo, leaving placeholders where you want to later include data.
Step 2. In Mail, define parameters for the information to export for memos. For example, on the General tab, select Faculty/Staff in the Create letters for [ ] field. On the Fields to Include tab, select the Faculty/Staff Name, and the action Start Date and End Date fields. On the Filters tab, select <Bus Duty> for the Action Types filter.
Step 3. Click Send to Word Merge wizard on the toolbar to access the Word merge wizard. Go through its steps including exporting the data, selecting simple mail merge, and creating the merge document.
Step 4. Insert the form letter you created in step 1 into the blank Word document.Step 5. Insert the field names you selected on the Fields to Include tab into the placeholders created for that
information. For example, insert the Faculty/Staff Name field. Step 6. Return to the Word merge wizard and click Finish to run the merge. Word opens automatically to the
first page of the merged document. A *.doc file containing the merged documents is saved in the location you specified.
Creating a simple merge letter in MailIn this example, we send memos to teachers reminding them when they have bus duty that month. 1. Once you complete the planning of your documents, open Word. 2. Create the form letter by typing the document in Word, leaving placeholders for the fields of information
to add later. For example, for this memo we create a header including this information:Date: 03/10/2005To: <Faculty/Staff Name>Subject: April 2005 Bus Duty Assignments
We enclose the field name in brackets < > to designate a placeholder. These placeholders help identify where Education Edge information should be inserted.
3. When you finish, save the form letter in a location you can easily access again. 4. Open Admission’s Office or Registrar’s Office. On the navigation bar, click Mail. The Mail page appears.
Tip: While you can create the form letter directly from Mail after defining the parameters, we recommend creating the document in Word first and later inserting it. This makes it easier to identify which fields you need to export.

LET TE RS 32
5. Click Letters. The Letters page appears.6. Select Action Letters and click New. The New Action Letters screen appears displaying the General tab.
7. In the Create letters for field, select “Faculty/Staff”.8. In the Start date field, select “<Specific range>” and enter “04/01/05” in the Start date field and
“04/30/05” in the End date field.9. In the Include [ ] actions field, select “Incomplete”.
10. Leave Mark included actions complete [ ] marked, and select “<Specific date>” in the field. Enter “04/30/05”.

322 CH A PT E R
11. Use the default values for all other fields on the General tab.
12. Select the Fields to Include tab.13. Select Faculty/Staff Name field and click the single arrow to move it to the Fields to Include box.
Note: If you include a field for which several values exist in your database, the Field Options screen appears. Enter “1” as the number of fields to export. For more information about the Field Options screen, see “Fields to Include Tab” on page 302.

LET TE RS 32
14. Under the Actions folder, select the Start date and End date fields and move these to the Fields to Include box.
15. Select the Filters tab.16. For this example we filter by <Bus Duty> for the Action Types filter. For more information about filtering,
see “Filters Tab” on page 304.

324 CH A PT E R
17. On the toolbar, click Send to Word merge wizard. The Save Mailing as screen appears.
18. Enter a mailing name and description and click Save. The Save Mailing as screen closes and the Word mail merge wizard welcome screen appears.
19. Click Next.

LET TE RS 32
20. The program exports data based on the parameters you defined in the previous steps and then the What type of Mail Merge do you want to run? screen appears.
21. Select Perform a simple mail merge using only one document.22. Click Next. The Create the document and merge the data screen appears.
23. Click Create merge document.

326 CH A PT E R
24. Word opens automatically to a blank document to use to create your form letter.
25. You already created the text for the form letter in steps 1 through 3 — now you need to insert it into this blank document. From the file menu, select Insert, File. The Insert File screen appears.

LET TE RS 32
26. Browse to the location where you saved the form letter. Select the Word *.doc file and click Insert. The text for the form letter appears in the new Word document.
27. Highlight the placeholder for which you want to insert the first field of information. For this example, we highlight the <Faculty/staff Name> placeholder in the header so we can insert the Faculty/staff name field in its place.

328 CH A PT E R
28. Once the placeholder is highlighted, click Insert The Education Edge field on the toolbar. A list of the exported fields appears.
29. Select the first field you need from the list. For this example, we select the Faculty/Staff Name field. The program field name for Faculty/Staff Name appears in the document replacing the <Faculty/Staff Name> placeholder.

LET TE RS 32
30. Repeat these steps to continue placing the fields in the appropriate placeholders. For this example, we also add the Start date and End date fields.
31. To return to the wizard to continue the merge process, click Save and return to EE. You return to the Edit the document and merge the data screen.
32. To run the merge, click Finish. The Confirm File Location screen appears.The Save document as field displays the default location for saving merge documents. You can use this location or click the binoculars to browse to a different location.

330 CH A PT E R
33. Click OK. The program processes the merge and then opens automatically to the first page of the merged document in Word.• This single Word document contains all of the merged documents created from the export, each
appearing on a separate page. Faculty/staff-specific information now appears in each place you inserted a field name.
• To view the other documents created, scroll down to view the next page.
34. You can edit the document directly in Word. When finished, save and close the document, exit Word, and return to your action letter parameter file.
35. To save the action letter parameters, click Save on the toolbar. 36. To close action letter and return to the Letters page, in the upper right corner of the screen, click X.
Creating a Conditional Word Merge
The conditional merge process is essentially the same process as a simple merge in that both use Microsoft Word integrated features to produce documents customized with information exported from your Education Edge database. However, with the conditional merge, you can create more complex merges that use multiple form letters rather than a single form letter. Furthermore, you can define conditional “If/Then” statements that determine which document a recipient should receive. For example, using Checklist Letters, you can create form letters to send to applicants who completed specific checklist items — such as submitting an application or immunization form. You can create an export file of applicants, and using the conditional merge process, define conditional statements that match applicants with the letter they should receive based on the checklist item they completed. Furthermore, each letter is customized with information specific to its recipient, such as his name and address.
Overview of the Process
This is an overview of the process you would use to create the checklist letters described in the previous example:
Step 1. In Word, create two unique letters, one letter to acknowledge receipt of an application form and another to acknowledge receipt of the immunization form. Leave placeholders for exported information.
Tip: While you can create the form letter directly from Mail after defining the parameters, we recommend creating the document in Word first and later inserting it. This makes it easier to identify which fields you need to export.
LET TE RS 33
Step 2. In Admissions Office Mail, define parameters for the information to export for letters. For example, on the General tab, define a completion date range and include only completed checklist items. On the Fields to Include tab, select the Applicant Name and Full Address fields. On the Filters tab, select to include only the “completed application form”, and “completed immunization form” for the Checklist Items filter.
Step 3. Click Send to Word merge wizard on the toolbar to access the Word merge wizard. Go through its steps including exporting the data, selecting conditional mail merge, and selecting the conditional field. For this example, the conditional field is Checklist item.
Step 4. Click New Document to access the Conditional Word Merge Wizard screen. Define conditional statements to match recipients with the letter they should receive based on the checklist item they completed. For this example, one conditional statement would be, “Use this document when Checklist item is equal to completed application form”.
Step 5. Click Edit merge document to access Word. Insert the letter created for the first condition into the blank Word document.
Step 6. Insert the field names you selected in the export into the placeholders created for that information. For example, if you left a placeholder for the applicant’s name, insert the Applicant Name field here.
Step 7. Repeat steps 4 and 5 for the other letter.Step 8. Return to the Word merge wizard and click Finish to run the merge. Word opens automatically to the
first page of the merged document. A *.doc file containing the merged documents is saved in the location you specified.
Creating a conditional merge letter in Mail1. Once you complete the planning of your documents, open Word. 2. Create the first form letter by typing the document in Word, leaving placeholders for the fields of
information you will add. For example, we create the first letter for applicants who submitted an application form. The letter begins with a header with the applicant’s address and a salutation. We leave placeholders for the applicant’s name and each address field.<Applicant’s name><Address><City>, <State> <Zip>Dear <First name>,

332 CH A PT E R
We enclose the field name in brackets < > to designate a placeholder. These placeholders help identify where exported information should be inserted.
3. When you finish, save the form letter in a location you can easily access again. 4. Repeat steps 2 and 3 for the other condition. For this example, we also create form letters for applicants
who submitted an immunization form.5. Open Admission’s Office. On the navigation bar, click Mail. The Mail page appears. 6. Click Letters. The Letters page appears.7. Select Checklist Letters and click New. The New Checklist Letters screen appears displaying the General
tab.

LET TE RS 33
8. In the Create letters for field, select “Applicants”.9. In the Completion Date field, select “<Specific range>” and enter “6/1/05” in the Start date field and
“6/30/05” in the End date field.10. In the Include box, mark Completed and unmark all other statuses.11. Unmark Mark included checklist items complete.12. Use the default values for all other fields on the General tab.
13. Select the Fields to Include tab.14. Under the Applicants folder, select the Applicants Name field and click the single arrow to move it to the
Fields to Include box. Then select the First name field.15. Under the Addresses folder, select the Address, City, State/Province, ZIP/Postcode fields.

334 CH A PT E R
16. Under the Checklist folder, select Checklist item.
17. Select the Filters tab.18. For this example we filter by “Application form received” and “ Immunization form received” for the
Checklist Items filter. For more information about filtering, see “Filters Tab” on page 304.

LET TE RS 33
19. On the toolbar, click Send to Word merge wizard. The Save Mailing as screen appears.
20. Enter a mailing name and description and click Save. The Save Mailing as screen closes and the Word mail merge wizard welcome screen appears.
21. Click Next.22. The program exports data based on the parameters you defined in the previous steps and then the What
type of Mail Merge do you want to run? screen appears.

336 CH A PT E R
23. Select Perform a conditional mail merge using multiple documents.
24. Click Next. The Choose your conditional field screen appears listing all the fields you selected on the Fields to Include tab.
25. Select the field to use as the condition for the documents. For this example, we select the Checklist item field.

LET TE RS 33
26. Click Next. The Create merge documents screen appears.
27. Click New Document. The Conditional Merge Document screen appears.28. In the first field, select “equal to”.29. In the this value field, select the first field value to use as a condition. In this example, we select
“Application form received”. This will match applicants who submitted an application with the appropriate letter.
30. In the Document description field, enter a name for the document. For this example, we name the document “Application form received”.

338 CH A PT E R
31. Click Edit merge document. Word opens to a blank document titled “Merge document for condition ‘Application form received’”.
32. You already created the text for the form letter in steps 1 through 3 — now you need to insert it into this blank document. From the menu bar, select Insert, File. The Insert File screen appears.
33. Browse to the location where you saved the form letter for the first condition. Select the Word *.doc file and click Insert. The text for the form letter appears in the Word document.
34. Highlight the placeholder for which you want to insert the first field of information. For this example, we highlight the <Applicant’s name> placeholder in the header so we can insert the Applicant name field in its place.
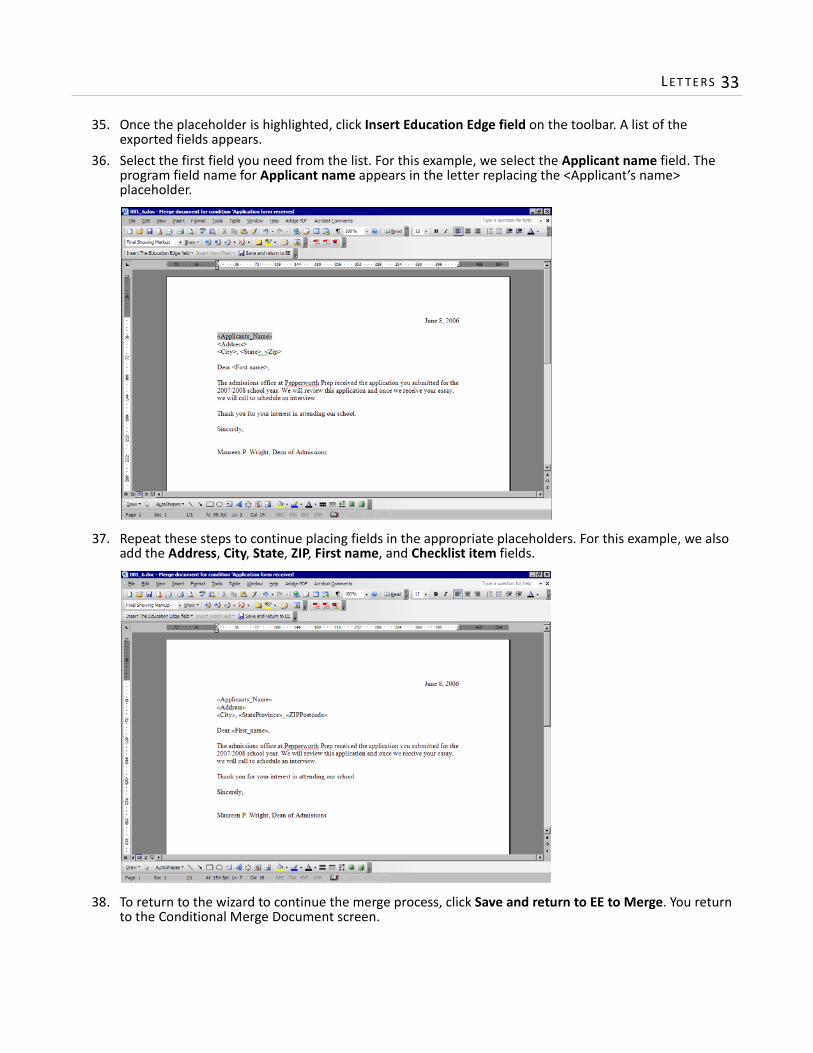
LET TE RS 33
35. Once the placeholder is highlighted, click Insert Education Edge field on the toolbar. A list of the exported fields appears.
36. Select the first field you need from the list. For this example, we select the Applicant name field. The program field name for Applicant name appears in the letter replacing the <Applicant’s name> placeholder.
37. Repeat these steps to continue placing fields in the appropriate placeholders. For this example, we also add the Address, City, State, ZIP, First name, and Checklist item fields.
38. To return to the wizard to continue the merge process, click Save and return to EE to Merge. You return to the Conditional Merge Document screen.

340 CH A PT E R
39. Click OK. You return to the Create merge documents screen and the new condition appears in the grid.
40. Click New Document. The Conditional Merge Document screen appears. Repeat steps 27 through 39 until you have created a document for each condition.
41. Once you have added program fields to each form letter, click Finish to run the merge. The Confirm File Location screen appears.
42. The Document name field displays the name you used for the parameter file. You can use this name or enter another.The Save in folder field displays the default location for saving merge documents. You can use this location or click the binoculars to browse to a different location.
43. Click OK. The program processes the merge and then opens automatically to the first of the generated documents in Word.Applicant-specific information now appears in each place you inserted a field name.
Note: The merge process creates a *.doc file and and an *.html file in the file location you specified. The *.html file lists all the exported information included in the documents.

LET TE RS 34
To view the other documents created, scroll down the screen to view the next page.
44. You can edit the document directly in Word. When finished, save and close the document, exit Word, and return to the checklist letter parameter file.
45. To save the checklist letter parameters, click Save on the toolbar. 46. To close checklist letter and return to the Letters page, in the upper right corner of the screen, click X.

342 CH A PT E R

Index
Aacademic summary
report card 62transcript 209XAP transcript 239
academic year, on transcripts 220action letter
overview 300tabs
address 308attributes 307fields to include 302filters 304format 309general 301relationship filters 306
activitiesreport card 67transcript 213
attendance, report card 79
Cchecklist letter
overview 310tabs
address 317attributes 316fields to include 312filters 313format 318general 311overview 310relationship filters 315
conditional word merge 330, 331conduct, report card 84courses
reports card 35transcript 200XAP transcript 236
creditsreport card 46transcript 159
Eenvelope
attributes tab 288creating 293fields to include tab 284filters tab 285format tab 290general tab 283overview 282, 293
export recordconditional word merges 330simple word merges 319
exporting mailings 12
Ffinding mailings 10formatting
report cardsdetail sections 95footers 122general information 94headers 118summary/notes 115
transcriptsacademic years 219detail sections 198footers 225general information 197headers 221summary/notes 208
freeform notesreport card 91transcript 195
GGPAs
report card 50transcript 204
Llabel
attributes tab 252

344
creating 257fields to include tab 248filters tab 249format tab 254general tab 246overview 246, 257
label truncation reportcreating 275overview 266tabs
address 271fields to include 268filters 269format 273general 267relationship 270
letteraccessing 300action letters 300checklist letters 310overview 300word merge 319
locating mailings 10
Mmail
categoriescards 9envelopes 9forms 8labels 9letters 9
mail taskexporting mailings 12opening saved mailings 10overview 9previewing mailings 10, 11sending mailings as e-mail 13
medical, XAP transcript 242
Oopening mailings 10
Pperformances
report card 54transcript 167
previewing mailings 11
Rrank
report card 58transcript 171
report cardcreating 92formatting
details 96footers 122general information 94headers 118summary/notes 115
printing 123sections
academic summary 62activities 67attendance 79conduct 84courses detail 35credits detail 46freeform notes 91GPAs detail 50performance detail 54rank detail 58student notes 89test scores 73
tabsaddress 25attributes 25details 20filters 23format tab 27general 19summary/notes 22
report, label truncation 275
Ssending mailings as e-mail 13simple word merge, creating 319student notes
report card 89transcript 192
Ttest scores
report card 73transcript 186XAP transcript 241
transcriptcreating 195formatting
academic years 220details 199

I N D EX 345
footers 225general information 197headers 221summary/notes 208
printing 226sections
academic summary 176, 209activities 180, 213courses detail 200freeform notes 195, 218GPAs 204performance detail 167ranks detail 171student notes 192test scores 186
tabsaddress 137attributes 137details 129filters 134format 139general 128summary/notes 132
Wword merge
conditional 330creating simple merges 320letters 319simple 319
XXAP transcript
exporting 244overview 228sections
academic summary 239courses 236medical 242test scores 241
tabsaddress 232details 230filters 231format 234general 229

346