mains clipper - wahl uk · mains clipper contents general user information page 3 important...
TRANSCRIPT

1
MAINS CLIPPER
CONSUMER MAINS CLIPPERINSTRUCTIONS

2
MAINS CLIPPER
CONTENTS
GENERAL USER INFORMATION Page 3IMPORTANT SAFEGUARDS Page 6 PRODUCT DESCRIPTION Page 9OPERATING INSTRUCTIONS Page 9CARE AND CLEANING Page 11CUTTING YOUR HAIR Page 13 DISPOSAL Page 17WIRING Page 17GUARANTEE Page 19
Please read all instructions carefully to familiarise yourselfwith your new Wahl Mains Clipper before using.
Save these instructions for further reference.
For any further assistance or information call Customer Services onT: 01227 740066
or visitW: www.wahl.co.uk

3
MAINS CLIPPER
GENERAL USER INFORMATIONInformation about using the operation manual
►Before using the appliance for the first time, you must read and understand the operation manual completely. ►Consider the operation manual as part of the product and store it in a safe and accessible place. ►Include this operation manual if passing the appliance on to a third party. ►In the case of conflicts with national safety specifications or instructions, the national requirements must be followed.
Explanation of symbols and notesDANGERDanger of electric shock which may result in serious physical injury or death.
DANGERDanger of explosion which may result in serious physical injury or death.
DANGERDanger of fire which may result in serious physical injury or death.
WARNINGWarning of possible physical injury or a health risk.
CAUTIONInformation about danger of material damage.
Note with useful information and tips. Action to be taken by owner.
Carry out these actions in the sequence described.
List
1.
·

4
MAINS CLIPPER
1
A
B
D
F
G
E
H
C

5
MAINS CLIPPER
432
65 7
8 9
0,5 – 1,0 mm
a
b
b
a
b
a
b
a

6
MAINS CLIPPER
Please retain this leaflet for future reference.
IMPORTANT SAFEGUARDSWhen using your electrical appliance, basic safety precautions should always be followed, including the following:
Intended use• Only use hair clippers to cut human head hair.• Only use animal clippers to cut animal hair
and animal fur.Requirements on the user
►Read the instruction manual in full to familiarise yourself with the product before the first use. ►This appliance can be used by children from aged 14 years and above and persons with reduced physical, sensory or mental capabilities, or lack of experience and knowledge, if they have been given supervision or instruction concerning use of the appliance in a safe way and understand the hazards involved. Children shall not play with the appliance. Cleaning and user maintenance shall not be made by children without supervision.

7
MAINS CLIPPER
►Use this appliance only for its intended purpose. ►Repairs to the appliance must only be carried out by a trained electrician in accordance with the electrical engineering regulations!
HazardsPlease adhere to the following safety instructions!
Danger! Electric shock due to damage to appliance.
►Do not operate the appliance with a broken cord or plug, or if the appliance malfunctions, or is dropped or damaged in anyway. ►Any servicing or repair must be performed by an authorised service representative. ►The use of attachments that are not supplied by the manufacturer may cause fire, electric shock or injury and damage to the appliance.
Danger! Electric shock due to penetration of liquid.
►To protect against risk of electrical shock, never immerse the unit or let it come into contact with water or any other liquids. Do not use the unit with wet hands. If the appliance should become wet, damp or fall in water, remove plug from mains socket immediately. Do not put your hands in the water. Do not take into bathroom.

8
MAINS CLIPPER
Warning! Injuries due to incorrect handling
►Switch off the appliance and unplug from outlet when not in use, before putting on or taking off attachments and also before cleaning the appliance.
Caution! Danger of product damage. ►Never use your appliance without paying attention! Always unplug this appliance from the electricity outlet immediately after use. ►Do not wrap the cord around the appliance. ►Do not use outdoors or in damp areas. ►Never carry the unit by its power cord. ►Do not drop or insert any object into any opening.
Caution! Danger Flamable! ►The appliance must never be sprayed with aerosol (spray) products classified as flammable
Caution: Injuries due to incorrect handling ►Do not use this appliance with damaged or broken comb or blade set as injury may occur.Danger of explosion ►Never use the appliance where aerosol (spray) products are being used or where oxygen is released.

9
MAINS CLIPPER
PRODUCT DESCRIPTION
Description of parts (Fig. 1)A Blade setB Cutting length adjustment leverC On/off switchD Mains cableE Adjusting screwF Blade guardG Oil for blade setH Cleaning brush
Not pictured Attachment combs and various accessories (depending on model)
OPERATING INSTRUCTIONSPreparation
Keep the packaging material for safe storage or transport later.
f Check that the contents are complete. f Check all the parts for possible transport damage.
SafetyHandle with care! Damage due to incorrect power supply.
f Only operate the appliance with an alternating current and with the voltage stated on the nameplate.
Mains operation1. Oil the blade set (Fig. 6).2. Insert the appliance plug into the mains socket.3. Switch on the appliance using the on/off switch (Fig. 2a) and, after use, switch it off again (Fig. 2b).
Accessories are available from your dealer.
Adjusting the power screw (Not found in all Wahl models)
10
MAINS CLIPPER
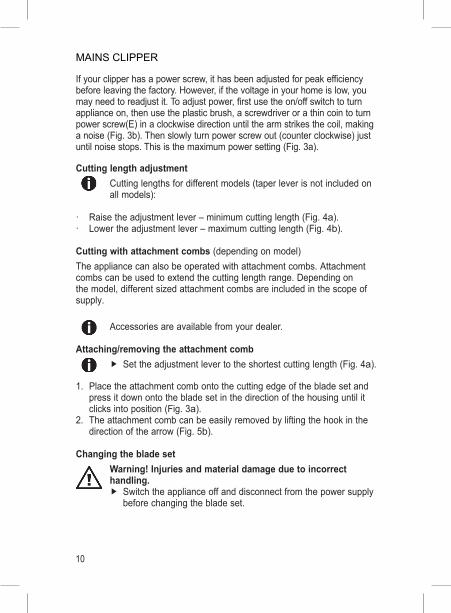
If your clipper has a power screw, it has been adjusted for peak efficiency before leaving the factory. However, if the voltage in your home is low, you may need to readjust it. To adjust power, first use the on/off switch to turn appliance on, then use the plastic brush, a screwdriver or a thin coin to turn power screw(E) in a clockwise direction until the arm strikes the coil, making a noise (Fig. 3b). Then slowly turn power screw out (counter clockwise) just until noise stops. This is the maximum power setting (Fig. 3a).
Cutting length adjustmentCutting lengths for different models (taper lever is not included on all models):
· Raise the adjustment lever – minimum cutting length (Fig. 4a). · Lower the adjustment lever – maximum cutting length (Fig. 4b).
Cutting with attachment combs (depending on model)The appliance can also be operated with attachment combs. Attachment combs can be used to extend the cutting length range. Depending on the model, different sized attachment combs are included in the scope of supply.
Accessories are available from your dealer.
Attaching/removing the attachment comb f Set the adjustment lever to the shortest cutting length (Fig. 4a).
1. Place the attachment comb onto the cutting edge of the blade set and press it down onto the blade set in the direction of the housing until it clicks into position (Fig. 3a).
2. The attachment comb can be easily removed by lifting the hook in the direction of the arrow (Fig. 5b).
Changing the blade setWarning! Injuries and material damage due to incorrect handling.
f Switch the appliance off and disconnect from the power supply before changing the blade set.

11
MAINS CLIPPER
1. Switch the appliance off using the on/off switch (Fig. 2b) and disconnect from the power supply.
2. Undo the screws on the blade set; remove the bottom blade and the top blade (Fig. 7).
When assembling, the bottom blade and the top blade should be aligned as follows:
f Set the adjustment lever to the shortest cutting length (Fig. 4a).
3. Place the top blade on the plastic cam (Fig. 8).4. Position bottom blade and re-insert the two screws.5. Before tightening the screws, align the bottom blade (Fig. 9).
Warning! Injuries due to incorrect handling. f Align the bottom blade so that there is a gap of 0.5 mm to
1.0 mm between the front edge of the bottom blade and the front edge of the top blade (Fig. 9)
f Baldfader clipper can be aligned as close as 0.2mm.6. Tighten screws (Fig. 7).
CARE AND CLEANING
Danger! Electric shock due to penetration of liquid. f Switch the appliance off and disconnect from the power supply,
before you start with cleaning and care. f Do not immerse the appliance in water! f Do not allow any liquid to get inside the appliance. f Only reconnect the appliance to the power supply if it is
completely dry.
Handle with care! Danger from aggressive chemicals.Aggressive chemicals could damage the appliance and accessories.
f Never use solvents or scouring agents. f Only use cleaning agents and blade set oil recommended by
the manufacturer.
Hygienic spray and blade set oil are available from your dealer or our Service Centre.

12
MAINS CLIPPER
f Remove the attachment comb (Fig. 5b) after every use. Remove the hair clippings from the blade set with the cleaning brush.
f If a thorough cleaning is required, the blade set can be removed. See chapter Changing the blade set.
f After cleaning the blade set, we recommend using Wahl hygienic spray. It keeps all blade sets hygienically clean and is effective againstbacteria and viruses.
f Oil the blade set with the blade set oil (Fig. 6). f We recommend that you clean and care for your blade set during and
after clipping. Oiling and cleaning of the blade set protects againstcorrosion and helps the blade to last longer.
f Switch the appliance on briefly (approx. 10 seconds) to ensure the oil film is evenly distributed.
f For a good and long-lasting cutting performance, it is important to oil the blade set frequently
f If the cutting performance deteriorates after long use despite regular cleaning and oiling, the blade set should be replaced.
f Only wipe the appliance with a soft, slightly damp cloth.
Problem eliminationBlade set is cutting badly.Blade set is pulling hair out.Cause: Blade set is dirty.
f Clean and oil the blade set (Fig. 6).
Cause: Blade set is worn out. f Replace the blade set (Fig. 7/8/9).
Skin injuryCause: Too much pressure on the skin.
f Less pressure on the skin.
Cause: Cutting angle is too high. f Hold appliance more flatly to the skin.
13
MAINS CLIPPER
Cause: Gap between the front edge of the bottom blade and the front edge of the top blade is not correctly aligned.
f Align the bottom blade (Fig. 7).
Appliance is not working.Cause: Defective power supply.
f Make sure that contact between the appliance plug and the socket is faultless. Check the mains cable for possible damage.
f Check the power supply.
CUTTING YOUR HAIR(for average medium to long cut)
The first time you cut the hair, cut only a small amount until you become accustomed to how long each attachment comb leaves the hair. Always start by placing the largest attachment comb on the clipper, then use shorter combs if desired length is shorter.Remember, between professional haircuts, the hair grows evenly all over the head and a light trimming at the lower neck and sides may be all that is needed to create that neat, well-groomed look.
Some kits do not include all WAHL attachment combs. However, these combs may be available from your dealer, or can be found on www.wahlstore.co.uk
For uniform cutting allow the clipper to cut its way through the hair. Do not force it through at a faster rate.
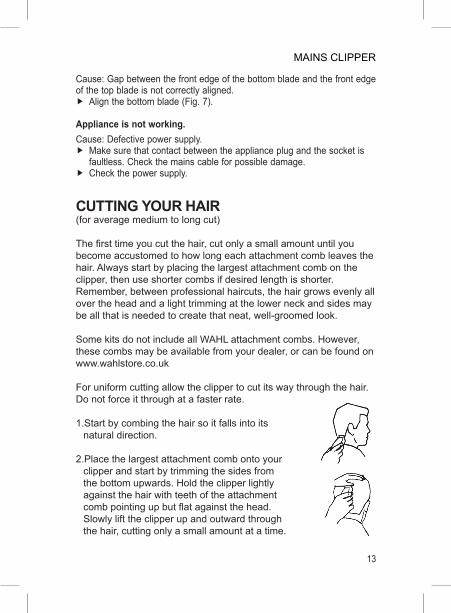
1.Start by combing the hair so it falls into its natural direction.
2.Place the largest attachment comb onto your clipper and start by trimming the sides from the bottom upwards. Hold the clipper lightly against the hair with teeth of the attachment comb pointing up but flat against the head. Slowly lift the clipper up and outward through the hair, cutting only a small amount at a time.

14
MAINS CLIPPER
3.Repeat around sides and back of head.If you desire shorter hair, either change to a lower number attachment comb, or apply more pressure and less lift away from head with the present attachment comb. This entire procedure requires practice, it is always better to leave too much hair the first few haircuts.
For the top of the head you will give a fairly short cut if you use the #8 (2.5cm length) attachment comb. With the teeth flat against the head, slowly start trimming from the front to the back.
Longer hair on top: (no attachment comb). Use either the enclosed barber comb, or a regular comb, and lift the hair on the top of the head cutting over the comb, or grasp the hair between the fingers from the front to the back of the head, gradually cutting the hair shorter by reducing the space between the comb or fingers and the head. Comb the hair frequently, removing trimmed hair and checking for uneven strands.
OUTLINING
When outlining, no attachment combs are needed. On a multi-cut clipper, push the lever up to the close-cut position. Comb hair into desired style, then starting between the ear and the sideburns as shown, hold clipper with corner edge of blade against the hair-line.Slowly follow the desired outline of the hair over, around and behind the ears.For defining sideburns and the back of the neck, hold the clipper upside down, as shown, and hold against the skin at the desired length and move down. Comb hair and check that sides are even. Check for uneven spots throughout the haircut and amend if required.

15
MAINS CLIPPER
SHORT TAPERED STYLES
If a short tapered cut on the sides and back is desired, please follow the following diagram:
Starting with the desired attachment comb, cut from the back of the neck to the crown. Hold the attachment comb flat against the head and slowly move the clipper through the hair as shown. Use the same procedure from the lower side to the upper side of the head, as shown. Then cut the hair against the direction in which it grows from the front to the crown and even up the cut with the sides.
To give a ‘flat top’ look, the hair on top of the head must be cut over the top of a flat top comb rather than using the attachment comb. Use closer cutting attachment combs to “taper” the hair down to the neckline as desired. Comb hair and check for uneven spots and outline sideburns and neckline as previously described.
The four basic areas illustrated on the following diagram are your “road map” to easy do-it-yourself hair cutting.

16
MAINS CLIPPER
BALD FADE (Only applies to Baldfader clipper)
Your Wahl Baldfader clipper is designed to allow you to create and maintain extremely close hair styles, such as the ‘Bald Fade’. Its fine tooth, steel blades and powerful cool running motor give a close, smooth cut every time.
1.This style leaves the head virtually bald at the bottom, fading to slightly longer hair on top. If the hair is fairly long, use the clipper over the comb technique to remove the bulk of the hair before starting the bald fade cut.
2.Start at the temple and cut all the way around the head to establish the ultimate location of the fade line. Always cut against the grain for the shortest cut. Do not force the blade through the hair. Let the clipper do the work.
3.Next, cut around the head again and up the nape of the neck to the fade line, brushing away the cut hair as you go. Pull the scalp taut with the thumb for the closest cut. Turn the clipper upside down when necessary to keep cutting against the grain. Make sure both sides of the head are even.
4.For the top of the head, cut with the grain. Comb or brush the hair as you cut for an even end result.
5.To complete the fade, blend the hair at the fade line by trimming up and across the line and against the grain all the way around the head. Then, repeat all around, turning the clipper upside down and cutting downward. The final objective is to blend the hair so there is no real line, just a perfect bald to very short hair. Continue combing and cutting until you achieve the desired effect.
#4#3
#2
#1

17
MAINS CLIPPER
6.To create a part, pick a spot off centre. Pull the scalp tight and with the end of the blade perpendicular to the head, move the clipper back and forth to cut a line. Comb through it and cut again to make sure the cut is precise.
BALD CUT
For a totally bald look, follow the directions for beginning the bald fade cut. Continue to cut progressively shorter, against the grain, all over the head.
DISPOSALHandle with care! Environmental damage in the case of incorrect disposal.
f Correct disposal will ensure environmental protection and prevent any potentially harmful impact on people or the environment.
Adhere to the relevant legal requirements when disposing of the appliance.Information on the disposal of electrical and electronic appliances in the European Community:
Within the European Community, national regulations are specified for the disposal of electrical appliances, based on EU Waste Electrical and Electronic Equipment Directive 2002/96/EC (WEEE). In accordance with this, the appliance can no longer be disposed of with the local or domestic waste.The appliance will be accepted free of charge by local collection points or recycling centres.
WIRINGWARNING: If the supply cord is damaged it must be replaced by the manufacturers service agent or a similarly qualified person in order to avoid a hazard.
18
MAINS CLIPPER
The wires in the mains lead are coloured in accordance to the following code:
Blue Neutral (N) Brown live (L) This lead is fitted with a 3 pin plug which has a 3 amp fuse fitted.If the plug supplied is not suitable for your socket or becomes damaged, it should be cut off and disposed of, and a suitable plug fitted as detailed below.
The wire which is coloured BLUE must be connected to the terminal in the plug which is marked with the letter ‘N’ or coloured BLACK or BLUE.
The wire which is coloured BROWN must be connected to the terminal in the plug which is marked with the letter ‘L’ or coloured RED or BROWN.
DO NOT connect either wire to the terminal in the plug which is marked with the letter ‘E’ or has the Earth symbol, or coloured GREEN or GREEN/YELLOW.
This lead has been specifically designed for use with Wahl mains powered clippers and should not be used with any other product.
Wahl (UK ) Ltd. accept no responsibility for any accidental injury or damage resulting from the incorrect fitting of this product.

19
MAINS CLIPPER
GUARANTEEThis product is guaranteed against defects in material and workmanship for a period of three years from the date of original purchase or receipt as a gift.
Should this product become defective during the guarantee period, return it to the store of purchase together with your proof of purchase for repair or replacement.
Alternatively within the guarantee period you can return the product to Wahl (UK) Ltd who will repair any such defect or elect to replace the product or any part of it, without charge, provided there is proof of purchase. Should a replacement be offered this will not extend the original guarantee period.
The guarantee becomes invalid in the case of misuse, alteration or repair by unauthorised persons.
This guarantee does not include blades, cables, shaver heads, foils and cutters etc., which are consumable parts.
This guarantee in no way affects your rights under law in the United Kingdom.
20
MAINS CLIPPER
WAHL (UK) LTDSTERLING HOUSECLIPPER CLOSERAMSGATE, KENT CT12 5GG
CUSTOMER SERVICES T: 01227 740066www.wahl.co.uk
Form No. Z100 Rev.11 09-18