maintaining your chapter web site · maintaining your chapter web site hosted by rick bradley, ......
TRANSCRIPT

Some Initial Concepts:
What does a web page consist of?
– Layout– Navigation– Images– Textual Content
Important Things to Consider:
Keep it simple: different browsers (IE, Firefox, Netscape) render pages differently – the more complex the page, the more likely you are to have appearance issues with different users. Graphics = Time: The more graphics you use, the longer a page takes to load. This can really put off some users. Animations are much worse! They have their place, but make sure you need it for a good reason.Colors and Font: another version of the keep it simple rule. Pages with a coherent theme and style are generally more pleasing to the eye, and have more attention paid to them than pages with different color and size fonts all over them. If you overdo the emphasizing, people will tune it out and miss your information.

Some Initial Concepts: Editing
What is code?– HTML – the code language that
tells the browser how to display the page
– Tags – individual code elements such as <p> for paragraph
– JAVA, Applet's, Active-X : things you won’t need!
What is wysiwyg?– What you see is what you get – this
is a not actually true!– Advantages over code based
editing – easy to use for beginners– Disadvantages to code based
editing – when wysiwyg doesn’t do what you want, it can be difficult to fix the problem.
<table width="580"><tbody><tr><td width="180"><img title="baltimorehome1" alt="baltimorehome1" src="/uploadedImages/Chapters/Chap042/j0078616.jpg" width="179" border="0" /></td><td><p><strong>Welcome to IIE-Maryland Chapter website!</strong> </p></td></tr></tbody></table>

Editing programs
Most editors now have both wysiwyg and code editing components. I recommend getting familiar with basic html code if you will be editing a lot of materials or attempting to create pages with complex layouts, multiple tables and columns…etc.
Frontpage, Dreamweaver, Adobe GoLive are examples of web design software. They incorporate lots of design elements into them such as limited graphics editing, layout controls, code andwysiwyg editing, and advanced page elements such as Active-X, Java, Flash animation.
We will be using Ektron CMS-400 system to create, edit, and maintain the IIE Chapter web sites.
Accessing your Web Site for Editing
You will use the urlhttp://www.iienet2.org/Chapterlogin.aspx
You will be prompted to enter your user name and password. These will be provided by Bisi Oyeyemi or JJ Koran at IIE. 770-449-0460 or 800-494-0460
Your session is limited to 4 hours. You will be automatically logged out after this time. Stay logged in to do all of your work. The system will not allow you to exit and return repeatedly.
CMS – Content Management SystemDMS – Document Management System
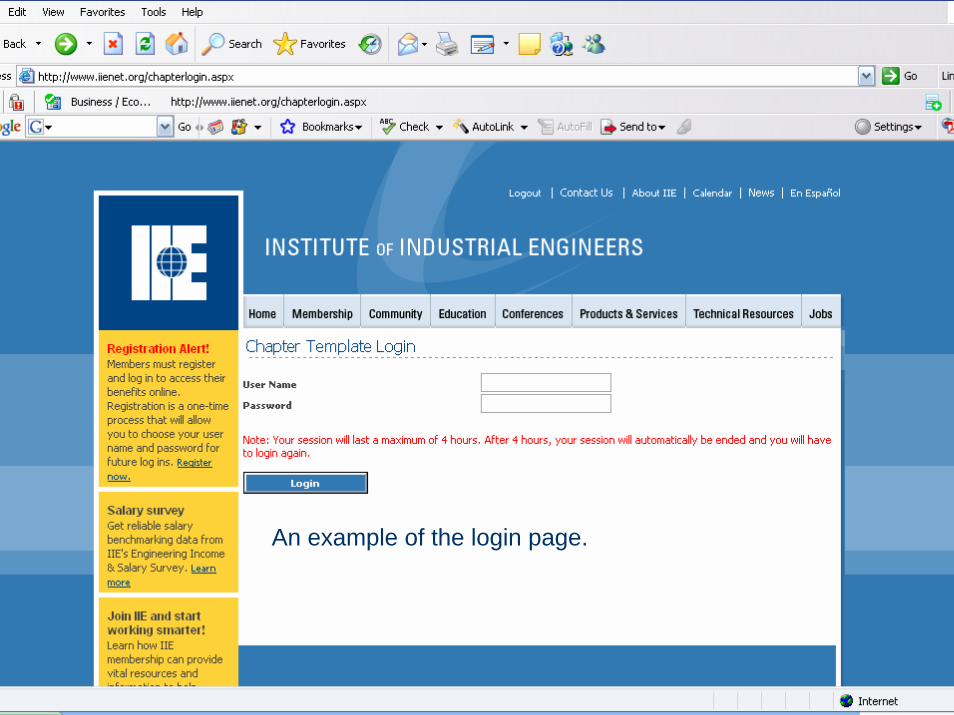
An example of the login page.
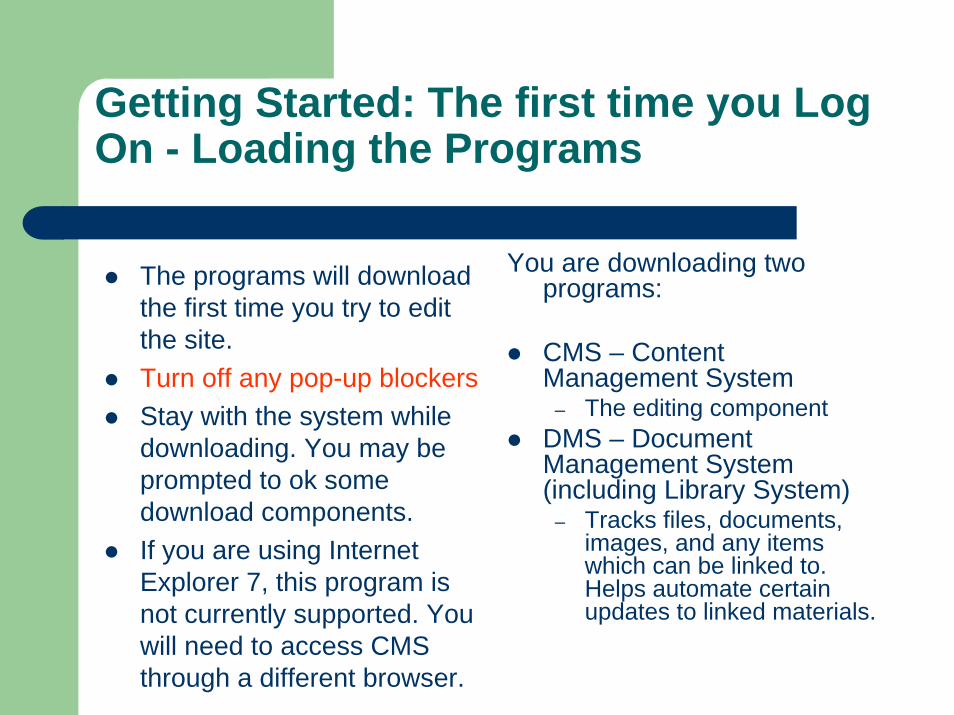
Getting Started: The first time you Log On - Loading the Programs
You are downloading two programs:
CMS – Content Management System
– The editing componentDMS – Document Management System (including Library System)
– Tracks files, documents, images, and any items which can be linked to. Helps automate certain updates to linked materials.
The programs will download the first time you try to edit the site.Turn off any pop-up blockersStay with the system while downloading. You may be prompted to ok some download components.If you are using Internet Explorer 7, this program is not currently supported. You will need to access CMS through a different browser.
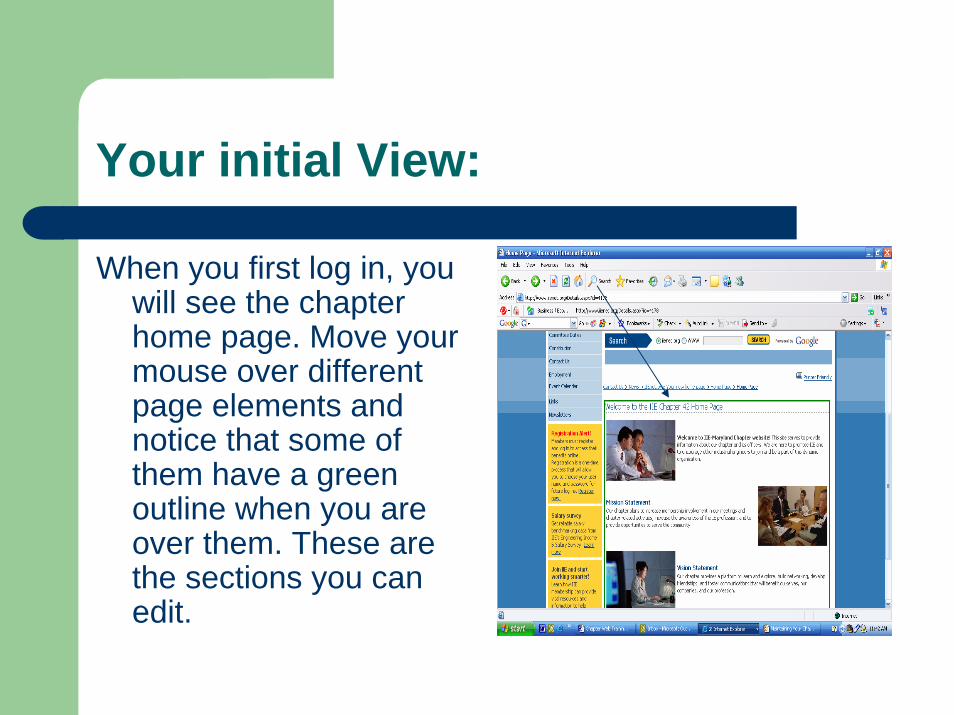
Your initial View:
When you first log in, you will see the chapter home page. Move your mouse over different page elements and notice that some of them have a green outline when you are over them. These are the sections you can edit.

Right click over a green highlighted area and you will get a menu with several options for editing or opening a workspace.

The workspace menu options:
Edit – opens a the current page’s content for editing, skipping the workarea view.View History – shows all past and current stages of the content, helpful in resetting to previous versions if you make a mistake!Delete – self explanatoryAdd Task – you will not be using this functionProperties – opens a workarea to view the properties of the page content ( such as date created, template used, who edited it, etc.). You can edit from this view as well as selecting editdirectly.Workarea – this opens the CMS workarea which is the main editing console. You can access all files, documents and images from here.

The CMS Workarea:You will be working in the first two areas of the workspace menu – Content and Library

The Workarea Menu: ContentThe four blue buttons in the lower left of the screen
Content – this will show all of the folders and page files which you have access to
You will only access the folder with your chapter number as part of the name. Even though you can see files in the higher folders, do not do anything with these files.
Each of the files shown in this view represent a page in the web site.
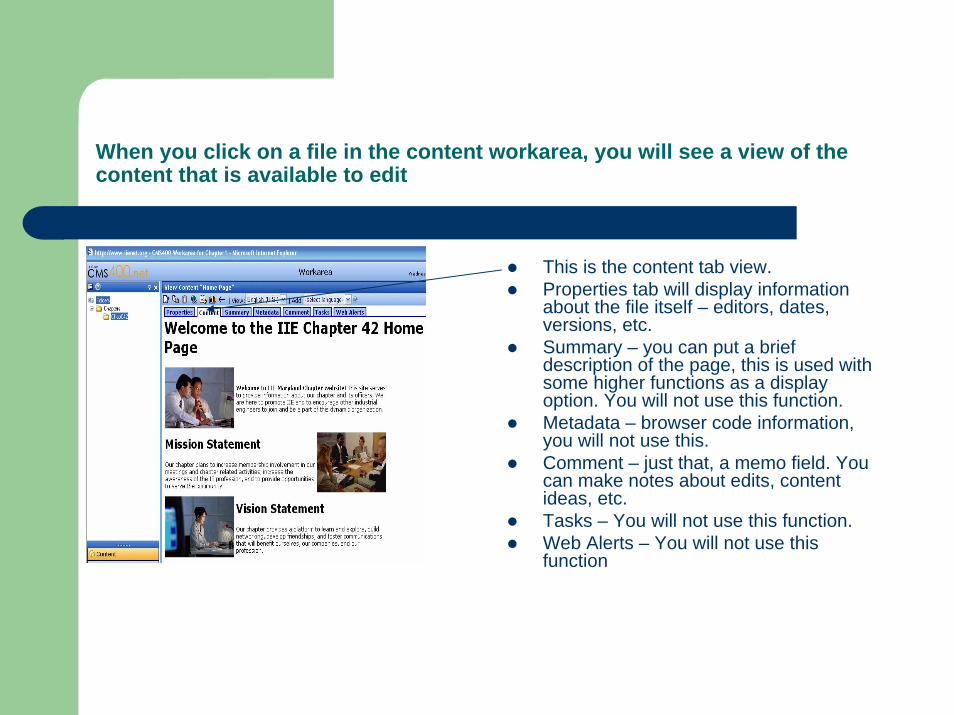
When you click on a file in the content workarea, you will see a view of the content that is available to edit
This is the content tab view.Properties tab will display information about the file itself – editors, dates, versions, etc.Summary – you can put a brief description of the page, this is used with some higher functions as a display option. You will not use this function.Metadata – browser code information, you will not use this.Comment – just that, a memo field. You can make notes about edits, content ideas, etc.Tasks – You will not use this function.Web Alerts – You will not use this function
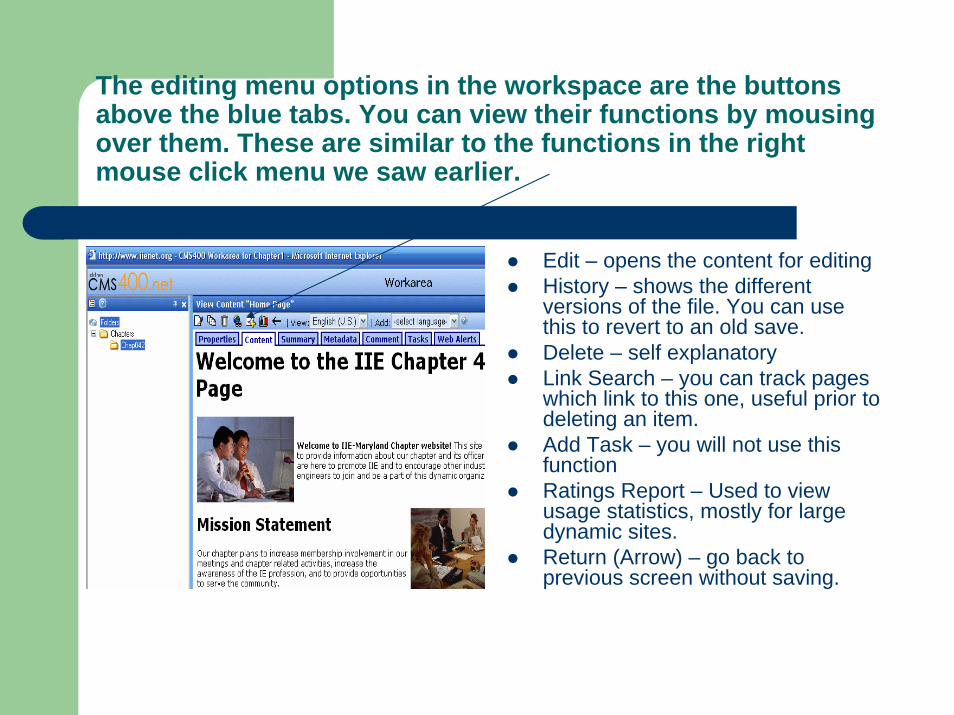
The editing menu options in the workspace are the buttons above the blue tabs. You can view their functions by mousingover them. These are similar to the functions in the right mouse click menu we saw earlier.
Edit – opens the content for editingHistory – shows the different versions of the file. You can use this to revert to an old save.Delete – self explanatoryLink Search – you can track pages which link to this one, useful prior to deleting an item.Add Task – you will not use this functionRatings Report – Used to view usage statistics, mostly for large dynamic sites.Return (Arrow) – go back to previous screen without saving.

The Workarea Menu: LibraryThe four blue buttons in the lower left of the screen
Library – this will show all of the images, documents or files you have uploaded to the web site, as well as content which you can link to (your own pages, files, and external hyperlinks)
The different view options (files/images/quicklinks/hyperlinks/forms) can be accessed in the drop down menu – see the arrow.
Each item shown in this area represents an item available for use in the site.

Adding Items to the Library
To add an item to the library, click on this icon and follow the steps.You can upload images from your computer directly to the site using this method or from the edit content mode which you will see shortly.
Remember – if you are adding images, you must be in the image view, files in file view, etc.

Editing an item in the library
If you click on an individual item in the library, you will get more menu options for editing the item.You can edit the properties of the item (such as title, description), search for links to this item, overwrite the file with a new version or different picture, or delete the item.Overwriting files or images can be useful when you want to replace the content but keep the links to it as they are.
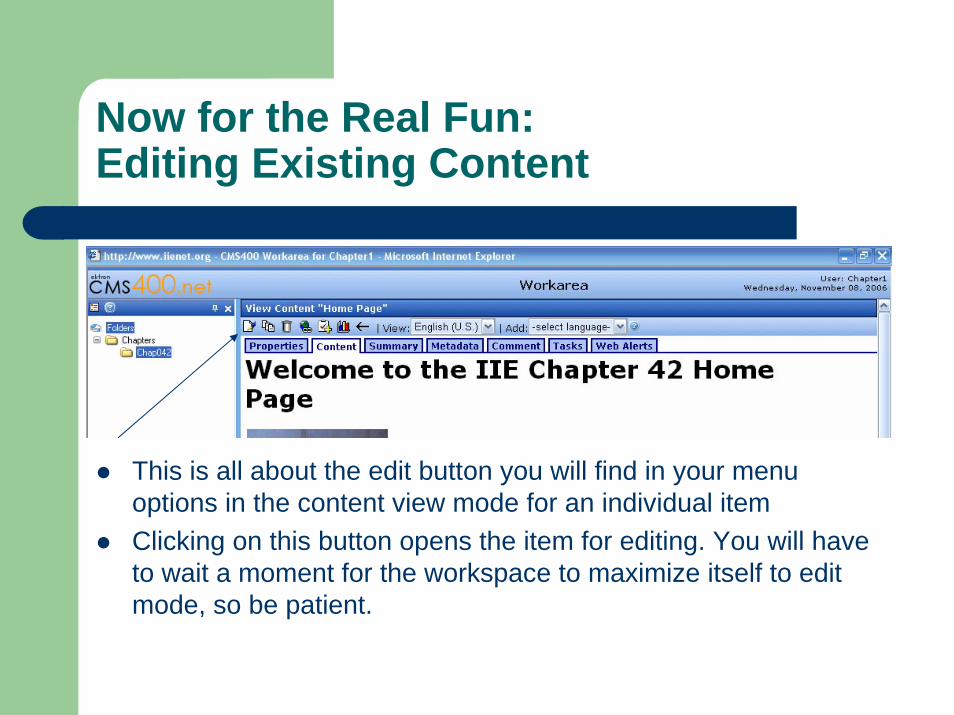
Now for the Real Fun:Editing Existing Content
This is all about the edit button you will find in your menu options in the content view mode for an individual itemClicking on this button opens the item for editing. You will have to wait a moment for the workspace to maximize itself to edit mode, so be patient.
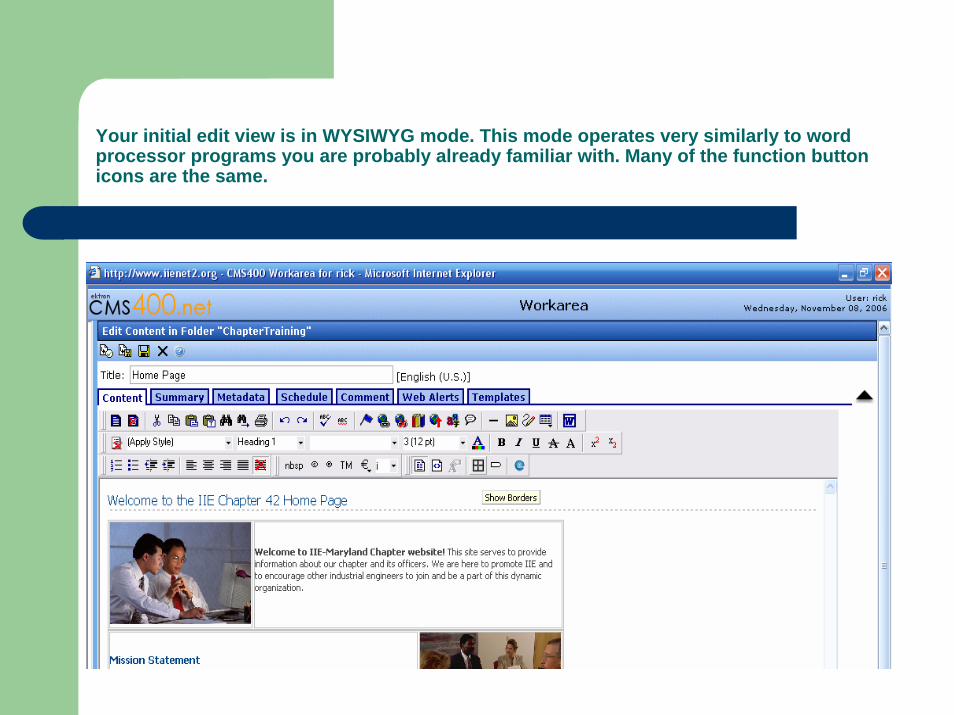
Your initial edit view is in WYSIWYG mode. This mode operates very similarly to word processor programs you are probably already familiar with. Many of the function button icons are the same.

The top row of menu icons are:
•Publish – save and publish directly to the web. This will be viewed by site visitors immediately.
•Check-in – Saves the work and allows others to access it for editing.
•Save – saves your progress, but only you can re-edit it.
•Exit Without Saving
•Help – accesses the Ektron help menu
Editing overview:
We are not going to go into every editing scenario we can think of here. Trial and error are going to play a part in your learning how to work with this system.Instead, we will go over some of the key things to know when using this system in an IIE Template site.
Some things to note about your chapter site:
The Chapter sites using the IIE Template are part of a CSS Site (Cascading Style Sheet). This means that rather than having to tell each item and area of text within the page how to look (Bold, Font Size 20, Red Text, Etc.), there is a file which creates styles for different sections of the web page and different types of text.

Because this is a CSS Site:
You will not want to use the font name or font size windows in the editing mode.Use the Paragraph format window to select a style you want for your text such as header 1, 2, 3, etc.

Adding Text to a Page
Text is fairly straightforward. Just type in what you want, and use your editing icons to format it as you wish.
There are some catches to note.If you cut and paste from another program (MS Word, another web page, etc.), you may be pasting code into your page as well as the visible content. This will affect how the material shows up on your web pa and can be quite a problem. The easiest solution is to paste everything into Notepad, recopy, and then paste into your page. Notepad is very basic and does not support codes, so it strips any hidden code from the text and leaves you with just the info you wanted.If you have pasted into your page directly and there are font problems, it is probably code. Go to source view to fix this. The rule of thumb here is that there should be no <span> or <font> tags Delete them all and start from scratch with your formatting. Remember, these tags have a start and a stop, so get both of them for each occurrence.
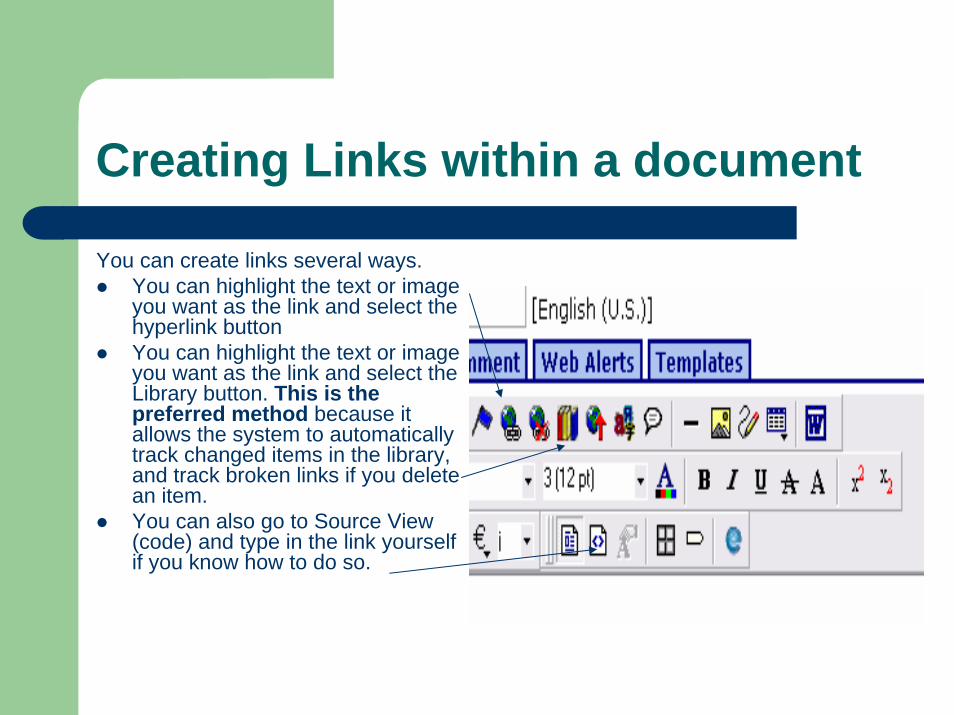
Creating Links within a document
You can create links several ways.You can highlight the text or image you want as the link and select the hyperlink buttonYou can highlight the text or image you want as the link and select the Library button. This is the preferred method because it allows the system to automatically track changed items in the library, and track broken links if you delete an item.You can also go to Source View (code) and type in the link yourself if you know how to do so.

The Library Hyperlink tool allows you to link to uploaded files, images, web pages which already exist on your site (quicklinks), and external web pages (hyperlinks).ust highlight the link text on the page, then click on the library icon, select the type of item you wish to link to, and double click on the item.

Adding Images to a Page:
Adding an image is fairly straight forward. You do need to note that the CMS System does not have image editing capabilities, so use an image editing software to make your image ready for use, then upload it.
You can put your cursor where you want the image and right click, or click on the image icon in the toolbar. Follow the prompts to link to an image already in the library, or select new image and upload it from your computer.

Using Tables in a Page
Tables can be very helpful when you want columns on your page, or a picture and text side by side.
Like a spreadsheet, table rows, columns, and cells can be merged and sized to provide a stable, non-linear platform to place objects and text on a page
Click on the table icon in your editing toolbar to bring up the table menu. You will see all of the options available to you. For advanced use, I recommend finding a good html code reference.
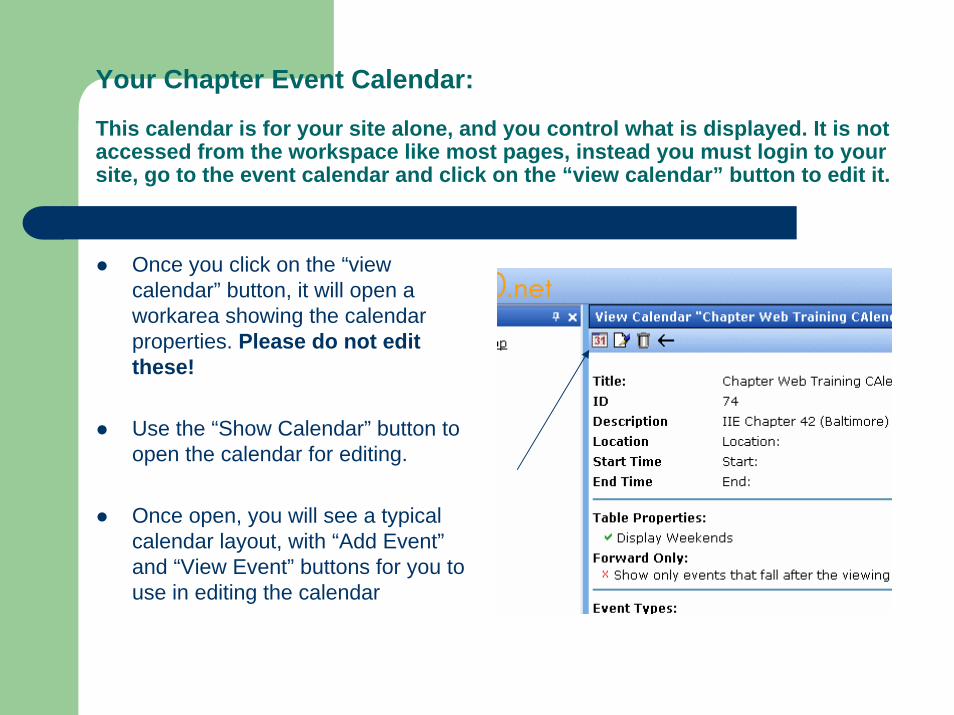
Your Chapter Event Calendar:
This calendar is for your site alone, and you control what is displayed. It is not accessed from the workspace like most pages, instead you must login to your site, go to the event calendar and click on the “view calendar” button to edit it.
Once you click on the “view calendar” button, it will open a workarea showing the calendar properties. Please do not edit these!
Use the “Show Calendar” button to open the calendar for editing.
Once open, you will see a typical calendar layout, with “Add Event” and “View Event” buttons for you to use in editing the calendar
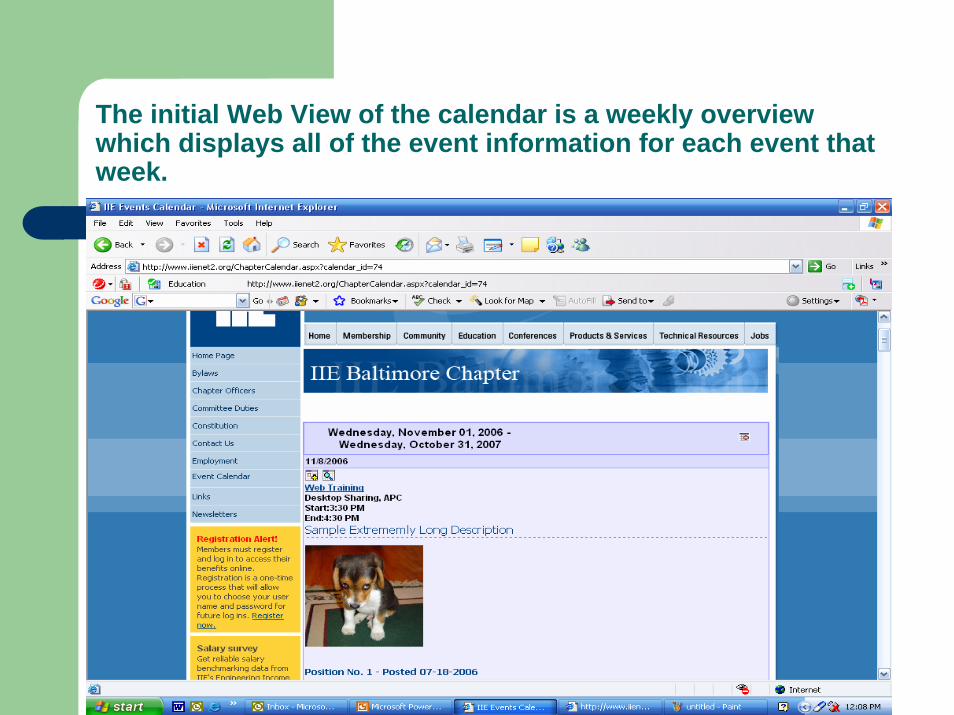
The initial Web View of the calendar is a weekly overview which displays all of the event information for each event that week.

Adding Events to the Calendar
Most of this process is very straightforward. Just fill in the requested information.
Please note that the long description field should not be used for long, detailed descriptions of the event. The listing will take over the calendar page on the site! Instead, if there is a lot of information, or graphics about the event, I recommend creating a page for the event on the site and linking the event to that page.
In Conclusion
Hopefully this presentation has given you the information you need to get started maintaining your web site using the CMS-400 system
Try different things with the editing software to see what it can do. Remember, you can always exit without saving!
If you would like more assistance, I can be reached at the following:Rick [email protected] business website – available after 11/14/06 – this slide will be updated
I offer web site maintenance, design, utilities implementation, and graphics solutions on a contract basis.