maintenance manual fervi · 2018. 6. 23. · make sure the protective gloves in the sandblaster are...
TRANSCRIPT

OPERATION AND
MAINTENANCE MANUAL
Sandblast Cabinet
Art. 0575
ORIGINAL INSTRUCTIONS
fervi.
com

MACHINES ANDACCESSORIES
Page 2 of 28
PREFACE
Read this manual before operating any machinery
ORIGINAL INSTRUCTIONS
Reading this instruction manual is required before operating any of the machinery. Theguarantee that the machine will function and perform properly is strictly dependent upon theapplication of all the instructions contained in this manual.
Operator Qualifications
The workers responsible for using this machine must have all necessary information,education and receive adequate training regarding safety, including:a) Conditions of use for the equipment;b) Foreseeable, abnormal situations;pursuant to art. 73 of Legislative Decree no. 81/08.
We guarantee the Machine's conformity to the specifications and technical instructions
described in the Manual on the date of issuance and listed herein; On the other hand,
the machine may also be subject to important technical changes in the future, without
the manual being updated.
Therefore, contact FERVI for information about modifications that may have been
implemented.
REV. 1 May 2013
fervi.
com

MACHINES ANDACCESSORIES
Page 3 of 28
Table of Contents
1 INTRODUCTION ........................................................................................5
1.1 Preface..........................................................................................................................6
2 GENERAL SAFETY WARNINGS ...................................................................7
2.1 General safety regulations ............................................................................................7
2.2 Safety regulations for the electrical system ..................................................................8
2.3 Technical Support .........................................................................................................8
2.4 Other Provisions ...........................................................................................................82.4.1 TAMPERING WITH SAFETY DEVICES IS FORBIDDEN....................................................... 8
3 TECHNICAL SPECIFICATIONS ...................................................................9
4 DESCRIPTION OF THE MACHINE .............................................................10
4.1 Description of the Main Parts ......................................................................................11
4.2 Identification and Warning Plates...............................................................................12
4.3 Pictograms..................................................................................................................13
5 INSTALLATION OF THE MACHINE ...........................................................15
5.1 General Standards ......................................................................................................15
5.2 Connection to the compressed air system...................................................................16
5.3 Connecting the sandblast gun .....................................................................................17
6 LAMP SWITCHES.....................................................................................18
7 OPERATION ............................................................................................18
7.1 Instructions for Use ....................................................................................................18
7.2 How to use the sandblasting cabinet ..........................................................................18
8 MACHINE SAFETY ...................................................................................20
8.1 "Mechanical" Safety Devices .......................................................................................208.1.1 Transparent screens................................................................................................. 208.1.2 Filters and suction systems ....................................................................................... 208.1.3 Door locking device .................................................................................................. 20
8.2 Use of PPE...................................................................................................................21
9 MAINTENANCE........................................................................................22
9.1 Routine Maintenance ..................................................................................................229.1.1 Obstructions............................................................................................................ 229.1.2 Excessive amount of dust in the cabinet ..................................................................... 23
9.2 Replacing the parts of the sandblasting cabinet..........................................................239.2.1 Replacing the transparent screen ............................................................................... 239.2.2 Replacing the sandblast gun nozzle ............................................................................ 239.2.3 Replacing the gloves ................................................................................................ 24
9.3 Cleaning the Sandblasting cabinet ..............................................................................24
10 REPLACEMENT PARTS...........................................................................25
fervi.
com

MACHINES ANDACCESSORIES
Page 4 of 28
11 TROUBLESHOOTING .............................................................................27
12 CHECKS TO BE MADE IN THE EVENT OF MALFUNCTIONING..................27
12.1 Recommended material for any type of processing..................................................27
13 DISPOSAL OF PARTS AND MATERIALS .................................................28
fervi.
com
MACHINES ANDACCESSORIES
Page 5 of 28
1 INTRODUCTIONThis manual is designed to provide the knowledge required for the use and maintenance ofthe Sandblast Cabinet Art. 0575, and to provide the operator assigned to the device with asense of responsibility and knowledge of its possibilities and limitations.
As a machine is entrusted to experienced and skilled operators, so operators must haveperfect knowledge of the following machines for effective and safe operation.
Selecting personnel is an important factor for efficiency and safety in the workplace, and thepeople considered suitable to perform a specific job must have the sufficient physical andmental capacity to allow them to understand the instructions that they are given.
GRAPHIC FORM OF THE ALERTS RELATED TO SAFETY, OPERATION AND RISK WARNINGS
The following boxes are designed to attract the attention of the reader / user for the properand safe use of the machine:
Pay Attention
This emphasizes behavioural rules to avoid damaging the machine and/or the occurrence ofhazardous situations.
Residual Risks
This emphasizes the presence of hazards causing residual risks which the operator mustwatch for to avoid personal injury or material damage.
fervi.
com

MACHINES ANDACCESSORIES
Page 6 of 28
1.1 PrefaceFor safe and easy operation of the sandblast cabinet, this manual must be read carefully inorder to acquire the necessary knowledge. In other words, the life and performance of themachine are dependent on how it is used.
Even if already familiar with the sandblast cabinet, it is necessary to follow the instructionscontained herein, in addition to the general precautions to be observed while working.
Acquire full knowledge of the machine.
Read this manual carefully to understand: operation, safety devices and all necessaryprecautions. All this is to allow safe use of the machine.
Wear appropriate clothing for the job.
The operator must wear appropriate clothing to prevent the occurrence of unpleasantaccidents.
Take proper care of the machine.
Using the Machine
The machine must only be used by qualified personnel trained to use the machine byauthorized personnel.
Figure 1 - Overview sandblast cabinet
fervi.
com

MACHINES ANDACCESSORIES
Page 7 of 28
2 GENERAL SAFETY WARNINGS
2.1 General safety regulations
Risks associated with using the machine
DO NOT underestimate the risks associated with using the machine and concentrate on thework in progress.
Risks associated with using the machine
Despite the implementation of all the safety devices for safe use of the machine, it isnecessary to take note of all the requirements for the prevention of accidents reported invarious parts of this manual.
Risks associated with using the machine
Every person who is responsible for the use and maintenance of the machine should havefirst read the instruction manual, particularly the chapter on safety information.
It is recommended that the plant safety manager get written confirmation of the above.
Operator Protection
Before starting any type of work on the machine, the operator must wear appropriatepersonal protective equipment (PPE) such as goggles, gloves and safety shoes.
Operator Qualifications
The workers responsible for using this machine must have all necessary information,education and receive adequate training regarding safety, including:
a. conditions of use for the equipment;
b. foreseeable, abnormal situations;
c. pursuant to art. 73 of Legislative Decree no. 81/08.
1. Read this manual carefully, and then work safely.2. Always check the efficiency and integrity of the machine.3. Do not use the machine in enclosed or poorly ventilated places and in the presence of
flammable and/or explosive atmospheres. Do not use the machine in damp and/or wetlocations, or those exposed to rain.
4. Keep the workplace tidy and free from obstruction; disorder causes accidents.5. Make sure that the work environment is forbidden to children, non-employees and
animals.6. Do not perform tasks on the machine other than those for which it was designed. Only use
the machine in the manner in which it was intended, as described in this instructionmanual.
7. Work without disturbances.
8. Work areas must be well lit.
9. Make sure the protective gloves in the sandblaster are in good condition.
fervi.
com

MACHINES ANDACCESSORIES
Page 8 of 28
10.Wear appropriate clothing.
11.Replace worn and/or damaged parts, check that the repairs and protections work properlybefore operating. If necessary, have the machine checked by the service supportpersonnel. Use only original spare parts.
12.It is recommended that users of this publication, for maintenance and repair, have a basicknowledge of the mechanical principles and procedures inherent in repair technique.
13.Management responsible for safety is to make sure that the staff responsible forusing the machine has read and understood this manual in its entirety.
14.The company safety manager is responsible for monitoring the company's riskstatus according to Legislative Decree no. 81/08 and subsequent modificationsand amendments.
2.2 Safety regulations for the electrical systemThe sandblasters are equipped with an electrical system for powering the lamps, locatedinside the sandblasting cabinets.
Modifications to the electrical system
Do not modify the electrical system in any way. Work carried out in the electrical system of the machine must be carried out only by
authorized personnel.
1. The supply voltage of the lamps must correspond to that stated on the plate and in thetechnical specifications (230 V / 50 Hz). Never use any other type of power supply.
2. The use of a life-saving device on the electric power supply for a nominal trip range of 10to 30 mA is recommended. For more detailed information, contact a trusted electrician.
3. The current transformer and the power cord should be checked regularly taking care thatthey do not to come into contact with hot objects, surfaces that are wet, oiled and/orhave sharp edges.
4. Do not use the power cord to lift the machine or remove the transformer plug from thesocket.
2.3 Technical SupportFor any problems or concerns, please contact, without hesitation, the Customer ServiceDepartment of the dealer who sold the product to you, who has competent and specialisedstaff, specific equipment and spare parts.
2.4 Other Provisions
2.4.1 TAMPERING WITH SAFETY DEVICES IS FORBIDDEN.
Check the presence and integrity of protections and the proper functioning of safety devicesbefore starting operation.
If any defect is encountered do not use the Sandblast Cabinet!!
It is strictly forbidden to modify or remove guards, safety devices, labels andcaution signs.
fervi.
com

MACHINES ANDACCESSORIES
Page 9 of 28
3 TECHNICAL SPECIFICATIONS
Model Art. 0575
Pla
ted
ata
Weight (kg) 46
Lamp voltage (V) 230
Lamp power (W) 6
Frequency (Hz) 50
Operating pressure 0.65 ÷ 0.75 MPa
Tech
nic
ald
ata
Accessories Sandblast gun
gun nozzle (mm) 4 – 5 – 6 – 7
Hose length (m) 1.5
Overall dimensions (mm) 890 x 560 x 1385
Internal usable dimensions (mm) 850 x 480 x 340/540
Testi
ng Acoustic emission (dB(A)) < 70
Vibration level transmitted through the hand-armsystem (m/s2)
< 2.5
fervi.
com

MACHINES ANDACCESSORIES
Page 10 of 28
4 DESCRIPTION OF THE MACHINEThe sandblasting cabinet has been built to smooth and clean metal surfaces, by means of apressurised stream of dried abrasive particles, such as glass granules or abrasive stonegranules.
Fall of Abrasive Particles
If the abrasive particles (micro beads) fall onto the floor, clean immediately and collect them,to avoid possible falls.
The processing may result in different degrees of finishing, varying from coarse to finedepending on the particle size of the abrasive particles and the type of work pieces.
The processing takes place within a closed cabinet. It is possible to check the work carriedout through the transparent screen located on top of the machine.
With this model of sandblasting cabinet the door for introducing the piece is positioned on theside.
The Sandblasting Cabinet has been designed and built to be used inside buildings, and shouldnot be exposed to the weather.
The Sandblasting Cabinet is equipped with an electrical circuit for powering the lamps, locatedinside the cabinet.
Do not use the machine in areas with a risk of explosion !
Parts under pressure
Before using the Sandblasting Cabinet, verify the status of the gun and the hoses underpressure and the absence of losses in the pneumatic circuit.
fervi.
com

MACHINES ANDACCESSORIES
Page 11 of 28
4.1 Description of the Main Parts
Figure 2 - Main parts of the sandblasting cabinet.
1 Transparent PVC screen 5 Air hose connection
2 Side door 6 Sand unloading hopper
3 Gloves 7 Sand unloading opening
4 Sandblast gun 8 Side door lock
2
7
6
5
1
3
4
8
fervi.
com
MACHINES ANDACCESSORIES
Page 12 of 28
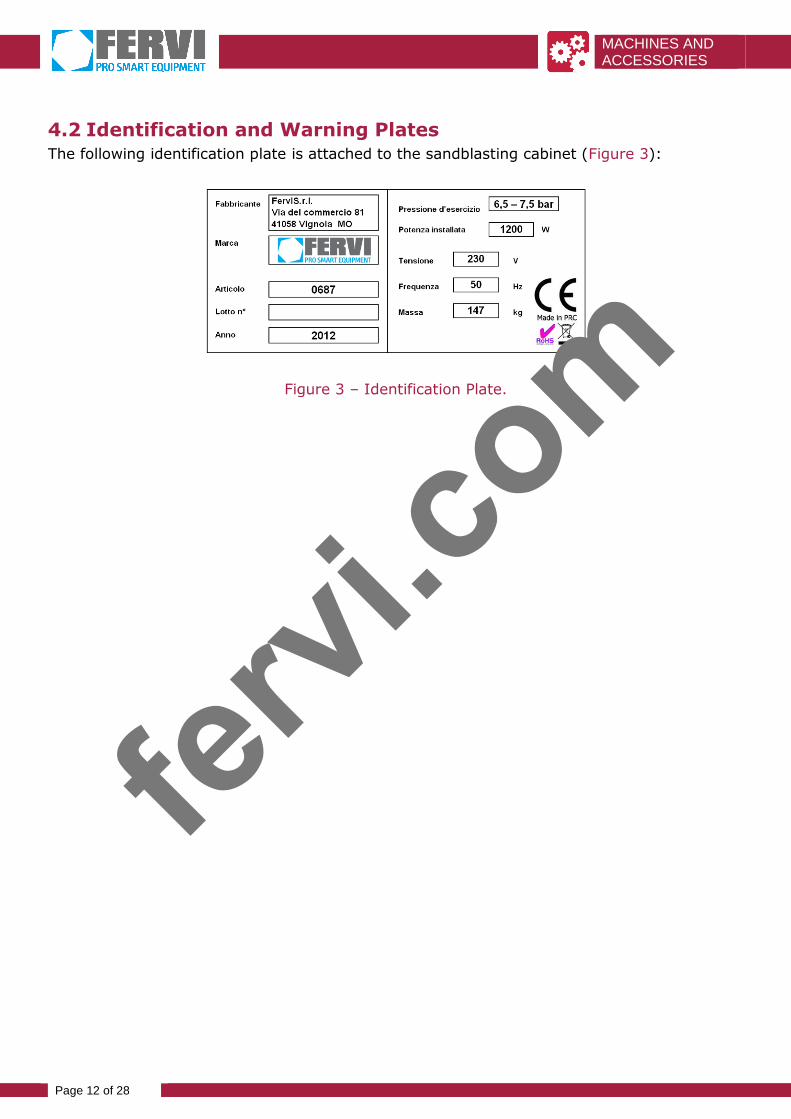
4.2 Identification and Warning PlatesThe following identification plate is attached to the sandblasting cabinet (Figure 3):
Figure 3 – Identification Plate.
fervi.
com

MACHINES ANDACCESSORIES
Page 13 of 28
4.3 PictogramsThe machine has the following warning, attention, and prohibition pictograms (figure 3).
Figure 4 – Warning, Attention, and Prohibition Pictograms
DO NOTREMOVE
THE SAFETY DEVICES
ATTENTION!!
READ THE INSTRUCTIONS BEFORE USING THEMACHINE
BEFORE STRTING WORK MAKE SURE THE DOOR ISCLOSED PROPERLY.
REGULARLY CHECK THE PARTS THAT WEAR OUT(SUCH AS NOZZLES AND GLOVES).
DO NOT USE THE MACHINE AT A PRESSURE LEVELHIGHER THAN THAT ENVISAGED (0.65 ÷ 0.75MPa).
DO NOT USE WITH LAMPS WITH GREATER POWERTHAN THAT INDICATED.
ONLY USE ABRASIVE MATERIALS DESIGNED FORUSE WITH SANDBLASTING CABINETS.
IN THE HOSES AND IN THE SAND THERE MUST BENO CONDENSATION OR MOISTURE.
CHECK THAT THE DOOR SEALS ARE INTACT.
WHEN VISIBILITY IS POOR, REPLACE THETRANSPARENT SCREEN.
DO NOT USE THE GUN OUTSIDE THESANDBLASTING CABINET.
ATTENTIONIT IS PROHIBITED TO WORK ON LIVE ELECTRICAL
EQUIPMENT ANY EXCEPTIONS MUST BE APPROVED BY THE HEAD
MANAGER UNDER PARTICULARLY DANGEROUS CONDITIONS,
ANOTHER PERSON MUST BE PRESENT WHO IS NOTPERFORMING THE WORK
ONLY BEGIN WORKING WHEN SAFETY MEASURESHAVE BEEN IMPLEMENTED
In accordance with Legislative Decree 81/08 on accidentprevention
fervi.
com

MACHINES ANDACCESSORIES
Page 14 of 28
Description
PLATE IN ITALIAN PLATE IN ENGLISH
ATTENZIONEÈ VIETATO ESEGUIRE LAVORI SU
APPARECCHIATURE ELETTRICHE SOTTOTENSIONE
EVENTUALI DEROGHE DEVONO ESSEREAUTORIZZATE DAL CAPO RESPONSABILE
IN CONDIZIONI DI PARTICOLARE PERICOLO DEVEESSERE PRESENTE UN’ALTRA PERSONA OLTRE A CHI
ESEGUE IL LAVOROINIZIARE I LAVORI SOLO AD AVVENUTA
ATTAZIONE DELLE MISURE DI SICUREZZAIn ottemperanza al Dgs.81/08 relativo alla prevenzioni
infortuni
ATTENTIONIT IS PROHIBITED TO WORK ON LIVE ELECTRICAL
EQUIPMENT ANY EXCEPTIONS MUST BE APPROVED BY THE HEAD
MANAGER UNDER PARTICULARLY DANGEROUS CONDITIONS,
ANOTHER PERSON MUST BE PRESENT WHO IS NOTPERFORMING THE WORK
ONLY BEGIN WORKING WHEN SAFETY MEASURESHAVE BEEN IMPLEMENTED
In accordance with Legislative Decree 81/08 on accidentprevention
ATTENZIONE!!
LEGGERE LE ISTRUZIONI PRIMA DI UTILIZZARE LAMACCHINA
PRIMA DI INIZIARE A LAVORARE ASSICURARSI CHE ILPORTELLO SIA CHIUSO CORRETTAMENTE.
CONTROLLARE SPESSO LE PARTI CHE SI USURANO (COMEUGELLI E GUANTI).
NON UTILIZZARE LA MACCHINA AD UNA PRESSIONESUPERIORE A QUELLA PREVISTA (0,65 ÷ 0,75 MPa).
NON UTILIZZARE LAMPADE CON POTENZA SUPERIORE AQUELLA INDICATA SULLA STESSA.
USARE SOLAMENTE MATERIALI ABRASIVI STUDIATI PERL’UTILIZZO TRAMITE SABBIATRICI.
NEI TUBI DELLA SABBIA NON DEVE ESSERE PRESENTECONSENSA O UMIDITÀ.
CONTROLLARE CHE LE FUARNIZIONI DELLO SPORTELLOSIANO INTEGRE.
QUANDO LA VISIONE NON È OTTIMALE, SOSTITUIRE LAPLASTICA TRASPARENTE.
NON UTILIZZARE LA PISTOLA AL DI FUORI DELLA CABINA DISABBIATURA.
ATTENTION!!
READ THE INSTRUCTIONS BEFORE USING THE MACHINE
BEFORE STRTING WORK MAKE SURE THE DOOR IS CLOSEDPROPERLY.
REGULARLY CHECK THE PARTS THAT WEAR OUT (SUCH ASNOZZLES AND GLOVES).
DO NOT USE THE MACHINE AT A PRESSURE LEVEL HIGHER THANTHAT ENVISAGED (0.65 ÷ 0.75 MPa).
DO NOT USE WITH LAMPS WITH GREATER POWER THAN THATINDICATED.
ONLY USE ABRASIVE MATERIALS DESIGNED FOR USE WITHSANDBLASTING CABINETS.
IN THE HOSES AND IN THE SAND THERE MUST BE NOCONDENSATION OR MOISTURE.
CHECK THAT THE DOOR SEALS ARE INTACT.
WHEN VISIBILITY IS POOR, REPLACE THE TRANSPARENT SCREEN.
DO NOT USE THE GUN OUTSIDE THE SANDBLASTING CABINET.
NONRIMUOVEREI DISPOSITIVI DI
SICUREZZA
DO NOTREMOVE
THE SAFETY DEVICESfervi.
com
MACHINES ANDACCESSORIES
Page 15 of 28
5 INSTALLATION OF THE MACHINE
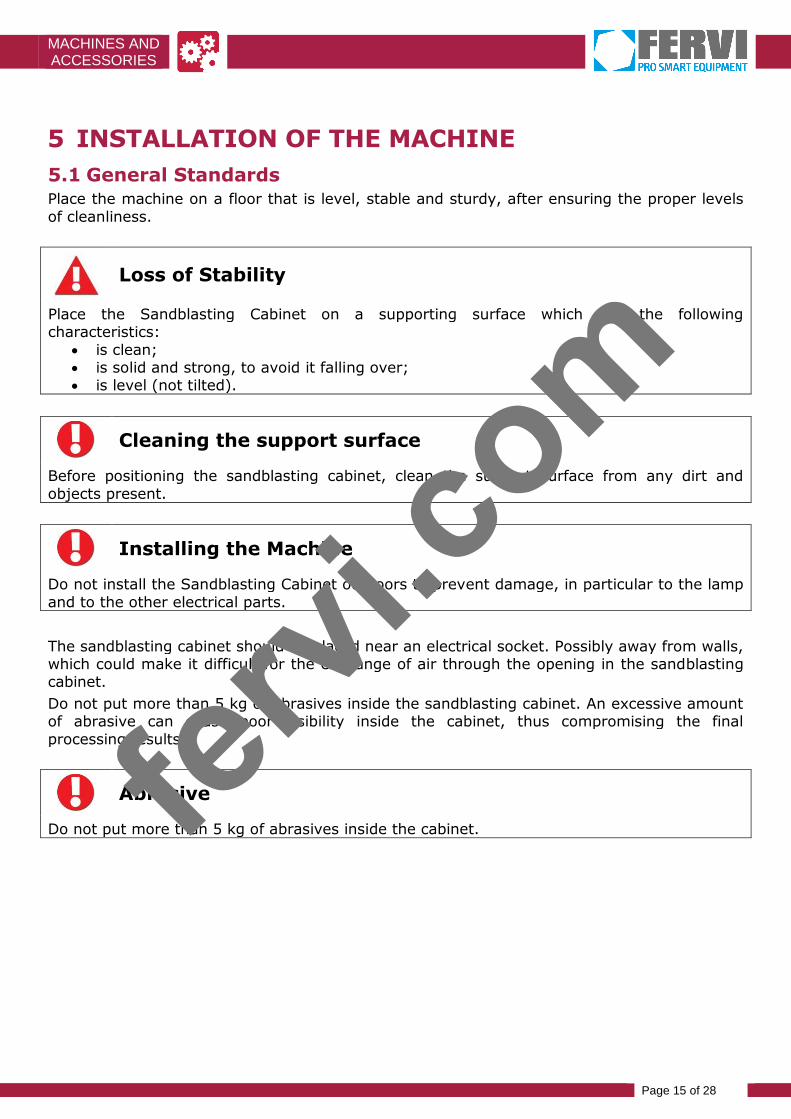
5.1 General StandardsPlace the machine on a floor that is level, stable and sturdy, after ensuring the proper levelsof cleanliness.
Loss of Stability
Place the Sandblasting Cabinet on a supporting surface which has the followingcharacteristics:
is clean; is solid and strong, to avoid it falling over; is level (not tilted).
Cleaning the support surface
Before positioning the sandblasting cabinet, clean the support surface from any dirt andobjects present.
Installing the Machine
Do not install the Sandblasting Cabinet outdoors to prevent damage, in particular to the lampand to the other electrical parts.
The sandblasting cabinet should be placed near an electrical socket. Possibly away from walls,which could make it difficult for the exchange of air through the opening in the sandblastingcabinet.
Do not put more than 5 kg of abrasives inside the sandblasting cabinet. An excessive amountof abrasive can cause poor visibility inside the cabinet, thus compromising the finalprocessing results.
Abrasive
Do not put more than 5 kg of abrasives inside the cabinet.fervi.
com

MACHINES ANDACCESSORIES
Page 16 of 28
5.2 Connection to the compressed air systemIn order to perform the sandblasting of the pieces it is necessary to connect the machine to acompressor, or a central compressed air system for the plant, verifying that a constantpressure of approx. 5.5 bar can be provided.
Figure 5 - Compressed air connector.
The quick coupling for connection of the compressed air hose is positioned on the side at thefront of the sandblasting cabinet, as shown in Figure 5.
fervi.
com

MACHINES ANDACCESSORIES
Page 17 of 28
5.3 Connecting the sandblast gunTo connect the sandblast gun to the sandblasting cabinet, first attach the metal end part (ref.4 in Figure 6) of the abrasive suction pipe (ref. 3) to the bottom of the cabinet, using thecorresponding joints. Then, connect the compressed air hose of the gun (ref. 1) to therelative connector (ref. 2), inside the sandblasting cabinet. Attach the compressed air hose tothe connector by tightening the relative “screw” clip.
Figure 6 - Sandblast gun connection.
Pressure
Make sure that all the connections between the various parts under pressure on thesandblasting cabinet are secure and properly tightened.
Check the condition of the parts under pressure of the sandblasting cabinet (hoses, gun,etc.).
Pressure
To achieve the best adjustments to the compressed air pressure it is a good idea to insert apressure regulator.
1
2
4
3
fervi.
com
MACHINES ANDACCESSORIES
Page 18 of 28
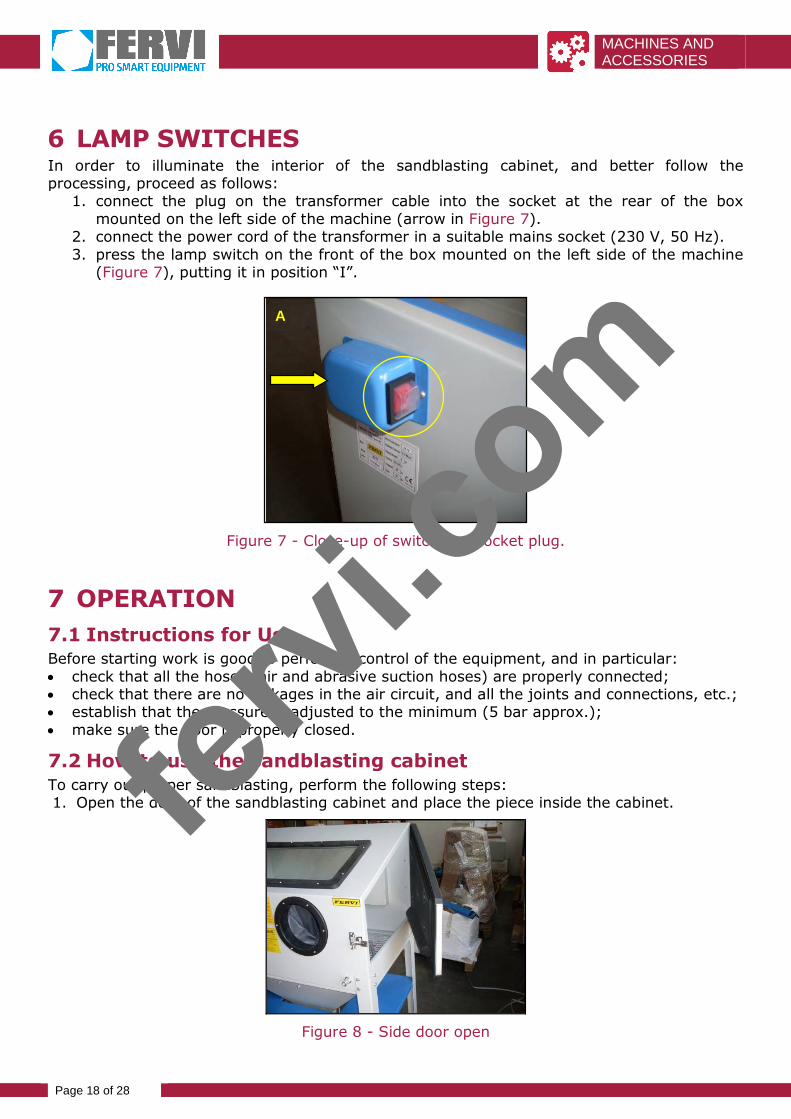
6 LAMP SWITCHESIn order to illuminate the interior of the sandblasting cabinet, and better follow theprocessing, proceed as follows:
1. connect the plug on the transformer cable into the socket at the rear of the boxmounted on the left side of the machine (arrow in Figure 7).
2. connect the power cord of the transformer in a suitable mains socket (230 V, 50 Hz).3. press the lamp switch on the front of the box mounted on the left side of the machine
(Figure 7), putting it in position “I”.
Figure 7 - Close-up of switch and socket plug.
7 OPERATION
7.1 Instructions for UseBefore starting work is good to perform a control of the equipment, and in particular: check that all the hoses (air and abrasive suction hoses) are properly connected; check that there are no leakages in the air circuit, and all the joints and connections, etc.; establish that the pressure is adjusted to the minimum (5 bar approx.); make sure the door is properly closed.
7.2 How to use the sandblasting cabinetTo carry out proper sandblasting, perform the following steps:1. Open the door of the sandblasting cabinet and place the piece inside the cabinet.
Figure 8 - Side door open
A
fervi.
com

MACHINES ANDACCESSORIES
Page 19 of 28
Closing the cabinet door
Before you start sandblasting operations, ALWAYS make sure that the door of thesandblasting cabinet is closed via the special locking systems.
Exposure to a jet of compressed air and sand can cause serious injury to the skin and eyes.
2. Close the door of the sandblasting cabinet, there is a locking latch on the side door.
Figure 9 - Locking system
3. After inserting your hands into the protective gloves mounted on the machine, hold thegun and press the trigger, sending a jet of air / sand onto the piece to be "sanded". If theabrasive does not come out, check the nozzle of the gun (it could be blocked), and checkthat there are no obstructions or bent hoses.
Protective gloves
ALWAYS use the protective gloves of the machine during sandblasting operations.
4. To perform proper cleaning of the part, the jet of sand must be applied with a smooth andcircular movement.
Sandblasting
The jet must not be too strong or concentrated in a single point on the piece, to preventdamage.
The jet should NEVER be aimed directly at the hands (even if protective gloves are beingused).
fervi.
com
MACHINES ANDACCESSORIES
Page 20 of 28
8 MACHINE SAFETY
8.1 "Mechanical" Safety Devices
8.1.1 Transparent screens
At the top of the sandblasting cabinet there is a transparent PVC screen that allows you tosee what you are doing, and prevents abrasive micro beads, compressed air and otherparticles from causing damage to the eyes.
Transparent screen
Each time the Sandblasting cabinet is used check that the screen is not damaged or thatthere is a lack of transparency.
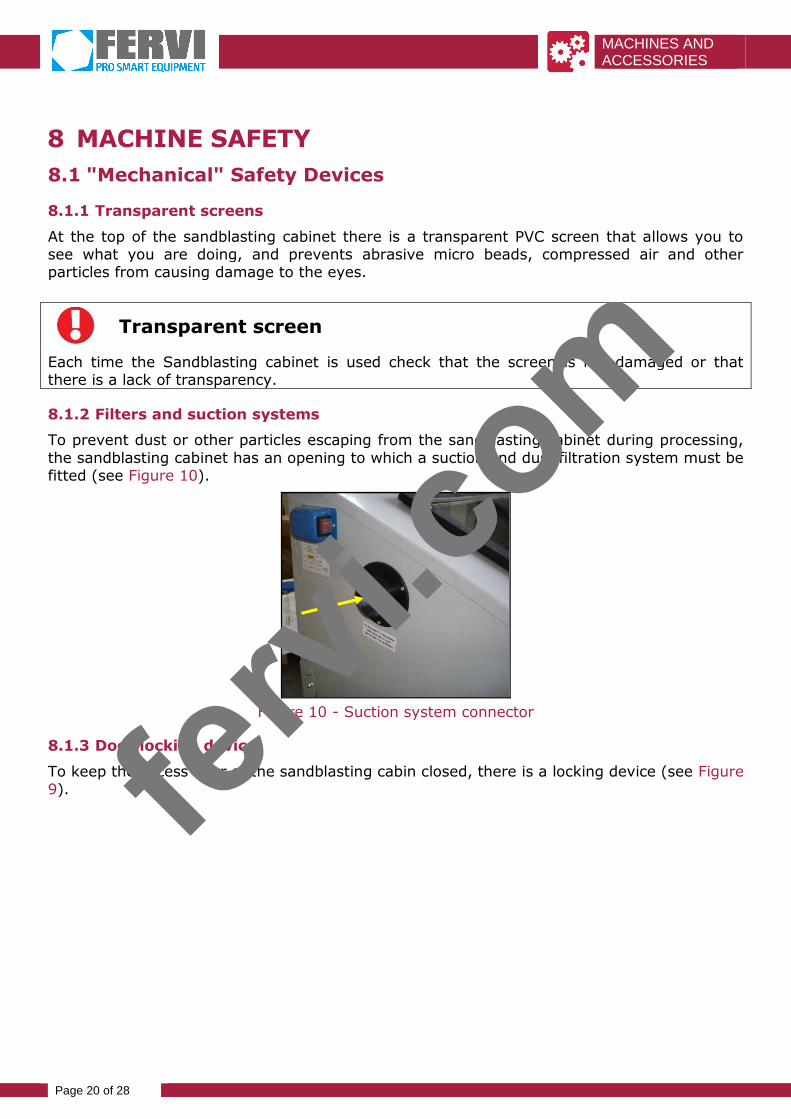
8.1.2 Filters and suction systems
To prevent dust or other particles escaping from the sandblasting cabinet during processing,the sandblasting cabinet has an opening to which a suction and dust filtration system must befitted (see Figure 10).
Figure 10 - Suction system connector
8.1.3 Door locking device
To keep the access door of the sandblasting cabin closed, there is a locking device (see Figure9). fer
vi.co
m

MACHINES ANDACCESSORIES
Page 21 of 28
8.2 Use of PPE
Use of PPE
ALWAYS use appropriate personal protective equipment (PPE), such as:
The protective gloves mounted on the machine;
Goggles or face shields;
Overalls or aprons;
Safety shoes.
fervi.
com
MACHINES ANDACCESSORIES
Page 22 of 28
9 MAINTENANCE
9.1 Routine Maintenance
Maintenance
Whenever maintenance is carried out or parts are replaced:
Remove the plug from the mains socket;
Close the compressed air.
To ensure the safe operation of the sandblasting cabinet it is necessary to perform a varietyof control and maintenance operations.In particular:1. Regularly clean the suction hose and the filters.2. Regularly check the parts that wear out (such as nozzles and gloves).3. Check the abrasive. The sand loses its abrasive power and mixes with the powder from
processing, filter or replace it as needed.4. Clean inside the cabin when necessary.5. In the hoses and in the sand there must be no condensation or moisture.6. Regularly check that the door seals are intact.7. Do not use the sandblasting cabinet with a pressure above 7 bar.8. When visibility is poor, replace the transparent screen.9. Use an abrasive that is refined and free from dust.
The entire sandblasting system is subjected to wear and tear, as highly abrasive materialsare used. Therefore, it is important to perform maintenance operations.
Use of PPE
When performing maintenance work or the replacement of parts it is necessary to wearspecific PPE for workplace safety.
9.1.1 Obstructions
The gun nozzle may be obstructed by impurities that are found in the abrasive. Try to removethe obstruction by inserting a pointed object.If the hose which sucks the abrasive appears closed, cover the outlet of the gun and let theair flow through the obstructed hose. Dust can fly upwards when this is done, so make surethe hose is inserted in the sand and the lid is closed.
fervi.
com
MACHINES ANDACCESSORIES
Page 23 of 28
9.1.2 Excessive amount of dust in the cabinet
This occurs if: The abrasive material is inefficient, i.e., it has lost its abrasive powers (rounding of the
grains) or it is mixed with particles that detach from the work pieces. This usually occurswhen just a little abrasive comes out of the nozzle along with a cloud of smoke, ratherthan just a steady stream of abrasive. Replace the abrasive.
The air outlet is obstructed or the air flow is blocked. Cleaning the hole, will reduce thedust inside the cabinet.
When the sandblasting jet is too wide and inefficient. Replace the nozzle or adjust the jet.
9.2 Replacing the parts of the sandblasting cabinet
9.2.1 Replacing the transparent screen
On the underside of the transparent screen, there is areplaceable transparent PVC film that is approx. 0.5mmthick.
If during work, the transparent screen does not allow goodvisibility, replace the film with a new one (Figure 11).
Figure 11 - Replaceable PVCfilm.
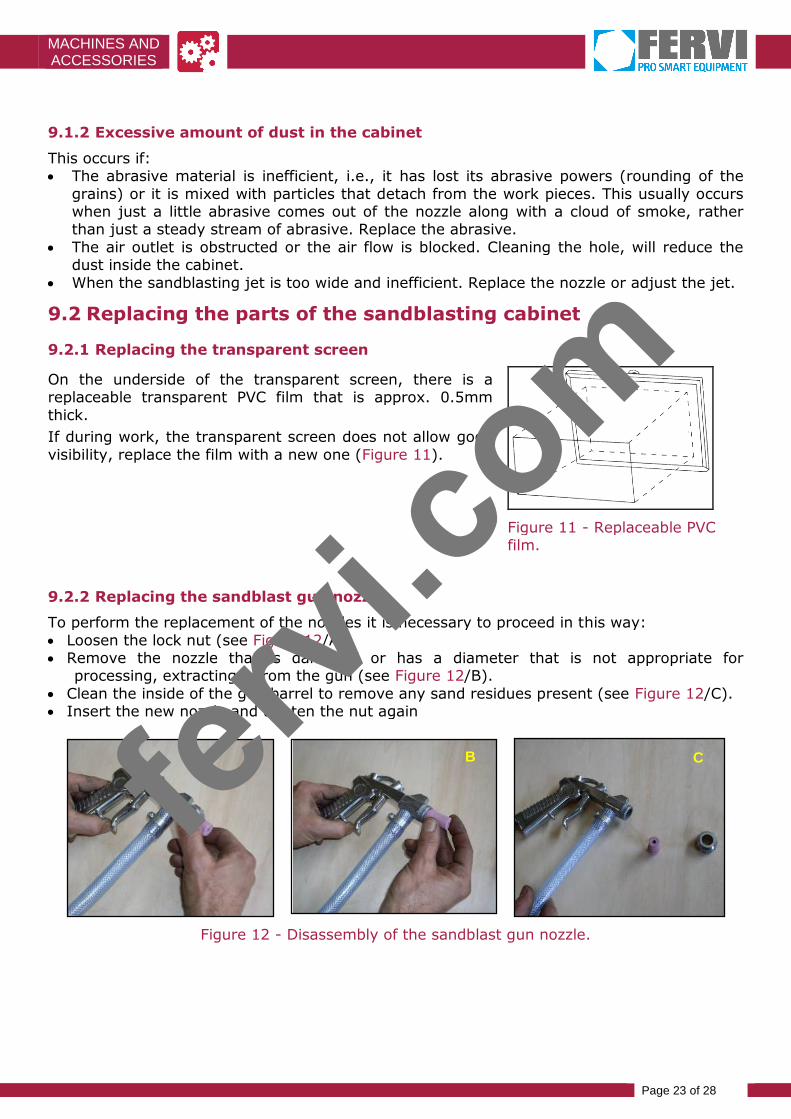
9.2.2 Replacing the sandblast gun nozzle
To perform the replacement of the nozzles it is necessary to proceed in this way: Loosen the lock nut (see Figure 12/A). Remove the nozzle that is damaged or has a diameter that is not appropriate for
processing, extracting it from the gun (see Figure 12/B). Clean the inside of the gun barrel to remove any sand residues present (see Figure 12/C). Insert the new nozzle and tighten the nut again
Figure 12 - Disassembly of the sandblast gun nozzle.
A B Cfervi.
com

MACHINES ANDACCESSORIES
Page 24 of 28
9.2.3 Replacing the gloves
To perform the replacement of the gloves it is necessary to loosen the fastening clip (ref. a inFigure 12), positioned inside the sandblasting cabinet.
Replace the damaged glove with one that is equal or equivalent, then re-tighten the clip (ref.1).
Figure 13 - Replacing the gloves.
9.3 Cleaning the Sandblasting cabinetRegularly clean and take care of your machine, this will ensure perfect efficiency and a longworking life.
Through the use of a compressor, regularly blow away dust and processing waste arisingfrom the sandblasting operations that accumulate on the machine and on the protectivescreens.
Working with compressed air
ALWAYS wear the protective goggles when using compressed air.
To clean the body of the machine and other external parts only use a cloth dampened withwarm water, or at the most a mild detergent.
Cleaning the machine
DO NOT use detergents or any solvents; the plastic parts are easily damaged by chemicalagents.
A
fervi.
com

MACHINES ANDACCESSORIES
Page 25 of 28
10 REPLACEMENT PARTS
fervi.
com

MACHINES ANDACCESSORIES
Page 26 of 28
Number Description Number Description
0575/01 Plastic frame 0575/19 Plug
0575/02 Glass 0575/20 Switch box
0575/03 Frame 0575/21 Suction connector
0575/04 Protective film 0575/22 Air connector
0575/05 Cabinet 0575/23 Closure device
0575/06 Dividing net 0575/24 Metal shutter
0575/07 Frame 0575/25 Sandblast gun
0575/08 Sand container 0575/26 Hose for sand suction
0575/09 Metal hose 0575/27 Retaining ring
0575/10 Cap 0575/28 Clip
0575/11 Cap lock 0575/29 Gloves
0575/12 Shelf 0575/30 Rubber feet
0575/13 Legs 0575/31 Screws
0575/14 Door 0575/32 Lamp
0575/15 Hinge 0575/33 Suction hole
0575/16 Cover 0575/34 Switch
0575/17 Lamp 0575/35 Ceramic nozzles
0575/18 Power pack
fervi.
com

MACHINES ANDACCESSORIES
Page 27 of 28
11 TROUBLESHOOTINGPROBLEM PROBABLE CAUSE SOLUTION
Excessive dust in thecabinet.
A) The air filter is clogged.
B) Abrasive used up.
C) Excessive abrasive in thecabinet.
D) Loss of air from the hoses orseals.
A) Clean the air filter, keepingthe opening away from thewalls.
B) Replace the abrasive.
C) Remove the excess abrasive.
D) Properly tighten theconnections and make surethat the air lines areefficient.
Irregularsandblasting.
A) Too much abrasive.
B) Humidity in the cabinet.
A) Remove the excess abrasive.
B) Check the air hoses, andmake sure there is nomoisture inside.
Inadequate speed orinefficient jet.
A) Abrasive used up.
B) Pressure too low
A) Replace the abrasive.
B) Increase the pressure andmake sure the valves arefully open.
12 CHECKS TO BE MADE IN THE EVENT OFMALFUNCTIONING
The rear holes in the sandblasting cabinet should be open, where the aspirator is notprovided.
We recommend the use of an aspirator or vacuum cleaner. Keep the air filter clean. Replace the abrasive product if it is dirty. Replace the ceramic nozzle if the diameter of the hole is too wide. Check that the hoses that carry air and sand are not clogged, cover the gun outlet and
blow to purge the hose.
12.1Recommended material for any type of processing Art. 0581 Glass micro beads for finishing (not very aggressive) ART. 0582/80 Corundum for Medium Roughing (aggressive) ART. 0582/36 Corundum for Roughing (aggressive)fer
vi.co
m

MACHINES ANDACCESSORIES
Page 28 of 28
13 DISPOSAL OF PARTS AND MATERIALSIf the machine is to be scrapped, its parts must be disposed of separately.
Respect the Environment!
Contact a specialist centre for the collection of metallic materials.
Divide the materials according to their nature, employing specialist companies which areauthorised for their disposal, in accordance with the requirements of law.
fervi.
com