maintenance manual - geberit - in-wall systems for wall ... · settings using the geberit service...
TRANSCRIPT

Maintenance ManualInstandhaltungsanleitungManuel d‘entretienIstruzioni per la manutenzione
Table of ContentD
54850-001 © 06-2012
2
Table of Content ........................................................................................................................................................................ 2Target group.............................................................................................................................................................................. 2Explanation of symbols .............................................................................................................................................................. 2Safety notes .............................................................................................................................................................................. 2Product assignment................................................................................................................................................................... 2Functional principle ................................................................................................................................................................... 3Structure ................................................................................................................................................................................... 4Troubleshooting......................................................................................................................................................................... 5Settings using the Geberit Service Handy .................................................................................................................................. 6Manual settings ....................................................................................................................................................................... 11
A – Activating or deactivating the cleaning function................................................................................................................ 12B – Selecting the light colour of the actuator buttons .............................................................................................................12C – Setting the actuator button illumination ............................................................................................................................13D – Activating or deactivating the automatic flush actuation ...................................................................................................14E – Resetting to factory setting ..............................................................................................................................................14
Care ........................................................................................................................................................................................ 15Cleaning the actuator plate ....................................................................................................................................................15
Repair...................................................................................................................................................................................... 16Replacing the actuator plate ..................................................................................................................................................16Replacing the mounting frame ...............................................................................................................................................17Replacing the lifting device ....................................................................................................................................................20Commissioning after repair ....................................................................................................................................................23Function test after repair ........................................................................................................................................................23
Disposal................................................................................................................................................................................... 25
This document is intended for use by skilled persons as defined by EN IEC 62079:2001.
– Repairs may only be carried out by a skilled person using original spare parts and accessories– Do not modify the Geberit actuator plate Sigma80 or add any additional modules
This document describes the maintenance of the following Geberit products:– 116.090.xx.1, Geberit WC flush control, electronic, mains operation, dual flush, actuator plate Sigma80, touchless– 116.091.xx.1, Geberit WC flush control, electronic, mains operation, dual flush, actuator plate Sigma80, touchless
Table of Content
Target group
Explanation of symbols
Symbol Meaning
CAUTION Refers to a potentially dangerous situation that may cause slight or moderate injury or material damage.
Refers to important information.
Safety notes
Product assignment

EN
EN
FR
IT
NL
ES
PT
DK
NO
SE
FI
IS
PL
HU
SK
CZ
SL
HR
SR
EE
LV
LT
BG
RO
GR
TR
RU
AE
CN
JP
Functional principleD
5485
0-00
1 ©
06-
2012
3
Several IR sensors are located behind the glass plate of the WC flush control. These sensors scan different detection ranges. The distances of the various detection ranges are not precisely defined; it depends on how strongly the infrared light is reflected on the respective object (piece of clothing etc.).The proximity detection range (A) scans a wide range. As soon as a person crosses the threshold of this detection range, the actuator buttons start to light up and thereby signal that the WC flush control is ready for operation.The user detection range (B) measures whether a user is sitting or standing in front of the WC flush control. No objects (wall, curtain etc.) should be permanently placed in this area. If a sitting user is detected, the manual flush actuation is deactivated. This prevents a flush from being inadvertently activated if the user leans back during use.If someone's hand crosses the threshold of the manual flush detection range (C), the WC flush control activates a small or large flush. Manual flush actuation is only possible when a person is in the proximity detection range (A).
Detection rangesA Proximity detection rangeB User detection rangeC Manual flush detection range
Functional principle
~ 5−15 cm~ 100 cm
~ 150 cm
C B A
C B A
20°
StructureD
54850-001 © 06-2012
4
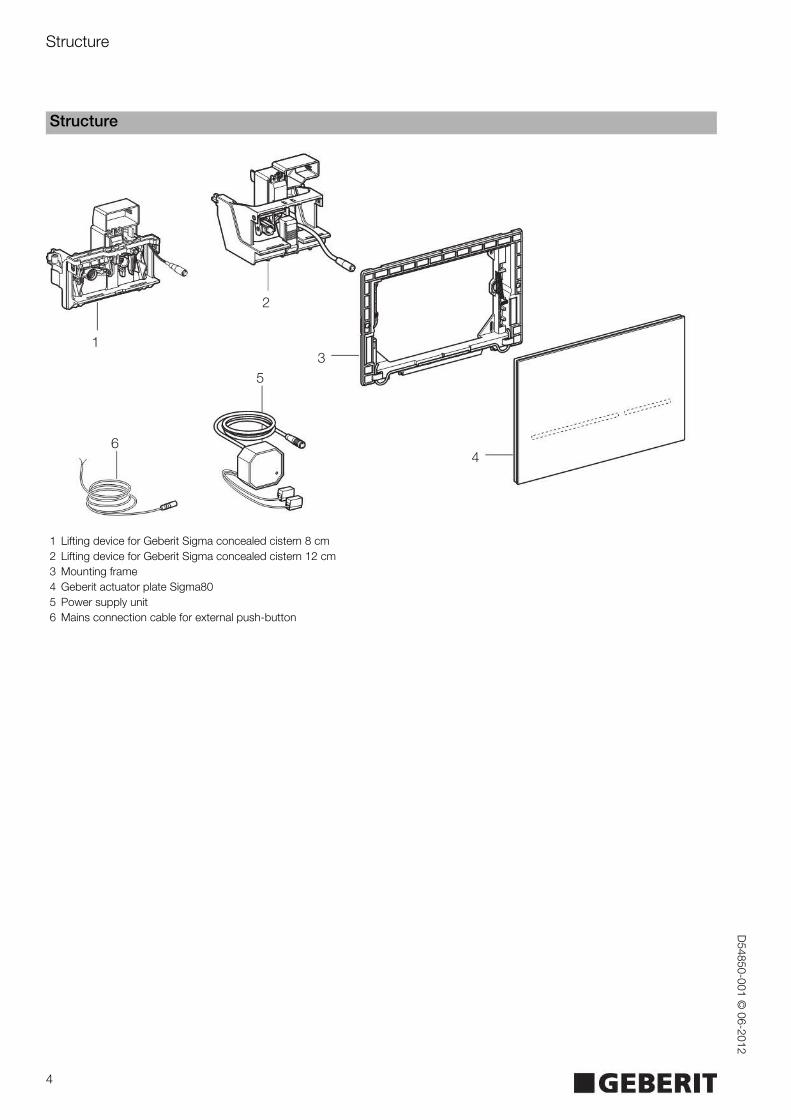
1 Lifting device for Geberit Sigma concealed cistern 8 cm2 Lifting device for Geberit Sigma concealed cistern 12 cm3 Mounting frame4 Geberit actuator plate Sigma805 Power supply unit6 Mains connection cable for external push-button
Structure
5
64
3
2
1

EN
EN
FR
IT
NL
ES
PT
DK
NO
SE
FI
IS
PL
HU
SK
CZ
SL
HR
SR
EE
LV
LT
BG
RO
GR
TR
RU
AE
CN
JP
TroubleshootingD
5485
0-00
1 ©
06-
2012
5
Troubleshooting
Malfunction Possible cause Fault clearance
The actuator buttons are flashing red • The WC flush control waits until all objects (tools, people, curtain, etc.) are outside of the user detection range. The teach-in process for the surrounding area then begins
• Remove objects from the user detection range
When you approach the WC, the actuator button illumination comes on, but the flush does not work
• Software fault • Interrupt the power supply (mains fuse) for 60 min
• The actuator plate is dirty • Clean the actuator plate
• The plug of the lifting device is not plugged in correctly
• Correctly attach the plug to the control
• The lifting device is defective • Replace the lifting device
When you approach the WC, the actuator button illumination does not come on and the flush does not work
• Power failure • Wait until the end of the power failure
• The power supply unit is defective (green LED on the power supply unit does not light
• Replace the power supply unit
• The plug of the power supply unit on the control is not plugged in correctly
• Correctly attach the plug to the control
• Software fault • Interrupt the power supply (mains fuse) for 60 min
• The control is defective • Replace the actuator plate and the control
When you approach the WC, the actuator button illumination does not come on, but the flush works
• The actuator button illumination for the user detection is deactivated
• Activate the actuator button illumination, see "Settings"
The actuator button illumination does not go off when you step away (stays on for more than 15 minutes)
• The actuator button illumination for the user detection is activated
• Deactivate the actuator button illumination, see "Settings"
• An object is located within the 1 m measuring zone in front of the actuator plate
• Remove objects (tools, people, curtain, etc.) from the 1 m measuring zone
• A new object is located within the 1,5 m detection distance around the actuator plate
• Wait 15 minutes until the surrounding area has been reassessed
Incorrect flushes (too soon, too late, unwanted)
• The actuator plate is dirty or damp • Clean or dry the actuator plate, see "Care"
• The actuator plate is scratched • Replace the actuator plate
A flush is triggered when you step back from the WC, without manual actuation
• Automatic flush actuation is activated • Deactivate the automatic flush actuation, see "Settings"
Water is running continuously into the WC ceramic appliance
• Software fault • Interrupt the power supply (mains fuse) for 60 min
• Flat gasket for flush valve inside cistern is defective
• Replace the flat gasket for flush valve
• Filling valve in the cistern is defective • Replace the filling valve
The WC ceramic appliance is not being flushed out properly
• The flush volumes are set incorrectly • Correctly set the full flush volume on the flush valve system
• Correctly set the partial flush volume with the Geberit Service Handy
Settings using the Geberit Service HandyD
54850-001 © 06-2012
6
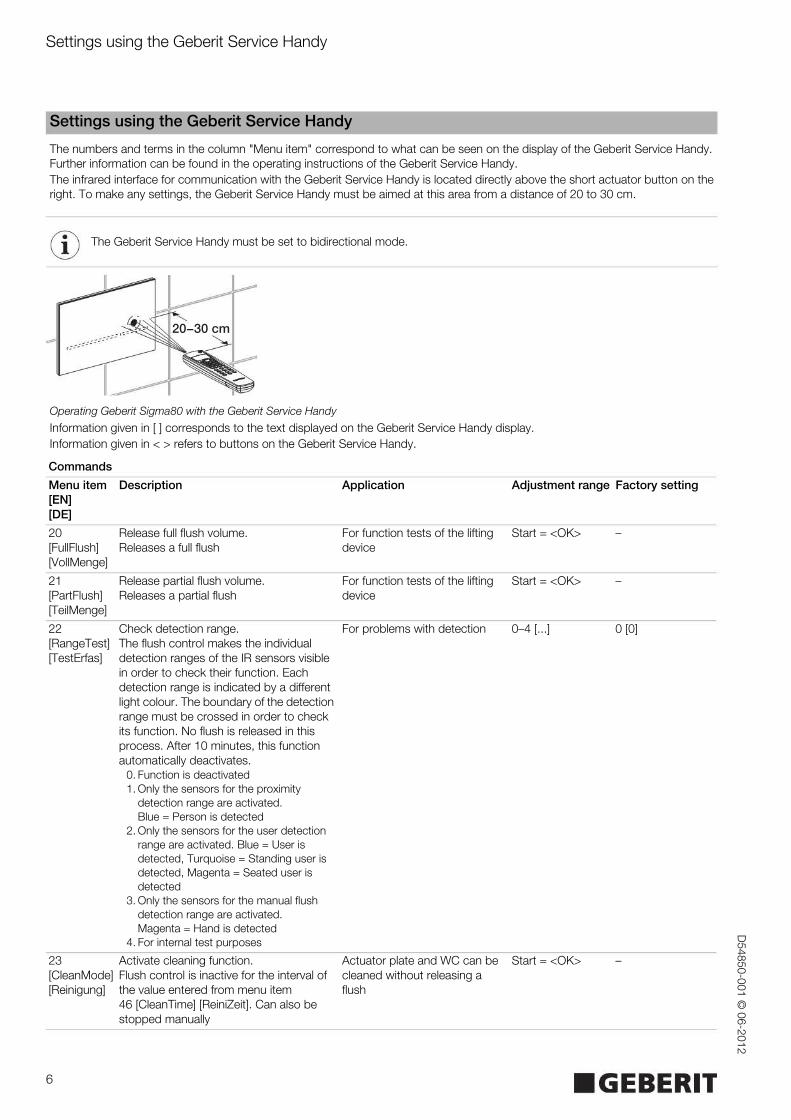
The numbers and terms in the column "Menu item" correspond to what can be seen on the display of the Geberit Service Handy. Further information can be found in the operating instructions of the Geberit Service Handy.The infrared interface for communication with the Geberit Service Handy is located directly above the short actuator button on the right. To make any settings, the Geberit Service Handy must be aimed at this area from a distance of 20 to 30 cm.
Operating Geberit Sigma80 with the Geberit Service Handy
Information given in [ ] corresponds to the text displayed on the Geberit Service Handy display.Information given in < > refers to buttons on the Geberit Service Handy.
Settings using the Geberit Service Handy
The Geberit Service Handy must be set to bidirectional mode.
Commands
Menu item[EN][DE]
Description Application Adjustment range Factory setting
20[FullFlush][VollMenge]
Release full flush volume.Releases a full flush
For function tests of the lifting device
Start = <OK> –
21[PartFlush][TeilMenge]
Release partial flush volume.Releases a partial flush
For function tests of the lifting device
Start = <OK> –
22[RangeTest][TestErfas]
Check detection range.The flush control makes the individual detection ranges of the IR sensors visible in order to check their function. Each detection range is indicated by a different light colour. The boundary of the detection range must be crossed in order to check its function. No flush is released in this process. After 10 minutes, this function automatically deactivates.
0. Function is deactivated1. Only the sensors for the proximity
detection range are activated. Blue = Person is detected
2. Only the sensors for the user detection range are activated. Blue = User is detected, Turquoise = Standing user is detected, Magenta = Seated user is detected
3. Only the sensors for the manual flush detection range are activated. Magenta = Hand is detected
4. For internal test purposes
For problems with detection 0–4 [...] 0 [0]
23[CleanMode][Reinigung]
Activate cleaning function.Flush control is inactive for the interval of the value entered from menu item 46 [CleanTime] [ReiniZeit]. Can also be stopped manually
Actuator plate and WC can be cleaned without releasing a flush
Start = <OK> –
20−30 cm
EN
EN
FR
IT
NL
ES
PT
DK
NO
SE
FI
IS
PL
HU
SK
CZ
SL
HR
SR
EE
LV
LT
BG
RO
GR
TR
RU
AE
CN
JP
Settings using the Geberit Service HandyD
5485
0-00
1 ©
06-
2012
7
24[BlocFlush][Blockiere]
Block flush.No flush is released. Function is cancelled upon re-establishing connection with the Geberit Service Handy. The function switches off automatically after 10 hours
In the event of detection malfunctions
Start = <OK> –
25[FactrySet][Werkeinst]
Factory settings.All programs and parameters are reset to factory settings
In the event of malfunctions Start = <OK>, confirm with <R>, <OK>
–
Programs
Menu item[EN][DE]
Description Application Adjustment range Factory setting
30[AutFlshEn][AutFlshEn]
Enable automatic flush.If this function is set, the control always releases a flush when the user steps back from the WC. Manual flush actuation is no longer necessary
Hygiene On = [ON]Off = [OFF]
[OFF]
31[PowOnFlsh][NetzEinSp]
Select power-on flush.If the mains voltage is on, a flush is released by the flush control
a) Releasing the central flushb) Function confirmation
On = [ON]Off = [OFF]
[OFF]
32[PreFlush][Vorspülng]
Select pre-flush.The flush control releases a partial flush when a user steps into the user detection range
Wets the ceramic appliance before use to reduce deposits
On = [ON]Off = [OFF]
[OFF]
33[CleanEn][FreiReini]
Enable cleaning.Allows the user to manually start the cleaning program. Turning off the program simultaneously blocks the setting mode under the menu item 34 [Sett En] [Sett En]
Prerequisite for starting the manual cleaning function
On = [ON]Off = [OFF]
[ON]
34[SettEn][SettEn]
Activate setting mode.Blocks or allows the end user to change settings in accordance with the user manual
If the program is turned off, the settings cannot be unintentionally changed
On = [ON]Off = [OFF]
[ON]
Commands
Menu item[EN][DE]
Description Application Adjustment range Factory setting

Settings using the Geberit Service HandyD
54850-001 © 06-2012
8
Parameters
Menu item[EN][DE]
Description Application Adjustment range Factory setting
40[T LightOn][T LightOn]
Detection time until light goes on.Length of time during which a person must remain in the proximity detection range for the actuator button illumination to switch on
A longer duration prevents the button illumination from switching on when a person walks by
1–30 [...]1 = 0,5 s10 = 5,0 s30 = 15,0 s
0,5 s [1]
41[DetectT][VerweilZ]
Set detection time.Minimum time a person must remain within the user detection range in order to be recognised as a standing or seated user. Only relevant if automatic flush actuation is switched on
Prevents flushes due to unintentional entry of a person into the user detection range
1–60 s [...] 7 s [7]
42[RunOnTime][NachlaufZ]
Set run-on time.The actuator button illumination remains lighted for the length of time entered after the user has left the proximity detection range
– 1–20 s [...] 2 s [2]
43[DelayTime][Spülverzö]
Set flush delay.After the user has left the user detection range, the set time interval elapses before a flush is released. Only relevant if automatic flush actuation is switched on
– 1–15 s [...] 3 s [3]
44[FlshTime][Spülzeit]
Set flush time.The flush volume of the partial flush can be set. (The specified flush volumes are reference values.)
Optimum flushing of the WC ceramic appliance
0–4 [...]0 = 2,5 l2 = 3,5 l4 = 4,5 l
3,5 l [2]
45[IntervalT][IntervalZ]
Set flush interval – interval flush.The control automatically releases a full flush after the interval entered. The interval is restarted with every flush
a) Filling the trap for low usage frequency b) Flushing out standing water (to prevent stagnation)
1–168 h [...]0 = Off
0 [0]
46[CleanTime][ReiniZeit]
Set cleaning time.Defines the inactive interval of the flush control when the menu item 23 [CleanMode] [Reinigung] or the manual cleaning function is started
– 1–30 min [...] 3 min [3]
47[RngPresen][RngPresen]
Set proximity detection range.Defines the distance at which a person is detected. The actuator button illumination turns on when a person is detected
– 0–4 [...]0 = close2 = medium4 = far
2 [2]
48[RngManual][RngManual]
Set manual flush detection range.Affects the distance at which a hand is detected for flush actuation
– 0–4 [...]0 = close2 = medium4 = far
2 [2]
49[CeramSize][CeramSize]
Specify size of WC ceramic appliance.Relevant for detection of seated user
– 0–2 [...]0 = short1 = medium2 = long
1 [1]
50[LightMode][LightMode]
Set light mode.0. The actuator button illumination always
remains off and does not come on even when a person approaches the WC
1. The actuator button illumination always remains on, even when a person steps back from the WC and leaves the room
2. The actuator button illumination turns on when a person approaches the WC and turns off when the person leaves
– 0–2 [...]0 = Off1 = On2 = Auto
2 [2]
EN
EN
FR
IT
NL
ES
PT
DK
NO
SE
FI
IS
PL
HU
SK
CZ
SL
HR
SR
EE
LV
LT
BG
RO
GR
TR
RU
AE
CN
JP
Settings using the Geberit Service HandyD
5485
0-00
1 ©
06-
2012
9
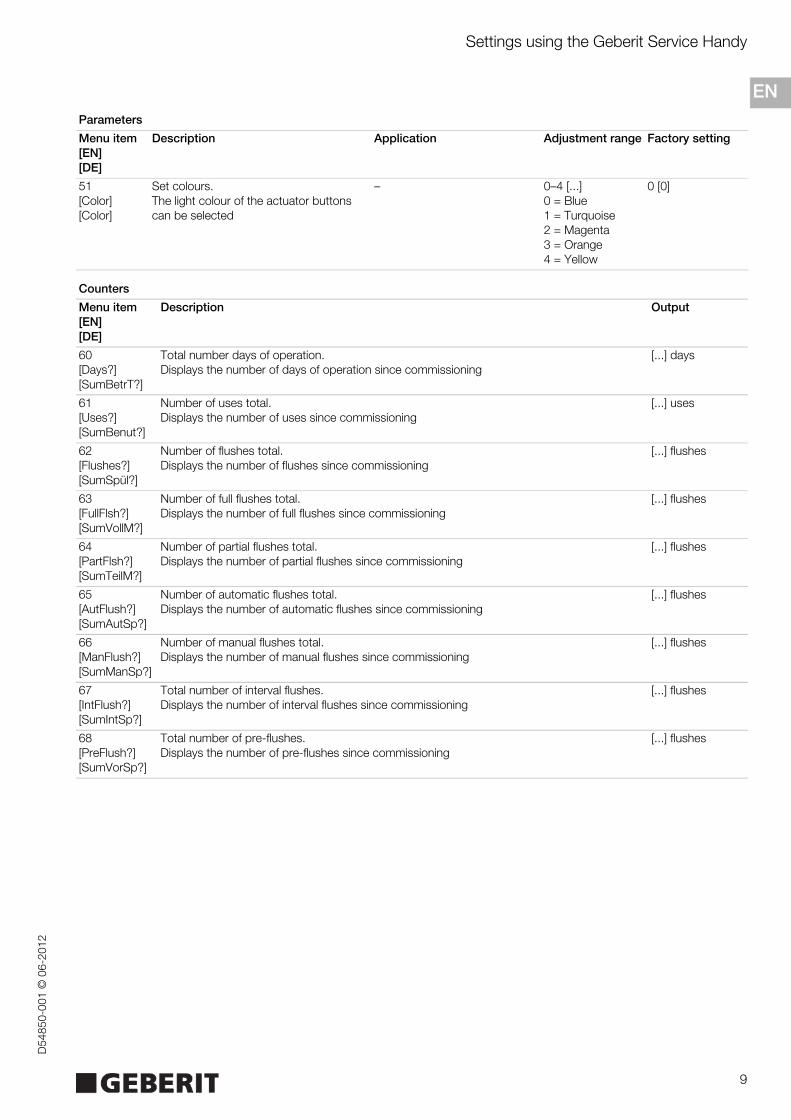
51[Color][Color]
Set colours.The light colour of the actuator buttons can be selected
– 0–4 [...]0 = Blue1 = Turquoise2 = Magenta3 = Orange4 = Yellow
0 [0]
Counters
Menu item[EN][DE]
Description Output
60[Days?][SumBetrT?]
Total number days of operation.Displays the number of days of operation since commissioning
[...] days
61[Uses?][SumBenut?]
Number of uses total.Displays the number of uses since commissioning
[...] uses
62[Flushes?][SumSpül?]
Number of flushes total.Displays the number of flushes since commissioning
[...] flushes
63[FullFlsh?][SumVollM?]
Number of full flushes total.Displays the number of full flushes since commissioning
[...] flushes
64[PartFlsh?][SumTeilM?]
Number of partial flushes total.Displays the number of partial flushes since commissioning
[...] flushes
65[AutFlush?][SumAutSp?]
Number of automatic flushes total.Displays the number of automatic flushes since commissioning
[...] flushes
66[ManFlush?][SumManSp?]
Number of manual flushes total.Displays the number of manual flushes since commissioning
[...] flushes
67[IntFlush?][SumIntSp?]
Total number of interval flushes.Displays the number of interval flushes since commissioning
[...] flushes
68[PreFlush?][SumVorSp?]
Total number of pre-flushes.Displays the number of pre-flushes since commissioning
[...] flushes
Parameters
Menu item[EN][DE]
Description Application Adjustment range Factory setting
10
Settings using the Geberit Service HandyD
54850-001 © 06-2012
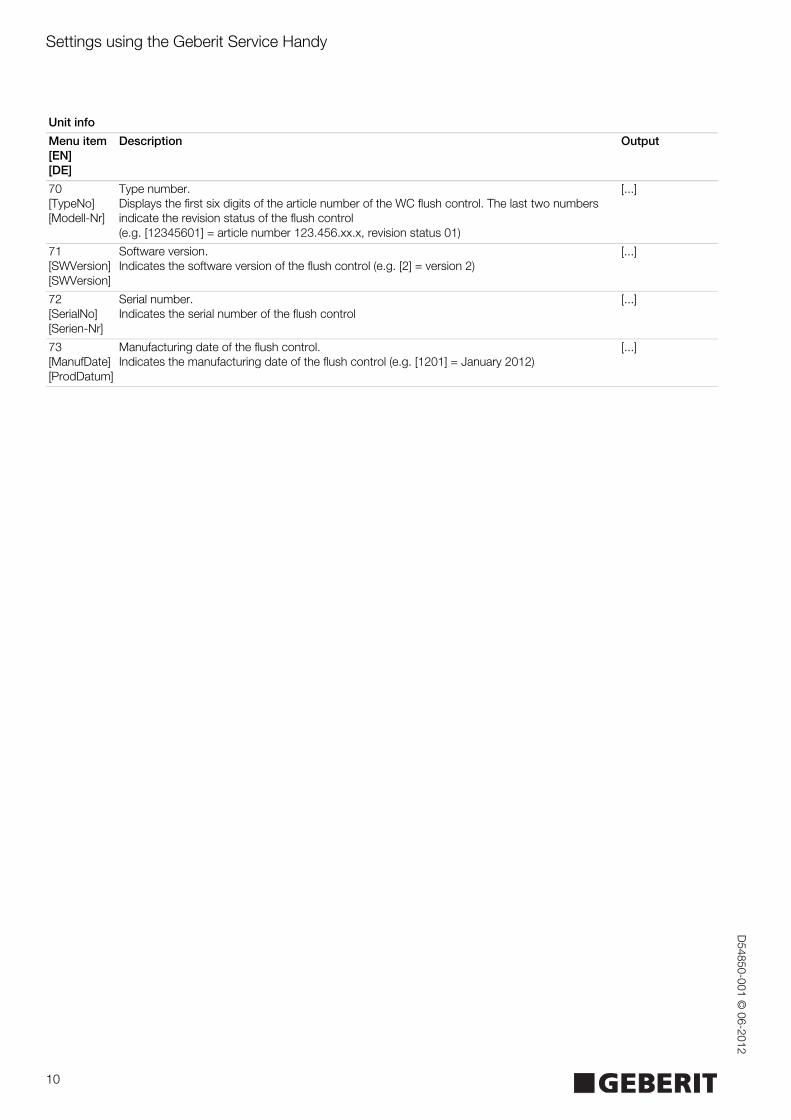
Unit info
Menu item[EN][DE]
Description Output
70[TypeNo][Modell-Nr]
Type number.Displays the first six digits of the article number of the WC flush control. The last two numbers indicate the revision status of the flush control (e.g. [12345601] = article number 123.456.xx.x, revision status 01)
[...]
71[SWVersion][SWVersion]
Software version.Indicates the software version of the flush control (e.g. [2] = version 2)
[...]
72[SerialNo][Serien-Nr]
Serial number.Indicates the serial number of the flush control
[...]
73[ManufDate][ProdDatum]
Manufacturing date of the flush control.Indicates the manufacturing date of the flush control (e.g. [1201] = January 2012)
[...]
EN
EN
FR
IT
NL
ES
PT
DK
NO
SE
FI
IS
PL
HU
SK
CZ
SL
HR
SR
EE
LV
LT
BG
RO
GR
TR
RU
AE
CN
JP
Manual settingsD
5485
0-00
1 ©
06-
2012
11
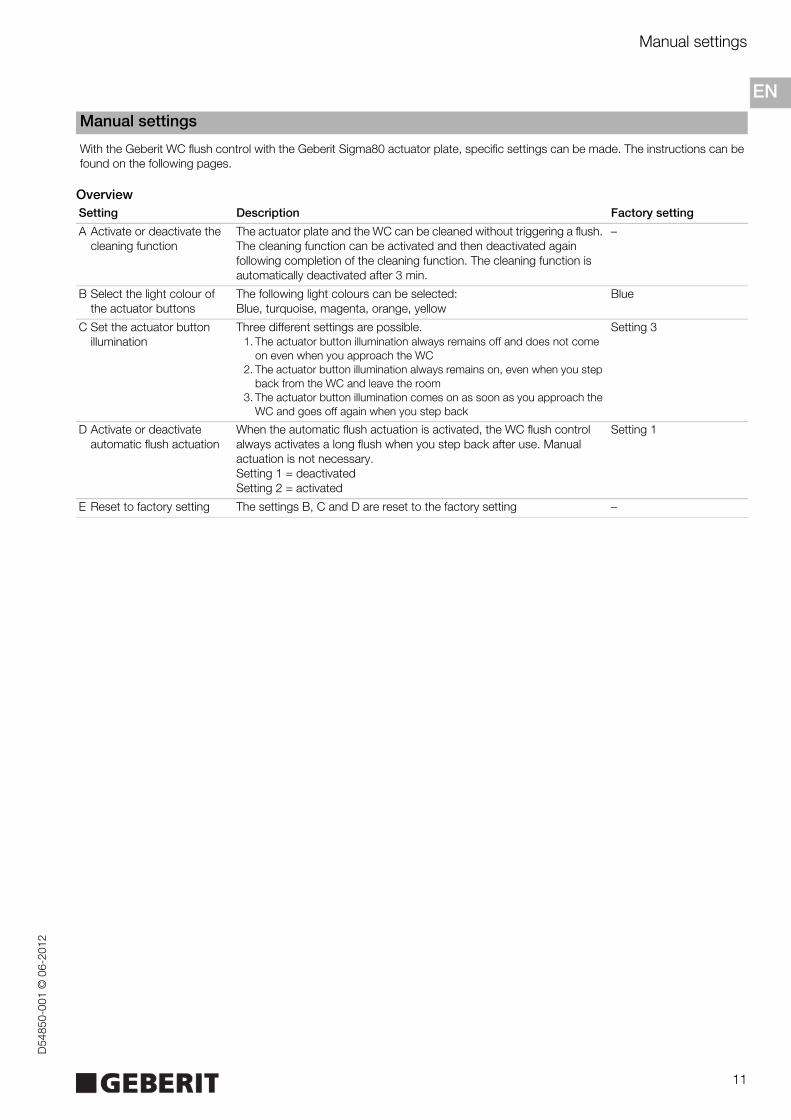
With the Geberit WC flush control with the Geberit Sigma80 actuator plate, specific settings can be made. The instructions can be found on the following pages.
Overview
Manual settings
Setting Description Factory setting
A Activate or deactivate the cleaning function
The actuator plate and the WC can be cleaned without triggering a flush. The cleaning function can be activated and then deactivated again following completion of the cleaning function. The cleaning function is automatically deactivated after 3 min.
–
B Select the light colour of the actuator buttons
The following light colours can be selected:Blue, turquoise, magenta, orange, yellow
Blue
C Set the actuator button illumination
Three different settings are possible.1. The actuator button illumination always remains off and does not come
on even when you approach the WC2. The actuator button illumination always remains on, even when you step
back from the WC and leave the room3. The actuator button illumination comes on as soon as you approach the
WC and goes off again when you step back
Setting 3
D Activate or deactivate automatic flush actuation
When the automatic flush actuation is activated, the WC flush control always activates a long flush when you step back after use. Manual actuation is not necessary.Setting 1 = deactivatedSetting 2 = activated
Setting 1
E Reset to factory setting The settings B, C and D are reset to the factory setting –
12
Manual settingsD
54850-001 © 06-2012
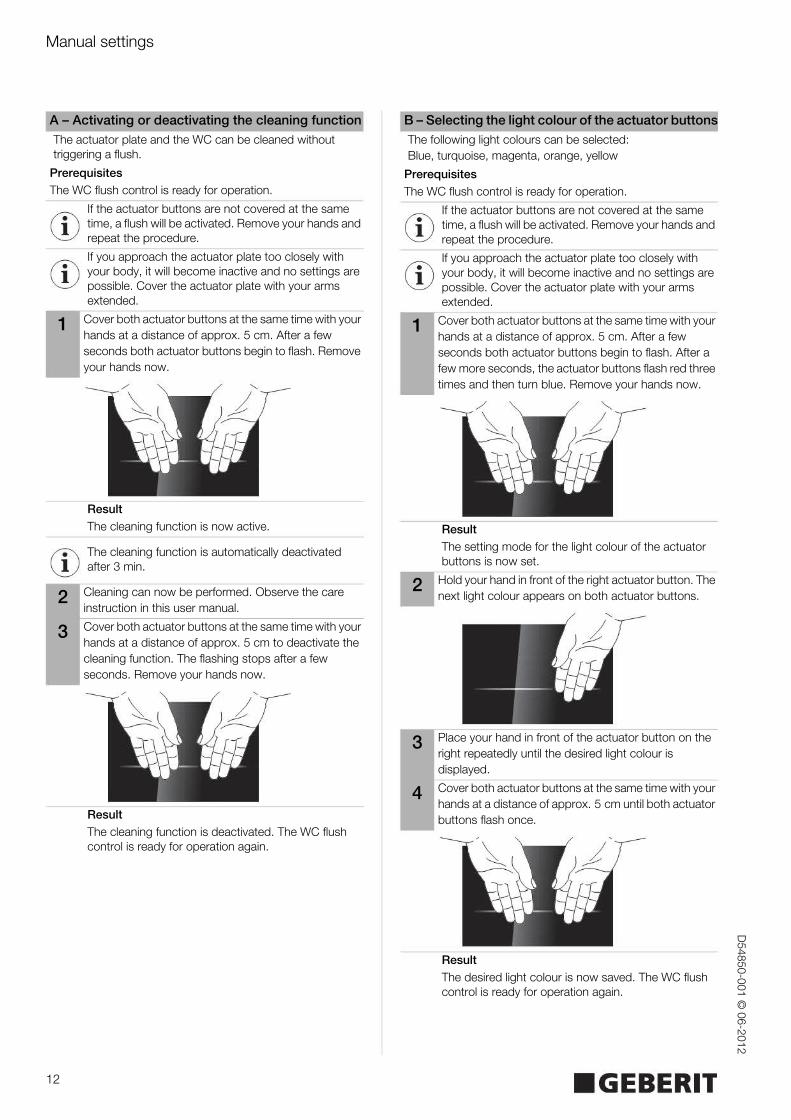
A – Activating or deactivating the cleaning functionThe actuator plate and the WC can be cleaned without triggering a flush.
PrerequisitesThe WC flush control is ready for operation.
If the actuator buttons are not covered at the same time, a flush will be activated. Remove your hands and repeat the procedure.
If you approach the actuator plate too closely with your body, it will become inactive and no settings are possible. Cover the actuator plate with your arms extended.
1 Cover both actuator buttons at the same time with your hands at a distance of approx. 5 cm. After a few seconds both actuator buttons begin to flash. Remove your hands now.
ResultThe cleaning function is now active.
The cleaning function is automatically deactivated after 3 min.
2 Cleaning can now be performed. Observe the care instruction in this user manual.
3 Cover both actuator buttons at the same time with your hands at a distance of approx. 5 cm to deactivate the cleaning function. The flashing stops after a few seconds. Remove your hands now.
ResultThe cleaning function is deactivated. The WC flush control is ready for operation again.
B – Selecting the light colour of the actuator buttonsThe following light colours can be selected:Blue, turquoise, magenta, orange, yellow
PrerequisitesThe WC flush control is ready for operation.
If the actuator buttons are not covered at the same time, a flush will be activated. Remove your hands and repeat the procedure.
If you approach the actuator plate too closely with your body, it will become inactive and no settings are possible. Cover the actuator plate with your arms extended.
1 Cover both actuator buttons at the same time with your hands at a distance of approx. 5 cm. After a few seconds both actuator buttons begin to flash. After a few more seconds, the actuator buttons flash red three times and then turn blue. Remove your hands now.
ResultThe setting mode for the light colour of the actuator buttons is now set.
2 Hold your hand in front of the right actuator button. The next light colour appears on both actuator buttons.
3 Place your hand in front of the actuator button on the right repeatedly until the desired light colour is displayed.
4 Cover both actuator buttons at the same time with your hands at a distance of approx. 5 cm until both actuator buttons flash once.
ResultThe desired light colour is now saved. The WC flush control is ready for operation again.
EN
EN
FR
IT
NL
ES
PT
DK
NO
SE
FI
IS
PL
HU
SK
CZ
SL
HR
SR
EE
LV
LT
BG
RO
GR
TR
RU
AE
CN
JP
Manual settingsD
5485
0-00
1 ©
06-
2012
13
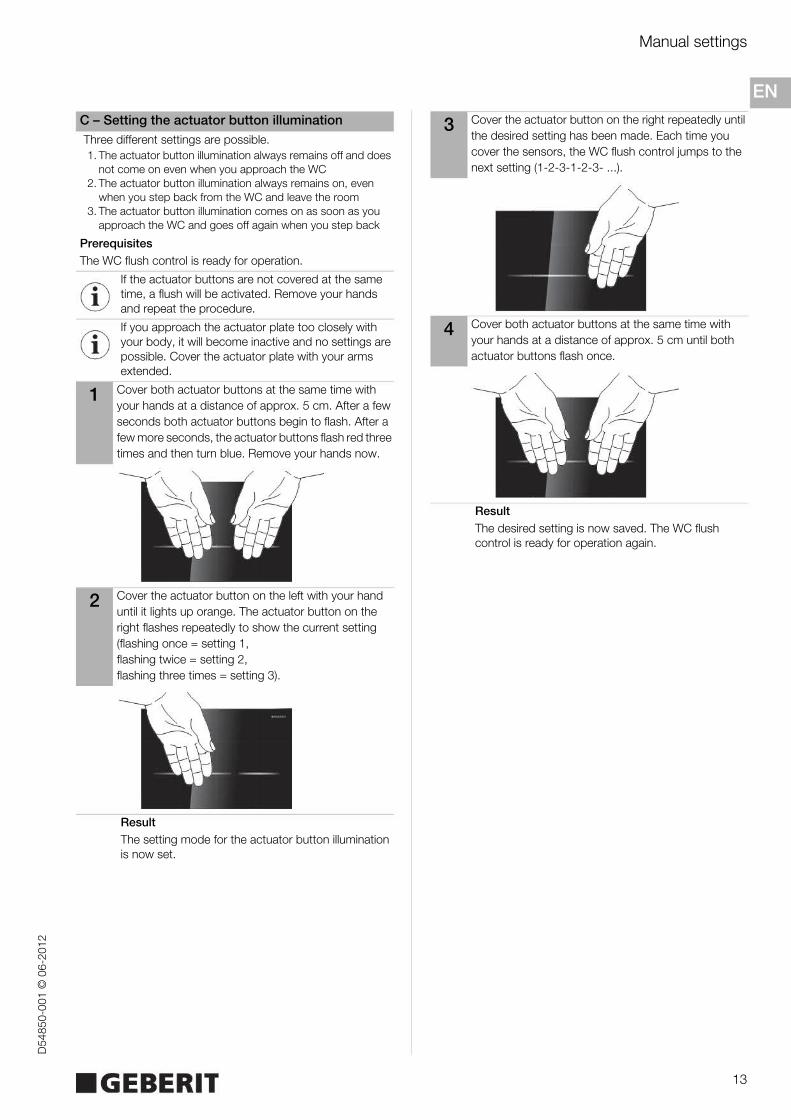
C – Setting the actuator button illuminationThree different settings are possible.1. The actuator button illumination always remains off and does
not come on even when you approach the WC2. The actuator button illumination always remains on, even
when you step back from the WC and leave the room3. The actuator button illumination comes on as soon as you
approach the WC and goes off again when you step back
PrerequisitesThe WC flush control is ready for operation.
If the actuator buttons are not covered at the same time, a flush will be activated. Remove your hands and repeat the procedure.
If you approach the actuator plate too closely with your body, it will become inactive and no settings are possible. Cover the actuator plate with your arms extended.
1 Cover both actuator buttons at the same time with your hands at a distance of approx. 5 cm. After a few seconds both actuator buttons begin to flash. After a few more seconds, the actuator buttons flash red three times and then turn blue. Remove your hands now.
2 Cover the actuator button on the left with your hand until it lights up orange. The actuator button on the right flashes repeatedly to show the current setting (flashing once = setting 1, flashing twice = setting 2, flashing three times = setting 3).
ResultThe setting mode for the actuator button illumination is now set.
3 Cover the actuator button on the right repeatedly until the desired setting has been made. Each time you cover the sensors, the WC flush control jumps to the next setting (1-2-3-1-2-3- ...).
4 Cover both actuator buttons at the same time with your hands at a distance of approx. 5 cm until both actuator buttons flash once.
ResultThe desired setting is now saved. The WC flush control is ready for operation again.

14
Manual settingsD
54850-001 © 06-2012
D – Activating or deactivating the automatic flush actuationWhen the automatic flush actuation is activated, the WC flush control always activates a flush when you step back. Manual actuation is not necessary.Setting 1 = deactivatedSetting 2 = activated
PrerequisitesThe WC flush control is ready for operation.
If the actuator buttons are not covered at the same time, a flush will be activated. Remove your hands and repeat the procedure.
If you approach the actuator plate too closely with your body, it will become inactive and no settings are possible. Cover the actuator plate with your arms extended.
1 Cover both actuator buttons at the same time with your hands at a distance of approx. 5 cm. After a few seconds both actuator buttons begin to flash. After a few more seconds, the actuator buttons flash red three times and then turn blue. Remove your hands now.
2 Cover the actuator button on the left with your hand until it lights up orange. The actuator button on the right flashes.
3 Cover the actuator button on the left with your hand again until it lights up yellow. The actuator button on the right flashes repeatedly to show the current setting 1 or 2 (flashing once = setting 1, flashing twice = setting 2).
ResultThe setting mode for the automatic flush actuation is now set.
4 Cover the actuator button on the right repeatedly until the desired setting has been made. Each time the sensor is covered, the WC flush control changes between the two settings (1-2-1-2- ...).
5 Cover both actuator buttons at the same time with your hands at a distance of approx. 5 cm until both actuator buttons flash once.
ResultThe desired setting is now saved. The WC flush control is ready for operation again.
E – Resetting to factory settingThe settings B, C and D are reset to the factory setting, see Overview.
PrerequisitesThe WC flush control is ready for operation.
Cover the actuator button on the left for half a minute until both actuator buttons light up red. A flush is triggered.
ResultThe factory settings are restored.
EN
EN
FR
IT
NL
ES
PT
DK
NO
SE
FI
IS
PL
HU
SK
CZ
SL
HR
SR
EE
LV
LT
BG
RO
GR
TR
RU
AE
CN
JP
CareD
5485
0-00
1 ©
06-
2012
15
Care
Cleaning the actuator plateCAUTIONAggressive and scouring cleaning agents can damage the surface.
Never use aggressive cleaning agents that contain chlorine or are acidic, abrasive or corrosive.Clean the actuator plate with mild cleaning agents and water.Use a soft cloth.
Geberit recommends the Geberit AquaClean cleaning set (article number 242.547.00.1) for cleaning the actuator plate.
16
RepairD
54850-001 © 06-2012
Repair
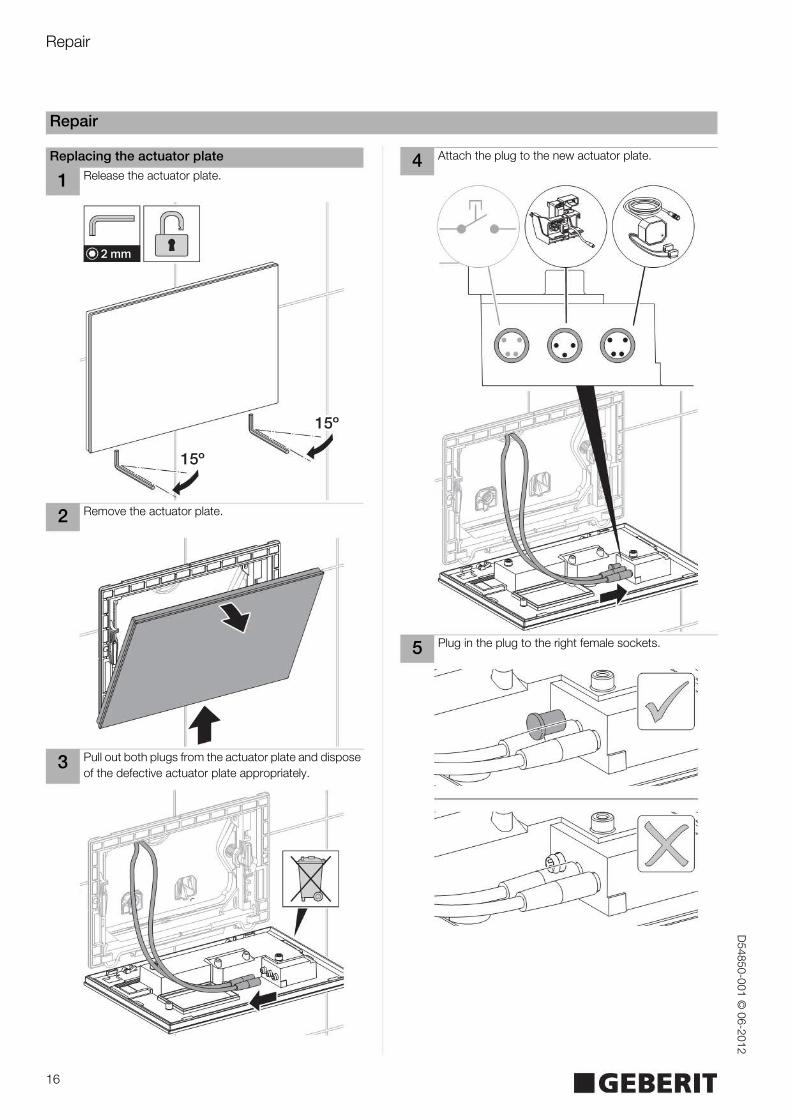
Replacing the actuator plate
1 Release the actuator plate.
2 Remove the actuator plate.
3 Pull out both plugs from the actuator plate and dispose of the defective actuator plate appropriately.
2 mm
15º
15º
4 Attach the plug to the new actuator plate.
5 Plug in the plug to the right female sockets.
EN
EN
FR
IT
NL
ES
PT
DK
NO
SE
FI
IS
PL
HU
SK
CZ
SL
HR
SR
EE
LV
LT
BG
RO
GR
TR
RU
AE
CN
JP
RepairD
5485
0-00
1 ©
06-
2012
17
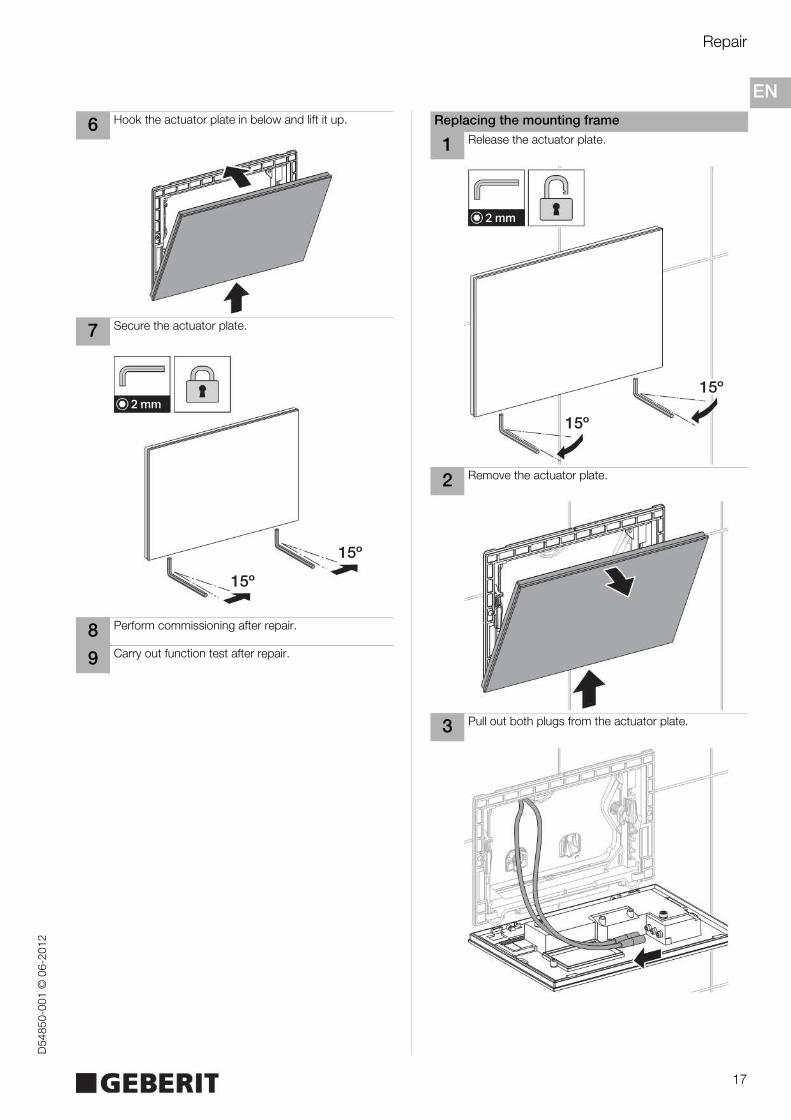
6 Hook the actuator plate in below and lift it up.
7 Secure the actuator plate.
8 Perform commissioning after repair.
9 Carry out function test after repair.
15º
15º
2 mm
Replacing the mounting frame
1 Release the actuator plate.
2 Remove the actuator plate.
3 Pull out both plugs from the actuator plate.
2 mm
15º
15º
18
RepairD
54850-001 © 06-2012
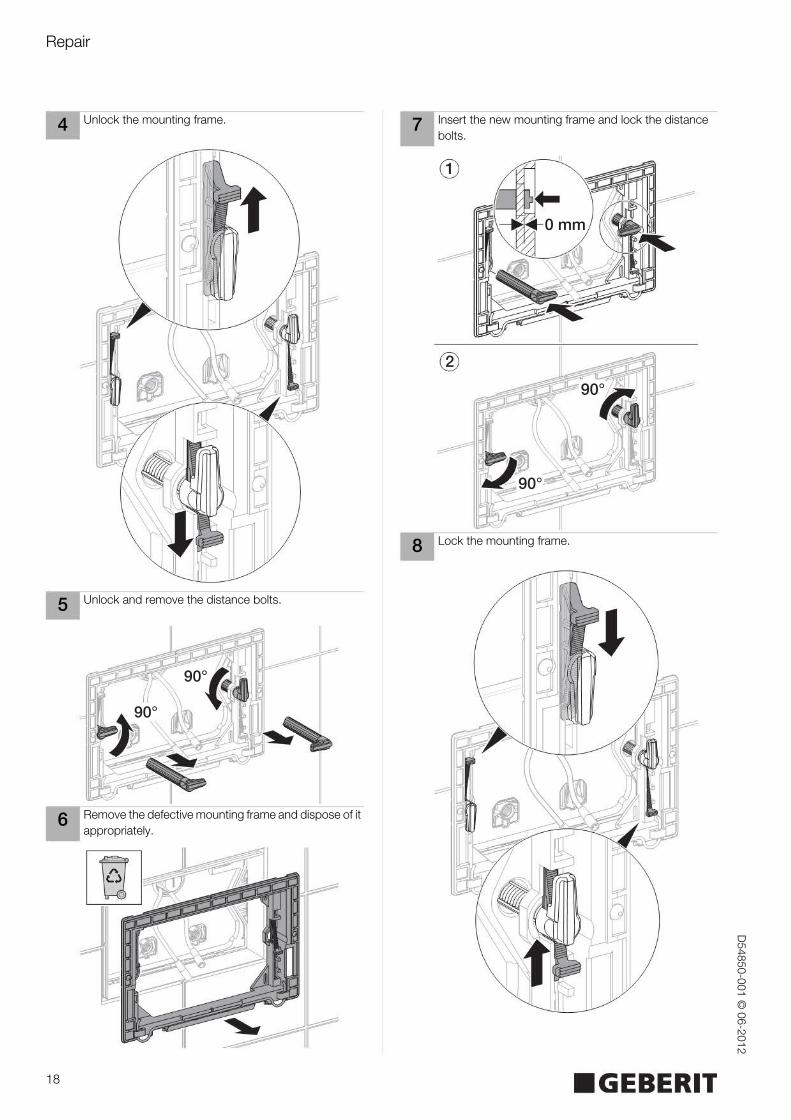
4 Unlock the mounting frame.
5 Unlock and remove the distance bolts.
6 Remove the defective mounting frame and dispose of it appropriately.
90°90°
90°90°
7 Insert the new mounting frame and lock the distance bolts.
8 Lock the mounting frame.
0 mm
1
90°90°
90°90°
2

EN
EN
FR
IT
NL
ES
PT
DK
NO
SE
FI
IS
PL
HU
SK
CZ
SL
HR
SR
EE
LV
LT
BG
RO
GR
TR
RU
AE
CN
JP
RepairD
5485
0-00
1 ©
06-
2012
19
9 Attach the plug to the actuator plate.
10 Plug in the plug to the right female sockets.
11 Hook the actuator plate in below and lift it up.
12 Secure the actuator plate.
13 Perform commissioning after repair.
14 Carry out function test after repair.
15º
15º
2 mm

20
RepairD
54850-001 © 06-2012
Replacing the lifting deviceThe procedure is the same for the Geberit Sigma concealed cistern 8 cm and 12 cm.
1 Release the actuator plate.
2 Remove the actuator plate.
3 Pull out both plugs from the actuator plate.
2 mm
15º
15º
4 Unlock the mounting frame.
5 Unlock the distance bolts.
6 Remove the mounting frame.
90°90°
90°90°
EN
EN
FR
IT
NL
ES
PT
DK
NO
SE
FI
IS
PL
HU
SK
CZ
SL
HR
SR
EE
LV
LT
BG
RO
GR
TR
RU
AE
CN
JP
RepairD
5485
0-00
1 ©
06-
2012
21
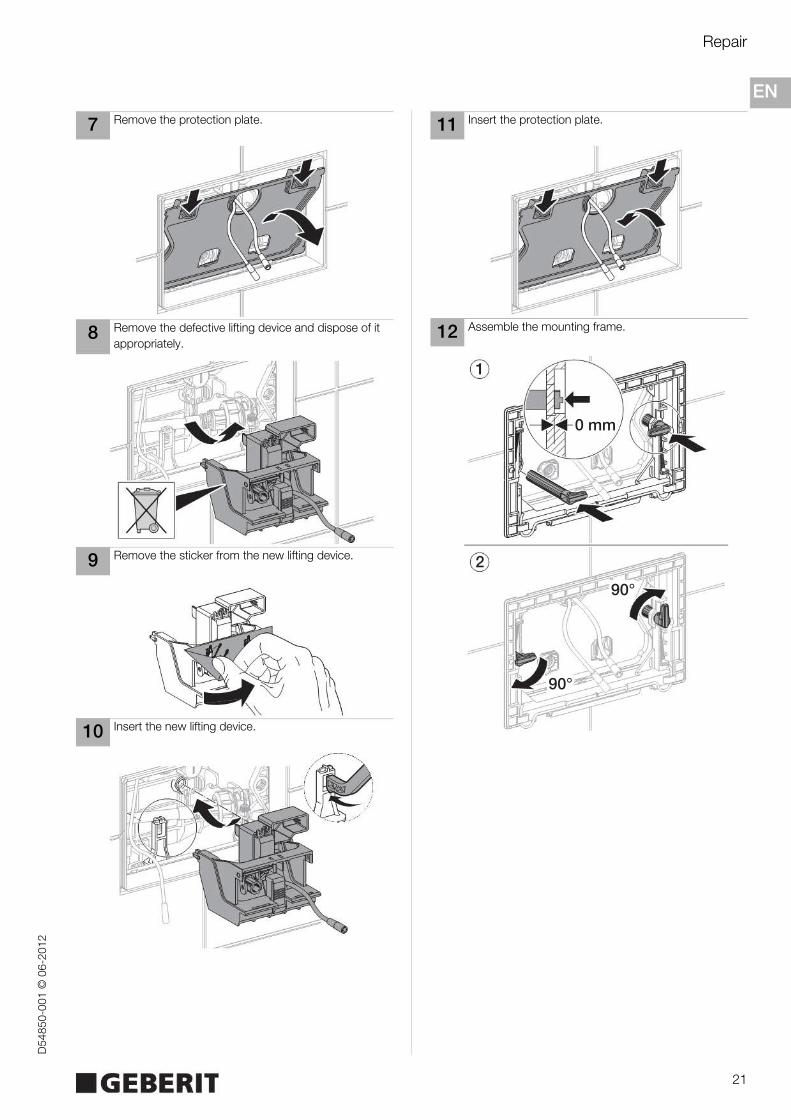
7 Remove the protection plate.
8 Remove the defective lifting device and dispose of it appropriately.
9 Remove the sticker from the new lifting device.
10 Insert the new lifting device.
816.418
816.418
11 Insert the protection plate.
12 Assemble the mounting frame.
0 mm
1
90°90°
90°90°
2

22
RepairD
54850-001 © 06-2012
13 Lock the mounting frame.
14 Attach the plug to the actuator plate.
15 Plug in the plug to the right female sockets.
16 Hook the actuator plate in below and lift it up.
17 Secure the actuator plate.
18 Perform commissioning after repair.
19 Carry out function test after repair.
15º
15º
2 mm

EN
EN
FR
IT
NL
ES
PT
DK
NO
SE
FI
IS
PL
HU
SK
CZ
SL
HR
SR
EE
LV
LT
BG
RO
GR
TR
RU
AE
CN
JP
RepairD
5485
0-00
1 ©
06-
2012
23
Commissioning after repair
1 Move at least 2 m away from the actuator plate.
2 As soon as the control has detected the environment, the actuator buttons flash three times.
ResultThe WC flush control is in operation.
> 2 m
3 x
Function test after repair
1 Enter the proximity detection range; the actuator buttons start to light up.
2 Hold your hand in front of the long actuator button on the left. A large flush volume is actuated.
< 1,5 m
24
RepairD
54850-001 © 06-2012
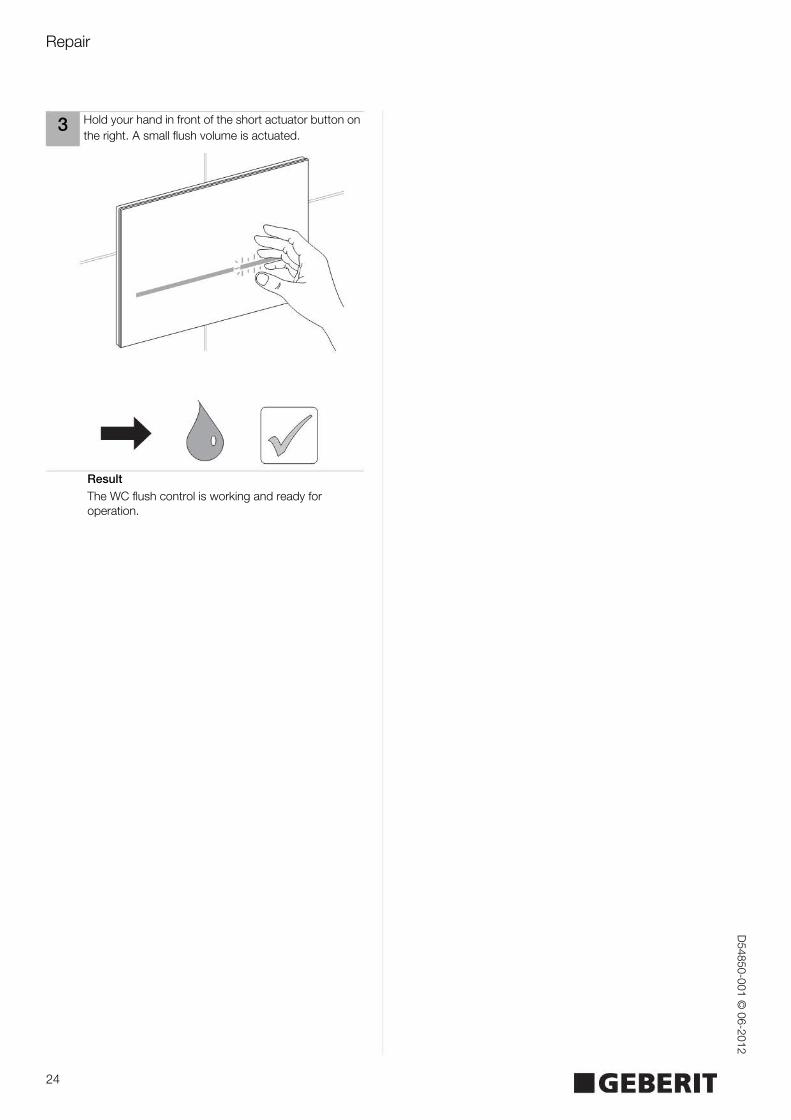
3 Hold your hand in front of the short actuator button on the right. A small flush volume is actuated.
ResultThe WC flush control is working and ready for operation.

EN
EN
FR
IT
NL
ES
PT
DK
NO
SE
FI
IS
PL
HU
SK
CZ
SL
HR
SR
EE
LV
LT
BG
RO
GR
TR
RU
AE
CN
JP
DisposalD
5485
0-00
1 ©
06-
2012
25
ConstituentsThis product meets the requirements of the directive 2002/95/EC RoHS (Restriction of Hazardous Substances in electrical and electronic equipment).
Disposal
In accordance with directive 2002/96/EC WEEE on waste electrical and electronic equipment, manufacturers of electrical equipment are obliged to take back old equipment and to dispose of it correctly.The symbol indicates that the product cannot be disposed of with non-recyclable waste. Old equipment should be returned directly to Geberit where it will be disposed of appropriately.Please contact your responsible Geberit sales company or visit www.geberit.com for collection point addresses.
Disposal
Geberit International AGSchachenstrasse 77CH-8645 Jona
➔ www.geberit.com
965.050.00.0 (00)D54850-001 © 06-2012