maintenance manual ii - freecontrails.free.fr/temp/912_heavy_maintenance.pdf · maintenance manual...
TRANSCRIPT


MAINTENANCE MANUAL IIAIRCRAFT ENGINES
page 2Initial issue, Jan. 01/2002
Effectivity: 912 Series
d013
81
1) Table of contents1) Table of contents .............................................................................................. 22) Index .................................................................................................................. 63) List of the current pages .................................................................................. 84) Table of amendments ..................................................................................... 105) Introduction ..................................................................................................... 136) Safety ............................................................................................................... 13
6.1) Repeating symbols ..........................................................................................137) Technical documentation............................................................................... 138) General ............................................................................................................ 139) Auxiliary equipment ....................................................................................... 1310) Description of design ..................................................................................... 1311) Maintenance .................................................................................................... 15
11.1) General note.....................................................................................................1511.2) Version .............................................................................................................1511.3) Procedure notes ..............................................................................................1511.4) Auxiliary tools ...................................................................................................1611.5) Measuring tools ................................................................................................1711.6) Special tools and devices ................................................................................1811.7) Consumable materials .....................................................................................24
11.7.1) Motor oil ...................................................................................................... 2611.7.2) Lithium grease............................................................................................. 2611.7.3) Multi-purpose grease LZ .............................................................................. 2611.7.4) Corrosion inhibiting oil Mobil®Arma 524 ...................................................... 2611.7.5) SILASTIC 743 RTV ..................................................................................... 2611.7.6) LOCTITE® ANTISEIZE 15378 .................................................................... 2611.7.7) LOCTITE® “574 orange”.............................................................................. 2611.7.8) LOCTITE® “380 black” ................................................................................ 2711.7.9) LOCTITE® “648 green” ............................................................................... 2711.7.10) LOCTITE® “221 violet” ................................................................................ 2711.7.11) LOCTITE® “243 blue” .................................................................................. 2711.7.12) LOCTITE® “603 green” ............................................................................... 2711.7.13) MICRONORM shot blasting abrasive .......................................................... 2711.7.14) Lapping fleece SR 4600 A - very fine grading ............................................. 2811.7.15) Cleaning agents .......................................................................................... 2811.7.16) Valve lapping paste ..................................................................................... 2811.7.17) MOLYKOTE® 44 medium ............................................................................ 2811.7.18) Grease MOLYKOTE® GN ............................................................................ 2811.7.19) K&N® Filteroil 99 - 1131.............................................................................. 28
11.8) Securing elements ...........................................................................................2911.8.1) Safety wiring ............................................................................................... 2911.8.2) Nut securing ................................................................................................ 30
11.9) Tightening torques ...........................................................................................3111.10) Treatment of corrosion and surface damages .................................................3211.11) Engine preservation and engine back to operation ..........................................32
11.11.1) Preservation of a new engine ...................................................................... 3311.11.2) Engine back to operation ............................................................................. 33
12) Periodic maintenance..................................................................................... 34

Effectivity: 912 Series
MAINTENANCE MANUAL IIAIRCRAFT ENGINES
d013
81
page 3Initial issue, Jan. 01/2002
13) Maintenance of the Systems.......................................................................... 3513.1) Fuel system......................................................................................................35
13.1.1) Removal of carburetors and carburetor flange ............................................. 3513.1.2) BING constant depression carburetor: Check and maintenance.................. 36
13.1.2.1) Leakage test of float needle valve ............................................. 3613.1.2.2) Diaphragm ................................................................................. 3713.1.2.3) Jet needle .................................................................................. 3713.1.2.4) Jets ............................................................................................ 3813.1.2.5) Float chamber ............................................................................ 3813.1.2.6) Float suspension ........................................................................ 3913.1.2.7) Check of float needle valve........................................................ 3913.1.2.8) Starting carburetor (choke) ........................................................ 40
13.1.3) Check of the fuel system ............................................................................ 4113.1.3.1) General notes on fuels ............................................................... 4113.1.3.2) Fuel pressure ............................................................................. 42
13.1.4) Carburetor flange ......................................................................................... 4413.1.5) Fuel pump ................................................................................................... 4513.1.6) Fuel tubes ................................................................................................... 4613.1.7) Carburetor flange, carburetor ....................................................................... 47
13.2) Lubricating system ...........................................................................................4813.2.1) Oil pump removal ........................................................................................ 4813.2.2) Oil pump checking ...................................................................................... 4813.2.3) Oil pump reassembly .................................................................................. 4913.2.4) Magnetic plug .............................................................................................. 5013.2.5) Drain screw ................................................................................................. 50
13.3) Cooling system ................................................................................................5113.3.1) Water pump removal ................................................................................... 5113.3.2) Water pump housing disassembly and inspection ....................................... 5113.3.3) Magneto hub ............................................................................................... 5213.3.4) Ignition housing disassembly and inspect ................................................... 5213.3.5) Water pump shaft disassembly ................................................................... 5513.3.6) Rotary seal disassembly ............................................................................. 5513.3.7) Rotary seal reassembly ............................................................................... 5613.3.8) Crosssection of water pump ........................................................................ 5713.3.9) Ignition housing reassembly ........................................................................ 5813.3.10) water pump housing reassembly ................................................................. 5913.3.11) Hose clamps ............................................................................................... 6013.3.12) Cooling air baffle ......................................................................................... 60
13.4) Ignition system .................................................................................................6113.4.1) Checking of ignition unit, trouble shooting ................................................... 6113.4.2) Spark plugs, ignition cables, spark plug connectors, cables ....................... 6113.4.3) Electronic module, trigger set ...................................................................... 6213.4.4) Charging coil ............................................................................................... 6313.4.5) Double ignition coil ...................................................................................... 6313.4.6) Generator coil .............................................................................................. 6413.4.7) Resistance values of the ignition unit .......................................................... 6413.4.8) Wiring diagrams .......................................................................................... 65
13.4.8.1) Wiring diagram for ignition system("Single Plug") ...................... 6513.4.8.2) Wiring diagram for ignition system ("Central plug") .................... 66

MAINTENANCE MANUAL IIAIRCRAFT ENGINES
page 4Initial issue, Jan. 01/2002
Effectivity: 912 Series
d013
81
13.4.9) Ignition electric set disassembly ................................................................. 6713.4.10) Ignition electric set disassembly ................................................................. 68
Double ignition coil renewal ......................................................................... 6813.4.11) Ignition electric set reassembly ................................................................... 7013.4.12) Ignition electric set installation .................................................................... 7113.4.13) Removal of trigger coil set .......................................................................... 7213.4.14) Stator removal and re-fitting ........................................................................ 7313.4.15) Magneto hub ............................................................................................... 7413.4.16) Interference suppression box ...................................................................... 74
13.4.16.1) Disassembly of interference suppression box: ........................... 7413.4.16.2) Wiring diagram for interference suppression box ........................ 7513.4.16.3) Re-assembly of interference suppression box ............................ 7613.4.16.4) Installation of interference suppression box ............................... 76
13.5) Temperature- and pressure measuring system ...............................................7713.5.1) Cylinder head temperature sensor ............................................................... 7713.5.2) Oil temperature sensor ................................................................................ 7813.5.3) Oil pressure sensor ..................................................................................... 78
14) Maintenance of components ......................................................................... 8014.1) Electric starter .................................................................................................80
14.1.1) Electric starter disassembly ....................................................................... 8014.1.2) Electric starter single parts check .............................................................. 8114.1.3) Electric starter reassembly ......................................................................... 8214.1.4) Electric starter mounting ............................................................................. 82
14.2) Sprag clutch .....................................................................................................8214.2.1) Sprag clutch removal .................................................................................. 8314.2.2) Sprag clutch disassembly ........................................................................... 8414.2.3) Sprag clutch reassembly ............................................................................. 8414.2.4) Reduction gear for electric starter ............................................................... 8514.2.5) Ignition housing fitting ................................................................................. 85
14.3) Rev. counter drive ............................................................................................8614.4) Propeller gearbox .............................................................................................86
14.4.1) Roller bearing removal for configuration 1 and 2 only .................................. 8814.4.2) Roller bearing removal for configuration 3 only ............................................ 8914.4.3) Roller bearing removal for configuration 4 only ............................................ 8914.4.4) Vacuum pump disassembly ........................................................................ 9014.4.5) Vacuum pump drive disassembly ................................................................ 9014.4.6) Drive for vacuum pump and hydraulic governor reassembly ....................... 9114.4.7) Vacuum pump ............................................................................................. 9114.4.8) Hydraulic governor disassembly ................................................................. 9214.4.9) Drive for hydraulic governor reassembly ..................................................... 9314.4.10) Propeller gearbox disassembly ................................................................... 9414.4.11) Propeller shaft disassembly ........................................................................ 9614.4.12) Gearbox components check ........................................................................ 9714.4.13) Propeller gearbox refitting ........................................................................... 9914.4.14) Disk spring pre-tension adjust ....................................................................10014.4.15) Propeller gearbox installation .....................................................................101

Effectivity: 912 Series
MAINTENANCE MANUAL IIAIRCRAFT ENGINES
d013
81
page 5Initial issue, Jan. 01/2002
14.5) Cylinder head removal ...................................................................................10314.5.1) Cylinder head disassembly ........................................................................10414.5.2) Valve guides ..............................................................................................10514.5.3) Valve seats ................................................................................................10514.5.4) Valves ........................................................................................................10614.5.5) Valve springs .............................................................................................10614.5.6) Rocker arm ................................................................................................10714.5.7) Cylinder head hardness test .......................................................................10714.5.8) Cylinder heads reassembly ........................................................................108
14.6) Cylinder and Piston disassembly ...................................................................10914.6.1) Piston check ..............................................................................................11014.6.2) Piston rings check .....................................................................................11114.6.3) Dimensions of pistons and piston rings ......................................................11114.6.4) Piston pin ...................................................................................................11214.6.5) Cylinder check ...........................................................................................112
14.7) Hydraulic valve tappets .................................................................................11314.8) Push rods .......................................................................................................11314.9) Displacement parts reassembly .................................................................... 114
14.9.1) Hydraulic valve tappets ..............................................................................11414.9.2) Piston fitting ...............................................................................................11414.9.3) Fitting of cylinder ........................................................................................11614.9.4) Fitting of cylinder head ...............................................................................116
14.10) Fitting of coolant hoses .................................................................................. 11814.11) Fitting of intake manifolds ...............................................................................11814.12) Fitting of an extra carburetor support ............................................................11814.13) Connecting of the fuel lines ............................................................................119
15) Wear limits sheets ......................................................................................... 12015.1) Wear limits for ROTAX® 912 UL/A/F ............................................................. 12015.2) Wear limits for ROTAX® 912 S/ULS ..............................................................122
16) Form Sheets .................................................................................................. 12316.1) Form Sheet for Cylinders and Pistons for ROTAX® 912 UL/A/F/ULS/S .......12316.2) Form sheet for ext. generator ......................................................................... 12416.3) Form sheet for crack inspection .................................................................... 125

MAINTENANCE MANUAL IIAIRCRAFT ENGINES
page 6Initial issue, Jan. 01/2002
Effectivity: 912 Series
d013
81
2) IndexAAuxiliary equipment 13Auxiliary tools 16
CCables 61Carburetor 47Carburetor flange 44, 47Charging coil 63Cleaning agents 28Constant depression carburetor36Consumable materials 24Coolant hoses fitting 118Cooling air baffle 60Cooling system 51Corrosion 32Corrosion inhibiting oil 26Cylinder and Piston disassem-bly 109Cylinder check 112Cylinder fitting 116Cylinder head disassembly 104Cylinder head fitting 116Cylinder head hardness test107Cylinder head reassembly 108Cylinder head removal 103Cylinder head temp. sensor 77
DDescription of design 13design 13Devices 18Diaphragm 37DisassemblyCylinder head 104Gearbox 86Water pump housing 51Disk spring pre-tension adjust100Displacement parts reassembly114Double ignition coil 63Drain screw 50Drive for hydraulic governor 93
EElectric starter 80Electric starter check 81Electric starter reassembly 82Electric system 32Electronic module 62Engine back to operation32, 33
FFilteroil 28Fitting of cylinder 116Fitting of cylinder head 116Fitting of intake manifolds 118Float chamber 38Float needle valve 36, 39Float suspension 39Form Sheets 123Fuel lines connecting 119Fuel pressure 42Fuel pump 45Fuel system 35, 41Fuel tubes 46Fuels 41
GGearbox components check 97General 13General note 15Generator coil 64Grease 28
HHose clamps 60Hydraulic governor 92Hydraulic valve tappets 113
IIgnition housing 52, 58Ignition system 61Ignition unit check 61InspectionFlywheel hub 74Gearbox components 97Ignition electric set 68, 70Piston pin 112Piston rings 111Push rods 113Intake manifold 118Interference suppression box74Introduction 13
JJet needle 37Jets 38
LLapping fleece 28List of the current pages 8Lithium grease 26LOCTITE “221 violet” 27LOCTITE “380 black” 27LOCTITE “574 orange” 26LOCTITE “603 green” 27LOCTITE “648 green” 27LOCTITE ANTISEIZE 26Lubricating system 48
MMagnetic plug 50Magneto hub 52, 74Maintenance 15Maintenance of the Systems35Measuring tools 17MOLYKOTE 28Motor oil 26Multi-purpose grease 26
NNeedle valve 36, 39Nut securing 30
OOil pressure sensor 78Oil pump 48Oil temperature sensor 78
PPiston check 110Piston fitting 114Piston pin 112Piston rings check 111Preservation 32Pressure measuring system 77Procedure notes 15Propeller gearbox 86Propeller gearbox disassembly94Propeller gearbox installation101Propeller gearbox refitting 99Propeller shaft 32Propeller shaft disassembly 96Push rods 113

Effectivity: 912 Series
MAINTENANCE MANUAL IIAIRCRAFT ENGINES
d013
81
page 7Initial issue, Jan. 01/2002
RRe-assemblycarburetor 47Hydraulic valve tappets 114Oil pump 49Reduction gear for electricstarter 85Removal of carburetors andcarburetor flange 35Resistance values of theignition unit 64Rev. counter drive 86Rocker arm 107Roller bearing removal forconfiguration 1 and con 88Roller bearing removal forconfiguration 3 89Roller bearing removal forconfiguration 4 89Rotary seal 55
SSafety 13Safety wiring 29Securing elements 29Shot blasting abrasive 27SILASTIC 26Special tools 18Sprag clutch 82Sprag clutch disassembly 84Sprag clutch reassembly 84Sprag clutch removal 83Starting carburetor 40Stator 73Surface damages 32symbols 13
TTable of amendments 10Technical documentation 13Temperature measuring system77Temperature sensor 77Tightening torques 31Trigger coil set 72Trigger set 62Trouble shooting 61
VVacuum pump 90Vacuum pump drive 90Valve guides 105Valve lapping paste 28Valve seats 105Valve springs 106Valves 106Version 15
WWater pump 51Water pump housing 51, 59Water pump shaft 55Wear limits 120Wiring diagrams 65

MAINTENANCE MANUAL IIAIRCRAFT ENGINES
page 8Initial issue, Jan. 01/2002
Effectivity: 912 Series
d013
81
02708
3) List of the current pages fig. 002
Kapitel / chapter Seite / page Datum /date Kapitel / chapter Seite / page Datum /date
1 2002 01 011 2 2002 01 01
3 2002 01 014 2002 01 015 2002 01 01
2 6 2002 01 017 2002 01 01
3 8 2002 01 019 2002 01 01
4 10 2002 01 0111 2002 01 0112 2002 01 01
5678910 13 2002 01 01
14 2002 01 0111 15 2002 01 01
16 2002 01 0117 2002 01 0118 2002 01 0119 2002 01 0120 2002 01 0121 2002 01 0122 2002 01 0123 2002 01 0124 2002 01 0125 2002 01 0126 2002 01 0127 2002 01 0128 2002 01 0129 2002 01 0130 2002 01 0131 2002 01 0132 2002 01 0133 2002 01 01
12 34 2002 01 0113 35 2002 01 01
36 2002 01 0137 2002 01 0138 2002 01 0139 2002 01 0140 2002 01 01
41 2002 01 0142 2002 01 0143 2002 01 0144 2002 01 0145 2002 01 0146 2002 01 0147 2002 01 0148 2002 01 0149 2002 01 0150 2002 01 0151 2002 01 0152 2002 01 0153 2002 01 0154 2002 01 0155 2002 01 0156 2002 01 0157 2002 01 0158 2002 01 0159 2002 01 0160 2002 01 0161 2002 01 0162 2002 01 0163 2002 01 0164 2002 01 0165 2002 01 0166 2002 01 0167 2002 01 0168 2002 01 0169 2002 01 0170 2002 01 0171 2002 01 0172 2002 01 0173 2002 01 0174 2002 01 0175 2002 01 0176 2002 01 0177 2002 01 0178 2002 01 0179 2002 01 01
14 80 2002 01 0181 2002 01 0182 2002 01 0183 2002 01 0184 2002 01 0185 2002 01 01

Effectivity: 912 Series
MAINTENANCE MANUAL IIAIRCRAFT ENGINES
d013
81
page 9Initial issue, Jan. 01/2002
02708
fig. 002
Kapitel / chapter Seite / page Datum /date Kapitel / chapter Seite / page Datum /date
86 2002 01 0187 2002 01 0188 2002 01 0189 2002 01 0190 2002 01 0191 2002 01 0192 2002 01 0193 2002 01 0194 2002 01 0195 2002 01 0196 2002 01 0197 2002 01 0198 2002 01 0199 2002 01 01
100 2002 01 01101 2002 01 01102 2002 01 01103 2002 01 01104 2002 01 01105 2002 01 01106 2002 01 01107 2002 01 01108 2002 01 01109 2002 01 01110 2002 01 01112 2002 01 01113 2002 01 01114 2002 01 01115 2002 01 01116 2002 01 01117 2002 01 01118 2002 01 01119 2002 01 01
15 120 2002 01 01121 2002 01 01122 2002 01 01
16 123 2002 01 01124 2002 01 01125 2002 01 01

MAINTENANCE MANUAL IIAIRCRAFT ENGINES
page 10Initial issue, Jan. 01/2002
Effectivity: 912 Series
d013
81
date of remark for date of approval date ofno. chapter page change approval from authorities inclusion signature
english version01 ÷16 1 up to 125 02 01 01 not required
04955
4) Table of amendmentsfig. 003

Effectivity: 912 Series
MAINTENANCE MANUAL IIAIRCRAFT ENGINES
d013
81
page 11Initial issue, Jan. 01/2002
date of remark for date of approval date ofno. chapter page change approval from authorities inclusion signature
04955 fig. 003

MAINTENANCE MANUAL IIAIRCRAFT ENGINES
page 12Initial issue, Jan. 01/2002
Effectivity: 912 Series
d013
81
tax-
airc
raft-
engi
nes.
com
www.rota
x-ai
rcra
ft-en
gine
s.co
m
www.rota
x-ai
rcra
ft-en
gine
s.co
m
www.rota
x-ai
rcra
ft-en
gine
s.co
m
www.rota
x-ai
rcra
ft-en
gine
s.co
m
com
www.rota
x-ai
rcra
ft-en
gine
s.co
m
www.rota
x-ai
rcra
ft-en
gine
s.co
m
-eng
ines
.com
www.rota
x-ai
rcra
ft-en
gine
s.co
m
aft-e
ngin
es.c
om
www.rota
x-ai
rcra
ft-en
gine
s.co
m
www.rota
x-ai
rcra
ft-en
gine
s.co
m
Www.ro
tax-
airc
raft-
engi
nes.
com
www.rota
x-ai
rcra
www.rota
x-ai
rcra
ft-en
gine
s.co
m

Effectivity: 912 Series
MAINTENANCE MANUAL IIAIRCRAFT ENGINES
d013
81
page 13Initial issue, Jan. 01/2002
5) IntroductionSee Maintenance Manual type 912 (Line Maintenance) Chapter 00-00-00 para 4.
6) SafetySee Maintenance Manual type 912 (Line Maintenance) Chapter 00-00-00 para 5.
6.1) Repeating symbols
This Manual uses the following symbols to emphasize particular information:
WARNING: Identifies an instruction which, if not followed, may causeserious injury including the possibility of death.
CAUTION: Denotes an instruction which, if not followed, may severelydamage the engine or other component.
NOTE: Indicates supplementary information which may be needed tofully complete or understand an instruction.
7) Technical documentationSee Maintenance Manual type 912 (Line Maintenance) Chapter 00-00-00 para 5.3.
8) GeneralFor further information see relevant Operator’s Manual of the engine type 912.
9) Auxiliary equipmentFor further information see relevant Operator’s Manual of the engine type 912.
10) Description of designFor further information see relevant Operator’s Manual of the engine type 912.

MAINTENANCE MANUAL IIAIRCRAFT ENGINES
page 14Initial issue, Jan. 01/2002
Effectivity: 912 Series
d013
81
tax-
airc
raft-
engi
nes.
com
www.rota
x-ai
rcra
ft-en
gine
s.co
m
www.rota
x-ai
rcra
ft-en
gine
s.co
m
www.rota
x-ai
rcra
ft-en
gine
s.co
m
www.rota
x-ai
rcra
ft-en
gine
s.co
m
com
www.rota
x-ai
rcra
ft-en
gine
s.co
m
www.rota
x-ai
rcra
ft-en
gine
s.co
m
-eng
ines
.com
www.rota
x-ai
rcra
ft-en
gine
s.co
m
aft-e
ngin
es.c
om
www.rota
x-ai
rcra
ft-en
gine
s.co
m
www.rota
x-ai
rcra
ft-en
gine
s.co
m
Www.ro
tax-
airc
raft-
engi
nes.
com
www.rota
x-ai
rcra
www.rota
x-ai
rcra
ft-en
gine
s.co
m

Effectivity: 912 Series
MAINTENANCE MANUAL IIAIRCRAFT ENGINES
d013
81
page 15Initial issue, Jan. 01/2002
11) Maintenance
11.1) General note
See Maintenance Manual type 912 (Line Maintenance) Chapter 05-00-00 para 2.1.
In this chapter the maintenance of engine Type ROTAX® 912 is described. TheManual is subdivided into sections that contain the description and function of thevarious systems Some overlapping maintenance instructions are treated as gener-ally valid information at the beginning of this section
The information given in the Maintenance Manual is based on data and experiencewhich are considered to be applicable for a skilled mechanic under normal workingconditions. The guidelines given in the Maintenance Manual are useful and necessarysupplements to training. They, however, cannot substitute competent theoretical andpractical personal instruction.
Maintenance of engines and systems requires special knowledge and specialtools.See also para 11.2,11.3, 11.4, 11.5, 11.6 and 11.7.
11.2) Version
See Maintenance Manual type 912 (Line Maintenance) Chapter 05-00-00 para 2.2.
We particularly emphasize that parts and accessories not supplied as genuineROTAX
® parts are not verified for suitability by ROTAX
® and thus are not authorized
for use. Installation and/or use of such products may possibly change or negativelyinfluence the operational characteristics of the engine. For damages resulting fromuse of non-genuine parts and accessories ROTAX
® refuses any liability.
Non-authorized modifications as well as the use of components and auxiliarycomponents not corresponding to the installation instructions exclude any liability bythe engine manufacturer.
Besides our instructions in the documentation supplied, also respect the generallyvalid safety and accident preventive directives and legal regulations.
11.3) Procedure notes
See Maintenance Manual type 912 (Line Maintenance) Chapter 05-00-00 para 2.3.

MAINTENANCE MANUAL IIAIRCRAFT ENGINES
page 16Initial issue, Jan. 01/2002
Effectivity: 912 Series
d013
81
11.4) Auxiliary tools– Screwdriver ground to shape Q for piston pin circlip removal (see fig. 5)
– 2 pressure gauges, adapter for dial gauge in spark plug thread for leakage test
– valve spring pliers
– step punch for valve guide
– adjustable reamer 6,5 ÷ 7,5 mm
– valve seat rework set, valve lapping paste
– gearbox support plate
– fixing device for overload clutch
– fitting tool for “Heli-coil” inserts
– auxiliary screws for crankcase joining, 2 hex. screws M8x110, DIN 931 - 8.8(part no. 941 171) or equivalent
– stud extraction tool
– scraper, lapping fleece, grinding wheel, cover sheet, adhesive tape
– cleaning agent, approved cleaners, funnel, graphite marker
– magnetic particle tester DEUTROFLUX®, series UHW, or equivalent. These testersare suitable for complete combined magnetic particle crack inspection of all ferromagneticmaterials. For this purpose an A.C. field circulation can be combined with a shiftedphase A.C. circulation. Both magnetizing methods are independent from each otherand canbe applied separately.
To achieve the direction changes of the magnetic field vector necessary for indicationof cracks in any direction, the alternating currents serving as current supply for thedifferent methods of magnetizing are dephased by 120° to each other:
a) current circulation for longitudinal cracks
b) field circulation for transverse cracks
c) auxiliary circulation for axial and radial crack indication on parts withbores right through by using an electric auxiliary conductor (copper bar).
00141
fig. 018
1

Effectivity: 912 Series
MAINTENANCE MANUAL IIAIRCRAFT ENGINES
d013
81
page 17Initial issue, Jan. 01/2002
11.5) Measuring toolsVernier callipers, dial gauge, micrometer, internal micrometer,
feeler gauge,
spring scale up to 50 kp (500 N).
Stroboscope: BOSCH® 0 684 100 308 or equivalent.
Supply voltage 8 ÷ 15 V. Flash triggering by inductive pick-up. Flashingfrequency 4500 r.p.m.
Multimeter: FLUKE® series 70, series 80 or equivalent.
Electronic, 3 1/2 digits indication.
Current range 10 A.
Direct voltage range 200 V minimum.
Resistance range 200 Ω ÷ 2 MΩ
Accoustic continuity tester.
Oscilloscope:TEKTRONIX® 2225 or equivalent
(optional) 2 channels
Analogous
Sensitivity 5 mV to 5V/div
Frequency limit 50 MHz
WARNING: Using these instruments, observe the manufacturer’s specifica-tions.

MAINTENANCE MANUAL IIAIRCRAFT ENGINES
page 18Initial issue, Jan. 01/2002
Effectivity: 912 Series
d013
81
11.6) Special tools and devicesSee fig. 6.
The following tools and devices are also indicated in the spare parts list.
Fig.No. Part-No. Description, application quantity
1 276 282 spark plug wrenchSW 16 ..................................................... 1
2 276 280 spark plug wrench SW 18 .................................................... 1
3 977 420 handle bolt 8x130-10 ............................................................ 1for spark plug wrench
4 240 880 threaded pin DIN 915-M8x50 ............................................... 1for crankshaft locking
5 876 510 insertion jig .......................................................................... 1for oil seal (12x30x7), water pump shaft
6 877 258 insertion jig .......................................................................... 1for face seal
CAUTION: The new insert jig can be used only in conjunction with rotary sealpart no. 850.945.
7 877 270 insertion jig ........................................................................... 1for oil seal 32x52x7, crankshaft, magneto side
8 877 276 insertion jig ........................................................................... 1for oil seal 22x32x7, vacuum pump
9 276 332 insertion jig ........................................................................... 1for pressing out needle sleeve 22x28x12 and .......................ball bearing 15x32x8, vacuum pump
10 877 650 handle for insertion jigs ........................................................ 1
11 876 518 insertion jig ..... ..................................................................... 1for oil seal 40x55x7, gearbox cover
12 877 320 insertion ring ......................................................................... 1for ball bearing 35-72-17, propeller shaft, ..............................use together with insertion jig 876 518
13 877 680 insertion jig with sleeve ........................................................ 1for oil seal 6x11x3/4,5 of rev. counter housing
14 877 410 protection piece .................................................................... 1for crankshaft, magneto side
15 - 16 877 375 extractor ass'y ...................................................................... 1for magneto flywheel
16 841 875 hex. screw M16x120 DIN 931 .............................................. 1for extractor
17 877 360 insertion sleeve .................................................................... 1for oil seal 32x52x7, crankshaft, magneto side

Effectivity: 912 Series
MAINTENANCE MANUAL IIAIRCRAFT ENGINES
d013
81
page 19Initial issue, Jan. 01/2002
Fig.No. Part-No. Description, application quantity
18 877 295 impeller spanner ................................................................... 1for water pump impeller
19 ÷ 20 877 730 float level gauge ass’y .......................................................... 1to check the float bracket
20 240 381 hex. screw M6x12 DIN933-8.8 ............................................. 1for float level gauge
21 877 710 dial gauge adapter ass’y ...................................................... 1
22 877 700 spring scale .......................................................................... 1for valve spring close force
23 877 802 circlip installation tool ........................................................... 1for installation of piston pin circlip
24 876 950 precision dial gauge ............................................................. 1
25 ÷ 26 877 091 piston pin extraction tool ass’y ............................................. 1for removal and installation of piston pin
26 877 155 extracting nut M6 ass’y ........................................................ 1for piston pin extraction tool
27 876 978 piston ring spanner ............................................................... 1for piston 79,5 mm dia.
28 876 967 piston ring spanner ............................................................... 1for piston 84 mm dia.
29 877 385 valve spring clamp ass’y ...................................................... 1for removal and installation of valve springs
30 877 380 valve spring mounting device ............................................... 1for removal and installation of valve springs
31 877 790 adapter ring .......................................................................... 1for valve spring clamp ass’y
32 242 660 distance nut spanner M8x33 ................................................ 1fixture for vacuum pump drive sleeve
33 876 470 ring spanner 10/13 a/f .......................................................... 1
34 877 260 cylinder aligning tool ............................................................. 1for aligning the cylinders
35 877 262 cylinder aligning tool ............................................................. 1for aligning the cylinders
36 877 300 aligning plate ........................................................................ 1for plain bearing position
37 877 315 measuring plate .................................................................... 1to check plain bearing protrusion
38 ÷ 39 877 230 trestle ass’y .......................................................................... 1for chucking the engine
38 876 762 trestle support ass'y ............................................................. 1

MAINTENANCE MANUAL IIAIRCRAFT ENGINES
page 20Initial issue, Jan. 01/2002
Effectivity: 912 Series
d013
81
Fig.No. Part-No. Description, application quantity
39 877 240 trestle support ass'y ............................................................. 1
40 877 670 cutting tool ............................................................................ 1for oil filter
41 877 620 oil filter wrench 80-110 ......................................................... 1for oil filter removal
42 877 390 pin-face wrench A90 DIN 3116 ............................................ 1for overload clutch
43 877 450 socket S 46x20 L DIN 3121 ................................................. 1for hex. nut, crankshaft, magneto side
44 877 465 reduction socket 3/4x1 ......................................................... 11" to 3/4", for socket wrench 46 a/f
45 877 440 socket S 41x20 L DIN 3124 ................................................. 1
46 877 460 reduction socket A 20x12,5.................................................. 13/4" to 1/2", for socket wrench 41 a/f
47 877 660 puller ass’y. .......................................................................... 1for gearbox
48 876 885 mounting yoke ...................................................................... 1
49 ÷ 52 877 615 puller ass’y ........................................................................... 1for prop shaft, roller bearing 25x52x15 and oil seal 30x52x7
50 877 580 pull-in spindle M24x1,5 ......................................................... 1
51 276 155 handle 12x250 ...................................................................... 1
52 842 585 hex. nut M24x1,5 length 19 .................................................. 1
53 941 180 stud M10x45/20 .................................................................... 1for roller bearing 25x52x15 and oil seal 30x52x7
54 877 605 protection piece .................................................................... 1for propeller shaft configuration 2
55 877 600 protection piece .................................................................... 1for propeller shaft configuration 3 and 4
56 877 592 protection piece .................................................................... 1for roller bearing 25x52x15 and oil seal 30x52x7, configuration 4
57 877 590 protection piece .................................................................... 1for roller bearing 25x52x15 and oil inlet flange, configuration 3
58 877 560 puller plate ............................................................................ 1for roller bearing 25x52x15, oil seal 30x52x7
59 242 091 hex. nut M10 ......................................................................... 1for roller bearing 25x52x15, oil seal 30x52x7
60 ÷ 63 876 489 puller cap ass’y .................................................................... 1for ball bearing 15x32x8 and needle bearing 22x28x12
61 941 730 hex. screw M6x80 DIN 933.................................................. 1

Effectivity: 912 Series
MAINTENANCE MANUAL IIAIRCRAFT ENGINES
d013
81
page 21Initial issue, Jan. 01/2002
Fig.No. Part-No. Description, application quantity
62 827 305 washer 6,2/18/2 .................................................................... 1
63 242 211 hex. nut M6 DIN 934 ............................................................ 1
64 877 597 protection piece .................................................................... 1for needle bearing 22x28x12, vacuum pump
65 877 595 protection piece .................................................................... 1for ball bearing 15x32x8, vacuum pump
66 874 230 fuel pressure gauge .............................................................. 1
67 877 690 check lever............................................................................ 1to check the valve spring close force
68 877 377 extractor ass'y ....................................................................... 1
69 877 570 Tapping drill M18x1 .............................................................. 1To clean the thread at exhange of coolant bend
70 877 245 trestle support ass'y ............................................................. 1

MAINTENANCE MANUAL IIAIRCRAFT ENGINES
page 22Initial issue, Jan. 01/2002
Effectivity: 912 Series
d013
81
1
2
3 46
7 8 9
10 12
13
14
15
16
68
17
18
19
20
21
24
22
23
2526
27
29
30
31
67
34
35
38
39 70
40
41
42
45
46
43
44
66
37
36
28
5
69
04926
fig. 019/1
REPARATURWERKZEUGE FÜR MOTOR
REPAIR TOOLS FOR ENGINE
877 320
876
510
877
276
877
270
276
332
877
650
877
375
877 260
876 762
877 390
877 450
SW 46
877 440
SW 41
877 090
010
20
30
4050
60
70
80
90
0.01mm1
234 5 6
78
90
877 6 8 0
0123456789
101112
0123456789101112
877 700
877
380
877
670
877
690
877 385
877 315
877 620
877 300
877
240
877
570
877 710
877 800877 802
877 091

Effectivity: 912 Series
MAINTENANCE MANUAL IIAIRCRAFT ENGINES
d013
81
page 23Initial issue, Jan. 01/2002
03083
876 489
877 590
877 600
877 605
87 7 5 92
877 560
877
615
876 885
876 518
11
33
32
4748
49
50
51
52
53
54
55
56
57
58
59
60
61
62636465
REPARATURWERKZEUGE FÜR GETRIEBE
REPAIR TOOLS FOR GEARBOX
fig. 019/2
877
660

MAINTENANCE MANUAL IIAIRCRAFT ENGINES
page 24Initial issue, Jan. 01/2002
Effectivity: 912 Series
d013
81
11.7) Consumable materialsSee fig. 020.
CAUTION: Use only the specified or technically equivalent materials for allmaintenance work.
The materials specified have been tested and are suitable for all operating conditionsindicated by the manufacturer.
Fig. part no. description, application Qty.
1 899 785 LOCTITE® 221 violet, medium-duty screw securing agent 10 cm3
2 897 651 LOCTITE® 243 blue.......................................................... 10 cm3
3 899 788 LOCTITE® 648 green, heavy-duty screw securing agent ..... 5 g
4 899 784 LOCTITE® 574 orange, sealing compound ...................... 50 cm3
5 297 434 LOCTITE® Anti-Seize,to prevent fretting corrosion ............ 50 ml
6 897 511 LOCTITE® 380 black, Adhesive medium-duty .................... 20 ml
7 897 186 SILICONE HEAT CONDUCTIVITY PASTE ..................... 150 g
8 899 789 LOCTITE® 603, heavy-duty screw securing agent ......... 10 cm3
9 897 330 Lithiumgrease, to avoid leakage current ............................ 250 g
10 897 166 MOLYKOTE® 44 medium ................................................... 100 g
11 297 386 SILASTIC 732 RTV multi purpose, ...............................................one component sealing compound on silicon base .................. 100 g
12 297 710 PU-Adhesive ..................................................................... 310 ml
13 297 433 MOLYKOTE® G-N, Lubricant ............................................ 100 g
14 897 870 K&N® Filter oil 99 - 1131, Bag .......................................... 15,8 ml
15 996 943 gasket set, for complete engine ................................................ 1
16 996 947 gasket set, for complete carburetor ................................................ 1

Effectivity: 912 Series
MAINTENANCE MANUAL IIAIRCRAFT ENGINES
d013
81
page 25Initial issue, Jan. 01/2002
Filter
öl
LOCTITE®
SCHMIERMETALL
ANTI SEIZE 15378
50 ml
®
Schrauben-sicherung221
®
Schrauben-sicherung243
BUCHSEN+LAGERKLEBER
648Zum Einkleben von zyl.Metallteilen in Gehäuse
und auf Wellen
LOCTITE®
LOCTITE®
38020g Cat. No.38028
BUCHSENKLEBER
603Zum Einkleben von .Buchsen in Gehäuse
und Bohrungen
LOCTITE®
GFAG FAG FAG FA
arcanolWälzlagerfettRolling Bearing grease
Graisse pour RoulementsGrasa para Rodamientos
Grassi per Cuscinetti
Volventi
FAGFAG KugelfischerGeorg Schäfer KGaG
MO
LY
KO
TE
®
44 medium
lus
lusdrehclusdrehclusdrehclusdrehclusdrehclusdrehclusdrehclusdrehclusdrehclusdrehclusdrehclusdrehclusdrehclusdrehclusdrehclusdrehclusdrehcaswlusdrehcwerdlusdrehcdere 50 g G-n p l
MO
LY
KO
TE
®
DOWN CORNING
Siliko
ne h
eat
com
pound
VERGASERDichtungssatz
CARBURETORgasket set
AIRCRAFT ENGINES
MOTORDichtungssatz
ENGINEgasket set
AIRCRAFT ENGINES
04700
1 23
45
6
7 89
10
11
12
13
14
15 16
fig.020

MAINTENANCE MANUAL IIAIRCRAFT ENGINES
page 26Initial issue, Jan. 01/2002
Effectivity: 912 Series
d013
81
11.7.1) Motor oilSee relevant Operator’s Manual of the engine type 912.
In principle motor oil is used for lubrication of components duringreassembly. except where something different is specified. Use only oilsspecified in the "Chart of Lubricants" in order to avoid chemical reaction.
11.7.2) Lithium greaseIs used on all electrical connections, to avoid current loss. After assemblyis complete, apply Lithium grease to the connection as anti-corrosive.
11.7.3) Multi-purpose grease LZGenerally usable, neutrally coloured multi-purpose grease, water resist-ant and higly adherent.Usable for temperatures from -35°C to +120°C (-31°F to 248° F).
11.7.4) Corrosion inhibiting oil Mobil®Arma 524Corrosion inhibiting oil, unsoluble in water, hydrocarbon basis with addi-tives. The pour point is below -18° C ( -3° F).
WARNING: When handling chemicals, respect the generally validsafety directives.
11.7.5) SILASTIC 743 RTVIs used for vibration damping of the exhaust system springs. The materialfills the complete inside of the springs.
11.7.6) LOCTITE® ANTISEIZE 15378High-temperature lubricating and anti-corrosion agent. LOCTITE®
ANTISEIZE is always applied on both components mated and warrants formaintenance-free bearing seats due to the hermetically sealed slidingsurface.
11.7.7) LOCTITE® “574 orange”Is a sealing material used as an alternative to conventional solid gasketswhere a high friction factor and exactly defined distance between parts isrequired. LOCTITE® sealing compound is a solvent-free liquid gasketapplied to the sealing surfaces. After assembly it cures under hermeticalconditions with metal contact.
Its surface sealing properties are guaranteed for temperature rangebetween - 55°C and + 200°C (- 67°F to + 390°F).

Effectivity: 912 Series
MAINTENANCE MANUAL IIAIRCRAFT ENGINES
d013
81
page 27Initial issue, Jan. 01/2002
11.7.8) LOCTITE® “380 black”Adhesive suitable for materials of different properties. Suitable for mediumduty connections. Its cure time depending on the materials is max.12 hoursand it resists temperatures from -55° C (- 67°F) up to +150° C (300° F).
11.7.9) LOCTITE® “648 green”Heavy duty adhesive or screw securing agent. Its cure time depending onthe materials and temperatures is max. 12 hours and it resists tempera-tures from -55° C (- 67°F) up to +175° C (347° F). To separate partssecured by this agent, it may be necessary to heat the parts to approx.250° C (480° F).
11.7.10) LOCTITE® “221 violet”Medium duty adhesive or screw securing agent suitable for materials ofdifferent properties. In case of strain the stress is distributed evenly overthe whole surface of connection. The adhesive connection creates her-metic sealing for gas and liquids. This sealing property protects the partsfrom corrosion.
LOCTITE® 221 is suitable for screws and nuts up to M12 threads and forlow duty connections.
11.7.11) LOCTITE® “243 blue”Medium duty adhesive or screw securing agent suitable for materials ofdifferent properties. Its cure time depending on the materials and tempera-tures and it resists temperatures from -55° C (- 67°F) up to +150° C (300°F).
11.7.12) LOCTITE® “603 green”Heavy duty adhesive or screw securing agent, similar to LOCTITE® 648,especially for applications where the mating surfaces can not be madeabsolutely free of grease.
11.7.13) MICRONORM shot blasting abrasiveThis abrasive is suitable for local and gradual very fine treatment of steelparts with rust film (propeller shaft). The MICRONORM shot blastingabrasive does not contain any noxious matter, is approved by the compe-tent authorities and warrants for optimum cleaning. The granulates usedare of sizes 40 to 60 µ. The surface roughness to be achieved is 0,5 - 1 µrepresenting a microfinish of the parts.

MAINTENANCE MANUAL IIAIRCRAFT ENGINES
page 28Initial issue, Jan. 01/2002
Effectivity: 912 Series
d013
81
11.7.14) Lapping fleece SR 4600 A - very fine gradingIs sold by the meter and used for manual removal of smaller rust spotsor oxidation, especially for optimum ground connections. It is mostappropriate to remove LOCTITE® from surfaces or threads to make themmetallic clean. Before re-applying LOCTITE®, clean surfaces with nitro-thinner or degreasing agent (Castrol ZA 30 or ÖMV - SOFT SOL).
11.7.15) Cleaning agents WARNING: Use only approved cleaning agents (e.g. fuel, kero-
sine, varsol, etc.) for cleaning metal parts.
Do not use cold cleaner on lye basis or degreasing agents. Do not cleancoolant- and oil hoses with aggressive solutions. Clean off remains ofsealing compound with sealant remover.
Soak combustion chamber, piston and cylinder head with cleaning agentand remove combustion residues with a bronze brush. Very goodexperience was made with CASTROL® “Clenvex 2000” as cold cleaningagent on basis of laboratory fuel and kerosine. It is a solvent - coldcleaner, free of halogen, on base of selected fuel fractions with densities,and it is biologically disposable.
Never use caustic or corrosive cleaning agents.
WARNING: Proceed with great caution when using solvents. Inhal-ing of vapours is hazardous to health.
11.7.16) Valve lapping pasteThis paste produced by various manufacturers is a fine granulate lappingpaste for valve seats and valves. The paste is usually available in 3different granulate sizes.
WARNING: Use valve lapping paste as per manufacturer’s direc-tives.
11.7.17) MOLYKOTE® 44 mediumIs a long time lubricant for shaft-sealing-rings.
11.7.18) Grease MOLYKOTE® GNIs used on highly loaded bearing positions as initial lubrication and atpress fits for prevention of fretting corrosion. MOLYKOTE® GN is appliedto both components mated.To application is pointed in case.
11.7.19) K&N® Filteroil 99 - 1131To optimize filtration and to protect against moisture.

Effectivity: 912 Series
MAINTENANCE MANUAL IIAIRCRAFT ENGINES
d013
81
page 29Initial issue, Jan. 01/2002
11.8) Securing elementsSee fig. 021.
CAUTION: Self-locking nuts, cotter pins,tab washers and safety wiresmust be replaced with newparts each time they havebeen removed.
Respect without fail all additional informationregarding securing and sealing means andlubrication of fixation elements. Adhere to speci-fied tightening torques.
NOTE: Fit the lock washers with the bent up ends Q facing the screw heador nut.
11.8.1) Safety wiringSee fig. 022 and 023.
Safety wiring serves to secure screws or nuts to prevent unintendedloosening. The screws or nuts are secured by a 0,8 mm (.0315 in.) safetywire twisted 3 to 4 turns per 10 mm (.4 in.). The wire must by no means beoverstretched.
WARNING: As a principle, all external engine components andaccessories must be wire-secured for safety reasons.
Twist wire several timesup to next screw
Pass through safetywire
Pass wire through andstretch it with pliers
Turn twisted wire endaround screw
Stretch wires andtwist approx. 4 times
Bend wire end andpress it towards
screw
Cut off excesslength of wire
Twist wire around thescrew
Wind wire end aroundthe screw
00145
00144
1
fig. 021
fig. 022
FINAL CHECKSafety wiring between screws must
not be loose!

MAINTENANCE MANUAL IIAIRCRAFT ENGINES
page 30Initial issue, Jan. 01/2002
Effectivity: 912 Series
d013
81
11.8.2) Nut securingWhen using a self-locking nut, take care that the polyamide insert ring onnuts according to DIN 985 as well as the securing element on nutsaccording to DIN 980 is positioned towards outside.
00146
Various typical applications of safety wiring
fig. 023

Effectivity: 912 Series
MAINTENANCE MANUAL IIAIRCRAFT ENGINES
d013
81
page 31Initial issue, Jan. 01/2002
11.9) Tightening torquesAdhere to the tightening torques specified. See also indications in Illustrated PartsCatalog (IPC).
M4 ........................... 4Nm (35 in lb)
M5 ........................... 6Nm (55 in lb)
M6 ........................... 10Nm (90 in lb)
M8 ........................... 24Nm (212 in lb)
M10 ......................... 35Nm (310 in lb)
hex. nut ................... housing of sprag clutch ...... M 34x1,5 ..... 120 Nm (1062 in lb)
stud ......................... cylinder and cylinder head . M 8 .................. 3 Nm ( 27 in lb)
hex. cap nut............. cylinder head ..................... M 8 ................ 22 Nm ( 195 in lb)
hex. nut ................... cylinder head ..................... M 8 ................ 22 Nm ( 195 in lb)
allen screw .............. valve cover ........................ M 6 ................ 12 Nm ( 106 in lb)
temperature sensor . cylinder head ..................... M 10 .............. 10 Nm ( 88 in lb)
locknut ..................... exhaust stack ..................... M 8 ................ 12 Nm ( 106 in lb)
impeller .................... water pump ........................ M 8 ................ 15 Nm ( 133 in lb)
allen screw .............. stator assy and trigger coil . M 5 .................. 6 Nm ( 53 in lb)
hex.hd. screw .......... flywheel .............................. M 16x1,5 ..... 120 Nm (1062 in lb)
sparking plugs ......... cold engine ........................ M 12x1,25 ..... 20 Nm ( 177 in lb)
hex.hd. screw .......... gearbox bearing fixation..... M 7 ................ 15 Nm ( 133 in lb)
hex. nut ................... drive gear (crankshaft) ....... M 30x1,5 LH 200 Nm (1770 in lb)
allen screw .............. gear cover .......................... M 8 ................ 25 Nm ( 221 in lb)
hex. nut ................... fuel pump ........................... M 8 ................ 22 Nm ( 195 in lb)
plug screw ............... oil drain .............................. M 16x1,5 ....... 35 Nm ( 310 in lb)
banjo bolt ................. oil drain .............................. M 16x1,5 ....... 35 Nm ( 310 in lb)
plug screw ............... pressure relief valve ........... M 12x1 .......... 25 Nm ( 221 in lb)
oil filter nipple .......... oil pump ............................. M 18x1,5 ....... 60 Nm ( 530 in lb)
oil pressure sensor .. oil pump ............................. 1/8-27 NPTF . 15 Nm ( 133 in lb)
hex.hd. screw .......... oil tank ............................... M 12 .............. 25 Nm ( 221 in lb)
hex.hd. screw .......... carburetor flange................ M 8 ................ 15 Nm ( 133 in lb)
clamp....................... carburetor .......................... up to 7 mm (0,275 in.)
clamp ...................... air filter ............................... hand tight
oil filter ..................... oil pump ............................. first hand tight to stop and after trialrun retighten by hand
banjo bolt ................. oil line, pressure side ......... M 10x1 .......... 20 Nm ( 177 in lb)

MAINTENANCE MANUAL IIAIRCRAFT ENGINES
page 32Initial issue, Jan. 01/2002
Effectivity: 912 Series
d013
81
11.10) Treatment of corrosion and surface damagesAt longer standstill it may occur that a rust film forms on various metal parts. Withconsiderable corrosion or heavily corroded screws, nuts, shims, bearings, bushesetc., an exchange is inevitable.
Propeller shaftThe flange of the propeller shaft is likely to get a rust film. A special treatment is onlypossible with propeller shaft removed. After covering all bearing seats with plasticadhesive or a plastic tube, the propeller flange can be treated with MICRONORM®
shot blasting abrasive with incorporated anticorrosive.
At heavy rust damage, when the material is affected, renewal of the propeller shaftis necessary.
Electric systemFormation of a rust film on the permanent magnets in the magneto flywheel and on themetal cores of the pick-ups is harmless. Replace fixation screws and lock washersat heavy oxidation or rust formation. Before reassembly clean all contact surfaces ofthe screws removed and apply lithium grease. Take care that no foreign material fallsinto the magneto flywheel. Clean cable shoes and apply lithium grease to the contactsurfaces to assure lasting contact.
At exchange of a pick-up apply PU-adhesive to the cable inlet to avoid vibrationbreakage at these points.
Check contact between plugs and/or fasten connections by separation test, ifnecessary apply contact spray to increase conductivity.
11.11) Engine preservation and engine back to operationDue to the special material of the cylinder wall, the ROTAX
® aircraft engine needs no
extra protection against corrosion. At extreme climatic conditions and for long out ofservice periods we recommend the following to protect the valve guides againstcorrosion :
— Let engine run until warm, then change oil.
— Remove the air intake filters and insert approx. 30 cm3 (1 fl oz) of corrosioninhibiting oil (see para 11.7.4) or equivalent oil into the carburetor throat with theengine running at increased idle speed.
— Shut off engine.
— Drain carburetor float chambers.
— Apply motor oil to all joints on carburetors.
— Close all openings on the cold engine, like exhaust end pipe, venting tube and airintake against entry of dirt and humidity.
— Spray all steel external engine parts with corrosion inhibiting oil.

Effectivity: 912 Series
MAINTENANCE MANUAL IIAIRCRAFT ENGINES
d013
81
page 33Initial issue, Jan. 01/2002
11.11.1) Preservation of a new engineStorage and preservation directives of ROTAX® for the aircraft engine type912 Series:
ROTAX® as the manufacturer of the engine warrants for perfect corrosion
protection of aircraft engine 912 Series for min. 12 months from date ofdelivery by ROTAX
®.
This warranty consent is subject to the following conditions:
— The engine must be stored in the original packing as supplied byROTAX
®.
— The protection covers must not be removed.
— The engine must be stored in a suitable place (closed area, clean anddry).
If the engine is stored longer than 12 months, the following inspectionshave to be carried out every 3 months:
— Remove 1 spark plug on each cylinder and turn crankshaft by hand 2full turns
— Visually check for corrosion (e.g. on propeller shaft). If corrosion isdetected, the engine has to be sent immediately to an authorizedoverhaul facility for inspection.
WARNING: The engine is not allowed to be taken into operation.
NOTE: The maximum possible storage period is limited to 24months.
If exceeding this period, the engine has to be sent to an authorized overhaulfacility for inspection.
11.11.2) Engine back to operation— Remove all plugs and fasteners.
— Clean spark plugs with solvent and a plastic brush.
— If preservation including oil change took place not longer than a yearago, oil renewal will not be necessary. At longer shut down periodsrepeat preservation annually.
WARNING: Work on the engine is only allowed to be carried out andapproved by authorized persons. See para 11.3.

MAINTENANCE MANUAL IIAIRCRAFT ENGINES
page 34Initial issue, Jan. 01/2002
Effectivity: 912 Series
d013
81
12) Periodic maintenanceFor further information see relevant Maintenance Manual type 912 (Line Maintenance) .

Effectivity: 912 Series
MAINTENANCE MANUAL IIAIRCRAFT ENGINES
d013
82
page 35Initial issue, Jan. 01/2002
13) Maintenance of the Systems
13.1) Fuel system
Besides the maintenance work prescribed, see Maintenance Manual type 912 (LineMaintenance) chapter 05-00-00 para 5, further maintenance procedures are describedas follows.
13.1.1) Removal of carburetors and carburetor flangeSee fig. 10 and 11.
Identify both carburetors to respective cylinders, e.g. carburetor for cyl. 1/3 and cyl. 2/4.
NOTE: The standard attachment of the carburetors Q is byflexible flanges W on the intake manifold E.
Verify positioning of clamp screw R with positiondownward as delivered and 7 mm (.28 in.) gap betweenclamp lugs.
Remove tension spring T of carb support with a suitable tool.
Slacken clamp screw R and remove carburetor Q by slight turning andswivel action.
CAUTION: If the float chamber Y should not have been drained yet,proceed as follows:
Swing open spring clip U take off and empty floatchamber while holding both floats in position. Refit floatchamber and secure with spring clip.
Ensure proper disposal of fuel.
The carburetor flange assemblies W can be taken offafter removal of the hex. hd. screws M8x20 I andwashers O.
Verg. für Zyl. 1/3carb. for Cyl. 1/3
Verg. für Zyl. 2/4carb. for Cyl. 2/4
02611
7 mm ±0,25
Part
no.
(0,276 in )±0,01
04956
fig. 10
2
3
5
1
6
78
9
fig. 11
4
2

MAINTENANCE MANUAL IIAIRCRAFT ENGINES
page 36Initial issue, Jan. 01/2002
Effectivity: 912 Series
d013
82
2
bar
0
5
6
432
1
7
x 0,1
00026
13.1.2) BING constant depression carburetor: Check and maintenanceSee fig. 037 and 038
CAUTION: In principle no modification must be made on thecarburetor calibration. The determination of the main jetis carried out on a dyno at 300 m (1000 ft) above MeanSea Level. Modification is allowed to be carried out to ourspecifications only by aeronautical personnel orauthorized test staff.
Before removal of the carburetors for a precise inspection, close the fuelcock and remove the fuel feed lines, collect possibly emerging fuel andensure proper disposal.
CAUTION: To avoid contamination in the fuel system proceed withgreat care and cleanliness. Put carburetor and partsremoved on a clean surface.
Remove carburetor from the carburetor flange, after loosening the tubeclamps and deposit them on a clean surface.
13.1.2.1) Leakage test of float needle valveUnhook spring Q from choke lever W and chamber top E.Connect vacuum pump R to the fuel supply line T andgenerate a depression of approx. 0,4 bar (5,8 psi). The depres-sion must not change within approx. 5 seconds. Otherwise tiltspring clip Y backward, remove the float chamber U and thepin I with a punch and remove the float bracket O. Check thefloat needle P and its seat for wear and if inlet is contaminated.
With this check the float needle seat is checked for tightness.If the depression is not maintained, pay particular attentionduring disassembly to the float needle with Viton tip and thecarburetor housing.
00326
10
8
9
fig. 038
fig. 037

Effectivity: 912 Series
MAINTENANCE MANUAL IIAIRCRAFT ENGINES
d013
82
page 37Initial issue, Jan. 01/2002
13.1.2.2) DiaphragmSee fig. 039.
The diaphragm is linked to the plunger (carburetor piston). Depend-ing on the pressure prevailing the plunger is moved up or down. Forchecking, remove the 2 countersunk screws Q M5x12, the cham-ber top W and the spring E. Check tight fit of the cover R onchamber top. Wash chamber top with cleaning agent and blow theinside venting bore with compressed air, then check.
Remove plunger from the carburetor housing and remove 4 Allenscrews T M4x12. The diaphragm Y is fixed by the retaining ring Uto the carburetor piston I. The position of the carburetor piston iscontrolled via the diaphragm. On the diaphragm Y there are 2positioning noses. The nose O fits exactly in the recess in theplunger, nose P must engage in the recess in the carburetorhousing.
Check diaphragm for cracks or brittleness, replace if necessary.
13.1.2.3) Jet needleSee fig. 040.
The jet needle controls the fuel consumption at part load. It may beregulated by choosing position of jet needle between 1 and 4.Standard the needle is set to position 2. Modifications are allowedonly after consultation with the engine manufacturer.
Remove fixation screw and check jet needle with circlip q andO-ring i for wear.
NOTE: O-ring i is only used in 912 ULS/S.
Pay special attention to the grooves and the taper of the needle. Atvisible wear the jet needle must be exchanged and refitted in thesame position.
NOTE: The jet needle fitted must move freely.
Visually check outside of plunger I and the two inside compensa-tion bores.
04973
00356
fig. 040
fig. 039

MAINTENANCE MANUAL IIAIRCRAFT ENGINES
page 38Initial issue, Jan. 01/2002
Effectivity: 912 Series
d013
82
13.1.2.4) JetsSee fig. 041.
Remove float chamber. Remove main jet w, mixing tube e,needle jet r, idle jet t, start jet y and mixture screw u. Cleancarburetor and jets with fuel. Carefully blow through all jets andbores in the carburetor housing with compressed air and checkfor free passage.
Check inner diameter of needle jet if oval, replace if necessary.Check the size, see IPC.
CAUTION: At all works on the carburetor proceed withoptimum cleanliness.
00359
13.1.2.5) Float chamberSee fig. 042, 043, 044, and 045.
Remove and clean float chamber Q. Check both floats W forfree movement on the guide pin E. When the float is at itslowest position it still must have clearance and must not stickon the float chamber wall. Check if both distance pieces R arein position.
NOTE: Distance pieces R were used to avoid thestucking of the floats.With the new floats is no use for them.
A float stuck causes the carburetor to flood. Check wear ofguide sleeves T inserted in the float. Check the pins Y for floatsupport U for wear due to excessive vibration. At noticeablewear replace both floats and if necessary also the float suspen-sion I.
00358
00361
00360
12
7
5
8
6
2
fig. 044
fig.043
3
41
fig. 041
fig. 042

Effectivity: 912 Series
MAINTENANCE MANUAL IIAIRCRAFT ENGINES
d013
82
page 39Initial issue, Jan. 01/2002
0,5
mm
-0,1
0,0
2In-0
,004
(
(
gutgood
schlechtbad
0,5
mm
(0,0
2 in
)13.1.2.6) Float suspension
See fig. 043, 044, and 045.
Check if float suspension brackets are parallel. To do so,remove main jet and attach gauge O, part no. 877 730, with ahex. screw P to the mixing tube. When the needle valve isclosed, both brackets of the float suspension must be ofequal distance of 0,4 ÷ 0,5 mm (.016 ÷ .02 in.). At noticeableimperfection the float suspension can be bent for correction orbe renewed. After the check remove the gauge and refit mainjet.
13.1.2.7) Check of float needle valveSee fig. 046.
Remove float chamber. Remove barring pin of the floatsuspension and float needle. Check the fuel supply for freeflow. Inspect Viton tip Q. At visible wear of the beaded edge Wat the sprung pin E the valve has to be renewed. If the distancebecomes less than 0,5 mm (.02 in.) the float level will beaffected, leading even to interruption of the fuel flow. Engagefloat needle clip into float bracket, place it in position and fix floatbracket with pin. Fit float chamber and fix it with spring clip.
NOTE: Various float needle valves,see IPC. Higherspringrate for the engine type 912 ULS/Swhich have a black colored spring pin E.
04928
04927
10
9
11fig. 045
1
3 2 2
fig. 046

MAINTENANCE MANUAL IIAIRCRAFT ENGINES
page 40Initial issue, Jan. 01/2002
Effectivity: 912 Series
d013
82
13.1.2.8) Starting carburetor (choke)See fig. 047, 048 and 048/1.
Remove 4 countersunk screws M4x14 and remove thecomplete choke housing.
NOTE: The choke shaft is marked with L- and R-.The shaft marked with L- is assigned for thecarburetor of the cylindes 2/4 and shaftmarked R- is for carburetor of cylinders 1/3.Fig. 048/1 shows the positions of the markson the choke shaft.
Remove hex. nut and complete fuel choke valve from thehousing. Clean all parts and check.
NOTE: The choke shaft Q has a mark W. This markhas to point towards cable engagement E orto bore R.
Clean all parts and blow all bores and ducts with compressedair. Check all parts and replace imperfect ones.
Reassembly of the carburetor with new O-rings and gaskets inreversed sequence.
Apply the 4 countersunk screws M4x14 with Loctite 221.
00362
00363
04704
3
2
1
4
1
fig. 048the fig. shows thecarburetor for cyl. 2/4
fig. 047
fig. 048/1

Effectivity: 912 Series
MAINTENANCE MANUAL IIAIRCRAFT ENGINES
d013
82
page 41Initial issue, Jan. 01/2002
13.1.3) Check of the fuel systemThe most common reason for engine failure is a shortcoming in the fuelsystem. Many problems can be prevented by regular checks.Contamination and water by condensation can lead to erratic engine runor misfiring.
— Check float chamber for dirt and water.
— With bad contamination or formation of water, drain the completesystem inclusive tank, filter and fuel lines, clean and rinse it well.
13.1.3.1) General notes on fuelsUse clean fuel of a registered brand only. Do not store fuel forlonger periods. For storage use only clean, non-translucent,safety approved fuel containers. If possible avoid the use ofplastic containers. When refuelling from containers, use a finemesh screen.
WARNING: Handling of fuel in well ventilated places only.Never mix fuel in closed rooms. Gasoline ishighly inflammable and under certainconditions explosive. Do not smoke, no nakedflame or sparks. Do not fill tank brimful, allowfor expansion of fuel. Never refuel while engineis running.

MAINTENANCE MANUAL IIAIRCRAFT ENGINES
page 42Initial issue, Jan. 01/2002
Effectivity: 912 Series
d013
82
13.1.3.2) Fuel pressureSee fig. 050.
Fuel pressure at fuel pump is limited to max. 0,4 bar (5,8 psi),and is normally between 0,15 ÷ 0,3 bar (2,2 psi ÷ 4,4 psi). Byutilizing the fuel pressure tester, part no. 874 230, the pressureas well as the operation of the fuel system can be checked.
Installation of fuel pressure test kit
Connect pressure gauge Q with hose W instead of fuel returnline on the four-fold banjo screw E. Attach the pressure gaugewhere it can be easily observed by the operator of the groundtest run.
ATTENTION: Make sure there is no danger that the gaugeand hose get drawn into the propeller airstream. If necessary, secure with cable ties.
If during the test run the nominal fuel pressure values are notmet, stop engine and start with the trouble shooting procedure.
WARNING: Do not start the aircraft before an obviousfault has been found and eliminated!
00365
23 1
fig. 050

Effectivity: 912 Series
MAINTENANCE MANUAL IIAIRCRAFT ENGINES
d013
82
page 43Initial issue, Jan. 01/2002
CAUTION:
— Water and dirt in the fuel may cause engine failure and performancedrop.
— Leaks in the fuel system may cause performance drop and bad idlingof the engine
— Unsuitable routing of fuel tubes may cause engine failure.
— After maintenance work the fuel system has to be checked for leaks.
— Always use clean and non-translucent, safety approved fuel containers.At refuelling use filter funnel. Do not smoke, do not allow open flamesor sparks in the vicinity.
— Never refuel with engine running.
— Do not refill tank brimfull, allow for expansion of the fuel.
— Remove split fuel immediately, dispose of it respecting environmentalregulations.
— Gasoline is highly inflammable and under certain conditions explosive.Handling of fuel in well ventilated places only.
— Faultless function of the carburetors cannot be warranted if the fuelpressure is below 0,15 bar (2,2 psi) or over 0,4 bar (5,8 psi). If therequired fuel pressure is not achieved, use of an electric backing pumpis necessary.
— Between fuel tank and fuel pump a suitable fuel filter of mesh size 0,1mm (.004 in) has to be placed. Do not use a paper filter.
— Choose fuel lines respecting the national directives for aviation. Aminimum diameter of 5 mm (.2 in.) should be respected.
— The tank must be provided with a fuel cock (with filter) to cut off fuelsupply at any time.
— The float needle valve cannot retain the fuel pressure over a longerperiod or during transport of the aircraft.
— If problems with fuel supply are encountered and cannot be resolved,contact a ROTAX
® authorized Distributor or Service Center.

MAINTENANCE MANUAL IIAIRCRAFT ENGINES
page 44Initial issue, Jan. 01/2002
Effectivity: 912 Series
d013
82
13.1.4) Carburetor flangeSee fig. 051 and 052.
The fixation of carburetor on engine 912 is designed to allow securefastening on intake manifold by carburetor flange ass’y 267 787and use ofthe genuine ROTAX air filter 825 551.
An additional carburetor suspension by a tension springhas been introduced standard since design year 1996.See para 14.12 and Service Bulletin SB 912-010, currentissue.
This kind of fixation warrants for safety in case of hardlanding, air turbulences, excessive vibration etc., pro-tecting the carburetor at a large extent from vibration.
The carburetor flange is subject, apart from chemicalstrain due to fuel and UV radiation also to stress byvibration. Excessive tightening of the clamp may alsodamage it.
Compress carburetor socket in the area of the carbure-tor connection to allow easier detection of existingcracks Q and E. Also check the area of the innerdiameter W. If cracks are suspected, tighten the newcarburetor socket up to the prescribed gap of 7 mm(.275 in.).
At replacement of the carburetor socket take care of the following:
— As on engine of type 912 Series and type 914 Series the old carburetorsockets won't be longer available, a new socket will be used.
— On the affected engines old carburetor sockets of the carburetor 1/3and 2/4 can be replaced separetly and therefor a mixed arrengementis feasible.
As this carburetor socket is without Al-spacer, the carburetor socket mustbe fitted according to Service Instruction SI 912-004 and Service BulletinSB 912-010.
CAUTION: To assure safety of the fixation, it is recommended toapply a safety wiring of suitable dimension, as per usualstandard in aviation.
➊
➊
➋
➌
➌
➌➌
➌
00366
fig. 051

Effectivity: 912 Series
MAINTENANCE MANUAL IIAIRCRAFT ENGINES
d013
82
page 45Initial issue, Jan. 01/2002
Every modification on the intake unit (e.g. additional air box, carburetorpreheating device etc.) should be fitted only after careful judgement of
consequences by the additional weight charged on thecarburetor flange. In many cases an additional suspensionwill be required.
From field experience cases are known where the hoseclamp was tightened excessively. This may cause theflange to be scoured at the inside by the carburetor rimpossibly damaging it.
To avoid cutting through of carburetorflange, fit the hoseclamp with the screw showing downward and tighten thescrew only to an extent that a gap of 7 mm (.275 in.)between the lugs remains.
00367
04956
7 mm ±0,25
Part
no.
(0,276 in )±0,01
13.1.5) Fuel pumpSee fig. 053.
Check if pump flange Q is perfectly plane. If the pump plunger W showsscuffing marks, replace the pump and check the eccentric on the propellergearbox. Check the connections E for fuel lines.
Replace pump if its performance drops due to leaking valves or a leakingdiaphragm. A leaking diaphragm can be detected if fuel exits at the ventingholes R.
The sucked in fuel is filtered by a screen of 0,17 mm (.007 in.) mesh size.The fuel pump cannot be dismantled. Check for contamination is onlypossible by endoscope on suction side T. At overhaul the fuel pump mustbe renewed. The carburetor flange Y is marked with a continuous 6-digitnumber.
fig. 052
2
1
53
6
34fig. 053

MAINTENANCE MANUAL IIAIRCRAFT ENGINES
page 46Initial issue, Jan. 01/2002
Effectivity: 912 Series
d013
82
13.1.6) Fuel tubesSee fig. 054.
Check fuel tubes Q between fuel pump W, fuel manifold and carburetor forleaks — see also para 13.1.2. Check connections on fuel pump and oncarburetors. Check fuel manifold and check for leaks. Renew damagedfuel tubes. Route the tubes to avoid scuffing during operation.
or
04962
fig. 054
100368
1
1

Effectivity: 912 Series
MAINTENANCE MANUAL IIAIRCRAFT ENGINES
d013
82
page 47Initial issue, Jan. 01/2002
40 mm
5÷6 mm
(1,6 in)
(0,2 0,24 in)÷
04958
7 mm ±0,25
Part
no.
(0,276 in )±0,01
04956
13.1.7) Carburetor flange, carburetorSee fig. 220 and 221.
Fit carburetor flange Q with 2 hex. screws W M8x25 secured withLOCTITE 221 and washers E, tighten to 14 Nm (125 in.lb).
CAUTION: The screw R of the hose clamp must face downward.
Put the carburetor into the carb flange socket, free of oil and grease. Aligncarbs and secure with hose clamp.
CAUTION: Tighten the hose clamp only to an extent that a gap of 7mm (.275 in.) remains between the lugs. See fig. 220.
From field experience cases are known where the hose clamp wastightened excessively. This may cause the flange to be scored at theinside by the carburetor rim possibly damaging it.
Verify the 5-6 mm (0,2-0,24 in) distance on the cheese head screw as thisdistance is required to maintain flexibility of the tension spring.
NOTE: Since design year 1995 an additional carburetorsuspension by a tension spring has been introduced,seeService Bulletin SB-912-10.
Use suitable tool to engagne spring I on bracket Y.
CAUTION: To warrant efficiency of the carburetor support, a
distance of 40 mm (1,69 in) has to be maintained betweencheese head screw U and support bracket Y.
1
4
6 7
8
3
1
2fig. 221fig. 220

MAINTENANCE MANUAL IIAIRCRAFT ENGINES
page 48Initial issue, Jan. 01/2002
Effectivity: 912 Series
d013
82
010
20
30
4050
60
70
80
90
0.01mm1
234 5 6
78
90
13.2) Lubricating systemBesides the maintenance work prescribed in para12 and description of the oil circuit in the engine inpara 10 further work for maintenance is de-scribed as follows:
13.2.1) Oil pump removalSee fig. 055.
Remove oil filter Q with strap spanner,part no. 877 620. Remove 4 Allen screwsW M6x50 with lock washers and the oilpump ass’y with 3 O-rings E.
13.2.2) Oil pump checkingSee fig. 056, 057, 058, 059, 060 and 061.
Remove oil pump cover and check insideQ with a straightedge W for wear. The gapbetween pump cover E, revolving pistonR and rotor T, see dimension W inpara 15.
Withdraw revolving piston and rotor, driv-ing pin and pump shaft. At noticeable furrows onmating faces of rotor inside Y and revolving pistonoutside U renew both components. A bigger gapgreatly reduces pump capacity. Check sealingfaces of oil pump housing and pump cover, plane onan even plate if necessary. Check pump shaft onthe bearing seats I. As a spare part, the pumpshaft O is supplied with driving pin pressed in.
Remove plug screw P from pressure releasevalve with pressure spring , clean and checkball seat in pump housing. The shim q is only fittedif required to reach specified oil pressure.
Clean all parts and clear oil bores with compressedair.
On engine type 912 configuration 3 the oil pumphousing is machined for an additional connection wfor the pressure oil line for the propeller governor.On version 912 configuration 2 and 912 configuration4 this connection is closed with a plug screw. e =oil pressure sensor.
00369
00370
00371
04705
00072
Maß
/dim
.W
00074
00073
2
1
fig. 056
fig. 060
fig.058
9
8
11
12
13 10
fig. 055
fig. 057
fig. 059
fig. 061
Q
W
3 4
7
1415
5
6
E
E

Effectivity: 912 Series
MAINTENANCE MANUAL IIAIRCRAFT ENGINES
d013
82
page 49Initial issue, Jan. 01/2002
13.2.3) Oil pump reassemblySee fig. 062.
Lubricate bearing of pump shaft in oil pump housing with motor oil (seerelevant Operator's Manual) and install pump shaft Q. Insert pin W 4x15,8in the pump shaft Q, install rotary piston assembly E and turn pump shaftto check for ease of movement. Fit the 2 outer O-rings R 11-2,7 and oneO-ring T 30-2,5 in the oil pump housing and fit it to the crankcase.
NOTE: Turn oil pump shaft until the driving pin Y engages in thecamshaft (Nut).
NOTE: With design year 1995 rotary piston length was changedfrom 13 mm to 16 mm (0,53 to 0,65 in)!
Push both locating pins U 4x15,8 into the pump housing, fit O-ring I 57-3 and oil pump cover O with Allen screws M6x50 and lock washers,tighten equally to 10 Nm (90 in.lb).
Fit ball P 8,5 mm, spring 39,5 mm (1,55 in.) long and plug screw M12x1. Torque to 25 Nm (220 in.lb).
CAUTION: The adjustment shim q is not used for the time being andis only fitted if during test run the specified oil pressureis not reached.
NOTE: Spring 39,5 mm (1,55 in.) long, renew at wear.
Loctite 221
Loctite 221
Loctite 221
Loctite 221
Loctite 221
Loctite 221
04701
fig. 062
3 8
21
1920 17
2216
23
2
6
15411
13
10
15 1418
7
9
12

MAINTENANCE MANUAL IIAIRCRAFT ENGINES
page 50Initial issue, Jan. 01/2002
Effectivity: 912 Series
d013
82
00081
If the oil filter nipple w has been removed, re-tighten it to 60 Nm (530 in.lb).Slightly lubricate the rubber seal for oil filter e. Screw oil filter on by handuntil it stops at the oil filter housing. Then tighten by an extra 3/4 turn(270°).Secure with LOCTITE® 221 the following parts hose nipple r14x1,5 (metric socket p or UNF socket [), oil pressure sensor t, oiltemperature sensor y and the plug screw u.
NOTE: On version 912 configuration 3 instead of the threadedplug the pressure oil hose i for the hydraulic governorwill be connected. Tightening torque of banjo bolt u is17 Nm (150 in.lb).
13.2.4) Magnetic plugRefer to Maintenance Manual 912 Series (Line Maintenance) chapter12-00-00, para 5.4.
13.2.5) Drain screwSee fig. 063.
On crankcase bottom side there is a plug screw Q and a banjo screw Wfor oil return line.
Remove both screws, drain remaining oil and check. Refit the cleanedscrews, tighten to 35 Nm (310 in.lb) and secure with safety wiring.
NOTE: Location of screw Q and banjo bolt W might be inter-changed depending on installation.
WARNING: After re-installation of the engine ensure no air is trappedin the lubrication system. For correct procedure, seeMaintenance Manual type 912 (Line Maintenance) chapter12-00-00, para 5.2.2.
Ölablauf optional (UNF)
Oil outlet optional (UNF)
fig. 063
1 2

Effectivity: 912 Series
MAINTENANCE MANUAL IIAIRCRAFT ENGINES
d013
82
page 51Initial issue, Jan. 01/2002
13.3) Cooling system
13.3.1) Water pump removalSee fig. 065, 066 and 067.
The water pump is integrated in the ignition housing. For mainte-nance works the magneto hub Q and the magneto housing Whave to be removed. On some engine installations this requiresremoval or partial lifting of engine.
To remove the hex. screw E M16x1,5 from the flywheel hub thecrankshaft has to be looked, see Maintenance Manual 912 Series(Line Maintenance) Chapter 12-00-00 para 2.7.
00344
I T R
E
W
O
Y
E
Q00377
3
1
7
2
6
fig. 065
13.3.2) Water pump housing disassembly and inspectionSee fig. 068 and 069.
Remove the 2 Allen screws M6x20 Q of the water inlet elbow W andremove water inlet elbow with O-ring.
NOTE: Register the position of the inlet elbow W!
Remove the 4 hose clamps from water drain hoses and from water pumphousing R. By removing 5 Allen screws M6 E the water pump housing Rwith gasket T can be taken off.
CAUTION: The Allen screw M6x35 Y reaches into the waterchamber, therefore it is of stainless steel and fitted witha sealing ring U 6x10.
Check inside for traces of possible contact with impeller I.The clearance is not within manufacturers recommenda-tions the installation has to be done again and new rotary
seal and new oil seal must be installed, see SI-912-001. The shim O fitted behind the impelleris of stainless steel.
Remove the impeller I with special tool, partno 877 295, with crankshaft locked, turningcounter-clockwise.
7fig. 068

MAINTENANCE MANUAL IIAIRCRAFT ENGINES
page 52Initial issue, Jan. 01/2002
Effectivity: 912 Series
d013
82
00378
00379
00380
10fig. 069
1
fig. 070
1
23
56
fig. 071
Verify the coolant elbows P screwed into the water pumphousing for leakage, cracks and tight fit. Replace asnecessary. Mark the position of the coolant elbows. Warmup water pump housing to approx. 80° C (180° F) andremove the elbows. Carefully clean threads fromLOCTITE® remains, apply LOCTITE® 648 on the newcoolant elbows and fit it into position with at least 5courses of thread engaged.
13.3.3) Magneto hubSee fig. 070.
Remove hex. screw M16x1,5. Place protectionmushroom 877 410 onto the crankshaft, screw puller 877375 fully down and pull off flywheel hub with washer.Remove Woodruff key Q from crankshaft.
CAUTION: If Woodruff key is not removed,the oil seal and bearing bush willbe damaged when removing theignition housing!
13.3.4) Ignition housing disassembly and inspectSee fig. 071, 072, 073, 074 and 075.
Open the plastic clamp and remove cable clampfrom electronic module. Detach both 4-poleplugs of the 2 pick-up cables and both connec-tions of charging cable. Detach both plug con-nectors of generator cable and control cable forthe electronic rev. counter. See para 13.4.12.
Decide whether the stator may remain in theignition housing. Otherwise remove the cableclamps and remove the stator.
Cover the groove for Woodruff key with a pro-tective tape to avoid damage to the oil seal. Seefig. 070.

Effectivity: 912 Series
MAINTENANCE MANUAL IIAIRCRAFT ENGINES
d013
82
page 53Initial issue, Jan. 01/2002
Remove 7 Allen screws M6 from igni-tion cover and 2 hex. nuts M5 Q withlock washers W and washers E fromthe bottom side of the ignition cover.By a smart blow with a mallet theignition cover R separates from thecrankcase and can be taken off.
NOTE: Remove the electricstarter U, if necessary, by removing thestrap clamp I.
The electric starter is kept in positionby 2 distance sleeves T and O-ringsY. When withdrawing the electricstarter from the ignition housing, keepthe bearing flange with starter housing
and rotor support assembled. Otherwise the carbon brushes will jump offthe rotor.
NOTE: The crankshaft bearings in the ignition housing arelubricated via the oil duct O. Sealing of the oil duct at thejoining face between crankcase and ignition housing is byan O-ring P 5x2.
NOTE: At the backside of the ignition housing a thrust washer ofthe intermediate starter gear may stick.
Visually check the sealing surfaces. Clean oil duct with compressed airand check for free passage. Check dimension of bore (dimension E) ofbearing bush for crankshaft support q,(dimension R) , see para 15.
dimensions new mm(in.) wear limit mm(in.)See Dimension Sheets in para 15.
00381
mag
nets
eitig
/m
agne
to s
ide
00084
fig. 073
00382
9
10
fig. 072
78
4
13
12
RM
aßdi
m.
Maßdim. E
fig. 074

MAINTENANCE MANUAL IIAIRCRAFT ENGINES
page 54Initial issue, Jan. 01/2002
Effectivity: 912 Series
d013
82
Renewal of the bearing bush is not planned as after pressing in the bush,the internal bore and the lubricating bore are machined. At wear of thebearing bush the complete ignition cover with pressed-in and machinedbush has to be replaced or to be sent for repair to the manufacturer.
Check oil seal w 32x52x7 for crankshaft, replace if necessary. Press innew oil seal with insertion jig, part no. 877 270. Check whether at theleakage bore e emergency of oil or water is visible.
Check rotary seal r for water pump sealing. At emergency of liquid, renewrotary seal and oil seal t. See para 13.3.7.
Visually inspect location bore y for electric starter.
u = Drive shaft for mechanical rev. counter.
1214
19
11
fig. 075
15
17
18
00383
16

Effectivity: 912 Series
MAINTENANCE MANUAL IIAIRCRAFT ENGINES
d013
82
page 55Initial issue, Jan. 01/2002
00386
00384
00385
fig. 076
fig. 078
4
5fig. 077
21
1
2
13.3.5) Water pump shaft disassemblySee fig. 076 and 077.
It is an advantage to loosen the impeller already when dismantlingthe engine (with crankshaft locked). Otherwise block water pumpdrive gear Q with suitable tool. Unscrew impeller using impellerwrench 877 295 to avoid damage to the impeller blades. Placeignition cover on a suitable plain surface and press water pump shaftout with a suitable punch W. Remove drive gear Q.
NOTE: With design year 1994 the transmission ratio on waterpump drive was changed from 24:16 Q into 26:16 thusincreasing the water pump speed.
Inspect water pump shaft E for wear. Pay attention to possiblecorrosion at the thread end R. If engine is run without antifreeze,formation of corrosion is possible in this position.
If corroded, replace the water pump shaft.
NOTE: The shaft has a conical end T.
13.3.6) Rotary seal disassemblySee fig. 078.
Remove old oil seal and rotary seal utilizing 2 pins Q (approx. 5 mm dia.= 0,2 in.) and suitable punch W. Oil seal and rotary seal will be destroyedat removal and must be renewed.

MAINTENANCE MANUAL IIAIRCRAFT ENGINES
page 56Initial issue, Jan. 01/2002
Effectivity: 912 Series
d013
82
00388
2
1
00387
fig. 079
13.3.7) Rotary seal reassemblySee fig. 079, 080 and 081.
See SI-912-001.
Press new oil seal Q 12x30x7(sealing lip lubricated with motor oil) withsealing lip facing inwards, into ignition cover using punch W, part no. 876510.
Carefully push rotary seal E part no.. 850 945 on punch Rpart no. 877 258 , and press the water pump shaft T
carefully to positive stop of the insertion jig.
Place pump gear into gear cover. The larger collar of thegear should face towards inside, to the crankcase. Turninsertion jig R and push water pump shaft T with rotaryseal E already fitted into ignition cover. Turn pump drivegear into a position to align with pump shaft.
Now place the ignition cover under a hand press (20 kN /4400 lb. capacity) on a plane face and press pump shaft intoposition until stop. Then turn ignition housing and presswater pump shaft back using 10 mm (.4 in.) punch R untillevel with sealing face. Turn water pump shaft for check.
NOTE: The spring of the rotary seal presses the waterpump shaft outwards towards the sealing faceY, depending on axial clearance O. Seefig. 082.
fig. 080
4
3
5
00389
fig. 081
4
3

Effectivity: 912 Series
MAINTENANCE MANUAL IIAIRCRAFT ENGINES
d013
82
page 57Initial issue, Jan. 01/2002
13.3.8) Crosssection of water pumpSee fig. 082.
Check axial position of water pump shaft and pump gear. Large collar Qof the gear shows inward to the sealing face.
NOTE: To warrant the correct gap E (dimension T in para 15)between impeller R and water pump housing T, ensurealignment of shoulder W on water pump shaft withsealing face Y of ignition cover U. If need be, placeignition cover on a hardened and ground face plate withan 8 mm (0.3 in.) dia. clearance hole, and press shaftbackwards accordingly, using a 10 mm (0.4 in.) dia. pin.Trial spin the pump shaft installed.
Place washer I TNr. 926 273 of stainless steel on the shaft. Fit impellerR part no.922 224 turning clockwise, tighten with special wrench, part no.877 295. Torque to 15 Nm (133 in.lb).
NOTE: Check impeller R for out-of-round. At noticeable out-of-round replace impeller or if necessary also the pump shaft.
02873
fig.082
9
1
7
6
38
2
4
5
Maß dim.T

MAINTENANCE MANUAL IIAIRCRAFT ENGINES
page 58Initial issue, Jan. 01/2002
Effectivity: 912 Series
d013
82
13.3.9) Ignition housing reassemblySee fig. 083 and 084.
If the idle gear W for electric starter has previously been removed, placethrust washer Q 12,5/21,5/1 onto the crankcase. Place idle gear intoposition and lubricate idle gear shaft E with motor oil (see relevantOperator's Manual) and insert it. Place thrust washer R 12,5/21,5/1 on top.
NOTE: Commencing with model 95 the gear ratio was changedby using a differnt idle gear W and consequently thedistance between the axis of electric starter and idlegear shaft E.
Place O-ring 5x2 T into crankcase and fit guide sleeve, part no. 877 360,for oil seal onto the crankshaft.
CAUTION: Without using the guide sleeve, part no. 877 360, the oilseal will be damaged by the keyway in crankshaft.
Apply LOCTITE® 574 sealing compound on the sealing face Y of pre-assembled ignition cover, apply multi-purpose grease LZ or equivalentgrease onto oil seal U see para 11.7.3, fit it and turn water pump to engagein the teeth. Tighten ignition cover with 7 Allen screws M6x30 I and lockwashers evenly to 10 Nm (90 in.lb.).
NOTE: The Allen screw O M6x30 reaches into the oil compart-ment and must be sealed with LOCTITE® 221.
P = drive shaft for mechanical rev. counter.
5
31 2
4
fig. 08300390
fig. 084
6
7
10
8
9
04974

Effectivity: 912 Series
MAINTENANCE MANUAL IIAIRCRAFT ENGINES
d013
82
page 59Initial issue, Jan. 01/2002
13.3.10) Water pump housing reassemblySee fig. 085
Place gasket Q and attach water pump housing W with 2 Allen screws EM6x90 and 3 Allen screws R M6x35 with lock washers to the ignitionhousing, tightening to 10 Nm (90 in.lb).
CAUTION: The Allen screw T M6x35 at the lowest position reachesinto the water chamber, therefore it is of stainless steeland fitted with a sealing ring Y 6x10. This gasket ringhas to be fitted and mustn't be replaced by any other part.
Visually check whether the impeller scuffs in the pump housing. This canbe recognized by scuffing traces in the pump housing or on the impeller.If necessary, the axial position of the impeller can be corrected to achievean optimum gap (see para 13.3.8).
Insert O-ring U into water pump housing and fit the water inlet elbow I inthe position marked before disassembly with 2 Allen screws O M6x20 andtighten to 10 Nm (90 in.lb).
NOTE: The water inlet elbow is symmetrical and can be fittedturned by 180° if required.
Fit coolant hoses and fix them with genuine hose clamps.
CAUTION: Do not tighten hose clamps, excessively in order not todamage the hose!
00392
fig. 085
6
35
98
2
1
4
37

MAINTENANCE MANUAL IIAIRCRAFT ENGINES
page 60Initial issue, Jan. 01/2002
Effectivity: 912 Series
d013
82
13.3.11) Hose clampsVisually check. Do not tighten hose clamps excessively to avoid damageto the coolant hose. Position the lugs as to avoid collision and friction withneighbouring parts.
13.3.12) Cooling air baffleThe cylinders are ram-air cooled. The cooling air is pushed at flight and bythe propeller into the engine compartment and is distributed by the air baffleequally to the single cylinders. Visually check for damages, cracks,chafing marks, burnt spots etc. At noticeable damages replace the airbaffle.

Effectivity: 912 Series
MAINTENANCE MANUAL IIAIRCRAFT ENGINES
d013
82
page 61Initial issue, Jan. 01/2002
13.4) Ignition systemThe DCDI ignition unit consists of 2 groups of components:
— the external ignition electric set (consisting of: 2 electronic modules, 4 doubleignition coils with ignition cables, 8 resistance spark plug connectors and resist-ance spark plugs), and
— the components integrated in the ignition housing (consisting of: stator, magnetoring, magneto hub and trigger set).
In principle the ignition unit requires no maintenance. Before, however, dismantlingthe ignition unit it is useful to trace defects by trial and error method.
13.4.1) Checking of ignition unit, trouble shootingComponents can only be exchanged but not repaired. If there is no spark,systematically trace for possible cause.
WARNING: For safety’s sake, switch off ignition, if possible, andwithdraw ignition key!
13.4.2) Spark plugs, ignition cables, spark plug connectors, cablesSee fig. 091.
NOTE: Engine is sensitive to a too large electrode gap. Especiallyat cold start problems check the gap and set to theminimum or renew spark plug.
— Visually check resistance spark plug connector Q. Assure securityof the spark plug connector. Minimum withdrawal force is 30 N(6,74lbf). The spark plug connector is screw-fastened to the ignition cableW and secured with a cable clamp E. At visible wear renew spark plugconnector. It has a resistance value of 5 kΩ.
— Check for correct connection of the ignition cables W, as per WiringDiagram (see para 13.4.8). The cable ends are furnished with codingsleeves R. The ignition cables for the bottom spark plugs are pro-tected by glass fibre/silicone protection hose T. All ignition cables arecovered by a protection hose Y — renew at visible wear.
— Check all cables and their plug connections for damage and correctconnection as per Wiring Diagram (see para 13.4.8).
— Check all plug- and screwed connections for oxidation and tight fit.
fig. 0911 4
523
6
00397

MAINTENANCE MANUAL IIAIRCRAFT ENGINES
page 62Initial issue, Jan. 01/2002
Effectivity: 912 Series
d013
82
— Check short-circuit cables and ignition switch. If an ignition switchfailure is suspected, the short-circuit cable can be withdrawn from theignition switch.
WARNING: Proceed with particular care because the ignition is notswitched off.
— Assure sufficient ground connection between engine, battery andfuselage. Respect the wiring diagram of the aircraft manufacturer.
13.4.3) Electronic module, trigger setSee fig. 092 and 093.
— If one ignition circuit failed, the two 4-pole plug connectors Q of thetrigger cables may be interchanged. For this, connect the plug W of thetriggers A1/2 and A3/4 (coded with red and blue colour mark E on thecable ends) to the electronic module T of ignition circuit "B" (bottommodule). R = electronic module "A" (top module).
If the failure remains with the ignition circuit, either the electronic module orthe charging coil on the stator is the cause. If renewal of the respectiveelectronic module does not help, the charging coil is defective. Removeand renew the stator (see para 13.4.14).
If the failure passes on with the ignition circuit, the triggers are the cause.In both cases the disassembly work described below is necessary (seepara 13.4.9 and 13.4.10).
NOTE: The electronic modules are marked on the front side withpart no. and serial number!
00398
fig.092
23
1
A00399fig. 093
4
5

Effectivity: 912 Series
MAINTENANCE MANUAL IIAIRCRAFT ENGINES
d013
82
page 63Initial issue, Jan. 01/2002
13.4.4) Charging coilSee fig. 094.
In case of failure of one ignition circuit, the 2 single-pole plugsof the red charging cables may be interchanged for failuretracing.
If the failure remains on the same circuit, the electronic moduleis the cause and the respective module has to be renewed (seepara 13.4.12).
If the failure passes on with the ignition circuit, the charging coilQ for ignition circuit "A" or W for circuit "B" is the cause. In thiscase the stator must be removed (see para 13.4.14).
Check charging cable for damage. Check resistance valuewith ohmmeter, see para 11.5 and 13.4.7. If required, renew thecomplete stator.
04959
2
1
3fig. 094
00400
13.4.5) Double ignition coilSee fig. 095.
If the failure of a single spark plug or 2 spark plugs is noticed, check theconnections and the resistance values of the respective double ignitioncoil, see para 11.5, 13.4.7, 13.4.8 and 13.4.11.
Assure the iron core Q is not loose. If required, renew the double ignitioncoil. In this case the disassembly work as described below is necessary,see para 13.4.9 and 13.4.10.
fig. 095
1

MAINTENANCE MANUAL IIAIRCRAFT ENGINES
page 64Initial issue, Jan. 01/2002
Effectivity: 912 Series
d013
82
13.4.6) Generator coilSee fig. 094.
If the generator does not work, the reason may be a defective or squeezedyellow generator cable or a defective winding on the 8 generator coils E(see fig. 094). Disconnect generator cables (yellow) and check resistancevalues, see para 13.4.7. There must be no connection between yellowcable and ground, and the indication on the ohmmeter must be ∞. If thevalue measured corresponds with the values indicated, the cause may bea defective rectifier-regulator.
Check of the complete ignition unit is only possible on an ignition test benchwith an oscilloscope, see para 11.5. Especially if the failure occurs onlyoccasionally this is necessary. In this case send the complete ignition unitto an authorized overhaul facility, see Maintenance Manual 912 Series(Line Maintenance ) Chapter 05-00-00 para 2.2.
CAUTION: On all these works pay special attention that no foreignmatter will enter the ignition.
13.4.7) Resistance values of the ignition unitThe values indicated below can be checked on the engine installed in theaircraft, after detaching connections:
Generator coil (on stator) .................. yellow – yellow ............0,1 ÷ 0,8 ΩGenerator winding ............................. yellow – grounding ..... ∞Charging coil (on stator) ......................... red – ground ...........3,2 ÷ 4,5 Ω
Trigger coil ................................ green/white – blue/yellow ..15,0 ÷ 123,0 Ω
Trigger coil new* (with clamps) white/yellow – blue/yellow 240,0 ÷ 250,0 Ω
Ignition coil, primary ..... connection contact – ground ...........0,1 ÷ 0,4 ΩIgnition coil, secondary ............high voltage – high voltage ... 6,1 ÷ 6,7 kΩ
Resistance spark plug connector ............... ...................... 4,4 ÷ 6,0 kΩ
NOTE: * Fitted in serial production, starting with design year1995!

Effectivity: 912 Series
MAINTENANCE MANUAL IIAIRCRAFT ENGINES
d013
82
page 65Initial issue, Jan. 01/2002
o ro
O b
l
O g
n
o bl
o gn
o r
o V
O g
n
O b
l
4B
1T2T
1B2B
4B3B
1
3
gew
s
blgn
4T2T
2B
3T3B
1T1B
1 sw
1 sw
1 sw
1 sw
0,75 ws
0,75 sw
0,75
ws
0,75
ge
0,75
sw
0,75
sw
0,75
ws
0,75
ge
0,75
br
0,75
or
0,75
ro1,5
ge
0,75
ro
0,5 ws/ge
0,5 bl/ge
0,75 br 0,75 sw
0,75 sw
0,5
bl/g
e
0,5
ws/
ge
0,5
bl/g
e0,
5 w
s/ge
0,75 br
1,5
B1/2
A3/
4
B3/4
A1/
2
1,5
ge
1 sw
1 sw
1 sw
1 sw
0,75 ws
0,75 ws
0,75 ws
1,5
0,75
gn
0,75
bl
0,75
ge
0,75
ws
A
B B
Propeller-seite
Magnet-seite
3T4T
0,75
br
0,75
gn
0,75
bl
0,75
ge
0,75
ws
0,75
or
ws/
ge
bl/g
e
ws/
ge
bl/g
eO
roO
bl
ws/
ge
bl/g
e
ws/
ge
bl/g
e
O g
n
O b
l
O ro
O g
n
gn bl
ro
0,5
ws/
ge0,
5 bl
/ge
0,5 bl/ge0,5 ws/ge
0,75
bl
0,75
bl
0,75
sw
0,75
sw
0,75
sw
A
0,75
bl
0,75
bl
O r
o
gew
s
blgn
O g
em
it A O
ws
mit
B
6
7
8
9
12
13
1
2
3
3
4
2
5
816
1
34
2
7
8
8
8
8
9
12 12 12
14 1415
A B
10 11
15
00403
NOTE:
Fig. 100 shows the wiring dia-gram with 1-pol and 4-pol con-nector.
Q ignition magneto-generatorW pick-up for ignition circuit A”E pick-up for ignition circuit ”B”R pick-up for rev-counterT plug receptacle 2-poleY electronic tachometerU shorting switch for ignition circuit
”A” and ”B”I plug receptacle 1-poleO plug receptacle 4-poleP electronic module for circuit ”A” electronic module for circuit ”B” double ignition coilq enginew cylinder 1-4e spark plugsr charging coilst 6-fach SteckerV consumer connectiono colour code
T = top = obenB = bottom = unten
bl bluebr brownge yellowgn greenro redrs pinksw blackws whiteor orange
ignition circuit A: 1 and 2 TOP3 and 4 BOT
ignition circuit B: 1 and 2 BOT3 and 4 TOP
fig.100
13.4.8) Wiring diagrams13.4.8.1) Wiring diagram for ignition system("Single Plug")
See fig. 100.

MAINTENANCE MANUAL IIAIRCRAFT ENGINES
page 66Initial issue, Jan. 01/2002
Effectivity: 912 Series
d013
82
ro3/
4Tw
s1/
2B ws
ro3/
4Bw
s1/
2T ws
orw
sge
swbl
bl
9
1
3
8
9
A B
ws/
ge
bl/g
e
ws/
ge
bl/g
e
O g
n
gew
s
blgn
0,75
br
0,75
sw
sw1/
2Bsw 3/
4Tsw
orw
sge
swbl
blsw
1/2T
sw 3/4B
sw
17
A
B
B
A
gew
s
blgn
0,75 sw0,75 or
0,75
ro
0,75 ge0,75 ws
0,75
sw
0,75 ws
0,75 sw
0,75 ws
0,75 sw
0,75
gn
0,75
bl
0,75
ge
0,75
ws
1 sw
1 sw
1 sw
0,75
ws
0,75
bl
0,75
ge
0,75 bl0,75 sw
0,75
gn
0,75
bl
0,75
ge
0,75
ws
0,75
ro
0,75
br
1 sw
1 sw
1 sw
1 sw
ws/
ge
bl/g
e
ws/
ge
bl/g
eO
roO
bl
o ro
O b
l
0,5
bl/g
e
0,5
ws/
ge
0,5
bl/g
e0,
5 w
s/ge
0,75
ro
0,75 br
7
8
2
3
7
6 5
0,5 ws/ge
0,5 bl/ge
1,51,5
O g
n
o bl
o r
o
1,5
ge
0,75 sw
0,75 sw
B1/2
A3/
4
1,5
ge
0,5
ws/
ge0,
5 bl
/ge
0,5 bl/ge0,5 ws/ge
o gn
V
1
3
4
28
16
B3/4
A1/
2
1B2B
4B3B 12
Propeller-seite
Magnet-seite
3T4T
0,75 sw0,75 sw
0,7
5 or
0,75 bl0,75 bl
17
13
1
34
2
3T3B
1T1B
4B
14
4T2T
2B
15
0,75 ws0,75 ws
1T2T
1 sw
10
11
04702
NOTE:
Fig. 100 shows the wiring dia-gram with 1-pol,4-pol and 6-pol connector.
13.4.8.2) Wiring diagram for ignition system ("Central plug")See fig. 100/1.
fig.100/1

Effectivity: 912 Series
MAINTENANCE MANUAL IIAIRCRAFT ENGINES
d013
82
page 67Initial issue, Jan. 01/2002
13.4.9) Ignition electric set disassemblySee fig. 102.
The ignition electric set, consisting of 2 electronic modules and 4 doubleignition coils, is fitted to the engine on 3 rubber mounts. For removal, detachall 8 spark plug connectors Q from the spark plugs. Cut the cable strapsfor the 4 lower spark plug connectors and draw the ignition cables withprotection hose through the cylinder heads. Take care not to lose theignition cable marking sleeves.
NOTE: On engines with hydraulic propeller governor it isnecessary to remove also the spark plug connectorsof the 2 upper spark plugs of cylinders 2 and 4 to alloweasy removal of the ignition cables.
Cut off cable straps W for ignition cable fixation and the plug connectors.Remove hose clamp E and grounding cable after removal of Allenscrew M5x25 R at the electronic module. Mark the two 4-pole plugs T ofthe generator cables and the plug connection of the red trigger cable andremove them (see fig 100 and 100/1). Detach both fasteners Y of theignition electric set (1 x M6 on bracket (ignition housing) and 1 x M8x50 Uon crankcase).
Unhook the tension spring of the carb support and remove the 4 Allenscrews M6 U each of the two intake manifolds I. Now the 2 intakemanifolds I with O-rings, compensating tube O, fuel line and ignitionelectric set can be removed, proceeding with great care. Plug all 4 intakeapertures to avoid entry of foreign matter.
00334
7
fig. 102
1
2
7
8
96
5
310
4
4
7
8
2
1

MAINTENANCE MANUAL IIAIRCRAFT ENGINES
page 68Initial issue, Jan. 01/2002
Effectivity: 912 Series
d013
82
13.4.10) Ignition electric set disassemblySee fig. 103, 104
NOTE: Before removal, mark all 8 ignition cables resp. checkthe correct application of the marking sleeves Q-W-E-R of cylinders no. 1 to 4, to avoid mix-up at reassembly.
Cut the cable straps A of the lower spark plug connectors and pull ignitioncables through the cylinder heads. If necessary, push off the 2 protectionhoses T for the lower ignition cables.
Remove Allen screw M5x25 Y for the electronic modules U and tiltmodules sideways from the engine. Remove hex. screw M6x16 I andlock washer A6 from intake manifold and the ground cables O from bothelectronic modules and P from the 4 ignition coilsS. Pay attention to thecorrect connection between electronic modules and ignition coils.
Double ignition coil renewalAt renewal of a double ignition coil, the following dismantling procedure isrequired:
Remove hex. nut M6 and rubber mount with bracket q. Remove theAllen screw M6x16 w from rubber mount e with an Allen key. Removeboth Allen screws r and ignition coil bracket t as well as the 3rd rubbermount y with bracket u.
Remove both Allen screws M6x30 i from the distance nut M6 o. Afterdetaching the double grounding cables P, the double ignition coilsp and[ can be replaced individually. The ignition cables are screwed in andtherefore are renewable.
NOTE: Except for the double ignition coil [ for spark plug 3 topand 4 bottom, all are fitted in the same position, with boss] upwards.
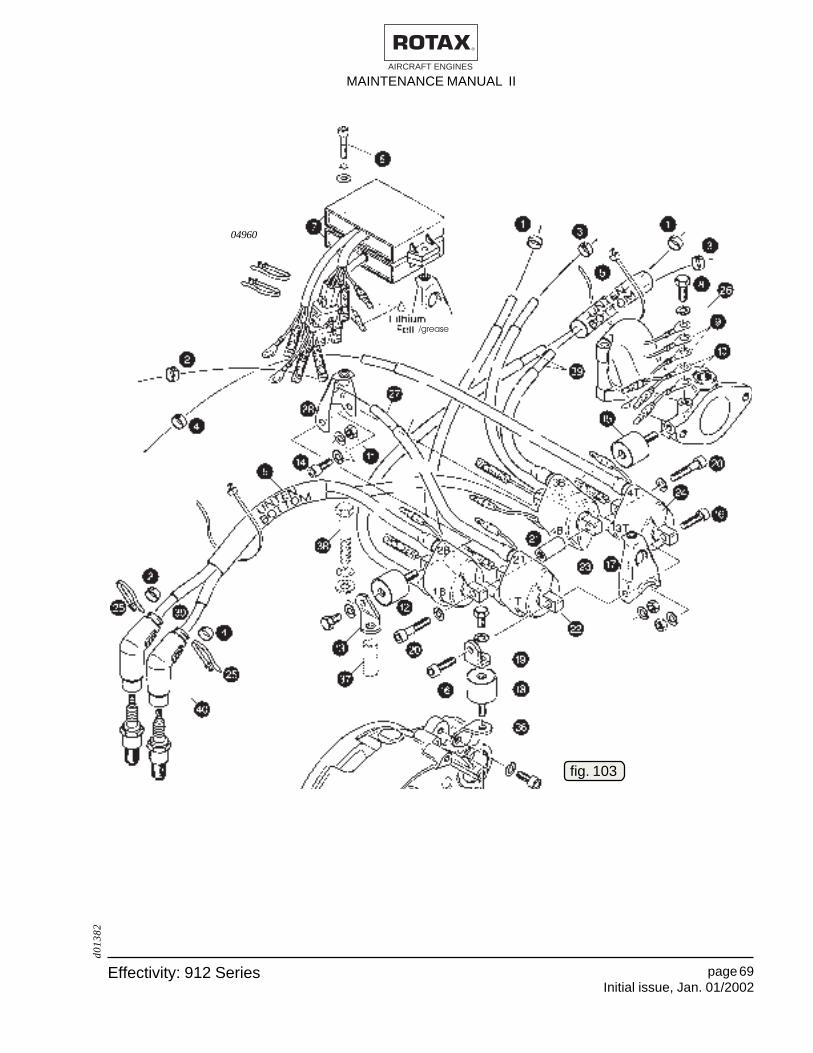
Effectivity: 912 Series
MAINTENANCE MANUAL IIAIRCRAFT ENGINES
d013
82
page 69Initial issue, Jan. 01/2002
/grease
04960
fig. 103

MAINTENANCE MANUAL IIAIRCRAFT ENGINES
page 70Initial issue, Jan. 01/2002
Effectivity: 912 Series
d013
82
2B
2T
4B
4T
1B
1T
3B
3T
2B2T
4B
4T
1B1T
3B
3T
wsws sw
swsw
ws wssw
B = unten / bottomT = oben / topws = weiß / whitesw = schwarz / black
swswswsw
AB
A
B
Propellerseite /propeller side
Magnetseite /magneto side
23
00407
13.4.11) Ignition electric set reassemblySee fig. 103, 104.
Re-assembly of double ignition coils is in reversed sequence of removal.
Attach the double ignition coils offset and in the correct position as perillustration, with the two Allen screws M6x30 i and lock washers A6 withdistance nut M6 o. Pay attention to the double ignition coil [ for sparkplugs 3B and 4B. It must be fitted turned by 180°, compared with the 3 otherdouble ignition coils (see fig. 104).
With the two Allen screws M6x20 r, lock washer A6 and hex. nut M6 re-assemble, first only loosely tightening, the ignition coil bracket t, ignitioncoil bracket u, and the double ignition coils.
Insert ignition cable D into the ignition coil bracket F, and fit the doubleignition coils on rubber mounts e with the Allen screw w M6x16 and lockwasher.
NOTE: When replacing the rubber mounts e, secure them withLOCTITE® 221 on the intake manifold.
Connect the white cables and the black grounding cables of the doubleignition coils without fail as per wiring diagram. Route the grounding cablesO and P towards outside. To achieve correct distance, fit the electronicmodules U on the ignition coil brackets with Allen screws Y M5x25.
Now all ignition coil fasteners can be tightened. Tighten ignition coil bracketq and rubber mounts with hex. nut M6 and lock washer.
fig. 104

Effectivity: 912 Series
MAINTENANCE MANUAL IIAIRCRAFT ENGINES
d013
82
page 71Initial issue, Jan. 01/2002
00408
13.4.12) Ignition electric set installationSee fig. 103 and 105.
Place O-rings L 34x2 into the groove : of cylinder heads and remove theprotections from the intake apertures. Fit both intake manifolds a with pre-assembled ignition electric set and tighten crosswise with 4 Allen screwsto 10 Nm (90 in.lb). Insert rubber buffer y into bracket s of ignition housingand tighten with hex. nut and lock washer.
Place distance sleeve d into position and fix ignition electric set with hex.screw f M8, washer and lock washer on crankcase. Now tighten allscrews and nuts of the ignition electric set.
Fit grounding cables O, P and S on boss j of intake manifold with hex.screw I M6x16 and lock washer. Attach both 4-pole plug connectors(electronic module to trigger set) and secure with cable strap.
NOTE: The trigger cable of ignition circuit A (top module) ismarked at the end of the isolating hose with the coloursblue and red. Those of ignition circuit B (bottom module)are marked with colours green and colourless (neutral).
Connect the two red cables coming from the charg-ing coils with the two pink cables of the SMDelectronic modules. Route the whole cable assemblyinto the cable clamp and fit electronic module withAllen screw Y M5x25 on the ignition coil bracket t.
CAUTION: The cable shielding must be fullyinserted into the cable clamp toassure optimum mass connection.
Fit two each ignition cables g for the lower sparkplugs into the glassfibre/silicone protection hose Tand route them between cylinder heads. Screwspark plug connector h onto the ignition cables,secure with cable straps A and plug them to thespark plugs according to the wiring diagram, seepara 13.4.11.
Fasten ignition cables for cylinder 1 - 3 and 2 - 4 withnew cable strap on coolant hose, see para 13.4.9.
fig.105
34
33
35
41
3334

MAINTENANCE MANUAL IIAIRCRAFT ENGINES
page 72Initial issue, Jan. 01/2002
Effectivity: 912 Series
d013
82
13.4.13) Removal of trigger coil setSee fig. 106 and 107.
Because of the shielding Y the trigger coil T set can be exchanged onlyin pairs. Remove the attachment screws U with the distance sleeves Iand clamps and re-fit new trigger coil set. The stator O need not beremoved in this case.
The trigger coil Q is adjustable only to a limited extent. The gap W betweenpick-up and trigger cam E is dimension U in para 15. The axial positionof the triggers should be in the middle over the trigger cam and may beoffset by max. dimension I in para 15.
NOTE: The two trigger coils for ignition circuit A (marked red andblue on cable ends) are fitted in the higher position, ondistance sleeves T, these of ignition circuit B are fittedin the lower position.
CAUTION: Fit the clamps as to ensure perfect ground connectionbetween shielding and ignition housing.
2
3
14
fig. 106
00409
Maß /dim. I
Maß
/d
imU

Effectivity: 912 Series
MAINTENANCE MANUAL IIAIRCRAFT ENGINES
d013
82
page 73Initial issue, Jan. 01/2002
00410
13.4.14) Stator removal and re-fittingSee fig. 107.
Block crankshaft with crankshaft locking screw, part no. 240 880, see para13.3.1.
Remove hex. screw P M16x1,5 together with lock washer and washers.Place protection piece, part no. 877 410, on crankshaft, screw puller, partno. 877 375, fully onto thread and press off magneto hub together withmagneto flywheel with hex. screw. Lay magneto hub ass’y aside so thatno particles can be attracted.
NOTE: For removal of stator the ignition housing need not beremoved.
Remove four Allen screws q M5x25 and hose clamp. Remove statorass’y O from the centering w and make visual check. Check cableassembly for damage. The contact faces e between stator and ignitionhousing must be clean to assure good ground connection. Check ofresistance values, see para 13.4.7.
Repair of the stator is not planned. At exchange or re-installation of thestator take care for correct routing of cable assembly. Every stator fixationis screwed together with a loading coil ground line. At assembly applyLithium grease to the contact faces i of the stator and the screw heads.
fig. 107

MAINTENANCE MANUAL IIAIRCRAFT ENGINES
page 74Initial issue, Jan. 01/2002
Effectivity: 912 Series
d013
83
13.4.15) Magneto hubSee fig. 106 and 107.
Visually check magneto inner side r and the taper surface t. Undernormal circumstances dismantling of magneto hub is not necessary.
If it had been dismantled, clean the contact surfaces y. Apply LOCTITE®
221 to all 10 Allen screws u (alternating 5 screws M6x30 and 5 screwsM6x25) and torque to 10 Nm (90 in.lb.).
NOTE: The hole pattern in the magneto ring is symmetrical andtherefore it can be assembled in any position with theflywheel hub.
Check Woodruff key in crankshaft for tight fit and degrease tapers ofcrankshaft and magneto hub. Apply LOCTITE® 221 sparingly, howeverwell spread into the taper of magneto hub.
Fit magneto hub, washer 17x36x5, spring washer. Apply LOCTITE®
221 to hex. screw M16x1,5, fit and immediate tighten to 60 Nm (531in.lb.) +180° angle to rotation.
CAUTION: The Woodruff key serves for positioning and must re-main in the groove.
Check the gap U between trigger coil and trigger cam with a feeler gage.The axial position of the trigger coil to the trigger cam (part of the flywheelhub) must be in the middle and offsetting must not exceed I, see para 15.
13.4.16) Interference suppression boxSee fig. 107/1.
13.4.16.1) Disassembly of interference suppression box:The 2 electronic boxes, 4 double ignition coils and 2 feed-through capacitors are placed in the interference suppressionbox. On every suppression box you will find a successiveserial number on its cover. Always state this number oninquiries..
To prevent any mix-up at a later stage, mark all 8 H.V. (highvoltage) leads according to code on cover, prior to withdrawal.Remove 3 countersunk screws M4x8 and upper half of highvoltage clip plate. Now, single H.V. leads can be exchanged asrequired. H.V. leads are available pre-assembled with connec-tion to spark plug.
Mark all connections to ignition coils and then detach wiring.Remove 4 countersunk screws M4x12 from underside ofelectronic box and detach mass connection. The complete setof ignition coils can be withdrawn now. If need be, removeelectronic boxes as well, after disconnecting shorting linesfrom capacitors. Check capacitors, renew as required. Checkall other components.

Effectivity: 912 Series
MAINTENANCE MANUAL IIAIRCRAFT ENGINES
d013
83
page 75Initial issue, Jan. 01/2002
pic
k u
ps
A1/
2 B
3/4
pic
k u
ps
A3/
4 B
1/2
3B
3T 1B
1T
2B
2T
4B
4T
B3/4
A1/2
Ignitionswitch:
capacitor top:ignition circuit A
capacitor bottom:ignition circuit B
B1/2
A3/4
6
910
1
45
BA
tocapacitor
whi
te -
whi
te/r
edw
hite
- w
hite
/redred
red
whi
tew
hite
char
gin
g c
able
sig
nit
ion
cir
cuit
A a
nd
B
378
pick
up
cabl
esof
ign
itio
n c
ircu
it B
are
mar
ked
on b
oth
ends
with
a r
edsl
eeve
whitewhite
2
3B3T 1T1B 2B2T 4B 4T
whi
te -
whi
te/r
edw
hite
- w
hite
/red
IGNITION CIRCUIT A
Q charging cable, red
shorting cable, white (to capacitor)
W pick-up cable
white, for ignition circuit A-cyl. 3
white/red, for ignition circuit A-cyl. 4
E pick-up cable
white, for ignition circuit A, cyl. 1
white/red, for ignition circuit A, cyl.
R primary cable for ignition coil,
ignition circuit A, cyl. 3/4, black (ground)
ignition circuit A, cyl. 3/4, white
T primary cable for ignition coil,
ignition circuit A, cyl. 1/2, black (ground)
ignition circuit A, cyl. 1/2, white
IGNITION CIRCUIT B
YYYYY charging cable, red (of stator)
shorting cable, white (to capacitor)
U pick-up cable
white, for ignition circuit B-cyl. 1
white/red, for ignition circuit B-cyl. 2
I pick-up cable
white, for ignition circuit B, cyl. 3
white/red, for ignition circuit B, cyl. 4
OOOOO primary cable for ignition coil,
ignition circuit B, cyl. 1/2, black (ground)
ignition circuit B, cyl. 1/2, white
P primary cable for ignition coil,
ignition circuit B, cyl. 3/4, black (ground)
ignition circuit B, cyl. 3/4, white
13.4.16.2) Wiring diagram for interference suppression box
04803
fig. 107/1

MAINTENANCE MANUAL IIAIRCRAFT ENGINES
page 76Initial issue, Jan. 01/2002
Effectivity: 912 Series
d013
83
13.4.16.3) Re-assembly of interference suppression boxGenerally in reversed sequence to dis-assembly. Consult inany case the wiring diagram for the suppression box. ApplyLithium grease to all cable connections to prevent leakagecurrent.
Put both electronic boxes into interference suppression boxand place foam rubber filling pieces in position. Connect massand primary wiring to ignition coils. Fit set of ignition coils intosuppression box using 4 countersunk screws M4x12. Securecountersunk screws with LOCTITE® 221.
Arrange H.V. leads according to wiring diagram or to code onsuppression box cover, in bottom part of clip-plate. Add tophalf, using 3 counter sunk screws M4x8, attach clip plate ass'yby two cheese-hd. screws M4x12 to box wall. Secure allscrews, using LOCTITE® 221. Attach H.V. leads 1T and 3B toignition coil support by cable retaining straps.
NOTE: As every suppression box is numbered andessential data is registered under this number,it should be stated on all inquiries.
13.4.16.4) Installation of interference suppression boxFor safety reasons don't expose suppression box to ambienttemperatures above 60° C (140° F) and if possible attach byreason of vibration to aircraft frame. If for space reasons thebox must be fitted to engine, make absolutely sure to usevibration absorbing mountings.
Verify all mass connections beginning from interference sup-pression box right to the engine. Clean contact surfaces asrequired and use footned spring washer at connection. SeeService Instruction SI-25-1994.
NOTE: Since design year 1992 the resistance spar-ing plug 12mm DCPR7E was introduced,see SB-912-01.

Effectivity: 912 Series
MAINTENANCE MANUAL IIAIRCRAFT ENGINES
d013
83
page 77Initial issue, Jan. 01/2002
13.5) Temperature- and pressure measuring systemOn the ROTAX
® engine 912 there are three temperature measuring points. See
Wiring Diagram in the aircraft manufacturer's Operating Manual.
13.5.1) Cylinder head temperature sensorSee fig. 108 and 109.
The two sensors Q for cylinders 2 and 3 are screwed into the bottom sideof the cylinder heads. On the cylinder head only the material temperatureof the head is measured and not the temperature of the cooling liquid. Theoperational temperature is 90 - 120°C (194 - 250°F) and must not exceed150°C (300°F). If temperature is exceeded, check the
— cooling system— temperature sensor— monitoring instrument— cable connection— sensor cable
See Maintenance Manual type 912 Series (Line Maintenance) Chapter05-50-00 para 2.7.If using 100 % anti-freeze (without adding water),coolant residues in the area of the sensor may result in too high materialtemperature readings. As a remedy add 20 % water.
The sensor has its grounding connection directly via the cylinder head.
The sensor resistance values are shown in the resistance temperaturecurve beside.
CAUTION: The resistance temperature curve was defined underthe following conditions and is valid only under thesecircumstances.
Ambient temperature: 20°C (68 °F)
Deviation: max. ± 10%
00327
12010080604020 140 160
1200
1000
(Ω)
(°C)
800
600
400
200
0
fig.109
00227
1
fig. 108

MAINTENANCE MANUAL IIAIRCRAFT ENGINES
page 78Initial issue, Jan. 01/2002
Effectivity: 912 Series
d013
83
TO
Loctite 221
13.5.2) Oil temperature sensorSee fig. 110.
For readings of the oil temperature, a sensor Q is fitted to the oil pumphousing. The sensor is an NTC resistor and identical with the two sensorsfor cylinder head temperature.
The standard temperature should be between 90 and 110°C (194 - 230° F).If max. temperature 140°C (284° F) is exceeded, check
— oil system
— temperature sensor
— monitoring instrument
— cable connection
— sensor cable
See Maintenance Manual type 912 Series (Line Maintenance) Chapter05-50-00 para 2.8.
The sensor is grounded directly via the oil pumphousing.
CAUTION: At replacement of a temperaturesensor, always let the engine cooldown to avoid burns.
After removal of the temperature sensor clean thethread in the oil pump housing. Secure new sensorwith LOCTITE® 221 and tighten to 15 Nm (135 in.lb).
04710
fig. 111
04715
fig. 110
21
13.5.3) Oil pressure sensorSee fig. 110, 111 and 112.
The sensor W for measuring of oil pressure is screwed into the oil pumphousing.
The standard oil pressure in the engine is between 1,5 - 5 bar (22 - 73 psi).The sensor covers a range of 0 - 10 bar (0 - 145 psi).
CAUTION: The pressure range of the monitoring instrument must byall means be adapted to the pressure range of thesensor. Otherwise there will be wrong reading of the oilpressure.

Effectivity: 912 Series
MAINTENANCE MANUAL IIAIRCRAFT ENGINES
d013
83
page 79Initial issue, Jan. 01/2002
After removal of the oil pressure switch, clean the threads. Apply LOCTITE®
221 on the threads of the new sensor and tighten to 15 Nm (135 in.lb.).
If not reaching and/or exceeding the max. oil pressure, check the
— lubrication system
— oil pressure sensor
— monitoring instrument
— cable connection
— sensor cable
See Maintenance Manual type 912 Series (Line Maintenance) Chapter05-50-00 para 2.9.
The grounding connection of the sensor is directly via the oil pump housing.
The sensor resistance values are shown in the resistance/pressure curvebeside. Adjust your measuring instrument with a standardized (calibrated)instrument.
CAUTION: The resistance/pressure curve was made under thefollowing conditions and is only valid under these cir-cumstances:
Ambient temperature: 20°C (68 °F)Voltage: 12 VDeviation: max. ± 5%
200(Ω)
(bar)
150
100
50
0108642
fig. 112
00229

MAINTENANCE MANUAL IIAIRCRAFT ENGINES
page 80Initial issue, Jan. 01/2002
Effectivity: 912 Series
d013
83
12 3
6
5
7
4
89
10
00230
14) Maintenance of components
14.1) Electric starter
See fig. 113.
Remove 2 hex. nuts M5 Q with lockwashers W and washers E from thebottom side of the ignition housing R.Disengage the clamp 76 you can re-move the electric starter T . Theelectric starter is kept in position by 2distance sleeves Y and O-ringsU.
NOTE: When withdrawing theelectric starter from the igni-tion housing, keep the bearing flange I with starter housing O androtor support assembled. Otherwise the carbon brushes will bepulled off the rotor.
14.1.1) Electric starter disassemblySee fig. 114.
Remove supporting flange Q from starter housing W. Withdraw commu-tator bearing E from starter housing and remove carbon brush holder Rtogether with springs from armature T. Withdraw armature and thrustwasher Y from starter housing, clean partscarefully, see para 11.7.15.
fig. 113
00231fig. 114
61
19
20
p
21
14
12
10
1911
5
17
19
313
17
18
14
4
16
2
15

Effectivity: 912 Series
MAINTENANCE MANUAL IIAIRCRAFT ENGINES
d013
83
page 81Initial issue, Jan. 01/2002
14.1.2) Electric starter single parts checkSee fig. 114, 115 and 116.
After disassembly of starter, check the following parts:
Armature
Clean commutator, check for straightness, check visually, and if need be,slightly machine and undercut segments U (see fig. 131). The insulationshould start 0,5 mm (0,02 in.) below face of segments.
WARNING: During this machining process material particles are setfree and could possibly be inhaled.
Check armature at 12 or 24 Volt with test lamp between commutator I andiron core O for connection to ground. If the lamp lights up, renew armature.
Check windings for interruption, utilizing 2or 4 Volt supply and interconnectedamperemeter (measuring range 60 A) (seefig. 116). The armature has to berenewed if the ampere readingsdiffer esentially between singlesegments. If the armature showsheavy signs of overheating, re-new it.
Check ball bearing P 6002 Z. Atrenewal, fit it with closed side towards armature (open side facingoutward). Inspect teeth and radial clearance of armature shaft in rotorsupport E.
BearingsCheck bearing sleeve q, renew rotor support as necessary.
Carbon brushesCarbon brushes w must be freelymoving in their respective guidese. Renew brushes that are tooshort (minimum 8 mm (0,32 in)).Check spring pressure and re-new any brush spring r whichshows evidence of heat dam-age. Check isolating sleeves tof the plus-pole carbon brush y,renew as required.
O-ringsRenew all O-rings u and oil seal i at overhaul of electric starter.
700232
9
8
00233
fig. 116
fig. 115

MAINTENANCE MANUAL IIAIRCRAFT ENGINES
page 82Initial issue, Jan. 01/2002
Effectivity: 912 Series
d013
83
Maßdim.
fig. 117
6
00234
OOOOO
O
Starter housingVisually check inner magnets o for cracks.
StudsVisually check both studs p . They are to be removed only as required.
14.1.3) Electric starter reassemblySee fig. 113, 114 and 117.
Define the necessary number of shims Y to achievethe axial play O of the armature T, see para 15.Grease oil seal i, the ball bearing P and bearingbushing q. Insert armature into thebearing supportT, fit new O-ring62x1,5 and push starter housing Wover armature.
Install carbon brush holder R withsprings. Fit the necessary number ofshims Y onto armature shaft and thecomplete commutator support E withnew O-ring 62x1,5 on starter hous-ing.
NOTE: Take care for correct position-ing and engagement of theguide pins.
14.1.4) Electric starter mountingSee fig. 113.
Grease bearing P slightly.Fit complete electric starter T with new O-ringsU 4,7x1,4 and distance sleeves Y into the ignition housing R.
NOTE: Take care that the electric starter does not come apartduring insertion.
Tighten electric starter with washer E, lock washer A5 W and hex. nut M5Q and secure it with strap clamp 76 to ignition housing.
14.2) Sprag clutchSee fig. 118 and 120.
After removal of magneto hub and ignition housing, see para 13.3.3 and 13.3.4, thesprag clutch can be removed. Withdraw idle gear shaft Q and idle gear W and boththrust washers 12,5x21,5x1 E from both sides of the idle gear.

Effectivity: 912 Series
MAINTENANCE MANUAL IIAIRCRAFT ENGINES
d013
83
page 83Initial issue, Jan. 01/2002
Maß
dim
.
To determine wear, check the axial clearance of the sprag clutch housing. It shouldbe dimension 0 in para 15. At no or too little axial clearance the sprag clutch may notdisengage and the electric starter will be dam-aged.
Remove hex. nut R M34x1,5 with socketwrench 46 a/f, part no. 877 450, from crank-shaft.
NOTE: The hex. nut R has lefthand threads!
5
4
2
1
3
7
6
fig. 119
8
9
00236
6
fig. 118
2
13
00235
0
14.2.1) Sprag clutch removalSee fig. 119.
Insert protection piece, part no. 877 410, into crankshaft and remove spragclutch housing T with puller 877 375 from crankshaft. The freewheel gearY, the timing gear placed behind, the pump gear I pressed onto thecamshaft and the timing gear O underneath can be removed only aftersplitting the crankcase.
Drive of mechanical rev. counter via worm gear U pressed into camshaft.

MAINTENANCE MANUAL IIAIRCRAFT ENGINES
page 84Initial issue, Jan. 01/2002
Effectivity: 912 Series
d013
83
im Eingriff /engaged
frei drehbar /freely turning
fig. 122
00239
14.2.2) Sprag clutch disassemblySee fig. 120 and 121.
Visually check for accumula-tion of oil sludge in sprag clutchhousing Q. For cleaning, re-move retaining ring W. Com-press circlip E in sprag clutchR with circlip pliers and twistsprag unit out of the sprag clutchhousing. Clean all parts. Thecircumferential helical spring Tmust not be loose or wavy.Replace sprag unit if required.
The sprags Y must be freelymoving and the surface mustbe free of scoring. Check en-
gagement face in housing Q.
At detectable wear of gripping faces exchange corresponding parts.Inspect taper bore U in housing. Verify teeth I and sprag engagementface O on free wheel gear and bearing bush P.
14.2.3) Sprag clutch reassemblySee fig. 118, 120, 121 and 122.
Place sprag clutch lubricated with motor oil into clutch housing with brakeclip E visible. At fitting of brake clip, compress slightly using circlip pliersand ensure that clip remains in position in the groove and engages fully onthe catches in sprag unit. Fit circlip W in the groove Q with the beveledge showing to the sprag clutch.
00238
7
16
42
8
10
9 fig. 1205
00237
fig. 121
5 113

Effectivity: 912 Series
MAINTENANCE MANUAL IIAIRCRAFT ENGINES
d013
83
page 85Initial issue, Jan. 01/2002
Lock crankshaft using fixing screw 241 965. Degrease taper and threadsof crankshaft and taper of clutch housing. Coat taper of clutch housingthinly with LOCTITE® 221 and fit on crankshaft. Turn freewheel gear q tofacilitate aligning of the sprags Y.
NOTE: The freewheel gear must engage on crankshaft ewhen turning counter-clockwise (left), looking towardsmagneto side of engine, and turn freely turning clock-wise (right)!
Secure degreased hex. nut M34x1,5 with LOCTITE® 221 and tighten to120 Nm (1060 in.lb).
NOTE: The hex. nut has left hand threads!
CAUTION: Check axial clearance P of free-wheel. See fig. 118 andpara 15.
14.2.4) Reduction gear for electric starterSee fig. 123.
Inspect the toothing of the idle gear Q. Deformed teeth W generate a noiseat engine start. Renew as required.
NOTE: Commencing with model 95 the gear ratio has beenchanged from 44x14 to 50x11.
Place thrust washer E 12,5x21,5x1 onto crankcase. Place intermediategear Q lubricate intermediate gear shaft R. Fit thrust washer T 12,5x21,5x1on top of it.
5
4
1
3
fig. 123
00240
2
14.2.5) Ignition housing fittingSee para 13.3.9.

MAINTENANCE MANUAL IIAIRCRAFT ENGINES
page 86Initial issue, Jan. 01/2002
Effectivity: 912 Series
d013
83
14.3) Rev. counter driveSee fig. 124, 125 and 126.
Driving gear of the mechanical rev.counter Q is offered as an optionand it is driven via the worm gearWpressed into the camshaft.
Remove Allen screw M5x16 E andlock washer and withdraw rev. coun-
ter housing R along with O-ringT and rev. counter shaft Y
from ignition housing, see para13.3.9.
Inspect teeth U and square end I of rev. counter shaft. At oil leakagerenew oil seal O 6x11x3 resp. O-ring T. Press in new oil seal right downto stop in housing using punch, part no. 877 680.
On engines without a mechanical rev-counter a cover plate is fitted insteadof the rev-counter housing R.
2fig. 124
00242
fig. 126
5 7
684
9
300243
fig. 125
1
00241
00244
14.4) Propeller gearboxSee fig. 127, 128, 129 and 130.
Before removing the gearbox it is useful to check the slipping torque, see Mainte-nance Manual type 912 (Line Maintenance) Chapter 12-00-00 para 7.2.
Remove the remaining Allen screws M6 Q and 2 Allenscrews M8 W with lock washers crosswise from gear cover
E. The gear cover is kept inposition by 2 dowels. Screwpuller R, part no. 877 660,into the two M8 threads T ofgear cover. Now the com-plete gearbox can be pulledoff with the impact puller Ywithout damaging the ballbearing and the propellershaft.
fig. 127
6 45
3
2
1

Effectivity: 912 Series
MAINTENANCE MANUAL IIAIRCRAFT ENGINES
d013
83
page 87Initial issue, Jan. 01/2002
When the gearbox is loosened, it can be removed with 2 screwdrivers Q leveringon the lugs W provided on the gear cover.Do not lever on sealing face.
CAUTION: When removing the gearbox, take care not to damage the bearingseat and the oil ring contact surface of propeller shaft.
Remove hex. nut M30x1,5 E (by turning clockwise) with wrench 41 a/f, part no. 877445, and the drive gear with friction washer R from crankshaft. If required, lever drivegear gently off with 2 screwdrivers.
NOTE: The hex. nut I has left hand threads!
Make sure that both dowels remain with crankcase and not with gear cover.
CAUTION: The gear pair has a continuous 6-digit serial number which is shownon drive gear front side T and on dog gear. The gears are pairedas a set and must not be exchanged individually!
00245
00246fig.129fig. 128
2
2
1
00247
4
3
fig. 130
5

MAINTENANCE MANUAL IIAIRCRAFT ENGINES
page 88Initial issue, Jan. 01/2002
Effectivity: 912 Series
d013
83
5
412
6
1 710
89
2
3
fig. 131
00248
14.4.1) Roller bearing removal for configuration 1 and 2 onlySee fig. 131.
After the propeller gearbox is removed, the crankcase side propeller shaftbearing and oil seal can be renewed if necessary. The roller bearing,sealing rings etc. can be easily removed after the crankcase has beendisassembled.
Remove circlip Q with circlip pliers. Screw extractor ass’y W, part no. 877615, with 8 Allen screws M6x25 to the crankcase. Screw stud E
M10x45x20, part no. 941 180, into the pull-in spindle R, part no. 877 580,and screw hex. nut T M24x1,5 onto the spindle.
For better guiding push the press-out tool Y, part no. 877 592, into the rollerbearing U. Screw the Pull in spindle R into extractor W and fit the Pull inspindle in crankcase.
Push the pull-out plate I, part no. 877 560, onto the stud at the backsideof the crankcase and fix with hex. nut M10 O, part no. 242 091.
Keep pull-in spindle with handle in position and turn hex. nut clockwise untilthe roller bearing U with oil seal P is pressed off the case. Unscrew hex.nut, remove pull-out plate with roller bearing and oil seal and withdrawspindle. Remove extractor ass’y from crankcase.
CAUTION: At this procedure the oil seal P is damaged and must berenewed.

Effectivity: 912 Series
MAINTENANCE MANUAL IIAIRCRAFT ENGINES
d013
83
page 89Initial issue, Jan. 01/2002
2
00250
14.4.2) Roller bearing removal for configuration 3 onlySee fig. 132.
After the propeller gearbox is removed d, the crankcase side propellershaft bearing and oil inlet flange can be renewed, if necessary.
At configuration 3 with hydraulic governor the removalprocedure is different from types configuration 2 andconfiguration 4. The roller bearing for type configuration3 is pressed off together with the oil inlet flange T.
Remove circlip Q with circlip pliers. Position puller capW 876 489 and push hex. screw E through cap, roller
bearing R and oil inlet flange T. Atthe opposite side fit washer Y andnut U. By turning hex. screw clock-wise, the roller bearing is pressedoff together with oil inlet flange. De-tain nut U. Remove O-ring I andboth O-rings O.
00249
14.4.3) Roller bearing removal for configuration 4 onlySee fig. 133.
After the propeller gearbox is removed, the crankcase side propeller shaftbearing can be renewed, if necessary.
For the removal procedure it is necessary to drill a min. 6,2 mm (.24 in.)bore W into the middle of the oil inlet cover Q.
CAUTION: Remove metal chips carefully after drilling.
The roller bearing is pressed off together with the oilinlet cover. Remove circlip E with circlip pliers. Fitpuller cap R 876 489 on gearbox side and push hex.
screw T through cap, roller bearingY and the perforated oil inlet flangeQ. At the opposite side fit nut Otogether with washer I. By turninghex. screw clockwise, the rollerbearing is pressed off together withthe oil inlet flange. Remove O-ringP.
fig. 132
21
4
5
96
7
8
3
fig. 133
5
43
61
107
89

MAINTENANCE MANUAL IIAIRCRAFT ENGINES
page 90Initial issue, Jan. 01/2002
Effectivity: 912 Series
d013
83
14.4.4) Vacuum pump disassemblySee fig. 134.
After the removal of the 4 nuts M6 Q along withwashers the vacuum pump W, gasket E andattachment flange R can be taken off.
6
00252
00251
14.4.5) Vacuum pump drive disassemblySee fig 135.
Drive of vacuum pump via drive gear Q fitted on propeller shaft. Reductionratio 22 : 29.
Check ball bearing W and needle sleeve E. Check teething of drive gearQ, vacuum pump gear R, drive sleeve T and drive shaft of vacuum pump.
If the ball bearing or needle sleeve must be renewed,remove the vacuum pump as follows:
Lock drive sleeve T with holder, part no. 242 660,remove Allen screw Y M8x14 and withdrawvacuum pump gear R with drive sleeve T.
Remove countersunkscrew U M5x12 withwasher I for ball bearingfixation.
Remove oil seal O andpress out needle sleeveand ball bearing with suit-able step punch towardspropeller flange. Cleanbearing seat and check.
NOTE: At this procedure the needle sleeve E, oil seal O andball bearing W are damaged and must be renewed.
4
3
1
2
fig. 134
fig. 135
1
7
4 2
39
58

Effectivity: 912 Series
MAINTENANCE MANUAL IIAIRCRAFT ENGINES
d013
83
page 91Initial issue, Jan. 01/2002
14.4.6) Drive for vacuum pump and hydraulic governor reassemblySee fig. 135, 136 and 137.
Insert new needle sleeve E lubricated with motor oil. Position puller capP,part no. 876 489, on gearbox side, place press-in tool, part no. 877 579
onto the needle sleeve and fix with hex. nut and washer. By turningthe hex. screw q the needle sleeve is pressed in completely.
The ball bearing is pressed in with same procedure, how-ever, the puller cap P, part no. 876 489, is fitted on pumpflange side, and the press-in tool w, part no. 877 595,is used.
Then press in new oil seal O (grease sealing lip withmotor oil) with assembly jig, part no. 877 276. ApplyLOCTITE® 221 to countersunk screw U M5x12 andwasher I for ball bearing fixation and tighten.
Fit vacuum pump gear R and drive sleeve T and fixwith holder, part no. 242 660. Apply LOCTITE® 221 onAllen screw Y M8x14, fit and tighten to 25 Nm (220in.lb.).
CAUTION: The length of the Allen screw Y M8x14 must be impera-tively respected or it will interfere with the drive shaft forvacuum pump.
14.4.7) Vacuum pumpSee fig. 138.
The vacuum pump serves as drive of pneumatic inertial navigationinstruments.
NOTE: The vacuum pump must not be dismantled and must berenewed completely, if necessary. Renewal at overhaulat the latest.
Remove and check toothing Q, connections or plugs W fromthe used vacuum pump. If in good order, re-use, but renewdamaged ones as required. For fitting of hose connections,clamp vacuum pump with drive end downwards in vice usingprotective grips.
CAUTION: Clamp pump on flange E only. Never clamp onpump housing as pump rotor would be damaged. Never install a pump which has beendropped!
Spray silicone on connection thread R 3/8" NPT and let it dry.Do not use Teflon tape, sealing paint or thread grease atconnections. Tighten connections exclusively by ring- or socketspanner and ensure correct positioning. Re-torque by 1,5 turnsat the most.
4
00255
q
P
w
W00254
E
Pfig.136
q
00253
fig. 137
1
3
2
fig. 138

MAINTENANCE MANUAL IIAIRCRAFT ENGINES
page 92Initial issue, Jan. 01/2002
Effectivity: 912 Series
d013
83
14.4.8) Hydraulic governor disassemblySee fig.139 and 140.
Remove banjo bolts M10x1 Q and sealing rings W onboth sides from governor flange E and oil pump housingand detach oil line. Remove the 4 Allen screws M6x20R and the two Allen screws M6x16 T securing oil inletflange. Remove governor flange with O-ring 32x4 placedbehind and spacer.
After removal of propeller gearbox the drive can bedisassembled. Fix drive sleeve Y with holder 242 660.Remove Allen screw M8x16 U and vacuum pump gearI with drive sleeve O. Remove countersunk screw PM5x12 with washer for ball bearing fixation.
Press out needle bearing and ball bearing withsuitable step punch towards gearbox.
NOTE: Needle bearing and ball bearing are damaged by this procedure and must bereplaced.
Check inner diameter q of propeller shaft andjournal w of oil inlet flange. The wear willprobably show as a flat area on the journal.Check teeth of drive gear and vacuum pumpgear I. Visually check ball bearing androller bearing r.
CAUTION: The fixationscrew U M8 for vacuum pumpgear is for propeller governordrive 16 mm long (.63 in.) andhas a thin screw head. Forvacuum pump drive, however,it is only 14 mm long (.55 in.)with standard screw head.
Clean parts carefully and re-move sealant residues. Checksealing surface and all oil boresin governor flange E for freepassage. Visually check nee-dle bearing as well as teethand bearing surface of drivesleeve O. Care for clean con-necting surface for oil pres-sure hose.
If service work is necessary on the propeller governor, it must be sent tothe engine manufacturer.
00256
00257
fig. 140
fig. 139
55
1
2
3
4
44
4
10
13
7
15
1416
8
12
11
9

Effectivity: 912 Series
MAINTENANCE MANUAL IIAIRCRAFT ENGINES
d013
83
page 93Initial issue, Jan. 01/2002
00258
dimension new wear limit
See para 15.
14.4.9) Drive for hydraulic governor reassemblySee fig. 141, 142 and 143.
Installation of needle sleeve and ball bearing as described in para 14.4.6.Grease new O-ring Q and insert it together with oil inlet flange W intocrankcase. Take care that both M6 threads are horizontal and the openingis in a position to let the oil pass. For better positioning tighten governorflange only slightly with 2 Allen screws M6x20 and oil inlet flange with 2Allen screws M6x16.
Fit extractor E, part no. 877 615, onto crankcase, place press-in tool R877 590 into roller bearing T, place it on centering Y and press it withspindle U fully into crankcase. Fit circlip in groove with its sharp edgetowards outside.
CAUTION: The oil inlet flange W must be fitted well aligned and theO-ring Q must not be squeezed.
Remove governor flange I again. Fit distance sleeve O and new O-ringP 32x4 into crankcase. Insert one each O-ring 7x2 into the oil inletflange and governor flange, keeping them in position with some multi-purpose grease LZ. Fit governor flange and fix it with 4 Allen screws M6x20 with LOCTITE® 221 on the crankcase and 2 Allen screws qM6x16 on oil inlet flange.
CAUTION: Longer screws would damage the oil inlet flange!
NOTE: Tightening torque 10 Nm (90 in.lb). Secure the 2 Allenscrews for oil inlet flange and the 4 Allen screws for thegovernor flange with LOCTITE® 221.
Install hydraulic governor w and new gasket e with 3 Allen screws rM8x40 and 1x M8x35 with lock washers , tighten to 22 Nm (195 in.lb). Takecare that teeth engage.
NOTE: Fit screw t M8x35 on left side, bottom.
Install oil pressure line y free of stress on governorflange and on oil pump housing and with hose clamp onfuel pump.
The banjo screws tighten to 17 Nm (150 in.lb).
fig. 141
3
6
7
5
4
1
2

MAINTENANCE MANUAL IIAIRCRAFT ENGINES
page 94Initial issue, Jan. 01/2002
Effectivity: 912 Series
d013
83
fig. 142
12
1315
18
20
8109
19
11
1716
00259
14
90°15°
5
min.Steigung /minimum pitch
max
. Ste
igun
g /
max
imum
pitc
h
38
00270fig. 143
The plug screws u and i normally remain closed. On position u apressure gauge for governor pressure check can be connected. Themaximum regulating pressure is between 22 and 25 bar (320 ÷ 360 p.s.i.).The governor starts regulating at 3600 ÷ 3700 rpm.
At malfunction of propeller governing suspect the following as possiblecause:
— adjustment of governor actuation
— function of propeller governor
— insufficient oil pressure, oil pressure fluc-tuations
— propeller pitch control.
14.4.10) Propeller gearbox disassemblySee fig. 144, 145 and 146.
Place gearbox under suitable fixture Q and put pressure on dog gear Wvia yoke, part no. 876 885, until ring halves E come free and can beremoved.
CAUTION: Depress the dog gear only so far that free movement ofthis gear is still warranted, as any further depressionmight destroy the gear cover.

Effectivity: 912 Series
MAINTENANCE MANUAL IIAIRCRAFT ENGINES
d013
83
page 95Initial issue, Jan. 01/2002
Now release pressure from dog gear by turning spindle R back andremove gearbox from fixture. Remove drive gear T, thrust washer Y anddog gear. Force apart bush Y with circlip pliers and withdraw frompropeller shaft.
00261
CAUTION: Do not overstress bearing bush Y, otherwise it willbecome unusable.
Overload clutch disassembly
Remove overload clutch Q, 3 disk springs W 80x35x3, step sleeve E,washers R, eccenter T for fuel pump and distance sleeve Y.
With design year 1992 the inner centering E of the disk springs wasintroduced.
NOTE: For an intermediate periode the backlash between thedogs was changed from 30° to 15°. In the course ofstandardizing of the gearbox the backlash was changedagain to 30°, and the gear width, crankshaft and gearboxhousing was modified.
Refer to: standardization of gearbox for ROTAX® 912/
914, SL 912-002.
12
46
5 3
fig. 14600262
8
7
fig. 144 fig. 145
62
3
5
41
00260

MAINTENANCE MANUAL IIAIRCRAFT ENGINES
page 96Initial issue, Jan. 01/2002
Effectivity: 912 Series
d013
83
14.4.11) Propeller shaft disassemblySee fig. 147 and 148.
Place gear cover on a suitable fixture andpress propeller shaft off with a hand press. Topress off the propeller shaft, alternatively theextractor Q, part no. 877 615 can be used.
Screw extractor with 6 x M6 screws W ontogear cover E and place protection piece R,part no. 877 605 ( for engine version configu-ration 2) or T, part no. 877 600 (for versionsconfiguration 3 and 4) onto the end Y ofpropeller shaft U.
Insert spindle I into the support O of theextractor Q and screw hex. nut P M24x1,5from inside onto the spindle I. By turning thespindle clockwise, the propeller shaft ispressed off the gear cover.
CAUTION: The protection piece R or Tmust be used without fail asthe machined internal diam-eter of propeller shaft will bedamaged. If the propellershaft will be removed the ballbearing should be renewed.
For removal of ball bearing unscrew the 4hex. screws M7x16 with washers q fromgear cover E.
Heat gear cover to 80 ÷ 100°C (180 ÷ 210° F) and removeball bearing together withoil seal w and radius shim ewith suitable punch from out-side towards inside.
3 fig. 148
14
1511
13
12
00264
CAUTION: At this procedure the oil sealw and the ball bearing isdamaged and must be re-newed.
NOTE: Commencing with model 1995onwards size of oil seal w
was changed from 40x52x7into 40x55x7 and hex. hd.screws from M6 to M7.
1
2
3
R T
6
8
9
10
7
fig. 147
00263

Effectivity: 912 Series
MAINTENANCE MANUAL IIAIRCRAFT ENGINES
d013
83
page 97Initial issue, Jan. 01/2002
010
20 30
4050
60
7080
90
0.01
mm
12 3 4
56
789
0
Maß/dim.
32
54
6
7
fig. 15000266
Maß
dim
.
fig. 151
98
10
00267
Maß/dim.
fig. 1491
00265
w
e
14.4.12) Gearbox components checkSee fig. 149, 150, 151, 152, 153 and 154.
Clean disassembled gearbox with kerosine or gasoline and check thefollowing components:
— Verify crankshaft bearing bushing Q fitted in gear cover, for insidediameter and tight fit, see para 15.
— Take dimensions of both bearing seats W and E on propeller shaft.See dim. and dim. q in para 15. Inspect oil seal contact area R andT. Verify propeller shaft between centres for straightness and propel-ler flange for out-of-true w, see para 15.
— The surface of propeller shaftmust be free of fretting corrosionon the bearing seats W and E.The ball bearing Y 6207 E (35x72x17) has to be fitted witha press fit between inner race and prop shaft as well aswith a press fit between outer race and gearbox cover. Inspect grooveU for ring halves and teeth I for wear or damage.
On configuration 3 check the inner diameter O of propeller shaft in thearea of oil inlet flange P, see dim. e in para 15.
Inspect propeller shaft for cracks by magnetic particles inspection method(MPI), see para 11.4. Check tangential intensity of magnetic field with testinstrument DEUTROMETER® 3870. Nominal value is 10 ÷ 50 A/cm. Atindication of cracks renew the respective part. Clean and demagnetize thepart. The maximum admissible remaining magnetism must not exceed 1,2A/cm. Register the results of the magnetic particle inspection in therespective Form Sheet, see para 16.3.

MAINTENANCE MANUAL IIAIRCRAFT ENGINES
page 98Initial issue, Jan. 01/2002
Effectivity: 912 Series
d013
83
— Visually inspect dog gear and dog hub or pitting on gear teeth and/or ramps q. Ensure that ramp tops of dog gear are clearing valley ofdog hub. Check gap r between ramp top and valley, see para 15.Slight wear and pitting on the dogs is permissible.
1614 15
17 18
fig. 153 11
00269
3
41ø
80ø
Maß
dim
.
20
20
19
fig. 15400271
y
Maß/dim.
13
fig. 15200268
r
— Inspect teeth of drive gear w for wear and damage.
— Inspect eccenter for fuel pump and pump plunger for wear, see para13.1.5.
— Check step collar for wear.
— Measure thickness of plastic thrust washer r, between dog gear and drive gear e, see dim. t in para 15.
— Check length of dog gear bush t (of hardened steel) for wear.
— Visually check ring halves y for damage and wear, renew as required.
— Check the disk springs u. At visible wear of disk springs in the contactarea i they have to be renewed. Check dimension y of the releaseddisk spring. See para 15.
dimensions new mm (in.) wear limit mm (in.)
See Dimension Sheets in para 15.

Effectivity: 912 Series
MAINTENANCE MANUAL IIAIRCRAFT ENGINES
d013
83
page 99Initial issue, Jan. 01/2002
ø 40,8 mm1,606 in.
fig. 156
00276
00272
14.4.13) Propeller gearbox refittingSee fig. 155, 156 and 157.
Heat up gear cover Q in oven to approx. 100° C (214° F), insert oil seal W40x55x7 (sealing lips lubricated with motor oil) from the inside, usingpunch, part no. 876 518. Add distance ring E 36x50x5,5 with rounded sideR towards oil seal. Press in ball bearing T, utilizing press-ring, part no.877 320, and insertion punch, part no. 877 275. Fix bearing in position,using 4 hardened washers Y 7,2/18,8/3 and hex. screws U M7x16.
NOTE: Secure screws with LOCTITE® 221 and tighten to 15 Nm(135 in.lb).
If fitted pull out both dowel pins from gear coverand place gear housing on a suitable support Iwith a recess for the propeller shaft. ApplyLOCTITE® Anti-Seize to bearing seat P 35 mm(1,4 in.) diameter and press propeller shaft Ofrom outside into gear cover.
CAUTION: Do not tap!
Make absolutely sure to support the inner ring of the bearing with suitable tube . It is anadvantage if gear cover is still warm at this stage.
Turnaround gearcover. Fit distance sleeve q35,2x42x8 and eccenter w for fuel pump. Then fitstep collar e with diameter 40,8 mm (1,6 in)facing towards disk spring, 2 disk springs rplaced against each other and the 3rd disk springt with the back facing the previous disk spring.Take care that the disk springs rest on the centeringcollar y. Apply LOCTITE® Anti-Seize to teeth ofpre-assembled overload clutch u and slide intoposition on propeller shaft. Carefully fit bearingbush i lubricated with motor oil on propeller
shaft, using circlip pliers. Apply LOCTITE® Anti-Seize on dogs of doggear o and fit it. Slide plastic thrust washer p 33,2x51x1,2 coatedon both sides with LOCTITE® Anti-Seize, and drive gear [ ontopropeller shaft.
CAUTION: If the disk springs are not fitted centrically, the dog gearcannot be depressed enough to allow insertion of thering halves. Do not increase the press force, but disas-semble the gearbox again and fit disk springs bettercentered.
NOTE: Apply LOCTITE® Anti-Seize on the contact surfaces ofthe disk springs, on the dogs and the tooth profile of thepropeller shaft.
fig. 155
9
2
5
1
3
4
6
7
8
10
11
12

MAINTENANCE MANUAL IIAIRCRAFT ENGINES
page 100Initial issue, Jan. 01/2002
Effectivity: 912 Series
d013
83
2614
13
1615
21
19
20
23
17
18
22
24
25
27
04961
fig. 157
14.4.14) Disk spring pre-tension adjustSee fig. 157 and 144.
With springs in the released state, the face ] or the ring halves must bein line with the upper edge A of the groove in propeller shaft. Compensatethe difference by using shims S placed without fail between eccentercollar w and step collar e.
After pre-tensioning of disk springs, depress dog gear o with assemblyring, part no. 876 885, until the ring halves can be inserted. Insert ringhalves and release disk springs, see para 14.4.10.
CAUTION: Never depress springs completely, otherwise the doggear will damage the gear cover. The ring halvesmust be completely inserted in the groove onpropeller shaft!

Effectivity: 912 Series
MAINTENANCE MANUAL IIAIRCRAFT ENGINES
d013
83
page 101Initial issue, Jan. 01/2002
14.4.15) Propeller gearbox installationSee fig. 158, 159 and 202.
Check the crankshaft Q on power takeoff side for out-of-roundness, seedim. u in para 15. Slide drive gear W onto crankshaft E. Fit friction washerT VS 30 and hex. nut R M30x1,5 secured with LOCTITE® 221. Torqueto 200 Nm (1770 in.lb).
CAUTION: Dog gear and drive gear are paired and marked with acontinuous serial number Y and must not be exchangedindividually.
NOTE: Verify alignment of crankshaft see fig. 202 and dim. G inpara 15. Before rotating the crankshft remove one sparkplug per cylinder. At excessive out of roundness, re-move hex nut R M30x1,5 and check again. If not out oftolerance replace hex nut R M30x1,5 and friction washerT VS30.
Maß
/dim
.
fig. 158
6
3
541
2
00275
I
Clean the sealing surfaces of gearbox and and crankcase. Insert bothdowels R 6x20 into crankcase. Lubricate oil seal 30x52x7 (sealing lip) forpropeller shaft in crankcase and bearing bore for propeller shaft with motoroil.
NOTE: There is no oil seal fitted on types 912 configuration 3 and912 configuration 4!
Keep the rollers of the roller bearing in position with multi-purpose greaseLZ to facilitate assembly of propeller shaft.
Position gear cover with completely pre-assembled gear unit, previouslycoated on sealing surface with sealing compound LOCTITE® 574.Thepropeller shaft or the drive sleeve must be turned slightly to allow engage-ment of the drive gear. By gently tapping on the gear cover with a plasticmallet (not on propeller shaft) the gearbox is fitted on crankcase.
2
010
20
30
4050
60
70
80
90
0.01mm1
23456
78
9 0
fig. 20201374

MAINTENANCE MANUAL IIAIRCRAFT ENGINES
page 102Initial issue, Jan. 01/2002
Effectivity: 912 Series
d013
83
010
2030
4050
60
70 80
90
0.01mm
1234
56
7 89
0
00274
NOTE: If at a gap of approx. 10 mm (.4 in.) (gear cover tocrankcase) resistance, is felt the rollers must be betteraligned.The drive sleeve must be turned slightly to allowengagement of the drive gear in the vacuum pump gear.
CAUTION: If excessive force is applied at assembly, the rollerbearing or the drive for vacuum pump or hydraulicgovernor can be damaged. If oil gets on the sealingsurface due to difficult assembly, clean it and applyagain sealing compound LOCTITE® 574.
Tighten gearbox evenly with 2 Allen screws M8x45 and 8 Allen screws UM6x45 with lockwashers crosswise. Tightening torque for M8 = 25 Nm(220 in.lb) and for M6 = 10 Nm ( 90 in.lb).
Check gear backlash with dial gauge I radially on propeller flange O, seedim. i in para 15.
If the studs P for attachment of fuel pump have been removed, fit the2 studs M8x23/14 secured with LOCTITE® 221 into the gear cover andtighten to 8 Nm (70 in.lb).Install fuel pump with insulating gasket andtighten with lockwasher and hex. nut q M8. Torque to 15 Nm (133 in.lb).
Remove crankshaft locking screw and screw in crankshaft plug screwwith Cu sealing ring and tighten to 22 Nm (195 in.lb). For inspection turncrankshaft with wrench 24 a/f on hex. screw on magneto side.
fig. 159
8
7
12 13 10
9

Effectivity: 912 Series
MAINTENANCE MANUAL IIAIRCRAFT ENGINES
d013
83
page 103Initial issue, Jan. 01/2002
Blank page
14.5) Cylinder head removalSee fig. 160 and 161.
If components of several cylinders are dis-assembled, they must be marked to ensurecorrect coordination at re-fitting.
Remove Allen screw M6x25 Q with shimfrom valve cover W and lift off valve coverwith large and small O-ring. Remove cross-wise 2 each collar nuts E with washers R
and 2 collar cap nuts M8. The collar cap nutis inside the valve cover and has a sealingedge.
NOTE: Therefor no washer is re-quired under the collar capnut.
Lever complete cylinder head off with screw-driver between cylinder T and cylinderhead.
CAUTION:Do not damage sealing sur-face!
Keep both push rods Y in oil return tubesU in position and remove cylinder head I.The oil return tubes remain with the cylinderhead. Remove O-rings O 16x5 from crank-case P.
Lay aside cylinder head so as not to dam-age sealing surface and oil return tubes. Liftout oil filled push rods, stop oil from drippingby sealing with finger. Lay aside push rods,coordinated to cylinder heads by numbersto avoid any mix up at reassembly.
200277
00278
1
3
4
5
7
8
9
10
6
fig. 160
fig. 161

MAINTENANCE MANUAL IIAIRCRAFT ENGINES
page 104Initial issue, Jan. 01/2002
Effectivity: 912 Series
d013
83
14.5.1) Cylinder head disassemblySee fig. 162.
If the cylinder head is not removed and the rocker arms should bedismantled, turn crankshaft to set the piston of the respective cylinder toignition T.D.C. and to have only little pressure on the rocker arm. Depressrocker arm with test lever 877 690 towards hydraulic valve tappet. Now therocker arm is completely released and the rocker arm shaft can beremoved.
NOTE: The hexagon of the cap collar nut may be in an unfavour-able position as to prevent removal of the rocker armshaft. In this case loosen the nut.
Withdraw rocker arm shaft and remove both rocker arms.
Compress valve springs utilizing valve spring mounting deviceQ, part no. 877 380 and clamp W or similar tool and lift out valvecotters. Release valve spring. Remove valve spring retainer andboth springs, and withdraw valve.
NOTE: Prior to the removal of valves, clear off burrs whichmay be present on valve stems to prevent damage
to valve stem seal and valve guide. Mark valvescoordi nately.
Repeat this procedure for the second valve and clean cylinderhead.
Check oil return tubes W for leaks (visual check). At leaks in thearea E the tubes affected must be renewed. For this procedure,heat cylinder head to approx. 180O C (356O F). Extract tubes andremove any glue residues from bore. Apply LOCTITE® 648 on the
new oil tubes in the area of the two grooves and push tubes into positionin the cold cylinder head.
NOTE: Apply LOCTITE® only on the cold part!
Prior to removal of the coolant elbow mark or take dimensions of its locationto ensure proper position at re-installation. Heat cylinder head to approx.80-100°C (180-210°F) and unscrew coolant elbow. Remove residues ofsecuring agent with a tapping drill M18x1 (part no. 877 570) and checkthreads. Apply LOCTITE® 648 on cylinder head and on new coolant elbowand screw elbow into the cold cylinder head. Allow cylinder head to curefor approx. 10 minutes at 80° C (176° F).
Carbon deposits on the sealing surface to the cylinder, should be removedcarefully with lapping fleece or solvent.
1
3
2
fig. 162
00280

Effectivity: 912 Series
MAINTENANCE MANUAL IIAIRCRAFT ENGINES
d013
83
page 105Initial issue, Jan. 01/2002
NOTE: At reassembly coat cylinder sealing face thinly withLOCTITE® 221.
At slight wear, valve and valve seat may be re-lapped, using emery paste.Because of seat armour, restrict re-lapping to 0,2 mm (.008 in.) max.
Clean cylinder head and single components in gasoline or kerosine.Check sealing face of cylinder head, and if need be, true up along withcylinder, but only slight rework is allowed.
Renew valve stem seals. If the engine has been "run hot", check in anycase hardness of cylinder head material, see para 14.5.7.
Maß /dim.
1
fig. 164
00281
Maßdim.
2
fig. 163
00279
Maß
dim.
45°
1
fig. 16500285
o
p
[
14.5.2) Valve guidesSee fig. 163 and 164.
Check diameter of valvestem Q and int. dia. ofvalve guide W dim. pand dim. o in para 15.
If wear limit is reached,renew valve guide.
For this procedure sentthe cylinder head to anauthorized overhaul fa-cility.
dimensions new mm (in.) wear limit mm(in.)
See Wear Limits in para 15.
14.5.3) Valve seatsSee fig. 165.
Ensure sealing surfaces Q of valveseats are clean. If necessary, re-lapusing emery paste, see para 11.7.16.Check Imprint width, see dim. [ inpara 15. At presence of burned spotsor deformation, send cylinder headfor overhaul to an authorized overhaul facility.
dimensions new mm (in.) wear limit mm(in.)
See Wear Limits in para 15.

MAINTENANCE MANUAL IIAIRCRAFT ENGINES
page 106Initial issue, Jan. 01/2002
Effectivity: 912 Series
d013
83
1 2 3 4 5 6 7 8 9 10 11 12 13 14 15 16 17 18 19 20
Maßdim.
00282
fig. 167
1
00283
A
fig. 168
14.5.4) ValvesSee fig. 166.
Clean valves and check valve head Q for wear. Place valve on V-blocksW, roll them for checking out-of-true with dial gauge (max. admissible out-of-true, measured on valve head, see dimension ] in para 15.
The sealing surface on thevalve head is armouredand must not be reworked,seal-lapping by emerypaste is allowed only, seepara 11.7.16. Renew valveas necessary. Minimumrim thickness R of thevalve head is 1,2 mm(0,047 in.). Check holdinggrooves T on valve stem.Check valve cotters, re-place as necessary.
The thermal stress is higher on the exhaust valves (dia. 32 mm = 1,3 in.)therefore direct special attention when checking this valve. Seal-lap bothvalves and check for leakage.
14.5.5) Valve springsSee fig. 167 and 168.
One spring retainer per valve is used. The spring Q got a wire gage of 3,85mm (0,15 in). The same springs are on inlet and exhaust valves. Springrate non progressive. Visually check springs for fracture and deformation.
Check free length of both springs, see dimension A in para15. Renew valves shorter than the minimum length.
NOTE: In design year 1997 the single spring retainer wasintroduced, see SI-14-97.
NOTE: Actual spring length should be as equal as possible, oninlet and outlet side. Renew as required.
Dimensions New Wear limits
See Wear Limits in para 15.
010 20
30
40
50
6070
80
90
0.01
mm
12
3 4567
890
1,2 mm0,472 in.fig. 166
2
3
1
400284

Effectivity: 912 Series
MAINTENANCE MANUAL IIAIRCRAFT ENGINES
d013
83
page 107Initial issue, Jan. 01/2002
fig. 169
fig. 170
Maßdim.
00286
00287
S3 61 5
7
6
4
2
14.5.6) Rocker armSee fig. 169 and 170.
The rocker arm bearing surface Q is lubricated via the hollow push rod Wtowards the ball cup E. The oil flows through the bores R in the rockerarm. The oil exit and in consequence the splash oil lubrication of thecomplete valve mechanism is via bore T. The rocker arms for inlet andoutlet are different.
Check rocker arm shaft and rocker arm bearing Y for traces of seizure.Visually inspect valve stem contact area U and ball cup E of rocker arm.Excessive signs of wear indicate lack of oil. Slightly rework of valve stemcontact area U on rocker arm is allowed. Check oil bores R in rocker armfor free passage.
Dimensions New Wear limits
See Wear Limits in para 15.
14.5.7) Cylinder head hardness testSee fig. 211.
If the engine has exceeded the maximumcylinder head temperature (e.g. the cylin-der head temperature has exceeded 180°C or (356 F) for more than 30 minutes).Verification of cylinder head hardness ismandatory and must be carried out.
Check hardness in the area T of the bear-ing support.
For minimum hardness, see Wear Limits inpara 15.
Do not damage sealing surface for O-ring6,4 x 1,8 Y.
5
6
fig. 21104315

MAINTENANCE MANUAL IIAIRCRAFT ENGINES
page 108Initial issue, Jan. 01/2002
Effectivity: 912 Series
d013
83
M
M
M
M
C
C
fig. 17204711
M..... MOLYKOTE G-NC..... LOCTITE 648M..... MOLYKOTE G-NC..... LOCTITE 648
14.5.8) Cylinder heads reassemblySee fig. 172.
Place valve spring support Q on valve guide and fit new valve stem sealW (on inlet side only). Insert valve E pre-oiled with motor oil, place innerand outer valve spring R and spring retainer T in position. Compressvalve springs by utilizing valve spring mounting device and clamp. Insertvalve cotters Y and release springs, see para 14.5.1. Same procedure forthe exhaust valve U.
NOTE: Ensure correct positioning of valve cotters.
Apply MOLYKOTE® G-N to rocker arm bore I, push rod head O andvalve contact area P.Bring inlet rocker arm and exhaust rocker arm into position, Apply MOLYKOTE® G-N to both sides of rocker arm shaft qand fit into bearing bores in cylinder head, see para 11.7.18.
NOTE: The rocker arm shaft must slide easily into the bore. Donot apply force!
Lubricate all internal parts with motor oil and check for easy movement.,see para 11.7.1.
6
5
42
1
73
10
1113
128 9

Effectivity: 912 Series
MAINTENANCE MANUAL IIAIRCRAFT ENGINES
d013
83
page 109Initial issue, Jan. 01/2002
2
1
3
00290
fig. 173
R
69
7
5
108
00291
fig. 174
14.6) Cylinder and Piston disassemblySee fig. 173 and 174.
NOTE: Prior to removal, mark cylinders and pistons to ensure correctposition at reassembly. Cylinders are identical, pistons have offsetcentres of pin to piston!
Set piston to top dead centre position and with arrow mark facing gearbox. This arrowQ has to face gearbox on all 4 cylinders and serves as positioning aid for the pistonshaving offset centres.
Withdraw cylinder carefully. Support piston by hand to avoiddamaging piston and piston rings, see para 11.6. After mov-ing circlips W remove piston pin circlips using the speciallyshaped screwdriver E, see para 11.4.
Push out piston pin using guide punch with puller R, part no.877 091, see para 11.6. Insert puller spindle T into piston pinY and screw nut U onto it. Turning the spindle clockwise, thepiston pin is pulled out of the conrod I into the puller sleeveO until the piston P can be removed.
Remove nut U and the puller ass´y.
Coordinate piston pin to keep each piston pin with its respec-tive piston for reassembly.

MAINTENANCE MANUAL IIAIRCRAFT ENGINES
page 110Initial issue, Jan. 01/2002
Effectivity: 912 Series
d013
83
14.6.1) Piston checkSee fig. 175 and 176.
The engine type 912 Series has cast light alloy, full skirt pistons. The pistonaxis is offset by 1 mm (.039 in.).
Remove piston rings using a pair of piston ring pliers.
CAUTION: Make absolutely sure to re-fit rings in their initial position.
Check piston rings and ring grooves for oil carbon residues. The best wayto clean piston ring grooves is by using a piece of a broken ring. Increasedamount of residue is to be expected when using AVGAS 100LL. Removecarbon deposits from piston crown.
Visually check and measure piston. Piston and/or cylinder must berenewed if piston to wall clearance exceeds 0,1 mm (.004 in.). Todetermine this clearance, measure cylinder bore by internal caliper withdial gauge, to find the biggest piston dia. (most probably found at theposition Q depicted), see dimension D in para 15.
Comparing the 2 dimensions — smallest cylinder dia. less biggest pistonskirt dia. — is the piston to cylinder clearance.
Visually inspect groove for piston pin circlip W. At presence of a burrremove it carefully. If the groove is excessively worn (> 0,3 mm = .012 in.),renew piston.
2 dimension groups of pistons are available, marked by a red or greencolour dot on piston crown. Nominal dimension differs by 0,01 mm. Thepiston with red dot is the smaller one. The nominal dimension is stampedon the piston crown. There are no oversize pistons planned. The piston issupplied only complete with 3 rings.
75
75—100 mm1/100 mm
Maß
dim
.
1
04707
fig. 176
2 2
04708
D
fig. 175

Effectivity: 912 Series
MAINTENANCE MANUAL IIAIRCRAFT ENGINES
d013
83
page 111Initial issue, Jan. 01/2002
14.6.2) Piston rings checkSee fig. 177, 178 and 179.
Check cleaned piston rings for correct end gap and flank clearance. Withthe rings Q fitted on piston, measure flank clearance by feeler gauge W.Increased amount of residues in the spiral spring E of oil scraper ringindicates use of AVGAS 100LL.
To determine ring end gap R remove ring from the piston using piston ringpliers, insert ring into a new cylinder, utilizing a piston as pusher andmeasure ring end gap R by feeler gauge W, see dim. F in para 15.
At inspection of ring surface T the portion of surface contact can be seenand indicating the wear. Fit piston rings using piston ring pliers, withmarking Y "TOP" or the dot mark towards piston crown.
Maßdim.
4
fig. 177
00294
top
topKompressionsring/compression ring
Minutenring/bevel-edged ring
Ölabstreifring /oil scraper ring
fig. 179
5
53 00296
fig. 178
1
2
00295
F
6
6
14.6.3) Dimensions of pistons and piston ringsSee fig. 175, 177, 178 and 179.
Dimensions New Wear limits
See Wear Limits in para 15.

MAINTENANCE MANUAL IIAIRCRAFT ENGINES
page 112Initial issue, Jan. 01/2002
Effectivity: 912 Series
d013
83
14.6.4) Piston pinMeasure piston pin and check for traces of seizure in area of con-rod seat.In case of distinct traces of seizure, renew piston pin even if dimensionsare correct.
Dimensions New Wear limits
See Wear Limits in para 15.
The circlips for axial piston pin securing must be used only once andtherefore must be renewed.
14.6.5) Cylinder checkSee fig. 180 and 181.
The cylinder walls are “GILNISIL”-coated. All 4 cylinders are identical.Clean cooling fins Q of cylinder. Remove carbon deposits from top end Wof cylinder bore with suitable tool (e.g. lapping fleece) or solvent. Cleansealing surfaces E on top and bottom, make visual check.
Measure cylinders as per illustration and record dimensions in the Dimen-sion Sheet, para 16. Determine piston to cylinder clearance, see para14.6.1. If the wear limit of the cylinder is reached, renew cylinder andpiston.
Dimensions New Wear limits
See Wear Limits in para 15.
NOTE: Slight carbon residues on the cylinder sealing surfaceindicate leakage. True up cylinder and cylinder head bylapping the mating surfaces with lapping paste (e.g.valve lapping paste or equivalent) until required sealingis achieved.
fig. 180
1
3
32
00297
fig. 18100298

Effectivity: 912 Series
MAINTENANCE MANUAL IIAIRCRAFT ENGINES
d013
83
page 113Initial issue, Jan. 01/2002
14.7) Hydraulic valve tappetsSee fig. 182, 183 and 184.
Remove valve tappet Q from crankcase using a specially shaped screwdriver W.Never engage at circlip E. This would cause valve tappet to fall apart.
CAUTION: Lay aside tappets in a manner to ensure refitting in their initial place.
Visually inspect hydraulic valve tappets. The hydraulictappets rotate during engine operation. Therefore, the cam-shaft lobes R should be worn evenly. Failure of the hydrau-lic tappets to rotate properly will result in unevenly worncamshaft lobes. Any visible pitting on the contact face of thehydraulic tappet is a cause for part rejection and the tappetmust be replaced. It is not permissible to re-work the face ofthe hydraulic tappet!
If a valve tappet must be renewed, closely inspect itsrespective camshaft lobe. Disassembly of a hydraulic tap-pet is not permitted.
The new valve tappet is supplied dry and will pump itself fullwith oil during starting procedure. Oil enters the valve tappet
through bore T. The securing ring E keeps the valve tappet plunger Y in positionwhen the tappet is removed.
CAUTION: The first start of a repaired engine should be without ignition, until therequired oil pressure is built up.
2
fig.182
3
1
00299
14.8) Push rodsSee fig. 185.
Clean and inspect visually the push rods Q. Pay attention to tight fit of the two ballheads W pressed into the rod. If the engine has exceeded themaximum admissible speed this may have caused bending ofthe push rods. Check push rods supported on V-blocks forstraightness, see dim. G. Through the bores E oil passes from
the valve tappet to therocker arm.
010
20
30
4050
60
70
80
90
0.01mm1
234 5 6
78
90
Q00302
fig.185
2
2
3
5
fig.1834
00300
fig.184
6
3 00301

MAINTENANCE MANUAL IIAIRCRAFT ENGINES
page 114Initial issue, Jan. 01/2002
Effectivity: 912 Series
d013
83
14.9) Displacement parts reassembly
14.9.1) Hydraulic valve tappetsLubricate bearing bore Q for valve tappets W in crankcase with motor oil.Apply LOCTITE® Anti-Seize to the contact surfaces E of the valvetappets, lubricate their outside with motor oil and insert them according to
the recorded position into the crankcase. The valvetappets must be able to turn without resistance in thecrankcase.
14.9.2) Piston fittingSee fig. 186, 187, 188, 189, 190 and 191.
The piston pin centre is offset from piston centre and thepiston must be installed with the arrow Q on pistoncrown showing towards propeller shaft. This meansthat on cylinders 1 and 3 the narrower side W of thepistons must be below the conrod, and on cylinders 2and 4 the narrower side E of the piston must be abovethe conrod.
Install the piston as shown on fig. beside. The offsettingof piston pin bore is 1 mm (.039 in.).
If the arrow Q on piston crown is no more visible, thepiston must be measured.
Apply MOLYKOTE® G-N slide paste over the whole ofthe piston pin R , coat bore T in conrod and the borein piston Y. Insert piston pin with installation pusher,part no. 877 011 (slide fit).
The piston pin may also be inserted with the use of thepiston pin extractor ass'y U, part no. 877 091. Pushpiston pin into the piston, insert puller spindle I fromthe opposite side and fit on nut O. By turning the spindleclockwise, the piston pin can be pulled up to the circlipgroove P.
Zylinder 1 und 3 /Cylinder 1 and 3
Bol
zena
chse
/pi
ston
pin
axi
s
Bol
zena
chse
/pi
ston
pin
axi
s
Zylinder 2 und 4 /Cylinder 2 and 4auf den Propellerflansch gesehen /
looking at propeller flange
piston centreKolbenmitte
1mm / 0,394 in
Bolzenmittepin centre
fig. 18704709
fig. 188
3
00305
2
1
fig. 186
00303

Effectivity: 912 Series
MAINTENANCE MANUAL IIAIRCRAFT ENGINES
d013
83
page 115Initial issue, Jan. 01/2002
Fit piston pin circlips with circlip installation tool part no. 877 805. For thisprocedure push the circlip with the insertion jig into the locating sleeveq until it engages in the groove w. Now position the complete circlipinstallation tool e on the piston. Support piston with hand and push circlip with a strike at the insertion jig into the groove r of the piston. Applysame procedure on the opposite side of the piston. See Service InstructionSI-2ST-001 and SI-21-1997.
WARNING: Always use new piston pin circlips! Used or circlipsalready fitted once exert insufficient tangential force thusallowing circlips to turn with consequent wear of thecirclip groove.
8
967 5
10fig. 189
4
00306
fig. 190
11
13
12 1404706
16 fig. 191
02038
15

MAINTENANCE MANUAL IIAIRCRAFT ENGINES
page 116Initial issue, Jan. 01/2002
Effectivity: 912 Series
d013
83
00278
14.9.3) Fitting of cylinderSee fig. 191.
Place O-ring 87x2 on cylinder spigot and lubricate cylinder.
NOTE: On the type 912 S/ULS/ULSFR an O-ring 7x2 at thecylinder base for damping of the studs has been intro-duced with start of serial production. See the groove atthe cylinder base.
Pay attention to position of piston ring gaps Q. The gap of the1st and 3rd piston ring should be in the middle of piston skirt,and the 2nd ring be turned by 180°. The ring gap should neverbe in the area of the piston pin bore.
Check whether piston pin circlips are installed. Lubricatepiston, compress rings with piston ring spanner and mountthe coordinated cylinder with care. Same procedure with theother cylinders.
CAUTION: To avoid ring breakage, use piston ring spanner!
14.9.4) Fitting of cylinder headSee fig. 193, 194 and 195.
Install respective pushrod Q in both oil returntubes on pre-assembled cylinder head andplace pre-oiled O-ring W 16x5 on oil returntube E.
Mount cylinder head until O-rings W on bothoil return tubes rest in crankcase R. Now liftcylinder T until the centering Y of cylinderengages in the cylinder head recess U.
NOTE: This is a safety measure toprevent jamming of cylinderhead resulting in leakage.
Fit cylinder head and cylinder together oncrankcase. Tighten cylinder head crosswisewith 2 collar cap nuts M8 and 2 hex. nuts M8along with washers, tightening slightly only!Pay attention for squeezing O-rings W evenlyinto crankcase.
Repeat same procedure, if necessary, on thecylinder heads.
toptop
Ringstoßring gap
12
3
fig. 192
1
00309
7
3
6
5
4
1
2
fig. 193

Effectivity: 912 Series
MAINTENANCE MANUAL IIAIRCRAFT ENGINES
d013
83
page 117Initial issue, Jan. 01/2002
Attach cylinder aligning tool I, to intake flange of cylinder heads P by 4screws O M6x25. Align cylinder heads, thus warranting a plane supportfor intake manifold. Fit collar cap nut and collar nut along with washer and tighten cylinder heads crosswise to 22 Nm (195 in.lb). Remove 4screws O and cylinder aligning tool.
Lubricate all moving parts in rocker arm compartment. Place O-ring q105x2,5 and O-ring w 6,4x1,8 on valve cover e, put cover in position andtighten Allen screw r M6x30 along with washer t to 10 Nm (90 in.lb).
Between the outside shape of the valve covers a gap of at least 0,2 mm hasto remain. The valve covers must not touch each other.
CAUTION: Do not ever change the length of valve cover screw!Check whether threads are damaged. If this screw isloose or worn or if the valve cover is leaking, the oilreturn to the oil tank by "blow-by gas" will not or notsufficiently function.
Screw in resistance spark plugs and tighten to 20 Nm(180 in.lb). Fit spark plug connectors according to cod-ing sleeves on spark plugs, see para 13.4.11.
NOTE: Proceed as per Wiring Diagram.
8
9
1112
1010
fig. 19404713
1617
e
14
13
00312
fig. 195

MAINTENANCE MANUAL IIAIRCRAFT ENGINES
page 118Initial issue, Jan. 01/2002
Effectivity: 912 Series
d013
83
14.10) Fitting of coolant hosesSee fig. 005.
Fix all coolant hoses coming from expansion tank to the coolant exit on cylinder headswith spring type clamps 23 mm (.905 in.). Also fit the coolant hoses between water pumpand coolant entry into cylinder heads with spring type clamps 23 mm (.905 in.).
NOTE: Position the hose clamps so that no neighbouring coolant hoses canbe damaged.
14.11) Fitting of intake manifoldsSee fig. 012, 105 and 195.
Place both intake manifolds showing inwards, together with O-rings 34-2 Q oncylinder head and attach with 4 each Allen screws M6x25 W and M6x70 E along withlock washers. Torque to 10 Nm (90 in.lb), see also para 13.4.12.
NOTE: Do not squeeze the O-rings.
Attach compensating tube R and the hoses T on both endswith hose clamps 15/9 Y. Share hose clamp Y to attach oneeach bracket U for carburetor support.
NOTE: Verify position of hose clamp with head of theclamp screw towards propeller flange and lugsof clamp pointing upwards to achieve the properpretension of carb support spring.
1
2
3
4
56
7
fig. 196
00313
14.12) Fitting of an extra carburetor support
See fig. 197 and 198.
Check tension spring Q for mobility on cheese head screw W and engage spring onbracket E by using a suitable tool. Ensure that the two lugs R of the clamp pointupwards. Rectify as required.
CAUTION: To render the carburetor support effective, adistance of 40 mm (1,57 in.) between cheesehead screw W and bracket E has to bemaintained.
If instead of the Allen screw and the spacer a cheese head screw is fitted the supportkit part no. 887.730 (fig. 198) has to be used.
Same procedure with the 2nd carburetor.

Effectivity: 912 Series
MAINTENANCE MANUAL IIAIRCRAFT ENGINES
d013
83
page 119Initial issue, Jan. 01/2002
NOTE: From design year 1996 onwards the additional arburetor supportis fitted already in the serial production. For all engines prior tothis design year we recommend the retro-fitting of this support.Consult the Service Bulletin SB 912-10.
fig. 198
03884
14.13) Connecting of the fuel lines
The fuel lines from the tank to the fuel pump, from fuel pump to the two carburetorsand the return line to tank have to be routed at engine installation in accordance tospecifications of the aircraft builder.
CAUTION: At tightening of joints on the fuel lines do not apply any forces ormoments on fuel pump connections and prevent bending of theconnecting tubes. Refer to para 13.1.6.
40 mm
fig. 197
1
42
04730
3
5

MAINTENANCE MANUAL IIAIRCRAFT ENGINES
page 120Initial issue, Jan. 01/2002
Effectivity: 912 Series
d013
83
15) Wear limits sheets
15.1) Wear limits for ROTAX® 912 UL/A/FDesignation new wear limit actual dim.
mm (in.) mm (in.) int. / exh.
Cylinder/Piston EV / AV
see para 16.1 Form sheets
Piston pin
piston pin bore ..................................... 20,001÷20,005 (0,7874÷ 0,7876) .... 20,04 (0,789) ..........................piston pin ............................................. 19,992÷19,995 (0,7870÷ 0,7872) .... 19,97 (0,786) ..........................clearance,pin in piston ........................... 0,006÷ 0,013 (0,0002÷ 0,0005) ...... 0,5 (0,002) ..........................con-rod bore,small end ........................ 20,010÷20,020 (0,787 ÷ 0,788) ...... 20,04 (0,789) ..........................clearance, pin in con-rod........................ 0,015÷ 0,028 (0,0006÷ 0,001) ........ 0,05 (0,002) ..........................
Piston rings
1st compression ring
height of groove ..................................... 1,52 ÷ 1,54 (0,059 ÷ 0,061) ........ 1,6 (0,063) ..........................height of ring .......................................... 1,478÷ 1,49 (0,058 ÷ 0,059) ........ 1,45 (0,057) ..........................ring / groove clearance ..........................0,03 ÷ 0,062 (0,001 ÷ 0,002) ........ 0,1 (0,004) ..........................ring end gap F ......................................0,15 ÷ 0,35 (0,006 ÷ 0,014) ........ 1,0 (0,04) ............................
2nd compression ring (bevel-edged)height of groove ..................................... 1,27 ÷ 1,29 (0,050 ÷ 0,051) ........ 1,35 (0,053) ..........................height of ring .......................................... 1,228÷ 1,24 (0,048 ÷ 0,049) ........ 1,20 (0,047) ..........................ring / groove clearance ..........................0,03 ÷ 0,062 (0,001 ÷ 0,002) ........ 0,1 (0,004) ..........................ring end gap F ......................................0,3 ÷ 0,5 (0,011 ÷ 0,02) .......... 1,0 (0,04) ............................
3rd ring (oil scraper ring)
height of groove ..................................... 3,01 ÷ 3,03 (0,118 ÷ 0,119) ........ 3,1 (0,122) ..........................height of ring .......................................... 2,975÷ 2,99 (0,117 ÷ 0,118) ........ 2,95 (0,116) ..........................ring / groove clearance ..........................0,02 ÷ 0,045 (0,0008÷ 0,002) ........ 0,1 (0,004) ..........................ring end gap F ......................................0,15 ÷ 0,40 (0,006 ÷ 0,016) ........ 1,0 (0,04) ............................
Cylinder headwear on valve seat ................................. 0,0 ÷ 0,0 ......... max. 0,3 (0,012) ..........................valve guide bore o ................................7,006÷ 7,018 (0,275 ÷ 0,276) ........ 7,15 (0,282) ..........................valve stem p ........................................ 6,965÷ 6,98 (0,274 ÷ 0,275) ........ 6,94 (0,273) ..........................stem clearance ......................................0,026÷ 0,053 (0,001 ÷ 0,002) ........ 0,15 (0,006) ..........................sealing face width, inlet valve [ ...........1,40 ÷ 1,90 (0,055 ÷ 0,075) ........ 2,40 (0,094) ..........................sealing face width, exhaust valve [ ..... 1,50 ÷ 2,00 (0,059 ÷ 0,079) ........ 2,50 (0,098) ..........................out-of-true on valve head ] .................. 0,00 ÷ 0,01 (0,0 ÷ 0,0004) ...... 0,03 (0,0012) ........................rocker arm S with cast iron bush ........ 12,000÷12,018 (0,472 ÷ 0,473) ...... 12,09 (0,476) ..........................rocker arm S with bronze bush ........... 12,000÷12,027 (0,472 ÷ 0,474) ...... 12,10 (0,476) ..........................rocker arm shaft .................................. 11,983÷11,994 (0,471 ÷ 0,472) ...... 11,95 (0,470) ..........................rocker arm, radial clearance .................. 0,006÷ 0,035 (0,0002÷ 0,001) ........ 0,10 (0,004) ..........................depth of wear on contact face of valve stem 0,0 ÷ 0,0 .................. 0,25 (0,01)spring length at testload, inner . ........... 31,6 ÷30,4 (1,244÷ 1,197) ...... 30,0 (1,181) ..........................spring length at testload, outer . .......... 33,6 ÷32,4 (1,323÷ 1,276) ...... 32,0 (1,260) ..........................spring length at testload, single . ......... 33,6 ÷32,4 (1,323 ÷ 1,276) ...... 32,0 (1,260) ..........................spring rate, inner spring ....................... 13,25 N/mm (75,66 lbf/in) ............ .....................................spring rate, outer spring ....................... 33,25 N/mm (189,86 lbf/in) ........... .....................................spring rate, single ................................ 39,7 ÷59,9 N/mm (226,69÷342,03 lbf/in) .....................................

Effectivity: 912 Series
MAINTENANCE MANUAL IIAIRCRAFT ENGINES
d013
83
page 121Initial issue, Jan. 01/2002
Designation new wear limit actual dim.mm (in.) mm (in.) int. / exh.
Hardness of cylinder head (fill in if requested) EV / AV
cylinder head no. 1 .................... min. 85 HB 2,5/62,5/30 .................... .....................................cylinder head no. 2 .................... min. 85 HB 2,5/62,5/30 .................... .....................................cylinder head no. 3 .................... min. 85 HB 2,5/62,5/30 .................... .....................................cylinder head no. 4 .................... min. 85 HB 2,5/62,5/30 .................... .....................................
Propeller gearboxwear depth on dogs ................................. 0,00 0,00................. 0,20 (0,008) ..........................length of bearing sleeve, dog gear ....... 29,6 ÷29,8 (1,165 ÷ 1,173) ...... 29,00 (1,142) ..........................axial clearance of propeller shaft ...........0,02 ÷ 0,07 (0,0008÷ 0,0028) ...... 0,30 (0,012) ..........................propeller shaft ø 35 mm (1,378 in) ... 35,009÷35,02 (1,378 ÷ 1,379) ...... 35,003(1,378) ..........................propeller shaft ø 31,5 mm (1,24 in) q . 31,481÷31,47 (1,240 ÷ 1,239) ...... 31,460(1,239) ..........................prop. flange, axial out-of-true ø 122 (4,8 in) w
0,00 ÷ 0,05 (0,00 ÷ 0,002) ........ 0,06 (0,002) ..........................propeller shaft, internal dia. e ............. 11,00 ÷11,02 (0,433 ÷ 0,434) ...... 11,05 (0,435) ..........................oil inlet flange, journal dia. e ............... 10,935÷10,96 (0,430 ÷ 0,431) ...... 10,88 (0,428) ..........................radial clearance 0,04 ÷ 0,085 (0,0016÷ 0,003) ........ 0,16 (0,006) ..........................dog clearance r ....................................1,00 ÷ 1,20 (0,039 ÷ 0,047) ........ 0,50 (0,019) ..........................thickness of thrust washer t ................1,075÷ 1,325 (0,042 ÷ 0,052) ........ 1,00 (0,039) ..........................disk spring, free length y ......................5,20 ÷ 5,40 (0,205 ÷ 0,213) ........ 4,50 (0,177) ..........................gear backlash i ....................................0,07 ÷ 0,15 (0,003 ÷ 0,006) ........ 0,20 (0,008) ..........................
Crankshaft
out-of-round, magneto side Q ................0,00 ÷ 0,03 (0,00 ÷ 0,0012) ...... 0,06 (0,002) ..........................out-of-round, p.t.o. side Q .....................0,00 ÷ 0,03 (0,00 ÷ 0,0012) ...... 0,06 (0,002) ..........................bearing,magneto side R ...................... 31,99 ÷32,00 (1,259 ÷ 1,260) ...... 31,95 (1,258) ..........................ignition housing E 32,02 ÷32,03 (1,261 ÷ 1,261) ...... 32,10 (1,264) ..........................radial clearance, magneto side ..............0,02 ÷ 0,04 (0,0008÷ 0,0016) ...... 0,12 (0,005) ..........................bearing, p.t.o. side u .......................... 27,99 ÷28,00 (1,102 ÷ 1,102) ...... 27,95 (1,100) ..........................gearbox cover ................................. 28,02 ÷28,03 (1,103 ÷ 1,104) ...... 28,10 (1,106) ..........................radial clearance, p.t.o. side....................0,02 ÷ 0,04 (0,0008÷ 0,0016) ...... 0,12 (0,005) ..........................
Sprag clutchaxial clearance 0 ..................................0,30 ÷ 0,50 (0,012 ÷ 0,019) ........ 0,7 (0,028) ..........................
Water pump
impeller clearance T .............................0,40 ÷ 0,50 (0,016 ÷ 0,019) ........ 0,7 (0,028) ..........................
Oil pumppump plunger, axial clearance 2 0,00 ÷ 0,07 (0,00 ÷ 0,028) ........ 0,2 (0,008) ..........................
Ignition unit
spark plug, electrode gap Y ..................0,7 ÷ 0,8 (0,028 ÷ 0,031) ........ 0,9 (0,035) ..........................gap 7 for "old type" trigger coil ...............0,4 ÷ 0,5 (0,016 ÷ 0,020) ........ 0,5 (0,020) ..........................gap 7 for trigger coil with clamps ...........0,3 ÷ 0,4 (0,012 ÷ 0,016) ........ 0,4 (0,016) ..........................trigger coil, axial offsetting 8 ................0,0 ÷ 0,2 (0,000 ÷ 0,008) ........ 0,3 (0,012) ..........................
Electric starterarmature, axial clearance 9 ..................0,1 ÷ 0,2 (0,004 ÷ 0,008) ........ 0,3 (0,012) ..........................
Push rod
out of round G .......................................0,0 ÷ 0,1 (0,0 ÷ 0,004) ........ 0,2 (0,008) ..........................

MAINTENANCE MANUAL IIAIRCRAFT ENGINES
page 122Initial issue, Jan. 01/2002
Effectivity: 912 Series
d013
83
15.2) Wear limits for ROTAX® 912 S/ULSDesignation new wear limit actual dim.
mm (in.) mm (in.) int. / exh.
Cylinder/Piston EV / AV
see para 16.1 Form sheets
Piston pin
see para 15.1
Piston rings
1st compression ring
see para 15.1ring end gap F ......................................0,25 ÷0,5 (0,01 ÷ 0,02) .......... 1,0 (0,04) ............................
2nd compression ring (bevel-edged)see para 15.1ring end gap F ......................................0,25 ÷0,5 (0,01 ÷ 0,02) .......... 1,0 (0,04) ............................
3rd ring (oil scraper ring)
see para 15.1ring end gap F ......................................0,1 ÷ 0,3 (0,004 ÷ 0,012) ........ 1,0 (0,04) ............................
Cylinder headsee para 15.1
Propeller gearbox
see para 15.1
Crankshaft
see para 15.1
Sprag clutch
see para 15.1Water pump
see para 15.1
Oil pumpsee para 15.1
Ignition unit
see para 15.1
Electric startersee para 15.1
Push rod
see para 15.1
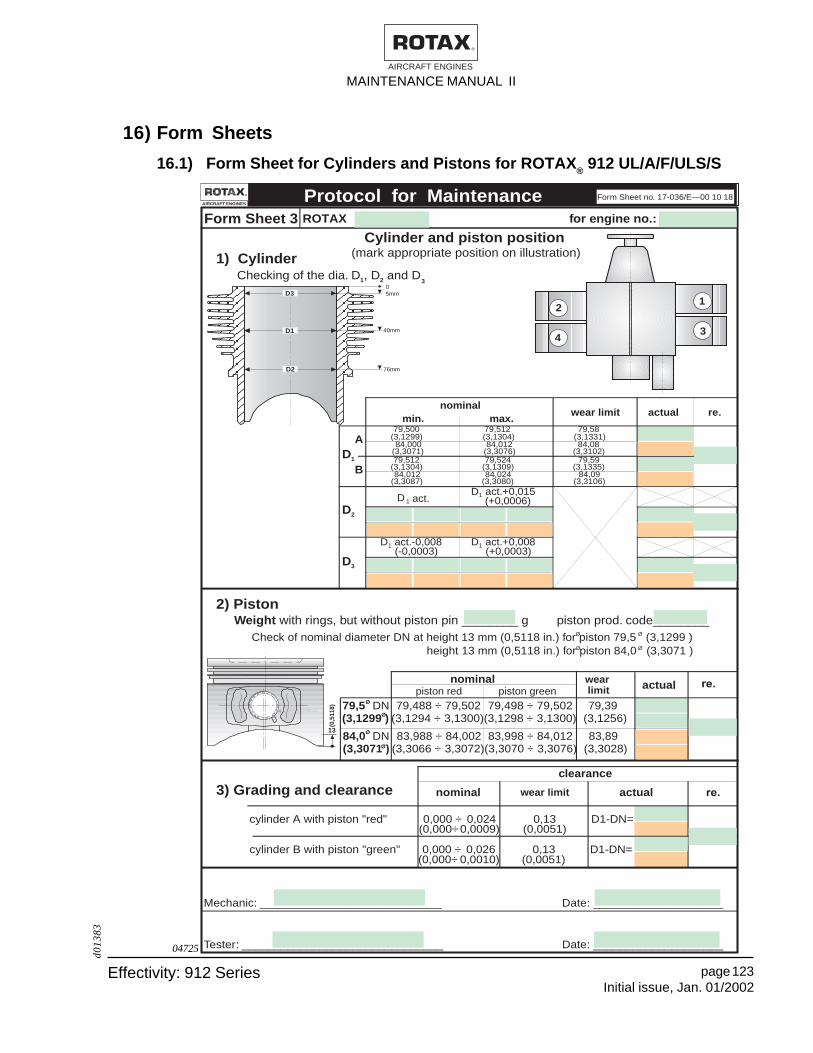
Effectivity: 912 Series
MAINTENANCE MANUAL IIAIRCRAFT ENGINES
d013
83
page 123Initial issue, Jan. 01/2002
AIRCRAFT ENGINES Protocol for Maintenance Form Sheet no. 17-036/E—00 10 18
Form Sheet 3 ROTAX for engine no.:
Mechanic: ____________________________ Date: ____________________
Tester: _______________________________ Date: ____________________
Cylinder and piston position(mark appropriate position on illustration)1) Cylinder
Checking of the dia. D , D and D
height 13 mm (0,5118 in.) for piston 84,0 (3,3071 )Ø
Check of nominal diameter DN at height 13 mm (0,5118 in.) for piston 79,5 (3,1299 )Ø
2) PistonWeight with rings, but without piston pin ________ g piston prod. code________
nominal
D1 act.-0,008 D1 act.+0,008
D 1 act.D1 act.+0,015
79,500 79,512 79,58
84,012 84,024 84,09
84,000 84,012 84,08
79,512 79,524 79,59D1
D2
D3
B
A
piston greennominal
piston red
DN 79,488 ÷ 79,502 79,498 ÷ 79,502 79,39
DN 83,988 ÷ 84,002 83,998 ÷ 84,012 83,89
actual
3) Grading and clearance
cylinder A with piston "red" 0,000 ÷ 0,024 0,13 D1-DN=
nominal actual
cylinder B with piston "green" 0,000 ÷ 0,026 0,13 D1-DN=
Ø
84,0Ø
wearlimit
clearance
wear limit
min. max.wear limit actual
79,5
13
re.
1 2 3
(3,1299) (3,1304) (3,1331)
(3,1304) (3,1309) (3,1335)
(3,3087) (3,3080) (3,3106)
(3,3071) (3,3076) (3,3102)
(+0,0006)
(-0,0003) (+0,0003)
(3,1294 ÷ 3,1300)(3,1298 ÷ 3,1300) (3,1256)Ø(3,1299 )
(3,3066 ÷ 3,3072)(3,3070 ÷ 3,3076) (3,3028)(3,3071 )Ø
Ø
Ø
(0,000÷0,0009) (0,0051)
(0,000÷ 0,0010) (0,0051)
(0,5
118)
05mm
40mm
76mm
D3
D1
D2
2
4
1
3
04725
16) Form Sheets
16.1) Form Sheet for Cylinders and Pistons for ROTAX® 912 UL/A/F/ULS/S

MAINTENANCE MANUAL IIAIRCRAFT ENGINES
page 124Initial issue, Jan. 01/2002
Effectivity: 912 Series
d013
83
P
rü
fpr
oto
ko
ll f
ür
ex
t. G
en
ea
ro
r/
I
ns
pe
cti
on
pr
oto
co
l fo
r a
lte
rn
ato
rG
ener
ator
, Tei
le N
r.:G
ener
ator
, Ser
ien
Nr.:
Ein
geba
ut in
Mot
or N
r.:R
P A
uftr.
Nr.:
Alte
rnat
or, p
art n
o.:
Alte
rnat
or, s
eria
l no.
:In
stal
led
in e
ngin
e no
.:re
pair
orde
r no
.:
Rot
or /
roto
r:ne
u / n
ewm
in:
ist
/ ac
tual
:S
chle
ifrin
ge /
slip
rin
g:ø
14,
40 m
m ø
14,
20 m
m ø
mm
Bem
erku
ng /
rem
ark:
Rot
orw
elle
Lag
ersi
tz /
roto
r sh
aft b
earin
g se
at:
ø 1
4,98
mm
ø
14,
95 m
mø
mm
Sch
iebe
sitz
/ sl
idin
g se
at:
Rot
orw
elle
, Sic
htko
ntro
lle a
ntrie
bsei
tig /
roto
r sh
aft,
visu
al c
heck
driv
e si
de:
Rot
orw
elle
, Sic
htko
ntro
lle a
btrie
bsei
tig /
roto
r sh
aft,
com
mut
. sid
e:Lü
fterf
lüge
l / fa
n bl
ades
:B
emer
kung
/ re
mar
k:
Koh
lebü
rste
n / c
arbo
n br
ushe
s:ne
u / n
ewm
in.
ist /
act
ual
Läng
e de
r P
lus-
Koh
le /
Plu
s br
ush:
13
,5m
m9,
0 m
m.
mm
Läng
e de
r M
inus
-Koh
le /
Min
us b
rush
:13
,5 m
m9,
0 m
m
.m
m
Bem
erku
ng /
rem
ark:
Sta
tord
ecke
l / s
tato
r co
ver:
neu
/ new
max
ist /
act
ual
Bem
erku
ng /
Rem
ark
La
gers
itz /
bear
ing
seat
:ø
31,
995m
mø
32,
00ø
mm
Pre
ßsi
tz /
pres
sfit:
Sta
torg
ehäu
se /
stat
or h
ousi
ng:
neu
/ new
max
.is
t / a
ctua
lB
emer
kung
/ R
emar
k
La
gers
itz /
bear
ing
seat
:ø
34,
988
mm
ø 3
5,00
øm
mP
reß
sitz
/ pr
essf
it:
Rk-
Lage
r / b
all b
eari
ng: a
ntrie
bsei
tig ø
35
mm
/ dr
ive
side
35 m
mø
abtr
iebs
eitig
ø 3
2 m
m /
com
mut
. sid
e 32
mm
ø
Sta
rtor
wic
klun
g / s
tato
r w
indi
ng (j
ede
Pha
se g
egen
Ste
rnpu
nkt,
+20°
C/ e
ach
phas
e ag
ains
t wye
cen
ter,
+20°
C):
soll/
nom
inal
: 0,1
÷0,4
Ω i
st /
actu
al:
Rot
orw
ickl
ung/
rot
orw
indi
ng (S
chle
ifrin
g ge
gen
Sch
leifr
ing,
+20
°C/ c
olle
ctor
rin
g ag
ains
t col
lect
or r
ing,
+20
°C):
soll/
nom
inal
: 2,8
÷3,2
Ω i
st /
actu
al:
Prü
flauf
/ te
st r
un:
n 1/
min
. / r
pm s
oll,
min
. / n
omin
al, m
in.
ist /
act
ual
Spa
nnun
g / v
olta
ge
80
0037
A.
A13
,5V
kon
st. /
con
st.
n 1/
min
. / r
pmA
breg
elsp
annu
ng s
oll /
reg
. vol
tage
nom
.A
breg
elsp
annu
ng is
t / r
eg. v
olta
ge a
ct.
Prü
flast
8000
14,2
÷14,
8 V
.V
3÷10
A
Reg
ler
/ reg
ulat
or:
Dio
denp
latt
e / d
iode
pla
te:
Bem
erku
ngen
/ re
mar
ks:
Unt
ersc
hrift
Prü
fer
/ Sig
natu
re T
este
r:D
atum
/ D
ate:
Abt
. / D
ep.:
(dyn
amis
ch b
ei +
50°C
, m
it ve
rste
llb.
elek
tr. L
ast u
nd 4
4000
µF K
onde
nsat
or/
dyna
mic
at
+50
°C,
with
adj
usta
ble
elec
trica
l loa
d an
d 44
000µ
F co
nden
ser)
For
mbl
att N
r. K
D-1
7-04
8/A
—96
05
17
Ver
t. / C
o.:
AC
GH
alte
rR
PK
D
0472716.2) Form sheet for ext. generator fig. 209

Effectivity: 912 Series
MAINTENANCE MANUAL IIAIRCRAFT ENGINES
d013
83
page 125Initial issue, Jan. 01/2002
Materialprüfung / Material inspectionb e i I n s t a n d s e t z u n g e n / a t r e p a i r s
Formblatt Nr. KD-17-038/C-97 02 18
Magnetpulver-Rißprüfung für Motortype:Magnaflux - inspection for engine type: ................................ _____________________________________
Motor S/N / Engine s/n: ........................................................._____________________________________
Kurbelwellen S/N / Crankshaft s/n:........................................ _____________________________________
Propeller-Getriebe S/N / Propeller gear s/n: ......................... _____________________________________
Bezeichnung Teile Nr.: Anzeichen / Findings BemerkungDescription Part no. nein/no ja/yes Remark
Pleuel 1 / Conrod 1 ...................917.345 .............. .............. ______________________________________________________________
Pleuel 2 / Conrod 2 ...................917.345 .............. .............. ______________________________________________________________
Pleuel 3 / Conrod 3 ...................917.345 .............. .............. ______________________________________________________________
Pleuel 4 / Conrod 4 ...................917.345 .............. .............. ______________________________________________________________
Kurbelwelle ASCrankshaft, p.t.o. side ..............818.300 .............. .............. _______________________________
_______________________________
Kurbelwange ASCrank blade, p.t.o. side .............818.310 .............. .............. _______________________________
_______________________________
Kurbelwelle MSCrankshaft, magneto side.........818.320 .............. .............. _______________________________
_______________________________
Kurbelwange MSCrankblade, magneto side........818.310 .............. .............. _______________________________
_______________________________
KW-MittelteilCrankshaft, centre ....................818.290 .............. .............. _______________________________
_______________________________
Klauenrad / Dog gear ........................................... .............. ______________________________________________________________
Antriebsrad / Drive gear. ...................................... .............. ______________________________________________________________
Propellerwelle / Propeller shaft ............................ .............. ______________________________________________________________
Magnetnabe / Magneto flywheel. ......................... .............. ______________________________________________________________
Nockenwelle / Cam shaft............... HV 10 min.680 ................ ______________________________________________________________
Prüfer / Tester ________________ Datum / Date ___________ Abt./ Dept.: _____________________________ Vert.: ACG Halter/Owner RP KD 04728
16.3) Form sheet for crack inspection
fig. 208
