making ‘anticipatory’ reasonable adjustments cost & financial sustainability embedding...
TRANSCRIPT

Making ‘anticipatory’ reasonable adjustments
What do I
need to do?

Paying attention to ALL learning material being created
In our daily work this will apply mostly to the following tools:•MS WORD or any other word processing package•MS PowerPoint•Acrobat Reader with its built-in accessibility features•Your online module pages on the Hub•Any media created such as screen recordings, narrated PPs, videos, audios

1. Using MS WORD
We suggest the following:•Consistent font type (Arial, Verdana, Tahoma), size (no smaller than pt. 12 pt.) and colours•No text background colour•Line spacing - double or 1.5 spacing•Avoid italics (unless required in a particular context i.e. citations etc), underlining and justified text alignment wherever possible
Avoid this at all costs …

Using MS WORDDon’t use tabs to make text look like a table – use the Insert/Table tool instead.Note: Screen reader software will read the entire table cell moving from left to right.Example:
Do it this way Jack and JillWent up the hillTo fetch a pail of water.Jack fell downAnd broke his crownAnd Jill came tumbling after.
Old King ColeWas a merry old soulAnd a merry old soul was he.He called for his pipeAnd he called for his bowlAnd he called for his fiddlers three.
Don’t do it this way Jack and Jill Old King Cole Went up the hill Was a merry old soul To fetch a pail of water. And a merry old soul was he. Jack fell down He called for his pipe And broke his crown And he called for his bowl And Jill came tumbling after. And he called for his fiddlers three.

Using MS WORD
Dealing with tables in document•right-click on table and select “Table properties” and then the tab on the very right called ALT TEXT. Enter text into the ‘Title’ box and a few words in the ‘Description’ box.

Using MS WORD
Dealing with images in document•right-click on the image and choose “Format picture” then use third icon from the left, and select ALT TEXT option. Enter a title and a few words in the ‘Description’ box – see also this video
•Adding image captions – right click image and select Insert Caption

Using MS WORDInserting Web-links•Right click of selected source image/text and select Hyperlink – copy link into Address bar. Click on ScreenTip button and provide info in link address.
•Avoid using ‘Click here’ as source descriptor

Using MS WORD
• Make use of Page Styles Sheets to structure a document – this generates a Document Map for ease of Navigation with Title/Heading 1/ Heading 2 (subheading)

Using MS WORD
• Sufficient contrast between font and b/g colour• At the end do File/Info/
Check for Issues/ Check Accessibility/Compatibility
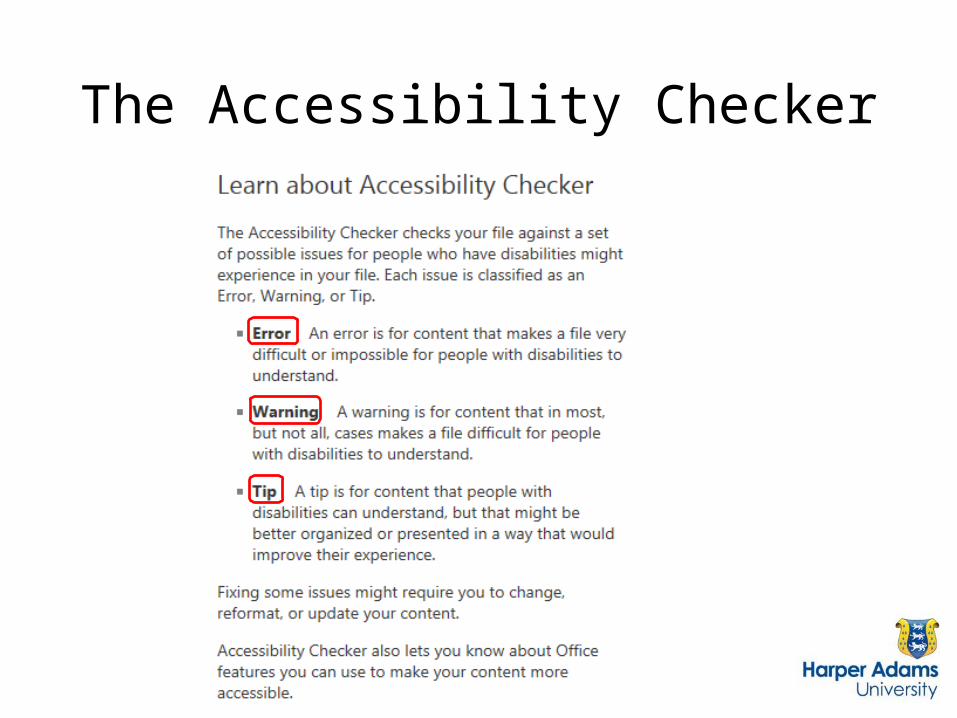
The Accessibility Checker

Some additional useful sources
• How to write good ALT Descriptors: http://jebswebs.net/blog/2010/12/writing-alt-descriptions/
http://webaim.org/techniques/alttext/
• MS WORD Accessibilityhttp://webaim.org/techniques/word/
• PowerPoint Accessibility: http://webaim.org/techniques/powerpoint/
• University of Edinburgh, guide for creating accessible material
http://www.ed.ac.uk/schools-departments/information-services/help-consultancy/accessibility/creating-materials/word-documents

2. Using MS PowerPoint
Our suggestions•Keep slides simple!•Be consistent – use light background colour•Consider using one of the Harper Adams University themes: http://www.harper-adams.ac.uk/brand/
•Use Sans Serif font, 24 pts minimum•No more than 6-7 lines of text or 4-5 bullet points

Using MS PowerPoint
• No long series of CAPITALS• As few colours as possible (max. 4-5)• Adapt image resolution to purpose (print vs. Web)• Insert Image with ALT Tag as with MS Word• Insert Table ALT Tag – right-click Format Shape,
then right tab – ALT TEXT• For Inserting Hyperlinks use ‘Screen Tips’ tool

Using MS PowerPoint
• Avoid Animations/transitions as it infers with pdf-conversion
• Instead increase complexity on a slide by duplicating the slide and then add extra features
• At the end do File/Info/Check for Issues/Check Accessibility/Compatibility
• Upload PP-file at least 48 h before the scheduled class

3. Why PDF format?
Adobe Reader is free and has good built-in Accessibility Features for the user
… accessed via:
a) the Accessibility Setup Assistant:Edit – Accessibility – Setup Assistant – Set all Accessibility options
b) Preferences:
Edit/Preferences/ Accessibility
c) ViewPage Display/Automatic scrolling, Read Out Loud etc

4. Your Learning Hub module page
Our suggestions:•Keep layout simple and organised!•For Topic headers, Labels and Pages choose font type and size as for MS Word detailed earlier•Again avoid the following:
– Italics (unless really necessary)– Underlining large text blocks– CAPITAL LETTERS– Bright fonts and font background

Learning Hub module page
• Avoid embedding videos - instead link from a thumbnail image
• Set thumbnail images at around 100 pixels square
• Set image resolution to 96 ppi for decorative images
• If images are to be printed out set the resolution to 300 ppi

5. Working with images
• Add image description (alternative text) when uploading an image
• Set maximum image size to 640x480, compressed file type (jpg, png)
• Only use high quality bitmap images for important content – e.g. do not resize 150x100 px to above

6. Web links and videos
• Again when inserting hyperlinks avoid ‘Click here’ – use meaningful source name instead
• When generating new media add ‘subtitles’ and ‘captioning’ (may be done automatically)
• Adding audio file transcripts (audio into text conversion: Wave-to-Text)
• YouTube is doing this ‘on the fly’