making cereal box dioramas of native american … making cereal box dioramas of native american...
TRANSCRIPT
1
Making Cereal Box Dioramas of Native American Historic Homes and Culture
Editors: Audrey C. Rule and Lois A. Lindell University of Northern Iowa Cedar Falls, Iowa November 20, 2009
Abstract Hands-on projects such as creating a
three-dimensional diorama are among the most memorable of positive elementary school experiences, yet they are generally uncommon because these complex projects are daunting to undertake. Therefore, it is important to prepare preservice teachers with the skills to lead children in creating these types of projects. This document is a compilation of preservice teacher work completed during a social studies methods class that assists instructors in teaching students to create unique dioramas. After the preservice teachers had constructed dioramas and assisted elementary students in making their own, they reflected on previous social studies projects from their childhoods and considered the learning outcomes of the current project.
Eighty preservice teachers enrolled in a social studies methods course participated in the study. These college students created their own Native American dioramas along with images for furnishing and finishing dioramas of the Native American group on which they focused. The five Native American groups explored through dioramas include the Iroquois of the northeastern United States, the Seminole of the Southeast, the Lakota of the Central Plains, Hopi (and Navajo) of the American Southwest and the Haida of the Northwest Coast. This document provides photo-illustrated examples and steps of how to create an intricate diorama from a cereal box, recycled copy paper, white craft glue, paints, images, and common craft items. The cereal box base is cut to open like a book and a model of a Native American home made of recycled cardboard is affixed over a cut-out hole in the cover so that the box opens to reveal the interior of the home. All surfaces are covered with a layer of torn recycled copy paper that is securely glued, coated with white gesso base paint, and then decorated with
acrylic craft paints. In the facing inside enclosure, a ceremony scene is displayed. The back of the cereal box features crafts of the Native American group, while the other cereal box exterior sides show foods, clothing, and other cultural Reflection data indicate that preservice teachers recognized the large amount of time and patience necessary to complete a quality diorama and the valuable amount of in-depth learning that results, including a deeper respect for Native American people and greater confidence in teaching these concepts. Therefore, we recommend diorama projects in teaching about diverse cultures (2 tables, 5 figures, 2 photo-illustrated appendices). Preservice Teacher Contributing Authors: Amanda Achenback, Erin Anderson, Kelsey Blattler, Daniel Bartel, Abby Barton, Andy Beringer, Renee Boggess, Lawrence Boney, Emily E. Brincks, Lyndsay Brink, Kellie Burke, Robin Callahan, Ami Claiborne, Renee Decker, Sarah Demers, Katie Deranleau, Traci Edson, Jeanette Fischer, Nicole Freeman, Sandy Friest, Kathleen J. Fry, Samantha J. Fuchs, Steph Haacke, Sara Hageman, Dana Hanson, Jennifer Hedrick, Rachel Ingstad, Brittany Johnson, Sarah J. Johnson, Holly Janssen, Tasha Kauten, Katie Kerns, Jenniffer Konomi, Elizabeth Latta, Kelli Lugo, Cassidy Lang, Kimberly Levorson, Jesse Lyon, Christy Martin, Justin McGuinness, Hailey McQuiston, Preston Meineke, Amanda Melcher, Laura Miller, David Muehe, Abi Nicholson, Jennifer Nicholson, Katherine E. Nietzel, Misty Olney, Carley Paul, Rachel Pecha, Angela Pehl, Danielle Postel, Jennifer Potter, Larissa Pray, Bonnie Rector, Megan Reed, Lesa Rieken, Eddie Rosenquist, Tyler Ruane, Daniel Sale, Alyssa Schaben, Tiffany Semelroth, Stephanie Simms, Stefanie Slothouber, Kelli Snodgrass, Beth Struzynski, Maegan Swick, Natalie Tendall, Allison Thomann, Kate M. Thomas, Amanda Wasylik, Nate Weber, Kevin White, Shelby White, Amanda Whiting, Jill Whitney, Brittney Wiltgen, Erin Yates, Marissa York.
Related Conference Presentation Lindell, L. A. (2009). Investigating student growth in
spatial, social studies, and organizational skills during a social studies methods project on cereal box dioramas of Native American culture. Second Annual Graduate Research Symposium, University of Northern Iowa, April 1, Cedar Falls, Iowa.
2
Introduction
Take a moment to think back on your own elementary education experiences. What social studies lessons can you remember as particularly interesting or satisfying? What made these lessons so exciting and memorable?
In this document, we present a study that examines preservice teacher thoughts on the most memorable social studies experiences from childhood and their reflections after completing a complex diorama project on Native American culture. We also provide step-by-step directions for constructing and furnishing Native American dioramas featuring five main groups of people from various parts of the United States (Iroquois from the Northeast, Seminole from the Southeast, Lakota from the Central Plains, Hopi from the Southwest, and Haida from the Northwest Coast). The instructions for constructing the basic diorama base provided here as Appendix 1 were written by the first author and refined as preservice teachers implemented these steps in making their dioramas. The second set of instructions (Appendix 2) for completing and furnishing the dioramas was produced by cooperative efforts from preservice teachers. The National Council for the Social Studies (1994) states that powerful social studies lessons are active, meaningful to students, integrate various areas of social studies or other subjects, are challenging, and address values. The Native American cereal box diorama project described here satisfies these criteria. Students making a diorama are actively involved in locating content information that will be translated into the features of the diorama. They also construct the three-dimensional diorama from a cereal box and furnish it with miniature artifacts, scenes, and crafts. This spatial work of building, incorporating diverse materials, and considering scale and arrangement of items is challenging. The diorama is made meaningful by allowing students choice in the Native American group featured and the colors, placement, and selection of items employed in furnishing it. Each diorama is unique to the maker. Many aspects of
social studies such as culture, geography, history, and religion are integrated into the project along with spatial construction and artwork. Finally, the ceremony scenes and lifestyle information convey some of the values of Native Americans. This document presents research data from preservice teachers enrolled in a social studies methods class who created their own Native American cereal box dioramas and then planned and executed lessons in assisting fifth graders in completing Native American dioramas of their own. The two appendices present detailed and illustrated instructions for making dioramas of the five previously–mentioned Native American groups.
Method
Eighty preservice elementary teachers (68 female, 12 male) of mostly traditional-age enrolled in three sections of a social studies methods course at the University of Northern Iowa participated in the study. Permission was obtained from the University Human Subjects Committee to conduct the study and from participants for their data to be included. Preservice teachers each constructed a diorama for one of the five Native American groups addressed here using the directions for constructing the cereal box base. See Figures 1-5 for example images of completed dioramas. They then researched information about their Native American group and devised ways to decorate and furnish the home, portray a ceremony scene, construct a craft, and show information about clothing and foods of these people. Preservice teachers planned and implemented work with fifth graders to assist them in completing their own dioramas. The images provided for furnishing the dioramas were a result of this work. At the conclusion of this work, preservice teachers recalled their most memorable childhood social studies lessons and reflected on major learning as a result of this project.

3
Results Most Memorable Social Studies Activities
Hands-on social studies projects are among the most memorable elementary social studies activities. When the preservice teachers in this study reported their two most memorable positive elementary school social studies experiences, making hands-on models was the most frequently-cited activity. See Table 1. Of these hands-on, three-dimensional projects, twenty-three were dioramas of Native American scenes, ancient Egyptian buildings and tombs, miniature towns, or pioneer settlements. Three were salt dough relief maps of the United States, two were period costumes, and the remaining projects were other historical/cultural artifacts or masks.
A close second to hands-on projects were dramatizations and reenactments that often included wearing costumes or using props, and significant research about the historical person or event. Ten of these were reenactments of historic events including the Boston Tea Party, battles such as a World War II battles with the use of water balloons as ammunition, and M. L. King’s “I have a dream” speech. Seven of these dramatizations involved trips to historic one-room schoolhouses and taking the role of children of that era. Another popular dramatic project involved students in researching a historic figure or president, dressing the part, and telling facts about that person’s life in a sort of live “Wax Museum.” Simulations such as various teacher-devised or commercial computer game Oregon Trail simulations were mentioned as being very positive experiences. Creating one’s own business, town, country, or tribe was also noted as effective, along with mock elections. Field trips to historic sites or museums were remembered fondly, especially visits to a living history farm, and child-centered history museums at which students could experience hands-on items and pretend to be of that era. Creating visuals, artwork, maps, and compilations of work that showed the learning that had taken places were impressive activities.
Students felt a well-remembered sense of pride in finding out new information on their own. Having personal choice in the topic was noted as significant by seven preservice teachers. Table 1 lists additional learning activities reported as effective by preservice teachers. Table 1. Responses of eighty preservice elementary
teachers to this prompt: “Think back to your years as an elementary school student. Briefly describe two memorable (because they were positive experiences) social studies lessons.”
Frequency Category of Favorite Activity
36 Making a hands-on 3-D model
33
Dramatization, often including costumes and research of information about the historic figure portrayed
24 Finding information on own and feeling satisfied to have expertise
19 Participating in simulation with problem solving
18 Field trip to historic museum or site with interactive or life-size diorama displays
8 Creating a large map
7 2D Artwork
7 Compilation of all we learned through a scrapbook or book
7 Allowed to choose a topic of personal interest that fit with assignment
6 Learned something new that was particularly interesting
5 Explored personal heritage
5 Writing to communicate through newspaper article, poster, letters, report
4 Experienced different foods of a culture
3 Playing a game to learn facts
3
Only 1 memorable event - most social studies was reading the book and answering questions
2 Listening to intriguing guest speakers
2 Learning information through song
Most Important Learning from the Project Preservice teachers were asked at the conclusion of the project to reflect and describe the most important things they learned from the experience. Table 2 shows a compilation of the results.
4
Table 2. Responses of eighty preservice teachers to
“What were the most important things you learned from the diorama project?” Most preservice teachers mentioned two ideas.
No.
Response
30 A diorama project takes time and patience to complete. One must not procrastinate, but take time to do a quality job in which one can feel pride.
15
I learned content about Native Americans, especially that Native American groups have distinct cultures. I developed greater interest in and respect for them, along with confidence in teaching about them.
12 Hands-on learning is essential because it is meaningful, engaging, memorable, enjoyable, and meets the needs of a vast array of learners.
12
Long-term diorama projects can produce in-depth learning, especially when students discuss the meaning of items they add. I have more confidence in implementing long-term projects as a result of this experience.
12 Teamwork and problem-solving between preservice teachers and elementary students makes the task easier and results in success.
11
Organization and planning are necessary for a complex project to be accomplished. Preparation is needed, but one must be flexible and able to think quickly to make changes to solve problems.
10
I learned I could successfully make this complex project even though I initially felt greatly challenged. The final product resulted in great pride and sense of worthwhile accomplishment
8
Materials management is important in a project like this- using recycled items, having a stash of craft materials, and carefully planning the needed materials.
7 I learned how to construct and complete a diorama, managing the project with elementary students.
5
The diorama project allowed instruction to be differentiated, allowed choice through the different Native American dioramas and allowed for multiple intelligences to be addressed.
4 Step-by-step directions and clear explanations are very helpful in a complex project of this type.
The most frequent response was the realization of the amount of time, task commitment, and patience necessary to complete a complex project of this type. Preservice teachers noted that they had learned content and changed their attitudes towards Native Americans and teaching about this topic during social studies. They valued the hands-on three-dimensional project, acknowledging how
engaged they and their elementary students were during the work. Because they had learned so much about Native Americans through this assignment, they recognized the learning that was taking place in their students. Preservice teachers acknowledged the positive effects of collaboration and teamwork when engaged in a new, complex project. They stated the importance of organization and planning of how materials would be used, how time would be spent, and of how directions would be given step-by-step.
Conclusion
The results show that hands-on projects, especially dioramas, are effective as positive, memorable experiences in social studies learning. Although many of the preservice teachers in this study reported that they had initially thought they would not be able to successfully create and manage a complex diorama project, they were all successful in doing so and felt pride and new confidence in this accomplishment. They were surprised at the depth of learning about Native Americans they evidenced at the end of the project and valued dioramas as a result of this. Because of the efficacy of this project with preservice teachers and fifth graders, we recommend that others utilize the step-by-step directions provided here in constructing and furnishing dioramas of their own. We suggest you use these materials as a starting point and research additional items to be added to improve and personalize the work. Additionally, the project ideas presented here can be transferred to dioramas of any culture.
Reference
National Council for the Social Studies. (1994). Curriculum standards for social studies: Expectations of excellence. Washington DC: National Council for the Social Studies.
Appendix 1: Step-by-step directions for making a cereal box diorama of a traditional Native American home [in attached file]
Appendix 2: Images for furnishing and finishing the dioramas [in attached file]
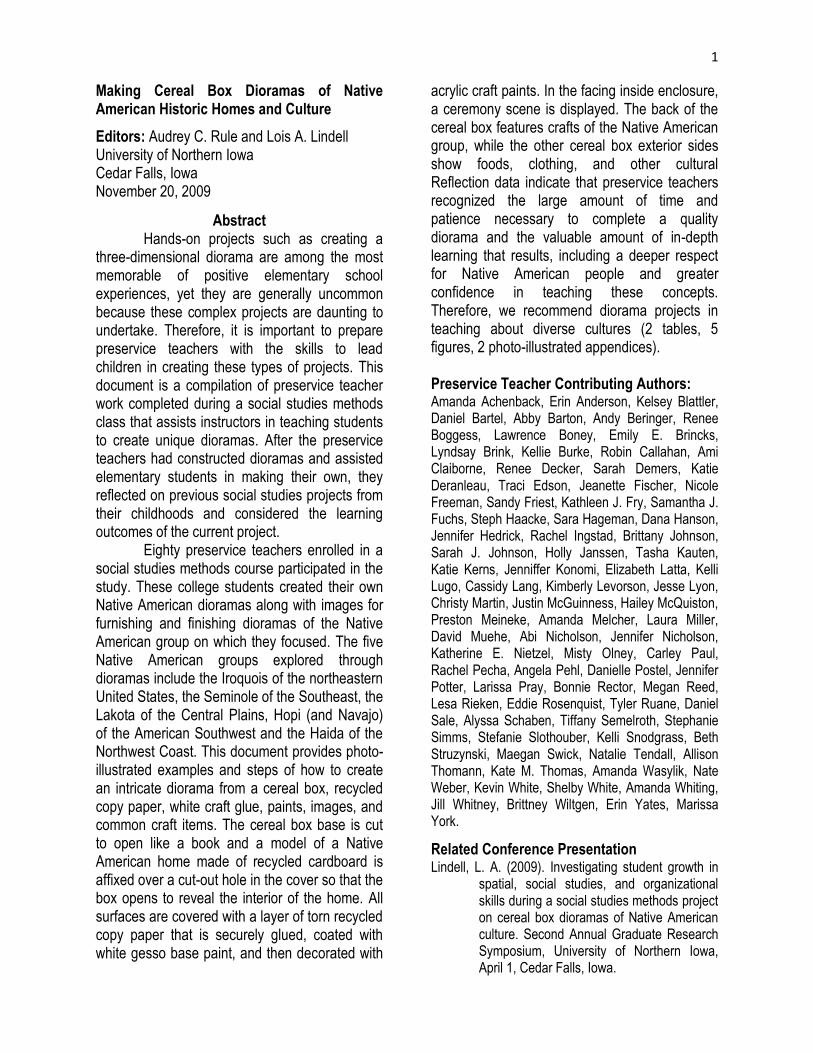
Figure 1. Example Haida dioramas made by preservice teachers.

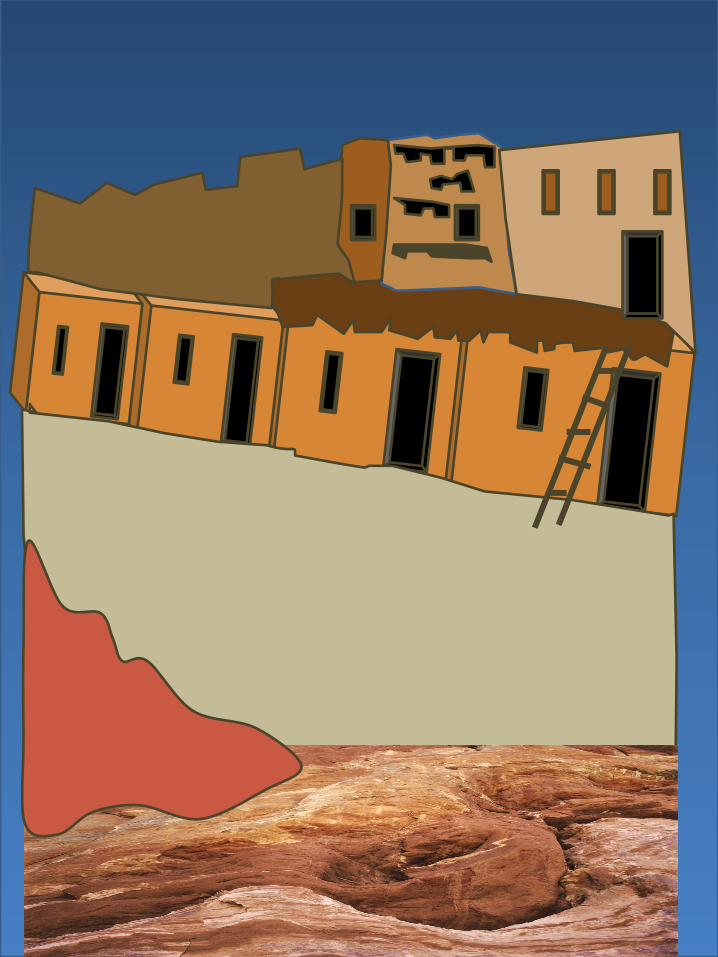
Figure 2. Example Hopi dioramas made by preservice teachers.
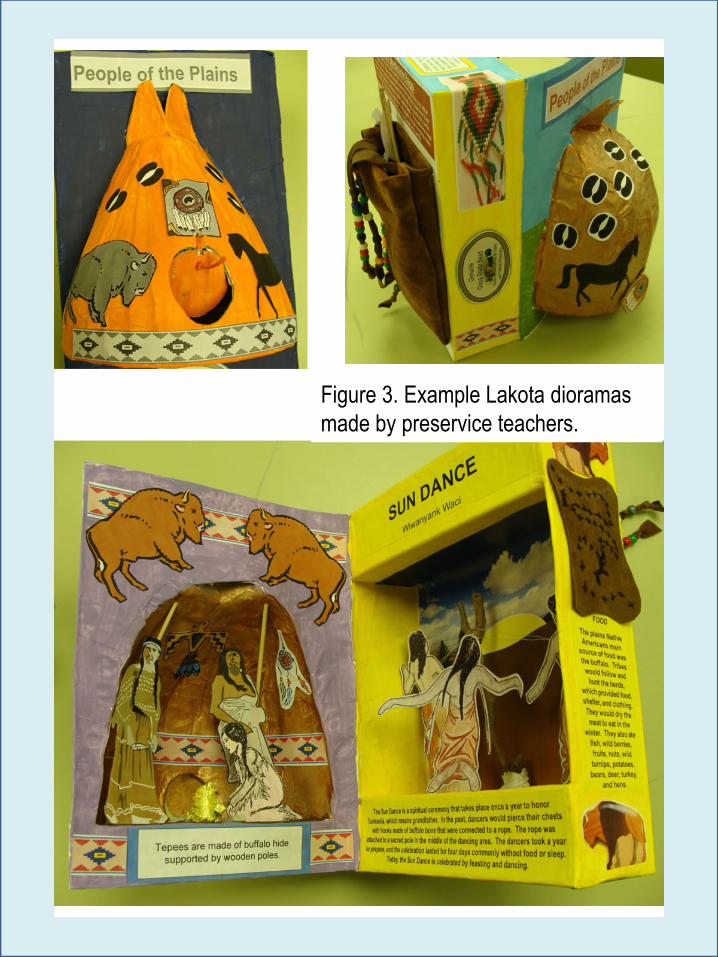
Figure 3. Example Lakota dioramas made by preservice teachers.
Figure 4. Example Seminole dioramas made by preservice teachers.
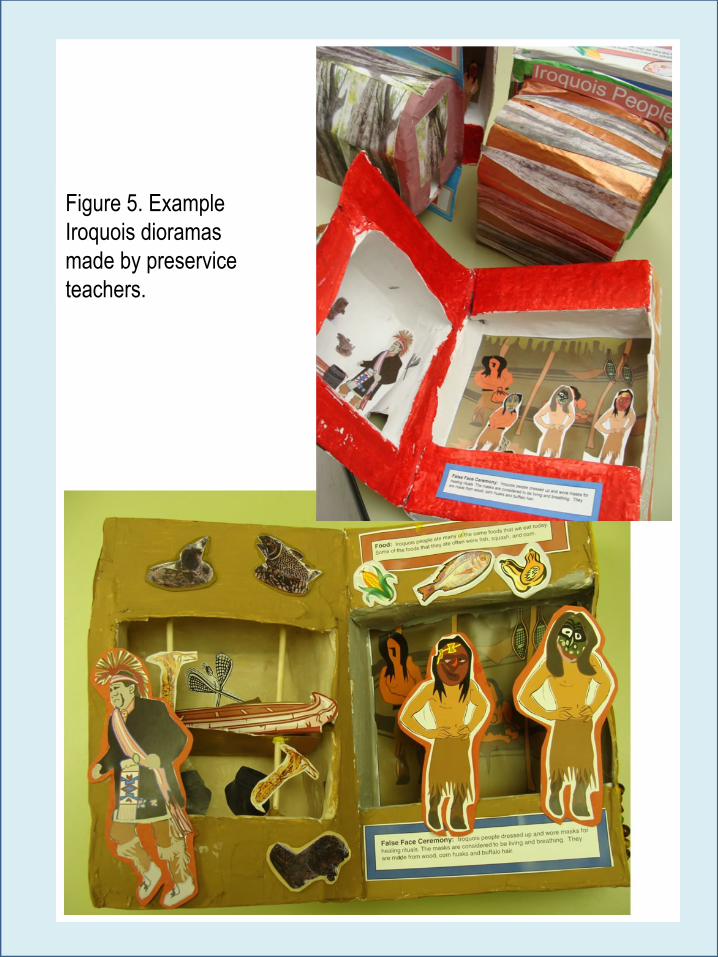
Figure 5. Example Iroquois dioramas made by preservice teachers.
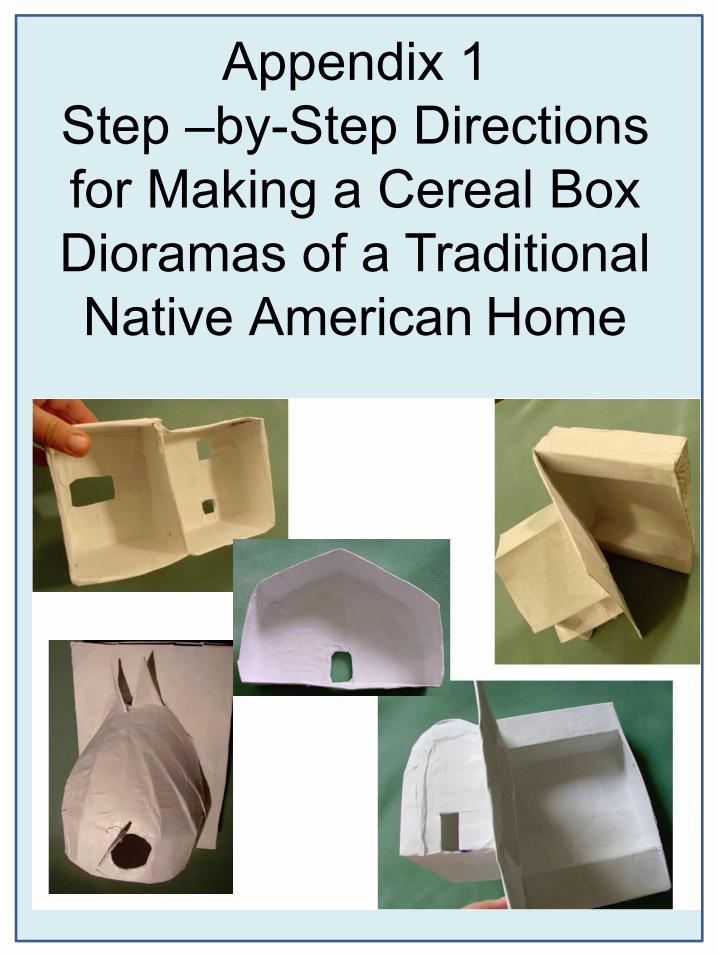
Appendix 1Step –by-Step Directions for Making a Cereal Box Dioramas of a Traditional Native American Home

Before You Begin!Quality
Taking the time and care to make a neat,high-quality cereal box diorama isimportant. This project is complex,requiring quite a bit of task commitment.The end product should be a uniquediorama of which you are proud.Unfortunately, many school tasks aresimplified so that the student only needs tofill in blanks or complete tasks that take ashort time. However, the solutions to reallife problems are often multi-stepped.
Tear pieces of paper about half the size of an 3” x5” index card. Adjust the glue bottle so that a thinstream of glue comes out. Outline the strip ofpaper and scribble the glue over the surface ofthe paper so that it is evenly glue-coated. As youapply the glue-coated paper, twist it on thesurface to further spread the glue. If the paperdrips, you are applying too much glue.
Periodic CheckingAs you complete this project, stop fromtime to time to check your work. It is agood idea to smooth and pinch thepapier-mâché while the glue is stilldamp. Check for edges or flaps ofpaper that are not glued down well.Squirt a little glue underneath them andsmooth them flat.
Papier-mâchéThe main diorama structure is made withwhite craft glue and white copy paper in atype of papier-mâché technique that is notvery messy. Elmer’s glue and recycledpaper may be used, but paper with a higher“rag” or cotton content tears, folds, bends,and sticks better. Other craft glues, such asAleene’s Original Tacky Glue (in a goldplastic cylindrical bottle) may be thicker andwork well also.
Making “Tape” of Glue-covered Strips of Paper
Example of how to apply the glue
Other TipsWet a sponge or paper towel to clean glue from thetable. Let dried glue soak in a little water for a fewminutes and it will turn white again. Then it can beremoved.Glue will wash out of clothing and off hands.
Making the Basic Diorama Box
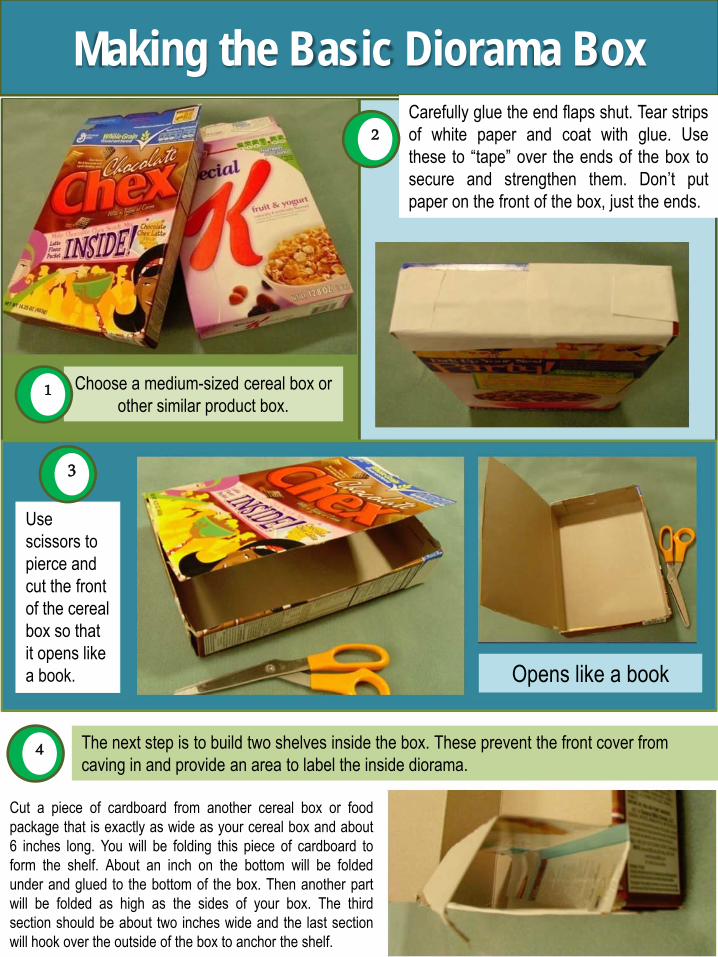
Choose a medium-sized cereal box or other similar product box.
Carefully glue the end flaps shut. Tear stripsof white paper and coat with glue. Usethese to “tape” over the ends of the box tosecure and strengthen them. Don’t putpaper on the front of the box, just the ends.
1
2
Use scissors to pierce and cut the front of the cereal box so that it opens like a book.
3
Opens like a book
The next step is to build two shelves inside the box. These prevent the front cover from caving in and provide an area to label the inside diorama.
4
Cut a piece of cardboard from another cereal box or foodpackage that is exactly as wide as your cereal box and about6 inches long. You will be folding this piece of cardboard toform the shelf. About an inch on the bottom will be foldedunder and glued to the bottom of the box. Then another partwill be folded as high as the sides of your box. The thirdsection should be about two inches wide and the last sectionwill hook over the outside of the box to anchor the shelf.
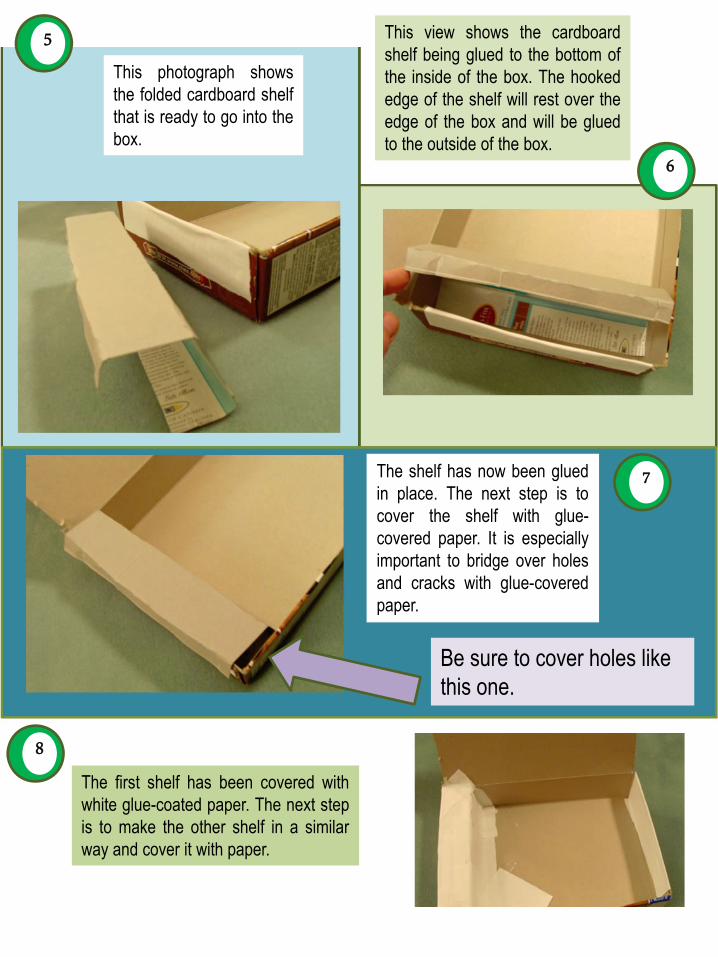
This view shows the cardboardshelf being glued to the bottom ofthe inside of the box. The hookededge of the shelf will rest over theedge of the box and will be gluedto the outside of the box.
This photograph showsthe folded cardboard shelfthat is ready to go into thebox.
5
6
The shelf has now been gluedin place. The next step is tocover the shelf with glue-covered paper. It is especiallyimportant to bridge over holesand cracks with glue-coveredpaper.
7
The first shelf has been covered withwhite glue-coated paper. The next stepis to make the other shelf in a similarway and cover it with paper.
8
Be sure to cover holes like this one.
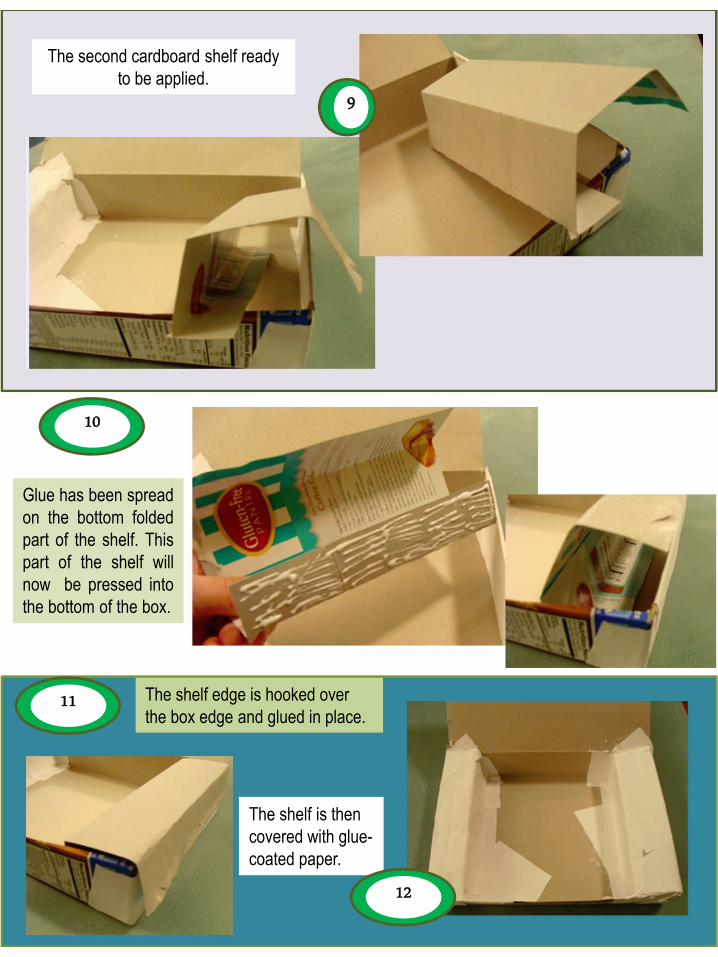
Glue has been spreadon the bottom foldedpart of the shelf. Thispart of the shelf willnow be pressed intothe bottom of the box.
The shelf is then covered with glue-coated paper.
The shelf edge is hooked over the box edge and glued in place.
The second cardboard shelf ready to be applied.
9
10
11
12
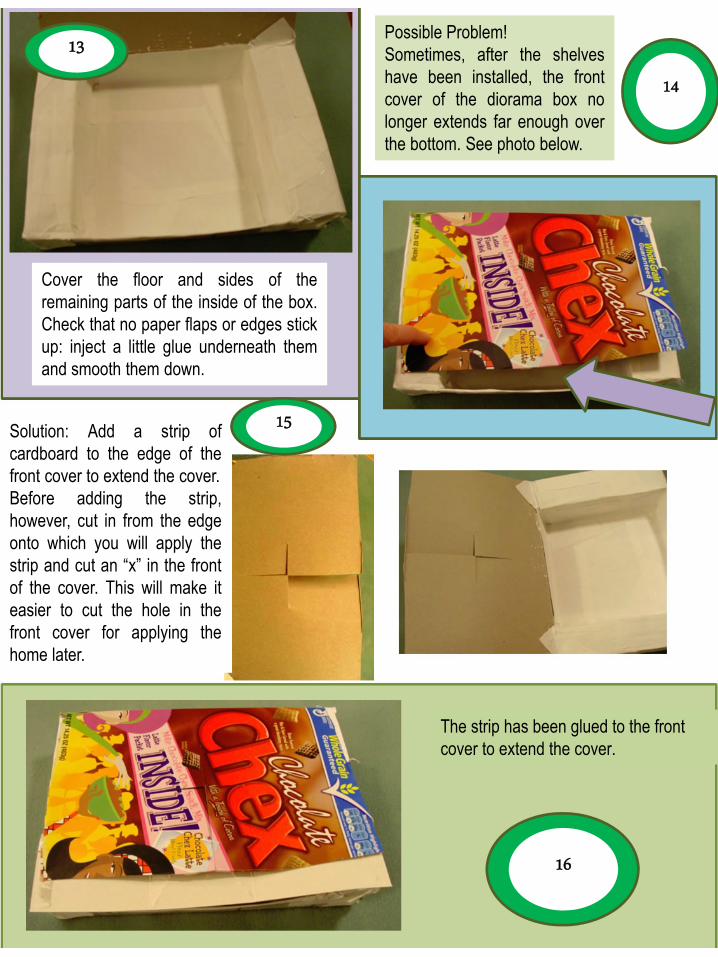
Possible Problem!Sometimes, after the shelveshave been installed, the frontcover of the diorama box nolonger extends far enough overthe bottom. See photo below.
Cover the floor and sides of theremaining parts of the inside of the box.Check that no paper flaps or edges stickup: inject a little glue underneath themand smooth them down.
Solution: Add a strip ofcardboard to the edge of thefront cover to extend the cover.Before adding the strip,however, cut in from the edgeonto which you will apply thestrip and cut an “x” in the frontof the cover. This will make iteasier to cut the hole in thefront cover for applying thehome later.
The strip has been glued to the front cover to extend the cover.
13
14
15
16
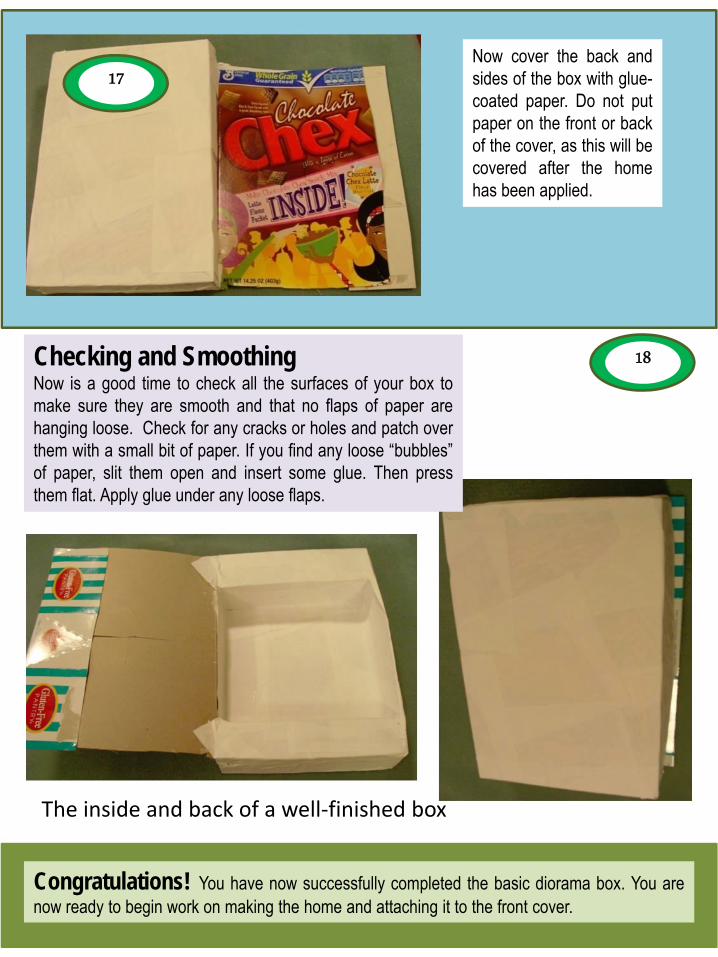
Checking and SmoothingNow is a good time to check all the surfaces of your box tomake sure they are smooth and that no flaps of paper arehanging loose. Check for any cracks or holes and patch overthem with a small bit of paper. If you find any loose “bubbles”of paper, slit them open and insert some glue. Then pressthem flat. Apply glue under any loose flaps.
Now cover the back andsides of the box with glue-coated paper. Do not putpaper on the front or backof the cover, as this will becovered after the homehas been applied.
18
17
Congratulations! You have now successfully completed the basic diorama box. You arenow ready to begin work on making the home and attaching it to the front cover.
The inside and back of a well‐finished box

Homes are made of cardboard and papier-mâché in a similar way to the construction of the diorama box. Here, we describe how to make the first of five different home styles used by Native Americans. You can expand these ideas by finding a drawing or photograph of a home and re-creating it in cardboard using basic geometric shapes.
Making Different Homes: Iroquois Longhouse
Iroquois Longhouse
Haida Plankhouse
Seminole Chickee
Lakota Tepee
Hopi Adobe Home
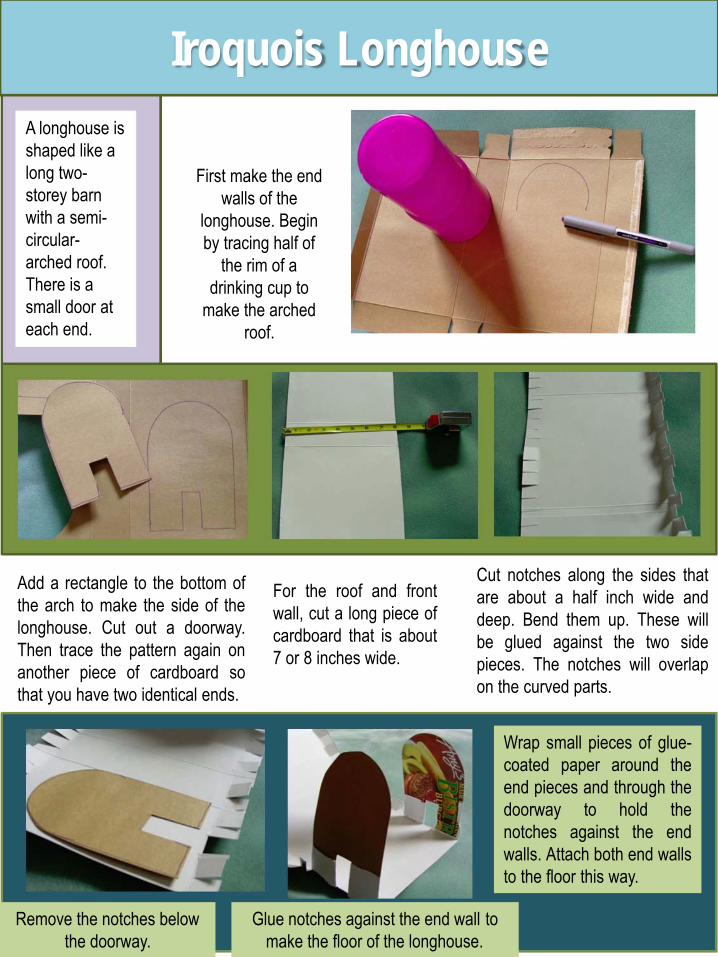
Add a rectangle to the bottom ofthe arch to make the side of thelonghouse. Cut out a doorway.Then trace the pattern again onanother piece of cardboard sothat you have two identical ends.
A longhouse is shaped like a long two-storey barn with a semi-circular-arched roof. There is a small door at each end.
Remove the notches below the doorway.
Iroquois Longhouse
First make the end walls of the
longhouse. Begin by tracing half of
the rim of a drinking cup to
make the arched roof.
For the roof and frontwall, cut a long piece ofcardboard that is about7 or 8 inches wide.
Cut notches along the sides thatare about a half inch wide anddeep. Bend them up. These willbe glued against the two sidepieces. The notches will overlapon the curved parts.
Glue notches against the end wall to make the floor of the longhouse.
Wrap small pieces of glue-coated paper around theend pieces and through thedoorway to hold thenotches against the endwalls. Attach both end wallsto the floor this way.
Curl the notched cardboardaround the side and top of theend piece. The entire semi-circular roof should be made,but leave one side of thelonghouse open.
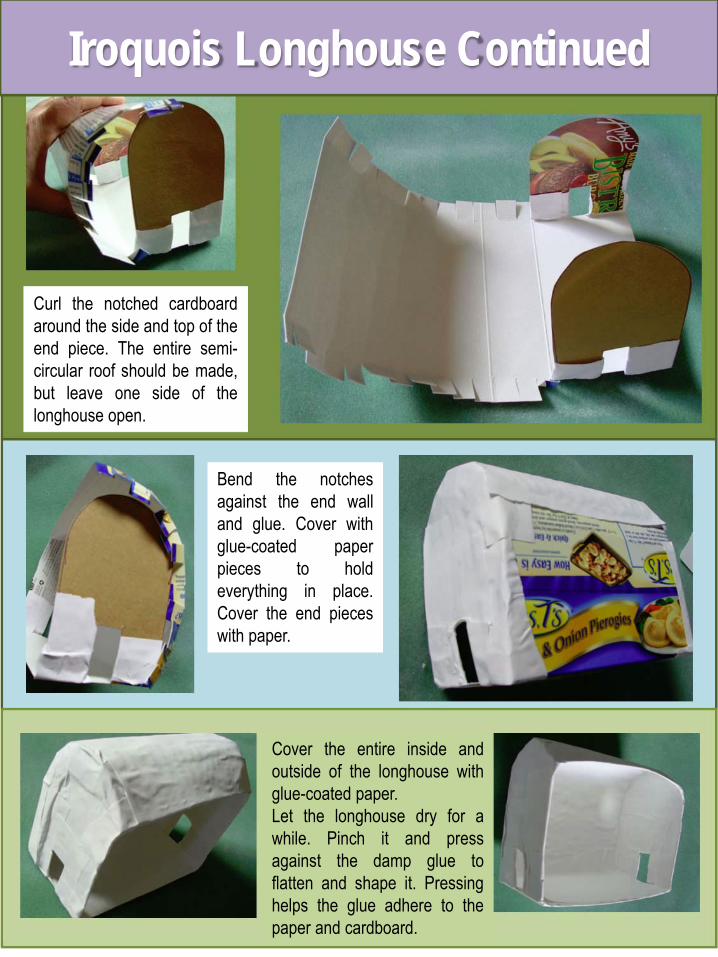
Iroquois Longhouse Continued
Bend the notchesagainst the end walland glue. Cover withglue-coated paperpieces to holdeverything in place.Cover the end pieceswith paper.
Cover the entire inside andoutside of the longhouse withglue-coated paper.Let the longhouse dry for awhile. Pinch it and pressagainst the damp glue toflatten and shape it. Pressinghelps the glue adhere to thepaper and cardboard.
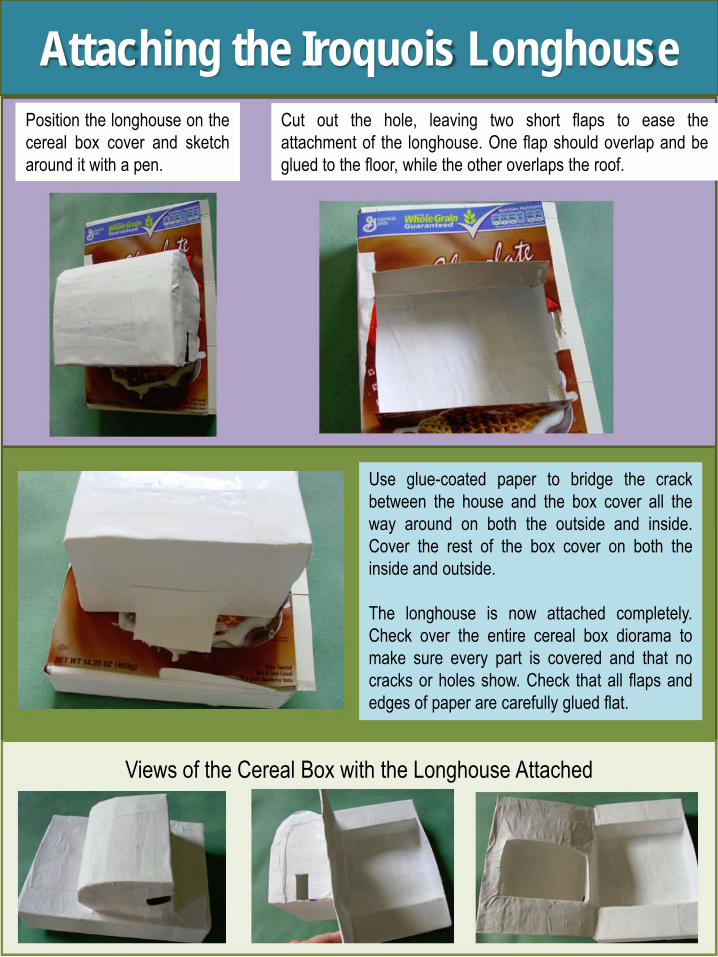
Position the longhouse on thecereal box cover and sketcharound it with a pen.
Attaching the Iroquois LonghouseCut out the hole, leaving two short flaps to ease theattachment of the longhouse. One flap should overlap and beglued to the floor, while the other overlaps the roof.
Use glue-coated paper to bridge the crackbetween the house and the box cover all theway around on both the outside and inside.Cover the rest of the box cover on both theinside and outside.
The longhouse is now attached completely.Check over the entire cereal box diorama tomake sure every part is covered and that nocracks or holes show. Check that all flaps andedges of paper are carefully glued flat.
Views of the Cereal Box with the Longhouse Attached
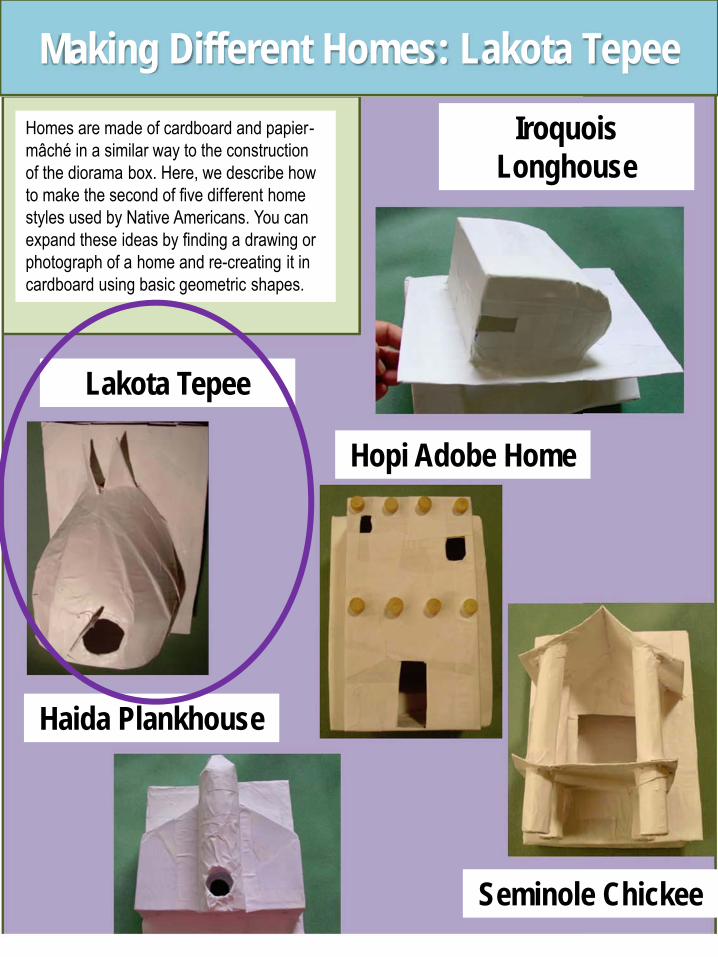
Homes are made of cardboard and papier-mâché in a similar way to the construction of the diorama box. Here, we describe how to make the second of five different home styles used by Native Americans. You can expand these ideas by finding a drawing or photograph of a home and re-creating it in cardboard using basic geometric shapes.
Making Different Homes: Lakota Tepee
IroquoisLonghouse
Haida Plankhouse
Seminole Chickee
Lakota Tepee
Hopi Adobe Home
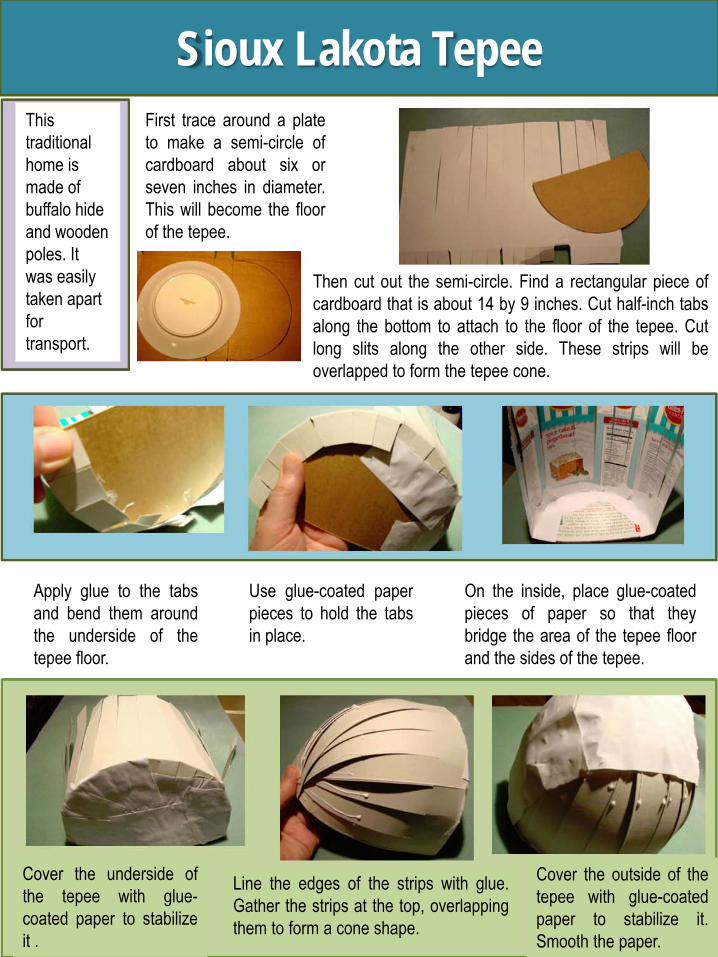
Apply glue to the tabsand bend them aroundthe underside of thetepee floor.
This traditional home is made of buffalo hide and wooden poles. It was easily taken apart for transport.
Cover the underside ofthe tepee with glue-coated paper to stabilizeit .
Sioux Lakota TepeeFirst trace around a plateto make a semi-circle ofcardboard about six orseven inches in diameter.This will become the floorof the tepee.
Use glue-coated paperpieces to hold the tabsin place.
On the inside, place glue-coatedpieces of paper so that theybridge the area of the tepee floorand the sides of the tepee.
Line the edges of the strips with glue.Gather the strips at the top, overlappingthem to form a cone shape.
Cover the outside of thetepee with glue-coatedpaper to stabilize it.Smooth the paper.
Then cut out the semi-circle. Find a rectangular piece ofcardboard that is about 14 by 9 inches. Cut half-inch tabsalong the bottom to attach to the floor of the tepee. Cutlong slits along the other side. These strips will beoverlapped to form the tepee cone.
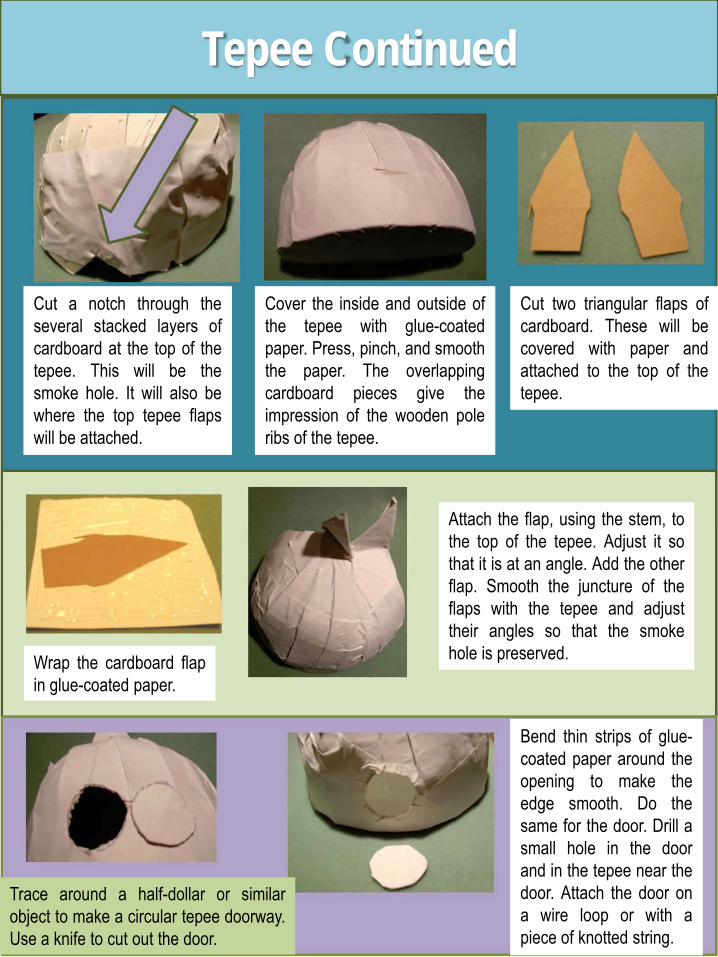
Cut a notch through theseveral stacked layers ofcardboard at the top of thetepee. This will be thesmoke hole. It will also bewhere the top tepee flapswill be attached.
Tepee Continued
Attach the flap, using the stem, tothe top of the tepee. Adjust it sothat it is at an angle. Add the otherflap. Smooth the juncture of theflaps with the tepee and adjusttheir angles so that the smokehole is preserved.
Trace around a half-dollar or similarobject to make a circular tepee doorway.Use a knife to cut out the door.
Cover the inside and outside ofthe tepee with glue-coatedpaper. Press, pinch, and smooththe paper. The overlappingcardboard pieces give theimpression of the wooden poleribs of the tepee.
Cut two triangular flaps ofcardboard. These will becovered with paper andattached to the top of thetepee.
Wrap the cardboard flapin glue-coated paper.
Bend thin strips of glue-coated paper around theopening to make theedge smooth. Do thesame for the door. Drill asmall hole in the doorand in the tepee near thedoor. Attach the door ona wire loop or with apiece of knotted string.
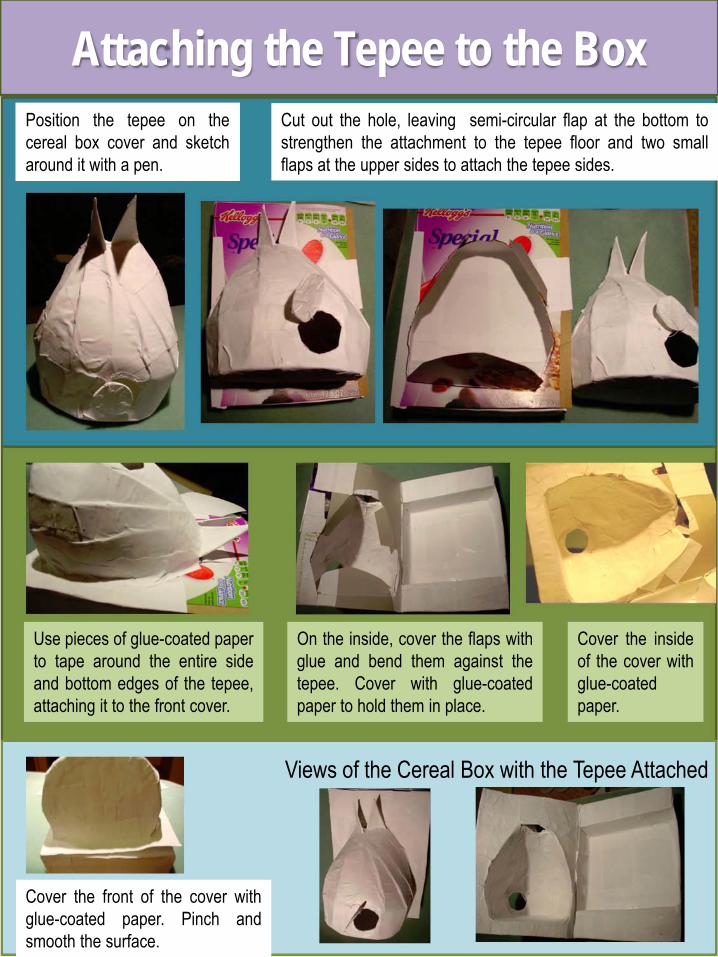
Position the tepee on thecereal box cover and sketcharound it with a pen.
Attaching the Tepee to the BoxCut out the hole, leaving semi-circular flap at the bottom tostrengthen the attachment to the tepee floor and two smallflaps at the upper sides to attach the tepee sides.
Use pieces of glue-coated paperto tape around the entire sideand bottom edges of the tepee,attaching it to the front cover.
Views of the Cereal Box with the Tepee Attached
On the inside, cover the flaps withglue and bend them against thetepee. Cover with glue-coatedpaper to hold them in place.
Cover the insideof the cover withglue-coatedpaper.
Cover the front of the cover withglue-coated paper. Pinch andsmooth the surface.

Homes are made of cardboard and papier-mâché in a similar way to the constructionof the diorama box. Here, we describe howto make the third of five different homestyles used by Native Americans. You canexpand these ideas by finding a drawing orphotograph of a home and re-creating it incardboard using basic geometric shapes.
Making Different Homes: Haida Plankhouse
Iroquois Longhouse
Haida Plankhouse
Seminole Chickee
Lakota Tepee
Hopi Adobe Home
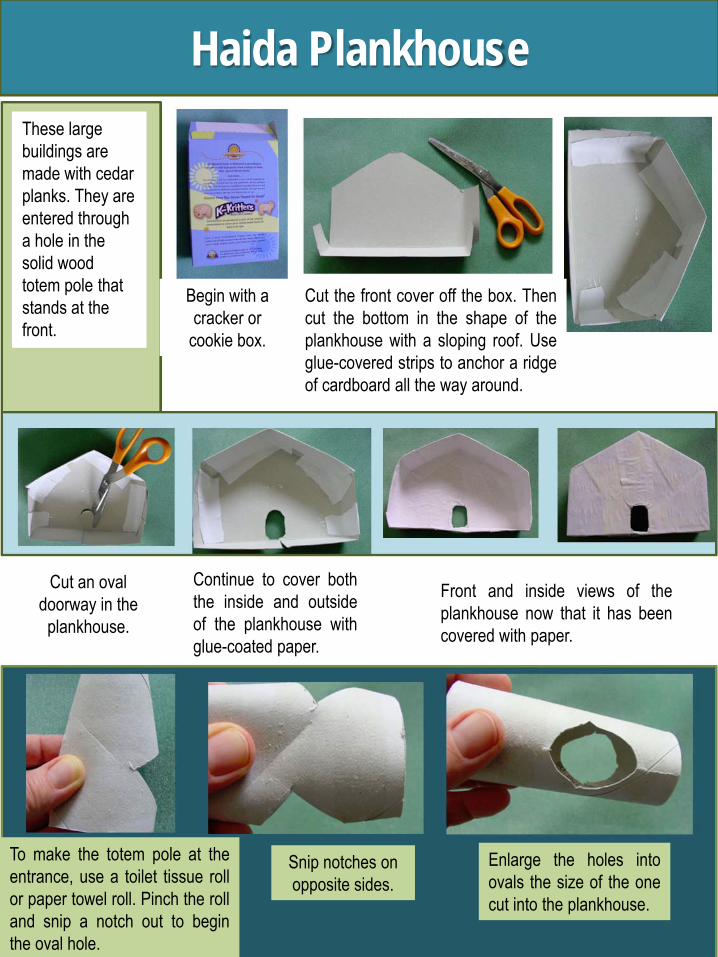
Cut an oval doorway in the
plankhouse.
These large buildings are made with cedar planks. They are entered through a hole in the solid wood totem pole that stands at the front.
To make the totem pole at theentrance, use a toilet tissue rollor paper towel roll. Pinch the rolland snip a notch out to beginthe oval hole.
Haida Plankhouse
Begin with a cracker or
cookie box.
Continue to cover boththe inside and outsideof the plankhouse withglue-coated paper.
Front and inside views of theplankhouse now that it has beencovered with paper.
Snip notches on opposite sides.
Enlarge the holes intoovals the size of the onecut into the plankhouse.
Cut the front cover off the box. Thencut the bottom in the shape of theplankhouse with a sloping roof. Useglue-covered strips to anchor a ridgeof cardboard all the way around.
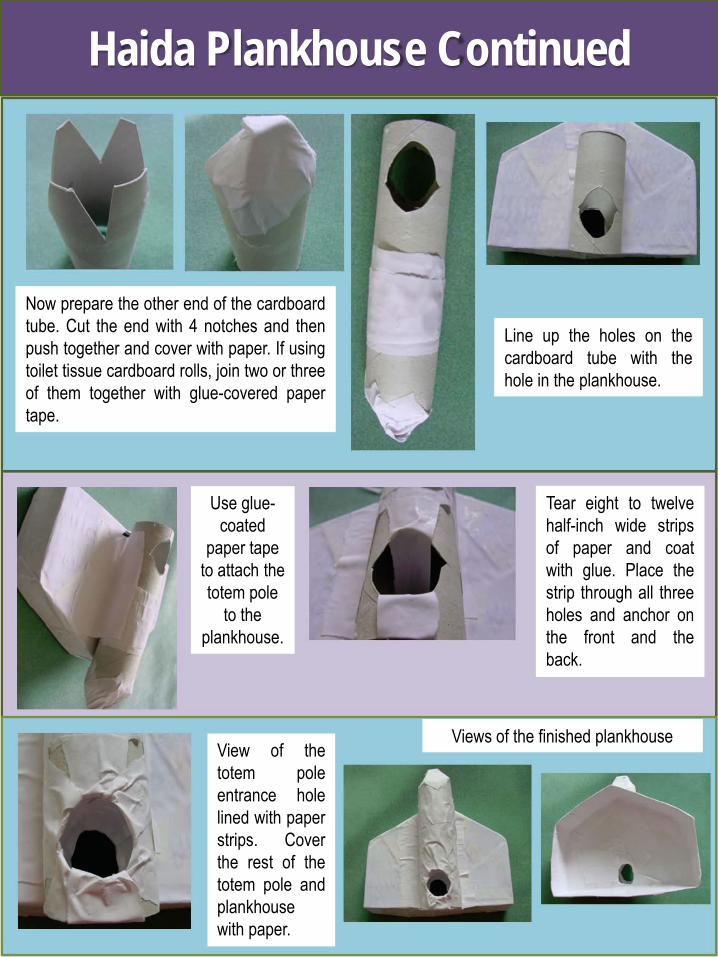
Line up the holes on thecardboard tube with thehole in the plankhouse.
Haida Plankhouse Continued
View of thetotem poleentrance holelined with paperstrips. Coverthe rest of thetotem pole andplankhousewith paper.
Tear eight to twelvehalf-inch wide stripsof paper and coatwith glue. Place thestrip through all threeholes and anchor onthe front and theback.
Now prepare the other end of the cardboardtube. Cut the end with 4 notches and thenpush together and cover with paper. If usingtoilet tissue cardboard rolls, join two or threeof them together with glue-covered papertape.
Use glue-coated
paper tape to attach the totem pole
to the plankhouse.
Views of the finished plankhouse
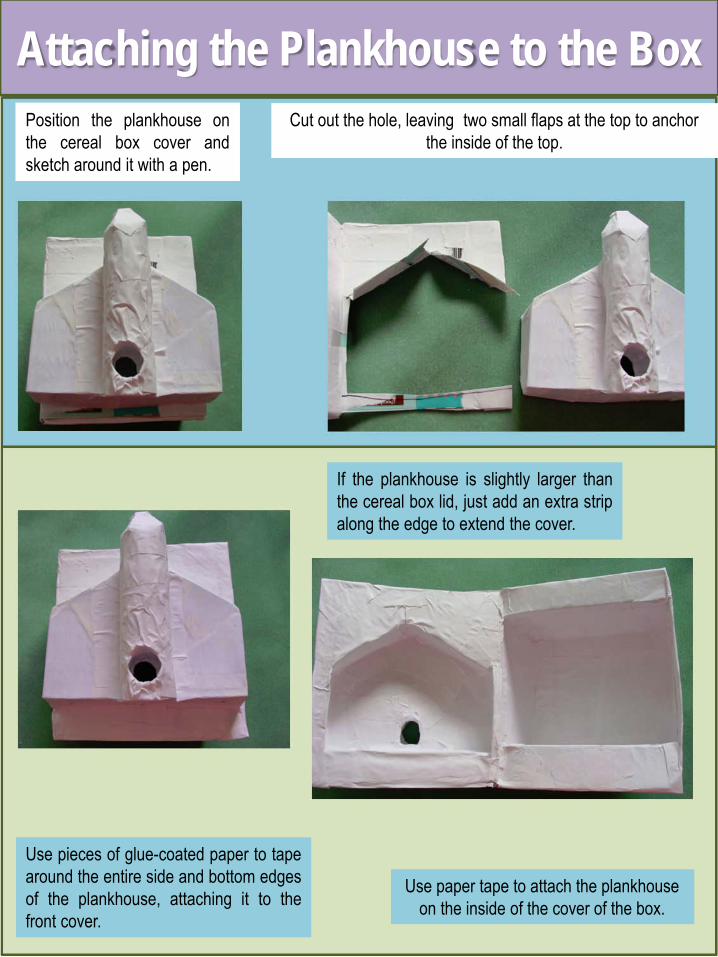
Position the plankhouse onthe cereal box cover andsketch around it with a pen.
Attaching the Plankhouse to the BoxCut out the hole, leaving two small flaps at the top to anchor
the inside of the top.
Use pieces of glue-coated paper to tapearound the entire side and bottom edgesof the plankhouse, attaching it to thefront cover.
Use paper tape to attach the plankhouse on the inside of the cover of the box.
If the plankhouse is slightly larger thanthe cereal box lid, just add an extra stripalong the edge to extend the cover.
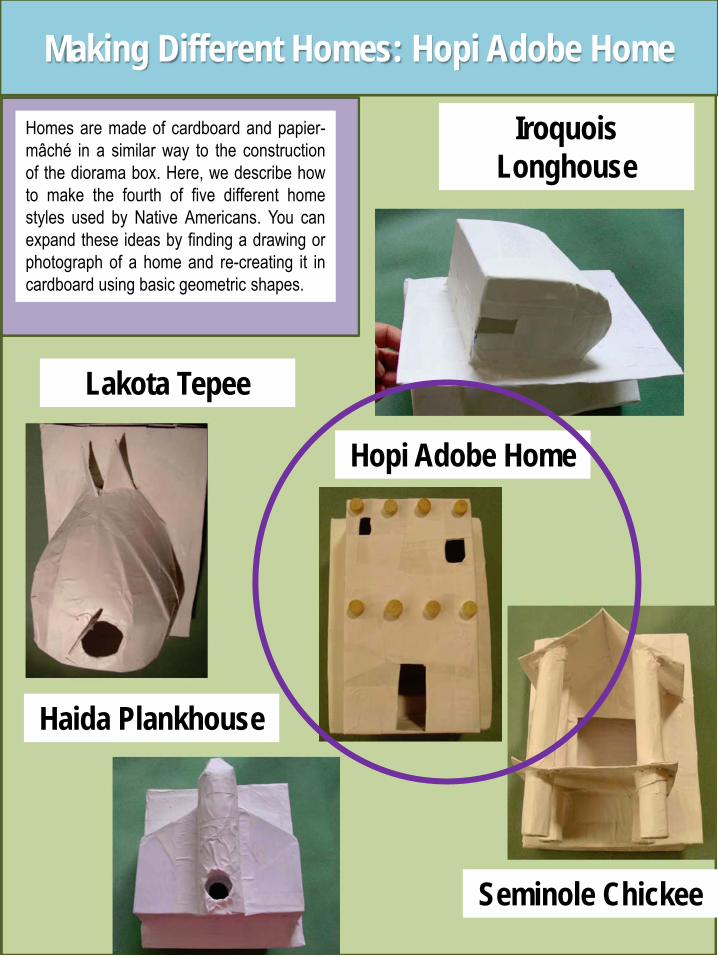
Homes are made of cardboard and papier-mâché in a similar way to the constructionof the diorama box. Here, we describe howto make the fourth of five different homestyles used by Native Americans. You canexpand these ideas by finding a drawing orphotograph of a home and re-creating it incardboard using basic geometric shapes.
Making Different Homes: Hopi Adobe Home
Iroquois Longhouse
Haida Plankhouse
Seminole Chickee
Lakota Tepee
Hopi Adobe Home
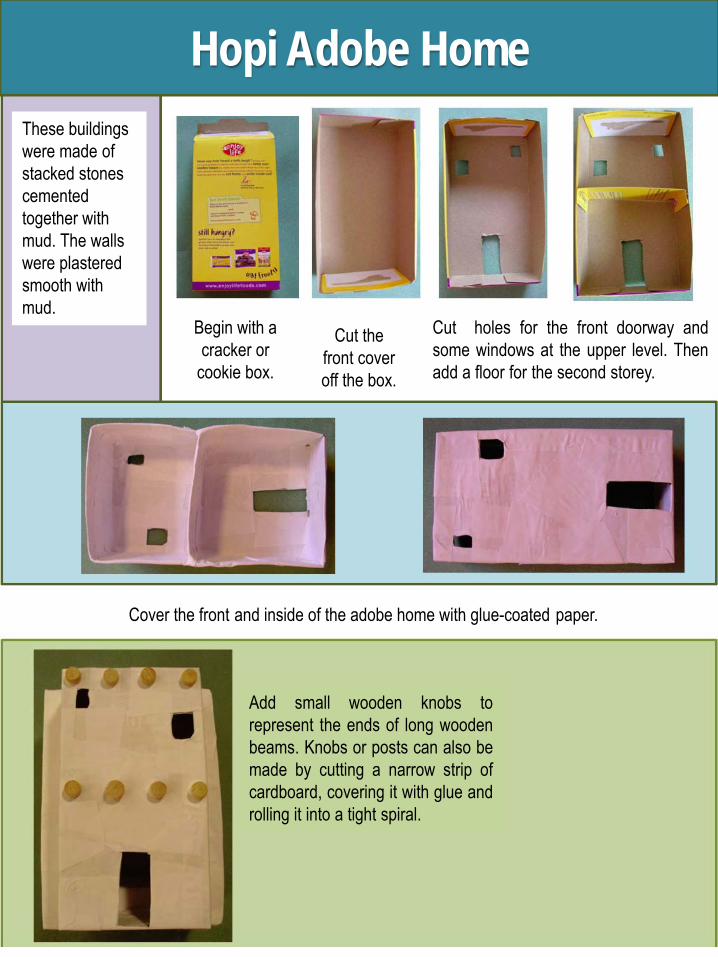
Cover the front and inside of the adobe home with glue-coated paper.
These buildings were made of stacked stones cemented together with mud. The walls were plastered smooth with mud.
Hopi Adobe Home
Begin with a cracker or
cookie box.
Add small wooden knobs torepresent the ends of long woodenbeams. Knobs or posts can also bemade by cutting a narrow strip ofcardboard, covering it with glue androlling it into a tight spiral.
Cut the front cover off the box.
Cut holes for the front doorway andsome windows at the upper level. Thenadd a floor for the second storey.
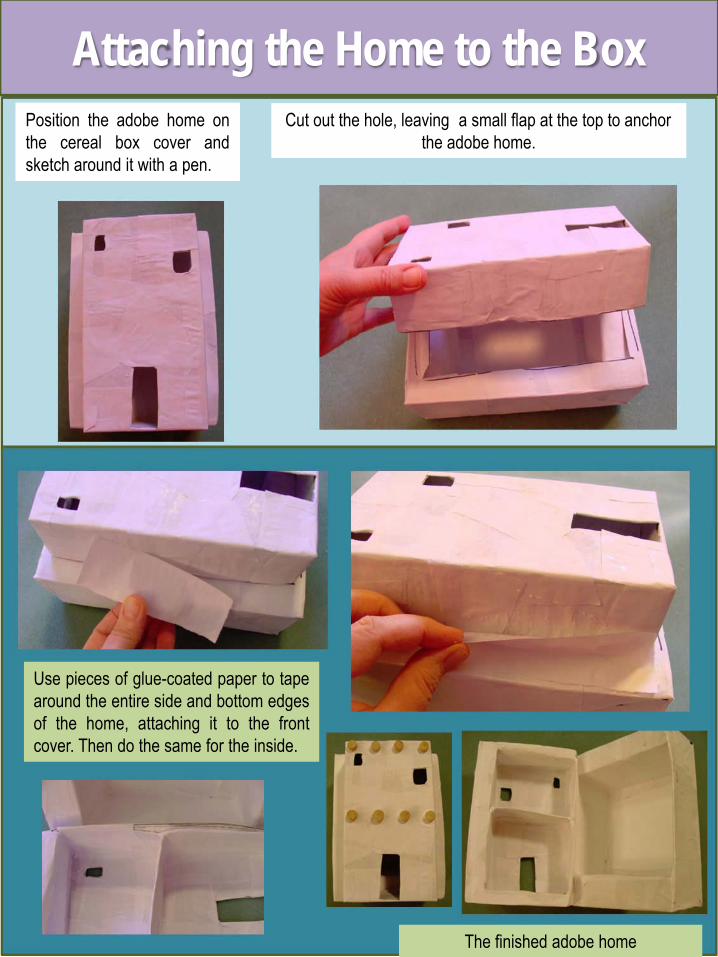
Position the adobe home onthe cereal box cover andsketch around it with a pen.
Attaching the Home to the BoxCut out the hole, leaving a small flap at the top to anchor
the adobe home.
Use pieces of glue-coated paper to tapearound the entire side and bottom edgesof the home, attaching it to the frontcover. Then do the same for the inside.
The finished adobe home
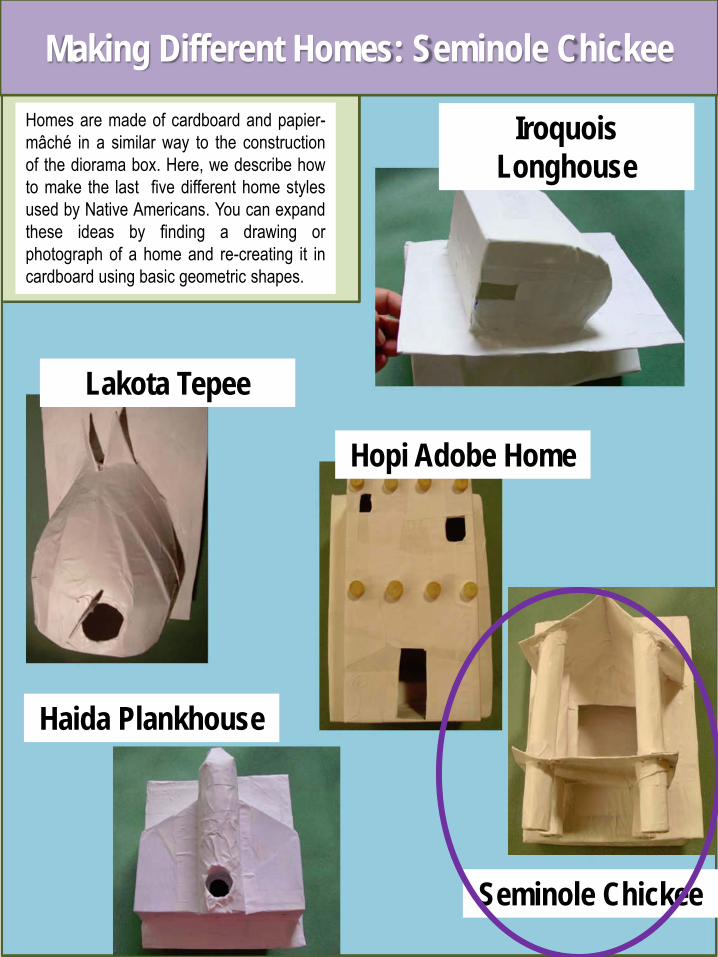
Homes are made of cardboard and papier-mâché in a similar way to the constructionof the diorama box. Here, we describe howto make the last five different home stylesused by Native Americans. You can expandthese ideas by finding a drawing orphotograph of a home and re-creating it incardboard using basic geometric shapes.
Making Different Homes: Seminole Chickee
Iroquois Longhouse
Haida Plankhouse
Seminole Chickee
Lakota Tepee
Hopi Adobe Home
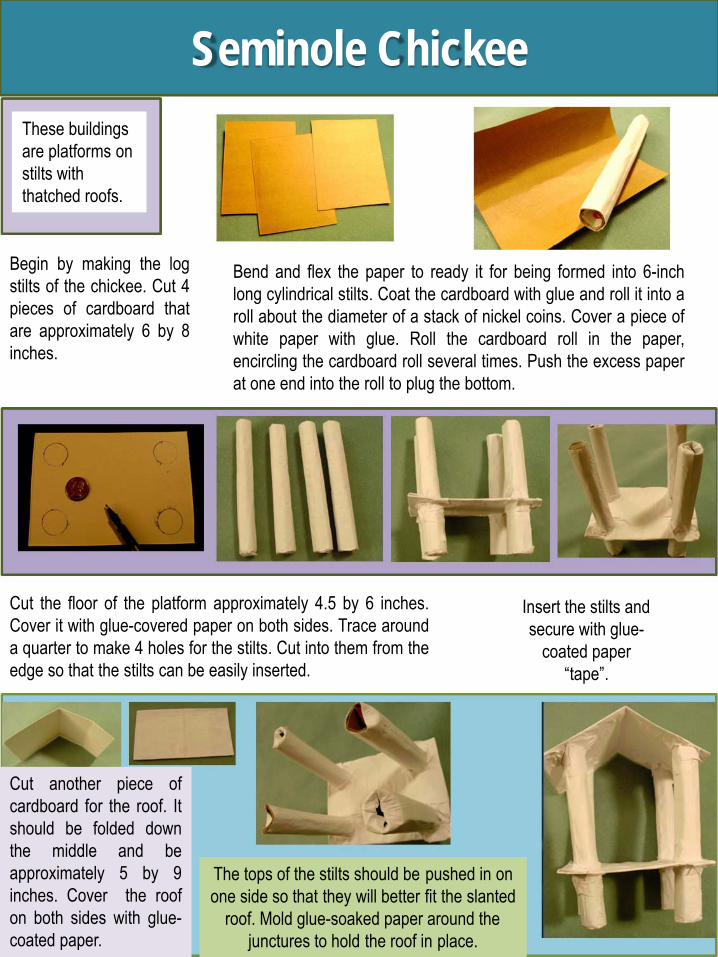
Cut the floor of the platform approximately 4.5 by 6 inches.Cover it with glue-covered paper on both sides. Trace arounda quarter to make 4 holes for the stilts. Cut into them from theedge so that the stilts can be easily inserted.
These buildings are platforms on stilts with thatched roofs.
Cut another piece ofcardboard for the roof. Itshould be folded downthe middle and beapproximately 5 by 9inches. Cover the roofon both sides with glue-coated paper.
Seminole Chickee
Begin by making the logstilts of the chickee. Cut 4pieces of cardboard thatare approximately 6 by 8inches.
Insert the stilts and secure with glue-
coated paper “tape”.
The tops of the stilts should be pushed in on one side so that they will better fit the slanted
roof. Mold glue-soaked paper around the junctures to hold the roof in place.
Bend and flex the paper to ready it for being formed into 6-inchlong cylindrical stilts. Coat the cardboard with glue and roll it into aroll about the diameter of a stack of nickel coins. Cover a piece ofwhite paper with glue. Roll the cardboard roll in the paper,encircling the cardboard roll several times. Push the excess paperat one end into the roll to plug the bottom.
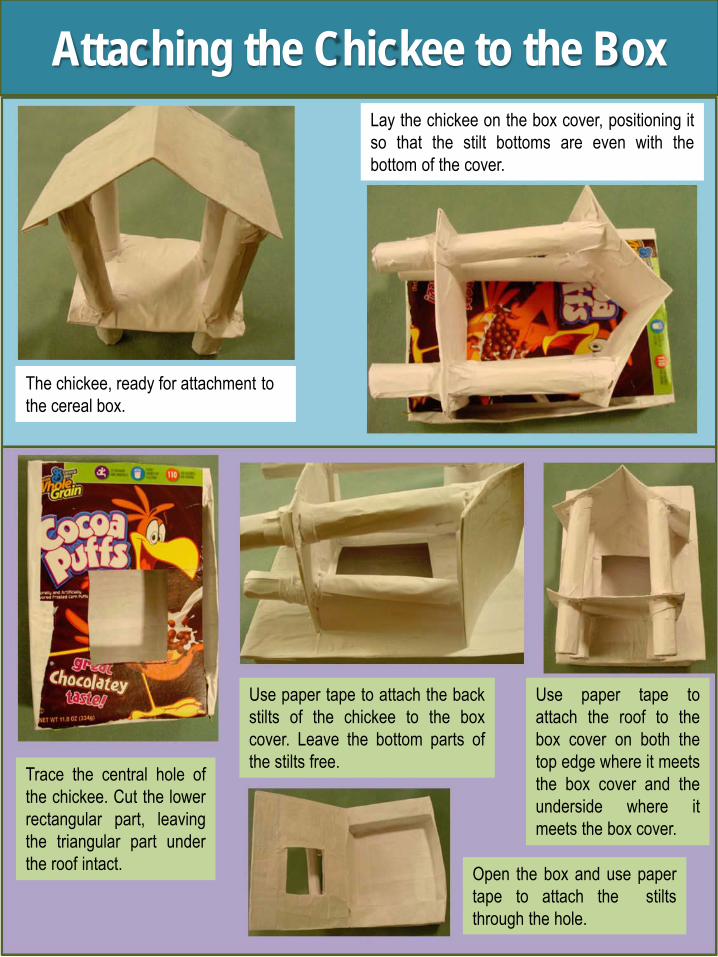
The chickee, ready for attachment to the cereal box.
Attaching the Chickee to the BoxLay the chickee on the box cover, positioning itso that the stilt bottoms are even with thebottom of the cover.
Trace the central hole ofthe chickee. Cut the lowerrectangular part, leavingthe triangular part underthe roof intact.
Use paper tape to attach the backstilts of the chickee to the boxcover. Leave the bottom parts ofthe stilts free.
Use paper tape toattach the roof to thebox cover on both thetop edge where it meetsthe box cover and theunderside where itmeets the box cover.
Open the box and use papertape to attach the stiltsthrough the hole.
Appendix 2Images for
Furnishing and Finishing the
Dioramas
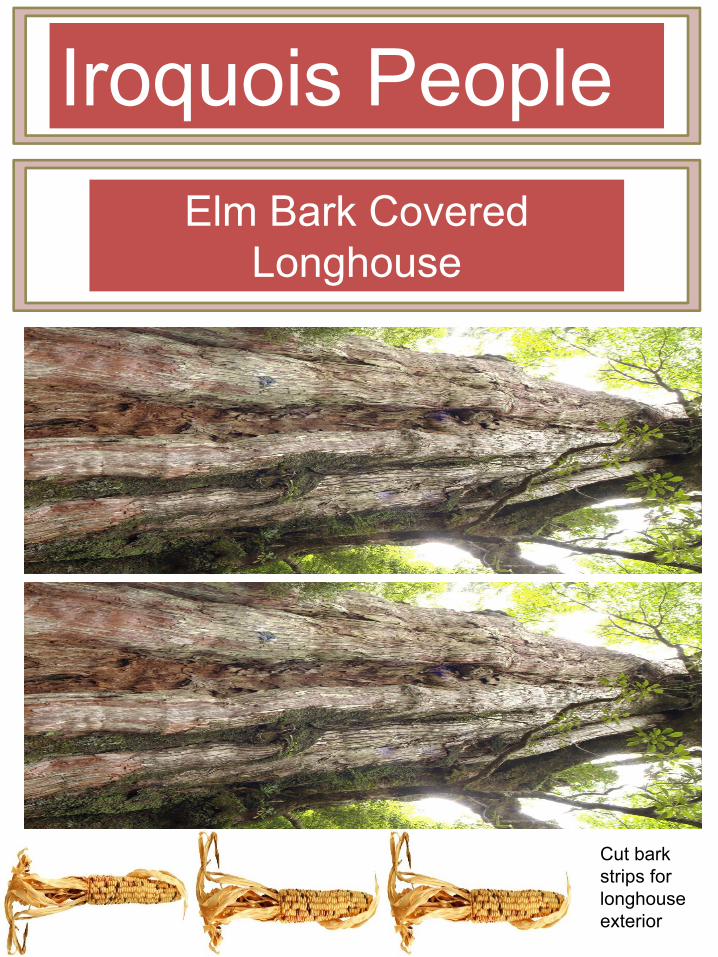
Iroquois PeopleElm Bark Covered
Longhouse
Cut bark strips for longhouse exterior

Fold and glue ends of canoe
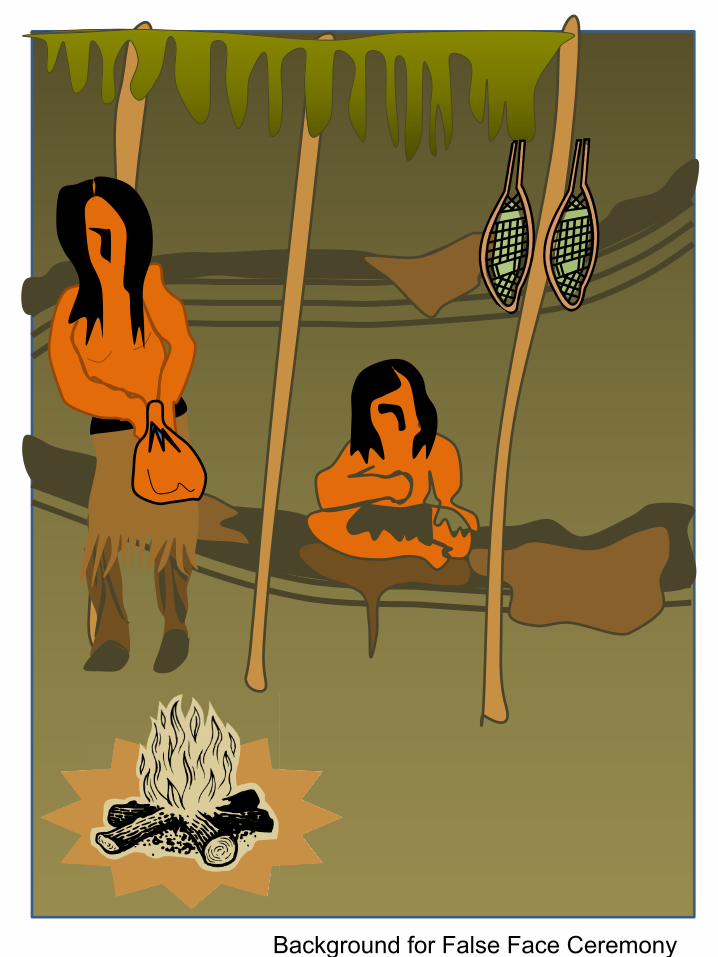
Background for False Face Ceremony
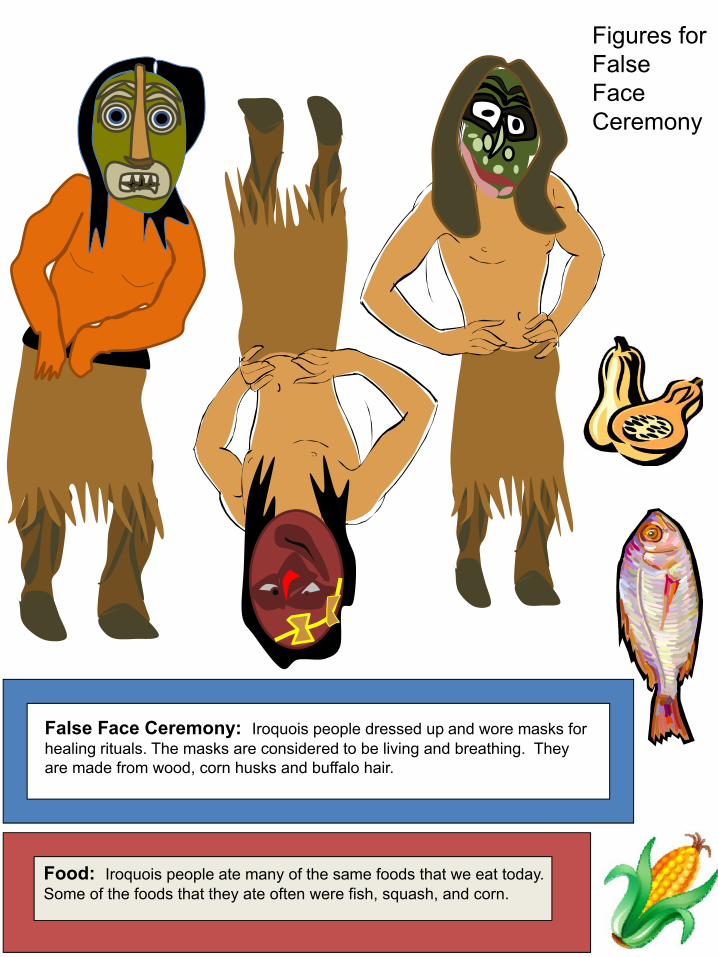
False Face Ceremony: Iroquois people dressed up and wore masks for healing rituals. The masks are considered to be living and breathing. They are made from wood, corn husks and buffalo hair.
Food: Iroquois people ate many of the same foods that we eat today. Some of the foods that they ate often were fish, squash, and corn.
Figures for FalseFaceCeremony

A picture of an Iroquois corn husk mask. These masks are used as a part of agricultural and fertility festivals.
Wampum belts and beading are important to the Iroquois people. The
Iroquois originally acquired Wampum by
trade and tribute. Wampum belts were
often given at significant events in Iroquois
history. Beading is a very slow and meticulous
process. The beads were made of white and purple
shell.
Simulated wampum beading.
The c
loth
ing
cons
isted
of m
any i
tem
s mad
e out
of d
eer
skin
such
as lo
inclo
ths w
orn
by m
en. K
ilts,
like s
kirts
, we
re w
orn
by Ir
oquo
ian m
en o
n fo
rmal
occa
sions
. Wom
en
wore
legg
ings
, skir
ts, a
nd ve
sts.
Mocc
asin
s wer
e wor
e by
both
sexe
s. Je
welry
was
wor
n by
bot
h m
en an
d wo
men
an
d m
ade o
ut o
f por
cupi
ne q
uills
, bea
ds, a
nd d
yed
hair.
Women’s Vest
Moccasins
Deer Hide
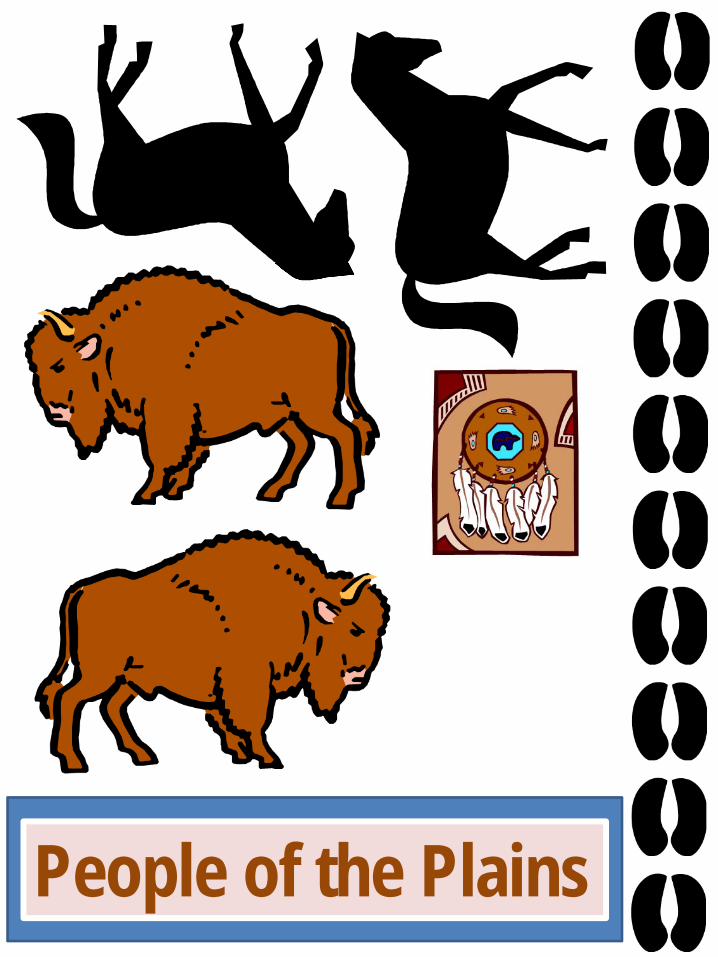
People of the Plains
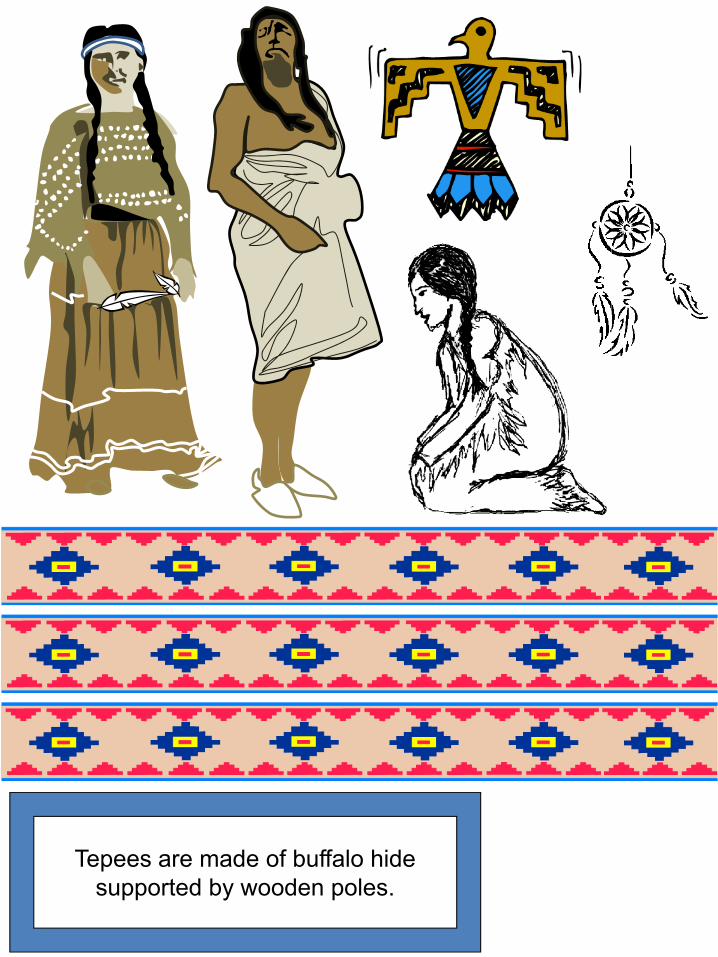
Tepees are made of buffalo hide supported by wooden poles.
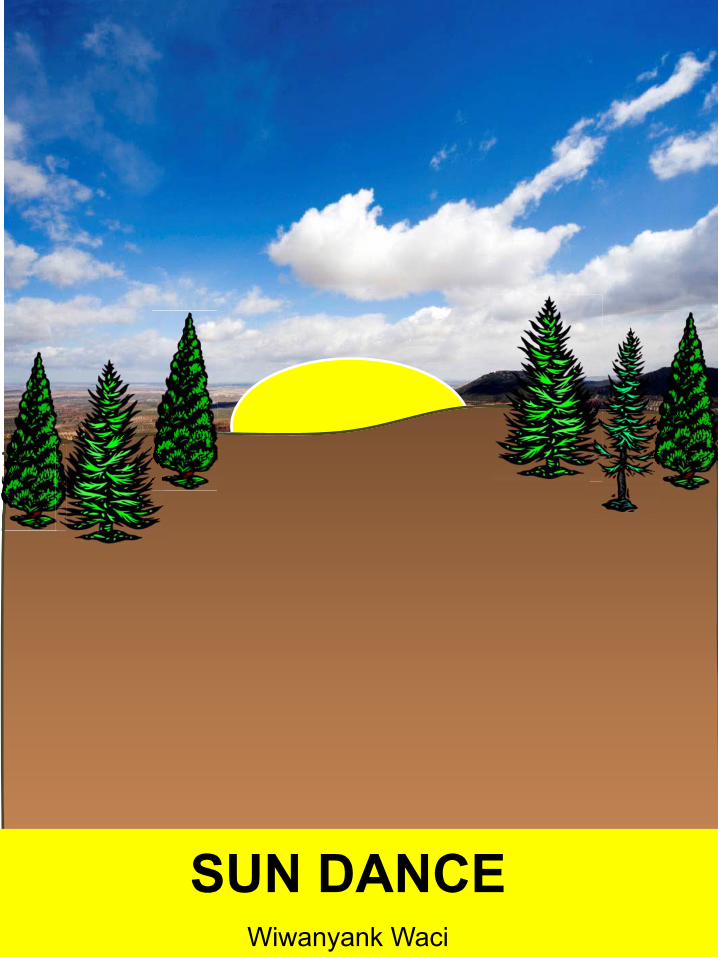
SUN DANCEWiwanyank Waci
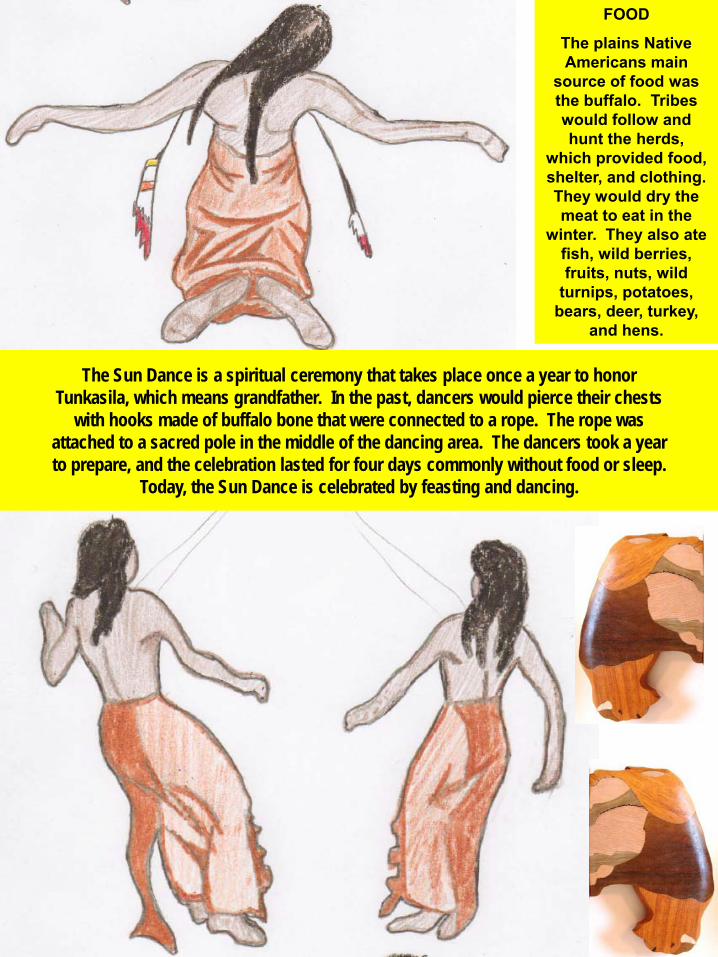
The Sun Dance is a spiritual ceremony that takes place once a year to honor Tunkasila, which means grandfather. In the past, dancers would pierce their chests
with hooks made of buffalo bone that were connected to a rope. The rope was attached to a sacred pole in the middle of the dancing area. The dancers took a year to prepare, and the celebration lasted for four days commonly without food or sleep.
Today, the Sun Dance is celebrated by feasting and dancing.
FOOD
The plains Native Americans main
source of food was the buffalo. Tribes would follow and hunt the herds,
which provided food, shelter, and clothing. They would dry the meat to eat in the
winter. They also ate fish, wild berries, fruits, nuts, wild
turnips, potatoes, bears, deer, turkey,
and hens.
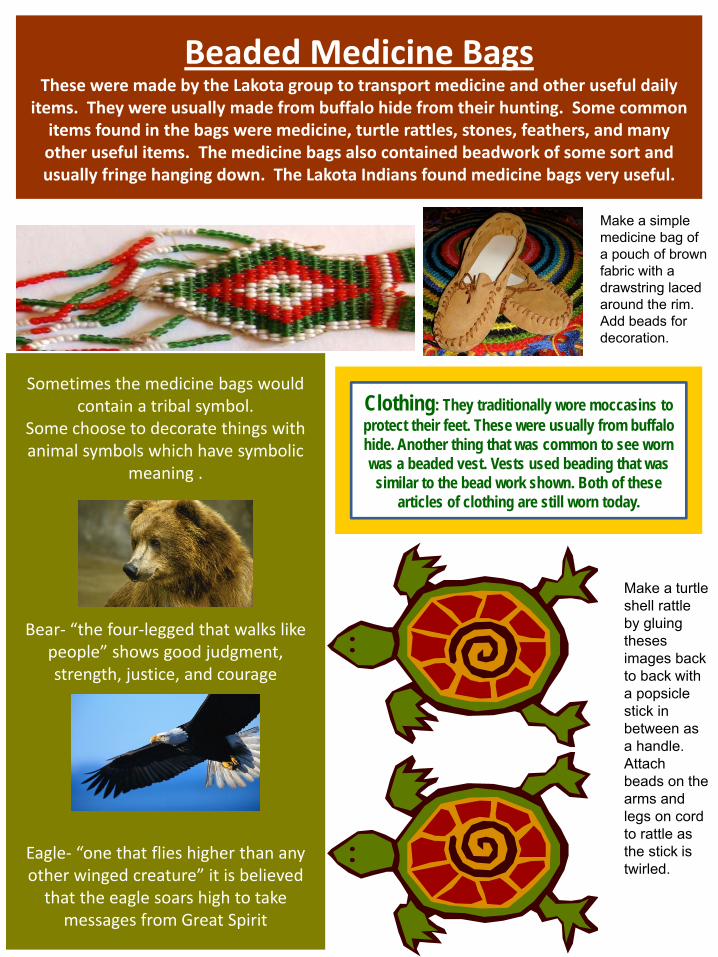
Beaded Medicine BagsThese were made by the Lakota group to transport medicine and other useful daily
items. They were usually made from buffalo hide from their hunting. Some common items found in the bags were medicine, turtle rattles, stones, feathers, and many other useful items. The medicine bags also contained beadwork of some sort and usually fringe hanging down. The Lakota Indians found medicine bags very useful.
Sometimes the medicine bags would contain a tribal symbol.
Some choose to decorate things with animal symbols which have symbolic
meaning .
Bear‐ “the four‐legged that walks like people” shows good judgment, strength, justice, and courage
Eagle‐ “one that flies higher than any other winged creature” it is believed that the eagle soars high to take
messages from Great Spirit
Clothing: They traditionally wore moccasins to protect their feet. These were usually from buffalo hide. Another thing that was common to see worn was a beaded vest. Vests used beading that was
similar to the bead work shown. Both of these articles of clothing are still worn today.
Make a turtle shell rattle by gluing theses images back to back with a popsicle stick in between as a handle. Attach beads on the arms and legs on cord to rattle as the stick is twirled.
Make a simple medicine bag of a pouch of brown fabric with a drawstring laced around the rim. Add beads for decoration.
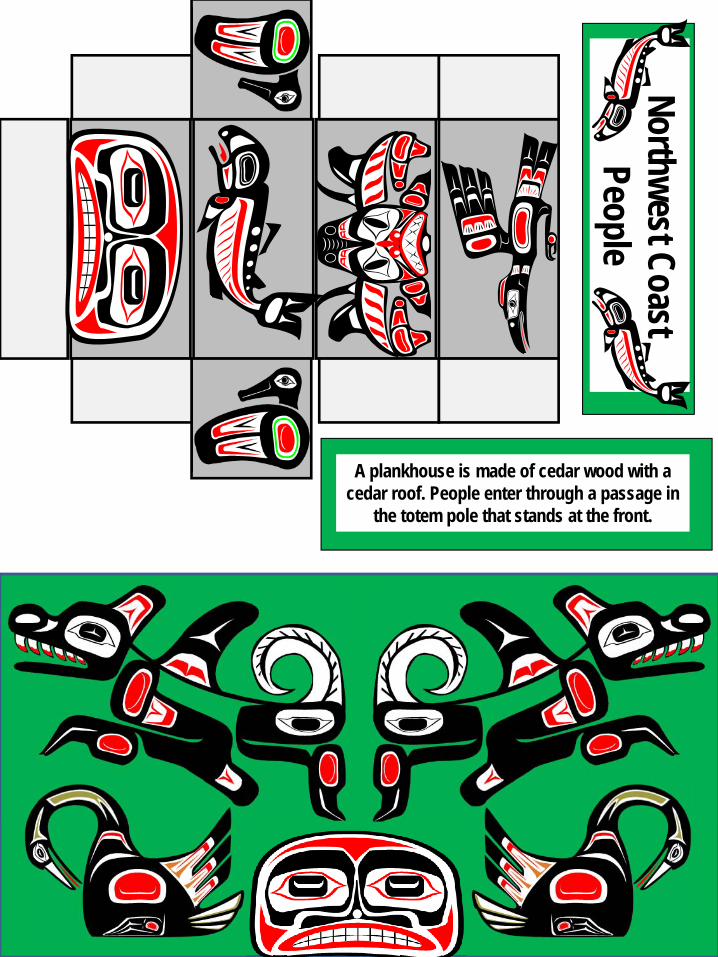
A plankhouse is made of cedar wood with a cedar roof. People enter through a passage in
the totem pole that stands at the front.
Northwest Coast People
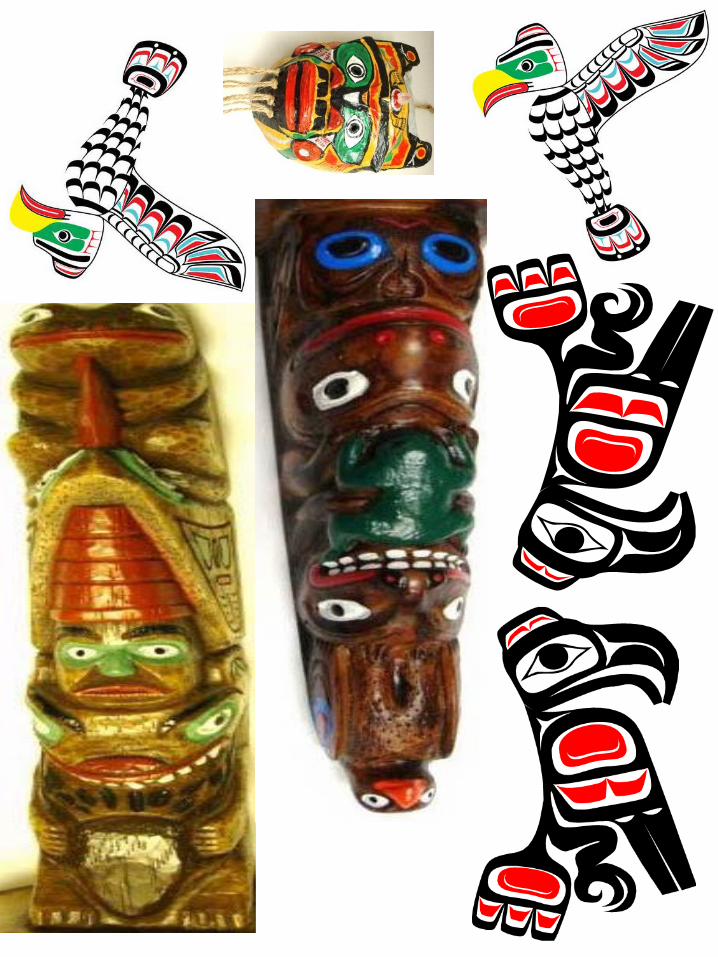

This scene shows a memorial totem pole raising. When a Haida chief dies, his remains are placed into a box that is then put into the totem pole. The totem pole is designed to have symbols that show the accomplishments of the chief when he was alive. The ceremony to raise the pole takes place exactly one year after the chief dies.
Memorial Totem Pole Raising
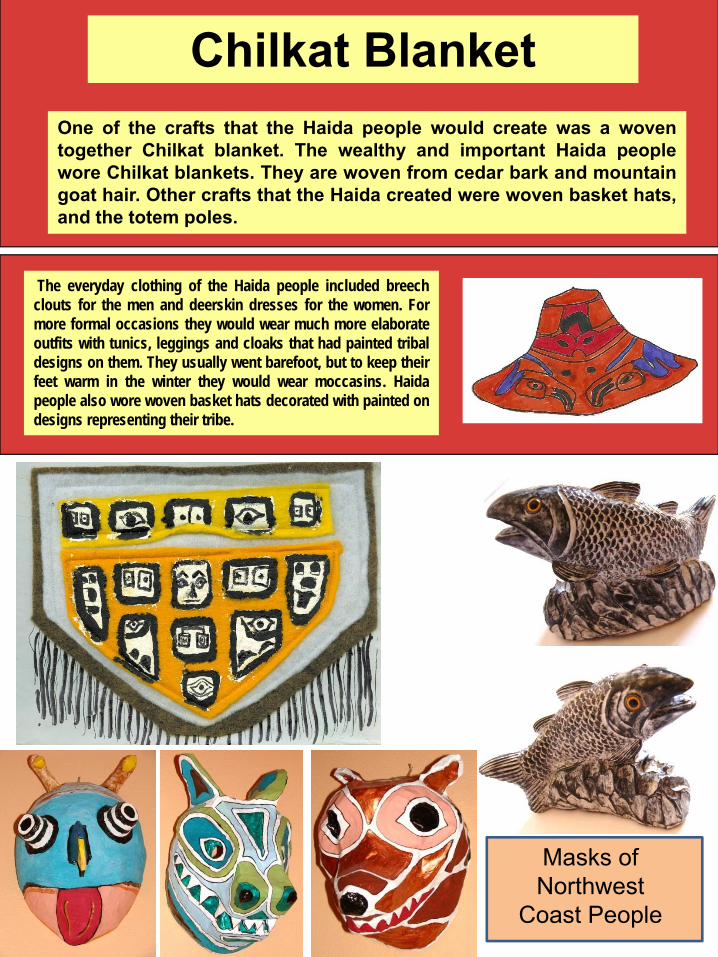
One of the crafts that the Haida people would create was a woventogether Chilkat blanket. The wealthy and important Haida peoplewore Chilkat blankets. They are woven from cedar bark and mountaingoat hair. Other crafts that the Haida created were woven basket hats,and the totem poles.
The everyday clothing of the Haida people included breechclouts for the men and deerskin dresses for the women. Formore formal occasions they would wear much more elaborateoutfits with tunics, leggings and cloaks that had painted tribaldesigns on them. They usually went barefoot, but to keep theirfeet warm in the winter they would wear moccasins. Haidapeople also wore woven basket hats decorated with painted ondesigns representing their tribe.
Masks of Northwest
Coast People
Chilkat Blanket
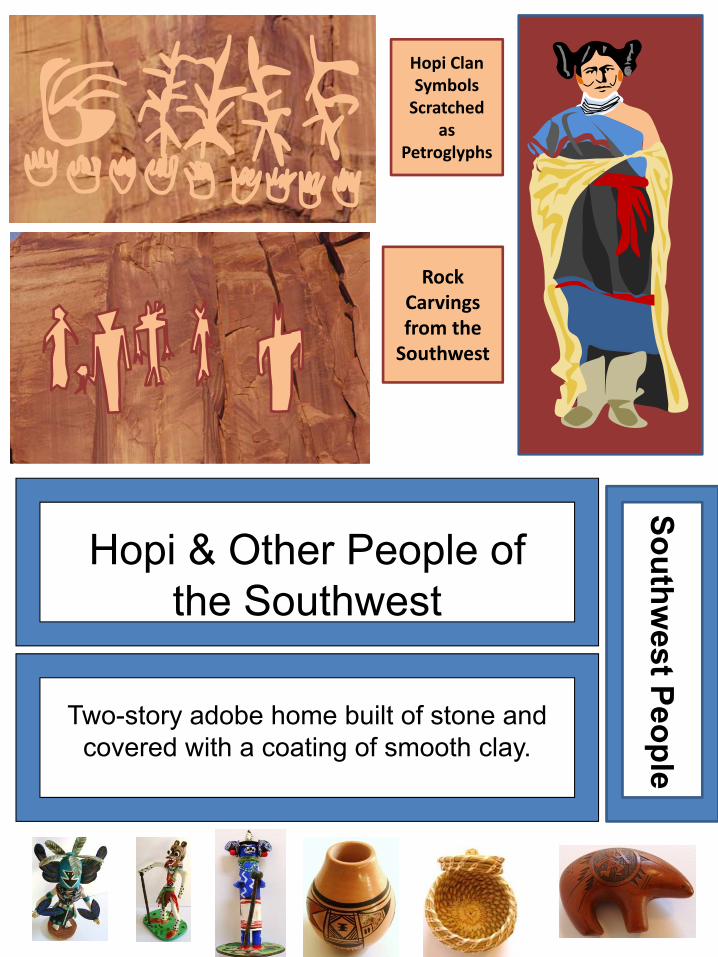
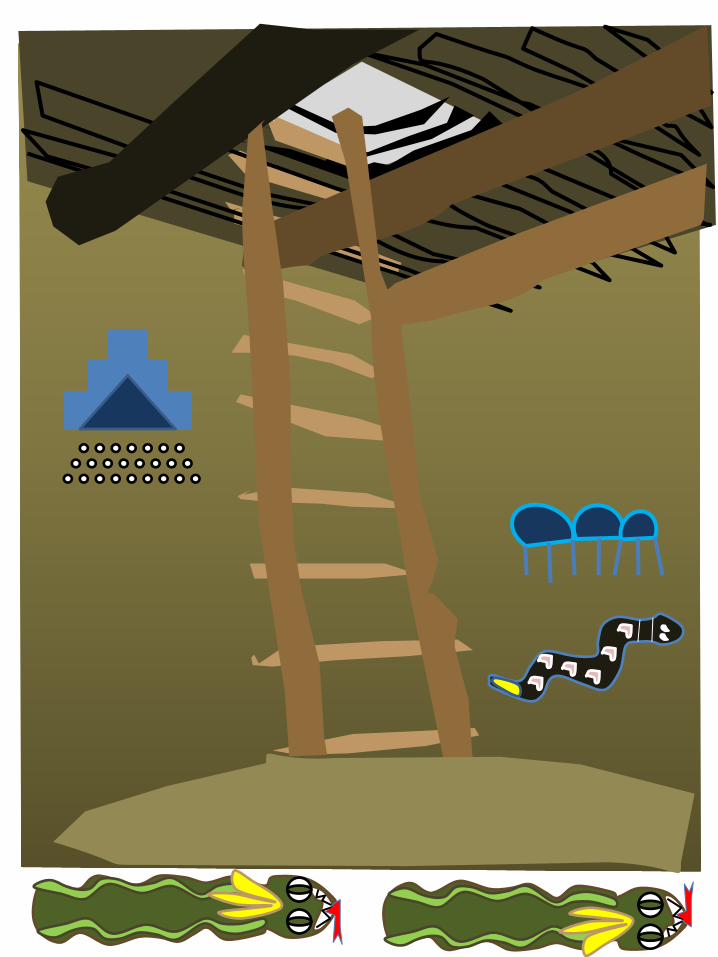
Hopi Clan Symbols Scratched
as Petroglyphs
Rock Carvings from the Southwest
Hopi & Other People of the Southwest
Two-story adobe home built of stone and covered with a coating of smooth clay.
Southwest People
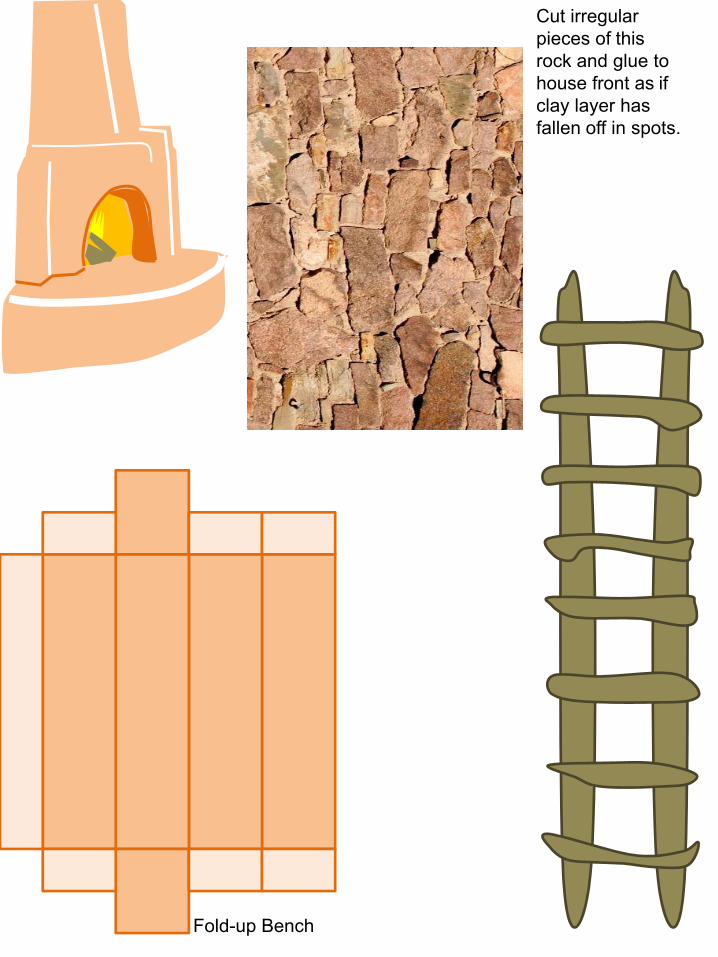
Fold-up Bench
Cut irregular pieces of this rock and glue to house front as if clay layer has fallen off in spots.
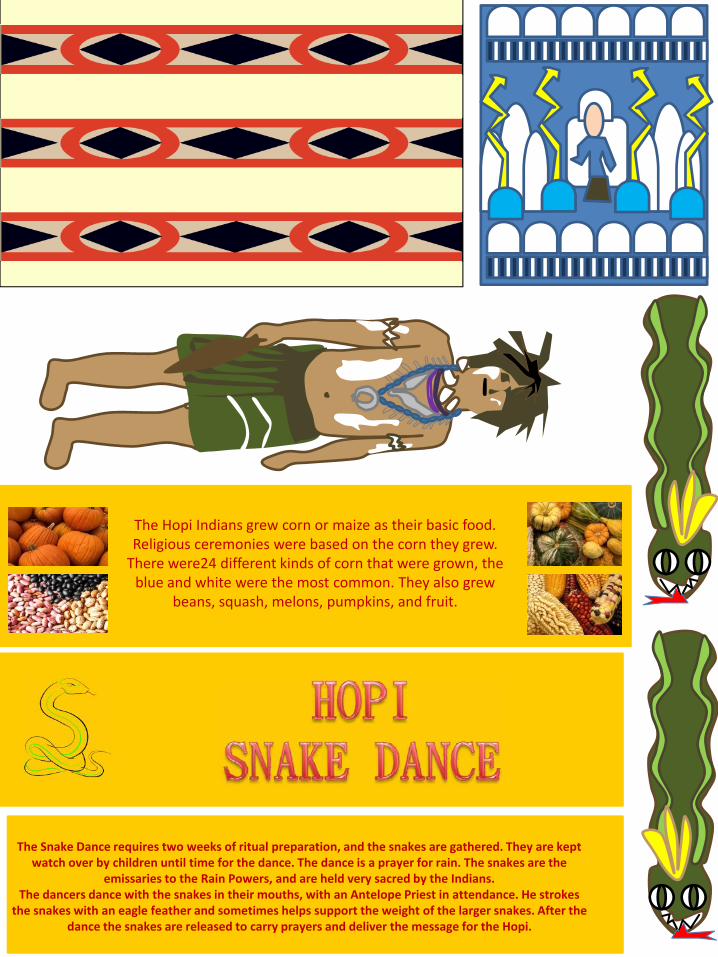
The Snake Dance requires two weeks of ritual preparation, and the snakes are gathered. They are kept watch over by children until time for the dance. The dance is a prayer for rain. The snakes are the
emissaries to the Rain Powers, and are held very sacred by the Indians. The dancers dance with the snakes in their mouths, with an Antelope Priest in attendance. He strokes
the snakes with an eagle feather and sometimes helps support the weight of the larger snakes. After the dance the snakes are released to carry prayers and deliver the message for the Hopi.
The Hopi Indians grew corn or maize as their basic food. Religious ceremonies were based on the corn they grew. There were24 different kinds of corn that were grown, the blue and white were the most common. They also grew
beans, squash, melons, pumpkins, and fruit.
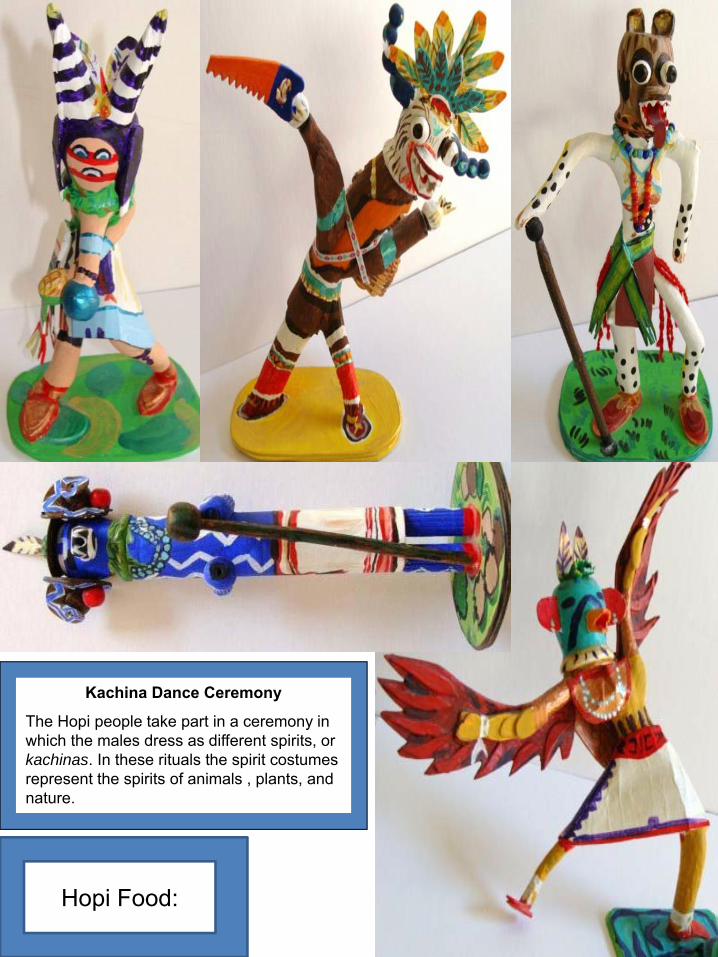
Kachina Dance Ceremony
The Hopi people take part in a ceremony in which the males dress as different spirits, or kachinas. In these rituals the spirit costumes represent the spirits of animals , plants, and nature.
Hopi Food:
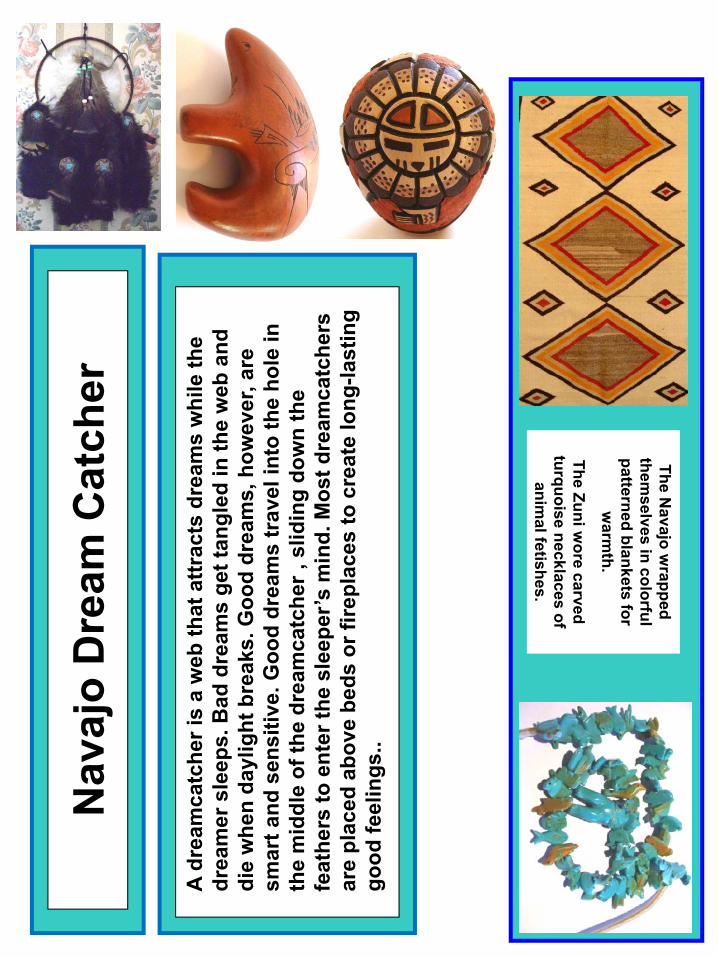
Nav
ajo
Dre
am C
atch
er
A dr
eam
catc
her i
s a
web
that
attr
acts
dre
ams
whi
le th
e dr
eam
er s
leep
s. B
ad d
ream
s ge
t tan
gled
in th
e w
eb a
nd
die
whe
n da
ylig
ht b
reak
s. G
ood
drea
ms,
how
ever
, are
sm
art a
nd s
ensi
tive.
Goo
d dr
eam
s tr
avel
into
the
hole
in
the
mid
dle
of th
e dr
eam
catc
her ,
slid
ing
dow
n th
e fe
athe
rs to
ent
er th
e sl
eepe
r’s m
ind.
Mos
t dre
amca
tche
rs
are
plac
ed a
bove
bed
s or
fire
plac
es to
cre
ate
long
-last
ing
good
feel
ings
..
The Navajo w
rapped them
selves in colorful patterned blankets for
warm
th.
The Zuni wore carved
turquoise necklaces of anim
al fetishes.

The medicine man for the tribe does sandpainting. When he paints the sand paintings, hemakes sure that the design is symmetrical so thatit will balance the patient’s harmony. The patientsits on the painting and the medicine man startshis healing chanting. The reason the patient sitson the painting is because the painting is like aportal for spirits to come and go. The holy spiritswill take the illnesses away while a patient issitting on the sand painting. After the healing hasoccurred, the sand painting is disposed of withina 24 hour period because it is toxic.
Hopimen
worebreechcloths,which
arelike
ashortkilt.
Wom
enwore
kneelength
cottondresses
thatwere
calledm
antas.This
garment
fastenedon
theright
shoulder,exposing
theother
shoulder.W
henm
issionariescam
ein
the1900’s,they
thoughtthatwasnotm
odestenough,sowom
enstarted
wearingblouses
undertheirmantas.Men
andwom
enalso
woredeerskin
moccasins.
Forspecialoccasions,they
wrappedwhite
deerskins
aroundtheir
shinslike
leggings.Hopimen
usuallywore
headbands
tiedaround
theirheads.
Unmarried
Hopiwomen
woretheirhair
inwhat
wascalled
butterfly
whorlsand
married
women
woreitinpigtails.
Navajo Sandpaintings
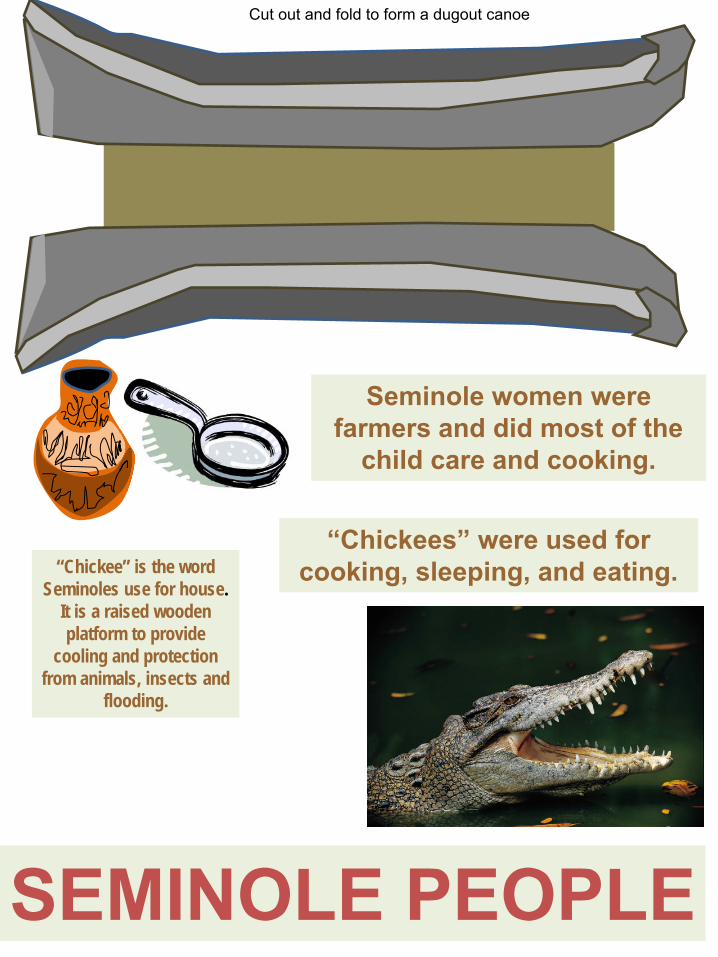
SEMINOLE PEOPLE
“Chickee” is the word Seminoles use for house.
It is a raised wooden platform to provide
cooling and protection from animals, insects and
flooding.
“Chickees” were used for cooking, sleeping, and eating.
Seminole women were farmers and did most of the
child care and cooking.
Cut out and fold to form a dugout canoe
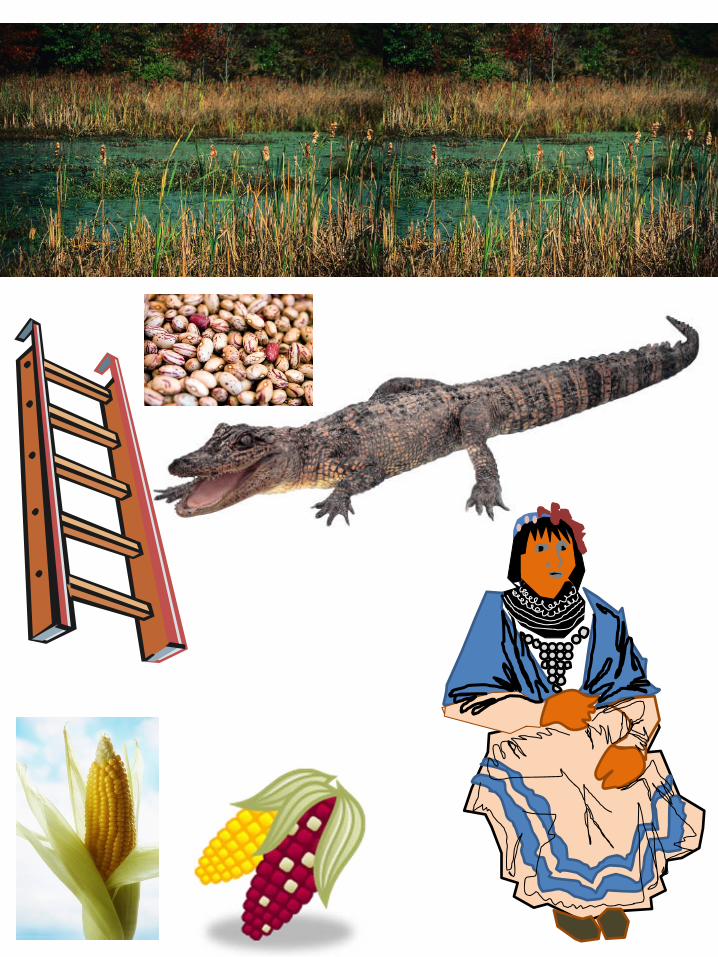

The Seminoles farmed, hunted, and fished. The Seminole men did most of the fishing and hunting.They hunted animals such as deer, turtles, alligators, and wild turkeys. The Seminole womenharvested crops: beans, pumpkins, and squash. From these crops they made soups and stews. Cornwas the main crop of the Seminoles. They used corn to make corn flour, corn bread, corn pancakes,and a drink called sofk. Traditional foods include taal-holelke (boiled swamp cabbage) and fry bread.
tt
A celebration the Seminole Indians in which participated was the Green Corn Ceremony. The GreenCorn Ceremony is a celebration of the ripening of their harvests, especially corn. During theCeremony, members of the tribe give thanks for the corn, rain, sun, and a good harvest. TheSeminoles from different camps or areas would get together for hours of dancing. One of thepopular dances was “stomp dancing”. To perform the stomp dance the groups would get in a singlefile line and follow the “leader” or medicine man. The males would imitate the moves of the medicineman and the female dancers would quietly shuffle using turtle shells as shakers attached to theirlegs.
Green Corn Ceremony

Whenever a Seminole woman hadextra money, she purchased a strandof beads. When a man courted awoman, he bought her a strand ofbeads to express his interest incourting her. Buy the end of aSeminole woman’s life, she worehundreds of strands of beads.
Seminole Beads
The Seminoles designed their own form of patchwork using blocks and bars. The organization of the blocks gave meaning to the Seminole’s and gave value to their clothing.
Seminole people often wore a ruffled style clothing. Women had these ruffles at the bottoms of their skirts while men often had the ruffles on the fronts of their shirts.