managing & editing sites with wsu tri-cities wordpress€¦ · managing & editing sites...
TRANSCRIPT
Managing & Editing Sites with WSU Tri-Cities WordPress 1
Managing & editing sites with WSU Tri-Cities WordPress Table of Contents
1. Requesting a WordPress site for your department, unit, or division 2. Logging in 3. Dashboard 4. Posts 5. Media 6. Pages 7. Contact form 8. Appearance 9. Plugins 10. Users 11. Tools 12. Settings

Managing & Editing Sites with WSU Tri-Cities WordPress 2
1. Requesting a WordPress site for your department, unit, or division In July 2014, Washington State University Tri-Cities began migrating most department sites on the WSU Tri-Cities master website (tricities.wsu.edu) to the WordPress content management system (CMS). While the previous system required either an extensive knowledge of, at minimum, HTML or assistance from the Marketing and Communications team to update content on individual department pages, the shift to the new CMS puts the power of updates and page management back in the hands of department managers and content coordinators. Although many sites have been established in the WSU Tri-Cities WordPress CMS, many more still need to be migrated to the new environment or simply don’t yet exist. To create a new site in the WordPress environment, contact the Marketing and Communications team at [email protected] or Information Technology Services team at [email protected].
• You will need to provide the following: o The WSU Tri-Cities network username for the designated site manager
§ This is the username you use to log in on WSU Tri-Cities computers. If you do not have one, request one from the IT department in CIC 225.
o Department/unit name o The name of the site, i.e. “Marketing & Communications at WSU Tri-
Cities” o Best point of contact or name of department designated content manager o Preferred site URL, i.e. tricities.wsu.edu/SITENAME (Please understand
that while we cannot accommodate all requests for custom site URLs, we will do our best to craft you an address that is simple, effective, and relevant for your site.)
• You may provide the following, but it is not required for MarComm to create your new site at a very basic level:
o Page content and titles, preferably in a Word document, or a list of URLs where we should source content for your site, such as an existing site currently owned by your department.
o Images (larger is better) o Relevant logos o Relevant documents and forms o Navigation panel outline, i.e. which pages should be in your navigation
menu
Managing & Editing Sites with WSU Tri-Cities WordPress 3
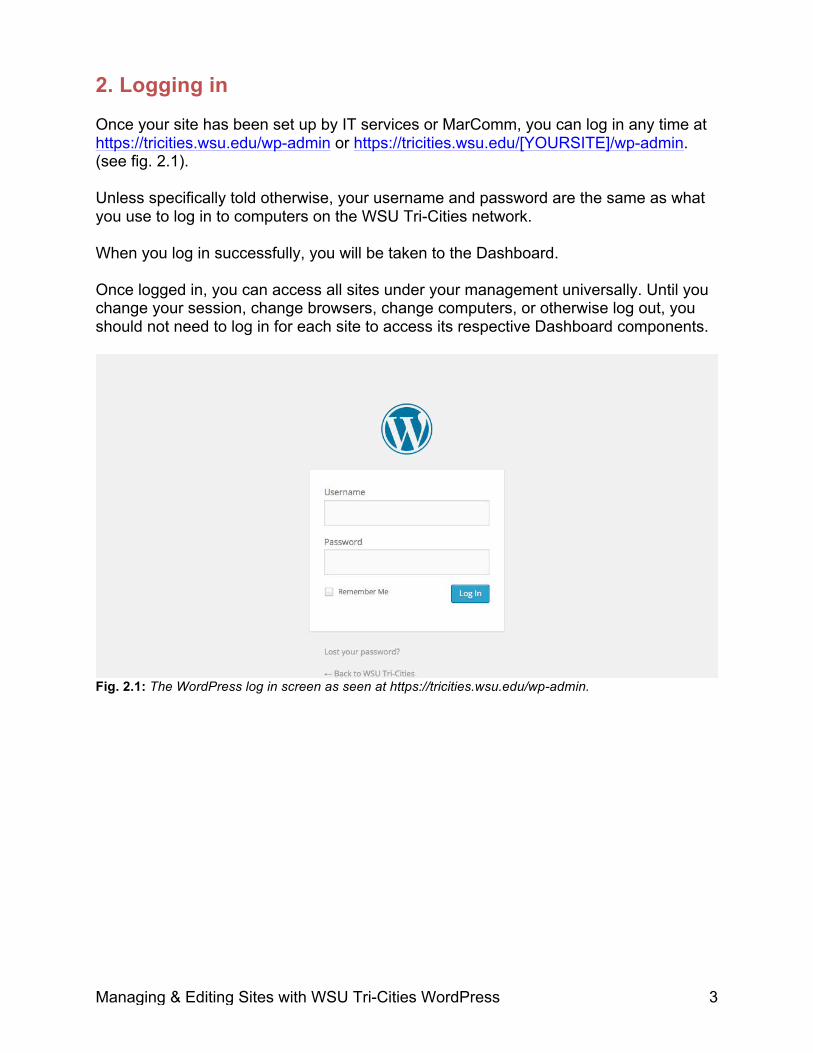
2. Logging in Once your site has been set up by IT services or MarComm, you can log in any time at https://tricities.wsu.edu/wp-admin or https://tricities.wsu.edu/[YOURSITE]/wp-admin. (see fig. 2.1). Unless specifically told otherwise, your username and password are the same as what you use to log in to computers on the WSU Tri-Cities network. When you log in successfully, you will be taken to the Dashboard. Once logged in, you can access all sites under your management universally. Until you change your session, change browsers, change computers, or otherwise log out, you should not need to log in for each site to access its respective Dashboard components.
Fig. 2.1: The WordPress log in screen as seen at https://tricities.wsu.edu/wp-admin.
Managing & Editing Sites with WSU Tri-Cities WordPress 4
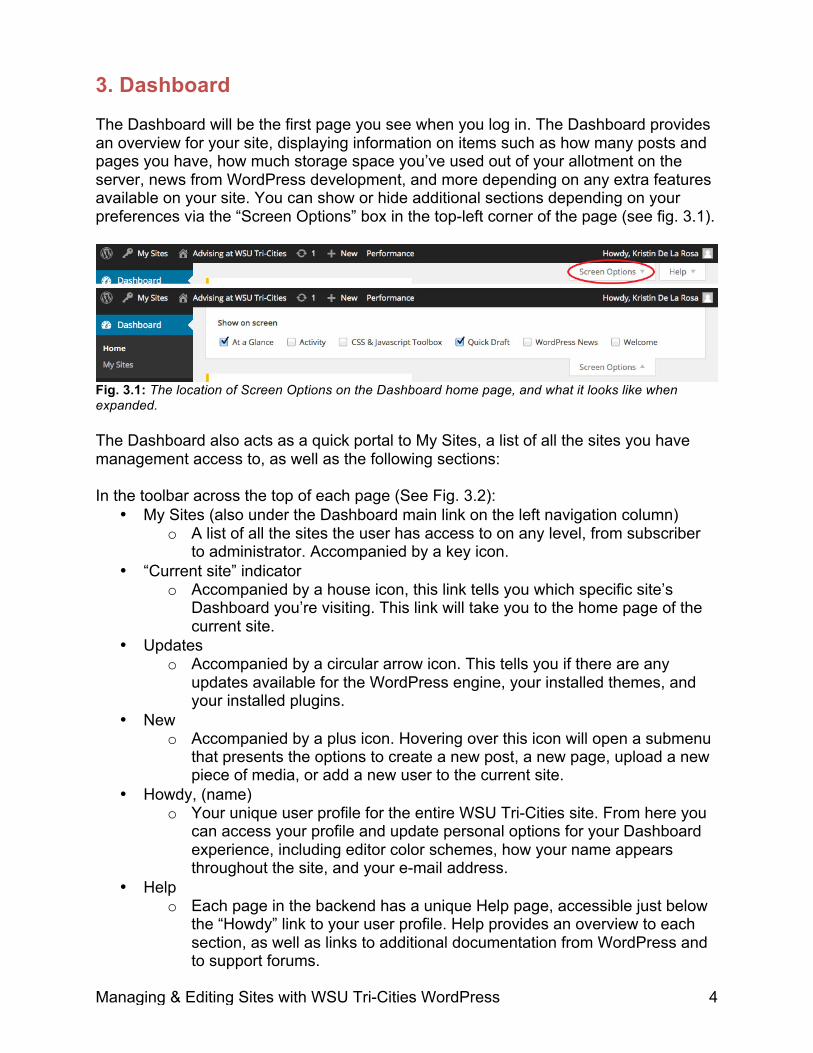
3. Dashboard The Dashboard will be the first page you see when you log in. The Dashboard provides an overview for your site, displaying information on items such as how many posts and pages you have, how much storage space you’ve used out of your allotment on the server, news from WordPress development, and more depending on any extra features available on your site. You can show or hide additional sections depending on your preferences via the “Screen Options” box in the top-left corner of the page (see fig. 3.1).
Fig. 3.1: The location of Screen Options on the Dashboard home page, and what it looks like when expanded. The Dashboard also acts as a quick portal to My Sites, a list of all the sites you have management access to, as well as the following sections: In the toolbar across the top of each page (See Fig. 3.2):
• My Sites (also under the Dashboard main link on the left navigation column) o A list of all the sites the user has access to on any level, from subscriber
to administrator. Accompanied by a key icon. • “Current site” indicator
o Accompanied by a house icon, this link tells you which specific site’s Dashboard you’re visiting. This link will take you to the home page of the current site.
• Updates o Accompanied by a circular arrow icon. This tells you if there are any
updates available for the WordPress engine, your installed themes, and your installed plugins.
• New o Accompanied by a plus icon. Hovering over this icon will open a submenu
that presents the options to create a new post, a new page, upload a new piece of media, or add a new user to the current site.
• Howdy, (name) o Your unique user profile for the entire WSU Tri-Cities site. From here you
can access your profile and update personal options for your Dashboard experience, including editor color schemes, how your name appears throughout the site, and your e-mail address.
• Help o Each page in the backend has a unique Help page, accessible just below
the “Howdy” link to your user profile. Help provides an overview to each section, as well as links to additional documentation from WordPress and to support forums.

Managing & Editing Sites with WSU Tri-Cities WordPress 5
Fig. 3.2: The page-top navigation, which shows “My Sites,” Current site, available updates, “New” additions, the user profile, “Screen Options” (fig. 3.1), and “Help” options. In the left-column navigation panel (See Fig. 3.3), you can access the following:
• Dashboard o Quickly get to the Dashboard landing page with
this link. Users additionally can see which sites they have access to via the “My Sites” link in this section.
• Posts o Manage the blog aspect of your site, if it is
enabled • Media
o Manage photos, Word documents, PDFs, and more digital files that have been uploaded to your site
• Pages o Manage non-blog pages on your site, like “Home,”
“About,” and more • Contact (forms)
o Manage and create contact forms to plug in on your site
• Appearance o Customize various aspects of your site, like theme
elements (site point of contact, universal page headers, site titles), widgets, navigation menus, and custom Cascade Style Sheets (CSS)
• Plugins (admin only) o See a full list of available plugins (extensions and
usability modifiers for your website) and enable or disable them here. Please note that this option is available only to network administrators.
• Users o See a full list of all the users on your site, including
their real name, username, and user permission level. Add or remove users here.
• Tools o Backup and import site data here, as well as see a
list of what tools are available to use for your site. This is different from plugins.
• Settings o An overview of your site’s settings, including site title, administrative
contact, custom page URLs, time zone and more • CSS & Javascript Toolbox (CJT)
Fig. 3.3: Options available in the left-side navigation column. Some options are admin-only.
Managing & Editing Sites with WSU Tri-Cities WordPress 6
o For the more adventurous and tech-savvy user, the CJT can be enabled on individual sites to allow the use of custom JavaScript and CSS throughout your site or on specific pages or even blog posts. Full documentation is available on the landing page for this section, online, and in support forums. Because of all of these resources being so readily available, there will not be a section covering the CJT in this user guide.
Users can access these links from any page in the backend, not just the home page of the Dashboard.
Managing & Editing Sites with WSU Tri-Cities WordPress 7
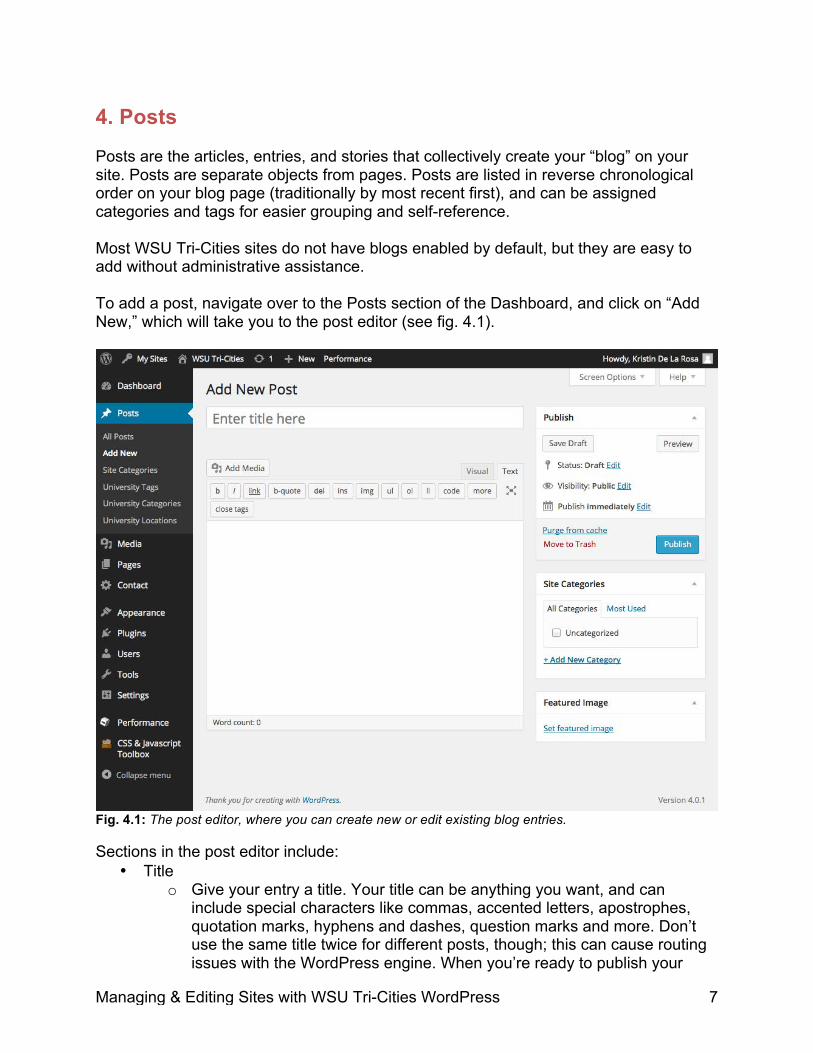
4. Posts Posts are the articles, entries, and stories that collectively create your “blog” on your site. Posts are separate objects from pages. Posts are listed in reverse chronological order on your blog page (traditionally by most recent first), and can be assigned categories and tags for easier grouping and self-reference. Most WSU Tri-Cities sites do not have blogs enabled by default, but they are easy to add without administrative assistance. To add a post, navigate over to the Posts section of the Dashboard, and click on “Add New,” which will take you to the post editor (see fig. 4.1).
Fig. 4.1: The post editor, where you can create new or edit existing blog entries. Sections in the post editor include:
• Title o Give your entry a title. Your title can be anything you want, and can
include special characters like commas, accented letters, apostrophes, quotation marks, hyphens and dashes, question marks and more. Don’t use the same title twice for different posts, though; this can cause routing issues with the WordPress engine. When you’re ready to publish your

Managing & Editing Sites with WSU Tri-Cities WordPress 8
entry, WordPress will clean up your title to make a user-friendly and browser-friendly name to make the final URL for your specific entry.
• Add Media button o Embed a link to a file or add an image to your post. You can upload a new
file to your media library or use an existing file that’s already been previously uploaded. For more on media, see Section 5 later in this document.
• Post editing box o Write the article in this big, blank box. You can use Visual Editor or Text
Editor. The Visual Editor functions much like Microsoft Word, where you can apply styles by clicking on buttons in the toolbar (see fig. 4.2). The Visual Editor will not give you a one-to-one representation of how the final content will look, but it will give you an idea of the general appearance, from placement of largest headlines, image alignment, italic and bold fonts, bulleted list, links, and more. The Text Editor (see fig. 4.3) is a simplified editor with fewer style buttons to click on and requires a basic knowledge of HTML and inline CSS styling to apply visual changes to your content. The exception to this is line breaks; line breaks entered in text by hitting the “return” key will still appear as line breaks (new paragraphs) in the final content without needing to use HTML.
Fig. 4.2: The Visual Editor toolbar has two levels of features. The first row includes, from left to right, bold, italicize, strikethrough, bulleted list, numbered list, block quote, horizontal rule, text alignment, add or remove links, “Read more…” link, and toolbar toggle, which shows or hides the second row, and (if enabled) enable scripts from CSS & JavaScript Toolbox. The second row includes a dropdown menu to apply different styles, underline text, full justified alignment, text color, “Paste as text” without formatting, clear formatting, special characters, decrease or increase indent, undo and redo actions, and keyboard shortcut overview. You can also expand the editor to take up the full browser window by clicking on the icon in the top right corner that shows four arrows expanding from a rectangle.
Fig. 4.3: The Text Editor toolbar has only one level of buttons for styling and editing. The buttons are, from left to right, bold, italicize, add a link, block quote, strike through text, label text that’s been inserted into a post and assigned a timestamp, image tag (if you know the image’s online URL), bulleted
Managing & Editing Sites with WSU Tri-Cities WordPress 9
(unordered) list, numbered (ordered) list, list item (the bulleted/numbered items in lists), unformatted code, “Read More,” and close any open HTML tags. You can also expand the editor to take up the whole browser window with the icon in the top right corner.
• Save Draft button o If you aren’t finished writing your entry yet, click on this button to save your
content as a draft. It will appear in your list of all entries with “— Draft” appended to the title, but will not appear online until you’ve published it.
• Preview button o Preview what your entry will look like before you publish it.
• Status, Visibility, and Publish Date o See the status of your post (draft, pending review), the visibility (public,
password protected [anyone with the right password can view it online], or private [only you can see it]), and when it will be published (immediately, or at a specific time and date in the future). After you’ve saved the page or created a draft, you can also review the post’s revision history and roll back to previous versions if needed.
• Publish/Save button o Publish your post for the world to see! It will publish with the status,
visibility, and publish date settings picked above. If it has already been published, it will say “Save” instead.
• Site Categories o Assign a category – what is the post about? You can use pre-existing
categories or create a new one. Think about this in a general sense. If you wrote an entry that was a recipe for brownies, for example, the categories might be “recipes.” More specific ideas representing the entry content, called tags, might be “baking,” “chocolate,” “brownies,” and “walnuts.” Tags are not currently used in the WSU Tri-Cities engine.
• Featured Image o Upload or select an image in your media library; this image will show at
the top of the post before all the content and should be related to the content. You can still insert images in your content independent of this featured image.
Once you’ve written content and given it a title, you can click on the Publish button to make your entry live on the Internet. You can continue to edit the entry after this point as many times as wanted or needed. When you’ve created your post, whether it is as a draft or a published item, you can see it listed on your All Posts page (see fig. 4.5). From here, you can move posts to the trash bin (this does not delete them, but takes them offline and places them in the equivalent of a recycling bin; they can be restored later if desired), quick edit posts (see fig. 4.6), and review the current status of each post in your archive (“Draft,” “Password protected,” or “Private” posts will indicate as much next to the title).
Managing & Editing Sites with WSU Tri-Cities WordPress 10
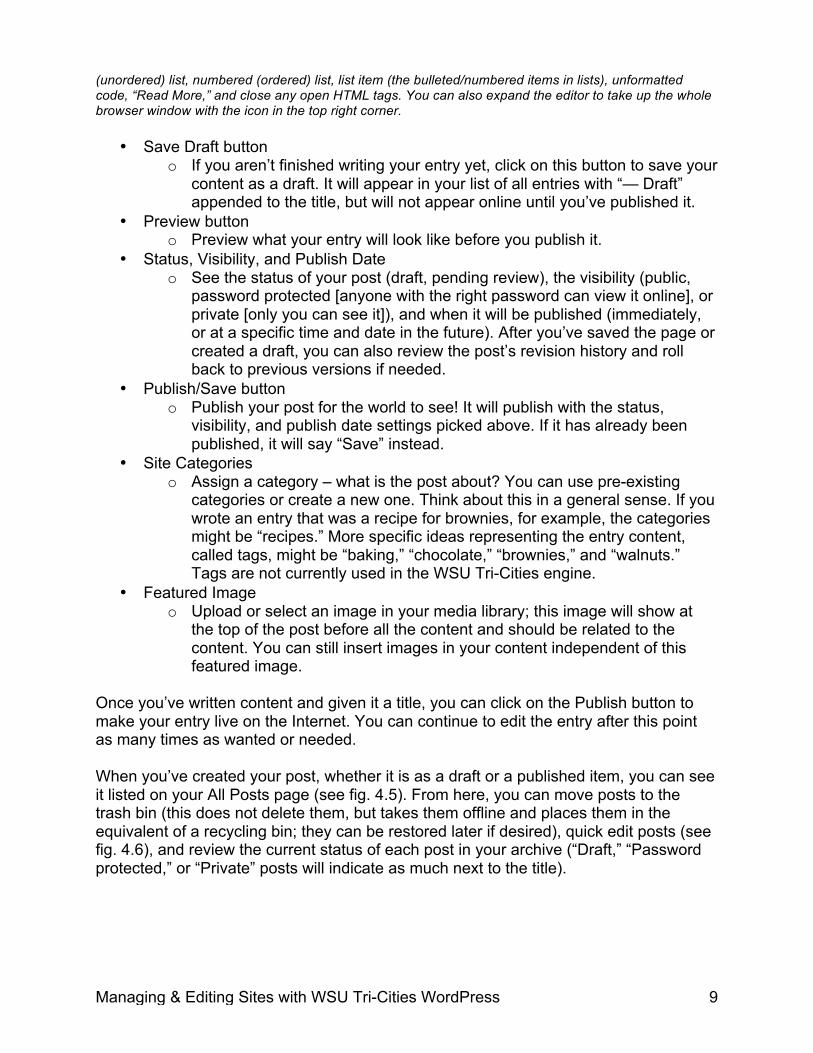
Fig. 4.5: By hovering over a post title in the All Posts page, you can review options such as Edit, Quick Edit (fig. 4.6), Trash, and View. You can also review the author, assigned site categories, and the published date.
Fig. 4.6: By selecting Quick Edit, you can quickly update various settings for each post without going into the Post Editor interface. With Quick Edit, you can update the title, slug, published date, author, add a password or make private, change assigned categories and tags, and change its publish status.
Creating a blog page Now that you’ve created an entry or two, you will need a page to showcase the content in its blog format. This will cover the minimum needed to create a blog page. In the Pages section, click on “Add New” to create a new page. This will open a new page that features the Page Editor, which looks similar to the Post Editor. Give the page a title, and click on the Publish button on the right side of the window. No content is needed in this page’s main text box; the WordPress engine will discard the text in favor of the blog articles you’ve been writing once we’ve told it what to do with the next step.

Managing & Editing Sites with WSU Tri-Cities WordPress 11
After you’ve created your blank page with the title of your choice, navigate to “Settings” in the left-column navigation, then “Reading” within that. This will open the Reading Settings page (see fig. 4.7).
Fig. 4.7: The Reading Settings page contains the settings that affect how your site displays its content. In the example above, we’ve established a Front page, traditionally called a “home page,” and a Posts page, which is where your blog will live. At the top of the Reading Settings page, the first setting should be “Front page displays.” This is where you will set your home page (the “Front page”) and your blog page (the “Posts page”). If the MarComm team set up your page, the radio button for “A static page (select below)” should already be filled in. If not, click on the selection button for “A static page (select below)” to enable the dropdown menus. The default selection in each dropdown menu should say, “—Select—.” Click on this to reveal the full list of pages within your site. If a Front page has not been picked, select an appropriate one now for your site. If you are unsure of this, please contact the MarComm team for guidance on how to select or build a strong Front page for your site. Remember that blank page we just built previous to coming to the Reading Settings? This will be our Posts page. Click on the dropdown menu for Posts page, and select the new blank page.
Managing & Editing Sites with WSU Tri-Cities WordPress 12
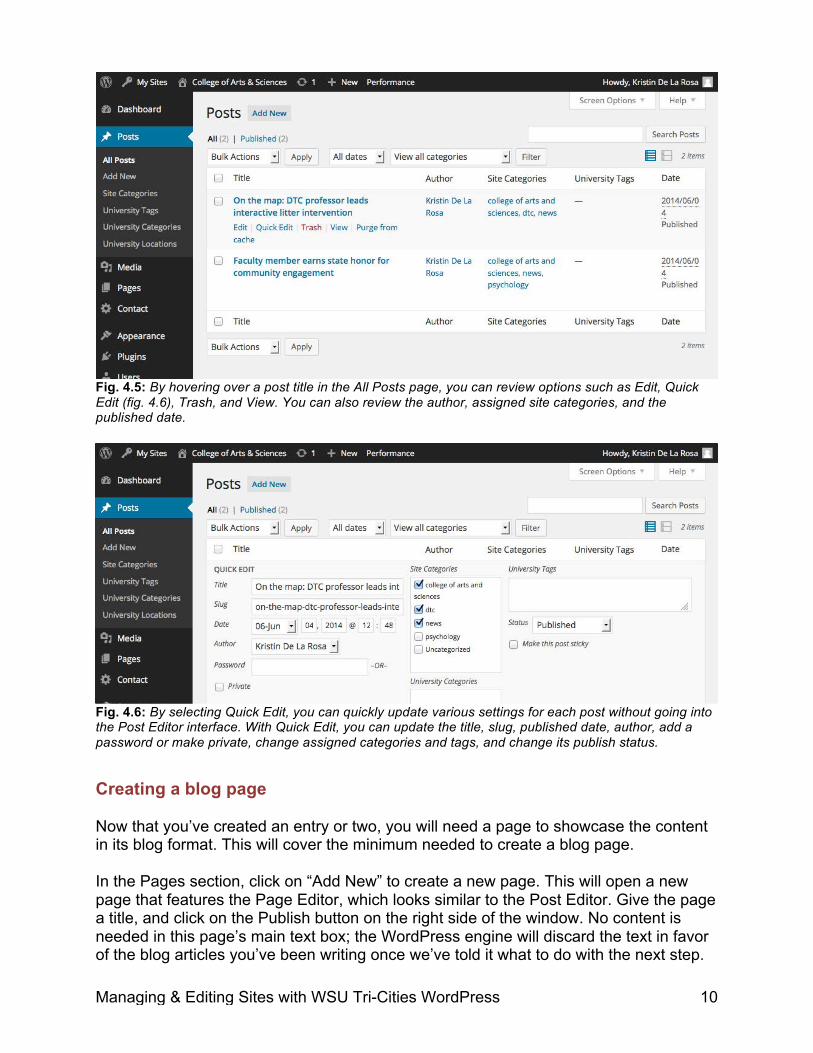
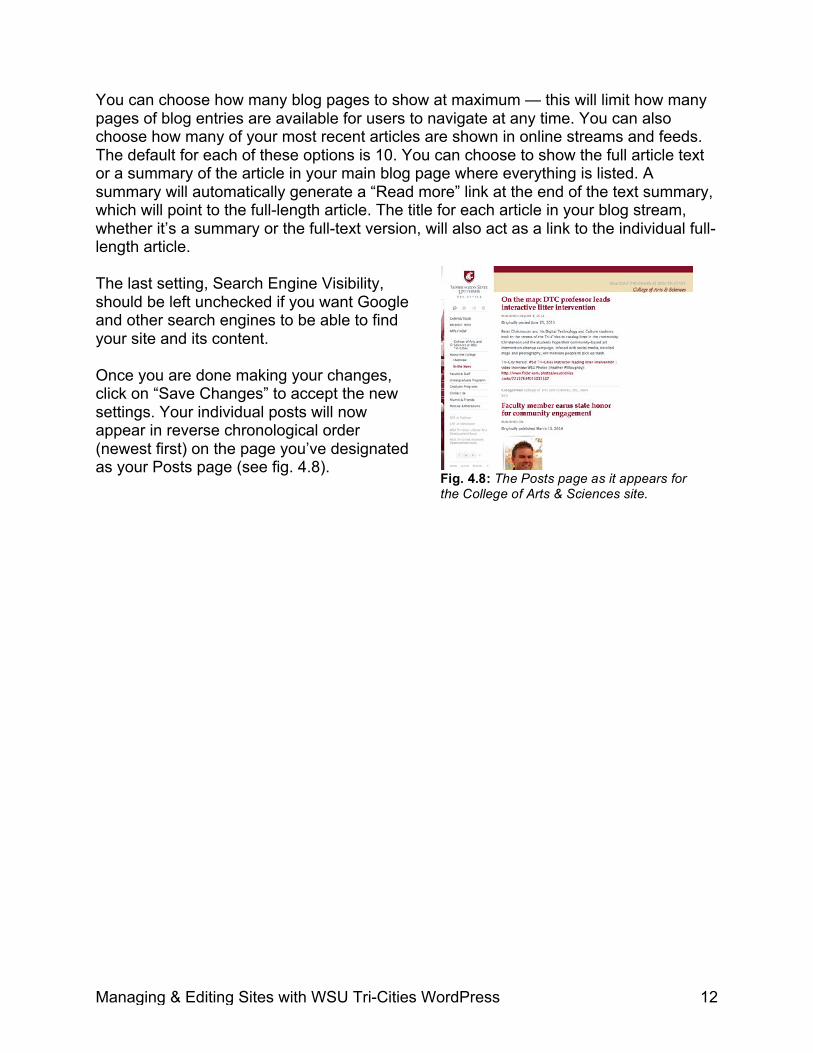
You can choose how many blog pages to show at maximum — this will limit how many pages of blog entries are available for users to navigate at any time. You can also choose how many of your most recent articles are shown in online streams and feeds. The default for each of these options is 10. You can choose to show the full article text or a summary of the article in your main blog page where everything is listed. A summary will automatically generate a “Read more” link at the end of the text summary, which will point to the full-length article. The title for each article in your blog stream, whether it’s a summary or the full-text version, will also act as a link to the individual full-length article. The last setting, Search Engine Visibility, should be left unchecked if you want Google and other search engines to be able to find your site and its content. Once you are done making your changes, click on “Save Changes” to accept the new settings. Your individual posts will now appear in reverse chronological order (newest first) on the page you’ve designated as your Posts page (see fig. 4.8).
Fig. 4.8: The Posts page as it appears for the College of Arts & Sciences site.
Managing & Editing Sites with WSU Tri-Cities WordPress 13
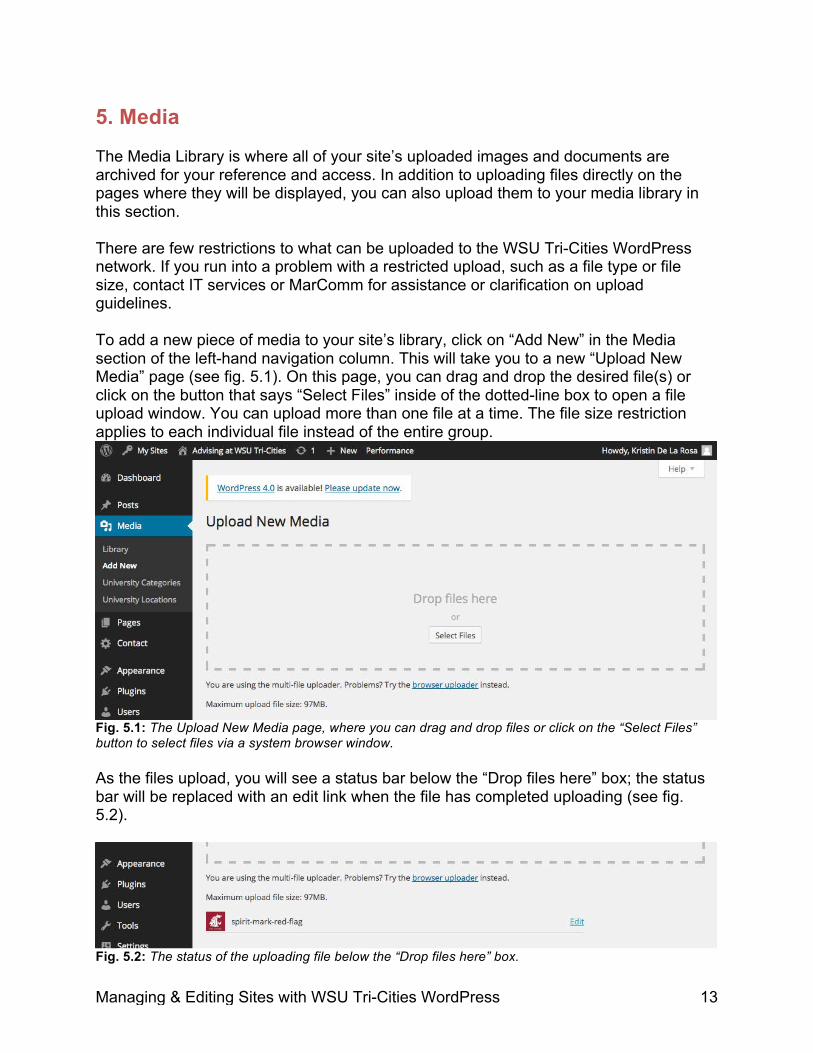
5. Media The Media Library is where all of your site’s uploaded images and documents are archived for your reference and access. In addition to uploading files directly on the pages where they will be displayed, you can also upload them to your media library in this section. There are few restrictions to what can be uploaded to the WSU Tri-Cities WordPress network. If you run into a problem with a restricted upload, such as a file type or file size, contact IT services or MarComm for assistance or clarification on upload guidelines. To add a new piece of media to your site’s library, click on “Add New” in the Media section of the left-hand navigation column. This will take you to a new “Upload New Media” page (see fig. 5.1). On this page, you can drag and drop the desired file(s) or click on the button that says “Select Files” inside of the dotted-line box to open a file upload window. You can upload more than one file at a time. The file size restriction applies to each individual file instead of the entire group.
Fig. 5.1: The Upload New Media page, where you can drag and drop files or click on the “Select Files” button to select files via a system browser window. As the files upload, you will see a status bar below the “Drop files here” box; the status bar will be replaced with an edit link when the file has completed uploading (see fig. 5.2).
Fig. 5.2: The status of the uploading file below the “Drop files here” box.
Managing & Editing Sites with WSU Tri-Cities WordPress 14
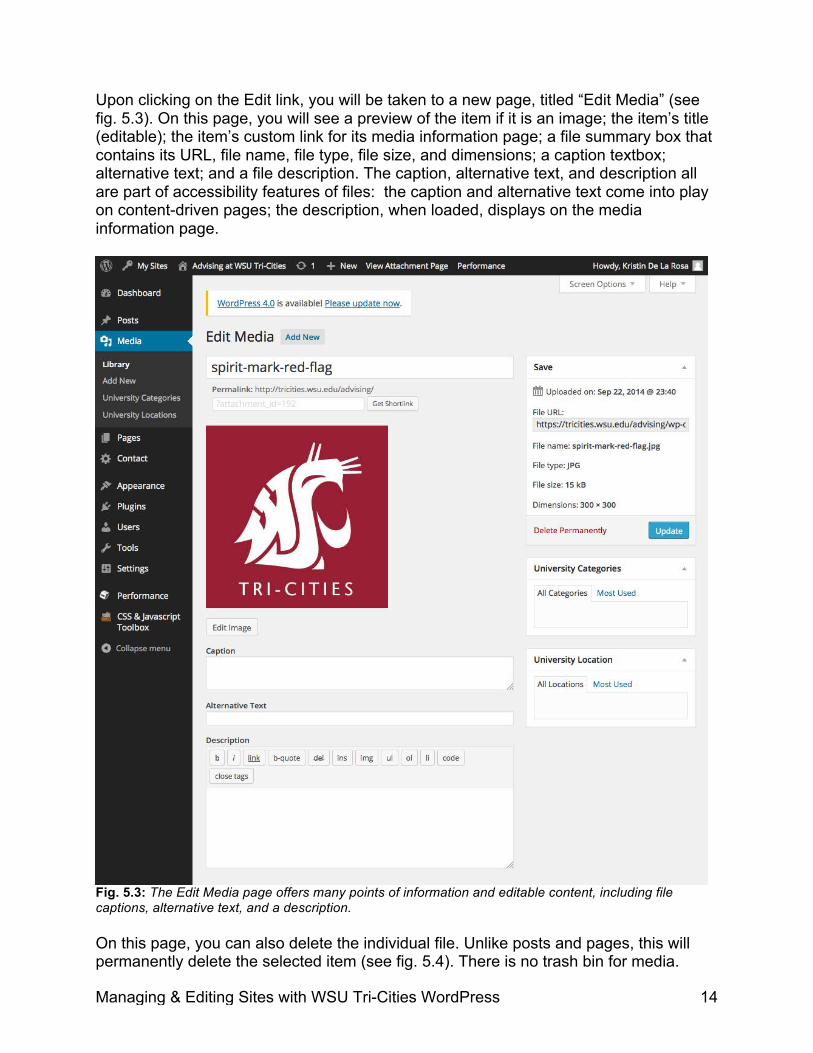
Upon clicking on the Edit link, you will be taken to a new page, titled “Edit Media” (see fig. 5.3). On this page, you will see a preview of the item if it is an image; the item’s title (editable); the item’s custom link for its media information page; a file summary box that contains its URL, file name, file type, file size, and dimensions; a caption textbox; alternative text; and a file description. The caption, alternative text, and description all are part of accessibility features of files: the caption and alternative text come into play on content-driven pages; the description, when loaded, displays on the media information page.
Fig. 5.3: The Edit Media page offers many points of information and editable content, including file captions, alternative text, and a description. On this page, you can also delete the individual file. Unlike posts and pages, this will permanently delete the selected item (see fig. 5.4). There is no trash bin for media.

Managing & Editing Sites with WSU Tri-Cities WordPress 15
Upon deletion, you will receive a confirmation message on the Media Library page (see fig. 5.5).
Once you’ve uploaded at least one file to your site, you can see an overview of all of your files in your Library. You can read details like file name, who uploaded it, if it’s attached to any pages, and when it was uploaded.
Fig. 5.4 (left): Media files will be permanently deleted from the site when marked for removal; unlike posts and pages, there is no trash bin for media items. Fig. 5.5 (right): You will receive a confirmation message on the Media Library page.
Fig. 5.6: Review files in your site in the Media Library, where you can read details like file name, type, author, and when it was uploaded.

Managing & Editing Sites with WSU Tri-Cities WordPress 16
6. Pages Pages are content that are not blog entries. They are for things like “About us,” “Academic Programs,” “Contact,” and other items that present less time-dependent but still important information about your program or department. Like posts, pages can have a title and content; unlike posts, pages cannot be assigned categories or tags, nor do they appear in any chronological order on another page in your site. Pages also do not show up in any site feeds. They can be organized into sub-pages related to other pages, and can be set individually as a static front page for your site. To create a new page, click on “Add New” in the “Pages” category in the navigation column on the left side of the page. This will take you to the Page Editor. The Page Editor looks and functions very much like the Post Editor with a few differences (see fig. 6.1).
Fig. 6.1: The Page Editor in the WordPress engine. Features of the Page Editor include:

Managing & Editing Sites with WSU Tri-Cities WordPress 17
• Title o Create a title for your page. Like posts, special characters are allowed.
WordPress will clean it up and generate a URL for your page based on your title.
• Content o Similar to the Post Editor, this is where you will write or insert your page’s
content. You can also embed or link to images or files in your Media Library via the “Add Media” button above the blank content box. The style toolbars in the Visual Editor and the Text Editor work exactly the same as they do in the Post Editor (see figs. 4.2 and 4.3).
• Publish panel o This panel also functions the same here as it does in the Post Editor. You
can apply privacy settings, set the publish date, preview your page before you publish it, review revisions and rollback to previous versions, save it as a draft, and publish or update pages in this panel.
• Page Attributes panel o Update several settings in this panel that will affect your page’s layout and
its appearance in your site’s default navigation. § Parent: Assign a parent page to arrange pages in nested
hierarchies. You can assign one parent to each page; parent pages can have multiple child pages. A page about “Academic Programs” could list “Bachelor’s Program” and “Master’s Program” under it. There is no limit to page nesting levels.
§ Template: The WSU Tri-Cities “Spine” theme has several layouts you can use for your pages. Picking a template layout is optional; a default layout with a sidebar has been established for all pages. Scroll through the different options to see what works best for your information.
§ Order: Pages are typically listed in the default navigation menu in alphabetical order, but if you can alter the order by entering a number in this field (1 for first, 2 for second, etc.).
• Spine Main Header o By default, your page will load with a pre-defined site title and subtitle at
the very top of the page that is based upon your site’s title and subtitle. You can change this in the General Settings section. However, if you want a specific page to have a header title and subtitle that differs from your site title and subtitle, this is where you will enter that new text. Please note that the PAGE title is different from the SITE title; this setting affects the display of the SITE title on the particular page you are currently editing.
Once you’ve saved your page, whether as a draft or a published item, you can see a list of all of the pages in your site on the All Pages page (see fig. 6.2). As with the All Posts page, you can move pages to the trash bin, quick edit page attributes, and review the status of each page (“Draft,” “Private,” “Password protected,” etc.). If you need to edit a page’s content, you can click on its title in the list or on the “Edit” link that appears below the title when you hover over it. Both of these options will take you to the same page.

Managing & Editing Sites with WSU Tri-Cities WordPress 18
Fig. 6.2: The All Pages page shows a list of your site’s pages, the respective author, and the publish date. Hovering over a title reveals additional options, such as Edit, Quick Edit, Trash, and View. You can see an example of parent page nesting in the Advising site with E-Advising (the parent page) and the various E-Advising program pages (child pages) nested below. Several settings are available to change when you click on Quick Edit under a title (see fig. 6.3). These options include page title, slug, publish date, author, password protection, make private, parent, menu order, template, and publish-or-review status.
Fig. 6.3: The Quick Edit link makes several page attributes available for updating without having to go into the page editor.
Managing & Editing Sites with WSU Tri-Cities WordPress 19
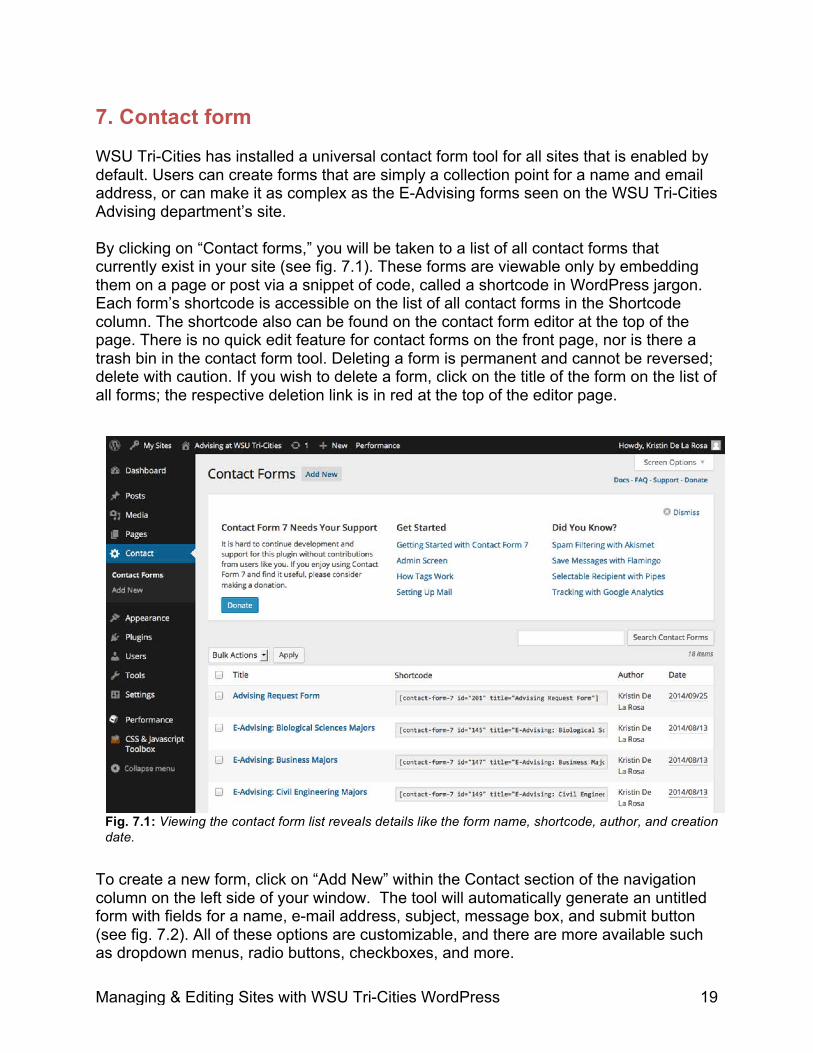
7. Contact form WSU Tri-Cities has installed a universal contact form tool for all sites that is enabled by default. Users can create forms that are simply a collection point for a name and email address, or can make it as complex as the E-Advising forms seen on the WSU Tri-Cities Advising department’s site. By clicking on “Contact forms,” you will be taken to a list of all contact forms that currently exist in your site (see fig. 7.1). These forms are viewable only by embedding them on a page or post via a snippet of code, called a shortcode in WordPress jargon. Each form’s shortcode is accessible on the list of all contact forms in the Shortcode column. The shortcode also can be found on the contact form editor at the top of the page. There is no quick edit feature for contact forms on the front page, nor is there a trash bin in the contact form tool. Deleting a form is permanent and cannot be reversed; delete with caution. If you wish to delete a form, click on the title of the form on the list of all forms; the respective deletion link is in red at the top of the editor page.
To create a new form, click on “Add New” within the Contact section of the navigation column on the left side of your window. The tool will automatically generate an untitled form with fields for a name, e-mail address, subject, message box, and submit button (see fig. 7.2). All of these options are customizable, and there are more available such as dropdown menus, radio buttons, checkboxes, and more.
Fig. 7.1: Viewing the contact form list reveals details like the form name, shortcode, author, and creation date.

Managing & Editing Sites with WSU Tri-Cities WordPress 20
You can update fields below the form builder to send messages to your own e-mail address instead of the admin default, customize the “from” field, create a subject based on what the user submits or create your own, create additional headers such as a reply-to address, file attachments, and the message body as it will appear in your inbox. You can also customize or create confirmation, validation, and error messages for the form. We encourage users to utilize the developer’s Support Documents (labeled as “Docs”), linked at the top of each Contact Form page, to better familiarize themselves with all the features available. When you’ve finished editing your form and have saved it, the shortcode will be available at the top of the form editor page or on the contact form list in the same row as the form title. Copy the shortcode and paste it in the page or post you want it to appear in; the WordPress engine will take care of converting that snippet into a fully-functioning form.
Fig. 7.2: The contact form tool will automatically generate a generic contact form for your site when you add a new form to your site.
Managing & Editing Sites with WSU Tri-Cities WordPress 21
8. Appearance The WSU Tri-Cities WordPress platform utilizes the Spine theme, developed in Pullman and launched during the summer of 2014. As with many themes, there are customizable options for your site’s appearance that can all be accessed from one section of the Dashboard:
• Themes o Review which themes are installed on your site and see the options
available for customization. • Customize
o Change and preview settings, such as site title, point of contact, and theme colors, on a fully interactive version of your site without affecting the live side. Save and publish changes to accept the new settings, or hit the giant “X” icon in the top left corner to cancel and return to the main Appearance page.
• Widgets o Edit and create sidebar content for your site.
• Menus o Edit and create navigation menus to be used throughout your site, either
in the main navigation panel or as widgets in the sidebar. • Edit CSS
o If you know CSS (Cascading Style Sheets), this is where you can override the default template with your own styles. Your stylesheet will load after the theme’s own stylesheets, so yours will always take precedence over the default rules.
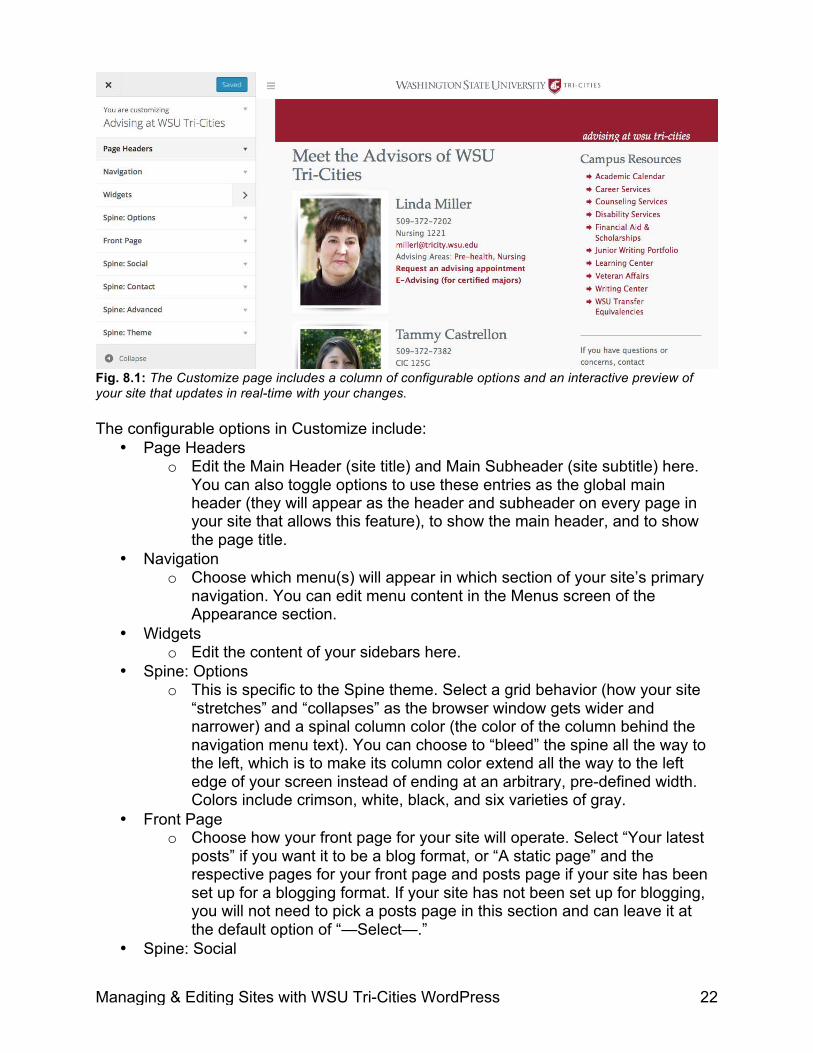
Customize To customize the appearance of your site, click on “Customize” in the Appearance section of the navigation menu or the “Customize” button in the Spine theme preview on the Themes page. This will open a window that features the interactive version of your site and a menu of categories you can adjust (see fig. 8.1). You can navigate to other pages in your site during this interactive preview to see how the changes will affect everything throughout your site.
Managing & Editing Sites with WSU Tri-Cities WordPress 22
Fig. 8.1: The Customize page includes a column of configurable options and an interactive preview of your site that updates in real-time with your changes. The configurable options in Customize include:
• Page Headers o Edit the Main Header (site title) and Main Subheader (site subtitle) here.
You can also toggle options to use these entries as the global main header (they will appear as the header and subheader on every page in your site that allows this feature), to show the main header, and to show the page title.
• Navigation o Choose which menu(s) will appear in which section of your site’s primary
navigation. You can edit menu content in the Menus screen of the Appearance section.
• Widgets o Edit the content of your sidebars here.
• Spine: Options o This is specific to the Spine theme. Select a grid behavior (how your site
“stretches” and “collapses” as the browser window gets wider and narrower) and a spinal column color (the color of the column behind the navigation menu text). You can choose to “bleed” the spine all the way to the left, which is to make its column color extend all the way to the left edge of your screen instead of ending at an arbitrary, pre-defined width. Colors include crimson, white, black, and six varieties of gray.
• Front Page o Choose how your front page for your site will operate. Select “Your latest
posts” if you want it to be a blog format, or “A static page” and the respective pages for your front page and posts page if your site has been set up for a blogging format. If your site has not been set up for blogging, you will not need to pick a posts page in this section and can leave it at the default option of “—Select—.”
• Spine: Social
Managing & Editing Sites with WSU Tri-Cities WordPress 23
o This is specific to the Spine theme. At the bottom of each navigation column in the Spine theme, there are linked icons that point to the default social network pages and profiles of Washington State University. You may leave them as they are or update the locations to point to your own social network pages and profiles. You may have up to four different location icons, or you may have zero. Location options include Facebook, Twitter, YouTube, Directory, LinkedIn, Tumblr, and Pinterest.
• Spine: Contact o This is specific to the Spine theme. This should be the information for the
official contact for your website, including your unit, unit mailing address, phone number, e-mail address, and an optional contact page URL and contact page title.
• Spine: Advanced o This is specific to the Spine theme. Select which version of the Spine
theme you want to use – at this point, version 1.0 is the only version available, but Pullman has plans to release more versions in the near future. You can select the width of your content, from the default 990 pixels to 1980 pixels wide or 100% of the window width. You can choose if your homepage will have a “Cropped Spine,” which appears as a square with the WSU logo and icons for search, contact, share, and print. The cropped spine removes navigation on the homepage, so use this feature with caution. You can choose to “Bleed Main Right,” which extends the edge of your content further right and allows full-width images and page headers to run all the way to the right edge of the window. You can also choose to “Hide Post Author,” which applies to blog posts, if you don’t want the posting author’s name to show with articles. It is enabled by default, which means names will be hidden.
• Spine: Theme o This is specific to the Spine theme. Choose additional styling (skeletal
theme, which will make the page Header banner gray and stretch all the way across the top of the content section, or Bookmark, which is the default styling and is affected by the choice selected in Secondary Color); Secondary Color (this selection affects the color of the Header banner if Bookmark is selected in Additional Styling); Sitewide Spacing (this affects the padding/spacing of the content section as it relates to the site navigation column on the left); and Enable Open Sans, a different typeface selected by WSU that is appropriate for Web use.
When you are satisfied with your changes, click on “Save & Publish” at the top of the page. If you want to discard your changes without saving, click on the “X” icon to the left of the “Save & Publish” button.
Widgets Widgets are sections of content independent of your pages and posts that can be placed into any widget-ready area on any page or post, provided the selected template has support for widgets built in. Widgets are typically referred to as sidebars. The “Default Template” is the only Spine theme template that supports sidebar widgets at
Managing & Editing Sites with WSU Tri-Cities WordPress 24
this time. Individual posts also support widget sidebars. The WSU Spine theme also only supports one sidebar per site; this can be augmented with add-ons that can be installed by a network administrator. To create your sidebar, drag and drop a widget from the “Available Widgets” section of the page to the Sidebar box awaiting your content. You can give your widget a title (optional) and customize its content. Click “Save” to save your changes. If you click Delete, it will remove the widget from the sidebar. There are a wide variety of widgets available to use in the sidebar, including text, a custom menu, pages list, a search form for your site, recent posts, and more. You can have multiple widgets in the same sidebar.
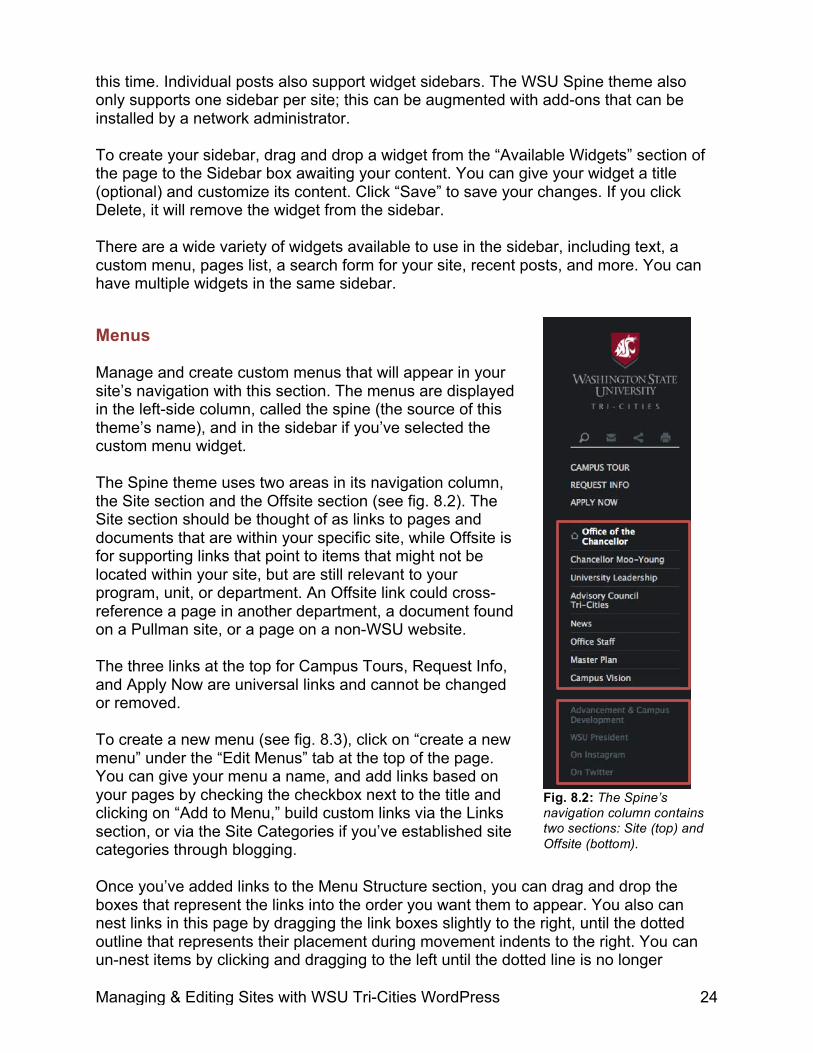
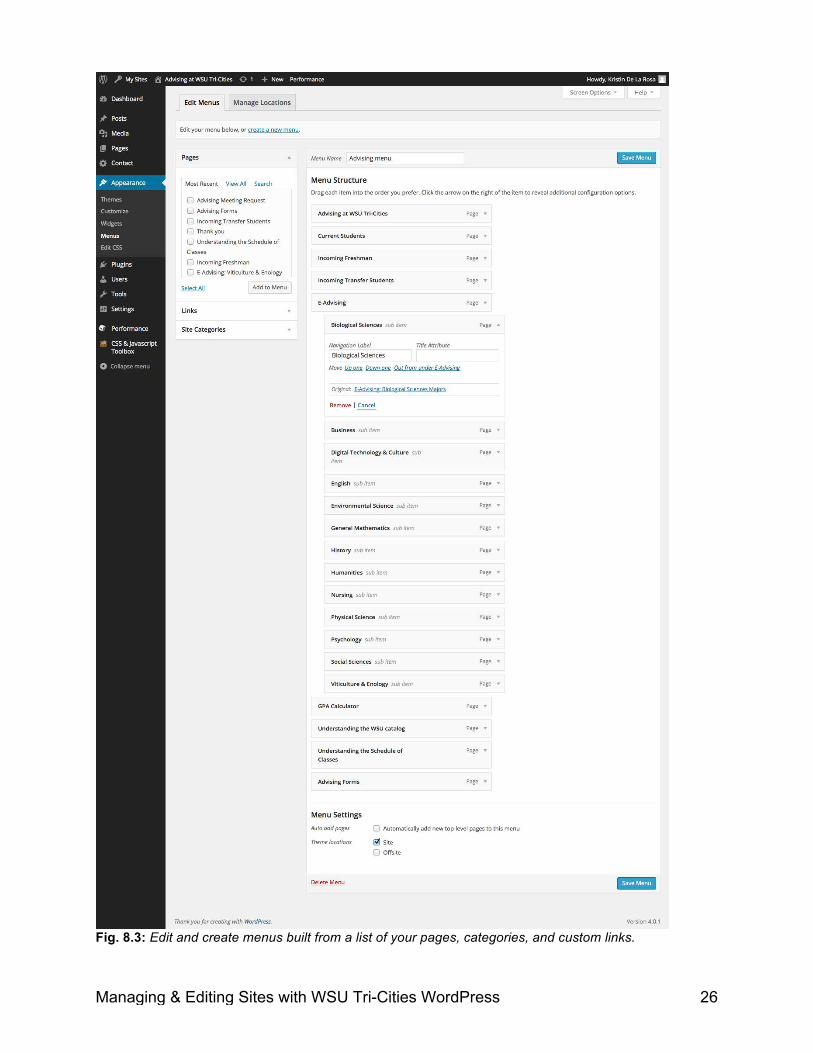
Menus Manage and create custom menus that will appear in your site’s navigation with this section. The menus are displayed in the left-side column, called the spine (the source of this theme’s name), and in the sidebar if you’ve selected the custom menu widget. The Spine theme uses two areas in its navigation column, the Site section and the Offsite section (see fig. 8.2). The Site section should be thought of as links to pages and documents that are within your specific site, while Offsite is for supporting links that point to items that might not be located within your site, but are still relevant to your program, unit, or department. An Offsite link could cross-reference a page in another department, a document found on a Pullman site, or a page on a non-WSU website. The three links at the top for Campus Tours, Request Info, and Apply Now are universal links and cannot be changed or removed. To create a new menu (see fig. 8.3), click on “create a new menu” under the “Edit Menus” tab at the top of the page. You can give your menu a name, and add links based on your pages by checking the checkbox next to the title and clicking on “Add to Menu,” build custom links via the Links section, or via the Site Categories if you’ve established site categories through blogging. Once you’ve added links to the Menu Structure section, you can drag and drop the boxes that represent the links into the order you want them to appear. You also can nest links in this page by dragging the link boxes slightly to the right, until the dotted outline that represents their placement during movement indents to the right. You can un-nest items by clicking and dragging to the left until the dotted line is no longer
Fig. 8.2: The Spine’s navigation column contains two sections: Site (top) and Offsite (bottom).

Managing & Editing Sites with WSU Tri-Cities WordPress 25
indented. You can also nest and un-nest links by clicking on “Page (downward arrow)” or “Custom (downward arrow)” in the right corner of each link box, which exposes more options. Among these options are:
• Navigation Label, o Rename links as they appear in your navigation
• Title Attribute o Add extra text that is visible to search engines;
• Move o Move links by clicking on the different directions instead of dragging and
dropping • URL
o Update the address in custom links • Original
o Shows you the original name of the Page link, which can be useful if you’ve changed its navigation name to something very different
• Remove o Remove the link from the navigation menu
In the Menu Settings section, you can tell the menu to automatically add top-level pages (pages that haven’t been assigned a parent page) to the menu by checking the box next to “Automatically add new top-level pages to this menu.” Just below that, select the location that you want the menu to appear in, Site or Offsite. If you intend for this to appear in the sidebar as a custom menu widget, you can check neither box. Save the menu when you are done making your changes. Additionally, you can assign menus to different locations under the “Manage Locations” tab. You can create many menus, but the Spine theme only supports two menus in the primary navigation.
Managing & Editing Sites with WSU Tri-Cities WordPress 26
Fig. 8.3: Edit and create menus built from a list of your pages, categories, and custom links.
Managing & Editing Sites with WSU Tri-Cities WordPress 27
Edit CSS Custom CSS (Cascading Style Sheets) can be applied to the theme. They will load after the theme’s own stylesheets, which means your rules will take precedence. You can review revision history, choose to append to the theme’s current CSS (recommended) or replace it entirely with your own rules, and limit image and video maximum widths. If you do not know CSS, we recommend that you leave this section alone. This section otherwise functions normally as a freehand CSS editor. When you have finished making your additions, click on “Save Stylesheet” to apply your rules to your site’s theme.
Managing & Editing Sites with WSU Tri-Cities WordPress 28
9. Plugins Plugins help augment the functionality and appearance of WordPress sites. Once a network administrator has installed a plugin, it can be enabled or disabled from this section. Plugins at this time are available only to network administrators.
Managing & Editing Sites with WSU Tri-Cities WordPress 29
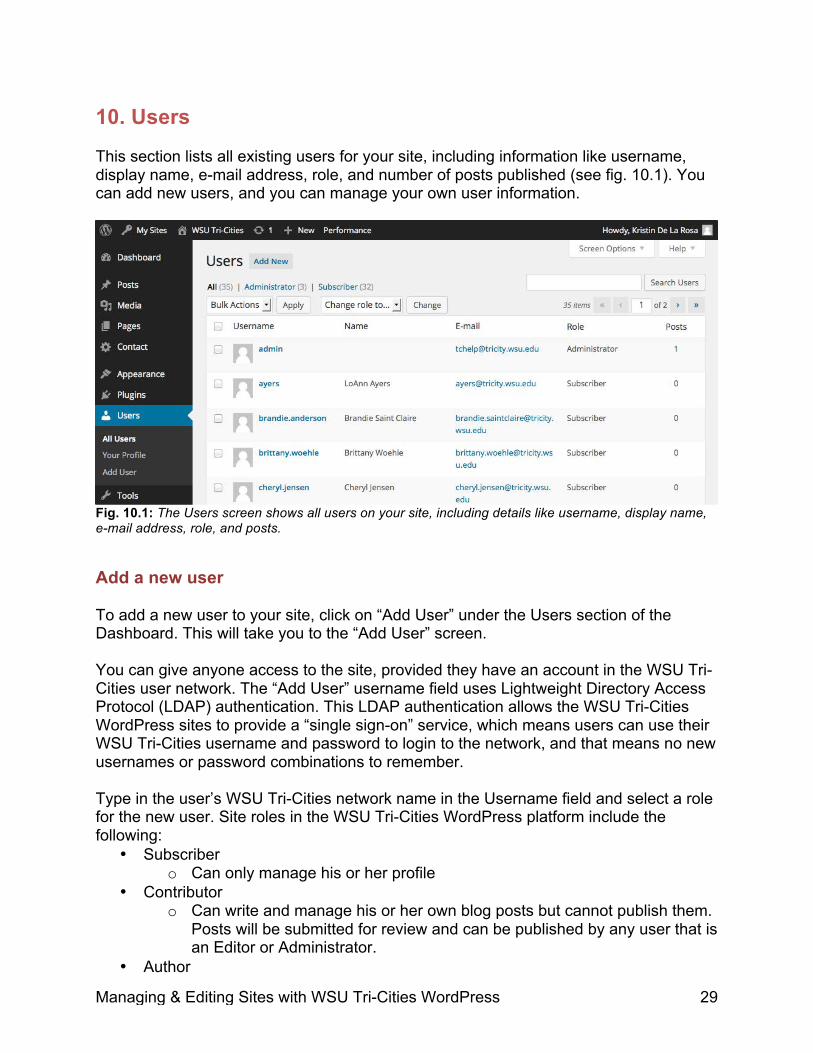
10. Users This section lists all existing users for your site, including information like username, display name, e-mail address, role, and number of posts published (see fig. 10.1). You can add new users, and you can manage your own user information.
Fig. 10.1: The Users screen shows all users on your site, including details like username, display name, e-mail address, role, and posts.
Add a new user To add a new user to your site, click on “Add User” under the Users section of the Dashboard. This will take you to the “Add User” screen. You can give anyone access to the site, provided they have an account in the WSU Tri-Cities user network. The “Add User” username field uses Lightweight Directory Access Protocol (LDAP) authentication. This LDAP authentication allows the WSU Tri-Cities WordPress sites to provide a “single sign-on” service, which means users can use their WSU Tri-Cities username and password to login to the network, and that means no new usernames or password combinations to remember. Type in the user’s WSU Tri-Cities network name in the Username field and select a role for the new user. Site roles in the WSU Tri-Cities WordPress platform include the following:
• Subscriber o Can only manage his or her profile
• Contributor o Can write and manage his or her own blog posts but cannot publish them.
Posts will be submitted for review and can be published by any user that is an Editor or Administrator.
• Author
Managing & Editing Sites with WSU Tri-Cities WordPress 30
o Can publish and manage his or her own blog posts. Cannot manage the blog posts of other users.
• Editor o Can publish and manage all posts, including the blog posts of other users.
• Administrator o Has access to all the administrative features within a single site. This
includes managing themes, managing users, and managing posts and pages.
After you’ve entered the username and selected a role, click the “Add User” button. If the username doesn’t exist in the WSU Tri-Cities directory, you may receive an error message saying as much. You may also receive the following message, if the username is found in the directory but cannot be added:
“[username] does not have an email address associated with the ldap record. All wordpress accounts must have a unique email address.”
If this particular error message appears after you’ve submitted the username, it means that the username is valid and in the directory, but it does not have an e-mail address on record in the database. To correct this, visit the IT Services office in the CIC building or send an e-mail to [email protected] and request that the username entry in the database be updated to include an e-mail address. It is helpful to include any error messages that pop up in your e-mail to the IT team so they know how to better assist you. Additionally, you can add users in bulk and assign them all the same role. Each separate username goes on its own line. The same LDAP authentication requirements apply to bulk additions too.
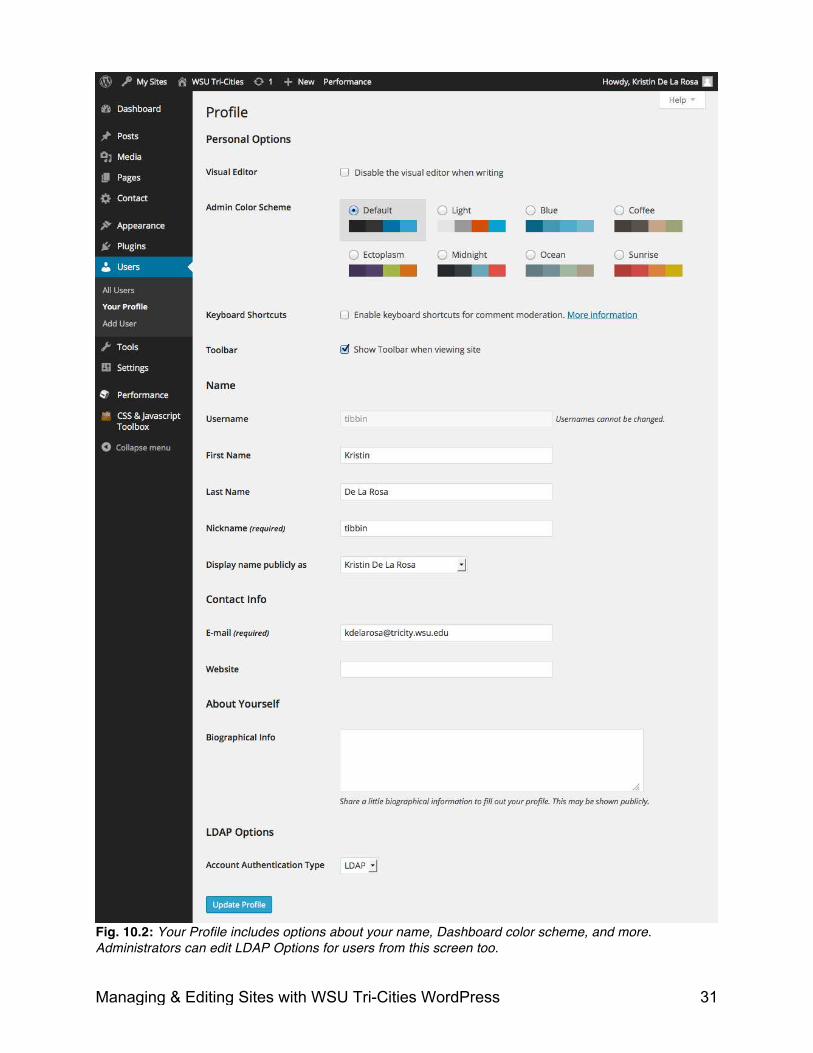
Your Profile Your profile includes information about your account on the site, including your user name (cannot be changed), first and last name, nickname, name display options, contact information, and additional biography information (see fig. 10.2). You can manage personal options on this page as well, including which editor you want to use for pages and posts, the Dashboard color scheme, keyboard shortcuts, and viewing the WordPress toolbar on the live website whenever you’re logged in. Administrators can change LDAP authentication preferences for individual users. For more information about this option, contact IT Services. Once you’ve made your changes, click on the “Update Profile” button at the bottom of the page.
Managing & Editing Sites with WSU Tri-Cities WordPress 31
Fig. 10.2: Your Profile includes options about your name, Dashboard color scheme, and more. Administrators can edit LDAP Options for users from this screen too.
Managing & Editing Sites with WSU Tri-Cities WordPress 32
11. Tools The Tools screen hosts Press This and a tag-category converter. You can also import and export existing data in this section. Press This is a browser-based app that runs in your browser and lets you grab bits of the web. This is ideal for sharing items in blog posts as you browse the Web. You can add more and edit entries before publishing them to your blog, or save it as a draft and come back later when you’re ready to write more. If you have comments and entries that exist in another WordPress blog or on another platform, you can import them to your new site via the Import screen. You can also convert tags to categories and categories to tags on an individual basis at this screen. If you would like to backup your site data, you can export it as an XML file that you can read on your computer. This export includes your posts, pages, comments, custom fields, categories, and tags. You can then import this new XML file in another WordPress site to import the content from one site to another.
Managing & Editing Sites with WSU Tri-Cities WordPress 33
12. Settings Users who have access to the Settings section can manage several types of settings for the site:
• General o These options determine some of the basics of your site, such as the site
title, subtitle, administrative e-mail address, timezone, date format for blog entries, time format for blog entries, and what day the week starts. Click on the “Save Changes” button when you’ve finished updating your settings.
• Writing o These options affect content in blog entries. You can pre-select a default
blog entry category in this section and a blog post format. This screen also gives you access to the Press This bookmarklet app, seen previously in the Tools section. Click on the “Save Changes” button when you’ve finished updating your settings.
• Reading o This screen contains the settings that affect the display of your content. As
seen previously in the Customize Appearance section, this is also where you can choose what is displayed on your site’s front page (classic blog or a fixed page). You can also manage how many entries appear in your RSS feed, how many posts to display at once on the blog page, and if you want to show a summary or the full text of the blog post. Click on the “Save Changes” button once you’ve finished updating your settings.
• Media o On this screen, you can set maximum sizes for images inserted into your
content via the page and post editors. You can also choose whether you want your thumbnails to be cropped to square dimensions, or scaled down to fit within the pixel values provided. Click on the “Save Changes” button once you’ve finished updating your settings.
• Permalinks o Permalinks are the permanent URLs to every visible component of your
website; this includes pages, posts, category and tag archives, and media pages. The URL to each item should be permanent, and never change, which is why these are called permalinks. You can select your default permalink structure here. There are a variety of common, pre-defined settings, or you can create your own custom permalink structure. For further information on how to structure your own permalinks, visit the WordPress documentation and support; they have a list of the tags needed to build your custom permalinks. The default for the WSU Tri-Cities WordPress platform is “pretty permalink,” which generates a fairly easy-to-read and user-friendly URL from the post or page title. Click on the “Save Changes” button once you’ve finished updating your settings.