manual and user‟s guide - · pdf filei reporting and database system for the national...
TRANSCRIPT

i
Reporting and Database System for the National Implementation of the
Philippine Informal Reading Inventory (Phil-IRI)
MANUAL and USER‟S GUIDE
For the
Division Data Management Program
Bureau of Elementary Education Department of Education
Pasig City, Philippines
June 2009

Phil-IRI Division Data Management Program Manual and User’s Guide
Phil-IRI Reporting and Database System ii Bureau of Elementary Education, DepED
Foreword
The Philippine Informal Reading Inventory (PHIL-IRI) aims to establish the reading level
profile of children in the public elementary school system. To do this, tests are
administered twice a year (pre-test and post-test) to assess the reading speed and
comprehension of pupils in oral and silent reading in both English and Filipino. While
tests have already been developed for this purpose and administered in the past recent
years, difficulties had been encountered in drawing accurate reading profile from the data
generated. Further, programs and projects to improve the reading competencies of
pupils implemented through the Every Child A Reader Program (ECARP) have not been
documented. Thus, there is a dearth of information for determining what works and what
works best as far as addressing the reading competencies of school children is
concerned.
The difficulties encountered in accurately profiling the reading performance of school
children are attributed primarily to problems in processing, reporting and transmission of
test results from the school to the division to the region and finally, to the central office.
The Reporting and Database System for the National Implementation of Phil-IRI was
designed to address these issues.
The Phil-IRI Reporting and Database System is made up of the following components:
Component 1. The PHIL-IRI Test Scores Encoding Template and Data Validation
Program for use at the school level;
Component 2. The Phil-IRI Division Data Management Program; Component 3. The Phil-IRI National Data Management Program; and Component 4. The Phil-IRI Website
Component 2, the Phil-IRI Division Data Management Program was designed for reproduction and dissemination to the divisions. This program was designed to address difficulties in processing and transmitting Phil-IRI data by:
1.) eliminating possible encoding and computational errors by integrating functions for easy and accurate merging and integration of school-based data;
2.) automatically generating readily usable (viewable and printable) pre-programmed summaries of data;
3.) facilitating convenient and speedy transmission of division-level reports to the national level data repository.
This Manual explains the features and functionalities of the Division Data Management Program and outlines the procedures for its proper use.

Phil-IRI Division Data Management Program Manual and User’s Guide
Phil-IRI Reporting and Database System iii Bureau of Elementary Education, DepED
Table of Contents
Cover Page........................................................................................................................... i
Foreword.............................................................................................................................. ii
Table of Contents................................................................................................................. iii
Installing and Setting-up the Program................................................................................... 1
Program Requirements……………………………………………………………………… 1
Installing and Setting-up the Program…………………………………………………….. 2
Setting the Division Name............................................................................................... 5
Setting the School Year ................................................................................................. 5
Setting the Password ..................................................................................................... 6
Using the Program...................... ........................................................................................ 6
The ‗Load School Report‘ Function ...................................................................................... 8
The ‗View Reports‘ Function................................................................................................ 10
Individual School Summary........................................................................................... 10
The Division Summaries……………………………………………………………………. 11
What Can Be Done With Summary Reports? ................................................................ 12
The ‗Generate Division Output for National Submission‘ Function...................................... 13
When Can a Division Output Be Created for National Submission?............................ 14
The ‗Submissions Monitoring‘ Function................................................................................ 14
Annex 1:
Additional Guidelines for the Efficient and Responsible Use of the
Phil-IRI Division Data Management Program ....................................................................
16
Annex 2: Revisions to the Phil-IRI Division Data Management Program ……………………………..
17

Phil-IRI Division Data Management Program Manual and User’s Guide
Phil-IRI Reporting and Database System 1 Bureau of Elementary Education, DepED
Installing and Setting-up the Program
Program Requirements Before installing the Phil-IRI Division Data Management Program, check if your PC has the necessary resources. The program can run on any personal computer with the following specifications:
1. Operating System. An operating system (commonly abbreviated to either OS or O/S) is an interface between hardware and user; an OS is responsible for the management and coordination of activities and the sharing of the resources of the computer. Common contemporary operating system families include BSD, Darwin (Mac OS X), Linux, SunOS (Solaris/OpenSolaris), and Windows NT (XP/Vista/7)1. Information regarding your computer‘s OS is displayed right after the computer is booted (turned on).
The program requires either Windows XP or Windows Vista OS. The OS usually comes bundled with a new PC (desktop or laptop). It is the experience of the program developers that the program runs faster with Windows XP than with Windows Vista. This is most probably due to the many features and services of the newer Windows Vista. Once the computer is booted (turned on) these features and services run in the background using a considerable portion of the computer‘s memory.
2. Software Prerequisites. The program needs the following software to run effectively:
- .Net Framework 2.0. This is included in the installation CD and will be automatically installed with the program;
- Microsoft Internet Explorer 5.01 or later versions. This comes with a Windows OS.
3. Memory. In simple terms, the computer‘s memory (or RAM, for Random Access Memory) may be equated to the amount of processes the computer can perform at any given time, or to how fast the computer can perform these tasks or processes. The higher the memory, the faster the computer can perform. The program requires 512 MB of RAM minimum, 1GB or more is recommended and preferred. Computers running in Windows Vista OS should have at least 1 GB. Information regarding your computer‘s memory can be viewed in: Start/Control Panel/System and Maintenance (for Windows Vista) or System (for Windows XP).
4. Hard Disk Space. The program and the data to be inputted in it requires the following
hard disk space: At least 380 MB [100MB + 280 MB (.NET)] for installation 2 GB or more for database growth and Excel Files backup
1 http://en.wikipedia.org/wiki/Operating_system
Phil-IRI Division Data Management Program Manual and User’s Guide
Phil-IRI Reporting and Database System 2 Bureau of Elementary Education, DepED
Installing and Setting Up the Program
The Phil-IRI Division Data Management program may be installed following the simple steps
below:
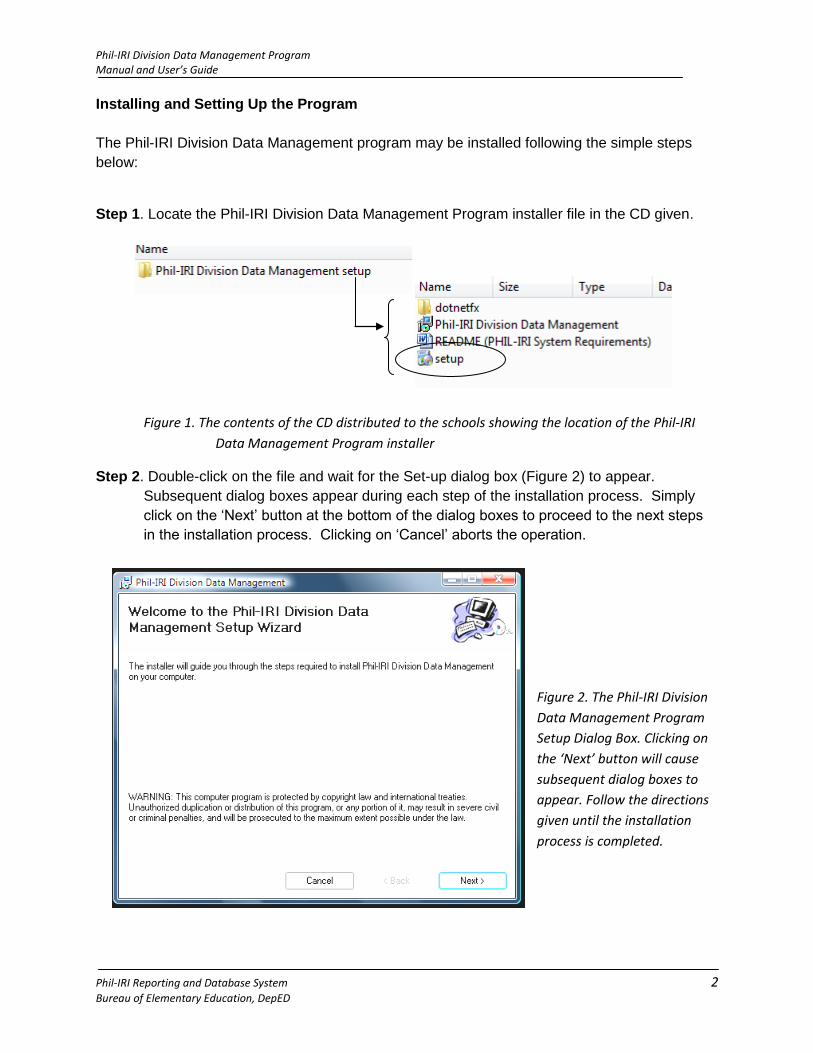
Step 1. Locate the Phil-IRI Division Data Management Program installer file in the CD given.
Figure 1. The contents of the CD distributed to the schools showing the location of the Phil-IRI
Data Management Program installer
Step 2. Double-click on the file and wait for the Set-up dialog box (Figure 2) to appear.
Subsequent dialog boxes appear during each step of the installation process. Simply
click on the ‗Next‘ button at the bottom of the dialog boxes to proceed to the next steps
in the installation process. Clicking on ‗Cancel‘ aborts the operation.
Figure 2. The Phil-IRI Division
Data Management Program
Setup Dialog Box. Clicking on
the ‘Next’ button will cause
subsequent dialog boxes to
appear. Follow the directions
given until the installation
process is completed.

Phil-IRI Division Data Management Program Manual and User’s Guide
Phil-IRI Reporting and Database System 3 Bureau of Elementary Education, DepED
Once the installation process is completed, a short-cut icon representing the program is created
on the computer‘s desktop.
Figure 3. A clipping of the computer’s desktop showing the Phil-
IRI Division Data Management Program short-cut icon
(encircled). The icon appears on the computer’s
desktop once the installation is successfully
completed.
Step 3. Double-click on the short-cut to run the program. The splash screen briefly appears
quickly followed by the log-in page with a dialog box
asking for the password. A default password- ―admin‖
had been pre-programmed into the system. To log-in,
key in the default password. You can change the
password later on.
Figure 3. The Phil-IRI Division Data Management Program
Splash Screen.
Figure 4. The log-in facility. Key in ‘admin’
then click ok.
After logging-in, the user is taken to the
program‘s main page. The icons at the left of the page represent the program‘s
functions. The specific functions of these buttons (or icons) are discussed in the next
section. Before the program can be used effectively however, some adjustments to the
settings have to be made.

Phil-IRI Division Data Management Program Manual and User’s Guide
Phil-IRI Reporting and Database System 4 Bureau of Elementary Education, DepED
Figure 6. The ‘Options’ menu facilitates making the desired setting for your program.
Figure 5. The program’s main page. Icons at the left of the page correspond to the program’s
main functions
Step 4. The program has to be set for your division and the current school year. Make the
necessary settings by clicking on ‗Options‘
at the menu bar at the top left corner of your
screen. What needs to be adjusted are: the
division name, the school year and of course,
the password.
Phil-IRI Division Data Management Program Manual and User’s Guide
Phil-IRI Reporting and Database System 5 Bureau of Elementary Education, DepED
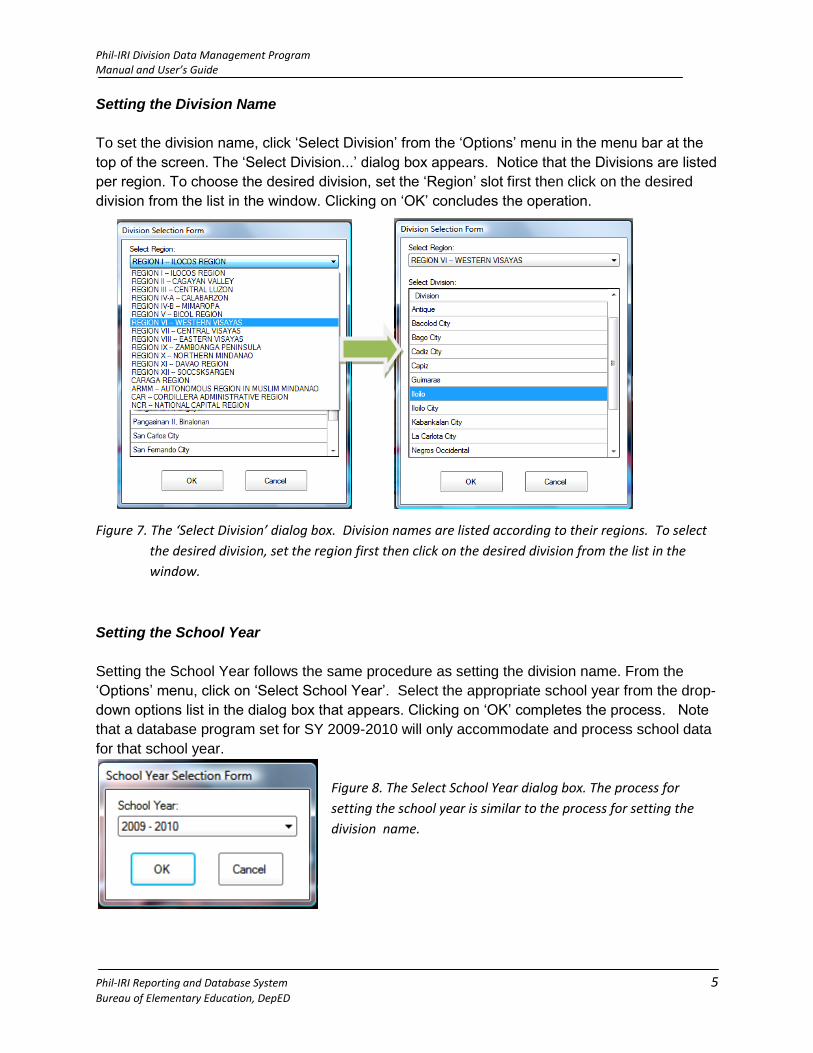
Setting the Division Name
To set the division name, click ‗Select Division‘ from the ‗Options‘ menu in the menu bar at the
top of the screen. The ‗Select Division...‘ dialog box appears. Notice that the Divisions are listed
per region. To choose the desired division, set the ‗Region‘ slot first then click on the desired
division from the list in the window. Clicking on ‗OK‘ concludes the operation.
Figure 7. The ‘Select Division’ dialog box. Division names are listed according to their regions. To select
the desired division, set the region first then click on the desired division from the list in the
window.
Setting the School Year
Setting the School Year follows the same procedure as setting the division name. From the
‗Options‘ menu, click on ‗Select School Year‘. Select the appropriate school year from the drop-
down options list in the dialog box that appears. Clicking on ‗OK‘ completes the process. Note
that a database program set for SY 2009-2010 will only accommodate and process school data
for that school year.
Figure 8. The Select School Year dialog box. The process for
setting the school year is similar to the process for setting the
division name.

Phil-IRI Division Data Management Program Manual and User’s Guide
Phil-IRI Reporting and Database System 6 Bureau of Elementary Education, DepED
Figure 10. The ‘Change Password’ dialog box.
For our example, let us assume that the database is set for the Division of Iloilo for SY 2009-
2010. After setting the Division name and School Year, the title bar at the top left corner of the
main page should look as shown in Figure 9:
Figure 9. The title bar of the main page of the program set for use of Iloilo Division for SY
2009-2010.
Setting the Password
Setting or changing the password follows a similar process. From the ‗Options‘ menu, click on
‗Change Program Password‘ and wait for the ‗Change Password...‖ dialog box to appear. To set
or change the password, simply type in the
old password and the new password in the
indicated slots. Clicking on ‗OK‘ completes
the process.
Do not forget your new password. After
closing the program, it cannot be run again
without the proper password. Changing the
password is optional. The program will
function just as well with the old password.
But once set, the password will always be
required. The Program is now ready for use.
Using the Program
The Phil-IRI Division Data Management Program was designed for simple operation. Once all
the necessary settings had been made, there is no longer a need for keying-in instructions via
the keyboard. Instructions had been pre-programmed and may be executed by mouse clicks.
The Phil-IRI Division Data Management Program was designed for three main functions
represented by icons displayed at the left hand side of the main page (as illustrated in Figure
11).

Phil-IRI Division Data Management Program Manual and User’s Guide
Phil-IRI Reporting and Database System 7 Bureau of Elementary Education, DepED
Figure 11. The ‘Task’ menu showing the
main functions of the program
To execute a function or a task of the program, simply click on the corresponding icon. The
same functions may also be executed from the menu bar at the top of the page. Clicking on the
‗Tasks‘ menu presents these functions in a drop-down list. Click on a function to execute it.
Figure 11. The main functions of the Phil-IRI division data management program represented by
icons in the left hand side of the main page.
Function 1. Integrating individual school’s Phil-IRI data into a single division Phil-IRI database
Function 2. Processing and presenting gathered data in usable summaries Phil-IRI database
Function 3. Packaging the division Phil-IRI database for easy transmission and integration to the national Phil-IRI database
Function 4. Monitoring data submissions from the schools.
Power ‘On/Off’ button. Click to close the program.

Phil-IRI Division Data Management Program Manual and User’s Guide
Phil-IRI Reporting and Database System 8 Bureau of Elementary Education, DepED
The „ Load School Report‟ Function
Once the Division Name is set, the system automatically extracts from the installer file a list of
all the schools in that particular division. In a sense, this tells the system from which schools to
expect and accept data. The system will not accommodate data from any school not in its list.
Setting the school year tells the system to accept only data for that particular school year. A
division program set for SY 2009-2010 will only accept data file from the schools:
with file names beginning with Phil-IRI_2009;
with a school code corresponding to a school in the division; and
which is properly validated, locked and packaged by the School Validation
Program (distributed with the Schools Scores Encoding Template)
To load a report from any school in the division, click on the icon or click the ‗Load School
Report ‗ option from the ‗Tasks‘ menu.
The data transfer dialog box appears.
Click on the ‗Browse‘ button to search
for the file to be loaded.
Figure 12. The Data Transfer dialog box
An ‗Open File‘ dialog
box (common to MS
Office/MS Windows and
other applications)
appears. Locate the
file, as you would in any
application. Choose the
desired file and click
‗Open‘.
Figure 13. A usual ‘Open
File’ dialog box in a MS
Office/MS Windows Vista
environment.

Phil-IRI Division Data Management Program Manual and User’s Guide
Phil-IRI Reporting and Database System 9 Bureau of Elementary Education, DepED
Clicking on the ‗Open‘ button sets in motion a process of validation and initialization before the
file is integrated into the division database. Subsequent message and dialog boxes appear to
inform the user of the system‘s progress and/or to guide the user through the process of file
integration.
Figure 14a. The data file selected is
checked and validated by the system.
Figure 14c.Message box informing
the user of the outcome of the file
transfer.
The last message box indicates that the school data has been successfully integrated into the
division database. Repeat the same process for every school data to be integrated into the
database. The same procedure applies for loading both Phil-IRI Pre-test and Pos-Test Data.
Figure 14b. Information about the file to be
transferred is displayed for
confirmation. At this point, the user
may proceed with the file transfer by
clicking on the ‘Start Transfer’ button or
abort the operation by clicking on the
‘Close’ button.

Phil-IRI Division Data Management Program Manual and User’s Guide
Phil-IRI Reporting and Database System 10 Bureau of Elementary Education, DepED
The „View Reports‟ Function
A set of summarized data reports in tabular form is already pre-programmed into the system.
The division data management program keeps track of all submissions from the schools and
automatically updates the figures in the tables whenever a new set of school data is integrated
into the database. Thus, the user at the division level need not perform any manual calculation.
Viewing Reports
To view the pre-programmed summaries of division Phil-IRI data, simply click on the icon
at the center of the page or click on ‗View Reports‘ from the ‗Tasks‘ menu. Doing so would take
the user to the ‗View Reports‘ page. Note that the page is blank (since the type of summary
report to be viewed has not yet been specified) except for two ‗menus‘ indicated at the upper left
corner of your screen—the ‗File‘ and ‗View Reports‘ menu. To specify the type of report wished
to be viewed, click on the ‗View Reports‘ menu. Two types of reports are available for viewing,
Individual School Summary and Division Summaries
Individual School Summary
To view the submitted summarized data of a school in the division, click on the appropriate
option from the View Reports menu.
Figure 15. Viewing Individual School’s Phil-IRI data.
The School Selection box then appears
listing all the schools which have
submitted Phil-IRI data. Highlight the
name of the school the data of which
you wish to view. Clicking on ‗OK‘
executes the command.

Phil-IRI Division Data Management Program Manual and User’s Guide
Phil-IRI Reporting and Database System 11 Bureau of Elementary Education, DepED
The Division Summaries
The division summaries may be viewed also through the ‗View Reports‘ menu. Phil-IRI and Phil-
IRI related data collected from the schools are summarized as follows:
1. Reading Performance Summaries – these summarize in tables the reading performance
of pupils in the entire division. Each table shows the number and percentage of children
per reading level during pre-test and post-test. When pre-test and post-test data from all
the schools are already entered into the system, improvements from pre-test to post-test
will likewise be presented. Four tables for each Grade level are presented—one each for
English Oral, English Silent, Filipino Oral and Filipino Silent. The reading performances
of pupils are summarized for the entire division (overall), according to school type and
according to the LGU income class where the schools are located.
2. Predominant Reading Level Summaries – these summaries were designed to give a
picture of the reading profile of the students at a glance. The predominant reading level
is simply the reading level where the highest percentage of pupils is in a given test. The
Predominant Reading Levels Summary tables show the number and percentage of
schools having the indicated reading level as the predominant reading level for a given
grade level. The tables also present an easier way of determining the improvements in
reading performance from pre-test to post-test. Two such tables are available for
viewing, one for English and one for Filipino.
Same with the reading performance, the predominant reading levels are summarized for
the entire division (overall), according to school type and according to the LGU income
class where the schools are located. This is to enable decision-makers at the division
level to identify which type of schools are performing well, which are not and just where
these schools are situated.
3. Reading Intervention Programs – this summarizes the information on the reading
intervention programs implemented in all the schools in the division. The data presented
in this summary gives some insights on the schools‘ capabilities to implement reading
intervention programs. The reading intervention programs of schools with the best
reading profiles are also presented.
Figure 16 below shows the path for accessing the different division summaries.

Phil-IRI Division Data Management Program Manual and User’s Guide
Phil-IRI Reporting and Database System 12 Bureau of Elementary Education, DepED
Figure 16. The different division summaries accessible through the ‘View Reports’ menu.
What Can Be Done with the Summary Reports
The summary tables in the ‗View Reports‘ menu may not be edited. However, they may be
printed and saved as separate files which can be inserted (copy-pasted) in any report or
presentation. As previously discussed the ‗View Reports‘ menu specifies what particular
summary is to be viewed. The ‗File‘ menu shows what can be done to any open or accessed
report. Options under the ‗File‘ menu are as follows:
Save as HTML – saves the currently open page and all tables on it in HTML format. The
saved HTML page may be copy-pasted onto a report (.doc file) or presentation (.ppt file);
Print – prints the currently open page. The print dialog box that appears varies depending
on the printer and/or the computer‘s operating system;
Print preview – gives a preview of the currently open page including number of pages
when printed;

Phil-IRI Division Data Management Program Manual and User’s Guide
Phil-IRI Reporting and Database System 13 Bureau of Elementary Education, DepED
Figure 17. The ‘Create Division Output for National Submission’ form
Page setup – enables adjustments in paper size, margins and headers and footers for the
currently open page. It is recommended that adjustment in the page setup be made first
before printing any page.
Close Report Form – ends the report viewing session and takes the user back to the main
page. The view report page (or form) must be closed first before any other feature of the
program may be accessed.
The „Generate Division Output for National Submission Function‟
After all the schools‘ Phil-IRI data have been integrated to the division database, a copy of the
database must now be
submitted to the Bureau of
Elementary Education. A
copy of the division Phil-IRI
database must now be
created and packaged for
submission. A function of
the Division Data
Management Program is
devoted for this purpose.
To create a copy of the
division data base, click on
the icon, or click on
‗Generate Division
Output....‘ from the ‗Tasks‘
menu.
The School Submissions
page (or form) is opened.
Click on ‗Create Division
Output for Submission‘. A
copy of the division Phil-IRI
database is created and
lodged in the computer‘s
desktop. The copy of the division database should have a filename following this format:
Phil-IRI_(school year)_(Division name).xml . Thus, a copy of the Phil-IRI division database of
Iloilo division for school year 2009-2010 should have this filename: Phil-IRI_2009_Iloilo.xml.

Phil-IRI Division Data Management Program Manual and User’s Guide
Phil-IRI Reporting and Database System 14 Bureau of Elementary Education, DepED
Figure 18. A division output can only be created once
50% of all the schools in the division have
submitted data. A message box appears to
remind the user of this rule.
When Can a Division Output Be Created for National Submission?
Some realities had to be considered in designing this particular aspect of the program. On one
hand, waiting for all schools (100% schools submission) to submit their respective Phil-IRI
results before creating a division output for submission might take too long, perhaps most of the
school year. On the other hand, getting data from only few schools defeats the purpose for
automating Phil-IRI data collection. In view of these, the system had been designed for multiple
(at least 3) submissions to the central office (SDD-BEE). This means that a division output will
have to be created several times, one each for every submission.
The first submission to the central
office should have pre-test data from
at least 50% of all the schools in the
division. A memo will be issued by
BEE regarding the deadline for this
submission. The system had been
designed so that a division output will
be created only after 50% submission
has been reached.
Another submission to the central
office (hence, another division output)
can be made after all the schools have
submitted their pre-test data, and
another once a considerable
percentage of schools have submitted post-test data. The deadline and percentage requirement
for each submission shall be communicated through a memo from the Bureau of Elementary
Education. Another component of the Phil-IRI Reporting and Database System, the National
Data Management Program was developed to consolidate all Phil-IRI division databases. The
national data management program was designed to accept multiple versions of division
databases. Older versions are simply overwritten.
The „School Submissions Monitoring‟ Function
The submissions monitoring function of the Phil-IRI Division Data Management program was
designed primarily to help division personnel keep track of Phil-IRI data submissions by the
schools. The monitoring form is essentially a checklist showing all the schools in the division
and whether or not each has submitted Phil-IRI pre-test or post-test data. The monitoring form
also gives the status, in terms of content, of the division database. The School Submissions
Monitoring form appears once the icon is clicked.
Phil-IRI Division Data Management Program Manual and User’s Guide
Phil-IRI Reporting and Database System 15 Bureau of Elementary Education, DepED
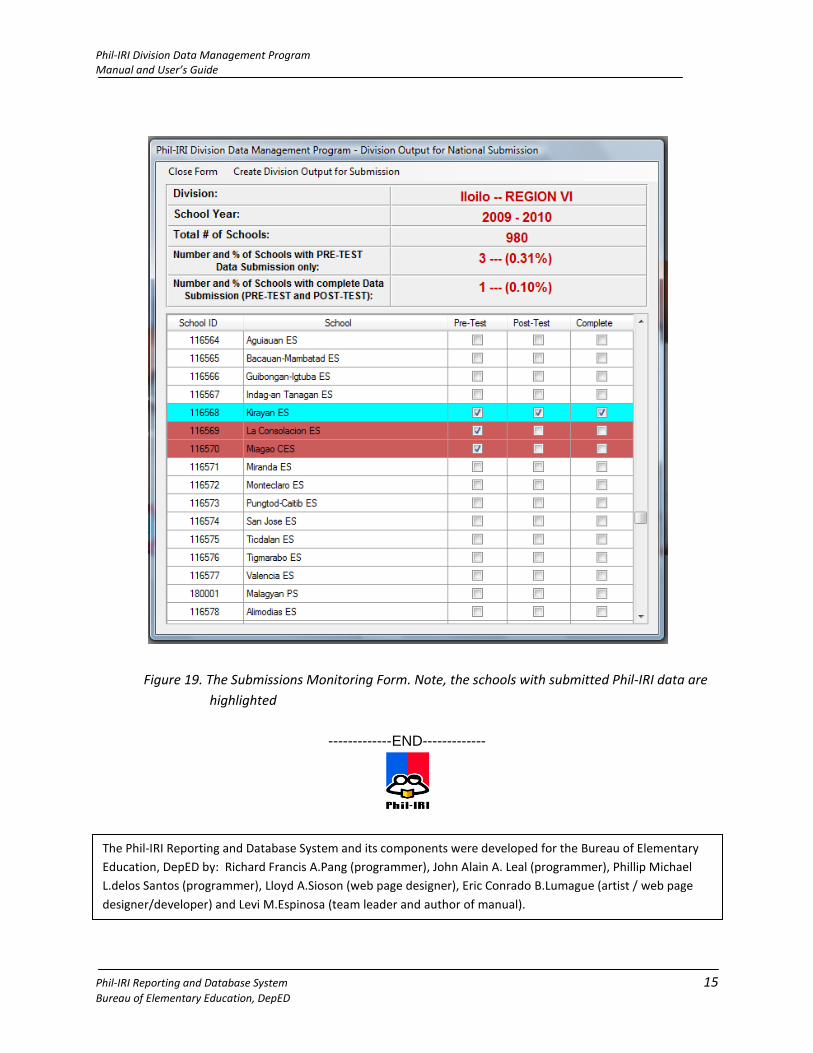
Figure 19. The Submissions Monitoring Form. Note, the schools with submitted Phil-IRI data are
highlighted
-------------END-------------
The Phil-IRI Reporting and Database System and its components were developed for the Bureau of Elementary
Education, DepED by: Richard Francis A.Pang (programmer), John Alain A. Leal (programmer), Phillip Michael
L.delos Santos (programmer), Lloyd A.Sioson (web page designer), Eric Conrado B.Lumague (artist / web page
designer/developer) and Levi M.Espinosa (team leader and author of manual).

Phil-IRI Division Data Management Program Manual and User’s Guide
Phil-IRI Reporting and Database System 16 Bureau of Elementary Education, DepED
Annex 1. Additional Guidelines for the Efficient and Responsible Use of the Phil-IRI Division Data Management Program
The Phil-IRI Division Data Management Program is a tool designed for speedy and efficient
gathering and processing of Phil-IRI data nationwide. In spite of all the features built into it, it is
still just a tool. And like most tools, it is useless without responsible hands to wield it. The
development and reproduction of the program had been the responsibility of the Bureau of
Elementary Education. The divisions are entrusted with its care and responsible use.
Following are some pointers for care and proper use of the Phil-IRI Division Data Management
Program:
1. Make sure that the program is installed in a computer with the necessary hardware and
software. The system requirements are enumerated in the manual.
2. Make sure that the division maintains only one Phil-IRI database. Do not install the
program in several computers. Division personnel needing Phil-IRI data may be
furnished with printed reports or electronic copies of summary reports saved in HTML
format.
3. The program and other components of the Phil-IRI reporting and database system are
properties of the Bureau of Elementary Education. Make sure that no copy of the
installation CD is made and that the program is not used outside of the division office.
4. Make sure that the programming is not tampered with. Difficulties or glitches in the
system should be reported to SDD-BEE.
5. For additional information regarding the Phil-IRI Reporting and Database System, visit
www.phil-iri.info.
Phil-IRI Division Data Management Program Manual and User’s Guide
Phil-IRI Reporting and Database System 17 Bureau of Elementary Education, DepED
Annex 2. Revisions to the Phil-IRI Division Data Management Program
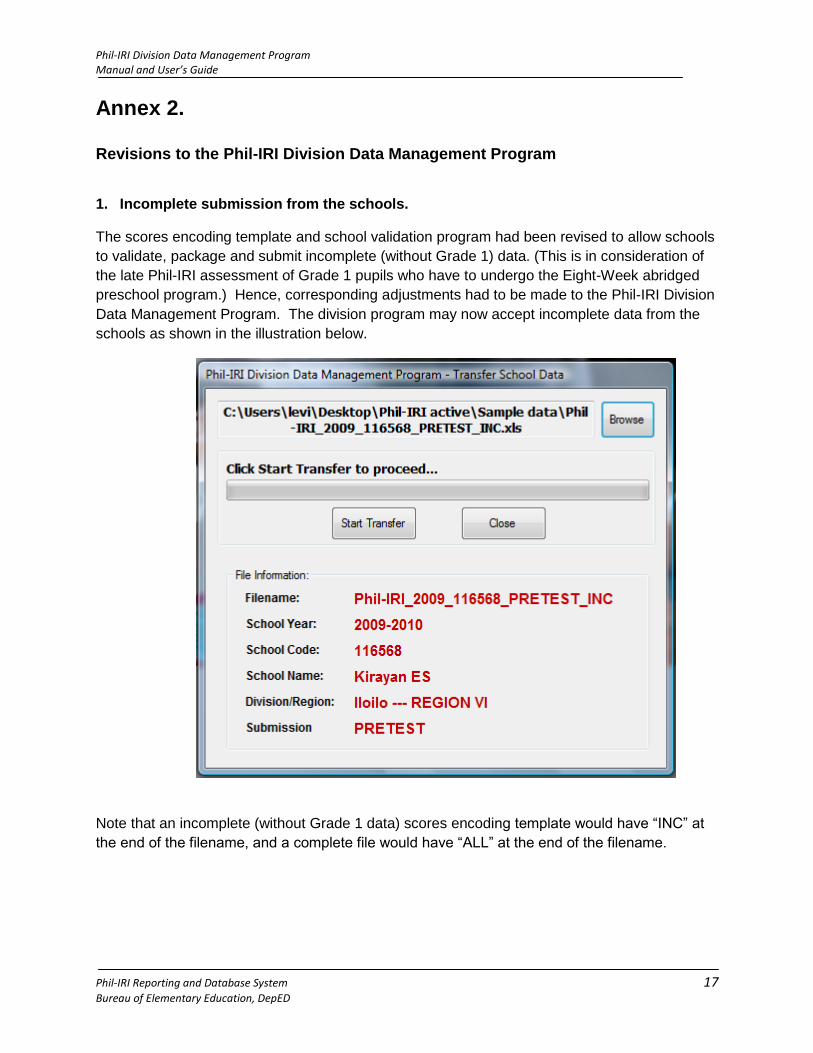
1. Incomplete submission from the schools.
The scores encoding template and school validation program had been revised to allow schools
to validate, package and submit incomplete (without Grade 1) data. (This is in consideration of
the late Phil-IRI assessment of Grade 1 pupils who have to undergo the Eight-Week abridged
preschool program.) Hence, corresponding adjustments had to be made to the Phil-IRI Division
Data Management Program. The division program may now accept incomplete data from the
schools as shown in the illustration below.
Note that an incomplete (without Grade 1 data) scores encoding template would have ―INC‖ at
the end of the filename, and a complete file would have ―ALL‖ at the end of the filename.

Phil-IRI Division Data Management Program Manual and User’s Guide
Phil-IRI Reporting and Database System 18 Bureau of Elementary Education, DepED
The submissions monitoring form was also revised to keep track of incomplete submissions (as
shown in the illustration below.
The illustration above shows that Kirayan ES has submitted incomplete (without Grade 1) pre-
test data. Once the complete file (with ―ALL‖ in the filename) is submitted and loaded into the
division database, the system will simply overwrite the previously submitted file and the
completion will be noted in the submissions monitoring form.
Note that the submissions monitoring form lists the schools according to school ID. Clicking on
―Pre-Test‖ (encircled in the illustration) once rearranges the list so that schools with submission
are placed at the bottom list. Click on ―Pre-Test‖ again and the list is rearranged so that the
schools with submission are placed at the top of the list. In the illustration above, ―Pre-Test‖ had
been clicked twice.

Phil-IRI Division Data Management Program Manual and User’s Guide
Phil-IRI Reporting and Database System 19 Bureau of Elementary Education, DepED
2. The “Master Reset” function
A master reset function has been incorporated into the Phil-IRI Division Data Management
Program. This function may be accessed from the Options menu.
This function is useful in removing from the system sample data loaded for demonstration
purposes during an echo-training or orientation session. Note however, that the master reset is
indiscriminate, that is, it does not allow for choosing which data to remove and which ones to
retain. It simply deletes ALL entries. Note also, that resetting the database is an irreversible
process and can not be undone.