manual comendo security center · search for the subject tom and you will find e-mails with tom in...
TRANSCRIPT
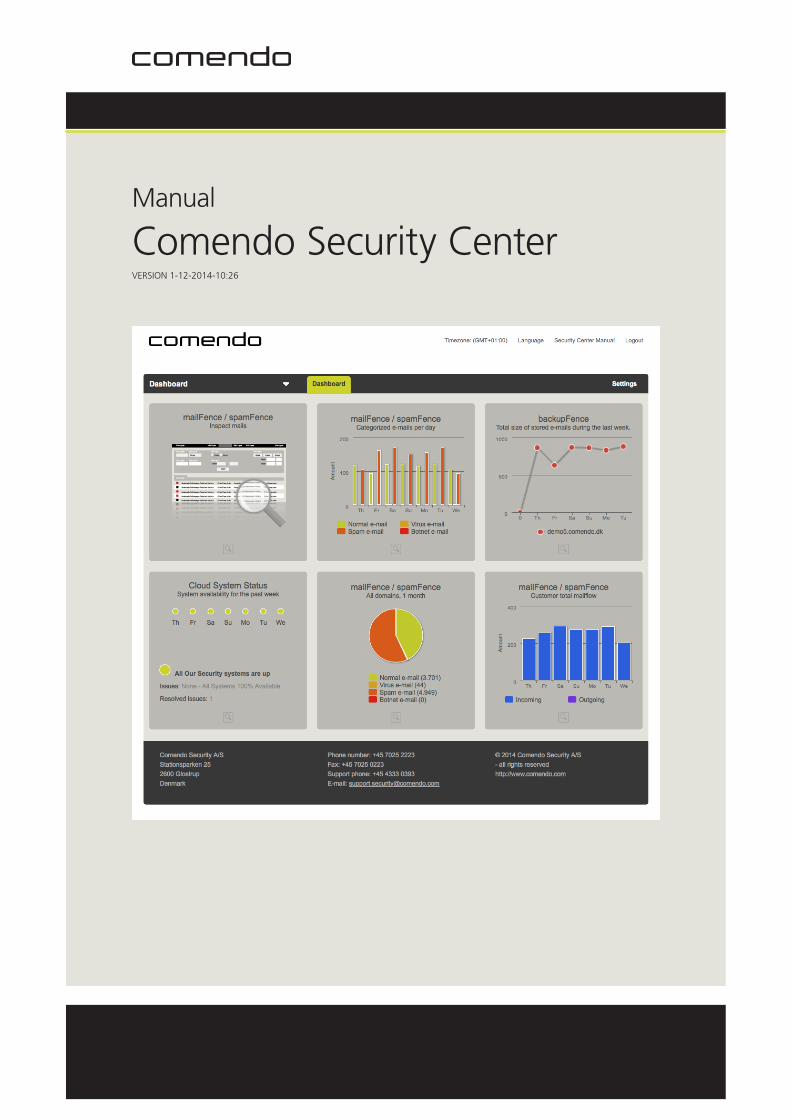
Manual
Comendo Security CenterVERSION 1-12-2014-10:26

2
CONTENTS
WELCOME ............................................................................................4Login Screen ................................................................................................. 5Main Screen .................................................................................................. 6Drop-down menu .......................................................................................... 7Dashboard tab .............................................................................................. 7Settings tab ................................................................................................... 8Miscellaneous operations .............................................................................. 8
MAILFENCE AND SPAMFENCE ............................................................9Status .......................................................................................................... 10
Viewing the status of filters..................................................................... 10Inspect e-mails ............................................................................................ 11
Searching an e-mail ................................................................................ 11Liveflow .................................................................................................. 13
Statistics ...................................................................................................... 19Viewing statistics .................................................................................... 20
Reports & alerts ........................................................................................... 21Managing PDF e-mail reports .................................................................. 21Server monitoring ................................................................................... 24
Settings ....................................................................................................... 26General .................................................................................................. 26Blacklist / Whitelist .................................................................................. 30Country Blocking .................................................................................... 33File types ................................................................................................ 34Users & contacts ..................................................................................... 35Access restrictions ................................................................................... 39Delivery diagnostics................................................................................. 40QER ....................................................................................................... 41Audit log ................................................................................................ 44
BACKUPFENCE ...................................................................................46Inspect e-mails ............................................................................................ 46
Searching for a backup e-mail ................................................................. 46Resend overview ......................................................................................... 47Statistics ...................................................................................................... 47
Viewing statistics .................................................................................... 48
DNSFENCE ..........................................................................................49Statistics ...................................................................................................... 49
Viewing statistics .................................................................................... 49Check domain ............................................................................................. 50
Checking domain ................................................................................... 50Settings ....................................................................................................... 50
Configuration ......................................................................................... 50Blacklist / Whitelist .................................................................................. 51Content categories ................................................................................. 52Domain monitoring ................................................................................ 52
MAILCONTINUITY ..............................................................................53Configuration .............................................................................................. 53
Activate Extended SMTPbackup .............................................................. 53Deactivate Extended SMTPbackup........................................................... 53
User administration and AD synchronization ................................................ 54Create user manually .............................................................................. 54

3
Create user automatically........................................................................ 54Edit user ................................................................................................. 57Delete user ............................................................................................. 57User activation ........................................................................................ 57Send activation codes ............................................................................. 58Catch-all ................................................................................................. 58FTP access ............................................................................................... 58Aliases and distribution lists ................................................................... 58
Using Comendo mailContinuity ................................................................... 58Web browser .......................................................................................... 58IMAP ...................................................................................................... 58Import contacts ...................................................................................... 59Synchronization of e-mails sent from mailContinuity ............................... 59
MAILARCHIVE ....................................................................................60Index information / Privacy ...................................................................... 60Archive encryption .................................................................................. 60
Inspect e-mails ............................................................................................ 61Searching for an archived e-mail ............................................................. 61Attachment search.................................................................................. 62Index based search ................................................................................. 63Userbased access and search................................................................... 63
Resend overview ......................................................................................... 64Cancel a redelivery job ............................................................................ 64
Statistics ...................................................................................................... 65Viewing statistics .................................................................................... 65
APPENDIX 1 .......................................................................................66Setting up Journaling with mailArchive ........................................................ 66
Archiving possibilities ............................................................................. 66Microsoft Journaling and archiving differences ........................................ 66MS Exchange 2010 Journaling configuration........................................... 68Exchange Online/Office 365 Journaling configuration ............................. 74

4
WELCOMEThis manual is for customers using security solutions from Comendo.
It is recommended that users read the manual so as to gain a thorough understanding of the system and remove all ambiguities regarding the online solution.
No part of this document can be distributed, modified, sold or replaced without the written consent ofComendo Security.
5
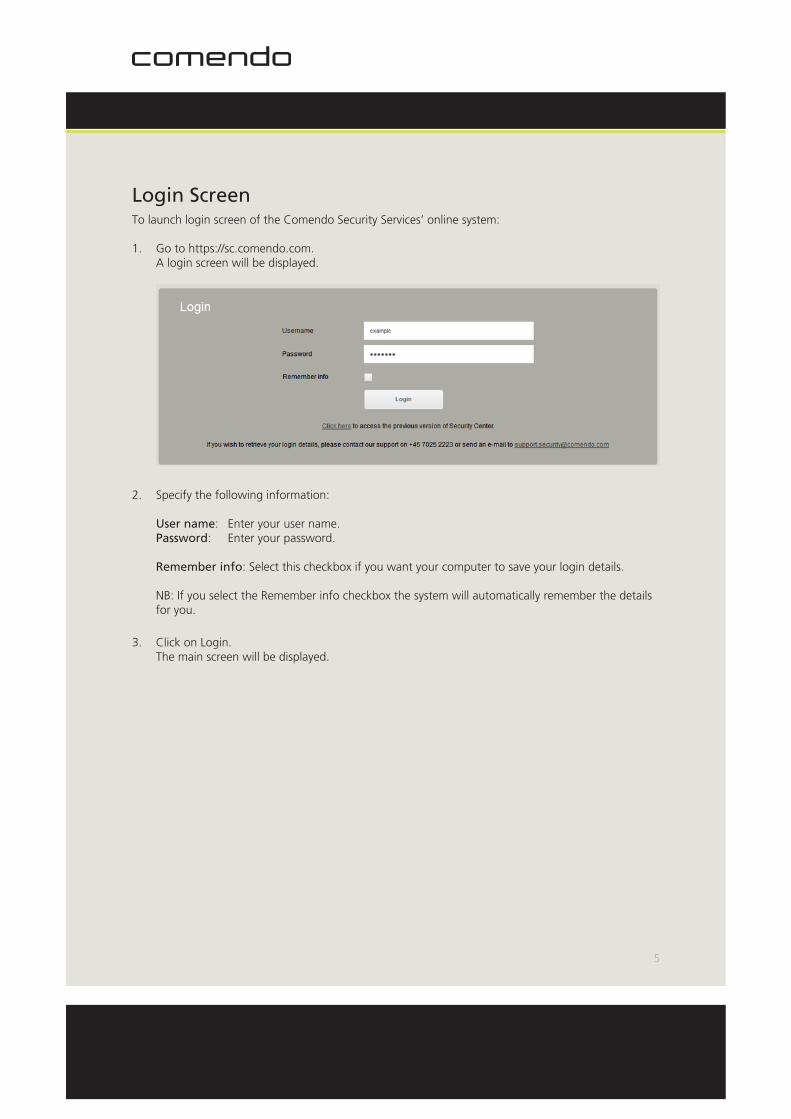
Login ScreenTo launch login screen of the Comendo Security Services’ online system:
1. Go to https://sc.comendo.com. A login screen will be displayed.
2. Specify the following information: User name: Enter your user name. Password: Enter your password. Remember info: Select this checkbox if you want your computer to save your login details. NB: If you select the Remember info checkbox the system will automatically remember the details for you.
3. Click on Login. The main screen will be displayed.

6
Main ScreenOnce you are successfully logged on to the system the main screen will be displayed.

7
Drop-down menuThe drop-down menu shows a few sub-options with distinct functions (You will get an overviewof the services your company has subscribed to).
Selecting any of these options opens different tabs.
Dashboard tabThe Dashboard tab shows all the selected widgets in the Settings section.

8
Settings tabThe Settings menu offers an interface with the select/deselect widgets to be shown on the main screen.
The dull widgets are ones that are not selected.
Once you are done with selecting widgets, click on Save to apply the changes. These widgets are shown on the main screen under the Dashboard tab.
Miscellaneous operations
Time zone: Click to change your time zone.Language: Click to change your language.Security Center Manual: Click to view Comendo Security Services’ user manual.Logout: Click to sign out

9
MAILFENCE AND SPAMFENCEComendo mailFence scans e-mails before they reach business servers, using the most advanced virus scanner currently available on the market. Viruses are thus stopped using Comendo’s unique Pre-Virus Recognition (PVR) filter technology before they are detected and classified as viruses.
Comendo spamFence is based on market-leading antispam filters and technologies, and is regarded as being one of the most effective filtering systems around. We use over 20 different spam detection tech-nologies - blocking at least 99.8% of the spam sent to our customers.
MailFence and spamFence offer the following sub-tabs for various operations:
ê Status
ê Inspect e-mails
ê Statistics
ê Reports & Alerts
ê Settings

10
StatusThis tab provides the status of the various filters based on the criteria selected.
Viewing the status of filtersTo view the status of the various filters:
1. Log on to the system.
2. Select the mailFence & spamFence option from the drop down menu.
3. Select the Status tab.
4. Specify the following information: Day: Select to view the daily status of filters. Week: Select to view the weekly status of filters. Month: Select to view the monthly status of filters
NB: To modify the settings for any of the filters, click on .

11
Inspect e-mailsThis tab shows an overview of all your live e-mails, and allows you to search for e-mails as required.
Searching an e-mailTo search for an e-mail:
1. Log on to the system.
2. Select the mailFence & spamFence option from the drop-down menu.
3. Select the Inspect e-mails tab.
4. Specify the following information: Choose Domain: Select one domain or all the domains from the drop-down list. Filter Mail Types: Select Filter Mail Types from the drop-down list. Inbound: Select this checkbox to include incoming e-mails in your search. Outbound: Select this checkbox to include outgoing e-mails in your search. Time Span: Specify the particular time span for your search. Recipient: Enter the e-mail address of the recipient. Sender: Enter the e-mail address of the sender. Subject: Enter the subject of the e-mail. Spam Score: Select the range of the spam score as required. NB: The recommended starting range for a spam score is 2.
5. Click on Search.

12
How to search
With the e-mail search function you can search across all your domains at once. This search will be faster than the previous single-domain search.
All criteria must match
A search will only find the e-mails that match all the search criteria and all the search words. Searching for sender [email protected], recipient [email protected] and subject win lottery will find only e-mails for which both the sender and the recipient match, and which contain both the words win and lottery in the subject.
Exact criteria matches
Search for the subject tom and you will find e-mails with tom in the subject but not the word stomp. To improve speed, by default the function will search for exactly what you enter (ignoring case − see below).
Inexact criteria matches
If you only know part of a word you are looking for, use * to represent the unknown part. To find a sub-ject beginning with tom, search for tom* and you will find all subjects containing the words tom, tom-smith, and tomato, but not stomp. Searching for *tom* will find all these words, including stomp.
You can even include the star inside a word, e.g. w*e to find we and wince.
Was the client’s name Dorn or Durn? Use ? to represent a single, unknown character. Search for d?rn to find both Dorn and Durn.
* represents any number of characters or none.? represents exactly one character.
Case-insensitive
You do not need to worry about the case of the letters. Searching for apple, Apple or APPLE will find everything involving the word apple, with any combination of letter cases, including aPpLe.
Stop words
A good idea when searching is to search for words that are more likely to match what you arelooking for. In the phrase Will you be my Valentine?, the first four words could each match alot of different e-mails, thus they are generally bad choices when searching for something. Theword Valentine is very specific, and is well-suited to finding all e-mails relating to Valentine’sDay.
The following words have almost no effect on a search, and cannot be used. They are called “stopwords” and must not be used in your searches:
a, an, and, are, as, at, be, but, by, for, if, in, into, is, it, no, not, of, on, or, such, that, the, their,then, there, these, they, this, to, was, will, with.
You can still search for *and to find words such as hand and brand.

13
LiveflowIn liveflow and during searches under “Inspect e-mails” all e-mails are marked with one or more icons in-dicating the type of e-mail. Mouseover is possible on all icons, and an explanatory text will be displayed. All icons are listed and explained here.
Rejected
”RECIPIENTDOMAIN.comendo.local”This is Comendo’s local name for the recipient’s e-mail server. If you get this rejection message it means the e-mail has been rejected by the recipient’s e-mail server, not by Comendo.
! Mailbox unavailable / User does not exist.
The recipient’s e-mail server has rejected the e-mail because the recipient’s mailbox does not exist. The sender may have misspelt the e-mail address.
! Message size exceeds fixed maximum message size
The recipient’s e-mail server has rejected the e-mail because it is too big. Either split the contents and send several smaller e-mails to the recipient, or make the e-mail contents available to the recipient by some other means, e.g. using Dropbox or a similar service.
Exceeded max time without delivery.
It has not been possible to deliver the e-mail for seven (7) days. To receive the e-mail you must ask the sender to resend it. This is the only situation in which Comendo will reject an e-mail to be found in your Security Center. All other rejected e-mails will be rejected by the recipient’s e-mail server.
Deleted
Virus
MailFence has detected a virus. The e-mail has been deleted. Ensure that you know the sender, and that you want the e-mail. Ask the sender to check the attached file using antivirus software, or to scan the attached file at www.virustotal.com. Ask the sender to resend the attachment as an encrypted archive. Once the e-mail arrives decrypt the attached file, then check it using antivirus software or scan it at www.virustotal.com.
!

14
Quarantined
Click on the quarantined e-mail. In the pop-up window click on ”Release message” to release the e-mail to your e-mail server.
Blacklisted
The e-mail has been quarantined because the sender is on your blacklist. You have had the sender’s e-mail address, domain, IP or country added to your blacklist. All e-mails from your blacklisted senders are quarantined.
PVR PVR
The e-mail has been quarantined for 24 hours by the Pre Virus Recognition filter. The e-mail looks very similar to a known virus. PVR prevents new, undiscovered viruses from reaching your systems at a time when no definition files for the virus exist and no traditional antivirus software can detect the virus. This gives Comendo 24 hours to figure out how to detect the virus and update mailFence. After 24 hours the e-mail will be released from quaran- tineand rescanned before either being delivered to the recipient’s e-mail server or being deleted because it contained a virus. PVR protects you against unknown, fast-spreading viruses.
Spam
The e-mail is unwanted and has been quarantined. Unsolicited mass e-mails are considered to be spam - unwanted e-mails - and are quarantined by spamFence.
Temporarily rejected
! It has not been possible to reach any MXes for this domain at this time.
The recipient’s e-mail server has not been responding to telnet requests.
! Insufficient system resources.
The recipient’s e-mail server has been unable to receive the e-mail because it did not have enough disk space or memory, was busy or needed to be restarted. Comendo will try to resend the e-mail several times over the next seven days, and as soon as the recipient’s e-mail server is able to receive the e-mail it will be delivered.
! No valid hosts (too many connection failures).
The recipient’s e-mail server is not responding to telnet requests.
! Mailbox has exceeded the limit.
The recipient’s e-mail server is unable to receive the e-mail because the recipient’s mailbox is full.
15
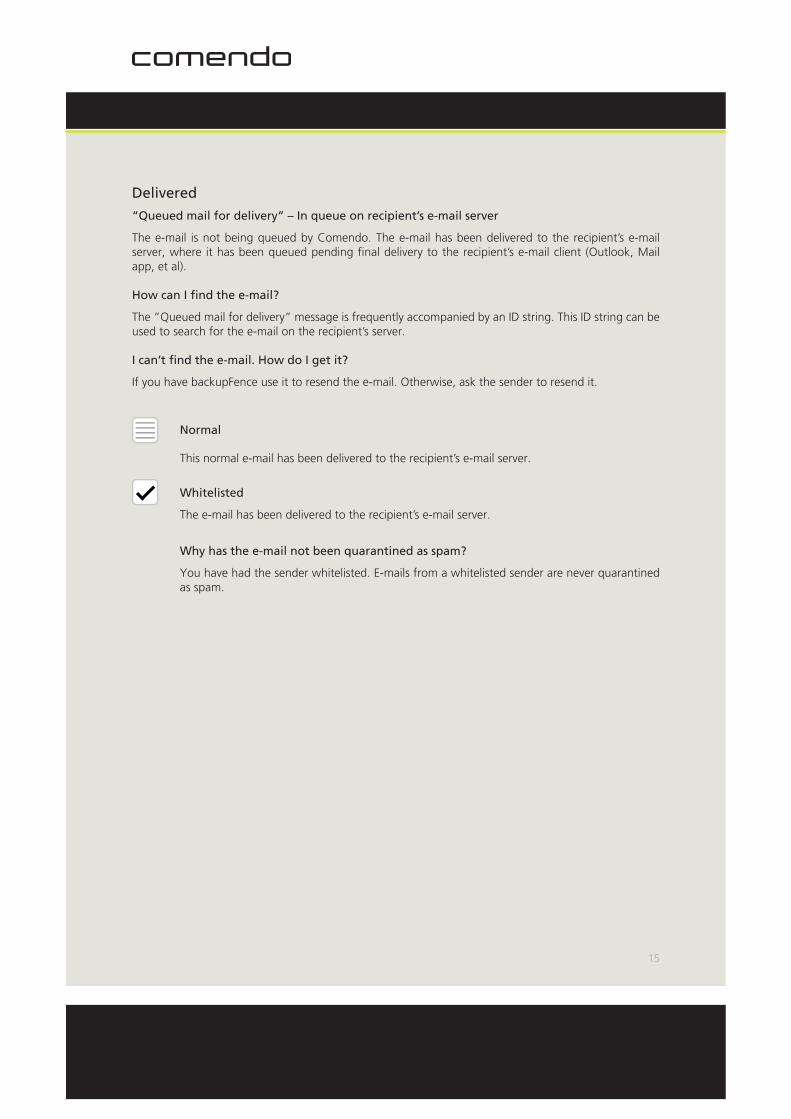
Delivered
“Queued mail for delivery” – In queue on recipient’s e-mail server
The e-mail is not being queued by Comendo. The e-mail has been delivered to the recipient’s e-mail server, where it has been queued pending final delivery to the recipient’s e-mail client (Outlook, Mail app, et al).
How can I find the e-mail?
The ”Queued mail for delivery” message is frequently accompanied by an ID string. This ID string can be used to search for the e-mail on the recipient’s server.
I can’t find the e-mail. How do I get it?
If you have backupFence use it to resend the e-mail. Otherwise, ask the sender to resend it.
Normal
This normal e-mail has been delivered to the recipient’s e-mail server.
Whitelisted
The e-mail has been delivered to the recipient’s e-mail server.
Why has the e-mail not been quarantined as spam?
You have had the sender whitelisted. E-mails from a whitelisted sender are never quarantined as spam.

16
TLS / mailTunnel
With the product mailTunnel, e-mails can be sent and received using secure connections. This will be displayed in the log in Security Center.
Gold
The e-mail was received using a secure TLS connection.
Silver
The e-mail was delivered using a secure TLS connection.
Gold and Silver
The e-mail was received and delivered using a secure TLS connection.
Secure Mail
If you have purchased the product “Secure Mail”, you will receive and send encrypted and signed e-mails and use the tunnel mail standard. If you have received or sent e-mails with encryption or signing, or tun-nel mails, they will appear in the Security Centre log.
Unidentified
When an encrypted e-mail is received, it is marked as “Unidentified” and is logged. The e-mail is then sent on to our encryption system, which recognises, processes and logs the email as “En- crypted”, “Signed” or “Tunnel mail”.
Encrypted
E-mails, which are decrypted by Secure Mail, will be marked with this icon.
Signed
E-mails, which have been sent with a signature, and whose signature Secure Mail has been able to validate, will be marked with this icon.
Tunnel mail
A tunnel mail is first logged as “Unidentified” and both sender and recipient are logged as the respective functional mailboxes. After the e-mail has been processed by the encryption system,
the tunnel mail will be logged as “Tunnel mail” with the final sender and recipient.
Unidentified, but sent
If the e-mail has been encrypted with a certificate, to which the encryption system has no access for decryption, the encrypted e-mail will be sent to your mail server. An “unidentified”
e-mail is usually encrypted using a certificate, which is not implemented in the Secure Mail solution (for example, an employee certificate).
17
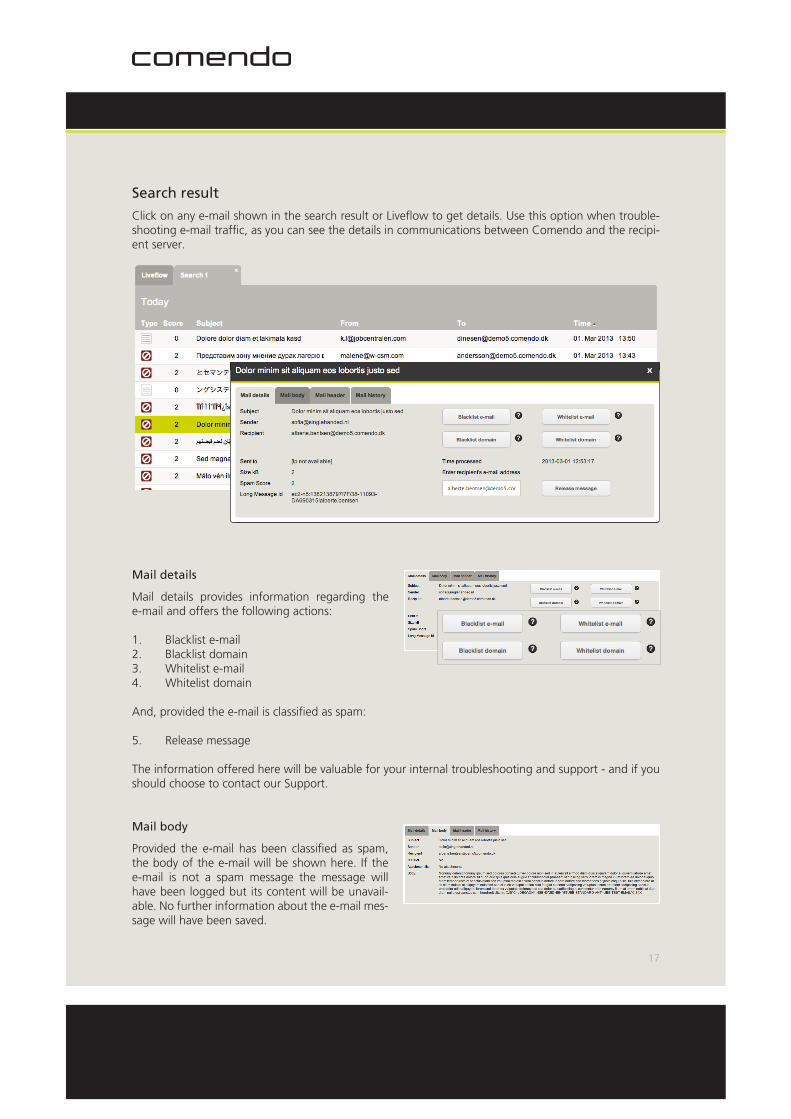
Search result
Click on any e-mail shown in the search result or Liveflow to get details. Use this option when trouble-shooting e-mail traffic, as you can see the details in communications between Comendo and the recipi-ent server.
Mail details
Mail details provides information regarding the e-mail and offers the following actions: 1. Blacklist e-mail2. Blacklist domain3. Whitelist e-mail4. Whitelist domain And, provided the e-mail is classified as spam: 5. Release message The information offered here will be valuable for your internal troubleshooting and support - and if you should choose to contact our Support.
Mail body
Provided the e-mail has been classified as spam, the body of the e-mail will be shown here. If the e-mail is not a spam message the message will have been logged but its content will be unavail-able. No further information about the e-mail mes-sage will have been saved.

18
Examining the e-mail body will help you determine whether the e-mail is correctly classified as spam or is a legitimate e-mail that should be released.
Mail header
Provided the e-mail has been classified as spam the e-mail header will be shown here. If the e-mail is not a spam message the message will have been logged but its content will be unavailable. No fur-ther information about the e-mail message will have been saved.
The e-mail header constitutes technical details re-garding the e-mail in question.
The e-mail header is valuable for your internal trou-bleshooting and support - and should you choose to contact our Support.
Mail history
The e-mail history will include date stamps and re-plies from the server for all delivery attempts.
The e-mail history is valuable for your internal trou-bleshooting and support - and should you choose to contact our Support.
19
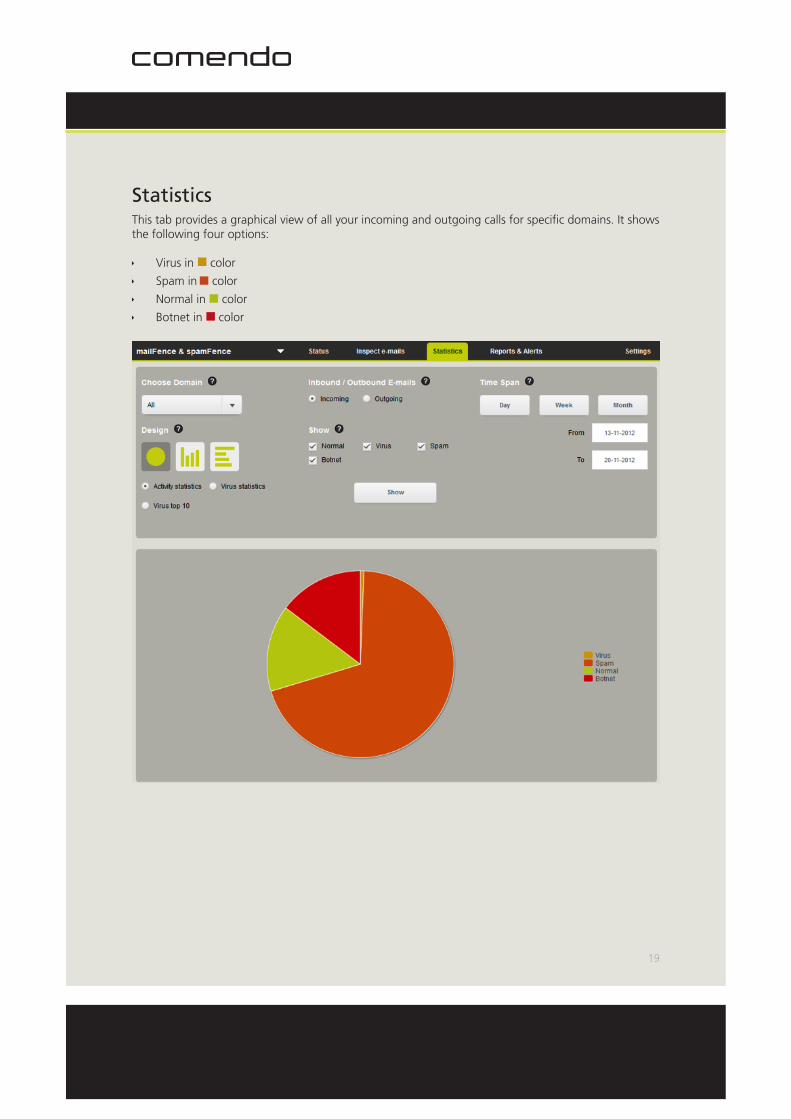
StatisticsThis tab provides a graphical view of all your incoming and outgoing calls for specific domains. It showsthe following four options:
ê Virus in color
ê Spam in color
ê Normal in color
ê Botnet in color

20
Viewing statisticsTo view statistics:
1. Log on to the system.
2. Select the mailFence & spamFence option from the drop-down menu.
3. Select the Statistics tab.
4. Specify the following information: Choose Domain: Select the domain from the drop-down list box. Inbound: Select inclusion of incoming e-mails in your statistics representation. Outbound: Select inclusion of outgoing e-mails in your statistics representation. Time Span: State the specific time span for your search. Design: Select the layout of the graphical representation as required. The options available for Design are: Circle Vertical Bars Horizontal Bars Show: Select the requisite checkbox(es) to view the statistics. The options available for Show are: Normal Virus Spam Botnet Activity Statistics: Select to view statistics for various activities in the system. Virus Statistics: Select to view statistics for viruses in the system. Virus Top 10: Select to view statistics for the latest 10 viruses in the system.
5. Click Show.

21
Reports & alertsThis tab provides detailed reports regarding e-mails, servers and operation statuses. You can add con-tacts and reports depending on your requirements. This module allows you to keep track of all the alerts closed/opened as needed.
Managing PDF e-mail reportsIn the PDF e-mail reports section you can view, add, edit and delete reports depending on your require-ments. You can also add contacts in this section.
Viewing PDF e-mail reports
To view e-mail reports:
1. Log on to the system.
2. Select the mailFence & spamFence option from the drop-down menu.
3. Select the Reports & Alerts tab.
Adding PDF e-mail reports
To add e-mail reports:
1. Log on to the system.
2. Select the mailFence & spamFence option from the drop-down menu.
3. Select the Reports & Alerts tab.
4. Click on +Add Report.
5. In the Create Report window specify the fol-lowing information: Report Name: Enter the name of the report Report Type: Select the type of report from the drop-down list box. Language: Select a language from the drop-down list box.

22
Frequency: Select a frequency from the drop-down list box. The options available for Frequency are: Daily Weekly Biweekly Monthly
6. Click on Save.
Editing PDF e-mail reports
To edit e-mail reports:
1. Log on to the system.
2. Select the mailFence & spamFence options from the drop-down menu.
3. Select the Reports & Alerts tab.
4. In the Edit column click on .
5. Modify information as required and click on Save.
Deleting PDF e-mail reports
To delete e-mail reports:
1. Log on to the system.
2. Select the mailFence & spamFence option from the drop-down menu.
3. Select the Reports & Alerts tab.
4. In the Delete column, click .
23
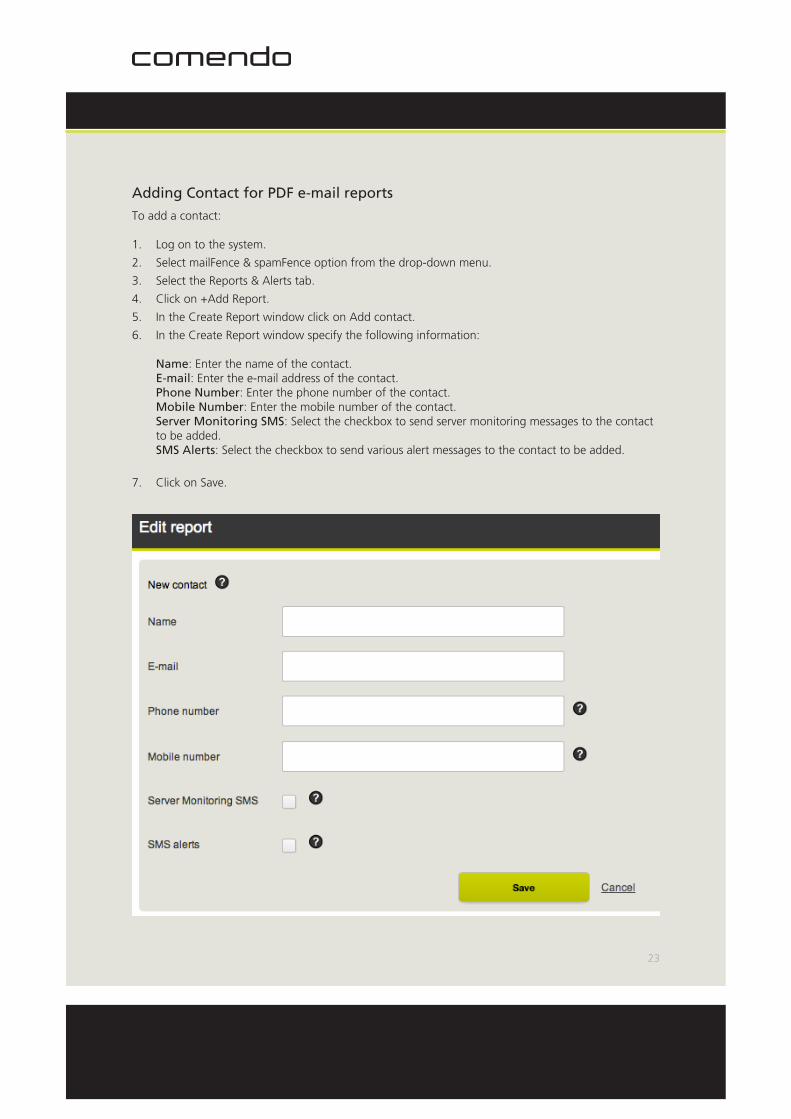
Adding Contact for PDF e-mail reports
To add a contact:
1. Log on to the system.
2. Select mailFence & spamFence option from the drop-down menu.
3. Select the Reports & Alerts tab.
4. Click on +Add Report.
5. In the Create Report window click on Add contact.
6. In the Create Report window specify the following information: Name: Enter the name of the contact. E-mail: Enter the e-mail address of the contact. Phone Number: Enter the phone number of the contact. Mobile Number: Enter the mobile number of the contact. Server Monitoring SMS: Select the checkbox to send server monitoring messages to the contact to be added. SMS Alerts: Select the checkbox to send various alert messages to the contact to be added.
7. Click on Save.

24
Server monitoringIf you enable Server Monitoring, Comendo will send an SMS to relevant parties, if/when your mail server is not responding, and is therefore unable to receive emails.
The function is activated in the Security Centre, which can also select which contacts should receive the alert.
Enabling Server Monitoring
How to enable server monitoring:
1. Log on to the system.
2. Select “mailFence” & “spamFence” from the drop-down menu.
3. Select the “Reports and Alerts” tab
4. Click on “Turn server monitoring on”
Disabling server monitoring
How to disable server monitoring:
1. Log on to the system.
2. Select “mailFence” & “spamFence” from the drop-down menu.
3. Select the “Reports and Alerts” tab
4. Click on “Turn server monitoring off”
Add recipients of alarms
How to add recipients of server monitoring alerts
1. Log on to the system.
2. Select “mailFence” & “spamFence” from the drop-down menu.
25
3. Select the “Reports and Alerts” tab
4. In the “Server Monitoring” section click on “Add recipient”
5. The list will display any previously created contacts (Contacts can also be created under mailFence & spamFence> Advanced> Users and contacts). Select a contact, whom you wish to receive alerts, by checking the SMS field (monitoring). If you want to create a new contact, click on “Add con-tact”.
Operation status
All operating messages will be displayed here and it is also possible to see closed alerts. Operating mes-sages are generated, if there is interference in the operation or the planned service window etc. In some cases the notification will be sent out via email or SMS to the selected contacts. These are con-figured under mailFence & spamFence > Advanced > Users and contacts.
By clicking on “Show closed alerts”, you can see alerts, which have closed within the past seven days. You can still see details and time information, even though the alert is closed and any problems have been solved. By clicking on “Show open alerts” you can see all open alerts: i.e. all current problems, which have not yet been solved and/or closed. Under each alarm, it will state when the item was created and last up-dated, and when the next update is expected.

26
SettingsThis tab provides absolute configuration of filters with respect to various aspects. Under the Settings tab you can configure the following options as:
ê General
ê Blacklist/Whitelist
ê Country Blocking
ê File Types
ê Users & Contacts
ê Access Restrictions
ê Delivery Diagnostics
ê QER
GeneralThis tab allows you to specify your e-mail servers, enable/disable stamps and notifications and adjustspam score settings.
NB: Quarantined e-mails are removed from the system (default after 14 days).
You can also activate a mailer-daemon/postmaster filter, to quarantine NDR (Non Delivery Report) e mail.These e-mails are automated messages that are sent when e-mail delivery fails.

27
Configuring spam thresholds
To configure spam thresholds:
1. Log on to the system.
2. Select the mailFence & spamFence option from the drop-down menu.
3. Select the Settings tab.
4. Under the General tab and the Spam Thres-holds section specify the following informa-tion: Spam Score: Select the required score from the drop-down list box. Spam Status: Select the status of spam from the drop-down list box. Tag Spam Score: Select the checkbox to classify your required spam score as a probable spam score.
Configuring scanning and filter technologies
To configure scanning and filter technologies:
1. Log on to the system.
2. Select the mailFence & spamFence option from the drop-down menu.
3. Select the Settings tab.
4. Under the General tab and the Scanning and Filter Technologies section, select checkboxes for required scanning and filter techniques. With PVR enabled you are protected against viruses even before they are registered. PVR e-mails contain code that is not yet registered as a virus, and thus not necessarily malicious Enabling “Receive e-mail only for added users” will cause the system to reject e-mails to users that do not exist in Security Center. E-mails from mailer-daemons/postmasters will be quarantined and therefore not delivered to the recipient. SPF will validate senders of e-mails. This technique will enhance the protection against spam by verifying the sender’s IP address. SPF will define which hosts can send legitimate e-mails from a given domain.
28
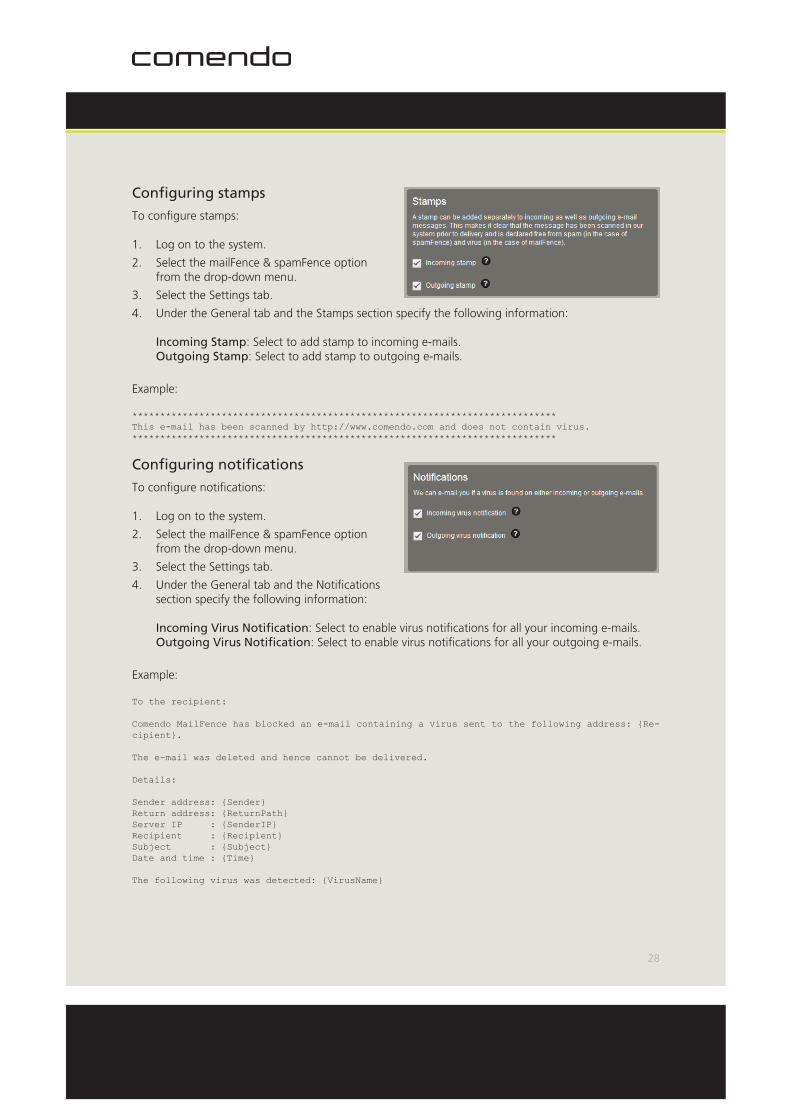
Configuring stamps
To configure stamps:
1. Log on to the system.
2. Select the mailFence & spamFence option from the drop-down menu.
3. Select the Settings tab.
4. Under the General tab and the Stamps section specify the following information: Incoming Stamp: Select to add stamp to incoming e-mails. Outgoing Stamp: Select to add stamp to outgoing e-mails.
Example:
****************************************************************************This e-mail has been scanned by http://www.comendo.com and does not contain virus.****************************************************************************
Configuring notifications
To configure notifications:
1. Log on to the system.
2. Select the mailFence & spamFence option from the drop-down menu.
3. Select the Settings tab.
4. Under the General tab and the Notifications section specify the following information: Incoming Virus Notification: Select to enable virus notifications for all your incoming e-mails. Outgoing Virus Notification: Select to enable virus notifications for all your outgoing e-mails.
Example:
To the recipient:
Comendo MailFence has blocked an e-mail containing a virus sent to the following address: {Re-cipient}.
The e-mail was deleted and hence cannot be delivered.
Details:
Sender address: {Sender}Return address: {ReturnPath}Server IP : {SenderIP}Recipient : {Recipient}Subject : {Subject}Date and time : {Time}
The following virus was detected: {VirusName}
29
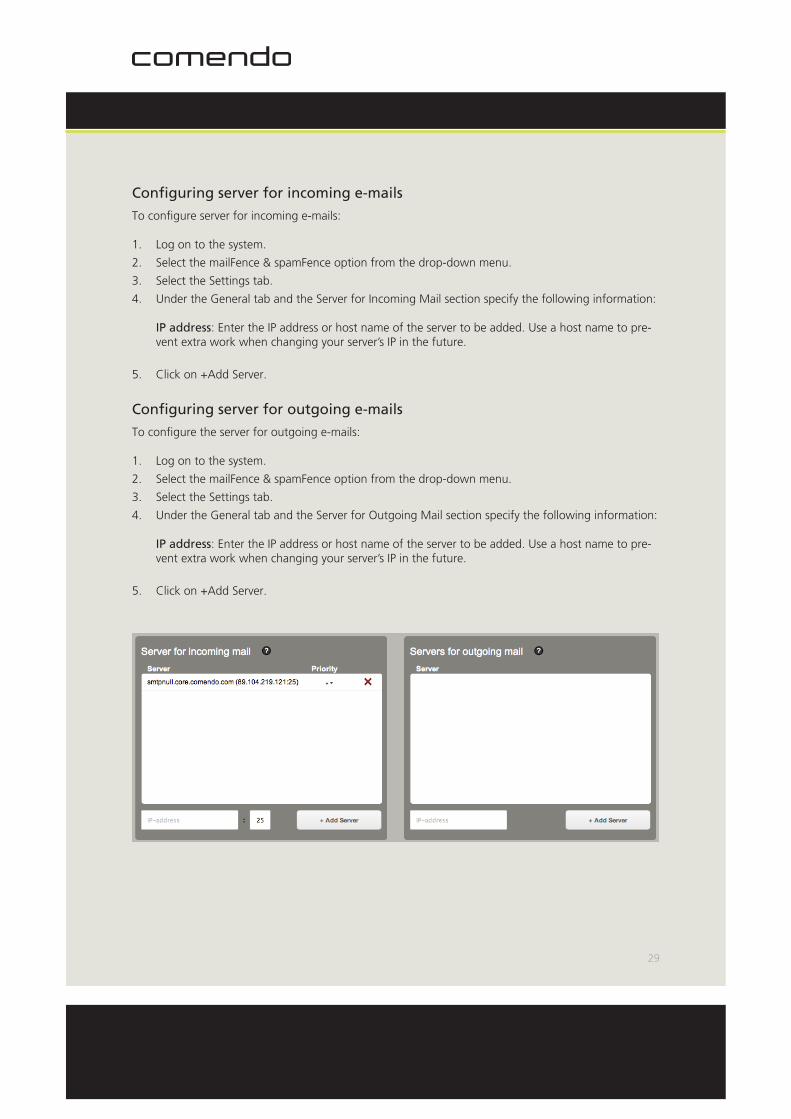
Configuring server for incoming e-mails
To configure server for incoming e-mails:
1. Log on to the system.
2. Select the mailFence & spamFence option from the drop-down menu.
3. Select the Settings tab.
4. Under the General tab and the Server for Incoming Mail section specify the following information: IP address: Enter the IP address or host name of the server to be added. Use a host name to pre-vent extra work when changing your server’s IP in the future.
5. Click on +Add Server.
Configuring server for outgoing e-mails
To configure the server for outgoing e-mails:
1. Log on to the system.
2. Select the mailFence & spamFence option from the drop-down menu.
3. Select the Settings tab.
4. Under the General tab and the Server for Outgoing Mail section specify the following information: IP address: Enter the IP address or host name of the server to be added. Use a host name to pre-vent extra work when changing your server’s IP in the future.
5. Click on +Add Server.

30
Blacklist / WhitelistThis section allows you to accept/reject certain e-mail addresses as required. The Blacklist option even allows you to block entire undesired domains as well, and the Whitelist option allows all your required domains.
NB: In order to block domains you have to specify the prefix ‘@’, e.g.: ‘@example.com’.

31
Managing whitelist for e-mails/domains
To manage a whitelist for e-mails/domains:
1. Log on to the system.
2. Select the mailFence & spamFence option from the drop-down menu.
3. Select the Settings tab, and then the Black-list/Whitelist tab.
4. In the Whitelist section specify the following information: E-mail/Domain: Enter the allowed e-mail ad-dress or domain.
5. Click on Add.
NB: To find any e-mail address or domain, enter its name in the Search box at the top left corner. To remove any entry click on the Delete column.
We recommend that you avoid whitelisting entire domains if possible. Whitelisting an entire domain means allowing any e-mail from that domain – including all spam e-mails. It is generally better to whitelist a single e-mail address or single IP rather than an entire domain – especially large, well-known domains such as gmail.com.
You can whitelist many addresses at once
Multiple e-mail addresses can be whitelisted in one go by entering them all, separated with commas(”,”), like this: [email protected],[email protected],[email protected]
Managing blacklist for e-mails/domains
To manage a blacklist for e-mails/domains:
1. Log on to the system.
2. Select the mailFence & spamFence option from the drop-down menu.
3. Select the Settings tab, and then the Black-list/Whitelist tab.
4. In the Blacklist section specify the following information: E-mail/Domain: Enter the rejected email ad-dress or domain.
5. Click on Add.
NB: To find any e-mail address or domain enter its name in the Search box in the top left-hand corner. To remove any entry click on the Delete column.
32
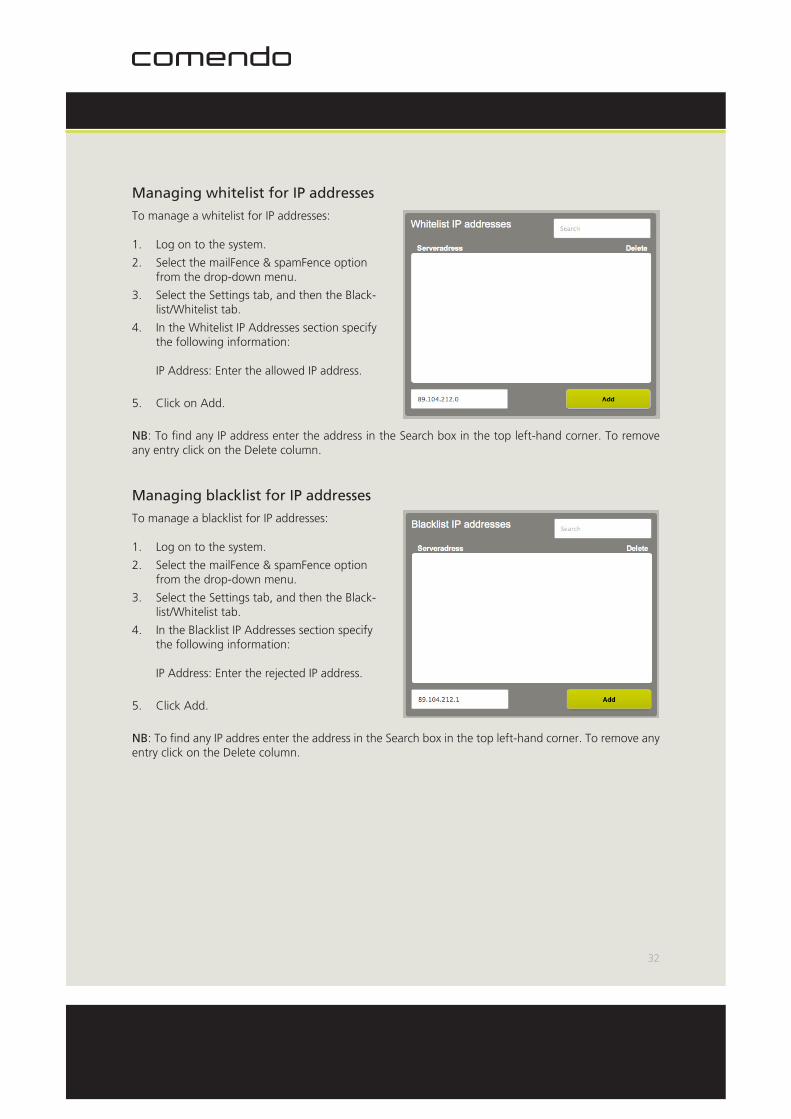
Managing whitelist for IP addresses
To manage a whitelist for IP addresses:
1. Log on to the system.
2. Select the mailFence & spamFence option from the drop-down menu.
3. Select the Settings tab, and then the Black-list/Whitelist tab.
4. In the Whitelist IP Addresses section specify the following information: IP Address: Enter the allowed IP address.
5. Click on Add.
NB: To find any IP address enter the address in the Search box in the top left-hand corner. To remove any entry click on the Delete column.
Managing blacklist for IP addresses
To manage a blacklist for IP addresses:
1. Log on to the system.
2. Select the mailFence & spamFence option from the drop-down menu.
3. Select the Settings tab, and then the Black-list/Whitelist tab.
4. In the Blacklist IP Addresses section specify the following information: IP Address: Enter the rejected IP address.
5. Click Add.
NB: To find any IP addres enter the address in the Search box in the top left-hand corner. To remove any entry click on the Delete column.

33
Country BlockingThis section allows you to reject/block e-mails from a specific country.
NB: All e-mails from a blocked country will be blocked. This also applies to e-mails from other countries, which are scanned in a blocked country.
Blocking e-mails from a specific country
To block e-mails:
1. Log on to the system.
2. Select the mailFence & spamFence option from the drop-down menu.
3. Select the Settings tab, and then the Country Blocking tab.
4. Specify the following information: Filter by Continents: Select the continent from the drop-down list box. Type to Search: Type the name of the continent to be searched for. Choose Countries [+Block]: Click to add the region to the list of blocked countries.
Unblocking Countries
To unblock countries:
1. Log on to the system.
2. Select the mailFence & spamFence option from the drop-down menu.
3. Select the Settings tab, and then the Country Blocking tab.
4. In the Blocked Countries section specify the following information: Type to Search: Type the name of the region to be searched for. Unblock: Click to remove the region from the list of blocked countries.
NB: To remove all the countries from the list click on Clear List.

34
File types
This section allows you to define rules for rejecting/blocking certain types of file.
Blocking file types
To block file types:
1. Log on to the system.
2. Select the mailFence & spamFence option from the drop-down menu.
3. Select the Settings tab, and then the File Types tab.
4. Specify the following information: Filter by Types: Select the type of file from the drop-down list box. The options available for Filter by Types are: All Archive Documents Executable Image Sound Video Type to Search: Enter the name of the file to be searched for. All File Types [+Block]: Click to add the file type to the list of blocked file types.

35
Unblocking file types
To unblock file types:
1. Log on to the system.
2. Select the mailFence & spamFence option from the drop-down menu.
3. Select the Settings tab, and then the File Types tab.
4. In the Blocked File Types section specify the following information: Type to Search: Enter the name of the file type to be searched for. Unblock: Click to remove the file type from the list of blocked file types.
NB: To remove all the file types from the list click on Clear List.
Users & contactsThis section allows you to manage users and contacts of the system. You can view, add, edit and delete users as needed. You will also be provided with a send password and search facilities for this section.
As far as users are concerned there are two types of user, namely “Normal User” and “Administrator”. Administrators are given full access to all the e-mails in the system, whilst normal users can only access their own e-mails and e-mails to which they are given access.

36
Viewing system users
To view system users:
1. Log on to the system.
2. Select the mailFence & spamFence option from the drop-down menu.
3. Select the Settings tab, and then the Users & Contacts tab.
4. In the Users section all the system users are displayed.
Adding system users
To add system users:
1. Log on to the system.
2. Select the mailFence & spamFence option from the drop-down menu.
3. Select the Settings tab, and then the Users & Contacts tab.
4. In the Users section select the type of user.
5. Enter the User Name, then click on Add.
6. In the New User window specify the following information: User Name: Enter the name of the user. Password: Enter the password as required. Type: Select the type of user from the drop-down list box. Language: Select a language from the drop-down list box. Personal Settings: Select the checkbox to apply settings as required. Users with personal settings has a separate spam score, a blacklist, a whitelist and customer rules. Does not use domain set-tings. Spam Score: Selected spam score from the drop-down list box as required. Tag spam score of [selected value] as a possible spam: Select the checkbox to classify your desired value as a possible spam. E-mails: Specify the following information to add e-mail address(s) to the user being added: E-mail Address: Enter the e-mail address Domain: Select the drop-down arrow to select the required domain.
7. Click on Save.

37
Editing system users
To edit system users:
1. Log on to the system.
2. Select the mailFence & spamFence option from the drop-down menu.
3. Select the Settings tab, and then the Users & Contacts tab.
4. In the Users section and the Edit column click on .
5. In the Edit User window specify the following information: User Name: The name of the user to be edited. Password: Modify password as required Type: The type of user. Language: Change the language as required Personal Settings: Select the checkbox to ap-ply settings as required. Spam Score: Selected spam score from the drop-down list box as required. Tag spam score of [selected value] as a possible spam: Select the checkbox to classify your desired value as a possible spam. E-mails: Shows e-mail address(s) assigned to the selected user. Domains: If the user is able to manage other domains, add them here.
6. Click on Save.

38
Deleting system users
To delete system users:
1. Log on to the system.
2. Select the mailFence & spamFence option from the drop-down menu.
3. Select the Settings tab, and then the Users & Contacts tab.
4. In the Users section and the Delete column click on .
5. In the confirmation window click on OK
Sending password to system users
To send a password to system users:
1. Log on to the system.
2. Select the mailFence & spamFence option from the drop-down menu.
3. Select the Settings tab, and then the Users & Contacts tab.
4. In the Users section and the Password column, click on .
5. In the confirmation window click on OK.
Searching for system users
To search for system users:
1. Log on to the system.
2. Select the mailFence & spamFence option from the drop-down menu.
3. Select the Settings tab, and then the Users & Contacts tab.
4. In the Users section enter the user name in the Search box.

39
Access restrictionsThis section allows you to prevent unknown IPs from logging on to the system, resulting in only the IP addresses in the IP Access list being able to access the system. This ensures the security and reliability of the system.
Adding IP addresses
To add IP addresses:
1. Log on to the system.
2. Select the mailFence & spamFence option from the drop-down menu.
3. Select the Settings tab, and then the Access Restrictions tab.
4. In the IP access section enter IP access and then click on Add IP.

40
Adding your own IP address
To add your own IP address:
1. Log on to the system.
2. Select the mailFence & spamFence option from the drop-down menu.
3. Select the Settings tab, and then the Access Restrictions tab.
4. In the IP access section click on Add my IP, and then Add IP.
Delivery diagnosticsThis section monitors the communication between Comendo’s network and your provider’smail servers.
Hover the mouse to read server reply.
If the server reply is ***...* turn off ESMTP inspection in your (Cisco ASA) firewall.

41
QER QER stands for Quarantined E-mail Report. This function provides a full report on e-mail messages blocked during a specific time period.
Each listed e-mail message in the Quarantined E-mail Report has a “Release” link, which delivers thee-mail message to the user if they click on it. Each spam message can be released once, and this musthappen within 14 days of receipt.
Whether QER is enabled or not, spam messages can be released in your Security Center from the menu Inspect e-mails.

42
Configuring QER
To configure QER:
1. Log on to the system.
2. Select the mailFence & spamFence option from the drop-down menu.
3. Select the Settings tab, and then the QER tab.
4. Under QER - Quarantined E-mail Report section, specify the following information: Enable QER: Select the checkbox to enable QER. Spam Score Ceiling: Select the spam score as required. Do not Send QER: Select the checkbox if you do not want the system to send QER. Data is still collected. Use this feature to pause sending QER. Redirect QER mail to: Enter the e-mail address of the recipient to whom the QER should be sent. This recipient will receive QER for all users. Notification Hours: Select the time of notification. The options available for Notification Hours are: Daily Every Hour from 8am to 5pm Every Two Hours from 8am to 4pm Every Two Hours from 9am to 5pm Every Hour 8, 12, and 16 Every Two Hours Advanced Hour Selector: Select hours at which QER should be sent.
Users can granulate which types of quarantine e-mails, they would like included in the QER e-mails. Se-lectable types are Spam, PVR, SPF and Customer Rules. Customer Rules is blocking of files types. The user can select one, several or all types to be included.

43
Outlook Tool
Outlook Tool is a plug-in for Outlook that allows you to generate QERs “on demand” without having tolog on to the Security Center. The Outlook Tool can be installed locally on your machine or be centrallydistributed.
The tool is added to the Outlook standard ribbon to order QERs (quarantined E-mail Reports) and reportspam.
The tool also has a built-in help feature.
You can request a QER at most every 15 minutes. Before Comendo can send you these QERs, QER must have been activated for the user’s domain in your Security Center, or by e-mailing Comendo Security Support.

44
Audit logFor auditing purposes it is possible to access the “Audit Log” in the Security Center. The log contains all changes on all your domains.
Comendo mail archiving solution mailArchive has its own entries in the ”Audit Log”, where all e-mail releases and searches are logged. It is possible to filter on domains and changes of the following types: ê Domain added
ê Domain removed
ê Domain setting changed
ê Server added
ê Server removed
ê Contact added
ê Contact removed
ê Whitelist entry added
ê Whitelist entry removed
ê Blacklist entry added
ê Blacklist entry removed
ê Black/Whitelist replication added
ê Black/Whitelist replication removed

45
ê Login added
ê Login removed
ê Login changed
ê Login right added
ê Login right removed
ê Login ip added
ê Login ip removed
ê Email setting changed
ê Mail released
ê Botnet WhiteList added
ê Botnet WhiteList removed
ê DNSFence - WhiteList entry added
ê DNSFence - Redirect modified
ê DNSFence - WhiteList entry removed
ê DNSFence - Allowed IP entry added
ê DNSFence - Allowed IP entry modified
ê DNSFence - Allowed IP entry removed
ê DNSFence - Customerrule added
ê DNSFence - Customerrule modified
ê DNSFence - Customerrule removed
ê DNSFence - Domain monitoring added
ê DNSFence - Domain monitoring removed
ê DNSFence - Grouprules modified
ê MailArchive search
Pick the filters relevant for your search and perform the search in order to get the relevant results.

46
BACKUPFENCEBackupFence provides complete functionality for managing backups of all your e-mails. BackupFence offers the following sub-tabs for various operations:
ê Inspect E-mails
ê Resend Overview
ê Statistics
Inspect e-mailsThis tab shows an overview of all the backup of your e-mails, and allows you to search for youre-mail backup as required.
Searching for a backup e-mailTo search for a backup e-mail:
1. Log on to the system.
2. Select the backupFence option from the drop-down menu.
3. Select the Inspect e-mails tab.
4. Specify the following information: Choose Domain: Select a domain from the drop-down list box. Inbound: Select to include incoming e-mails in your search. Outbound: Select to include outgoing e-mails in your search. Time Span: State the specific time span for your search. Subject: Type subject of the e-mail. Sender E-mail: Enter the sender’s e-mail address. Recipient E-mail: Enter the recipient’s e-mail address.
5. Click on Search.
47
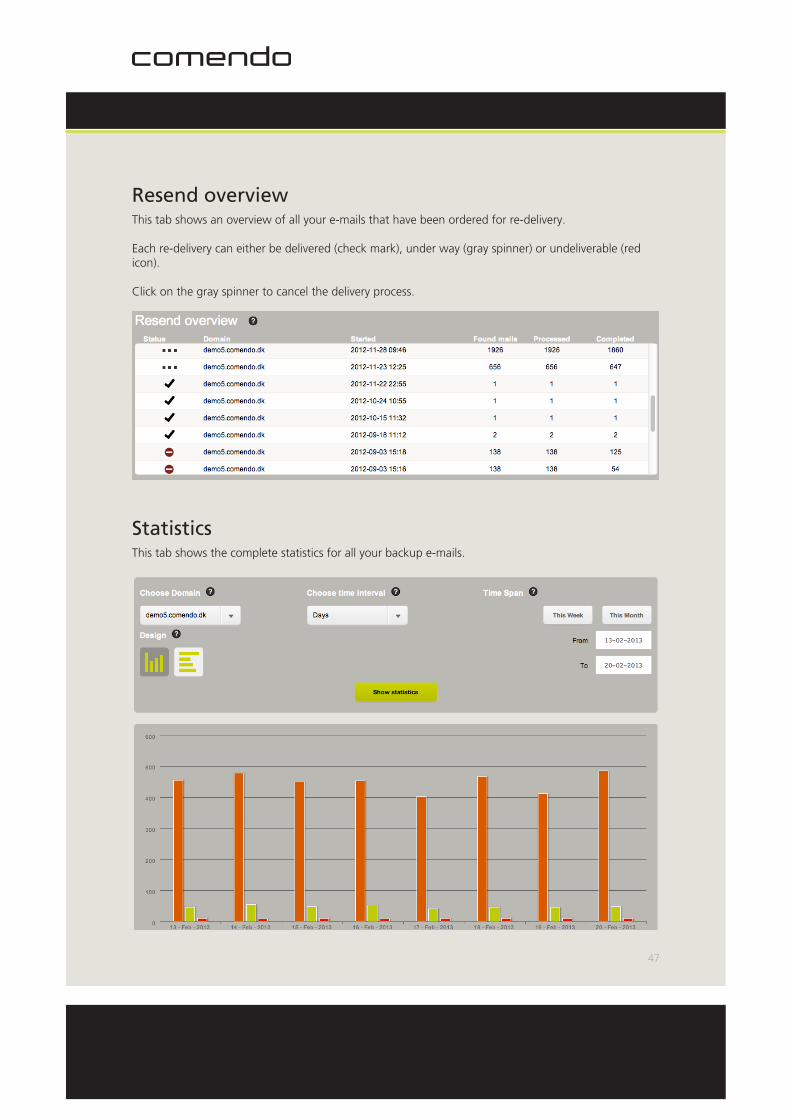
Resend overviewThis tab shows an overview of all your e-mails that have been ordered for re-delivery.
Each re-delivery can either be delivered (check mark), under way (gray spinner) or undeliverable (redicon).
Click on the gray spinner to cancel the delivery process.
StatisticsThis tab shows the complete statistics for all your backup e-mails.
48
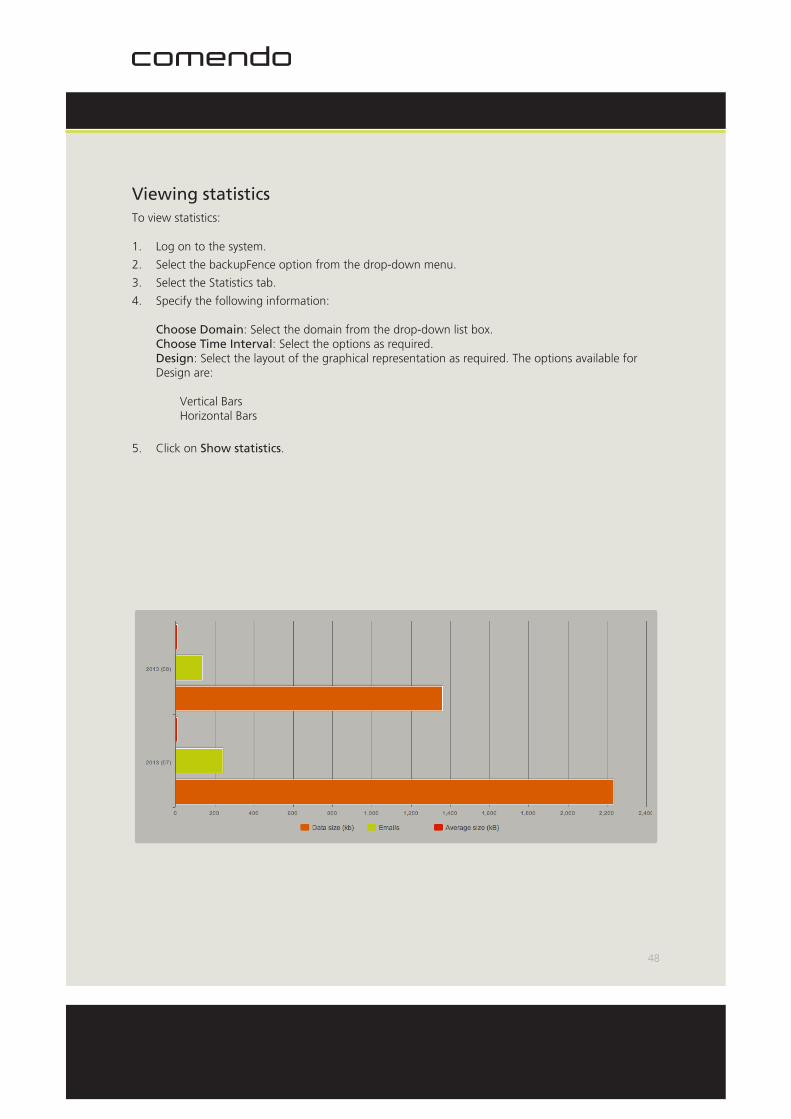
Viewing statisticsTo view statistics:
1. Log on to the system.
2. Select the backupFence option from the drop-down menu.
3. Select the Statistics tab.
4. Specify the following information: Choose Domain: Select the domain from the drop-down list box. Choose Time Interval: Select the options as required. Design: Select the layout of the graphical representation as required. The options available for Design are: Vertical Bars Horizontal Bars
5. Click on Show statistics.

49
DNSFENCEComendo dnsFence protects against web-based threats and harmful content before they can penetratethe company’s network. To support the company’s IT policies and any legal requirements, dnsFence also allows for blocking of unsuitable websites, filtering by content categories and restrictions on promotion of employee productivity.
StatisticsThis tab provides a graphical view of all your blocked and monitored domains.
Viewing statisticsTo view statistics:
1. Log on to the system.
2. Select the dnsFence option from the drop-down menu.
3. Select the Statistics tab.
4. Specify the following information: Design: Select the layout of the graphical representation as required. The options avail-able for Design are: Vertical Bars Horizontal Bars Mixed Bars Type: Select the type of statistics you want to view. The options available for Type are: Malware Blacklist Content Categories Whitelist Monitored Domains

50
Time Span: State the specific time span as required.
5. Click Show.
Check domainThis tab provides domain management. It allows you to find out how a specific domain is managed and to which lists it belongs.
Checking domainTo check the domain:
1. Log on to the system.
2. Select the backupFence option from the drop-down menu.
3. Select the Check Domain tab.
4. Enter the domain name and click on Check.
SettingsConfigurationThis tab allows you to configure your dnsFence solution.

51
Allowed client IP addresses
The list contains IP addresses affected by your dnsFence setup. For maximum security, include all comput-ers on the network. Please note that the list should contain the public IP addresses for the computers on the network. If all computers have internet access using a common router with a single, public IP address, that public IP address is the only IP address you should enter. Add an IP address
1. Click on +Add.
2. Enter a valid, single public IP address or a IP address group that is to have access to the DNS server Valid IP address: A valid IP address consists of 4 whole numbers between 1 and 255. The numbers are to be separated by 3 period.
Edit or copy IP addresses already entered
1. Click one of the icons .
2. Change the required information.
Delete the IP address already entered
1. Click on the icon .
Redirection IP
When access to a domain is blocked the user will be taken to a rejection page.
You can choose to use the default pages by checking “Use default pages”.
You could also enter two IP addresses
ê Domains registered as being harmful will be redirected to the IP address you have entered under “When malware”.
ê Domains locked using either blacklist or content categories will be redirected to the IP address you have entered under “Other”.
NB: Only valid IP addresses will be accepted. Host names cannot be used.
Blacklist / WhitelistHere you can white- or blacklist a domain or domains − either entirely or for a chosen period of the day.To blacklist a domain click on +Add and enter the required information. Here you can chose when to block access to the domain. The options are: 24/7 (always blocked) or an active time (e.g. 8am-5pm)
You can edit blacklist domains already entered with regard to time span, and you can also copy rules and delete.
52
To whitelist a domain, enter the domain or domains in the textbox and click on Add.
Note that you must be explicit about subdomains. For example, if you add www.tv2.dk, spil.tv2.dk willnot be covered - but if you add tv2.dk, all subdomains (news.tv2.dk, spil.tv2.dk, www.tv2.dk etc) willautomatically be included.
Important! Domains on your whitelist will not be rejected, even if dnsFence has categorized thepage as being harmful.
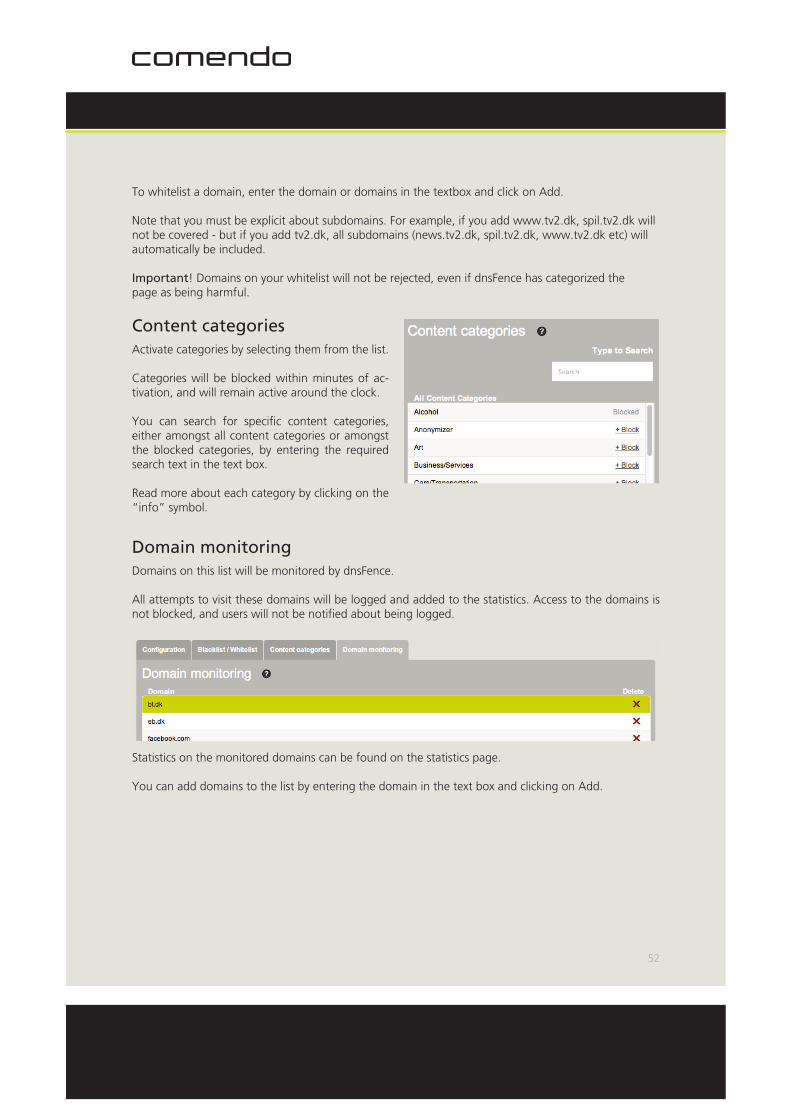
Content categoriesActivate categories by selecting them from the list.
Categories will be blocked within minutes of ac-tivation, and will remain active around the clock.
You can search for specific content categories, either amongst all content categories or amongst the blocked categories, by entering the required search text in the text box.
Read more about each category by clicking on the “info” symbol.
Domain monitoringDomains on this list will be monitored by dnsFence.
All attempts to visit these domains will be logged and added to the statistics. Access to the domains is not blocked, and users will not be notified about being logged.
Statistics on the monitored domains can be found on the statistics page.
You can add domains to the list by entering the domain in the text box and clicking on Add.
53
MAILCONTINUITYComendo mailContinuity offers you online access to your e-mails, which will always be available, inde-pendently of your mail server and other infrastructure. Employees will always be able to read, answer and send e-mails.
Depending on your choice, the past 7 or 30 days’ e-mail will be available online.
After setup each employee can get a login with access limited to personal e-mails. All employees will of course be credited as the sender for any outgoing e-mail. They will be ready to pick up their work as if nothing had happened – ‘Business as usual’.
Users log on using an encrypted connection, and access codes, user names etc. will be handled confi-dentially.
ConfigurationMailFence & spamFence automatically receive and store e-mails sent to your business when your network is down for up to 7 days. When the network is up and running again we will forward youre-mail to your network.
MailContinuity Extended SMTPbackup increases the storage time for your company’s e-mails, and at the same time offers your colleagues the option of accessing their e-mail and e-mail client through mailContinuity.
E-mail from mailContinuity is synchronized with the company’s network when it becomes accessible again.
It is recommended that users activate Extended SMTPbackup as soon as they discover that their mail server is down.
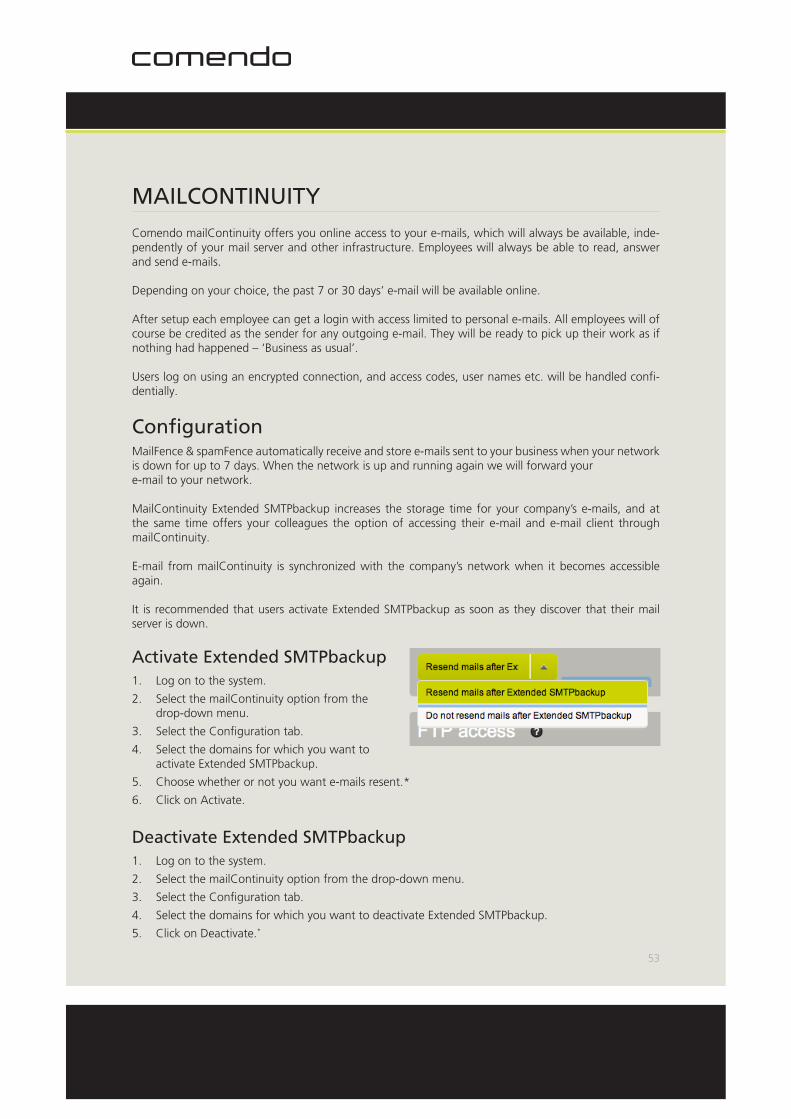
Activate Extended SMTPbackup1. Log on to the system.
2. Select the mailContinuity option from the drop-down menu.
3. Select the Configuration tab.
4. Select the domains for which you want to activate Extended SMTPbackup.
5. Choose whether or not you want e-mails resent.*
6. Click on Activate.
Deactivate Extended SMTPbackup1. Log on to the system.
2. Select the mailContinuity option from the drop-down menu.
3. Select the Configuration tab.
4. Select the domains for which you want to deactivate Extended SMTPbackup.
5. Click on Deactivate.*

54
* When deactivating Extended SMTP backup in a domain, the e-mails received in the backup period will be resent to your mail server.
User administration and AD synchronizationMailContinuity delivers all actual incoming e-mail as copies to a mail hotel. In order for mailContinuity to receive e-mails correctly, mail boxes must have been created, along with any aliases corresponding to the e-mail addresses used by the company.
Any users you create will be able to log on and access their incoming e-mails. This will be administered through Comendo Security Center or by means of AD synchronization. All users must activate the solu-tion themselves.
Users can be administered in two ways. You can create/edit/delete users manually, or you can upload auser data file in a specific format or use a special tool for uploading parts of your Active Directory. Weoffer the alternative of automating user administration by means of XML data files, or a tool that extractsthe necessary information from your AD and sends it to mailContinuity.
Create user manually1. Log on to the system.
2. Select the mailContinuity option from the drop-down menu.
3. Select the User admin tab.
4. Click on Add User and specify the requested information.
5. Click on Save
Create user automaticallyComendo enables you to automate user administration using XML data files.
AD synchronization
Comendo offers a tool that extracts the necessary information from your AD and sends it to mailContinuity.

55
The XML file generated contains only the data necessary for the product: Name, mobile number, primary e-mail address and other associated e-mail addresses.
The tool consists of two files:
ê MCADUploader.exe
ê config.txt
The tool is downloaded from Comendo Security Center.
Configuration
The first step is to complete config.txt correctly. This is normally carried out by your system administrator.The following necessary information should be inputted:
‘ldap_path’‘ldap_username’‘ldap_password’‘ftp_server’‘ftp_username’‘ftp_password’‘default_prefix’
If you don’t wish to upload to FTP automatically you can leave the ‘ftp_server’ field blank, so that the tool will instead save the XML file generated as a file, named ‘mc.users.xml’ and placed in the same folder as the tool. This file can be imported manually using Comendo Security Center.
MCADUploader.exe can then be run as needed. It can be run once, and will then maintain users in Comendo Security Center, or plan frequent uploads. This can usually be configured with a batch job or scheduled job.
Error messages
It is important to note that no text will be written to the screen unless the field in config.txt is set to text_output = 1’. This also applies to error messages.
There are 4 potential errors: ’[ERROR] Could not open config file’This means the tool has been unable to read ‘config.txt’. This file must be in the same folder as ’MCADUploader.exe’.

56
’[ERROR] Could not connect to AD’ This error occurs if the tool is not configured correctly with respect to ldap_path, ldap_username andldap_password.
’[ERROR] Could not upload file’ This error occurs if the tool is not configured correctly with respect to ftp_server, ftp_username andftp_password.
‘[ERROR] Could not store file locally’ This error can occur when another program has opened the file ‘mc.users.xml’.
Manuel upload of user data
You can also select to maintain users by uploading an XML file containing the users. This upload is carried out using Comendo Security Center. Alternatively, you can choose to upload through FTP.
The XML data file format is defined as follows:
<?xml version=”1.0” encoding=”UTF-8”?> <import> <creationtime>YYYY-MM-DD HH:MM:SS</creationtime> <defaultprefix>+CC</defaultprefix> <user name=”Firstname Lastname” email=”localpart@domainpart” mobile=”+CCMOBILE”> <alias address=”my_alias_01@domainpart” /> </user> </import>
Example
We create two users, Andrew and Ben, with two aliases, one of them common. Creation time is notmandatory, but in the example we input it as above.
<?xml version=”1.0” encoding=”UTF-8”?> <import> <creationtime>2011-12-31 23:59:00</creationtime> <defaultprefix>+45</defaultprefix> <user name=”Anders Jensen” email=”[email protected]” mobile=”+4611111111”> <alias address=”[email protected]” /> <alias address=”[email protected]” /> <alias address=”[email protected]” /> </user> <user name=”Benny Nielsen” email=”[email protected]” mobile=”11111212”> <alias address=”[email protected]” /> <alias address=”[email protected]” /> </user> </import>
The file should be named: mc.users.xml.
The field ‘defaultprefix’ lets the system know that if a user’s mobile number does not begin with ‘00’ or‘+’ it should start with the value provided in this field. In the example above, Andrew will keep his statedmobile number while Ben will be assigned +4511111212.
The XML computer file cannot contain user access codes.
When acquiring mailContinuity, you were given an FTP account at our mail hotel. Regardless of whether you upload through FTP yourself or use Comendo Security Center to do so, the XML data file will end

57
up in the same location. MailContinuity runs a service that will detect and process the data file within minutes.
Your FTP program should use the following information:
Host name: mailcontinuity.comendo.comUser name: Your customer user name (also used when logging in to Comendo Security Center)Password: FTP password as selected from Configuration
When using FTP upload it is very important that the file be named “mc.users.xml”, otherwise our systems will ignore the file.
Comma-separate file
It is possible to download activation codes and access codes using a comma-separated file.
Edit user1. Log on to the system.
2. Select the mailContinuity option from the drop-down menu.
3. Select the User admin tab.
4. Search for the user and click to edit this user’s information.
5. Edit the necessary information and click on Save.
Delete user1. Log on to the system.
2. Select the mailContinuity option from the drop-down menu.
3. Select the User admin tab.
4. Search for the user and click to delete this user.
User activationWhen users are created - either manually or using a comma-separated file - they will not yet have been activated.
This will be indicated in Comendo Security Center by a red symbol in the “Activated” column.
You may choose to text the activation codes (“SMS info”) or e-mail them (“E-mail info”). We recommend you send all users “E-mail info” to enable them to activate their accounts and choose their passwords.
Whenever “E-mail info” or “SMS info” is selected a new activation code is created and sent to the user,who will receive an e-mail or text containing the following text:
Please activate mailContinuity for your e-mail address athttps://security.comendo.com/mailcontinuity Activationcode: XYX99XYX

58
Send activation codesUse “Reset via e-mail” or “Reset via SMS” to send activation codes to all marked users simultaneously. The e-mail or text will contain mailContinuity’s web address and an activation code. We recommend that you use this function to distribute information to users.
Catch-allE-mails for users who haven’t been created will be delivered to the user “catchall__”, a separate username created automatically for each domain. This user cannot be deleted. You are therefore guaranteed that e-mails sent to unknown users will not be rejected and returned to sender.
The e-mail address “catchall__” is reserved. You cannot create this mailbox yourself, nor can you delete the existing one. The access code is the same as the FTP access code.
FTP accessHere you can change the password for your FTP access, as well as the catchall addresses for all yourdomains. FTP access is used when creating users from an XML file or AD extraction. The user “catch-all__” is an undeletable user automatically created on all your domains. This ensures that e-mail to un-known users will not be rejected.
Aliases and distribution lists Once users have each been matched with one mailContinuity mail box, a number of aliases can be as-sociated with each mail box. One alias is therefore equivalent to an additional e-mail address for the user.
If the user [email protected] is given the aliases [email protected] and [email protected], e-mails sent to any of these three addresses will be sent to the mailbox called [email protected].
Several users can have the same alias, thus a kind of virtual distribution list can be created. If, for ex-ample, the alias [email protected] is given to the users [email protected] and [email protected], they will both receive e-mails sent to [email protected].
Note that exporting an XML file from the Active Directory does not transfer distribution lists from Ex-change. Also note that no user e-mail address can be identical to other users’ aliases - if this is the case, only the primary user will receive e-mails sent to this address.
Using Comendo mailContinuityYou may use Comendo mailContinuity with a web browser or through IMAP on an e-mail client such as Microsoft Outlook 2010.
Web browserThe end user logs on at http://mailcontinuity.comendo.com/ using their E-mail address and access code.
IMAPIncoming server: mailcontinuity.comendo.com

59
Outgoing server: mailcontinuity.comendo.com (port 25) User name: ”end user’s E-mail address”Access code: ”the created access code” Microsoft Outlook 2010 example:
1. Select Manually configure settings or additional server types. Click on Next.
2. Select Internet e-mail. Click on Next.
3. Fill out User Information and Server Information (Account Type = IMAP).
4. Click on More Settings. Select My outgoing server (SMTP) requires authentication.
5. Add ”(mailContinuity)” after the e-mail address created. This will make it easier to identify which e-mail accounts use Comendo mailContinuity.
6. Click on Next.
Import contactsMailContinuity facilitates import of your contacts from the address book. You first need to export the contacts as a vCard*.
1. Log on to mailContinuity
2. Click on Address Book
3. Click on the icon Import Contacts
4. Click on Browser and select the vCard
5. Click on Import
The contacts will be imported to mailContinuity.
* Note that MS Outlook may need a third-party plug-in.
Synchronization of e-mails sent from mailContinuityIt is possible to synchronize e-mails sent from mailContinuity with your mail client using IMAP.
Add an IMAP account to the mail client, e.g. MS Outlook, and then copy all e-mails from ”Sent items” in mailContinuity to ”Sent items” in the user mailbox.
All e-mails will be part of the user’s normal mail flow and follow the normal backup procedures.
Use this IMAP info:
Incoming server: mailcontinuity.comendo.comOutgoing server: mailcontinuity.comendo.com (port 25)User name: ”end user e-mail address”Password: “created password”
60
MAILARCHIVEMailArchive provides complete functionality for archiving all your e-mails. Advanced search filters and individual user access provides a comprehensive archiving solution, suitable for SME as well as enterprise companies.
Dependent on your license plan, mailArchive does also offer to archive your internal mailflow. For in-formation on setting up journaling for your MailArchive solution, please refer to “Appendix 1: Setting up Journaling with mailArchive.”
MailArchive offers the following sub-tabs for various operations:
ê Inspect E-mails
ê Resend Overview
ê Statistics
Index information / PrivacyTo ensure privacy and data integrity, indexed informations related to single e-mails and general mail stor-age are separately. Furthermore, it is not possible to restore individual mail based indexed info and / or recover data from archived emails via unauthorized access to indexed data and files.
Archive encryptionIn order to ensure the highest standard of privacy and data security, the archived e-mails are stored encrypted. The encryption algorithm used is Advanced Encryption Standard with an encryption key of 256 bits (AES-256). In order for an attacker to be able to successfully decrypt the emails, they would require access to both the server on which the archived e-mails are stored, and also to the decryption key which is stored onto another server. Without access to the key, the chances of being able to decipher a given e-mail are considered too small to be currently feasible1.
1 NIST, the American National Institute of Standards and Technology, which usually writes cybersecurity standards used by US organizations to defend against possible attacks, recommends an encryption key of 80 as being sufficiently secure. Using a key of 80 bits length means that the number of cryptographic operations needed to break the encryption would be 280 – which is currently regarded as highly imprac-tical. Regarding AES-256, although attacks requiring a smaller number of operations than 2256 have been documented (http://eprint.iacr.org/2009/317.pdf), the fact that they would require 299.5 number of operations means that AES-256 still offers a markedly higher security than the one recommended by current best practices.
61
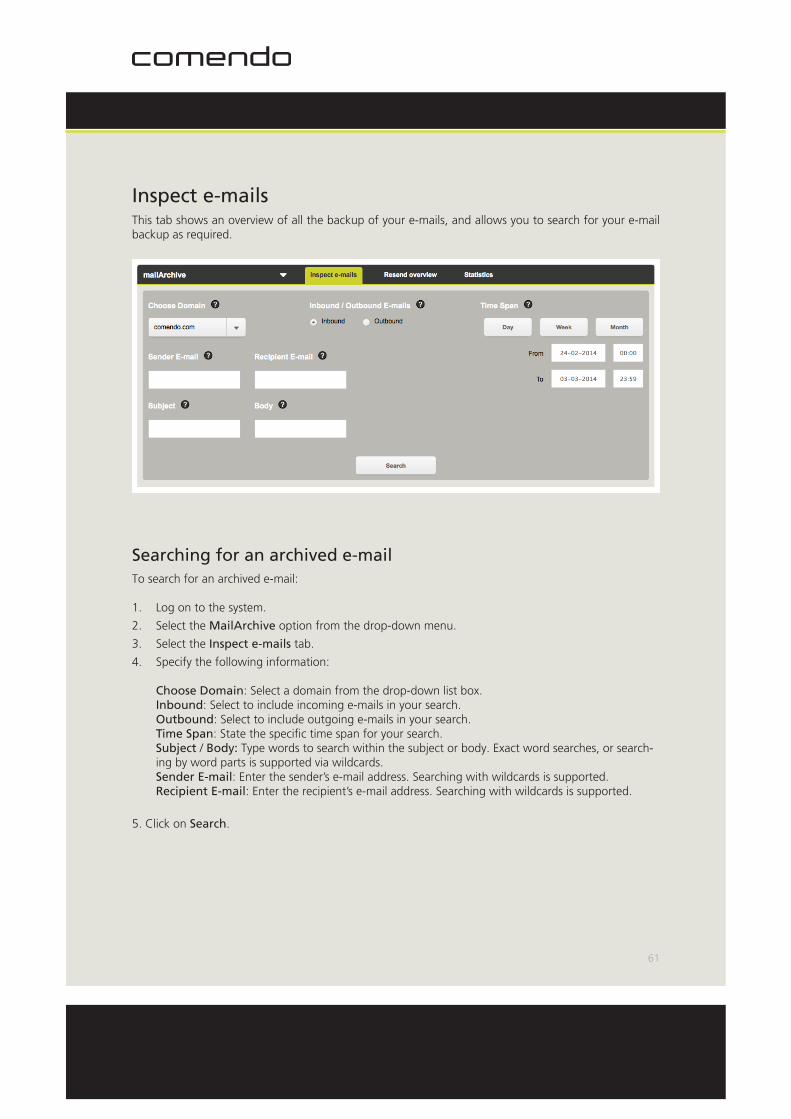
Inspect e-mailsThis tab shows an overview of all the backup of your e-mails, and allows you to search for your e-mail backup as required.
Searching for an archived e-mailTo search for an archived e-mail:
1. Log on to the system.
2. Select the MailArchive option from the drop-down menu.
3. Select the Inspect e-mails tab.
4. Specify the following information: Choose Domain: Select a domain from the drop-down list box. Inbound: Select to include incoming e-mails in your search. Outbound: Select to include outgoing e-mails in your search. Time Span: State the specific time span for your search. Subject / Body: Type words to search within the subject or body. Exact word searches, or search-ing by word parts is supported via wildcards. Sender E-mail: Enter the sender’s e-mail address. Searching with wildcards is supported. Recipient E-mail: Enter the recipient’s e-mail address. Searching with wildcards is supported.
5. Click on Search.

62
Attachment searchIn mailArchive attachments are searchable. The searches utilizes the same advanced filters and methods as body search, subject etc. The following types of attachments are searchable: ê Office
ê Word
ê Excel
ê Powerpoint
ê Visio
ê Outlook e-mails
ê OpenOffice
ê Text
ê Presentation
ê Spreadsheet
ê Chart
ê Formula
ê Text-Master
ê Text-Web
Various
ê XML
ê HTML
ê RTF
ê PDF
ê Text
All attachments up to 10MB are being indexed for attachment searches.

63
Index based searchRelated to indexing in general
In order to enable text searching within the subject and the body of the e-mail, the e-mails are indexed using a powerful text search engine. The indexing operation creates an association between a word within an e-mail and its occurrence in the respective e-mail.
Prior to the actual indexing operation, several text processing stages occur. For example, uppercase let-ters are converted to lowercase. Thus, given a lowercase-only word (for ex. “apple”) it becomes possible to associate (and later find) not only e-mails that contain an exact case match of that word, but also other e-mails containing non-exact case matches (for ex. “Apple”).
Another important pre-indexing stage involves excluding particular words which are considered to occur too frequently in human language to be relevant for indexing (a search for such a word would return a too large number of results). These words are referred to as “Stop words”, and are currently only in use for English.
Specific to body search
Similar to the way in which it is possible to search for words within the subject of an e-mail, it also pos-sible to search within the body of the e-mail. When not knowing the exact word they wish to search for (situation often encountered with proper nouns), users can replace the unknown character or characters with “?”, respectively “*”. For further information, please refer to the searching options described in the mailFence & spamFence > Inspect e-mails > Searching an e-mail > How to search section of this manual.
Userbased access and searchAll created users from the Comendo Security Center (mailFence & spamFence > Settings > Users & contacts > Adding system users) are able to access the mailArchive solution in order to search and redeliver their own e-mails.
Access is defines by the individual rights of each user. This refers to the access scope of each individual user to the whole e-mail archive. The individual rights are the same as the ones used for inspecting e-mails from mailFence & spamFence.
The following types of users and access to the archived e-mails are possible:
ê Customer/”SuperAdmin” users – are able to access all archived e-mails.
ê Admin users – in addition to accessing e-mails archived for their own e-mail address, admin users can also access e-mails archived for other users which might be administering and belong to the same domain. Furthermore, admin users are also able to access all e-mails archived under any domain(s) which they might be administering.
ê Normal users – in addition to accessing e-mails archived for their own e-mail address, normal users can also access e-mails archived for other users which might be administering and belong to the same domain.
For further information on configuring both Admin and Normal system users, please refer to mailFence & spamFence > Settings > Users & contacts > Adding system users section of this manual.

64
Resend overviewThis tab shows an overview of all your e-mails that have been ordered for re-delivery. Each re-delivery can either be: delivered (check mark), under way (gray spinner) or cancelled (red stop icon). For a more relevant overview of the resend jobs’ processing state, refreshing the webpage (via clicking on the Re-send Overview tab) is recommended.
Cancel a redelivery jobClick on the gray spinner to cancel the delivery process. Depending on how far ahead the resend jobs’ processing state actually is when the cancel command is issued, and also on the inherent delay in com-munication up until the cancel command is received, the number of e-mails that get canceled from resend may vary.

65
StatisticsThis tab shows the complete statistics for all your archived e-mails.
Viewing statisticsTo view statistics:
1. Log on to the system.
2. Select the MailArchive option from the drop-down menu.
3. Select the Statistics tab.
4. Specify the following information: Choose Domain: Select the domain from the drop-down list box. Choose time Interval: Select the options as required for seeing the cumulated (per time interval) statistics of your archived e-mails for the chosen domain. Design: Select the layout of the graphical representation as required. The options available are: vertical bars and horizontal bars.
5. Click on Show statistics.
APPENDIX 1
Setting up Journaling with mailArchive
VERSION 01-12-2014
Archiving possibilities MailArchive will as standard archive all all incoming and outgoing e-mails, for customers that have also purchased the MailFence and SpamFence product.
In addition to having incoming and outgoing e-mails archived, customers also have the possibility of hav-ing their entire e-mails archived, including internal e-mails. In order for Comendo to be able to archive internal e-mails, customers need to configure the Microsoft Journaling feature on their Microsoft Server Exchange environment.
For customers purchasing MailArchive without MailFence and SpamFence, Comendo has no information enabling it to archive any of the customers’ e-mails. In these scenarios, Comendo would rely entirely on the customers’ configuration of the Microsoft Journaling feature on their Microsoft Server Exchange environment.
Microsoft Journaling and archiving differencesJournaling refers to the ability of maintaining a record of all communications and, in this case, of e-mails. In simple terms, it implies sending copies of new e-mails to another e-mail address (i.e. the journaling ad-dress). E-mails already existing in the user’s mailboxes will not be journaled. As it will be presented next, depending on the customer’s Exchange CAL, there may be several Journaling options possible. These refer to both the e-mails’ scope/direction (i.e. internal, external, or both), as well as its granularity (i.e. specifying a specific target address).
Archiving differs from Journaling in the fact that it implies backing-up the data in a location different from its native one. Because the native environment may often be subject to storage constraints, on the long term this approach often becomes unfeasible, and the need for a different, dedicated storage arises. Journaling thus becomes a tool for transferring the e-mails to such a dedicated storage.
Journaling and MailArchive possibilities in relation to the customers’ Microsoft Server Exchange environ-ment Depending on the customers’ Microsoft Server Exchange environment several Journaling options exist. Currently, Microsoft Server Exchange 2003 is not supported.
Depending on their Exchange CAL, customers with on premises MS Exchange Server 2007 and higher1, have the following types of journaling options:
1 All Office 365 licenses include by default the Premium options listed for on premises MS Exchange Server 2007 and higher.
67
ê Standard Journaling – all messages being sent to and from addresses configured on a specific mailbox database will be journaled.
ê Premium Journaling – offers the following options to clients in possession of a Microsoft Exchange Premium CAL:
ê Global journaling scope. All e-mails passing through the Exchange organization are journaled. Strongly recommended!
ê Internal scope. Only e-mails sent from members of the Exchange organization to members of the same Exchange organization are journaled.
ê External scope. Only emails either sent to or received from addresses outside are journaled.
ê Individual recipients. Once the general scope (global/internal/external) of the journaling has been defined, this can be further refined to target a specific recipient only. The recipient can be a mailbox, contact or distribution list.
Regardless of the type of journaling chosen, the e-mail address receiving the journaled e-mails will be that provided by Comendo upon request of the MailArchive journaling feature. More details describing the use of the journaling e-mail address within the journaling configuration phase will be presented in the section describing a MS Exchange 2010 Journaling configuration.
For specifics on setting up Journaling on Microsoft Exchange environments, please refer to the guide below. The description and the screen shots are based on MS Exchange 2010 Enterprise CAL. Setting up Journaling in Exchange 2007, Exchange 2013 and Office 365 might differ slightly and the graphical interface can be designed in another manner. For specifics on your exact version of Exchange, please refer to your technical documentation on the product or Microsoft Technet articles (some such useful references are provided at the end of this guide).

68
MS Exchange 2010 Journaling configurationJournaling set-up is based on the configuration of new journaling rules.To set-up a rule, a journaling e-mail address to which the journaled e-mails will be sent is required. MS Exchange journaling in the context of archiving e-mails with Comendo MailArchive requires using the e-mail address provided by Comendo as the journaling address. As this address is an external (i.e. not be-longing to the organization) address, a new e-mail contact for this address needs first to be configured. For configuring a New Mail Contact, the Exchange Management Console (EMC) needs to be opened. Once the EMC is opened, the following configuration steps should be made:
1. In the console tree, click Recipient Configuration.
2. In the action pane, click New Mail Contact (Figure 1).
3. On the Introduction page, under Create a mail contact for, select one of the following options.
ê New contact - This button is selected by default. Click this button to create and mail-enable a new contact. If you click this button, you’ll need to provide the required account informa-tion for the contact on the Contact Information page of this wizard.
Figure 1: Exchange Management Console -- New Mail Contact configuration
4. Complete the following fields on the Contact Information page.
ê Specify the organizational unit rather than using a default one – Select this check box to select an organizational unit (OU) other than the default (which is the recipient scope). If the recipient scope is set to the forest, the default value is set to the Users container in the Active Directory domain that contains the computer on which the EMC is running. If the recipient scope is set to a specific domain, the Users container in that domain is selected by default. If the recipient scope is set to a specific OU, that OU is selected by default. To select a different OU, click Browse to open the Select Organizational Unit dialog box. This dialog box displays all OUs in the forest that are within the specified scope. Select the desired OU, and then click OK.
ê First name - Use this box to type the contact’s first name. This field is optional.
ê Initials - Use this box to type the contact’s initials. This field is optional.
ê Last name - Use this box to type the contact’s last name. This field is optional.
ê Name - Use this box to type a name for the contact. This is the name that’s listed in Active Directory. “Comendo MailArchive Contact”
ê Alias - Use this box to type a unique alias (64 characters or less) for the contact. This field is required. “ComendoMailArchiveContact”

69
Figure 2: Exchange Management Console -- New Mail Contact: Contact Information configuration
ê External e-mail address - To specify an SMTP e-mail address, click Edit (Figure 3). In the SMTP address dialog box, type the SMTP e-mail address provided by Comendo. In this example, [email protected] was used. Please note that a real journal-ing address provided by Comendo for this purpose will typically have a distinctive format (the local part of the address will typically be long and hard to remember).
Figure 3: Exchange Management Console -- New Mail Contact: SMTP Address configuration
5. On the New Mail Contact page, review your configuration settings (Figure 4). To make changes, click Back. To create the new mail contact, click New. Click Cancel to close the wizard without creating the new mail contact.
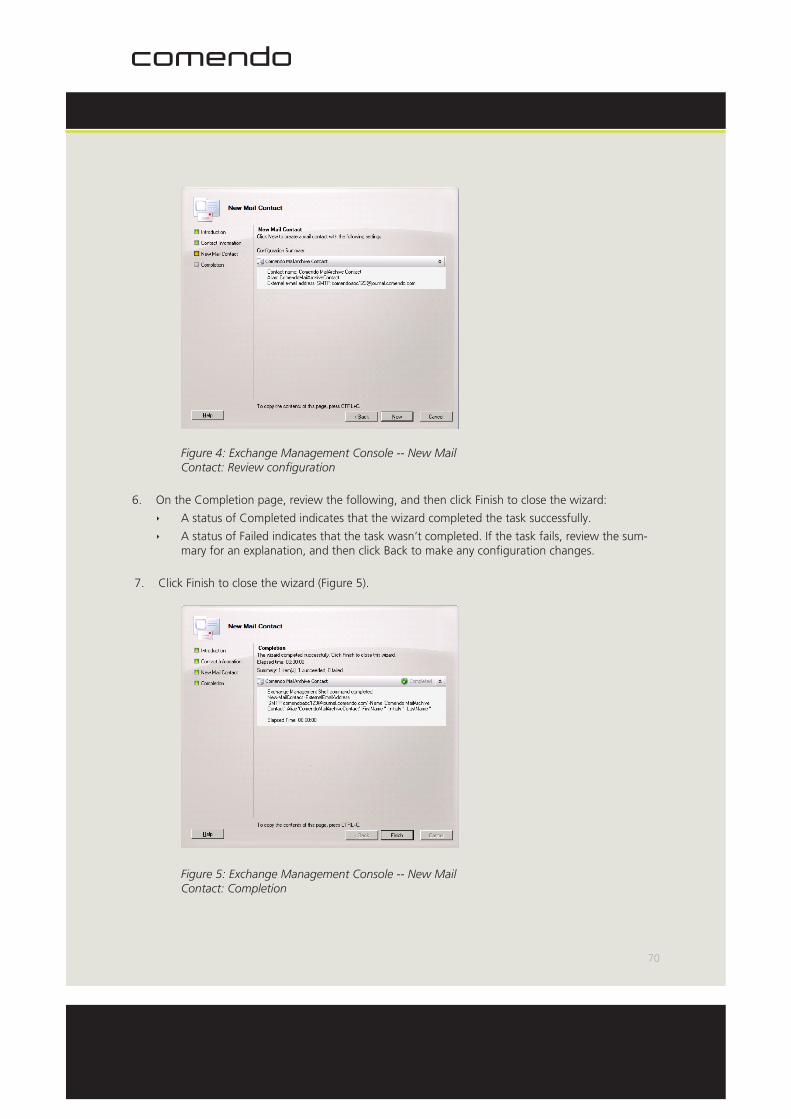
70
Figure 4: Exchange Management Console -- New Mail Contact: Review configuration
6. On the Completion page, review the following, and then click Finish to close the wizard:
ê A status of Completed indicates that the wizard completed the task successfully.
ê A status of Failed indicates that the task wasn’t completed. If the task fails, review the sum-mary for an explanation, and then click Back to make any configuration changes.
7. Click Finish to close the wizard (Figure 5).
Figure 5: Exchange Management Console -- New Mail Contact: Completion
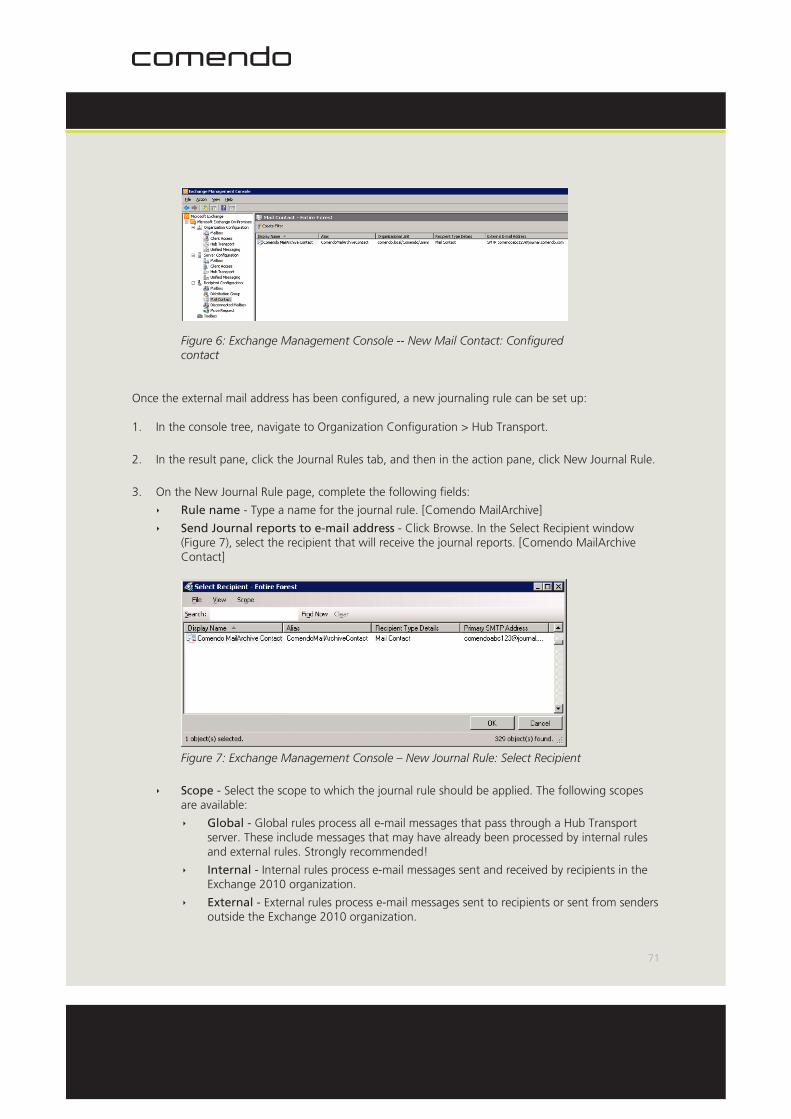
71
Figure 6: Exchange Management Console -- New Mail Contact: Configured contact
Once the external mail address has been configured, a new journaling rule can be set up:
1. In the console tree, navigate to Organization Configuration > Hub Transport.
2. In the result pane, click the Journal Rules tab, and then in the action pane, click New Journal Rule.
3. On the New Journal Rule page, complete the following fields:
ê Rule name - Type a name for the journal rule. [Comendo MailArchive]
ê Send Journal reports to e-mail address - Click Browse. In the Select Recipient window (Figure 7), select the recipient that will receive the journal reports. [Comendo MailArchive Contact]
Figure 7: Exchange Management Console – New Journal Rule: Select Recipient
ê Scope - Select the scope to which the journal rule should be applied. The following scopes are available:
ê Global - Global rules process all e-mail messages that pass through a Hub Transport server. These include messages that may have already been processed by internal rules and external rules. Strongly recommended!
ê Internal - Internal rules process e-mail messages sent and received by recipients in the Exchange 2010 organization.
ê External - External rules process e-mail messages sent to recipients or sent from senders outside the Exchange 2010 organization.

72
ê Journal messages for recipient - If you want to journal messages sent to or from a specific recipient, click Browse to select the recipient. In the Select Recipient window, select the mail-box, contact, or distribution group that you want to journal, and then click OK. All messages sent to or from this recipient are journaled.
ê Enable Rule - Journal rules are enabled by default. To create the rule in a disabled state, clear the check box.
Figure 8: Exchange Management Console – New Journal Rule: Overview of configured settings
4. Click New to create the journal rule.
ê On the Completion page, review the following, and then click Finish to close the wizard: A status of Completed indicates that the wizard completed the task successfully.

73
A status of Failed indicates that the task wasn’t completed. If the task fails, review the sum-mary for an explanation, and then click Back to make any configuration changes.
Figure 9: Exchange Management Console – New Journal Rule: Completion
Figure 10: Exchange Management Console – New Journal Rule: Configured rule
ê
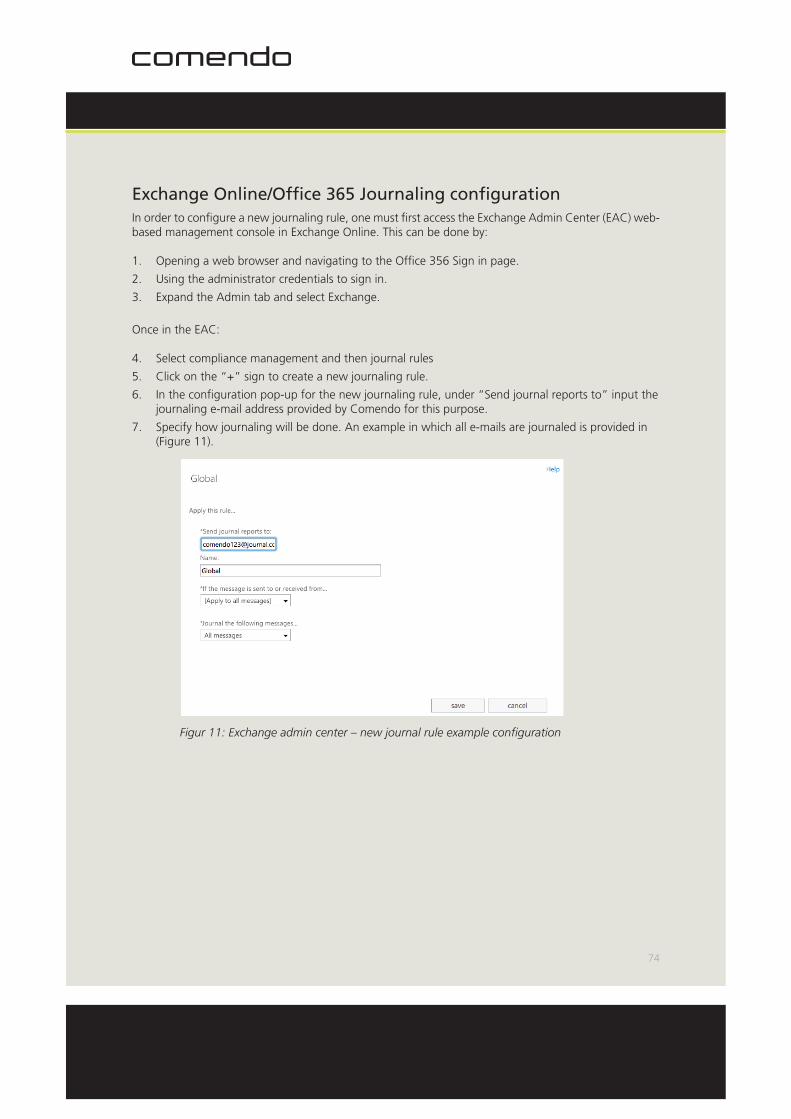
74
Exchange Online/Office 365 Journaling configurationIn order to configure a new journaling rule, one must first access the Exchange Admin Center (EAC) web-based management console in Exchange Online. This can be done by:
1. Opening a web browser and navigating to the Office 356 Sign in page.
2. Using the administrator credentials to sign in.
3. Expand the Admin tab and select Exchange.
Once in the EAC:
4. Select compliance management and then journal rules
5. Click on the “+” sign to create a new journaling rule.
6. In the configuration pop-up for the new journaling rule, under “Send journal reports to” input the journaling e-mail address provided by Comendo for this purpose.
7. Specify how journaling will be done. An example in which all e-mails are journaled is provided in (Figure 11).
Figur 11: Exchange admin center – new journal rule example configuration

75
Once the new rule is set up, a new corresponding entry should appear similar to the one presented in Figure 12.
Figur 12: Exchange admin center – overview of a newly configured journaling rule
A collection of Microsoft TechNet articles relevant to Journaling is presented below:
ê http://technet.microsoft.com/en-us/library/gg191845.aspx
ê http://technet.microsoft.com/en-us/library/bb124382(v=exchg.141).aspx - Microsoft Exchange 2010
ê http://technet.microsoft.com/en-us/library/aa998649(v=exchg.150).aspx - Microsoft Exchange 2013
ê http://technet.microsoft.com/en-us/library/jj898487(v=exchg.150).aspx - Exchange Online