manual eng
DESCRIPTION
Manual de scaner carma para vehiculosTRANSCRIPT

Carman Scan Lite PC Scan
User’s Guide
Ver. 01.02.01
1

Contents
CONTENTS
Chapter 1 : Program Installation………………………………………………………3
Chapter 2 : Main Screen………………………………………………………………5
Chapter 3 : Customer Management…………………………………………………7
Chapter 4 : Vehicle Diagnosis………………………………………………………11
Chapter 5 : Program Download……………………………………………………29
Chapter 6 : Flight Record……………………………………………………………40
Chapter 7 : SAVE DATA (Freeze)…………………………………………………43
Chapter 8 : SAVE DATA(Auto DTC Searching)…………………………………46
C h a p t e r 9 : C a l c u l a t o r ………………………………………………………4 8
Chapter 10 : Configuration …………………………………………………………49
Carman Scan LITE PC Scan User’s Guide
2

Chapter 1: Program Installation
1. Program Installation
1) Insert the “Craman Scan Lite PC Scan” CD into user’s PC.
2) When the screen below appears, begin installing.
▶ Select insta lation language and click [select].
▶ Click [Program install].
Carman Scan LITE PC Scan User’s Guide
3

Chapter 1: Program Installation
3) Install the program in the following order.
4) When the installation is completed,
the icon below will appear on the
screen.
Carman Scan LITE PC Scan User’s Guide
4

[Finish]
Chapter 1: Program Installation
2. Drive Installation
1) Click [USB Driver Installation].
2) Connect USB cable to the USB port of the computer and scanner.
3) Scanner power ON after the [S / W Download] to enter the menu.
4) Click [Drive Installation].
5) When the [Installation is completed] pop-up message appears,
Click .
6) Installation is completed.
Carman Scan LITE PC Scan User’s Guide
5

Chapter 2 : Main Screen
- Click the icon.
1. Main Screen Menu and Explanation
1) CUSTOMER MANAGEMENT
: a lows the user to:
- enter, search, and change customer’s information
- select a customer from the customer’s list and execute
the vehicle diagnosis. [see CHAPTER 3]
2) VEHECLE DIAGNOSIS
: enables user to check the self-diagnosis and the sensor
output through the communication with the user’s car.
[see CHAPTER 4]
3) PROGRAM DOWNLOAD
: a lows user to download the data from the user’s computer.
[see CHAPTER 5]
Carman Scan LITE PC Scan User’s Guide
6

Chapter 2 : Main Screen
4) CALCULATOR
: may function as a general calculator or a measurement converter.
[see CHAPTER 9]
5) FLIGHT RECORD
: shows graphs of the saved sensor data.
[see CHAPTER 6]
6) SAVE DATA(FREEZE)
: shows saved freeze codes and sensor data
[see CHAPTER 7]
7) SAVE DATA (AUTO DTC SEARCHING)
: enables user to check the details of the saved freeze codes.
[see CHAPTER 8]
8) CONFIGURATION
: a lows user to set the user language and basic settings.
[see CHAPTER 10]
Carman Scan LITE PC Scan User’s Guide
7

[Registration Number/ Vehicle number] and [User Name]
are required.
Chapter 3: Customer Management
1. After clicking the icon on the main menu, the screen below
wi l appear.
1) : Insert the required information of a new customer and the customer’s car in the spaces below.
Carman Scan LITE PC Scan User’s Guide
8

Chapter 3: Customer Management
2. : edits the information of registered customers.
3. : deletes the information of registered customers.
4. : refreshes the list of registered customers.
5. : displays saved data of the selected customer’s car.
▶Select the customer’s
name and click [Saved
data].
▶Then, the following screen
wi l appear.
▶ Next, the list of the
saved data will appear.
▶ When user clicks[View],
each viewer screen will
appear.
Carman Scan LITE PC Scan User’s Guide

9

When searching, entering only a part of a sentence is enough.
e.g.) name ‘Kil-dong Hong’ ⇒ ‘Kil-dong’ or ‘dong’ is sufficient
License plate # ‘Seoul 12 Ga 1234’⇒ ‘12 Ga’ or ‘1234’
is su ficient.
Chapter 3: Customer Management
6. : Set the location of the folder of the customer’s DB file
and search data.
▶ local drive : for one computer.
▶ network drive : locates the folder in the server computer so that
more than one computer connected through the
network can share the customer’s data and enter
new information
7. : returns to the main menu screen.
8. : begins vehicle diagnosis of the selected customer.
9. Customer Search Function: Click a searching category and enter a search
word.
Tip
Carman Scan LITE PC Scan User’s Guide
10

Chapter 4 : Vehicle Diagnosis
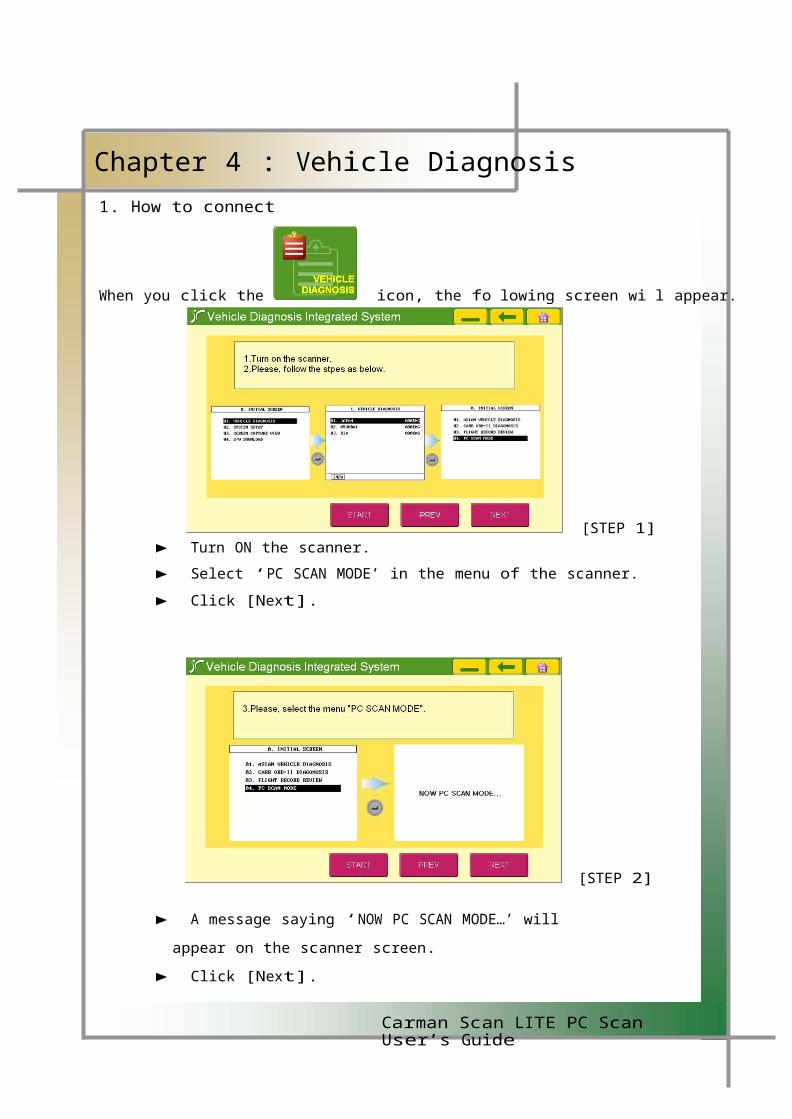
1. How to connect
When you click the icon, the fo lowing screen wi l appear.
[STEP 1]▶ Turn ON the scanner.
▶ Select ‘PC SCAN MODE’ in the menu of the scanner.
▶ Click [Next].
[STEP 2]
▶ A message saying ‘NOW PC SCAN MODE…’ will appear on
the scanner screen.
▶ Click [Next].
Carman Scan LITE PC Scan User’s Guide
11

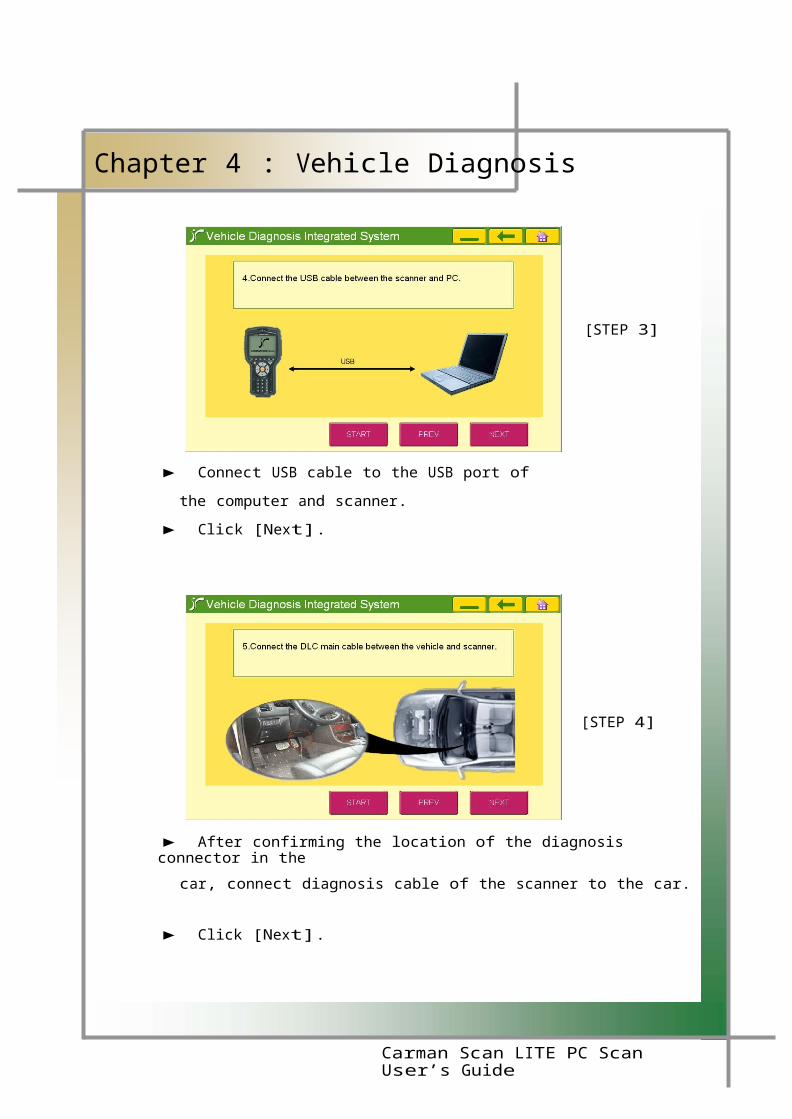
Chapter 4 : Vehicle Diagnosis
▶ Connect USB cable to the USB port of the computer
and scanner.
▶ Click [Next].
[STEP 3]
[STEP 4]
▶ After confirming the location of the diagnosis connector in the
car, connect diagnosis cable of the scanner to the car.
▶ Click [Next].
Carman Scan LITE PC Scan User’s Guide
12

If everything is ready, the communication can be directly started
by clicking on the [STEP 1] screen.
Chapter 4 : Vehicle Diagnosis
[STEP 5]
▶ When ready, click [Next] or [Start] to start communication
with the car.
Tip
▶ Now the menu for vehicle diagnosis will show.
Carman Scan LITE PC Scan User’s Guide
13

Chapter 4 : Vehicle Diagnosis
2. Auto DTC Searching function
- checks entire system of the selected car in one scan and displays
a l the freeze codes on one screen.
[STEP 1]
▶ Select [Maker] and [Vehicle].
▶ Click [Auto DTC Searching].
▶ Select the diagnosis connector and click.
▶ The ‘Please Wait’ pop-up message will appear.
Carman Scan LITE PC Scan User’s Guide
14

Chapter 4 : Vehicle Diagnosis
[STEP 2]
▶ The Auto DTC Searching function may take a long time.
Click [CANCEL] if you do not want to continue.
▶ Click [OK] to continue.
1[STEP 3]
2
▶ Select the system that is going to be diagnosed.
▶ Click [OK].
Carman Scan LITE PC Scan User’s Guide
15

The diagnosis data inserted in [Contents/Reference] will be
useful for managing the repair and maintenance record of the car.
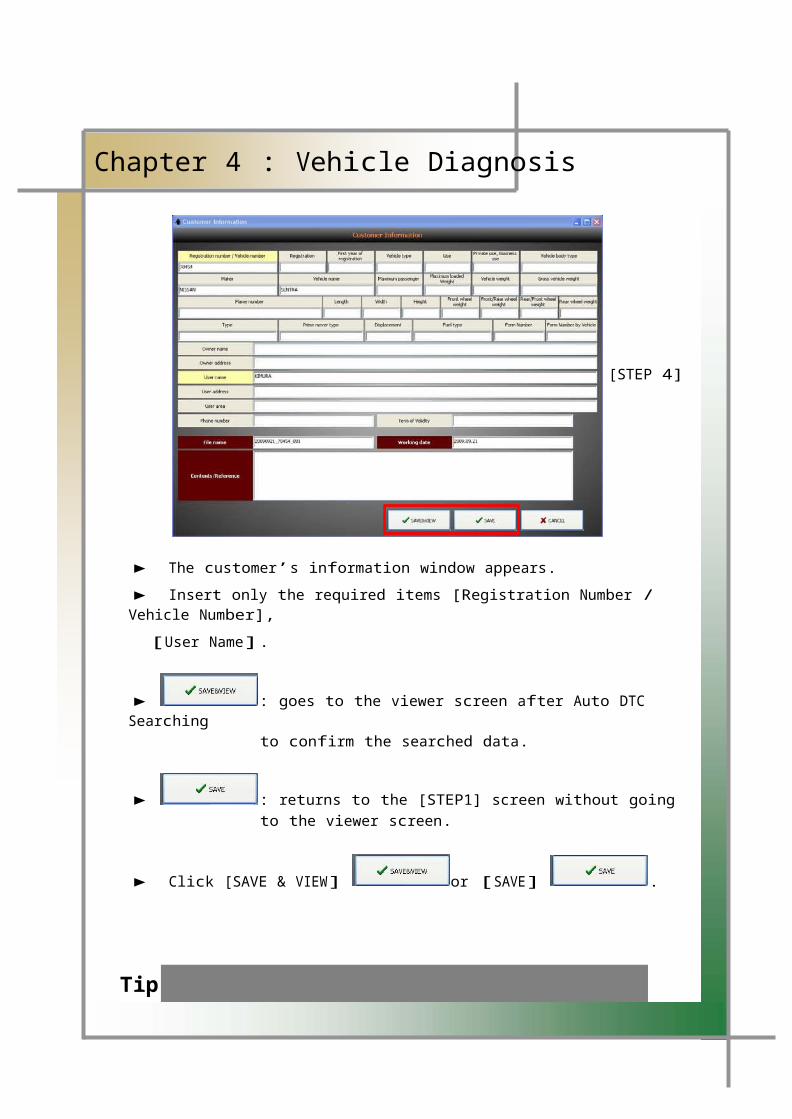
Chapter 4 : Vehicle Diagnosis
[STEP 4]
▶ The customer’s information window appears.
▶ Insert only the required items [Registration Number / Vehicle Number],
[User Name].
▶ : goes to the viewer screen after Auto DTC Searching to confirm the searched data.
▶ : returns to the [STEP1] screen without goingto the viewer screen.
▶ Click [SAVE & VIEW] or [SAVE] .
Tip
Carman Scan LITE PC Scan User’s Guide
16

※ See [CHAPTER 8 : SAVE DATA (Auto DTC Searching)]for the details.
Chapter 4 : Vehicle Diagnosis
▶ The Auto Search Mode is in progress. Wait until finished.
[STEP 5]
▼ If [SAVE] is selected in [STEP4],
- The[Saving is completed] pop-up message will appear. Click [OK]
to return to the[STEP 1] screen.
▶ To confirm the stored contents, return to the main menu and
click the icon.
Carman Scan LITE PC Scan User’s Guide
17

※ See [CHAPTER 8 : SAVE DATA (Auto DTC Searching)] for the details.
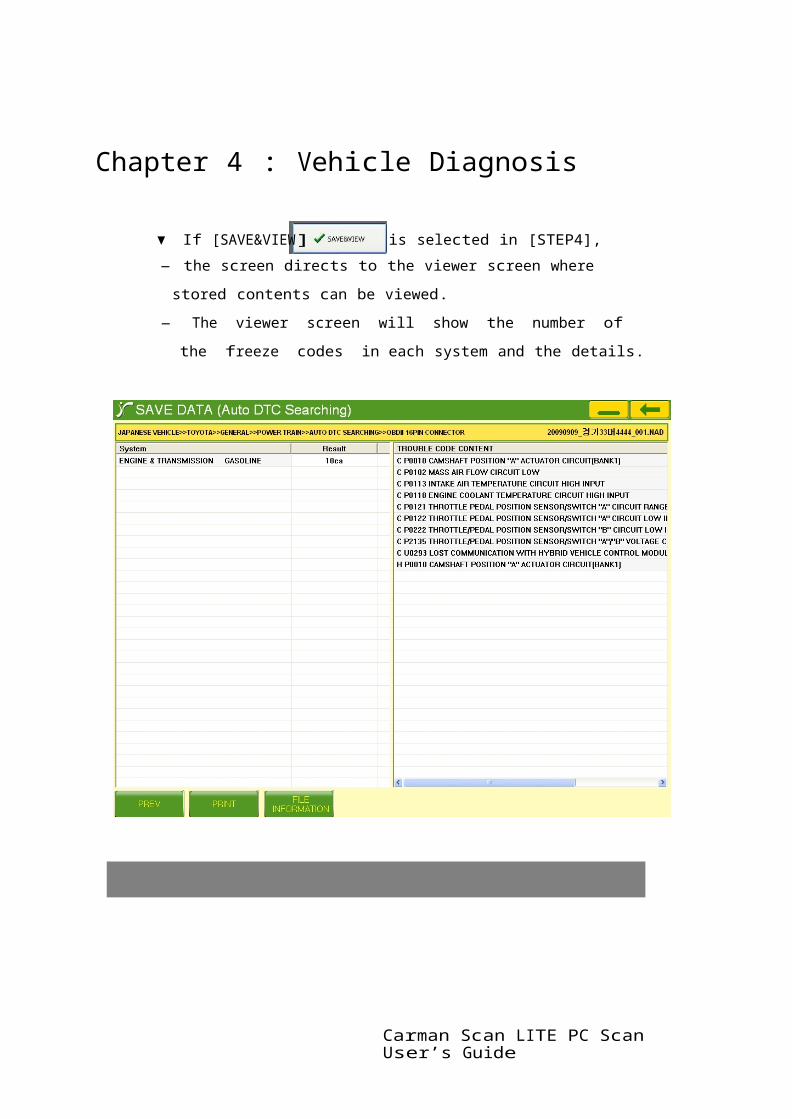
Chapter 4 : Vehicle Diagnosis
▼ If [SAVE&VIEW] is selected in [STEP4],
- the screen directs to the viewer screen where stored contents
can be viewed.
- The viewer screen will show the number of the freeze codes in
each system and the details.
Carman Scan LITE PC Scan User’s Guide
18

- Shows the procedure for selecting a diagnosis menu.
Chapter 4 : Vehicle Diagnosis
3. Diagnosis Program
1) Main Screen
1. Procedure for selecting a diagnosis menu
Country -> Maker -> Vehicle Type -> System -> System Spec.
2. Icon for returning to a main screen
: Pressing this icon on any menu displays the main menu again.
3. Trouble Code
- You can display the trouble code of the system, and delete a trouble code.
4. Sensor
You can search the current values of the sensors of the relevant system
Carman Scan LITE PC Scan User’s Guide
19
※ See [CHAPTER 7 : SAVE DATA (Auto DTC Searching)] for the details.
Chapter 4 : Vehicle Diagnosis
5. Actuator
- You can check if the system is normal by forcibly starting or stopping the
actuators of the relevant system.
6. Save Data (FREEZE)
- The current time and sensor data to the trouble code is stored.
- Data stored on the main screen [Save Data (FREEZE)] through the menu
Can be checked.
7. DIAG Menu
- Pressing this menu displays the diagnosis main screen again on any screen.
8. Home (exit from diagnosis)
- Pressing this menu displays the system selection screen again on any screen.
9. PRINT
- You can print the screen.
Carman Scan LITE PC Scan User’s Guide
20

Be sure to delete trouble codes only when the ignition key is on
and an engine is o f. A trouble code may not be erased,
or abnormal problems may occur if deleting codes with the
engine running.
A temporary trouble code may be erased without repairing. But if the fault is
still valid, the code is erased temporarily, and will then be displayed again.
Chapter 4 : Vehicle Diagnosis
2) Major Functions
1.Trouble Code
- If troubles are detected, the trouble code, number of trouble codes and
description are displayed. If there are some troubles, List is displayed as show
in the picture.
: If there is a fault code, tap on “ERASE” to delete the code.
☞ Deletes the displayed trouble code.
Tip
Carman Scan LITE PC Scan User’s Guide
21
Chapter 4 : Vehicle Diagnosis
2. SENSOR
- You can analyze the changes in the sensor or actuator values.
: Tap on “+FILE” to select the record mode or open a file.
☞ Then and are activated.
: Tap on “RECORD” to start a recording.
☞ You can save the value changes of the (fixed) items you have selected for
later analysis. Recording will continue until “RECORD” is pressed again.
: Tap on ”OPEN” to open a recorded event.
☞ You can move to a screen where you can select the saved data.
Carman Scan LITE PC Scan User’s Guide
22

Chapter 4 : Vehicle Diagnosis
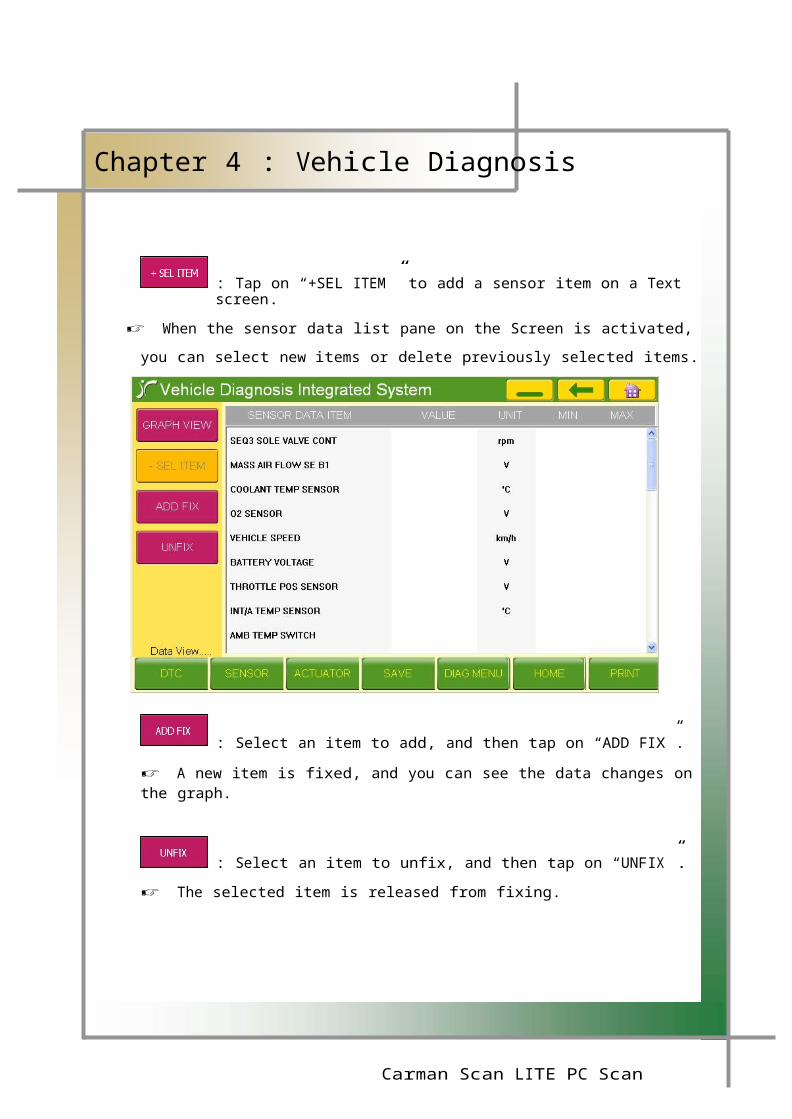
: Tap on “+SEL ITEM” to add a sensor item on a Text screen.
☞ When the sensor data list pane on the Screen is activated, you can select new
items or delete previously selected items.
: Select an item to add, and then tap on “ADD FIX”.
☞ A new item is fixed, and you can see the data changes on the graph.
: Select an item to unfix, and then tap on “UNFIX”.
☞ The selected item is released from fixing.
Carman Scan LITE PC Scan User’s Guide
23

Chapter 4 : Vehicle Diagnosis
: Tap on “TEXT VIEW” to return to the text screen.
☞ You can move to the text view screen in
: Tap on “+FILE” to select the record mode or open a file.
☞ Then and are activated.
: Tap on “RECORD” to start a recording.
☞ You can save the value changes of the (fixed) items you have selected for
later analysis. Recording will continue until “RECORD” is pressed again.
: Tap on ”OPEN” to open a recorded event.
☞ You can move to a screen where you can select the saved data.
Carman Scan LITE PC Scan User’s Guide
24

Chapter 4 : Vehicle Diagnosis
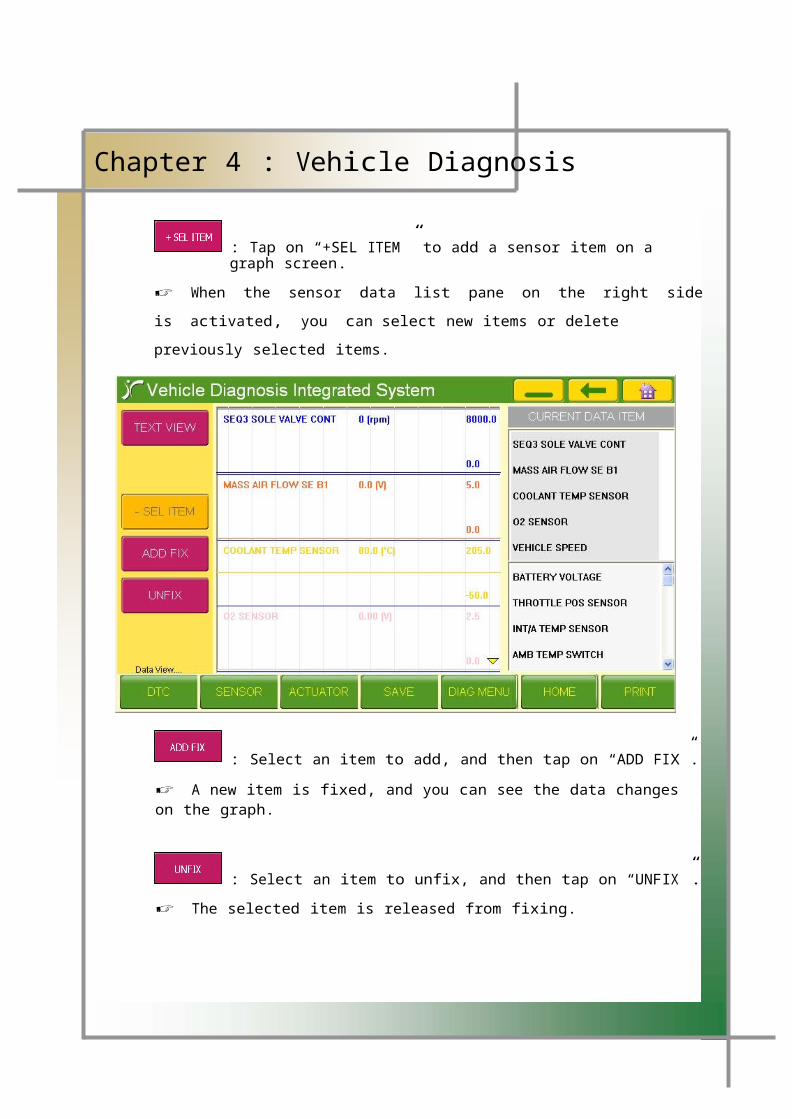
: Tap on “+SEL ITEM” to add a sensor item on a graph screen.
☞ When the sensor data list pane on the right side is activated, you can
select new items or delete previously selected items.
: Select an item to add, and then tap on “ADD FIX”.
☞ A new item is fixed, and you can see the data changes on the graph.
: Select an item to unfix, and then tap on “UNFIX”.
☞ The selected item is released from fixing.
Carman Scan LITE PC Scan User’s Guide
25

Chapter 4 : Vehicle Diagnosis
/ : Tap on “CONFIG” to change the screen settings.
☞ Icons necessary for screen settings are displayed on the right hand side.
: Tap on “VIEW CH +” to increase the number of sensor items to be
displayed on the screen.
☞ 4 items are displayed by default.
☞ But, the number can be increased up to 8.
: Tap on “VIEW CH -” to decrease the number of sensor items to be
displayed on the screen.
☞ The number can be decreased down to 1.
: Tap on “VIEW DATA” to remove or replace the numeric data display on
the graph.
☞ Data is displayed on the graph on the center of a screen.
: Tap on “VIEW RANGE” to remove or replace the MIN/MAX values on the
graph.
Carman Scan LITE PC Scan User’s Guide
26

Chapter 4 : Vehicle Diagnosis
: Tap on “VIEW NAME” to remove or replace the data item
names on the graph.
☞ The name is displayed on the left hand side of a graph.
TIP)
/ /
Data is displayed on the graph by default. To remove the display data on the
screen, tap on a relevant icon once. The icon then turns to a red color, and the
data will not displayed on the screen.
: To zoom the graph displayed on the screen, in or out, tap on the “CH” icon until the
desired sensor’s channel is displayed and then tap the “MAX+” or “MAX-“ icon.
☞ To observe the graphical wave of a test item in more detail , you can tap on
‘+’ or ‘-‘ icon to zoom in or out the graph.
Carman Scan LITE PC Scan User’s Guide
27

Chapter 4 : Vehicle Diagnosis
/ : Tap on “CONFIG / HOLD/RUN”.
☞ You can check the changes of the date through holding or running the screen..
: Tap on “HOLD/RUN”.
☞ When you tap on "HOLD", the screen will be frozen and by tapping on "RUN"
the screen will proceed again.
: Tap on “PAGE” to move the screen to backward or forward.
☞ You can check the saved screen by pages.
: Tap on "ZOOM" to zoom in or out the screen of the value.
☞ Default value is set up at 60 and you can zoom in and out by 10units.
Carman Scan LITE PC Scan User’s Guide
28

Chapter 5 : Program Download
1. Connecting the product to PC 1
- This is how to connect CARMAN SCAN Lite to PC.
1) Turn on the power of CARMAN SCAN Lite.
2) Select S/W Download item and push [ENTER].
3) The mode is converted to download mode.
4) Connect CARMAN SCAN Lite to PC using USB cable.
5) Click this icon in PC Desktop screen. 6) Program starts with the window like below is activated on the screen.
Carman Scan LITE PC Scan User’s Guide
29
Chapter 5 : Program Download
7) When CARMAN SCAN Lite is norma ly connected to PC, program window like
below appears on the screen.
8) If the screen like below appears, follow the instruction in the next page.
Carman Scan LITE PC Scan User’s Guide
30

Chapter 5 : Program Download
2. Connection to PC 2
- If the product cannot be connected to PC with above instruction, follow the
instruction below.
1) Click [CONNECT] key on the upper right side in the program window.
2) If CARMAN SCAN product connected to PC is detected, the program
window appears on the screen, if the product is not detected, window like
bellow appears.
3) After making sure if the USB cable is connected and the mode is converted to
download mode like the message on the screen, try connection again by
pushing [CONNECT].
Carman Scan LITE PC Scan User’s Guide
31

ROM UPDATE and CANPIC UPDATE is done when needed, not
regularly. Refer the notice on our website before updating.
Chapter 5 : Program Download
3. Description on Downloading Program Function
- Each function key in the downloading program is described.
: CARMAN SCAN device and user’s PC can be connected.
- As described above, if the connection is not done automatically, manual
connection can be tried by pushing CONNECT button.
- In case that connection is tried by CONNECT button, please make sure if
the product is connected to USB on PC and if download mode
is activated.
: Inside Rom data version of CARMAN SCAN is shown- Inside ROM data version is verified and updated if needed.
: ROM data inside CARMAN SCAN can be updated.
: PIC data inside CARMAN SCAN can be updated to the latest version
Tip
Carman Scan LITE PC Scan User’s Guide
32

Chapter 5 : Program Download
:
The button of the product currently connected to downloading program is
activated.
: This bu ton can fetch the capture image saved in the storage area in the product to open on PC screen
and save.
: Language set up, memory format, USD drive installation can be done with this button.
Carman Scan LITE PC Scan User’s Guide
33
Chapter 5 : Program Download
4. Downloading Diagnosis Program
- This is how to download diagnosis program.
1) Download diagnosis program and save it in the indicated location.
* Downloading location of diagnosis program
C:₩Program Files₩nextech₩CARMANSCAN Download₩data
Click ‘My computer’ Select the hard disk where the
program is installed (Generally C: drive)
Select Nextech folder Select Program Files
Select CARMANSCAN Download folder Select data folder
Carman Scan LITE PC Scan User’s Guide
34

Chapter 5 : Program Download
* PC : Data saved in PC is shown.
- Data that is not saved in dedicated location is not shown.
If data is not shown, verify the saved path of the data one more time
* SCANNER :
- Data currently saved in the inside memory of CARMAN SCAN is shown.
* How to download program
1. Select the file to be downloaded in PC directory.
2. V mark appears in the space on left of the file name.
3. Click “Download” button in the middle of the screen.
4. Download proceeds.
Carman Scan LITE PC Scan User’s Guide
35

Chapter 5 : Program Download
* Data Information : Data on name, size, version, and type of the selected file
can be found.
* Memory Usage : Current capacity in the memory, used space and free space
size can be found.
Carman Scan LITE PC Scan User’s Guide
36

Chapter 5 : Program Download
5. Screen Capture Function
- Capture screen saved inside of the diagnosis device can be uploaded in
PC to verify or be saved during using the product.
1) After connecting CARMANSCAN, the screen is fetched automatically
when Screen Capture button is clicked.
2) / buttons can
3) be used to shift saved screens.
: User can move to the desired page
by using page selection button, and
currently selected page number is
shown
Carman Scan LITE PC Scan User’s Guide
37

Only data saved inside the product can be opened as a captured image
and up to 7 images can be saved.
Chapter 5 : Program Download
* Title : Title of the captured date is set up.
* Date : Saved date is set up.
* File Name : File name is set up.
* Description : User can use this space to make a note.
: Open the file by selecting location of the captured image
: Captured image can be saved in the desired location by user
: Captured image and recorded data can be printed.
Tip
Carman Scan LITE PC Scan User’s Guide
38

If the driver is not installed, PC cannot detect CARMAN SCAN and the
product cannot be connected. Insta l the driver before using the
program.
Chapter 5 : Program Download
6. Configuration
- Program language set up, memory format, USB Driver installation.
: Language set up in the program can be changed.
- Korean / English are supported.
: Memory inside the CARMAN SCAN product and
CF card in CARMAN SCAN II can be formatted.
: CARMAN SCAN driver can be insta led.
Tip
Carman Scan LITE PC Scan User’s Guide
39

Chapter 6 : FLIGHT RECORD
- Function explanation: the menu shows saved sensor data values during
the vehicle diagnosis. Up to 8 items can be saved.
- After clicking the icon on the main menu, the screen below
wi l appear.
3
1
2
1. List of saved files: displays the date the file is saved, vehicle number,
and the size of file.
2. Information saved: displays vehicle information and the saved sensor
data items.
3. Search function: searches for saved data.
Carman Scan LITE PC Scan User’s Guide
40

Chapter 6 : FLIGHT RECORD
4. : changes the name of selected file.
5. : deletes selected file.
6. : displays the data value graph of the selected item and goes
to the fo lowing screen to show the saved values.
1) : returns to the screen for the file list.
2) : increases the number of channels on the screen.
3) : decreases the number of channels on the screen.
Carman Scan LITE PC Scan User’s Guide
41

Chapter 6 : FLIGHT RECORD
4) : goes up the screen.
5) : goes down the screen.
6) : prints the cu rent screen.
Carman Scan LITE PC Scan User’s Guide
42

Chapter 7 : SAVE DATA (FREEZE)
- Function explanation: displays saved freeze codes and the sensor data
during the vehicle diagnosis.
- If user clicks the icon on the main menu, the screen below
will show.
1
2
1. List of saved files
2. Information about the vehicle in the selected file
3. : selects the file the user desires to see. The user can selectmaximum of two files and compare them.
Carman Scan LITE PC Scan User’s Guide
43
Chapter 7 : SAVE DATA (FREEZE)
4. : deletes selected file.
5. : changes name of the selected file.
6. : searches for a file. It is possible to search with vehicle
number, vehicle name, and customer’s name.
7. : goes to the selected customer’s information file.
8. : goes to the fo lowing screen to display the freeze codes
and saved sensor data in the selected file.
▶ The changed screen through [View Details] after selecting 2 files.
Carman Scan LITE PC Scan User’s Guide
44

This is useful for comparing and assessing, on the screen, the sensor
data changes resulted from the saved data before and after the repair,
and the freeze code existence and non-existence.
Chapter 7 : SAVE DATA (FREEZE)
Tip
Carman Scan LITE PC Scan User’s Guide
45

Chapter 8:SAVE DATA(Auto DTC Searching)
- Function explanation: The user can see the data saved through [Auto DTC
Searching], during the vehicle diagnosis.
- After clicking the icon, it wi l shift to the screen below.
1
2
1. List of saved files
2. The information about the vehicle in selected file
3. : deletes the selected file.
4. : changes the name of the selected file,
Carman Scan LITE PC Scan User’s Guide
46

Chapter 8:SAVE DATA(Auto DTC Searching)
5. : searches a file. It is possible to search with the vehicle
number, vehicle name, and customer name.
6. : goes to the selected customer’s information file.
7. : directs to the fo lowing screen to display freeze codes
saved in the selected file.
▶ displays the number of freeze codes as well as the details saved in
selected file.
Carman Scan LITE PC Scan User’s Guide
47
Chapter 9 : Calculator
- Provides a general calculator and unit conversion function.
1. Input data pane
- The data entered via the number panel is displayed.
2. Data input keys
- Can be used the same as a general calculator.
3. Unit setting pane
- You can select the unit of the number to be displayed on an input pane.
- If you select a unit, the result is converted to other units shown in the pane (4)
and displayed under a corresponding unit symbol.
4. Unit result pane
- The entered number and unit are displayed here.
5. Unit conversion pane
- The entered number is converted to other units listed in this pane.
Carman Scan LITE PC Scan User’s Guide
48

Chapter 10 : Configuration
- Confirms system information and changes the settings of the product.
1 2
3
1. Select User’s language.
- 9 different languages are available.
2. Set up the information of the auto repair shop.
- The auto repair shop information will show on every printed document.
3. Set color of the grid or line of the graphs.
- Clicking [Graph setting] will lead the screen below.
Carman Scan LITE PC Scan User’s Guide
49

Chapter 10 : Configuration
- You can change the Color of Line for your better analysis
in case of being a lot of lines in the screen, which might
confuse you at various similar line.
1. : Tap to select Bottom.
☞ You can select the bottom color of screen.
2. : Tap to select Grid 1.
☞ As you can see in the picture above it makes you to analyze the data
precisely while dividing the box among ten.
You can change the color of the line of the horizontal axis using screen scale
configuration.(Which is not shown on the picture above.).
Carman Scan LITE PC Scan User’s Guide
50

Chapter 10 : Configuration
3. : Tap to select Center Grid.
☞ You can change the color of the vertical axis line on the screen.
4. : Tap to select Cursor.
☞ You can change the color of the cursor which the point of time is selected by
user.
5. : Tap to select CH1/8.
☞ You can select from Channel 1 to Channel 8.
6. : Tap to select CH Color.
☞ You can change the color of the selected channel.
7. : Tap to select OK.
☞ The selected item will be saved.
8. : Tap to select CANCEL.
☞ The selected item will be canceled.
9. : Tap to select Default 1.
☞ Setting-up as default 1 value.
10. : Tap to select Default 2.
☞ Setting-up as default 2 value.
Carman Scan LITE PC Scan User’s Guide
51