manual key2publish version 2.7.5.0. filemanual key2publish version 2.7.5.0. 1 . index: ... setting...
TRANSCRIPT

Manual Key2Publish version 2.7.5.0.
1

Index:
Introduction:
Preparation Installation Registration
Online form: Company Code:
Activation e-mail If you have registered as a user, you will receive an email with your username and password.
Activate Booting with test data.
Meet Key2Publish Screen Layout Global functioning PIM system
Importing and entering data Import CSV file.
Import type Import Script Import File Import File - From Import URL New Add
File import Wizard. New Config/Change Config
Configuration Name Input Columns delimiter Lines delimiter Import file Has Groups / Nr of levels Has Header /On line Number Line number Start Data
2

Line number End Data Add field en Delete Field Save Configuration” and “Save Configuration and Close Window
Import K2Z file. File / URL Select k2z file New Add Add New products. Update Select.
Import from a webshop Import from webshop.
View and edit data Data tree Drag and drop View & Edit functions
New Group Move Selected Copy Selected Delete Selected Group Manger Remove SubGroups
Remove groups Manually add, cloning and remove products.
Add Product Clone Product Delete Product
Search functions Search Exact Search Search and Replace
Remove formatting characters Convert HTML to Text Clean
Repair unwanted changes. Backup data
Export to CSV: File Output File Name
Setting structure exported file.
3

PDF Export
InDesign Export
Webshop Export Settings Webscript Select the webshop. Set Language Store Settings Images for the web Images Folder
Close Key2Publish. Quit Without Saving Quit
Support:
Customization
4

Introduction: Key2Publish helps organizations improve the way they create, collect, manage, and enrich product data and publish that content to web, print and mobile devices. Good data quality data: Good data quality is essential for marketing success. Before feeding the data into the product presentations, data has to be good enough to be used across sales channels. Key2Publish offers many ways to simplify the way how to get the data ready for publication. Making Key2Publish the central source of product content suited for cross-media publication. Collect and create "plug and play" K2Z data file, from your suppliers: With Key2Publish data can be added through manual entry or by importing data from systems, like ERP system or webshop. But the most efficient and less time consuming is to get the suppliers to do it. With K2Z, Key2Publish offers a plug and play file format. Special made for stroring and exchanging data. Sharing data with Key2Publish K2Z productfeeds limits manual intervention. Avoiding time-consuming manual input and problems that occur when using Excel changing the file structure. A solution for your organization, but also for your suppliers and your resellers.They also may use Key2Publish for free. In-build database publishing functionality: Through the in-build database publishing functionality in Key2Publish, the data is easily placed in all kinds of webshopssystems and also it automates the publication of producfeeds, catalogs, productsheets and price lists. Customization Key2Publish can be changed according to individual or personal specifications or preference. Creative and unique catalog layout designs can be build and external data sources can be linked. Support: This guide explains how to work with Key2Publish.We have thereby tried to be as bright and clear as possible. We are aware that this probably was not successful in all areas. If you have an question, please let us know. Send an email with your question to [email protected]. We will respond as soon as possible.
5

Preparation Before you can start working with Key2Publish you have to install it on your computer and to register yourself and your PC at Key2Publish. In case you want to use a webshop import or export option, you have to place a Key2Publish folder in the main folder of your webshop. This folder you can download from the Key2Publish website. Installation If have downloaded the setup file on your computer, you can install Key2Publish as follows:
1. Double-click on setup.exe in Windows. 2. If a UAC popup appears, click Yes.
6

3. Click on Next to start the setup program.
4. Accept the license agreement and click Next.
7

5. Select the folder where you want to place the Key2Publish files .
6. . Select the folder where the startup folder has to be, and then click Next.
8

7. Select the checkbox if you want a start-up icon on your desktop.
8. Everything is set and you can now install the application via the Setup button.
9

9. Select the checkbox if you want Key2Publish to start immediately after installation.
10

Registration Click on register. The web browser will take you to the registration page on the Key2Publish website.
Online form: To register you must complete the online registration form.
Company Code: If you register the basic version, you have to let the Company Code field empty !.
11

Activation e-mail If you have registered as a user, you will receive an email with your username and password.
Activate You fill in (only once) your username and password (password) and then click Activate. This registration is computer specific. If you want to use Key2Publish also on another computer you also have to register for that computer.
Booting with test data. After activation you can start Key2Publish. To work with Key2Publish data must be imported or entered. If this is not the case, this should be done first. If you do not have any data available you can use demo data from Key2Publish website.
12

Meet Key2Publish After starting Key2Publish you will see the following screen. We can divide the screen into four screen parts
Screen Layout
Part 1: Here you will find a menu where you can access a number of support functions.
13

Part 2: This part contains a bar with the logo and on the right of the progress bars. This bar will show the progress while importing data.
Part 3: This is the part where the real action will be. Depending on the choice in part 4, this can be, data import, edit, view or export. Import:
View and edit:
14

Part 4: Bottom of the screen you can choose from an import, view / edit and export opportunities. This one can select via the corresponding tabs. This four part can be seen as the main menu.
File Export:
InDesign Export:
PDF Export
15

Webshop Export
Global functioning Many users will work as following with Key2Publish. Import data, Edit it, select the products data set and upload it to the shop or use this dataset in order to generate a file, catalog or a product sheet.
PIM system Users that use Key2Publish as a PIM system (Product Information Management (PIM) system) will update the existing data while importing new external data.
16

Importing and entering data For this you have the choice of importing data or manually entering data. or a combination of these two. To import data, go to the Import tab.
You have the choice of import options for importing data from external data sources. This may be data from files, but also data from databases. In basic version has the options to import from CSV and text files. and import data from the following open source shop systems: Magento, OpenCart, PrestaShop and WooCommerce.
17

Import CSV file.
To import a CSV file, first following variables have to be set:
Import type With “Import type ” is meant, specifying file type you want to import. In this case you can choose between a CSV and a Text file.
Import Script Vendors will usually provide CSV files with the same structure. Using a import script you can be read all files from this supplier. You can select the structure of the CSV / Text file import set script. These scripts can be created or downloaded via key2publish.com or through the wizard.
Import File With "Import File" select the appropriate CSV / Text file you want to import.
18

Import File - From Import URL Via the "Import File" or "Import URL" you can set whether the import file has to be imported from the web(=URL) or from your PC (=Import File). Then you can indicate how the data will be imported. Where you can choose from the following options:
New Imports data. Thereby removing any previously imported data.
Add Imports data. and adds it to previously imported data.
Add New Products Adds only the products that are not in the current CSV file ) Update Updates the products of the existing data set that (same) products from the CSV file. Select Selects, the products from the existing data set that are also in the CSV file.
If everything is set correctly can import the file via the "Import" button.
19

File import Wizard. Go to the menu at the top of the screen and select "Settings" and then "Import". Then the import script CSV/TXT wizard opens. As previously reported, making a import script is useful for reading CSV files with the same structure. With an import script, you can read all CSV/TXT files coming from the same data provider. This wizard is suitable for advanced users. If you are not an experienced user, we will help you on your way to creating your script.
New Config/Change Config At the first screen, you choose the type of file "Configuration type". In this case, CSV / TXT. In addition, you have to make the choice between a new script (New Config), change a (Change Config) or remove a script (Delete Config).
If you did choose "Make of Change" you go to the next screen of the wizard.
20

Configuration Name With this option, you enter the name of the script. This name will appear in the import dropdown menu.
Input Here you select the file you're importing to link the import structure to the structure of Key2Publish.
Columns delimiter Here you set delimiter to separate the columns.
21

Lines delimiter Here you set delimiter to separate the lines.
Import file Reads the file using the set parameters
If everything is set correctly, go through the button "next" what brings you to the next screen of the wizard.
22

There you will see the following options:
Has Groups / Nr of levels Select here the number of group levels.
Has Header /On line Number If the data has data headers, select the checkbox and select on which row they are.
Line number Start Data Indicate from which row the data begins.
Line number End Data Indicate on which row the data ends. If you leave it empty the import will contain all the rows.
By clicking on the button "Next" you go to the group variables link page.
23

There you can use the dropdown menu in the column "link" to link the variables from the file to those of Key2Publish (index, name, description and picture). There may also be variables that can not be linked. Like when there is no index variable in the file. In that case you can use the name field in the file to link to the Key2Publish index. If the group fields are linked, proceed using the next button. The next screen is again a screen for linking a group or a screen for linking the product varaiables. How many groups you have to link, depends on the number group levels you did enter.For the product level you have to link the Key2Publish variables, index, name, description, picture and tax, in a similar manner.
24

Using the mouse over image function,the linked picture has to be a low resolution image!!
Using the mouse over image function,the linked picture has to be a low resolution image!!
Add field en Delete Field Using the buttons "Add Field" and "Delete Field" you can create Key2Publish fields. In the "type" column you can set which kind of field this filed must be. Data Options, Attributes, or Manufacturer. For the basic version, however, it must always be on set dates. The "next" button takes you to the last screen.
25
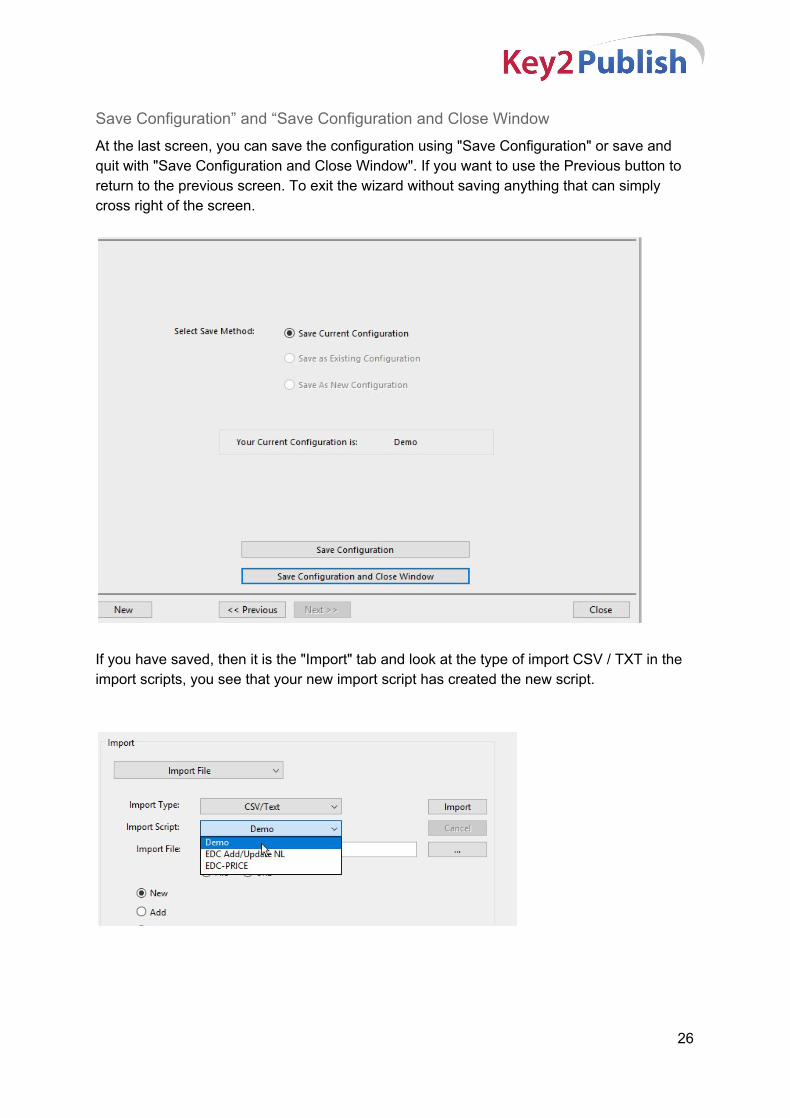
Save Configuration” and “Save Configuration and Close Window At the last screen, you can save the configuration using "Save Configuration" or save and quit with "Save Configuration and Close Window". If you want to use the Previous button to return to the previous screen. To exit the wizard without saving anything that can simply cross right of the screen.
If you have saved, then it is the "Import" tab and look at the type of import CSV / TXT in the import scripts, you see that your new import script has created the new script.
26

Import K2Z file. Key2Publish has its own file format, K2Z . The great advantage of a defined structure like K2Z is that no import different scripts have to be used.
To actually import the file, select "Import k2z".
File / URL An import file can be imported either from your own PC (select "File") as well as from a website/webserver (select:"URL").
Select k2z file "Select k2z file", select the file you want to import. If you have selected the file, then you have to indicate how the data has to be imported. With that you can choose from the following options:
27

New When importing using this option, the existing data is overwritten by the imported data from the file.
Add Imports and places the imported data below the existing data set.
Add New products. Adds only the from the imported file products that are not in the current data set
Update Updates the products of the existing dataset with the same products from the imported CSV file.
Select. Selects, via a check mark, the products in the Existing dataset which are also in the imported data. If everything is set correctly, the file can be imported by clicking the "Import k2z" button.
28

Import from a webshop
Import from webshop. The function "import data from webshop" imports data from a webshop into Key2Publish. This is done as follows. - Select "Import from shop". - Then select the type of shop. (Magento, Open Cart, PrestaShop or WooCommerce.) - In "Settings" you need to specify the settings of the shop.
Take note, select the right Webshop type in the setting!
29
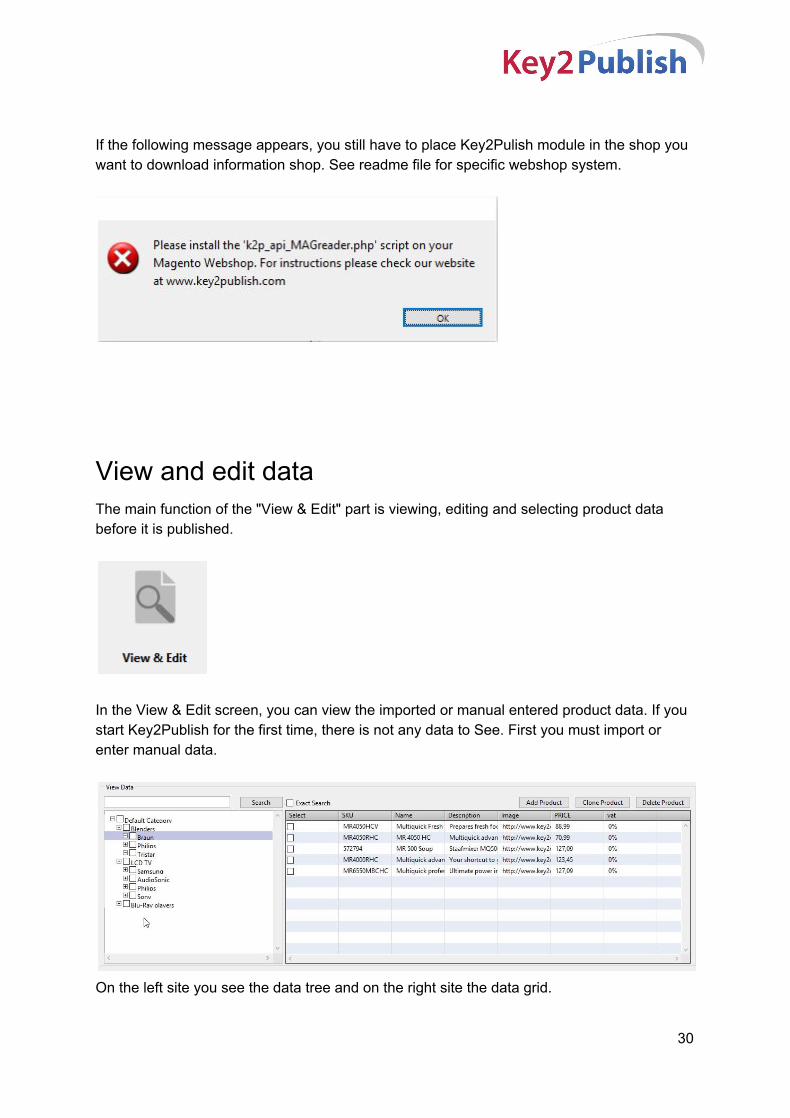
If the following message appears, you still have to place Key2Pulish module in the shop you want to download information shop. See readme file for specific webshop system.
View and edit data The main function of the "View & Edit" part is viewing, editing and selecting product data before it is published.
In the View & Edit screen, you can view the imported or manual entered product data. If you start Key2Publish for the first time, there is not any data to See. First you must import or enter manual data.
On the left site you see the data tree and on the right site the data grid.
30

Data tree By clicking on the plus and minus signs you close or open the underlying structure. At the lowest level you find the products. If you (once), click it selects a group in the tree. Via a double-click a group in the tree appears to the left a screen where you can edit the group information. If you "double-click" on a product you can edit the product.
Drag and drop You can drag and drop groups and products. The groups can only be moved in the tree, while the products can be moved only in the data grid. Moving is done by selecting a product or family, while keeping the mouse clicked, go to the place where you want to place the product or group, and then release the group or product by unclick the mouse.
In this example the Samsung group is placed between the group Philips and Sony. You can move a group to change the order, but also place a group under another group.
The selected group Philips is placed in the group Audiosonic.
31
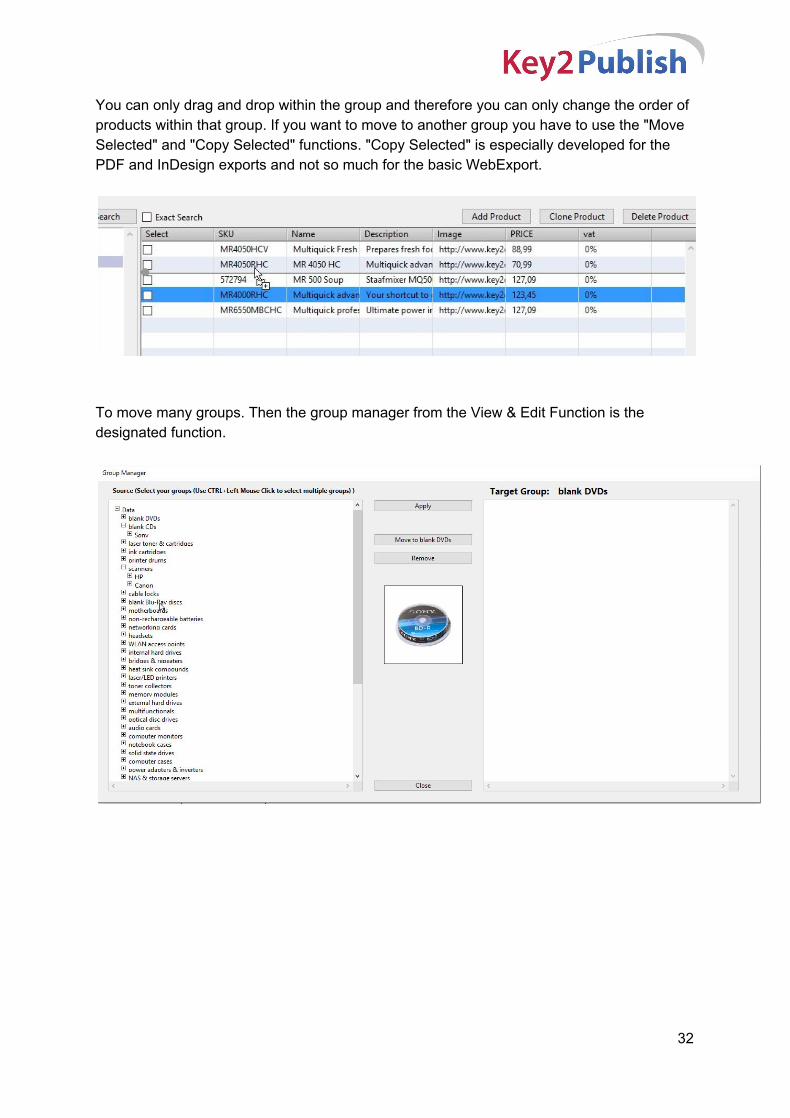
You can only drag and drop within the group and therefore you can only change the order of products within that group. If you want to move to another group you have to use the "Move Selected" and "Copy Selected" functions. "Copy Selected" is especially developed for the PDF and InDesign exports and not so much for the basic WebExport.
To move many groups. Then the group manager from the View & Edit Function is the designated function.
32

View & Edit functions Move and Copy selected and other editing functions can be accessed by right-clicking in the tree screen.
New Group Creates a new group.
Move Selected Move selected products from one folder to another.
Copy Selected Makes a copy and places it in a different group. This is useful when you have a product in multiple groups. If you change a copied product in one group, it changes automatically in the other group (s). This function is not suitable if you use the basic WebEx port
Delete Selected Removes selected products.
Group Manger To move many groups. Then the group manager is the designated function.
Remove SubGroups Removes a layer groups. So you can put all the products in one group.
33

Remove groups You can delete a group by selecting it and clicking the delete button on your keyboard,
Manually add, cloning and remove products. On top of the data grid there are three buttons that allow you to create, cloning and remove products,
Add Product => if you click on "new product" at the top of the data grid a new product is created. By clicking on the product, a screen where you can enter the data will open.
Clone Product => Creates a new product. By clicking on the product, a screen where you can enter the data will appear.
Delete Product => Removes a selected product.
Search functions
Search In the top of the View & Edit screen, you find a search function.
34
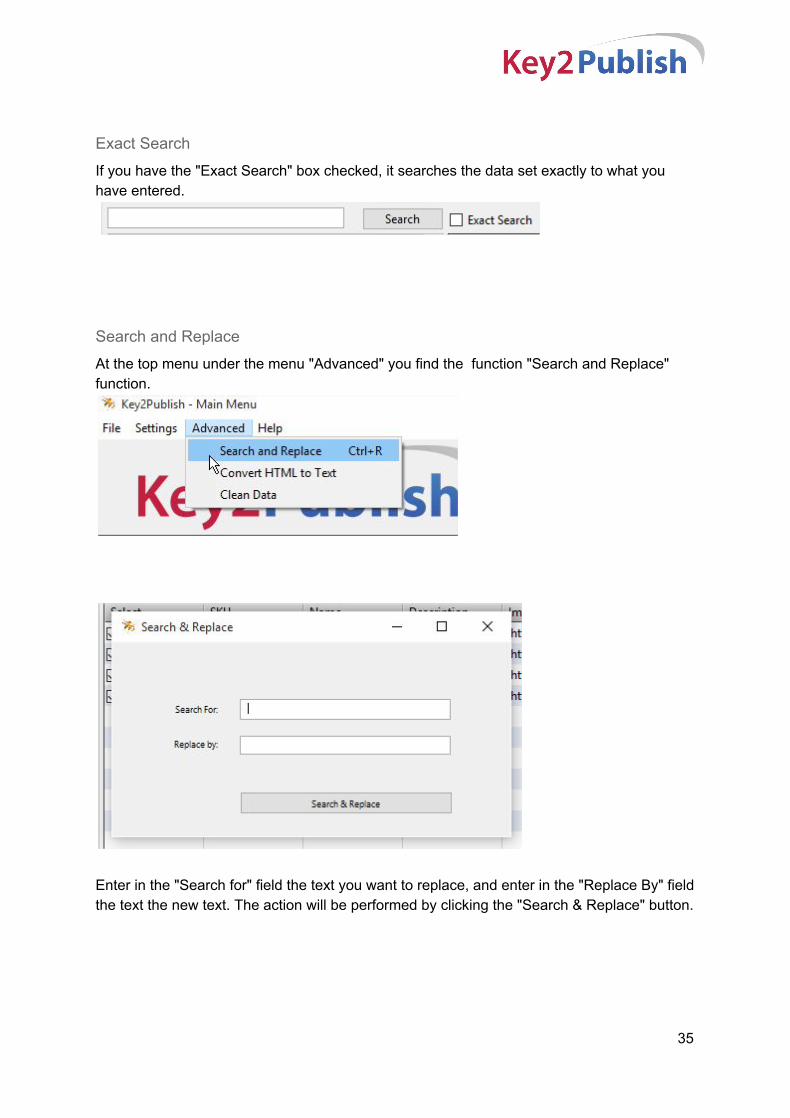
Exact Search If you have the "Exact Search" box checked, it searches the data set exactly to what you have entered.
Search and Replace At the top menu under the menu "Advanced" you find the function "Search and Replace" function.
Enter in the "Search for" field the text you want to replace, and enter in the "Replace By" field the text the new text. The action will be performed by clicking the "Search & Replace" button.
35

Remove formatting characters Especially data imported from online shops can contain formatting characters.
If you go to the top menu and there select "Advanced". You will find the features "Convert HTML to Text" and "Clean."
Convert HTML to Text The function "Convert HTML to Text" will remove all HTML code from the data.
Clean The "Clean" feature allows you to remove all format characters that are not caused by HTML characters.
36

Repair unwanted changes. If you are not satisfied with your changes to the structure of the data. By "drag and drop" action groups, deleting groups, moving or removing products, you can reverse them with the key combination Ctrl Z.
Backup data It is very wise, especially if you are going to spend a lot of changes in the data to make one or more backups.
That can be done in the top menu via "File" and "Save As k2z". This is also useful if you for some reason want to make a customer-specific data set for single use only.
37

Export to CSV: By selecting the tab "File" to get to the file export section. Basically, this part works very simple.
File Output First, select a file in the "file output" in which the data will be exported. In this case, this is an output file named "Default CSV file". The structure of this export file is set in advance in a output script. "Setting structure exported file" explains how such scripts must be made.
File Name Then you specify the file name and its extension. By pressing the button" Export "the file is generated.
Setting structure exported file. How the structure of the exported file looks like can be set in a "File Output" script. By adjusting the code in "export_tofile.xml" the structure of the export file can be adjusted. Multiple scripts can be displayed in "File Output" via a dropdown menu.
38

To do this, go to the folder C: \ Users \ your user rnaam \ AppData \ Roaming \ Key2Publish \ Config. A shortcut is to type %appdata% in the address bar of the browser. It will bring you directly into the "Roaming" folder.
The file "export_tofile.xml" can be found as follows: 1. %APPDATA% 2. Key2Publish folder 3. Config folder 4. Kopieer bestand
Als u het bestand opent in bijvoorbeeld Notepad ++ krijgt u de volgende code te zien.
39

elements explained
<configurations> root element to hold all CSV configurations
<config> A single configuration
<options> Holds the options available for the CSV Export
<delimiter> Holds the delimiter that is used too divide the data
<quoted> If the data needs to be surrounded by quotes
<grouping> If the data has groups
<groups> Beginning of the group fields
<column> A single column of data
<products> Beginning of the products field (A Single line)
<field> A single field used to combine the data (only if the combine property is set to true)
attributes explained
name config attribute for column name or configuration name
order the column number the value needs to be inserted
type "not used, should be used for import type"
has "if the option is valid for this configuration"
levels "number of group levels (the depth)"
combine "If certain fields are combined"
delimiter "delimiter used when combined is true, can be zero or space or whatever"
grouped "if group fields are combined into a single column"
groupdel "the delimiter used to seperate the group fields"
40

Simple Example of a Configuration with groups.
We see in the example below that a few things are clear. The name of the configuration is “Simple CSV” and the type is “CSV”. It has a delimiter “;” and it is quoted by ”. The configuration has groups (see grouping has is true) and the depth of the groups is 1. The File Export follows a bottom to top approach. Where if you have multiple levels of groups. Like TV’s → Samsung. It wil only show Samsung if it’s value is 1. Leave empty if you wish to have all groups. Following this comes the groups columns. It has only one. The name of the Column in this case “Category” can be anything the user wants. Type is not used but always filled in with the value “1”. The order attribute is very important it shows the order in which the columns will appear in the exported file. One warning if you have already filled in the same number somewhere else. Only the last column that has that number will appear. Lastly the name between the elements tags needs to refer to a column name in Key2Publish. So if your data tells us that it’s not “name”, but “title”. You need to fill in “title”. Otherwise you will have an empty column.
The same goes for Products. You need to fill in a column name. Fill in the type. Make sure that the order is a different number then the group and fill in the referenced column name from your data in Key2Publish.
41

Complex grouped example
This more complex example demonstrates a few more features. We have multiple columns in both the groups and products section. This is an easy way to create new column names. Even empty ones can be made and will be shown in the exported File. Handy if some data needs to be added later on. Also we see a few more added attributes to the groups column tags. These are grouped and groupdel (short for groupdelimiter). The first attribute tells us that all names of the categories must be combined into one field. So all different category levels will be put in one column field. So for example if the category level is this TV’s → Sony. You wil get as output TV’s > Sony into one field. Without Grouped begin true or even being present in the configuration. All Category levels will be assigned to there own columns. The groupdel attribute tells us which delimiter to use between the multiple levels of categories. Products can also group fields together, but this time not as a level, but as a combination of fields. For example we have two descriptions in the data. Which need to be combined as one. First of we create a normal column tag and give it the name of “desc” we fill in the type and order as usual. Then come the new attributes combine and delimiter. Combine tells us that we want to combine fields together. The delimiter tells us which character to use to split these fields together. It needs to be another character then used by the delimiter tag. So in the above example it shouldn’t be “|”. That’s why we use the value “-” instead, but it can be any character except the character that was filled in by the delimiter element tag which is “|” In between the column element tags. We now don’t put a column name referenced from the data, but a new field element tag. We give it a name for instance desc1. (It can be anything you want it, is not used in the exported file document). We fill in the type and order. In between the field element tags we put the column name used in Key2Publish. We repeat the creation of field element tags for all fields we wish to combine into one column.
42

PDF Export This export is not available in the basic version.
InDesign Export This export is not available in the basic version.
Webshop Export If you have made a data selection in the “View & Edit” section. You go to the webexport tab to export or delete this data in your webshop.
43

But before you can export data, need to install an module and specify the settings of the shop. All, only once and very simple.
Settings At Settings you have to fill in the url, username and password from the admin from your webshop. Set Items per page on 10 or if you have a good internet connection on 25. If you want to export to another shop click on the buttons new.
Webscript
Select the webshop.
Set Language Select which language part.
Store Settings These store settings will appear automatically.
44

Delete records? Select this option if you want to delete the in Key2Publish selected products from your shop.
Images for the web
To upload images, check "Upload Images".
Images Folder
If the data only contains a names of the images, a image folder has to be selected. That is not the case If there are addresses in the data for the images.
Through the URL in the data, the images are taken directly from the icecat website and directly placed in the shop.
45

The data is then placed in the shop as it is set in the View & Edit.
For the above selection, this means that the selected products from entering the main group Acer Z series Workstations and the subgroup. Groups are not present they are created in the shop.
Group names Leading The export function of Key2Publish works on a very simple principle. The category structure is leading. If you want to place products in a specific category in the shop, then make sure those products are under the same category structure in Key2Publish.
46

Error message webexport If this message appears there is something wrong with your internet connecting or with your data. For example that your description in Key2Publish has to many characters for your shop.
Close Key2Publish. You can Key2Publish close to the top right of Key2Publish by clicking on the closing icon.
If you choose the top left of the screen "File", you can tchoose two ways of exiting.
Quit Without Saving Quit without saving your adjustments.
47

Quit If you choose "Quit" or if you close the program via the shutdown icon top right of the you get the following saving options.
Support: If you have questions about the operation or installation of Key2Publish. Please check our website or send us an email. E [email protected] I www.key2publish.com
Customization Key2Publish can be changed according to individual or personal specifications or preference. reative and unique catalog layout designs can be build and external data sources can be linked.
Helperpark 294a, 9723 ZA Groningen Postbus 7079,9701 JB Groningen T +31 (0)50 720 02 25 E [email protected]
48