manual leica sp2 revision - usf health
TRANSCRIPT

LMW
Ente Thin M
co
CThm
Syst1. T
Ss
2. Td
3. Tif
4. SdtO
t
W Microscop
er you nam
ngs to chec
Make sure thoverslips. Fi
heck the objhere are 40xmicroscope.
tem Start‐Turn on the
Scanner Laseswitches.
Turn on the cdesktop as L
Turn on the f you look atStart the LCSdouble‐clickithe desktop.On the pop‐u
the Personal
py Lab : Lei
M
me, the da
ck before s
at your samixed samples
jectives. Thex and 63x OIIf oil immer
up. microscope
er HeNec a
computereMW‐User.
Mercury Arct fluorescentS program bying the LCS i up starting w
l and click
ica SP2
Manual fo
te, the tim
start‐up.
ple slides ars need to be
e 10x and 20L immersionsion objectiv
controllerb
nd PC/Stand
e and log on
c lamp Powetly labeled sy con on
window pane
butt
or Leica S
me in and t
re clean and e sealed with
0x objectivesn objectives,ves have oil
b and the
dd
to the
er Supplyf,amples.
el, select
ton.
Page 1
SP2 Confo
time out in
sealed. Useh nail polish.
s are DRY ob, and a 63x Won them, wi
,
ocal Micro
n the user
e Windex an.
bjectives, andWATER immipe the lens
oscope
log book.
nd cotton ba
d should NEVersion objecgently only
dc
`7/
lls or Kimwip
VER have oictive also onwith lens pa
b
d
/7/2014
pes to clean
l on them! n this aper.
f
e
LMWOvev
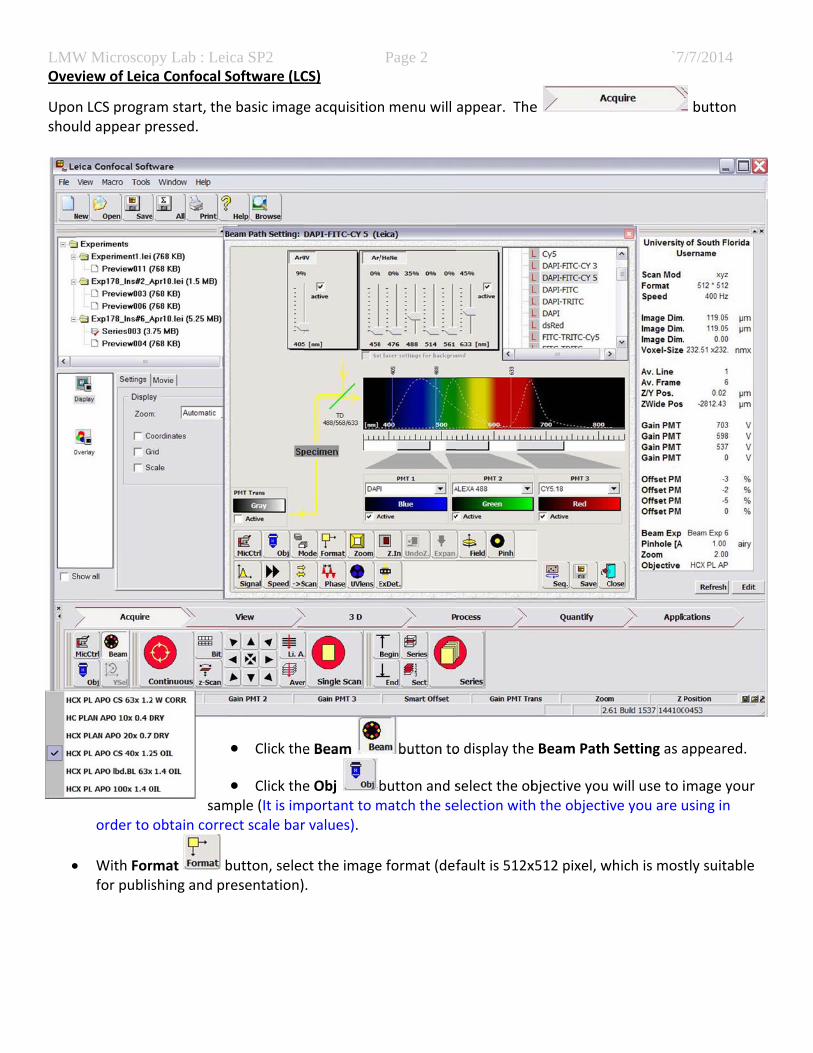
Uposhou
W Microscopview of Leic
n LCS prograuld appear p
order to
With Forfor publis
py Lab : Leia Confocal S
am start, theressed.
samobtain corre
rmat bshing and pr
ica SP2 Software (LC
e basic image
Click the
Click themple (It is imect scale bar
button, selecresentation)
CS)
e acquisition
e Beam
e Obj bportant to mr values).
ct the image.
Page 2
n menu will
button to
button and smatch the se
e format (def
appear. The
o display the
select the obelection with
fault is 512x
e
e Beam Path
bjective youh the objecti
x512 pixel, w
`7/
h Setting as a
will use to iive you are u
which is most
/7/2014
button
appeared.
image your using in
tly suitable

LMWBasi
Brigh1. P
ct
2. F
h
tV
3. S
s
bot
4. F
fBit
5. Um
bP
6. Wfm
C
7. Feoaokoo
W Microscopic Operatio
ht‐field viewPlace your sacoverslip (prtoward the o
For bright‐fie
halogen lam
toward you aVIS position
Start with low
specimen. P
by hand. Thof the objectthe panel).
Focus on to t
f (upper anButton to brt away from
Use the Finemovement c
button h (SPlease DO N
With most cefocus to youmode. For P
Condenser R
For using oil expose the leoil or water oapplication tobjective unknob to gradoccasionallyobjective. Th
py Lab : Leion of Leica
wing: ample slide oeferably #1.objective.
eld viewing,
p light by tu
and turn the(Note: make
w magnifica
Place the des
e readout ptive (Note: o
the sample b
nd lower) andring the objem the sample
e focus knobcan be set fro
2 is recommOT press th
ells or tissuer sample witPhase Contra
Ring i to se
or water imens by turninon the objectools!). Turntil the oil jusdually bring yy to make suhis can dama
ica SP2 a DM IRE2
on the stage5 thickness)
turn on the
rning the wh
e VIS/SCAN se sure to swi
tion objectiv
sired objecti
anel e at thother inform
by moving th
d the Fine Foective close te.
g to fine tuom S0 (very
mended for me LEARN, CH
e samples stath a fluorescast mode wit
elect PH1 (fo
mersion lenng the turrective (be carn the objectist spreads ouyour samplere that you age the obje
Inverted M
e holder with) facing dow
microscope
heel b switch c toitch back to
ves (10X or 2
ve in positio
he front of thation is not
he objective
ocus Knob gto the sampl
une focusingfine) to S3 (
most cases). HANGE, or
ained with flcence mode th 10x or 20
or 10x) or PH
ns, lower thet half way byeful not to tve turret baut as it contae into focus. are not pusective lens a
Page 3Microsocp
h n
e
o Scan positio
20X) first to
on by turning
he scope shocorrect due
e with the Co
g. Push the le or the low
g. The extencoarse) by p
buttons.
luorescent d(see below)x objectives
H2 (for 20x).
e objective tuy hand, and ouch the lenck in positioacts the slide Check yourhing up the and your sam
pe.
on for confoc
focus onto y
g the lens tu
ows the z‐poto malfunct
oarse Focus
upper Coarswer button to
t of the finepressing the
dye, you cou) or Phase Cos, turn the
urret slightlyplace a dropns directly won and raise e. Use find fr slide slide with tmple!
g
cal laser scan
your
urret d osition tion of
Buttons
se o bring
STEP
uld easily ontrast
y, p of with the focus
the
b
`7/
e
nning, see b
d
/7/2014
h
i
elow)
e
c
f
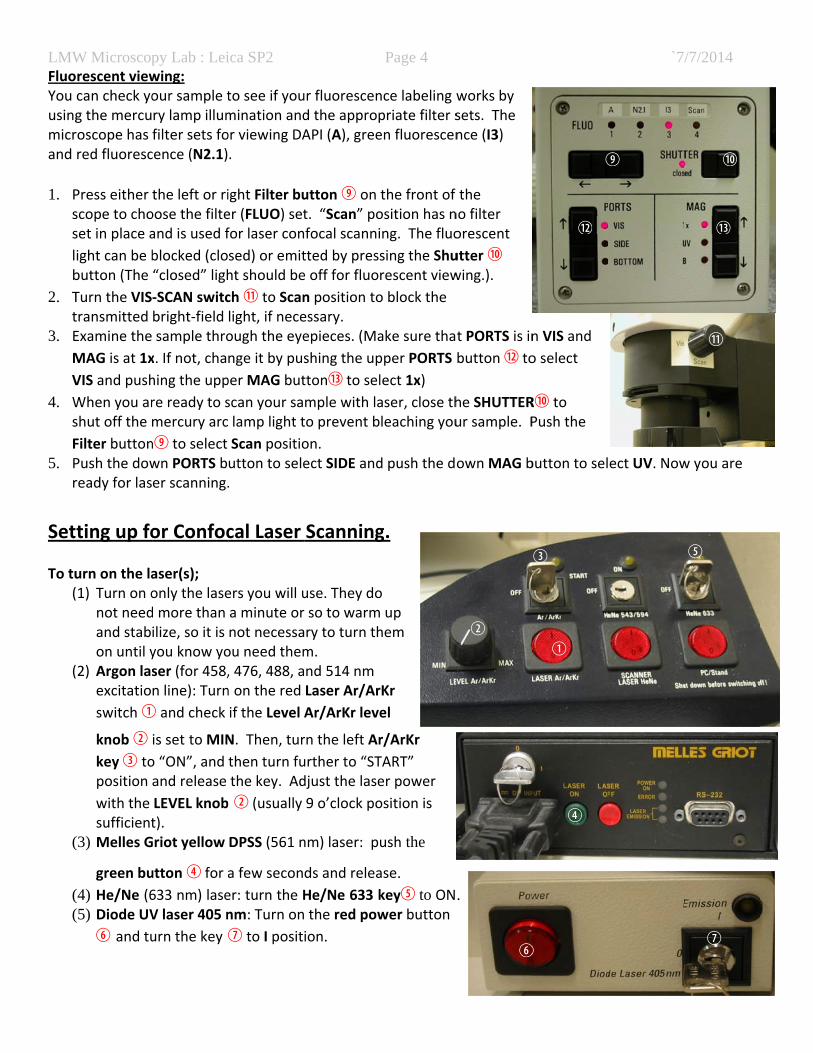
LMWFluoYou usingmicrand 1. P
ss
lb
2. Tt
3. E
M
V
4. Ws
F5. P
r
Set To tu
(
(
(
((
W Microscoprescent viewcan check yog the mercuroscope has red fluoresc
Press either scope to choset in place a
ight can be bbutton (The
Turn the VIStransmitted Examine the
MAG is at 1x
VIS and push
When you arshut off the
Filter buttonPush the dowready for las
ting up fo
urn on the la1) Turn on o
not needand stabon until y
2) Argon lasexcitatio
switch b
knob c key d toposition
with the sufficient
(3) Melles G
green bu
(4) He/Ne (6(5) Diode UV
g and tu
py Lab : Leiwing: our sample try lamp illumfilter sets focence (N2.1)
the left or rioose the filteand is used f
blocked (clo“closed” ligh
‐SCAN switcbright‐field sample thro
x. If not, cha
hing the upp
re ready to smercury arc
nj to select wn PORTS ber scanning.
or Confoc
aser(s); only the lased more than ilize, so it is you know yoser (for 458,n line): Turn
b and check
is set to MIN
o “ON”, and and release
LEVEL knobt). Griot yellow
utton e for a
633 nm) laseV laser 405 n
urn the key h
ica SP2
to see if youmination andor viewing DA.
ight Filter buer (FLUO) setfor laser con
sed) or emitht should be
ch 1! to Scanlight, if neceough the eye
nge it by pus
per MAG but
scan your sa lamp light t
Scan positioutton to sele.
cal Laser
ers you will ua minute ornot necessaou need them, 476, 488, an on the red if the Level
N. Then, tur
then turn futhe key. Ad
b c (usually
DPSS (561 n
a few secon
er: turn the Hnm: Turn on
h to I posit
ur fluorescend the appropAPI (A), gree
utton j on t. “Scan” pofocal scanni
tted by presse off for fluor
n position toessary. epieces. (Ma
shing the up
tton1# to sel
mple with lato prevent b
on. ect SIDE and
Scanning
use. They dor so to warmry to turn thm. nd 514 nm Laser Ar/Ar
Ar/ArKr leve
rn the left Ar
urther to “STdjust the lase
9 o’clock po
nm) laser: pu
ds and relea
He/Ne 633 k the red pow
ion.
Page 4
nce labeling wpriate filter sen fluorescen
the front of osition has nng. The fluo
sing the Shurescent view
o block the
ake sure tha
pper PORTS
lect 1x) aser, close thleaching you
d push the d
g.
o up hem
rKr
el
r/ArKr
TART” er power
osition is
ush the
ase. keyf to ONwer button
c
g
works by sets. The nce (I3)
the no filter orescent
utter 1) wing.).
t PORTS is in
button 1@ to
he SHUTTERur sample. P
own MAG b
.
e
d
g
j
1@
n VIS and
o select
R1) to Push the
button to sel
b
`7/
j
ect UV. Now
/7/2014
1!
f
h
1)
1#
w you are

LMWLCS I
1. F
f(
e
dcl
2. Y
go
3. P
W MicroscopImaging pro
First, select t
fluorescent lLeica Factor
emission det
dichroic beacan adjust thevel as nece
You can also
grey scale byon the windo
Press Mode
py Lab : Leiogram settin
the appropri
abels you usry setting) b
tector band‐
m splitter1!he range andessary.
change the
y clicking theow screen (N
button
ica SP2 g
iate laser lin
sed on your y double clic
‐widthj, act
, and excitatd position of
color schem
e pseudo‐coNote: the co
to select Sc
es and set u
sample fromcking. This w
tivate the pr
tion laser waf detector ba
me of individ
lor selectorlor informat
can Mode (d
1)
1!
Page 5
up detectors
m the drop‐dwill automat
roper detect
avelength anandwidth an
ual images i
1# associatetion will be s
default is XYZ
1@
for the
down L listitically set up
tor (PMTs)1)
nd [email protected] the laser p
into any colo
ed with eachsaved with im
Z).
j
1#
i p the
),
. You power
or or
h PMT mage files w
i
`7/
when saved).
/7/2014

LMW
4. Pp
5. P
ki
6. PSm
R
7. O
(a) T(b) Z
re
(c) Pinu
knrawsaand
la
W Microscop
Press Formaparameters (
Press Z‐scan
knob 1$ to ms used with
Press ContinStop button)monitor.
Remote Con
Optimize the
The z‐positio
Zoom factor esolution, bu
PMT1, 2, 3, Tncrease the snder 600 V)
nob counterange of the Pwindow in thaturating thend PMT offsarkest pixels
aser power b
P
py Lab : Lei
t , and (defaults are
button
move the objthe Galvo st
nuous ). An image
ntrol Knobs
e images by
on (focusing)
(ZOOM knout also will b
Trans and Smsignal intens. To decreas
rclockwise. PMT for optree differene PMT will aet such thats are just ab
bar1@ on the
seudocolor
ica SP2
Speed e 512x512 fo
and select
jective for fotage adaptor
button tor images, d
adjusting pa
) within the s
ob 1%): Defaubleach the sa
mart Offset sity of each fse backgrou
With Q LUT imal image qt LUT modesppear blue at the brighteove the zero
e menu wind
1^
buttons to ormat and 40
t z‐Wide in o
ocusing (Defr).
to start scandepending o
arameters in
specimen (Z
ult is 1; increample faster
knobs 1^: Tufluorescent and signal, cl
button quality can bs; pseudocoand pixels west pixels areo value (a so
dow if neces
Page 6
select these00Hz scan sp
order to use
fault is z‐Gal
nning (it will on the numb
cluding;
Z‐POS knob1$
easing zoom r!
urn PMT knoand transmiick the mou
in the Expbe obtained.lor> Hi‐Lo>m
which are blae just under tme green pi
ssary).
Hi‐Lo
e peed).
Z POS
vo, which
become ber of active
$).
will magnify
obs to increassion imagese over a ch
periment live. Every clickmonochromeck (0 value) the saturatioixels). (Adjus
1%
Galv
detectors, w
y the image
ase the dete channel (Nohannel to sel
e view windking this butte. In the Hi‐Lappear greeon (a few blst Laser pow
1$
`7/
vo stage ada
will appear o
and improv
ector sensitivote: Keep thect it and tu
dow, a full dyton changesLo mode, pixen. Adjust thue pixels) anwer by dragg
monoch
/7/2014
aptor
on the right
e the
vity so to he PMT leveurn Offset
ynamic the view xels he PMT gainnd the ging the
hrome
l
n

LMW
C
S View
Spssfc
Cbtt
Tvcs
Oomi
Dcmt
Lct
Acqu
P4n
Tbs
W Microscop
Click the Sto
Save button
wing Images
Single buttoputs up full screen of selected fluorescent channel.
Ch 1, 2, 3, 4 buttons– actthe channel the screen.
Tiled buttonviews up to 3channels simultaneou
Ovl button –overlays (memultiple chanto one.
Display buttochange the magnificatiothe screen i
Lut button‐ ocolor look‐uptable.
uiring Single
Press Single 400Hz). Thenoise and im
To use averabutton and sstarting poin
py Lab : Lei
p button
and put a sp
.
n–
tivate on
– 3
sly.
– erge) nnels
on‐
n of mage.
open p
e Optical Sec
Scan button resulting im
mprove the si
aging, click eselect the nunt). Then, cli
ica SP2
again
pecific name
ction Image.
n to acquire mage may disignal‐to‐nois
ither Li.A umber of lineick the Singl
to stop scan
e for later us
.
an image bysplay backgrse ratio.
(line avees (or framee Scan butto
Page 7
nning. (You c
se).
y a single lasround noise.
eraging, recos) to be aveon.
can save the
er scanning . Image ave
ommended) raged (4 line
e current pa
at a scanninraging is a p
or Avere or frame a
`7/
rameter set
ng speed (noprocess to de
(frame avveraging is a
/7/2014
ting with
ormally ecrease this
eraging) a good
LMW A
haC
I
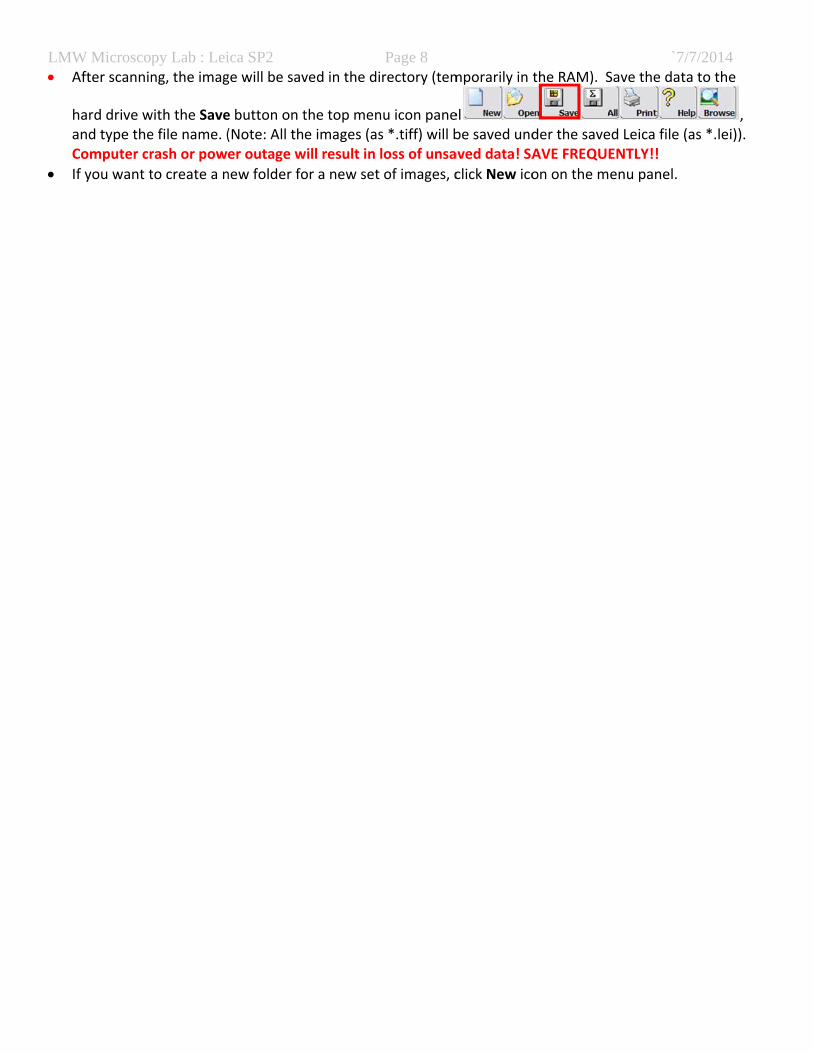
W MicroscopAfter scannin
hard drive wand type theComputer cr
f you want t
py Lab : Leing, the imag
with the Savee file name. (rash or powe
to create a n
ica SP2 ge will be sav
e button on t(Note: All ther outage w
new folder fo
ved in the di
the top mene images (as
will result in
or a new set
Page 8rectory (tem
nu icon panes *.tiff) will bloss of unsa
of images, c
mporarily in
elbe saved undaved data! SA
click New ico
the RAM). S
der the saveAVE FREQU
on on the m
`7/Save the dat
ed Leica file (ENTLY!! enu panel.
/7/2014 ta to the
, (as *.lei)).
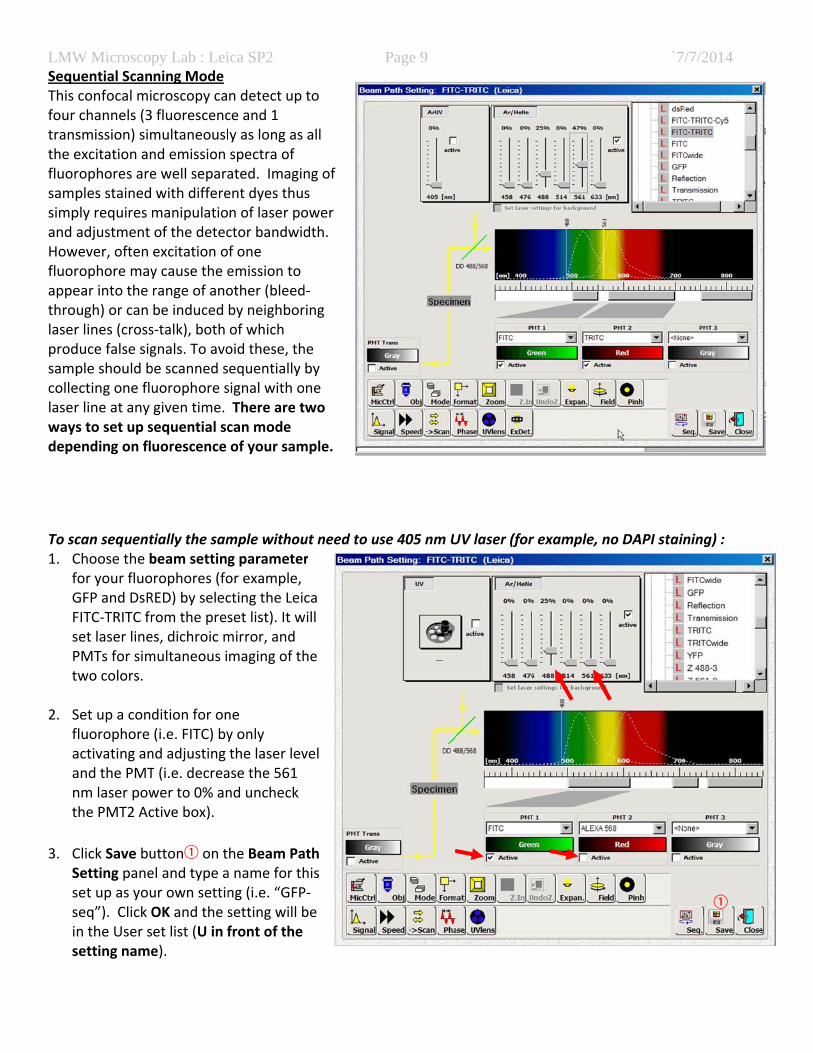
LMWSequThis four transthe efluorsampsimpand Howfluorappethrolaserprodsampcollelaserwaysdepe To sc1. C
fGFsPt
2. S
faant
3. CSssis
W Microscopuential Scanconfocal michannels (3smission) simexcitation anrophores areples stainedply requires madjustment
wever, often rophore mayear into the ugh) or can r lines (crossduce false sigple should becting one flur line at any s to set up sending on fl
can sequentChoose the bfor your fluoGFP and DsRFITC‐TRITC frset laser linePMTs for simtwo colors.
Set up a confluorophore activating anand the PMTnm laser powthe PMT2 Ac
Click Save buSetting paneset up as youseq”). Click On the User ssetting name
py Lab : Leining Mode croscopy ca fluorescencmultaneouslnd emission e well separawith differemanipulatioof the detecexcitation oy cause the erange of anobe induced s‐talk), both gnals. To avobe scanned suorophore sgiven time. sequential scuorescence
tially the sambeam settingrophores (foRED) by selecrom the preses, dichroic mmultaneous i
dition for on(i.e. FITC) bynd adjusting T (i.e. decreawer to 0% anctive box).
uttonb on tel and type aur own settinOK and the set list (U in fe).
ica SP2
n detect up ce and 1 y as long as spectra of ated. Imaginent dyes thun of laser poctor bandwidf one emission to other (bleedby neighborof which oid these, thequentially signal with o There are tcan mode of your sam
mple withoug parameteor example, cting the Leiset list). It wmirror, and maging of th
ne y only the laser levase the 561 nd uncheck
he Beam Paa name for thng (i.e. “GFPsetting will bfront of the
to
all
ng of s ower dth.
d‐ring
he by ne two
mple.
ut need to usr
ca will
he
vel
ath his P‐be
Page 9
se 405 nm UUV laser (forr example, n
`7/
no DAPI stain
/7/2014
ning) :
b

LMW4. R
c
5. CB
SwastS
6. KlsYa
ew
7. S
Sdc
W MicroscopRepeat the scheck box an
Click the SeqBeam Path S
Sequential swill appear. Aacquisition sselecting it frthen click AdSequential s
Keep the scaines”. Do noscan settingsYou can saveacquisition s
e in the Seqwindow.
Start the acqSingle Scan odepending ocondition.
py Lab : Leisame procesnd lower 488
q button Setting wind
can settingsAdd the fluoetting one arom the Usedd button in can settings
an moded aot close the s window. e this sequenettings by Sa
quential sca
quisition by cor Series buton your imag
ica SP2 s for the oth8 laser level
in the ow. The
s windowc orophore at a time by er list and the s window.
t “between Sequential
ntial ave button
n settings
clicking tton ging
her fluorophto 0%), and
e
Page 10ore (i.e. TRITsave the co
TC)(Make sundition as a
ure to unchenother setti
c
`7/eck the PMT1ng (i.e. “DsR
c
d
/7/2014 1 Active RED‐seq”).
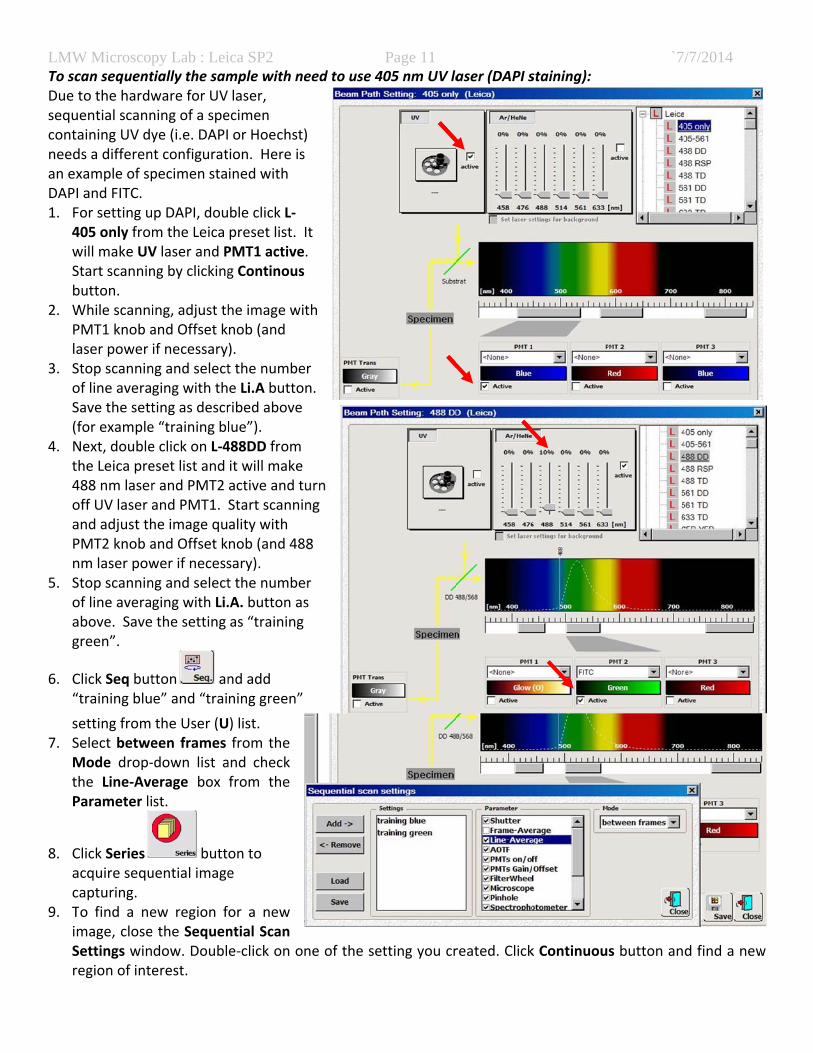
LMWTo scDue sequcontneedan exDAP1. F
4wSb
2. WPl
3. SoS(
4. Nt4oaPn
5. Soag
6. C“
s7. S
MtP
8. Cac
9. TiSr
W Microscopcan sequentto the hardwuential scanntaining UV dyds a differenxample of spI and FITC. For setting u405 only fromwill make UVStart scanninbutton. While scanniPMT1 knob aaser power Stop scanninof line averaSave the settfor exampleNext, doublethe Leica pre488 nm laseroff UV laser aand adjust thPMT2 knob anm laser powStop scanninof line averaabove. Savegreen”.
Click Seq but“training blu
setting from Select betweMode drop‐the Line‐AveParameter li
Click Seriesacquire sequcapturing. To find a nemage, closeSettings winregion of int
py Lab : Leitially the samware for UV ning of a speye (i.e. DAPInt configuratpecimen sta
p DAPI, doum the Leica V laser and Png by clicking
ing, adjust thand Offset kif necessaryng and selectging with thting as descre “training ble click on L‐4eset list and r and PMT2 and PMT1. he image quand Offset kwer if necessng and selectging with Li. the setting
tton ane” and “trai
the User (Ueen frames ‐down list aerage box st.
buttuential image
ew region fe the Sequendow. Doublerest.
ica SP2 mple with nelaser,
ecimen or Hoechst)ion. Here isined with
ble click L‐preset list. PMT1 activeg Continous
he image winob (and ). t the numbee Li.A buttoribed above lue”). 488DD from it will make active and tStart scanniality with nob (and 48sary). t the numbe.A. button asas “training
nd add ning green”
) list. from the
and check from the
on to e
or a new ntial Scan e‐click on o
eed to use 4
) s
It .
th
er n.
urn ng
88
er s
ne of the se
Page 11405 nm UV la
etting you cr
aser (DAPI s
reated. Click
staining):
k Continuou
`7/
s button an
/7/2014
d find a neww

LMW
10. O
s
W Microscop
Once you fin
sequential im
py Lab : Lei
nd a region, s
maging with
ica SP2
stop scannin
Series
ng. Click Seq
button.
Page 12
button to bring up the seque
`7/
ential setting
/7/2014
g and acquiree
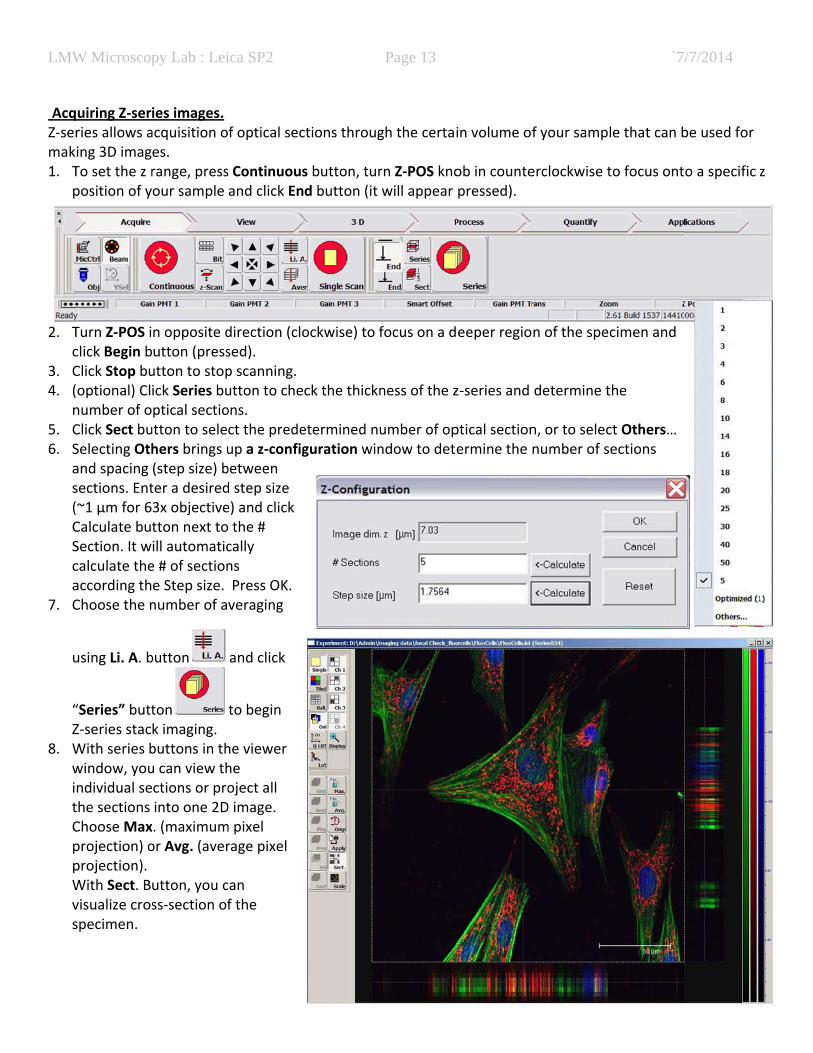
LMW AcqZ‐sermak1. T
p
2. Tc
3. C4. (
n5. C6. S
as(CSca
7. C
u
“Z
8. WwitCppWvs
W Microscop
uiring Z‐serries allows aing 3D imagTo set the z rposition of y
Turn Z‐POS iclick Begin bClick Stop buoptional) Clnumber of oClick Sect buSelecting Othand spacing sections. Ent~1 µm for 6Calculate buSection. It wcalculate theaccording thChoose the n
using Li. A. b
“Series” buttZ‐series stacWith series bwindow, youndividual sethe sections Choose Maxprojection) oprojection). With Sect. Bvisualize crosspecimen.
py Lab : Lei
ies images. acquisition oes. range, pressour sample
n opposite dutton (pressutton to stopick Series buptical sectioutton to selehers brings u(step size) bter a desired3x objectivetton next toill automatice # of sectione Step size. number of a
button
ton k imaging. buttons in thu can view thctions or prointo one 2D
x. (maximumor Avg. (aver
utton, you css‐section of
ica SP2
f optical sec
s Continuousand click En
direction (closed). p scanning. utton to cheons. ct the predeup a z‐configbetween d step size e) and click the # cally ns Press OK. veraging
and click
to begin
he viewer he oject all D image. m pixel rage pixel
can f the
ctions throug
s button, turd button (it
ockwise) to f
ck the thickn
etermined nuguration win
Page 13
gh the certai
rn Z‐POS knowill appear
focus on a d
ness of the z
umber of opndow to det
in volume of
ob in countepressed).
eeper regio
z‐series and
ptical sectionermine the n
f your samp
erclockwise t
n of the spe
determine t
n, or to selecnumber of s
`7/
le that can b
to focus ont
cimen and
the
ct Others…sections
/7/2014
be used for
o a specific z

LMW AcquTimeinter 1. T
ssxT
2. C
twpta
3. Ceootpr
eFC
4. C5. C (Optinter
To in
W Microscop
uiring Time Se series allowrest. The tim
To set obtainseries imageselect scan Mxyt. It will acTime button
. Click Time bu
to opetime‐lapse sewindow and parameters sthe time inteand the numCheck one ofenter the deother two paon keyboardthe value forparameter. (right, check “
enter 5 sec fFrames. EnteComplete TimClick Apply bClick Series b
tion) Click onrest changes
ncrease the s
py Lab : Lei
Series imagews time‐lapsme‐lapse ima
n time‐s, Mode as ctivate s
utton
en the etting set the such as erval betweember of framf three parasired numbearameters H, which will r the checke(for example“Complete T
or T and 10er key will came as total tbutton. button to sta
n Aver or Li.s or move fa
signal, use s
ica SP2
es. se imaging oages can be s
en frames es. meters and ers into the it Enter key calculate d e shown in Time” and
00 for alculate the time of 8min
art the time‐
A. button toster than sca
lower scan s
f live samplesaved as mu
n 15s.)
‐lapse series
o set the numanning spee
speed by clic
Page 14
es to study tltiple Tiff file
s acquisition
mber of avered, averaging
cking Speed
the changes es and AVI fi
.
raging per frg will genera
and dynamiiles for playi
rame. Note: ate distorted
butt
`7/
ics of your oing in movie
If your objed or ghost im
ton.
Seof
/7/2014
object of programs.
ct of mages.
Set time interval
et the numbef frames
er

LMWProcchanimagpres
1. A
2. C3. C
Tw
4. FPc
5. S
W Microscopcessing and ennel image isge processinentation).
Adjust image
Click the DispClick on the To>Experimewill export to
Selection
Selection
All (snap
For time seriPrev, Last). can also visuSave the *.le
py Lab : Leiexporting ims saved in twg such as br
es and put a
play buttonimage you went>Selectioo a new ima
n (raw): expo
n (snapshot)
pshot): expor
ies, you can For Z‐series,alize the croei folder file
ica SP2 mages: The wo tiff files ‐‐ightness‐con
nnotations y
and sewant to expoon (raw)/Selge file.
ort the curre
): export the
rt all the scr
go through , Max or Avgoss‐section owhenever yo
original imag‐ one for eacntrast enhan
you want, su
elect 1:1 to dort and rightlection (snap
ent selected
e current sele
een images
or play the tg buttons prof the specimou add new
Page 15ges are savech channel. ncement and
uch as scale
display imag‐click on thepshot)/All (s
image only
ected screen
with annota
time lapse mrojects the dmen with Secimages.
ed as single tYou can savd merging ch
bar.
ge in exact pe mouse to bsnaphot). S
(no annotat
n image with
ations.
movie with seifferent sectct. button.
tiff files; for ve a current hannels (use
ixel dimensibring the conSelect one of
tions include
h all annotat
equence buttions into a p
`7/example a tscreen imageful for powe
on. ntext menu;f these optio
ed).
tions.
ttons (First, projected 2D
/7/2014 wo‐color ge after erpoint
Send ons and it
Next, Play, D image. Youu
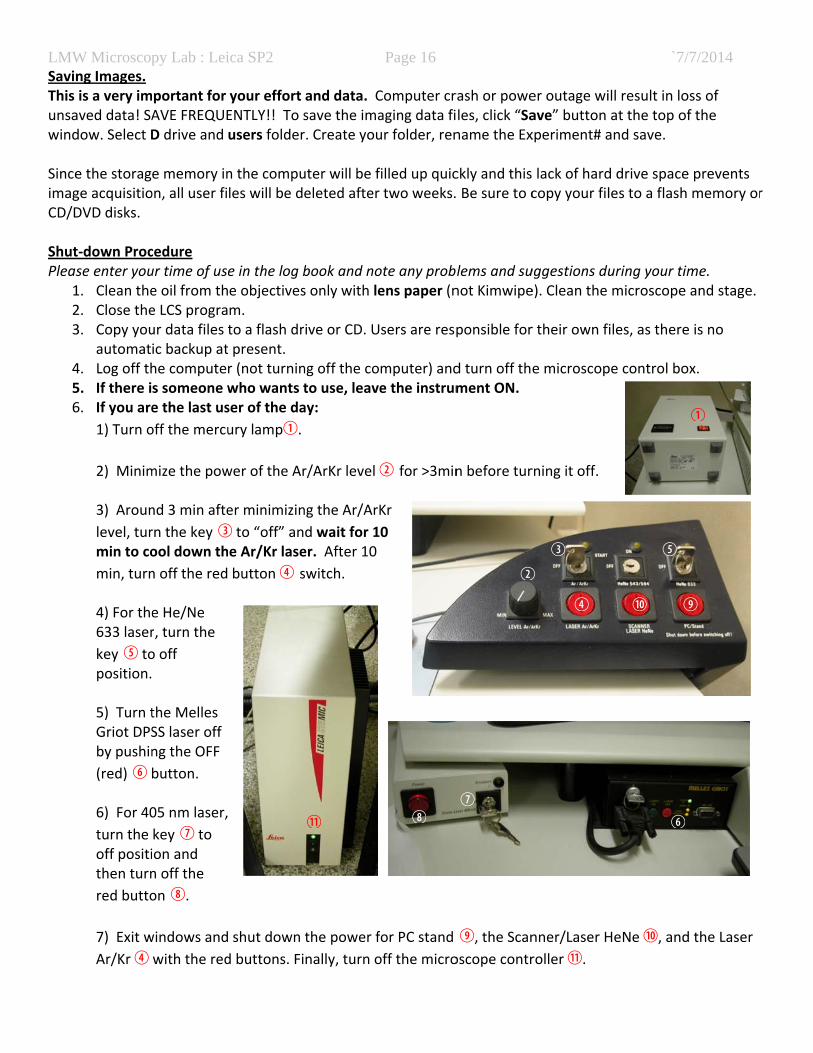
LMWSavinThis unsawind SinceimagCD/D ShutPleas
123
456
W Microscopng Images. is a very imaved data! SAdow. Select D
e the storagge acquisitioDVD disks.
t‐down Procse enter you1. Clean the2. Close the3. Copy you
automat4. Log off th5. If there i6. If you are
1) Turn o
2) Minim 3) Aroun
level, turmin to co
min, turn 4) For the633 laser
key f toposition. 5) Turn tGriot DPSby pushin
(red) g 6) For 40
turn the off positithen turn
red butto
7) Exit w
Ar/Kr e
py Lab : Lei
portant for AVE FREQUED drive and
e memory inon, all user fi
cedure ur time of usee oil from the LCS prograur data files tic backup athe computes someone we the last us
off the mercu
mize the pow
nd 3 min afte
rn the key dool down th
n off the red
e He/Ne r, turn the
o off
the Melles SS laser off ng the OFF
button.
05 nm laser,
key h to ion and n off the
on i.
windows and
with the red
ica SP2
your effort ENTLY!! To susers folder
n the compules will be d
e in the log be objectivesm. to a flash dr present. r (not turninwho wants tser of the da
ury lampb.
wer of the Ar
er minimizin
d to “off” ane Ar/Kr lase
button e s
shut down
d buttons. Fi
and data. Csave the imar. Create you
uter will be feleted after
book and nos only with le
ive or CD. U
ng off the coto use, leaveay:
r/ArKr level c
ng the Ar/ArK
d wait for 1er. After 10
switch.
the power f
nally, turn o
1!
Page 16
Computer craging data fiur folder, ren
illed up quictwo weeks.
ote any probens paper (n
sers are resp
mputer) ande the instrum
c for >3min
Kr
0
or PC stand
off the micro
i
rash or poweles, click “Saname the Ex
ckly and this Be sure to c
lems and sunot Kimwipe
ponsible for
d turn off thement ON.
n before tur
j, the Scan
oscope contr
c
h
er outage wiave” button xperiment# a
lack of hardcopy your fil
uggestions due). Clean the
r their own f
e microscop
rning it off.
nner/Laser H
roller 1!.
c
d
e
`7/
ill result in loat the top oand save.
d drive spaceles to a flash
uring your timicroscope
iles, as there
pe control bo
HeNe 1), and
f
g
j1)
/7/2014
oss of of the
e prevents h memory or
ime. e and stage.
e is no
ox.
d the Laser
b
g
j
r