manual mini contac-ii - lpkf laser & electronics manuel and especially the safety instructions...
TRANSCRIPT
Manual Mini Contac-II
English, version 1.0
LPKF Laser & Electronics AGOsteriede 7D-30827 Garbsen
Telefon : ++ 49 - 51 31 - 70 95 - 0 Telefax : ++ 49 - 51 31 - 70 95 - 90eMail : [email protected] : http: //www.lpkf.de
2 Mini Contac-II
The information contained in this document may be modified without prior notification. No part of this document may be reproduced or transmitted for any purpose or in any form by any means, electronic or mechanical, by photocopy, by recording or by information storage and information retrieval systems without the express written permission of LPKF.We have taken great trouble to ensure the accuracy and completeness of the information in this document. However, LPKF accepts no liability for the use of the document, including breach of copyright or other infringement against third parties which may arise from this.
© 2000 LPKF Laser & Electronics AG. All rights reserved.
Part number 10854

Mini Contac-II 3
Information on this manual
It is the duty of the system owner to care for and plan these measures as well as to control their execution. The owner especially has to ensure that
• the system is only used as directed
• the system is only operated in perfect and functional condition. Especially the function of the safty appliances has to be checked regularly
• the necessary personal protectiv equipment for the operating, maintaining and repairing personnel is available and being used
• the operating manual is kept legible and complete at the place of operation
• only sufficiently qualified and authorized personnel operates, maintains and repairs the system
• this personnel is regularly instructed in matters of work safety and environmental protection and is informed on the operation manuel and especially the safety instructions
• all safety and warning notes or signs stay on the system and are legible

4 Mini Contac-II
Using this manual
I. Orientation
This manual is divided into the following chapters:
1. Introduction 2. Products supplied 3. Safety regulations 4. Description of the machine 5. The operating menu 6. The process menu 7. Setting up 8. Description of operating procedure 9. Maintenance and servicing 10.Waste disposal 11.Appendix
II. Conventions used in this manual
Bold text is used to emphasise important information.
Illustrations are numbered. Example: Fig. 5
› Prompts for actions are identified with an arrow.
Italic sections are used to indicate the reactions consequent on an action.
Words printed in italics mark proper names
Key inscriptions and menu terms are printed in BOLD CAPITALS.
III. Notes on the symbols used
Danger! This symbol is used to highlight danger to life or health.
Caution! This symbol is used to identify hazards which may cause damage.
Note: This symbol is used for notes intended to help you avoid faults in operation or to help you improve your procedures.

Mini Contac-II 5
IV. Target Group
This manuel is written for people with basic knowledge in PCB production, including the production of multilayer PCBs for electronics

6 Mini Contac-II
Table of contents
1.0 Introduction. . . . . . . . . . . . . . . . . . . . . . . . . . 8
2.0 Products supplied . . . . . . . . . . . . . . . . . . . . 9
3.0 Safety regulations. . . . . . . . . . . . . . . . . . . . 10
4.0 Description of the machine . . . . . . . . . . . . 11
4.1 Connections diagram . . . . . . . . . . . . . . . . . . . . . . .12
4.2 Electrical connections. . . . . . . . . . . . . . . . . . . . . . .12
4.3 Description of the individual containers . . . . . . . . .13
4.4 The operating panel . . . . . . . . . . . . . . . . . . . . . . . .16
4.5 Program selection mode . . . . . . . . . . . . . . . . . . . .17
5.0 The Mini Contac-II operating menu. . . . . . 18
6.0 The Mini Contac-II process menu . . . . . . . 19
7.0 Setting up . . . . . . . . . . . . . . . . . . . . . . . . . . 20
8.0 Description of operating procedure . . . . . 22
9.0 Maintenance and servicing . . . . . . . . . . . . 25
10.0 Waste disposal . . . . . . . . . . . . . . . . . . . . . 27
11.0 Appendix . . . . . . . . . . . . . . . . . . . . . . . . . . 28
11.1 Through-hole plating record . . . . . . . . . . . . . . . . .28
11.2 Inspection report 1 . . . . . . . . . . . . . . . . . . . . . . . .29

Mini Contac-II 7
11.3 Translation of Inspection report 1 . . . . . . . . . . . . .30
11.4 Inspection report 2 . . . . . . . . . . . . . . . . . . . . . . . .31
11.5 Translation of Inspection report 2 . . . . . . . . . . . . .32
11.6 Inspection report 3 . . . . . . . . . . . . . . . . . . . . . . . .33
11.7 Translation of Inspection report 3 . . . . . . . . . . . . .34
11.8 Safety Data Sheet. . . . . . . . . . . . . . . . . . . . . . . . .36
Introduction
8 Mini Contac-II
1.0 Introduction
Dear Customer
May we congratulate you on your choice of the LPKF Mini Contac-II system for through-hole plating in the laboratory.
This is the simplest system for galvanic through-hole plating to use in terms of the number of baths and production steps that we know of on the market. The process requires no specialist knowledge of chemistry or galvanizing.
Nevertheless, as with all galvanizing systems, the instructions in the operating manual must be followed carefully, otherwise there is a significant danger of a bath being damaged to such an extent that it can no longer be used.
In particular we would like to draw on our experience and bring to your attention the following possible errors:
• Do no allow the temperature of the baths to drop below 20°C (overnight, for example). The machine should always be kept at room temperature.
• Pay particular attention to careful rinsing. Under no circumstances should residues from one bath be allowed to get into the next bath. You must also rinse the circuit board holder carefully after use.
• Do not use steel wool or similar to clean circuit boards. Even the tiniest particle of metal is enough to destroy a bath.
• Always keep the baths covered, in other words, keep them as clean as humanly possible. This will ensure them a long lifetime.
• Ensure that drillings are technically perfect. Please observe the drilling parameters.
• Ammonia and chlorine vapours must not be allowed to escape into the room.
• An air extraction system can be installed over the machine but there must be no draft created over the baths.
• A ventilation system must not be installed over the baths.
• We recommend that you receive a basic training from our subject expert. This will provide you with tips and expertise for your entire circuit board production process.
We are certain that by following these notes and the instructions that follow precisely you will achieve reliable through-hole plating and will be satisfied with the LPKF Mini Contac-II system in all respects.

Products supplied
Mini Contac-II 9
2.0 Products supplied
The following are supplied with the LPKF Mini Contac-II in addition to the machine itself:
I. LPKF Mini Contac-II:
• 2 x Phosphorised copper anodes
• 2 x holders (1 with electric connection, 1 without electric connection)
• 4 x covers (for containers 1, 3, 4, 5)
• 1 x measuring cup
• this manual
II. Chemicals, sufficient for one year’s normal operation:
• Precleaning solutions:
• PRECLEANER 123• PRECLEANER 4
• Through-plating:
• CLEANER 110• CLEANER 210• ACTIVATOR 310• COPPER PLATER 400• SHINE 400
Not included in the materials supplied:
• Distilled water
• Squeeze bottle
• Mixing container
• Container for disposing of spent chemicals

Safety regulations
10 Mini Contac-II
3.0 Safety regulations
The user must have read this manual, paying particular attention to the safety instructions printed in bold, to ensure safe working with this system.
• Never reach into the machine when it is running.
• Avoid all contact with the fluids.
• Never prepare or eat food while operating the machine.
• Wash your hands after operating the machine.
• Wear suitable protective clothing when filling or draining the machine.
• Never drink the fluids.
• Do not allow any of the fluids to escape when working on the machine.
• Always ensure that there is sufficient fluid in the first container (CLEANER 110) to prevent the heater system running dry. Risk of fire.
• Modifications carried out on the machine by you may jeopardize the safety of the machine and are not covered by the terms of the warranty.
• Please note that some materials can produce toxic gasses during processing. Obtain information on this from your materials supplier.
• Always work in rooms with ventilation or air extraction.
• Please follow the instructions given on the containers and/or separate safety leaflets when using chemicals.
• Only use chemicals for the purposes for which they are intended.
• Keep your workplace clear.
• Observe safety instructions.

Description of the machine
Mini Contac-II 11
4.0 Description of the machine
The machine consists of a stable plastic casing and a metal case with working containers for the baths and their associated motion mechanism, the operating unit, the control unit and the circuit board holders.
The operating unit containing the main switch and the control unit is located on the left-hand side.
The water inflow and outflow ports are mounted on the left side.
The dimensions of the machine are: approx. 870 mm x 565 mm x 630 mm (W x D x H).
Fig. 1: Mini Contac-II (seen from the top)
Caution! Please note that the material holders are only to be inserted into the tilting frame in one direction. Otherwise the material holder and/or the system can be damaged. Use the material holder with the electrical connection only for the container no.5.
1- Power switch 8- Container 6 (Sprincler + drier)2- Emergency stop 9- Display3- Container 1 10- Operating buttons4- Container 2 (Sprincler) 11- Material holder with electrical connection5- Container 3 12- Cathode connections6- Container 4 13- Material holder without electrical connection7- Container 5

Description of the machine
12 Mini Contac-II
4.1 Connections diagram
Fig. 2: Mini Contac-II (seen from the left side)
Water enters by a ¾” hose and leaves by a DN-40 connection.The drain valves have connection adapters for M” and ½” PVC hoses.
4.2 Electrical connections
The machine can be run on 230 V 50 Hz 600 VA.
Any switchover must be performed at our factory.
Power is supplied via a power cord with shrouded contacts.
The anodes in container 5 are permanently connected to the rectifier fitted in the control unit via a contact rail while the circuit board holder (circuit board = the cathode) is connected to the cathode connection on the operating unit via the cathode cable.
1- Water outlet2- Water inlet3- Power supply connection
1
2
3

Description of the machine
Mini Contac-II 13
Fig. 3: Electronic
4.3 Description of the individual containers
Fig. 4:schematic view
1- 2 x 10 AT
1
1- Cleaner 110 4- Activator 3102- Sprincler bath 5- Copper Plater 4003- Cleaner 210 6- Sprincler bath + drier

Description of the machine
14 Mini Contac-II
Container 1 Degreasing and drilling preparation
Container 2
Sprinkler rinsing
Two sprinkler bars in the shape of drilled tubes are fitted on the right and left at the upper edge for rinsing the circuit board.
Container 3
Preparation
Solution: CLEANER 110
Dimensions: approximately 365 mm x 55 mm x 290 mm (W x L x H)
Volume of reagent: approximately 5,5 litres
Heating: approximately 55 °C
Frame motion: Lift approximately 20 mm
Drainage: via the outlet valve
Container cover: yes
Dimensions: approximately 365 mm x 55 mm x 240 mm (W x L x H)
Drainage: into the drain
Container cover: No
Solution: CLEANER 210
Dimensions: approximately 365 mm x 55 mm x 240 mm (W x L x H)
Volume of reagent: approximately 4,4 litres
Heating: none
Frame motion: Lift approximately 20 mm
Drainage: via the outlet valve
Container cover: yes
Description of the machine
Mini Contac-II 15
Container 4
Activation
Container 5
Copper plating
Two copper rails are fitted in the container to hold the 4 phosphatized copper anodes.
Container 6
Sprinkler rinsing + drier
Two sprinkler bars in the shape of drilled tubes are fitted on the right and left at the upper edge for rinsing the circuit board.
Solution: Activator 310
Dimensions: approximately 365 mm x 55 mm x 240 mm (W x L x H)
Volume of reagent: approximately 4,4 litres
Heating: none
Frame motion: Lift approximately 20 mm
Drainage: via the outlet valve
Container cover: yes
Solution: COPPER PLATER 400
Dimensions: approximately 365 mm x 150 mm x 240 mm (W x L x H)
Volume of reagent: approximately 11,7 litres
Heating: none
Frame motion: Lift approximately 20 mm
Drainage: via the outlet valve
Container cover: yes
Dimensions: approximately 365 mm x 55 mm x 240 mm (W x L x H)
Drainage: into the drain
Container cover: No

Description of the machine
16 Mini Contac-II
4.4 The operating panel
Fig. 5:Main switch
The following display appears in the indicator when the unit is switched on:
The unit is now in the heating position in the START menu. The following functions can then be carried out with the keys on the press control system:
ESC: Change-over to the modification mode
Not yet functional
Not yet functional
ENTER: Change-over to the program selection mode (afterheating up)
There are 2 modes in which it is possible to start the program or change the program parameters.
1- Main switch2- Emergency Stop3- Display

Description of the machine
Mini Contac-II 17
4.5 Program selection mode
You can enter this mode from Start menu by pressing ENTER. The follo-wing program can be started:
• Copper plater
The flow chart shown in Chapter 6 tells you how to select programs and which steps have to be taken manually whilst the program is running. The flow chart refers to the copper-plating program.
Cathode connection
The (circuit) board holder is connected to the cathode cable on the cathode connection.

The Mini Contac-II operating menu
18 Mini Contac-II
5.0 The Mini Contac-II operating menu
The operating menu for the control system is displayed once the machine has been switched on (by turning and pulling the main switch).
The version number of the software currently installed in the control unit appears in the first display.
Use the or buttons to navigate through the menu items, the ENTER button to select a menu item, and the ESC button to deselect a menu item and to go up one level.
Use ENTER to call up the start menu.
The Mini Contac-II process menu
Mini Contac-II 19
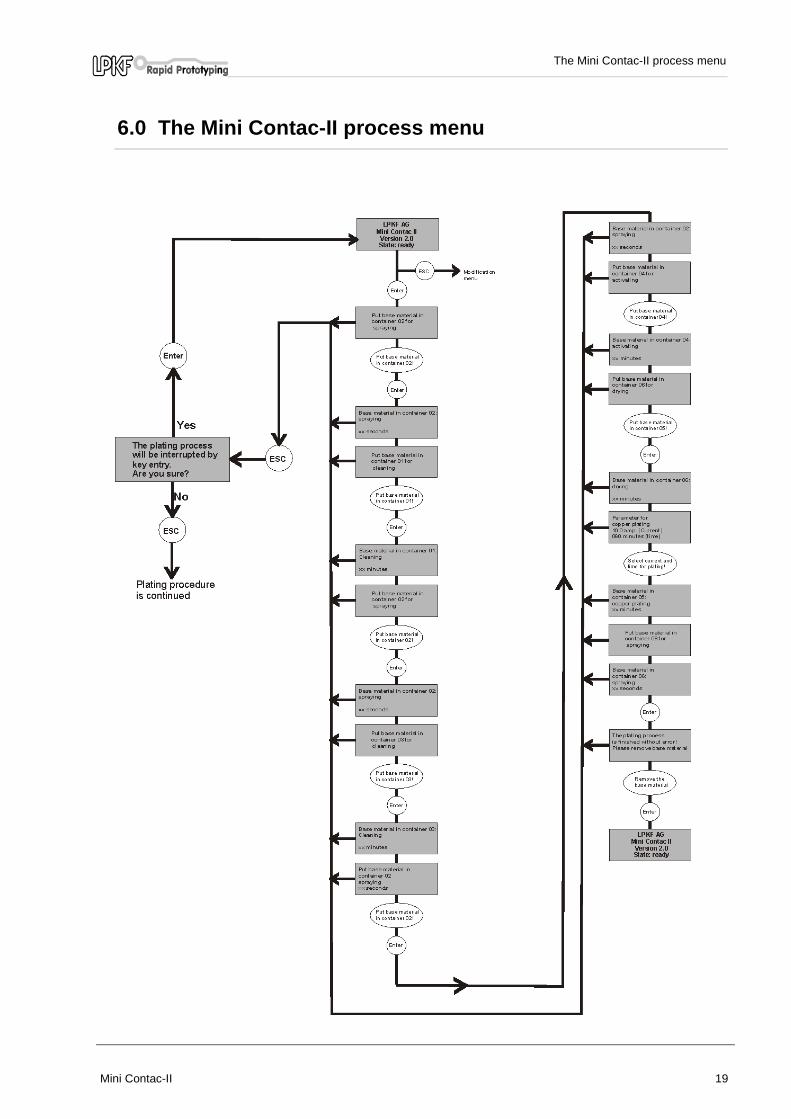
6.0 The Mini Contac-II process menu

Setting up
20 Mini Contac-II
7.0 Setting up
Caution! Always make sure that the first bath is sufficiently topped up. Top up with distilled water if necessary.
› Clean any impurities from the anodes completely using acetone, then scrub the anodes using scouring powder and water until they are bright and rinse off thoroughly so that no residue is left on the anodes.
› Clean the containers thoroughly using a sponge and plenty of clean water.
› Now rinse out with plenty of water.
› Next fill up with the precleaning solutions and leave to work for some time (at least 24 hours):
• PRECLEANER 123 in Container 1
• PRECLEANER 123 in Container 3
• PRECLEANER 123 in Container 4
• PRECLEANER 4 in Container 5
› Heat up container 1 (PRECLEANER 123) once during this period (to approximately 55°C) and allow to cool again.
› The baths must be moved or agitated from time to time.
› The precleaning solutions can now be drained into their original containers via the outlet valves and returned to the chemicals supplier for disposal (Please observe possible legal regulations!). Make sure that the outlet hoses are completely drained. The hoses can be dried with a cloth.
The containers are now ready and can be filled with the actual through-hole plating chemicals.
• CLEANER 110 in Container 1
• CLEANER 210 in Container 3
• AKTIVATOR 310 in Container 4
• COPPER PLATER 400 in Container 6
Caution! For the COPPER PLATER 400 you have to add 2 ml of SHINE 400 (use the enclosed measuring cup) per liter of bath volume (do this only shortly before putting the bath into operation).
Caution! The filling level depends on the container 5. The chemicals have to be filled in up to a level of approx. 5 mm below the copper bars. The other containers have to be filled to the same level.

Setting up
Mini Contac-II 21
› When all baths are filled, you must run a complete procedure with a test board. Then the baths are ready for operation.
› The chemicals must have been in the Contac-II container for a minimum of 24 hours before commencing through-hole plating.
Caution! It is imperative that you observe instructions in the safety data sheets for CLEANER 110, CLEANER 210, Activator 310, COPPER PLATER 400 and Shine 400!These must be fixed to the machine so that they are clearly visible.
Caution! Please note that the material holders are only to be inserted into the tilting frame in one direction. Otherwise the material holder and/or the system can be damaged. Use the material holder with the electrical connection only for the container no.5.

Description of operating procedure
22 Mini Contac-II
8.0 Description of operating procedure
Circuit boards must only be drilled with hard-metal drills suitable for drilling board material. They should fall within the drilling parameters which you can obtain from the machine manuals or the tool libraries in BoardMaster.
You may only use FR4 material as the board material.Ideally you should use FR4 with a 5 µm or 9 µm copper coating (depending on availability). This material only needs rinsing to clean the drillings as it is protected by a copper film.You will need to deburr the circuit board after drilling and brush or scrub the surface with, for example, artificial fleece (not with steel wool) if you are using a board material without a protective film, for example 18/18µm FR4. Rinse the circuit board thoroughly with water, paying particular attention to the drillings.
Caution!Never blast clean with compressed air. Any oil residues could destroy the chemicals.
Caution! Please note that the material holders are only to be inserted into the tilting frame in one direction. Otherwise the material holder and/or the system can be damaged. Use the material holder with the electrical connection only for the container no.5.
› Set the temperature of the first bath in the configuration menu. Temperature = 55°CCall up the parameter menu and set the holding time for bath 1.Holding time = 15 minutes
› Clamp the circuit board in the holder and send the circuit board into Container 1 (CLEANER 110).The frame motion is switched on by pressing ENTER in the programm menu and the holding time is shown beneath this.
› Rinse off the circuit board thoroughly in Container 2 (sprinkler rinsing). Press ENTER to start up the sprinkler system.The circuit board must be rinsed off immediately it has been treated in the CLEANER 110 bath to ensure that the degreasing chemicals do not harden. To do this, move the circuit board up and down about 15 times or at least 30 sec. Make sure that the circuit board mountings are also rinsed off to prevent the transfer of chemicals.
› Once the circuit board has been thoroughly rinsed, send it to Container 3 (CLEANER 210). The holding time for bath 2 should be set for this under the parameter menu: Holding time = approximately 2-3 minutes, (temperature = approx. 20°C) and the sequence is continued by pressing ENTER. Rinse off the circuit board in container 2. Afterwards remove as much water off the surface as possible by brushing off, dripping off or blowing off with oil-free compressed air. This will reduce the soiling of the ACTIVATOR 310 to a minimum.

Description of operating procedure
Mini Contac-II 23
This bath serves to neutralize the rinse water.
Note: Steer the ACTIVATOR 310 before you put the circuit board into the bath.
› Afterwards put into the Container 4 (ACTIVATOR 310). The holding time for bath 3 should be set for this under the parameter menu: Holding time = approximately 10-15 minutes, (temperature = approx. 20 °C) and then restarted by pressing ENTER.The circuit boards need to be moved to rinse out the drillings.The menu prompts you to dry the circuit board when the holding time expires.
› Let the circuit board drip off completely after removing it from the bath in Container 4. Now leave the circuit board to dry thoroughly. This can be also done using hot air, for example, or by waiting until it is dry. Drying in the oven (20 min. at approc. 60°C) is recommended.Make sure that the drillings are free from chemical residues.
Caution! Never blast clean with compressed air. Any oil residues could destroy the chemicals.
› Remove the copper film if you are using FR4 material with copper film.
› Gently rinse off board material without a protective film with distilled water over the spray tank. Then pat dry using a lint-free cloth very carefully so as not to wipe the ACTIVATOR out of the drillings.
› Now set the current level for the copper plating in the configuration menu. Please note that you must calculate the area of the circuit board which is being immersed in the COPPER PLATER 400 bath.
The current level is calculated as follows:
A current level of 1 ampere per 100 cm² surface area is required.
Board material of size A4: 200 mm x 300 mm = 60,000 mm² = 600 cm²
Surface area = front side plus reverse side = 600 cm² x 2 = 1,200 cm²
Current to be set = 12 A (max. current 25A)
› The circuit board holder must be connected to the cathode cable (negative) before sending the circuit board to Container 5.
› Only now can you immerse the circuit board immediately into Container 5 (COPPER PLATER 400).The process time is set under the parameter menu. start then by pressing ENTER. The control unit will detect if a circuit board has not been immersed in the bath because there will be no current flowing. The Contac-II will be reset to start menu.
Description of operating procedure
24 Mini Contac-II
› The circuit board should be removed after 20 minutes and checked to see that all the drillings have been copper plated. To do this press ESC again and ESC again after you have checked the circuit board and put it back in the container. Always keep the cathode cable connected to the holder when doing this. Leave for a further 60-90 minutes’ plating.
Copper will be deposited at a rate of approximately 0.2-0.3 µm per minute depending on the temperature of the bath, the current level, the size of the circuit board and the quality of the chemicals used. Thus approximately 12-18 µm of copper will form in sixty minutes.
Please note that the values given for the potential copper thickness are the approximate values that can be deposited using a machine such asthe LPKF Mini Contac-II under laboratory conditions. You will have to through-hole plate several test circuit boards and use micrographs to determine the actual wall thickness if you need to obtain precise data on the thickness of copper deposited in the drillings. You can begin through-hole plating the circuit boards themselves once you have determined the parameters for the wall thickness you require. We recommend that you use the parameters specified by us to obtain satisfactory through-hole plating.
Always allow the circuit board to drip off completely over the bath.
Through-hole plating is terminated using ENTER and the sprinkler system in Container 6 is started up. The sprinkler system always runs for 30 seconds. It cannot be shut off until this time has elapsed.
› Move the circuit board back and forth in the sprinkler system (Container 6) approximately fifteen times, or rinse the circuit board at least until the flow of water stops.
Pressing the ENTER button once more terminates the through-hole plating process.
› Now dry the circuit board, preferably in hot air. This should be carried out as quickly as possible to prevent oxidatrion of the copper in the drillings.
The water used for rinsing is neutral to slightly alkaline and can be disposed of via the normal sewerage system (see „Inspection report 3“ on page 33.).
Note: The quality of the surface finish on the circuit board may be poor and the life of the chemicals will be reduced if too high a current is used.

Maintenance and servicing
Mini Contac-II 25
9.0 Maintenance and servicing
Machine
The machine itself is maintenance-free.
It is important that you cover up the baths immediately work is completed to prevent contamination.The machine must be carefully cleaned from time to time and must be kept clean.
Baths
Cover the container during breaks in working.Fluid lost through evaporation can be replaced with distilled water. (Change the chemicals after 3 months).
Note: Avoid unnecessary heating, this will affect the chemical life.
Clean limescale deposits from the nozzles at regular intervals.
Cover the container during breaks in working.Fid lost through evaporation can be replaced with distilled water. (Change the chemicals after 3 months).
Cover the container during breaks in working.The bath is very sensitive and requires careful working procedures.
The tiniest amount of contamination, such as drops of CLEANER 110, Copper Plater 400, ferrous metal chips, or similar, will eventually cause the bath to fail. It is irrelevant whether the bath is used or not. The contents of the bath should be thoroughly mixed every 3-4 days at the latest if the bath is not being used.
Container 1 Degreasing :Product: CLEANER 110
Container 2 + 6 Sprinkler rinsing :
Container 3 Preparation :Product: CLEANER 210
Container 4 Activation :Product: ACTIVATOR 310

Maintenance and servicing
26 Mini Contac-II
Fluid lost can be topped up with ACTIVATOR 310.
Caution! Do never add water to the ACTIVATOR 310 otherwise the throuhg-hole plating will be out of order
The bath must be made up anew after a maximum of one year. Make sure that the dispersion is thoroughly mixed when doing this.
Caution! Chemicals which have splashed onto the machine should be removed with soft cloths, not with abrasive materials. Otherwise the machine’s plastic surface will be roughened, making it harder still to remove the chemicals.
Cover the container during breaks in working.Filter the chemicals from time to time (preferably using several coffee filter one inside the other). Empty the bath into a canister to do this. Do not rinse the black coating off the anodes as it important for their function. However, you must make sure that particles of the black coating do not break loose and get into the bath. Any such particles must be filtered out.
Fluid lost should be topped up with COPPER PLATER 400.
If the COPPER PLATER 400 bath is still working satisfactorily but the copper plate appears dull or coarsely crystalline, this can be corrected by the addition of SHINE 400. The chemical admix SHINE 400 is used up in dependence on the throughput. Fill up 10 ml SHINE 400 after 100 ampere-hours.
Ampere-hours/circuit board=Adjusted electicity x time in bath – then add up all circuit boards.
Take records of the through-hole plating.
Note: The service life of the bath is approximately one year. These figures are only approximate and may vary as the life expectancy is influenced by such factors as careful working procedures and local levels of air pollution.There can therefore be no warranty of the chemicals’ function after a certain period.
Caution! The machine should be started up again by mixing with test circuit boards if the baths have been changed or SHINE 400 has been added.
Container 5 Copper plating Product: COPPER PLATER 400

Waste disposal
Mini Contac-II 27
10.0 Waste disposal
• Do not allow spilt chemicals to enter waterways or the sewerage system.
• The rinsing water generated by working processes can be disposed of via the sewerage system without concern (see the investigation report in the Appendix).
• Never empty chemicals into the drain. Instead drain them into the containers provided for disposal and dispose of them at an authorized chemical processing plant.
• The appropriate method of disposal (neutralization, hazardous waste disposal, chemical-physical treatment) can be found in the safety data sheets provided by the chemical manufacturer.
• You must always check and comply with local and regional regulations governing the on-site and off-site disposal of waste.
• Local and state regulations will always take precedence in the event of any conflict with our recommendations.

Appendix
28 Mini Contac-II
11.0 Appendix
11.1 Through-hole plating record
Keeping this record up-to-date allows you to determine, monitor and analyse the service lives of the chemicals.
Please keep carefully.
Copy as required and keep by the machine
Chemical replaced / topped up
Date Board material size
W x L (mm)
Cur-rent
Time Chemical Quan-tity

Appendix
Mini Contac-II 29
11.2 Inspection report 1

Appendix
30 Mini Contac-II
11.3 Translation of Inspection report 1
Chemisches LaborDR. WIRTS + PARTNERSachverständigen GmbH
Inspection report Date: 02/10/1997 / b
Order no.: 7 1696-P1C
Customer: LPKF, CAD/CAM SYSTEME GmbH,Osterriede 7, 30827 Garbsen
Date Order received: 04/09/1997
Your ref.: Sch.
Subject: Copperplaten 400
Inspection: Inspection of waste water
Identification: Sample 1: Rinsing water after a Copperplaten400 bath
Packaging: Polyethylene bottle with a screw cap
Sample volume: approximately 1 litre
Sampled by: The customer
Sample delivered on: 03/09/97, by post
Inspection report prepared by:
Declaration of conformity
The results of the inspection exclusively to the samples tested. Duplication or publication of extracts from this inspection are permitted only with the express written permission of „Chemisches Labor Dr. Wirts + Partner Sachverständigen Gmbh“

Appendix
Mini Contac-II 31
11.4 Inspection report 2

Appendix
32 Mini Contac-II
11.5 Translation of Inspection report 2
Legend: = neglible = based on
Sample identification: Rinsing water after a Copperplaten 400 bath
Laboratory no.: 7 1696/1
Appearance:
Colour:
Opacity:
Sediment:
Odour:
colourless
none
none
faint, non-specific
Parameters
pH value:
Testing temperature:
Conducting capacity
calculated at 25°C:
Method of test:
DIN 38404 / 5
DIN 38404 / 8
Date of
analysis:04/09/97
04/09/97
04/09/97
Unit:
°C
µS/cm
TEST RESULTS:
7.4
22.0
780
Chrome Graphite fur-nace AAS
17/09/97 mg/l < 0.005
Chrome VI DIN 38405 / 24 17/09/97 mg/l < 0.02
Copper Graphite fur-nace AAS
17/09/97 mg/l < 0.01252
Nickel Graphite fur-nace AAS
17/09/97 mg/l < 0.0025
Zinc DIN 38406 / 22 05/09/97 mg/l <0.02
Lead Graphite fur-nace AAS
17/09/97 mg/l < 0.0125
Cadmium Graphite fur-nace AAS
17/09/97 mg/l < 0.0005
Mercury DIN 38406 / 12 05/09/97 mg/l < 0.0005
Arsenic Graphite fur-nace AAS
15/09/97 mg/l < 0.005
AOX content Din 38409 / 14 18/09/97 mg/l 0.059
TOC content DIN 38409 / 3/1
08/09/97 mg/l 4.2
Mineral oil hydrocar-bons
DIN 38409 / 18 12/09/97 mg/l < 0.2

Appendix
Mini Contac-II 33
11.6 Inspection report 3

Appendix
34 Mini Contac-II
11.7 Translation of Inspection report 3
Inspection report
The sample of rinsing water supplied was submitted for chemical analysis as requested from the point of view of possible waste disposal through the waste water system.
The inspection schedule was set up following initial criteria laid out ingeneral administrative regulations concerning the German WaterResources Law (article 7a). The requirements specified in Appendix 40 (Metal working, sector of origin no. 1.17 = Circuit board manufacture) were used as the basis for the inspection schedule.
The complete results for the analyses are printed above.
Analysis of the results of inspection established that the rinsing water sample (after a Copperplaten 400 bath) meets initial guide values in respect of the parameters tested. According to these results, it should be possible to dispose of the rinsing water via the waste water system.

Appendix
Mini Contac-II 35
11.8 Safety Data Sheet
PRECLEANER 123
CLEANER 110
CLEANER 210
ACTIVATOR 310
PRECLEANER 4
COPPER PLATER 400
SHINE 400