manual - vipa.dk€¦ · manual vipa tm-e chapter 1 assembly and installation guidelines ... 1-5...
TRANSCRIPT

Manual
VIPA Accessories Teleservice module
TM-E 900-1E650
Order-No.: VIPA HB39E_TME Reference: RE_900-1E650
Rev. 09/11
This manual is part of the documentation package with order number VIPA HB39E_TME and relevant for: Product Order number as of state: HW FW TM-E GSM/GPRS EU VIPA 900-1E650 01 5.6


Manual VIPA TM-E About this manual
Subject to change to cater for technical progress.
The information contained in this manual is supplied without warranties. The information is subject to change without notice. © Copyright 2009 VIPA, Gesellschaft für Visualisierung und Prozess-
automatisierung mbH Ohmstraße 4, D-91074 Herzogenaurach,
Tel.: +49 (91 32) 744 -0 Fax.: +49 (91 32) 744-1864 EMail: [email protected] http://www.vipa.de Hotline: +49 (91 32) 744-1150 All rights reserved
The contents of this manual were verified with respect to the hard- and software. However, we assume no responsibility for any discrepancies or errors. The information in this manual is verified on a regular basis and any required corrections will be included in subsequent editions. Suggestions for improvement are always welcome.
VIPA and System 300V are registered trademarks of VIPA Gesellschaft für Visualisierung und Prozessautomatisierung mbH. SPEED7 is a registered trademarks of profichip GmbH. SIMATIC, STEP and S7-300 are registered trademarks of Siemens AG. Any other trademarks referred to in the text are the trademarks of the respective owner and we acknowledge their registration.
Disclaimer of liability
Trademarks

About this manual Manual VIPA TM-E
Subject to change to cater for technical progress.
About this manual
The information in this manual should simplify you the deployment of remote controlling VIPA PLCs. More information concerning this may be found in German and English at:
suppport.ewon.biz www.ewon-online.de
The module TM-E from VIPA is constructed in the same way as the module "eWON2001".
Chapter 1: Assembly and installation guidelines In this chapter you will find all information, required for assembly and installation of the TM-E module. Chapter 2: Hardware description Here the hardware components of the TM-E module are more described. The technical data are at the end of this chapter. Chapter 3: Deployment This chapter concerns on the deployment of the TM-E module from VIPA with a PLC. With the fast introduction you will get an overview about the possibilities of teleservice. Another part of this chapter is the configuration of the TM-E module by means of the integrated Web page. This chapter ends with the possibilities of the teleservice functions.
Important note!
Overview

Manual VIPA TM-E Contents
HB39E - TME - RE_900-1E650 - Rev. 09/11 i
Contents
User considerations ................................................................................. 1 Safety information.................................................................................... 2 Chapter 1 Assembly and installation guidelines............................ 1-1
Safety information for Users................................................................. 1-2 Installation of the SIM card................................................................... 1-3 Installation dimensions ......................................................................... 1-5 Assembly.............................................................................................. 1-6 Cabling................................................................................................. 1-8 Installation guidelines ........................................................................... 1-9
Chapter 2 Hardware description ..................................................... 2-1 Properties............................................................................................. 2-2 Structure .............................................................................................. 2-3 Technical Data ..................................................................................... 2-8
Chapter 3 Deployment TM-E............................................................ 3-1 Fast introduction................................................................................... 3-2 Assembly.............................................................................................. 3-5 Cabling................................................................................................. 3-6 TM-E - Configuration - eBuddy............................................................. 3-7 TM-E - Reset...................................................................................... 3-13 TM-E - Web page............................................................................... 3-14 TM-E - PLC linking ............................................................................. 3-16 TM-E - Project integration - PG/PC interface...................................... 3-19 Installation of the SIM card................................................................. 3-24 Deployment of Tags ........................................................................... 3-26 Teleservice via telephone with MPI gateway ...................................... 3-29 Teleservice via telephone - Ethernet gateway .................................... 3-33 Teleservice via Callback function ....................................................... 3-36 Teleservice via SMS........................................................................... 3-40
Appendix ................................................................................................A-1 Index ....................................................................................................A-1

Contents Manual VIPA TM-E
ii HB39E - TME - RE_900-1E650 - Rev. 09/11

Manual VIPA TM-E User considerations
HB39E - TME - RE_900-1E650 - Rev. 09/11 1
User considerations
This manual describes the Teleservice-Modul TM-E GSM/GPRS EU. It contains a description of the construction, project implementation and usage.
The manual is targeted at users who have a background in automation technology.
The manual consists of chapters. Every chapter provides a self-contained description of a specific topic.
The following guides are available in the manual: • an overall table of contents at the beginning of the manual • an overview of the topics for every chapter • an index at the end of the manual.
The manual is available in: • printed form, on paper • in electronic form as PDF-file (Adobe Acrobat Reader)
Important passages in the text are highlighted by following icons and headings:
Danger! Immediate or likely danger. Personal injury is possible.
Attention! Damages to property is likely if these warnings are not heeded.
Note! Supplementary information and useful tips
Objective and contents
Target audience
Structure of the manual
Guide to the document
Availability
Icons Headings

Safety information Manual VIPA TM-E
2 HB39E - TME - RE_900-1E650 - Rev. 09/11
Safety information
The Teleservice-Modul TM-E is constructed and produced for: • communication and process control • general control and automation applications • industrial applications • operation within the environmental conditions specified in the technical
data • installation into a cubicle
Danger! This device is not certified for applications in • in explosive environments (EX-zone)
The manual must be available to all personnel in the • project design department • installation department • commissioning • operation
The following conditions must be met before using or commissioning the components described in this manual: • Modification to the process control system should only be carried out
when the system has been disconnected from power! • Installation and modifications only by properly trained personnel • The national rules and regulations of the respective country must be
satisfied (installation, safety, EMC ...)
National rules and regulations apply to the disposal of the unit!
Applications conforming with specifications
Documentation
Disposal

Manual VIPA TM-E Chapter 1 Assembly and installation guidelines
HB39E - TME - RE_900-1E650 - Rev. 09/11 1-1
Chapter 1 Assembly and installation guidelines
In this chapter you will find all information, required for assembly and installation of the TM-E module.
Topic Page Chapter 1 Assembly and installation guidelines............................ 1-1
Safety information for Users................................................................. 1-2 Installation of the SIM card................................................................... 1-3 Installation dimensions ......................................................................... 1-5 Assembly.............................................................................................. 1-6 Cabling................................................................................................. 1-8 Installation guidelines ........................................................................... 1-9
Overview
Content

Chapter 1 Assembly and installation guidelines Manual VIPA TM-E
1-2 HB39E - TME - RE_900-1E650 - Rev. 09/11
Safety information for Users
VIPA modules make use of highly integrated components in MOS-Technology. These components are extremely sensitive to over-voltages that can occur during electrostatic discharges. The following symbol is attached to modules that can be destroyed by electrostatic discharges.
The Symbol is located on the module, the module rack or on packing material and it indicates the presence of electrostatic sensitive equipment. It is possible that electrostatic sensitive equipment is destroyed by energies and voltages that are far less than the human threshold of perception. These voltages can occur where persons do not discharge themselves before handling electrostatic sensitive modules and they can damage components thereby, causing the module to become inoperable or unusable. Modules that have been damaged by electrostatic discharges can fail after a temperature change, mechanical shock or changes in the electrical load. Only the consequent implementation of protection devices and meticulous attention to the applicable rules and regulations for handling the respective equipment can prevent failures of electrostatic sensitive modules.
Modules must be shipped in the original packing material.
When you are conducting measurements on electrostatic sensitive modules you should take the following precautions: • Floating instruments must be discharged before use. • Instruments must be grounded. Modifying electrostatic sensitive modules you should only use soldering irons with grounded tips.
Attention! Personnel and instruments should be grounded when working on electrostatic sensitive modules.
Handling of electrostatic sensitive modules
Shipping of electrostatic sensitive modules
Measurements and alterations on electrostatic sensitive modules
Manual VIPA TM-E Chapter 1 Assembly and installation guidelines
HB39E - TME - RE_900-1E650 - Rev. 09/11 1-3
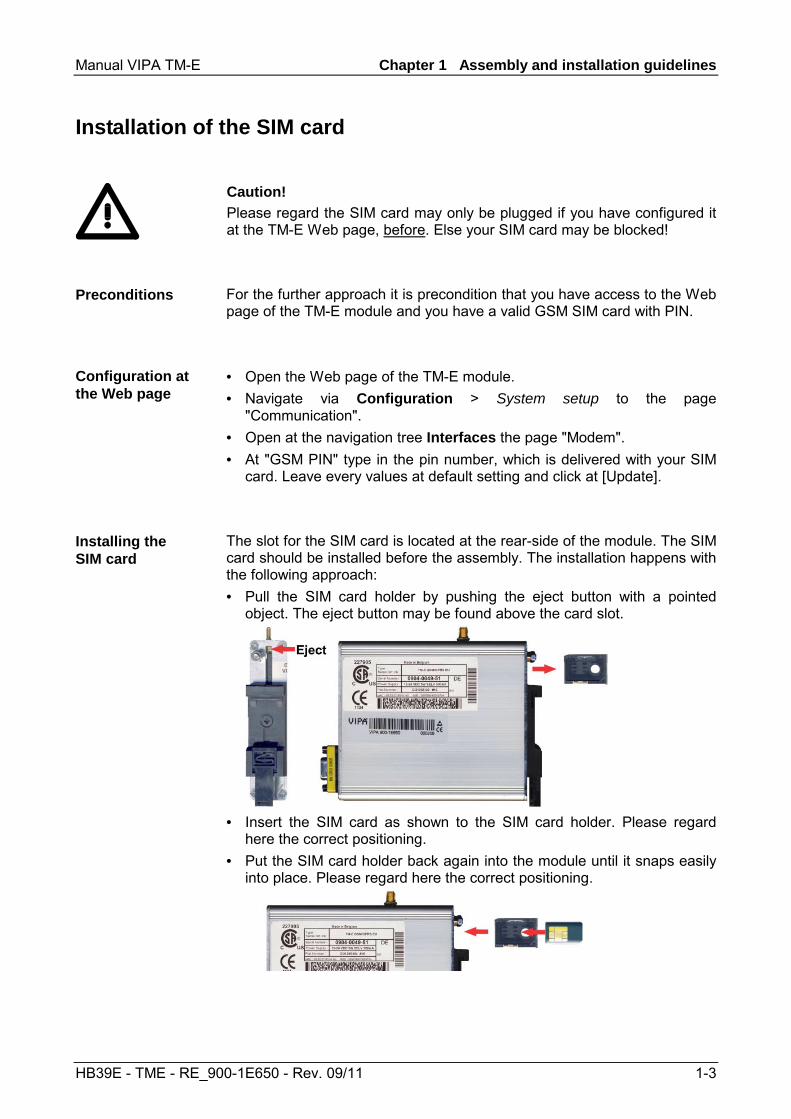
Installation of the SIM card
Caution! Please regard the SIM card may only be plugged if you have configured it at the TM-E Web page, before. Else your SIM card may be blocked!
For the further approach it is precondition that you have access to the Web page of the TM-E module and you have a valid GSM SIM card with PIN.
• Open the Web page of the TM-E module. • Navigate via Configuration > System setup to the page
"Communication". • Open at the navigation tree Interfaces the page "Modem". • At "GSM PIN" type in the pin number, which is delivered with your SIM
card. Leave every values at default setting and click at [Update].
The slot for the SIM card is located at the rear-side of the module. The SIM card should be installed before the assembly. The installation happens with the following approach: • Pull the SIM card holder by pushing the eject button with a pointed
object. The eject button may be found above the card slot.
• Insert the SIM card as shown to the SIM card holder. Please regard
here the correct positioning. • Put the SIM card holder back again into the module until it snaps easily
into place. Please regard here the correct positioning.
Preconditions
Configuration at the Web page
Installing the SIM card

Chapter 1 Assembly and installation guidelines Manual VIPA TM-E
1-4 HB39E - TME - RE_900-1E650 - Rev. 09/11
• Connect if not just happened a suited antenna. The TM-E module has a an antenna jack. Here a GSM dual band antenna may be connected. The TM-E module is delivered without any antenna. With the order number VIPA 240-0EA00 you may get a suited antenna from VIPA.
• Switch-on again the power supply of the TM-E module. With a cold restart it may last up to 2 minutes until the GSM modem is been rebooted and initialized.
• Open the Web page of the TM-E module. • Navigate via Configuration > System setup to the page
"Communication". • Open in the navigation tree Interfaces the page "Modem". If you have made everything correctly and your GSM modem is connected to a mobile network, the following parameters are listed: This parameter shows you the type of the internal modem. Here the text "internal Multiband GSM" should be shown. Here the signal level 0...99 is shown. This value is determined once a minute. For a communication connection this value should be higher than 17. A value of 25 corresponds to a good connection. If a value is higher than 30 this correspond to an excellent connection. A signal level of 0 indicates a non existing mobile network. "Home Network" is shown if the SIM card is operated in the country of which the SIM card is from. If the TM-E module is operated in an other country, "Roaming" is shown. Otherwise the following error messages may be displayed with his parameter: - "SIM card error!" if SIM card is missing - "PIN code error!" if PIN is faulty - "in operation..." the modem tries to connect to a mobile network. Here the name of your mobile network provider is listed.
Commissioning with SIM card
Modem detected
Signal level
Network
Operator

Manual VIPA TM-E Chapter 1 Assembly and installation guidelines
HB39E - TME - RE_900-1E650 - Rev. 09/11 1-5
Installation dimensions
Make sure that a clearance of at least 100mm exists above and 70mm below the middle of the bus rail.
100
mm
70 m
m
133 mm55
mm
115
mm
124 mm
127
mm
145 mm
161 mm
Dimensions
Dimensions assembled

Chapter 1 Assembly and installation guidelines Manual VIPA TM-E
1-6 HB39E - TME - RE_900-1E650 - Rev. 09/11
Assembly
The modules are installed on a profile rail. You may use the following standard 35mm profile rail:
35 mm
27 mm
15 m
m
1,5
mm
35 mm
27 mm
7,5
mm1
mm
The following sequence represents the assembly procedure as viewed from the side. • Install the profile rail. Make sure that a clearance of at least 100mm
exists above and 70mm below the middle of the profile rail.
100
mm
70 m
m
Clack
• Insert the module that you are installing into the profile rail at an angle
of about 45 degrees from the top and rotate the module into place until it clicks into the profile rail with an audible click.
General
Assembly procedure

Manual VIPA TM-E Chapter 1 Assembly and installation guidelines
HB39E - TME - RE_900-1E650 - Rev. 09/11 1-7
The following sequence shows the steps required for the removal of modules in a side view.
• The enclosure of the module has a spring-loaded clip at the bottom
by which the module can be removed from the rail. • Insert a screwdriver into the slot as shown. • The clip is unlocked by pressing the screwdriver in an upward
direction. • Withdraw the module with a slight rotation to the top.
Removal procedure

Chapter 1 Assembly and installation guidelines Manual VIPA TM-E
1-8 HB39E - TME - RE_900-1E650 - Rev. 09/11
Cabling
At the lower side of the TM-E module there are connectors for power supply and digital inputs/outputs. The output is designed as low-side output and may be configured. The connectors are plugs with screw contacts. If connected the plugs may be fixed with screws.
Pin Name Meaning Digital input/output
1 DO_GND DO ground 2 DO_OC Digital output DC 24V, 0.2A
Low-side output 3 DO_VDC DO load voltage DC 24V 4 DI_GND DI ground (isolated) 5 DI Digital input DC 0/24V
"0": 0 ... 5V DC "1": 10V ... 30V DC
Power supply
1 GND Ground power supply
1
.
.
.
5
12
2 12-24V DC DC 12 ... 24V ±20%
The TM-E module is to be supplied by DC 12...24V ±20%. The connection is established by means of a plug. This is at the lower side of the module and has the following allocation:
Pin Name Meaning 1 GND Ground power supply 1
2
2 12-24V DC DC 12 ... 24V ±20%
DO_GND 1
DC24V
DO_OC 2
-
+
DO_VDC 3
DC24V+
-DI_GND 4
DI 5
DC 24V
Output DO
Optocoupler
DO_GND1
DO_OC2
DO_VDC3
+
-
Overview
Power supply
DI/DO wiring / schematic diagram

Manual VIPA TM-E Chapter 1 Assembly and installation guidelines
HB39E - TME - RE_900-1E650 - Rev. 09/11 1-9
Installation guidelines
The installation guidelines contain information about the possible interference causes. Here we describe possible ways of interference that may disturb the controlling system and how you have to approach shielding and screening issues to ensure the electromagnetic compatibility (EMC).
The term "electromagnetic compatibility" (EMC) refers to the ability of an electrical device to operate properly in an electromagnetic environment without interference from the environment or without the device causing illegal interference to the environment. The TM-E is developed for applications in harsh industrial environments and they comply with EMC requirements to a large degree. In spite of this you should implement an EMC strategy before installing your SPS and the TM-E module, which should include any possible source of interference.
Electromagnetic interferences may interfere your control via different ways: • Fields • I/O signal conductors • Bus system • Current supply • Protected earth conductor Depending on the spreading medium (lead bound or lead free) and the distance to the interference cause, interferences to your control occur by means of different coupling mechanisms. One differs: • galvanic coupling • capacitive coupling • inductive coupling • radiant coupling
General
What is EMC?
Possible interference causes

Chapter 1 Assembly and installation guidelines Manual VIPA TM-E
1-10 HB39E - TME - RE_900-1E650 - Rev. 09/11
In the most times it is enough to take care of some elementary rules to guarantee the EMC. Please regard the following basic rules when installing your PLC. • Take care of a correct area-wide grounding of the inactive metal parts
when installing your components. - Install a central connection between the ground and the protected
earth conductor system. - Connect all inactive metal extensive and impedance-low. - Please try not to use aluminum parts. Aluminum is easily oxidizing
and is therefore less suitable for grounding. • When cabling, take care of the correct line routing.
- Organize your cabling in line groups (high voltage, current supply, signal and data lines).
- Always lay your high voltage lines and signal res. data lines in separate channels or bundles.
- Route the signal and data lines as near as possible beside ground areas (e.g. suspension bars, metal rails, tin cabinet).
• Proof the correct fixing of the lead isolation. - Data lines must be laid isolated. - Analog lines must be laid isolated. When transmitting signals with
small amplitudes the one sided laying of the isolation may be favorable.
- Lay the line isolation extensively on an isolation/protected earth con-ductor rail directly after the cabinet entry and fix the isolation with cable clamps.
- Make sure that the isolation/protected earth conductor rail is connected impedance-low with the cabinet.
- Use metallic or metalized plug cases for isolated data lines. • In special use cases you should appoint special EMC actions.
- Wire all inductivities with erase links, which are addressed by your PLC.
- For lightening cabinets you should prefer incandescent lamps and avoid luminescent lamps.
• Create a homogeneous reference potential and ground all electrical operating supplies when possible. - Please take care for the targeted employment of the grounding
actions. The grounding of the PLC is a protection and functionality activity.
- Connect installation parts and cabinets with your PLC in star topology with the isolation/protected earth conductor system. So you avoid ground loops.
- If potential differences between installation parts and cabinets occur, lay sufficiently dimensioned potential compensation lines.
Basic rules for EMC

Manual VIPA TM-E Chapter 1 Assembly and installation guidelines
HB39E - TME - RE_900-1E650 - Rev. 09/11 1-11
Electrical, magnetically and electromagnetic interference fields are weakened by means of an isolation, one talks of absorption. Via the isolation rail, that is connected conductive with the rack, interference currents are shunt via cable isolation to the ground. Hereby you have to make sure, that the connection to the protected earth conduc-tor is impedance-low, because otherwise the interference currents may appear as interference cause. When isolating cables you have to regard the following: • If possible, use only cables with isolation tangle. • The hiding power of the isolation should be higher than 80%. • Normally you should always lay the isolation of cables on both sides.
Only by means of the both-sided connection of the isolation you achieve high quality interference suppression in the higher frequency area. Only as exception you may also lay the isolation one-sided. Then you only achieve the absorption of the lower frequencies. A one-sided isolation connection may be convenient, if: - the conduction of a potential compensating line is not possible - analog signals (some mV res. µA) are transferred - foil isolations (static isolations) are used.
• With data lines always use metallic or metalized plugs for serial couplings. Fix the isolation of the data line at the plug rack. Do not lay the isolation on the PIN 1 of the plug bar!
• At stationary operation it is convenient to strip the insulated cable interruption free and lay it on the isolation/protected earth conductor line.
• To fix the isolation tangles use cable clamps out of metal. The clamps must clasp the isolation extensively and have well contact.
• Lay the isolation on an isolation rail directly after the entry of the cable in the cabinet. Lead the isolation further on to the PLC and don't lay it on there again!
Please regard at installation! At potential differences between the grounding points, there may be a compensation current via the isolation connected at both sides. Remedy: Potential compensation line
Isolation of conductors

Chapter 1 Assembly and installation guidelines Manual VIPA TM-E
1-12 HB39E - TME - RE_900-1E650 - Rev. 09/11

Manual VIPA TM-E Chapter 2 Hardware description
HB39E - TME - RE_900-1E650 - Rev. 09/11 2-1
Chapter 2 Hardware description
Here the hardware components of the TM-E module are more described. The technical data are at the end of this chapter.
Topic Page Chapter 2 Hardware description ..................................................... 2-1
Properties............................................................................................. 2-2 Structure .............................................................................................. 2-3 Technical Data ..................................................................................... 2-8
Overview
Content

Chapter 2 Hardware description Manual VIPA TM-E
2-2 HB39E - TME - RE_900-1E650 - Rev. 09/11
Properties
The TM-E is an intelligent teleservice module. This module makes simple and safe communication with your machines and plants possible via telephone respectively internet. Values of your plant may be observed and appropriate reactions to limit exceeds may be configured. Here e.g. plant data may be collected and sent via mail. Due to the integrated Web page, for configuration there is no additional software necessary. Due to the predefined server the embedding to a VIPA PLC may be established problem-free. The TM-E module may be integrated as PG/OP interface to the Siemens SIMATIC manager by means of a station file. • Transparent Ethernet-Gateway with TCP/IP Router • Sending alarms by E-Mail and SMS (only via free SMS provider) • up to 20 Ethernet sessions simultaneous • Programmable gateway by BASIC • fully customizable web pages (in HTML) • integrated alarm management • RS485 MPI interface • RJ45 Ethernet interface • integrated GSM/GPRS EU Modem - GSM 900MHz / DCS 1800MHz • Slot for SIM-Card
Type Order number Description TM-E GSM/ GPRS EU
VIPA 900-1E650 DC 12 ... 24V, GSM/GPRS EU, MPI, Ethernet RJ45, router functions, DI 1xDC 24V, DO 1xDC 24V 0.2A
Portable Antenna VIPA 240-0EA00 Portable antenna with SMA plug
Overview
Properties
Order data

Manual VIPA TM-E Chapter 2 Hardware description
HB39E - TME - RE_900-1E650 - Rev. 09/11 2-3
Structure
[1] LEDs [2] RJ45 Ethernet interface [3] not used [4] Reset button [5] RS485 MPI interface [6] DIP switch MPI interface [7] Connector for DC 12...24V
power supply [8] Connector for digital I/O [9] Slot for GSM SIM card [10] SMA antenna jack
with male thread
1
2
3
5
4
78
6
10
9
At the front-side of the TM-E module there are two rows of LEDs. The following table shows you the usage of the LEDs and the according colors:
Label Color Meaning POWER green Power supply is active. USER green blinks: The TM-E module is ready for
communication (ca. 20s after PowerOn) red blinks: IP address not valid (just exist) red/green blinks alternating: The TM-E module is just
waiting for an IP address during boot-up. The LED is also used with the Reset. More about this may be found at "TM-E - Reset".
Serial green blinks: The TM-E module is communicating with the PLC via MPI.
MDM green on: The modem of the TM-E module is physically connected.
LINK green on: The TM-E module is physically connected to Ethernet.
ACT green blinks: The TM-E module communicates via Ethernet (activity).
DI green on: The digital input of the TM-E module is "1".
POWER
SERIAL
LINK
DI
USER
MDM
ACT
DO
DO green on: The digital output of the TM-E module is "1".
TM-E GSM/EU
Components
LEDs

Chapter 2 Hardware description Manual VIPA TM-E
2-4 HB39E - TME - RE_900-1E650 - Rev. 09/11
You may connect your TM-E module to Ethernet by the RJ45 interface. Via Ethernet the integrated Web page of the TM-E module may be accessed for according configurations. The interface is automatically adapting to the transfer rate 10 or 100Mbit/s The jack has the following assignment: 8-pole RJ45 jack:
Pin Assignment 1 Transmit + 2 Transmit - 3 Receive + 4 - 5 - 6 Receive - 7 -
12345678
8 - Connect your PC to your TM-E module via Ethernet. Here either a crossed cable or a switch may be used. An active link via Ethernet is shown by the TM-E module with the green "LINK" led. The TM-E module is delivered with the following IP address parameters:
IP address: 10.0.0.53 Subnet mask: 255.255.255.0
To change the IP address parameters the configuration tool "eBuddy" from VIPA may be used.
RJ45 Ethernet interface
Linking to Ethernet

Manual VIPA TM-E Chapter 2 Hardware description
HB39E - TME - RE_900-1E650 - Rev. 09/11 2-5
The TM-E module is connected to your PLC CPU via the MPI interface. The interface is designed as RS485 plug. There is a gender changer in the scope of delivery. This converts the RS485 plug 1:1 to a RS485 jack. To connect a plug designed as jack you may remove the gender changer. The MPI interface has the following assignment:
9-pole SubD: Pin Assignment 1 n.c. 2 n.c. 3 RxD/TxD (line B) 4 n.c. 5 GND 6 n.c. 7 n.c. 8 RxD/TxD (line A)
1
2
3
4
5
6
7
8
9
9 n.c.
The serial line is to be terminated with its ripple resistor. Please make sure to terminate the last participants on the bus at both ends by activating the terminating resistor of 120Ω. If there is no data activity, the bus gets external disturbances. To avoid this a line polarization may be activated. Here the lines are held on a constant level by connecting a pair of resistors of 680Ω. At the left-side of the TM-E module there is a DIP switch. Here line polarization and termination may be activated or deactivated. The following switch positions are possible:
Position Polarization Termination
OFFON
4 3 2 1
off off
OFFON
4 3 2 1
on on
MPI interface
DIP switch for MPI

Chapter 2 Hardware description Manual VIPA TM-E
2-6 HB39E - TME - RE_900-1E650 - Rev. 09/11
A reset at the TM-E module may be initiated by the Reset button.
LINE
The Reset button is allocated below the "Line" jack behind an opening. Please use for operation a pointed object. More about the deployment of the Reset button may be found at "TM-E - Reset".
The TM-E module is to be power supplied by DC 12 ... 24V ±20%. Here the power consumption amounts to 3 ... 6W. For power supply there is a 2-pin connector at the lower-side of the TM-E module. The connector is a plug with screw contacts. If connected the plugs may be fixed with screws. The connector has the following assignment:
Pin Name Meaning 1 GND Ground power supply 1
2
2 12-24V DC DC 12 ... 24V ±20%
For the digital inputs/outputs there is a 5-pin connector at the low-side of the TM-E module. The output is designed as low-side output and may accordingly be configured. The connector is a plug with screw contacts. If connected the plugs may be fixed with screws.
Pin Name Meaning Digital input/output
1 DO_GND DO ground 2 DO_OC Digital output DC 24V, 0.2A
Low-side output 3 DO_VDC DO load voltage DC 24V 4 DI_GND DI ground (isolated)
1
2
3
4
5
5 DI Digital input DC 0/24V "0": 0 ... 5V "1": 10 ... 30V
DO_GND 1
DC24V
DO_OC 2
-
+
DO_VDC 3
DC24V+
-DI_GND 4
DI 5
DC 24V
Output DO
Optocoupler
DO_GND1
DO_OC2
DO_VDC3
+
-
Reset
Connector power supply
Connector digital I/O
Wiring diagram / Schematic diagram

Manual VIPA TM-E Chapter 2 Hardware description
HB39E - TME - RE_900-1E650 - Rev. 09/11 2-7
The TM-E module has an antenna jack. Here antennas of the type GSM 900MHz / DCS 1800MHz respectively GSM 850MHz / PCS 1900MHz, dual band may be connected. The consignment of the TM-E does not include an antenna. A suited antenna may be ordered by VIPA. The antenna is provided with a SMA plug. The coaxial built SMA plug (straight medium adaptor) is a miniature HF plug with a threaded connector that excels by high HF denseness. In the standard version the plug has a swivel nut with female thread and a pin. The SMA jack at the TM-E module is with its male thread and the calyx the complement for assembly. The portable antenna is a short rod antenna that is mounted without cable directly at the module via the SMA plug. The antenna may be angled and turned into any direction.
220
mm
The slot for a cellular mobile telephony SIM card is located at the rear-side of the module.
Caution! Please regard the SIM card may only be plugged if you have configured it at the TM-E Web page, before. Else your SIM card may be blocked! More about the installation of a SIM card may be found in the chapter "Deployment" at "Installation of the SIM card".
Antenna jack
Portable antenna
Slot for the SIM card

Chapter 2 Hardware description Manual VIPA TM-E
2-8 HB39E - TME - RE_900-1E650 - Rev. 09/11
Technical Data
TME-E GSM/GPRS EU Elektrical Data VIPA 900-1E650 Power supply (rated value) DC 12 ... 24V ±20% Power consumption 3 ... 6W Nominal current max. 300mA Mark of conformity and certification CE Hardware Memory 8Mbyte SDRAM, 8Mbyte Flash Real time clock Manual setting by Webinterface
or automatically by NTP Server, without Battery
Environment conditions Position of installation horizontal/vertical Operating temperature 0 ... +50°C Relative humidity 80% (no condensation) Storage /Transport temperature -20 bis +60°C Interfaces Ethernet Isolation tested with
RJ45 Ethernet 10/100 BaseTX; 1.5kV
MPI RS485 isolated Slot for SIM-Card Integrated GSM/GPRS modem Bands Dual band GSM 900MHz / DCS 1800MHz GPS Class Class 10 Baud rate max. 14.400bit/s Antenna connector SMA-F Digital I/Os Input 1xDI 0/24V DC Output (Low side) 1xDO DC 24V, 0.2A Isolation tested with 3.5kV Data record Protocols Modbus RS485, Modbus TCP, Unitelway, DF1, PPI
MPI (on board) and serial ASCII Dimensions and weight Dimension front (WxHxD) 26 x 105 x 120mm Weight 350g

Manual VIPA TM-E Chapter 4 Deployment TM-E
HB39E - TME - RE_900-1E650 - Rev. 09/11 3-1
Chapter 3 Deployment TM-E
This chapter concerns on the deployment of the TM-E module from VIPA with a PLC. With the fast introduction you will get an overview about the possibilities of teleservice. Another part of this chapter is the configuration of the TM-E module by means of the integrated Web page. This chapter ends with the possibilities of the teleservice functions.
Topic Page Chapter 3 Deployment TM-E............................................................ 3-1
Fast introduction................................................................................... 3-2 Assembly.............................................................................................. 3-5 Cabling................................................................................................. 3-6 TM-E - Configuration - eBuddy ............................................................. 3-7 TM-E - Reset...................................................................................... 3-13 TM-E - Web page............................................................................... 3-14 TM-E - PLC linking ............................................................................. 3-16 TM-E - Project integration - PG/PC interface ...................................... 3-19 Installation of the SIM card ................................................................. 3-24 Deployment of Tags ........................................................................... 3-26 Teleservice via telephone with MPI gateway ...................................... 3-29 Teleservice via telephone - Ethernet gateway .................................... 3-33 Teleservice via Callback function ....................................................... 3-36 Teleservice via SMS........................................................................... 3-40
Overview
Content

Chapter 4 Deployment TM-E Manual VIPA TM-E
3-2 HB39E - TME - RE_900-1E650 - Rev. 09/11
Fast introduction
The information in this manual should simplify you the deployment of remote controlling VIPA PLCs. More information concerning this may be found in German and English at:
suppport.ewon.biz www.ewon-online.de
The module TM-E from VIPA is constructed in the same way as the module "eWON2001". The TM-E module is to be supplied with DC 12...24V ±20%. The connection is established by a plug. This may be found at the lower side of the module and has the following allocation:
Pin Name Meaning 1 GND Ground power supply 1
2
2 12-24V DC DC 12 ... 24V ±20%
For the access to the TM-E-Modul valid IP address parameters are necessary. The IP addresses are assigned by the network administrator and must be coordinated with him. The TM-E module is delivered with the following IP address parameters:
IP address: 10.0.0.53 Subnet mask: 255.255.255.0
To change the IP address parameters the configuration tool "eBuddy" from VIPA may be used. Caution! For every TM-E module is delivered with the IP address 10.0.0.53 you must not connect more than one new TM-E module at one time. First commissioning: Connect the new TM-E module with the network, assign TCP/IP address parameters. Now you may connect the next new TM-E module and so on ...
Connect your PC to your TM-E module via Ethernet. Here either a crossed cable or a switch may be used. An active link via Ethernet is shown by the TM-E module with the green "LINK" led.
Important note!
Power supply
IP address parameters on delivery
Linking to Ethernet

Manual VIPA TM-E Chapter 4 Deployment TM-E
HB39E - TME - RE_900-1E650 - Rev. 09/11 3-3
The software tool "eBuddy" may be found at the download area of www.vipa.de. For installation execute eBuddySetup.exe and follow the instructions. • Start eBuddy.
• Switch to the list view with "Switch to list mode". Here every TM-E module available in you network is listed.
By selecting the corresponding TM-E module at the list, the following functions are available by the context menu (right click): - Changing respectively entering the IP address parameters - Loading respectively executing a firmware update - Backup respectively restoring of an application - Access to the integrated web page of the TM-E module
Open the Web page of the corresponding TM-E module. After entering User name and Password the web page of the corresponding TM-E module is opened. User name: adm Password: adm
Access via eBuddy
Access to the Web page
Access parameters

Chapter 4 Deployment TM-E Manual VIPA TM-E
3-4 HB39E - TME - RE_900-1E650 - Rev. 09/11
• Connect your CPU to the TM-E module via MPI. • Switch on the power supply of the CPU and switch the CPU to RUN. • Open the Web page of the corresponding TM-E module. • Open with Configuration > I/O server config. the page for adjusting an
I/O server. Set as I/O server "S73&400". • To access the VIPA PLC enter the following parameters:
MPI destination node: 2 (standard) Baud rate: 187500 Reply timeout: 3000 (Standard) MPI address: 0 (Standard) Highest MPI station address: 31 (Standard) Topic A: enabled Global device address: MPI, # (with #: MPI address CPU) Poll rate: 2000 MS (Standard)
• To confirm click at [Update config]. Now the CPU may be accessed via the TM-E module.
In a Tag the storage areas of you PLC may be defined. These storage areas may R/W accessed by the Tag. • To establish a Tag open at the Web page the page "Tag setup" and click
at "Create new Tag ...". • Enter the following parameters:
Tag name: Test Server name: S73&400 Topic name: A Address: MW0 Type: Boolean
• Otherwise leave the standard setting and click at [Add/Update...]. • Switch with Main menu > View I/O to the Tag list. • Enter a new value for the Tag "Test" and click at [Update]. Now this
value is set and may be transferred to the CPU with clicking to [Update] in the head line.
• If the new value is accepted by the CPU, so the communication between the TM-E module and the CPU is secured.
Caution! Please regard the SIM card may only be plugged if you have configured it at the TM-E Web page, before. Else your SIM card may be blocked! These steps are more described at the following pages.
Access to the VIPA PLC
Establish a Tag

Manual VIPA TM-E Chapter 4 Deployment TM-E
HB39E - TME - RE_900-1E650 - Rev. 09/11 3-5
Assembly
The modules are installed on a profile rail. You may use the following standard 35mm profile rail:
35 mm
27 mm
15 m
m
1,5
mm
35 mm
27 mm
7,5
mm1
mm
The following sequence represents the assembly procedure as viewed from the side. • Install the profile rail. Make sure that a clearance of at least 100mm
exists above and 70mm below the middle of the profile rail.
100
mm
70 m
m
Clack
• Insert the module that you are installing into the profile rail at an angle
of about 45 degrees from the top and rotate the module into place until it clicks into the profile rail with an audible click.
General
Assembly procedure

Chapter 4 Deployment TM-E Manual VIPA TM-E
3-6 HB39E - TME - RE_900-1E650 - Rev. 09/11
Cabling
At the lower side of the TM-E module there are connectors for power supply and digital inputs/outputs. The output is designed as low-side output and may be configured. The connectors are plugs with screw contacts. If connected the plugs may be fixed with screws.
Pin Name Meaning Digital input/output
1 DO_GND DO ground 2 DO_OC Digital output DC 24V, 0.2A
Low-side output 3 DO_VDC DO load voltage DC 24V 4 DI_GND DI ground (isolated) 5 DI Digital input DC 0/24V
"0": 0 ... 5V DC "1": 10V ... 30V DC
Power supply
1 GND Ground power supply
1
.
.
.
5
12
2 12-24V DC DC 12 ... 24V ±20%
The TM-E module is to be supplied by DC 12...24V ±20%. The connection is established by means of a plug. This is at the lower side of the module and has the following allocation:
Pin Name Meaning 1 GND Ground power supply 1
2
2 12-24V DC DC 12 ... 24V ±20%
DO_GND 1
DC24V
DO_OC 2
-
+
DO_VDC 3
DC24V+
-DI_GND 4
DI 5
DC 24V
Output DO
Optocoupler
DO_GND1
DO_OC2
DO_VDC3
+
-
Overview
Power supply
DI/DO wiring / schematic diagram

Manual VIPA TM-E Chapter 4 Deployment TM-E
HB39E - TME - RE_900-1E650 - Rev. 09/11 3-7
TM-E - Configuration - eBuddy
To deploy the TM-E module, the VIPA software tool "eBuddy" is necessary. With this new IP address parameters may be assigned to the TM-E module; you may load and transfer new firmware, backup/restore applications and access the integrated web page of the TM-E module.
The software tool "eBuddy" may be found at the download area of www.vipa.de. For installation execute eBuddySetup.exe and follow the instructions.
Connect the TM-E module via Ethernet and switch on its power supply. Start eBuddy. This always starts in the last used mode.
Here the following functions are available: • Set or modify the IP address parameters • Load or execute a firmware update • Backup or restore of an application To change to the List mode from the Wizard Mode click to the link "Switch to list mode". In the List mode every TM-E module available in you network is listed.
By selecting the corresponding TM-E module in the list, there are the same functions available by context menu (right click), which were listed above. Additionally the Web page integrated to the TM-E module may directly be accessed by "Open in browser"
Overview
Installation
Wizard mode List mode
Wizard mode
List mode

Chapter 4 Deployment TM-E Manual VIPA TM-E
3-8 HB39E - TME - RE_900-1E650 - Rev. 09/11
Industrial Ethernet exclusively supports IPv4. At IPv4 the IP address is a 32Bit address that must be unique within the network and consists of 4 numbers that are separated by a dot. Every IP address is a combination of a Net-ID and a Host-ID and its structure is as follows: xxx.xxx.xxx.xxx Range: 000.000.000.000 to 255.255.255.255 The network administrator also defines IP addresses.
The Network-ID identifies a network res. a network controller that administrates the network. The Host-ID marks the network connections of a participant (host) to this network.
The Host-ID can be further divided into a Subnet-ID and a new Host-ID by using a bit for bit AND assignment with the Subnet mask. The area of the original Host-ID that is overwritten by 1 of the Subnet mask becomes the Subnet-ID, the rest is the new Host-ID. Subnet mask binary all "1" binary all "0" IPv4 address Net-ID Host-ID Subnet mask and IPv4 address Net-ID Subnet-ID new Host-ID
A TCP-based communication via point-to-point, hub or switch connection is only possible between stations with identical Network-ID and Subnet-ID! Different area must be connected with a router. The subnet mask allows you to sort the resources following your needs. This means e.g. that every department gets an own subnet and thus does not interfere another department.
At the first start-up the TM-E module has the following IP address:
IP address: 10.0.0.53 Subnet mask: 255.255.255.0
Attention! For every TM-E module is delivered with the IP address 10.0.0.53 you must not connect more than one new TM-E module at one time. First commissioning: Connect the new TM-E module with the network, assign TCP/IP address parameters. Now you may connect the next new TM-E module and so on ...
Basics - IP address and subnet
Net-ID Host-ID
Subnet mask
Subnet
Address at first start-up

Manual VIPA TM-E Chapter 4 Deployment TM-E
HB39E - TME - RE_900-1E650 - Rev. 09/11 3-9
For IPv4 addresses there are five address formats (class A to class E) that are all of a length of 4byte = 32bit. Class A 0 Network-ID
(1+7bit) Host-ID (24bit)
Class B 10 Network-ID (2+14bit) Host-ID (16bit) Class C 110 Network-ID (3+21bit) Host-ID (8bit) Class D 1110 Multicast group Class E 11110 Reserved
The classes A, B and C are used for individual addresses, class D for multicast addresses and class E is reserved for special purposes. The address formats of the 3 classes A, B, C are only differing in the length of Network-ID and Host-ID. To build up private IP-Networks within the Internet, RFC1597/1918 reserves the following address areas:
Network class
Start IP End IP Standard subnet mask
A 10.0.0.0 10.255.255.255 255.0.0.0 B 172.16.0.0 172.31.255.255 255.255.0.0 C 192.168.0.0 192.168.255.255 255.255.255.0 (The Host-ID is underlined.)
These addresses can be used as net-ID by several organizations without causing conflicts, for these IP addresses are neither assigned in the Internet nor are routed in the Internet.
Some Host-IDs are reserved for special purposes. Host-ID = 0 Identifier of this network, reserved! Host-ID = maximum (binary complete 1) Broadcast address of this network
Note! Never choose an IP address with Host-ID=0 or Host-ID=maximum! (e.g. for class B with subnet mask = 255.255.0.0, the "172.16.0.0" is reserved and the "172.16.255.255" is occupied as local broadcast address for this network.)
Address classes
Private IP networks
Reserved Host-Ids

Chapter 4 Deployment TM-E Manual VIPA TM-E
3-10 HB39E - TME - RE_900-1E650 - Rev. 09/11
For the access to the TM-E-Modul valid IP address parameters are necessary. The IP addresses are assigned by the network administrator. Per default the TM-E module is delivered with the IP address 10.0.0.53. You may switch to the IP address parameter wizard with "Set IP address". By clicking to [Browse...] each TM-E module of the network is listed.
• Choose the TM-E module, which corresponds to the serial number.
Confirm your input and click to [Continue >]. • The dialog window to enter IP address data is opened. • Enter the new IP address parameters. By clicking to [Continue >] the
new IP address parameters are transferred to the TM-E module. → The TM-E module is started new. After a certain waiting period and during successful transmissions this is reported.
• [Finish >] closes the dialog.
With each new dial-in of the TM-E module, this is assigned automatically with a new IP address. This is called dynamic address allocation. Usually the TM-E module sends an eMail containing the current valid IP address. By this IP address the TM-E module may be accessed. With the service of a DNS service provider like e.g. www.no-ip.com there is the possibility to directly access the TM-E module by a name instead by the IP address. Here usually a free user account is to be established. The corresponding DNS service provider may be selected on the Web page of the TM-E module at "Networking config" with the page "Publish IP address". Here the user data may be entered. During communication the dynamic IP address is submitted to the service provider and there transformed to the symbolic name.
Changing the IP address
Symbolic name instead of IP address

Manual VIPA TM-E Chapter 4 Deployment TM-E
HB39E - TME - RE_900-1E650 - Rev. 09/11 3-11
A firmware update happens in 2 steps: • Update eBuddy • Update firmware With "Update eBuddy" the firmware files may directly be stored at you PC. This is necessary to update the firmware of you TM-E module. As source the Internet or a local directory may be selected. With [Continue >] the available firmware language versions are listed. Select the corresponding version and download it with [Continue >] to your PC. With "Update firmware" a dialog window is opened to request the login data. By selecting the corresponding TM-E module and by entering the login data, the firmware versions at your PC and at the TM-E module are listed.
Choose the concerning firmware version at your PC. The update procedure is started by [Continue >]. Attention! When installing a new firmware you have to be extremely careful. Under certain circumstances you may destroy the TM-E module, for example if the voltage supply is interrupted during transfer or if the firmware file is defective. In this case, please call the VIPA-Hotline!
The proceeding of the update is shown as a proceeding bar. Wait here until the bar is at 100%. A successful update is reported by a status report.
Update firmware
Update eBuddy
Update firmware

Chapter 4 Deployment TM-E Manual VIPA TM-E
3-12 HB39E - TME - RE_900-1E650 - Rev. 09/11
With this function the configuration of a TM-E module may be stored and uploaded to the TM-E module. Each modification on the configuration of the TM-E module should be stored.
Open the dialog window with clicking to "Backup/restore application". Select "Backup". Even if you want to forward the backup to the VIPA support the files relevant to the support should also be saved. Here activate the option "Include support files". Click to [Continue >]. Select the corresponding TM-E module, enter your login data and click to [Continue >]. Navigate to the concerning directory and enter a file name. With [Continue >] the backup is stored with the file name in the concerning directory. The proceeding of the write procedure is shown as a proceeding bar. Wait here until the bar is at 100%. As soon as the backup is finished, you get a feedback.
Open the dialog window with clicking to "Backup/restore application". Select "Restore" and click to [Continue >]. Select the corresponding TM-E module, enter your login data and click to [Continue >]. Navigate to the concerning directory and enter a file name of the backup. With [Continue >] the data are transferred to the TM-E module. The proceeding of the write procedure is shown as a proceeding bar. Wait here until the bar is at 100%. As soon as the restore is finished, you get a feedback.
Backup / restore application
Backup
Restore

Manual VIPA TM-E Chapter 4 Deployment TM-E
HB39E - TME - RE_900-1E650 - Rev. 09/11 3-13
TM-E - Reset
At the front-side of the TM-E module there is a Reset button. This may be located below the "Line" jack and may be operated by a pointed object. With the reset (user reset) extra created Web pages and Tag configurations are erased. Here the communication settings are still remaining. For a complete reset please contact the VIPA support.
Caution! An unauthorized complete reset, which possibly was not carefully executed, leads automatically to the expiring of the warranty! Then the device must be sent back to VIPA for reprogramming.
There is the following proceeding for the user reset: • Switch-off the TM-E module. • Press the Reset button. • Switch-on the TM-E module and leave the reset button pressed as long
as the "USER"-LED is blinking red. • Release the Reset button now. Now the TM-E module executes a restart. Wait until the "USER"-LED blinks green.
Overview
User-Reset

Chapter 4 Deployment TM-E Manual VIPA TM-E
3-14 HB39E - TME - RE_900-1E650 - Rev. 09/11
TM-E - Web page
• Start the VIPA configuration tool "eBuddy". • Switch to the list view with "Switch to list mode". Here every TM-E
module available in your network is listed.
• Click to the concerning TM-E module and select in the context menu "Open in browser". Your Web browser is opened with the request of User name and Password. Per default the TM-E module is delivered with the following user data: User name: adm Password: adm After entering User name and Password the web page of the corresponding TM-E module is opened.
Access to the Web page

Manual VIPA TM-E Chapter 4 Deployment TM-E
HB39E - TME - RE_900-1E650 - Rev. 09/11 3-15
The functionalities of your TM-E module are separated to the areas Main menu and Configuration with the following structure.
Each information of the TM-E module may be accessed by the Main menu. The Information are separated to the following pages: Shows a list of the configured Tags. Here PLC value may be preset and evaluated. At this page the current alarms are listed. Here the alarms may be acknowledged. Here each alarm and history arte listed. This page serves several possibilities for diagnostics of the TM-E module by means of sub pages. Here each information may be downloaded from the TM-E module as lists. Every setting of the TM-E module may be established by this page. Here the main functionalities are separated to the following pages: Here Tags may be configured, which were listed at "View I/O" and may be controlled there. Via this page the basic parameters of the TM-E module may be accessed. Depending on the functionality these are assigned to the pages General (general settings, net services and diagnosis), Communication (Interfaces and network) and Storage (administration storage memory). There are pre-defined servers for several communication protocols and systems inside the TM-E module. By selecting the corresponding server this may be configured. To expand the functionalities, scripts may be programmed by means of a BASIC language. Scripts may be transferred and maintained by this page. Here users may be applied and administrated. To increase the structure, Tags may be assigned to several pages. The administration of these pages happens by this page.
Structure
Main menu
View I/O
Alarm Summary
Alarm History
Diagnostic
File transfer
Configuration
Tag Setup
System Setup
IO Server Config
Script Setup
User Setup
Pages List

Chapter 4 Deployment TM-E Manual VIPA TM-E
3-16 HB39E - TME - RE_900-1E650 - Rev. 09/11
TM-E - PLC linking
For the further approach there is condition your TM-E module has valid IP address parameters and the Web page of the TM-E module may be accessed.
To get access to the VIPA PLC, the VIPA CPU is to be connected to the MPI jack of the TM-E module via a suited MPI cable. If there is an Ethernet CP within your PLC, for TM-E access you may connect it to Ethernet instead to MPI. Switch-on the power supply of the CPU and switch the CPU to RUN.
• Open the concerning Web page of the TM-E module. Now you are requested for access parameters. Per default the TM-E module has the following access parameters:
Access parameters User name: adm Password: adm
• After entering of User name and Password the Web page of the TM-E
module is opened.
• Open with Configuration > IO Server Config the page to preset I/O
server.
Preconditions
Connect VIPA PLC via MPI
Configure VIPA PLC in TM-E

Manual VIPA TM-E Chapter 4 Deployment TM-E
HB39E - TME - RE_900-1E650 - Rev. 09/11 3-17
• For the VIPA PLC select as I/O server "S73&400". The following dialog window is opened:
At "Gateway Configuration" and "MPI/Profibus Setup" the values are preset, which are to be used per default. - Destination node (Address of the destination node) - Protocol type (standard: MPI) - Baud rate (standard: 187500 - Reply Timeout (standard: 3000ms) - MPI/Profibus Address (Address of the TM-E module, standard: 0) - Highest MPI/Profibus Address (standard: 31)
At Topic ... access paths to your PLC may be defined, assigned to a corresponding Topic character and activated. By presetting the key words MPI, PROFIBUS respectively ISOTCP and adding an address, a corresponding access path may be defined. Access via Profibus: PROFIBUS, # (with # corresponds to the
Profibus address of your connected PLC) Example: PROFIBUS, 5
Access via MPI: MPI, # (with # corresponds to the MPI address of your PLC) Example: MPI, 2
Access via IP address: ISOTCP,IP address,00.02 Enter each without spaces and always add to the IP address ",00.02". Example: ISOTCP,192.16.167.123,00.02
Enter at Poll Rate the standard value 2000ms and click at [Update config].
I/O server configuration

Chapter 4 Deployment TM-E Manual VIPA TM-E
3-18 HB39E - TME - RE_900-1E650 - Rev. 09/11
To test the MPI connection a Tag is to be created. In a Tag memory areas of you PLC are defined. These storage areas may R/W accessed by the Tag. • To establish a Tag open at the Web page the page "Tag setup" and click
at "Create new Tag ...". • Enter the following parameters:
Tag name: Test Server name: S73&400 Topic name: A Address: MW0 Type: Boolean
• Otherwise leave the standard setting and click at [Add/Update...]. • Switch with Main menu > View I/O to the Tag list. • Enter a new value for the Tag "Test" and click at [Update]. Now this
value is set and may be transferred to the CPU with clicking to [Update] in the headline.
• If the new value is accepted by the CPU, so the communication between
the TM-E module and the CPU is secured.
Test PLC connection
Access via View I/O

Manual VIPA TM-E Chapter 4 Deployment TM-E
HB39E - TME - RE_900-1E650 - Rev. 09/11 3-19
TM-E - Project integration - PG/PC interface
For the further approach it is precondition that you have access to the Web page of the TM-E module and your CPU is connected to the TM-E module via MPI and is accordingly configured. For the project engineering, a thorough knowledge of the Siemens SIMATIC manager and the hardware configurator from Siemens is re-quired. IP address and subnet mask of your PC are known.
With the teleservice the TM-E module works as gateway. As gateway via the served communication connections you have access to the VIPA PLC, which is connected via MPI to the TM-E module. So that the TM-E module can work as gateway, you have to integrate this to your hardware configuration.
For the deployment of the TM-E module in the Siemens SIMATIC manager, the installation of the station file TM-E.cfg is necessary. This file may be found in the download area at www.vipa.de. Download this file to your PC. Later this file is to be imported to the PG/PC interface.
Since in the TM-E module predefined IP address data for the PPP server are used, in your project you have to de-activate the automatic address assignment. • Start the Siemens SIMATIC manager with your project. Your project
should contain your CPU, which is connected via MPI to the MPI bus. • Open via Options > Set PG/PC interface the properties dialog. • Select the interface parameter assignment "TCP/IP(Auto)...", which
corresponds to your network card and click to [Properties]. • Select the Register "IE-PG Access" and activate the parameter "Do not
assign IP address automatically". • Confirm your setting with [OK].
Precondition
Teleservice
Load TM-E.cfg station file
De-activate the automatic IP address assignment

Chapter 4 Deployment TM-E Manual VIPA TM-E
3-20 HB39E - TME - RE_900-1E650 - Rev. 09/11
The integration of the TM-E module to your project happens as PG/PC interface. After the configuration this may be defined as access path for the PLC functions. The configuration happens with the following approach:
• Start the software NetPro, by clicking to . For example you see the following structure:
• Add the station "PG/PC" from Network, by double-clicking to the station
"PG/PC".
Integrate the TM-E module to the Siemens SIMATIC manager
Add PG/PC station

Manual VIPA TM-E Chapter 4 Deployment TM-E
HB39E - TME - RE_900-1E650 - Rev. 09/11 3-21
• Open the properties of the PG/PC station. • Access the register "Interfaces" and click to [New...]. • Select the type "Industrial Ethernet" and click to [OK]. • De-activate "Set MAC address..." • Enter at "IP address" and "Subnet mask" the IP address parameters of
you PC determined before.
• To establish a new subnet click at [New...]. • Confirm the properties with [OK]. • Select if not happened the new established subnet and click at [OK].
Now you are back in the properties dialog. • Call the register "Assignment" auf. • Highlight at "Configured Interfaces" your Ethernet interface and select at
"Interface parameter assignments in the PG/PC" the parameter, which starts with "TCP/IP(Auto) ->..." and corresponds to your network card.
• Click at [Assign].
• Ignore the warn messages and close the "properties" dialog with [OK].
Properties PG/PC station

Chapter 4 Deployment TM-E Manual VIPA TM-E
3-22 HB39E - TME - RE_900-1E650 - Rev. 09/11
Now your graphical net view should show the following structure:
To import the TM-E module to your project the first downloaded station file is necessary. • Start in NetPro the import via Edit > Import. • Activate the parameter "Export file of a station". • Enter path and name of the station file TM-E.cfg and click to [OK].
Possibly appearing warnings may be ignored by [Close]. Now your graphical net view should show the following structure:
• Open the properties dialog of the communication component "IE
General" of the station "TM-E". • Click in the area "Interface" at [Properties...]. A dialog window for IP
address data settings is opened.
Import the TM-E module via station file

Manual VIPA TM-E Chapter 4 Deployment TM-E
HB39E - TME - RE_900-1E650 - Rev. 09/11 3-23
Depending on the access modes to your TM-E, there are the following possibilities to preset IP address parameters: Access via Ethernet Enter here IP address and subnet mask of your TM-E module. The IP address parameters must correspond to the IP address parameters, which were preset with the software tool "eBuddy". Access via PPP connection If you want to access your TM-E module via dial connection (PPP connection), the following preset IP address parameters are to be used: IP address: 202.0.0.240 Subnet mask: 255.255.255.0 Open the properties dialog of the communication component "MPI/DP" of "TM-E". Enter the MPI address. This must correspond to the MPI address preset by the software tool "eBuddy". NetPro should now show the following structure.
Click in the graphical net view at the CPU and transfer your project with Download > Selected stations. Now your CPU may be accessed via this connection from the Siemens SIMATIC manager.
Define access via IP address
Set the MPI address
Transfer the project to the CPU

Chapter 4 Deployment TM-E Manual VIPA TM-E
3-24 HB39E - TME - RE_900-1E650 - Rev. 09/11
Installation of the SIM card
Caution! Please regard the SIM card may only be plugged if you have configured it at the TM-E Web page, before. Else your SIM card may be blocked!
For the further approach it is precondition that you have access to the Web page of the TM-E module and you have a valid GSM SIM card with PIN.
• Open the Web page of the TM-E module. • Navigate via Configuration > System setup to the page
"Communication". • Open at the navigation tree Interfaces the page "Modem". • At "GSM PIN" type in the pin number, which is delivered with your SIM
card. Leave every values at default setting and click at [Update].
The slot for the SIM card is located at the rear-side of the module. The SIM card should be installed before the assembly. The installation happens with the following approach: • Pull the SIM card holder by pushing the eject button with a pointed
object. The eject button may be found above the card slot.
• Insert the SIM card as shown to the SIM card holder. Please regard here
the correct positioning. • Put the SIM card holder back again into the module until it snaps easily
into place. Please regard here the correct positioning.
Preconditions
Configuration at the Web page
Installing the SIM card

Manual VIPA TM-E Chapter 4 Deployment TM-E
HB39E - TME - RE_900-1E650 - Rev. 09/11 3-25
• Connect if not just happened a suited antenna. The TM-E module has a an antenna jack. Here a GSM dual band antenna may be connected. The TM-E module is delivered without any antenna. With the order number VIPA 240-0EA00 you may get a suited antenna from VIPA.
• Switch-on again the power supply of the TM-E module. With a cold restart it may last up to 2 minutes until the GSM modem is been rebooted and initialized.
• Open the Web page of the TM-E module. • Navigate via Configuration > System setup to the page
"Communication". • Open in the navigation tree Interfaces the page "Modem". If you have made everything correctly and your GSM modem is connected to a mobile network, the following parameters are listed: This parameter shows you the type of the internal modem. Here the text "internal Multiband GSM" should be shown. Here the signal level 0...99 is shown. This value is determined once a minute. For a communication connection this value should be higher than 17. A value of 25 corresponds to a good connection. If a value is higher than 30 this correspond to an excellent connection. A signal level of 0 indicates a non existing mobile network. "Home Network" is shown if the SIM card is operated in the country of which the SIM card is from. If the TM-E module is operated in an other country, "Roaming" is shown. Otherwise the following error messages may be displayed with his parameter: - "SIM card error!" if SIM card is missing - "PIN code error!" if PIN is faulty - "in operation..." the modem tries to connect to a mobile network. Here the name of your mobile network provider is listed.
Commissioning with SIM card
Modem detected
Signal level
Network
Operator

Chapter 4 Deployment TM-E Manual VIPA TM-E
3-26 HB39E - TME - RE_900-1E650 - Rev. 09/11
Deployment of Tags
For the further approach it is precondition that you have access to the Web page of the TM-E module, your PLC may be reached via the TM-E module and the corresponding Topics are configured. The access paths to your PLC are defined by Topics. More about the configuration of Topics may be found at "TM-E - PLC linking".
A Tag is a digital respectively analog value, which is assigned to a data source. For example the data source could be a flag word of your PLC. To a Tag you have reading and writing access (configurable). So the directly assigned data source may be accessed by the Tag. By presetting of limit values for a Tag, the TM-E module has the possibility for limit monitoring and appropriate alerting via SMS respectively eMail.
• Open the Web page of the TM-E module to establish a Tag. • Navigate via Configuration > Tag setup to the page "Create New
Tag....". • Here the following parameters may be entered:
Identification
Tag name: Name with which the Tag is listed. The Tag name may maximally consist of 64 characters and must not include the following characters: space $ "
Page: Let the value at "Standard" Tag description: Give a comment to the Tag
I/O server setup
Server name: For VIPA PLCs select "S73&400" Topic name: Devices within an I/O server are grouped by
Topic name. Enter A, if you have defined your MPI interface as Topic A, as described at "TM-E - PLC linking".
Address: Enter a value from your PLC, which is to be assigned to the Topic (see the following table).
Type: Here define as Type boolean or analog depending on the parameter Address.
Alarm setup If you wish an alerting, you may enter limit values here for alert
messages.
Precondition
What is a Tag?
Establishing a Tag

Manual VIPA TM-E Chapter 4 Deployment TM-E
HB39E - TME - RE_900-1E650 - Rev. 09/11 3-27
The following symbolic names may be used on deployment together with a VIPA PLC by selecting "S73&400" server:
Symbol Memory type Modificator Address DBx Data block with No. x B, C, W, S, D, L, F Byte offset M Internal memory (flag) B, C, W, S, D, L, F Byte offset C Counter W, S Counter No.T Timer W, S Timer No. I Process inputs B, C, W, S, D, L, F Byte offset Q Process outputs B, C, W, S, D, L, F Byte offset PI Peripheral inputs B, C, W, S, D, L, F Byte offset PQ Peripheral outputs B, C, W, S, D, L, F Byte offset
Modificator Type Range of values
B Byte 0 ... 255 C Byte with sign -128 ... 127 W Word 0 ... 65535 (default) S Word with sign -32768 ... 32767 D DWord 0 ... 4294967296 L DWord with sign -2147483648 ... 2147483647 F Float +/- 3.4E38
With each memory type there is the possibility to access a bit. Here add a # and the bit no. to the Address name. For the bit no. the values 0 ... 7 may be used. Note! If you do not enter a Modificator automatically the type "Word" is used. With data blocks a Modificator is always to be entered.
Address Description
MW4 Flag word 4 CS1 Counter 1, read as word with sign TS7 Timer 7, read as word with sign
DB2L5 DWord at address 5 (in bytes) in data block 2 IB3 Byte at address 3 (in bytes) in the input area I5#2 Input I5.2
Q10#6 Output Q10.6
Name conventions for Address
Symbol
Modificator
Bit access via #
Example

Chapter 4 Deployment TM-E Manual VIPA TM-E
3-28 HB39E - TME - RE_900-1E650 - Rev. 09/11
For the further approach it is precondition that you have access to the Web page of the TM-E module, your PLC may be reached via the TM-E module and the corresponding Topics are configured. • Open the Web page of the TM-E module • Navigate via Configuration > Tag setup to the page "Create new Tag ...". • Enter the following parameters:
Tag name: Test Server name: S73&400 Topic name: A Address: MW0 Type: Boolean
• Otherwise leave the standard setting and click at [Add/Update...]. • Switch with Main menu > View I/O to the Tag list. • Enter a new value for the Tag "Test" and click at [Update]. Now this
value is set and may be transferred to the CPU with clicking to [Update] in the headline.
• If the new value is accepted by the CPU, so the communication between
the TM-E module and the CPU is secured.
Example
Access via View I/O

Manual VIPA TM-E Chapter 4 Deployment TM-E
HB39E - TME - RE_900-1E650 - Rev. 09/11 3-29
Teleservice via telephone with MPI gateway
With the teleservice via telephone with MPI gateway, a connection via telephone (PPP connection) is directly established from your PC to the TM-E module. Here the CPU is linked to the TM-E module by MPI. To be able to react to the calling, to authenticate the user and to assign the IP address, the TM-E module is to be configured as PPP server. The following picture shows the network topology on an example:
MPI: 0 MPI: 210.0.0.89 202.0.0.1
PPP connection
202.0.0.240
PC
PCTM-E
SPS
In the configuration above there are 2 various networks: • 10.0.0.0 is the network of your PC. • 202.0.0.0 is the temporary network, which is to be used for the PPP
connection. This network is only active during PPP connection.
For the further proceeding it is precondition you have access to the Web page of the TM-E module and your CPU is connected to the TM-E module via MPI and accordingly configured. Further it is precondition that a SIM card installed and your TM-E module is connected to the mobile network.
Overview
Precondition

Chapter 4 Deployment TM-E Manual VIPA TM-E
3-30 HB39E - TME - RE_900-1E650 - Rev. 09/11
To access the TM-E module via PPP connection the server for incoming PPP connections is to be configured. • Here open the Web page of the TM-E module. • Navigate to the "Communication" page via Configuration > System
setup. Open the page "Incoming" in the navigation tree Network Connection > Modem.
• Activate the option "Server enabled".
• Here enter the following parameters:
- "TM-E PPP server IP address": 202.0.0.240 - "PPP client IP address": 202.0.0.1
• Accept the remaining default settings and click at [Update]. Configure your PC modem so that it may establish a connection to the TM-E module. Here establish a DFÜ connection. More about this may be found in the manual of your PC operating system. Here please regard that User name and Password are identical to the access data in you TM-E module. Call your TM-E module via the PC modem. Open as soon as the TM-E module reacts a DOS command window and send a ping to the IP address 202.0.0.240. You should now get a response. Else check your settings.
Configuration of the direct telephone connection
Test the telephone connection

Manual VIPA TM-E Chapter 4 Deployment TM-E
HB39E - TME - RE_900-1E650 - Rev. 09/11 3-31
Information how to integrate your TM-E modules to your PLC may be found at "TM-E - Project integration - PG/PC interface". If you have just integrated your TM-E module into your PLC project, at the TM-E station of NetPro the routing is accordingly be adapted. • Open NetPro with your project.
• Open the properties dialog of the communication component
"IE General" of the station "TM-E". • Click at "Interface" at [Properties]. A dialog window for presetting the IP
address data is opened.
For the access via PPP dial connection the following predefined IP address data are to be used: IP address: 202.0.0.240 Subnet mask: 255.255.255.0 Open the properties dialog of the communication component "MPI/DP" of "TM-E". Enter the MPI address. This must be the same as the MPI address configured with the software tool "eBuddy". Please regard that your CPU is connected via MPI and the MPI address is accordingly assigned. VIPA CPUs are delivered with MPI address 2.
Configure routing in PLC project
Access defined by IP address
Set MPI address

Chapter 4 Deployment TM-E Manual VIPA TM-E
3-32 HB39E - TME - RE_900-1E650 - Rev. 09/11
NetPro should now show the following structure.
Click in the graphical net view at the CPU and transfer your project with Download > Selected stations.
Transfer the project to the CPU

Manual VIPA TM-E Chapter 4 Deployment TM-E
HB39E - TME - RE_900-1E650 - Rev. 09/11 3-33
Teleservice via telephone - Ethernet gateway
With teleservice via telephone with Ethernet gateway, a connection via telephone (PPP connection) is directly established from your PC to the TM-E module. Here the CPU is linked to the TM-E module by Ethernet. To be able to react to the calling, to authenticate the user and to assign the IP address, the TM-E module is to be configured as PPP server. The following picture shows the network topology on an example:
10.0.1.9 10.0.1.1010.0.0.89 202.0.0.1
PPP connection
202.0.0.240
PC
PCTM-E
SPS
In the configuration above there are 3 various networks: • 10.0.0.0 is the network of your PC. • 202.0.0.0 is the temporary network, which is to be used for the PPP
connection. This network is only active during PPP connection. • 10.0.1.0 is the network, over which the PLC is to be accessed. Here the following routing configuration is to be established:
• Configure the PC so that every IP package, based on the PPP
connection, is transferred to the 10.0.1.0 network of the PLC. • Configure the TM-E module so that every IP package, which was
received from address 202.0.0.240, is transferred to the address 10.0.1.0.
• Configure the PLC so that it may answer every net except the net with 10.0.1.0.
Overview

Chapter 4 Deployment TM-E Manual VIPA TM-E
3-34 HB39E - TME - RE_900-1E650 - Rev. 09/11
For the further proceeding it is precondition you have access to the Web page of the TM-E module and your CPU is connected to the TM-E module via Ethernet and accordingly configured. Further it is precondition that a SIM card installed and your TM-E module is connected to the mobile network.
To access the TM-E module via PPP connection the server for incoming PPP connections is to be configured. • Here open the Web page of the TM-E module. • Navigate to the "Communication" page via Configuration > System
setup. Open the page "Incoming" in the navigation tree Network Connection > Modem.
• Activate the option "Server enabled".
• Here enter the following parameters:
- "TM-E PPP server IP address": 202.0.0.240 - "PPP client IP address": 202.0.0.1
• Accept the remaining default settings and click at [Update]. Configure your PC modem so that it may establish a connection to the TM-E module. Here establish a DFÜ connection. More about this may be found in the manual of your PC operating system. Here please regard that User name and Password are identical to the access data in you TM-E module. Call your TM-E module via the PC modem. Open as soon as the TM-E module reacts a DOS command window and send a ping to the IP address 202.0.0.240. You should now get a response. Else check your settings.
Precondition
Configuration of the direct telephone connection
Test the telephone connection

Manual VIPA TM-E Chapter 4 Deployment TM-E
HB39E - TME - RE_900-1E650 - Rev. 09/11 3-35
So that your TM-E module may transfer every IP packages received from the PPP connection to the PLC, you have to configure Forwarding.
• Navigate to the page "Communication" via Configuration > System Setup. Open in the Navigation tree Network Configuration the page "Routing".
• Activate the option "Enable IP forwarding between IP interfaces" and click at [Update].
Since your PC is connected to the TM-E module via telephone, your TM-E module is automatically set as gateway in your PC. Here in you PC no further settings are necessary. To get access to your via Ethernet connected PLC, in your PLC respectively network device you have to set the IP address of your TM-E module as gateway. For this open in NetPro the properties dialog of your Ethernet part and enter as gateway the IP address of your TM-E module.
If you have just established the teleservice via telephone, the callback function in your TM-E module may now be used. By means of a call (defined numbers of ring signals) your TM-E module may be activated to send an eMail. In the eMail among others an IP address may be found as link. As long as your TM-E module is online, it may be accessed via this link. More about this may be found at "Teleservice via Callback function".
Configure forwarding
Configure TM-E as gateway
Callback-Function

Chapter 4 Deployment TM-E Manual VIPA TM-E
3-36 HB39E - TME - RE_900-1E650 - Rev. 09/11
Teleservice via Callback function
With Callback there is the possibility to call the TM-E module with a defined number of ring signals to initiate the callback mode. Now the module accesses the Internet and sends an eMail, which contains in its text a dynamic PPP IP address. This address may be accessed as long as the TM-E module is online. So you may safe money for connection, if e.g. the plant to be observed is abroad. The configuration of the Callback mode happens on the Web page of the TM-E module with the following approach: • Configuration of the direct telephone connection • Configuration of the dial-up server • Configuration of the mail server • Activation of the Callback
For the further proceeding it is precondition you have access to the Web page of the TM-E module and your CPU is connected to the TM-E module and accordingly configured. Further it is precondition that a SIM card installed and your TM-E module is connected to the mobile network.
If you have just established the teleservice via telephone, please continue with the configuration of the dial-up server. With the teleservice via telephone a connection via telephone (PPP connection) is directly established from your PC to the TM-E module. To be able to react to the calling, to authenticate the user and to assign the IP address, the TM-E module is to be configured as PPP server. The following picture shows the network topology on an example:
10.0.0.89 202.0.0.1
PPP connection
202.0.0.240
PC
PCTM-E
SPS
In the configuration above there are 2 various networks: • 10.0.0.0 is the network of your PC. • 202.0.0.0 is the temporary network, which is to be used for the PPP
connection. This network is only active during PPP connection.
Overview
Precondition
Configuration of the direct telephone connection

Manual VIPA TM-E Chapter 4 Deployment TM-E
HB39E - TME - RE_900-1E650 - Rev. 09/11 3-37
To access the TM-E module via PPP connection the server for incoming PPP connections is to be configured. • Here open the Web page of the TM-E module. • Navigate to the "Communication" page via Configuration > System
setup. Open the page "Incoming" in the navigation tree Network Connection > Modem.
• Activate the option "Server enabled".
• Here enter the following parameters:
- "TM-E PPP server IP address": 202.0.0.240 - "PPP client IP address": 202.0.0.1
• Accept the remaining default settings and click at [Update]. Configure your PC modem so that it may establish a connection to the TM-E module. Here establish a DFÜ connection. More about this may be found in the manual of your PC operating system. Here please regard that User name and Password are identical to the access data in you TM-E module. The default access parameters are: User name: adm Password: adm Call your TM-E module via the PC modem. Open as soon as the TM-E module reacts a DOS command window and send a ping to the IP address 202.0.0.240. You should now get a response. Else check your settings.
Configuration
Test the telephone connection

Chapter 4 Deployment TM-E Manual VIPA TM-E
3-38 HB39E - TME - RE_900-1E650 - Rev. 09/11
Activate the dial-up server for the dial-up to the Internet. • Here open the Web page of the TM-E module. • Navigate via Configuration > System setup to the page
"Communication". Open at the navigation tree Network connection > Modem > Outgoing the page "Global".
• Activate the option "PPP outgoing connection parameters".
• Leave every value at default setting and click at [Update]. • Click at "Server1".
• For the dial-up via modem enter Server phone number, User name and Password and click at [Update].
Configuration of the dial-up server

Manual VIPA TM-E Chapter 4 Deployment TM-E
HB39E - TME - RE_900-1E650 - Rev. 09/11 3-39
• To enter the SMTP server open the page "General" at "System setup". • Navigate at the navigation tree to Net Services > SMTP (mails).
• Here enter the following parameters:
- SMTP server address (may be an IP address or a domain) - SMTP server port (default: 25) - eMail address (valid eMail address) - User name and Password may only be entered if secure authentication was activated in the dial-up server configuration.
• To activate the Callback open the page "Communication" at "System
setup. • Navigate in the navigation tree to Network Config > Callback.
• Activate the option "Callback enabled". • Accept the default settings and click at [Update]. For a test call the telephone number of your TM-E module. Let it ring 5 times and then disconnect. After about 30 seconds the TM-E module attempts now to dial-up to the Internet to establish a connection to the mail server to send you an eMail. The eMail contains an IP address. The TM-E module may now be accessed by this address.
Configuration of the mail server
Activation of the Callback
Test the Callback

Chapter 4 Deployment TM-E Manual VIPA TM-E
3-40 HB39E - TME - RE_900-1E650 - Rev. 09/11
Teleservice via SMS
With the TM-E module with GSM modem there is the possibility to remote control your connected PLC. Here a script language with a syntax similar to BASIC is used. In this part we cannot nearly describe the programming instructions. More information about this script language may be found in the programming guide in German an English at:
suppport.ewon.biz www.ewon-online.de
The TM-E module from VIPA is constructed in the same way as the module "eWON2001". For the further proceeding it is precondition you have access to the Web page of the TM-E module and your CPU is connected to the TM-E module via MPI and accordingly configured. Further it is precondition that a SIM card installed and your TM-E module is connected to the mobile network. • To create a script open the Web page of the TM-E module. • Open with Configuration > Script setup the "Script Section". The
following dialog window is opened:
Here the scripts may be programmed and administrated. Per default there are the scripts "Init Section" and "Cyclic Section", which are empty. The script processing should always be stopped with [STOP (currently running)], before a script is been created respectively edited. With [RUN (currently stopped)] the scripts processing may be started again after editing. At the following pages you may find scripts for the following applications: • Reboot TM-E via SMS • Acknowledge alarm via SMS • Request an eMail report via SMS
Overview
Precondition
Creating a script
Example

Manual VIPA TM-E Chapter 4 Deployment TM-E
HB39E - TME - RE_900-1E650 - Rev. 09/11 3-41
• Open the Web page of the TM-E module. • Navigate to "Script setup". • To be able to use the SMS services you have to create the scripts
"SMS" and "Restart". For this click at [New section].
• Enter "SMS" at Script Name and click at [Update]. • Click at [New section]. • Enter "Restart" and click at [Update]. The new created scripts are now
listed in the Script list. • Select in the list the script "SMS" and click at [Edit]. • In the dialog window type in the following programming code: SMS: a%=Getsys Prg,"SmsRead" If(a%<>0) Then s%=s%+1 PRINT "SMS Nr: ";s% f$=Getsys Prg,"smsfrom" Print"From:";f$ Print Getsys Prg,"smsdate" a$=Getsys Prg,"smsmsg" Print "Message: ";a$ b$=f$+",gsm,0" If(a$="Reboot") THEN c$="Received message: "+a$ d$="Reboot is started in 1 min." Sendsms b$,d$ ONTIMER 1, "goto restart" Else e$="Wrong instruction" Sendsms b$,e$ Endif Goto SMS Endif End
Reboot TM-E via SMS

Chapter 4 Deployment TM-E Manual VIPA TM-E
3-42 HB39E - TME - RE_900-1E650 - Rev. 09/11
• To confirm the script click at [Update]. Please regard that the script processing is in state "RUN (currently stopped)". Otherwise you will get an error message.
• Enter the following into the "Restart" script: Restart: REBOOT
• Confirm with [Update]. Please also regard that the script processing is just stopped.
• So that your TM-E module is able to execute the "SMS" script when prompted by SMS, the following lines are to added to the "Init Section": ONSMS "Goto SMS" TSET 1,60
With ONSMS the SMS surveillance is started. TSET 1,60 starts Timer 1 , which executes the "Restart" script after 60s as defined in the "SMS" script.
• Confirm with [Update]. • Click at [RUN (currently stopped)] to start the script processing. Send a SMS with Reboot to the telephone number of the GSM card of the TM-E module. Now you will get a confirmation SMS with the following text: Reboot is started in 1 min. Within one minute the TM-E module is rebooted, which you may see at the reaction of the LEDs.
Activating the script
Test reboot via SMS

Manual VIPA TM-E Chapter 4 Deployment TM-E
HB39E - TME - RE_900-1E650 - Rev. 09/11 3-43
For example you may monitor the following values of your VIPA PLC: DB 1, Byte 13, Bit 3 • For this open the Web page of the TM-E module. • To establish an alarm Tag open the page "Create new tag..." via
Configuration > Tag setup. • Enter here the following parameters:
Identification Tag name: Alarm1 Page: Default Tag description: Comment
I/O server setup Server name: S73&400 Topic name: A Address: DB1B13#3 Type: boolean
Alarm setup Alarm enabled: enable option Boolean alarm level: set to 1 • Leave the other values on its default setting, enable the option "Then
edit notification" and click at [Add/Update only]. The dialog window "Alarm notification ..." is opened • Enter the following parameters:
SMS upon: enable the option ALM SMS designation: here type in the telephone number with the
following structure: number,gsm,0 Enter each without spaces and always add to telephone number ",gsm,0".
SMS subject: please type in the following text: "Alarm 1: Error message - please confirm with A1"
• Click at [Update].
Acknowledge alarm via SMS
Establishing an alarm Tag

Chapter 4 Deployment TM-E Manual VIPA TM-E
3-44 HB39E - TME - RE_900-1E650 - Rev. 09/11
To be able to react to a confirmation SMS, a script at your TM-E module is necessary. The configuration of the script happens with the following approach: • Navigate to Configuration > Script settings. • Stop if not just happened the script processing with [STOP (currently
started)]. • Click at [New section], type in as script name "A1_Quit" and enter the
following programming code: A1_Quit: a%=Getsys Prg,"SmsRead" If(a%<>0) Then s%=s%+1 PRINT "SMS Nr: ";s% f$=Getsys Prg,"smsfrom" Print"From:";f$ Print Getsys Prg,"smsdate" a$=Getsys Prg,"smsmsg" Print "Message: ";a$ b$=f$+",gsm,0" If(a$="A1") THEN c$="Received message: "+a$ d$="Alarm1 was confirmed" Sendsms b$,d$ ALMACK "Alarm1","" Else e$="Wrong instruction" Sendsms b$,e$ Endif Goto A1_Quit Endif End
• To confirm the script click at [Update]. • So that your TM-E module is able to execute the "A1_Quit" script when
prompted by SMS, the following lines are to added to the "Init Section": ONSMS "Goto A1_Quit"
• Confirm with [Update]. • Click at [RUN (currently stopped)] to start the script processing.
Script for alarm acknowledge via SMS
Activating the script

Manual VIPA TM-E Chapter 4 Deployment TM-E
HB39E - TME - RE_900-1E650 - Rev. 09/11 3-45
To release a test SMS you have to release an alarm. • For this open the Main menu of the TM-E Web page and click at "View
I/O". Here you will find the new created Tag "Alarm1". • To release an alarm set the "New value" to 1 • Click at "Update". The new value is set. This releases an alarm due to
the alarm settings and is indicated by the alarm symbol .
• Reset the value to 0 and click at "Update". The alarm symbol just remains and the value is reset to 0.
In the mean time the TM-E has sent a SMS to your preset telephone number. • Please send a SMS with A1 to the telephone number of the GSM card of
your TM-E module. Now you will receive a confirmation SMS with the following text: "Alarm1 was confirmed". The alarm symbol disappears.
Test alarm acknowledge via SMS

Chapter 4 Deployment TM-E Manual VIPA TM-E
3-46 HB39E - TME - RE_900-1E650 - Rev. 09/11
With this example it is shown how to receive an extraction of your event file by eMail prompted by SMS. The configuration happens with the following approach: For the dial-up to the Internet the dial-up server is to be activated. • Here open the Web page of the TM-E module. • Navigate to the "Communication" page via Configuration > System
Setup. Open at the navigation tree Network connection > Modem > Outgoing the page "Global".
• Activate the option "PPP outgoing Connection".
• Leave the values with its standard setting and click at [Update]. • Click at "Server1"
• Type in Phone number, User name and Password for the Modem-dial-
up and click at [Update]. • Open at the navigation tree Network config the page "Internet
Connection". • Select at "Internet access" the parameter "Modem Connection" and click
at [Update].
Request an eMail report via SMS
Configuration of the dial-up server
Configuration of the Internet connection

Manual VIPA TM-E Chapter 4 Deployment TM-E
HB39E - TME - RE_900-1E650 - Rev. 09/11 3-47
• For the eMail configuration navigate via Configuration > System setup to the page "General". Open the page "SMTP (Mails)" in the navigation tree Net services.
• Enter the following parameters: SMTP server address: Server address of your eMail provider (outbox). SMTP server port: Default 25, this is to be changed very rarely. eMail "from": Your eMail address. User name: Your eMail user name. In most cases it is the same as the eMail
address. Password: Your eMail password.
• Click at [Update].
To be able to react to a request SMS, a script at your TM-E module is necessary. The configuration of the script happens with the following approach: • Navigate to Configuration > Script settings. • Stop if not just happened the script processing with [STOP (currently
started)]. • Click at [New section], type in as script name "Report" and enter the
following programming code: Report: a%=Getsys Prg,"SmsRead" If(a%<>0) Then s%=s%+1 PRINT "SMS Nr: ";s% f$=Getsys Prg,"smsfrom" Print"From:";f$ Print Getsys Prg,"smsdate" a$=Getsys Prg,"smsmsg" Print "Message: ";a$ b$=f$+",gsm,0" If(a$="A1") THEN c$="Received message: "+a$ d$="Report is sent to your eMail" Sendsms b$,d$ Sendmail "mailaddress","","Event-Mail ","&[$dtEV $ftH $st_d1]" Else e$="Wrong instruction" Sendsms b$,e$ Endif Goto A1_Quit Endif End
For mailaddress type in your eMail address.
Configuration of the eMail functionality
Script for requesting an eMail report via SMS

Chapter 4 Deployment TM-E Manual VIPA TM-E
3-48 HB39E - TME - RE_900-1E650 - Rev. 09/11
• To confirm the script click at [Update]. • So that your TM-E module is able to execute the "A1_Quit" script when
prompted by SMS, the following lines are to added to the "Init Section": ONSMS "Goto Report"
• Confirm with [Update]. • Click at [RUN (currently stopped)] to start the script processing. Send a SMS with Report to the telephone number of the GSM card of your TM-E module. Now you will get a confirmation SMS with the following text: Report is sent to your eMail. Now you should receive an eMail with the added event list.
Activating the script
Test request a report via SMS

Manual VIPA TM-E Index
HB39E - TME - RE_900-1E650 - Rev. 09/11 A-1
Appendix A Index
A Alarm function............................. 3-40 Antenna jack ................................. 2-7 Assembly ...............................1-6, 3-5 B Backup function .......................... 3-12 Bit access ................................... 3-27 C Cabling...................................1-8, 3-6 Callback ...................................... 3-36 D Deployment................................... 3-1 Dial-up server ............................. 3-38 Digital I/O ...................................... 2-6 DIP switch..................................... 2-5 E eBuddy.......................................... 3-7 EMC.............................................. 1-9
Basic rules .............................. 1-10 Ethernet ...................................... 3-33 F Fast introduction ........................... 3-2 Firmware update......................... 3-11 Forwarding.................................. 3-35 H Hardware description.................... 2-1 Host-ID.......................................... 3-8
reserved.................................... 3-9 I Installation dimensions ................. 1-5 Installation guidelines.................... 1-9 Interface
MPI ........................................... 2-5 RJ45 Ethernet........................... 2-4
Interference influences ................. 1-9 IP address..................................... 3-8
at PPP connection .........3-23, 3-31 Basics ....................................... 3-8 change.................................... 3-10 Classes..................................... 3-9 on delivery ................................ 3-2
Isolation of conductors................ 1-11 L LEDs ............................................. 2-3
Line termination ............................ 2-5 M Mail gateway............................... 3-36 Mail server .................................. 3-39 MPI ............................................. 3-29 N Net-ID ........................................... 3-8 NetPro ........................................ 3-20 P PG/PC interface.......................... 3-19 PLC............................................. 3-16
Linking .................................... 3-16 Project integration .................. 3-19 Routing ................................... 3-31 Teleservice ............................. 3-26
Polarization................................... 2-5 Power supply ................................ 2-6 Profile rails............................. 1-6, 3-5 Properties ..................................... 2-2 R Removal ....................................... 1-7 Reset ................................... 2-6, 3-13 S Safety information......................... 1-2 SIM card .............................. 1-3, 3-24 SMS............................................ 3-40 Station file................................... 3-19 Structure ....................................... 2-3 Subnet mask ................................ 3-8 T Tag ............................................. 3-26
Name conventions.................. 3-27 Technical Data.............................. 2-8 Telephone conn........3-30, 3-34, 3-37 Teleservice
Callback function .................... 3-36 SMS........................................ 3-40 Telephone
Ethernet gateway............... 3-33 MPI gateway ...................... 3-29
Topic........................................... 3-17 W Web page ................................... 3-14
Access data............................ 3-14 Structure................................. 3-15

Index Manual VIPA TM-E
A-2 HB39E - TME - RE_900-1E650 - Rev. 09/11
M.Stich