manualslib - makes it easy to find manuals online! x user guide welcome... to your new motorola...
TRANSCRIPT

USER’S GUIDE
Wi-Fi® Home Video Camera
Models: FOCUS85, FOCUS85-B, FOCUS85-S, FOCUS85-W
The features described in this user’s guide are subject to modifications without prior notice.
Downloaded from www.Manualslib.com manuals search engine
This User’s Guide has all the information you need to make the most of your
product.
Please read the Safety Instructions on pages 5 - 6 before you install the Unit.
Inside the Box• 1 x Wi-Fi® Camera Unit
• 1 x Power Adapter
• 1 x Quick Start Guide
• 1 x User Guide
Welcome...to your new Motorola Wi-Fi® Home Video Camera!
Thank you for purchasing your new Motorola Wi-Fi® Home Video Camera.
If you have always wondered what happens when you are away, wonder no more. Now you can monitor your children, pets or property with this easy-to-use
system. You can install the Camera App on your iPhone®/iPad® or devices for
Android™ and view the Camera’s video stream from your PC or Notebook, as well as devices for Android™ or iPhone®/iPad®.
Please keep your original dated sales receipt for your records. For warranty service of your Motorola product, you will need to provide a copy of your dated
sales receipt to confirm warranty status. Registration is not required for warranty
coverage.
For product related questions, please call:
+44 (0) 844 557 0890 (UK only)
+44 (0) 8187 62092 (ROI)
Downloaded from www.Manualslib.com manuals search engine
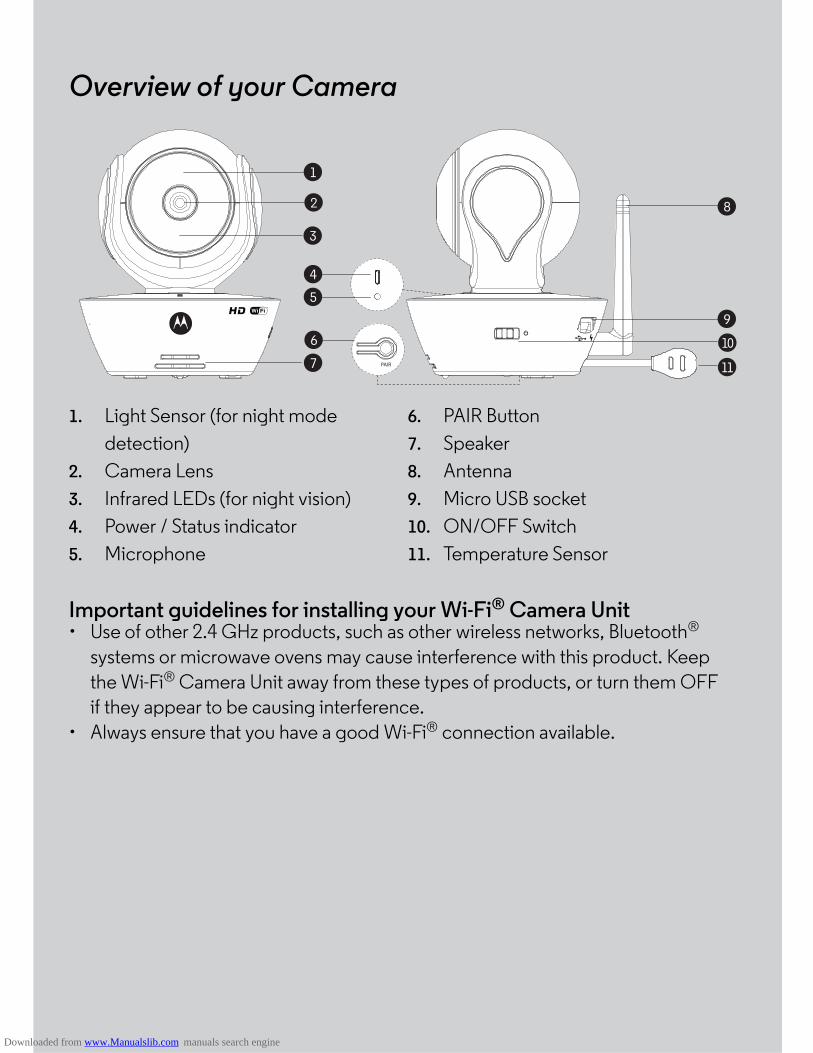
1. Light Sensor (for night mode
detection)
2. Camera Lens
3. Infrared LEDs (for night vision)
4. Power / Status indicator
5. Microphone
6. PAIR Button
7. Speaker
8. Antenna
9. Micro USB socket
10. ON/OFF Switch
11. Temperature Sensor
Overview of your Camera
1
9
11
10
82
3
6
5
4
7
Important guidelines for installing your Wi-Fi® Camera Unit• Use of other 2.4 GHz products, such as other wireless networks, Bluetooth®
systems or microwave ovens may cause interference with this product. Keep
the Wi-Fi® Camera Unit away from these types of products, or turn them OFF if they appear to be causing interference.
• Always ensure that you have a good Wi-Fi® connection available.
Downloaded from www.Manualslib.com manuals search engine
4 Table of contents
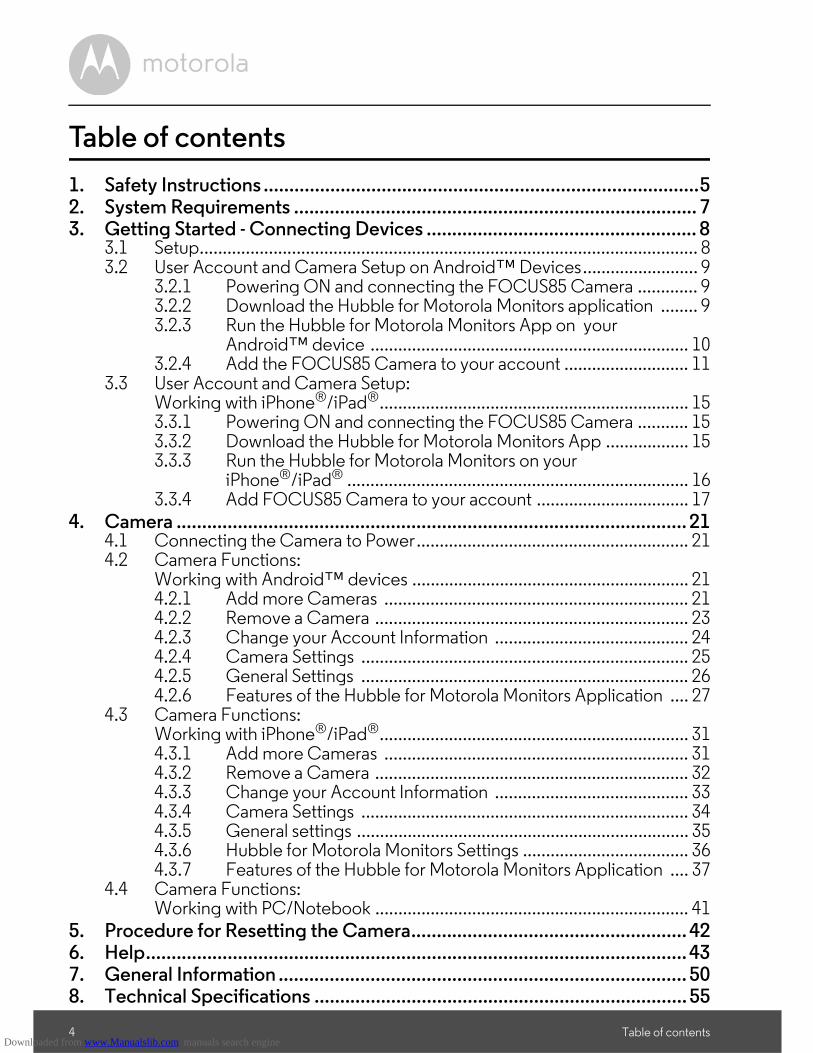
Table of contents
1. Safety Instructions .....................................................................................52. System Requirements ............................................................................... 73. Getting Started - Connecting Devices ..................................................... 8
3.1 Setup............................................................................................................ 83.2 User Account and Camera Setup on Android™ Devices......................... 9
3.2.1 Powering ON and connecting the FOCUS85 Camera ............. 93.2.2 Download the Hubble for Motorola Monitors application ........ 93.2.3 Run the Hubble for Motorola Monitors App on your
Android™ device ..................................................................... 103.2.4 Add the FOCUS85 Camera to your account ........................... 11
3.3 User Account and Camera Setup: Working with iPhone®/iPad®................................................................... 153.3.1 Powering ON and connecting the FOCUS85 Camera ........... 153.3.2 Download the Hubble for Motorola Monitors App .................. 153.3.3 Run the Hubble for Motorola Monitors on your
iPhone®/iPad® .......................................................................... 163.3.4 Add FOCUS85 Camera to your account ................................. 17
4. Camera .................................................................................................... 214.1 Connecting the Camera to Power........................................................... 214.2 Camera Functions:
Working with Android™ devices ............................................................ 214.2.1 Add more Cameras .................................................................. 214.2.2 Remove a Camera .................................................................... 234.2.3 Change your Account Information .......................................... 244.2.4 Camera Settings ....................................................................... 254.2.5 General Settings ....................................................................... 264.2.6 Features of the Hubble for Motorola Monitors Application .... 27
4.3 Camera Functions:Working with iPhone®/iPad®................................................................... 314.3.1 Add more Cameras .................................................................. 314.3.2 Remove a Camera .................................................................... 324.3.3 Change your Account Information .......................................... 334.3.4 Camera Settings ....................................................................... 344.3.5 General settings ........................................................................ 354.3.6 Hubble for Motorola Monitors Settings .................................... 364.3.7 Features of the Hubble for Motorola Monitors Application .... 37
4.4 Camera Functions:Working with PC/Notebook .................................................................... 41
5. Procedure for Resetting the Camera...................................................... 426. Help.......................................................................................................... 437. General Information ................................................................................ 508. Technical Specifications ......................................................................... 55
Downloaded from www.Manualslib.com manuals search engine
Safety Instructions 5
EN
GL
ISH1. Safety Instructions
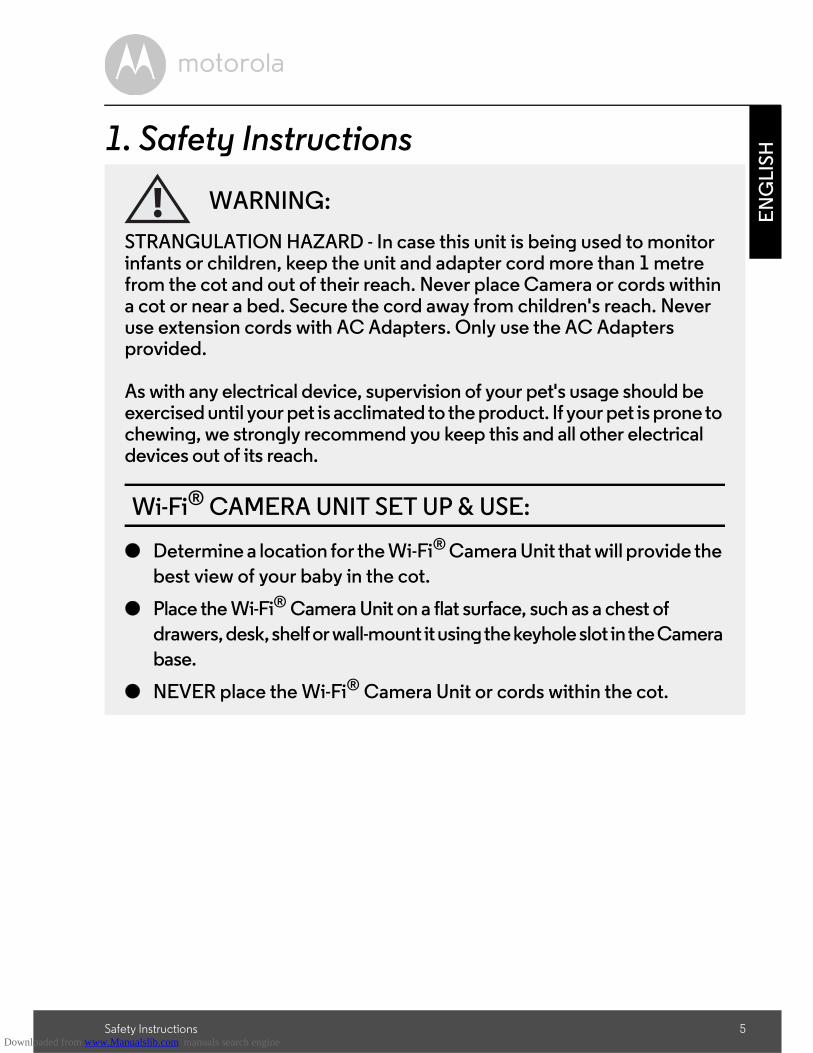
WARNING:
STRANGULATION HAZARD - In case this unit is being used to monitor infants or children, keep the unit and adapter cord more than 1 metre from the cot and out of their reach. Never place Camera or cords within a cot or near a bed. Secure the cord away from children's reach. Never use extension cords with AC Adapters. Only use the AC Adapters provided.
As with any electrical device, supervision of your pet's usage should be exercised until your pet is acclimated to the product. If your pet is prone to chewing, we strongly recommend you keep this and all other electrical devices out of its reach.
Wi-Fi® CAMERA UNIT SET UP & USE:
● Determine a location for the Wi-Fi® Camera Unit that will provide the
best view of your baby in the cot.
● Place the Wi-Fi® Camera Unit on a flat surface, such as a chest of
drawers, desk, shelf or wall-mount it using the keyhole slot in the Camera
base.
● NEVER place the Wi-Fi® Camera Unit or cords within the cot.
Downloaded from www.Manualslib.com manuals search engine
6 Safety Instructions
WARNINGThis Wi-Fi® Camera Unit is compliant with all relevant electromagnetic field
standards and is, when handled as described in the User’s Guide, safe to use. Therefore, always read the instructions in this User’s Guide carefully before
using the device.
• Adult assembly is required due to small parts. Keep all small parts away from children.
• This product is not a toy. Do not allow children to play with it.
• This Wi-Fi® Camera Unit is not a substitute for responsible adult supervision.
• Keep this User’s Guide for future reference.
• Do not place the Wi-Fi® Camera Unit or cords in the cot or within reach of the baby (the unit should be at least 1 metre away).
• Keep the cords out of reach of children.
• Do not cover the Wi-Fi® Camera Unit with a towel or blanket.
• Test the Wi-Fi® Camera Unit and all its functions so that you are familiar with it prior to use.
• Do not use the Wi-Fi® Camera Unit near water.
• Do not install the Wi-Fi® Camera Unit near a heat source.
• Only use the Power Adapter provided. Do not use other power adapters as this may damage the device.
• Never use extension cords with Power Adapter.
• Do not touch the plug contacts with sharp or metal objects.
Downloaded from www.Manualslib.com manuals search engine

System Requirements 7
EN
GL
ISH2. System Requirements
Web Portal• Windows® 7
• Mac OS® 10.7
• Chrome™ 24
• Internet Explorer® 9
• Safari® 6
• Java™ 7
• Firefox® 18.0
• Adobe® Flash® Player 15.0
Android™ System • Version 4.2 or above
iPhone®/iPad® iOS • Version 7.0 or above
High Speed (Wi-Fi®) Internet• At least 0.6 Mbps upload bandwidth per Camera (you can test your internet
speed on this site: http://www.speedtest.net)
Downloaded from www.Manualslib.com manuals search engine
8 Getting Started - Connecting Devices
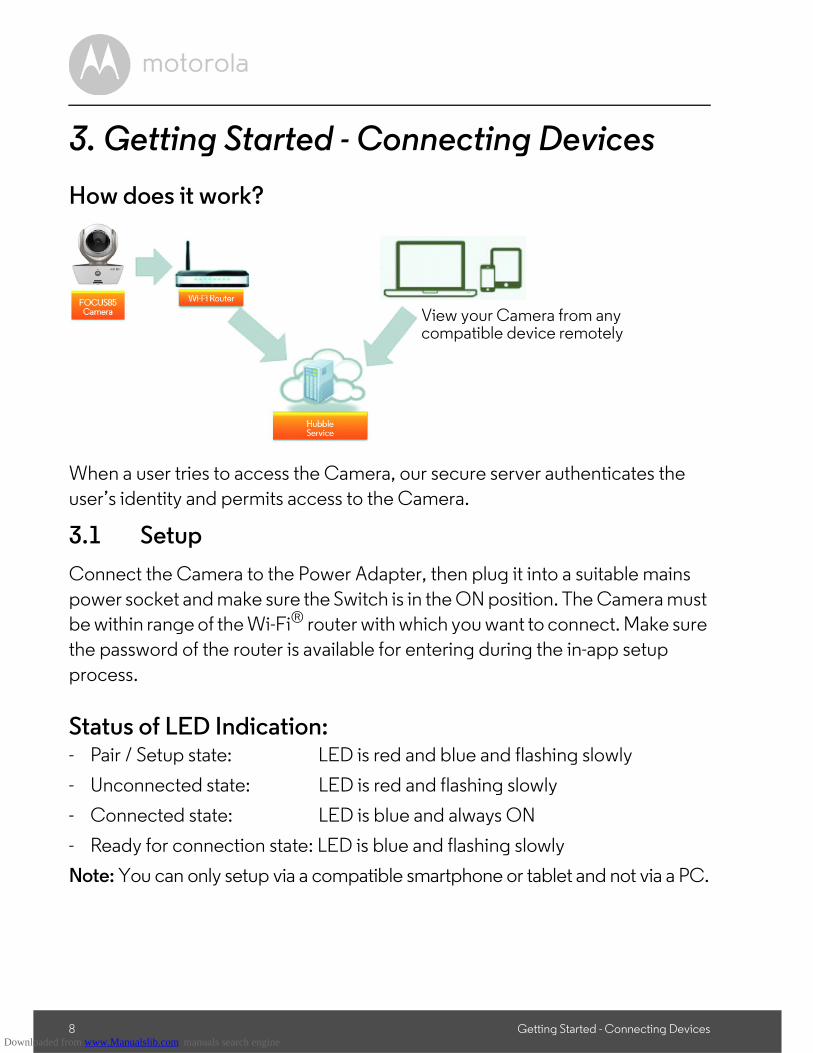
3. Getting Started - Connecting Devices
How does it work?
When a user tries to access the Camera, our secure server authenticates the
user’s identity and permits access to the Camera.
3.1 Setup
Connect the Camera to the Power Adapter, then plug it into a suitable mains
power socket and make sure the Switch is in the ON position. The Camera must be within range of the Wi-Fi® router with which you want to connect. Make sure
the password of the router is available for entering during the in-app setup
process.
Status of LED Indication:- Pair / Setup state: LED is red and blue and flashing slowly
- Unconnected state: LED is red and flashing slowly
- Connected state: LED is blue and always ON
- Ready for connection state: LED is blue and flashing slowly
Note: You can only setup via a compatible smartphone or tablet and not via a PC.
View your Camera from any compatible device remotely
Downloaded from www.Manualslib.com manuals search engine
Getting Started - Connecting Devices 9
EN
GL
ISH
An
dro
id™
3.2 User Account and Camera Setup on Android™ Devices
What you need• FOCUS85 Camera
• FOCUS85 Camera Power Adapter
• Device with Android™ system version 4.0 or above
3.2.1 Powering ON and connecting the FOCUS85 Camera• Connect the FOCUS85 adapter to a suitable mains power socket, insert the
Power Adapter plug into the micro USB socket at the back of the FOCUS85 Camera.
• Make sure that the ON/OFF switch is in the ON position.
• The Camera’s Red LED flashes after the Camera has completed the booting
process. When you hear two ‘beeps’, the Camera is ready for setup.
3.2.2 Download the Hubble for Motorola Monitors application• Go to the Google Play™ Store to search for “Hubble for Motorola Monitors”.
• Download the Hubble for Motorola Monitors application from the Google
Play™ Store and install it on to your Android™ device.
Downloaded from www.Manualslib.com manuals search engine
10 Getting Started - Connecting Devices
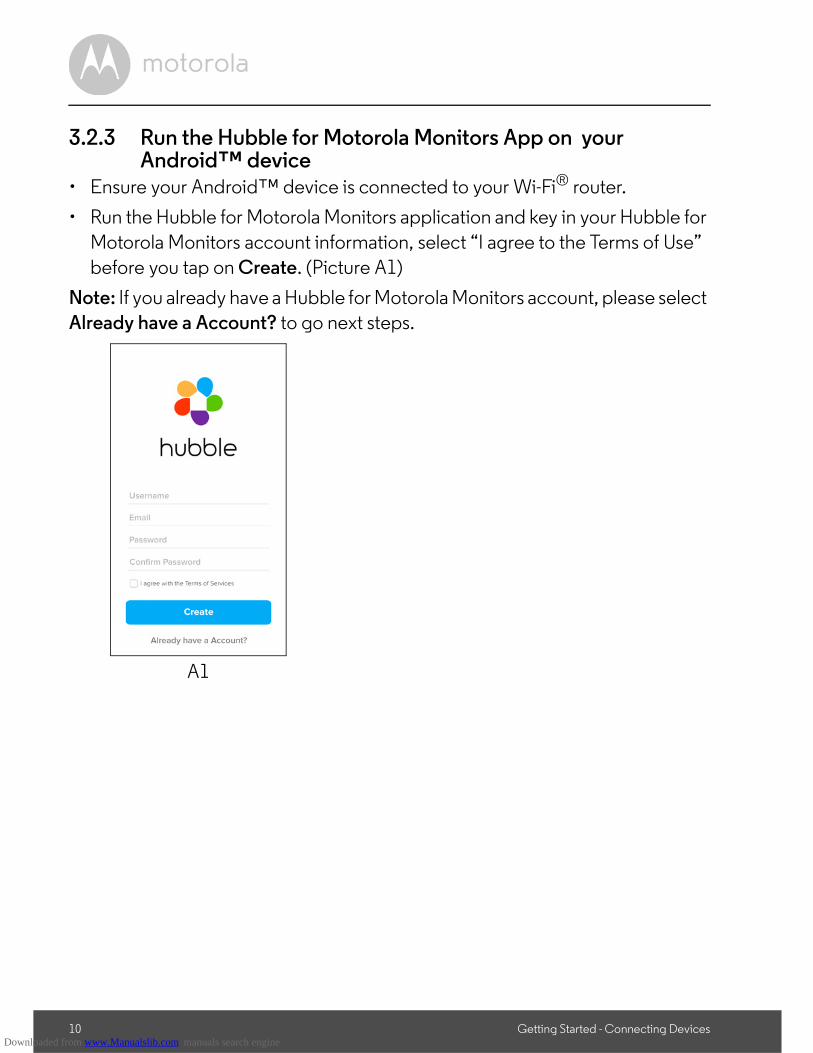
3.2.3 Run the Hubble for Motorola Monitors App on your Android™ device
• Ensure your Android™ device is connected to your Wi-Fi® router.
• Run the Hubble for Motorola Monitors application and key in your Hubble for
Motorola Monitors account information, select “I agree to the Terms of Use”
before you tap on Create. (Picture A1)
Note: If you already have a Hubble for Motorola Monitors account, please select Already have a Account? to go next steps.
A1
Downloaded from www.Manualslib.com manuals search engine
Getting Started - Connecting Devices 11
EN
GL
ISH
An
dro
id™
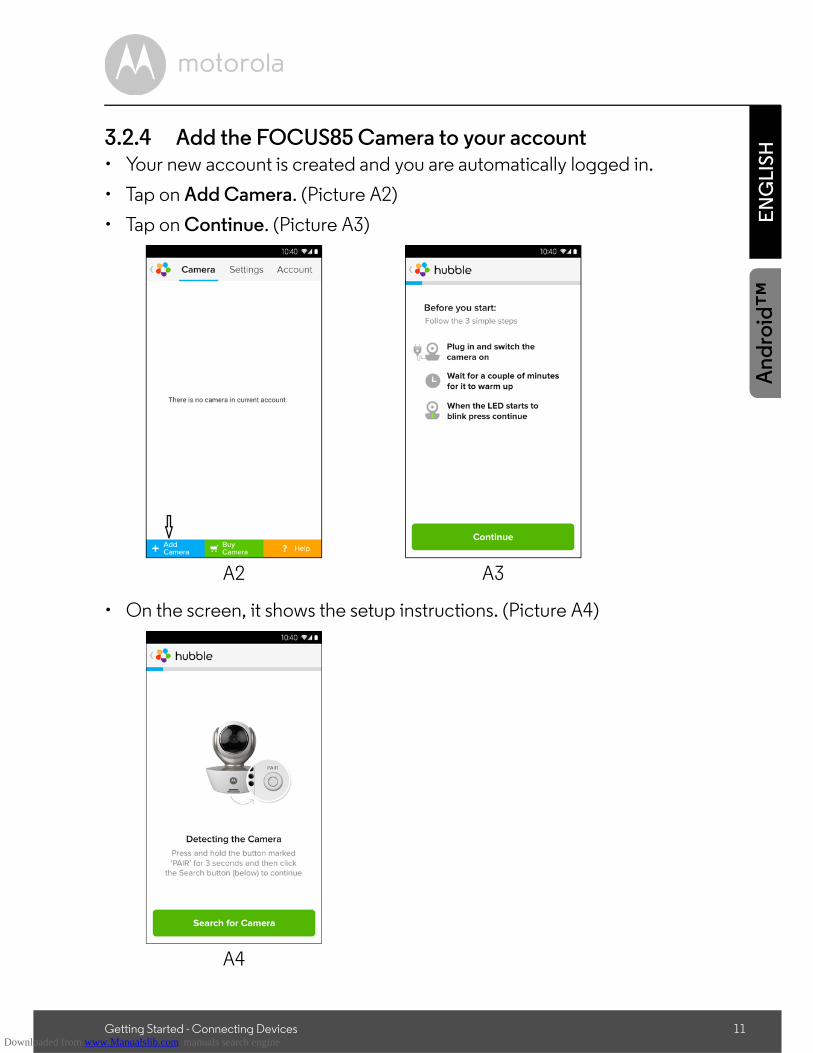
3.2.4 Add the FOCUS85 Camera to your account• Your new account is created and you are automatically logged in.
• Tap on Add Camera. (Picture A2)
• Tap on Continue. (Picture A3)
• On the screen, it shows the setup instructions. (Picture A4)
A2 A3
A4
Downloaded from www.Manualslib.com manuals search engine
12 Getting Started - Connecting Devices
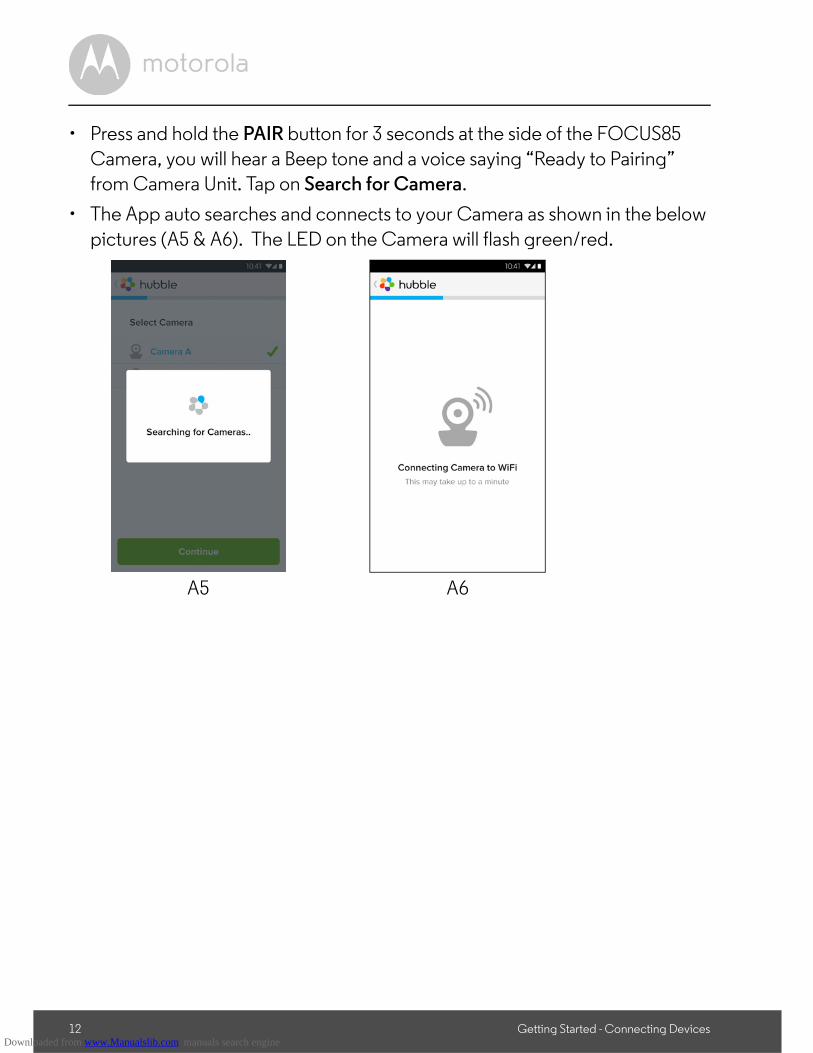
• Press and hold the PAIR button for 3 seconds at the side of the FOCUS85
Camera, you will hear a Beep tone and a voice saying “Ready to Pairing” from Camera Unit. Tap on Search for Camera.
• The App auto searches and connects to your Camera as shown in the below
pictures (A5 & A6). The LED on the Camera will flash green/red.
A5 A6
Downloaded from www.Manualslib.com manuals search engine
Getting Started - Connecting Devices 13
EN
GL
ISH
An
dro
id™
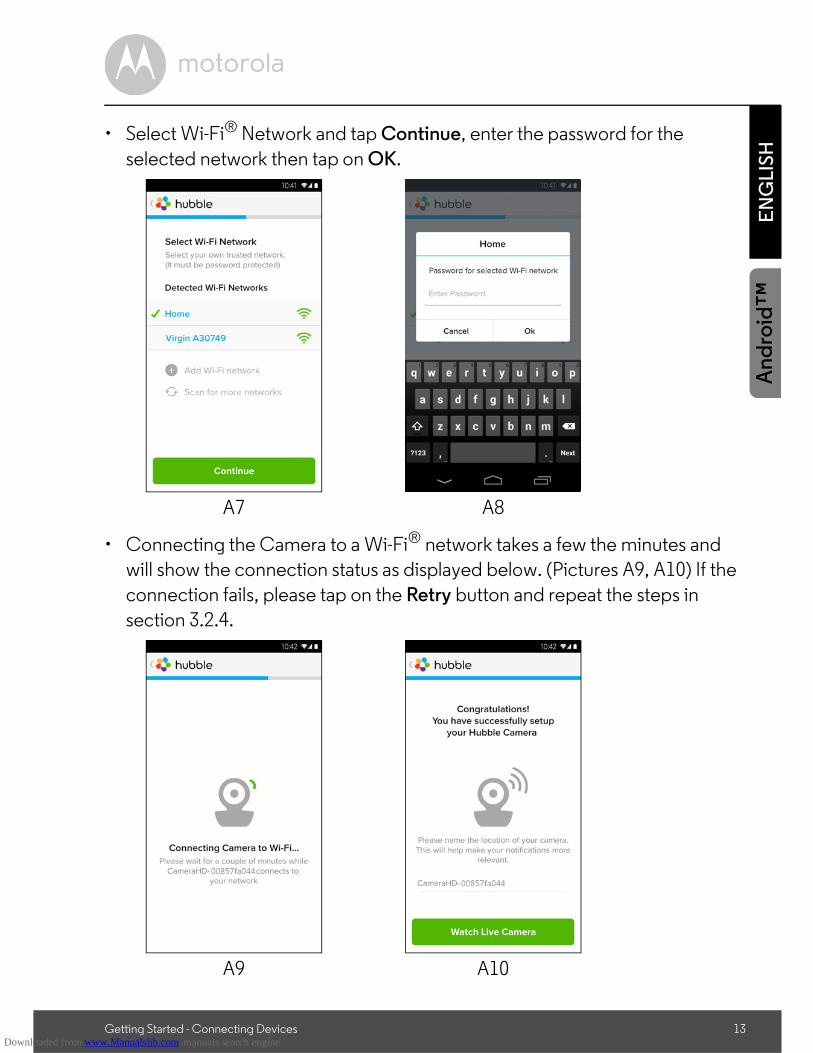
• Select Wi-Fi® Network and tap Continue, enter the password for the
selected network then tap on OK.
• Connecting the Camera to a Wi-Fi® network takes a few the minutes and will show the connection status as displayed below. (Pictures A9, A10) If the
connection fails, please tap on the Retry button and repeat the steps in
section 3.2.4.
A7 A8
A9 A10
Downloaded from www.Manualslib.com manuals search engine

14 Getting Started - Connecting Devices
• Tap on Watch Live Camera to view the Camera video stream, the Camera's
blue LED is flashing. (Picture A11)
• Tap on the Hubble logo to go back to the Camera tab for a list of available Cameras. (Picture A12)
A11 A12
Downloaded from www.Manualslib.com manuals search engine
Getting Started - Connecting Devices 15
EN
GL
ISH
iOS
®
3.3 User Account and Camera Setup: Working with iPhone®/iPad®
What you need• FOCUS85 Camera
• FOCUS85 Camera Power Adapter
• iPhone® / iPad® with iOS version 7.0 or up
3.3.1 Powering ON and connecting the FOCUS85 Camera• Connect the FOCUS85 adapter to a suitable mains power socket, insert the
plug into the micro USB socket at back of the FOCUS85 Camera.
• Make sure that the ON/OFF switch is in the ON position.
• The Camera’s red LED begins to flash after the Camera has completed the booting process. It means the Camera is ready for setup.
3.3.2 Download the Hubble for Motorola Monitors App• Go to the App Store to search for the “Hubble for Motorola Monitors” app.
• Download the Hubble for Motorola Monitors App and install it on your iPhone®/iPad®.
Downloaded from www.Manualslib.com manuals search engine

16 Getting Started - Connecting Devices
3.3.3 Run the Hubble for Motorola Monitors on your iPhone®/
iPad®
• Ensure your iPhone®/iPad® is connected to your Wi-Fi® Router.
• Run the Hubble for Motorola Monitors application and key in your Hubble for
Motorola Monitors account information, read through the Terms of Service
then select “I agree to the Terms of Service” before you tap on Create. (Picture i1)
Note: If you already have a Hubble for Motorola Monitors account, please select Already have a Account? to go next steps.
i1
Downloaded from www.Manualslib.com manuals search engine

Getting Started - Connecting Devices 17
EN
GL
ISH
iOS
®
3.3.4 Add FOCUS85 Camera to your account• Your new account is created and you are automatically logged in.
• Tap on Add Camera. (Picture i2)
• Tap on “FOCUS85”. (Picture i3)
• Follow on-screen instructions to turn on the Bluetooth™ function on your
iPhone/iPad.
i2 i3
FOCUS85
i4
Downloaded from www.Manualslib.com manuals search engine
18 Getting Started - Connecting Devices
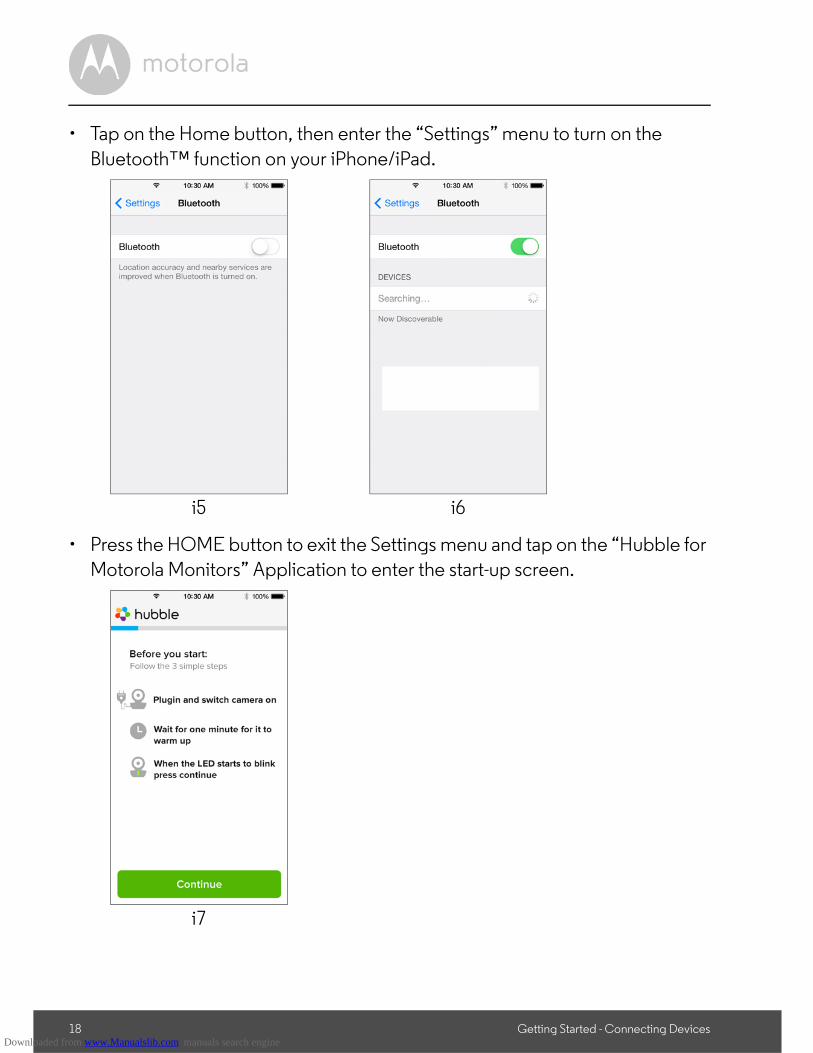
• Tap on the Home button, then enter the “Settings” menu to turn on the
Bluetooth™ function on your iPhone/iPad.
• Press the HOME button to exit the Settings menu and tap on the “Hubble for Motorola Monitors” Application to enter the start-up screen.
i5 i6
i7
Downloaded from www.Manualslib.com manuals search engine
Getting Started - Connecting Devices 19
EN
GL
ISH
iOS
®
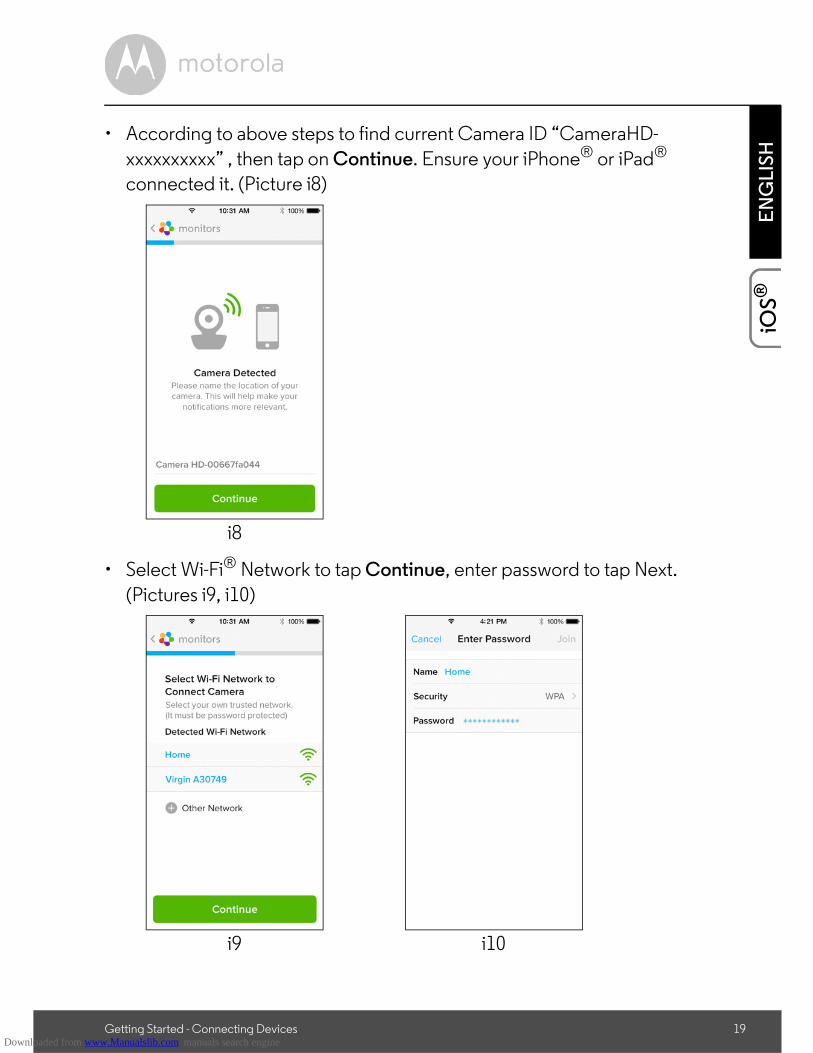
• According to above steps to find current Camera ID “CameraHD-
xxxxxxxxxx” , then tap on Continue. Ensure your iPhone® or iPad® connected it. (Picture i8)
• Select Wi-Fi® Network to tap Continue, enter password to tap Next.
(Pictures i9, i10)
i8
i9 i10
Downloaded from www.Manualslib.com manuals search engine

20 Getting Started - Connecting Devices
• Connecting the Camera to a Wi-Fi® network, need to wait a few minutes then
see connection status as displayed below (Pictures i11, i12). If connection fails, please tap on the Retry button and repeat the steps in 3.3.4.
• Tap on the Camera you wish to view from the Camera tab to view the
Camera’s video stream. (Picture i13)
• Tap on the Hubble logo to go back to the Camera tab for a list of available Cameras. (Picture i14)
i11 i12
i13 i14
Downloaded from www.Manualslib.com manuals search engine

Camera 21
EN
GL
ISH
An
dro
id™
4. Camera4.1 Connecting the Camera to Power
• Insert the small end of the Power Adapter into the Power Adapter Connector and plug the Power Adapter into a suitable mains power socket.
• Slide the ON/OFF switch to ON, the blue Power LED will light up. (Note: To
switch the device off, slide the ON/OFF switch to OFF.)
4.2 Camera Functions: Working with Android™ devices
• Run the Hubble for Motorola Monitors application on your Android™
device.
• The Camera view appears on the screen.
4.2.1 Add more Cameras• On Camera view, tap on the Hubble logo to go to the Add Camera page.
(Picture A13)
• Tap on Add Camera to add one more Camera by following steps for
Android™ device setup in section 3.2.4. (Picture A14)
Downloaded from www.Manualslib.com manuals search engine
22 Camera
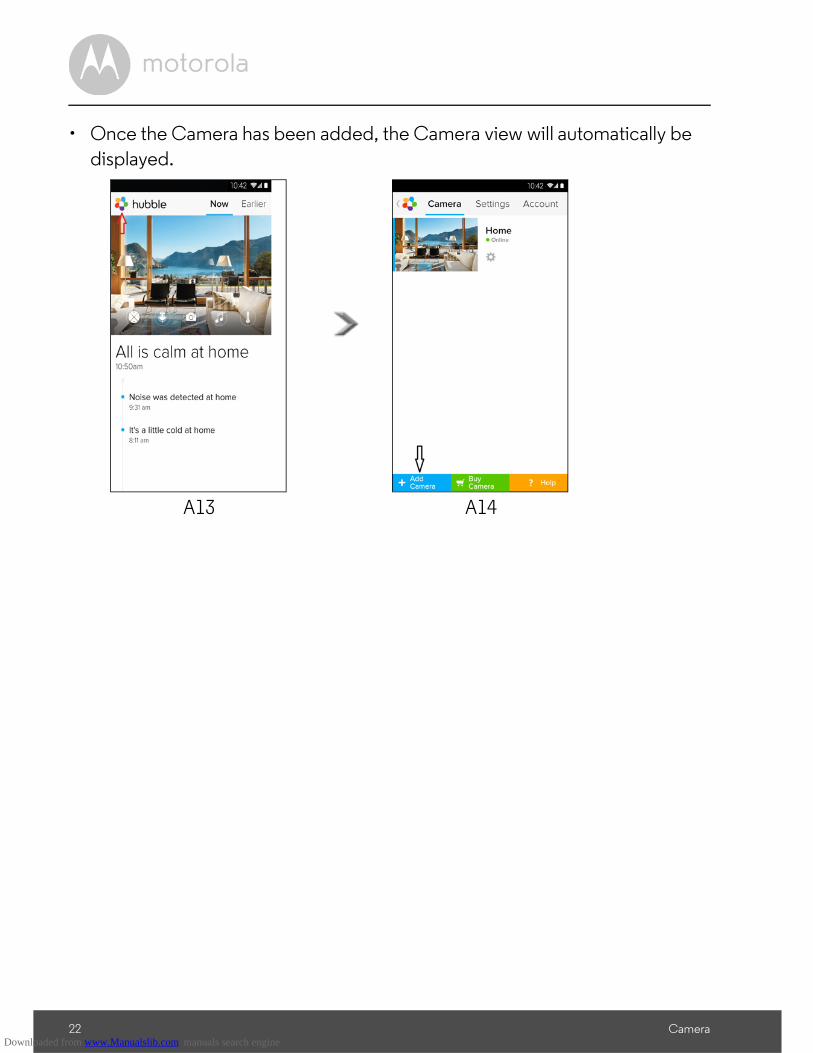
• Once the Camera has been added, the Camera view will automatically be
displayed.
A13 A14
Downloaded from www.Manualslib.com manuals search engine
Camera 23
EN
GL
ISH
An
dro
id™
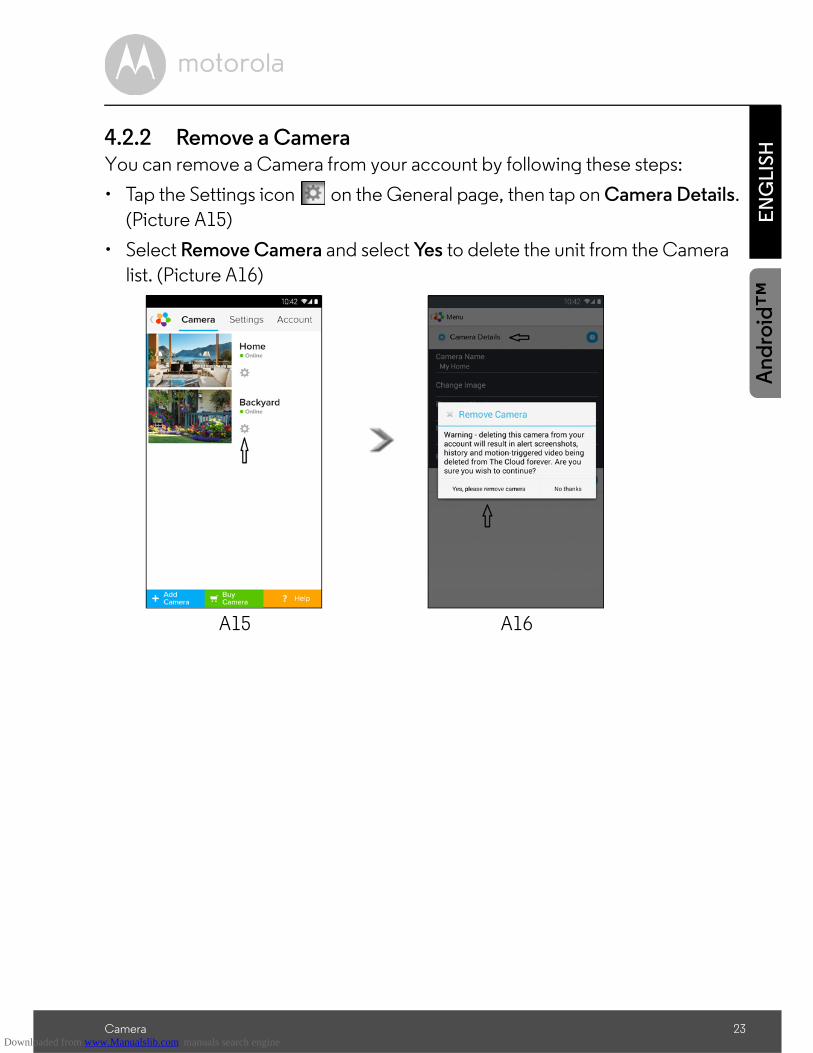
4.2.2 Remove a CameraYou can remove a Camera from your account by following these steps:
• Tap the Settings icon on the General page, then tap on Camera Details.
(Picture A15)
• Select Remove Camera and select Yes to delete the unit from the Camera
list. (Picture A16)
A15 A16
Downloaded from www.Manualslib.com manuals search engine

24 Camera
4.2.3 Change your Account InformationYou can change the account information using your Android™ device.
• Tap Account on the General page, the Account Settings will appear on
screen. (Picture A17)
• Tap on Change Password to change your password and follow the
instructions.
• Tap on Log Out to leave the account.
• Tap on Freemium plan, it will go to link to the Cloud Video Recording Service. To obtain more information, please visit our website
http://www.hubbleconnected.com.
• Tap on Use to access Remote Connection Setting , use Remote Only by
Selecting Yes.
• Enable Disconnect Alert. When disconnect it will be beeps alert. Enable the Disconnect Alert by selecting Yes.
• Tap on Send Log to send your Hubble for Motorola Monitors Android App
report to our server via e-mail; this should be sent if requested by a customer
service agent.
A17
Downloaded from www.Manualslib.com manuals search engine

Camera 25
EN
GL
ISH
An
dro
id™
4.2.4 Camera SettingsYou can change the Camera settings by tapping the Settings icon on the
Camera page. (Picture A18)
• Tap on Camera Details to review Camera Name, Change Image, Firmware
version, Model ID and Remove Camera. (Picture A19)
• Tap on Notification Sensitivity to set the sensitivity of sound & motion detection, and to set an Alert for High/Low temperature. (Picture A20)
A18 A19
A20
Downloaded from www.Manualslib.com manuals search engine
26 Camera
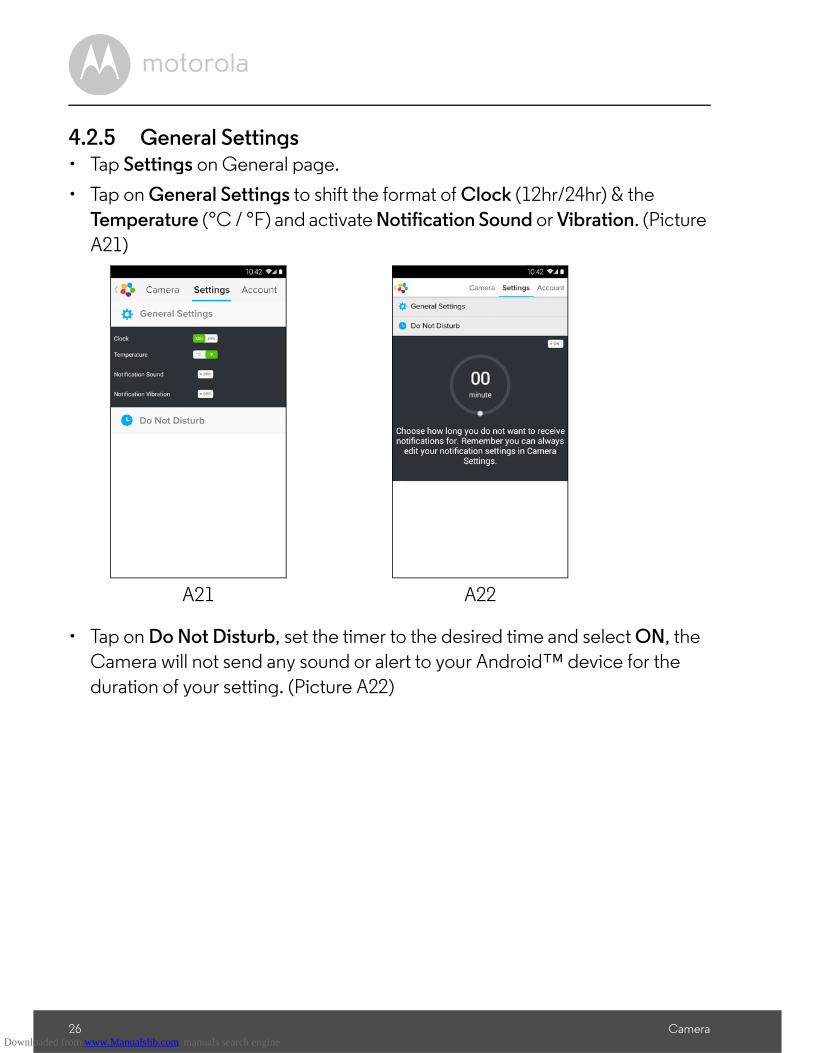
4.2.5 General Settings• Tap Settings on General page.
• Tap on General Settings to shift the format of Clock (12hr/24hr) & the
Temperature (°C / °F) and activate Notification Sound or Vibration. (Picture
A21)
• Tap on Do Not Disturb, set the timer to the desired time and select ON, the Camera will not send any sound or alert to your Android™ device for the
duration of your setting. (Picture A22)
A21 A22
Downloaded from www.Manualslib.com manuals search engine

Camera 27
EN
GL
ISH
An
dro
id™
4.2.6 Features of the Hubble for Motorola Monitors Application On Camera view, tap the viewing area, Function Icons will appear as following:
Two Way Communication – Tap on the Microphone icon to turn on the talk
back function to the Camera, press the circle button once to speak. Toggle again to listen from the Camera. (Pictures A23, A24)
A23 A24
Downloaded from www.Manualslib.com manuals search engine

28 Camera
Pan and Tilt Function:
Tap the up and down buttons to tilt, the left and right buttons to pan. (Pictures
A25, A26)
A25 A26
Downloaded from www.Manualslib.com manuals search engine
Camera 29
EN
GL
ISH
An
dro
id™
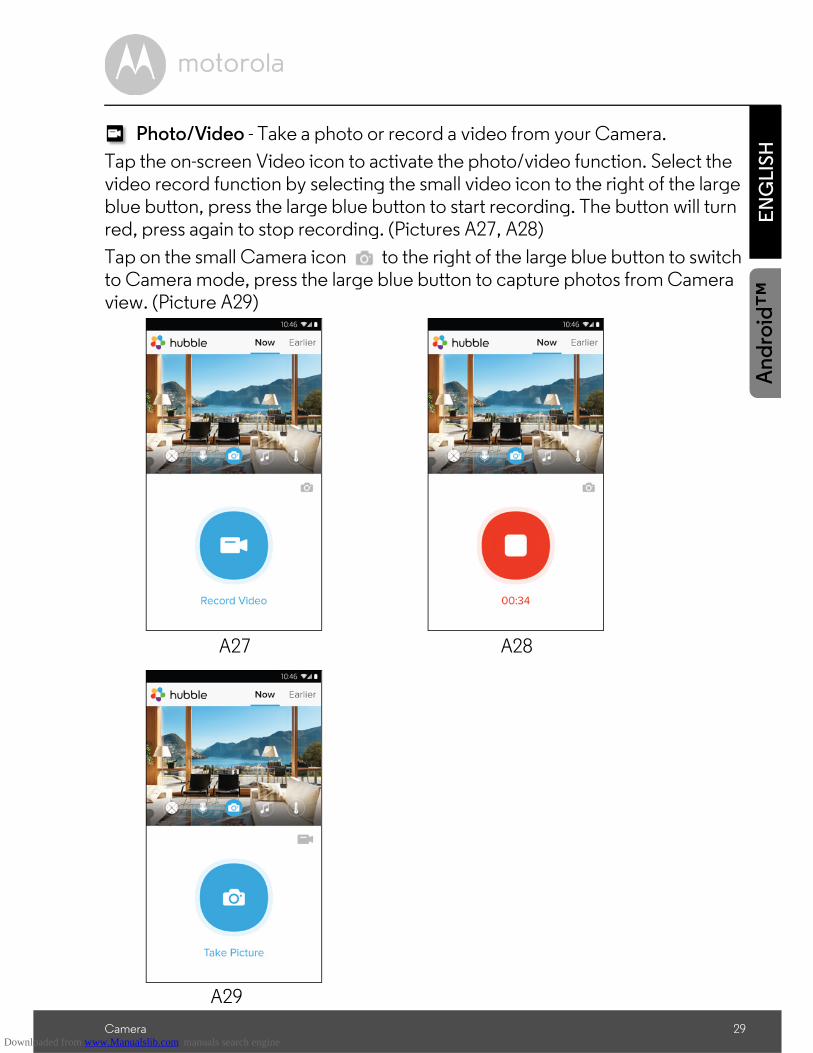
Photo/Video - Take a photo or record a video from your Camera.
Tap the on-screen Video icon to activate the photo/video function. Select the video record function by selecting the small video icon to the right of the large blue button, press the large blue button to start recording. The button will turn red, press again to stop recording. (Pictures A27, A28)
Tap on the small Camera icon to the right of the large blue button to switch to Camera mode, press the large blue button to capture photos from Camera view. (Picture A29)
A27 A28
A29
Downloaded from www.Manualslib.com manuals search engine

30 Camera
Note: Photos and videos will be stored in the internal flash memory of your device for Android™, they can be accessed from the Gallery or Media Player. To play videos, please use the Hubble for Motorola Monitors application or a 3rd party application, such as MX player (found in the Google Play™ Store), which is able to play MJPG (Motionjpeg) files.
Melody – To play one of the pre-set 5 melodies sound in system, tap on
Melody to show the Melody menu and select one you prefer to play on your
Camera. (Picture A30)
Temperature Measure – The temperature reading from the temperature
sensor at the back of the Camera will display at your Android™ device CD screen (Picture A31). The reading will turn RED if the temperature exceeds the
High/Low Temperature limits set in the Account. (see section 4.2.4)
A30 A31
Downloaded from www.Manualslib.com manuals search engine

Camera 31
EN
GL
ISH
iOS
®
4.3 Camera Functions:Working with iPhone®/iPad®
• Run the Hubble for Motorola Monitors application on your iPhone®/iPad®.
• The Camera view appears on the screen.
4.3.1 Add more Cameras• Whilst in the Camera view, tap on the Motorola logo to go to the Add Camera
page. (Picture i15)
• Tap on Add Camera to add one more Camera by following steps of iPhone®/iPad® setup 3.3.4. (Picture i16)
• Once the Camera has been added, the Camera view will automatically be
displayed.
Note: You can only add up to 4 Cameras connected to one account.
i15 i16
Downloaded from www.Manualslib.com manuals search engine
32 Camera
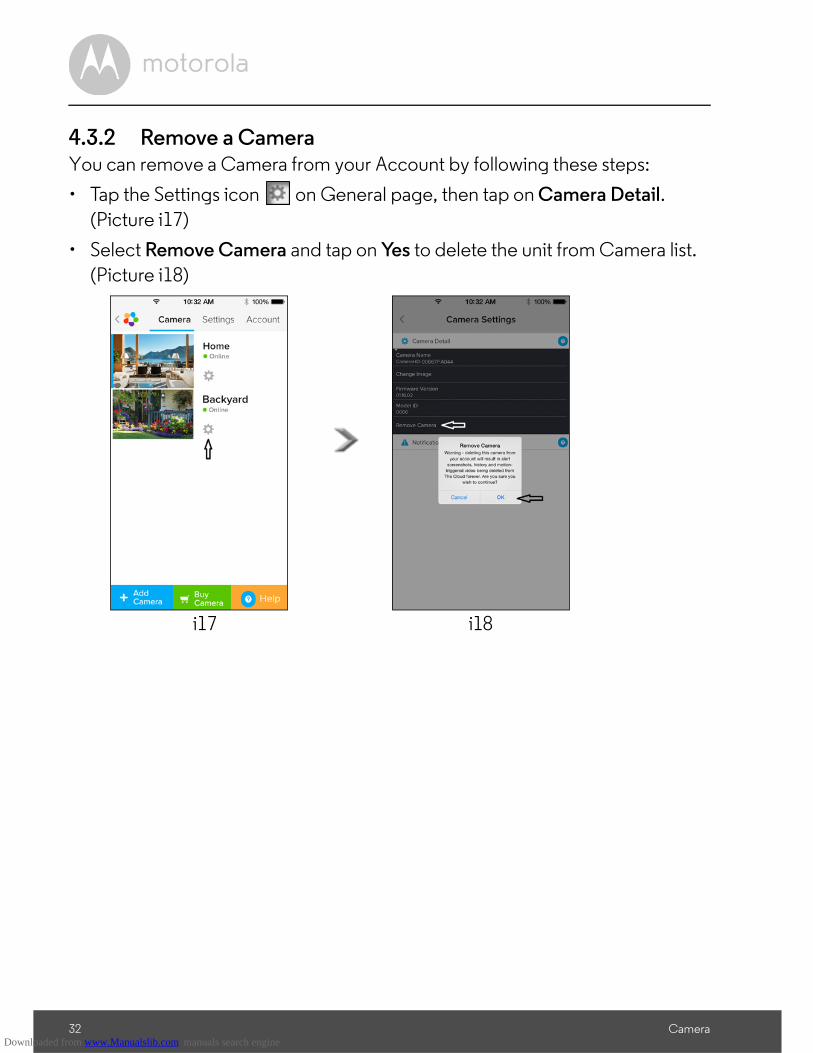
4.3.2 Remove a CameraYou can remove a Camera from your Account by following these steps:
• Tap the Settings icon on General page, then tap on Camera Detail.
(Picture i17)
• Select Remove Camera and tap on Yes to delete the unit from Camera list.
(Picture i18)
i17 i18
Downloaded from www.Manualslib.com manuals search engine
Camera 33
EN
GL
ISH
iOS
®
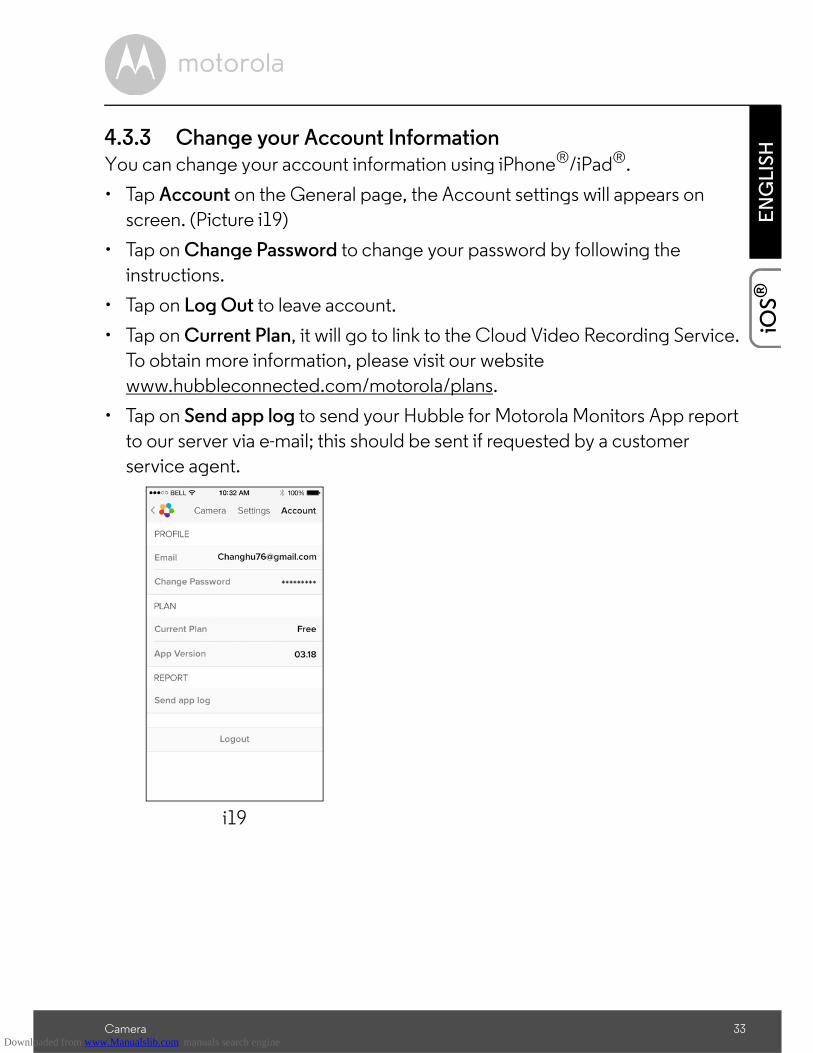
4.3.3 Change your Account InformationYou can change your account information using iPhone®/iPad®.
• Tap Account on the General page, the Account settings will appears on
screen. (Picture i19)
• Tap on Change Password to change your password by following the
instructions.
• Tap on Log Out to leave account.
• Tap on Current Plan, it will go to link to the Cloud Video Recording Service. To obtain more information, please visit our website
www.hubbleconnected.com/motorola/plans.
• Tap on Send app log to send your Hubble for Motorola Monitors App report
to our server via e-mail; this should be sent if requested by a customer service agent.
i19
Downloaded from www.Manualslib.com manuals search engine
34 Camera
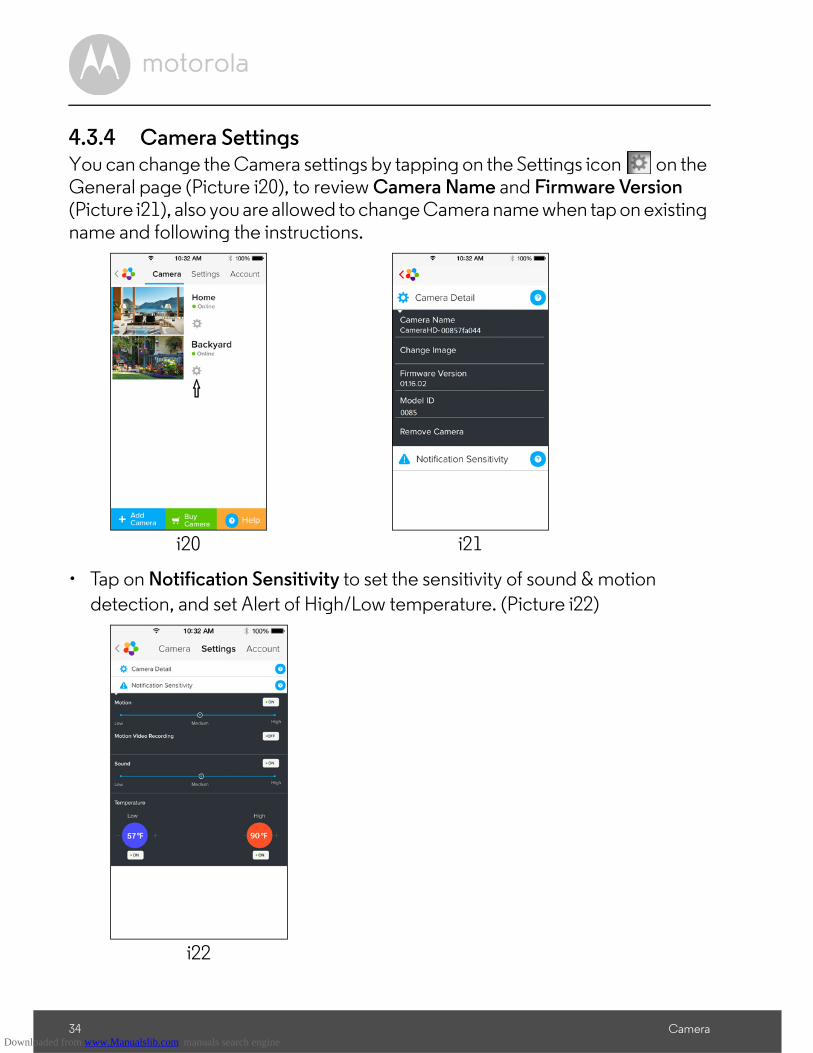
4.3.4 Camera SettingsYou can change the Camera settings by tapping on the Settings icon on the General page (Picture i20), to review Camera Name and Firmware Version (Picture i21), also you are allowed to change Camera name when tap on existing name and following the instructions.
• Tap on Notification Sensitivity to set the sensitivity of sound & motion detection, and set Alert of High/Low temperature. (Picture i22)
i20 i21
i22
Downloaded from www.Manualslib.com manuals search engine
Camera 35
EN
GL
ISH
iOS
®
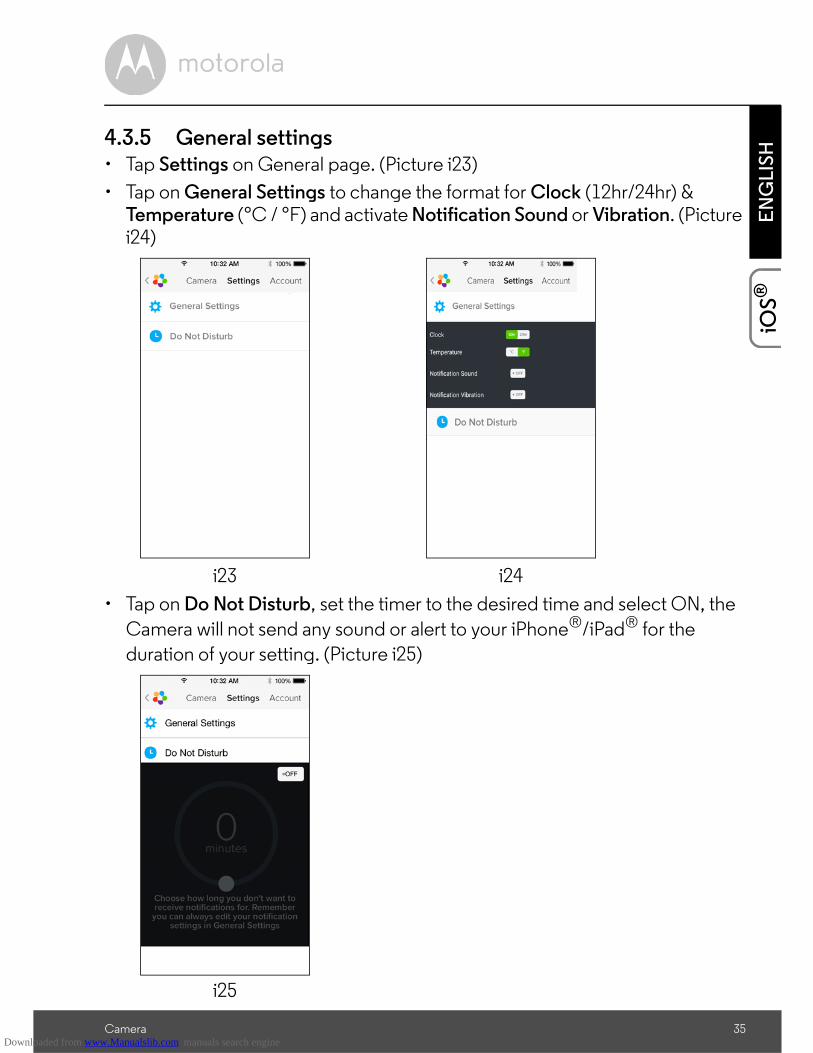
4.3.5 General settings• Tap Settings on General page. (Picture i23)
• Tap on General Settings to change the format for Clock (12hr/24hr) & Temperature (°C / °F) and activate Notification Sound or Vibration. (Picture i24)
• Tap on Do Not Disturb, set the timer to the desired time and select ON, the
Camera will not send any sound or alert to your iPhone®/iPad® for the duration of your setting. (Picture i25)
i23 i24
i25
Downloaded from www.Manualslib.com manuals search engine
36 Camera
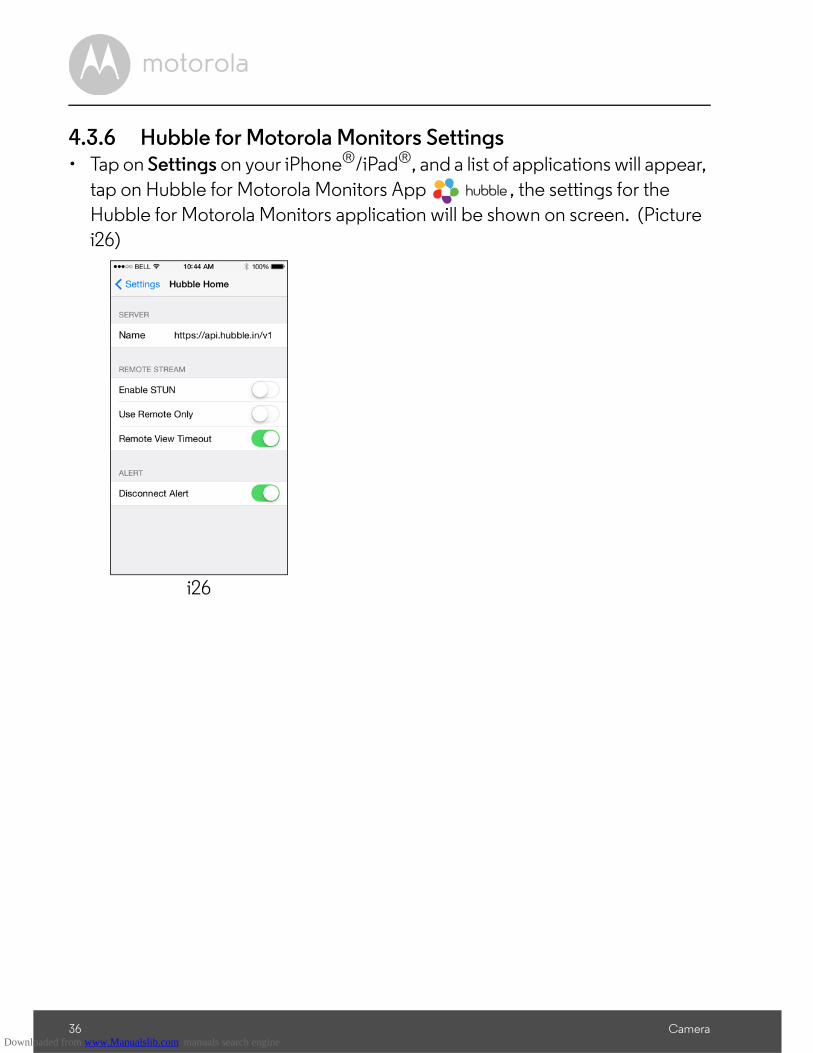
4.3.6 Hubble for Motorola Monitors Settings• Tap on Settings on your iPhone®/iPad®, and a list of applications will appear,
tap on Hubble for Motorola Monitors App , the settings for the
Hubble for Motorola Monitors application will be shown on screen. (Picture i26)
i26
Downloaded from www.Manualslib.com manuals search engine

Camera 37
EN
GL
ISH
iOS
®
4.3.7 Features of the Hubble for Motorola Monitors Application In Camera view, tap the viewing area, Function Icons will appear as follows:
Two Way Talk – Tap on the microphone icon to turn on the talkback function
to the Camera, press the circle button once to speak. Toggle again to listen from the Camera. (Pictures i27, i28)
i27 i28
Downloaded from www.Manualslib.com manuals search engine

38 Camera
Pan and Tilt Function:
Tap the 4 Way Arrow icon to activate the pan/tilt function. Press the up/down
arrows to tilt the Camera up and down, press the left/right arrows to pan the Camera left and right. (Pictures i29, i30)
i29 i30
Downloaded from www.Manualslib.com manuals search engine

Camera 39
EN
GL
ISH
iOS
®
Photo Function - Tap the on-screen Camera icon to activate the photo
capture function. Press the large blue Camera button to take a photograph. (Picture i31)
Note: Photos will be stored in The internal flash memory of your iPhone®/iPad®.
i31
Downloaded from www.Manualslib.com manuals search engine

40 Camera
Melody – To play one of the pre-set melodies sound in system, tap on
Melody to show the Melody menu and select the one you prefer to play on your Camera. (Picture i32)
Temperature Measure – The temperature reading from the temperature
sensor at the back of the Camera will display at your iPhone®/iPad® LCD screen
(Picture i33). The readings will turn RED if the temperature exceeds High/Low Temperature limited which set in the Account. (see section 4.3.5)
i32 i33
Downloaded from www.Manualslib.com manuals search engine
Camera 41
EN
GL
ISH
4.4 Camera Functions:Working with PC/Notebook
• Go to URL: http://www.hubbleconnected.com/motorola/login/
• Enter your User Name and Password and then click Login if you have already
created an account.
• Click on the Camera list paired in your account via Android™ device or
iPhone®/iPad®, and the Camera view will appear on screen. You can easily
stay connected with your favourite people, places and pets with live video streaming.
• At the website, you can change the settings by following the Menu instruction
steps.
Downloaded from www.Manualslib.com manuals search engine

42 Procedure for Resetting the Camera
5. Procedure for Resetting the CameraNote: If your Camera is moved from one router (e.g. home) to another (e.g.
office) or you have Camera setup issues, then this Camera must be reset. Please reset the Camera with the following procedure:
1. Slide the ON/OFF switch to OFF.2. Press and hold the PAIR button then slide the ON/OFF switch to ON.3. Release the PAIR button when you hear a confirmation beep and wait for
Camera to compete internal reset procedure, the LED indicator will be red and flashes slowly when Camera is reset successfully.
4. You can add your Camera again by following the steps in section 3.2.4 for Android devices or in section 3.3.4 for iOS devices.
Downloaded from www.Manualslib.com manuals search engine
Help 43
EN
GL
ISH6. Help
Noise interference
To avoid background noise or echoes, ensure that there is enough distance
between your device and the Wi-Fi® Camera Unit.
Use of other 2.4 GHz products, such as Bluetooth® systems or microwave ovens, may cause interference with this product. Keep the Wi-Fi® Camera Unit
at least 1.5m away from these types of products, or turn them off if they appear
to be causing interference.
Lost connection
Check your Wi-Fi® settings. If necessary, reconnect your Wi-Fi®. Ensure the
Wi-Fi ® Camera Unit is switched ON. Wait a few minutes to connect to the Wi-Fi®
network.
If you forgot your password
If you do not remember your password, tap "Forgot Password" and submit
your e-mail address. A new password will be sent to your e-mail address immediately.
Trouble Shooting
Category Problem Description / Error
Solution
Account I am unable to login
even after registration.
Please check your user name and
password.
Account I receive an error
message saying: "Email ID is not registered".
Please ensure that you have
registered an account with us. Tap Create Account to create an account
to be able to use the Wi-Fi® Home
Video Baby Monitor Camera.
Downloaded from www.Manualslib.com manuals search engine

44 Help
Account What do I do if I forget
my password?
Click on the "Forgot Password" link on
the website http://
www.hubbleconnected.com/motorola/login/ OR on your Android™
or iOS application. An email will be sent
to your registered email address.
Account I am unable to receive a
new password although I have used the "Forgot
Password" option.
1. The e-mail might have been sent to your Junk Mail Folder. Please check your Junk Mail Folder.
2. There might be a delay in getting your e-mail. Please wait a few minutes and refresh your email account.
Connectivity
Issues
I get a message: We
are having problems accessing your
Camera. This could be
due to the lack of an internet connection.
Please wait and try
again later.
1. Please try again in a few minutes. This could be because of any issue with your internet connection.
2. If the problem persists, please restart your Camera to check if this fixes the problem.
3. Please restart your Wireless Router.
Viewing Camera
When I am in "Remote Mode", the video stops
after 5 minutes. How
do I view it for longer?
When you are accessing your Camera via a network different from your
home network (over the internet) your
video time-outs after 5 minutes.
You can click on the Camera again from the Android™/iOS application
to start streaming again.
If you are accessing from your web-
browser, you can press the Reload button to start viewing your Camera
video stream again.
Downloaded from www.Manualslib.com manuals search engine

Help 45
EN
GL
ISH
Features The sound alert setting
threshold is not right.
You can adjust Sound Sensitivity to
trigger notifications under the
Camera Settings menu.
Connectivity Issues
My phone application displays the following
message: "Unable to
connect to BMS
server".
1. Check the Wi-Fi network strength.
2. Check if you are connected to the internet by starting the phone browser and going to a website like www.google.com.
3. Try again if you successfully connect to the internet.
Setting Up While I am adding a
new Camera to my
account, I am not able to find any Cameras to
add.
If you are trying to add a Camera
which has previously been added into
your account or another account, you will first have to reset the Camera. This
can be done by pressing and holding
the PAIR button at the bottom of the Camera for 5 seconds.
General What are the
supported browsers for
access from my PC/Mac®?
On PC and Mac , we recommend
using Google Chrome. However the
following browsers are also supported: PC: Internet Explorer 8
and above. Mac : Safari.
®
®
®
Downloaded from www.Manualslib.com manuals search engine

46 Help
General What is the
significance of LED
flashing?
A flashing LED indicates the following
status:
Slow flashing: 1. Your Camera is in
setup mode. You can add the Camera to your account in this mode. Out of the
box, the Camera is in Setup mode. To
reset to Setup mode, press and hold the
PAIR button on the bottom of the Camera untill you hear a beep.
Slow flashing: 2. The Camera is either
connecting to the router or has lost the
link to the router. Please ensure that the Camera is in the Wi-Fi signal range.
LED is stable: The Camera is
connected to the Wi-Fi network.
Connectivity
Issues
I am not able to access
my Camera.
Please check if the Camera is within
Wi-Fi range. If the LED on your Camera is flashing slowly, please try to
move the Camera closer to the router
for better Wi-Fi connectivity and try again.
Setting Up During setup on
devices for Android™
and iOS, I am not able to find my Camera
during the last step and
the setup fails.
Please reset the Camera to Setup
mode and try again. Press and hold
the PAIR button on the bottom of the Camera untill you hear a beep. Wait
for a minute for the Camera to restart.
The Camera LED, indicates that it is in setup mode. Now restart the Setup
from your smartphone again.
®
®
®
®
Downloaded from www.Manualslib.com manuals search engine

Help 47
EN
GL
ISH
Connectivity
Issues
Even though I am
accessing my Camera
from the same Wi-Fi network, I still find my
Camera is shown as
remote. I can only access it for 5 minutes
at a time.
Please check your wireless router
settings. For example, for Buffalo
brand routers there is an option called Wireless Isolation. Please disable this
option.
Camera When I try to view the
Camera, I get a prompt
for Camera firmware upgrade. What should I
do?
Please upgrade your firmware. This
takes around 5 minutes. We push
upgrades from time to time to improve Camera features.
General Which platforms are
supported for accessing my Camera?
Minimum requirement:
Windows 7*
*Java browser plug-in needed
Mac OS version 10.7
Chrome™ version 24
Internet Explorer version 9
Safari version 6
Java™ version 7
Firefox version 18.0
Adobe Flash Player 15.0
Android™ 4.2
iPhone /iPad iOS version 7.0
General I do not hear sound
when I am accessing a remote Camera.
You can tap on the Speaker icon in the
video stream screen to hear audio. By default, the audio is not ON when you
are accessing a remote Camera.
®
®
®
®
®
®
® ®
® ®
Downloaded from www.Manualslib.com manuals search engine
48 Help
General What is the meaning of
"Local Camera" and
"Remote Camera"?
When you are accessing your Camera
from the same wireless network (Home)
in which it is configured, it is a local Camera. When you are accessing your
Camera away from your home, it is a
Remote Camera. You may be using 3G, 4G or 4G LTE or a Wi-Fi connection
outside of your home.
General How do I download the
Application for
Android™ and iOS devices?
Android™:
- Open the Google Play Store on your Android™ device.
- Select Search
- Type in "Hubble for Motorola Monitors"
- The results will show the Hubble App
- Select to install it
iOS Device:
- Open the App StoreSM
- Select Search
- Type in "Hubble for Motorola Monitors"
- The results will show the Hubble App
- Select to install it
Setting up When the video is cut
off, the application
attempts to reconnect and this results in lost
sound and choppy
video.
You will need to turn off the auto lock
function on your smart device to
ensure continuous video/audio feeding.
®
Downloaded from www.Manualslib.com manuals search engine
Help 49
EN
GL
ISH
Features How many users can
access the Camera at
one time?
If you are accessing in local more, two
users are supported. For more than
two users all streaming will go through remote server. This allows for
unlimited user access to a single
Camera at one time.
Connectivity
issues
I found interference
caused by my other webcam devices.
Video streaming performance is
related to internet bandwidth, especially if you have 2 or more video
streaming devices that are working
through the same router.
Downloaded from www.Manualslib.com manuals search engine
50 General Information
7. General InformationIf your product is not working properly....
1. Read this User's Guide. 2. Contact Customer Service at:
Consumer Products and Accessories Limited Warranty ("Warranty")Thank you for purchasing this Motorola branded product manufactured under
license by Binatone Electronics International Ltd ("BINATONE").
What Does this Warranty Cover?Subject to the exclusions contained below, BINATONE warrants that this
Motorola branded product ("Product") or certified accessory ("Accessory") sold for use with this product is manufactured to be free from defects in materials and
workmanship under normal consumer usage for the period outlined below. This
Warranty is your exclusive warranty and is not transferable.
Who is covered?This Warranty extends only to the first consumer purchaser, and is not transferable.
What will BINATONE do?BINATONE or its authorised distributor at its option and within a commercially
reasonable time, will at no charge repair or replace any Products or Accessories
that does not conform to this Warranty. We may use functionally equivalent reconditioned/ refurbished/ pre-owned or new Products, Accessories or parts.
+44 (0) 844 557 0890 (UK only)
+44 (0) 8187 62092 (ROI)
Downloaded from www.Manualslib.com manuals search engine

General Information 51
EN
GL
ISH
What Other Limitations Are There?ANY IMPLIED WARRANTIES, INCLUDING WITHOUT LIMITATION THE
IMPLIED WARRANTIES OF MERCHANTABILITY AND FITNESS FOR A
PARTICULAR PURPOSE, SHALL BE LIMITED TO THE DURATION OF THIS LIMITED WARRANTY, OTHERWISE THE REPAIR OR REPLACEMENT
PROVIDED UNDER THIS EXPRESS LIMITED WARRANTY IS THE EXCLUSIVE
REMEDY OF THE CONSUMER, AND IS PROVIDED IN LIEU OF ALL OTHER WARRANTIES, EXPRESS OR IMPLIED. IN NO EVENT SHALL MOTOROLA OR
BINATONE BE LIABLE, WHETHER IN CONTRACT OR TORT (INCLUDING
NEGLIGENCE) FOR DAMAGES IN EXCESS OF THE PURCHASE PRICE OF
THE PRODUCT OR ACCESSORY, OR FOR ANY INDIRECT, INCIDENTAL, SPECIAL OR CONSEQUENTIAL DAMAGES OF ANY KIND, OR LOSS OF
REVENUE OR PROFITS, LOSS OF BUSINESS, LOSS OF INFORMATION OR
OTHER FINANCIAL LOSS ARISING OUT OF OR IN CONNECTION WITH THE ABILITY OR INABILITY TO USE THE PRODUCTS OR ACCESSORIES TO THE
FULL EXTENT THESE DAMAGES MAY BE DISCLAIMED BY LAW.
Some jurisdictions do not allow the limitation or exclusion of incidental or
consequential damages, or limitation on the length of an implied warranty, so the above limitations or exclusions may not apply to you. This Warranty gives
you specific legal rights, and you may also have other rights that vary from one
jurisdiction to another.
Downloaded from www.Manualslib.com manuals search engine

52 General Information
Exclusions
Normal Wear and Tear. Periodic maintenance, repair and replacement of parts
due to normal wear and tear are excluded from coverage.
Batteries. Only batteries whose fully charged capacity falls below 80% of their rated capacity and batteries that leak are covered by this Warranty.
Abuse & Misuse. Defects or damage that result from: (a) improper operation,
storage, misuse or abuse, accident or neglect, such as physical damage (cracks,
scratches, etc.) to the surface of the product resulting from misuse; (b) contact with liquid, water, rain, extreme humidity or heavy perspiration, sand, dirt or the
like, extreme heat, or food; (c) use of the Products or Accessories for
commercial purposes or subjecting the Product or Accessory to abnormal usage or conditions; or (d) other acts which are not the fault of MOTOROLA or
BINATONE, are excluded from coverage.
Use of Non-Motorola branded Products and Accessories. Defects or damage
that result from the use of Non-Motorola branded or certified Products or Accessories or other peripheral equipment are excluded from coverage.
Unauthorised Service or Modification. Defects or damages resulting from
service, testing, adjustment, installation, maintenance, alteration, or
modification in any way by someone other than MOTOROLA, BINATONE or its authorised service centres, are excluded from coverage.
Products Covered Length of Coverage
Consumer Products One (1) year from the date of the
Products, original purchase by the first consumer purchaser of the product.
Consumer Accessories Ninety (90) days from the date of the
Accessories, original purchase by the
first consumer purchaser of the
product.
Consumer Products and Accessories that are Repaired or Replaced
The balance of the original warranty or for Ninety (90) days from the date
returned to the consumer, whichever is
longer.
Downloaded from www.Manualslib.com manuals search engine
General Information 53
EN
GL
ISH
Altered Products. Products or Accessories with (a) serial numbers or date
tags that have been removed, altered or obliterated; (b) broken seals or that show evidence of tampering; (c) mismatched board serial numbers;
or (d) nonconforming or non-Motorola branded housings, or parts, are excluded
from coverage.
Communication Services. Defects, damages, or the failure of Products or Accessories due to any communication service or signal you may subscribe to
or use with the Products or Accessories is excluded from coverage.
How to Obtain Warranty Service or Other Information?To obtain service or information, please call:
You will receive instructions on how to ship the Products or Accessories at your expense and risk, to a BINATONE Authorised Repair Centre.
To obtain service, you must include: (a) the Product or Accessory; (b) the
original proof of purchase (receipt) which includes the date, place and seller of
the Product; (c) if a warranty card was included in your box, a completed warranty card showing the serial number of the Product; (d) a written
description of the problem; and, most importantly; (e) your address and
telephone number.
These terms and conditions constitute the complete warranty agreement between you and BINATONE regarding the Products or Accessories purchased
by you, and supersede any prior agreement or representations, including
representations made in any literature publications or promotional materials issued by BINATONE or representations made by any agent employee or staff
of BINATONE, that may have been made in connection with the said purchase.
+44 (0) 844 557 0890 (UK only)
+44 (0) 8187 62092 (ROI)
Downloaded from www.Manualslib.com manuals search engine
54 General Information
FOCUS85, FOCUS85-B, FOCUS85-S, FOCUS85-W
London, 30 May , 2014
Declare under our sole responsibility that the following products
Radio Spectrum: EN300328 V1.8.1:2012
EN60950-1/A12:2011RF Safety: EN62311:2010
EMC: EN301489-17 V2.2.1:2012 EN301489-1 V1.9.2:2011
BINATONE TELECOM PLC1 Apsley Way London NW2 7HF,United Kingdom.Tel: +44(0) 20 8955 2700 Fax: +44(0) 20 8344 8877e-mail: [email protected]________________________________________ .
EC Declaration of Conformity
We the manufacturer / Importer : Binatone Telecom Plc1 Apsley Way LondonNW2 7HF, United Kingdom.
Type of equipment:Model Name:Country of Origin: ChinaBrand: Motorola
complies with the essential protection requirements of R&TTE Directive 1999/5/EC on the approximation of the laws of the Member States relating to Radio Spectrum Matters, the Council Directive /108/EC on the approximation of the laws of the Member Statesrelating to electromagnetic compatibility (EMC) and the European Community Directive 2006/95/EC relating to Electrical Safety. Directive 2011/65/EC on the restriction of use ofhazardous substances (RoHS) and 2009/125/EC relating to ecodesign requirement forEnergy-Related Products (ErP).
Assessment of compliance of the product with the requirements relating to the essential requirements according to Article 3 R&TTE was based on Annex III of the Directive 1999/5/EC and the following standard:
Electrical Safety:
The product is labelled with the European Approval Marking CE as show. Any Unauthori edmodification of the product voids this Declaration.
Manufacturer / Importer(Signature of authori ed person)
Karl Heinz Mueller / Chief Technical Officer Place & Date
Wi-Fi Video Camera
Downloaded from www.Manualslib.com manuals search engine

Technical Specifications 55
EN
GL
ISH8. Technical Specifications
Camera Unit
Wi-Fi 802.11 b/g/n
Image sensor Colour CMOS 1M Pixels
Lens f = 2.3 mm, F = 2.4
IR LED 7 pcs
Power Adapter: Ten Pao International Ltd.
S009GB0500150
Input: 100-240Vac, 50/60Hz, 300mA
Output: 5Vdc, 1500mA
®
Downloaded from www.Manualslib.com manuals search engine

Manufactured, distributed or sold by Binatone Electronics International LTD., official licensee for this product. MOTOROLA and the Stylized M logo are trademarks or registered trademarks of Motorola Trademark Holdings, LLC. and are used under license. Mac, Mac OS, iPhone, iPad and Safari are the trademarks of Apple Inc., registered in the U.S. and other countries. Android, Google Play and Chrome are trademarks of Google Inc. Wi-Fi is a trademark of the Wi-Fi Alliance. Windows XP and Internet Explorer are trademarks of the Microsoft group of companies. Oracle and Java are registered trademarks of Oracle and /or its affiliates. All other trademarks are the property of their respective owners. © 2014 Motorola Mobility LLC. All rights reserved.
EN_UK Version 7.0
Printed in China
Downloaded from www.Manualslib.com manuals search engine
KÄYTTÖOHJE
Wi-Fi®-videotoiminnolla varustettu itkuhälytin
Malli: MBP85CONNECT
Tässä käyttöohjeessa kuvattuja ominaisuuksia voidaan muuttaa ilman ennakkoilmoitusta.
Tässä käyttöohjeessa on kaikki tuotteen tehokkaaseen käyttöön tarvittavat
tiedot.Lue turvallisuusohjeet sivuilta 5–6 ennen laitteen asentamista.
Pakkauksen sisältö• 1 x Wi-Fi®-kamerayksikkö
• 1 x verkkolaite
• 1 x pikaopas
Pakkauksissa, joissa on useita kameroita, on yksi tai useampi kamera verkkolaitteineen.
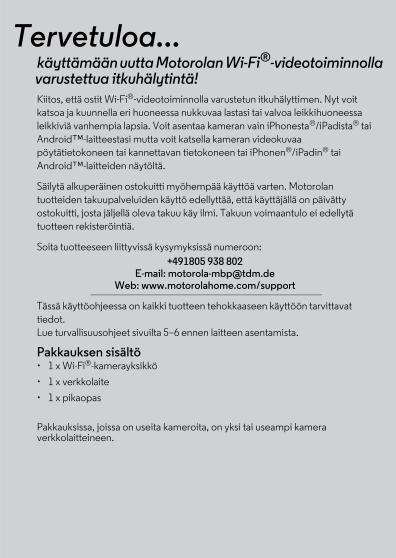
Tervetuloa... käyttämään uutta Motorolan Wi-Fi®-videotoiminnolla varustettua itkuhälytintä!Kiitos, että ostit Wi-Fi®-videotoiminnolla varustetun itkuhälyttimen. Nyt voit katsoa ja kuunnella eri huoneessa nukkuvaa lastasi tai valvoa leikkihuoneessa
leikkiviä vanhempia lapsia. Voit asentaa kameran vain iPhonesta®/iPadista® tai
Android™-laitteestasi mutta voit katsella kameran videokuvaa pöytätietokoneen tai kannettavan tietokoneen tai iPhonen®/iPadin® tai
Android™-laitteiden näytöltä.
Säilytä alkuperäinen ostokuitti myöhempää käyttöä varten. Motorolan
tuotteiden takuupalveluiden käyttö edellyttää, että käyttäjällä on päivätty
ostokuitti, josta jäljellä oleva takuu käy ilmi. Takuun voimaantulo ei edellytä tuotteen rekisteröintiä.
Soita tuotteeseen liittyvissä kysymyksissä numeroon:
+491805 938 802 E-mail: [email protected]
Web: www.motorolahome.com/support
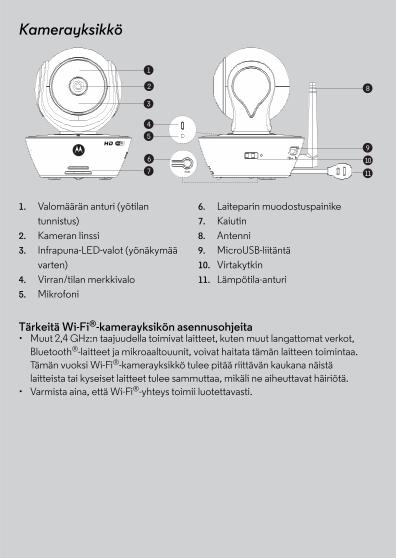
1. Valomäärän anturi (yötilan
tunnistus)
2. Kameran linssi
3. Infrapuna-LED-valot (yönäkymää
varten)
4. Virran/tilan merkkivalo
5. Mikrofoni
6. Laiteparin muodostuspainike
7. Kaiutin
8. Antenni
9. MicroUSB-liitäntä
10. Virtakytkin
11. Lämpötila-anturi
Kamerayksikkö
1
9
11
10
82
3
6
5
4
7
Tärkeitä Wi-Fi®-kamerayksikön asennusohjeita• Muut 2,4 GHz:n taajuudella toimivat laitteet, kuten muut langattomat verkot,
Bluetooth®-laitteet ja mikroaaltouunit, voivat haitata tämän laitteen toimintaa. Tämän vuoksi Wi-Fi®-kamerayksikkö tulee pitää riittävän kaukana näistä
laitteista tai kyseiset laitteet tulee sammuttaa, mikäli ne aiheuttavat häiriötä.
• Varmista aina, että Wi-Fi®-yhteys toimii luotettavasti.
4
Sisällysluettelo
1. Turvallisuusohjeet .................................................................................... 5
2. Järjestelmävaatimukset ........................................................................... 7
3. Käytön aloittaminen - Laitteiden yhdistäminen ....................................... 83.1 Valmistelut .................................................................................................. 83.2 Käyttäjätilin ja kameran määrittäminen Android™-laitteilla ..................... 93.3 Käyttäjätilin ja kameran määrittäminen iPhonella®/iPadilla® ................. 13
4. Kameran toiminnot ................................................................................. 194.1 Kamerayksikön kytkeminen virtalähteeseen ........................................... 194.2 Hubble-sovelluksen toiminnot ................................................................. 19
5. Käyttäminen tietokoneella/kannettavalla.............................................. 22
6. Kameran asetusten palauttaminen ........................................................ 22
7. Ohje ........................................................................................................ 23
8. Yleisiä tietoja .......................................................................................... 30
9. Tekniset tiedot ........................................................................................ 35

SU
OM
I
1. TurvallisuusohjeetVAROITUS:Kuristumisvaara: Lapsia on KURISTUNUT johtoihin. Pidä tämä johto aina lasten ulottumattomissa (vähintään metrin päässä). Älä koskaan kytke verkkolaitetta jatkojohtoon. Käytä vain laitteen mukana tulleita verkkolaitteita.
Turvallisuusohjeet 5
6 Turvallisuusohjeet
VAROITUSTämä Wi-Fi®-kamerayksikkö noudattaa kaikkia sähkömagneettisia kenttiä käsitteleviä standardeja. Laitetta on turvallista käyttää käyttöohjeissa
kuvatuilla tavoilla. Lue siis tämä käyttöohje huolellisesti läpi ennen laitteen
käyttöä.
• Aikuisen henkilön on asennettava tämä laite, koska siinä on pieniä osia. Pidä kaikki pienet osat lasten ulottumattomissa.
• Tämä laite ei ole lelu. Älä anna lasten leikkiä sillä.
• Tämä Wi-Fi®-kamerayksikkö ei korvaa vastuullisen aikuisen valvontaa.
• Säilytä tämä käyttöohje myöhempää käyttöä varten.
• Älä peitä Wi-Fi®-kamerayksikköä pyyhkeellä tai peitolla.
• Testaa Wi-Fi®-kamerayksikön toiminta ja tutustu kaikkiin toimintoihin ennen laitteen käyttöönottoa.
• Älä käytä Wi-Fi®-kamerayksikköä veden äärellä.
• Älä asenna Wi-Fi®-kamerayksikköä lämmönlähteen lähelle.
• Älä kosketa pistoketta tai pistorasiaa terävillä tai metallisilla esineillä.
WI-FI®-KAMERAYKSIKÖN VALMISTELU JA KÄYTTÖ:
• Valitse Wi-Fi®-kamerayksikön paikka niin, että siitä näkee sängyssä
nukkuvan vauvan mahdollisimman hyvin.
• Aseta Wi-Fi®-kamerayksikkö tasaiselle alustalle, kuten vaatekaapin, lipaston tai hyllyn päälle, tai kiinnitä yksikkö tukevasti seinään jalustan alla
olevista rei'istä.
• Älä KOSKAAN aseta Wi-Fi®-kamerayksikköä tai sen johtoja lapsen
sänkyyn.
SU
OM
I
2. JärjestelmävaatimuksetInternet-portaali• Windows® 7
• Mac OS® 10.7
• Chrome™ 24
• Internet Explorer® 9
• Safari® 6
• Java™ 7
• Firefox® 18.0
• Adobe® Flash® Player 15.0
Android™-järjestelmä • Versio 4.2 tai uudempi
iPhone®/iPad® iOS • Versio 7.0 tai uudempi
Nopea (Wi-Fi®) Internet-yhteys • Jokaista kameraa kohden vähintään 0,6 Mt kaistanleveyttä lataamista varten
(upload). Nopeuden voi testata tällä sivustolla: http://www.speedtest.net)
Järjestelmävaatimukset 7
3. Käytön aloittaminen - Laitteiden yhdistäminen
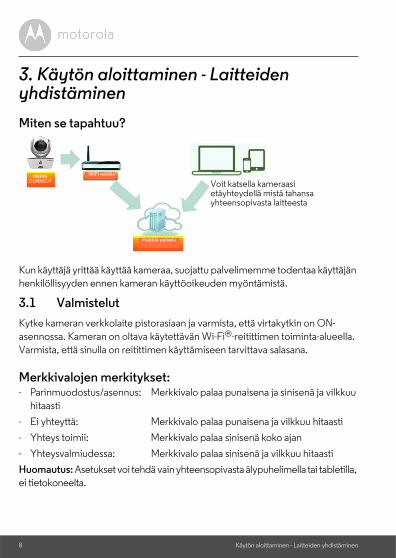
Miten se tapahtuu?
Kun käyttäjä yrittää käyttää kameraa, suojattu palvelimemme todentaa käyttäjän henkilöllisyyden ennen kameran käyttöoikeuden myöntämistä.
3.1 Valmistelut
Kytke kameran verkkolaite pistorasiaan ja varmista, että virtakytkin on ON-
asennossa. Kameran on oltava käytettävän Wi-Fi®-reitittimen toiminta-alueella.
Varmista, että sinulla on reitittimen käyttämiseen tarvittava salasana.
Merkkivalojen merkitykset:- Parinmuodostus/asennus: Merkkivalo palaa punaisena ja sinisenä ja vilkkuu
hitaasti
- Ei yhteyttä: Merkkivalo palaa punaisena ja vilkkuu hitaasti
- Yhteys toimii: Merkkivalo palaa sinisenä koko ajan
- Yhteysvalmiudessa: Merkkivalo palaa sinisenä ja vilkkuu hitaasti
Huomautus: Asetukset voi tehdä vain yhteensopivasta älypuhelimella tai tabletilla, ei tietokoneelta.
View your Camera from any compatible device remotely
MBP85CONNECT
Wi-Fi® Router
Hubble Service
Voit katsella kameraasi etäyhteydellä mistä tahansa yhteensopivasta laitteesta
WiFi-reititin
Hubble-palvelu
8 Käytön aloittaminen - Laitteiden yhdistäminen

SU
OM
IA
nd
roid
™
3.2 Käyttäjätilin ja kameran määrittäminen Android™-laitteillaTarvitset • MBP85CONNECT kamera• Kameran verkkolaitteen• Laitteen, jonka AndroidTM -käyttöjärjestelmän versio on 4.2 tai uudempi
3.2.1 Käynnistä ja kytke kamera• Kytke verkkolaite pistorasiaan ja sen pistoke kamerayksikön takapuolella
olevaan microUSB-porttiin. • Varmista, että virtakytkin on ON-asennossa.• Kameran punainen merkkivalo vilkkuu, kun kamera on käynnistynyt
uudelleen. Kamera on valmis määritettäväksi, kun kuulet yhden piippauksen.
3.2.2 Lataa Hubble for Motorola Monitors -sovellus• Siirry Google Play™ Kauppaan ja etsi sovellus "Hubble for Motorola
Monitors".• Lataa "Hubble for Motorola Monitors" -sovellus Google Play™ Kaupasta ja
asenna se Android™-laitteeseesi
3.2.3 Käynnistä Hubble for Motorola Monitors -sovellus Android™-laitteessasi
• Varmista, että Android™-laitteesi on yhteydessä Wi-Fi®-reitittimeesi.
• Käynnistä Hubble for Motorola Monitors -sovellus, syötä tilisi tiedot, lue käyttöehdot ja valitse ”I agree to the Terms of Use” (Hyväksyn käyttöehdot) ennen kuin napautat Create (Luo). (Kuva A1)
HuomautusJos sinulla on jo Hubble App -tili, siirry seuraavaan vaiheeseen valitsemalla
Already have an Account (Onko sinulla jo tili)?
A1
Käytön aloittaminen - Laitteiden yhdistäminen 9

3.2.4 Lisää kamera tilillesi• Lisää kamera napauttamalla näytön oikeasta yläkulmasta . (Kuva A2)
• Näyttöön tulee seuraavat määritysohjeet. (Kuva A3)
• Kytke kameran virtajohto ja virta, ja odota muutaman minuutin ajan, että kamera lämpenee.
• Napauta Continue (Jatka), kun kameran merkkivalo alkaa vilkkua.
A2
A3
10 Käytön aloittaminen - Laitteiden yhdistäminen
SU
OM
IA
nd
roid
™
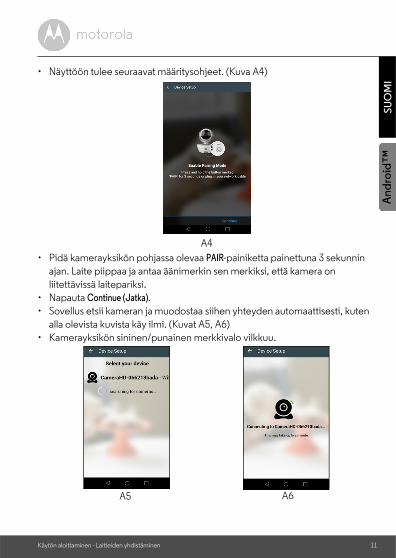
• Näyttöön tulee seuraavat määritysohjeet. (Kuva A4)
• Pidä kamerayksikön pohjassa olevaa PAIR-painiketta painettuna 3 sekunnin
ajan. Laite piippaa ja antaa äänimerkin sen merkiksi, että kamera on
liitettävissä laitepariksi. • Napauta Continue (Jatka).
• Sovellus etsii kameran ja muodostaa siihen yhteyden automaattisesti, kuten
alla olevista kuvista käy ilmi. (Kuvat A5, A6)• Kamerayksikön sininen/punainen merkkivalo vilkkuu.
A4
A5 A6
Käytön aloittaminen - Laitteiden yhdistäminen 11

• Valitse Wi-Fi®-verkko, kirjoita salasanasi ja napauta sen jälkeen Connect (Yhdistä). (Kuvat A7, A8)
• Kamera muodostaa yhteyden Wi-Fi®-verkkoon muutamassa minuutissa ennen yhteyden tilan näyttämistä. (Kuvat A9, A10)
• Jos yhteyden muodostaminen ei onnistu, napauta Retry (Yritä uudelleen) ja toista vaiheet kohdasta 3.2.4 alkaen.
• Katso kamerayksikön tallentamaa kuvaa napauttamalla View Camera (Katso kameraa). Kamerayksikön merkkivalo syttyy ja palaa sinisenä.
A7 A8
A9 A10
12 Käytön aloittaminen - Laitteiden yhdistäminen
SU
OM
IiO
S
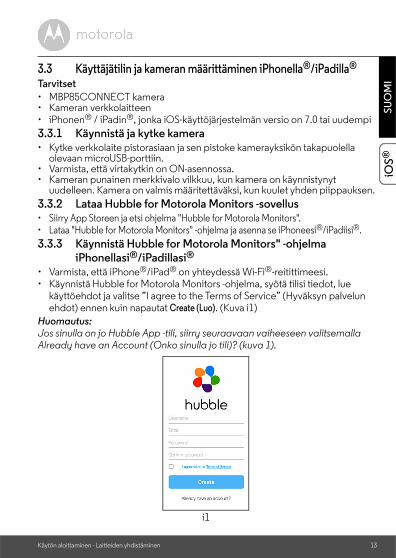
®3.3 Käyttäjätilin ja kameran määrittäminen iPhonella®/iPadilla®
Tarvitset • MBP85CONNECT kamera• Kameran verkkolaitteen• iPhonen® / iPadin®, jonka iOS-käyttöjärjestelmän versio on 7.0 tai uudempi
3.3.1 Käynnistä ja kytke kamera • Kytke verkkolaite pistorasiaan ja sen pistoke kamerayksikön takapuolella
olevaan microUSB-porttiin.• Varmista, että virtakytkin on ON-asennossa.• Kameran punainen merkkivalo vilkkuu, kun kamera on käynnistynyt
uudelleen. Kamera on valmis määritettäväksi, kun kuulet yhden piippauksen.
3.3.2 Lataa Hubble for Motorola Monitors -sovellus • Siirry App Storeen ja etsi ohjelma "Hubble for Motorola Monitors".• Lataa "Hubble for Motorola Monitors" -ohjelma ja asenna se iPhoneesi®/iPadiisi®.
3.3.3 Käynnistä Hubble for Motorola Monitors" -ohjelma iPhonellasi®/iPadillasi®
• Varmista, että iPhone®/iPad® on yhteydessä Wi-Fi®-reitittimeesi. • Käynnistä Hubble for Motorola Monitors -ohjelma, syötä tilisi tiedot, lue
käyttöehdot ja valitse ”I agree to the Terms of Service” (Hyväksyn palvelun ehdot) ennen kuin napautat Create (Luo). (Kuva i1)
Huomautus: Jos sinulla on jo Hubble App -tili, siirry seuraavaan vaiheeseen valitsemalla Already have an Account (Onko sinulla jo tili)? (kuva 1).
i1
Käytön aloittaminen - Laitteiden yhdistäminen 13

3.3.4 Lisää kamera tilillesi • Lisää kamera napauttamalla näytön oikeasta yläkulmasta . (Kuva i2)
• Näyttöön tulee seuraavat Bluetoothin määritysohjeet. (Kuva i3)i2
i3
14 Käytön aloittaminen - Laitteiden yhdistäminen

SU
OM
IiO
S
®• Napauta Asetukset ja ota Bluetooth käyttöön iPhonessa®/iPadissa® (kuvat i4,
i5).
• Palaa aloitusnäyttöön KOTI-painikkeesta ja jatka määritystoimintoa
napauttamalla "Hubble for Motorola Monitors".
• Näyttöön tulee seuraavat määritysohjeet. (Kuva i6)Huomautus: jos Bluetooth oli jo päällä, siirryt suoraan tähän vaiheeseen.
• Odota muutama minuutti, että kamerayksikkö lämpenee, ja napauta Continue (Jatka), kun kameran merkkivalo alkaa vilkkua.
i4 i5
i6
Käytön aloittaminen - Laitteiden yhdistäminen 15

• Näyttöön tulee seuraavat ohjeet. (Kuvat i7, i8)
• Nimeä kamerayksikön paikka ja napauta Continue (Jatka). (Kuvat i9, i10)
i7 i8
i9 i10
16 Käytön aloittaminen - Laitteiden yhdistäminen

SU
OM
IiO
S
®• Kamerayksikkö etsii Wi-Fi®-verkkoja (Kuva i11) ja näyttää saatavilla olevien
verkkojen luettelon. (Kuva i12)
• Valitse Wi-Fi®-verkko ja napauta Continue (Jatka). (Kuva i13)
• Anna Wi-Fi®-verkon salasana ja napauta Next (Seuraava). (Kuva i14)
• Kamera muodostaa yhteyden Wi-Fi®-verkkoon muutamassa minuutissa
ennen yhteyden tilan näyttämistä. (Kuvat i15, i16)
i11 i12
i13 i14
Käytön aloittaminen - Laitteiden yhdistäminen 17
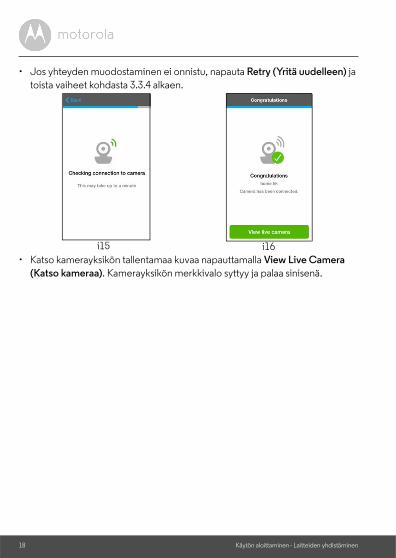
• Jos yhteyden muodostaminen ei onnistu, napauta Retry (Yritä uudelleen) ja
toista vaiheet kohdasta 3.3.4 alkaen.
• Katso kamerayksikön tallentamaa kuvaa napauttamalla View Live Camera
(Katso kameraa). Kamerayksikön merkkivalo syttyy ja palaa sinisenä.
i15 i16
18 Käytön aloittaminen - Laitteiden yhdistäminen

SU
OM
IiO
S
®4. Kameran toiminnot4.1 Kamerayksikön kytkeminen virtalähteeseen
• Kytke verkkolaite pistorasiaan ja sen pistoke kamerayksikön takapuolella olevaan microUSB-porttiin.
• Siirrä virtakytkin ON-asentoon. Virran vihreä LED-merkkivalo syttyy. (Huom:
Voit sammuttaa laitteen siirtämällä virtakytkimen OFF-asentoon.)
• Käynnistä Hubble-sovellus älylaitteessasi.
4.2 Hubble-sovelluksen toiminnot
Valikko • Napauta Cameras (Kamerat) kun haluat avata
kameraluettelon.
• Napauta Event Log (Tapahtumaloki) kun haluat
avata liike- tai äänitunnistuksen käynnistämien
tallenteiden luettelon.
• Napauta Account (Tili) kun haluat avata käyttäjän profiilin (Profile), tilauksen (Plan),
ilmoitusasetukset (Notification setting), etäyhteyden
asetukset (Remote Connection Setting) tai Tietoja Hubblesta (About Hubble)
Kehtolaulu Tätä napauttamalla pääset Melody (Melodia) -
valikkoon, jossa voit valita jonkun viidestä
melodiasta kamerayksikössä toistettavaksi.
Lämpötilan mittaaminen
Kamerayksikön takareunassa olevan lämpötila-anturin lämpötilalukema näytetään Android™- tai
iOS®-laitteesi näytössä. Lukemat näkyvät
PUNAISINA, jos lämpötila ylittää tai alittaa tilin asetuksissa määritetyn ylä- tai alarajan.
Kameran toiminnot 19

Valokuva/Video • Ota kuva tai tallenna video kamerallasi.
• Aktivoi videotoiminto napauttamalla Video-
kuvaketta . Aloita nauhoitus painamalla punainen painike pohjaan ja pysäytä
nauhoitus vapauttamalla painike.
• Voit vaihtaa kameratilaan napauttamalla Kamera-kuvaketta . Kameranäkymässä voi
ottaa valokuvia.
Huomautus: Valokuvat ja videot tallennetaan älylaitteesi Flash-
muistiin ja niitä voi katsella Galleria- tai
Mediasoitin-sovelluksessa (Android-laitteessa). Videoita voi katsoa Hubble-sovelluksessa.
Kaksisuuntainen tiedonsiirto
Aktivoi toiminto tätä painiketta napauttamalla. Paina pyöreää painiketta kerran, kun haluat puhua kamerayksikön kautta. Voit kuunnella kamerayksikön ääntä painamalla tätä painiketta uudelleen.
Kaiutin Kytke kaiutin päälle tai pois päältä tätä napauttamalla.
Panorointi ja kallistus
Tätä napauttamalla voit panoroida kuvaa oikealle ja vasemmalle sekä kallistaa kuvaa ylös ja alas.
Zoom Voit lähentää tai loitontaa kuvaa käyttämällä näytön oikeassa laidassa olevaa vierityspalkkia.Kuvaa voi lähentää ja loitontaa myös nipistyseleillä.Nipistyseleiden käyttö edellyttää, että käyttämäsi laite tukee monikosketustoimintoja.
20 Kameran toiminnot
SU
OM
I
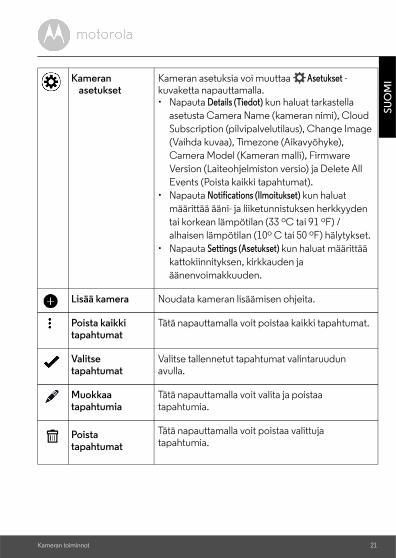
Kameran asetuksetKameran asetuksia voi muuttaa Asetukset -kuvaketta napauttamalla.• Napauta Details (Tiedot) kun haluat tarkastella
asetusta Camera Name (kameran nimi), Cloud
Subscription (pilvipalvelutilaus), Change Image (Vaihda kuvaa), Timezone (Aikavyöhyke),
Camera Model (Kameran malli), Firmware
Version (Laiteohjelmiston versio) ja Delete All
Events (Poista kaikki tapahtumat). • Napauta Notifications (Ilmoitukset) kun haluat
määrittää ääni- ja liiketunnistuksen herkkyyden
tai korkean lämpötilan (33 oC tai 91 oF) / alhaisen lämpötilan (10o C tai 50 oF) hälytykset.
• Napauta Settings (Asetukset) kun haluat määrittää
kattokiinnityksen, kirkkauden ja äänenvoimakkuuden.
Lisää kamera Noudata kameran lisäämisen ohjeita.
Poista kaikki tapahtumat
Tätä napauttamalla voit poistaa kaikki tapahtumat.
Valitse tapahtumat
Valitse tallennetut tapahtumat valintaruudun avulla.
Muokkaa tapahtumia
Tätä napauttamalla voit valita ja poistaa tapahtumia.
Poista tapahtumat
Tätä napauttamalla voit poistaa valittuja tapahtumia.
Kameran toiminnot 21

5. Käyttäminen tietokoneella/kannettavalla • Siirry osoitteeseen https://app.hubbleconnected.com/#login
• Syötä käyttäjätunnuksesi ja salasanasi, ja napsauta sen jälkeen Login (Kirjaudu), jos
sinulla on jo tili valmiina.
• Napsauta laitepariksi liitettyjen kameroiden luetteloa Android™-laitteellasi tai iPhonessa®/iPadissa®, ja kameranäkymä tulee näyttöön. Nyt sinun on
helppo seurata itsellesi tärkeitä henkilöitä, paikkoja ja lemmikkejä
reaaliaikaisen videon suoratoiston avulla.
• Voit muuttaa asetuksia seuraamalla sivuston valikon ohjeita.
6. Kameran asetusten palauttaminen Huomautus: Kamera täytyy nollata, jos se siirretään yhdestä reitittimestä (esim. koti) toiseen (esim. toimisto) tai jos sen asennus ei onnistu. Voit nollata kameran
seuraavasti:
1. Siirrä virtakytkin OFF-asentoon.
2. Pidä PAIR-painike pohjassa ja siirrä sitten virtakytkin ON-asentoon. 3. Vapauta PAIR-painike, kun laite antaa vahvistuksen äänimerkillä, ja odota
että kamerayksikkö suorittaa sisäisen nollaustoiminnon loppuun. LED-
merkkivalo muuttuu punaiseksi ja alkaa vilkkua hitaasti kun kamera yksikön nollaus on suoritettu.
4. Voit lisätä kamerasi uudelleen kohdan 3.2.4 Android-laitteiden tai kohdan
3.3.4 iOS-laitteiden ohjeiden mukaisesti.
22 Käyttäminen tietokoneella/kannettavalla

SU
OM
I
7. OhjeÄänihäiriötVarmista taustahälyn tai kaiun estämiseksi, että laitteesi ja Wi-Fi®-kamerayksikkö
ovat riittävän kaukana toisistaan.
Muut 2,4 GHz:n taajuudella toimivat laitteet, kuten Bluetooth®-laitteet ja mikroaaltouunit, voivat haitata tämän laitteen toimintaa. Tämän vuoksi Wi-Fi®-
kamerayksikkö tulee pitää vähintään 1,5 metrin päässä näistä laitteista tai
kyseiset laitteet tulee sammuttaa, mikäli ne aiheuttavat häiriötä.
Yhteys ei toimi
Tarkista Wi-Fi®-asetukset. Muodosta Wi-Fi®-yhteys tarvittaessa uudelleen.
Varmista, että
Wi-Fi®-kamerayksikkö on päällä. Odota muutama minuutti, jotta Wi-Fi®-yhteys muodostuu.
Jos unohdat salasanasi
Jos et muista salasanaasi, napauta Forgot Password (Unohtunut salasana) ja anna sähköpostiosoitteesi. Uusi salasanasi lähetetään heti
sähköpostiosoitteeseesi.
Vianmääritys
Luokka Ongelma
Kuvaus/virhe
Ratkaisu
Tili En pysty kirjautumaan
edes rekisteröitymisen
jälkeen.
Tarkista käyttäjänimesi ja salasanasi.
Tili Saan virheilmoituksen
jossa lukee: "Email ID is not registered"
(Sähköpostiosoitetta
ei ole rekisteröity).
Varmista, että olet rekisteröitynyt
palveluumme. Voit luoda tilin napauttamalla Create Account
(Luo tili).
Ohje 23

24 Ohje
Tili Mitä voin tehdä, jos
unohdan salasanani?
Napsauta sivulla Forgot Password
(Unohtunut salasana) -linkkiä joko
sivustolla https://app.hubbleconnected.com/
#lostpassword tai Android™- tai
iOS-sovelluksessa. Sähköpostiviesti lähetetään rekisteröitymisessä
antamaasi sähköpostiosoitteen.
Tili En saa uutta salasanaa
vaikka olen käyttänyt
"Forgot password"- toimintoa.
1. Sähköposti on saattanut mennä roskapostikansioosi. Tarkista roskapostikansiosi.
2. Viestin perille toimituksessa voi olla viive. Odota muutama minuutti ja päivitä saapuneiden viestin näkymä.
Yhteysongelmat Saan ilmoituksen: We
are having problems
accessing your Camera (Kamerasi
käyttäminen ei
onnistu). Tämä voi johtua siitä, että
internet-yhteys ei
toimi. Odota hetki ja yritä myöhemmin
uudelleen.
1. Yritä hetken päästä uudelleen. Tämä voi johtua internet-yhteyteen liittyvistä ongelmista.
2. Jos ongelma ei ratkea, käynnistä kamera uudelleen ja katso, onko siitä apua.
3. Käynnistä langaton reitittimesi uudelleen.
SU
OM
I
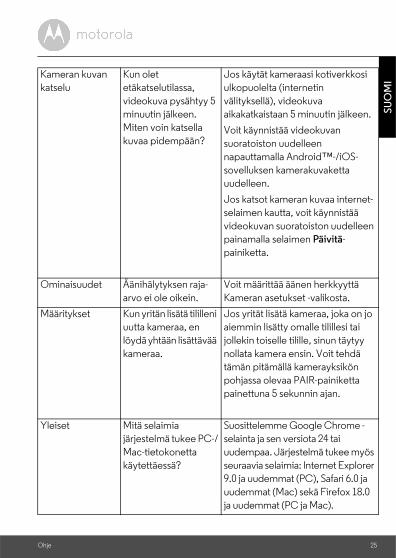
Kameran kuvan
katselu
Kun olet
etäkatselutilassa,
videokuva pysähtyy 5 minuutin jälkeen.
Miten voin katsella
kuvaa pidempään?
Jos käytät kameraasi kotiverkkosi
ulkopuolelta (internetin
välityksellä), videokuva aikakatkaistaan 5 minuutin jälkeen.
Voit käynnistää videokuvan
suoratoiston uudelleen
napauttamalla Android™-/iOS-
sovelluksen kamerakuvaketta uudelleen.
Jos katsot kameran kuvaa internet-
selaimen kautta, voit käynnistää
videokuvan suoratoiston uudelleen painamalla selaimen Päivitä-
painiketta.
Ominaisuudet Äänihälytyksen raja-
arvo ei ole oikein.
Voit määrittää äänen herkkyyttä
Kameran asetukset -valikosta.
Määritykset Kun yritän lisätä tililleni uutta kameraa, en
löydä yhtään lisättävää
kameraa.
Jos yrität lisätä kameraa, joka on jo aiemmin lisätty omalle tilillesi tai
jollekin toiselle tilille, sinun täytyy
nollata kamera ensin. Voit tehdä tämän pitämällä kamerayksikön
pohjassa olevaa PAIR-painiketta
painettuna 5 sekunnin ajan.
Yleiset Mitä selaimia järjestelmä tukee PC-/
Mac-tietokonetta
käytettäessä?
Suosittelemme Google Chrome -selainta ja sen versiota 24 tai
uudempaa. Järjestelmä tukee myös
seuraavia selaimia: Internet Explorer 9.0 ja uudemmat (PC), Safari 6.0 ja
uudemmat (Mac) sekä Firefox 18.0
ja uudemmat (PC ja Mac).
Ohje 25

Yleiset Mitä vilkkuva LED-
merkkivalo tarkoittaa?
Vilkkuva merkkivalo voi tarkoittaa
seuraavia asioita:
Vilkkuu hitaasti: Kamerasi on
asetustilassa. Voit lisätä kameran omalle tilillesi, kun kamera on tässä
tilassa. Kamera on pakkauksesta
purettaessa asetustilassa. Voit nollata
kameran ja palauttaa sen asetustilaan pitämällä kameran pohjassa olevaa
PAIR-painiketta painettuna niin
kauan, että laite antaa äänimerkin.
Vilkkuu hitaasti: Kamera muodostaa parhaillaan yhteyttä reitittimeen tai
yhteys reitittimeen on katkennut.
Varmista, että kamera on ®-verkon toiminta-alueella.
Merkkivalo palaa koko ajan: Kamera
on yhdistettynä Wi-Fi®-verkkoon.
Yhteysongelmat En pysty käyttämään
kameraani.
Tarkista, että kamera on
Wi-Fi®-verkon toiminta-alueella. Jos kamerasi merkkivalo vilkkuu hitaasti,
siirrä kameraa reititintä lähemmäksi,
jotta Wi-Fi®-yhteys toimisi paremmin, ja yritä uudelleen.
26 Ohje
SU
OM
I
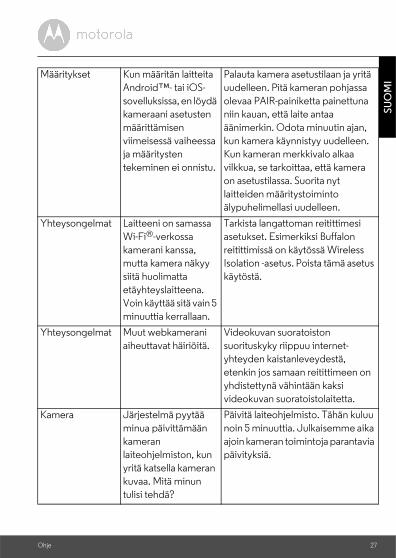
Määritykset Kun määritän laitteita
Android™- tai iOS-
sovelluksissa, en löydä kameraani asetusten
määrittämisen
viimeisessä vaiheessa ja määritysten
tekeminen ei onnistu.
Palauta kamera asetustilaan ja yritä
uudelleen. Pitä kameran pohjassa
olevaa PAIR-painiketta painettuna niin kauan, että laite antaa
äänimerkin. Odota minuutin ajan,
kun kamera käynnistyy uudelleen. Kun kameran merkkivalo alkaa
vilkkua, se tarkoittaa, että kamera
on asetustilassa. Suorita nyt
laitteiden määritystoiminto älypuhelimellasi uudelleen.
Yhteysongelmat Laitteeni on samassa
Wi-Fi®-verkossa
kamerani kanssa, mutta kamera näkyy
siitä huolimatta
etäyhteyslaitteena. Voin käyttää sitä vain 5
minuuttia kerrallaan.
Tarkista langattoman reitittimesi
asetukset. Esimerkiksi Buffalon
reitittimissä on käytössä Wireless Isolation -asetus. Poista tämä asetus
käytöstä.
Yhteysongelmat Muut webkamerani
aiheuttavat häiriöitä.
Videokuvan suoratoiston
suorituskyky riippuu internet-yhteyden kaistanleveydestä,
etenkin jos samaan reitittimeen on
yhdistettynä vähintään kaksi videokuvan suoratoistolaitetta.
Kamera Järjestelmä pyytää
minua päivittämään
kameran laiteohjelmiston, kun
yritä katsella kameran
kuvaa. Mitä minun tulisi tehdä?
Päivitä laiteohjelmisto. Tähän kuluu
noin 5 minuuttia. Julkaisemme aika
ajoin kameran toimintoja parantavia päivityksiä.
Ohje 27
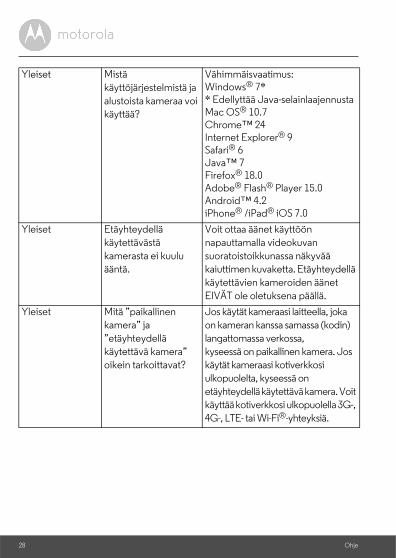
Yleiset Mistä
käyttöjärjestelmistä ja
alustoista kameraa voi käyttää?
Vähimmäisvaatimus: Windows® 7* * Edellyttää Java-selainlaajennusta Mac OS® 10.7 Chrome™ 24 Internet Explorer® 9 Safari® 6 Java™ 7 Firefox® 18.0 Adobe® Flash® Player 15.0Android™ 4.2 iPhone® /iPad® iOS 7.0
Yleiset Etäyhteydellä
käytettävästä
kamerasta ei kuulu ääntä.
Voit ottaa äänet käyttöön
napauttamalla videokuvan
suoratoistoikkunassa näkyvää kaiuttimen kuvaketta. Etäyhteydellä
käytettävien kameroiden äänet
EIVÄT ole oletuksena päällä.
Yleiset Mitä ”paikallinen kamera” ja
”etäyhteydellä
käytettävä kamera” oikein tarkoittavat?
Jos käytät kameraasi laitteella, joka on kameran kanssa samassa (kodin)
langattomassa verkossa,
kyseessä on paikallinen kamera. Jos käytät kameraasi kotiverkkosi
ulkopuolelta, kyseessä on
etäyhteydellä käytettävä kamera. Voit käyttää kotiverkkosi ulkopuolella 3G-,
4G-, LTE- tai Wi-Fi®-yhteyksiä.
28 Ohje

SU
OM
I
Yleiset Miten voin ladata
sovelluksen
Android™- ja iOS-laitteisiin?
Android™:
- Siirry Android™-laitteellasi Play Kauppaan
- Valitse Haku
- Kirjoita Hubble for Motorola Monitors
- Hubblen kyseinen sovellus näkyy hakutuloksissa
- Asenna se laitteeseesi
iOS-laite:
- Avaa App Store
- Valitse Haku
- Kirjoita Hubble for Motorola Monitors
- Hubblen kyseinen ohjelma näkyy hakutuloksissa
- Asenna se laitteeseesi
Määritykset Jos videokuva katkeaa, sovellus
yrittää muodostaa
yhteyden uudelleen ja ääni ja kuva toimivat
katkonaisesti.
Poista laitteesi automaattinen lukitustoiminto käytöstä, jotta
videokuvan ja äänen suoratoisto
toimii ilman katkoksia.
Ominaisuudet Kuinka monta
käyttäjää voi käyttää kameraa
samanaikaisesti?
Paikalliset kamerat tukevat kahta
samanaikaista käyttäjää. Tätä seuraavien käyttäjien kohdalla
suoratoisto toimii aina
etäpalvelimen kautta. Kameran samanaikaisten käyttäjien määrää ei
siis ole rajoitettu mitenkään.
Ohje 29
8. Yleisiä tietojaJos laitteesi ei toimi kunnolla...
1. Lue tämä käyttöohje tai pikaopas.2. Käy internet-sivuillamme: www.motorolahome.com/support
3. Ota yhteyttä asiakaspalveluun:
Kuluttajakäyttöön tarkoitettujen tuotteiden ja lisävarusteiden rajoitettu takuu (”Takuu”)Kiitos, kun hankit tämän Motorola-merkkisen tuotteen, joka on valmistettu
Binatone Electronics International LTD:n ("BINATONE") lisenssillä.
Mitä tämä takuu kattaa? BINATONE takaa, ettei tässä Motorola-merkkisessä tuotteessa (jäljempänä
”Tuote”) tai tämän tuotteen kanssa käytettäväksi tarkoitetuissa sertifioiduissa lisävarusteissa (jäljempänä ”Lisävarusteet”) esiinny normaalissa
kuluttajakäytössä seuraavassa määritettynä aikana sellaisia materiaali- tai
valmistusvirheitä, joita ei ole mainittu tätä takuuta koskevissa poikkeuksissa. Tämä takuu on yksinomainen takuu eikä sitä voida siirtää muille.
Ketkä kuuluvat takuun piiriin?Tämä takuu rajoittuu vain alkuperäiseen ostajaan eikä sitä voida siirtää muille.
Mitä BINATONE tekee?BINATONEN tai sen valtuutetun jälleenmyyjän vastuu rajoittuu enimmillään
tämän takuun vastaisten tuotteiden ja lisävarusteiden maksuttomaan korjaamiseen tai vaihtamiseen kaupallisesti kohtuulliseksi katsottavassa ajassa.
Voimme käyttää toiminnaltaan vastaavia tehdaskunnostettuja, käytettyjä tai
uusia tuotteita ja lisävarusteita.
+491805 938 802
E-mail: [email protected]
30 Yleisiä tietoja

SU
OM
I
Muut rajoituksetKAIKKI KONKLUDENTTISET TAKUUT, MUKAAN LUKIEN RAJOITUKSETTA
MYYNTIKELPOISUUTEEN TAI TIETTYYN TARKOITUKSEEN
SOVELTUVUUTEEN LIITTYVÄT KONKLUDENTTISET TAKUUT, OVAT VOIMASSA VAIN TÄMÄN RAJOITETUN TAKUUN AJAN; MUILTA OSIN
KULUTTAJAN AINOANA TÄMÄN TAKUUN MUKAISENA OIKEUSKEINONA
ON VAATIA LAITTEEN KORJAUSTA TAI VAIHTAMISTA, EIKÄ TÄTÄ OIKEUTTA VOIDA KUMOTA MILLÄÄN MUILLA EHDOILLA; MITÄÄN MUITA
SUORIA TAI KONKLUDENTTISIA TAKUITA EI MYÖNNETÄ. MOTOROLAN TAI
BINATONEN KORVAUSVASTUU RAJOITTUU TUOTTEEN TAI
LISÄVARUSTEEN OSTOHINTAAN KAIKISSA SOPIMUSVELVOITTEESTA TAI KORVAUSVASTUUSTA (MUKAAN LUKIEN HUOLIMATTOMUUDESTA)
AIHEUTUNEISTA VAHINGOISTA, SEKÄ KAIKENLAISISSA EPÄSUORISSA,
SATUNNAISISSA, ERIKOISISSA TAI VÄLILLISISSÄ VAHINGOISSA, TULOJEN TAI TUOTTOJEN MENETYKSISSÄ, LIIKETOIMINTATAPPIOISSA, TIETOJEN
KATOAMISTAPAUKSISSA TAI MUISSA TALOUDELLISISTA MENETYKSISSÄ,
JOTKA OVAT AIHEUTUNEET TÄYSIN TAI OSITTAIN TUOTTEIDEN TAI LISÄVARUSTEIDEN KÄYTÖSTÄ TAI KÄYTÖN ESTYMISESTÄ. VAHINKOJEN
KORVAAMISESTA VOIDAAN SANOUTUA IRTI TÄYSIN, JOS VAATIMUS ON
LAINVASTAINEN.
Jotkin hallintoalueet eivät salli välillisten tai satunnaisten vahinkojen poissulkemista tai rajoittamista tai konkludenttisen takuun pituuden
rajoittamista, joten yllä olevat rajoitukset tai poissulkemiset eivät välttämättä
koske sinua. Tämä takuu takaa sinulle laillisia oikeuksia. Lainkäyttöalueesta riippuen sinulla voi olla myös muita oikeuksia.
Yleisiä tietoja 31

Poikkeukset
Normaalikäytössä kuluminen. Takuu ei kata normaalin käytön ja kulumisen edellyttämiä huoltotoimenpiteitä, korjauksia tai laite- tai osanvaihtoja.
Paristot ja akut. Tämä rajoitettu takuu kattaa vain vuotavat paristot tai paristot,
joiden varaustaso jää täyteen ladattuna alle 80 %:iin niissä ilmoitetusta määrästä.
Väärinkäytökset. Takuu ei kata vikoja ja vaurioita, jotka aiheutuvat: (a)
vääränlaisesta käytöstä, säilytyksestä, väärinkäytöksestä, onnettomuudesta tai välinpitämättömyydestä, kuten väärinkäytöksen seurauksena laitteen pintaan
tulleista vaurioista (esim. halkeamat ja naarmut); (b) altistumisesta nesteelle,
vedelle, sateelle, suurelle kosteudelle tai hikoilulle, hiekalle, pölylle tai muulle vastaavalle, kuumuudelle tai ruoalle; (c) tuotteiden tai lisävarusteiden
kaupallisesta tai normaalista poikkeavasta käytöstä tai epätavallisista
käyttöolosuhteista; tai (d) muista toimenpiteistä, jotka eivät johdu MOTOROLAN tai BINATONEN virheestä.
Muiden kuin Motorolan tuotteiden ja lisävarusteiden käyttäminen. Takuu ei
kata vikoja tai vaurioita, jotka aiheutuvat muiden kuin Motorola-merkkisten tai
Motorolan sertifioimien tuotteiden ja lisävarusteiden tai muiden oheislaitteiden käytöstä.
Luvattomat korjaukset ja muutokset. Takuu ei kata vikoja vai vaurioita, jotka
ovat aiheutuneet millään tavoin jonkun muun kuin MOTOROLAN, BINATONEN
tai näiden valtuutettujen huoltokeskusten tekemistä korjauksia, testauksista, säädöistä, asennuksista, huolloista tai muutoksista.
Takuuseen kuuluvat tuotteet Takuun kesto
Kuluttajatuotteet Kaksi (2) vuotta tuotteen
ensimmäisestä ostopäivästä.
Kuluttajakäyttöön tarkoitetut lisävarusteet
Yhdeksänkymmentä (90) päivää lisävarusteen ensimmäistä ostopäivästä.
Korjatut tai vaihdetut
kuluttajakäyttöön tarkoitetut tuotteet
ja lisävarusteet
Alkuperäisen takuun jäljellä oleva
kesto tai yhdeksänkymmentä (90)
päivää tuotteen kuluttajalle
palauttamisesta, sen mukaan kumpi näistä on pidempi.
32 Yleisiä tietoja
SU
OM
I
Muunnellut tuotteet. Takuu ei kata sellaisia tuotteita tai lisävarusteita, (a) joiden
sarjanumeroita tai päiväysmerkintöjä on poistettu, muutettu tai turmeltu; (b) joiden sinetti on rikkoutunut tai joiden sinetissä näkyy merkkejä luvattomista
toimenpiteistä; (c) joiden osien sarjanumerot eivät täsmää; tai (d) joissa on
käytetty muita kuin Motorola-merkkisiä koteloita tai osia.
Viestintäpalvelut. Takuu ei kata sellaisia tuotteissa tai lisävarusteissa ilmeneviä vikoja, vaurioita tai toimintahäiriöitä, jotka aiheutuvat käyttäjän tilaamasta tai
tuotteiden ja lisävarusteiden yhteydessä käyttämästä televiestintäpalvelusta tai
sen signaalista.
Takuupalveluiden ja muiden tietojen hankkiminenJos tarvitset takuupalveluita tai lisätietoja, soita numeroon
Saat lisäohjeita tuotteiden ja lisävarusteiden lähettämisestä BINATONEN
valtuuttamaan korjauskeskukseen. Käyttäjä lähettää tuotteet ja lisävarusteet omalla vastuullaan ja vastaa lähetyksestä aiheutuvista kustannuksista.
Takuupalvelun saanti edellyttää, että käyttäjä lähettää: (a) tuotteen tai
lisävarusteen; (b) alkuperäisen ostotositteen (kuitti), jossa on tiedot
ostopäivämäärästä, ostopaikasta ja tuotteen myyjästä; (c) täytetyn takuukortin, jossa näkyy tuotteesi sarjanumero, mikäli tuotteesi pakkauksessa oli takuukortti
mukana; (d) kirjoitetun kuvauksen tuotteen ongelmasta; ja mikä tärkeintä (e)
oman osoitteensa ja puhelinnumeronsa.
Nämä ehdot ja määräykset muodostavat kokonaisuudessaan käyttäjän ja BINATONEN välisen takuusopimuksen, joka koskee käyttäjän ostamia tuotteita
tai lisävarusteita ja joka korvaa kaikki aiemmat sopimukset tai ilmoitukset,
mukaan lukien kaikki BINATONEN julkaisut ja mainosmateriaalit sekä myyjän tai BINATONEN työntekijän myyntihetkellä antamat ilmoitukset.
+491805 938 802
E-mail: [email protected]
Yleisiä tietoja 33

34 Yleisiä tietoja

SU
OM
I
9. Tekniset tiedotKamerayksikköWi-Fi® 802.11 b/g/n
Kameran kenno Väri-CMOS, 1 megapikseliä
Objektiivi f = 2.3 mm, F = 2.4
Infrapuna-LED-valot 8 kpl
Verkkolaite Ten Pao International Ltd.
S009GU0500150
Tulo: 100–240 VAV, 50/60 Hz, 300 mA
Lähtö: 5 V DC, 1500 mA
Tekniset tiedot 35
Laitteen valmistuksesta, jakelusta ja jälleenmyynnistä vastaa Binatone Electronics International LTD, joka on tämän tuotteen lisenssinhaltija. MOTOROLA ja tyylitelty M-logo ovat Motorola Trademark Holdings, LLC:n tavaramerkkejä tai rekisteröityjä tavaramerkkejä ja niiden käyttö edellyttää käyttöoikeutta. Apple-logo ja Safari ovat Apple Inc:n tavaramerkkejä jotka on rekisteröity Yhdysvalloissa ja muissa maissa. App Store on Apple Inc:n palvelumerkki. Google Play, Android ja Chrome ovat Google Inc:n tavaramerkkejä. Wi-Fi on WiFi Alliancen tavaramerkki. Internet Explorer ja Windows ovat Microsoft-konsernin tavaramerkkejä. Firefox on Mozilla Foundationin rekisteröity tavaramerkki. Adobe ja Flash ovat Adobe Systems Incorporatedin tavaramerkkejä tai rekisteröityjä tavaramerkkejä. Java on Oraclen ja/tai sen kumppaneiden rekisteröity tavaramerkki. Kaikki muut tavaramerkit ovat niiden omistajien omaisuutta. © 2016 Motorola Mobility LLC. Kaikki oikeudet pidätetään.
EU_FI Version 1.0
Painettu Kiinassa