map intelligence - iserver usage guide - pitney...
TRANSCRIPT

Map Intelligence - iServer Usage Guide

Map Intelligence - iServer User Guide i

Map Intelligence - iServer User Guide ii
CONTENTS
INTRODUCTION ......................................................................................................... 3
Hyperion Products ................................................................................................................................. 3
Required Knowledge .............................................................................................................................. 3
Requirements for configuring the Intelligence iServer to connect to the Map Intelligence Server3
Overview .................................................................................................................................................. 4
CREATING THE COMMUNICATIONS DATABASE .................................................. 5
CONFIGURING THE INTELLIGENCE ISERVER ....................................................... 8
Set up the ODBC connection ................................................................................................................ 8
Set up Intelligence iServer data access service ................................................................................. 9
Hyperion version 9 ......................................................................................................................... 9
Hyperion version 11 .....................................................................................................................10
Create and upload an OCE ..................................................................................................................14
CONFIGURING THE MAP INTELLIGENCE SERVER ............................................. 16
CONFIGURING THE MAP INTELLIGENCE HYPERION CLIENT ........................... 17
Prerequisites .........................................................................................................................................17
Configuring the Map Intelligence Hyperion Intelligence iServer Settings .....................................17
Advanced Settings ...............................................................................................................................18
SQL Buffer Size ............................................................................................................................18
Query Limit ...................................................................................................................................18
PUBLISHING THE BQY ON THE INTELLIGENCE ISERVER ................................. 20

Map Intelligence - iServer User Guide 3
INTRODUCTION
HYPERION PRODUCTS
This manual uses the following names to describe Hyperion products.
Hyperion Intelligence Designer means Hyperion Intelligence Designer 8.5, Hyperion System 9 BI+
Interactive Reporting Studio.
Hyperion Intelligence Dashboard Builder means Hyperion Intelligence Dashboard Builder 8.5, Hyperion
System 9 BI+ Dashboard Studio.
Hyperion Intelligence iServer means Hyperion Performance Suite Intelligence iServer, System 9 BI+
Workspace.
REQUIRED KNOWLEDGE
This guide is written for users familiar with using and configuring the Hyperion Intelligence iServer and with using
Relational Database Management Systems.
Required Knowledge includes:
Publishing documents to the Hyperion Intelligence iServer.
Restarting the Hyperion Intelligence iServer.
Creating a database and database tables.
Restarting the Map Intelligence Server.
This process will be easier for users familiar with:
Creating ODBC DSNs
Adding Data Access Services to the Hyperion iServer
REQUIREMENTS FOR CONFIGURING THE INTELLIGENCE ISERVER TO CONNECT TO THE MAP
INTELLIGENCE SERVER
Ensure the following is set up before configuring the Intelligence iServer to connect to the Map Intelligence Server:
A Machine with an ODBC compliant Database Management System (DBMS) installed.
A Windows machine with Hyperion Intelligence iServer and Hyperion Intelligence Designer installed. This
machine must have access to the DBMS and have ODBC drivers to access that database installed.
A Machine with Map Intelligence Server installed. This machine must have access to the DBMS and the
Map Intelligence Server must include the appropriate jar file to access the DBMS. Note: The
OdbcJdbcDriver is always available as it is part of the Java Runtime Environment.
All the software above can be on the same machine if desired.

Map Intelligence - iServer User Guide 4
OVERVIEW
When a Map Intelligence enabled dashboard is viewed in the Hyperion Intelligence iServer, it sends information to
the Map Intelligence Server via a relational database (Communications Database).
Configuring the Intelligence iServer and Map Intelligence to communicate via the Communications Database allows
the power of Map Intelligence enabled dashboards to be distributed throughout an organization without the need
to install software on every computer.
The database must be created with the appropriate tables. The Intelligence iServer and dashboards must be
configured with the appropriate OCE. The Map Intelligence Server needs to be configured to connect to the
database too.
Map Intelligence – Intelligence iServer functionality is officially supported for Windows only, however it should be possible to work on any other platform.
Fig 1. Communication between the Intelligence iServer and the Map Intelligence Server.

Map Intelligence - iServer User Guide 5
CREATING THE COMMUNICATIONS DATABASE
When a Map Intelligence enabled dashboard is viewed in the Intelligence iServer, it needs the Communications
Database to communicate with the Map Intelligence server. The Communications Database must be specifically
configured by creating appropriate tables.
Map Intelligence officially supports Mysql, Microsoft SQL Server and Oracle for the communication. However it should be possible to use any relational database that supports ODBC.
1. Create a new database, this Communications Database requires two tables.
CREATING THE FIRST TABLE
1. Add a table named dummy.
2. Create an integer column named dummy in the dummy table.
3. Add to the table a single row with the value ‘1’.
CREATING THE SECOND TABLE
1. Add a table named mapintelligencechannel.
2. Create columns as similar as possible to those shown in the table below:
Column Name Data Type Size
user_id Varchar 50
request_number Integer 4 bytes
chunk_number Integer 4 bytes
param_name Varchar 40
param_value Text N/A
*Oracle Users – see Note to Oracle Users below.
CREATING THE THIRD TABLE
1. Add a table named selection_buffers
2. Create columns as similar as possible to those shown in the table below:

Map Intelligence - iServer User Guide 6
Column Name Data Type Size
selection_id Integer 4
user_id Varchar 100
name Varchar 100
enabled Integer 4
type Integer 4
layer_name Varchar 100
*Oracle Users – see Note to Oracle Users below.
CREATING THE FOURTH TABLE
1. Add a table named selection_columns
2. Create columns as similar as possible to those shown in the table below:
Column Name Data Type Size
column_id Integer 4
selection_id Integer 4
user_id Varchar 100
name Varchar 100
*Oracle Users – see Note to Oracle Users below.
CREATING THE FIFTH TABLE
1. Add a table named selection_values
2. Create columns as similar as possible to those shown in the table below:
Column Name Data Type Size
selection_id Integer 4
user_id Varchar 100
column_id Integer 4
val Varchar 200
row_id Numeric 9
*Oracle Users – see Note to Oracle Users below.
For further information on param_value see section Configuring the Map Intelligence Hyperion Client

Map Intelligence - iServer User Guide 7
NOTE TO ORACLE USERS
For Oracle users, use the following data types when creating the 5 tables above
Integer with Number
Varchar with Varchar2
Text with Long

Map Intelligence - iServer User Guide 8
CONFIGURING THE INTELLIGENCE iSERVER
There are three basic steps to configure the Intelligence iServer on a windows machine.
Set up an ODBC connection to the database.
Configure a data access service using the ODBC connection.
Upload an OCE to the Intelligence iServer.
SET UP THE ODBC CONNECTION
In order for the Intelligence iServer to connect to the Communications Database, there needs to be an ODBC
connection to the database.
Instructions and images for setting up the ODBC connection are for Windows 2000, Dialog boxes will differ depending on the Windows version you are using.
To create an ODBC connection:
1. From the Start menu select: Settings > Control Panel > Administrative Tools > Data Sources (ODBC).
The ODBC Data Source Administrator screen will open.
2. Select the System DSN tab.
Fig 2. The ODBC Data Source Administrator System DNS tab selected.
3. Click the Add button.

Map Intelligence - iServer User Guide 9
The Create New Data Source screen will open.
Fig 3. The Create New Data Source screen.
4. Select an appropriate driver, then click Finish.
If your database driver does not appear in the list, you will need to install it. (Consult your database documentation for further details).
5. The next set up screen to appear will vary depending on the driver selected in step 4 above.
Further information on completing the screen can be found by clicking the Help button on the set up screen.
6. Complete the ODBC set up process to connect to the Communications Database.
SET UP INTELLIGENCE iSERVER DATA ACCESS SERVICE
HYPERION VERSION 9
1. Start the Hyperion Service Configurator from Start > Programs > Hyperion Solutions > Hyperion Performance
Suite > Foundation Services> Service Configurator.
The Service Configurator will open.
2. Click the Local Service Configurator button. A log in screen will open.
3. Enter the Local Service Configuration User ID and Password.
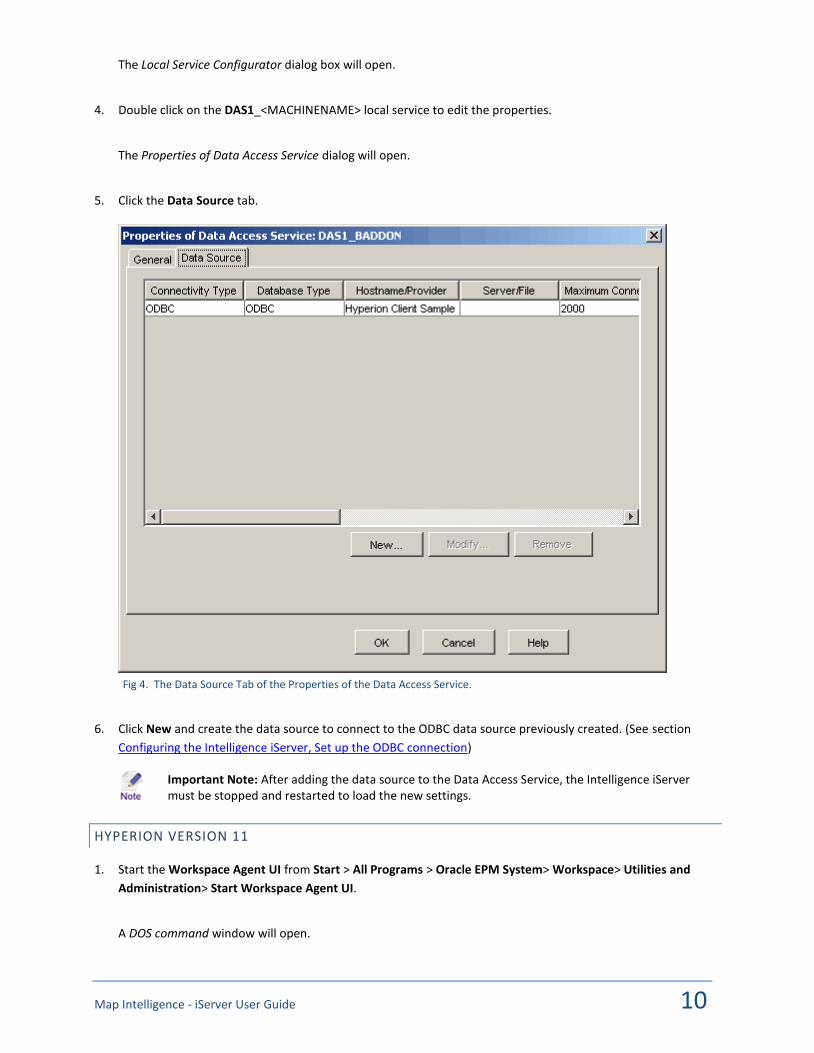
Map Intelligence - iServer User Guide 10
The Local Service Configurator dialog box will open.
4. Double click on the DAS1_<MACHINENAME> local service to edit the properties.
The Properties of Data Access Service dialog will open.
5. Click the Data Source tab.
Fig 4. The Data Source Tab of the Properties of the Data Access Service.
6. Click New and create the data source to connect to the ODBC data source previously created. (See section
Configuring the Intelligence iServer, Set up the ODBC connection)
Important Note: After adding the data source to the Data Access Service, the Intelligence iServer must be stopped and restarted to load the new settings.
HYPERION VERSION 11
1. Start the Workspace Agent UI from Start > All Programs > Oracle EPM System> Workspace> Utilities and
Administration> Start Workspace Agent UI.
A DOS command window will open.

Map Intelligence - iServer User Guide 11
Fig 5. DOS command window.
2. Minimize this command window.
3. Open a browser window and navigate to the following address:
http://localhost:55000/cmc
If you are not logged onto the server that is running Hyperion Workspace, then use that server name instead of localhost.
4. Log on to the Oracle® EPM System Configurator with your Workspace Administrator password.

Map Intelligence - iServer User Guide 12
Fig 6. Login screen.
The following screen will open
Fig 7. Initial screen after logging in.

Map Intelligence - iServer User Guide 13
5. Right click on the Interactive Reporting Data Access Service and select Properties.
Fig 8. Selecting Interactive Reporting Data Access Services Properties.
6. Select the Data Sources tab.
Fig 9. Selecting the Data Sources tab.
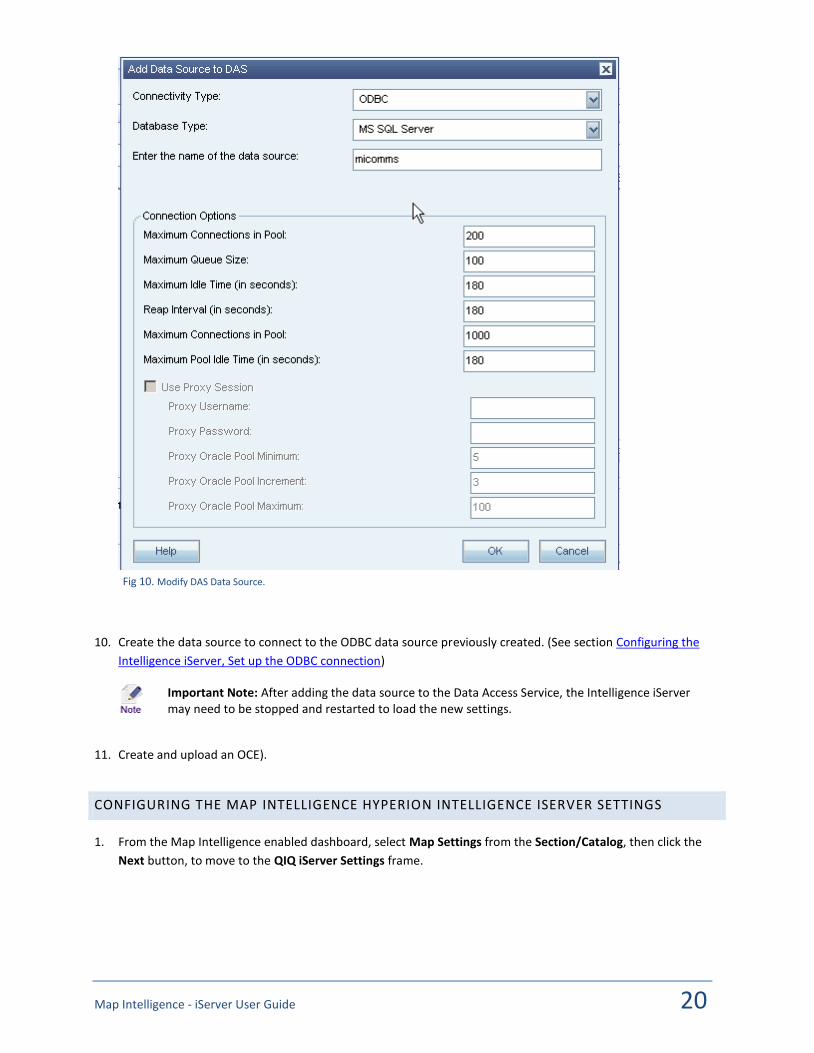
7. Click the New.. buttonThe Add Data Source to DAS window will open.

Map Intelligence - iServer User Guide 14
Fig 10. Modify DAS Data Source.
8. Create the data source to connect to the ODBC data source previously created. (See section Configuring the
Intelligence iServer, Set up the ODBC connection)
Important Note: After adding the data source to the Data Access Service, the Intelligence iServer may need to be stopped and restarted to load the new settings.
CREATE AND UPLOAD AN OCE
1. On the Intelligence iServer machine, open Hyperion Intelligence Designer from Start > Programs > Hyperion
Solutions > Hyperion Performance Suite > Developer Applications> Hyperion Intelligence Designer.
The Welcome to Hyperion – Designer dialog will open.

Map Intelligence - iServer User Guide 15
Fig 11. The Hyperion Intelligence Designer Welcome dialog box.
2. In the Create a New Document section, click the A New Database Connection File radio button.
3. Click the OK button.
4. Complete the Database Connection Wizard.
5. Save the new OCE.
6. Publish the OCE to the Intelligence iServer.

Map Intelligence - iServer User Guide 16
CONFIGURING THE MAP INTELLIGENCE SERVER
To configure the Map Intelligence Server
1. Edit the mapintelligencechannel.properties file found in the
“…\mapIntelligence\WEB-INF\properties”, to point to the database you are using to communicate with the
Intelligence iServer.
The file contains four properties:
connection-string
driver-name
user-name
password
The connection-string and driver-name are required and will vary depending on your database software. The user-
name and password are used to access the Communications Database. Some databases do not require a username
and password.
Below are two configuration examples using Mysql and SQL Server, properties:
The Map Intelligence Server will need to restarted for the changes to take effect.
EXAMPLE: MYSQL PROPERTIES
connection-string = jdbc:mysql://localhost:3306/mapintelligencetest
driver-name = com.mysql.jdbc.Driver
user-name = mapintelligence
password = mapintelligence
EXAMPLE: SQL SERVER PROPERTIES
connection-string = jdbc:odbc:Sqlserver_mi
driver-name = sun.jdbc.odbc.JdbcOdbcDriver
user-name = mapintelligence
password = mapintelligence
EXAMPLE: ORACLE PROPERTIES
connection-string = jdbc:oracle:thin:@host:1521:oracle_mi
driver-name = oracle.jdbc.driver.OracleDriver
user-name = mapintelligence
password = mapintelligence

Map Intelligence - iServer User Guide 17
CONFIGURING THE MAP INTELLIGENCE HYPERION CLIENT
PREREQUISITES
If configuring a dashboard from a machine other than the Intelligence iServer, the following 2 steps need to be
completed before a dashboard can be configured to work on the Intelligence iServer.
1. Create an ODBC connection (See Section 3 – Configuring the Intelligence iServer, Setting up the ODBC
Connection).
The ODBC connection must have the same name as the ODBC connection on the Intelligence iServer machine.
2. Log in to the Intelligence iServer web page and download the OCE uploaded previously (See Section
Configuring the Intelligence ISERVER, Hyperion version 11
3. Start the Workspace Agent UI from Start > All Programs > Oracle EPM System> Workspace> Utilities and
Administration> Start Workspace Agent UI.
A DOS command window will open.
Fig 5. DOS command window.
4. Minimize this command window.
5. Open a browser window and navigate to the following address:
http://localhost:55000/cmc
If you are not logged onto the server that is running Hyperion Workspace, then use that server name instead of localhost.
6. Log on to the Oracle® EPM System Configurator with your Workspace Administrator password.

Map Intelligence - iServer User Guide 18
Fig 6. Login screen.
The following screen will open
Fig 7. Initial screen after logging in.

Map Intelligence - iServer User Guide 19
7. Right click on the Interactive Reporting Data Access Service and select Properties.
Fig 8. Selecting Interactive Reporting Data Access Services Properties.
8. Select the Data Sources tab.
Fig 9. Selecting the Data Sources tab.
9. Click the New.. buttonThe Add Data Source to DAS window will open.
Map Intelligence - iServer User Guide 20
Fig 10. Modify DAS Data Source.
10. Create the data source to connect to the ODBC data source previously created. (See section Configuring the
Intelligence iServer, Set up the ODBC connection)
Important Note: After adding the data source to the Data Access Service, the Intelligence iServer may need to be stopped and restarted to load the new settings.
11. Create and upload an OCE).
CONFIGURING THE MAP INTELLIGENCE HYPERION INTELLIGENCE ISERVER SETTINGS
1. From the Map Intelligence enabled dashboard, select Map Settings from the Section/Catalog, then click the
Next button, to move to the QIQ iServer Settings frame.

Map Intelligence - iServer User Guide 21
Fig 12. The Map Intelligence QIQ iServer Settings frame.
2. Click the Set OCE button, the Set New OCE dialog box will appear.
3. In the Connection OCE field, enter the path of the OCE that connects to the Communications Database to the
Map Intelligence Server.
4. In the Username and Password fields, enter the user name and password used to connect to the database.
5. Click OK.
Fig 13. The Set New OCE dialog box.

Map Intelligence - iServer User Guide 22
ADVANCED SETTINGS
SQL BUFFER SIZE
The SQL Buffer Size must be set to a number less than or equal to the maximum length of the param_value column
in the database used for communication. It should not be set to less than 500. If the SQL Buffer Size is set too small,
errors may occur, which are hard to detect. The value should not be set too large otherwise the communication
may fail in ways difficult to detect. (See also the Query Limit description below).
If the param_value column is of type varchar, then the SQL Buffer Size should be exactly the same size as the length
of the param_value column.
QUERY LIMIT
The Query Limit is the number of rows written to the Communications Database each time the bqy connects to the
database. Generally, the more rows written per connection, the faster the communication will be. Making a
connection requires some overhead. The more rows written per connection, the fewer connections are made, the
less time goes to this connection overhead, so the faster the communication will be.
However, there are exceptions to this rule.
If database is Mysql then the Query Limit must be set to 1.
The more rows written to the database at a time, the more data must be stored in a buffer in memory
waiting to be sent. If too much memory is used, performance will degrade.
There is a maximum size to how much can be written to the database in a single connection. If inexplicable
errors occur, particularly checksum errors, it may be because some data is being ignored. If this occurs,
decrease either the SQL Buffer Size or the Query Limit.
Save the Map Intelligence enabled dashboard (bqy document).

Map Intelligence - iServer User Guide 23
PUBLISHING THE BQY ON THE INTELLIGENCE ISERVER
Once configured, the Map Intelligence enabled Dashboard can be published on the Intelligence iServer.
At the BQY Properties step of publishing:
1. From the SEND SQL QUERY drop-down menu , select the OCE previously uploaded to the Intelligence iServer
(See Section Configuring the Intelligence ISERVER, Hyperion version 11
2. Start the Workspace Agent UI from Start > All Programs > Oracle EPM System> Workspace> Utilities and
Administration> Start Workspace Agent UI.
A DOS command window will open.
Fig 5. DOS command window.
6. Minimize this command window.
7. Open a browser window and navigate to the following address:
http://localhost:55000/cmc
If you are not logged onto the server that is running Hyperion Workspace, then use that server name instead of localhost.
8. Log on to the Oracle® EPM System Configurator with your Workspace Administrator password.

Map Intelligence - iServer User Guide 24
Fig 6. Login screen.
The following screen will open
Fig 7. Initial screen after logging in.

Map Intelligence - iServer User Guide 25
9. Right click on the Interactive Reporting Data Access Service and select Properties.
Fig 8. Selecting Interactive Reporting Data Access Services Properties.
10. Select the Data Sources tab.
Fig 9. Selecting the Data Sources tab.
11. Click the New.. buttonThe Add Data Source to DAS window will open.

Map Intelligence - iServer User Guide 26
Fig 10. Modify DAS Data Source.
12. Create the data source to connect to the ODBC data source previously created. (See section Configuring the
Intelligence iServer, Set up the ODBC connection)
Important Note: After adding the data source to the Data Access Service, the Intelligence iServer may need to be stopped and restarted to load the new settings.
3. Create and upload an OCE).
4. From the Options drop-down menu, select Use default username/password.
On the Edit Permissions page, ensure the User is assigned Adaptive State: “View and Process”