markforged design guide 3d printing with compositesmarkforged design guide 3d printing with...
TRANSCRIPT

MARKFORGED DESIGN GUIDE
3D Printing with CompositesDesigning for manufacturing is a critical part of the product development cycle. It prevents roadblocks in manufacturing and delivers successful parts well designed for the process. Designing for 3D printing is no different — considering the process from the start of your design workflow will ensure successful and cost-effective prints. This guide walks you through the key considerations of design success with Markforged composite printers.

Forces key
Important terms
YX
Z
XY plane
Table of Contents1 Quick Reference Sheet ...............................................................................01
Plastic .............................................................................................................. 01
Fiber ................................................................................................................. 03
2 Identifying 3D Printing Opportunities ....................................................04
Calculate ROI ................................................................................................ 04
Determine material needs and behaviors .......................................... 04
When should you print with continuous fiber?................................. 04
3 What to Consider When Printing .............................................................05
4 Strategic 3D Printing Design Practices .................................................07
Use unit tests to validate geometries and save print time .......... 08
Tolerancing and clearances .................................................................... 08
5 Understanding Matrix Materials ...............................................................09
Types of matrix materials ......................................................................... 09
Designing for Onyx FR ............................................................................... 09
6 Diving Deep into Fiber Reinforcement ...................................................10
Types of fiber ................................................................................................ 10
Types of fiber fill ......................................................................................... 10
A brief composites fiber lesson ............................................................ 11
How to think about reinforcing with continuous fibers ................ 12
Basic reinforcement strategy: Shelling ............................................... 13
Specialized reinforcement strategies ................................................. 14
COMPOSITES DESIGN GUIDE
At several points in this guide we discuss different loading conditions with respect to print orientation. Due to the anisotropic nature of 3D printed parts, properties about or along the Z axis of printing — normal to the print bed — are different than those of the X and Y axes — parallel to the print bed. Properties and behaviors in this guide are framed in the context of the Z axis or the XY plane.
Imporant terms from Eiger, the Markforged 3D printing software, will be highlighted in BOLD CAPITAL LETTERS.

COMPOSITES DESIGN GUIDE
1version 1.2
Maximum part size
Desktop SeriesX: 320 mm (12.60”)Y: 132 mm (5.20”)Z : 154 mm (6.06”)
Industrial SeriesX: 330mm (13.00”)Y1: 270 mm (10.63”) Y2: 250 mm (9.84”) with fiberZ : 200 mm (7.87”)
These build volumes reference the maximum bounding box your part must fit in to print on either a Desktop or Industrial Series Markforged composite printer. Industrial Series printers have a deeper print area when printing with only plastic.
These guides serve as recommendations and may not reflect all implementations, as 3D printing is a geometry-dependent process. Unless otherwise specified, data is based on parts printed on Markforged composite printers at 100 micron layer height in Onyx with default print settings.
Minimum part dimensions
X: 1.6 mm (0.063”)Y: 1.6 mm (0.063”) Z: 0.8 mm (0.031”)
Minimum part size is limited to the extrusion width and height of each bead. The dimensions are derived from the minimum number of roof layers, floor layers, and shells needed to print a part successfully.
Minimum unsupported overhang angle
θ: 40o
This is the minimum angle to the horizontal at which a feature of a part can print without needing supports to hold it up. Eiger will generate supports for angles below 45o, but may not be needed in all cases.
Quick Reference Sheet
Plastic
Minimum hole diameter
XY: 1.5 mm (0.059”)Z: 1.0 mm (0.039”)
Holes with too small a diameter may close off during printing or print inaccurately. Horizontal surface holes (Z) print more precisely than vertical surface holes (XY).
Z
Y X
θ
XY
Z
Z
XY
Z
XY
Y

COMPOSITES DESIGN GUIDE
2version 1.2
Quick Reference Sheet
Minimum engraved feature size
Z Layer featuresH: 0.10 mm (0.004”)W: 0.50 mm (0.020”)
Horizontal XY featuresD: 0.20 mm (0.079”)H: 0.80 mm (0.031”)
Vertical XY featuresD: 0.20 mm (0.079”)W: 0.50 mm (0.020”)
An engraved feature is one that is recessed below the surface of the model. Common examples include lettering and texture. Engraved features may blend into the rest of the model if they are too small.
Minimum post diameter
XY: 1.6 mm (0.063”)Z: 2.0 mm (0.079”)
Posts with too small a diameter may not print precisely. Consider adding dowels or pins to your part for strong vertical posts to avoid shear along layer lines.
Minimum embossed feature size
Z Layer featuresH: 0.10 mm (0.004”)W: 0.80 mm (0.031”)
Horizontal XY featuresD: 0.20 mm (0.079”)H: 0.80 mm (0.031”)
Vertical XY featuresD: 0.20 mm (0.079”)W: 0.80 mm (0.031”)
An embossed feature is one that is raised above the surface of the model. Common examples include lettering and texture. Embossed features may blend into the rest of the model if they are too small.
Important note: To prevent gaps on features less than than 2 mm (0.078”) wide, design embosses to be even multiples of 0.4 mm (0.016”), the width of a single extrusion of plastic.
Important note: Avoid printing posts with heights (H) more than five times their diameter (D). Tall posts are more susceptible to shear on layer lines. If you do print posts, fillet interfacing edges to reduce stress concentrations.
H > 5D
H = 5D
H < 5D
1.6 mm(0.063”)
XY
Z
H
W
HD
WD
W
H
H
D
WD

COMPOSITES DESIGN GUIDE
3version 1.2
Quick Reference Sheet
Minimum fiber length
L: 45 mm (1.77”)
The smallest area you can reinforce with fiber is limited to the smallest strand of fiber that can be laid down and cut. This minimum strand length (L) can materialize in a few ways but must also meet the reinforcement width criteria.
Smallest reinforced holes
Smallest reinforced post
Post Diameter: 9.6 mm (0.38”)
It is possible to reinforce vertical posts down to 9.6 mm (0.38”) in diameter. However, vertical printed posts may shear along layer lines, so consider integrating dowels, rods, or pins into your part for strong posts.
Smallest reinforced area
Area: 90 mm2 (0.14 in2)
Independent of part shape, the smallest reinforceable area is about 90 mm (but may vary based on specific geometry). The part must also meet the minimum width requirements listed above.
Fiber
Minimum fiber reinforcement part height
Fiberglass, HSHT, Kevlar® Carbon FiberH: 0.9 mm (0.035”) H: 1.125 mm (0.04”)
Four roof and four floor layers of plastic are needed above and below Fiber Groups, meaning the minimum reinforceable height (H) is nine layers thick, leaving one layer for fiber. This value changes with fiber selection since some fibers print at different layer heights.
Minimum fiber reinforcement feature width
Open feature Looped featureW: 3.6 mm (0.15”) W: 2.8 mm (0.11”)
Thin reinforced features must allow the fiber to double back and meet the endpoint of the fiber with its start. While the minimum width (Wopen ) of an “open” feature on a part must fit two fiber strands, the minimum reinforcement width (Wlooped ) can be thinner if the segment in question allows the fiber to form a loop.
Sometimes holes are too small to reinforce with a given number of concentric fiber rings because of the minimum fiber length. In these cases, you can simply increase the number of CONCENTRIC FIBER RINGS. Here are the minimum hole sizes for 1-3 rings of fiber.
Three rings D3: 0.5 mm (0.020“)
Two ringsD2: 3.85 mm (0.152“)
One ringD1: 12.16 mm (0.479”)
Wopen
Wlooped
H
A
D1D2
D3
D

COMPOSITES DESIGN GUIDE
4version 1.2
Identifying 3D Printing Opportunities
When should you print with continuous fiber?Continuous Fiber Fabrication (CFF) serves as the backbone for strong 3D printed parts. Inlaid fibers within a printed plastic matrix form a composite part in which the properties of the fiber provide high stiffness, toughness, strength, or heat deflection.
Metal strength
The strength of a fiber reinforced part comes from the combined strength of the plastic and the continuous fiber strands woven throughout the part. This can make parts comparable to aluminum in strength and stiffness.
Durability
Reinforcing fibers can vastly increase the lifetime of a part. Fibers strengthen the part far beyond traditional plastics, meaning a reinforced part can hold up much better over an extended period of time than a standard plastic part.
Optimized properties
Continuous Fiber Fabrication is unique in that you can selectively reinforce a part for its use-case. Tailor a part’s strength profile exactly for its application by adding continuous fibers where strength is needed most.
3D printers vary widely in size, material, and method — simply put, they are just tools to help you create specific parts. Just as you wouldn’t use a screwdriver on a nail, a 3D printer is well-suited for certain types of parts and ineffective for others. The key to determining whether to 3D print a part stems from its material properties and return on investment (ROI).
Calculate ROIUse ROI calculations to justify which parts or subassemblies will benefit from 3D printing. Upload your parts to Markforged’s Eiger software to get the material cost and print time, and compare this to estimates from other manufacturing platforms. This should give you a sense for the time and cost savings involved in creating your part.
Cost considerations
Turn to 3D printing when the costs of traditional manufacturing are prohibitively expensive for your needs. 3D printing is often appropriate for low- to mid-volume applications, but for a given part there is always an inflection point at which other manufacturing methods become more cost-effective. Compare cost-per-quantity values to discover this tipping point.
Time analysis
3D printing allows for rapid iteration so you can test out many different designs early and often to refine your models. Continuous fiber reinforcement facilitates strong parts for works-like prototypes and end-use that you can improve print-by-print and implement in a matter of days. Look for opportunities to cut down on lengthy lead times with additive manufacturing.
Determine material needs and behaviorsConsider the material requirements of your part.
• How strong or stiff does it need to be?• What environment will your part be in?• How many cycles does it need to last?• How much can it weigh?
Use these considerations to select a material that suits the part.
Part Quantity
3D Printing
Traditional Manufacturing
Cost
per
par
t
Machining
3DP 3DP 3DP
Day 1 Day 4

COMPOSITES DESIGN GUIDE
5version 1.2
What to Consider When PrintingAs you design your part, consider how it can be optimized for the layer-by-layer printing process. Below are six considerations to keep in mind when designing your parts:
5. Fillet or chamfer edges
Adding fillets ensures smooth edge transitions and reduces stress concentrations at corners. Filleting edges normal to the print bed reduces the potential for warping, while chamfering edges flush with the build plate makes part removal easier and prevents edges from splaying on the first layer. Chamfers on interface edges like holes will help line up fits more easily.
1. Determine loading conditions
Composite 3D printed parts are stronger on planes parallel to the print bed, especially if you are reinforcing with continuous fiber. Analyze how your part will be loaded and design the part such that the largest forces traverse the XY plane. Some parts may need to be split into multiple printed pieces to optimize for strength.
2. Identify critical dimensions
3D printers have higher precision in planes parallel to the build plate. What are your critical dimensions or features? Critical features print optimally when in plane with the print bed.
3. Maximize bed contact
Greater surface area on the print bed minimizes supports and improves bed adhesion. Which face of your part contacts the bed? Try to orient the part so that the largest face lies on the print bed, unless strength or geometry needs dictate otherwise.
4. Reduce supports and improve overhangs
Fewer supports reduce printing and processing time. How can you design to minimize supports? Are the supports in your part accessible? Use angled overhangs to reduce supports and improve support removal.
R68
57.5
17.5
Ø27.5 Ø6.6 x2
Units: mm
COMPOSITES DESIGN GUIDE
6version 1.2
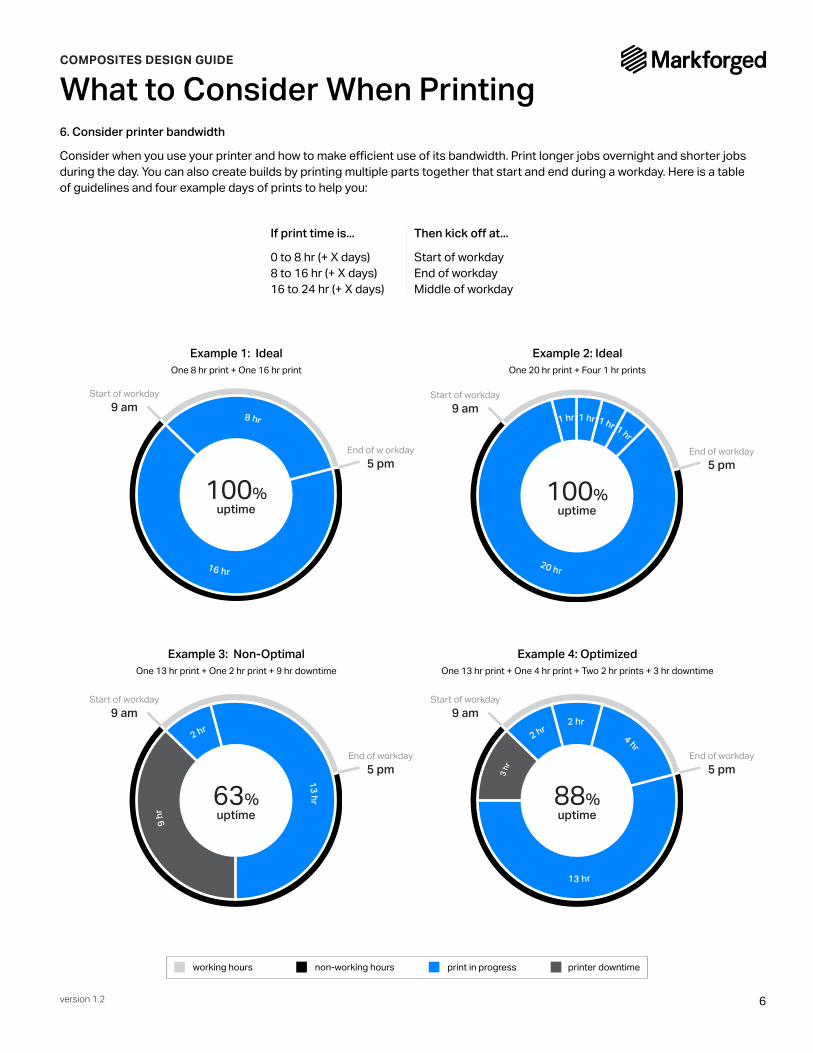
6. Consider printer bandwidth
Consider when you use your printer and how to make efficient use of its bandwidth. Print longer jobs overnight and shorter jobs during the day. You can also create builds by printing multiple parts together that start and end during a workday. Here is a table of guidelines and four example days of prints to help you:
What to Consider When Printing
If print time is... Then kick off at...
0 to 8 hr (+ X days) Start of workday8 to 16 hr (+ X days) End of workday16 to 24 hr (+ X days) Middle of workday
working hours print in progressnon-working hours printer downtime
Start of workday9 am
End of workday5 pm
88%uptime
3 hr
2 hr2 hr
4 hr
13 hr
End of workday5 pm
Start of workday9 am
63%uptime
13 hr
9 hr
2 hr
End of w orkday5 pm
Start of workday9 am
100%uptime
8 hr
16 hr
End of workday5 pm
Start of workday9 am
100%uptime
1 hr
20 hr
1 hr 1 hr 1 hr
Example 1: IdealOne 8 hr print + One 16 hr print
Example 3: Non-OptimalOne 13 hr print + One 2 hr print + 9 hr downtime
Example 2: IdealOne 20 hr print + Four 1 hr prints
Example 4: OptimizedOne 13 hr print + One 4 hr print + Two 2 hr prints + 3 hr downtime

COMPOSITES DESIGN GUIDE
7version 1.2
Strategic 3D Printing Design Practices
Splitting up parts
Sometimes it is more effective to split up a part than to print it as one piece. This part is split in two, with each piece printed from its highlighted face to prioritize the strength of each segment. Here are some reasons to consider splitting a part up:
• Parts with many iterations or customizations can be designed with a core base geometry and interchangeable modules
• Elements of parts that undergo increased wear or strain can be isolated into components that can be changed out regularly
• Designs requiring specific strength profiles across multiple axes can be printed in sub-components in different orientations and joined post-print
• Complex prints with critical features on multiple planes can be split into sections to reduce supports, decrease print time, and ensure print success
Think critically about which aspects of your design need to be 3D printed. Some features could be implemented more efficiently with other manufacturing methods. When appropriate, integrate other parts into your design to save on print time and cost or to improve important features. Below are a few examples of where simple hardware integrations can improve part success.
Threads and inserts
Instead of printing or tapping threads into plastic, add a metal heat-set insert where you need threads. These inserts get pressed in with a soldering iron to reflow the plastic around the part for local isotropic strength. Inserts are stronger and last longer than printed or tapped plastic threads.
Wear surfaces
Dowel pins provide a hardened steel wear surface for areas of parts that interact with abrasive surfaces. In this example, robotic end effectors grip a threaded pipe coupling. The dowel pins prevent the threads from cutting into the printed plastic, increasing the lifetime of the grippers.
Alignment
Use pressed-in dowel pins or shoulder bolts to precisely align multiple components. Press-fit dowel pins are used to line up this handle with its baseplate, while screws secure it. Use dowel pins for alignment before glueing or bolting the components together to attach multiple printed parts precisely.
Concentricity
Bushings or sleeve bearings like the ones inserted into this bracket provide high cylindrical precision and smooth concentric clearance fits. Off-axis loads distribute to the printed part with the bushing’s larger surface area. The bushing cavity can be reinforced with continuous strand composite fibers for higher torsional resistance.

COMPOSITES DESIGN GUIDE
8version 1.2
Use unit tests to validate geometries and save print time
Tolerancing and clearances
In software development, a unit test is used to confirm that a small section of code works before its integration into a larger program. 3D printed unit tests work much the same way. A 3D printed unit test is a small test print that confirms feature success before committing to a long, costly print.
Unit tests can be designed to experiment with different clearances and select the fit most appropriate to your application. Isolate the critical segments of large parts and print multiple versions with slightly altered dimensions or configurations to test how they interface. Update your final CAD model with the specification you find works best, and print it with confidence in its success.
Below are some recommended fits between printed parts. Specifics may change based on material and geometry. Listed dimensions are diametral, indicating the overall change in dimension between the two interfacing parts.
Tutorial: Designing a unit test
1. Identify critical features in your CAD model that either require tolerance verification or need to be tested to confirm they print as expected.
2. Isolate features in question as a part file or body separate from the main CAD model. Try to make it a small section that can be printed quickly — aim for under an hour in print time.
3. Design segment variations if you want to test different tolerances on the feature in question. Each unit variation can be its own print or you can combine them into a single part to keep them organized.
4. Print and test segment variations to determine which variation fits the way you like it and best suits your part needs.
5. Update the original model with the desired dimensions tested with your variations and print out the full part.
Strategic 3D Printing Design Practices
1 2 3
1 2 3
3
Close fit
0.05 mm - 0.10 mm(0.002” - 0.004”)
Parts can be assembled or disassembled by hand with negligible clearance.
Press fit
0.00 mm - 0.05 mm(0.00” - 0.002”)
Parts require some applied force via cold pressing to assemble.
Free fit
0.10 mm - 0.20 mm(0.004” - 0.008”)
Parts can slide and/or rotate easily when assembled.
AB
AB
Diametral clearance = A - B

COMPOSITES DESIGN GUIDE
9version 1.2
Understanding Matrix Materials
Types of matrix materials
Designing for Onyx FROnyx FR beams have been UL tested and achieve a V-0 rating in the UL94 vertical flame test down to 3mm thickness. A material’s UL rating is in part determined by the afterflame time, the time it takes for a flame to self-extinguish after the beam is lit. Materials rated at V-0 extinguish in under 10 seconds. However, the UL rating applies to the base material and does not account for how it is processed, so the flame performance of your part is dependent on its geometry and print settings. Therefore, a part might not be V-0 rated, but will still be flame retardant. You can follow these guidelines to decrease or eliminate your part’s afterflame time:
Reducing afterflame time with Onyx FR:
1. Feature size: Onyx FR beams 3mm (0.12”) and above extinguish in less than 10 seconds, so keep the important elements of your part thicker than this dimension. Small embossed or engraved features on thicker segments are ok to include.
2. Walls and infill: The more Onyx FR in your part, the higher its flame resistance. You can decrease the afterflame time by increasing the number of walls or infill density within your part.
3. Fiber reinforcement: Adding continuous fiber will increase the afterflame time of a part. Use fiber-efficient reinforcement practices to place continuous fibers where you need strength to limit the afterflame time. Follow strategic practices to reinforce most effectively and limit your fiber volume.
All Markforged matrix materials are chemically resistant and reinforceable with any continuous fiber options.
A composite material is a combination of two materials that, when combined, create a material to leverage benefits of both of its constituents. Each constituent material is distinct within the composite, so a mixture is not considered a composite material. Markforged 3D printers print in composites by laying continuous fibers into a plastic matrix material. By combining the surface and chemical properties of the matrix material with the strength, stiffness, and failure behavior of a fiber, you can create a composite 3D printed part optimized for the environment and the application you need.
≥ 3 mm (0.12”)
< 3 mm (0.12”)
≥ 3 mm (0.12”)
Properties
Aesthetic
Printers
Onyx
Strong, stiff material with heat-resistance and high dimensional stability
Professional, matte-black finish
All Markforged 3D printers
Onyx FR
Flame retardant, meets UL94 V-0 specification down to 3mm, shares the chemical and physical attributes of Onyx
Professional, matte-black finish
Industrial Series printers
Nylon W
Tough material with smooth surface texture for repeated skin contact or workholding when handling highly polished surfaces
Semi-gloss white that can be painted or dyed
Top-tier printers: Mark Two and X7(No print head swap needed)
Little or no afterflame Longer afterflame

COMPOSITES DESIGN GUIDE
10version 1.2
Diving Deep into Fiber ReinforcementTypes of fiber
Types of fiber fill
Concentric Fill
Concentric Fill lays fiber around the perimeter of a wall. This fill type mainly helps resist bending about the Z axis and strengthens the walls against deformation. You can specify how many fiber shells you want by changing the number of CONCENTRIC FIBER RINGS. You can edit the start point of the fiber by changing the START ROTATION PERCENT setting when viewing a 2D layer slice or group in INTERNAL VIEW.
Outer shell only
This type only reinforces the outer walls of a part. This can be used to reinforce the part for bending or impact loads applied to the sides of the part.
All walls
This type lays down fiber to reinforce both the outer shell and the inner holes, providing the reinforcement properties of both.
Inner holes only
This type only reinforces the inside walls of a part. This can be used to strengthen bolt holes or cavities to improve load distribution when compressive or out-of axis torsional forces are applied to inner holes.
Isotropic fill
Isotropic fill is routes fiber back and forth in a zig-zag pattern to simulate the individual unidirectional layers of a traditional laminated composite. By default, subsequent Isotropic Fiber layers rotate the fibers by 45o to achieve unidirectional strength within a fiber group, but the FIBER ANGLE can be changed if needed. Layers of Isotropic Fill Fiber resist bending in the XY plane. In addition to the isotropic fill pattern, this option by default traces concentric rings around all walls to improve wall strength.
Properties
Ideal loading type
Failure behavior
Characteristics and advantages
Carbon Fiber
High strength-to-weight ratio, stiff
Constant loading
Stiff until fracture
Metal stiffness and strength, lightweight
Fiberglass
Sturdy, cost-effective
Intermittent loading
Bends until fracture
Economical starting point, general-use fiber
Kevlar®
Tough, impact-resistant
Impact loading
Bends until deformation
High deflection and impact resistance
HSHT Fiberglass
Sturdy, high heat deflection
Constant loadingat high temperatures
High energy absorption until fracture
Keeps strength at high temperatures

COMPOSITES DESIGN GUIDE
11version 1.2
A brief composites fiber lessonImagine you are holding a piece of raw spaghetti by one of its ends. Under which type of load is it strongest? If you try to bend it, it snaps. If you try to compress it lengthwise by trying to push the two endpoints closer together, it also snaps. However, if you load it in tension by pulling on it, it can hold a decent load.
This is the theory behind working with continuous composite fibers. Whether you are printing them, winding them, or weaving them, continuous fibers are strongest when loaded in tension. Composite fiber materials like carbon fiber, Kevlar®, and fiberglass are known for their material properties in tension. The key is understanding where the fibers are loaded in tension, and how a given load can distribute amongst the local fibers.
Tension
Fibers are strongest in tension, so a part loaded in tension should consist of fibers running up and down the length of the part, being “stretched” by the force. You can align fibers with your tensile forces with CONCENTRIC FIBER along ribs or with FIBER ANGLES when using ISOTROPIC FIBER.
Bending
Beam Bending Theory shows that when a beam is bent, the inside face of the bend is loaded in compression, while the outside face of the bend is loaded in tension. By putting rigid materials on the extremes of a beam you reinforce it most effectively. This is why traditional composite layups consist of fiber panels on each face with a softer material on the inside, forming what is called a sandwich panel. To reinforce a part in bending, build a sandwich panel with ISOTROPIC FIBER panels if the neutral plane is in XY, or CONCENTRIC FIBER when bending around the Z axis.
Compression
The key to dealing with compressive forces is in the force distribution. The fiber should serve as a scaffold beneath the load, able to distribute the load along the fiber’s path. Side loads can be reinforced from compression with CONCENTRIC REINFORCEMENT. Vertical loads can be reinforced from compression using ISOTROPIC REINFORCEMENT on the upper and lower faces, and CONCENTRIC REINFORCEMENT between the two Isotropic panels to further support the load. This is especially helpful for supporting clamping forces from bolts.
Diving Deep into Fiber Reinforcement
Important note:
Markforged 3D printers print composite parts that are effectively transverse isotropic. While isotropic materials have uniform material properties in all directions, transverse isotropic materials have one set of properties along an axis, and a different set on planes normal to that axis. This translates to 3D printed parts, in which the part strength on XY planes is stronger than the part strength along the Z axis, especially with continuous fibers. This is why it’s important to consider print orientation during the design process.

COMPOSITES DESIGN GUIDE
12version 1.2
How to think about reinforcing with continuous fibers
5. Confirm fiber pathing
Does fiber fit and travel through the areas you need it to? Can you trace continuous strands of fiber that route along the load paths and “brace” against the force? If not, you may need to adjust fiber settings or modify features so that fiber runs through the places you need it to. Remember that fiber groups requires at least four plastic roof and floor layers to print, so any faces that need reinforcement should start four layers offset from the closest roof or floor.
Diving Deep into Fiber Reinforcement
1. Identify loading conditions
Take a look at your design. Where will it undergo bending forces? Tensile forces? Compressive forces? If you’re not sure, think about how forces will transmit through other parts — draw a diagram if you need to! This will help you to make an informed decision about your fiber routing strategy.
2. Determine print orientation
What directions are the largest loads traveling in on your part? You want your part to be oriented such that these forces largely travel in plane with the print bed to load fibers in bending or tension. If you have many large forces spanning multiple axes, you may want to consider modifying the design or splitting it up into a few parts.
3. Determine reinforcement areas
Based on loading conditions, what surfaces or segments need to be strengthened? With that in mind, think about what types of reinforcement you will need to implement in those areas.
4. Balance fiber panels
If only one side of a part is reinforced, it may be prone to warping due to an uneven sandwich panel — if one face is strengthened and the other isn’t, or if one face has a vastly different cross-section. If one layer group of your part is reinforced, balance the sandwich panel by reinforcing an equivalent layer group on the furthest substantial Z layer with a similar cross section.
COMPOSITES DESIGN GUIDE
13version 1.2
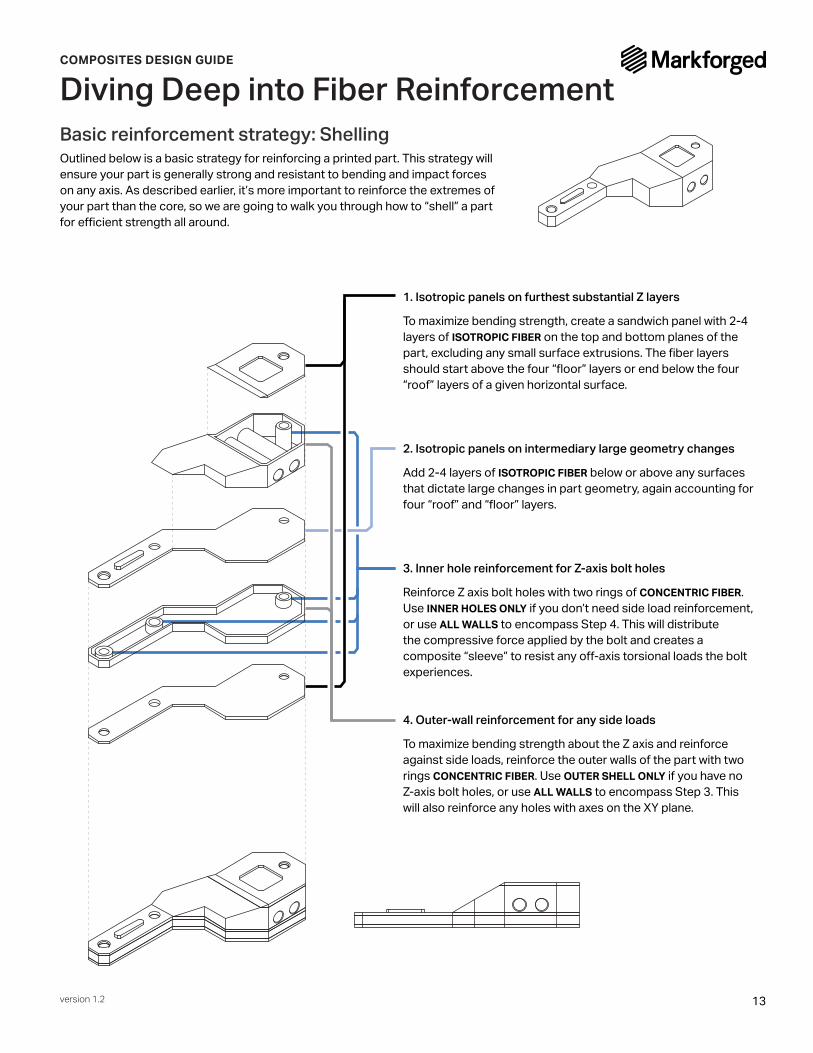
Basic reinforcement strategy: Shelling
1. Isotropic panels on furthest substantial Z layers
To maximize bending strength, create a sandwich panel with 2-4 layers of ISOTROPIC FIBER on the top and bottom planes of the part, excluding any small surface extrusions. The fiber layers should start above the four “floor” layers or end below the four “roof” layers of a given horizontal surface.
2. Isotropic panels on intermediary large geometry changes
Add 2-4 layers of ISOTROPIC FIBER below or above any surfaces that dictate large changes in part geometry, again accounting for four “roof” and “floor” layers.
3. Inner hole reinforcement for Z-axis bolt holes
Reinforce Z axis bolt holes with two rings of CONCENTRIC FIBER. Use INNER HOLES ONLY if you don’t need side load reinforcement, or use ALL WALLS to encompass Step 4. This will distribute the compressive force applied by the bolt and creates a composite “sleeve” to resist any off-axis torsional loads the bolt experiences.
4. Outer-wall reinforcement for any side loads
To maximize bending strength about the Z axis and reinforce against side loads, reinforce the outer walls of the part with two rings CONCENTRIC FIBER. Use OUTER SHELL ONLY if you have no Z-axis bolt holes, or use ALL WALLS to encompass Step 3. This will also reinforce any holes with axes on the XY plane.
Outlined below is a basic strategy for reinforcing a printed part. This strategy will ensure your part is generally strong and resistant to bending and impact forces on any axis. As described earlier, it’s more important to reinforce the extremes of your part than the core, so we are going to walk you through how to “shell” a part for efficient strength all around.
Diving Deep into Fiber Reinforcement

COMPOSITES DESIGN GUIDE
14version 1.2
Specialized reinforcement strategies
Fiber panel striping
For increased bending strength on the XY plane, you can add “stripes” of ISOTROPIC FIBER across multiple Z layers. This is most effective with thicker parts that have a fairly consistent or symmetric cross section, because Fiber striping creates multiple superimposed sandwich panels to further reinforce a part in bending.
If you need to address more specific loading conditions, you can employ different tactics to strengthen specific areas, reinforce certain part sections, or control fiber placement. Below are some unique additional strategies you can implement inside your part.
Diving Deep into Fiber Reinforcement
Achieving Z-axis strength
Clever design and reinforcement strategies allow you to achieve greater strength on multiple axes. Running a bolt through your part with fiber reinforcing the compressed surfaces can strengthen the part and prevent shear or tensile forces from splitting the part on layer lines. You can reinforce the area around the bolt with CONCENTRIC FIBER — INNER HOLES ONLY so that any of those forces distribute to the fiber in the form of bending forces.
Directing fiber with ribs
You can route fiber in specific directions with reinforced ribs or cutouts that follow load paths from forces applied to your part. You can force the fiber to follow these load paths by applying CONCENTRIC FIBER to reinforce around the cutouts or walls.
Using fiber angles to direct fibers
You can use the FIBER ANGLES tool to route the “zig-zag” of Isotropic Fibers in a certain direction. If you have the fibers routed in a specific direction to better align with the forces being applied to your part, you can manipulate the angle of this pattern. The default setting rotates the fill pattern by 45o each layer, but you can change that by putting a specific angle or pattern of angles in the Fiber Angles dialog box for any layer, any group of layers, or across the entire part.
210º
330º
90º