mastering go web services - sample chapter
DESCRIPTION
Chapter No. 5 Templates and Options in GoProgram and deploy fast, scalable web services and create high-performance RESTful APIs using GoFor more information: http://bit.ly/1DYMO5bTRANSCRIPT

Free Sample

In this package, you will find: • The author biography • A preview chapter from the book, Chapter 5 'Templates and Options in Go' • A synopsis of the book’s content • More information on Mastering Go Web Services
About the Author Nathan Kozyra is a veteran developer and software architect with more than a dozen years of experience in developing web applications and large-scale SaaS platforms. He has also authored the book Mastering Concurrency in Go, published by Packt Publishing.
Mastering Go Web Services If there's one thing that's said more than anything else about the Go language, it's that "Go is a server language."
Certainly, Go was built to be an ideal server language, designed as a next- generation iteration over the expanses and/or over-engineering of C, C++, and Java.
The language has evolved—largely with fervent community support— to go far beyond servers into system tools, graphics, and even compilers for new languages. At its heart, however, Go is made for powerful, concurrent, and easy-to-deploy cross-platform servers. This is what makes the language ideal for this book's topic.
Mastering Web Services in Go is intended to be a guide to building robust web services and APIs that can scale for production, with emphasis on security, scalability, and adherence to RESTful principles.
In this book, we'll build a rudimentary API for a social network, which will allow us to demonstrate and dive deeper into some fundamental concepts, such as connecting Go to other services and keeping your server secure and highly available.
By the end of this book, you should be experienced with all the relevant instances to build a robust, scalable, secure, and production-ready web service.
What This Book Covers Chapter 1, Our First API in Go, quickly introduces—or reintroduces— some core concepts related to Go setup and usage as well as the http package.
Chapter 2, RESTful Services in Go, focuses on the guiding principles of the REST architecture and translates them into our overall API design infrastructure.
Chapter 3, Routing and Bootstrapping, is devoted to applying the RESTful practices from the previous chapter to built-in, third-party, and custom routers for the scaffolding of our API.
Chapter 4, Designing APIs in Go, explores overall API design while examining other related concepts, such as utilization of web sockets and HTTP status codes within the REST architecture.
Chapter 5, Templates and Options in Go, covers ways to utilize the OPTIONS request endpoints, implementing TLS and authentication, and standardizing response formats in our API.
Chapter 6, Accessing and Using Web Services in Go, explores ways to integrate other web services for authentication and identity in a secure way.
Chapter 7, Working with Other Web Technologies, focuses on bringing in other critical components of application architecture, such as frontend reverse proxy servers and solutions, to keep session data in the memory or datastores for quick access.
Chapter 8, Responsive Go for the Web, looks at expressing the values of our API as a consumer might, but utilizing frontend, client-side libraries to parse and present our responses.
Chapter 9, Deployment, introduces deployment strategies, including utilization of processes to keep our server running, highly accessible, and interconnected with associated services.
Chapter 10, Maximizing Performance, stresses upon various strategies for keeping our API alive, responsive, and fast in production. We look at caching mechanisms that are kept on disk as well as in memory, and explore ways in which we can distribute these mechanisms across multiple machines or images.
Chapter 11, Security, focuses more on best practices to ensure that your application and sensitive data are protected. We look at eliminating SQL injection and cross-site scripting attacks.
[ 81 ]
Templates and Options in GoWith the basics of our social networking web service fl eshed out, it's time we take our project from a demo toy to something that can actually be used, and perhaps eventually in production as well.
To do this, we need to focus on a number of things, some of which we'll address in this chapter. In the last chapter, we looked at scoping out the primary functions of our social network application. Now, we need to make sure that each of those things is possible from a REST standpoint.
In order to accomplish that, in this chapter, we'll look at:
• Using OPTIONS to provide built-in documentation and a REST-friendly explanation of our resources' endpoints purposes
• Considering alternative output formats and an introduction on how to implement them
• Implementing and enforcing security for our API• Allowing user registration to utilize secure passwords• Allowing users to authenticate from a web-based interface• Approximating an OAuth-like authentication system• Allowing external applications to make requests on behalf of other users
After the implementation of these things, we will have the foundation of a service that will allow users to interface with it, either directly via an API or through a third-party service.
Templates and Options in Go
[ 82 ]
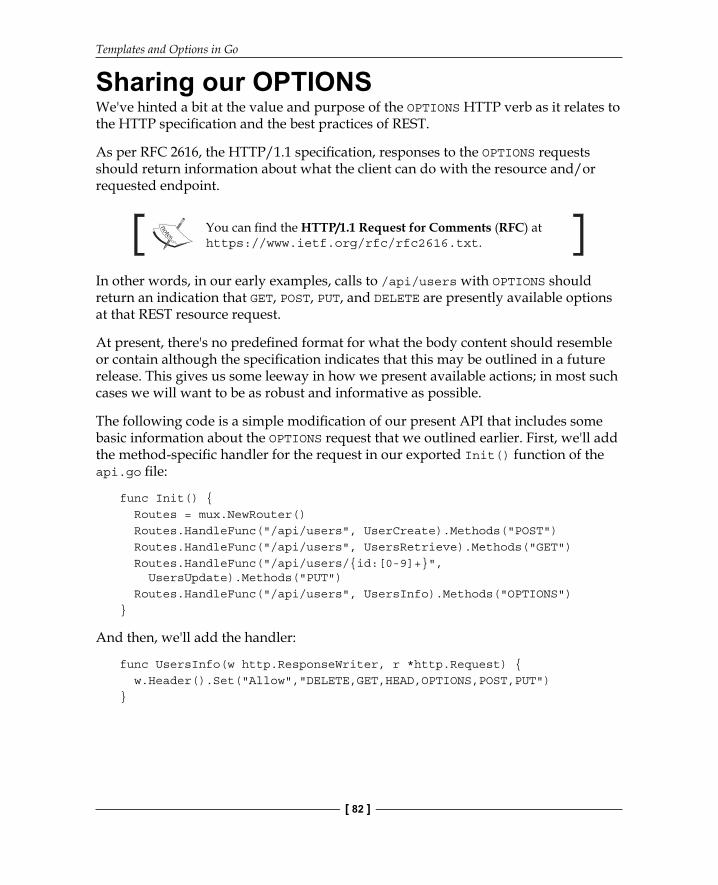
Sharing our OPTIONSWe've hinted a bit at the value and purpose of the OPTIONS HTTP verb as it relates to the HTTP specifi cation and the best practices of REST.
As per RFC 2616, the HTTP/1.1 specifi cation, responses to the OPTIONS requests should return information about what the client can do with the resource and/or requested endpoint.
You can fi nd the HTTP/1.1 Request for Comments (RFC) at https://www.ietf.org/rfc/rfc2616.txt.
In other words, in our early examples, calls to /api/users with OPTIONS should return an indication that GET, POST, PUT, and DELETE are presently available options at that REST resource request.
At present, there's no predefi ned format for what the body content should resemble or contain although the specifi cation indicates that this may be outlined in a future release. This gives us some leeway in how we present available actions; in most such cases we will want to be as robust and informative as possible.
The following code is a simple modifi cation of our present API that includes some basic information about the OPTIONS request that we outlined earlier. First, we'll add the method-specifi c handler for the request in our exported Init() function of the api.go fi le:
func Init() { Routes = mux.NewRouter() Routes.HandleFunc("/api/users", UserCreate).Methods("POST") Routes.HandleFunc("/api/users", UsersRetrieve).Methods("GET") Routes.HandleFunc("/api/users/{id:[0-9]+}", UsersUpdate).Methods("PUT") Routes.HandleFunc("/api/users", UsersInfo).Methods("OPTIONS")}
And then, we'll add the handler:
func UsersInfo(w http.ResponseWriter, r *http.Request) { w.Header().Set("Allow","DELETE,GET,HEAD,OPTIONS,POST,PUT")}

Chapter 5
[ 83 ]
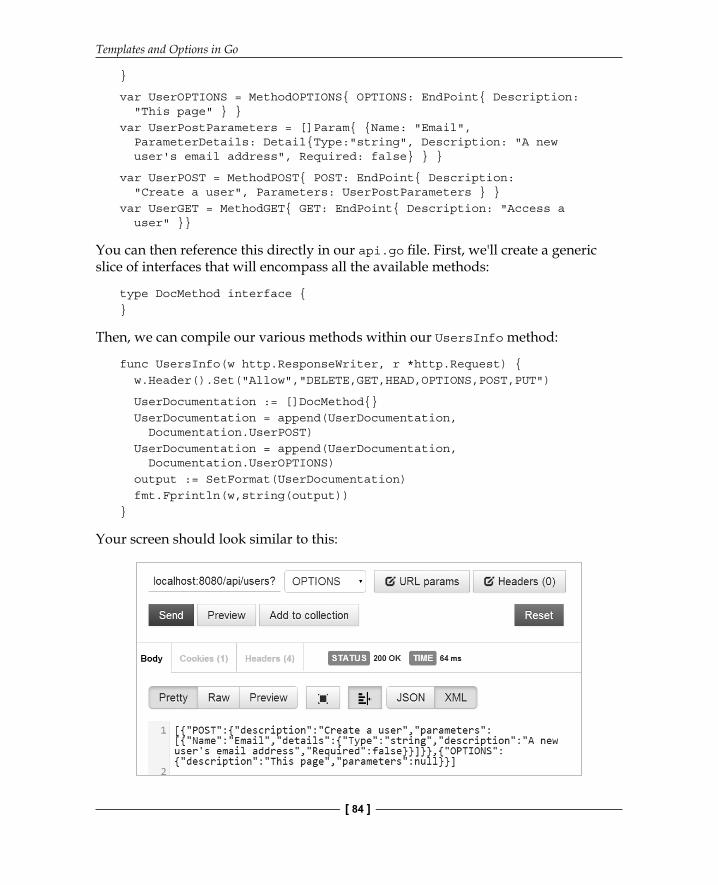
Calling this with cURL directly gives us what we're looking for. In the following screenshot, you'll notice the Allow header right at the top of the response:
This alone would satisfy most generally accepted requirements for the OPTIONS verb in the REST-based world, but remember that there is no format for the body and we want to be as expressive as we can.
One way in which we can do this is by providing a documentation-specifi c package; in this example, it is called specifi cation. Keep in mind that this is wholly optional, but it is a nice treat for any developers who happen to stumble across it. Let's take a look at how we can set this up for self-documented APIs:
package specificationtype MethodPOST struct { POST EndPoint}type MethodGET struct { GET EndPoint}type MethodPUT struct { PUT EndPoint}type MethodOPTIONS struct { OPTIONS EndPoint}type EndPoint struct { Description string `json:"description"` Parameters []Param `json:"parameters"`}type Param struct { Name string "json:name" ParameterDetails Detail `json:"details"`}type Detail struct { Type string "json:type" Description string `json:"description"` Required bool "json:required"
Templates and Options in Go
[ 84 ]
}
var UserOPTIONS = MethodOPTIONS{ OPTIONS: EndPoint{ Description: "This page" } }var UserPostParameters = []Param{ {Name: "Email", ParameterDetails: Detail{Type:"string", Description: "A new user's email address", Required: false} } }
var UserPOST = MethodPOST{ POST: EndPoint{ Description: "Create a user", Parameters: UserPostParameters } }var UserGET = MethodGET{ GET: EndPoint{ Description: "Access a user" }}
You can then reference this directly in our api.go fi le. First, we'll create a generic slice of interfaces that will encompass all the available methods:
type DocMethod interface {}
Then, we can compile our various methods within our UsersInfo method:
func UsersInfo(w http.ResponseWriter, r *http.Request) { w.Header().Set("Allow","DELETE,GET,HEAD,OPTIONS,POST,PUT")
UserDocumentation := []DocMethod{} UserDocumentation = append(UserDocumentation, Documentation.UserPOST) UserDocumentation = append(UserDocumentation, Documentation.UserOPTIONS) output := SetFormat(UserDocumentation) fmt.Fprintln(w,string(output))}
Your screen should look similar to this:
Chapter 5
[ 85 ]
Implementing alternative formatsWhen looking at the world of API formats, you know by now that there are two big players: XML and JSON. As human-readable formats, these two have owned the format world for more than a decade.
As is often the case, developers and technologists rarely settle happily for something for long. XML was number one for a very long time before the computational complexity of encoding and decoding as well as the verbosity of schema pushed many developers towards JSON.
JSON is not without its faults either. It's not all that readable by humans without some explicit spacing, which then increases the size of the document excessively. It doesn't handle commenting by default either.
There are a number of alternative formats that are sitting on the sideline. YAML, which stands for YAML Ain't Markup Language, is a whitespace-delimited format that uses indentation to make it extremely readable for humans. An example document would look something like this:
---api: name: Social Network methods: - GET - POST - PUT - OPTIONS - DELETE
The indentation system as a method of simulating code blocks will look familiar to anyone with experience in Python.
There are a number of YAML implementations for Go. The most noteworthy is go-yaml and this is available at https://github.com/go-yaml/yaml.
TOML, or Tom's Obvious, Minimal Language, takes an approach that will look very familiar to anyone who has worked with the .ini style confi g fi les.
Templates and Options in Go
[ 86 ]
Rolling our own data representation formatTOML is a good format to look at with regard to building our own data format, primarily because its simplicity lends itself to multiple ways of accomplishing the output within this format.
You may be immediately tempted to look at Go's text template format when devising something as simple as TOML because the control mechanisms to present it are largely there inherently. Take this structure and loop, for example:
type GenericData struct { Name string Options GenericDataBlock}
type GenericDataBlock struct { Server string Address string}
func main() { Data := GenericData{ Name: "Section", Options: GenericDataBlock{Server: "server01", Address: "127.0.0.1"}}
}
And, when the structure is parsed against the text template, it will generate precisely what we want as follows:{{.Name}}.
{{range $index, $value := Options}} $index = $value{{end}}
One big problem with this method is that you have no inherent system for unmarshalling data. In other words, you can generate the data in this format, but you can't unravel it back into Go structures the other way.
Another issue is that as the format increases in complexity, it becomes less reasonable to use the limited control structures in the Go template library to fulfi ll all of the intricacies and quirks of such a format.
Chapter 5
[ 87 ]
If you choose to roll your own format, you should avoid text templates and look at the encoding package that allows you to both produce and consume structured data formats.
We'll look at the encoding package closely in the following chapter.
Introducing security and authenticationA critical aspect of any web service or API is the ability to keep information secure and only allow access to specifi c users to do specifi c things.
Historically, there have been a number of ways to accomplish this and one of the earliest is HTTP digest authentication.
Another common one is inclusion of developer credentials, namely an API key. This isn't recommended much anymore, primarily because the security of the API relies exclusively on the security of these credentials. It is, however, largely a self-evident method for allowing authentication and as a service provider, it allows you to keep track of who is making specifi c requests and it also enables the throttling of requests.
The big player today is OAuth and we'll look at this shortly. However, fi rst things fi rst, we need to ensure that our API is accessible only via HTTPS.
Forcing HTTPSAt this point, our API is starting to enable clients and users to do some things, namely create users, update their data, and include image data for these users. We're beginning to dabble in things that we would not want to leave open in a real-world environment.
The fi rst security step we can look at is forcing HTTPS instead of HTTP on our API. Go implements HTTPS via TLS rather than SSL since TLS is considered as a more secure protocol from the server side. One of the driving factors was vulnerabilities in SSL 3.0, particularly the Poodlebleed Bug that was exposed in 2014.
You can read more about Poodlebleed at https://poodlebleed.com/.
Templates and Options in Go
[ 88 ]
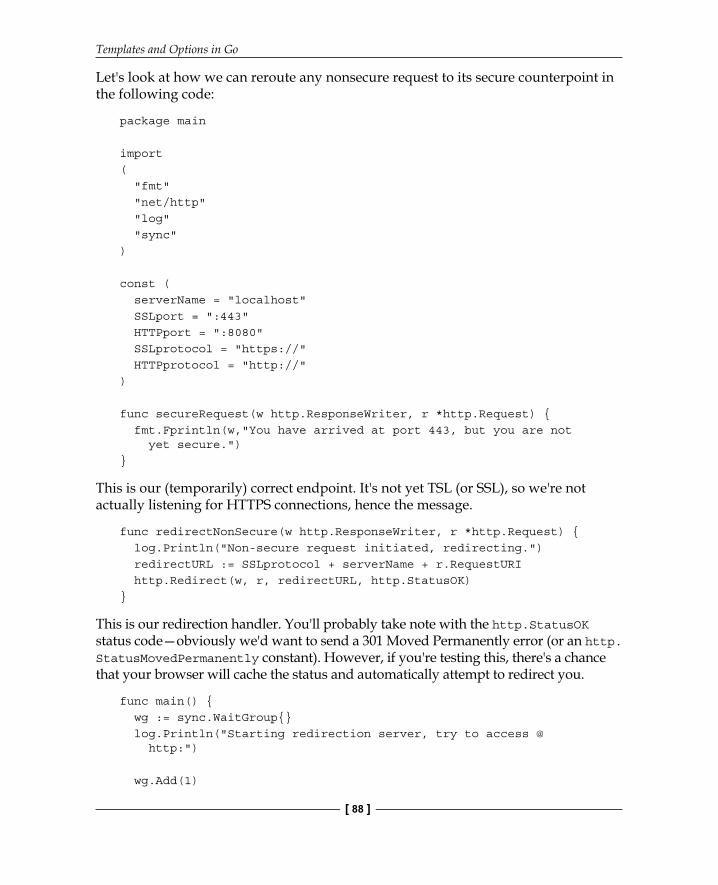
Let's look at how we can reroute any nonsecure request to its secure counterpoint in the following code:
package main
import( "fmt" "net/http" "log" "sync")
const ( serverName = "localhost" SSLport = ":443" HTTPport = ":8080" SSLprotocol = "https://" HTTPprotocol = "http://")
func secureRequest(w http.ResponseWriter, r *http.Request) { fmt.Fprintln(w,"You have arrived at port 443, but you are not yet secure.")}
This is our (temporarily) correct endpoint. It's not yet TSL (or SSL), so we're not actually listening for HTTPS connections, hence the message.
func redirectNonSecure(w http.ResponseWriter, r *http.Request) { log.Println("Non-secure request initiated, redirecting.") redirectURL := SSLprotocol + serverName + r.RequestURI http.Redirect(w, r, redirectURL, http.StatusOK)}
This is our redirection handler. You'll probably take note with the http.StatusOK status code—obviously we'd want to send a 301 Moved Permanently error (or an http.StatusMovedPermanently constant). However, if you're testing this, there's a chance that your browser will cache the status and automatically attempt to redirect you.
func main() { wg := sync.WaitGroup{} log.Println("Starting redirection server, try to access @ http:")
wg.Add(1)
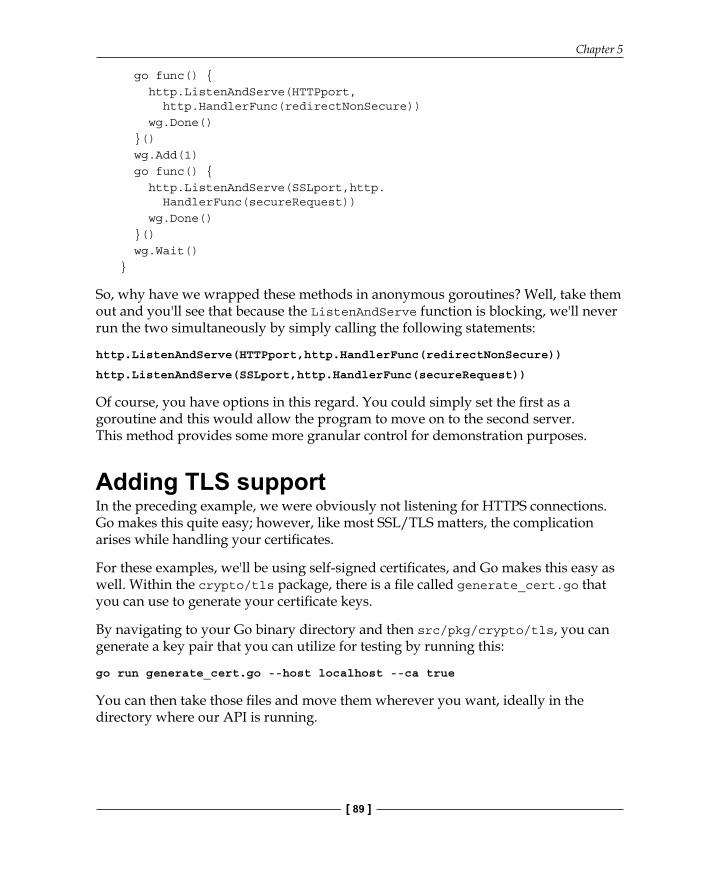
Chapter 5
[ 89 ]
go func() { http.ListenAndServe(HTTPport, http.HandlerFunc(redirectNonSecure)) wg.Done() }() wg.Add(1) go func() { http.ListenAndServe(SSLport,http. HandlerFunc(secureRequest)) wg.Done() }() wg.Wait()}
So, why have we wrapped these methods in anonymous goroutines? Well, take them out and you'll see that because the ListenAndServe function is blocking, we'll never run the two simultaneously by simply calling the following statements:
http.ListenAndServe(HTTPport,http.HandlerFunc(redirectNonSecure))
http.ListenAndServe(SSLport,http.HandlerFunc(secureRequest))
Of course, you have options in this regard. You could simply set the fi rst as a goroutine and this would allow the program to move on to the second server. This method provides some more granular control for demonstration purposes.
Adding TLS supportIn the preceding example, we were obviously not listening for HTTPS connections. Go makes this quite easy; however, like most SSL/TLS matters, the complication arises while handling your certifi cates.
For these examples, we'll be using self-signed certifi cates, and Go makes this easy as well. Within the crypto/tls package, there is a fi le called generate_cert.go that you can use to generate your certifi cate keys.
By navigating to your Go binary directory and then src/pkg/crypto/tls, you can generate a key pair that you can utilize for testing by running this:
go run generate_cert.go --host localhost --ca true
You can then take those fi les and move them wherever you want, ideally in the directory where our API is running.

Templates and Options in Go
[ 90 ]
Next, let's remove our http.ListenAndServe function and change it to http.ListenAndServeTLS. This requires a couple of additional parameters that encompass the location of the keys:
http.ListenAndServeTLS(SSLport, "cert.pem", "key.pem", http.HandlerFunc(secureRequest))
For the sake of being more explicit, let's also modify our secureRequest handler slightly:
fmt.Fprintln(w,"You have arrived at port 443, and now you are marginally more secure.")
If we run this now and go to our browser, we'll hopefully see a warning, assuming that our browser would keep us safe:
Assuming we trust ourselves, which is not always advisable, click through and we'll see our message from the secure handler:
Chapter 5
[ 91 ]
And of course, if we again visit http://localhost:8080, we should now be automatically redirected with a 301 status code.Creating self-signed certifi cates is otherwise fairly easy when you have access to an OS that supports OpenSSL.You can get a signed (but not verifi ed) certifi cate for free through a number of services for a one-year period if you'd like to experiment with real certifi cates and not self-signed ones. One of the more popular ones is StartSSL (https://www.startssl.com/), which makes getting free and paid certifi cates a painless process.
Letting users register and authenticateYou may recall that as part of our API application we have a self-contained interface that allows us to serve a HTML interface for the API itself. Any discussion of security goes out the door if we don't lock down our users.
Of course, the absolute simplest way of implementing user authentication security is through the storage and use of a password with a hashing mechanism. It's tragically common for servers to store passwords in clear text, so we won't do that; but, we want to implement at least one additional security parameter with our passwords.
We want to store not just the user's password, but at least a salt to go along with it. This is not a foolproof security measure, although it severely limits the threat of dictionary and rainbow attacks.
To do this, we'll create a new package called password as part of our suite, which allows us to generate random salts and then encrypt that value along with the password.
We can use GenerateHash() to both create and validate passwords.

Templates and Options in Go
[ 92 ]
A quick hit – generating a saltGetting a password is simple, and creating a secure hash is also fairly easy. What we're missing to make our authentication process more secure is a salt. Let's look at how we can do this. First, let's add both a password and a salt fi eld to our database:
ALTER TABLE `users` ADD COLUMN `user_password` VARCHAR(1024) NOT NULL AFTER `user_nickname`, ADD COLUMN `user_salt` VARCHAR(128) NOT NULL AFTER `user_password`, ADD INDEX `user_password_user_salt` (`user_password`, `user_salt`);
With this in place, let's take a look at our password package that will contain the salt and hash generation functions:
package password
import( "encoding/base64" "math/rand" "crypto/sha256" "time")
const randomLength = 16
func GenerateSalt(length int) string { var salt []byte var asciiPad int64
if length == 0 { length = randomLength }
asciiPad = 32
for i:= 0; i < length; i++ { salt = append(salt, byte(rand.Int63n(94) + asciiPad) ) }
return string(salt)}

Chapter 5
[ 93 ]
Our GenerateSalt() function produces a random string of characters within a certain set of characters. In this case, we want to start at 32 in the ASCII table and go up to 126.
func GenerateHash(salt string, password string) string { var hash string fullString := salt + password sha := sha256.New() sha.Write([]byte(fullString)) hash = base64.URLEncoding.EncodeToString(sha.Sum(nil))
return hash}
Here, we generate a hash based on a password and a salt. This is useful not just for the creation of a password but also for validating it. The following ReturnPassword() function primarily operates as a wrapper for other functions, allowing you to create a password and return its hashed value:
func ReturnPassword(password string) (string, string) { rand.Seed(time.Now().UTC().UnixNano())
salt := GenerateSalt(0) hash := GenerateHash(salt,password)
return salt, hash}
On our client side, you may recall that we sent all of our data via AJAX in jQuery. We had a single method on a single Bootstrap tab that allowed us to create users. First, let's remind ourselves of the tab setup.
And now, the userCreate() function, wherein we've added a few things. First, there's a password fi eld that allows us to send that password along when we create a user. We may have been less comfortable about doing this before without a secure connection:
function userCreate() { action = "https://localhost/api/users"; postData = {}; postData.email = $('#createEmail').val(); postData.user = $('#createUsername').val(); postData.first = $('#createFirst').val(); postData.last= $('#createLast').val(); postData.password = $('#createPassword').val();
Templates and Options in Go
[ 94 ]
Next, we can modify our .ajax response to react to different HTTP status codes. Remember that we are already setting up a confl ict if a username or an e-mail ID already exists. So, let's handle this as well:
var formData = new FormData($('form')[0]);$.ajax({
url: action, //Server script to process data dataType: 'json', type: 'POST', statusCode: { 409: function() { $('#api-messages').html('Email address or nickname already exists!'); $('#api-messages').removeClass ('alert-success').addClass('alert-warning'); $('#api-messages').show(); }, 200: function() { $('#api-messages').html('User created successfully!'); $('#api-messages').removeClass ('alert-warning').addClass('alert-success'); $('#api-messages').show(); } },
Now, if we get a response of 200, we know our API-side has created the user. If we get 409, we report to the user that the e-mail address or username is taken in the alert area.
Examining OAuth in GoAs we briefl y touched on in Chapter 4, Designing APIs in Go, OAuth is one of the more common ways of allowing an application to interact with a third-party app using another application's user authentication.
It's extraordinarily popular in social media services; Facebook, Twitter, and GitHub all use OAuth 2.0 to allow applications to interface with their APIs on behalf of users.

Chapter 5
[ 95 ]
It's noteworthy here because while there are many API calls that we are comfortable leaving unrestricted, primarily the GET requests, there are others that are specifi c to users, and we need to make sure that our users authorize these requests.
Let's quickly review the methods that we can implement to enable something akin to OAuth with our server:
Endpoint/api/oauth/authorize/api/oauth/token/api/oauth/revoke
Given that we have a small, largely demonstration-based service, our risk in keeping access tokens active for a long time is minimal. Long-lived access tokens obviously open up more opportunities for unwanted access by keeping the said access open to clients, who may not be observing the best security protocols.
In normal conditions, we'd want to set an expiry on a token, which we can do pretty simply by using a memcache system or a keystore with expiration times. This allows values to die naturally, without having to explicitly destroy them.
The fi rst thing we'll need to do is add a table for client credentials, namely consumer_key and consumer_token:
CREATE TABLE `api_credentials` ( `user_id` INT(10) UNSIGNED NOT NULL, `consumer_key` VARCHAR(128) NOT NULL, `consumer_secret` VARCHAR(128) NOT NULL, `callback_url` VARCHAR(256) NOT NULL CONSTRAINT `FK__users` FOREIGN KEY (`user_id`) REFERENCES `users` (`user_id`) ON UPDATE NO ACTION ON DELETE NO ACTION)
We'll check the details against our newly created database to verify credentials, and if they are correct, we'll return an access token.
An access token can be of any format; given our low security restrictions for a demonstration, we'll return an MD5 hash of a randomly generated string. In the real world, this probably wouldn't be suffi cient even for a short-lived token, but it will serve its purpose here.
Templates and Options in Go
[ 96 ]
Remember, we implemented a random string generator as part of our password package. You can create a quick key and secret value in api.go by calling the following statements:
fmt.Println(Password.GenerateSalt(22)) fmt.Println(Password.GenerateSalt(41))
If you feed this key and secret value into the previously created table and associate it with an existing user, you'll have an active API client. Note that this may generate invalid URL characters, so we'll restrict our access to the /oauth/token endpoint to POST.
Our pseudo OAuth mechanism will go into its own package, and it will strictly generate tokens that we'll keep in a slice of tokens within our API package.
Within our core API package, we'll add two new functions to validate credentials and the pseudoauth package:
import( Pseudoauth "github.com/nkozyra/gowebservice/pseudoauth" )
The functions that we'll add are CheckCredentials() and CheckToken(). The fi rst will accept a key, a nonce, a timestamp, and an encryption method, which we'll then hash along with the consumer_secret value to see that the signature matches. In essence, all of these request parameters are combined with the mutually known but unbroadcasted secret to create a signature that is hashed in a mutually known way. If those signatures correspond, the application can issue either a request token or an access token (the latter is often issued in exchange for a request token and we'll discuss more on this shortly).
In our case, we'll accept a consumer_key value, a nonce, a timestamp, and a signature and for the time being assume that HMAC-SHA1 is being used as the signature method. SHA1 is losing some favor do to the increased feasibility of collisions, but for the purpose of a development application, it will do and can be simply replaced later on. Go also provides SHA224, SHA256, SHA384, and SHA512 out of the box.
The purpose of the nonce and timestamp is exclusively added security. The nonce works almost assuredly as a unique identifying hash for the request, and the timestamp allows us to expire data periodically to preserve memory and/or storage. We're not going to do this here, although we will check to make sure that a nonce has not been used previously.

Chapter 5
[ 97 ]
To begin authenticating the client, we look up the shared secret in our database:
func CheckCredentials(w http.ResponseWriter, r *http.Request) { var Credentials string Response := CreateResponse{} consumerKey := r.FormValue("consumer_key") fmt.Println(consumerKey) timestamp := r.FormValue("timestamp") signature := r.FormValue("signature") nonce := r.FormValue("nonce") err := Database.QueryRow("SELECT consumer_secret from api_credentials where consumer_key=?", consumerKey).Scan(&Credentials) if err != nil { error, httpCode, msg := ErrorMessages(404) log.Println(error) log.Println(w, msg, httpCode) Response.Error = msg Response.ErrorCode = httpCode http.Error(w, msg, httpCode) return
}
Here, we're taking the consumer_key value and looking up our shared consumer_secret token, which we'll pass along to our ValidateSignature function as follows:
token,err := Pseudoauth.ValidateSignature (consumerKey,Credentials,timestamp,nonce,signature,0) if err != nil { error, httpCode, msg := ErrorMessages(401) log.Println(error) log.Println(w, msg, httpCode) Response.Error = msg Response.ErrorCode = httpCode http.Error(w, msg, httpCode) return }
If we fi nd our request to be invalid (either due to incorrect credentials or an existing nonce), we'll return an unauthorized error and a 401 status code:
AccessRequest := OauthAccessResponse{} AccessRequest.AccessToken = token.AccessToken output := SetFormat(AccessRequest) fmt.Fprintln(w,string(output))}

Templates and Options in Go
[ 98 ]
Otherwise, we'll return the access code in a JSON body response. Here's the code for the pseudoauth package itself:
package pseudoauthimport( "crypto/hmac" "crypto/sha1" "errors" "fmt" "math/rand" "strings" "time")
Nothing too surprising here! We'll need some crypto packages and math/rand to allow us to seed:
type Token struct { Valid bool Created int64 Expires int64 ForUser int AccessToken string}
There's a bit more here than what we'll use at the moment, but you can see that we can create tokens with specifi c access rights:
var nonces map[string] Tokenfunc init() { nonces = make(map[string] Token)}
func ValidateSignature(consumer_key string, consumer_secret string, timestamp string, nonce string, signature string, for_user int) (Token, error) { var hashKey []byte t := Token{} t.Created = time.Now().UTC().Unix() t.Expires = t.Created + 600 t.ForUser = for_user
qualifiedMessage := []string{consumer_key, consumer_secret, timestamp, nonce}
Chapter 5
[ 99 ]
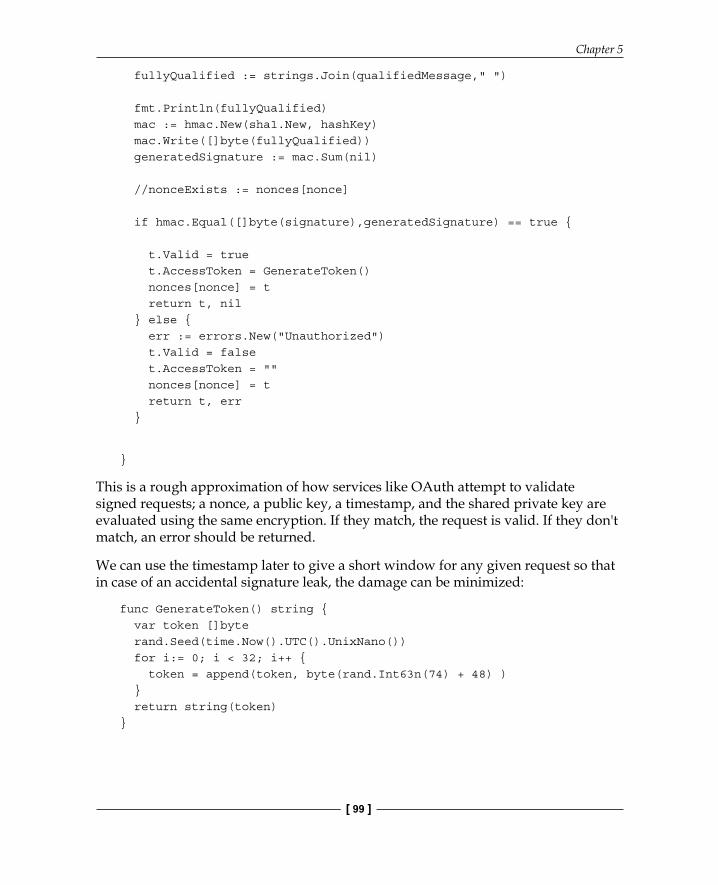
fullyQualified := strings.Join(qualifiedMessage," ")
fmt.Println(fullyQualified) mac := hmac.New(sha1.New, hashKey) mac.Write([]byte(fullyQualified)) generatedSignature := mac.Sum(nil)
//nonceExists := nonces[nonce]
if hmac.Equal([]byte(signature),generatedSignature) == true {
t.Valid = true t.AccessToken = GenerateToken() nonces[nonce] = t return t, nil } else { err := errors.New("Unauthorized") t.Valid = false t.AccessToken = "" nonces[nonce] = t return t, err }
}
This is a rough approximation of how services like OAuth attempt to validate signed requests; a nonce, a public key, a timestamp, and the shared private key are evaluated using the same encryption. If they match, the request is valid. If they don't match, an error should be returned.
We can use the timestamp later to give a short window for any given request so that in case of an accidental signature leak, the damage can be minimized:
func GenerateToken() string { var token []byte rand.Seed(time.Now().UTC().UnixNano()) for i:= 0; i < 32; i++ { token = append(token, byte(rand.Int63n(74) + 48) ) } return string(token)}

Templates and Options in Go
[ 100 ]
Making requests on behalf of usersWhen it comes to making requests on behalf of users, there is a critical middle step that is involved in the OAuth2 process, and that's authentication on the part of the user. This cannot happen within a consumer application, obviously, because it would open a security risk wherein, maliciously or not, user credentials could be compromised.
Thus, this process requires a few redirects.
First, the initial request that will redirect users to a login location is required. If they're already logged in, they'll have the ability to grant access to the application. Next, our service will take a callback URL and send the user back along with their request token. This will enable a third-party application to make requests on behalf of the user, unless and until the user restricts access to the third-party application.
To store valid tokens, which are essentially permissive connections between a user and a third-party developer, we'll create a database for this:
CREATE TABLE `api_tokens` ( `api_token_id` INT(10) UNSIGNED NOT NULL AUTO_INCREMENT, `application_user_id` INT(10) UNSIGNED NOT NULL, `user_id` INT(10) UNSIGNED NOT NULL, `api_token_key` VARCHAR(50) NOT NULL, PRIMARY KEY (`api_token_id`))
We'll need a few pieces to make this work, fi rst, a login form for users who are not presently logged in, by relying on a sessions table. Let's create a very simple implementation in MySQL now:
CREATE TABLE `sessions` ( `session_id` VARCHAR(128) NOT NULL, `user_id` INT(10) NOT NULL, UNIQUE INDEX `session_id` (`session_id`))
Next, we'll need an authorization form for users who are logged in that allows us to create a valid API access token for the user and service and redirects the user to the callback.
The template can be a very simple HTML template that can be placed at /authorize. So, we need to add that route to api.go:
Routes.HandleFunc("/authorize", ApplicationAuthorize).Methods("POST") Routes.HandleFunc("/authorize", ApplicationAuthenticate).Methods("GET")
Chapter 5
[ 101 ]
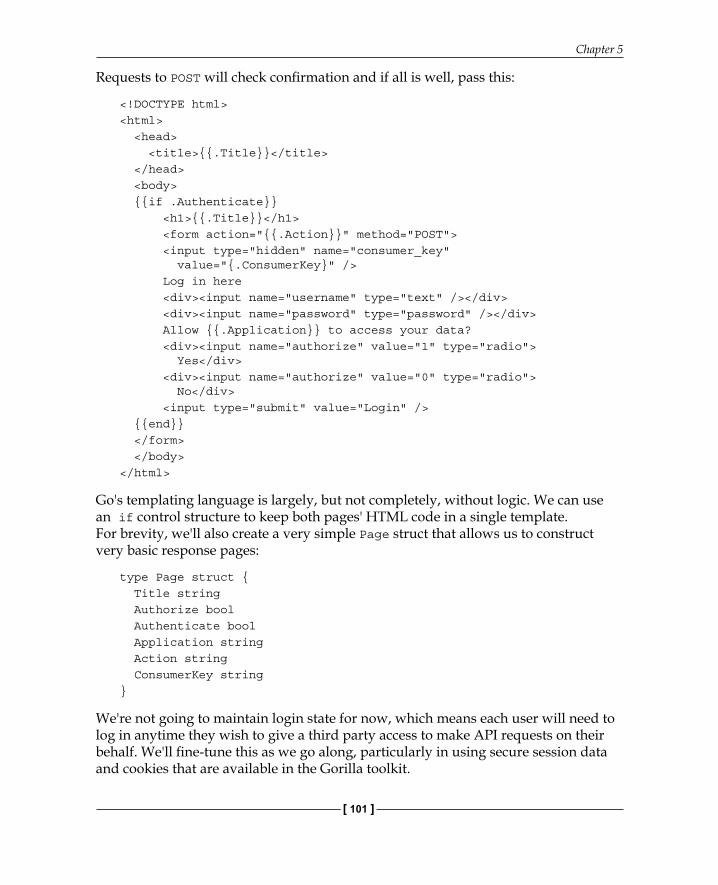
Requests to POST will check confi rmation and if all is well, pass this:
<!DOCTYPE html><html> <head> <title>{{.Title}}</title> </head> <body> {{if .Authenticate}} <h1>{{.Title}}</h1> <form action="{{.Action}}" method="POST"> <input type="hidden" name="consumer_key" value="{.ConsumerKey}" /> Log in here <div><input name="username" type="text" /></div> <div><input name="password" type="password" /></div> Allow {{.Application}} to access your data? <div><input name="authorize" value="1" type="radio"> Yes</div> <div><input name="authorize" value="0" type="radio"> No</div> <input type="submit" value="Login" /> {{end}} </form> </body></html>
Go's templating language is largely, but not completely, without logic. We can use an if control structure to keep both pages' HTML code in a single template. For brevity, we'll also create a very simple Page struct that allows us to construct very basic response pages:
type Page struct { Title string Authorize bool Authenticate bool Application string Action string ConsumerKey string}
We're not going to maintain login state for now, which means each user will need to log in anytime they wish to give a third party access to make API requests on their behalf. We'll fi ne-tune this as we go along, particularly in using secure session data and cookies that are available in the Gorilla toolkit.
Templates and Options in Go
[ 102 ]
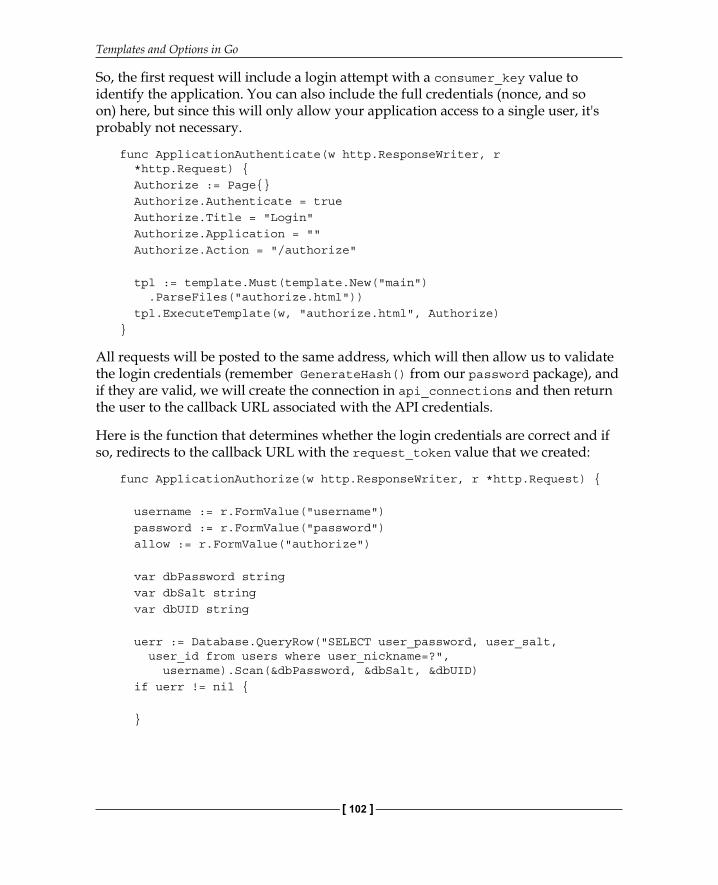
So, the fi rst request will include a login attempt with a consumer_key value to identify the application. You can also include the full credentials (nonce, and so on) here, but since this will only allow your application access to a single user, it's probably not necessary.
func ApplicationAuthenticate(w http.ResponseWriter, r *http.Request) { Authorize := Page{} Authorize.Authenticate = true Authorize.Title = "Login" Authorize.Application = "" Authorize.Action = "/authorize"
tpl := template.Must(template.New("main") .ParseFiles("authorize.html")) tpl.ExecuteTemplate(w, "authorize.html", Authorize)}
All requests will be posted to the same address, which will then allow us to validate the login credentials (remember GenerateHash() from our password package), and if they are valid, we will create the connection in api_connections and then return the user to the callback URL associated with the API credentials.
Here is the function that determines whether the login credentials are correct and if so, redirects to the callback URL with the request_token value that we created:
func ApplicationAuthorize(w http.ResponseWriter, r *http.Request) {
username := r.FormValue("username") password := r.FormValue("password") allow := r.FormValue("authorize")
var dbPassword string var dbSalt string var dbUID string
uerr := Database.QueryRow("SELECT user_password, user_salt, user_id from users where user_nickname=?", username).Scan(&dbPassword, &dbSalt, &dbUID) if uerr != nil {
}
Chapter 5
[ 103 ]
With the user_password value, the user_salt value, and a submitted password value, we can verify the validity of the password by using our GenerateHash() function and doing a direct comparison, as they are Base64 encoded.
consumerKey := r.FormValue("consumer_key") fmt.Println(consumerKey)
var CallbackURL string var appUID string err := Database.QueryRow("SELECT user_id,callback_url from api_credentials where consumer_key=?", consumerKey).Scan(&appUID, &CallbackURL) if err != nil {
fmt.Println(err.Error()) return }
expectedPassword := Password.GenerateHash(dbSalt, password) if dbPassword == expectedPassword && allow == "1" {
requestToken := Pseudoauth.GenerateToken()
authorizeSQL := "INSERT INTO api_tokens set application_user_id=" + appUID + ", user_id=" + dbUID + ", api_token_key='" + requestToken + "' ON DUPLICATE KEY UPDATE user_id=user_id"
q, connectErr := Database.Exec(authorizeSQL) if connectErr != nil {
} else { fmt.Println(q) } redirectURL := CallbackURL + "?request_token=" + requestToken fmt.Println(redirectURL) http.Redirect(w, r, redirectURL, http.StatusAccepted)

Templates and Options in Go
[ 104 ]
After checking expectedPassword against the password in the database, we can tell whether the user authenticated correctly. If they did, we create the token and redirect the user back to the callback URL. It is then the responsibility of the other application to store the token for future use.
} else {
fmt.Println(dbPassword, expectedPassword) http.Redirect(w, r, "/authorize", http.StatusUnauthorized) }
}
Now that we have the token on the third-party side, we can make API requests with that token and our client_token value to make requests on behalf of individual users, such as creating connections (friends and followers), sending automated messages, or setting status updates.
SummaryWe began this chapter by looking at ways to bring in more REST-style options and features, better security, and template-based presentation. Towards this goal, we examined a basic abstraction of the OAuth security model that allows us to enable external clients to work within a user's domain.
With our application now accessible via OAuth-style authentication and secured by HTTPS, we can now expand the third-party integration of our social networking application, allowing other developers to utilize and augment our service.
In the next chapter, we'll look more at the client-side and consumer-side of our application, expanding our OAuth options and empowering more actions via the API that will include creating and deleting connections between users as well as creating status updates.

Where to buy this book You can buy Mastering Go Web Services from the Packt Publishing website. Alternatively, you can buy the book from Amazon, BN.com, Computer Manuals and most internet book retailers.
Click here for ordering and shipping details.
www.PacktPub.com
Stay Connected:
Get more information Mastering Go Web Services