mastering microsoft outlook - skillpath · ignore will move the current message and all subsequent...
TRANSCRIPT
Mastering Microsoft® Outlook®
Produced bySkillPath® Seminars
The Smart Choice®
6900 Squibb Road • P.O. Box 2768 • Mission, KS 66201-2768 1-800-873-7545
www.skillpath.comMastering Microsoft® Outlook®
Copyright © SkillPath®All rights reserved.
All trademarks are the property of their respective owners. SkillPath claims no ownership interest in the trademarks.
Presented by:
TABLE OF CONTENTS
Manage E-mail with Flags, Tags and Clean Up Commands ...............................................................................................3
How to Organize E-mail Folders .............................................................................................................................................................8
Modify Calendar Views ..............................................................................................................................................................................10
Create Appointments ..................................................................................................................................................................................12
Schedule Meetings .........................................................................................................................................................................................14
How to Print from Outlook® .....................................................................................................................................................................16
Bonus Material .................................................................................................................................................................................................18

3
Manage E-mail with Flags, Tags and Clean Up Commands
SkillSteps—To flag a message in Outlook®Home > Follow Up
Managing e-mail refers to how you handle the avalanche of messages you receive each day. Do you start from the top of the list and work down? Do you hunt for the least important messages and delete them before you begin rummaging through the remainder?
Is that a process?
There are many ways to “process” your mail. The goal of your e-mail processing strategy is to be effective, to be organized and to be productive.
Outlook® provides a number of features to help you be more productive … special shortcuts for “processing” your mail.
Follow-up Flags
Follow-Up Flags are tags you can attach to messages that create a to-do item from a message. Why would you attach a flag to a message? Flags make it easier to prioritize e-mail and identify those messages that are most urgent and important (with a bright red flag).
The Outlook® Follow-up Flags come in different levels of “urgency.”
Today
Tomorrow
This Week
Next Week
No Date
Custom …
You can attach tags to messages manually or via rules that associate flags with messages based on a condition.
4
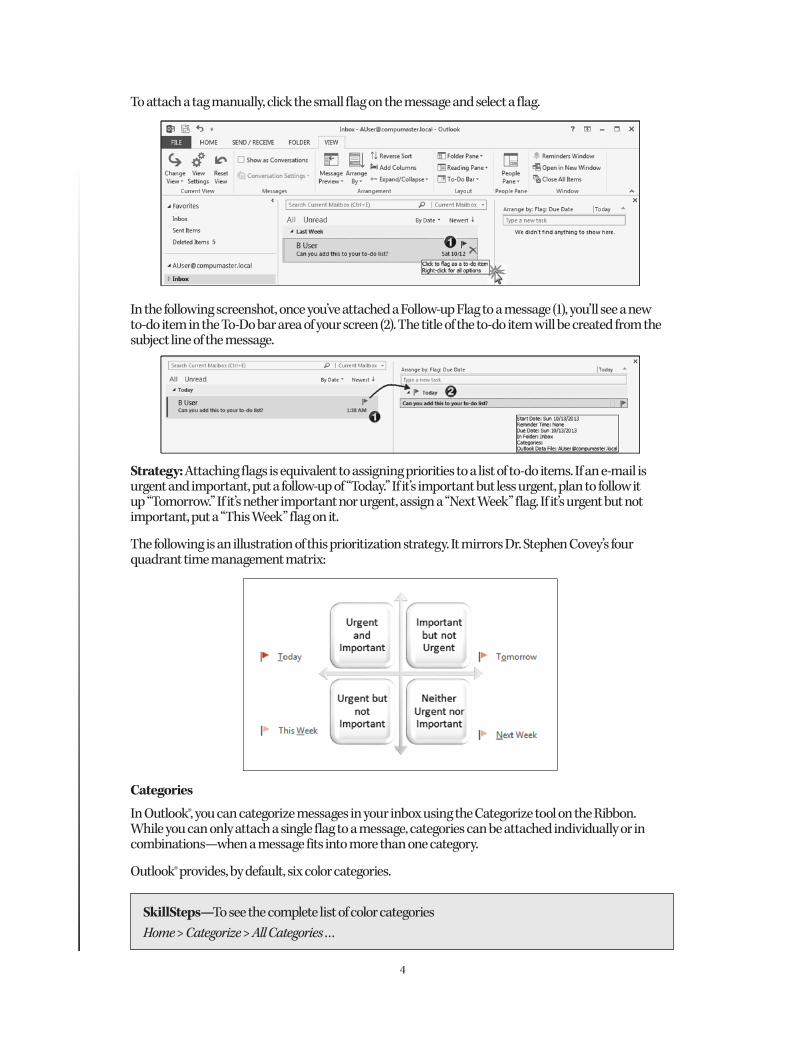
To attach a tag manually, click the small flag on the message and select a flag.
In the following screenshot, once you’ve attached a Follow-up Flag to a message (1), you’ll see a new to-do item in the To-Do bar area of your screen (2). The title of the to-do item will be created from the subject line of the message.
Strategy: Attaching flags is equivalent to assigning priorities to a list of to-do items. If an e-mail is urgent and important, put a follow-up of “Today.” If it’s important but less urgent, plan to follow it up “Tomorrow.” If it’s nether important nor urgent, assign a “Next Week” flag. If it’s urgent but not important, put a “This Week” flag on it.
The following is an illustration of this prioritization strategy. It mirrors Dr. Stephen Covey’s four quadrant time management matrix:
Categories
In Outlook®, you can categorize messages in your inbox using the Categorize tool on the Ribbon. While you can only attach a single flag to a message, categories can be attached individually or in combinations—when a message fits into more than one category.
Outlook® provides, by default, six color categories.
SkillSteps—To see the complete list of color categoriesHome > Categorize > All Categories …

5
You can rename the default categories and you can create additional ones.
SkillSteps—To create or modify the default list of color categoriesHome > Categorize > All Categories … > Rename (or New … )
There are many ways to assign a category. Categories can be assigned using shortcut keys which have been configured in the Color
Categories dialog box Categories can be assigned by Rules you define and which will automatically assign a
category to a mailbox item Categories can be assigned using Quick Steps which are custom commands you define and
use to manage the items in your mailbox A single category can be assigned with a Quick Click. When you configure a Quick Click,
you determine the default category assigned when you click an item.

6
Categories are available across all the Outlook® workspaces
Categories can be assigned to messages, appointments, meetings, people and tasks
Outlook® items (messages, appointments, meetings, people, and tasks) can be grouped by Categories
Outlook® items (messages, appointments, meetings, people and tasks) can be filtered by Categories
Clean Up Commands
A third method of managing your inbox utilizes the array of commands that help you de-clutter your inbox.
Delete moves the current message to the deleted items folder. Use this command when you want to remove a message from your inbox.
Ignore will move the current message and all subsequent messages that are part of the same conversation to the deleted items folder. Messages that share the same subject line are considered part of a thread, a conversation.
SkillTip: It’s important to understand what is meant by a conversation. A conversation begins with a single message and includes all the responses (and responses to responses) that it spawns with the same subject.
The following screenshot displays a conversation whose subject is, “Let’s Start a Conversation.”
SkillSteps—To display messages in conversation styleMail > View > Show as Conversations
7
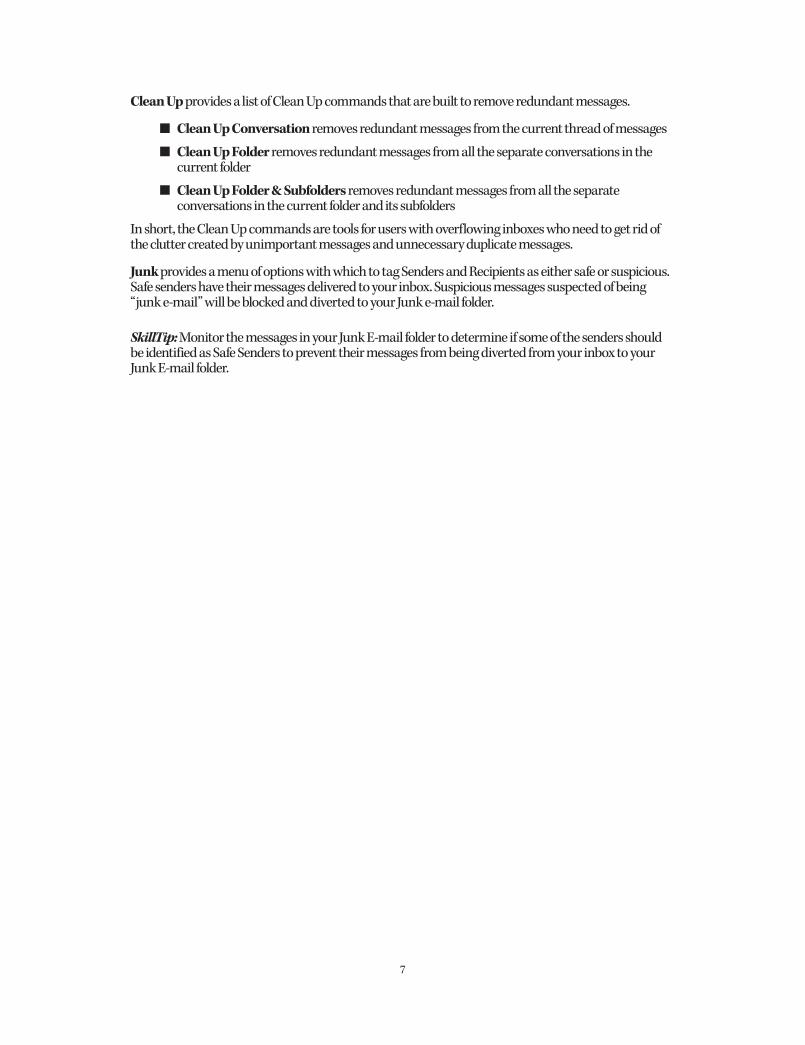
Clean Up provides a list of Clean Up commands that are built to remove redundant messages.
Clean Up Conversation removes redundant messages from the current thread of messages
Clean Up Folder removes redundant messages from all the separate conversations in the current folder
Clean Up Folder & Subfolders removes redundant messages from all the separate conversations in the current folder and its subfolders
In short, the Clean Up commands are tools for users with overflowing inboxes who need to get rid of the clutter created by unimportant messages and unnecessary duplicate messages.
Junk provides a menu of options with which to tag Senders and Recipients as either safe or suspicious. Safe senders have their messages delivered to your inbox. Suspicious messages suspected of being “junk e-mail” will be blocked and diverted to your Junk e-mail folder.
SkillTip: Monitor the messages in your Junk E-mail folder to determine if some of the senders should be identified as Safe Senders to prevent their messages from being diverted from your inbox to your Junk E-mail folder.

8
How to Organize E-mail Folders
SkillSteps—To create a new e-mail folder in Outlook®Mail > Folder > New Folder
When you are working in the E-mail workspace the navigation panel on the left side of the screen displays a collection of e-mail folders (containers).
By default, e-mail arrives and is placed by Outlook® in your Inbox folder. Outlook® uses other folders to group messages.
Messages that have been written, but not sent, remain in your Drafts folder
Messages that are sent … but awaiting transmission … are stored in your Outbox
Messages that are sent, are copied automatically into your Sent Items folder
Messages that are received, but deemed to be “junk,” are stored in the Junk E-mail folder
The RSS Feeds folder displays messages from Really Simple Syndication publishers to which you’ve subscribed
Search Folders dynamically displays messages that match search criteria
While these are the default folders, you can create your own.
You can use the New Folder command on the Folder tab of the Ribbon to create new folders.

9
Folder Strategies
There are a number of possible folder strategies. It’s important to have one, otherwise your e-mail folders will multiply and become overgrown… no better than those old “bulging file cabinets,” relics of the 20th century.
Strategy #1: Have your e-mail folders mirror your document library structure to make message storage consistent with document storage.
Strategy #2: Have only one e-mail folder, name it “Processed Mail,” and use Search folders to group messages based on your categories rather than needing to organize messages by “foldering” them yourself.
In this way, all your mail is processed and then stored in a single folder named “Processed Mail.” Your messages are automatically grouped by the built-in search criteria you define when you create a Search folder.
Here’s an example:

10
Modify Calendar Views
While storing appointments and meetings on your calendar, you can change the way those commitments are displayed.
Meetings and appointments can be displayed as a simple list or they can be displayed on a calendar.
SkillSteps—To change a calendar view in Outlook® Calendar > View > Change View
There are a number of built-in Calendar views in Outlook®, you can see their names on the View tab of the Ribbon.
When you are in a list view of the Calendar, you can arrange the list in a number of ways:
By Categories
By Start Date
By Recurrence
By Location
When you are in a calendar view or a Calendar, you can display events in five different arrangements:
Day
Work Week
Week
Month
Schedule

11
The Weather Bar
In the Calendar workspace, you can view a Weather Bar below the Ribbon. You can customize the city whose weather is displayed and configure multiple locations.
SkillSteps—To modify Weather Bar optionsFile > Options > Calendar > Weather
Customizing List and Calendar Views
To customize a list view or calendar view, click View Settings. Depending on the view you had been in—list or calendar, you’ll see different options.

12
Create Appointments
To Microsoft® Outlook®, an appointment is not the same thing as a meeting.
An appointment is an event which does not track attendees. It’s just a time commitment.
Examples of appointments:
Each morning from 8 a.m. to 9 a.m. you are planning to process e-mail
Each day from 11 a.m. to noon you are planning to return phone calls
A dentist appointment is scheduled for Friday at 4 p.m.
A meeting is a type of appointment for which you send out invitations and track responses.
Examples of meetings:
In two weeks you’re hosting a conference call with three co-workers
Next Friday you’re hosting a kickoff meeting for the new project with your team
SkillSteps—To create a new appointmentCalendar > Home > New Appointment
When you select New Appointment you’ll be able to define:
Subject
Location
Start Time
End Time
The default start date and time will display the currently selected date (and time) in your calendar. (You can change it by typing or choosing a different date and time.)
SkillTip: Did you know Outlook® enables you to type descriptive dates like “next Friday” or “two weeks from today,” instead of typing an actual date?

13
SkillTip: If you are scheduling a meeting or appointment in a time zone different from your current computer time zone, make sure you display and use the time zone fields by clicking Time Zone in the Appointment tab of the Ribbon.
Other Appointment Settings
Using the Appointment tab, you can set a reminder alert for your appointment, and determine how the appointment will be shown to others when they use the Scheduling Assistant to view your availability.

14
Schedule Meetings
SkillSteps—To schedule a new meeting in Outlook®Calendar > Home > New Meeting
The Meeting Invitation Dialog box will provide a “To … ” field that enables you to send meeting invitations to the other invitees.
The Scheduling Assistant button on the Ribbon enables you to find out the availability of others invited to your meeting.
SkillTip: The Scheduling Assistant is only as accurate as the calendars to which you are connecting. If others fail to update their calendars with appointments and meetings, the Scheduling Assistant will be unaware of those co-workers’ true schedules. Not good!
15
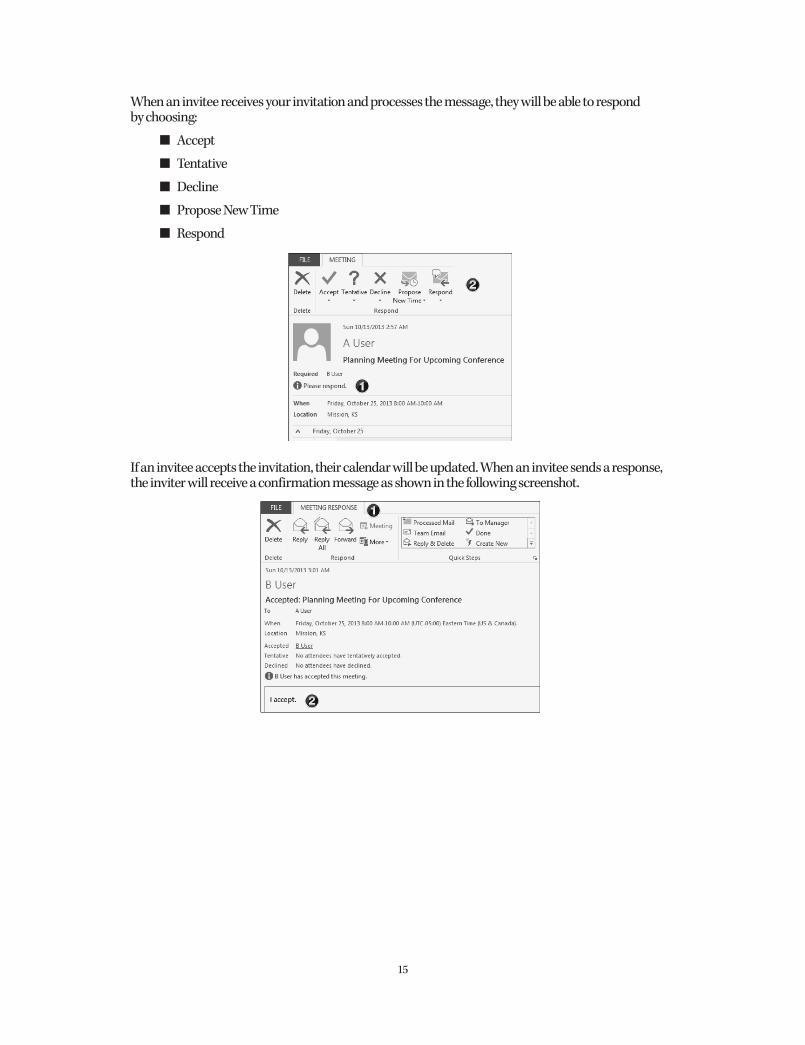
When an invitee receives your invitation and processes the message, they will be able to respond by choosing:
Accept
Tentative
Decline
Propose New Time
Respond
If an invitee accepts the invitation, their calendar will be updated. When an invitee sends a response, the inviter will receive a confirmation message as shown in the following screenshot.
16
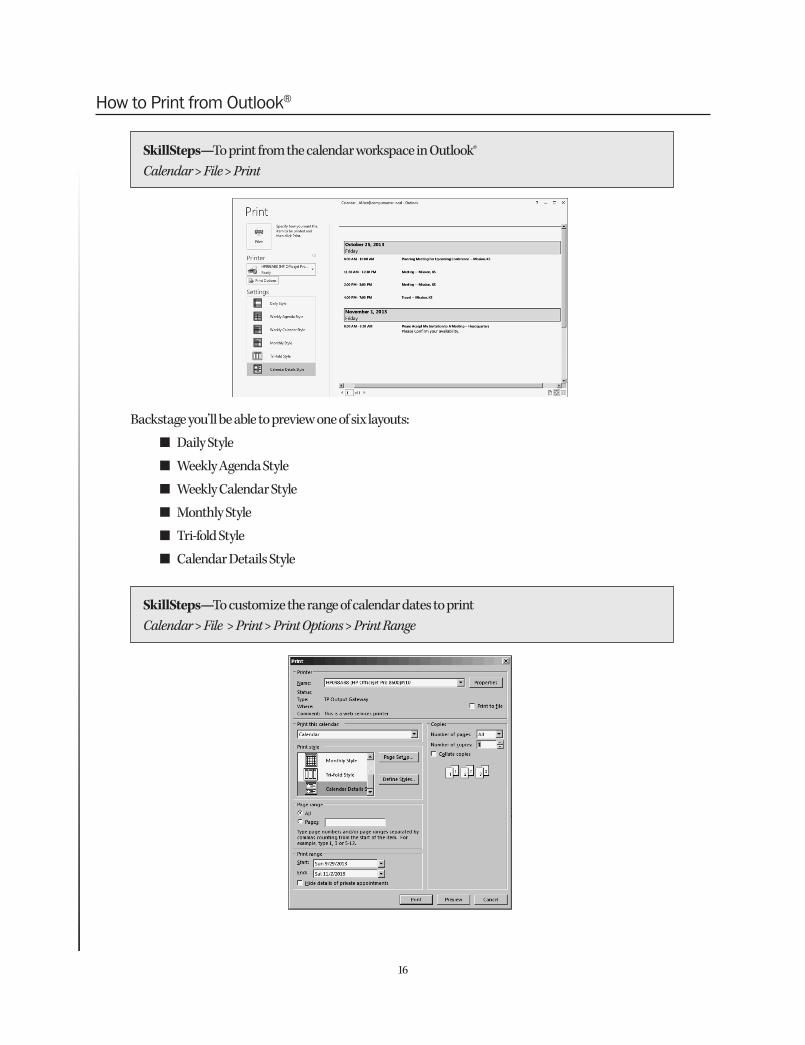
How to Print from Outlook®
SkillSteps—To print from the calendar workspace in Outlook®Calendar > File > Print
Backstage you’ll be able to preview one of six layouts:
Daily Style
Weekly Agenda Style
Weekly Calendar Style
Monthly Style
Tri-fold Style
Calendar Details Style
SkillSteps—To customize the range of calendar dates to print Calendar > File > Print > Print Options > Print Range

17
In order to magnify the preview screen text, you can use the magnify pointer which appears on the screen in Print Preview when you hover your mouse over the preview region of the screen.

18
BONUS MATERIAL
Keyboard Shortcuts
For lovers of shortcuts, here is an Outlook® keyboard shortcuts checklist. How many do you know?
h F1 Help
h F3 Find a message or other item
h F4 Find and Replace
h F7 Check Spelling
h F9 Check for new messages
h F11 Find a contact
h Esc Cancel/Clear search results
h Ctrl + 1 Switch to Mail
h Ctrl + 2 Switch to Calendar
h Ctrl + 3 Switch to People
h Ctrl + 4 Switch to Tasks
h Ctrl + 5 Switch to Notes
h Ctrl + 6 Switch to Folder List in Folder Pane
h Ctrl + 7 Switch to Shortcuts
h Ctrl + D Delete an item
h Ctrl + E Find a message or other item
h Ctrl + F Forward a Message
h Ctrl + K Insert a hyperlink into a message
h Ctrl + N Create something new (message in Mail, appointment in Calendar, e.g.)
h Ctrl + P Print
h Ctrl + Q Mark message as Read
h Ctrl + R Reply to a Message
h Ctrl + U Mark message as Unread
h Ctrl + Z Undo
h Ctrl + Enter Send
h Ctrl + Shift + A Create an appointment
h Ctrl + Shift + B Open the Address Book
h Ctrl + Shift + C Create a contact
h Ctrl + Shift + E Create a folder
h Ctrl + Shift + F Use Advanced Find
h Ctrl + Shift + G Open the Flag for Follow Up dialog box to assign a flag
h Ctrl + Shift + I Switch to the Inbox
19
h Ctrl + Shift + K Create a task
h Ctrl + Shift + L Create a contact group
h Ctrl + Shift + M Create a message
h Ctrl + Shift + N Create a note
h Ctrl + Shift + O Switch to the Outbox
h Ctrl + Shift + P Create a Search Folder
h Ctrl + Shift + P Display the Font dialog box (when editing a message)
h Ctrl + Shift + Q Create a meeting request
h Ctrl + Shift + X Create a fax
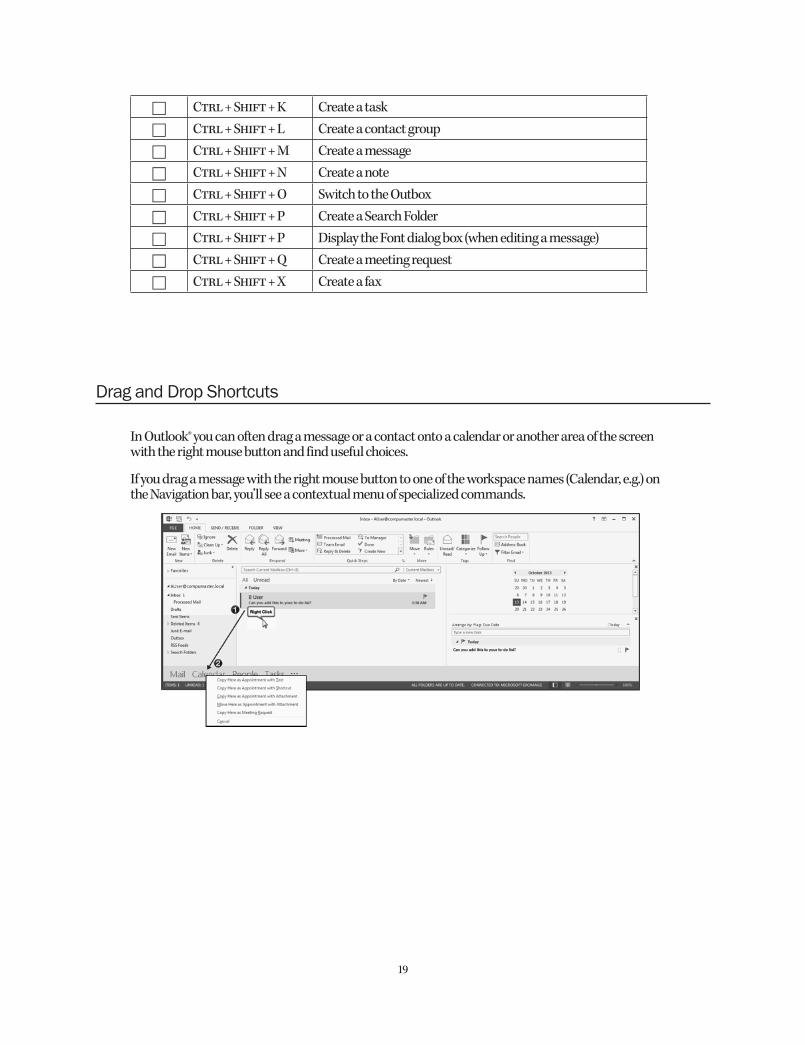
Drag and Drop Shortcuts
In Outlook® you can often drag a message or a contact onto a calendar or another area of the screen with the right mouse button and find useful choices.
If you drag a message with the right mouse button to one of the workspace names (Calendar, e.g.) on the Navigation bar, you’ll see a contextual menu of specialized commands.
20
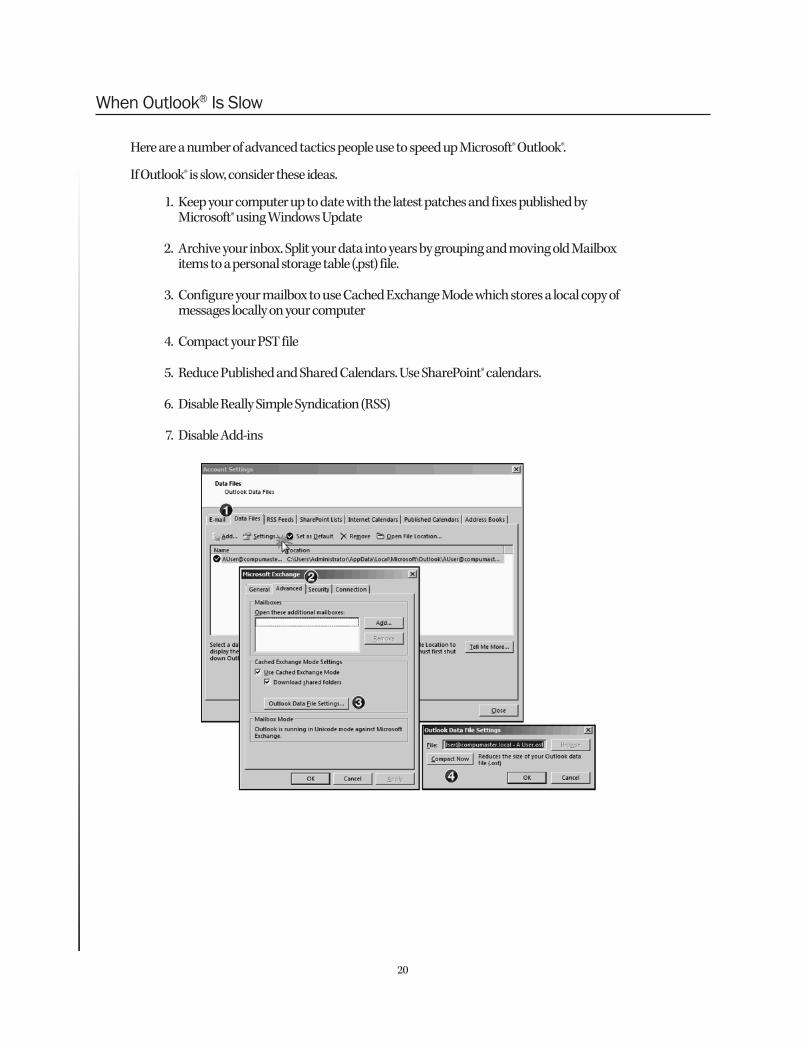
When Outlook® Is Slow
Here are a number of advanced tactics people use to speed up Microsoft® Outlook®.
If Outlook® is slow, consider these ideas.
1. Keep your computer up to date with the latest patches and fixes published by Microsoft® using Windows Update
2. Archive your inbox. Split your data into years by grouping and moving old Mailbox items to a personal storage table (.pst) file.
3. Configure your mailbox to use Cached Exchange Mode which stores a local copy of messages locally on your computer
4. Compact your PST file
5. Reduce Published and Shared Calendars. Use SharePoint® calendars.
6. Disable Really Simple Syndication (RSS)
7. Disable Add-ins

21
How to Use Basic E-mail Functions
SkillSteps—To work with e-mail in the Mail workspaceMail > Home
The basic e-mail functions are: New E-mail Delete Reply Forward
You’ll find each of these on the Home tab of the Ribbon when you are working in the “Mail” workspace of Outlook®.
Once you’ve written a new message or begun to reply or forward an existing message, Outlook® will add the Send button beside your new message.
The Reading Pane Commands
In Outlook®, the Send, Reply, Reply All, and Forward commands (that were once available only on the Ribbon) are now displayed in the Reading Pane area of the screen. If you are displaying a Reading Pane for your e-mail, you’ll find “Reply,” “Reply All” and “Forward” are clickable there. Using these choices is called using an “Inline Reply.”
Moreover, if you select Reply, you’ll be able to write and send your reply from the Reading Pane, rather than needing to open your reply in a separate window. Notice there is a “Pop Out” command above the Send button. With “Pop Out,” you can switch to a full editing window.

22
How to Navigate Outlook® Help
SkillSteps—To display the Help window in Outlook®Press F1 or click the Help button (question mark) near the top right corner of your Outlook® window.
The Help window provides hyperlinks to more detailed information on “What’s new with Outlook,” “Outlook keyboard shortcuts,” and other online sources of Outlook® information.
If you are unable to locate a hyperlink for the answer to your question, use the search box at the top of the window to find information related to your search terms.
After you type a question into the search window, press Enter on the keyboard or press the magnifying glass icon beside the editing box.
Only from SkillPath ...Training is our only business. That’s why our books, audios and computer-based training programs are uniquely focused on boosting your skills, expanding your capabilities and growing your career.
Our expert authors and audio presenters are professional trainers who don’t get bogged down in hype and fluff. They know how to zero in on the essentials, simplify complex subjects and not waste your time.
As a SkillPath seminar participant, you always get the lowest price and fastest service because our resources are not sold through middlemen at discount stores, local booksellers or commercial Web sites.
Only from SkillPath can you get so much. For more information and a free catalog, call toll-free 1-800-873-7545 or visit us on the Web at www.ourbookstore.com
Mastering Microsoft® Outlook® 6/15V537 Webinar
On-Site Training WorksInvesting in on-site training demonstrates that you’re serious about your employees’ success— and the success of your organization.We can deliver this workshop right to your company’s door or provide customized, you-pick-the-day training on any program pertinent to your organization’s training goals. We offer a comprehensive library of more than 250 courses with content unparalleled in the training industry. Management and supervisory, leadership, business writing, communication, customer service training, teambuilding, administrative excellence, desktop design and hardware and software technology training are just a few of the course offerings available. Whether you have 3 or 300 people to train, SkillPath is the answer. For complete details and a no-obligation quote, call 1-800-873-7545 and ask for the on-site training department.
Please join us again soon!For dates, locations, complete course outlines and information on other SkillPath seminars, products and services, visit us at
www.skillpath.com
a division of the Graceland College Center for Professional Development and Lifelong Learning, Inc.