mastering the bent press cover page - dan...
TRANSCRIPT


Copyright © 2009 Walter J. Dorey i
Secrets to Mastering The Bent Press By Walter J. Dorey Copyright© 2009 Walter J. Dorey All rights reserved. No part of this book may be reproduced in any form or by any means without the prior written consent of the author, except brief quotes used in reviews. Printed in the United States of America Book design, illustrations, photo manipulations and cover by Walter J. Dorey Photography by Ginger A. Dorey Website: sinewandsteel.com Email: [email protected]
DISCLAIMER The author and publisher of this material and sinewandsteel.com are not responsible in any manner whatsoever for any injury or death that may result through use or misuse of the instructions and techniques contained in this material. The activities, physical and otherwise, described herein for informational purposes only, may be too strenuous or dangerous for some people and the reader(s) should consult a physician before engaging in them.

Copyright © 2009 Walter J. Dorey ii
Secrets to Mastering the Bent Press Table of Contents Page---contents 1-----Introduction 3-----Several precautions 4-----One arm military press-rack position barbell & kettlebell 6-----Foot positioning, rooting, tension techniques, wrist joints, proper alignment, lats 11----Pressing the barbell 13----Pressing the kettlebell 14---“How do I breathe?” power breathing and options, path arm takes in pressing, the elbow in pressing, 16--- “How do I do that?” lat and shoulder, a bad position for pressing, proper position for pressing, 20----Further lat instructions, lowering the weight, crunching ribs, strange eyes, the ribs, a collection of links, bad form, speed of execution, manipulating tension relaxation, 29----The side press, three variations, the first method, 30----Bar positioning, body mechanics for side press, hand placement, this is PTP style, 37----Completing the side press, second method for PTP style side press 38----Side press with kettlebell, conventional style 38----Third method of side press, traditional style, “Why? I just want to learn to do a bent press.” Pressing a heavier weight, tilting at windmills, 40----Foot positioning, hips, proper alignment 43----Do not do this, hip action, loading of tension, practicing, the loaded windmill stretch, 47----Pink panther windmill stretch 48----The band windmill stretch, pushing into the hip, breathing, speed of execution, a simple goal 52----The wedge-hips and body 54----The big difference: traditional side press verses bent press 54----The traditional side press, feet, body mechanics, lats and triceps, demo with barbell, 59----Traditional side press with kettlebell 63----Traditional side press alternative method of standing up 64----Squatting under while going down in traditional side press is bad press 66----Rotating the hand/arm into the weight 67----Wedging the elbow 68----Hand position on kettlebell 69----A simple goal, the bent press 70----The bent press with a kettlebell, critiquing my performance, the camera does not lie, taking pictures, learn from my mistakes, 73----Bent press with a barbell, safety violation 77----Orientation of the bar and safety, the wrist, dropping the bar, 79----Technique tip driving through the arm, body mechanics, rotating the arm, 85----Zero and Hero the bent arm, 87----Rope in the bent press the original post, 90----Setting up the rope, the bowline, the wrong way, give me 20, 94----Doing the rope bent press 97----RBP with a chain, Adam T. Glass 98----On using bands 99----Bent press overhead squats, execution 101---Using barbells in SP and BP 102---Technique tips 103---Real life application 104---Getting the most out of your training and you may think I’m an idiot, but…

Copyright © 2009 Walter J. Dorey 1
Introduction Initially I wrote this book to differentiate the differences between the bent press (BP) and the side press (SP). This publication certainly does that. But one thing seemed to keep coming to my mind. These exercises are great for building up physical and mental toughness. When drawing up a program to teach these lifts and get the most out of them, I soon realized that there is a natural progression from some other lifts that would readily lend themselves to improving a persons ability to perform the SP and BP. Thus, it became a necessity to start with the one arm military press to be sure everyone is on the same page and is building on the same foundation. There are some very important details to be learned here. From there it was just a natural progression to segue into the windmill. The windmill is a unique lift or exercise in its own right. To the uninitiated it looks very dangerous, as if you will hurt your back. But in the hands of a knowledgeable trainer, it becomes a very useful tool for strengthening the back, hips, torso, and shoulder while at the same time improving mobility. Many trainees can not go very deep in the windmill at the beginning and that is OK. Even with a limited range of motion it is still a very productive exercise. If one perseveres they can, with the help of some unique stretching movements, not only increase their range of motion, but also improve their strength within that range. And isn’t that part of the reason for training? Improving not only your flexibility and mobility, but having the ability to demonstrate your strength in the newfound range of movement. Various means of improving on this quality are explored in the section on windmills. From there we will delve into how we can get the most out of the side press. This is a technical lift. Once that groundwork is laid, we will then begin working on mastering the bent press. Some lifts or exercises are way more powerful in developing a tough, resilient body. Side presses and bent presses belong in this group. They should be practiced every week and in some cycles it would be good to really focus on increasing the quality of movement and amount of weight used in these lifts. At other cycles you may wish just to use a more moderate weight for a few sets, just to keep the movement patterns ingrained in your CNS. Granted, doing one arm military presses may be hard. But try struggling to lift a heavy weight in the side press or bent press and you will soon learn that if you aren’t 100% focused, you will not lift the weight but will end up dumping it. The consequences of failing in the one arm military press are a little easier to deal with than that of losing the lift in the side press or bent press. While the one arm military press (1AMP) can be hard with a very heavy weight, it will generally only take a few seconds to accomplish. Not so with the side press, this will take

Copyright © 2009 Walter J. Dorey 2
you another 5 seconds or more to complete. The bent press is even harder and with a heavy weight, it can take 10-15 seconds to complete the lift. Think about it this way: in the 1AMP you clean the weight to the rack, press it and lower it, all while standing upright. In both the side press and bent press you will find you are bent over in a much less comfortable position than military pressing. You will find it harder to breathe as you struggle to support the weight and press it overhead. Your upper body is moving away from the weight. Then, once you have pressed the weight out to a straight locked arm, you have to get your body realigned under the weight and now straighten up with it, standing, controlling the weight the entire time. Then you lower the weight. It is much more detailed than this, but you get the picture. This makes the SP and BP way tougher than the one arm military press. Doing the SP and/or the BP will ramp up your ability to toughen your body and your mind. The SP and BP require a unique body position that will tax your musculature in a way it is not use to. In order to handle heavier weights with these two lifts you will have to toughen up. These lifts should be included in any aspiring tough guys’ routine. I guarantee that if you master these lifts and use them on a regular basis you will notice a difference in your body, both mentally and physically. Wimps need not apply. The vast majority of lifters are not aware of the benefits of doing these lifts. They harden the body and help one develop a more focused mind. If your mind wanders while doing these lifts with a heavy weight you will lose the weight. There is an element of danger here. You could drop the weight on yourself. My hope is that if you have never tried these lifts, you will give them a shot and put some real effort into mastering them. If you have tried them before, hopefully you will learn something new that will spur you on to greater gains with these lifts. It would be really cool if these lifts filtered in to mainstream gyms, so that if you went to one and looked around, you would see more than one person practicing these lifts and gaining the benefits they supply. As for a goal to shoot for: I would say shoot for at least half your bodyweight in the traditional side or bent press to really reap the benefits. And then, if you’re tough enough, dig in to see how far you can go and see what you are really made of… Tear it up! Walter

Copyright © 2009 Walter J. Dorey 3
Secrets to Mastering the Bent Press On many fitness/strength oriented forums the question comes up frequently about the differences between the side press and the bent press and how to perform them. This little tutorial will hopefully clear up some confusion concerning these two exercises. But it will also go much deeper than that. We will explore fully how to perform several exercises that will lead up to mastering the bent press. So let’s jump right into the mix and get our feet wet.
Several Precautions to be Aware of: If you are familiar with kettlebells and exercises like side presses, bent presses and windmills, feel free to jump to what you want to read first. However, I will suggest you read this book in its entirety, as I am sure you will pick up at least a few tips that can help you in your exercise performance, or, if you instruct others in the iron game, you will be able to use these tips in training them. Sometimes teaching someone a new exercise that they are having trouble grasping comes down to creating mental imagery or doing something different physically to cue them in. If you are a beginner and just learning, please follow the format outlined here. Each chapter and exercise will build on the other. For example, if you do not know how to do a windmill or how to do a one arm military press properly, you will not be able to perform the bent press as safely and effectively. Be aware that receiving proper training from an experienced trainer can get you on the right course much faster. If you have access to such training, use it. However, a person can teach themselves IF they pay attention to the details. Certainly a person can be taught how to do the windmill or how to do the bent press without knowledge of other exercises related to them. But this isn’t about just learning how to bent press. It is designed to give a student or a teacher of the iron game the tools needed to get the most out of the bent press and those related exercises. Whether student or teacher, lift where you can drop the weight and avoid hurting yourself or your floor. Dropped weights will crack tile and cut carpet. Don’t ask me how I know. When you lose a lift, (and yes it will happen), it is far safer to just be able to let it go than worry about damaging property and then try to save the lift only to injure yourself. In any case, if it comes down to damaging property rather than yourself, remember: it is far better to replace or repair something than to spend time recovering from an injury that you may possibly have to work around for the rest of your life. Lift in an area away from pets and small children. Be sure your workout area immediately around you is clutter free. That includes spare plates and kettlebells laying around that you might trip on.

Copyright © 2009 Walter J. Dorey 4
If using barbells for the exercises, be sure they will not hit anything as you lift them. Lifting barbells one handed causes the bar to slowly rotate at times. Control that and be aware the bar may bump a wall, tree branch or whatever, and this can cause you to lose balance. So check you area for space to lift and drop the bar if needed. Get your doctors permission. Proceed at your own risk. First order of business is a strict one arm military press (1AMP). Why? First we must be able to use the proper techniques or if we already are familiar with these techniques, to reinforce them. Second, if we do not know how to apply proper technique in the 1AMP, how can we begin to apply those same techniques to our other pressing exercises? If we do not know how to use the lats when doing a one arm MP, how would we know how to use them in the bent press to safely execute it? So, proper technique in the 1AMP will be transferred to improve other lifts. Third, it will help us have a solid press performance, a better appreciation for what is involved and thus, help us in differentiating the various presses. This knowledge will help eliminate the confusion between the side press and the bent press in our own minds or the minds of our students. I believe in learning and teaching by doing, so grab a barbell, dumbbell or kettlebell (KB) and let’s start pressing. If this is entirely new to you, please read through the entire chapter before trying the techniques. Then you may want to do these without any weight at all or even perform them standing in a doorway and pushing up against the doorframe. I will reiterate that several times throughout this chapter. Those familiar with presses, grab a weight! The One Arm Military Press. First, we must get the weight to shoulder level, or, as it is commonly referred to, clean the weight to the rack position. With a barbell you can load the weight up in a power rack and take it to one shoulder. Or you can clean the weight from the floor with two hands and then shift it to one shoulder. Or if you are feeling exceptionally manly you can clean it from the floor with one hand. You may also tip the bar up on one end and bring it to the shoulder. With a dumbbell or KB, simply clean the weight to the rack position. By rack position I mean this, using a barbell:

Copyright © 2009 Walter J. Dorey 5
Or this: And with a kettlebell:
So whenever we mention getting the weight into the rack or rack position this is where we want the weight to be. If I mention cleaning the weight to rack or if you have the weight already pressed over head and I mention pulling it down to the rack or racking the weight, this is where I want you to go with it. Hopefully you are familiar with these techniques of cleaning the weight. If not, learn how to do it properly from a good coach or experienced training partner or DVD. There is a lot to learn when it comes to cleaning various weights and is beyond the scope of this book.

Copyright © 2009 Walter J. Dorey 6
Once in the racked position your feet should be about shoulder width apart.
In this picture you can see my stance is about shoulder width and my toes are pointing slightly outward. This gives me good solid footing on the ground. In the above pictures notice that even my stance varies a little as I lift various implements. That is OK, as long as my stance is not too narrow or too wide. Nothing exaggerated.
Thus, everyone will feel a little different, or stronger, by moving their feet in or out a little from that position. We will now run down through some finer points of pressing. This should serve as a checklist to help you refine you technique. If this is all new for you I would suggest using a lighter weight than you would normally use for presses or you might even run through all of this with an empty hand for a few reps just to get a better idea of what you want to accomplish. It may even help to stand in a doorway and push up against the top of the door frame to practice the techniques. Make sure your feet are grabbing the ground. As some say, root your feet to the ground. Remember how as a little kid, a friend would try to pick you up, and you would make your body all stiff and try to stick your feet to the ground by making them hard and tensing up your legs trying to grab the floor with your feet? Remember how just by doing this your friend had a harder time picking you up? Well, if you remember that, you’ve got it! If you never tried this in your childhood, I feel for you. It’s part of being a kid influenced by old martial arts movies. If you do not understand the principle of rooting the feet and why you should do it, ask yourself this: Can you push a car easier on ice or solid ground? Can you take off running faster on ice or pavement? Can you swing a bat, throw or kick a ball better on which surface? Which surface would you rather be standing on if you were lifting a weight overhead? When we initiate movement or stand still while generating tension to lift a weight or push a stuck car, our feet and thus our body need something to push against. If they slip or move about, we lose force opposite the direction we want to apply it.

Copyright © 2009 Walter J. Dorey 7
If you are having trouble getting that feeling of being connected to the ground, try doing this: Try to make your feet a part of the ground. You might try standing in a slightly wider stance than normal and sliding your right foot toward you left. As you do so, cup your foot a little, scraping the top of the ground with the outside bottom edge of your foot. You don’t have to scrape real hard to get the feel. Your entire foot is in contact with the ground but more pressure is on the outside of your foot, the balls of your foot are in contact with the ground as is your heel. This act should create a higher arch than normal. Off course the bottom of the arch will not touch the ground. Once your right foot is under your body more, maintain that foot position and really tense it up along with your leg and butt muscles. Literally try to grab the ground with the toes and balls of the foot, the heel and the outside edge of the foot. This creates a solid arch which also prevents the foot from pronating, (which creates ankle, knee, hip and back problems), which means your foot is rolling inward. We do not want the foot to roll inwards and cause the ankle to collapse inwards with it. Now relax a moment and repeat everything with the left foot. Then, once again, relax a moment, shaking off the tension, maybe hopping in place lightly for a few reps, then recreate that feeling with both feet in a shoulder width stance. You should definitely feel your feet are more planted. Like tree roots. Sink your feet into the ground. If you have a training partner or any unsuspecting friend or family member you can also try this: Have them push you from the front or back as you stand relaxed. Then try it again and this time create that sensation of rooting your feet. They should note you are much harder to move. Try this in a normal stance such as you would be in while talking to someone. You may also repeat the experiment with a more staggered stance. To continue: Feet grabbing ground Legs tight, solid, make your leg muscles hard. Knees locked straight, but not hyper-extended backwards or flexed forwards. Hips pulled under the body. Glutes squeezed tight, pinch a coin with your butt! (Well, not really, but pretend you are). Pelvic floor lifted and tight-like the Kegel exercises you should be practicing. Google it if you don’t know. Basically it is tightening the muscles you use to stop yourself from urinating and from passing gas around someone you don’t want to embarrass yourself in front of. Abdominals braced as if someone is going to punch you. Arm nice and strong or tight in the rack position.

Copyright © 2009 Walter J. Dorey 8
Wrist locked straight as if there is no wrist joint, as pictured below:
Oh, this feels real good! NOT! THIS is MUCH better! Another view:
Notice in this picture that even though the back of the hand tilts back a little, the wrist is still straight, unlike the first picture. Also, notice that the weight of the bar sits directly over the wrist, so the weight drives down straight through the wrist and into the forearm. This facilitates directing your pressing force into the bar rather than tweaking your wrist even more.

Copyright © 2009 Walter J. Dorey 9
Back braced or locked into position and lats, especially on pressing side, fired or tight.
Take a close look at these pictures. In both pics you should notice that my shoulders have not lifted up at all. In the left picture I am standing semi-relaxed. In the right picture I am firing my lat or making it tight and solid. You can really see this in the difference of the left lat in both pictures. The shirt is loose over my left lat in the left picture. My shirt is tighter over the left lat in the right picture. Look at the right lat in both pictures. They sort of look the same. Yet there is a difference. In the left pic, my arm and lat are mashed together because the muscles are relaxed. In the right pic, where I am flexing my arm and lats, you can see the two are not squished together. They are tight together, but because the muscles of the arm and the lats and back are tight and solid, the arm is lifted away from the body. Thus, my arm has a solid shelf of muscle to push off of. This tightening of the arm and back/lats also lifts the KB as you can see. Yet, notice the shoulder is still pulled down, it has not gotten higher. On one end, the lats and the pectorals (chest muscles) both attach at the humerus, the upper arm bone, basically forming your armpit. Thus, tightening them up helps pull the shoulder into the joint. So, to continue: Shoulders pulled down into joint or packed into the socket.

Copyright © 2009 Walter J. Dorey 10
Keep your head and neck in a neutral position, not tilting back or jutting forward or at some other odd angle. Doing the following will put a kink in your neck.
Do NOT do This! Or This!
This is good. Good body position. Good wrist position. Good head and neck alignment. This is what we want!

Copyright © 2009 Walter J. Dorey 11
We will run down through all of these without the pics, so it will be easier to follow. Granted it might seem like a lot to remember, but after you do it a few times it gets easier and will strengthen the entire body, teaching good lifting technique that can be applied to everyday life. If this is old hat to you please bear with me. You may try pressing a weight for one rep and each rep you do add one of the techniques until you are using them all. Try adding one technique each rep, start working from the ground up. Also, you may wish to stand in the 1AMP position and tighten up the entire body as if you are about to press a weight. Get really tight as fast as you can and then relax. Try that for several repetitions and then relax. Practice this until you can perform it at will. Certainly when we are lifting a lighter weight we may not use a lot of tension, but practicing that tension with a lighter weight will key the central nervous system (CNS) to fire up more readily and effectively when we use these same techniques in lifting a heavier weight. If we cannot control our muscular tension with a light weight or no weight, how are we going to convince our body to perform under a heavier load? It’s just not going to happen. Also, even if doing a more ballistic exercise or participating in a sport, we still must get momentarily tight when we begin to apply force. So be sure to practice these techniques in your presses and other exercises to hardwire them into your CNS. There is much more to this that we will examine at a later date. Just remember: Perfect practice makes for perfect performance, or as close as we can get to it. Practice makes permanent. Poor practice equals poor performance and bad, injuring forming habits. Pressing the weight: Ready? Entire body tight, loaded with tension? Good, now press that weight up!

Copyright © 2009 Walter J. Dorey 12
Starting position... Mid way up… Almost locked out…
Wow! Things actually brighten up when you get the weight locked out overhead! Well, truth be told, it is a different day. But…it is locked out overhead. Notice that the weight and my arm are in line with my leg. The weight is directly over my right foot and possibly a little to the inside of that foot. With a heavy weight I would shift my right hip out more to the side and under the weight to help counter-balance the weight. However, with lighter weights keep your form strict and stand upright and be sure to keep the body tight.

Copyright © 2009 Walter J. Dorey 13
Let’s take a look at a series of pics pressing the KB:
The start… Mid way up…eyes closed (sorry sweetie!) Just meditating… Wow! It happened again! Lock the weight out and it gets brighter!
Well I actually inserted this picture for a reason. Looking at the two pics you can see my feet are slightly wider apart in this one, so don’t sweat your foot placement too much. Do not feel your feet have to be in exactly the same place every time. An inch or so either way will not affect your press. I am just pointing this out because sometimes we can get hung up on minute details which don’t really matter. Some details do matter. It’s just knowing which ones we really need to pay attention too. Sure, we may not be perfectly aligned every rep but we want to be close to it.
The point is: get in a good stance with good posture and then press with good technique. That will make you stronger. Every body is a little different. Each rep may not be a carbon copy of the preceding rep. BUT, that is no reason to get sloppy!

Copyright © 2009 Walter J. Dorey 14
“Wait a minute! How do I breathe?” My answer: “With your lungs.” Really don’t sweat it too much. Once in the rack position you should have ½ to ¾ lungs full of air. Keep the pressure low in your abdomen. Breathe from your lower lungs using your diaphragm. Press while either momentarily holding your breath or exhale with a hissing noise, pressurizing the air as it leaves your body. Just remember you should not feel light headed or pressure in your head or face. The pressure should come from your braced abs and lungs and diaphragm and pelvic floor all squeezing together toward one another. The air will “hiss” out, sounding like an air hose filling your tires up. The pressure emanates from your gut area, like a balloon deep behind your navel that someone (you!) is squeezing. The air squeezes out past your tongue pressed against your teeth. This is called power breathing. Remember, the abs do NOT get sucked in. The abs do NOT get pushed out. The abs merely get tight, forming a wall of solid muscle for the other muscles to build pressure against, thereby stabilizing the spine and forming a solid column for the upper arms and shoulders to work off of. Your abs MAY bulge out a little as they get tight, just like any muscle will bunch up as you tighten it, but you are NOT actively pushing your gut out. If you have any medical concerns, cross the breathing patterns by your doc to get his approval. If you cannot breathe this way, simply breathe out as you press the weight, keeping your body, including the abs, tight. Pause at the top, staying tight, to catch a quick inhale and breathe out as you lower the weight. “What path does my arm take? “ “It should move upward.” Well, not trying to diss ya, but try to find a comfortable pressing groove. In other words do not try some exaggerated means of pressing. Generally you want your forearm vertical. Try to keep the forearm and the elbow directly under the weight. This will help you apply force directly to the weight and eliminate shoulder strains. You can press in a fairly straight up and down motion. You can press by pushing your arm out somewhat from your body as you start pressing and following a more circular type path to overhead. Whatever path you use in pressing up, follow that same groove in lowering the weight. You want to find out which groove of pressing feels best for your shoulders. One thing that helps many is to imagine they are pressing from the elbow. If that sounds weird, think of your hand, wrist and forearm as being a part of the weight rather than a part of your body. Then your elbow would be supporting the weight and pressing up against the forearm which is attached to the weight. Make the elbow “tight” by flexing the triceps and the biceps and squeezing the weight hard which will tighten up the forearm. Thus, muscles on both sides of the elbow will be protecting the elbow by being tight with tension.
Copyright © 2009 Walter J. Dorey 15
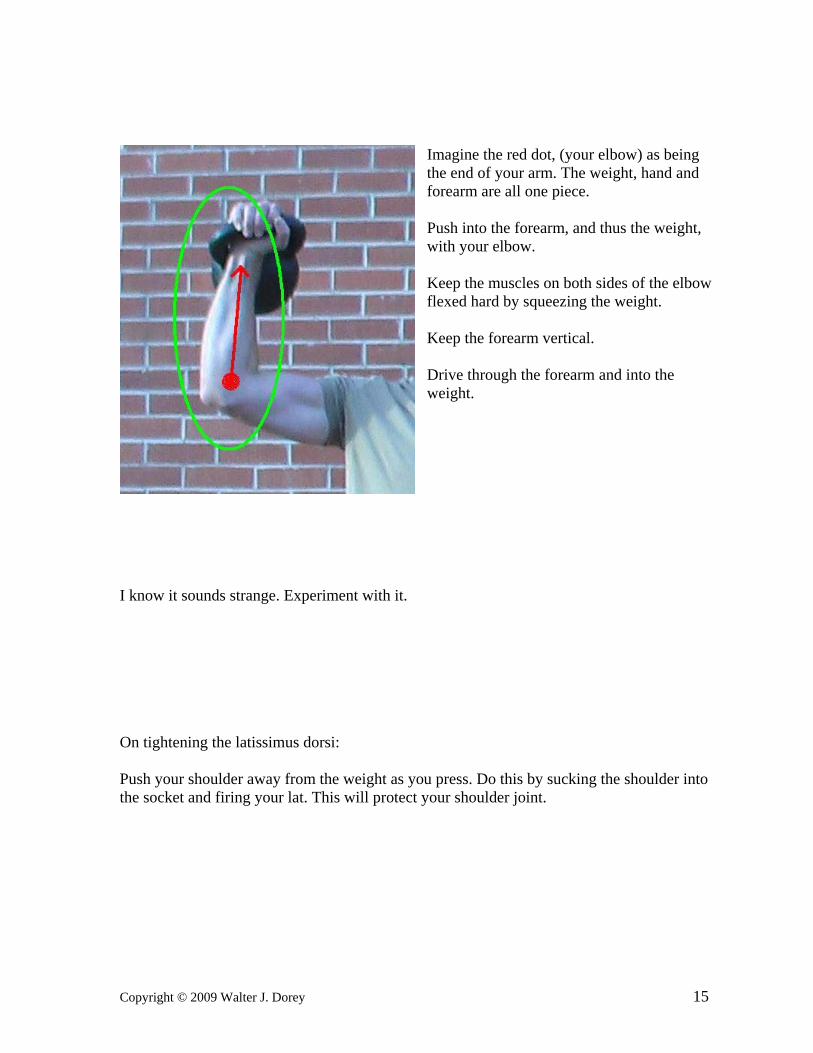
Imagine the red dot, (your elbow) as being the end of your arm. The weight, hand and forearm are all one piece. Push into the forearm, and thus the weight, with your elbow. Keep the muscles on both sides of the elbow flexed hard by squeezing the weight. Keep the forearm vertical. Drive through the forearm and into the weight.
I know it sounds strange. Experiment with it. On tightening the latissimus dorsi: Push your shoulder away from the weight as you press. Do this by sucking the shoulder into the socket and firing your lat. This will protect your shoulder joint.

Copyright © 2009 Walter J. Dorey 16
“How do I do THAT!?” If you can do pull-ups then get on a chin-up bar. Hang from your arms. Now pull your body up several inches by shrugging your shoulders down into the sockets without bending your arms. Relax and let your bodyweight pull the arms out again. Do this several times to get the feeling of what you want to accomplish. It will look to an observer like your arms are getting shorter and longer as you do this.
Look closely at this picture. I measured out the space from the bar to the top of my head. Almost ten equal spaces. Notice the blue line at my elbow joint. Notice the red line at the top of my head. This is a relaxed stretch, simply hanging from a pull-up bar, letting my arms get pulled out of the sockets. Definitely do not want to press weights with your shoulder in this position! The arm is, in a sense, disconnected from the body. Not Good!
Examine the two pictures. Here you can see I have shortened my arms by pulling my body up simply by pulling my shoulders into the socket. Some refer to this as “packing the shoulder”. Notice there are only seven equal spaces above my head. Notice the top of my head has actually gone higher than my elbow joint as marked by the blue and red lines. While doing this I did not flex or bend my elbows! This is a very strong position for the shoulders to press from, shoulders packed into the socket.

Copyright © 2009 Walter J. Dorey 17
The arms should not bend when doing this! Your elbows should be locked straight. Have someone watch you. Many times we fool ourselves and think we are doing something a certain way and we are not. If you have a digital video camera you can film yourself and check your form. Or better yet, have someone snap a quick picture of you doing this with their digital camera or cell phone. Compare the two pics and notice the difference. And look for bent elbows! We don’t want to do that in this form cue. It might surprise you. The camera does not lie. If a pull-up bar is not available, try extending a straight arm over head. Lock the elbow straight! Stretch the arm out as far as you can letting the shoulder get long in order to reach higher. Now reverse that and pull your straight arm right back down into the socket, packing it down as tight as you can. Tighten up the armpit muscles. Your arm should still be straight overhead, no bending at the elbow.
Here I am standing with a relaxed posture. Notice the two red lines indicating the mortar joints. The one black line indicates the tip of my middle finger. Notice my elbow is bent, it should be straight. My bad!

Copyright © 2009 Walter J. Dorey 18
In this picture you can readily see I am reaching as high as I can by stretching out my arm. This pulls the arm out of the shoulder socket. Notice my middle finger is way above where the original black line was, and my finger is even above the top red line. This, once again is a disconnected shoulder. Not a very stable position for the shoulder to be in.
In this final shot, I have pulled my shoulder down into the socket. My middle finger is even lower than it was in the relaxed shot in the first picture even though my arm is straighter, and much lower than in the second picture. This is the position we want our shoulder to be in when we press weights overhead. The shoulder itself should be in this packed position when we start the press and all the way through the entire press to overhead lockout of the weight. This will protect the shoulder joint from injury. Get used to re-creating this packed shoulder.

Copyright © 2009 Walter J. Dorey 19
If you do this with your right arm overhead, feel your right lat with your left hand. You should feel it get harder as you pull the arm down into the shoulder socket. Get tighter. You may even feel the lat area begin to cramp up a little. That is good as it will help you zero in on what you want to tighten up. Now rack the weight and try shrugging the shoulder up and down with a light weight in your hand. Shrug the weight up trying to touch your shoulder to your ear. Suck it back down using the lats.
There are several things I want you to notice in this shot. I am standing with my shoulder up and out of the socket. You can see how it tilts my shoulders as represented by the black line in relation to the red line. Notice the position my head is in. My spine is also tilted away from my center line as noted by the green line. Interestingly enough is the effect this has on my rack position: a high shoulder causes my arm to drift away from my body as indicated by the angle of the blue lines. Notice how high my elbow is.
This is not a good position to be in while pressing weight. Some times we might start off pressing with our shoulder down (which is good) and then as we continue pressing our shoulder comes up (not good) as pictured.

Copyright © 2009 Walter J. Dorey 20
Let’s try this again! Here I am standing with my shoulder pulled down into the joint. My shoulders are in a more favorable position. My spine and head are aligned much more advantageously to express power. The elbow and arm have dropped much closer to the body, allowing me to generate more tension and control over the kettlebell. All-in-all, a much safer position to press weight from!
Therefore, we want the weight, arm and shoulder sucked down at the beginning of the press. As we press, the arm and weight move upward but the shoulder stays down. It is as if you are pressing your shoulder away from the weight as you press the weight up. This will keep the shoulder tightly in the socket where it has the most support. To do this we must be able to “fire”, or tense up the lats, thereby holding the shoulder down in its strongest and safest position. “I still don’t understand how to fire my lats. I just don’t get it!” Here are a couple of more methods for teaching the great lat firing mystery, the first works like a charm: Stand straight with your arms hanging down at your sides. Have a training partner, or whoever you can grab, get behind you. Have them stick their grubby little fingers up into your armpit from behind you. You will prevent this by squeezing your shoulder down and back and by tightening up your arm pit muscles and your lats. Try to squeeze the tips of their fingers off by squeezing your upper arm, your triceps/biceps, tight against your side/lats. You may have to buy your friend a beer to convince him to stick his fingers in your sweaty pits, but that’s between the two of you. He might ask for two beers.

Copyright © 2009 Walter J. Dorey 21
We used to do this as kids, (I’m not talking about buying beer), sneaking up on one another to tickle each other by surprise. It never fails to get someone to throw their shoulders back and squeeze the lats. Just remember to keep the shoulder pulled DOWN. Use the newfound lat power to pull the shoulder down into the joint. You should be able to make the shoulder solid, tight and compact. Another thing you can try is to grab a weight and as you press it overhead, have a training partner slap or thump your lat with their hand or fingers. This should help you key in on feeling the lat and keeping it tight, keeping the shoulder down while you complete your press. One final method of firing the lat and getting it tight applies only if you happen to have this new, strange breed of extraterrestrial teenage boys lying around playing video games: Ha ha, I suggest you get one of those little tow-headed, “I just got woke up at noon” bed head-hair-dooed teen aged boys that like to bounce around all cocky and knowledgeable and have them pop you in the back right on the lat. Have them lay into it with all their might, punching you right over the lat just under and slightly behind the arm pit. Their measly sleepy-headed pop will feel just about right to help you tense up the dormant latissimus dorsi. Your mileage may vary. And if you happen to be a teenager and are reading this, I don’t mean you, (despite the hairdo) because you evidently are not lying around becoming a human flesh slug, but are actually trying to improve yourself by becoming educated and strong. More power to you! OK, enough of the fun; grab a weight and apply all the techniques and press that weight overhead. But before you do, hopefully you have read this first: On lowering the weight: Be sure to stay tight and pull the weight down back to the rack position. Flex the bicep as if you are doing a one arm pull-up. Be sure to actively fire the lat and keep pulling the shoulder down. You may even crunch your side down a little on the side that is bearing the weight. Just don’t let your hips sway to the other side. Keep your hips directly under you and don’t lean forward much while doing this. It is a subtle movement that others may not even be able to observe. The crunching occurs in the torso, internally, in the ribs. It involves the muscles of the oblique’s, serratus anterior, rectus abdominus, and the lats, to name a few. To understand the crunching of the side as you lower or pull the weight down, try this: Put your right hand overhead as if pressing a weight. You may use a light weight. Take your left hand and place the fingers between the ribs. Then, keeping the abs braced, breathe into the abs and chest a little, expanding your rib cage upward so the space between the ribs gets greater.

Copyright © 2009 Walter J. Dorey 22
Try to stretch your rib cage upward, elongating the torso. You should feel the space between the ribs get bigger. Now exhale some of the air and compress the ribs, squeezing them back together as you begin lowering the right arm. Your left hand fingers should feel the ribs mash back together. Squeeze with those side muscles and try to form a solid wall of ribs with no gaps as you forcefully flex the biceps and lower the arm all the way down to the rack position. Squeezing the weight with your hand or if empty handed, making a white knuckled fist can help, especially when lowering the weight. It is not so much of a crunch as it is a compressing of the body. It will feel like your torso is getting shorter and much tighter. Here’s another visual:
All the lines in the following series of pictures are the same distance as counted downward on the bricks behind me. Blue line-6 bricks down Black line-7 bricks down Red line-12 bricks down Green dot & line-reference mark position of elbow This is a relaxed stance.

Copyright © 2009 Walter J. Dorey 23
In this shot we can definitely see I am reaching upward. Notice the distance between my elbow, green line, and the black line has increased. My head is at about the same level but my shoulder has gone up and is much closer to my ear. The yellow lines show the distance my fingers have spread, ribs opening up to cover almost 3 bricks in this measured area. Once again, this is not the best position to be in when lifting weights overhead. It is a compromising position, wherein our shoulder could easily be injured.
This is not a good position for the ribs if you happen to play sports, as they can easily be broken, since one or two ribs will take the full force of the blow.
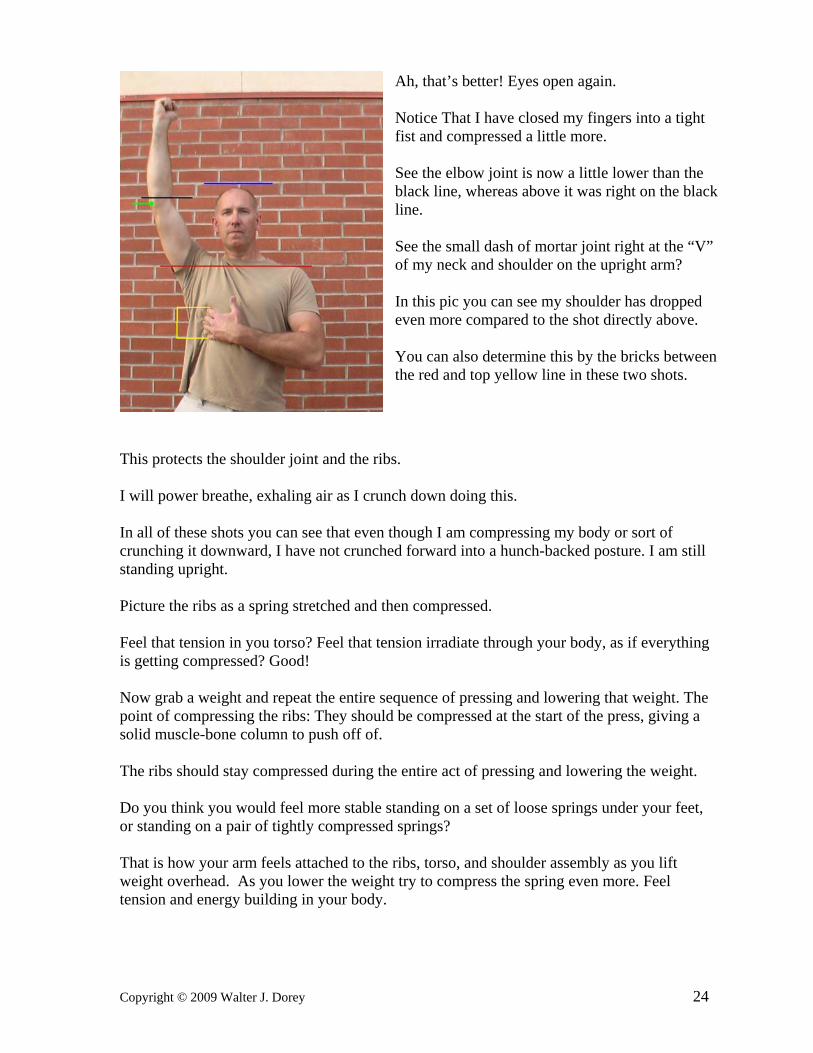
I had to add some eyes to this shot because my wife said my eyes were shut again. I think it looks pretty good! Here I have crunched down or compressed my ribs and pulled the shoulder down. My arm is still relatively straight. My focus right now is on compressing my body. My head has lowered a little. My elbow has dropped about a brick and a half. Quite a difference! Notice the finger and rib spacing: now they cover about 2 bricks. This is an excellent position to be in for pressing.
Strong, compressed and stable! Those eyes are freaking me out! I‘ve got to get to another pic.
Copyright © 2009 Walter J. Dorey 24
Ah, that’s better! Eyes open again. Notice That I have closed my fingers into a tight fist and compressed a little more. See the elbow joint is now a little lower than the black line, whereas above it was right on the black line. See the small dash of mortar joint right at the “V” of my neck and shoulder on the upright arm? In this pic you can see my shoulder has dropped even more compared to the shot directly above. You can also determine this by the bricks between the red and top yellow line in these two shots.
This protects the shoulder joint and the ribs. I will power breathe, exhaling air as I crunch down doing this. In all of these shots you can see that even though I am compressing my body or sort of crunching it downward, I have not crunched forward into a hunch-backed posture. I am still standing upright. Picture the ribs as a spring stretched and then compressed. Feel that tension in you torso? Feel that tension irradiate through your body, as if everything is getting compressed? Good! Now grab a weight and repeat the entire sequence of pressing and lowering that weight. The point of compressing the ribs: They should be compressed at the start of the press, giving a solid muscle-bone column to push off of. The ribs should stay compressed during the entire act of pressing and lowering the weight. Do you think you would feel more stable standing on a set of loose springs under your feet, or standing on a pair of tightly compressed springs? That is how your arm feels attached to the ribs, torso, and shoulder assembly as you lift weight overhead. As you lower the weight try to compress the spring even more. Feel tension and energy building in your body.

Copyright © 2009 Walter J. Dorey 25
Here is another great technique to pressing weight overhead without momentum: Eliminate movement in all joints and muscles not used in the direct action of pressing by locking them together solid. Build the tension and then push that tension into the parts of your body that are moving. It may feel as if the tension in you non-moving body parts is building even more even as it flows into the moving parts of your body. In time you will be able to build tension at a standstill and then explode that tension into the object you are trying to move. Can you PUSH a weight with a chain? Can you PUSH a weight with a chain, where all the links have been welded together straight? Think about it. Your body is a collection of links, or moveable joints, like a chain. You’ve heard the expression “You are only as strong as your weakest link”, well, how about: “You are only as strong as your non-moving joints are locked together”? If, while your are pressing a weight strictly overhead, your hips and ankles and knees and back are loose and moving around what will happen to the energy or force you are generating to press the weight? It will get dissipated or lost in those loose joints, a power leakage. Lock those loose joints together and more power will be transferred along the human chain of your body to press the weight. It is as if you have welded the loose chain links in your body together. OK, you are pressing the weight up with authority. It knows you are the boss and you are maintaining an upright stance with good posture. Just to be sure your posture is good: No leaning back! This is not an algebra pop quiz you have failed to prepare for, so, no squirming around under the weight while pressing.
Not good! This is a sure ticket to an injured back! In this position, as you press, you will have a tendency to lean back even more, jamming the vertebrae in your lower back.

Copyright © 2009 Walter J. Dorey 26
I know there is a lot going on in this picture. Let’s decipher it. The top red line and arrows show how gravity is exerting its force on pulling you and the weight downward. The bottom red line and arrows picture you generating force through your legs and feet into the ground, but since the earth will not move for you, the force then has only one direction to go (if you are rooted and have solid footing) and that is straight up your body. Some of the force will be lost through loose joints in this posture. But enough of the force generated will travel up and collide with the force of gravity and meet in the middle, your hips and back.
This is represented by the yellow lines. That force must go somewhere! That energy will load up in the hips, which are very strong and then migrate up into the spine, pictured by the blue line. The force will follow the path of least resistance. Well, if the spine is locked straight and solid you may get away with this, THIS time. But if it is rounded over at all, the energy will follow the direction of the green arrows (the path of least resistance) which will cause your spine to round forward more and POP!... there goes your back! So, lesson learned: Do not lean back when pressing or round forward when pressing.
Back to our regularly scheduled program: Pressing the weight. This is what we want. No lean back, no rounding forward. Weight sitting comfortably behind head. Body straight and comfortably balanced with weight behind.

Copyright © 2009 Walter J. Dorey 27
I am showing this pic again as I want you to take a look at the lines. The black line represents my center of balance if I had no weight. If I had the weight directly over my head I would have to lean back more. This would cause the weight to pull my arm back and would be difficult to hold. I would probably have to take a step forward or back with one leg to keep my balance. The red line is my center of balance with the KB. By keeping the mass of the weight behind my head, I can lean ever so slightly forward and counter-balance that mass
of the KB trying to pull me and my arm back. Thus, the KB and my body are in perfect balance, the weight “sits” easily in this position. With a bigger KB I would lean slightly forward even more. This slight lean occurs at the ankles and NOT the hips! Keep the hips locked and under the upper body. So, time to start pressing again. Switch arms and repeat everything for a few sets of 3-5 reps. If this is new to you, take breaks as you need them. Don’t get dizzy or out of breath. Don’t get all red faced and shaking with tension. Practice at your own pace and at your own risk. Shake off the tension in between sets and reps if you are doing single repetitions. In time, with practice, you will be able to generate a tremendous amount of tension that you will channel into lifting a weight and accomplishing other things in everyday life. Now for the interesting part. Drop the little pink or blue dumbbell you have been using. Grab a heavier weight and try everything again. Gradually work up in weight for a few reps per set, until you can tell that it is hard for you to maintain an upright stance. In other words, if you went any heavier in weight you would find you are leaning over or kicking your hip out to the side to press the weight. There is a way to do that but first learn a strict press. A heavy weight will cause one to kick the hip out more, but one must build up to it and learn proper technique to do it safely. Only do 1-5 reps per set. Even doing single reps with a minute or two between reps is fine for learning the techniques. One good rep performed flawlessly is worth more than 100 reps done sloppily. You are learning a skill not trying to kill yourself. If you can press the KB “beast”, a 106 lb. KB, sorry for the overkill, as you already know how to do all this.

Copyright © 2009 Walter J. Dorey 28
And just in case you have this question: “How fast do I press the weight up and lower it?” Here is your answer: Press it at a comfortable pace. I am not going to give you some mumbo-jumbo like: “Take three seconds to press the weight and five seconds to lower it because that works the muscles to the fullest extent, creating hypertrophy”. That is a bunch of bull. Don’t press so fast you cannot maintain muscular tension and control the weight. Don’t press so slow you pass out from holding your breath or if breathing, you feel you need to breathe in twice on the way up. Ditto for lowering the weight. PULL it down under control. But don’t take forever. Experiment with different rep cadences, (how fast you press), and find a speed that is comfortable for you. By comfortable I mean not relaxed and easy, but a pace where you can press and lower the weight, feeling you’re strongest, that speed at which you can apply your tension and strength the most. Remember: this is a strict press using no momentum. Too slow and you will fatigue before you lock the weight out overhead. Too fast and you will not be able to apply your full strength or tension to the weight. It will float too much. You will not feel the load as much. You want to feel the load in your hand and body and use that feedback to help you get tighter and press the weight with control. There is a time to press fast and use momentum, but it is not now. You may hear some say that pressing a light weight with full body tension is a waste, is fatiguing, and such tension is only necessary when pressing a heavy weight, and then only at certain times during that press. Well, that is true and yet, it is not true. Confused? When a person is first learning how to press, it is safer and more productive to teach them how to use tension to amplify their strength. And that is best done with a lighter weight. Certainly a person can learn to press a light weight without many of these techniques, but that teaches them only how to press in poor form. If they continue pressing that way, chances are good they will injure themselves at a later date when attempting to press a weight that is too heavy for them. They will not have the proper technique to press it safely. Also, poor form and lack of tension while performing strict presses will actually lower the effectiveness of your training. Proper techniques will greatly increase the learning curve of your CNS and your body’s bio-mechanical properties. In other words, you will get stronger faster by using proper form. And isn’t that what we are after, greater strength and speed from our training? And acquiring that as fast as we can? So train appropriately. However, when we are doing variations of the press, (such as speed presses, push presses and jerks), tension is manipulated. And at times the body is fluidly moving through the states of tension/semi-relaxation to a new position. Yet, even so, if we do not know HOW to apply

Copyright © 2009 Walter J. Dorey 29
that tension, WHICH muscles to tense up and WHEN or in what sequence to fire those muscles, we will fail at the lift or worse: get injured. Your CNS must know when to apply which technique at exactly the right moment to explosively lift a weight, swing a bat or racket or go for a rebound and produce the most effective result. Learn the techniques first and the performance will follow. Once you are a master at applying proper technique you will know when and where to use them without thinking. There is a reason why 1,000 horsepower motors are not put in Volkswagen beetles: it would twist the car into a gnarled lump of metal. Build the framework through proper manipulation of tension, and then add the power. Then you can use the tension to create a base off of which you can express your power or force. And you will be able to do it instantaneously without thinking. Once we know how to manipulate that tension, we can turn it on or off at will, in a split second. This will amplify our force, will help us know when and how to save a lift, or how to pull out all the stops to make the play. There is way more to this than can be discussed here. Trust me and practice you tension techniques. So, we have a pretty good picture of proper technique for the one arm military press. We have a boatload of mental images and methods to use to teach ourselves or others how to press with one arm effectively. Time to move on to the confusion. The side press: Generally one will be able to side press more weight than they can MP, IF they have been practicing the side press. One of the things that gets a little confusing is there are several methods that you will see people use and then call it a side press. Part of the problem comes, I believe, from the three variations you will see. We will look at the variations of the side press to help eliminate confusion and to provide you with several methods of working this exercise. Pick the one that is most comfortable for you to perform. They all work in helping you press a heavier weight. However, if you really want to learn how to do the bent press, be sure to learn how to do the traditional form of the side press. If you are not familiar with any of these exercises then learn to do them all. The first method is somewhat similar to a military press. Your feet will be taking a wider than shoulder width position. This will vary from one individual to another. Again, it all depends on your body, short legs or long legs, etc. There is no mold you must fit in. First you will have to clean the weight to the shoulder. If using a barbell you can have it set up in a rack and take it to your shoulder from there or you can clean it from the floor with one or two hands. Or you may tip it up on one end and rock it up to your shoulder.

Copyright © 2009 Walter J. Dorey 30
With a barbell, the bar will be in the same position as if doing a press behind the neck. If using a KB, start with the KB in the same position as the barbell, as if doing a press behind the neck.
This is where we want the bar at the start. Note the vertical forearm. In both cases, (KB or barbell), you will tense up the entire body and fire your lat to give a solid platform from which to press the weight. Rather than the weight being racked more on the chest, the arm will be out to the side with the upper arm tight against the side and tight against the lat. Squeeze the arm back more against the body. With the weight in the right hand you will align your right hip directly under the right hand and elbow. The forearm should be vertical, wrist locked straight. Squeeze the weight.

Copyright © 2009 Walter J. Dorey 31
Here is a different view. Notice, again, that the forearm is vertical, ready to drive directly upward into the weight. My hip is pushed over toward the weighted side of my body. Here, as denoted by the red line, you can see my hip is not directly under the weight. In this case I can get away with this because the weight is not that heavy. If I were to load up the bar with some plates, the extra weight would almost force me to kick my hip out even more in the direction of the black arrow. This would put my hip under the weight more. Otherwise the weight of the bar would cause me to lose my balance. By kicking the hip out more under the heavier weight, not only can you keep your balance better in this press, you can also support the arm more with your hip and body, giving an even better platform from which to press. As you begin pressing the weight overhead you will lean slightly forward and begin leaning more to the side opposite the pressing hand. The point of leaning slightly forward is to prevent you from leaning back. If you try to press and lean strictly to the side, you may begin to lean back inadvertently, which can tweak your lower back. Thus, by leaning forward ever so slightly you prevent this from happening.

Copyright © 2009 Walter J. Dorey 32
In the picture directly below you can see In the picture directly below, you I am leaning to the side and also forward. can see I am leaning back so far my head is under the bar. Any more forward lean would be too much. This will put a crimp in your back fast! This is accep This is NOT acceptable. Do Not go Here!
This shot is half way up in the side press. What do you note about this shot? Does my form look good? Hopefully you answered: No! Why? Leaning back too far. Back injury here I come!
Below, notice I am leaning slightly forward. This can help keep me from leaning back. However, any more forward lean than this would be too much. This here is acceptable.

Copyright © 2009 Walter J. Dorey 33
As far as foot positioning, this is about where I go. You may wish to actually move the outward pointing foot out further by several inches. Not point it out more but slide it over away from the other foot. You will want to play with the foot position to see what works best for you. Understand that every body is different. Long legs or short legs will change your stance, as will a shorter torso verses a longer torso. Use the picture as a base from which to experiment with.
Here again we see a half-way-up shot of the side press. You may look slightly at the bar, but if you do, do not twist your neck far or you will tweak it. The red line shows the alignment of the forearm, hip and leg at the half way point. You will notice my forearm is tilted a little toward my head. This is partly due to the bar being shifted in the direction of the black arrows, which causes the bar to tilt down as indicated by the black vertical arrow. This is because I am holding the bar off center, more to the right of the center of the bar. This throws the weight somewhat more
toward my center of balance. If I shift the bar in my hand in the direction of the blue arrows, the bar will tilt the other way as shown by the blue bar. This shifts the weight somewhat away from my center of balance.

Copyright © 2009 Walter J. Dorey 34
This may not seem good, but it may allow me to counter balance the weight better and also allow me to push into the bar more advantageously. You do not need to shift the bar much in either direction to affect this change. Perhaps a half inch to an inch. Some like to hold the bar directly in the center, which allows the bar to tilt back and forth as you lift it. You must control that tilt so it does not become too extreme in either direction. But, having the bar as pictured above and below can allow you to grip the bar harder, giving a greater sense of control over the bar.
Notice that if I run the bar the other way, as pictured by the blue bar in the preceding picture, it will run like this through my hand (as denoted by the blue line). This will put more pressure on that red spot on my palm. Pressure on this area will fire the triceps more readily, which may help the press.
So, my suggestion is that you experiment with various bar placement in your hand. Find out what gives you the greatest ability to exert control over and express power into the bar. This will be your best hand position to press from in the side press. Be aware that gripping the bar fully in the hand right in the center of the bar will work very well for many. Having the bar fully enclosed in your hand and not running at any slight angles can actually give you a more secure grip on the bar. If you squeeze the bar tight you can control its movement better. But, as I said, experiment and see what works best for you. See what you feel gives you the most secure grip. That will allow you to press a heavier weight with the most control.

Copyright © 2009 Walter J. Dorey 35
Once you have pressed the weight overhead your body will be leaning slightly forward and to the side opposite the weighted arm. Now simply straighten up your body by pulling the hips back under you. This is the side press as demonstrated by Pavel Tsatsouline in his book: Power to the People, (PTP). I highly recommend it. You will learn a lot from that book.
Start of side press….
Mid position…. With heavier weight you may be leaned over more….

Copyright © 2009 Walter J. Dorey 36
Progressing further into the lift: Bottom….and remember, if I were using a heavier weight I would be leaned over further to counter-balance it…so, at the bottom get even tighter, clench the glutes and pull the hips back under you to stand upright as below…
Cool! We did the side press. Practice it until you can handle the weight with strong control and no feelings of impending doom to your back. If it feels like you might tweak something…DROP the weight! If you drop the weight, direct its fall away from you and get your body out of the way. Figure out where you went wrong with your technique and correct it. You may also need to use a lighter weight until you get the proper form nailed down.

Copyright © 2009 Walter J. Dorey 37
The second method that you will see is someone will press exactly as was just outlined, but, halfway through the press they will begin pulling the hips back under their body. Thus, as they press, once they get to that midway position going down, simply begin to pull the hips back under you as you continue to press the weight up. This is actually a good way to press a heavier weight and has a very nice flow to it once you figure it out. However, it is very hard to demonstrate this through pictures. But we’ll try… Mid position…pressing bar up, body going down-- we switch to: hips coming under as arm presses up at the same time…notice red arrows
As we continue pressing the weight AND pulling the hips under at the same time we end up here:
Mission accomplished! I really like this style of the side press. It just feels good and has a very strong flowing feel to it. It may take a little bit to master. Learn the first version to begin with and then experiment with this variation. Also note I am looking at the bar. You can do this but be careful.

Copyright © 2009 Walter J. Dorey 38
The reason why these variations of a 1AMP are referred to as a side press is that you are pressing more from the side of your body and the body is falling away from the weight at the same time as the arm presses it up. The body and arm move away from each other like two cars pulling away from each other going in opposite directions. They are both moving.
Side press demo’d with a KB. Everything is the same, except the weight. Note red arrows. Arm presses up. Body folds away. At the same time. This is a Side Press! This is a side press PTP style. This is a conventional style of side press.
The third method of doing the side press is taken from the traditional method of doing the exercise. Pavel has demonstrated this lift on his video and book entitled: The Russian Kettlebell Challenge (RKBC). I believe this is where the main confusion stems from. In PTP, Pavel shows the side press with a barbell, conventional style and uses a different groove than the traditional side press demo’d on The Russian Kettlebell Challenge, wherein he shows the side press with a KB in the old-style traditional form.

Copyright © 2009 Walter J. Dorey 39
Also, in the RKB Challenge book, Pavel demonstrates the bent press immediately after the side press. It is hard to pick up the nuances of these two lifts from a book. But we will iron this all out for you. So to continue, it would be a good idea to perform the windmill before moving on to the traditional side press with a KB or BB (barbell). “Why? I just want to learn how to do a bent press.” Before you can learn and master the traditional side press (TSP) or the bent press (BP), you must understand how to perform a windmill properly. It is easier and less technical to teach than the TSP and BP. All of these exercise are complementary, they build off of each other. If you can execute a powerful windmill with a good sized weight, it will only make your TSP and BP that much stronger. Which means you will be able to TSP or BP a heavier weight. You don’t have anything against bent pressing a heavier weight, do you? Carry on my wayward son… And start tilting at windmills: Some view the windmill as an unnecessary exercise. But that is false. It is a great exercise for strengthening the hips, the side of the body and building strong, stabilized shoulders. It also teaches one to rotate along the spine as they fold at the hips. This is useful not only to progress in other lifts, but in everyday life we at times find that in cramped quarters we may not be in the best position to lift something. The windmill strengthens us in a unique way and teaches good body mechanics. Once again we will start at ground zero and build the exercise from there. A strong windmill will help you in preparing for a strong side or bent press. Start off the windmill by using no weight, just an empty hand. Run through the entire sequence to get a feel for what you need to do. Then grab a light weight and begin practicing the proper form. We will demonstrate this by working our left side.

Copyright © 2009 Walter J. Dorey 40
With your left hand overhead, stand with your feet a little more than shoulder width apart. Pivot on your heels, rotating both feet to the right. You will have to experiment a little with your foot positioning. Look closely at the pictures. Root the feet to the ground.
Look closely and you can tell that my right foot is turned out more than the left foot. This is because I am going to be folding over in the direction of my right foot. By turning that foot out more it gives me a more stable base to root and lift from. Once again I will say you may want to try moving your feet around a little to find the best position for you. You should feel stable rather than feel like you may lose your balance.
Look up at your hand and rotate along the spine. Kick your left hip back and keep that leg locked straight. You will fold at the crease in your hips, folding forward in the direction in which your feet are pointing. E .
Here is the start of the windmill. Keep an eye on the red line in relation to my left hip as we progress through this series of pictures. Also, note the relation of my leg to the hole in the brick as circled by the blue line. And keep an eye on the hole circled by the green line. This will make more sense in the next picture.

Copyright © 2009 Walter J. Dorey 41
I am keeping my eyes on the KB. My body is folding over because I am p Arm is still straight. I have also rotated my shoulders around my spine even more.
Moving a little further, note my hips are moving back in the direction of the black arrows. My left leg and hip are moving back as can be seen in relation to the red line. You can see my leg moving away from the black hole in the brick circled by blue. My spine is straight (orange line) and I have begun to rotate my upper body and shoulders (yellow arrow) around the spine. I am looking at the KB and keeping the arm locked straight.
Half-way down! My hip has moved back further in the direction of the black arrows, as can be seen by the red line. Notice the same with the hole circled by blue. My front leg (right leg in this case) has moved very little in relation to the hole circled by green. If the front leg moves forward by much, it means I am shifting my weight forward to that leg, which I do not want to do. I want to feel the loading of tension and stretch in my back leg (left leg in this case) and especially the glute.

Copyright © 2009 Walter J. Dorey 42
Depending upon your flexibility and position, you may only go as deep as I will end up in the same position as at the start of the windmill. As you stand up, drive through your arm into the KB. In the above picture you may note how deep I have gone. You may go deeper or you may not. It will depend on your flexibility. However, you should not force yourself to go deeper until you have built strength at that depth, otherwise you may injure yourself. You can work up to being able to place your palm of your hand flat on the ground. But you do not need to go that deep to benefit from this exercise. We will explore several methods of going deeper into the windmill stretch in just a bit. First, we will delve into the execution of the windmill a little more before we try to go deeper in the stretch. So, as a fair warning, pay attention to what follows:
At the bottom of the windmill! My weight has shifted back slightly more toward the left leg and hip. That leg has been kept straight the entire time! Do the same. My shoulders are in line with each other and I am rotated around the spine so the top shoulder and arm are above the bottom shoulder, more or less. They line up with the inside of my right foot and heel. Eyes still on the KB. Spine still straight. To stand back up: I will tighten up even more and PULL the hips back under me. I will follow the exact groove going up as I used coming down. At the top I will lock the hip directly under me and get set for another rep.

Copyright © 2009 Walter J. Dorey 43
Do NOT twist and bend! Fold at the hips. This is very important for back safety. In the windmill, the spine is straight and you rotate around it and fold at the HIPS to lean over. You do NOT bend and fold at the spine! Focus on what you are doing and if you have a short attention span and do not pay attention, you will hurt your back. That is your problem. You have been warned!
This is what we want. Green line shows my spine is straight Red arrow shows I have folded at the crease where my leg meets my hips. I am actually folding over around the straight black line running through the center of my hips. Notice how straight the rear leg is. This keeps weight on that leg and to fold over I must push the hips back. The right leg may be straight or bent as in this picture.
Please, do not do this! This is a sure ticket to a messed up back. The blue line represents my spine. I am bent over and you can see I have my shoulders twisted around which would twist the spine at the same time. Definitely not good!

Copyright © 2009 Walter J. Dorey 44
So, just to run down this again, heed the following points. Look for the nuances in the exercise. Pay attention to the details. This is a great exercise, but it must be performed with clear attention on what you are going to accomplish. If you can not learn to do a proper windmill, you will not do well in either the traditional side press or the bent press. So, without the pics, do this: When doing a windmill to the right with the weight overhead in the left hand: Your left leg remains straight and the right leg may bend as you fold forward. The left hip will travel in the direction of the left heel, more or less. You definitely should feel the tension loading up in the left leg and hip. A good portion of your weight should be supported by the left leg and hip. If you lean too far forward with your body you will feel the weight more in the front leg (the right in this case), than you will in the left leg and hip. If this happens, PUSH your left hip back more until you feel the weight shift into that back leg. Continue folding at the hips sliding your right hand down along the inner side of the right leg. Go as deep as you can without straining. Eventually you will become flexible enough to touch the floor with your hand. You should feel a stretch in the left hip and leg. Look at the hand overhead the entire time. When you reach the limit of your flexibility, tighten up the entire body, especially your glutes, and straighten back up. Follow the same groove going up that you made as you went down. Drive through the arm extended overhead. Notice that your shoulder should be pulled in tight to protect it. ALWAYS keep the elbow locked straight. Pretend there is no elbow joint. This will help you drive through the arm and into the weight. This will give you much more control over the weight and the movement will have a better groove or feel to it. You will be able to drive the weight up more effectively. Pull the hips back under you with tension in the glutes and braced abs. This will protect the back. Really focus on tightening or crunching your glutes as much as you can all the way up to the top. If your glutes, especially the left one (in this case), feel as if they will cramp up; Great! That will tell you that you are really squeezing them under you. This will make the exercise safer and strengthen the body better. One thing that can really clue you in to bad form is feeling like you are pushing off the front leg in order to stand back up. You should not feel that. You should feel as if something is pulling your hips back under you, forcing you to straighten out. Of course that something is you, wedging your hips back under to drive the weight up.

Copyright © 2009 Walter J. Dorey 45
Perform 3-5 reps and then reverse everything to work the right side. Do not get fatigued. Execute each rep with control and precision. Practice the skill. You may consider doing this several times without weight and then when you are ready grab a weight and practice it again 3-5 reps on each side. As you get stronger and more flexible you can increase the weight that you use and the depth to which you go. You may practice this several times a day for a week or two in order to really get the form down. If you practice it each day, just do one set each time and do not get fatigued. Vary the reps each set and vary how many sets you do each day. So, first day you might do 3 sets for the whole day. The second day you might do 7 sets spread throughout the day. The next day you might only do 1-2 sets. The next day you could do 12-15 sets spread out. Vary your total sets or volume each day. In just a week or two you will be knocking the windmill out like it is second nature. Look at it as a lift and not an exercise that you are trying to smoke yourself with. Focus on your form each and every rep. Keep your reps in the 1-5 rep range. This exercise does not favor higher reps; too risky to maintain form as the body fatigues. Use it to get the hips and side of the body stronger and build stability in the shoulders. If you do not practice the lift daily, do 3-5 reps of 3-5 sets 3-5 times a week. When using a heavier weight you should get a feeling of “sinking back into the hip” as the weight overhead sinks down into the arm and drives the hip back and to the side. Even so, you should be actively pulling yourself down and into the windmill position. Load that tension into the body and then at the bottom, use that tension to drive the weight back up keeping tight the entire distance. As you pull the hips back under your body, you are driving through the body and through the arm into the weight. If you are not going as deep as you would like in the windmill, there are several methods of increasing your flexibility. The loaded windmill stretch: With no weight or with a light weight you will perform the windmill. At the bottom position, tighten up your entire body, make a white knuckled fist with the lower hand and then suddenly relax for a second. In other words, fold over as far as you can go safely with good form, load your body with tension and then suddenly unload that tension by relaxing while still maintaining good form. You should drop lower by about an inch. Repeat this several times. After the last contraction/ relaxation, get tight and then pull the hips under your body to come to the upright position. Repeat this entire sequence several times and you will be able to go a little deeper in the windmill. Do not push this too hard and try to touch the floor in one day. Warm up with a set or two of windmills and then do a few sets of the loaded/unloaded stretches. Then do a few sets of regular windmills with your normal working weight, going to the newly acquired depth that your flexibility allows.

Copyright © 2009 Walter J. Dorey 46
Gradually work up the amount of weight you can handle at this newly acquired depth. Gradually improve this range of motion over the course of several weeks to a month. You need to build strength in the newly found reaches of your flexibility, so tread slowly to prevent injuries. Progressively work into heavier weight going deeper into your flexibility. Above, I take a breath, make white knuckled fists and tighten up my body as much as I can. Note red line at 9 bricks high. Note blue line at wrist.
Repeat above tension….Suddenly release air and tension…drop another inch or so…
Suddenly, I relax with a quick exhale of air. My body drops and inch or so. You can see the drop in relation to the red line. Also, my wrist is closer to my ankle.
Copyright © 2009 Walter J. Dorey 47
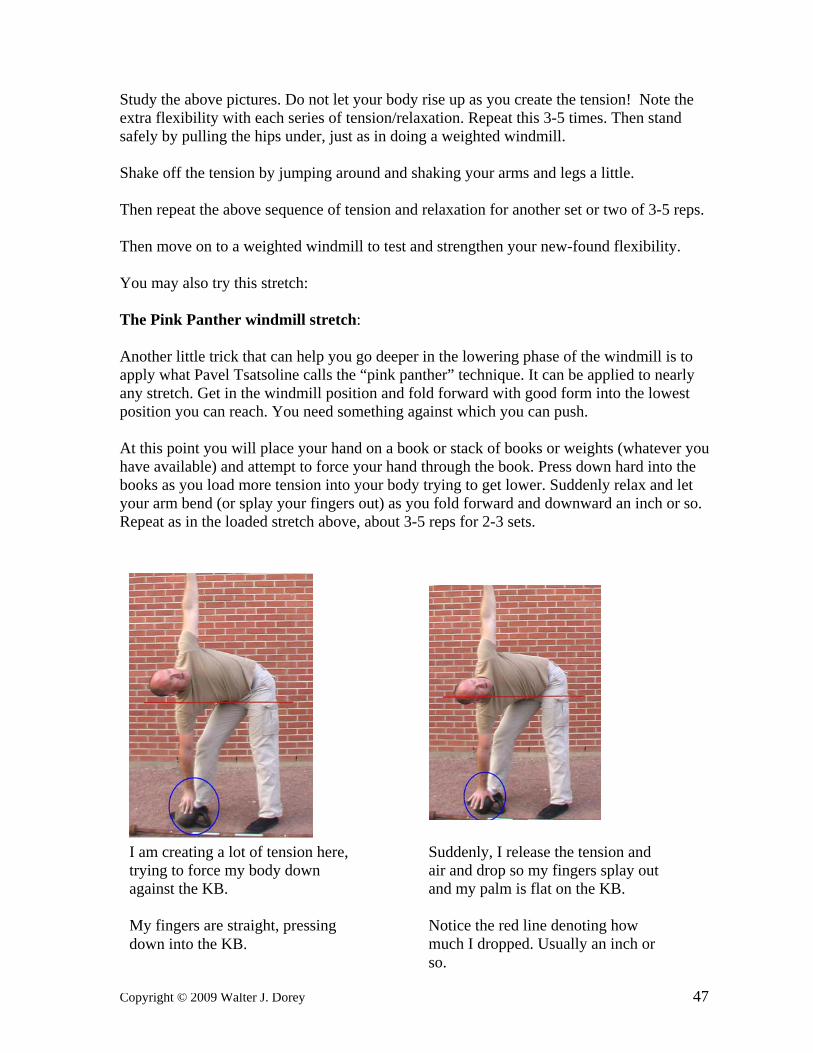
Study the above pictures. Do not let your body rise up as you create the tension! Note the extra flexibility with each series of tension/relaxation. Repeat this 3-5 times. Then stand safely by pulling the hips under, just as in doing a weighted windmill. Shake off the tension by jumping around and shaking your arms and legs a little. Then repeat the above sequence of tension and relaxation for another set or two of 3-5 reps. Then move on to a weighted windmill to test and strengthen your new-found flexibility. You may also try this stretch: The Pink Panther windmill stretch: Another little trick that can help you go deeper in the lowering phase of the windmill is to apply what Pavel Tsatsoline calls the “pink panther” technique. It can be applied to nearly any stretch. Get in the windmill position and fold forward with good form into the lowest position you can reach. You need something against which you can push. At this point you will place your hand on a book or stack of books or weights (whatever you have available) and attempt to force your hand through the book. Press down hard into the books as you load more tension into your body trying to get lower. Suddenly relax and let your arm bend (or splay your fingers out) as you fold forward and downward an inch or so. Repeat as in the loaded stretch above, about 3-5 reps for 2-3 sets.
I am creating a lot of tension here, trying to force my body down against the KB. My fingers are straight, pressing down into the KB.
Suddenly, I release the tension and air and drop so my fingers splay out and my palm is flat on the KB. Notice the red line denoting how much I dropped. Usually an inch or so.

Copyright © 2009 Walter J. Dorey 48
Once again, shake off the tension between sets. Then try out your new reach by doing a weighted windmill. Just don’t go too heavy too fast until you get used to controlling the tension and thus the weight at this newly acquired depth. The band windmill stretch: A little trick I learned has to do with pulling yourself down into the windmill position. Certainly you want to feel the weight you are using in the windmill pushing you down, loading your body like a spring being compressed. With a heavier weight you can use it to help push your body down. But if you can also pull yourself down under control, loading your body with even more tension, the exercise will be safer and more productive because you will be able to safely handle a heavier weight. To do this windmill stretch you will need a jump stretch band or similar. When working the right side, place one end of the band under the right foot and the other end you will hold in your right hand. Give the band a turn or two so it is twisted. This will help keep it from having one side of the band slip off your glutes and back. You will get in the windmill position to work your right side, so you will press the band overhead. Start off with a lighter strength band for a few reps before trying a heavier strength band. Next, you will fold forward and down into the windmill. The band will stretch, running from your right foot, up over your glutes, over your back and behind the shoulder to your right hand. You will find you have to PUSH your butt back into the band and PULL down with your abdominals, serratus, etc., contracting them, to get to the lower position of the windmill. Be absolutely certain to maintain good form and not to twist and bend, but to rotate and fold over. Do not think of crunching down, but think of pushing the hip back into the resistance of the band. Your arm will start off overhead with your fist directly above the head. As you fold over in the stretch, keep your fist locked directly over your head so your arm position remains the same throughout the stretch. Even as your glute pushes back into the band as you fold over, your hand and arm will be pushing into the band in line with it. Be sure to keep the arm solid and strong when using the band stretch. You may have a slight bend in the elbow for the band stretch, but be sure to lock the elbow in that position if you do. Keep your shoulder solid and strong! Be absolutely certain to follow excellent form in the windmill when performing any of these stretches, particularly the band stretch.

Copyright © 2009 Walter J. Dorey 49
Band on right foot… putting a twist or two in the band…
In right hand, ready to press…and pressed out and beginning to do windmill…

Copyright © 2009 Walter J. Dorey 50
Notice the band runs from right leg, behind right glute, up over back and shoulder to the right hand. I am pushing my hip back into the band. You may or may not lock out your arm, it is up to you. Just be sure to keep the arm locked in whatever position you use. Keep the shoulder packed and tight. Don’t think so much about lowering yourself or pressing the arm. Focus all your energy on pushing the hip back into that band. Use good form! Go as deep as you can comfortably. Look to where the KB would be in your straight, locked out arm.
Here is a back side view. Notice the band runs up the glute. Try to get it on the middle of that glute on the side you are stretching, not up the middle of your butt. If the band runs up the middle of your butt it is uncomfortable and changes the feel of the stretch. With the band right on the gluteus muscle, you can really push into it. Each rep try to go a little deeper into the stretch.
Copyright © 2009 Walter J. Dorey 51
This is a great method of helping a person feel the act of pushing back into the hip and at the same time contracting the anterior muscles to lower or pull themselves down into the bottom of the windmill. Perform 3-5 reps per side and immediately after working one side, drop the band and do a regular windmill. You will find you can go deeper into the stretch much easier with greater confidence. I believe band windmills are an excellent way to warm up for heavier weights in this exercise. My thinking is that they provide a much greater input to the CNS than just letting a KB push you down. You have to activate the anterior muscles (on the front side) more fully to fold down with the band, and thus, fire the CNS more readily to more muscles so that they “wake up” to the task at hand. They also help dis-inhibit the posterior muscles so they do not provide too much of a braking effect as you fold over, limiting your range of motion. Try these band windmills and I am sure you will agree. You may have to experiment with what size (strength) of band you use. Start off with a lighter band to get the feel of it. You may also try these band windmill stretches before doing side presses or bent presses. It will warm you up, greasing the groove and prepare you for the weights. On breathing: Take a breath before you begin folding over and then begin to release some of the air as you descend. At the bottom you can grab a quick inhale and then exhale as you come back up. However, you should keep the abs braced hard the entire time. Use the power breathing technique if you have no medical restrictions, like high blood pressure. On speed of execution: Focus on the form. Nice and smooth and controlled and the speed will take care of itself. Focus on the lift. Keep your head in the game. Always squeeze the glutes hard when you pull them back under to stand up in the windmill. Once you feel you have the windmill form down and are getting strong with it, then you can progress to the side and bent press as described below. For men I would say it would be best to at least be able to windmill a 24kg KB (53lb.) and for women at least a 12 to 16kg KB (26-35lbs.) before moving on to the traditional side press and the bent press. And that means being able to do 5 reps each side for 3-5 sets. with excellent form in the windmill. If you can not do that yet, focus on the windmill until you can. You only stand to benefit. This way your body will be strong enough to handle the loading of the traditional side press and the bent press and you will not be trying to learn too much at one time as you gain strength and technique.

Copyright © 2009 Walter J. Dorey 52
The wedge: One technique that can really improve your windmill, and incidentally be applied to many other things, is the act of wedging yourself under the weight. This technique is especially useful when trying to conquer a heavier weight in the windmill and is very useful for many other exercises and lifts. It also works great in sports. More on that at a later date. What forces two sides of a log apart when a person splits wood? A wedge, or the wedging action of an ax or splitting maul. To experience this feeling, stand in front of a wall. Put your hands on the wall about chest high. Now push against the wall. What happened? Hopefully you did feel some tension building in your body and you felt you were pushing pretty hard. Now try this: Get in the same position, hands against the wall at chest height. Root your feet to the ground. One foot may be farther away from the wall than the other. Grab the ground with your feet; try to make you feet a part of the ground like tree roots sinking into the ground. Now you know the true meaning of the term “rooting your feet to the ground”. Do the same with your hands, making them become a part of the wall. Now build up tension using all the techniques from your one arm military press practice. Try to wedge your body between the wall and the ground. Literally try to push the wall and the ground apart from each other. Be sure to power breathe.
The red lines represent the wall and the ground. The black line and arrows represent my body and the direction I am trying to wedge myself into. I want to wedge myself in between these two objects, compressing and getting tighter, trying to force myself into the space between the two. This will generate great tension and pressure in the direction of the blue arrows. In this case, neither object will move. But if I apply this same technique to a movable object, it will move much more readily.
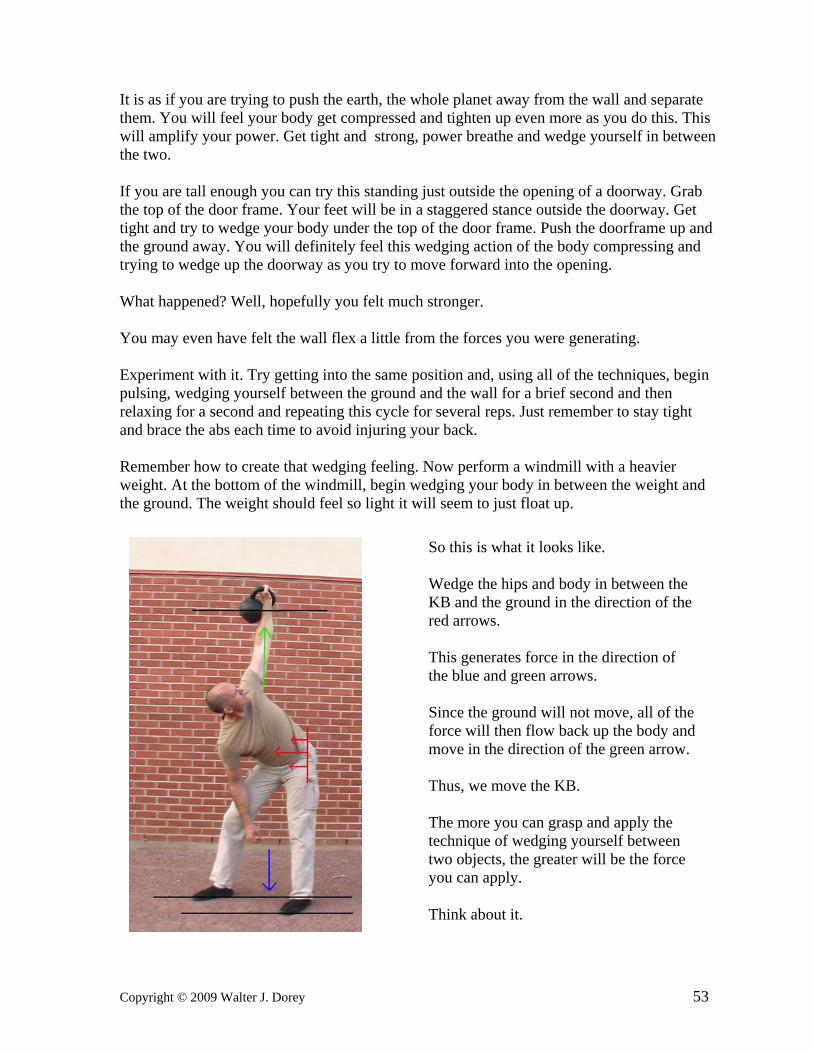
Copyright © 2009 Walter J. Dorey 53
It is as if you are trying to push the earth, the whole planet away from the wall and separate them. You will feel your body get compressed and tighten up even more as you do this. This will amplify your power. Get tight and strong, power breathe and wedge yourself in between the two. If you are tall enough you can try this standing just outside the opening of a doorway. Grab the top of the door frame. Your feet will be in a staggered stance outside the doorway. Get tight and try to wedge your body under the top of the door frame. Push the doorframe up and the ground away. You will definitely feel this wedging action of the body compressing and trying to wedge up the doorway as you try to move forward into the opening. What happened? Well, hopefully you felt much stronger. You may even have felt the wall flex a little from the forces you were generating. Experiment with it. Try getting into the same position and, using all of the techniques, begin pulsing, wedging yourself between the ground and the wall for a brief second and then relaxing for a second and repeating this cycle for several reps. Just remember to stay tight and brace the abs each time to avoid injuring your back. Remember how to create that wedging feeling. Now perform a windmill with a heavier weight. At the bottom of the windmill, begin wedging your body in between the weight and the ground. The weight should feel so light it will seem to just float up.
So this is what it looks like. Wedge the hips and body in between the KB and the ground in the direction of the red arrows. This generates force in the direction of the blue and green arrows. Since the ground will not move, all of the force will then flow back up the body and move in the direction of the green arrow. Thus, we move the KB. The more you can grasp and apply the technique of wedging yourself between two objects, the greater will be the force you can apply. Think about it.

Copyright © 2009 Walter J. Dorey 54
You must walk before you can run. Arrive at your destination injury free and you will go much further than he who rushes to face the lions. The traditional side press and the bent press are serious strength tools and, though offering a means of acquiring great overall body strength, they will bite you if you are not careful. Ready to face the lions? Grab your weapons and let’s roll! Back to the confusion: Traditional side press, bent press, what’s the diff? Simple. Slightly different body positioning and performance. Traditional Side press: arm presses weight away from the body as body drops away from the arm. Two cars pulling away from each other in opposite directions. The body moves down as the arm moves up. Bent press: Hand holding weight remains stationary as body falls away or drops under weight, straightening the arm. Parked car being your hand, car pulling away being your body. Body moves away from your stationary hand. The arm merely supports the weights as you straighten the arm by moving your body down and away from the weight. That is the BIG difference. And a few subtler points we will discuss. But that is really the hardest part for many to see. If you happen to have Pavel’s vid, on the RKBC, watch the demo of the side press, you can see his hand in the side press moving upward as the body drops down, by looking at the bricks on the wall behind Pavel. When you look at the demo of the bent press you will notice that Pavel’s hand, (marking it’s location by the bricks behind him), does not move upward at all as he drops under the weight. If anything, his hand moves down a little, but not up, until he drops fully under, extending his arm to lockout and THEN he stands up with the weight locked out overhead. And therein hides the beauty, the secret to unlocking your true potential in the bent press and being able to rapidly teach someone else how to do it! So let’s look at the first lion, the traditional side press. Slay it and you will be ready to rock on the bent press. The Traditional Side Press: Remember the lowly windmill? You will get your body in a similar position but your feet will be a little closer together. You will rotate the feet to the left when working the right side. Kick the right hip back and to the side and rotate along the spine. Your right arm, which should be holding a light weight, (at least for now), will rest on your side.
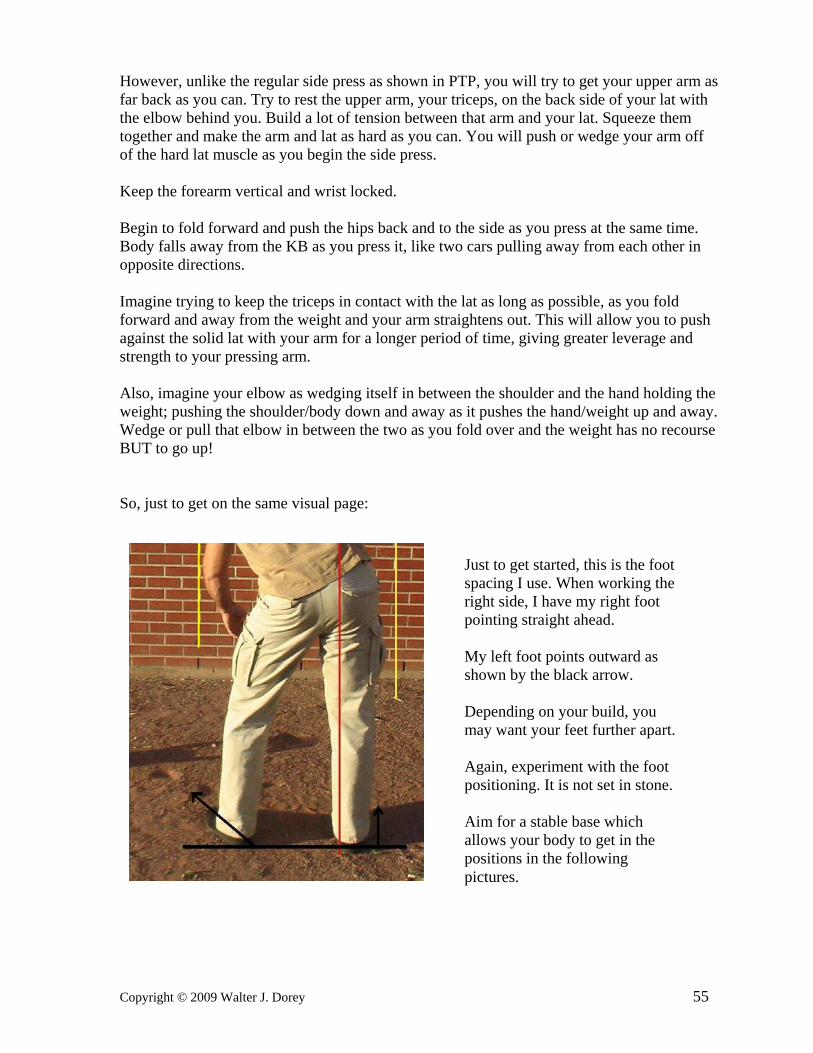
Copyright © 2009 Walter J. Dorey 55
However, unlike the regular side press as shown in PTP, you will try to get your upper arm as far back as you can. Try to rest the upper arm, your triceps, on the back side of your lat with the elbow behind you. Build a lot of tension between that arm and your lat. Squeeze them together and make the arm and lat as hard as you can. You will push or wedge your arm off of the hard lat muscle as you begin the side press. Keep the forearm vertical and wrist locked. Begin to fold forward and push the hips back and to the side as you press at the same time. Body falls away from the KB as you press it, like two cars pulling away from each other in opposite directions. Imagine trying to keep the triceps in contact with the lat as long as possible, as you fold forward and away from the weight and your arm straightens out. This will allow you to push against the solid lat with your arm for a longer period of time, giving greater leverage and strength to your pressing arm. Also, imagine your elbow as wedging itself in between the shoulder and the hand holding the weight; pushing the shoulder/body down and away as it pushes the hand/weight up and away. Wedge or pull that elbow in between the two as you fold over and the weight has no recourse BUT to go up! So, just to get on the same visual page:
Just to get started, this is the foot spacing I use. When working the right side, I have my right foot pointing straight ahead. My left foot points outward as shown by the black arrow. Depending on your build, you may want your feet further apart. Again, experiment with the foot positioning. It is not set in stone. Aim for a stable base which allows your body to get in the positions in the following pictures.

Copyright © 2009 Walter J. Dorey 56
Several points to look for: Notice my body position in relation to the two yellow lines and how it changes. In these pictures, the bright green line does not change. It remains at 24 bricks high in the following pictures. This will give a reference to watch, as the knuckles of the weight bearing hand (marked by orange line and arrow) press up above that bright green line. Also, watch the position of my head (marked by the dark green line and arrow) in relation to that bright green line. My head will drop lower as my body pushes away from the hand. As you begin to drop the body and press the arm up at the same time, really focus on keeping that armpit tension as high as possible. Do not get lazy! Keep the whole body tight and control the weight. Push into the weight.
OK, lot going on here. This is the starting position for the TSP. Vertical forearm, (red line),pretty much lined up over hip. Folded at hip crease. Shoulders rotated around spine. Notice contact of tricep and lat circled by blue. I have my arm sitting back (in direction of blue arrow) as far as I can. I will tighten up that connection between the arm and lat as much as I can, building tension. I will imagine that tension expanding and pushing my arm up and my body down.

Copyright © 2009 Walter J. Dorey 57
Here we are about halfway down. Notice as I fold down, my left shoulder has moved further away from the yellow line on the left. That is because I am rotating my shoulders around the length of my spine. The blue circle is the area you want to really focus on, expanding that balloon of tension. We can also see my hand is now above the bright green reference line and my head is now under it as my body drops away from the weight. Keep the feet rooted!
All the way down and weight locked out! Initially, the hand was below the head. They passed each other as the body went down and the hand pressed up. Here, they are at their greatest distance from the bright green reference line. My right hip has traveled back closer to the right yellow line as I continued to fold over. That hip should be pushed back and loaded with tension. My left shoulder has rotated down even more as I press the weight to lockout. At this bottom position I am in a very similar position as I would be in if doing a windmill. Keep the arm locked straight and the shoulder tight and packed!

Copyright © 2009 Walter J. Dorey 58
In the above picture, my left arm may hang loose or I may brace it against my left leg, depending on how heavy the weight is.
So, now we have to get back up! Take a quick breath without relaxing. All that tension you loaded into your hips as you folded down will now be unleashed to drive the weight back up. Squeeze your glutes tighter and pull or wedge the hips back under you as indicated by the red arrow. This wedging action will cause your rigid arm to drive the weight up. Drive through that arm with strength! Keep going until you are standing fully upright.
Here we are standing up. Be sure to keep the arm locked straight. I have a slight bend to my arm here (the picture does not lie). I can get away with it because of the light weight (for me). With a heavier weight, if my arm bent at any point of the lift after lockout, I would most likely lose the weight and drop it, failing at the lift. From this point I would lower the weight to the original starting position to do another rep.
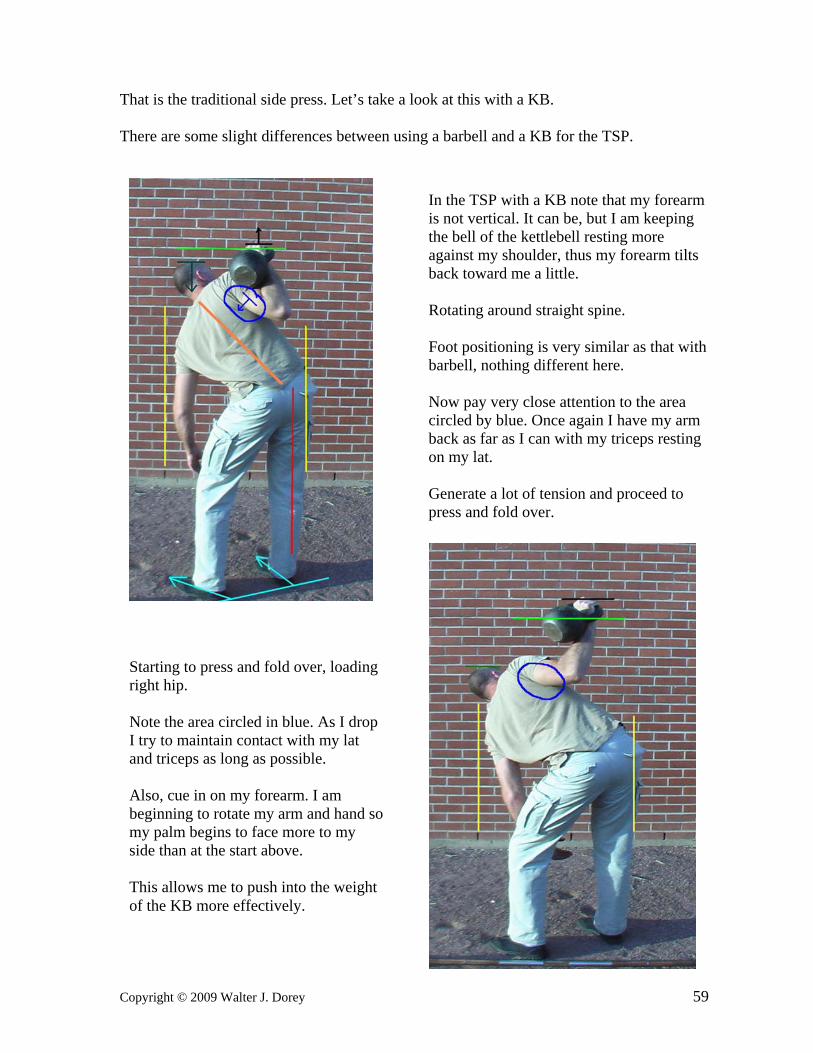
Copyright © 2009 Walter J. Dorey 59
That is the traditional side press. Let’s take a look at this with a KB. There are some slight differences between using a barbell and a KB for the TSP.
In the TSP with a KB note that my forearm is not vertical. It can be, but I am keeping the bell of the kettlebell resting more against my shoulder, thus my forearm tilts back toward me a little. Rotating around straight spine. Foot positioning is very similar as that with barbell, nothing different here. Now pay very close attention to the area circled by blue. Once again I have my arm back as far as I can with my triceps resting on my lat. Generate a lot of tension and proceed to press and fold over.
Starting to press and fold over, loading right hip. Note the area circled in blue. As I drop I try to maintain contact with my lat and triceps as long as possible. Also, cue in on my forearm. I am beginning to rotate my arm and hand so my palm begins to face more to my side than at the start above. This allows me to push into the weight of the KB more effectively.

Copyright © 2009 Walter J. Dorey 60
The reason is because I am dropping my body faster than I am pressing the weight. But if you look at the two pictures, take a close look at the area circled in blue. I am still maintaining a lot of contact between the lat and triceps. This allows me to use the tension generated there to the full, leveraging off the lat with my arm to lift the weight. How do I maintain that contact for so long? By keeping my rear leg as straight as possible as I fold my body over. Also, by rotating my forearm so my palm faces to the side and even toward my back more, it allows me to keep my arm back further on the lat longer. This is easier to do with a KB than with a barbell. With a barbell we would have to rotate the entire length of the bar around our forearm, which we can do, but it is harder to control.
This may look like the same picture as above, but it is not. Three things will tell you it is a different shot: First, look at my left hand. It is further under my body. Second, in the shot above, my elbow bone is directly in line with the “V” of my armpit, as can be seen by the mortar line in the bricks. In this shot to the left, my elbow is above that line by a full brick. Third, above there are 5 bricks between my head and the bright green reference line. To the left there are 8 bricks between the two. So why do they look so similar? Because, even though I have dropped my body more, my hand has not gone much higher at this point.

Copyright © 2009 Walter J. Dorey 61
At the bottom! Note my right leg has bent some at this point. Keeping it straighter is a matter of flexibility. Yet, it is OK to bend it some when you get this deep. You can see my hips have moved back even more. My arm is still locked out straight. So now we have to get back up.
I am driving through the arm into the weight as I begin to stand up. The hips must be pulled or wedged back under the body to provide that drive into the arm and weight. If needed I can brace myself and push off with my left hand , IF the weight is really heavy. Focus on your tension and the drive up. Standing up should be very much like standing up from a windmill.

Copyright © 2009 Walter J. Dorey 62
Almost all the way up. Keep the spine straight. Keep the arm locked out. Keep pulling the hips under with authority! Do not get lazy at this point thinking the lift is in the bag. Lack of focus at this point can still hurt me. If I relax I can hurt my back or lose focus on keeping my arm locked out. A heavy weight would fold my arm if I do not keep it straight. Keeping a tight grip on the KB handle and tightening up the biceps and triceps will help.
So we made it all the way up. If doing singles with a real heavy weight I would probably drop the weight to the ground, catch my breath, and clean it to start another rep. If doing more than one rep, I would drop the weight down in a controlled manner, get set as in the first picture, and start my next rep.

Copyright © 2009 Walter J. Dorey 63
At the bottom of the traditional side press, I may stand up in an action very similar to the windmill as demoe’d above, or, once at the bottom of the TSP with my arm locked out, I might drop my hips even lower, so I am in more of an overhead squat position and then stand up.
This is a front shot, but note I am dropping my hips so I can get my body under the weight more. In order to do this, I need to squat down lower, bending my knees.
To the right you can see I have dropped or squatted even lower to get my body under the weight more. Now my hips are under the weight so I can drive back up. This is more of an overhead squat. Experiment with both styles of recovering from the traditional side press to see which you like better.

Copyright © 2009 Walter J. Dorey 64
Another point I want to share concerns the keeping the triceps and the lats in contact as long as possible. The more you can do this, the easier it is to control and leverage the weight to lockout. By folding over the torso, just like we do in the windmill, it enables me to maintain that contact. Think of the traditional side press as a press combined with a windmill. If I do not follow a pattern of folding over similar to the windmill, I will end up squatting down under the weight as I press it. I do not want to do that. Note: If you have difficulty folding over in the windmill and going very deep into it, you will NOT be able to do a traditional side press or a bent press very effectively or safely. So, do not rush from the windmill too quickly to these other lifts. Get proficient at the windmill and you WILL progress much faster and safer with the TSP and BP. Let’s look at what happens when we squat down under the weight, rather than fold down under it:
So, here we find I am squatting down during the TSP. Note the effect on my lat and triceps circled in blue. Is there any contact between them? Very little. So there is nothing for me to leverage off of. And it will be very hard to maintain that tension in my armpit.

Copyright © 2009 Walter J. Dorey 65
I have pressed the weight up more and continued to squat under it more. Note that area encircled with blue. Is there any contact at all? No, I have lost all leveraging from that area. Plus look at how far I need to bend my legs to get under the weight. I am trying to do a slow, awkward squat at the same time I am trying to press. This is not the way to do a TSP!
This is simply lovely! NOT!! This would be fine if I had done the TSP as mentioned, following the folding over like a windmill, and THEN, at the bottom, dropping the hips under to overhead squat the weight back up. But if I squat down while pressing it is not a TSP. It is awkward and not very fun to perform. So please do not do a side press like this: squatting down under the weight as you press it up.

Copyright © 2009 Walter J. Dorey 66
Just as a reminder, when doing the TSP or the BP, by rotating the arm and hand back you can press into the weight, especially a KB, much more effectively:
At the start my palm is facing to the side. This will change as I begin folding over and pressing.
You can see very clearly my arm and hand are rotating to the back as I press the weight. This helps keep the KB centered over my body and gives me a better angle to push into the weight from.
Once again, you can see my palm has rotated more toward my back, the direction my hip or glute is pointing. This is a very stable position, and very forgiving on the shoulder. It also helps me in maintaining that lat/triceps connection.
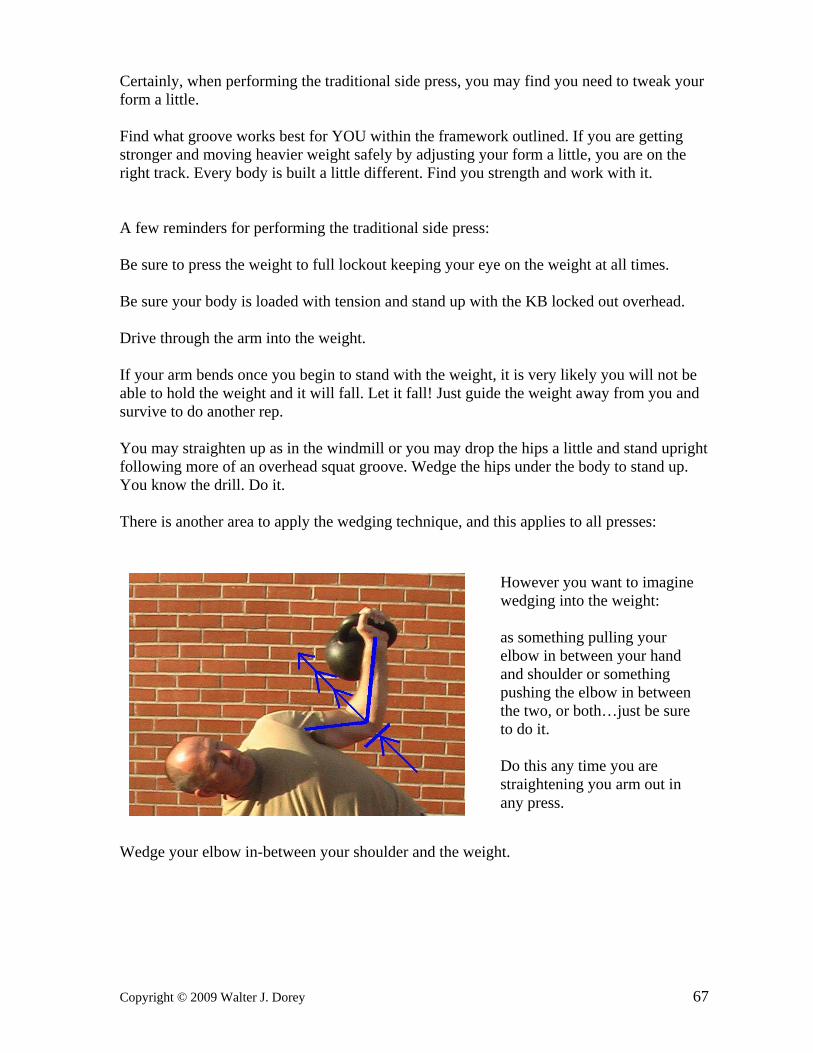
Copyright © 2009 Walter J. Dorey 67
Certainly, when performing the traditional side press, you may find you need to tweak your form a little. Find what groove works best for YOU within the framework outlined. If you are getting stronger and moving heavier weight safely by adjusting your form a little, you are on the right track. Every body is built a little different. Find you strength and work with it. A few reminders for performing the traditional side press: Be sure to press the weight to full lockout keeping your eye on the weight at all times. Be sure your body is loaded with tension and stand up with the KB locked out overhead. Drive through the arm into the weight. If your arm bends once you begin to stand with the weight, it is very likely you will not be able to hold the weight and it will fall. Let it fall! Just guide the weight away from you and survive to do another rep. You may straighten up as in the windmill or you may drop the hips a little and stand upright following more of an overhead squat groove. Wedge the hips under the body to stand up. You know the drill. Do it. There is another area to apply the wedging technique, and this applies to all presses: Wedge your elbow in-between your shoulder and the weight.
However you want to imagine wedging into the weight: as something pulling your elbow in between your hand and shoulder or something pushing the elbow in between the two, or both…just be sure to do it. Do this any time you are straightening you arm out in any press.

Copyright © 2009 Walter J. Dorey 68
Another little tip is your hand position with the kettlebell:
This hand positioning on the KB is OK, but by tweaking it a little I can strengthen my pressing ability. Notice how the handle runs straight across my palm.
Here, I have shifted the handle to run through my palm diagonally, so it puts more pressure on that red sweet spot of the palm. Remember talking about that before when doing a press with a barbell? I thought so…
This open hand shot shows you how I want the KB handle to set in my palm a little more clearly. Experiment with this hand and KB placement. The KB seems to hang from the hand in a more stable position when situated thus.

Copyright © 2009 Walter J. Dorey 69
Once standing upright, safely lower the weight back to the starting position and perform another rep. Keep the reps in the 1-5 range. However, as you get stronger and the weights you use get heavier, you may want to work in the 1-3 rep range. It is perfectly acceptable to do single reps and drop the weight to the ground after each rep when the weight gets really heavy. However, each time you drop the weight means you have to pick it back up and get it to the starting position. Start off with a weight you can handle and progressively, within the workout, build to a heavier weight. Do not get caught up in trying to lift what a friend might lift. Do not go too fast in trying heavier weights. Push yourself as your technique and ability improves, but do so in a safe manner. Injuries are never the best way to make progress. Give your body time to build up strength and toughness. Over the course of time, as you get stronger and your body toughens up, you will be able to lift impressive poundage. This will take time, dedication and perseverance, to work up to really heavy weights. Once again I would suggest working up to a 24kg KB for several reps in the side press before moving on to the bent press. A good goal to shoot for would be 3-5 reps of 3-5 sets with the 24kg, if you are a male. I would say a 16kg KB if you are a female. This will not take long. You are learning a skill and how to generate tension, loading the body and applying that tension to moving the weight. Be sure to use the wedging technique at the two critical areas in the traditional side press. It will greatly improve your pressing prowess. This lift will toughen and harden your body. The great lifters of a bygone era could easily lift several hundred pounds this way. Hopefully you followed suggestions to practice the windmill for several weeks to a month or so. If you did, you should be performing that exercise up to the recommended standard of at least a 24kg. Kb for 5 reps. If that is the case, you could easily do just a set or two of windmills to loosen up and then jump into your side press. Or you could plug in the windmills at the end of your workout or put them on a separate day. You may even drop them from your routine for a month or two as you focus on the side press. So did you kill it? Great! Time for the bent press: You will follow all of the above techniques for the side press in getting into your starting position. However, your feet may change position a little and they may be closer together. You will notice one major performance difference. As you begin folding forward at the hips you will keep the hand and the weight stationary in relation to its position above the ground. Your body will fall away from the weight as your hand supports the weight. You will NOT be pressing the weight up so it moves upward! Your hand will, however, be rotating to push back into the KB just as in the side press.

Copyright © 2009 Walter J. Dorey 70
This does not mean you are not actively pressing against the weight. You will use great tension with your pressing muscles to keep it in its proper position. You are using holding strength, locking the weight into a fixed position in space as you drop below it. Remember to wedge your elbow in between the weight and your shoulder/body. Leverage you triceps off of your lat. They MUST be tight and hard to do that. But as you do so, the body is forced to drop while the hand remains in place as if prevented from rising by a low ceiling. Your hand supporting the weight is the parked car. Your body is the car pulling away. Once in the lowest position with the weight locked out overhead, stand back up driving though the weight. In the bent press you will find you MUST drop the body even lower than in the side press. You will probably be forced to bend both knees in order to complete the rep. Of course this will depend on your body and your flexibility. The reason for the lower body position is that with the side press you are pressing up at the same time you drop the body. So part of straightening the arm comes from arm movement upward, so the body does not have to drop as much. With the bent press, only the body moves to straighten the arm, so all of the straightening of the arm must be accomplished by a lowering of the shoulder and body. As with the TSP, once you achieve lockout of the weight you must stand up with it. So, once again, in order to stand up, you may find it advantageous to bring the hips under your body more, so you are in somewhat of an overhead squat position. Then from that position, wedge your hips under you more as you drive the locked out arm and weight overhead to the standing position. Drive through the arm. We will take a look at a series of pictures of the bent press. I am going to be hard on myself as we analyze these pictures for two reasons. First, it will help me as I critique my own performance, it will serve as a reminder for me on where I need to tweak my form. Remember, the camera does not lie. So, every now and then have someone take some pictures or video of you lifting. Analyze it and improve your technique even more. Second, it will show you common areas where you might slip up and how to fix them. It will show you that not every rep will look the same, but we want to try to get them to be pretty much in the same groove. One thing to be aware of: whenever doing the windmill, side press or bent press, your form may be a little different from one side to the other. As long as your form is good, a slight variation on either side is OK. But a major difference from one side to the other could spell trouble, i.e., an injury waiting to happen. Find out what is wrong and fix it before continuing.

Copyright © 2009 Walter J. Dorey 71
That is my mistake. Learn from it. Take pictures, study them, and correct your mistakes. Once you are set to begin the bent press: as soon as you begin folding over, keep the KB in that same spot in space. Press you body away from it, do not let the weight follow you too much. It may drop a little with your body, which Pavel does on his RKBC video, but it should not drop as much as I did in the above picture. Not a big point, but something to look out for.
Here is the start of the bent press. Personally, I had started to fold forward and simply forgot to start keeping the weight pressed in its original position as marked by the green line. That green line is where I had my hand when I first got set up for this shot, but before the photographer could snap the shot, I had already started my downward descent. Which is fine, except for my lack of pressing on the KB. I was allowing it to fall with my body. Ideally, my hand should have been where the green line is and my body where it is in the picture. There should have been two pictures.
Because of my above mistake, I tried to correct it by pressing the KB up to try to gain the room I needed to drop my body under it. Here you can see my hand is at the height it should have been at the very start. Also, you may want your stance slightly wider. You can even use the foot position of the windmill and drop down in that same groove, thus giving yourself a better chance of keeping your back leg straighter. Experiment. From here on out my hand positioning remains good.

Copyright © 2009 Walter J. Dorey 72
When I talk about keeping the rear leg straight, it does not mean it is hyper-extended back- ward. Just keep it locked straight, if your flexibility allows. However, do not round the back to do this.
That’s better! I’m keeping my hand at the same spot as I lower my body under the weight. I am still pressing hard against that KB, though, to keep it in this position. My arm is almost locked out. I have bent my legs more to drop under the KB. As you get more flexible with this lift, you may be able to perform it with a straight back leg the entire time, particularly if you have short legs and a long torso.
At the bottom! My arm is fully pressed out, or I should say: my body is fully pressed under the weight. Notice my hand did not move upward. From this position I will get set, tightening up my glutes and dropping my hips under the weight and body. Then I will stand, driving my arm up through the weight and wedging my hips under.

Copyright © 2009 Walter J. Dorey 73
As far as your weighted hand drifting up, it may do so a few inches, and this would still be acceptable as a bent press. However, I would avoid letting it rise up any more than that. Then we would be crossing the line into doing a traditional side press. Really focus on dropping under or pressing yourself away from the weight. This can be a little hard to get. It may take a while to find the right groove. But I have found a way to correct that problem a little more readily. Let’s take a look at the bent press with a barbell.
Hopefully, you remember how to drop the hips and stand up that way as demoe’d for the traditional side press. This is the end position after standing back up with the weight. Again, if you desire to do another rep, lower the KB and reset in the start of the bent press.
Set for the bent press. The red line will remain at the same height through out this series of pictures. Everything with the KB applies here with the barbell. Once again you will note I press up a little at the beginning of the bent press. Not the best way to perform it, but passable. This is hard to note while performing the lift. Soon we will take a look at how to correct this technique flaw.

Copyright © 2009 Walter J. Dorey 74
Already you can see I have pressed my hand up. The rest of the technique is good. We really need to focus on keeping the weighted hand fixed in space and pressing the BODY away from the weight. This is usually the big issue when performing a bent press. It can be difficult to tell or feel if you are pressing away from the weight properly, or pressing it higher as you fold over.
Here you can see my hand has not moved much compared to the above picture. This is much better. I am pressing away from the weight. Practice the skill of pressing away from the weight to master the bent press. Support the weight as you press away from it. Everything else looks good: straight spine. Triceps on lat. Arm back. Rear leg almost straight. Forearm near vertical.

Copyright © 2009 Walter J. Dorey 75
This pic looks very similar to the one above. Yet it is different. My left hand is under my body more. Look closely at the red line. My hand has actually dropped down an inch or so, but my arm is straighter. Thus, I am pressing away from the weight better. I suggest if you do take pictures to grade your performance, take them against a backdrop like a brick or block wall to measure what is occurring.
I am just about bottomed out here and my arm is nearly straight. Note the hand position in relation to the red line. The last four shots are actually pretty good for the bent press. My starting shot, though, is a little shaky. But this is good, because I know where I am with this lift. I would have never noted this without the pictures. So, beginner, intermediate or advanced lifter: check your form on occasion. Film it or take pics.

Copyright © 2009 Walter J. Dorey 76
From the above position stand up to this position:
There are a couple of things to be aware off when using a barbell for traditional side presses or bent presses. The barbell will be a little harder to balance than a KB. It will also have a tendency to rotate around as you lift it. And it will want to roll in your hand. Also, think about your hand positioning and how best to press into the bar as shown earlier. You want to be aware of your surroundings so you have a clear path to drop the bar if needed. And think about how the bar is positioned over your body if you drop it.
Lower the weight safely to perform another rep. Of note: You are more apt to press the weight up a little when using a lighter weight, especially at the start of the bent press. Using a heavier weight almost forces you to drop the body under the bar than press the bar up. Just use low reps or do single reps.
Notice I am pressing into the bar and it runs parallel with my body. If I start to lose the barbell I can guide it away from me in the direction of the red arrow. Safety violation! Do you see it? If I dumped the bar it would land on my KB.

Copyright © 2009 Walter J. Dorey 77
Does the hand positioning and the orientation of the bar make more sense now? What would happen if I dropped the bar here? This is a good way to be spitting out Chiclets. Also, the weight of the bar in this position is resting more on my thumb.
Here you can see a little better shot of the bar in my hand. The weight will want to roll toward my thumb if I am not careful. If that happens, chances are my wrist will fold over and ALL the weight will be on my thumb which will cause me to drop it on my head. Far better to rotate the bar more in line with my body.
In this picture, if I lose the bar I can guide it forward and away from my body. Also, note how my wrist has fallen back? Not good, as it can tweak my wrist a little. Best to keep the wrist straight. But if my wrist did get fatigued and I felt the bar rolling in my hand, it is far better to control it and roll the wrist back a little than let it roll to the thumb side and lose the weight straight down before I can guide it away from me. By controlling the roll of the bar I can keep it in my palm and fingers which are stronger than the thumb.

Copyright © 2009 Walter J. Dorey 78
BUT, if I do not control the bar and let it roll back too far into my hand I can actually lose the bar behind me, which is likely to tweak my wrist and my shoulder. So keep a tight grip on that bar! Be aware of the bars positioning in your hand and how it is oriented at all times!
So, always train in an area where you can dump the weight safely. It would be a good idea to even drop the weight a couple of times from various positions to get used to the idea that you can do so safely. Then if you start to lose the weight you will be primed to let it go safely rather than struggle to “catch” or “save” the lift and get injured. The weight is not in danger and does not need to be saved. You are not competing in the Olympics for a world record. Let it go! We will now take a look at a few technique tips that will help you in your performance. We may have touched on some of these a little, but it is a good reminder.
In this picture we can see what happens if I lose the bar and it is oriented along the length of my body. I can guide the bar away from me as it falls. I simply push into the bar as it goes over and do not resist it. Plus, I am making sure my body and head is out of the way. Pushing on the bar as it falls pushes the bar away from me and helps me push my body away from the bar.

Copyright © 2009 Walter J. Dorey 79
Technique tips: You will read many times about the thought of driving up through the arm. What does that mean? The weight in your hand locked out overhead will be pushing your arm down into the shoulder joint even as you are actively pulling the shoulder and straight arm down. As you begin straightening up in the windmill, side press or bent press, gravity and your muscles pull the shoulder down as your rising body comes up against them. You should feel a strong compressive force in the shoulder, locking it tighter together providing greater stability. If the arm begins to drift out of position and the weight and arm lean forward, back or to the sides too much, as you stand up you will feel the weight is not balanced over your body. You will find the body is not centered under the weight to drive it up optimally. Your arm will begin to fall away from you and you might try to catch the weight or save the lift. This is a sure ticket to a torn shoulder. If this happens, LET THE WEIGHT FALL! Get your hand, arm and body out of the way and save your shoulder and be more focused on what you are doing on the next rep. If you are having trouble feeling this action of driving through the arm, I suggest one of the following remedies: First, if you are tall enough, stand in a doorway and put one hand up against the top of the doorframe. Fold down into the windmill or side press position as far as you can until your arm above you is straight. You may not be folded over that far, but that is OK. Lock your arm solid and pack the shoulder into the shoulder joint. Press up through the arm into the doorframe. Use all of the tension techniques as you try to press the doorframe up, push hard and then relax. Next, try shifting your position, your body, farther away from the doorway, either forward or back ward. Keep your hand locked to the top part of the doorframe. Then re-apply all of the tension techniques and press up against the top of the doorway. Notice how stable or unstable you feel. Repeat this several times, and as you move around, you will find at some points you cannot press as hard up into the doorframe. It just doesn’t feel right. This is because you are not centered under the arm and hand and you are losing applied force because your body is not optimally aligned with your overhead hand and arm and the point where you are pushing. At some point you will find you are in your strongest position to really press hard against the doorway and will feel very stable. You will notice that in this position, the harder you press and the harder you create tension, wedging up against the doorframe, the more stable you will feel. THAT is applying strength, force; driving though the arm! If you are not tall enough to do that, try grabbing a weight that is medium heavy for you. Press it overhead and then fold over about half way down into your windmill. Now begin to move your straight arm forward or backward and to the sides. Do so slowly! As you do, you

Copyright © 2009 Walter J. Dorey 80
will find that at some point your arm wants to continue falling in that direction and you have to fight it so it does not fall. (Be very careful here! If you start to lose it, LET IT GO!) At this point the weight will not feel very stable, and if you began to stand up with the weight in that position, the very act of standing would push the weight into the direction your arm is leaning even more and you would probably lose the lift. It is like balancing a broom handle on your palm. When it is balanced, or centered completely over your hand you can push the broom stick straight up. But if it leans outward in any direction and you push up on the bottom of the broom stick, you will be pushing the end in your hand up faster than the end away from your hand, so it leans and falls in that direction even faster. Try it.
Here, a red weight is balanced on a straight arm. If we push up through that arm the weight will rise up. Pretty simple.
In the picture to the right we can see that if our straight arm is not directly under the weight, the mass of the weight, due to gravity, will try to pull our arm down in the direction our arm is leaning. Again, really simple.
So, with our straight arm leaning and not centered under the weight, what will happen as we begin to stand with the weight as in the windmill, TSP and BP? Easy: as we press up, the force will travel along our arm and push the weight further away from us, increasing its incline and speeding its fall to the ground.

Copyright © 2009 Walter J. Dorey 81
So, get your body centered under the weight by keeping the weight locked out overhead in the most stable position. Then as you begin standing upright you can apply all of your force to moving the weight upward, rather than pushing it to the side. When the weight is centered over your body you can feel it is much more stable; and your arm is not waving around like a stalk of grass in the wind. Thus, you can apply all of your strength to moving the weight upward, rather than wasting your strength fighting to keep it from falling to the side. Yet, interestingly enough, things look a little different when using a KB verses a barbell. It is very easy for the most part to get centered under a barbell. A KB, however, has its mass located further from your arm, which creates a somewhat different scenario.
It is very easy to see how a kettlebell wants to pull your arm back in the direction of its center of mass. Gravity is pulling it straight down, but since the mass of the bell is not balanced over the palm like a barbell, but is on the back of the forearm, it pulls the arm in the direction of the green arrow. So getting the arm centered under the KB can be a little more challenging at times. Sometimes we can ignore this and just keep the body tight and control, resist, this unbalanced weight, as in the one arm military press (1AMP).
However, (unlike the 1AMP), in the windmill, side and bent press, my body is folded way over, so my shoulder is not in an optimum position to resist the weight. So by orienting the weight as pictured at the right, we can get the shoulder under the center of gravity of the KB and press into the weight more effectively as we stand upright with it. This is at the BOTTOM of the windmill, TSP and BP.
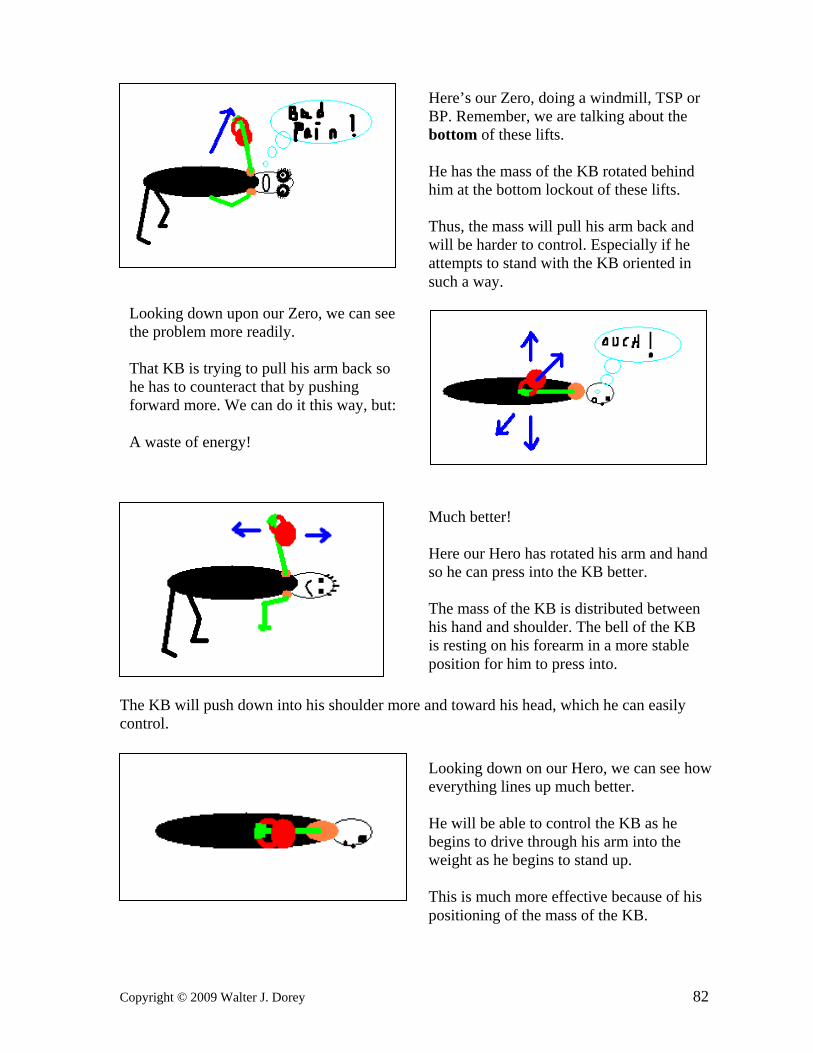
Copyright © 2009 Walter J. Dorey 82
The KB will push down into his shoulder more and toward his head, which he can easily control.
Here’s our Zero, doing a windmill, TSP or BP. Remember, we are talking about the bottom of these lifts. He has the mass of the KB rotated behind him at the bottom lockout of these lifts. Thus, the mass will pull his arm back and will be harder to control. Especially if he attempts to stand with the KB oriented in such a way.
Looking down upon our Zero, we can see the problem more readily. That KB is trying to pull his arm back so he has to counteract that by pushing forward more. We can do it this way, but: A waste of energy!
Much better! Here our Hero has rotated his arm and hand so he can press into the KB better. The mass of the KB is distributed between his hand and shoulder. The bell of the KB is resting on his forearm in a more stable position for him to press into.
Looking down on our Hero, we can see how everything lines up much better. He will be able to control the KB as he begins to drive through his arm into the weight as he begins to stand up. This is much more effective because of his positioning of the mass of the KB.

Copyright © 2009 Walter J. Dorey 83
Just so we are clear, at the start of the side press and bent press we want the mass of the KB toward our back to help pull the arm back onto the lat. But as we lower ourselves under the KB, it is advantageous to rotate the arm so we can press into the weight of the KB more effectively as demonstrated earlier. As we fold down we rotate the palm toward our butt so the KB rides up on the forearm more. Then, once we are at the bottom of the TSP and the BP, it is further to our advantage to have the KB oriented as pictured. It may swing back a little toward our back, but not too much. By and large, we want the palm facing somewhat in the direction our butt is pointing. This would be similar in the bottom of the windmill. One other thing to understand is that as we begin to stand we will rotate the arm and palm back forward again. The arm and palm rotate toward our butt as we fold over. As we stand the arm and palm begin to rotate so the palm ends up facing forward in the direction we are facing. This puts less stress on the shoulders.
It does not matter: bottom of windmill, TSP or BP. Beginning to stand, you can see my palm is beginning to turn more to my side than back. I will continue to “unwind” my arm as I stand up.
Standing more upright, my hand has rotated to face even more to the side. This will usually occur naturally as we stand with the weight. But, if while you are standing, it feels as if your shoulder is impinging or jamming up or you feel a hint of pain, it could be because you are not “unwinding” the shoulder as you stand up.

Copyright © 2009 Walter J. Dorey 84
Another point to take note of: Once we have reached the bottom of the windmill (where the arm is always straight) or the side or bent press and have locked our arm out straight: we MUST keep it that way as we begin to stand back up. If we allow the arm to bend at this point, we may get away with it with a lighter weight, but with a heavier weight we will most likely lose the lift. Time for some spicy little pictures once again:
Almost upright and you can see how my palm and arm continue to unwind. Even as I do this, I am keeping my shoulder tight and pulled down into the socket. I still must drive though the arm as I stand up.
So, there we go, fully upright with weight locked out overhead. My palm has rotated with my arm so it faces directly forward. I could even rotate my arm a little more so my palm faces a little more to the left. For some that may feel even better.

Copyright © 2009 Walter J. Dorey 85
It will fall faster and faster and be harder to push away as the bent arm will bend more and not have the leverage to apply to the weight. Our opportunity to push the weight away is gone very quickly.
Here is our happy little Zero about to become unhappy. He is at the bottom of the lift and ready to begin standing. But, what’s wrong? Yeah…his arm is bent. Light weight…might get away with it.
Bent arm with heavier weight: Our Zero is in trouble! As he brings the hips under to stand as in direction of blue arrows, the rising body will, with the help of gravity pulling the weight down, cause the arm to bend more. Fatigue may cause the arm to bend. That, and lack of focus. Yes, he may be able to dump the weight, but with a bent arm it is much harder to control and push a heavier weight away. The weight is much more likely to drop…straight down.
And as it falls straight down it will gain momentum…

Copyright © 2009 Walter J. Dorey 86
Earlier, we had looked at a picture where I was doing a bent press and I had lost the weight and pushed it away. In that picture my arm is bent. But when you are in the lowering phase, you are focusing on applying a great deal of pressure to the bar as you straighten the arm, and if you begin to lose it, the wedging pressure into the bar from your arm is already there. We simply keep that pressure there and guide the weight away from us. At the bottom of the TSP and the BP, once we lock the arm straight, we are not exerting as much pressure to keep it there. It doesn’t take as much force to keep the bar in that straight arm position as it took to get it there. As we begin to wedge the hips under ourselves to stand up, we can easily lose focus of keeping the arm straight. We have shifted our attention to getting the glutes tight and tensing up our body to pull our hips under and thus may forget to keep the arm straight and solid. We may have done too many reps so our arm is tired. In any case, it does not matter how we got here. What does matter is making sure we do not get in the bad habit of letting the arm bend with lighter weights. Proper technique with lighter weights will help us use that same technique with heavier weights. Don’t fall into the habit of letting the arm bend a little as you stand up with the weight. In the windmill, keep the arm locked straight at all times during the performance of that lift. In the side press and the bent press, once we reach bottom: keep the arm straight! You have been warned.
So, this could be the possible result. It might not happen this way but why risk it. Upon reaching the bottom of the windmill, side and bent presses: Keep that arm locked straight!
Copyright © 2009 Walter J. Dorey 87
So, picking up where we left off: OK, so now you are standing up with the weight locked out overhead. Lower it safely and get in the starting position to do another rep. Keep your reps in the 1-5 range. Lighter weights can be done for 5 reps. When you start lifting a weight that is really heavy for you, do 1-3 reps. Single reps can build tremendous strength. Just do more sets of single reps. Once again you do not want to get fatigued to the point where your form suffers. This is not the exercise to build cardio with. It is a technical lift for developing and testing strength. Back in June of 2004, I had posted a reply on the Dragon Door forum about the bent press. The thread title was called “Rope in the Bent Press”. In that post I shared a method I had stumbled upon while analyzing the bent press on Pavel’s video. Once I realized the hand supporting the weight should not move upward it was relatively easy to experiment with a method to mimic the bent press and drill the proper form of the lowering phase. In the post on DD”s forum I mentioned how I went from a shaky, one rep 35lb. KB bent press to a solid 73 lb. bent press. This was accomplished in 2 weeks. Yes, in two weeks I doubled my bent press! This method will help you teach the bent press more readily and safely. It will also help you boost your bent press numbers. And, as noted above in some of the pictures, it can be used to help you tweak your own form if you are pressing the weight up too much in the bent press as you fold over. You will soon find out why. I did save that original forum post that I put on Dragon Doors forum, though I may have edited it some when I actually posted it. So, I will present what I had saved to my computer back then. However, disregard references to figure/picture numbers in the following italicized portion. Rope In the Bent Press “The Bent Press (BP) develops men of strength. Names such as Eugene Sandow, Arthur Saxon, Thomas Inch, Edward Aston and John Grimek come to mind. These men could BP anywhere from 271 to 400 pounds! Lifting such weight in the BP builds tremendous bodily power. The BP creates true functional strength that would greatly benefit any would-be strongman or athlete today. However, the BP can be a little intimidating to learn. After all, you are in a bent over, seemingly twisted position, with a weight overhead just waiting to come crashing down on you. Flexibility and knowing which muscles to contract forcefully become key issues in the BP. Also, one must develop intense “focus” on the task at hand. This is not the time to multi-task, thinking about a myriad of other things. Focus.

Copyright © 2009 Walter J. Dorey 88
To be honest, the BP was not my favorite exercise. My personal bodily operating parameters (tall, long arms, short torso, long legs, old back & shoulder injuries) did not lend to a graceful BP. A 16kg Kettlebell (KB) was possible but difficult. Then an idea fell upon me. With a little experimenting, in less than two weeks I went from a shaky rep or two with the 16kg KB to a rock-solid rep with a 32kg KB. And all of this with bent pressing a KB only a few times to test myself. So, here we go! Get yourself a length of rope, 3/8-1/2” in diameter, 7-8 feet long. Tie a fixed loop in both ends. (A bowline knot works well – refer to Fig. 1.) . I suggest running the rope through a piece of PVC or pipe for the handle end. How do you determine how long the rope with two loops should be? (Refer to Fig. 2.) Of course, you may need to adjust the length for your particular build, but this gives you a good starting point. Once you have your rope set up you’re ready to rock. O.K. we’ll work the left side first. Put one loop around your right foot; pass the rope outside the leg, behind your back and up to the left hand. (Fig. 3 & 4) Get into position of BP. Note: I suggest wearing shoes with the rope. And you will soon find out why you will want a piece of pipe for the handle. In short order you will be building tremendous pressure which could hurt or injure your instep or hand. Now tense your body. Build some tension against the rope. Begin to rotate your upper body to the left, right shoulder pivoting around and down toward your right knee. At the same time, kick your left hip back and to the left as you press yourself down into a squat. (Fig. 5 & 6) Continue “screwing” your body under the rope/weight until the left arm is fully locked-out. (Fig. 7) Pause for a few seconds in this locked-out bottom position, maintaining or building more tension. Now relax smoothly, stand and repeat. Do 3 reps each side. Now I know what you’re thinking: “That’s only half the lift! I need to stand with the weight locked-out overhead too!” Hold on and we’ll get to that. First, some tips that will greatly improve your results. If you are having trouble rotating your upper body, kicking the hip sideways and back and squatting at the same time, try breaking it up. Get in the starting position; kick your hip back and to the side a little. Then rotate your upper body. Then kick the hip back to the side more as you squat down. Practice this movement with little tension. Get smooth with it. Then add more tension. Second, are your shoulders hurting? They should not be! Two cues to improper form, noticeable when using a KB, is pain in the back of the shoulder and the arm falling over from the weight of the KB. Let’s fix it.

Copyright © 2009 Walter J. Dorey 89
Get your triceps seated over or almost crossways on your lat. Study pictures Fig 3 & 4. Note especially the position of my palm. What direction is it facing in the various stages? At the start it is facing forward. Halfway down it faces to the left, two-thirds of the way down it faces to the back – in the same direction as my left glute. This will vary from one person to the next, but for me, it eliminates shoulder pain from an old injury. Also, if you have problems keeping your forearm vertical, it puts the bell over your upper arm and shoulder where it sits in a more stable position. Very important: The palm/forearm rotate. Keep your shoulder tight and pulled into the socket! High tension in the lats, armpit muscles stabilizes the joint. Third, build that tension! Keep your body tight but mobile. Focus on creating massive amounts of pressure in you lat/triceps area. Now let’s put it all together. Get in position with the rope. Build some good tension. Hip back and to the side, rotate upper body, right shoulder going to right knee, forearm/palm rotating back. Do several reps slower than normal and try to keep the triceps/lat in contact as long as possible. Remember, you are pressing yourself under the weight! Try to keep that pressure in you lat/triceps all the way down. Press all the way down, relax, and stand up. Then do the other side. Rest a few minutes and try a couple of reps faster than normal with less tension. Think smooth – let the movement flow. Then go for max tension and normal speed. Try to fuse your rock hard triceps and lat together! It may take a few sessions to really generate maximum tension, but continued practice will produce it at will. If you watch Pavel Tsatsouline on his DVD “More Russian Kettlebell Challenges,” you will notice his hand does not go up at all. Watch his hand in relation to the brick wall. He is pushing himself under the KB. That is the beauty of the RBP – it teaches one to press under, as the hand cannot rise! You cannot cheat! The RBP is perfect for training as you can examine and correct form easily on your own or on a “victim.” While in various positions one can create or relax the tension to make adjustments in form without fear of injury or undue fatigue. KB’s and elastic stretch bands are hard to relax under or adjust body mechanics under, as loss of tension can spell injury. The last thing a trainer wants with a client! Of course, compressing yourself under the weight is only half the battle. You must stand with it in the overhead position! Here’s the program:
1. Grease the groove with the RBP ever day, vary your sets/reps each day, some days do 5-10 sets of 1-3 reps, other days do 2-3 sets of 5 reps. Other days do singles throughout the day.

Copyright © 2009 Walter J. Dorey 90
2. Create maximum tension in the target area. Strive to break the rope, not by jerking it but by building and generating power in your lat/triceps, fuse the muscles together. Press from the lat.
3. Practice windmills 2-3 times a week from the “Russian Kettlebell Challenge” DVD/book to improve flexibility and core strength.
4. Practice variation of BP overhead squat 2-3 times a week. Snatch or clean and press weight overhead. Get set in BP position; perform BP with same “screwing” action with weight overhead. Go to bottom of BP. Pause and drop hips a little lower, then stand, project force straight up arm into KB. Low reps (1-3) each side. Be sure to tighten glutes, abs, before standing. Keep your shoulder in the socket!
Final thoughts: Try “pulsing” or “pumping” at sticking point using the RBP. Once or twice a week, try your BP with a KB. Remember to recreate the movement pattern and tension you learned from the RBP. You compress under the KB, it “rises” on your lat. Pretend it has hit a low ceiling or the end of your rope, so you have to go under. Keep your grip tight! Maximize tension so much that your mind is in your lat/triceps. With a perfectly executed BP you will feel as if the weight is floating as you press under, notice an expanding, burning pressure in the lat/triceps area. At the bottom, wedge yourself under the KB to drive it back up. Drop the weight, absorb the shock with a controlled dip, readjust and go for another rep. Keep the reps low, 1-5, though I prefer 1-3.” Well, that is pretty much the gist of my original post on the Dragon door forum years ago. I do not know if anyone put it to use or not. But it is a sure fire way to teach someone the difference between a side press and a bent press. So let’s actually review the points above and take a more in-depth look at how to do the Rope Bent Press.
First order of business is to get the length of rope set up for the RBP. I have a loop on both ends and you can see how the rope is taunt between my thumbs. This will give you a pretty good start on setting up your rope.

Copyright © 2009 Walter J. Dorey 91
So, tie a loop in one end of your rope. On the right hand I have enclosed a piece of PVC pipe in the loop. Then I string the rope between my outstretched arms and pinch the rope between my left hand thumb and index finger. This is where I want to tie my second loop. We want to tie a fixed loop that will not close up on our hand or foot, so we will tie a bowline in each end of the rope. A bowline has many uses, is easy to tie and easy to untie even after being subjected to a load. This is how to tie a bowline:
The end running off the top of the picture is referred to as the standing end. We will call it the trunk in this case. The end encircled in blue (which has black tape on it) is referred to as the working end, the end you manipulate to tie the knot. In this case we will call it the rabbit. Put a small loop in the rope as pictured. Do it exactly as pictured. This is when you would put about a 6” piece of PVC on the rope.
Pass the rabbit through the hole and over the front of the trunk.

Copyright © 2009 Walter J. Dorey 92
The rabbit then passes from the front of the trunk as pictured above, around behind the trunk and back through the hole. Follow the pictures exactly or your bowline will not work.
Don’t let this picture fool you. It is the same picture as above, but I have flipped the bowline over so you could see it from the back side. This will give you another view as to exactly how the bowline is tied. Study the pictures and you will figure it out.
Tighten the knot up carefully. This is a bowline. On one end, or both if you want, you should place a piece of PVC over your rope.
This is just another shot, a close up of the knot itself. It is basically a loop passed through a loop to form a fixed loop. Sounds kind of loopy to me.

Copyright © 2009 Walter J. Dorey 93
Now that we have a bowline tied in both ends of our rope, let’s take a look at some pictures to see how to use it for the Rope Bent Press:
Here is one more shot of the tied bowline before I tighten up the knot. I loosened up the knot a little more so you can see the path the rope takes in the forming of the knot. With practice you will tie this without thinking. It can even be tied around itself to form a running bowline. But that’s another story.
This is why you will want to put a piece of PVC pipe in your bowline. As you apply a load to the rope, the loop will close up, squeezing your hand and foot. However, it will not close up like a slip knot. If you apply a lot of tension to the rope it will begin to crush your hand. Not good!
This is the wrong way to use the rope! Why? I have the rope in my right hand and on my right foot. It will not work this way. Trust me. And if you do not, a simple test will prove it to you. Try it yourself…then drop and give me 20 for not listening to me.

Copyright © 2009 Walter J. Dorey 94
off the lat/triceps connection. It is not very comfortable either. When I tried it this way I could definitely feel it in my shoulder, and it was not a good feeling.
This will not work either. I have the rope running in a straighter line from my hand to my foot. The rope is not running behind my glute as in the pic above. But it still will not work this way.
This is the same wrong way of doing the RBP. The rope is on the same side hand and foot. In this pic we can see what is going on a little better. As I apply tension to the rope and try to press under my hand, the force or load on the rope will cause my forearm to rotate forward in the direction of the blue arrow. This causes my arm to drift forward in the direction of the green arrow and my elbow to rise upward more. This causes my arm to rotate up and off the lat, which negates being able to leverage

Copyright © 2009 Walter J. Dorey 95
In the two pictures above I am doing the RBP correctly. The rope goes from the foot, outside the hip, up behind the back and to the opposite hand. So, working right arm, rope is on left foot. Do the opposite to work the left arm. Notice also, how as I apply tension to the rope, it actually helps pull my arm back to ride on the lat. I want to create a lot of pressure or tension in that lat/triceps area. Push your body away by pushing on that rope. In the two pics below I am pressing myself under more. I cannot cheat with the rope. My hand cannot rise, so I must press myself down as I straighten my arm. Beauty.

Copyright © 2009 Walter J. Dorey 96
By focusing on the windmill more and getting better flexibility, I could keep my lat and arm in contact longer. Thus I would be able to leverage the arm off the lat for a longer period of time as I drop under the weight. This would equate to a heavier weight lifted. So do not be in too big of a hurry to go from the windmill to these other lifts. However, you can do the bent press with more leg bend as I am demonstrating here. Just be sure your form is good: fold at hips, rotate along spine, press yourself under the weight. After working on the rope bent press and the regular bent press for a while you may wish to revisit the windmill. Or use the windmill to warm up for the bent press. So, there you have it, an excellent method of teaching and drilling the bent press. One thing that this allows is an opportunity to drill the bent press anywhere. You don’t need weight, just the rope. Its light and does not take up much space.
In this shot I have pressed myself fully under. My arm is locked straight. My right leg is bent in order for me to get my body low enough to lock my arm out. If I want to perform this with a straighter right leg, in this instance, I would need to work on my flexibility by focusing on performing the windmill correctly. Or I could lengthen the rope a little. Also, note how I have rotated my arm and hand toward my right glute, so I can press into the rope much more effectively.

Copyright © 2009 Walter J. Dorey 97
Some other thoughts on the RBP: You can use a length of chain and a couple of clips and pipe. It is fast and easy to set up. However, unless you are Unbreakable Adam T. Glass, you will not feel the chain stretching like you can with the rope. Feeling the rope stretch a small degree actually provides more feedback to the CNS than the chain does. As the rope stretches a small amount, you can feel the tension of it trying to compress back. You can use that feedback to focus on where you feel that loading force and generate more tension. If you do not know who Adam T. Glass is, I suggest you Google his name and check out some of his awesome strength feats. You will be amazed. So, if you really want too, use the chain, but I feel strongly that most will get better mileage by using a rope.
With a chain, definitely use some pipe on both ends. It will save your hands and feet.
You can see the clip I used to attach the chain to itself. Also note the use of the pipe. This set up is very easy to do.

Copyright © 2009 Walter J. Dorey 98
On using stretch bands for the bent press: In a word: Don’t! There are several reasons for this and they all come back to injuries. When you have a heavy weight overhead many times your arm may sway a little. A stretch band will amplify that a great deal. If you want to do regular overhead presses with bands, or a light band with a KB, that is good. But avoid trying to do the RBP with a band. For one thing, you will be able to press the band up at the same time as your drop under the hand, so your bent press practice will turn into side press practice. The second thing is that as you drop under your hand, and the band tension increases, it is very difficult to straighten out the arm. Once you get the arm straight it wants to pull backwards even more. If you lose it here, you are in a world of hurt. This is what can happen:
I did this intentionally. I knew when it would happen and even then: It…did…not…feel…good! Imagine if it happens unintentionally when you least expect it. With a kettlebell or a barbell, as you perform the bent press with a weight, if you lose it, you can readily drop the weight and get out of the way.

Copyright © 2009 Walter J. Dorey 99
You can move your hand out of the way faster than the weight can fall. With a stretched band in the BP position, if you lose it, the band will accelerate faster than you can move your hand. It will literally rip your hand and arm down behind you. There is a very strong possibility of tearing up your shoulder. I tested this out using just a light band of about 50lbs. I got down in the BP position with my arm extended and let my arm fall back from the pull of the band. I tried to disengage my hand from the band but it whipped my hand down before I could. Even that little whip was enough to feel it in my shoulder. Not good! So, if you want to play with bands in the BP, do so at your own risk. Bands are excellent for many things, but this is not one of them. If you still wish to try it just remember what boys use bands for: slingshots. Is that what you really want to risk doing with your arm? On doing BP overhead squats: The RBP will drill the proper form on the lowering phase of the BP. Usually, if we can extend the arm to lockout with the weight overhead at the bottom position of the BP, we can drive the weight up to the standing position. If you use the windmill style of bent press, where you keep that rear leg almost straight, and you use that same groove going back up, practicing the windmill with a heavier weight will help you recover from your bent press. However, for some, lowering under the weight is easier than standing with it. As you begin standing, your shoulder must move through a constantly changing angle until it is extending straight upward at the completion of the lift. This requires you to control that weight and maintain your body centered under the weight as you rise up. Your feet do not shift around but your hips do wedge under you to help you drive more upright through the arm. The BP overhead squat can help with this. Simply get the weight overhead (press it, snatch it, whatever), and then begin squatting down in a path as close as you can to the path you follow with your bent press. At the bottom you will drop the hips a little lower and bring them under you body more to provide a better angle of attack on the weight as you begin driving upward.

Copyright © 2009 Walter J. Dorey 100
With the weight overhead… begin dropping down following groove of bent press… Continue to screw your body down under the weight… At the bottom, drop the hips under… And start driving up through the weight until standing up- right.

Copyright © 2009 Walter J. Dorey 101
That is the bent press squat. Most will not have difficulty with standing up with the weight when they complete the regular bent press. But if you do, this movement can help. Just be sure to follow the exact groove you use in the bent press going down. On using barbells in the side press and bent press: Definitely do so if you wish or if that is all you have to use. You can even do the strict one arm military press with a barbell. One advantage is that you can incrementally add weight, rather than jumping up in weight by 9lbs. or more, as with using KB’s. If all you have are a 16kg and a 24 kg KB that is about an 18 pound jump. You can increase the weight on the bar by as little as a pound. With the KB’s you can add a chain to the KB to gradually add weight, but this begins to change the feel of it. Plus the cahin, if not clipped on, can slide off. But it can certainly work if you cannot jump from one KB to the next because of the weight difference. Some use duct tape. But it can tear and drop a small weight plate on your head. Use at your own risk. Another great thing with the barbell is that if you really want to push yourself and see how strong you can get with these lifts; the barbell is the way to go. Kettlebells begin to get very unwieldy above 120 pounds or so. The mass of the bell sits so far out from the forearm that it is a great strain upon the wrist and shoulders. Plus it begins to get very difficult to clean a KB that big to the shoulder. Not to mention the cost of buying such a large KB. When using a barbell, if you rotate your hand slowly as when using a KB, you can push into the bar better. Also, if you begin to lose the weight the bar is parallel to your body and thus if you dump it the bar will fall away from you. If you keep the bar running across the body, if you lose it, it may thump you one in the head. Not pretty! If you do this, as you begin standing back up, the bar will begin to sort of unwind itself with your hand. It seems to want to go back into the position it was in when you started the lift. Let it do so but be sure to control how fast it does this so you do not tweak your shoulder. I believe this unwinding as you stand up is because if your arm did not rotate back to the starting position, your shoulder would impinge itself. Stretch your right arm overhead and in that position rotate the arm so the palm faces your head or faces forward. Pretty comfortable position isn’t it? Now with your right arm still overhead, rotate the arm so the palm faces to your right side, palm facing away from you and even slightly back. You will probably notice your shoulder at the top of the joint seems to jam up a little. That is exactly what is happening. With weight in your hand it would not feel very good. Plus it would be very difficult to hold that weight overhead in such an unnatural position. It is creating impingement in the joint. We want to avoid that.

Copyright © 2009 Walter J. Dorey 102
Technique tip: Place your hand slightly off center on the bar. This will cause the bar to dip in a slight line from one end to the other. By placing your hand slightly closer to the end of the bar on the thumb side of your hand, the bar will be weighted a little heavier on the pinky side of your hand. Thus, it will sit on that pad of your palm opposite your thumb, sort of running a little crosswise in your palm. This puts more pressure on that pad and activates the triceps more. Also, the thumb is stronger at keeping the bar in position than the pinky finger. If you place the hand closer to the end of the bar on the pinky side of your hand, the bar does not sit as solidly in the hand. It will also lift a little on that pinky side as the weight of the bar settles more toward the thumb, and your pinky finger cannot control it as well as your thumb can with the weight running the other way. Experiment with this and you will soon see what I mean. Examine the pictures. Technique tip: Whatever you use, barbell or KB, be sure to keep the arm, once it is pressed overhead, locked straight. Do not allow the arm to bend as you begin standing up. If you do allow the arm to bend you will lose power at the bending joint and stand a good chance of losing the lift, especially with a heavier weight. You cannot drive through the weight if the arm is bent when you begin to stand upright. This is true in the windmill, the side press and the bent press. A little bonus tip on your one arm military presses: On the press up, extend your fingers as hard as you can. On the way down, squeeze the KB as hard as you can. At the start, spear your hand through the KB. Forcefully extend your fingers as you press the KB up. Do this all the way to lockout overhead. Forcefully extending the fingers in such a way fires your extensors, your pressing muscles, recruiting the muscles more fully for a stronger press.

Copyright © 2009 Walter J. Dorey 103
On real life application: You have just learned a bunch of techniques you can use and practice that you can also put to use in everyday life. The application of bracing the abs, lifting the pelvic floor and power breathing can and should be used whenever you lift anything heavy from the floor, the trunk of your car or leaning in to put or get you child out of his safety seat in the back seat. These techniques can and should be used even when lifting a lighter weight. You may not create as much tension with a lighter job or weight but it can protect your back. If you vacuum your carpet, try connecting the shoulder with the lat and armpit muscles and making your arm more solid as you push the vacuum away and pull it back. Put your lat into it. It will feel easier. If you reach for a gallon of milk in the fridge or a gallon of water up on a shelf, use the same packing of the shoulder as you do in the press, and you will lift the jug safer and it will feel lighter. Again, tighten up the lat and brace your abs and glutes. If digging a hole, brace the abs and grunt the air out as the shovel hits the dirt for you next shovel full. At the same instant, pack the shoulders and tighten the body and arms and the shovel will slam into the dirt with more authority. I’ve spent a lot of time digging holes. These are just a few examples. Experiment with the techniques you learned as you do various things throughout the day, whether mundane chores or playing some sport. Learn when, where and how much tension to apply to various duties or movements and how to relax in between movements and you will express more force to get a job done more effectively with less fatigue.
Once the weight is locked out overhead, re-grasp the KB and squeeze it for all you are worth. Pretend you are doing a one arm pullup on the KB and actively, forcefully, pull the KB down to the starting position. Your biceps should pop up while doing this. Experiment with this for a few reps. It will make you more fully aware of which muscles you should be recruiting and how to do so during the press.

Copyright © 2009 Walter J. Dorey 104
Just as an example of how to use some of these techniques in sports, imagine you are playing a friendly game of hoop thumping (basketball) with some friends. You are dribbling the ball and Jim-bo, who out-weighs you by 100 pounds, suddenly steps up to guard you and block your shot like he always does. He knows all he has to do is bump you and you will stumble, losing the ball like always, as he good-naturedly laughs at you… THIS TIME, however, just a micro-second before impact, you brace your abs, root your feet to the ground and cement your body into a solid piece of rock-hard muscle, power breathing and using the tension techniques you have learned and practiced. Jim-bo bounces into you expecting you to go flying, but instead, his eyes widen as he bounces off of you, and you suddenly, in that micro-second after contact, use the force and tension your generated from the ground to explode around his staggered body as you make your jump shot. It’s in! A three pointer! Practice the techniques and shake out the tension in between sets. Learn to use the tension to generate force at will and learn to relax the tension at will so you can flow between moments of tension. You will move faster and pack more power in your chosen sport. Carry on my wayward son. On getting the most out of your training: A few words of advice (take it or leave it): In all exercises focus on what you are doing. I am not a fan of working out to music or in front of the television. If you must have music, I insist on rock; like Van Halen, Ted Nugent, etc. You know, 70’s--early 80’s rock music. Nothing else will do. Or crank some old Rocky music. Can’t go wrong there. You want music that cranks you up, not make you sleepy headed or melancholy. Give 100% attention to the task at hand and you will lift safer and get back 100% from your efforts. When lifting do not try to multitask and solve other problems you may be thinking about. Clear your head and get in the game. You will enjoy it more and reap greater rewards for your efforts. And it will take you less time to train. Remember: 100% effort directed at a few things is far more productive than 100% effort divided and directed at many things. Picture this: Your mind giving a percentage of its ability to each of the following: Folding the laundry in between sets. Thinking about bills you need to pay. What you are going to watch on the brain sucker tonight and eat as you watch it.

Copyright © 2009 Walter J. Dorey 105
Realizing you forgot to do the dishes before your mate gets home. Singing along with your favorite music. Lifting your weights and training while all of the above is filtering through your brain. (My wife was helping me format this and reading the above, shot me a look and said “You’re talking about me! I do all of that! I can’t believe that you are using me for material for your book!” LOL, well, we’ve all done it. Now stop doing it.) How effective will you be at any of the above tasks? Not very! So now you know why you shouldn’t be on the phone or texting or reading or eating or drinking or smoking or putting on make-up or playing with the CD changer while you are driving. I have seen many doing a combination of these at one time. Have someone toss eggs at you while you do these things sitting in a chair and see how well you catch the eggs. Wear your best clothes. You’ll understand why shortly. Do this with you teenage children who are driving. See how many they catch. That egg is your or someone else’s life, in your car or the other car or a pedestrian or bicyclists or motorcyclist. Focus when you drive, please. Rant over. FOCUS! When you are lifting: Lift! Do nothing else. Not only more productive to lift this way but also much safer. When you are done lifting: do something else! Do not continue to lift! You are done training so move on to other things you need to accomplish. You have a finite amount of energy. Direct it at one task at a time and finish it before moving on to the next task. Multi tasking multiplies the difficulty of each task. If you are getting interrupted by friends or family, put them on hold while training. Tell everyone not to interrupt until you are done unless it is a real emergency. This is particularly a problem when lifting at home. An emergency means the house is burning down or someone got in an accident, etc. Discussing what’s for dinner, or which movie you want to watch or a taking a call from a friend who wants to see what you are doing are NOT emergencies. Get your family on the same page with you on this and you will progress much more rapidly. Put your cell phone out of earshot. Years ago we had no cell phones, no answering machines, no pagers and we survived just fine and got much more done. Not to mention we were smarter. Technology seems to backfire many times, making people dumber, i.e. texting while driving. If people will not leave you alone while you train, take some equipment and go somewhere so they cannot bug you. If they insist on pestering you while you lift, and you cannot get away to lift elsewhere, get them lifting with you. Pester them to lift with you and they either will put up or shut up.

Copyright © 2009 Walter J. Dorey 106
If you lift with others keep your talk to a minimum and help each other focus on lifting and training. Discussing other training related matters, such as recovery methods or nutrition, should be saved for after you are done training. Nothing takes the wind out of training more than some one flapping their jaw when they should be lifting. If you must train with someone else, and they won’t stop jawing, crank some loud obnoxious music (you know, like country or rap) to drown them out. Then when they ask about the music, explain it’s either that or no unnecessary chatter. If you train with a friend, your set time for training is irrefutable. Agree to a set time and if they have not shown up, begin training. They can jump in wherever you are when they get there. Your time is valuable and if they lift at your place, they must respect that. They will soon get the picture and begin showing you respect by getting there on time or they will probably begin training elsewhere. In either case, problem solved. The same is true if you train at their place. Respect their time. I cannot tell you how many times I was pumped to start training and some friend was training with me and showed up late. Always with some lame excuse for being late. Then, when you start lifting they want to talk about all kinds of nonsense and you just lose all steam. Thanks a lot, Dude! That is why I prefer to train alone. So, set a fixed time to train. If they are a true friend they will give you a heads up a day or more ahead of time if they can’t make it. If they are late because of an emergency, you will know it is a true emergency. If you decide to switch training dates or time of training to work around some other thing you must take care of, discuss that with your training partner and do so together if you can. However, do not fall into the trap of constantly shifting days on each other. Having a set time and date to train can really help you focus and begin looking forward to that training period. Set a specific time to end the training session. With no set time to finish you will meander around training this and that and the next thing you know 2-3 hours will go by. Your workout will expand to the amount of time you allow for it. In 20 to 60 minutes you can get the most productive workouts in. Anymore than that is a waste, with very little return on the extra time put in. Shorter, more frequent training time frames will beat out long training sessions nearly every time. Implement this whether training alone or with training partners. If you do train with a friend, be sure they are on the same page. “We start at this time and we stop at this time”. If you do this, your workouts will become more focused. They will become more intense. You will make progress more rapidly. And so will your friend. Stick to this format! If you do not, you will find you or your friend will always have one more thing they want to train or do. Your short, highly productive, 45 minute “tear it up” workout, including short warm-up, will suddenly be a long, exhaustive, unproductive, drawn out session. Stick to your guns! Be sure you are lifting and breathing more than you are talking. This is a training session not a gossip session.

Copyright © 2009 Walter J. Dorey 107
Lay out what you will do and why. Set some goals as far as lifting: “I will lift x amount of poundage by x date. I will do this by following this set and rep scheme with these exercises. I will not deviate from my program until this goal has been accomplished”. Both you and your training partners should have this figured out. Realize that at times you may be overly tired from several late nights of work or something similar. Sometimes you must take an honest look at your routine for the day and know that if you push to do it you may get sick from overtraining or get injured. Learn when to deviate from your planned routine and when to take an extra day off. However, this should be the exception rather than the rule. Stick with a routine long enough to meet your short term goal, long enough to see how it works for you before changing routines. Reaching many short term goals stair steps you up to your main goal in a controllable, attainable, realistic fashion. Track everything in a workout log book. Have a set start time and set stop time for each training period. Jump in and do it. Then go relax and have fun. Be realistic in your goals. A 10 to 20 pound jump on an exercise is doable in a month. Depending on how new you are to the iron game you may make bigger increases the first 6 months or so of training. But don’t get too excited thinking you can continue to put on 40 pounds a month to your lifts. Eventually such progress dries up. Take your time and build a strong foundation that you can continue to build on for years. It takes many years to build true lasting strength. Plan some days where you work a specific lift or movement for a certain amount of time and then have a set period of time at the end where you do whatever you feel like. For example: Maybe you are focusing on perfecting your power cleans so you have a routine of sets and reps you follow. On a couple of days, after your normal routine, take ten minutes just to mess around with things you normally don’t do, like sled pulls or sprints. And above all: Have Fun! Training may be intense and focused. It should be if you are going to make progress. However, some workouts will be easier, to speed recovery. Mix harder training days with easier training days throughout the week. If you don’t enjoy it you will quit. Don’t try to kill yourself every workout. Stop at your set time with some energy in the bank. This will help you recover quicker so you can get in another workout sooner. Plan for the long haul and you will haul long and hard. You will still be training and in great shape when many others have thrown in the towel and said “I’m too old to be doing that stuff”. You will find you have the capacity to do many things others your age cannot do or will not do because they think they are too old or will get injured. That is probably true for their untrained bodies and minds. But if you train properly and stick with it you can be hanging in there with people many years younger than you, and who knows, you might even surprise them with what you can do.

Copyright © 2009 Walter J. Dorey 108
Think about it this way: you are never too old to be walking around strong, breathing, and able to do things you want to do and also help others. Anyway, to all those who enjoy getting strong and tough and desiring to remain so:
Tear It Up!! Yours in strength and health, Walter J. Dorey sinewandsteel.com [email protected]