mastering the model shoot: everything a photographer...
TRANSCRIPT

FRANK DOORHOF

FRANK DOORHOF

The Mastering the Model Shoot Team
CREATIVE DIRECTOR Felix Nelson
EDITORSCindy SnyderKim Doty
ART DIRECTORJessica Maldonado
PHOTOGRAPHY BY Frank Doorhof
PRODUCTION SHOTS BY Studio FD
Published by New Riders
New Riders is an imprint of Peachpit, a division of Pearson Education
Copyright ©2014 by Kelby Corporate Management, Inc.
All rights reserved. No part of this book may be reproduced or transmitted in any form, by any means,
electronic or mechanical, including photocopying, recording, or by any information storage and retrieval
system, without written permission from the publisher, except for the inclusion of brief quotations in
a review.
Composed in Frutiger, Interstate, and Gridnik by Kelby Media Group, Inc.
Trademarks
All terms mentioned in this book that are known to be trademarks or service marks have been appropri-
ately capitalized. New Riders cannot attest to the accuracy of this information. Use of a term in the book
should not be regarded as affecting the validity of any trademark or service mark.
Photoshop and Lightroom are registered trademarks of Adobe Systems, Inc.
Warning and Disclaimer
This book is designed to provide information about photography. Every effort has been made to make
this book as complete and as accurate as possible, but no warranty of fitness is implied.
The information is provided on an as-is basis. The author and New Riders shall have neither liability nor
responsibility to any person or entity with respect to any loss or damages arising from the information
contained in this book or from the use of the discs or programs that may accompany it.
ISBN13: 978-0-321-96816-6
ISBN10: 0-321-96816-6
9 8 7 6 5 4 3 2 1
www.kelbytraining.comwww.newriders.com

This book is dedicated to my grandparents,
who got me into photography at a very early age.

This is the part of the book where I get to say
thank you to everyone who has helped me over
the years. Well, this could be a book on its own.
For me, it’s very simple: you can only be successful
when you network and have people that help you
out. My list is huge, but I want to thank a few
people in person via this page:
First of all, of course, my family for always
being there and supporting me, even when the
ideas I have sometimes are probably a bit too
ambitious. :-D Without them, the career I’ve
chosen would be impossible. So, Mom, Leo,
Annewiek, and Brian, thank you so very much
for always being there and inspiring me.
Second of all, Scott and Kalebra Kelby and
their whole team. These people are awesome
and I consider them to be my family overseas.
Of course, my work would be less interesting
without the help of some of the fine models
I work with, our crazy creative stylist Nadine, and
the awesome makeup artists I’ve worked with
over the years.
But also, the fellow instructors I’ve met
over the years that have in some way changed
my work or inspired me to push much harder
to achieve things I never thought possible.
Photographers like Jay Maisel, Moose Peterson,
Joe McNally, Glyn Dewis, and many more have
changed the way I look at the world around me
and the techniques I use, and have inspired me
to do things differently or add their techniques
to my own and create something that became
more interesting.
Gear and software are also important, and
the following companies have grown to become
close friends over the years and have supported
my work to a large extent, so many thanks to
the team at Mamiya/Leaf (Ziv/Yair), Elinchrom,
ExpoImaging, Fujifilm, DxO (Hector), Tether Tools,
and all the other supporting companies like Sony,
Alien Skin, Imagenomic, Topaz, Google/Nik, X-Rite,
SmallHD, DNA, and many more. Thanks to you,
my work has always been able to continue and
I’ve been able to experiment with new things.
Let’s be honest, the support of the people that
follow my work online and attend the workshops/
seminars is very important. You guys rock!
And finally, someone I never had the chance
to meet but who has an enormous influence
on me and actually got me into teaching the
way I do: Dean Collins, who is, in my opinion,
still the Dean of Light.
iv MASTERING THE MODEL SHOOT
ACKNOWLEDGMENTS
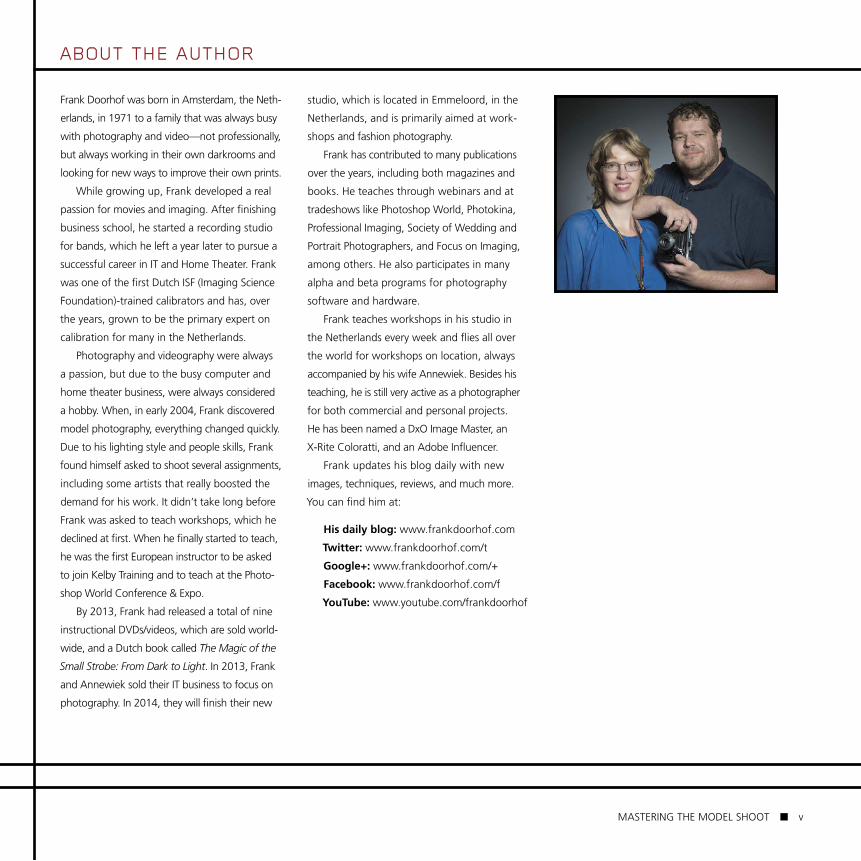
Frank Doorhof was born in Amsterdam, the Neth-
erlands, in 1971 to a family that was always busy
with photography and video—not professionally,
but always working in their own darkrooms and
looking for new ways to improve their own prints.
While growing up, Frank developed a real
passion for movies and imaging. After finishing
business school, he started a recording studio
for bands, which he left a year later to pursue a
successful career in IT and Home Theater. Frank
was one of the first Dutch ISF (Imaging Science
Foundation)-trained calibrators and has, over
the years, grown to be the primary expert on
calibration for many in the Netherlands.
Photography and videography were always
a passion, but due to the busy computer and
home theater business, were always considered
a hobby. When, in early 2004, Frank discovered
model photography, everything changed quickly.
Due to his lighting style and people skills, Frank
found himself asked to shoot several assignments,
including some artists that really boosted the
demand for his work. It didn’t take long before
Frank was asked to teach workshops, which he
declined at first. When he finally started to teach,
he was the first European instructor to be asked
to join Kelby Training and to teach at the Photo-
shop World Conference & Expo.
By 2013, Frank had released a total of nine
instructional DVDs/videos, which are sold world-
wide, and a Dutch book called The Magic of the
Small Strobe: From Dark to Light. In 2013, Frank
and Annewiek sold their IT business to focus on
photography. In 2014, they will finish their new
studio, which is located in Emmeloord, in the
Netherlands, and is primarily aimed at work-
shops and fashion photography.
Frank has contributed to many publications
over the years, including both magazines and
books. He teaches through webinars and at
trade shows like Photoshop World, Photokina,
Professional Imaging, Society of Wedding and
Portrait Photographers, and Focus on Imaging,
among others. He also participates in many
alpha and beta programs for photography
software and hardware.
Frank teaches workshops in his studio in
the Netherlands every week and flies all over
the world for workshops on location, always
accompanied by his wife Annewiek. Besides his
teaching, he is still very active as a photographer
for both commercial and personal projects.
He has been named a DxO Image Master, an
X-Rite Coloratti, and an Adobe Influencer.
Frank updates his blog daily with new
images, techniques, reviews, and much more.
You can find him at:
His daily blog: www.frankdoorhof.com
Twitter: www.frankdoorhof.com/t
Google+: www.frankdoorhof.com/+
Facebook: www.frankdoorhof.com/f
YouTube: www.youtube.com/frankdoorhof
MASTERING THE MODEL SHOOT v
ABOUT THE AUTHOR

Chapter 1 1
FINDING YOUR MODELS
Getting the Models to Your Studio 2
TFP or Paid 11
Model Releases 12
Paying Your Team 16
Conclusion 17
Chapter 2 19
LOCATIONS
On Location 21
Frank’s List of Free Places to Shoot 22
The Simplest Things 25
Shooting in Tight Spaces 27
Tips for Making Your Studio a Location 29
The Best Location? 33
My Favorite Locations 37
Chapter 3 51
PROPS & BACKGROUNDS
If the Background Is Boring, Add Some Smoke 52
Reflections 57
Finding Unique or Good-Looking Angles 58
Seamless Paper 59
Canvas/Muslin/ Scenic Backgrounds 65
Sometimes Inspiration Can Be Instant 66
The Best Props Are the Cheap Ones 68
vi MASTERING THE MODEL SHOOT
CONTENTS

Chapter 4 81
CLOTHING & STYLING (THE MOST IMPORTANT THINGS)
It’s More Than Lighting 82
Building a Team 85
Chapter 5 95
COACHING YOUR MODELS ONCE THEY’RE ON THE SET
The Day of the Shoot 96
Poses 98
In-Depth About Posing 108
Getting a Glamour Shot 112
Portraits 121
How to Work with Your Models 124
Raising the Bar Over and Over Again 128
Chapter 6 133
USING NATURAL LIGHT
Natural Light 135
Getting Two Looks (or More) from One Location by Adding Strobes 144
Chapter 7 147
LIGHTING WHEN YOU DON’T HAVE NATURAL LIGHT
On the Cheap Side 148
Some Lighting Tips 149
Killer Lighting Tips 153
Chapter 8 163
LIGHTING FASHION ON LOCATION
I Need Big Strobes 164
Letting the Sun/Light Source Participate 167
MASTERING THE MODEL SHOOT vii
CONTENTS
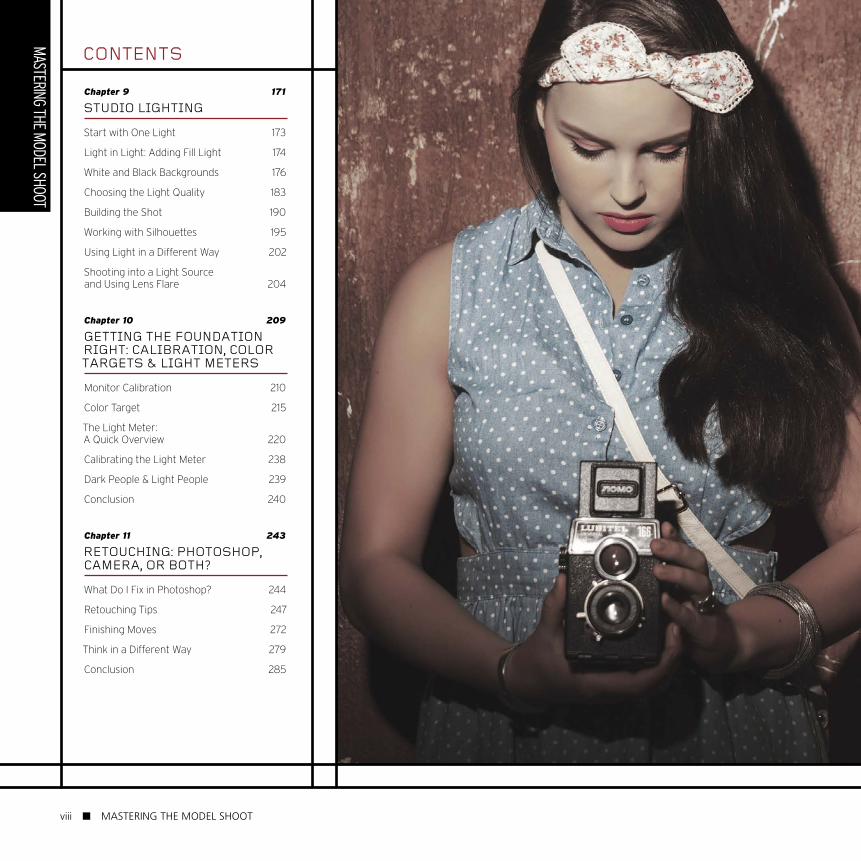
Chapter 9 171
STUDIO LIGHTING
Start with One Light 173
Light in Light: Adding Fill Light 174
White and Black Backgrounds 176
Choosing the Light Quality 183
Building the Shot 190
Working with Silhouettes 195
Using Light in a Different Way 202
Shooting into a Light Source and Using Lens Flare 204
Chapter 10 209
GETTING THE FOUNDATION RIGHT: CALIBRATION, COLOR TARGETS & LIGHT METERS
Monitor Calibration 210
Color Target 215
The Light Meter: A Quick Overview 220
Calibrating the Light Meter 238
Dark People & Light People 239
Conclusion 240
Chapter 11 243
RETOUCHING: PHOTOSHOP, CAMERA, OR BOTH?
What Do I Fix in Photoshop? 244
Retouching Tips 247
Finishing Moves 272
Think in a Different Way 279
Conclusion 285
viii MASTERING THE MODEL SHOOT
CONTENTS
Chapter 12 287
MARKETING YOUR WORK
Create an Online Presence 288
Create a Guestbook 295
Providing Estimates 295
TFP—How Should You Get There? 298
Chapter 13 301
A PHOTO SHOOT FROM START TO FINISH (FROM A TO Z)
The Team 302
The Set 302
Setup One 303
Setup Two 305
Setup Three 31 1
Setup Four 314
Conclusion 315
Chapter 14 317
MORE CONCEPTS & IDEAS
Composition 318
Adding Some Motion 320
Lens Choice 324
Expression 327
Putting Some of This Together 328
The Analog Photography Tip 331
Index 337
MASTERING THE MODEL SHOOT ix
CONTENTS

INTRODUCTION
Welcome to my book. Over the years, my focus has
always been on teaching workshops and seminars,
and filming the videos I’ve released. When I joined
Kelby Training a few years ago, I got into a conver-
sation with Scott and, before I knew it, he talked
me into writing a book, and he was right (well, of
course he was).
For me, photography is a passion, not just a
profession. In fact, I don’t think I ever do a day’s
work (although doing bookkeeping comes very
close, but hey, that’s only one day a week). I always
tell my students that, when it comes to work, you
have a few options. The biggest ones are:
1. You can work your whole life for a boss.
You can work long hours (or short), earn a lot of
money (or a little), and have some free time for
hobbies and your family. A lot of people I know
choose this option. They literally “go to work,”
and they often don’t really like it. But, it’s what
most people do.
2. You can start your own business.
I grew up in a family where owning your own
business was normal. Both my grandparents and
parents owned companies, so when I was still at
school, I already knew I wanted to go into business
for myself. Not for the money, but because I don’t
want to “go to work” every day. I want to look
back later in life and realize that I had a fantastic
ride, and if there is enough money to live my life
and take care of my family, that’s enough, I think.
We don’t need three cars and two houses.
Of course, being in business has its risks, but in
today’s economy I don’t think there’s a profession
where you can be really certain you’ll be doing the
x MASTERING THE MODEL SHOOT

same thing in a few years. At least when you’re in
business for yourself, you can control the situation
slightly and find new opportunities.
“But, Frank, I thought this was a photography
book.” Well, yes, it is. Bear with me. In photography
nowadays, there’s a disturbing trend. It’s like the
joke I always tell (which is more true than you can
imagine): When someone buys a violin, he is some-
one who owns a violin; however, when someone
buys a camera, he is a photographer. I think that
says it all.
In the past, photography was a profession that
needed the proper training and an understanding of
light, chemicals, gear, and more. Nowadays, when
you buy a camera (thanks to the big “Polaroid” on
the back—what I call my LCD), you can immediately
see the results and the learning curve is shorter. That
on its own is not a bad thing, but it becomes a bad
thing when people start losing their focus on quality,
and that is what’s happening in today’s market.
“Photographers” are aiming more toward “spray
and pray” techniques, in which they shoot as many
images as they can and just hope the right one is
there. Also, customers are losing their focus on qual-
ity, and that’s not hard to understand. In a market
where prices are going down and the quantity is
growing explosively, people get used to mediocre
photography. It’s simply what everyone sees most of
the day and are getting when they hire a “photog-
rapher.” I’ve seen websites for wedding shooters
that charge $300–$700 for a wedding, including
retouching, and when I see their work it’s…well,
not really okay, but also not really bad.
So, when someone wants to hire a photographer
for their wedding, they have three options: (1) hire
Uncle Harold, who owns a nice DSLR and can make
MASTERING THE MODEL SHOOT xi

candid shots (maybe even some good ones) for
free; (2) hire a “photographer,” pay $300–$700,
and at least get shots that are probably better
than Uncle Harold’s; (3) hire a real photographer,
pay $2,000–$7,000+, and get professional shots.
Some of you will say, “Okay, that’s easy, hire the
pro.” But there’s more to it than that. Some peo-
ple simply don’t have the money for a pro and are
happy with the “photographers.” And (this might
come as a shock), some of the “photographers”
are really—and I mean really—good. The problem
with them, however, is that they are, in fact, dig-
ging their own graves.
The problem is that you can’t charge $300
one day and then raise your price to $2,000 the
next because you realize you can’t make a living
on $300. So, when they decide to give up their
day job and shoot as a pro, they will probably go
bankrupt very quickly. So, how do we change
this? Well, we can’t. Welcome to the new world.
But, we can make it easier for ourselves, and
that’s why I wrote this book.
Look at it this way: Photography is there
in many forms. One is just taking candids, and
I don’t think you’ll make any money there be-
cause there are way too many Uncle Harolds.
Then there is the “copycat/CC” behavior. You
see a lot of forum questions about this, like
“How do I get the look of this image?” I’m
always a bit puzzled by these questions. For
most of the images, it’s clear how to achieve
them—mostly it’s in the light, styling, and pos-
ing, and the Photoshop work is often in color
changes. The people asking this often show
images they want to look like “that image”
that are differently lit or are shot with strobes
while the original is clearly shot with natural
light, or vice versa.
Now, say they master that look. They are
one step higher in the food chain, and can create
a look that’s popular, although it’s not their look.
I call these people the engineers. There are plenty
of engineers. They earn some money, but if some -
one else is cheaper and delivering the same look,
they will be replaced.
Next, we come to a group I call the artists.
These photographers have their own “voice,”
They know how to shape images into something
that is their own, but they also understand light
and Photoshop (or have a good retoucher), so
they can create something a customer wants to
see. Artists will be hired for their “voice/look”
and not for the cheap or copycat look. If you
belong in this group, you will be hired for you,
xii MASTERING THE MODEL SHOOT
not for something else. The customer wants
you, so that means you can charge a different
price. Don’t overcharge, because there probably
will be more yous that also look okay, but if
you’re smart, I think this is really where the
options are.
How do you get into that group? If I could
give you a one-step solution, I’d probably be rich,
but there is no universal formula for success. Over
the years that I’ve been teaching, however, I’ve
found a lot of similar things that either hold back
a photographer or make him successful.
You’ll find a lot of information about these
in this book. For me, photography and running
a business all boil down to the small details.
Of course, you need to master the basics first,
but after that, it’s all in the details, and those
forgotten details are in a lot of photography
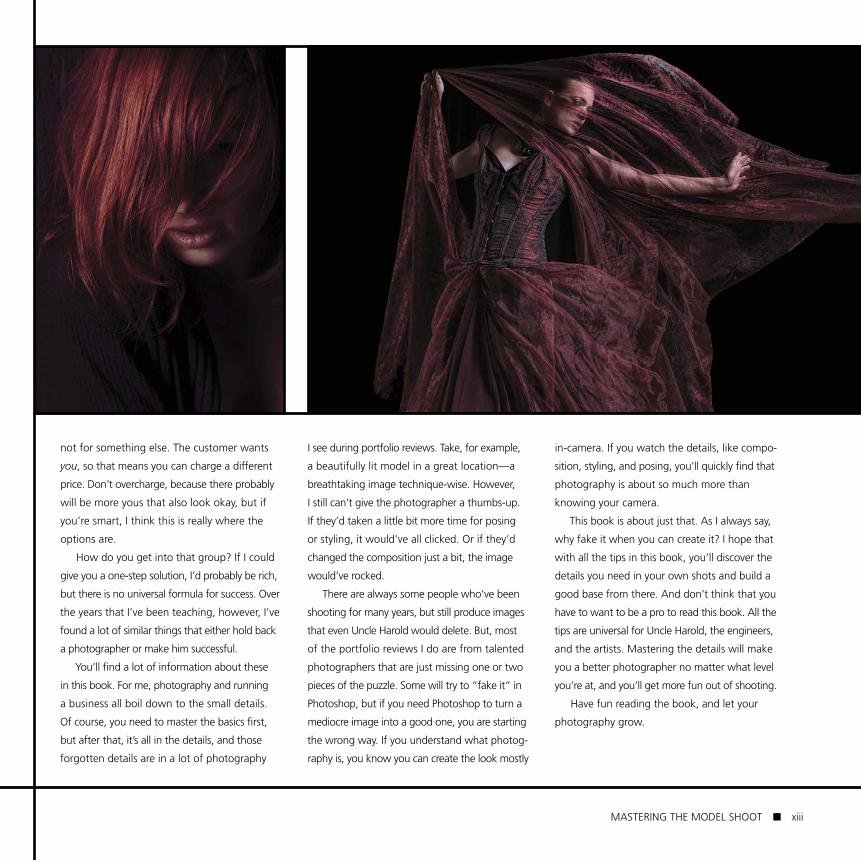
I see during portfolio reviews. Take, for example,
a beautifully lit model in a great location—a
breathtaking image technique-wise. However,
I still can’t give the photographer a thumbs-up.
If they’d taken a little bit more time for posing
or styling, it would’ve all clicked. Or if they’d
changed the composition just a bit, the image
would’ve rocked.
There are always some people who’ve been
shooting for many years, but still produce images
that even Uncle Harold would delete. But, most
of the portfolio reviews I do are from talented
photographers that are just missing one or two
pieces of the puzzle. Some will try to “fake it” in
Photoshop, but if you need Photoshop to turn a
mediocre image into a good one, you are starting
the wrong way. If you understand what photog-
raphy is, you know you can create the look mostly
in-camera. If you watch the details, like compo-
sition, styling, and posing, you’ll quickly find that
photography is about so much more than
knowing your camera.
This book is about just that. As I always say,
why fake it when you can create it? I hope that
with all the tips in this book, you’ll discover the
details you need in your own shots and build a
good base from there. And don’t think that you
have to want to be a pro to read this book. All the
tips are universal for Uncle Harold, the engineers,
and the artists. Mastering the details will make
you a better photographer no matter what level
you’re at, and you’ll get more fun out of shooting.
Have fun reading the book, and let your
photography grow.
MASTERING THE MODEL SHOOT xiii


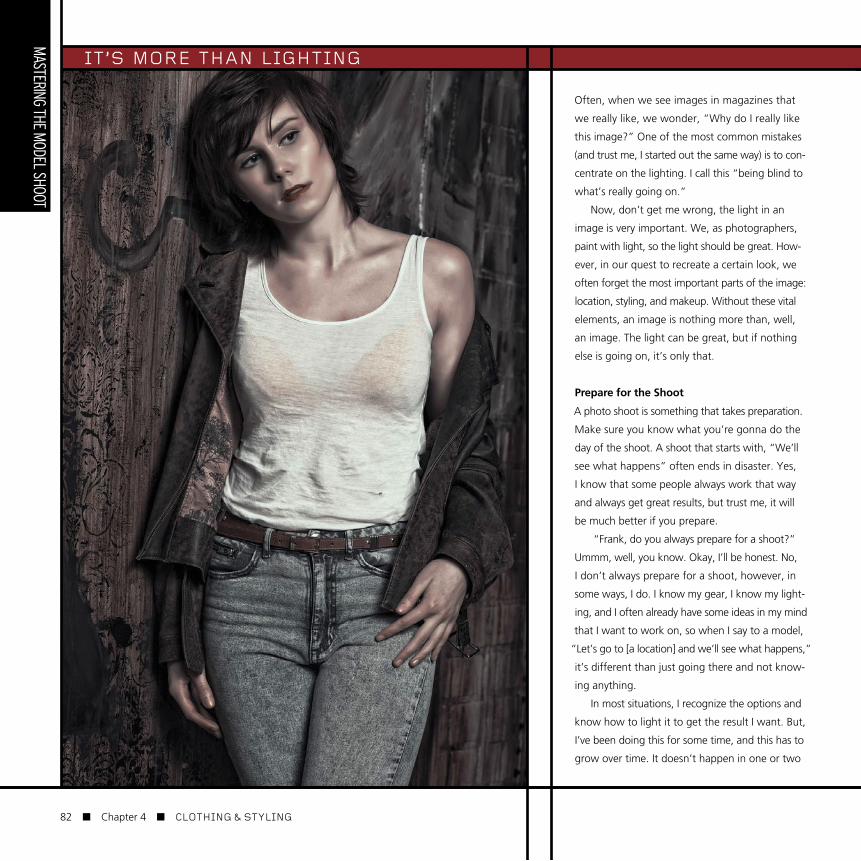
CHAPTERFOURCHAPTERCLOTHING & STYLING(THE MOST IMPORTANT THINGS)
Photography is an art form. To create art we need inspiration,
vision, etc. When you start out as a photographer, you will know
this problem. You find a model who is willing to pose for you, but
she shows up with the standard jeans and tank top that she wears
in everyday life. In the end, you can make some images but it’s
not what you really want, is it? It’s not about lighting; it’s not about
gear; it’s about the image—you’re telling a story. When you take a
photograph of a model wearing jeans and a tank top, your lighting
has to be spectacular because there’s simply nothing else going
on. When you start talking about styling and hair and makeup,
you can shoot even in the bright sunlight and it will look amazing.
81
Often, when we see images in magazines that
we really like, we wonder, “Why do I really like
this image?” One of the most common mistakes
(and trust me, I started out the same way) is to con-
centrate on the lighting. I call this “being blind to
what’s really going on.”
Now, don’t get me wrong, the light in an
image is very important. We, as photographers,
paint with light, so the light should be great. How-
ever, in our quest to recreate a certain look, we
often forget the most important parts of the image:
location, styling, and makeup. Without these vital
elements, an image is nothing more than, well,
an image. The light can be great, but if nothing
else is going on, it’s only that.
Prepare for the Shoot
A photo shoot is something that takes preparation.
Make sure you know what you’re gonna do the
day of the shoot. A shoot that starts with, “We’ll
see what happens” often ends in disaster. Yes,
I know that some people always work that way
and always get great results, but trust me, it will
be much better if you prepare.
“Frank, do you always prepare for a shoot?”
Ummm, well, you know. Okay, I’ll be honest. No,
I don’t always prepare for a shoot, however, in
some ways, I do. I know my gear, I know my light-
ing, and I often already have some ideas in my mind
that I want to work on, so when I say to a model,
“Let’s go to [a location] and we’ll see what happens,”
it’s different than just going there and not know-
ing anything.
In most situations, I recognize the options and
know how to light it to get the result I want. But,
I’ve been doing this for some time, and this has to
grow over time. It doesn’t happen in one or two
IT’S MORE THAN LIGHTING
82 Chapter 4 CLOTHING & STYLING

years. So, although I sometimes go to a shoot
with an attitude of, “We’ll see what happens,”
I still go prepared. For example, we always have
some sort of idea, like doing something with
a motorcycle, or doing a session with balloons
in a field. Often, I have sketches of ideas, even
if they are not completely worked out. However,
for about 95% of my sessions, I have prepared
before the actual shoot, and these are often the
ones that really rock. How can you do this?
Before the shoot
Let’s say you have your team together and you
want to start preparing. The first thing you have
to do is find a theme. In the old days, people
would use physical mood boards and have
meetings before the shoot. Today, that’s not
necessary anymore. Instead, one of the things
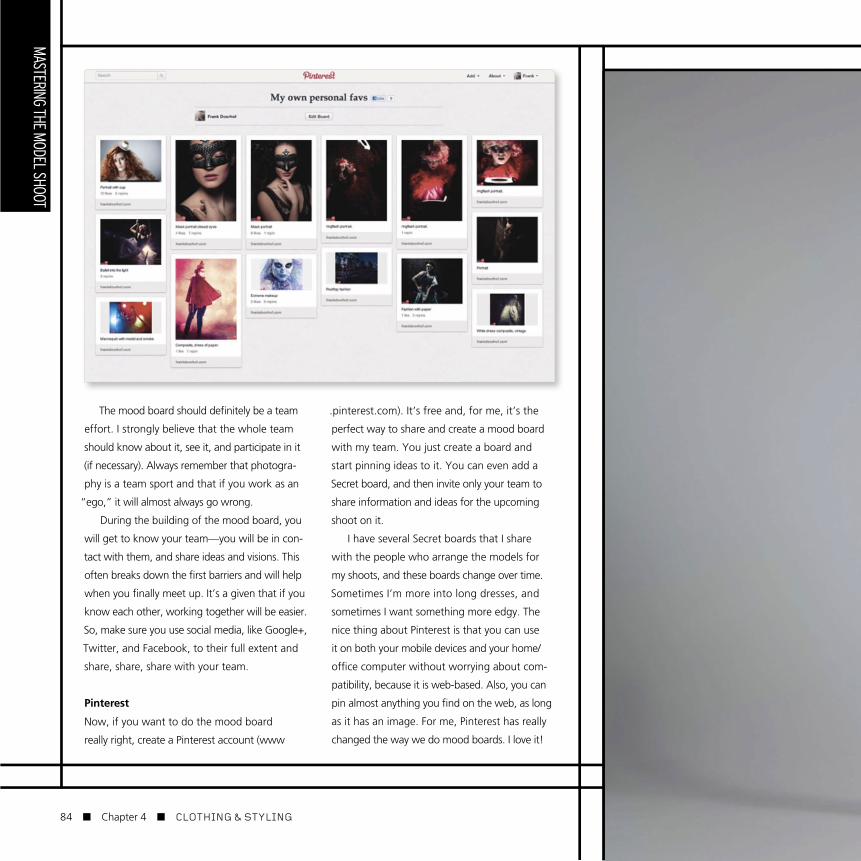
I love to use now is Pinterest.
Mood boards
The best way to prepare for a shoot is with a mood
board. You can do it the old-fashioned way by
gluing images, or colors, or materials to a piece
of cardboard. But, you can, of course, also do
it digitally. If you own an iPhone, iPad, or similar
device, there are even apps that will help you
design and store a mood board. So far, though,
there aren’t any killer mood board apps for tab-
lets that are cross-platform. My friend, UK-based
photographer Glyn Dewis, uses an app for his
iPad called Moodboard, but you can run into
problems with there not being the same app
for both Apple and Android users. On the other
hand, Pinterest works for everybody (iPhone and
Android), it’s online, and it’s free.
Just remember that a mood board is not
about copying the images on the board; it should
be used to “feel” the session. I’ve seen several
mood boards over the years that, for example,
also contained fabrics, just to get a feel for the
material or structure. But, most boards will just
contain images, colors, text, etc. You should see
the mood board as your personal/team collection
of ideas from which your shoot will grow.
Chapter 4 CLOTHING & STYLING 83
The mood board should definitely be a team
effort. I strongly believe that the whole team
should know about it, see it, and participate in it
(if necessary). Always remember that photogra-
phy is a team sport and that if you work as an
“ego,” it will almost always go wrong.
During the building of the mood board, you
will get to know your team—you will be in con-
tact with them, and share ideas and visions. This
often breaks down the first barriers and will help
when you finally meet up. It’s a given that if you
know each other, working together will be easier.
So, make sure you use social media, like Google+,
Twitter, and Facebook, to their full extent and
share, share, share with your team.
Now, if you want to do the mood board
really right, create a Pinterest account (www
.pinterest.com). It’s free and, for me, it’s the
perfect way to share and create a mood board
with my team. You just create a board and
start pinning ideas to it. You can even add a
Secret board, and then invite only your team to
share information and ideas for the upcoming
shoot on it.
I have several Secret boards that I share
with the people who arrange the models for
my shoots, and these boards change over time.
Sometimes I’m more into long dresses, and
sometimes I want something more edgy. The
nice thing about Pinterest is that you can use
it on both your mobile devices and your home/
office computer without worrying about com-
patibility, because it is web-based. Also, you can
pin almost anything you find on the web, as long
as it has an image. For me, Pinterest has really
changed the way we do mood boards. I love it!
84 Chapter 4 CLOTHING & STYLING

Now let’s take a look at what we need for a suc-
cessful photo shoot. We already talked in more
detail about picking models, setting up the photo
shoot, and paying for everything in Chapter 1. So,
here’s a quick rundown of the people you need
on your team:
The First Thing We Need Is the Model
Getting the right model for the job does not
mean picking the first pretty face you see on the
street. This works for some images, but a good
model is someone who is flexible with their poses
and, most of all, has character. Somehow, I don’t
like the “pretty” models. I always want something
offbeat in my models, something that sets them
apart from the crowd. When you go through my
portfolio, you will see a lot of pretty girls (and
guys), but I selected them because of their other
qualities: the way they act in front of the camera,
the way they dress when they come in at the cast-
ing/test shoots, and so on. Often I can see in the
blink of an eye if a model is what I am looking for.
“Now,” I hear you ask, “how about some
examples?” Well, I thought about this and I want
to spare you the boring headshots, so I thought
we’d do it a bit more in sync with the book. For
example, one of things I always ask a model to
do during a test shoot is to jump. We use a lot of
motion in our shoots, and a model that moves freely
in front of the camera is a huge plus for me. So,
here is a shot of a jump from a test session we did
with Loes, a model we now work with a lot.
Expression is also very important, so it’s not
uncommon for me to ask a model to scream in
front of the camera. Often, it’s a way to break the
ice, and for me, it’s a great way to see what kind
BUILDING A TEAM
Chapter 4 CLOTHING & STYLING 85

One small tip: When asking a model to
scream, make sure you tell them to scream
without making a sound. Your neighbors will
love you for it. Actually, a pretty funny story
happened a few years ago during the Profes-
sional Imaging show in the Netherlands. I used
a model whose native language wasn’t Dutch
and it was a bit loud during the start of the
demo. I told her to scream and said quietly,
“Without making a sound.” Somehow she did
not hear that last part, and I’m so glad I used
a strap for my camera, because otherwise it
would have been on the ground. It was a great
way to get a lot of attendees to the booth, by
the way, because after the scream, the whole
building was dead silent and we went from
approximately 40 viewers at the demo to more
than 100, so it can be interesting.
86 Chapter 4 CLOTHING & STYLING

of expression the new model can/will bring to the
set. A model that is restrained will often also be
less “free” in front of the camera. So this is actually
a pretty good way to test a model. It won’t give
you the best images, but it does show you how
free a model feels in front of the camera.
The Makeup Artist (MUA)
Now that we have our model, it’s up to the next
vital part, the makeup artist. Put a model in front
of the lights without makeup and…well, she will
look very, very bad. Add some makeup, and there
we go.
The first problem a lot of starting photog-
raphers experience is the “shine” on the face.
Whatever they try, they don’t seem to be able to
figure this out. In reality, it’s simple: when you put
someone in front of strobes without any make-
up, the skin reflects the light. So, we need to put
something on the skin—in most cases, a powder
that will remove the shine. The correct powder is
chosen based upon the model’s skin. So, if you
can’t afford a makeup artist, at least make sure
you have some of this powder in your studio, with
a brush to apply it to your model’s face. It makes
a huge difference.
But, this is not where the job of a good MUA
stops. They are often the creative force behind
your shoot. They will come up with ideas that you
probably would never think of, or enhance the
ideas you have. The moment you start working
with an MUA, you’ll see an immediate jump in
your image quality.
Now, some makeup artists also do a little bit
of hairstyling, however when you have the chance,
try to get a hairstylist, too.
Chapter 4 CLOTHING & STYLING 87
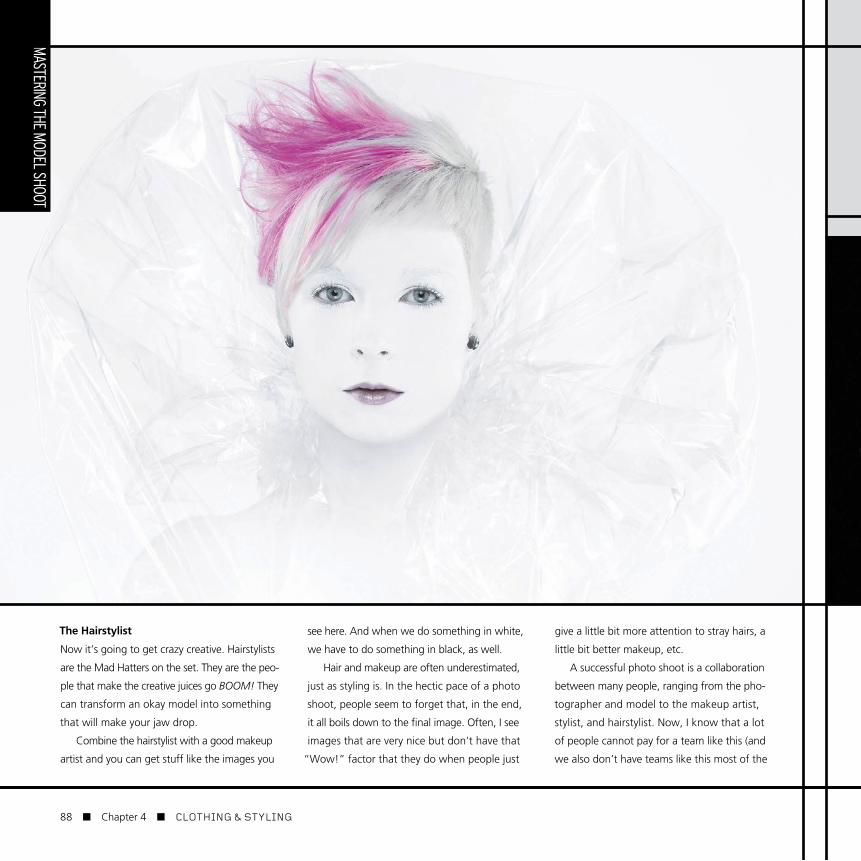
The Hairstylist
Now it’s going to get crazy creative. Hairstylists
are the Mad Hatters on the set. They are the peo-
ple that make the creative juices go BOOM! They
can transform an okay model into something
that will make your jaw drop.
Combine the hairstylist with a good makeup
artist and you can get stuff like the images you
see here. And when we do something in white,
we have to do something in black, as well.
Hair and makeup are often underestimated,
just as styling is. In the hectic pace of a photo
shoot, people seem to forget that, in the end,
it all boils down to the final image. Often, I see
images that are very nice but don’t have that
“Wow!” factor that they do when people just
give a little bit more attention to stray hairs, a
little bit better makeup, etc.
A successful photo shoot is a collaboration
between many people, ranging from the pho-
tographer and model to the makeup artist,
stylist, and hairstylist. Now, I know that a lot
of people cannot pay for a team like this (and
we also don’t have teams like this most of the
88 Chapter 4 CLOTHING & STYLING

Both the white and black skin were done with
makeup. Afterward, I had to touch it up in Photoshop
because it’s almost impossible to get 100% coverage
the way I wanted it. The shots were done with standard
strobes, so the makeup and lip colors were actually all
standard, readily available makeup material, although we
did choose colors that were, let’s say, “eye-catching.”
time). But, even without a full team, it’s very easy
to, for example, just wet the hair a little bit to make
sure it’s not “fluffy,” or just add a little bit of gel or
hairspray to the hair to make sure it stays in place.
It’s all those little things that you can do yourself,
or that a team normally does, that will make your
image go from okay to “Wow!” And now for the
final part of our team:
Chapter 4 CLOTHING & STYLING 89

The Stylist
If the hairstylist is the Mad Hatter, the stylist is
the über Mad Hatter—the one that puts the
whole team into overdrive. These people are
the creative engine behind a shoot. But, to find
a good one is very hard and often expensive.
Stylists are able to throw together stuff
that make you think, “That will never, ever go
together,” and when you see the end result,
you will say, “Oh my! What just happened?”
Now don’t get me wrong, styling a shoot is
not just throwing some stuff together and
hoping it will work out. It’s much, much more.
It’s about knowing what goes together, know-
ing how to pose your model, and knowing
how to light the scene.
Often, getting a stylist isn’t easy. I always
tell people that there are a million models out
there, about a thousand makeup artists, and
maybe one good stylist. Now, I do exaggerate
a little bit, but it’s actually pretty close to the
truth—there really are not that many stylists
out there, and the reasons are very simple:
First of all, being a good stylist means
being almost freakishly creative, but it also
means being able/willing to spend a lot of
money on accessories, clothing, fabrics, etc.
90 Chapter 4 CLOTHING & STYLING

The stylist we work with in our studio literally
has moved to a bigger house to be able to
store all the materials she uses. She also creates
90% of the dresses herself and takes them
apart again after one shoot. She does not
want to use something more than once (maybe
twice). This means a lot of dedication and mon-
ey that is spent. It also means that a lot of styl-
ists won’t work for free (Time For Print [TFP]—
more on this back in Chapter 1), however I
strongly feel that they are worth every cent
and can really lift your work to the next level.
Let’s look at a few images to see how easy
it can be to add some flair to them without
breaking the bank, and imagine these images
with a model in just jeans and a tank top.
This shot was actually not as easy as it looks.
The cup and saucer were bought by the model,
and it was actually sold as a hairclip. However,
whoever designed it must have had a bad day,
because the cup and saucer were way too
heavy to stay in the hair. In the end, we taped
(yes, I’m serious) the cup and saucer to the hair
of the model to keep it steady. One good tip: If
you use tape, make sure you are nowhere near-
by when the makeup artist removes the prop
from the hair.
Chapter 4 CLOTHING & STYLING 91

All we needed for this image was a strong face,
some nice basic makeup, and a leaf from a plant
that was in our studio at the time. It’s all very sim-
ple, but because of the proper placement, and the
composition, and position of the hair, it all works.
This next dress (above right) looks expensive,
right? Well, actually, it’s just Christmas wrapping
paper and some tape to hold it together. It was
put together by Nadine (our model and stylist)
in about two hours. Total cost: $0 (well, okay,
just the cost of some tape).
Below right, we used some fabric the model
bought at the market, some chicken wire, and
some crazy makeup. Add a little bit of smoke
and some backlight and you’re done (more on
the smoke back in Chapter 2, and lots more on
lighting later in the book). Overall, the costs
were less than $20.
In most model photography books, the writer
only touches on one topic needed for a photo
shoot, like “How to Operate Your Strobes” or “The
1,001 Poses Book.” That doesn’t work for me. In
the end, we all know how a strobe works, what
a reflector does, etc. We don’t need an extended
There are different kinds of tape, so read this
carefully. We all know duct tape—no photogra-
pher can live without it; it holds together some
shoots. But, when you use duct tape on a model,
it hurts when it has to come off. We also have
gaffer’s tape. This is very strong tape and sticks
very well, however, it’s designed to not tear away
paint when you stick it to a wall. This is the better
option for when you need to connect something
to a model. Now, if you did use duct tape by acci-
dent, and it has to come off—run!
92 Chapter 4 CLOTHING & STYLING
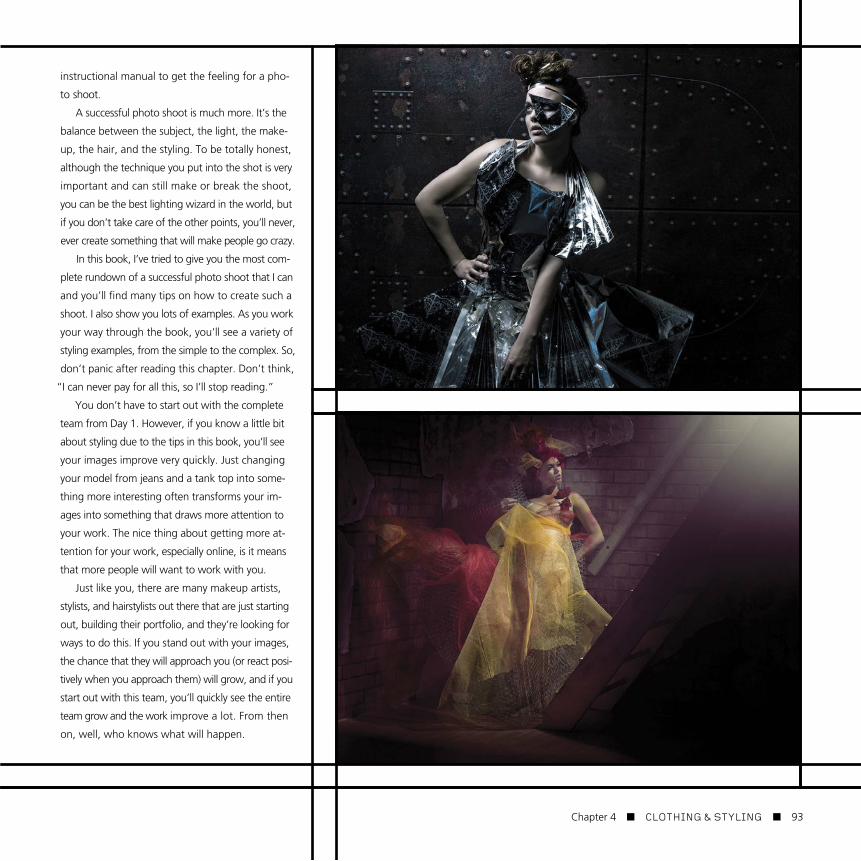
instructional manual to get the feeling for a pho-
to shoot.
A successful photo shoot is much more. It’s the
balance between the subject, the light, the make-
up, the hair, and the styling. To be totally honest,
although the technique you put into the shot is very
important and can still make or break the shoot,
you can be the best lighting wizard in the world, but
if you don’t take care of the other points, you’ll never,
ever create something that will make people go crazy.
In this book, I’ve tried to give you the most com-
plete rundown of a successful photo shoot that I can
and you’ll find many tips on how to create such a
shoot. I also show you lots of examples. As you work
your way through the book, you’ll see a variety of
styling examples, from the simple to the complex. So,
don’t panic after reading this chapter. Don’t think,
“I can never pay for all this, so I’ll stop reading.”
You don’t have to start out with the complete
team from Day 1. However, if you know a little bit
about styling due to the tips in this book, you’ll see
your images improve very quickly. Just changing
your model from jeans and a tank top into some-
thing more interesting often transforms your im-
ages into something that draws more attention to
your work. The nice thing about getting more at-
tention for your work, espe cially online, is it means
that more people will want to work with you.
Just like you, there are many makeup artists,
stylists, and hairstylists out there that are just starting
out, building their portfolio, and they’re looking for
ways to do this. If you stand out with your images,
the chance that they will approach you (or react posi-
tively when you approach them) will grow, and if you
start out with this team, you’ll quickly see the entire
team grow and the work improve a lot. From then
on, well, who knows what will happen.
Chapter 4 CLOTHING & STYLING 93

This page intentionally left blank

Index
Aabandoned building shots, 55abandoned city/street shots, 24abuse of models, 125accent lights, 184, 197Add Noise filter, 64, 254agencies, modeling, 9agricultural area shots, 23, 41air conditioning, 96airflow in studios, 31Alien Skin’s Exposure, 273–275, 276, 277ambient light
dragging the shutter for, 154–158metering of, 224–226, 234–236shooting with strobes and, 153,
154–158, 235shutter speed and, 155, 157, 174
analog photography, 331–335disadvantages of, 334–335film types for, 331–332happy accidents in, 332–333learning to shoot, 331myths about, 334starting out in, 333
anglesfinding the best, 58lens flare related to, 205
aperture priority mode, 145, 224, 234aperture settings, 149–150
depth of field and, 150, 234light meters and, 225, 228, 230strobe output and, 157theory for calculating, 230
appsmodel release, 15mood board, 83WordPress, 295
Art of Dance video, 77artists, xii–xiii
Bbackgrounds, 51–65
angles and, 58black, 60, 180
canvas/muslin, 65challenge of finding, 51color, 60, 61, 62fabrics as, 32gray, 60metering, 230reflections in, 57scenic, 65seamless paper, 59–64smoke added to, 52–56white, 60, 176–180, 232See also props
backlighting smoke, 52baking flour, 76, 77bicycle tunnel shots, 24Bizarro, Douglas, 107black backgrounds, 60, 180black canvas technique, 45, 46black-and-white photos
creative use of light for, 187experimenting with, 282–283high-contrast look for, 139–140Silver Efex Pro plug-in for, 258–259
blend modes, 251blinds, 73blogging, 293–294blue backgrounds, 60, 61blurring seamless backgrounds, 64brick wall location shots, 24bridge location shots, 24brown backgrounds, 60, 61business considerations
marketing your work, 287–295providing estimates, 295–297starting your own business, x–xiTFP work, 298–299
Ccaged model photo, 78, 79calibrating your monitor. See monitor
calibrationcameras
analog, 333, 334aperture setting on, 149–150dynamic range of, 181–183formats for, 149–150metering with, 233
mirrorless, 158profiles for, 218
canvas backgrounds, 65Capture One program, 140, 183, 201Caravaggio paintings, 328cars, models with, 39, 42, 45–46, 56casting calls, 3, 5catering, 96chairs
posing models in, 103, 118using as props, 68–69, 119
channels, color, 250–251cheap/inexpensive props, 68–79Chinese restaurant photos, 38–39church interior photos, 47–48Clarity plug-in, 277, 278Clone Stamp tool, 253clothing, 81
created by stylists, 91, 92for skinny and plus-sized models, 122
cloudy skies, 135, 137coaching models, 95–131
day-of-the-shoot tips for, 96–98glamour photography and, 112–120jump photography and, 322overview of posing and, 98–112portrait photography and, 121–123skinny and plus-sized models, 121–123tips for working with and, 124–131See also posing models
cold weather shoots, 313color
seamless paper, 60, 61, 62studio wall/ceiling, 30–31
color analyzers, 210color channels, 250–251Color Efex Pro plug-in, 261, 273, 284, 285color targets, 215–219ColorChecker Passport, 215–219
Lightroom workflow, 216–217standalone workflow, 218–219
ColorMunki calibrator, 210–214composition, 318–319Concepcion, RC, 293concepts, importance of, 78Content-Aware Fill, 57contracts (releases), 12–15
Index MASTERING THE MODEL SHOOT 337

contrastB&W high-contrast look, 139–140controlling with distance, 161
contrast ratio, 212copycat behavior, xiicowboy photos, 52–53creativity, 78critique days, 288cropping jump shots, 322–323crop-sensor cameras, 149–150cross-processing technique, 332cube props, 69curtains, 72, 175curves
high heels and, 114posing to create, 99, 101–102, 115props for making, 118
Ddark-skinned models, 239–240day-to-night effect, 236deleting bad shots, 98, 129DeLorean car photos, 45–46, 56deposits from models, 8depth of field
aperture setting and, 150, 234camera type and, 149–150
desert location shots, 22Dewis, Glyn, 83Dodge tool, 257dodge-and-burn method, 246dragging the shutter, 40, 46, 154–158drinking straws, 97, 126–127duct tape, 92DxO FilmPack plug-in, 276, 277dying out moment, 152dynamic range
of cameras, 181–183of monitors, 212
EEasy Release – Model Release app, 15elevator location shots, 24Elinchrom Varistar Umbrella Set, 197Elliptical Marquee tool, 263emails, 290–292Emboss filter, 255
engineers, photography, xiiEpson Perfection V700 scanner, 334estimates, providing, 295–297Expan background system, 59Exposure plug-in, 273–275, 276, 277expression, 85–87, 327eye retouching, 257
Ffabrics, 32, 70–71Facebook, 289, 290facial expressions, 85–87, 327facial retouching
Healing Brush for, 252–253iris brightening, 257removing facial shine, 87returning detail to skin, 254–256smoothing skin, 247–249
fashion magazines, 107feathering the light, 158feet in photos, 110fill light
adding to lighting, 174, 176ring flash used as, 169
filmdeveloping rolls of, 334shooting on, 331–332
film looks, 273film noir effect, 73FilmPack plug-in, 276, 277filter-based analyzers, 210filters
ND (Neutral Density), 150as vision getters, 331
filters (Photoshop)Add Noise, 64, 254Emboss, 255Gaussian Blur, 64, 255Liquify, 266–267
FireCloth material, 70flags, 178, 195flash
fill, 41, 169ring, 167–169See also strobes
flash duration, 322food and drink, 96, 126–127forest location shots, 22
frankdoorhof.com website, 291free models, 7–9freeze moment, 151–152Fresnel spots, 190–191friends, models as online, 4–5f-stops
setting on light meters, 228theory for calculating, 230See also aperture settings
full-frame cameras, 149–150
Ggaffer’s tape, 92garbage bin shots, 42–44garden location shots, 22Gaussian Blur filter, 64, 255Gaussian noise, 64gels, strobe, 191generators, 52glamour photography, 112–120
explanation of, 112–113lighting setup for, 117posing models for, 113–120timing for nude and, 128
Google+, 288–289, 290goosebumps on models, 96, 313graveyard photos, 48gray seamless paper, 60Greenberg, Jill, 107grids, metering with, 158, 160guestbook creation, 295
Hhabit breaking, 280–283hair retouching, 268–271hairstylist, 88–89halo effect, 60hands in photos, 106happy accidents, 332–333hard light, 187Healing Brush, 252–253high heels, 114high-contrast look, 139–140high-end fashion look, 250–251high-speed sync (HSS), 164hotel location shots, 24
338 Index MASTERING THE MODEL SHOOT

Iignoring models, 124–125Imagenomic Portraiture, 247Impossible Project film, 333incident metering, 179, 220–224industrial area shots, 23inexpensive props, 68inspiration
photographers used for, 107for props, 66–67
insulting models, 124Internet presence, 288–295inverting selections, 64, 263iPad/iPhone. See mobile devicesiridescent organza, 70iris brightening, 257ISO setting
depth of field and, 150incident metering and, 221studio photography and, 181–182
Jjump shots, 85, 116, 320–323
KKelby, Scott, x, 5, 291Kelby Training, x, 77, 293
LLaChapelle, David, 107ladders as props, 77lake location shots, 23landscapes
including in photos, 139magic hour for, 135
laundromat location shots, 23layer masks, 247, 248leading lines, 319leaf shutter lens, 158learning to shoot, 331legs-crossed pose, 99Leibovitz, Annie, 107lens flare
lighting setup for, 204–207smoke for creating, 54
lensesanalog, 334, 335choice of, 324–326longer, 180tilt shift, 27wide-angle, 28, 324–326
lightambient, 153, 154–158controlling, 31feathering, 158hard vs. soft, 187learning to use, 172multiple sources of, 202natural, 135–143painting with, 262–265rim, 198window, 136, 138–139, 142
light in light technique, 174, 176light meters, 220–238
advice on buying, 220aiming at source with, 230ambient light metering with, 224–226,
234–236calibration pointers/tips for, 238camera adjustments using built-in, 233changing the settings on, 228, 230day-to-night effect using, 236grid metering with, 158, 160importance of ColorChecker and, 229incident metering with, 179, 220–224,
231killer tip on using, 230natural light metering with, 234–236reflective metering with, 227, 230,
231, 236spot metering with, 179–180sunlight and, 136–139
light sourceaiming meters at, 230including in images, 167–168shooting into, 204–207
lightingaccent lights for, 184, 197black backgrounds, 180blinds as props, 73camera settings and, 149–152creative use of, 187–189, 203fill light added to, 174, 176flags used in, 178, 195
glamour photography, 117killer tips about, 153–161lens flare created by, 204–207one-light setup for, 173silhouettes, 195–201single bulb used for, 148skin of models, 183–186smoke in images, 52softboxes and, 150white backgrounds, 176–180
LightroomColorChecker workflow, 216–217shooting tethered in, 140, 201See also Photoshop
light-skinned models, 239–240Liquify filter, 266–267locations, 19–49
author’s favorite, 37–49list of free, 22–24paying a fee for, 21permission for using, 48relating to owners of, 21smoke added to, 46, 52–56studio-based, 25–26, 29–32, 35, 36tight spaces as, 27–28tips for choosing, 33–36
long lenses, 180luminance, 212lying to models, 127
Mmagic hour, 135Magic Wand tool, 64makeup area shots, 25–26makeup artist (MUA), 16, 87makeup considerations, 302Manfrotto seamless setups, 59, 62mannequins in photos, 190–194marketing your work, 287–295
emails for, 290–292guestbook for, 295personal website for, 292–295social media for, 288–290, 291TFP work for, 298–299
McNally, Joe, 163medium-format cameras, 150metering. See light metersmirrorless cameras, 158
Index MASTERING THE MODEL SHOOT 339

mistakes, beautiful, 130mobile devices
model releases on, 15portfolios on, 48
Model Mayhem website, 3modeling agencies, 9models, 1–17
coaching, 95–131creative ideas of, 78day-of-the-shoot tips for, 96expression of, 85–87, 327first contact with, 5getting to your studio, 2–11goosebumps on, 96, 313not showing up, 7–9posing, 98–111putting at ease, 96–98releases used with, 12–15requesting photos from, 5right casting of, 5–7skin tone of, 239–240skinny and plus-sized, 121–123street scouting for, 2styling for, 81–93tape used on, 91, 92TFP work with, 11–12tips for working with, 124–131websites for finding, 2–5
monitor calibration, 210–215ColorMunki used for, 210–214tips and reasons for, 215
mood boards, 83–84motion
adding to poses, 115–116, 320–323guidelines for shooting, 320, 322–323silhouettes with, 197
music, mood, 96muslin backgrounds, 65
Nnatural light, 135–143
bright sunlight as, 135, 139–142cloudy skies as, 135, 137metering of, 136–139, 234–236shadows created in, 142–143shooting with strobes and, 144–145window light as, 136, 138–139, 142
ND (Neutral Density) filters, 150
Nevada desert shot, 328–329Nik Color Efex Pro plug-in, 261, 273, 284,
285Nik Silver Efex Pro plug-in, 258nude photography, 128
Ooffice location shots, 22Olaf, Erwin, 107One Model Place website, 3one-light setup, 173online presence, 288–295open studio spaces, 29organza, iridescent, 70
PPaint Bucket tool, 264painting with light, 262–265pallets
location shots using, 23studio shots using, 66–67
paper, seamless, 59–64Paste in Place command, 64pastel-like portraits, 136patterns, repeating, 319paying
location owners, 21models, 11–12team members, 16
performance night look, 207permits, obtaining, 48photo shoots
components of successful, 93finding models for, 1–17locations for, 19–49mood boards for, 83–84preparing for, 82–84start-to-finish, 301–315team members for, 85–93, 302
photography profession, xi–xiiPhotoshop
Add Noise filter, 64, 254color channels, 250–251Content-Aware Fill, 57correct way of using, 285cropping jump shots in, 322–323finishing moves in, 272–275
Gaussian Blur filter, 64, 255hair retouches in, 268–271Healing Brush, 252–253iris brightening in, 257layer masks used in, 247, 248Liquify filter, 266–267painting with light in, 262–265retouching photos using, 247–271seamless backgrounds fixed in, 64, 244silhouette adjustments in, 197skin retouches in, 244–246, 247–249,
252–256things to fix in, 244–246
Photoshop Lightroom. See LightroomPinterest accounts, 84playing with approaches, 123Plexiglas on floor, 199plug-ins
Alien Skin’s Exposure, 273–275, 276, 277DxO FilmPack, 276Nik Color Efex Pro, 261, 284, 285Nik Silver Efex Pro, 258Topaz Clarity, 277, 278Topaz ReStyle, 276, 277
plus-sized models, 121–123Pocket Wizards, 158Polaroid SX-70 camera, 333portfolios
author’s reviews of, xiiihaving on mobile device, 48
portraitscoaching models for, 121–123creating pastel-like, 136curves created in, 102fitting to models, 187glamour shots as, 114, 115
posing models, 98–112curves created by, 99, 101–102, 115glamour photography and, 113–120in-depth examples of, 108–111legs-crossed pose for, 99male vs. female models, 99motion added when, 115–116personal nature of, 104portrait photography and, 121–123right and wrong of, 105–106seated in a chair, 103for silhouettes, 201skinny and plus-sized models, 121–123
340 Index MASTERING THE MODEL SHOOT

where to learn about, 107See also coaching models
posing stools, 69power
generators for on-location, 52studio outlets for, 32
pre-focusing for motion, 320preparing for shoots, 82–84
“Prize Inside” emails, 291profiles, ColorChecker, 218promoting your work. See marketing
your workprops, 66–79
blinds as, 73cages as, 78, 79cameras as, 74chairs as, 68–69, 119curtains as, 72curves made with, 118fabrics as, 32, 70–71inexpensive, 68inspiration for, 66–67ladders as, 77second-hand items as, 32, 68–69, 74–75substances used as, 77toilet paper idea for, 78unrecognizable, 69See also backgrounds
public photos, 15
Rradio triggers, 221, 222red eye, 169reflections
reducing with flags, 178using in photos, 57
reflective metering, 227, 230, 231, 236reflectors, 174, 178, 195, 236, 303relationship to models, 124–131
guidelines for, 124–127, 128raising the bar in, 128–131
relaxed atmosphere, 129releases (contracts), 12–15repeating patterns, 319ReStyle plug-in, 276, 277retouching tips, 247–271
B&W with impact, 258–259hair adjustments, 268–271
Healing Brush, 252–253high-end fashion look, 250–251iris brightening, 257Liquify filter, 266–267painting with light, 262–265skin fixes, 247–249, 252–256white clothing fix, 260–261See also Photoshop
rim light, 198ring flash
how to use, 168–169including in images, 167–168
road location shots, 22roof location shots, 22Rule of Thirds, 318
Sscanning prints, 334scenic backgrounds, 65scream test for models, 86seamless paper, 59–64
color choices for, 60–61, 62fixing problems with, 64model interacting with, 62–63setups for hanging, 59, 62
seated poses, 103second-hand item props, 32, 68–69, 74–75Sekonic L-758DR light meter, 220, 238selections
inverting, 64, 263making in Photoshop, 64, 263, 268working with, 268–269
sensor size, 149sets for photo shoots, 302shadows
blinds for adding, 73hiding problems using, 122metering skies and, 237silhouettes with, 199
sheer material, 71shooting tethered, 128–129, 140, 201shutter button delay, 322shutter priority mode, 225, 234shutter speed
ambient light and, 155, 157, 174, 234–235
dragging the shutter technique, 40, 46, 154–158
finding with light meter, 224studio strobes and, 150–152x-sync speed and, 150–151, 231
silhouettes, 195–201lighting setup for, 195–199Photoshop work on, 197, 199posing models for, 201
silo location shots, 23Silver Efex Pro plug-in, 258skate park location shots, 22skies
cloudy, 135, 137metering, 237
skindark vs. light, 239–240quality of light for, 183–186
skin retouching, 244–245Healing Brush used for, 252–253returning detail to skin, 254–256smoothing skin, 247–249
skin tone, 239–240skinny models, 121–123smartphones. See mobile devicessmoke
adding to images, 52–56, 193, 305, 306importance of backlighting, 52overloading images with, 55spreading light using, 46
smoke machines, 46, 52, 306social media, 288–295
critique days on, 288emails and, 290–292Facebook, 289, 290Google+, 288–289, 290tips for using, 291Twitter, 290See also websites
soft light, 135, 183, 187Soft Light blend mode, 251, 254, 262softboxes, 150, 161, 183Sony A99 camera, 145spectrometers, 210spot meters, 179–180, 220
“spray and pray” techniques, xistaircase shots, 23, 42, 102, 120start-to-finish photo shoot, 301–315storytelling, 23, 24, 25, 328straight-on shots, 123straws for drinking, 97, 126–127
Index MASTERING THE MODEL SHOOT 341

street-scouting of models, 2strobes
ambient light and, 153, 154–158, 235dying out moment for, 152feathering the light with, 158freeze moment for, 151–152gels used with, 191high-speed sync for, 164including in images, 167–168motion photography and, 322natural light and, 144–145shooting into, 204–207shutter speed for, 150–151
studio photographyaccent lights in, 184black backgrounds in, 180building the shot in, 190–194creative use of light in, 187–189fill light added in, 174–176flags used in, 178, 195lens flare created in, 204–207location shots in, 25–26, 29–32, 35, 36one-light setup in, 173quality of light in, 183–186silhouettes in, 195–201tips for shooting, 29–32white backgrounds in, 176–180
stylist, 16, 90–93substances as props, 77sunlight
metering in, 136–139shooting in bright, 135, 139–142sun in images with, 167See also natural light
TT values, 152tablets. See mobile devicestape, using on models, 91, 92
team members, 85–93hairstylist, 88–89makeup artist, 16, 87model, 1–17, 85–87stylist, 16, 90–93
teamworkimportance of, 78mood boards and, 84
tethered shooting, 128–129, 140, 201TFP (Time for Print) work, 11–12, 298–299themes for photo shoots, 83thinking differently, 279–284tight spaces, shooting in, 27–28tilt shift lenses, 27tinted images, 274–275, 331Tonal Contrast filter, 284, 285toning process, 332Topaz Clarity plug-in, 277, 278Topaz ReStyle plug-in, 276, 277top-of-building location shots, 22touching models, 124trust, gaining, 128–129Twitter, 290
Uunrecognizable props, 69unretouched images, 5
Vvignettes, creating, 263–264vintage gear, 335
WWacom tablet, 256, 262wall mural background, 44wallpaper in studios, 31–32
waterlocation shots with, 23used as prop, 77
websitesfinding models via, 2–5importance of updating, 295marketing yourself via, 288–295yellow pages vs., 292–293See also social media
wedding photographers, xi–xiiwhite backgrounds, 60, 176–180
flags used for, 178lighting setup for, 178metering for, 179–180, 232umbrella set for, 197
white clothing fix, 260–261white seamless paper, 60wide-angle lenses
model photography using, 324–326shooting in tight spaces using, 28
wind machines, 175window light, 136, 138–139, 142WordPress apps, 295wrinkle removal, 106WYSIWYG view, 145
XX-Rite ColorChecker Passport, 215–219X-Rite ColorMunki Photo, 210–214x-sync speed, 150–151, 231
Yyellow pages, 292–293
Zzooming in, 323
342 Index MASTERING THE MODEL SHOOT