masterquote for aspire rel1 01 -...
TRANSCRIPT

8/25/03 Page 1
MasterQuote For Aspire
User’s Guide (Release 1.01)

8/25/03 Page 2
This document will explain how to access and use the web-based MasterQuote to configure the Aspire system. The end result will be a quote of all the components at list
price which can be used as the basis of a customer quote. Note that MasterQuote is not intended to be an end user quoting system. MasterQuote quote is valid for 90 days. How to Access MasterQuote
1. Go to your web browser an go to the NEC Information Portal: http://www.cng.nec.com/eip/login/login.asp
2. If you are not signed up for the NEC Information Portal, go to the above address and request access to the Information Portal. A user name and password will be assigned to you. This will allow access to the Information Portal.
3. If you have not already done so, you should add this to your favorites for easy
access in the future. 4. Log into the Information Portal using your user name and password.

8/25/03 Page 3
5. Click on the Links and then select Web MQ.
6. If MasterQuote does not appear as a choice then it is not in your profile for access.

8/25/03 Page 4
7. To request access to MasterQuote, click on the Preferences tab.

8/25/03 Page 5
8. This will bring you to the MasterQuote main screen.
9. If you look at this screen, you will see 3 choices, MasterQuote, MQ Compare and Logoff. Clicking on MasterQuote will start your quote. MQ Compare is used to compare 2 MasterQuotes which have previously been run.

8/25/03 Page 6
10. To enter MasterQuote, click on MasterQuote. This will bring you to the
MasterQuote Welcome screen.
11. At the left of the screen, you will see some selections named Masters, History, New Parts, Help and Exit.
12. The Masters List is designed to help you organize the quotes developed for each individual customer. The setup is similar to setting up a filing cabinet where the customer name is a file drawer.

8/25/03 Page 7
13. Select Masters
14. Note the heading above the choices. In this case, Master List is the heading.
Some screens look similar. This header will tell you which screen you are in.
15. If the Masters list is empty, Select ADD. If you have some Masters already set up you will see those and an additional choices.

8/25/03 Page 8
16. You can now either add a new master or select an existing master.

8/25/03 Page 9
17. Selecting ADD opens a screen for you to add a Master to your list.
18. The required entries are Name, Address, City, State and Zip. Your contact name and telephone number are optional entries. The information you enter here will appear on the Masters List and headings of your completed quote. Only your NEC Account Manager have access to your quotes so coded entries are not required unless this is how you keep track of your individual customers.

8/25/03 Page 10
19. Once you have entered the Master information and clicked on Add Master you will advance to the next screen which is for a job site. The job site is the installation location for the quote or quotes you will be generating.
20. Keeping the filing cabinet in mind: The file drawer is the Master Information and the folder or folders in that drawer are the Job Sites which contain the actual quotes.
21. Select ADD

8/25/03 Page 11
22. As with the Master List, the required entries are site name, street address, city, state and zip. For a customer with only one site the information entered in the Adding a Master screen will be the same as the Job Site screen.
23. For a customer with multiple sites, the information entered on this screen will be site specific. Multiple Job Sites, each reflecting a different address, can be added to a single Master. This is especially beneficial when you need to develop multiple quotes for each site.
24. Although contact name and number is optional, if you are quoting a customer with multiple sites each with a different contact name and number, you may want to add the information here.
25. Enter the location information and press ADD Job Site to advance to the next screen.

8/25/03 Page 12
26. To add a quote to the Job Site, click on ADD.

8/25/03 Page 13
27. On this screen you will select the system to quote. At this time there is only one system type to choose from.
8/25/03 Page 14
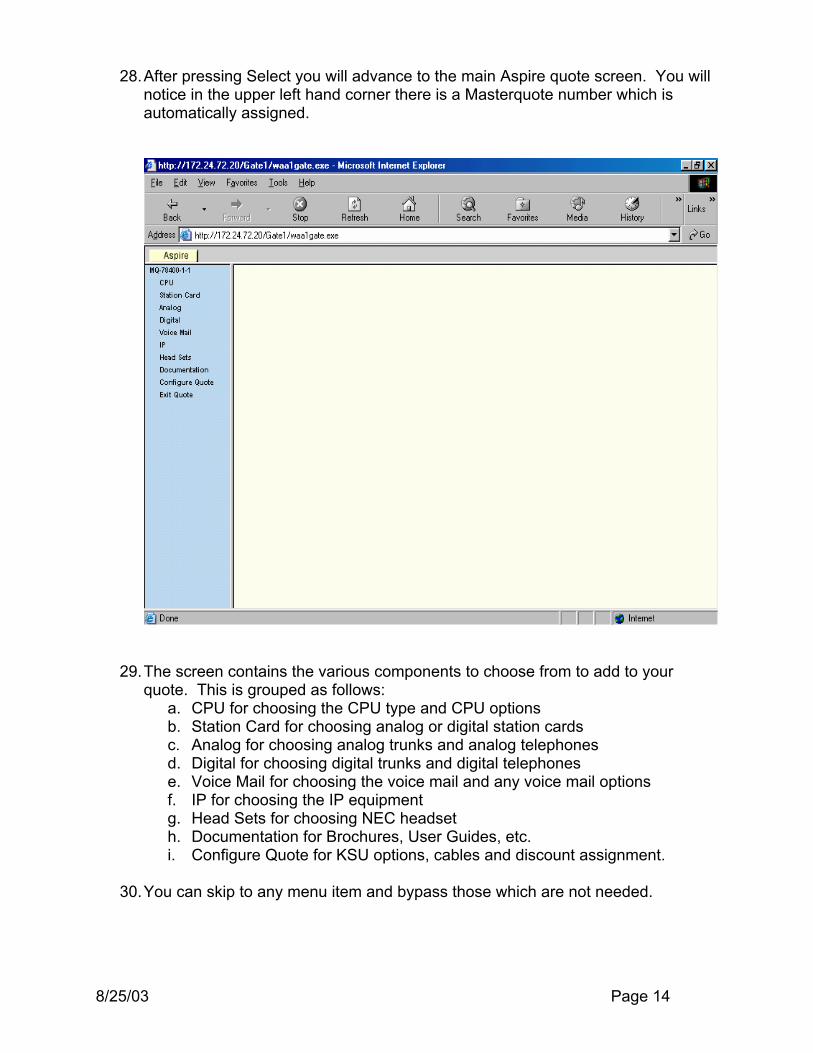
28. After pressing Select you will advance to the main Aspire quote screen. You will notice in the upper left hand corner there is a Masterquote number which is automatically assigned.
29. The screen contains the various components to choose from to add to your quote. This is grouped as follows:
a. CPU for choosing the CPU type and CPU options b. Station Card for choosing analog or digital station cards c. Analog for choosing analog trunks and analog telephones d. Digital for choosing digital trunks and digital telephones e. Voice Mail for choosing the voice mail and any voice mail options f. IP for choosing the IP equipment g. Head Sets for choosing NEC headset h. Documentation for Brochures, User Guides, etc. i. Configure Quote for KSU options, cables and discount assignment.
30. You can skip to any menu item and bypass those which are not needed.

8/25/03 Page 15
31. Click on CPU.
32. There is a pull down menu for the CPU type, choose either 64 Port CPU or 256 Port CPU. Note that MasterQuote will be checking throughout the quote to make sure you don’t exceed the limits.
33. Check the YES boxes for the feature upgrade PAL, the DSPDBU for additional
resources or the Voice Recording Daughterboard. Note that the DSPDBU is required when using the Voice recording Daughterboard so it will be automatically added when selecting it. In this case you need not check YES for the DSPDB.
34. The indicates that there is help information available for the question.
35. When you click on the box the help message will be displayed in a new
window.
?
?

8/25/03 Page 16
36. Each MasterQuote screen has an associated entry number. These numbers are used to keep track of screen items. If you find any problems with a part of the quote you can write down the number and tell us, or, you can save the problem quote, write down the MQ number and tell us.

8/25/03 Page 17
37. You may receive error messages during the course of the MasterQuote. The message should give you enough information about what the problem is and how you can correct it. MasterQuote will not guarantee a quote which has an error.
38. If you receive an error, click on Return to Question and make the correction.
8/25/03 Page 18
39. Before moving on to the next screen some explanation is helpful regarding how MasterQuote actually configures the information you input.
½ Sized Card
a) Some Aspire circuit cards come in multiple port sizes. CO loop and
ground are in 4 or 8 ports sizes, Digital station cards are in 8/16 and BRI cards are 2, 4 and 8 ports.
b) When you click on this box, MasterQuote will configure using the ½ sized card based on the entered data. This will result in a reduced priced systems.
c) If the ½ Sized Card is not checked, MasterQuote will always use the larger card. This will result in a slightly higher prices system but will provide some growth.
Wired & Equipped
a) MasterQuote allows you to “pre-wire” station and trunk ports by entering 2 different fields of data. An entry marked “Equip” is for the cards you want to use at the time of installation.
b) The entry marked “Wired” will outfit the system with the common equipment (KSU, CPU, Power Supply) based on the Wired entries but will not include the additional trunk/station cards in the quote.
c) When you input a number into the Equip box you will notice that the Wired entry will automatically fill in with the same value. You can increase this value if you want to include pre-wired station or trunks. Note that the Wired MUST ALWAYS be equal to or larger than the Equip.
Bay face
a) One of the features of MasterQuote is that at the end of the Quote, a schematic of the KSU and card cage is provided which shows where MasterQuote recommends the placement of the card selected in the quote.
b) Card placement will show Power Supplies, CPUs, Station, Trunk and Optional Cards. When you have pre-wired ports, the cards will be prefixed with a “#” sign.
c) If more than 8 cards are configured, the system will automatically add a second cabinet and the expansion interface kit.
d) Because a full sized card may be used for the Wired but a ½ sized card used for the Equipped, the Bay face may show a #Full size for wired but a ½ sized card will actually be installed. You must watch for this when reviewing the bay face.
e) The Bay face will lay out the cards in this order: Digital Station Cards Analog Station Cards Voice Mail Analog CO Cards Digital CO Cards

8/25/03 Page 19
f) The VoIP cards, SHUBU and other optional cards will be spread evenly between cabinets based on slot availability.
g) The Bay face layout will use abbreviations for the cards which are installed. The cards and abbreviations are shown in the following table. Please note that the Bay Face will show cards with on-board options, such as the 64CPU with a PAL upgrade or an 8 SLIU with an 8SLIDB added.
64CPU 0891002 IP1NA-NTCPU-A1
64CPAL 0891002
+ 0891039
IP1NA-NTCPU-A1 +
IP1NA-PALA-UGD 256CPU 0891038 IP1NA-NTCPU-B1
PS 0891000 IP1WW-PSU-A1 8CO-LS 0891004 IP1NA-8COIU-LS1 4CO-LS 0891005 IP1NA-4COIU-LS1 8CO-LG 0891028 IP1NA-8COIU-LG1 4CO-LG 0891029 IP1NA-4COIU-LG1
2BRI 0891006 IP1WW-2BRIU-A1 4BRI 0891007 IP1WW-4BRIU-A1 8BRI 0891008 IP1WW-8BRIU-A1 T1 0891009 IP1WW-1PRIU-P1 PRI 0891009 IP1WW-1PRIU-P1 4TLI 0891011 IP1NA-4TLIU-A1 8DID 0891012 IP1NA-8DIOPU-A1 4DID 0891013 IP1NA-4DIOPU-A1
8SLI+ 0891017
+ 0891018
IP1NA-8SLIU-A1 +
IP1NA-8SLIDB-A1 8SLI 0891017 IP1NA-8SLIU-A1 EXP 0891001 IP1NA-8KSU EXP SET
16ESI 0891014 IP1WW-16ESIU-PR2 8ESI 0891015 IP1WW-8ESIU-PR2
16DST 0891016 IP1WW-16DSTU-A1
2AMDB 0891032
+ 0891045
IP1WW-2FMSU-A1 +
IP1WW-4FMDB-A1 2AM 0891032 IP1WW-2FMSU-A1
4AMDB 0891037
+ 0891045
IP1WW-4FMSU-A1 +
IP1WW-4FMDB-A1
4AM 0891037 IP1WW-4FMSU-A1
4AMPDB 0891033
+ 0891034
IP1WW-4VMSU-A1 +
IP1WW-4VMDB-A1 4AMP 0891033 IP1WW-4VMSU-A1
4UMSDB 0891035
+ 0891034
IP1WW-4UMSU-A1 +
IP1WW-4VMDB-A1 4UMS 0891035 IP1WW-4UMSU-A1 SHUB 0891021 IP1WW-8SHUBU-A1
8/25/03 Page 20
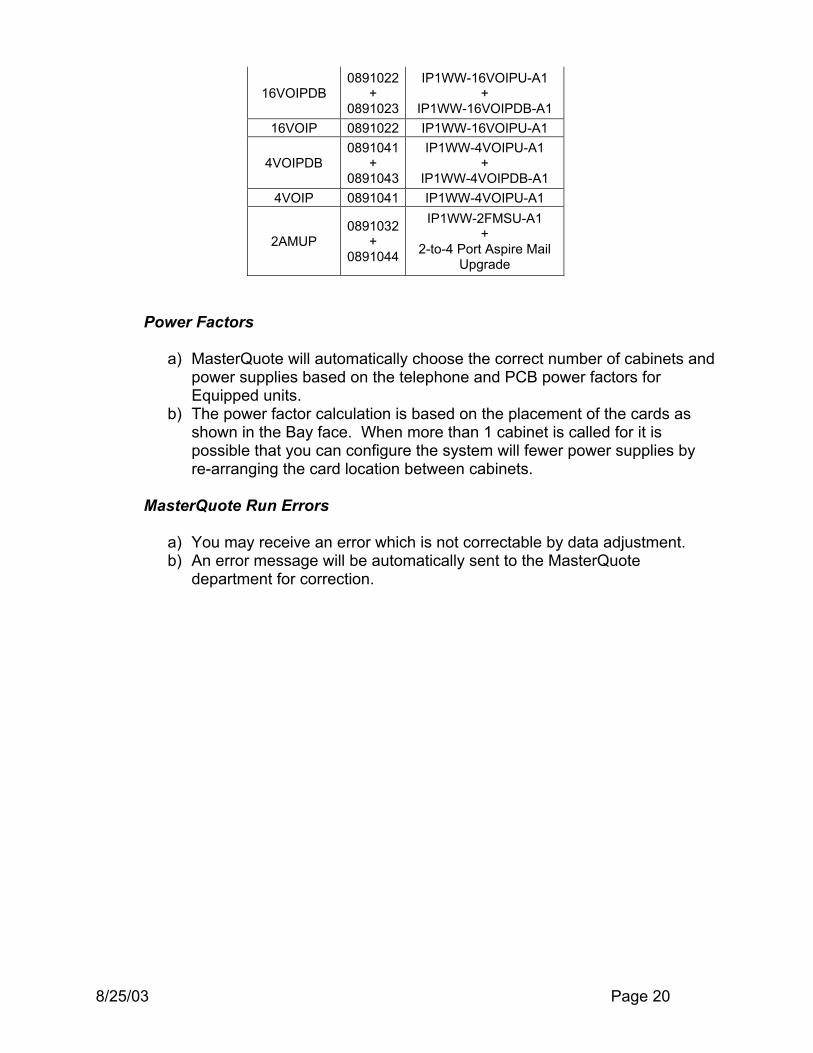
16VOIPDB 0891022
+ 0891023
IP1WW-16VOIPU-A1 +
IP1WW-16VOIPDB-A1 16VOIP 0891022 IP1WW-16VOIPU-A1
4VOIPDB 0891041
+ 0891043
IP1WW-4VOIPU-A1 +
IP1WW-4VOIPDB-A1 4VOIP 0891041 IP1WW-4VOIPU-A1
2AMUP 0891032
+ 0891044
IP1WW-2FMSU-A1 +
2-to-4 Port Aspire Mail Upgrade
Power Factors
a) MasterQuote will automatically choose the correct number of cabinets and power supplies based on the telephone and PCB power factors for Equipped units.
b) The power factor calculation is based on the placement of the cards as shown in the Bay face. When more than 1 cabinet is called for it is possible that you can configure the system will fewer power supplies by re-arranging the card location between cabinets.
MasterQuote Run Errors
a) You may receive an error which is not correctable by data adjustment. b) An error message will be automatically sent to the MasterQuote
department for correction.

8/25/03 Page 21
40. Click on Station Card
41. The Aspire Digital Station card comes in 8 port or 16 port sizes. If you want MasterQuote to use the 8 port cards in the quote, click YES for ½ sized card. If this is not checked MasterQuote will always use 16 port Digital Station cards.
42. Enter the data for both the Aspire digital and analog station ports. 43. The entries are for the number of station ports needed, not the number of cards.
MasterQuote will select the type and quantity based on the numbers entered.
8/25/03 Page 22
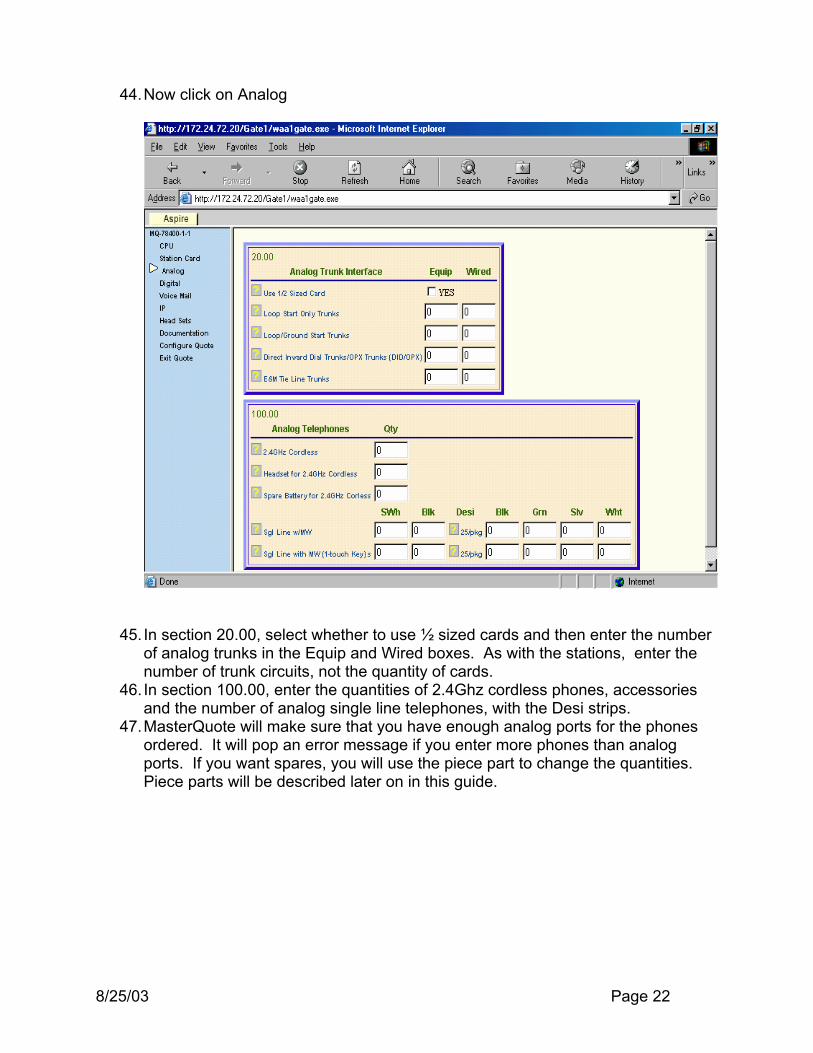
44. Now click on Analog
45. In section 20.00, select whether to use ½ sized cards and then enter the number of analog trunks in the Equip and Wired boxes. As with the stations, enter the number of trunk circuits, not the quantity of cards.
46. In section 100.00, enter the quantities of 2.4Ghz cordless phones, accessories and the number of analog single line telephones, with the Desi strips.
47. MasterQuote will make sure that you have enough analog ports for the phones ordered. It will pop an error message if you enter more phones than analog ports. If you want spares, you will use the piece part to change the quantities. Piece parts will be described later on in this guide.

8/25/03 Page 23
48. Click on the next menu choice: Digital.
49. In box 30.00 the ½ sized box pertains only to BRI cards which are available in 2, 4 and 8 port sizes. If BRI is not needed then this box does nothing.
50. Enter the number of PRI Channels in the Equipped and Wired boxes. The system will select PRI cards based on 23 channels per card.

8/25/03 Page 24
51. Next enter the number of T1 Channels in the Equipped and Wired boxes. T1 cards will be calculated on 24 channels per card.
52. In actuality the same PCB is used for PRI and T1 but because the channels cannot be mixed on a single card we need multiple cards when both PRI and T1 are used.
53. In Section 50.00, enter the quantities of Soft White and Black Aspire Telephones needed. MasterQuote will check to make sure enough Digital Station Card Ports have been entered. If more telephones than ports are needed, use piece parts to enter the additional phones.
54. Enter the quantity of Desi labels, each in packages of 25. 55. Enter the quantity of Single Line and Page/Doorbox adapters. Keep in mind that
each of these use a digital station port. MasterQuote will make sure enough station ports have been entered.
56. In Section 70.00, enter the number of station adapter modules. 57. Some station adapter modules require an AC adapter to operate. MasterQuote
will automatically add 1 ac adapter per module that you’ve entered.

8/25/03 Page 25
58. Click on the next menu item: Voice Mail
59. Check off the yes box for the type of voice mail and voice mail options desired. 60. MasterQuote will allow you to select only 1 voice mail card.

8/25/03 Page 26
61. Click on the next menu item: IP
62. In Section 80.00, Enter the number of Aspire IP Phones, H.323 IP Terminals, the Desi packages for the IP terminals and the various optional adapters and power supplies. The Desi sheets for the Aspire IP phone are the same as the Aspire 34 Button Display phone.
63. Since the Aspire IP Phone, IP Adapter and the H.323 Terminal can be powered
over the Ethernet, the AC adapter is not included in the quote so if you need the AC adapters you must enter the quantity.
64. In Section 90.00, enter the number of IP trunk and station channels. Aspire can
program the IP circuits to be IP trunks, IP stations or both. If you plan to set up the IP channels for both then enter the quantity into the trunk circuit only.
65. Enter the number of SHUBU cards needed. Each card support 8 ports.
8/25/03 Page 27
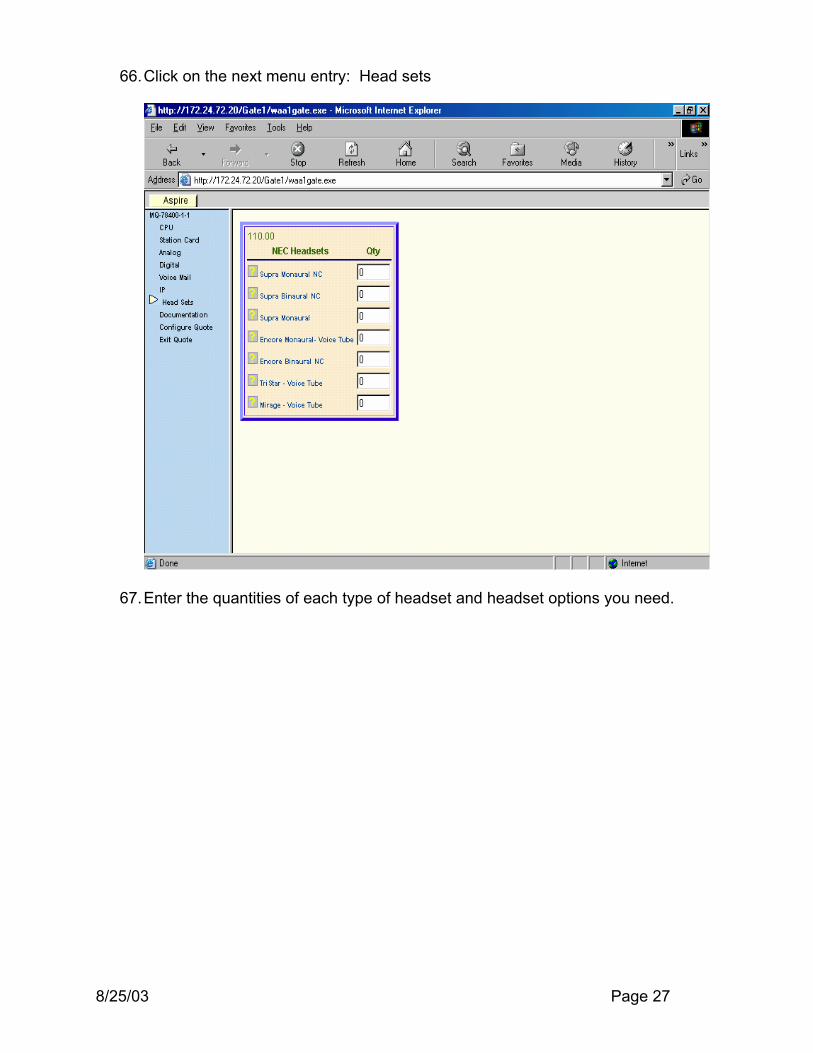
66. Click on the next menu entry: Head sets
67. Enter the quantities of each type of headset and headset options you need.

8/25/03 Page 28
68. Click on the next menu entry: Documentation
69. Aspire manuals and programming software are contained on the CD you receive with the system. Also, Quick reference guides are included in each telephone box. For additional documentation, enter the needed quantities in the appropriate boxes.
70. You are ready to move onto the final menu item.

8/25/03 Page 29
71. Click on the next menu item: Configure Quote
72. Section 190.00 shows you how many KSUs are in the quote and how many slots are used and available in both the Equipped and Wired quotes.
73. In Section 120.00, check the Yes boxes for the 19” rack mount bracket.
74. Also in Section 120.00 there is a Yes box for Use Installation Cables. If you
check yes, MasterQuote will calculate how many cables are needed and include them on the quote. Please note that MasterQuote will configure installation for CO lines and then for Stations then add them together.
75. Section 120.00 also has an entry for additional installation cables. Any quantity
entered here will be added to those calculated by the system if you checked Yes for “Use Installation Cables”.
8/25/03 Page 30
76. Section 200 is where you enter your dealer discount, additional discounts, optional 5 year warranty and whether to show the Bay Face layout on the quote.
77. The Distributor Discount Percentage should be entered as a whole number. If
your discount is 17%, enter 17, not 0.17. The number you enter should be your normal dealer discount. When entering the order, your normal discounts will apply. The discount entered in MasterQuote is not used by the order entry system.
78. Any additional discounts should be entered in the next box. Again, enter a whole
number, not a decimal point.
79. The Extended System Protection Plan is the 5 year warranty. It will be applied to all parts with a 5 year warranty availability.
80. The Include Bayface layout is checked Yes by default. Uncheck it if you do not
wish to see the Bayface layout.

8/25/03 Page 31
81. Click on Continue Config box in Section 200.00
82. Select the Quote status. If this is the first configuration for the customer, or you are testing the pricing waters, use budgetary as the status. If you are going to propose the quoted system to the user, click on proposed. If you are forecasting a sale, click on forecast. Default is forecast.
83. Next click on government/non-government. Non/Government is the default. 84. Enter any notes about this quote. Because you may be creating several quotes
for this customer the comments should be used to enter quick reference information such as PRI or analog trunks. This information will show in the comments column in the quote list by job site.
8/25/03 Page 32
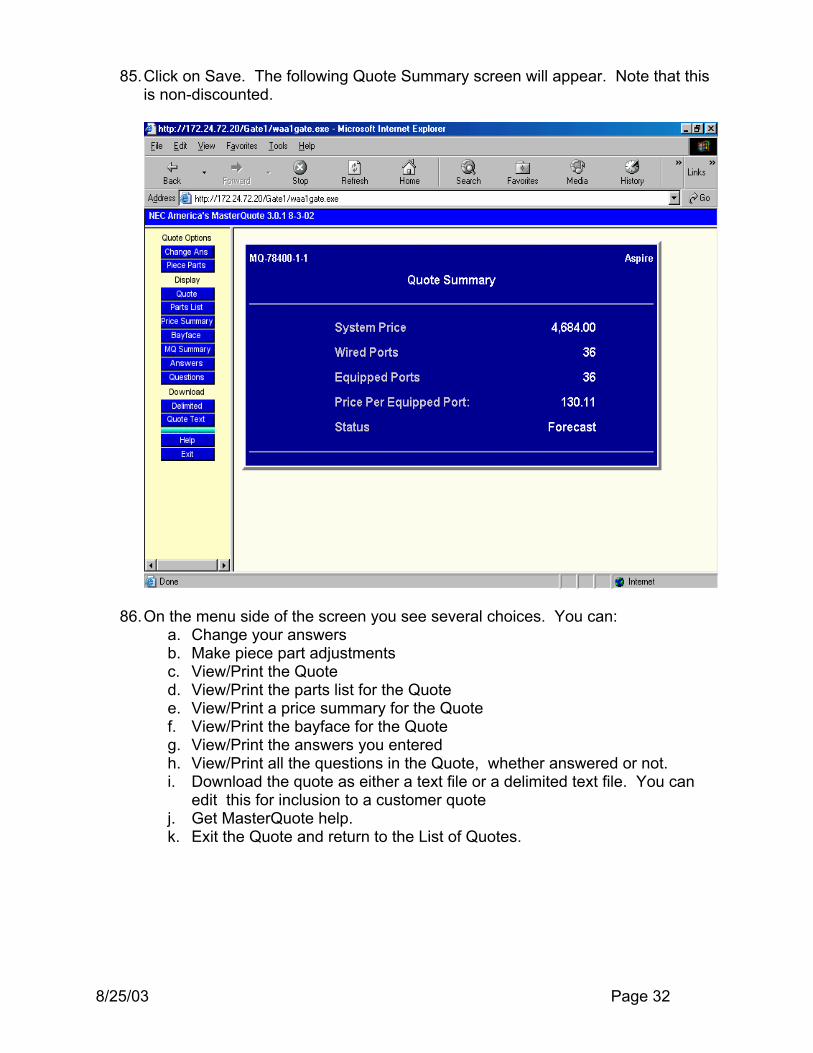
85. Click on Save. The following Quote Summary screen will appear. Note that this is non-discounted.
86. On the menu side of the screen you see several choices. You can: a. Change your answers b. Make piece part adjustments c. View/Print the Quote d. View/Print the parts list for the Quote e. View/Print a price summary for the Quote f. View/Print the bayface for the Quote g. View/Print the answers you entered h. View/Print all the questions in the Quote, whether answered or not. i. Download the quote as either a text file or a delimited text file. You can
edit this for inclusion to a customer quote j. Get MasterQuote help. k. Exit the Quote and return to the List of Quotes.
8/25/03 Page 33
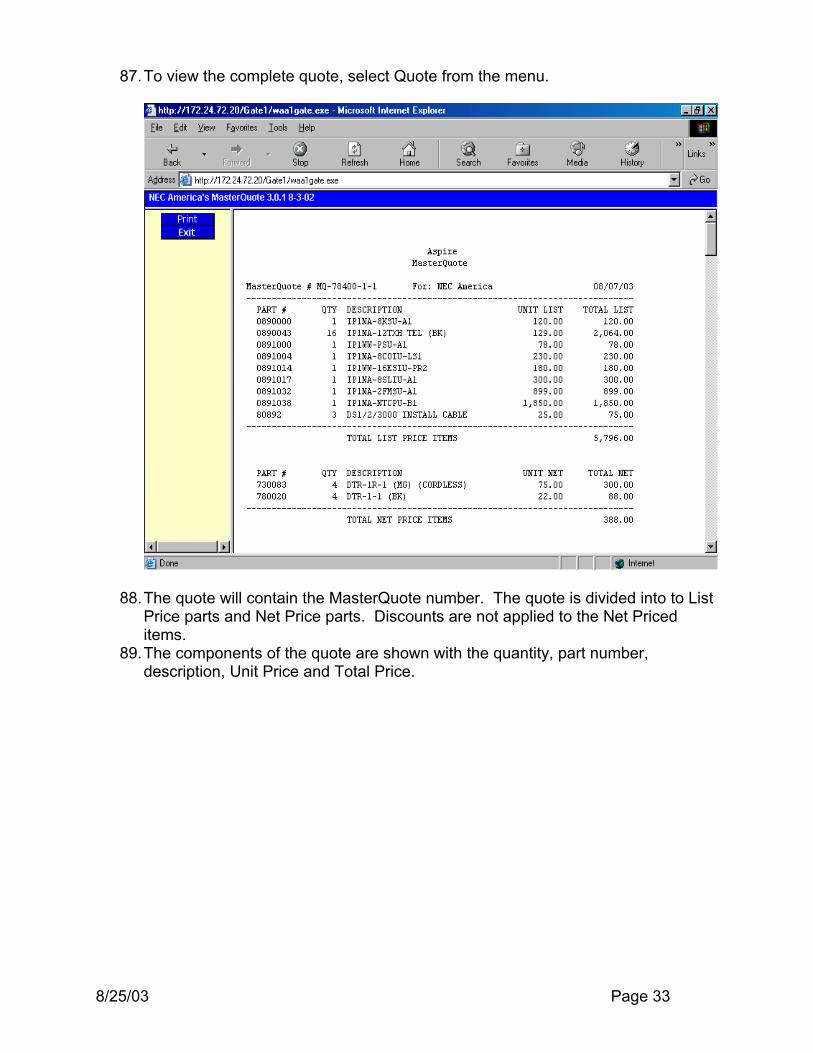
87. To view the complete quote, select Quote from the menu.
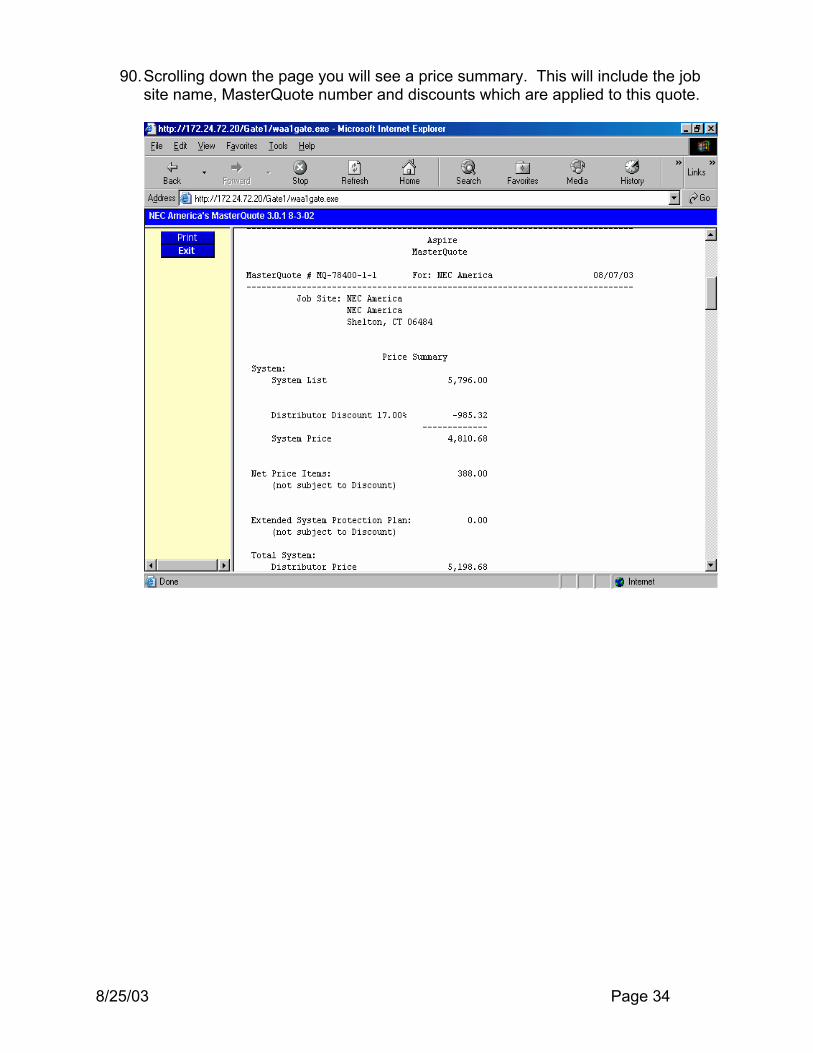
88. The quote will contain the MasterQuote number. The quote is divided into to List Price parts and Net Price parts. Discounts are not applied to the Net Priced items.
89. The components of the quote are shown with the quantity, part number, description, Unit Price and Total Price.
8/25/03 Page 34
90. Scrolling down the page you will see a price summary. This will include the job site name, MasterQuote number and discounts which are applied to this quote.

8/25/03 Page 35
91. Scrolling further down the page you will see the Bayface for the Aspire system configured by this quote. For each cabinet it shows you which cards are used and where they are placed. Placement includes power supplies, NTCPUs and expansion card, if used.
92. Please refer to pages 18 & 19 for a description the abbreviations used for the
card names.
8/25/03 Page 36
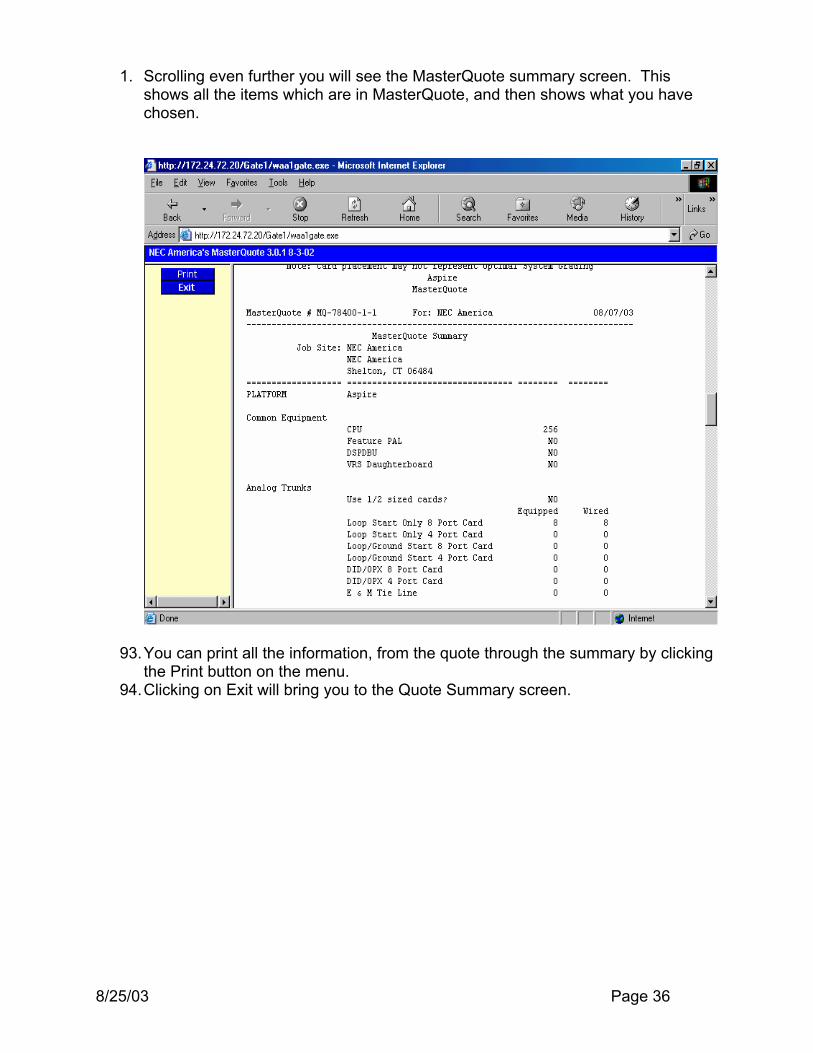
1. Scrolling even further you will see the MasterQuote summary screen. This shows all the items which are in MasterQuote, and then shows what you have chosen.
93. You can print all the information, from the quote through the summary by clicking the Print button on the menu.
94. Clicking on Exit will bring you to the Quote Summary screen.
8/25/03 Page 37
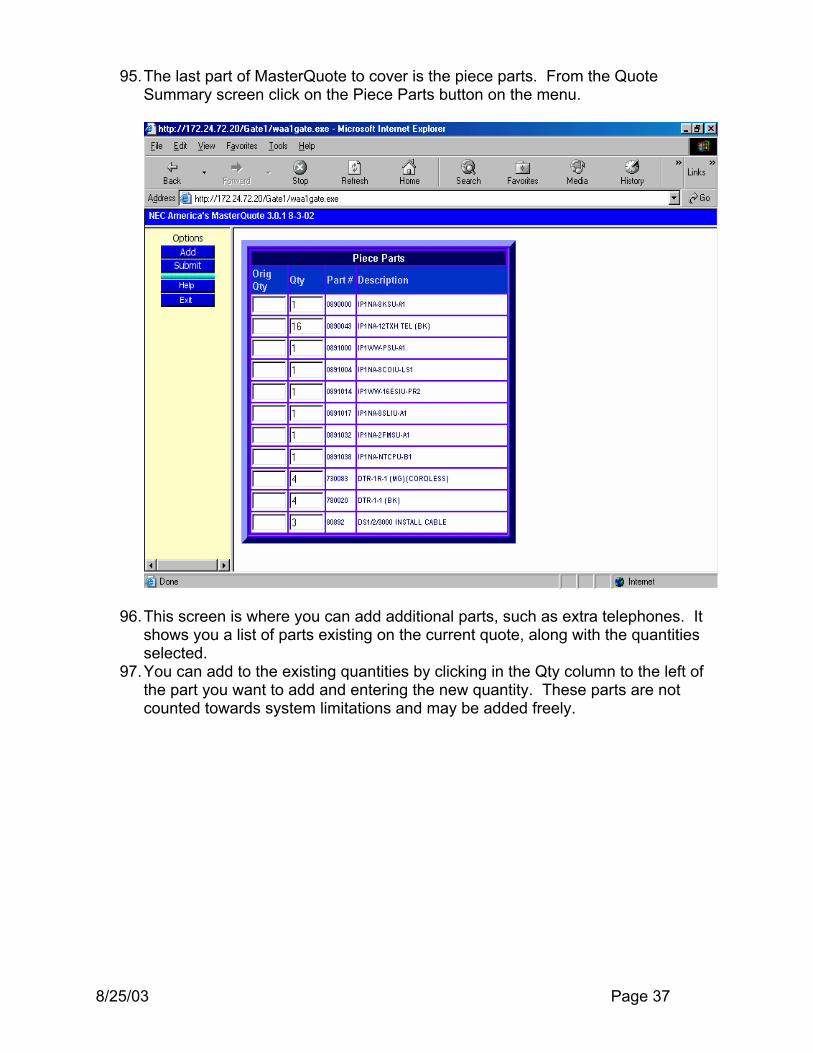
95. The last part of MasterQuote to cover is the piece parts. From the Quote Summary screen click on the Piece Parts button on the menu.
96. This screen is where you can add additional parts, such as extra telephones. It shows you a list of parts existing on the current quote, along with the quantities selected.
97. You can add to the existing quantities by clicking in the Qty column to the left of the part you want to add and entering the new quantity. These parts are not counted towards system limitations and may be added freely.

8/25/03 Page 38
98. After entering a quantity the original MasterQuote quantity will be shown in the Orig. Qty column and the new quantity will be in the Qty column.

8/25/03 Page 39
99. To add a part which is not on the list, click on ADD. This will bring you to the
following screen.
100. Enter a part number in the marked box and click on Locate. 101. One of two things will happen:
a. If the part is not piece partable, the Piece Parts box will be empty. This means you cannot add this as a piece part.
b. The part number will show up in the Piece Parts box.
8/25/03 Page 40
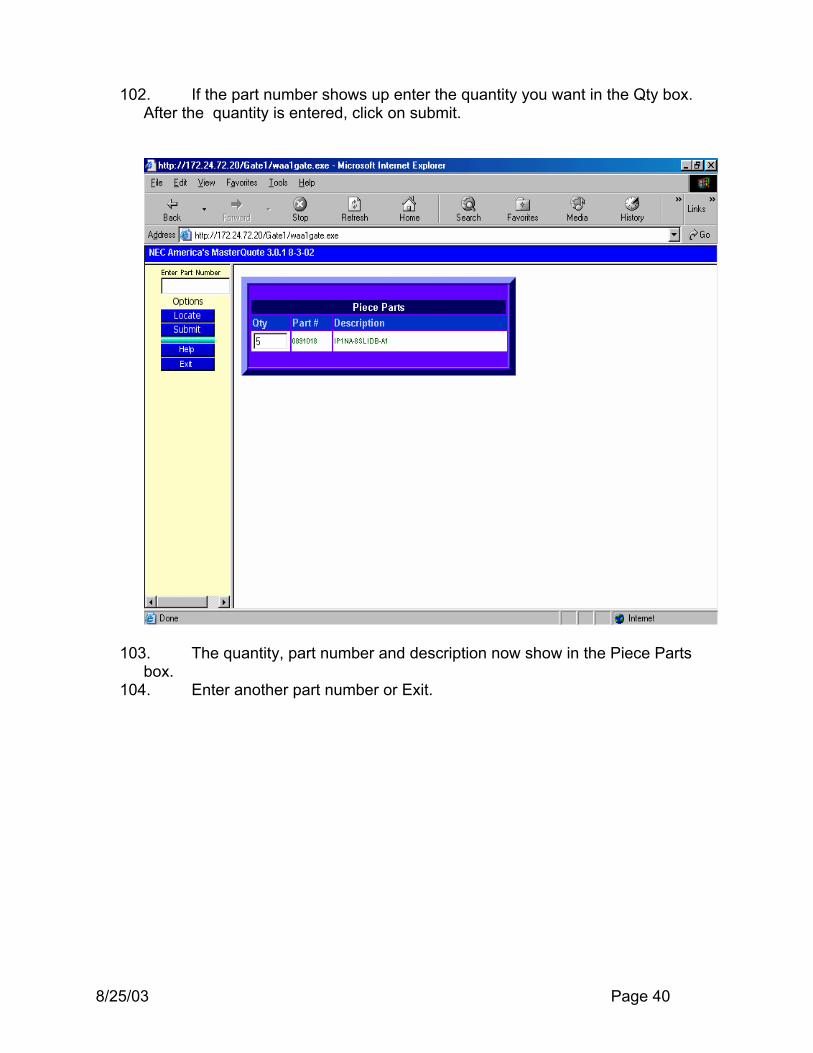
102. If the part number shows up enter the quantity you want in the Qty box.
After the quantity is entered, click on submit.
103. The quantity, part number and description now show in the Piece Parts box.
104. Enter another part number or Exit.
8/25/03 Page 41
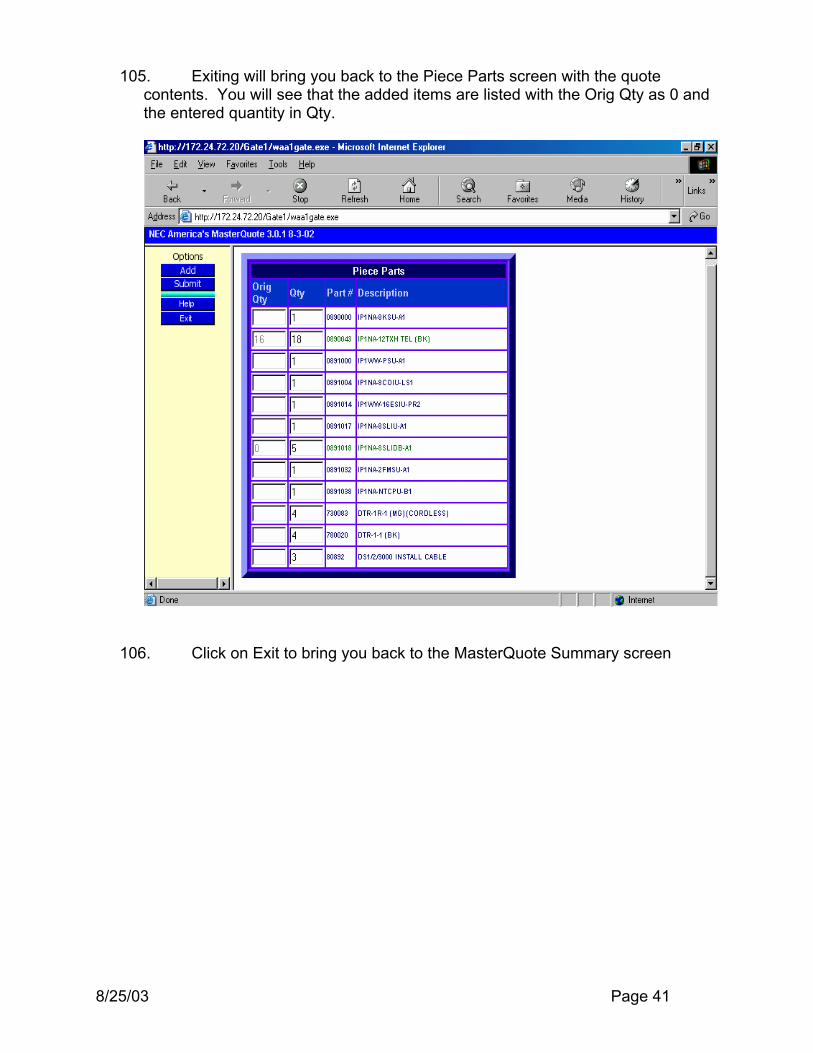
105. Exiting will bring you back to the Piece Parts screen with the quote contents. You will see that the added items are listed with the Orig Qty as 0 and the entered quantity in Qty.
106. Click on Exit to bring you back to the MasterQuote Summary screen
8/25/03 Page 42
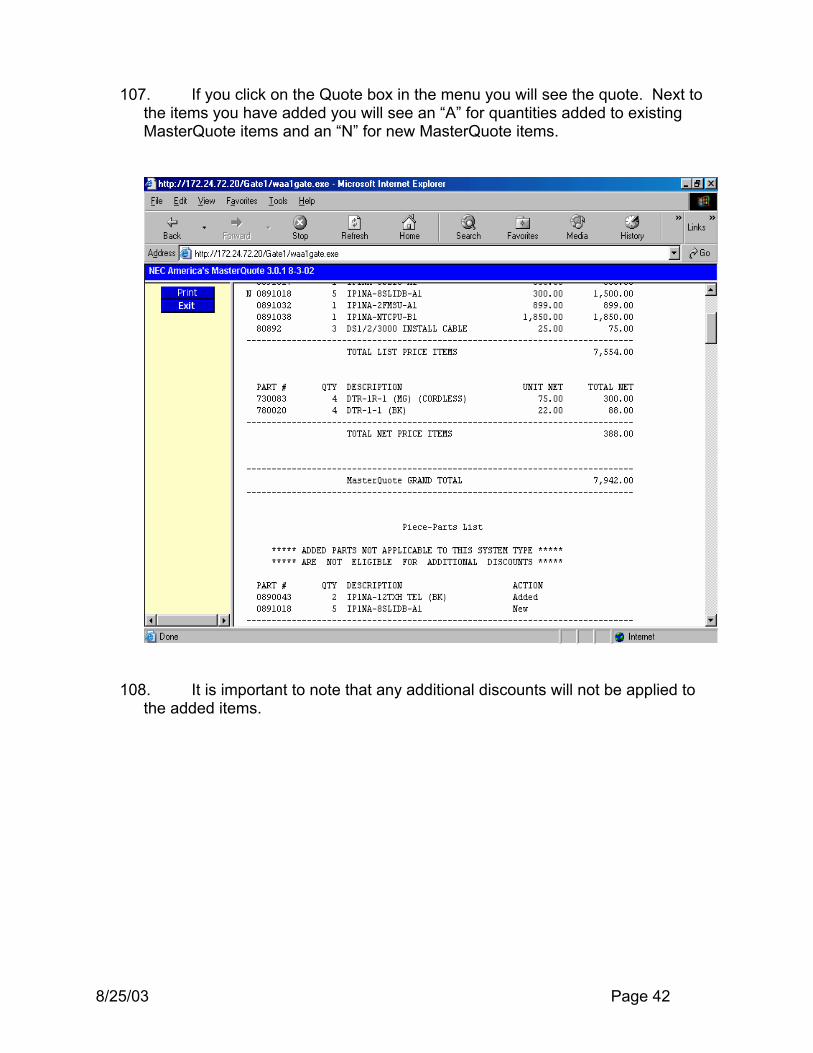
107. If you click on the Quote box in the menu you will see the quote. Next to
the items you have added you will see an “A” for quantities added to existing MasterQuote items and an “N” for new MasterQuote items.
108. It is important to note that any additional discounts will not be applied to the added items.

8/25/03 Page 43
109. You have completed the Quote. You can print or exit back to the Summary Screen. You can fax the quote to NEC Customer Service in Shelton, Ct.
110. You should NOT use the browser “X” to exit MasterQuote as your
data may not have been saved. Use the Exit boxes in the menu section when exiting out of MasterQuote.
111. From the Summary Screen, clicking on exit will back you through the List
of Quotes, Job Sites, Masters then finally to the Main Menu screen. You will see a big red circle labeled “Exit to Menu”. Clicking on this will bring you to the main menu. You can either log-off, go back into MasterQuote or run a comparison between 2 quotes.
112. To run a comparison, you need the MasterQuote numbers for the two
quotes to compare.

8/25/03 Page 44
113. To compare two quotes, click on MQ Compare. Enter the two MasterQuote numbers to be compared.
8/25/03 Page 45
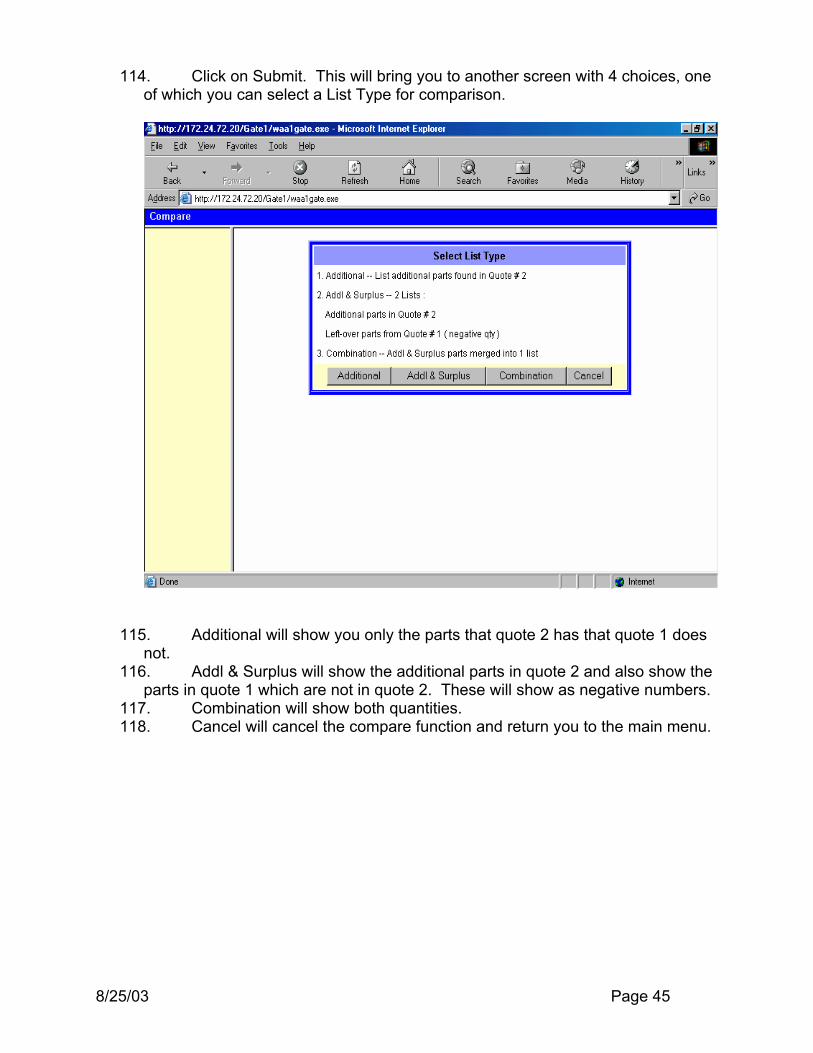
114. Click on Submit. This will bring you to another screen with 4 choices, one of which you can select a List Type for comparison.
115. Additional will show you only the parts that quote 2 has that quote 1 does not.
116. Addl & Surplus will show the additional parts in quote 2 and also show the parts in quote 1 which are not in quote 2. These will show as negative numbers.
117. Combination will show both quantities. 118. Cancel will cancel the compare function and return you to the main menu.

8/25/03 Page 46
119. Clicking on Combination will give you the following screen.
120. This comparison may be printed or downloaded to your computer.