masterscope virtual datacenter automation v4 - nec.com · • sap is a trademark or registered ......
TRANSCRIPT

MasterScope Virtual DataCenterAutomation v4.0
Standard Edition Setup Guide
1st EditionApril, 2017
NEC Corporation
DisclaimerThe copyrighted information noted in this document shall belong to NEC Corporation.
Copying or revising this document, in whole or in part, is strictly prohibited without thepermission of NEC Corporation.
This document may be changed without prior notice.
NEC Corporation shall not be liable for any technical or editing errors or omissions in thisdocument.
NEC Corporation shall not be liable for the accuracy, usability, or certainty of information notedin this document.
Copyright Information• SigmaSystemCenter, MasterScope, Network Manager, NEC Storage, ESMPRO,
EXPRESSBUILDER, EXPRESSSCOPE, SIGMABLADE, UNIVERGE, andProgrammableFlow are registered trademarks of NEC Corporation.
• VMware is a trademark or registered trademark of VMware, Inc. in the United States and othercountries.
• Microsoft, Windows, Windows Server, Windows Vista, Internet Explorer, SQL Server, andHyper-V are trademarks or registered trademarks of Microsoft Corporation in the United Statesof America and other countries.
• Linux is a trademark or registered trademark of Linus Torvalds in the United States of Americaand other countries.
• Red Hat is a trademark or registered trademark of Red Hat, Inc. in the United States and othercountries.
• Intel and Itanium are trademarks or registered trademarks of Intel Corporation in the UnitedStates of America and other countries.
• Apache, Apache Tomcat, and Tomcat are trademarks or registered trademarks of ApacheSoftware Foundation.
• Oracle, Solaris, Java, and WebLogic are registered trademarks of Oracle Corporation and itssubsidiaries and affiliates in the United States of America and other countries.
• SAP is a trademark or registered trademark of SAP AG in Germany and other countries.
• Fortinet, FortiGate, FortiClient, and FortiGuard are registered trademarks of Fortinet, Inc. OtherFortinet products contained in this guide are trademarks of Fortinet, Inc.
• Thunder Series and AX Series of A10 Networks is a registered trademark of A10 Networks,Inc.
• Catalyst, IOS, Cisco IOS, Cisco, Cisco Systems, and Cisco logo are trademarks or registeredtrademarks of Cisco Systems, Inc. in the United States of America and other countries.
• F5, F5 Networks, F5 logo, and product names in the text are trademarks or registeredtrademarks of F5 Networks, Inc. in the United States of America and other countries.
• The OpenStack Word Mark and the OpenStack logos are registered trademarks or trademarks ofthe OpenStack Foundation in the United States of America and other countries.
i
• MySQL is a registered trademark of Oracle Corporation and/or its affiliates in the United Statesof Amerida and other countries.
Other system names, company names, and product names in this document are trademarks orregistered trademarks of their respective companies.
The ® and ™ marks are not included in this document.
Notes on exporting this productIf this product (including its software) is subject to regulation under the Foreign Exchange andForeign Trade Law, it will be necessary to follow the procedures required by this law when exportingthis product, such as obtaining an export license from the Japanese Government. If you requiredocuments from NEC in order to obtain an export license, please contact the dealer where youpurchased your MasterScope product, or your local NEC sales office.
ii
PrefaceTarget Readers and Objective
This document is intended for system administrators and includes details of how to install anduninstall Virtual DataCenter Automation Standard Edition.
Overview of the DocumentThis document describes the procedure for installation Virtual DataCenter Automation StandardEdition.
Notation Rules of This DocumentThis document describes precautions, important items, and related information as follows.
NoteIndicates precautions, warnings, and supplementary notes for the function, operation, and setting
TipIndicates the location of reference destination information
Notation rulesIn addition, the following notation rules are applied in this document.
Notation How to use Example
XXXXX Used before and after the items (text boxes,check boxes, or tabs, etc.) to be displayed inthe dialog box or used for screen names(dialog boxes, windows, and others).
Enter the machine name in theMachine name text box.All check boxSetting window
" "XXXXX
Used used before and after other manualname.
"Installation Guide"Installation Guide
[ ] in a commandline
Indicates that the specification of the valuein [ ] can be omitted.
add [/a] Gr1
Monospace font(courier new)
Indicates the outputs (messages, prompts,and others) from the command line orsystem.
Perform the following command.replace Gr1
Italicizedmonospace font(courier new)< >
Indicates the items to be replaced with avalid value and input by users.When a space is included in the value, place“ “ before and after the value.
add GroupNameInstallPath="Install Path"<Install DVD>
iii
ContentsChapter 1. Overview of Virtual DataCenter Automation Standard Edition Installation..... 1
1.1 Virtual DataCenter Automation Standard Edition Integrated Installer ...................................21.1.1 Installation Modes of the Virtual DataCenter Automation Standard Edition................2
1.2 DVD Configuration of Virtual DataCenter Automation ........................................................2
Chapter 2. Performing installation by selecting functions....................................................... 42.1 Types of Functions to be Installed .........................................................................................5
2.1.1 Server Configuration Diagram of Virtual DataCenter Automation Standard Edition ............................................................................................................................................5
2.1.2 Roles of Each Function ...............................................................................................6
2.2 Software Required to be Installed in Advance.......................................................................72.2.1 List of Software to be Installed in Advance.................................................................72.2.2 Installing Internet Information Service (IIS) Manager and ASP.NET ..........................82.2.3 Installing .Net Framework 3.5 Service Pack1..............................................................82.2.4 Installing .Net Framework 4.0 .....................................................................................82.2.5 Installing .Net Framework 4.6.2 ..................................................................................82.2.6 Installing Visual C++ 2013 Redistributable Packages..................................................92.2.7 Installing SQL Server..................................................................................................92.2.8 Installing MySQL .....................................................................................................13
2.3 Installing the components of Management Server ...............................................................132.3.1 Components Installed on the Management Server .....................................................142.3.2 Software Required to be Installed in Advance...........................................................142.3.3 DHCP Server Configuration......................................................................................142.3.4 Setting Up the Windows Firewall..............................................................................152.3.5 Precautions When Setting NEC ESMPRO Manager User Group ..............................152.3.6 Precautions When Installing Virtual DataCenter Automation Management Server....152.3.7 Cautions before Performing Installation ....................................................................162.3.8 Installing the components of Management Server .....................................................16
2.4 Installing the components of Management Server Console .................................................202.4.1 Components Installed on the Management Server Console .......................................202.4.2 Cautions before Performing Installation ....................................................................202.4.3 Installing the components of Management Server Console .......................................21
2.5 Installing the components of VM Monitoring Server ..........................................................242.5.1 Components Installed on the VM monitoring Server.................................................242.5.2 Software Required to be Installed in Advance...........................................................242.5.3 Setting up the Windows Firewall...............................................................................242.5.4 Cautions before Performing Installation ....................................................................252.5.5 Installing the components of VM Monitoring Server.................................................25
2.6 Installing the components of VM Monitoring Server Console.............................................282.6.1 Components Installed on the VM monitoring Server Console ...................................282.6.2 Cautions before Performing Installation ....................................................................282.6.3 Installing the components of VM Monitoring Server Console...................................28
2.7 Installing the Stack Management Server .............................................................................31
iv
2.7.1 Components to Be Installed to the Stack Management Server ...................................312.7.2 Software Required to be Installed in Advance...........................................................322.7.3 Firewall Settings .......................................................................................................322.7.4 Installing the Stack Management Server....................................................................32
2.8 Installing the components of Managed Machine .................................................................322.8.1 VMWare ESXi Virtualization Infrastructure..............................................................322.8.2 Hyper-V Virtualization Infrastructure........................................................................332.8.3 KVM Virtualization Infrastructure ............................................................................33
2.9 Installing the components of Managed Machine (Windows) ...............................................332.9.1 Software Required to be Installed in Advance...........................................................332.9.2 Cautions before Performing Installation ....................................................................332.9.3 Installing the components of Managed Machine (Windows) .....................................33
2.10 Installing the components of Managed Machine (Linux)...................................................372.10.1 Software Required to be Installed in Advance .........................................................372.10.2 Cautions before Performing Installation ..................................................................372.10.3 Installing the components of Managed Machine (Linux).........................................38
2.11 Registering and Setting up the Management Server...........................................................432.11.1 Registering License to SigmaSystemCenter Function..............................................432.11.2 Registering License to SystemManager G Function ................................................432.11.3 Registering Code Word to SystemManager G Function...........................................442.11.4 Virtual DataCenter Automation Standard Edition Portal setting ..............................442.11.5 Portal setting of Resource Management function.....................................................442.11.6 Connection Settings to ServiceGovernor .................................................................452.11.7 Connection Settings to SystemManager G...............................................................462.11.8 Setting SSL/TLS for Tomcat ...................................................................................462.11.9 Default Settings of SystemManager G Function ......................................................462.11.10 Pre-importing Monitoring Settings ........................................................................48
2.12 Registering and Setting up the VM Monitoring Server......................................................512.12.1 Registering the License to the SystemManager G Function.....................................512.12.2 Registering Code Word to SystemManager G Function...........................................522.12.3 Default Settings of SystemManager G Function......................................................522.12.4 Pre-importing Monitoring Settings ..........................................................................52
2.13 Registering and Setting up the Stack Management Server.................................................522.13.1 Registering the License of Virtual DataCenter Automation Standard Edition
Topology Template Registering License to Orchestrator Option Function....................522.13.2 Settings for connecting to SigmaSystemCenter .......................................................532.13.3 Settings for connecting to SystemManager G..........................................................532.13.4 TLS, SSL setting of OpenStack...............................................................................53
2.14 Setting up the Managed Machine ......................................................................................532.14.1 Creating the VM Template of the Managed Machine ..............................................53
Chapter 3. Basic setting after installation................................................................................ 553.1 Resource Management Function .........................................................................................56
3.1.1 Registering Related Products to the SigmaSystemCenter ..........................................563.1.1.1 Registering the Virtualization Infrastructure to the SigmaSystemCenter..........563.1.1.2 Registering a Storage Device to the SigmaSystemCenter ................................57
v
3.1.1.3 Registering a Virtual DataCenter Automation Component to theSigmaSystemCenter..............................................................................................58
3.1.2 Performing Various Settings of the SigmaSystemCenter ...........................................583.1.3 Performing Hardware Settings of the VM Server ......................................................59
3.1.3.1 Registering VM Server on SigmaSystemCenter ..............................................593.1.3.2 Performing Setting to Manage the VM Server with the OOB Management.....603.1.3.3 Setting the Machine Properties of the VM Server............................................60
3.1.4 Creating a Resource Pool ..........................................................................................613.1.4.1 Creating a Category of the VM Server ............................................................613.1.4.2 Creating an Operation Group of the VM Server ..............................................613.1.4.3 Setting an Operation Group of the VM Server.................................................623.1.4.4 Defining a Resource Pool ................................................................................633.1.4.5 Allocating a Sub-pool......................................................................................64
3.1.5 Registering a VM Server Resource ...........................................................................643.1.6 Registering a Logical Network..................................................................................653.1.7 Registering a Storage Resource .................................................................................65
3.1.7.1 Allocating a Disk Volume................................................................................653.1.7.2 Setting a Storage Tag.......................................................................................67
3.1.8 About using Resource Manager Function..................................................................67
3.2 Monitoring Function ...........................................................................................................673.2.1 Configuring the Monitoring Manager........................................................................673.2.2 Setting up DeploymentManager ................................................................................673.2.3 Setting up Virtual DataCenter Automation Standard Edition Portal...........................693.2.4 About using Monitoring Function .............................................................................69
Chapter 4. Performing Uninstallation ..................................................................................... 704.1 Precautions before Uninstallation........................................................................................71
4.2 Uninstalling the components of Management Server...........................................................71
4.3 Uninstalling the components of Management Server Console.............................................76
4.4 Uninstalling the components of VM Monitoring Server ......................................................78
4.5 Uninstalling the components of VM Monitoring Server Console ........................................78
4.6 Uninstalling the Stack Management Server .........................................................................80
4.7 Uninstalling the components of Managed Machine(Windows)............................................81
4.8 Uninstalling the components of Managed Machine(Linux) .................................................82
vi
List of TablesTable 2-1 Selection of function ...............................................................................................10Table 2-2 Instance name to create ...........................................................................................10Table 2-3 Log on user of the SQL Server services ..................................................................10Table 2-4 SQL Server network configuration..........................................................................11Table 2-5 Adding a fixed server role member .........................................................................11
vii
Chapter 1. Overview of Virtual DataCenterAutomation Standard EditionInstallationThis chapter describes how to read this document and the Virtual DataCenter Automation IntegratedInstaller for installing and uninstalling Virtual DataCenter Automation Standard Edition.
Contents1.1 Virtual DataCenter Automation Standard Edition Integrated Installer ..........................................2
1.2 DVD Configuration of Virtual DataCenter Automation ...............................................................2
Chapter 1. Overview of Virtual DataCenter Automation Standard Edition Installation
1
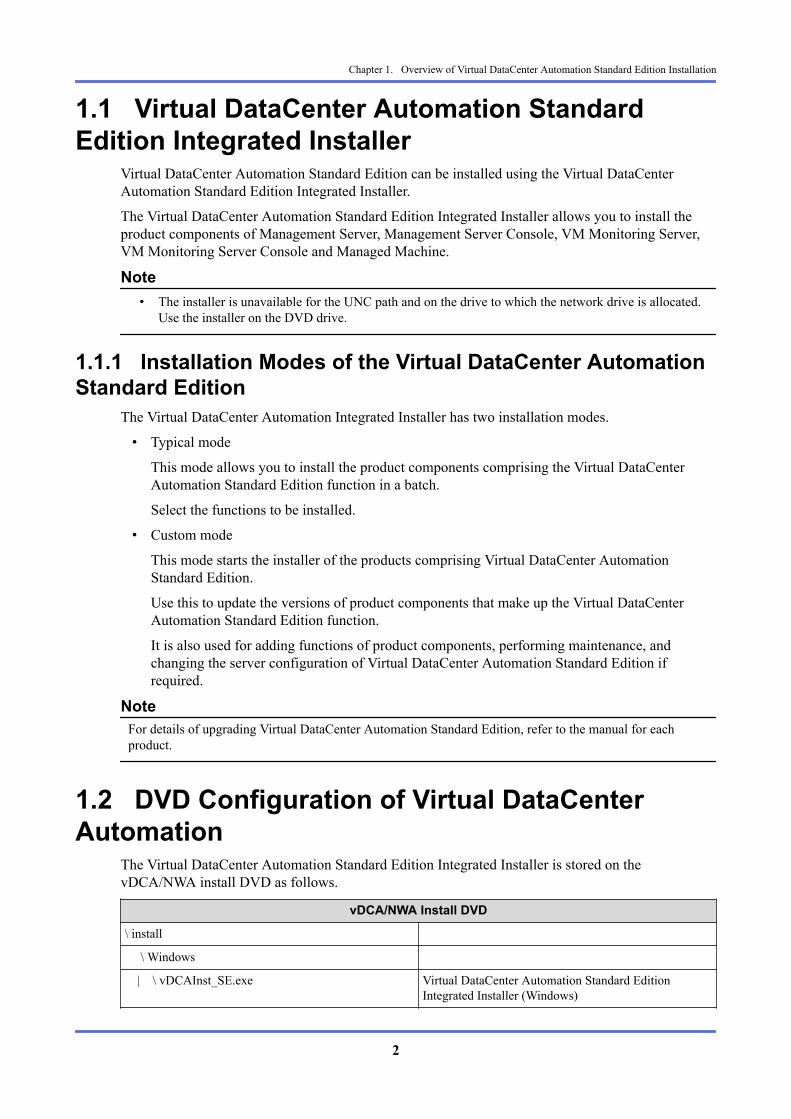
1.1 Virtual DataCenter Automation StandardEdition Integrated Installer
Virtual DataCenter Automation Standard Edition can be installed using the Virtual DataCenterAutomation Standard Edition Integrated Installer.
The Virtual DataCenter Automation Standard Edition Integrated Installer allows you to install theproduct components of Management Server, Management Server Console, VM Monitoring Server,VM Monitoring Server Console and Managed Machine.
Note• The installer is unavailable for the UNC path and on the drive to which the network drive is allocated.
Use the installer on the DVD drive.
1.1.1 Installation Modes of the Virtual DataCenter AutomationStandard Edition
The Virtual DataCenter Automation Integrated Installer has two installation modes.
• Typical mode
This mode allows you to install the product components comprising the Virtual DataCenterAutomation Standard Edition function in a batch.
Select the functions to be installed.
• Custom mode
This mode starts the installer of the products comprising Virtual DataCenter AutomationStandard Edition.
Use this to update the versions of product components that make up the Virtual DataCenterAutomation Standard Edition function.
It is also used for adding functions of product components, performing maintenance, andchanging the server configuration of Virtual DataCenter Automation Standard Edition ifrequired.
NoteFor details of upgrading Virtual DataCenter Automation Standard Edition, refer to the manual for eachproduct.
1.2 DVD Configuration of Virtual DataCenterAutomation
The Virtual DataCenter Automation Standard Edition Integrated Installer is stored on thevDCA/NWA install DVD as follows.
vDCA/NWA Install DVD
\ install
\ Windows
| \ vDCAInst_SE.exe Virtual DataCenter Automation Standard EditionIntegrated Installer (Windows)
Chapter 1. Overview of Virtual DataCenter Automation Standard Edition Installation
2
vDCA/NWA Install DVD
\ Linux
\ vDCAInst_SE.sh Virtual DataCenter Automation Standard EditionIntegrated Installer (Linux)
Chapter 1. Overview of Virtual DataCenter Automation Standard Edition Installation
3
Chapter 2. Performing installation by selectingfunctionsThis chapter describes the installation procedures for each function type of Virtual DataCenterAutomation Standard Edition. It describes the required settings in Windows Server before installationusing the Virtual DataCenter Automation Standard Edition Integrated Installer, tools to be inadvance, and installation of product components using the Integrated Installer.
Contents2.1 Types of Functions to be Installed ................................................................................................5
2.2 Software Required to be Installed in Advance..............................................................................7
2.3 Installing the components of Management Server ......................................................................13
2.4 Installing the components of Management Server Console ........................................................20
2.5 Installing the components of VM Monitoring Server .................................................................24
2.6 Installing the components of VM Monitoring Server Console....................................................28
2.7 Installing the Stack Management Server ....................................................................................31
2.8 Installing the components of Managed Machine ........................................................................32
2.9 Installing the components of Managed Machine (Windows) ......................................................33
2.10 Installing the components of Managed Machine (Linux)..........................................................37
2.11 Registering and Setting up the Management Server..................................................................43
2.12 Registering and Setting up the VM Monitoring Server.............................................................51
2.13 Registering and Setting up the Stack Management Server........................................................52
2.14 Setting up the Managed Machine .............................................................................................53
Chapter 2. Performing installation by selecting functions
4
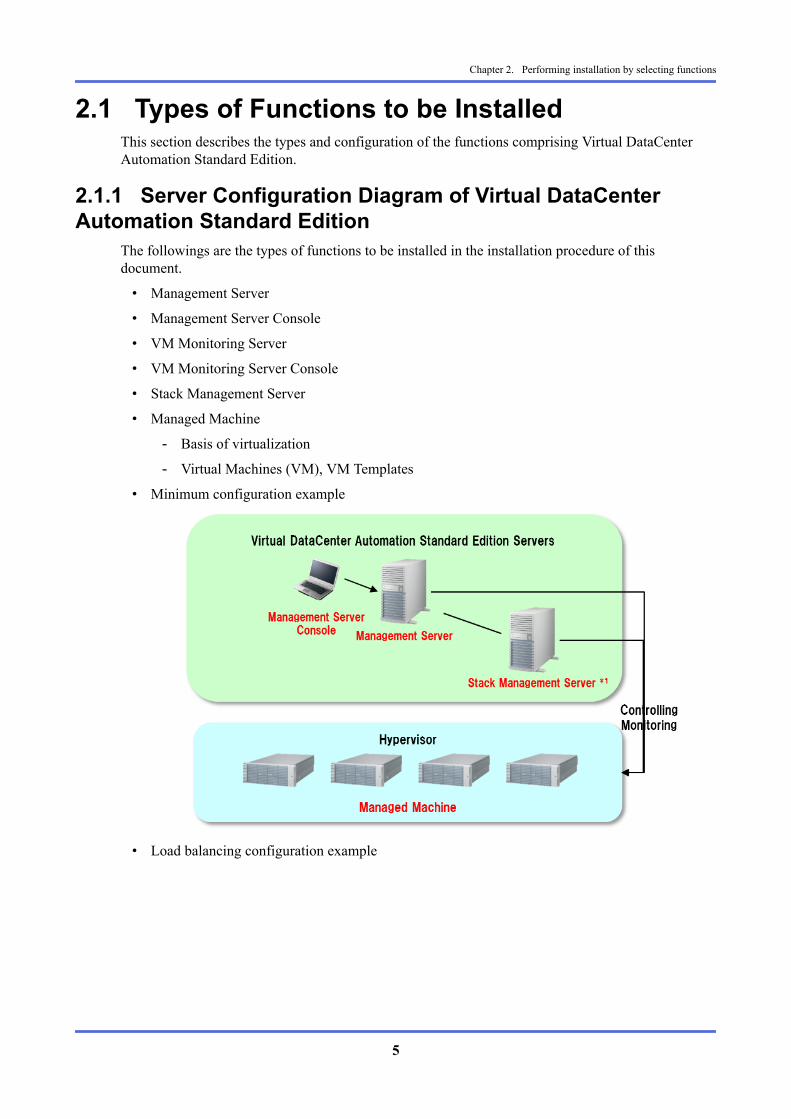
2.1 Types of Functions to be InstalledThis section describes the types and configuration of the functions comprising Virtual DataCenterAutomation Standard Edition.
2.1.1 Server Configuration Diagram of Virtual DataCenterAutomation Standard Edition
The followings are the types of functions to be installed in the installation procedure of thisdocument.
• Management Server
• Management Server Console
• VM Monitoring Server
• VM Monitoring Server Console
• Stack Management Server
• Managed Machine
- Basis of virtualization
- Virtual Machines (VM), VM Templates
• Minimum configuration example
• Load balancing configuration example
Chapter 2. Performing installation by selecting functions
5
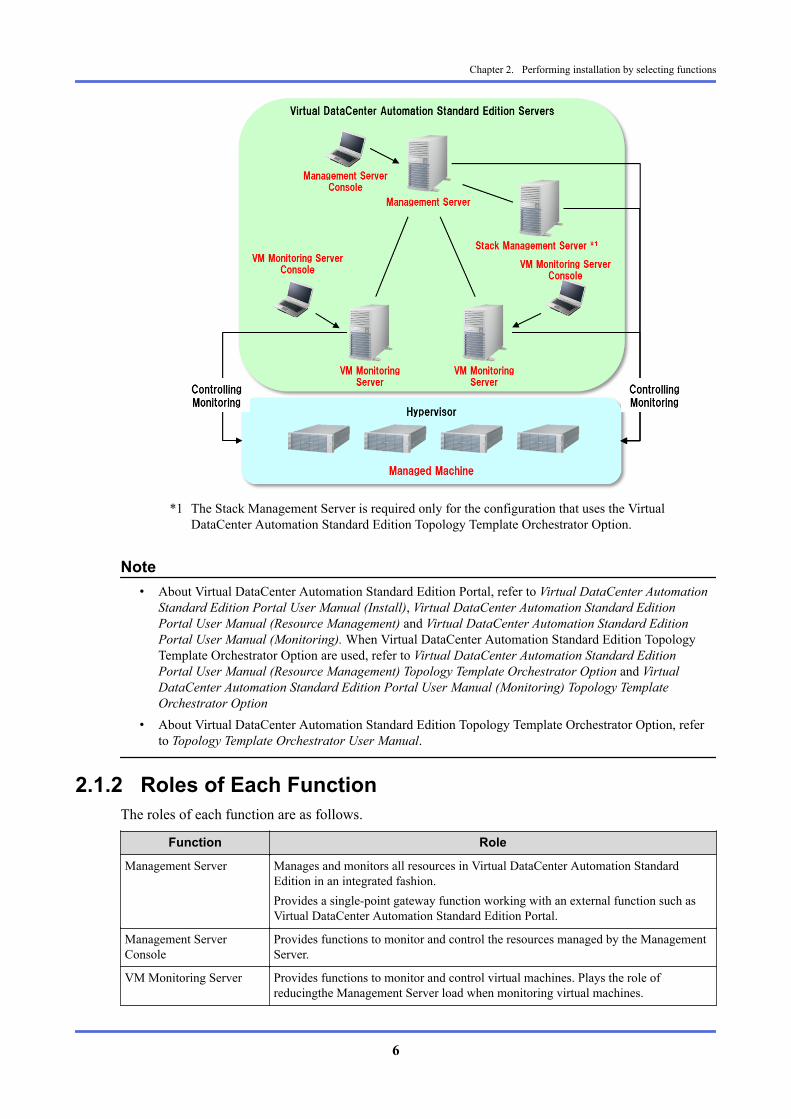
*1 The Stack Management Server is required only for the configuration that uses the VirtualDataCenter Automation Standard Edition Topology Template Orchestrator Option.
Note• About Virtual DataCenter Automation Standard Edition Portal, refer to Virtual DataCenter Automation
Standard Edition Portal User Manual (Install), Virtual DataCenter Automation Standard EditionPortal User Manual (Resource Management) and Virtual DataCenter Automation Standard EditionPortal User Manual (Monitoring). When Virtual DataCenter Automation Standard Edition TopologyTemplate Orchestrator Option are used, refer to Virtual DataCenter Automation Standard EditionPortal User Manual (Resource Management) Topology Template Orchestrator Option and VirtualDataCenter Automation Standard Edition Portal User Manual (Monitoring) Topology TemplateOrchestrator Option
• About Virtual DataCenter Automation Standard Edition Topology Template Orchestrator Option, referto Topology Template Orchestrator User Manual.
2.1.2 Roles of Each FunctionThe roles of each function are as follows.
Function Role
Management Server Manages and monitors all resources in Virtual DataCenter Automation StandardEdition in an integrated fashion.Provides a single-point gateway function working with an external function such asVirtual DataCenter Automation Standard Edition Portal.
Management ServerConsole
Provides functions to monitor and control the resources managed by the ManagementServer.
VM Monitoring Server Provides functions to monitor and control virtual machines. Plays the role ofreducingthe Management Server load when monitoring virtual machines.
Chapter 2. Performing installation by selecting functions
6

Function Role
VM Monitoring ServerConsole
Provides functions to monitor and control the resources managed by the VMMonitoring Server.
Managed Machine Provides functions to monitor and control by installation on the virtualizationinfrastructure such as a managed virtual machine.
Stack Management Server The function to assign and delete multiple resources at a time according to the systemconfiguration information defined in the topology template are provided.
NoteFor the system requirements of each function, see Chapter 6. Operating Environments/System Requirementsin Virtual DataCenter Automation First Step Guide.For the Stack Management Server system requirements, refer to Chapter 1 Operating Environment ofVirtual DataCenter Automation Standard Edition Topology Template Orchestrator Option User’s Guide.
2.2 Software Required to be Installed in AdvanceThis section describes the software required before installation using the Virtual DataCenterAutomation Standard Edition Integrated Installer.
2.2.1 List of Software to be Installed in AdvanceIn Virtual DataCenter Automation Standard Edition, the following software must be installed beforeinstalling for Management Server.
Management Server
Internet Information Service Necessary
.NET Framework 3.5 Service Pack 1 Necessary*1
.NET Framework 4.0 Necessary
.NET Framework 4.6.2 Necessary
Visual C++ 2013 Redistributable Packages Necessary
SQL Server / client tool Necessary*2
*1 When using SQL Server 2014, it's necessary.*2 To use a separate server for the DBMS, install SQL Server on the DBMS server, and install the SQL
Server client tools on the machine on which the Management Server is installed. For the requiredsoftware of the DB server, see 6.10 DB server in Virtual DataCenter Automation First Step Guide. Ifthe DBMS is not separately used as a server, the\ SQL Server client tools do not have to be installed.
Before installing the Stack Management Server, install the following software.
Stack Management Server
MySQL Necessary
For VM Monitoring Server and consoles (Management Server and VM Monitoring Server), there isno software required to be installed in advance.
Chapter 2. Performing installation by selecting functions
7
2.2.2 Installing Internet Information Service (IIS) Manager andASP.NET
1. For Windows Server 2012 R2, start [All Programs]-[Administrative Tools]-[Server Manager]from the [Start] menu, and install [Web Server (IIS)] from the [Add Role] wizard in [ServerManager].
2. Select the following check box on the [Select Server Roles] dialog box, and performinstallation.
• [Web Server] - [Common HTTP Features] - [Static Content]
• [Web Server] - [Application Development] -[ASP.NET 4.5] (Windows Server 2012,Windows Server 2012 R2)
• [Web Server] - [Application Development] -[ASP.NET 4.6] (Windows Server 2016)
• [Management Tools] - [IIS Management Console]
• [Management Tools] - [IIS 6 Metabase Compatibility]
2.2.3 Installing .Net Framework 3.5 Service Pack1Install .Net Framework 3.5 Service Pack1.
The following is the example when installing from the powershell command.
1. Insert the Windows Server install DVD into the DVD drive.
2. To start PowerShell, click Start, click the Windows PowerShell folder, right-click WindowsPowerShell, and then click Run as Administrator.
3. run the following command: (when the DVD drive letter is E)
PS > Install-WindowsFeature Net-Framework-Core -source E:\sources\sxs
2.2.4 Installing .Net Framework 4.0Note
For Windows Server 2012 or later, this operation is not required because it is installed as standard.
Execute the following command on the command prompt to start the installer, and performinstallation by following the wizard.
> <Install DVD>:\ssc\dotNet Framework40\Windows6.0-KB942288-v2-x64.msu
> <Install DVD>:\ssc\dotNet Framework40\Windows6.0-KB942288-v2-x86.msu
2.2.5 Installing .Net Framework 4.6.2Note
For Windows Server 2012 R2, be sure to install the Windows Update (KB2919355) before installing .NETFramework 4.6.2. If the Windows Update (KB2919355) is not installed, installing .NET Framework 4.6.2will fail.Check whether the Windows Update (KB2919355) is installed according to the following procedure.
Chapter 2. Performing installation by selecting functions
8
Run Msinfo32.exe to check the exact version of Windows Server 2012 R2. If Windows Server 2012 R2Update is installed, the value reported for the hardware abstraction layer is 6.3.9600.17031.If the value is smaller than 6.3.9600.17031, install the Windows Update (KB2919355).https://www.microsoft.com/en-US/download/details.aspx?id=42334For Windows Server 2016, this operation is not required because it is installed as standard.
1. Execute the following command on the command prompt to start the installer, and performinstallation by following the wizard.
> <Install DVD>:\ssc\dotNet Framework462\NDP462-KB3151800-x86-x64-AllOS-ENU.exe
Installation is not necessary when the Net Framework 4.6.2 maintenance screen is displayed.
Select Cancel.
2.2.6 Installing Visual C++ 2013 Redistributable PackagesInstall Microsoft Visual C++ 2013 Redistributable Packages by the following procedure.
1. Execute the following command on the command prompt to start the installer, and performinstallation by following the wizard.
> <Install DVD>:\ssc\DPM\Setup\VCRTL\vcredist_x86_2013.exe
2.2.7 Installing SQL ServerIn Virtual DataCenter Automation Standard Edition, SQL Server is used on the Management Server.
As the product types of SQL Server, Express Edition, Standard Edition, and Enterprise Edition canbe used. If Express Edition is used, a cluster environment cannot be built (an upgrade from ExpressEdition to Standard Edition or Enterprise Edition is required). This section describes how to installSQL Server Enterprise Edition.
When the DBMS is separately used as a server, install SQL Server on the DBMS server machine bythe following procedure. The SQL Server client tools must be installed on the machine on which theManagement Server is installed. If the DBMS is not separately used as a server, the SQL Serverclient tools do not have to be installed.
• Installing SQL Server
Check the name of the instance created for each server by referring to table: [Instance name tocreate] below. For the Management Server, perform this installation operation three times foreach instance.
1. Execute Setup.exe to start the SQL Server installer.
2. On the [SQL Server Installation Center] screen, click [New SQL Server stand-aloneinstallation or add features to an existing installation] in [Install].
3. On the [Product Key] screen, enter the product key, and click [Next].
4. On the [License Terms] screen, select the [I accept the license terms.] check box, andclick [Next].
5. On the [Product Update] screen, a search for the update program starts. Click [Next].
6. On the [Install Rules] screen, click [Next].
Chapter 2. Performing installation by selecting functions
9
7. On the [Setup Role] screen, click [Next].
8. On the [Feature Selection] screen, select the necessary function indicated on thefollowing, and click [Next].
Table 2-1 Selection of function
Function to select Instance name
FWCMDB SSCCMDB DPMDBI
DatabaseEngine service Select Select Select
SQL Server Replication Do not select Do not select Select
9. On the [Instance Configuration] screen, select the [Named instance:] radio button, enteran appropriate instance name in the text box, and click [Next].Enter it by referring totable: [Instance name to create] below.
Table 2-2 Instance name to create
Machine type Instance name to create
FWCMDB*1 SSCCMDB DPMDBI
Management Server Create Create Create
*1 To install the DBMS on a separate server, create only one FWCMDB instance on theserver on which the DBMS is installed. It does not have to be created on the ManagementServer.
10. On the [Server Configuration] screen, click [Next].
11. On the [Database Engine Configuration] screen, set the following.
a. Select the [Mixed Mode (SQL Server authentication and Windows authentication)]radio button in [Authentication Mode], and enter the password in [Enter Password:]and [Confirm Password:] text boxes.
b. In [Specify SQL Server administrators], click [Add Current User].Click [Next].
12. On the [Ready to Install] screen, click [Install].
13. When the installation is complete, the [Complete] screen is displayed. Click [Close].
14. Close the SQLServer Install Center.
15. After installation of SQL Server, a restart may be requested. In that case, restart thecomputer.
• Setting the logon user of the SQL Server services
Perform setting of the required instances by referring to table: [Log on user of the SQL ServerServices] below.
Table 2-3 Log on user of the SQL Server services
Instance name
FWCMDB SSCCMDB DPMDBI
Logon User Local System NT Service\MSSQL$SSCCMDB
(Default value)
NT Service\MSSQL$DPMDBI
(Default value)
1. Start the SQL Server Configuration Manager.
Chapter 2. Performing installation by selecting functions
10
2. Click [SQL Server Services] on the left pane, and double-click [SQL Server (InstanceName)] displayed on the right pane.
The [SQL Server (Instance Name) Properties] screen is displayed.
3. On the [Log On] tab, select the [Built-in account:] radio button, select an appropriate userfrom the drop-down list, and click [OK]. Select it by referring to "Log on user of the SQLServer services" below.
4. Click [Yes] in the message displayed.
5. Click [Restart]. When restart processing is complete, click [OK] to finish the SQL ServerConfiguration Manager.
• Setting the network configuration of SQL Server
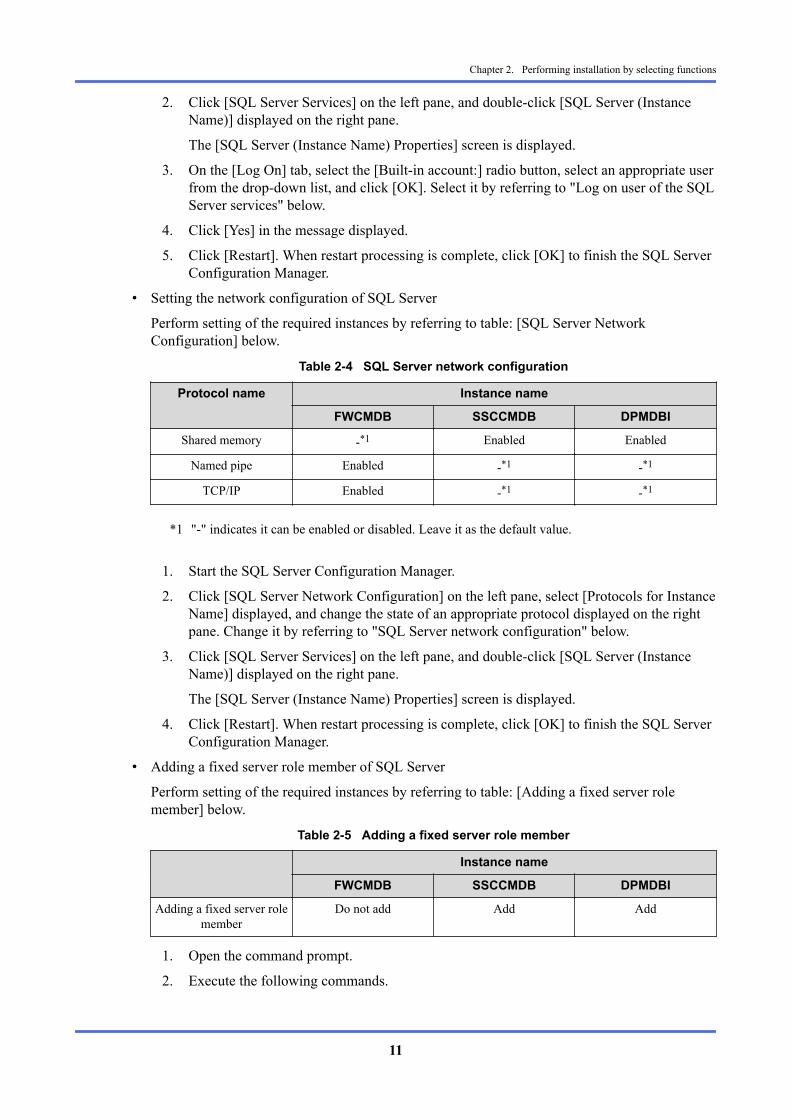
Perform setting of the required instances by referring to table: [SQL Server NetworkConfiguration] below.
Table 2-4 SQL Server network configuration
Protocol name Instance name
FWCMDB SSCCMDB DPMDBI
Shared memory -*1 Enabled Enabled
Named pipe Enabled -*1 -*1
TCP/IP Enabled -*1 -*1
*1 "-" indicates it can be enabled or disabled. Leave it as the default value.
1. Start the SQL Server Configuration Manager.
2. Click [SQL Server Network Configuration] on the left pane, select [Protocols for InstanceName] displayed, and change the state of an appropriate protocol displayed on the rightpane. Change it by referring to "SQL Server network configuration" below.
3. Click [SQL Server Services] on the left pane, and double-click [SQL Server (InstanceName)] displayed on the right pane.
The [SQL Server (Instance Name) Properties] screen is displayed.
4. Click [Restart]. When restart processing is complete, click [OK] to finish the SQL ServerConfiguration Manager.
• Adding a fixed server role member of SQL Server
Perform setting of the required instances by referring to table: [Adding a fixed server rolemember] below.
Table 2-5 Adding a fixed server role member
Instance name
FWCMDB SSCCMDB DPMDBI
Adding a fixed server rolemember
Do not add Add Add
1. Open the command prompt.
2. Execute the following commands.
Chapter 2. Performing installation by selecting functions
11
> sqlcmd.exe -E -S ".\<Instance Name>"
1> alter server role [sysadmin] add member [NT AUTHORITY\SYSTEM]2> go1> exit
3. When the operation above is complete, restart each of the instances by the followingprocedure.
a. Select [SQL Server Services] on the left pane, and double-click [SQL Server(Instance Name)] displayed on the right pane.
The [SQL Server (Instance Name) Properties] screen is displayed.
b. Click [Restart]. When restart processing is complete, click [OK] to finish the SQLServer Configuration Manager.
• SQL Connection Settings for Virtual DataCenter Automation Standard Edition Portal
Refer to 2.2 SQL Connection Settings in Virtual DataCenter Automation Standard Edition UserManual (Install), and configure SQL Connection Settings.
• Changing the startup type of the SQL Server Browser service
Set the startup type of the SQL Server Browser service to [Auto] and start the service.
1. Select [Control Panel] -> [Administrative Tools] -> [Service]. If the startup type of theSQL Server Browser service is not [Auto], change it to [Auto].
2. If the SQL Server Browser service is not active, start it.
• Installing the SQL Server client tools
This section describes the installation method for the Express Edition.
1. Start the installer.
2. Click [New SQL Server stand-alone installation or add features to an existinginstallation].
3. On the [Product Updates] screen, click [Next] after the search for the update program iscomplete.
4. On the [Install Setup Files] screen, the next screen is displayed automatically afterinstallation of SQL Server setup is complete.
5. On the [Setup Support Rules] screen, the next screen is displayed automatically after therule check is complete.
6. On the [Installation Type] screen, select the [Perform a new installation of SQL Server]radio button, and click [Next].
7. On the [License Terms] screen, select the [I accept the license terms.] check box, andclick [Next].
8. On the [Feature Selection] screen, select [Management Tools - Basic], and click [Next].
If the SQL Server client tools have been installed on the server, [Management Tools -Basic] is grayed out and selected. In this case, installation of the SQL Server client toolsis not required. Cancel the installation.
9. On the [Installation Rules] and [Disk Space Requirements] screens, the next screen isdisplayed automatically.
10. On the [Error Reporting] screen, click [Next].
Chapter 2. Performing installation by selecting functions
12
11. On the [Installation Configuration Rules] screen, the next screen is displayedautomatically after the rule check is complete.
12. On the [Installation Progress] screen, the [Complete] screen is displayed after installationof the management tool is complete. Click [Close].
13. Close the SQL Server Install Center.
2.2.8 Installing MySQLFor the configuration that uses the Virtual DataCenter Automation Standard Edition TopologyTemplate Orchestrator Option, the Stack Management Server uses MySQL.
For the MySQL editions, Standard Edition and Enterprise Edition can be used.
Install MySQL by referring to Virtual DataCenter Automation Standard Edition Topology TemplateOrchestrator Option User’s Guide.
2.3 Installing the components of ManagementServer
The subsequent sections describe how to install the components to the Virtual DataCenterAutomation Standard Edition Management Server.
Before installing the components by using the Virtual DataCenter Automation Standard EditionIntegrated Installer, the following preparations are required.
• Software Required to be Installed in Advance (see "2.3.2 Software Required to be Installed inAdvance (page 14)")
• DHCP Server Configuration
• Setting up the Windows Firewall
• Cautions regarding the NEC ESMPRO Manager user group setting
• Cautions regarding installation of the Virtual DataCenter Automation Standard EditionManagement Server
NoteWhen installing the components of Management Server by upgrading, or performing installation again wheninstallation is interrupted, stop the services in the order below in advance.After installation, start the services manually.
• MasterScope UMF Operations Manager_102
NoteWhen installing a new management server in an environment in which SigmaSystemCenter manager isinstalled, first update the version of the SigmaSystemCenter manager to 3.6.
NoteWhen installing a new Management Server in an environment in which MasterScope SystemManagerManager is installed, first update the version of MasterScope SystemManager G Manager to 7.0. To updatethe version, add MasterScope SystemManager G Manager to the service in which MasterScopeSystemManager Manager is installed in the custom mode.
Chapter 2. Performing installation by selecting functions
13
2.3.1 Components Installed on the Management ServerFor the system requirements of the Management Server, see Chapter 6. Operating Environments/System Requirements in Virtual DataCenter Automation First Step Guide.
The components installed on the Management Server are as follows.
• MasterScope SystemManager G Manager
• Application Server*1*2
• MasterScope vDC Automation Service Governor WebAPI Base Option
• MasterScope vDC Automation Portal
• MasterScope SigmaSystemCenter*1 Java 8u121 and Tomcat 8.0.41 will be installed.*2 The log files of Tomcat keep growing and become huge if you do not delete them periodically. So
delete the files on a regular basis.The log files of Tomcat are output to the following folder.<installation folder>\FW\Tomcat\logs
Note<installation folder> is the installation destination folder of Management Server.The default value of the installation folder is "C:\Program Files (x86)\NEC\vDCA\MoM".
2.3.2 Software Required to be Installed in AdvanceBefore starting installation of the components of the Management Server, install the followingsoftware.
• .NET Framework 3.5 Service Pack 1*1
• .NET Framework 4.0
• .NET Framework 4.6.2
• Visual C++ 2013 Redistributable Packages
• SQL Server *2
• SQL Server client tools*2
• Internet Information Service*1 When using SQL Server 2014, it's necessary.*2 When the DBMS is separately used as a server, install SQL Server on the DBMS server, and install the
SQL Server client tools on the machine on which the Management Server is installed. If the DBMS isnot separately used as a server, the SQL Server client tools do not have to be installed.
Install it by referring to the procedure in "2.2 Software Required to be Installed in Advance (page7)".
2.3.3 DHCP Server ConfigurationIf HYPER-V or KVM is used as the virtualization infrastructure server, or if physical serverprovisioning is used, a DHCP server is required in the same network as Virtual DataCenterAutomation Standard Edition.
Chapter 2. Performing installation by selecting functions
14
Prepare the DHCP server before installing the Virtual DataCenter Automation Standard Edition.
The DHCP server can be installed on the same machine as the management server. Multiple DHCPservers can exist within the same network segment.
For the DHCP server, specify gateway and IP pools for all IP subnets to be used.
TipFor setup methods and precautions of the DHCP server, see 2.2.1 Network Environment in theDeploymentManager First Step Guide and 1.2.2 Setting UP the DHCP Sever in the DeploymentManagerInstallation Guide.
Note• If not setting the DHCP server, the functions using backing up/restoration of DeploymentManager,
disk replication OS installation, OS clear installation, and VM Provisioning are restricted.
2.3.4 Setting Up the Windows FirewallIf the Windows Firewall function is enabled on the Management Server, the port used by theManagement Server must be opened. Some ports are registered automatically during the installation,while others must be registered manually.
For details, refer to the following manuals.
• Virtual DataCenter Automation Standard Edition Portal User Manual (Install)
5.1
• Virtual DataCenter Automation Service Governor WebAPI Base Option 3.22.0.1 InstallationGuide (Windows)
3.7 About the Port Numbers Used
• SigmaSystemCenter manual
• SystemManager G manual
2.3.5 Precautions When Setting NEC ESMPRO Manager UserGroup
When using Windows GUI of ESMPRO/ServerManager, the users must belong to the group knownas "NEC ESMPRO User Group" for security reasons.
The "NEC ESMPRO User Group" will be determined at the installation of the ESMPRO/ServerManager. The "Administrators" group is specified by default.
2.3.6 Precautions When Installing Virtual DataCenterAutomation Management Server
• Check that the IP address for the OS network connection of the Virtual DataCenter AutomationStandard Edition Management Server is set to an unchanging IP address instead of automaticacquisition.
• Depending on the operating system, an ephemeral port may cause a conflict between the portused by DeploymentManager and the port used by other services and applications, preventingthe DeploymentManager service from running. For details on how to check and troubleshootephemeral ports, see 2.2 Precautions Regarding System Configuration in theDeploymentManager First Step Guide.
Chapter 2. Performing installation by selecting functions
15

• For the other precautions, see 2.1 Installing DPM Server in the DeploymentManagerInstallation Guide and 2.2 Precautions Regarding System Configuration in theDeploymentManager First Step Guide.
2.3.7 Cautions before Performing InstallationBe sure to exit all applications and Web browsers being used before starting the installation.
2.3.8 Installing the components of Management Server1. Insert the vDCA/NWA install DVD into the DVD drive.
2. Execute the following command on the command prompt or Explorer to start the VirtualDataCenter Automation Standard Edition Integrated Installer.
> <Install DVD>:\install\Windows\vDCAInst_SE.exe
3. The installer starts up.
4. Select [Typical], and click [Next].
The [Selection of Function] screen is displayed.
5. Select the [Management Server] check box.
Functions other than [VM Monitoring Server] and [Managed Machine] can be installed on theManagement Server. To install them, select the check boxes.
6. Click [Next].
The [Setting of Management Server] screen is displayed.
7. Set the following required items. Select the setting item name and click [Edit]. Perform settingin the screen displayed.
• [Self Hostname] (Example:vdca_mom)
Chapter 2. Performing installation by selecting functions
16

8. The following items are required when SigmaSystemCenter is not installed. Select the settingitem name and click [Edit]. Perform setting in the screen displayed.
• [ESMPRO/ServerManager - Administrator Name] (Example: Administrator)
• [ESMPRO/ServerManager - Administrator's Password] (Example: Password)
9. Set the setting items as required. Click the setting item and click [Edit], or double-click thesetting item.
The setting screen for the selected setting item opens.
Item Name Value
[Install Directory Path] Specify the installation destination folder.The default value is "C:\Program Files (x86)\NEC\vDCA\MoM".
Specify the folder path by using up to 55 characters.*1
[Using Monitoring] If "Yes" is selected, the following components will be installed.• MasterScope SystemManager G Manager• MasterScope vDC Automation Service Governor WebAPI
Base Option
The default value is "Yes".*7
[Self Hostname] Specify the computer name of the Management Server.
The default value is machine name (e.g. MANAGER).*2*7
[Agent Port] Specify the port number on the manager side used forconnection from the agent.
The default value is "12520".*7
[Viewer Port] Specify the port number on the manager side used forconnection from the Management Server Console.
The default value is "12521".*7
[Change Data Directory] The default value is "No".*3*7
[Data Directory] It can be specified if "Yes" is selected in [Change DataDirectory].*3*7
[Store Initial Setting Data] It can be specified if "Yes" is selected in [Change DataDirectory].*3*7
The default value is "Yes".
[Application Server Type] Specify the Application Server type.
Only "Tomcat" can be specified in this version.*8
[Application Server - HTTP Port] Specify the HTTP port number of the Application Server.
The default value is "12080".*8
[Application Server - HTTPS Port] Specify the HTTPS port number of the Application Server.
The default value is "12443".*4*8
[Tomcat - Management Port] Tomcat - Management Port Specify the Management portnumber of the Tomcat.
The default value is "12005".*8
[Tomcat - AJP/1.3 Port] Specify the AJP/1.3 port number of the Tomcat.
The default value is "12009".*8
Chapter 2. Performing installation by selecting functions
17
Item Name Value
[Portal - ServiceGovernor connectionprotocol]
Specify the hconnection protocol between Portal toServiceGovernor."http" or "https" can be specified.
The default value is "http".*9
[Portal - SQL Server Host Name] Specify the host name of the machine on which the database isinstalled.
The default value is "localhost".*9
[Portal - SQL Server Instance Name] Specify the instance name of the database.Specify the name of the instance created in "2.2.7 InstallingSQL Server (page 9)".
The default value is "FWCMDB".*9
[Portal - SQL Server Port] Specify the port number of the database.
The default value is "1433".*9
[Using Resource Management] If "Yes" is selected, the following component will be installed.• MasterScope SigmaSystemCenter
The default value is "Yes".*5
[ESMPRO/ServerManager -Administrator Name]
Specify the name of the administrator of ESMPRO Manager.*5
[ESMPRO/ServerManager -Administrator's Password]
Specify the password of the administrator of NEC ESMPROManager.**5
[DeploymentManager - ManagementServer's IP Address]
Specify the IP address of the DPM management server.*5*6
*1 Note that [Install Directory Path] and [Data Directory] are not case-sensitive. The followingcharacters cannot be used in [Install Directory Path] /[ Data Directory].\ / : * ? " < > | ; , & ^"\" can be used as a delimiter.
*2 Check that name resolution for [Self Hostname] can be performed from other machinesconnected. It is recommended to specify the fully qualified domain name (e.g.,manager.domain.net.jp) or the IP address. For a cluster configuration, specify the floating IPaddress or virtual host name.
*3 Specify "Yes" to use a cluster configuration. Since this document does not support clusterconfiguration, specify "No".
*4 In vCenter Server 5.5, port 12443 is used. Change the port number because it affects WebAPI(https) when installing vCenter Server 5.5 in the identical server.
*5 This can be specified when MasterScope SigmaSystemCenter is not installed.*6 If it is omitted, all the LAN boards on the Management Server will be used by the DPM server.*7 This can be specified when MasterScope SystemManager G Manager is not installed.*8 This can be specified when Application Server is not installed.*9 This can be specified when MasterScope vDC Automation Portal is not installed.
10. Click [Next].
The installation confirmation screen is displayed.
Chapter 2. Performing installation by selecting functions
18
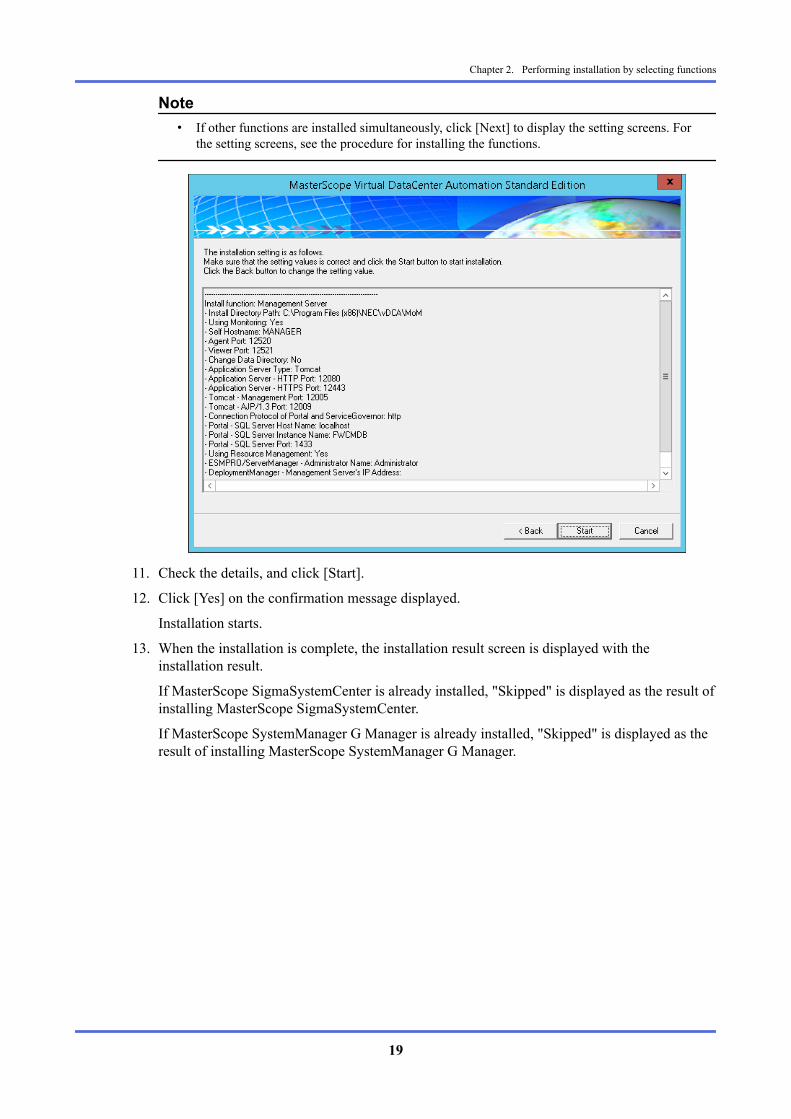
Note• If other functions are installed simultaneously, click [Next] to display the setting screens. For
the setting screens, see the procedure for installing the functions.
11. Check the details, and click [Start].
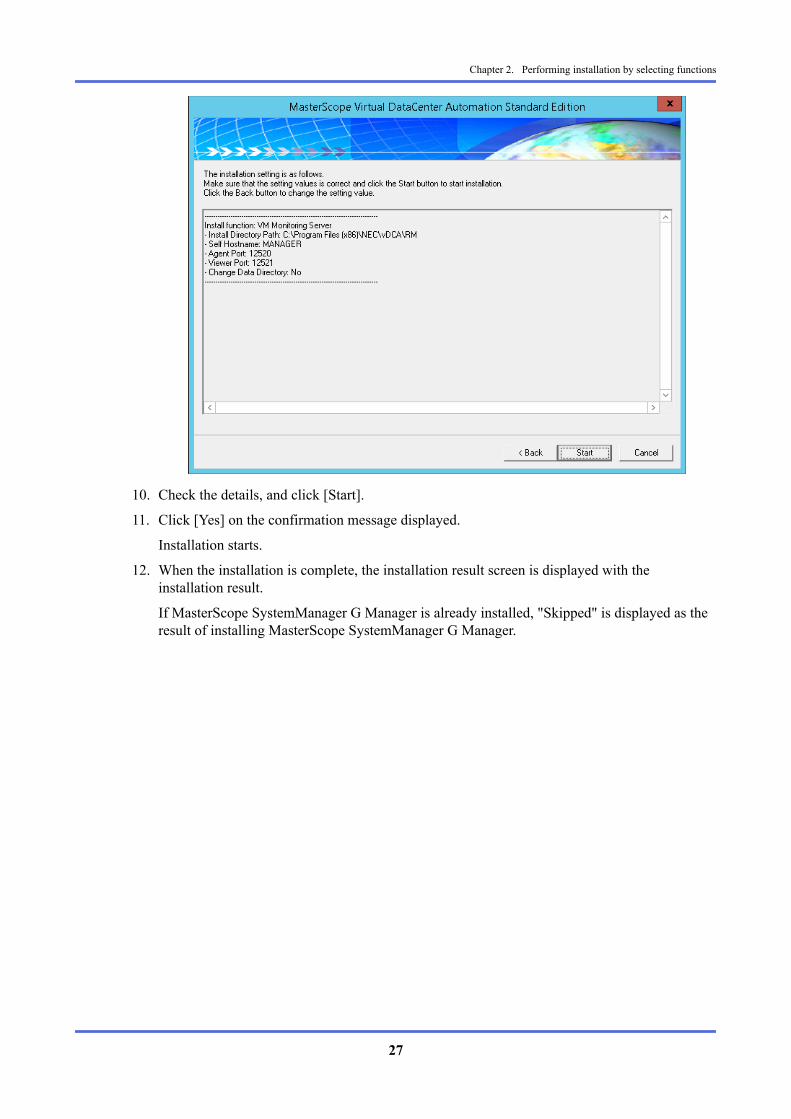
12. Click [Yes] on the confirmation message displayed.
Installation starts.
13. When the installation is complete, the installation result screen is displayed with theinstallation result.
If MasterScope SigmaSystemCenter is already installed, "Skipped" is displayed as the result ofinstalling MasterScope SigmaSystemCenter.
If MasterScope SystemManager G Manager is already installed, "Skipped" is displayed as theresult of installing MasterScope SystemManager G Manager.
Chapter 2. Performing installation by selecting functions
19
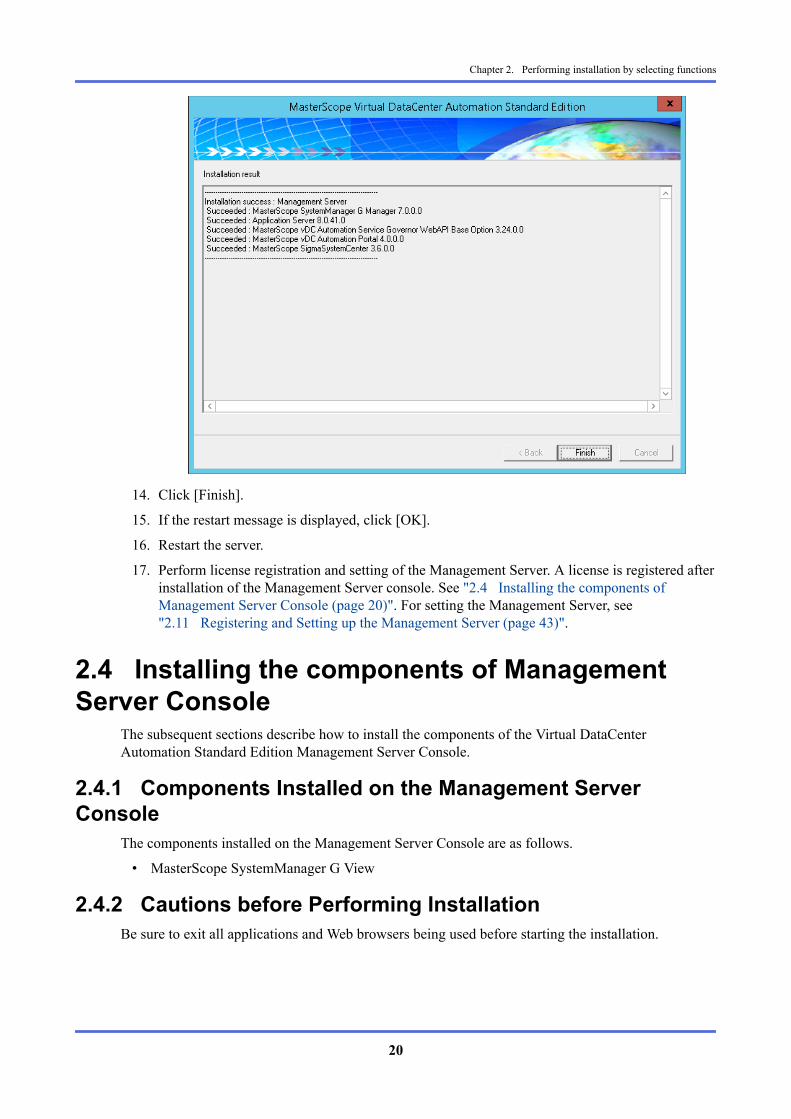
14. Click [Finish].
15. If the restart message is displayed, click [OK].
16. Restart the server.
17. Perform license registration and setting of the Management Server. A license is registered afterinstallation of the Management Server console. See "2.4 Installing the components ofManagement Server Console (page 20)". For setting the Management Server, see"2.11 Registering and Setting up the Management Server (page 43)".
2.4 Installing the components of ManagementServer Console
The subsequent sections describe how to install the components of the Virtual DataCenterAutomation Standard Edition Management Server Console.
2.4.1 Components Installed on the Management ServerConsole
The components installed on the Management Server Console are as follows.
• MasterScope SystemManager G View
2.4.2 Cautions before Performing InstallationBe sure to exit all applications and Web browsers being used before starting the installation.
Chapter 2. Performing installation by selecting functions
20
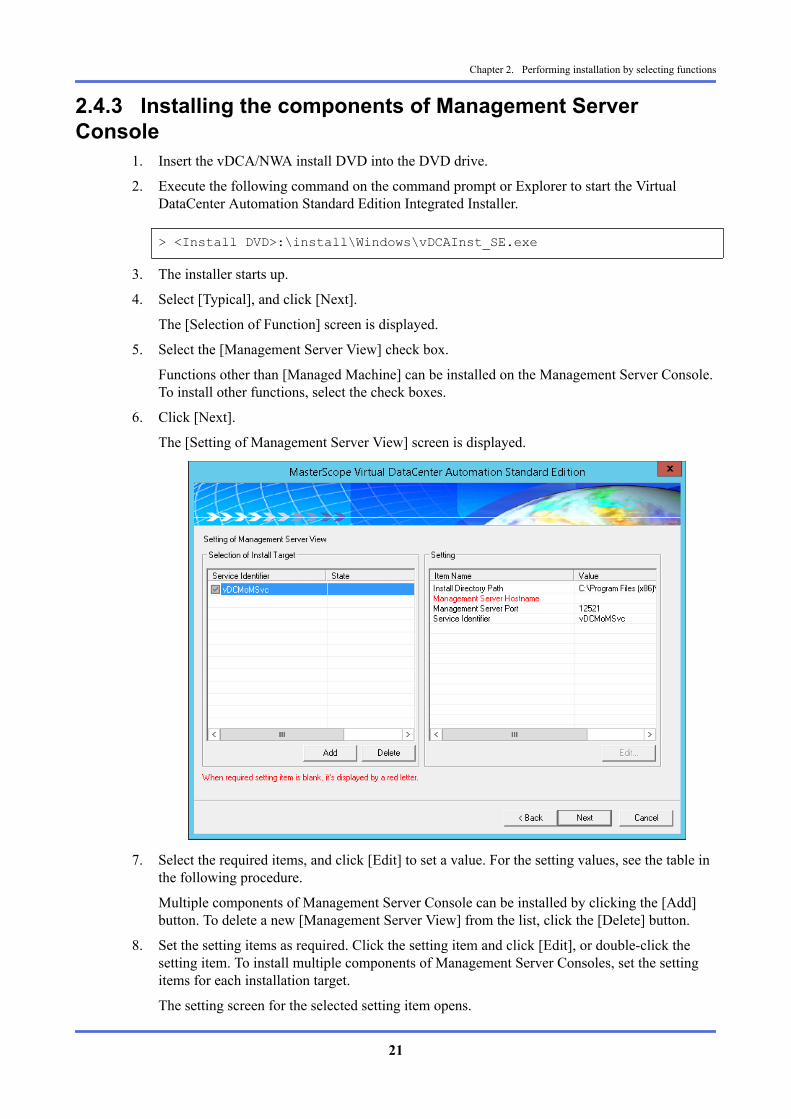
2.4.3 Installing the components of Management ServerConsole
1. Insert the vDCA/NWA install DVD into the DVD drive.
2. Execute the following command on the command prompt or Explorer to start the VirtualDataCenter Automation Standard Edition Integrated Installer.
> <Install DVD>:\install\Windows\vDCAInst_SE.exe
3. The installer starts up.
4. Select [Typical], and click [Next].
The [Selection of Function] screen is displayed.
5. Select the [Management Server View] check box.
Functions other than [Managed Machine] can be installed on the Management Server Console.To install other functions, select the check boxes.
6. Click [Next].
The [Setting of Management Server View] screen is displayed.
7. Select the required items, and click [Edit] to set a value. For the setting values, see the table inthe following procedure.
Multiple components of Management Server Console can be installed by clicking the [Add]button. To delete a new [Management Server View] from the list, click the [Delete] button.
8. Set the setting items as required. Click the setting item and click [Edit], or double-click thesetting item. To install multiple components of Management Server Consoles, set the settingitems for each installation target.
The setting screen for the selected setting item opens.
Chapter 2. Performing installation by selecting functions
21

Item Name Value
[Install Directory Path] Specify the installation destination folder.The default value is "C:\Program Files (x86)\NEC\vDCA\MoMView".
Specify the folder path using up to 55 characters.*1
[Management Server Hostname] Specify the IP address or host name of the ManagementServer.*2
[Management Server Port] Specify the port number specified in [Viewer Port] in theconfiguration of the Management Server.The default value is "12521".
[Service Identifier] Identifier to distinguish multiple consoles installed.*3
*1 Note that the folder path is not treated as case-sensitive at the installation destination folder.The following characters cannot be used for an installation destination folder:\ / : * ? " < > | ; , & ^"\" can be used as a delimiter.
*2 Check that name resolution can be performed if a host name is specified.*3 Note that the service identifier is not treated as case-sensitive.
The following characters cannot be used for service identifiers.b!"#$%&'()*+,./:;<=>?@[\]^`{|}~* "b" indicates a 1-byte space.
9. Click [Next].
The installation confirmation screen is displayed.
NoteIf other functions are installed simultaneously, click [Next] to display the setting screens. For thesetting screens, see the procedure for installing the functions.
Chapter 2. Performing installation by selecting functions
22
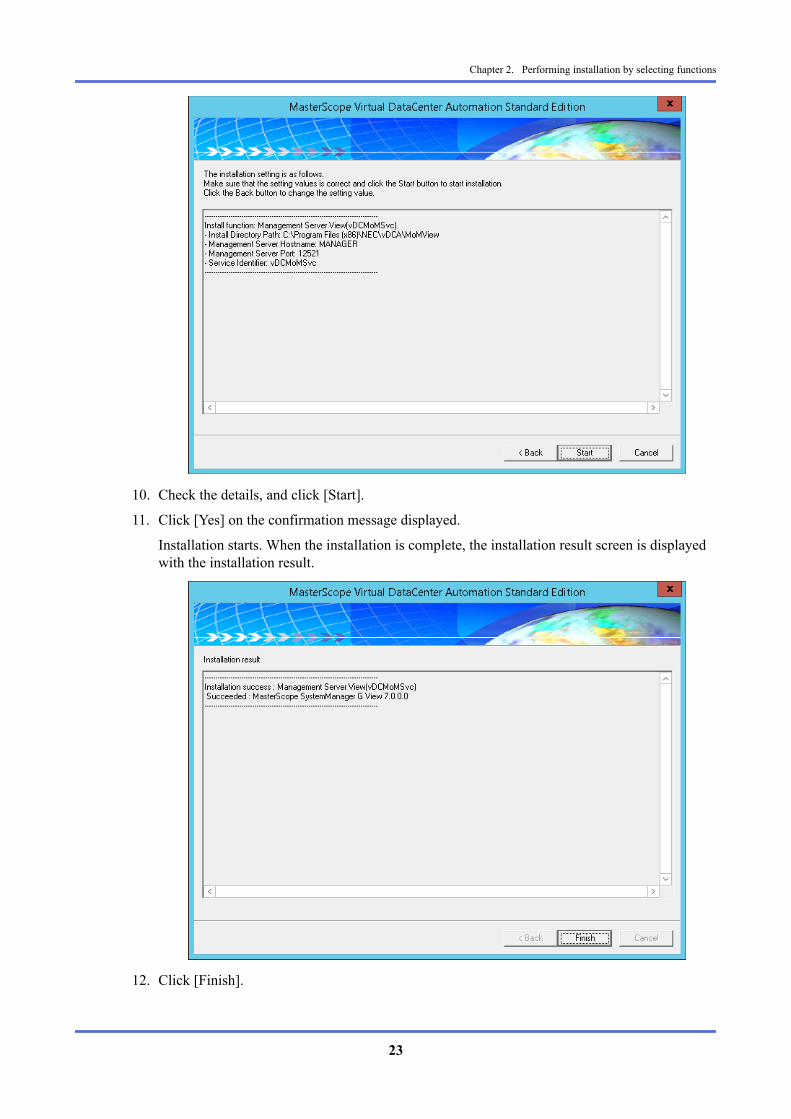
10. Check the details, and click [Start].
11. Click [Yes] on the confirmation message displayed.
Installation starts. When the installation is complete, the installation result screen is displayedwith the installation result.
12. Click [Finish].
Chapter 2. Performing installation by selecting functions
23
2.5 Installing the components of VM MonitoringServer
The subsequent sections describe how to install the components on the Virtual DataCenterAutomation Standard Edition VM Monitoring Server.
NoteWhen installing the components of VM Monitoring Server by upgrading, or performing installation againwhen installation is interrupted, stop the services in the order below in advance.After installation, start the services manually.
• MasterScope UMF Operations Manager_103
NoteWhen installing a new VM Monitoring Server in an environment in which MasterScope SystemManagerManager is installed, first update the version of MasterScope SystemManager G Manager to 7.0. To updatethe version, add MasterScope SystemManager G Manager to the service in which MasterScopeSystemManager Manager is installed in the custom mode.
2.5.1 Components Installed on the VM monitoring ServerFor the system requirements of the VM Monitoring Server, see Chapter 6. Operating Environments/System Requirements in Virtual DataCenter Automation First Step Guide.
The components installed on the VM Monitoring Server are as follows.
• MasterScope SystemManager G Manager
2.5.2 Software Required to be Installed in AdvanceBefore starting installation of the components of the VM Monitoring Server, install the followingsoftware.
• .NET Framework 3.5 Service Pack 1
• .NET Framework 4.0
• SQL Server *1
• SQL Server client tools*1
*1 When the DBMS is separately used as a server, install SQL Server on the DBMS server, and install theSQL Server client tools on the machine on which the VM Monitoring Server is installed. If the DBMSis not separately used as a server, the SQL Server client tools do not have to be installed.
Install it by referring to the procedure in "2.2 Software Required to be Installed in Advance (page7)".
2.5.3 Setting up the Windows FirewallIf the Windows Firewall function is enabled in the VM Monitoring Server, the port used by the VMMonitoring Server must be opened. Some ports are automatically registered during installation, butsome items require manual registration.
For details, refer to the following manuals.
• SystemManager G manual
Chapter 2. Performing installation by selecting functions
24

2.5.4 Cautions before Performing InstallationBe sure to exit all applications and Web browsers being used before starting the installation.
2.5.5 Installing the components of VM Monitoring Server1. Insert the vDCA/NWA install DVD into the DVD drive.
2. Execute the following command on the command prompt or Explorer to start the VirtualDataCenter Automation Standard Edition Integrated Installer.
> <Install DVD>:\install\Windows\vDCAInst_SE.exe
3. The installer starts up.
4. Select [Typical], and click [Next].
The [Selection of Function] screen is displayed.
5. Select the [VM Monitoring Server] check box.
Functions other than [Management Server] and [Managed Machine] can be installed on theVM the VM Monitoring Server. To install them, select the check boxes.
6. Click [Next].
The [Setting of VM Monitoring Server] screen is displayed.
7. Select the required items, and click [Edit] to set a value. For the setting values, see the table bythe following procedure.
8. Set the setting items as required. Click the setting item and click [Edit], or double-click thesetting item.
The setting screen for the selected setting item opens.
Chapter 2. Performing installation by selecting functions
25
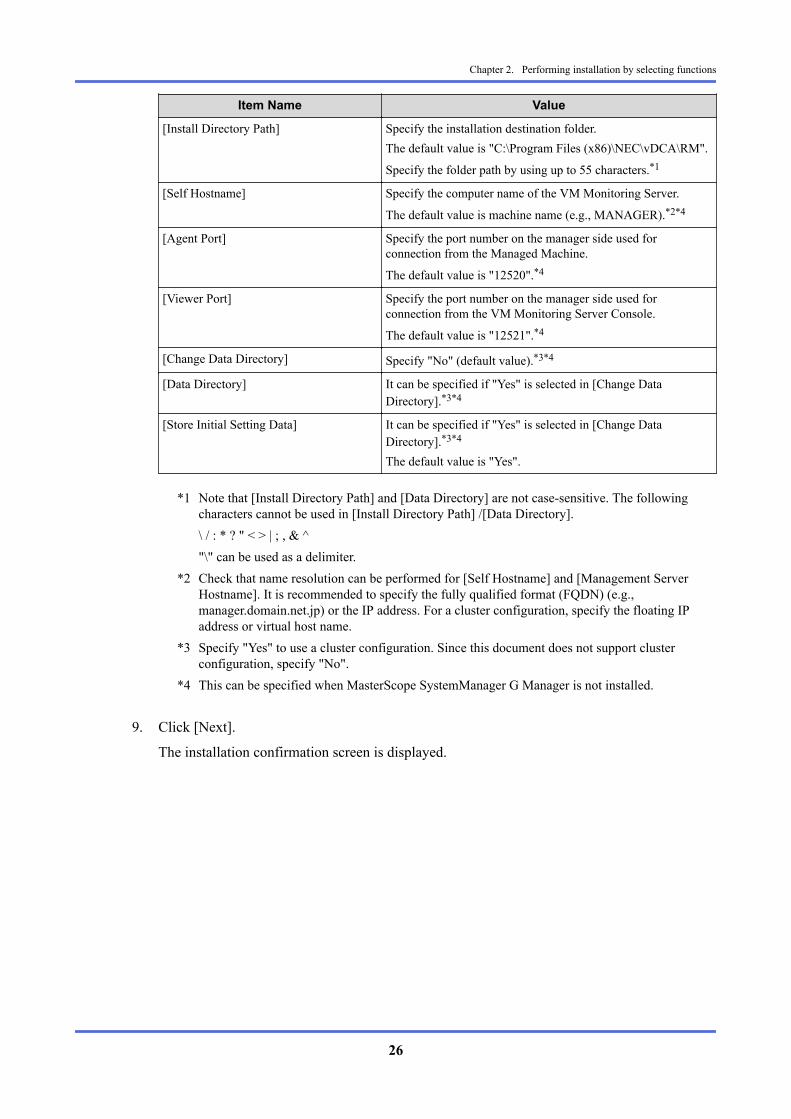
Item Name Value
[Install Directory Path] Specify the installation destination folder.The default value is "C:\Program Files (x86)\NEC\vDCA\RM".
Specify the folder path by using up to 55 characters.*1
[Self Hostname] Specify the computer name of the VM Monitoring Server.
The default value is machine name (e.g., MANAGER).*2*4
[Agent Port] Specify the port number on the manager side used forconnection from the Managed Machine.
The default value is "12520".*4
[Viewer Port] Specify the port number on the manager side used forconnection from the VM Monitoring Server Console.
The default value is "12521".*4
[Change Data Directory] Specify "No" (default value).*3*4
[Data Directory] It can be specified if "Yes" is selected in [Change DataDirectory].*3*4
[Store Initial Setting Data] It can be specified if "Yes" is selected in [Change DataDirectory].*3*4
The default value is "Yes".
*1 Note that [Install Directory Path] and [Data Directory] are not case-sensitive. The followingcharacters cannot be used in [Install Directory Path] /[Data Directory].\ / : * ? " < > | ; , & ^"\" can be used as a delimiter.
*2 Check that name resolution can be performed for [Self Hostname] and [Management ServerHostname]. It is recommended to specify the fully qualified format (FQDN) (e.g.,manager.domain.net.jp) or the IP address. For a cluster configuration, specify the floating IPaddress or virtual host name.
*3 Specify "Yes" to use a cluster configuration. Since this document does not support clusterconfiguration, specify "No".
*4 This can be specified when MasterScope SystemManager G Manager is not installed.
9. Click [Next].
The installation confirmation screen is displayed.
Chapter 2. Performing installation by selecting functions
26
10. Check the details, and click [Start].
11. Click [Yes] on the confirmation message displayed.
Installation starts.
12. When the installation is complete, the installation result screen is displayed with theinstallation result.
If MasterScope SystemManager G Manager is already installed, "Skipped" is displayed as theresult of installing MasterScope SystemManager G Manager.
Chapter 2. Performing installation by selecting functions
27

13. Click [Finish].
14. Restart the server.
15. Perform license registration and setting of the VM Monitoring Server. A license is registeredafter installation of the VM Monitoring Server console. See "2.6 Installing the components ofVM Monitoring Server Console (page 28)". For setting the VM Monitoring Server, see"2.12 Registering and Setting up the VM Monitoring Server (page 51)".
2.6 Installing the components of VM MonitoringServer Console
The subsequent sections describe how to install the components of the Virtual DataCenterAutomation Standard Edition VM Monitoring Server Console.
2.6.1 Components Installed on the VM monitoring ServerConsole
The components installed on the VM Monitoring Server Console are as follows.
• MasterScope SystemManager G View
2.6.2 Cautions before Performing InstallationBe sure to exit all applications and Web browsers being used before starting the installation.
2.6.3 Installing the components of VM Monitoring ServerConsole
1. Insert the vDCA/NWA install DVD into the DVD drive.
Chapter 2. Performing installation by selecting functions
28
2. Execute the following command on the command prompt or Explorer to start the VirtualDataCenter Automation Standard Edition Integrated Installer.
> <Install DVD>:\install\Windows\vDCAInst_SE.exe
3. The installer starts up.
4. Select [Typical], and click [Next].
The [Selection of Function] screen is displayed.
5. Select the [VM Monitoring Server View] check box.
Functions other than [Managed Machine] can be installed on the VM Monitoring Server View.To install other functions, select the check boxes.
6. Click [Next].
The [Setting of VM Monitoring Server View] screen is displayed.
7. Select the required items, and click [Edit] to set a value. For the setting values, see the table bythe following procedure.
Multiple components of VM Monitoring Server Console can be installed by clicking the [Add]button. To delete a new [VM Monitoring Server View] from the list, click the [Delete] button.
8. Set the setting items as required. Click the setting item and click [Edit], or double-click thesetting item. To install multiple VM Monitoring Server Consoles, set the setting items for eachinstallation target.
The setting screen for the selected setting item opens.
Item Name Value
[Install Directory Path] Specify the installation destination folder.The default value is "C:\Program Files (x86)\NEC\vDCA\RMView".
Chapter 2. Performing installation by selecting functions
29
Item Name ValueSpecify the folder path by using up to 55 characters.*1
[VM Monitoring Server Hostname] Specify the IP address or host name of the VM MonitoringServer.*2
[VM Monitoring Server Port] Specify the port number specified in [Viewer Port] in theconfiguration of the VM Monitoring Server.The default value is "12521".
[Service Identifier] Identifier to distinguish multiple consoles installed.
*1 Note that the folder path is not treated as case-sensitive at the installation destination folder.The following characters cannot be used for an installation destination folder:\ / : * ? " < > | ; , & ^"\" can be used as a delimiter.
*2 Check that name resolution can be performed if a host name is specified.*3 Note that the service identifier is not treated as case-sensitive.
The following characters cannot be used for service identifiers.b!"#$%&'()*+,./:;<=>?@[\]^`{|}~* "b" indicates a 1-byte space.
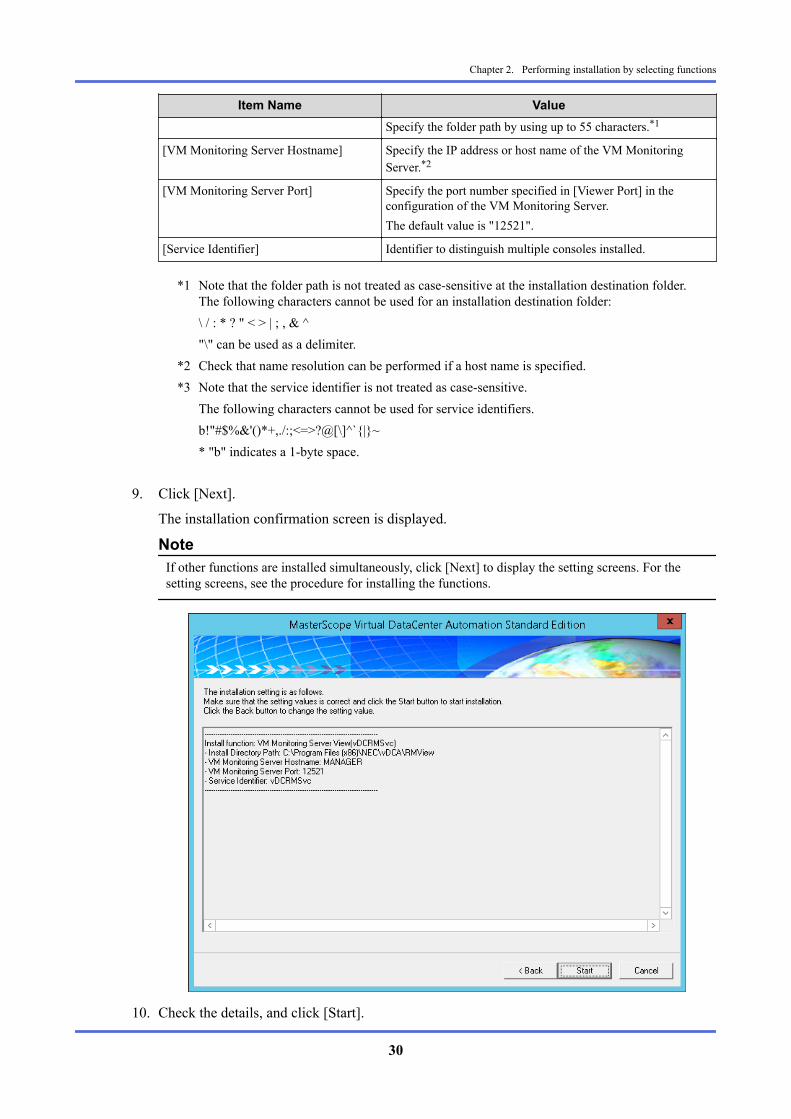
9. Click [Next].
The installation confirmation screen is displayed.
NoteIf other functions are installed simultaneously, click [Next] to display the setting screens. For thesetting screens, see the procedure for installing the functions.
10. Check the details, and click [Start].
Chapter 2. Performing installation by selecting functions
30

11. Click [Yes] on the confirmation message displayed.
Installation starts.
12. When the installation is complete, the installation result screen is displayed with theinstallation result.
13. Click [Finish].
2.7 Installing the Stack Management ServerThe procedure to install the TTO Management Server components is described below.
The procedure described in this section is required only for the configuration that uses the VirtualDataCenter Automation Standard Edition Topology Template Orchestrator Option.
Before installing the components, prepare the following items.
• Software Required to be Installed in Advance"2.2 Software Required to be Installed inAdvance (page 7)"
• Firewall settings
2.7.1 Components to Be Installed to the Stack ManagementServer
For the Stack Management Server system requirements, refer to Chapter 1 Operating Environment ofVirtual DataCenter Automation Standard Edition Topology Template Orchestrator Option User’sGuide.
The components to be installed in the Stack Management Server are as follows.
• SSC Resource Plug-in
Chapter 2. Performing installation by selecting functions
31
2.7.2 Software Required to be Installed in AdvanceBefore installing the Stack Management Server's components, install the following software.
• MySQL
• OpenStack
- Identity Service (keystone)
- Orchestration Service (heat)
• RabbitMQ
Install components by referring to Chapter 2.1 Installing the software to be prepared in advance ofVirtual DataCenter Automation Standard Edition Topology Template Orchestrator Option User’sGuide.
2.7.3 Firewall SettingsIf the Firewall function is enabled on the Stack Management Server, the port used by the StackManagement Server must be opened. If you use the support script described in the manual below toinstall the software that needs to be installed in advance, it will be released automatically.
For details, refer to the following manual: Chapter 2 Installation of Virtual DataCenter AutomationStandard Edition Topology Template Orchestrator Option User’s Guide
2.7.4 Installing the Stack Management ServerFor details about how to install the Stack Management Server, refer to the following manual:•Chapter 2.2 Installing SSC Resource Plug-in of Virtual DataCenter Automation Standard EditionTopology Template Orchestrator Option User’s Guide
2.8 Installing the components of ManagedMachine
The subsequent sections describe how to install the components to the Managed Machine.
The components installed on each of the virtualization infrastructures are described.
Note• The component indicated as "Option" in tables, it is not essential in the function range used by Virtual
DataCenter Automation Standard Edition. Install it to use the specific function.• Install the DPM client and SystemManager G agent using the Virtual DataCenter Automation Standard
Edition Integrated Installer.
2.8.1 VMWare ESXi Virtualization InfrastructureTo use the VMWare ESXi virtualization infrastructures, install the following components.
Managed machine NEC ESMPRO Agent DPM client SystemManager Gagent
VMware ESXivirtualization infrastructure
Not required Not required Not required
Windows ManagedMachine (virtual machine)
Option Required Required
Chapter 2. Performing installation by selecting functions
32
Managed machine NEC ESMPRO Agent DPM client SystemManager Gagent
Linux Managed Machine(virtual machine)
Option Required Required
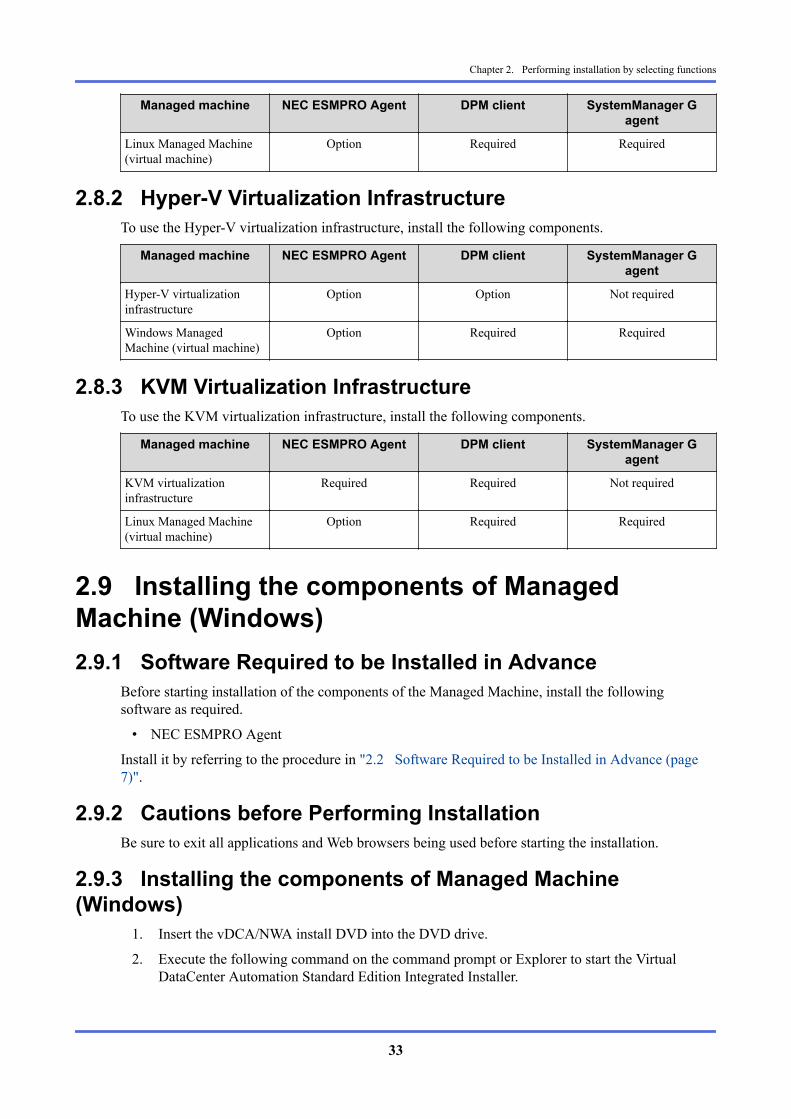
2.8.2 Hyper-V Virtualization InfrastructureTo use the Hyper-V virtualization infrastructure, install the following components.
Managed machine NEC ESMPRO Agent DPM client SystemManager Gagent
Hyper-V virtualizationinfrastructure
Option Option Not required
Windows ManagedMachine (virtual machine)
Option Required Required
2.8.3 KVM Virtualization InfrastructureTo use the KVM virtualization infrastructure, install the following components.
Managed machine NEC ESMPRO Agent DPM client SystemManager Gagent
KVM virtualizationinfrastructure
Required Required Not required
Linux Managed Machine(virtual machine)
Option Required Required
2.9 Installing the components of ManagedMachine (Windows)2.9.1 Software Required to be Installed in Advance
Before starting installation of the components of the Managed Machine, install the followingsoftware as required.
• NEC ESMPRO Agent
Install it by referring to the procedure in "2.2 Software Required to be Installed in Advance (page7)".
2.9.2 Cautions before Performing InstallationBe sure to exit all applications and Web browsers being used before starting the installation.
2.9.3 Installing the components of Managed Machine(Windows)
1. Insert the vDCA/NWA install DVD into the DVD drive.
2. Execute the following command on the command prompt or Explorer to start the VirtualDataCenter Automation Standard Edition Integrated Installer.
Chapter 2. Performing installation by selecting functions
33

> <Install DVD>:\install\Windows\vDCAInst_SE.exe
3. The installer starts up.
4. Select [Typical], and click [Next].
The [Selection of Function] screen is displayed.
5. Select the [Managed machine] check box.
6. Click [Next].
The [Setting of Managed machine] screen is displayed.
In some environments, installation of the "Microsoft Visual C++ 2005 SP1 redistributablepackage (x86)" may be required. Install the "Microsoft Visual C++ 2005 SP1 redistributablepackage (x86)" according to the screen.
7. Select the required items, and click [Edit] to set a value. For the setting values, see the table bythe following procedure.
Chapter 2. Performing installation by selecting functions
34
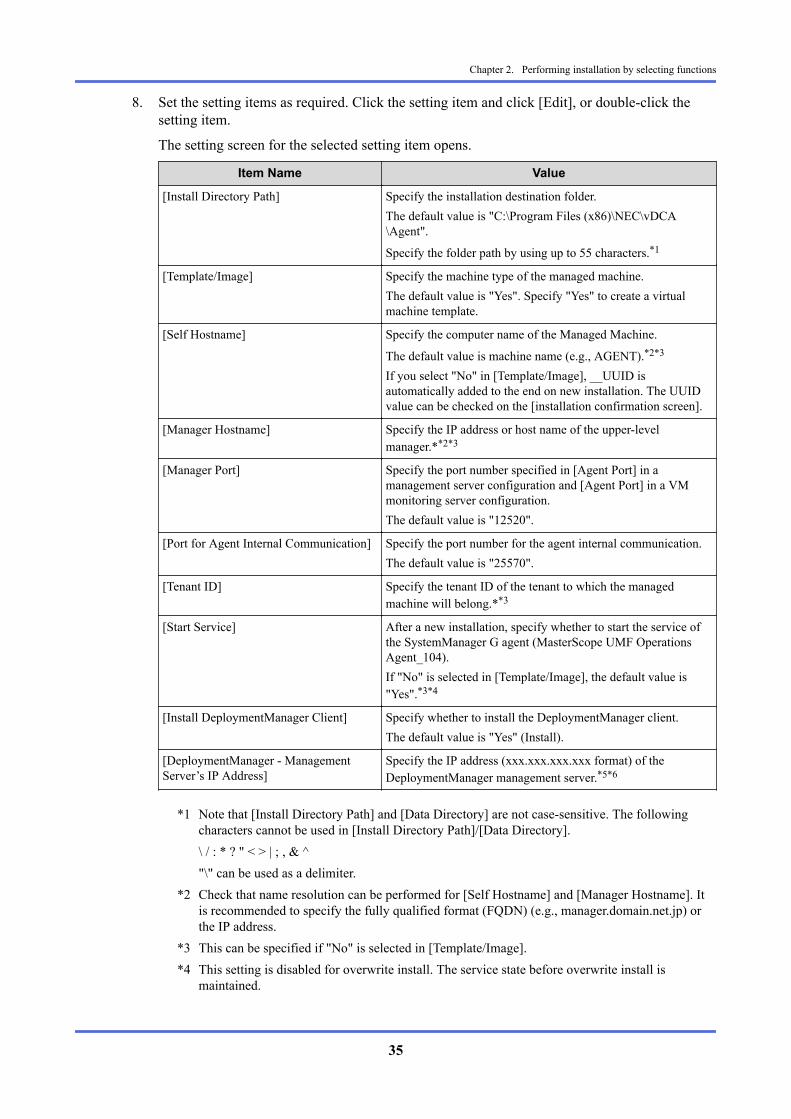
8. Set the setting items as required. Click the setting item and click [Edit], or double-click thesetting item.
The setting screen for the selected setting item opens.
Item Name Value
[Install Directory Path] Specify the installation destination folder.The default value is "C:\Program Files (x86)\NEC\vDCA\Agent".
Specify the folder path by using up to 55 characters.*1
[Template/Image] Specify the machine type of the managed machine.The default value is "Yes". Specify "Yes" to create a virtualmachine template.
[Self Hostname] Specify the computer name of the Managed Machine.
The default value is machine name (e.g., AGENT).*2*3
If you select "No" in [Template/Image], __UUID isautomatically added to the end on new installation. The UUIDvalue can be checked on the [installation confirmation screen].
[Manager Hostname] Specify the IP address or host name of the upper-levelmanager.**2*3
[Manager Port] Specify the port number specified in [Agent Port] in amanagement server configuration and [Agent Port] in a VMmonitoring server configuration.The default value is "12520".
[Port for Agent Internal Communication] Specify the port number for the agent internal communication.The default value is "25570".
[Tenant ID] Specify the tenant ID of the tenant to which the managedmachine will belong.**3
[Start Service] After a new installation, specify whether to start the service ofthe SystemManager G agent (MasterScope UMF OperationsAgent_104).If "No" is selected in [Template/Image], the default value is"Yes".*3*4
[Install DeploymentManager Client] Specify whether to install the DeploymentManager client.The default value is "Yes" (Install).
[DeploymentManager - ManagementServer’s IP Address]
Specify the IP address (xxx.xxx.xxx.xxx format) of theDeploymentManager management server.*5*6
*1 Note that [Install Directory Path] and [Data Directory] are not case-sensitive. The followingcharacters cannot be used in [Install Directory Path]/[Data Directory].\ / : * ? " < > | ; , & ^"\" can be used as a delimiter.
*2 Check that name resolution can be performed for [Self Hostname] and [Manager Hostname]. Itis recommended to specify the fully qualified format (FQDN) (e.g., manager.domain.net.jp) orthe IP address.
*3 This can be specified if "No" is selected in [Template/Image].*4 This setting is disabled for overwrite install. The service state before overwrite install is
maintained.
Chapter 2. Performing installation by selecting functions
35
*5 If it is omitted, a management server is automatically searched for after completion ofinstallation.
*6 This can be specified if "Yes" is selected in [Install DeploymentManager Client].
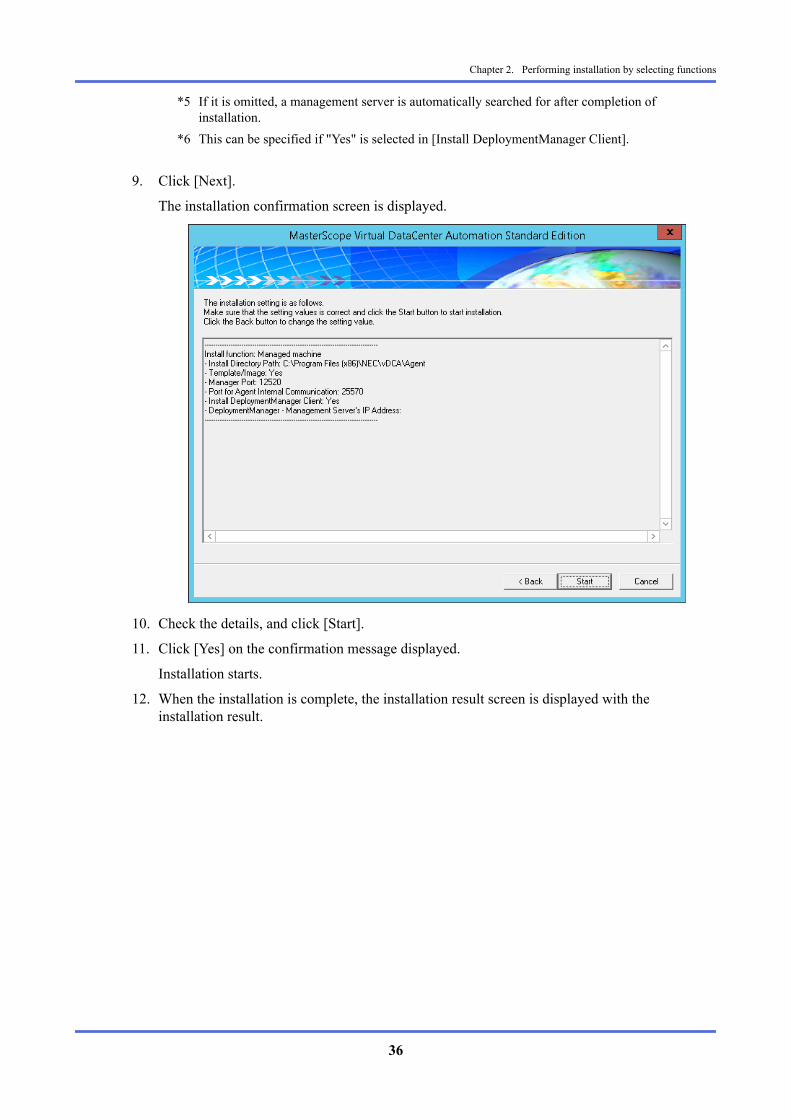
9. Click [Next].
The installation confirmation screen is displayed.
10. Check the details, and click [Start].
11. Click [Yes] on the confirmation message displayed.
Installation starts.
12. When the installation is complete, the installation result screen is displayed with theinstallation result.
Chapter 2. Performing installation by selecting functions
36
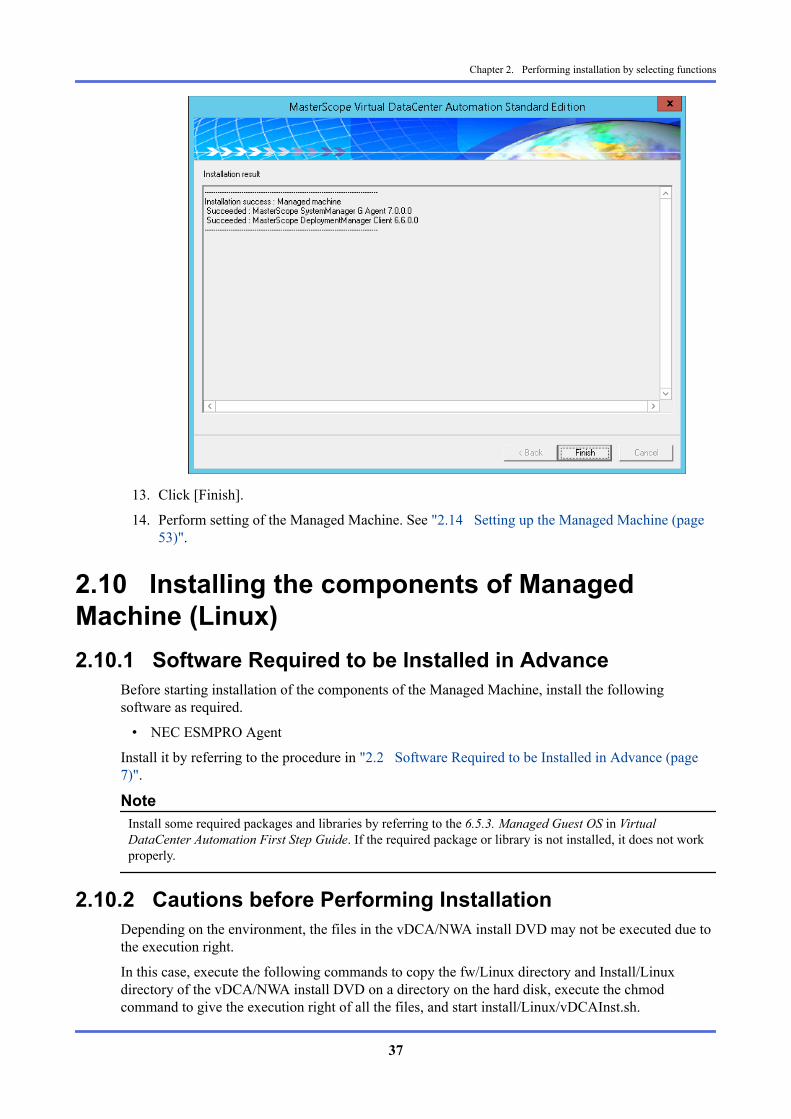
13. Click [Finish].
14. Perform setting of the Managed Machine. See "2.14 Setting up the Managed Machine (page53)".
2.10 Installing the components of ManagedMachine (Linux)2.10.1 Software Required to be Installed in Advance
Before starting installation of the components of the Managed Machine, install the followingsoftware as required.
• NEC ESMPRO Agent
Install it by referring to the procedure in "2.2 Software Required to be Installed in Advance (page7)".
NoteInstall some required packages and libraries by referring to the 6.5.3. Managed Guest OS in VirtualDataCenter Automation First Step Guide. If the required package or library is not installed, it does not workproperly.
2.10.2 Cautions before Performing InstallationDepending on the environment, the files in the vDCA/NWA install DVD may not be executed due tothe execution right.
In this case, execute the following commands to copy the fw/Linux directory and Install/Linuxdirectory of the vDCA/NWA install DVD on a directory on the hard disk, execute the chmodcommand to give the execution right of all the files, and start install/Linux/vDCAInst.sh.
Chapter 2. Performing installation by selecting functions
37
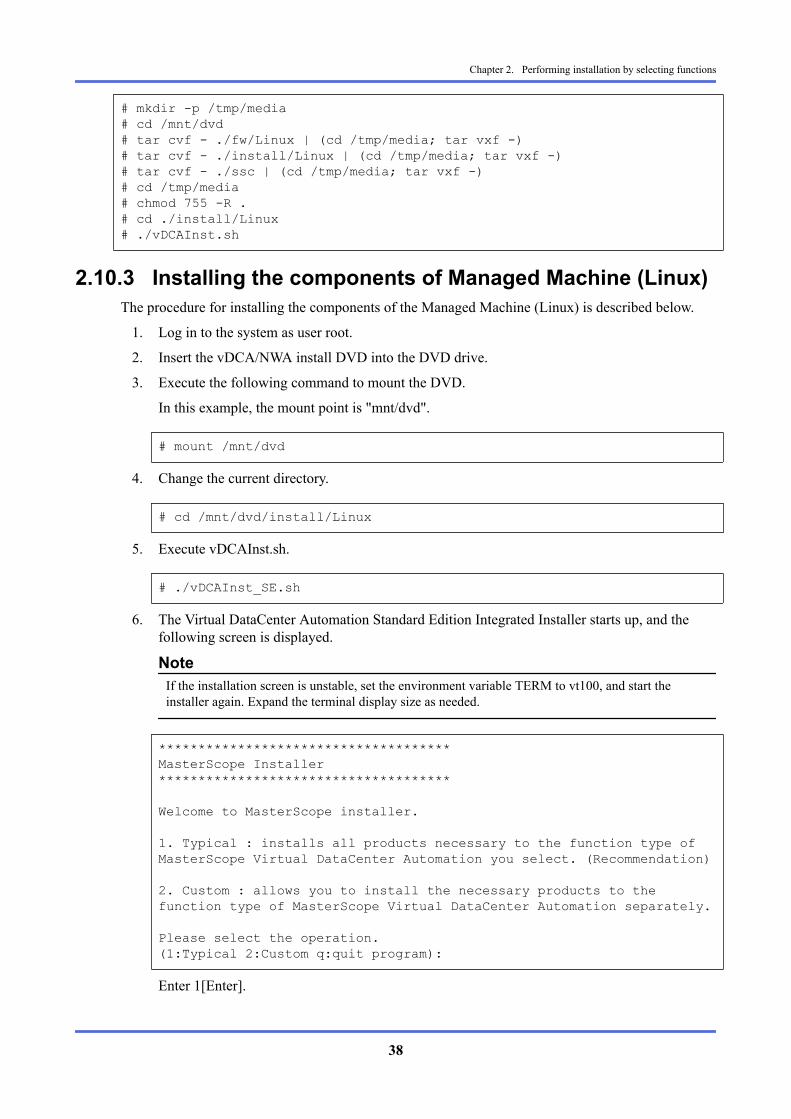
# mkdir -p /tmp/media# cd /mnt/dvd# tar cvf - ./fw/Linux | (cd /tmp/media; tar vxf -)# tar cvf - ./install/Linux | (cd /tmp/media; tar vxf -)# tar cvf - ./ssc | (cd /tmp/media; tar vxf -)# cd /tmp/media# chmod 755 -R .# cd ./install/Linux# ./vDCAInst.sh
2.10.3 Installing the components of Managed Machine (Linux)The procedure for installing the components of the Managed Machine (Linux) is described below.
1. Log in to the system as user root.
2. Insert the vDCA/NWA install DVD into the DVD drive.
3. Execute the following command to mount the DVD.
In this example, the mount point is "mnt/dvd".
# mount /mnt/dvd
4. Change the current directory.
# cd /mnt/dvd/install/Linux
5. Execute vDCAInst.sh.
# ./vDCAInst_SE.sh
6. The Virtual DataCenter Automation Standard Edition Integrated Installer starts up, and thefollowing screen is displayed.
NoteIf the installation screen is unstable, set the environment variable TERM to vt100, and start theinstaller again. Expand the terminal display size as needed.
*************************************MasterScope Installer*************************************
Welcome to MasterScope installer.
1. Typical : installs all products necessary to the function type of MasterScope Virtual DataCenter Automation you select. (Recommendation)
2. Custom : allows you to install the necessary products to the function type of MasterScope Virtual DataCenter Automation separately.
Please select the operation.(1:Typical 2:Custom q:quit program):
Enter 1[Enter].
Chapter 2. Performing installation by selecting functions
38

(1:Typical 2:Custom q:quit program):1
7. Subsequently, the following screen of the Virtual DataCenter Automation Standard EditionIntegrated Installer is displayed.
*************************************Welcome to MasterScope Installer !!*************************************
This program will install/uninstall products.
1. Install
Please select the operation.(1:install q:quit program):
Enter 1[Enter].
(1:install q:quit program):1
8. A list of components that can be installed is displayed.
--------Products--------
1 [ ] MasterScope Virtual DataCenter Automation Standard Edition Managed machine components 4.0.0.0
--------------------------------------------Please select product(s) by entering numbers separated by commas.[Example: 1, 3, 4](b:back q:quit program):
Select MasterScope Virtual DataCenter Automation Managed machine components 4.0.0.0 asshown below.
(b:back q:quit program):1
9. The confirmation screen of the components to be installed is displayed.
------------Confirmation------------
1 [*] MasterScope Virtual DataCenter Automation Standard Edition Managed machine components 4.0.0.0
--------------------------------------------These product(s) will be installed, OK to continue?(default:y y:yes n:no q:quit program):
Enter y[Enter] to continue.
Chapter 2. Performing installation by selecting functions
39
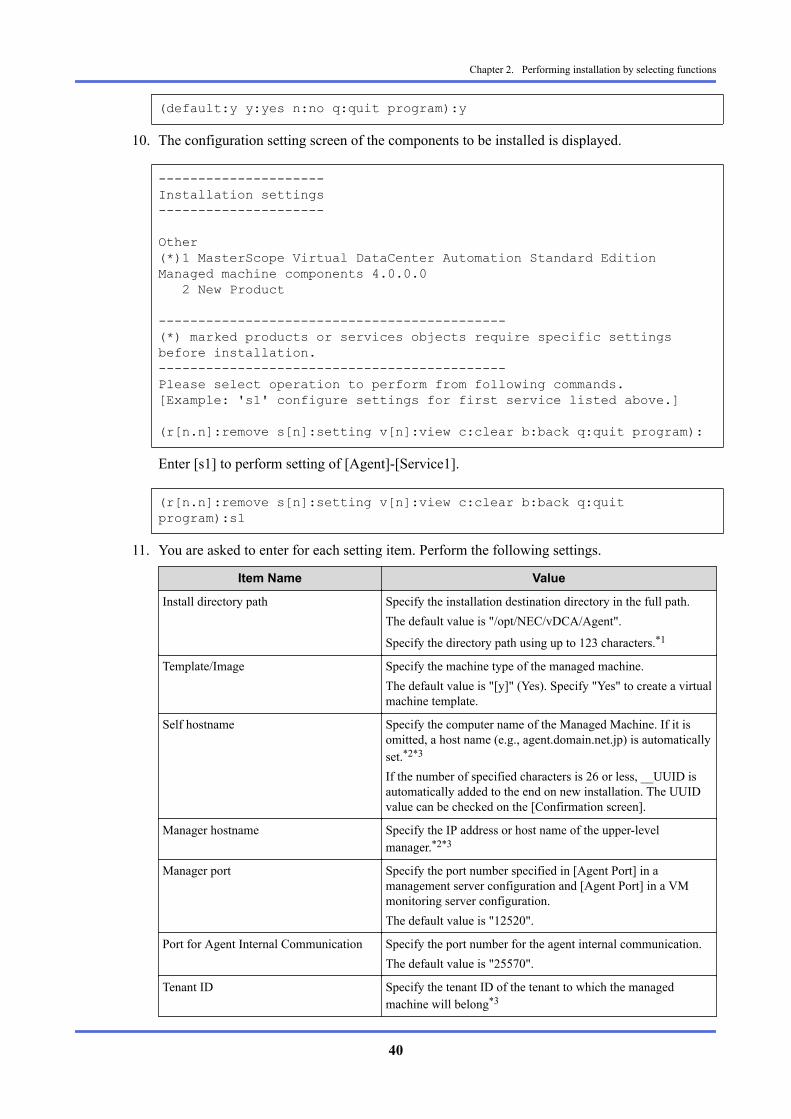
(default:y y:yes n:no q:quit program):y
10. The configuration setting screen of the components to be installed is displayed.
---------------------Installation settings---------------------
Other(*)1 MasterScope Virtual DataCenter Automation Standard Edition Managed machine components 4.0.0.0 2 New Product
--------------------------------------------(*) marked products or services objects require specific settings before installation.--------------------------------------------Please select operation to perform from following commands.[Example: 's1' configure settings for first service listed above.]
(r[n.n]:remove s[n]:setting v[n]:view c:clear b:back q:quit program):
Enter [s1] to perform setting of [Agent]-[Service1].
(r[n.n]:remove s[n]:setting v[n]:view c:clear b:back q:quit program):s1
11. You are asked to enter for each setting item. Perform the following settings.
Item Name Value
Install directory path Specify the installation destination directory in the full path.The default value is "/opt/NEC/vDCA/Agent".
Specify the directory path using up to 123 characters.*1
Template/Image Specify the machine type of the managed machine.The default value is "[y]" (Yes). Specify "Yes" to create a virtualmachine template.
Self hostname Specify the computer name of the Managed Machine. If it isomitted, a host name (e.g., agent.domain.net.jp) is automaticallyset.*2*3
If the number of specified characters is 26 or less, __UUID isautomatically added to the end on new installation. The UUIDvalue can be checked on the [Confirmation screen].
Manager hostname Specify the IP address or host name of the upper-levelmanager.*2*3
Manager port Specify the port number specified in [Agent Port] in amanagement server configuration and [Agent Port] in a VMmonitoring server configuration.The default value is "12520".
Port for Agent Internal Communication Specify the port number for the agent internal communication.The default value is "25570".
Tenant ID Specify the tenant ID of the tenant to which the managedmachine will belong*3
Chapter 2. Performing installation by selecting functions
40
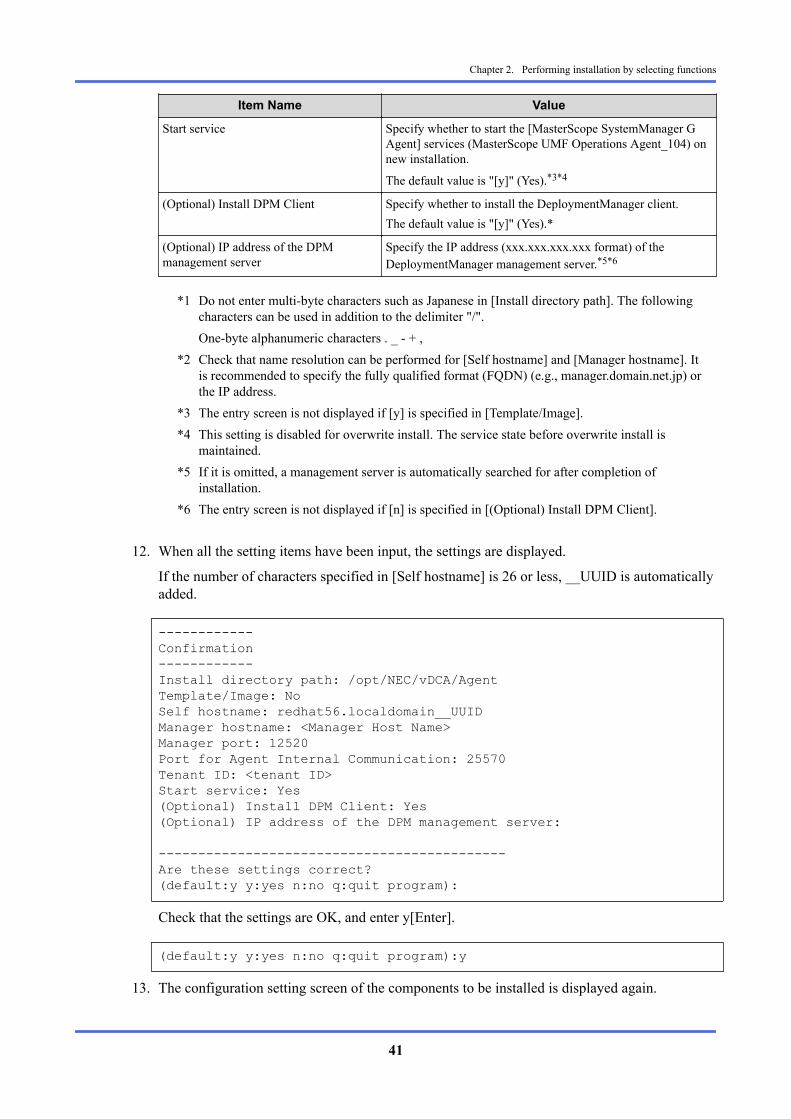
Item Name Value
Start service Specify whether to start the [MasterScope SystemManager GAgent] services (MasterScope UMF Operations Agent_104) onnew installation.
The default value is "[y]" (Yes).*3*4
(Optional) Install DPM Client Specify whether to install the DeploymentManager client.The default value is "[y]" (Yes).*
(Optional) IP address of the DPMmanagement server
Specify the IP address (xxx.xxx.xxx.xxx format) of theDeploymentManager management server.*5*6
*1 Do not enter multi-byte characters such as Japanese in [Install directory path]. The followingcharacters can be used in addition to the delimiter "/".One-byte alphanumeric characters . _ - + ,
*2 Check that name resolution can be performed for [Self hostname] and [Manager hostname]. Itis recommended to specify the fully qualified format (FQDN) (e.g., manager.domain.net.jp) orthe IP address.
*3 The entry screen is not displayed if [y] is specified in [Template/Image].*4 This setting is disabled for overwrite install. The service state before overwrite install is
maintained.*5 If it is omitted, a management server is automatically searched for after completion of
installation.*6 The entry screen is not displayed if [n] is specified in [(Optional) Install DPM Client].
12. When all the setting items have been input, the settings are displayed.
If the number of characters specified in [Self hostname] is 26 or less, __UUID is automaticallyadded.
------------Confirmation------------Install directory path: /opt/NEC/vDCA/AgentTemplate/Image: NoSelf hostname: redhat56.localdomain__UUIDManager hostname: <Manager Host Name>Manager port: 12520Port for Agent Internal Communication: 25570Tenant ID: <tenant ID>Start service: Yes(Optional) Install DPM Client: Yes(Optional) IP address of the DPM management server:
--------------------------------------------Are these settings correct?(default:y y:yes n:no q:quit program):
Check that the settings are OK, and enter y[Enter].
(default:y y:yes n:no q:quit program):y
13. The configuration setting screen of the components to be installed is displayed again.
Chapter 2. Performing installation by selecting functions
41
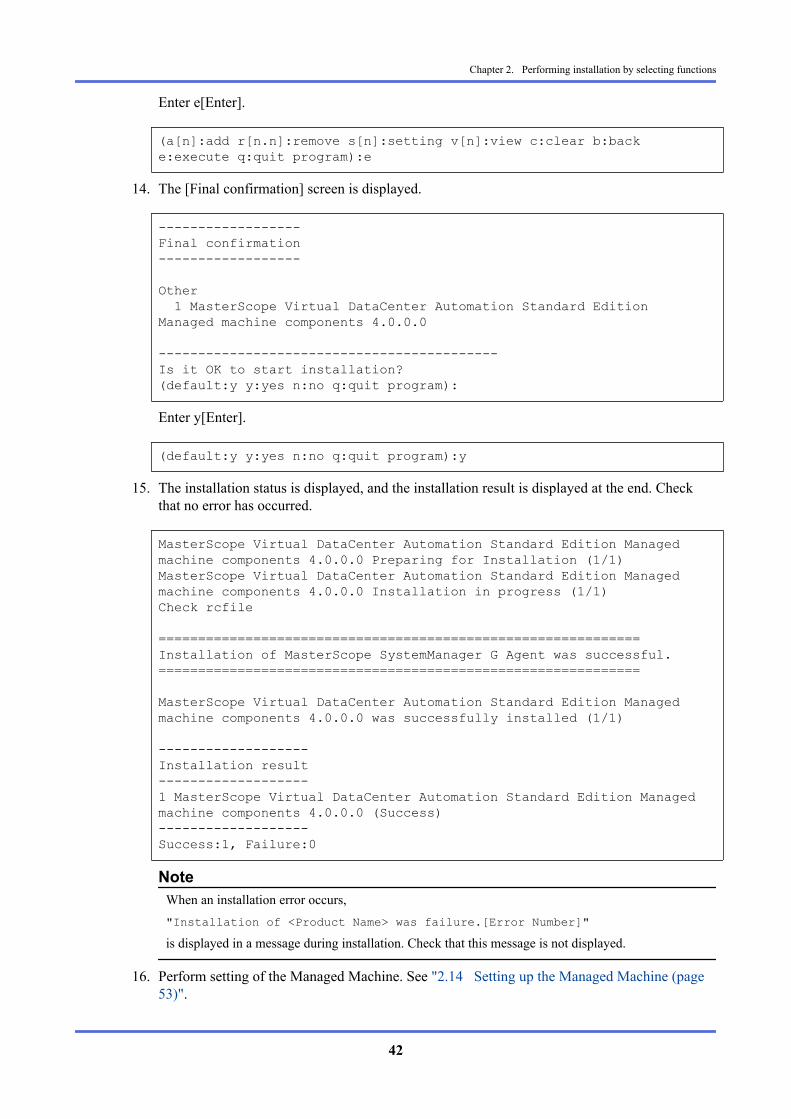
Enter e[Enter].
(a[n]:add r[n.n]:remove s[n]:setting v[n]:view c:clear b:back e:execute q:quit program):e
14. The [Final confirmation] screen is displayed.
------------------Final confirmation------------------
Other 1 MasterScope Virtual DataCenter Automation Standard Edition Managed machine components 4.0.0.0
-------------------------------------------Is it OK to start installation?(default:y y:yes n:no q:quit program):
Enter y[Enter].
(default:y y:yes n:no q:quit program):y
15. The installation status is displayed, and the installation result is displayed at the end. Checkthat no error has occurred.
MasterScope Virtual DataCenter Automation Standard Edition Managed machine components 4.0.0.0 Preparing for Installation (1/1)MasterScope Virtual DataCenter Automation Standard Edition Managed machine components 4.0.0.0 Installation in progress (1/1)Check rcfile
=============================================================Installation of MasterScope SystemManager G Agent was successful.=============================================================
MasterScope Virtual DataCenter Automation Standard Edition Managed machine components 4.0.0.0 was successfully installed (1/1)
-------------------Installation result-------------------1 MasterScope Virtual DataCenter Automation Standard Edition Managed machine components 4.0.0.0 (Success)-------------------Success:1, Failure:0
NoteWhen an installation error occurs,"Installation of <Product Name> was failure.[Error Number]"is displayed in a message during installation. Check that this message is not displayed.
16. Perform setting of the Managed Machine. See "2.14 Setting up the Managed Machine (page53)".
Chapter 2. Performing installation by selecting functions
42

2.11 Registering and Setting up the ManagementServer
This section describes license registration performed after installation of the components of theManagement Server and the settings of the Management Server.
2.11.1 Registering License to SigmaSystemCenter FunctionPurchase the SigmaSystemCenter license in advance and register license.
Further the license for evaluation for which everything's function of SSC can be used is registered bydefault and is effective for 60 days.
1. Start the SystemProvisioning Web Console.
In the [Start] menu, select [SigmaSystemCenter] to start the [SystemProvisioning WebConsole]. The web browser starts and the SigmaSystemCenter login dialog box is displayed.
2. Enter the user name and password, and then click [Login].
You can login with the user name "admin" and password "admin" by default.
3. Click [Management].
4. Click [License].
5. When installing SigmaSystemCenter, a registered license key is eliminated.
6. Enter the license key described above in [License Key].
7. Click [Add].
8. Restart the following service.
• PVMService
2.11.2 Registering License to SystemManager G FunctionPurchase the SystemManager G license in advance and register license.
Further when installing Management Server, Trial Licenses is registered by default and is effectivefor 3 months.
1. Start up the console of the Management Server function.
Execute the shortcut [MasterScope SystemManager G Console__vDCMoMSvc] created on thedesktop or on the Start menu.
2. The [Login] screen is displayed. Enter the following default password to log in as anadministrator.
• [Login name]: Administrator
• [Password]: websam
3. Click [Setting] and then [Configuration Mode] from the pull-down menu to enter theconfiguration mode.
4. Click [Setting] and then [License Management] from the pull-down menu.
5. The [License Management] dialog box is displayed. Click the [Product Code] tab and [Add].
6. The [License Key Registration] screen is displayed. Input "ProductCode" and "LicenseKey".
7. Click [Registration].
Chapter 2. Performing installation by selecting functions
43
8. Record the string displayed in [Request Code], and click [Close].
9. Delete all the trial version licenses registered during installation.
On the [Product Code] tab, specify the licenses with "Trial License Key", and click [Delete].When the confirmation dialog box is displayed, click [Yes].
10. Click [OK].
11. Shut down the console of the Management Server function.
12. Restart the following services.
• WebSAM UMF Operations Manager_102
Registration of the license keys to the operation management function is now complete. Theregistered license keys will expire in one month unless a "codeword" described in the next section isregistered.
2.11.3 Registering Code Word to SystemManager G FunctionAcquire the code word of the license key registered to the SystemManager G function, and thenregister the code word as the procedure below.
1. Start up the console of the Management Server function.
Execute the shortcut [MasterScope SystemManager G Console__vDCMoMSvc] created on thedesktop or on the Start menu.
2. Click [Setting] and then [Configuration Mode] from the pull-down menu to enter theconfiguration mode.
3. Click [Setting] and then [License Management] from the pull-down menu.
4. On the [Product Code] tab, select the license of SystemManager G, and click [Registration].
5. Enter the code word sent to [Codeword].
6. Click [Registration].
2.11.4 Virtual DataCenter Automation Standard Edition Portalsetting
For details of setting, refer to Chapter 5. Setting after the Installation in the MasterScope VirtualDataCenter Automation Standard Edition Portal User Manual (Install).
2.11.5 Portal setting of Resource Management functionIf you want to use the Resource Management function, set the SigmaSystemCenter. For details ofsetting, refer to 4.1 Setting of SigmaSystemCenter in the MasterScope Virtual DataCenterAutomation Standard Edition Portal User Manual (Install).
1. 4.1.1 Connect setting
The setting is automatically registered on Virtual DataCenter Automation Standard EditionInstaller as follows.
• Host Name: localhost
• Port number: 26105
2. 4.1.2 Creating an IIS certificate and configuring the binding settings
3. 4.1.3 Acquiring and configuring the SigmaSystemCenter API key
Chapter 2. Performing installation by selecting functions
44
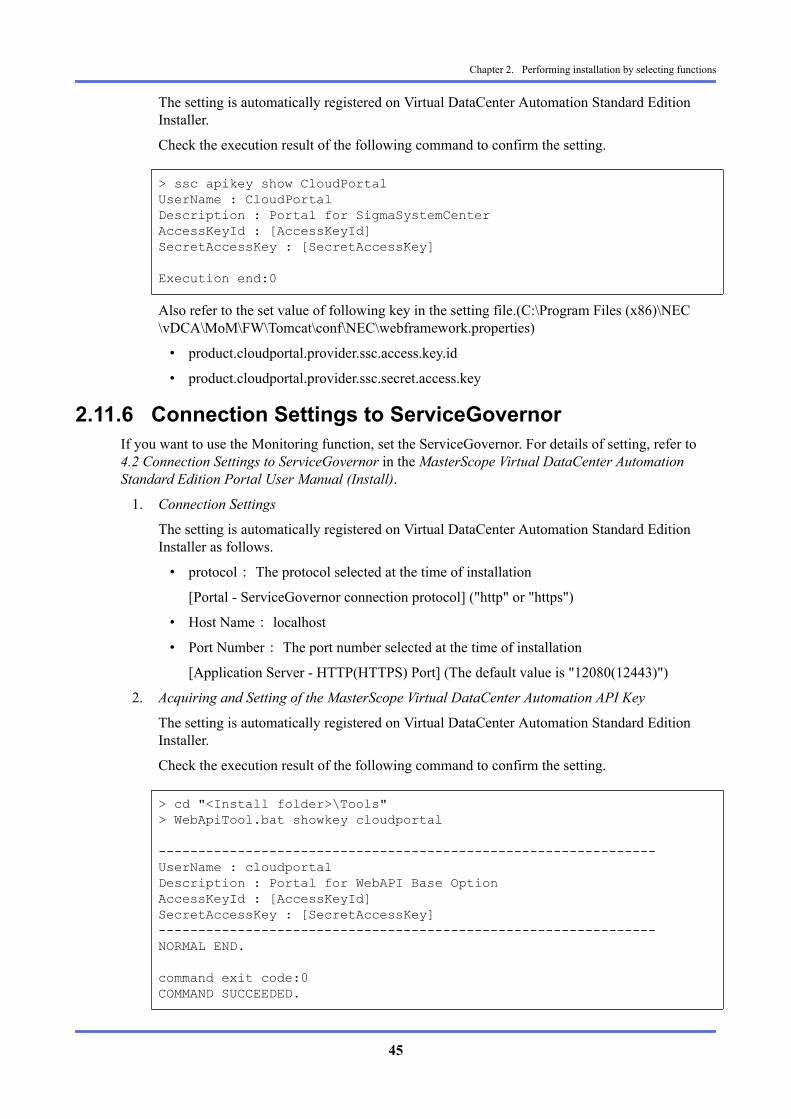
The setting is automatically registered on Virtual DataCenter Automation Standard EditionInstaller.
Check the execution result of the following command to confirm the setting.
> ssc apikey show CloudPortalUserName : CloudPortalDescription : Portal for SigmaSystemCenterAccessKeyId : [AccessKeyId]SecretAccessKey : [SecretAccessKey]
Execution end:0
Also refer to the set value of following key in the setting file.(C:\Program Files (x86)\NEC\vDCA\MoM\FW\Tomcat\conf\NEC\webframework.properties)
• product.cloudportal.provider.ssc.access.key.id
• product.cloudportal.provider.ssc.secret.access.key
2.11.6 Connection Settings to ServiceGovernorIf you want to use the Monitoring function, set the ServiceGovernor. For details of setting, refer to4.2 Connection Settings to ServiceGovernor in the MasterScope Virtual DataCenter AutomationStandard Edition Portal User Manual (Install).
1. Connection Settings
The setting is automatically registered on Virtual DataCenter Automation Standard EditionInstaller as follows.
• protocol: The protocol selected at the time of installation
[Portal - ServiceGovernor connection protocol] ("http" or "https")
• Host Name: localhost
• Port Number: The port number selected at the time of installation
[Application Server - HTTP(HTTPS) Port] (The default value is "12080(12443)")
2. Acquiring and Setting of the MasterScope Virtual DataCenter Automation API Key
The setting is automatically registered on Virtual DataCenter Automation Standard EditionInstaller.
Check the execution result of the following command to confirm the setting.
> cd "<Install folder>\Tools"> WebApiTool.bat showkey cloudportal
---------------------------------------------------------------UserName : cloudportalDescription : Portal for WebAPI Base OptionAccessKeyId : [AccessKeyId]SecretAccessKey : [SecretAccessKey]---------------------------------------------------------------NORMAL END.
command exit code:0COMMAND SUCCEEDED.
Chapter 2. Performing installation by selecting functions
45
Also refer to the set value of following key in the setting file.(C:\Program Files (x86)\NEC\vDCA\MoM\FW\Tomcat\conf\NEC\webframework.properties)
• product.cloudportal.service.monitoring.provider.webapibase.access.key.id
• product.cloudportal.service.monitoring.provider.webapibase.secret.access.key
2.11.7 Connection Settings to SystemManager GIf you want to use the Monitoring function, set the WebAPI Base Option. For details of setting, referto Chapter 3. Setting Up WebAPI Base Option in the MasterScope Virtual DataCenter AutomationService Governor WebAPI Base Option 3.23.0.0 Installation Guide.
1. 3.2 Setting SSL/TLS for a Manager
2. 3.3 Settings for Adding a Manager
2.11.8 Setting SSL/TLS for TomcatWhen doing the following setting at the time of Management Server installation ("2.3.8 Installingthe components of Management Server (page 16)"), SSL setting of Tomcat is needed.
• [Portal - ServiceGovernor connection protocol]: "https"
For details of setting, refer to Chapter 3. Setting Up WebAPI Base Option in the MasterScope VirtualDataCenter Automation Service Governor WebAPI Base Option 3.23.0.0 Installation Guide.
1. 3.5 Setting SSL/TLS for Tomcat
2. 3.5.1 Importing the Certificate
3. 3.5.2 Modifying the Tomcat Settings
4. 3.5.3 Changing env.bat
5. 3.5.4 Restarting the Service
6. 3.6 After the Tomcat Settings Are Monitored
2.11.9 Default Settings of SystemManager G FunctionAs the default setting to perform monitoring of Managed Machines, perform the setting of theperformance monitoring function and disable the message monitoring function. The setting isperformed on the console of the Management Server.
1. Start up the console of the Management server function.
Execute the shortcut [MasterScope SystemManager G Console__vDCMoMSvc] created on thedesktop or on the Start menu.
2. The [Login] screen is displayed. Enter the following default password to log in as anadministrator.
• [Login name]: Administrator
• [Password]: websam
3. Click [Setting] and then [Configuration Mode] from the pull-down menu to enter theconfiguration mode.
4. Click [Setting] and then [Option] from the pull-down menu.
5. Select the [Performance Monitor] tab.
6. Specify 300 Sec. as the [Monitoring Interval] value.
Chapter 2. Performing installation by selecting functions
46
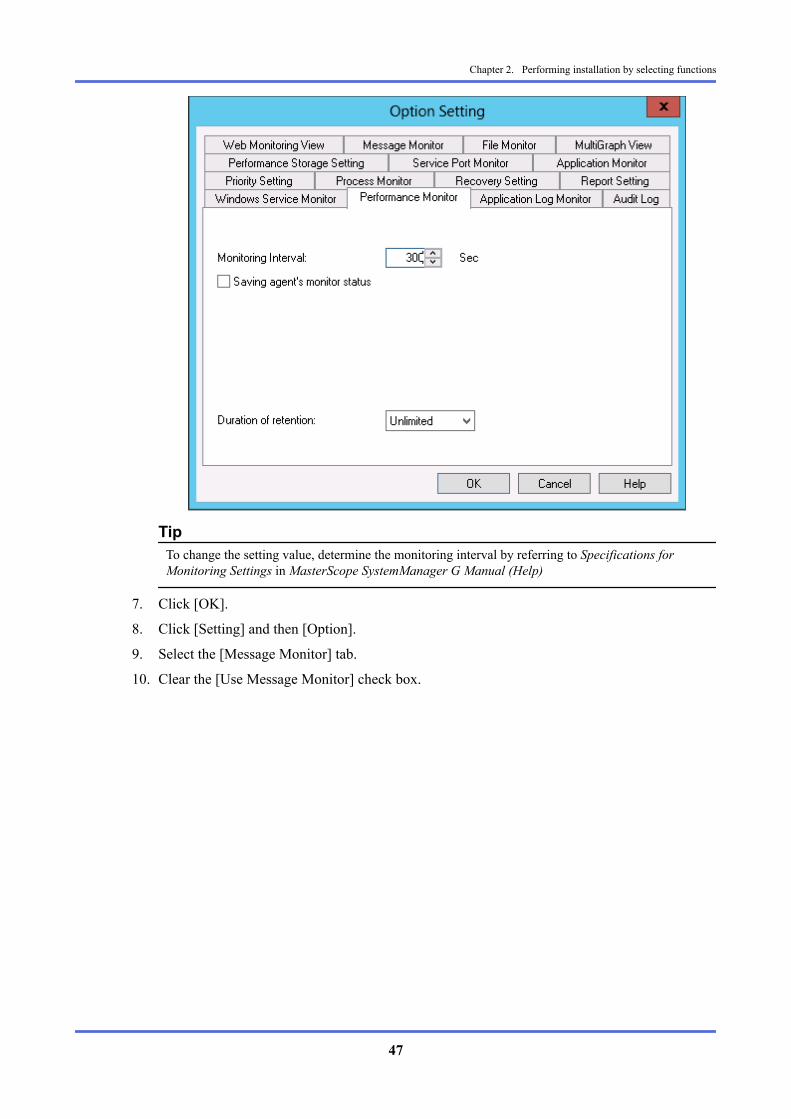
TipTo change the setting value, determine the monitoring interval by referring to Specifications forMonitoring Settings in MasterScope SystemManager G Manual (Help)
7. Click [OK].
8. Click [Setting] and then [Option].
9. Select the [Message Monitor] tab.
10. Clear the [Use Message Monitor] check box.
Chapter 2. Performing installation by selecting functions
47
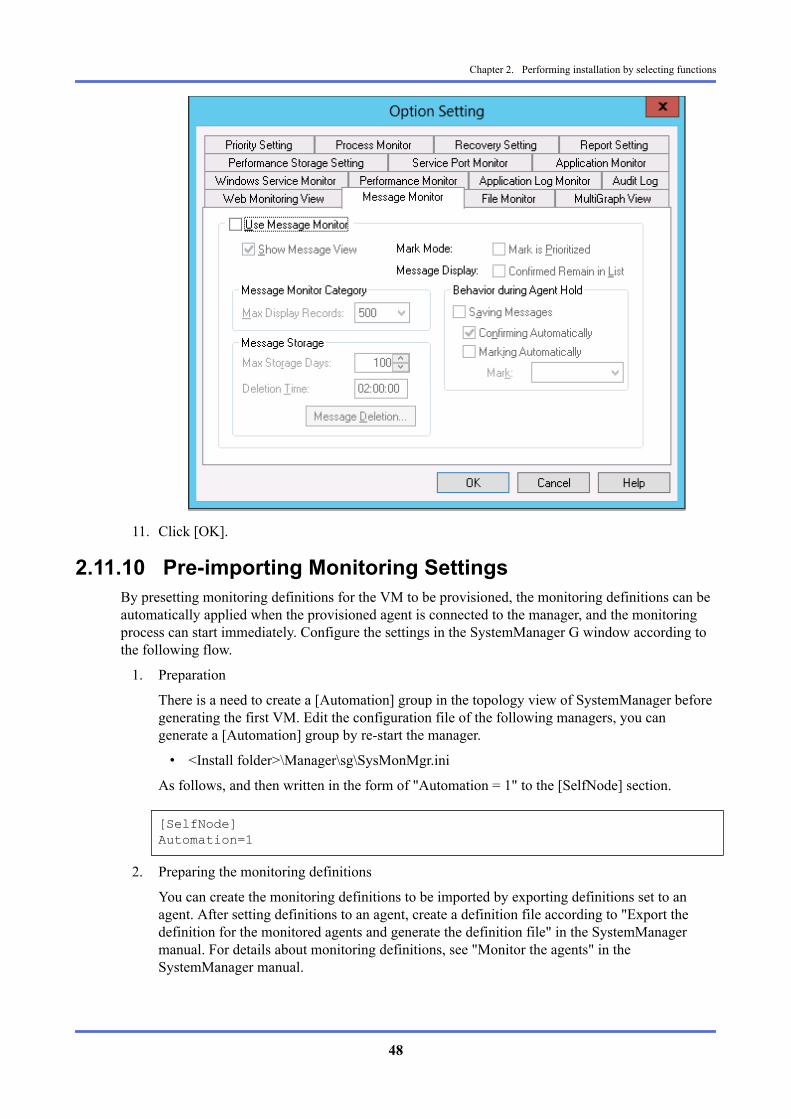
11. Click [OK].
2.11.10 Pre-importing Monitoring SettingsBy presetting monitoring definitions for the VM to be provisioned, the monitoring definitions can beautomatically applied when the provisioned agent is connected to the manager, and the monitoringprocess can start immediately. Configure the settings in the SystemManager G window according tothe following flow.
1. Preparation
There is a need to create a [Automation] group in the topology view of SystemManager beforegenerating the first VM. Edit the configuration file of the following managers, you cangenerate a [Automation] group by re-start the manager.
• <Install folder>\Manager\sg\SysMonMgr.ini
As follows, and then written in the form of "Automation = 1" to the [SelfNode] section.
[SelfNode]Automation=1
2. Preparing the monitoring definitions
You can create the monitoring definitions to be imported by exporting definitions set to anagent. After setting definitions to an agent, create a definition file according to "Export thedefinition for the monitored agents and generate the definition file" in the SystemManagermanual. For details about monitoring definitions, see "Monitor the agents" in theSystemManager manual.
Chapter 2. Performing installation by selecting functions
48
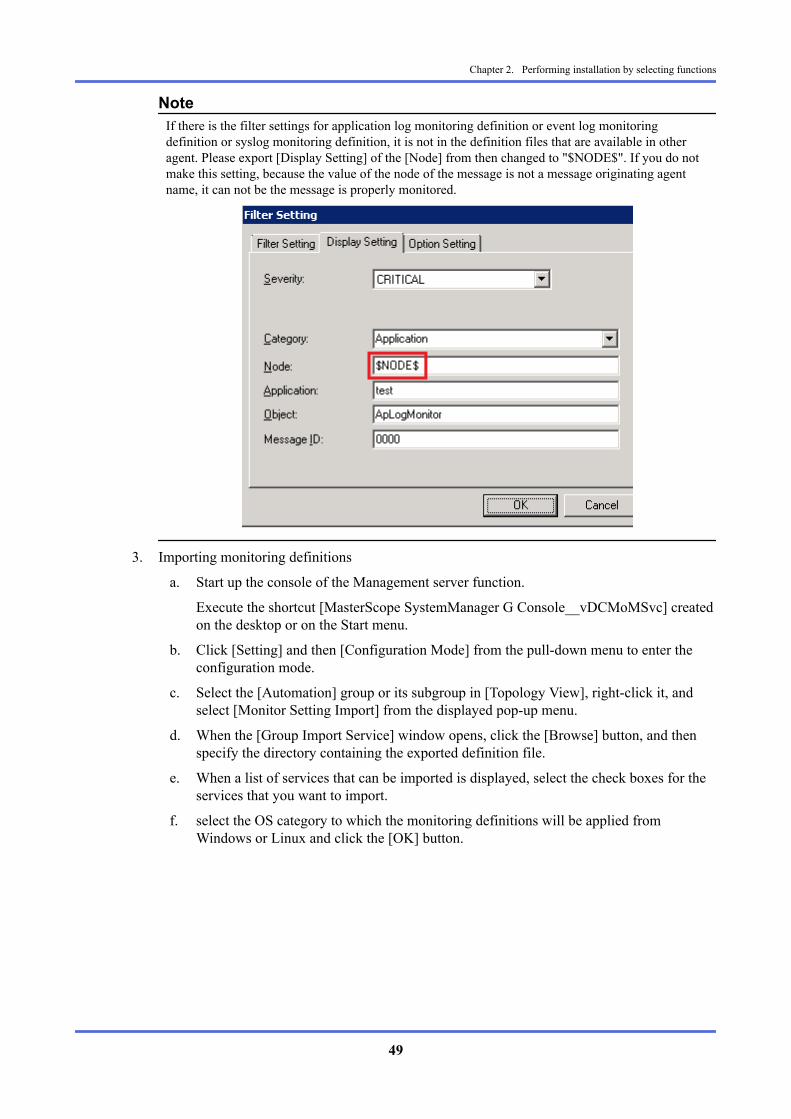
NoteIf there is the filter settings for application log monitoring definition or event log monitoringdefinition or syslog monitoring definition, it is not in the definition files that are available in otheragent. Please export [Display Setting] of the [Node] from then changed to "$NODE$". If you do notmake this setting, because the value of the node of the message is not a message originating agentname, it can not be the message is properly monitored.
3. Importing monitoring definitions
a. Start up the console of the Management server function.
Execute the shortcut [MasterScope SystemManager G Console__vDCMoMSvc] createdon the desktop or on the Start menu.
b. Click [Setting] and then [Configuration Mode] from the pull-down menu to enter theconfiguration mode.
c. Select the [Automation] group or its subgroup in [Topology View], right-click it, andselect [Monitor Setting Import] from the displayed pop-up menu.
d. When the [Group Import Service] window opens, click the [Browse] button, and thenspecify the directory containing the exported definition file.
e. When a list of services that can be imported is displayed, select the check boxes for theservices that you want to import.
f. select the OS category to which the monitoring definitions will be applied fromWindows or Linux and click the [OK] button.
Chapter 2. Performing installation by selecting functions
49
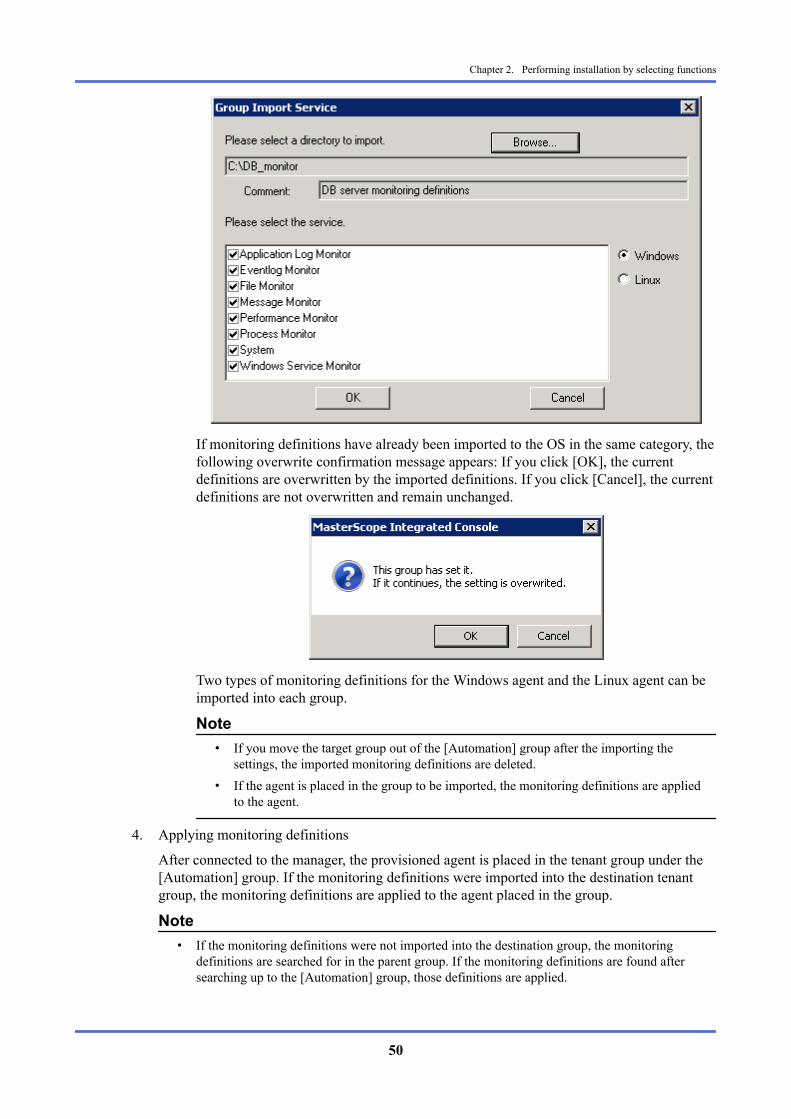
If monitoring definitions have already been imported to the OS in the same category, thefollowing overwrite confirmation message appears: If you click [OK], the currentdefinitions are overwritten by the imported definitions. If you click [Cancel], the currentdefinitions are not overwritten and remain unchanged.
Two types of monitoring definitions for the Windows agent and the Linux agent can beimported into each group.
Note• If you move the target group out of the [Automation] group after the importing the
settings, the imported monitoring definitions are deleted.• If the agent is placed in the group to be imported, the monitoring definitions are applied
to the agent.
4. Applying monitoring definitions
After connected to the manager, the provisioned agent is placed in the tenant group under the[Automation] group. If the monitoring definitions were imported into the destination tenantgroup, the monitoring definitions are applied to the agent placed in the group.
Note• If the monitoring definitions were not imported into the destination group, the monitoring
definitions are searched for in the parent group. If the monitoring definitions are found aftersearching up to the [Automation] group, those definitions are applied.
Chapter 2. Performing installation by selecting functions
50
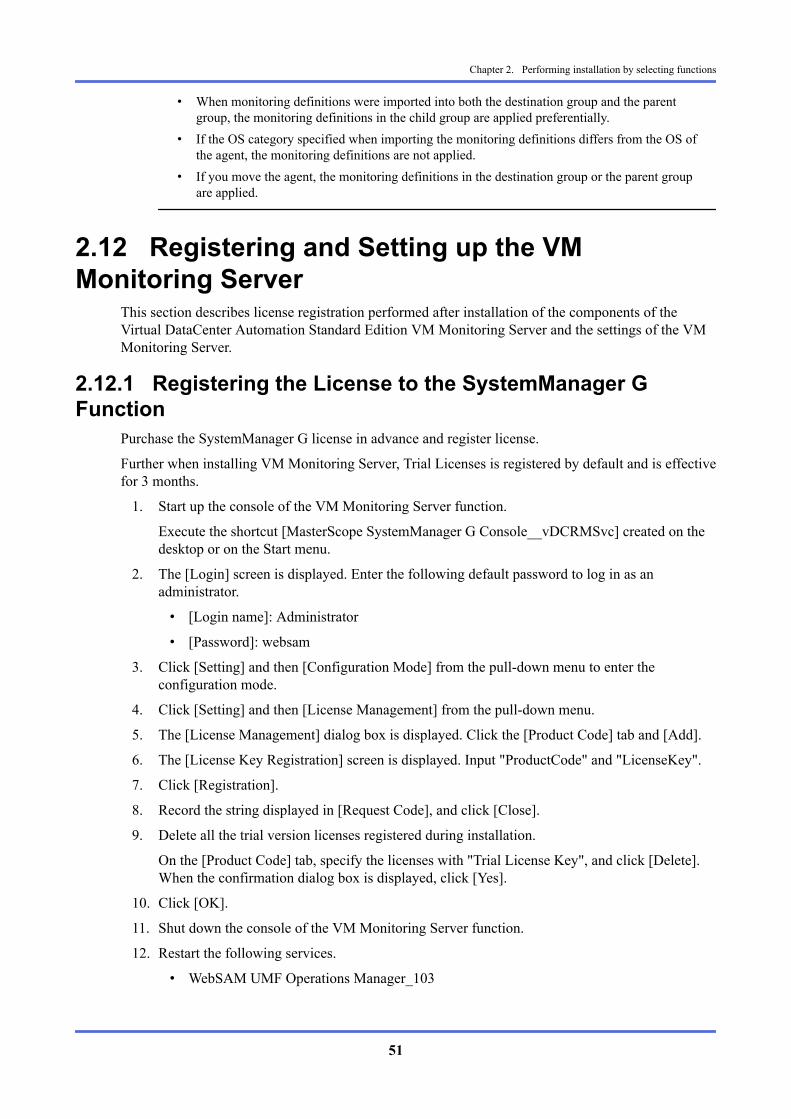
• When monitoring definitions were imported into both the destination group and the parentgroup, the monitoring definitions in the child group are applied preferentially.
• If the OS category specified when importing the monitoring definitions differs from the OS ofthe agent, the monitoring definitions are not applied.
• If you move the agent, the monitoring definitions in the destination group or the parent groupare applied.
2.12 Registering and Setting up the VMMonitoring Server
This section describes license registration performed after installation of the components of theVirtual DataCenter Automation Standard Edition VM Monitoring Server and the settings of the VMMonitoring Server.
2.12.1 Registering the License to the SystemManager GFunction
Purchase the SystemManager G license in advance and register license.
Further when installing VM Monitoring Server, Trial Licenses is registered by default and is effectivefor 3 months.
1. Start up the console of the VM Monitoring Server function.
Execute the shortcut [MasterScope SystemManager G Console__vDCRMSvc] created on thedesktop or on the Start menu.
2. The [Login] screen is displayed. Enter the following default password to log in as anadministrator.
• [Login name]: Administrator
• [Password]: websam
3. Click [Setting] and then [Configuration Mode] from the pull-down menu to enter theconfiguration mode.
4. Click [Setting] and then [License Management] from the pull-down menu.
5. The [License Management] dialog box is displayed. Click the [Product Code] tab and [Add].
6. The [License Key Registration] screen is displayed. Input "ProductCode" and "LicenseKey".
7. Click [Registration].
8. Record the string displayed in [Request Code], and click [Close].
9. Delete all the trial version licenses registered during installation.
On the [Product Code] tab, specify the licenses with "Trial License Key", and click [Delete].When the confirmation dialog box is displayed, click [Yes].
10. Click [OK].
11. Shut down the console of the VM Monitoring Server function.
12. Restart the following services.
• WebSAM UMF Operations Manager_103
Chapter 2. Performing installation by selecting functions
51
Registration of the license keys to the operation management function is now complete. Theregistered license keys will expire in one month unless a "codeword" described in the next section isregistered.
2.12.2 Registering Code Word to SystemManager G FunctionAcquire the code word of the license key registered to the SystemManager G function, and thenregister the code word as the procedure below.
1. Start up the console of the VM Monitoring Server function.
Execute the shortcut [MasterScope SystemManager G Console__vDCRMSvc] created on thedesktop or on the Start menu.
2. Click [Setting] and then [Configuration Mode] from the pull-down menu to enter theconfiguration mode.
3. Click [Setting] and then [License Management] from the pull-down menu.
4. On the [Product Code] tab, select the license of SystemManager G, and click [Registration].
5. Enter the code word sent to [Codeword].
6. Click [Registration].
2.12.3 Default Settings of SystemManager G FunctionAs the default setting to perform monitoring of Managed Machines, perform the setting of theperformance monitoring function and disable the message monitoring function. The setting isperformed on the console of the VM Monitoring Server.
For the procedure, see "2.11.9 Default Settings of SystemManager G Function (page 46)".
2.12.4 Pre-importing Monitoring SettingsBy presetting monitoring definitions for the VM to be provisioned, the monitoring definitions can beautomatically applied when the provisioned agent is connected to the manager, and the monitoringprocess can start immediately. Configure the settings in the SystemManager G window according tothe following flow.
For the procedure, see "2.11.10 Pre-importing Monitoring Settings (page 48)".
2.13 Registering and Setting up the StackManagement Server
This section describes license registration performed after installation of the components of the StackManagement Server.
The procedure described in this section is required only for the configuration that uses the VirtualDataCenter Automation Standard Edition Topology Template Orchestrator Option.
2.13.1 Registering the License of Virtual DataCenterAutomation Standard Edition Topology Template RegisteringLicense to Orchestrator Option Function
For Virtual DataCenter Automation Standard Edition, it is necessary to purchase the license of theVirtual DataCenter Automation Standard Edition Topology Template Orchestrator Option.
Chapter 2. Performing installation by selecting functions
52
For details about the license registration, refer to Chapter 11 vDCA SE Topology TemplateOrchestrator Option operation settings of Virtual DataCenter Automation Standard Edition PortalUser Manual (Resource Management) Topology Template Orchestrator Option and enable the vDCASE Topology Template Orchestrator Option.
2.13.2 Settings for connecting to SigmaSystemCenterSet the SigmaSystemCenter. For details of setting, refer to 3.2.1 Settings for connecting toSigmaSystemCenter in the Virtual DataCenter Automation Standard Edition Topology TemplateOrchestrator Option User’s Guide.
2.13.3 Settings for connecting to SystemManager GIf you want to use the Monitoring function, set the SystemManager G. For details of setting, refer to3.3.1 Settings for connecting to MasterScope SystemManager in the Virtual DataCenter AutomationStandard Edition Topology Template Orchestrator Option User’s Guide.
2.13.4 TLS, SSL setting of OpenStackWhen connecting the Management Server and the Stack Management Server by SSL / TLS, SSLsetting of OpenStack is needed. Set by referring to 2.3 Setting for SSL communication of VirtualDataCenter Automation Standard Edition Topology Template Orchestrator Option User’s Guide.
2.14 Setting up the Managed MachineThis section describes the settings of the Managed Machine performed after installation of thecomponents of the Virtual DataCenter Automation Standard Edition Managed Machine.
2.14.1 Creating the VM Template of the Managed MachineAfter the components are installed on the Managed Machine, create VM templates of the Windowsmaster VM and Linux master VM as required.
Configure the following settings to change the automatic startup setting of the SystemManager Gagent before creating the VM template.
• Windows
1. Log into the master VM system with the Administrator account.
2. Stop the services of the installed SystemManager agent.
Stop the following services:
- MasterScope UMF Operations Agent_identifier_104
3. If [Startup type] of the SytemManager G agent service is [Automatic], change it to[Manual].
• Linux
1. Log into the master VM system with the root account.
2. Stop the services of the installed SystemManager G agent.
Stop the following services:
- /etc/init.d/UMFOperationsAgent_104
3. Delete the automatic startup setting of the SystemManager G agent.
Chapter 2. Performing installation by selecting functions
53

# chkconfig --del UMFOperationsAgent_104
For details about how to create a VM template, see SigmaSystemCenter Configuration Guide.
Chapter 2. Performing installation by selecting functions
54
Chapter 3. Basic setting after installationThis chapter describes the basic setting procedures for using Resource Management and Monitoringfunction of Virtual DataCenter Automation Standard Edition.
Contents3.1 Resource Management Function ................................................................................................56
3.2 Monitoring Function ..................................................................................................................67
Chapter 3. Basic setting after installation
55
3.1 Resource Management Function3.1.1 Registering Related Products to the SigmaSystemCenter
To link the Virtual DataCenter Automation and related products, register the related products in theSigmaSystemCenter. The related products to be registered are as follows:
• Virtualization infrastructure (VMware vCenter Server, Hyper-V cluster, KVM)
• Storage device (iStorage, VNX, NetApp)
Also, register the Virtual DataCenter Automation Standard Edition component in theSigmaSystemCenter. The component to be registered is as follows:
• DeploymentManager
Register the related products to use in the SigmaSystemCenter by following the steps in this section.
TipFor information about registering related products, refer to 4.2. Adding a Subsystem in theSigmaSystemCenter Configuration Guide.
3.1.1.1 Registering the Virtualization Infrastructure to theSigmaSystemCenter
Register the virtualization infrastructure product in the SigmaSystemCenter.
• Registering the VMware vCenter Server
1. From the [Management] tree of the [Management] view, click [Subsystem]. From the[Configuration] menu, click [Add Subsystem].
2. From the [Subsystem Type] pull-down box, select [VMware vCenter Server].
3. Enter [Host Name], [User], and [Password]. Other text boxes can be left blank.
NoteThe default port number is (443) if it is omitted.
TipFor details of how to register, refer to 4.2.1. Adding the VMware vCenter Server to the Subsystem inthe SigmaSystemCenter Configuration Guide.
• Registering the Hyper-V cluster
1. From the [Management] tree of the [Management] view, click [Subsystem]. From the[Configuration] menu, click [Add Subsystem].
2. From the [Subsystem Type] pull-down box, select [Hyper-V Cluster].
3. Enter [Host Name], [Domain\User], and [Password].
NoteIn [Domain\User], enter the domain name and account name to connect to the Hyper-V clusterseparated by a backslash.
Chapter 3. Basic setting after installation
56
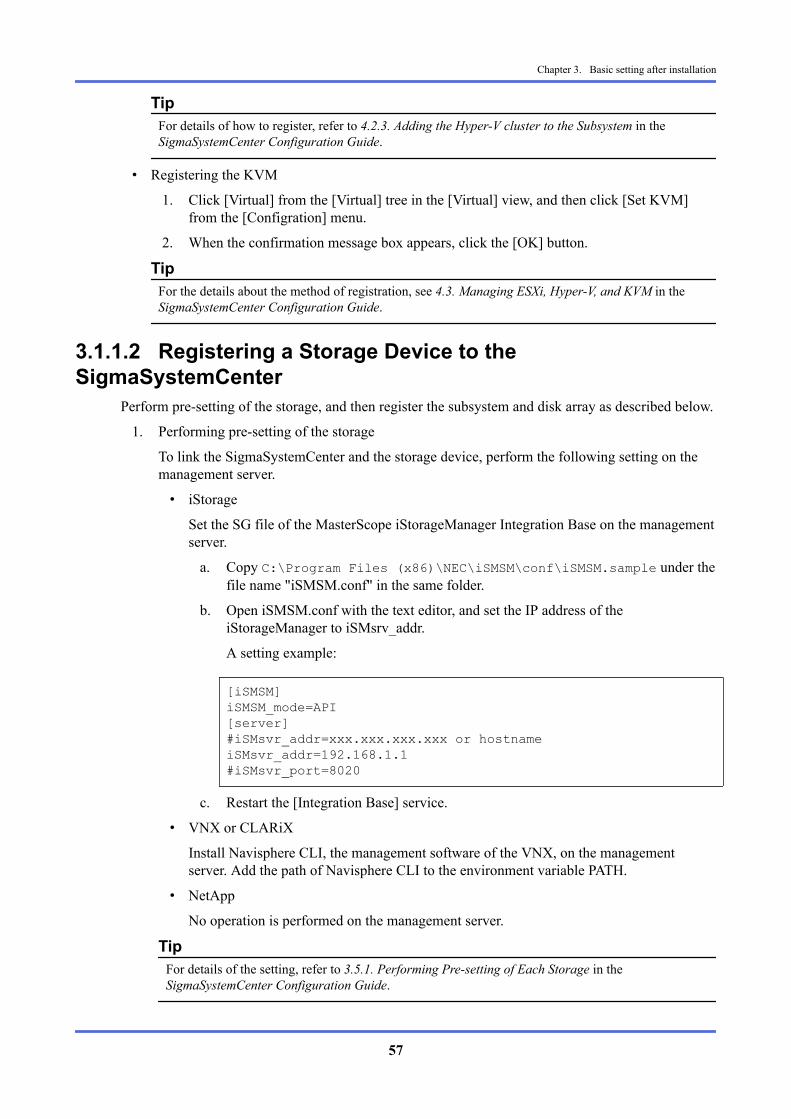
TipFor details of how to register, refer to 4.2.3. Adding the Hyper-V cluster to the Subsystem in theSigmaSystemCenter Configuration Guide.
• Registering the KVM
1. Click [Virtual] from the [Virtual] tree in the [Virtual] view, and then click [Set KVM]from the [Configration] menu.
2. When the confirmation message box appears, click the [OK] button.
TipFor the details about the method of registration, see 4.3. Managing ESXi, Hyper-V, and KVM in theSigmaSystemCenter Configuration Guide.
3.1.1.2 Registering a Storage Device to theSigmaSystemCenter
Perform pre-setting of the storage, and then register the subsystem and disk array as described below.
1. Performing pre-setting of the storage
To link the SigmaSystemCenter and the storage device, perform the following setting on themanagement server.
• iStorage
Set the SG file of the MasterScope iStorageManager Integration Base on the managementserver.
a. Copy C:\Program Files (x86)\NEC\iSMSM\conf\iSMSM.sample under thefile name "iSMSM.conf" in the same folder.
b. Open iSMSM.conf with the text editor, and set the IP address of theiStorageManager to iSMsrv_addr.
A setting example:
[iSMSM]iSMSM_mode=API[server]#iSMsvr_addr=xxx.xxx.xxx.xxx or hostnameiSMsvr_addr=192.168.1.1#iSMsvr_port=8020
c. Restart the [Integration Base] service.
• VNX or CLARiX
Install Navisphere CLI, the management software of the VNX, on the managementserver. Add the path of Navisphere CLI to the environment variable PATH.
• NetApp
No operation is performed on the management server.
TipFor details of the setting, refer to 3.5.1. Performing Pre-setting of Each Storage in theSigmaSystemCenter Configuration Guide.
Chapter 3. Basic setting after installation
57

2. Registering the storage to the subsystem
Register the storage management server to the SigmaSystemCenter as a subsystem asdescribed below.
a. From the [Management] tree of the [Management] view, click [Subsystem]. From the[Configuration] menu, click [Add Subsystem].
b. Select [NEC Storage], [EMC CLARiiON], or [NetApp Manager] according to thestorage type.
TipFor details of how to register, refer to 4.2.8 Adding the Storage Management Server to the Subsystemin the SigmaSystemCenter Configuration Guide.
3. Registering a disk array
Register a disk array to the SigmaSystemCenter as described below.
a. From the [System Resource] tree of the [Resource] view, click [Storage]. From the[Configuration] menu, click [Register/Delete Disk Array].
b. For the NEC Storage, select the disk array to register from [Unmanaged Disk ArrayList], and click [OK].
c. For the VNX and NetApp, click [Add and Register] in [Unmanaged Disk Array List].
TipFor details of how to register, refer to 4.7. Registering a Storage in the SigmaSystemCenterConfiguration Guide.
3.1.1.3 Registering a Virtual DataCenter AutomationComponent to the SigmaSystemCenter
Register the DeploymentManager, component of the Virtual DataCenter Automation, to theSigmaSystemCenter as a subsystem.
1. From the [Management] tree of the [Management] view, click [Subsystem]. From the[Configuration] menu, click [Add Subsystem].
2. From the [Subsystem Type] pull-down box, select [DPM Server].
3. Enter [Host Name] and [Password]. Other text boxes can be left blank.
NoteIn [Password], enter the password set for the user "deployment_user" registered in the DPM server.The default password is (dpmmgr).
TipFor information on how to register, refer to 4.2.5 Adding the DPM Server to the Subsystem in theSigmaSystemCenter Configuration Guide.
3.1.2 Performing Various Settings of the SigmaSystemCenterPerform various settings of the Virtual DataCenter Automation Standard Edition.
From the [Management] tree of the [Management] view, click [Environment]. Open the [VirtualResource] tab in the [Environment Setting] window to perform the following setting.
Chapter 3. Basic setting after installation
58
• Setting the capacity value and cost value
By default, the capacity value of the VM server is 200 and the cost value of a virtual machine is10, so the number of virtual machines available on each VM server is restricted to 20. If thisrestriction on the number of units could be an issue in capacity management with the resourcepool, set a sufficiently large capacity value for the cost value to virtually disable the restriction.
TipFor details of how to specify the capacity value and cost value, refer to 4.7.1 Capacity Control of theVirtual Machine Server in the SigmaSystemCenter Reference Guide.
• Setting the root password of the VMware ESXi
Set the root password of the ESXi. The password specified here is used as the default for allESXis.
NoteTo set an account and password for each VM server, perform setting from the subsystem edit windowfor each VM server.
TipFor the details of environmental setting, see 4. Configuring the Environment in the SigmaSystemCenterConfiguration Guide..
3.1.3 Performing Hardware Settings of the VM ServerA VM server is established about hardware.
"3.1.3.1 Registering VM Server on SigmaSystemCenter (page 59)", for, indispensable setting.
The case you'd like to make a VM server manage in OOB Management when do"3.1.3.2 Performing Setting to Manage the VM Server with the OOB Management (page 60)" .
3.1.3.1 Registering VM Server on SigmaSystemCenterThe setting to register a VM server as a management target of SigmaSystemCenter is performed.When registering a VM server, a resource group is designated. Please register along the followingprocedure.
1. [Machine] is clicked from a [System Resource] tree of a [Resource] view and [Add Group]from the [Configuration] menu is clicked.
2. The resource group name is input on the [Add Group] screen, and [OK] is clicked.
3. The group made from a [System Resource] tree is clicked and [Register Machine] is clickedfrom the [Configuration] menu.
4. [OK] is clicked including a check in the VM server a [Register Machine] screen registers from[Unmanaged Machine List].
TipFor details of how to make a category, refer to 4.8.3 Registering a Machine in the SigmaSystemCenterConfiguration Guide.
Chapter 3. Basic setting after installation
59
3.1.3.2 Performing Setting to Manage the VM Server with theOOB Management
Perform setting to manage the VM server with the OOB Management of the SigmaSystemCenter.
perform setting to manage the registered VM server with OOB Management. For the OOBManagement setting procedure, refer to 3.10. Performing Pre-setting for Using Out-of-Band (OOB)Management in the SigmaSystemCenter Configuration Guide.
The points for setting OOB Management are as follows:
• Required setting for OOB Management
To use the OOB Management, BMC must be set to a connectable state. Perform BMC setting byreferring to the following sections in the SigmaSystemCenter Configuration Guide.
- 3.10.1 Setting an IP Address of BMC
- 3.10.2 Creating a User with Administrator Rights in BMC
• Setting to use other functions
Perform setting of the functions corresponding to the following sections in theSigmaSystemCenter Configuration Guide as required:
- 3.10.3 Setting a PET Report Destination and Report Level in BMC
- 3.10.4 Enabling a Dump
- 3.10.5 Enabling ACPI Shutdown
- 3.10.6 Setting SOL (Serial Over Lan)
3.1.3.3 Setting the Machine Properties of the VM ServerFrom the [Resource] view of the SigmaSystemCenter, set the machine properties of the VM server(This setting is option).
The icon of the VM Server for property setting is clicked from a [System Resource] tree of a[Resource] view. [Property] is clicked from a [Configuration], then please set for each tab from a[Machine Property Setting] view.
TipFor details, refer to 4.10 Setting Machine Properties in the SigmaSystemCenter Configuration Guide.
The points for setting machine properties are as follows:
• [Network] tab
- Assign an NIC number to the MAC address corresponding to the NIC used in the VMserver. No number needs to be set for an unused NIC.
- The numbering of NIC must be uniform for each of the roles of NIC within the resourcepool. For example, when the NICs installed in the VM server have the following roles,assign numbers similarly for all the VM servers in the resource pool:
Role of NIC NIC number
NIC connected to the operations management LAN 1
NIC connected to the provider administration VLAN, tenant administrationVLAN, production VLAN
2
NIC used for Live Migration 3
Chapter 3. Basic setting after installation
60

Role of NIC NIC number
NIC used for NAS connection 4
- No setting is required for the switch and port of the connection destination of NIC.
• [Storage] tab
- Add an HBA connected to storage devices for creating a datastore , and set an HBAnumber. No number needs to be added for an HBA connected to a storage device without adatastore .
- The numbering of HBA must be uniform for each of the roles of HBA within the resourcepool. For example, when the HBAs installed in the VM server have the following roles,assign numbers similarly for all the VM servers in the resource pool:
Role of HBA HBA number
HBA connected to iStorage 1
HBA connected to VNX or CLARiX 2
• [Account] tab
Set the IP address and account information of the BMC installed on the VM server to managethe VM server with the OOB Management.
3.1.4 Creating a Resource PoolCreate an operation group of the VM server with the SigmaSystemCenter, and then define theoperation group of the VM server as a resource pool.
3.1.4.1 Creating a Category of the VM ServerTo manage operation groups of the VM server in a hierarchical structure on the [Operation] view ofthe SigmaSystemCenter, create a category to store the operation groups of the VM server.
The icon of the Category to be added or a [Operations] is clicked from a [Operations] tree of a[Operations] view. [Add Category] is clicked from a [Configuration] menu, please enter [Name] and[OK] is clicked.
The points for creating a category of the VM server are as follows:
• Settings of the resource pool, DPM server, and optimized startup are not required.
TipFor details of how to make a category, refer to 5.2. Adding a Category in the SigmaSystemCenterConfiguration Guide.
3.1.4.2 Creating an Operation Group of the VM ServerTo define the VM server as a resource pool, create an operation group of the VM server with theSigmaSystemCenter.
The points for creating an operation group of the VM server are as follows:
• Create operation groups of the VM server in the following management units:
- For VMware: DataCenter or cluster
- For Hyper-V: Hyper-V cluster
- For KVM: DataCenter or cluster
Chapter 3. Basic setting after installation
61
• OS type of the operation groups of the VM server as follows:
- For VMware: Linux
- For Hyper-V: Windows Server
- For KVM: Linux
TipFor details of how to create an operation group, refer to 5.3. Adding an Operation Group in theSigmaSystemCenter Configuration Guide.
3.1.4.3 Setting an Operation Group of the VM ServerAdd the host of the VM server to the operation group of the VM server with the SigmaSystemCenter.
Also, perform optimized placement setting, setting to exclude datastores from VM creationdestination candidates, and setting of live monitoring and performance monitoring.
Set an operation group via the following steps:
1. Click the operation group of the VM server.
2. In the [Host] tab, add hosts for the number of VM servers.
a. Click [Add].
b. Enter the host name of the VM server in [Host Name].
NoteAn after step is option setting. It is not a required setting.
3. In the [Host] tab, set the IP address information for each of the VM servers.
a. Refer to the [Host List] group box, and click [Property] of the host.
b. Select the [Network] tab.
c. Click [Add] to add the NIC to be connected to the operations management LAN.
i. In [NIC Number], select the NIC number of the NIC connected to the operationsmanagement LAN.
ii. Click [Add] and enter the management IP address of the VM server.
iii. In [Management IP Address], select the management IP address of the VM server.
d. To use NAS, click [Add] to add the NIC to be connected to the LAN for NAS.
i. In [NIC Number], select the NIC number of the NIC connected to the LAN forNAS.
ii. Click [Add] and enter the IP address of the NIC used for NAS connection.
TipFor NIC numbers, refer to "3.1.3.3 Setting the Machine Properties of the VM Server (page60)".
4. When using the function of the VM Optimized Placement, Optimized Placement isestablished.
a. Click [Property] on the [Setting] menu.
b. Set [High Load Bound], [Target Region] and [Low Load Bound] on the [VM OptimizedPlacement] tab.
Chapter 3. Basic setting after installation
62
c. Set a monitoring profile to watch the state of the CPU on the[Performance Monitor] tab.
d. Click [Apply].
TipRefer to after steps for [Performance Monitor] tab setttings.
5. In the [Alive Monitor] tab, set whether the VM server is registered to the ESMPRO/ServerManager.
• If the ESMPRO/ServerAgent is installed in the VM server, select [Register a machine inthe group to NEC ESMPRO Manager].
• If the ESMPRO/ServerAgent is not installed in the VM server, clear [Register a machinein the group to NEC ESMPRO Manager].
TipNormally, the ESMPRO/ServerAgent is installed in the ESX and Hyper-V. The ESMPRO/ServerAgent is not installed in the ESXi.
6. To use VM optimized placement or perform performance monitoring of the VM server, set the[Performance Monitor] tab.
a. Select [Performance Data Collection Settings] check box.
b. In [Profile Name], select [Standard Monitoring Profile (x min)] or [Physical MachineMonitoring Profile (x min)]. (Refer to the following related information.)
TipFor details of the monitoring profile of performance data, refer to Appendix A Monitoringprofile in the SigmaSystemCenter Configuration Guide.
c. Set the IP address and port number for System Monitor - Performance MonitoringServices.
d. Set the account of the VM server used to obtain performance data.
TipFor details of the operation group setting, refer to 5.5. Setting Group Properties in the SigmaSystemCenterConfiguration Guide.
3.1.4.4 Defining a Resource PoolDefine a resource pool for the operation group of the VM server.
To add a resource pool, click [Create] of [Resource Pool] from the [Configuration] menu of theoperation group of the VM server.
The points for defining a resource pool are as follows:
• Set the resource pool type to [Shared] so that the resource pool is not directly allocated to thecategory. Instead of allocating the resource pool directly, a sub-pool is extracted and allocated.
• For the vCPU unit, setting in [Frequency] is recommended. By specifying the virtual CPU unitin frequency, a virtual CPU of the specific specifications can be issued to the tenant independentof the specifications of the physical CPU of the VM server.
Chapter 3. Basic setting after installation
63
TipFor detail of the defining a resource pool, refer to 5.11.1 Adding a Resource Pool in the SigmaSystemCenterConfiguration Guide.
3.1.4.5 Allocating a Sub-poolDefine a Sub-pool for the operation group of the VM server.
The points to be noted when creating a Sub-pool are described below.
• Click the operation group of the VM server under the [Operations] tree in the [Operations] view,open the [Resource Pool] tab and click Create [Sub-pool].
• Specify the assignment destination category in [To assign to a group].
• Select the "Allow Overcommit Resources" check box to enable overcommitting. This allowsyou to extract the necessary size of CPU, memory, and storage resources as a sub-poolregardless of the remaining amount of physical resources in the resource pool.
TipFor detail of the allocating a Sub-pool, refer to 5.11.2 Dividing a Resource Pool into a Sub-Pool in theSigmaSystemCenter Configuration Guide.
3.1.5 Registering a VM Server ResourceAdd a CPU resource and memory resource to the resource pool by adding each VM server to theoperation group of the VM server of the SigmaSystemCenter.
The method to add a VM server to the operation group is as follows:
1. Refer to the [General] tab of the operation group of the VM server.
2. Perform the following for each VM server to be added to the operation group:
a. In [Host List], select one host that executes the allocation of the VM server.
b. Click [Register Master].
c. Select [Select a machine from shared pool].
d. Select the VM server to allocate to the host.
e. The confirmation screen is displayed. Click [Finish].
3. Perform setting so that disks in which no virtual disk should be allocated (such as the systemdisk) will not be used.
a. From the [Configuration] menu of the operation group of the VM server, click[Property].
b. Click [Datastore Setting] tab.
c. Refer to the [Datastore List] group box, and click [Edit] for each datastore with [VMDestination] selected but not used for the creation destination of the VM.
d. Clear the [As candidate destination of vm] check box.
TipFor details, refer to 7.2.1. Registering a Master Machine in the SigmaSystemCenter Configuration Guide.
Chapter 3. Basic setting after installation
64
3.1.6 Registering a Logical NetworkIn SigmaSystemCenter, the logical network that need to be registered to handle virtual network, youneed to be registered in advance.
For details of how to register logical network, refer to 4.5. Adding a Logical Network in theSigmaSystemCenter Configuration Guide and MasterScope Virtual DataCenter Automation StandardEdition Portal User Manual(Resource Management).
For the configuration that uses the Virtual DataCenter Automation Standard Edition TopologyTemplate Orchestrator Option, the template provisioning function enables to create a logical networkfrom the Virtual DataCenter Automation Standard Edition portal.
When permitting register logical network to users, set by referring to 3.2.3 Network setting method ofVirtual DataCenter Automation Standard Edition Topology Template Orchestrator Option User’sGuide.
Also, as for the method of creating the topology template including the network, refer to Appendix B.Topology Template Format of Virtual DataCenter Automation Standard Edition Topology TemplateOrchestrator Option User’s Guide.
3.1.7 Registering a Storage ResourceAdd a disk volume to the resource pool with the SigmaSystemCenter. Also, set the and tags.
Note• The Hyper-V does not support the NAS environment.
3.1.7.1 Allocating a Disk VolumeCreate a SAN or NAS disk volume and add it to the resource pool via the following steps:
NoteIf a dialog box that prompts for the maintenance mode is displayed while you are working on the WebConsole of the SigmaSystemCenter, turn on the maintenance mode to continue the operation. After theoperation is complete, be sure to turn off the maintenance mode.
1. The icon of the group of the machine to be turned on maintenance mode is clicked from a [Operations]tree of a [Operations] view.
2. Select the check box of the machine to be turned on maintenance mode from [Host List] group box or[Group Pool] group box.
3. Click [Maintenance On] from [Operation] menu.4. If the machine is turned off maintenance mode, click [Maintenance Off] from [Operation] menu.
For the maintenance mode, refer to 9.1.3. Turning On/Off the Maintenance Mode in the SigmaSystemCenterConfiguration Guide.
1. Creating and registering a disk volume
To create a new disk volume without using an existing disk volume, create a disk volume.
Next, by using the Web Console of the SigmaSystemCenter, select a disk array from the[Resource] view, and click [Register Disk Volume] to register the disk volume as amanagement target. For details, refer to 4.7.4. Registering a Disk Volume in theSigmaSystemCenter Configuration Guide.
Chapter 3. Basic setting after installation
65
Note• To make the newly created disk volume recognized by the SigmaSystemCenter, select the
storage registered in [Subsystem] of the [Management] view, and click [Collect].
2. Performing setting for disk volume allocation
a. By using the Web Console of the SigmaSystemCenter, click [Operations] on the title barto switch to the [Operations] view.
b. From the [Operations] tree of the Web Console, click the icon of the target operationgroup to display detailed information of the operation group in the main window.
c. From the [Host List] group box, perform the following for each of the hosts to which thedisk volume is to be allocated:
i. Click [Property] of the host to which the disk volume is added, select the[Storage] tab, and click [Add].
ii. Select the SAN disk array in [Disk Array] of [Storage Information], and performsetting as follows:
A. Enter LUN in [LUN Number] as required.
B. [Connect after distribution] need not be selected.
C. From [Storage List], select the disk volume to allocate to the VM server.
D. In the [HBA information], select [Specify an HBA to connect] and enterthe HBA number.
TipFor HBA numbers, refer to "3.1.3.3 Setting the Machine Properties of the VMServer (page 60)".
iii. Select the NAS disk array in [Disk Array] of [Storage Information], and performsetting as follows:
A. From [Storage List], select the disk volume to allocate to the VM server.
B. In [The exported IP address of the destination host], select the IP addressallocated to the NIC for NAS connection.
TipFor details of the procedure, refer to 5.8.2. Configuring Settings on the Storage Tab (if the ModelType is Physical or VM Server) in the SigmaSystemCenter Configuration Guide.
3. Performing disk volume allocation
a. By using the Web Console of the SigmaSystemCenter, click the icon of the targetoperation group from the [Operations] tree to display the detailed information of theoperation group on the main window. Select all the check boxes of the target VM server,and click [Change Configuration] in the [Machine Individual Operations...] menu.
b. Under [Customize Processing for Selected Machine.], a list of processing forconfiguration change is displayed. Select only the [Modify Storage] check box, andclick [OK].
4. Making the disk volume recognized by the virtualization infrastructure
• VMware vCenter Server management environment
Format the disk volume for the datastore in VMFS by using the vCenter Server.
Chapter 3. Basic setting after installation
66
• Hyper-V cluster environment
By using the failover cluster manager, add the disk volume for datastore in [Storage], andthen add the disk volume for datastore added to [Storage] to [Cluster Shared Volumes].
5. Making the disk volume recognized by the SigmaSystemCenter
By using the Web Console of the SigmaSystemCenter, select [VMware vCenter Server] or[Hyper-V Cluster] registered in [Subsystem] on the [Management] view, and click [Collect].
3.1.7.2 Setting a Storage TagBy using the Web Console of the SigmaSystemCenter, set a tag to the datastore.
For example, by set a tag to each of the disk volumes according to the service level of the storagedevice such as "Gold", "Silver", and "Bronze", storage resources at different service levels can beprovided.
1. Open the [Resource Pool] tab of the operation group of the VM server.
2. In [Datastore List], click [Edit] of the datastore to which the tag is set, and enter the tag.
3.1.8 About using Resource Manager FunctionFor details about how to Virtual DataCenter Automation Standard Edition Resouce ManagerFunction, see below.
• Virtual DataCenter Automation Standard Edition Portal User Manual (Resouce Management)
For the configuration that uses the vDC Automation Standard Edition Topology TemplateOrchestrator Option, refer to the following manual:
• Virtual DataCenter Automation Standard Edition Portal User Manual (Resource Management)Topology Template Orchestrator Option
3.2 Monitoring Function3.2.1 Configuring the Monitoring Manager
After creating a tenant by using Virtual DataCenter Automation Standard Edition Portal, you mustconfigure the monitoring manager used by the tenant.
For details about how to configure the settings, see Virtual DataCenter Automation Standard EditionPortal User Manual (Monitoring)
• Chapter 3 Operation Flow
• 3.2 Registering a tenant
• 3.3 Setting of Monitoring Agent
NoteFor Monitoring manager and port, specify Self hostname and Agent port specified at the time of installation.
3.2.2 Setting up DeploymentManagerTo configure the initial settings for the monitoring agent when provisioning the VM, register ascenario to distribute and execute the script for initial settings in SigmaSystemCenter (andDeploymentManager).
Chapter 3. Basic setting after installation
67
The script for initial settings is stored under (application server installation directory)\Tomcat\portal\bin.
Use one of the following files according to the OS type.
• Windows OS : SetupMonitoring.bat
• Linux OS : SetupMonitoring.sh
NoteUse CRLF in a Windows OS and LF in a Linux OS as the linefeed code in the script for initial settings.
1. Registering an application in DeploymentManager(DPM)
Register the script for initial settings for each OS type as an application by using the DPMimage builder. For details about how to register an application by using the image builder, seethe DPM manual.
Specify the following values at registration. Register the default values as is for items notshown below.
Setting item Settings in Windows OS Settings in Linux OS
Package ID WindowsSetupMonitoring LinuxSetupMonitoring
Type Application
[Execution Settings] tab -Execution file
SetupMonitoring.bat SetupMonitoring.sh
[Applicable OS and language] tab- OS
ALL OS
[Applicable OS and language] tab- Lang
ALL Language
2. Creating a DPM scenario group
Create a DPM scenario group with any name.
For details about how to create a scenario group, see the DPM manual.
3. Adding a scenario to the scenario group
Add a scenario to the scenario group that you created.
For details about how to add a scenario, see the DPM manual.
Specify the following values when adding a scenario.
Setting item Settings in Windows OS Settings in Linux OS
Scenario name WindowsSetupMonitoring LinuxSetupMonitoring
[Package] tab - Package Add Local-WindowsSetupMonitoring
Add Local-LinuxSetupMonitoring
[Package] tab - Execution TimingSetting
The [Execute Immediately After Distribution] check box is selected.
4. Registering software in SigmaSystemCenter
To register a scenario that you created in DPM in SigmaSystemCenter, collect software byusing the SigmaSystemCenter Web console.
For details about how to collect software, see the SigmaSystemCenter manual.
5. Setting the DPM server to the SigmaSystemCenter operation group
Chapter 3. Basic setting after installation
68
To enable software distribution by DPM, set the DPM server to each of theSigmaSystemCenter operation groups used by Virtual DataCenter Automation Standard EdtionPortal. For details about how to configure the settings, see the SigmaSystemCenter manual.
The SigmaSystemCenter operation group used by Virtual DataCenter Automation StandardEdtion Portal differs depending on whether the resource pool used for VM provisioning isdedicated to the tenant or shared.
When using a resource pool dedicated to the tenant, configure the DPM server for theoperation group corresponding to the relevant tenant. (The group name is the tenant ID.) Therelevant operation group is automatically created in SigmaSystemCenter when you create atenant by using Virtual DataCenter Automation Standard Edition Poratal. (The group categoryis "tenant.")
When provisioning the VM by using a shared resource pool, create the operation group underthe shared resource pool name (the group category is "category") and configure the DPMserver.
3.2.3 Setting up Virtual DataCenter Automation StandardEdition Portal
Specify the path to store the monitoring agent execution file in the Virtual DataCenter AutomationStandard Edition Portal configuration file for each template before assigning a VM.
Specify the following items in (application server installation directory)\Tomcat\conf\NEC\webframework.properties.
product.cloudportal.template.monitoring.agent.setup.path.<Template name> = <File path of the agent execution file>
The agent execution file is stored in bin in the agent installation location. The following is a settingexample for installation in a Windows OS using the default installation destination.
product.cloudportal.template.monitoring.agent.setup.path.TemplateA = C\:\\Program Files (x86)\\NEC\\UMF\\Operations\\Agent\\bin
3.2.4 About using Monitoring FunctionFor details about how to Virtual DataCenter Automation Standard Edition Monitoring Function, seebelow.
• Virtual DataCenter Automation Standard Edition Portal User Manual (Monitoring)
For the configuration that uses the vDC Automation Standard Edition Topology TemplateOrchestrator Option, refer to the following manual:
• Virtual DataCenter Automation Standard Edition Portal User Manual (Monitoring) TopologyTemplate Orchestrator Option
Chapter 3. Basic setting after installation
69
Chapter 4. Performing UninstallationThis chapter describes how to uninstall the components.
Contents4.1 Precautions before Uninstallation...............................................................................................71
4.2 Uninstalling the components of Management Server..................................................................71
4.3 Uninstalling the components of Management Server Console....................................................76
4.4 Uninstalling the components of VM Monitoring Server .............................................................78
4.5 Uninstalling the components of VM Monitoring Server Console ...............................................78
4.6 Uninstalling the Stack Management Server ................................................................................80
4.7 Uninstalling the components of Managed Machine(Windows)...................................................81
4.8 Uninstalling the components of Managed Machine(Linux) ........................................................82
Chapter 4. Performing Uninstallation
70

4.1 Precautions before Uninstallation• Be sure to exit all applications and Web browsers being used before starting the uninstallation.
• The setting file is deleted after the uninstallation. Back up the file as needed.
4.2 Uninstalling the components of ManagementServer
1. Stop all DeploymentManager services.
2. Select [SigmaSystemCenter] in [Programs and Features] in Control Panel, and click[Uninstall].
The [Welcome to the SigmaSystemCenter Uninstall Wizard] screen is displayed.
3. Click [Next].
The screen for selecting components to uninstall is displayed.
Chapter 4. Performing Uninstallation
71
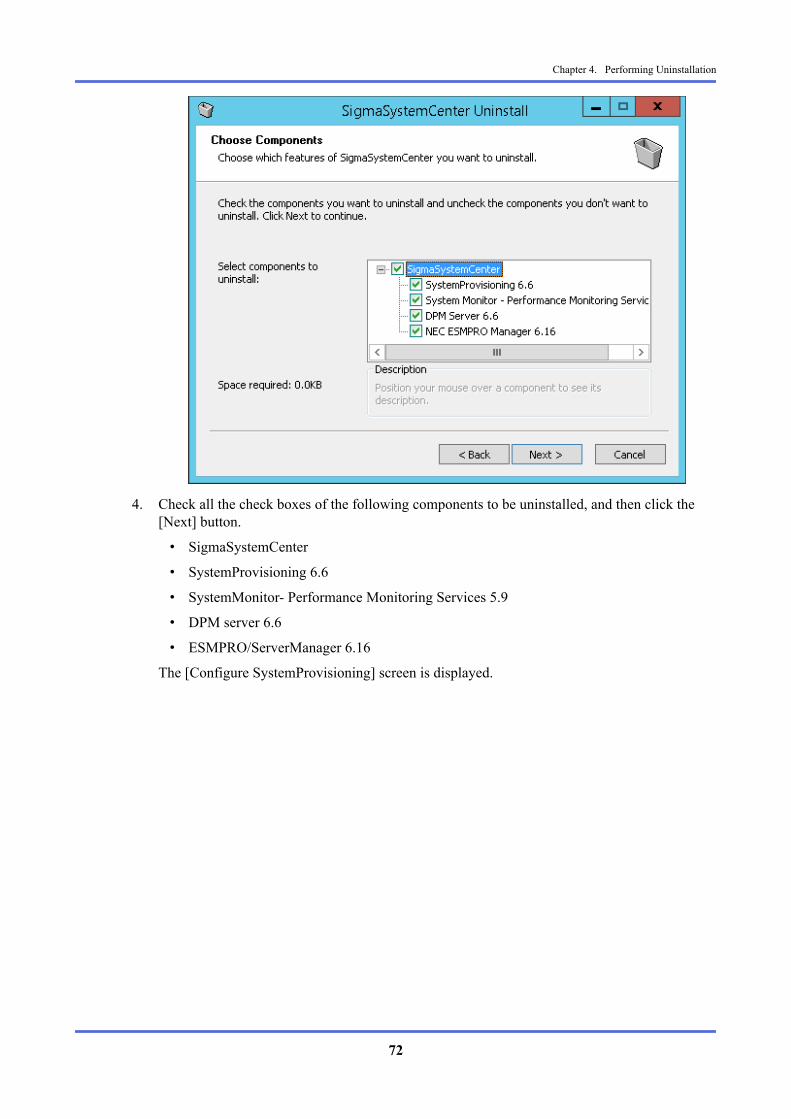
4. Check all the check boxes of the following components to be uninstalled, and then click the[Next] button.
• SigmaSystemCenter
• SystemProvisioning 6.6
• SystemMonitor- Performance Monitoring Services 5.9
• DPM server 6.6
• ESMPRO/ServerManager 6.16
The [Configure SystemProvisioning] screen is displayed.
Chapter 4. Performing Uninstallation
72
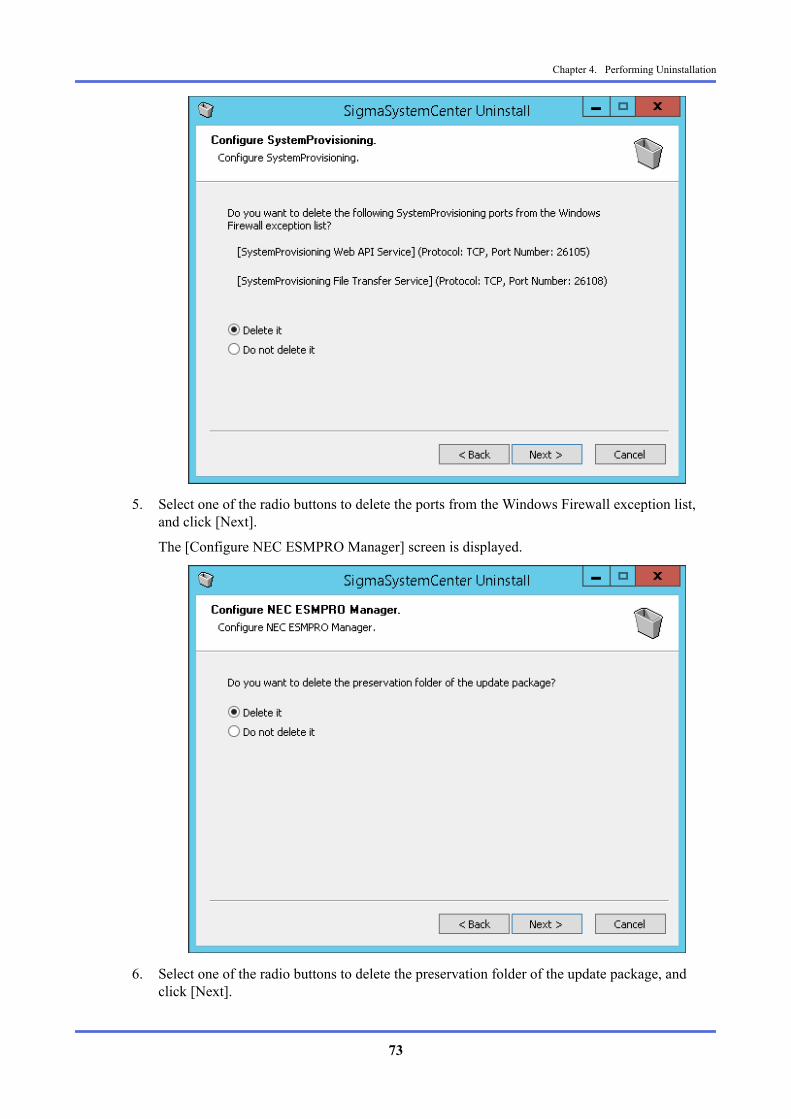
5. Select one of the radio buttons to delete the ports from the Windows Firewall exception list,and click [Next].
The [Configure NEC ESMPRO Manager] screen is displayed.
6. Select one of the radio buttons to delete the preservation folder of the update package, andclick [Next].
Chapter 4. Performing Uninstallation
73

The [Uninstall SigmaSystemCenter] screen is displayed.
7. Click [Uninstall].
After all the components are uninstalled, the [Finish] screen is displayed.
NoteAfter the uninstallation of NEC ESMPRO Manager, the message "This program might not haveuninstalled correctly" may be displayed after completing the uninstallation, depending on theenvironment. The uninstallation has been completed without any errors. Click [This programuninstalled correctly] or [Cancel] to finish.
8. If a dialog box prompting you to restart the system is displayed, restart the system.
9. Stop the following services in the following order.
• MasterScope UMF Operations Manager_102
• Apache Tomcat 8.0 ServiceGovernor
10. Execute the following command to delete database.
> sqlcmd -E -S ".\<Portal - SQL Server Instance Name>"1> drop database cloudportal2> go1> drop login cpuser2> go1> exit
TipThe default of <Portal - SQL Server Instance Name> is "FWCMDB".
11. Insert the vDCA/NWA install DVD into the DVD drive.
Chapter 4. Performing Uninstallation
74

12. Execute the following command on the command prompt or Explorer to start the VirtualDataCenter Automation Standard Edition Integrated Installer.
> <Install DVD>:\install\Windows\vDCAInst_SE.exe
13. The installer starts up.
14. Select [Custom], and click [Next].
15. Select [MasterScope Media], and click [Run].
The MasterScope framework media installer starts up.
16. Select the [Uninstall] radio button, and click [Next].
The [Uninstallation Selection] screen is displayed.
17. Select the check boxes of the following components.
• following components under [Manager]-[Service 102]
- MasterScope SystemManager G
18. Click [Next].
The [Uninstallation Confirmation] screen is displayed.
19. Check [Target products:], and click [Start].
Uninstallation of the selected components is performed. When uninstallation is complete, the[Finish] screen is displayed.
20. Click [Finish].
21. Delete Application Server(Tomcat) Service.
Execute the following command to delete Application Server(Tomcat) Service.
> set "CATALINA_HOME=<Install folder>\FW\Tomcat"> "<Install folder>\FW\Tomcat\bin\service.bat" remove ServiceGovernor
After the deletion of service is complete, delete the following folders.
• C:\Program Files (x86)\NEC\vDCA\MoM\FW\Tools
• C:\Program Files (x86)\NEC\vDCA\MoM\FW\Tomcat
NoteJava that has been installed cannot be uninstalled. Uninstall other programs that are not used.
22. Delete the following registry:
• HKEY_LOCAL_MACHINE\SOFTWARE\Wow6432Node\NEC\vDCAInst\APServer
• HKEY_LOCAL_MACHINE\SOFTWARE\Wow6432Node\NEC\vDCAInst\MOM
• HKEY_LOCAL_MACHINE\SOFTWARE\Wow6432Node\NEC\vDCAInst\Portal
• HKEY_LOCAL_MACHINE\SOFTWARE\Wow6432Node\NEC\vDCAInst\WebAPIBase
23. The "Install Directory Path" specified during installation may remain. Delete it if it isunnecessary.
Chapter 4. Performing Uninstallation
75
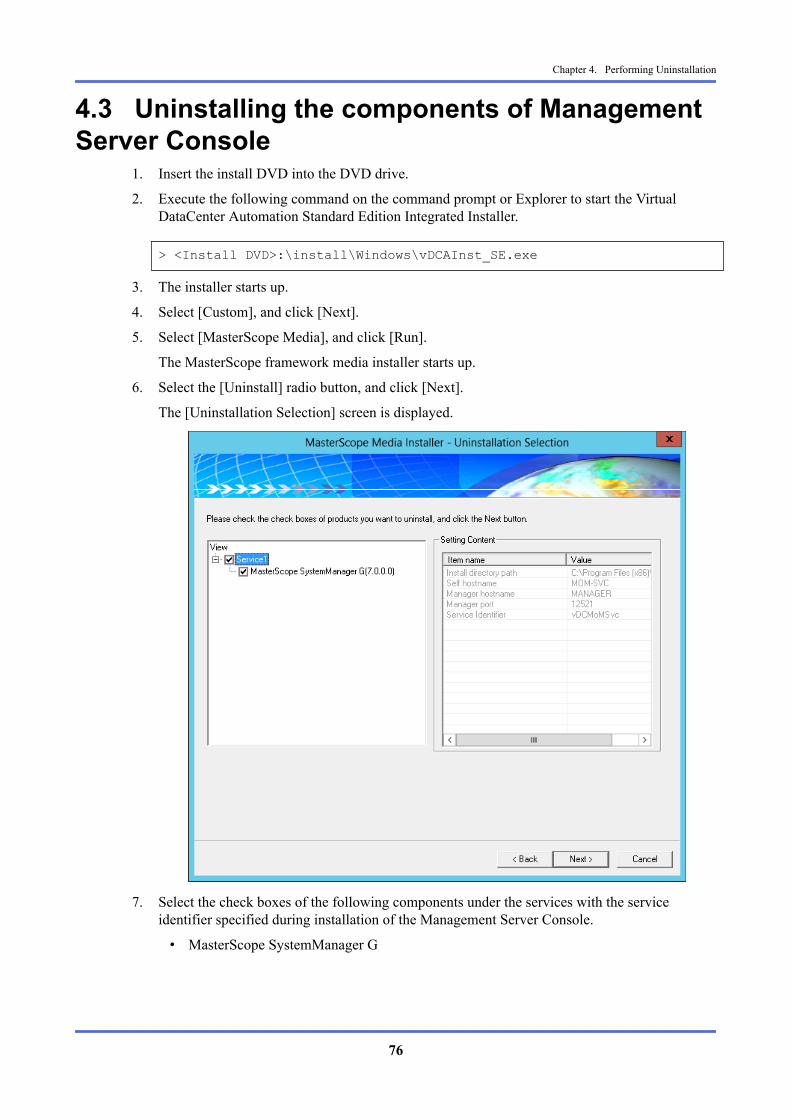
4.3 Uninstalling the components of ManagementServer Console
1. Insert the install DVD into the DVD drive.
2. Execute the following command on the command prompt or Explorer to start the VirtualDataCenter Automation Standard Edition Integrated Installer.
> <Install DVD>:\install\Windows\vDCAInst_SE.exe
3. The installer starts up.
4. Select [Custom], and click [Next].
5. Select [MasterScope Media], and click [Run].
The MasterScope framework media installer starts up.
6. Select the [Uninstall] radio button, and click [Next].
The [Uninstallation Selection] screen is displayed.
7. Select the check boxes of the following components under the services with the serviceidentifier specified during installation of the Management Server Console.
• MasterScope SystemManager G
Chapter 4. Performing Uninstallation
76
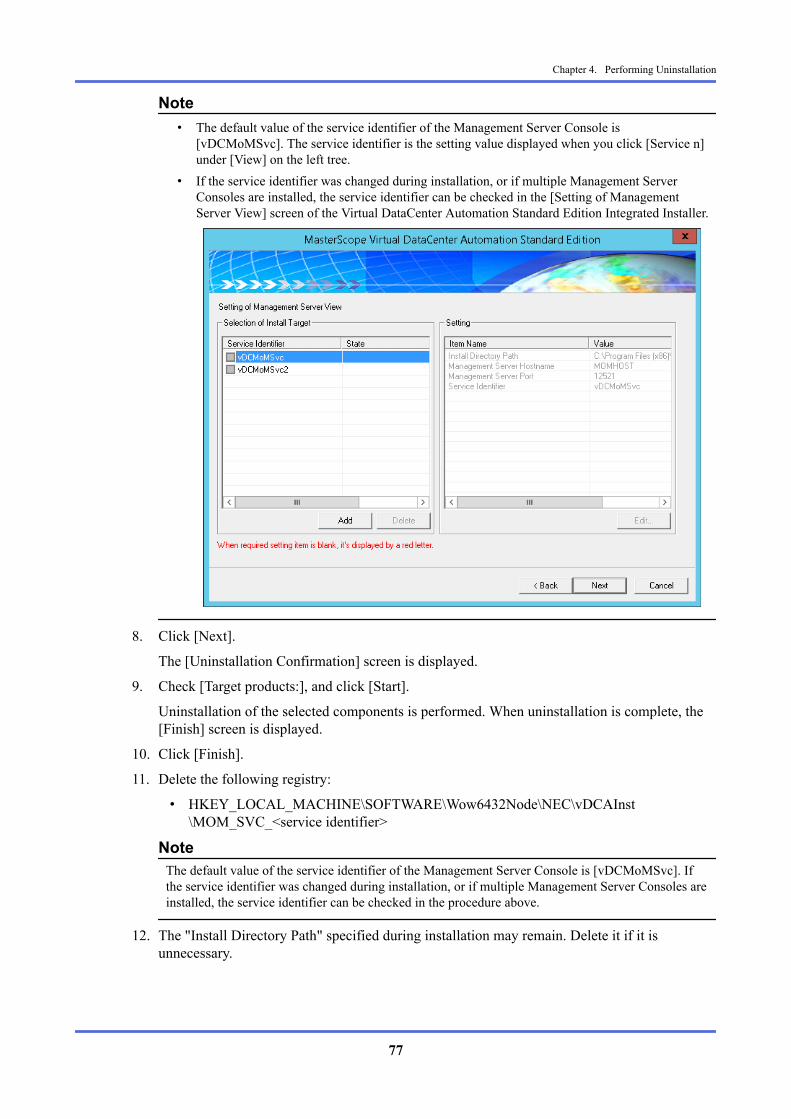
Note• The default value of the service identifier of the Management Server Console is
[vDCMoMSvc]. The service identifier is the setting value displayed when you click [Service n]under [View] on the left tree.
• If the service identifier was changed during installation, or if multiple Management ServerConsoles are installed, the service identifier can be checked in the [Setting of ManagementServer View] screen of the Virtual DataCenter Automation Standard Edition Integrated Installer.
8. Click [Next].
The [Uninstallation Confirmation] screen is displayed.
9. Check [Target products:], and click [Start].
Uninstallation of the selected components is performed. When uninstallation is complete, the[Finish] screen is displayed.
10. Click [Finish].
11. Delete the following registry:
• HKEY_LOCAL_MACHINE\SOFTWARE\Wow6432Node\NEC\vDCAInst\MOM_SVC_<service identifier>
NoteThe default value of the service identifier of the Management Server Console is [vDCMoMSvc]. Ifthe service identifier was changed during installation, or if multiple Management Server Consoles areinstalled, the service identifier can be checked in the procedure above.
12. The "Install Directory Path" specified during installation may remain. Delete it if it isunnecessary.
Chapter 4. Performing Uninstallation
77
4.4 Uninstalling the components of VMMonitoring Server
1. Stop the following services in advance.
• MasterScope UMF Operations Manager_103
2. Insert the vDCA/NWA install DVD into the DVD drive.
3. Execute the following command on the command prompt or Explorer to start the VirtualDataCenter Automation Standard Edition Integrated Installer.
> <Install DVD>:\install\Windows\vDCAInst_SE.exe
4. The installer starts up.
5. Select [Custom], and click [Next].
6. Select [MasterScope Media], and click [Run].
The MasterScope framework media installer starts up.
7. Select the [Uninstall] radio button, and click [Next].
The [Uninstallation Selection] screen is displayed.
8. Select the check boxes of the following components.
• The following components under [Manager]-[Service 103]
- MasterScope SystemManager G
9. Click [Next].
The [Uninstallation Confirmation] screen is displayed.
10. Check [Target products:], and click [Start].
Uninstallation of the selected components is performed.When uninstallation is complete, the[Finish] screen is displayed.
11. Click [Finish].
12. Delete the following registry:
• HKEY_LOCAL_MACHINE\SOFTWARE\Wow6432Node\NEC\vDCAInst\RM
13. The "Install Directory Path" specified during installation may remain. Delete it if it isunnecessary.
4.5 Uninstalling the components of VMMonitoring Server Console
1. Insert the vDCA/NWA install DVD into the DVD drive.
2. Execute the following command on the command prompt or Explorer to start the VirtualDataCenter Automation Standard Edition Integrated Installer.
> <Install DVD>:\install\Windows\vDCAInst_SE.exe
3. The installer starts up.
Chapter 4. Performing Uninstallation
78
4. Select [Custom], and click [Next].
5. Select [MasterScope Media], and click [Run].
The MasterScope framework media installer starts up.
6. Select the [Uninstall] radio button, and click [Next].
The [Uninstallation Selection] screen is displayed.
7. Select the check boxes of the following components under the services with the serviceidentifier specified during installation of the VM Monitoring Server Console, and click [Next].
• MasterScope SystemManager G
The [Uninstallation Confirmation] screen is displayed.
Note• The default value of the service identifier of the VM Monitoring Server Console is
[vDCRMSvc].• If the service identifier was changed during installation, or if multiple VM Monitoring Server
Consoles are installed, the service identifier can be checked on the [Setting of VM MonitoringServer View] screen of the Virtual DataCenter Automation Standard Edition Integrated Installer.
Chapter 4. Performing Uninstallation
79
8. Click [Next].
The [Uninstallation Confirmation] screen is displayed.
9. Check [Target products:], and click [Start].
Uninstallation of the selected components is performed. When uninstallation is complete, the[Finish] screen is displayed.
10. Click [Finish].
11. Delete the following registry:
• HKEY_LOCAL_MACHINE\SOFTWARE\Wow6432Node\NEC\vDCAInst\RM_SVC_<service identifier>
NoteThe default value of the service identifier of the Management Server Console is [vDCRMSvc]. If theservice identifier was changed during installation, or if multiple VM Monitoring Server Consoles areinstalled, the service identifier can be checked in the procedure above.
12. The "Install Directory Path" specified during installation may remain. Delete it if it isunnecessary.
4.6 Uninstalling the Stack Management ServerFor details about how to uninstall the Stack Management Server, refer to the following manual:
• Chapter 5 Uninstallation of Virtual DataCenter Automation Standard Edition TopologyTemplate Orchestrator Option User’s Guide
Chapter 4. Performing Uninstallation
80
4.7 Uninstalling the components of ManagedMachine(Windows)
NoteStart from Step 1 if the DeploymentManager client is installed, or from Step 5 otherwise.
1. From [Programs and Features] on the Control Panel, select [DeploymentManager], and click[Uninstall].
2. The [DeploymentManager Setup Type] screen is displayed. Select [Uninstall] and click [Next].
3. In the displayed confirmation dialog box, click [OK] to uninstall.
4. When the message "Maintenance Completed" is displayed, uninstallation is complete.
5. Insert the install DVD into the DVD drive.
6. Execute the following command on the command prompt or Explorer to start the VirtualDataCenter Automation Standard Edition Integrated Installer.
> <Install DVD>:\install\Windows\vDCAInst_SE.exe
7. The installer starts up.
8. Select [Custom], and click [Next].
9. Select [MasterScope Media], and click [Run].
The MasterScope framework media installer starts up.
10. Select the [Uninstall] radio button, and click [Next].
The [Uninstallation Selection] screen is displayed.
11. Select the check boxes of the following components.
• The following components under [Agent]-[Service 104]
- MasterScope SystemManager G
12. Click [Next].
The [Uninstallation Confirmation] screen is displayed.
13. Check [Target products:], and click [Start].
Uninstallation of the selected components is performed. When uninstallation is complete, the[Finish] screen is displayed.
14. Click [Finish].
15. Delete the following registry:
• HKEY_LOCAL_MACHINE\SOFTWARE\Wow6432Node\NEC\vDCAInst\AG
16. The "Install Directory Path" specified during installation may remain. Delete it if it isunnecessary.
Chapter 4. Performing Uninstallation
81
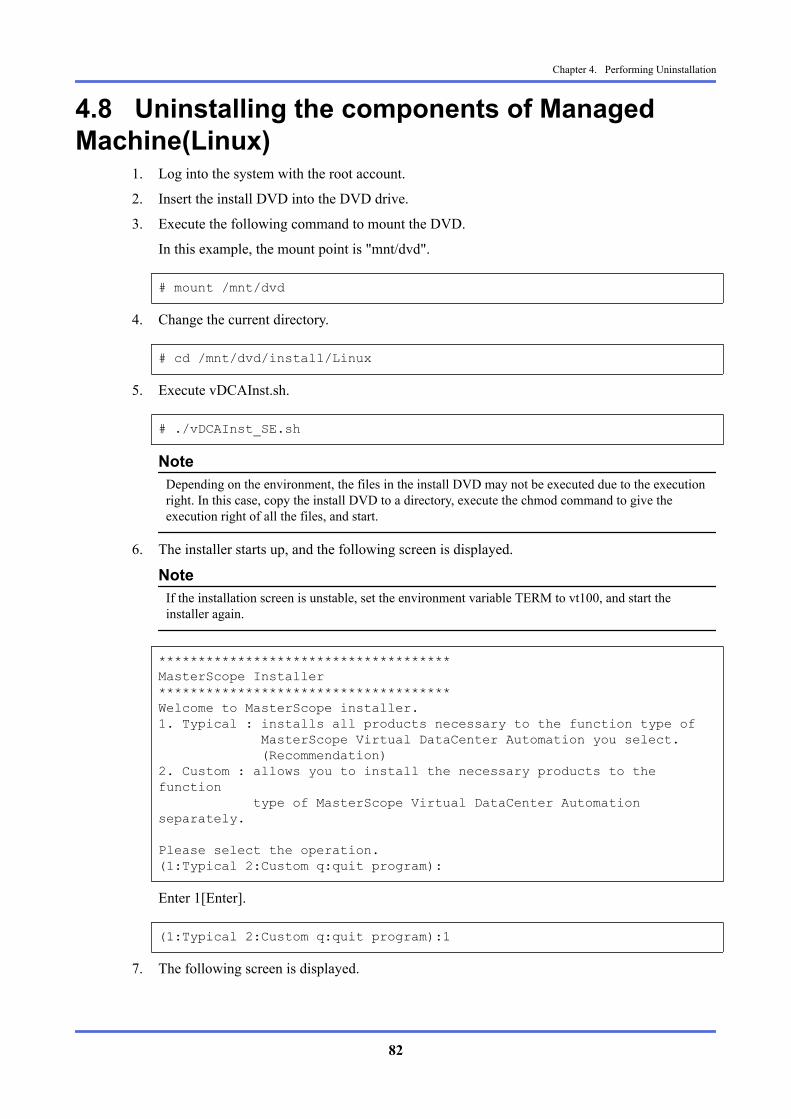
4.8 Uninstalling the components of ManagedMachine(Linux)
1. Log into the system with the root account.
2. Insert the install DVD into the DVD drive.
3. Execute the following command to mount the DVD.
In this example, the mount point is "mnt/dvd".
# mount /mnt/dvd
4. Change the current directory.
# cd /mnt/dvd/install/Linux
5. Execute vDCAInst.sh.
# ./vDCAInst_SE.sh
NoteDepending on the environment, the files in the install DVD may not be executed due to the executionright. In this case, copy the install DVD to a directory, execute the chmod command to give theexecution right of all the files, and start.
6. The installer starts up, and the following screen is displayed.
NoteIf the installation screen is unstable, set the environment variable TERM to vt100, and start theinstaller again.
*************************************MasterScope Installer*************************************Welcome to MasterScope installer.1. Typical : installs all products necessary to the function type of MasterScope Virtual DataCenter Automation you select. (Recommendation)2. Custom : allows you to install the necessary products to the function type of MasterScope Virtual DataCenter Automation separately.
Please select the operation.(1:Typical 2:Custom q:quit program):
Enter 1[Enter].
(1:Typical 2:Custom q:quit program):1
7. The following screen is displayed.
Chapter 4. Performing Uninstallation
82

************************************* Welcome to MasterScope Installer !!*************************************This program will install/uninstall products.
2. Uninstall
Please select the operation.(2:uninstall q:quit program):
Enter 2[Enter].
(2:uninstall q:quit program):2
8. A list of installed components is displayed.
-----------------Installed products----------------- Agent 1 Service104 1.1 MasterScope SystemManager G Agent 7.0.0.0 Other 2 MasterScope Virtual DataCenter Managed machine components--------------------------------------------Please select product(s) by entering numbers separated by commas.[Example: 1.1, 2.1](v[n]:view b:back q:quit program):
Select MasterScope Virtual DataCenter Standard Edition Managed machine components asshown below.
(v[n]:view b:back q:quit program):2
9. The confirmation screen of the components to be uninstalled is displayed.
------------------Final confirmation------------------ Other 2 MasterScope Virtual DataCenter Standard Edition Managed machine components-------------------------------------------Is it OK to start uninstallation?(y:yes n:no q:quit program):
Enter y[Enter].
(y:yes n:no q:quit program):
The selected components are uninstalled.
Chapter 4. Performing Uninstallation
83
MasterScope Virtual DataCenter Automation v4.0Standard Edition Setup Guide
April, 2017 1st Edition
NEC Corporation
©NEC Corporation 2012-2017