mat activity – pc interfacing with matlab & python · mat activity – pc interfacing with...
TRANSCRIPT
MAT Activity – PC Interfacing with MATLAB &
Python
2nd Year Electronics Lab
IMPERIAL COLLEGE LONDON
v2.02
Autumn 2013

2
Table of Contents
Equipment ............................................................................................................................................................... 2
Software ................................................................................................................................................................... 2
Objectives ................................................................................................................................................................ 3
Recommended Timetable .................................................................................................................................. 3
Introduction ............................................................................................................................................................ 3
Learning MATLAB & Python ............................................................................................................................. 4
PC Interface and Programming ........................................................................................................................ 4
Setting up the Programming Environment .............................................................................................................. 5
Task #1 .................................................................................................................................................................................. 5
Task #2 .................................................................................................................................................................................. 7
Task #3 .................................................................................................................................................................................. 9
Task #4 ............................................................................................................................................................................... 11
Conclusions .......................................................................................................................................................... 12
END .......................................................................................................................................................................... 12
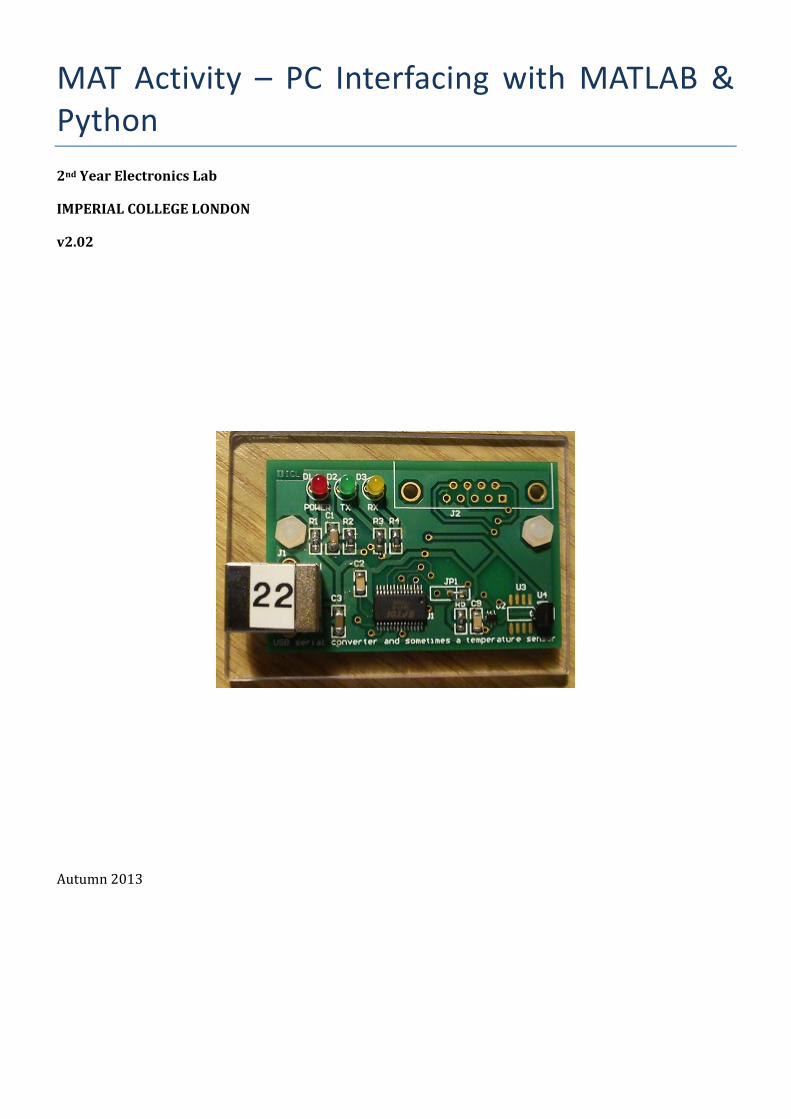
Equipment
• Lab Computer
• Temperature Sensor USB Board
Software
• MATLAB
• Python-Portable
• PyScripter-Portable
• MySQL database running on lab server (provided)
Optional Home/Laptop Installation details. All software free as of Autumn 2013. Package Install files for win32 Notes MATLAB ICT software shop
website Student licenses can be purchased cheaply from the software
shop, 2013-2014 - licenses are currently FREE for Faculty of
Engineering students - this is a good deal, well worth using. PyScripter (32-
bit) pyscripter latest x86
version PyScripter is free and provides a high quality, fast, IDE. It is
preinstalled in portable python and easily installable elsewhere. Python 2.7 latest 2.7 installer (32
bit)
Use the 32-bit version on 64 & 32 bit PCs since not all code will
work with 64-bit. Python is slowly moving to v3.1 but v2.7 has
currently more supported software pyserial (serial
port interface) pyserial-2.6.tar.gz Pyserial is not python release dependent
matplotlib matplotlib page Recommended for MATLAB clone graphical plot functions from
python. Not used in this experiment. MySQL-python MySQL-python for
python 2.7 Provides python interface to remote MySQL database
Portable version
of everything see handout page for
portable python zip The laboratory version of portable python can be copied to any
directory on any windows PC and used as is, no installation
required, all packages are installed as well as pyscripter.
3
Objectives
Consider an industrial process (e.g. a chemical
factory, food processing unit, energy control
systems, etc.) where temperature has to be
registered and controlled at all times. For large
sites, it is advantageous to collate readings from
all the different sensors placed around the site to
one location, which can be accessed remotely.
In this laboratory activity, each group has a USB
temperature sensor and the computer will
provide temperature readings to a remote
database. Later, each group will do statistics on
the data collected from the database.
The purpose of this laboratory is to develop
software to control a peripheral that interfaces
with a PC. In the present scenario, the peripheral
is a temperature sensor that is connected to the
PC via a USB port.
This activity will introduce two languages well
suited to this task, both of which you are likely to
use later on in project work and show how sensor
interface and remote logging can be accomplished.
Recommended Timetable
• Session 1: Python Tutorial
• Session 2: Setup and Task #1
• Session 3: Task #2 and Task #3
• Session 4: Task #4
You should note that the main purpose of the
tutorial is to allow you to do the later
programming work. You may therefore wish to
start the programming earlier than shown
above in order to make sure that you finish on
time. The two tutorials are good introductions to
the two languages. The final “words” activity in
the python tutorial is not assessed and can be
skipped if you run out of time. Note also that
you can play with python on your own laptops
– the code provided will work anywhere.
Introduction
MATLAB & Python have a number of similarities.
You are certain to use MATLAB, and likely to use
Python, in 3rd & 4th year project work. Compared
with languages you have learnt (C/C++, etc.) these
new languages have a number of characteristics,
which make them suitable for prototyping code in
the quickest time possible.
• Interpreted - you can run fragments of
code immediately using an interpreter to
see what happens. This is especially useful
when learning a language, though does not
make much difference to competent
programmers. All interpreted languages
actually have compilers as well, though
they are not used as standard, to speed the
language up.
• High Level - both languages have very
sophisticated built-in data structures that
you can use to write your code straight
away, instead of having to implement
them yourself.
• Large Libraries - almost anything you
want to do will have already been
implemented. MATLAB has code for
computing graphs, partial differential
equations, etc. Almost every conceivable
scientific algorithm. Python has code for
almost everything, especially connecting
with various interfaces: web, e-mail and
databases.
• Dynamic Strong Typing – Variables can
have any value, you don't specify types.
The run- time system keeps track of all the
variables’ type and ensures that when
operations are applied, they have a
suitable meaning. One feature of this is
that array bounds errors are always
discovered, and memory access errors
(the bane of languages like C) can't
happen. This lack of overhead (you need
not declare variables - just use them) has
problems but generally results in faster
programming.
MATLAB is ideal for prototyping any type of
algorithm involving arrays or matrices - hence its
widespread use to simulate algorithms in signal
processing, communications, control, etc. 80% of
final year projects require MATLAB coding.
Python is a general-purpose ``glue'' language good
for interfacing between peripherals and the
Internet. It now has a very large user base and

4
high quality code is available to do almost any
programming task. Python programs are typically
1/3 the length and take 1/3 the length of time to
code when compared with C++.
This experiment will familiarize you with
MATLAB and Python, and illustrate their use in a
typical PC interface application.
About half of the experiments are tutorials, so
the experiment will be “tick-marked” from
demonstration of working code & (to support
this) logbook.
Learning MATLAB & Python
Since you are learning new programming
languages, it is better for you to experiment with
small examples and gain confidence before
“diving” directly into the project. To do that, you
should go through both tutorials on the web page.
The reference material is available to help: please
note that the MATLAB lecture, in particular, is a
very good introduction to MATLAB (though not a
tutorial). You should read this quickly before
doing the MATLAB tutorial and use it as reference
in subsequent work.
PC Interface and Programming
The application you have to develop collects data
from a temperature sensor at given sampling
times. It should then store the sampling time and
the temperature read into a remote database,
which will be downloaded into a file and
processed in MATLAB.
The application GUI allows the user to set the
sampling period, clear the contents of the
database and request statistics.
The code you will use to implement this is
arranged in three separate files:
→ guidemo.py GUI to control application
→ tempdemo.py subfunctions to control
USB temperature monitor
hardware
→ sqldemo.py subfunctions to interface
with an SQL database on a
remote computer
Some other files performing specific tasks when
run have also been given to you and will be used
below.
→ scan_serial.py
→ writedb.py
→ readdb.py
You should use the pyscripter project
matdemo.psproj that you are given, which
contains all these files. You can run any file from
this project or modify guidemo.py to import code
previously tested from other files.
Each python file is written so that it will either
perform a task (if run at top-level) or have a
function within that file to be called by another
top-level file (subfunction) when imported. This
allows the subfiles to be written as standalone
tests, which are ignored when the subfunctions
are used elsewhere.
The sequences of tasks below are:
1. Complete the GUI (guidemo.py
standalone)
2. Implement communication with the
temperature sensor (tempdemo.py
standalone) and import the read
temperature function into guidemo.py
3. Implement communication with the
database (sqldemo.py standalone) and
import read and write functionality into
guidemo.py
4. Implement GUI driven data analysis using
MATLAB and import statistics functions
into guidemo.py
The following sections give more details for each
of the tasks.
NOTE: In this handout you will find some work
labeled “(Optional)”. This should only be
attempted ONLY AFTER all other work has been
completed. Optional work is truly optional; it is
not part of the logbook marking scheme.
All the files you need are downloadable from the
handouts page on the intranet. The source files
archive (matdemo.zip) contains a PyScripter
Project (matdemo.psproj), which can be loaded
from the software PyScripter Portable. You can
edit and run each python file within the archive as
5
a standalone by loading it from the PyScripter
Project Explorer panel.
Setting up the Programming Environment
Locate the handouts page on the intranet and
download “Source Files” (matdemo.zip) to your
home folder and download “Portable Python zip
file” (mat.zip) to a non-networked drive e.g. in
the lab C:\TEMP. (USB disks and networked
drives are too slow).
Open mat.zip and extract the “PP27” folder to the
current directory (C:\TEMP). Open matdemo.zip
and extract its contents to your home folder.
NOTE: it is important NOT to download or extract
mat.zip to your home directory! There are over
10,000 source files for Portable Python and
Portable PyScripter software making extraction
over the network extremely slow.
You may need to redo this at the beginning of
every session. When the computer reboots, the C:\
directory is restored to its original state and any
files under C:\temp will be lost.
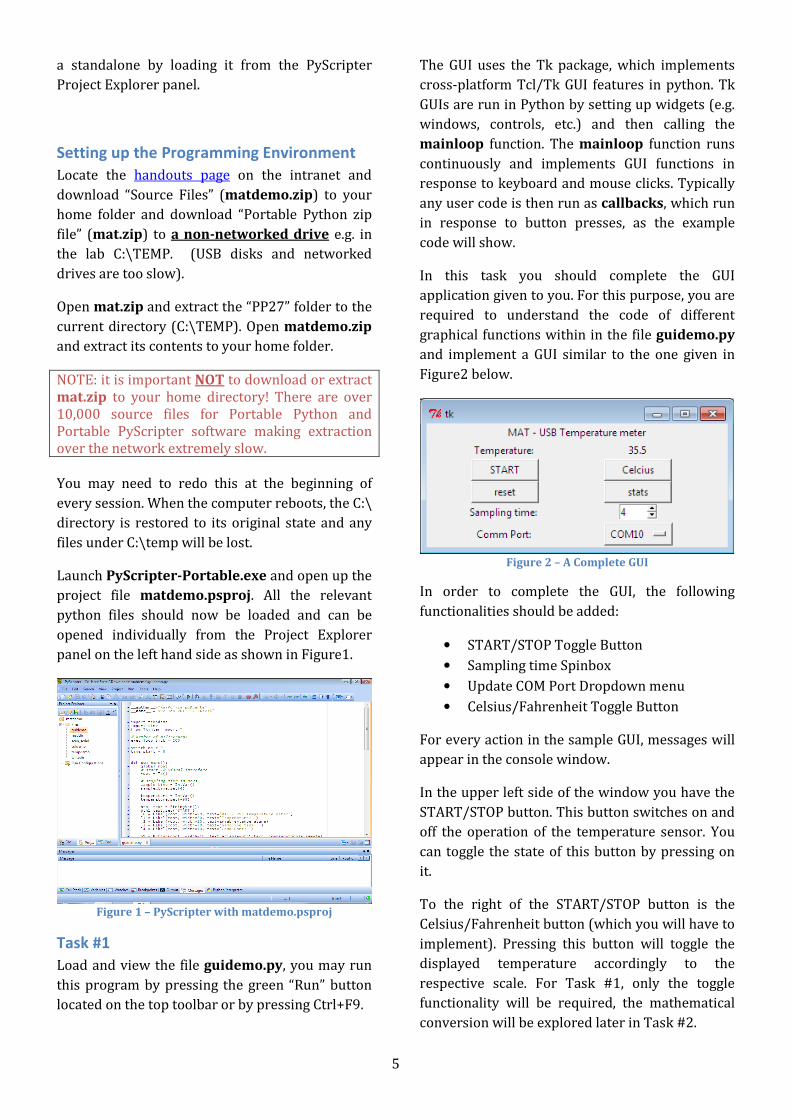
Launch PyScripter-Portable.exe and open up the
project file matdemo.psproj. All the relevant
python files should now be loaded and can be
opened individually from the Project Explorer
panel on the left hand side as shown in Figure1.
Figure 1 – PyScripter with matdemo.psproj
Task #1
Load and view the file guidemo.py, you may run
this program by pressing the green “Run” button
located on the top toolbar or by pressing Ctrl+F9.
The GUI uses the Tk package, which implements
cross-platform Tcl/Tk GUI features in python. Tk
GUIs are run in Python by setting up widgets (e.g.
windows, controls, etc.) and then calling the
mainloop function. The mainloop function runs
continuously and implements GUI functions in
response to keyboard and mouse clicks. Typically
any user code is then run as callbacks, which run
in response to button presses, as the example
code will show.
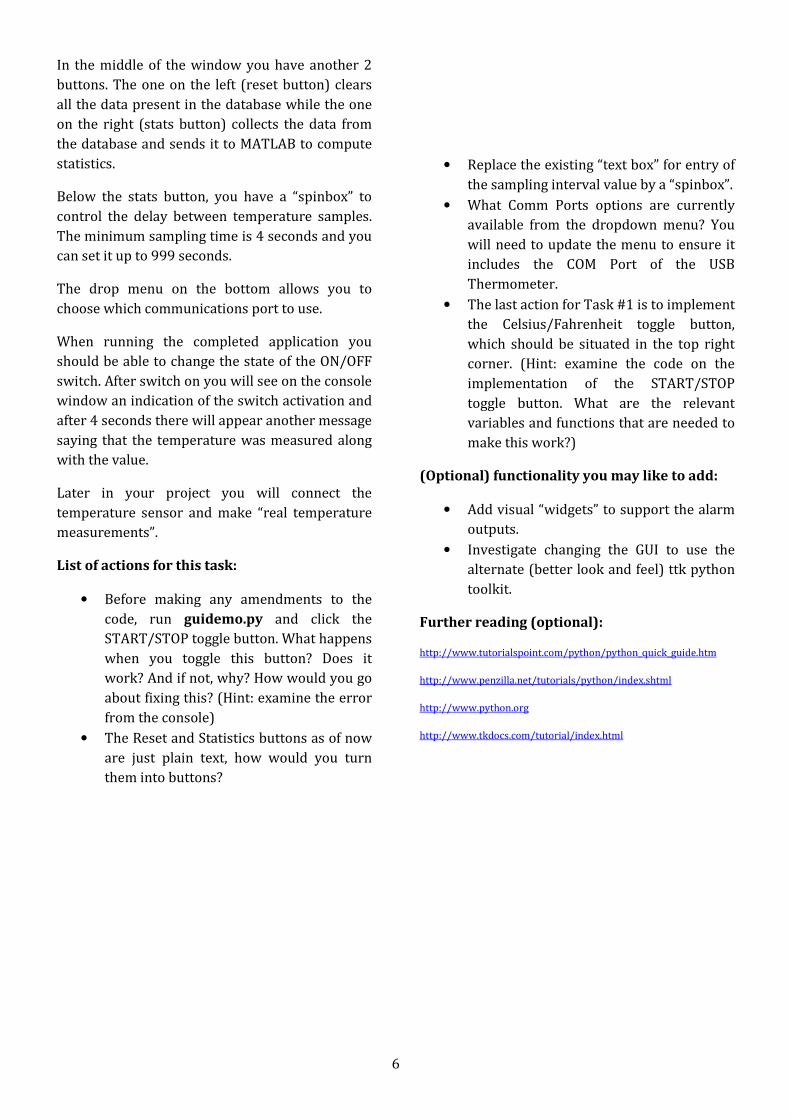
In this task you should complete the GUI
application given to you. For this purpose, you are
required to understand the code of different
graphical functions within in the file guidemo.py
and implement a GUI similar to the one given in
Figure2 below.
Figure 2 – A Complete GUI
In order to complete the GUI, the following
functionalities should be added:
• START/STOP Toggle Button
• Sampling time Spinbox
• Update COM Port Dropdown menu
• Celsius/Fahrenheit Toggle Button
For every action in the sample GUI, messages will
appear in the console window.
In the upper left side of the window you have the
START/STOP button. This button switches on and
off the operation of the temperature sensor. You
can toggle the state of this button by pressing on
it.
To the right of the START/STOP button is the
Celsius/Fahrenheit button (which you will have to
implement). Pressing this button will toggle the
displayed temperature accordingly to the
respective scale. For Task #1, only the toggle
functionality will be required, the mathematical
conversion will be explored later in Task #2.
6
In the middle of the window you have another 2
buttons. The one on the left (reset button) clears
all the data present in the database while the one
on the right (stats button) collects the data from
the database and sends it to MATLAB to compute
statistics.
Below the stats button, you have a “spinbox” to
control the delay between temperature samples.
The minimum sampling time is 4 seconds and you
can set it up to 999 seconds.
The drop menu on the bottom allows you to
choose which communications port to use.
When running the completed application you
should be able to change the state of the ON/OFF
switch. After switch on you will see on the console
window an indication of the switch activation and
after 4 seconds there will appear another message
saying that the temperature was measured along
with the value.
Later in your project you will connect the
temperature sensor and make “real temperature
measurements”.
List of actions for this task:
• Before making any amendments to the
code, run guidemo.py and click the
START/STOP toggle button. What happens
when you toggle this button? Does it
work? And if not, why? How would you go
about fixing this? (Hint: examine the error
from the console)
• The Reset and Statistics buttons as of now
are just plain text, how would you turn
them into buttons?
• Replace the existing “text box” for entry of
the sampling interval value by a “spinbox”.
• What Comm Ports options are currently
available from the dropdown menu? You
will need to update the menu to ensure it
includes the COM Port of the USB
Thermometer.
• The last action for Task #1 is to implement
the Celsius/Fahrenheit toggle button,
which should be situated in the top right
corner. (Hint: examine the code on the
implementation of the START/STOP
toggle button. What are the relevant
variables and functions that are needed to
make this work?)
(Optional) functionality you may like to add:
• Add visual “widgets” to support the alarm
outputs.
• Investigate changing the GUI to use the
alternate (better look and feel) ttk python
toolkit.
Further reading (optional):
http://www.tutorialspoint.com/python/python_quick_guide.htm
http://www.penzilla.net/tutorials/python/index.shtml
http://www.python.org
http://www.tkdocs.com/tutorial/index.html
7
Task #2
The temperature sensor given to you (ref:
DS18S20 from Dallas Semiconductor) operates via
a USB port and is seen on the computer as a Serial
Port device. It communicates with the computer
by sending and receiving a stream of bytes.
To communicate with a serial port using Python
you must have package PySerial added to your
Python installation (as is the case for the lab
portable python).
After establishing the serial connection (physical
link), the application has to be compliant with the
temperature sensor protocol (1-wire) so it can
retrieve information from the sensor (data link).
Details on the protocol can be found in the
sensor's manufacturer site.
Load and view file tempdemo.py.
This file controls and reads temperatures from the
USB-thermometer. It is only a text based
application, as all information is displayed in the
console window.
In the source code given, you have all necessary
low level functions to use the serial port and also
functions to send commands and receive data
from the sensor using 1-wire protocol.
The demo application initializes the device and
then enters an infinite loop measuring and
printing the result on the screen.
At this point, the temperature read by the device
is always 127.5ºC! This happens because the
correct command is not being sent to the sensor
@line216. Using the datasheet as reference, you
will need to determine the correct command to
perform the read operation from the sensor.
List of actions for this task:
• The script scan_serial.py can be used to
detect all the COM ports available. Run it
before and after plugging in the USB-
Thermometer to determine which COM
Port it is using.
• Run tempdemo.py and understand it. Be
sure to use the correct COM port. What is
the minimum sampling time required?
• For the statement shown below (line216):
if onewire_cmd(0x00) != 0:
Replace the value 0x00 in the function
argument with the correct value (you will
need to check the sensor datasheet). Once
corrected, you should be able to read the
correct temperature value from the
sensor.
• Identify the commands being sent to the
sensor. How is the temperature value
returned? (refer to the sensor datasheet)
• Examine the if-else statement of the code
beginning on line 23. Modify the code so
that you can pass another argument from
the command line to select a temperature
scale (Celsius/Fahrenheit).
NOTE: You will need to load command line
window MinGW, move to the directory in which
tempdemo.py is stored, and test this from the
MinGW command line e.g. "C:/temp/PP27/App/python tempdemo.py COM10 F"
for Fahrenheit scale. Do not run directly from
python.exe or portable-python.exe, where the
prompt begins with “>>>”, this must be from a
shell prompt.
• First verify that the arguments are being
passed correctly by printing them onto the
console.
• Now modify the read_temp() function so
that it will take another argument. This
will allow you to pass the temperature
scale argument from the command line
into this function.
• Write code here to convert Celsius to
Fahrenheit so that the appropriate
temperature is being returned.
• Load up guidemo.py and make
modifications so that you can call
read_temp() function from
tempdemo.py.
import tempdemo Gives access to
functions defined in
tempdemo, should
be at top of file.
tempdemo.read_temp() How to call function
read_temp(). Note
the qualified name is:
<module>.<function_
name>.

8
• Make further changes in the guidemo.py
to make sure that the correct temperature
value is displayed on the GUI.
(Optional) functionality you may like to add:
• Incorporate code to detect the available
COM ports in your computer.
• Change the code in such a way that it
behaves like a thermostat, with lower and
higher thresholds (too cold and too hot
alerts). For this you can use your body
temperature (hold the sensor in your
hands) as the regular temperature and
raise alarms for temperatures below and
above that.
• Use the sensor as a thermostat by setting
the value directly in the temperature
sensor register (see DS18S20 datasheet).
Further reading (optional):
• http://pyserial.sourceforge.net/index.html
• Temperature sensor datasheet:
http://www.maxim-
ic.com/quick_view2.cfm/qv_pk/2815
• Using a UART to Implement a 1-Wire Bus
Master: http://www.maxim-ic.com/app-
notes/index.mvp/id/214/
• Temperature conversion:
http://en.wikipedia.org/wiki/Temperatur
e_conversion

9
Task #3
Using the Python package MySQLdb, it is possible
to access a remote MySQL database server to
store the values read from the temperature
sensor. The database is set up ready to be
accessed by you. You are given sample code that
has the necessary access permissions.
In MySQL, each database is composed of tables.
Each group will use their own table to do the
experiment:
Database: host="ee-fs1", user="ee2student",
password="ee2pass", database="ee2"
Database access is accomplished through single
statements (given to you) in SQL language. Each
statement performs some operation on a table.
readdb.py and writedb.py from matdemo
project folder are separate skeleton codes to see if
you can connect, read and write from the
database. You will need to understand the code in
these files that performs the necessary operations
on the database.
NOTE: BEFORE YOU USE THIS CODE make sure
that you change the table name to the correct
string for your pair, which should be "pair-
id_data", where pair-id is derived from the letters
and last two digits, in your ID. So if your pair id is
AX104 the table name is ax04_data. [Ensure you
get table name right: bx03 not bx3, use lowercase
letters followed by two digits].
writedb.py sample code asks the user to input
time and temperature which will then be entered
into the database as a record. readdb.py sample
code will read the remote database and print all
records onto the console.
You have been given a MySQL database, which
contains a suitable table with two integer fields
named 'time' and 'temp'. To insert data in your
MySQL table you can construct a python string
which contains the correct SQL command:
stmt = ("INSERT INTO pair-id_data (time,temp)
VALUES ('" + str(time) + "', '" + str(temp) + "')")
In the above line a variable called stmt is set to the
command being sent to the SQL server. The
command INSERT is followed by an indication in
which table the values should be stored and in
which fields, along with their values. The values
for time and temperature are assumed already
available in the specified variables.
Note a Python peculiarity here: because lines are
used to terminate statements a multi-line
statement (as here) is not normally allowed
without using explicit line continuation character.
The best way to get round this problem, used
here, is to break the line inside a bracketed part of
the expression. In this case the Python interpreter
knows that the expression cannot be finished
before the closing bracket and so will read
multiple lines as required. That is why the string
expression is enclosed in brackets.
To clear the contents of a table you have to send
the following SQL command to the MySQL server:
DELETE FROM PAIR-ID_DATA
To store data from the database in a file you can
use any format. Having in mind that it is going to
be processed using MATLAB, there is one file
format that is preferable, a set of lines of the form:
(time value, temperature value)
Note that all values should be type integer (int).
The table in the database was created with
integers. If other data types different from
integers are used, it will give an error.
Later, you will be required to write code that
reads the database and write the data into a text
file. Your output file should be similar to the
following, where the first column is sample time
and the second column is the temperature:
4 27
4 27
4 27
4 27
4 27
4 28
4 28

10
List of actions for this task:
• Investigate writedb.py and readdb.py
and try to understand them. Verify that
you are able to connect to the MySQL
database.
• sqldemo.py currently has one function
called sqlmain(). It has similar
functionality to read_main() in
readdb.py. Modify this function so that it
will read the contents of the database and
store all entries to a text file saved in your
project folder.
• Examine the function write_main() in
writedb.py, copy this function into
sqldemo.py and modify it so that it takes
2 arguments, temperature and time,
instead of asking for users' input.
• Create a new function in sqldemo.py that
will clear all the database records in your
table.
• Load up guidemo.py and make
modifications so that you can call the read,
write and clear functions in sqldemo.py.
Ensure that: every time the temperature is
read, it is also written to your table in the
MySQL database; when the reset button is
pressed in the GUI, the table is cleared;
similarly, when the stats button is pressed,
the contents of the table is written into a
text file.
(Optional) functionality you may like to add:
• Encode all temperature values (e.g. 25.5
C/F) in the database without changing its
type (int)
• Filter data fetched from the database
adding “WHERE” to your query. Add the
filtering fields in your GUI interface, or
create an extra dialog box for that
purpose.
Further reading (optional):
http://sourceforge.net/projects/mysql-python/
http://en.wikipedia.org/wiki/MySQL

11
Task #4
After getting familiar with MATLAB by going
through the tutorial and/or lecture, your task now
will be writing a MATLAB script to perform statistics
on the data collected from the database.
When looking at data from a samples sequence,
several statistical measures describe the data: mean,
variance, minimum, maximum and mode. Your
script should compute, at least, these values and
produce a 2D plot with temperature vs. time.
To run an external PC application, e.g. example.exe
from a Python script, you should use the following
statement:
import os # must be at top of file
...
os.system('example.exe arg1 arg2 .. argN')
To run, for example, a MATLAB script called
demo.m from a python application use os.system to
execute the following line:
matlab -r demo -nodesktop -nosplash
Understand the above instruction and note that the
file demo.m will run only if it’s either in your
current directory, in the MATLAB path, or if you call
it using its complete pathname.
NOTE: you may be required to copy the matdemo
project folder to a local drive (e.g. C:\TEMP), which
allows the output file to be mutually accessible by
both Python and MATLAB.
List of actions for this task:
• Write a MATLAB script that will read in the
contents from the output file (created in
Task #3) into the MATLAB workspace.
• For the same data, compute: average,
maximum, minimum, variance and mode.
Print these values into the MATLAB console.
• Plot the data collected (time vs.
temperature) as well as a histogram.
• Incorporate the MATLAB code into the
python GUI (the Stats button should now
create an output file with all the records
from the database and then run the MATLAB
script).
(Optional) functionality you may like to add:
• Fit a curve on top of the graph for the collected
data.
• Create a web-server in MATLAB to provide
updated information on a browser
o Change your Python application to compute
statistics periodically;
o Use file tcp_udp_ip_2.0.6.zip;
o Generate random values
(temperatures=round(50*rand(1,5)
)) or read the temperatures from the
statistics file;
o Make the changes below so that the webpage
is refreshed automatically;
Replace line #30:
pnet(con,'printf','<html><HEAD><TITLE>WEBSERVER DEMO</TITLE></HEAD>\n <body><h1>WEBSERVER DEMO</h1>\n');
With: pnet(con,'printf','<html><HEAD><TITLE>WEBSERVER DEMO</TITLE>\n'); pnet(con,'printf','<script type="text/javascript">\nvar timerRefresh = setTimeout("go()", 4000);\n'); pnet(con,'printf','function go() { document.location.reload(); } </script>'); pnet(con,'printf','</HEAD>\n<body><h1>WEBSERVER DEMO</h1>\n');
Note: you can access the MATLAB generated webpages with a web browser at http://localhost:8888/
4000 in the above code is the refresh interval in milliseconds.
Further reading (optional):
http://www.mathworks.com/access/helpdesk/help/helpdesk.html
12
Conclusions
Programming languages are workhorses. You use
whatever gets the job done quickly. It is tempting to
use the language you know best, since this will be
quickest. You have learnt C++ (and therefore C).
MATLAB will be used throughout 3rd and 4th year
coursework as well as later on, if you work in
science or engineering. Python is not required
(much) in our course but often used throughout
industry and academia because it is very
productive for prototyping and glue applications,
typical of student project work.
END