math & drawing - yolaweldinginst.yolasite.com/resources/maths and drawing.pdf · oblique...
TRANSCRIPT

MATH & DRAWINGMATH & DRAWINGMATH & DRAWINGMATH & DRAWING
Certification level

2
Table of Contents
2.1 Simple or Vulgar Fraction .................................................................................................................................. 7
2.1.1 Introduction to Simple or Vulgar Fraction ................................................................................................. 7
2.1.2 Application of Vulgar Fraction Problems ................................................................................................. 7
2.1.3 Decimal Fraction ...................................................................................................................................... 8
2.1.4 Practice Exercises ...................................................................................................................................... 9
2.2 SI units ............................................................................................................................................................. 10
2.2.1 Unit of measurement. ............................................................................................................................. 10
2.2.2 Scales and units .................................................................................................................................... 10
2.2.3 Some useful definitions .......................................................................................................................... 10
2.2.4 Base Units of the International System (SI) .................................................................................................. 11
2.2.5 BASIC UNITS .................................................................................................................................................. 11
2.2.6 SI derived units .......................................................................................................................................... 11
2.3 SI Prefixes ........................................................................................................................................................ 12
2.3.1 SI Prefixes Table ...................................................................................................................................... 12
2.4 Perimeter ......................................................................................................................................................... 13
2.4.1Perimeter of Circle: ......................................................................................................................................... 13
2.4.4 Perimeter of a Triangle .................................................................................................................................. 14
2.4.5 Area of Plane Shapes ................................................................................................................................... 15
2.4.7 Volume .................................................................................................................................................... 27
2.5 Elements of a circle ......................................................................................................................................... 34
2.5.1 Circumference of a circle: ............................................................................................................................... 34
2.5.2 Radius: ............................................................................................................................................................ 34
2.5.3 Diameter: ........................................................................................................................................................ 35
2.5.4 Chord: ............................................................................................................................................................ 36
2.5.5 Arc:................................................................................................................................................................. 37
2.5.6 Segment: ....................................................................................................................................................... 37

3
2.5.7 Sector: ............................................................................................................................................................ 37
2.5.8 Tangent ........................................................................................................................................................... 38
2.6 Special Right angled Triangles — 45-45-90 and 60-30-90 ...................................................................... 39
2.6.1 Definition of Sine, Cosine, Tangent ................................................................................................................ 39
2.6.2 Special Right angled Triangles — 45-45-90 and 60-30-90 ........................................................................ 39
2.7 Pythagorean Triples - Advanced ...................................................................................................................... 42
2.7.1 Examples of Pythagorean Triples are ............................................................................................................ 42
2.7.2 Properties ..................................................................................................................................................... 43
2.7.3 Constructing Pythagorean Triples .................................................................................................................. 44
2.8 Simple workshop problems involving Pythagoras and right angled triangles ................................................ 45
2.8.1 The Pythagorean Theorem and Right Triangle Definitions ........................................................................... 45
2.8.2 Pythagorean Theorem Examples: Solving Right Triangle Problems .............................................................. 45
2.9 Evaluate and transpose simple formulae associated with workshop problems. ................................................ 48
2.10 Convert minutes and seconds to decimal fractions of a degree. .................................................................... 51
2.10.1 Introduction .............................................................................................................................................. 51
2.10.2 Fractions of Degrees .................................................................................................................................... 51
2.10.3 Converting Degrees, Minutes, & Seconds to Degrees & Decimals ....................................................... 52
2.10.4 Converting Degrees & Decimals to Degrees, Minutes, & Seconds ......................................................... 52
2.11 Line Convections ........................................................................................................................................... 54
Object Line ............................................................................................................................................................... 54
Center Line .............................................................................................................................................................. 54
Hidden Line .............................................................................................................................................................. 54
Break Line ................................................................................................................................................................ 54
Section Line ............................................................................................................................................................. 54
Phantom lines .......................................................................................................................................................... 54
Dimension lines ....................................................................................................................................................... 55
Dimensioning ........................................................................................................................................................... 58
Principles of Dimensioning ...................................................................................................................................... 58

4
Aligned Dimensioning ................................................................................................. Error! Bookmark not defined.
Parallel Dimensioning .............................................................................................................................................. 61
Superimposed Running Dimensions........................................................................................................................ 61
Chain Dimensioning ................................................................................................................................................. 61
Dimensioning by Co-ordinates ................................................................................................................................ 61
Simplified dimensioning by co-ordinates ................................................................................................................ 61
2.12 Drawing Sheet Layout ..................................................................................................................................... 62
Title Block ................................................................................................................................................................ 62
Company Name and Location ................................................................................................................................. 62
Part Name ................................................................................................................................................................ 62
Part Number ............................................................................................................................................................ 62
Drawing Number ..................................................................................................................................................... 62
Scale......................................................................................................................................................................... 62
Date ......................................................................................................................................................................... 62
Tolerances ............................................................................................................................................................... 63
Material & Specification .......................................................................................................................................... 63
Finish ....................................................................................................................................................................... 63
Revisions block ........................................................................................................................................................ 63
Views ....................................................................................................................................................................... 63
Dimensions .............................................................................................................................................................. 63
2.13 Identify Angles .................................................................................................................................................... 66
Acute Angle ............................................................................................................................................................. 66
Obtuse Angle ........................................................................................................................................................... 66
Right angle ............................................................................................................................................................... 66
Reflex Angle ............................................................................................................................................................. 66
2.14 Plane Figures ....................................................................................................................................................... 68
Square...................................................................................................................................................................... 68
Rectangle ................................................................................................................................................................. 68

5
Parallelogram .......................................................................................................................................................... 68
Hexagon ................................................................................................................................................................... 69
Octagon ................................................................................................................................................................... 69
2.15, 2.16 Orthographic projection ........................................................................................................................... 70
Principal views: ........................................................................................................................................................ 70
Angles of projection ................................................................................................................................................ 71
Orthographic Projections ........................................................................................................................................ 71
First-angle projections ............................................................................................................................................. 71
Third-angle projections ........................................................................................................................................... 72
Symbol used to differentiate first angle and third angle Projection ....................................................................... 73
Summing up ............................................................................................................................................................. 73
Isometric Drawing ................................................................................................................................................... 75
Oblique Drawing ...................................................................................................................................................... 75
Cavalier Oblique ...................................................................................................................................................... 75
Cabinet Oblique ....................................................................................................................................................... 75
2.17 Sections ............................................................................................................................................................. 76
Cutting plane lines: .................................................................................................................................................. 76
Labeling Cutting Planes ........................................................................................................................................... 76
Common Mistakes ................................................................................................................................................... 77
Sectional Views ........................................................................................................................................................ 78
Full Sectional ........................................................................................................................................................... 78
Half-Sectional .......................................................................................................................................................... 78
Broken-out or Partial Section .................................................................................................................................. 78
Offset Sections ........................................................................................................................................................ 78
2.18 three-dimensional shapes ................................................................................................................................... 79
Cones ....................................................................................................................................................................... 79
Cylinders .................................................................................................................................................................. 80
Pyramid ................................................................................................................................................................... 80

6
Prisms ...................................................................................................................................................................... 82

7
Certificate in Engineering Skills Math & Drawing
Duration: 60 – Mins
2.1 Simple or Vulgar Fraction
2.1.1 Introduction to Simple or Vulgar Fraction
Vulgar Fraction is a fraction in which there is a horizontal line with one number above it and one number below it. Vulgar fraction consists of a numerator (the number on the top) and a denominator (the number on the bottom), the numerator representing a number of equal parts of the denominator.
Say I have 3 of 10 apples then I will express it as 3/10. The total is written below a horizontal or diagonal line, and the number of parts comprising the fraction (numerator) is written above and Denominator should not 0. e.g: [3/4]
2.1.2 Application of Vulgar Fraction Problems Addition of vulgar fractions 5/7 + 4/9.
These two fractions never have same denominators (lower numbers), so we must first find a common denominator of the two vulgar fractions, before adding them together.
For the denominators here, the 7 and 9, a common denominator (LCM) for both is 63.
From your mathematics knowledge you know that 5/9 becomes 45/63 and 4/9 becomes 28/63. The problem here is to add 45/63 and 28/63. We can directly add the numerators because we have the same denominator. We get 73/63.
Subtraction of vulgar fractions 5/7- 4/7.
These two fractions have same denominators (lower numbers), so common denominator of the two vulgar fractions is the same.
The Factors of Denominator become as 7 because these numbers are same so it will remain the same.

8
For the denominators here, a common denominator (LCM) for both is 7.
With the common denominator, the 5/7 becomes same 5/7 and 4/7 becomes 4/7. The problem here is to subtract 5/7 and 4/7. We can directly subtract the numerators because we have the same denominator. We get 1/7.
Multiplication of Vulgar Fractions 2/3 x 5/7.
This problem can solved by multiplying together the two numerators (the 2 and 5), giving 10, which will be the numerator in our answer. Multiply together the two denominators (the 3 and 7), giving 21 We get an answer of 10/21, The vulgar fraction answer is 10/21.
Division of Vulgar Fractions 2/5 / 3/4.
This problem can solved by converting this function into multiplication, as 2/5 x 4/3 the order of second number is replaced as denominator becomes numerator and numerator as denominator e.g 4/3. then simply multiplying together the two numerators (the 2 and 4), giving 8, which will be the numerator in our answer. Multiply together the two denominators (the 5 and 3), giving 15. We get an answer of 8/15,The vulgar fraction answer is 8/15.
e.g:
2/5 = 2/5 x 4/3 3/4
= 2 x 4 / 5 x 3 = 8 / 15
2.1.3 Decimal Fraction Expressing the fraction in decimal values (denominator a power of 10) is called decimal fraction. 1/2 is expressed as 0.5 in decimal fraction. e.g: [0.45773]
Examples of the Fractions and Decimal Numbers:
Fractional numbers:
1/2, 5/6, 6/9, 51/2, 2/3, 561/2, 7/8
Decimal Numbers:
489.1, 0.002, 0.1, 369.669, 34.81, 0.12, 0.01
Method of Converting a decimal to vulgar fraction: a) Calculate the total numbers after decimal point. b) Remove the decimal point from the number.

9
c) Put 1 under the denominator and annex it with "0" as many as the total in step a. d) Reduce the fraction to its lowest terms. Example-1: Consider0.44 Step a: Total number after decimal point is 2 Step b and c: 44/ 100 Step d: Reducing it to lowest terms: 44/100 = 22/50 = 11/25 2.1.4 Practice Exercises Minimize the following expressions
1) 2/5 + 3/7 = -------- 2) 5/8 + 4/16= -------- 3) 7/8x4/5+5/6x3/5=- --------- 4) 8/9x4/8+4/5x3/4=- --------- 5) 0.3x0.6=- -------- 6) 0.5 / 0.6=- ------- 7) 3/6 / 8/9=- -------- 8) 4/5 - 3/8 = -------- 9) 7/8 - 5/9= --------

10
Certificate in Engineering Skills Math & Drawing
Duration: 30 – Mins
2.2 SI units
(Mathematics & Measurements / Units) any of the units adopted for international use under the System International, now employed for all scientific and most technical purposes. There are seven fundamental units: The meter, kilogram, second, ampere, Kelvin, candela, and mole. All other units are derived by multiplication or division of these units without the use of numerical factors.
2.2.1 Unit of measurement.
A unit of measurement is a definite magnitude of a physical quantity, defined and adopted by convention and/or by law, that is used as a standard for measurement of the same physical quantity any other value of the physical quantity can be expressed as a simple multiple of the unit of measurement.
For example, length is a physical quantity. The meter is a unit of length that represents a definite predetermined length. When we say 10 meters (or 10 m), we actually mean 10 times the definite predetermined length called "meter". The definition, agreement, and practical use of units of measurement have played a crucial role in human endeavor from early ages up to this day. Different systems of units used to be very common. Now there is a global standard, the International System of Units (SI).
2.2.2 Scales and units
The results of a measurement are always expressed on some kind of a scale that is defined in terms of a particular kind of unit . The first scales of distance were likely related to the human body, either directly (the length of a limb) or indirectly (the distance a man could walk in a day). A wide variety of measuring scales came into existence, many for the same quantity (such as length), but adapted to particular activities or trades. Eventually, it became apparent that in order for trade and commerce to be possible, these scales had to be defined in terms of standards that would allow measures to be verified, and, when expressed in different units (bushels and pecks, for example), to be correlated or converted.
2.2.3 Some useful definitions
A quantity in the general sense is a property ascribed to phenomena, bodies, or substances that can be quantified for, or assigned to, a particular phenomenon, body, or substance. Examples are mass and electric charge.

11
A quantity in the particular sense is a quantifiable or assignable property ascribed to a particular phenomenon, body, or substance. Examples are the mass of the moon and the electric charge of the proton.
A physical quantity is a quantity that can be used in the mathematical equations of science and technology.
A unit is a particular physical quantity, defined and adopted by convention, with which other particular quantities of the same kind are compared to express their value.
2.2.4 Base Units of the International System (SI) The General Conference on Weights and Measures has replaced all but one of the
definitions of its base (fundamental) units based on physical objects (such as standard meter sticks or standard kilogram bars) with physical descriptions of the units based on stable properties of the Universe.
2.2.5 BASIC UNITS Following are the seven base units:
Quantity UNIT SYMBOL Length meter m Mass kilogram kg Time second s Electric current ampere A Temperature, thermodynamic Kelvin K Amount of substance mole mol Luminous intensity candela cd
2.2.6 SI derived units
Other quantities, called derived quantities, are defined in terms of the seven base quantities via a system of quantity equations. The SI derived units for these derived quantities are obtained from these equations and the seven SI base units.
The following is a sample set of derived units commonly used in engineering trades
Quantity Unit Area m2
Volume m3 Mass density kg/m3
12
Certificate in Engineering Skills Math & Drawing
Duration: 30 – Mins
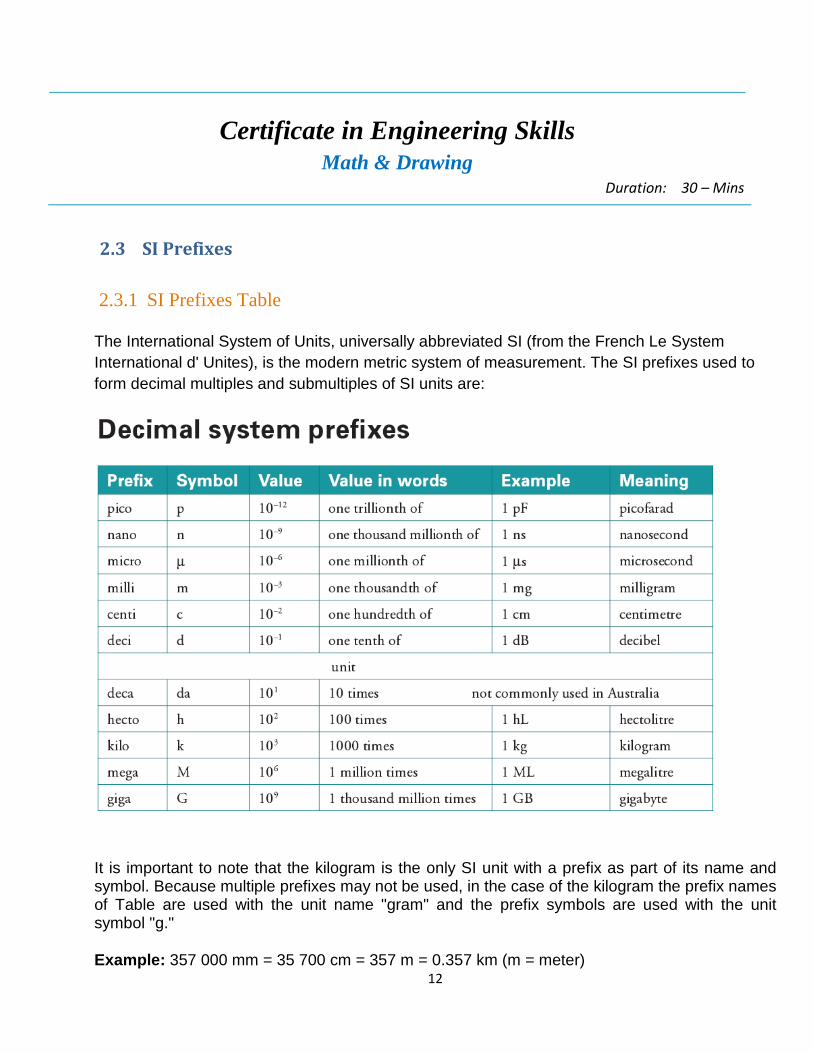
2.3 SI Prefixes
2.3.1 SI Prefixes Table The International System of Units, universally abbreviated SI (from the French Le System International d' Unites), is the modern metric system of measurement. The SI prefixes used to form decimal multiples and submultiples of SI units are:
It is important to note that the kilogram is the only SI unit with a prefix as part of its name and symbol. Because multiple prefixes may not be used, in the case of the kilogram the prefix names of Table are used with the unit name "gram" and the prefix symbols are used with the unit symbol "g."
Example: 357 000 mm = 35 700 cm = 357 m = 0.357 km (m = meter)

13
Certificate in Engineering Skills Math & Drawing
Duration: 120 – Mins
2.4 Perimeter
A perimeter is a path that surrounds an area. The word comes from the Greek peri
(around) and meter (measure). The term may be used either for the path or its length - it can be thought of as the length of the outline of a shape.
Perimeters can be measured in millimeters (mm), centimeters (cm), meters (m) and kilometers (km). These units are related as follows:
2.4.1Perimeter of Circle: The perimeter of a circle is called the circumference . The circumference is the distance around the circle.
The circumference, C, of a circle is given by the formula
where r is the radius of the circle, and

14
Example 1
A circular swimming pool has a radius of 14 m. Find the circumference of the pool.
Solution:
So, the circumference of the pool is 88 m.
Note:
So, the circumference of the flower-bed is 56.5487 m.
2.4.4 Perimeter of a Triangle
The perimeter, P, of a triangle is given by the formula:
P = a + b + c where a, b and c are the side lengths of the triangle

15
Example Find the perimeter, P, of the triangle shown.
Solution:
So, the perimeter is 24 cm.
2.4.5 Area of Plane Shapes
Definition of Area
The definition of area (in mathematics) is the inside space of a shape or boundary. Area is also used to measure the outermost surface of an object.
Area of Plane Shapes
Triangle Area = ½b × h
b = base h = vertical height
Square Area = a2
a = length of side
Rectangle Area = w × h
w = width h = height
Circle Area = πr2
Circumference=2πr r = radius

16
Example: What is the area of this rectangle?
The formula is: Area = w × h
w = width h = height
We know w = 5 and h = 3, so:
Area = 5 × 3 = 15
Problems Related To Area:
Example 1: The radius of a circle is 3 inches. What is the area?
Solution:
= 3.14 · (3 in) · (3 in)
= 3.14 · (9 in2)
= 28.26 in2
Example 2: The diameter of a circle is 8 centimeters. What is the area?
Solution: A = πd2 /4
=3.141x82 /4
= 3.141 x 64/4
=3.141 x 16
= 50.256 sq cm
Example 3: The area of a circle is 78.5 square meters. What is the radius?

17
Solution:
78.5 m2 = 3.14 · ·
78.5 m2 ÷ 3.14 = ·
25 m2 = ·
= 5 m
Summary: Given the radius or diameter of a circle, we can find its area. We can also find the radius (and diameter) of a circle given its area. The formulas for the diameter and area of a circle are listed below:
or
Example 1 : Find the area of an acute triangle with a base of 15 inches and a height of 4 inches.
Solution :
= · (15 in) · (4 in)
= · (60 in2)
= 30 in2
Example 2: Find the area of a right triangle with a base of 6 centimeters and a height of 9 centimeters.
Solution:
= · (6 cm) · (9 cm)
= · (54 cm2)

18
= 27 cm2
Example 3: Find the area of an obtuse triangle with a base of 5 inches and a height of 8 inches.
Solution:
= · (5 in) · (8 in)
= · (40 in2)
= 20 in2
Example 4: The area of a triangular-shaped mat is 18 square feet and the base is 3 feet. Find the height. (Note: The triangle in the illustration to the right is NOT drawn to scale.)
Solution: In this example, we are given the area of a triangle and one dimension, and we are asked to work backwards to find the other dimension.
18 ft2 = · (3 ft) ·
Multiplying both sides of the equation by 2, we get:
36 ft2 = (3 ft) ·
Dividing both sides of the equation by 3 ft, we get:
12 ft =
Commuting this equation, we get:
= 12 ft
Find the area of a square with each side measuring 2 inches.
Solution:

19
= (2 in) · (2 in) = 4 in2
Example 2 : A rectangle has a length of 8 centimeters and a width of 3 centimeters. Find the area.
Solution:
= (8 cm) · (3 cm) = 24 cm2
In Examples 1 and 2, we found the area given the dimensions of the rectangle. Let's look at some examples in which we are given the area of the rectangle, and are asked to work backwards to find the missing dimension.
Example 3: The area of a square is 9 square centimeters. How long is one side?
Solution:
9 cm2 = ·
Since 3 · 3 = 9, we get 3 cm · 3 cm = 9 cm2. So must equal 3 cm.
= 3 cm
Example 4: The area of a rectangle is 12 square inches and the width is 3 inches. What is the length?
Solution:
12 in2 = · 3 in
Since 4 · 3 = 12, we get (4 in) · (3 in) = 12 in2. So must equal 4 in.
= 4 in

20
2.4.6 Area of solid shapes
Area is the measure of how much exposed area a solid object has, expressed in square units. The area is the sum of the areas of the faces or curved surface of a three-dimensional object. The area also includes any unseen base area.
Area of a Cube = 6 a 2
(a is the length of the side of each edge of the cube)
In words, the area of a cube is the area of the six squares that cover it. The area of one of them is axa, or a 2 . Since these are all the same, you can multiply one of them by six, so the area of a cube is 6 times one of the sides squared. Area of a Rectangular Prism = 2ab + 2bc + 2ac
(a, b, and c are the lengths of the 3 sides)
In words, the area of a rectangular prism is the area of the six rectangles that cover it. But we don't have to figure out all six because we know that the top and bottom are the same, the front and back are the same, and the left and right sides are the same.
The area of the top and bottom (side lengths a and c) = axc. Since there are two of them, you get 2ac. The front and back have side lengths of b and c. The area of one of them is bxc, and there are two of them, so the area of those two is 2bc. The left and right side have side lengths of a and b, so the area of one of them is axb. Again, there are two of them, so their combined area is 2ab.
Area of a Cylinder = 2 πr 2 + 2 πr h
(h is the height of the cylinder, r is the radius of the top)
Area = Areas of top and bottom +Area of the side
Area = 2(Area of top) + (perimeter of top)x height
Area = 2(π r 2) + (2 π r)x h

21
In words, the easiest way is to think of a can. The area is the areas of all the parts needed to cover the can. That's the top, the bottom, and the paper label that wraps around the middle.
You can find the area of the top (or the bottom). That's the formula for area of a circle (π r2). Since there is both a top and a bottom, that gets multiplied by two.
The side is like the label of the can. If you peel it off and lay it flat it will be a rectangle. The area of a rectangle is the product of the two sides. One side is the height of the can, the other side is the perimeter of the circle, since the label wraps once around the can. So the area of the rectangle is (2 π r)x h.
Add those two parts together and you have the formula for the area of a cylinder.
Area = 2(π r 2) + (2 π r)x h
Tip! Don't forget the units.
These equations will give you correct answers if you keep the units straight. For example - to find the area of a cube with sides of 5 inches, the equation is:
Area = 6x (5 inches) 2
= 6x (25 square inches)
= 150 sq. inches
Problems Related to Area:
Area of Circle
Formula:
Area (area) of circle (A) = ππππ r2 square unit.
A is area of circle.
r is radius of circle.
Example # 1 : Find the area of circle whose radius is 3cm.
Sol : Given:
Radius (r) =3cm
Formula:
Area (area) of circle (A) = ππππ r2 square unit.
A is area of circle.
r is radius of circle.
= 3.14 x 32
=3.14 x 9
= 28.26 cm2

22
Example # 2. Find the area of circle whose radius is 2.5m.
Sol: Given:
Radius (r) =2.5m
Formula:
Area (area) of circle (A) = ππππ r2 square unit.
A is area of circle.
r is radius of circle.
= 3.14 x 2.52
=3.14 x 6.25
= 19.625m2
Example # 4. Find the area of circle whose diameter is 12feet.
Sol: Given:
Diameter (d) =12 feet
Radius(r) =d/2 = 12/2 = 6 feet
Formula:
Area (area) of circle (A) = ππππ r2 square unit.
A is area of circle.
r is radius of circle.
= 3.14 x 62
=3.14 x 36
= 113.04m2
Example # 5. Find the area of circle whose diameter is 8cm.
Sol: Given:
Diameter (d) =8cm
Radius(r) =d/2 = 8/2 = 4 feet
Area (area) of circle (A) = ππππ r2 square unit.
A is area of circle.
r is radius of circle.
= 3.14 x 42
=3.14 x 16
=50.24cm2
Area Circle-practice Problems:
1. Find the area of circle whose radius is 7.2m.
Answer: area = 162.77 m2

23
2. Find the area of circle whose radius is 5.5 cm.
Answer: area = 94.985 cm 2
3. Find the area of circle whose diameter is 15cm.
Answer: area = 176.625cm 2
Area of a Triangle:
Area of a Triangle when all three Sides are Given
s= half parameter= ½(a+b+c) where a,b and c are sides of the triangle.
Let’s take example as side1(a) = 3cm side2(b) = 4cm , side3(c) = 5cm
Here we calculate “s” first ….
S= (3+4+5)/2
= 12/2 = 6… now we substitute it in the Area formula above along with values of “a”, “b” and “c”
A = √ 6(6-3)(6-4)(6-5) = √6x3x2x1 =√36
Area = 6 cm2
Area of a Triangle when Base and side are Given
When base and height is given, for exam[ple base = 20 and height = 10
here we just substitute the values into formula…for example taking above figure we get
Area = (1/2) x 20 x 10 = (200/2) = 100 cm2
Examples on Area of Rectangle:
Example 1: Find the area of a rectangular field 15 m length and 8 m width.
Solution: The area of a rectangle is equal to its length multiplied by its width.
= 15 x 8
Area = 90 m2
Area ∆∆∆∆ = √√√√s(s-a)(s-b)(s-c)
∆ = ½ x b x h
Area = Length x width

24
Example 2:
Find the area of a rectangular field 8 m length and 12 m width.
Solution: The area of a rectangle is equal to its length multiplied by its width.
Area = Length x width
= 8 x 12
= 96 m2
Example 3:
Find the area of a rectangular field 5.2 cm length and 3.7 cm width.
Solution: The area of a rectangle is equal to its length multiplied by its width.
Area = Length x width
= 5.2 x 3.7
= 19.24 cm2
Example 4:
Find the area of a rectangular field 7.3 cm length and 4.6 cm width.
Solution: The area of a rectangle is equal to its length multiplied by its width.
Area = Length x width
= 7.3 x 4.6
= 33.58 cm2
Example 5:
Find the area of a rectangular field 3/2 in length and 8/3 in width.
Solution: The area of a rectangle is equal to its length multiplied by its width.
Area = Length x width
= (3/2) x (8/3)
= 4 in2
Area of Square Cube:
Area is the measure of how much exposed of area a solid object has, expressed in square units. Mathematical description of the area is considerably more involved than the definition of arc length of a curve. We can find the area for only three dimensional objects. The square cube is a three dimensional object. All angles in square cube are right angle and its all

25
opposite faces are equal in length. In this article we shall discus about how to calculate area of square cube.
Example of Square Cube:
The total area of cube can be calculated by adding the area of its six faces. Sides lengths of cube are same in length.
Example # 1
Find the area of cube with side length 5cm
Solution: Given:
Side length (a) =5cm
Area of cube (A) = 6a2 square unit.
Substitute the value in the formula and simplify.
= 6 x 52
= 6 x 25
=150
Area of cube (A) = 150 cm2
Example # 2
Find the area of cube with side length 6cm
Solution: Given:
Side length (a) =6cm
Area of cube (A) = 6a2 square unit.
Substitute the value in the formula and simplify.
= 6 x 62
= 6 x 36
=216
Area of square (A) = 216 cm2
Area of Cube A = 6a 2 square unit.
A =area.
a= side length
26
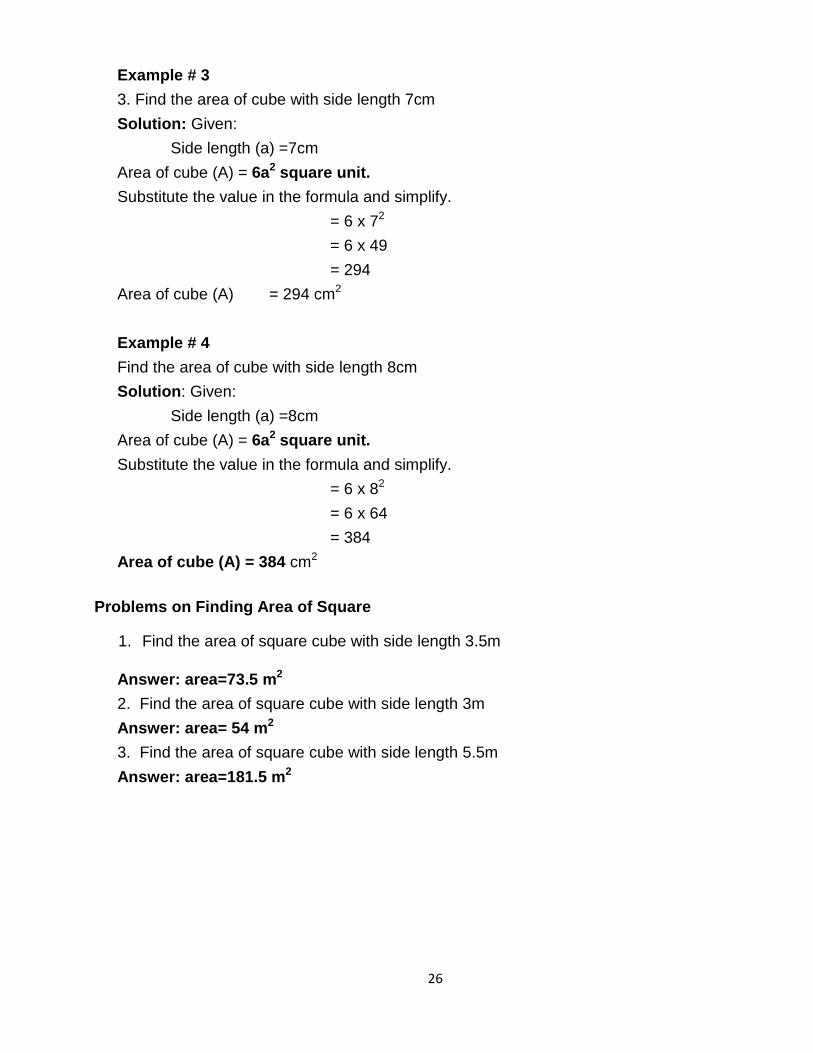
Example # 3
3. Find the area of cube with side length 7cm
Solution: Given:
Side length (a) =7cm
Area of cube (A) = 6a2 square unit.
Substitute the value in the formula and simplify.
= 6 x 72
= 6 x 49
= 294
Area of cube (A) = 294 cm2
Example # 4
Find the area of cube with side length 8cm
Solution : Given:
Side length (a) =8cm
Area of cube (A) = 6a2 square unit.
Substitute the value in the formula and simplify.
= 6 x 82
= 6 x 64
= 384
Area of cube (A) = 384 cm2
Problems on Finding Area of Square
1. Find the area of square cube with side length 3.5m
Answer: area=73.5 m 2
2. Find the area of square cube with side length 3m
Answer: area= 54 m 2
3. Find the area of square cube with side length 5.5m
Answer: area=181.5 m 2

27
2.4.7 Volume
Definition of Volume
The amount of space occupied by an object in three dimensions is called its volume.
Volume Formulas
Note: "ab" means "a" multiplied by "b". "a2" means "a squared", which is the same as "a" times "a". "b3" means "b cubed", which is the same as "b" times "b" times "b".
Be careful!! Units count. Use the same units for al l measurements
Examples
A cube is a three-dimensional figure with six equal square faces
If a is the length of one of its sides
Cube = a3
Rectangular prism = a b c
A cylinder is a solid with two equal circles joined by a curved surface.
If the radius of the circular base is r and the height is h then,
Volume formula of the cube = a3
Rectangular prism = w (width), h (height), l (lengt h)
Cylinder = b h = ππππ r 2 h

28
Examples on Volume of Cube
Examples
1. Find the volume of a cube whose length is 8 cm.
Solution:
Here,
Length, l = 8 cm
We know
8 x 8 x 8 = 83 volume, V = l3 = 512 cm
2. If the volume of a cube is 2197 cu.cm then find the length of the edges.
Solution:
Here,
Volume, V = 2197 cu. cm
We know
V = l3 = 133 or, l = V = (2197) = (13 cm.
3. If the volume of a cube is 15625 cu. cm. How many cubes of sides 5 cm can be cut out of it.
Solution:
If V be the volume of the 3 bigger cube then V = 15625 cu cm
Let v and l be the volume and length respectively of the smaller cube to be cut.
Therefore l = 5 cm and v = l3 = 5 x 5 x 5 = 125 cu cm3= 5
Required number of cube = 15625/125 = 125
Therefore 125 cubes can be cut out of the bigger cube.
Volume of a Triangular Prism
Formula for volume of a triangular prism:
Below formula is used for finding the volume of a triangular prism.
Formula:
Volume of a triangular prism = lbh, Where l,b and are h are length, base and height of the triangular prism.
Or = area of base × h

29
Let us see some problem to find volume of a triangular prism using formula.
Example 1:
Find the volume of a triangular prism whose length is 3cm, base is 3cm and height is 3cm?
Solution:
Given: l = 3, b = 3, h = 3
Formula:
Volume of a triangular prism = (lb)h
= (3×3)3
= (27)
= 13.5cm3
Additional Examples for Volume of a Triangular Pris m Formula:
Example 2:
Find the volume of a triangular prism whose length is 3cm, base is 4cm and height is 5cm?
Solution:
Given: l = 3, b = 4, h = 5
Formula:
Volume of a triangular prism = (lb)h
= (3×4)5
= (60)
= 30cm3
Example 3:
Find the volume of a triangular prism whose length is 4cm, base is 5cm and height is 7cm?
Solution:
Given: l = 4, b = 5, h = 7
Formula:
Volume of a triangular prism = (lb)h
= (4×5)7

30
= (140)
= 70cm3
Example 4 :
Find the volume of a triangular prism whose length is 6cm, base is 7cm and height is 6cm?
Solution:
Given: l = 6, b = 7, h = 6
Formula:
Volume of a triangular prism = (lb)h
= (6×7)6
= (252)
= 126cm3
Volume of Cylinder:
Formula to Find the Volume of Cylinder:
The diagrammatic representation of a cylinder is shown below:
Example Problems for Finding Volume of a Cylinder:
Q: 1 Find the volume of a cylinder with radius 12 c m and height 19 cm
Given: radius r = 12 cm
height h = 19 cm
Sol:
= 3.14 (12)2 19
= 3.14 (144) 19
= 8591.04 cm3
Ex:2 Find the volume of a cylinder with radius 8 cm and height 13 cm
Formula for finding volume of a cylinder:
Volume of a cylinder = r2 h
Where, r ----> radius
h----->height
r
h
Volume of a cylinder = r2 h

31
Given: radius r = 8 cm
height h = 13 cm
Sol:
Volume of a cylinder = r2 h
= 3.14 (8)2 13
= 3.14 (64) 13
= 2612.48 cm3
Ex:3 Find the volume of a cylinder with radius 5 cm and height 12 cm
Given: radius r = 5 cm
height h = 12 cm
Sol:
Volume of a cylinder = r2 h
= 3.14 (5)2 12
= 3.14 (5) 12
= 188.4 cm3
Ex:4 The radius and height of a cylinder is 3 inch and 5 inch respectively. Find the volume of the cylinder in liters.
Sol:
Volume of the cylinder = πr^2h cubic units
r = 3 inch
h = 5 inch
Volume = 3.14 x 3 x 3 x 5
= 141.3 cubic inch
So the volume of the cylinder is 141.3 cubic inch.
To convert the volume from cubic inch to liters,
1 cubic inch = 0.016387064 liter
So, 141.3 cubic inch = 141.3 x 0.016387064 liter
= 2.31549214
So, the volume of the given cylinder is 2.32 liters.
Ex:5 The radius and height of a cylinder tank is 1 3 feet and 50 feet respectively. Find the volume of the tank in liters.
Sol:
Volume of cylinder = ∏ r2 h
r = 13 feet
h = 50 feet
Volume = 3.14 x 13 x 13 x 50
= 26533 cubic feet
So the volume of the tank is 26533 cubic feet.
32
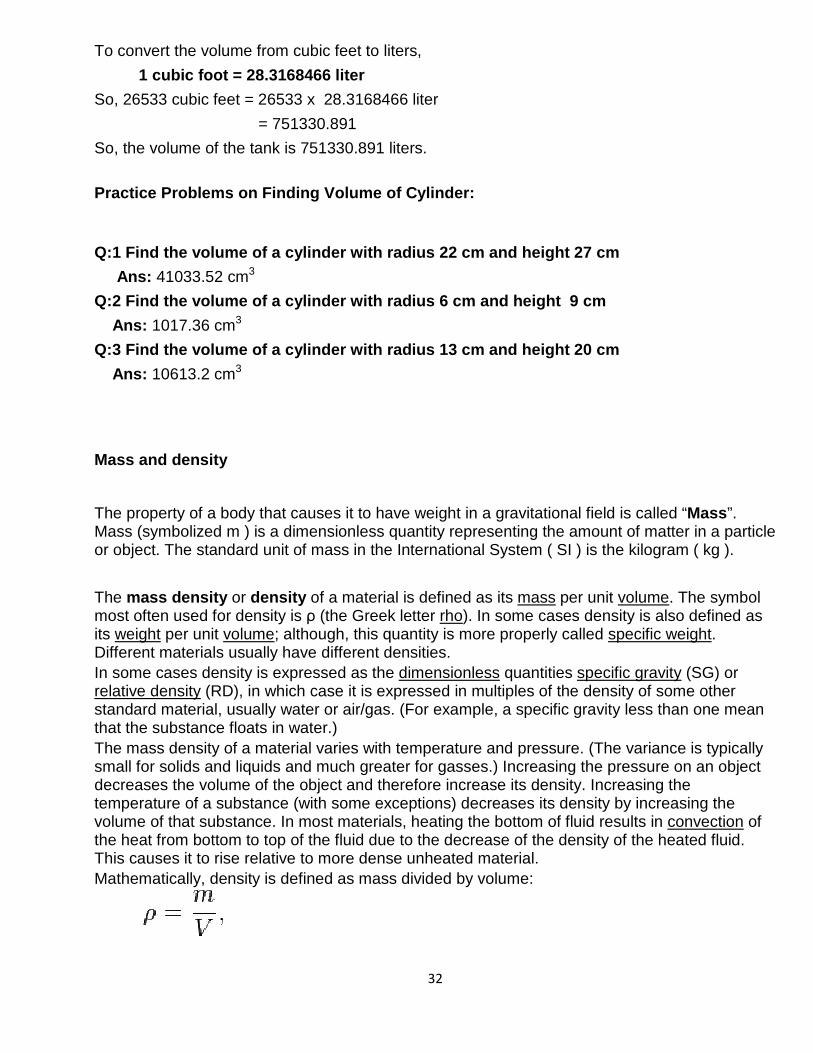
To convert the volume from cubic feet to liters,
1 cubic foot = 28.3168466 liter
So, 26533 cubic feet = 26533 x 28.3168466 liter
= 751330.891
So, the volume of the tank is 751330.891 liters.
Practice Problems on Finding Volume of Cylinder:
Q:1 Find the volume of a cylinder with radius 22 cm and height 27 cm
Ans: 41033.52 cm3
Q:2 Find the volume of a cylinder with radius 6 cm and height 9 cm
Ans: 1017.36 cm3
Q:3 Find the volume of a cylinder with radius 13 cm and height 20 cm
Ans: 10613.2 cm3
Mass and density
The property of a body that causes it to have weight in a gravitational field is called “Mass ”. Mass (symbolized m ) is a dimensionless quantity representing the amount of matter in a particle or object. The standard unit of mass in the International System ( SI ) is the kilogram ( kg ).
The mass density or density of a material is defined as its mass per unit volume. The symbol most often used for density is ρ (the Greek letter rho). In some cases density is also defined as its weight per unit volume; although, this quantity is more properly called specific weight. Different materials usually have different densities. In some cases density is expressed as the dimensionless quantities specific gravity (SG) or relative density (RD), in which case it is expressed in multiples of the density of some other standard material, usually water or air/gas. (For example, a specific gravity less than one mean that the substance floats in water.) The mass density of a material varies with temperature and pressure. (The variance is typically small for solids and liquids and much greater for gasses.) Increasing the pressure on an object decreases the volume of the object and therefore increase its density. Increasing the temperature of a substance (with some exceptions) decreases its density by increasing the volume of that substance. In most materials, heating the bottom of fluid results in convection of the heat from bottom to top of the fluid due to the decrease of the density of the heated fluid. This causes it to rise relative to more dense unheated material. Mathematically, density is defined as mass divided by volume:

33
Where ρ is the density, m is the mass, and V is the volume. From this equation, mass density must have units of a unit of mass per unit of volume. As there are many units of mass and volume covering many different magnitudes there are a large number of units for mass density in use. The SI unit of kilogram per cubic meter (kg/m³) and the cgs unit of gram per cubic centimeter (g/cm³) are probably the most common used units for density. Example: IF mass of Density is 5 kg/m3 and volume is 10m3, then find out

34
Certificate in Engineering Skills Math & Drawing
Duration: 60 – Mins
2.5 Elements of a circle
Following are the elements of circle:
Center: divider while drawing a circle, using the compass, you move only the pencil-holding arm. the other arm is fixed at a point. the fixed point is called the center of the circle.
2.5.1 Circumference of a circle: The perimeter, that is, the length of the outer boundary of the circle is known as the Circumference. Can we measure the circumference using a ruler? no. . . why not? It is because the circumference is not a line segment. it is a single closed curve. then you may wonder how one measures the circumference of a circle? there are so many ways. Let us investigate a very simple method. Take a piece of thread. Place one end at point p of the circle. take the remaining thread and run it along the circumference until you come back to p. then take the thread and measure it with a ruler. this gives the measure of the circumference of the circle.
2.5.2 Radius:
Now, join the center o of the circle to any point p on the circle. you get a line
segment . this is called the Radius Of the circle.
Now, take another point, q, on the circle, and join oq. what is oq? This is also a line segment. Now,
measure And .

35
What can you say about And ? They are equal in length. This fixed distance between the center and any other point on the boundary of the circle is known as the radius of the circle.
2.5.3 Diameter:
In the adjacent figures, the points p, o, and q are collinear, as they lie on the same straight line. the line segment pq (
) passes through the center o.
Any line segment that passes through the center of the circle and has the end points (p) and (q) on the perimeter of the circle is called the Diameter .
In the figure, , And Are all diameters. so it is obvious that we can draw many diameters. they would all be of equal length.
Let us draw circles of different sizes, with a radius and a diameter in each circle.
Measure the radius and the diameter. tabulate the values.
Circle Length of the radius
R in cms
Length of the diameter
D in cMs.
Relation
(i) 3 6 = 2
(ii) 4 8 = 2
(iii) 6 12 = 2
What do you infer from the above table?
That is, diameter = 2 (radius)

36
Therefore, in the case of circles, we have
Length of diameter = 2 x length of radius
That is, d = 2r
A diameter divides the circle into two equal parts, each part is known as a Semi-circle.
We denote a circle by stating its center and the measure of its radius. if the center is 'o' and radius is 'r'.
we write this as c(o, r)
If the center is o' and radius is 5
We write this as c(o', 5) and so on.
2.5.4 Chord: Consider the line segments ab and cd in the given circle. do they pass through the center of the circle?
No. But their end points a, b and c, d are on the circle.
Therefore, A straight-line segment joining two points on the c ircumference of a circle is called a chord of the circle.
A diameter is also a straight-line segment joining two points on the perimeter of a circle. Then, can a diameter be considered a chord? Obviously, a diameter of a circle is also a chord of the circle.
We can say that,

37
• A chord passing through the center of the circle is a diameter of the circle.
• The diameter is the longest chord possible in a circle.
• An infinite number of chords, radii (plural of radius) and diameters can be drawn in a circle.
2.5.5 Arc: any part of the circumference of a circle is called an arc of the circle.
We denote a circle with center o and radius r. Here, ab is an arc of the circle. We write this as . Minor arc and major arc:
If (arc ab) is less than the semi-circle, it is known as the Minor arc . if Is greater than the semi circle, it is known as the Major arc .
Therefore, in the figure we have,
= Minor arc
= major arc
Just to differentiate between minor arc and major arc, we insert two points p and q, usually, we name an arc of a circle by means of three points of the arc--two end points and one point in between them.
Note: A semi-circle is also an arc.
2.5.6 Segment:
A chord that divides the circle into two parts is c alled a segment . The segment containing the minor arc is known as Minor segment , and the segment containing the major arc Is known as Major segment .
2.5.7 Sector: A sector of a circle is the part that lies between an arc and the two radii joining the end points of the arc to the center.

38
Here, oa and ob are radii and ab is an arc. Thus, the part oab is called a sector.
So far, we have looked at the various elements of a circle. Now, let us look at the some of the other terms associated with a circle.
Interior and exterior of a circle:
A circle divides the plane into three regions:
(a) interior of the circle
(b) exterior of the circle
(c) the circle
Here p lies in the interior; q on the circle and r in the exterior of the circle.
The Interior Of a circle is the set of all points of the plane whose distance from the center is less than the radius.
The Exterior Is the set of all points of the plane whose distance from the center is greater than the radius.
2.5.8 Tangent. In fig ‘A’ we can see a perpendicular line PQ is touching with a circle at two points ‘a’ & ‘b’. Another perpendicular dotted line is also touching with circle at two points ‘a’ & ‘b’, but the distance is less than the first line from the circle point ‘c’. Another perpendicular line is touching outside the circle at one point ‘c’ is known as Tangent. Properties of tangent .
1) A tangent to a circumference is perpendicular to a radius, drawing to a point of tangency 2) From a point, lying outside a circle, it can be drawn two tangents to the same circumference; their segments lengths are equal
A
B

39
Certificate in Engineering Skills Math & Drawing
Duration: 60 – Mins
2.6 Special Right angled Triangles — 45-45-90 an d 60-30-90
2.6.1 Definition of Sine, Cosine, Tangent
The sine of an angle is the ratio of the length of the opposite side to the length of the hypotenuse. In our case
Note that this ratio does not depend on size of the particular right triangle chosen, as long as it contains the
angle A, since all such triangles are similar.
The cosine of an angle is the ratio of the length of the adjacent side to the length of the hypotenuse. In our
case
The tangent of an angle is the ratio of the length of the opposite side to the length of the adjacent side
(called so because it can be represented as a line segment tangent to the circle).[1] In our case
2.6.2 Special Right angled Triangles — 45-45-90 and 60-30-90 A triangle with one right angle is called a right triangle. The side opposite the right angle is called the hypotenuse of the triangle. The other two sides are called legs. The other two angles are always acute and complementary.

40
The triangle above has side c as its hypotenuse, sides a and b as its legs. Angle C is its right angle. Angles A and B are acute and complementary. . There are two types of right angled triangles that every geometry student should know very well. One is the right angled triangle formed when an altitude is drawn from a vertex of an equilateral triangle, forming two congruent right triangles.
The angles of the triangle will be 30, 60, and 90 degrees, giving the triangle its name: 30-60-90 triangle. The ratio of side lengths in such triangles is always the same. 30-60-90 Triangle Theorem – In a 30-60-90 triangle, the hypotenuse is twice as long as the shorter leg, and the longer leg is times as long as the shorter leg. If the leg opposite the 30 degree angle is of length , the leg opposite the 60 degree angle will be of , and the hypotenuse across from the right angle will be .
Here is an example. There is a lot going on.
41
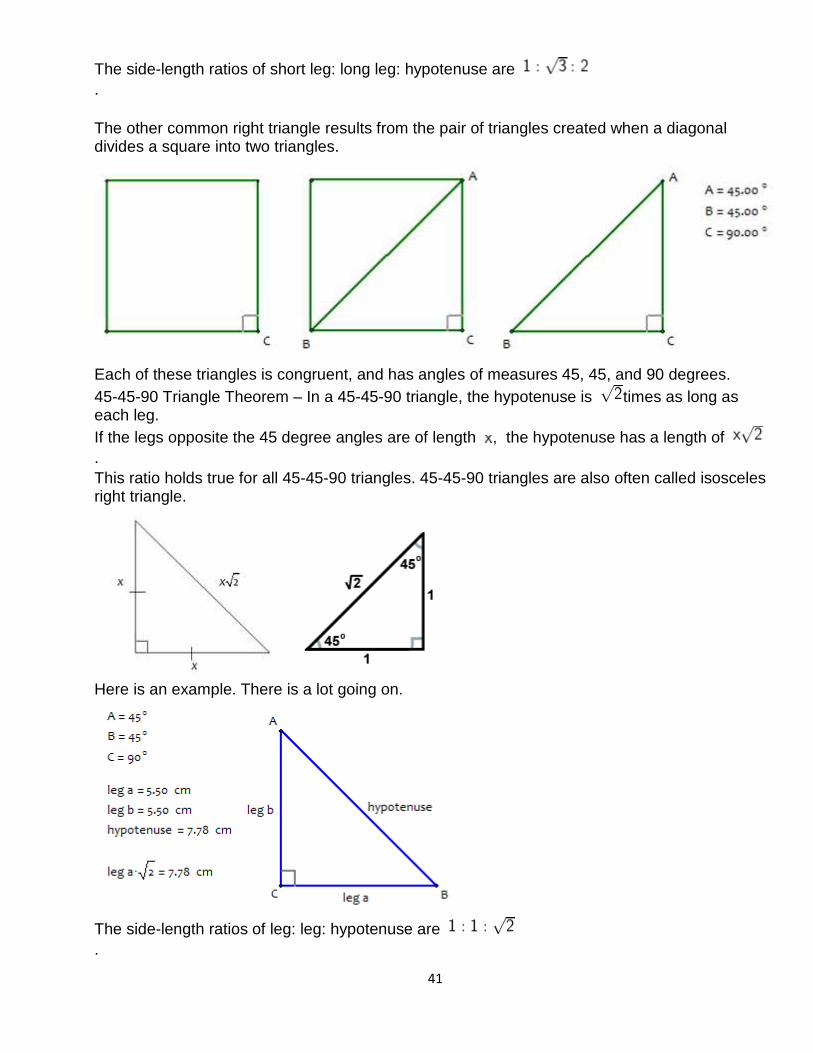
The side-length ratios of short leg: long leg: hypotenuse are . The other common right triangle results from the pair of triangles created when a diagonal divides a square into two triangles.
Each of these triangles is congruent, and has angles of measures 45, 45, and 90 degrees. 45-45-90 Triangle Theorem – In a 45-45-90 triangle, the hypotenuse is times as long as each leg. If the legs opposite the 45 degree angles are of length , the hypotenuse has a length of . This ratio holds true for all 45-45-90 triangles. 45-45-90 triangles are also often called isosceles right triangle.
Here is an example. There is a lot going on.
The side-length ratios of leg: leg: hypotenuse are .

42
Certificate in Engineering Skills Math & Drawing
Duration: 60 – Mins
2.7 Pythagorean Triples - Advanced
A "Pythagorean Triple" is a set of positive integers, a, b and c that fits the rule:
And when you make a triangle with sides a, b and c it will be a right angled triangle (see Pythagoras' Theorem for more details):
Note:
• c is the longest side of the triangle, called the "hypotenuse" • a and b are the other two sides
2.7.1 Examples of Pythagorean Triples are:
3, 4, 5 5, 12, 13 9, 40, 41
32 + 42 = 52 52 + 122 = 132 92 + 402 = 412
9 + 16 = 25 25 + 144 = 169 (try it yourself)
The set of Pythagorean Triples is endless. It is easy to prove this with the help of the first Pythagorean Triple, (3, 4, and 5).Let n be any integer greater than 1, then 3n, 4n and 5n would also be a set of Pythagorean Triple. This is true because: (3n)2 + (4n)2 = (5n)2

43
Examples:
n (3n, 4n, 5n)
2 (6,8,10)
3 (9,12,15)
... ... etc ...
So, you can make infinite triples just using the (3,4,5) triple. Euclid's Proof that there are Infinitely Many Pytha gorean Triples
However, Euclid used a different reasoning to prove the set of Pythagorean Triples is unending. The proof was based on the fact that the difference of the squares of any two consecutive numbers is always an odd number. Examples:
22 - 12 = 4-1 = 3 (an odd number), 152 - 142 = 225-196 = 29 (an odd number)
And also every odd number can be expressed as a difference of the squares of two consecutive numbers. Have a look at this table as an example:
n n2 Difference
1 1
2 4 4-1 = 3
3 9 9-4 = 5
4 16 16-9 = 7
5 25 25-16 = 9
... ... ...
And there are an infinite number of odd numbers. There is an infinite number of odd numbers. Since the perfect squares form a subset of the odd numbers, and a fraction of infinity is also infinity, it follows that there must also be an infinite number of odd squares. Therefore, there are an infinite number of Pythagorean Triples.
2.7.2 Properties It can be observed that a Pythagorean Triple always consists of:
• all even numbers, or • two odd numbers and an even number.

44
A Pythagorean Triple can never be made up of all odd numbers or two even numbers and one odd number. This is true because:
• (i) The square of an odd number is an odd number and the square of an even number is an even number.
• (ii) The sum of two even numbers is an even number and the sum of an odd number and an even number is in odd number.
Therefore, if one of a and b is odd and the other is even, c would have to be odd. Similarly, if both a and b are even, c would be an even number too!
2.7.3 Constructing Pythagorean Triples It is easy to construct sets of Pythagorean Triples. When m and n are any two positive integers (m < n):
• a = n2 - m2 • b = 2nm • c = n2 + m2
Then, a, b, and c form a Pythagorean Triple. Example: m=1 and n=2
• a = 22 - 12 = 4 - 1 = 3 • b = 2 × 2 × 1 = 4 • c = 22 + 12 = 5
Thus, we obtain the first Pythagorean Triple (3,4,5).
Similarly, when m=2 and n=3 we get the next Pythagorean Triple (5,12,13).

45
Certificate in Engineering Skills Math & Drawing
Duration: 30 – Mins
2.8 Simple workshop problems involving Pythagoras and right angled
triangles.
2.8.1 The Pythagorean Theorem and Right Triangle Definitions The Pythagorean Theorem, named after the Greek mathematician Pythagoras, is a formula used to calculate the length of the sides of a right triangle. The theorem states:
• In a right triangle, the square of the hypotenuse is equal to the sum of the squares of the legs.
A right triangle is a triangle containing a right angle (90 degrees). The hypotenuse is the longest side of a right triangle, the one opposite the right angle. The legs are the two shorter sides, which meet at the right angle. By convention, the legs are usually labeled a and b and the hypotenuse is labeled c. Therefore, the Pythagorean theorem formula is as follows:
• a² + b² = c²
2.8.2 Pythagorean Theorem Examples: Solving Right Triangle Problems Pythagorean Theorem problems start by giving you the length of two of the sides of a right triangle. Using the Pythagorean formula, it is possible to calculate the length of the third side. Example 1
Find the length of the missing side:

46
The hypotenuse (side opposite the right angle) is the missing side. If this side is c, then by Pythagoras theorem c2 = 72 + 242 = 49 + 576 = 625 c = √625 = 25 Example 2
Find the length of the missing side:
The hypotenuse is the side of length 10. If the missing side is a, then by pythagoras theorem 102 = a2 + 62 Rearrange to solve for a a2 = 102 − 62 = 100 − 36 = 64 a = √64 = 8 Example 3
Find the length of the missing side:
The hypotenuse is the side of length 29. If the missing side is b, then by pythagoras theorem 292 = b2 + 212 Rearrange to solve for b b2 = 292 − 212 = 841− 441 = 400 b = √400 = 20 Example 4: Find the hypotenuse A right triangle has legs of length 3 and 4. What is the length of the hypotenuse? How to solve:

47
Name the legs a and b and the hypotenuse c. We are given that a = 3 and b = 4. Add these values to the formula and solve for c: 3² + 4² = c² 9 + 16 = c² 25 = c² Now take the square root of both sides of the equation to solve for c. The square root of 25 is 5. Answer: c = 5 Example 5 : Find one of the legs A right triangle has a leg of length 5 and a hypotenuse of length 13. What is the length of the other leg? How to solve: Name the known leg a, the unknown leg b, and the hypotenuse c. We are given that a = 5 and c = 13. Add these values to the formula and solve for b: 5² + b² = 13² 25 + b² = 169 Using algebra, subtract 25 from both sides: b² = 144 Now take the square root of both sides to solve for b. The square root of 144 is 12. Answer: b = 12 Example 6 TV Screen Width You want to purchase a 30" television. You know that TV and monitor screens are measured across the diagonal, and you also know that this screen is 18" high. How wide is the screen horizontally? How to solve: The TV screen is a rectangle, and the diagonal is 30". The screen's height and width make up two legs of a right triangle with the diagonal as the hypotenuse. The problem gives us the length of the hypotenuse and one of the legs. Therefore, name the height a, the width b, and the diagonal c. Add these values to the formula and solve for b: 18² + b² = 30² 324 + b² = 900 Subtract 324 from both sides: b² = 576 Now find the square root of both sides to solve for b (use a calculator to find the square root of large numbers). The square root of 576 is 24. Answer: The screen is 24" wide.

48
Certificate in Engineering Skills Math & Drawing
Duration: 30 – Mins
2.9 Evaluate and transpose simple formulae associated with workshop
problems.
Example # 1
Find the diameter of a circle given that its radius is 5
Solution:
The diameter is always multiply by 2 the length of the radius,
Diameter = 2 x 5 = 10
Example # 2
Find the diameter of a semi circle known that area of the semi circle is 153.86
Solution:
Step 1:
Find the radius of the circle
= 153.86
=
= 49
r2 = 49 x 2 = 9.899
Step 2:
Then calculate the diameter of the circle,
Diameter = 2 * r
= 2 * 9.899
= 19.79800
Therefore, the diameter of the semi circle is 19.798.
Example # 3
Find the diameter of a semi circle known that its radius is 6
Solution:

49
The diameter is always multiply by 2 the length of the radius,
Diameter = 2 x 6 = 12
Example # 4
Find the diameter of a semi circle known that area of the semi circle is 133.04
Solution:
Step 1:
Find the radius of the semi circle
= 113.04
=
r2 = 36 x 2 = 72
r = 8.485
Step 2:
Then calculate the diameter of the semi circle,
Diameter = 2 * r
= 2 *8.485
= 16.97
Therefore, the diameter of the semi circle is 16.97.
Example # 5
Find the diameter of a semi circle known that its radius is 8
Solution:
The diameter is always multiply by 2 the length of the radius,
Diameter = 2 x 8 = 16
Example # 6
Find the diameter of a semi circle known that its radius is 21
Solution:
The diameter is always multiply by 2 the length of the radius,
Diameter = 2 x 21 = 42
Example # 17
Find the diameter of a semi circle known that area of the circle is 1384.74
Solution:
Step 1:
Find the radius of the circle
= 1384.74
r2/2 = 1384.74 / 3.14
r2 = 441 x 2
r2 = 882

50
r = 29.698
Step 2:
Then calculate the diameter of the circle,
Diameter = 2 * r
= 2 * 29.698
= 59.396
Therefore, the diameter of the semi circle is 59.396.
Example # 8
Find the diameter of a semi circle known that its radius is 32
Solution:
The diameter is always multiply by 2 the length of the radius,
Diameter = 2 x 32 = 64
Example # 9
Find the diameter of a semi circle known that its radius is42
Solution:
The diameter is always multiply by 2 the length of the radius,
Diameter = 2 x 42 = 84

51
Certificate in Engineering Skills Math & Drawing
Duration: 30 – Mins
2.10 Convert minutes and seconds to decimal fractions of a degree.
2.10.1 Introduction
Degrees are the units of measurement for angles. There are 360 degrees in any circle, and one degree is equal to 1/360 of the complete rotation of a circle. 360 may seem to be an unusual number to use, but this part of math was developed in the ancient Middle East. During that era, the calendar was based on 360 days in a year, and one degree was equal to one day.
2.10.2 Fractions of Degrees
There are two methods of expressing fractions of degrees.
1. The first method divides each degree into 60 minutes (1° = 60'), then each minute into 60 seconds (1' = 60").
For example, you may see the degrees of an angle stated like this: 37° 42' 17" The symbol for degrees is ° , for minutes is ', and for seconds is ".
2. The second method states the fraction as a decimal of a degree. This is the method we will use.
An example is 37° 42' 17" expressed as 37.7047.
Most scientific calculators can display degrees both ways. The key for degrees on my calculator looks like ° ' " , but the key on another brand may look like DMS. You will need to refer to your calculator manual to determine the correct keys for degrees. Most calculators display answers in the form of degrees and a decimal of a degree.
It is seldom necessary to convert from minutes and seconds to decimals or vice versa; however, if you use the function tables of many trade manuals, it is necessary. Some tables show the fractions of degrees in minutes and seconds (DMS) rather than decimals (DD). In order to calculate using the different function tables, you must be able to convert the fractions to either format.

52
2.10.3 Converting Degrees, Minutes, & Seconds to Degrees & Decimals To convert degrees, minutes, and seconds (DMS) to degrees and decimals of a degree (DD):
1. First: Convert the seconds to a fraction. Since there are 60 seconds in each minute, 37° 42' 17" can be expressed as 37° 42 17/60'. Convert to 37° 42.2833'.
2. Second: Convert the minutes to a fraction. Since there are 60 minutes in each degree, 37° 42.2 833' can be expressed as 37 42.2833/60°. Convert to 37.7047°.
Practice Problems 1: Convert these DMS to the DD form. Round off to four decimal places. (1) 89° 11' 15" (5) 42° 24' 53" (2) 12° 15' 0" (6) 38° 42' 25" (3) 33° 30' (7) 29° 30' 30" (4) 71° 0' 30" (8) 0° 49' 49"
2.10.4 Converting Degrees & Decimals to Degrees, Minutes, & Seconds To convert degrees and decimals of degrees (DD) to degrees, minutes, and seconds (DMS), reverse the previous process.
1. First: Subtract the whole degrees. Convert the fraction to minutes. Multiply the decimal of a degree by 60 (the number of minutes in a degree). The whole number of the answer is the whole minutes.
2. Second: Subtract the whole minutes from the answer. 3. Third: Convert the decimal number remaining (from minutes) to seconds. Multiply the decimal by
60 (the number of seconds in a minute). The whole number of the answer is the whole seconds. 4. Fourth: If there is a decimal remaining, write that down as the decimal of a second.
Example: Convert 5.23456° to DMS. 5.23456° - 5° = 023456° 5° is the whole degrees 0.23456° x 60' per degree = 14.0736' 14 i s the whole minutes 0.0736' x 60" per minutes = 4.416" 4.416" is the seconds
DMS is stated as 5° 14' 4.416"

53
Practice Problems 2: Convert these DD to the DMS form. (1) 75.25° (5) 13.12345° (2) 43.375° (6) 21.5° (3) 9.5625° (7) 59.7892°
(4) 33.9645° (8) 65.1836°
54
Certificate in Engineering Skills
Math & Drawing
Duration: 60 – Mins
2.11 Line Convections
Line types used in technical drawing are used for different purposes to provide specific information.
Object Line These lines define the shape of the object portrayed and are the outermost outline of the object. Object
lines are solid heavy lines of 0.7 mm to 0.9 mm.
Center Line A center line is a .3 mm to .5 mm line that alternates between short and long dashes. It is used to identify
a hole as shown from the side. If a hole were in a plate, the center line would locate the center in the view
where the feature isn't shown.
Hidden Line A line used to define a part feature that is not visible in a specific view is known as a hidden line. A
hidden line is a 0 .3 mm to 0.5 mm consist of series of short dashed.
Break Line A break line is a .3 mm to .5 mm or .7 mm to .9 mm line with "Z" breaks, for a flat object, and "S"
breaks, for a round object. These are used to show that a portion of the part is not shown.
Section Line A section line is a .7 mm to .9 mm line drawn at angles, normally 45, 30 or 60 degrees, to show a feature
more clearly. The section line is a .5 mm dashed line with arrows on the end, and it is used to provide
internal details of the object.
Phantom lines Used to illustrate features which do not truly exist, for example section cuts, the extents of travel for
machine parts, etc.

55
Dimension lines Dimension lines are used to indicate a length, or label a line or object and are terminated at either end with
an arrowhead.
Draw the following lines:
• Object line
• Cutting plane line
• Short break line
• Extension and dimension lines
• Hidden lines
• Section line
• Center line
• Long break line
• Phantom line

56
Match the following (write the letter of the correct definition in the Box to the left)
Object line
Hidden line
Center line
Phantom line
Break line
Extension line
Cutting plane
Section line
Dimension line
A Used when it is not necessary to show all of a part.
B The lines which show the visible parts in a view.
C Used in combination with a cutting plane line to depict the inner
structure of an object.
D Used to show the location of a cut for a sectional view or the direction
from which a view is taken.
E Shows the course through which center travels.
F A thin line that extends from the part or feature being dimensioned
G Used to indicate edges, intersections, etc., that are behind other
features of the part.
H Used in conjunction with extension lines to indicate a linear distance.
I Shows alternate positions of parts and also the location of parts that
are not integral parts of the item depicted.

Maths & Drawing
57
Identify the ten lines found on the drawing below by writing the correct name of
each in the space provided.
1 8
2 9
3 10
4 11
5 12
6 13
7 14

Maths & Drawing
58
Dimensioning Drawing of a component, in addition to providing complete shape description, must also furnish
information regarding the size description. These are provided through the distances between the
surfaces, location of holes, nature of surface finish, type of material, etc. The expression of these
features on a drawing, using lines, symbols, figures and notes is called dimensioning.
Principles of Dimensioning Some of the basic principles of dimensioning are given below. 1. All dimensional information necessary to describe a component clearly and completely shall be
written directly on a drawing.
2. Each feature shall be dimensioned once only on a drawing, i.e., dimension marked in one view need not be repeated in another view.
3. Dimension should be placed on the view where the shape is best seen

Maths & Drawing
59
4. As far as possible, dimensions should be expressed in one unit only preferably in millimeters, without showing the unit symbol (mm).
5. As far as possible dimensions should be placed outside the view.
6. Dimensions should be taken from visible outlines rather than from hidden lines.
7. No gap should be left between the feature and the start of the extension line.

Maths & Drawing
60
8. Leader are used to indicate radius of arcs and circles Note: Crossing of centre lines should be done by a long dash and not a short dash and circle are with the help of leader.

Maths & Drawing
61
Aligned Dimensioning Dimensions should be placed parallel to and above their dimension lines and preferably at the middle, and clear of the line
Parallel Dimensioning Parallel dimensioning consists of several dimensions originating from one projection line.
Superimposed Running Dimensions Superimposed running dimensioning simplifies parallel dimensions in order to reduce the space used on a drawing
Chain Dimensioning Chains of dimension should only be used if the function of the object won't be affected by the accumulation of the tolerances
Dimensioning by Co-ordinates Two sets of superimposed running dimensions running at right angles can be used with any features which need their centre points defined, such as holes.
Simplified dimensioning by co-ordinates It is also possible to simplify co-ordinate dimensions by using a table to identify feature

Maths & Drawing
62
2.12 Drawing Sheet Layout
Title Block Contains information needed for manufacturing, located in lower right corner of drawing. Block
format varies from company to company. Title Blocks often divided into following general
sections:
Company Name and Location It indicates the name of the company or organization
Part Name It indicate the name of part
Part Number A part number is a unique identifier of a part used in a particular industry
Drawing Number On drawings with more than one sheet, the drawing number block shows the sheet number and the number of sheets in the series
Scale The scale block shows the-size of the drawing compared to the actual size of the part or assembly.
Whereas the scale indicate the relationship between the drawing size and the actual part size.
Date It identify the date of creation.
Certificate in Engineering Skills
Math & Drawing
Duration: 30 – Mins

Maths & Drawing
63
Tolerances Used to indicate fractional, decimal, and angular tolerances where as tolerance is the acceptable
variation from a specified dimension.
Material & Specification Material and specification block contains a list of the parts or material needed for the project.
Finish Finish marks (Y') used on machine drawings show surfaces to be finished.
Revisions block All modifications to the drawing should be documented here. A revision table is normally located
in the upper right of the drawing frame, or at the bottom on the left side of the title block.
Views No of views top view, front view and side view.
Dimensions The unit of dimensions here is specified it may be in millimeters (mm), Inches (in.) or feet (ft).

Maths & Drawing
64
EXERCISE – VIEWS AND TITLE BLOCK
What is the name and part number of the part?
How many are required?
How many views of the part are shown?
What is the overall length, height thickness and width?

Maths & Drawing
65
In which two views length, height and width are shown?
If number 6 represents the top surface, what line represents this surface in the front view?
If number 8 represents the surface in the right side view, what line represents this surface in the top view?
What line in the top view represents the surface 7 of the front view?
What line in the right side view represents the front surface of front view?
What surface shown does line 10 represent?
What line of the front view does point 1 represent?
What line of the top view does point 2 represent?
What line of the top view does point 3 represent?
What kind, or type of line, is line 12

Maths & Drawing
66
Certificate in Engineering Skills Math & Drawing
Duration: 30 – Mins
2.13 Identify Angles
Acute Angle An angle that is less than 90° is known as Acute angle.
Obtuse Angle An angle that is greater than 90° but less than 180° is known as Obtuse angle.
Right angle An angle that is 90° exactly is known as Right angle.
Reflex Angle An angle that is greater than 180° is known as Reflex angle.
Question
1. The angle 89° is 2. How many right angles are there in two full rotations? 3. The angle 234° is 4. The angle 98° is
Acute Obtuse Right Reflex

Maths & Drawing
67
Measure the following angles and Identify each angle as an acute, obtuse, or right angle.
Answers:
A:
B:
C:
D:
E:
H
G
0 B
0
A
B
A
D
0
C
C
J 0
I
D
0
F
E
E

Maths & Drawing
68
Certificate in Engineering Skills Math & Drawing
Duration: 30 – Mins
2.14 Plane Figures
Square
It has four sides. All are equal in length.
Area of square (A) = side x side = a2 The algebraic expression for Perimeter of the square (P) = 4 x a
Rectangle
A rectangle is any quadrilateral with four right angles.
Area of the rectangle (A) = length x width Perimeter (P) = 2 (l + w) units. Diagonal (D2) = l2 + w2 units
Parallelogram
In geometry, a parallelogram is a quadrilateral with two pairs of
parallel sides and the opposite angles of a parallelogram are of
equal measure.

Maths & Drawing
69
Hexagon
In geometry, a hexagon is a polygon with six edges and six
vertices. A regular hexagon has.The total of the internal angles
of any hexagon is 720 degrees.
Octagon
A regular octagon is a closed figure with sides of the same length
and internal angles of the same size. It has eight lines of
reflective symmetry and rotational symmetry of order 8. The
internal angle at each vertex of a regular octagon is 135° and the
sum of all the internal angles is

Maths & Drawing
70
Certificate in Engineering Skills
Math & Drawing
Duration: 120 – Mins
2.15, 2.16 Orthographic projection
Orthographic projection (or orthogonal projection) is a means of representing three-dimensional
object in two dimensions. It is a form of parallel projection, where all the projection lines are
orthogonal to the projection plan.
Principal views:
There are six principal views in a multi-view orthographic projection. These are the front, back,
top, bottom, and left- and right-side views. A drawing can have any combination of views but
the three most common views are:
• Front view • Side view • Top view.

Maths & Drawing
71
Angles of projection The primary planes intersect each other at right angles. The angles between the horizontal and vertical planes are described as first, second, third, and fourth angles of projection.
Orthographic Projections There are two ways of drawing in orthographic - First Angle and Third Angle. They differ only in the position of the plan, front and side views
First-angle projections First-angle projection places the object on the profile plane with the vertical plane on the left and the horizontal plane on the bottom. This position locates the top view below the front view, the right-side view on the left side of the front view, and the bottom view above the front view.

Maths & Drawing
72
Because the positioning of the views initially seems illogical, first-angle projections is mostly used in asain countries.
Third-angle projections Third-angle projection places the object with the front view projected onto the vertical plane, the top view onto the horizontal plane, and the right-side view onto the profile plane. The arrangement of the three views on paper is logically sequenced. Since the late 1800s, third-angle projection has been the American standard in drafting practice.

Maths & Drawing
73
Symbol used to differentiate first angle and third angle Projection
Symbol used for first angle projection
Symbol used for third angle projection
Summing up

Maths & Drawing
74
Sketch the orthographic projection of the following pictorial views
First angle projection method Third angle projection method

Maths & Drawing
75
Isometric Drawing The representation of the object in below figure is called an isometric drawing. This is one of a
family of three-dimensional views called pictorial drawings. In an isometric drawing, the object's
vertical lines are drawn vertically, and the horizontal lines in the width and depth planes are shown
at 30 degrees to the horizontal.
Oblique Drawing In this convention the angles used are 45 degrees and 90 degrees.
Two types of Oblique drawing are as follows
Cavalier Oblique
In cavalier oblique drawings, all lines (including receding lines) are made
to their true length.
Cabinet Oblique
In Cabinet oblique the scale (depth) is halved whilst in Cavalier oblique
the depth scale is the same as in the X and Y directions

Maths & Drawing
76
Certificate in Engineering Skills Math & Drawing
Duration: 60 – Mins
2.17 Sections
To give a clearer view of obscure or oblique planes and interior or hidden features of an object that cannot be clearly observed in a conventional outside view, use viewing or cutting plane lines respectively.Viewing or cutting plane lines are the thickest of all lines. Viewing or cutting plane lines are solid lines.
Cutting plane lines: Cutting plane lines indicate a plane or planes exposed by cutting and removing an imaginary section of the object. The exposed plane is called the sectional view and the line used to cut the object is referred to as the cutting plane line. Hidden lines behind the plane of projection are customarily omitted, while lines visible behind the plane of projection must be included in the sectional view.
Labeling Cutting Planes
When more than one cutting plane is used, it is
especially important to label them for clarity
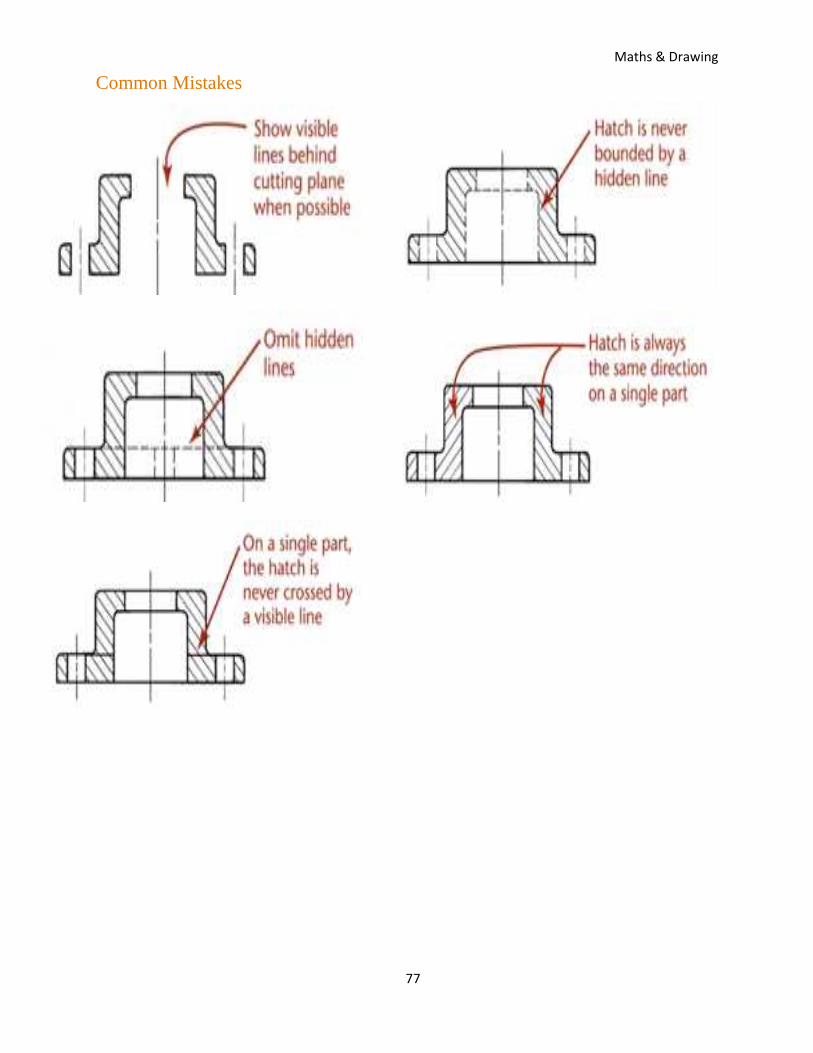
Maths & Drawing
77
Common Mistakes

Maths & Drawing
78
Sectional Views
Full Sectional Cut across entire object, exposes whole inner surface.
Half-Sectional Places two cutting planes at right angles to each other.
Broken-out or Partial Section When partial section of a view is needed to expose interior shapes.
Offset Sections When it is desirable to show features that do not lie in a straight line offset section are used.

Maths & Drawing
79
Certificate in Engineering Skills Math & Drawing
Duration: 60 – Mins
2.18 three-dimensional shapes
Cones If one end of a line is rotated about a second fixed line while keeping the lines other end fixed, then a cone is formed. The point about which the line is rotated is called the vertex and the base of the cone is a circle. A cone is said to be right when the vertex is directly above the centre of the base.
The net of a cone consists of the following two parts:
1. A circle that gives the base 2. A sector that gives the curved surface

Maths & Drawing
80
Cylinders If a line is rotated about a second fixed line while keeping both lines parallel, then a cylinder is formed. Note:
1. The fixed line about which the line is rotated is called the axis of symmetry. 2. The base of the cylinder is a circle and the top of the cylinder is also a circle. 3. A cylinder is said to be right when the line joining the centre of the base and the centre of
the top is perpendicular to the base of the cylinder. 4. The cross-sections parallel to the base are circles and are all identical.
The net of a cylinder consists of three parts:
5. One circle gives the base and another circle gives the top. 6. A rectangle gives the curved surface.
Pyramid Pyramids are polyhedra because they are made up of plane faces. If a line that is fixed at a point, called the vertex, is moved around the perimeter of a polygon, then a pyramid is formed.
Pyramids are named after their base. So, the pyramid shown above is an example of a rectangular pyramid. Some other pyramids are shown below.

Maths & Drawing
81
A pyramid is said to be right when its vertex is directly above the centre of the base. The cross-sections parallel to the base are the same shape but have different sizes
The net of the above pyramid consists of
1. A rectangular base 2. Four triangular faces

Maths & Drawing
82
Prisms A prism is a solid with cross-sections that are parallel to its base. A prism is named according to the shape of its base (i.e. shape of its cross-section). So, the solid drawn above is an example of triangular prism. Some other prisms are drawn below: