mattress installation - ramm fence · mattress installation • measure the stall and the...
TRANSCRIPT

MATTRESS INSTALLATION
• Measure the stall and the mattresses to which is the most effective way to lay the mattress.
• Not every stall is exactly square but due to the make-up of the mattress this is not a problem.
• Starting in one corner, bring in the first mattress. The labeled end of the mattress should lie in the middle of the stall.
• This end of the mattress is slightly less full than the other end and the reason why the mattress is put label to label is it can be compressed down end-to-end better.
• Lay the mattress down tight to the wall.
• It is not necessary to push the mattress together too much.
• Basically the mattress should be 46” wide.
• Make sure there are no gaps in between the mattresses while installing.
• Close to the walls it may be necessary to cut the mattress, the easiest way is to cut along a cell with the stitching.
• Cutting a cell empties the rubber from it so best is to cut on top of the other mattresses without cutting these.
• Cutting against the stitching can be done, cut across the cell at the length you need the mattress to be.
• Towards the end of the mattress cut the other way and create a “T” cut. This will make it easier to remove the rubber from the mattress.
• When the rubber is removed fold the excess mattress material over, then flip the mattress over and lay it in. Depending on the length of the mattress you may want to cut some of the excess material if needed just make sure there is a flap big enough that stops the rubber from flowing out.
LOOSE CRUMB
• The loose crumb is used to fill the ribs in the mattresses where the stitching is.
• The loose crumb prevents the top cover from following the ribs of the mattress.
• Make sure that the crumb is not sitting on top of the cells and is evenly spread and leveled.
• If your stall dimensions work out better to run the mattress in different directions, that is fine but remember to fill the junction with loose rubber. This because you will find the end of the mattress is less full then the middle of the cell running the other way.
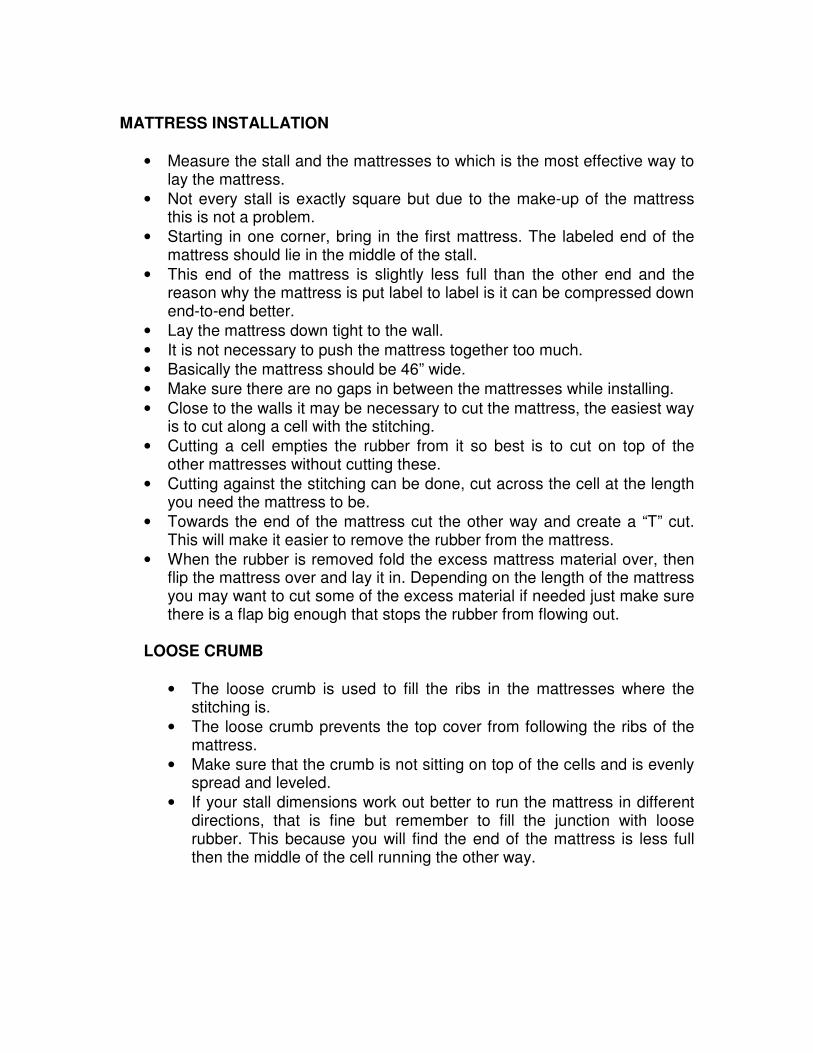
The picture below shows two mattresses joined together, the gaps are also filled with loose rubber crump from cutting up cells of a mattress.
TOP COVER INSTALLATION Installation of the top cover can really vary from stall to stall. Different stalls have different materials to fasten to, but we will start with a standard wooden wailed box stall.
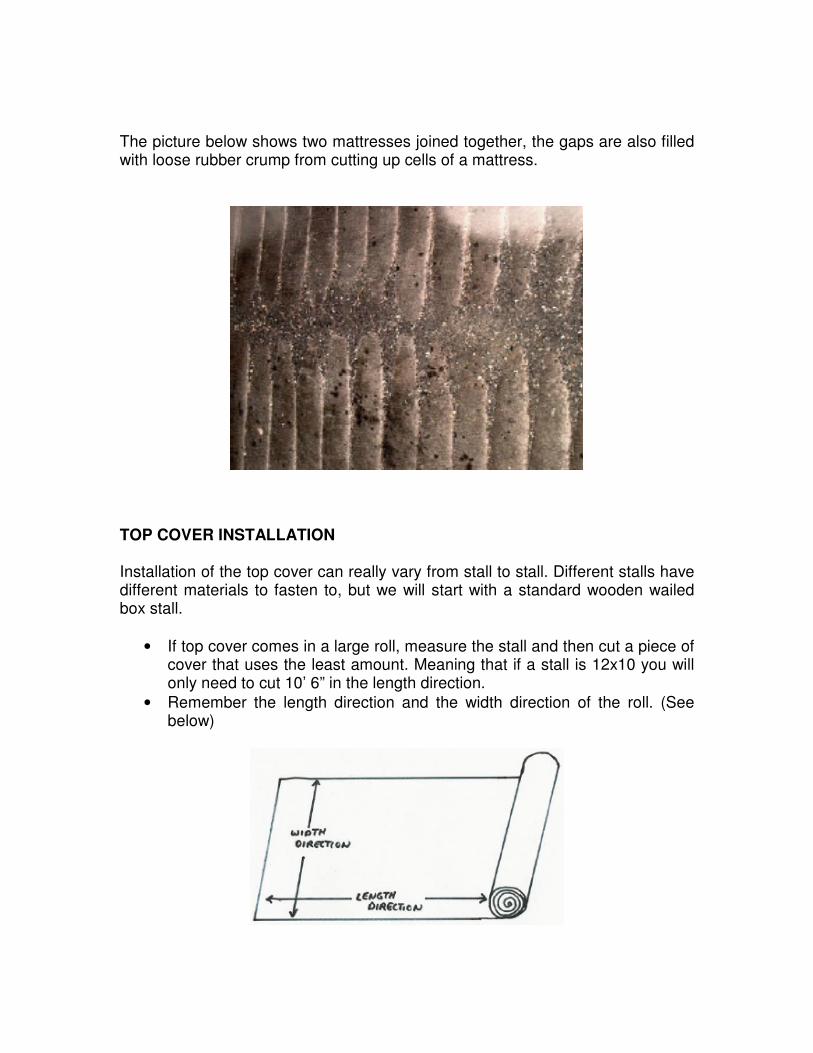
• If top cover comes in a large roll, measure the stall and then cut a piece of cover that uses the least amount. Meaning that if a stall is 12x10 you will only need to cut 10’ 6” in the length direction.
• Remember the length direction and the width direction of the roll. (See below)
• The 6” is added to the length for extra material to go up the stall wall when cutting cover.
• Make sure to cut straight.
• If the stall is slightly larger than the width of the top cover can accommodate (12’3” x 12’3”) then fasten a 2x4 on each wall where the cover is too short. This brings the stall in 3” in the width direction.
• Now that the mattresses are laid and loose crumb is evenly spread the top cover can be brought in and unrolled with the black rubberized side up.
• Move around the cover so that there is at least 2” going up each wall and that the cover is square in the stall.
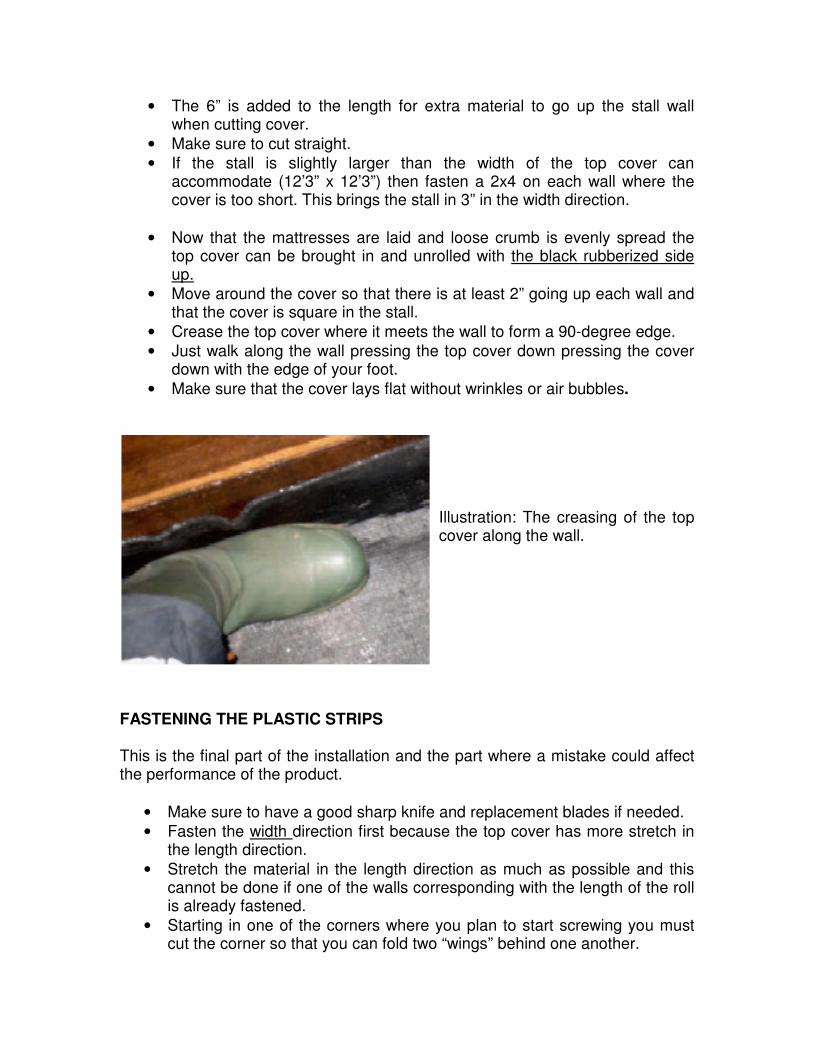
• Crease the top cover where it meets the wall to form a 90-degree edge.
• Just walk along the wall pressing the top cover down pressing the cover down with the edge of your foot.
• Make sure that the cover lays flat without wrinkles or air bubbles.
Illustration: The creasing of the top cover along the wall.
FASTENING THE PLASTIC STRIPS This is the final part of the installation and the part where a mistake could affect the performance of the product.
• Make sure to have a good sharp knife and replacement blades if needed.
• Fasten the width direction first because the top cover has more stretch in the length direction.
• Stretch the material in the length direction as much as possible and this cannot be done if one of the walls corresponding with the length of the roll is already fastened.
• Starting in one of the corners where you plan to start screwing you must cut the corner so that you can fold two “wings” behind one another.
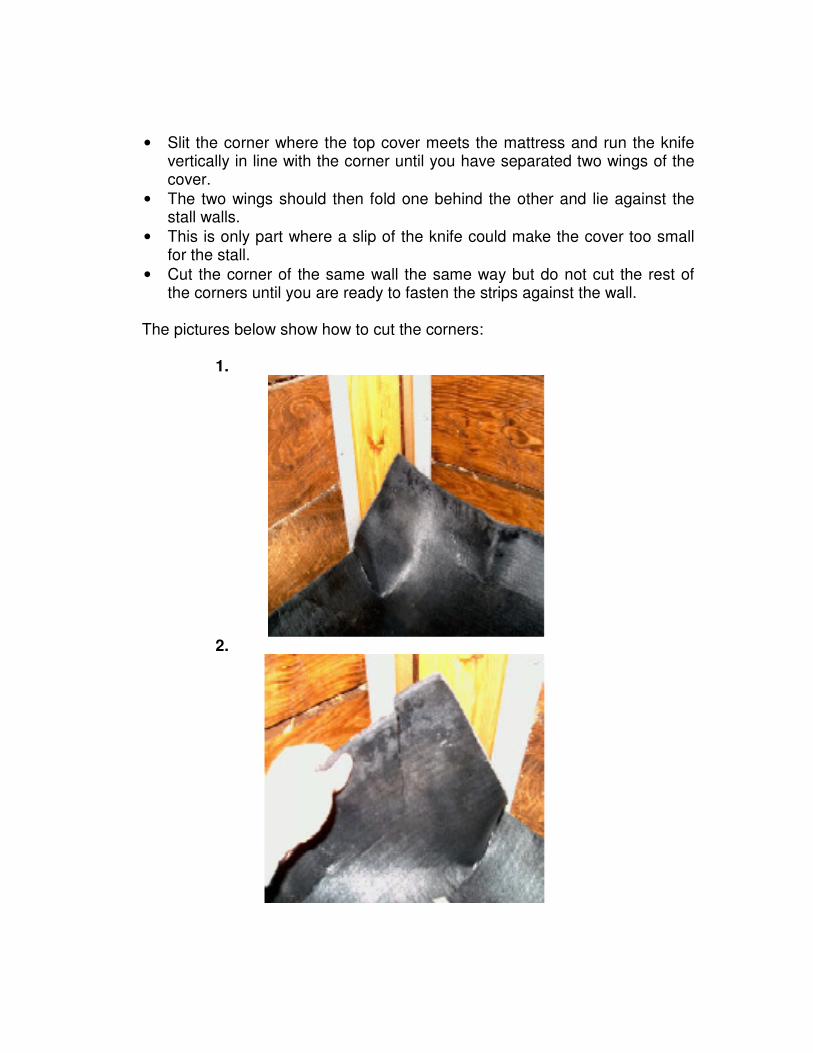
• Slit the corner where the top cover meets the mattress and run the knife vertically in line with the corner until you have separated two wings of the cover.
• The two wings should then fold one behind the other and lie against the stall walls.
• This is only part where a slip of the knife could make the cover too small for the stall.
• Cut the corner of the same wall the same way but do not cut the rest of the corners until you are ready to fasten the strips against the wall.
The pictures below show how to cut the corners: 1.
2.
3.
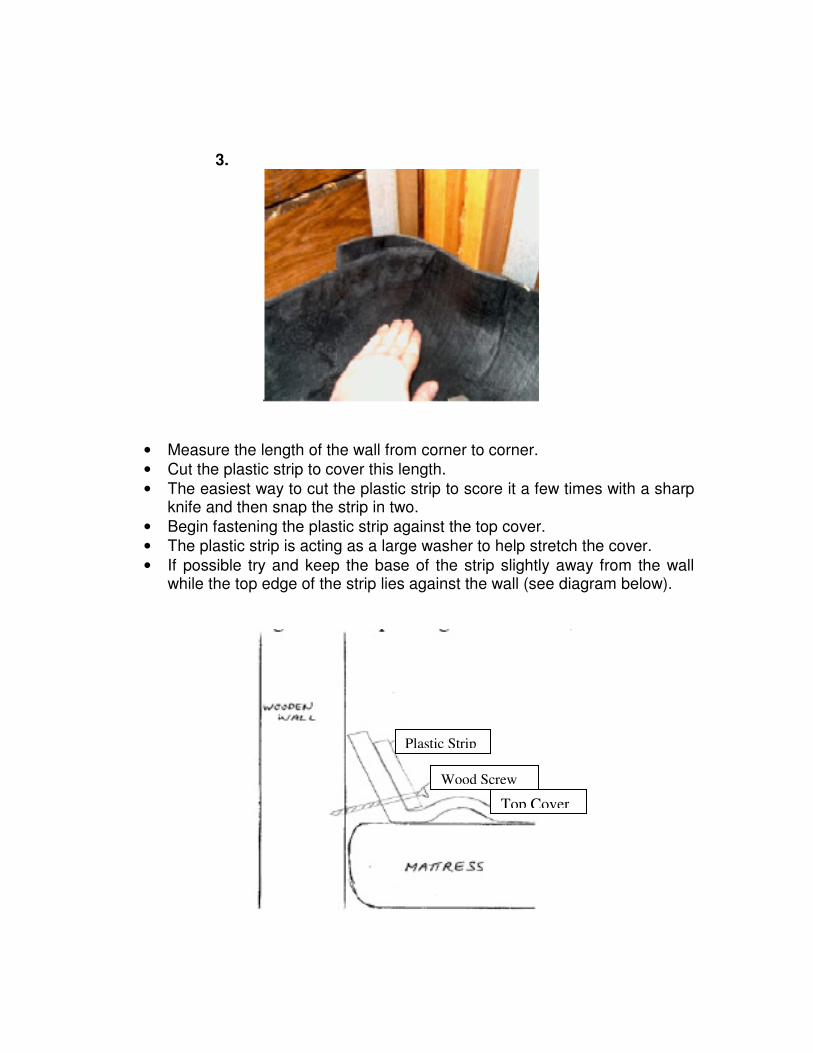
• Measure the length of the wall from corner to corner.
• Cut the plastic strip to cover this length.
• The easiest way to cut the plastic strip to score it a few times with a sharp knife and then snap the strip in two.
• Begin fastening the plastic strip against the top cover.
• The plastic strip is acting as a large washer to help stretch the cover.
• If possible try and keep the base of the strip slightly away from the wall while the top edge of the strip lies against the wall (see diagram below).
Plastic Strip
Wood Screw
Top Cover
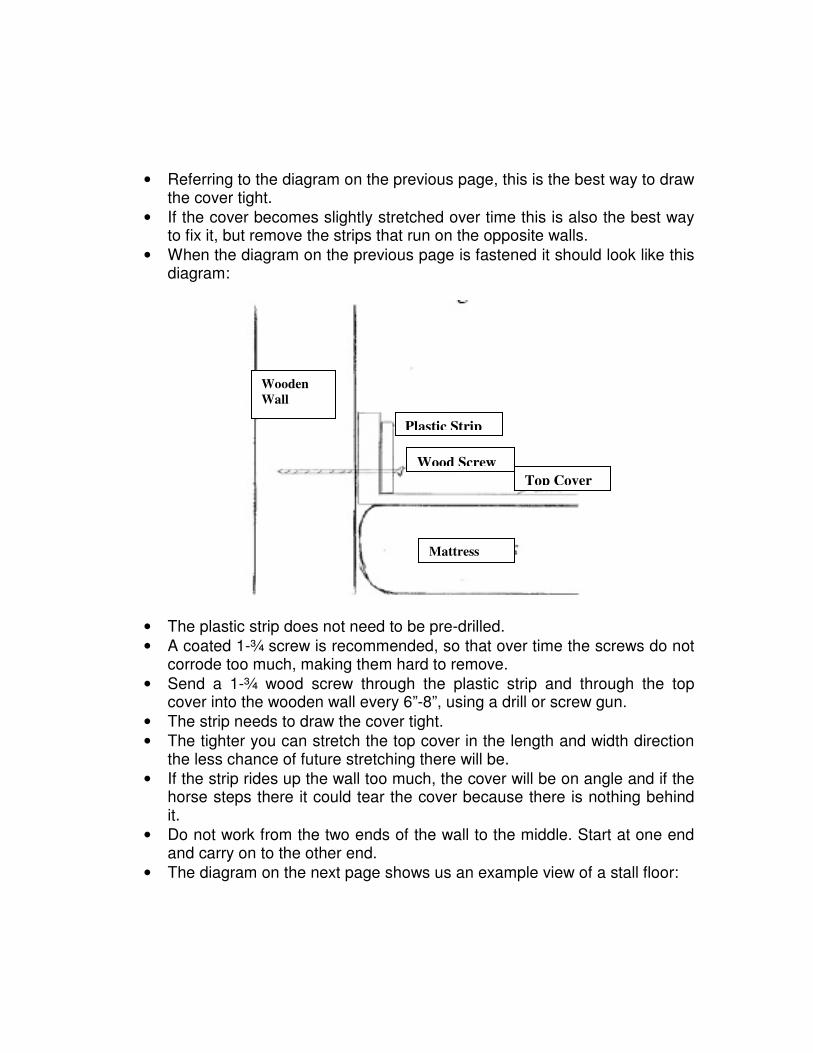
• Referring to the diagram on the previous page, this is the best way to draw the cover tight.
• If the cover becomes slightly stretched over time this is also the best way to fix it, but remove the strips that run on the opposite walls.
• When the diagram on the previous page is fastened it should look like this diagram:
• The plastic strip does not need to be pre-drilled.
• A coated 1-¾ screw is recommended, so that over time the screws do not corrode too much, making them hard to remove.
• Send a 1-¾ wood screw through the plastic strip and through the top cover into the wooden wall every 6”-8”, using a drill or screw gun.
• The strip needs to draw the cover tight.
• The tighter you can stretch the top cover in the length and width direction the less chance of future stretching there will be.
• If the strip rides up the wall too much, the cover will be on angle and if the horse steps there it could tear the cover because there is nothing behind it.
• Do not work from the two ends of the wall to the middle. Start at one end and carry on to the other end.
• The diagram on the next page shows us an example view of a stall floor:
Plastic Strip
Wood Screw
Top Cover
Mattress
Wooden
Wall
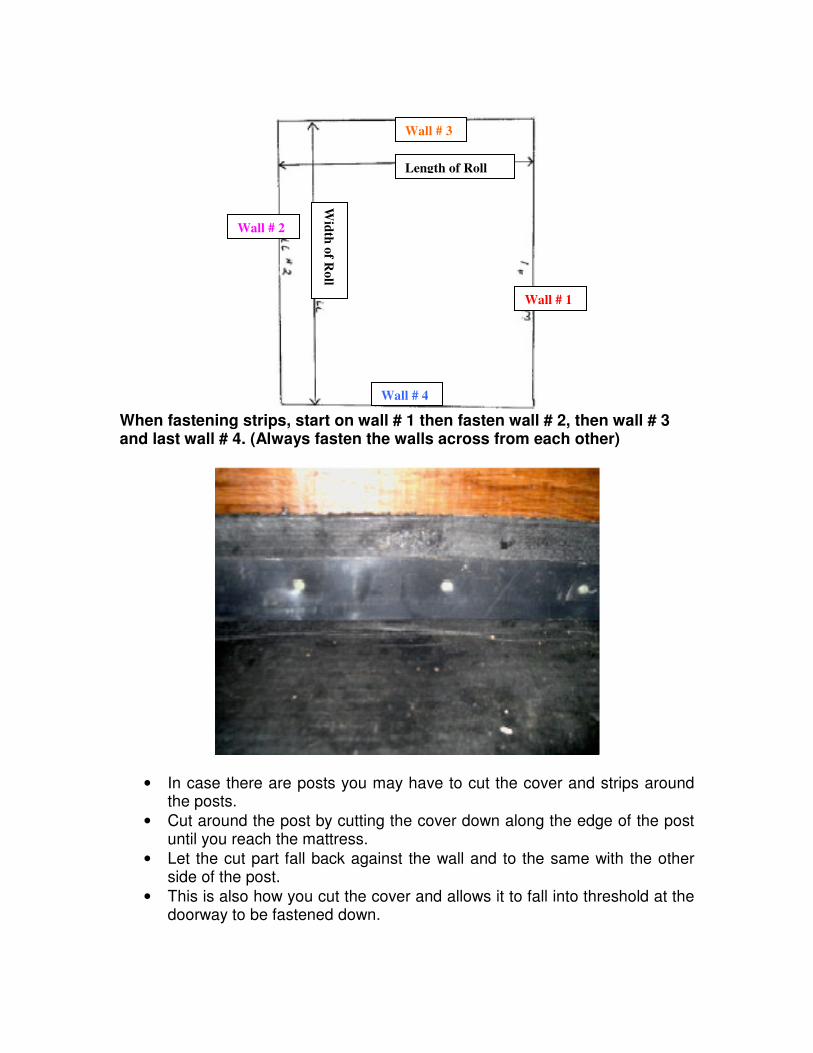
When fastening strips, start on wall # 1 then fasten wall # 2, then wall # 3 and last wall # 4. (Always fasten the walls across from each other)
• In case there are posts you may have to cut the cover and strips around the posts.
• Cut around the post by cutting the cover down along the edge of the post until you reach the mattress.
• Let the cut part fall back against the wall and to the same with the other side of the post.
• This is also how you cut the cover and allows it to fall into threshold at the doorway to be fastened down.
Wid
th o
f Ro
ll
Length of Roll
Wall # 3
Wall # 1
Wall # 2
Wall # 4
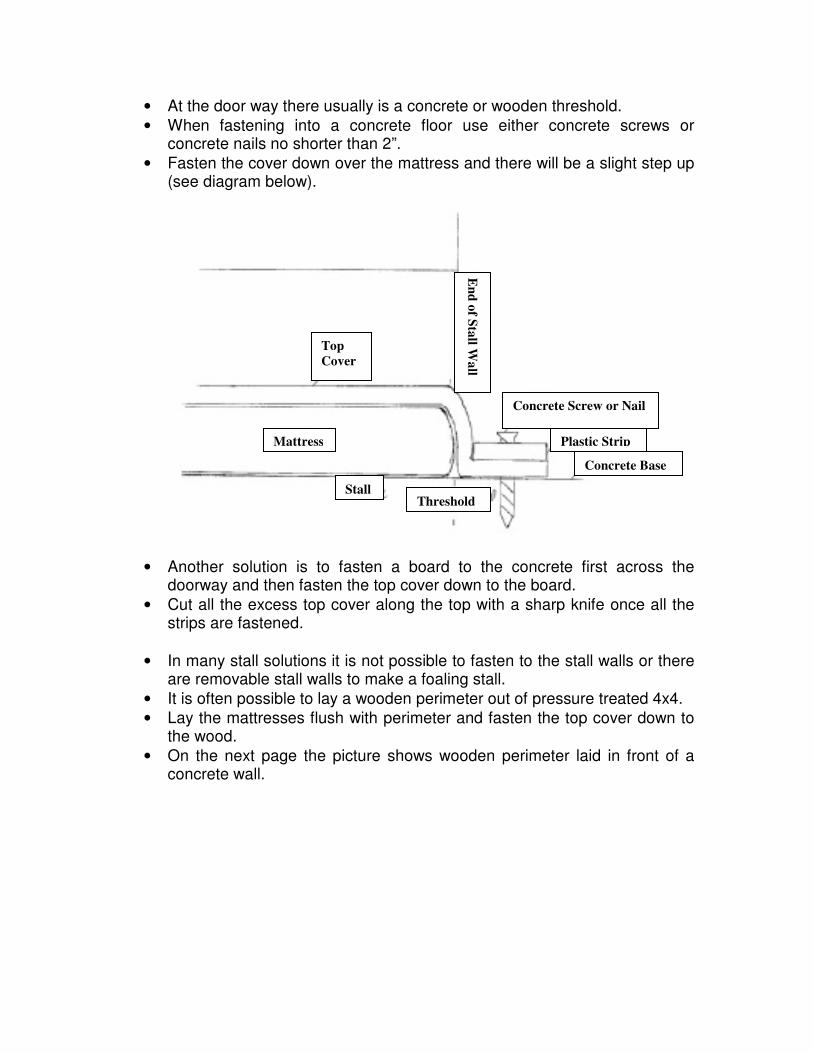
• At the door way there usually is a concrete or wooden threshold.
• When fastening into a concrete floor use either concrete screws or concrete nails no shorter than 2”.
• Fasten the cover down over the mattress and there will be a slight step up (see diagram below).
• Another solution is to fasten a board to the concrete first across the doorway and then fasten the top cover down to the board.
• Cut all the excess top cover along the top with a sharp knife once all the strips are fastened.
• In many stall solutions it is not possible to fasten to the stall walls or there are removable stall walls to make a foaling stall.
• It is often possible to lay a wooden perimeter out of pressure treated 4x4.
• Lay the mattresses flush with perimeter and fasten the top cover down to the wood.
• On the next page the picture shows wooden perimeter laid in front of a concrete wall.
Threshold
Concrete Base
Plastic Strip
Concrete Screw or Nail
En
d o
f Sta
ll Wa
ll Top
Cover
Mattress
Stall

• If the top cover cannot be fastened to the wall because its composition (concrete, steel etc.) the first solution to consider is to fasten a board to the wall using the appropriate screws or bolts.
• Then fasten the top cover to the board. Below is a series of diagrams that describe some different fastening methods. (Other situations are possible)
Situation # 1: When you cannot fasten to the wall directly
Mattress
¾” Wood Screw
Pressure Treated 2x4
Fastened to Stall Wall
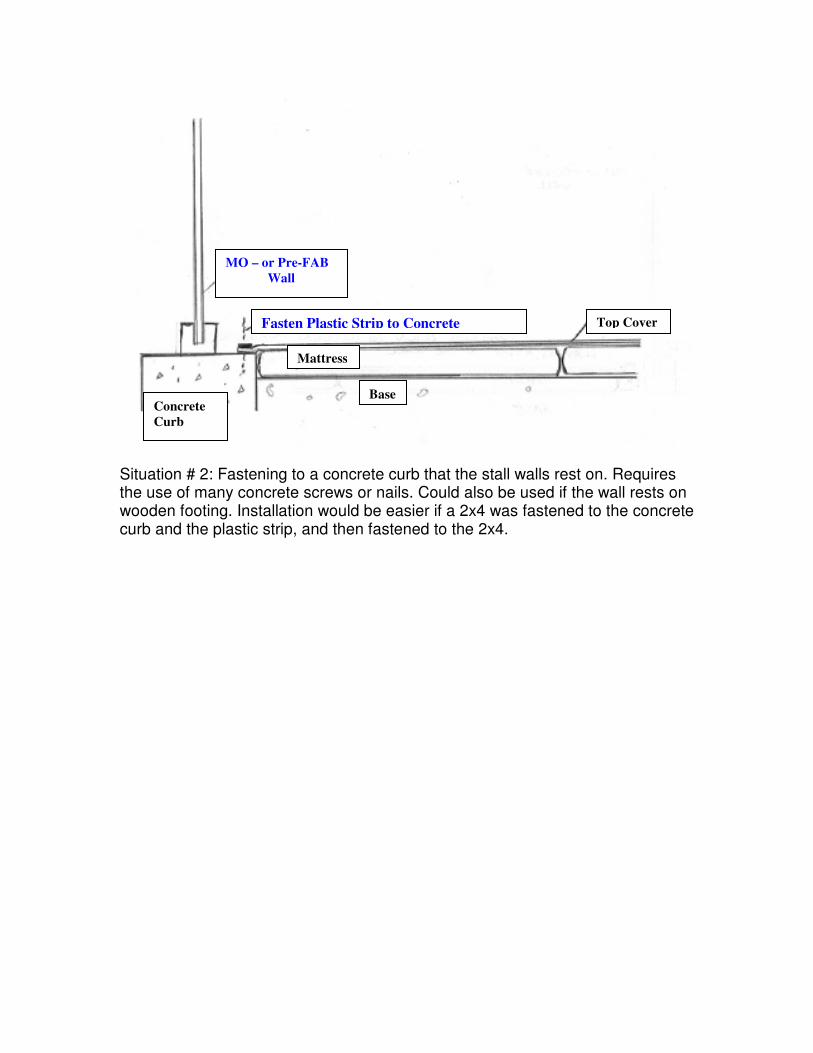
Situation # 2: Fastening to a concrete curb that the stall walls rest on. Requires the use of many concrete screws or nails. Could also be used if the wall rests on wooden footing. Installation would be easier if a 2x4 was fastened to the concrete curb and the plastic strip, and then fastened to the 2x4.
MO – or Pre-FAB
Wall
Fasten Plastic Strip to Concrete
Mattress
Top Cover
Concrete
Curb
Base