maximo 7 t g m w m f international university...screen queries enable the user to search the maximo...
TRANSCRIPT

MAXIMO 7 TRAINING GUIDE
MAXIMO WORK MANAGEMENT
FLORIDA INTERNATIONAL UNIVERSITY
3451 NE 1st Ave – M1008 • Miami, FL 33137

MAXIMO WORK MANAGEMENT MAXIMO™ 7 TRAINING CURRICULUM
2 of 62 © copyright 2010 Banetti, Inc. • a Banetti University production
TABLE OF CONTENTS
TABLE OF CONTENTS .......................................................................................................................................... 2
WORK MANAGEMENT TRAINING OVERVIEW...................................................................................................... 4
1 OBJECTIVES.........................................................................................................................................................4
II. CHAPTER 2 – MAXIMO QUERIES ................................................................................................................ 6
1 OBJECTIVES.........................................................................................................................................................6 2 OUTLINE.............................................................................................................................................................6 3 OPERATORS AND WILDCARDS...............................................................................................................................11 4 BUILDING QUERIES.............................................................................................................................................12 5 SELECTING A SINGLE RECORD ...............................................................................................................................13 6 BROWSING RECORD SETS ....................................................................................................................................14 7 SAVING QUERIES................................................................................................................................................14 8 ADVANCED OPTIONS ..........................................................................................................................................16 9 BOOKMARKS .....................................................................................................................................................17 10 QUICK KEY SEARCH ............................................................................................................................................19 11 REVIEW QUESTIONS ...........................................................................................................................................19
III. CHAPTER 3 ‐ LOCATIONS AND ASSETS...................................................................................................... 20
1 OBJECTIVE ........................................................................................................................................................20 2 OUTLINE...........................................................................................................................................................20 3 THE LOCATION APPLICATIONS – SELECTING A LOCATION............................................................................................21 4 LOCATION APPLICATION ......................................................................................................................................27 5 REVIEW QUESTIONS ...........................................................................................................................................38
IV. CHAPTER 4 ‐ MAXIMO WORK ORDERS ..................................................................................................... 39
1 OBJECTIVES.......................................................................................................................................................39 2 OUTLINE...........................................................................................................................................................39 3 INDUSTRY STANDARDS AND BEST PRACTICES ...........................................................................................................41 4 CREATING WORK ORDERS ...................................................................................................................................42 5 WORK ORDER HIERARCHIES .................................................................................................................................45 6 FOLLOW‐UP WORK ORDERS ................................................................................................................................49 7 REVIEW QUESTIONS ...........................................................................................................................................50
V. CHAPTER 5 ‐ WORK ORDER TRANSACTIONS ............................................................................................. 52
1 OBJECTIVE ........................................................................................................................................................52 2 OUTLINE...........................................................................................................................................................52 3 APPLYING MATERIAL UTILIZING PLANNED MATERIAL ................................................................................................57 4 APPLYING MATERIAL WHEN NOT COPYING PLANNED MATERIAL ................................................................................58 5 PRIMARY COMPONENT FIELDS..............................................................................................................................59 6 APPLYING TOOLS................................................................................................................................................60 7 APPLYING FAILURE INFORMATION .........................................................................................................................60
MAXIMO WORK MANAGEMENT MAXIMO™ 7 TRAINING CURRICULUM
3 of 62 © copyright 2010 Banetti, Inc. • a Banetti University production
8 ROUTES............................................................................................................................................................61 9 REVIEW QUESTIONS ...........................................................................................................................................62

MAXIMO WORK MANAGEMENT MAXIMO™ 7 TRAINING CURRICULUM
4 of 62 © copyright 2010 Banetti, Inc. • a Banetti University production
WORK MANAGEMENT TRAINING OVERVIEW
Work Management is designed to cover all of the applications that would be necessary for maintenance/asset management professionals in their work roles. The applications covered include the MAXIMO 7 Environment, Navigation, Locations, Assets (aka Equipment), Work Orders (creation, planning and reporting of actual charges) and Failure Classifications. In addition, the Work Planning components are included which focuses on the roles ofr Maintenance Craft Leads, Planners and Supervisors. The content includes Job Plans, PM Records, Routes and Safety Plans. Inventory and Purchasing personnel would likewise benefit from the courses specifically designed for those materials management topics.
According to the principles of Total Productive Maintenance (TPM), the most critical element in accomplishing those goals is the education, inclusion and responsibility of all related parties: management, supervisors, planners, mechanics and data entry personnel. It is imperative that users are properly trained to make data entries that accurately and consistently represent the activities of the Organization. This data entered into MAXIMO 7 constitutes the source input for measuring maintenance success, as well as the source for establishment and evaluation of future policy improvement initiatives.
1 OBJECTIVES
Upon the successful completion of this course, the Maximo user will be able to:
1. Accurately and efficiently log into MAXIMO 7 2. Identify and Utilize Screen Form Conventions 3. Successfully navigate to any given Maximo Application or screen 4. Effectively query for Maximo Records

MAXIMO WORK MANAGEMENT MAXIMO™ 7 TRAINING CURRICULUM
5 of 62 © copyright 2010 Banetti, Inc. • a Banetti University production
5. Understand how to enter Asset and Location records and their relationship to the Drilldown (Hierarchy)
6. Within the confines of the Organization’s Business Process understand how to create, route for approval and maintain a Maximo Work Order
7. Efficiently plan the usage of labor, materials and tool resources to build effective Work Plans
8. Apply Failure Codes and Remarks to Work Orders 9. Electronically enter the actual resource usage and costs against Work Orders their
associated Locations, Assets and general ledger accounts 10. Create and modify Job Plans 11. Identify the relationship between Job Plans and the:
• Scheduling of Labor Resources • Reorder of Planned Materials • Attachment of Safety Procedures

MAXIMO WORK MANAGEMENT MAXIMO™ 7 TRAINING CURRICULUM
6 of 62 © copyright 2010 Banetti, Inc. • a Banetti University production
II. CHAPTER 2 – MAXIMO QUERIES
Searching for Records in the Maximo Applications
1 OBJECTIVES
Users should learn the process to search and retrieve data from the Maximo 7 database using the default query settings and to create custom queries through the employment of query operator tool set.
2 OUTLINE
2.1. INTRODUCTION TO SCREEN QUERIES
Screen queries enable the User to search the Maximo 7 database for selected records or record sets. Queries are built as Users enter known record information into selected fields on a designated Maximo 7 screen. Upon entry, each Maximo application opens on the List tab. Searches for records are made from this screen. If the User wishes to create a new record, they can click the New Record button on the toolbar which will transfer them into the application “data” page where they can complete the fields necessary to create a new record.
The primary query building process in Maximo 7 is intuitive and user‐friendly. One of the significant value propositions of Maximo is to enable users to easily and quickly locate records. Record matching is “case insensitive” meaning that your search entry does not have to match

MAXIMO WORK MANAGEMENT MAXIMO™ 7 TRAINING CURRICULUM
7 of 62 © copyright 2010 Banetti, Inc. • a Banetti University production
the upper or lower case of the letter values in the database. In addition to the standard pre‐built query structure, the program allows more advanced users to construct and save their own queries as SQL (Structured Query Language) commands, a resource that can be as robust and in some cases, a partial substitute for a low‐end report writer.
Standard Query Search ‐ To locate a record or records in Maximo 7, the User should populate one or more fields with a known value or partial value (wildcard characters can be employed here). The system will then return a result set of records which match the User’s input criteria.
For example, if users wish to find all Work Orders against a specific Location, from the List screen of the WO Tracking application, they would type or return a selected value in the Location field on the List tab. Then, after clicking the ENTER key or clicking the binoculars icon (located to the left and two rows above), a result set of all Work Orders for that Location will appear.
2.2. RESULT
Matching Record set Returned to Results screen
Queried Field
Execute Query
Matching Records Total Records
MAXIMO WORK MANAGEMENT MAXIMO™ 7 TRAINING CURRICULUM
8 of 62 © copyright 2010 Banetti, Inc. • a Banetti University production
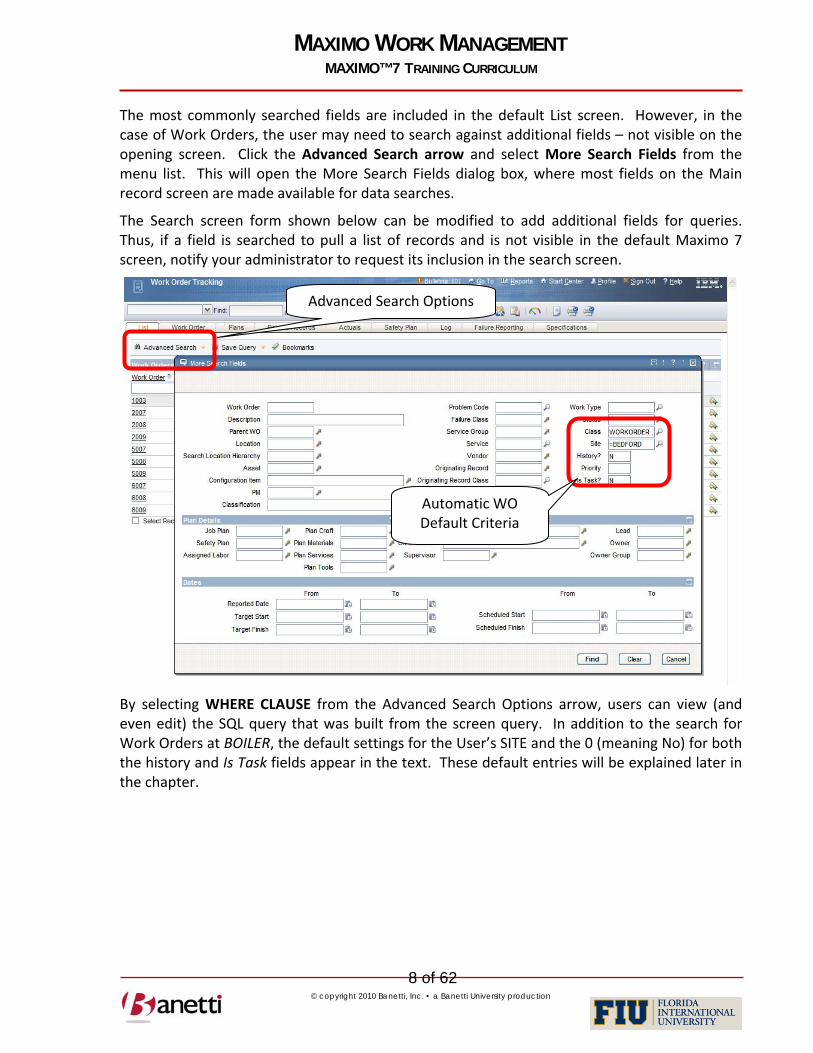
The most commonly searched fields are included in the default List screen. However, in the case of Work Orders, the user may need to search against additional fields – not visible on the opening screen. Click the Advanced Search arrow and select More Search Fields from the menu list. This will open the More Search Fields dialog box, where most fields on the Main record screen are made available for data searches.
The Search screen form shown below can be modified to add additional fields for queries. Thus, if a field is searched to pull a list of records and is not visible in the default Maximo 7 screen, notify your administrator to request its inclusion in the search screen.
By selecting WHERE CLAUSE from the Advanced Search Options arrow, users can view (and even edit) the SQL query that was built from the screen query. In addition to the search for Work Orders at BOILER, the default settings for the User’s SITE and the 0 (meaning No) for both the history and Is Task fields appear in the text. These default entries will be explained later in the chapter.
Advanced Search Options
Automatic WO Default Criteria

MAXIMO WORK MANAGEMENT MAXIMO™ 7 TRAINING CURRICULUM
9 of 62 © copyright 2010 Banetti, Inc. • a Banetti University production
2.3. SEARCHING FOR A RESULT SET USING MULTIPLE SEARCH FIELDS
To complete a multiple field query, the User populates two or more fields with data. The system will then return a result set containing those records for which both conditions are true. For example, you might want to find all Waiting for Approval Work Orders for Location BOILER. First, you would enter both known values in the respective fields to identify the records that you are trying to find. By populating multiple fields, the result set becomes smaller (more narrowly defined). Notice that in the illustration below, the value =BOILER is entered into the Location field and the value =APPR is entered into the Status field.
Notice in the result set above the number of matching records decreased to one record from ten in the original query (using only the location criteria). Users can search against as many fields as they choose and view the results of only those records that match all search criteria.
2.4. SEARCHING FOR A RESULT SET USING MULTIPLE VALUES IN THE SAME FIELD
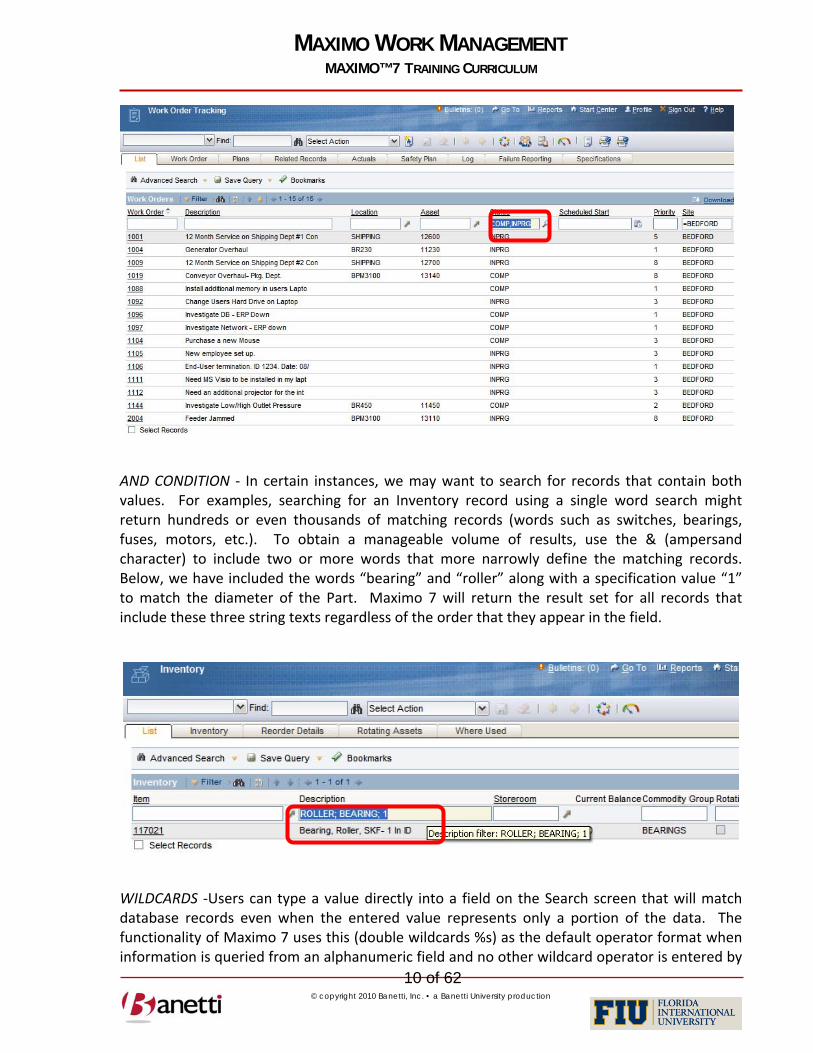
OR CONDITION ‐ Queries can be constructed to search for more than one value in the same field. In the example below, we are searching for Work Orders with a status of COMP (Complete) or INPRG (In Progress). A comma is used to separate values. In the result set, notice that Work Orders with either status are displayed.
Queried Fields
MAXIMO WORK MANAGEMENT MAXIMO™ 7 TRAINING CURRICULUM
10 of 62 © copyright 2010 Banetti, Inc. • a Banetti University production
AND CONDITION ‐ In certain instances, we may want to search for records that contain both values. For examples, searching for an Inventory record using a single word search might return hundreds or even thousands of matching records (words such as switches, bearings, fuses, motors, etc.). To obtain a manageable volume of results, use the & (ampersand character) to include two or more words that more narrowly define the matching records. Below, we have included the words “bearing” and “roller” along with a specification value “1” to match the diameter of the Part. Maximo 7 will return the result set for all records that include these three string texts regardless of the order that they appear in the field.
WILDCARDS ‐Users can type a value directly into a field on the Search screen that will match database records even when the entered value represents only a portion of the data. The functionality of Maximo 7 uses this (double wildcards %s) as the default operator format when information is queried from an alphanumeric field and no other wildcard operator is entered by

MAXIMO WORK MANAGEMENT MAXIMO™ 7 TRAINING CURRICULUM
11 of 62 © copyright 2010 Banetti, Inc. • a Banetti University production
the user. In early Maximo versions, text searches defaulted to exact matches (=). . Users then had to be trained to employ the wildcard character (%) to find records where there were multiple words in the field. Now the text string entered will match against both full and partial words. Your Administrator can change the global query default to an exact match setting. There is one exception to this rule, which relates to queries against the description fields within each application (located to the right of the key field on the top row). Thus, a search for PIN would not return records that had SPINDLE in the description field, but would consider SPINDLE as a match for fields other than the description field.
Users can also type an equal sign in front of the text to eliminate unwanted results. For example, when searching for Work Orders, a user that enters APPR in the status field will receive output for both WAPPR and APPR Work Orders (as APPR is part of WAPPR). Using the text =APPR will remove any Work Orders with a status of WAPPR. If an exact value is known, the use of an equal sign in front of the text (or a wildcard value after the text) will speed up the process time to return values from the query search.
3 OPERATORS AND WILDCARDS
To assist the user with query building, Maximo 7 allows the use of Operators (=, >, <), and Wild Cards (% , _ ). Understanding the use of these characters will substantially expand the query capabilities of the user.
_ ‐ The underscore (Wild Card) character denotes an unidentified value containing a one character placeholder (i.e. – the query for 12_ ‐ will return all values that fall between 120 and 129. The record containing 1200 would not be included because there are two characters after the 12.).
% ‐ The percent sign (Wild Card) character allows the User to tell Maximo that the known information being input is only partial information for that field.
By placing the percent sign before the known information (%12), the user is telling Maximo that the known information resides at the end of the string.
If the % character placeholder is entered after the known information (12%), the user is telling Maximo that the known information resides at the beginning of the string.
If the % character placeholder exists both before and after the known information, the user is telling Maximo that the known information might be found anywhere in the string.
= ‐ Placing the equal sign before the known information tells Maximo that the user is asking for only records that have an exact match in that field.
!= ‐ Placing the exclamation point before the equals sign expresses that the user is asking for all records that are not exact matches in that field.
Placing the greater than sign before a numeric, date or alphanumeric value tells Maximo that the user is asking for all records that have a value greater than that entered into the selected field. There are a few tips to keep in mind, regarding sort order of values. Whenever using the

MAXIMO WORK MANAGEMENT MAXIMO™ 7 TRAINING CURRICULUM
12 of 62 © copyright 2010 Banetti, Inc. • a Banetti University production
>, < and between operators. Special characters are considered lower value than alphanumeric values. Numeric values are next. (Note: they sort correctly in “numeric only” fields, but are sorted as follows (from 1 to 1000) when the field they are in has a data type of alphanumeric (1, 10, 100, 1000, 11, 110, etc.) Finally, alpha values are last and they sort capitals first (A‐Z) followed by lower case (a‐z). By incorporating the equals sign (>=) the user is telling Maximo to also include records equal to the given information.
< ‐ Placing the less than sign before a numeric or date value expresses that the user is asking for all records that have a value less than that entered into the selected field. By incorporating the equals sign (<=) the user is telling Maximo 7 to also include records equal to the given information.
Value1, Value2, Value3 – By placing multiple values in the same query field, the system will create a query searching for all records in which the values queried appear for that field. Example: (PM, EM, CM) in the Work Type field would have a result set equal to all records that were Preventive Maintenance, Emergency, or Corrective Work Orders. Do not put = in front of these multiple values in this case, as it will be evaluated as a single value and pull no records.
is null, is not null – Since blank fields cannot be compared (e.g. < ‘0’ or > ‘0’), it is necessary to use the following symbols to search for records that have blank fields or not blank fields. Example: If the user was searching for all Work Order records that have nothing in the Work Type field, the user could populate the Work Order Type field on the Find tab with ~NULL~. If the user wanted to search for all Work Orders that did have a populated Work Type, then the query would be !=~NULL~). Null searches cannot be made against text search fields (description fields).
4 BUILDING QUERIES
To quickly retrieve a small set of matching records, users should enter all known information/operators should be entered into the appropriate fields.
From our earlier search for Work Orders is the BOILER room location we noted that some defaults had been placed into the fields that are visible in the More Search Fields window. In Work Order applications, the History? field differentiates between Current and History Work Orders. History Work Orders are defined as those Work Orders with a Status of Close (Closed) or Cancel (Cancelled). The purpose of this division was to allow users to query against only active records, without including in the result set, numerous records that had been cancelled or completed from much earlier time periods. All Statuses other than Cancel and Close represent Current Work Orders (History? Field = N). When accessing the Work Order application Search screens, the History field automatically defaults to N. If the field is left blank, the user can search both History and Current Work Orders.

MAXIMO WORK MANAGEMENT MAXIMO™ 7 TRAINING CURRICULUM
13 of 62 © copyright 2010 Banetti, Inc. • a Banetti University production
The Site field identifies the Site to which the Work Order belongs. The Class field defaults to values WORKORDER and ACTIVITY. This eliminates the CHANGE and RELEASE optional values that are used with the Service Desk application functionality (see Chapter VII) and share the Work Order table. As the Maximo product migrated to its current version, all Work Order tasks were given a Work Order number. Tasks are differentiated in the database from “true” Work Orders by the Is Task? field, which is set to Y for tasks and to N for true Work Orders. Therefore, when entering the Work Order Search screens, the Is Task? field automatically populates with an N to remove job tasks from the result set of available Work Orders. Using the Is Task? And History filter also enhances the performance of the system in processing query requests.
Once the parameters for the query have been entered, the User must click on the FIND button (or binoculars) or they can use the ENTER key to initiate the search. Maximo 7 will then automatically open the results sub tab and display all records that meet the query.
5 SELECTING A SINGLE RECORD
When selecting a single record from the Results sub tab, the User may click on the underlined record number in the left column to populate that record’s information on the main screen of
History? Field
Find Button
Is Task? Field

MAXIMO WORK MANAGEMENT MAXIMO™ 7 TRAINING CURRICULUM
14 of 62 © copyright 2010 Banetti, Inc. • a Banetti University production
the respective Application. To modify the record selected or to change the underlying query, return by clicking on the List tab.
6 BROWSING RECORD SETS
All records in the Query Results may be brought over to the main screen, for review, by simply clicking on the Work Order tab while on the List tab. This allows the User to browse through all of the result set records, using the Next and Previous Record buttons (left and right arrow on the toolbar).
The User can also bring over only selected records from the Query Results. After clicking the Select Records box (bottom right of the result set), check boxes will appear by each listed record. Users can check blocks beside the desired records refining the record set. Click on the application’s main screen to review each record.
7 SAVING QUERIES
Maximo allows the User to save queries, either for their own use only, or to share the saved queries with all Maximo Users in that application.
Once a query has been created and the User has determined that they would like to save that Query, (from the List tab) the user must next go to Save Current Query option under the Save Query Options drop down.
Select Records Button

MAXIMO WORK MANAGEMENT MAXIMO™ 7 TRAINING CURRICULUM
15 of 62 © copyright 2010 Banetti, Inc. • a Banetti University production
A file name is required to save the query and an accurate brief description should be provided for the query in the next field, especially if other Users will have access to this query.
By clicking Public, this query can be shared with other Users. When doing this, all other Users will be able to see, run, and even set the query as their default screen setting within that application.
The User also has the ability to set the query as their default query. In doing so, this query will run automatically whenever Users log into the application and Users will be transferred directly to the Results sub tab of that application.
Saved queries (and bookmarks) can be retrieved at any time by clicking the drop down arrow at the top left of the application screen.
Saved Queries Results

MAXIMO WORK MANAGEMENT MAXIMO™ 7 TRAINING CURRICULUM
16 of 62 © copyright 2010 Banetti, Inc. • a Banetti University production
All User Saved and Public Queries can be managed from the View/Manage Queries option on the same drop down menu. The SQL text can be edited and queries can be deleted by their owner. Note that queries are only accessible from the specific application (screen) in which they were built. In other words, Users cannot access Asset stored queries from the Work Order applications (screens). Users must first enter the Assets application to retrieve stored queries for that application.
When making changes to a Saved Query, the User must first select the record to edit. Only the author of the query is authorized to edit or delete the query. Once the Record has been edited, the User must then click on the OK button, to complete the Save process.
8 ADVANCED OPTIONS
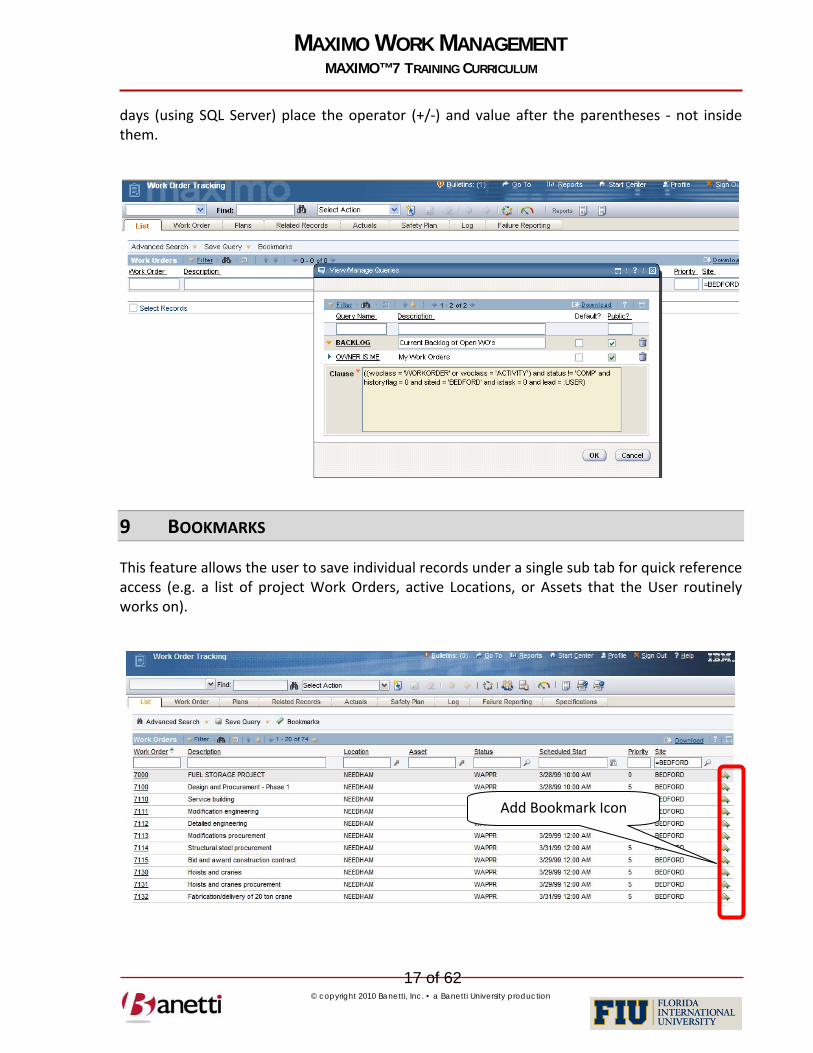
Follow the Save Query process as described in the previous section, but click the Public checkbox so that the query will be usable by all. After saving the query, go to the Save Query dropdown and select View Manage Queries. Find the text that includes your labor id (lead=’WILSON’). Replace ‘WILSON’ with :USER. Do not add the single quotes back in as :USER is a system variable. Click the OK button and the text modification will be saved. Now all Users can select this saved query from the list when configuring their dashboard.
The system variable SYSDATE is also a valuable tool, since it allows you to deploy a floating date range. For example, show me all the Work Orders that have been completed in the last seven days. After creating the query on the Maximo screens go to View/Manage Queries and add a condition AND STATUSDATE BETWEEN SYSDATE‐7 AND SYSDATE. Whenever the stored query is executed, the current date is substituted for SYSDATE. If your database is SQL Server, rather than Oracle the variable for the current day is getdate(). When you want to add or subtract
Saved Queries Options
MAXIMO WORK MANAGEMENT MAXIMO™ 7 TRAINING CURRICULUM
17 of 62 © copyright 2010 Banetti, Inc. • a Banetti University production
days (using SQL Server) place the operator (+/‐) and value after the parentheses ‐ not inside them.
9 BOOKMARKS
This feature allows the user to save individual records under a single sub tab for quick reference access (e.g. a list of project Work Orders, active Locations, or Assets that the User routinely works on).
Add Bookmark Icon

MAXIMO WORK MANAGEMENT MAXIMO™ 7 TRAINING CURRICULUM
18 of 62 © copyright 2010 Banetti, Inc. • a Banetti University production
In the example above, a search was made for Work Orders with a work type of CP (Capital Projects). Project Work Orders assigned to us were bookmarked for easy future reference. The user can Bookmark a record by either clicking on the Bookmark icon located on the Results sub tab or by choosing to Bookmark a record from an application’s main screen using the Select Actions menu.
After bookmarking a record, the User can find all Bookmarked records under the drop down menu item where we accessed Saved Queries. Records can also be viewed by clicking Bookmarks just above the Result Set window. The bookmark list will appear in a dialog box, where they can be selected or deleted as bookmarks.
Select Action Menu
Add To Bookmarks

MAXIMO WORK MANAGEMENT MAXIMO™ 7 TRAINING CURRICULUM
19 of 62 © copyright 2010 Banetti, Inc. • a Banetti University production
10 QUICK KEY SEARCH
This selection will return a record where the key field of that record (i.e. Work Order Number, Asset Number) is equal to the User input. This method is quicker than conducting a query from the Search screens, but can only be used when the user knows the exact record number (key field value). Wildcard searches are not allowed. To initiate this action, a User does not need to select the option from the pull down menu. Users place the data into the Find field and click on the Binoculars icon or ENTER key, returning the record to the application screen for viewing.
11 REVIEW QUESTIONS
Using the Work Order Tracking application, find all Work Orders that are currently in progress (status=’INPRG’). How many records are there?
Pull up any Asset record in the Asset application and locate the manufacturer field. Query to find all other records which have the same manufacturer.
You can only read the numbers the first three numbers of the serial numbers (233) on an old generator. How would you find all the Asset record numbers that match those two conditions? How would the query change if you were not sure whether 233 were the first three digits?
Find all Work Order records that have been created during the past 90 days. Which application would you run the query from? What fields need to be populated to complete the query? How many records are there?
Bookmarks Access
Delete Bookmark
Quick Key Search

MAXIMO WORK MANAGEMENT MAXIMO™ 7 TRAINING CURRICULUM
20 of 62 © copyright 2010 Banetti, Inc. • a Banetti University production
III. CHAPTER 3 ‐ LOCATIONS AND ASSETS
Understanding the Role of Locations & Assets
1 OBJECTIVE
Given the new Maximo 7 architecture, the end user must be able to successfully navigate through the Location and Asset records, their hierarchies and understand the relationship and maintenance implications for both.
2 OUTLINE
2.1 INTRODUCTION TO LOCATIONS, ASSETS (EQUIPMENT), AND DRILLDOWN
With the release of MXES, Maximo 6, the name for Equipment was changed to Assets. This definition change reflects the broader definition of maintainable objects. The creation of Locations and Assets provides a method of physically tracking and storing critical identifying characteristics about such objects, their ongoing maintenance requirements, and operating history. While a full discussion of the differences between Assets and Locations is not included herein, some of the major characteristics of both classes are described below:
Locations can be tangible (physical) or intangible objects. A building, or pump station, as a Location, is something that can be seen and touched. However, intangible Locations may also exist in the database, in order to create an orderly flow to navigate through the Drilldown in

MAXIMO WORK MANAGEMENT MAXIMO™ 7 TRAINING CURRICULUM
21 of 62 © copyright 2010 Banetti, Inc. • a Banetti University production
search of a Location record and its associated Asset objects. Examples of intangible records might be North Campus (geographical parent location), Housing Units (for cost roll‐ups of all residential property) or Water Treatment (parent for a Location process). As with Housing units or other Location placeholders, intangible Locations can serve as logical Location steps when using the Drilldown for navigation and can also serve as accumulators for cost roll‐ups from subordinate Locations. The total Work Order costs at North Campus would include the accumulated cost of all Work Order Costs directly to North Campus as well as all buildings within that Campus (child locations). Cost roll‐ups are also a valuable tool for use with Asset records, as all Site Vehicles might be created as children to a phantom parent denoted as “Rolling Stock”.
Asset objects (with the exception of cost roll‐up Asset record placeholders) are generally tangible. Most Asset objects are loaded in the Maximo 7 database because they require some form of periodic maintenance. Maximo 7 stores standard nameplate information for Assets including: Serial Number, Vendor, Location, Installation Date, Warranty Dates, and default Failure Classification. Category specific information can also be defined, loaded and reviewed using the Maximo 7 Specification application. Examples of an Asset Classification category are Motors, which need descriptive information about RPM, Phase, Horsepower, Volts, etc. and Air Handlers, where the critical information would include the number of Belts and Filters, Filter size, and electrical ratings.
It would be impractical to load all the characteristics for each variety of Asset classification as fields on the same asset screen. For this reason, Maximo 7 provides a Specifications tab, to allow users to first define a category (and create a Classifications template), which will reveal the appropriate attribute fields for that Asset type on the Specifications tab. In addition to Asset Classifications, Maximo 7 also contains this functionality with most other Maximo applications.
3 THE LOCATION APPLICATIONS – SELECTING A LOCATION
When searching for a Location, it is important that the user knows and understands 1) what search tool options are available and 2) the Drilldown structure and system of how Locations are associated.
3.1 NAVIGATION OPTIONS FOR LOCATIONS AND ASSETS
To illustrate an example of the Location navigation options available within Maximo 7, let’s start where most users start ‐ by inserting a Work Order record in the Work Order Tracking application. After selecting the Insert Record option from the Search screen, you can populate the known information fields in that screen (such as the description of the activity required, priority, etc.) ‐ leaving the Location field blank for the moment.
Now, as shown in the illustration below, we want to locate and charge the correct asset to the Work Order. Work Orders can be written against Locations, Assets or both. Click on the
MAXIMO WORK MANAGEMENT MAXIMO™ 7 TRAINING CURRICULUM
22 of 62 © copyright 2010 Banetti, Inc. • a Banetti University production
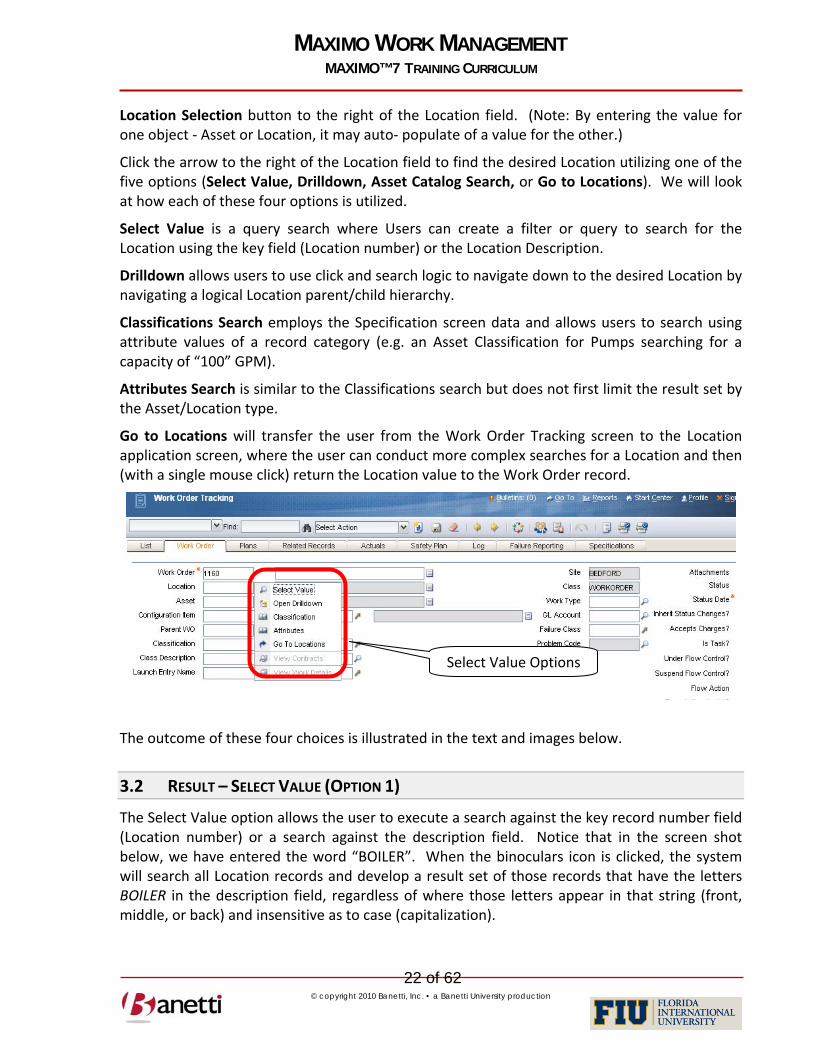
Location Selection button to the right of the Location field. (Note: By entering the value for one object ‐ Asset or Location, it may auto‐ populate of a value for the other.)
Click the arrow to the right of the Location field to find the desired Location utilizing one of the five options (Select Value, Drilldown, Asset Catalog Search, or Go to Locations). We will look at how each of these four options is utilized.
Select Value is a query search where Users can create a filter or query to search for the Location using the key field (Location number) or the Location Description.
Drilldown allows users to use click and search logic to navigate down to the desired Location by navigating a logical Location parent/child hierarchy.
Classifications Search employs the Specification screen data and allows users to search using attribute values of a record category (e.g. an Asset Classification for Pumps searching for a capacity of “100” GPM).
Attributes Search is similar to the Classifications search but does not first limit the result set by the Asset/Location type.
Go to Locations will transfer the user from the Work Order Tracking screen to the Location application screen, where the user can conduct more complex searches for a Location and then (with a single mouse click) return the Location value to the Work Order record.
The outcome of these four choices is illustrated in the text and images below.
3.2 RESULT – SELECT VALUE (OPTION 1)
The Select Value option allows the user to execute a search against the key record number field (Location number) or a search against the description field. Notice that in the screen shot below, we have entered the word “BOILER”. When the binoculars icon is clicked, the system will search all Location records and develop a result set of those records that have the letters BOILER in the description field, regardless of where those letters appear in that string (front, middle, or back) and insensitive as to case (capitalization).
Select Value Options

MAXIMO WORK MANAGEMENT MAXIMO™ 7 TRAINING CURRICULUM
23 of 62 © copyright 2010 Banetti, Inc. • a Banetti University production
3.3 RESULT – DRILLDOWN (OPTION 2)
If the Location field is blank upon entering the Drilldown screen, you will enter the Location hierarchy at the top of the structure (Location System). If you enter the Drilldown with a Location value already entered, you will view the hierarchy from that level downward. Note: the Show Path to Top button may need to be clicked upon to view the Drilldown more completely. The Locations are grouped in a hierarchical format and the drilldown allows the user to visualize the structure. The (+) sign to the far left of the Asset number denotes that there are lower levels. Once the (+) sign has been clicked upon, the drilldown will open up. Once the user clicks on the square blue Select button next to a Location (or Asset) record, the associated record will be returned to the WO Tracking screen.
Expand (+) and Collapse (‐) Buttons
Show Path to Top Button Select Button
Asset Tab

MAXIMO WORK MANAGEMENT MAXIMO™ 7 TRAINING CURRICULUM
24 of 62 © copyright 2010 Banetti, Inc. • a Banetti University production
To view Assets at the Location from the Drilldown dialog box, locate the desired Location value and click on the text to the right of the Select button. Then click the Asset tab at the top left of the Drilldown dialog box. The screen will then reveal the top‐level Assets for that Location, and by clicking any (+) characters the child Assets will be viewable as illustrated in the image below:
3.4 RESULT ‐ CLASSIFICATION SEARCH (OPTION 3)
This screen allows the user to search for Locations utilizing the Classifications functionality. A Classification template must first be created and then attribute values must be entered into the appropriate Location, Asset and Inventory records, so that users will be able to search for records matching the desired attributes. In the illustration below, we are searching for pumps with a capacity of 100 GPM (gallons per minute).
Classifications
Result Set
Attribute Search

MAXIMO WORK MANAGEMENT MAXIMO™ 7 TRAINING CURRICULUM
25 of 62 © copyright 2010 Banetti, Inc. • a Banetti University production
After selecting the pump category and CNTRFGL subcategory, we can see the list of Locations that have been associated with this classification in the bottom table window. To filter the record set, view the attributes defined in the template and enter values in the Search Value section. Then click the Refine button to view only records matching your entries. The greater than (>) and less than (<) can be used, but be careful that alphanumeric (ALN) values sort differently than numeric values. Once the user clicks on a record in the result set, that record will be returned to the field in the Work Order Tracking screen.
3.5 RESULT ‐ GO TO LOCATIONS (OPTION 4)
This action will transfer the user to the Locations Application. From this option, the user will have application search capabilities against all fields. When a value has been located (in Locations), the User can then return the value (to Work Order Tracking) by clicking on the Return with Value button.
Result – The Location Value is returned to the Work Order Tracking Screen
Location
Return with Value

MAXIMO WORK MANAGEMENT MAXIMO™ 7 TRAINING CURRICULUM
26 of 62 © copyright 2010 Banetti, Inc. • a Banetti University production
We have now finished our exercise in examining four distinct navigational methods of searching for Location values from the Work Order Tracking (or any non‐Locations application) screen. These same search procedures would be utilized to locate an Asset record or a Job Plan or a Supervisor for the Work Order as well – all fields with an arrow icon to the right. Throughout the Maximo screens, the user will be faced with determining the most efficient method of locating records from one application while being on the screen of a different application. The Drilldown option is only available for use with Locations and Assets. The Classifications screen option is now available for most of the Maximo applications. Select Value and Go to Other application options are available from all linked applications.
At this time, let’s leave the Work Order Tracking application and navigate to the Locations application. Notice that since we initiated a new record and did not save it, the system asks us if we want to save our changes. This warns us that our entered data will be deleted. Click OK on the warning message. In the next section we will take a look at the various tabs (screens) within the Locations application. The Locations application only contains a few fields for entry. Each record entered holds a position in the Location hierarchy to which it is attached. A description of each of the key fields for this application is provided below.
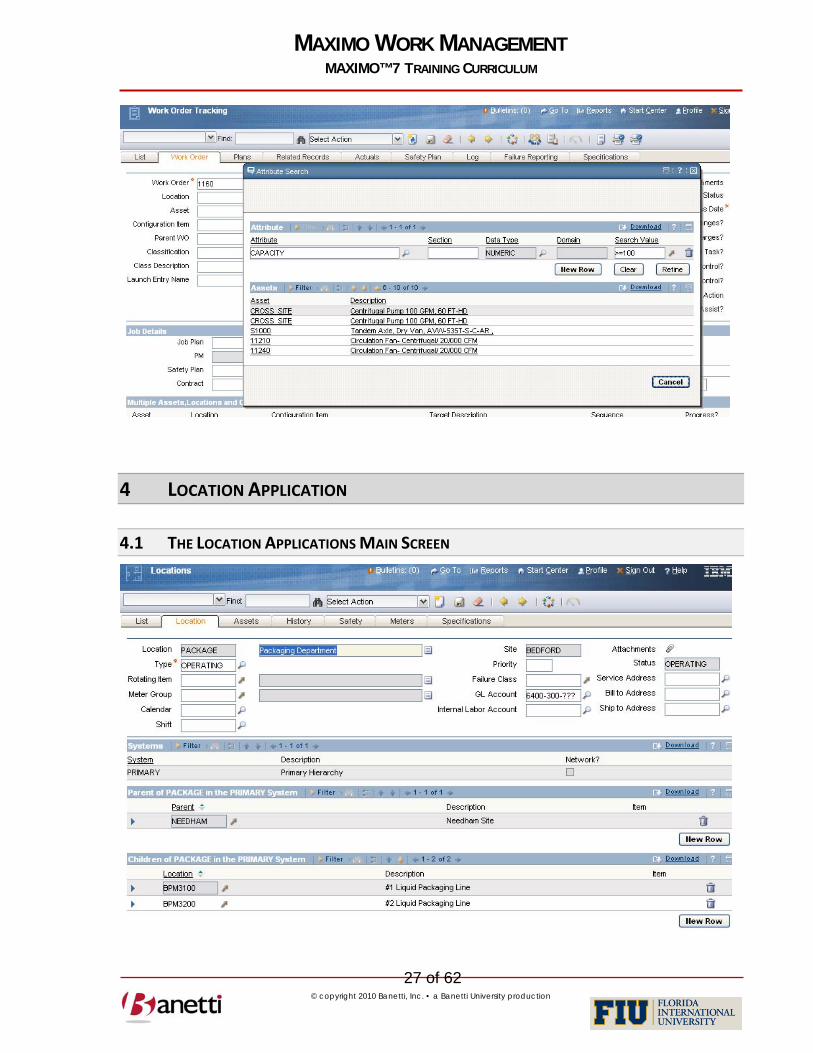
3.6 RESULT ‐ ATTRIBUTE SEARCH (OPTION 5)
This action utilizes the same search engine as the Classifications search. Instead of selecting the class and sub‐class, Users can enter an attribute value and then search for records that meet the specified criteria. Be careful, as the records retrieved may have the same attribute values, but not match the asset category of other assets listed. The attribute search below was conducted from the Asset field for records with a capacity greater than or equal to 100. First, click the New Row button and then enter the attribute value(s) in the Search Value field. Note in the illustration below, the entered criteria captured pumps as well as a vehicle and two fans.
MAXIMO WORK MANAGEMENT MAXIMO™ 7 TRAINING CURRICULUM
27 of 62 © copyright 2010 Banetti, Inc. • a Banetti University production
4 LOCATION APPLICATION
4.1 THE LOCATION APPLICATIONS MAIN SCREEN

MAXIMO WORK MANAGEMENT MAXIMO™ 7 TRAINING CURRICULUM
28 of 62 © copyright 2010 Banetti, Inc. • a Banetti University production
4.2 CREATING LOCATION RECORDS
To create a new record (for the Location application, or any other application):
Navigate to the Application where the record will be created.
From the Search Screen, click the New Location Button
Enter a value for the Location record number and all other required fields. Required fields are designated with a red asterisk (*) next to the field label. If the Location is placed within a System (a Location parent will be required, unless this is the first record entered into that System. The first record entered in a System becomes the top level of that System.
• A record is not created until the user saves the record. Users must click the Save (diskette) icon button on the toolbar to execute a save transaction.
4.3. PRIMARY LOCATION FIELDS
4.3.1 LOCATION
Key field to identify the Location. This ID constitutes the record number within the Maximo database and must be a unique value from all other Location records. This field becomes read‐only (no future edits allowed) after the first save.
4.3.2 DESCRIPTION
The description field value provides a longer text field for descriptive purposes. Remember, the description field is not only one of the two prime query fields for record searches within the Location applications, but also for searches on Locations within other applications, such as the Work Order Tracking. If the Location description exceeds the field length, additional information can be populated into the long description field by clicking on the Page icon to the right of the description field. When this field is populated, the icon will change to an orange color.
4.3.3 GL ACCOUNT
Each Location can be populated with a GL account. By populating the GL Account on the Location record, the GL value will transfer to all Work Orders written against this Location. (Note: if the Work Order has an Asset record, and the Asset record carries its own GL Account, the Asset GL value will supercede the Locations GL Account – as a more specific reference.)
4.3.4 TYPE
The standard Location Type is Operating. Other Location types include:
4.3.5 COURIER
Can serve as a temporary Storeroom to hold Assets or Inventory.

MAXIMO WORK MANAGEMENT MAXIMO™ 7 TRAINING CURRICULUM
29 of 62 © copyright 2010 Banetti, Inc. • a Banetti University production
4.3.6 LABOR
A Maximo Labor record. Also acting as temporary Storerooms, Labor Locations can be the recipients of a Parts issue.
4.3.7 REPAIR
Utilized as a Location for Assets currently undergoing repair.
4.3.8 SALVAGE/HOLDING
A Location designed to hold all Asset records which are no longer in use, e.g. being held for sale or disposal.
4.3.9 VENDOR
A Maximo Company record which can receive (hold) Asset records which are under warranty or demand repair at the Manufacturer’s site.
4.4 THE LOCATIONS ASSET TAB
This Locations application screen tab shows a list of all Asset records that are currently registered in that Location – in this instance, the Shipping and Receiving Department.
MAXIMO WORK MANAGEMENT MAXIMO™ 7 TRAINING CURRICULUM
30 of 62 © copyright 2010 Banetti, Inc. • a Banetti University production
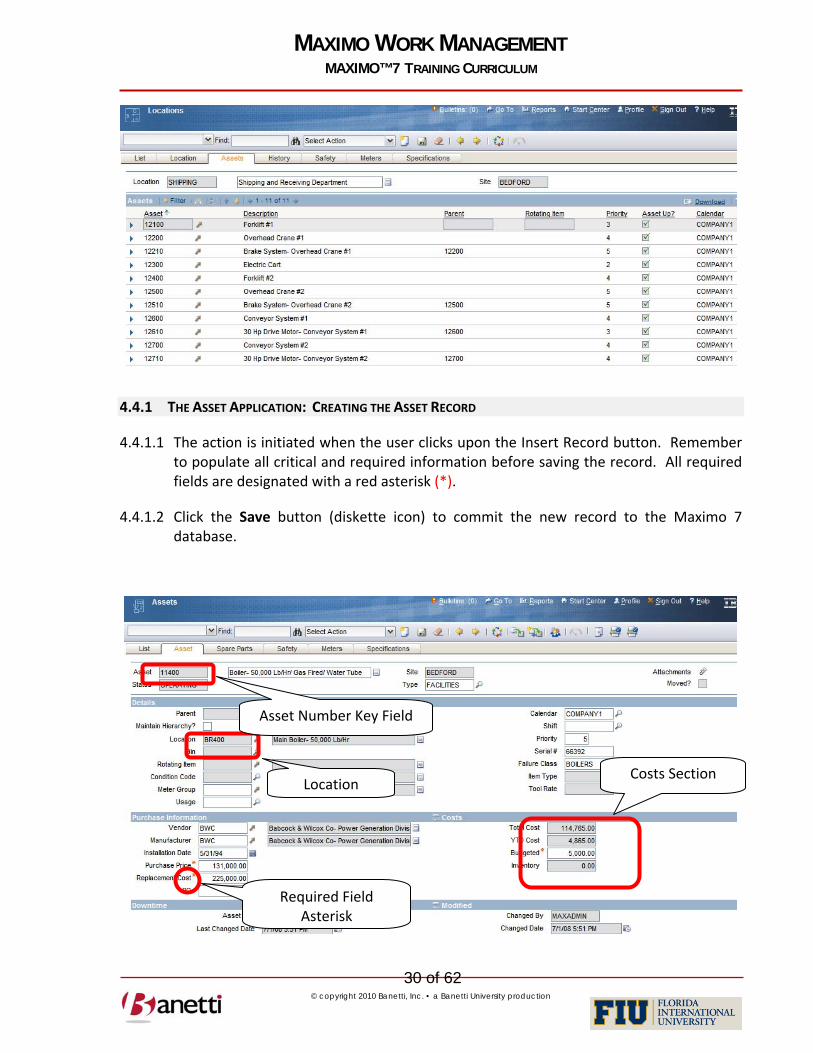
4.4.1 THE ASSET APPLICATION: CREATING THE ASSET RECORD
4.4.1.1 The action is initiated when the user clicks upon the Insert Record button. Remember to populate all critical and required information before saving the record. All required fields are designated with a red asterisk (*).
4.4.1.2 Click the Save button (diskette icon) to commit the new record to the Maximo 7 database.
Location
Asset Number Key Field
Costs Section
Required Field Asterisk

MAXIMO WORK MANAGEMENT MAXIMO™ 7 TRAINING CURRICULUM
31 of 62 © copyright 2010 Banetti, Inc. • a Banetti University production
The procedure is the same as when creating a Location record. Let’s create an Asset record while discussing some of the critical fields that make up this application.
4.5 (PRIMARY COMPONENT FIELDS):
4.5.1 ASSET NUMBER
This key field is the unique identifier for the Asset record and becomes a read‐only value after the first save of the record.
4.5.2 DESCRIPTION
Using consistent and specific Asset descriptions is a critical element for efficient querying and reporting, especially if intelligent sequences are not being used for the key field. The description field value provides a longer text field for descriptive purposes. Remember, the description field is not only one of the two prime query fields for record searches within the Asset applications, but also for searches on Asset within other applications, such as the Work Order Tracking. For optimal results, these descriptions should be created as noun first followed by attribute adjectives. If the Asset Description exceeds the allotted field length, additional information can be populated into the long description field by clicking on the Page icon to the right of the description field. When this field is populated, the icon will change to an orange color.
(Option) Another strategy for populating the Description field is to deploy the “Overwrite” feature found in the Classifications application. When a Classification template is created, the Class, Sub‐class and each of the attributes can (optionally) be used to create a new description value which will overwrite the existing record description upon association of that template to the record. For example, the description of a newly acquired centrifugal pump is entered as Condensate Return Pump – Centrifugal. After associating this record with the Classification of Centrifugal Pumps, that description would be replaced by PUMP, CENTRIFUGAL, 200 GPM, 50 HP, 60 Ft Hd.
4.5.3 BELONGS TO
An Asset hierarchy is automatically established when this field is populated with a parent Asset Number. By creating Asset hierarchies, search capabilities will be improved (through the use of the Drilldown feature), and a cost roll‐up at the parent Asset level will be accomplished, identifying the total cost for the parent record and all subordinate Asset records. An example would be the association of a Condensate Return Pump (child), a Feed Water Pump (child) and a Burner System with a Boiler (parent).
4.5.4 LOCATION
When a User accesses the Drilldown search from either a blank Asset or Location field, the hierarchy displayed defaults to the PRIMARY Location hierarchy. It is generally much easier to locate a specific Asset record by drilling down through the Location hierarchy, then by using word searches against a long list of like‐Assets. For example, the Location of a specific

MAXIMO WORK MANAGEMENT MAXIMO™ 7 TRAINING CURRICULUM
32 of 62 © copyright 2010 Banetti, Inc. • a Banetti University production
defibrillator (Asset record) for Preventive Maintenance within a 200 bed hospital is much easier by accessing the drilldown through Infirmary, Wing and Room Number, as opposed to searching for a specific defibrillator amongst a population of over 100 other defibrillators.
4.5.5 COSTS SECTION
This section reflects the accumulated costs of the various Work Orders and Purchase Orders which have been charged to that Asset record for the current year and for the entire record’s life. These charges include Labor, Material and Tools (which are expensed to Work Orders) as well as Services that are charged to that Asset directly/indirectly through Work Orders from a Purchase Order.
4.6 THE ASSETS SPARE PARTS TAB
The Spare Parts tab is divided into two sections – an upper table window to display child Asset records and the lower table window to display all inventory parts that have been associated with that Asset record. These “Part to Asset” associations can be loaded manually through the Asset record, or through the reciprocal Where Used tab in the Inventory application (shown below):

MAXIMO WORK MANAGEMENT MAXIMO™ 7 TRAINING CURRICULUM
33 of 62 © copyright 2010 Banetti, Inc. • a Banetti University production
Manually populating Part to Asset relationships can be both time consuming and costly. Maximo 7 supports the automatic Parts and Asset record association through the Item application Add as Spare Part field functionality. Whenever a part is charged to a Work Order referencing that Asset, the Part is added to the Asset’s Bill of Materials and populates the appropriate screens Spare Parts and Where Used screens. Example: A Work Order is issued to replace the bearings on Motor 23972, using inventory part number 117021 – SKF Roller Bearing. After the parts are charged to the Work Order, Maximo adds this part to the Spare Parts tab of Motor Asset record. (Note: This feature requires that the Add as Spare Part field be set to ‘Y’ for item 117021 in the Item Master screen. The Default value for an Item record in Maximo 7 is unchecked or ‘N’.)
4.7 THE ASSET SPECIFICATION TAB
To view the unique characteristics of the Asset record, click on the Specifications Tab. The sample below is for an asset catalog classification for a Centrifugal Pump.
Specification Attributes
Data Values for Attributes
Class and Sub Class

MAXIMO WORK MANAGEMENT MAXIMO™ 7 TRAINING CURRICULUM
34 of 62 © copyright 2010 Banetti, Inc. • a Banetti University production
4.8 ADDITIONAL NAVIGATION DETAIL
When looking at the navigation options from the Asset field in Work Order applications, you will note that the top five navigation options are the same ones that we discussed earlier concerning Locations. However, additional selections and functionality have been added. Clicking the arrow to the right of the Assets field, we can use the options: View Contracts, View Work Orders and PMs and View Asset Details.
4.8.1 VIEW CONTRACTS:
In earlier Maximo versions the warranty expiration was represented inside a single field on an Asset or Location record. Now, the warranty contract is a record itself, which can be associated to one or more Assets or Locations. By selecting the View Contracts option for an Asset record, all related contracts will appear in a dialog box in front of the active screen. (Note: The WARRANTYEXPDATE field was not deleted from the Maximo system and is still available to use as an attribute field for Assets or Locations. Unhide the field in the appropriate screen(s) and populate the expiration on the object records. When the value in this field is greater than the current system date, Users will see a dialog box prompt informing them that the object is still under warranty.)

MAXIMO WORK MANAGEMENT MAXIMO™ 7 TRAINING CURRICULUM
35 of 62 © copyright 2010 Banetti, Inc. • a Banetti University production
In the example above, we have a Work Order to repair the transmission on a Freightliner. As with earlier Maximo versions, Maximo 7 will display a warning box on the Work Order if the warranty contract is still in force.
Warranty information for Assets and Locations is now entered through the new Maximo 7 Contracts module. There are seven new applications under the Contracts module. Most of them relate to the Purchasing applications and thus are included in the content of the Maximo 7 Purchasing course.
When creating a new Warranty Contract record, there are several screen tabs to populate. The contract tab contains basic information about the term and start date of the contract as well as the Vendor information. The Properties tab contains certain contract extension, termination and notification requirements which have pre‐established defaults (but are subject to modification) set by your System Administrator.
MAXIMO WORK MANAGEMENT MAXIMO™ 7 TRAINING CURRICULUM
36 of 62 © copyright 2010 Banetti, Inc. • a Banetti University production
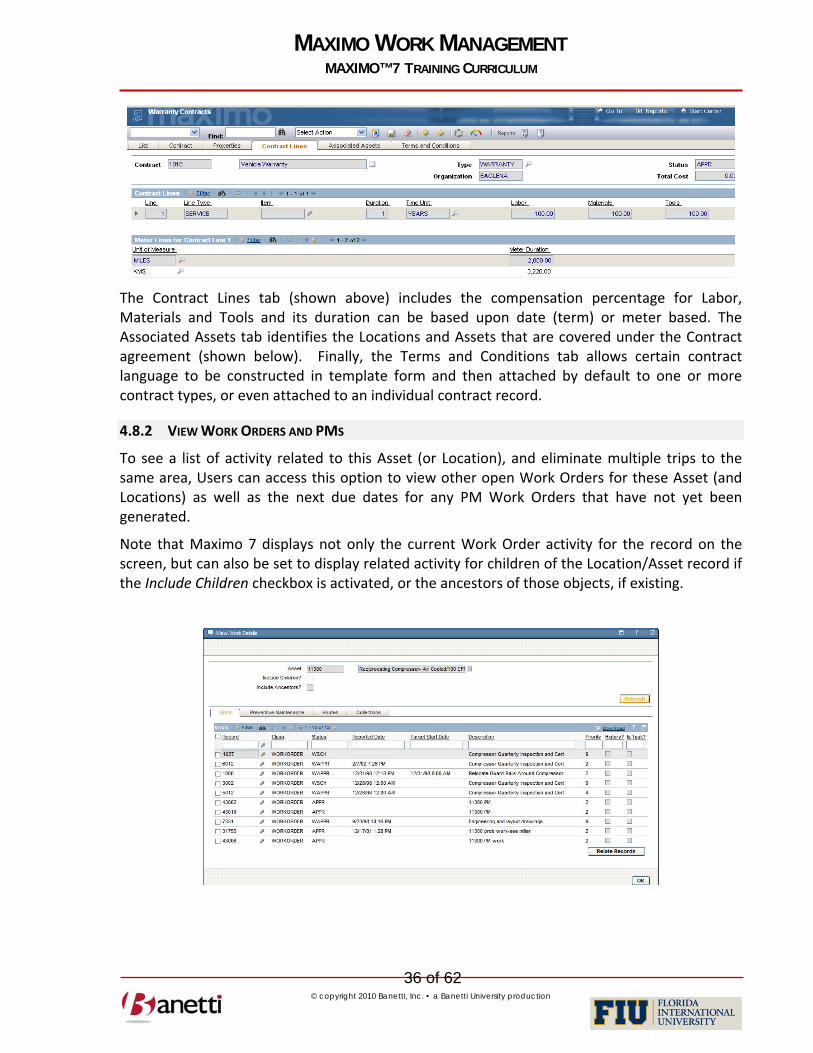
The Contract Lines tab (shown above) includes the compensation percentage for Labor, Materials and Tools and its duration can be based upon date (term) or meter based. The Associated Assets tab identifies the Locations and Assets that are covered under the Contract agreement (shown below). Finally, the Terms and Conditions tab allows certain contract language to be constructed in template form and then attached by default to one or more contract types, or even attached to an individual contract record.
4.8.2 VIEW WORK ORDERS AND PMS
To see a list of activity related to this Asset (or Location), and eliminate multiple trips to the same area, Users can access this option to view other open Work Orders for these Asset (and Locations) as well as the next due dates for any PM Work Orders that have not yet been generated.
Note that Maximo 7 displays not only the current Work Order activity for the record on the screen, but can also be set to display related activity for children of the Location/Asset record if the Include Children checkbox is activated, or the ancestors of those objects, if existing.

MAXIMO WORK MANAGEMENT MAXIMO™ 7 TRAINING CURRICULUM
37 of 62 © copyright 2010 Banetti, Inc. • a Banetti University production
4.8.3 VIEW ASSET DETAILS
Users can access this option from the Detail Menu arrow to view the Classification attribute values that has been loaded for that Asset record in the Specifications tab (without having to hyperlink back to the Asset application).
4.9 DUPLICATION OF MAXIMO 7 RECORDS
Asset (and other application records) can be duplicated to create new records in Maximo 7. This process expedites the loading of multiple like records. Expand the Select Actions drop down menu from the Asset tab and choose Duplicate Asset. The system will generate a new record, and will provide an Autonumber for the record’s key field if that application uses the Autonumber function. The duplicate record function is intelligent and will remove certain existing data specific to the original record (cost information, date entered, etc.) from being copied into the new record. For example, in the Asset application, the description, vendor, manufacturer and spare parts are copied into the newly created duplicate record; but the record number, installation date, serial number and accumulated costs are set back to null for the new record, since the values in these fields will vary from the record being copied. In Work Orders, the planned resources section would be copied to the duplicated record but the actual charge entries would be deleted and the date fields would be set to the current date.

MAXIMO WORK MANAGEMENT MAXIMO™ 7 TRAINING CURRICULUM
38 of 62 © copyright 2010 Banetti, Inc. • a Banetti University production
5 REVIEW QUESTIONS
1. From the Locations Application, access the drilldown and drill down to view the various levels of the Location Hierarchy? Select a Location and determine how many Assets are located in the Location?
2. Go to the Asset application and query for a particular type of Asset (Boiler, Transformer, Generator, Pump, etc,). Choose one of the Asset records in the list and identify where you can find the Asset’s Serial Number, Manufacturer, Purchase Price and Vendor.
3. How many systems are present in the drilldown? What is the purpose of having more than one Location system?
4. Create a representative Asset record of your own choosing.
5. Navigate to the Asset application Search screen and select the New Asset button on the toolbar.
6. Enter an Asset record number according to your Organization’s coding standards.
7. Enter a description of the Asset in the field to the right and a long description by activating the page icon.
8. Using the search functionality of the detail (arrow) button next to fields such as Location and Vendor, search for a database value and enter it in the appropriate field.
9. Populate the other fields on the Main screen and check the other tabs in this application to complete the record.
10. Save the record using the diskette button on the toolbar.

MAXIMO WORK MANAGEMENT MAXIMO™ 7 TRAINING CURRICULUM
39 of 62 © copyright 2010 Banetti, Inc. • a Banetti University production
IV. CHAPTER 4 ‐ MAXIMO WORK ORDERS
THE WORK ORDER PROCESS
1 OBJECTIVES
Given the Maximo 7 environment, create and properly maintain a Maximo Work Order including tracking its progress though the change of statuses. Identify the reasons for planning work activities as it relates to Labor, Materials and Tools. Explain how parent/child Work Orders and cost rollups are structured in the Maximo environment.
2 OUTLINE
2.1 INTRODUCTION
Work Orders constitute the heart of any Automated Asset Management System. The use of manual Work Orders and Preventive Maintenance (PM) procedures pre‐date the existence of computers by many years. Before the advent of the computer era, scheduling and completion of Work was processed on a columnar pad or chalk board while PM events were pulled as index cards from the monthly tabs of an index card file box. The automation of this process began in the late 1980s – including the tracking of buildings, equipment, inventory parts and cost
MAXIMO WORK MANAGEMENT MAXIMO™ 7 TRAINING CURRICULUM
40 of 62 © copyright 2010 Banetti, Inc. • a Banetti University production
centers, making the maintenance process more efficient and less expensive to maintain. Through proper implementation of the Maximo software, maintenance personnel will have immediate access to the entire work history of specific Assets and Locations, including a history of individual work tasks performed, required safety procedures, labor, material and tool resources deployed, and even a bill of materials (detailed parts list) accompanying those assets.
Below is a quick review of the value proposition of Maximo 7’s Work Order Module in terms of meeting Organization maintenance objectives.
Organizations posses a wide range of critical, and oftentimes, expensive assets that need to be accounted for, tracked, and properly maintained. Many Organizations have exacting work and reporting standards and require full compliance with regulatory requirements.
To optimize current and future asset purchases, a Total Cost of Ownership figure needs to be developed for these assets including a proper allocation of initial purchase as well as ongoing maintenance costs.
It is imperative to maximize performance and extend the life of all physical assets through the generation of a proper Preventive Maintenance Work Order schedule. Breakdown Work Orders are estimated to be four times more expensive than planned maintenance activities without considering the value of lost production.
Finally, to accomplish more with less ‐ improve the productivity of Labor, as a result of better Scheduling and Planning, and to reduce the required volume of on‐hand Material resources while reducing “stock‐out” events.
Work Orders are initiated into Maximo from two sources. First, they may be created as a response to emergency and corrective incidents, and second, they may be for periodic maintenance activities necessary to properly maintain and optimize the useful life of Assets and Locations. Incoming Work Orders should be evaluated for proper labor and material resource allocation, to reduce “dry run” trips to the Work Order site. Based upon these estimates, supervisors then prioritize and schedule completion of the tasks. Maximo 7 can assist supervisors in scheduling work for employees in contiguous areas, reducing indirect transit time component.
2.2 COMPLETION
Upon the completion of the Work Order, users will enter the transactional history into the Maximo 7 database, including a charge for labor (time spent multiplied by cost per unit) and materials (part quantity multiplied by part cost). Maximo 7 already stores the labor pay rates and cost of each inventory item, thus Users need only enter the correct labor and time spent, plus the part ID along with the quantity of parts used. The labor and material costs become associated with that Work Order, as well as becoming a charge to the Location and/or the Asset specified in the Work Order. In this manner, Users are able to view their most costly assets a) in terms of total dollars and b) in terms of percentage cost to purchase price.
MAXIMO WORK MANAGEMENT MAXIMO™ 7 TRAINING CURRICULUM
41 of 62 © copyright 2010 Banetti, Inc. • a Banetti University production
2.3 PARENT / CHILD
If the Work Order is a Parent / Child relationship, the Parent Work Order will display its own direct cost plus the cost of all of its subordinate Work Orders. There are pre‐constructed reports in Maximo 7 that will calculate the specific hierarchical costs to Asset and Location objects, including the cumulative cost of all charges against that object and all of its children. For example, users might want to calculate the cost of maintaining a single building, or the accumulated cost of a number of buildings within a particular campus. Likewise, on the Asset side, the cost of a boiler could be viewed as the singular cost of those Work Orders specifically charged against the boiler, or include all charges against it and its various children: the boiler, furnace, condensate return pump, feed water pump and the associated motors (children of the pumps).
3 INDUSTRY STANDARDS AND BEST PRACTICES
3.1 BUILD AN EFFECTIVE PREVENTIVE MAINTENANCE PROGRAM
As an “industry Standards” or “Best Practices” procedure, Organizations should develop a process to record all new incoming Assets and Locations. Just as the Purchasing department records the cost of each newly purchased asset and assigns it an asset number and tag, maintainable assets should be processed by the maintenance department for registration into Maximo 7. Nameplate and specification information can be collected and entered into Maximo. Based upon the manufacturer’s O&M manuals, Job Plans and a PM record should be created to support the ongoing maintenance program for that asset.
Preventive Maintenance on most assets is generally scheduled on a calendar or date driven basis, daily, weekly, monthly, quarterly, or annually. In other instances, you may wish to use a maintenance schedule based upon usage volume, such as the increase in a meter reading, or other non‐calendar driven parameter. For example, an automobile requires an oil change every three months or 3000 miles, whichever comes first. Maximo supports either (or both) methods of triggering Preventive Maintenance Work Orders. While the manual entry requirement of meter readings has restrained the use of non‐calendar PMs, wireless transfer of data from machine to Maximo 7 will increase in usage dramatically in the coming years.
To reduce equipment failure events and overall costs, Organization have moved from a “reactive” posture to a “proactive” one. Management must recognize that there is an initial ramp‐up in costs to execute the increased initial level of PM activity, but historical data indicates that, within a six to nine month period, a measurable reduction in failure events and overall maintenance expenses will appear. Progress can be monitored on a monthly basis comparing the planned to unplanned Work Order time spent and costs.

MAXIMO WORK MANAGEMENT MAXIMO™ 7 TRAINING CURRICULUM
42 of 62 © copyright 2010 Banetti, Inc. • a Banetti University production
4 CREATING WORK ORDERS
Open the Work Order Tracking application and perform the following steps:
1. The first step in creating a Work Order is initiated when the User clicks the Insert Record button and a unique number is assigned to the new record.
2. The user who wishes to create a record must populate all required information before the record can be saved. All required fields are designated with a red asterisk (*).
3. According to your Organization’s business practices enter a meaningful and complete description of the issue requiring maintenance, identify the location(s) and asset(s) involved and select a supervisor, craft, labor group or other responsible party to direct the activities.
4. A record is not created / saved until the User clicks on the diskette icon.
Insert and Save Record Buttons
WO Number Generated
MAXIMO WORK MANAGEMENT MAXIMO™ 7 TRAINING CURRICULUM
43 of 62 © copyright 2010 Banetti, Inc. • a Banetti University production
4.1 PRIMARY COMPONENT FIELDS
4.1.1 WORK ORDER NUMBER
The Work Order number is a sequential, system‐generated autonumber value. Whenever the Insert button is clicked by any of the Organization users, this number will increment by one. As with all primary key fields, the Work Order number must be unique and is not editable after the record has been saved.
4.1.2 DESCRIPTION
When filling out the description field of the Work Order, the User should give as much detail about the problem being reported, including the service requested and more specific Location instructions, if necessary. This field should describe the work that needs to be accomplished and any other notes for the participating workers (permits, safety issues, etc.). If the necessary number of characters exceeds the field size, additional text can be entered into the long description field (accessed on the page icon directly to the right of the description field). When a long description field has been populated, the icon will change color to orange. This notifies Users that text is populated there. For tracking purposes, it is often suggested that the entry date and the User’s initials should be entered prior to the descriptive text for each entry made to the long description field.
4.1.3 WO PRIORITY
This field will define the criticality of the Work Order activity.
4.1.4 WORK TYPE
This field allows the user to classify the Work Order’s type of work to be performed. Your Organization can add to the list of Work Types.
4.1.5 STATUS
This required field represents the current standing of each Work Order in the Maintenance process. As the user clicks the Insert Work Order button in Work Order Tracking, and a new Work Order is generated, this field is populated automatically with the status of Waiting for Approval (WAPPR).

MAXIMO WORK MANAGEMENT MAXIMO™ 7 TRAINING CURRICULUM
44 of 62 © copyright 2010 Banetti, Inc. • a Banetti University production
The following table lists the default Maximo statuses (in time order), and whether or not monetary transactions can be charged against a Work Order with the associated status. Your Organization can add “synonym” statuses to the default list of statuses.
STATUS DESCRIPTION SYNONYMS CAN CHARGE $WAPPR Waiting Approval N APPR Approved Waiting on Plant Cond (WPCOND) Y WSCH Waiting for Scheduling Y WMATL Waiting on Material (WMATL) Y INPRG In Progress Y COMP Completed Y CLOSE Closed N CAN Canceled N HISTEDIT Edited in History Y
4.2 ACTIONS AND PRIMARY WORK ORDER FIELDS
4.2.1 CLICK ON THE CHANGE STATUS BUTTON
If a User does not have the authority to change a Work Order’s Status, the button will not be visible on the toolbar. Signature authority is available individually for each status, so that a mechanic might have authority to change a Work Order Status to COMP (Complete), but not be able to change the status to APPR (Approved).
4.2.2 CHOOSE THE NEW STATUS
From the Value list and click OK to return selected value to the Work Order.
Status Value List

MAXIMO WORK MANAGEMENT MAXIMO™ 7 TRAINING CURRICULUM
45 of 62 © copyright 2010 Banetti, Inc. • a Banetti University production
4.2.3 WORK GROUP
This field populated to transfer the responsibility assignment to the proper Work Group/Department. If the Labor Group field is populated a default value from the Labor Group application will automatically populate the Lead Craft/Person field directly below.
4.2.4 SUPERVISOR
The Supervisor’s name that will be responsible for assigning Labor resources to this Work Order. This could be entered by the initiator of the Work Order or auto populated from Supervisor values in the PM record.
4.2.5 REPORTED BY / REPORTED BY DATE
These read‐only fields indicate the User and the time stamp recorded at the creation point of the Work Order.
4.2.6 LEAD
This field can be used to indicate the primary technician responsible for completing the work on the associated record.
4.2.7 LOCATION
This field represents the site area in which work is to be performed. This field is user populated, unless the Asset field is populated first, in which case the Location associated with that Asset will be carried over to the Work Order. It is essential that Locations be correctly entered. Personnel dispatched to the site must be able to accurately identify the exact work area, and also ensure that all costs incurred are charged to the appropriate General Ledger/Cost Center accounts. When the location value is entered, other location information is transferred from the Location record into the Work Order using Maximo crossover field functionality.
4.2.8 ASSET
This field is used when a Work Order is created against an existing Asset record. The Work Order may inherit some values from the Asset record, such as Asset/Location priority and Failure Class. When one of the values for the Asset and Location information is null, then the populated value moves into the Work Order record. If both Asset and Location value are populated but not the same, the Work Order will inherit the value from the Asset record, as a more specific reference.
5 WORK ORDER HIERARCHIES
Maximo 7 allows Users to group Work Orders utilizing a Parent Child relationship. In building these relationships, Users have the ability to sequence work sets and roll up all costs to the parental Work Order.
MAXIMO WORK MANAGEMENT MAXIMO™ 7 TRAINING CURRICULUM
46 of 62 © copyright 2010 Banetti, Inc. • a Banetti University production
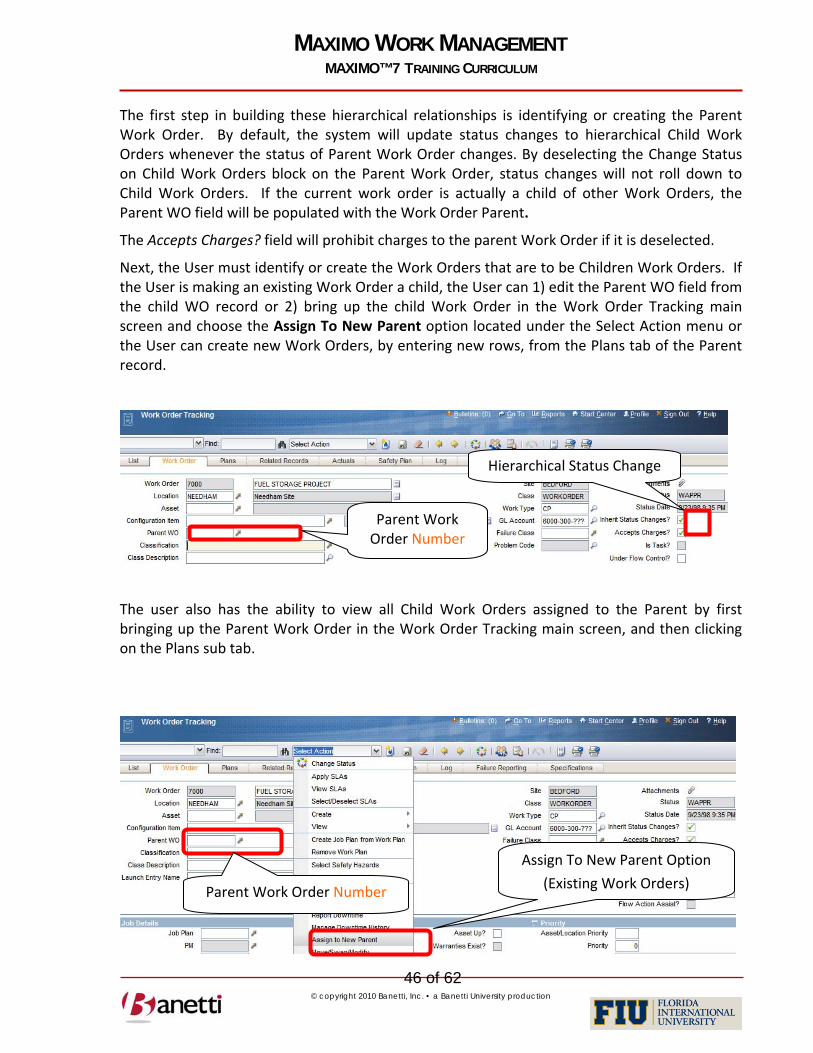
The first step in building these hierarchical relationships is identifying or creating the Parent Work Order. By default, the system will update status changes to hierarchical Child Work Orders whenever the status of Parent Work Order changes. By deselecting the Change Status on Child Work Orders block on the Parent Work Order, status changes will not roll down to Child Work Orders. If the current work order is actually a child of other Work Orders, the Parent WO field will be populated with the Work Order Parent.
The Accepts Charges? field will prohibit charges to the parent Work Order if it is deselected.
Next, the User must identify or create the Work Orders that are to be Children Work Orders. If the User is making an existing Work Order a child, the User can 1) edit the Parent WO field from the child WO record or 2) bring up the child Work Order in the Work Order Tracking main screen and choose the Assign To New Parent option located under the Select Action menu or the User can create new Work Orders, by entering new rows, from the Plans tab of the Parent record.
The user also has the ability to view all Child Work Orders assigned to the Parent by first bringing up the Parent Work Order in the Work Order Tracking main screen, and then clicking on the Plans sub tab.
Parent Work Order Number
Hierarchical Status Change
Parent Work Order Number
Assign To New Parent Option
(Existing Work Orders)

MAXIMO WORK MANAGEMENT MAXIMO™ 7 TRAINING CURRICULUM
47 of 62 © copyright 2010 Banetti, Inc. • a Banetti University production
The Child Work Orders are listed in a Table Window directly above the Tasks of the Parent. There is an icon to the left of the label “Work Order ___’s Children” that will expand/contract the view of the Child Work Orders. New Child Work Orders can be reviewed, edited, and created from this screen.
Users are able to navigate to the Parent or Child Work Order by clicking the Select button located next to either the Child or Parent WO field.
The Plans tab in Work Order Tacking also offers the user the ability to create new Child Work Orders or Tasks by clicking on the New Row button.
Move to
Child Buttons
Plans Tab
Child Work Orders Create New Child Button
Maximize/Minimize Section
Child Work Order
Parent WO and Move to Parent WO icon
Children of Child Work Orders

MAXIMO WORK MANAGEMENT MAXIMO™ 7 TRAINING CURRICULUM
48 of 62 © copyright 2010 Banetti, Inc. • a Banetti University production
The User has the ability to sequence Tasks / Work Orders in the record set.
After completing new rows for each of the Child Work Orders, click the Save button (on the menu bar). This will commit your additions to the database.
To view the Cost Roll Up information for a Parent Work Order, Users can select the View Cost pull down option from the Select Action menu. This will total all scheduled hours and costs as well as actual hours and costs for the WO ancestor.
Result – Display of Costs to Parent Only and Parent plus Children (Roll‐Up)
View WO Information
View Parent WO Only Costs
View Entire Hierarchy Costs

MAXIMO WORK MANAGEMENT MAXIMO™ 7 TRAINING CURRICULUM
49 of 62 © copyright 2010 Banetti, Inc. • a Banetti University production
6 FOLLOW‐UP WORK ORDERS
A Follow‐up Work Order does not build a true parent child Work Order relationship. The Follow‐up Work Order does not appear on the Plans tab of the Parent (Original WO), nor does the Parent roll‐up the costs of the Follow‐Up Work Orders. However, the Follow‐up Work Order can indicate that a new Work activity was a) created from or b) completed in conjunction with the originating Work Order. For example, after completing repair work on an emergency generator in the boiler room, you might want to generate a new Work Order to rebuild the door frame, or to repair wall damage. In order to close your activity, but to maintain a “queryable” relationship between your wall replacement Work Order and the secondary Work Order, a follow up Work Order might be appropriate. In the screen shots below, a Follow up Work Order was generated from the initial repair Work Order.
In the creation of the Follow‐up Work Order, the system duplicates certain information from the originating Work Order, so the Description field, Supervisor, Work Type information and other planned information may need to be edited to reflect the circumstances of the new activity. After creating a Follow‐up Work Order, the Has Follow‐up Work will become checked on the originating Work Order.

MAXIMO WORK MANAGEMENT MAXIMO™ 7 TRAINING CURRICULUM
50 of 62 © copyright 2010 Banetti, Inc. • a Banetti University production
Note in the screen shot above, to the right side of the screen, there is a field labeled Originating WO. By selecting the Arrow button, you can navigate back to the original Work Order. Rather than roll the entire cost of a repair procedure into a PM activity (which distorts the average time deployed to the task), the use of Follow‐up Work Orders creates a separate event for both work activities, while maintaining the relationship between the two events.
7 REVIEW QUESTIONS
1. A call has come in to your department concerning a water leak in one the housing units. Create a Work Order for the Location of your choice, estimating the labor time at 2 hours. As this is an Emergency situation and needs immediate attention, enter the correct Work Type and change the Status of the Work Order to APPR.
• Navigate to the Work Order Tracking application Search screen and select the New Work Order button on the toolbar.
• Enter a description of the Asset in the field to the right and a long description by activating the page icon.
• Using the search functionality of the detail (arrow) button next to fields such as Location and Vendor, search for an existing database value and enter it in the appropriate field.
• Populate the other fields on the Main screen and check the other tabs in this application to complete the record
• Save the record suing the diskette button on the toolbar.
Originating WO Button

MAXIMO WORK MANAGEMENT MAXIMO™ 7 TRAINING CURRICULUM
51 of 62 © copyright 2010 Banetti, Inc. • a Banetti University production
2. You have received a follow‐up call that several Fluorescent Light Bulbs need to be replaced at the same Location. Create a Follow‐up Work Order to dispatch a General Mechanic to the Location. Where would you go to navigate between the Originating and Follow‐up Work Orders?
3. Create a Project (parent) Work Order of your choice. Using one of the methods described in this chapter, add three children Work Orders that support this project. Practice transferring the record from the parent to one of the Sub Work Orders and back again. Identify the place where the total costs can be viewed for the parent Work Order and all of the Sub Work Orders.
MAXIMO WORK MANAGEMENT MAXIMO™ 7 TRAINING CURRICULUM
52 of 62 © copyright 2010 Banetti, Inc. • a Banetti University production
V. CHAPTER 5 ‐ WORK ORDER TRANSACTIONS
Recording Labor, Materials, and Tools
1 OBJECTIVE
Given the Maximo 7 platform, users should be able to proficiently enter Labor, Material and Tools Usage for a given Work Order and then complete the Work Order process according to your Organization’s current business processes (using the appropriate entry screen, record status modifications and failure reporting).
2 OUTLINE
2.1 WORK ORDER TRACKING APPLICATION
This first and primary objective is track activity and to report labor and material charged in the completion of a Work Order. Users also have the ability to change the Work Order’s status as the work itself moves from one phase to the next. For example, when the work portion of the assignment is completed, the individual entering the data should change the status to Complete (COMP); otherwise, it will remain on the backlog list and possibly be inadvertently reassigned.
Failure Reporting, Task Completions and other vital fields on the Work Order may need to be appended or modified.
MAXIMO WORK MANAGEMENT MAXIMO™ 7 TRAINING CURRICULUM
53 of 62 © copyright 2010 Banetti, Inc. • a Banetti University production
2.2 ENTERING DATA
2.2.1 LOCATING THE WORK ORDER
Querying for a Work Order can be done by either using the List screen from a Work Order application, or by using the Select Value or Go To Work Order functions from the Work Order field of a non‐Work Order applications:
2.2.2 USING THE SELECT VALUE FUNCTION
This allows the user to query on two fields at once, the Work Order Number or Description fields. When entering the search criteria, both of the fields will be searched for data matches. If matches are found, the data set will be listed in the Results sub tab.
By using the Go To Work Order function, the user will be brought to the Work Order Tracking application. Once inside the application, the user will have all of the querying abilities associated with that more detailed application.
From the Work Order application, users have the ability to use the Quick Key Search on any of the Work Order screens when the (WO) record number is known.
2.3 REPORTING ACTUAL RESOURCE USAGE
Once a Work Order has been received an Approved or higher status, the User can manually enter (or copy from the Work Plan) costs and other information concerning that Work Order utilizing the Labor, Materials, Tools, Meters, and Failure Reporting sub tabs.
2.4 APPLYING LABOR UTILIZING PLANNED LABOR
Work Plans associated with a Work Order can be used to apply labor charges to that Work Order. To do so, the user should follow these steps.
First click on the Select Planned Labor button located under the Labor Actuals sub tab.
A dialog box will appear showing all planned labor entries associated with that Work Order. The user can then pick the Labor entries from those plans by either clicking on the boxes to the right of the planned entries, or by clicking the top checkbox which will select all rows from the Plan. The user must then click the OK button to return to the Work Order screen with the captured Labor Code, Labor Name, Estimated Hours, and a default Start Date. If the Plan carries a Craft designation, the Labor code field will be cleared, awaiting the entry of a real person. Click the arrow to the right of the Labor field and choose Select Value. A list of Labor records matching the Craft designation will appear. Select the correct individual and then the OK button to return the name to the screen.
Click the arrow at the left margin in order to expand the row detail for editing the information from the Labor rows after they have been entered.
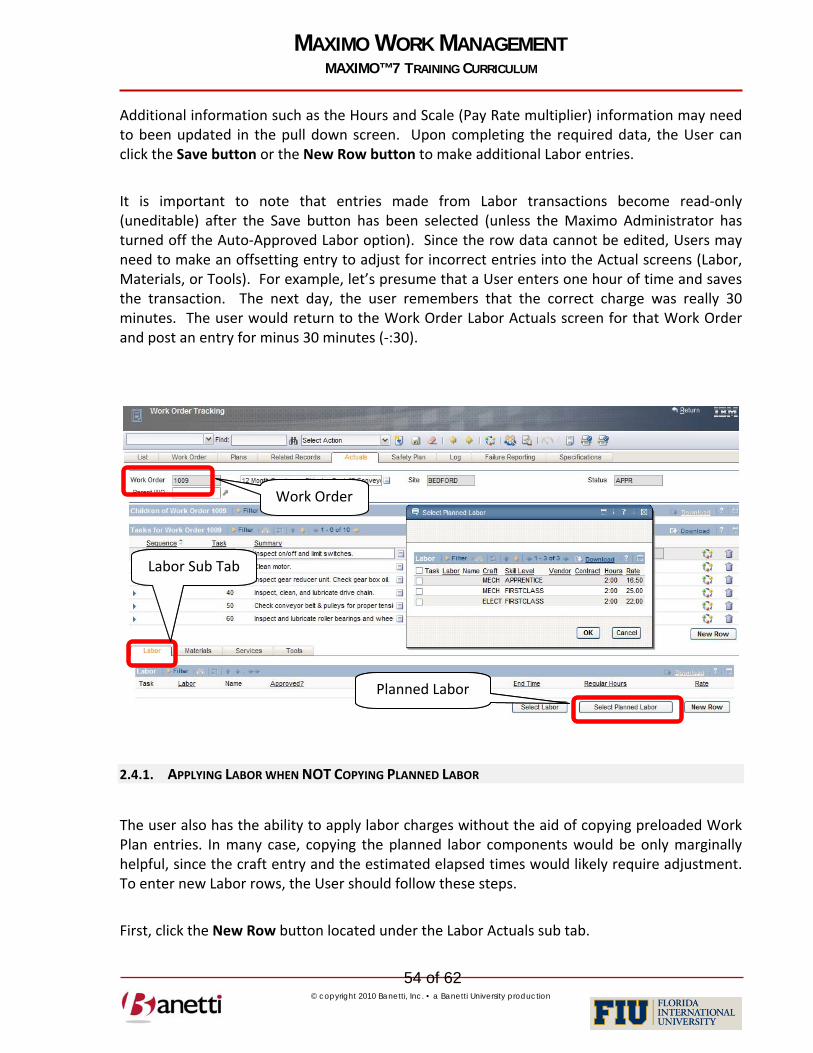
MAXIMO WORK MANAGEMENT MAXIMO™ 7 TRAINING CURRICULUM
54 of 62 © copyright 2010 Banetti, Inc. • a Banetti University production
Additional information such as the Hours and Scale (Pay Rate multiplier) information may need to been updated in the pull down screen. Upon completing the required data, the User can click the Save button or the New Row button to make additional Labor entries.
It is important to note that entries made from Labor transactions become read‐only (uneditable) after the Save button has been selected (unless the Maximo Administrator has turned off the Auto‐Approved Labor option). Since the row data cannot be edited, Users may need to make an offsetting entry to adjust for incorrect entries into the Actual screens (Labor, Materials, or Tools). For example, let’s presume that a User enters one hour of time and saves the transaction. The next day, the user remembers that the correct charge was really 30 minutes. The user would return to the Work Order Labor Actuals screen for that Work Order and post an entry for minus 30 minutes (‐:30).
2.4.1. APPLYING LABOR WHEN NOT COPYING PLANNED LABOR
The user also has the ability to apply labor charges without the aid of copying preloaded Work Plan entries. In many case, copying the planned labor components would be only marginally helpful, since the craft entry and the estimated elapsed times would likely require adjustment. To enter new Labor rows, the User should follow these steps.
First, click the New Row button located under the Labor Actuals sub tab.
Work Order
Labor Sub Tab
Planned Labor
Work Order
Labor Sub Tab
Planned Labor

MAXIMO WORK MANAGEMENT MAXIMO™ 7 TRAINING CURRICULUM
55 of 62 © copyright 2010 Banetti, Inc. • a Banetti University production
The User must then populate all Required Fields (*). To populate the Labor Code field, Users can either type in a Labor Code or use one of the Select Options associated with the field.
Once the User clicks on the Save button, the entry will be permanently attached to the Labor sub tab.
2.4.2 TASK ID
An optional field, which designates the specific task against which time is recorded.
2.4.3 LABOR CODE
The actual resource person that should be charged to the Work Order. Upon entry, the pay rate, craft, qualification and outside information will be transferred from the data previously entered on that Labor record. If an employee has multiple craft designations, Users will be prompted to select the correct craft entry for this row.
Labor Sub Tab
New Row Button
Expanded Screen Labor Data Input

MAXIMO WORK MANAGEMENT MAXIMO™ 7 TRAINING CURRICULUM
56 of 62 © copyright 2010 Banetti, Inc. • a Banetti University production
2.4.4 START DATE
The System will initially default the Start field to the current (entry) date, but if the Work was initiated on an earlier date, an adjustment to the date should be made. Users can employ the date shortcuts (Ctrl+minus and Ctrl+minus) to adjust the dates.
2.4.5 START TIME/END TIME
(Optional) If your Organization requires entry of the time of day, enter the start and end time values. The duration between those time intervals will populate the Hours field automatically, but the duration field can be subsequently adjusted for lunch breaks, etc.
2.4.6 HOURS
The total time charged to the Work Order by this resource should be entered here. This might include not only wrench time, or also be inclusive of associated time to procure materials, check maintenance specs and transit time. Hours can be entered using the format 2:30 or 2.5 (which the system will convert to 2:30).
2.4.7 OVERTIME AND OT SCALE
If your Business Process supports the use of Overtime (OT) multipliers, add the appropriate number of hours in the Overtime field. The OT Scale will default from the value used on the Labor record. If the default scale value is not correct, select a different overtime multiplier to enter the correct amount.
2.4.8 TRANS TYPE
WORK is the default value for this field ‐ as Maximo 7 is generally charged with capturing labor hours associated with Work Order activities. Your Organization may choose to track separately other work categories such as planning, part procurement and transit and/or capture non‐work (overhead) activities such as meetings and training. The labor transaction type field contains the following pre‐loaded values: Travel Time, Waiting Materials and Work. Other indirect labor values can be added to support your data mining efforts.
2.4.9 DEBIT GL ACCOUNT
If General Ledger accounts are utilized in Maximo 7, this field should already be partially or fully populated with the value from the GL Account field on the Work Order main screen. (The Work Order GL value may be derived from the Location record’s GL Account or in certain instances from the Asset or PM record). GL account fields are built in segments. After selecting the first accounting segment, Users will see the available matching segments for the second segment. And so on.

MAXIMO WORK MANAGEMENT MAXIMO™ 7 TRAINING CURRICULUM
57 of 62 © copyright 2010 Banetti, Inc. • a Banetti University production
3 APPLYING MATERIAL UTILIZING PLANNED MATERIAL
Work Plans associated with a Work Order can also be used to apply Material charges to that Work Order. To do so, the user should follow these steps.
First click on the Select Reserved Items button located on the Materials Actuals sub tab.
The User will be then be given all Planned Item entries associated with that Work Order that were to be issued from a Storeroom. The User can then click the checkbox on individual rows or the top row to select all rows. The user must then click the OK button to return to the Work Order screen with the Item Number (if used), Item Description, Unit of Issue, Quantity, Unit Cost, and Total Cost. (Note: Planned Materials which do not reference a Part ID in the Maximo 7 database are Direct Issue items and may also be received through the Purchasing applications in Maximo 7.)
In order to edit or augment the carried over information, the User must click on the Select button located at the left margin of each row. This will expand the row detail so that updated information can be entered. After all information has been updated on the pull down screen, the user must click the Save button to update the Maximo Record.

MAXIMO WORK MANAGEMENT MAXIMO™ 7 TRAINING CURRICULUM
58 of 62 © copyright 2010 Banetti, Inc. • a Banetti University production
4 APPLYING MATERIAL WHEN NOT COPYING PLANNED MATERIAL
The User also has the ability to apply Material charges without the aid of copying associated Work Plans. To do so, the user must follow these steps.
6.1 First, the user must click the New Row button located under the Materials Actuals sub tab.
6.2 The user must then populate all Required Fields (*). Information about a selected piece of material can either be typed in or be populated by the system once an Item Number has been provided. The Item number itself can either be typed in or selected through one of the select options provided.
6.3 Once the user clicks on the Save button, a row will be committed under the Material sub tab and the details section will roll up to return the User to the table window format.
Select Reserved
Items Button
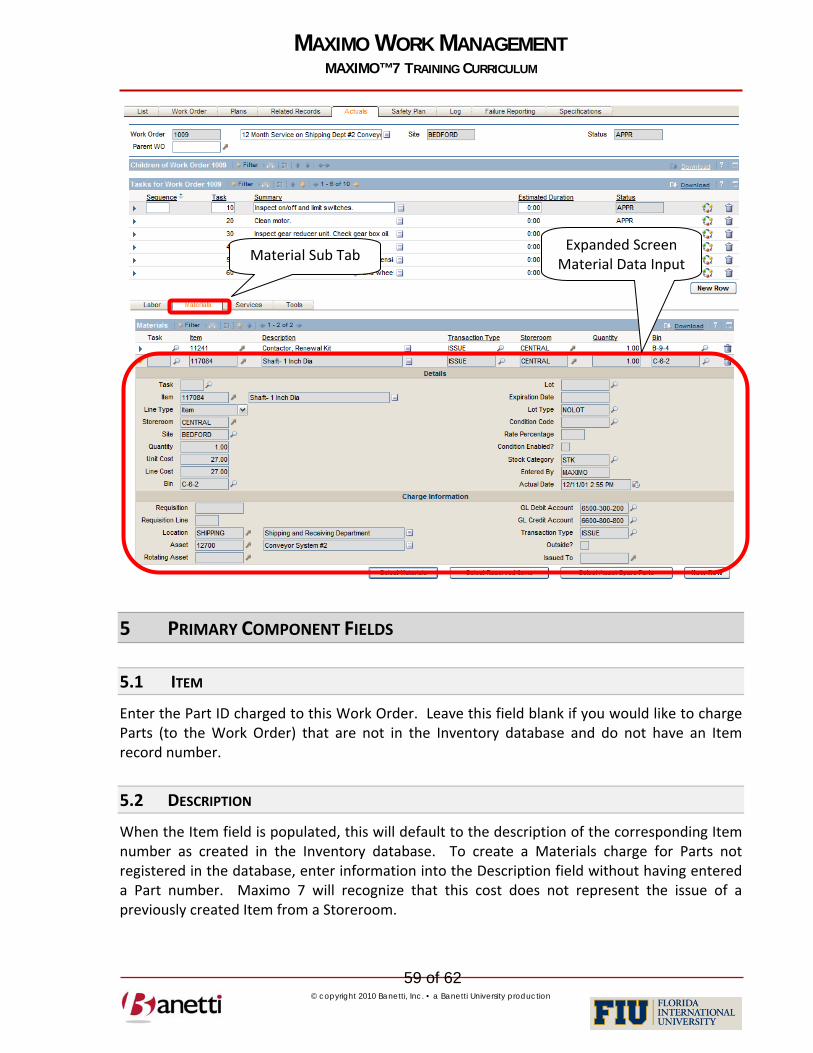
MAXIMO WORK MANAGEMENT MAXIMO™ 7 TRAINING CURRICULUM
59 of 62 © copyright 2010 Banetti, Inc. • a Banetti University production
5 PRIMARY COMPONENT FIELDS
5.1 ITEM
Enter the Part ID charged to this Work Order. Leave this field blank if you would like to charge Parts (to the Work Order) that are not in the Inventory database and do not have an Item record number.
5.2 DESCRIPTION
When the Item field is populated, this will default to the description of the corresponding Item number as created in the Inventory database. To create a Materials charge for Parts not registered in the database, enter information into the Description field without having entered a Part number. Maximo 7 will recognize that this cost does not represent the issue of a previously created Item from a Storeroom.
Expanded Screen Material Data InputMaterial Sub Tab

MAXIMO WORK MANAGEMENT MAXIMO™ 7 TRAINING CURRICULUM
60 of 62 © copyright 2010 Banetti, Inc. • a Banetti University production
5.3 STOREROOM
This field references the source of the Part which was issued. The Storeroom field will remain blank when there is a material charge that does not denote a Part in the Maximo 7 database. If a Storeroom value is not populated, the User must enter a Work Order number, Location, Asset or GL Account, so that the Materials expense is correctly captured.
5.4 DEBIT GL ACCOUNT
This field should already be correctly populated, or at least partially populated with the value from the GL Account field on the Work Order main screen. (The Work Order screen value is derived from the default GL Account brought over from the Location or in infrequent instances from the Asset or PM record).
6 APPLYING TOOLS
If tool usage has been planned and utilized, the user can follow the same procedures described in the Materials sub tab to report this usage in the Tools sub tab.
7 APPLYING FAILURE INFORMATION
If the Work Order constitutes a failure event, complete the Cause and Remedy fields on the Failure Reporting tab.

MAXIMO WORK MANAGEMENT MAXIMO™ 7 TRAINING CURRICULUM
61 of 62 © copyright 2010 Banetti, Inc. • a Banetti University production
8 ROUTES
Although routes are covered in the Work Order Planning course, users may find it expeditious to create a route to record a series of events as a singular event. For example, it may be easier to generate one Work Order to PM all exhaust fans or all air handlers on the roof of the same building. Routes can also be used to provide direction for a weekly lubrication route, or any set of events that could easily be treated in a singular fashion Routes can create a single Work Order, or a hierarchy of parent and child Work Orders, depending upon the selection made regarding the Route Stop configuration.

MAXIMO WORK MANAGEMENT MAXIMO™ 7 TRAINING CURRICULUM
62 of 62 © copyright 2010 Banetti, Inc. • a Banetti University production
9 REVIEW QUESTIONS
• From the Work Order Tracking application, locate a Work Order of your own choosing. If you have difficulty locating the record, try searching for a value that you remember entering in one of the Work Order fields, or by your login name, which will is automatically populated in the Reported By field upon insert. (Note: To further refine your search, you could also enter a date range in the Reported Date field (in addition to your login) and extract a list of your own work orders for the past X days.) After locating your Work Order, go to the Actuals tab. At the bottom of the screen, click the Planned Labor button and you will see the estimate(s) of labor that you built in the previous exercise. Highlight the left column box, click the OK button and you will return to the Actuals Labor tab with the value. To edit the estimated hours (to match the actual hours worked), click the arrow at the far left of the column of the row, which will explode out into a detail screen for the row selected. Change the hours charged field to an amount 15 minutes less than the estimate. If the Labor record is a Craft, edit that field as well, to change the reference from a Craft record to an individual.
• As in the preceding question, locate the Work Order that selected from a list of Waiting for Approval Work. Then go to the Actuals tab and copy the planned labor to the Actuals screen, using the Select Planned Labor button. What happened? If necessary, follow the error message instructions, and then complete the suggested task to be able to charge actual labor and materials to the Work Order. Add a new row to the Labor Actuals to record that an additional employee who assisted in the work. Finally, click on the Failure Reporting tab. Check the various levels to see if you can supplement additional information for future historical reference. If no accurate value exists for the third and fourth Failure Classification levels, leave the fields blank.
• From the Work Order Tracking, create a new Work Order to replace a damaged traffic sign. Enter the actual charges for labor and materials. Finally, complete the information on the Failure Reporting tab and change the status of the Work Order to COMP – Complete. This last step will make it clear to all users that the work process has been completed, so that it is not rescheduled as a subsequent work assignment.