maximo enterprise adapter for oracle applications ... · pdf filev ibm maximo enterprise...
TRANSCRIPT

IBM Tivoli Software
Maximo Enterprise Adapter for Oracle Applications Installation Guide
Version 7.5


This edition applies to version 7, release 5, modification 0 of IBM Maximo Enterprise Adapter for Oracle Applications and to all subsequent releases and modifications until otherwise indicated in new editions.
© Copyright International Business Machines Corporation 2008 - 2011. All rights reserved.
US Government Users Restricted Rights - Use, duplication or disclosure restricted by GSA ADP Schedule Contract with IBM Corp.
NoteBefore using this information and the product it supports, read the information in “Notices” on page 101

Contents
Chapter 1: Installation overview. . . . . . . . . . . . . . . . . . . . . . . . . . . . . . . . . . . . . . . . . . . . . . . . . . . . . . . . . . . . . . . . . . . . . 1Integration architecture and components . . . . . . . . . . . . . . . . . . . . . . . . . . . . . . . . . . . . . . . . . . . . . . . . . . . . . . . . . . 1Adapter configuration options . . . . . . . . . . . . . . . . . . . . . . . . . . . . . . . . . . . . . . . . . . . . . . . . . . . . . . . . . . . . . . . . . . . 2Installation sequence . . . . . . . . . . . . . . . . . . . . . . . . . . . . . . . . . . . . . . . . . . . . . . . . . . . . . . . . . . . . . . . . . . . . . . . . . . . . 2
Chapter 2: Installing IBM Maximo Enterprise Adapter for Oracle Applications . . . . . . . . . . . . . . . . . . . . . . . . . . 3Preparing for the installation . . . . . . . . . . . . . . . . . . . . . . . . . . . . . . . . . . . . . . . . . . . . . . . . . . . . . . . . . . . . . . . . . . . . . 4Running the installation . . . . . . . . . . . . . . . . . . . . . . . . . . . . . . . . . . . . . . . . . . . . . . . . . . . . . . . . . . . . . . . . . . . . . . . . . 5Deploying the EAR files on WebLogic Server. . . . . . . . . . . . . . . . . . . . . . . . . . . . . . . . . . . . . . . . . . . . . . . . . . . . . . . 6Deploying the EAR files on WebSphere Application Server . . . . . . . . . . . . . . . . . . . . . . . . . . . . . . . . . . . . . . . . . . 7
Command syntax for deploying EAR files on WebSphere Application Server . . . . . . . . . . . . . . . . . . . . . . . 8
Chapter 3: Configuring the adapter in Maximo Asset Management. . . . . . . . . . . . . . . . . . . . . . . . . . . . . . . . . . . . . . 9Adding support for flat structures . . . . . . . . . . . . . . . . . . . . . . . . . . . . . . . . . . . . . . . . . . . . . . . . . . . . . . . . . . . . . . . . 9Specifying and enabling the endpoint for the adapter. . . . . . . . . . . . . . . . . . . . . . . . . . . . . . . . . . . . . . . . . . . . . . . . 9Enabling publish channels and enterprise services . . . . . . . . . . . . . . . . . . . . . . . . . . . . . . . . . . . . . . . . . . . . . . . . . 11
Publish channels and enterprise services . . . . . . . . . . . . . . . . . . . . . . . . . . . . . . . . . . . . . . . . . . . . . . . . . . . . . . 12Setting up integration controls . . . . . . . . . . . . . . . . . . . . . . . . . . . . . . . . . . . . . . . . . . . . . . . . . . . . . . . . . . . . . . . . . . 13
Integration controls . . . . . . . . . . . . . . . . . . . . . . . . . . . . . . . . . . . . . . . . . . . . . . . . . . . . . . . . . . . . . . . . . . . . . . . . 13Configuring cron tasks . . . . . . . . . . . . . . . . . . . . . . . . . . . . . . . . . . . . . . . . . . . . . . . . . . . . . . . . . . . . . . . . . . . . . . . . . 16
Configuring the cron task for interface table polling . . . . . . . . . . . . . . . . . . . . . . . . . . . . . . . . . . . . . . . . . . . . 16Configuring cron tasks for JMS queues. . . . . . . . . . . . . . . . . . . . . . . . . . . . . . . . . . . . . . . . . . . . . . . . . . . . . . . . 17Configuring a cron task for message reprocessing . . . . . . . . . . . . . . . . . . . . . . . . . . . . . . . . . . . . . . . . . . . . . . 17
Adjusting databases to be compatible . . . . . . . . . . . . . . . . . . . . . . . . . . . . . . . . . . . . . . . . . . . . . . . . . . . . . . . . . . . . 19Matching GL account formats and column lengths . . . . . . . . . . . . . . . . . . . . . . . . . . . . . . . . . . . . . . . . . . . . . 19
Viewing the GL account format of Oracle E-Business Suite . . . . . . . . . . . . . . . . . . . . . . . . . . . . . . . . . . . 19Reconfiguring the GL account format in Maximo Asset Management. . . . . . . . . . . . . . . . . . . . . . . . . . 19
Adjusting the size and type of tables and columns. . . . . . . . . . . . . . . . . . . . . . . . . . . . . . . . . . . . . . . . . . . . . . 21Adjusting the size of the COMPTYPE domain . . . . . . . . . . . . . . . . . . . . . . . . . . . . . . . . . . . . . . . . . . . . . . . . . 22Updating the database . . . . . . . . . . . . . . . . . . . . . . . . . . . . . . . . . . . . . . . . . . . . . . . . . . . . . . . . . . . . . . . . . . . . . . 23
Adding Oracle Vendors to the Maximo Asset Management Companies Master Set . . . . . . . . . . . . . . . . . . . . . 23Setting active default item status. . . . . . . . . . . . . . . . . . . . . . . . . . . . . . . . . . . . . . . . . . . . . . . . . . . . . . . . . . . . . . . . . 24
Chapter 4: Configuring the adapter on Oracle E-Business Suite . . . . . . . . . . . . . . . . . . . . . . . . . . . . . . . . . . . . . . . . 25PL/SQL files for the Maximo Enterprise Adapter. . . . . . . . . . . . . . . . . . . . . . . . . . . . . . . . . . . . . . . . . . . . . . . . . . . 26Creating the integration schema . . . . . . . . . . . . . . . . . . . . . . . . . . . . . . . . . . . . . . . . . . . . . . . . . . . . . . . . . . . . . . . . . 26Creating the Maximo interface tables in the Oracle E-Business Suite database. . . . . . . . . . . . . . . . . . . . . . . . . . 28Configuring installation environment variables. . . . . . . . . . . . . . . . . . . . . . . . . . . . . . . . . . . . . . . . . . . . . . . . . . . . 28Running the installation script on Oracle . . . . . . . . . . . . . . . . . . . . . . . . . . . . . . . . . . . . . . . . . . . . . . . . . . . . . . . . . 29Verifying and fixing installation errors . . . . . . . . . . . . . . . . . . . . . . . . . . . . . . . . . . . . . . . . . . . . . . . . . . . . . . . . . . . 30MAXORACTLS integration control and the Oracle E-Business Suite database . . . . . . . . . . . . . . . . . . . . . . . . . 31
Chapter 5: Configuring integration controls and synchronizing data . . . . . . . . . . . . . . . . . . . . . . . . . . . . . . . . . . . 35Activating the cron task for interface table polling . . . . . . . . . . . . . . . . . . . . . . . . . . . . . . . . . . . . . . . . . . . . . . . . . 36Enabling the external system . . . . . . . . . . . . . . . . . . . . . . . . . . . . . . . . . . . . . . . . . . . . . . . . . . . . . . . . . . . . . . . . . . . . 36Setting up Oracle-specific integration control values in Maximo Asset Management . . . . . . . . . . . . . . . . . . . . 37
Generating the showcats.out output file. . . . . . . . . . . . . . . . . . . . . . . . . . . . . . . . . . . . . . . . . . . . . . . . . . . . . . . 37Generating the showmult.out output file . . . . . . . . . . . . . . . . . . . . . . . . . . . . . . . . . . . . . . . . . . . . . . . . . . . . . . 38
Synchronizing Oracle and Maximo Asset Management GL components . . . . . . . . . . . . . . . . . . . . . . . . . . . . . . 39
© Copyright IBM Corp. 2011 iv

Synchronizing Oracle and Maximo Asset Management Chart of Accounts . . . . . . . . . . . . . . . . . . . . . . . . . . . . 40Synchronizing Oracle Employees and Maximo Asset Management Labor Codes . . . . . . . . . . . . . . . . . . . . . . . 41Synchronizing Oracle Organizations and Locations and Maximo Asset Management Address Codes . . . . . 41
Listing Oracle Applications E-Business Suite Organizations and Location Codes . . . . . . . . . . . . . . . . . . . 42Mapping Oracle Organizations and Locations to Maximo Asset Management System Address Codes . 42
Synchronizing Oracle and Maximo Asset Management Currencies . . . . . . . . . . . . . . . . . . . . . . . . . . . . . . . . . . . 43Listing Oracle Applications E-Business Suite Currency Codes. . . . . . . . . . . . . . . . . . . . . . . . . . . . . . . . . . . . 43Defining Oracle Currency Codes in Maximo Asset Management . . . . . . . . . . . . . . . . . . . . . . . . . . . . . . . . . 44
Synchronizing Oracle Vendors and Maximo Asset Management Companies . . . . . . . . . . . . . . . . . . . . . . . . . . 44Updating the Maximo Asset Management Company ID with an RBNI and Suspense Account . . . . . . . 45
Synchronizing Oracle Inventory Organizations and Maximo Asset Management Storeroom Locations . . . . 46Listing Oracle Applications E-Business Suite Organizations . . . . . . . . . . . . . . . . . . . . . . . . . . . . . . . . . . . . . 46Defining Storerooms in Maximo Asset Management . . . . . . . . . . . . . . . . . . . . . . . . . . . . . . . . . . . . . . . . . . . . 46
Synchronizing Oracle Order Units and Maximo Asset Management Units of Measure . . . . . . . . . . . . . . . . . . 47Listing Oracle Applications E-Business Suite Order Units . . . . . . . . . . . . . . . . . . . . . . . . . . . . . . . . . . . . . . . 47Defining Units of Measure and Conversion Factors in Maximo Asset Management . . . . . . . . . . . . . . . . . 47
Adding Tax Codes to Maximo Asset Management . . . . . . . . . . . . . . . . . . . . . . . . . . . . . . . . . . . . . . . . . . . . . . . . . 48Listing Oracle Applications E-Business Suite Tax Codes. . . . . . . . . . . . . . . . . . . . . . . . . . . . . . . . . . . . . . . . . 48Defining Oracle Tax Codes in Maximo Asset Management . . . . . . . . . . . . . . . . . . . . . . . . . . . . . . . . . . . . . . 48
Synchronizing Oracle and Maximo Asset Management Items. . . . . . . . . . . . . . . . . . . . . . . . . . . . . . . . . . . . . . . . 49Synchronizing Oracle and Maximo Asset Management Item Balances . . . . . . . . . . . . . . . . . . . . . . . . . . . . . . . . 51
Transferring Oracle Item Balances to Maximo Asset Management . . . . . . . . . . . . . . . . . . . . . . . . . . . . . . . . 51Verifying Item Balances in Maximo Asset Management . . . . . . . . . . . . . . . . . . . . . . . . . . . . . . . . . . . . . . . . . 52
Appendix A: MAXORA Schema Table . . . . . . . . . . . . . . . . . . . . . . . . . . . . . . . . . . . . . . . . . . . . . . . . . . . . . . . . . . . . . . 53Schema objects for concurrent jobs architecture . . . . . . . . . . . . . . . . . . . . . . . . . . . . . . . . . . . . . . . . . . . . . . . . . . . . 53Schema objects for database trigger architecture . . . . . . . . . . . . . . . . . . . . . . . . . . . . . . . . . . . . . . . . . . . . . . . . . . . 55Schema objects common to both architectures . . . . . . . . . . . . . . . . . . . . . . . . . . . . . . . . . . . . . . . . . . . . . . . . . . . . . 56
Appendix B: Predefined components for the concurrent jobs architecture . . . . . . . . . . . . . . . . . . . . . . . . . . . . . . . 67
Appendix C: Oracle Applications E-Business Suite Configuration . . . . . . . . . . . . . . . . . . . . . . . . . . . . . . . . . . . . . 71Creating a ship to location . . . . . . . . . . . . . . . . . . . . . . . . . . . . . . . . . . . . . . . . . . . . . . . . . . . . . . . . . . . . . . . . . . . . . . 72Setting up a general ledger to import journals from Maximo Asset Management . . . . . . . . . . . . . . . . . . . . . . . 72Setting up accounts payable to import invoices from Maximo Asset Management . . . . . . . . . . . . . . . . . . . . . . 74Sending purchase order updates from Maximo Asset Management to Oracle Applications . . . . . . . . . . . . . . 74Scheduling concurrent jobs to run . . . . . . . . . . . . . . . . . . . . . . . . . . . . . . . . . . . . . . . . . . . . . . . . . . . . . . . . . . . . . . . 75
Appendix D: Oracle Project Accounting Configurations . . . . . . . . . . . . . . . . . . . . . . . . . . . . . . . . . . . . . . . . . . . . . . 77Configuration Prerequisites . . . . . . . . . . . . . . . . . . . . . . . . . . . . . . . . . . . . . . . . . . . . . . . . . . . . . . . . . . . . . . . . . . . . . 78Configuration Activities . . . . . . . . . . . . . . . . . . . . . . . . . . . . . . . . . . . . . . . . . . . . . . . . . . . . . . . . . . . . . . . . . . . . . . . . 78
Update Database Column Lengths . . . . . . . . . . . . . . . . . . . . . . . . . . . . . . . . . . . . . . . . . . . . . . . . . . . . . . . . . . . 79Enable New Publish Channels, Enterprise Services, and the Integration Event Listener . . . . . . . . . . . . . . 79Configure Projects-specific Maximo Asset Management Integration Controls . . . . . . . . . . . . . . . . . . . . . . 79Add Fields to User Interfaces . . . . . . . . . . . . . . . . . . . . . . . . . . . . . . . . . . . . . . . . . . . . . . . . . . . . . . . . . . . . . . . . 80
Adding Fields to the Work Order Tracking Application . . . . . . . . . . . . . . . . . . . . . . . . . . . . . . . . . . . . . 81Adding Fields to Purchase Requisition Application . . . . . . . . . . . . . . . . . . . . . . . . . . . . . . . . . . . . . . . . . 87Adding Fields to the Purchase Order Application. . . . . . . . . . . . . . . . . . . . . . . . . . . . . . . . . . . . . . . . . . . 88Adding Fields to the Invoice Application . . . . . . . . . . . . . . . . . . . . . . . . . . . . . . . . . . . . . . . . . . . . . . . . . . 89Adding Fields to the Receipts Application . . . . . . . . . . . . . . . . . . . . . . . . . . . . . . . . . . . . . . . . . . . . . . . . . 90Adding Fields to the Issues and Transfers Application . . . . . . . . . . . . . . . . . . . . . . . . . . . . . . . . . . . . . . 93Adding Fields to the Cost Management Application . . . . . . . . . . . . . . . . . . . . . . . . . . . . . . . . . . . . . . . . 94
Predefined content for Oracle Project Accounting . . . . . . . . . . . . . . . . . . . . . . . . . . . . . . . . . . . . . . . . . . . . . . 96Synchronize Oracle Employees and Maximo Asset Management Labor Codes . . . . . . . . . . . . . . . . . . . . . 96
Notices . . . . . . . . . . . . . . . . . . . . . . . . . . . . . . . . . . . . . . . . . . . . . . . . . . . . . . . . . . . . . . . . . . . . . . . . . . . . . . . . . . . . . . . . . 101
v IBM Maximo Enterprise Adapter for Oracle Applications Installation Guide
e and components
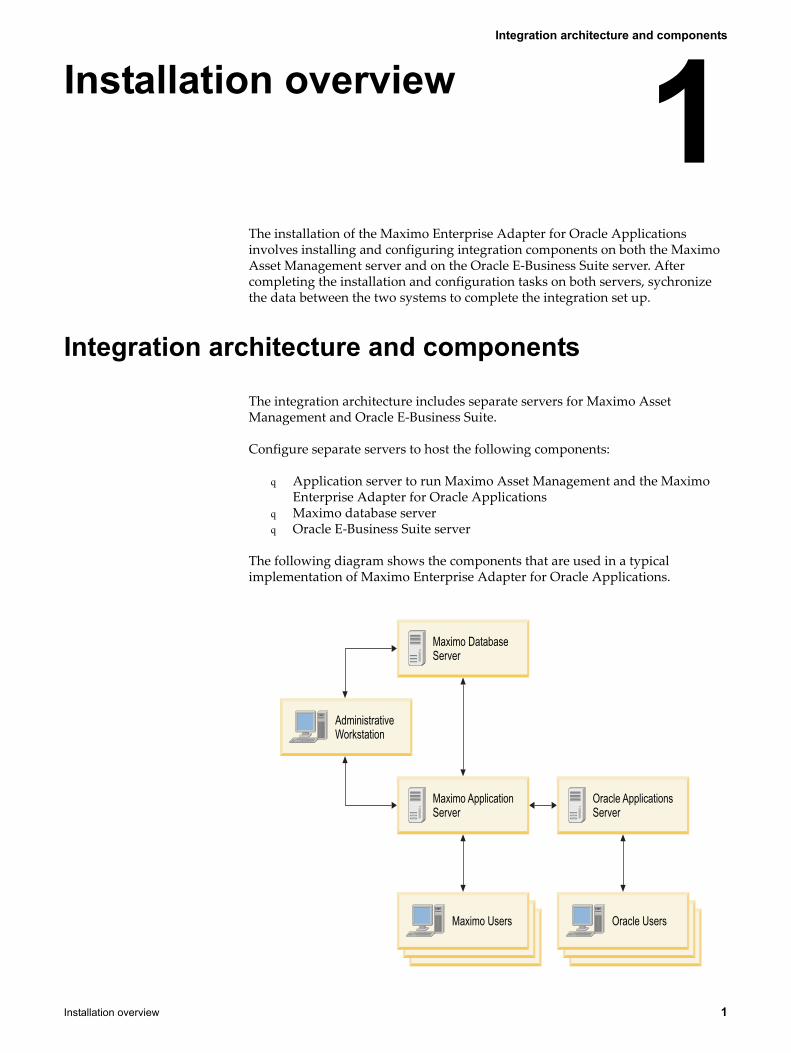
The installation of the Maximo Enterprise Adapter for Oracle Applications involves installing and configuring integration components on both the Maximo Asset Management server and on the Oracle E-Business Suite server. After completing the installation and configuration tasks on both servers, sychronize the data between the two systems to complete the integration set up.
Integration architecture and components
The integration architecture includes separate servers for Maximo Asset Management and Oracle E-Business Suite.
Configure separate servers to host the following components:
q Application server to run Maximo Asset Management and the Maximo Enterprise Adapter for Oracle Applications
q Maximo database serverq Oracle E-Business Suite server
The following diagram shows the components that are used in a typical implementation of Maximo Enterprise Adapter for Oracle Applications.
Installation overview 1
Maximo DatabaseServer
Maximo ApplicationServer
Oracle ApplicationsServer
Maximo Users Oracle Users
AdministrativeWorkstation
Integration architectur
Installation overview 1
Adapter configuration options
During the installation of integration components on the Oracle E-Business Suite server, choose the type of processing to use when sending transactions to Maximo Asset Management.
The adapter can use trigger-based processing to send data from Oracle Applications to Maximo Asset Management in real time. Alternatively, the adapter can use concurrent jobs to send data in batches or when activated by a user. Trigger-based processing is the default type of processing.
You can reconfigure the adapter to change from one processing type to another, but you cannot use both processing types at the same time. To change processing type requires the reinstallation and reconfiguration of Oracle adapter components and is best carried out when you are performing other major maintenance activities, such as installing a product hot fix.
To use concurrent jobs to process transactions into Maximo Asset Management, you must configure a cron task to run in Maximo Asset Management. Inbound messages can fail if they arrive in the incorrect sequence, such as a receipt arriving before the associated purchase order. The message reprocessing cron task ensures that these messages are reprocessed in a timely manner without impairing the performance of inbound transaction processing.
Installation sequence
Perform the installation in the following sequence:
1 Use the administrative workstation to install the Maximo Enterprise Adapter for Oracle Applications on the Maximo application server.
2 Configure the integration components in Maximo Asset Management.
3 Install PL/SQL objects on the Oracle E-Business Suite server.
4 Synchronize the data between Maximo Asset Management and Oracle Applications.
Adapter configuration options
2 IBM Maximo Enterprise Adapter for Oracle Applications Installation Guide
The installation of IBM® Maximo® Enterprise Adapter for Oracle Applications Version 7.5 involves installing the product, deploying the Enterprise Application Archive (EAR) files, and configuring the software. You start the installation programs from the launchpad.
Before you begin
IBM Maximo Asset Management Version 7.5 must be installed on the same Windows® administrative workstation where you plan to install Maximo Enterprise Adapter for Oracle Applications Version 7.5, and in the same language as Maximo Enterprise Adapter for Oracle Applications Version 7.5.
For information about installing Maximo Asset Management, see the IBM Maximo Asset Management 7.5 Installation Guide in the Maximo Asset Management information center (http://publib.boulder.ibm.com/infocenter/tivihelp/v49r1/index.jsp?topic=/com.ibm.mam.doc/mam_install/t_ctr_install.html).
For information about upgrading to version 7.5, see the Upgrade Guide, IBM Maximo Products V7.1 to V7.5 on the Maximo Upgrade Resources web site. (https://www-304.ibm.com/support/docview.wss?rs=3214&context=SSLKT6&uid=swg21266217)
For information about the hardware, software, and network requirements for your product, see the Overview and Planning page on the Maximo Asset Management wiki (http://www.ibm.com/developerworks/wikis/display/maximo/Overview+and+Planning).
About this task
You must install Maximo Enterprise Adapter for Oracle Applications on a Microsoft® Windows administrative workstation. The Maximo Enterprise Adapter for Oracle Applications EAR files are built on the Windows workstation and later deployed to the application server.
Procedure
1 Prepare to install.
2 Install Maximo Enterprise Adapter for Oracle Applications.
3 If you use Oracle WebLogic Server, deploy the EAR files.
4 For IBM WebSphere® Application Server environments: The EAR files were installed during the IBM Maximo Asset Management installation. If this task
Installing IBM Maximo Enterprise Adapter for Oracle Applications
2
Installing IBM Maximo Enterprise Adapter for Oracle Applications 3
was deferred during the Maximo Asset Management installation, deploy the EAR files.
Preparing for the installation
Before you install Maximo® Enterprise Adapter for Oracle Applications, you must complete tasks on the middleware servers and on your administrative workstation.
Before you begin
The installation program requires access to the middleware servers that are installed with Maximo Asset Management to complete the installation. You need the administrative user IDs and passwords for the middleware servers.
About this task
When you install Maximo Enterprise Adapter for Oracle Applications, you modify the configuration and content of your application server, database server, and directory server. These servers are referred to as the middleware servers.
Procedure
1 Install IBM® Maximo Asset Management 7.5 on the same administrative workstation where you install Maximo Enterprise Adapter for Oracle Applications, and in the same language as Maximo Enterprise Adapter for Oracle Applications. Be sure to update the Maximo database during the Maximo Asset Management installation.
2 Back up the middleware servers and the administrative workstation.
3 Prepare the application server.
Application server What to do
WebSphere® Application Server Ensure that the middleware servers are started. The installation program connects to the middleware servers by using the middleware login information that you specify during the product installation.
WebLogic Server Ensure that the application server (MAXIMOSERVER) is stopped. If the application server is running, stop the server and wait a few minutes before you start the installation program. If the application server is not stopped, the installation process stops.
Preparing for the installation
4 IBM Maximo Enterprise Adapter for Oracle Applications Installation Guide

ing the installation
4 If you run the installation program in a double-byte language or an Eastern European language, set the workstation regional settings to that language. You can reset your regional settings after you complete the installation.
Running the installation
You can start the installation program for Maximo Asset Management Adapter for Oracle Applications from the launchpad.
About this task
You access the product software either from IBM® Passport Advantage® or from the product DVD if you requested one. To download your product from IBM Passport Advantage, follow the instructions in the download document.
Procedure
1 Open Windows Explorer on the administrative workstation where Maximo Asset Management 7.5 is installed, navigate to the \ibm\SMP\bin directory and double-click the solution-InstallerGUI.bat file. A wizard application opens that guides you through the installation process.
2 In the wizard application window, select the language for the installation, and click OK. This language must be the same language that was used for the Maximo Asset Management 7.5 installation.
3 In the Introduction window, click Next.
4 In the Choose PSI Package window, click Choose and browse to the OracleAdapter75.zip file. Click Next. The Process Solution Installer validates the package in the zip file and checks that the package is not already deployed.
5 Follow the steps in the installation program.
6 If the Package Options window opens, ensure that the check box to defer updating the Maximo database is cleared, and the check box to defer redeploying the Maximo applications is cleared. If you are installing additional products, you can choose to defer the Maximo application redeployment option. If the package options were specified during the Maximo Asset Management installation, the Package Options window might not open.
7 Continue the installation program until the Pre-Install Summary window opens. If the system check passes successfully, no error messages appear under System Check Messages.
8 If any error messages are shown, make a note of the message identifiers, and stop the installation. Contact your system administrator.
9 When the installation is complete, from the Package Successfully Deployed window, click Done.
Runn
Installing IBM Maximo Enterprise Adapter for Oracle Applications 5

What to do next
Download and install the latest hot fix to ensure that you have the most current build with all recent fixes. The latest hot fixes and release notes are on the IBM Support Portal for Maximo Enterprise Adapter for Oracle Applications (http://www-947.ibm.com/support/entry/portal/Overview/Software/Tivoli/Maximo_Enterprise_Adapter_for_Oracle_Applications).
Review any existing release notes for this product at Release Notes for Maximo Enterprise Adapter for Oracle Applications 7.5.
Additionally, perform the following steps:
q To check the results of the language package installation, review the language package installation log file, TDToolkitdate-time.log, in the Maximo_home\maximo\tools\maximo\log directory.
q If you use WebLogic Server, deploy the EAR files.q If you use WebSphere® Application Server, the installation is complete.
However, if your environment requires you to deploy the EAR files manually, and this task was deferred during the Maximo Asset Management installation, deploy the EAR files.
Deploying the EAR files on WebLogic Server
If you use WebLogic Server, after you install Maximo® Enterprise Adapter for Oracle Applications, you must deploy the EAR files from the WebLogic Server console. Deploying the EAR files starts the application server.
Before you begin
q The EAR files must be deployed after the Maximo database is updated. The Maximo database is updated as part of the installation process. However, if you manually update the database (by running the updatedb command), make sure that you do so before you deploy the EAR files.
q On a Windows® operating system: If the MAXIMOSERVER server is not running, start it from a command prompt.
q On a UNIX® operating system: Ensure that the WebLogic Server daemon is running.
To use the WebLogic Server console, you must have a Java™ Virtual Machine installed.
Procedure
1 Change to the mydomain directory:
Operating system Location
Windows From a command prompt, change the path to drive:\Oracle_installation_location\user_projects\domain\mydomain
Deploying the EAR files on WebLogic Server
6 IBM Maximo Enterprise Adapter for Oracle Applications Installation Guide

Application Server
2 Start WebLogic Server.:
3 Type the WebLogic Server user name and password.
4 Start the MAXIMOSERVER administration console by typing the following address in the address bar of your browser: http://hostname:7001/console.
5 Log on to the WebLogic Server console.
6 Follow the instructions in the WebLogic Server console help to deploy the maximo.ear file and the maximoiehs.ear file.
Results
The installation is complete.
Deploying the EAR files on WebSphere Application Server
You can manually deploy Maximo® Enterprise Adapter for Oracle Applications EAR files on WebSphere® Application Server. You perform this task if your organization has application deployment restrictions that require that you deploy application files manually.
About this task
The EAR files are installed on WebSphere Application Server during the Maximo Asset Management installation. If the deployment of the EAR files was deferred during the Maximo Asset Management installation, you can deploy the EAR files manually.
Procedure
1 Deploy the Maximo EAR file:
MEA_ORA_HOME\jacl\solutions\DeployApplication.[bat|sh] WASAdminUserName WASAdminPassword "MAXIMO" WASNodeName WASApplicationServerName "MEA_ORA_HOME\maximo\deployment\default\maximo.ear" WASVirtualHost WASWebServerName
UNIX Open a command prompt, and change the path to /home/mxad-min/oracle/user_projects/domains/mydomain
Operating system Location
Windows startWebLogic.cmd UNIX ./startWebLogic.sh
Deploying the EAR files on WebSphere
Installing IBM Maximo Enterprise Adapter for Oracle Applications 7

Deploying the EAR files on WebSphere Application Server
2 Deploy the Maximo help system EAR file:
MEA_ORA_HOME\jacl\solutions\DeployApplication.[bat|sh] WASAdminUserName WASAdminPassword "MAXIMOIEHS" WASNodeName WASApplicationServerName "MEA_ORA_HOME_HOME\maximo\deployment\default\maximoiehs.ear" WASVirtualHost WASWebServerName
Command syntax for deploying EAR files on WebSphere Application Server
You use parameters in the command syntax when you manually deploy EAR files on WebSphere® Application Server.
The syntax of the commands for deploying the EAR files includes the following parameters.
Parameter Description
WASAdminUserName A WebSphere Application Server Network Deployment account with deployment privileges.
WASAdminPassword The password of the user who is specified in the WASAdminUserName parameter.
WASNodeName The name of the WebSphere Application Server Network Deployment node.
WASApplicationServerName The name of the WebSphere Application Server Network Deployment application server.
WASVirtualHost The name of the WebSphere Application Server Network Deployment virtual host.
WASWebServerName The name of the WebSphere Application Server Network Deployment web server.
8 IBM Maximo Enterprise Adapter for Oracle Applications Installation Guide

t for flat structures
You must configure the adapter in Maximo Asset Management to send transactional data between Maximo Asset Management and Oracle E-Business Suite. After you complete the adapter configuration, Maximo Asset Management can transform data from its format to a format that is compatible with Oracle E-Business Suite and vice versa.
Adding support for flat structures
If you use the object structure in interface tables or flat files, you must enable the support for flat structure in Maximo Asset Management. After you do so, the objects are checked for duplicate column names in the object structure. Duplicate column names produce errors.
Procedure
1 In Maximo Asset Management, select Integration > Object Structures.
2 Select the Support Flat Structure check box for the following object structures.
3 Click Save.
4 If duplicate column names exist, change the alias name by choosing Add/Modify Alias from the Select Action menu.
Specifying and enabling the endpoint for the adapter
In Maximo Asset Management, the endpoint defines where and how you send outbound transactions to the Oracle E-Business Suite external system. You must specify an endpoint for Maximo Enterprise Adapter for Oracle Applications.
Configuring the adapter in Maximo Asset Management
3
Table 1: Object structures used for integration with Oracle Applications
q MXCOA q MXITEMq MXCRAFT q MXLABORq MXGLCOMP q MXPCq MXGLTXN q MXPOq MXINVBAL q MXPRq MXINVENTORY q MXPROJq MXINVISSUE q MXRCVROTITMq MXINVOICE q MXRECEIPTq MXINVRES q MXVENDOR
Adding suppor
Configuring the adapter in Maximo Asset Management 9

About this task
The handler describes how the adapter sends transactions to the external system, such as an interface table, HTTP post, or XML file.
Procedure
1 In Maximo Asset Management, go to Integration > End Points and select a new endpoint.
2 Populate the new endpoint with the following data:
3 Save the endpoint.
Table 2: Endpoint and handler parameters
Name OAIFACETABLE
Description Oracle adapter 12 Endpoint
Handler IFACETABLE
ISREMOTE 1
URL jdbc:oracle:thin:[server-name]:[port-number]:[database-instance]
q [server-name] is where Oracle E-Business Suite is hosted
q [port-number] is the database port number
q [database-instance] is the Oracle database instance
User name maxora
Password maxora
Driver oracle.jdbc.driver.OracleDriver
Specifying and enabling the endpoint for the adapter
10 IBM Maximo Enterprise Adapter for Oracle Applications Installation Guide
nterprise services
Enabling publish channels and enterprise services
The integration framework uses publish channels to transform data from the asset management software to a format that is compatible with Oracle E-Business Suite. Similarly, the integration framework uses enterprise services to transform data from Oracle E-Business Suite to a format that is compatible with Maximo Asset Management.
Procedure
1 Go to Integration > External Systems and display a list of external systems by pressing Enter.
2 To display information about the Oracle E-Business Suite external system in the System tab, click OA12.
3 To display all the publish channels for Maximo Enterprise Adapter for Oracle Applications, select the Publish Channels tab. By default, the publish channels are enabled.
4 Clear the Enabled check box for any publish channels that you do not use for your integration.
5 Click Save External System.
6 Enable the integration events for publish channels that you choose to use:
a Select Integration > Publish Channels.
b In the adapter field, filter the records by OA12.
c Select the Select Records check box and mark the publish channels that you choose to use.
d From the Select Action menu, choose Enable Listener.
7 Click OK.
8 To display all the enabled enterprise services for the adapter, select the Enterprise Services tab.
9 Clear the Enabled check box for any enterprise services that you do not use for your integration, or click New Row to add a new outbound or enterprise service.
10 Click Save External System.
For a list of publish channels and enterprise services that Maximo Enterprise Adapter for Oracle Applications provides, see Publish channels and enterprise services.
Enabling publish channels and e
Configuring the adapter in Maximo Asset Management 11

Publish channels and enterprise services
Maximo Enterprise Adapter for Oracle Applications has a specific set of enterprise services and publish channels. They are used to transform outbound and inbound data into formats that are compatible with Maximo Asset Management and Oracle E-Business Suite.
The following table lists the publish channels that the adapter provides.
The following table lists the enterprise services that the adapter provides.
Table 3: Publish channels for integrating with Oracle Applications
Publish channels Oracle description
MXGLTXN_TOOA12 OA GL Journals
MXINVENTORY_TOOA12 OA Inventory
MXINVOICE_TOOA12 OA Invoices
MXINVRES_TOOA12 OA Inventory Reservations
MXITEM_TOOA12 OA Items
MXPC_TOOA12 OA Purchase Contracts
MXPO_TOOA12 OA Purchase Orders
MXPROJTXN_TOOA12 OA Project Actuals
MXPR_TOOA12 OA Purchase Requisitions
MXRECEIPT_TOOA12 OA Receipts
Table 4: Enterprise services for integrating with Oracle Applications
Enterprise services Oracle description
MXCOA_FROA12 OA Chart of Accounts
MXCRAFT_FROA12 OA Employee Jobs
MXGLCOMP_FROA12 OA GL Components
MXINVBAL_FROA12 OA Inventory Balances
MXINVENTORY_FROA12 OA Inventory
MXINVISSUE_FROA12 OA Inventory Issue
MXINVOICE_FROA12 OA Invoices
MXITEM_FROA12 OA Items
MXLABOR_FROA12 OA Employees
MXPC_FROA12 OA Purchase Contracts
MXPO_FROA12 OA Purchase Orders
MXPROJ_FROA12 OA Projects
MXPR_FROA12 OA Purchase Requisitions
MXRCVROTITM_FROA12 OA Receive Rotating Items
MXRECEIPT_FROA12 OA Receipts
MXVENDOR_FROA12 OA Vendors
Enabling publish channels and enterprise services
12 IBM Maximo Enterprise Adapter for Oracle Applications Installation Guide

tegration controls
Setting up integration controls
You use integration controls to change the processing of data within a publish channel or enterprise service. You also use integration controls to configure them according to the requirements of your organization and sites. You can create integration controls to meet your business needs.
Procedure
1 Go to Integration > External Systems and select OA12 external system record.
2 From the Select Action menu, select Setup Integration Controls.
3 Click Save External System.
4 Optional: If you want to add a new integration control, or a new organization or site value for an existing integration control:
a In the Integration Control subtab, click New Row.
b Specify the required information and repeat steps 2 and 3.
For a list of integration controls that Maximo Enterprise Adapter for Oracle Applications provides, see Integration controls.
Integration controls
The adapter has a set of controls that are associated with its publish channels and enterprise service.
The following table lists the integration controls that the adapter provides for the Oracle E-Business Suite external system.
Table 5: Integration controls for integration with Oracle Applications
Integration control Description
APLINETYPE Default invoice line type in the OracleE-Business Suite
APSEND Statuses at which invoices are sent from Maximo Asset Management to Oracle E-Business Suite. The domain is INVSTATUS
CATEGORYXREF Cross-reference Maximo Asset Management item category and Oracle stock enabled flag
CHARGEORG Default charge (project expenditure) organization
COAXREF Cross-reference Maximo Asset Management organization ID and Oracle chart of accounts ID
CONVHRS Hours to convert annual salary to hourly rate
CRAFTXREF Multiply Oracle craft code to Maximo Asset Management organizations
Setting up in
Configuring the adapter in Maximo Asset Management 13

EXPENDITEM Oracle Project Accounting item expenditure type
EXPENDLABOR Oracle Project Accounting labor expenditure type
EXPENDTOOL Oracle Project Accounting tool expenditure type
FCSTATUSXREF Cross-reference Oracle project status and Maximo Asset Management financial control status
GENITEM Dummy identifier for masking item number
GENSTORE Dummy identifier for masking storeroom on outbound transactions
GENUSR Dummy identifier for masking user ID on outbound transactions
GLCURNCY Default currency code in the Oracle Applications E-Business Suite
GLCURNCYTYPE Type of currency exchange rates
GLSOURCE Source business object of Maximio Asset Management general ledger journal. The domain is GLSOURCE.
INVCSTATUSXREF Translate Maximo Asset Management internal and external invoice status, if using synonyms
INVCTYPEXREF Cross-reference Maximo Asset Management and Oracle invoice document types
ITMSUBXREF Cross-reference storeroom and subinventory
JECATXREF Cross-reference Maximo Asset Management transaction type and the Oracle E-Business Suite journal category
JEPROJSEND List of Maximo Asset Management project transactions to forward to Oracle general ledger. The domain is GLSOURCE.
LABXREF Multiply Oracle labor code to Maximo Asset Management organizations
LANGXREF Cross-reference Maximo Asset Management language code and Oracle SET_PROCESS_ID
LINETYPEXREF Cross-reference Maximo Asset Management line type (synonyms) and the Oracle E-Business Suite line type
LOTTYPEXREF Cross-reference Maximo Asset Management and Oracle lot control indicators
NLRORG Default Oracle Project Accounting non-labor resource organization
OACATXREF Cross-reference Maximo Asset Management line type and Oracle item or service category identifier
Table 5: Integration controls for integration with Oracle Applications (Continued)
Integration control Description
Setting up integration controls
14 IBM Maximo Enterprise Adapter for Oracle Applications Installation Guide

tegration controls
OAITMLOTPREF Default starting lot prefix
OAITMLOTSTART Default starting lot Number
OAPCDEFORDERUNIT Default order unit for purchase contracts
ORGXREF Cross-reference Maximo Asset Management organization and Oracle ledger ID
PCSEND Statuses at which purchase requisitions are sent from Maximo Asset Management to Oracle E-Business Suite. The domain is CONTRACTSTATUS.
PCSTATUSXREF Cross-reference Maximo Asset Management internal and external contract status, if using synonyms
PCTYPEXREF Cross-reference Maximo Asset Management and Oracle contract types
POSTATUSXREF Cross-reference Maximo Asset Management internal and external PO status, if using synonyms
POSEND Statuses at which purchase orders are sent from from Maximo Asset Management to Oracle E-Business Suite. The domain is POSTATUS.
POTYPEXREF Cross-reference Maximo Asset Management and Oracle E-Business Suite purchase order types
PROJAP Include project accounting data on outbound invoice lines
PROJPO Include project accounting data on outbound purchase order lines
PROJPR Include project accounting data on outbound purchase requisition lines
PROJSEND Transaction types for which actuals transactions are sent to Oracle Project Accounting. The domain is GLSOURCE.
PRSEND Statuses at which purchase requisitions are sent from Maximo Asset Management to Oracle E-Business Suite. The domain is PRSTATUS.
PRSTATUSXREF Cross-reference Maximo Asset Management internal and external PR status, if using synonyms
RESLEVELITEM Resource level for items
RESLEVELLABOR Resource level for labor
RESLEVELTOOL Resource level for tools
SITEXREF Cross-reference Maximo Asset Management site ID and Oracle operating unit
SRCTIM Transaction source for labor actuals
Table 5: Integration controls for integration with Oracle Applications (Continued)
Integration control Description
Setting up in
Configuring the adapter in Maximo Asset Management 15
Configuring cron tasks
Cron tasks are behind-the-scene jobs that run automatically and on a fixed schedule in Maximo Asset Management. Configure cron tasks to monitor interface tables and JMS queues for messages that are waiting to be processed. Use the Cron Task Setup application to configure cron tasks.
For information about configuring cron tasks, see Managing cron tasks in the Maximo Asset Management information center (http://publib.boulder.ibm.com/infocenter/tivihelp/v49r1/index.jsp?topic=/com.ibm.mbs.doc/gp_intfrmwk/c_ctr_message_reprocessing.html).
Configuring the cron task for interface table polling
Configure a cron task to prepare the Oracle interface table for polling. Do not activate this cron task until you are ready to send transactions between Maximo Asset Management and Oracle E-Business Suite. You must first install Oracle objects.
Procedure
1 Go to System Configuration > Platform Configuration > Cron Task Setup.
2 Display a list of cron tasks by pressing Enter.
3 Open the Interface Table Polling Task page by clicking IFACETABLECONSUMER..
4 Click New Row and specify a cron task instance name, for example, OAPolling.
5 Specify a schedule for the interface table polling:
a Display the Select Schedule or Time Interval window by clicking the Schedule icon.
b Specify an OAPolling task schedule that reflects how frequently you want to poll the interface table.
SRCUSE Transaction source for non-labor actuals
SUBLOCDEL Delimiter between subinventory code and locator ID in the Maximo Asset Management bin number
USEPRNUM Specifies whether integration uses the Maximo Asset Management PR number as the Oracle E-Business Suite PR number (value 1) or uses the autogenerated number used by the Oracle import routine (0)
Table 5: Integration controls for integration with Oracle Applications (Continued)
Integration control Description
Configuring cron tasks
16 IBM Maximo Enterprise Adapter for Oracle Applications Installation Guide
figuring cron tasks
6 To display a Select Value list where you can choose a user ID to associate with the cron task, click the Run as User icon . The default value is MAXADMIN, which provides the highest level of user authorization.
7 Do not activate the polling cron task (by selecting the Active check box) until Maximo Asset Management is ready to receive transactions from Oracle Applications E-Business Suite.
8 In the Parameters tab for OAPolling, select ENDPOINT Cron Task Parameter and specify the name that you assigned to the endpoint for the adapter, for example, OAIFACETABLE.
9 Select the EXTSYSNAME cron task parameter, type OA12, and save the cron task.
10 From the Select Action menu, choose Reload Request.
11 Select all activated items and click OK.
Configuring cron tasks for JMS queues
You must activate the JMS sequential queues in Maximo Asset Management to process inbound and outbound transactions. The transactions are processed one at a time, in the order that they are received and sent.
Procedure
1 Go to System Configuration > Platform Configuration > Cron Task Setup.
2 Display a list of cron tasks by pressing Enter.
3 Display the cron task details by selecting JMSQSEQCONSUMER.
4 Select the Active check box for the sequential outbound queue (SEQQOUT).
Select the Active check box for SEQQIN only when you have enabled the sequential inbound queue for any enterprise service (by clearing the Use Continuous Queue check box in the Enterprise Services tab for the OA12 external system).
5 Click Save Cron Task.
6 Select Action > Reload Request.
7 Select all activated items and click OK.
Configuring a cron task for message reprocessing
If you intend to use concurrent jobs on the Oracle Applications server to process inbound transactions, set up a cron task in Maximo Asset Management to automate the reprocessing of messages that are in error.
Con
Configuring the adapter in Maximo Asset Management 17

About this task
When you use concurrent jobs to send messages from Oracle Applications to Maximo Asset Management, errors can occur if associated transactions are sent in the wrong order. For example, if a receipt is sent from Oracle Applications before the associated purchase order is sent, the transaction containing the receipt cannot be processed. These messages are moved from the JMS queue into a reprocessing queue. You can manually fix messages that are in error in the Message Reprocessing application or you can configure the OAREPROCESSMSG cron task to retry messages in the error queue at predefined intervals.
Procedure
1 In the Cron Task Setup application, filter for the OAREPROCESSMSG cron task, and then select it.
2 In the OA12 cron task instance, set the shedule for running the cron task.
3 Select the Active check box to activate the cron task instance.
4 Optional: Select the IFACENAME cron task parameter and specify the names of interfaces if you want the cron task to filter for error messages from specific interfaces. You can specify the names of multiple interfaces, separated by commas, such as MXCOA_FROA12,MXCRAFT_FROA12,MXVENDOR_FROA12. If you do not specify a value, the cron task will return error messages for all interfaces.
5 Click Save Cron Task.
6 Select Action > Reload Request.
7 Select all activated items and click OK.
Configuring cron tasks
18 IBM Maximo Enterprise Adapter for Oracle Applications Installation Guide

s to be compatible
Adjusting databases to be compatible
You must adjust certain Maximo Asset Management database attributes to make them compatible with the corresponding attributes in the Oracle database.
1 To match the format of general ledger accounts:
a Review the GL account format in Oracle E-Business Suite.
b Reconfigure the GL account format in Maximo Asset Management to match the Oracle format.
2 Change the size and type attributes of tables and columns in Maximo Asset Management to match the corresponding attributes in the Oracle database.
3 Adjust the size of the COMPTYPE domain.
4 Update the Maximo Asset Management database to apply the changes you made.
Matching GL account formats and column lengths
Configure the general ledger accounts of Maximo Asset Management to have the same length and account delimiters as those defined in the Oracle database.
Viewing the GL account format of Oracle E-Business Suite
To view the structure of the chart of accounts in the Oracle Applications E-Business Suite, complete the following steps:
1 In Oracle, select Responsibility > General Ledger, Vision Operations (USA).
2 Select Setup > Financials > Flexfields > Key > Segments.
3 Select View > Query by Example > Enter.
4 Enter General Ledger for Application and Accounting Flexfield for Flexfield Title.
5 Select View > Query by Example > Run.
The Structures section displays all of the system chart of accounts.
6 To view the Segments Summary window, select a chart of accounts and click Segments.
Reconfiguring the GL account format in Maximo Asset Management
Complete the following steps to reconfigure the Maximo Asset Management GL account format so that it matches the Oracle GL account format.
1 Navigate to the Database Configuration page by selecting Go To > Configuration > Database Configuration.
Adjusting database
Configuring the adapter in Maximo Asset Management 19
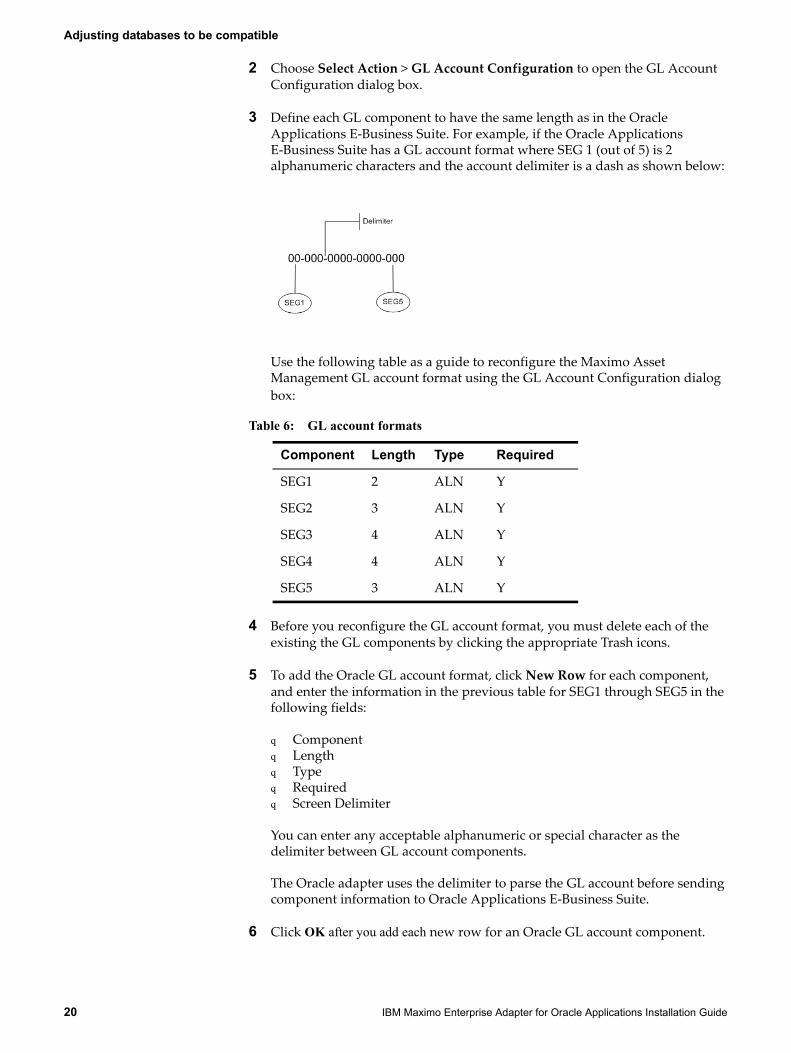
2 Choose Select Action > GL Account Configuration to open the GL Account Configuration dialog box.
3 Define each GL component to have the same length as in the Oracle Applications E-Business Suite. For example, if the Oracle ApplicationsE-Business Suite has a GL account format where SEG 1 (out of 5) is 2 alphanumeric characters and the account delimiter is a dash as shown below:
Use the following table as a guide to reconfigure the Maximo Asset Management GL account format using the GL Account Configuration dialog box:
4 Before you reconfigure the GL account format, you must delete each of the existing the GL components by clicking the appropriate Trash icons.
5 To add the Oracle GL account format, click New Row for each component, and enter the information in the previous table for SEG1 through SEG5 in the following fields:
q Componentq Lengthq Typeq Required q Screen Delimiter
You can enter any acceptable alphanumeric or special character as the delimiter between GL account components.
The Oracle adapter uses the delimiter to parse the GL account before sending component information to Oracle Applications E-Business Suite.
6 Click OK after you add each new row for an Oracle GL account component.
Table 6: GL account formats
Component Length Type Required
SEG1 2 ALN Y
SEG2 3 ALN Y
SEG3 4 ALN Y
SEG4 4 ALN Y
SEG5 3 ALN Y
Adjusting databases to be compatible
20 IBM Maximo Enterprise Adapter for Oracle Applications Installation Guide
s to be compatible
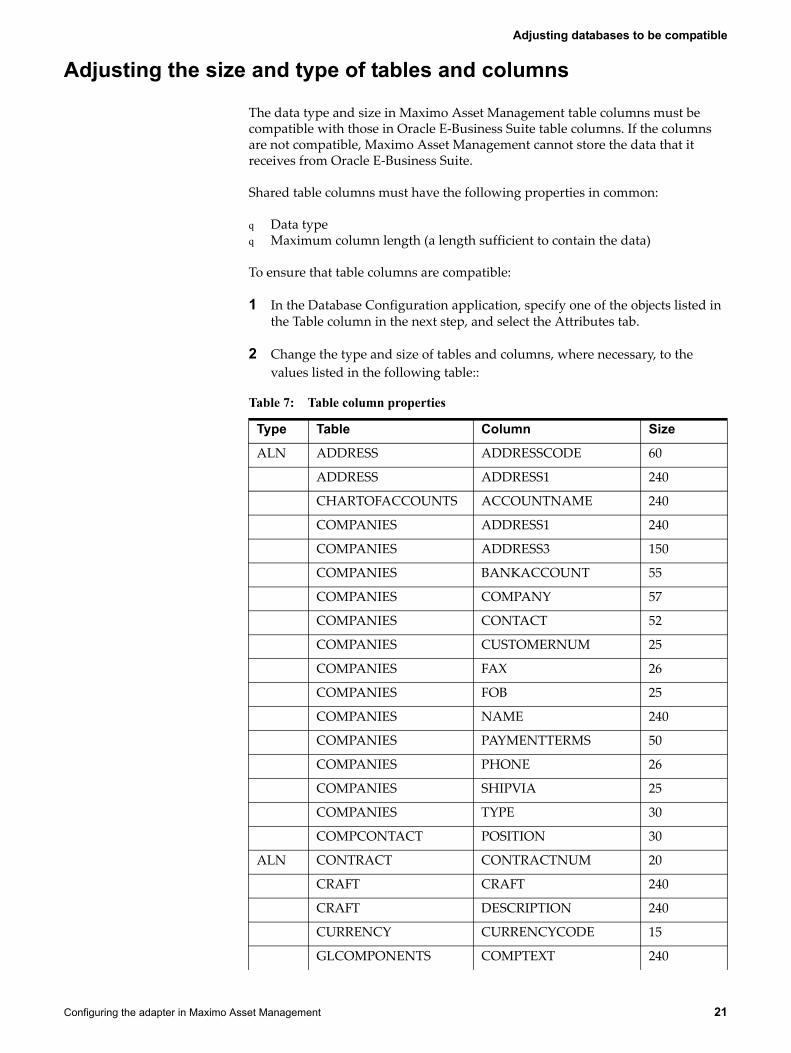
Adjusting the size and type of tables and columns
The data type and size in Maximo Asset Management table columns must be compatible with those in Oracle E-Business Suite table columns. If the columns are not compatible, Maximo Asset Management cannot store the data that it receives from Oracle E-Business Suite.
Shared table columns must have the following properties in common:
q Data typeq Maximum column length (a length sufficient to contain the data)
To ensure that table columns are compatible:
1 In the Database Configuration application, specify one of the objects listed in the Table column in the next step, and select the Attributes tab.
2 Change the type and size of tables and columns, where necessary, to the values listed in the following table::
Table 7: Table column properties
Type Table Column Size
ALN ADDRESS ADDRESSCODE 60
ADDRESS ADDRESS1 240
CHARTOFACCOUNTS ACCOUNTNAME 240
COMPANIES ADDRESS1 240
COMPANIES ADDRESS3 150
COMPANIES BANKACCOUNT 55
COMPANIES COMPANY 57
COMPANIES CONTACT 52
COMPANIES CUSTOMERNUM 25
COMPANIES FAX 26
COMPANIES FOB 25
COMPANIES NAME 240
COMPANIES PAYMENTTERMS 50
COMPANIES PHONE 26
COMPANIES SHIPVIA 25
COMPANIES TYPE 30
COMPCONTACT POSITION 30
ALN CONTRACT CONTRACTNUM 20
CRAFT CRAFT 240
CRAFT DESCRIPTION 240
CURRENCY CURRENCYCODE 15
GLCOMPONENTS COMPTEXT 240
Adjusting database
Configuring the adapter in Maximo Asset Management 21

Adjusting databases to be compatible
3 When you change one or more column attributes in a table object, click Save Object.
4 Repeat this procedure for each table and column listed in the step 2.
Adjusting the size of the COMPTYPE domain
The COMPTYPE domain contains values that Maximo Asset Management can use to validate company type data from Oracle applications. The size of the domain must match the size used in Oracle applications.
1 In the Domains application, specify COMPTYPE domain.
2 If necessary, change the value in the Length field to 30.
3 Click Save Domain.For information about the Domains application, see Managing Domains in the Maximo Asset Management information center (http://publib.boulder.ibm.com/infocenter/tivihelp/v49r1/index.jsp?topic=/com.ibm.mbs.doc/domainadm/t_manage_domains.html).
GLCOMPONENTS COMPVALUE 150
GLCOMPONENTS EXTERNALREFID 15
INVENTORY BINNUM 49
INVENTORY MODELNUM 25
INVLOT LOTNUM 30
INVOICE DESCRIPTION 240
INVOICE DOCUMENTTYPE 25
INVOICE INVOICENUM 50
INVOICE VENDORINVOICENUM 50
ITEM DESCRIPTION 240
ALN ITEM ITEMNUM 40
ITEM MSDSNUM 40
MATRECTRANS PACKINGSLIPNUM 25
MATRECTRANS REJECTCODE 30
ALN MEASUREUNIT MEASUREUNITID 25
ALN PO PONUM 20
PO POTYPE 25
PRLINE REMARK 240
Table 7: Table column properties (Continued)
Type Table Column Size
22 IBM Maximo Enterprise Adapter for Oracle Applications Installation Guide

Adding Oracle Vendors to the Maximo Asset Management Companies Master Set
Updating the database
Run the configdb.bat utility to update the database with the changes you made. When you run this tool, it applies all pending database configuration changes.
Procedure
1 Stop the Maximo Asset Management application server.
2 Navigate to the Maximo Asset Management directory that contains the configdb.bat file. The default path is:
Maximo_root\tools\maximo
3 Run the configdb.bat tool.
4 After the tool runs, open the log files in the following directory to review changes made to the database.
Maximo_root\tools\maximo\log
5 Restart the application server to continue with the installation tasks.
Adding Oracle Vendors to the Maximo Asset Management Companies Master Set
If you intend to synchronize Oracle vendors with the companies in Maximo Asset Management, you must select the Automatically Add Companies to Company Master check box for each company.
About this task
Enabling this flag ensures that all the Oracle vendors that you add are also included in the company master set in Maximo Asset Management. For the vendor and company integration to work, you must include Oracle vendors in the company set so that vendors are added at the organizational level in Maximo Asset Management.
Procedure
1 Navigate to the Sets application by selecting Go To > Administration > Sets.
2 Open the Details section for each Set record with a company type.
3 Select the Automatically Add Companies to Company Master check box.
4 Click Save Set.
Configuring the adapter in Maximo Asset Management 23

Setting active default item status
Setting active default item status
When you are sending item transactions to Maximo Asset Management, you must set the default item status to active.
Procedure
1 Go to Administration > Sets.
2 For each Item Set row, change the default item status to Active.
3 Click Save Set.
4 Go to Administration > Organizations.
5 For each Organization row, change the default item status to Active.
6 Click Save Organization.
24 IBM Maximo Enterprise Adapter for Oracle Applications Installation Guide

To install and configure the Maximo Enterprise Adapter on Oracle, perform the following tasks:
1 Locate the PL/SQL files required for the installation
2 Create a schema in the Oracle E-Business Suite database.
3 Create Maximo interface tables in the Oracle E-Business Suite database.
4 Configure the installation environment parameters.
5 Run the installation script.
6 Verify and fix installation errors.
Configuring the adapter on Oracle E-Business Suite
4
Configuring the adapter on Oracle E-Business Suite 25

PL/SQL files for the Maximo Enterprise Adapter
The installation program for Maximo Enterprise Adapter for Oracle Applications creates the ORACLEAPIS directory. The directory holds user template files and scripts in the root directory of your Maximo Asset Management installation. The default path for the directory is Maximo_root\ORACLEAPIS.
The following table lists the files in the ORACLEAPIS subdirectories.
The template .usp files that are in the apiuser subdirectory contain sample code for the user exit procedures. If you have written custom user exit procedures, you must integrate your changes within these template files.
Creating the integration schema
You must create a schema for managing the integration framework in the Oracle E-Business Suite database. You can create multiple integration schemas on the same database instance to support multiple Maximo Asset Management application servers.
About this task
The procedure uses MAXORA as the schema user name for the Oracle E-Business Suite integration. You can specify any user name for the schema, but the name must be the same as the user name configured for the endpoint in System tab of the External Systems application.
Procedure
1 In the Maximo_root\ORACLEAPIS\install directory, open the cremxora.sql file.
2 Replace all instances of MAXORA with your integration schema name.
3 Replace all instances of USER_DATA with your table space name.
4 Save the cremxora.sql file.
5 Start SQL* Plus and connect to the Oracle E-Business Suite database as a database administration user.
Table 1: Files installed in the ORACLEAPIS directory
Subdirectory Description
apiuser Contains standard template files for the user exit procedures
concurrent Contains the PL/SQL procedures that the concurrent jobs run
install Contains installation scripts
interfac Contains the script that creates triggers, procedures, and packages
log The log subdirectory
PL/SQL files for the Maximo Enterprise Adapter
26 IBM Maximo Enterprise Adapter for Oracle Applications Installation Guide

ntegration schema
6 Create and grant privileges to the integration schema by entering the following command:
SQL > start Maximo_root\ORACLEAPIS\install\cremxora <Enter>
7 Review and correct any errors that you see on the screen.
Creating the i
Configuring the adapter on Oracle E-Business Suite 27

Creating the Maximo interface tables in the Oracle E-Business Suite database
You must run the create procedure in Maximo Asset Management. The procedure creates the interface tables in the Oracle E-Business Suite database. Anticipate that it might take several minutes to build the interface tables.
Procedure
1 In the External Systems application, click the System tab.
2 In the System field, press Enter and then select OA12 External System.
3 From the Select Action menu, choose Create Interface Tables.
4 Click the End Point Select icon and then select OAIFACETABLE.
5 Select the interface tables that you want to create or recreate.
6 Click Create.
Configuring installation environment variables
The setofvar.sql script contains installation environment parameters that the install script uses when you run it to install PL/SQL objects and synchronize databases.
Procedure
1 In the Maximo_root\ORACLEAPIS\install directory, open the setofvar.sql script.
Table 2: Maximo interface tables
q MXCOA_IFACE q MXITEM_IFACE
q MXCRAFT_IFACE q MXLABOR_IFACE
q MXGLCOMP_IFACE q MXPC_IFACE
q MXGLTXN_IFACE q MXPO_IFACE
q MXINVBAL_IFACE q MXPR_IFACE
q MXINVENTORY_IFACE q MXPROJ_IFACE
q MXINVISSUE_IFACE q MXPROJTXN_IFACE
q MXINVOICE_IFACE q MXRCVROTITM_IFACE
q MXINVRES_IFACE q MXRECEIPT_IFACE
q MXINVVENDOR_IFACE q MXVENDOR_IFACE
Creating the Maximo interface tables in the Oracle E-Business Suite database
28 IBM Maximo Enterprise Adapter for Oracle Applications Installation Guide

n script on Oracle
2 Configure only the variables specified in the following parameters:
Running the installation script on Oracle
After configuring the installation environment variables, run the install script to install the packages, procedures, triggers, concurrent jobs, and objects in the Oracle E-Business Suite database.
Before you begin
Make a note of the following usernames and passwords that you are prompted to provide during the installation:
q Maxmo Asset Management username, which must be all uppercase, and password
q Oracle Applications username and password
Procedure
1 In SQL * Plus, connect as the MAXORA user to the Oracle E-Business Suite database.
Table 3: Installation environment variables to configure
Parameter Description
hostStrOF = 'service name for Oracle database' Specify the Oracle database service name that is configured in tnsnames.ora.
RootApis = 'Maximo_root\ORACLEAPIS' Specify the install directory for the Oracle E-Business Suite adapter, that contains the following subdirectories:
q apiuserq concurrentq installq interfacq log
LogDir = 'Maximo_root\ORACLEAPIS\log' The location of output log files.
UserDir = 'Maximo_root\ORACLEAPIS\apiuser'
The location of user exit templates.
If you have customized versions of the user exits, be sure to add them to the templates.
ConcVer = 'n' Specify the type of architecture to use for processing messages from Oracle Applications. The options are:
q To use concurrent jobs for batch-mode inbound processing, set ConcVer = 'y'.
q To use triggers for real-time inbound processing, set ConcVer = 'n'.
The default value for this parameter is 'n'.
Running the installatio
Configuring the adapter on Oracle E-Business Suite 29

2 Specify the following command to list the parameters that are defined in the setofvar.sql script:
SQL> start Maximo_root\ORACLEAPIS\install\setofvar
This command lists the install parameters that are defined in the setofvar.sql script.
3 Specify the following command to run the install.sql script:
SQL> start &InstallDir.install
4 In the Maximo_root\ORACLEAPIS\log\install.out directory, open the install.out file and check the file for any errors.
Verifying and fixing installation errors
After you install the packages, procedures, triggers, and concurrent jobs to the Oracle E-Business Suite database, you must check for installation errors and fix them.
To verify and fix installation errors:
1 Open the install.out file in the log directory and check for errors. The following table describes the types of errors that you can find:
2 Fix any problems that you find and rerun install.sql without errors.
Table 4: Typical installation errors
Error type Description
File not found Search for text similar to “unable to open file \Maximo_root\ORACLEAPIS\...”. Errors of this type indicate that the setofvar.sql file might not have correct directory settings. For example, the user directory Maximo_root\ORACLEAPIS\apiuser might be missing a \ after “apiuser.”
Statements not accepted by the system Search for “unknown command” text. If you find this error, check that your version of SQL * Plus for Windows is equal to or higher than 3.1.3.5.4.
Oracle Search for “ORA –” text. If you find any ORA-type errors, contact your Oracle Database Administrator.
Compile Search for “PLS –” text. If you find any lines that start with “PLS-”, then also search for “with compilation error” text. If you find any compile errors, contact IBM Support.
Verifying and fixing installation errors
30 IBM Maximo Enterprise Adapter for Oracle Applications Installation Guide
ess Suite database
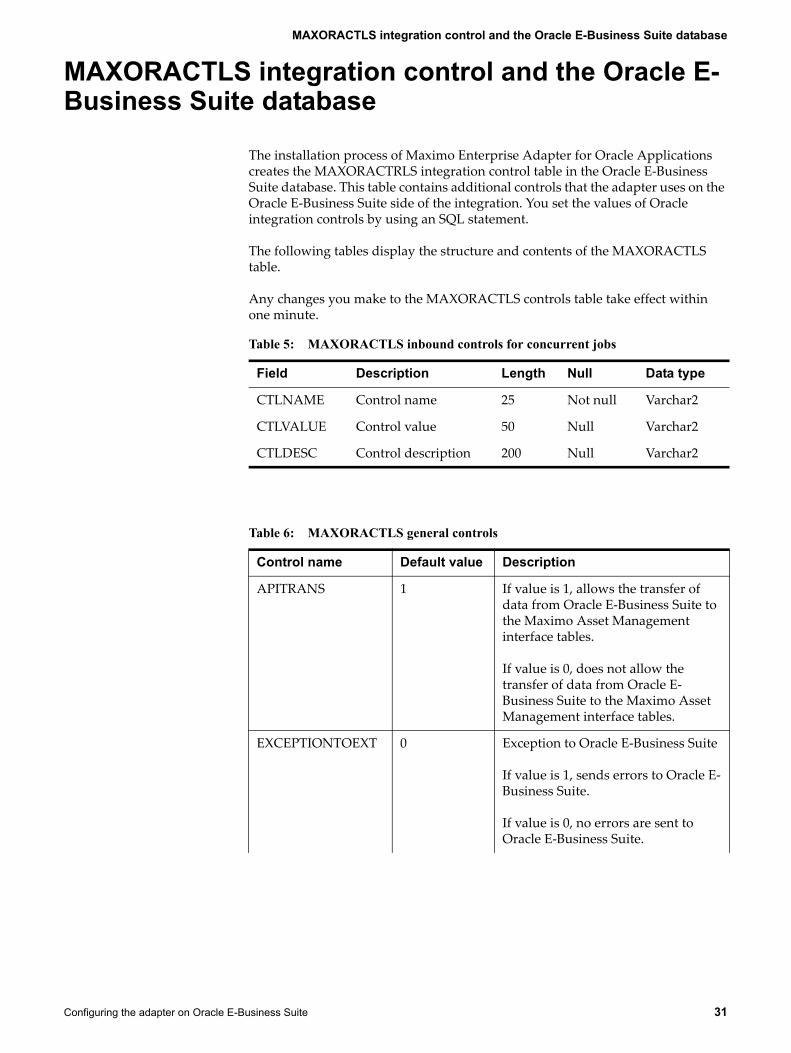
MAXORACTLS integration control and the Oracle E-Business Suite database
The installation process of Maximo Enterprise Adapter for Oracle Applications creates the MAXORACTRLS integration control table in the Oracle E-Business Suite database. This table contains additional controls that the adapter uses on the Oracle E-Business Suite side of the integration. You set the values of Oracle integration controls by using an SQL statement.
The following tables display the structure and contents of the MAXORACTLS table.
Any changes you make to the MAXORACTLS controls table take effect within one minute.
Table 5: MAXORACTLS inbound controls for concurrent jobs
Field Description Length Null Data type
CTLNAME Control name 25 Not null Varchar2
CTLVALUE Control value 50 Null Varchar2
CTLDESC Control description 200 Null Varchar2
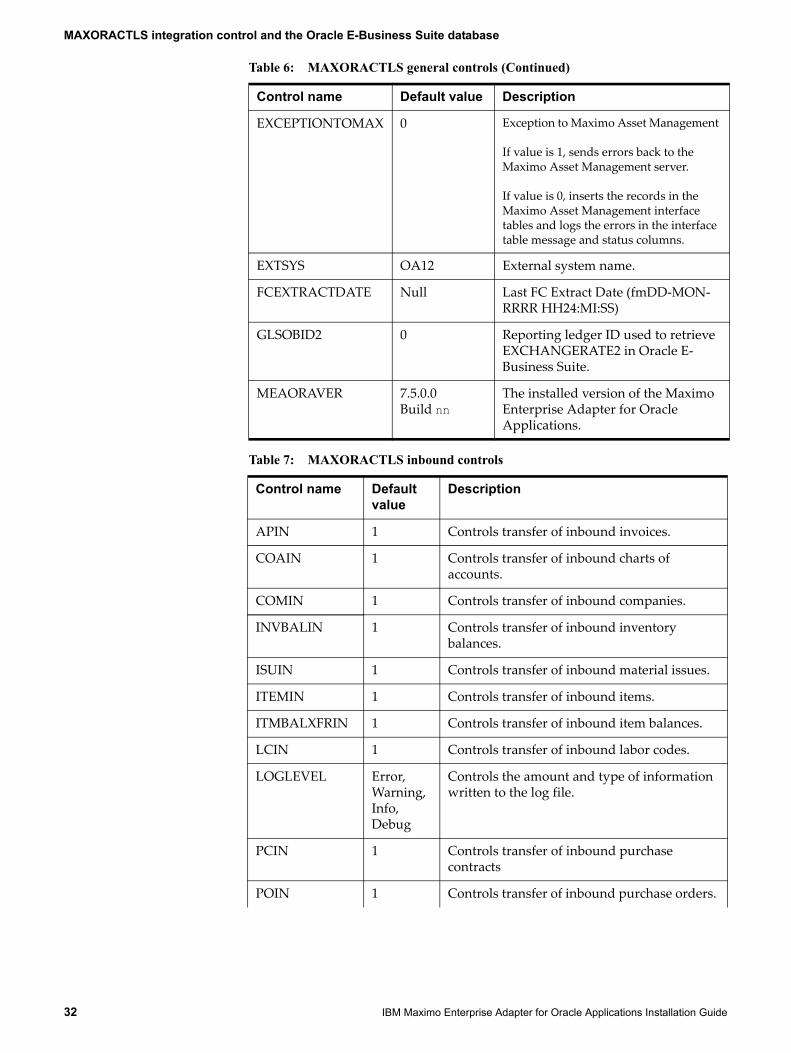
Table 6: MAXORACTLS general controls
Control name Default value Description
APITRANS 1 If value is 1, allows the transfer of data from Oracle E-Business Suite to the Maximo Asset Management interface tables.
If value is 0, does not allow the transfer of data from Oracle E-Business Suite to the Maximo Asset Management interface tables.
EXCEPTIONTOEXT 0 Exception to Oracle E-Business Suite
If value is 1, sends errors to Oracle E-Business Suite.
If value is 0, no errors are sent to Oracle E-Business Suite.
MAXORACTLS integration control and the Oracle E-Busin
Configuring the adapter on Oracle E-Business Suite 31
MAXORACTLS integration control and the Oracle E-Business Suite database
EXCEPTIONTOMAX 0 Exception to Maximo Asset Management
If value is 1, sends errors back to the Maximo Asset Management server.
If value is 0, inserts the records in the Maximo Asset Management interface tables and logs the errors in the interface table message and status columns.
EXTSYS OA12 External system name.
FCEXTRACTDATE Null Last FC Extract Date (fmDD-MON-RRRR HH24:MI:SS)
GLSOBID2 0 Reporting ledger ID used to retrieve EXCHANGERATE2 in Oracle E-Business Suite.
MEAORAVER 7.5.0.0 Build nn
The installed version of the Maximo Enterprise Adapter for Oracle Applications.
Table 7: MAXORACTLS inbound controls
Control name Default value
Description
APIN 1 Controls transfer of inbound invoices.
COAIN 1 Controls transfer of inbound charts of accounts.
COMIN 1 Controls transfer of inbound companies.
INVBALIN 1 Controls transfer of inbound inventory balances.
ISUIN 1 Controls transfer of inbound material issues.
ITEMIN 1 Controls transfer of inbound items.
ITMBALXFRIN 1 Controls transfer of inbound item balances.
LCIN 1 Controls transfer of inbound labor codes.
LOGLEVEL Error, Warning, Info, Debug
Controls the amount and type of information written to the log file.
PCIN 1 Controls transfer of inbound purchase contracts
POIN 1 Controls transfer of inbound purchase orders.
Table 6: MAXORACTLS general controls (Continued)
Control name Default value Description
32 IBM Maximo Enterprise Adapter for Oracle Applications Installation Guide

MAXORACTLS integration control and the Oracle E-Business Suite database
PROJPAY 1 Controls transfer of inbound Oracle Projects pay rates.
Default value is 1 when integration with Oracle Project Accounting is installed.
RCVIN 1 Controls transfer of inbound receipts.
Table 8: MAXORACTLS inbound controls for concurrent jobs
Control name Control value format
Description
CR_POAPPR_DATE fmDD-MON-RRRR HH24:MI:SS
Records the last date concurrent requests ran for PO approvals.
CR_POLINE_DATE fmDD-MON-RRRR HH24:MI:SS
Records the last dateconcurrent requests ran for PO lines.
CR_PRIMP_DATE fmDD-MON-RRRR HH24:MI:SS
Records the last date concurrent requests ran for PO requisitions.
CR_RECEIPT_DATE fmDD-MON-RRRR HH24:MI:SS
Records the last date concurrent requests ran for receipts.
CR_RCVSERIAL_DATE fmDD-MON-RRRR HH24:MI:SS
Records the last date concurrent requests ran for receiving rotating items.
CR_INVC_DATE fmDD-MON-RRRR HH24:MI:SS
Records the last date concurrent requests ran for invoices.
CR_INVCAPPR_DATE fmDD-MON-RRRR HH24:MI:SS
Records the last date concurrent requests ran for invoice approvals.
CR_POREL_DATE fmDD-MON-RRRR HH24:MI:SS
Records the last date concurrent requests ran for PO releases.
CR_POIMP_DATE fmDD-MON-RRRR HH24:MI:SS
Records the last date rejected concurrent requests ran for PO interfaces.
CR_POACTION_DATE fmDD-MON-RRRR HH24:MI:SS
Records the last date concurrent requests ran for PO action histories.
CR_GLCC_DATE fmDD-MON-RRRR HH24:MI:SS
Records the last date concurrent requests ran for GL code combinations.
Table 7: MAXORACTLS inbound controls (Continued)
Control name Default value
Description
Configuring the adapter on Oracle E-Business Suite 33

MAXORACTLS integration control and the Oracle E-Business Suite database
CR_GLCOMP_DATE fmDD-MON-RRRR HH24:MI:SS
Records the last date concurrent requests ran for GL components.
CR_GLCOMPDESC_DATE
fmDD-MON-RRRR HH24:MI:SS
Records the last date concurrent requests ran for GL component descriptions.
CR_MTLBAL_DATE fmDD-MON-RRRR HH24:MI:SS
Records the last date for concurrent requests ran for inventory balances.
CR_MTLITM_DATE fmDD-MON-RRRR HH24:MI:SS
Records the last date concurrent requests ran for inventory items.
CR_MTLITMTL_DATE fmDD-MON-RRRR HH24:MI:SS
Records the last date concurrent requests ran for inventory item descriptions.
CR_VNDHDR_DATE fmDD-MON-RRRR HH24:MI:SS
Records the last date concurrent requests ran for suppliers.
CR_VNDSITE_DATE fmDD-MON-RRRR HH24:MI:SS
Records the last date concurrent requests ran for supplier sites.
CR_VNDCONT_DATE fmDD-MON-RRRR HH24:MI:SS
Records the last date concurrent requests ran for supplier contacts.
CR_VNDCONTUPD_DATE
fmDD-MON-RRRR HH24:MI:SS
Records the last date concurrent requests ran for supplier contact processes.
CR_PAEMP_DATE fmDD-MON-RRRR HH24:MI:SS
Records the last date concurrent requests ran for PA employees master data.
CR_PACOMP_DATE fmDD-MON-RRRR HH24:MI:SS
Records the last date concurrent requests ran for master data related to PA employees compensate rates.
Table 8: MAXORACTLS inbound controls for concurrent jobs (Continued)
Control name Control value format
Description
34 IBM Maximo Enterprise Adapter for Oracle Applications Installation Guide
Certain data that is shared by Maximo Asset Management and the Oracle Applications E-Business Suite must be consistent at the Maximo Asset Management organization-level and Oracle Applications E-Business Suite ledger-level. To ensure consistency, you must configure and synchronize a number of Maximo Asset Management and Oracle fields by using the integration controls.
You must accurately synchronize information like Oracle employees and Maximo Asset Management labor codes and Oracle vendors and Maximo Asset Management companies before you can successfully exchange data between Maximo Asset Management and Oracle.
For example, if the Oracle Applications E-Business Suite uses the British pound as the base currency in a ledger, the asset management system must use the British pound as the base currency for the corresponding organization.
The following data must be consistent between the asset management system and the Oracle Applications E-Business Suite:
q Currenciesq Financial calendarsq Tax ratesq Units of measure and conversion factorsq User names (if you do not use the GENUSR integration control)
To maintain this data, update it manually in the applications.
Configuring integration controls and synchronizing data
5
Configuring integration controls and synchronizing data 35

Activating the cron task for interface table polling
Now that you have completed installing and configuring the Oracle Adapter on the Oracle side of the integration, you are ready to send transactions between the asset management system and the Oracle Applications E-Business Suite. You must first enable the OAPolling cron task.
Procedure
1 Navigate to the Cron Task Setup application by selecting Go To > System Configuration > Platform Configuration>Cron Task Setup.
2 Press Enter to display a list of cron task instances.
3 Click IFACETABLECONSUMER.
4 Click OAPolling (or some other Cron task name) to display record information.
5 Select the Active check box to enable the cron task.
6 Click Save Cron Task.
7 Click Select Action > Reload Request.
Enabling the external system
In addition to enabling the cron task for interface table polling, you also must enable the Oracle Applications E-Business Suite external system (OA12).
Procedure
1 Navigate to the External Systems application by selecting Go To > Integration > External Systems.
2 Type OA12 in the System field, and press Enter.
3 Click OA12 to open the OA12 external systems window.
4 Select the Enabled check box.
5 Click Save External System.
Activating the cron task for interface table polling
36 IBM Maximo Enterprise Adapter for Oracle Applications Installation Guide

sset Management
Setting up Oracle-specific integration control values in Maximo Asset Management
There are several Oracle-specific integration control values you must configure in the asset management system.
Generating the showcats.out output file
Generate the showcats.out output file to determine the values you must specify for the Oracle-specific integration controls for Services, Special Orders, and Materials.
Procedure
1 Login to SQL* Plus, and enter the following commands:
SQL> start c:\MAXIMO\ORACLEAPIS\install\setofvar
SQL> start &InstallDir.showcats
The generated file is in the following location:
c:\MAXIMO\ORACLEAPIS\log\showcats.out
The showcats.out file displays the values of category IDs to use for Services, Special Orders, and Materials.
2 Select a category ID to transfer, then rerun the showcats script.
3 Use the information from showcats.out shown in the following table to set the integration control values in the asset management system:
Table 1: showcats.out output file
Control Value
OACATXREF Used to convert the asset management system line types into Oracle categories.
Setting up Oracle-specific integration control values in Maximo A
Configuring integration controls and synchronizing data 37

Generating the showmult.out output file
Generate the showmult.out output file to determine the values you must specify for the Oracle-specific integration controls fthat display the relationship between inventory organizations and operating units.
Procedure
1 Login to SQL* Plus and enter the following commands:
SQL> start c:\MAXIMO\ORACLEAPIS\install\setofvar
SQL> start &InstallDir.showmult
The generated file is in the following location:
c:\MAXIMO\ORACLEAPIS\log\showmult.out
The showmult.out file displays the relationship between inventory organizations and operating units.
2 Use the information from showmult.out shown in the following table to set the ORGXREF and SITEXREF integration control values in the asset management system.
If the multi_org_flag at the top of the file is Y, your application is running multiple operating units (organizations). If you are not running multiple organizations, you can bypass setting up values for the ORGXREF and SITEXREF controls.
Table 2: showmult.out output file
Control Value
ORGXREF Maps the asset management system organizations to the Oracle Applications E-Business Suite ledger.
SITEXREF Maps the asset management system sites to the Oracle Applications E-Business Suite operating units.
Setting up Oracle-specific integration control values in Maximo Asset Management
38 IBM Maximo Enterprise Adapter for Oracle Applications Installation Guide

nt GL components
Synchronizing Oracle and Maximo Asset Management GL components
The Oracle Applications E-Business Suite and the asset management system must use the same chart of accounts structure before you can begin transferring GL data from Oracle to the asset management system. Oracle and asset management system chart of accounts must share the same number of segments.
You can reconfigure the asset management system so that its account segments have the same structure as those in the Oracle Applications E-Business Suite.
Additionally, you can modify the Oracle and asset management system GL structures with user exit procedures that transform accounts from one structure to the other. For example, Oracle allows null segments in any part of the account structure, while the asset management system does not allow a null segment to precede a populated segment. To reconcile these differences, you may need to create a user exit procedure that alters the number and position of the GL segments.
To transfer GL components from Oracle to the asset management system, complete the following steps:
1 Navigate to the Install directory from Maximo_root. Locate and open the syncglcomp.sql file. You can edit this file by using a WHERE clause to accomplish the following:
q To transfer all accounts to the asset management system
q Transfer selected accounts to the asset management system
2 Login to SQL* Plus and connect to the Oracle Applications E-Business Suite database.
3 Enter the following commands:
SQL> start c:\MAXIMO\ORACLEAPIS\install\setofvar <Enter>
SQL> start &InstallDir.syncglcomp.sql <Enter>
The above commands set the Oracle Adapter environment and start the transfer of Oracle GL component data to Asset Management System.
4 When prompted, press Enter.
5 Enter a chart of accounts ID (COA_ID) from the list of IDs displayed on your screen, then press Enter.
The generated file is in the following location:
c:\MAXIMO\ORACLEAPIS\log\syncglcomp.out
Synchronizing Oracle and Maximo Asset Manageme
Configuring integration controls and synchronizing data 39
6 Review the syncglcomp.out file for errors.
The spool file might direct you to select from the MAXORALOG table to review error conditions. You can view this log in SQL* Plus after logging in as user MAXORA.
For example, you might see errors similar to the following:
column application = ‘API_GLCC_SP’ ORA-06502: PL/SQL: numeric or value error
If you get the above error message, check the mapping for the MX_GLCOMP_IFACE table. This error indicates that the COMPTEXT field is not large enough to hold the GL component description from the Oracle Applications E-Business Suite. To resolve this type of error, reconfigure the asset management system GLCOMPONENTS table and increase the length of the COMPTEXT field.
Synchronizing Oracle and Maximo Asset Management Chart of Accounts
To transfer the chart of accounts from Oracle to the asset management system, complete the following steps:
1 Navigate to the ORAAPIS directory from Maximo_root. Locate and open the synccoa.sql file. You can edit this file by using a WHERE clause to accomplish the following:
q To transfer all accounts to the asset management system
q Transfer selected accounts to the asset management system
2 Login to SQL* Plus and connect to the Oracle Applications E-Business Suite database.
3 Enter the following commands:
SQL> start c:\MAXIMO\ORACLEAPIS\install\setofvar <Enter>
SQL> start &InstallDir.synccoa.sql <Enter>
The above commands set the Oracle Adapter environment and start the transfer of Oracle chart of accounts data to the asset management system.
4 When prompted, press Enter.
5 Enter a chart of accounts ID (COA_ID) from the list of IDs displayed on your screen, then press Enter.
The generated file is in the following location:
c:\MAXIMO\ORACLEAPIS\log\synccoa.out
6 Review the synccoa.out file for errors.
Synchronizing Oracle and Maximo Asset Management Chart of Accounts
40 IBM Maximo Enterprise Adapter for Oracle Applications Installation Guide

ment Labor Codes
7 To transfer additional chart of accounts IDs:
q Select a different COA_ID from the list
q Rerun the script
q Review the output file for errors
Synchronizing Oracle Employees and Maximo Asset Management Labor Codes
To transfer the Oracle employees to the asset management system labor codes, complete the following steps:
1 Login to SQL* Plus, then enter the following commands:
SQL> start c:\MAXIMO\ORACLEAPIS\install\setofvar <Enter>
SQL> start &InstallDir.synclabor <Enter>
2 When prompted, press Enter.
3 Enter an Oracle business group ID from the list of IDs displayed on your screen, then press Enter.
Each time you want to transfer a different business group ID, select it from the screen and rerun the synclabor script.
The generated file is in the following location:
c:\MAXIMO\ORACLEAPIS\log\synclabor.out
4 Review the synclabor.out file for errors.
Synchronizing Oracle Organizations and Locations and Maximo Asset Management Address Codes
You must map the Oracle Applications E-Business Suite organizations and locations to the asset management system address codes. To synchronize the two systems, you must first obtain a listing of the organizations and locations in the Oracle Applications E-Business Suite and then define those codes in the asset management system.
Synchronizing Oracle Employees and Maximo Asset Manage
Configuring integration controls and synchronizing data 41
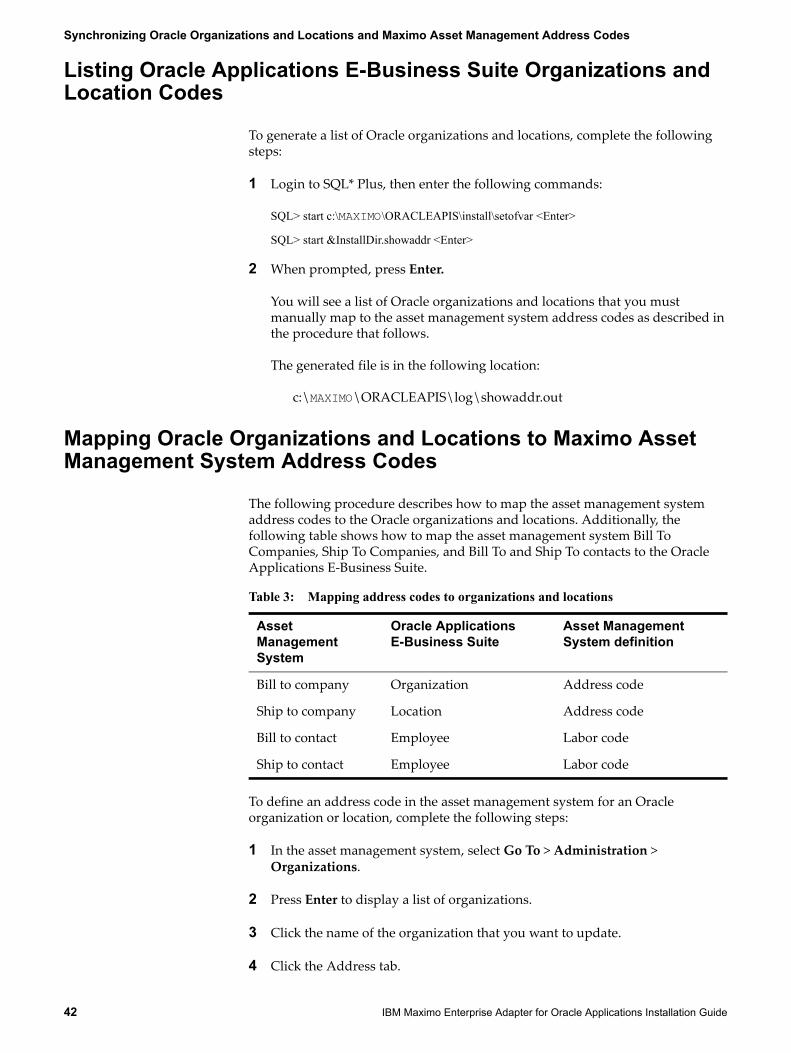
s
Listing Oracle Applications E-Business Suite Organizations and Location Codes
To generate a list of Oracle organizations and locations, complete the following steps:
1 Login to SQL* Plus, then enter the following commands:
SQL> start c:\MAXIMO\ORACLEAPIS\install\setofvar <Enter>
SQL> start &InstallDir.showaddr <Enter>
2 When prompted, press Enter.
You will see a list of Oracle organizations and locations that you must manually map to the asset management system address codes as described in the procedure that follows.
The generated file is in the following location:
c:\MAXIMO\ORACLEAPIS\log\showaddr.out
Mapping Oracle Organizations and Locations to Maximo Asset Management System Address Codes
The following procedure describes how to map the asset management system address codes to the Oracle organizations and locations. Additionally, the following table shows how to map the asset management system Bill To Companies, Ship To Companies, and Bill To and Ship To contacts to the Oracle Applications E-Business Suite.
To define an address code in the asset management system for an Oracle organization or location, complete the following steps:
1 In the asset management system, select Go To > Administration > Organizations.
2 Press Enter to display a list of organizations.
3 Click the name of the organization that you want to update.
4 Click the Address tab.
Table 3: Mapping address codes to organizations and locations
Asset Management System
Oracle Applications E-Business Suite
Asset Management System definition
Bill to company Organization Address code
Ship to company Location Address code
Bill to contact Employee Labor code
Ship to contact Employee Labor code
Synchronizing Oracle Organizations and Locations and Maximo Asset Management Address Code
42 IBM Maximo Enterprise Adapter for Oracle Applications Installation Guide

ement Currencies
5 Click New Row.
6 Enter the Oracle location or organization in the Address Code field.
7 Enter the following address information:
q Long descriptionq Addressq Cityq State/Provinceq Zip/Postal Codeq Country
8 Click Save Organization.
Synchronizing Oracle and Maximo Asset Management Currencies
The asset management system and the Oracle Applications E-Business Suite must use the same currency. To synchronize the two systems, you must first obtain a listing of the currency codes in the Oracle Applications E-Business Suite and then define those codes in the asset management system.
Listing Oracle Applications E-Business Suite Currency Codes
To obtain a listing of the currency codes in the Oracle Applications E-Business Suite, complete the following steps:
1 Login to SQL* Plus and connect to the Oracle Applications E-Business Suite database.
2 Enter the following commands:
SQL> start c:\MAXIMO\ORACLEAPIS\install\setofvar <Enter>
SQL> start &InstallDir.showcurr <Enter>
The generated file is in the following location:
c:\MAXIMO\ORACLEAPIS\log\showcurr.out
The showcurr.out file lists the currency codes defined in the Oracle Applications E-Business Suite.
Synchronizing Oracle and Maximo Asset Manag
Configuring integration controls and synchronizing data 43
Defining Oracle Currency Codes in Maximo Asset Management
To define the Oracle currency codes in the asset management system, complete the following steps:
1 In the asset management system, select Go To > Financial > Currency Codes.
2 Click New Row.
3 Enter a currency code in the Currency field and a description in the adjacent text box.
4 Click Save Currency Code.
Synchronizing Oracle Vendors and Maximo Asset Management Companies
To synchronize the Oracle vendors and the asset management system companies, you must run a script that defines the Oracle Applications E-Business Suite vendors as companies in the asset management system.
Before you run the synchronization script, you must set up the Oracle vendor type defaults in the asset management system as follows:
1 In the asset management system, select Go To > Financial > Chart of Accounts.
2 Choose Select Action > Company-Related Accounts to open the Company-Related Accounts screen.
3 Click New Row, then add the following information:
q Company Type (Courier, Manufacturer, or Vendor)q RBNI Accountq AP Suspense Accountq AP Control Account
4 Repeat Steps 1 – 3 for each Oracle vendor type you expect to transfer to the asset management system.
The newly defined asset management system company ID is a concatenation of the Oracle operating unit ID, vendor ID, and vendor site code. Hyphens separate the three segments.
The script adds the AP control account to each asset management system company ID. If you plan on using invoicing, you must update each company ID with an RBNI (received but not invoiced) and suspense account.
Synchronizing Oracle Vendors and Maximo Asset Management Companies
44 IBM Maximo Enterprise Adapter for Oracle Applications Installation Guide

ement Companies
To synchronize the Oracle vendors and the asset management system companies, complete the following steps:
1 Navigate to the Install directory from Maximo_root. Locate and open the syncvnd.sql file. You can edit this file by using a WHERE clause to accomplish the following:
q To transfer all vendors to the asset management system
q Transfer selected vendors to the asset management system
2 Login to SQL*Plus and connect to the Oracle Applications E-Business Suite database.
3 Enter the following commands:
SQL> start c:\MAXIMO\ORACLEAPIS\install\setofvar <Enter>
SQL> start &InstallDir.syncvnd <Enter>
4 When prompted, press Enter.
5 Enter an Oracle operating unit ID from the list of IDs displayed on your screen, then press Enter.
Each time you want to transfer a different operating unit ID, select it from the screen and rerun the syncvnd script.
The generated file is in the following location:
c:\MAXIMO\ORACLEAPIS\log\syncvnd.out
6 Review the syncvnd.out file for errors.
Updating the Maximo Asset Management Company ID with an RBNI and Suspense Account
To update the company ID with an RBNI and suspense account, complete the following steps:
1 In the asset management system, select Go To > Purchasing > Companies.
2 Press Enter to display a list of company IDs.
3 Click the company you want to update to display the record in the Company tab.
4 Click the Select Icon for the RBNI Account to open the Select GL Account dialog box where you can build the RBNI account.
5 Repeat Step 4 for the Suspense Account.
6 Click Save Company.
Synchronizing Oracle Vendors and Maximo Asset Manag
Configuring integration controls and synchronizing data 45

ns
Synchronizing Oracle Inventory Organizations and Maximo Asset Management Storeroom Locations
To synchronize the Oracle inventory organizations and the asset management system storeroom locations, you must first obtain a listing of the organizations in the Oracle Applications E-Business Suite, then define them as storerooms in the asset management system.
Listing Oracle Applications E-Business Suite Organizations
To obtain a listing of the organizations and other control values from the Oracle Applications E-Business Suite, complete the following steps:
1 Login to SQL* Plus, then enter the following commands:
SQL> start c:\MAXIMO\ORACLEAPIS\install\setofvar <Enter>
SQL> start &InstallDir.showids <Enter>
2 When prompted, press Enter to display a list of the Oracle ApplicationsE-Business Suite showids.out control values as shown in the following table.
The generated file is in the following location:
c:\MAXIMO\ORACLEAPIS\log\showids.out
3 Review the showids.out file for any errors.
Defining Storerooms in Maximo Asset Management
To create a storeroom in the asset management system, complete the following steps:
1 In the asset management system, select Go To > Inventory > Storerooms.
2 Click New Storeroom.
Table 4: showids.out output file
Control Default value
APLINETYPE ITEM
GENSTORE Null or ORG_CODE
COAXREF Chart_of_accounts_ID
ORGXREF Ledger_ID
Synchronizing Oracle Inventory Organizations and Maximo Asset Management Storeroom Locatio
46 IBM Maximo Enterprise Adapter for Oracle Applications Installation Guide

t Units of Measure
3 Enter data about the storeroom, including:
q Storeroom and site locationq GL account informationq Ship to and Bill to information
4 Click Save Storeroom.
Synchronizing Oracle Order Units and Maximo Asset Management Units of Measure
To synchronize the Oracle and the asset management system order units, you must first obtain a listing of the order units in the Oracle Applications E-Business Suite, then define them in the asset management system.
Listing Oracle Applications E-Business Suite Order Units
To obtain a listing of the order units in the Oracle Applications E-Business Suite, complete the following steps:
1 Login to SQL* Plus, then enter the following commands:
SQL> start c:\MAXIMO\ORACLEAPIS\install\setofvar <Enter>
SQL> start &InstallDir.showuom <Enter>
2 When prompted, press Enter.
The generated file is in the following location:
c:\MAXIMO\ORACLEAPIS\log\showuom.out
The showuom.out output file lists the units of measure defined in the Oracle Applications E-Business Suite.
3 Review the showuom.out file for any errors.
Defining Units of Measure and Conversion Factors in Maximo Asset Management
To define a unit of measure and a conversion factor in Asset Management System, complete the following steps:
1 In asset management system, select Go To > Inventory > Item Master.
2 Choose Select Action > Unit of Measure and Conversion > Add/Modify Units of Measure.
3 Click New Row.
Synchronizing Oracle Order Units and Maximo Asset Managemen
Configuring integration controls and synchronizing data 47

4 Enter the unit of measure, a long description, and an abbreviation for the unit of measure. For example, you might enter GBYTE, GIGABYTE, and GB.
5 Click OK.
6 Additionally, if you wish to add a conversion factor for a unit of measure, choose Select Action > Unit of Measure and Conversion > Add/Modify Conversions.
For example, you might enter a conversion factor of 250 when converting a unit of measure value of BOX to a unit measure value of FEET.
7 Click OK.
8 Click Save Item.
Adding Tax Codes to Maximo Asset Management
Before you can synchronize the Oracle and the asset management system items, you must define the Oracle tax codes that you use in asset management system.
Listing Oracle Applications E-Business Suite Tax Codes
To obtain a listing of the tax codes in the Oracle Applications E-Business Suite, complete the following steps:
1 Login to SQL* Plus, then enter the following commands:
SQL> start c:\MAXIMO\ORACLEAPIS\install\setofvar <Enter>
SQL> start &InstallDir.showtax <Enter>
2 When prompted if OK to continue, press Enter.
The generated file is in the following location:
c:\MAXIMO\ORACLEAPIS\log\showtax.out
The showtax.out file lists the tax codes defined in the Oracle ApplicationsE-Business Suite.
3 Review the showtax.out file for any errors.
Defining Oracle Tax Codes in Maximo Asset Management
To define tax codes, complete the following steps:
1 In the asset management system, select Go To > Administration > Organizations.
2 Press Enter to display a list of organizations.
3 Click an organization to open the record.
Adding Tax Codes to Maximo Asset Management
48 IBM Maximo Enterprise Adapter for Oracle Applications Installation Guide

Management Items
4 Click Select Action > Purchasing Options > Tax Options.
5 Click New Row.
6 Enter values for the following fields:
q Tax Codeq Tax Code Descriptionq Tax Rateq Effective Dateq Paid Tax GL Accountq Unpaid Tax GL Account
7 Click OK.
8 Click Save Organization.
Synchronizing Oracle and Maximo Asset Management Items
To synchronize items between the two systems, you must complete the following tasks:
q Verify integration control settings and financial periodsq Run a SQL script that transfers the Oracle items to the asset management
systemq Verify that the Oracle items were added to the Item Master in the asset
management systemq Define the item as a direct delivery item in Oracle (optional)
You must define individual or all items in an Oracle organization as direct delivery so that you can receive an item in Oracle and then send the receipt to the asset management system.
Items that belonged to an organization in the Oracle Applications E-Business Suite belong to a storeroom in the asset management system after you run the syncitm.sql script.
Synchronizing Oracle and Maximo Asset
Configuring integration controls and synchronizing data 49

To synchronize items across the two systems, complete the following steps:
1 Verify that the item-related asset management system integration controls for the Oracle Adapter have the following default value setting:
2 Ensure that the financial periods during which you synchronize items are open in the asset management system.
For information on displaying the financial periods in Asset Management System, see the IBM Maximo Asset Management Integration Guide.
3 Navigate to the Install directory from Maximo_root. Locate and open the syncitm.sql file. You can edit this file by using a WHERE clause to accomplish the following:
q To transfer all items to the asset management system
q Transfer selected items to the asset management system
4 Login to SQL* Plus and connect to the Oracle Applications E-Business Suite database.
5 Enter the following commands:
SQL> start c:\MAXIMO\ORACLEAPIS\install\setofvar <Enter>
SQL> start &InstallDir.syncitm <Enter>
The generated file is in the following location:
c:\MAXIMO\ORACLEAPIS\log\syncitm.out
The syncitm.out file contains a list of all the inventory items that you can transfer to the asset management system.
6 Review the syncitm.out file for any errors.
7 Enter an Oracle item ID from the list of IDs displayed on your screen, then press Enter.
Each time you want to transfer a different item ID, select it from the screen and rerun the syncitm script.
8 To verify that you successfully transferred an Oracle item to the asset management system, select Go To > Inventory > Item Master.
9 Enter the item number in the Item field, and press Enter.
10 If successfully transferred, the item search action displays a line item for the record.
11 Click the Item number to open the detail record.
Integration control Default value
ITEMIN 1
Synchronizing Oracle and Maximo Asset Management Items
50 IBM Maximo Enterprise Adapter for Oracle Applications Installation Guide

ent Item Balances
Synchronizing Oracle and Maximo Asset Management Item Balances
If you want to transfer item balances from Oracle to the asset management system, complete the following procedures. This synchronization transfers the current balance and the bin number where the balance is located. Transferring item balances is optional.
When testing reservations, receipts, and issues, you need a default bin. The script in the following procedure defines the default bin.
Transferring Oracle Item Balances to Maximo Asset Management
To transfer item balances from Oracle to the asset management system, complete the following steps:
1 Navigate to the Install directory from Maximo_root. Locate and open the syncbal.sql file.
2 Edit this file by entering an organization ID in a WHERE clause that represents the organization item balances that you wish to transfer.
3 Login to SQL* Plus, then enter the following commands:
SQL> start c:\MAXIMO\ORACLEAPIS\install\setofvar <Enter>
SQL> start &InstallDir.syncbal <Enter>
4 When prompted, press Enter.
The generated file is in the following location:
c:\MAXIMO\ORACLEAPIS\log\syncbal.out
The syncbal.out file lists the Oracle inventory organization IDs that can be transferred to the asset management system.
5 Review the syncbal.out file for any errors.
Each time you want to transfer a different inventory balance, select the inventory organization ID from the screen and rerun the syncbal script.
Synchronizing Oracle and Maximo Asset Managem
Configuring integration controls and synchronizing data 51

Synchronizing Oracle and Maximo Asset Management Item Balances
Verifying Item Balances in Maximo Asset Management
To verify that transferred items were updated with the correct balance and bin number in the asset management system, complete the following steps:
1 In the asset management system, select Go To > Inventory > Inventory.
2 Type an item number in the Item field, and press Enter. Also, you can click the Select Icon > Select Value, and click an item number from the displayed list of items.
The summary line displays the current balance for the selected item.
3 Click the Inventory tab to view the item detail record, including bin and lot numbers.
52 IBM Maximo Enterprise Adapter for Oracle Applications Installation Guide

t jobs architecture
When you install the adapter on the Oracle Applications server, asset management objects are created in the MAXORA schema. Do not drop, modify, move, or grant additional access to any of these objects.
These objects are listed as a reference for the Oracle database administrator. There are three groups of schema objects:
q Schema objects for concurrent jobs architectureq Schema objects for database trigger architectureq Schema objects common to both architectures
If you want to change from one architecture to another, you must reconfigure the environment variables and rerun the installation script on the Oracle Applications server. The reinstallation process performs the following changes to the schema objects:
q Removes the objects that were specific to the old architectureq Installs the objects that are specific to the new architecture
The objects that are common to both architectures are not affected.
Schema objects for concurrent jobs architecture
The schema objects listed in the following table are installed in the MAXORA schema only if the concurrent jobs architecture is selected
MAXORA Schema Table 6
Table 1: Schema objects for a concurrent jobs architecture
Object name Object type
API_GLCC_CR_SP PROCEDURE
API_GLCOMP_CR_SP PROCEDURE
API_INVCAPPR_CR_SP PROCEDURE
API_INVC_CR_SP PROCEDURE
API_MTLBAL_CR_SP PROCEDURE
API_MTLITMTL_CR_SP PROCEDURE
API_MTLITM_CR_SP PROCEDURE
API_PACOMP_CR_SP PROCEDURE
API_PAEMP_CR_SP PROCEDURE
Schema objects for concurren
MAXORA Schema Table 53

API_POACTION_CR_SP PROCEDURE
API_POAPPR_CR_SP PROCEDURE
API_POIMP_CR_SP PROCEDURE
API_POLINE_CR_SP PROCEDURE
API_POREL_CR_SP PROCEDURE
API_PRIMP_CR_SP PROCEDURE
API_RCVLOT_CR_SP PROCEDURE
API_RCVSERIAL_CR_SP PROCEDURE
API_RECEIPT_CR_SP PROCEDURE
API_VNDCONTUPD_CR_SP PROCEDURE
API_VNDCONT_CR_SP PROCEDURE
API_VNDHDR_CR_SP PROCEDURE
GL_SETS_OF_BOOKS SYNONYM
MX_HZ_PARTIES_CR TABLE
MX_HZ_PARTIES_CR_IDX1 INDEX
MX_INVCAPPR_CR TABLE
MX_INVCAPPR_CR_IDX1 INDEX
MX_INVCPAY_CR TABLE
MX_INVCPAY_CR_IDX1 INDEX
MX_MTL_MATTRANS_CR_IDX1 INDEX
MX_MTL_MAT_TRANS_CR TABLE
MX_POREL_CR TABLE
MX_POREL_CR_IDX1 INDEX
MX_PO_HEADERS_CR TABLE
MX_PO_HEADERS_CR_IDX1 INDEX
MX_REQ_INTERFACE_CR TABLE
MX_REQ_INTERFACE_CR_IDX1 INDEX
MX_SUP_SITES_ALL_CR TABLE
MX_SUP_SITES_ALL_CR_IDX1 INDEX
Table 1: Schema objects for a concurrent jobs architecture (Continued)
Object name Object type
Schema objects for concurrent jobs architecture
54 IBM Maximo Enterprise Adapter for Oracle Applications Installation Guide

rigger architecture
Schema objects for database trigger architecture
The schema objects listed in the following table are installed in the MAXORA schema only if the database trigger architecture is selected
Table 2: Schema objects for a database trigger architecture
Object name Object type
API_GLCC_TRG TRIGGER
API_GLCOMP_DESC_TRG TRIGGER
API_GLCOMP_TRG TRIGGER
API_INVCAPPR_TRG TRIGGER
API_INVC_TRG TRIGGER
API_MTLBAL_TRG TRIGGER
API_MTLITMTL_TRG TRIGGER
API_MTLITM_TRG TRIGGER
API_PA_COMPENSATION_TRG TRIGGER
API_PA_EMPLOYEE_TRG TRIGGER
API_POACTION_TRG TRIGGER
API_POAPPR_TRG TRIGGER
API_POIMP_TRG TRIGGER
API_POLINE_TRG TRIGGER
API_POREL_TRG TRIGGER
API_PRIMP_TRG TRIGGER
API_RCV_LOT_TRG TRIGGER
API_RCV_SERIAL_TRG TRIGGER
API_RECEIPT_TRG TRIGGER
API_VNDCONTUPD_TRG TRIGGER
API_VNDCONT_TRG TRIGGER
API_VNDHDR_TRG TRIGGER
API_VNDSITE_TRG TRIGGER
Schema objects for database t
MAXORA Schema Table 55
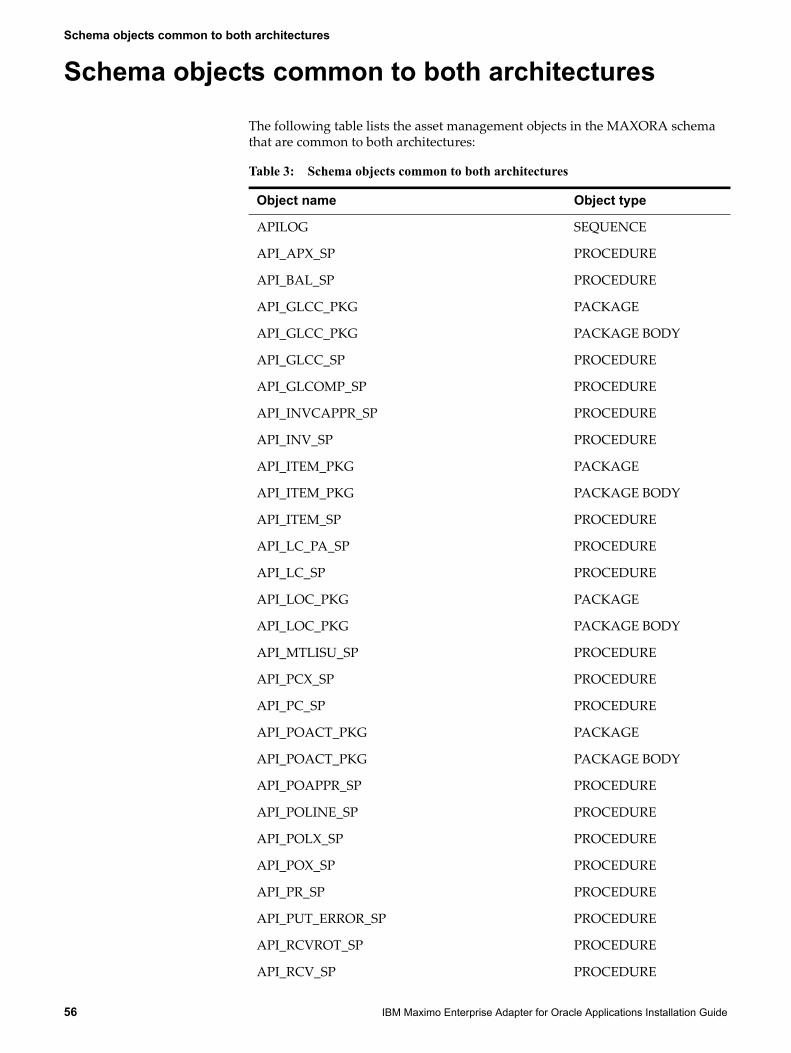
Schema objects common to both architectures
The following table lists the asset management objects in the MAXORA schema that are common to both architectures:
Table 3: Schema objects common to both architectures
Object name Object type
APILOG SEQUENCE
API_APX_SP PROCEDURE
API_BAL_SP PROCEDURE
API_GLCC_PKG PACKAGE
API_GLCC_PKG PACKAGE BODY
API_GLCC_SP PROCEDURE
API_GLCOMP_SP PROCEDURE
API_INVCAPPR_SP PROCEDURE
API_INV_SP PROCEDURE
API_ITEM_PKG PACKAGE
API_ITEM_PKG PACKAGE BODY
API_ITEM_SP PROCEDURE
API_LC_PA_SP PROCEDURE
API_LC_SP PROCEDURE
API_LOC_PKG PACKAGE
API_LOC_PKG PACKAGE BODY
API_MTLISU_SP PROCEDURE
API_PCX_SP PROCEDURE
API_PC_SP PROCEDURE
API_POACT_PKG PACKAGE
API_POACT_PKG PACKAGE BODY
API_POAPPR_SP PROCEDURE
API_POLINE_SP PROCEDURE
API_POLX_SP PROCEDURE
API_POX_SP PROCEDURE
API_PR_SP PROCEDURE
API_PUT_ERROR_SP PROCEDURE
API_RCVROT_SP PROCEDURE
API_RCV_SP PROCEDURE
Schema objects common to both architectures
56 IBM Maximo Enterprise Adapter for Oracle Applications Installation Guide

both architectures
API_VNDCONTUPD_SP PROCEDURE
API_VNDCONT_SP PROCEDURE
API_VND_SP PROCEDURE
AP_INVOICES_ALL SYNONYM
AP_INVOICES_INTERFACE SYNONYM
AP_INVOICES_INTERFACE_S SYNONYM
AP_INVOICE_DISTRIBUTIONS_ALL SYNONYM
AP_INVOICE_LINES_INTERFACE SYNONYM
AP_INVOICE_LINES_INTERFACE_S SYNONYM
AP_SUPPLIERS SYNONYM
AP_SUPPLIER_CONTACTS SYNONYM
AP_SUPPLIER_SITES_ALL SYNONYM
AP_TAX_CODES SYNONYM
AP_TERMS SYNONYM
CHK_OPERID_SP PROCEDURE
CREATE_DEBUG_SP PROCEDURE
CREATE_INSERT_SP PROCEDURE
CREATE_TRIGGER_SP PROCEDURE
CST_INV_LAYERS SYNONYM
CST_ITEM_COSTS SYNONYM
CST_QUANTITY_LAYERS SYNONYM
CVROTITM_IFACE_NDX INDEX
ENTERPROC PROCEDURE
EXTRACT_FC_DATA PROCEDURE
FA_CATEGORIES SYNONYM
FINANCIALS_SYSTEM_PARAMETERS SYNONYM
FND_API SYNONYM
FND_APPLICATION_VL SYNONYM
FND_FILE SYNONYM
FND_FLEX_VALUES SYNONYM
FND_FLEX_VALUES_TL SYNONYM
FND_ID_FLEX_SEGMENTS SYNONYM
FND_ID_FLEX_STRUCTURES SYNONYM
Table 3: Schema objects common to both architectures (Continued)
Object name Object type
Schema objects common to
MAXORA Schema Table 57

Schema objects common to both architectures
FND_LANGUAGES SYNONYM
FND_MSG_PUB SYNONYM
FND_PRODUCT_GROUPS SYNONYM
FND_PROFILE_OPTIONS SYNONYM
FND_PROFILE_OPTION_VALUES SYNONYM
FND_USER SYNONYM
GET_OPERID_SP PROCEDURE
GET_PA_ORGID_SP FUNCTION
GL_CODE_COMBINATIONS SYNONYM
GL_INTERFACE SYNONYM
GL_LEDGERS SYNONYM
HR_ALL_ORGANIZATION_UNITS SYNONYM
HR_EMPLOYEES SYNONYM
HR_LOCATIONS SYNONYM
HR_LOCATIONS_ALL SYNONYM
HR_OPERATING_UNITS SYNONYM
HZ_CONTACT_POINTS SYNONYM
HZ_LOCATIONS SYNONYM
HZ_ORG_CONTACTS SYNONYM
HZ_PARTIES SYNONYM
HZ_PARTY_SITES SYNONYM
HZ_RELATIONSHIPS SYNONYM
INVISSUE_IFACE_NDX INDEX
IN_INTER_TRANS_NDX INDEX
IS_PARENT_REJECTED FUNCTION
MAXAPIDEBUG PACKAGE
MAXAPIDEBUG PACKAGE BODY
MAXAPIERRORS PACKAGE
MAXAPIERRORS PACKAGE BODY
MAXAPIINSERT PACKAGE
MAXAPIINSERT PACKAGE BODY
MAXAPISET PACKAGE
MAXAPISET PACKAGE BODY
Table 3: Schema objects common to both architectures (Continued)
Object name Object type
58 IBM Maximo Enterprise Adapter for Oracle Applications Installation Guide
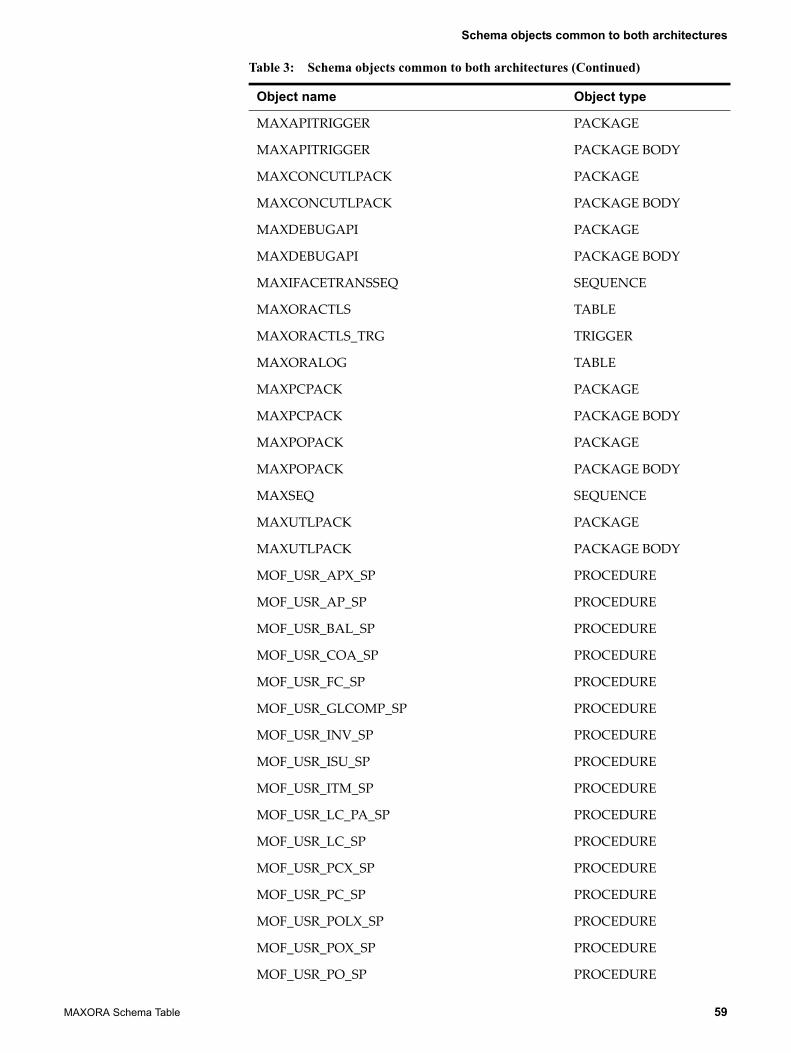
Schema objects common to both architectures
MAXAPITRIGGER PACKAGE
MAXAPITRIGGER PACKAGE BODY
MAXCONCUTLPACK PACKAGE
MAXCONCUTLPACK PACKAGE BODY
MAXDEBUGAPI PACKAGE
MAXDEBUGAPI PACKAGE BODY
MAXIFACETRANSSEQ SEQUENCE
MAXORACTLS TABLE
MAXORACTLS_TRG TRIGGER
MAXORALOG TABLE
MAXPCPACK PACKAGE
MAXPCPACK PACKAGE BODY
MAXPOPACK PACKAGE
MAXPOPACK PACKAGE BODY
MAXSEQ SEQUENCE
MAXUTLPACK PACKAGE
MAXUTLPACK PACKAGE BODY
MOF_USR_APX_SP PROCEDURE
MOF_USR_AP_SP PROCEDURE
MOF_USR_BAL_SP PROCEDURE
MOF_USR_COA_SP PROCEDURE
MOF_USR_FC_SP PROCEDURE
MOF_USR_GLCOMP_SP PROCEDURE
MOF_USR_INV_SP PROCEDURE
MOF_USR_ISU_SP PROCEDURE
MOF_USR_ITM_SP PROCEDURE
MOF_USR_LC_PA_SP PROCEDURE
MOF_USR_LC_SP PROCEDURE
MOF_USR_PCX_SP PROCEDURE
MOF_USR_PC_SP PROCEDURE
MOF_USR_POLX_SP PROCEDURE
MOF_USR_POX_SP PROCEDURE
MOF_USR_PO_SP PROCEDURE
Table 3: Schema objects common to both architectures (Continued)
Object name Object type
MAXORA Schema Table 59

Schema objects common to both architectures
MOF_USR_PR_SP PROCEDURE
MOF_USR_RCVROT_SP PROCEDURE
MOF_USR_RCV_SP PROCEDURE
MOF_USR_VNDCONT_SP PROCEDURE
MOF_USR_VND_SP PROCEDURE
MO_GLOBAL SYNONYM
MTL_CATEGORY_SET_VALID_CATS SYNONYM
MTL_DEFAULT_CATEGORY_SETS SYNONYM
MTL_DEFAULT_SETS_VIEW SYNONYM
MTL_DEMAND SYNONYM
MTL_ITEM_CATEGORIES SYNONYM
MTL_ITEM_LOCATIONS SYNONYM
MTL_MATERIAL_TRANSACTIONS SYNONYM
MTL_MATERIAL_TRANSACTIONS_S SYNONYM
MTL_ONHAND_QUANTITIES SYNONYM
MTL_PARAMETERS SYNONYM
MTL_PHYSICAL_ADJUSTMENTS SYNONYM
MTL_RESERVATIONS SYNONYM
MTL_RESERVATIONS_INTERFACE SYNONYM
MTL_RESERVATIONS_INTERFACE_S SYNONYM
MTL_SECONDARY_INVENTORIES SYNONYM
MTL_SERIAL_NUMBERS_INTERFACE SYNONYM
MTL_SYSTEM_ITEMS SYNONYM
MTL_SYSTEM_ITEMS_INTERFACE SYNONYM
MTL_SYSTEM_ITEMS_TL SYNONYM
MTL_TRANSACTION_ACCOUNTS SYNONYM
MTL_TRANSACTION_LOTS_INTERFACE SYNONYM
MTL_TRANSACTION_LOT_NUMBERS SYNONYM
MTL_TXN_SOURCE_TYPES SYNONYM
MTL_UNITS_OF_MEASURE SYNONYM
MTL_UNIT_TRANSACTIONS SYNONYM
MTL_UOM_CLASSES SYNONYM
MTL_UOM_CONVERSIONS SYNONYM
Table 3: Schema objects common to both architectures (Continued)
Object name Object type
60 IBM Maximo Enterprise Adapter for Oracle Applications Installation Guide
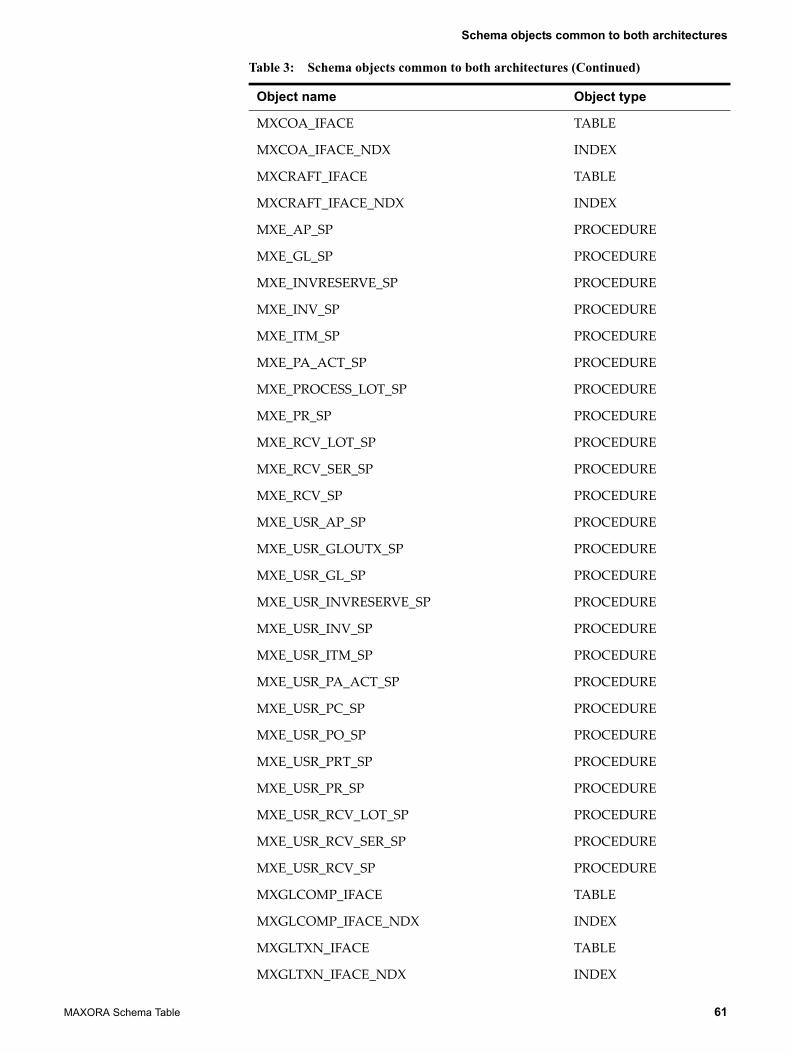
Schema objects common to both architectures
MXCOA_IFACE TABLE
MXCOA_IFACE_NDX INDEX
MXCRAFT_IFACE TABLE
MXCRAFT_IFACE_NDX INDEX
MXE_AP_SP PROCEDURE
MXE_GL_SP PROCEDURE
MXE_INVRESERVE_SP PROCEDURE
MXE_INV_SP PROCEDURE
MXE_ITM_SP PROCEDURE
MXE_PA_ACT_SP PROCEDURE
MXE_PROCESS_LOT_SP PROCEDURE
MXE_PR_SP PROCEDURE
MXE_RCV_LOT_SP PROCEDURE
MXE_RCV_SER_SP PROCEDURE
MXE_RCV_SP PROCEDURE
MXE_USR_AP_SP PROCEDURE
MXE_USR_GLOUTX_SP PROCEDURE
MXE_USR_GL_SP PROCEDURE
MXE_USR_INVRESERVE_SP PROCEDURE
MXE_USR_INV_SP PROCEDURE
MXE_USR_ITM_SP PROCEDURE
MXE_USR_PA_ACT_SP PROCEDURE
MXE_USR_PC_SP PROCEDURE
MXE_USR_PO_SP PROCEDURE
MXE_USR_PRT_SP PROCEDURE
MXE_USR_PR_SP PROCEDURE
MXE_USR_RCV_LOT_SP PROCEDURE
MXE_USR_RCV_SER_SP PROCEDURE
MXE_USR_RCV_SP PROCEDURE
MXGLCOMP_IFACE TABLE
MXGLCOMP_IFACE_NDX INDEX
MXGLTXN_IFACE TABLE
MXGLTXN_IFACE_NDX INDEX
Table 3: Schema objects common to both architectures (Continued)
Object name Object type
MAXORA Schema Table 61

Schema objects common to both architectures
MXGLTXN_IFACE_TRG TRIGGER
MXINVBAL_IFACE TABLE
MXINVBAL_IFACE_NDX INDEX
MXINVENTORY_IFACE TABLE
MXINVENTORY_IFACE_TRG TRIGGER
MXINVISSUE_IFACE TABLE
MXINVOICE_IFACE TABLE
MXINVOICE_IFACE_TRG TRIGGER
MXINVRES_IFACE TABLE
MXINVRES_IFACE_NDX INDEX
MXINVRES_IFACE_TRG TRIGGER
MXIN_INTER_TRANS TABLE
MXITEM_IFACE TABLE
MXITEM_IFACE_NDX INDEX
MXITEM_IFACE_TRG TRIGGER
MXI_USR_GLINX_SP PROCEDURE
MXLABOR_IFACE TABLE
MXLABOR_IFACE_NDX INDEX
MXOUT_INTER_NDX2 INDEX
MXOUT_INTER_TRANS TABLE
MXPC_IFACE TABLE
MXPC_IFACE_NDX INDEX
MXPC_IFACE_TRG TRIGGER
MXPO_IFACE TABLE
MXPO_IFACE_NDX INDEX
MXPO_IFACE_TRG TRIGGER
MXPROJTXN_IFACE TABLE
MXPROJTXN_IFACE_TRG TRIGGER
MXPROJ_IFACE TABLE
MXPROJ_IFACE_NDX INDEX
MXPR_IFACE TABLE
MXPR_IFACE_NDX INDEX
MXPR_IFACE_TRG TRIGGER
Table 3: Schema objects common to both architectures (Continued)
Object name Object type
62 IBM Maximo Enterprise Adapter for Oracle Applications Installation Guide
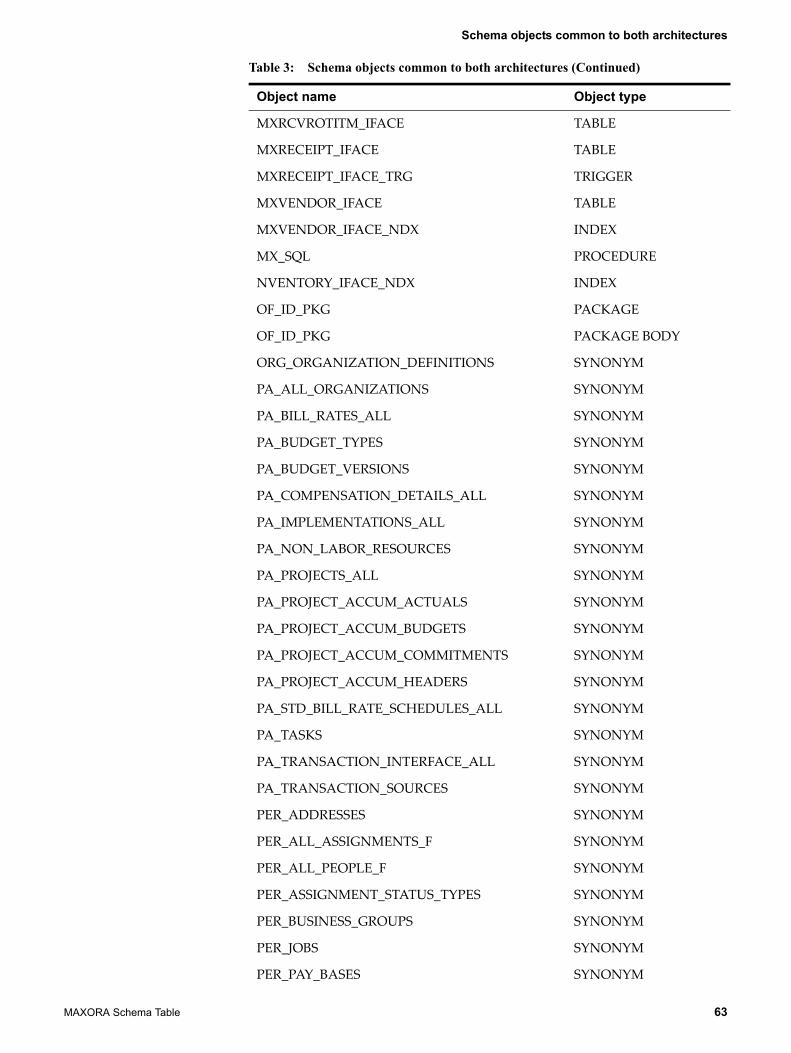
Schema objects common to both architectures
MXRCVROTITM_IFACE TABLE
MXRECEIPT_IFACE TABLE
MXRECEIPT_IFACE_TRG TRIGGER
MXVENDOR_IFACE TABLE
MXVENDOR_IFACE_NDX INDEX
MX_SQL PROCEDURE
NVENTORY_IFACE_NDX INDEX
OF_ID_PKG PACKAGE
OF_ID_PKG PACKAGE BODY
ORG_ORGANIZATION_DEFINITIONS SYNONYM
PA_ALL_ORGANIZATIONS SYNONYM
PA_BILL_RATES_ALL SYNONYM
PA_BUDGET_TYPES SYNONYM
PA_BUDGET_VERSIONS SYNONYM
PA_COMPENSATION_DETAILS_ALL SYNONYM
PA_IMPLEMENTATIONS_ALL SYNONYM
PA_NON_LABOR_RESOURCES SYNONYM
PA_PROJECTS_ALL SYNONYM
PA_PROJECT_ACCUM_ACTUALS SYNONYM
PA_PROJECT_ACCUM_BUDGETS SYNONYM
PA_PROJECT_ACCUM_COMMITMENTS SYNONYM
PA_PROJECT_ACCUM_HEADERS SYNONYM
PA_STD_BILL_RATE_SCHEDULES_ALL SYNONYM
PA_TASKS SYNONYM
PA_TRANSACTION_INTERFACE_ALL SYNONYM
PA_TRANSACTION_SOURCES SYNONYM
PER_ADDRESSES SYNONYM
PER_ALL_ASSIGNMENTS_F SYNONYM
PER_ALL_PEOPLE_F SYNONYM
PER_ASSIGNMENT_STATUS_TYPES SYNONYM
PER_BUSINESS_GROUPS SYNONYM
PER_JOBS SYNONYM
PER_PAY_BASES SYNONYM
Table 3: Schema objects common to both architectures (Continued)
Object name Object type
MAXORA Schema Table 63

Schema objects common to both architectures
PER_PAY_PROPOSALS SYNONYM
PO_ACTION_HISTORY SYNONYM
PO_AGENTS SYNONYM
PO_API_ERRORS_REC_TYPE SYNONYM
PO_CANCEL_IFACE TABLE
PO_CHANGE_API1_S SYNONYM
PO_DISTRIBUTIONS_ALL SYNONYM
PO_DISTRIBUTIONS_INTERFACE SYNONYM
PO_DISTRIBUTIONS_INTERFACE_S SYNONYM
PO_DISTRIBUTIONS_S SYNONYM
PO_DOCUMENT_CONTROL_PUB SYNONYM
PO_HAZARD_CLASSES SYNONYM
PO_HEADERS_ALL SYNONYM
PO_HEADERS_INTERFACE SYNONYM
PO_HEADERS_INTERFACE_S SYNONYM
PO_HEADERS_S SYNONYM
PO_LINES_ALL SYNONYM
PO_LINES_INTERFACE SYNONYM
PO_LINES_INTERFACE_S SYNONYM
PO_LINES_S SYNONYM
PO_LINE_LOCATIONS SYNONYM
PO_LINE_LOCATIONS_ALL SYNONYM
PO_LINE_LOCATIONS_S SYNONYM
PO_LINE_TYPES SYNONYM
PO_LOOKUP_CODES SYNONYM
PO_RELEASES_ALL SYNONYM
PO_RELEASES_S SYNONYM
PO_REQUISITIONS_INTERFACE_ALL SYNONYM
PO_REQUISITION_HEADERS_ALL SYNONYM
PO_REQUISITION_LINES_ALL SYNONYM
PO_REQ_DISTRIBUTIONS_ALL SYNONYM
PO_SYSTEM_PARAMETERS_ALL SYNONYM
PO_UNIQUE_IDENTIFIER_CONTROL SYNONYM
Table 3: Schema objects common to both architectures (Continued)
Object name Object type
64 IBM Maximo Enterprise Adapter for Oracle Applications Installation Guide
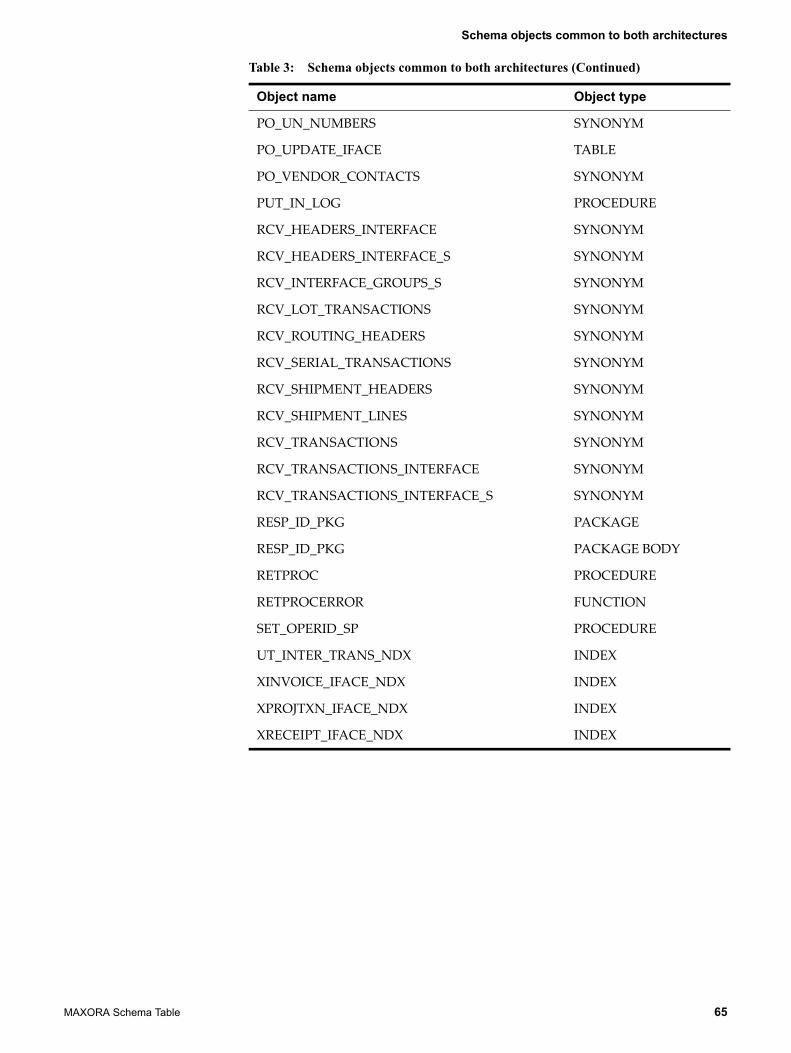
Schema objects common to both architectures
PO_UN_NUMBERS SYNONYM
PO_UPDATE_IFACE TABLE
PO_VENDOR_CONTACTS SYNONYM
PUT_IN_LOG PROCEDURE
RCV_HEADERS_INTERFACE SYNONYM
RCV_HEADERS_INTERFACE_S SYNONYM
RCV_INTERFACE_GROUPS_S SYNONYM
RCV_LOT_TRANSACTIONS SYNONYM
RCV_ROUTING_HEADERS SYNONYM
RCV_SERIAL_TRANSACTIONS SYNONYM
RCV_SHIPMENT_HEADERS SYNONYM
RCV_SHIPMENT_LINES SYNONYM
RCV_TRANSACTIONS SYNONYM
RCV_TRANSACTIONS_INTERFACE SYNONYM
RCV_TRANSACTIONS_INTERFACE_S SYNONYM
RESP_ID_PKG PACKAGE
RESP_ID_PKG PACKAGE BODY
RETPROC PROCEDURE
RETPROCERROR FUNCTION
SET_OPERID_SP PROCEDURE
UT_INTER_TRANS_NDX INDEX
XINVOICE_IFACE_NDX INDEX
XPROJTXN_IFACE_NDX INDEX
XRECEIPT_IFACE_NDX INDEX
Table 3: Schema objects common to both architectures (Continued)
Object name Object type
MAXORA Schema Table 65

Schema objects common to both architectures
66 IBM Maximo Enterprise Adapter for Oracle Applications Installation Guide
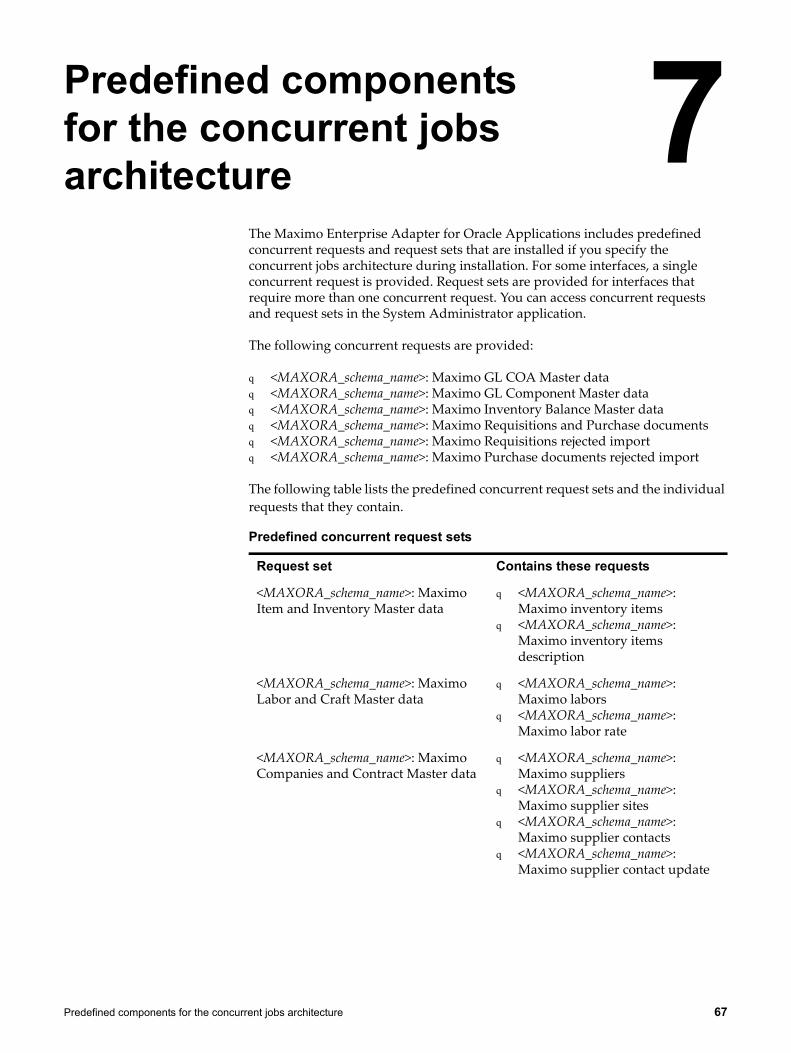
The Maximo Enterprise Adapter for Oracle Applications includes predefined concurrent requests and request sets that are installed if you specify the concurrent jobs architecture during installation. For some interfaces, a single concurrent request is provided. Request sets are provided for interfaces that require more than one concurrent request. You can access concurrent requests and request sets in the System Administrator application.
The following concurrent requests are provided:
q <MAXORA_schema_name>: Maximo GL COA Master dataq <MAXORA_schema_name>: Maximo GL Component Master dataq <MAXORA_schema_name>: Maximo Inventory Balance Master dataq <MAXORA_schema_name>: Maximo Requisitions and Purchase documentsq <MAXORA_schema_name>: Maximo Requisitions rejected importq <MAXORA_schema_name>: Maximo Purchase documents rejected import
The following table lists the predefined concurrent request sets and the individual requests that they contain.
Predefined components for the concurrent jobs architecture
7
Predefined concurrent request sets
Request set Contains these requests
<MAXORA_schema_name>: Maximo Item and Inventory Master data
q <MAXORA_schema_name>: Maximo inventory items
q <MAXORA_schema_name>: Maximo inventory items description
<MAXORA_schema_name>: Maximo Labor and Craft Master data
q <MAXORA_schema_name>: Maximo labors
q <MAXORA_schema_name>: Maximo labor rate
<MAXORA_schema_name>: Maximo Companies and Contract Master data
q <MAXORA_schema_name>: Maximo suppliers
q <MAXORA_schema_name>: Maximo supplier sites
q <MAXORA_schema_name>: Maximo supplier contacts
q <MAXORA_schema_name>: Maximo supplier contact update
Predefined components for the concurrent jobs architecture 67

<MAXORA_schema_name>: Maximo Requisitions and Purchase documents
q <MAXORA_schema_name>: Maximo purchase documents approvals and status changes
q <MAXORA_schema_name>: Maximo purchase documents require reapproval
q <MAXORA_schema_name>: Maximo release purchase orders require reapproval
q <MAXORA_schema_name>: Maximo purchase lines cancellations and close
<MAXORA_schema_name>: Maximo Receipts, Returns and Corrections
q <MAXORA_schema_name>: Maximo receipt concurrent
q <MAXORA_schema_name>: Maximo receiving lot concurrent
q <MAXORA_schema_name>: Maximo purchase lines cancellations and close
<MAXORA_schema_name>: Maximo Invoices and Payments
q <MAXORA_schema_name>: Maximo Invoice approval concurrent
q <MAXORA_schema_name>: Maximo Invoice payment concurrent
Predefined concurrent request sets (Continued)
68 IBM Maximo Enterprise Adapter for Oracle Applications Installation Guide

Predefined components for the concurrent jobs architecture 69

70 IBM Maximo Enterprise Adapter for Oracle Applications Installation Guide

When you setup and configure the Oracle Applications E-Business Suite for Maximo Asset Management integration, you must create and configure the ship to locations, general ledger accounts, and accounts payable capabilities. You can use general ledger accounts to import journals from Maximo Asset Management. You also can use the accounts payable capabilities to import invoices from Maximo Asset Management.
For procedures, you must enter the key value in both the general ledger accounts and accounts payable fields.
If you intend to run concurrent jobs to a predefined schedule, you must define these schedules. This task applies to the concurrent jobs that are used for processing transactions from Maximo Asset Management to Oracle Applications as well as the concurrent jobs used for sending transactions to Maximo Asset Management if you are using the concurrent jobs architecture.
Oracle Applications E-Business Suite Configuration
8
Oracle Applications E-Business Suite Configuration 71
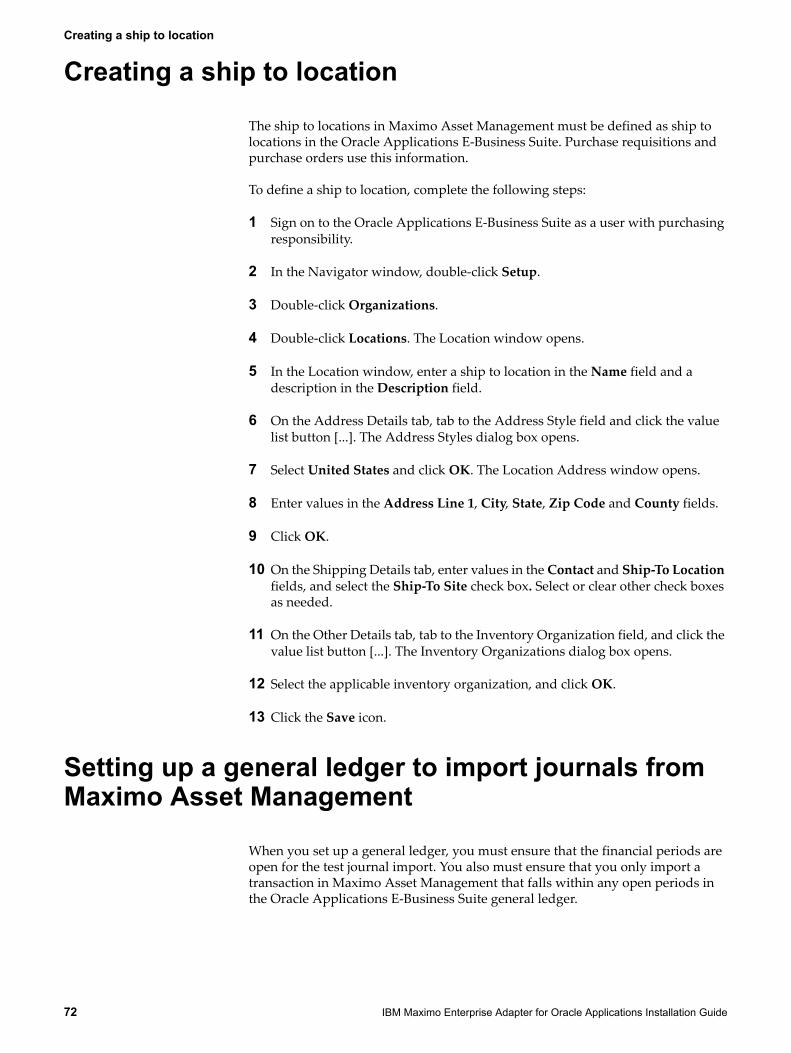
Creating a ship to location
The ship to locations in Maximo Asset Management must be defined as ship to locations in the Oracle Applications E-Business Suite. Purchase requisitions and purchase orders use this information.
To define a ship to location, complete the following steps:
1 Sign on to the Oracle Applications E-Business Suite as a user with purchasing responsibility.
2 In the Navigator window, double-click Setup.
3 Double-click Organizations.
4 Double-click Locations. The Location window opens.
5 In the Location window, enter a ship to location in the Name field and a description in the Description field.
6 On the Address Details tab, tab to the Address Style field and click the value list button [...]. The Address Styles dialog box opens.
7 Select United States and click OK. The Location Address window opens.
8 Enter values in the Address Line 1, City, State, Zip Code and County fields.
9 Click OK.
10 On the Shipping Details tab, enter values in the Contact and Ship-To Location fields, and select the Ship-To Site check box. Select or clear other check boxes as needed.
11 On the Other Details tab, tab to the Inventory Organization field, and click the value list button [...]. The Inventory Organizations dialog box opens.
12 Select the applicable inventory organization, and click OK.
13 Click the Save icon.
Setting up a general ledger to import journals from Maximo Asset Management
When you set up a general ledger, you must ensure that the financial periods are open for the test journal import. You also must ensure that you only import a transaction in Maximo Asset Management that falls within any open periods in the Oracle Applications E-Business Suite general ledger.
Creating a ship to location
72 IBM Maximo Enterprise Adapter for Oracle Applications Installation Guide
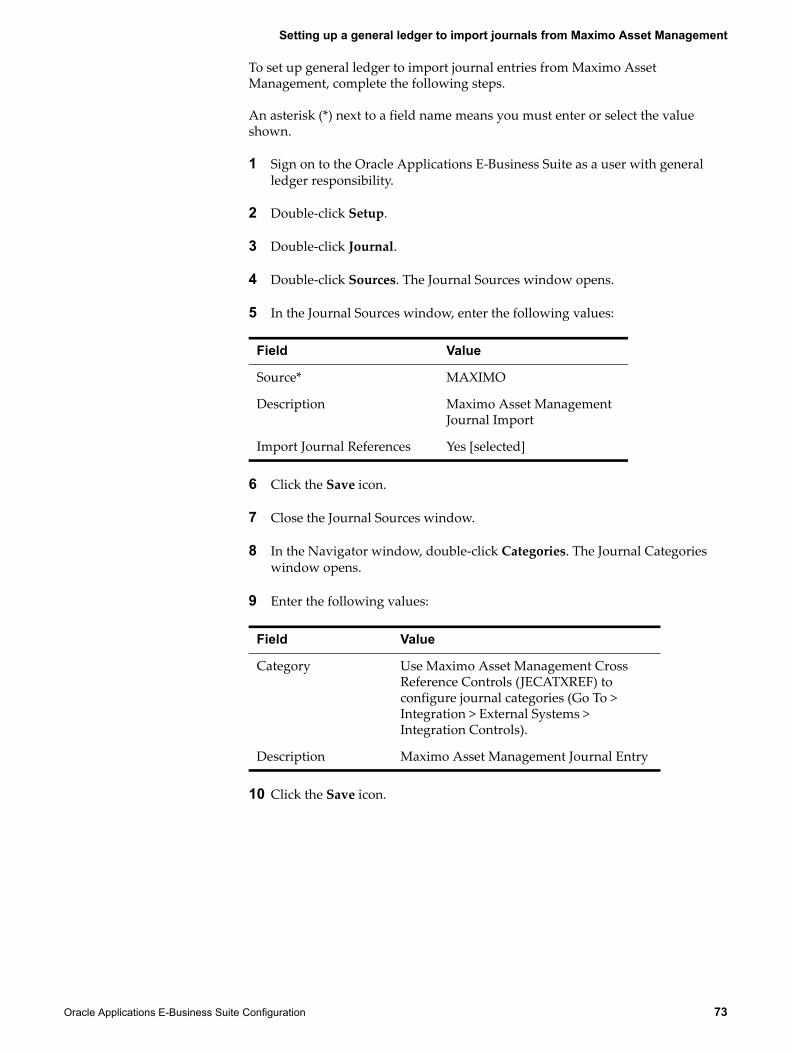
sset Management
To set up general ledger to import journal entries from Maximo Asset Management, complete the following steps.
An asterisk (*) next to a field name means you must enter or select the value shown.
1 Sign on to the Oracle Applications E-Business Suite as a user with general ledger responsibility.
2 Double-click Setup.
3 Double-click Journal.
4 Double-click Sources. The Journal Sources window opens.
5 In the Journal Sources window, enter the following values:
6 Click the Save icon.
7 Close the Journal Sources window.
8 In the Navigator window, double-click Categories. The Journal Categories window opens.
9 Enter the following values:
10 Click the Save icon.
Field Value
Source* MAXIMO
Description Maximo Asset Management Journal Import
Import Journal References Yes [selected]
Field Value
Category Use Maximo Asset Management Cross Reference Controls (JECATXREF) to configure journal categories (Go To > Integration > External Systems > Integration Controls).
Description Maximo Asset Management Journal Entry
Setting up a general ledger to import journals from Maximo A
Oracle Applications E-Business Suite Configuration 73
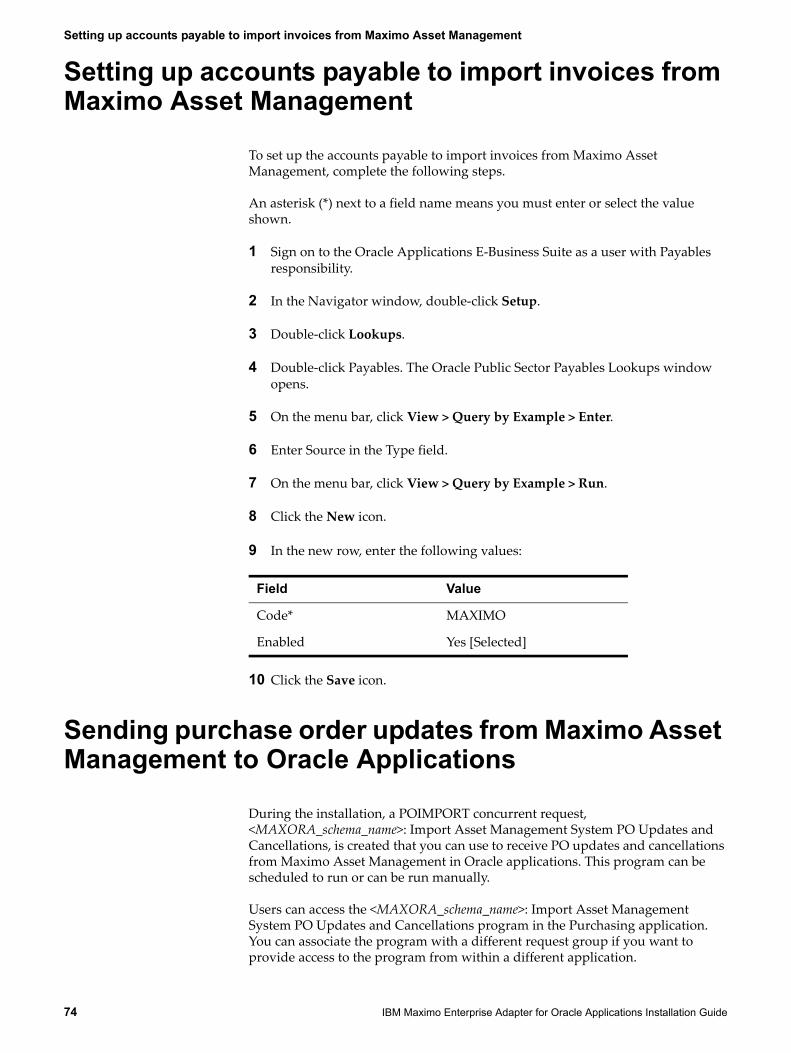
Setting up accounts payable to import invoices from Maximo Asset Management
Setting up accounts payable to import invoices from Maximo Asset Management
To set up the accounts payable to import invoices from Maximo Asset Management, complete the following steps.
An asterisk (*) next to a field name means you must enter or select the value shown.
1 Sign on to the Oracle Applications E-Business Suite as a user with Payables responsibility.
2 In the Navigator window, double-click Setup.
3 Double-click Lookups.
4 Double-click Payables. The Oracle Public Sector Payables Lookups window opens.
5 On the menu bar, click View > Query by Example > Enter.
6 Enter Source in the Type field.
7 On the menu bar, click View > Query by Example > Run.
8 Click the New icon.
9 In the new row, enter the following values:
10 Click the Save icon.
Sending purchase order updates from Maximo Asset Management to Oracle Applications
During the installation, a POIMPORT concurrent request, <MAXORA_schema_name>: Import Asset Management System PO Updates and Cancellations, is created that you can use to receive PO updates and cancellations from Maximo Asset Management in Oracle applications. This program can be scheduled to run or can be run manually.
Users can access the <MAXORA_schema_name>: Import Asset Management System PO Updates and Cancellations program in the Purchasing application. You can associate the program with a different request group if you want to provide access to the program from within a different application.
Field Value
Code* MAXIMO
Enabled Yes [Selected]
74 IBM Maximo Enterprise Adapter for Oracle Applications Installation Guide

Scheduling concurrent jobs to run
Concurrent Jobs Installed for Concurrent Architecture
Customers who are opting for Concurrent Architecture may schedule jobs to be executed based on a frequency and/or run manually. Refer to Schedule Concrrent Jobs Section below
Scheduling concurrent jobs to run
Oracle E-Business Suite uses concurrent jobs to process all transactions that are outbound from Maximo Asset Management into Oracle Applications. During installation, users choose if they want to use the concurrent jobs architecture to process transactions that are inbound to Maximo Asset Management from Oracle Applications.
For all concurrent jobs (inbound and outbound), you can define a schedule for these processes to execute, or the user can execute them manually, depending on your business requirements.
The following procedure schedules the import process to run for the <MAXORA_schema_name>: Import Asset Management System PO Updates and Cancellations concurrent job. To schedule other concurrent jobs, specify the appropriate responsibility in step 1 and change the name of the concurrent program that is specified in step 5.
Procedure
1 Select Responsibility > Purchasing.
2 Click OK.
3 Select Reports > Run.
4 Select the Single Request option and click OK.
5 Enter the name <MAXORA_schema_name>: Import Asset Management System PO Updates and Cancellations.
6 Optional: If you want to start importing the report for the current data, click Submit.
7 Optional: If you want the report to run on the background for a given time interval, for example, every 5 minutes:
a Click Schedule.
b Select Periodically and specify the start and end dates.
c Select Run Every 5 Minute(s) from the drop-down menu, or any other time interval appropriate to your implementation.
d Select the Save this Schedule check box.
e Click OK.
Oracle Applications E-Business Suite Configuration 75

Scheduling concurrent jobs to run
The request now runs every five minutes for the period established between the start and end dates. The request also imports all the purchase order updates from the interface tables.
For more information, see the Oracle EBS System Administrator.
76 IBM Maximo Enterprise Adapter for Oracle Applications Installation Guide

oo
When you install and configure the integration between Maximo Asset Management and Oracle Project Accounting (the Projects integration), you must be familiar with the installation prerequisites and the configuration activities.
ATTENTION You must completely install and configure the Maximo Enterprise Adapter for Oracle Applications before you install the Projects integration.
To complete these procedures, you need the following documentation:
q IBM Maximo Enterprise Adapter System Administrator Guide for Oracle Applications 12 Adapter
q The most recent Maximo Enterprise Adapter for Oracle Applications 12 patch release notes
Oracle Project Accounting Configurations
9
Oracle Project Accounting Configurations 77
Configuration Prerequisites
Configuration Prerequisites
Before you configure the Projects integration, you must define the following values. You might already have performed much of this configuration when you installed the Maximo Enterprise Adapter for Oracle Applications.
q Budget entry methodsq Budget typesq Expenditure categoriesq Expenditure typesq Labor and craft (as Oracle employees)q Non-labor resourcesq Project templatesq Project typesq Resource listsq Transaction sources
For information about these values, refer to your Oracle Applications E-Business Suite documentation.
Configuration Activities
Depending on the combination of processes that you perform (installing the Oracle Adapter, installing the Projects integration, installing patches, and applying manual updates), there may be some overlap in the required activities. If you encounter the same activity a second time, perform it a second time. Skipping a duplicate procedure might cause errors.
Configuring the Projects integration involves the activities shown in the following table. All the activities may not apply to you.
Table 1: Configuration tasks for integration with Oracle Projects
Configuration activity
[ ] Update database column lengths.
[ ] Enable new publish channels, enterprise services and integration event listener.
[ ] Configure the Projects-specific Maximo Asset Management integration controls.
[ ] Add fields to user interfaces.
[ ] Enable the financial control concurrent extract manager.
[ ] Provide access to the financial control concurrent extract manager.
[ ] Synchronize the Oracle employees and Maximo Asset Management labor codes.
78 IBM Maximo Enterprise Adapter for Oracle Applications Installation Guide

Configuration Activities
Update Database Column Lengths
Use the Maximo Asset Management Database Configuration application to resize the following columns in the Maximo Asset Management database tables.
Enable New Publish Channels, Enterprise Services, and the Integration Event Listener
The Projects integration adds the following enterprise service and publish channel:
q MXPROJ_FROA12q MXPROJTXN_TOOA12
The Projects integration also uses the MXGLTXN_OA12 publish channel.
To enable the new publish channels and enterprise services see the enabling publish channels and enterprise services information.
Configure Projects-specific Maximo Asset Management Integration Controls
The Projects integration uses the following Projects-specific Maximo Asset Management integration controls:
q CHARGEORGq EXPENDITEMq EXPENDLABORq EXPENDTOOLq FCSTATUSXREFq NLRORGq PROJAPq PROJPOq PROJPRq PROJSENDq RESLEVELITEMq RESLEVELLABORq RESLEVELTOOLq SRCTIMq SRCUSE
The Projects integration also uses the PROJPAY Oracle processing control to determine whether to extract cost rates from Oracle Human Resources (value 0) or Oracle Project Accounting (value 1). The default value of the control is 1 when the Projects integration is installed.
Table 2: Database tables to resize
Table Column Change type Size
CRAFT CRAFT ALN 240
CRAFT DESCRIPTION ALN 240
Oracle Project Accounting Configurations 79
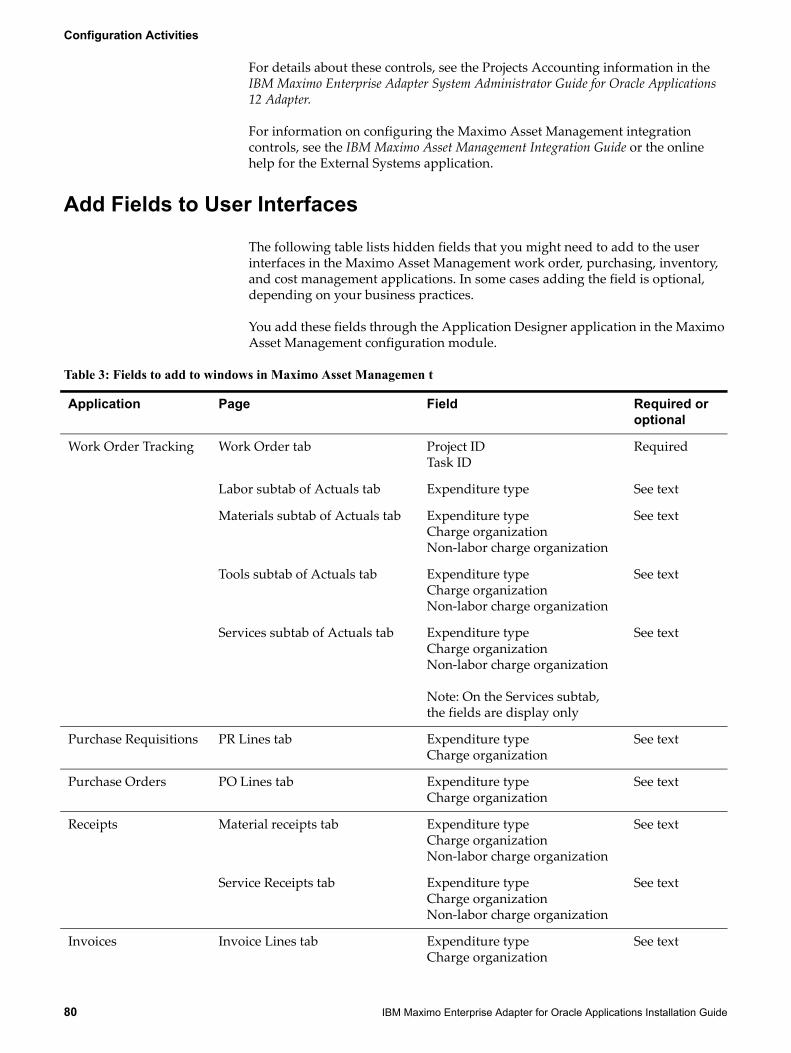
Configuration Activities
For details about these controls, see the Projects Accounting information in the IBM Maximo Enterprise Adapter System Administrator Guide for Oracle Applications 12 Adapter.
For information on configuring the Maximo Asset Management integration controls, see the IBM Maximo Asset Management Integration Guide or the online help for the External Systems application.
Add Fields to User Interfaces
The following table lists hidden fields that you might need to add to the user interfaces in the Maximo Asset Management work order, purchasing, inventory, and cost management applications. In some cases adding the field is optional, depending on your business practices.
You add these fields through the Application Designer application in the Maximo Asset Management configuration module.
Table 3: Fields to add to windows in Maximo Asset Managemen t
Application Page Field Required or optional
Work Order Tracking Work Order tab Project IDTask ID
Required
Labor subtab of Actuals tab Expenditure type See text
Materials subtab of Actuals tab Expenditure typeCharge organizationNon-labor charge organization
See text
Tools subtab of Actuals tab Expenditure typeCharge organizationNon-labor charge organization
See text
Services subtab of Actuals tab Expenditure typeCharge organizationNon-labor charge organization
Note: On the Services subtab, the fields are display only
See text
Purchase Requisitions PR Lines tab Expenditure typeCharge organization
See text
Purchase Orders PO Lines tab Expenditure typeCharge organization
See text
Receipts Material receipts tab Expenditure typeCharge organizationNon-labor charge organization
See text
Service Receipts tab Expenditure typeCharge organizationNon-labor charge organization
See text
Invoices Invoice Lines tab Expenditure typeCharge organization
See text
80 IBM Maximo Enterprise Adapter for Oracle Applications Installation Guide
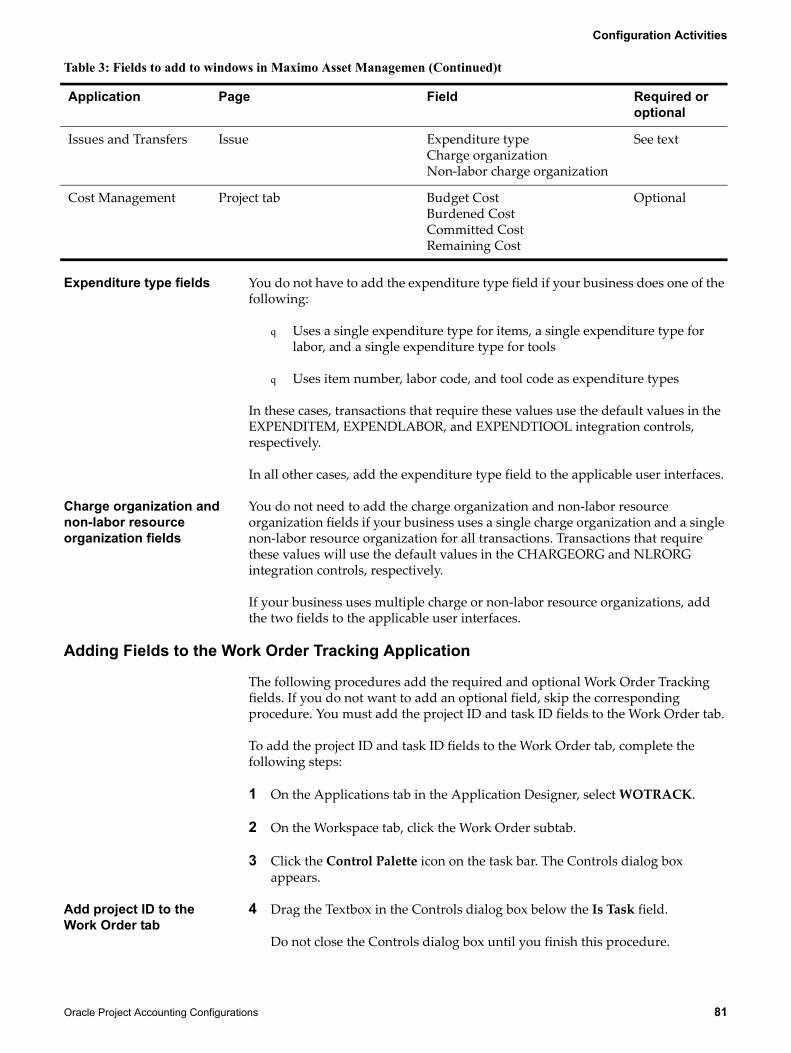
Configuration Activities
Expenditure type fields You do not have to add the expenditure type field if your business does one of the following:
q Uses a single expenditure type for items, a single expenditure type for labor, and a single expenditure type for tools
q Uses item number, labor code, and tool code as expenditure types
In these cases, transactions that require these values use the default values in the EXPENDITEM, EXPENDLABOR, and EXPENDTIOOL integration controls, respectively.
In all other cases, add the expenditure type field to the applicable user interfaces.
Charge organization and non-labor resource organization fields
You do not need to add the charge organization and non-labor resource organization fields if your business uses a single charge organization and a single non-labor resource organization for all transactions. Transactions that require these values will use the default values in the CHARGEORG and NLRORG integration controls, respectively.
If your business uses multiple charge or non-labor resource organizations, add the two fields to the applicable user interfaces.
Adding Fields to the Work Order Tracking Application
The following procedures add the required and optional Work Order Tracking fields. If you do not want to add an optional field, skip the corresponding procedure. You must add the project ID and task ID fields to the Work Order tab.
To add the project ID and task ID fields to the Work Order tab, complete the following steps:
1 On the Applications tab in the Application Designer, select WOTRACK.
2 On the Workspace tab, click the Work Order subtab.
3 Click the Control Palette icon on the task bar. The Controls dialog box appears.
Add project ID to the Work Order tab
4 Drag the Textbox in the Controls dialog box below the Is Task field.
Do not close the Controls dialog box until you finish this procedure.
Issues and Transfers Issue Expenditure typeCharge organizationNon-labor charge organization
See text
Cost Management Project tab Budget CostBurdened CostCommitted CostRemaining Cost
Optional
Table 3: Fields to add to windows in Maximo Asset Managemen (Continued)t
Application Page Field Required or optional
Oracle Project Accounting Configurations 81
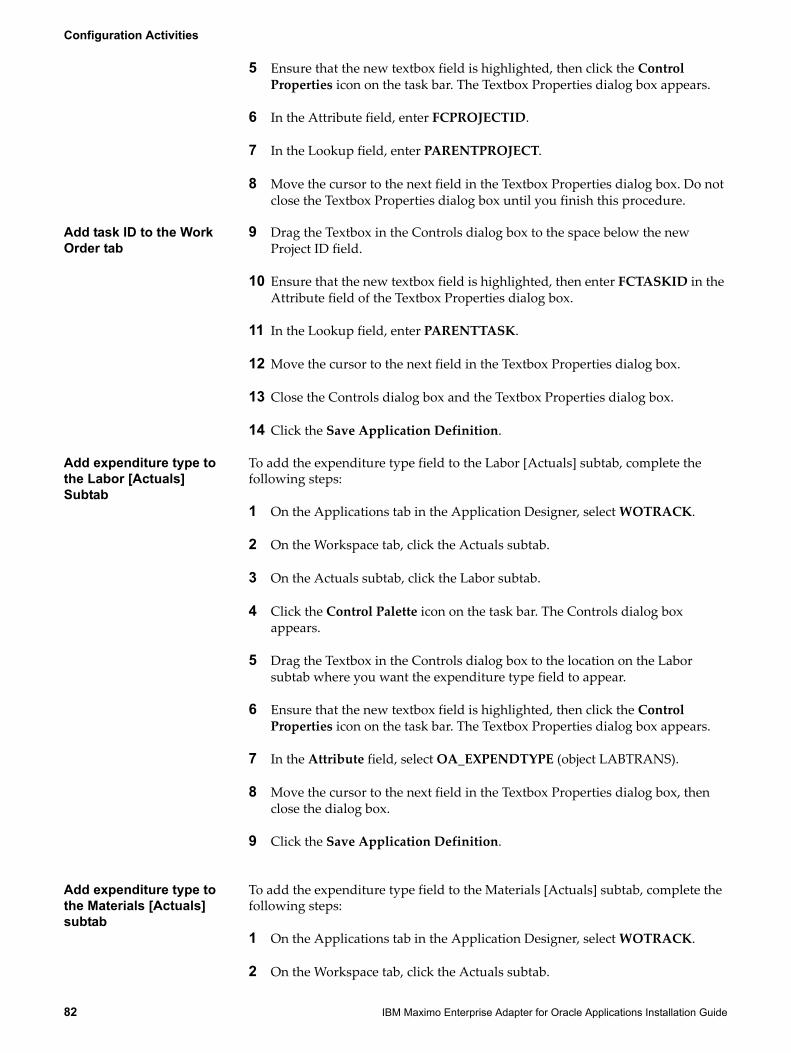
Configuration Activities
5 Ensure that the new textbox field is highlighted, then click the Control Properties icon on the task bar. The Textbox Properties dialog box appears.
6 In the Attribute field, enter FCPROJECTID.
7 In the Lookup field, enter PARENTPROJECT.
8 Move the cursor to the next field in the Textbox Properties dialog box. Do not close the Textbox Properties dialog box until you finish this procedure.
Add task ID to the Work Order tab
9 Drag the Textbox in the Controls dialog box to the space below the new Project ID field.
10 Ensure that the new textbox field is highlighted, then enter FCTASKID in the Attribute field of the Textbox Properties dialog box.
11 In the Lookup field, enter PARENTTASK.
12 Move the cursor to the next field in the Textbox Properties dialog box.
13 Close the Controls dialog box and the Textbox Properties dialog box.
14 Click the Save Application Definition.
Add expenditure type to the Labor [Actuals] Subtab
To add the expenditure type field to the Labor [Actuals] subtab, complete the following steps:
1 On the Applications tab in the Application Designer, select WOTRACK.
2 On the Workspace tab, click the Actuals subtab.
3 On the Actuals subtab, click the Labor subtab.
4 Click the Control Palette icon on the task bar. The Controls dialog box appears.
5 Drag the Textbox in the Controls dialog box to the location on the Labor subtab where you want the expenditure type field to appear.
6 Ensure that the new textbox field is highlighted, then click the Control Properties icon on the task bar. The Textbox Properties dialog box appears.
7 In the Attribute field, select OA_EXPENDTYPE (object LABTRANS).
8 Move the cursor to the next field in the Textbox Properties dialog box, then close the dialog box.
9 Click the Save Application Definition.
Add expenditure type to the Materials [Actuals] subtab
To add the expenditure type field to the Materials [Actuals] subtab, complete the following steps:
1 On the Applications tab in the Application Designer, select WOTRACK.
2 On the Workspace tab, click the Actuals subtab.
82 IBM Maximo Enterprise Adapter for Oracle Applications Installation Guide

Configuration Activities
3 On the Actuals subtab, click the Materials subtab.
4 Click the Control Palette icon on the task bar. The Controls dialog box appears.
5 Drag the Textbox in the Controls dialog box to the location on the Materials subtab where you want the expenditure type field to appear.
6 Ensure that the new textbox field is highlighted, then click the Control Properties icon on the task bar. The Textbox Properties dialog box appears.
7 In the Attribute field, select OA_EXPENDTYPE (object MATUSETRANS).
8 Move the cursor to the next field in Textbox Properties dialog box, then close the dialog box.
9 Click the Save Application Definition.
Add charge organization to the Materials [Actuals] subtab
To add the charge organization field to the Materials [Actuals] subtab, complete the following steps:
1 On the Applications tab in the Application Designer, select WOTRACK.
2 On the Workspace tab, click the Actuals subtab.
3 On the Actuals subtab, click the Materials subtab.
4 Click the Control Palette icon on the task bar. The Controls dialog box appears.
5 Drag the Textbox in the Controls dialog box to the location on the Materials subtab where you want the charge organization field to appear.
6 Ensure that the new textbox field is highlighted, then click the Control Properties icon on the task bar. The Textbox Properties dialog box appears.
7 In the Attribute field, select OA_CHARGE_ORG (object MATUSETRANS).
8 Move the cursor to the next field in Textbox Properties dialog box, then close the dialog box.
9 Click the Save Application Definition.
Oracle Project Accounting Configurations 83

Configuration Activities
Add non-labor resource organization to the Materials [Actuals] subtab
To add the non-labor resource organization field to the Materials [Actuals] subtab, complete the following steps:
1 On the Applications tab in the Application Designer, select WOTRACK.
2 On the Workspace tab, click the Actuals subtab.
3 On the Actuals subtab, click the Materials subtab.
4 Click the Control Palette icon on the task bar. The Controls dialog box appears.
5 Drag the Textbox in the Controls dialog box to the location on the Materials subtab where you want the non-labor resource organization field to appear.
6 Ensure that the new textbox field is highlighted, then click the Control Properties icon on the task bar. The Textbox Properties dialog box appears.
7 In the Attribute field, select OA_NLR_ORG (object MATUSETRANS).
8 Move the cursor to the next field in Textbox Properties dialog box, then close the dialog box.
9 Click the Save Application Definition.
Add expenditure type to the Services [Actuals] subtab
To add the expenditure type field to the Services [Actuals] subtab, complete the following steps:
1 On the Applications tab in the Application Designer, select WOTRACK.
2 On the Workspace tab, click the Actuals subtab.
3 On the Actuals subtab, click the Services subtab.
4 Click the Control Palette icon on the task bar. The Controls dialog box appears.
5 Drag the Textbox in the Controls dialog box to the location on the Services subtab where you want the expenditure type field to appear.
6 Ensure that the new textbox field is highlighted, then click the Control Properties icon on the task bar. The Textbox Properties dialog box appears.
7 In the Attribute field, select OA_EXPENDTYPE (object SERVRECTRANS).
8 Move the cursor to the next field in Textbox Properties dialog box, then close the dialog box.
9 Click the Save Application Definition.
84 IBM Maximo Enterprise Adapter for Oracle Applications Installation Guide

Configuration Activities
Add charge organization to the Service [Actuals] subtab
To add the charge organization field to the Services [Actuals] subtab, complete the following steps:
1 On the Applications tab in the Application Designer, select WOTRACK.
2 On the Workspace tab, click the Actuals subtab.
3 On the Actuals subtab, click the Services subtab.
4 Click the Control Palette icon on the task bar. The Controls dialog box appears.
5 Drag the Textbox in the Controls dialog box to the location on the Services subtab where you want the charge organization field to appear.
6 Ensure that the new textbox field is highlighted, then click the Control Properties icon on the task bar. The Textbox Properties dialog box appears.
7 In the Attribute field, select OA_CHARGE_ORG (object SERVRECTRANS).
8 Move the cursor to the next field in Textbox Properties dialog box, then close the dialog box.
9 Click the Save Application Definition.
Add non-labor resource organization to the Services [Actuals] subtab
To add the non-labor resource organization field to the Services [Actuals] subtab, complete the following steps:
1 On the Applications tab in the Application Designer, select WOTRACK.
2 On the Workspace tab, click the Actuals subtab.
3 On the Actuals subtab, click the Services subtab.
4 Click the Control Palette icon on the task bar. The Controls dialog box appears.
5 Drag the Textbox in the Controls dialog box to the location on the Services subtab where you want the non-labor resource organization field to appear.
6 Ensure that the new textbox field is highlighted, then click the Control Properties icon on the task bar. The Textbox Properties dialog box appears.
7 In the Attribute field, select OA_NLR_ORG (object SERVRECTRANS).
8 Move the cursor to the next field in Textbox Properties dialog box, then close the dialog box.
9 Click the Save Application Definition.
Oracle Project Accounting Configurations 85
Configuration Activities
Add expenditure type to the Tools [Actuals] subtab
To add the expenditure type field to the Tools [Actuals] subtab, complete the following steps:
1 On the Applications tab in the Application Designer, select WOTRACK.
2 On the Workspace tab, click the Actuals subtab.
3 On the Actuals subtab, click the Tools subtab.
4 Click the Control Palette icon on the task bar. The Controls dialog box appears.
5 Drag the Textbox in the Controls dialog box to the location on the Tools subtab where you want the expenditure type field to appear.
6 Ensure that the new textbox field is highlighted, then click the Control Properties icon on the task bar. The Textbox Properties dialog box appears.
7 In the Attribute field, select OA_EXPENDTYPE (object TOOLTRANS).
8 Move the cursor to the next field in Textbox Properties dialog box, then close the dialog box.
9 Click the Save Application Definition.
Add charge organization to the Tools [Actuals] subtab
To add the charge organization field to the Tools [Actuals] subtab, complete the following steps:
1 On the Applications tab in the Application Designer, select WOTRACK.
2 On the Workspace tab, click the Actuals subtab.
3 On the Actuals subtab, click the Tools subtab.
4 Click the Control Palette icon on the task bar. The Controls dialog box appears.
5 Drag the Textbox in the Controls dialog box to the location on the Tools subtab where you want the charge organization field to appear.
6 Ensure that the new textbox field is highlighted, then click the Control Properties icon on the task bar. The Textbox Properties dialog box appears.
7 In the Attribute field, select OA_CHARGE_ORG (object TOOLTRANS).
8 Move the cursor to the next field in Textbox Properties dialog box, then close the dialog box.
9 Click the Save Application Definition.
86 IBM Maximo Enterprise Adapter for Oracle Applications Installation Guide
Configuration Activities
Add non-labor resource organization to the Tools [Actuals] subtab
To add the non-labor resource organization field to the Tools [Actuals] subtab, complete the following steps:
1 On the Applications tab in the Application Designer, select WOTRACK.
2 On the Workspace tab, click the Actuals subtab.
3 On the Actuals subtab, click the Tools subtab.
4 Click the Control Palette icon on the task bar. The Controls dialog box appears.
5 Drag the Textbox in the Controls dialog box to the location on the Tools subtab where you want the non-labor resource organization field to appear.
6 Ensure that the new textbox field is highlighted, then click the Control Properties icon on the task bar. The Textbox Properties dialog box appears.
7 In the Attribute field, select OA_NLR_ORG (object TOOLTRANS).
8 Move the cursor to the next field in Textbox Properties dialog box, then close the dialog box.
9 Click the Save Application Definition.
Adding Fields to Purchase Requisition Application
The following procedures add the optional purchase requisition fields. If you do not want to add a field, skip the corresponding procedure.
Add expenditure type to the PR Lines tab
To add the expenditure type field to the purchase requisition (PR) application, complete the following steps:
1 On the Applications tab in the Application Designer, select PR.
2 On the Workspace tab, click the PR Lines subtab.
3 Click the Control Palette icon on the task bar. The Controls dialog box appears.
4 Drag the Textbox in the Controls dialog box to the location where you want the expenditure type field to appear.
5 Ensure that the new textbox field is highlighted, then click the Control Properties icon on the task bar. The Textbox Properties dialog box appears.
6 In the Attribute field, select OA_EXPENDTYPE (object PRLINE)
7 Move the cursor to the next field in Textbox Properties dialog box, then close the dialog box.
8 Click the Save Application Definition.
Oracle Project Accounting Configurations 87
Configuration Activities
Add charge organization to the PR Lines tab
To add the charge organization field to the purchase requisition (PR) application, complete the following steps:
1 On the Applications tab in the Application Designer, select PR.
2 On the Workspace tab, click the PR Lines subtab.
3 Click the Control Palette icon on the task bar. The Controls dialog box appears.
4 Drag the Textbox in the Controls dialog box to the location where you want the charge organization field to appear.
5 Ensure that the new textbox field is highlighted, then click the Control Properties icon on the task bar. The Textbox Properties dialog box appears.
6 In the Attribute field, select OA_CHARGE_ORG (object PRLINE).
7 Move the cursor to the next field in Textbox Properties dialog box, then close the dialog box.
8 Click the Save Application Definition.
Adding Fields to the Purchase Order Application
The following procedures add the optional purchase order fields. If you do not want to add a field, skip the corresponding procedure.
Add expenditure type to the PO Lines tab
To add the expenditure type field to the purchase order (PO) application, complete the following steps:
1 On the Applications tab in the Application Designer, select PO.
2 On the Workspace tab, click the PO Lines subtab.
3 Click the Control Palette icon on the task bar. The Controls dialog box appears.
4 Drag the Textbox in the Controls dialog box to the location where you want the expenditure type field to appear.
5 Ensure that the new textbox field is highlighted, then click the Control Properties icon on the task bar. The Textbox Properties dialog box appears.
6 In the Attribute field, select OA_EXPENDTYPE (object POLINE).
7 Move the cursor to the next field in Textbox Properties dialog box, then close the dialog box.
8 Click the Save Application Definition.
88 IBM Maximo Enterprise Adapter for Oracle Applications Installation Guide
Configuration Activities
Add charge organization to the PO Lines tab
To add the charge organization field to the purchase order (PO) application, complete the following steps:
1 On the Applications tab in the Application Designer, select PO.
2 On the Workspace tab, click the PO Lines subtab.
3 Click the Control Palette icon on the task bar. The Controls dialog box appears.
4 Drag the Textbox in the Controls dialog box to the location where you want the charge organization field to appear.
5 Ensure that the new textbox field is highlighted, then click the Control Properties icon on the task bar. The Textbox Properties dialog box appears.
6 In the Attribute field, select OA_CHARGE_ORG (object POLINE).
7 Move the cursor to the next field in Textbox Properties dialog box, then close the dialog box.
8 Click the Save Application Definition.
Adding Fields to the Invoice Application
The following procedures add the optional invoice fields. If you do not want to add a field, skip the corresponding procedure.
Add expenditure type to the Invoice Lines tab
To add the expenditure type field to the Invoice application, complete the following steps:
1 On the Applications tab in the Application Designer, select INVOICE.
2 On the Workspace tab, click the Invoice Lines subtab.
3 Click the Control Palette icon on the task bar. The Controls dialog box appears.
4 Drag the Textbox in the Controls dialog box to the location where you want the expenditure type field to appear.
5 Ensure that the new textbox field is highlighted, then click the Control Properties icon on the task bar. The Textbox Properties dialog box appears.
6 In the Attribute field, select OA_EXPENDTYPE (object INVOICELINE)
7 Move the cursor to the next field in Textbox Properties dialog box, then close the dialog box.
8 Click the Save Application Definition.
Oracle Project Accounting Configurations 89
Configuration Activities
Add charge organization to the Invoice Lines tab
To add the charge organization field to the Invoice application, complete the following steps:
1 On the Applications tab in the Application Designer, select INVOICE.
2 On the Workspace tab, click the Invoice Lines subtab.
3 Click the Control Palette icon on the task bar. The Controls dialog box appears.
4 Drag the Textbox in the Controls dialog box to the location where you want the charge organization field to appear.
5 Ensure that the new textbox field is highlighted, then click the Control Properties icon on the task bar. The Textbox Properties dialog box appears.
6 In the Attribute field, select OA_CHARGE_ORG (object INVOICELINE).
7 Move the cursor to the next field in Textbox Properties dialog box, then close the dialog box.
8 Click the Save Application Definition.
Adding Fields to the Receipts Application
The following procedures add the optional receipts fields. If you do not want to add a field, skip the corresponding procedure.
Add expenditure type to the Material Receipts tab
To add the expenditure type field to the Material Receipts tab, complete the following steps:
1 On the Applications tab in the Application Designer, select RECEIPTS.
2 On the Workspace tab, click the Material Receipts subtab.
3 Click the Control Palette icon on the task bar. The Controls dialog box appears.
4 Drag the Textbox in the Controls dialog box to the location where you want the expenditure type field to appear.
5 Ensure that the new textbox field is highlighted, then click the Control Properties icon on the task bar. The Textbox Properties dialog box appears.
6 In the Attribute field, select OA_EXPENDTYPE (object MATRECTRANS).
7 Move the cursor to the next field in Textbox Properties dialog box, then close the dialog box.
8 Click the Save Application Definition.
90 IBM Maximo Enterprise Adapter for Oracle Applications Installation Guide
Configuration Activities
Add charge organization to the Material Receipts tab
To add the charge organization field to the Material Receipts tab, complete the following steps:
1 On the Applications tab in the Application Designer, select RECEIPTS.
2 On the Workspace tab, click the Material Receipts subtab.
3 Click the Control Palette icon on the task bar. The Controls dialog box appears.
4 Drag the Textbox in the Controls dialog box to the location where you want the charge organization field to appear.
5 Ensure that the new textbox field is highlighted, then click the Control Properties icon on the task bar. The Textbox Properties dialog box appears.
6 In the Attribute field, select OA_CHARGE_ORG (object MATRECTRANS).
7 Move the cursor to the next field in Textbox Properties dialog box, then close the dialog box.
8 Click the Save Application Definition.
Add non-labor resource organization to the Material Receipts tab
To add the non-labor resource organization field to the Material Receipts tab, complete the following steps:
1 On the Applications tab in the Application Designer, select RECEIPTS.
2 On the Workspace tab, click the Material Receipts subtab.
3 Click the Control Palette icon on the task bar. The Controls dialog box appears.
4 Drag the Textbox in the Controls dialog box to the location where you want the non-labor resource organization field to appear.
5 Ensure that the new textbox field is highlighted, then click the Control Properties icon on the task bar. The Textbox Properties dialog box appears.
6 In the Attribute field, select OA_NLR_ORG (object MATRECTRANS).
7 Move the cursor to the next field in Textbox Properties dialog box, then close the dialog box.
8 Click the Save Application Definition.
Add expenditure type to the Service Receipts tab
To add the expenditure type field to the Service receipts tab, complete the following steps:
1 On the Applications tab in the Application Designer, select RECEIPTS.
2 On the Workspace tab, click the Service receipts subtab.
Oracle Project Accounting Configurations 91
Configuration Activities
3 Click the Control Palette icon on the task bar. The Controls dialog box appears.
4 Drag the Textbox in the Controls dialog box to the location on where you want the expenditure type field to appear.
5 Ensure that the new textbox field is highlighted, then click the Control Properties icon on the task bar. The Textbox Properties dialog box appears.
6 In the Attribute field, select OA_EXPENDTYPE (object SERVRECTRANS).
7 Move the cursor to the next field in Textbox Properties dialog box, then close the dialog box.
8 Click the Save Application Definition.
Add charge organization to the Service Receipts tab
To add the charge organization field to the Service Receipts tab, complete the following steps:
1 On the Applications tab in the Application Designer, select RECEIPTS.
2 On the Workspace tab, click the Service Receipts subtab.
3 Click the Control Palette icon on the task bar. The Controls dialog box appears.
4 Drag the Textbox in the Controls dialog box to the location where you want the charge organization field to appear.
5 Ensure that the new textbox field is highlighted, then click the Control Properties icon on the task bar. The Textbox Properties dialog box appears.
6 In the Attribute field, select OA_CHARGE_ORG (object SERVRECTRANS).
7 Move the cursor to the next field in Textbox Properties dialog box, then close the dialog box.
8 Click the Save Application Definition.
Add non-labor resource organization to the Service Receipts tab
To add the non-labor resource organization field to the Service Receipts tab, complete the following steps:
1 On the Applications tab in the Application Designer, select RECEIPTS.
2 On the Workspace tab, click the Service Receipts subtab.
3 Click the Control Palette icon on the task bar. The Controls dialog box appears.
4 Drag the Textbox in the Controls dialog box to the location where you want the non-labor resource organization field to appear.
5 Ensure that the new textbox field is highlighted, then click the Control Properties icon on the task bar. The Textbox Properties dialog box appears.
92 IBM Maximo Enterprise Adapter for Oracle Applications Installation Guide

Configuration Activities
6 In the Attribute field, select OA_NLR_ORG (object SERVRECTRANS).
7 Move the cursor to the next field in Textbox Properties dialog box, then close the dialog box.
8 Click the Save Application Definition.
Adding Fields to the Issues and Transfers Application
The following procedures add the optional issue fields. If you do not want to add a field, skip the corresponding procedure.
Add expenditure type to the Issue subtab
To add the expenditure type field to the Issue subtab, complete the following steps:
1 On the Applications tab in the Application Designer, select INVISSUE.
2 On the Workspace tab, click the Issue subtab.
3 Click the Control Palette icon on the task bar. The Controls dialog box appears.
4 Drag the Textbox in the Controls dialog box to the location on the Issue subtab where you want the expenditure type field to appear.
5 Ensure that the new textbox field is highlighted, then click the Control Properties icon on the task bar. The Textbox Properties dialog box appears.
6 In the Attribute field, select OA_EXPENDTYPE (object MATUSETRANS).
7 Move the cursor to the next field in Textbox Properties dialog box, then close the dialog box.
8 Click the Save Application Definition.
Add charge organization to the Issue subtab
To add the charge organization field to the Issue subtab, complete the following steps:
1 On the Applications tab in the Application Designer, select INVISSUE.
2 On the Workspace tab, click the Issue subtab.
3 Click the Control Palette icon on the task bar. The Controls dialog box appears.
4 Drag the Textbox in the Controls dialog box to the location on the Issue subtab where you want the charge organization field to appear.
5 Ensure that the new textbox field is highlighted, then click the Control Properties icon on the task bar. The Textbox Properties dialog box appears.
6 In the Attribute field, select OA_CHARGE_ORG (object MATUSETRANS).
Oracle Project Accounting Configurations 93
Configuration Activities
7 Move the cursor to the next field in Textbox Properties dialog box, then close the dialog box.
8 Click the Save Application Definition.
Add non-labor resource organization to the Issue subtab
To add the non-labor resource organization field to the Issue subtab, complete the following steps:
1 On the Applications tab in the Application Designer, select INVISSUE.
2 On the Workspace tab, click the Issue subtab.
3 Click the Control Palette icon on the task bar. The Controls dialog box appears.
4 Drag the Textbox in the Controls dialog box to the location on the Issue subtab where you want the non-labor resource organization field to appear.
5 Ensure that the new textbox field is highlighted, then click the Control Properties icon on the task bar. The Textbox Properties dialog box appears.
6 In the Attribute field, select OA_NLR_ORG (object MATUSETRANS).
7 Move the cursor to the next field in Textbox Properties dialog box, then close the dialog box.
8 Click the Save Application Definition.
Adding Fields to the Cost Management Application
You can add budget, burdened, committed, and remaining cost fields to the Cost Management application. These optional fields display the rolled-up project costs transferred from Oracle PA to Maximo Asset Management.
Add budget cost To add the budget cost field to the Cost Management (FINCNTRL) application, complete the following steps:
1 On the Applications tab in the Application Designer, select FINCNTRL.
2 On the Workspace tab, click the Project subtab.
3 Click the Control Palette icon on the task bar. The Controls dialog box appears.
4 Drag the Textbox in the Controls dialog box to the location where you want the budget cost field to appear.
5 Ensure that the new textbox field is highlighted, then click the Control Properties icon on the task bar. The Textbox Properties dialog box appears.
6 In the Attribute field, select BUDGETCOST (object FINCNTRL)
94 IBM Maximo Enterprise Adapter for Oracle Applications Installation Guide

Configuration Activities
7 Move the cursor to the next field in Textbox Properties dialog box, then close the dialog box.
8 Click the Save Application Definition.
Add burdened cost To add the burdened cost field to the Cost Management application, complete the following steps:
1 On the Applications tab in the Application Designer, select FINCNTRL.
2 On the Workspace tab, click the Project subtab.
3 Click the Control Palette icon on the task bar. The Controls dialog box appears.
4 Drag the Textbox in the Controls dialog box to the location where you want the burdened cost field to appear.
5 Ensure that the new textbox field is highlighted, then click the Control Properties icon on the task bar. The Textbox Properties dialog box appears.
6 In the Attribute field, select BURDENEDCOST (object FINCNTRL)
7 Move the cursor to the next field in Textbox Properties dialog box, then close the dialog box.
8 Click the Save Application Definition.
Add committed cost To add the committed cost field to the Cost Management application, complete the following steps:
1 On the Applications tab in the Application Designer, select FINCNTRL.
2 On the Workspace tab, click the Project subtab.
3 Click the Control Palette icon on the task bar. The Controls dialog box appears.
4 Drag the Textbox in the Controls dialog box to the location where you want the committed cost field to appear.
5 Ensure that the new textbox field is highlighted, then click the Control Properties icon on the task bar. The Textbox Properties dialog box appears.
6 In the Attribute field, select COMMITTEDCOST (object FINCNTRL)
7 Move the cursor to the next field in Textbox Properties dialog box, then close the dialog box.
8 Click the Save Application Definition.
Oracle Project Accounting Configurations 95

Configuration Activities
Add remaining cost To add the remaining cost field to the Cost Management application, complete the following steps:
1 On the Applications tab in the Application Designer, select FINCNTRL.
2 On the Workspace tab, click the Project subtab.
3 Click the Control Palette icon on the task bar. The Controls dialog box appears.
4 Drag the Textbox in the Controls dialog box to the location where you want the remaining cost field to appear.
5 Ensure that the new textbox field is highlighted, then click the Control Properties icon on the task bar. The Textbox Properties dialog box appears.
6 In the Attribute field, select REMAININGCOST (object FINCNTRL)
7 Move the cursor to the next field in Textbox Properties dialog box, then close the dialog box.
8 Click the Save Application Definition.
For more information about all listed fields, see the Projects Accounting information in the IBM Maximo Enterprise Adapter System Administrator Guide for Oracle Applications.
Predefined content for Oracle Project Accounting
During the installation, the <MAXORA_schema_name> PRC: Asset Management System Financial Control Update from Oracle concurrent extract manager is created that can initiate the transfer of project and task summary information from Oracle Project Accounting to the Cost Management application in Maximo Asset Management.
Users can access the <MAXORA_schema_name> PRC: Asset Management System Financial Control Update from Oracle program in the Projects application. You can associate the program with a different request group if you want to provide access to the program from within a different application.
Synchronize Oracle Employees and Maximo Asset Management Labor Codes
To synchronize the labor and craft to update Maximo Asset Management with cost rates from Oracle Project Accounting, see the synchronizing Oracle employees and Maximo Asset Management labor codes information.
96 IBM Maximo Enterprise Adapter for Oracle Applications Installation Guide

Index
A
accounts payable, configuring in Oracle to import invoices from asset management system 74
address codes, synchronizing with Oracle organizations 41APIN control 32APITRANS control 31asset management system
changing GL account formats 79
B
base currency 35
C
calendars, financial 35charge organization field 81chart of accounts, synchronizing Oracle and asset management
system 40checklist, Oracle Project Accounting installation 78COAIN control 32column lengths, changing, asset management system 79COMIN control 32concurrent jobs processing
description 2predefined components 67schema objects 53selecting 29
configdb.bat 23configuring
Oracle Adapter endpoint 9Oracle Adapter in Maxino Asset Management 9Oracle Adapter installation parameters 28Oracle Adapter integration controls 13Oracle Applications for integration with asset management
system 71Oracle-specific integration controls 35
conversion factorscoordinating 35defining in asset management system 47
coordinationconversion factors 35general ledger accounts 35tax rates 35user names 35
cost management hidden fields 94cron task
activating for interface table polling 36configuring 16
configuring message reprocessing 17message reprocessing description 2setting up schedule for interface table polling 16
currency codesdefining Oracle codes in asset management system 44synchronizing Oracle and asset management system 43
currency, base 35
D
database columns, resizing after installation 79database trigger processing
description 2schema objects 55selecting 29
duplicate processes 78
E
endpoint, configuring 9enterprise services
Oracle Project Accounting integration 79enterprise services, enabling for Oracle Project Accounting
integration 79environment variables
configuring processing type 29EXCEPTIONTOEXT control 31EXCEPTIONTOMAX control 32expenditure type 81EXTSYS control 32
F
financial calendars 35
G
general ledgeraccount coordination 35account format, changing, asset management system 79components, synchronizing 39configuring in Oracle to import journals from asset
management system 72
© Copyright IBM Corp. 2011 97

Index
structurechanging Maximo Asset Management to match Oracle 19
GLSOBID2 control 32
I
install.out 30installation
checking install.out for errors 30Oracle adapter in Windows 3
integration controlsconfiguring for the Oracle Adapter 13Oracle Project Accounting integration 79setting up 79setting up Oracle-specific values in asset management system
37interface tables
creating using the Maxino Asset Management integration 28enable polling with a cron task 36polling with a cron task 16
INVBALIN control 32invoice application hidden fields 89issue application hidden fields 93ISUIN control 32item balances
synchronizing in Oracle and asset management system 51transferring from Oracle to asset management system 51verifying in asset management system 52
ITEMIN control 32items, synchronizing Oracle and asset management system values 49ITMBALXFRIN control 32
L
labor codes, synchronizing with Oracle employees 41LCIN control 32LOGLEVEL control 32
M
mappingasset management system bill to company to Oracle
organization 42asset management system bill to contact to Oracle employee 42asset management system ship to company, employee to Oracle
location 42Oracle organizations and locations to asset management system
address codes 42MAXFCEXP. see financial control concurrent extract managerMaximo Asset Management
changing column lengths 79companies master set, inserting Oracle vendors 23companies, synchronizing with Oracle vendors 44company ID, updating with RBNI and suspense account 45creating interface tables in the Oracle database 28GL account format, reconfiguring to match Oracle 19how to configure the Oracle Adapter 9item status, active 24
synchronizing storeroom locations, Oracle organizations 46Maximo Asset Management, synchronizing data with Oracle 35MAXORACTLS controls
APIN 32APITRANS 31COAIN 32COMIN 32EXCEPTIONTOEXT 31EXCEPTIONTOMAX 32EXTSYS 32GLSOBID2 32integration control table in the Oracle database 31INVBALIN 32ISUIN 32ITEMIN 32ITMBALXFRIN 32LCIN 32LOGLEVEL 32MEAORAVER 32PCIN 32POIN 32PROJPAY 33, 79RCVIN 33, 34
MEAORAVER control 32measure, units of 35message reprocessing
configuring cron task 17
N
names, user, coordinating 35non-labor resource organization 81
O
OA12 external system 36Oracle adapter
checking for installation errors 30configuring in Maximo Asset Management 9installing in Windows 3name and location of PL/SQL files 26path to setofvar.sql configuration file 28setofvar.sql configuration file 28
Oracle Applicationsconfiguring for asset management system integration 71currency codes, generating with showcurr 43data, synchronizing with Maximo Asset Management 35item balances, transferring to asset management system 51locations, generating with showaddr 42order units
generating with showtax 48generating with showuom 47
organizations, generating with showaddr 42organizations, generating with showids 46setting up accounts payable to import invoices from asset
management system 74setting up general ledger to import journals from asset
management system 72vendors, adding to Maximo Asset Management companies
master set 23Oracle database
configuring the MAXORACTLS integration controls table 31
98 IBM Maximo Enterprise Adapter for Oracle Applications Installation Guide

Index
Oracle external system (OA12), enabling 36Oracle Project Accounting integration 77–96
checklist 78database column lengths 79enabling publish channels, enterprise services 79hidden fields 80integration controls 79integration event listener 79prerequisites 78publish channels, enterprise services 79user interfaces 80
ORACLEAPIS directory 26output file
generating showcats.out 37generating showmult.out 38
P
PCIN control 32PL/SQL files 26POIN control 32prerequisites
Oracle Project Accounting integration 78Projects integration. see Oracle Project Accounting integrationPROJPAY control 33, 79publish channels
Oracle Project Accounting integration 79publish channels, enabling for Oracle Project Accounting integration
79purchase order application hidden fields 88purchase requisition application hidden fields 87
R
RBNI, adding to Maximo Asset Management company ID 45RCVIN control 33, 34receipts applications hidden fields 90
S
schemaconcurrent jobs processing 53
schema objectsdatabase trigger processing 55
setofvar.sql 28setup, Oracle Applications for asset management system integration
71showaddr, generating a list of Oracle organizations and locations 42showcats.out file, generating 37showcurr, generating a list of Oracle currency codes 43showids, generating a list of Oracle organizations 46showmult.out file 38showtax, generating a list of Oracle tax codes 48showuom, generating a list of Oracle order units 47storeroom, creating in asset management system 46suspense account, adding to Maximo Asset Management company
ID 45synchronizing
Oracle and asset management system chart of accounts 40Oracle and asset management system currency codes 43Oracle and asset management system GL components 39Oracle and asset management system item balances 51Oracle and asset management system items 49Oracle and Maximo Asset Management data 35Oracle employees and asset management system labor codes
41, 96Oracle order units and asset management system units of
measure 47Oracle organizations and locations and asset management
system address codes 41Oracle organizations and Maximo Asset Management
storeroom locations 46Oracle vendors and Maximo Asset Management companies 23,
44
T
tax codesadding in asset management system 48defining in asset management system 48
tax rates, coordination 35
U
units of measure 35defining in asset management system 47synchronizing with Oracle order units 47
user interfacecharge organization field 81cost management application 94expenditure type field 81invoice application 89issue application 93non-labor resource organization field 81Oracle Project Accounting integration 80purchase order application 88purchase requisition application 87receipt applications 90work order tracking application 81
user names, coordinating 35
W
Windows, installing Oracle adapter 3work order tracking application hidden fields 81
99

Index
100 IBM Maximo Enterprise Adapter for Oracle Applications Installation Guide

Notices
This information was developed for products and services offered in the U.S.A.
IBM may not offer the products, services, or features discussed in this document in other countries. Consult your local IBM representative for information on the products and services currently available in your area. Any reference to an IBM product, program, or service is not intended to state or imply that only that IBM product, program, or service may be used. Any functionally equivalent product, program, or service that does not infringe any IBM intellectual property right may be used instead. However, it is the user's responsibility to evaluate and verify the operation of any non-IBM product, program, or service.
IBM may have patents or pending patent applications covering subject matter described in this document. The furnishing of this document does not grant you any license to these patents. You can send license inquiries, in writing, to:
IBM Director of LicensingIBM CorporationNorth Castle DriveArmonk, NY 10504-1785U.S.A.
For license inquiries regarding double-byte (DBCS) information, contact the IBM Intellectual Property Department in your country or send inquiries, in writing, to:
Intellectual Property LicensingLegal and Intellectual Property LawIBM Japan, Ltd.1623-14, Shimotsuruma, Yamato-shiKanagawa 242-8502 Japan
The following paragraph does not apply to the United Kingdom or any other country where such provisions are inconsistent with local law: INTERNATIONAL BUSINESS MACHINES CORPORATION PROVIDES THIS PUBLICATION "AS IS" WITHOUT WARRANTY OF ANY KIND, EITHER EXPRESS OR IMPLIED, INCLUDING, BUT NOT LIMITED TO, THE IMPLIED WARRANTIES OF NON-INFRINGEMENT, MERCHANTABILITY OR FITNESS FOR A PARTICULAR PURPOSE. Some states do not allow disclaimer of express or implied warranties in certain transactions, therefore, this statement may not apply to you.
This information could include technical inaccuracies or typographical errors. Changes are periodically made to the information herein; these changes will be incorporated in new editions of the publication. IBM may make improvements and/or changes in the product(s) and/or the program(s) described in this publication at any time without notice.
Any references in this information to non-IBM Web sites are provided for convenience only and do not in any manner serve as an endorsement of those Web sites. The materials at those Web sites are not part of the materials for this IBM product and use of those Web sites is at your own risk.
101
IBM may use or distribute any of the information you supply in any way it believes appropriate without incurring any obligation to you.
Licensees of this program who wish to have information about it for the purpose of enabling: (i) the exchange of information between independently created programs and other programs (including this one) and (ii) the mutual use of the information which has been exchanged, should contact:
IBM Corporation2Z4A/10111400 Burnet RoadAustin, TX 78758 U.S.A.
Such information may be available, subject to appropriate terms and conditions, including in some cases, payment of a fee.
The licensed program described in this document and all licensed material available for it are provided by IBM under terms of the IBM Customer Agreement, IBM International Program License Agreement or any equivalent agreement between us.
Information concerning non-IBM products was obtained from the suppliers of those products, their published announcements or other publicly available sources. IBM has not tested those products and cannot confirm the accuracy of performance, compatibility or any other claims related to non-IBM products. Questions on the capabilities of non-IBM products should be addressed to the suppliers of those products.
All statements regarding IBM's future direction or intent are subject to change or withdrawal without notice, and represent goals and objectives only.
This information contains examples of data and reports used in daily business operations. To illustrate them as completely as possible, the examples include the names of individuals, companies, brands, and products. All of these names are fictitious and any similarity to the names and addresses used by an actual business enterprise is entirely coincidental.
If you are viewing this information softcopy, the photographs and color illustrations may not appear.
COPYRIGHT LICENSE: This information contains sample application programs in source language, which illustrate programming techniques on various operating platforms. You may copy, modify, and distribute these sample programs in any form without payment to IBM, for the purposes of developing, using, marketing or distributing application programs conforming to the application programming interface for the operating platform for which the sample programs are written. These examples have not been thoroughly tested under all conditions. IBM, therefore, cannot guarantee or imply reliability, serviceability, or function of these programs. The sample programs are provided "AS IS", without warranty of any kind. IBM shall not be liable for any damages arising out of your use of the sample programs.
© Copyright IBM Corp. 2008, 2011. All rights reserved
102 IBM Maximo Enterprise Adapter for Oracle Applications Installation Guide

Trademarks
IBM, the IBM logo, and ibm.com are trademarks or registered trademarks of International Business Machines Corp., registered in many jurisdictions worldwide. Other product and service names might be trademarks of IBM or other companies. A current list of IBM trademarks is available on the Web at “Copyright and trademark information” at www.ibm.com/legal/copytrade.shtml.
Linux is a registered trademark of Linus Torvalds in the United States, other countries, or both.
Microsoft, Windows, Windows NT, and the Windows logo are trademarks of Microsoft Corporation in the United States, other countries, or both.
UNIX is a registered trademark of The Open Group in the United States and other countries.
Java and all Java-based trademarks and logos are trademarks or registered trademarks of Oracle and/or its affiliates.
Other product and service names might be trademarks of IBM or other companies.
103

104 IBM Maximo Enterprise Adapter for Oracle Applications Installation Guide