max's distinctive, impressive biztech student...
TRANSCRIPT

Max's Distinctive, Impressive BizTech Student Blog
S a t u r d a y , N o v e m b e r 1 2 , 2 0 1 6
How to be a Better Borg
So...even if you don’t remember back from my first posting, I’m sure you could tell by now. Love
classic movies. Terminator (the original) is a fave. Did you catch the character names in the Leadrecords last time?
Kyle Reese: “The terminator’s an infiltration unit. Part man. Part machine. Underneath it’s ahyper‐alloy combat chassis. Micro‐processor controlled. Fully armored. Very tough. But outside it’sliving human tissue—flesh, skin, hair, blood, grown for the cyborgs...”
Yep. Ahhh‐nold. Our beloved guv. A T‐800 (Model 101) cyborg, sent back in time from the post‐
apocalyptic future to kill Sarah Conner before she has a son (you guessed it), John, who would grow
up to lead the humans against the Cyberdyne cyborg army. Kyle gets sent back to protect her so she
can have John & he can save the world, etc.
No spoilers. Watch it for yourself. Thank me.
Ok, so maybe I’m ever so slightly borg‐obsessed. But you gotta admit—it’s pretty dang sweet having
a robot part of me to keep the human part’s backside covered. It’s smart. It’s fast. It never makes
a mistake—the cyborg‐me is so totally on top of this job now and I keep finding more & more stuff I
can do on the robo side, using SF.
Copyright © 2017 The Max Labs Project

Like remember last time? I’d set up the Leads object with automatic assignment rules so when Ityped in a new lead, SF automatically assigned it to Riley or me, based on our business rules.Cyborg‐me can’t mess that up anymore. Hah. And all this process automation stuff madelife so much easier, esp with the leads piling up fast.
But even the T‐800 (Model 101) could be upgraded. In Terminator 2 (Judgment Day), Ahhh‐noldcame back, reprogrammed as a good guy to protect John Conner from the T‐1000, a new cyborgmade from a “mimetic poly‐alloy” so it could liquefy, turn into whatever, & harden again. Cooleffect (for its day) but otherwise typical sequel, lacking the originality & dramatic tension of theoriginal. Still, it makes a point—even a cyborg has room for improvement. The cyborg‐me did too.
Kick it up a Notch: Human side(Oh, the humanity!)
To start, since my robot/SF side was automatically handling all the lead assignment & alerting, itleft me with more time to do the human‐side stuff better, eg. better prepping to have good callswith my leads. I even found some SF tools to help. Check this out.
So remember how last episode, Kyle Reese was a new lead. He got assigned to you and you senthim an email to introduce yourself.
So now, Kyle has emailed you back and said yes, he actually would like you to give him a call. Now,if you want to be smart about managing this relationship, maybe you should check the dude out abit before you connect in real time:
1. Click on your Leads tab and open Kyle Reese (if you don’t see him show up under RecentLeads, pull down the View menu & select All Open Leads to see the full list)
2. Scroll to the top of the Kyle Reese details page and click the YouTube icon under his name
3. In the popup window that appears, you should see a list of YouTube vids you can watch toget you up to speed on this guy before you call. Since Kyle Reese was a Terminatorcharacter, there’s a bunch to choose from (I recommend Greatest screen heroes ‐ KyleReese in The Terminator 8:10) “Hi, I see you’re handy with a shotgun...”
4. Go ahead & close out your YouTube popup when you’re done & if he was real, you couldcheck him out in LinkedIn, Twitter, Facebook and Klout, but you get the idea so on we go
5. Now, pretending you just called him, go back down to the bottom of the page, underActivity History, and click the Log a Call button to make a record of it
6. Under Description Information, in the Comments textbox, enter “Sounded like a nut case.Kept ranting about being from the future.” and click Save
7. Now you can see the call logged under Activity History (along with the completed email taskfrom last time)

So SF has social media baked in. Awesome. But turns out they also worked in this “social business”thing called “Chatter.” Prof says it’s like social media but inside your org. It’s like Facebook butjust between you and your co‐workers. Like, you can connect a discussion to any record, like a lead(like Kyle), do Likes, polls, etc. to get quick answers from your peeps:
8. Scroll up to the top of the Kyle Reese details page again
9. Just below the row of social media icons like LinkedIn, Twitter, etc. you should see a barwith an option to Hide Feed but don’t click it (or if it says Show Feed, DO click that)
10. Below that you’ll see Post and below that a textbox with Write something... grayed out
11. Click on Write something... and enter “This guy’s a weirdo. Says he came from the future towarn us about Cyberdine’s cyborgs”
12. Click the green Share button to post it to a Chatter feed for the Kyle Reese lead record
13. Now, to get help from you peeps (just Riley for now), find the More drop‐down, just abovethe Write something... textbox, to the right, & select Poll
14. Type over What would you like to ask? with “Should we pursue this guy any further?”
15. Below, in the Choice 1 textbox, enter “Yeah, he could be crazy but wealthy”
16. In the Choice 2 textbox enter “Nah, he’s creeping me out”
17. Click the green Share button

Now vote in the poll yourself:
18. See the poll appearing in the feed? Click the button for Nah, he’s creeping me out.
19. Then, click the Vote button & notice the bar chart showing 100% Nah... for now (w 1 vote)
Now, to see what it looks like to Riley, you’ll be logging out of your account and logging in as her.
Remember, last time you created her as a user with an email address you could check. When you
created her account, SF sent an email to that address with a link to activate the account and set
the password. But it may have been awhile since you did that, so do it again now to make sure:
20. Go to Setup > Administer > Manage Users > Users, find the row for Riley and note the
Username it shows for her b/c you’ll need it in a sec to login is as Riley
21. On the row for Riley, check the checkbox on the left & then click Reset Password(s) (above
or below) to make SF send another account activation email to “Riley’s” email address
22. When you see the popup window asking Reset passwords for these users? then click OK
23. Log out of SF (popup menu under your name) and close the window/tab it was in
24. Open the new email message (pretending to be Riley) & then click the link they gave you to
get back to your browser, set the new password & log in to her account
25. Now click on the sadly‐goofy raccoon/mascot icon at the top right to get a popup & then
click Switch to Salesforce Classic
Now, as Riley, you can engage in “social business” with your co‐worker (you) in a FB‐like way:
26. Click the Chatter tab & close whatever popups appear with Chatter intro vids, etc.
27. Click All Company under Feed on the leftside menu to see how Riley would see your two
posts about Kyle Reese. (The real Riley sees all my posts b/c she set her account
to Follow me, using People, below Feeds on the left. But don’t bother with that now.)
28. For your comment about him being a weirdo, click Like, just underneath
29. That should trigger an email to you, informing you Riley Liked your comment

30. For the poll, vote for Nah... and notice the bar chart showing 100% Nah... with two votesnow
31. Click the little blue Comment link just below the blue bar
32. In the Write a comment... textbox that opens up, enter “go ahead & bag him” and click theComment button, just below, on the right
And you got another email telling you Riley commented on your poll. SF keeps you “posted”. (;‐J)
Basically, it’s a quick way to get/give ideas across the whole company. You can follow specificpeople or groups of people at work, specific leads in the database, post links & files. Pretty muchthe whole social thing works here. (Probably best to stay away from posting pics from last night’srave, however. Just sayin’.)
33. So play around with the chatter stuff if you want & then when you’re done, just go up toRiley’s name (by Setup), pull down the menu and then logout (as Riley) & log back in asyourself
Kick it up a notch: Robo‐side(everything but a time‐machine)
So the YouTube & Chatter stuff helped me do my part better, but when I got those initial emailsfrom our web page, I still had to enter the leads by hand and create the tasks to remind me & Rileyto follow up. Keeping track of dates & times. Heck, that’s something computers are supposed to begood at. I figured there had to be a way to hand this part of my work off to my robo‐half, too &there was—“workflow rules.” I could tell SF, “Whenever I add a new lead, don’t just assign it to meand send me an alert (like before), also automatically create a new task for me to email themabout calling.” Here’s how it works (but make sure you’re logged in as you now, not Riley!):
34. Go to Setup > Build > Create > Workflow & Approvals > Workflow Rules
35. Check out Understanding Workflow screen and then click the Continue button at thebottom
36. On the All Workflow Rules page that comes up, click New Rule
1
37. On the New Workflow Rule page, in the Step 1: Select Object pane, use the drop‐downmenu to select Lead as the Object for triggering this new workflow and click Next
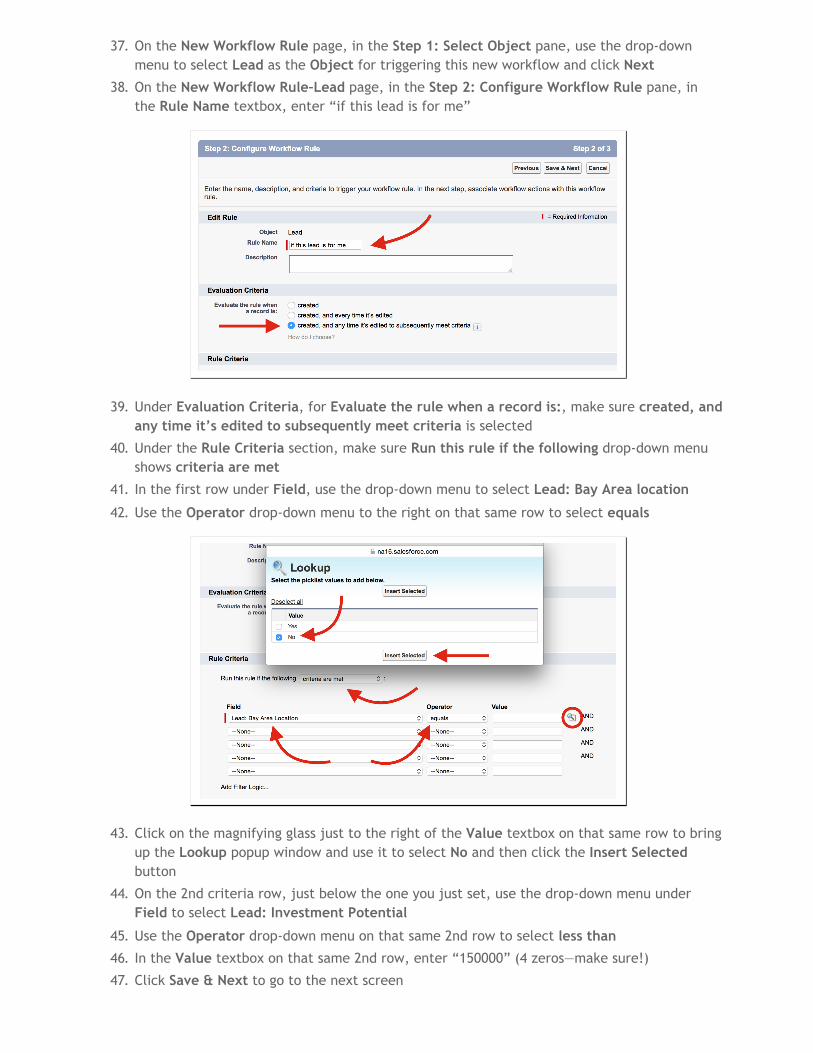
38. On the New Workflow Rule–Lead page, in the Step 2: Configure Workflow Rule pane, inthe Rule Name textbox, enter “if this lead is for me”
39. Under Evaluation Criteria, for Evaluate the rule when a record is:, make sure created, andany time it’s edited to subsequently meet criteria is selected
40. Under the Rule Criteria section, make sure Run this rule if the following drop‐down menushows criteria are met
41. In the first row under Field, use the drop‐down menu to select Lead: Bay Area location
42. Use the Operator drop‐down menu to the right on that same row to select equals
43. Click on the magnifying glass just to the right of the Value textbox on that same row to bringup the Lookup popup window and use it to select No and then click the Insert Selectedbutton
44. On the 2nd criteria row, just below the one you just set, use the drop‐down menu underField to select Lead: Investment Potential
45. Use the Operator drop‐down menu on that same 2nd row to select less than
46. In the Value textbox on that same 2nd row, enter “150000” (4 zeros—make sure!)
47. Click Save & Next to go to the next screen

Ok, you told it how to spot a lead for you, now tell it what to do when it spots one—create a taskfor you, attached to that new lead (it’ll be added to your “to‐do” list in SF, complete withreminders):
48. In the Step 3: Specify Workflow Actions pane, under Immediate Workflow Actions, clickAdd Workflow Action and select New Task
49. On the New Task page that opens up, in the Edit Task pane, click the magnifying glass nextto Assigned To to bring up the Lookup popup window and click on yourself to fill your nameinto the textbox (you may have to search for your first name to find you)
50. In the Subject textbox, enter “email to ask about calling”
51. Tab to autofill the Unique Name with “email_to_ask_about_calling”
52. Set the Due Date drop‐down menu to Lead: Created Date
53. Make sure the drop‐down menu immediately to the right is set to plus
54. To give your yourself 24 hours to make that first contact, enter “1” into the days textbox tothe right
55. For Priority, on the upper right of the panel, use the drop‐down menu to change Normal toHigh
56. Click Save to get back to the Edit Rule if this lead is for me page and click Done
57. On the Workflow Rule page for your new rule, click Activate
Cool. Then whenever a new lead gets entered for me, SF automatically creates a task for me so Ican’t forget to call them and I can track if I did or not and what was said. Cyborgs rule! (in a goodway). Of course, I set this up for Riley’s leads too, just like mine, but skip that for now. I’m dyingto show you how to go full‐on cyber. I figured out how to create a web form to embed in our fancyweb site so leads can submit their info directly to SF instead of emailing me. Sweet, eh?
First I went back to create another email template for automatically sending an instant,“personalized” thank‐you email to leads as soon as they submit their info:
58. Click on Setup > Administer > Communication Templates > Email Templates
59. Click on New Template
60. For Choose the type of email template you would like to create, the button for Textshould be selected by default which is fine for this first message so just click Next

61. For that personal feel, you want to embed the lead’s first name in the email so, underAvailable Merge Fields, use the Select Field Type drop‐down menu to select Lead Fields tomake them available for embedding
62. Just beneath that menu, scroll down the Select Field drop‐down menu to select First Name
63. Now, copy what SF has populated into the Copy Merge Field Value textbox below, so you’llbe able to paste it into the message body in a sec
64. On down, in the pane labeled Step 2. Text Email Template: New Template, checkthe Available for Use checkbox
65. For Email Template Name, enter “auto‐response template for incoming web leads for me”
66. Just click on the Template Unique Name textbox and it will auto‐populate with theunderscore‐embedded name
67. For Description enter “This is the template for email messages that are triggered by weblead form submits”
68. For Subject enter “Thank you for your inquiry”
69. In the Email Body textbox, type “Dear ” (including the trailing space) and then paste in themail merge syntax you copied for the lead’s first name and then add a comma at the end
70. Leave one blank line and then “We have received your inquiry. Thank you. I will be getting intouch with you soon.”

71. Leave another blank line and enter “Cheers,”
72. Write your first name on the line below
73. Click Save
Next create the auto‐response rule telling SF, if an incoming lead is for you, apply the niftytemplate you just built & send them that automated thank‐you email from you:
74. Go to Setup > Build > Customize > Leads > Lead Auto‐Response Rules & then click New
75. For Rule Name, enter “This one is mine so...”
76. ***Critical!*** Click the Active checkbox and then click the Save button
77. Now you’ll see the new rule appearing on the Web‐to‐Lead Auto‐Response Rules page
78. Click on the name you gave it—This one is mine so... to open it up
79. In the Rule Entries section at the bottom, click the New button
80. Under Step 1: Set the order in which this rule entry will be processed, for Sort Order,enter the number “1”
81. Under Step 2: Select the criteria for this rule entry, make sure Run this rule if thefollowing drop‐down menu shows criteria are met
82. In the first row under Field, use the drop‐down menu to select Lead: Bay Area location
83. Use the Operator drop‐down menu to the right on that same row to select equals
84. Click on the magnifying glass just to the right of the Value textbox on that same row to bringup the Lookup popup window and use it to select No and then click Insert Selected
85. On the 2nd criteria row, just below the one you just set, use the drop‐down menuunder Field to select Lead: Investment Potential
86. Use the Operator drop‐down menu on that same 2nd row to select less than
87. In the Value textbox on that same 2nd row, enter “150000” (4 zeros—make sure!)
88. Under Step 3: Specify the name and address to include on the auto‐response messageFrom line, enter your name
89. In the Email Address textbox, enter the one you entered for yourself when you created yourSF login (probably the same as for your login, depending on what you had set up)

90. Under Step 4: Select the template to use, click the magnifying glass next to Email
Template to bring up the Lookup popup window and click auto‐response template for
incoming web leads for me to populate it into the textbox
91. Click Save
Now for the grand finale! All your automation instructions are in place. Just need to create theform for your website—the one leads will fill out:
92. Under Setup > Build > Customize > Leads click Web‐to‐Lead
93. In the Web‐to‐Lead Settings, click Create Web‐to‐Lead Form
94. On the Web‐to‐Lead Setup page, under Create a Web‐to‐Lead Form, in the Selected
Fields list, click City to highlight it and click the Remove button immediately to the left(don’t need it)
95. Do the same for State/Province (don’t need it either)
96. Click Company to highlight it and then click the Up button immediately to the right to moveit above Email
97. In the Available Fields list, click Phone to highlight it and click the Add button immediatelyto the right to move it over to the Selected Fields list
98. In the Available Fields list, click Bay Area location to highlight & Add to move it over too
99. In the Available Fields list, click Investment Potential to highlight it and clickthe Add button immediately to the right
100. Below, in the Return URL textbox, after the “http://” that’s already there, add“www.signingsavvy.com/sign/THANK%20YOU/426/1” (be exact!) because you don’t reallyhave a website with a thank‐you page of your own but this one’s a clever sign‐languagethank‐you video page you can send leads to after they submit their stuff
101. Uncheck Enable Spam Filtering (not a worry for now) & then click Generate
102. On the Web‐to‐Lead Setup page, under Copy and paste the sample HTML below and send
it to your webmaster, select (highlight) & copy everything in the large textbox (there’smore than you see at first—scroll if needed OR use the Select All shortcut: Cntrl/Cmnd‐A)

Now, you’ve got the HTML for a web‐based form ready to paste into a file you can open in yourbrowser! You can’t paste it into a Word doc though, b/c Word will embed all kinds of otherformatting, etc. that messes it up. You need a plain text editor that will let you make a file withjust exactly what you just copied. Fortunately, both Windows and the MacOS have plain text editorsbuilt in. If you’re using Windows, skip on down to Step 117.
So if you’re using a Mac:
103. Find & open an app called TextEdit that resides in your Applications folder (use Finder orLaunchpad or Spotlight, the magnifying glass at the top right of the screen, to find it)
104. Click TextEdit on the menu bar at the top to get the drop‐down menu & click Preferences
105. Make sure you’re on the New Document tab and check Plain Text under Format
106. Now clickTextEdit on the menu bar at the top to get the drop‐down menu again and thistime select Quit TextEdit (that’ll save the preference change)
107. Now reopen TextEdit
108. If you don’t have a new blank document to work in, then pull down the TextEdit menu, goto File and select New to open a new document (if your new blank document window openswith formatting tools at the top, then your file isn’t in Plain Text mode & it won’t work—tryfixing the preferences again by repeating Steps104‐107)
109. Paste all that HTML code you copied from SF into the new document
110. In the TextEdit menu, go to File and select Save...
111. In the dialog box that opens, in the Save As: textbox, enter “myweb2lead.html”
112. Use the Where: drop‐down menu to select Desktop so you can easily find the file later
113. Click the Save button
114. In the dialog box that opens, click the Use .html button
115. In the menu, under TextEdit, select Quit TextEdit
116. Skip down to just after Step 125
To open Notepad in Windows 7 or earlier:
117. Click Start (bottom left on your screen) > All Programs > Accessories > Notepad
To open Notepad in Windows 8 or later:
118. Open the Start screen (the window symbol at the bottom left on your screen) and type“Notepad”

Once you have Notepad open:
119. Paste all that HTML code you copied from SF into the new blank document that has opened
120. In the Notepad menu, click File and select Save As
121. Set the destination of the new file to Desktop using the drop‐down menu
122. For File name enter “myweb2lead.html” (the “.html” part is critical!)
123. For Save as type select All Files (*.*)
124. Click the Save button
125. In the Notepad menu, click Exit
Do you realize what you’ve got there, in your little file? It’s a fully functional web form page! Youcould put it on a website where potential leads could fill it out & when they click Submit, SF woulddo all this, automatically:
take them to a thank‐you page,
send them a personalized thank‐you email from you,
create a lead record with the info they entered,
log the thank‐you email in the Activity History for that lead record,
assign the new lead record to you or Riley, according to the business rules aboutlocation and investment potential,
send you or Riley a new lead alert email, providing the lead name & basic info,
create a high‐priority task for you, under the Open Activities for that lead, telling youto follow up, within a day, by sending them an email to ask if it’s ok for you to call,
remind you, every time you log in, to send that email (if you haven’t by the due date),and
take out the trash, wash the dishes & give you this insane neck rub.
Ok, it’s not advanced enough to do that last line (yet), but all the rest? Totally. All thanks to all theautomation setup you did in my last posting and this one. You’re epic!
Now it’s not fancy looking, mind you. (I just gave mine to our geek, Linh. She made it pretty &uploaded it to our site.) But what you have there really works, just like it is. Try it out:
126. Navigate to your Desktop, find the file you just created, called myweb2lead.html anddouble‐click to open it up in your browser (if it looks like a bunch of HTML instead of the picbelow, then it didn’t get made as a “plain text” file so go back to Steps 104‐107)
127. For First Name & Last Name, enter “Miles” and “Dyson” (from Terminator 2—he was thescientist that created the bad borg technology)

128. For Company, enter “Cyberdyne”
129. For Email, use your own email address so you can see & open the thank‐you message
130. Make up a random number for Phone
131. Select No for Bay Area Location (important—this lead is yours, not Riley’s!)
132. For Investment Potential enter a number less than 150000, like 78000
133. Click Submit
You should see the cool sign‐language thank‐you video now playing in your browser. (Ours takes youto a thank‐you page on our site, of course.)
134. Check your email (as Miles) for the thank‐you & (as you) for the alert about your new lead
And finally, go back to SF and see all the stuff that happened there:
135. Click your Leads tab
136. If you don’t already see Miles, select the Today’s Leads or All Open Leads view
137. Click on Miles to open up his Lead record
138. On the upper part of the page, you’ll see the field values you entered on the form, likeName, Company, Bay Area Location & Investment Potential, etc. (is that crazy or what?)
See where it says you changed the Lead Owner (using assignment rules) from a blank value to yourname? Your assignment rules worked on the lead, automatically, when it came in from the form!And the assignment notification was posted, automatically, to the Chatter feed so your co‐workers(e.g. Riley) are kept posted about new leads that are yours too, not just theirs (hers).
But wait, there’s more...
2

Older PostHome
139. On the lower part of the page, under the Open Activities section you should see the “to‐do”task that your workflow created for you, “email to ask about calling” & under ActivityHistory you should see the task “Email: Thank you for your inquiry” that was done alreadyby the auto auto‐response rule you set up (sending the thank‐you email to Miles)
K, like me, you just made yourself into an ultra‐advanced, lead‐processing cyborg! Like the T‐1000but without blowing things up & impaling people on your pointy 5‐foot long finger (hopefully). Nowmy human time is spent on the important stuff, like dealing with the leads, while my robo‐half doesall the dirty work.
Smooth, eh?
Powered by Blogger.
3