mazda cx-7 owner manual 2009.06.15
TRANSCRIPT

CX-7_8AP5-EE-09F_Edition1_QuickGuide.indb 1CX-7_8AP5-EE-09F_Edition1_QuickGuide.indb 1 2009/06/15 13:29:452009/06/15 13:29:45

Selective Catalytic Reduction (SCR) system
For details, refer to Section 5, "Selective Catalytic Reduction (SCR) system".
Selective Catalytic Reduction (SCR) system
The SCR system is designed to reduce nitrogen oxide (NOx) and purify exhaust gas through a chemical reaction in which urea is injected into the exhaust gas.
1
AdBlue gauge
The remaining amount of urea and the remaining distance-to-empty indications are displayed when the ignition switch is turned to the ON position.
SCR Warning Light
This warning light illuminates when the ignition switch is turned to the ON position and turns off after the engine is started.
SCR Warning Beep
If the remaining distance-to-empty indication for the urea supply is displayed in the AdBlue gauge, the beep sounds for a few seconds after the engine is started.
* AdBlue is a registered trademark of the Verband der Automobilindustrie e.V. (VDA).
AdBlue gauge Remaining distance-to-empty
CX-7_8AP5-EE-09F_Edition1_QuickGuide.indb 2CX-7_8AP5-EE-09F_Edition1_QuickGuide.indb 2 2009/06/15 13:30:222009/06/15 13:30:22

2
Selective Catalytic Reduction (SCR) system
Selective Catalytic Reduction (SCR) system
The SCR system provides the following notification as the urea supply begins to run out.
For details, refer to Section 5, "Selective Catalytic Reduction (SCR) system".
Displays at engine start
Displays at engine start
Displays at engine start
Constant displayFlashes
SCR Warning Light
SCR Warning Beep
Flashes constantly (Check engine
light illuminates also)
At engine start
Multi Information Display
Displays at engine start
Displays at engine start
In addition, the following notification is provided when there is a system malfunction.
Engine starting possible
Engine start not possible
Flashes constantly (Check engine
light illuminates also) Flashes
Remaining distance-to-empty
SCR Warning Light
SCR Warning Beep
2,400 km (1,500 mile) or less
Flashes at engine start At engine start
1,500 km (940 mile) or less
Flashes at engine start then,
illuminates constantly
At engine start
830 km (520 mile) or less
Flashes constantly At engine start
0 km (0 mile)Flashes
constantly
AdBlue gaugeMulti Information
Display
AdBlue gauge
CX-7_8AP5-EE-09F_Edition1_QuickGuide.indb 3CX-7_8AP5-EE-09F_Edition1_QuickGuide.indb 3 2009/06/15 13:30:232009/06/15 13:30:23

CX-7_8AP5-EE-09F_Edition1_QuickGuide.indb 4CX-7_8AP5-EE-09F_Edition1_QuickGuide.indb 4 2009/06/15 13:30:242009/06/15 13:30:24

Black plate (1,1)
Thank you for choosing a Mazda. We at Mazda design and build vehicles with completecustomer satisfaction in mind.
To help ensure enjoyable and trouble-free operation of your Mazda, read this manualcarefully and follow its recommendations.
Regular servicing of your vehicle by an expert repairer helps maintain both itsroadworthiness and its resale value. Aworld-wide network of Authorised Mazda Repairerscan help you with their professional servicing expertise.Their specially trained personnel are best qualified to service your Mazda vehicle properlyand exactly. Also, they are supported by a wide range of highly specialized tools andequipment specially developed for servicing Mazda vehicles. When maintenance or serviceis necessary we recommend an Authorised Mazda Repairer.
We assure you that all of us at Mazda have an ongoing interest in your motoring pleasureand in your full satisfaction with your Mazda product.
Mazda Motor CorporationHIROSHIMA, JAPAN
Important Notes About This ManualKeep this manual in the glove box as a handy reference for the safe and enjoyable use of your Mazda. Should youresell the vehicle, leave this manual with it for the next owner.
All specifications and descriptions are accurate at the time of printing. Because improvement is a constant goal atMazda, we reserve the right to make changes in specifications at any time without notice and without obligation.
Please be aware that this manual applies to all models, equipment and options. As a result, you may findsome explanations for equipment not installed on your vehicle.
©2009 Mazda Motor CorporationPrinted in Japan June 2009(Print1)
AWord to Mazda Owners
CX-7_8AP5-EE-09F_Edition1 Page1Monday, June 15 2009 3:24 PM
Form No.8AP5-EE-09F

Black plate (2,1)
We want to help you get the most drivingpleasure from your vehicle. Your owner'smanual, when read from cover to cover,can do that in many ways.
Illustrations complement the words of themanual to best explain how to enjoy yourMazda. By reading your manual, you canfind out about the features, importantsafety information, and driving undervarious road conditions.
The symbol below in this manual means“Do not do this” or “Do not let thishappen”.
References to left hand and right hand aremade as if facing in the same direction thevehicle faces. Although this manualexplains a left-hand-drive model, it alsoapplies to right-hand-drive models.
Index: A good place to start is the Index,an alphabetical listing of all informationin your manual.
You'll find several WARNINGs,CAUTIONs, and NOTEs in the manual.
WARNINGAWARNING indicates a situation inwhich serious injury or death couldresult if the warning is ignored.
CAUTIONA CAUTION indicates a situation inwhich bodily injury or damage to yourvehicle, or both, could result if thecaution is ignored.
NOTE
A NOTE provides information andsometimes suggests how to make betteruse of your vehicle.
The symbol below, located on some partsof the vehicle, indicates that this manualcontains information related to the part.Please refer to the manual for a detailedexplanation.
How to Use This Manual
CX-7_8AP5-EE-09F_Edition1 Page2Monday, June 15 2009 3:24 PM
Form No.8AP5-EE-09F

Black plate (3,1)
CX-7_8AP5-EE-09F_Edition1 Page3Monday, June 15 2009 3:24 PM
Form No.8AP5-EE-09F
Table of Contents
Your Vehicle at a GlanceInterior, exterior views and part identification of your Mazda.
1
Essential Safety EquipmentUse of safety equipment, including seats, seat belt system, child-restraintsystems and SRS air bags.
2
Knowing Your MazdaExplanation of basic operations and controls; opening/closing and adjustmentof various parts.
3
Before Driving Your MazdaImportant information about driving your Mazda.
4
Driving Your MazdaExplanation of instruments and controls.
5
Interior ComfortUse of various features for drive comfort, including air-conditioning and audiosystem.
6
In Case of an EmergencyHelpful information on what to do in an emergency.
7
Maintenance and CareHow to keep your Mazda in top condition.
8
Customer InformationImportant consumer information including warranties and add-on equipment.
9
SpecificationsTechnical information about your Mazda.
10
Index 11

Black plate (4,1)
CX-7_8AP5-EE-09F_Edition1 Page4Monday, June 15 2009 3:24 PM
Form No.8AP5-EE-09F

Black plate (5,1)
1 Your Vehicle at a Glance
Interior, exterior views and part identification of your Mazda.
Interior Overview (Left-Hand Drive Model) .............................. 1-2Interior Equipment (View A) .................................................... 1-2Interior Equipment (View B) .................................................... 1-3Interior Equipment (View C) .................................................... 1-4
Interior Overview (Right-Hand Drive Model) ........................... 1-5Interior Equipment (View A) .................................................... 1-5Interior Equipment (View B) .................................................... 1-6Interior Equipment (View C) .................................................... 1-7
Exterior Overview ......................................................................... 1-8Front .......................................................................................... 1-8Rear ........................................................................................... 1-9
1-1
CX-7_8AP5-EE-09F_Edition1 Page5Monday, June 15 2009 3:24 PM
Form No.8AP5-EE-09F

Black plate (6,1)
Interior Equipment (View A)
Power window lock switch ................................................................................ page 3-47Power window switches .................................................................................... page 3-41Door-lock knob .................................................................................................. page 3-32Power door lock switch ..................................................................................... page 3-32Outside mirror switch ........................................................................................ page 3-73Headlight levelling switch ................................................................................. page 5-78TCS-OFF switch ................................................................................................ page 5-27RVM switch ....................................................................................................... page 5-43Lighting control ................................................................................................. page 5-75Turn and lane-change signals ............................................................................ page 5-79Instrument panel illumination knob ................................................................... page 5-53Instrument cluster .............................................................................................. page 5-48Wiper and washer lever ..................................................................................... page 5-83Ignition switch ..................................................................................................... page 5-2Lock release lever .............................................................................................. page 3-73Bonnet release handle ........................................................................................ page 3-52
1-2
Your Vehicle at a Glance
The equipment and installation position varies by vehicle
Interior Overview (Left-Hand Drive Model)
CX-7_8AP5-EE-09F_Edition1 Page6Monday, June 15 2009 3:24 PM
Form No.8AP5-EE-09F

Black plate (7,1)
Interior Equipment (View B)
Audio control switches ...................................................................................... page 6-52SRS air bags ...................................................................................................... page 2-50Multi information display ................................................................................ page 6-100Multi information display (MID) with compact navigation system (ifequipped) .............................................................................. Refer to the separate manualAir-conditioning system ...................................................................................... page 6-2Information display ............................................................................................ page 6-98Hazard warning flasher switch .......................................................................... page 5-89Audio system ..................................................................................................... page 6-18Glove box ........................................................................................................ page 6-120Rear window defroster switch ........................................................................... page 5-88Accessory socket ............................................................................................. page 6-124MT shift lever .................................................................................................... page 5-12AT shift lever ...................................................................................................... page 5-14Cruise control switches ...................................................................................... page 5-237-inch navigation system (if equipped) ................................ Refer to the separate manual
Your Vehicle at a Glance
Interior Overview (Left-Hand Drive Model)
1-3The equipment and installation position varies by vehicle
CX-7_8AP5-EE-09F_Edition1 Page7Monday, June 15 2009 3:24 PM
Form No.8AP5-EE-09F

Black plate (8,1)
Interior Equipment (View C)
Luggage compartment light ............................................................................... page 6-97Seat belts ............................................................................................................ page 2-17Overhead lights .................................................................................................. page 6-96SRS air bags ...................................................................................................... page 2-50Centre console ................................................................................................. page 6-121Bottle holder .................................................................................................... page 6-120Remote fuel-filler flap release ........................................................................... page 3-51Vanity mirror ...................................................................................................... page 6-95Sunroof switches ............................................................................................... page 3-54Rearview mirror ................................................................................................. page 3-75Sunvisor ............................................................................................................. page 6-95Front seat ............................................................................................................. page 2-2Cup holders ...................................................................................................... page 6-119Accessory socket ............................................................................................. page 6-124Rear seat ............................................................................................................ page 2-10Luggage compartment cover ............................................................................. page 3-36
1-4
Your Vehicle at a Glance
The equipment and installation position varies by vehicle
Interior Overview (Left-Hand Drive Model)
CX-7_8AP5-EE-09F_Edition1 Page8Monday, June 15 2009 3:24 PM
Form No.8AP5-EE-09F

Black plate (9,1)
Interior Equipment (View A)
Lighting control ................................................................................................. page 5-75Turn and lane-change signals ............................................................................ page 5-79Instrument panel illumination knob ................................................................... page 5-53Instrument cluster .............................................................................................. page 5-48Wiper and washer lever ..................................................................................... page 5-83RVM switch ....................................................................................................... page 5-43TCS-OFF switch ................................................................................................ page 5-27Headlight levelling switch ................................................................................. page 5-78Power door lock switch ..................................................................................... page 3-32Door-lock knob .................................................................................................. page 3-32Power window lock switch ................................................................................ page 3-47Power window switches .................................................................................... page 3-41Outside mirror switch ........................................................................................ page 3-73Bonnet release handle ........................................................................................ page 3-52Ignition switch ..................................................................................................... page 5-2Lock release lever .............................................................................................. page 3-73
Your Vehicle at a Glance
Interior Overview (Right-Hand Drive Model)
1-5The equipment and installation position varies by vehicle
CX-7_8AP5-EE-09F_Edition1 Page9Monday, June 15 2009 3:24 PM
Form No.8AP5-EE-09F

Black plate (10,1)
Interior Equipment (View B)
Glove box ........................................................................................................ page 6-120SRS air bags ...................................................................................................... page 2-50Air-conditioning system ...................................................................................... page 6-2Information display ............................................................................................ page 6-98Hazard warning flasher switch .......................................................................... page 5-89Multi information display ................................................................................ page 6-100Multi information display (MID) with compact navigation system (ifequipped) .............................................................................. Refer to the separate manualAudio system ..................................................................................................... page 6-18Audio control switches ...................................................................................... page 6-52Cruise control switches ...................................................................................... page 5-23Rear window defroster switch ........................................................................... page 5-88Accessory socket ............................................................................................. page 6-124MT shift lever .................................................................................................... page 5-12AT shift lever ...................................................................................................... page 5-147-inch navigation system (if equipped) ................................ Refer to the separate manual
1-6
Your Vehicle at a Glance
The equipment and installation position varies by vehicle
Interior Overview (Right-Hand Drive Model)
CX-7_8AP5-EE-09F_Edition1 Page10Monday, June 15 2009 3:24 PM
Form No.8AP5-EE-09F

Black plate (11,1)
Interior Equipment (View C)
Sunvisor ............................................................................................................. page 6-95Rearview mirror ................................................................................................. page 3-75Sunroof switches ............................................................................................... page 3-54Overhead lights .................................................................................................. page 6-96Vanity mirror ...................................................................................................... page 6-95Remote fuel-filler flap release ........................................................................... page 3-51Bottle holder .................................................................................................... page 6-120Centre console ................................................................................................. page 6-121SRS air bags ...................................................................................................... page 2-50Seat belts ............................................................................................................ page 2-17Luggage compartment light ............................................................................... page 6-97Luggage compartment cover ............................................................................. page 3-36Rear seat ............................................................................................................ page 2-10Cup holders ...................................................................................................... page 6-119Accessory socket ............................................................................................. page 6-124Front seat ............................................................................................................. page 2-2
Your Vehicle at a Glance
Interior Overview (Right-Hand Drive Model)
1-7The equipment and installation position varies by vehicle
CX-7_8AP5-EE-09F_Edition1 Page11Monday, June 15 2009 3:24 PM
Form No.8AP5-EE-09F

Black plate (12,1)
Front
Bonnet ............................................................................................................... page 3-52Windscreen wiper blades ................................................................................... page 8-31Sunroof .............................................................................................................. page 3-53Door lock ........................................................................................................... page 3-31Fuel-filler flap .................................................................................................... page 3-50Tyres .................................................................................................................. page 8-38Light bulbs ......................................................................................................... page 8-42
1-8
Your Vehicle at a Glance
The equipment and installation position varies by vehicle
Exterior Overview
CX-7_8AP5-EE-09F_Edition1 Page12Monday, June 15 2009 3:24 PM
Form No.8AP5-EE-09F

Black plate (13,1)
Rear
Rear wiper blade ................................................................................................ page 8-33Liftgate .............................................................................................................. page 3-34Light bulbs ......................................................................................................... page 8-42Aerial ................................................................................................................. page 6-18Child safety locks .............................................................................................. page 3-34Outside mirror .................................................................................................... page 3-73Tyres .................................................................................................................. page 8-38Rear view parking camera (Without 7-inch navigation system) ...................... page 6-112Rear view parking camera (With 7-inch navigation system) (ifequipped) .............................................................................. Refer to the separate manual
Your Vehicle at a Glance
Exterior Overview
1-9The equipment and installation position varies by vehicle
CX-7_8AP5-EE-09F_Edition1 Page13Monday, June 15 2009 3:24 PM
Form No.8AP5-EE-09F

Black plate (14,1)
1-10
CX-7_8AP5-EE-09F_Edition1 Page14Monday, June 15 2009 3:24 PM
Form No.8AP5-EE-09F

Black plate (15,1)
2 Essential Safety Equipment
Use of safety equipment, including seats, seat belt system, child-restraintsystems and SRS air bags.
Seats ............................................................................................... 2-2Front Seats (Manually Operated Seats) ..................................... 2-2Front Seats (Electrically Operated Seats) .................................. 2-4Rear Seat ................................................................................. 2-10Head Restraints ....................................................................... 2-14Seat Warmerí ......................................................................... 2-15
Seat Belt Systems ........................................................................ 2-17Seat Belt Precautions .............................................................. 2-17Seat Belt (Except Centre-Rear Position) ................................. 2-21Front Seat Belt Pretensioner and Load Limiting Systems ....... 2-23Centre-Rear Position Seat Belt ................................................ 2-26Seat Belt Warning Light/Beep ................................................ 2-29
Child Restraint ............................................................................ 2-31Child Restraint Precautions ..................................................... 2-31Categories of Child-Restraint Systems ................................... 2-36Child-Restraint System Installation Position .......................... 2-37Child-Restraint System Suitability for Various Seat PositionsTable ........................................................................................ 2-42Installing Child-Restraint Systems .......................................... 2-44ISOFIX Anchor-Secured Child-Restraint Systems ................. 2-47
SRS Air Bags ............................................................................... 2-50Supplementary Restraint System (SRS) Precautions .............. 2-50Front Passenger Air Bag Deactivation Switchí ..................... 2-55Supplementary Restraint System Components ....................... 2-60How the SRS Air Bags Work .................................................. 2-61SRS Air Bag Deployment Criteria .......................................... 2-65Limitations to SRS Air Bag .................................................... 2-66Monitoring and Maintenance .................................................. 2-68
2-1íSome models.
CX-7_8AP5-EE-09F_Edition1 Page15Monday, June 15 2009 3:24 PM
Form No.8AP5-EE-09F

Black plate (16,1)
Front Seats (ManuallyOperated Seats)
WARNINGDo not modify or replace the frontseats:Modifying or replacing the front seatssuch as replacing the upholstery orloosening any bolts is dangerous. Thefront seats contain air bagcomponents essential to thesupplementary restraint system. Suchmodifications could damage thesupplementary restraint system andresult in serious injury. Consult anAuthorised Mazda Repairer if there isany need to remove or reinstall thefront seats.
Do not drive with damaged front seats:Driving with damaged front seats isdangerous. A collision, even one notstrong enough to inflate the air bags,could damage the front seats whichcontain essential air bag components.If there was a subsequent collision, anair bag may not deploy which couldlead to injuries. Always have anAuthorised Mazda Repairer inspectthe front seats, front seat beltpretensioners and air bags after acollision.
WARNINGMake sure the adjustable componentsof a seat are locked in place:Adjustable seats and seatbacks thatare not securely locked are dangerous.In a sudden stop or collision, the seator seatback could move, causinginjury. Make sure the adjustablecomponents of the seat are locked inplace by attempting to slide the seatforward and backward and rockingthe seatback.
qSeat Slide
WARNINGAdjust the driver's seat only when thevehicle is stopped:Adjusting the driver's seat while thevehicle is moving is dangerous. Thedriver could lose control of the vehicleand have an accident.
To move a seat forward or backward, raisethe lever and slide the seat to the desiredposition and release the lever.
2-2
Essential Safety Equipment
Seats
CX-7_8AP5-EE-09F_Edition1 Page16Monday, June 15 2009 3:24 PM
Form No.8AP5-EE-09F

Black plate (17,1)
Make sure the lever returns to its originalposition and the seat is locked in place byattempting to push it forward andbackward.
qSeat Recline
WARNINGDo not drive with either front seatreclined:Sitting in a reclined position while thevehicle is moving is dangerousbecause you do not get the fullprotection from seat belts. Duringsudden braking or a collision, you canslide under the lap belt and sufferserious internal injuries. Formaximum protection, sit well back andupright.
Do not drive with the seatbackunlocked:All of the seatbacks play an importantrole in your protection in a vehicle.Leaving the seatback unlocked isdangerous as it can allow passengersto be ejected or thrown around andbaggage to strike occupants in asudden stop or collision, resulting insevere injury. After adjusting theseatback at any time, even when thereare no other passengers, rock theseatback to make sure it is locked inplace.
To change the seatback angle, leanforward slightly while raising the lever.Then lean back to the desired position andrelease the lever.
Make sure the lever returns to its originalposition and the seatback is locked inplace by attempting to push it forward andbackward.
CAUTIONWhen returning a rear-reclined seatbackto its upright position, make sure youhold onto the seatback with your otherhand while operating the lever. If theseatback is not supported, it will flipforward suddenly and could causeinjury.
Essential Safety Equipment
Seats
2-3
CX-7_8AP5-EE-09F_Edition1 Page17Monday, June 15 2009 3:24 PM
Form No.8AP5-EE-09F

Black plate (18,1)
qHeight Adjustment (Driver's Seat)í
To adjust the seat height, move the leverup or down.
Down
Up
qLumbar Support Adjustment(Driver's Seat)í
To increase the seat firmness, pull thelever forward. Push the lever backward todecrease firmness.
Front Seats (ElectricallyOperated Seats)
WARNINGDo not modify or replace the frontseats:Modifying or replacing the front seatssuch as replacing the upholstery orloosening any bolts is dangerous. Thefront seats contain air bagcomponents essential to thesupplementary restraint system. Suchmodifications could damage thesupplementary restraint system andresult in serious injury. Consult anAuthorised Mazda Repairer if there isany need to remove or reinstall thefront seats.
Do not drive with damaged front seats:Driving with damaged front seats isdangerous. A collision, even one notstrong enough to inflate the air bags,could damage the front seats whichcontain essential air bag components.If there was a subsequent collision, anair bag may not deploy which couldlead to injuries. Always have anAuthorised Mazda Repairer inspectthe front seats, front seat beltpretensioners and air bags after acollision.
2-4
Essential Safety Equipment
íSome models.
Seats
CX-7_8AP5-EE-09F_Edition1 Page18Monday, June 15 2009 3:24 PM
Form No.8AP5-EE-09F

Black plate (19,1)
CAUTIONl The seat-bottom power adjustment isoperated by motors. Avoid extendedoperation because excessive use candamage the motors.
l To prevent the battery from runningdown, avoid using the poweradjustment when the engine isstopped. The adjuster uses a largeamount of electrical power.
l Do not use the switch to make morethan one adjustment at a time.
qSeat Slide
To slide the seat, move the slide lifterswitch on the outside of the seat to thefront or back and hold it. Release theswitch at the desired position.
qSeat Recline
WARNINGDo not drive with either front seatreclined:Sitting in a reclined position while thevehicle is moving is dangerousbecause you do not get the fullprotection from seat belts. Duringsudden braking or a collision, you canslide under the lap belt and sufferserious internal injuries. Formaximum protection, sit well back andupright.
To change the seatback angle, press thefront or rear side of the reclining switch.Release the switch at the desired position.
Essential Safety Equipment
Seats
2-5
CX-7_8AP5-EE-09F_Edition1 Page19Monday, June 15 2009 3:24 PM
Form No.8AP5-EE-09F

Black plate (20,1)
qHeight Adjustment (Driver's Seat)
To adjust the seat height, move the switchup or down.
qSeat Position Memoryí
One-touch seat position programming andactivation is available on the driver's seat.
CAUTIONWhen activating the seat position, donot place your hands or fingers aroundthe seat bottom. The seat moves to thedesired position automatically, and ifyour hands or fingers are placed aroundthe seat bottom, it could cause injury.
Set button
Programming of the driver's seat positionsis possible using the following functions:
l Programming buttons 1, 2, or 3 and theset button.
l Operation using the advanced key/retractable type key
Programmed seat positions can beactivated using the following functions:
l Programming buttons 1, 2, or 3.
l Operation using advanced keylessfunctions/keyless entry system
NOTE
Individual seat positions can beprogrammed to the three availableprogramming buttons on the side of thedriver's seat, plus one seat position foreach advanced key/retractable type keyused with the vehicle.
2-6
Essential Safety Equipment
íSome models.
Seats
CX-7_8AP5-EE-09F_Edition1 Page20Monday, June 15 2009 3:24 PM
Form No.8AP5-EE-09F

Black plate (21,1)
Operation using the seat-side buttons
Programming
Park the vehicle in a safe location beforeperforming the seat positionprogramming. (Vehicle must be stopped)
1. Adjust the seat to the desired position.For each seat position adjustmentmethod refer to the following pages:Seat Slide (page 2-5)Seat Recline (page 2-5)Height Adjustment (page 2-6)
2. Press the desired programming button1, 2, or 3 while pressing the set buttonuntil a beep sound is heard.The button is programmed after a beepsound is heard. Other buttons can beprogrammed using the same procedure.
NOTE
Vehicle maintenance or other reasonsrequiring the vehicle battery to bedisconnected will result in the seatposition memory being erased.In this case, re-programme the seatpositions.
Setting the driver's seat to a pre-programmed position
There are two methods for setting thedriver's seat to a pre-programmedposition. For example, the type A methodcan be used before sitting in the seat andwhile the driver's door is open, and thetype B method can be used after getting inthe vehicle with the driver's door closed.
TYPE AWhen the ignition switch in the LOCKposition and the driver's door is open,press the programming button 1, 2, or 3for the desired seating position.
NOTE
In the following cases, the seat positionset function cancels:
l Any of the seat adjustment switchesare operated.
l The set button is pressed.
l A programming button 1, 2, or 3 ispressed.
l The vehicle starts moving.
l Vehicle locking/unlocking is doneusing the transmitter.
l Vehicle locking/unlocking is done bypressing the request switch on a frontdoor while the advanced key is beingcarried.
TYPE BWhen the ignition switch the ON positionor the driver's door is closed, press andhold the desired programming button 1, 2,or 3.
NOTE
In the following cases, the seat positionset function cancels:
l Any of the seat adjustment switchesare operated.
l The set button is pressed.
l The vehicle starts moving.
Essential Safety Equipment
Seats
2-7
CX-7_8AP5-EE-09F_Edition1 Page21Monday, June 15 2009 3:24 PM
Form No.8AP5-EE-09F

Black plate (22,1)
Operation using the advanced key/retractable type key
With advanced key
Lock button
Unlock button
With retractable type key
Lock buttonUnlock button
Operation indicator light
Programming
One seat position can be programmed intoeach advanced key/retractable type key.After the following conditions have beenmet, operate the seat and the advancedkey/retractable type key to programme theseat positions.
l The ignition switch in the LOCKposition(The auxiliary key/retractable type keyis removed from the ignition switch)
l The driver's door is open
1. Adjust the seat to the desired position.For each seat position adjustmentmethod, refer to the following pages:Seat Slide (page 2-5)Seat Recline (page 2-5)Height Adjustment (page 2-6)
2. Press and hold the unlock button on theadvanced key/retractable type keywhile pressing the set button until abeep sound is heard.The advanced key/retractable type keyis programmed after a beep sound isheard.
Seat position memory setting procedure
To set the driver's seat to pre-programmedposition, turn the ignition switch to theLOCK position, unlock the doors usingany of the following methods, and thenopen the driver's door within about 40seconds.
l Press the unlock switch on theadvanced key/retractable type key.
l Press the request switch on a front dooror liftgate while the advanced key isbeing carried.
2-8
Essential Safety Equipment
Seats
CX-7_8AP5-EE-09F_Edition1 Page22Monday, June 15 2009 3:24 PM
Form No.8AP5-EE-09F

Black plate (23,1)
NOTE
If any of the following occurs, the seatposition activation function cancels:
l The lock/unlock button is pressedwhile the key is not inserted into theignition switch.
l A seat adjustment switch is operated.
l The vehicle starts moving.
l The selected programming button 1,2, or 3 is pressed.
l The request switch on a front door orliftgate is pressed while the advancedkey is being carried.
l The set button is pressed.
Erasing memory
After the following conditions have beenmet, press the lock button on theadvanced key/retractable type key whilepressing the set button until a beep soundis heard.
l The ignition switch in the LOCKposition(The auxiliary key/retractable type keyis removed from the ignition switch)
l The driver's door is open
NOTE
Memory will also be erased if any ofthe following operations are performed:
l The advanced key/retractable typekey code has been changed.Refer to Immobilizer System (withAdvanced Key) on page 3-57.Refer to Immobilizer System onpage 3-60.
l The vehicle battery is disconnectedfor vehicle maintenance or otherreasons.
qLumbar Support Adjustment(Driver's Seat)
To increase the seat firmness, pull thelever forward. Push the lever backward todecrease firmness.
Essential Safety Equipment
Seats
2-9
CX-7_8AP5-EE-09F_Edition1 Page23Monday, June 15 2009 3:24 PM
Form No.8AP5-EE-09F

Black plate (24,1)
Rear Seat
WARNINGDo not stack cargo higher than theseatbacks:Stacking luggage or other cargohigher than the seatbacks, and placingarticles on the rear seat is dangerous.During sudden braking or a collision,objects can fly around and becomeprojectiles that may hit and injurepassengers.
Make sure luggage and cargo issecured before driving:Not securing cargo while driving isdangerous as it could move or becrushed during sudden braking or acollision and cause injury.
Make sure the adjustable componentsof a seat are locked in place:Adjustable seats that are not securelylocked are dangerous. In a suddenstop or collision, the seat or seatbackcould move, causing injury.
Do not drive with the seatbackunlocked:All of the seatbacks play an importantrole in your protection in a vehicle.Leaving the seatback unlocked isdangerous as it can allow passengersto be ejected or thrown around andbaggage to strike occupants in asudden stop or collision, resulting insevere injury. After returning theseatback at any time, even when thereare no other passengers, rock theseatback to make sure it is locked inplace.
WARNINGNever allow a passenger to sit or standon the folded seatback while thevehicle is moving:Driving with a passenger on the foldedseatback is dangerous. Allowing achild to sit up on the folded seatbackwhile the vehicle is moving isparticularly dangerous. In a suddenstop or even a minor collision, a childnot in a proper seat or child-restraintsystem and seat belt could be thrownforward, back or even out of thevehicle resulting in serious injuries ordeath. The child in the baggage areacould be thrown into other occupantsand cause serious injury.
NOTE
When returning a rear seat to itsoriginal position, also replace the seatbelt to its normal position. Verify thatthe seat belt pulls out and retracts.
2-10
Essential Safety Equipment
Seats
CX-7_8AP5-EE-09F_Edition1 Page24Monday, June 15 2009 3:24 PM
Form No.8AP5-EE-09F

Black plate (25,1)
qSplit-Folding Rear Seatback
The seatbacks can be folded down toprovide more space in the luggagecompartment.
To fold down the seatbacks
WARNINGAlways remove the child-restraintsystem from the rear seat beforeoperating the remote handle levers forthe rear seat:Operating (pulling) the remote handlelevers while a rear-facing child-restraint system is in the rear seat isdangerous. It could cause injury to achild seated in the child-restraintsystem when the seatback suddenlyflips forward.
Make sure there is nobody in the rearseat area before operating (pulling)the remote handle levers:Not checking the rear seat area forpersons before folding the seatbacksdown with the remote handle levers isdangerous. The rear seat area isdifficult to see from the rear of thevehicle. Operating (pulling) the remotehandle levers without checking couldcause injury to a person when aseatback suddenly flips forward.
CAUTIONBefore folding the seatbacks down withthe remote handle levers, make surethere is no cup in a rear cup holder.Folding the seatbacks with the remotehandle levers while a cup is in the cupholder could soil or damage the seatbottom and seatback.
When using the remote handle levers:
CAUTIONBe careful of the following when usingthe remote handle levers:
l On a downward slope, the seatbackcould flip forward faster than on aflat surface.
l On an upward slope, the seatbackmay not fold down. When theseatbacks cannot be folded downwith levers, pull the rear seatbackforward from inside the vehicle.
1. Unfasten the lap portion of the centre-rear seat belt (page 2-26).
CAUTIONAlways unfasten the lap portion of thebelt before folding left-rear seatback.Leaving the lap portion of the beltfastened could cause damage to the seatbelt, buckle and seatback.
Essential Safety Equipment
Seats
2-11
CX-7_8AP5-EE-09F_Edition1 Page25Monday, June 15 2009 3:24 PM
Form No.8AP5-EE-09F

Black plate (26,1)
2. After checking that the rear seats areclear, open the liftgate compartmentand pull the remote handle levers onthe left and right sides of the liftgatecompartment.
When using the rear seatback knobs:
CAUTIONWhen operating the rear seatback knob,make sure you support the seatbackwith your hand. If the seatback is notsupported with your hand, it will flipforward suddenly and could causeinjury to the finger that pushes the rearseatback knob down.
1. Unfasten the lap portion of the centre-rear seat belt (page 2-26).
CAUTIONAlways unfasten the lap portion of thebelt before folding the rear-leftseatback. Leaving the lap portion of thebelt fastened could cause damage to theseat belt, buckle and seatback.
2. Support the seatback with your hand.
3. Push the rear seatback knob down.
To return the seatbacks to the uprightposition
1. Lift the seatbacks upright.
2. Pull on the top of the seatbacks frominside the vehicle to make sure they arelocked.
3. Fasten the centre-rear lap/shoulder beltand check that all seat belts are routedproperly for passenger use (page 2-26).
WARNINGAlways make sure the seat belts arefully pulled out from under theseatbacks:A seat belt caught under a seatbackafter the seatback is returned to itsupright position is dangerous. In acollision or sudden stop, the seat beltcannot provide adequate protection.
2-12
Essential Safety Equipment
Seats
CX-7_8AP5-EE-09F_Edition1 Page26Monday, June 15 2009 3:24 PM
Form No.8AP5-EE-09F

Black plate (27,1)
WARNINGWhen returning the seatback to theupright position, make sure there is nored indication:A rear seatback not fully returned andlocked in the upright position isdangerous. Sudden stops ormanoeuvring could cause a seatbackto flip forward suddenly resulting ininjury. If the red indicator is visible onthe back of the rear seatback knob, theseatback is not locked in the uprightposition.
Locked position
Unlocked positionRed indicator
qArmrest
The rear armrest in the centre of the rearseatback can be used (no occupant in thecentre seat) or placed upright.
Essential Safety Equipment
Seats
2-13
CX-7_8AP5-EE-09F_Edition1 Page27Monday, June 15 2009 3:24 PM
Form No.8AP5-EE-09F

Black plate (28,1)
Head RestraintsHead restraints are intended to helpprotect you and the passengers from neckinjury.
WARNINGAlways drive with the head restraintsinstalled when seats are being usedand make sure they are properlyadjusted:Driving with the head restraintsadjusted too low or removed isdangerous. With no support behindyour head, your neck could beseriously injured in a collision.
Height adjustment
To raise a head restraint, pull it up to thedesired position.To lower the head restraint, press the stop-catch release, then push the head restraintdown.Adjust the head restraint so that the top iseven with the top of the passenger's ears,never the passenger's neck to preventinjury.Front seat
Rear outboard seat
Rear centre seat
Removal/Installation
To remove the head restraint, pull it upwhile pressing the stop-catch.To install the head restraint, press theuprights into the holes while pressing thestop-catch.
WARNINGAlways drive with the head restraintsset up when seats are being used andmake sure they are properly set up:Driving with the head restraints notset up is dangerous. With no supportbehind your head, your neck could beseriously injured in a collision.
2-14
Essential Safety Equipment
Seats
CX-7_8AP5-EE-09F_Edition1 Page28Monday, June 15 2009 3:25 PM
Form No.8AP5-EE-09F

Black plate (29,1)
Seat Warmerí
The front seats are electrically heated. Theignition switch must be in the ONposition.
Press the switch to turn the seat warmeron or off. When the switch is in the ONposition, the indicator light will come on.
Manual transaxle
Automatic transaxle
WARNINGl Be careful when using the seatwarmer. The heat from the seatwarmer may be too hot for somepeople, as indicated below, andcould cause a low-temperatureburn.l Infants, small babies, elderly
people, and physicallychallenged people
l People with delicate skinl People who are excessively
fatiguedl People who are intoxicatedl People who have taken sleep-
inducing medicine such assleeping pills or cold medicine
l Do not use the seat warmer withanything having high moisture-retention ability such as a blanketor cushion on the seat. The seatmay be heated excessively andcause a low-temperature burn.
l Do not use the seat warmer evenwhen taking a short nap in thevehicle. The seat may be heatedexcessively and cause a low-temperature burn.
l Do not place heavy objects withsharp projections on the seat, orinsert needles or pins into it. Thiscould cause the seat to becomeexcessively heated and result ininjury from a minor burn.
CAUTIONDo not use organic solvents to clean theseat. It may damage the seat surface andthe heater.
Essential Safety Equipment
Seats
2-15íSome models.
CX-7_8AP5-EE-09F_Edition1 Page29Monday, June 15 2009 3:25 PM
Form No.8AP5-EE-09F

Black plate (30,1)
NOTE
l Use the seat warmer when the engineis running, and do not continue touse it for a long period of time.
l The temperature of the seat warmercannot be adjusted beyond High andLow because the seat warmer iscontrolled by a thermostat.
2-16
Essential Safety Equipment
Seats
CX-7_8AP5-EE-09F_Edition1 Page30Monday, June 15 2009 3:25 PM
Form No.8AP5-EE-09F

Black plate (31,1)
Seat Belt PrecautionsSeat belts help to decrease the possibility of severe injury during accidents and suddenstops. Mazda recommends that the driver and all passengers always wear seat belts.
European model
All the seats have lap/shoulder belts. These belts have retractors with inertia locks that keepthem out of the way when not in use. The locks allow the belts to remain comfortable onusers, but they'll lock in position during a collision.
Except European model
The front seats have lap/shoulder belts. These belts have retractors with inertia locks thatkeep them out of the way when not in use. The locks allow the belts to remain comfortableon users, but they'll lock in position during a collision.The rear seats have lap/shoulder belts. The rear outboard seat belt retractors operate in twomodes, emergency locking mode and, for child-restraint systems, automatic locking mode.The centre-rear seat has lap/shoulder belts that have retractors with inertia locks.
WARNINGAlways wear your seat belt and make sure all occupants are properly restrained:Not wearing a seat belt is extremely dangerous. During a collision, occupants notwearing seat belts could hit someone or things inside the vehicle or even be thrown outof the vehicle. They could be seriously injured or even killed. In the same collision,occupants wearing seat belts would be much safer.
Do not wear twisted seat belts:Twisted seat belts are dangerous. In a collision, the full width of the belt is notavailable to absorb the impact. This puts more force on the bones beneath the belt,which could cause serious injury or death.
Never use one seat belt on more than one person at a time:Using one seat belt for more than one person at a time is dangerous. A seat belt usedin this way cannot spread the impact forces properly and the two passengers could becrushed together and seriously injured or even killed. Never use one belt for morethan one person at a time and always operate the vehicle with each occupant properlyrestrained.
Do not operate a vehicle with a damaged seat belt:Using a damaged seat belt is dangerous. An accident could damage the belt webbingof the seat belt in use. A damaged seat belt cannot provide adequate protection in acollision. Have an expert repairer, we recommend an Authorised Mazda Repairerinspect all seat belt systems in use during an accident before they are used again.
Essential Safety Equipment
Seat Belt Systems
2-17
CX-7_8AP5-EE-09F_Edition1 Page31Monday, June 15 2009 3:25 PM
Form No.8AP5-EE-09F

Black plate (32,1)
WARNINGHave your seat belts changed immediately if the pretensioner or load limiter has beenexpended:One or both front air bags may deploy, and the corresponding pretensioner(s) mayalso deploy at the same time. Like the air bags, the front seat belt pretensioners willonly function once. If the front seat belt pretensioners are not replaced, the risk ofinjury in a collision will increase. Expended front seat belt pretensioners and air bagsmust be replaced after any collision which caused them to deploy. Additionally, theload limiter will only limit loads on the chest once in a collision and this is anotherreason to have the front seat belts inspected. Always have an expert repairer, werecommend an Authorised Mazda Repairer inspect the front seat belt pretensionersand air bags after any collision.
Instructions for Use of Seat Belt Assemblies:l Seat belts are designed to bear upon the bony structure of the body, and should beworn low across the front of the pelvis, or the pelvis, chest and shoulders, asapplicable; wearing the lap section of the belt across the abdominal area must beavoided.
l Seat belts should be adjusted as firmly as possible, consistent with comfort, toprovide the protection for which they have been designed. A slack belt will greatlyreduce the protection afforded to the wearer.
l Care should be taken to avoid contamination of the webbing with polishes, oils andchemicals, and particularly battery acid. Cleaning may safely be carried out usingmild soap and water. The belt should be replaced if webbing becomes frayed,contaminated, or damaged.
l It is essential to replace the entire assembly after it has been worn in a severeimpact even if damage to the assembly is not obvious.
l Belts should not be worn with straps twisted.l Each seat belt assembly must only be used by one occupant; it is dangerous to put abelt around a child being carried on the occupant's lap.
l No modifications or additions should be made by the user which will either preventthe seat belt adjusting devices from operating to remove slack, or prevent the seatbelt assembly from being adjusted to remove slack.
2-18
Essential Safety Equipment
Seat Belt Systems
CX-7_8AP5-EE-09F_Edition1 Page32Monday, June 15 2009 3:25 PM
Form No.8AP5-EE-09F

Black plate (33,1)
CAUTIONBelt retraction may become difficult if the belts and rings are soiled, so try to keep themclean. For more details about cleaning the seat belts, refer to “Cleaning the Lap/ShoulderBelt Webbing” (page 8-65).
Ring
qPregnant Women and Persons with Serious Medical Conditions
Pregnant women should always wear seat belts. Ask your doctor for specificrecommendations.The lap belt should be worn SNUGLYAND AS LOWAS POSSIBLE OVER THE HIPS.The shoulder belt should be worn across your shoulder properly, but never across thestomach area.Persons with serious medical conditions also should wear seat belts. Check with yourdoctor for any special instructions regarding specific medical conditions.
qEmergency Locking Mode
European model
When the seat belt is fastened, it will always be in the emergency locking mode. In theemergency locking mode, the belt remains comfortable on the occupant and the retractorwill lock in position during a collision.If the belt is locked and cannot be pulled out, retract the belt once, and then try pulling itout slowly. If this fails, pull the belt strongly one time and loosen, then pull it out againslowly.
Essential Safety Equipment
Seat Belt Systems
2-19
CX-7_8AP5-EE-09F_Edition1 Page33Monday, June 15 2009 3:25 PM
Form No.8AP5-EE-09F

Black plate (34,1)
Except European model
In the emergency locking mode, the belt remains comfortable on the occupant and theretractor will lock in position during a collision. When the seat belt is fastened, it willalways be in the emergency locking mode until it is switched to automatic locking mode bypulling it all the way out to its full length. If the belt feels tight and hinders comfortablemovement while the vehicle is stopped or in motion, it may be in the automatic lockingmode because the belt has been pulled too far out. To return the belt to the morecomfortable emergency locking mode, wait until the vehicle has stopped in a safe, levelarea, retract the belt fully to convert it back to emergency locking mode and then extend itaround you again.If the belt is locked and cannot be pulled out, retract the belt once, and then try pulling itout slowly. If this fails, pull the belt strongly one time and loosen, then pull it out againslowly.
qAutomatic Locking Mode (Except European model)
Always use the automatic locking mode to keep the child-restraint system from shifting toan unsafe position in the event of an accident. To enable seat belt automatic locking mode,pull it all the way out and connect it as instructed on the child-restraint system. It willretract down to the child-restraint system and stay locked on it. See the section on childrestraint (page 2-31).
2-20
Essential Safety Equipment
Seat Belt Systems
CX-7_8AP5-EE-09F_Edition1 Page34Monday, June 15 2009 3:25 PM
Form No.8AP5-EE-09F

Black plate (35,1)
Seat Belt (Except Centre-Rear Position)
qFastening the Seat Belt
1. Grasp the seat belt tongue.
2. Slowly pull out the lap/shoulder belt.
Lap/shoulder belt
Seat belt tongue
3. Insert the seat belt tongue into the seatbelt buckle until you hear a clicksound.
Seat belt tongue
Seat belt buckle
WARNINGPositioning the Shoulder Portion ofthe Seat Belt:Improper positioning of the shoulderportion of the seat belt is dangerous.Always make sure the shoulderportion of the seat belt is positionedacross your shoulder and near yourneck, but never under your arm, onyour neck, or on your upper arm.
4. Position the lap belt as low as possible,not on the abdominal area, then adjustthe shoulder belt so that it fits snuglyagainst your body.
Keep low on hip bone
Too high
Take up slack
WARNINGPositioning the Lap Portion of theSeat Belt:The lap portion of the seat belt worntoo high is dangerous. In a collision,this would concentrate the impactforce directly on the abdominal area,causing serious injury. Wear the lapportion of the belt snugly and as lowas possible.
Essential Safety Equipment
Seat Belt Systems
2-21
CX-7_8AP5-EE-09F_Edition1 Page35Monday, June 15 2009 3:25 PM
Form No.8AP5-EE-09F

Black plate (36,1)
qUnfastening the Seat Belt
Depress the button on the seat belt buckle.If the belt does not fully retract, pull it outand check for kinks or twists. Then makesure it remains untwisted as it retracts.
Button
NOTE
l When using the centre-rear seat belt,refer to “Centre-Rear Position SeatBelt” (page 2-26).
l If a belt does not fully retract, inspectit for kinks and twists. If it is still notretracting properly, have it inspectedat an expert repairer, we recommendan Authorised Mazda Repairer.
qFront Shoulder Belt Adjuster
Adjust the height of the shoulder belt ifthe seat belt touches your neck, or if itcrosses your arm instead of your shoulder.To raise the shoulder belt adjuster, pushthe adjuster up. To lower the shoulder beltadjuster, pull the adjuster and slide itdown. Make sure the adjuster is locked.
To raise To lower
WARNINGPositioning the Shoulder Portion ofthe Seat Belt:Improper positioning of the shoulderportion of the seat belt is dangerous.Always make sure the shoulderportion of the seat belt is positionedacross your shoulder and near yourneck, but never under your arm, onyour neck, or on your upper arm.
2-22
Essential Safety Equipment
Seat Belt Systems
CX-7_8AP5-EE-09F_Edition1 Page36Monday, June 15 2009 3:25 PM
Form No.8AP5-EE-09F

Black plate (37,1)
Front Seat Belt Pretensionerand Load Limiting Systems
For optimum protection, the driver andfront passenger seat belts are equippedwith pretensioner and load limitingsystems. For both these systems to workproperly you must wear the seat beltproperly.
Pretensioners:In moderate or severe frontal or near-frontal accidents, the front air bag andpretensioner systems deploysimultaneously. The front seat beltretractors remove slack quickly as the airbags are expanding. Any time the air bagsand front seat belt pretensioners have firedthey must be replaced.(With front passenger air bagdeactivation switch)In addition, the pretensioner system forthe front passenger, like the frontpassenger air bag, is designed to onlydeploy when the front passenger air bagdeactivation switch is turned to the ONposition.For details, refer to front passenger air bagdeactivation switch (page 2-55).
Load limiter:The load limiting system releases beltwebbing in a controlled manner to reducebelt force on the occupant's chest. Whilethe most severe load on a seat belt occursin frontal collisions, the load limiter hasan automatic mechanical function and canactivate in any accident mode withsufficient occupant movement.Even if the pretensioners have not fired,the load limiting function must bechecked by an expert repairer, werecommend an Authorised MazdaRepairer after any collision.
WARNINGWear seat belts only as recommendedin this owner's manual:Incorrect positioning of the driver andfront passenger seat belts isdangerous. Without properpositioning, the pretensioner and loadlimiting systems cannot provideadequate protection in an accidentand this could result in serious injury.For more details about wearing seatbelts, refer to “Fastening the seatbelts” (page 2-21).
Essential Safety Equipment
Seat Belt Systems
2-23
CX-7_8AP5-EE-09F_Edition1 Page37Monday, June 15 2009 3:25 PM
Form No.8AP5-EE-09F

Black plate (38,1)
WARNINGHave your seat belts changedimmediately if the pretensioner or loadlimiter has been expended:One or both front air bags may deploy,and the corresponding pretensioner(s)may also deploy at the same time. Likethe air bags, the front seat beltpretensioners will only function once.If the front seat belt pretensioners arenot replaced, the risk of injury in acollision will increase. Expended frontseat belt pretensioners and air bagsmust be replaced after any collisionwhich caused them to deploy.Additionally, the load limiter will onlylimit loads on the chest once in acollision and this is another reason tohave the front seat belts inspected.Always have an expert repairer, werecommend an Authorised MazdaRepairer inspect the front seat beltpretensioners and air bags after anycollision.
Do not modify the components orwiring, or use electronic testingdevices on the pretensioner system:Modifying the components or wiringof the pretensioner system, includingthe use of electronic testing devices isdangerous. You could accidentallyactivate it or make it inoperable whichwould prevent it from activating in anaccident. The occupants or repairerscould be seriously injured.
WARNINGProperly dispose of the pretensionersystem:Improper disposal of the pretensionersystem or a vehicle with non-deactivated pretensioners isdangerous. Unless all safetyprocedures are followed, injury couldresult. Ask an expert repairer, werecommend an Authorised MazdaRepairer how to safely dispose of thepretensioner system or how to scrap apretensioner-equipped vehicle.
NOTE
l The pretensioner system will activatein a moderate or greater frontal ornear-frontal collision. It will notactivate in most rollovers, side orrear impacts.
l Some smoke (non-toxic gas) will bereleased when the air bags andpretensioners deploy. This does notindicate a fire. This gas normally hasno effect on occupants, however,those with sensitive skin mayexperience light skin irritation. Ifresidue from the deployment of theair bags or the front pretensionersystem gets on the skin or in theeyes, wash it off as soon as possible.
2-24
Essential Safety Equipment
Seat Belt Systems
CX-7_8AP5-EE-09F_Edition1 Page38Monday, June 15 2009 3:25 PM
Form No.8AP5-EE-09F

Black plate (39,1)
qAir Bag/Front Seat BeltPretensioner System Warning Light
If the air bag/front seat belt pretensionersystem is working properly, the warninglight illuminates when the ignition switchis turned to the ON position or after theengine is cranked. The warning light turnsoff after a specified period of time.
A system malfunction is indicated if thewarning light constantly flashes,constantly illuminates or does notilluminate at all when the ignition switchis turned to the ON position. If any ofthese occur, consult an expert repairer, werecommend an Authorised MazdaRepairer as soon as possible. The systemmay not work in an accident.
WARNINGNever tamper with the air bag/pretensioner systems and always havean expert repairer, we recommend anAuthorised Mazda Repairer performall servicing and repairs:Self-servicing or tampering with thesystems is dangerous. An air bag/pretensioner could accidentallyactivate or become disabled causingserious injury or death.
qAir Bag/Front Seat BeltPretensioner System Warning Beep
If a malfunction is detected in the air bag/front seat belt pretensioner systems andthe warning light, a warning beep soundwill be heard for about 5 seconds everyminute.
The air bag and seat belt pretensionersystem warning beep sound will continueto be heard for approximately 35 minutes.Have your vehicle inspected at an expertrepairer, we recommend an AuthorisedMazda Repairer as soon as possible.
WARNINGDo not drive the vehicle with the airbag/front seat belt pretensioner systemwarning beep sounding:Driving the vehicle with the air bag/front seat belt pretensioner systemwarning beep sounding is dangerous.In a collision, the air bags and thefront seat belt pretensioner system willnot deploy and this could result indeath or serious injury.Contact an expert repairer, werecommend an Authorised MazdaRepairer to have the vehicle inspectedas soon as possible.
Essential Safety Equipment
Seat Belt Systems
2-25
CX-7_8AP5-EE-09F_Edition1 Page39Monday, June 15 2009 3:25 PM
Form No.8AP5-EE-09F

Black plate (40,1)
Centre-Rear Position SeatBelt
Before using the centre-rear lap/shoulderbelt make sure tongue (A) and anchorbuckle (B) are fastened.
(B)
(A)
qFastening the Seat Belt
1. Grasp the seat belt tongue (C).
2. Slowly pull out the lap/shoulder belt.
3. Insert the seat belt tongue (C) into theseat belt buckle (D) until you hear aclick sound.
(A)
(B)
(C)
(D)
WARNINGFastening the Centre-Rear Seat Beltwith Only One Buckle:Fastening the centre-rear seat beltwith only one buckle is dangerous. Ifonly one pair of seat belt tongues andbuckles is fastened (either seat belttongue (C) and seat belt anchor buckle(D) or seat belt tongue (A) and seatbelt buckle (B)), then the seat beltcannot provide full protection. In asudden stop or collision, the usercould slide under the belt and sufferserious injuries. Always make surethat both pairs of seat belt tongues andbuckles are fastened properly.
Positioning the Shoulder Portion ofthe Seat Belt:Improper positioning of the shoulderportion of the seat belt is dangerous.Always make sure the shoulderportion of the seat belt is positionedacross your shoulder and near yourneck, but never under your arm, onyour neck, or on your upper arm.
4. Position the lap belt as low as possible,not on the abdominal area, then adjustthe shoulder belt so that it fits snuglyagainst your body.
2-26
Essential Safety Equipment
Seat Belt Systems
CX-7_8AP5-EE-09F_Edition1 Page40Monday, June 15 2009 3:25 PM
Form No.8AP5-EE-09F

Black plate (41,1)
WARNINGPositioning the Lap Portion of theSeat Belt:The lap portion of the seat belt worntoo high is dangerous. In a collision,this would concentrate the impactforce directly on the abdominal area,causing serious injury. Wear the lapportion of the belt snugly and as lowas possible.
qUnfastening the Seat Belt
Depress the button on the seat belt buckle.If the belt does not fully retract, pull it outand check for kinks or twists. Then makesure it remains untwisted as it retracts.
Button
NOTE
If a belt does not fully retract, inspect itfor kinks and twists. If it is still notretracting properly, have it inspected atan expert repairer, we recommend anAuthorised Mazda Repairer.
qRetracting the centre seat belt tolower the seatbacks for carryingcargo
To retract the centre belt and lower theseatbacks for carrying cargo, insert asmall object such as a key in the seat beltanchor buckle (B) slot.
(B)
(A)
CAUTIONAlways unfasten the lap portion of thebelt before folding the left-rearseatback. Leaving the lap portion of thebelt fastened could cause damage to theseat belt, seat belt buckle and seatback.
qStowing and pulling out theCentre-Rear Position Seat Belt
The centre-rear position seat belt can bestowed using the following procedure.
CAUTIONWhen stowing the seat belt, make surethe belt is locked securely into therecess. If the seat belt is not properlystowed, it might get caught in the seatsand be damaged.
Essential Safety Equipment
Seat Belt Systems
2-27
CX-7_8AP5-EE-09F_Edition1 Page41Monday, June 15 2009 3:25 PM
Form No.8AP5-EE-09F

Black plate (42,1)
To stow the seat belt, retract the belt, putthe seat belt tongues (A) and (C) togetherand insert them into the recess.
(A)
(C)
Ceiling recess
To pull out the seat belt, slide the seat belttongue (A) with your finger while movingit downward, and slowly pull out the seatbelt from the ceiling recess.
NOTE
To encourage rear seat passengers towear their seat belts, we suggest leavingthe centre-rear lap position of the beltfastened at all times except whenfolding the rear seat forward.
qRe-attaching the seat belt afterthe rear seatbacks are returned totheir upright positions
To re-attach the centre seat belt after therear seats are returned to their uprightpositions, grasp the seat belt tongue (A)and insert it into the seat belt anchorbuckle (B) until you hear a click sound. Itis now secure for passenger use.
NOTE
After returning the left-rear seatback toits upright position, fasten the lapportion of the belt.
2-28
Essential Safety Equipment
Seat Belt Systems
CX-7_8AP5-EE-09F_Edition1 Page42Monday, June 15 2009 3:25 PM
Form No.8AP5-EE-09F

Black plate (43,1)
Seat Belt Warning Light/Beep
The seat belt warning light illuminates ifthe driver's seat belt is not fastened whenthe ignition switch is turned to the ONposition.
qBelt Minder (European model)
NOTE
The belt minder can be deactivated.Consult an Authorised Mazda Repairerto deactivate or restore the seat beltminder.
Driver's seat
If the driver's seat belt is not fastened andthe vehicle is driven at a speed faster thanabout 20 km/h (12 mph), the warninglight will flash and a beep sound will beheard.Once the beep sound is heard, it soundsintermittently even if the vehicle speedlowers to 20 km/h (12 mph) or less untilthe seat belt is fastened or the beep soundperiod has passed.
Front passenger seat
If the front passenger seat belt is notfastened with the ignition switch in theON position, the driver and the passengerwill be informed by the warning light andthe beep sounds.
If the front passenger seat belt is notfastened and the vehicle is driven at aspeed faster than about 20 km/h (12 mph),the warning light will flash and a beepsound will be heard.Placing heavy items on the frontpassenger seat may cause the frontpassenger seat belt warning function tooperate depending on the weight of theitem.Once the beep sound is heard, it soundsintermittently even if the vehicle speedlowers to 20 km/h (12 mph) or less untilthe seat belt is fastened or the beep soundperiod has passed.
Essential Safety Equipment
Seat Belt Systems
2-29
CX-7_8AP5-EE-09F_Edition1 Page43Monday, June 15 2009 3:25 PM
Form No.8AP5-EE-09F

Black plate (44,1)
NOTE
l To allow the front passenger seatweight sensor to function properly,do not place and sit on an additionalseat cushion on the front passengerseat. The sensor may not functionproperly because the additional seatcushion could cause sensorinterference.
l When a small child sits on the frontpassenger seat, it is possible thatneither the warning light nor thewarning beep operate.
2-30
Essential Safety Equipment
Seat Belt Systems
CX-7_8AP5-EE-09F_Edition1 Page44Monday, June 15 2009 3:25 PM
Form No.8AP5-EE-09F

Black plate (45,1)
Child Restraint PrecautionsMazda strongly urges the use of child-restraint systems for children small enough to usethem.
Mazda recommends use of a Mazda genuine child-restraint system or one that complieswith European regulations (ECE R44). If you would like to purchase a Mazda genuinechild-restraint system, please contact an Authorised Mazda Dealer.Check your local and state or provincial laws for specific requirements regarding the safetyof children riding in your vehicle.
Whatever child-restraint system you consider, please pick the appropriate one for the ageand size of the child, obey the law and follow the instructions that come with the individualchild-restraint system.
A child who has outgrown child-restraint systems should sit in the rear and use seat belts.
The child-restraint system should be installed on the rear seat.Statistics confirm that the rear seat is the best place for all children up to 12 years of age-the more so with a supplementary restraint system (air bags).
A rear-facing child-restraint system should NEVER be used in the front passenger seatwith the air bag system activated. The front passenger's seat is also the least preferred seatfor other child-restraint systems.
For some models, we have provided a deactivation switch that will disable front passengerair bag inflation. Do not switch off the front passenger air bag without reading the “FrontPassenger Air Bag Deactivation Switch” (page 2-55).
WARNINGUse the correct size child-restraint system:For effective protection in vehicle accidents and sudden stops, a child must beproperly restrained using a seat belt or child-restraint system depending on age andsize. If not, the child could be seriously injured or even killed in an accident.
Essential Safety Equipment
Child Restraint
2-31
CX-7_8AP5-EE-09F_Edition1 Page45Monday, June 15 2009 3:25 PM
Form No.8AP5-EE-09F

Black plate (46,1)
WARNINGFollow the manufacturer's instructions and always keep the child-restraint systembuckled down:An unsecured child-restraint system is dangerous. In a sudden stop or a collision itcould move causing serious injury or death to the child or other occupants. Make sureany child-restraint system is properly secured in place according to the child-restraintsystem manufacturer's instructions. When not in use, remove it from the vehicle orfasten it with a seat belt, or latch it down to BOTH ISOFIX anchors, and attach thecorresponding tether anchor.
Always secure a child in a proper child-restraint system:Holding a child in your arms while the vehicle is moving is extremely dangerous. Nomatter how strong the person may be, he or she cannot hold onto a child in a suddenstop or collision and it could result in serious injury or death to the child or otheroccupants. Even in a moderate accident, the child may be exposed to air bag forcesthat could result in serious injury or death to the child, or the child may be slammedinto an adult, causing injury to both child and adult.
2-32
Essential Safety Equipment
Child Restraint
CX-7_8AP5-EE-09F_Edition1 Page46Monday, June 15 2009 3:25 PM
Form No.8AP5-EE-09F

Black plate (47,1)
WARNINGExtreme Hazard! Never use a rear-facing child-restraint system on the frontpassenger seat with an air bag that could deploy:Extreme Hazard! Do not use a rearward facing child restraint on a seat protected byan airbag in front of it!Even in a moderate collision, the child-restraint system can be hit by a deploying airbag and moved violently backward resulting in serious injury or death to the child. Ifyour vehicle is equipped with a front passenger air bag deactivation switch, always setthe switch to the OFF position when installing a rear-facing child-restraint system onthe front passenger seat.
Vehicles with a front passenger air bag have a warning label attached as shown below.The warning label reminds you not to put a rear-facing child-restraint system on thefront passenger seat at any time.
Essential Safety Equipment
Child Restraint
2-33
CX-7_8AP5-EE-09F_Edition1 Page47Monday, June 15 2009 3:25 PM
Form No.8AP5-EE-09F

Black plate (48,1)
WARNINGDo not install a front-facing child-restraint system on the front passenger seat unlessit is unavoidable:In a collision, the force of a deploying air bag could cause serious injury or death tothe child. If installing a front-facing child-restraint system on the front passenger seatis unavoidable, move the front passenger seat as far back as possible and make surethat the front passenger air bag deactivation switch is in the OFF position. Refer toFront Passenger Air Bag Deactivation Switch (page 2-55).
Do not allow a child or anyone to lean over or against the side window of a vehiclewith side and curtain air bags:It is dangerous to allow anyone to lean over or against the side window, the area ofthe front passenger seat, the front and rear window pillars and the roof edge alongboth sides from which the side and curtain air bags deploy, even if a child-restraintsystem is used. The impact of inflation from a side or curtain air bag could causeserious injury or death to an out of position child. Furthermore, leaning over oragainst the front door could block the side and curtain air bags and eliminate theadvantages of supplementary protection. With the front air bag and the additional sideair bag that comes out of the front seat, the rear seat is always a better location forchildren. Take special care not to allow a child to lean over or against the sidewindow, even if the child is seated in a child-restraint system.
Never use one seat belt on more than one person at a time:Using one seat belt for more than one person at a time is dangerous. A seat belt usedin this way cannot spread the impact forces properly and the two passengers could becrushed together and seriously injured or even killed. Never use one belt for morethan one person at a time and always operate the vehicle with each occupant properlyrestrained.
Always remove the child-restraint system from the rear seat before operating theremote handle levers for the rear seat:Operating the remote handle levers while a rear-facing child-restraint system is in therear seat is dangerous. It could cause injury to a child seated in the child-restraintsystem when the seatback suddenly flips forward.
2-34
Essential Safety Equipment
Child Restraint
CX-7_8AP5-EE-09F_Edition1 Page48Monday, June 15 2009 3:25 PM
Form No.8AP5-EE-09F

Black plate (49,1)
CAUTIONA seat belt or child-restraint system can become very hot in a closed vehicle duringwarm weather. To avoid burning yourself or a child, check them before you or your childtouches them.
NOTE
Your Mazda is equipped with ISOFIX anchors for attachment of specially designedchild-restraint systems in the rear. When using these anchors to secure a child-restraintsystem, refer to “ISOFIX Anchor-Secured Child-Restraint Systems” (page 2-47).
Essential Safety Equipment
Child Restraint
2-35
CX-7_8AP5-EE-09F_Edition1 Page49Monday, June 15 2009 3:25 PM
Form No.8AP5-EE-09F
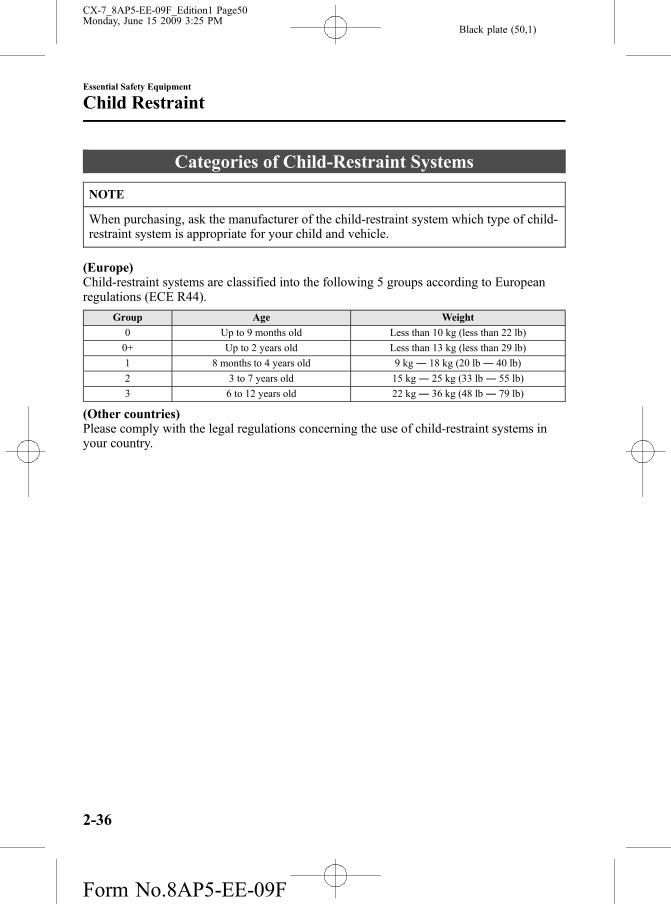
Black plate (50,1)
Categories of Child-Restraint Systems
NOTE
When purchasing, ask the manufacturer of the child-restraint system which type of child-restraint system is appropriate for your child and vehicle.
(Europe)Child-restraint systems are classified into the following 5 groups according to Europeanregulations (ECE R44).
Group Age Weight
0 Up to 9 months old Less than 10 kg (less than 22 lb)
0+ Up to 2 years old Less than 13 kg (less than 29 lb)
1 8 months to 4 years old 9 kg ― 18 kg (20 lb ― 40 lb)
2 3 to 7 years old 15 kg― 25 kg (33 lb ― 55 lb)
3 6 to 12 years old 22 kg― 36 kg (48 lb ― 79 lb)
(Other countries)Please comply with the legal regulations concerning the use of child-restraint systems inyour country.
2-36
Essential Safety Equipment
Child Restraint
CX-7_8AP5-EE-09F_Edition1 Page50Monday, June 15 2009 3:25 PM
Form No.8AP5-EE-09F

Black plate (51,1)
Child-Restraint SystemInstallation Position
(Europe)In this owner's manual, explanation ofchild-restraint systems secured with seatbelts is provided for the following threetypes of popular child-restraint systems:baby seat, child seat, junior seat.
NOTE
l Installation position is determined bythe type of child-restraint system.Always read the manufacturer'sinstructions and this owner's manualcarefully.
l Due to variations in the design ofchild-restraint systems, vehicle seatsand seat belts, all child-restraintsystems may not fit all seatingpositions. Before purchasing a child-restraint system is tested in thespecific vehicle seating position (orpositions) where it is intended to beused. If a previously purchasedchild-restraint system does not fit,you may need to purchase a differentone that will.
Baby seatEqual to Group 0 and 0 of Europeanregulations (ECE R44).
Child seatEqual to Group 1 of European regulations(ECE R44).
Essential Safety Equipment
Child Restraint
2-37
CX-7_8AP5-EE-09F_Edition1 Page51Monday, June 15 2009 3:25 PM
Form No.8AP5-EE-09F

Black plate (52,1)
Junior seatEqual to Group 2 and 3 of Europeanregulations (ECE R44).
(Other countries)Please comply with the legal regulationsconcerning the use of child-restraintsystems in your country.
qBaby Seat Installation Position
A baby seat is used in the rear-facingposition only.
Refer to the table, “Child-RestraintSystem Suitability for Various SeatPositions” for baby seat installationposition (page 2-42).
WARNINGAlways install a baby seat in thecorrect seat position:Installing a baby seat without firstconsulting the table “Child-RestraintSystem Suitability for Various SeatPositions” is dangerous. A baby seatinstalled on the wrong seat positioncannot be properly secured. In acollision, the child could hit somethingor someone in the vehicle and beseriously injured or even killed.
Never use a rear-facing child-restraintsystem on the front passenger seatprotected by an air bag:Extreme Hazard! Do not use arearward facing child restraint on aseat protected by an airbag in front ofit!The child-restraint system can be hitby the deploying air bag and knockedout of position. A child in the child-restraint system could be seriouslyinjured or killed. If your vehicle isequipped with a front passenger airbag deactivation switch, always set theswitch to the OFF position if installinga rear-facing child-restraint system onthe front passenger seat isunavoidable.
2-38
Essential Safety Equipment
Child Restraint
CX-7_8AP5-EE-09F_Edition1 Page52Monday, June 15 2009 3:25 PM
Form No.8AP5-EE-09F

Black plate (53,1)
qChild Seat Installation Position
A child seat is used in either the front orrear-facing position depending on the ageand size of the child. When installing achild-restraint system, follow themanufacturer's instructions that areappropriate to the age and size of thechild.Refer to the table, “Child-RestraintSystem Suitability for Various SeatPositions” for child seat installationposition (page 2-42).
Rear-facing type
WARNINGAlways install a front-facing child seatin the correct seat position:Installing a front-facing child seatwithout first consulting the table“Child-Restraint System Suitability forVarious Seat Positions” is dangerous.A front-facing child seat installed onthe wrong seat position cannot beproperly secured. In a collision, thechild could hit something or someonein the vehicle and be seriously injuredor even killed.
WARNINGNever use a rear-facing child-restraintsystem on the front passenger seatprotected by an air bag:Extreme Hazard! Do not use arearward facing child restraint on aseat protected by an airbag in front ofit!The child-restraint system can be hitby the deploying air bag and knockedout of position. A child in the child-restraint system could be seriouslyinjured or killed. If your vehicle isequipped with a front passenger airbag deactivation switch, always set theswitch to the OFF position if installinga rear-facing child-restraint system onthe front passenger seat isunavoidable.
Essential Safety Equipment
Child Restraint
2-39
CX-7_8AP5-EE-09F_Edition1 Page53Monday, June 15 2009 3:25 PM
Form No.8AP5-EE-09F

Black plate (54,1)
Front-facing type
WARNINGNever install a front-facing child seatin the wrong seat position:Installing a front-facing child seatwithout first consulting the table“Child-Restraint System Suitability forVarious Seat Positions” is dangerous.A front-facing child seat installed inthe wrong seat position cannot beproperly secured. In a collision, thechild could hit something or someonein the vehicle and be seriously injuredor even killed.
Do not install a front-facing child-restraint system on the front passengerseat unless it is unavoidable:In a collision, the force of a deployingair bag could cause serious injury ordeath to the child. If installing a front-facing child-restraint system on thefront passenger seat is unavoidable,move the front passenger seat as farback as possible and make sure thatthe front passenger air bagdeactivation switch is in the OFFposition. Refer to Front Passenger AirBag Deactivation Switch (page 2-55).
qJunior Seat Installation Position
A junior seat is used in the front-facingposition only.
Refer to the table, “Child-RestraintSystem Suitability for Various SeatPositions” for junior seat installationposition (page 2-42).
WARNINGAlways install a junior seat in thecorrect seat position:Installing a junior seat without firstconsulting the table “Child-RestraintSystem Suitability for Various SeatPositions” is dangerous. A junior seatinstalled on the wrong seat positioncannot be properly secured. In acollision, the child could hit somethingor someone in the vehicle and beseriously injured or even killed.
2-40
Essential Safety Equipment
Child Restraint
CX-7_8AP5-EE-09F_Edition1 Page54Monday, June 15 2009 3:25 PM
Form No.8AP5-EE-09F

Black plate (55,1)
WARNINGDo not install a front-facing child-restraint system on the front passengerseat unless it is unavoidable:In a collision, the force of a deployingair bag could cause serious injury ordeath to the child. If installing a front-facing child-restraint system on thefront passenger seat is unavoidable,move the front passenger seat as farback as possible and make sure thatthe front passenger air bagdeactivation switch is in the OFFposition. Refer to Front Passenger AirBag Deactivation Switch (page 2-55).
Essential Safety Equipment
Child Restraint
2-41
CX-7_8AP5-EE-09F_Edition1 Page55Monday, June 15 2009 3:25 PM
Form No.8AP5-EE-09F

Black plate (56,1)
Child-Restraint System Suitability for Various SeatPositions Table
(Europe)Provided information in the table shows your child-restraint system suitability for variousseating position. For installation suitability of other manufacturer child-restraint system,carefully consult the manufacturer's instructions which accompany the child-restraintsystem.
ISOFIX anchor-secured child-restraint systems
Mass group Size Class FixtureVehicle ISOFIX positions
Rear Outboard
Carrycot
F ISO/L1 X
G ISO/L2 X
(1) X
GROUP 0, Less than 10 kg(less than 22 lb)
E ISO/R1 IL
(1) X
GROUP 0 , Less than 13kg (less than 29 lb)
E ISO/R1 IL
D ISO/R2 IL
C ISO/R3 IL
(1) X
GROUP 1, 9 kg ― 18 kg(20 lb― 40 lb)
D ISO/R2 IL
C ISO/R3 IL
B ISO/F2 IUF
B1 ISO/F2X IUF
A ISO/F3 IUF
(1) X
GROUP 2, 15 kg ― 25 kg(33 lb― 55 lb)
(1) X
GROUP 3, 22 kg ― 36 kg(48 lb― 79 lb)
(1) X
(1) For the CRS which do not carry the ISO/XX size class identification (A to G), for theapplicable mass group, the car manufacturer shall indicate the vehicle specific ISOFIXchild-restraint system(s) recommended for each position.Key of letters to be inserted in the above table:IUF = suitable for ISOFIX forward child-restraints systems of universal category approvedfor use in this mass group.IL = suitable for particular ISOFIX child-restraint systems (CRS).These ISOFIX CRS are those of the “specific vehicle”, “restricted” or “semi-universal”categories.X = ISOFIX position not suitable for ISOFIX child-restraint systems in this mass groupand/or this size class.
2-42
Essential Safety Equipment
Child Restraint
CX-7_8AP5-EE-09F_Edition1 Page56Monday, June 15 2009 3:25 PM
Form No.8AP5-EE-09F

Black plate (57,1)
Except ISOFIX anchor-secured child-restraint systems
Systemgroup
Agegroup
Weightgroup
Child-re-straintsystemtype
Position
Front passenger seat
Rear seat(out-board)
Rear seat(centre)
Withoutair bagdeactiva-tionswitch
With air bagdeactivation switch
ON OFF
GROUP 0Up to 9monthsold
Less than10 kg
(less than22 lb)
Baby seat Rear-facing - U X U U
GROUP0
Up to 2years old
Less than13 kg
(less than29 lb)
Baby seat Rear-facing - U X U U
GROUP 18 monthsto 4 years
old
9 kg―18 kg
(20 lb―40 lb)
Child seat Front-facing - U X U U
GROUP 23 to 7
years old
15 kg―25 kg
(33 lb―55 lb)
Juniorseat
Front-facing - U X U U
GROUP 36 to 12years old
22 kg―36 kg
(48 lb―79 lb)
Juniorseat
Front-facing - U X U U
Key of letters to be inserted in the above table:U = Suitable for “universal” category restraints approved for use in this mass group.L1 = Suitable for Mazda genuine Baby seat approved for use in this mass group.L2 = Suitable for Mazda genuine Child seat approved for use in this mass group.L3 = Suitable for Mazda genuine Junior seat approved for use in this mass group.X = Seat position not suitable for children in this mass group.(Other countries)Please comply with the legal regulations concerning the use of child-restraint systems inyour country.
Essential Safety Equipment
Child Restraint
2-43
CX-7_8AP5-EE-09F_Edition1 Page57Monday, June 15 2009 3:25 PM
Form No.8AP5-EE-09F

Black plate (58,1)
Installing Child-RestraintSystems
First, please verify which type of rear seatbelt is equipped on your vehicle byreferring to Seat Belt Precautions (page2-17).When installing a child-restraint systemusing a seat belt, follow the manufacture'sinstructions.Also refer to the ISOFIX anchor-securedchild restraint system instructions forsecuring specially designed child-restraintsystems (page 2-47).
With automatic locking mode retractorseat belt
Refer to Rear Seat Child-Restraint SystemInstallation (Using Automatic LockingMode) on page 2-45.
Without automatic locking moderetractor seat belt
When installing a child-restraint systemthat requires a tether, verify each of theanchor bracket locations by looking at theillustrations. Route the tether strapbetween the head restraint and theseatback.
WARNINGUse the tether and tether anchor onlyfor a child-restraint system:Using the tether or tether anchor tosecure anything but a child-restraintsystem is dangerous. This couldweaken or damage the tether or tetheranchor and result in injury.
Always route the tether strap betweenthe head restraint and the seatback:Routing the tether strap on top of thehead restraint is dangerous. In acollision the tether strap could slide offthe head restraint and loosen thechild-restraint system. The child-restraint system could move whichmay result in death or injury to thechild.
Always attach the tether strap to thecorrect tether anchor position:Attaching the tether strap to theincorrect tether anchor position isdangerous. In a collision, the tetherstrap could come off and loosen thechild-restraint system. If the child-restraint system moves it could resultin death or injury to the child.
2-44
Essential Safety Equipment
Child Restraint
CX-7_8AP5-EE-09F_Edition1 Page58Monday, June 15 2009 3:25 PM
Form No.8AP5-EE-09F

Black plate (59,1)
Outboard
Tether strap
For rightFor left
Centre
Cover
qRear Seat Child-Restraint SystemInstallation (Using AutomaticLocking Mode)
Follow these instructions when using theautomatic locking mode for a child-restraint system.
1. Make sure the seatback is securelylatched by pushing it back until it isfully locked.
2. Raise the head restraint to the toplocked position.Refer to Head Restraints on page 2-14.
3. Secure the child-restraint system withthe lap portion of the lap/shoulder belt.See the instructions on the child-restraint system for belt routinginstructions.
4. To get the retractor into the automaticlocking mode, pull the shoulder beltportion of the seat belt until the entirelength of the belt is out of the retractor.
5. Push the child-restraint system firmlyinto the vehicle seat. Be sure the beltretracts as snugly as possible. Clickingfrom the retractor will be heard duringretraction if the system is in theautomatic locking mode. If the beltdoes not lock the seat down tight,repeat this step.
Essential Safety Equipment
Child Restraint
2-45
CX-7_8AP5-EE-09F_Edition1 Page59Monday, June 15 2009 3:25 PM
Form No.8AP5-EE-09F

Black plate (60,1)
NOTE
Inspect this function before each use ofthe child-restraint system. You shouldnot be able to pull the shoulder belt outof the retractor while the system is inthe automatic locking mode. When youremove the child-restraint system, besure the belt fully retracts to return thesystem to emergency locking modebefore occupants use the seat belts.
6. If your child-restraint system requiresthe use of a tether strap, refer to themanufacturer's instructions to hook andtighten the tether strap after raising thehead restraint.
Anchor bracket location
Tether strap position
Forward
Tether strap
WARNINGUse the tether and tether anchor onlyfor a child-restraint system:Child-restraint system anchorages aredesigned to withstand only those loadsimposed by correctly installed child-restraint systems.Under nocircumstances are they to be used foradult seat belts, harnesses, or forattaching other items or equipment tothe vehicle.
Always route the tether strap betweenthe head restraint and the seatback:Routing the tether strap on top of thehead restraint is dangerous. In acollision the tether strap could slide offthe head restraint and loosen thechild-restraint system. The child-restraint system could move whichmay result in death or injury to thechild.
Always attach the tether strap to thecorrect tether anchor position:Attaching the tether strap to theincorrect tether anchor position isdangerous. In a collision, the tetherstrap could come off and loosen thechild-restraint system. If the child-restraint system moves it could resultin death or injury to the child.
2-46
Essential Safety Equipment
Child Restraint
CX-7_8AP5-EE-09F_Edition1 Page60Monday, June 15 2009 3:25 PM
Form No.8AP5-EE-09F

Black plate (61,1)
ISOFIX Anchor-SecuredChild-Restraint Systems
Your Mazda is equipped with ISOFIXanchors for attachment of speciallydesigned child-restraint systems in theoutboard rear seat.Contact your Authorised Mazda Dealerfor further information on the speciallydesigned child-restraint system.
WARNINGFollow the manufacturer'sinstructions for the use of the child-restraint system:An unsecured child-restraint system isdangerous. In a sudden stop or acollision it could move causing seriousinjury or death to the child or otheroccupants. Make sure any child-restraint system is properly secured inplace according to the manufacturer'sinstructions.
Make sure the child-restraint system isproperly secured:A child-restraint system that is notsecured is dangerous. In a sudden stopor collision, it can become a projectileand hit someone, causing seriousinjury. When not in use, remove itfrom the vehicle, put it in the luggagecompartment or at least make sure it issecurely fastened to the ISOFIXanchors.
WARNINGMake sure there are no seat belts orforeign objects near or around theISOFIX anchor-secured child-restraint system:Not following the child-restraintsystem manufacturer's instructionswhen installing the child-restraintsystem is dangerous. If seat belts or aforeign object prevent the child-restraint system from being securelyattached to the ISOFIX anchors andthe child-restraint system is installedimproperly, the child-restraint systemcould move in a sudden stop orcollision causing serious injury ordeath to the child or other occupants.When installing the child-restraintsystem, make sure there are no seatbelts or foreign objects near or aroundthe ISOFIX anchors. Always followthe child-restraint systemmanufacturer's instructions.
Essential Safety Equipment
Child Restraint
2-47
CX-7_8AP5-EE-09F_Edition1 Page61Monday, June 15 2009 3:25 PM
Form No.8AP5-EE-09F

Black plate (62,1)
qChild-Restraint SystemInstallation Procedure
1. First slide the front seat as far back aspossible and then slide it more than 5notches (50 mm) forward, near thecentre of the seat sliding area, to allowclearance for installing the child-restraint system (page 2-2).
More than 5 notches (50 mm)
End of the seat sliding area
2. Make sure the seatback is securelylatched by pushing it back until it isfully locked.
3. Expand the area between the seatbottom and the seatback slightly toverify the locations of the ISOFIXanchor.
NOTE
The markings above the ISOFIX anchorindicate the locations of the ISOFIXanchor for the attachment of a child-restraint system.
4. Raise the head restraint to the toplocked position.Refer to Head Restraints on page 2-14.
5. Secure the child-restraint system usingthe ISOFIX anchor, following thechild-restraint system manufacturer'sinstruction.
6. If your child-restraint system cameequipped with a tether, that probablymeans it is very important to properlysecure the tether for child safety. Pleasecarefully follow the child-restraintsystem manufacturer's instructionswhen installing tethers.
Anchor bracket location
2-48
Essential Safety Equipment
Child Restraint
CX-7_8AP5-EE-09F_Edition1 Page62Monday, June 15 2009 3:25 PM
Form No.8AP5-EE-09F

Black plate (63,1)
Tether strap position
Forward
Tether strap
WARNINGUse the tether and tether anchor onlyfor a child-restraint system:Child-restraint system anchorages aredesigned to withstand only those loadsimposed by correctly installed child-restraint systems. Under nocircumstances are they to be used foradult seat belts, harnesses, or forattaching other items or equipment tothe vehicle.
Always route the tether strap betweenthe head restraint and the seatback:Routing the tether strap on top of thehead restraint is dangerous. In acollision the tether strap could slide offthe head restraint and loosen thechild-restraint system. The child-restraint system could move whichmay result in death or injury to thechild.
WARNINGAlways attach the tether strap to thecorrect tether anchor position:Attaching the tether strap to theincorrect tether anchor position isdangerous. In a collision, the tetherstrap could come off and loosen thechild-restraint system. If the child-restraint system moves it could resultin death or injury to the child.
Essential Safety Equipment
Child Restraint
2-49
CX-7_8AP5-EE-09F_Edition1 Page63Monday, June 15 2009 3:25 PM
Form No.8AP5-EE-09F

Black plate (64,1)
Supplementary Restraint System (SRS) PrecautionsThe front and side supplementary restraint systems (SRS) include 6 air bags. Please verifythe air bags equipped on your vehicle by locating the “SRS AIRBAG” locationindicators. These indicators are visible in the area where the air bags are installed.The air bags are installed in the following locations:
l The steering wheel hub (driver air bag)
l The front passenger instrument panel (front passenger air bag)
l The outboard sides of the front seatbacks (side air bags)
l The front and rear window pillars, and the roof edge along both sides (curtain air bags)
The air bag supplementary restraint systems are designed to provide supplementaryprotection in certain situations so seat belts are always important in the following ways:
Without seat belt usage, the air bags cannot provide adequate protection during an accident.Seat belt usage is necessary to:
l Keep the occupant from being thrown into an inflating air bag.
l Reduce the possibility of injuries during an accident that is not designed for air baginflation, such as roll-over or rear impact.
l Reduce the possibility of injuries in frontal, near frontal, side collisions that are notsevere enough to activate the air bags.
l Reduce the possibility of being thrown from your vehicle.
l Reduce the possibility of injuries to lower body and legs during an accident because theair bags provide no protection to these parts of the body.
l Hold the driver in a position which allows better control of the vehicle.
A child who is too small to use a seat belt must be properly secured using a child-restraintsystem (page 2-31).
Carefully consider which child-restraint system is necessary for your child and follow theinstallation directions in this Owner's Manual as well as the child-restraint systemmanufacturer's instructions.
2-50
Essential Safety Equipment
SRS Air Bags
CX-7_8AP5-EE-09F_Edition1 Page64Monday, June 15 2009 3:25 PM
Form No.8AP5-EE-09F

Black plate (65,1)
WARNINGSeat belts must be worn in air bag equipped vehicles:Depending only on the air bags for protection during an accident is dangerous. Alone,air bags may not prevent serious injuries. The appropriate air bags can be expected toinflate only in the first accident, such as frontal, near frontal, side collisions that areat least moderate. Vehicle occupants should always wear seat belts.
Children should not ride in the front passenger seat:Placing a child, 12 years or under, in the front seat is dangerous. The child could behit by a deploying air bag and be seriously injured or even killed. A sleeping child ismore likely to lean against the door and be hit by the side air bag in a moderate, right-side collision. Whenever possible, always secure a child 12 years and under on therear seat with an appropriate child-restraint system for the child's age and size.
Extreme Hazard! Never use a rear-facing child-restraint system on the frontpassenger seat with an air bag that could deploy:Extreme Hazard! Do not use a rearward facing child restraint on a seat protected byan airbag in front of it!Even in a moderate collision, the child-restraint system can be hit by a deploying airbag and moved violently backward resulting in serious injury or death to the child. Ifyour vehicle is equipped with a front passenger air bag deactivation switch, always setthe switch to the OFF position when installing a rear-facing child-restraint system onthe front passenger seat.
Do not sit too close to the driver and front passenger air bags:Sitting too close to the driver and front passenger air bag modules or placing hands orfeet on them is extremely dangerous. The driver and front passenger air bags inflatewith great force and speed. Serious injuries could occur if someone is too close. Thedriver should always hold onto only the rim of the steering wheel. The front seatpassenger should keep both feet on the floor. Front seat occupants should adjust theirseats as far back as possible and always sit upright against the seatbacks with seatbelts worn properly.
Essential Safety Equipment
SRS Air Bags
2-51
CX-7_8AP5-EE-09F_Edition1 Page65Monday, June 15 2009 3:25 PM
Form No.8AP5-EE-09F

Black plate (66,1)
WARNINGSit in the centre of the seat and wear seat belts properly:Sitting too close to the side air bag modules or placing hands on them, or sleeping upagainst the door or hanging out the windows is extremely dangerous. The side andcurtain air bags inflate with great force and speed directly expanding along the dooron the side the car is hit. Serious injury could occur if someone is sitting too close tothe door or leaning against a window, or if rear seat occupants grab the sides of thefront seatbacks. Give the side and curtain air bags room to work by sitting in thecentre of the seat while the vehicle is moving with seat belts worn properly.
Do not attach objects on or around the area where driver and front passenger air bagsdeploy:Attaching an object to the driver and front passenger air bag modules or placingsomething in front of them is dangerous. In an accident, an object could interfere withair bag inflation and injure the occupants.
Do not attach objects on or around the area where a side air bag deploys:Attaching things to the front seat in such a way as to cover the outboard side of theseat in any way is dangerous. In an accident the object could interfere with the side airbag, which inflates from the outboard side of the front seats, impeding the addedprotection of the side air bag system or redirecting the air bag in a way that isdangerous. Furthermore, the bag could be cut open releasing the gas.Do not hang net bags, map pouches or backpacks with side straps on the front seats.Never use seat covers on the front seats. Always keep the side air bag modules in yourfront seats free to deploy in the event of a side collision.
Do not attach objects on or around the area where a curtain air bag deploys:Attaching objects to the areas where the curtain air bag activates such as on thewindscreen glass, side door glass, front and rear window pillars and along the roofedge and assist grips is dangerous. In an accident the object could interfere with thecurtain air bag, which inflates from the front and rear window pillars and along theroof edge, impeding the added protection of the curtain air bag system or redirectingthe air bag in a way that is dangerous. Furthermore, the bag could be cut openreleasing the gas.Do not place hangers or any other objects on the assist grips. When hanging clothes,hang them on the coat hook directly. Always keep the curtain air bag modules free todeploy in the event of a side collision.
2-52
Essential Safety Equipment
SRS Air Bags
CX-7_8AP5-EE-09F_Edition1 Page66Monday, June 15 2009 3:25 PM
Form No.8AP5-EE-09F

Black plate (67,1)
WARNINGDo not place luggage or other objects under the front seats:Placing luggage or other objects under the front seats is dangerous. The componentsessential to the supplementary restraint system could be damaged, and in the event ofa side collision, the appropriate air bags may not deploy, which could result in deathor serious injury. To prevent damage to the components essential to the supplementaryrestraint system, do not place luggage or other objects under the front seats.
Do not touch the components of the supplementary restraint system after the air bagshave inflated:Touching the components of the supplementary restraint system after the air bagshave inflated is dangerous. Immediately after inflation, they are very hot. You couldget burned.
Never install any front-end equipment to your vehicle:Installation of front-end equipment, such as frontal protection bar (kangaroo bar, bullbar, push bar, or other similar devices), snowplow, or winches, is dangerous. The airbag crash sensor system could be affected. This could cause air bags to inflateunexpectedly, or it could prevent the air bags from inflating during an accident. Frontoccupants could be seriously injured.
Do not modify the suspension:Modifying the vehicle suspension is dangerous. If the vehicle's height or thesuspension is modified, the vehicle will be unable to accurately detect a collisionresulting in incorrect or unexpected air bag deployment and the possibility of seriousinjuries.
Do not modify the supplementary restraint system:Modifying the components or wiring of the supplementary restraint system isdangerous. You could accidentally activate it or make it inoperable. Do not make anymodifications to the supplementary restraint system. This includes installing trim,badges, or anything else over the air bag modules. It also includes installing extraelectrical equipment on or near system components or wiring. An expert repairer, werecommend an Authorised Mazda Repairer can provide the special care needed in theremoval and installation of front seats. It is important to protect the air bag wiring andconnections to assure that the bags do not accidentally deploy and that the seats retainan undamaged air bag connection.
Essential Safety Equipment
SRS Air Bags
2-53
CX-7_8AP5-EE-09F_Edition1 Page67Monday, June 15 2009 3:25 PM
Form No.8AP5-EE-09F

Black plate (68,1)
NOTE
l When an air bag deploys, a loud inflation noise can be heard and some smoke will bereleased. Neither is likely to cause injury, however, the texture of the air bags maycause light skin injuries on body parts not covered with clothing through friction.
l Should you sell your Mazda, we urge you to tell the new owner of its air bag systemsand that familiarization with all instructions about them, from the Owner's Manual, isimportant.
l This highly-visible label warns against the use of rear-facing child-restraint systems inthe front seat.
2-54
Essential Safety Equipment
SRS Air Bags
CX-7_8AP5-EE-09F_Edition1 Page68Monday, June 15 2009 3:25 PM
Form No.8AP5-EE-09F

Black plate (69,1)
Front Passenger Air Bag Deactivation Switchí
WARNINGDo not deactivate the front passenger air bag unnecessarily:Unnecessary deactivation of the front passenger air bag is dangerous. If turned offunnecessarily, the front passenger will not receive the added protection of the air bag.Serious injuries or even death could occur. With the exception of installing a child-restraint system on the front passenger seat, do not turn the air bag deactivationswitch to the OFF position.
Your vehicle is equipped with a front passenger air bag deactivation switch.The front passenger air bag deactivation switch is located in the position shown in thefigure below.
The front passenger air bag deactivation switch should be used to deactivate the frontpassenger front and side air bags and also the front passenger seat belt pretensioner systemif installing a child-restraint system on the front passenger seat.When installing a child-restraint system on the front passenger seat, refer to the table,“Child-Restraint System Suitability for Various Seat Positions Table” (page 2-42).
Essential Safety Equipment
SRS Air Bags
2-55íSome models.
CX-7_8AP5-EE-09F_Edition1 Page69Monday, June 15 2009 3:25 PM
Form No.8AP5-EE-09F

Black plate (70,1)
The front passenger air bag deactivation switch turns off the front passenger front and sideair bags and also the front seat belt pretensioner system. Make sure the front passenger airbag deactivation switch is in the ON position except when a child-restraint system isinstalled on the front passenger seat.When the ignition switch is turned to the ON position, the front passenger air bagdeactivation indicator light illuminates regardless of the front passenger air bagdeactivation switch conditions. The indicator light turns off after a specified period of time,then turns on/off depending on the conditions as indicated in the following table.
Front Passenger Air BagDeactivation Switch
Front Passenger Air BagDeactivation Indicator Light
Front Passenger Frontand Side Air Bag
Operation
Front Passenger SeatBelt Pretensioner
System
OFF position
ON Deactivate Deactivate
ON position
OFF Ready Ready
2-56
Essential Safety Equipment
SRS Air Bags
CX-7_8AP5-EE-09F_Edition1 Page70Monday, June 15 2009 3:25 PM
Form No.8AP5-EE-09F

Black plate (71,1)
NOTE
Have the front passenger air bag deactivation switch inspected by an expert repairer, werecommend an Authorised Mazda Repairer if any of these conditions occur:
l The front passenger air bag deactivation indicator light does not illuminate for aspecified period of time when the ignition switch is turned to the ON position.
l The front passenger air bag deactivation indicator light does not remain illuminatedwhen the ignition switch is turned to the ON position and the front passenger air bagdeactivation switch is in the OFF position.
l The front passenger air bag deactivation indicator light remains illuminated when theignition switch is turned to the ON position and the front passenger air bagdeactivation switch is in the ON position.
qTo Deactivate the Front Passenger Air Bag
Before driving, always confirm that the front passenger air bag deactivation switch is in theappropriate position according to your requirements.
WARNINGDo not leave the key in the front passenger air bag deactivation switch:(With advanced key)Unintentional deactivation of the front passenger air bag is dangerous. In anaccident, the front passenger will not be properly protected. Serious injuries or evendeath could occur. To avoid unintentional deactivation, always use the auxiliary keystored in the advanced key currently being used to operate the front passenger air bagdeactivation switch. After deactivating the air bag, put the auxiliary key back into theadvanced key. That way you will not leave the key in the front passenger air bagdeactivation switch.(Without advanced key)Unintentional deactivation of the front passenger air bag is dangerous. In anaccident, the front passenger will not be properly protected. Serious injuries or evendeath could occur. To avoid unintentional deactivation, always use the same key tooperate the front passenger air bag deactivation switch and the ignition switch, thatway you will not leave the key in the front passenger air bag deactivation switch.
Essential Safety Equipment
SRS Air Bags
2-57
CX-7_8AP5-EE-09F_Edition1 Page71Monday, June 15 2009 3:25 PM
Form No.8AP5-EE-09F

Black plate (72,1)
1. Insert the key into the front passenger air bag deactivation switch and turn the keyclockwise until the key points to OFF.
2. Remove the key.
3. Make sure the air bag deactivation indicator light remains illuminated when the ignitionis in the ON position.
NOTE
(With advanced key)After operating the front passenger air bag deactivation switch, put the auxiliary keyback into the advanced key.
The front passenger front and side air bags and also the seat belt pretensioner system willremain deactivated until the front passenger air bag deactivation switch is turned to the ONposition.
2-58
Essential Safety Equipment
SRS Air Bags
CX-7_8AP5-EE-09F_Edition1 Page72Monday, June 15 2009 3:25 PM
Form No.8AP5-EE-09F

Black plate (73,1)
qTo Ready the Front Passenger Air Bag
Before driving, always confirm that the front passenger air bag deactivation switch is in theappropriate position according to your requirements.
1. Insert the key into the front passenger air bag deactivation switch and turn the keyanticlockwise until the key points to ON.
2. Remove the key.
3. Make sure the air bag deactivation indicator light turns off after the ignition switch isturned to the ON position.
NOTE
(With advanced key)After operating the front passenger air bag deactivation switch, put the auxiliary keyback into the advanced key.
Essential Safety Equipment
SRS Air Bags
2-59
CX-7_8AP5-EE-09F_Edition1 Page73Monday, June 15 2009 3:25 PM
Form No.8AP5-EE-09F

Black plate (74,1)
Supplementary Restraint System Components
Driver/Front passenger inflators and air bagsCrash sensors, and diagnostic module (SAS unit)Front seat belt pretensioners (page 2-23)Front air bag sensorSide crash sensorsAir bag/front seat belt pretensioner system warning light (page 2-63)Side and curtain inflators and air bagsFront passenger air bag deactivation indicator light (page 2-55)í
Front passenger air bag deactivation switch (page 2-55)í
2-60
Essential Safety Equipment
íSome models.
SRS Air Bags
CX-7_8AP5-EE-09F_Edition1 Page74Monday, June 15 2009 3:25 PM
Form No.8AP5-EE-09F

Black plate (75,1)
How the SRS Air Bags WorkYour Mazda is equipped with the following types of SRS air bags. SRS air bags aredesigned to work together with the seat belts to help to reduce injuries during an accident.The SRS air bags are designed to provide further protection for passengers in addition tothe seat belt functions. Be sure to wear seat belts properly.
qFront Seat Belt Pretensioners
The front seat belt pretensioners are designed to deploy in moderate or severe frontal, nearfrontal collisions.
qDriver Air Bag
The driver's air bag is mounted in the steering wheels.When air bag crash sensors detect a frontal impact of greater than moderate force, thedriver's air bag inflates quickly helping to reduce injury mainly to the driver's head or chestcaused by directly hitting the steering wheel.
Essential Safety Equipment
SRS Air Bags
2-61
CX-7_8AP5-EE-09F_Edition1 Page75Monday, June 15 2009 3:25 PM
Form No.8AP5-EE-09F

Black plate (76,1)
qFront Passenger Air Bag
The front passenger air bag is mounted in the front passenger instrument panel.The inflation mechanism for the front passenger air bag is the same as the driver's air bag,as mentioned above.
qSide Air Bags
The side air bags are mounted in the outboard sides of the front seatbacks.When the air bag crash sensors detect a side impact of greater than moderate force, thesystem inflates the side air bag only on the side in which the vehicle was hit. The side airbag inflates quickly to reduce injury to the driver or front passenger's chest caused bydirectly hitting interior parts such as a door or window.
qCurtain Air Bags
The curtain air bags are mounted in the front and rear window pillars, and the roof edgealong both sides.When the air bag crash sensors detect a side impact of greater than moderate force, thecurtain air bag inflates quickly and helps to reduce injury mainly to the rear outboardpassenger's head caused by directly hitting interior parts such as a door or window.
2-62
Essential Safety Equipment
SRS Air Bags
CX-7_8AP5-EE-09F_Edition1 Page76Monday, June 15 2009 3:25 PM
Form No.8AP5-EE-09F

Black plate (77,1)
In a side impact:Greater than moderate impact to one side of the vehicle will cause the curtain air bag onthat side only to inflate.
The only one side of curtain air bag will deploy only on the side the vehicle receives the force of the impact.
qAir Bag/Front Seat Belt Pretensioner System Warning Light
If the air bag/front seat belt pretensioner system is working properly, the warning lightilluminates when the ignition switch is turned to the ON position or after the engine iscranked. The warning light turns off after a specified period of time.
A system malfunction is indicated if the warning light constantly flashes, constantlyilluminates or does not illuminate at all when the ignition switch is turned to the ONposition. If any of these occur, consult an expert repairer, we recommend an AuthorisedMazda Repairer as soon as possible. The system may not work in an accident.
WARNINGNever tamper with the air bag/pretensioner systems and always have an expertrepairer, we recommend an Authorised Mazda Repairer perform all servicing andrepairs:Self-servicing or tampering with the systems is dangerous. An air bag/pretensionercould accidentally activate or become disabled causing serious injury or death.
Essential Safety Equipment
SRS Air Bags
2-63
CX-7_8AP5-EE-09F_Edition1 Page77Monday, June 15 2009 3:25 PM
Form No.8AP5-EE-09F

Black plate (78,1)
qAir Bag/Front Seat Belt Pretensioner System Warning Beep
If a malfunction is detected in the air bag/front seat belt pretensioner systems and thewarning light, a warning beep sound will be heard for about 5 seconds every minute.
The air bag and seat belt pretensioner system warning beep sound will continue to be heardfor approximately 35 minutes.Have your vehicle inspected at an expert repairer, we recommend an Authorised MazdaRepairer as soon as possible.
WARNINGDo not drive the vehicle with the air bag/front seat belt pretensioner system warningbeep sounding:Driving the vehicle with the air bag/front seat belt pretensioner system warning beepsounding is dangerous. In a collision, the air bags and the front seat belt pretensionersystem will not deploy and this could result in death or serious injury.Contact an expert repairer, we recommend an Authorised Mazda Repairer to have thevehicle inspected as soon as possible.
2-64
Essential Safety Equipment
SRS Air Bags
CX-7_8AP5-EE-09F_Edition1 Page78Monday, June 15 2009 3:25 PM
Form No.8AP5-EE-09F

Black plate (79,1)
SRS Air Bag Deployment CriteriaThis chart indicates the applicable SRS equipment that will deploy depending on the typeof collision.(The illustrations are the representative cases of collisions.)
SRSequipment
Types of collision
A severe frontal/near frontal collision A severe side collision A rear collision
Front seatbelt
pretensionerX*1(both sides)
No air bag and front seatbelt pretensioner will beactivated in a rear collision.
Driver airbag
X
Frontpassenger air
bagX*1
Side air bag X*1(impact side only)
Curtain airbag
X (impact side only)
X : The SRS air bag equipment is designed to deploy in a collision.
*1 : The front passenger front and side air bags and the seat belt pretensioner are designedto deploy depending on the status of the front passenger air bag deactivation switch.
Essential Safety Equipment
SRS Air Bags
2-65
CX-7_8AP5-EE-09F_Edition1 Page79Monday, June 15 2009 3:25 PM
Form No.8AP5-EE-09F

Black plate (80,1)
Limitations to SRS Air BagIn severe collisions such as those described previously in “SRS Air Bag DeploymentCriteria”, the applicable SRS air bag equipment will deploy. However, in some accidents,the equipment may not deploy depending on the type of collision and its severity.
Limitations to front/near front collision detection:The following illustrations are examples of front/near front collisions that may not bedetected as severe enough to deploy the SRS air bag equipment.
Impacts involving trees or poles Frontal offset impact to the vehicle
Rear-ending or running under a truck's tail gate
Limitations to side collision detection:The following illustrations are examples of side collisions that may not be detected assevere enough to deploy the SRS air bag equipment.
Side impacts involving trees or poles Side impacts with two-wheeled vehicles
2-66
Essential Safety Equipment
SRS Air Bags
CX-7_8AP5-EE-09F_Edition1 Page80Monday, June 15 2009 3:25 PM
Form No.8AP5-EE-09F

Black plate (81,1)
Roll-over
Essential Safety Equipment
SRS Air Bags
2-67
CX-7_8AP5-EE-09F_Edition1 Page81Monday, June 15 2009 3:25 PM
Form No.8AP5-EE-09F

Black plate (82,1)
Monitoring and Maintenance
qConstant Monitoring
The following components of the air bag systems are monitored by a diagnostic system:
l Crash sensors, and diagnostic module (SAS unit)
l Front air bag sensor
l Air bag modules
l Side crash sensors
l Air bag/Front seat belt pretensioner system warning light
l Front seat belt pretensioners
l Front passenger air bag deactivation indicator lightí
l Related wiring
l Front passenger air bag deactivation switchí
The diagnostic module continuously monitors the system's readiness. This begins when theignition switch is turned to the ON position and continues while the vehicle is beingdriven.
qMaintenance
The air bag systems do not require regular maintenance. But if any of the following occurs,take your vehicle to an Authorised Mazda Repairer as soon as possible:
l The air bag system warning light flashes.
l The air bag system warning light remains illuminated.
l The air bag system warning light does not illuminate when the ignition switch is turnedto the ON position.
l The air bag system warning beep sound is heard.
l The air bags have deployed.
2-68
Essential Safety Equipment
íSome models.
SRS Air Bags
CX-7_8AP5-EE-09F_Edition1 Page82Monday, June 15 2009 3:25 PM
Form No.8AP5-EE-09F

Black plate (83,1)
WARNINGDo not operate a vehicle with damaged air bag/seat belt pretensioner systemcomponents:Expended or damaged air bag/seat belt pretensioner system components must bereplaced after any collision which caused them to deploy or damage them. Only atrained expert repairer, we recommend an Authorised Mazda Repairer can fullyevaluate these systems to see that they will work in any subsequent accident. Drivingwith an expended or damaged air bag or pretensioner unit will not afford you thenecessary protection in the event of any subsequent accident which could result inserious injury or death.
Do not remove interior air bag parts:Removing any components such as the front seats, front instrument panel, the steeringwheel or parts on the front and rear window pillars and along the roof edge,containing air bag parts or sensors is dangerous. These parts contain essential air bagcomponents. The air bag could accidentally activate and cause serious injuries.Always have an Authorised Mazda Repairer remove these parts.
Dispose of the air bag properly:Improper disposal of an air bag or a vehicle with live air bags in it can be extremelydangerous. Unless all safety procedures are followed, injury can result. Ask anAuthorised Mazda Repairer how to safely dispose of an air bag or how to scrap an airbag equipped vehicle.
NOTE
Should you sell your Mazda, we urge you to tell the new owner of its supplementaryrestraint systems and that familiarization with all instructions about them, from theOwner's Manual, is important.
Essential Safety Equipment
SRS Air Bags
2-69
CX-7_8AP5-EE-09F_Edition1 Page83Monday, June 15 2009 3:25 PM
Form No.8AP5-EE-09F

Black plate (84,1)
2-70
CX-7_8AP5-EE-09F_Edition1 Page84Monday, June 15 2009 3:25 PM
Form No.8AP5-EE-09F

Black plate (85,1)
3 Knowing Your Mazda
Explanation of basic operations and controls; opening/closing and adjustmentof various parts.
Advanced Keyless Entry and Start System ................................ 3-2Advanced Keysí ...................................................................... 3-2Operation Using Advanced Keyless Functions ......................... 3-7Operation Using Advanced Key Functions ............................. 3-18Advanced Key Suspend Function ........................................... 3-20Warning and Beep Sounds ...................................................... 3-21Setting Change (Function Customization) .............................. 3-23When Warning Indicator/Beep is Activated ............................ 3-24
Doors and Locks ......................................................................... 3-25Keys ........................................................................................ 3-25Keyless Entry System ............................................................. 3-26Door Locks ............................................................................. 3-31Liftgate .................................................................................... 3-34Power Windows ...................................................................... 3-37Fuel-Filler Flap and Cap ......................................................... 3-50Bonnet ..................................................................................... 3-52Sunroofí ................................................................................. 3-53
Security System ........................................................................... 3-57Immobilizer System (with Advanced Key) ............................. 3-57Immobilizer System (without Advanced Key) ........................ 3-60Theft-Deterrent System (European models)í ......................... 3-62Theft-Deterrent System (Except European models) ................ 3-69Double Locking System (European models) .......................... 3-71
Steering Wheel and Mirrors ...................................................... 3-73Steering Wheel ........................................................................ 3-73Mirrors .................................................................................... 3-73
3-1íSome models.
CX-7_8AP5-EE-09F_Edition1 Page85Monday, June 15 2009 3:25 PM
Form No.8AP5-EE-09F
Black plate (86,1)
Advanced Keysí
The advanced keyless functions (advanced keyless entry and start system) enables thefollowing operations while the advanced key is being carried (page 3-7).
l Locking/unlocking the doors and the liftgate without operating the key.
l Starting the engine without operating the key.
Additional functions are available using the buttons on the advanced key.Refer to Operation Using Advanced Key Functions on page 3-18.
l The following operations are possible using the transmitter of the keyless entry systemfrom a distance (Lock/Unlock/Intrusion sensor cancelí button):
l Locking/unlocking the doors and the liftgate.l Opening/closing the power windows and the sunroofí.l Operating the theft-deterrent systemí.
l Locking/unlocking the doors or starting the engine using the auxiliary key.
WARNINGDo not leave the key in your vehicle with children and keep them in a place whereyour children will not find or play with them:Leaving children in a vehicle with the key is dangerous. This could result in someonebeing badly injured or even killed. Children may find these new kinds of keys to be aninteresting toy to play with and could cause the power windows or other controls tooperate, or even make the vehicle move.
Radio waves from the advanced key may affect medical equipment such aspacemakers:Before using the advanced key near people who use medical equipment, ask themedical equipment manufacturer or your physician if radio waves from the advancedkey will affect the equipment.
NOTE
l The driver must carry the advanced key to ensure the system functions properly.
l Refer to Immobilizer System (page 3-57) for information regarding keys and enginestarting.
l (With theft-deterrent system)Refer to Theft-Deterrent System (page 3-62) for information regarding keys and theprevention of vehicle and vehicle contents theft.
3-2
Knowing Your Mazda
íSome models.
Advanced Keyless Entry and Start System
CX-7_8AP5-EE-09F_Edition1 Page86Monday, June 15 2009 3:25 PM
Form No.8AP5-EE-09F

Black plate (87,1)
Intrusion sensor cancel button
Lock button
Operation indicator light Auxiliary key
Key code number plate
Unlock button
Some models.
A code number is stamped on the plate attached to the key set; detach this plate and store itin a safe place (not in the vehicle) for use if you need to make a replacement key.
Also write down the code number and keep it in another safe and handy place, but not inthe vehicle.
If your key is lost, consult your Authorised Mazda Repairer with the code number ready.
Knowing Your Mazda
Advanced Keyless Entry and Start System
3-3
CX-7_8AP5-EE-09F_Edition1 Page87Monday, June 15 2009 3:25 PM
Form No.8AP5-EE-09F

Black plate (88,1)
CAUTIONl Because the advanced key uses low-intensity radio waves, it may not functioncorrectly under the following conditions:
l The advanced key is carried with communication devices such as cellular phones.l The advanced key contacts or is covered by a metal object.l The advanced key is near electronic devices such as personal computers or cell
phones.l Non-Mazda genuine electronic equipment is installed in the vehicle.l There is equipment which discharges radio waves near the vehicle.
l The advanced key may consume battery power excessively if it receives high-intensity radio waves. Do not place the advanced key near electronic devices such astelevisions or personal computers.
l To avoid damage to the advanced key, DO NOT:
l Drop the advanced key.l Get the advanced key wet.l Disassemble the advanced key.l Expose the advanced key to high temperatures on places such as the instrument
panel or bonnet, under direct sunlight.l Place heavy objects on the advanced key.l Put the advanced key in an ultrasonic cleaner.l Put any magnetized objects close to the advanced key.
NOTE
l Battery life is about one year. Be sure to replace the battery as soon as you see thegreen KEY indicator light in the instrument cluster begin flashing for 30 seconds afterturning off the engine, otherwise, you will not be able to start the engine using theadvanced keyless start system once the battery is completely dead Refer to KEYwarning light (red) on page 5-66. If this occurs, you will have to either force-start theengine or use the auxiliary key Refer to Advanced Key Battery Dead Warning onpage 3-22.
l Additional advanced keys can be obtained at an Authorised Mazda Repairer. Up to 6advanced keys can be used with the advanced keyless functions per vehicle.
3-4
Knowing Your Mazda
Advanced Keyless Entry and Start System
CX-7_8AP5-EE-09F_Edition1 Page88Monday, June 15 2009 3:25 PM
Form No.8AP5-EE-09F

Black plate (89,1)
qAdvanced Key Maintenance
CAUTIONl Make sure the battery is installedwith the correct pole facing upward.Battery leakage could occur if it isnot installed correctly.
l When replacing the battery, becareful not to bend the electricalterminals or get oil on them. Also becareful not to get dirt in thetransmitter as it could be damaged.
l There is the danger of explosion ifthe battery is not correctly replaced.
l Replace only with the same typebattery (CR2025 or equivalent).
l Dispose of used batteries accordingto the following instructions.
l Insulate the plus and minusterminals of the battery usingcellophane or equivalent tape.
l Never disassemble.l Never throw the battery into fire
or water.l Never deform or crush.
The following conditions indicate that thebattery power is low:
l The KEY indicator light (green) flashesin the instrument cluster for about 30seconds after the engine is turned off.
l The system does not operate and theoperation indicator light on thetransmitter does not flash when thebuttons are pressed.
l The system's operational range isreduced.
Replacing the battery at an AuthorisedMazda Repairer is recommended toprevent damage to the advanced key. Ifreplacing the battery by yourself, followthe instruction below.
Replacing the advanced key battery
1. Pull out the auxiliary key.
2. Insert a flathead screwdriver into thegroove shown in the figure and rotatethe screwdriver to open the coverslightly.
Knowing Your Mazda
Advanced Keyless Entry and Start System
3-5
CX-7_8AP5-EE-09F_Edition1 Page89Monday, June 15 2009 3:25 PM
Form No.8AP5-EE-09F

Black plate (90,1)
3. Insert the flathead screwdriver into thegap between the cover and thetransmitter, and then rotate thescrewdriver to detach the cover.
4. Remove the battery cap, then removethe battery.
5. Insert a new battery with the positivepole facing up, and then cover thebattery with the battery cap.
6. Close the cover.
7. Reinsert the auxiliary key.
3-6
Knowing Your Mazda
Advanced Keyless Entry and Start System
CX-7_8AP5-EE-09F_Edition1 Page90Monday, June 15 2009 3:25 PM
Form No.8AP5-EE-09F

Black plate (91,1)
CAUTIONl Be careful not to allow the rubberring shown in the figure to bescratched or damaged.
l If the rubber ring detaches, reattachit before inserting a new battery.
Rubber ring
qService
If you have a problem with the advancedkeyless functions, consult an expertrepairer, we recommend an AuthorisedMazda Repairer.
If your advanced key is lost or stolen,bring all remaining advanced keys to anAuthorised Mazda Repairer as soon aspossible for a replacement and to makethe lost or stolen advanced keyinoperative.
CAUTIONChanges or modifications not expresslyapproved by the party responsible forcompliance could void the user'sauthority to operate the equipment.
Operation Using AdvancedKeyless Functions
qOperational Range
The system operates only when the driveris in the vehicle or within operationalrange while the advanced key is beingcarried.
NOTE
When the battery power is low, or inplaces where there are high-intensityradio waves or noise, the operationalrange may become narrower or thesystem may not operate.
Locking, unlocking the doors and theliftgate
The operational range for locking/unlocking the doors is an area of up to 80cm (31 in) from the centre of the frontdoor handles.The operational range for locking/unlocking the liftgate is an area of up to80 cm (31 in) from the centre of theliftgate.
Exterior transmitter
Operational range
Knowing Your Mazda
Advanced Keyless Entry and Start System
3-7
CX-7_8AP5-EE-09F_Edition1 Page91Monday, June 15 2009 3:25 PM
Form No.8AP5-EE-09F

Black plate (92,1)
NOTE
The system may not operate if you aretoo close to the windows, door handles,or liftgate.
Starting the engine
The operational range for starting theengine includes nearly the entire cabinarea except for the luggage compartment.
Interior transmitter
Operational range
NOTE
l The luggage compartment is out ofthe operational range, however,starting the engine may be possible.
l The engine may not start if theadvanced key is placed in thefollowing areas:
l Around the instrument panell In the storage compartments such
as the glove box
l Starting the engine may be possibleeven if the advanced key is outsideof the vehicle and extremely close toa door and window, however, alwaysstart the engine from the driver's seat.If the vehicle is started and drivenaway while the advanced key is notin the vehicle, the vehicle will notrestart after it is turned off and theignition switch is turned to the Lockposition.
l If the advanced key is detectedwithin operational range, theoperation indicator light on thetransmitter flashes momentarily.
3-8
Knowing Your Mazda
Advanced Keyless Entry and Start System
CX-7_8AP5-EE-09F_Edition1 Page92Monday, June 15 2009 3:25 PM
Form No.8AP5-EE-09F

Black plate (93,1)
qLocking, Unlocking with RequestSwitch
All doors and the liftgate can be locked/unlocked by pressing the request switchon the front doors or the liftgate while theadvanced key is being carried.Front doors
Request switch
Liftgate (Type A)
Request switch
Liftgate (Type B)
Request switch
To lock
(Except European models)To lock the doors and the liftgate, pressthe request switch. A beep sound will beheard once and the hazard warning lightswill flash once.(European models)To lock the doors and the liftgate, pressthe request switch and the hazard warninglights will flash once.
Knowing Your Mazda
Advanced Keyless Entry and Start System
3-9
CX-7_8AP5-EE-09F_Edition1 Page93Monday, June 15 2009 3:25 PM
Form No.8AP5-EE-09F

Black plate (94,1)
NOTE
(Without theft-deterrent system)The hazard warning lights will flashonce to indicate that the doors and theliftgate are locked.(With theft-deterrent system)The hazard warning lights flash whenthe theft deterrent system is armed.The hazard warning lights do not flashif all the doors and the liftgate arelocked before the theft-deterrent systemis properly armed.When the doors are locked by pressingthe request switch on the front doorswhile the theft-deterrent system isarmed, the hazard warning lights willflash once to indicate that the system isarmed.Refer to the theft-deterrent system onpage 3-62.Refer to the theft-deterrent system(Except European models) on page3-69.
To unlock
Driver's door request switch
(Except European models)To unlock the driver's door, press therequest switch. A beep sound will beheard twice and the hazard warning lightswill flash twice.To unlock all doors and the liftgate, pressthe request switch again within 5 secondsand two more beep sounds will be heard.(European models)To unlock the doors and the liftgate, pressthe request switch and the hazard warninglights will flash twice.
NOTE
(Without theft-deterrent system)The hazard warning lights will flashtwice to indicate that the doors and theliftgate are unlocked.(With theft-deterrent system)The hazard warning lights flash whenthe theft deterrent system is turned off.The hazard warning lights do not flashunless the theft deterrent system hasbeen properly turned off.When the doors are unlocked bypressing the unlock button on thetransmitter or request switch on thefront doors while the theft-deterrentsystem is turned off, the hazard warninglights will flash twice to indicate thatthe system is turned off.Refer to the theft-deterrent system onpage 3-62.Refer to the theft-deterrent system(Except European models) on page3-69.
Front passenger door/liftgate requestswitch
(Except European models)To unlock the doors and the liftgate, pressthe request switch. A beep sound will beheard twice and the hazard warning lightswill flash twice.(European models)To unlock the doors and the liftgate, pressthe request switch and the hazard warninglights will flash twice.
3-10
Knowing Your Mazda
Advanced Keyless Entry and Start System
CX-7_8AP5-EE-09F_Edition1 Page94Monday, June 15 2009 3:25 PM
Form No.8AP5-EE-09F

Black plate (95,1)
NOTE
l The request switch on the driver'sdoor can be used to close the powerwindows, refer to Opening/Closingthe Power Windows from Outside(page 3-48).
l The request switch on the driver'sdoor can be used to close the powerwindows and the moonroof.Refer to the following pages:Opening/Closing the PowerWindows (page 3-48)Opening/Closing the Moonroof(page 3-55)
l Confirm that all doors and theliftgate are securely locked.
l All doors and the liftgate cannot belocked when any door or the liftgateis open.
l (Except European models)A beep sound is heard forconfirmation when the doors and theliftgate are locked/unlocked usingthe request switch. If you prefer, thebeep sound can be turned off (page3-23).
l (European models)The setting can be changed so that abeep sound is heard for confirmationwhen the doors and the liftgate arelocked/unlocked using a requestswitch (page 3-23).
NOTE
l The setting can be changed so thatthe doors and the liftgate are lockedautomatically without pressing therequest switch (page 3-23).(Auto-lock function)A beep sound is heard when alldoors and the liftgate are closedwhile the advanced key is beingcarried. All doors and the liftgate arelocked automatically after about 3seconds when the advanced key isout of the operational range. Also,the hazard warning lights flash once.(Even if the driver is in theoperational range, all doors and theliftgate are locked automatically afterabout 30 seconds.)If you are out of the operationalrange before the doors and theliftgate are completely closed oranother advanced key is left in thevehicle, the auto-lock function willnot work. Always make sure that alldoors and the liftgate are closed andlocked before leaving the vehicle.The auto-lock function does notclose the power windows.
Knowing Your Mazda
Advanced Keyless Entry and Start System
3-11
CX-7_8AP5-EE-09F_Edition1 Page95Monday, June 15 2009 3:25 PM
Form No.8AP5-EE-09F

Black plate (96,1)
NOTE
l (Auto re-lock function)After unlocking all doors and theliftgate by pressing the requestswitch, all doors and the liftgate willautomatically lock and the hazardwarning light will flash if any of thefollowing operations are notperformed within about 30 seconds.If your vehicle has a theft-deterrentsystem, the hazard warning lightswill flash for confirmation.
l A door or the liftgate is opened.l The auxiliary key is inserted into
the ignition switch.l The start knob is pushed.
qStarting the Engine
Ignition switch positions
As there is no a traditional key, some ofthe ignition switch functions are different.
Start knob
LOCK (Released)
The steering wheel locks to help protectagainst theft.
LOCK (Depressed)
The ignition switch can be turned to theACC position when the KEY indicatorlight (green) illuminates in the instrumentcluster.
WARNINGBefore leaving the driver's seat,always put the key or start knob toLOCK position, set the parking brakeand make sure the shift lever is in Pwith an automatic transaxle or in 1 orR with a manual transaxle:It is important to place the key or startknob in the LOCK position even if youare not removing the key from theignition or leaving the vehicle.Leaving the key in other positions willdisable some of the vehicle securitysystems and run the battery down.Leaving the driver's seat withoutputting the ignition switch in LOCKposition, setting the parking brake andshifting the shift lever to P with anautomatic transaxle, or to 1 or R witha manual transaxle is dangerous.Unexpected vehicle movement couldoccur. This could cause an accident.
3-12
Knowing Your Mazda
Advanced Keyless Entry and Start System
CX-7_8AP5-EE-09F_Edition1 Page96Monday, June 15 2009 3:25 PM
Form No.8AP5-EE-09F

Black plate (97,1)
NOTE
l If turning the ignition switch isdifficult, jiggle the steering wheelfrom side to side.
l (Automatic transaxle)The ignition switch cannot be turnedfrom the ACC position to the LOCKposition when the shift lever is not inP.
ACC (Accessory)
The steering wheel unlocks and someelectrical accessories will operate.
NOTE
The Advanced Keyless Entry Systemdoes not function in the ACC position,and the doors will not lock/unlock evenif they have been locked manually orthe advanced key is carried away fromthe vehicle.
ON
This is the normal running position afterthe engine is started. The warning lights(except brakes) should be inspectedbefore the engine is started (page 5-54).
NOTE
When the ignition switch is turned tothe ON position, the sound of the fuelpump motor operating near the fueltank can be heard. This does notindicate an abnormality.
NOTE
(With headlight auto-levelling)When the ignition switch is turned tothe ON position, the sound of theheadlight levelling motors operating atthe front of the engine compartment canbe heard. This does not indicate anabnormality.
START
The engine is started in this position. Itwill crank until you release the start knob;then it returns to the ON position.
Starting the engine
NOTE
l The advanced key must be carriedbecause the advanced key carries animmobilizer chip that mustcommunicate with the enginecontrols at short range.
l When starting the engine, be sure thestart knob is securely attached beforetrying to operate it. If the knobbecomes detached from the ignitionswitch, re-attach it by pushing it onto the ignition switch.
Knowing Your Mazda
Advanced Keyless Entry and Start System
3-13
CX-7_8AP5-EE-09F_Edition1 Page97Monday, June 15 2009 3:25 PM
Form No.8AP5-EE-09F

Black plate (98,1)
Petrol engine
1. Make sure the advanced key is beingcarried.
2. Occupants should fasten their seatbelts.
3. Make sure the parking brake is on.
4. Depress the brake pedal.
5. (Manual transaxle)Depress the clutch pedal all the wayand shift into neutral.Keep the clutch pedal depressed whilecranking the engine.(Automatic transaxle)Put the vehicle in park (P). If you mustrestart the engine while the vehicle ismoving, shift into neutral (N).
NOTE
(Automatic transaxle)The starter will not operate if the shiftlever is not in P or N.
6. Push the start knob slowly all the wayin.
7. Verify that the KEY indicator light(green) illuminates in the instrumentcluster. The KEY warning light (red)means you cannot continue to start theengine using the Advanced KeylessSystem. You may have to use theauxiliary key instead (page 3-24).
NOTE
In the following cases, the KEYwarning light (red) illuminates and theengine will not start.
l The advanced key battery is dead.
l The advanced key is out ofoperational range.
l The advanced key is placed in areaswhere it is difficult for the system todetect the signal (page 3-7).
l A key from another manufacturersimilar to the advanced key is in theoperational range.
3-14
Knowing Your Mazda
Advanced Keyless Entry and Start System
CX-7_8AP5-EE-09F_Edition1 Page98Monday, June 15 2009 3:25 PM
Form No.8AP5-EE-09F

Black plate (99,1)
8. Turn the ignition switch to the ACCposition while pushing the start knobin.
9. Turn the ignition switch from the ACCposition to the START position andhold (up to 10 seconds at a time) untilthe engine starts.
CAUTIONDo not try the starter for more than 10seconds at a time. If the engine stalls orfails to start, wait 10 seconds beforetrying again. Otherwise, you maydamage the starter and drain the battery.
10. After starting the engine, let it idle forabout 10 seconds (prohibited inGermany).
NOTE
l In extremely cold weather or afterthe vehicle has not been driven inseveral days, let the engine warm upwithout operating the accelerator.
l Whether the engine is cold or warm,it should be started without use ofthe accelerator.
l (Germany)Drive immediately after starting theengine. However do not use highengine speeds until reaching theoperating temperature.
Diesel engine
1. Make sure the advanced key is beingcarried.
2. Occupants should fasten their seatbelts.
3. Make sure the parking brake is on.
4. Depress the brake pedal.
5. Depress the clutch pedal all the wayand shift into neutral.Keep the clutch pedal depressed whilecranking the engine.
6. Push the start knob slowly all the way.
Knowing Your Mazda
Advanced Keyless Entry and Start System
3-15
CX-7_8AP5-EE-09F_Edition1 Page99Monday, June 15 2009 3:25 PM
Form No.8AP5-EE-09F

Black plate (100,1)
7. Verify that the KEY indicator light(green) illuminates in the instrumentcluster. The KEY warning light (red)means you cannot continue to start theengine (page 3-24).
NOTE
In the following cases, the KEYwarning light (red) illuminates and theengine will not start.
l The advanced key battery is dead.
l The advanced key is out ofoperational range.
l The advanced key is placed in areaswhere it is difficult for the system todetect the signal (page 3-7).
l A key from another manufacturersimilar to the advanced key is in theoperational range.
8. Turn the ignition switch to the ACCposition while pushing the start knobin.
9. Turn the ignition switch to the ONposition. If the glow indicator lightilluminates, wait a few seconds for it toturn off.
10. Turn the ignition switch from the ONposition to the START position andhold it there without depressing theaccelerator until the engine starts.If the engine fails to start, turn theignition switch to the LOCK or ACCposition, then try again.
CAUTIONDo not try the starter for more than 30seconds at a time. If the engine stalls orfails to start, wait 30 seconds beforetrying again. Otherwise, you maydamage the starter and drain the battery.
3-16
Knowing Your Mazda
Advanced Keyless Entry and Start System
CX-7_8AP5-EE-09F_Edition1 Page100Monday, June 15 2009 3:25 PM
Form No.8AP5-EE-09F

Black plate (101,1)
11. After starting the engine, let it idle forabout 10 seconds (prohibited inGermany).
NOTE
l For easier starting, all the accessoriesshould be OFF.
l The engine may not start whentrying to start the engine with theglow indicator light on.
l If the glow indicator light stays on ordoes not come on at all, the glowplug control system could have anelectrical problem. If one of thesehappens, consult an expert repairer,we recommend an AuthorisedMazda Repairer as soon as possible.
l (Germany)Drive immediately after starting theengine. However do not use highengine speeds until reaching theoperating temperature.
Turning off the engine
1. Shift the shift lever to the P position(Automatic transaxle).
2. Turn the ignition switch from the ONposition to the ACC position.
NOTE
When the engine is turned off and theignition switch it turned from the ACCposition to the LOCK position, theKEY indicator light (green) flashes inthe instrument cluster for about 30seconds if the battery power of theadvanced key is low. Replace thebattery with a new one.Refer to Battery Replacement (page3-7).
3. Push in the start knob from the ACCposition and turn it to the LOCKposition.
CAUTIONWhen leaving the vehicle, make surethe ignition switch is turned to theLOCK position.
NOTE
l When turning the ignition switch tothe LOCK position, the start knobhas to be pushed in from the ACCposition and turned. Without beingpushed in, the ignition switch stopsat the ACC position and the vehiclebattery may be discharged if theignition switch is left in the ACCposition. When leaving the vehicle,make sure the ignition switch isturned to the LOCK position.
l If the vehicle is left with the ignitionswitch not in the LOCK position, abeep sound is heard and the indicatorlight flashes to notify the driver.Refer to Warning Beep (page 3-21).
Knowing Your Mazda
Advanced Keyless Entry and Start System
3-17
CX-7_8AP5-EE-09F_Edition1 Page101Monday, June 15 2009 3:25 PM
Form No.8AP5-EE-09F

Black plate (102,1)
Operation Using AdvancedKey Functions
qKeyless Entry System
This system uses the more traditionalkeyless entry buttons to remotely lock andunlock the doors and the liftgate, andopens/closes the power windows.Operating the theft-deterrent system isalso possible on theft-deterrent system-equipped vehicles.Press the buttons slowly and carefully.
NOTE
l The keyless entry system is designedto operate up to 1 m (3 ft) fromaround the vehicle, but this may varydue to local conditions.
l The system does not operate whenthe auxiliary key is in the ignitionswitch.
l With the start knob installed in theLOCK position, the system is fullyoperational. If the ignition switch isnot in the LOCK position or the startknob is pushed in, the system doesnot operate.
l Doors and the liftgate cannot belocked by pressing the lock buttonwhile any other door or the liftgate isopen. The hazard warning lights willalso not flash.
l If the transmitter does not operatewhen pressing a button or theoperational range becomes too small,the battery may be dead. To install anew battery, refer to Maintenance(page 3-5).
Transmitter
Lock button
Unlock button
Intrusion cancel button
Operation indicator light
Some models.
NOTE
l (European models)The lock and unlock buttons can beused to open/close the powerwindows.Refer to Opening/Closing PowerWindows from Outside (page 3-48).
l If your vehicle has a theft-deterrentsystem, the hazard warning lightsflash when the system is armed orturned off.Refer to the theft-deterrent system(page 3-62).
The operation indicator light flashes whenthe buttons are pressed.
Lock button
(European models)To lock the doors and the liftgate, pressthe lock button and the hazard warninglights will flash once.(Except European models)To lock the doors and the liftgate, pressthe lock button. A beep sound will beheard once and the hazard warning lightswill flash once.
3-18
Knowing Your Mazda
Advanced Keyless Entry and Start System
CX-7_8AP5-EE-09F_Edition1 Page102Monday, June 15 2009 3:25 PM
Form No.8AP5-EE-09F

Black plate (103,1)
NOTE
l All doors and the liftgate cannot belocked when any door or the liftgateis open.
l Make sure all doors and the liftgateare locked after pressing the button.
l If your vehicle has a double lockingsystem, pressing the lock buttontwice within 3 seconds will activatethe system.Refer to the double locking system(page 3-71).
l When the doors are locked bypressing the lock button on thetransmitter or using the key while thetheft-deterrent system is armed, thehazard warning lights will flash onceto indicate that the system is armed.
Unlock button
(European models)To unlock the doors and the liftgate, pressthe unlock button and the hazard warninglights will flash twice.
(Except European models)To unlock the driver's door, press theunlock button. A beep will be heard twiceand the hazard warning lights will flashtwice.
To unlock all doors and the liftgate, pressthe unlock button again within 5 seconds.
NOTE
l When the doors are unlocked bypressing the unlock button on thetransmitter or using the key while thetheft-deterrent system is turned off,the hazard warning lights will flashtwice to indicate that the system isturned off.
l (Auto re-lock function)After unlocking with the transmitter,all doors and the liftgate willautomatically lock and the hazardwarning light will flash if any of thefollowing operations are notperformed within about 30 seconds.
l A door or the liftgate is opened.l The auxiliary key is inserted into
the ignition switch.l The start knob is pressed.
Intrusion sensor cancel button(European models)í
To cancel the intrusion sensor (part of thetheft-deterrent system), press the intrusionsensor cancel button within 20 secondsafter pressing the lock button and thehazard warning lights will flash threetimes.Refer to Theft-Deterrent System (page3-62).
Knowing Your Mazda
Advanced Keyless Entry and Start System
3-19íSome models.
CX-7_8AP5-EE-09F_Edition1 Page103Monday, June 15 2009 3:25 PM
Form No.8AP5-EE-09F

Black plate (104,1)
qAuxiliary Key Function
Use the auxiliary key stored in theadvanced key in the event of a deadtransmitter battery or malfunction.
Removing the auxiliary key
Pull out the auxiliary key from theadvanced key.
Locking, unlocking the doors
The doors can be locked/unlocked usingthe auxiliary key, refer to Locking,Unlocking with Key (page 3-31).
Starting the engine
The engine can be started with theauxiliary key, refer to Ignition Switch(page 5-2).
Locking, unlocking the glove box
The glove box can be locked/unlockedusing the auxiliary key, refer to GloveBox (page 6-120).
Advanced Key SuspendFunction
If one advanced key is left in the vehicleand a second advanced key is used to lockit, the functions of the advanced key leftin the vehicle is temporarily suspended toprevent theft of the vehicle.The following are inoperable:
l Starting the engine using the startknob.
l Operating the request switches.
To restore these functions, perform anyone of the following:
l Press the lock or unlock button on theadvanced key which has had itsfunctions temporarily suspended.
l While carrying another advanced key,push in the start knob until the KEYindicator light (green) illuminates.
l Insert the auxiliary key and turn theignition switch to the ON position.
3-20
Knowing Your Mazda
Advanced Keyless Entry and Start System
CX-7_8AP5-EE-09F_Edition1 Page104Monday, June 15 2009 3:25 PM
Form No.8AP5-EE-09F

Black plate (105,1)
Warning and Beep Sounds
qSystem Malfunction Warning Light
If any malfunction occurs in the advancedkeyless function, the KEY warning light(red) in the instrument cluster illuminatescontinuously.
CAUTIONIf the KEY warning light (red) remainsilluminated, do not continue to drive thevehicle with the advanced keylessfunction. Park the vehicle in a safeplace and use the auxiliary key tocontinue driving the vehicle. Have thevehicle inspected at an AuthorisedMazda Repairer as soon as possible.Refer to Ignition Switch (page 5-2).
qStart Knob Not in LOCKWarning Beep
(European models)If the start knob is in the ACC positionand the driver's door is opened, a beepsound will be heard 6 times to notify thedriver that the start knob has not beenreturned to the LOCK position. In thiscase, the keyless entry system does notoperate, the car cannot be locked, and thebattery will run down.(Except European models)If the start knob is in the ACC positionand the driver's door is opened, acontinuous beep sound will be heard tonotify the driver that the start knob has notbeen returned to the LOCK position. Inthis case, the keyless entry system doesnot operate, the car cannot be locked, andthe battery will run down.
qAdvanced Key Removed fromVehicle Warning Beep
Under the following conditions, a beepsound will be heard and the KEY warninglight (red) will flash continuously whenthe start knob has not been returned to theLOCK position to notify the driver thatthe advanced key has been removed. TheKEY warning light (red) will stop flashingwhen the advanced key is back inside thevehicle:
l The start knob has not been returned tothe LOCK position, the driver's door isopen, and the advanced key is removedfrom the vehicle. (A beep sound will beheard three times.)However the beep sound will be heardcontinuously when the start knob is inthe ACC position and the door is opendue to the activation of the warningbeep sound indicating that the startknob is not in the LOCK position.
l The start knob has not been returned tothe LOCK position and all the doorsare closed after removing the advancedkey from the vehicle. (A beep soundwill be heard six times.)
NOTE
Because the advanced key utilizes low-intensity radio waves, the AdvancedKey Removed From Vehicle Warningmay activate if the advanced key iscarried together with a metal object or itis placed in a poor signal reception areawithin the vehicle.
Knowing Your Mazda
Advanced Keyless Entry and Start System
3-21
CX-7_8AP5-EE-09F_Edition1 Page105Monday, June 15 2009 3:25 PM
Form No.8AP5-EE-09F

Black plate (106,1)
qRequest Switch InoperableWarning Beep
If the request switch for a front door or theliftgate is pressed under the followingconditions while the advanced key isbeing carried, a beep will be heard 6 timesto indicate that the front doors and theliftgate cannot be locked.
l A door or the liftgate is open (door ajarincluded).
l The start knob has not been returned tothe LOCK position.
l The auxiliary key is inserted into theignition switch.
qAdvanced Key Battery DeadWarning
When the start knob is returned to theACC or LOCK position from the ONposition, the KEY indicator light (green)flashes for approximately 30 secondsindicating that the remaining batterypower is low. Replace with a new batterybefore the advanced key becomesunusable.Refer to Advanced Key Maintenance(page 3-5).
NOTE
The advanced key can be set so that theKEY indicator light (green) does notflash even if the battery power is low.Refer to Setting Change (page 3-23).
qEngine Start Not Permitted Warning
Under the following conditions, the KEYwarning light (red) flashes to inform thedriver that the start knob will not rotate tothe ACC position even if it is pushed infrom the LOCK position.
l The advanced key battery is dead.
l The advanced key is not withinoperational range.
l The advanced key is placed in areaswhere it is difficult for the system todetect the signal (page 3-7).
l A key from another manufacturersimilar to the advanced key is in theoperational range.
qAdvanced Key Left-in-vehicleWarning Beep
If an advanced key is left in the vehiclecabin and all the doors and the liftgate arelocked using a separate advanced key, abeep sound is heard for about 10 secondsto remind the driver that the advanced keyhas been left in the vehicle cabin. If thishappens, the doors and the liftgate lockbut the functions of the advanced key leftin the vehicle cabin may be temporarilysuspended. Perform the followingprocedure to restore the functions of theadvanced key (page 3-20).
3-22
Knowing Your Mazda
Advanced Keyless Entry and Start System
CX-7_8AP5-EE-09F_Edition1 Page106Monday, June 15 2009 3:25 PM
Form No.8AP5-EE-09F

Black plate (107,1)
Setting Change (Function Customization)The following function settings are possible. These settings can only be changed by anAuthorised Mazda Repairer.
Setting FunctionAt InitialSetting
After SettingChange
Advanced key battery deadindicator
KEY indicator light (green) flashes to indicate thatthe advanced key battery power is low.
Activated Deactivated
Lock/unlock operationconfirmation beep sound(European models)
A beep sound is heard to confirm that all doors orthe liftgate have been locked/unlocked. Deactivated Activated
Lock/unlock operationconfirmation beep sound(Except European models)
A beep sound is heard to confirm that all doors orthe liftgate have been locked/unlocked. Activated Deactivated
Autolock function*1
When all doors and the liftgate are closed and theadvanced key is being carried and out of operationalrange, all the doors and the liftgate automaticallylock after 3 seconds.(Even if the driver is in the operational range, alldoors and the liftgate are locked automatically afterabout 30 seconds.)
Deactivated Activated
*1: When the autolock function is enabled, windows will not automatically close. You must close them beforeleaving vehicle.
Knowing Your Mazda
Advanced Keyless Entry and Start System
3-23
CX-7_8AP5-EE-09F_Edition1 Page107Monday, June 15 2009 3:25 PM
Form No.8AP5-EE-09F

Black plate (108,1)
When Warning Indicator/Beep is ActivatedUnder the following conditions, warning beeps are heard and a warning/indicator light inthe instrument cluster illuminates to notify the driver of improper operation of theadvanced key to prevent theft of the vehicle (page 3-21).
Warning How to check
When a door is open, a continuous beep sound will beheard.
Check whether the start knob has been returned to theLOCK position.
When a door is open, three beep sounds are heard, andthe KEY warning light (red) in the instrument clusterflashes.
Check whether the advanced key has been removedfrom the vehicle.
When a door is closed, a beep sound is heard six times,and the KEY warning light (red) in the instrumentcluster flashes.
Check whether the advanced key has been removedfrom the vehicle.
When locking the doors, the chime sounds for about tenseconds.
Check whether the advanced key has been left in thevehicle.
When attempting to lock the doors by pressing therequest switch on the front doors, and six beep soundsare heard.
Check whether the start knob has been returned to theLOCK position.
Check whether a door or the liftgate is open.
When the KEY indicator light (green) flashes in theinstrument cluster.
The advanced key battery power is low. Replace thebattery with a new one.Refer to Advanced Key Maintenance on page 3-5.
When the KEY warning light (red) remains illuminatedin the instrument cluster.
The advanced key is malfunctioning. Park the vehicle ina safe place, and use the auxiliary key to continuedriving the vehicle. Have the vehicle inspected at anAuthorised Mazda Repairer as soon as possible.
3-24
Knowing Your Mazda
Advanced Keyless Entry and Start System
CX-7_8AP5-EE-09F_Edition1 Page108Monday, June 15 2009 3:25 PM
Form No.8AP5-EE-09F

Black plate (109,1)
Keys
WARNINGDo not leave the key in your vehiclewith children and keep them in a placewhere your children will not find orplay with them:Leaving children in a vehicle with thekey is dangerous. This could result insomeone being badly injured or evenkilled. Retractable-type keys arefascinating to children. They couldplay with power windows or othercontrols, or even make the vehiclemove.
NOTE
l Refer to Immobilizer System (page3-60) for information regarding keysand engine starting.
l Refer to Theft-Deterrent System(page 3-62) (page 3-69) forinformation regarding keys and theprevention of vehicle and vehiclecontents theft.
The keys operate all locks.
Key code number plate
Retractable type key
A code number is stamped on the plateattached to the key set; detach this plateand store it in a safe place (not in thevehicle) for use if you need to make areplacement key.
NOTE
l Write down the code number andkeep it in a separate, safe andconvenient place, but not in thevehicle.If your key is lost, consult yourAuthorised Mazda Dealer and haveyour code number ready.
l Some types of key chains cannot beattached to the retractable type key.In this case, use the key ringprovided with the transmitter whichhas the key code number plateattached.
Key ring
Knowing Your Mazda
Doors and Locks
3-25
CX-7_8AP5-EE-09F_Edition1 Page109Monday, June 15 2009 3:25 PM
Form No.8AP5-EE-09F

Black plate (110,1)
Key extend/retract method (Retractabletype key)
To extend the key, press the releasebutton.
To retract the key, rotate it into the holderwhile pressing the release button.
Keyless Entry SystemThis system remotely locks and unlocksthe doors and the liftgate, and opens thepower windows and the sunroof.It can also help you signal for attention.Press the buttons slowly and carefully.
CAUTIONTo avoid damage to the transmitter, donot:
l Drop the transmitter.
l Get the transmitter wet.
l Disassemble the transmitter.
l Expose the transmitter to any kind ofmagnetic field.
l Expose the transmitter to hightemperatures on places such as theinstrument panel or bonnet, underdirect sunlight.
3-26
Knowing Your Mazda
Doors and Locks
CX-7_8AP5-EE-09F_Edition1 Page110Monday, June 15 2009 3:25 PM
Form No.8AP5-EE-09F

Black plate (111,1)
NOTE
l The keyless entry system is designedto operate up to about 2.5 m (8 ft)from the centre of the vehicle, butthis may vary due to localconditions.
l The system does not operate whenthe key is in the ignition switch.
l Doors and the liftgate cannot belocked by pressing the lock buttonwhile any other door or the liftgate isopen. Also, the hazard warning lightswill not flash.
l If the transmitter does not operatewhen pressing a button or theoperation range becomes too small,the battery may be dead. To install anew battery, refer to Maintenance(page 3-28).
l Additional transmitters can beobtained at an Authorised MazdaRepairer. Up to 3 transmitters can beused with the keyless entry systemper vehicle. Bring all transmitters toan Authorised Mazda Repairer whenadditional transmitters are required.
qTransmitter
Lock button
Unlock button
Intrusion sensor cancel button (With theft-deterrent system)
Operation indicator light
NOTE
l The lock and unlock buttons can beused to open/close the powerwindows.Refer to Opening/Closing the PowerWindows from Outside on page3-48.
l If your vehicle has a theft-deterrentsystem, the hazard warning lightsflash when the theft-deterrent systemis armed or turned off.Refer to the theft-deterrent system onpage 3-62.Refer to the theft-deterrent system onpage 3-69.
The operation indicator light flashes whenthe buttons are pressed.
Lock button
To lock the doors and the liftgate, pressthe lock button and the hazard warninglights will flash once.
Knowing Your Mazda
Doors and Locks
3-27
CX-7_8AP5-EE-09F_Edition1 Page111Monday, June 15 2009 3:25 PM
Form No.8AP5-EE-09F

Black plate (112,1)
NOTE
l When the doors are locked bypressing the lock button on thetransmitter while the theft-deterrentsystem is armed, the hazard warninglights will flash once to indicate thatthe system is armed.Refer to the theft-deterrent system onpage 3-62.Refer to the theft-deterrent system onpage 3-69.
l All doors and the liftgate cannot belocked when any door or the liftgateis open.
l Make sure all doors and the liftgateare locked after pressing the button.
l (With double-locking system)Pressing the lock button twice within3 seconds will activate the double-locking system.Refer to the double locking system(page 3-71).
Unlock button
(European models)To unlock the doors and the liftgate, pressthe unlock button and the hazard warninglights will flash twice.(Except European models)To unlock the driver's door, press theunlock button and the hazard warninglights will flash twice.To unlock all doors and the liftgate, pressthe unlock button again within 5 secondsand the hazard warning lights will flashtwice.
NOTE
l When the doors are unlocked bypressing the unlock button on thetransmitter while the theft-deterrentsystem is turned off, the hazardwarning lights will flash twice toindicate that the system is turned off.Refer to the theft-deterrent system onpage 3-62.Refer to the theft-deterrent system onpage 3-69.
l Auto re-lock functionAfter unlocking with the transmitter,all doors and the liftgate willautomatically lock and the hazardwarning light will flash if one of thedoors or the liftgate is not openedwithin about 30 seconds.
Intrusion sensor cancel buttoní
To cancel the intrusion sensor (part of thetheft-deterrent system), press the intrusionsensor cancel button within 20 secondsafter pressing the lock button and thehazard warning lights will flash threetimes.Refer to Theft-Deterrent System (page3-62).
qTransmitter Maintenance
If the buttons on the transmitter areinoperable and the operation indicatorlight does not flash, the battery may bedead.Replace with a new battery before thetransmitter becomes unusable.
3-28
Knowing Your Mazda
íSome models.
Doors and Locks
CX-7_8AP5-EE-09F_Edition1 Page112Monday, June 15 2009 3:25 PM
Form No.8AP5-EE-09F

Black plate (113,1)
CAUTIONl Install the battery with the positivepole ( ) facing down. Batteryleakage could occur if it is notinstalled correctly.
l When replacing the battery, becareful not to bend the electricalterminals or get oil on them. Also becareful not to get dirt in thetransmitter as it could be damaged.
l There is the danger of explosion ifthe battery is not correctly replaced.
l Replace only with the same typebattery (CR1620 or equivalent).
l Dispose of used batteries accordingto the following instructions.
l Insulate the plus and minusterminals of the battery usingcellophane or equivalent tape.
l Never disassemble.l Never throw the battery into fire
and/or water.l Never deform or crush.
Replacing the transmitter battery
1. Unfold the key (page 3-25).
2. Insert a screwdriver into the slot andpush the tab to remove the key fromthe transmitter.
Tab
3. Insert a screwdriver into the slot andgently pry open the transmitter.
4. Remove the battery.
A
Knowing Your Mazda
Doors and Locks
3-29
CX-7_8AP5-EE-09F_Edition1 Page113Monday, June 15 2009 3:25 PM
Form No.8AP5-EE-09F

Black plate (114,1)
5. Put in the new battery (CR1620 orequivalent) with the positive pole ( )facing down.
6. Align the front and back covers andsnap the transmitter shut.
7. Align the key with the transmitter asshown in the figure, and insert the keyuntil a click sound is heard.
CAUTIONInsert the key into the transmittersecurely until a click sound is heard. Ifit is not inserted securely, it coulddetach from the transmitter.
qService
If you have a problem with the keylessentry system, consult an expert repairer,we recommend an Authorised MazdaRepairer.
If your transmitter is lost or stolen, bringall remaining transmitters to anAuthorised Mazda Repairer as soon aspossible for a replacement and to makethe lost or stolen transmitter inoperative.
CAUTIONChanges or modifications not expresslyapproved by the party responsible forcompliance could void the user'sauthority to operate the equipment.
3-30
Knowing Your Mazda
Doors and Locks
CX-7_8AP5-EE-09F_Edition1 Page114Monday, June 15 2009 3:25 PM
Form No.8AP5-EE-09F

Black plate (115,1)
Door Locks
WARNINGAlways take all children and pets withyou or leave a responsible person withthem:Leaving a child or a pet unattended ina parked vehicle is dangerous. In hotweather, temperatures inside a vehiclecan become high enough to causebrain damage or even death.
Do not leave the key in your vehiclewith children and keep them in a placewhere your children will not find orplay with them:Leaving children in a vehicle with thekey is dangerous. This could result insomeone being badly injured or evenkilled.
Keep all doors locked when driving:Unlocked doors in a moving vehicleare dangerous. Passengers can fall outif a door is accidentally opened andcan more easily be thrown out in anaccident.
Always close all the windows and thesunroof, lock the doors and take thekey with you when leaving yourvehicle unattended:Leaving your vehicle unlocked isdangerous as children could lockthemselves in a hot vehicle, whichcould result in death. Also, a vehicleleft unlocked becomes an easy targetfor thieves and intruders.
qLocking, Unlocking with Key
The driver's door can be locked/unlockedwith the key.Turn the key toward the front to unlock,toward the back to lock.
Unlock
Lock
qLocking, Unlocking with RequestSwitch (with Advanced Key)
The doors can be locked/unlocked byoperating the request switch whilecarrying the advanced key outside thevehicle, refer to Operations UsingAdvanced Keyless Functions (page 3-7).
qLocking, Unlocking withTransmitter (with Advanced Key)
The doors can be locked/unlocked byoperating the keyless entry systemtransmitter, refer to Keyless Entry System(page 3-18).
qLocking, Unlocking with Transmitter(with Retractable Type Key)
The doors can be locked/unlocked byoperating the keyless entry systemtransmitter, refer to Keyless Entry System(page 3-26).
Knowing Your Mazda
Doors and Locks
3-31
CX-7_8AP5-EE-09F_Edition1 Page115Monday, June 15 2009 3:25 PM
Form No.8AP5-EE-09F

Black plate (116,1)
qLocking, Unlocking with Door-Lock Knob
To lock any door from the inside, push thedoor-lock knob.To unlock, pull it out.This does not operate the other doorlocks.
Unlock
Lock
To lock the front passenger door with thedoor-lock knob from the outside, push thedoor-lock knob to the lock position andclose the door (holding the door handlepulled is not required).
Door-lock knob
NOTE
When locking the door this way:
l Be careful not to leave the key insidethe vehicle.
l The front passenger door and reardoors can be locked by pushing thedoor-lock knob and closing the doors(holding the door handle pulled isnot required).
NOTE
The driver's door cannot be lockedusing the door-lock knob from theoutside.
qPower Door Locks
Vehicle lock-out prevention
The vehicle lock-out prevention featureprevents you from locking yourself out ofthe vehicle. All doors and the liftgate willautomatically unlock if they are lockedusing the power door locks with any dooror the liftgate open.
Locking, unlocking with key
(European models)All doors and the liftgate lockautomatically when the driver's door islocked with the key. They all unlock whenthe driver's door is unlocked with the key.
3-32
Knowing Your Mazda
Doors and Locks
CX-7_8AP5-EE-09F_Edition1 Page116Monday, June 15 2009 3:25 PM
Form No.8AP5-EE-09F
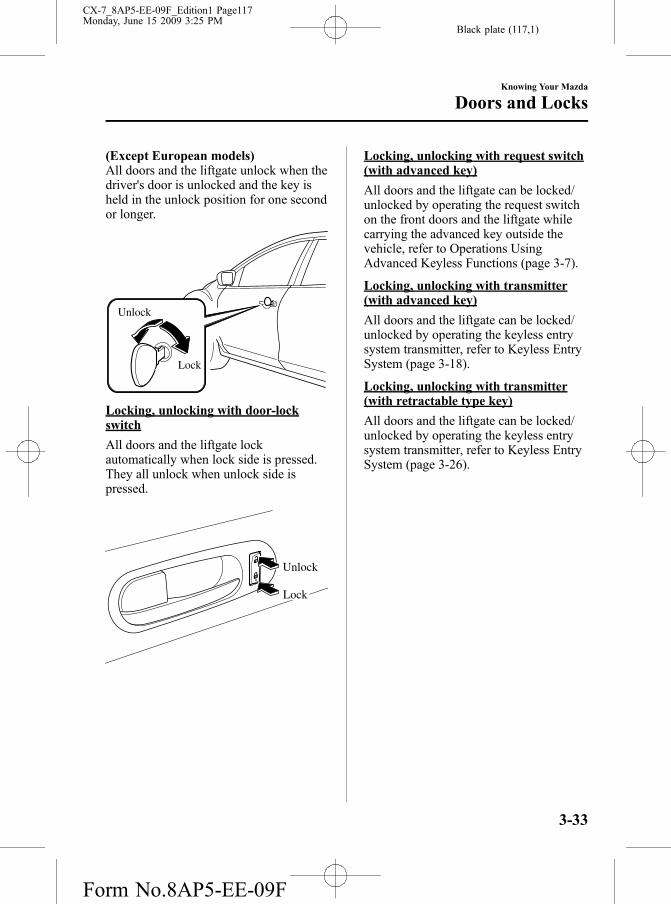
Black plate (117,1)
(Except European models)All doors and the liftgate unlock when thedriver's door is unlocked and the key isheld in the unlock position for one secondor longer.
Unlock
Lock
Locking, unlocking with door-lockswitch
All doors and the liftgate lockautomatically when lock side is pressed.They all unlock when unlock side ispressed.
Unlock
Lock
Locking, unlocking with request switch(with advanced key)
All doors and the liftgate can be locked/unlocked by operating the request switchon the front doors and the liftgate whilecarrying the advanced key outside thevehicle, refer to Operations UsingAdvanced Keyless Functions (page 3-7).
Locking, unlocking with transmitter(with advanced key)
All doors and the liftgate can be locked/unlocked by operating the keyless entrysystem transmitter, refer to Keyless EntrySystem (page 3-18).
Locking, unlocking with transmitter(with retractable type key)
All doors and the liftgate can be locked/unlocked by operating the keyless entrysystem transmitter, refer to Keyless EntrySystem (page 3-26).
Knowing Your Mazda
Doors and Locks
3-33
CX-7_8AP5-EE-09F_Edition1 Page117Monday, June 15 2009 3:25 PM
Form No.8AP5-EE-09F

Black plate (118,1)
qRear Door Child Safety Locks
These locks are intended to help preventchildren from accidentally opening therear doors. Use them both whenever achild rides in the vehicle.
If you slide the child safety lock to thelock position before closing that door, thedoor cannot be opened from the inside.The door can be opened only by pullingthe outside handle.
Unlock
Lock
Liftgate
WARNINGNever allow a person to ride in theluggage compartment:Allowing a person to ride in theluggage compartment is dangerous.The person in the luggagecompartment could be seriouslyinjured or killed during suddenbraking or a collision.
Do not drive with the liftgate open:Exhaust gas in the cabin of a vehicleis dangerous. An open liftgate in amoving vehicle will cause exhaust gasto be drawn into the cabin. This gascontains CO (carbon monoxide),which is colourless, odourless, andhighly poisonous, and it can causeloss of consciousness and death.Moreover, an open liftgate could causeoccupants to fall out in an accident.
qLocking, Unlocking with Key
The liftgate can be locked/unlocked byinserting the key into the driver's door keyslot, refer to Power Door Locks (page3-32).
qLocking, Unlocking with RequestSwitch (with Advanced Key)
The liftgate can be locked/unlocked byoperating the request switch whilecarrying the advanced key outside thevehicle, refer to Operations UsingAdvanced Keyless Functions (page 3-7).
3-34
Knowing Your Mazda
Doors and Locks
CX-7_8AP5-EE-09F_Edition1 Page118Monday, June 15 2009 3:25 PM
Form No.8AP5-EE-09F

Black plate (119,1)
qLocking, Unlocking withTransmitter (with Advanced Key)
The liftgate can be locked/unlocked byoperating the keyless entry systemtransmitter, refer to Keyless Entry System(page 3-18).
qLocking, Unlocking with Transmitter(with Retractable Type Key)
The liftgate can be locked/unlocked byoperating the keyless entry systemtransmitter, refer to Keyless Entry System(page 3-26).
qLocking, Unlocking with Door-Lock Switch
The liftgate can be locked/unlocked byoperating the door-lock switch, refer toPower Door Locks (page 3-32).
qOpening and Closing the Liftgate
Opening the liftgate
Pull up on the handle.
NOTE
If the vehicle battery is dead or there isa malfunction in the electrical systemand the liftgate cannot be unlocked,perform the following procedure as anemergency measure to unlock it:
1. Remove the cap on the interiorsurface of the liftgate with a flatheadscrewdriver.
Cap
2. Turn the lever to the right to unlockthe liftgate.
Lever
After performing this emergencymeasure, have the vehicle inspected atan expert repairer, we recommend anAuthorised Mazda Repairer as soon aspossible.
Closing the liftgate
Use both hands to push the liftgate downuntil the lock snaps shut. Do not slam it.Pull up on the liftgate to make sure it issecurely latched.
Knowing Your Mazda
Doors and Locks
3-35
CX-7_8AP5-EE-09F_Edition1 Page119Monday, June 15 2009 3:25 PM
Form No.8AP5-EE-09F

Black plate (120,1)
qLuggage Compartment
WARNINGDo not place luggage or other cargoon top of the luggage compartmentcover:Placing luggage or other cargo on topof the luggage compartment cover isdangerous. During sudden braking ora collision, the cargo could become aprojectile that could hit and injuresomeone. The vehicle has a lightweight luggage compartment cover tokeep the contents of your luggage areaout of sight; it will not retain heavyobjects that are not tied down in anaccident such as a rollover. Tie downall heavy objects, whether luggage orcargo, using the tie down hooks.
Make sure luggage and cargo issecured before driving:Not securing cargo while driving isdangerous as it could move or becrushed during sudden braking or acollision and cause injury.
CAUTIONMake sure the luggage compartmentcover is firmly secured. If it is notfirmly secured, it could unexpectedlydisengage resulting in injury.
Luggage compartment coverí
Installing the cover
1. Insert the left end of the retractor barinto the notch.
2. Squeeze the spring holder on right endof the retractor bar inward, then insertit into the notch.
3-36
Knowing Your Mazda
íSome models.
Doors and Locks
CX-7_8AP5-EE-09F_Edition1 Page120Monday, June 15 2009 3:25 PM
Form No.8AP5-EE-09F

Black plate (121,1)
3. Slowly pull out the cover and insert itinto the retainers.
Hook retainer
Removing the cover
Reverse the procedure for installation.
Power WindowsThe ignition switch must be in the ONposition for the power windows tooperate.
WARNINGMake sure the opening is clear beforeclosing a window:Closing power windows aredangerous. A person's hands, head, oreven neck could be caught by thewindow and result in serious injury oreven death.This warning applies especially tochildren.
Always lock all passenger powerwindows with the power window lockswitch on the driver's side whilechildren are in the vehicle, and neverallow children to play with powerwindow switches:Leaving the power window switchesunlocked while children are in thevehicle is dangerous. Power windowswitches that are not locked with thepower window lock switch would allowchildren to operate power windowsunintentionally which could result inserious injury if a child's hands, heador neck becomes caught by thewindow.
CAUTIONTo prevent burning out the fuse anddamaging the power window system,do not open or close more than threewindows at once.
Knowing Your Mazda
Doors and Locks
3-37
CX-7_8AP5-EE-09F_Edition1 Page121Monday, June 15 2009 3:25 PM
Form No.8AP5-EE-09F

Black plate (122,1)
qOperating the Driver's SidePower Window (ExceptEuropean models Type A)
Manual opening/closing
To open the window to the desiredposition, lightly hold down the switch.To close the window to the desiredposition, lightly pull up the switch.
Close
Open Driver's window
Front passenger's window
Owner master control switch
Auto-opening/closing
To fully open the window automatically,press the switch completely down, thenrelease. The window will fully openautomatically.To fully close the window automatically,pull the switch completely up, thenrelease. The window will fully closeautomatically.
To stop the window partway, pull or pressthe switch in the opposite direction andthen release it.
NOTE
If the battery was disconnected duringvehicle maintenance, or for otherreasons such as a switch continues to beoperated after the window is fully open/close, the window will not fully openand close automatically. Carry out thefollowing procedure to resumeoperation:
1. Turn the ignition switch to the ONposition.
2. Press the switch and fully open thewindow.
3. Pull up the switch to fully close thewindow and continue holding theswitch for about 2 seconds after thewindow fully closes.
Two-step down function
With the window completely closed, pressthe switch lightly and the window willopen and stop about 3 cm (1 in) from thetop.If you continue to press and hold theswitch, the window will resume openingall the way.
NOTE
Pressing the power window switch oncewhen the window is fully closed willonly open it about 3 cm (1 in) to allowconvenient ventilation of the cabin.
3-38
Knowing Your Mazda
Doors and Locks
CX-7_8AP5-EE-09F_Edition1 Page122Monday, June 15 2009 3:25 PM
Form No.8AP5-EE-09F

Black plate (123,1)
Cancelling the two-step down function
To cancel the two-step down function,carry out the following procedure usingthe master control switches.
1. Turn the ignition switch to the ONposition and complete the followingprocedure within 5 seconds:Press the power window switch 2 timesfirmly, then pull it 2 times firmly.
Driver's switch
2. Turn the ignition switch to the LOCKposition.
3. With the ignition switch in the LOCKposition, and within 40 seconds, turnthe ignition switch to the ON positionand complete the following procedurewithin 5 seconds:Press the power window switch 2 timesfirmly, then pull 2 times firmly.
NOTE
l The two-step down function cannotbe cancelled if the procedure is notcompleted within the specified times,or the procedure is changed alongthe way. To redo the procedure, firstturn the ignition switch to the LOCKposition and proceed from thebeginning.
l If you are unable to cancel thefunction despite doing thecancellation procedure, consult anexpert repairer, we recommend anAuthorised Mazda Repairer.
Restoring the two-step down function
With the two-step down function in thecancelled state, repeat the previousprocedure for cancelling the function andit will be restored.
NOTE
If you are unable to restore the functiondespite carrying out the restoreprocedure, consult an expert repairer,we recommend an Authorised MazdaRepairer.
Jam-safe window
If a person's hands, head or an objectblocks the window during the auto-closing operation, the window will stopand open halfway.
Knowing Your Mazda
Doors and Locks
3-39
CX-7_8AP5-EE-09F_Edition1 Page123Monday, June 15 2009 3:25 PM
Form No.8AP5-EE-09F

Black plate (124,1)
WARNINGMake sure nothing blocks the windowjust before it reaches the fully closedposition or while fully holding up thepower window switch:Blocking the power window justbefore it reaches the fully closedposition or while fully holding up thepower window switch is dangerous.In this case, the jam-safe functioncannot prevent the window fromclosing all the way. If fingers arecaught, serious injuries could occur.
NOTE
Depending on driving conditions, aclosing power window could stop andstart opening when the window feels ashock that is similar to somethingblocking it.In the event the jam-safe functionactivates and the power window cannotbe closed automatically, pull and holdthe switch and the window will close.
Engine-off power window operation
The power window can be operated forabout 40 seconds after the ignition switchis turned from the ON position to theACC or LOCK position.
NOTE
The two-step down function isinoperable during engine-off operation.
qOperating the Passenger PowerWindows (Except Europeanmodels Type A)
The power windows may be operatedwhen the power window lock switch onthe driver's door is in the unlockedposition.
The passenger windows may be opened orclosed by the power window mastercontrol switches on the driver's door.
Driver's windowFront
passenger's window
Owner master control switch
Left rear window
Right rear window
To open the window to the desiredposition, hold down the switch.To close the window to the desiredposition, pull up the switch.
Close
Open
3-40
Knowing Your Mazda
Doors and Locks
CX-7_8AP5-EE-09F_Edition1 Page124Monday, June 15 2009 3:25 PM
Form No.8AP5-EE-09F

Black plate (125,1)
qOperating the Power Windows(European models)
NOTE
l Each passenger window can beoperated with each door switch whenthe power window lock switch onthe driver's door is in the unlockedposition (page 3-47).
l Each passenger window can also beoperated by the power windowmaster control switches on thedriver's door.
Master control switches
Left rear window
Right rear window
Driver's window
Front passenger's window
l The following functions can beperformed for each power windowusing the power window mastercontrol switches on the driver's dooror each door switch.
l Manual opening/closingl Auto-opening/closingl Two-step down function
Manual opening/closing
To open the window to the desiredposition, lightly hold down the switch.To close the window to the desiredposition, lightly pull up the switch.
Open
Close
Owner master control switch
Driver's window
Front passenger's window
Open
Close
Front passenger switch
Auto-opening/closing
To fully open the window automatically,press the switch completely down.To fully close the window automatically,pull the switch completely up.
To stop the window partway, pull or pressthe switch in the opposite direction andthen release it.
Knowing Your Mazda
Doors and Locks
3-41
CX-7_8AP5-EE-09F_Edition1 Page125Monday, June 15 2009 3:25 PM
Form No.8AP5-EE-09F

Black plate (126,1)
NOTE
If the battery was disconnected duringvehicle maintenance, or for otherreasons such as a switch continues to beoperated after the window is fully open/close, the windows will not fully openand close automatically. Resetting ofthe automatic function can beperformed using the driver's mastercontrol switch or each passenger doorswitch.The power window auto function resetprocedure can be done on all doorswitches. The power window autofunction will only resume on the powerwindow that has been reset.
1. Turn the ignition switch to the ONposition.
2. Make sure that the power windowlock switch located on the driver'sdoor is not depressed.
3. Press the switch and fully open thewindow.
4. Pull up the switch to fully close thewindow and continue holding theswitch for about 2 seconds after thewindow fully closed.
5. Repeat Steps 3-4 for the frontpassenger power window whileseated in the front passenger seat.
6. Repeat Steps 3-4 for both the left andright rear power windows whileseated in the rear seat.
NOTE
7. Make sure that the power windowsoperate correctly using the doorswitches.
After the system has been reset, eachpassenger window can be fully openedor closed automatically using the mastercontrol switches.
Two-step down function
With the window completely closed, pressthe switch lightly and the window willopen and stop about 3 cm (1 in) from thetop.If you continue to press and hold theswitch, the window will resume openingall the way.
NOTE
Pressing the power window switch oncewhen the window is fully closed willonly open it about 3 cm (1 in) to allowconvenient ventilation of the cabin.
3-42
Knowing Your Mazda
Doors and Locks
CX-7_8AP5-EE-09F_Edition1 Page126Monday, June 15 2009 3:25 PM
Form No.8AP5-EE-09F

Black plate (127,1)
Cancelling the two-step down function
To cancel the two-step down function foreach passenger window, carry out thefollowing procedure using the mastercontrol switches.
1. Turn the ignition switch to the ONposition and complete the followingprocedure within 5 seconds:Press the power window switch 2 timesfirmly, then pull it 2 times firmly.
Owner master control switch
Driver's window
Front passenger's window
2. Turn the ignition switch to the LOCKposition.
3. With the ignition switch in the LOCKposition, and within 40 seconds, turnthe ignition switch to the ON positionand complete the following procedurewithin five seconds:Press the power window switch 2 timesfirmly, then pull two times firmly.
NOTE
l The two-step down function cannotbe cancelled if the procedure is notcompleted within the specified times,or the procedure is changed alongthe way. To redo the procedure, firstturn the ignition switch to the LOCKposition and proceed from thebeginning.
l If you are unable to cancel thefunction despite carrying out thecancellation procedure, consult anexpert repairer, we recommend anAuthorised Mazda Repairer.
Restoring the two-step down function
With the two-step down function in thecancelled state, repeat the previousprocedure for cancelling the function oneach door switch and it will be restored.
NOTE
If you are unable to restore the functiondespite doing the restore procedure,consult an expert repairer, werecommend an Authorised MazdaRepairer.
Jam-safe window
If a person's hands, head or an objectblocks the window during the manualclosing operation or the auto-closingoperation, the window will stop and openhalfway.
Knowing Your Mazda
Doors and Locks
3-43
CX-7_8AP5-EE-09F_Edition1 Page127Monday, June 15 2009 3:25 PM
Form No.8AP5-EE-09F

Black plate (128,1)
WARNINGMake sure nothing blocks the windowjust before it reaches the fully closedposition or while fully holding up thepower window switch:Blocking the power window justbefore it reaches the fully closedposition or while fully holding up thepower window switch is dangerous.In this case, the jam-safe functioncannot prevent the window fromclosing all the way. If fingers arecaught, serious injuries could occur.
NOTE
l Depending on driving conditions, aclosing power window could stopand start opening when the windowfeels a shock that is similar tosomething blocking it.In the event the jam-safe functionactivates and the power windowcannot be closed automatically, pulland hold the switch fully and thewindow will close.
l The jam-safe window function doesnot operate until the system has beenreset.
Engine-off power window operation
The power window can be operated forabout 40 seconds after the ignition switchis turned from the ON position to theACC or LOCK position with all doorsclosed. If any door is opened, the powerwindow will be inoperable.
NOTE
l For engine-off operation of thepower window, the switch must beheld up firmly throughout windowclosure because the auto-closingfunction will be inoperable.
l The two-step down function isinoperable during engine-offoperation.
qOperating the Front Power Windows(Except European models Type B)
NOTE
l Each passenger power window canbe operated with each door switchwhen the power window lock switchon the driver's door is in theunlocked position (page 3-47).
l Each passenger power window canalso be operated by the powerwindow master control switches onthe driver's door.
Owner master control switchDriver's window
Left rear window
Front passenger's window
Right rear window
3-44
Knowing Your Mazda
Doors and Locks
CX-7_8AP5-EE-09F_Edition1 Page128Monday, June 15 2009 3:25 PM
Form No.8AP5-EE-09F

Black plate (129,1)
NOTE
l The following functions can beperformed for the front powerwindows using the power windowmaster control switches on thedriver's door or front passenger'sdoor switch.
l Manual opening/closingl Auto-opening/closing
Manual opening/closing
To open a power window to the desiredposition, lightly hold down the switch.To close the power window to the desiredposition, lightly pull up the switch.
Open
Close
Master control switches
Driver's window
Front passenger's window
Open
Close
Front passenger switch
Auto-opening/closing
To fully open a power windowautomatically, press the switch completelydown.To fully close the power windowautomatically, pull the switch completelyup.
To stop the power window partway, pullor press the switch in the oppositedirection and then release it.
NOTE
(POWERWINDOW RESETPROCEDURE)If the battery was disconnected duringvehicle maintenance, or for otherreasons such as a switch continues to beoperated after the window is fully open/close, the power windows will not fullyopen and close automatically. Resettingof the automatic function can beperformed using the driver's mastercontrol switch or the front passengerdoor switch.The power window auto function resetprocedure can be done on one or bothdoor switches. The power window autofunction will only resume on the sidethat has been reset.
1. Turn the ignition switch to the ONposition.
2. Make sure that the power windowlock switch located on the driver'sdoor is not depressed.
3. Press the switch and fully open thepower window.
4. Pull up the switch to fully close thepower window and continue holdingthe switch for about 2 seconds afterthe window fully closes.
Knowing Your Mazda
Doors and Locks
3-45
CX-7_8AP5-EE-09F_Edition1 Page129Monday, June 15 2009 3:25 PM
Form No.8AP5-EE-09F

Black plate (130,1)
NOTE
5. Repeat Steps 3-4 for each frontpower window.
6. Make sure that the power windowsoperate correctly using the doorswitches.
Jam-safe window
If a person's hands, head or an objectblocks the window during the manualclosing operation or the auto-closingoperation, the window will stop and openhalfway.
WARNINGMake sure nothing blocks the windowjust before it reaches the fully closedposition or while fully holding up thepower window switch:Blocking the power window justbefore it reaches the fully closedposition or while fully holding up thepower window switch is dangerous.In this case, the jam-safe functioncannot prevent the window fromclosing all the way. If fingers arecaught, serious injuries could occur.
NOTE
l Depending on driving conditions, aclosing power window could stopand start opening when the windowfeels a shock that is similar tosomething blocking it.In the event the jam-safe functionactivates and the power windowcannot be closed automatically, pulland hold the switch fully and thewindow will close.
l The jam-safe window function doesnot operate until the system is re-initialized.
Engine-off power window operation
The power window can be operated forabout 40 seconds after the ignition switchis turned from the ON position to theACC or LOCK position with all doorsclosed. If either front door is opened, thepower window will be inoperable.
NOTE
For engine-off operation of the powerwindow, the switch must be held upfirmly throughout window closurebecause the auto-closing function willbe inoperable.
3-46
Knowing Your Mazda
Doors and Locks
CX-7_8AP5-EE-09F_Edition1 Page130Monday, June 15 2009 3:25 PM
Form No.8AP5-EE-09F

Black plate (131,1)
qOperating the Rear Power Windows(Except European models Type B)
The power windows may be operatedwhen the power window lock switch onthe driver's door is in the unlockedposition.
The rear power windows may be openedor closed using the power window mastercontrol switches on the driver's door.
Left rear window
Power window lock switch
Right rear window
To open the power window to the desiredposition, hold down the switch.To close the power window to the desiredposition, pull up the switch.
Close
Open
Engine-off power window operation
The power windows can be operated forabout 40 seconds after the ignition switchis turned from the ON position to theACC or LOCK position with all doorsclosed. If either front door is opened, thepower windows will be inoperable.
qPower Window Lock Switch
With the lock switch in the unlockedposition (button not depressed), all powerwindows on each door can be operated.
With the lock switch in the lockedposition (button depressed), only thedriver's side power window can beoperated.
Locked position
Unlocked position
WARNINGUnless a passenger needs to operate apower window, keep the power windowlock switch in the locked position:Unintentional power windowoperation is dangerous. A person'shands, head, or neck could be caughtby the window and result in seriousinjury.
Knowing Your Mazda
Doors and Locks
3-47
CX-7_8AP5-EE-09F_Edition1 Page131Monday, June 15 2009 3:25 PM
Form No.8AP5-EE-09F

Black plate (132,1)
NOTE
When the power window lock switch isin the locked position, the light on eachpower window switch, except for thedriver's power window switch, turnsoff. The light may be difficult to seedepending on the surroundingbrightness.
qOpening/Closing the PowerWindows and the Sunroof fromOutside (European models)
All power windows and the sunroof canbe opened or closed from outside thevehicle after the doors and the liftgate areclosed.The power windows may be operatedremotely when the power window lockswitch on the driver's door is in the lockor unlocked position.
WARNINGMake sure the opening is clear beforeclosing a window and the sunroof:Closing power windows and thesunroof are dangerous. A person'shands, head, or even neck could becaught by the window or the sunroofand result in serious injury or evendeath.This warning applies especially tochildren.
NOTE
l The power windows and the sunroofcannot be opened or closed fromoutside the vehicle under thefollowing condition:
l A door or the liftgate is opened.l The key is inserted into the
ignition switch.l (With advanced key)
The start knob is in any positionexcept LOCK.
l The power windows may not closecompletely. Make sure all thewindows are closed.
If the power windows and thesunroof cannot be closed completely,operate each power window switchor the tilt/slide switch from inside thevehicle.After closing the windows and thesunroof from outside the vehicle,verify that they are completelyclosed.
Opening
The windows and the sunroof can beopened for ventilating the cabin beforegetting in the vehicle.
With unlock button (Keyless entrysystem)
Press and hold the unlock button on thetransmitter. After the doors and the liftgateare unlocked, the windows and thesunroof open while the unlock button ispressed.
3-48
Knowing Your Mazda
Doors and Locks
CX-7_8AP5-EE-09F_Edition1 Page132Monday, June 15 2009 3:25 PM
Form No.8AP5-EE-09F

Black plate (133,1)
Advanced key
Lock button
Unlock button
Intrusion sensor cancel button (With theft-deterrent system)
Operation indicator light
Retractable type key
Lock button
Unlock button
Intrusion sensor cancel button (With theft-deterrent system)
Operation indicator light
To stop the windows and the sunroof fromopening, release the button. If theoperation is performed from the beginningagain, the windows and the sunroof open.
Closing
The windows and the sunroof can beclosed in case they are left open aftergetting out of the vehicle.
With lock button (Keyless entry system)
Press and hold the lock button on thetransmitter. After the doors and the liftgateare locked, the windows and the sunroofclose while the lock button is pressed.
Advanced key
Lock button
Unlock button
Intrusion sensor cancel button (With theft-deterrent system)
Operation indicator light
Retractable type key
Lock button
Unlock button
Intrusion sensor cancel button (With theft-deterrent system)
Operation indicator light
To stop the windows and the sunroof fromclosing, release the button. If theoperation is performed from the beginningagain, the windows and the sunroof close.
With request switch on the driver'sdoor (Advanced key)
1. If the doors and the liftgate are locked,unlock them.
Knowing Your Mazda
Doors and Locks
3-49
CX-7_8AP5-EE-09F_Edition1 Page133Monday, June 15 2009 3:25 PM
Form No.8AP5-EE-09F

Black plate (134,1)
2. Press and hold the request switch onthe driver's door. After the doors andthe liftgate are locked, the windowsand the sunroof close while the requestswitch is pressed.
Request switch
To stop the windows and the sunroof fromclosing, release the request switch. If theoperation is performed from the beginningagain, the windows and the sunroof close.
Fuel-Filler Flap and Cap
WARNINGWhen removing the fuel-filler cap,loosen the cap slightly and wait forany hissing to stop. Then remove it:Fuel spray is dangerous. Fuel canburn skin and eyes and cause illness ifingested. Fuel spray is released whenthere is pressure in the fuel tank andthe fuel-filler cap is removed tooquickly.
Before refuelling, stop the engine, andalways keep sparks and flames awayfrom the filler neck:Fuel vapour is dangerous. It could beignited by sparks or flames causingserious burns and injuries.Additionally, use of the incorrect fuel-filler cap or not using a fuel-filler capmay result in fuel leak, which couldresult in serious burns or death in anaccident.
CAUTIONAlways use only a designated Mazdafuel-filler cap or an approvedequivalent, available at an expertrepairer, we recommend an AuthorisedMazda Repairer. The wrong cap canresult in a serious malfunction of thefuel and emission control systems.
3-50
Knowing Your Mazda
Doors and Locks
CX-7_8AP5-EE-09F_Edition1 Page134Monday, June 15 2009 3:25 PM
Form No.8AP5-EE-09F

Black plate (135,1)
qFuel-Filler Flap
To open, pull up the remote fuel-filler flaprelease.
Remote fuel-filler flap release
qFuel-Filler Cap
To remove the fuel-filler cap, turn itanticlockwise.
To close the fuel-filler cap, turn itclockwise until two or more clicks areheard.
Open
Close
NOTE
The removed cap can be attached to theinner side of the lid during refuelling toprevent fuel on the cap from drippingonto the vehicle.
Knowing Your Mazda
Doors and Locks
3-51
CX-7_8AP5-EE-09F_Edition1 Page135Monday, June 15 2009 3:25 PM
Form No.8AP5-EE-09F

Black plate (136,1)
Bonnet
WARNINGAlways check that the bonnet is closedand securely locked:A bonnet that is not closed andsecurely locked is dangerous as itcould fly open while the vehicle ismoving and block the driver's visionwhich could result in a seriousaccident.
qOpening the Bonnet
1. With the vehicle parked, pull therelease handle to unlock the bonnet.
Release handle
2. Insert your hand into the bonnetopening and slide the bonnet latchlever to the right and lift the bonnet.
3. Grasp the support rod in the paddedarea and secure it in the stay holeindicated by the arrow to hold thebonnet open.
Pad
ClipSupport rod
3-52
Knowing Your Mazda
Doors and Locks
CX-7_8AP5-EE-09F_Edition1 Page136Monday, June 15 2009 3:25 PM
Form No.8AP5-EE-09F

Black plate (137,1)
qClosing the Bonnet
WARNINGDo not leave items in the enginecompartment:After you have finished checking ordoing servicing in the enginecompartment, do not forget and leaveitems such as tools or rags in theengine compartment.Tools or other items left in the enginecompartment could cause enginedamage or a fire leading to anunexpected accident.
1. Check under the bonnet area to makecertain all filler caps are in place andall loose items (e.g. tools, oilcontainers, etc.) have been removed.
2. Insert the support rod in its clip whileholding up the bonnet. Verify that thesupport rod is secured in the clip beforeclosing the bonnet.
3. Close the bonnet so that it lockssecurely.
Sunroofí
The sunroof can be opened or closedelectrically only when the ignition switchis in the ON position.
Tilt switch
Slide switch
WARNINGDo not let passengers stand up orextend part of their body through theopen sunroof while the vehicle ismoving:Extending the head, arms, or otherparts of the body through the sunroofis dangerous. The head or arms couldhit something while the vehicle ismoving. This could cause seriousinjury or death.
Make sure the opening is clear beforeclosing the sunroof:A closing sunroof is dangerous. Thehands, head, or even neck of a person―especially a child― could be caughtin it as it closes, causing serious injuryor even death.
Knowing Your Mazda
Doors and Locks
3-53íSome models.
CX-7_8AP5-EE-09F_Edition1 Page137Monday, June 15 2009 3:25 PM
Form No.8AP5-EE-09F

Black plate (138,1)
NOTE
Before washing your Mazda, make surethe sunroof is completely closed so thatwater does not get inside the cabin area.After washing your Mazda or after itrains, wipe the water off the sunroofbefore operating it to avoid waterpenetration which could cause rust andwater damage to your headliner.
qOperating the Sunroof
Tilt Operation
The rear of the sunroof can be tilted opento provide more ventilation.
To fully tilt automatically, momentarilypress the rear of the tilt switch.To fully close automatically, momentarilypress the front of the tilt or slide switch.
To stop tilting partway, press any part ofthe tilt or slide switch.
Close
Tilt up
Close
Slide Operation
To fully open automatically, momentarilypress the rear of the slide switch.To fully close automatically, momentarilypress the front of the tilt or slide switch.
To stop sliding partway, press any part ofthe tilt or slide switch.
CloseClose
Open
Power sunroof re-set procedure
If the battery had been disconnectedduring vehicle maintenance or for otherreasons, the sunroof may not fully open orclose. The sunroof's jam-safe functiondoes not function while the sunroof is re-setting. Carry out the following procedureto resume operation:
1. Turn the ignition switch to the ONposition.
2. Press the rear of the tilt switch, topartially tilt open the rear of thesunroof.
NOTE
If the re-set procedure is performedwhile the sunroof is in the slide position(partially open) it closes before the reartilts opens.
3. Repeat the procedure in Step 2. Therear of the sunroof tilts open to thefully open position, then closes a little.
3-54
Knowing Your Mazda
Doors and Locks
CX-7_8AP5-EE-09F_Edition1 Page138Monday, June 15 2009 3:25 PM
Form No.8AP5-EE-09F

Black plate (139,1)
qEngine-off Sunroof Operation
The sunroof can be operated for about 40seconds after the ignition switch is turnedfrom the ON position to the ACC orLOCK position with all doors closed. Ifany door is opened, the sunroof will beinoperable.
NOTE
For engine-off operation of the sunroof,the switch must be pushed firmlythroughout sunroof closure because theauto-closing function will beinoperable.
qOpening/Closing the Sunrooffrom Outside (European models)
The sunroof can be opened or closed fromoutside the vehicle after the doors and theliftgate are closed.Refer to Opening/Closing the PowerWindows and the Sunroof from theOutside on page 3-48.
qJam-safe Sunroof
If a person's hands, head or an objectblocks the sunroof during closingoperation, the sunroof will stop and openhalfway.
WARNINGMake sure nothing blocks the sunroofjust before it reaches the fully closedposition:Blocking the sunroof just before itreaches the closed position isdangerous.In this case, the jam-safe functioncannot prevent the sunroof fromstopping. If fingers are caught, seriousinjuries could occur.
NOTE
l Depending on driving conditions, aclosing sunroof could stop and startopening when the sunroof feels ashock that is similar to somethingblocking it.
l The sunroof's jam-safe function doesnot function while the sunroof isinitializing.
Knowing Your Mazda
Doors and Locks
3-55
CX-7_8AP5-EE-09F_Edition1 Page139Monday, June 15 2009 3:25 PM
Form No.8AP5-EE-09F

Black plate (140,1)
qSunshade
The sunshade can be opened and closedby hand.
The sunshade opens automatically whenthe sunroof is opened, but must be closedby hand.
Sunshade
CAUTIONl The sunshade does not tilt. To avoiddamaging the sunshade, do not pushup on it.
l Do not close the sunshade while thesunroof is opening. Trying to forcethe sunshade closed could damage it.
3-56
Knowing Your Mazda
Doors and Locks
CX-7_8AP5-EE-09F_Edition1 Page140Monday, June 15 2009 3:25 PM
Form No.8AP5-EE-09F

Black plate (141,1)
Immobilizer System (withAdvanced Key)
The immobilizer system allows the engineto start only with an advanced key thesystem recognizes.
If someone attempts to start the enginewith an unrecognized advanced key, theengine will not start, thereby helping toprevent the theft of your vehicle.If you have a problem with theimmobilizer system or the advanced key(including auxiliary key), consult anAuthorised Mazda Repairer.
CAUTIONl Changes or modifications notexpressly approved by the partyresponsible for compliance couldvoid the user's authority to operatethe equipment.
l To avoid damage to the key, do not:
l Drop the key.l Get the key wet.l Expose the key to any kind of
magnetic field.l Expose the key to high
temperatures on places such as theinstrument panel or bonnet, underdirect sunlight.
CAUTIONDo not allow the following whenstarting the engine with the auxiliarykey due to an advanced key deadbattery or other malfunction. Otherwisethe signal from the auxiliary key willnot be received correctly and the enginemay not start.
l A key ring rests on the key grip.
l Metal parts of other keys or metalobjects touch the auxiliary key grip.
l Spare auxiliary keys or keys forother vehicles equipped with animmobilizer system touch or comenear the auxiliary key.
l Devices for electronic purchases, orsecurity passage which touch orcome near the auxiliary key.
Knowing Your Mazda
Security System
3-57
CX-7_8AP5-EE-09F_Edition1 Page141Monday, June 15 2009 3:25 PM
Form No.8AP5-EE-09F

Black plate (142,1)
NOTE
l The advanced keys (includingauxiliary key) carry a uniqueelectronic code. For this reason, andto assure your safety, obtaining areplacement advanced key (includingauxiliary key) requires some waitingtime. They are only availablethrough an Authorised MazdaRepairer.
l Always keep a spare advanced keyin case one is lost. If an advancedkey is lost, consult an AuthorisedMazda Repairer as soon as possible.
l If you lose an advanced key(including auxiliary key), anAuthorised Mazda Repairer willreset the electronic codes of yourremaining advanced keys (includingauxiliary keys) and immobilizersystem. Bring all the remainingadvanced keys (including auxiliarykeys) to an Authorised MazdaRepairer to reset.Starting the vehicle with a key thathas not been reset is not possible.
qOperation
Arming
The system is armed when the ignitionswitch is turned from the ON position tothe ACC or LOCK position. The securityindicator light in the instrument clusterflashes every 2 seconds until the system isdisarmed.
Disarming
The system is disarmed when the ignitionswitch is turned to the ON position withthe registered advanced key.The security indicator light illuminates forabout 3 seconds and goes out.
If the engine does not start with thecorrect advanced key, and the securityindicator light keeps illuminating orflashing, the system may have amalfunction. Consult an AuthorisedMazda Repairer.
3-58
Knowing Your Mazda
Security System
CX-7_8AP5-EE-09F_Edition1 Page142Monday, June 15 2009 3:25 PM
Form No.8AP5-EE-09F
Black plate (143,1)
NOTE
l The engine may not start and thesecurity indicator light mayilluminate or flash if the advancedkey is placed in an area where it isdifficult for the system to detect thesignal, such as on the instrumentpanel, or in the glove box. Move theadvanced key to another place, turnthe ignition switch to the LOCKposition, and then restart the engine.
l Signals from a TVor radio station, orfrom a transceiver or a mobiletelephone could interfere with yourimmobilizer system. If you are usingthe proper advanced key and theengine fails to start, check thesecurity indicator light. If theindicator light is flashing, turn theignition switch to the ACC or LOCKposition and wait for a while, thenrestart the engine. If it does not startafter 3 or more tries, contact anAuthorised Mazda Repairer.
l If the security indicator light flashescontinuously while you are driving,do not shut off the engine. Go to anAuthorised Mazda Repairer and haveit checked. If the engine is shut offwhile the indicator light is flashing,you will not be able to restart it.
l Since the electronic codes are resetwhen repairing the immobilizersystem, the advanced key (includingauxiliary key) are needed. Bring allthe advanced keys (includingauxiliary keys) to an AuthorisedMazda Repairer.
qModification and Add-OnEquipment
Mazda cannot guarantee the immobilizersystem's operation if the system has beenmodified or if any add-on equipment hasbeen installed.
CAUTIONTo avoid damage to your vehicle, donot modify the system or install anyadd-on equipment to the immobilizersystem or the vehicle.
Knowing Your Mazda
Security System
3-59
CX-7_8AP5-EE-09F_Edition1 Page143Monday, June 15 2009 3:25 PM
Form No.8AP5-EE-09F

Black plate (144,1)
Immobilizer System(without Advanced Key)
The immobilizer system allows the engineto start only with a key the systemrecognizes.
If someone attempts to start the enginewith an unrecognized key, the engine willnot start, thereby helping to prevent thetheft of your vehicle.If you have a problem with theimmobilizer system or the key, consult anAuthorised Mazda Repairer.
CAUTIONl Changes or modifications notexpressly approved by the partyresponsible for compliance couldvoid the user's authority to operatethe equipment.
l To avoid damage to the key, do not:
l Drop the key.l Get the key wet.l Expose the key to any kind of
magnetic field.l Expose the key to high
temperatures on places such as theinstrument panel or bonnet, underdirect sunlight.
CAUTIONWhen starting the engine do not allowthe following, as the engine may notstart due to the electronic signal fromthe ignition key not being transmittedcorrectly.
l A key ring rests on the key grip.
l Metal parts of other keys or metalobjects touch the key grip.
l Spare keys or keys for other vehiclesequipped with an immobilizersystem touch or come near the keygrip.
l Devices for electronic purchases, orsecurity passage which touch orcome near the key.
3-60
Knowing Your Mazda
Security System
CX-7_8AP5-EE-09F_Edition1 Page144Monday, June 15 2009 3:25 PM
Form No.8AP5-EE-09F

Black plate (145,1)
NOTE
l The keys carry a unique electroniccode. For this reason, and to assureyour safety, obtaining a replacementkey requires some waiting time.They are only available through anAuthorised Mazda Repairer.
l Always keep a spare key, in case oneis lost. If a key is lost, contact anAuthorised Mazda Repairer as soonas possible.
l If you lose a key, an AuthorisedMazda Repairer will reset theelectronic codes of your remainingkeys and immobilizer system. Bringall the remaining keys to anAuthorised Mazda Repairer to reset.Starting the vehicle with a key thathas not been reset is not possible.
qOperation
Arming
The system is armed when the ignitionswitch is turned from the ON to the ACCor LOCK position.The security indicator light in theinstrument cluster flashes every twoseconds until the system is disarmed.
Disarming
The system is disarmed when the ignitionswitch is turned to the ON position withthe correct ignition key.The security indicator light illuminates forabout three seconds and goes out.
If the engine does not start with thecorrect ignition key, and the securityindicator light keeps illuminating orflashing, the system may have amalfunction. Consult an AuthorisedMazda Repairer.
NOTE
l If the security indicator lightilluminates and stays on or flasheswhen the ignition switch is turned tothe ON position, the engine will notstart.
l Signals from a TVor radio station, orfrom a transceiver or a mobiletelephone, could interfere with yourimmobilizer system. If you are usingthe proper key and your engine failsto start, check the security indicatorlight. If it is flashing, remove theignition key and wait 2 seconds ormore, then reinsert it and try startingthe engine again. If it does not startafter 3 or more tries, contact anAuthorised Mazda Repairer.
l If the security indicator light flashescontinuously while you are driving,do not shut off the engine. Go to anAuthorised Mazda Repairer and haveit checked. If you shut off the enginewhile the light is flashing you willnot be able to restart it.
Knowing Your Mazda
Security System
3-61
CX-7_8AP5-EE-09F_Edition1 Page145Monday, June 15 2009 3:25 PM
Form No.8AP5-EE-09F

Black plate (146,1)
NOTE
l Since the electronic codes are resetwhen repairing the immobilizersystem, the keys are needed. Bringall the existing keys to an AuthorisedMazda Repairer.
qModification and Add-OnEquipment
Mazda cannot guarantee the immobilizersystem's operation if the system has beenmodified or if any add-on equipment hasbeen installed.
CAUTIONTo avoid damage to your vehicle, donot modify the system or install anyadd-on equipment to the immobilizersystem or the vehicle.
Theft-Deterrent System(European models)í
If the theft deterrent system detects aninappropriate entry into the vehicle or theintrusion sensor detects movement in thevehicle which could result in the vehicleor its contents being stolen, the alarmalerts the surrounding area of anabnormality by sounding the siren andflashing the hazard warning lights.Refer to Operation on page 3-64.
NOTE
l The theft-deterrent system isdesigned to operate with the keylessentry system.
Lock button
Unlock button
Intrusion/tilt sensor cancel button
Advanced key (transmitter)
Lock button
Unlock button
Intrusion sensor cancel button
Retractable type key
3-62
Knowing Your Mazda
íSome models.
Security System
CX-7_8AP5-EE-09F_Edition1 Page146Monday, June 15 2009 3:25 PM
Form No.8AP5-EE-09F

Black plate (147,1)
NOTE
l (With advanced key)The theft-deterrent system can alsobe operated using the advancedkeyless function.The system operates only when thedriver is in the vehicle or withinoperational range while the advancedkey is being carried.
The system will not function unless it'sproperly armed. So when you leave thevehicle, follow the arming procedurecorrectly.
Intrusion sensor
The intrusion sensor uses ultrasonicwaves to detect movement inside thevehicle and to raise an alert of an intrusioninto the vehicle.
The intrusion sensor detects certain kindsof movement inside the vehicle, however,it may also respond to phenomenonoutside the vehicle such as vibrations,loud noise, wind, and air currents.
CAUTIONl If the theft deterrent system is set upas follows, the intrusion sensor willbe operational and could trigger thealarm.
l Leaving the vehicle withpassengers or pets remaininginside.
l Hanging small objects/accessoriesin the vehicle, hanging clothingon a coat hook, or placing otheritems which can move easilyinside the vehicle.
l Parking in an area where there isstrong vibration or loud noise.
l When using a high pressure orautomatic car wash.
l Continuous shock and vibrationfrom hail or thunder andlightening is transmitted to thevehicle.
l Awindow or the sunroof* is open.* If equipped
Knowing Your Mazda
Security System
3-63
CX-7_8AP5-EE-09F_Edition1 Page147Monday, June 15 2009 3:25 PM
Form No.8AP5-EE-09F

Black plate (148,1)
CAUTIONl In order for the intrusion sensor tooperate appropriately, be aware ofthe following:
l Do not hang clothing or objectsfrom a head restraint or a coathook.
l Return the extension sunvisors totheir original positions.
l Do not blind the intrusion sensorby covering it or placing objectsover it.
l Do not allow the intrusion sensorto get soiled or wipe it with aliquid.
l Do not shock or cause an impactto the intrusion sensor or theintrusion sensor bezel.
l Do not install seats or seat coversthat are not Mazda genuineproducts.
l To prevent obstruction ofintrusion sensor, do not placeobjects or cargo near the intrusionsensor that are higher than thehead restraints.
Intrusion sensor and intrusion sensor bezel
qOperation
Siren triggering conditions
The siren sounds intermittently and thehazard warning lights flash for about 30seconds when the system is triggered byany one of the following:
l Unlocking a door with the key.
l Unlocking a door by operating aninside door-lock knob.
l Forcing open a door, the bonnet or theliftgate.
l Opening the bonnet by operating thebonnet release handle.
l Turning the ignition switch to the ONposition without the key.(With advanced key)Turning the ignition switch to the ONposition without the start knob.
l The intrusion sensor detects amovement in the vehicle.
The system will be triggered again (up to10 times) if one of the above conditionsremains.
l Disconnecting the battery terminal (thehazard warning lights do not flash).
The system will be triggered about 10times.
3-64
Knowing Your Mazda
Security System
CX-7_8AP5-EE-09F_Edition1 Page148Monday, June 15 2009 3:25 PM
Form No.8AP5-EE-09F

Black plate (149,1)
NOTE
l To turn the siren and flashing hazardlights off, press the unlock button onthe transmitter or start the enginewith the key.(With advanced key)The siren and flashing hazard lightscan also be turned off by pressing arequest switch or starting the enginewith the start knob.
l If the battery goes dead while thetheft-deterrent system is armed, thesiren will activate and the hazardwarning lights will flash when thebattery is charged or replaced.
qHow to Arm the System
1. Close the windows and the sunroof*
securely.
* If equipped
NOTE
Even with a window or the sunroof*
open, the system can be armed,however, leaving the windows and thesunroof* even partially open can invitetheft, and wind blowing into the vehiclecould trigger the alarm.The intrusion sensor function can alsobe cancelled.Refer to Cancelling the Intrusion Sensoron page 3-66.
* If equipped
2. Remove the key from the ignitionswitch.(With advanced key)Turn the start knob to the LOCKposition.
3. Make sure all windows, the sunroof*,the bonnet, the doors and the liftgateare closed.
* If equipped
4. Press the lock button on the transmitter.The hazard warning lights will flashonce.(With advanced key)Press a request switch on a door.
The theft deterrent system can also bearmed by activating the auto re-lockfunction with all the doors, the liftgateand the bonnet closed.The security indicator light in theinstrument panel flashes twice persecond for 20 seconds.
5. After 20 seconds, the system is fullyarmed.
Knowing Your Mazda
Security System
3-65
CX-7_8AP5-EE-09F_Edition1 Page149Monday, June 15 2009 3:25 PM
Form No.8AP5-EE-09F

Black plate (150,1)
NOTE
l Auto re-lock functionAfter unlocking with the transmitteror the request switch, all doors andthe liftgate will automatically lockand the hazard warning lights willflash if any of the followingoperations are not performed withinabout 30 seconds.
l A door or the liftgate is opened.l The auxiliary key inserted into the
ignition switch (with advancedkey).
l The start knob is pushed (withadvanced key).
l To cancel the intrusion sensorfunction, press the intrusion sensorcancel button on the transmitterwithin 20 seconds (while the securityindicator light is flashing twice persecond) after pressing the lockbutton.
NOTE
l The system will disarm if one of thefollowing operations takes placewithin 20 seconds after pressing thelock button:
l Pressing the unlock button on thetransmitter.
l Any door or the liftgate is opened.l Unlocking a door with the inside
door-lock knob.l The bonnet is opened.l The key is inserted in the ignition
switch.l (With advanced key)
The start knob is pressed into theignition switch or a request switchis pressed.
l The ignition switch is turned tothe ON position.
To rearm the system, do the armingprocedure again.
l When the doors are locked bypressing the lock button on thetransmitter or request switch on thefront doors or using the key whilethe theft-deterrent system is armed,the hazard warning lights will flashonce to indicate that the system isarmed.
qCancelling the Intrusion Sensor
If the theft deterrent system has beenarmed while any of the followingconditions are present, cancel theintrusion sensor to prevent the alarm fromtriggering unnecessarily.
l Leaving the vehicle with a movableobject, passengers or pets remaininginside.
3-66
Knowing Your Mazda
Security System
CX-7_8AP5-EE-09F_Edition1 Page150Monday, June 15 2009 3:25 PM
Form No.8AP5-EE-09F

Black plate (151,1)
l Leaving an object inside the vehiclethat can roll around, such as when thevehicle is placed on a tilting, unstablesurface when being shipped.
l When using a high pressure orautomatic car wash.
l Doors are locked with a window or thesunroof* left open.
* If equipped
l All the windows and the sunroof* areleft open after all the doors and theliftgate are unlocked using a long pressof the transmitter unlock button.
* If equipped
NOTE
If any door or the liftgate remainsclosed for 30 seconds, all the doors andthe liftgate automatically re-lock andthe theft deterrent system arms even if awindow and the sunroof* is left open.
* If equipped
l An accessory heater or device thatproduces moving air and vibrationoperates while the theft deterrentsystem is armed.
To cancel the intrusion sensor, press theintrusion sensor cancel button on thetransmitter within 20 seconds afterpressing the lock button.The hazard warning lights will flash threetimes.
NOTE
l To reactivate the intrusion sensor,turn off the armed theft-deterrentsystem and then rearm it.
l The intrusion sensor is operationalwhen the theft-deterrent system isarmed. To cancel the intrusionsensor, press the intrusion sensorcancel button each time the theft-deterrent system is armed.
qTo Turn Off an Armed System
With advanced key
To turn off the armed system, press theunlock button on the transmitter or arequest switch.The hazard warning lights will flashtwice.
NOTE
The system turns off when the engine isstarted with the ignition key or the startknob.
Without advanced key
To turn off the armed system, press theunlock button on the transmitter.The hazard warning lights will flashtwice.
Knowing Your Mazda
Security System
3-67
CX-7_8AP5-EE-09F_Edition1 Page151Monday, June 15 2009 3:25 PM
Form No.8AP5-EE-09F

Black plate (152,1)
NOTE
l The system turns off when theengine is started with the ignitionkey.
l When the doors are unlocked bypressing the unlock button on thetransmitter or request switch on thefront doors or using the key whilethe theft-deterrent system is turnedoff, the hazard warning lights willflash twice to indicate that thesystem is turned off.
qTo Stop the Alarm
With advanced key
To stop a triggered alarm, press the unlockbutton on the transmitter or a requestswitch.The hazard warning lights will flashtwice.
NOTE
The alarm stops when the engine isstarted with the ignition key or the startknob.
Without advanced key
To stop a triggered alarm, press the unlockbutton on the transmitter.The hazard warning lights will flashtwice.
NOTE
The alarm stops when the engine isstarted with the ignition key.
qModification and Add-OnEquipment
Mazda cannot guarantee the theft-deterrent system's operation if the systemhas been modified or if any add-onequipment has been installed.
CAUTIONTo avoid damage to your vehicle, donot modify the system or install anyadd-on equipment to the theft-deterrentsystem or the vehicle.
qTheft-Deterrent Labels
A label indicating that your vehicle isequipped with a Theft-Deterrent System isin the glove compartment.
Mazda recommends that you affix it to thelower rear corner of a front door window.
3-68
Knowing Your Mazda
Security System
CX-7_8AP5-EE-09F_Edition1 Page152Monday, June 15 2009 3:25 PM
Form No.8AP5-EE-09F

Black plate (153,1)
Theft-Deterrent System(Except European models)
If the theft deterrent system detects aninappropriate entry into the vehicle, whichcould result in the vehicle or its contentsbeing stolen, the alarm alerts thesurrounding area of an abnormality bysounding the horn and flashing the hazardwarning lights.Refer to Operation on page 3-69.
NOTE
l The theft-deterrent system operateswith the key or the keyless entrysystem transmitter.
l (With advanced key)The theft-deterrent system can alsobe operated using the advancedkeyless function.The system operates only when thedriver is in the vehicle or withinoperational range while the advancedkey is being carried.
l The system will not function unlessit is properly armed. To properlysecure the vehicle, always make sureall the windows are completelyclosed and all doors and the liftgateare locked before leaving the vehicle.Remember to take your key andtransmitter.
qOperation
System triggering conditions
The horn sounds intermittently and thehazard warning lights flash for about 30seconds when the system is triggered byany one of the following:
l Forcing open a door, the bonnet or theliftgate.
l Unlocking a door with the inside door-lock knob.
l Opening a door, the bonnet byoperating an inside door-lock knob, thebonnet release handle.
If the system is triggered again, the lightsand horn will activate until a door or theliftgate is unlocked with the key or withthe transmitter.(With advanced key)The lights and horn can also bedeactivated by pressing a request switch.
NOTE
If the battery goes dead while the theft-deterrent system is armed, the horn willactivate and the hazard warning lightswill flash when the battery is charged orreplaced.
Knowing Your Mazda
Security System
3-69
CX-7_8AP5-EE-09F_Edition1 Page153Monday, June 15 2009 3:25 PM
Form No.8AP5-EE-09F

Black plate (154,1)
qHow to Arm the System
1. Remove the key from the ignitionswitch.(With advanced key)Turn the start knob to the LOCK.
2. Close the bonnet. Then close and lockall doors and the liftgate from theoutside using the key. If you have thekeyless entry system, press the lockbutton on the transmitter. The hazardwarning lights will flash once toindicate that the system is armed.(With advanced key)Press a request switch or the lockbutton on the transmitter.
The theft deterrent system can also bearmed by activating the auto re-lockfunction with all the doors, the liftgate andthe bonnet closed.
NOTE
l Locking the doors with the insidedoor-lock knob will not arm thesystem.
l Auto re-lock functionAfter unlocking with the transmitter,all doors and the liftgate willautomatically lock if one of the doorsor the liftgate is not opened withinabout 30 seconds.
l When the doors are locked bypressing the lock button on thetransmitter or request switch on thefront doors while the theft-deterrentsystem is armed, the hazard warninglights will flash once to indicate thatthe system is armed.
qTo Turn Off an Armed System
An armed system can be turned off by anyone of the following methods:
l Unlock a door with the key.
l Press the unlock button on the keylessentry system transmitter.
l Insert the key into the ignition switchand turn it to the ON position.
l (With advanced key)
l Press a request switch or the unlockbutton on the transmitter.
l Turn the start knob to the ONposition.
NOTE
When the doors are unlocked bypressing the unlock button on thetransmitter or request switch on thefront doors or using the key while thetheft-deterrent system is turned off, thehazard warning lights will flash twice toindicate that the system is turned off.
qTo Stop the Alarm
A triggered alarm can be turned off byany one of the following methods:
l Unlock a door with the key.
l Press the unlock button on the keylessentry system transmitter.
l (With advanced key)
l Press a request switch.l Press the unlock button on the
transmitter.
3-70
Knowing Your Mazda
Security System
CX-7_8AP5-EE-09F_Edition1 Page154Monday, June 15 2009 3:25 PM
Form No.8AP5-EE-09F

Black plate (155,1)
NOTE
l The alarm stops when the engine isstarted using the ignition key or thestart knob (with advanced key).
l If you have any problem with thetheft-deterrent system, consult anexpert repairer, we recommend anAuthorised Mazda Repairer.
qTheft- Deterrent Labels
A label indicating that your vehicle isequipped with a Theft-Deterrent System isin the glove compartment.
Mazda recommends that you affix it to thelower rear corner of a front door window.
Double Locking System(European models)
The double locking system is designed toprevent someone who has broken intoyour vehicle from opening the door fromthe inside.
WARNINGNever activate the double lockingsystem with passengers, especiallychildren, still inside the vehicle:Activating the system with passengers,especially children, still inside thevehicle is dangerous. The passengerscannot open the doors from inside.They would be trapped and subjectedto extreme temperatures. This couldresult in serious injuries or evendeath.
qHow to Activate the System
1. Close all the windows and the sunroof.
2. Remove the key from the ignitionswitch and take it with you.
3. Close all doors and liftgate.
Knowing Your Mazda
Security System
3-71
CX-7_8AP5-EE-09F_Edition1 Page155Monday, June 15 2009 3:25 PM
Form No.8AP5-EE-09F

Black plate (156,1)
4. Insert the key in the driver's door, turnthe key to the lock position, and returnit to the centre position. Then turn it tothe lock position again within 3seconds.
Centre Position
Lock Position
NOTE
You can also activate the system bypressing the lock button on thetransmitter twice within 3 seconds.
NOTE
(With advanced key)If your vehicle is equipped with theadvanced key, you can also activate thesystem by pressing the request switchon a front door twice within 3 seconds.
5. The indicator light comes on for about3 seconds to indicate that the systemhas been activated.
NOTE
The system cannot be activated whenany door or the liftgate is open.
qHow to Deactivate the System
Unlock a door with the key, thetransmitter, or a request switch or turn theignition switch to the ON position.
NOTE
l If the power supply is interrupted(fuse blows or the battery isdisconnected), the system can onlybe deactivated by unlocking a doorwith the key.
l If you have any problems with thedouble locking system, consult anexpert repairer, we recommend anAuthorised Mazda Repairer.
3-72
Knowing Your Mazda
Security System
CX-7_8AP5-EE-09F_Edition1 Page156Monday, June 15 2009 3:25 PM
Form No.8AP5-EE-09F

Black plate (157,1)
Steering Wheel
WARNINGNever adjust the steering wheel whilethe vehicle is moving:Adjusting the steering wheel while thevehicle is moving is dangerous.Moving it can very easily cause thedriver to abruptly turn to the left orright. This can lead to loss of controlor an accident.
qSteering Wheel Adjustment
To change the angle or length of thesteering wheel:
1. Stop the vehicle, pull down the lockrelease lever under the steeringcolumn.
Lock release lever
2. Tilt the steering wheel and/or adjust thesteering column length to the desiredpositions, push the lever up to lock thecolumn.
3. Push the wheel up and down to becertain it's locked before driving.
Mirrors
qOutside Mirrors
Check the mirror angles before driving.
WARNINGBe sure to look over your shoulderbefore changing lanes:Changing lanes without taking intoaccount the actual distance of thevehicle in the convex mirror isdangerous. You could have a seriousaccident. What you see in the convexmirror is closer than it appears.
NOTE
(Driver's Side Wide Angle Mirror í)
l The wide angle mirror has twocurvatures on its surface separated bya region line into outer and innerregions. The inner region is astandard convex mirror whereas theouter region allows for a wider rangeof visibility within the same sweep.This combination allows for betterassurance when making lanechanges.
Region line
Knowing Your Mazda
Steering Wheel and Mirrors
3-73íSome models.
CX-7_8AP5-EE-09F_Edition1 Page157Monday, June 15 2009 3:25 PM
Form No.8AP5-EE-09F

Black plate (158,1)
NOTE
l The perceived distance of objects inthe outer and inner regions of thewide angle mirror is different.Objects appearing in the outer regionare actually further away than theyare in the inner region.
Power mirror
The ignition switch must be in the ACCor ON position.
To adjust:
1. Press the left or right side of theselector switch to choose the left orright side mirror.
2. Depress the mirror switch in theappropriate direction.
Outside mirror
Mirror switch
Selector switch
After adjusting the mirror, lock the controlby placing the selector switch in themiddle position.
Power folding mirror
The ignition switch must be in the ACCor ON position.
To fold, press the switch.
To return the mirror to the drivingposition, press the switch again.
WARNINGAlways return the outside mirrors tothe driving position before you startdriving:Driving with the outside mirrorsfolded in is dangerous. Your rear viewwill be restricted, and you could havean accident.
Do not touch a power fold-in mirrorwhile it is moving:Touching the power fold-in mirrorwhen it is moving is dangerous. Yourhand could be pinched and injured orthe mirror could be damaged.
Use the power fold-in switch to set themirror to the on-road position:Setting the power fold-in mirror to theon-road position by hand isdangerous. The mirror will not lock inposition and will prevent effectiverearview visibility.
3-74
Knowing Your Mazda
Steering Wheel and Mirrors
CX-7_8AP5-EE-09F_Edition1 Page158Monday, June 15 2009 3:25 PM
Form No.8AP5-EE-09F

Black plate (159,1)
WARNINGOnly operate the power fold-in mirrorwith the vehicle safely parked:Operating the power fold-in mirrorwhile the vehicle is moving isdangerous. Wind blast on the mirrorwill cause them to collapse and youwill be unable to return it to the on-road position, preventing rearviewvisibility.
Manual folding mirror
Fold the outside mirror rearward until it isflush with the vehicle.
WARNINGAlways return the outside mirrors tothe driving position before you startdriving:Driving with the outside mirrorsfolded in is dangerous. Your rear viewwill be restricted, and you could havean accident.
Engine-off outside mirror operationí
The outside mirrors can be operated forabout 40 seconds after the ignition switchis turned from the ON position to theACC or LOCK position.
qRearview Mirror
WARNINGDo not stack cargo or objects higherthan the seatbacks:Cargo stacked higher than theseatbacks is dangerous. It can blockyour view in the rearview mirror,which might cause you to hit anothercar when changing lanes.
Rearview mirror adjustment
Before driving, adjust the rearview mirrorto centre on the scene through the rearwindow.Manual antidazzle mirror
Knowing Your Mazda
Steering Wheel and Mirrors
3-75íSome models.
CX-7_8AP5-EE-09F_Edition1 Page159Monday, June 15 2009 3:25 PM
Form No.8AP5-EE-09F

Black plate (160,1)
Auto-dimming mirror
NOTE
For the manual antidazzle mirror,perform the adjustment with theantidazzle lever in the day position.
Reducing glare from headlights
Manual antidazzle mirror
Push the antidazzle lever forward for daydriving. Pull it back to reduce glare ofheadlights from cars at the rear.
Night
Day
Antidazzle lever
Auto-dimming mirror
The auto-dimming mirror automaticallyreduces glare of headlights from cars atthe rear when the ignition is switched ON.
Press the ON/OFF button ( ) to cancelthe automatic dimming function. Theindicator light will turn off.To reactivate the automatic dimmingfunction, press the ON/OFF button ( ).The indicator light will illuminate.
ON/OFF buttonIndicator light
3-76
Knowing Your Mazda
Steering Wheel and Mirrors
CX-7_8AP5-EE-09F_Edition1 Page160Monday, June 15 2009 3:25 PM
Form No.8AP5-EE-09F

Black plate (161,1)
NOTE
l Do not use glass cleaner or suspendobjects on or around the light sensor.Otherwise, light sensor sensitivitywill be affected and may not operatenormally.
Light sensor
Light sensor
l The auto-dimmer function iscancelled when the ignition isswitched ON and the shift lever/selector lever is in reverse (R).
Knowing Your Mazda
Steering Wheel and Mirrors
3-77
CX-7_8AP5-EE-09F_Edition1 Page161Monday, June 15 2009 3:25 PM
Form No.8AP5-EE-09F

Black plate (162,1)
3-78
CX-7_8AP5-EE-09F_Edition1 Page162Monday, June 15 2009 3:25 PM
Form No.8AP5-EE-09F

Black plate (163,1)
4 Before Driving Your Mazda
Important information about driving your Mazda.
Fuel and Engine Exhaust Precautions ........................................ 4-2Fuel Requirements (Petrol engine) ............................................ 4-2Fuel Requirements (Diesel Engine) .......................................... 4-3Emission Control System (Petrol engine) ................................. 4-4Emission Control System (Diesel Engine) ................................ 4-5Engine Exhaust (Carbon Monoxide) ......................................... 4-7
Before Starting the Engine ........................................................... 4-8Before Getting In ...................................................................... 4-8After Getting In ......................................................................... 4-8
Driving Tips ................................................................................... 4-9Running-In ................................................................................ 4-9Money-Saving Suggestions ...................................................... 4-9Hazardous Driving .................................................................. 4-10Rocking the Vehicle ................................................................ 4-11Winter Driving ........................................................................ 4-12Driving In Flooded Area ......................................................... 4-14Turbocharger Information ....................................................... 4-15
Towing ......................................................................................... 4-16Towing Caravan and Trailers .................................................. 4-16
4-1
CX-7_8AP5-EE-09F_Edition1 Page163Monday, June 15 2009 3:25 PM
Form No.8AP5-EE-09F

Black plate (164,1)
Fuel Requirements (Petrol engine)Vehicles with catalytic converters or oxygen sensors must use ONLY UNLEADED FUEL,which will reduce exhaust emissions and keep spark plug fouling to a minimum.
Your Mazda will perform best with fuel listed in the table.
Europe
FuelResearch Octane
NumberCountry
Premium unleaded fuel(Conforming to EN
228)*1
98 or above Except below
95 or above Russia, Belarus, Ukraine
*1 EuropeThis vehicle is designed to use 98 octane (RON) or higher petrol for best performance. If 98 octane (RON) is notavailable, 95 octane (RON) petrol can be used. Use of 95 octane (RON) petrol can decrease performance. Petrollower than 95 octane (RON) could cause the emission control system to lose effectiveness. It could also causeengine knocking and serious engine damage.
Except Europe
L3 turbocharger engine
Fuel Research Octane Number
Premium unleaded fuel 95 or above
L5 engine
FuelResearch Octane
NumberCountry
Premium unleaded fuel 95 or above New Caledonia, Mauritius
Regular unleaded fuel 90 or above Except above
Fuel with a lower rating could cause the emission control system to lose effectiveness. It could also cause engineknocking and serious damage.
CAUTIONl USE ONLY UNLEADED FUEL.Leaded fuel is harmful to the catalytic converter and oxygen sensors and will lead todeterioration of the emission control system and or failures.
l Never add fuel system additives. Never add cleaning agents other than those specifiedby Mazda. Other cleaning agents and additives may damage the system. Consult anexpert repairer, we recommend an Authorised Mazda Repairer.
4-2
Before Driving Your Mazda
Fuel and Engine Exhaust Precautions
CX-7_8AP5-EE-09F_Edition1 Page164Monday, June 15 2009 3:25 PM
Form No.8AP5-EE-09F

Black plate (165,1)
Fuel Requirements (Diesel Engine)Your Mazda will operate efficiently on diesel fuel with specification EN590 or theequivalent.
CAUTIONl Never use fuel other than specification EN590 or the equivalent for your vehicle. Useof petrol or paraffin in diesel engines will result in engine damage.
l Never add fuel system additives or cleaning agents. These may cause damage thesystem.
NOTE
When refuelling, always add at least 10 L (11 US qt, 8.8 lmp qt) of fuel.
Before Driving Your Mazda
Fuel and Engine Exhaust Precautions
4-3
CX-7_8AP5-EE-09F_Edition1 Page165Monday, June 15 2009 3:25 PM
Form No.8AP5-EE-09F

Black plate (166,1)
Emission Control System (Petrol engine)Your vehicle is equipped with an emission control system (the catalytic converter is part ofthis system) that enables your vehicle to comply with existing exhaust emissionsrequirements.
WARNINGNever park over or near anything flammable:Parking over or near anything flammable, such as dry grass, is dangerous. Even withthe engine turned off, the exhaust system remains very hot after normal use and couldignite anything flammable. A resulting fire could cause serious injury or death.
CAUTIONIgnoring the following precautions could cause lead to accumulate on the catalyst insidethe converter or cause the converter to get very hot. Either condition will damage theconverter and cause poor performance.
l USE ONLY UNLEADED FUEL.
l Do not drive your Mazda with any sign of engine malfunction.
l Do not coast with the ignition switch turned off.
l Do not descend steep grades in gear with the ignition switch turned off.
l Do not operate the engine at high idle for more than 2 minutes.
l Do not tamper with the emission control system. All inspections and adjustmentsmust be made by a qualified technician.
l Do not push-start or pull-start your vehicle.
4-4
Before Driving Your Mazda
Fuel and Engine Exhaust Precautions
CX-7_8AP5-EE-09F_Edition1 Page166Monday, June 15 2009 3:25 PM
Form No.8AP5-EE-09F

Black plate (167,1)
Emission Control System (Diesel Engine)Your vehicle is equipped with an emission control system (the catalytic converter is part ofthis system) that enables your vehicle to comply with existing exhaust emissionsrequirements.
WARNINGNever park over or near anything flammable:Parking over or near anything flammable, such as dry grass, is dangerous. Even withthe engine turned off, the exhaust system remains very hot after normal use and couldignite anything flammable. A resulting fire could cause serious injury or death.
CAUTIONIgnoring the following precautions could cause lead to accumulate on the catalyst insidethe converter or cause the converter to get very hot. Either condition will damage theconverter and cause poor performance.
l Do not drive your Mazda with any sign of engine malfunction.
l Do not descend steep grades in gear with the ignition switch turned off.
l Do not tamper with the emission control system. All inspections and adjustmentsmust be made by a qualified technician.
l Do not push-start or pull-start your vehicle.
Before Driving Your Mazda
Fuel and Engine Exhaust Precautions
4-5
CX-7_8AP5-EE-09F_Edition1 Page167Monday, June 15 2009 3:25 PM
Form No.8AP5-EE-09F

Black plate (168,1)
Using the correct type of urea
WARNINGl Only use *AdBlue®. If urea other than AdBlue® is used, the resulting emission ofpollutants may be subject to fines and penalties.* AdBlue® is a registered trademark of the Verband der Automobilindustrie e.V.
(VDA).l If the remaining distance-to-empty for the urea supply is 830 km (520 mile) or less(SCR warning light flashes continuously), optimum driving performance is notpossible because the vehicle speed is limited. Have the urea supply replenished assoon as possible.
l If the remaining travel distance reaches 0 km (0 mile) and the engine is stopped,the engine cannot be restarted. If the supply of urea runs out while the vehicle isbeing driven, exhaust gas purification worsens and the resulting emission ofpollutants may be subject to fines and penalties. For replenishment of the ureasupply, consult a Mazda Repairer.
NOTE
l The urea supply needs to be replenished when the engine oil is replaced. Consult aMazda Repairer.
l The urea supply needs to be replenished periodically. When the remaining distance-to-empty indication of the AdBlue® gauge is displayed, or the SCR warning lightilluminates, consult a Mazda Repairer.
l In general, the distance the vehicle can be driven on a full tank of urea is about20,000 km (12,427 mile). A supply of urea is useable for a period of about 2 yearsunder ambient temperature conditions of 30 °C.
l The urea supply needs to be replenished when the engine oil is replaced. Consult aMazda Repairer.
4-6
Before Driving Your Mazda
Fuel and Engine Exhaust Precautions
CX-7_8AP5-EE-09F_Edition1 Page168Monday, June 15 2009 3:25 PM
Form No.8AP5-EE-09F

Black plate (169,1)
Engine Exhaust (Carbon Monoxide)
WARNINGDo not drive your vehicle if you smell exhaust gas inside the vehicle:Engine exhaust gas is dangerous. This gas contains carbon monoxide (CO), which iscolourless, odourless, and poisonous. When inhaled, it can cause loss ofconsciousness and death. If you smell exhaust gas inside your vehicle, keep allwindows fully open and contact an expert repairer, we recommend an AuthorisedMazda Repairer immediately.
Do not run the engine when inside an enclosed area:Running the engine inside an enclosed area, such as a garage, is dangerous. Exhaustgas, which contains poisonous carbon monoxide, could easily enter the cabin. Loss ofconsciousness or even death could occur.
Open the windows or adjust the heating or cooling system to draw fresh air whenidling the engine:Exhaust gas is dangerous. When your vehicle is stopped with the windows closed andthe engine running for a long time even in an open area, exhaust gas, which containspoisonous carbon monoxide, could enter the cabin. Loss of consciousness or evendeath could occur.
Clear snow from underneath and around your vehicle, particularly the tail pipe,before starting the engine:Running the engine when a vehicle is stopped in deep snow is dangerous. The exhaustpipe could be blocked by the snow, allowing exhaust gas to enter the cabin. Becauseexhaust gas contains poisonous carbon monoxide, it could cause loss ofconsciousness or even death to occupants in the cabin.
Before Driving Your Mazda
Fuel and Engine Exhaust Precautions
4-7
CX-7_8AP5-EE-09F_Edition1 Page169Monday, June 15 2009 3:25 PM
Form No.8AP5-EE-09F

Black plate (170,1)
Before Getting Inl Be sure the windows, outside mirrors,and outside lights are clean.
l Inspect inflation pressures andcondition of tyres.
l Look under the vehicle for any sign offluid leaks.
l If you plan to back up, make surenothing is in your way.
NOTE
Engine oil, engine coolant, brake/clutchfluid, washer fluid, and other fluidlevels should be inspected daily,weekly, or at refuelling, depending onthe fluid. See Maintenance, Section 8.
After Getting Inl Are all doors closed?
l Is the seat adjusted properly?
l Are the inside and outside mirrorsadjusted?
l Is the steering wheel adjusted properly?
l Is everyone's seat belt fastened?
l Check all gauges.
l Check all warning lights when theignition switch is turned to the ONposition.
l Release the parking brake and makesure the brake warning light goes off.
Always be thoroughly familiar with yourMazda.
4-8
Before Driving Your Mazda
Before Starting the Engine
CX-7_8AP5-EE-09F_Edition1 Page170Monday, June 15 2009 3:25 PM
Form No.8AP5-EE-09F

Black plate (171,1)
Running-InNo special running-in is necessary, but afew precautions in the first 1,000 km (600miles) may add to the performance,economy, and life of your Mazda.
l Do not race the engine.
l Do not maintain one constant speed,either slow or fast, for a long period oftime.
l Do not drive constantly at full-throttleor high engine rpm for extendedperiods of time.
l Avoid unnecessary hard stops.
l Avoid full-throttle starts.
l Do not tow a trailer.
Money-Saving SuggestionsHow you operate your Mazda determineshow far it will travel on a tank of fuel. Usethese suggestions to help save money onfuel and repairs.
l Avoid long warm-ups. Once the engineruns smoothly, begin driving.
l Avoid fast starts.
l Keep the engine tuned. Follow themaintenance schedule (page 8-3) andhave an expert repairer, we recommendan Authorised Mazda Repairer performinspections and servicing.
l Use the air conditioner only whennecessary.
l Slow down on rough roads.
l Keep the tyres properly inflated.
l Do not carry unnecessary weight.
l Do not rest your foot on the brakepedal while driving.
l Keep the wheels in correct alignment.
l Keep windows closed at high speeds.
l Slow down when driving in crosswindsand headwinds.
WARNINGNever stop the engine when goingdown a hill:Stopping the engine when going downa hill is dangerous. This causes theloss of power steering and powerbrake control, and may cause damageto the drivetrain. Any loss of steeringor braking control could cause anaccident.
Before Driving Your Mazda
Driving Tips
4-9
CX-7_8AP5-EE-09F_Edition1 Page171Monday, June 15 2009 3:25 PM
Form No.8AP5-EE-09F

Black plate (172,1)
Hazardous Driving
qDriving on Slippery Surface
WARNINGBe extremely careful if it is necessaryto downshift on slippery surfaces:Downshifting into lower gear whiledriving on slippery surfaces isdangerous. The sudden change in tyrespeed could cause the tyres to skid.This could lead to loss of vehiclecontrol and an accident.
Do not rely on ABS as a substitute forsafe driving:The ABS cannot compensate forunsafe and reckless driving, excessivespeed, tailgating (following anothervehicle too closely), driving on ice andsnow, and hydroplaning (reduced tyrefriction and road contact because ofwater on the road surface). You canstill have an accident.
When driving on ice or in water, snow,mud, sand, or similar hazards:
l Be cautious and allow extra distancefor braking.
l Avoid sudden braking and suddenmanoeuvring.
l Do not pump the brakes. Continue topress down on the brake pedal.
l If you get stuck, select a lower gear andaccelerate slowly. Do not spin the frontwheels.
l For more traction in starting onslippery surfaces such as ice or packedsnow, use sand, rock salt, chains,carpeting, or other nonslip materialunder the front wheels.
NOTE
Use snow chains only on the frontwheels.
qRoll-over
WARNINGAvoid sharp turns, excessive speed andabrupt manoeuvres when driving thisvehicle:Sharp turns, excessive speed andabrupt manoeuvring of this vehicle isdangerous as it could result in theincreased risk of loss of vehiclecontrol, vehicle roll-over, personalinjury or death.This vehicle has a higher centre ofgravity. Vehicles with a higher centreof gravity such as utility and 4WDvehicles handle differently thanvehicles with a lower centre of gravity.Utility and 4WD vehicles are notdesigned for cornering at high speedsany more than low profile sports carsare designed to perform satisfactorilyunder off-road conditions. In addition,utility vehicles have a significantlyhigher rollover rate than other types ofvehicles.
4-10
Before Driving Your Mazda
Driving Tips
CX-7_8AP5-EE-09F_Edition1 Page172Monday, June 15 2009 3:25 PM
Form No.8AP5-EE-09F

Black plate (173,1)
WARNINGDrive carefully when the vehicle isloaded by lowering vehicle speed andapplying the brakes earlier:Abrupt manoeuvring and suddenbraking when driving a loaded vehicleis dangerous as the driving behaviorof a vehicle with a high centre ofgravity is different when it is loadedcompared to when it is not, and couldresult in the loss of vehicle control andan accident.
Rocking the Vehicle
WARNINGDo not spin the wheels at high speed,and do not allow anyone to standbehind a wheel when pushing thevehicle:When the vehicle is stuck, spinningthe wheels at high speed is dangerous.The spinning tyre could overheat andexplode. This could cause seriousinjuries.
CAUTIONToo much rocking may cause engineoverheating, transaxle failure, and tyredamage.
If you must rock the vehicle to free it fromsnow, sand or mud, depress theaccelerator slightly and slowly move theshift lever from 1 (D) to R.
Before Driving Your Mazda
Driving Tips
4-11
CX-7_8AP5-EE-09F_Edition1 Page173Monday, June 15 2009 3:25 PM
Form No.8AP5-EE-09F

Black plate (174,1)
Winter Drivingl Carry emergency gear, including tyrechains, window scraper, flares, a smallshovel, jumper leads, and a small bagof sand or salt.
Ask an expert repairer, we recommend anAuthorised Mazda Repairer to performthe following precautions:
l Have the proper ratio of antifreeze inthe radiator.Refer to Engine Coolant on page 8-23.
l Inspect the battery and its leads. Coldreduces battery capacity.
l Inspect the ignition system for damageand loose connections.
l Use washer fluid made withantifreeze―but do not use enginecoolant antifreeze for washer fluid(page 8-30).
l Do not use the parking brake infreezing weather as it may freeze.Instead, shift to P with an automatictransaxle and to 1 or R with a manualtransaxle. Block the rear wheels.
l Do not apply excessive force to awindow scraper when removing ice orfrozen snow on the mirror glass andwindscreen.
l Never use warm or hot water forremoving snow or ice from windowsand mirrors as it could result in theglass cracking.
qSnow Tyres
WARNINGUse only the same size and type tyres(snow, radial, or non-radial) on allfour wheels:Using tyres different in size or type isdangerous. Your vehicle's handlingcould be greatly affected and result inan accident.
CAUTIONCheck local regulations before usingstudded tyres.
Use snow tyres on all four wheels
Do not exceed the maximum permissiblespeed for your snow tyres or legal speedlimits.
Europe
When snow tyres are used, select thespecified size and pressure (page 10-8).
4-12
Before Driving Your Mazda
Driving Tips
CX-7_8AP5-EE-09F_Edition1 Page174Monday, June 15 2009 3:25 PM
Form No.8AP5-EE-09F

Black plate (175,1)
qTyre Chains
Check local regulations before using tyrechains.
CAUTIONl Chains may affect handling.
l Do not go faster than 50 km/h (30mph) or the chain manufacturer'srecommended limit, whichever islower.
l Drive carefully and avoid bumps,holes, and sharp turns.
l Avoid locked-wheel braking.
l Do not use chains on a temporaryspare tyre; it may result in damage tothe vehicle and to the tyre.
l Do not use chains on roads that arefree of snow or ice. The tyres andchains could be damaged.
l Chains may scratch or chipaluminium wheels.
Install the chains on the front tyres.Do not use chains on the rear tyres.
Tyre chain selection (Europe)
Mazda recommends hexagon type steelring chains. Select the proper typeaccording to your tyre size.
Tyre size Tyre chain
235/55R19 Hexagon type
235/60R18 Hexagon type
235/65R17 Hexagon type
NOTE
Although Mazda recommends hexagontype steel ring chains, all chains withinthe installation specifications may beused.
Before Driving Your Mazda
Driving Tips
4-13
CX-7_8AP5-EE-09F_Edition1 Page175Monday, June 15 2009 3:25 PM
Form No.8AP5-EE-09F

Black plate (176,1)
Installation specification (Europe)
When installing tyre chains, the distancebetween the tyre tread and the chain mustbe within the prescribed limits in thefollowing table.
Distance [Unit: mm (in)]
A B
MAX 11.0 (0.43) MAX 11.0 (0.43)
Side view Cross section view
Tyre
A B
Installing the chains
1. Secure the chains on the front tyres astightly as possible. Always follow thechain manufacturer's instructions.
2. Retighten the chains after driving 1/2―1 km (1/4―1/2 mile).
Driving In Flooded Area
WARNINGDry wet brakes by driving very slowlyand applying the brakes lightly untilbrake performance returns to normal:Driving with wet brakes is dangerous.Increased stopping distance or thevehicle pulling to one side whenbraking could result in a seriousaccident. Light braking will indicatewhether the brakes have been affected.
CAUTIONDo not drive the vehicle on floodedroads as it could cause short circuitingof electrical/electronic parts, or enginedamage or stalling from waterabsorption. If the vehicle has beenimmersed in water, consult an expertrepairer, we recommend an AuthorisedMazda Repairer.
4-14
Before Driving Your Mazda
Driving Tips
CX-7_8AP5-EE-09F_Edition1 Page176Monday, June 15 2009 3:25 PM
Form No.8AP5-EE-09F

Black plate (177,1)
Turbocharger InformationThe turbocharger greatly enhances engine power. Its advanced design provides improvedoperation and requires minimum additional maintenance. To get maximum performancefrom your turbocharged engine, take note of the following tips:
l The turbocharged engine is designed for optimal operation with premium unleadedpetrol . Do not use fuel with a lower octane rating. Extra fuel additives are NOTrecommended.
l Change the engine oil and filter using the turbo engine interval outlined in themaintenance schedule (for your driving condition).
l Use only the recommended engine oil (page 8-18). Extra oil additives are NOTrecommended.
l After driving at freeway speeds or up a long hill, idle the engine at least 30 seconds tocool the turbo before turning off the engine. Avoid simply shutting the engine offabruptly after a hard or long drive. Damage to the turbocharger may result.
l Do not race or over-rev the engine when starting. This should not be done with ANYengine, especially not with one that's turbocharged.
l Do not add any aftermarket devices to alter the engine's ignition timing, fuel delivery, orturbo boost pressure. This may lead to serious engine damage and may void yourwarranty.
Before Driving Your Mazda
Driving Tips
4-15
CX-7_8AP5-EE-09F_Edition1 Page177Monday, June 15 2009 3:25 PM
Form No.8AP5-EE-09F

Black plate (178,1)
Towing Caravan and TrailersYour Mazda was designed and built primarily to carry passengers and cargo.If you tow a trailer, follow these instructions because driver and passenger safety dependson proper equipment and safe driving habits. Towing a trailer will affect handling, braking,durability, performance, and economy.Never overload vehicle or trailer. Consult an Authorised Mazda Dealer if you need furtherdetails.
CAUTIONDo not tow a trailer during the first 1,000 km (600 miles) of your new Mazda. If you do,you may damage the engine, transaxle, differential, wheel bearings, and other powertrain components.
qWeight Limits
The total trailer weight, gross combination weight and trailer nose weight must bewithin the prescribed limits in the Trailer Towing-Load Table.
In a high-altitude operating environment, the engine loses power as elevation increases. Inthese conditions, a reduction of 10% per 1,000 m (3,280 ft) in total trailer weight and grosscombination weight is recommended.
TRAILER TOWING-LOAD TABLE
Because vehicle weights vary, adjustments must be made to meet the requirements in this table.Gradient up to 12%
MODEL
TOTALTRAILERWEIGHT (MAX)
GROSS COMBINATIONWEIGHT (MAX)
TRAILER NOSEWEIGHT (MAX)
TRAILERWITHOUTBRAKE
TRAILERWITHBRAKE
L3T Manualtransaxle
750 kg (1,653.5 lb)1,450 kg(3,196.7 lb)
3,751 kg (8,269.5 lb) 85 kg (187.4 lb)
R2 Manual transaxle 750 kg (1,653.5 lb)1,800 kg(3,968.3 lb)
4,230 kg (9,325.6 lb) 85 kg (187.4 lb)
L3TAutomatictransaxle
750 kg (1,653.5 lb)1,600 kg(3,527.4 lb)
3,889 kg (8,573.8 lb) 85 kg (187.4 lb)
4-16
Before Driving Your Mazda
Towing
CX-7_8AP5-EE-09F_Edition1 Page178Monday, June 15 2009 3:25 PM
Form No.8AP5-EE-09F
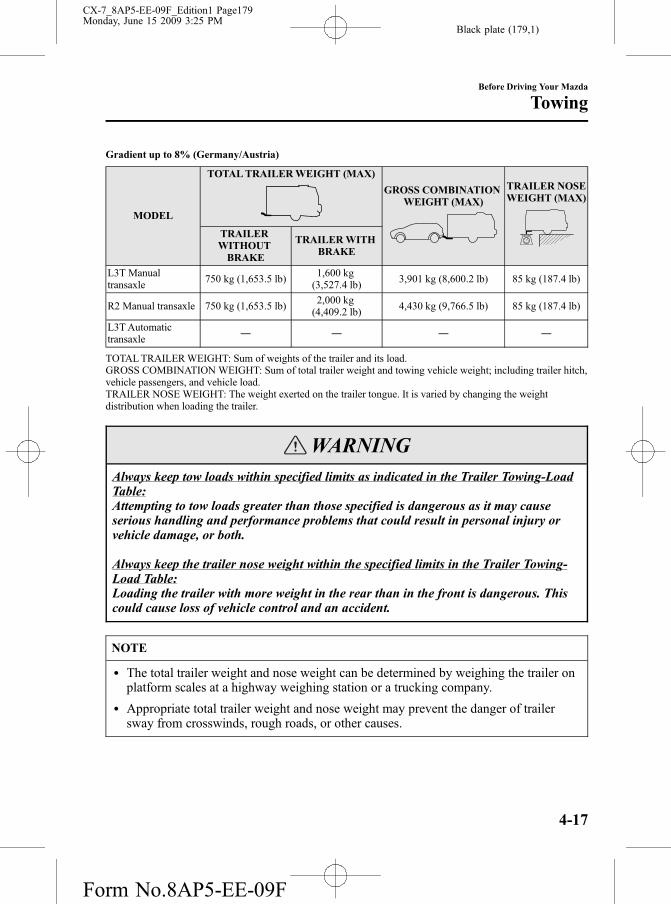
Black plate (179,1)
Gradient up to 8% (Germany/Austria)
MODEL
TOTALTRAILERWEIGHT (MAX)
GROSS COMBINATIONWEIGHT (MAX)
TRAILER NOSEWEIGHT (MAX)
TRAILERWITHOUTBRAKE
TRAILERWITHBRAKE
L3T Manualtransaxle
750 kg (1,653.5 lb)1,600 kg(3,527.4 lb)
3,901 kg (8,600.2 lb) 85 kg (187.4 lb)
R2 Manual transaxle 750 kg (1,653.5 lb)2,000 kg(4,409.2 lb)
4,430 kg (9,766.5 lb) 85 kg (187.4 lb)
L3TAutomatictransaxle
― ― ― ―
TOTALTRAILERWEIGHT: Sum of weights of the trailer and its load.GROSS COMBINATION WEIGHT: Sum of total trailer weight and towing vehicle weight; including trailer hitch,vehicle passengers, and vehicle load.TRAILER NOSE WEIGHT: The weight exerted on the trailer tongue. It is varied by changing the weightdistribution when loading the trailer.
WARNINGAlways keep tow loads within specified limits as indicated in the Trailer Towing-LoadTable:Attempting to tow loads greater than those specified is dangerous as it may causeserious handling and performance problems that could result in personal injury orvehicle damage, or both.
Always keep the trailer nose weight within the specified limits in the Trailer Towing-Load Table:Loading the trailer with more weight in the rear than in the front is dangerous. Thiscould cause loss of vehicle control and an accident.
NOTE
l The total trailer weight and nose weight can be determined by weighing the trailer onplatform scales at a highway weighing station or a trucking company.
l Appropriate total trailer weight and nose weight may prevent the danger of trailersway from crosswinds, rough roads, or other causes.
Before Driving Your Mazda
Towing
4-17
CX-7_8AP5-EE-09F_Edition1 Page179Monday, June 15 2009 3:25 PM
Form No.8AP5-EE-09F

Black plate (180,1)
qTrailer Hitch
When towing a trailer, use an appropriate trailer hitch. We recommend using a genuineMazda trailer hitch. Use the original bolt holes drilled by the vehicle manufacture forsecuring the trailer hitch. Contact your Authorised Mazda Dealer for more information.
MAX 85kg (187.4lb)
Unit:mm(in)
C
A
B C
Trailer hitch installation area
A:350—420 (13.8—16.5) B:1,031 (40.6) C:1,110 (43.7)
Hitch coupling point
qTyres
When towing a trailer, make sure all tyres are inflated to the recommended cold-tyrepressure, as indicated on the tyre pressure chart on the driver's door frame. Trailer tyre size,load rating, and inflation pressures should conform to tyre manufacturer specifications.
WARNINGNever use the temporary spare tyre when towing:Using the temporary spare tyre on your vehicle when towing a trailer is dangerous asit could result in tyre failure, loss of control, and injury to vehicle occupants.
4-18
Before Driving Your Mazda
Towing
CX-7_8AP5-EE-09F_Edition1 Page180Monday, June 15 2009 3:25 PM
Form No.8AP5-EE-09F

Black plate (181,1)
qSafety Chains
Safety chains must be used as a precautionary measure should the trailer becomeunintentionally unhitched. They should cross under the trailer tongue and attach to thehitch. Leave enough slack to allow full turns. Consult literature published by your trailer orhitch manufacturer for more details.
WARNINGMake sure the safety chain is securely attached to both the trailer and the vehicle priorto departure:Towing a trailer without using a safety chain securely attached to both the trailer andthe vehicle is dangerous. If damage occurs to the coupling unit or hitch ball, thetrailer could wander into another lane and cause a collision.
qTrailer Lights
CAUTIONDo not connect a trailer lighting system directly to the lighting system of your Mazda.This may damage your vehicle's electrical system and lighting systems. To connect thelighting system, consult an Authorised Mazda Dealer.
qTrailer Brakes
If the total trailer weight exceeds 750 kg (1,653.5 lb) trailer brakes are required.
If your trailer has brakes, make sure they meet regulations.
WARNINGDo not connect a hydraulic trailer-brake system to your vehicle's brake system:Connecting a hydraulic trailer-brake system directly to the vehicle brake system isdangerous and will result in inadequate braking and possible injury.
Before Driving Your Mazda
Towing
4-19
CX-7_8AP5-EE-09F_Edition1 Page181Monday, June 15 2009 3:25 PM
Form No.8AP5-EE-09F

Black plate (182,1)
qTrailer Towing Tips
Before driving
l Verify that your Mazda maintains a near-normal attitude when a loaded or unloadedtrailer is connected. Do not drive if it has an abnormal front-up or front-down position.Inspect for incorrect nose weight, worn suspension parts, and trailer overloading. Havethe vehicle inspected by an expert repairer, we recommend an Authorised MazdaRepairer.
l Make sure the trailer cargo is secure to prevent it from shifting.
l Make sure the mirrors meet all government regulations. Inspect them.
l Before starting out, inspect the operation of all vehicle and trailer lights and all vehicle-to-trailer connections. Stop and re-inspect all lights and connections after driving a shortdistance.
Driving
l Your Mazda will handle differently with a trailer in tow, so practice turning, backing,and stopping in a traffic-free area.
l Take time to get accustomed to the extra weight and length.
l Do not exceed 100 km/h (62 mph) with a trailer in tow. If the local legal maximumspeed with a trailer in tow is less than 100 km/h (62 mph), do not exceed the legalspeed.
CAUTIONIf the vehicle exceeds 100 km/h (62 mph) with a trailer in tow, the vehicle could bedamaged.
l When ascending a hill, shift into a lower gear to reduce the possibility of overloading oroverheating the engine, or both.
l When descending a hill, shift into a lower gear and use engine compression as a brakingeffect. Pay constant attention to speed and use the brakes only as needed. Holding thebrake pedal down for a prolonged period may cause the brakes to overheat and losepower.
Parking
Avoid parking on an incline with a trailer. If this must be done, follow these instructions.
Parking on an Incline
1. Set the parking brake and the brakes.
2. Have someone block the wheels of the vehicle and trailer while you apply the brakes.
4-20
Before Driving Your Mazda
Towing
CX-7_8AP5-EE-09F_Edition1 Page182Monday, June 15 2009 3:25 PM
Form No.8AP5-EE-09F

Black plate (183,1)
3. After the wheels are blocked, release the parking brake and the brakes slowly, allowingthe blocks to bear the load.
4. Set the parking brake firmly.
5. If the vehicle has an automatic transaxle, put the selector lever in P. If it has a manualtransaxle, place the gear shift in 1 or R.
Starting on an Incline
1. Start the engine (page 5-4).
2. Release the parking brake and slowly pull away a short distance from the wheel blocks.
3. Stop on the nearest level ground, set the parking brake, and pick up the wheel blocks.
Before Driving Your Mazda
Towing
4-21
CX-7_8AP5-EE-09F_Edition1 Page183Monday, June 15 2009 3:25 PM
Form No.8AP5-EE-09F

Black plate (184,1)
4-22
CX-7_8AP5-EE-09F_Edition1 Page184Monday, June 15 2009 3:25 PM
Form No.8AP5-EE-09F

Black plate (185,1)
5 Driving Your Mazda
Explanation of instruments and controls.
Starting and Driving ..................................................................... 5-2Ignition Switch .......................................................................... 5-2Starting the Engine .................................................................... 5-4Brake System ............................................................................ 5-6Manual Transaxle Operation ................................................... 5-12Automatic Transaxle Controls ................................................ 5-14Power Steering ........................................................................ 5-204-Wheel Drive (4WD) Operation ............................................ 5-21Cruise Controlí ...................................................................... 5-23Traction Control System (TCS) .............................................. 5-27Dynamic Stability Control (DSC) ........................................... 5-29Tyre Pressure Monitoring Systemí ........................................ 5-31Rear Vehicle Monitoring (RVM) Systemí ............................. 5-38Diesel Particulate Filter (Diesel engine) .................................. 5-44Selective Catalytic Reduction (SCR) System (Dieselengine) .................................................................................... 5-46
Instrument Cluster and Indicators ............................................ 5-48Meters and Gauges .................................................................. 5-48
Warning/Indicator Lights and Beep Sounds ............................ 5-54Warning/Indicator Lights ........................................................ 5-54Beep Sounds ........................................................................... 5-73
Switches and Controls ................................................................ 5-75Lighting Control ..................................................................... 5-75Turn and Lane-Change Signals ............................................... 5-79Front Fog Lightsí .................................................................. 5-80Rear Fog Lightí ..................................................................... 5-81Windscreen Wipers and Washer .............................................. 5-83Rear Window Wiper and Washer ............................................ 5-87Headlight Washerí ................................................................. 5-87Rear Window Defroster ........................................................... 5-88Horn ........................................................................................ 5-89Hazard Warning Flasher .......................................................... 5-89
5-1íSome models.
CX-7_8AP5-EE-09F_Edition1 Page185Monday, June 15 2009 3:25 PM
Form No.8AP5-EE-09F

Black plate (186,1)
Ignition SwitchAuxiliary key (with advanced key)
NOTE
When starting the engine using theadvanced key, refer to Starting theEngine (page 3-12).
When starting the engine with theauxiliary key, perform the followingprocedure.
1. Remove the auxiliary key from theadvanced key (page 3-20).
2. Make sure the start knob is in LOCKposition.
3. Remove the start knob by pulling itoutward while pressing the buttons onboth the left and right sides.
4. Insert the auxiliary key in the ignitionswitch.
qIgnition Switch Positions
With advanced key
Without advanced key
LOCK
The steering wheel locks to protectagainst theft. Only in this position can thekey be removed.
WARNINGRemove the key only when the vehicleis parked:Removing the key from the ignitionswitch while the vehicle is moving isdangerous. Removing the key allowsthe steering wheel to lock. You willlose steering control and a seriousaccident could occur. (For vehiclesequipped with the advanced key, thesteering wheel locks when the starterknob is turned to the LOCK position.)
5-2
Driving Your Mazda
Starting and Driving
CX-7_8AP5-EE-09F_Edition1 Page186Monday, June 15 2009 3:25 PM
Form No.8AP5-EE-09F

Black plate (187,1)
WARNINGBefore leaving the driver's seat,always put the key or start knob toLOCK position, set the parking brakeand make sure the shift lever is in Pwith an automatic transaxle or in 1 orR with a manual transaxle:It is important to place the key or startknob in the LOCK position even if youare not removing the key from theignition or leaving the vehicle.Leaving the key in other positions willdisable some of the vehicle securitysystems and run the battery down.Leaving the driver's seat withoutputting the ignition switch in LOCKposition, setting the parking brake andshifting the shift lever to P with anautomatic transaxle, or to 1 or R witha manual transaxle is dangerous.Unexpected vehicle movement couldoccur. This could cause an accident.
NOTE
If turning the key is difficult, jiggle thesteering wheel from side to side.Leaving the key or start knob in anyposition but LOCK position alsodisables some of the security featuresand may run the battery down.
ACC (Accessory)
The steering wheel unlocks and someelectrical accessories will operate.
ON
This is the normal running position afterthe engine is started. Some indicatorlights/warning lights should be inspectedbefore the engine is started (page 5-54).
NOTE
(Petrol engine models)When the ignition switch is turned tothe ON position, the sound of the fuelpump motor operating near the fueltank can be heard. This does notindicate an abnormality.
NOTE
(With headlight auto-levelling)When the ignition switch is turned tothe ON position, the sound of theheadlight levelling motors operating atthe front of the engine compartment canbe heard. This does not indicate anabnormality.
START
The engine is started in this position. Itwill crank until you release the key. Itthen returns to the ON position.
qIgnition Key Reminder (ExceptEuropean model)
If the ignition switch is in the LOCK orACC position with the key inserted, acontinuous beep sound will be heardwhen the driver's door is opened.
Driving Your Mazda
Starting and Driving
5-3
CX-7_8AP5-EE-09F_Edition1 Page187Monday, June 15 2009 3:25 PM
Form No.8AP5-EE-09F

Black plate (188,1)
Starting the EnginePetrol engine
1. Occupants should fasten their seatbelts.
2. Make sure the parking brake is on.
3. Depress the brake pedal.
4. (Manual transaxle)Depress the clutch pedal all the wayand shift into neutral.Keep the clutch pedal depressed whilecranking the engine.(Automatic transaxle)Put the vehicle in park (P). If you mustrestart the engine while the vehicle ismoving, shift into neutral (N).
NOTE
(Automatic transaxle)The starter will not operate if the shiftlever is not in P or N.
5. Turn the ignition switch to the STARTposition and hold (up to 10 seconds ata time) until the engine starts.
CAUTIONDo not try the starter for more than 10seconds at a time. If the engine stalls orfails to start, wait 10 seconds beforetrying again. Otherwise, you maydamage the starter and drain the battery.
6. After starting the engine, let it idle forabout 10 seconds (prohibited inGermany).
NOTE
l In extremely cold weather or afterthe vehicle has not been driven inseveral days, let the engine warm upwithout operating the accelerator(prohibited in Germany).
l Whether the engine is cold or warm,it should be started without use ofthe accelerator.
l (Germany)Drive immediately after starting theengine. However do not use highengine speeds until reaching theoperating temperature.
l If the engine does not start the firsttime, refer to Starting a FloodedEngine under Emergency Starting. Ifthe engine still does not start, haveyour vehicle inspected by anAuthorised Mazda Repairer (page7-13).
Diesel engine
1. Occupants should fasten their seatbelts.
2. Make sure the parking brake is on.
3. Depress the brake pedal.
4. Depress the clutch pedal all the wayand shift into neutral.Keep the clutch pedal depressed whilecranking the engine.
5-4
Driving Your Mazda
Starting and Driving
CX-7_8AP5-EE-09F_Edition1 Page188Monday, June 15 2009 3:25 PM
Form No.8AP5-EE-09F

Black plate (189,1)
5. Turn the ignition switch to the ONposition. If the glow indicator lightilluminates, wait a few seconds for it toturn off.
6. Turn the ignition switch to the STARTposition and hold it there withoutdepressing the accelerator until theengine starts.If the engine fails to start, turn theignition switch to the LOCK or ACCposition, then try again.
CAUTIONDo not try the starter for more than 30seconds at a time. If the engine stalls orfails to start, wait more than 60 secondsbefore trying again. Otherwise, youmay damage the starter and drain thebattery.
7. After starting the engine, let it idle forabout 10 seconds (prohibited inGermany).
NOTE
l For easier starting, all the accessoriesshould be OFF.
l The engine may not start whentrying to start the engine with theglow indicator light on.
l If the glow indicator light stays on ordoes not come on at all, the glowplug control system could have anelectrical problem. If one of thesehappens, consult an expert repairer,we recommend an AuthorisedMazda Repairer as soon as possible.
l (Germany)Drive immediately after starting theengine. However do not use highengine speeds until reaching theoperating temperature.
Driving Your Mazda
Starting and Driving
5-5
CX-7_8AP5-EE-09F_Edition1 Page189Monday, June 15 2009 3:25 PM
Form No.8AP5-EE-09F

Black plate (190,1)
Brake System
qFoot Brake
Your Mazda has power-assisted brakesthat adjust automatically through normaluse.
Should power-assist fail, you can stop byapplying greater force than normal to thebrake pedal. But the distance required tostop will be greater than usual.
WARNINGDo not coast with the engine stalled orturned off, find a safe place to stop:Coasting with the engine stalled orturned off is dangerous. Braking willrequire more effort, and the brake'spower-assist could be depleted if youpump the brake. This will causelonger stopping distances or even anaccident.
Shift to a lower gear when going downsteep hills:Driving with your foot continuouslyon the brake pedal or steadily applyingthe brakes for long distances isdangerous. This causes overheatedbrakes, resulting in longer stoppingdistances or even total brake failure.This could cause loss of vehiclecontrol and a serious accident. Avoidcontinuous application of the brakes.
WARNINGDry brakes that have become wet bydriving very slowly and applying thebrakes lightly until brake performanceis normal:Driving with wet brakes is dangerous.Increased stopping distance or thevehicle pulling to one side whenbraking could result in a seriousaccident. Light braking will indicatewhether the brakes have been affected.
qParking Brake
WARNINGBefore leaving the driver's seat,always put the key or start knob toLOCK position, set the parking brakeand make sure the shift lever is in Pwith an automatic transaxle or in 1 orR with a manual transaxle:It is important to place the key or startknob in the LOCK position even if youare not removing the key from theignition or leaving the vehicle.Leaving the key in other positions willdisable some of the vehicle securitysystems and run the battery down.Leaving the driver's seat withoutputting the ignition switch in LOCKposition, setting the parking brake andshifting the shift lever to P with anautomatic transaxle, or to 1 or R witha manual transaxle is dangerous.Unexpected vehicle movement couldoccur. This could cause an accident.
5-6
Driving Your Mazda
Starting and Driving
CX-7_8AP5-EE-09F_Edition1 Page190Monday, June 15 2009 3:25 PM
Form No.8AP5-EE-09F

Black plate (191,1)
CAUTIONDriving with the parking brake on willcause excessive wear of the brakelinings or pads.
NOTE
For parking in snow, refer to WinterDriving (page 4-12) regarding parkingbrake use.
Lever type
Setting the parking brake
Depress the brake pedal and then firmlypull the parking brake lever fully upwardswith sufficient force to hold the vehicle ina stationary position.
Releasing the parking brake
Depress the brake pedal and pull theparking brake lever upwards, then pressthe release button. While holding thebutton, lower the parking brake lever allthe way down to the released position.
Pedal type
Setting the parking brake
Depress the brake pedal, then depress theparking brake pedal fully.
Driving Your Mazda
Starting and Driving
5-7
CX-7_8AP5-EE-09F_Edition1 Page191Monday, June 15 2009 3:25 PM
Form No.8AP5-EE-09F

Black plate (192,1)
Releasing the parking brake
Depress the brake pedal, then depress theparking brake pedal until it releases.Gradually let up on the parking brakepedal.
NOTE
Release the parking brake pedal oncebefore trying to reapply it.
qBrake System Warning Light
This warning has the following functions:
Parking brake warning
The light illuminates when the parkingbrake is applied with the ignition switchin the START or ON position. It turns offwhen the parking brake is fully released.
Low brake fluid level warning
If the light stays on after the parking brakeis fully released, you may have a brakeproblem.
Drive to the side of the road and park offthe right-of-way.
You may notice that the pedal is harder todepress or that it may go closer to thefloor. In either case, it will take longer tostop the vehicle.
1. With the engine stopped, open thebonnet and check the brake fluid levelimmediately, and then add fluid ifrequired (page 8-25).
2. After adding fluid, check the lightagain.
If the warning light remains on, or if thebrakes do not operate properly, do notdrive the vehicle. Have it towed to anexpert repairer, we recommend anAuthorised Mazda Repairer.
Even if the light turns off have your brakesystem inspected as soon as possible byan expert repairer, we recommend anAuthorised Mazda Repairer.
NOTE
Having to add brake fluid is sometimesan indicator of leakage. Consult anexpert repairer, we recommend anAuthorised Mazda Repairer as soon aspossible even if the brake light is nolonger illuminated.
5-8
Driving Your Mazda
Starting and Driving
CX-7_8AP5-EE-09F_Edition1 Page192Monday, June 15 2009 3:25 PM
Form No.8AP5-EE-09F

Black plate (193,1)
WARNINGDo not drive with the brake systemwarning light illuminated. Contact anexpert repairer, we recommend anAuthorised Mazda Repairer to havethe brakes inspected as soon aspossible:Driving with the brake system warninglight illuminated is dangerous. Itindicates that your brakes may notwork at all or that they couldcompletely fail at any time. If this lightremains illuminated, after checkingthat the parking brake is fullyreleased, have the brakes inspectedimmediately.
qParking Brake Reminder(Automatic Transaxle)
If the parking brake has not beencompletely released and the vehicle isdriven at about 5 km/h (3 mph) or faster, acontinuous beep sound will be heard tonotify the driver that the parking brakehas not been released.
qAnti-Lock Brake System (ABS)
The ABS control unit continuouslymonitors the speed of each wheel. If oneis about to lock up, the ABS responds byautomatically releasing and reapplyingthat wheel's brake.
The driver will feel a slight vibration inthe brake pedal and may hear a chatteringnoise from the brake system. This isnormal when the ABS operates. Continueto depress the brake pedal withoutpumping the brakes.
WARNINGDo not rely on ABS as a substitute forsafe driving:The ABS cannot compensate forunsafe and reckless driving, excessivespeed, tailgating (following anothervehicle too closely), driving on ice andsnow, and hydroplaning (reduced tyrefriction and road contact because ofwater on the road surface). You canstill have an accident.
NOTE
l Braking distances may be longer onloose surfaces (snow or gravel, forexample) which usually have a hardfoundation. A vehicle with a normalbraking system may require lessdistance to stop under theseconditions because the tyres willbuild up a wedge of surface layerwhen the wheels skid.
l The sound of the ABS operating maybe heard when starting the engine orimmediately after starting thevehicle. However, it does notindicate a malfunction.
qABS Warning Light
The warning light stays on for a fewseconds when the ignition switch is turnedto the ON position.
Driving Your Mazda
Starting and Driving
5-9
CX-7_8AP5-EE-09F_Edition1 Page193Monday, June 15 2009 3:25 PM
Form No.8AP5-EE-09F

Black plate (194,1)
If the ABS warning light stays on whileyou're driving, the ABS control unit hasdetected a system malfunction. If thisoccurs, your brakes will function normallyas if the vehicle had no ABS.Should this happen, consult an expertrepairer, we recommend an AuthorisedMazda Repairer as soon as possible.
NOTE
l When the engine is jump-started tocharge the battery, uneven rpmoccurs and the ABS warning lightmay illuminate. If this occurs, it isthe result of the weak battery anddoes not indicate an ABSmalfunction.Recharge the battery.Refer to Battery Recharging on page8-37.
l The brake assist system does notoperate while the ABS warning lightis illuminated.
qElectronic Brake ForceDistribution System Warning
If the electronic brake force distributioncontrol unit determines that somecomponents are operating incorrectly, thecontrol unit may illuminate the brakesystem warning light and the ABSwarning light on simultaneously. Theproblem is likely to be the electronicbrake force distribution system.
WARNINGDo not drive with both the ABSwarning light and brake warning lightilluminated. Have the vehicle towed toan expert repairer, we recommend anAuthorised Mazda Repairer to havethe brakes inspected as soon aspossible:Driving when the brake systemwarning light and ABS warning lightare illuminated simultaneously isdangerous.When both lights are illuminated, therear wheels could lock more quickly inan emergency stop than under normalcircumstances.
qBrake Assist
During emergency braking situationswhen it is necessary to depress the brakepedal with greater force, the brake assistsystem provides braking assistance, thusenhancing braking performance.
When the brake pedal is depressed hard ordepressed more quickly, the brakes applymore firmly.
5-10
Driving Your Mazda
Starting and Driving
CX-7_8AP5-EE-09F_Edition1 Page194Monday, June 15 2009 3:25 PM
Form No.8AP5-EE-09F

Black plate (195,1)
NOTE
l When the brake pedal is depressedhard or depressed more quickly, thepedal will feel softer but the brakeswill apply more firmly. This is anormal effect of the brake assistoperation and does not indicate anabnormality.
l When the brake pedal is depressedhard or depressed more quickly, amotor/pump operation noise may beheard. This is a normal effect of thebrake assist and does not indicate anabnormality.
l The brake assist equipment does notsupersede the functionality of thevehicle's main braking system.
qEmergency Stop Signal Systemí
Your Mazda is equipped with anemergency stop signal system that isdesigned to determine whether you aredepressing the brake pedal with greaterforce than during normal braking such asin a situation requiring emergencybraking. If the system determines thatsuch a situation is occurring, it flashes allthe direction indicators rapidly to cautionthe driver of the vehicle following behindyour vehicle of the sudden brakingsituation.The system is cancelled when the brakepedal is released or the system determinesthat the brake pedal is no longer heavilydepressed based on the rate at which thevehicle speed decreases.
NOTE
l If you bring your vehicle to acomplete stop while all the directionindicators are flashing rapidly, therapid flashing of all the directionindicators changes back to thenormal flashing pattern.
l The emergency stop signal systemdoes not operate at vehicle speedsunder about 50 km/h (31 mph).
qBrake Pad Wear Indicator
When the disc brake pads become worn,the built-in wear indicators contact thedisc plates. This causes a screeching noiseto warn that the pads should be replaced.
When you hear this noise, consult anexpert repairer, we recommend anAuthorised Mazda Repairer as soon aspossible.
Driving Your Mazda
Starting and Driving
5-11íSome models.
CX-7_8AP5-EE-09F_Edition1 Page195Monday, June 15 2009 3:25 PM
Form No.8AP5-EE-09F
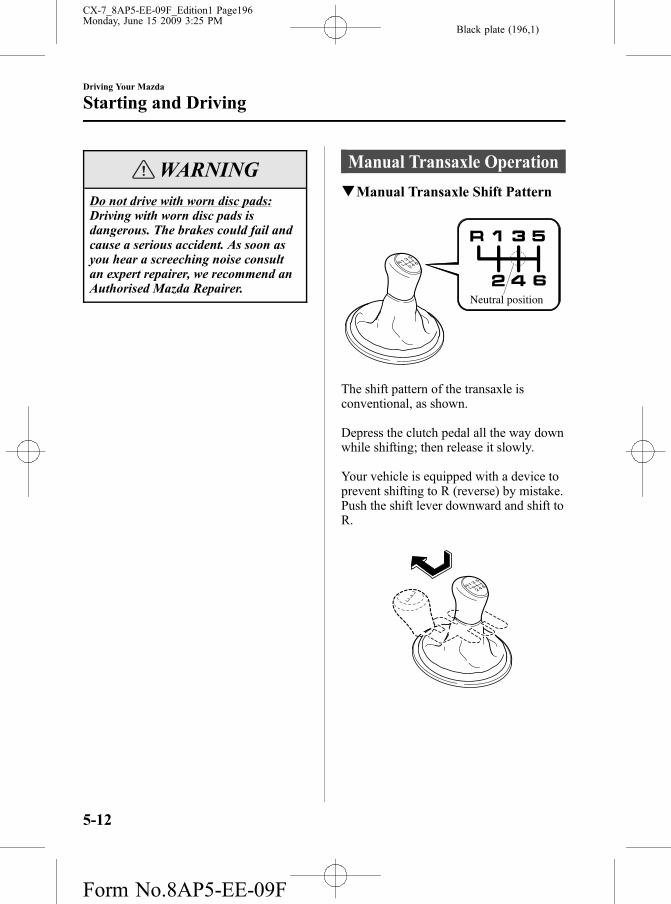
Black plate (196,1)
WARNINGDo not drive with worn disc pads:Driving with worn disc pads isdangerous. The brakes could fail andcause a serious accident. As soon asyou hear a screeching noise consultan expert repairer, we recommend anAuthorised Mazda Repairer.
Manual Transaxle Operation
qManual Transaxle Shift Pattern
Neutral position
The shift pattern of the transaxle isconventional, as shown.
Depress the clutch pedal all the way downwhile shifting; then release it slowly.
Your vehicle is equipped with a device toprevent shifting to R (reverse) by mistake.Push the shift lever downward and shift toR.
5-12
Driving Your Mazda
Starting and Driving
CX-7_8AP5-EE-09F_Edition1 Page196Monday, June 15 2009 3:25 PM
Form No.8AP5-EE-09F

Black plate (197,1)
WARNINGDo not use sudden engine braking onslippery road surfaces or at highspeeds:Shifting down while driving on wet,snowy, or frozen roads, or whiledriving at high speeds causes suddenengine braking, which is dangerous.The sudden change in tyre speed couldcause the tyres to skid. This could leadto loss of vehicle control and anaccident.
Be sure to leave the shift lever in 1 orR position and set the parking brakewhen leaving the vehicle unattended:Otherwise the vehicle could move andcause an accident.
CAUTIONl Keep your foot off the clutch pedalexcept when shifting gears. Also, donot use the clutch to hold the vehicleon an upgrade. Riding the clutch willcause needless clutch wear anddamage.
l Do not apply any excessive lateralforce to the gear lever whenchanging from 5th to 4th gear. Thiscould lead to the accidental selectionof 2nd gear, which can result indamage to the transaxle.
l Make sure the vehicle comes to acomplete stop before shifting to R.Shifting to R while the vehicle is stillmoving may damage the transaxle.
NOTE
If shifting to R is difficult, shift backinto neutral, release the clutch pedal,and try again.
Driving Your Mazda
Starting and Driving
5-13
CX-7_8AP5-EE-09F_Edition1 Page197Monday, June 15 2009 3:25 PM
Form No.8AP5-EE-09F

Black plate (198,1)
Automatic Transaxle Controls
Indicates that you must depress the brake pedal to shift (The ignition switch must be in the ACC or ON position).
Indicates the shift lever can be shifted freely into any position.
Various Lockouts:
NOTE
The Sport AT has an option that is not included in the traditional automatic transaxlegiving the driver the option of selecting each gear instead of leaving it to the transaxle toshift gears. Even if you intend to use the automatic transaxle functions as a traditionalautomatic, you should also be aware that you can inadvertently shift into manual shiftmode and an inappropriate gear may be retained as the vehicle speed increases. If younotice the engine speed going higher or hear the engine racing, confirm you have notaccidentally slipped into manual shift mode (page 5-16).
5-14
Driving Your Mazda
Starting and Driving
CX-7_8AP5-EE-09F_Edition1 Page198Monday, June 15 2009 3:25 PM
Form No.8AP5-EE-09F

Black plate (199,1)
qTransaxle Ranges
The shift lever must be in P or N tooperate the starter.
P (Park)
P locks the transaxle and prevents thefront wheels from rotating.
WARNINGAlways set the shift lever to P and setthe parking brake:Only setting the shift lever to the Pposition without using the parkingbrake to hold the vehicle is dangerous.If P fails to hold, the vehicle couldmove and cause an accident.
CAUTIONl Shifting into P, N or R while thevehicle is moving can damage yourtransaxle.
l Shifting into a driving gear orreverse when the engine is runningfaster than idle can damage thetransaxle.
R (Reverse)
In position R, the vehicle moves onlybackward. You must be at a complete stopbefore shifting to or from R, except underrare circumstances as explained inRocking the Vehicle (page 4-11).
N (Neutral)
In N, the wheels and transaxle are notlocked. The vehicle will roll freely evenon the slightest incline unless the parkingbrake or brakes are on.
WARNINGIf the engine is running faster thanidle, do not shift from N or P into adriving gear:It's dangerous to shift from N or Pinto a driving gear when the engine isrunning faster than idle. If this isdone, the vehicle could move suddenly,causing an accident or serious injury.
Do not shift into N when driving thevehicle:Shifting into N while driving isdangerous. Engine braking cannot beapplied when decelerating whichcould lead to an accident or seriousinjury.
CAUTIONDo not shift into N when driving thevehicle. Doing so can cause transaxledamage.
NOTE
Apply the parking brake or depress thebrake pedal before moving the shiftlever from N to prevent the vehiclefrom moving unexpectedly.
D (Drive)
D is the normal driving position. From astop, the transaxle will automatically shiftthrough a 5-gear/6-gear* sequence.
* L3 turbocharger engine
Driving Your Mazda
Starting and Driving
5-15
CX-7_8AP5-EE-09F_Edition1 Page199Monday, June 15 2009 3:25 PM
Form No.8AP5-EE-09F

Black plate (200,1)
M (Manual)
M is the manual shift mode position.Gears can be shifted up or down byoperating the shift lever.Refer to Manual Shift Mode (page 5-16).
qActive Adaptive Shift (AAS)
Active Adaptive Shift (AAS)automatically controls the transaxle shiftpoints to best suit the road conditions anddriver input. This optimizes engineperformance and improves drivingcomfort. When cornering the vehicle,AAS mode will hold the transaxle in thegear the vehicle was in before entering thecurve, allowing the vehicle to beaccelerated from the same gear afterexiting the curve.If the driver accelerates rapidly, oraccelerates and decelerates rapidly byoperating the accelerator and brake pedalfor a certain period of time while theselector lever is in the D position, AASmode could activate. When this occurs,AAS mode will maintain the transaxle inthe optimum gear and the driver maysense that the transaxle is not shifting,however this does not indicate anabnormality.
qShift-Lock System
The shift-lock system prevents shiftingout of P unless the brake pedal isdepressed.
To shift from P:
1. Depress and hold the brake pedal.
2. Start the engine.
3. Move the shift lever.
NOTE
l When the ignition switch is in theLOCK position, the shift levercannot be shifted from P.
l To be sure the vehicle is in park, theignition key cannot be removedunless the shift lever is in P.
l (With Advanced Key)The ignition switch cannot be turnedfrom the ACC to the LOCK positionwhen the shift lever is not in P.
qManual Shift Mode
This mode gives you the feel of driving amanual transaxle vehicle by operating theshift lever and allows you to controlengine rpm and torque to the drive wheelsmuch like a manual transaxle when morecontrol is desired.
To change to manual shift mode, shift thelever from D to M.
NOTE
Changing to manual mode can be donewhile driving the vehicle with nodamage occurring to the transaxle.
5-16
Driving Your Mazda
Starting and Driving
CX-7_8AP5-EE-09F_Edition1 Page200Monday, June 15 2009 3:25 PM
Form No.8AP5-EE-09F

Black plate (201,1)
To return to automatic shift mode, shiftthe lever from M to D.
NOTE
l If you change to manual shift modewhen the vehicle is stopped, the gearwill shift to M1.
l If you change to manual shift modewithout depressing the acceleratorpedal when driving in D range, 5thgear, the gear will shift to M4.
l (L3 turbocharger engine model)If you change to manual shift modewithout depressing the acceleratorpedal when driving in D range, 6thgear, the gear will shift to M5.
Indicators
Shift position indicator
In manual shift mode, the “M” of the shiftposition indicator in the instrument panelilluminates.
Gear position indicator
The numeral for the selected gearilluminates.
Shift position indicator
Gear position indicator
NOTE
l If the gears cannot be shifted downwhen driving at higher speeds, thegear position indicator will flashtwice to signal that the gears cannotbe shifted down.
l (L5 engine model)If the automatic transaxle fluid (ATF)temperature becomes too high, thereis the possibility that the transaxlewill switch to automatic shift mode,cancelling manual shift mode andturning off the gear position indicatorillumination. This is a normalfunction to protect the AT. After theATF temperature has decreased, thegear position indicator illuminationturns back on and driving in manualshift mode is restored.
Shifting
Manually Shifting up
(M1 → M2 → M3 → M4 → M5 →M6í)To shift up to a higher gear, tap the shiftlever back ( ) once.
Driving Your Mazda
Starting and Driving
5-17íSome models.
CX-7_8AP5-EE-09F_Edition1 Page201Monday, June 15 2009 3:25 PM
Form No.8AP5-EE-09F

Black plate (202,1)
NOTE
l When driving slowly, the gears maynot shift up depending on vehiclespeed.
l In manual shift mode, gears do notshift up automatically. Do not run theengine with the tachometer needle inthe RED ZONE. If the tachometerneedle enters the RED ZONE, youmay feel engine-braking because thefuel delivery will be stopped toprotect the engine. However, thisdoes not indicate an abnormality.
l (L3 turbocharger engine model)When depressing the acceleratorfully, the transaxle will shift to alower gear, depending on vehiclespeed.
Manually Shifting down
( M6í → M5 → M4 → M3 → M2 →M1)To shift down to a lower gear, tap the shiftlever forward ( ) once.
WARNINGDo not use engine braking on slipperyroad surfaces or at high speeds:Shifting down while driving on wet,snowy, or frozen roads, or whiledriving at high speeds causes suddenengine braking, which is dangerous.The sudden change in tyre speed couldcause the tyres to skid. This could leadto loss of vehicle control and anaccident.
NOTE
l When driving at high speeds, thegear may not shift down dependingon vehicle speed.
l During deceleration, the gear mayautomatically shift down dependingon vehicle speed.
l (L3 turbocharger engine model)When depressing the acceleratorfully, the transaxle will shift to alower gear, depending on vehiclespeed.
Second gear fixed mode
When the shift lever is tapped back ( )while the vehicle is stopped, the transaxleis set in the second gear fixed mode. Thegear is fixed in second while in this modefor easier starting and driving on slipperyroads. If the shift lever is tapped back ( )or forward ( ) while in the second gearfixed mode, the mode will be cancelled.
5-18
Driving Your Mazda
íSome models.
Starting and Driving
CX-7_8AP5-EE-09F_Edition1 Page202Monday, June 15 2009 3:25 PM
Form No.8AP5-EE-09F
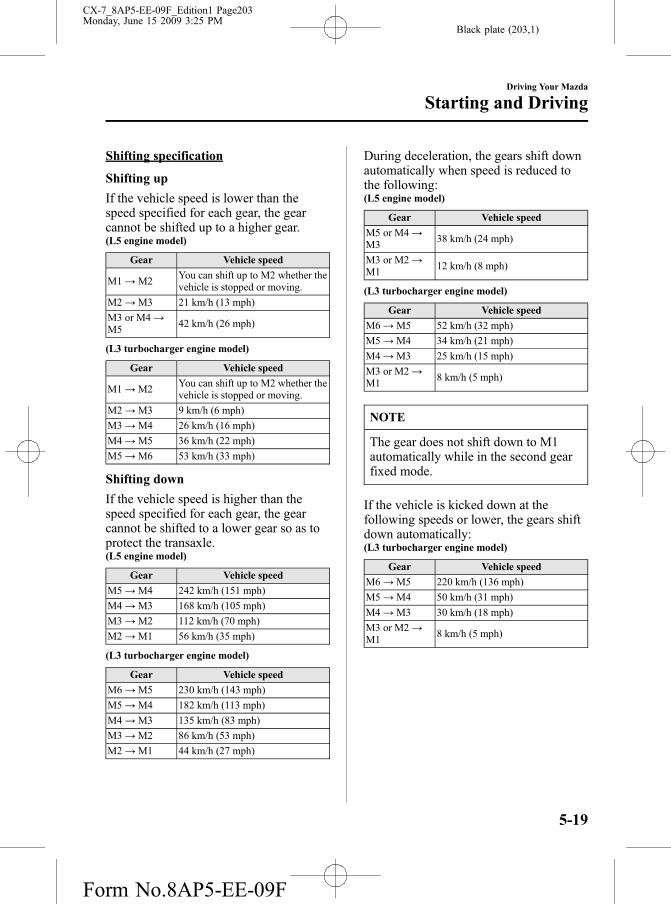
Black plate (203,1)
Shifting specification
Shifting up
If the vehicle speed is lower than thespeed specified for each gear, the gearcannot be shifted up to a higher gear.(L5 engine model)
Gear Vehicle speed
M1 →M2You can shift up to M2 whether thevehicle is stopped or moving.
M2 →M3 21 km/h (13 mph)
M3 or M4 →M5
42 km/h (26 mph)
(L3 turbocharger engine model)
Gear Vehicle speed
M1 →M2You can shift up to M2 whether thevehicle is stopped or moving.
M2 →M3 9 km/h (6 mph)
M3 →M4 26 km/h (16 mph)
M4 →M5 36 km/h (22 mph)
M5 →M6 53 km/h (33 mph)
Shifting down
If the vehicle speed is higher than thespeed specified for each gear, the gearcannot be shifted to a lower gear so as toprotect the transaxle.(L5 engine model)
Gear Vehicle speed
M5 →M4 242 km/h (151 mph)
M4 →M3 168 km/h (105 mph)
M3 →M2 112 km/h (70 mph)
M2 →M1 56 km/h (35 mph)
(L3 turbocharger engine model)
Gear Vehicle speed
M6 →M5 230 km/h (143 mph)
M5 →M4 182 km/h (113 mph)
M4 →M3 135 km/h (83 mph)
M3 →M2 86 km/h (53 mph)
M2 →M1 44 km/h (27 mph)
During deceleration, the gears shift downautomatically when speed is reduced tothe following:(L5 engine model)
Gear Vehicle speed
M5 or M4 →M3
38 km/h (24 mph)
M3 or M2 →M1
12 km/h (8 mph)
(L3 turbocharger engine model)
Gear Vehicle speed
M6 →M5 52 km/h (32 mph)
M5 →M4 34 km/h (21 mph)
M4 →M3 25 km/h (15 mph)
M3 or M2 →M1
8 km/h (5 mph)
NOTE
The gear does not shift down to M1automatically while in the second gearfixed mode.
If the vehicle is kicked down at thefollowing speeds or lower, the gears shiftdown automatically:(L3 turbocharger engine model)
Gear Vehicle speed
M6 →M5 220 km/h (136 mph)
M5 →M4 50 km/h (31 mph)
M4 →M3 30 km/h (18 mph)
M3 or M2 →M1
8 km/h (5 mph)
Driving Your Mazda
Starting and Driving
5-19
CX-7_8AP5-EE-09F_Edition1 Page203Monday, June 15 2009 3:25 PM
Form No.8AP5-EE-09F

Black plate (204,1)
qDriving Tips
WARNINGDo not allow the vehicle to move inreverse on an up-slope while theselector lever is in a forward gearposition, or move forward on a down-slope while the selector lever is in thereverse position.Otherwise, the engine will stop,causing the loss of the power brakeand power steering functions, andmake it difficult to control the vehiclewhich could result in an accident.
Passing
For extra power when passing anothervehicle or climbing steep grades, depressthe accelerator fully. The transaxle willshift to a lower gear, depending on vehiclespeed.
Climbing steep grades from a stop
To climb a steep grade from a stoppedposition:
1. Depress the brake pedal.
2. Shift to D or M1, depending on theload weight and grade steepness.
3. Release the brake pedal whilegradually accelerating.
Descending steep grades
When descending a steep grade, shift tolower gears, depending on load weightand grade steepness. Descend slowly,using the brakes only occasionally toprevent them from overheating.
Power SteeringPower steering is only operable when theengine is running. If the engine is off or ifthe power steering system is inoperable,you can still steer, but it requires morephysical effort.
If the steering feels stiffer than usualduring normal driving, consult an expertrepairer, we recommend an AuthorisedMazda Repairer.
CAUTIONNever hold the steering wheel to theextreme left or right for more than 5seconds with the engine running.This could damage the power steeringsystem.
qPower Steering MalfunctionIndicator Light (Diesel engine)
This indicator light illuminates when theignition switch is turned to the ONposition, and turns off when the engine isstarted.The light illuminates continuously if anyone of the following occurs:
l A malfunction occurs in the powersteering while driving.
5-20
Driving Your Mazda
Starting and Driving
CX-7_8AP5-EE-09F_Edition1 Page204Monday, June 15 2009 3:25 PM
Form No.8AP5-EE-09F

Black plate (205,1)
l The outside temperature is extremelylow (The light turns off when thepower steering fluid reaches theappropriate temperature).
If the light remains illuminated after theengine is started, or illuminates whiledriving, turn off the engine after parkingin a safe place, and then start the engineagain.If the light does not illuminate afterrestarting the engine, this indicates thatthe power steering is restored and normalsteering is possible.When the outside temperature isextremely low, the power steeringmalfunction indicator light may remainilluminated until the power steeringbegins to operate normally.If the malfunction indicator light does notturn off after about 2 minutes or morehave passed since the engine was started,have the vehicle inspected at anAuthorised Mazda Repairer.
NOTE
l The power steering system isinoperable when the power steeringmalfunction indicator lightilluminates. Steering is possible, butrequires more physical effort.
l Repeatedly jerking the steeringwheel left and right while the vehicleis stopped or moving extremelyslowly will cause the power steeringsystem to go into protective modewhich will make the steering feelheavy, but this does not indicate amalfunction. If this occurs, park thevehicle safely and wait a fewminutes for the system to return tonormal.
4-Wheel Drive (4WD)Operation
4WD provides excellent driveability onsnow-covered and ice-packed roads, sandand mud, as well as on steep slopes andother slippery surfaces.
q4WD Driving
WARNINGAvoid sharp turns, excessive speed andabrupt manoeuvres when driving thisvehicle:Sharp turns, excessive speed andabrupt manoeuvring of this vehicle isdangerous as it could result in theincreased risk of loss of vehiclecontrol, vehicle roll-over, personalinjury or death.This vehicle has a higher centre ofgravity. Vehicles with a higher centreof gravity such as utility and 4WDvehicles handle differently thanvehicles with a lower centre of gravity.Utility and 4WD vehicles are notdesigned for cornering at high speedsany more than low profile sports carsare designed to perform satisfactorilyunder off-road conditions. In addition,utility vehicles have a significantlyhigher rollover rate than other types ofvehicles.
Driving Your Mazda
Starting and Driving
5-21
CX-7_8AP5-EE-09F_Edition1 Page205Monday, June 15 2009 3:25 PM
Form No.8AP5-EE-09F

Black plate (206,1)
WARNINGDrive carefully when the vehicle isloaded by lowering vehicle speed andapplying the brakes earlier:Abrupt manoeuvring and suddenbraking when driving a loaded vehicleis dangerous as the driving behaviorof a vehicle with a high centre ofgravity is different when it is loadedcompared to when it is not, and couldresult in the loss of vehicle control andan accident.
q4WDWarning Light
This warning light stays on for a fewseconds when the ignition switch is turnedto the ON position.Thereafter, the warning light willilluminate or flash under the followingconditions:
l Illuminates when there is anabnormality with the 4WD system.
l Flashes when the differential oiltemperature is abnormally high.
l Flashes when there are continuallylarge differences between front and rearwheel rotation, such as when trying topull away from an icy surface, or whentrying to extricate the vehicle frommud, sand or similar conditions.
If the 4WD warning light illuminates:
If the 4WD warning light illuminates,contact an expert repairer, we recommendan Authorised Mazda Repairer.
If the 4WD warning light flashes:
Park the vehicle in a safe place. After afew moments, if the warning light stopsflashing, you can resume driving. If thelight does not stop flashing, contact anexpert repairer, we recommend anAuthorised Mazda Repairer.
WARNINGNever spin a wheel that is off theground:Spinning a wheel that is off theground as a result of the vehicle beingstuck or in a ditch is dangerous. Thedrive assembly could be seriouslydamaged which could lead to anaccident or could even lead tooverheating, oil leakage, and a fire.
qTyres and Tyre Chains
The condition of the tyres plays a largerole in the performance of the vehicle.Moreover, to prevent adverse effects tothe drive assembly, please note thefollowing:
Tyres
l When replacing tyres, always replaceall front and rear tyres at the same time.
l All tyres must be of the same size,manufacture, brand and tread pattern.Pay particular attention whenequipping snow or other types ofwinter tyres.
5-22
Driving Your Mazda
Starting and Driving
CX-7_8AP5-EE-09F_Edition1 Page206Monday, June 15 2009 3:25 PM
Form No.8AP5-EE-09F

Black plate (207,1)
l Do not mix tread-worn tyres withnormal tyres.
l Inspect tyre inflation pressures at thespecified periods and adjust to thespecified pressures.
NOTE
Check the tyre inflation pressure labelattached to driver's door frame for thecorrect tyre inflation pressure.
l Make sure to equip the vehicle withgenuine wheels of the specified size,on all wheels. With 4WD, the system iscalibrated for all four wheels being ofthe same dimensions.
Tyre chains
l Install tyre chains to the front tyres.
l Do not use tyre chains on the rearwheels.
l Do not drive the vehicle faster than 30km/h (19 mph) with the tyre chainsinstalled.
l Do not drive the vehicle with tyrechains on road conditions other thansnow or ice.
qTowing
If the vehicle requires towing, have ittowed with all four wheels completely offthe ground(page 7-18).
Cruise Controlí
With cruise control, you can set andautomatically maintain any speed of morethan about 30 km/h (19 mph).
WARNINGDo not use the cruise control underthe following conditions:Using the cruise control under thefollowing conditions is dangerous andcould result in loss of vehicle control.l Hilly terrainl Steep inclinesl Heavy or unsteady trafficl Slippery or winding roadsl Similar restrictions that requireinconsistent speed
qCruise Main Indicator Light(Amber)/Cruise Set IndicatorLight (Green)
The indicator light has two colours.
Cruise Main Indicator Light (Amber)
The indicator light illuminates amberwhen the CRUISE ON switch is pressedand the cruise control system is activated.
Cruise Set Indicator Light (Green)
The indicator light illuminates green whena cruising speed has been set.
Driving Your Mazda
Starting and Driving
5-23íSome models.
CX-7_8AP5-EE-09F_Edition1 Page207Monday, June 15 2009 3:25 PM
Form No.8AP5-EE-09F

Black plate (208,1)
qActivation/Deactivation
To activate the system, press the CRUISEON switch.The cruise main indicator lightilluminates.
To deactivate the system, press the OFFswitch.The cruise main indicator light turns off.
WARNINGAlways turn off the cruise controlsystem when it is not in use:Leaving the cruise control system inan activation-ready state while thecruise control is not in use isdangerous as the cruise control couldunexpectedly activate if the activationbutton is accidentally pressed, andresult in loss of vehicle control and anaccident.
qTo Set Speed
1. Activate the cruise control system bypressing the CRUISE ON switch.
2. Accelerate to the desired speed, whichmust be more than 30 km/h (19 mph).
3. Set the cruise control by pressing theSET or SET - switch at the desiredspeed. The cruise control is set at themoment the SET or SET - switch ispressed. Release the accelerator pedalsimultaneously.
NOTE
l Release the SET or SET - switchat the desired speed, otherwise thespeed will continue increasing whilethe SET switch is pressed andheld, and continue decreasing whilethe SET - switch is pressed and held(except when the accelerator pedal isdepressed).
l On a steep grade, the vehicle maymomentarily slow down whileascending, or speed up whiledescending.
l Cruise control will turn off if vehiclespeed drops below 23 km/h (14 mph)when cruise is activated, such aswhen climbing a steep grade.
5-24
Driving Your Mazda
Starting and Driving
CX-7_8AP5-EE-09F_Edition1 Page208Monday, June 15 2009 3:25 PM
Form No.8AP5-EE-09F

Black plate (209,1)
qTo Increase Cruising Speed
Follow either of these procedures.
To increase speed using cruise controlswitch
Press the SET switch and hold it. Yourvehicle will accelerate.Release the switch at the speed you want.
Your vehicle has a tap-up feature thatallows you to increase your current speedin increments of 1.6 km/h (1 mph) by amomentary tap of the SET switch.Multiple taps will increase your vehiclespeed 1.6 km/h (1 mph) for each tap.
To increase speed using acceleratorpedal
Depress the accelerator pedal to accelerateto the desired speed. Press the SET orSET - switch and release it immediately.
NOTE
Accelerate if you want to speed uptemporarily when the cruise control ison. Greater speed will not interfere withor change the set speed.Take your foot off the accelerator toreturn to the set speed.
qTo Decrease Cruising Speed
Press the SET - switch and hold it. Thevehicle will gradually slow.Release the switch at the speed you want.
Driving Your Mazda
Starting and Driving
5-25
CX-7_8AP5-EE-09F_Edition1 Page209Monday, June 15 2009 3:25 PM
Form No.8AP5-EE-09F

Black plate (210,1)
Your vehicle has a tap-down feature thatallows you to decrease your current speedin decrements of 1.6 km/h (1 mph) by amomentary tap of the SET- switch.Multiple taps will decrease your vehiclespeed 1.6 km/h (1 mph) for each tap.
qTo Resume Cruising Speed atMore Than 30 km/h (19 mph)
If some other method besides the OFFswitch was used to cancel cruising speed(such as applying the brake pedal) and thesystem is still activated, the most recentset speed will automatically resume whenthe RES switch is pressed.If vehicle speed is below 30 km/h (19mph), increase the vehicle speed up to 30km/h (19 mph) or more and press the RESswitch.
qTo Cancel
To cancel the system, use one of thesemethods:
l Press the OFF switch.
l Slightly depress the brake pedal.
l Depress the clutch pedal (Manualtransaxle only).
l Press the CANCEL switch.
The system turns off when the ignition isswitched off.
NOTE
Cruise control will cancel at about 15km/h (9 mph) below the preset speed(such as may happen when climbing along, steep grade).
5-26
Driving Your Mazda
Starting and Driving
CX-7_8AP5-EE-09F_Edition1 Page210Monday, June 15 2009 3:25 PM
Form No.8AP5-EE-09F

Black plate (211,1)
Traction Control System(TCS)
The Traction Control System (TCS)enhances traction and safety bycontrolling engine torque. When the TCSdetects driving wheel slippage, it lowersengine torque to prevent loss of traction.
This means that on a slick surface, theengine adjusts automatically to provideoptimum power to the drive wheelswithout causing them to spin and losetraction.
WARNINGDo not rely on the traction controlsystem as a substitute for safe driving:The traction control system (TCS)cannot compensate for unsafe andreckless driving, excessive speed,tailgating (following another vehicletoo closely), and hydroplaning(reduced tyre friction and road contactbecause of water on the road surface).You can still have an accident.
Use snow tyres or tyre chains anddrive at reduced speeds when roadsare covered with ice and/or snow:Driving without proper tractiondevices on snow and/or ice-coveredroads is dangerous. The tractioncontrol system (TCS) alone cannotprovide adequate traction and youcould still have an accident.
qTCS/DSC Indicator Light
This indicator light stays on for a fewseconds when the ignition switch is turnedto the ON position. If the TCS or DSC isoperating, the indicator light flashes.
If the light stays on, the TCS or DSC mayhave a malfunction and they may notoperate correctly. Take your vehicle to anexpert repairer, we recommend anAuthorised Mazda Repairer.
NOTE
l In addition to the indicator lightflashing, a slight labouring soundwill come from the engine. Thisindicates that the TCS is operatingproperly.
l On slippery surfaces, such as freshsnow, it will be impossible toachieve high rpm when the TCS ison.
Driving Your Mazda
Starting and Driving
5-27
CX-7_8AP5-EE-09F_Edition1 Page211Monday, June 15 2009 3:25 PM
Form No.8AP5-EE-09F

Black plate (212,1)
qTCS OFF Indicator Light
This indicator light stays on for a fewseconds when the ignition switch is turnedto the ON position.It also illuminates when the TCS OFFswitch is pressed and TCS is switched off.Refer to TCS OFF Switch on page 5-28.If the light remains illuminated and theTCS is not switched off, take your vehicleto an expert repairer, we recommend anAuthorised Mazda Repairer. The dynamicstability control may have a malfunction.
NOTE
If the battery is disconnected or a fuse isreplaced, the DSC will be inoperable.When this happens, the TCS OFFindicator light flashes and the TCS/DSCindicator light illuminates.To reactivate the DSC, perform thefollowing procedure with the batteryconnected.
1. Turn the ignition switch to the ONposition.
2. Turn the steering clockwise fully,then turn it anticlockwise fully.
3. Make sure the TCS OFF indicatorlight turns off.
4. Turn the ignition switch to the OFFposition, then turn it to the ONposition again.
NOTE
5. Make sure the TCS/DSC indicatorlight turns off.
If the TCS/DSC indicator light and theTCS OFF indicator light remainilluminated even after turning theignition switch to the ON position,attempt the procedure again. If this stilldoes not work, consult an expertrepairer, we recommend an AuthorisedMazda Repairer.
qTCS OFF Switch
If the vehicle speed is less than 30 km/h(18 mph), press the TCS OFF switch toturn off the TCS. The TCS OFF indicatorlight will illuminate.
Press the switch again to turn the TCSback on. The TCS OFF indicator lightwill turn off. If the vehicle speed is morethan 30 km/h (18 mph), the TCS OFFindicator light will not illuminate even ifthe switch is pressed.
5-28
Driving Your Mazda
Starting and Driving
CX-7_8AP5-EE-09F_Edition1 Page212Monday, June 15 2009 3:25 PM
Form No.8AP5-EE-09F

Black plate (213,1)
NOTE
l When TCS is on and you attempt tofree the vehicle when it is stuck, ordrive it out of freshly fallen snow,the TCS will activate. Depressing theaccelerator will not increase enginepower and freeing the vehicle maybe difficult. When this happens, turnoff the TCS.
l If the TCS is off when the engine isturned off, it automatically activateswhen the ignition switch is turnedon.
l Leaving the TCS on will provide thebest traction.
l If the TCS is OFF when the vehiclespeed is more than 30 km/h (18mph), it automatically activates andthe TCS OFF indicator light will turnoff.
l If the TCS OFF switch is pressedand held for 10 seconds or more, theTCS OFF switch malfunctiondetection function operates and theTCS system activates automatically.The TCS OFF indicator light turnsoff while the TCS system isoperative.
Dynamic Stability Control(DSC)
The Dynamic Stability Control (DSC)automatically controls braking and enginetorque in conjunction with systems suchas ABS and TCS to help control side slipwhen driving on slippery surfaces, orduring sudden or evasive manoeuvring,enhancing vehicle safety.
Refer to ABS (page 5-9) and TCS (page5-27).
DSC operation is possible at speedsgreater than 20 km/h (12 mph).
WARNINGDo not rely on the dynamic stabilitycontrol as a substitute for safe driving:The dynamic stability control (DSC)cannot compensate for unsafe andreckless driving, excessive speed,tailgating (following another vehicletoo closely), and hydroplaning(reduced tyre friction and road contactbecause of water on the road surface).You can still have an accident.
Driving Your Mazda
Starting and Driving
5-29
CX-7_8AP5-EE-09F_Edition1 Page213Monday, June 15 2009 3:25 PM
Form No.8AP5-EE-09F

Black plate (214,1)
CAUTIONl The DSC may not operate correctlyunless the following are observed:
l Use tyres of the correct sizespecified for your Mazda on allfour wheels.
l Use tyres of the samemanufacturer, brand and treadpattern on all four wheels.
l Do not mix worn tyres.
l The DSC may not operate correctlywhen tyre chains are used or atemporary spare tyre is installedbecause the tyre diameter changes.
qTCS/DSC Indicator Light
This indicator light stays on for a fewseconds when the ignition switch is turnedto the ON position. If the TCS or DSC isoperating, the indicator light flashes.
If the light stays on, the TCS or DSC mayhave a malfunction and they may notoperate correctly. Take your vehicle to anexpert repairer, we recommend anAuthorised Mazda Repairer.
5-30
Driving Your Mazda
Starting and Driving
CX-7_8AP5-EE-09F_Edition1 Page214Monday, June 15 2009 3:25 PM
Form No.8AP5-EE-09F

Black plate (215,1)
Tyre Pressure Monitoring Systemí
The tyre pressure monitoring system (TPMS) monitors the pressure for each tyre.If tyre pressure is too low in one or more tyres, the system will inform the driver via thewarning light in the instrument panel and by the warning beep sound.
The tyre pressure sensors installed on each wheel send tyre pressure data by radio signal tothe receiver unit in the vehicle.
Tyre pressure sensors
NOTE
When the ambient temperature is low due to seasonal changes, tyre temperatures are alsolower. When the tyre temperature decreases, the air pressure decreases as well. TheTPMS warning light may illuminate more frequently. Visually inspect the tyres dailybefore driving, and check tyre pressures monthly with a tyre pressure gauge. Whenchecking tyre pressures, use of a digital tyre pressure gauge is recommended.
TPMS does not alleviate your need to check the pressure and condition of all four tyresregularly.
Driving Your Mazda
Starting and Driving
5-31íSome models.
CX-7_8AP5-EE-09F_Edition1 Page215Monday, June 15 2009 3:25 PM
Form No.8AP5-EE-09F

Black plate (216,1)
CAUTIONl Each tyre, including the spare (if provided), should be checked monthly when coldand inflated to the inflation pressure recommended by the vehicle manufacturer on thevehicle placard or tyre inflation pressure label. (If your vehicle has tyres of a differentsize than the size indicated on the vehicle placard or tyre inflation pressure label, youshould determine the proper tyre inflation pressure for those tyres.)As an added safety feature, your vehicle has been equipped with a tyre pressuremonitoring system (TPMS) that illuminates a low tyre pressure telltale when one ormore of your tyres is significantly under-inflated. Accordingly, when the low tyrepressure telltale illuminates, you should stop and check your tyres as soon as possible,and inflate them to the proper pressure. Driving on a significantly under-inflated tyrecauses the tyre to overheat and can lead to tyre failure. Under-inflation also reducesfuel efficiency and tyre tread life, and may affect the vehicle's handling and stoppingability.Please note that the TPMS is not a substitute for proper tyre maintenance, and it is thedriver's responsibility to maintain correct tyre pressure, even if under-inflation has notreached the level to trigger illumination of the TPMS low tyre pressure telltale.
l Your vehicle has also been equipped with a TPMS malfunction indicator to indicatewhen the system is not operating properly.The TPMS malfunction indicator is combined with the low tyre pressure telltale.When the system detects a malfunction, the telltale will flash for approximately oneminute and then remain continuously illuminated. This sequence will continue uponsubsequent vehicle start-ups as long as the malfunction exists.When the malfunction indicator is illuminated, the system may not be able to detect orsignal low tyre pressure as intended. TPMS malfunctions may occur for a variety ofreasons, including the installation of replacement or alternate tyres or wheels on thevehicle that prevent the TPMS from functioning properly. Always check the TPMSmalfunction telltale after replacing one or more tyres or wheels on your vehicle toensure that the replacement or alternate tyres and wheels allow the TPMS to continueto function properly.
l To avoid false readings, the system samples for a little while before indicating aproblem. As a result it will not instantaneously register a rapid tyre deflation or blowout.
5-32
Driving Your Mazda
Starting and Driving
CX-7_8AP5-EE-09F_Edition1 Page216Monday, June 15 2009 3:25 PM
Form No.8AP5-EE-09F

Black plate (217,1)
qTyre Pressure Monitoring SystemWarning Light
This warning light illuminates for a fewseconds when the ignition switch is turnedto the ON position.
Thereafter, the warning light illuminatesand a beep is heard when tyre pressure istoo low in one or more tyres, and flasheswhen there is a system malfunction.
WARNINGIf the tyre pressure monitoring systemwarning light illuminates or flashes,or the tyre pressure warning beepsound is heard, decrease vehicle speedimmediately and avoid suddenmanoeuvring and braking:If the tyre pressure monitoring systemwarning light illuminates or flashes,or the tyre pressure warning beepsound is heard, it is dangerous to drivethe vehicle at high speeds, or performsudden manoeuvring or braking.Vehicle drivability could worsen andresult in an accident.To determine if you have a slow leakor a flat, pull over to a safe positionwhere you can check the visualcondition of the tyre and determine ifyou have enough air to proceed to aplace where air may be added and thesystem monitored again by an expertrepairer, we recommend anAuthorised Mazda Repairer or a tyrerepair station.
Do not ignore the TPMS WarningLight:Ignoring the TPMS warning light isdangerous, even if you know why it isilluminated. Have the problem takencare of as soon as possible before itdevelops into a more serious situationthat could lead to tyre failure and adangerous accident.
Driving Your Mazda
Starting and Driving
5-33
CX-7_8AP5-EE-09F_Edition1 Page217Monday, June 15 2009 3:25 PM
Form No.8AP5-EE-09F

Black plate (218,1)
Warning light illuminates/Warningbeep sounds
When the warning light illuminates, andthe warning beep sound is heard (about 3seconds), tyre pressure is too low in oneor more tyres.
Adjust the tyre pressure to the correct tyrepressure. Refer to the specification charts(page 10-8).
CAUTIONWhen replacing/repairing the tyres orwheels or both, have the work done byan Authorised Mazda Dealer, or the tyrepressure sensors may be damaged.
NOTE
l Perform tyre pressure adjustmentwhen the tyres are cold. Tyrepressure will vary according to thetyre temperature, therefore let thevehicle stand for 1 hour or only driveit 1.6 km (1 mile) or less beforeadjusting the tyre pressures. Whenpressure is adjusted on hot tyres tothe cold inflation pressure, the TPMSwarning light/beep may turn on afterthe tyres cool and pressure dropsbelow specification.Also, an illuminated TPMS warninglight, resulting from the tyre airpressure dropping due to coldambient temperature, may turn off ifthe ambient temperature rises. In thiscase, it will also be necessary toadjust the tyre air pressures. If theTPMS warning light illuminates dueto a drop in tyre air pressure, makesure to check and adjust the tyre airpressures.
NOTE
l After adjusting the tyre air pressures,it may require some time for theTPMS warning light to turn off. Ifthe TPMS warning light remainsilluminated, drive the vehicle at aspeed of at least 25 km/h (16 mph)for 10 minutes, and then verify that itturns off.
l Tyres lose air naturally over time andthe TPMS cannot tell if the tyres aregetting too soft over time or youhave a flat. However, when you findone low tyre in a set of four-that is anindication of trouble; you shouldhave someone drive the vehicleslowly forward so you can inspectany low tyre for cuts and any metalobjects sticking through tread orsidewall. Put a few drops of water inthe valve stem to see if it bubblesindicating a bad valve. Leaks need tobe addressed by more than simplyrefilling the trouble tyre as leaks aredangerous - take it to an expertrepairer, we recommend anAuthorised Mazda Repairer whichhas all the equipment to fix tyres,TPMS systems and order the bestreplacement tyre for your vehicle.
If the warning light illuminates again evenafter the tyre pressures are adjusted, theremay be a tyre puncture. Replace thepunctured tyre with the temporary sparetyre (page 7-6).
5-34
Driving Your Mazda
Starting and Driving
CX-7_8AP5-EE-09F_Edition1 Page218Monday, June 15 2009 3:25 PM
Form No.8AP5-EE-09F

Black plate (219,1)
NOTE
A tyre pressure sensor is not installed tothe temporary spare tyre. The warninglight will flash continuously while thetemporary spare tyre is being used.
Warning light flashes
When the warning light flashes, there maybe a system malfunction. Consult anAuthorised Mazda Dealer.
qSystem Error Activation
When the TPMS warning light flashes,there may be a system malfunction.Consult an Authorised Mazda Dealer.A system error activation may occur inthe following cases:
l When there is equipment or a devicenear the vehicle using the same radiofrequency as that of the tyre pressuresensors.
l When using the following devices inthe vehicle that may cause radiointerference with the receiver unit.
l A digital device such as a personalcomputer.
l A current converter device such as aDC-AC converter.
l When excess snow or ice adheres tothe vehicle, especially around thewheels.
l When the tyre pressure sensor batteriesare exhausted.
l When using a wheel with no tyrepressure sensor installed.
l When using tyres with steel wirereinforcement in the side walls.
l When using tyre chains.
qTyres and Wheels
CAUTIONWhen inspecting or adjusting the tyreair pressures, do not apply excessiveforce to the stem part of the wheel unit.The stem part could be damaged.
Changing tyres and wheels
The following procedure allows theTPMS to recognize a tyre pressuresensor's unique ID signal code whenevertyres or wheels are changed, such aschanging to and from winter tyres.
NOTE
Each tyre pressure sensor has a uniqueID signal code. The signal code must beregistered with the TPMS before it canwork. The easiest way to do it is to havean Authorised Mazda Dealer changeyour tyre and complete ID signal coderegistration.
When having tyres changed at anAuthorised Mazda Dealer
Tyre pressure sensor ID signal coderegistration is completed when anAuthorised Mazda Dealer changes yourvehicle's tyres.
Driving Your Mazda
Starting and Driving
5-35
CX-7_8AP5-EE-09F_Edition1 Page219Monday, June 15 2009 3:25 PM
Form No.8AP5-EE-09F

Black plate (220,1)
When changing tyres yourself
If you or someone else changes tyres, youor someone else can also undertake thesteps for the TPMS to complete the IDsignal code registration.
1. After tyres have been changed, turn theignition switch to the ON position, thenturn it back to the ACC or LOCKposition.
2. Wait for about 15 minutes.
3. After about 15 minutes, drive thevehicle at a speed of at least 25 km/h(16 mph) for 10 minutes and the tyrepressure sensor ID signal code will beregistered automatically.
NOTE
If the vehicle is driven within about 15minutes of changing tyres, the tyrepressure monitoring system warninglight will flash because the sensor IDsignal code would not have beenregistered. If this happens, park thevehicle for about 15 minutes, afterwhich the sensor ID signal code willregister upon driving the vehicle for 10minutes.
Replacing tyres and wheels
CAUTIONl When replacing/repairing the tyresor wheels or both, have the workdone by an Authorised MazdaDealer, or the tyre pressure sensorsmay be damaged.
l The wheels equipped on your Mazdaare specially designed for installationof the tyre pressure sensors. Do notuse non-genuine wheels, otherwise itmay not be possible to install thetyre pressure sensors.
Be sure to have the tyre pressure sensorsinstalled whenever tyres or wheels arereplaced.When having a tyre or wheel or bothreplaced, the following types of tyrepressure sensor installations are possible.
l The tyre pressure sensor is removedfrom the old wheel and installed to thenew one.
l The same tyre pressure sensor is usedwith the same wheel. Only the tyre isreplaced.
l A new tyre pressure sensor is installedto a new wheel.
5-36
Driving Your Mazda
Starting and Driving
CX-7_8AP5-EE-09F_Edition1 Page220Monday, June 15 2009 3:25 PM
Form No.8AP5-EE-09F

Black plate (221,1)
NOTE
l The tyre pressure sensor ID signalcode must be registered when a newtyre pressure sensor is purchased.For purchase of a tyre pressuresensor and registration of the tyrepressure sensor ID signal code,consult an Authorised Mazda Dealer.
l When reinstalling a previouslyremoved tyre pressure sensor to awheel, replace the grommet (sealbetween valve body/sensor andwheel) for the tyre pressure sensor.
Driving Your Mazda
Starting and Driving
5-37
CX-7_8AP5-EE-09F_Edition1 Page221Monday, June 15 2009 3:25 PM
Form No.8AP5-EE-09F

Black plate (222,1)
Rear Vehicle Monitoring (RVM) Systemí
The rear vehicle monitoring system is designed to assist the driver in verifying the area tothe rear of the vehicle on both sides during lane changes by alerting the driver of thepresence of vehicles approaching from the rear in an adjacent lane. The system's detectionarea extends from the area near the rear edge of the vehicle's front doors to a distance ofabout 50 m (164 ft) rearward on both the left and right adjacent lanes. When the systemdetects an approaching vehicle, it illuminates the RVM warning indicator light equipped onthe left and right outside mirrors depending on the conditions. If the direction indicator isoperated to either side where the RVM warning indicator light is illuminated, the RVMwarning indicator light starts flashing and a warning chime sounds to alert the driver.
Detection area
Your vehicle
WARNINGThis system is only designed to assist the driver in verifying the area to the rear of thevehicle before changing vehicle lanes. Before changing vehicle lanes, always verifythe area surrounding the vehicle visually. Due to various limitations on the operationof the rear vehicle monitoring system, the RVM warning indicator light may notilluminate or it could be delayed even though another vehicle is present in an adjacentvehicle lane. Do not rely solely on this system and always verify the area surroundingthe vehicle visually.
5-38
Driving Your Mazda
íSome models.
Starting and Driving
CX-7_8AP5-EE-09F_Edition1 Page222Monday, June 15 2009 3:25 PM
Form No.8AP5-EE-09F

Black plate (223,1)
NOTE
l The rear vehicle monitoring system operates when all of the following conditions aresatisfied:
l The ignition is switched ON.l The RVM switch is pressed and the RVM indicator light (green) in the instrument
cluster is illuminated.l The vehicle speed is about 60 km/h (38 mph) or higher.
l The rear vehicle monitoring system does not operate under the following conditions:
l The vehicle speed falls below 60 km/h (38 mph) even though the RVM indicatorlight (green) is illuminated.
l The shift lever is shifted into reverse (R) and the vehicle moves in reverse.
l In the following cases, the system illuminates the RVM warning light (amber) in theinstrument cluster and stops the operation of the system. If the RVM warning light(amber) continues to illuminate, have the system inspected at an Authorised MazdaDealer as soon as possible:
l A malfunction in the system, including the RVM warning indicator light, isdetected.
l The position of a radar sensor has changed significantly. The direction in which theradar sensors are pointed is factory-adjusted specific to the installation conditionsfor each vehicle so that they detect approaching vehicles correctly. If the directionof a radar sensor has deviated for some reason, it needs to be readjusted.
l Large quantities of snow or ice are on the rear bumper near the radar sensors.l Driving on snow-covered roads for long periods.l The temperature surrounding the radar sensors becomes extremely high when the
vehicle is driven up-hill for long periods under hot summer weather conditions.l The battery voltage is low.
l There is a limit to the detection capability of the radar sensors. In the following cases,the rear vehicle monitoring system's detection capability may weaken and not operatenormally:
l The rear bumper near a radar sensor is deformed.l Snow, ice or mud adheres to the area near a radar sensor on the rear bumper.l Under certain weather conditions including rain, snow, or fog.
Driving Your Mazda
Starting and Driving
5-39
CX-7_8AP5-EE-09F_Edition1 Page223Monday, June 15 2009 3:25 PM
Form No.8AP5-EE-09F

Black plate (224,1)
NOTE
l It might be impossible or difficult for the radar sensors to detect the following:
l Small, two-wheeled vehicles, bicycles, pedestrians, and stationary objects on or atthe edge of the road.
l Vehicles with body shapes off of which radar may not reflect such as unloadedtrailers with a low vehicle height and sports cars.
l Avehicle is in the detection area in an adjacent lane to the rear but it is notapproaching. The system makes determinations based on the radar detection datafrom approaching vehicles.
l Another vehicle is travelling at the same speed alongside the vehicle for extendedperiods.
l Vehicles approaching from the opposite direction.l Another vehicle which your vehicle is attempting to pass is in an adjacent lane.l Avehicle is in an adjacent lane which is extremely wide. The radar sensor
detection area is set according to the lane width of general freeways.
l In the following cases, the RVM warning indicator light and the warning chime maynot activate or they may be delayed:
l Another vehicle moves from a lane two lanes over to the adjacent lane.l When driving on a steep incline.l When going over a mountain pass.l When cornering at a sharp curve in the road.l There is a difference in height between vehicle lanes.l Immediately after this system is turned on.
l If the lane width is extremely narrow, a vehicle in an adjacent lane two lanes over maybe detected. The radar sensor detection area is set according to the lane width ofgeneral freeways.
5-40
Driving Your Mazda
Starting and Driving
CX-7_8AP5-EE-09F_Edition1 Page224Monday, June 15 2009 3:25 PM
Form No.8AP5-EE-09F

Black plate (225,1)
NOTE
l The RVM warning indicator light may illuminate for stationary objects in or on theedge of the road, such as guardrails, tunnels, and side walls.
Objects such as guardrails and concrete walls running alongside the vehicle.
Places where the width between guardrails or walls on each side of the vehicle narrows.
The walls at the entrance and exits of tunnels, turnouts.
l If a trailer is being towed or a vehicle carrier is equipped to the rear of the vehicle, therear vehicle monitoring system may not operate correctly because radar emissioncould be obstructed. Turn off the rear vehicle monitoring system.
Driving Your Mazda
Starting and Driving
5-41
CX-7_8AP5-EE-09F_Edition1 Page225Monday, June 15 2009 3:25 PM
Form No.8AP5-EE-09F

Black plate (226,1)
qRVMWarning Indicator Light/Warning Chime
The rear vehicle monitoring system alerts the driver to the presence of another vehicle in anadjacent lane using the RVM warning indicator lights and the warning chime while thesystem is operational.
RVM warning indicator light
The RVM warning indicator lights are installed to the left and right outside mirrors. Thewarning indicator light illuminates when a vehicle approaching from the rear in an adjacentlane is detected. Awarning indicator light flashes when the direction indicator lever isoperated to the side where the RVM warning indicator light is illuminated to alert thedriver.
Illumination dimmer cancel function
Normally, when the headlight switch is turned to the or position, the brightness ofthe RVM warning indicator lights is dimmed when they illuminate.When driving on snow and fog bound roads where the brightness of the surrounding lightmakes it difficult to see a RVM warning indicator light while it is dimmed, pressing theillumination dimmer cancel button cancels the dimmer function and restores the brightnessof the RVM warning indicator lights to full brightness.Refer to Instrument panel Illumination on page 5-53.
Warning Chime
The warning chime activates at the same time the RVM warning indicator light beginsflashing to alert the driver.
5-42
Driving Your Mazda
Starting and Driving
CX-7_8AP5-EE-09F_Edition1 Page226Monday, June 15 2009 3:25 PM
Form No.8AP5-EE-09F

Black plate (227,1)
qRVMWarning Light (Amber)/RVM Indicator Light (Green)
RVM warning light (amber)
This warning light illuminates when theignition switch is turned to the ONposition. The colour of the light changesfrom amber to green when the rear vehiclemonitoring system is operable, or turnsoff when the system is turned off. Thelight stays on if the system has amalfunction. Consult an AuthorisedMazda Dealer.
RVM indicator light (green)
This indicator light illuminates when therear vehicle monitoring system isoperable.
qRVM Switch
When the switch is pressed, the rearvehicle monitoring system becomesoperable and the RVM indicator light(green) illuminates on the instrumentpanel. When the switch is pressed again,this system is turned off and the RVMindicator light (green) turns off.
NOTE
l When the ignition is switched off,the condition before the ignition wasswitched off is maintained. Forexample, if the ignition is switchedoff with the rear vehicle monitoringsystem operable, the system will beoperable when the ignition isswitched ON the next time.
l If the battery is disconnected or afuse is replaced, the rear vehiclemonitoring system will be turned off.Press the RVM switch to turn thissystem on.
Driving Your Mazda
Starting and Driving
5-43
CX-7_8AP5-EE-09F_Edition1 Page227Monday, June 15 2009 3:25 PM
Form No.8AP5-EE-09F

Black plate (228,1)
qCare of Radar Sensors
The radar sensors for the rear vehiclemonitoring system are equipped inside therear bumper, one each on the left and rightsides.
Radar sensors
The surface area of the rear bumper nearthe radar sensors should always be cleanso that the rear vehicle monitoring systemoperates correctly. Do not apply stickersor similar objects to the rear bumper.Refer to Exterior Care on page 8-60.
NOTE
Consult an Authorised Mazda Dealerfor radar sensor repairs andreplacement, or repair, replacement orpainting of the rear bumper near a radarsensor.
Diesel Particulate Filter(Diesel engine)
The diesel particulate filter collects andremoves most of the particulate matter(PM) in the exhaust gas of a diesel engine.PM collected by the diesel particulatefilter is cleared during normal driving,however, PM may not be removed and thediesel particulate filter indicator light mayilluminate under the following conditions:
l If the vehicle is driven at 15 km/h (9mph) or less continuously.
l If the vehicle is repeatedly driven for ashort period of time (10 minute or less)or driven while the engine is cold.
l If the vehicle is idled for a long time.
NOTE
The engine sound and exhaust gas smellmay change when PM is being removedwhile driving.
qDiesel Particulate Filter IndicatorLight
The warning light stays on for a fewseconds when the ignition switch is turnedto the ON position.
5-44
Driving Your Mazda
Starting and Driving
CX-7_8AP5-EE-09F_Edition1 Page228Monday, June 15 2009 3:25 PM
Form No.8AP5-EE-09F

Black plate (229,1)
The diesel particulate filter indicator lightilluminates when the particulate matter(PM) cannot be removed automaticallyand the amount of collected PM reaches aspecified amount. Drive the vehicle at anengine speed of 2,000 rpm or more and avehicle speed of 40 km/h (25 mph) ormore for about 10 to 15 minutes toeliminate the PM.
If the diesel particulate filter indicatorlight flashes, contact an expert repairer,we recommend an Authorised MazdaRepairer.In addition, the diesel particulate filterindicator light for vehicles equipped withthe diesel engine starts flashing when theengine oil replacement period is reacheddue to engine oil deterioration. If theindicator light starts flashing, have anExpert Repairer replace the engine oil. Werecommend an expert repairer, werecommend an Authorised MazdaRepairer.
CAUTIONIf the vehicle is continually driven asusual with the diesel particulate filterindicator light illuminated, PMincreases and the indicator light maystart flashing. If the diesel particulatefilter indicator light starts flashing, havethe vehicle inspected immediately at anexpert repairer, we recommend anAuthorised Mazda Repairer. If thevehicle is not inspected and continuesto be driven, the engine maymalfunction.
NOTE
When the diesel particulate filterindicator light flashes, the engine outputis restricted to protect the dieselparticulate filter.
Driving Your Mazda
Starting and Driving
5-45
CX-7_8AP5-EE-09F_Edition1 Page229Monday, June 15 2009 3:25 PM
Form No.8AP5-EE-09F

Black plate (230,1)
Selective Catalytic Reduction (SCR) System (Diesel engine)The SCR system is designed to reduce nitrogen oxide (NOx) and purify exhaust gasthrough a chemical reaction in which urea is injected into the exhaust gas.
CAUTIONBe careful to not allow the supply of urea to run out. If the remaining travel distancereaches 0 km (0 mile) and the engine is stopped, the engine cannot be restarted. If thesupply of urea runs out while the vehicle is being driven, exhaust gas purificationworsens and the resulting emission of pollutants may be subject to fines and penalties.Consult a Mazda Repairer before the supply of urea completely runs out.
NOTE
l It is necessary to periodically replenish the supply of urea. When the remainingdistance-to-empty display of the AdBlue® gauge appears, or the SCR warning lightilluminates, consult a Mazda Repairer.
l The SCR warning light and the AdBlue® gauge do not reset immediately after theurea supply is replenished. The SCR warning light turns off and the correct urea levelis displayed after the vehicle is driven for about 1 minute (Vehicle speed 10 km/h ormore).
5-46
Driving Your Mazda
Starting and Driving
CX-7_8AP5-EE-09F_Edition1 Page230Monday, June 15 2009 3:25 PM
Form No.8AP5-EE-09F

Black plate (231,1)
The SCR system provides the following notification as the urea supply begins to run out.
Remaining distanceto empty
SCRWarning Light
SCRWarning Beep AdBlue® gaugeMulti Information
Display
2,400 km(1,500 mile) or less
Flashes at enginestart
At engine start
Displays at engine start
1,500 km (940 mile)or less
Flashes at enginestart than, illuminates
constantlyAt engine start
Displays at engine start
830 km (520 mile) orless
Flashes constantly At engine start
Displays at engine start
0 km (0 mile) Flashes constantly ―
Flashes Constant display
In addition, the following notification is provided when there is a system malfunction.
SCRWarning Light
SCRWarning Beep AdBlue® gaugeMulti Information
Display
Engine startingpossible
Flashes constantly(Check engine lightilluminates also)
At engine start
Displays at engine start
Engine start notpossible
Flashes constantly(Check engine lightilluminates also)
―
Flashes Displays at engine start
Driving Your Mazda
Starting and Driving
5-47
CX-7_8AP5-EE-09F_Edition1 Page231Monday, June 15 2009 3:26 PM
Form No.8AP5-EE-09F
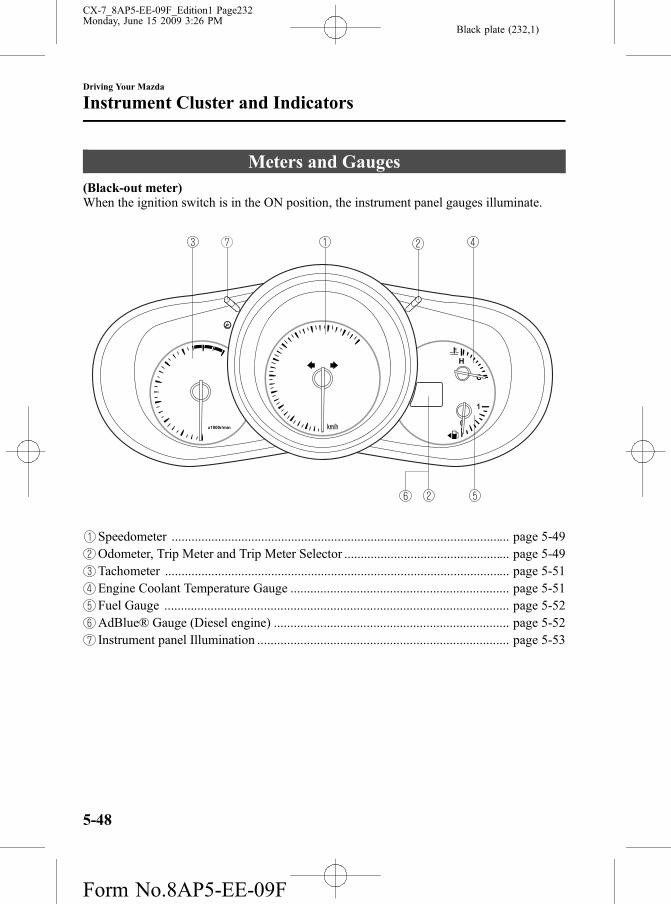
Black plate (232,1)
Meters and Gauges(Black-out meter)When the ignition switch is in the ON position, the instrument panel gauges illuminate.
Speedometer ...................................................................................................... page 5-49Odometer, Trip Meter and Trip Meter Selector .................................................. page 5-49Tachometer ........................................................................................................ page 5-51Engine Coolant Temperature Gauge .................................................................. page 5-51Fuel Gauge ........................................................................................................ page 5-52AdBlue® Gauge (Diesel engine) ....................................................................... page 5-52Instrument panel Illumination ............................................................................ page 5-53
5-48
Driving Your Mazda
Instrument Cluster and Indicators
CX-7_8AP5-EE-09F_Edition1 Page232Monday, June 15 2009 3:26 PM
Form No.8AP5-EE-09F

Black plate (233,1)
qSpeedometer
The speedometer indicates the speed ofthe vehicle.
qOdometer, Trip Meter and TripMeter Selector
The display mode can be changedbetween trip meter A and trip meter B bypressing the selector while one of them isdisplayed. The selected mode will bedisplayed.
Selector
Trip meter
Odometer
Odometer
Odometer
Trip meter A
Press the selector
Press the selector
Trip meter B
Driving Your Mazda
Instrument Cluster and Indicators
5-49
CX-7_8AP5-EE-09F_Edition1 Page233Monday, June 15 2009 3:26 PM
Form No.8AP5-EE-09F

Black plate (234,1)
NOTE
l (Standard meter)The odometer and trip meter can bedisplayed as follows even when theignition switch is in the ACC orLOCK position.
l Displays for 10 minutes after theignition switch is turned to theACC or LOCK position from theON position.
l Displays for 10 minutes after thedriver's door is opened.
l (Black-out meter)When the ignition switch is in theACC or LOCK position, theodometer or trip meters cannot bedisplayed, however, pressing theselector button can inadvertentlyswitch the trip meters or reset themduring an approximate ten-minuteperiod in the following cases:
l After the ignition switch is turnedto the ACC or LOCK positionfrom the ON position.
l After the driver's door is opened.
Odometer
The odometer records the total distancethe vehicle has been driven.
Trip meter
The trip meter can record the totaldistance of two trips. One is recorded intrip meter A, and the other is recorded intrip meter B.
For instance, trip meter A can record thedistance from the point of origin, and tripmeter B can record the distance fromwhere the fuel tank is filled.
When trip meter A is selected, pressingthe selector again within one second willchange to trip meter B mode.
When trip meter A is selected, TRIPAwill be displayed. When trip meter B isselected, TRIP B will be displayed.
The trip meter records the total distancethe vehicle is driven until the meter isagain reset. Return it to “0.0” by holdingthe selector depressed for 1 second ormore. Use this meter to measure tripdistances and to compute fuelconsumption.
NOTE
l Only the trip meters record tenths ofkilometres (miles).
l The trip record will be erased when:
l The power supply is interrupted(blown fuse or the battery isdisconnected).
l The vehicle is driven over 999.9km (mile).
5-50
Driving Your Mazda
Instrument Cluster and Indicators
CX-7_8AP5-EE-09F_Edition1 Page234Monday, June 15 2009 3:26 PM
Form No.8AP5-EE-09F

Black plate (235,1)
qTachometer
The tachometer shows engine speed inthousands of revolutions per minute(rpm).(Petrol engine)
L3 turbocharger engine (European model)L5 engine
Red zoneL3 turbocharger engine (Except European model)
(Diesel engine)
Red zone
CAUTIONDo not run the engine with thetachometer needle in the RED ZONE.This may cause severe engine damage.
qEngine Coolant Temperature Gauge
The engine coolant temperature gaugeshows the temperature of the enginecoolant.
If the needle is near H, it indicatesoverheating.
CAUTIONDriving with an overheated engine cancause serious engine damage (page7-11).
Driving Your Mazda
Instrument Cluster and Indicators
5-51
CX-7_8AP5-EE-09F_Edition1 Page235Monday, June 15 2009 3:26 PM
Form No.8AP5-EE-09F

Black plate (236,1)
qFuel Gauge
The fuel gauge shows approximately howmuch fuel is remaining in the tank whenthe ignition switch is in the ON position.We recommend keeping the tank over 1/4full. When the low fuel warning lightilluminates or when the needle is near E,refuel as soon as possible.
Low fuel warning light
Full Approx. 1/4 Full
NOTE
l After refuelling, it may require sometime for the needle to stabilize. Inaddition, the needle may deviatewhile driving on a slope or curvesince the fuel moves in the tank.
l The direction of the arrow ( )shows that the fuel-filler flap is onthe left side of the vehicle.
qAdBlue® Gauge (Diesel engine)
The remaining amount of urea and theremaining distance-to-empty indicationsare displayed when the ignition switch isturned to the ON position.
5-52
Driving Your Mazda
Instrument Cluster and Indicators
CX-7_8AP5-EE-09F_Edition1 Page236Monday, June 15 2009 3:26 PM
Form No.8AP5-EE-09F

Black plate (237,1)
qInstrument panel Illumination
Rotate the knob to adjust the brightness ofthe instrument cluster and otherilluminations in the instrument panel.
NOTE
l The brightness of instrument panelilluminations can be adjusted whenthe headlight switch is in the or
position.
l When the instrument panelillumination brightness cannot beadjusted any more, a beep sound willbe heard.
l (Black-out meter)The brightness of the instrumentcluster illumination can be adjustedwhen the headlight switch is in anyposition.
Dim
Bright
Cancelling the illumination dimmer
When the headlight switch is in the orposition, the illumination of the
instrument cluster and the informationdisplay dims.
When driving on snowy or foggy roads,or in other situations when the instrumentcluster or information display's visibilityis reduced due to glare from surroundingbrightness, cancel the illuminationdimmer and increase the illuminationintensity.
To cancel the illumination dimmer, pressthe instrument panel illumination knob.
NOTE
l This symbol ( ) indicates the knobto adjust the brightness of theinstrument panel illumination.
l If the illumination dimmer iscancelled, the instrument cluster andthe information display will not dimwhen the headlight switch is turnedto the or position again.
Driving Your Mazda
Instrument Cluster and Indicators
5-53
CX-7_8AP5-EE-09F_Edition1 Page237Monday, June 15 2009 3:26 PM
Form No.8AP5-EE-09F

Black plate (238,1)
Warning/Indicator Lights
Warning/Indicator lights will appear in any of the highlighted areasWarning/Indicator lights will appear in any of the highlighted areas
With Black-out meterWith Black-out meter
Without Black-out meterWithout Black-out meter
Signal Warning/Indicator Lights Page
Brake System Warning Light 5-57
Charging System Warning Light 5-59
Engine Oil Pressure Warning Light 5-59
5-54
Driving Your Mazda
Warning/Indicator Lights and Beep Sounds
CX-7_8AP5-EE-09F_Edition1 Page238Monday, June 15 2009 3:26 PM
Form No.8AP5-EE-09F

Black plate (239,1)
Signal Warning/Indicator Lights Page
Check Engine Light 5-59
SCRWarning Light 5-60
ABS Warning Light 5-58
Air Bag/Front Seat Belt Pretensioner System Warning Light 5-60
Low Fuel Warning Light 5-61
Seat Belt Warning Light/Beep 5-61
Door-Ajar Warning Light 5-62
120 km/h Warning Light 5-62
Sedimentor Warning Light (Diesel engine) 5-62
Low Washer Fluid Level Warning Light 5-63
Automatic Transaxle Warning Light 5-63
4WDWarning Light 5-63
Tyre Pressure Monitoring System Warning Light 5-64
RVMWarning Light (Amber)/RVM Indicator Light (Green) 5-66
KEY Warning Light (Red)/KEY Indicator Light (Green) 5-66
Security Indicator Light 5-67
Driving Your Mazda
Warning/Indicator Lights and Beep Sounds
5-55
CX-7_8AP5-EE-09F_Edition1 Page239Monday, June 15 2009 3:26 PM
Form No.8AP5-EE-09F

Black plate (240,1)
Signal Warning/Indicator Lights Page
Headlight Main-Beam Indicator Light 5-68
Front Fog Lights Indicator Light 5-68
Rear Fog Light Indicator Light 5-68
Shift Position Indicator Light 5-68
Glow Indicator Light (Diesel engine) 5-69
TCS/DSC Indicator Light 5-69
TCS OFF Indicator Light 5-69
Cruise Main Indicator Light (Amber)/Cruise Set Indicator Light (Green) 5-70
Lights-On Indicator Light 5-70
Diesel Particulate Filter Indicator Light (Diesel engine) 5-70
Power Steering Malfunction Indicator Light 5-71
Headlight Auto-Levelling Malfunction Indicator Light 5-72
Direction Indicator/Hazard Warning Indicator Lights 5-72
5-56
Driving Your Mazda
Warning/Indicator Lights and Beep Sounds
CX-7_8AP5-EE-09F_Edition1 Page240Monday, June 15 2009 3:26 PM
Form No.8AP5-EE-09F

Black plate (241,1)
qBrake System Warning Light
This warning has the following functions:
Parking brake warning
The light illuminates when the parkingbrake is applied with the ignition switchin the START or ON position. It turns offwhen the parking brake is fully released.
Low brake fluid level warning
If the light stays on after the parking brakeis fully released, you may have a brakeproblem.
Drive to the side of the road and park offthe right-of-way.
You may notice that the pedal is harder todepress or that it may go closer to thefloor. In either case, it will take longer tostop the vehicle.
1. With the engine stopped, open thebonnet and check the brake fluid levelimmediately, and then add fluid ifrequired (page 8-25).
2. After adding fluid, check the lightagain.
If the warning light remains on, or if thebrakes do not operate properly, do notdrive the vehicle. Have it towed to anexpert repairer, we recommend anAuthorised Mazda Repairer.
Even if the light turns off have your brakesystem inspected as soon as possible byan expert repairer, we recommend anAuthorised Mazda Repairer.
NOTE
Having to add brake fluid is sometimesan indicator of leakage. Consult anexpert repairer, we recommend anAuthorised Mazda Repairer as soon aspossible even if the brake light is nolonger illuminated.
WARNINGDo not drive with the brake systemwarning light illuminated. Contact anexpert repairer, we recommend anAuthorised Mazda Repairer to havethe brakes inspected as soon aspossible:Driving with the brake system warninglight illuminated is dangerous. Itindicates that your brakes may notwork at all or that they couldcompletely fail at any time. If this lightremains illuminated, after checkingthat the parking brake is fullyreleased, have the brakes inspectedimmediately.
Driving Your Mazda
Warning/Indicator Lights and Beep Sounds
5-57
CX-7_8AP5-EE-09F_Edition1 Page241Monday, June 15 2009 3:26 PM
Form No.8AP5-EE-09F

Black plate (242,1)
qABS Warning Light
The warning light stays on for a fewseconds when the ignition switch is turnedto the ON position.
If the ABS warning light stays on whileyou're driving, the ABS control unit hasdetected a system malfunction. If thisoccurs, your brakes will function normallyas if the vehicle had no ABS.Should this happen, consult an expertrepairer, we recommend an AuthorisedMazda Repairer as soon as possible.
NOTE
l When the engine is jump-started tocharge the battery, uneven rpmoccurs and the ABS warning lightmay illuminate. If this occurs, it isthe result of the weak battery anddoes not indicate an ABSmalfunction.Recharge the battery.Refer to Battery Recharging on page8-37.
l (With DSC vehicles)The brake assist system does notoperate while the ABS warning lightis illuminated.
qElectronic Brake ForceDistribution System Warning
If the electronic brake force distributioncontrol unit determines that somecomponents are operating incorrectly, thecontrol unit may illuminate the brakesystem warning light and the ABSwarning light on simultaneously. Theproblem is likely to be the electronicbrake force distribution system.
WARNINGDo not drive with both the ABSwarning light and brake warning lightilluminated. Have the vehicle towed toan expert repairer, we recommend anAuthorised Mazda Repairer to havethe brakes inspected as soon aspossible:Driving when the brake systemwarning light and ABS warning lightare illuminated simultaneously isdangerous.When both lights are illuminated, therear wheels could lock more quickly inan emergency stop than under normalcircumstances.
5-58
Driving Your Mazda
Warning/Indicator Lights and Beep Sounds
CX-7_8AP5-EE-09F_Edition1 Page242Monday, June 15 2009 3:26 PM
Form No.8AP5-EE-09F

Black plate (243,1)
qCharging System Warning Light
This warning light illuminates when theignition switch is turned to the ONposition and turns off when the engine isstarted.
If the warning light illuminates whiledriving, it indicates a malfunction of thealternator or of the charging system.Drive to the side of the road and park offthe right-of-way. Consult an expertrepairer, we recommend an AuthorisedMazda Repairer.
CAUTIONDo not continue driving when thecharging system warning light isilluminated because the engine couldstop unexpectedly.
qEngine Oil Pressure Warning Light
This warning light illuminates when theignition switch is turned to the ONposition and turns off when the engine isstarted.
This warning light indicates low engineoil pressure.
If the light illuminates while driving:
1. Drive to the side of the road and parkoff the right-of-way on level ground.
2. Turn off the engine and wait 5 minutesfor the oil to drain back into the sump(Diesel engine: 10 minutes).
3. Inspect the engine oil level (page 8-21).If it's low, add the appropriate amountof engine oil while being careful not tooverfill.
4. Start the engine and check the warninglight.
If the light remains illuminated even afteryou add oil, stop the engine immediatelyand have your vehicle towed to an expertrepairer, we recommend an AuthorisedMazda Repairer.
CAUTIONDo not run the engine if the oil pressureis low. It could result in extensiveengine damage.
qCheck Engine Light
This indicator light illuminates when theignition switch is turned to the ONposition and turns off when the engine isstarted.
Driving Your Mazda
Warning/Indicator Lights and Beep Sounds
5-59
CX-7_8AP5-EE-09F_Edition1 Page243Monday, June 15 2009 3:26 PM
Form No.8AP5-EE-09F

Black plate (244,1)
If this light illuminates while driving, thevehicle may have a problem. It isimportant to note the driving conditionswhen the light illuminated and consult anexpert repairer, we recommend anAuthorised Mazda Repairer.
The check engine light may illuminate inthe following cases:
l The fuel tank level being very low orapproaching empty.
l The engine's electrical system has aproblem.
l The emission control system has aproblem.
If the check engine light remains on orflashes continuously, do not drive at highspeeds and consult an expert repairer, werecommend an Authorised MazdaRepairer as soon as possible.
qSCRWarning Light (Diesel engine)
This warning light illuminates when theignition switch is turned to the ONposition and turns off after the engine isstarted. The light remains illuminatedduring the following. Consult a MazdaRepairer.Refer to Selective Catalytic Reduction(SCR) System on page 5-46.
l The remaining distance-to-emptydisplay of the AdBlue® gauge alwaysindicates less than about 1,500 km (940mile) remaining.
l There is a malfunction in the system(the check engine light alsoilluminates).
qAir Bag/Front Seat BeltPretensioner System Warning Light
If the air bag/front seat belt pretensionersystem is working properly, the warninglight illuminates when the ignition switchis turned to the ON position or after theengine is cranked. The warning light turnsoff after a specified period of time.
A system malfunction is indicated if thewarning light constantly flashes,constantly illuminates or does notilluminate at all when the ignition switchis turned to the ON position. If any ofthese occur, consult an expert repairer, werecommend an Authorised MazdaRepairer as soon as possible. The systemmay not work in an accident.
WARNINGNever tamper with the air bag/pretensioner systems and always havean expert repairer, we recommend anAuthorised Mazda Repairer performall servicing and repairs:Self-servicing or tampering with thesystems is dangerous. An air bag/pretensioner could accidentallyactivate or become disabled causingserious injury or death.
5-60
Driving Your Mazda
Warning/Indicator Lights and Beep Sounds
CX-7_8AP5-EE-09F_Edition1 Page244Monday, June 15 2009 3:26 PM
Form No.8AP5-EE-09F

Black plate (245,1)
qLow Fuel Warning Light
Low fuel warning light
This warning light in the fuel gaugesignals that the fuel tank will soon beempty.Refuel as soon as possible.
qSeat Belt Warning Light/Beep
The seat belt warning light illuminates ifthe driver's seat belt is not fastened whenthe ignition switch is turned to the ONposition.
Belt minder (European model)
NOTE
The belt minder can be deactivated.Consult an Authorised Mazda Repairerto deactivate or restore the seat beltminder.
Driver's seat
If the driver's seat belt is not fastened andthe vehicle is driven at a speed faster thanabout 20 km/h (12 mph), the warninglight will flash and a beep sound will beheard.Once the beep sound is heard, it soundsintermittently even if the vehicle speedlowers to 20 km/h (12 mph) or less untilthe seat belt is fastened or the beep soundperiod has passed.
Front passenger seat
If the front passenger seat belt is notfastened with the ignition switch in theON position, the driver and the passengerwill be informed by the warning light andthe beep sounds.
Driving Your Mazda
Warning/Indicator Lights and Beep Sounds
5-61
CX-7_8AP5-EE-09F_Edition1 Page245Monday, June 15 2009 3:26 PM
Form No.8AP5-EE-09F

Black plate (246,1)
If the front passenger seat belt is notfastened and the vehicle is driven at aspeed faster than about 20 km/h (12 mph),the warning light will flash and a beepsound will be heard.Placing heavy items on the frontpassenger seat may cause the frontpassenger seat belt warning function tooperate depending on the weight of theitem.Once the beep sound is heard, it soundsintermittently even if the vehicle speedlowers to 20 km/h (12 mph) or less untilthe seat belt is fastened or the beep soundperiod has passed.
NOTE
l To allow the front passenger seatweight sensor to function properly,do not place and sit on an additionalseat cushion on the front passengerseat. The sensor may not functionproperly because the additional seatcushion could cause sensorinterference.
l When a small child sits on the frontpassenger seat, it is possible thatneither the warning light nor thewarning beep operate.
qDoor-Ajar Warning Light
This warning light illuminates when anydoor or liftgate is not securely closed.Close the door or liftgate securely beforedriving the vehicle.
q120 km/h Warning Lightí
When the ignition switch is turned to theON position, the 120 km/h warning lightilluminates and then turns off after a fewseconds.The 120 km/h warning light illuminateswhen the vehicle speed exceeds 120km/h.
qSedimentor Warning Light(Diesel engine)
The fuel filter acts as a sedimentor thatseparates water from the fuel.
5-62
Driving Your Mazda
íSome models.
Warning/Indicator Lights and Beep Sounds
CX-7_8AP5-EE-09F_Edition1 Page246Monday, June 15 2009 3:26 PM
Form No.8AP5-EE-09F

Black plate (247,1)
If 0.13 L (0.14 US qt, 0.11 Imp qt) ofwater accumulates in this filter, thewarning light will illuminate.When it does, consult an expert repairer,we recommend an Authorised MazdaRepairer as soon as possible.
qLowWasher Fluid LevelWarning Lightí
This warning light indicates that littlewasher fluid remains. Add fluid (page8-30).
qAutomatic Transaxle Warning Light
This warning light stays on for a fewseconds when the ignition switch is turnedto the ON position.The light illuminates when the transaxlehas a problem.
CAUTIONIf the automatic transaxle warning lightilluminates, the transaxle has anelectrical problem. Continuing to driveyour Mazda in this condition couldcause damage to your transaxle.Consult an expert repairer, werecommend an Authorised MazdaRepairer as soon as possible.
q4WDWarning Light (4WD)
This warning light stays on for a fewseconds when the ignition switch is turnedto the ON position.Thereafter, the warning light willilluminate or flash under the followingconditions:
l Illuminates when there is anabnormality with the 4WD system.
l Flashes when the differential oiltemperature is abnormally high.
l Flashes when there are continuallylarge differences between front and rearwheel rotation, such as when trying topull away from an icy surface, or whentrying to extricate the vehicle frommud, sand or similar conditions.
If the 4WD warning light illuminates:
If the 4WD warning light illuminates,contact an expert repairer, we recommendan Authorised Mazda Repairer.
Driving Your Mazda
Warning/Indicator Lights and Beep Sounds
5-63íSome models.
CX-7_8AP5-EE-09F_Edition1 Page247Monday, June 15 2009 3:26 PM
Form No.8AP5-EE-09F

Black plate (248,1)
If the 4WD warning light flashes:
Park the vehicle in a safe place. After afew moments, if the warning light stopsflashing, you can resume driving. If thelight does not stop flashing, contact anexpert repairer, we recommend anAuthorised Mazda Repairer.
WARNINGNever spin a wheel that is off theground:Spinning a wheel that is off theground as a result of the vehicle beingstuck or in a ditch is dangerous. Thedrive assembly could be seriouslydamaged which could lead to anaccident or could even lead tooverheating, oil leakage, and a fire.
qTyre Pressure Monitoring System(TPMS) Warning Lightí
This warning light illuminates for a fewseconds when the ignition switch is turnedto the ON position.
Thereafter, the warning light illuminatesand a beep is heard when tyre pressure istoo low in one or more tyres, and flasheswhen there is a system malfunction.
WARNINGIf the tyre pressure monitoring systemwarning light illuminates or flashes,or the tyre pressure warning beepsound is heard, decrease vehicle speedimmediately and avoid suddenmanoeuvring and braking:If the tyre pressure monitoring systemwarning light illuminates or flashes,or the tyre pressure warning beepsound is heard, it is dangerous to drivethe vehicle at high speeds, or performsudden manoeuvring or braking.Vehicle drivability could worsen andresult in an accident.To determine if you have a slow leakor a flat, pull over to a safe positionwhere you can check the visualcondition of the tyre and determine ifyou have enough air to proceed to aplace where air may be added and thesystem monitored again by an expertrepairer, we recommend anAuthorised Mazda Repairer or a tyrerepair station.
Do not ignore the TPMS WarningLight:Ignoring the TPMS warning light isdangerous, even if you know why it isilluminated. Have the problem takencare of as soon as possible before itdevelops into a more serious situationthat could lead to tyre failure and adangerous accident.
5-64
Driving Your Mazda
íSome models.
Warning/Indicator Lights and Beep Sounds
CX-7_8AP5-EE-09F_Edition1 Page248Monday, June 15 2009 3:26 PM
Form No.8AP5-EE-09F

Black plate (249,1)
Warning light illuminates/Warningbeep sounds
When the warning light illuminates, andthe warning beep sound is heard (about 3seconds), tyre pressure is too low in oneor more tyres.
Adjust the tyre pressure to the correct tyrepressure. Refer to the specification charts(page 10-8).
CAUTIONWhen replacing/repairing the tyres orwheels or both, have the work done byan Authorised Mazda Dealer, or the tyrepressure sensors may be damaged.
NOTE
l Perform tyre pressure adjustmentwhen the tyres are cold. Tyrepressure will vary according to thetyre temperature, therefore let thevehicle stand for 1 hour or only driveit 1.6 km (1 mile) or less beforeadjusting the tyre pressures. Whenpressure is adjusted on hot tyres tothe cold inflation pressure, the TPMSwarning light/beep may turn on afterthe tyres cool and pressure dropsbelow specification.Also, an illuminated TPMS warninglight, resulting from the tyre airpressure dropping due to coldambient temperature, may turn off ifthe ambient temperature rises. In thiscase, it will also be necessary toadjust the tyre air pressures. If theTPMS warning light illuminates dueto a drop in tyre air pressure, makesure to check and adjust the tyre airpressures.
NOTE
l After adjusting the tyre air pressures,it may require some time for theTPMS warning light to turn off. Ifthe TPMS warning light remainsilluminated, drive the vehicle at aspeed of at least 25 km/h (16 mph)for 10 minutes, and then verify that itturns off.
l Tyres lose air naturally over time andthe TPMS cannot tell if the tyres aregetting too soft over time or youhave a flat. However, when you findone low tyre in a set of four-that is anindication of trouble; you shouldhave someone drive the vehicleslowly forward so you can inspectany low tyre for cuts and any metalobjects sticking through tread orsidewall. Put a few drops of water inthe valve stem to see if it bubblesindicating a bad valve. Leaks need tobe addressed by more than simplyrefilling the trouble tyre as leaks aredangerous - take it to an expertrepairer, we recommend anAuthorised Mazda Repairer whichhas all the equipment to fix tyres,TPMS systems and order the bestreplacement tyre for your vehicle.
If the warning light illuminates again evenafter the tyre pressures are adjusted, theremay be a tyre puncture. Replace thepunctured tyre with the temporary sparetyre (page 7-6).
Driving Your Mazda
Warning/Indicator Lights and Beep Sounds
5-65
CX-7_8AP5-EE-09F_Edition1 Page249Monday, June 15 2009 3:26 PM
Form No.8AP5-EE-09F

Black plate (250,1)
NOTE
A tyre pressure sensor is not installed tothe temporary spare tyre. The warninglight will flash continuously while thetemporary spare tyre is being used.
Warning light flashes
When the warning light flashes, there maybe a system malfunction. Consult anAuthorised Mazda Dealer.
qRVMWarning Light (Amber)/RVM Indicator Light (Green)í
RVM warning light (amber)
This warning light illuminates when theignition switch is turned to the ONposition. The colour of the light changesfrom amber to green when the rear vehiclemonitoring system is operable, or turnsoff when the system is turned off. Thelight stays on if the system has amalfunction. Consult an AuthorisedMazda Dealer.
RVM indicator light (green)
This indicator light illuminates when therear vehicle monitoring system isoperable.
qKEY Warning Light (Red)/KEYIndicator Light (Green) (withadvanced key)
This indicator has two colours.
KEY Warning Light (Red)
When illuminated
l When the ignition switch is turned tothe ON position, it illuminatesmomentarily and then goes out.
l If any malfunction occurs in theadvanced keyless system, it illuminatescontinuously.
WARNINGDo not drive the vehicle with the KEYwarning light illuminated:If the KEY warning light remainsilluminated, do not continue to driveusing the advanced key system. Parkthe vehicle in a safe place and use theauxiliary key to continue driving thevehicle. Have the vehicle inspected atan Authorised Mazda Repairer assoon as possible.
5-66
Driving Your Mazda
íSome models.
Warning/Indicator Lights and Beep Sounds
CX-7_8AP5-EE-09F_Edition1 Page250Monday, June 15 2009 3:26 PM
Form No.8AP5-EE-09F

Black plate (251,1)
When flashing
l Under the following conditions, theKEY warning light (red) flashes toinform the driver that the start knobwill not rotate to the ACC positioneven if it is pushed in from the LOCKposition.
l The advanced key battery is dead.l The advanced key is not within
operational range.l The advanced key is placed in areas
where it is difficult for the system todetect the signal (page 3-7).
l A key from another manufacturersimilar to the advanced key is in theoperational range.
l Under the following conditions, theKEY warning light (red) will flashcontinuously when the start knob hasnot been returned to the LOCKposition to notify the driver that theadvanced key has been removed fromthe vehicle. It will stop flashing whenthe advanced key is back inside thevehicle.
l The start knob has not been returnedto the LOCK position, the driver'sdoor is open, and the advanced keyis removed from the vehicle.
l The start knob has not been returnedto the LOCK position and all thedoors are closed after removing theadvanced key from the vehicle.
NOTE
The flashing KEY warning light (red)and the beep sound operatesimultaneously (page 3-24).
KEY Indicator Light (Green)
When illuminated
When the start knob is pushed in from theLOCK position, the system confirms thatthe correct advanced key is inside thevehicle, the KEY indicator light (green)illuminates, and the start knob can beturned to the ACC position (page 3-12).
When flashing
When the advanced key battery power islow, the KEY indicator light flashes for 30seconds after the start knob is turned fromthe ON position to the ACC or LOCKposition. Replace with a new batterybefore the advanced key becomesunusable (page 3-7).
NOTE
The advanced key can be set so that theKEY indicator light (green) does notflash even if the battery power is low.Refer to Setting Change (FunctionCustomization)(page 3-23).
qSecurity Indicator Light
This indicator light starts flashing every 2seconds when the ignition switch is turnedfrom the ON to the ACC position and theimmobilizer system is armed.
Driving Your Mazda
Warning/Indicator Lights and Beep Sounds
5-67
CX-7_8AP5-EE-09F_Edition1 Page251Monday, June 15 2009 3:26 PM
Form No.8AP5-EE-09F

Black plate (252,1)
The light stops flashing when the ignitionswitch is turned to the ON position withthe correct ignition key.At this time, the immobilizer system isdisarmed and the light illuminates forabout 3 seconds and then turns off.
If the engine does not start with thecorrect ignition key, and the securityindicator light keeps illuminating orflashing, the system may have amalfunction. Consult an AuthorisedMazda Repairer.
qHeadlight Main-Beam IndicatorLight
This light indicates one of two things:
l The main-beam headlights are on.
l The direction indicator lever is in theflash-to-pass position.
qFront Fog Lights Indicator Lightí
This light comes on when the front foglights are operating.
qRear Fog Light Indicator Lightí
This light comes on when the rear foglight is operating.
qShift Position Indicator Light(Automatic Transaxle)
This indicates the selected shift positionwhen the ignition switch is in the ONposition.
Gear position indicator
Gear position indicator
When the shift lever is in the D or Mposition, the numeral for the selected geardisplays.
5-68
Driving Your Mazda
íSome models.
Warning/Indicator Lights and Beep Sounds
CX-7_8AP5-EE-09F_Edition1 Page252Monday, June 15 2009 3:26 PM
Form No.8AP5-EE-09F

Black plate (253,1)
qGlow Indicator Light (Diesel engine)
This light may illuminate when theignition switch is turned to the ONposition.It turns off when the glow plugs arewarm.
qTCS/DSC Indicator Light
This indicator light stays on for a fewseconds when the ignition switch is turnedto the ON position. If the TCS or DSC isoperating, the indicator light flashes.
If the light stays on, the TCS or DSC mayhave a malfunction and they may notoperate correctly. Take your vehicle to anexpert repairer, we recommend anAuthorised Mazda Repairer.
qTCS OFF Indicator Light
This indicator light stays on for a fewseconds when the ignition switch is turnedto the ON position.It also illuminates when the TCS OFFswitch is pressed and TCS is switched off.Refer to TCS OFF Switch on page 5-28.If the light remains illuminated and theTCS is not switched off, take your vehicleto an expert repairer, we recommend anAuthorised Mazda Repairer. The dynamicstability control may have a malfunction.
NOTE
If the battery is disconnected or a fuse isreplaced, the DSC will be inoperable.When this happens, the TCS OFFindicator light flashes and the TCS/DSCindicator light illuminates.To reactivate the DSC, perform thefollowing procedure with the batteryconnected.
1. Turn the ignition switch to the ONposition.
2. Turn the steering clockwise fully,then turn it anticlockwise fully.
3. Make sure the TCS OFF indicatorlight turns off.
4. Turn the ignition switch to the OFFposition, then turn it to the ONposition again.
Driving Your Mazda
Warning/Indicator Lights and Beep Sounds
5-69
CX-7_8AP5-EE-09F_Edition1 Page253Monday, June 15 2009 3:26 PM
Form No.8AP5-EE-09F

Black plate (254,1)
NOTE
5. Make sure the TCS/DSC indicatorlight turns off.
If the TCS/DSC indicator light and theTCS OFF indicator light remainilluminated even after turning theignition switch to the ON position,attempt the procedure again. If this stilldoes not work, consult an expertrepairer, we recommend an AuthorisedMazda Repairer.
qCruise Main Indicator Light(Amber)/Cruise Set IndicatorLight (Green)
The indicator light has two colours.
Cruise Main Indicator Light (Amber)
The indicator light illuminates amberwhen the ON/OFF switch is pressed andthe cruise control system is activated.
Cruise Set Indicator Light (Green)
The indicator light illuminates green whena cruising speed has been set.
qLights-On Indicator Light(Black-out meter)
This indicator light illuminates when theexterior lights and instrument panelillumination are on.
qDiesel Particulate Filter IndicatorLight (Diesel engine)
The warning light stays on for a fewseconds when the ignition switch is turnedto the ON position.
The diesel particulate filter indicator lightilluminates when the particulate matter(PM) cannot be removed automaticallyand the amount of collected PM reaches aspecified amount. Drive the vehicle at anengine speed of 2,000 rpm or more and avehicle speed of 40 km/h (25 mph) ormore for about 10 to 15 minutes toeliminate the PM.
5-70
Driving Your Mazda
Warning/Indicator Lights and Beep Sounds
CX-7_8AP5-EE-09F_Edition1 Page254Monday, June 15 2009 3:26 PM
Form No.8AP5-EE-09F

Black plate (255,1)
If the diesel particulate filter indicatorlight flashes, contact an expert repairer,we recommend an Authorised MazdaRepairer.In addition, the diesel particulate filterindicator light for vehicles equipped withthe diesel engine starts flashing when theengine oil replacement period is reacheddue to engine oil deterioration. If theindicator light starts flashing, have anExpert Repairer replace the engine oil. Werecommend an expert repairer, werecommend an Authorised MazdaRepairer.
CAUTIONIf the vehicle is continually driven asusual with the diesel particulate filterindicator light illuminated, PMincreases and the indicator light maystart flashing. If the diesel particulatefilter indicator light starts flashing, havethe vehicle inspected immediately at anexpert repairer, we recommend anAuthorised Mazda Repairer. If thevehicle is not inspected and continuesto be driven, the engine maymalfunction.
NOTE
When the diesel particulate filterindicator light flashes, the engine outputis restricted to protect the dieselparticulate filter.
qPower Steering MalfunctionIndicator Light (Diesel engine)
This indicator light illuminates when theignition switch is turned to the ONposition, and turns off when the engine isstarted.The light illuminates continuously if anyone of the following occurs:
l A malfunction occurs in the powersteering while driving.
l The outside temperature is extremelylow (The light turns off when thepower steering fluid reaches theappropriate temperature).
If the light remains illuminated after theengine is started, or illuminates whiledriving, turn off the engine after parkingin a safe place, and then start the engineagain.If the light does not illuminate afterrestarting the engine, this indicates thatthe power steering is restored and normalsteering is possible.When the outside temperature isextremely low, the power steeringmalfunction indicator light may remainilluminated until the power steeringbegins to operate normally.If the malfunction indicator light does notturn off after about 2 minutes or morehave passed since the engine was started,have the vehicle inspected at anAuthorised Mazda Repairer.
Driving Your Mazda
Warning/Indicator Lights and Beep Sounds
5-71
CX-7_8AP5-EE-09F_Edition1 Page255Monday, June 15 2009 3:26 PM
Form No.8AP5-EE-09F

Black plate (256,1)
NOTE
l The power steering system isinoperable when the power steeringmalfunction indicator lightilluminates. Steering is possible, butrequires more physical effort.
l Repeatedly jerking the steeringwheel left and right while the vehicleis stopped or moving extremelyslowly will cause the power steeringsystem to go into protective modewhich will make the steering feelheavy, but this does not indicate amalfunction. If this occurs, park thevehicle safely and wait a fewminutes for the system to return tonormal.
qHeadlight Auto-LevellingMalfunction Indicator Lightí
This indicator light stays on far a fewseconds when the ignition switch is turnedto the ON position.Thereafter, the indicator light willilluminate when the headlight auto-levelling system has a malfunction.
If the indicator light illuminates, contactan expert repairer, we recommend anAuthorised Mazda Repairer.
qDirection Indicator/HazardWarning Indicator Lights
When operating the direction indicatorlights, the left or right direction indicatorlight flashes to indicate which directionindicator light is operating (page 5-79).
When operating the hazard warninglights, both direction indicator lights flash(page 5-89).
NOTE
If an indicator light remains illuminated(does not flash) or if it flashesabnormally, one of the directionindicator bulbs may be burned out.
5-72
Driving Your Mazda
íSome models.
Warning/Indicator Lights and Beep Sounds
CX-7_8AP5-EE-09F_Edition1 Page256Monday, June 15 2009 3:26 PM
Form No.8AP5-EE-09F
Black plate (257,1)
Beep Sounds
qAir Bag/Front Seat BeltPretensioner System Warning Beep
If a malfunction is detected in the air bag/front seat belt pretensioner systems andthe warning light, a warning beep soundwill be heard for about 5 seconds everyminute.
The air bag and seat belt pretensionersystem warning beep sound will continueto be heard for approximately 35 minutes.Have your vehicle inspected at an expertrepairer, we recommend an AuthorisedMazda Repairer as soon as possible.
WARNINGDo not drive the vehicle with the airbag/front seat belt pretensioner systemwarning beep sounding:Driving the vehicle with the air bag/front seat belt pretensioner systemwarning beep sounding is dangerous.In a collision, the air bags and thefront seat belt pretensioner system willnot deploy and this could result indeath or serious injury.Contact an expert repairer, werecommend an Authorised MazdaRepairer to have the vehicle inspectedas soon as possible.
qSeat Belt Warning Beep(European model)
If the driver or the front passenger's seatbelt is not fastened and the vehicle isdriven at a speed faster than about 20km/h (12 mph), a beep sound will beheard for a specified period of time.Refer to Seat Belt Warning Light/Beep onpage 5-61.
qIgnition Key Reminder (ExceptEuropean model)
If the ignition switch is in the LOCK orACC position with the key inserted, acontinuous beep sound will be heardwhen the driver's door is opened.
qLights-On Reminder
(Except European model)If lights are on and the key is removedfrom the ignition switch, a continuousbeep sound will be heard when thedriver's door is opened.
NOTE
When the advanced keyless function isused and the start knob is in the ACCposition, the Start Knob Not in LockWarning Beep (page 3-21) overrides thelights-on reminder.
(European model)If lights are on and the ignition switch isin the ACC or LOCK position, or the keyis removed from the ignition switch, acontinuous beep sound will be heardwhen the driver's door is opened.
Driving Your Mazda
Warning/Indicator Lights and Beep Sounds
5-73
CX-7_8AP5-EE-09F_Edition1 Page257Monday, June 15 2009 3:26 PM
Form No.8AP5-EE-09F

Black plate (258,1)
NOTE
When the advanced keyless function isused and the start knob is in the ACCposition, the Start Knob Not in LockWarning Beep (page 3-21) overrides thelights-on reminder.
qParking Brake Reminder(Automatic Transaxle)
If the parking brake has not beencompletely released and the vehicle isdriven at about 5 km/h (3 mph) or faster, acontinuous beep sound will be heard tonotify the driver that the parking brakehas not been released.
qSCRWarning Beep (Diesel engine)
If the remaining distance-to-emptyindication for the urea supply is displayedin the AdBlue® gauge, the beep soundsfor a few seconds after the engine isstarted.
q120 km/h Warning Beepí
If the vehicle speed exceeds 120 km/h, achime sounds for 5 seconds.
qTyre Inflation Pressure WarningBeepí
The warning beep sound will be heard forabout 3 seconds when there is anyabnormality in tyre inflation pressures(page 5-31).
qAdvanced Keyless Warningí
Warning indicators for the advanced key,such as “the advanced key removed fromvehicle warning”, use a beep sound andwarning/indicator lights in the instrumentcluster.Refer to Warning and Beep Sounds onpage 3-21.
qRear Vehicle Monitoring SystemWarning Chimeí
Awarning chime sounds when thedirection indicator lever is operated toeither side where the vehicle may hit anapproaching vehicle in the adjacent lane.
5-74
Driving Your Mazda
íSome models.
Warning/Indicator Lights and Beep Sounds
CX-7_8AP5-EE-09F_Edition1 Page258Monday, June 15 2009 3:26 PM
Form No.8AP5-EE-09F

Black plate (259,1)
Lighting Control
qHeadlights
Type A (Without AUTO position)
Turn the headlight switch to turn theheadlights, other exterior lights andinstrument panel illumination on or off.
Switch Position
Headlights Off Off On
Tail lightsParking lightsNumber plate lightsSide-marker lightsInstrument panelillumination
Off On On
NOTE
To prevent discharging the battery, donot leave the lights on while the engineis off unless safety requires them.
Type B (With AUTO position)
Turn the headlight switch to turn theheadlights, other exterior lights andinstrument panel illumination on or off.
Switch Position
Headlights Off Off On
Auto
Tail lightsParking lightsNumber platelightsSide-markerlightsInstrument panelillumination
Off On On
NOTE
To prevent discharging the battery, donot leave the lights on while the engineis off unless safety requires them.
AUTO (Auto-light control)When the headlight switch is in theAUTO position and the ignition switch isin the ON position, the light sensor sensesthe surrounding lightness or darkness andautomatically turns on or off theheadlights, other exterior lights andinstrument panel illumination (see chartabove).
Driving Your Mazda
Switches and Controls
5-75
CX-7_8AP5-EE-09F_Edition1 Page259Monday, June 15 2009 3:26 PM
Form No.8AP5-EE-09F

Black plate (260,1)
CAUTIONl Do not shade the light sensor byadhering a sticker or a label on thewindscreen. Otherwise the lightsensor will not operate correctly.
Light sensor
l The light sensor also works as a rainsensor for the auto-wiper control.Keep hands and scrapers clear of thewindscreen when the wiper lever isin the AUTO position and theignition switch is in the ON positionas fingers could be pinched or thewipers and wiper blades damagedwhen the wipers activateautomatically. If you are going toclean the windscreen, be sure thewipers are turned off completely -this is particularly important whenclearing ice and snow - when it isparticularly tempting to leave theengine running.
NOTE
l The headlights, other exterior lightsand instrument panel illuminationmay not turn off immediately even ifthe surrounding area becomes well-lit because the light sensordetermines that it is nighttime if thesurrounding area is continuouslydark for several minutes such asinside long tunnels, traffic jamsinside tunnels, or in indoor parkinglots.In this case, the light turns off if thelight switch is turned to the OFFposition.
l When the headlight switch is in theAUTO position and the ignitionswitch is turned to the ACC orLOCK position, the headlights, otherexterior lights and instrument panelillumination will turn off.
l The timing for turning on theheadlights, other exterior lights andinstrument panel illumination can bedelayed by adjusting the sensitivityof the light sensor. Consult anAuthorised Mazda Repairerregarding sensor adjustment.
l The sensitivity of the AUTO lightsmay be changed by an AuthorisedMazda Repairer.
Xenon fusion headlight bulbsí
The low-beam bulbs of the headlightshave xenon fusion bulbs that produce abright white beam over a wide area.
5-76
Driving Your Mazda
íSome models.
Switches and Controls
CX-7_8AP5-EE-09F_Edition1 Page260Monday, June 15 2009 3:26 PM
Form No.8AP5-EE-09F

Black plate (261,1)
WARNINGDo not replace the xenon fusion bulbsyourself:Replacing the xenon fusion bulbsyourself is dangerous. Because thexenon fusion bulbs require highvoltage, you could receive an electricshock if the bulbs are handledincorrectly. Consult an expert repairer,we recommend an Authorised MazdaRepairer when the replacement isnecessary.
NOTE
If the headlights flicker, or thebrightness weakens, the bulb-life maybe depleted and a replacement isnecessary. Consult an expert repairer,we recommend an Authorised MazdaRepairer.
qLights-On Reminder
(Except European model)If lights are on and the key is removedfrom the ignition switch, a continuousbeep sound will be heard when thedriver's door is opened.
NOTE
When the advanced keyless function isused and the start knob is in the ACCposition, the Start Knob Not in LockWarning Beep (page 3-21) overrides thelights-on reminder.
(European model)If lights are on and the ignition switch isin the ACC or LOCK position, or the keyis removed from the ignition switch, acontinuous beep sound will be heardwhen the driver's door is opened.
NOTE
When the advanced keyless function isused and the start knob is in the ACCposition, the Start Knob Not in LockWarning Beep (page 3-21) overrides thelights-on reminder.
qHeadlight Main-Low Beam
Push the lever forward for main beam.Pull back to original position for lowbeam.
Main beam
Low beam
Driving Your Mazda
Switches and Controls
5-77
CX-7_8AP5-EE-09F_Edition1 Page261Monday, June 15 2009 3:26 PM
Form No.8AP5-EE-09F

Black plate (262,1)
qFlashing the Headlights
To flash the headlights, pull the lever fullytoward you. The headlight switch doesnot need to be on, and the lever will returnto the normal position when released.
OFF
Flashing
qHeadlight Levelling
The number of passengers and weight ofcargo in the luggage compartment changethe angle of the headlights.
Auto type
The angle of the headlights will beautomatically adjusted when turning onthe headlights.
Headlight auto-levelling malfunctionindicator light
This indicator light stays on far a fewseconds when the ignition switch is turnedto the ON position.Thereafter, the indicator light willilluminate when the headlight auto-levelling system has a malfunction.
If the indicator light illuminates, contactan expert repairer, we recommend anAuthorised Mazda Repairer.
Manual type
The headlight levelling switch adjusts thisangle.
Select the proper setting from the following chart.
Front seat Rearseat
LoadSwitchPositionDriver Passenger
× ― ― ― 0
× × ― ― 0
× × × ― 1
× × × × 2
× ― ― × 3
×: Yes―: No
5-78
Driving Your Mazda
Switches and Controls
CX-7_8AP5-EE-09F_Edition1 Page262Monday, June 15 2009 3:26 PM
Form No.8AP5-EE-09F

Black plate (263,1)
qRunning Lightsí
Some countries require moving vehiclesto have their lights on (running lights)during the daytime.
Running lights come on automaticallywhen the ignition switch is in the ONposition.
They turn off when the parking lights areturned on.
Turn and Lane-ChangeSignals
qDirection Indicator
Move the signal lever down (for a leftturn) or up (for a right turn) to the stopposition. The signal will self-cancel afterthe turn is completed.
If the indicator light continues to flashafter a turn, manually return the lever toits original position.
Right turn
Left turn
Right lane change
Left lane change
OFF
Green indicators on the instrument panelshow which signal is working.
Lane-change signals
Move the lever slightly toward thedirection of the change ―until theindicator flashes― and hold it there. Itwill return to the off position whenreleased.
NOTE
If an indicator light stays on withoutflashing or if it flashes abnormally, oneof the direction indicator bulbs may beburned out.
Driving Your Mazda
Switches and Controls
5-79íSome models.
CX-7_8AP5-EE-09F_Edition1 Page263Monday, June 15 2009 3:26 PM
Form No.8AP5-EE-09F

Black plate (264,1)
Front Fog Lightsí
The fog lights help you to see as well asto be seen.
qType A (With Rear Fog Light)
To turn the front fog light on, rotate thefog light switch to the or position(the fog light switch returns to theposition automatically).The front fog light indicator in theinstrument cluster illuminates while thefront fog light is on.
Fog light switch
To turn the front fog light off, rotate thefog light switch to the OFF position orturn the headlight switch to the OFFposition.The front fog light indicator in theinstrument cluster turns off when the frontfog light is turned off.
NOTE
If the headlight switch is in the AUTOposition, the front fog light can beturned on when the exterior lights andinstrument panel illumination are on.
qType B (Without Rear Fog Light)
To turn the front fog lights on, rotate thefog light switch to the position.The headlight switch must be in the or
position to turn on the front fog lights.The front fog light indicator in theinstrument cluster illuminates while thefront fog light is on.
Fog light switch
To turn them off, rotate the fog lightswitch to the OFF position or turn theheadlight switch to the OFF position.The front fog light indicator in theinstrument cluster turns off when the frontfog light is turned off.
5-80
Driving Your Mazda
íSome models.
Switches and Controls
CX-7_8AP5-EE-09F_Edition1 Page264Monday, June 15 2009 3:26 PM
Form No.8AP5-EE-09F

Black plate (265,1)
Rear Fog Lightí
The rear fog light helps your vehicle to beseen.
qType A (With Front Fog Light)
The headlights must be turned on to turnon the rear fog light.
To turn the rear fog light on, rotate the foglight switch to the position (the foglight switch returns to the positionautomatically).The rear fog light indicator in theinstrument cluster illuminates while therear fog light is on.
Fog light switch
To turn the rear fog light off, do any of thefollowing:
l Rotate the fog light switch to theposition again (the fog light switchreturns to the positionautomatically).
l Rotate the fog light switch to the OFFposition.
l Turn the headlight switch to the OFFposition.
The rear fog light indicator in theinstrument cluster turns off when the rearfog light is turned off.
NOTE
l The front fog lights turn on when therear fog light is turned on.
l If the headlight switch is in theAUTO position, the rear fog lightcan be turned on when theheadlights, the exterior lights andinstrument panel illumination are on.
qType B (Without Front Fog Light)
The headlights must be turned on to turnon the rear fog light.
To turn the rear fog light on, rotate the foglight switch to the position (the foglight switch returns to its original positionautomatically).The rear fog light indicator in theinstrument cluster illuminates while therear fog light is on.
Fog light switch
To turn the rear fog light off, do any of thefollowing:
l Rotate the fog light switch to theposition again (the fog light switchreturns to its original positionautomatically).
l Turn the headlight switch to the OFFposition.
Driving Your Mazda
Switches and Controls
5-81íSome models.
CX-7_8AP5-EE-09F_Edition1 Page265Monday, June 15 2009 3:26 PM
Form No.8AP5-EE-09F

Black plate (266,1)
The rear fog light indicator in theinstrument cluster turns off when the rearfog light is turned off.
NOTE
If the headlight switch is in the AUTOposition, the rear fog light can be turnedon when the headlights, the exteriorlights and instrument panel illuminationare on.
qType C (Without Front Fog Light)
To turn the rear fog light on, rotate the foglight switch to the position.The headlight switch must be in theposition to turn on the rear fog light.The rear fog light indicator in theinstrument cluster illuminates while therear fog light is on.
Fog light switch
To turn it off, rotate the fog light switch tothe OFF position or turn the headlightswitch to the OFF position.The rear fog light indicator in theinstrument cluster turns off when the rearfog light is turned off.
NOTE
l The fog light switch cannot berotated to the position when theheadlight switch is in the or OFFposition.
l If the headlight switch is rotated tothe OFF position when the fog lightswitch is in the position, the foglight switch will rotate to the OFFposition automatically.
5-82
Driving Your Mazda
Switches and Controls
CX-7_8AP5-EE-09F_Edition1 Page266Monday, June 15 2009 3:26 PM
Form No.8AP5-EE-09F

Black plate (267,1)
Windscreen Wipers andWasher
The ignition switch must be in the ONposition.
WARNINGUse only windscreen washer fluid orplain water in the reservoir:Using radiator antifreeze as washerfluid is dangerous. If sprayed on thewindscreen, it will dirty thewindscreen, affect your visibility, andcould result in an accident.
Only use windscreen washer fluidmixed with anti-freeze protection infreezing weather conditions:Using windscreen washer fluidwithout anti-freeze protection infreezing weather conditions isdangerous as it could freeze on thewindscreen and block your visionwhich could cause an accident.In addition, make sure the windscreenis sufficiently warmed using thedefroster before spraying the washerfluid.
NOTE
Because heavy ice and snow can jamthe wiper blades, the wiper motor isprotected from motor breakdown,overheating and possible fire by acircuit breaker. This mechanism willautomatically stop operation of theblades, but only for about 5 minutes.If this happens, turn off the wiperswitch and park off the right-of-way,and remove the snow and ice.After 5 minutes, turn on the switch andthe blades should operate normally. Ifthey do not resume functioning, consultan expert repairer, we recommend anAuthorised Mazda Repairer as soon aspossible. Drive to the side of the roadand park off the right-of-way. Wait untilthe weather clears before trying to drivewith the wipers inoperative.
qWindscreen Wipers
Type A (With INT position)
Turn the wipers on by pulling the leverdown.INT ― Intermittent1 ― Low speed2 ― High speed
Driving Your Mazda
Switches and Controls
5-83
CX-7_8AP5-EE-09F_Edition1 Page267Monday, June 15 2009 3:26 PM
Form No.8AP5-EE-09F

Black plate (268,1)
For a single wiping cycle, press the leverup to MIST.MIST ― Mist
Variable-speed intermittent wipersí
Set the lever to INT and choose theinterval timing by rotating the ring.
INT ring
Type B (With AUTO position)
Turn the wipers on by pulling the leverdown.AUTO― Auto control1 ― Low speed2 ― High speed
For a single wiping cycle, press the leverup to MIST.MIST ― Mist
AUTO (Auto-wiper control)When the wiper lever is in the AUTOposition, the rain sensor senses theamount of rainfall on the windscreen andturns the wiper on or off automatically(off―intermittent―low speed―highspeed).
The sensitivity of the rain sensor can beadjusted by turning the switch on thewiper lever.From the centre position (normal), turnthe switch towards (+) for highersensitivity (faster response) or turn theswitch towards (_) for less sensitivity(slower response).
Centre position
Higher sensitivity
Less sensitivitySwitch
5-84
Driving Your Mazda
íSome models.
Switches and Controls
CX-7_8AP5-EE-09F_Edition1 Page268Monday, June 15 2009 3:26 PM
Form No.8AP5-EE-09F

Black plate (269,1)
CAUTIONl Do not shade the rain sensor byadhering a sticker or a label on thewindscreen. Otherwise the rainsensor will not operate correctly.
Rain sensor
CAUTIONl When the wiper lever is in theAUTO position and the ignitionswitch is in the ON position, thewipers may move automatically inthe following cases:
l If the windscreen above the rainsensor is touched.
l If the windscreen above the rainsensor is wiped with a cloth.
l If the windscreen is struck with ahand or other object.
l If the rain sensor is struck with ahand or other object from insidethe vehicle.
Keep hands and scrapers clear of thewindscreen when the wiper lever isin the AUTO position and theignition switch is in the ON positionas fingers could be pinched or thewipers and wiper blades damagedwhen the wipers activateautomatically.If you are going to clean thewindscreen, be sure the wipers areturned off completely - this isparticularly important when clearingice and snow - when it is particularlytempting to leave the enginerunning.
Driving Your Mazda
Switches and Controls
5-85
CX-7_8AP5-EE-09F_Edition1 Page269Monday, June 15 2009 3:26 PM
Form No.8AP5-EE-09F

Black plate (270,1)
NOTE
l Switching the auto-wiper lever fromthe OFF to the AUTO position whiledriving at a vehicle speed of 4 km/h(2 mph) or higher (or after drivingthe vehicle) activates the windscreenwipers once, after which they operateaccording to the rainfall amount.
l The auto-wiper control may notoperate when the rain sensortemperature is about _10 °C (14 °F)or lower, or about 85 °C(185 °F) orhigher.
l If the windscreen is coated withwater repellent, the rain sensor maynot be able to sense the amount ofrainfall correctly and auto-wipercontrol may not operate properly.
l If dirt or foreign matter (e.g. ice ormatter containing salt water) adheresto the windscreen above the rainsensor or if the windscreen is iced, itcould cause the wipers to moveautomatically. However, if the wiperscannot remove this ice, dirt orforeign matter, the auto-wipercontrol will stop operation. In thiscase, pull the wiper lever to the lowspeed or high speed position formanual operation, or remove the ice,dirt or foreign matter by hand torestore the auto-wiper operation.
qWindscreen Washer
Pull the lever toward you and hold it tospray washer fluid.
OFF
Washer
NOTE
With the wiper lever in the OFF or INT(Type A)/AUTO (Type B) position, thewipers will operate continuously untilthe lever is released.
If the washer does not work, inspect thefluid level (page 8-30). If it's normal,consult an expert repairer, we recommendan Authorised Mazda Repairer.
NOTE
(With headlight washers)When the headlights are on, theheadlight washers operate automaticallyonce every fifth time the windscreenwasher operates.Refer to Headlight Washer (page 5-87).
5-86
Driving Your Mazda
Switches and Controls
CX-7_8AP5-EE-09F_Edition1 Page270Monday, June 15 2009 3:26 PM
Form No.8AP5-EE-09F

Black plate (271,1)
Rear Window Wiper andWasher
The ignition switch must be in the ONposition.
qRear Window Wiper
Turn the wiper on by turning the rearwiper/washer switch.ON ― NormalINT ― Intermittent
qRear Window Washer
To spray washer fluid, turn the rear wiper/washer switch to the position. Afterthe switch is released, the washer willstop.If the washer does not work, inspect thefluid level (page 8-30). If it's normal andthe washer still does not work, consult anexpert repairer, we recommend anAuthorised Mazda Repairer.
Headlight Washerí
The engine must be started and theheadlights must be turned on.
The headlight washers operateautomatically once every fifth time thewindscreen washer operates.
If you want to operate headlight washers,double flick the wiper lever.
OFF
Washer
NOTE
If air enters the headlight washer fluidpipe under conditions such as when thevehicle is brand-new or after an emptywasher tank is replenished with washerfluid, washer fluid will not spray evenwhen the wiper lever is operated. If thisoccurs, perform the followingprocedure:
1. Start the engine.
2. Turn on the headlights.
3. Double flick the wiper lever severaltimes until the washer fluid sprays.
Driving Your Mazda
Switches and Controls
5-87íSome models.
CX-7_8AP5-EE-09F_Edition1 Page271Monday, June 15 2009 3:26 PM
Form No.8AP5-EE-09F

Black plate (272,1)
Rear Window DefrosterThe rear window defroster clears frost,fog, and thin ice from the rear window.
The ignition switch must be in the ONposition.
Press the switch to turn on the rearwindow defroster. The rear windowdefroster operates for about 15 minutesand turns off automatically.The indicator light illuminates duringoperation.
To turn off the rear window defrosterbefore the 15 minutes has elapsed, pressthe switch again.
Indicator light
CAUTIONDo not use sharp instruments orwindow cleaners with abrasives toclean the inside of the rear windowsurface. They may damage the defrostergrid inside the window.
NOTE
This defroster is not designed formelting snow. If there is anaccumulation of snow on the rearwindow, remove it before using thedefroster.
qMirror Defroster
To turn on the mirror defrosters, turn theignition switch to the ON position andpress the rear window defroster switch(page 5-88).
5-88
Driving Your Mazda
Switches and Controls
CX-7_8AP5-EE-09F_Edition1 Page272Monday, June 15 2009 3:26 PM
Form No.8AP5-EE-09F

Black plate (273,1)
HornTo sound the horn, press the mark onthe steering wheel.
Hazard Warning FlasherThe hazard warning lights should alwaysbe used when you stop on or near aroadway in an emergency.
The hazard warning lights warn otherdrivers that your vehicle is a traffic hazardand that they must take extreme cautionwhen near it.
Depress the hazard warning flasher and allthe direction indicators will flash.
NOTE
l The direction indicators do notoperate when the hazard warninglights are on.
l Check local regulations about the useof hazard warning lights while thevehicle is being towed to verify thatit is not in violation of the law.
l While the emergency stop signalsystem is operating, all the directionindicators automatically flash rapidlyto caution the driver of a vehiclefollowing behind your vehicle of asudden braking situation. Refer toEmergency Stop Signal System onpage 5-11.
Driving Your Mazda
Switches and Controls
5-89
CX-7_8AP5-EE-09F_Edition1 Page273Monday, June 15 2009 3:26 PM
Form No.8AP5-EE-09F

Black plate (274,1)
5-90
CX-7_8AP5-EE-09F_Edition1 Page274Monday, June 15 2009 3:26 PM
Form No.8AP5-EE-09F

Black plate (275,1)
6 Interior Comfort
Use of various features for drive comfort, including air-conditioning and audiosystem.
Air-Conditioning System .............................................................. 6-2Operating Tips ........................................................................... 6-2Vent Operation .......................................................................... 6-3Types of the Air-Conditioning System ...................................... 6-6Manual Type ............................................................................. 6-7Fully Automatic Type ............................................................. 6-12Auxiliary Heaterí ................................................................... 6-17
Audio System ............................................................................... 6-18Aerial ...................................................................................... 6-18Operating Tips for Audio System ........................................... 6-18Audio Set ................................................................................ 6-29Audio Control Switch Operation ............................................ 6-52AUX Mode (Auxiliary input) ................................................. 6-56
Bluetooth Audio .......................................................................... 6-59Bluetooth Audioí ................................................................... 6-59
Bluetooth Hands-Free ................................................................. 6-69Bluetooth Hands-Freeí .......................................................... 6-69Basic Bluetooth Hands-Free Operation ................................... 6-74Convenient Use of the Hands-Free System ............................. 6-79Hands-Free Setting .................................................................. 6-86When Bluetooth Hands-Free Cannot be Used ........................ 6-94
Interior Equipment ..................................................................... 6-95Sunvisors ................................................................................. 6-95Interior Lights ......................................................................... 6-96Information Display ................................................................ 6-98Multi Information Display ..................................................... 6-100Cup Holder ............................................................................ 6-119Bottle Holder ......................................................................... 6-120Storage Compartments .......................................................... 6-120Accessory Sockets ................................................................ 6-124
6-1íSome models.
CX-7_8AP5-EE-09F_Edition1 Page275Monday, June 15 2009 3:26 PM
Form No.8AP5-EE-09F

Black plate (276,1)
Operating Tips
qOperating the Air-ConditioningSystem
Operate the air-conditioning system withthe engine running.
NOTE
To prevent the battery from beingdischarged, do not leave the fan controldial on for a long period of time withthe ignition switch in the ON positionwhen the engine is not running.
qClearing the Air Inlet
Clear all obstructions such as leaves,snow and ice from the bonnet and the airinlet in the cowl grille to improve thesystem efficiency.
qFoggy Windows
The windows may fog up easily in humidweather. Use the air-conditioning systemto defog the windows.
To help defog the windows, operate theair conditioner to dehumidify the air.
NOTE
The air conditioner may be used alongwith the heater to dehumidify the air.
qParking in Direct Sunlight
If the vehicle has been parked in directsunlight during hot weather, open thewindows to let warm air escape, then runthe air-conditioning system.
qNot Using for a Long Period
Run the air conditioner about 10 minutesat least once a month to keep internalparts lubricated.
qCheck the Refrigerant before theWeather Gets Hot
Have the air conditioner checked beforethe weather gets hot. Lack of refrigerantmay make the air conditioner lessefficient. Consult an expert repairer, werecommend an Authorised MazdaRepairer for refrigerant inspection.
The air conditioner is filled withHFC134a (R134a), a refrigerant that willnot damage the ozone layer.If the air conditioner is low on refrigerantor has a malfunction, consult an expertrepairer, we recommend an AuthorisedMazda Repairer.
qReplacement of the Cabin Air Filter
If your vehicle is equipped with an airfilter for the air conditioner, it is necessaryto change the filter periodically asindicated in scheduled maintenance (page8-3). Consult an expert repairer, werecommend an Authorised MazdaRepairer for replacement of the cabin airfilter.
6-2
Interior Comfort
Air-Conditioning System
CX-7_8AP5-EE-09F_Edition1 Page276Monday, June 15 2009 3:26 PM
Form No.8AP5-EE-09F

Black plate (277,1)
Vent Operation
qAdjusting the Vents
Directing airflow
Side Vents
To adjust the direction of airflow, open thevents and rotate them left and right.
Centre Vents
To adjust the direction of airflow, movethe adjustment knob.
Dial
Close Open
Some models.
Knob
Interior Comfort
Air-Conditioning System
6-3
CX-7_8AP5-EE-09F_Edition1 Page277Monday, June 15 2009 3:26 PM
Form No.8AP5-EE-09F

Black plate (278,1)
NOTE
When using the air conditioner underhumid ambient temperature conditions,the system may blow fog from thevents. This is not a sign of trouble but aresult of humid air being suddenlycooled.
6-4
Interior Comfort
Air-Conditioning System
CX-7_8AP5-EE-09F_Edition1 Page278Monday, June 15 2009 3:26 PM
Form No.8AP5-EE-09F

Black plate (279,1)
qSelecting the Airflow Mode
Instrument panel and Floor Vents Defroster Vents
Floor Vents
Instrument panel Vents Defroster and Floor Vents
* Europe (Left-hand drive model)
Interior Comfort
Air-Conditioning System
6-5
CX-7_8AP5-EE-09F_Edition1 Page279Monday, June 15 2009 3:26 PM
Form No.8AP5-EE-09F

Black plate (280,1)
Types of the Air-Conditioning SystemManual type and fully automatic type air-conditioning systems are explained separately.Check your vehicle's air-conditioning type and read the appropriate pages.Manual Type ............................................................................................................ page 6-7
Fully Automatic Type ............................................................................................ page 6-12
Illustration is of a representative control panel.
6-6
Interior Comfort
Air-Conditioning System
CX-7_8AP5-EE-09F_Edition1 Page280Monday, June 15 2009 3:26 PM
Form No.8AP5-EE-09F

Black plate (281,1)
Manual Type
Air intake selector A/C switch
Rear window defroster switch
Temperature control dial Fan control dial Mode selector dial
qControl Switches
Temperature control dial
Cold Hot
This dial controls temperature. Turn itclockwise for hot and anticlockwise forcold.
NOTE
When the mode is set to or withthe fan control dial in a position otherthan 0 and the temperature control dialin the maximum cold position, the airintake selector switches to therecirculated air mode and the A/C turnson automatically.If A/C is not desired, press the A/Cswitch to turn it off.
Interior Comfort
Air-Conditioning System
6-7
CX-7_8AP5-EE-09F_Edition1 Page281Monday, June 15 2009 3:26 PM
Form No.8AP5-EE-09F

Black plate (282,1)
Fan control dial
This dial allows variable fan speeds.0―Fan off1―Low speed2―Medium low speed3―Medium high speed4―High speed
Mode selector dial
Turn the mode selector dial to selectairflow mode (page 6-5).
NOTE
l The mode selector dial can be set atthe intermediate positions ( )between each mode. Set the dial toan intermediate position if you wantto slightly adjust the airflow amount.
l For example, when the mode selectordial is at the position between the
and positions, airflow fromthe floor vent is less than that of the
position.
A/C switch
Press the A/C switch to turn the airconditioner on. The indicator light on theswitch will illuminate when the fancontrol dial is set at position 1, 2, 3, or 4.
Press the switch once again to turn the airconditioner off.
NOTE
The air conditioner may not functionwhen the outside temperatureapproaches 0 °C.
Air intake selector
This switch controls the source of airentering the vehicle.
Press the switch to alternatebetween the outside air and recirculatedair modes.
It is recommended that under normalconditions the switch be kept in theoutside air mode.
6-8
Interior Comfort
Air-Conditioning System
CX-7_8AP5-EE-09F_Edition1 Page282Monday, June 15 2009 3:26 PM
Form No.8AP5-EE-09F
Black plate (283,1)
Outside air mode (indicator lightturned off)
Outside air is taken into the vehicle. Usethis mode for normal ventilation andheating.
Recirculated air mode (indicator lightilluminated)
Outside air is shut off. Air within thevehicle is recirculated.
This mode can be used when driving on adusty road or in similar conditions. It alsohelps to provide quicker cooling of theinterior.
WARNINGDo not use the recirculated air modein cold or rainy weather:Using the recirculated air mode incold or rainy weather is dangerous asit will cause the windows to fog up.Your vision will be hampered, whichcould lead to a serious accident.
qHeating
1. Set the mode selector dial to theposition.
2. Set the temperature control dial to thehot position.
3. Set the fan control dial to the desiredspeed.
NOTE
l If the windscreen fogs up easily, setthe mode selector dial to theposition.
l If cooler air is desired at face level,set the mode selector dial at theposition and adjust the temperaturecontrol dial to maintain maximumcomfort.
l The air to the floor is warmer thanair to the face (except when thetemperature control dial is set at theextreme hot or cold position).
l In the or position, the airconditioner is automatically turnedon (however, the indicator light doesnot illuminate) and the outside airmode is automatically selected todefrost the windscreen.In the or position, the outsideair mode cannot be changed to therecirculated air mode.
qCooling (With Air Conditioner)
1. Set the mode selector dial to theposition.
2. Set the temperature control dial to thecold position.
3. Set the fan control dial to the desiredspeed.
4. Turn on the air conditioner by pressingthe A/C switch.
5. Adjust the fan control dial andtemperature control dial to maintainmaximum comfort.
Interior Comfort
Air-Conditioning System
6-9
CX-7_8AP5-EE-09F_Edition1 Page283Monday, June 15 2009 3:26 PM
Form No.8AP5-EE-09F

Black plate (284,1)
CAUTIONWhen using the air conditioner whiledriving up long hills or in heavy traffic,closely monitor the temperature gauge(page 5-51).The air conditioner may cause engineoverheating. If the gauge indicatesoverheating, turn the air conditioner off(page 7-11).
NOTE
l When maximum cooling is desired,set the temperature control dial to theextreme cold position and set the airintake selector to the recirculated airmode, then set the fan control dial toposition 4.
l If warmer air is desired at floor level,set the mode selector dial at theposition and adjust the temperaturecontrol dial to maintain maximumcomfort.
l The air to the floor is warmer thanair to the face (except when thetemperature control dial is set at theextreme hot or cold position).
qVentilation
1. Set the mode selector dial to theposition.
2. Set the air intake selector to the outsideair mode.
3. Set the temperature control dial to thedesired position.
4. Set the fan control dial to the desiredspeed.
qWindscreen Defrosting andDefogging
1. Set the mode selector dial to theposition.
2. Set the temperature control dial to thedesired position.
3. Set the fan control dial to the desiredspeed.
WARNING
Do not defog the windscreen using theposition with the temperature
control set to the cold position:Using the position with thetemperature control set to the coldposition is dangerous as it will causethe outside of the windscreen to fogup. Your vision will be hampered,which could lead to a serious accident.Set the temperature control to the hotor warm position when using theposition.
6-10
Interior Comfort
Air-Conditioning System
CX-7_8AP5-EE-09F_Edition1 Page284Monday, June 15 2009 3:26 PM
Form No.8AP5-EE-09F
Black plate (285,1)
NOTE
l For maximum defrosting, set thetemperature control dial to theextreme hot position and the fancontrol dial to position 4.
l If warm air is desired at the floor, setthe mode selector dial to theposition.
l In the , or position, the airconditioner is automatically turnedon (however, the indicator light doesnot illuminate) and the outside airmode is automatically selected todefrost the windscreen.In the or position, the outsideair mode cannot be changed to therecirculated air mode.
qDehumidifying (With AirConditioner)
Operate the air conditioner in cool or coldweather to help defog the windscreen andside windows.
1. Set the mode selector dial to thedesired position.
2. Set the air intake selector to the outsideair mode.
3. Set the temperature control dial to thedesired position.
4. Set the fan control dial to the desiredspeed.
5. Turn on the air conditioner by pressingthe A/C switch.
NOTE
One of the functions of the airconditioner is dehumidifying the airand, to use this function, thetemperature does not have to be set tocold. Therefore, set the temperaturecontrol dial to the desired position (hotor cold) and turn on the air conditionerwhen you want to dehumidify the cabinair.
Interior Comfort
Air-Conditioning System
6-11
CX-7_8AP5-EE-09F_Edition1 Page285Monday, June 15 2009 3:26 PM
Form No.8AP5-EE-09F

Black plate (286,1)
Fully Automatic TypeAir-conditioning information is displayed on the information display.
Mode selector switch
Windscreen defroster switchTemperature control dial
Rear window defroster switch
A/C switch
OFF switchAuto switch
Air intake selector
Fan control dial
qControl Switches
AUTO switch
By pressing the AUTO switch thefollowing functions will be automaticallycontrolled in accordance with the selectedset temperature:
l Airflow temperature
l Amount of airflow
l Selection of airflow mode
l Outside/Recirculated air selection
l Air conditioner operation
l A/C or A/C ECO selection
6-12
Interior Comfort
Air-Conditioning System
CX-7_8AP5-EE-09F_Edition1 Page286Monday, June 15 2009 3:26 PM
Form No.8AP5-EE-09F

Black plate (287,1)
NOTE
AUTO switch indicator light
l When on, it indicates AUTOoperation, and the system willfunction automatically.
l If any of the following dials orswitches are operated while inAUTO control, the AUTO switchindicator turns off.
l Mode selector switchl Fan control diall Windscreen defroster switch
The functions for dials and switchesother than those operated in theabove continue to operate in AUTOcontrol.
OFF switch
Pressing the OFF switch shuts off the air-conditioning system.
Temperature control dial
Cold Hot
This dial controls temperature.Turn itclockwise for hot and anticlockwise forcold.
Fan control dial
Slow Fast
The fan has seven speeds. The selectedspeed will be displayed.
Mode selector switch
The desired airflow mode can be selected(page 6-5).
NOTE
l With the airflow mode set toposition and the temperature controldial set at a medium temperature,heated air is directed to the feet and acomparably lower air temperaturewill flow through the central, left andright vents.
l To set the air vent to , press thewindscreen defroster switch.
Interior Comfort
Air-Conditioning System
6-13
CX-7_8AP5-EE-09F_Edition1 Page287Monday, June 15 2009 3:26 PM
Form No.8AP5-EE-09F

Black plate (288,1)
A/C switch
Pressing the A/C switch while the AUTOswitch is turned on will turn off the airconditioning (cooling/dehumidifyingfunctions). The air conditioning can beturned on and off by pressing the A/Cswitch while the fan control dial is on.
NOTE
l The air conditioning operates whenthe A/C switch is pressed even if thefan control dial is off.
l Selection of A/C and A/C ECO isdone automatically. The A/C ECOfunction is designed to economizeuse of the air conditioning system.“A/C ECO” is displayed to indicatethat the air conditioning system isoperating at optimum control.
l The air conditioner may not functionwhen the outside temperatureapproaches 0 °C. (Indicator remainson even when system is off.)
Air intake selector
Outside or recirculated air positions canbe selected. Press the switch to selectoutside/recirculated air positions.
Recirculated air position (indicatorlight illuminated)
Use this position when going throughtunnels, driving in congested traffic (highengine exhaust areas) or when quickcooling is desired.
Outside air position (indicator lightturned off)
Use this position for normal conditionsand defogging.
WARNING
Do not use the position in coldor rainy weather:Using the position in cold orrainy weather is dangerous as it willcause the windows to fog up. Yourvision will be hampered, which couldlead to a serious accident.
Windscreen defroster switch
Press the switch to defrost the windscreenand front door windows.
6-14
Interior Comfort
Air-Conditioning System
CX-7_8AP5-EE-09F_Edition1 Page288Monday, June 15 2009 3:26 PM
Form No.8AP5-EE-09F

Black plate (289,1)
qOperation of Automatic AirConditioning
1. Press the AUTO switch. Selection ofthe airflow mode, air intake selectorand amount of airflow will beautomatically controlled.
2. Use the temperature control dial toselect a desired temperature.
Cold Hot
To turn off the system, press the OFFswitch.
NOTE
l Setting the temperature to maximumhigh or low will not provide thedesired temperature at a faster rate.
l When selecting heat, the system willrestrict airflow until it has warmed toprevent cold air from blowing out ofthe vents.
NOTE
(European model)For an optimal cabin temperature, setthe temperature close to “22.0”. Adjustto the desired temperature if necessary.
NOTE
(Except European model)For an optimal cabin temperature, setthe temperature close to “25.0”. Adjustto the desired temperature if necessary.
qWindscreen Defrosting andDefogging
Press the windscreen defroster switch.In this position, the outside air position isautomatically selected, and the airconditioner automatically turns on. Theair conditioner will directly dehumidifythe air to the front windscreen and sidewindows (page 6-5). Airflow amount willbe increased.
Interior Comfort
Air-Conditioning System
6-15
CX-7_8AP5-EE-09F_Edition1 Page289Monday, June 15 2009 3:26 PM
Form No.8AP5-EE-09F

Black plate (290,1)
WARNING
Set the temperature control to the hotor warm position when defogging (position):Using the position with thetemperature control set to the coldposition is dangerous as it will causethe outside of the windscreen to fogup. Your vision will be hampered,which could lead to a serious accident.
NOTE
Use the temperature control dial toincrease the air flow temperature anddefog the windscreen more quickly.
qSunlight/Temperature Sensor
The fully automatic air conditionerfunction measures inside and outsidetemperatures, and sunlight. It then setstemperatures inside the passengercompartment accordingly.
CAUTIONDo not obstruct either sensor, otherwisethe automatic air conditioner will notoperate properly.
Sunlight sensor
Interior temperature sensor
6-16
Interior Comfort
Air-Conditioning System
CX-7_8AP5-EE-09F_Edition1 Page290Monday, June 15 2009 3:26 PM
Form No.8AP5-EE-09F

Black plate (291,1)
Auxiliary Heaterí
An auxiliary heater is equipped to rapidlyheat the vehicle cabin after a cold enginestart.The auxiliary heater operatesautomatically when the ambient andengine coolant temperatures are low afterthe engine is started. The auxiliary heaterstops operation when the ambient andengine coolant temperatures are higher orthe engine is stopped. Shortly after theauxiliary heater stops, it purges any non-combusted fuel vapour via the heaterexhaust pipe over a period ofapproximately three minutes.
NOTE
l While non-combusted fuel vapour isbeing purged, fan operation andexhaust noise can be heard. Thisdoes not indicate an abnormality.
l If the battery leads are disconnectedwithin three minutes of the enginebeing stopped, white smoke maydischarge from under the vehicle andunder the engine compartment. Thisoccurs as a result of the auxiliaryheater being unable to purge (fandoes not operate) the non-combustedfuel vapour. This does not indicatean abnormality. White smoke mayalso discharge when the auxiliaryheater operates for the first time orafter it has been replaced.
Interior Comfort
Air-Conditioning System
6-17íSome models.
CX-7_8AP5-EE-09F_Edition1 Page291Monday, June 15 2009 3:26 PM
Form No.8AP5-EE-09F

Black plate (292,1)
Aerial
qDetachable Type
To remove the aerial, turn itanticlockwise.To install the aerial, turn it clockwise.Make sure the aerial is securely installed.
Install
Remove
CAUTIONl To prevent damage to the aerial,remove it before entering a car washfacility or passing beneath a lowoverhead clearance.
l Be careful around the aerial whenremoving snow from the roof.Otherwise the aerial could bedamaged.
NOTE
When leaving your vehicle unattended,we recommend that you remove theaerial and store it inside the vehicle.
Operating Tips for AudioSystem
WARNINGDo not adjust the audio controlswitches while driving the vehicle:Adjusting the audio while driving thevehicle is dangerous as it coulddistract your attention from the vehicleoperation which could lead to aserious accident. Always adjust theaudio while the vehicle is stopped.Even if the audio control switches areequipped on the steering wheel, learnto use the switches without lookingdown at them so that you can keepyour maximum attention on the roadwhile driving the vehicle.
CAUTIONFor the purposes of safe driving, adjustthe audio volume to a level that allowsyou to hear sounds outside of thevehicle including car horns andparticularly emergency vehicle sirens.
NOTE
l To prevent the battery from beingdischarged, do not leave the audiosystem on for a long period of timewhen the engine is not running.
l If a cellular phone or CB radio isused in or near the vehicle, it couldcause noise to occur from the audiosystem, however, this does notindicate that the system has beendamaged.
6-18
Interior Comfort
Audio System
CX-7_8AP5-EE-09F_Edition1 Page292Monday, June 15 2009 3:26 PM
Form No.8AP5-EE-09F

Black plate (293,1)
qRadio Reception
AM characteristics
AM signals bend around such things asbuildings or mountains and bounce off theionosphere. Therefore, they can reachlonger distances than FM signals. Becauseof this, two stations may sometimes bepicked up on the same frequency at thesame time.
Station 2Station 1
Ionosphere
FM characteristics
An FM broadcast range is usually about40―50 km (25―30 miles) from thesource. Because of extra coding needed tobreak the sound into two channels, stereoFM has even less range than monaural(non-stereo) FM.
FM Station
40—50km (25—30 miles)
Signals from an FM transmitter are similarto beams of light because they do notbend around corners, but they do reflect.Unlike AM signals, FM signals cannottravel beyond the horizon. Therefore, FMstations cannot be received at the greatdistances possible with AM reception.
AM waveFM wave
FM wave
100—200 km (60—120 miles)
Ionosphere
Atmospheric conditions can also affectFM reception. High humidity will causepoor reception. However, cloudy daysmay provide better reception than cleardays.
Multipath noise
Since FM signals can be reflected byobstructions, it is possible to receive boththe direct signal and the reflected signal atthe same time. This causes a slight delayin reception and may be heard as a brokensound or a distortion. This problem mayalso be encountered when in closeproximity to the transmitter.
Reflected waveDirect
Interior Comfort
Audio System
6-19
CX-7_8AP5-EE-09F_Edition1 Page293Monday, June 15 2009 3:26 PM
Form No.8AP5-EE-09F

Black plate (294,1)
Flutter/Skip noise
Signals from an FM transmitter move instraight lines and become weak in valleysbetween tall buildings, mountains, andother obstacles. When a vehicle passesthrough such an area, the receptionconditions may change suddenly, resultingin annoying noise.
Weak signal noise
In suburban areas, broadcast signalsbecome weak because of distance fromthe transmitter. Reception in such fringeareas is characterised by sound breakup.
Strong signal noise
This occurs very close to a transmittertower. The broadcast signals areextremely strong, so the result is noise andsound breakup at the radio receiver.
Station drift noise
When a vehicle reaches the area of twostrong stations broadcasting at similarfrequencies, the original station may betemporarily lost and the second stationpicked up. At this time there will be somenoise from this disturbance.
Station 2 88.3 MHz
Station 1 88.1 MHz
6-20
Interior Comfort
Audio System
CX-7_8AP5-EE-09F_Edition1 Page294Monday, June 15 2009 3:26 PM
Form No.8AP5-EE-09F

Black plate (295,1)
qOperating Tips for CD Player/In-Dash CD Changer
Condensation phenomenon
Immediately after turning on the heaterwhen the vehicle is cold, the CD oroptical components (prism and lens) in theCD player/In-dash CD changer maybecome clouded with condensation. Atthis time, the CD will eject immediatelywhen placed in the unit. A clouded CDcan be corrected simply by wiping it witha soft cloth. Clouded optical componentswill clear naturally in about an hour. Waitfor normal operation to return beforeattempting to use the unit.
Handling the CD player/In-dash CDchanger
The following precautions should beobserved.
l Do not spill any liquid on the audiosystem.
l Do not insert any objects, other thanCDs, into the slot.
l The CD revolves at high speed withinthe unit. Defective (cracked or badlybent) CDs should never be used.
l Do not use non-conventional discssuch as heart-shaped, octagonal discs,etc. The disc may not eject resulting ina malfunction.
l If the memory portion of the CD istransparent or translucent, do not usethe disc.
Transparent
Interior Comfort
Audio System
6-21
CX-7_8AP5-EE-09F_Edition1 Page295Monday, June 15 2009 3:26 PM
Form No.8AP5-EE-09F

Black plate (296,1)
l A new CD may have rough edges onits inner and outer perimeters. If a discwith rough edges is used, propersetting will not be possible and the CDplayer/In-dash CD changer will notplay the CD. In addition, the disc maynot eject resulting in a malfunction.Remove the rough edges in advance byusing a ball-point pen or pencil asshown below. To remove the roughedges, rub the side of the pen or pencilagainst the inner and outer perimeter ofthe CD.
l When driving over uneven surfaces,the sound may jump.
l The CD player/In-dash CD changer hasbeen designed to play CDs bearing theidentification logo as shown. No otherdiscs can be played.
l Use discs that have been legitimatelyproduced. If illegally-copied discs suchas pirated discs are used, the systemmay not operate properly.
l Be sure never to touch the signalsurface when handling the CDs. Pickup a CD by grasping the outer edge orthe edge of the hole and the outer edge.
l Do not stick paper or tape on the CD.Avoid scratching the reverse side (theside without a label). The disc may noteject resulting in a malfunction.
l Dust, finger smudges, and dirt candecrease the amount of light reflectedfrom the signal surface, thus affectingsound quality. If the CD shouldbecome soiled, gently wipe it with asoft cloth from the centre of the CD tothe edge.
6-22
Interior Comfort
Audio System
CX-7_8AP5-EE-09F_Edition1 Page296Monday, June 15 2009 3:26 PM
Form No.8AP5-EE-09F

Black plate (297,1)
l Do not use record sprays, antistaticagents, or household spray cleaners.Volatile chemicals such as benzine andthinner can also damage the surface ofthe CD and must not be used. Anythingthat can damage, warp, or fog plasticshould never be used to clean CDs.
l Insert discs one by one. If two discs areinserted at the same time, the systemmay not operate properly.
l The CD player/In-dash CD changerejects the CD if the CD is insertedupside down. Also dirty and/ordefective CDs may be ejected.
l Do not insert cleaning discs in the CDplayer/In-dash CD changer.
l Do not insert any disc with a peel-offseal affixed to it.
l This unit may not be able to playcertain CD-R/CD-RWs made using acomputer or music CD recorder due todisc characteristics, scratches,smudges, dirt, etc., or due to dust orcondensation on the lens inside theunit.
l Storing CDs in the vehicle exposed todirect sunlight or high temperature maydamage the CD-R/CD-RWs, and makethem unplayable.
l CD-R/CD-RWexceeding 700 MBcannot be played.
l This unit may not be able to playcertain discs made using a computerdue to the application (writingsoftware) setting used. (For details,consult the store where the applicationwas purchased.)
l It is possible that certain text data, suchas titles, recorded on a CD-R/CD-RWmay not be displayed when musicaldata (CD-DA) is playing.
l The period from when a CD-RW isinserted to when it begins playing islonger than a normal CD or CD-R.
l Completely read the instruction manualand cautions for CD-R/CD-RWs.
l Do not use discs with cellophane tapeadhering, partially peeled off labels, oradhesive material exuding from theedges of the CD label. Also, do not usediscs with a commercially-availableCD-R label affixed. The disc may noteject resulting in a malfunction.
qOperating tips for MP3
NOTE
Supply of this product only conveys alicense for private, non-commercial useand does not convey a license nor implyany right to use this product in anycommercial (i.e. revenue-generating)real time broadcasting (terrestrial,satellite, lead and/or any other media),broadcasting/streaming via the Internet,intranets and/or other networks or inother electronic content distributionsystems, such as pay-audio or audio-on-demand applications. An independentlicense for such use is required. Fordetails, please visithttp://www.mp3licensing.com.
Interior Comfort
Audio System
6-23
CX-7_8AP5-EE-09F_Edition1 Page297Monday, June 15 2009 3:26 PM
Form No.8AP5-EE-09F

Black plate (298,1)
l This audio system handles MP3 filesthat have been recorded on CD-R/CD-RW/CD-ROMs. Discs that have beenrecorded using the following formatscan be played:
l ISO 9660 level 1l ISO 9660 level 2l Joliet extended formatl Romeo extended format
l This unit handles MP3 filesconforming to the MP3 formatcontaining both header frames and dataframes.
l This unit can play multi-sessionrecorded discs that have up to 40sessions.
l This unit can play MP3s with samplingfrequencies of 16/22.05/24/32/44.1/48kHz.
l This unit can play MP3 files that havebeen recorded in bit rates of 8 kbps to320 kbps. Nonetheless, to insureenjoyment of music with consistentsound quality, it is recommended to usediscs that have been recorded at a bitrate of 128 kbps or more.
l If a disc has both music data (CD-DA)and MP3 files, playback of the two filetypes differs depending on how thedisc was recorded.
l Packet written discs cannot be playedon this unit.
l This unit does not play CDs recordedusing MP3i (MP3 interactive), MP3PRO and RIFF MP3 formats.
About folders and files
l The order of hierarchy for MP3 filesand folders during playback or otherfunctions is from shallow to deep. Thearrangement and playing order of arecorded disc containing MP3 files isas follows:
l File numberA numerical file number is assignedto each file in a folder in the order ofhierarchy from shallow to deep.
l Folder numberA numerical folder number isassigned to each folder in the orderof hierarchy from shallow to deep.
NOTE
Folders and tracks (files) within thesame hierarchy play in the order theywere written to the disc depending onthe write software.
6-24
Interior Comfort
Audio System
CX-7_8AP5-EE-09F_Edition1 Page298Monday, June 15 2009 3:26 PM
Form No.8AP5-EE-09F

Black plate (299,1)
01
03
0204
05
06
1
4
2
3
5
Playback may not occur in the above hierarchy depending on the audio unit.
: Track (File): FolderFolder No.
Level1Level2
Level3Level4
l The folder order is automaticallyassigned and this order cannot beoptionally set.
l Any folder without an MP3 file will beignored. (It will be skipped and thefolder number will not be displayed.)
l MP3 files not conforming to the MP3format containing both header framesand data frames will be skipped andnot played.
l This unit will play MP3 files that haveup to eight levels. However, the morelevels a disc has, the longer it will taketo initially start playing. It isrecommended to record discs with twolevels or less.
l A single disc with up to 512 files canbe played and a single folder with up to255 files can be played.
l When naming an MP3 file, be sure toadd an MP3 file extension (.mp3) afterthe file name.
l The maximum number of charactersthat can be used for file names is asfollows. However, this unit will onlydisplay up to 32 characters, includingthe file extension (.mp3).
Maximum number ofcharacters in a file name(including a separator “.”and the three letters of the
file extension)
ISO9660 level 1 12*
ISO9660 level 2 31*
Joliet extendedformat
64
Romeo extendedformat
128
* English one-byte characters (capitalized only) andunderbar “_” are available.
CAUTIONThis unit can only play MP3 files thathave an MP3 file extension (.mp3)attached. Do not attach an MP3 fileextension to any other type file as itcould cause noise to be emitted or amalfunction in the unit.
About ID3 Tag display
l This unit can only display ID3 Tagalbum, track and artist names that havebeen input using Ver.1.0/1.1/2.2/2.3formats. Any other data that may havebeen input cannot be displayed.
Interior Comfort
Audio System
6-25
CX-7_8AP5-EE-09F_Edition1 Page299Monday, June 15 2009 3:26 PM
Form No.8AP5-EE-09F

Black plate (300,1)
l This unit can only display English(including numerals) one-bytecharacters. Use only English (includingnumerals) one-byte characters wheninputting ID3 tags. Two-byte charactersand some special symbols cannot bedisplayed.
Specialized glossary
MP3
Abbreviation for “MPEG Audio Layer 3”.A technical standard for audiocompression as decided by an ISO(International Organization forStandardization) MPEG working group.Use of MP3 allows for audio data to becompressed to approximately a tenth ofthe source data size.
ISO 9660
An international standard for logicalformatting of CD-ROM files and folders.It is divided into three separate levelsbased on differences in file namingprocedures, data configuration and othercharacteristics.
Multi-session
A session is the complete amount of datarecorded from the beginning to the end ofa single period of CD-ROM, CD-R/CD-RW data recording. Multi-session refers tothe existence of data from two or moresessions on a single disc.
Sampling
Refers to the process of encoding analogaudio data at regular intervals andconverting it to digital data. The samplingrate refers to the number of times asample is taken in one second and isexpressed in Hz units. Increasing thesampling rate improves the sound qualitybut also increases the data size.
Bit rate
Refers to the volume of data per second,expressed in bps (bits per second).Generally, the larger the number of thetransfer bit rate when compressing anMP3 file, the more information regardingmusical reproduction it carries, andtherefore the better the sound quality.
Packet writing
A general term for the method, similar tothat used for floppy discs or hard drives,of recording the required file in a singleincrement on a CD-R and similar.
ID3 Tag
ID3 tag is a method for storinginformation related to the music in anMP3 file. Information such as track, artistand album name can be stored. Thiscontent can be freely edited using ID3editing function software.
VBR
Abbreviation for Variable Bit Rate. WhileCBR (Constant Bit Rate) is generallyused, VBR varies the bit rate for audiocompression according to compressionconditions and this allows forcompression with preference given tosound quality.
qOperating Tips for WMA
WMA is short for Windows Media Audioand is the audio compression format usedby Microsoft.Audio data can be created and stored at ahigher compression ratio than MP3.
* Microsoft and Windows Media areregistered trademarks of MicrosoftCorporation U.S. in the United Statesand other countries.
6-26
Interior Comfort
Audio System
CX-7_8AP5-EE-09F_Edition1 Page300Monday, June 15 2009 3:26 PM
Form No.8AP5-EE-09F

Black plate (301,1)
Playable WMA file specification
CD-R and CD-RW including WMA filescan be played with this unit. Discs whichconform to the following formats can beplayed.Playable WMA files are as follows:
Item Content
SpecificationWindows MediaAudio Version 7.0,8.0, 9.0
Samplingfrequency
Bit rate
32kHz. . . . . . . 32, 40,48 kbps
44.1kHz . . . . . 32, 48,64, 80, 96, 128, 160,192, 256, 320 kbps
48kHz. . . . . . . 64, 96,128, 160, 192 kbps
VBR (Variable Bit Rate) Supported
Channel mode Stereo/Monaural
WMA tagTitle, artist name,album name
CAUTIONThis unit plays files with the (.wma) fileextension as a WMA file. Do not usethe WMA file extension for files otherthan WMA files. It may cause noise ora malfunction.
l In a WMA file, the track name, artistname and album name are recordedwith data called “WMA-Tag”, and theinformation can be displayed.
l WMA files which do not comply withthe specific standard may not be playedcorrectly or its file and folder namemay not be displayed correctly.
l The file extension may not be provideddepending on the computer operatingsystem, version, software, or settings.In this case, add the file extension“.wma” to the end of the file name, andthen write the disc.
Interior Comfort
Audio System
6-27
CX-7_8AP5-EE-09F_Edition1 Page301Monday, June 15 2009 3:26 PM
Form No.8AP5-EE-09F

Black plate (302,1)
MEMO
6-28
CX-7_8AP5-EE-09F_Edition1 Page302Monday, June 15 2009 3:26 PM
Form No.8AP5-EE-09F

Black plate (303,1)
Audio SetAudio information is displayed on the information display.
Type A Type B
Illustration is of a representative audio unit.
CD Player In-Dash CD Changer
Power/Volume/Sound Controls .............................................................................. page 6-30Operating the Radio (Type A) ................................................................................ page 6-36Operating the Radio (Type B) ................................................................................ page 6-38Operating the Compact Disc (CD) Player .............................................................. page 6-42Operating the In-Dash CD Changer ....................................................................... page 6-46Operating the Auxiliary jack .................................................................................. page 6-50Error Indications ..................................................................................................... page 6-51
Interior Comfort
Audio System
6-29
CX-7_8AP5-EE-09F_Edition1 Page303Monday, June 15 2009 3:26 PM
Form No.8AP5-EE-09F

Black plate (304,1)
qPower/Volume/Sound Controls
Power/Volume dialAudio control dial
The figure is an example showing the type A unit.
Power ON/OFF
Turn the ignition switch to the ACC orON position.
Press the power/volume dial to turn theaudio system on.Press the power/volume dial again to turnthe audio system off.
NOTE
To prevent the battery from beingdischarged, do not leave the audiosystem on for a long period of timewhen the engine is not running.
Volume adjustment
To adjust the volume, turn the power/volume dial.
Turn the power/volume dial to the right toincrease volume, to the left to decrease it.
6-30
Interior Comfort
Audio System
CX-7_8AP5-EE-09F_Edition1 Page304Monday, June 15 2009 3:26 PM
Form No.8AP5-EE-09F

Black plate (305,1)
Audio sound adjustment
1. Press the audio control dial to select thefunction. The selected function will beindicated.
Standard audio-equipped model*1
*1
*2
*1,2
*1,2
Bose Sound System-equipped model*1
*1
*1
*2
*1,2
*1,2
*1 Depending on the mode selected, theindication changes.
*2 Depending on the model, this functionmay not be available.
Interior Comfort
Audio System
6-31
CX-7_8AP5-EE-09F_Edition1 Page305Monday, June 15 2009 3:26 PM
Form No.8AP5-EE-09F

Black plate (306,1)
2. Turn the audio control dial to adjust theselected functions as follows:
Standard audio-equipped model
Indication Turn Left Turn Right
Select mode
Decreasebass
Increasebass
Decreasetreble
Increasetreble
Shift thesound to the
front
Shift thesound to the
rear
Shift thesound to the
left
Shift thesound to the
right
OFF ON
OFF ON
OFF ON
Select mode
Bose® Sound System-equipped model
Indication Turn Left Turn Right
OFF ON
Select mode
Decreasebass
Increasebass
Decreasetreble
Increasetreble
Shift thesound to the
front
Shift thesound to the
rear
Shift thesound to the
left
Shift thesound to the
right
OFF ON
OFF ON
OFF ON
Select mode
NOTE
About 5 seconds after selecting anymode, the volume function will beautomatically selected. To reset bass,treble, fade, and balance, press theaudio control dial for 2 seconds. Theunit will beep and “CLEAR” will bedisplayed.
Automatic Level Control (ALC)
(Standard audio-equipped model)
The automatic level control is a featurethat automatically adjusts audio volumeand sound quality according to the vehiclespeed.The volume increases in accordance withthe increase in vehicle speed, anddecreases as vehicle speed decreases.
6-32
Interior Comfort
Audio System
CX-7_8AP5-EE-09F_Edition1 Page306Monday, June 15 2009 3:26 PM
Form No.8AP5-EE-09F

Black plate (307,1)
Select the desired ALC mode.
Mode Volume change
No change
Minimum
Medium
Maximum
Turn the audio control dial to select ALCOFF or ALC LEVEL1―7 modes. Theselected mode will be indicated.
AudioPilot® 2 (Bose® Sound System-equipped model)
AudioPilot® 2 automatically adjusts audiovolume and sound quality in accordancewith the level of noise entering the vehicleinterior while driving. When AudioPilot®
2 is turned ON, the system automaticallycalculates the conditions for optimumhearing of sound which may be difficultto hear depending on exterior noise.
* AudioPilot® 2 is a registered trademarkof Bose Corporation.
*Centerpoint® (Bose® Sound System-equipped model)
Centerpoint® offers you the experience of5.1-channel surround sound in yourvehicle even with your conventional 2-channel stereo CDs.The true surround sound effect ofCenterpoint® can be adjusted to any oneof five level between minimum andmaximum enhancement.
Indication Enhance level
Off
Minimum
Low
Medium
High
Maximum
Interior Comfort
Audio System
6-33
CX-7_8AP5-EE-09F_Edition1 Page307Monday, June 15 2009 3:26 PM
Form No.8AP5-EE-09F

Black plate (308,1)
Turn the audio control dial to selectCENTERPT MIN―MAX mode. Theselected mode will be indicated.
NOTE
l Centerpoint® operates optimally witha 2-channel stereo CD. MP3 audiofiles can be played, however, MP3audio files encoded with highcompression may result in poorsound quality.
l Centerpoint® is available for 2-channel stereo audio except for AMradio/MW, LW radio/FM radio/AUX/BT audio.
* Centerpoint® is a registered trademarkof Bose Corporation.
BEEP setting
The beep-sound when operating the audiosystem can be set on or off.
Setting Alternative Frequency (AF)
The AF function of the Radio DataSystem (RDS) can be set on or off (page6-38).
Setting Regional Programme (REG)
The REG function of the Radio DataSystem (RDS) can be set on or off (page6-38).
BT SETUP modeí
Music and other audio such as voice datarecorded on portable audio devices andmobile phones available on the marketwhich are equipped with the Bluetoothtransmission function can be listened tovia wireless transmission over thevehicle's speakers. Using the BT SETUPmode, these devices can be programmedto the Bluetooth unit or changed. Fordetails, refer to Bluetooth audio (page6-59).
6-34
Interior Comfort
íSome models.
Audio System
CX-7_8AP5-EE-09F_Edition1 Page308Monday, June 15 2009 3:26 PM
Form No.8AP5-EE-09F

Black plate (309,1)
MEMO
6-35
CX-7_8AP5-EE-09F_Edition1 Page309Monday, June 15 2009 3:26 PM
Form No.8AP5-EE-09F

Black plate (310,1)
qOperating the Radio (Type A)
Channel preset buttons
Seek tuning buttons
Band selector buttons
Scan buttonManual tuning dialAuto memory button
Radio ON
Press a band selector button ( , or) to turn the radio on.
Band selection
Select a band by pressing the FM1 button( ), FM2 button ( ) or AM button( ).
The selected mode will be indicated. IfFM stereo is being received, “ST” will bedisplayed.
NOTE
If the FM broadcast signal becomesweak, reception automatically changesfrom STEREO to MONO for reducednoise, and the “ST” indicator will goout.
Tuning
The radio has the following tuningmethods: Manual, Seek, Scan, Presetchannel, and Auto memory tuning. Theeasiest way to tune stations is to set themon preset channels.
NOTE
If the power supply is interrupted (fuseblows or the battery is disconnected),the preset channels will be erased.
Manual tuning
Turning the manual tuning dial willchange the frequency higher or lower.
6-36
Interior Comfort
Audio System
CX-7_8AP5-EE-09F_Edition1 Page310Monday, June 15 2009 3:26 PM
Form No.8AP5-EE-09F

Black plate (311,1)
Seek tuning
Pressing the seek tuning button ( , )will cause the tuner to seek a higher orlower frequency automatically.
NOTE
If you continue to press and hold thebutton, the frequency will continuechanging without stopping.
Scan tuning
Press the scan button ( ) toautomatically sample strong stations.Scanning stops at each station for about 5seconds. To hold a station, press the scanbutton ( ) again during this interval.
Preset channel tuning
The 6 preset channels can be used to store6 AM and 12 FM stations.
1. To set a channel first select AM, FM1,or FM2. Tune to the desired station.
2. Depress a channel preset button forabout 2 seconds until a beep sound isheard. The preset channel number andstation frequency will be displayed.The station is now held in the memory.
3. Repeat this operation for the otherstations and bands you want to store.To tune one in the memory, select AM,FM1, or FM2 and then press itschannel preset button. The stationfrequency and the channel number willbe displayed.
NOTE
If the power supply is interrupted (fuseblows or the battery is disconnected),the preset channels will be erased.
Auto memory tuning
This is especially useful when driving inan area where the local stations are notknown. Additional AM/FM stations canbe stored without disturbing thepreviously set channels.
Press and hold the auto memory button( ) for about 2 seconds until a beepsound is heard; the system willautomatically scan and temporarily storeup to 6 stations with the strongestfrequencies in each selected band in thatarea.
After scanning is completed, the stationwith the strongest frequency will be tunedand its frequency displayed.Press and release the auto memory button( ) to recall stations from the auto-stored stations. One stored station will beselected each time; its frequency andchannel number will be displayed.
NOTE
If no stations can be tuned afterscanning operations, “A” will bedisplayed.
Interior Comfort
Audio System
6-37
CX-7_8AP5-EE-09F_Edition1 Page311Monday, June 15 2009 3:26 PM
Form No.8AP5-EE-09F

Black plate (312,1)
qOperating the Radio (Type B)
Channel preset buttons
Manual tuning dial
Seek tuning buttons
Band selector buttons
Traffic announcement button
Programme-type button
Auto memory button
Radio ON
Press a band selector button ( , or) to turn the radio on.
Band selection
Press the AM button ( ) to select MW/LW.Press the FM1 button ( ) to selectFM1.Press the FM2 button ( ) to selectFM2.
The selected mode will be indicated. IfFM stereo is being received, “ST” will bedisplayed.
NOTE
If the FM broadcast signal becomesweak, reception automatically changesfrom STEREO to MONO for reducednoise, and the “ST” indicator will goout.
Tuning
The radio has the following tuningmethods: Manual, Seek, Preset channel,and Auto memory tuning. The easiest wayto tune stations is to set them on presetchannels.
NOTE
If the power supply is interrupted (fuseblows or the battery is disconnected),the preset channels will be cancelled.
6-38
Interior Comfort
Audio System
CX-7_8AP5-EE-09F_Edition1 Page312Monday, June 15 2009 3:26 PM
Form No.8AP5-EE-09F

Black plate (313,1)
Manual tuning
Turning the manual tuning dial willchange the frequency higher or lower.
Seek tuning
Pressing the seek tuning button ( , )will cause the tuner to seek a higher orlower frequency automatically.
NOTE
If you continue to press and hold thebutton, the frequency will continuechanging without stopping.
Preset channel tuning
The 6 preset channels can be used to store6 MW/LWand 12 FM stations.
1. To set a channel first select MW/LW,FM1, or FM2. Tune to the desiredstation.
2. Depress a channel preset button forabout 2 seconds until a beep is heard.The preset channel number and stationfrequency will be displayed. Thestation is now held in the memory.
3. Repeat this operation for the otherstations and bands you want to store.To tune one in the memory, select MW/LW, FM1, or FM2 and then press itschannel preset button. The stationfrequency and the channel number willbe displayed.
NOTE
l If the power supply is interrupted(fuse blows or the battery isdisconnected), the preset channelswill be cancelled.
l The station's call sign is displayedwhile FM is selected.
Auto memory tuning
This is especially useful when driving inan area where the local stations are notknown.
Press and hold the auto memory button( ) for about 2 seconds until a beepis heard; the system will automaticallyscan and temporarily store up to 6 stationswith the strongest frequencies in eachselected band in that area.
After scanning is completed, the stationwith the strongest frequency will be tunedand its frequency displayed. Press andrelease the auto memory button ( )to recall stations from the auto-storedstations. One stored station will beselected each time; its frequency andchannel number will be displayed.
NOTE
l If no stations can be tuned afterscanning operations, “A” will bedisplayed.
l The station's call sign is displayedwhile FM is selected.
Interior Comfort
Audio System
6-39
CX-7_8AP5-EE-09F_Edition1 Page313Monday, June 15 2009 3:26 PM
Form No.8AP5-EE-09F

Black plate (314,1)
Radio Data System (RDS)
NOTE
The radio data system (RDS) does notfunction if it is out of the system'sservice coverage area.
Alternative frequency (AF)
AF functions on FM stations. Press theaudio control dial and select the AF modeto turn it on and “AF” will be displayed.If the radio reception of the current stationweakens, the system switches to analternative station automatically.
If you wish to continue a regionalprogramme, press the audio control dialand select the REG mode to turn it on.“REG ON” is displayed.To cancel it, press the audio control dialand select the REG mode to turn it off.“REG OFF” is displayed.
Traffic announcement (TA)
If the traffic announcement button ( )is pressed while the radio is on FMstations, the unit switches to TA mode and“TP” is displayed.In TA mode, only road trafficannouncements are searched. If acurrently tuned radio station is notbroadcasting a traffic announcement whenthe traffic announcement button ( ) ispressed, the radio will automatically seekone in another network. If no applicablestation is found, “Nothing” will bedisplayed and the system will return to thepreviously tuned station.
When in TA mode or a mode other thanthe radio and the traffic announcementbutton ( ) is pressed, the systemswitches to TA stand-by mode and “TA”and “TP” will be displayed. If thecurrently tuned radio station is notbroadcasting a traffic announcement (TA),the unit will seek one in another networkand the system will return to stand-bymode.
NOTE
Audio from the currently tuned radiobroadcast is muted while in TA stand-by mode.
When a TA broadcast is received, the TAbroadcast will supersede other radio, CDplay. “Traffic Info” will be displayed.During a TA broadcast, press the trafficannouncement button ( ) to end thebroadcast and return to the previousmode. To cancel the TA stand-by mode,press the traffic announcement button( ) while the unit is in TA stand-bymode.
To set the TA broadcast volume:
1. Press and hold the trafficannouncement button ( ) for about 2seconds while in FM mode. “TAVOL”will be displayed.
2. While “TAVOL” is displayed, turn thepower/volume dial to adjust thevolume.
Programme-type information (PTY)
Some FM stations transmit programme-type codes. This code enables alternativestations transmitting the sameprogramme-type code to be foundquickly.
6-40
Interior Comfort
Audio System
CX-7_8AP5-EE-09F_Edition1 Page314Monday, June 15 2009 3:26 PM
Form No.8AP5-EE-09F

Black plate (315,1)
Press the programme-type informationbutton ( ) while in FM mode. Theprogramme-type code and “PTY” will bedisplayed during reception. If there is noprogramme-type code, “None” will bedisplayed.
To choose a programme type:
1. Press the programme-type informationbutton ( ) when the programme-type code is displayed.
2. Press a channel preset button (1―6)with previously stored programmetypes, or press the seek tuning button( , ).
To scan for programme-type information:
3. Press the programme-type informationbutton ( ) when the programme-type code is displayed.
4. Press the seek tuning button ( , )for about 2 seconds until a beep isheard. The unit will scan forbroadcasts, if none are found,“Nothing” will be displayed and theunit will return to the previously tunedband.
To store programme types in the channelpreset buttons:
5. Press the seek tuning button ( , )and select a programme type.
6. While the programme type isdisplayed, press a channel preset buttonfor about 2 seconds.
Emergency broadcast
When an emergency broadcast isreceived, the emergency broadcast willsupersede other functions currentlyoperating such as the radio (FM) or CDplayback, and “Alarm” will be displayed.When the emergency broadcast ends, thesystem will return to the previous mode.
Interior Comfort
Audio System
6-41
CX-7_8AP5-EE-09F_Edition1 Page315Monday, June 15 2009 3:26 PM
Form No.8AP5-EE-09F

Black plate (316,1)
qOperating the Compact Disc (CD) Player
Random buttonTrack down/Reverse button
Track up/Fast-forward button
Load button Repeat buttonCD play button
CD eject button
Folder up button
Folder down buttonDisplay/Text button
Play/Pause button/File dial
CD slot
Type Playable data
Music/MP3/WMA CDplayer
· Music data (CD-DA)
· MP3/WMA file
NOTE
If a disc has both music data (CD-DA)and MP3/WMA files, playback of thetwo or three file types differs dependingon how the disc was recorded.
Inserting the CD
Insert the CD into the slot, label-side up.The auto-loading mechanism will set theCD and begin play.
NOTE
There will be a short lapse before playbegins while the player reads the digitalsignals on the CD.
Ejecting the CD
Press the CD eject button ( ) to eject theCD.
Playback
Press the CD play button ( ) to startplay when a CD is in the unit.If a CD is not in the unit when the CDplay button ( ) is pressed, “NO DISC”will flash on and off.
6-42
Interior Comfort
Audio System
CX-7_8AP5-EE-09F_Edition1 Page316Monday, June 15 2009 3:26 PM
Form No.8AP5-EE-09F

Black plate (317,1)
NOTE
When the load button ( ) is pressed,the CD will load and play even if theCD eject button ( ) had beenpreviously pressed.
Pause
To stop playback, press the Play/Pausebutton ( ).Press the button again to resumeplayback.
Fast-forward/Reverse
Press and hold the fast-forward button( ) to advance through a track at highspeed.Press and hold the reverse button ( ) toreverse through a track at high speed.
Track search
Press the track up button ( ) or turn thefile dial clockwise once to skip forward tothe beginning of the next track.Press the track down button ( ) or turnthe file dial anticlockwise once to skipback to the beginning of the current track.
Folder search (during MP3/WMA CDplayback)
To change to the previous folder, press thefolder down button ( ), or press thefolder up button ( ) to advance to thenext folder.
Repeat playback
During music CD playback
1. Press the repeat button ( ) duringplayback to play the current trackrepeatedly. “RPT” is displayed.
2. Press the button again to cancel therepeat playback.
During MP3/WMA CD playback
(Track repeat)
1. Press the repeat button ( ) duringplayback to play the current trackrepeatedly. “TRACK RPT” isdisplayed.
2. To cancel the repeat playback, press thebutton again after 3 seconds.
(Folder repeat)
1. Press the repeat button ( ) duringplayback, and then press the buttonagain within 3 seconds to play thetracks in the current folder repeatedly.“FOLDER RPT” is displayed.
2. Press the button again to cancel therepeat playback.
Random playback
Tracks are randomly selected and played.
During music CD playback
1. Press the random button ( ) duringplayback to play the tracks on the CDrandomly. “RDM” is displayed.
2. Press the button again to cancel therandom playback.
During MP3/WMA CD playback
(Folder random)
1. Press the random button ( ) duringplayback to play the tracks in the folderrandomly. “FOLDER RDM” isdisplayed.
2. To cancel the random playback, pressthe button again after 3 seconds.
Interior Comfort
Audio System
6-43
CX-7_8AP5-EE-09F_Edition1 Page317Monday, June 15 2009 3:26 PM
Form No.8AP5-EE-09F

Black plate (318,1)
(CD random)
1. Press the random button ( ) duringplayback, and then press the buttonagain within 3 seconds to play thetracks on the CD randomly.“DISC RDM” is displayed.
2. Press the button again to cancel therandom playback.
Switching the display
For files with a file name or other namethat have been input, the display changesin the order of the file names or othernames each time the display button ( )is pressed during playback.Music CD
Track number/Elapsed time display
Track name display*
Album name display*
Artist name display*
*Depending on the CD, this information may not be available.
MP3/WMA CD
Folder number/File number
File number/Elapsed time display
File name
Folder name
Album name (ID3 Tag)
Song name (ID3 Tag)
Artist name (ID3 Tag)
NOTE
(MP3/WMA CD)This unit can only read English(including numerals) one-bytecharacters. Depending on the CDwriting software used, proper displaymay not be possible.
Display scroll
Only 8 characters (File name) or 12characters (Except file name) can bedisplayed at one time. To display the restof the characters of a long title, press andhold the text button ( ). The displayscrolls the next 12 characters. Press andhold the text button ( ) again afterthe last 12 characters have been displayedto return to the beginning of the title.
6-44
Interior Comfort
Audio System
CX-7_8AP5-EE-09F_Edition1 Page318Monday, June 15 2009 3:26 PM
Form No.8AP5-EE-09F

Black plate (319,1)
NOTE
The displayable number of characters islimited. If the number of characters,including the file extension (.mp3/.wma), exceeds 32 characters, it may notbe fully displayed.
Message display
If “CHECK CD” is displayed, it meansthat there is some CD malfunction. Checkthe CD for damage, dirt, or smudges, andthen properly reinsert. If the messageappears again, take the unit to an expertrepairer, we recommend an AuthorisedMazda Repairer for service.
Interior Comfort
Audio System
6-45
CX-7_8AP5-EE-09F_Edition1 Page319Monday, June 15 2009 3:26 PM
Form No.8AP5-EE-09F

Black plate (320,1)
qOperating the In-Dash CD Changer
Scan button
Random button
Track down/Reverse button
Track up/Fast-forward button
Load button
Repeat button
CD play button
CD eject buttonFolder up buttonCD slot
Disc up buttonDisc down button
Folder down button
Display button
Text button
Play/Pause button/File dial
Channel preset buttons
The figure is an example showing the type A unit.
Type Playable data
Music/MP3/WMA CDplayer
· Music data (CD-DA)
· MP3/WMA file
NOTE
If a disc has both music data (CD-DA)and MP3/WMA files, playback of thetwo or three file types differs dependingon how the disc was recorded.
Inserting the CD
The CD must be label-side up wheninserting. The auto-loading mechanismwill set the CD and begin play.
NOTE
The CD will begin playbackautomatically after insertion. A CDcannot be inserted while the displayreads “WAIT”. A beeping sound can beheard during this waiting time.There will be a short lapse before playbegins while the player reads the digitalsignals on the CD.
Normal insertion
1. Press the load button ( ).
2. When “IN” is displayed, insert the CD.
Inserting CDs into desired tray number
1. Press and hold the load button ( )for about 2 seconds until a beep soundis heard.
6-46
Interior Comfort
Audio System
CX-7_8AP5-EE-09F_Edition1 Page320Monday, June 15 2009 3:26 PM
Form No.8AP5-EE-09F

Black plate (321,1)
2. Press the channel preset button for thedesired tray number while “WAIT” isdisplayed.
3. When “IN” is displayed, insert the CD.
NOTE
The CD cannot be inserted to thedesired tray number if the number isalready occupied.
Multiple insertion
1. Press and hold the load button ( )for about 2 seconds until a beep soundis heard.
2. When “IN” is displayed, insert the CD.
3. When “IN” is displayed again, insertthe next CD.
NOTE
The first-inserted CD will be playedautomatically when:
l No other CD is inserted within 15seconds after “IN” is displayed.
l The CD trays are full.
Displaying the CD-inserted traynumber
When you want to know the number for aCD-inserted tray, press the display button( ). The tray number will be displayedfor 5 seconds.
Ejecting the CD
Normal ejection
1. Press the CD eject button ( ). Thedisc number and “DISC OUT” will bedisplayed.
2. Pull out the CD.
NOTE
When the CD is ejected during play, thenext CD will be played automatically.
Ejecting CDs from desired tray number
1. Press and hold the CD eject button ( )for about 2 seconds until a beep soundis heard.The “DISC OUT” display flashes.
2. Press the channel preset button for thedesired CD number for less than 5seconds after the beep sound is heard.
3. Pull out the CD.
Multiple ejection
1. Press and hold the CD eject button ( )for about 2 seconds until a beep soundis heard.The “DISC OUT” display flashes.
2. Press the CD eject button ( ) againfor less than 5 seconds after the beepsound is heard.
NOTE
If the button is not pressed and about 5seconds have elapsed while“DISC OUT” is flashing, CDs areautomatically ejected.
3. Pull out the CD, then the next CD willbe ejected.
Interior Comfort
Audio System
6-47
CX-7_8AP5-EE-09F_Edition1 Page321Monday, June 15 2009 3:26 PM
Form No.8AP5-EE-09F

Black plate (322,1)
NOTE
l CDs will be ejected starting with theone with the lowest number.
l All CDs in the tray will be ejectedcontinuously.
l CDs can be ejected when the ignitionswitch is off. Press and hold the CDeject button ( ) for about 2 secondsand all CDs will eject.
Playback
Press the CD play button ( ) to startplay when a CD is in the unit.If a CD is not in the unit when the CDplay button ( ) is pressed, “NO DISC”will flash on and off.
Pause
To stop playback, press the Play/Pausebutton ( ).Press the button again to resumeplayback.
Fast-forward/Reverse
Press and hold the fast-forward button( ) to advance through a track at highspeed.Press and hold the reverse button ( ) toreverse through a track at high speed.
Track search
Press the track up button ( ) or turn thefile dial clockwise once to skip forward tothe beginning of the next track.Press the track down button ( ) or turnthe file dial anticlockwise once to skipback to the beginning of the current track.
Disc search
To change the disc, press the DISC button( or ) during playback.
Folder search (during MP3/WMA CDplayback)
To change to the previous folder, press thefolder down button ( ), or press thefolder up button ( ) to advance to thenext folder.
Music scan (Type A)
During music CD playback
This function scans the titles on a CD andplays 10 seconds of each song to aid youin finding a song you want to listen to.
During MP3/WMA CD playback
This function scans the titles in a foldercurrently being played and plays 10seconds of each song to aid you in findinga song you want to listen to.
Press the scan button ( ) duringplayback to start the scan play operation(the track number will flash).Press the scan button ( ) again tocancel scan playback.
NOTE
If the unit is left in scan, normalplayback will resume where scan wasselected.
Repeat playback
During music CD playback
1. Press the repeat button ( ) duringplayback to play the current trackrepeatedly. “RPT” is displayed.
2. Press the button again to cancel therepeat playback.
6-48
Interior Comfort
Audio System
CX-7_8AP5-EE-09F_Edition1 Page322Monday, June 15 2009 3:26 PM
Form No.8AP5-EE-09F

Black plate (323,1)
During MP3/WMA CD playback
(Track repeat)
1. Press the repeat button ( ) duringplayback to play the current trackrepeatedly. “TRACK RPT” isdisplayed.
2. To cancel the repeat playback, press thebutton again after 3 seconds.
(Folder repeat)
1. Press the repeat button ( ) duringplayback, and then press the buttonagain within 3 seconds to play thetracks in the current folder repeatedly.“FOLDER RPT” is displayed.
2. Press the button again to cancel therepeat playback.
Random playback
Tracks are randomly selected and played.
During music CD playback
1. Press the random button ( ) duringplayback to play the tracks in the CDrandomly. “RDM” is displayed.
2. Press the button again to cancel therandom playback.
During MP3/WMA CD playback
(Folder random)
1. Press the random button ( ) duringplayback to play the tracks in the folderrandomly. “FOLDER RDM” isdisplayed.
2. To cancel the random playback, pressthe button again after 3 seconds.
(CD random)
1. Press the random button ( ) duringplayback, and then press the buttonagain within 3 seconds to play thetracks on the CD randomly.“DISC RDM” is displayed.
2. Press the button again to cancel therandom playback.
Switching the display
For files with a file name or other namethat have been input, the display changesin the order of the file names or othernames each time the display button ( )is pressed during playback.Music CD
Disc tray number
Track name display*
Album name display*
Artist name display*
Disc number/Track number/Elapsed time display
*Depending on the CD, this information may not be available.
Type A
Type B
Interior Comfort
Audio System
6-49
CX-7_8AP5-EE-09F_Edition1 Page323Monday, June 15 2009 3:26 PM
Form No.8AP5-EE-09F

Black plate (324,1)
MP3/WMA CD
Disc number/File number/Elapsed time display
Disc tray number
File name
Folder name
Album name (ID3 Tag)
Song name (ID3 Tag)
Artist name (ID3 Tag)
Disc number/Folder number/File number
Type A
Type B
NOTE
(MP3/WMA CD)This unit can only read English(including numerals) one-bytecharacters. Depending on the CDwriting software used, proper displaymay not be possible.
Display scroll
Only 8 characters (File name) or 12characters (Except file name) can bedisplayed at one time.Type ATo display the rest of the characters of along title, press the text button ( ).The display scrolls the next 12 characters.Press the text button ( ) again afterthe last 12 characters have been displayedto return to the beginning of the title.
Type BTo display the rest of the characters of along title, press and hold the text button( ). The display scrolls the next 12characters. Press and hold the text button( ) again after the last 12 charactershave been displayed to return to thebeginning of the title.
NOTE
The displayable number of characters islimited. If the number of characters,including the file extension (.mp3/.wma), exceeds 32 characters, it may notbe fully displayed.
Message display
If “CHECK CD” is displayed, it meansthat there is some CD malfunction. Checkthe CD for damage, dirt, or smudges, andthen properly reinsert. If the messageappears again, take the unit to an expertrepairer, we recommend an AuthorisedMazda Repairer for service.
qOperating the Auxiliary jack
You can connect portable audio units orsimilar products on the market to theauxiliary jack to listen to music or audioover the vehicle's speakers, refer toAuxiliary Input (page 6-56).
6-50
Interior Comfort
Audio System
CX-7_8AP5-EE-09F_Edition1 Page324Monday, June 15 2009 3:26 PM
Form No.8AP5-EE-09F

Black plate (325,1)
qError Indications
If you see an error indication on the display, find the cause in the chart. If you cannot clearthe error indication, take the vehicle to an expert repairer, we recommend an AuthorisedMazda Repairer.
Indication Cause Solution
CHECK CD
CD is inserted upside downInsert the CD properly. If the error indication continuesto display, consult an expert repairer, we recommend anAuthorised Mazda Repairer.
CD is defectiveInsert another CD properly. If the error indicationcontinues to display, consult an expert repairer, werecommend an Authorised Mazda Repairer.
Interior Comfort
Audio System
6-51
CX-7_8AP5-EE-09F_Edition1 Page325Monday, June 15 2009 3:26 PM
Form No.8AP5-EE-09F

Black plate (326,1)
Audio Control SwitchOperation
When the audio unit is turned on,operation of the audio unit from thesteering wheel is possible.
NOTE
Because the audio unit will be turnedoff under the following conditions, theswitches will be inoperable.
l When the ignition switch is turned tothe LOCK position.
l When the power button on the audiounit is pressed and the audio unit isturned off.
l When the CD being played is ejectedand the audio unit is turned off.
Without Bluetooth Hands-Free and 7-inch navigation system
With Bluetooth Hands-Free only/Bluetooth Hands-Free and 7-inchnavigation systemUse the talk button, pick-up button, andhang-up button for navigation systemsound operation.For details, refer to the separate manual“NAVIGATION SYSTEM Owner'sManual”.
Talk buttonPick-up button
Talk button
Hang-up button
Pick-up button
NOTE
l The talk button, pick-up button, andhang-up button are operable with theaudio unit turned off.
l Mazda has installed this system toprevent distraction while driving thevehicle and using audio controls onthe instrument panel.Always make safe driving your firstpriority.
qAdjusting the Volume
To increase the volume, press up thevolume switch.
To decrease the volume, press down thevolume switch.
6-52
Interior Comfort
Audio System
CX-7_8AP5-EE-09F_Edition1 Page326Monday, June 15 2009 3:26 PM
Form No.8AP5-EE-09F

Black plate (327,1)
Without Bluetooth Hands-Free and 7-inch navigation system
With Bluetooth Hands-Free only/Bluetooth Hands-Free and 7-inchnavigation system
qChanging the Source
Without Bluetooth Hands-Free and 7-inch navigation system
With Bluetooth Hands-Free only/Bluetooth Hands-Free and 7-inchnavigation system
AM reception type
Press the mode switch ( ) to changethe audio source (FM1 radio → FM2radio → AM radio → CD changer→AUX → cyclical).
Interior Comfort
Audio System
6-53
CX-7_8AP5-EE-09F_Edition1 Page327Monday, June 15 2009 3:26 PM
Form No.8AP5-EE-09F

Black plate (328,1)
NOTE
CD changer mode cannot be selected inthe following case:CD has not been inserted.The AUX mode is locked out unlessyou connect a commercially availableportable audio unit to the auxiliary jack.Connect a portable audio unit or similarproduct on the market to the auxiliaryjack to listen to music or audio over thevehicle's speakers. Change the audiosource to AUX mode (page 6-56).
MWand LW reception type
Press the mode switch ( ) to changethe audio source (FM1 radio → FM2radio → LW/MW radio → CD player orCD changer → AUX → BT audio →cyclical).
NOTE
CD, CD changer, and BT audio modescannot be selected in the followingcases:
l CD has not been inserted.
l BT audio unit is not equipped on theaudio system.
The AUX mode is locked out unlessyou connect a commercially availableportable audio unit to the auxiliary jack.Connect a portable audio unit or similarproduct on the market to the auxiliaryjack to listen to music or audio over thevehicle's speakers. Change the audiosource to AUX mode (page 6-56).
qSeek Switch
Without Bluetooth Hands-Free and 7-inch navigation system
With Bluetooth Hands-Free only/Bluetooth Hands-Free and 7-inchnavigation system
When listening to the radio
Press the seek switch up or down. Theradio switches to the next/previous storedstation in the order that it was stored(1―6).
Press the seek switch up or down forabout 2 seconds until a beep sound isheard to seek all usable stations at ahigher or lower frequency whetherprogrammed or not.
6-54
Interior Comfort
Audio System
CX-7_8AP5-EE-09F_Edition1 Page328Monday, June 15 2009 3:26 PM
Form No.8AP5-EE-09F

Black plate (329,1)
NOTE
During radio receptionRadio stations which have beenpreviously stored in the auto memorytuning can be called up by pressing theseek switch up or down while any radiostation stored in the auto memorytuning is being received. Radio stationscan be called up in the order they werestored with each press of the switch upor down.
When playing a CD or BT audio
Press up the seek switch to skip to thenext track.Press down the seek switch to repeat thecurrent track.Press and hold the seek switch in the up ordown position to continuously switch thetracks up or down.
qMute Switchí
Press the mute switch ( ) once to muteaudio, press it again to resume audiooutput.
NOTE
If the ignition switch is turned to theLOCK position with the audio muted,the mute will be cancelled.Therefore, when the engine is restarted,the audio is not muted. To mute theaudio again, press the mute switch ( ).
Without Bluetooth Hands-Free and 7-inch navigation system
Interior Comfort
Audio System
6-55íSome models.
CX-7_8AP5-EE-09F_Edition1 Page329Monday, June 15 2009 3:26 PM
Form No.8AP5-EE-09F

Black plate (330,1)
AUX Mode (Auxiliary input)You can connect portable audio units orsimilar products on the market to theauxiliary jack to listen to music or audioover the vehicle's speakers.Type A
Type B
WARNINGDo not adjust the portable audio unitor a similar product while driving thevehicle:Adjusting the portable audio unit or asimilar product while driving thevehicle is dangerous as it coulddistract your attention from the vehicleoperation which could lead to aserious accident. Always adjust theportable audio unit or a similarproduct while the vehicle is stopped.
CAUTIONl Close the lid when the auxiliary jackis not in use to prevent foreignobjects and liquids from penetratingthe auxiliary jack.
l Depending on the portable audiodevice, noise may occur when usingthe device with it connected to theaccessory socket equipped on thevehicle. (If noise occurs, do not usethe accessory socket.)
6-56
Interior Comfort
Audio System
CX-7_8AP5-EE-09F_Edition1 Page330Monday, June 15 2009 3:26 PM
Form No.8AP5-EE-09F

Black plate (331,1)
NOTE
l Before using the auxiliary jack, readthe manufacturer's instructions forthe product being connected.
l Use a commercially-available, non-impedance (3.5 ) stereo mini plugfor connecting the portable audiounit to the auxiliary jack. Beforeusing the auxiliary jack, read themanufacture's instructions forconnecting a portable audio unit tothe auxiliary jack.
l To prevent discharging of the battery,do not use the auxiliary input forlong periods with the engine off oridling.
l Noise may occur depending on theproduct connected to the auxiliaryjack.
l With regard to connecting a portableaudio or similar device to a powersource, use the battery for the device,not the accessory socket.
Connecting the auxiliary jack
1. Open the console lid.
2. Pass the connection plug cord throughthe cutout of the console and insert theplug into the auxiliary jack.
Plug
The figure is an example showing Type A.
WARNINGDo not allow the connection plug cordto get tangled with the parking brakeor the shift lever:Allowing the plug cord to becometangled with the parking brake or theshift lever is dangerous as it couldinterfere with driving, resulting in anaccident.
CAUTIONDo not place objects or apply force tothe auxiliary jack with the plugconnected.
Interior Comfort
Audio System
6-57
CX-7_8AP5-EE-09F_Edition1 Page331Monday, June 15 2009 3:26 PM
Form No.8AP5-EE-09F

Black plate (332,1)
NOTE
l Insert the plug to the auxiliary jacksecurely.
l Insert or remove the plug with theplug perpendicular to the auxiliaryjack hole.
l Insert or remove the plug by holdingits base.
To listen to a portable audio unit
1. Turn the ignition switch to the ACC orON position.
2. Press the power/volume dial to turn theaudio system on.
3. Press the AUX button ( ) of theaudio unit or the mode switch ( )of the audio control switches on thesteering wheel to change to the AUXmode.
Audio Unit Audio Control Switches
NOTE
l Set the volume of the portable audiounit to the maximum within therange that the sound does notbecome distorted, then adjust thevolume using the power/volume dialof the audio unit or the up/downswitch of the audio control switch.
l Audio adjustments other than audiovolume can only be done using theportable audio device.
l If the connection plug is pulled outfrom the auxiliary jack while inAUX mode, noise may occur.
6-58
Interior Comfort
Audio System
CX-7_8AP5-EE-09F_Edition1 Page332Monday, June 15 2009 3:26 PM
Form No.8AP5-EE-09F

Black plate (333,1)
Bluetooth Audioí
qWhat is Bluetooth Audio?
Bluetooth audio outline
By programming portable audio devicesequipped with the Bluetoothcommunication function to the vehicle'sBluetooth unit, you can listen to music oraudio recorded on these audio devicesfrom the vehicle's speakers. Bluetoothaudio devices do not need to be pluggedinto the auxiliary jack.After programming, operate the audiosystem's control panel to play/stop themusic or audio.
CAUTIONl Always programme audio devices tothe Bluetooth audio system while thevehicle is stopped.
CAUTIONl Because only specified Bluetoothaudio devices can be used, consultan Authorised Mazda Repairer whenpurchasing or changing devices.Bluetooth audio devices whichcorrespond to specified Bluetoothversions and profiles can beBluetooth-connected to the vehicle'sBluetooth unit. However, evenamong these devices are ones whichcannot be Bluetooth-connected orhave limited functionality. Eachdevice to be used with the vehicle'sBluetooth unit needs to be checkedindividually for compatibility.Consult an Authorised MazdaRepairer concerning devicecompatibility.Web:http://www.mazdahandsfree.comPhone:(Germany)0800 4263 738 (8:00―18:00 CentralEuropean Time)(Europe)00800 4263 7383 (8:00―18:00Central European Time)(Worldwide)
49 (0) 6838 907 287(8:00―18:00 Central EuropeanTime)
Applicable Bluetooth specificationVer. 2.0 or higher
Audio profile
l A2DP (Advanced Audio DistributionProfile) Ver. 1.0
l AVRCP (Audio/Video Remote ControlProfile) Ver. 1.0
Interior Comfort
Bluetooth Audio
6-59íSome models.
CX-7_8AP5-EE-09F_Edition1 Page333Monday, June 15 2009 3:26 PM
Form No.8AP5-EE-09F

Black plate (334,1)
A2DP is a profile which transmits onlyaudio to the Bluetooth unit. If yourBluetooth audio device corresponds onlyto A2DP, but not AVRCP, you cannotoperate it using the control panel of thevehicle's audio system. In this case, theBluetooth audio device can be operatedby controlling the device itself, the sameas when a portable audio system withoutthe Bluetooth communication function isconnected to the AUX terminal.
Function A2DP A2DP·AVRCP
Playback No Yes
Pause No Yes
File (Track)up/down No Yes
Yes: AvailableNo: Not available
Bluetooth is the registered trademark ofBluetooth SIG. Inc.
NOTE
l It may not be possible to play aBluetooth audio device if it is placedanywhere transmission iscompromised, such as inside a metalcontainer or the boot. Move theBluetooth audio device to a locationwhere transmission is possible.
l Battery consumption of Bluetoothaudio devices is higher whileBluetooth-connected.
l If a non-Bluetooth device is to beused, a commercially-availableBluetooth adapter is required. Whenplaying an audio device with aBluetooth adapter installed,programming of the audio devicemay not be possible or audio maynot be heard from the vehiclespeakers if the connection of theadapter and the device is poor. If thishappens, check if the Bluetoothadapter is properly connected.
6-60
Interior Comfort
Bluetooth Audio
CX-7_8AP5-EE-09F_Edition1 Page334Monday, June 15 2009 3:26 PM
Form No.8AP5-EE-09F

Black plate (335,1)
qBluetooth Audio Preparation
Bluetooth audio device set-up
Bluetooth audio programming, changes,deletions, and display of programmeddevice information can be performed.
1. The mode changes as follows eachtime the audio control dial is pressed.Select “BT SETUP”.
Standard audio-equipped model
*
*
*
*
*
Bose Sound System-equipped model*
*
*
*
*
*
* Depending on the mode selected, theindication changes.
2. Turn the audio control dial and select adesired mode.
Interior Comfort
Bluetooth Audio
6-61
CX-7_8AP5-EE-09F_Edition1 Page335Monday, June 15 2009 3:26 PM
Form No.8AP5-EE-09F

Black plate (336,1)
Display Mode Function
PAIR DEVICEPairingprogrammemode
Bluetoothaudio deviceprogramming
LINK CHANGELink changemode
Changing linkto Bluetoothaudio device
PAIR DELETEPairingdeletion mode
Deleting linkto Bluetoothaudio device
DEVICE INFODeviceinformationdisplay mode
Displayingvehicle'sBluetooth unitinformation
3. Press the audio control dial todetermine the mode.
Bluetooth audio device programming
Any Bluetooth audio device must beprogrammed to the vehicle's Bluetoothunit before it can be listened to over thevehicle's speakers.A maximum of seven devices includingBluetooth audio devices and hands-freemobile phones can be programmed to onevehicle.
NOTE
l Always perform Bluetooth audiodevice programming while thevehicle is stopped.
l If a Bluetooth device has alreadybeen programmed to the vehicle as ahands-free mobile phone, it does notneed to be programmed again whenusing the device as a Bluetooth audiodevice. Conversely, it does not needto be programmed again as a hands-free mobile phone if it has alreadybeen programmed as a Bluetoothaudio device.
l Look around to be sure other likelyBluetooth audio devices are not inrange when you start to programme.If in doubt, move your car to anotherlocation. The transmission range of aBluetooth audio device is about 10 m(32 ft). Therefore, if there is anotherBluetooth audio device within a 10m (32 ft) radius of the vehicle, thedevice may be identified andprogrammed instead.
l Device registration can also be doneusing voice recognition (page 6-74).
Concerning the operation of a Bluetoothaudio device itself, refer to its instructionmanual.Some Bluetooth audio devices have PINcodes (four digits). Refer to the audiodevice's instruction manual because theprogramming procedure differs dependingon whether it has a PIN code or not.
6-62
Interior Comfort
Bluetooth Audio
CX-7_8AP5-EE-09F_Edition1 Page336Monday, June 15 2009 3:26 PM
Form No.8AP5-EE-09F

Black plate (337,1)
Programming a Bluetooth audio devicewhich has a PIN code (4 digits)
1. Using the audio control dial, select thepairing programme mode“PAIR DEVICE” in the “BT SETUP”mode. (Refer to“Bluetooth audio device set-up” fordetails.)
2. Press the audio control dial todetermine the mode.After “ENTER PIN” is displayed onthe information display for twoseconds, “PIN 0000” is displayed andthe PIN code can be input.
3. Input the PIN code of your Bluetoothaudio device by pressing channelpreset buttons 1 to 4 while “PIN 0000”is displayed.Press channel preset button 1 to inputthe first digit, 2 for the second, 3 forthe third, and 4 for the forth. Forexample, if the PIN code were “4213”,press channel preset button 1 fourtimes (1, 2, 3, 4), button 2 twice (1, 2),button 3 once (1), and button 4 threetimes (1, 2, 3). If the “PIN 0000”display disappears before finishing thePIN code input, repeat the procedurefrom Step 1.
NOTE
Some devices accept only a particularpairing code (Usually, “0000” or“1234”).If pairing cannot be completed, refer tothe owner's manual of your mobiledevice, and try those numbers ifnecessary.
4. Press the audio control dial while theinput PIN code is displayed.“PAIRING” flashes on the display.
5. Operate the Bluetooth audio device andset it to the programme mode while“PAIRING” is flashing.
6. When the programming is completed,“ ” and “PAIR SUCCESS” aredisplayed after about 10-30 seconds,after which “PAIR SUCCESS”continues to be displayed for threeseconds, and then the unit returns to thenormal display.
NOTE
l Some Bluetooth audio devices needa certain amount of time before the“ ” symbol is displayed.
l If the programming failed, “Err”flashes for three seconds.
l Programming cannot be performedwhile the vehicle is moving. If youattempt to perform programmingwhile the vehicle is moving,“PAIR DISABLE” is displayed.
l If seven Bluetooth audio deviceshave already been programmed tothe vehicle, programming cannot beperformed and “MEMORY FULL”is displayed. Delete one programmeddevice to programme another one.
Programming a Bluetooth audio devicewhich does not have a PIN code (4digits)
1. Using the audio control dial, select thepairing programme mode“PAIR DEVICE” in the “BT SETUP”mode. (Refer to“Bluetooth audio set up” for details.)
Interior Comfort
Bluetooth Audio
6-63
CX-7_8AP5-EE-09F_Edition1 Page337Monday, June 15 2009 3:26 PM
Form No.8AP5-EE-09F

Black plate (338,1)
2. Press the audio control dial todetermine the mode.After “ENTER PIN” is displayed onthe information display for twoseconds, “PIN 0000” is displayed andthe PIN code can be input.
3. Press the audio control dial while“PIN 0000” is displayed.“PAIRING” flashes on the display.
4. Operate the Bluetooth audio device andset it to the programme mode while“PAIRING” is flashing.
5. As the Bluetooth audio device requiresa PIN code, input “0000”.
6. When the programming is completed,“ ” and “PAIR SUCCESS” aredisplayed after about 10-30 seconds,after which “PAIR SUCCESS”continues to be displayed for threeseconds, and then the unit returns to thenormal display.
NOTE
l If pairing cannot be completed, try“1234” instead. Refer to the owner'smanual of your mobile device for theright PIN code.
l Some Bluetooth audio devices needa certain amount of time before the“ ” symbol is displayed.
l If the programming failed, “Err”flashes for three seconds.
l Programming cannot be performedwhile the vehicle is moving. If youattempt to perform programmingwhile the vehicle is moving,“PAIR DISABLE” is displayed.
l If seven Bluetooth audio deviceshave already been programmed tothe vehicle, programming cannot beperformed and “MEMORY FULL”is displayed. Delete one programmeddevice to programme another one.
Changing the link to a Bluetooth audiodevice
If several devices have been programmed,the Bluetooth unit links the device lastprogrammed. If you would like to link adifferent programmed device, it isnecessary to change the link. The order ofdevice priority after the link has beenchanged is maintained even when theignition switch is turned off.
1. Using the audio control dial, select thelink change mode “LINK CHANGE”in the “BT SETUP” mode. (Refer to“Bluetooth audio device set-up” fordetails.)
2. Press the audio control dial todetermine the mode.
6-64
Interior Comfort
Bluetooth Audio
CX-7_8AP5-EE-09F_Edition1 Page338Monday, June 15 2009 3:26 PM
Form No.8AP5-EE-09F
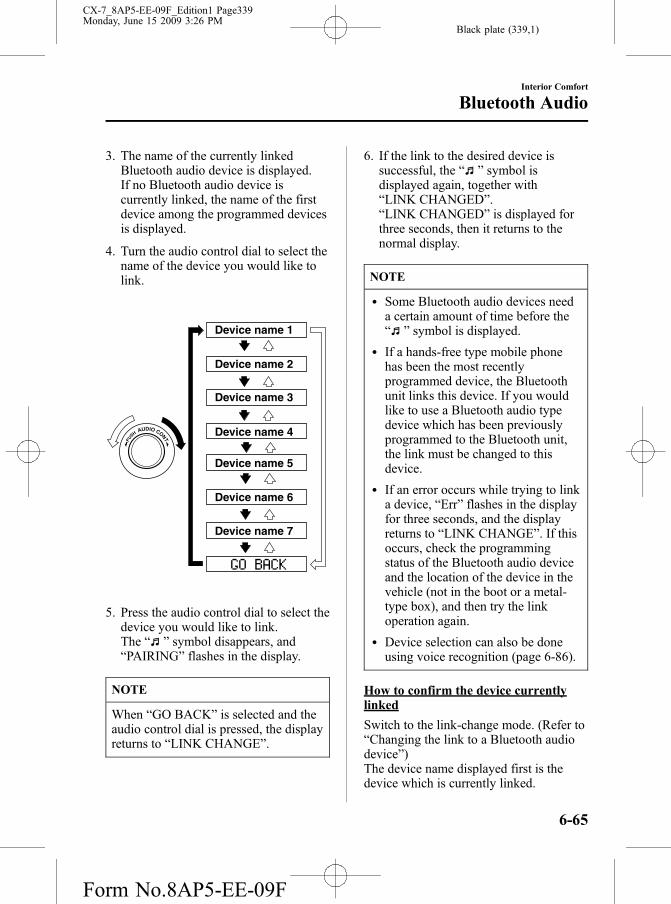
Black plate (339,1)
3. The name of the currently linkedBluetooth audio device is displayed.If no Bluetooth audio device iscurrently linked, the name of the firstdevice among the programmed devicesis displayed.
4. Turn the audio control dial to select thename of the device you would like tolink.
Device name 1
Device name 2
Device name 3
Device name 4
Device name 5
Device name 6
Device name 7
5. Press the audio control dial to select thedevice you would like to link.The “ ” symbol disappears, and“PAIRING” flashes in the display.
NOTE
When “GO BACK” is selected and theaudio control dial is pressed, the displayreturns to “LINK CHANGE”.
6. If the link to the desired device issuccessful, the “ ” symbol isdisplayed again, together with“LINK CHANGED”.“LINK CHANGED” is displayed forthree seconds, then it returns to thenormal display.
NOTE
l Some Bluetooth audio devices needa certain amount of time before the“ ” symbol is displayed.
l If a hands-free type mobile phonehas been the most recentlyprogrammed device, the Bluetoothunit links this device. If you wouldlike to use a Bluetooth audio typedevice which has been previouslyprogrammed to the Bluetooth unit,the link must be changed to thisdevice.
l If an error occurs while trying to linka device, “Err” flashes in the displayfor three seconds, and the displayreturns to “LINK CHANGE”. If thisoccurs, check the programmingstatus of the Bluetooth audio deviceand the location of the device in thevehicle (not in the boot or a metal-type box), and then try the linkoperation again.
l Device selection can also be doneusing voice recognition (page 6-86).
How to confirm the device currentlylinked
Switch to the link-change mode. (Refer to“Changing the link to a Bluetooth audiodevice”)The device name displayed first is thedevice which is currently linked.
Interior Comfort
Bluetooth Audio
6-65
CX-7_8AP5-EE-09F_Edition1 Page339Monday, June 15 2009 3:26 PM
Form No.8AP5-EE-09F

Black plate (340,1)
Deleting the link to a Bluetooth audiodevice
1. Using the audio control dial, select thepairing delete mode “PAIR DELETE”in the “BT SETUP” mode. (Refer to“Bluetooth audio device set-up” fordetails.)
2. Press the audio control dial todetermine the mode.
3. The name of the first device among theprogrammed devices is displayed.
4. Rotate the audio control dial and selectthe name of the programmed deviceyou would like to delete.
Device name 1
Device name 2
Device name 3
Device name 4
Device name 5
Device name 6
Device name 7
NOTE
Only the names of programmed devicescan be displayed. If only one device isprogrammed, only the name for thisdevice is displayed.
5. If a selection other than “GO BACK”is made and the audio control dial ispressed, “SURE ? NO” is displayed.
6. Rotate the audio control dial clockwiseand switch the display to “SURE ?YES”.
NOTE
The display changes as followsdepending on whether the audio controldial is rotated clockwise oranticlockwise.-Clockwise: “SURE ? YES” displayed-Anticlockwise: “SURE ? NO”displayed
7. Press the audio control dial to deletethe selected device.
NOTE
Select “GO BACK” and press the audiocontrol dial to return to the“PAIR DELETE” display.
8. “PAIR DELETED” is displayed forthree seconds after the deletion iscompleted, and then it returns to thenormal display.
NOTE
If an error occurs while trying to deletethe programmed device, “Err” flashes inthe display for three seconds and thedisplay returns to “LINK DELETE”.
6-66
Interior Comfort
Bluetooth Audio
CX-7_8AP5-EE-09F_Edition1 Page340Monday, June 15 2009 3:26 PM
Form No.8AP5-EE-09F

Black plate (341,1)
Bluetooth audio device informationdisplay
1. Using the audio control dial, select thepair device information display mode“DEVICE INFO” in the “BT SETUP”mode. (Refer to“Bluetooth audio device set-up” fordetails.)
2. Press the audio control dial todetermine the mode.
3. The name of the Bluetooth unit deviceis displayed.
4. Rotate the audio control dial to selectthe information for the Bluetooth unitwhich you would like to view.
Device name
BT address
NOTE
When “GO BACK” is selected and theaudio control dial is pressed, the displayreturns to “DEVICE INFO”.
qHow to Use the Bluetooth AudioSystem
Switching to Bluetooth audio mode
To listen to music or voice audio recordedto a Bluetooth audio device, switch to theBluetooth audio mode to operate theaudio device using the audio systemcontrol panel.Any Bluetooth audio device must beprogrammed to the vehicle's Bluetoothunit before it can be used. (Refer to“Bluetooth audio device programming”)
1. Turn the ignition switch to the ACC orON position.
2. Turn on the Bluetooth audio device'spower.Make sure that the “ ” symbol isdisplayed in the information display.The symbol is not displayed if anunprogrammed Bluetooth audio deviceis being used or the vehicle's Bluetoothunit has a malfunction.
NOTE
Some Bluetooth audio devices need acertain amount of time before the “ ”symbol is displayed.
3. Press the AUX button to switch theBluetooth audio mode to “BTAudio”.
4. The audio recorded to the Bluetoothaudio device begins playback.
Interior Comfort
Bluetooth Audio
6-67
CX-7_8AP5-EE-09F_Edition1 Page341Monday, June 15 2009 3:26 PM
Form No.8AP5-EE-09F

Black plate (342,1)
NOTE
l If the Bluetooth audio device doesnot begin playback, press the Play/Pause button ( ).
l If the mode is switched fromBluetooth audio mode to anothermode (radio mode), audio playbackfrom the Bluetooth audio devicestops.
l If a call is received on a hands-freemobile phone during playback fromthe Bluetooth audio device, theplayback is stopped. Playback fromthe Bluetooth audio device resumesafter the call ends.
Playback
1. To listen to a Bluetooth audio deviceover the vehicle's speaker system,switch the mode to Bluetooth audiomode. (Refer to“Switching to Bluetooth audio mode”)
2. To stop playback, press the Play/Pausebutton ( ).
3. Press the button again to resumeplayback.
Selecting a file (track)
Short-press the track down button ( ) orturn the file dial anticlockwise: Selects thebeginning of the current file (track).Short-press the track up button ( ) orturn the file dial clockwise: Selects thenext file (track).
6-68
Interior Comfort
Bluetooth Audio
CX-7_8AP5-EE-09F_Edition1 Page342Monday, June 15 2009 3:26 PM
Form No.8AP5-EE-09F

Black plate (343,1)
Bluetooth Hands-Freeí
qWhat is Bluetooth Hands-Free?
Bluetooth Hands-Free Outline
By connecting a Bluetooth equippeddevice (Mobile phone) to the hands-freeunit equipped on the vehicle, making andreceiving calls are possible using the talkbutton, pick-up button and hang-up buttonlocated on the steering wheel, and sayingthe voice commands.
WARNINGPerform phonebook registrationrelated operations while the vehicle isparked:Performing phonebook registrationwhile driving the vehicle could be adistraction to your driving and resultin an accident. In addition, a mistakein performing the phonebookoperation could result in the loss ofimportant data.
Bluetooth equipped device (Mobilephone)
A Bluetooth equipped device (Mobilephone) communicates with the hands-freeunit equipped on the vehicle using radiotransmission (Bluetooth).For example, if the device (Mobile phone)is placed in a coat pocket, the phone callscan be made through your mobile servicewithout taking out and handling thedevice (Mobile phone).
CAUTIONThe types of mobile phones which canbe connected to the hands-free unit arelimited. Therefore, before purchasing orchanging your mobile phone model,consult an Authorised Mazda Repairer.Mobile phones which can be connectedto the hands-free system need to becompliant with Bluetooth specificationsand the appropriate profile. However,even among these mobile phones areones which cannot be connected orhave limited functionality. Each mobilephone to be used with the hands-freesystem needs to be checkedindividually for compatibility.Therefore, consult an AuthorisedMazda Repairer, a Web support centre,or a call centre for informationregarding mobile phone compatibility.Web:http://www.mazdahandsfree.comPhone:(Germany)0800 4263 738 (8:00―18:00 CentralEuropean Time)(Europe)00800 4263 7383 (8:00―18:00 CentralEuropean Time)(Worldwide)
49 (0) 6838 907 287 (8:00―18:00Central European Time)
NOTE
Available LanguagesThe Bluetooth Hands-Free Systemapplies to the following languages:English, French, Spanish, Italian,German, Dutch, Portuguese.
Interior Comfort
Bluetooth Hands-Free
6-69íSome models.
CX-7_8AP5-EE-09F_Edition1 Page343Monday, June 15 2009 3:26 PM
Form No.8AP5-EE-09F

Black plate (344,1)
Applicable Bluetooth specificationVer. 2.0 or higherResponse profile
l HFP (Hands Free Profile) Ver. 1.5
l DUN (Dial-up Networking Profile)Ver. 1.1
l PBAP (Phone Book Access Profile)Ver. 1.0
l A2DP (Advanced Audio DistributionProfile) Ver. 1.0
l AVRCP (Audio/Video Remote ControlProfile) Ver. 1.0
l OPP (Object Push Profile) Ver. 1.1
Bluetooth is the registered trademark ofBluetooth SIG. Inc.
NOTE
l The Bluetooth Hands-Free system isoperable several seconds afterturning the ignition switch to theACC or ON position (requires lessthan 15 seconds).
l If the ignition switch is turned offduring a hands-free call, the line istransferred to the device (Mobilephone) automatically.
l If the device (Mobile phone) is in alocation where radio reception isdifficult such as a metal container orin the boot, the call may not beconnected using Bluetooth. Ifcommunication is not possible,change the location of the device(Mobile phone).
qComponent Parts
Bluetooth Hands-Free consists of thefollowing items:
l Talk button
l Pick-up button
l Hang-up button
l Information display
l Microphone
l Audio unit/7-inch Navigation system
6-70
Interior Comfort
Bluetooth Hands-Free
CX-7_8AP5-EE-09F_Edition1 Page344Monday, June 15 2009 3:26 PM
Form No.8AP5-EE-09F

Black plate (345,1)
Talk button, Pick-Up button and Hang-Up button
Basic functions of Bluetooth Hands-Freecan be used for such things as makingcalls or hanging up using the talk button,pick-up button and hang-up button on thesteering wheel.
Talk buttonPick-up button
Talk button
Hang-up button
Pick-up button
Talk button operations
A short press or a long press of the talkbutton is used to operate the system asfollows:
l Short press (Press the button less than0.7 sec.)
l Long press (Press the button 0.7 sec. ormore.)
Information display
When available, the information displayshows telephone numbers, BluetoothHands-Free messages, and operationstatus.
Bluetooth phone connected
Microphone
The microphone is used for speakingvoice commands or exchangingconversation.
Microphone
Audio unit/7-inch Navigation system
The audio unit or 7-inch navigationsystem is used for adjusting the volume.
Interior Comfort
Bluetooth Hands-Free
6-71
CX-7_8AP5-EE-09F_Edition1 Page345Monday, June 15 2009 3:26 PM
Form No.8AP5-EE-09F

Black plate (346,1)
qVoice
To prevent the deterioration in voicerecognition rate and voice quality, thefollowing points must be observed:
l It is not necessary to face themicrophone or approach it. Speak thevoice commands while maintaining asafe driving position.
l Close the windows and/or themoonroof to reduce loud noises fromoutside the vehicle, or turn down theairflow of the air-conditioning systemwhile Bluetooth Hands-Free is beingused. Voice recognition may notfunction correctly or voice quality maydeteriorate under the followingconditions.
l A passenger is speaking.l Driving with the window and/or the
moonroof open.l Driving on bumpy roads.l Noise outside of the vehicle is loud.
(Construction sites, inside tunnels,excess oncoming traffic, or heavyrain.)
l Operation noise from directionindicators, wipers, or the horn isheard.
l A/C airflow is strong or wind isblowing on the microphone.
l There is noise coming from cargoloaded in the vehicle.
l Voice commands may not berecognized depending on the voice. Ifthe voice commands are not recognizedcorrectly, repeat the commands in alouder voice, at a natural pace, as ifspeaking to another person.
l Dialects or different wording other thanhands-free prompts cannot berecognized by voice recognition. Speakin the wording specified by the voicecommands.
NOTE
If the voice recognition performance isnot satisfactory, refer to “VoiceRecognition Learning Function(Speaker Enrolment)” (page 6-92).
Please be aware that the voice recognitionmay error despite following the abovepoints.
qFunction Restrictions WhileUsing Bluetooth Hands-Free
Some functions are limited whileBluetooth Hands-Free is being used. Theyinclude:
l Beep sound and voice guidance relatedto the audio unit and 7-inch navigationsystem are not heard.
l Beep sound related to the A/Coperation is not heard.
l The 7-inch navigation system's voicerecognition command does notfunction.
qHow to Use This Section
Descriptions in the text are as follows:Say: Voice commands to be spoken byyou.Prompt: Voice guidance output from thespeaker.
6-72
Interior Comfort
Bluetooth Hands-Free
CX-7_8AP5-EE-09F_Edition1 Page346Monday, June 15 2009 3:26 PM
Form No.8AP5-EE-09F

Black plate (347,1)
NOTE
Say voice commands after the beepsound [Beep] is heard.
Example)Say: [Beep] “Dial”Prompt: “Number, please”Say: [Beep] “XXXXXXXXXXX (Ex.“555-1234”) (Telephone number)”
NOTE
To cancel a particular voice guidance inmidstream and have the system performa different operation, press the talkbutton and say the applicable voicecommand while the voice guidance isplaying.
Bluetooth Hands-Free ActivationMethod
Press the pick-up button (with/without 7-inch navigation system) or talk buttonwith a short press (without 7-inchnavigation system) or a long press (with7-inch navigation system).
NOTE
For vehicles with the 7-inch navigationsystem, you can also press the talkbutton with a short press and say:[Beep] “Telephone” or “Phone”.
The hands-free system is activated.Functions of the hands-free telephone,such as making and receiving calls, can beused after the activation. (For details onthe telephone functions, refer to “BasicBluetooth Hands-Free Operation” or“Convenient Use of the Hands-FreeSystem”.)
NOTE
For vehicles with a 7-inch navigationsystem, the system operates byspeaking the voice recognitioncommand of the 7-inch navigationsystem after pressing the talk buttonwith a short press. For voice recognitiondetails with the 7-inch navigationsystem, refer to the separate“NAVIGATION SYSTEM Owner'sManual”.
Tutorial
The tutorial explains how to useBluetooth Hands-Free.To activate the tutorial, do the following:
1. Press the pick-up button (with/without7-inch navigation system) or talkbutton with a short press (without 7-inch navigation system) or a long press(with 7-inch navigation system).
NOTE
For vehicles with the 7-inch navigationsystem, you can also press the talkbutton with a short press and say:[Beep] “Telephone” or “Phone”.
2. Say: [Beep] “Tutorial”
3. Follow the prompts to receive theappropriate voice guidanceinstructions.
Cancel
The Bluetooth Hands-Free systemtransitions to idling status if the followingoperation is performed while the system isactivating.Press the hang-up button, or the talkbutton with a long press.
Interior Comfort
Bluetooth Hands-Free
6-73
CX-7_8AP5-EE-09F_Edition1 Page347Monday, June 15 2009 3:26 PM
Form No.8AP5-EE-09F

Black plate (348,1)
Basic Bluetooth Hands-Free Operation
qBluetooth Hands-Free Preparation
Language setting
The available languages are English,French, Spanish, Italian, German, Dutch,and Portuguese. If the language setting ischanged, all of the voice guidance andvoice input commands are done in theselected language.
NOTE
l If the language setting is changed,device registration is maintained.Phonebook records are not cleared,but each language has a separatephonebook. Therefore, entriescreated in one language will need tobe re-entered in the phonebook ofthe new language.
l Do these steps before you startdriving. These less used functionsare too distracting to undertake whiledriving until you are fully familiarwith the system.
Method 1
1. Press the pick-up button (with/without7-inch navigation system) or talkbutton with a short press (without 7-inch navigation system) or a long press(with 7-inch navigation system).
NOTE
For vehicles with the 7-inch navigationsystem, you can also press the voicerecognition/hands-free switch with ashort press and say: [Beep] “Telephone”or “Phone”.
2. Say: [Beep] “Setup”
3. Prompt: “Select one of the following:Pairing options, confirmation prompts,language, password, select phone orselect music player.”
4. Say: [Beep] “Language”
5. Prompt: “Select a language: English,French, Spanish, Italian, German,Dutch, or Portuguese.”
6. Say: [Beep] “French” (Speak thedesired language: “English”, “French”,“Spanish”, “Italian”, “German”,“Dutch”, or “Portuguese”.)
NOTE
Other language settings can also bemade while in the current setting bysaying the name of the language in thenative pronunciation.
7. Prompt: “French (Desired language)selected. Is this correct?”
8. Say: [Beep] “Yes”
9. Prompt: “French (Desired language)selected, returning to main menu”(Spoken in the newly selectedlanguage).
6-74
Interior Comfort
Bluetooth Hands-Free
CX-7_8AP5-EE-09F_Edition1 Page348Monday, June 15 2009 3:26 PM
Form No.8AP5-EE-09F

Black plate (349,1)
Method 2
1. Press the pick-up button (with/without7-inch navigation system) or talkbutton with a short press (without 7-inch navigation system) or a long press(with 7-inch navigation system).
NOTE
For vehicles with the 7-inch navigationsystem, you can also press the voicerecognition/hands-free switch with ashort press and say: [Beep] “Telephone”or “Phone”.
2. Say: [Beep] “French” (Say the desiredlanguage: “English”, “French”,“Spanish”, “Italian”, “German”,“Dutch”, or “Portuguese”.)
NOTE
Other language settings can also bemade while in the current setting bysaying the name of the language in thenative pronunciation.
3. Prompt: “Would you like to changethe language to French (Desiredlanguage) ?”
4. Say: [Beep] “Yes”
5. Prompt: “Please wait. Switching toFrench phonebook. French selected,returning to main menu” (Spoken inthe newly selected language).
Device programming (Pairing)
To use Bluetooth Hands-Free, the deviceequipped with Bluetooth has to beprogrammed to the hands-free unit usingthe following procedure.
A maximum of seven devices includinghands-free mobile phones and Bluetoothaudio devices can be programmed to onevehicle.
NOTE
l A device can be programmed onlywhen the vehicle is parked. If thevehicle starts to move, the pairingprocedure will end. Programming isdangerous while driving - pair upyour device before you start driving.Park the car in a safe place beforeprogramming.
l If a Bluetooth device has alreadybeen programmed to the vehicle as aBluetooth audio device, it does notneed to be programmed again whenusing the device as a hands-freemobile phone. Conversely, it doesnot need to be programmed again asa Bluetooth audio device if it hasalready been programmed as ahands-free mobile phone.
l Since the communication range of aBluetooth equipped device is about10 meters (32 ft), if a device isplaced within a 10-meter (32 ft)radius of the vehicle, it may bedetected/programmedunintentionally while another deviceis being programmed.
1. Activate the Bluetooth application ofthe device.
NOTE
For the operation of the device, refer toits instruction manual.
Interior Comfort
Bluetooth Hands-Free
6-75
CX-7_8AP5-EE-09F_Edition1 Page349Monday, June 15 2009 3:26 PM
Form No.8AP5-EE-09F

Black plate (350,1)
2. Press the pick-up button (with/without7-inch navigation system) or talkbutton with a short press (without 7-inch navigation system) or a long press(with 7-inch navigation system).
NOTE
For vehicles with the 7-inch navigationsystem, you can also press the voicerecognition/hands-free switch with ashort press and say: [Beep] “Telephone”or “Phone”.
3. Say: [Beep] “Setup”
4. Prompt: “Select one of the following:Pairing options, confirmation prompts,language, password, select phone orselect music player.”
5. Say: [Beep] “Pairing options”
6. Prompt: “Select one of the following:Pair, edit, delete, or list.”
7. Say: [Beep] “Pair”
8. Prompt: “Please say a 4-digit pairingcode.”
9. Say: [Beep] “XXXX” (Speak anarbitrary 4-digit pairing code. This canbe any combination of 4 numbers.)
NOTE
l Some devices accept only aparticular pairing code (Usually,“0000” or “1234”).If pairing cannot be completed, referto the owner's manual of your mobiledevice, and try those numbers ifnecessary.
l Record the code as it will be used toprogramme your device in Step 16.
10. Prompt: “Pairing code XXXX (4-digit number). Is this correct?”
11. Say: [Beep] “Yes” or “No”
12. If “Yes”, go to Step 13.If “No”, the procedure returns to Step8.
13. Prompt: “Start pairing procedure onthe device. See the device manual forinstructions.”
14. Using the device, perform a searchfor the Bluetooth device (Peripheraldevice).
NOTE
For the operation of the device, refer toits instruction manual.
15. Select “Mazda” from the device listsearched by the device.
16. Input the 4-digit pairing code set inStep 9 to the device.
17. Prompt: “Please say the name of thedevice after the beep.”
18. Say: [Beep] “XXXX - - -” (Speak a“device tag”, an arbitrary name forthe device.)Example: “Stan's device.”
NOTE
Speak a programmed “device tag”within 10 seconds.If more than two devices are to beprogrammed, they cannot beprogrammed with the same or similar“device tag”.
6-76
Interior Comfort
Bluetooth Hands-Free
CX-7_8AP5-EE-09F_Edition1 Page350Monday, June 15 2009 3:26 PM
Form No.8AP5-EE-09F

Black plate (351,1)
19. Prompt: “Adding XXXXXX - - -(Ex. “Stan's device”) (Device tag). Isthis correct?”
20. Say: [Beep] “Yes”
21. Prompt: “Pairing complete”
After a device is registered, the systemautomatically identifies the device. Byactivating Bluetooth Hands-Free again, orby activating Bluetooth Hands-Free firstafter turning the ignition switch from theLOCK to the ACC position, the systemreads out a voice guidance, “XXXXXX -- - (Ex. “Stan's device”) (Device tag) isconnected”.
NOTE
l Device registration can also be doneby operating the audio unit or panelbuttons on the navigation unit. Referto “Bluetooth Audio Preparation”(page 6-61)(For audio unit) or theseparate manual “NAVIGATIONSYSTEM Owner's Manual” (Fornavigation unit).
l Depending on the device, theregistration status may be lost after acertain period of time. If this occurs,repeat the entire process from Step 1.
qMaking a Call Using a TelephoneNumber
NOTE
Practice this while parked until you areconfident you can do it while driving ina non-taxing road situation. If you arenot completely comfortable, make allcalls from a safe parking position, andmove out only when fully under controland you can devote your eyes and mindto driving.
1. Press the pick-up button (with/without7-inch navigation system) or talkbutton with a short press (without 7-inch navigation system) or a long press(with 7-inch navigation system).
NOTE
For vehicles with the 7-inch navigationsystem, you can also press the voicerecognition/hands-free switch with ashort press and say: [Beep] “Telephone”or “Phone”.
2. Say: [Beep] “Dial”
3. Prompt: “Number, please”
4. Say: [Beep] “XXXXXXXXXXX (Ex.“555-1234”) (Telephone number)”
5. Prompt: “Dialing XXXXXXXXXXX(Ex. “555-1234”) (Telephone number)is this correct?”
6. Say: [Beep] “Yes” or “No”.
7. When “Yes” is spoken, the procedureproceeds to Step 8.When “No” is spoken, the procedurereturns to Step 3.
Interior Comfort
Bluetooth Hands-Free
6-77
CX-7_8AP5-EE-09F_Edition1 Page351Monday, June 15 2009 3:26 PM
Form No.8AP5-EE-09F

Black plate (352,1)
8. Prompt: “Dialing”
NOTE
The “Dial” command and a telephonenumber can be combined.Ex. In Step 2, say, “Dial 123-4567”,then, Steps 3 and 4 can be skipped.
qReceiving an Incoming Call
1. Prompt: “Incoming call, press thepickup button to answer”.
2. To accept the call, press the pick-upbutton.To reject the call, press the hang-upbutton.
qHanging Up a Call
Press the hang-up button during the call.A beep sound will confirm that call isended.
qVolume Adjustment
The power/volume dial of the audio unitor the 7-inch navigation system is used toadjust the volume. Turn the dial to theright to increase volume, to the left todecrease it.
Audio unit Navigation system
NOTE
l The volume can also be adjustedusing the volume button on thesteering wheel.
l The music volume of the audio unitand the 7-inch navigation systemcannot be adjusted while BluetoothHands-Free is being used.
qVoice Guidance Interrupt Operation
Voice guidance can be stopped bypressing the talk button with a short presswhile it is being heard. A new voice inputcommand can then be spoken by the user.
· Press the talk button with a short press.
qHelp Function Use
The help function informs the user of allthe available voice commands under thecurrent conditions.
1. Press the talk button with a short press.
2. Say: [Beep] “Help”
3. Follow the prompts to receive theappropriate voice guidanceinstructions.
6-78
Interior Comfort
Bluetooth Hands-Free
CX-7_8AP5-EE-09F_Edition1 Page352Monday, June 15 2009 3:26 PM
Form No.8AP5-EE-09F

Black plate (353,1)
Convenient Use of theHands-Free System
qPhonebook Usage
Phonebook registration
Phone numbers can be registered to theBluetooth Hands-Free phonebook.
NOTE
Do this function only when parked. It istoo distracting to attempt while drivingand you may make too many errors tobe effective.
1. Press the pick-up button (with/without7-inch navigation system) or talkbutton with a short press (without 7-inch navigation system) or a long press(with 7-inch navigation system).
NOTE
For vehicles with the 7-inch navigationsystem, you can also press the voicerecognition/hands-free switch with ashort press and say: [Beep] “Telephone”or “Phone”.
2. Say: [Beep] “Phonebook”
3. Prompt: “Select one of the following:New entry, edit, list names, delete,erase all or import contact.”
4. Say: [Beep] “New entry”
5. Prompt: “Name please.”
6. Say: [Beep] “XXXXX... (Ex. “Mary'sphone”)” (Say a voice tag for the nameregistered.)
7. Prompt: “Adding XXXXX... (Ex.“Mary's phone”) (Registered voicetag). Is this correct?”
8. Say: [Beep] “Yes”
9. Prompt: “Home, Work, Mobile, orOther?”
10. Say: [Beep] “Mobile” (Say “Home”,“Work”, “Mobile”, or “Other”, for thedesired location to be registered.)
11. Prompt: “Mobile (Location to beregistered). Is this correct?”
12. Say: [Beep] “Yes”
13. Prompt: “Number, please.”
14. Say: [Beep] “XXXXXXXXXXX(Ex. “555-1234”)” (Say the phonenumber to be registered.)
15. Prompt: “XXXXXXXXXXX (Ex.“555-1234”) (Phone numberregistration). Is this correct? ”
16. Say: [Beep] “Yes”
17. Prompt: “Number saved. Would youlike to add another number for thisentry?”
18. Say: [Beep] “Yes” or “No”.
19. If “Yes”, an additional phone numberregistration can be made for the sameentry.If “No”, the procedure proceeds toStep 20.
20. Prompt: “Returning to main menu.”
Interior Comfort
Bluetooth Hands-Free
6-79
CX-7_8AP5-EE-09F_Edition1 Page353Monday, June 15 2009 3:26 PM
Form No.8AP5-EE-09F

Black plate (354,1)
Import contact
Phonebook data from your device (Mobilephone) can be sent and registered to yourBluetooth Hands-Free phonebook usingBluetooth.
1. Press the pick-up button (with/without7-inch navigation system) or talkbutton with a short press (without 7-inch navigation system) or a long press(with 7-inch navigation system).
NOTE
For vehicles with the 7-inch navigationsystem, you can also press the voicerecognition/hands-free switch with ashort press and say: [Beep] “Telephone”or “Phone”.
2. Say: [Beep] “Phonebook”
3. Prompt: “Select one of the following:New entry, edit, list names, delete,erase all or import contact.”
4. Say: [Beep] “Import contact”
5. Prompt: “Ready to receive a contactfrom the phone.”
6. Device (Mobile phone) operation:Select one entry from the phonebookand send it using Bluetooth.
7. Prompt: “X (Number of locationswhich include data) numbers have beenimported. What name would you liketo use for these numbers?”
8. Say: [Beep] “XXXXX... (Ex. “Mary'sphone”)” (Say a voice tag for the nameregistered.)
9. Prompt: “Adding XXXXX... (Ex.“Mary's phone”) (Voice tag). Is thiscorrect?”
10. Say: [Beep] “Yes”
11. Prompt: “Number saved. Would youlike to import another contact?”
12. Say: [Beep] “Yes” or “No”
13. If “Yes”, the procedure proceeds toStep 5.If “No”, the procedure proceeds toStep 14.
14. Prompt: “Returning to main menu.”
Making calls using the phonebook
Telephone calls can be made by sayingthe name of a person (voice tag) whosephone number has been registered inBluetooth Hands-Free in advance.For the phonebook setting method, referto (page 6-83).
1. Press the pick-up button (with/without7-inch navigation system) or talkbutton with a short press (without 7-inch navigation system) or a long press(with 7-inch navigation system).
NOTE
For vehicles with the 7-inch navigationsystem, you can also press the voicerecognition/hands-free switch with ashort press and say: [Beep] “Telephone”or “Phone”.
2. Say: [Beep] “Call”
3. Prompt: “Name please.”
4. Say: [Beep] “XXXXX... (Ex. “John'sphone”)” (Say a voice tag registered inthe phonebook.)
6-80
Interior Comfort
Bluetooth Hands-Free
CX-7_8AP5-EE-09F_Edition1 Page354Monday, June 15 2009 3:26 PM
Form No.8AP5-EE-09F

Black plate (355,1)
5. Prompt: “Calling XXXXX... (Ex.“John's phone”) XXXX (Ex. “athome”). Is this correct?” (Voice tag andphone number location registered inphonebook).
6. Say: [Beep] “Yes”
7. Prompt: “Dialing”
NOTE
The “Call” command and the voice tagcan be combined.Ex. In Step 2, say, “Call John's phone”,then, Steps 3 and 4 can be skipped.
qRedialing Function
Redialing the number of the personpreviously dialed using the phone ispossible.
1. Press the pick-up button (with/without7-inch navigation system) or talkbutton with a short press (without 7-inch navigation system) or a long press(with 7-inch navigation system).
NOTE
For vehicles with the 7-inch navigationsystem, you can also press the voicerecognition/hands-free switch with ashort press and say: [Beep] “Telephone”or “Phone”.
2. Say: [Beep] “Redial”
3. Prompt: “Dialing”
qEmergency Calls
A call can be made to the emergencyphone number (112) using the voice inputcommand.
1. Press the pick-up button (with/without7-inch navigation system) or talkbutton with a short press (without 7-inch navigation system) or a long press(with 7-inch navigation system).
NOTE
For vehicles with the 7-inch navigationsystem, you can also press the voicerecognition/hands-free switch with ashort press and say: [Beep] “Telephone”or “Phone”.
2. Say: [Beep] “Emergency”
3. Prompt: “Dialing“112”, is thiscorrect?”
4. Say: [Beep] “Yes”
5. Prompt: “Dialing”
qRefusing an Incoming Call
For incoming call refusal, refer to“Receiving an incoming call” (page 6-78).
qMute
The microphone can be muted during acall.
1. Press the talk button with a short press.
2. Say: [Beep] “Mute”
3. Prompt: “Microphone muted”
Cancelling mute
1. Press the talk button with a short press.
Interior Comfort
Bluetooth Hands-Free
6-81
CX-7_8AP5-EE-09F_Edition1 Page355Monday, June 15 2009 3:26 PM
Form No.8AP5-EE-09F

Black plate (356,1)
2. Say: [Beep] “Mute off”
3. Prompt: “Microphone unmuted”
qTransferring a Call
Transferring a call from Hands-Free toa device (Mobile phone)
Communication between the hands-freeunit and a device (Mobile phone) iscancelled, and the line can be switched toa standard call using a device (Mobilephone).
1. Press the talk button with a short press.
2. Say: [Beep] “Transfer call”
3. Prompt: “Transferred call to phone”
Transferring a call from a device(Mobile phone) to Hands-Free
Communication between devices (Mobilephone) can be switched to BluetoothHands-Free.
1. Press the talk button with a short press.
2. Say: [Beep] “Transfer call”
3. Prompt: “Transferred call to HandsFree system”
qMulti-Call Functions
Call waiting
A call can be interrupted to receive anincoming call from a third party.
Call interrupt
A call can be switched to a new incomingcall.
Method 1
1. Press the pick-up button.
2. Prompt: “Swapping calls.”
Method 2
1. Press the talk button with a short press.
2. Say: [Beep] “Swap call”
3. Prompt: “Swapping calls”
NOTE
l To refuse an incoming call, press thehang-up button.
l After receiving a new incoming call,the previous call is placed on hold.
Switching calls
Switching back to the previous call canalso be done.
Method 1
1. Press the pick-up button.
2. Prompt: “Swapping calls.”
Method 2
1. Press the talk button with a short press.
2. Say: [Beep] “Swap call”
3. Prompt: “Swapping calls”
Three-way call function
1. Press the talk button with a short press.
2. Say: [Beep] “Join call”
3. Prompt: “Joining calls”
Making a call using a telephonenumber
1. Press the talk button with a short press.
2. Say: [Beep] “Dial”
3. Prompt: “Number, please”
4. Say: [Beep] “XXXXXXXXXXX (Ex.“555-1234”) (Telephone number)”
6-82
Interior Comfort
Bluetooth Hands-Free
CX-7_8AP5-EE-09F_Edition1 Page356Monday, June 15 2009 3:26 PM
Form No.8AP5-EE-09F

Black plate (357,1)
5. Prompt: “Dialing XXXXXXXXXXX(Ex. “555-1234”) (Telephone number)is this correct?”
6. Say: [Beep] “Yes” or “No”.
7. When “Yes” is spoken, the procedureproceeds to Step 8.When “No” is spoken, the procedurereturns to Step 3.
8. Prompt: “Dialing”
Making calls using the phonebook
1. Press the talk button with a short press.
2. Say: [Beep] “Call”
3. Prompt: “Name please.”
4. Say: [Beep] “XXXXX... (Ex. “John'sphone”)” (Say a voice tag registered inthe phonebook.)
5. Prompt: “Calling XXXXX... (Ex.“John's phone”) XXXX (Ex. “athome”). Is this correct?” (Voice tag andphone number location registered inphonebook).
6. Say: [Beep] “Yes”
7. Prompt: “Dialing”
Redialing function
1. Press the talk button with a short press.
2. Say: [Beep] “Redial”
3. Prompt: “Dialing”
Ending the current call
Press the hang-up button during the call.
qPhonebook Settings
Editing phonebook
The data registered to the BluetoothHands-Free phonebook can be edited.
NOTE
Do this function only when parked. It istoo distracting to attempt while drivingand you may make too many errors tobe effective.
1. Press the pick-up button (with/without7-inch navigation system) or talkbutton with a short press (without 7-inch navigation system) or a long press(with 7-inch navigation system).
NOTE
For vehicles with the 7-inch navigationsystem, you can also press the voicerecognition/hands-free switch with ashort press and say: [Beep] “Telephone”or “Phone”.
2. Say: [Beep] “Phonebook”
3. Prompt: “Select one of the following:New entry, edit, list names, delete,erase all or import contact.”
4. Say: [Beep] “Edit”
5. Prompt: “Please say the name of theentry you would like to edit or say,“List names”.”
6. Say: [Beep] “XXXXX... (Ex. “Mary'sphone”)” (Say the voice tag for theregistered name to be edited in thephonebook.)
7. Prompt: “Home, Work, Mobile, orOther?”
Interior Comfort
Bluetooth Hands-Free
6-83
CX-7_8AP5-EE-09F_Edition1 Page357Monday, June 15 2009 3:26 PM
Form No.8AP5-EE-09F

Black plate (358,1)
8. Say: [Beep] “Home” (Say theregistered location to be edited:“Home”, “Work”, “Mobile”, or“Other”).
9. Prompt: “XXXXX... (Ex. “Mary'sphone”) (Registered voice tag) XXXX(Ex. “Home”) (Registered location). Isthis correct?”
10. Say: [Beep] “Yes”
11. Prompt: “The current number isXXXXXXXXXXX (Ex. “555-1234”)(Currently registered number). Newnumber, please.”
NOTE
If there was no previous phone numberregistered to a location (Ex. “Work”),the prompt will only read out “Number,please”.
12. Say: [Beep] “XXXXXXXXXXX(Ex. “555-5678”)” (Say the newphone number to be registered.)
13. Prompt: “XXXXXXXXXXX (Ex.“555-5678”) (The new phone numberto be registered). Is this correct?”
14. Say: [Beep] “Yes”
15. Prompt: “Number changed, returningto main menu.”
Phonebook data deletion
Erasing individual phonebook data
Individual data registered to the BluetoothHands-Free phonebook can be cleared.
NOTE
Do this function only when parked. It istoo distracting to attempt while drivingand you may make too many errors tobe effective.
1. Press the pick-up button (with/without7-inch navigation system) or talkbutton with a short press (without 7-inch navigation system) or a long press(with 7-inch navigation system).
NOTE
For vehicles with the 7-inch navigationsystem, you can also press the voicerecognition/hands-free switch with ashort press and say: [Beep] “Telephone”or “Phone”.
2. Say: [Beep] “Phonebook”
3. Prompt: “Select one of the following:New entry, edit, list names, delete,erase all or import contact.”
4. Say: [Beep] “Delete”
5. Prompt: “Please say the name of theentry you would like to delete or say,“List names”.”
6. Say: [Beep] “XXXXX... (Ex. “John'sphone”)” (Say the registered voice tagto be deleted from the phonebook.)
7. Prompt: “Deleting XXXXX... (Ex.“John's phone”) (Registered voice tag)Home (Registered location). Is thiscorrect?”
8. Say: [Beep] “Yes”
6-84
Interior Comfort
Bluetooth Hands-Free
CX-7_8AP5-EE-09F_Edition1 Page358Monday, June 15 2009 3:26 PM
Form No.8AP5-EE-09F

Black plate (359,1)
9. Prompt: “XXXXX... (Ex. “John'sphone”) (Registered voice tag) Home(Registered location) deleted, returningto main menu.”
Complete deletion of the phonebookdata
All data registered to the BluetoothHands-Free phonebook can be erased.
NOTE
Do this function only when parked. It istoo distracting to attempt while drivingand you may make too many errors tobe effective.
1. Press the pick-up button (with/without7-inch navigation system) or talkbutton with a short press (without 7-inch navigation system) or a long press(with 7-inch navigation system).
NOTE
For vehicles with the 7-inch navigationsystem, you can also press the voicerecognition/hands-free switch with ashort press and say: [Beep] “Telephone”or “Phone”.
2. Say: [Beep] “Phonebook”
3. Prompt: “Select one of the following:New entry, edit, list names, delete,erase all or import contact.”
4. Say: [Beep] “Erase all”
5. Prompt: “Are you sure you want todelete everything from your HandsFree system phonebook?”
6. Say: [Beep] “Yes”
7. Prompt: “You are about to deleteeverything from your Hands Freesystem phonebook. Do you want tocontinue?”
8. Say: [Beep] “Yes”
9. Prompt: “Please wait, deleting theHands Free system phonebook.”
10. Prompt: “Hands-Free systemphonebook deleted, returning to mainmenu.”
Read-out of names registered to theBluetooth Hands-Free phonebook
Bluetooth Hands-Free can read out the listof names registered to its phonebook.
1. Press the pick-up button (with/without7-inch navigation system) or talkbutton with a short press (without 7-inch navigation system) or a long press(with 7-inch navigation system).
NOTE
For vehicles with the 7-inch navigationsystem, you can also press the voicerecognition/hands-free switch with ashort press and say: [Beep] “Telephone”or “Phone”.
2. Say: [Beep] “Phonebook”
3. Prompt: “Select one of the following:New entry, edit, list names, delete,erase all or import contact.”
4. Say: [Beep] “List names”
5. Prompt: “XXXXX..., XXXXX...,XXXXX... (Ex. “John's phone”, Mary'sphone, Bill's phone)” (Voice guidancereads out the voice tags registered tothe phonebook.)
Interior Comfort
Bluetooth Hands-Free
6-85
CX-7_8AP5-EE-09F_Edition1 Page359Monday, June 15 2009 3:26 PM
Form No.8AP5-EE-09F

Black plate (360,1)
Press the talk button with a short pressduring the read-out at the desired name,and then say one of the following voicecommands to execute it.
l “Continue”: Continues the list read-out.
l “Call”: Calls the registered phonebookdata when the talk button is short-pressed.
l “Edit”: Edits the registered phonebookdata when the talk button is short-pressed.
l “Delete”: Deletes the registeredphonebook data when the talk button isshort-pressed.
l “Previous”: Returns to the previousphonebook data in read-out when thetalk button is short-pressed.
6. Prompt: “End of list, would you liketo start from the beginning?”
7. Say: [Beep] “No”
8. Prompt: “Returning to main menu.”
qDTMF (Dual Tone Multi-Frequency Signal) Transmission
This function is used when transmittingDTMF via the user's voice. The receiverof a DTMF transmission is generally ahome telephone answering machine or acompany's automated guidance call centre(When you send tone signals backaccording to the voice guidancerecording).
1. Press the talk button with a short press.
2. Say: [Beep] “XXXX... send” (SayDTMF code)
3. Prompt: “Sending XXXX... (DTMFcode)”
Hands-Free Setting
qDevice
Device registration
For the registration of a Bluetoothequipped device to Bluetooth Hands-Free,refer to “Bluetooth Hands-FreePreparation” (page 6-74).
Registered device read-out
Bluetooth Hands-Free can read-out thedevices registered to its system.
NOTE
Do this function only when parked. It istoo distracting to attempt while drivingand you may make too many errors tobe effective.
1. Press the pick-up button (with/without7-inch navigation system) or talkbutton with a short press (without 7-inch navigation system) or a long press(with 7-inch navigation system).
NOTE
For vehicles with the 7-inch navigationsystem, you can also press the voicerecognition/hands-free switch with ashort press and say: [Beep] “Telephone”or “Phone”.
2. Say: [Beep] “Setup”
3. Prompt: “Select one of the following:Pairing options, confirmation prompts,language, password, select phone orselect music player.”
4. Say: [Beep] “Pairing options”
6-86
Interior Comfort
Bluetooth Hands-Free
CX-7_8AP5-EE-09F_Edition1 Page360Monday, June 15 2009 3:26 PM
Form No.8AP5-EE-09F

Black plate (361,1)
5. Prompt: “Select one of the following:Pair, edit, delete, or list.”
6. Say: [Beep] “List”
7. Prompt: “XXXXX..., XXXXX...,XXXXX... (Ex. Device A, device B,device C)” (The voice guidance readsout the device tags registered to thehands-free system.)
Press the talk button with a short pressduring the read-out at the desired device,and then say one of the following voicecommands to execute it.
l “Select phone”: Selects device (Mobilephone) when the talk button is short-pressed.
l “Select music player”: Selects device(Music player) when the talk button isshort-pressed.
l “Edit”: Edits device when the talkbutton is short-pressed.
l “Continue”: Continues the list read-out.
l “Delete”: Deletes the registered devicewhen the talk button is short-pressed.
l “Previous”: Returns to the previousdevice in read-out when the talk buttonis short-pressed.
8. Prompt: “End of list, would you liketo start from the beginning?”
9. Say: [Beep] “No”
10. Prompt: “Returning to main menu.”
Device selection
If several devices have been programmed,the Bluetooth unit links the device lastprogrammed. If you would like to link adifferent programmed device, it isnecessary to change the link. The order ofdevice priority after the link has beenchanged is maintained even when theignition switch is turned off.
Hands-free phone
1. Press the pick-up button (with/without7-inch navigation system) or talkbutton with a short press (without 7-inch navigation system) or a long press(with 7-inch navigation system).
NOTE
For vehicles with the 7-inch navigationsystem, you can also press the voicerecognition/hands-free switch with ashort press and say: [Beep] “Telephone”or “Phone”.
2. Say: [Beep] “Setup”
3. Prompt: “Select one of the following:Pairing options, confirmation prompts,language, password, select phone orselect music player.”
4. Say: [Beep] “Select phone”
5. Prompt: “Please say 1 for XXXXX...(Ex. device A), 2 for XXXXX... (Ex.device B...)”
6. Say: [Beep] “X” (Say the number forthe mobile phone to be connected.)
7. Prompt: “XXXXX... (Ex. device B...)(Registered device tag) selected, is thiscorrect?”
8. Say: [Beep] “Yes”
Interior Comfort
Bluetooth Hands-Free
6-87
CX-7_8AP5-EE-09F_Edition1 Page361Monday, June 15 2009 3:26 PM
Form No.8AP5-EE-09F
Black plate (362,1)
9. Prompt: “XXXXX... (Ex. device B...)(Device tag) will temporarily overridephone priorities, returning to mainmenu.”
Music player
1. Press the pick-up button (with/without7-inch navigation system) or talkbutton with a short press (without 7-inch navigation system) or a long press(with 7-inch navigation system).
NOTE
For vehicles with the 7-inch navigationsystem, you can also press the voicerecognition/hands-free switch with ashort press and say: [Beep] “Telephone”or “Phone”.
2. Say: [Beep] “Setup”
3. Prompt: “Select one of the following:Pairing options, confirmation prompts,language, password, select phone orselect music player.”
4. Say: [Beep] “Select music player”
5. Prompt: “Please say 1 for XXXXX...(Ex. device A), 2 for XXXXX... (Ex.device B...)”
6. Say: [Beep] “X” (Say the number forthe music player to be connected.)
7. Prompt: “XXXXX... (Ex. device B...)(Registered device tag) selected, is thiscorrect?”
8. Say: [Beep] “Yes”
9. Prompt: “XXXXX... (Ex. device B...)(Device tag) selected.”
NOTE
Device (Music player) selection canalso be done by operating the panelbutton (page 6-61).
Registered device (Mobile phone)deletion
Registered devices (Mobile phone) can bedeleted individually or collectively.
NOTE
Do this function only when parked. It istoo distracting to attempt while drivingand you may make too many errors tobe effective.
1. Press the pick-up button (with/without7-inch navigation system) or talkbutton with a short press (without 7-inch navigation system) or a long press(with 7-inch navigation system).
NOTE
For vehicles with the 7-inch navigationsystem, you can also press the voicerecognition/hands-free switch with ashort press and say: [Beep] “Telephone”or “Phone”.
2. Say: [Beep] “Setup”
3. Prompt: “Select one of the following:Pairing options, confirmation prompts,language, password, select phone orselect music player.”
4. Say: [Beep] “Pairing options”
5. Prompt: “Select one of the following:Pair, edit, delete, or list.”
6-88
Interior Comfort
Bluetooth Hands-Free
CX-7_8AP5-EE-09F_Edition1 Page362Monday, June 15 2009 3:26 PM
Form No.8AP5-EE-09F

Black plate (363,1)
NOTE
A registered device (Mobile phone) canbe deleted using the registration list.
6. Say: [Beep] “Delete”
7. Prompt: “Please say 1 for XXXXX...(Ex. device A), 2 for XXXXX... (Ex.device B...)” (The device tag of theregistered device is read out by theHFP.).
8. Say: [Beep] “X” (Say the number ofthe device to be deleted.)
NOTE
Say “All” to delete all devices (Mobilephone).
9. Prompt: “Deleting XXXXX... (Ex.device B...) (Registered device tag). Isthis correct?”
10. Say: [Beep] “Yes”
11. Prompt: “Deleted”
Registered device editing
1. Press the pick-up button (with/without7-inch navigation system) or talkbutton with a short press (without 7-inch navigation system) or a long press(with 7-inch navigation system).
NOTE
For vehicles with the 7-inch navigationsystem, you can also press the voicerecognition/hands-free switch with ashort press and say: [Beep] “Telephone”or “Phone”.
2. Say: [Beep] “Setup”
3. Prompt: “Select one of the following:Pairing options, confirmation prompts,language, password, select phone orselect music player.”
4. Say: [Beep] “Pairing options”
5. Prompt: “Select one of the following:Pair, edit, delete, or list.”
6. Say: [Beep] “Edit”
7. Prompt: “Please say 1 for XXXXX...(Ex. device A), 2 for XXXXX... (Ex.device B...), which device please?”(The device tag of the registered deviceis read out by the HFP.)
8. Say: [Beep] “X” (Say the number ofthe device to be edited.)
9. Prompt: “New name please?”
10. Say: [Beep] “XXXXX... (Ex. deviceC)” (Speak a “device tag”, anarbitrary name for the device.)
11. Prompt: “XXXXX... (Ex. device C)(Device tag), is this correct?”
12. Say: [Beep] “Yes”
13. Prompt: “New name saved, returningto main menu.”
qSecurity Setting
If a password is set, the system cannot beactivated unless the password is input.
NOTE
Do this function only when parked. It istoo distracting to attempt while drivingand you may make too many errors tobe effective.
Interior Comfort
Bluetooth Hands-Free
6-89
CX-7_8AP5-EE-09F_Edition1 Page363Monday, June 15 2009 3:26 PM
Form No.8AP5-EE-09F

Black plate (364,1)
Password setting
1. Press the pick-up button (with/without7-inch navigation system) or talkbutton with a short press (without 7-inch navigation system) or a long press(with 7-inch navigation system).
NOTE
For vehicles with the 7-inch navigationsystem, you can also press the voicerecognition/hands-free switch with ashort press and say: [Beep] “Telephone”or “Phone”.
2. Say: [Beep] “Setup”
3. Prompt:“Select one of the following:Pairing options, confirmation prompts,language, password, select phone orselect music player.”
4. Say: [Beep] “Password”
5. Prompt: “Password is disabled. Wouldyou like to enable it?”
6. Say: [Beep] “Yes”
7. Prompt:“Please say a 4-digitpassword. Remember this password. Itwill be required to use this system.”
8. Say: [Beep] “XXXX” (Say a desired 4-digit password, “PCode”.)
9. Prompt:“Password XXXX (Password,PCode). Is this correct?”
10. Say: [Beep] “Yes”
11. Prompt:“Password is enabled,returning to main menu.”
Using Bluetooth Hands-Free with apassword
1. Press the pick-up button (with/without7-inch navigation system) or talkbutton with a short press (without 7-inch navigation system) or a long press(with 7-inch navigation system).
NOTE
For vehicles with the 7-inch navigationsystem, you can also press the voicerecognition/hands-free switch with ashort press and say: [Beep] “Telephone”or “Phone”.
2. Prompt:“Hands-Free system is locked.State the password to continue.”
3. Say: [Beep] “XXXX” (Say the setpassword “PCode”.)
4. If the correct password is input, voiceguidance “XXXXXX... (Ex. “Mary'sdevice) (Device tag) is connected” isannounced.If the password is incorrect, voiceguidance “XXXX (4-digit password,Pcode) incorrect password, please tryagain” is announced.
Cancelling the password
NOTE
Do this function only when parked. It istoo distracting to attempt while drivingand you may make too many errors tobe effective.
6-90
Interior Comfort
Bluetooth Hands-Free
CX-7_8AP5-EE-09F_Edition1 Page364Monday, June 15 2009 3:26 PM
Form No.8AP5-EE-09F

Black plate (365,1)
1. Press the pick-up button (with/without7-inch navigation system) or talkbutton with a short press (without 7-inch navigation system) or a long press(with 7-inch navigation system).
NOTE
For vehicles with the 7-inch navigationsystem, you can also press the voicerecognition/hands-free switch with ashort press and say: [Beep] “Telephone”or “Phone”.
2. Say: [Beep] “Setup”
3. Prompt: “Select one of the following:Pairing options, confirmation prompts,language, password, select phone orselect music player.”
4. Say: [Beep] “Password”
5. Prompt:“Password is enabled. Wouldyou like to disable it?”
6. Say: [Beep] “Yes”
7. Prompt:“Password is disabled,returning to main menu.”
Confirmation Prompts
The confirmation prompt confirms thecommand content to the user beforeadvancing to the operation requested bythe user. When this function is turned on,the system reads out the voice inputcommand previously received andconfirms whether the command is correctbefore advancing to the commandexecution.When the confirmation prompt function isturned on:(Ex. “Calling John's device. Is thiscorrect?”)
When the confirmation prompt function isturned off:(Ex. “Calling John's device.”)
NOTE
If the confirmation prompt function isturned off when making an emergencycall, the system reads out and confirmsthe command before executing it.
1. Press the pick-up button (with/without7-inch navigation system) or talkbutton with a short press (without 7-inch navigation system) or a long press(with 7-inch navigation system).
NOTE
For vehicles with the 7-inch navigationsystem, you can also press the voicerecognition/hands-free switch with ashort press and say: [Beep] “Telephone”or “Phone”.
2. Say: [Beep] “Setup”
3. Prompt:“Select one of the following:Pairing options, confirmation prompts,language, password, select phone orselect music player.”
4. Say: [Beep] “Confirmation prompts”
5. Prompt:“Confirmation prompts areon/off. Would you like to turnconfirmation prompts off/on?”
6. Say: [Beep] “Yes”
7. Prompt:“Confirmation prompts areoff/on, returning to main menu.”
Interior Comfort
Bluetooth Hands-Free
6-91
CX-7_8AP5-EE-09F_Edition1 Page365Monday, June 15 2009 3:26 PM
Form No.8AP5-EE-09F

Black plate (366,1)
qVoice Recognition LearningFunction (Speaker Enrolment)
The voice recognition learning functionenables voice recognition appropriate tothe characteristics of the user's voice.If the recognition of the voice inputcommands to the system is not adequate,this function can largely improve thesystem's voice recognition of the user. Ifyour voice can be recognized sufficientlywithout using this function, you may notrealize the added benefit of the function.To register your voice, the voice inputcommand list must be read out. Read outthe list when the vehicle is parked.Perform the registration in as quiet a placeas possible (page 6-72).The registration must be performedcompletely. The required time is a fewminutes. The user needs to be seated inthe driver's seat with the voice inputcommand list for voice recognitionlearning open to the page indicated below.
When voice recognition learning isdone for the first time
1. Press the pick-up button (with/without7-inch navigation system) or talkbutton with a short press (without 7-inch navigation system) or a long press(with 7-inch navigation system).
NOTE
For vehicles with the 7-inch navigationsystem, you can also press the voicerecognition/hands-free switch with ashort press and say: [Beep] “Telephone”or “Phone”.
2. Say: [Beep] “Voice training”
3. Prompt: “This operation must beperformed in a quiet environment whilethe vehicle is stopped. See the owner'smanual for the list of required trainingphrases. Press and release the talkbutton when you are ready to begin.Press the hangup button to cancel atany time.”
4. Press the talk button with a short press.
5. The voice guidance reads out the voiceinput command number (refer to thevoice input command list for voicerecognition learning). (Ex. “Please readphrase 1”)
6. Say: [Beep] “0123456789” (Say thevoice input command for voicerecognition learning (1 to 8) accordingto the voice guidance.)
7. Prompt: “Speaker enrolment iscomplete, returning to main menu.”
NOTE
If an error occurred in the voicerecognition learning, re-learning can bedone by pressing the talk button with ashort press.
Voice recognition re-learning
If voice recognition learning has alreadybeen done.
1. Press the pick-up button (with/without7-inch navigation system) or talkbutton with a short press (without 7-inch navigation system) or a long press(with 7-inch navigation system).
6-92
Interior Comfort
Bluetooth Hands-Free
CX-7_8AP5-EE-09F_Edition1 Page366Monday, June 15 2009 3:26 PM
Form No.8AP5-EE-09F

Black plate (367,1)
NOTE
For vehicles with the 7-inch navigationsystem, you can also press the voicerecognition/hands-free switch with ashort press and say: [Beep] “Telephone”or “Phone”.
2. Say: [Beep] “Voice training”
3. Prompt: “Enrolment is enabled/disabled. Would you like to disable/enable or retrain?”
4. Say: [Beep] “Retrain”
5. Prompt: “This operation must beperformed in a quiet environment whilethe vehicle is stopped. See the owner'smanual for the list of required trainingphrases. Press and release the talkbutton when you are ready to begin.Press the hangup button to cancel atany time.”
6. Press the talk button with a short press.
7. The voice guidance reads out the voiceinput command number (refer to thevoice input command list for voicerecognition learning). (Ex. “Please readphrase 1”)
8. Say: [Beep] “0123456789” (Say thevoice input command for voicerecognition learning (1 to 8) accordingto the voice guidance.)
9. Prompt: “Speaker enrolment iscomplete, returning to main menu.”
NOTE
If an error occurred in the voicerecognition learning, re-learning can bedone by pressing the talk button with ashort press.
Voice input command list for voicerecognition learning
When reading out, the following pointsmust be observed:
l Read out the numbers one at a timecorrectly and naturally.
(For example, “1234” must be read out“one, two, three, four”, not “twelve, thirtyfour”.)
l Do not read out parentheses. “ (” andhyphens “-” are used for separatingnumbers in a phone number.
Ex.“ (888) 555-1212” must be spoken “Eight,eight, eight, five, five, five, one, two, one,two.”
Phrase Command
1 0123456789
2 (888) 555-1212
3 Call
4 Dial
5 Setup
6 Cancel
7 Continue
8 Help
NOTE
l The applicable phrase appears in thedisplay.
l After user voice registration iscompleted, voice guidance “Speakerenrolment is complete, returning tomain menu” is announced.
Interior Comfort
Bluetooth Hands-Free
6-93
CX-7_8AP5-EE-09F_Edition1 Page367Monday, June 15 2009 3:26 PM
Form No.8AP5-EE-09F

Black plate (368,1)
Voice recognition learning on/off
1. Press the pick-up button (with/without7-inch navigation system) or talkbutton with a short press (without 7-inch navigation system) or a long press(with 7-inch navigation system).
NOTE
For vehicles with the 7-inch navigationsystem, you can also press the voicerecognition/hands-free switch with ashort press and say: [Beep] “Telephone”or “Phone”.
2. Say: [Beep] “Voice training”
3. Prompt: “Enrolment is enabled/disabled. Would you like to disable/enable or retrain?”
4. Say: [Beep] “Disable” or “Enable”
5. When “Disable” is spoken, the voicerecognition learning is turned off.When “Enable” is spoken, the voicerecognition learning is turned on.
6. Prompt: “Speaker Enrolment isdisabled/enabled, returning to mainmenu.”
When Bluetooth Hands-Free Cannot be Used
Bluetooth Hands-Free cannot be usedunder the following conditions:
l The device is outside of thecommunication area.
l The device has a malfunction.
l The device is not connected to thehands-free unit equipped on thevehicle.
l The device's battery is weak.
l The device is turned off.
l The device is placed where radioreception is difficult.
l The ignition switch is turned off.
6-94
Interior Comfort
Bluetooth Hands-Free
CX-7_8AP5-EE-09F_Edition1 Page368Monday, June 15 2009 3:26 PM
Form No.8AP5-EE-09F

Black plate (369,1)
SunvisorsWhen you need a sunvisor, lower it foruse in front or swing it to the side.
Sunvisor
qSide Extension Sunvisors
The visor extender extends the sunvisor'srange of sun shading.To use, pull it out.
CAUTIONWhen moving the sunvisor, retract thevisor extender to its original position.Otherwise, the visor extender could hitthe rearview mirror.
qVanity Mirrors
To use the vanity mirror, lower thesunvisor.The vanity mirror light will illuminatewhen you open the cover.
Interior Comfort
Interior Equipment
6-95
CX-7_8AP5-EE-09F_Edition1 Page369Monday, June 15 2009 3:26 PM
Form No.8AP5-EE-09F

Black plate (370,1)
Interior Lights
qIlluminated Entry System
When the illuminated entry systemoperates, the overhead light (switch is inthe DOOR position) turns on for:
l About 30 seconds after the driver'sdoor is unlocked and the ignitionswitch is in the LOCK position (withthe ignition key removed).
l About 15 seconds after all doors areclosed.(With Advanced key)About 5 seconds after all doors areclosed when the advanced key isoutside of the vehicle.
l About 15 seconds after the ignitionswitch is in the LOCK position (withthe ignition key removed) with alldoors closed.
The light also turns off when:
l The ignition switch is turned to the ONposition and all doors are closed.
l The driver's door is locked.
NOTE
Battery saverIf any door is left opened, the light turnsoff after about 30 minutes to save thebattery.The light turns on again when theignition switch is turned to the ONposition, or when any door is openedafter all doors have been closed.
qOverhead Lights
Front
Switch Position Front Overhead Lights
Light off
l Light is on when any door isopen
l Light is on or off when theilluminated entry system ison
Rear
6-96
Interior Comfort
Interior Equipment
CX-7_8AP5-EE-09F_Edition1 Page370Monday, June 15 2009 3:26 PM
Form No.8AP5-EE-09F

Black plate (371,1)
Switch Position Rear Overhead Lights
Light off
l Light is on when any door isopen
l Light is on or off when theilluminated entry system ison
Light on
qMap Lights
The map lights are switched on or off bypressing the switches.
Switches
qLuggage Compartment Light
SwitchPosition
Luggage Compartment Light
Light off
Light on when the liftgate is open
Interior Comfort
Interior Equipment
6-97
CX-7_8AP5-EE-09F_Edition1 Page371Monday, June 15 2009 3:26 PM
Form No.8AP5-EE-09F

Black plate (372,1)
Information Display
Audio display
Air-conditioning display
qInformation Display Functions
The information display has the following functions:
l Air-Conditioning Display
l Audio Display
6-98
Interior Comfort
Interior Equipment
CX-7_8AP5-EE-09F_Edition1 Page372Monday, June 15 2009 3:26 PM
Form No.8AP5-EE-09F

Black plate (373,1)
qAir-Conditioning Display
The air-conditioning system status isdisplayed. To operate the air-conditioningsystem, refer to“Air-Conditioning System” (page 6-2).
qAudio Display
The audio system status is displayed. Tooperate the audio system, refer to“Audio System” (page 6-18).
Interior Comfort
Interior Equipment
6-99
CX-7_8AP5-EE-09F_Edition1 Page373Monday, June 15 2009 3:26 PM
Form No.8AP5-EE-09F

Black plate (374,1)
Multi Information Display
Clock adjustment buttons Clock adjustment buttons
Steering Switch
Left switchRight switch
Navi switch
BACK switch
INFO switch
Enter (up/down) switch
6-100
Interior Comfort
Interior Equipment
CX-7_8AP5-EE-09F_Edition1 Page374Monday, June 15 2009 3:26 PM
Form No.8AP5-EE-09F

Black plate (375,1)
Switch Function
Enter (up/down) switch Used to select a menu and change numbers. Select up or down and press enter.
Right switch/Leftswitch
Used to select digits when setting numbers.
Navi switch(With navigation sys-tem)
Press to switch the system to the navigation system screen.
BACK switch Press during SETTINGS to return to the previous screen.
INFO switch Press to switch to the multi information display.Switches the setting display in the order of Trip computer(average fuel economy/average vehicle speed)→ Trip computer(current fuel economy/distance-to-empty) → Audio display→ Settings(reset averages/maintenance/preferences). Each time the switch is pressed, the multiinformation display cycles through.
qMulti Information Display Functions
Function name Details See page
Clock Constant display of time. 6-102
Outside temperaturedisplay
Constant display of ambient temperature. 6-103
Audio display Displays the audio operation status. Displayed when the INFO switch ispressed.
6-103
Trip computer Displays the average fuel economy, average vehicle speed, current fueleconomy, and distance-to-empty. Displayed when the INFO switch ispressed.
6-103
Maintenance monitor Notification of periodic inspection and tyre rotation period 6-105
Warning indicator Notification of the need to take caution 6-110
Settings Used to change the multi information display settings. Displayed when theINFO switch is pressed.
6-111
Rear view monitor The rear view monitor is a visual assist system when reversing the vehiclethat provides images from the rear of the vehicle.
6-112
Navigation system Refer to the separate manual
Interior Comfort
Interior Equipment
6-101
CX-7_8AP5-EE-09F_Edition1 Page375Monday, June 15 2009 3:26 PM
Form No.8AP5-EE-09F

Black plate (376,1)
qClock
The time is displayed when the ignition isswitched to ACC or ON.
Time setting
1. Turn the ignition switch to the ACC orON position.
2. Adjust the time using the time settingbuttons ( , ).The hours advance while the timesetting button ( ) is pressed.The minutes advance while the timesetting button ( ) is pressed.
Time resetting (with:00 button)
1. Turn the ignition switch to the ACC orON position.
2. Press the:00 button.
3. When the button is pressed, the timewill be reset as follows:
(Example)12:01―12:29→12:0012:30―12:59→1:00
NOTE
When the:00 button is pressed, theseconds will start at “00”.
Switching between 12 and 24-hourclock time (with 12/24h button)
1. Turn the ignition switch to the ACC orON position.
2. Press the 12/24h button.
With navigation system
Time zone switching
1. Press the INFO switch until theSETTINGS screen is displayed.
2. Select PREFERENCES by pressing theEnter (up/down) switch up or down,and then press the Enter (up/down)switch.
3. Select TIME ZONE by pressing theEnter (up/down) switch up or down,and then press the Enter (up/down)switch.
4. Select the desired time zone bypressing the Enter (up/down) switch upor down, and then press the Enter (up/down) switch.
NOTE
l Daylight saving time is not reflectedin the time zone displayed.
l The clock does not display if there isno GPS signal reception.
l If the battery leads are disconnectedand then reconnected, the clock doesnot operate until a GPS signal isreceived. Do not place objects on theinstrument panel, otherwise the clockmay be unable to receive the GPSsignal normally.
6-102
Interior Comfort
Interior Equipment
CX-7_8AP5-EE-09F_Edition1 Page376Monday, June 15 2009 3:26 PM
Form No.8AP5-EE-09F

Black plate (377,1)
qOutside Temperature Display
When the ignition switch is switched ON,the ambient temperature is displayed.
NOTE
l Under the following conditions, theambient temperature display maydiffer from the actual ambienttemperature depending on thesurroundings and vehicle conditions:
l Significantly cold or hottemperatures.
l Sudden changes in ambienttemperature.
l The vehicle is parked.l The vehicle is driven at low
speeds.
l When the ignition is switched toACC, “- - -” is displayed.
qAudio Display
Press the INFO switch until the AUDIOscreen is displayed. The audio operationstatus is displayed.To operate the audio system, refer to“Audio System” (page 6-18).
qTrip Computer
The trip computer can display thefollowing:
l The average fuel economy.
l The average vehicle speed.
l The current fuel economy.
l The approximate distance you cantravel on the available fuel.
1. Switch the ignition ON.
2. Press the INFO switch until the tripcomputer screen is displayed.
If you have any problems with your tripcomputer, consult an expert repairer, werecommend an Authorised MazdaRepairer.
Average fuel economy
This mode displays the average fueleconomy by calculating the total fuelconsumption and the total travelleddistance since purchasing the vehicle, re-connecting the battery after disconnection,or resetting the data. The average fueleconomy is calculated and displayedevery minute.
To erase the displayed data, Refer toSettings on page 6-111.
Interior Comfort
Interior Equipment
6-103
CX-7_8AP5-EE-09F_Edition1 Page377Monday, June 15 2009 3:26 PM
Form No.8AP5-EE-09F

Black plate (378,1)
After erasing, the calculated average fueleconomy in - - - L/100 km (- - - mpg) isdisplayed after 1 minute has elapsed.
Average vehicle speed
This mode displays the average vehiclespeed by calculating the distance and thetime travelled since connecting the batteryor resetting the data.The average vehicle speed will becalculated every 10 seconds.
To erase the displayed data, Refer toSettings on page 6-111.After erasing, the calculated averagevehicle speed in - - - km/h (- - - mph) isdisplayed after 1 minute has elapsed.
Current fuel economy
This mode displays the current fueleconomy by calculating the amount offuel consumption and the distancetravelled.
The current fuel economy will becalculated every 2 seconds.
When you've slowed to about 5 km/h (3mph), - - - L/100 km (- - - mpg) will bedisplayed.
Distance-to-empty
This mode displays the approximatedistance you can travel on the remainingfuel based on the fuel economy.The distance-to-empty will be calculatedevery second.
6-104
Interior Comfort
Interior Equipment
CX-7_8AP5-EE-09F_Edition1 Page378Monday, June 15 2009 3:26 PM
Form No.8AP5-EE-09F

Black plate (379,1)
NOTE
l Even though the distance-to-emptydisplay may indicate a sufficientamount of remaining drivingdistance before refuelling is required,refuel as soon as possible if the fuelgauge needle nears E or the low fuelwarning light illuminates.
l The display will not change unlessyou add more than approximately 5L {6 US qt, 5 lmp qt} of fuel.
l When the ignition is switched toACC, “- - -” is displayed.
qMaintenance Monitor
The periodic inspection and tyre rotationperiod notification can be displayed byturning the Maintenance Monitor on.
NOTE
l (Except European models)This function is inoperable while thevehicle is being driven.
l (With navigation system)If the battery leads are disconnectedand then reconnected, the SERVICEDUE item in the MAINTENANCEsetting cannot be done until the clockresets after receiving a GPS signal.Perform this setting after the clockresumes operation.
Initial setting method
1. Press the INFO switch until theSETTINGS screen is displayed.
2. Select MAINTENANCE by pressingthe Enter (up/down) switch up ordown, and then press the Enter (up/down) switch.
3. Select the item you want to turn on(TYRE ROTATION or SERVICEDUE) by pressing the Enter (up/down)switch up or down, and then press theEnter (up/down) switch.
4. Press the Enter (up/down) switch.
5. Select SET and press the Enter (up/down) switch.
Interior Comfort
Interior Equipment
6-105
CX-7_8AP5-EE-09F_Edition1 Page379Monday, June 15 2009 3:26 PM
Form No.8AP5-EE-09F

Black plate (380,1)
NOTE
l For the service due notification,either the number of days or distancecan be set. When selecting one of thetwo settings, the setting not selectedis set to the initial valueautomatically.
l Because tyre rotation can only be setaccording to distance, the screen forsetting distance is displayed whenSET is selected.
6. Select DISTANCE or DAYS and pressthe Enter (up/down) switch. The screenfor setting the distance or days to thenext maintenance period is displayed.
7. Select a digit using the Right switch/Left switch, and press the Enter (up/down) switch up or down to change thevalue of the digit. If there is no need tochange a digit, leave it as it is and pressthe Enter (up/down) switch.
NOTE
The initial setting values are displayedcorresponding to the maintenanceschedule (except some countries). Foreach regional maintenance schedule,Refer to Scheduled Maintenance onpage 8-3.
6-106
Interior Comfort
Interior Equipment
CX-7_8AP5-EE-09F_Edition1 Page380Monday, June 15 2009 3:26 PM
Form No.8AP5-EE-09F

Black plate (381,1)
Message display
When the remaining days or the distanceapproaches 0, a message is displayed for 5seconds each time the ignition is switchedto ACC or ON.
NOTE
l If the Enter (up/down) switch ispressed while a message isdisplayed, it will no longer bedisplayed the next time the engine isstarted.
l After the vehicle is serviced and theremaining days/distance is reset, themessage for the next maintenanceperiod will be displayed when theremaining distance or days to thenext maintenance period approaches0 (displays when engine is started).
l If there are multiple tyre rotationperiods or service due, they aredisplayed according to their order.
l If there is more than one servicingdue deadline with one past due andthe other approaching, only the onewhich is past due will be displayed.
Interior Comfort
Interior Equipment
6-107
CX-7_8AP5-EE-09F_Edition1 Page381Monday, June 15 2009 3:26 PM
Form No.8AP5-EE-09F

Black plate (382,1)
Display period
Item Start of message display End of message display
TYRE ROTATION When remaining distance is lessthan 500 km (300 mile)
Distance exceeds 500 km (300 mile) fromremaining distance of 0 km
SERVICE DUE When remaining distance is lessthan 500 km (300 mile), orremaining days are less than 15(which ever comes first)
Distance exceeds 500 km (300 mile) fromremaining distance of 0 km, or 15 days haveelapsed since remaining days reached “0” days(which ever comes first)
Message display
Item Timing Displayed message
TYRE ROTATION Remaining distance:500 km (300 mile) to _500 km (_300 mile)
TYRE ROTATION DUE
SERVICE DUE Remaining distance:500 km (300 mile) to 0 km (0 mile)
SERVICE DUE
Remaining days: 15 to 0 days
Remaining distance:0 km (0 mile) to_500 km (_300 mile)
SERVICE OVERDUE
Remaining days: 0 to 15 days
Reset method
If resetting is performed after a tyrerotation or periodic inspection has beendone, a notification of the nextmaintenance period will be displayedwhen the period approaches.
1. Press the INFO switch until theSETTINGS screen is displayed.
2. Select MAINTENANCE by pressingthe Enter (up/down) switch up ordown, and then press the Enter (up/down) switch.
3. Select the item you would like to reset(TYRE ROTATION or SERVICEDUE) by pressing the Enter (up/down)switch up or down, and then press theEnter (up/down) switch.
6-108
Interior Comfort
Interior Equipment
CX-7_8AP5-EE-09F_Edition1 Page382Monday, June 15 2009 3:26 PM
Form No.8AP5-EE-09F

Black plate (383,1)
NOTE
l The current remaining distance anddays is displayed.
l Even if the remaining distance ordays have surpassed 0, the displaydoes not display a minus (―) andleaves the value at 0.
4. Press the Enter (up/down) switch.
5. Select SET and press the Enter (up/down) switch.
NOTE
If the SERVICE DUE item has been set,both the days and distance can beselected. Because the tyre rotation itemcan only be set according to distance,the screen for setting distance isdisplayed when SET is selected.
6. The DISTANCE or DAYS screen isdisplayed, and the remaining distanceand days values return to the valuespreviously set. If no changes arenecessary, press the Enter (up/down)switch.
NOTE
l If the settings are changed from theinitial values, the values which youset are displayed, not the initialvalues.
l Even if the battery is disconnected,the remaining distance and daysinformation is not erased.
l If the multi information display isreplaced or repaired, there is thepossibility of the remaining distanceand days information being erased.
Interior Comfort
Interior Equipment
6-109
CX-7_8AP5-EE-09F_Edition1 Page383Monday, June 15 2009 3:26 PM
Form No.8AP5-EE-09F

Black plate (384,1)
Method for turning the system off
The maintenance monitor can be turnedoff even after it has been turned on. If youwant to turn it off, the remaining distanceand days calculation to the nextmaintenance period is stopped, and amessage does not display to indicate anapproaching maintenance period.
1. Press the INFO switch until theSETTINGS screen is displayed.
2. Select MAINTENANCE by pressingthe Enter (up/down) switch up ordown, and then press the Enter (up/down) switch.
3. Select the item you want to turn off(TYRE ROTATION or SERVICEDUE) by pressing the Enter (up/down)switch up or down, and then press theEnter (up/down) switch.
4. Select OFF and press the Enter (up/down) switch.
qWarning Indicator
The following warning indicators aredisplayed according to necessity. Warningindicators are displayed regardless of themulti information display operation.
l DOOR OPEN (including the liftgate)
l CHECK TIRE PRESSURE
l RELEASE PARKING BRAKE
l ICY ROAD CONDITIONS
l SCR related
l ADBLUE LEVEL LOWCONTACT YOUR DEALER
l ADBLUE LEVEL LOWCONTACT DEALER NOW
l IGNITION BLOCKED ADBLUEEMPTY
l SCR MALFUNCTION CONTACTDEALER NOW
l IGNITION BLOCKED SCRMALFUNCTION
NOTE
When more than two warnings occur atthe same time, indicators are switchedat each specified time.
6-110
Interior Comfort
Interior Equipment
CX-7_8AP5-EE-09F_Edition1 Page384Monday, June 15 2009 3:26 PM
Form No.8AP5-EE-09F

Black plate (385,1)
qSettings
The following settings can be changed:
l Buzzer volume (Ignition key reminder,lights-on reminder)
l Turn indicator sound
l Distance unit
l Temperature unit
l Display language
The data for the trip computer averagefuel economy and the average vehiclespeed can also be changed.
To change settings
1. Press the INFO switch until theSETTINGS screen is displayed.
2. Select PREFERENCES by pressing theEnter (up/down) switch up or down,and then press the Enter (up/down)switch.
3. Select the setting item you want tochange by pressing the Enter (up/down) switch up or down, and thenpress the Enter (up/down) switch.
4. Select the desired setting by pressingthe Enter (up/down) switch up ordown, and then press the Enter (up/down) switch.
NOTE
The buzzer volume for both the ignitionkey reminder and the lights-on reminderis changed simultaneously. If you preferseparate buzzer volume settings, consultan Authorised Mazda Repairer. Ifseparate buzzer volume settings havebeen done at an Authorised MazdaRepairer, you will be unable to changethe settings.
Resetting the data for the trip computeraverage fuel economy and the averagevehicle speed
1. Press the INFO switch until theSETTINGS screen is displayed.
2. Select RESETAVERAGES and pressthe Enter (up/down) switch.
3. Select FUEL ECONOMYor SPEED,and press the Enter (up/down) switch.
Interior Comfort
Interior Equipment
6-111
CX-7_8AP5-EE-09F_Edition1 Page385Monday, June 15 2009 3:26 PM
Form No.8AP5-EE-09F

Black plate (386,1)
qRear View Monitor
The rear view monitor is a visual assist system when reversing the vehicle that providesimages from the rear of the vehicle.
WARNINGThe rear view monitor is only a visual assist device when reversing the vehicle. Theimages on the screen may be different from the actual conditions. Always drivecarefully confirming the safety of the rear and the surrounding conditions by lookingdirectly with your eyes. Reversing the vehicle by only looking at the screen may causean accident or a collision with an object.
CAUTIONl When the display is cold, images may course across the monitor or the screen andmay be dimmer than usual, which could cause difficulty in confirming thesurrounding conditions of the vehicle. Always drive carefully confirming the safety ofthe rear and the surrounding conditions by looking directly with your eyes.
l Do not apply excessive force to the camera. The camera position and angle maydeviate.
l Do not disassemble, modify, or remove it as it may no longer be waterproof.
l The camera cover is made of plastic. Do not apply degreasing agents, organicsolvents, wax, or glass coating agents to the camera cover. If any are spilled on thecover, wipe off with a soft cloth immediately.
l Do not rub the cover excessively, or polish it using an abrasive compound or a hardbrush. The cover may be damaged affecting the image.
NOTE
l If water, snow, or mud is stuck on the camera lens, wipe it off using a soft cloth. If itcannot be wiped off, use a mild detergent.
l If the camera temperature changes rapidly, such as by pouring hot water on it undercold temperature conditions, the rear view monitor may not operate correctly.
6-112
Interior Comfort
Interior Equipment
CX-7_8AP5-EE-09F_Edition1 Page386Monday, June 15 2009 3:26 PM
Form No.8AP5-EE-09F

Black plate (387,1)
Rear View Parking Camera Location
Rear View Parking Camera
Switching to the Rear View Monitor Display
Shift the shift lever to R with the ignition switch in the ON position to switch the display tothe rear view monitor display.
NOTE
When the shift lever is shifted from R to another shift lever position, the screen returns tothe previous display.
Interior Comfort
Interior Equipment
6-113
CX-7_8AP5-EE-09F_Edition1 Page387Monday, June 15 2009 3:26 PM
Form No.8AP5-EE-09F

Black plate (388,1)
Displayable Range on the Screen
The images on the screen may be different from the actual conditions.
(Screen display)
(Actual view)
Both bumper ends are not displayed. Both bumper ends are not displayed.
Object
6-114
Interior Comfort
Interior Equipment
CX-7_8AP5-EE-09F_Edition1 Page388Monday, June 15 2009 3:26 PM
Form No.8AP5-EE-09F

Black plate (389,1)
NOTE
l The displayable range varies depending on the vehicle and road conditions.
l The displayable range is limited. Objects under the bumper or around the bumperends cannot be displayed.
l The distance appearing in the displayed image is different from the actual distancebecause the rear view parking camera is equipped with a specific lens.
l Some optionally installed vehicle accessories may be picked up by the camera. Do notinstall any optional parts that can interfere with the camera view, such as illuminatingparts or parts made of reflective material.
l It may be difficult to see the display under the following conditions, however, it doesnot indicate a malfunction.
l In darkened areas.l When the temperature around the lens is high/low.l When the camera is wet such as on a rainy day or during periods of high humidity.l When foreign material such as mud is stuck around the camera.l When the camera lens reflects sunlight or headlight beams.
l If the camera picks up a high-intensity light such as sunlight reflected off the vehiclebody, a bright belt (light line) may appear on the display. (Smear phenomenon)
l Image display may be delayed if the temperature around the camera is low.
Rear View Monitor Operation
The operation of the rear view monitor when reversing the vehicle varies depending on thetraffic, road, and vehicle conditions. The amount of steering and the timing also variesdepending on conditions, so confirm the surrounding conditions directly with your eyesand steer the vehicle in accordance with the conditions.Be well aware of the above cautions prior to using the rear view monitor.
NOTE
Images displayed on the monitor from the rear view parking camera are reversed images(mirror images).
1. Shift the shift lever to R to switch the display to the rear view monitor display.
Interior Comfort
Interior Equipment
6-115
CX-7_8AP5-EE-09F_Edition1 Page389Monday, June 15 2009 3:27 PM
Form No.8AP5-EE-09F

Black plate (390,1)
2. Confirming the surrounding conditions, reverse the vehicle.
(Screen display) (Actual view)
3. When the shift lever is shifted from R to another shift lever position, the screen returnsto the previous display.
Variance Between Actual Road Conditions and Displayed Image
Some variance occurs between the actual road and the displayed road. Such variance indistance perspective could lead to an accident. Note the following conditions that maycause a variance in distance perspective.
6-116
Interior Comfort
Interior Equipment
CX-7_8AP5-EE-09F_Edition1 Page390Monday, June 15 2009 3:27 PM
Form No.8AP5-EE-09F

Black plate (391,1)
When the vehicle is tilted due to the weight of passengers and load
When the vehicle rear is lowered, the object displayed on the screen appears farther thanthe actual distance.
Variance
Object
Interior Comfort
Interior Equipment
6-117
CX-7_8AP5-EE-09F_Edition1 Page391Monday, June 15 2009 3:27 PM
Form No.8AP5-EE-09F

Black plate (392,1)
When there is a steep grade behind the vehicle
When there is a steep upgrade (downgrade) behind the vehicle, the object displayed on thescreen appears farther (downgrade: closer) than the actual distance.
Appears farther than actual distance
Appears closer than actual distance
Object at actual position
Object at actual positionObject on screen
A: Distance between the vehicle and object displayed on the screen.B: Actual distance between the vehicle and object.
Object on screen
6-118
Interior Comfort
Interior Equipment
CX-7_8AP5-EE-09F_Edition1 Page392Monday, June 15 2009 3:27 PM
Form No.8AP5-EE-09F

Black plate (393,1)
Cup Holder
WARNINGNever use a cup holder to hold hotliquids while the vehicle is moving:Using a cup holder to hold hot liquidswhile the vehicle is moving isdangerous. If the contents spill, youcould be scalded.
Do not put anything other than cupsor drink cans in cup holders:Putting objects other than cups ordrink cans in a cup holder isdangerous.During sudden braking ormanoeuvring, occupants could be hitand injured, or objects could bethrown around the vehicle, causinginterference with the driver and thepossibility of an accident. Only use acup holder for cups or drink cans.
qFront
The front cup holder is in the centreconsole.Manual transaxle
Automatic transaxle
qRear
The rear cup holder is on the rear centrearmrest.
Interior Comfort
Interior Equipment
6-119
CX-7_8AP5-EE-09F_Edition1 Page393Monday, June 15 2009 3:27 PM
Form No.8AP5-EE-09F

Black plate (394,1)
Bottle HolderBottle holders are on the inside of thedoors.
Bottle holder
CAUTIONDo not use the bottle holders forcontainers without caps. The contentsmay spill when the door is opened orclosed.
Storage Compartments
WARNINGKeep storage boxes closed whendriving:Driving with the storage boxes open isdangerous. To reduce the possibility ofinjury in an accident or a sudden stop,keep the storage boxes closed whendriving.
CAUTIONDo not leave lighters or eyeglasses inthe storage boxes while parked underthe sun. A lighter could explode or theplastic material in eyeglasses coulddeform and crack from hightemperature.
qGlove Box
To open the glove box, pull the latchtoward you.
6-120
Interior Comfort
Interior Equipment
CX-7_8AP5-EE-09F_Edition1 Page394Monday, June 15 2009 3:27 PM
Form No.8AP5-EE-09F
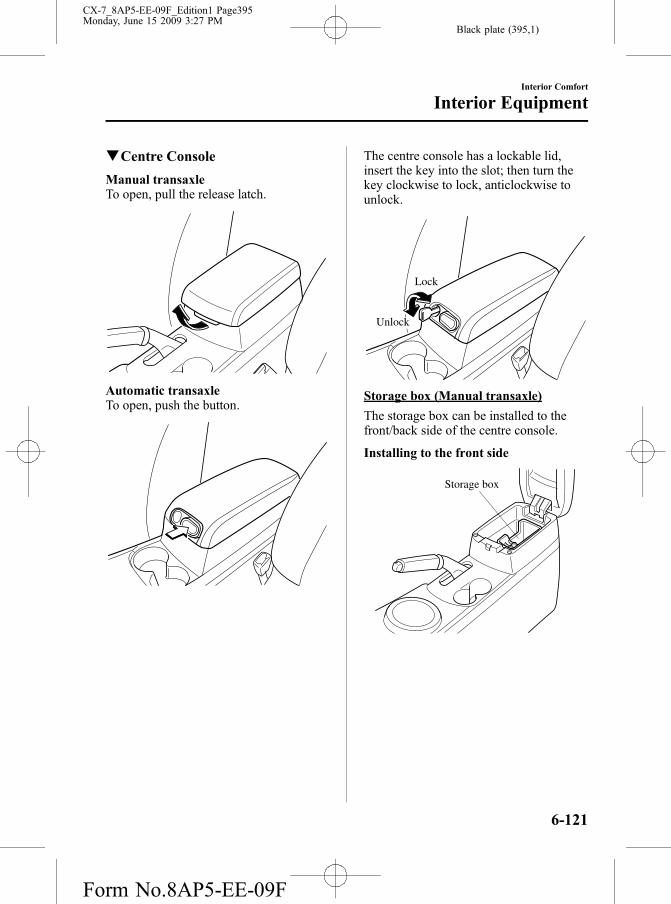
Black plate (395,1)
qCentre Console
Manual transaxleTo open, pull the release latch.
Automatic transaxleTo open, push the button.
The centre console has a lockable lid,insert the key into the slot; then turn thekey clockwise to lock, anticlockwise tounlock.
Lock
Unlock
Storage box (Manual transaxle)
The storage box can be installed to thefront/back side of the centre console.
Installing to the front side
Storage box
Interior Comfort
Interior Equipment
6-121
CX-7_8AP5-EE-09F_Edition1 Page395Monday, June 15 2009 3:27 PM
Form No.8AP5-EE-09F

Black plate (396,1)
Installing to the back side
Storage box
Storage box and tray (Automatictransaxle)
The storage box and tray can be removed.
Storage box
Storage tray
Centre console under-storage space
Manual transaxleSmall items can be stored in the under-storage space under the bottom (tray) ofthe centre console. Moreover, storageusing both levels is possible when thebottom (tray) of the centre console is keptopen.
To use the under-storage space
1. Remove the storage box.
2. Pull the strap and raise the bottom(tray) front.
CAUTIONClose the bottom (tray) in the reverseorder of opening. If it is not closedcorrectly (in the reverse order ofopening), the bottom (tray) may bedamaged.
qCargo Securing Loops
WARNINGMake sure luggage and cargo issecured before driving:Not securing cargo while driving isdangerous as it could move or becrushed during sudden braking or acollision and cause injury.
6-122
Interior Comfort
Interior Equipment
CX-7_8AP5-EE-09F_Edition1 Page396Monday, June 15 2009 3:27 PM
Form No.8AP5-EE-09F

Black plate (397,1)
Use the loops in the luggage compartmentto secure cargo with a rope or net. Thetensile strength of the loops is 196 N (20kgf, 44 lbf). Do not apply excessive forceto the loops as it will damage them.
qRear Coat Hooks
WARNINGNever hang heavy or sharp objects onthe assist grips and coat hooks:Hanging heavy or sharp-ended objectssuch as a coat hanger from the assistgrips or coat hooks is dangerous asthey can fly off and hit an occupant inthe cabin if a curtain air bag was todeploy, which could result in seriousinjury or death.
Always hang clothes on the coat hooksand the assist grips without hangers.
Coat hook
Interior Comfort
Interior Equipment
6-123
CX-7_8AP5-EE-09F_Edition1 Page397Monday, June 15 2009 3:27 PM
Form No.8AP5-EE-09F

Black plate (398,1)
Accessory SocketsThe ignition switch must be in the ACCor ON position.Only use genuine Mazda accessories orthe equivalent requiring no greater than120 W (DC 12 V, 10 A).The accessory socket is in the centreconsole.Type A
Type B
CAUTIONTo prevent accessory socket damage orelectrical failure, pay attention to thefollowing:
l Do not use accessories that requiremore than 120 W (DC 12 V, 10 A).
l Do not use accessories that are notgenuine Mazda accessories or theequivalent.
l Close the cover when the accessorysocket is not in use to preventforeign objects and liquids fromgetting into the accessory socket.
l Correctly insert the plug into theaccessory socket.
l Do not insert the cigarette lighterinto the accessory socket.
NOTE
To prevent discharging of the battery,do not use the socket for long periodswith the engine off or idling.
Connecting the accessory socket
1. Open the lid.
6-124
Interior Comfort
Interior Equipment
CX-7_8AP5-EE-09F_Edition1 Page398Monday, June 15 2009 3:27 PM
Form No.8AP5-EE-09F

Black plate (399,1)
2. Pass the connection plug cord throughthe cutout of the console and insert theplug into the accessory socket.
Plug
Interior Comfort
Interior Equipment
6-125
CX-7_8AP5-EE-09F_Edition1 Page399Monday, June 15 2009 3:27 PM
Form No.8AP5-EE-09F

Black plate (400,1)
6-126
CX-7_8AP5-EE-09F_Edition1 Page400Monday, June 15 2009 3:27 PM
Form No.8AP5-EE-09F

Black plate (401,1)
7 In Case of an Emergency
Helpful information on what to do in an emergency.
Parking in an Emergency ............................................................. 7-2Parking in an Emergency .......................................................... 7-2
Flat Tyre ........................................................................................ 7-3Spare Tyre and Tool Storage ..................................................... 7-3Changing a Flat Tyre ................................................................. 7-6
Overheating ................................................................................. 7-11Overheating ............................................................................. 7-11
Emergency Starting .................................................................... 7-13Starting a Flooded Engine ....................................................... 7-13Jump-Starting .......................................................................... 7-14Push-Starting ........................................................................... 7-17
Emergency Towing ..................................................................... 7-18Towing Description ................................................................. 7-18Towing Hooks ......................................................................... 7-20
7-1
CX-7_8AP5-EE-09F_Edition1 Page401Monday, June 15 2009 3:27 PM
Form No.8AP5-EE-09F

Black plate (402,1)
Parking in an EmergencyThe hazard warning lights should alwaysbe used when you stop on or near aroadway in an emergency.
The hazard warning lights warn otherdrivers that your vehicle is a traffic hazardand that they must take extreme cautionwhen near it.
Hazard warning flasher
Depress the hazard warning flasher and allthe direction indicators will flash.
NOTE
l The direction indicators do notoperate when the hazard warninglights are on.
l Check local regulations about the useof hazard warning lights while thevehicle is being towed to verify thatit is not in violation of the law.
7-2
In Case of an Emergency
Parking in an Emergency
CX-7_8AP5-EE-09F_Edition1 Page402Monday, June 15 2009 3:27 PM
Form No.8AP5-EE-09F

Black plate (403,1)
Spare Tyre and Tool StorageSpare tyre and tools are stored in the locations illustrated in the diagram.
Spare tyre Spare tyre cover JackWheel brace
Jack lever
Wing bolt
Tool bag
Towing eyelet
Wrench Screwdriver
Some models.
In Case of an Emergency
Flat Tyre
7-3
CX-7_8AP5-EE-09F_Edition1 Page403Monday, June 15 2009 3:27 PM
Form No.8AP5-EE-09F

Black plate (404,1)
qJack
To remove the jack
1. Remove the boot board.
Boot board
2. Turn the wing bolt and jack screwanticlockwise.
Jack screwWing bolt
NOTE
The jack can be removed from the reardoor if the rear seatback is foldedforward.Refer to Rear Seat on page 2-11.
To secure the jack
1. Turn the wing bolt clockwise andtemporarily tighten it.
2. Turn the jack screw clockwise andextend the jack to secure it to thevehicle.
3. Turn the wing bolt and tighten itcompletely.
Maintenance
l Always keep the jack clean.
l Make sure the moving parts are keptfree from dirt or rust.
l Make sure the screw thread isadequately lubricated.
qSpare Tyre
Your Mazda has a temporary spare tyre.The temporary spare tyre is lighter andsmaller than a conventional tyre, and isdesigned only for emergency use andshould be used only for VERY shortperiods. Temporary spare tyres shouldNEVER be used for long drives orextended periods.
WARNINGDo not install the temporary spare tyreon the front wheels (driving wheels):Driving with the temporary spare tyreon one of the front driving wheels isdangerous. Handling will be affected.You could lose control of the vehicle,especially on ice or snow bound roads,and have an accident. Move a regulartyre to the front wheel and install thetemporary spare tyre to the rear.
7-4
In Case of an Emergency
Flat Tyre
CX-7_8AP5-EE-09F_Edition1 Page404Monday, June 15 2009 3:27 PM
Form No.8AP5-EE-09F

Black plate (405,1)
CAUTIONl When using the temporary sparetyre, driving stability may decreasecompared to when using only theconventional tyre.Drive carefully.
l To avoid damage to the temporaryspare tyre or to the vehicle, observethe following precautions:
l Do not exceed 80 km/h (50 mph).l Avoid driving over obstacles.
Also, do not drive through anautomatic car wash. This tyre'sdiameter is smaller than aconventional tyre's, so the groundclearance is reduced about 25 mm(1 in).
l Do not use a tyre chain on thistyre because it will not fitproperly.
l Do not use your temporary sparetyre on any other vehicle; it hasbeen designed only for yourMazda.
l Use only one temporary spare tyreon your vehicle at the same time.
To remove the spare tyre
1. Remove the boot board and spare tyrecover.
Boot board
Spare tyre cover
2. Turn the tyre hold-down boltanticlockwise with the wheel brace.
To store the spare tyre
Store the spare tyre in the reverse order ofremoval. After storing, verify that thespare tyre is stored securely.
In Case of an Emergency
Flat Tyre
7-5
CX-7_8AP5-EE-09F_Edition1 Page405Monday, June 15 2009 3:27 PM
Form No.8AP5-EE-09F

Black plate (406,1)
Changing a Flat Tyre
NOTE
If the following occurs while driving, itcould indicate a flat tyre.
l Steering becomes difficult.
l The vehicle begins to vibrateexcessively.
l The vehicle pulls in one direction.
If you have a flat tyre, drive slowly to alevel spot that is well off the road and outof the way of traffic to change the tyre.Stopping in traffic or on the shoulder of abusy road is dangerous.
WARNINGBe sure to follow the directions forchanging a tyre, and never get under avehicle that is supported only by ajack:Changing a tyre is dangerous if notdone properly. The vehicle can slip offthe jack and seriously injure someone.
Never allow anyone inside a vehiclesupported by a jack:Allowing someone to remain in avehicle supported by a jack isdangerous. The occupant could causethe vehicle to fall resulting in seriousinjury.
NOTE
Make sure the jack is well lubricatedbefore using it.
1. Park on a level surface off the right-of-way and firmly set the parking brake.
2. Put a vehicle with an automatictransaxle in Park (P), a manualtransaxle in Reverse (R) or 1, and turnoff the engine.
3. Turn on the hazard warning flasher.
4. Have everyone get out of the vehicleand away from the vehicle and traffic.
5. Remove the jack, tool, and spare tyre(page 7-3).
6. Block the wheel diagonally oppositethe flat tyre. When blocking a wheel,place a tyre block both in front andbehind the tyre.
NOTE
When blocking a tyre, use rocks orwood blocks of sufficient size ifpossible to hold the tyre in place.
7-6
In Case of an Emergency
Flat Tyre
CX-7_8AP5-EE-09F_Edition1 Page406Monday, June 15 2009 3:27 PM
Form No.8AP5-EE-09F

Black plate (407,1)
qRemoving a Flat Tyre
1. Loosen the wheel nuts by turning themanticlockwise one turn each, but do notremove any wheel nuts until the tyrehas been raised off the ground.
2. Place the jack under the jackingposition closest to the tyre beingchanged.
Jacking position
WARNINGUse only the front and rear jackingpositions recommended in thismanual:Attempting to jack the vehicle inpositions other than thoserecommended in this manual isdangerous. The vehicle could slip offthe jack and seriously injure or evenkill someone.
Use only the jack provided with yourMazda:Using a jack that is not designed foryour Mazda is dangerous. The vehiclecould slip off the jack and seriouslyinjure someone.
Never place objects under the jack:Jacking the vehicle with an objectunder the jack is dangerous. The jackcould slip and someone could beseriously injured by the jack or thefalling vehicle.
3. Insert the jack lever and attach thewheel brace to tyre jack.
In Case of an Emergency
Flat Tyre
7-7
CX-7_8AP5-EE-09F_Edition1 Page407Monday, June 15 2009 3:27 PM
Form No.8AP5-EE-09F

Black plate (408,1)
4. Turn the wheel brace clockwise andraise the vehicle high enough so thatthe spare tyre can be installed. Beforeremoving the wheel nuts, make sureyour Mazda is firmly in position andthat it cannot slip or move.
5. Remove the wheel nuts by turningthem anticlockwise; then remove thewheel and centre cap.
qMounting the Spare Tyre
1. Remove dirt and grime from themounting surfaces of the wheel andhub, including the hub bolts, with acloth.
WARNINGMake sure the mounting surfaces ofthe wheel, hub and wheel nuts areclean before changing or replacingtyres:When changing or replacing a tyre,not removing dirt and grime from themounting surfaces of the wheel, huband hub bolts is dangerous. The wheelnuts could loosen while driving andcause the tyre to come off, resulting inan accident.
2. Mount the spare tyre.
3. Install the wheel nuts with the bevellededge inward; tighten them by hand.
7-8
In Case of an Emergency
Flat Tyre
CX-7_8AP5-EE-09F_Edition1 Page408Monday, June 15 2009 3:27 PM
Form No.8AP5-EE-09F

Black plate (409,1)
WARNINGDo not apply oil or grease to wheelnuts and bolts and do not tighten thewheel nuts beyond the recommendedtightening torque:Applying oil or grease to wheel nutsand bolts is dangerous. The wheelnuts could loosen while driving andcause the tyre to come off, resulting inan accident. In addition, wheel nutsand bolts could be damaged iftightened more than necessary.
4. Turn the jack handle anticlockwise andlower the vehicle. Use the wheel braceto tighten the nuts in the order shown.
If you are unsure of how tight the nutsshould be, have them inspected at anexpert repairer, we recommend anAuthorised Mazda Repairer.
Nut tightening torque
N·m (kgf·m, ft·lbf) 88―118 (9.0―12, 65―87)
WARNINGAlways securely and correctly tightenthe wheel nuts:Improperly or loosely tightened wheelnuts are dangerous. The wheel couldwobble or come off. This could resultin loss of vehicle control and cause aserious accident.
Be sure to reinstall the same nuts youremoved or replace them with metricnuts of the same configuration:Because the wheel studs and wheelnuts on your Mazda have metricthreads, using a non-metric nut isdangerous. On a metric stud, it wouldnot secure the wheel and woulddamage the stud, which could causethe wheel to slip off and cause anaccident.
5. Remove the centre cap by tapping itwith the wheel brace.
6. Store the damaged tyre, using the wingbolt to hold it in place.
Tyre clamp
Spare tyre cover
Wing bolt
In Case of an Emergency
Flat Tyre
7-9
CX-7_8AP5-EE-09F_Edition1 Page409Monday, June 15 2009 3:27 PM
Form No.8AP5-EE-09F

Black plate (410,1)
NOTE
Always use the wing bolt to secure thedamaged tyre. Store the tyre hold-downbolt used to tighten down the spare tyrein the same place as where the wingbolt had been stored.
7. Remove the tyre blocks and store thetools and jack.
8. Check the inflation pressure. Refer tothe specification charts on page 10-8.
9. Have the flat tyre repaired or replacedas soon as possible.
WARNINGDo not drive with any tyres that haveincorrect air pressure:Driving on tyres with incorrect airpressure is dangerous. Tyres withincorrect pressure could affecthandling and result in an accident.When you check the regular tyres' airpressure, check the spare tyre, too.
NOTE
To prevent the jack and tool fromrattling, store them properly.
7-10
In Case of an Emergency
Flat Tyre
CX-7_8AP5-EE-09F_Edition1 Page410Monday, June 15 2009 3:27 PM
Form No.8AP5-EE-09F

Black plate (411,1)
OverheatingIf the temperature gauge indicatesoverheating, the vehicle loses power, oryou hear a loud knocking or pingingnoise, the engine is probably too hot.
WARNING
Turn off the ignition switch andmake sure the fan is not runningbefore attempting to work near thecooling fan:Working near the cooling fan when itis running is dangerous. The fancould continue running indefinitelyeven if the engine has stopped and theengine compartment temperature ishigh. You could be hit by the fan andseriously injured.
Do not remove eithercooling system caps when the engineand radiator are hot:When the engine and radiator are hot,scalding coolant and steam may shootout under pressure and cause seriousinjury.
Open the bonnet ONLYafter steam isno longer escaping from the engine:Steam from an overheated engine isdangerous. The escaping steam couldseriously burn you.
If the temperature gauge indicatesoverheating:
1. Drive safely to the side of the road andpark off the right-of-way.
2. Put a vehicle with an automatictransaxle in park (P), a manualtransaxle in neutral.
3. Apply the parking brake.
4. Turn off the air conditioner.
5. Check whether coolant or steam isescaping from under the bonnet orfrom the engine compartment.
If steam is coming from the enginecompartment:Don't go near the front of the vehicle.Stop the engine.Wait until the steam dissipates, thenopen the bonnet and start the engine.
If neither coolant nor steam isescaping:Open the bonnet and idle the engineuntil it cools.
CAUTIONIf the cooling fan does not operatewhile the engine is running, the enginetemperature will increase. Stop theengine and call an expert repairer, werecommend an Authorised MazdaRepairer.
6. Make sure the cooling fan is operating,then turn off the engine after thetemperature has decreased.
7. When cool, check the coolant level.If it's low, look for coolant leaks fromthe radiator and hoses.
In Case of an Emergency
Overheating
7-11
CX-7_8AP5-EE-09F_Edition1 Page411Monday, June 15 2009 3:27 PM
Form No.8AP5-EE-09F
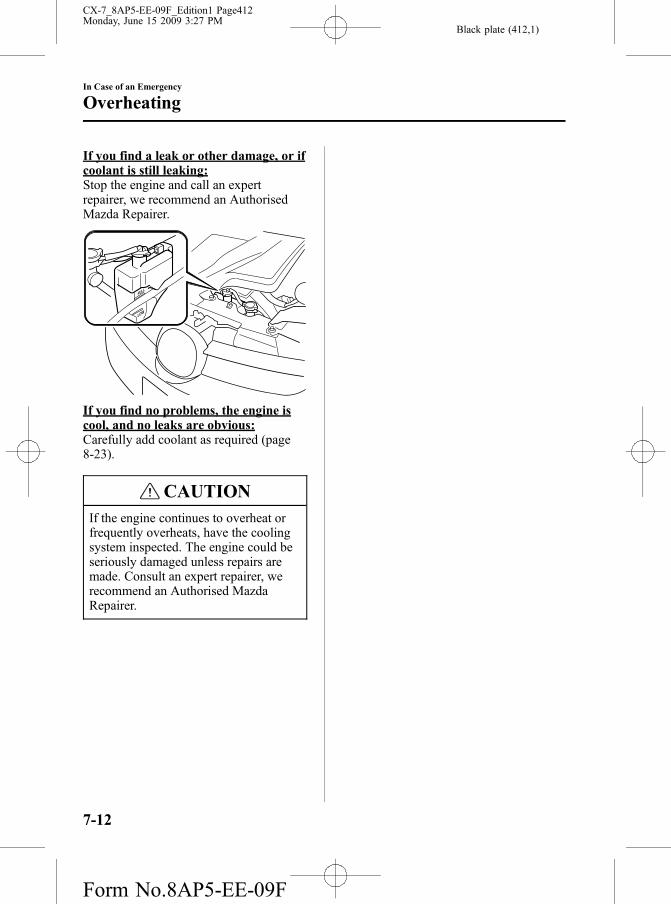
Black plate (412,1)
If you find a leak or other damage, or ifcoolant is still leaking:Stop the engine and call an expertrepairer, we recommend an AuthorisedMazda Repairer.
If you find no problems, the engine iscool, and no leaks are obvious:Carefully add coolant as required (page8-23).
CAUTIONIf the engine continues to overheat orfrequently overheats, have the coolingsystem inspected. The engine could beseriously damaged unless repairs aremade. Consult an expert repairer, werecommend an Authorised MazdaRepairer.
7-12
In Case of an Emergency
Overheating
CX-7_8AP5-EE-09F_Edition1 Page412Monday, June 15 2009 3:27 PM
Form No.8AP5-EE-09F

Black plate (413,1)
Starting a Flooded EngineIf the engine fails to start, it may beflooded (excessive fuel in the engine).
Follow this procedure:
1. If the engine does not start within fiveseconds on the first try, turn the key tothe LOCK position, wait ten secondsand try again.
2. Depress the accelerator all the way andhold it there.
3. Turn the ignition switch to the STARTposition and hold it there―for up toten seconds. If the engine starts, releasethe key and accelerator immediatelybecause the engine will suddenly revup.
4. If the engine fails to start, crank itwithout depressing the accelerator―forup to ten seconds.
If the engine still does not start using theabove procedure, have your vehicleinspected by an expert repairer, werecommend an Authorised MazdaRepairer.
In Case of an Emergency
Emergency Starting
7-13
CX-7_8AP5-EE-09F_Edition1 Page413Monday, June 15 2009 3:27 PM
Form No.8AP5-EE-09F

Black plate (414,1)
Jump-StartingJump-starting is dangerous if done incorrectly. So follow the procedure carefully. If youfeel unsure about jump-starting, we strongly recommend that you have a competent servicetechnician do the work.
WARNING
Follow These Precautions Carefully:To ensure safe and correct handling of the battery, read the following precautionscarefully before using the battery or inspecting it.
Always wear eye protection when working near the battery:Working without eye protection is dangerous. Battery fluid contains SULPHURICACID which could cause blindness if splashed into your eyes. Also, hydrogen gasproduced during normal battery operation, could ignite and cause the battery toexplode.
Wear eye protection and protective gloves to prevent contact with battery fluid:Spilled battery fluid is dangerous.Battery fluid contains SULPHURIC ACID which could cause serious injuries if it getsin eyes, skin or clothing. If this happens, immediately flush your eyes with water for15 minutes or wash your skin thoroughly and get medical attention.
Always keep batteries out of the reach of children:Allowing children to play near batteries is dangerous. Battery fluid could causeserious injuries if it gets in the eyes or on the skin.
Do not allow the positive ( ) terminal to contact any other metal object thatcould cause sparks:Flames and sparks near open battery cells are dangerous. Hydrogen gas, producedduring normal battery operation, could ignite and cause the battery to explode. Anexploding battery can cause serious burns and injuries. When working near a battery,do not allow metal tools to contact the positive ( ) or negative ( ) terminal of thebattery.
7-14
In Case of an Emergency
Emergency Starting
CX-7_8AP5-EE-09F_Edition1 Page414Monday, June 15 2009 3:27 PM
Form No.8AP5-EE-09F

Black plate (415,1)
WARNING
Keep all flames, including cigarettes, and sparks away from open battery cells:Flames and sparks near open battery cells are dangerous. Hydrogen gas, producedduring normal battery operation, could ignite and cause the battery to explode. Anexploding battery can cause serious burns and injuries.
Do not jump-start a frozen battery or one with a low fluid level:Jump-starting a frozen battery or one with a low fluid level is dangerous. It mayrupture or explode, causing serious injury.
Connect the negative lead to a good ground point away from the battery:Connecting the end of the second jumper lead to the negative ( ) terminal of thedischarged battery is dangerous.A spark could cause the gas around the battery to explode and injure someone.
Route the jumper leads away from parts that will be moving:Connecting a jumper lead near or to moving parts (cooling fans, belts) is dangerous.The lead could get caught when the engine starts and cause serious injury.
CAUTIONUse only a 12 V booster system. You can damage a 12 V starter, ignition system, andother electrical parts beyond repair with a 24 V power supply (two 12 V batteries inseries or a 24 V motor generator set).
In Case of an Emergency
Emergency Starting
7-15
CX-7_8AP5-EE-09F_Edition1 Page415Monday, June 15 2009 3:27 PM
Form No.8AP5-EE-09F

Black plate (416,1)
Connect leads in numerical order and disconnect in reverse order.Except diesel engine Diesel engine
Jumper leads Jumper leads
Booster battery Booster battery
Discharged battery
Discharged battery
1. Remove the battery cover.
Except diesel engine
Diesel engine
2. Make sure the booster battery is 12 Vand that its negative terminal isgrounded.
3. If the booster battery is in anothervehicle, don't allow both vehicles totouch. Turn off the engine of thevehicle with the booster battery and allunnecessary electrical loads in bothvehicles.
4. Connect the jumper leads in the exactsequence as in the illustration.
l Connect one end of a lead to thepositive terminal on the dischargedbattery (1).
l Attach the other end to the positiveterminal on the booster battery (2).
l Connect one end of the other lead tothe negative terminal of the boosterbattery (3).
l Connect the other end to the groundpoint indicated in the illustrationaway from the discharged battery(4).
7-16
In Case of an Emergency
Emergency Starting
CX-7_8AP5-EE-09F_Edition1 Page416Monday, June 15 2009 3:27 PM
Form No.8AP5-EE-09F

Black plate (417,1)
5. Start the engine of the booster vehicleand run it a few minutes. Then start theengine of the other vehicle.
6. When finished, carefully disconnect theleads in the reverse order described inthe illustration.
7. If the battery cover has been removed,install it in the reverse order ofremoval.
NOTE
Verify that the covers are securelyinstalled.
Push-StartingDo not push-start your Mazda.
NOTE
You can't start a vehicle with anautomatic transaxle by pushing it.
In Case of an Emergency
Emergency Starting
7-17
CX-7_8AP5-EE-09F_Edition1 Page417Monday, June 15 2009 3:27 PM
Form No.8AP5-EE-09F

Black plate (418,1)
Towing DescriptionWe recommend that towing be done onlyby an expert repairer, we recommend anAuthorised Mazda Repairer or acommercial tow-truck service.
Proper lifting and towing are necessary toprevent damage to the vehicle.Particularly when towing a 4WD vehicle,where all the wheels are connected to thedrive train, proper transporting of thevehicle is absolutely essential to avoiddamaging the drive system. Governmentand local laws must be followed.
Wheel dollies
A towed 2WD vehicle should have itsdrive wheels (front wheels) off theground. If excessive damage or otherconditions prevent this, use wheel dollies.
When towing a 2WD vehicle with the rearwheels on the ground, release the parkingbrake.
A towed 4WD vehicle must have all itswheels off the ground.
CAUTIONDo not tow the vehicle pointedbackward with driving wheels on theground. This may cause internaldamage to the transaxle.
CAUTIONDo not tow with sling-type equipment.This could damage your vehicle. Usewheel-lift or flatbed equipment.
7-18
In Case of an Emergency
Emergency Towing
CX-7_8AP5-EE-09F_Edition1 Page418Monday, June 15 2009 3:27 PM
Form No.8AP5-EE-09F

Black plate (419,1)
WARNINGAlways tow a 4WD vehicle with allfour wheels off the ground:Towing a 4WD vehicle with either thefront or rear wheels on the ground isdangerous as the drive train could bedamaged, or the vehicle could trailaway from the tow truck and cause anaccident. If the drive train has beendamaged, transport the vehicle on aflat bed truck.
If towing service is not available in anemergency, the vehicle may be towedwith all four wheels on the ground usingthe towing hook at the front of thevehicle.Only tow the vehicle on paved surfacesfor short distances at low speeds.
CAUTIONFollow these instructions when towingthe vehicle with all wheels on theground.
1. Shift to neutral.
2. Turn the ignition switch to the ACCposition.
3. Release the parking brake.
Remember that power assist for thebrakes and steering will not be availablewhen the engine is not running.
In Case of an Emergency
Emergency Towing
7-19
CX-7_8AP5-EE-09F_Edition1 Page419Monday, June 15 2009 3:27 PM
Form No.8AP5-EE-09F

Black plate (420,1)
Towing Hooks
CAUTIONl The towing eyelet should be used inan emergency (to get the vehicle outof a ditch or a snow bank, forexample).
l When using the towing eyelets,always pull the lead or chain in astraight direction with respect to theeyelet. Apply no sideways force.
NOTE
When towing with chain or lead, wrapthe chain or lead with a soft cloth nearthe bumper to prevent damage to thebumper.
qTowing Hooks
1. Remove the towing eyelet and thewheel brace from the boot (page 7-3).
2. Press the marking on the cover asshown in the figure to remove thecover.
Front
Rear
CAUTIONThe cap cannot be completely removed.Do not use excessive force as it maydamage the cap or scratch the paintedbumper surface.
7-20
In Case of an Emergency
Emergency Towing
CX-7_8AP5-EE-09F_Edition1 Page420Monday, June 15 2009 3:27 PM
Form No.8AP5-EE-09F

Black plate (421,1)
NOTE
If it is difficult to remove the towingeyelet, wrap the jack lever with a clothas shown in the figure and press themarking on the cover to remove it.
Front
Rear
3. Securely install the towing eyelet usingthe wheel brace.
Front
Wheel brace
Rear
Wheel brace
4. Hook the tying rope to the towingeyelet.
Front
In Case of an Emergency
Emergency Towing
7-21
CX-7_8AP5-EE-09F_Edition1 Page421Monday, June 15 2009 3:27 PM
Form No.8AP5-EE-09F

Black plate (422,1)
Rear
CAUTIONIf the towing eyelet is not securelytightened, it may loosen or disengagefrom the bumper when towing thevehicle. Make sure that the towingeyelet is securely tightened to thebumper.
7-22
In Case of an Emergency
Emergency Towing
CX-7_8AP5-EE-09F_Edition1 Page422Monday, June 15 2009 3:27 PM
Form No.8AP5-EE-09F

Black plate (423,1)
8 Maintenance and Care
How to keep your Mazda in top condition.
Introduction .................................................................................. 8-2Introduction ............................................................................... 8-2
Scheduled Maintenance ................................................................ 8-3Scheduled Maintenance ............................................................ 8-3
Owner Maintenance ................................................................... 8-13Owner Maintenance Schedule ................................................ 8-13Owner Maintenance Precautions ............................................. 8-14Engine Compartment Overview .............................................. 8-16Engine Oil ............................................................................... 8-18Engine Coolant ....................................................................... 8-23Brake/Clutch Fluid .................................................................. 8-25Power Steering Fluid ............................................................... 8-26Automatic Transaxle Fluid (ATF) ........................................... 8-27Washer Fluid ........................................................................... 8-30Body Lubrication .................................................................... 8-31Wiper Blades ........................................................................... 8-31Battery ..................................................................................... 8-35Tyres ........................................................................................ 8-38Light Bulbs ............................................................................. 8-42Fuses ....................................................................................... 8-51
Appearance Care ........................................................................ 8-58How to Minimize Environmental Paint Damage .................... 8-58Exterior Care ........................................................................... 8-60Interior Care ............................................................................ 8-64
8-1
CX-7_8AP5-EE-09F_Edition1 Page423Monday, June 15 2009 3:27 PM
Form No.8AP5-EE-09F

Black plate (424,1)
IntroductionBe extremely careful and prevent injury to yourself and others or damage to your vehiclewhen using this manual for inspection and maintenance.
If you're unsure about any procedure it describes, we strongly urge you to have a reliableand qualified technician perform the work, we recommend an Authorised Mazda Repairer.
Authorised Mazda technicians and genuine Mazda parts are dedicated to your vehicle.Without this expertise and the parts that have been designed and made especially for yourMazda, inadequate, incomplete, and insufficient servicing may result in problems. Thiscould lead to vehicle damage or an accident and injuries.
For expert advice and quality service, consult an expert repairer, we recommend anAuthorised Mazda Repairer.
The owner should retain evidence that proper maintenance has been performed asprescribed.
A claim against a warranty will not qualify if it results from lack of maintenance and notfrom defective material or authorised workmanship.
8-2
Maintenance and Care
Introduction
CX-7_8AP5-EE-09F_Edition1 Page424Monday, June 15 2009 3:27 PM
Form No.8AP5-EE-09F

Black plate (425,1)
Scheduled Maintenance
NOTE
l After the prescribed period, continue to follow the described maintenance at therecommended intervals.
l As the result of visual examination or functional measurement of a system's operation(performance), correct, clean, or replace as required. (Inspect, and if necessary replacethe air filter)
Emission control and related systemsThe ignition and fuel systems are highly important to the emission control system and toefficient engine operation. Don't tamper with them.All inspections and adjustments must be made by an expert repairer, we recommend anAuthorised Mazda Repairer.
Maintenance and Care
Scheduled Maintenance
8-3
CX-7_8AP5-EE-09F_Edition1 Page425Monday, June 15 2009 3:27 PM
Form No.8AP5-EE-09F

Black plate (426,1)
qEurope
L3 turbocharger engine
Maintenance Interval
Number of months or kilometres (miles), whichever comes first
Months 12 24 36 48 60 72 84 96 108 120 132 144
×1000 km 5 15 30 45 60 75 90 105 120 135 150 165 180
×1000 miles 3 9 18 27 36 45 54 63 72 81 90 99 108
Engine valve clearance Audibly inspect every 120,000 km (72,000 miles), if noisy, adjust
Drive belts*1 I I I
Engine oil*2 R R R R R R R R R R R R R
Engine oil filter*2 R R R R R R R R R R R R R
Cooling system I I I I I I
Engine coolantFL22 type*3 Replace every 195,000 km (117,000 miles) or 11 years
OthersReplace at first 90,000 km (54,000 miles) or 4 years; after that,
every 2 years
Air filter*4 Replace every 60,000 km (36,000 miles) or 3 years
Fuel lines and hoses I I I I I I
Spark plugs*5 Replace every 90,000 km (54,000 miles)
Evaporative system (if installed) I I I
Battery electrolyte level and specific gravity I I I I I I I I I I I I
Brake lines, hoses and connections I I I I I I I I I I I I
Brake fluid*6 R R R R R R
Parking brake I I I I I I I I I I I I
Disc brakes I I I I I I I I I I I I
Power steering fluid, lines, hoses andconnections
I I I I I I I I I I I I
Steering operation and linkages I I I I I I
Manual transaxle oil R R
Rear differential oil *7*8
Transfer oil *8
Front and rear suspension, ball joints andwheel bearing axial play
I I I I I I
Driveshaft dust boots I I I I I I
Exhaust system and heat shields I I
Bolts and nuts on chassis and body T T T T T T
Body condition(for rust, corrosion and perforation)
Inspect annually
8-4
Maintenance and Care
Scheduled Maintenance
CX-7_8AP5-EE-09F_Edition1 Page426Monday, June 15 2009 3:27 PM
Form No.8AP5-EE-09F

Black plate (427,1)
Maintenance Interval
Number of months or kilometres (miles), whichever comes first
Months 12 24 36 48 60 72 84 96 108 120 132 144
×1000 km 5 15 30 45 60 75 90 105 120 135 150 165 180
×1000 miles 3 9 18 27 36 45 54 63 72 81 90 99 108
Cabin air filter (if installed) Replace every 40,000 km (24,000 miles) or 2 years
Tyres (including spare tyre)(with inflation pressure adjustment)
I I I I I I I I I I I I
Chart symbols:
I: Inspect: Inspect and clean, repair, adjust, fill up, or replace if necessary.R: ReplaceT: Tighten
Remarks:
*1 Also inspect and adjust the power steering and air conditioner drive belts, if installed.If the vehicle is operated primarily under any of the following conditions, inspect the drive belts at every15,000 km (9,000 miles) or 12 months.a) Driving in dusty conditionsb) Extended periods of idling or low speed operationc) Driving for long period in cold temperatures or driving regularly at short distance onlyd) Driving in extremely hot conditionse) Driving in mountainous conditions continually
*2 If the vehicle is operated primarily under any of the following conditions, replace the engine oil and oil filter atevery 10,000 km (6,000 miles) or shorter.a) Driving in dusty conditionsb) Extended periods of idling or low speed operationc) Driving for long period in cold temperatures or driving regularly at short distance onlyd) Driving in extremely hot conditionse) Driving in mountainous conditions continually
*3 Use FL22 type coolant in vehicles with the inscription “FL22” on the radiator cap itself or the surroundingarea. Use FL22 when replacing the coolant.
*4 If the vehicle is operated in very dusty or sandy areas, clean and if necessary, replace the air filter more oftenthan the recommended intervals.
*5 In the countries below, inspect the spark plugs at every 15,000 km (9,000 miles) or 12 months before replacingthem at the said interval.Croatia, Macedonia, Bosnia and Herzegovina, Serbia, Montenegro, Bulgaria, Romania, Albania, Moldova,Latvia
*6 If the brakes are used extensively (for example, continuous hard driving or mountain driving) or if the vehicleis operated in extremely humid climates, replace the brake fluid annually.
*7 If the vehicle is operated primarily under any of the following conditions, replace the rear differential oil atevery 45,000 km (27,000 miles).a) Towing a trailer or using a car-top carrierb) Driving in dusty, sandy or wet conditionc) Extended periods of idling or low speed operationd) Repeated short trips of less than 16 km (10 miles)
*8 If this component has been submerged in water, the oil should be replaced.
Maintenance and Care
Scheduled Maintenance
8-5
CX-7_8AP5-EE-09F_Edition1 Page427Monday, June 15 2009 3:27 PM
Form No.8AP5-EE-09F

Black plate (428,1)
R2 engine
Maintenance Interval
Number of months or kilometres (miles), whichever comes first
Months 12 24 36 48 60 72 84 96 108
×1000 km 20 40 60 80 100 120 140 160 180
×1000 miles 12.5 25 37.5 50 62.5 75 87.5 100 112.5
Engine valve clearance I
Drive belts*1 I I I
Engine oil*2*3 R R R R R R R R R
Engine oil filter*2 R R R R R R R R R
Cooling system I I I I
Engine coolantFL22 type*4 Replace every 200,000 km (125,000 miles) or 11 years
OthersReplace at first 100,000 km (62,500 miles) or 4 years; after
that, every 2 years
Air filter*5 C C R C C R C C R
Fuel filter R R R
Fuel injection system*6 I I I I
Fuel lines and hoses I I I I
Urea solution (AdBlue) for SCR system I*7 I*8 I*7 I*8 I*7 I*8 I*7 I*8 I*7
Battery electrolyte level and specific gravity I I I I I I I I I
Brake lines, hoses and connections I I I I I I I I I
Brake fluid*9 R R R R
Parking brake I I I I I I I I I
Disc brakes I I I I I I I I I
Power steering fluid, lines, hoses andconnections
I I I I I I I I I
Steering operation and linkages I I I I
Manual transaxle oil R
Rear differential oil *10*11
Transfer oil *11
Front and rear suspension, ball joints and wheelbearing axial play
I I I I
Driveshaft dust boots I I I I
Exhaust system and heat shields Inspect every 80,000 km (50,000 miles) or 5 years
Bolts and nuts on chassis and body T T T T
Body condition(for rust, corrosion and perforation)
Inspect annually
Cabin air filter (if installed) R R R R
Tyres (including spare tyre)(with inflation pressure adjustment)
I I I I I I I I I
8-6
Maintenance and Care
Scheduled Maintenance
CX-7_8AP5-EE-09F_Edition1 Page428Monday, June 15 2009 3:27 PM
Form No.8AP5-EE-09F

Black plate (429,1)
Chart symbols:
I: Inspect: Inspect and clean, repair, adjust, fill up, or replace if necessary.R: ReplaceT: TightenC: Clean
Remarks:
*1 Also inspect and adjust the power steering and air conditioner drive belts, if installed.If the vehicle is operated primarily under any of the following conditions, inspect the drive belts at every20,000 km (12,500 miles) or 12 months.a) Driving in dusty conditionsb) Extended periods of idling or low speed operationc) Driving for long period in cold temperatures or driving regularly at short distance onlyd) Driving in extremely hot conditionse) Driving in mountainous conditions continually
*2 If the vehicle is operated primarily under any of the following conditions, replace the engine oil and oil filter atevery 10,000 km (6,250 miles) or shorter.a) Driving in dusty conditionsb) Extended periods of idling or low speed operationc) Driving for long period in cold temperatures or driving regularly at short distance onlyd) Driving in extremely hot conditionse) Driving in mountainous conditions continually
*3 Reset the engine oil data after replacing the engine oil.*4 Use FL22 type coolant in vehicles with the inscription “FL22” on the radiator cap itself or the surrounding
area. Use FL22 when replacing the coolant.*5 If the vehicle is operated in very dusty or sandy areas, clean and if necessary, replace the air filter more often
than the recommended intervals.*6 Implement the fuel injection amount correction.*7 Top up with new AdBlue in the urea tank.*8 If the tank gauge indicates half or less, top up with new AdBlue in the tank.
If the gauge indicates three quarters or more AdBlue remaining in tank, drain the tank, then fill it up with newAdBlue.
*9 If the brakes are used extensively (for example, continuous hard driving or mountain driving) or if the vehicleis operated in extremely humid climates, replace the brake fluid annually.
*10 If the vehicle is operated primarily under any of the following conditions, replace the rear differential oil atevery 40,000 km (25,000 miles).a) Towing a trailer or using a car-top carrierb) Driving in dusty, sandy or wet conditionsc) Extended periods of idling or low speed operationd) Repeated short trips of less than 16 km (10 miles)
*11 If this component has been submerged in water, the oil should be replaced.
Maintenance and Care
Scheduled Maintenance
8-7
CX-7_8AP5-EE-09F_Edition1 Page429Monday, June 15 2009 3:27 PM
Form No.8AP5-EE-09F

Black plate (430,1)
qExcept Europe
Russia
Maintenance Interval
Number of months or kilometres (miles), whichever comes first
Months 12 24 36 48 60 72 84 96 108 120 132 144
×1000 km 5 15 30 45 60 75 90 105 120 135 150 165 180
×1000 miles 3 9 18 27 36 45 54 63 72 81 90 99 108
Engine valve clearanceAudibly inspect every 45,000 km (27,000 miles) or 3 years, if noisy,
adjust
Drive belts*1 I I I I I I I I I I I I
Engine oil*2 R R R R R R R R R R R R R
Engine oil filter*2 R R R R R R R R R R R R R
Cooling system I I I I I I
Engine coolantFL22 type*3 Replace every 195,000 km (117,000 miles) or 11 years
OthersReplace at first 90,000 km (54,000 miles) or 4 years; after that, every
2 years
Air filter*4 C C R C C R C C R C C R
Fuel filter Replace every 60,000 km (36,000 miles)
Fuel lines and hoses I I I I I I
Spark plugs I I I I R I I I I R I I
Evaporative system (if installed) I I I
Battery electrolyte level and specificgravity
I I I I I I I I I I I I
Brake lines, hoses and connections I I I I I I I I I I I I
Brake fluid*5 R R R R R R
Parking brake I I I I I I I I I I I I
Disc brakes I I I I I I I I I I I I
Power steering fluid, lines, hoses andconnections
I I I I I I I I I I I I
Steering operation and linkages I I I I I I I I I I I I
Rear differential oil *6*7
Transfer oil *7
Front and rear suspension, ball joints andwheel bearing axial play
I I I I I I I I I I I I
Driveshaft dust boots I I I I I I I I I I I I
Exhaust system and heat shields I I I I I I I I I I I I
Bolts and nuts on chassis and body T T T T T T
Hinges and catches L L L L L L
All electrical system I I I I I I I I I I I I
Body condition(for rust, corrosion and perforation)
Inspect annually
8-8
Maintenance and Care
Scheduled Maintenance
CX-7_8AP5-EE-09F_Edition1 Page430Monday, June 15 2009 3:27 PM
Form No.8AP5-EE-09F

Black plate (431,1)
Maintenance Interval
Number of months or kilometres (miles), whichever comes first
Months 12 24 36 48 60 72 84 96 108 120 132 144
×1000 km 5 15 30 45 60 75 90 105 120 135 150 165 180
×1000 miles 3 9 18 27 36 45 54 63 72 81 90 99 108
Cabin air filter (if installed)*8 R R R R R R
Tyres (including spare tyre)(with inflation pressure adjustment)
I I I I I I I I I I I I
Chart symbols:
I: Inspect: Inspect and clean, repair, adjust, fill up, or replace if necessary.R: ReplaceC: CleanT: TightenL: Lubricate
Remarks:
*1 Also inspect and adjust the power steering and air conditioner drive belts, if installed.If the vehicle is operated primarily under any of the following conditions, inspect the drive belts at every7,500 km (4,500 miles) or 6 months.a) Driving in dusty conditionsb) Extended periods of idling or low speed operationc) Driving for long period in cold temperatures or driving regularly at short distance onlyd) Driving in extremely hot conditionse) Driving in mountainous conditions continually
*2 If the vehicle is operated primarily under any of the following conditions, replace the engine oil and oil filter atevery 7,500 km (4,500 miles) or 6 months.a) Driving in dusty conditionsb) Extended periods of idling or low speed operationc) Driving for long period in cold temperatures or driving regularly at short distance onlyd) Driving in extremely hot conditionse) Driving in mountainous conditions continually
*3 Use FL22 type coolant in vehicles with the inscription “FL22” on the radiator cap itself or the surroundingarea. Use FL22 when replacing the coolant.
*4 If the vehicle is operated in very dusty or sandy areas, clean the air filter at every 7,500 km (4,500 miles) or 6months.
*5 If the brakes are used extensively (for example, continuous hard driving or mountain driving) or if the vehicleis operated in extremely humid climates, replace the brake fluid annually.
*6 If the vehicle is operated primarily under any of the following conditions, replace the rear differential oil atevery 45,000 km (27,000 miles).a) Towing a trailer or using a car-top carrierb) Driving in dusty, sandy or wet conditionsc) Extended periods of idling or low speed operationd) Repeated short trips of less than 16 km (10 miles)
*7 If this component has been submerged in water, the oil should be replaced.*8 If the vehicle is operated in very dusty or sandy areas, replace the cabin air filter at every 15,000 km (9,000
miles) or 12 months.
Maintenance and Care
Scheduled Maintenance
8-9
CX-7_8AP5-EE-09F_Edition1 Page431Monday, June 15 2009 3:27 PM
Form No.8AP5-EE-09F

Black plate (432,1)
Except Russia
MaintenanceInterval
Number of months or kilometres (miles), whichever comes first
Months 6 12 18 24 30 36 42 48 54 60 66 72 78 84 90 96
×1000 km 10 20 30 40 50 60 70 80 90 100 110 120 130 140 150 160
×1000 miles 6.25 12.5 18.75 25 31.25 37.5 43.75 50 56.25 62.5 68.75 75 81.25 87.5 93.75 100
PETROL ENGINE
Engine valve clearance Audibly inspect every 120,000 km (75,000 miles), if noisy, adjust
Fuel filter Replace every 60,000 km (37,500 miles)
Spark plugsL3 turbochargerengine
Replace every 100,000 km (62,500 miles)
L5 engine Replace every 120,000 km (75,000 miles)
Evaporative system (if installed) I I I I I I I I
DIESEL ENGINE
Engine valve clearance I
Fuel filter R R R R
Fuel injection system*1 I I I
Urea solution (AdBlue) for SCRsystem
I*2 I*3 I*2 I*3 I*2 I*3 I*2 I*3
8-10
Maintenance and Care
Scheduled Maintenance
CX-7_8AP5-EE-09F_Edition1 Page432Monday, June 15 2009 3:27 PM
Form No.8AP5-EE-09F

Black plate (433,1)
MaintenanceInterval
Number of months or kilometres (miles), whichever comes first
Months 6 12 18 24 30 36 42 48 54 60 66 72 78 84 90 96
×1000 km 10 20 30 40 50 60 70 80 90 100 110 120 130 140 150 160
×1000 miles 6.25 12.5 18.75 25 31.25 37.5 43.75 50 56.25 62.5 68.75 75 81.25 87.5 93.75 100
PETROL AND DIESEL ENGINE
Drive belts*4 I I I I I I I I I I I I I I I I
Engine oil*5*6 R R R R R R R R R R R R R R R R
Engine oil filter*5 R R R R R R R R R R R R R R R R
Cooling system I I I I I I I I
Engine coolantFL22 type*7 R
Others Replace every 2 years
Air filter*8 C C R C C R C C
Fuel lines and hoses I I I I I I I I
Battery electrolyte level andspecific gravity*9
I I I I I I I I
Brake lines, hoses and connections I I I I I I I I
Brake fluid*10 I I I R I I I R I I I R I I I R
Parking brake I I I I I I I I I I I I I I I I
Power brake unit (Brake booster)and hoses
I I I I I I I I
Disc brakes I I I I I I I I I I I I I I I I
Power steering fluid, lines, hosesand connections
I I I I I I I I I I I I I I I I
Steering operation and linkages I I I I I I I I
Manual transaxle oil R
Rear differential oil (4WD) *11*12
Transfer oil (4WD) *12
Front and rear suspension, balljoints and wheel bearing axial play
I I I I I I I I
Driveshaft dust boots I I I I
Exhaust system and heat shields Inspect every 80,000 km (50,000 miles)
Bolts and nuts on chassis and body T T T T T T T T
Body condition(for rust, corrosion and perforation)
Inspect annually
Cabin air filter (if installed) R R R R R R R R
Tyre rotation Rotate every 10,000 km (6,250 miles)
Tyres (including spare tyre)(with inflation pressure adjustment)
I I I I I I I I I I I I I I I I
Maintenance and Care
Scheduled Maintenance
8-11
CX-7_8AP5-EE-09F_Edition1 Page433Monday, June 15 2009 3:27 PM
Form No.8AP5-EE-09F

Black plate (434,1)
Chart symbols:
I: Inspect: Inspect and clean, repair, adjust, fill up, or replace if necessary.R: ReplaceT: TightenC: Clean
Remarks:
*1 Implement the fuel injection amount correction.*2 Top up with new AdBlue in the urea tank.*3 If the tank gauge indicates half or less, top up with new AdBlue in the tank.
If the gauge indicates three quarters or more AdBlue remaining in tank, drain the tank, then fill it up with newAdBlue.
*4 Also inspect and adjust the power steering and air conditioner drive belts, if installed.If the vehicle is operated primarily under any of the following conditions, inspect the drive belts more oftenthan the recommended intervals.a) Driving in dusty conditionsb) Extended periods of idling or low speed operationc) Driving for long period in cold temperatures or driving regularly at short distance onlyd) Driving in extremely hot conditionse) Driving in mountainous conditions continually
*5 If the vehicle is operated primarily under any of the following conditions, replace the engine oil and oil filtermore often than the recommended intervals.a) Driving in dusty conditionsb) Extended periods of idling or low speed operationc) Driving for long period in cold temperatures or driving regularly at short distance onlyd) Driving in extremely hot conditionse) Driving in mountainous conditions continually
*6 For R2 engine, reset the engine oil data after replacing the engine oil.*7 Use FL22 type coolant in vehicles with the inscription “FL22” on the radiator cap itself or the surrounding
area. Use FL22 when replacing the coolant.*8 If the vehicle is operated in very dusty or sandy areas, clean and if necessary, replace the air filter more often
than the recommended intervals.*9 If the vehicle is operated in extremely heat and extremely cold areas, inspect the battery electrolyte level and
specific gravity at every 10,000 km (6,250 miles) or 6 months.*10 If the brakes are used extensively (for example, continuous hard driving or mountain driving) or if the vehicle
is operated in extremely humid climates, replace the brake fluid annually.*11 If the vehicle is operated primarily under any of the following conditions, replace the rear differential oil at
every 40,000 km (25,000 miles).a) Towing a trailer or using a car-top carrierb) Driving in dusty, sandy or wet conditionsc) Extended periods of idling or low speed operationd) Repeated short trips of less than 16 km (10 miles)
*12 If this component has been submerged in water, the oil should be replaced.
8-12
Maintenance and Care
Scheduled Maintenance
CX-7_8AP5-EE-09F_Edition1 Page434Monday, June 15 2009 3:27 PM
Form No.8AP5-EE-09F

Black plate (435,1)
Owner Maintenance Schedule
qRoutine Service
We highly recommend that these items be inspected daily, or at least every week.
l Engine Oil Level (page 8-18)
l Engine Coolant Level (page 8-23)
l Brake and Clutch Fluid Level (page 8-25)
l Washer Fluid Level (page 8-30)
l Battery Maintenance (page 8-37)
l Tyre Inflation Pressure (page 8-39)
Maintenance and Care
Owner Maintenance
8-13
CX-7_8AP5-EE-09F_Edition1 Page435Monday, June 15 2009 3:27 PM
Form No.8AP5-EE-09F

Black plate (436,1)
Owner Maintenance PrecautionsImproper or incomplete service may result in problems. This section gives instructions onlyfor items that are easy to perform.
As explained in the Introduction (page 8-2), several procedures can be done only by aqualified service technician with special tools.
Improper do-it yourself maintenance during the warranty period may affect warrantycoverage. For details, read the separate Mazda Warranty statement provided with thevehicle. If you're unsure about any servicing or maintenance procedure, have it done by anexpert repairer, we recommend an Authorised Mazda Repairer.
There are strict environmental laws regarding the disposal of waste oil and fluids. Pleasedispose of your waste properly and with due regard to the environment.
We recommend that you entrust the oil and fluid changes of your vehicle to an AuthorisedMazda Repairer.
8-14
Maintenance and Care
Owner Maintenance
CX-7_8AP5-EE-09F_Edition1 Page436Monday, June 15 2009 3:27 PM
Form No.8AP5-EE-09F

Black plate (437,1)
WARNINGDo not perform maintenance work if you lack sufficient knowledge and experience orthe proper tools and equipment to do the work. Have maintenance work done by aqualified technician:Performing maintenance work on a vehicle is dangerous if not done properly. You canbe seriously injured while performing some maintenance procedures.
If you must run the engine while working under the bonnet, make certain that youremove all jewellery (especially rings, bracelets, watches, and necklaces) and allneckties, scarves, and similar loose clothing before getting near the engine or coolingfan which may turn on unexpectedly:Working under the bonnet with the engine running is dangerous. It becomes evenmore dangerous when you wear jewellery or loose clothing.Either can become entangled in moving parts and result in injury.
Turn off the ignition switch and make sure the fan is not running before attempting towork near the cooling fan:Working near the cooling fan when it is running is dangerous. The fan could continuerunning indefinitely even if the engine has stopped and the engine compartmenttemperature is high. You could be hit by the fan and seriously injured.
Do not leave items in the engine compartment:After you have finished checking or doing servicing in the engine compartment, donot forget and leave items such as tools or rags in the engine compartment.Tools or other items left in the engine compartment could cause engine damage or afire leading to an unexpected accident.
Maintenance and Care
Owner Maintenance
8-15
CX-7_8AP5-EE-09F_Edition1 Page437Monday, June 15 2009 3:27 PM
Form No.8AP5-EE-09F

Black plate (438,1)
Engine Compartment Overview
Windscreen washer fluid reservoir Engine oil-filler cap
Engine oil-filler cap
Automatic transaxle fluid-level dipstick
Automatic transaxle fluid-level dipstick
Brake/Clutch fluid reservoir
Brake fluid reservoir
Power steering fluid reservoir
Power steering fluid reservoirEngine oil dipstick
Engine oil dipstick
Battery
Battery
Engine coolant reservoir
Engine coolant reservoir
Fuse block
Fuse block
Cooling system cap
Cooling system cap
Windscreen washer fluid reservoir
L3 turbocharger engine
L5 engine
(Only for automatic transaxle)
8-16
Maintenance and Care
Owner Maintenance
CX-7_8AP5-EE-09F_Edition1 Page438Monday, June 15 2009 3:27 PM
Form No.8AP5-EE-09F

Black plate (439,1)
Diesel engine
Engine oil -filler cap
Engine oil dipstick Battery
Brake/Clutch fluid reservoir
Cooling system capWindscreen washer fluid reservoir
Engine coolant reservoir
Power steering fluid reservoir
Fuse block
Maintenance and Care
Owner Maintenance
8-17
CX-7_8AP5-EE-09F_Edition1 Page439Monday, June 15 2009 3:27 PM
Form No.8AP5-EE-09F

Black plate (440,1)
Engine Oil
NOTE
Changing the engine oil should be done by an expert repairer, we recommend anAuthorised Mazda Repairer.
8-18
Maintenance and Care
Owner Maintenance
CX-7_8AP5-EE-09F_Edition1 Page440Monday, June 15 2009 3:27 PM
Form No.8AP5-EE-09F

Black plate (441,1)
qRecommended Oil
The maintenance intervals can only be supported by the use of following oils (page 8-3).
30
40
20W-20 20
10W-30
10W-40
10W-50
20W-40 15W-40
20W-50 15W-50
–30 –20 –10 0 10 20 30 40 50
–20 0 20 40 60 80 100 120
5W-40
5W-305W-20
5W-30
–30 –20 –10 0 10 20 30 40 50
–20 0 20 40 60 80 100 120
5W-30
–30 –20 –10 0 10 20 30 40 50
–20 0 20 40 60 80 100 120
Europe
(Except diesel engine)
(Diesel engine)
Except Europe
Grade
Temperature Range SAE Viscosity Numbers
Recommended oils
Mazda genuine Dexelia oil e.g.
API SL or ACEA A3/A5
API SL/SM or ACEA A3/A5
Mazda genuine Dexelia oil (DPF) e.g.
ACEA C1 or JASO DL-1
Grade Recommended oils
Temperature Range SAE Viscosity Numbers
Grade
Temperature Range SAE Viscosity Numbers
API SG/SH/SJ/SL/SM or ILSAC GF-II/GF-III/GF-IV
Maintenance and Care
Owner Maintenance
8-19
CX-7_8AP5-EE-09F_Edition1 Page441Monday, June 15 2009 3:27 PM
Form No.8AP5-EE-09F

Black plate (442,1)
Engine oil viscosity, or thickness, has an effect on fuel economy and cold-weatheroperation (starting and oil flow).Low-viscosity engine oils can provide improved fuel economy and cold-weatherperformance.But high-temperature weather conditions require higher-viscosity engine oils forsatisfactory lubrication.
When choosing an oil, consider the temperature range your vehicle will operate in beforethe next oil change.Then select the recommended viscosity from this chart above.
CAUTIONl Using oils of viscosity besides those recommended for specific temperature rangescould result in engine damage.
l (Diesel engine)The specified engine oil for vehicles with the diesel engine is low-ash engine oil(ACEA C1 or JASO DL-1). When replacing the engine oil, always replace with low-ash engine oil (ACEA C1 or JASO DL-1). If engine oil other than the specified oilis used, the Diesel Particulate Filter's effective period of use will be shortened orthe Diesel Particulate Filter may be damaged.
NOTE
(Petrol engine)It is normal for all engines to consume engine oil under normal driving conditions.This is caused by evaporation, internal ventilation and burning of the lubricating oil inthe working engine. Engine oil consumption can be as high as 0.8 L/1000 km (1 L/800miles). Oil consumption tends to be higher when the engine is new because of thelapping process. It also depends on engine speed and engine load. Under extreme drivingconditions, oil consumption can be higher.(Diesel engine)Whenever the engine oil is replaced, the vehicles engine control unit needs to be resetaccording to the instruction in Workshop Manual as soon as possible (within 1,000 km(620 miles) since engine oil replacement). Otherwise Diesel Particulate Filter indicatorlight may flash. Consult an expert repairer to reset the engine control unit, werecommend an Authorised Mazda Repairer.
8-20
Maintenance and Care
Owner Maintenance
CX-7_8AP5-EE-09F_Edition1 Page442Monday, June 15 2009 3:27 PM
Form No.8AP5-EE-09F

Black plate (443,1)
qInspecting Engine Oil Level
1. Be sure the vehicle is on a levelsurface.
2. Warm up the engine to normaloperating temperature.
3. Turn it off and wait at least 5 minutesfor the oil to return to the sump (Dieselengine: 10 minutes).
4. (L3 turbocharger engine)Open the cap.
5. Pull out the dipstick, wipe it clean, andreinsert it fully.
L3 turbocharger engine
MaxOKMin
L5 engine
Full
OK
Low
Diesel engine
FullOK
Low
6. Pull it out again and examine the level.The level is normal if it is betweenMIN and MAX.If it is near or below MIN, add enoughoil to bring the level to MAX.
CAUTIONDo not add engine oil over MAX. Thismay cause engine damage.
7. Make sure the O-ring on the dipstick ispositioned properly before reinsertingthe dipstick.
8. Reinsert the dipstick fully.
Maintenance and Care
Owner Maintenance
8-21
CX-7_8AP5-EE-09F_Edition1 Page443Monday, June 15 2009 3:27 PM
Form No.8AP5-EE-09F

Black plate (444,1)
9. (L3 turbocharger engine)Close the cap.
NOTE
When closing the engine oil cap, placethe cap with the ( ) mark aligned atthe OPEN ( ) position and then turnthe cap to the CLOSE ( ) position.
NOTE
(Diesel engine)Inspect the engine oil level periodically(before getting in the vehicle). Wheninspecting the engine oil, if the engineoil level is close to or exceeds the “X”mark on the dipstick, replace the engineoil. In addition, the diesel particulatefilter indicator light for vehiclesequipped with the diesel engine startsflashing when the engine oilreplacement period is reached due toengine oil deterioration. If the indicatorlight starts flashing, have an ExpertRepairer replace the engine oil. Werecommend an expert repairer, werecommend an Authorised MazdaRepairer. When replacing the engineoil, inspect the oil level using the oildipstick and refill so that the engine oillevel is within the range between F to Las shown in the figure.
X MarkF MarkL Mark
8-22
Maintenance and Care
Owner Maintenance
CX-7_8AP5-EE-09F_Edition1 Page444Monday, June 15 2009 3:27 PM
Form No.8AP5-EE-09F
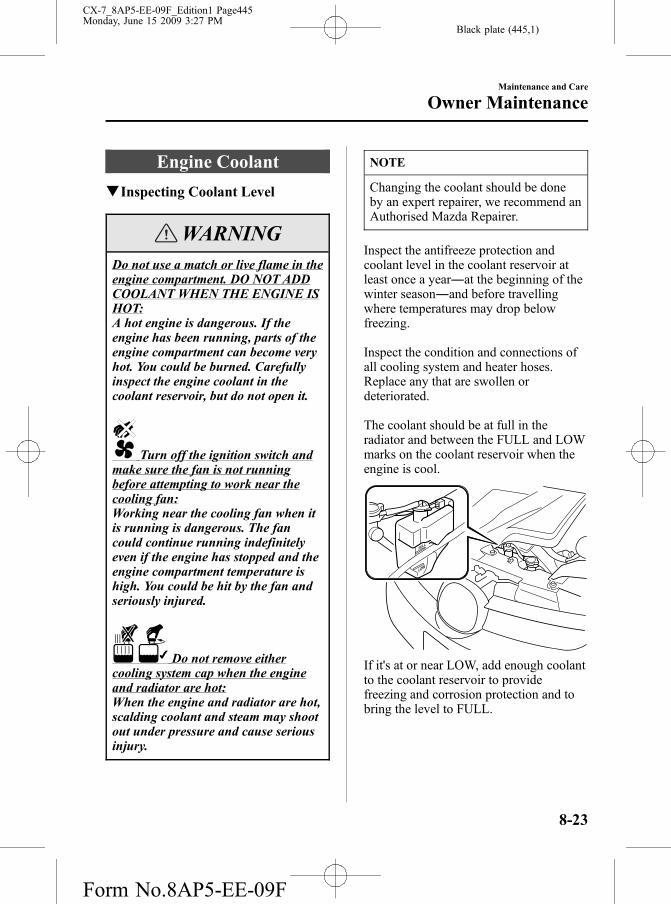
Black plate (445,1)
Engine Coolant
qInspecting Coolant Level
WARNINGDo not use a match or live flame in theengine compartment. DO NOT ADDCOOLANT WHEN THE ENGINE ISHOT:A hot engine is dangerous. If theengine has been running, parts of theengine compartment can become veryhot. You could be burned. Carefullyinspect the engine coolant in thecoolant reservoir, but do not open it.
Turn off the ignition switch andmake sure the fan is not runningbefore attempting to work near thecooling fan:Working near the cooling fan when itis running is dangerous. The fancould continue running indefinitelyeven if the engine has stopped and theengine compartment temperature ishigh. You could be hit by the fan andseriously injured.
Do not remove eithercooling system cap when the engineand radiator are hot:When the engine and radiator are hot,scalding coolant and steam may shootout under pressure and cause seriousinjury.
NOTE
Changing the coolant should be doneby an expert repairer, we recommend anAuthorised Mazda Repairer.
Inspect the antifreeze protection andcoolant level in the coolant reservoir atleast once a year―at the beginning of thewinter season―and before travellingwhere temperatures may drop belowfreezing.
Inspect the condition and connections ofall cooling system and heater hoses.Replace any that are swollen ordeteriorated.
The coolant should be at full in theradiator and between the FULL and LOWmarks on the coolant reservoir when theengine is cool.
If it's at or near LOW, add enough coolantto the coolant reservoir to providefreezing and corrosion protection and tobring the level to FULL.
Maintenance and Care
Owner Maintenance
8-23
CX-7_8AP5-EE-09F_Edition1 Page445Monday, June 15 2009 3:27 PM
Form No.8AP5-EE-09F

Black plate (446,1)
CAUTIONl Radiator coolant will damage paint.Rinse it off quickly if spilled.
l Use only soft (demineralised) waterin the coolant mixture. Water thatcontains minerals will cut down onthe coolant's effectiveness.
l Don't add only water. Always add aproper coolant mixture.
l The engine has aluminium parts andmust be protected by an ethylene-glycol-based coolant to preventcorrosion and freezing.
l DO NOT USE coolants ContainingAlcohol, methanol, Borate orSilicate.These coolants could damage thecooling system.
l DO NOT MIX alcohol or methanolwith the coolant. This could damagethe cooling system.
l Don't use a solution that containsmore than 60% antifreeze.This would reduce effectiveness.
NOTE
If the “FL22” mark is shown on or nearthe cooling system cap, use FL22 typeengine coolant. If engine coolant otherthan FL22 type is used, the enginecoolant must be replaced earlier thanthe specified replacement intervalindicated in the scheduled maintenance(page 8-3).
If the coolant reservoir is empty or newcoolant is required frequently, consult anexpert repairer, we recommend anAuthorised Mazda Repairer.
8-24
Maintenance and Care
Owner Maintenance
CX-7_8AP5-EE-09F_Edition1 Page446Monday, June 15 2009 3:27 PM
Form No.8AP5-EE-09F

Black plate (447,1)
Brake/Clutch Fluid
qInspecting Brake/Clutch Fluid Level
The brakes and clutch draw fluid from thesame reservoir.Inspect the fluid level in the reservoirregularly. It should be kept at MAX.The level normally drops withaccumulated distance, a conditionassociated with wear of brake and clutchlinings. If it is excessively low, have thebrake/clutch system inspected by anexpert repairer, we recommend anAuthorised Mazda Repairer.
Left-hand drive model
Right-hand drive model
Europe
Except Europe
qAdding Brake/Clutch Fluid
WARNINGBe careful not to spill brake fluid onyourself or on the engine:Spilled brake fluid is dangerous. If itgets in your eyes, they could beseriously injured. If this happens,immediately flush your eyes with waterand get medical attention. Brake fluidspilled on a hot engine could cause afire.
If the brake/clutch fluid level is low,have the brakes and clutch inspected:Low brake/clutch fluid levels aredangerous. Low levels could signalbrake lining wear or a brake systemleak. Your brakes could fail and causean accident.
If the fluid level is low, add fluid until itreaches MAX.Before adding fluid, thoroughly clean thearea around the cap.
Maintenance and Care
Owner Maintenance
8-25
CX-7_8AP5-EE-09F_Edition1 Page447Monday, June 15 2009 3:27 PM
Form No.8AP5-EE-09F

Black plate (448,1)
CAUTIONl Brake and clutch fluid will damagepainted surfaces. If brake or clutchfluid does get on a painted surface,wash it off with water immediately.
l Using nonspecified brake and clutchfluids (page 10-4) will damage thesystems. Mixing different fluids willalso damage them.If the brake/clutch system frequentlyrequires new fluid, consult an expertrepairer, we recommend anAuthorised Mazda Repairer.
Power Steering Fluid
qInspecting Power Steering FluidLevel
CAUTIONTo avoid damage to the power steeringpump, don't operate the vehicle for longperiods when the power steering fluidlevel is low.
NOTE
Use specified power steering fluid(page 10-4).
Inspect the fluid level in the reservoir ateach engine oil change with the engine offand cold. Add fluid if necessary; it doesnot require periodic changing.
Except Diesel engine
8-26
Maintenance and Care
Owner Maintenance
CX-7_8AP5-EE-09F_Edition1 Page448Monday, June 15 2009 3:27 PM
Form No.8AP5-EE-09F

Black plate (449,1)
Diesel engine
The level must be kept between MAX andMIN.
Visually examine the lines and hoses forleaks and damage.
If new fluid is required frequently, consultan expert repairer, we recommend anAuthorised Mazda Repairer.
Automatic Transaxle Fluid(ATF)
qInspecting Automatic TransaxleFluid Level
The automatic transaxle fluid level shouldbe inspected regularly. Measure it asdescribed below.
5 AT
CAUTIONl Always check the automatictransaxle fluid level according to thefollowing procedure. If theprocedure is not done correctly, theautomatic transaxle fluid levelcannot be measured accuratelywhich could lead to automatictransaxle damage.
l A low fluid level can cause transaxleslippage. Overfilling can causefoaming, loss of fluid, and transaxlemalfunction.
l Use only the specified fluid. A non-specified fluid could result intransaxle malfunction and failure(page 10-4).
1. Park on a level surface and set theparking brake firmly.
2. Make sure there is no ATF leakagefrom the ATF hose or the housing.
3. Shift the shift lever to the park position(P), start the engine and warm it up.
Maintenance and Care
Owner Maintenance
8-27
CX-7_8AP5-EE-09F_Edition1 Page449Monday, June 15 2009 3:27 PM
Form No.8AP5-EE-09F

Black plate (450,1)
CAUTIONDo not shift the shift lever while theengine is warming up. If the ATF levelis extremely low, the automatictransaxle could be damaged.
4. While the engine is still idling, pull outthe dipstick and wipe it clean, and thenput it back.
5. Check the ATF level. If there is no ATFadhering 5 mm from the end of thedipstick, add ATF.
CAUTIONIf there is no ATF adhering to thedipstick even after the engine has beenwarmed up, do not drive the vehicle.Otherwise, the automatic transaxlecould be damaged.
6. Shift the shift lever to each range andposition, and make sure there is noabnormality.
7. Drive the vehicle on city roads for5 km (3.1 mile) or more.
8. Park on a level surface and set theparking brake firmly.
9. Shift the shift lever to the park position(P), check the ATF level while theengine is idling, and make sure that theATF level is within the proper level. Ifthe ATF level is not within the properlevel, add ATF.The proper fluid level is marked on thedipstick as follows.
Full
OK
Low
6 AT
The volume of fluid changes withtemperature. Fluid must be checked whileidling the engine without driving atnormal operating temperature.
CAUTIONl Low fluid level causes transaxleslippage. Overfilling can causefoaming, loss of fluid, and transaxlemalfunction.
l Use specified fluid (page 10-4). Anonspecified fluid could result intransaxle malfunction and failure.
1. Park on a level surface and set theparking brake firmly.
2. Start the engine and depress the brakepedal.
8-28
Maintenance and Care
Owner Maintenance
CX-7_8AP5-EE-09F_Edition1 Page450Monday, June 15 2009 3:27 PM
Form No.8AP5-EE-09F

Black plate (451,1)
3. Move the shift lever through all ranges,then set it at P.
WARNINGMake sure the brake pedal is appliedbefore shifting the shift lever:Shifting the shift lever without firstdepressing the brake pedal isdangerous. The vehicle could movesuddenly and cause an accident.
4. With the engine still idling, pull out thedipstick, wipe it clean, and put it back.
5. Pull it out again.The proper fluid level is marked on thedipstick as follows.
A
B
Full
Low Full
Low
Fluid hot scale A
When the vehicle has been driven and thefluid is at normal operating temperature,about 65 °C (150 °F), the level must bebetween Full and Low.
Fluid cold scale B
When the engine has not been runningand the outside temperature is about 20 °C(70 °F), the fluid level should be close to,but not above, the bottom notch on thedipstick.
CAUTIONl Use the cold scale only as areference.
l If outside temperature is lower thanabout 20 °C (70 °F), start the engineand inspect the fluid level after theengine reaches operatingtemperature.
l If the vehicle has been driven for anextended period at high speeds or incity traffic in hot weather, inspect thelevel only after stopping the engineand allowing the fluid to cool for 30minutes.
Fully insert the dipstick. When addingfluid, inspect with the dipstick to makesure it does not pass full.
NOTE
Inspect the fluid on both sides of thedipstick in a well lit area for an accuratereading.
Maintenance and Care
Owner Maintenance
8-29
CX-7_8AP5-EE-09F_Edition1 Page451Monday, June 15 2009 3:27 PM
Form No.8AP5-EE-09F

Black plate (452,1)
Washer Fluid
qInspecting Washer Fluid Level
WARNINGUse only windscreen washer fluid orplain water in the reservoir:Using radiator antifreeze as washerfluid is dangerous. If sprayed on thewindscreen, it will dirty thewindscreen, affect your visibility, andcould result in an accident.
Inspect the fluid level in the washer fluidreservoir and add fluid if necessary.
Except diesel engine
To inspect the washer fluid level in thefront reservoir, pull off the cap. Then,holding your thumb over the hole in thecentre of the cap, lift it straight up. Thefluid level can be seen from the fluidcolumn in the pipe. Add fluid if necessary.
Use plain water if washer fluid isunavailable. But use only washer fluid incold weather to prevent it from freezing.
NOTE
Front and rear washer fluid is suppliedfrom the same reservoir.
Diesel engine
Use plain water if washer fluid isunavailable. But use only washer fluid incold weather to prevent it from freezing.
NOTE
Front and rear washer fluid is suppliedfrom the same reservoir.
8-30
Maintenance and Care
Owner Maintenance
CX-7_8AP5-EE-09F_Edition1 Page452Monday, June 15 2009 3:27 PM
Form No.8AP5-EE-09F

Black plate (453,1)
Body LubricationAll moving points of the body, such asdoor and bonnet hinges and locks, shouldbe lubricated each time the engine oil ischanged. Use a nonfreezing lubricant onlocks during cold weather.
Make sure the bonnet's secondary latchkeeps the bonnet from opening when theprimary latch is released.
Wiper Blades
CAUTIONl Hot waxes applied by automatic carwashers have been known to affectthe wiper's ability to clean windows.
l To prevent damage to the wiperblades, don't use petrol, paraffin,paint thinner, or other solvents on ornear them.
l When the wiper lever is in theAUTO position and the ignitionswitch is in the ON position, thewipers may move automatically inthe following cases:
l If the windscreen above the rainsensor is touched.
l If the windscreen above the rainsensor is wiped with a cloth.
l If the windscreen is struck with ahand or other object.
l If the rain sensor is struck with ahand or other object from insidethe vehicle.
Be careful not to pinch hands orfingers as it may cause injury, ordamage the wipers. When washingor servicing your Mazda, make surethe wiper lever is in the OFFposition.
Contamination of either the windscreen orthe blades with foreign matter can reducewiper effectiveness. Common sources areinsects, tree sap, and hot wax treatmentsused by some commercial car washes.
Maintenance and Care
Owner Maintenance
8-31
CX-7_8AP5-EE-09F_Edition1 Page453Monday, June 15 2009 3:27 PM
Form No.8AP5-EE-09F

Black plate (454,1)
If the blades are not wiping properly,clean the window and blades with a goodcleaner or mild detergent; then rinsethoroughly with clean water. Repeat ifnecessary.
qReplacing Windscreen Wiper Blades
When the wipers no longer clean well, theblades are probably worn or cracked.Replace them.
CAUTIONTo prevent damage to the wiper armsand other components, don't try tosweep the wiper arm by hand.
NOTE
To prevent damage to the wiper armblades when raising both the driver andpassenger side wiper arms, raise thedriver side wiper arm first. Conversely,when setting down the wiper arms, setthe passenger side wiper arm downfirst.
1. Raise the wiper arm.
2. Open the clip and slide the bladeassembly in the direction of the arrow.
3. Tilt the blade assembly and remove itfrom the arm.
CAUTIONTo prevent damage to the windscreenlet the wiper arm down easily, don't letit slap down on the windscreen.
4. Pull down the blade rubber and slide itout of blade holder.
8-32
Maintenance and Care
Owner Maintenance
CX-7_8AP5-EE-09F_Edition1 Page454Monday, June 15 2009 3:27 PM
Form No.8AP5-EE-09F

Black plate (455,1)
5. Remove the metal stiffeners from eachblade rubber and install them in thenew blade.
CAUTIONl Don't bend or discard the stiffeners.You need to use them again.
l If the metal stiffeners are switched,the blade's wiping efficiency couldbe reduced.So don't use the driver's side metalstiffeners on the passenger's side, orvice versa.
l Be sure to reinstall the metalstiffeners in the new blade rubber sothat the curve is the same as it was inthe old blade rubber.
6. Carefully insert the new blade rubber.Then install the blade assembly in thereverse order of removal.
qReplacing Rear Window WiperBlade
When the wiper no longer cleans well, theblade is probably worn or cracked.Replace it.
CAUTIONTo prevent damage to the wiper armand other components, don't try tosweep the wiper arm by hand.
1. Raise the wiper arm and rotate thewiper blade to the right until it unlocks,then remove the blade.
Maintenance and Care
Owner Maintenance
8-33
CX-7_8AP5-EE-09F_Edition1 Page455Monday, June 15 2009 3:27 PM
Form No.8AP5-EE-09F

Black plate (456,1)
CAUTIONTo prevent damage to the rear windowlet the wiper arm down easily, don't letit slap down on the rear window.
2. Pull down the blade rubber and slide itout of the blade holder.
3. Remove the metal stiffeners from eachblade rubber and install them in thenew blade.
CAUTIONDon't bend or discard the stiffeners.You need to use them again.
4. Carefully insert the new blade rubber.Then install the blade assembly in thereverse order of removal.
8-34
Maintenance and Care
Owner Maintenance
CX-7_8AP5-EE-09F_Edition1 Page456Monday, June 15 2009 3:27 PM
Form No.8AP5-EE-09F

Black plate (457,1)
Battery
WARNING
Read the following precautions carefully before using the battery or inspectingto ensure safe and correct handling:
Always wear eye protection when working near the battery:Working without eye protection is dangerous. Battery fluid contains SULPHURICACID which could cause blindness if splashed into your eyes. Also, hydrogen gasproduced during normal battery operation, could ignite and cause the battery toexplode.
Wear eye protection and protective gloves to prevent contact with battery fluid:Spilled battery fluid is dangerous.Battery fluid contains SULPHURIC ACID which could cause serious injuries if it getsin eyes, or on the skin or clothing. If this happens, immediately flush your eyes withwater for 15 minutes or wash your skin thoroughly and get medical attention.
Always keep batteries out of the reach of children:Allowing children to play near batteries is dangerous. Battery fluid could causeserious injuries if it gets in the eyes or on the skin.
Keep flames and sparks away from open battery cells and do not allow metaltools to contact the positive ( ) or negative ( ) terminal of the battery when workingnear a battery. Do not allow the positive ( ) terminal to contact the vehicle body:Flames and sparks near open battery cells are dangerous. Hydrogen gas, producedduring normal battery operation, could ignite and cause the battery to explode. Anexploding battery can cause serious burns and injuries. Keep all flames includingcigarettes and sparks away from open battery cells.
Maintenance and Care
Owner Maintenance
8-35
CX-7_8AP5-EE-09F_Edition1 Page457Monday, June 15 2009 3:27 PM
Form No.8AP5-EE-09F

Black plate (458,1)
WARNING
Keep all flames, including cigarettes, and sparks away from open battery cells:Flames and sparks near open battery cells are dangerous. Hydrogen gas, producedduring normal battery operation, could ignite and cause the battery to explode. Anexploding battery can cause serious burns and injuries.
8-36
Maintenance and Care
Owner Maintenance
CX-7_8AP5-EE-09F_Edition1 Page458Monday, June 15 2009 3:27 PM
Form No.8AP5-EE-09F

Black plate (459,1)
NOTE
Remove the battery cover beforeperforming battery maintenance.
Except diesel engine
Diesel engine
qBattery Maintenance
To get the best service from a battery:
l Keep it securely mounted.
l Keep the top clean and dry.
l Keep terminals and connections clean,tight, and coated with petroleum jellyor terminal grease.
l Rinse off spilled electrolyteimmediately with a solution of waterand baking soda.
l If the vehicle will not be used for anextended time, disconnect the batteryleads.
qBattery Recharging
NOTE
l Before performing maintenance orrecharging the battery, turn off allaccessories and stop the engine.
l To disconnect the battery, remove thenegative lead first. Install it last whenconnecting the battery.
l Be sure to remove the caps beforerecharging the battery.
Maintenance and Care
Owner Maintenance
8-37
CX-7_8AP5-EE-09F_Edition1 Page459Monday, June 15 2009 3:27 PM
Form No.8AP5-EE-09F

Black plate (460,1)
l If the battery quickly dischargesbecause, for example, the lights wereleft on too long with the engine off,slow-charge it as required by batterysize and charger capacity.
l If the battery gradually dischargesbecause of high electric load while thevehicle is being used, recharge it asrequired by battery size and chargercapacity.
TyresFor reasons of proper performance, safety,and better fuel economy, always maintainrecommended tyre inflation pressures andstay within the recommended load limitsand weight distribution.
WARNINGUsing Different Tyre Types:Driving your vehicle with differenttypes of tyres is dangerous. It couldcause poor handling and poorbraking; leading to loss of control.Except for the limited use of thetemporary spare tyre, use only thesame type tyres (radial, bias-belted,bias-type) on all four wheels.
Using Wrong-Sized Tyres:Using any other tyre size than what isspecified for your Mazda (page 10-8)is dangerous. It could seriously affectride, handling, ground clearance, tyreclearance, and speedometercalibration. This could cause you tohave an accident. Use only tyres thatare the correct size specified for yourMazda.
8-38
Maintenance and Care
Owner Maintenance
CX-7_8AP5-EE-09F_Edition1 Page460Monday, June 15 2009 3:27 PM
Form No.8AP5-EE-09F

Black plate (461,1)
qTyre Inflation Pressure
WARNINGAlways inflate the tyres to the correctpressure:Overinflation or underinflation oftyres is dangerous. Adverse handlingor unexpected tyre failure could resultin a serious accident.Refer to specification charts on page10-8.
Inspect all tyre pressures monthly(including the spare) when the tyres arecold. Maintain recommended pressuresfor the best ride, handling, and minimumtyre wear.
Left-hand drive model
Right-hand drive model
Refer to the specification charts (page10-8).
NOTE
l Always check tyre pressure whentyres are cold.
l Warm tyres normally exceedrecommended pressures. Don'trelease air from warm tyres to adjustthe pressure.
l Underinflation can cause reducedfuel economy, uneven andaccelerated tyre wear, and poorsealing of the tyre bead, which willdeform the wheel and causeseparation of tyre from rim.
l Overinflation can produce a harshride, uneven and accelerated tyrewear, and a greater possibility ofdamage from road hazards.Keep your tyre pressure at thecorrect levels. If one frequentlyneeds inflating, have it inspected.
qTyre Rotation
To equalize tread wear, rotate the tyresevery 10,000 km (6,000 miles) or soonerif irregular wear develops. Duringrotation, inspect them for correct balance.
Do not include (TEMPORARY USE ONLY) spare tyre in rotation.
Forward
Maintenance and Care
Owner Maintenance
8-39
CX-7_8AP5-EE-09F_Edition1 Page461Monday, June 15 2009 3:27 PM
Form No.8AP5-EE-09F

Black plate (462,1)
Also, inspect them for uneven wear anddamage. Abnormal wear is usually causedby one or a combination of the following:
l Incorrect tyre pressure
l Improper wheel alignment
l Out-of-balance wheel
l Severe braking
After rotation, inflate all tyre pressures tospecification (page 10-8) and inspect thewheel nuts for tightness.
CAUTIONRotate unidirectional tyres and radialtyres that have an asymmetrical treadpattern or studs only from front to rear,not from side to side. Tyre performancewill be reduced if rotated from side toside.
qReplacing a Tyre
WARNINGAlways use tyres that are in goodcondition:Driving with worn tyres is dangerous.Reduced braking, steering, andtraction could result in an accident.
If a tyre wears evenly, a wear indicatorwill appear as a solid band across thetread.Replace the tyre when this happens.
New tread
Tread wear indicator
Worn tread
You should replace it before the band isacross the entire tread.
qTemporary Spare Tyre
Inspect the temporary spare tyre at leastmonthly to make sure it's properly inflatedand stored.
NOTE
The temporary spare tyre conditiongradually deteriorates even if it has notbeen used.
The temporary spare tyre is easier tohandle because of its construction whichis lighter and smaller than a conventionaltyre. This tyre should be used only for anemergency and only for a short distance.
Use the temporary spare tyre only untilthe conventional tyre is repaired, whichshould be as soon as possible.
Refer to Tyre on page 10-8.
8-40
Maintenance and Care
Owner Maintenance
CX-7_8AP5-EE-09F_Edition1 Page462Monday, June 15 2009 3:27 PM
Form No.8AP5-EE-09F

Black plate (463,1)
CAUTIONl Do not use your temporary spare tyrerim with a snow tyre or aconventional tyre. Neither willproperly fit and could damage bothtyre and rim.
l The temporary spare tyre has a treadlife of less than 5,000 km (3,000miles). The tread life may be shorterdepending on driving conditions.
l The temporary spare tyre is forlimited use, however, if the treadwear solid-band indicator appears,replace the tyre with the same typeof temporary spare (page 8-40).
qReplacing a Wheel
WARNINGAlways use wheels of the correct sizeon your vehicle:Using a wrong-sized wheel isdangerous. Braking and handlingcould be affected, leading to loss ofcontrol and an accident.
CAUTIONAwrong-sized wheel may adverselyaffect:
l Tyre fit
l Wheel and bearing life
l Ground clearance
l Snow-chain clearance
l Speedometer calibration
l Headlight aim
l Bumper height
When replacing a wheel, make sure thenew one is the same as the original factorywheel in diameter, rim width, and offset.
Proper tyre balancing provides the bestriding comfort and helps reduce treadwear. Out-of-balance tyres can causevibration and uneven wear, such ascupping and flat spots.
Maintenance and Care
Owner Maintenance
8-41
CX-7_8AP5-EE-09F_Edition1 Page463Monday, June 15 2009 3:27 PM
Form No.8AP5-EE-09F

Black plate (464,1)
Light Bulbs
Headlights (Low beam)
Headlights (Main beam)
High-mount brake light
Front fog lights Parking lights
Front tarn signal lights
Side direction indicator lights
Number plate lights
Brake lights/Tail lights
Overhead light/Map lights (Front)
Overhead light (Rear)
Rear direction indicator lightsReverse lights
Rear fog light
Rear fog light
Luggage compartment light
Some models.
8-42
Maintenance and Care
Owner Maintenance
CX-7_8AP5-EE-09F_Edition1 Page464Monday, June 15 2009 3:27 PM
Form No.8AP5-EE-09F

Black plate (465,1)
WARNINGDo not replace the xenon fusion bulbsyourself:Replacing the xenon fusion bulbsyourself is dangerous. Because thexenon fusion bulbs require highvoltage, you could receive an electricshock if the bulbs are handledincorrectly. Consult an expert repairer,we recommend an Authorised MazdaRepairer when the replacement isnecessary.
Never touch the glass portion of ahalogen bulb with your bare handsand always wear eye protection whenhandling or working around thebulbs:When a halogen bulb breaks, it isdangerous. These bulbs containpressurised gas. If one is broken, itwill explode and serious injuries couldbe caused by the flying glass.If the glass portion is touched withbare hands, body oil could cause thebulb to overheat and explode when lit.
Always keep halogen bulbs out of thereach of children:Playing with a halogen bulb isdangerous. Serious injuries could becaused by dropping a halogen bulb orbreaking it some other way.
qReplacing Exterior Light Bulbs
Headlight bulbs
Main-beam bulb
1. Make sure the ignition is switched offand the headlight switch is off.
2. Lift the bonnet.
3. Turn the socket and bulb assemblyanticlockwise and remove it. Carefullyremove the main-beam bulb from itssocket in the reflector by gently pullingit straight backward out of the socket.
4. Disconnect the bulb from the electricalconnector by pressing the tab on theconnector with your finger and pullingthe bulb upward.
5. Install the new bulb in the reverse orderof removal.
Maintenance and Care
Owner Maintenance
8-43
CX-7_8AP5-EE-09F_Edition1 Page465Monday, June 15 2009 3:27 PM
Form No.8AP5-EE-09F

Black plate (466,1)
NOTE
l To replace the bulb, contact anexpert repairer, we recommend anAuthorised Mazda Repairer.
l If the halogen bulb is accidentallytouched, it should be cleaned withrubbing alcohol before being used.
l Use the protective cover and cartonof the replacement bulb to dispose ofthe old bulb promptly out of thereach of children.
Low-beam bulb
(Xenon fusion bulb)You cannot replace the low beam bulbs byyourself. The bulbs must be replaced at anexpert repairer, we recommend anAuthorised Mazda Repairer.(Halogen bulbs)
1. Make sure the headlight switch is off.
2. If you are changing the right low-beambulb, start the engine, turn the steeringwheel all the way to the right, andswitch the engine off. If you arechanging the left low-beam bulb, turnthe steering wheel to the left.
3. Turn the screws and the centre sectionof the plastic retainers anticlockwiseand remove them, then partially peelback the mudguard.
Installation
Removal
4. Detach the electrical connector fromthe bulb by pulling it to the rear.
5. Pull off the sealing cover.
6. Unhook the bulb retaining spring.
8-44
Maintenance and Care
Owner Maintenance
CX-7_8AP5-EE-09F_Edition1 Page466Monday, June 15 2009 3:27 PM
Form No.8AP5-EE-09F

Black plate (467,1)
7. Swing the retaining spring out andaway to free the bulb.
Sealing cover
8. Carefully remove the bulb from thesocket by pulling it straight back.
9. Replace the bulb.
10. Install the new bulb in the reverseorder of removal.
NOTE
l To replace the bulb, contact anexpert repairer, we recommend anAuthorised Mazda Repairer.
l If the halogen bulb is accidentallytouched, it should be cleaned withrubbing alcohol before being used.
l Use the protective cover and cartonof the replacement bulb to dispose ofthe old bulb promptly out of thereach of children.
Front direction indicator lights/Parkinglights
1. Make sure the ignition switch isswitched off and the headlight switch isoff.
2. Loosen the screws securing the unit.
3. Remove the unit by pulling it outwardusing both hands.
Maintenance and Care
Owner Maintenance
8-45
CX-7_8AP5-EE-09F_Edition1 Page467Monday, June 15 2009 3:27 PM
Form No.8AP5-EE-09F

Black plate (468,1)
4. Disconnect the connector from the unitby pressing the tab on the connectorwith your finger and pulling theconnector downward.
5. Turn the socket and bulb assemblyanticlockwise and remove it.
6. Disconnect the bulb from the socket.
Front direction indicator lights
Parking lights
7. Install the new bulb in the reverse orderof removal.
Front fog lightsí
1. Make sure the ignition switch isswitched off and the headlight switch isoff.
2. Loosen the screws securing the unit.
3. Remove the unit by pulling it outwardusing both hands.
8-46
Maintenance and Care
íSome models.
Owner Maintenance
CX-7_8AP5-EE-09F_Edition1 Page468Monday, June 15 2009 3:27 PM
Form No.8AP5-EE-09F

Black plate (469,1)
4. Disconnect the connector from the unitby pressing the tab on the connectorwith your finger and pulling theconnector downward.
5. Loosen the screws securing the foglight unit.
6. Turn the socket and bulb assemblyanticlockwise and remove it.
7. Disconnect the bulb from the socket.
8. Install the new bulb in the reverse orderof removal.
Rear fog lightí
1. Make sure the ignition switch isswitched off and the headlight switch isoff.
2. Turn the centre section of the plasticretainer anticlockwise and remove theretainers and partially peel back themudguard.
Removal
Installation
3. Turn the socket and bulb assemblyanticlockwise and remove it.
Maintenance and Care
Owner Maintenance
8-47íSome models.
CX-7_8AP5-EE-09F_Edition1 Page469Monday, June 15 2009 3:27 PM
Form No.8AP5-EE-09F

Black plate (470,1)
4. Disconnect the bulb from the socket.
5. Install the new bulb in the reverse orderof removal.
NOTE
Before installing the mudguard, verifythat the connector are securely installed.
Guide
Side direction indicator lights
Due to the complexity and difficulty ofthe procedure, the LED bulbs should bereplaced by an expert repairer, werecommend an Authorised MazdaRepairer.
Brake lights/Tail lights, Rear directionindicator lights, Reverse lights
1. Make sure the ignition is switched offand the headlight switch is off.
2. Remove the cover.
3. Turn the socket and bulb assemblyanticlockwise and remove it.
4. Disconnect the bulb from the socket.
Brake lights/Tail lights
8-48
Maintenance and Care
Owner Maintenance
CX-7_8AP5-EE-09F_Edition1 Page470Monday, June 15 2009 3:27 PM
Form No.8AP5-EE-09F

Black plate (471,1)
Rear direction indicator lights
Reverse lights
5. Install the new bulb in the reverse orderof removal.
High-mount brake light
Due to the complexity and difficulty ofthe procedure, the LED bulbs should bereplaced by an expert repairer, werecommend an Authorised MazdaRepairer.
Number plate lights
1. Make sure the ignition switch is turnedoff and the headlight switch is off.
2. Wrap a flathead screwdriver with a softcloth to prevent damage to the lens andremove the lens by carefully prying onthe edge of the lens with a flatheadscrewdriver.
3. Disconnect the bulb by pulling it out.
4. Install the new bulb in the reverse orderof removal.
qReplacing Interior Light Bulbs
Overhead light/Map lights (Front)
Due to the complexity and difficulty ofthe procedure, we recommend that youbring your vehicle to an expert repairer,we recommend an Authorised MazdaRepairer.
CAUTIONIf a flathead screwdriver is used, thevehicle or light unit could be damaged.Use a sturdy tool with a flat end (a thininstrument with a flat head, such as atable knife or a paper knife) to replacethe bulb.
Maintenance and Care
Owner Maintenance
8-49
CX-7_8AP5-EE-09F_Edition1 Page471Monday, June 15 2009 3:27 PM
Form No.8AP5-EE-09F

Black plate (472,1)
1. Insert the end of the tool into theposition shown in the figure and pullthe light unit outward while pressing inthe tab with your fingers. Pull the lightunit outward on the opposite side andremove the light.
Tab
NOTE
Due to the angle of the tab as shown inthe cross-sectional view below, theinsertion angle of the tool needs to beadjusted.
Light unit
Tool
Tab
Overhead light/Map light
2. Turn the socket and bulb assemblyanticlockwise and remove it.
3. Disconnect the bulb from the socket.
4. Install the new bulb in the reverse orderof removal.
Overhead light (Rear), Luggagecompartment light, Vanity mirror lights
1. Wrap a small flathead screwdriver witha soft cloth to prevent damage to thelens and remove the lens by carefullyprying on the edge of the lens with theflathead screwdriver.
2. Disconnect the bulb by pulling it out.
Overhead light (Rear), Luggagecompartment light
8-50
Maintenance and Care
Owner Maintenance
CX-7_8AP5-EE-09F_Edition1 Page472Monday, June 15 2009 3:27 PM
Form No.8AP5-EE-09F

Black plate (473,1)
Vanity mirror lights
3. Install the new bulb in the reverse orderof removal.
FusesYour vehicle's electrical system isprotected by fuses.
If any lights, accessories, or controls don'twork, inspect the appropriate circuitprotector. If a fuse has blown, the insideelement will be melted.
If the same fuse blows again, avoid usingthat system and consult an expert repairer,we recommend an Authorised MazdaRepairer as soon as possible.
qFuse Replacement
Replacing the fuses on the driver's side
If the electrical system does not work,first inspect the fuses on the driver's side.
1. Turn off the ignition switch and otherswitches.
2. Open the fuse panel cover.
Fuse panel cover
Maintenance and Care
Owner Maintenance
8-51
CX-7_8AP5-EE-09F_Edition1 Page473Monday, June 15 2009 3:27 PM
Form No.8AP5-EE-09F

Black plate (474,1)
3. Pull the fuse straight out with the fusepuller provided on the inside of thecover for the fuse panel and the fuseblock cover inside of the enginecompartment.
4. Inspect the fuse and replace it if it'sblown.
Normal Blown
5. Insert a new fuse of the same amperagerating, and make sure it fits tightly. If itdoes not fit tightly, have an expertinstall it. We recommend anAuthorised Mazda Repairer.If you have no spare fuses, borrow oneof the same rating from a circuit notessential to vehicle operation, such asthe ROOM circuit.
CAUTIONAlways replace a fuse with one of thesame rating. Otherwise you maydamage the electric system.
Replacing the fuses under the bonnet
If the headlights or other electricalcomponents do not work and the fuses inthe cabin are normal, inspect the fuseblock under the bonnet. If a fuse is blown,it must be replaced. Follow these steps:
1. Turn off the ignition switch and allother switches.
2. Remove the fuse block cover.
8-52
Maintenance and Care
Owner Maintenance
CX-7_8AP5-EE-09F_Edition1 Page474Monday, June 15 2009 3:27 PM
Form No.8AP5-EE-09F

Black plate (475,1)
3. Pull the fuse straight out with the fusepuller provided on the inside of theengine compartment fuse block cover.
4. If any fuse but the MAIN fuse isblown, replace it with a new one of thesame amperage rating.
Normal Blown
WARNINGDo not replace the main fuse byyourself. Have an Authorised MazdaRepairer perform the replacement:Replacing the fuse by yourself isdangerous because the MAIN fuse is ahigh current fuse. Incorrectreplacement could cause an electricalshock or a short circuit resulting in afire.
Maintenance and Care
Owner Maintenance
8-53
CX-7_8AP5-EE-09F_Edition1 Page475Monday, June 15 2009 3:27 PM
Form No.8AP5-EE-09F

Black plate (476,1)
qFuse Panel Description
Fuse block (Engine compartment)
DESCRIPTIONFUSE
RATINGPROTECTED COMPONENT
1PCS*1 ― ―
PTC 2*2 ― ―
2 BLOWER 40 A Blower motor
3FUEL PUMP*1 30 A Fuel systemí
P/ST*2 80 A EH-PASí
4 FAN 240 A*1
Cooling fan30 A*2
5 IG KEY 1 40 A Ignition system
6 FAN 140 A*1
Cooling fan30 A*2
7 P.SEAT (D) 30 A Power seatí
8INJ 1*1 30 A Injector
GLOW*2 30 A Glow plug
9P.SEAT (P)*1 30 A Power seatí
BTN*2 50 A For protection of various circuits
10 BOSE 30 A Audio system (BOSE® Sound System-equipped model)
11 ENGINE 30 A Engine control system
8-54
Maintenance and Care
íSome models.
Owner Maintenance
CX-7_8AP5-EE-09F_Edition1 Page476Monday, June 15 2009 3:27 PM
Form No.8AP5-EE-09F

Black plate (477,1)
DESCRIPTIONFUSE
RATINGPROTECTED COMPONENT
12D.LOCK*1 20 A Power door locks
SCR*2 40 A SCR System
13 P.WIND 30 A Power windows
14 IG KEY 2 40 A Ignition system
15 ABS 1 40 A ABS
16 ABS 2 20 A ABS
17 DSC ― ―
18H/L CLEAN/ROOF*1 20 A Headlight clean
W.HEATER/PTC*2 30 A Heaterí
19 DEF 30 A Rear window defroster
20 TNS 15 A Parking lights, Number plate lights, Illuminated entry system
21A/C*1 10 A Air conditioner
D.LOCK*2 20 A Door lock motor
22TRAILER/TCM*1 20 A TCMí
F.WARM*2 20 A Fuel warmerí
23 HEAD HI RH 15 A Headlight main beam (RH)
24 HEAD HI LH 15 A Headlight main beam (LH)
25 HEAD LO RH 15 A Headlight low beam (RH)
26 HEAD LO LH 15 A Headlight low beam (LH)
27ETC*1 10 A Accelerator position sensor
―*2 ― ―
28 ENG BAR 2 7.5 A Engine control system
29 ECM 10 A Engine control system
30INJ 2*1 10 A Injectorí
―*2 ― ―
31 ENG BAR 1 15 A Engine control system
32FOG*1 15 A
Front fog lightsíF.FOG*2 15 A
33 STOP 10 A Brake lights
34 HORN 20 A Horn
3525 A*1
Engine control system15 A*2
36 HAZARD 10 A Hazard warning flashers, Direction indicators
*1 Petrol engine*2 Diesel engine
Maintenance and Care
Owner Maintenance
8-55íSome models.
CX-7_8AP5-EE-09F_Edition1 Page477Monday, June 15 2009 3:27 PM
Form No.8AP5-EE-09F

Black plate (478,1)
Relay box (Engine compartment)í
DESCRIPTIONFUSE
RATINGPROTECTED COMPONENT
1 TRAILER ― ―
2 A/C 10 A Air conditioner
3 CLEAN/ROOF 20 A Headlight cleaner/Sun roof
4 ST SIG 5 A Starter
5 GLOW SIG 10 A Glow plugsí
6 P.SEAT (P) 30 A Power seatí
8-56
Maintenance and Care
íSome models.
Owner Maintenance
CX-7_8AP5-EE-09F_Edition1 Page478Monday, June 15 2009 3:27 PM
Form No.8AP5-EE-09F

Black plate (479,1)
Fuse block (Driver's side)
DESCRIPTIONFUSE
RATINGPROTECTED COMPONENT
1 P.WIND 30 A Power windows
2 OUTLET 1 15 A Front accessory socket
3 P.MIR 7.5 A Power control mirror
4 OUTLET 2 15 A Accessory Socket
5 SCR 10 A SCR Systemí
6 WIPER 20 A Windscreen wiper and washer
7 M.DEF 7.5 A Rear window defroster
8 P/ST/ENG BAR 3 7.5 A Air flow sensor, EGR control valve, EH-PASí
9 P.WIND 15 A Power windows
10 A/B 7.5 A Air bag system
11 ENGINE 15 A Engine control system
12 METER 15 A Instrument cluster
13 ILLUMI 10 A Instrument panel illumination
14 ROOM 15 A Audio system, Overhead light
15 R.FOG 10 A Rear fog lightí
16 SIREN 5 A Theft-deterrent systemí
17 SEAT 20 A Seat warmerí
18 A/C 10 A Air conditioner
19 R.WIP 10 A Rear wipe
Maintenance and Care
Owner Maintenance
8-57íSome models.
CX-7_8AP5-EE-09F_Edition1 Page479Monday, June 15 2009 3:27 PM
Form No.8AP5-EE-09F

Black plate (480,1)
How to MinimizeEnvironmental Paint Damage
The paintwork on your Mazda representsthe latest technical developments incomposition and methods of application.
Environmental hazards, however, canharm the paint's protective properties, ifproper care is not taken.
Here are some examples of possibledamage, with tips on how to preventthem.
qEtching Caused by Acid Rain orIndustrial Fallout
Occurrence
Industrial pollutants and vehicle emissionsdrift into the air and mix with rain or dewto form acids. These acids can settle on avehicle's finish. As the water evaporates,the acid becomes concentrated and candamage the finish.And the longer the acid remains on thesurface, the greater the chance is fordamage.
Prevention
It is necessary to wash and wax yourvehicle to preserve its finish according tothe instructions in this section. Thesesteps should be taken immediately afteryou suspect that acid rain has settled onyour vehicle's finish.
qDamage Caused by BirdDropping, Insects, or Tree Sap
Occurrence
Bird droppings contain acids. If thesearen't removed they can eat away the clearand colour base coat of the vehicle'spaintwork.
When insects stick to the paint surfaceand decompose, corrosive compoundsform. These can erode the clear andcolour base coat of the vehicle'spaintwork if they are not removed.
Tree sap will harden and adherepermanently to the paint finish. If youscratch the sap off while it is hard, somevehicle paint could come off with it.
Prevention
It is necessary to have your Mazdawashed and waxed to preserve its finishaccording to the instructions in thissection. This should be done as soon aspossible.
Bird droppings can be removed with asoft sponge and water. If you aretravelling and these are not available, amoistened tissue may also take care of theproblem. The cleaned area should bewaxed according to the instructions in thissection.Insects and tree sap are best removed witha soft sponge and water or a commerciallyavailable chemical cleaner.
Another method is to cover the affectedarea with dampened newspaper for one totwo hours. After removing the newspaper,rinse off the loosened debris with water.
8-58
Maintenance and Care
Appearance Care
CX-7_8AP5-EE-09F_Edition1 Page480Monday, June 15 2009 3:27 PM
Form No.8AP5-EE-09F

Black plate (481,1)
qWater Marks
Occurrence
Rain, fog, dew, and even tap water cancontain harmful minerals such as salt andlime. If moisture containing theseminerals settles on the vehicle andevaporates, the minerals will concentrateand harden to form white rings. The ringscan damage your vehicle's finish.
Prevention
It is necessary to wash and wax yourvehicle to preserve its finish according tothe instructions in this section. Thesesteps should be taken immediately afteryou find water marks on your vehicle'sfinish.
qPaint Chipping
Occurrence
Paint chipping occurs when gravel thrownin the air by another vehicle's tyres hitsyour vehicle.
How to avoid paint chipping
Keeping a safe distance between you andthe vehicle ahead reduces the chances ofhaving your paint chipped by flyinggravel.
NOTE
l The paint chipping zone varies withthe speed of the vehicle. Forexample, when travelling at 90 km/h(56 mph), the paint chipping zone is50 m (164 ft).
l In low temperatures a vehicle's finishhardens. This increases the chance ofpaint chipping.
l Chipped paint can lead to rustforming on your Mazda. Before thishappens, repair the damage by usingMazda touch-up paint according tothe instructions in this section.Failure to repair the affected areacould lead to serious rusting andexpensive repairs.
Maintenance and Care
Appearance Care
8-59
CX-7_8AP5-EE-09F_Edition1 Page481Monday, June 15 2009 3:27 PM
Form No.8AP5-EE-09F

Black plate (482,1)
Exterior CareFollow all label and container directionswhen using a chemical cleaner or polish.Read all warnings and cautions.
qMaintaining the Finish
Washing
CAUTIONWhen the wiper lever is in the AUTOposition and the ignition switch is in theON position, the wipers may moveautomatically in the following cases:
l If the windscreen above the rainsensor is touched.
l If the windscreen above the rainsensor is wiped with a cloth.
l If the windscreen is struck with ahand or other object.
l If the rain sensor is struck with ahand or other object from inside thevehicle.
Be careful not to pinch hands or fingersas it may cause injury, or damage thewipers. When washing or servicingyour Mazda, make sure the wiper leveris in the OFF position.
To help protect the finish from rust anddeterioration, wash your Mazdathoroughly and frequently, at least once amonth, with lukewarm or cold water.
If the vehicle is washed improperly, thepaint surface could be scratched. Here aresome examples of how scratching couldoccur.
Scratches occur on the paint surfacewhen:
l The vehicle is washed without firstrinsing off dirt and other foreignmatter.
l The vehicle is washed with a rough,dry, or dirty cloth.
l The vehicle is washed at a car washthat uses brushes that are dirty or toostiff.
l Cleansers or wax containing abrasivesare used.
NOTE
l Mazda is not responsible forscratches caused by automatic carwashes or improper washing.
l Scratches are more noticeable onvehicles with darker paint finishes.
To minimize scratches on the vehicle'spaint finish:
l Rinse off any dirt or other foreignmatter using lukewarm or cold waterbefore washing.
l Use plenty of lukewarm or cold waterand a soft cloth when washing thevehicle. Do not use a nylon cloth.
l Rub gently when washing or drying thevehicle.
l Take your vehicle only to a car washthat keeps its brushes well maintained.
l Do not use abrasive cleansers or waxthat contain abrasives.
8-60
Maintenance and Care
Appearance Care
CX-7_8AP5-EE-09F_Edition1 Page482Monday, June 15 2009 3:27 PM
Form No.8AP5-EE-09F

Black plate (483,1)
CAUTIONl Do not use steel wool, abrasivecleaners, or strong detergentscontaining highly alkaline or causticagents on chrome-plated or anodisedaluminium parts. This may damagethe protective coating; also, cleanersand detergents may discolour ordeteriorate the paint.
l To prevent damaging the aerial,remove it before entering a car washfacility or passing beneath a lowoverhead clearance.
Pay special attention to removing salt,dirt, mud, and other foreign material fromthe underside of the wings, and make surethe drain holes in the lower edges of thedoors and rocker panels are clean.
Insects, tar, tree sap, bird droppings,industrial fallout, and similar deposits candamage the finish if not removedimmediately. When prompt washing withplain water is ineffective, use a mild soapmade for use on vehicles.
Thoroughly rinse off all soap withlukewarm or cold water. Do not allowsoap to dry on the finish.
After washing the vehicle, dry it with aclean chamois to prevent water spots fromforming.
WARNINGDry wet brakes by driving very slowlyand applying the brakes lightly untilbrake performance is normal:Driving with wet brakes is dangerous.Increased stopping distance or thevehicle pulling to one side whenbraking could result in a seriousaccident. Light braking will indicatewhether the brakes have been affected.
When using a high water pressure carwash
High water temperature and high waterpressure car washers are availabledepending on the type of car washmachine. If the car washer nozzle is puttoo close to the vehicle, the force of thespray could damage or deform themolding, affect the sealability of parts,and allow water to penetrate the interior.Keep a sufficient space (30 cm or more)between the nozzle and the vehicle. Inaddition, do not spend too much timespraying the same area of the vehicle, andbe very careful when spraying betweengaps in doors and around windows.
Waxing
Your vehicle needs to be waxed whenwater no longer beads on the finish.Always wash and dry the vehicle beforewaxing it. In addition to the vehicle body,wax the metal trim to maintain its lustre.
1. Use wax which contains no abrasives.Waxes containing abrasive will removepaint and could damage bright metalparts.
2. Use a good grade of natural wax formetallic, mica, and solid colours.
Maintenance and Care
Appearance Care
8-61
CX-7_8AP5-EE-09F_Edition1 Page483Monday, June 15 2009 3:27 PM
Form No.8AP5-EE-09F

Black plate (484,1)
3. When waxing, coat evenly with thesponge supplied or a soft cloth.
4. Wipe off the wax with a soft cloth.
NOTE
A spot remover to remove oil, tar, andsimilar materials will usually also takeoff the wax. Rewax these areas even ifthe rest of the vehicle does not need it.
qRepairing Damage to the Finish
Deep scratches or chips on the finishshould be repaired promptly. Exposedmetal quickly rusts and can lead to majorrepairs.
CAUTIONIf your Mazda is damaged and needsmetal parts repaired or replaced, makesure the body shop applies anti-corrosion materials to all parts, bothrepaired and new. This will preventthem from rusting.
qPaint Damage Touch-up
Repair damage to the finish caused bystone chipping, damage during parkingetc., by using Mazda touch-up paintbefore rust begins to form. First, removethe dirt and grease with a clean soft cloth.
If rust has already begun to form:
1. Remove rust completely withsandpaper.
2. Wipe with a clean soft cloth.
3. Apply rust preventive primer to thearea.
4. After drying it completely, apply asuitable top coat material to the area.
Of course there will be no problem if youassign the work to an expert repairer, werecommend an Authorised MazdaRepairer.
qCavity Protection
Cavities are treated for protection at thefactory, but additional protective treatmentafter the vehicle has been put into use willextend the life of the body.We recommend that you consult an expertrepairer, we recommend an AuthorisedMazda Repairer concerning this additionalprecaution.
qBright-Metal Maintenance
l Use tar remover to remove road tar andinsects. Never do this with a knife orsimilar tool.
l To prevent corrosion on bright-metalsurfaces, apply wax or chromepreservative and rub it to a high lustre.
l During cold weather or in coastal areas,cover bright-metal parts with a coatingof wax or preservative heavier thanusual. It would also help to coat themwith noncorrosive petroleum jelly orsome other protective compound.
CAUTIONDon't use steel wool, abrasive cleaners,or strong detergents containing highlyalkaline or caustic agents on chrome-plated or anodised aluminium parts.This may result in damage to theprotective coating and causediscolouration or paint deterioration.
8-62
Maintenance and Care
Appearance Care
CX-7_8AP5-EE-09F_Edition1 Page484Monday, June 15 2009 3:27 PM
Form No.8AP5-EE-09F

Black plate (485,1)
qUnderbody Maintenance
Road chemicals and salt used for ice andsnow removal and solvents used for dustcontrol may collect on the underbody. Ifnot removed, they will speed up rustingand deterioration of such underbody partsas fuel lines, frame, floor pan, and exhaustsystem, even though these parts may becoated with anti-corrosive material.
Thoroughly flush the underbody andwheel housings with lukewarm or coldwater at the end of each winter. Try alsoto do this every month.
Pay special attention to these areasbecause they easily hide mud and dirt. Itwill do more harm than good to wetdown the road grime without removingit.
The lower edges of doors, rocker panels,and frame members have drain holes thatshould not be clogged. Water trappedthere will cause rusting.
WARNINGDry wet brakes by driving very slowlyand applying the brakes lightly untilbrake performance is normal:Driving with wet brakes is dangerous.Increased stopping distance or thevehicle pulling to one side whenbraking could result in a seriousaccident. Light braking will indicatewhether the brakes have been affected.
qUndercoating
This special coating is applied to thecritical parts of the underside to protectvehicles from damage caused bychemicals or stones. This coating is liableto be damaged with time. Check thiscoating periodically.
An expert repairer, we recommend anAuthorised Mazda Repairer are wellinformed on how repairs should be made.Consult an expert repairer, we recommendan Authorised Mazda Repairer.
qAluminiumWheel Maintenance
A protective coating is provided over thealuminium wheels. Special care is neededto protect this coating.
NOTE
l Do not use a wire brush or anyabrasive cleaner, polishingcompound, or solvent on aluminiumwheels. They may damage thecoating.
l Only use a mild soap or neutraldetergent and always use a sponge orsoft cloth to clean the wheels.Rinse thoroughly with lukewarm orcold water. Also, be sure to clean thewheels after driving on dusty orsalted roads. This helps preventcorrosion.
l Avoid washing your vehicle in anautomatic car wash that uses high-speed or hard brushes.
l If your aluminium wheels lose lustre,wax the wheels.
Maintenance and Care
Appearance Care
8-63
CX-7_8AP5-EE-09F_Edition1 Page485Monday, June 15 2009 3:27 PM
Form No.8AP5-EE-09F

Black plate (486,1)
Interior Care
qInstrument panel Precautions
Prevent caustic solutions such as perfumeand cosmetic oils from contacting theinstrument panel. They'll damage anddiscolour it. If these solutions get on theinstrument panel, wipe them offimmediately.
CAUTIONDo not use glazing agents.Glazing agents contain ingredientswhich may cause discolouration,wrinkling, cracks and peeling.
qCleaning the Interior and Floors
Keeping the interior clean ― especiallythe floor ― is important to help preventrust.
Remove mud and salt from the cabin flooras soon as possible.
If you transport salt, chemicals, or othertoxic cargo in the cabin or luggagecompartment, be very careful not to spillit. If you do, clean it up carefully.
From time to time, dry the cabin floor andthe floor luggage compartment.Moisture may collect there and generate arusting process.
qCleaning the Upholstery andInterior Trim
Vinyl
Remove dust and loose dirt from vinylwith a whisk broom or vacuum cleaner.Clean vinyl with a leather-and-vinylcleaner.
Leatherí
Real leather is not uniform and may havescars, scratches, and wrinkles. Clean itwith a leather cleaner or mild soap.
Wipe it with a damp soft cloth; then dryand buff it with a dry soft cloth.
Fabric
Remove dust and loose dirt from fabricwith a whisk broom or vacuum cleaner.Clean it with a mild soap solution goodfor upholstery and carpets. Remove freshspots immediately with a fabric spotcleaner.
To keep the fabric looking clean andfresh, take care of it. Otherwise its colourwill be affected, it can be stained easily,and its fire-resistance may be reduced.
CAUTIONUse only recommended cleaners andprocedures. Others may affectappearance and fire-resistance.
Piano black panelí
The following parts are fitted with panelsthat have been treated with a specialcoating that resists scratching.
l Centre panel
l Steering wheel (partial)
8-64
Maintenance and Care
íSome models.
Appearance Care
CX-7_8AP5-EE-09F_Edition1 Page486Monday, June 15 2009 3:27 PM
Form No.8AP5-EE-09F

Black plate (487,1)
l Shift lever panel
When the panel needs to be cleaned, use asoft cloth to wipe off dirt from the surface.
NOTE
Scratches or nicks on the panelsresulting from the use of a hard brush orcloth may not be repairable.
qCleaning the Lap/Shoulder BeltWebbing
Clean the webbing with a mild soapsolution recommended for upholstery orcarpets. Follow instructions. Don't bleachor dye the webbing; this may weaken it.
After cleaning the belts, thoroughly drythe belt webbing and make sure there isno remaining moisture before retractingthem.
WARNINGHave an expert repairer, werecommend an Authorised MazdaRepairer replace damaged seat beltsimmediately:Using damaged seat belts isdangerous. In a collision, damagedbelts cannot provide adequateprotection.
qCleaning the Window Interiors
If the windows become covered with anoily, greasy, or waxy film, clean themwith glass cleaner. Follow the directionson the container.
CAUTIONDon't scrape or scratch the inside of therear window. You may damage the rearwindow defroster grid.
Maintenance and Care
Appearance Care
8-65
CX-7_8AP5-EE-09F_Edition1 Page487Monday, June 15 2009 3:27 PM
Form No.8AP5-EE-09F

Black plate (488,1)
8-66
CX-7_8AP5-EE-09F_Edition1 Page488Monday, June 15 2009 3:27 PM
Form No.8AP5-EE-09F

Black plate (489,1)
9 Customer Information
Important consumer information including warranties and add-on equipment.
Warranty ....................................................................................... 9-2Registering Your Vehicle in A Foreign Country ....................... 9-2Add-On Non-Genuine Parts and Accessories ........................... 9-3
Cell Phones .................................................................................... 9-4Cell Phones Warning ................................................................. 9-4
Declaration of Conformity ........................................................... 9-5Declaration of Conformity ........................................................ 9-5
Electromagnetic Compatibility .................................................. 9-16Electromagnetic Compatibility ................................................ 9-16Information for Users on Collection and Disposal of OldEquipment and Used Batteries ................................................ 9-18
9-1
CX-7_8AP5-EE-09F_Edition1 Page489Monday, June 15 2009 3:27 PM
Form No.8AP5-EE-09F

Black plate (490,1)
Registering Your Vehicle in A Foreign CountryGovernment regulations in your country could require that automobiles meet specificemission and safety standards.Vehicles built for your country may differ from those built for other countries. In additionto registration problems, satisfactory service may be difficult or even impossible in anothercountry.
The fuel specified for your vehicle may be unavailable.
Parts, servicing techniques, and tools necessary to maintain and repair your vehicle may beunavailable.
There might not be an Authorised Mazda Dealer in the country you plan to take yourvehicle.
The Mazda warranty is valid only in certain countries.
9-2
Customer Information
Warranty
CX-7_8AP5-EE-09F_Edition1 Page490Monday, June 15 2009 3:27 PM
Form No.8AP5-EE-09F

Black plate (491,1)
Add-On Non-Genuine Parts and AccessoriesPlease note that technical alterations to the original state of your Mazda vehicle can affectthe safety of the vehicle. Such technical alterations include not only the use of unsuitablespare parts, but also accessories, fittings or attachments, including rims and tyres.
Genuine Mazda Parts and Genuine Mazda Accessories have been specifically designed forMazda vehicles.Other parts and accessories than those mentioned above have not been examined andapproved by Mazda unless explicitly stated by Mazda. We cannot certify the suitability ofsuch products. Mazda is not liable for any damage caused by the use of such products.
WARNINGBe very careful in choosing and installing add-on electrical equipment, such as mobiletelephones, two-way radios, stereo systems, and car alarm systems:Incorrectly choosing or installing improper add-on equipment or choosing animproper installer is dangerous. Essential systems could be damaged, causing enginestalling, air-bag (SRS) activation, ABS inactivation, or a fire in the vehicle.
Mazda assumes no responsibility for death, injury, or expenses that may result from theinstallation of add-on non-genuine parts or accessories.
Customer Information
Warranty
9-3
CX-7_8AP5-EE-09F_Edition1 Page491Monday, June 15 2009 3:27 PM
Form No.8AP5-EE-09F

Black plate (492,1)
Cell Phones Warning
WARNINGPlease comply with the legal regulations concerning the use of communicationequipment in vehicles in your State or Province:Use of any electrical devices such as cell phones, computers, portable radios, vehiclenavigation or other devices by the driver while the vehicle is moving is dangerous.Dialing a number on a cell phone while driving also ties-up the driver's hands. Use ofthese devices will cause the driver to be distracted and could lead to a serious accident.If a passenger is unable to use the device, pull off the right-of-way to a safe areabefore use. If use of a cell phone is necessary despite this warning, use a hands-freesystem to at least leave the hands free to drive the vehicle. Never use a cell phone orother electrical devices while the vehicle is moving and, instead, concentrate on thefull-time job of driving.
9-4
Customer Information
Cell Phones
CX-7_8AP5-EE-09F_Edition1 Page492Monday, June 15 2009 3:27 PM
Form No.8AP5-EE-09F

Black plate (493,1)
Declaration of Conformity
Immobilizer system
Customer Information
Declaration of Conformity
9-5
CX-7_8AP5-EE-09F_Edition1 Page493Monday, June 15 2009 3:27 PM
Form No.8AP5-EE-09F

Black plate (494,1)
9-6
Customer Information
Declaration of Conformity
CX-7_8AP5-EE-09F_Edition1 Page494Monday, June 15 2009 3:27 PM
Form No.8AP5-EE-09F

Black plate (495,1)
Customer Information
Declaration of Conformity
9-7
CX-7_8AP5-EE-09F_Edition1 Page495Monday, June 15 2009 3:28 PM
Form No.8AP5-EE-09F

Black plate (496,1)
9-8
Customer Information
Declaration of Conformity
CX-7_8AP5-EE-09F_Edition1 Page496Monday, June 15 2009 3:28 PM
Form No.8AP5-EE-09F

Black plate (497,1)
Keyless entry system
Customer Information
Declaration of Conformity
9-9
CX-7_8AP5-EE-09F_Edition1 Page497Monday, June 15 2009 3:28 PM
Form No.8AP5-EE-09F

Black plate (498,1)
9-10
Customer Information
Declaration of Conformity
CX-7_8AP5-EE-09F_Edition1 Page498Monday, June 15 2009 3:28 PM
Form No.8AP5-EE-09F

Black plate (499,1)
Customer Information
Declaration of Conformity
9-11
CX-7_8AP5-EE-09F_Edition1 Page499Monday, June 15 2009 3:28 PM
Form No.8AP5-EE-09F

Black plate (500,1)
9-12
Customer Information
Declaration of Conformity
CX-7_8AP5-EE-09F_Edition1 Page500Monday, June 15 2009 3:28 PM
Form No.8AP5-EE-09F

Black plate (501,1)
Customer Information
Declaration of Conformity
9-13
CX-7_8AP5-EE-09F_Edition1 Page501Monday, June 15 2009 3:28 PM
Form No.8AP5-EE-09F

Black plate (502,1)
9-14
Customer Information
Declaration of Conformity
CX-7_8AP5-EE-09F_Edition1 Page502Monday, June 15 2009 3:28 PM
Form No.8AP5-EE-09F

Black plate (503,1)
Customer Information
Declaration of Conformity
9-15
CX-7_8AP5-EE-09F_Edition1 Page503Monday, June 15 2009 3:28 PM
Form No.8AP5-EE-09F

Black plate (504,1)
Electromagnetic CompatibilityYour Mazda has been tested and certified to European legislations relating toelectromagnetic compatibility (2004/104/EC). Radio Frequency (RF) transmitterequipment (e.g. cellular telephones, amateur radio transmitters, etc.) may only be fitted toyour Mazda if they comply with the parameters shown in the table below.
It is your responsibility to ensure that any equipment you have fitted complies withapplicable local legislations. Have any equipment fitted by properly trained technicians.
CAUTIONl Do not mount any transceiver, microphones, speakers, or any other item in thedeployment path of the air bag system.
l Do not fasten aerial lead to original vehicle wiring, fuel pipes or brake pipes. Avoidrunning the aerial lead parallel with the wire harness to the best extent possible.
l Keep the aerial and power leads at least 100 mm (3.9 in) from any electronic modulesand the air bags.
l Avoid using the cigar lighter or accessory socket as a power source for the RF-transmitting equipment.
Aerial positions:
: front right of roof: front left of roof: centre of roof: both sides of liftgate
9-16
Customer Information
Electromagnetic Compatibility
CX-7_8AP5-EE-09F_Edition1 Page504Monday, June 15 2009 3:28 PM
Form No.8AP5-EE-09F

Black plate (505,1)
Frequency Band (MHz) Maximum output power (Wattage) Aerial Positions
50― 54 50
68― 87.5 50
142― 176 50
380― 470 50
806― 940 10
1200― 1300 10
1710― 1885 10
1885― 2025 10
2400― 2500 0.01*1 In a cabin*1
*1 Only for Bluetooth
NOTE
After the installation of RF transmitters, check for disturbances from and to all electricalequipment in the vehicle, both in the standby and transmit modes.Check all electrical equipment:
l with the ignition ON
l with the engine running
l during a road test at various speeds.
Customer Information
Electromagnetic Compatibility
9-17
CX-7_8AP5-EE-09F_Edition1 Page505Monday, June 15 2009 3:28 PM
Form No.8AP5-EE-09F

Black plate (506,1)
Information for Users on Collection and Disposal of OldEquipment and Used Batteries
When disposing your old battery, please refer to the information as follows.
qInformation on Disposal in the European Union
These crossed-out wheeled bin symbols on the products, packaging, and/or accompanyingdocuments mean that used electronic products and batteries should not be mixed withgeneral household waste. For proper treatment, recovery and recycling of old products andused batteries, please take them to applicable collection points, in accordance with yournational legislation and the Directives 2006/66/EC.
By disposing of these products and batteries correctly, you will help to save valuableresources and prevent any potential negative effects on human health and the environmentwhich could otherwise arise from inappropriate waste handling.
For more information about collection and recycling of old products and batteries, pleasecontact your local municipality, your waste disposal service or the point of sales where youpurchased the items.
NOTE
The bottom two letters might be used in combination with the crossed-out wheeled binsymbol. In this case it complies with the requirement established by the Directive for thechemical involved.“Pb” and “Cd” mean lead and cadmium respectively.
9-18
Customer Information
Electromagnetic Compatibility
CX-7_8AP5-EE-09F_Edition1 Page506Monday, June 15 2009 3:28 PM
Form No.8AP5-EE-09F

Black plate (507,1)
qInformation on Disposal in Other Countries Outside the European Union
The above symbols are only valid in the European Union. If you wish to discard oldproducts and used batteries, please contact your local authorities, your waste disposalservice or the point of sales where you purchased the items, and ask for the correct methodof disposal.
NOTE
The bottom two letters might be used in combination with the crossed-out wheeled binsymbol. In this case it complies with the requirement established by the Directive for thechemical involved.“Pb” and “Cd” mean lead and cadmium respectively.
Customer Information
Electromagnetic Compatibility
9-19
CX-7_8AP5-EE-09F_Edition1 Page507Monday, June 15 2009 3:28 PM
Form No.8AP5-EE-09F

Black plate (508,1)
9-20
CX-7_8AP5-EE-09F_Edition1 Page508Monday, June 15 2009 3:28 PM
Form No.8AP5-EE-09F

Black plate (509,1)
10 Specifications
Technical information about your Mazda.
Identification Numbers ............................................................... 10-2Vehicle Information Labels ..................................................... 10-2
Specifications ............................................................................... 10-4Specifications .......................................................................... 10-4
10-1
CX-7_8AP5-EE-09F_Edition1 Page509Monday, June 15 2009 3:28 PM
Form No.8AP5-EE-09F

Black plate (510,1)
Vehicle Information Labels
qModel Plate
qChassis Number/VehicleIdentification Number
Open the cover shown in the figure tocheck the chassis number.
qVehicle Emission ControlInformation Label (The Philippines)
qTyre Pressure Label
Left-hand drive model
Right-hand drive model
10-2
Identification Numbers
CX-7_8AP5-EE-09F_Edition1 Page510Monday, June 15 2009 3:28 PM
Form No.8AP5-EE-09F

Black plate (511,1)
qEngine Number
L3 turbocharger engine
Forward
L5 engine
Forward
Diesel engine
Forward
qConformity Plate (Arab GulfCooperation Council)
Production year and month are shown onthis plate.
Identification Numbers
10-3
CX-7_8AP5-EE-09F_Edition1 Page511Monday, June 15 2009 3:28 PM
Form No.8AP5-EE-09F

Black plate (512,1)
Specifications
qEngine
ItemSpecification
L3 turbocharger engine L5 engine Diesel engine
Type DOHC-16V in-line, 4-cylinder
Bore × Stroke87.5 × 94.0 mm(3.44 × 3.70 in)
89.0 × 100 mm(3.50 × 3.94 in)
86.0 × 94.0 mm(3.39 × 3.70 in)
Displacement2,261 ml
(2,261 cc, 138.0 cu in)2,488 ml
(2,488 cc, 151.8 cu in)2,184 ml
(2,184 cc, 133.3 cu in)
Compression ratio 9.5 9.7 16.3
qElectrical System
ItemClassification
L3 turbocharger engine L5 engine Diesel engine
Battery12V-48AH/5HR,12V-52AH/5HR,12V-55AH/5HR
12V-48AH/5HR,12V-55AH/5HR
12V-55AH/5HR,12V-70AH/5HR
Spark-plug numberL3BD 18 110*1, L3YD 18
110LFG1 18 110*1, L3Y2 18
110―
Spark-plug gap0.60―0.70 mm(0.024―0.027 in)
1.25―1.35 mm(0.049―0.053 in)
―
*1 ex factory
CAUTIONWhen cleaning the iridium plugs, do not use a wire brush. The fine particulate coating onthe iridium alloy and platinum tips could be damaged.
qLubricant Quality
Lubricant type and classification Recommended oils
Engine oil*1Europe
Petrol engine
API SL or ACEAA3/A5
5W-30Mazda genuine Dexelia oil e.g.
API SL/SM or ACEAA3/A5
―
Dieselengine
ACEA C1 or JASODL-1
5W-30Mazda genuine Dexelia oil
(DPF) e.g.
ExceptEurope
API SG/SH/SJ/SL/SM or ILSACGF-II/GF-III/GF-IV
―
*1 Refer to the recommended SAE viscosity numbers on page 8-19.
10-4
Specifications
CX-7_8AP5-EE-09F_Edition1 Page512Monday, June 15 2009 3:28 PM
Form No.8AP5-EE-09F

Black plate (513,1)
Lubricant Classification
Manual transaxle oilAPI Service GL-4
SAE 75W-80
Automatic transaxle fluid5-Speed transaxle ATF M-V
6-Speed transaxle JWS3309
Transfer case oil API Service GL-5 (SAE 80W-90)
Rear differential oil API Service GL-5 (SAE 80W-90)
Power steering fluid ATF M-III, M-V, or equivalent (e.g. Dexron® II)
Brake/Clutch fluidEuropean spec. model
SAE J1703 or FMVSS116DOT-3 or DOT-4
Except aboveSAE J1703 or FMVSS116
DOT-3
qCapacities
(Approximate Quantities)
Item Capacity
Engine oil
L3 turbochargerengine
With oil filter replacement 5.7 L (6.0 US qt, 5.0 Imp qt)
Without oil filter replacement 5.3 L (5.6 US qt, 4.7 Imp qt)
L5 engineWith oil filter replacement 5.0 L (5.3 US qt, 4.4 Imp qt)
Without oil filter replacement 4.6 L (4.9 US qt, 4.0 Imp qt)
Diesel engineWith oil filter replacement 4.7 L (5.0 US qt, 4.1 Imp qt)
Without oil filter replacement 4.4 L (4.6 US qt, 3.9 Imp qt)
Coolant 9.0 L (9.5 US qt, 7.9 Imp qt)
Manual transaxle oil 2.5 L (2.6 US qt, 2.2 Imp qt)
Automatic transaxle fluid5-speed transaxle 8.55 L (9.03 US qt, 7.52 Imp qt)
6-speed transaxle 7.0 L (7.4 US qt, 6.2 Imp qt)
Transfer case oil 1.2 L (1.3 US qt, 1.1 Imp qt)
Rear differential oil 1.0 L (1.1 US qt, 0.9 Imp qt)
Washer fluidPetrol engine
With low washer fluid levelwarning light
4.5 L (4.8 US qt, 4.0 Imp qt)
Without low washer fluid levelwarning light
2.5 L (2.6 US qt, 2.2 Imp qt)
Diesel engine 4.5 L (4.8 US qt, 4.0 Imp qt)
Urea tank 15.5 L (16.4 US qt, 13.6 Imp qt)
Fuel tankExcept L5 engine 69.0 L (18.2 US gal, 15.2 Imp gal)
L5 engine 62.0 L (16.4 US gal, 13.6 Imp gal)
Check oil and fluid levels with dipsticks or reservoir gauges.
Specifications
10-5
CX-7_8AP5-EE-09F_Edition1 Page513Monday, June 15 2009 3:28 PM
Form No.8AP5-EE-09F

Black plate (514,1)
qDimensions
Europe
Item Vehicle specification
Overall length 4,700 mm (185.0 in)
Overall width 1,870 mm (73.6 in)
Overall height 1,645 mm (64.8 in)
Front tread 1,615 mm (63.6 in)
Rear tread 1,610 mm (63.4 in)
Wheelbase 2,750 mm (108.3 in)
Taiwan
Item Vehicle specification
Overall length 4,693 mm (184.8 in)
Overall width 1,872 mm (73.7 in)
Overall height 1,645 mm (64.8 in)
Front tread 1,617 mm (63.7 in)
Rear tread 1,612 mm (63.5 in)
Wheelbase 2,750 mm (108.3 in)
Arab Gulf Cooperation Council
Item Vehicle specification
Overall lengthWith number plate holder 4,698 mm (185.0 in)
Without number plate holder 4,682 mm (184.3 in)
Overall width 1,872 mm (73.7 in)
Overall height 1,645 mm (64.8 in)
Front tread 1,617 mm (63.7 in)
Rear tread 1,612 mm (63.5 in)
Wheelbase 2,750 mm (108.3 in)
Except above
Item Vehicle specification
Overall length 4,699 mm (185.0 in)
Overall width 1,872 mm (73.7 in)
Overall height 1,645 mm (64.8 in)
Front tread17 inch 1,627 mm (64.1 in)
18 or 19 inch 1,617 mm (63.7 in)
Rear tread17 inch 1,622 mm (63.9 in)
18 or 19 inch 1,612 mm (63.5 in)
Wheelbase 2,750 mm (108.3 in)
10-6
Specifications
CX-7_8AP5-EE-09F_Edition1 Page514Monday, June 15 2009 3:28 PM
Form No.8AP5-EE-09F
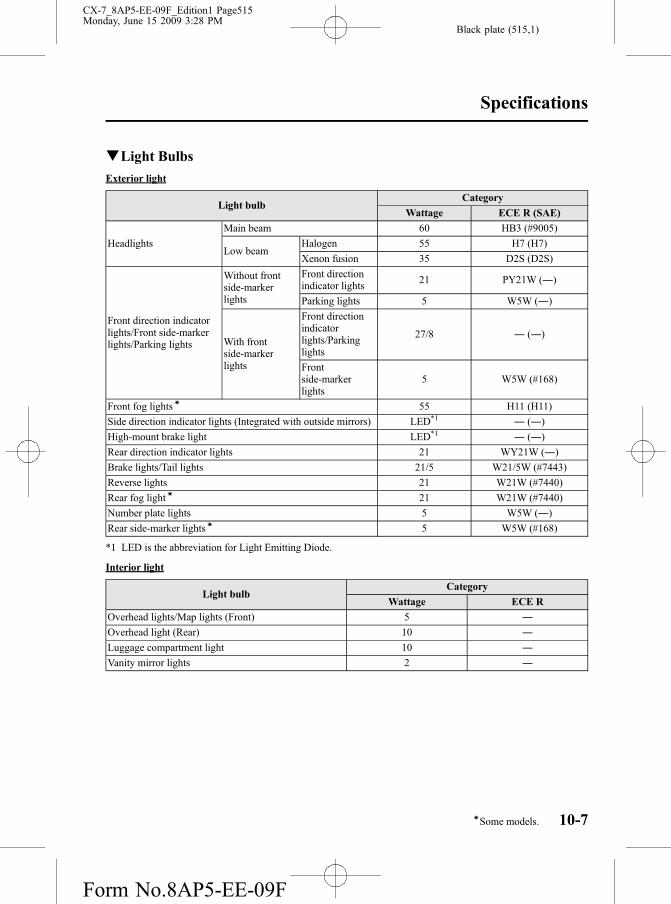
Black plate (515,1)
qLight Bulbs
Exterior light
Light bulbCategory
Wattage ECE R (SAE)
Headlights
Main beam 60 HB3 (#9005)
Low beamHalogen 55 H7 (H7)
Xenon fusion 35 D2S (D2S)
Front direction indicatorlights/Front side-markerlights/Parking lights
Without frontside-markerlights
Front directionindicator lights
21 PY21W (―)
Parking lights 5 W5W (―)
With frontside-markerlights
Front directionindicatorlights/Parkinglights
27/8 ― (―)
Frontside-markerlights
5 W5W (#168)
Front fog lightsí 55 H11 (H11)
Side direction indicator lights (Integrated with outside mirrors) LED*1 ― (―)
High-mount brake light LED*1 ― (―)
Rear direction indicator lights 21 WY21W (―)
Brake lights/Tail lights 21/5 W21/5W (#7443)
Reverse lights 21 W21W (#7440)
Rear fog lightí 21 W21W (#7440)
Number plate lights 5 W5W (―)
Rear side-marker lightsí 5 W5W (#168)
*1 LED is the abbreviation for Light Emitting Diode.
Interior light
Light bulbCategory
Wattage ECE R
Overhead lights/Map lights (Front) 5 ―
Overhead light (Rear) 10 ―
Luggage compartment light 10 ―
Vanity mirror lights 2 ―
Specifications
10-7íSome models.
CX-7_8AP5-EE-09F_Edition1 Page515Monday, June 15 2009 3:28 PM
Form No.8AP5-EE-09F

Black plate (516,1)
qTyres
Sample tyre mark and its meaning
Nominal section widthNominal aspect ratio in %Construction code
Mud and snowSpeed symbol
Load index (not on ZR tyres)Nominal rim diameter in inches
Tyre mark information
Choose the proper tyres for your vehicle using the following tyre mark information.
Speed symbol Maximum permissible speed
Q Up to 160 km/h (99 mph)
R Up to 170 km/h (105 mph)
S Up to 180 km/h (111 mph)
T Up to 190 km/h (118 mph)
U Up to 200 km/h (124 mph)
H Up to 210 km/h (130 mph)
V Up to 240 km/h (149 mph)
W Up to 270 km/h (167 mph)
Y Up to 300 km/h (186 mph)
ZR Over 240 km/h (149 mph)
Tyre and inflation pressure
NOTE
The tyres have been optimally matched with the chassis of your vehicle.When replacing tyres, Mazda recommends that you replace tyres of the same typeoriginally fitted to your vehicle. For details, contact an expert repairer, we recommend anAuthorised Mazda Repairer.
10-8
Specifications
CX-7_8AP5-EE-09F_Edition1 Page516Monday, June 15 2009 3:28 PM
Form No.8AP5-EE-09F

Black plate (517,1)
Check the tyre pressure label for tyre size and inflation pressure (page 8-39).
Standard tyre
(Europe)
Tyre sizeInflation pressure
Up to 4 persons ―Full load
235/60R18 103VFront 220 kPa (2.2 bar, 32 psi) 220 kPa (2.2 bar, 32 psi)
Rear 220 kPa (2.2 bar, 32 psi) 270 kPa (2.7 bar, 39 psi)
235/55R19 101VFront 220 kPa (2.2 bar, 32 psi) 220 kPa (2.2 bar, 32 psi)
Rear 220 kPa (2.2 bar, 32 psi) 270 kPa (2.7 bar, 39 psi)
1 person's weight: About 75 kg
(Russia)
Tyre sizeInflation pressure
Front Rear
235/60R18 103H 220 kPa (2.2 bar, 32 psi) 220 kPa (2.2 bar, 32 psi)
235/55R19 101H 220 kPa (2.2 bar, 32 psi) 220 kPa (2.2 bar, 32 psi)
(Except Europe and Russia)
Tyre sizeInflation pressure
Front Rear
215/70R17 101H 220 kPa (2.2 bar, 32 psi) 220 kPa (2.2 bar, 32 psi)
235/60R18 103H 220 kPa (2.2 bar, 32 psi) 220 kPa (2.2 bar, 32 psi)
Temporary spare tyre
Tyre size Inflation pressure
T155/90D18 103M 420 kPa (4.2 bar, 60 psi)
185/80R17 95M 250 kPa (2.5 bar, 36 psi)
Winter tyre
Tyre sizeInflation pressure
Up to 4 persons ―Full load
235/65R17 104*1 M SFront 220 kPa (2.2 kg/cm2) 220 kPa (2.2 kg/cm2)
Rear 220 kPa (2.2 kg/cm2) 280 kPa (2.9 kg/cm2)
235/60R18 103*1 M SFront 220 kPa (2.2 kg/cm2) 220 kPa (2.2 kg/cm2)
Rear 220 kPa (2.2 kg/cm2) 280 kPa (2.9 kg/cm2)
235/60R18 107*2 M SFront 220 kPa (2.2 kg/cm2) 220 kPa (2.2 kg/cm2)
Rear 220 kPa (2.2 kg/cm2) 280 kPa (2.9 kg/cm2)
235/55R19 101*3 M SFront 220 kPa (2.2 kg/cm2) 220 kPa (2.2 kg/cm2)
Rear 220 kPa (2.2 kg/cm2) 280 kPa (2.9 kg/cm2)
*1 Speed Symbols (The speed symbols for winter tyres are more than Q.)*2 Speed Symbols (The speed symbols for winter tyres are more than H.)*3 Speed Symbols (The speed symbols for winter tyres are more than V.)1 person's weight: About 75 kg
Specifications
10-9
CX-7_8AP5-EE-09F_Edition1 Page517Monday, June 15 2009 3:28 PM
Form No.8AP5-EE-09F

Black plate (518,1)
qFuses
Refer to the fuse rating on page 8-51.
qBrakes
If you require information regarding the wear limit specification for the brake disc platesand the measurement method, please contact an expert repairer, we recommend anAuthorised Mazda Repairer. The information is made freely available.
10-10
Specifications
CX-7_8AP5-EE-09F_Edition1 Page518Monday, June 15 2009 3:28 PM
Form No.8AP5-EE-09F

Black plate (519,1)
11 Index
11-1
CX-7_8AP5-EE-09F_Edition1 Page519Monday, June 15 2009 3:28 PM
Form No.8AP5-EE-09F

Black plate (520,1)
A
Accessory Socket ............................ 6-124Add-On Non-Genuine Parts andAccessories ......................................... 9-3Advanced Key ..................................... 3-2
Advanced key maintenance ......... 3-5Advanced key suspendfunction ...................................... 3-20Locking, unlocking with requestswitch ........................................... 3-9Remote control function ............. 3-18Service ......................................... 3-7Setting change ............................ 3-23Warning and beep sounds .......... 3-21
Aerial ................................................ 6-18Air Bag Systems ............................... 2-50Air-Conditioning System .................... 6-2Anti-Lock Brake System (ABS) ......... 5-9
Warning light ............................... 5-9Appearance Care ............................... 8-58Audio System ................................... 6-18
Audio control switch .................. 6-52Audio set .................................... 6-29AUX mode ................................. 6-56Operating tips for audiosystem ........................................ 6-18
Automatic TransaxleDriving tips ................................ 5-20Fluid ........................................... 8-27Manual shift mode ..................... 5-16Shift-lock system ....................... 5-16Transaxle ranges ........................ 5-15
B
BatteryEmergency starting .................... 7-13Maintenance ............................... 8-35Specifications ............................. 10-4
B
Beep Sounds120 km/h warning ...................... 5-74Ignition key reminder ................. 5-73Lights-on reminder ..................... 5-73Parking brake reminder .............. 5-74Rear vehicle monitoring systemwarning ...................................... 5-74SCR warning .............................. 5-74Seat belt warning ........................ 5-73Tyre inflation pressurewarning ...................................... 5-74
Before Starting the Engine .................. 4-8After getting in ............................. 4-8Before getting in .......................... 4-8
Bluetooth Audio ............................... 6-59Bluetooth Hands-Free ....................... 6-69
Basic Bluetooth Hands-FreeOperation ................................... 6-74Convenient Use of the Hands-FreeSystem ........................................ 6-79Hands-Free Setting ..................... 6-86When Bluetooth Hands-Free Cannotbe Used ...................................... 6-94
Body Lubrication .............................. 8-31Bonnet Release ................................. 3-52Bottle Holder ................................... 6-120Brake/Clutch
Fluid ........................................... 8-25Brakes
Anti-lock brake system (ABS) ..... 5-9Brakes assist ............................... 5-10Emergency Stop SignalSystem ........................................ 5-11Foot brake .................................... 5-6Pad wear indicator ...................... 5-11Parking brake ............................... 5-6Warning light ............................... 5-8
Bulb Replacement ............................. 8-42
11-2
Index
CX-7_8AP5-EE-09F_Edition1 Page520Monday, June 15 2009 3:28 PM
Form No.8AP5-EE-09F

Black plate (521,1)
C
Capacities .......................................... 10-5Carbon Monoxide ............................... 4-7Cargo Securing Loops .................... 6-122Catalytic Converter ............................. 4-4Cell Phones ......................................... 9-4Centre Console ................................ 6-121Child Restraint
Categories of child-restraintsystems ....................................... 2-36Child restraint precautions ......... 2-31Child-restraint system installationposition ...................................... 2-37Child-restraint system suitability forvarious seat positions table ........ 2-42Installing child-restraintsystems ....................................... 2-44ISOFIX anchor-secured child-restraint systems ......................... 2-47
Child Safety Locks for Rear Doors ... 3-34Cruise Control ................................... 5-23Cup Holder ...................................... 6-119
D
DefrosterMirror ......................................... 5-88Rear window .............................. 5-88
Dimensions ....................................... 10-6Door Locks ....................................... 3-31Double Locking System ................... 3-71DPF ................................................... 5-44
DPF Indicator Light ................... 5-44Driving In Flooded Area ................... 4-14
D
Driving Tips ........................................ 4-9Automatic transaxle ................... 5-20Driving in flooded area .............. 4-14Hazardous driving ...................... 4-10Money-saving suggestions ........... 4-9Rocking the vehicle .................... 4-11Running-in ................................... 4-9Turbocharged vehicles ............... 4-15Winter driving ............................ 4-12
Dynamic Stability Control (DSC) ..... 5-29TCS/DSC Indicator light ............ 5-30
E
Emergency Starting ........................... 7-13Flooded engine ........................... 7-13Jump-starting .............................. 7-14Push-starting .............................. 7-17
Emergency Towing ........................... 7-18Emission Control System(Diesel Engine) ................................... 4-5Emission Control System(Petrol engine) ..................................... 4-4Engine
Bonnet release ............................ 3-52Coolant ....................................... 8-23Exhaust gas .................................. 4-7Oil .............................................. 8-18Overheating ................................ 7-11Starting ......................................... 5-4
Engine Compartment Overview ........ 8-16Engine Coolant
Overheating ................................ 7-11Engine Coolant TemperatureGauge ................................................ 5-51Exhaust Gas ........................................ 4-7Exterior Care ..................................... 8-60
Index
11-3
CX-7_8AP5-EE-09F_Edition1 Page521Monday, June 15 2009 3:28 PM
Form No.8AP5-EE-09F

Black plate (522,1)
F
FlasherHazard warning .......................... 5-89Headlights .................................. 5-75
Flat Tyre .............................................. 7-3Changing ...................................... 7-6Spare tyre and tool storage ........... 7-3
FluidsClassification .............................. 10-4Owner maintenance ................... 8-13
Fog LightsFront ........................................... 5-80Rear ............................................ 5-81
Foot Brake .......................................... 5-6Four-Wheel Drive(4WD) Operation .............................. 5-21
4WD Warning light .................... 5-22Front Seats(Electrically Operated Seats) ............... 2-4Front Seats(Manually Operated Seats) ................. 2-2Fuel
Filler flap and cap ...................... 3-50Gauge ......................................... 5-52Requirements (Diesel engine) ...... 4-3Requirements (Petrol engine) ....... 4-2Tank capacity ............................. 10-5
Fuses ................................................. 8-51Panel description ........................ 8-54Replacement ............................... 8-51
G
Gauges .............................................. 5-48Glove Box ....................................... 6-120
H
Hazard Warning Flasher .................... 5-89
H
Hazardous Driving ............................ 4-10Headlight Washer .............................. 5-87Headlights
Control ....................................... 5-75Flashing ...................................... 5-78Levelling .................................... 5-78Main-low beam .......................... 5-77On reminder ............................... 5-77Running lights ............................ 5-79
Horn .................................................. 5-89
I
IgnitionKeys ........................................... 3-25Switch .......................................... 5-2
Illuminated Entry System ................. 6-96Immobilizer System(with Advanced Key) ........................ 3-57Immobilizer System(without Advanced Key) ................... 3-60
11-4
Index
CX-7_8AP5-EE-09F_Edition1 Page522Monday, June 15 2009 3:28 PM
Form No.8AP5-EE-09F

Black plate (523,1)
I
Indicator Lights ................................. 5-54Cruise ......................................... 5-70Diesel Particulate Filter .............. 5-70Direction indicator/hazardwarning ...................................... 5-72Front fog light ............................ 5-68Glow plug .................................. 5-69Headlight auto-levellingmalfunction ................................ 5-72Headlight main-beam ................. 5-68KEY ............................................ 5-66Power steering malfunction ........ 5-71Rear fog light ............................. 5-68RVM .......................................... 5-66Security ...................................... 5-67Shift position .............................. 5-68TCS OFF .................................... 5-69TCS/DSC ................................... 5-69
Information Display .......................... 6-98Air-conditioning display ............ 6-99Audio display ............................. 6-99Information display functions .... 6-98
Instrument Cluster ............................. 5-48Instrument panel Illumination ........... 5-53Interior Care ...................................... 8-64Interior Lights ................................... 6-96
J
Jump-Starting .................................... 7-14
K
Keyless Entry System ....................... 3-26Keys .................................................. 3-25
L
Label Information ............................. 10-2Lane-Change Signals ........................ 5-79Liftgate .............................................. 3-34
Luggage compartment ............... 3-36Light Bulbs
Replacement ............................... 8-42Specifications ............................. 10-7
Lighting Control ............................... 5-75Lubricant Quality .............................. 10-4Luggage Compartment Light ............ 6-97
M
MaintenanceIntroduction .................................. 8-2Owner maintenanceprecautions ................................. 8-14Owner maintenance schedule ..... 8-13Scheduled ..................................... 8-3
Manual Transaxle Operation ............. 5-12Map Lights ........................................ 6-97Meters and Gauges ........................... 5-48Mirror Defroster ................................ 5-88Mirrors
Outside mirrors .......................... 3-73Rearview mirror ......................... 3-75
Money-Saving Suggestions ................ 4-9Multi Information Display .............. 6-100
Audio Display .......................... 6-103Clock ........................................ 6-102Maintenance Monitor ............... 6-105Multi Information DisplayFunctions .................................. 6-101Outside Temperature Display.... 6-103Rear View Monitor ................... 6-112Settings ..................................... 6-111Trip Computer .......................... 6-103Warning Indicator ..................... 6-110
Index
11-5
CX-7_8AP5-EE-09F_Edition1 Page523Monday, June 15 2009 3:29 PM
Form No.8AP5-EE-09F

Black plate (524,1)
O
Odometer and Trip Meter .................. 5-49Outside Mirrors ................................. 3-73Overhead Lights ................................ 6-96Overheating ....................................... 7-11
P
Paint Damage .................................... 8-58Parking Brake ..................................... 5-6Parking in an Emergency .................... 7-2Power Door Locks ............................ 3-32Power Steering .................................. 5-20
Fluid ........................................... 8-26Power steering malfunction indicatorlight ............................................ 5-20
Power Windows ................................ 3-37Push-Starting ..................................... 7-17
R
Rear Coat Hooks ............................. 6-123Rear Door Child Safety Locks .......... 3-34Rear Seat ........................................... 2-10Rear Vehicle Monitoring(RVM) System .................................. 5-38
Care of Radar Sensors ................ 5-44RVM Switch .............................. 5-43RVM Warning Indicator Light/Warning Chime .......................... 5-42RVM Warning Light(Amber)/RVM Indicator Light(Green) ....................................... 5-43
Rear View Monitor .......................... 6-112Rear Window Defroster .................... 5-88Rear Window Washer ....................... 5-87Rear Window Wiper .......................... 5-87Rearview Mirror ................................ 3-75
R
Registering Your Vehicle in A ForeignCountry ............................................... 9-2Rocking the Vehicle .......................... 4-11Running-In .......................................... 4-9
S
Seat Belt System3-point type ................................ 2-21Automatic locking ...................... 2-20Belt minder ................................. 2-29Centre-rear lap/shoulder ............. 2-26Emergency locking .................... 2-19Pregnant women ........................ 2-19Pretensioner and load limiting .... 2-23Seat belt precautions .................. 2-17Warning light/beep ..................... 2-29
SeatsFront seat(Electrically operated seats) ......... 2-4Front seat(Manually operated seats) ............ 2-2Rear seat ..................................... 2-10Seat warmer ................................ 2-15
Security SystemImmobilizer system(without advanced key) .............. 3-60Double locking system ............... 3-71Immobilizer system(with advanced key) ................... 3-57Theft-deterrent system(European models) ..................... 3-62Theft-deterrent system(Except European models) ......... 3-69
Selective Catalytic Reduction(SCR) System ................................... 5-46Side Extension Sunvisors .................. 6-95Spare Tyre and Tool Storage ............... 7-3
11-6
Index
CX-7_8AP5-EE-09F_Edition1 Page524Monday, June 15 2009 3:29 PM
Form No.8AP5-EE-09F

Black plate (525,1)
S
Specifications .................................... 10-4Speedometer ...................................... 5-49SRS Air Bags
Front passenger air bag deactivationswitch ......................................... 2-55How the SRS air bags work ....... 2-61Limitations to SRS air bag ......... 2-66Monitoring and maintenance ..... 2-68SRS air bag deploymentcriteria ........................................ 2-65Supplementary restraint system(SRS) precautions ...................... 2-50Supplementary restraint systemcomponents ................................ 2-60
Starting the Engine .............................. 5-4Steering Wheel .................................. 3-73
Horn ........................................... 5-89Storage Compartments .................... 6-120
Cargo securing loops ................ 6-122Centre console .......................... 6-121Glove box ................................. 6-120Rear coat hooks ........................ 6-123
Sunroof ............................................. 3-53Sunshade ........................................... 3-56Sunvisors .......................................... 6-95
T
Tachometer ........................................ 5-51Temporary Spare Tyre ....................... 8-40Theft-deterrent system(European models) ............................ 3-62Theft-deterrent system(Except European models) ................ 3-69Tiedown
Hook .......................................... 7-20Tool ..................................................... 7-3
T
TowingDescription ................................. 7-18Emergency towing ..................... 7-18Hook .......................................... 7-20Towing caravan and trailers ....... 4-16
Traction Control System (TCS) ........ 5-27TCS OFF indicator light ............ 5-28TCS OFF switch ........................ 5-28TCS/DSC indicator light ............ 5-27
Trip Meter ......................................... 5-49Turn and Lane-Change Signals ......... 5-79Tyre Pressure Monitoring System ..... 5-31
System error activation .............. 5-35Tyre pressure monitoring systemwarning light .............................. 5-33Tyres and wheels ........................ 5-35
TyresFlat Tyre ....................................... 7-3Inflation pressure ........................ 8-39Replacement ............................... 8-40Rotation ...................................... 8-39Snow tyres .................................. 4-12Spare tyre and tool storage ........... 7-3Specifications ............................. 10-8Tyre chains ................................. 4-13
V
Vanity Mirrors ................................... 6-95Vehicle Information Labels ............... 10-2
Index
11-7
CX-7_8AP5-EE-09F_Edition1 Page525Monday, June 15 2009 3:29 PM
Form No.8AP5-EE-09F

Black plate (526,1)
W
Warning Lights ................................. 5-54120 km/h Warning ...................... 5-624WD ........................................... 5-63ABS ............................................ 5-58Air bag system ........................... 5-60Automatic transaxle ................... 5-63Brake system .............................. 5-57Charging system ......................... 5-59Check engine .............................. 5-59Door-ajar .................................... 5-62Engine oil pressure ..................... 5-59Front seat belt pretensionersystem ........................................ 5-60KEY ............................................ 5-66Low fuel ..................................... 5-61Low washer fluid level ............... 5-63RVM .......................................... 5-66SCR ............................................ 5-60Seat belt ...................................... 5-61Sedimentor ................................. 5-62Tyre pressure monitoringsystem ........................................ 5-64
Warranty .............................................. 9-2Washer Fluid ..................................... 8-30Wheel Replacement .......................... 8-41Windows
Power windows .......................... 3-37Windscreen Washer ........................... 5-86Windscreen Wipers ........................... 5-83
Blades replacement .................... 8-31Winter Driving .................................. 4-12
11-8
Index
CX-7_8AP5-EE-09F_Edition1 Page526Monday, June 15 2009 3:29 PM
Form No.8AP5-EE-09F