mazerunner installation guide for community edition · © cymmetria mazerunner 2017 – community...
TRANSCRIPT
March 28, 2017
MazeRunner
COMMUNITY EDITION
INSTALLATION GUIDE
© Cymmetria MazeRunner 2017 – Community Edition 1.5.0 2 www.cymmetria.com
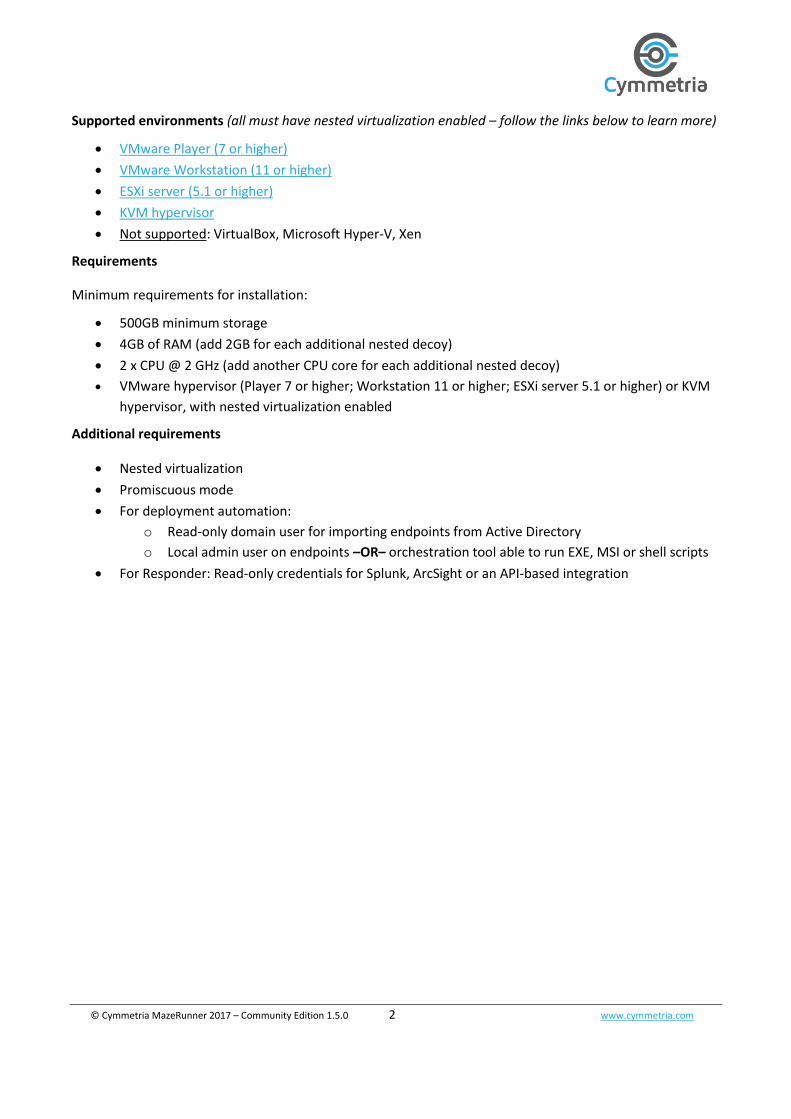
Supported environments (all must have nested virtualization enabled – follow the links below to learn more)
VMware Player (7 or higher)
VMware Workstation (11 or higher)
ESXi server (5.1 or higher)
KVM hypervisor
Not supported: VirtualBox, Microsoft Hyper-V, Xen
Requirements
Minimum requirements for installation:
500GB minimum storage
4GB of RAM (add 2GB for each additional nested decoy)
2 x CPU @ 2 GHz (add another CPU core for each additional nested decoy)
VMware hypervisor (Player 7 or higher; Workstation 11 or higher; ESXi server 5.1 or higher) or KVM
hypervisor, with nested virtualization enabled
Additional requirements
Nested virtualization
Promiscuous mode
For deployment automation:
o Read-only domain user for importing endpoints from Active Directory
o Local admin user on endpoints –OR– orchestration tool able to run EXE, MSI or shell scripts
For Responder: Read-only credentials for Splunk, ArcSight or an API-based integration

© Cymmetria MazeRunner 2017 – Community Edition 1.5.0 3 www.cymmetria.com
CONTENTS
Introduction – What is MazeRunner? ................................................................................................................................... 4
Legal notices ..................................................................................................................................................................... 4
How is the Community Edition different from the Enterprise Edition? ............................................................................ 5
Installation and setup ........................................................................................................................................................... 6
Virtual appliance (VMware Player) ................................................................................................................................... 6
Virtual appliance (VMware Workstation) ......................................................................................................................... 8
Virtual appliance (VMware ESXi) .................................................................................................................................... 11
Enabling nested virtualization using vCenter .............................................................................................................. 20
Enabling nested virtualization using VMware Workstation (version 11 and up)........................................................ 23
Enabling nested virtualization using SSH .................................................................................................................... 24
Powering on your virtual machine .............................................................................................................................. 27
Virtual appliance (KVM) .................................................................................................................................................. 29
MazeRunner network configuration ................................................................................................................................... 32
Static IP ........................................................................................................................................................................... 32
VLAN support .................................................................................................................................................................. 32
Non-promiscuous mode ................................................................................................................................................. 34
FAQ / Troubleshooting........................................................................................................................................................ 37
Problems during OVA import .......................................................................................................................................... 37
Problems deploying an OVA decoy on ESXi .................................................................................................................... 37
© Cymmetria MazeRunner 2017 – Community Edition 1.5.0 4 www.cymmetria.com
INTRODUCTION – WHAT IS MAZERUNNER?
MazeRunner™ is a platform for creating effective deception stories. Attackers making lateral movement will
first collect information on their next targets. At that time, they will find breadcrumbs deployed by
MazeRunner that point to decoys. Once the attackers connect to the decoys, they are led to believe that
they have successfully gained access to a target machine. Having gained a false sense of security, attackers
reveal their attack tools and methods, which defenders are then able to document and analyze.
Finally, MazeRunner communicates with an organization's existing defense infrastructure, exporting threat
information that allows for the creation of attack signatures.
For a more detailed overview of MazeRunner, please read our product whitepaper, which can be
downloaded for free from our website.
LEGAL NOTICES
Thank you for your interest in the free MazeRunner Community Edition!
If you are installing MazeRunner Community Edition for your own private use in a non-commercial
and non-production environment, you are not limited in the amount of "decoys" and "endpoints"
you may deploy.
If you are installing MazeRunner Community Edition on behalf of an organization, you may use the
product solely for internal testing and evaluation of the software and its performance in a non-
production environment. The software is not limited to any number of "decoys" and "endpoints" for
the first 30 days, but its use is limited to 1 "decoy" and 10 "endpoints" following this 30 day period.
Please consult the full text of the license for additional details, as the full terms of the license govern. For
more information or to give feedback, contact [email protected] or visit our website.

© Cymmetria MazeRunner 2017 – Community Edition 1.5.0 5 www.cymmetria.com
HOW IS THE COMMUNITY EDITION DIFFERENT FROM THE ENTERPRISE EDITION?
Cymmetria supports the cybersecurity community it calls home and believes strongly in giving back to that
community. This is why we decided to release a free Community Edition of our enterprise software platform.
The MazeRunner Community Edition is publicly available for private initiatives and research endeavors at no
cost or commitment to purchase. The platform is fully customizable and integrates seamlessly with existing
IT and security tools, allowing users to implement deception elements across the network. It is flexible and
does not burden existing organizational systems.
Community Enterprise
Linux decoys
Windows decoys ×
User-provided decoy image ×
Linux breadcrumbs
Windows breadcrumbs
Deception stories using business cases
Commercial use First 30 days only*
Large-scale deployment support ×
API
Remote deployment to endpoints through MazeRunner
Deception campaign auto-regeneration
Alerting through syslog and email
STIX/TAXII integration
Domain integration
Alerting of attempts to use deceptive credentials obtained using Responder.py
ActiveSOC™ ×
Get MazeRunner Download machine Contact us
*See Legal notices.

© Cymmetria MazeRunner 2017 – Community Edition 1.5.0 6 www.cymmetria.com
INSTALLATION AND SETUP
This section will guide you through the installation and setup of Cymmetria's MazeRunner solution. It
includes information on MazeRunner's platform and deployment.
VIRTUAL APPLIANCE (VMWARE PLAYER)
To begin, make sure you have VMware Player installed on your computer. Then, navigate to the directory in
which the MazeRunner OVA file is stored and proceed according to the following instructions:
1. To import MazeRunner into VMware Player, double-click on the OVA file (if you have multiple
hypervisors installed on your computer, you will need to right-click on the OVA file, select "Open
with", and then select "VMware Player"). You will need to provide a name and local storage path for
the new virtual machine, and then click "Import":
2. Before powering on your new virtual machine, you must enable nested virtualization support in
order to run MazeRunner with nested decoys. To do this:
a. Make sure the virtual machine is turned off, and then right-click on it and select "Settings…":
b. Select the Processors option and make sure the "Virtualize Intel VT-x/EPT or AMD-V/RVI"
and "Virtualize CPU performance counters" boxes are checked, then click "OK":

© Cymmetria MazeRunner 2017 – Community Edition 1.5.0 7 www.cymmetria.com
c. Nested virtualization is now enabled.
3. Now you can power on your virtual machine by clicking "Play virtual machine":
4. Once your virtual machine finishes booting, you will see its assigned IP address displayed on the
console:

© Cymmetria MazeRunner 2017 – Community Edition 1.5.0 8 www.cymmetria.com
Save this IP address; you will need to use it in subsequent sections of this guide.
That's it! MazeRunner is now ready for use.
By default, MazeRunner obtains its network configuration through DHCP. If you would like to change
MazeRunner's network configuration, see the section entitled MazeRunner network configuration on page
32 of this guide.
Learn more about how to get started with MazeRunner by reading the MazeRunner User Guide for
Community Edition v1.5.0.
VIRTUAL APPLIANCE (VMWARE WORKSTATION)
To begin, make sure you have VMware Workstation installed on your computer. Then, navigate to the
directory in which the MazeRunner OVA file is stored and proceed according to the following instructions:
1. To import MazeRunner into VMware Workstation, double-click on the OVA file. You will need to
provide a name and local storage path for the new virtual machine, and then click "Import":

© Cymmetria MazeRunner 2017 – Community Edition 1.5.0 9 www.cymmetria.com
2. Before powering on your new virtual machine, you must enable nested virtualization support in
order to run MazeRunner with nested decoys. To do this:
a. Make sure the virtual machine is turned off, and then right-click on it and select "Settings…":
b. Select the Processors option and make sure the "Virtualize Intel VT-x/EPT or AMD-V/RVI"
and "Virtualize CPU performance counters" boxes are checked, then click "OK":

© Cymmetria MazeRunner 2017 – Community Edition 1.5.0 10 www.cymmetria.com
c. Nested virtualization is now enabled.
3. Now you can power on your virtual machine by clicking "Power on this virtual machine":
4. Once your virtual machine finishes booting, you will see its assigned IP address displayed on the
console:

© Cymmetria MazeRunner 2017 – Community Edition 1.5.0 11 www.cymmetria.com
Save this IP address; you will need to use it in subsequent sections of this guide.
That's it! MazeRunner is now ready for use.
By default, MazeRunner obtains its network configuration through DHCP. If you would like to change
MazeRunner's network configuration, see the section entitled MazeRunner network configuration on page
32 of this guide.
Learn more about how to get started with MazeRunner by reading the MazeRunner User Guide for
Community Edition v1.5.0.
VIRTUAL APPLIANCE (VMWARE ESXI)
To begin, open your vSphere Client and connect to your ESXi server by entering your username and
password. From the File drop-down menu, choose "Deploy OVF Template" and open the MazeRunner OVA
file supplied.
Move through the stages of deploying the OVF Template:
1. Choose a name for your virtual machine (for example, "Cymmetria MazeRunner").
2. Choose your specific datacenter as the Host / Cluster on which to run the deployed template.
3. Select a destination for storing the virtual machine files.
4. Use the default values that appear in the Disk Format section.
5. Notice that the source network is shown as "bridged". Click "Next" to review all parameters and
finish the virtual machine creation:

© Cymmetria MazeRunner 2017 – Community Edition 1.5.0 12 www.cymmetria.com
After your virtual machine has finished being deployed (this will take some time), select your virtual machine
from the side bar on the left-hand side of the screen, then navigate to Home > Inventory > Hosts and
Clusters:
Now you will need to configure the network. Decoys can connect to the MazeRunner network in two ways:
using promiscuous mode or without using promiscuous mode. Cymmetria recommends running
MazeRunner in promiscuous mode, as it greatly simplifies decoy usage and system setup. It is possible to use
MazeRunner in non-promiscuous mode, but it will take more time and effort, and more issues may arise
during campaign creation.

© Cymmetria MazeRunner 2017 – Community Edition 1.5.0 13 www.cymmetria.com
Using MazeRunner with promiscuous mode
Open the Configuration tab and choose "Networking" by clicking on the link located in the Hardware box to
the left:
To make the nested virtual machines accessible from the network, enable promiscuous mode for the Virtual
Machine Port Group, where your virtual machine is connected (in our example, “Maze”). To do this, go to
“Properties”, select your virtual machine's port group, and then click “Edit”:
Go to the Security tab and make sure both “Promiscuous Mode” and “Forged Transmits” are enabled
("Accept"). Click "OK":

© Cymmetria MazeRunner 2017 – Community Edition 1.5.0 14 www.cymmetria.com
Why do we need promiscuous mode and forged transmits? In order for the nested virtual machines to
receive data packets, we need to enable these functions. If you do not enable promiscuous mode and forged
transmits, you will only be able to use OVA decoys, which are not nested.
Using MazeRunner without promiscuous mode
Make sure your virtual machine is turned off, then right-click on your virtual machine and select "Edit
Settings…":
© Cymmetria MazeRunner 2017 – Community Edition 1.5.0 15 www.cymmetria.com
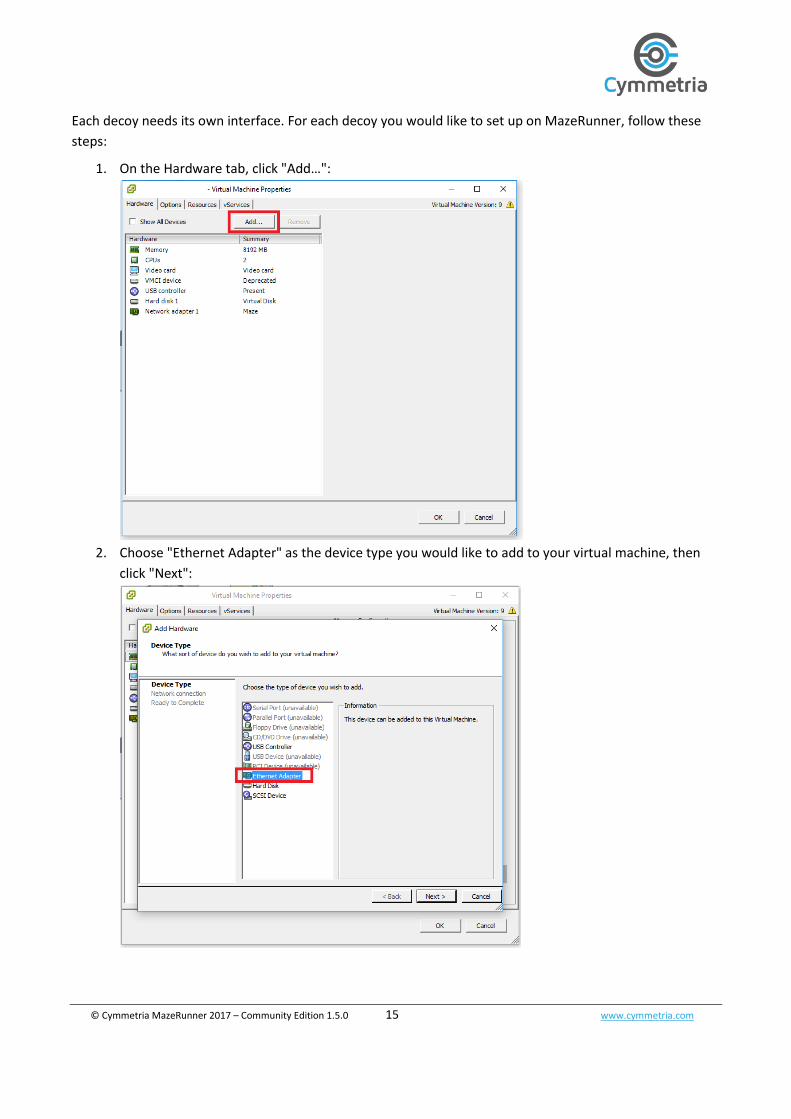
Each decoy needs its own interface. For each decoy you would like to set up on MazeRunner, follow these
steps:
1. On the Hardware tab, click "Add…":
2. Choose "Ethernet Adapter" as the device type you would like to add to your virtual machine, then
click "Next":

© Cymmetria MazeRunner 2017 – Community Edition 1.5.0 16 www.cymmetria.com
3. Choose your network connection from the drop-down list, then click "Next":
4. Review the options you selected and click "Finish" to add the hardware:

© Cymmetria MazeRunner 2017 – Community Edition 1.5.0 17 www.cymmetria.com
5. You will now see the hardware you added on the Hardware tab. Click "OK" to finish:
NOTE: You will also need to enable non-promiscuous mode within MazeRunner; see Non-promiscuous mode
on page 34 for more information.
Now you can configure VLAN support, if you wish to do so. Later, you will also need to configure VLAN
support within MazeRunner; see VLAN support on page 32 for more information.
To configure VLAN support, you need to make sure that your port group is configured to accept VLAN
tagging. Follow these steps:
1. In your vSphere control panel, access the Properties menu of the switch to which MazeRunner is
connected by navigating to Configuration > Networking > Properties…:

© Cymmetria MazeRunner 2017 – Community Edition 1.5.0 18 www.cymmetria.com
2. Under the Ports tab, select the appropriate switch name and click "Edit…":
3. Under the General tab, select "All (4095)" as the VLAN ID:

© Cymmetria MazeRunner 2017 – Community Edition 1.5.0 19 www.cymmetria.com
4. To make sure that the network adapter "sees" the VLAN network, expand the Networks list under
the Status area in Configuration > Networking > Properties > Network Adapters:
Now you must enable nested virtualization support, in order to run MazeRunner with nested decoys. There
are three common methods used to enable nested virtualization in ESXi products:
1. using vCenter
2. using VMware Workstation
3. using SSH
To find out which of these three methods you will need to use, you must look at which VMware hypervisor
you are running. To do this, open vSphere Client and go to Help > About VMware vSphere:

© Cymmetria MazeRunner 2017 – Community Edition 1.5.0 20 www.cymmetria.com
If you see the following pop-up window, it means you are using vCenter:
If you see the following pop-up window, it means you are using ESXi:
If you are using vCenter, see the instructions provided in the section entitled Enabling nested virtualization
using vCenter, below. If you are using ESXi, you have two options for enabling nested virtualization: via
VMware Workstation or SSH (see the relevant sections on page 23 and 24 of this guide).
ENABLING NESTED VIRTUALIZATION USING VCENTER
The following steps will guide you through enabling nested virtualization using vCenter.
1. Open vSphere Web Client in your web browser by navigating to the IP address of your vCenter server
(using HTTPS), and log in with the same credentials you used to log in to your vSphere client:
© Cymmetria MazeRunner 2017 – Community Edition 1.5.0 21 www.cymmetria.com
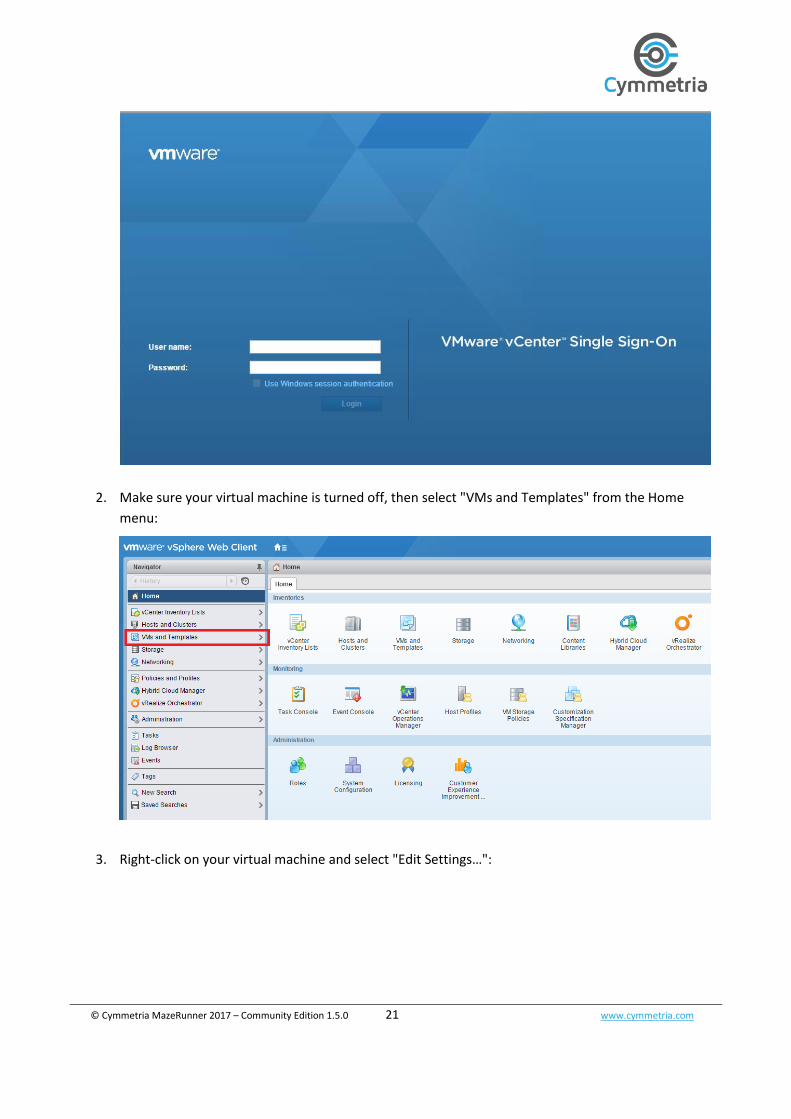
2. Make sure your virtual machine is turned off, then select "VMs and Templates" from the Home
menu:
3. Right-click on your virtual machine and select "Edit Settings…":

© Cymmetria MazeRunner 2017 – Community Edition 1.5.0 22 www.cymmetria.com
4. Expand the CPU drop-down options, check the Hardware virtualization and Performance counters
checkboxes, and click "OK":
Nested virtualization is now enabled. Please continue to the Powering on your virtual machine section of this
guide.

© Cymmetria MazeRunner 2017 – Community Edition 1.5.0 23 www.cymmetria.com
ENABLING NESTED VIRTUALIZATION USING VMWARE WORKSTATION (VERSION 11 AND UP)
The following steps will guide you through enabling nested virtualization using VMware Workstation (version
11 and up).
1. Open VMware Workstation and navigate to File > Connect to Server…:
2. Enter your login details (your ESXi credentials) and navigate to your MazeRunner virtual machine.
Make sure the virtual machine is turned off, and then right-click on it and select "Settings…" (you
may have to double-click on your virtual machine name before right-clicking):
3. Select the Processors option and make sure the "Virtualize Intel VT-x/EPT or AMD-V/RVI" and
"Virtualize CPU performance counters" boxes are checked, then click "OK":

© Cymmetria MazeRunner 2017 – Community Edition 1.5.0 24 www.cymmetria.com
Nested virtualization is now enabled. Please continue to the Powering on your virtual machine section of this
guide.
ENABLING NESTED VIRTUALIZATION USING SSH
The following steps will guide you through enabling nested virtualization using SSH.
1. In your vSphere client, under the Configuration tab, choose "Security Profile" from the Software box
on the bottom left of the screen, and then click "Properties":
2. Enable the ESXi Shell by selecting it from the list of labels, and then clicking on Options → Start →
OK:
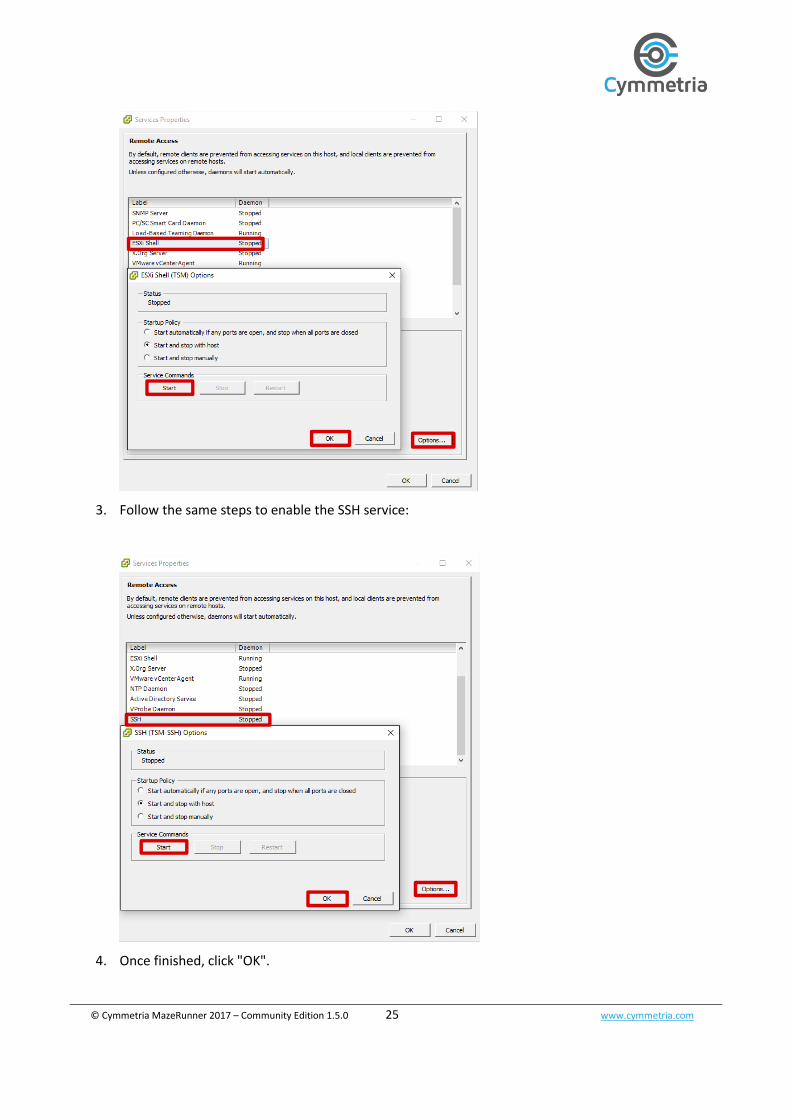
© Cymmetria MazeRunner 2017 – Community Edition 1.5.0 25 www.cymmetria.com
3. Follow the same steps to enable the SSH service:
4. Once finished, click "OK".

© Cymmetria MazeRunner 2017 – Community Edition 1.5.0 26 www.cymmetria.com
5. Log in to the ESXi Shell via an SSH client (PuTTY, for example), using your ESXi root user's credentials.
To do this:
a. Open PuTTY. In PuTTY, click "Open" to open a new SSH console:
b. In the SSH console, enter your username and password. Your shell should look like this:
6. Navigate to the MazeRunner virtual machine directory, located in
/vmfs/volumes/<datastore_name>/<virtual_machine_name>/. For example:
7. Make sure your MazeRunner virtual machine is turned off. Then, use your editor of choice to edit
the .vmx file (for example, "MazeRunner_release.vmx") in this directory by adding the following flags
to the end of the file:

© Cymmetria MazeRunner 2017 – Community Edition 1.5.0 27 www.cymmetria.com
vhv.enable = "TRUE"
vpmc.enable = "TRUE”
Nested virtualization is now enabled. Please continue to the Powering on your virtual machine section of this
guide.
POWERING ON YOUR VIRTUAL MACHINE
Once you have enabled nested virtualization, you can power on your new virtual machine. To do this, open
vSphere Client and navigate to Home > Inventory > VMs and Templates:
Use the search bar to find your virtual machine, select it, and then click "Power on the virtual machine":

© Cymmetria MazeRunner 2017 – Community Edition 1.5.0 28 www.cymmetria.com
Switch to the Console tab to see the virtual machine powering on. Once it finishes booting, you will see its
assigned IP address displayed on the console:
Save this IP address; you will need to use it in subsequent sections of this guide.
That's it! MazeRunner is now ready for use.
By default, MazeRunner obtains its network configuration through DHCP. If you would like to change
MazeRunner's network configuration, see the section entitled MazeRunner network configuration on page
32 of this guide.
Learn more about how to get started with MazeRunner by reading the MazeRunner User Guide for
Community Edition v1.5.0.
© Cymmetria MazeRunner 2017 – Community Edition 1.5.0 29 www.cymmetria.com
VIRTUAL APPLIANCE (KVM)
To begin, open a terminal, navigate to the directory in which the MazeRunner DSK file is stored (in QCOW2
format), and proceed according to the following instructions:
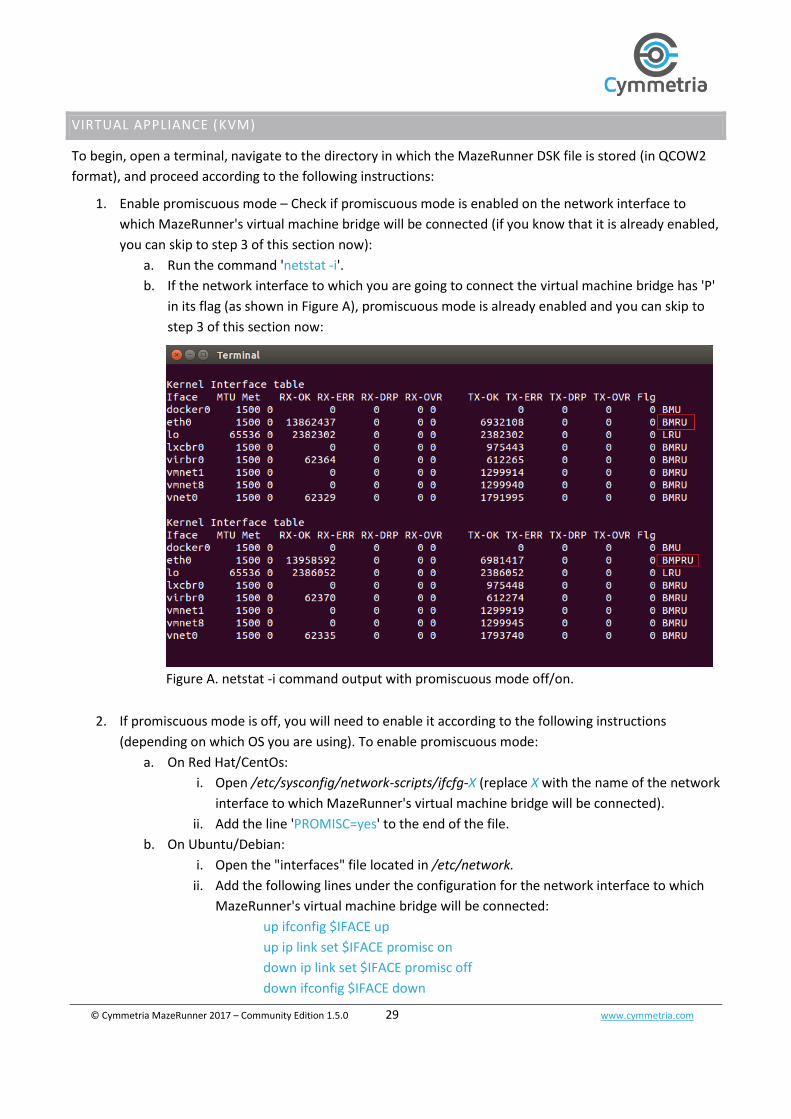
1. Enable promiscuous mode – Check if promiscuous mode is enabled on the network interface to
which MazeRunner's virtual machine bridge will be connected (if you know that it is already enabled,
you can skip to step 3 of this section now):
a. Run the command 'netstat -i'.
b. If the network interface to which you are going to connect the virtual machine bridge has 'P'
in its flag (as shown in Figure A), promiscuous mode is already enabled and you can skip to
step 3 of this section now:
Figure A. netstat -i command output with promiscuous mode off/on.
2. If promiscuous mode is off, you will need to enable it according to the following instructions
(depending on which OS you are using). To enable promiscuous mode:
a. On Red Hat/CentOs:
i. Open /etc/sysconfig/network-scripts/ifcfg-X (replace X with the name of the network
interface to which MazeRunner's virtual machine bridge will be connected).
ii. Add the line 'PROMISC=yes' to the end of the file.
b. On Ubuntu/Debian:
i. Open the "interfaces" file located in /etc/network.
ii. Add the following lines under the configuration for the network interface to which
MazeRunner's virtual machine bridge will be connected:
up ifconfig $IFACE up
up ip link set $IFACE promisc on
down ip link set $IFACE promisc off
down ifconfig $IFACE down

© Cymmetria MazeRunner 2017 – Community Edition 1.5.0 30 www.cymmetria.com
3. Import the MazeRunner image (DSK file) using the following command (run as root):
virt-install -n <name> -r <amount_of_RAM> --os-type=linux --os-variant= ubuntu14.04 --disk
MazeRunnerVirt.dsk,bus=virtio -w bridge=<name_of_network_bridge>,model=virtio --vnc --
noautoconsole --import --cpu=host
For example:
virt-install -n MazeRunner -r 16384 --os-type=linux --os-variant=ubuntu14.04 --disk
MazeRunnerVirt.dsk,bus=virtio -w bridge=virbr0,model=virtio --vnc --noautoconsole --import --
cpu=host
*NOTE: On some older virt-install versions, the os-variant argument for "ubuntu14.04" was
"ubuntutrusty". You can check the available variants on your system using the command 'osinfo-
query os'.
Parameters Detailed:
-n [an internal name for your virtual machine]
-r [the amount of RAM, in MB, for your virtual machine]
--os-type [the type of OS – Linux or Windows]
--os-variant [the distribution or version – for a full list, run command 'man virt-
install']
--disk [specifies media to use as storage for the guest, with various options]
-w [the network configuration]
--vnc [configures the graphics card to use VNC, allowing you to use virt-viewer or
virt-manager to see the desktop]
--noautoconsole [configures the installer to NOT automatically try to open virt-
viewer to view the console in order to complete the installation – this is helpful
if you are working on a remote system through SSH]
4. Check that the virtual machine was created successfully (we will use Virtual Machine Manager to do
this in our example):
a. Open Virtual Machine Manager and find the name you gave to the MazeRunner virtual
machine in step 3:
b. Click on the Open button and wait for the MazeRunner virtual machine to boot. Once it
finishes booting, you will see its assigned IP address displayed on the console:

© Cymmetria MazeRunner 2017 – Community Edition 1.5.0 31 www.cymmetria.com
c. Save this IP address; you will need to use it in subsequent sections of this guide.
That's it! MazeRunner is now ready for use.
By default, MazeRunner obtains its network configuration through DHCP. If you would like to change
MazeRunner's network configuration, see the section entitled MazeRunner network configuration on page
32 of this guide.
Learn more about how to get started with MazeRunner by reading the MazeRunner User Guide for
Community Edition v1.5.0.

© Cymmetria MazeRunner 2017 – Community Edition 1.5.0 32 www.cymmetria.com
MAZERUNNER NETWORK CONFIGURATION
This section includes information on configuring static IP, and enabling VLAN support and non-promiscuous
mode.
STATIC IP
By default, MazeRunner automatically obtains its network configuration through DHCP. If you would like to
change MazeRunner's network configuration, follow these steps:
1. Open the server's console. The console can be accessed using your hypervisor UI.
2. Log in as "usern":
a. Enter 'usern' as the MazeRunner login. For example:
b. Enter the password 'Password1!'1 and then enter ‘static’. For example:
Enter the details relevant to your network (IP address, netmask, default gateway, nameserver IP address,
DNS search domains). If you do not know your network details, contact your IT administrator. You will also
need to choose the main network interface for MazeRunner management.
NOTE: During automated deployment, the nameserver (DNS server) and the DNS search domains will be
used to look up endpoint names.
VLAN SUPPORT
VLAN support can be enabled by following the steps outlined below (make sure you have already completed
the steps outlined for configuring VLAN support, on page 17 of this guide):
1. In MazeRunner, click on the gear icon on the top right navigation bar to access the System Menu,
and select "Configure": 1 You will be prompted to change this password on first use of MazeRunner.
© Cymmetria MazeRunner 2017 – Community Edition 1.5.0 33 www.cymmetria.com
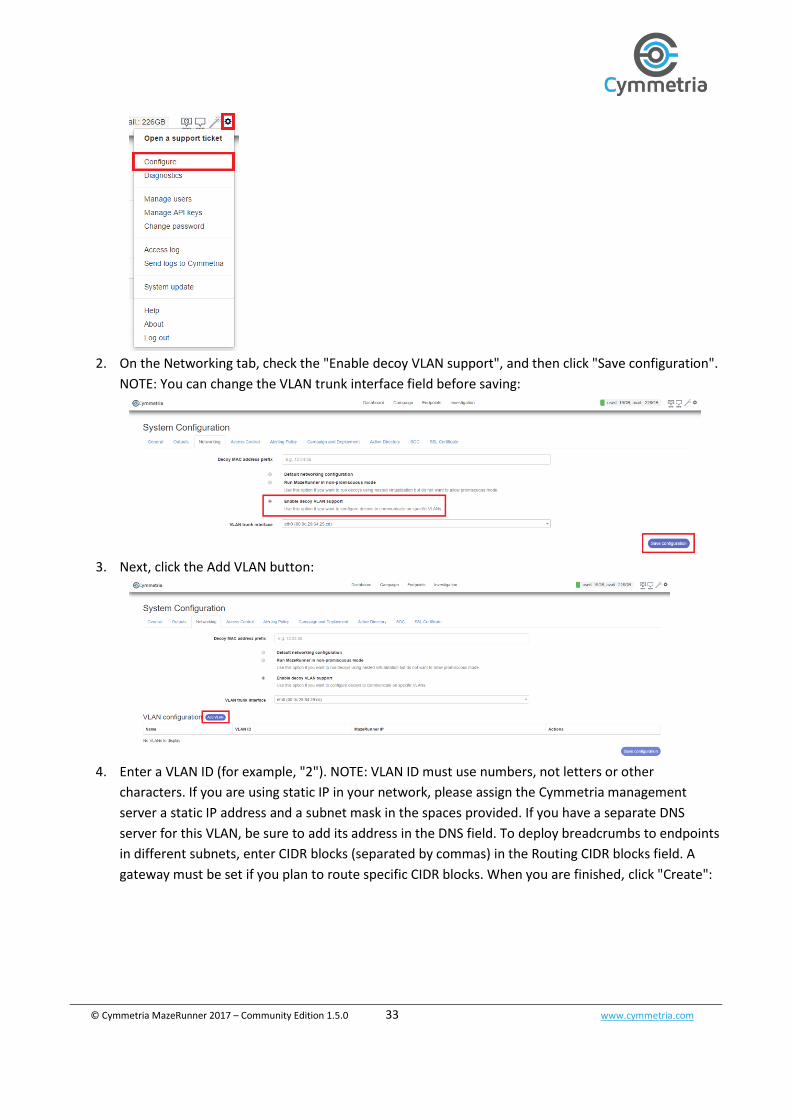
2. On the Networking tab, check the "Enable decoy VLAN support", and then click "Save configuration".
NOTE: You can change the VLAN trunk interface field before saving:
3. Next, click the Add VLAN button:
4. Enter a VLAN ID (for example, "2"). NOTE: VLAN ID must use numbers, not letters or other
characters. If you are using static IP in your network, please assign the Cymmetria management
server a static IP address and a subnet mask in the spaces provided. If you have a separate DNS
server for this VLAN, be sure to add its address in the DNS field. To deploy breadcrumbs to endpoints
in different subnets, enter CIDR blocks (separated by commas) in the Routing CIDR blocks field. A
gateway must be set if you plan to route specific CIDR blocks. When you are finished, click "Create":

© Cymmetria MazeRunner 2017 – Community Edition 1.5.0 34 www.cymmetria.com
That's it! VLAN support is now configured. NOTE: When you define a new decoy in MazeRunner (when
building your deception campaign either manually or with the help of the wizard), you will need to select
your VLAN ID from the drop-down list:
NON-PROMISCUOUS MODE
If you did not enable promiscuous mode during installation and setup, you will only be able to use OVA
decoys. If you would like to use nested decoys, you must enable non-promiscuous mode by selecting the Run
MazeRunner in non-promiscuous mode option from the Networking tab of the System Configuration screen.

© Cymmetria MazeRunner 2017 – Community Edition 1.5.0 35 www.cymmetria.com
To enable non-promiscuous mode, follow these steps:
1. Make sure you have completed the steps outlined for using MazeRunner without promiscuous
mode, on page 14 of this guide.
2. Also make sure you have chosen the main network interface for MazeRunner management:
NOTE: If you already configured static IP, please reference the section entitled Static IP.
3. In MazeRunner, click on the gear icon on the top right navigation bar to access the System Menu,
and select "Configure":
4. On the Networking tab, select the Run MazeRunner in non-promiscuous mode option, and then
click "Save configuration":

© Cymmetria MazeRunner 2017 – Community Edition 1.5.0 36 www.cymmetria.com
That's it! You have now enabled non-promiscuous mode. NOTE: When you define a new nested decoy in
MazeRunner (when building your deception campaign either manually or with the help of the wizard) you
will need to select an interface from the drop-down list:
NOTE: You can create only one decoy for each interface.
Learn more about how to get started with MazeRunner by reading the MazeRunner User Guide for
Community Edition v1.5.0.
We're here to help. If you have any questions, please contact us at [email protected].

© Cymmetria MazeRunner 2017 – Community Edition 1.5.0 37 www.cymmetria.com
FAQ / TROUBLESHOOTING
This section contains known issues that customers have encountered during MazeRunner installation, setup,
and use.
PROBLEMS DURING OVA IMPORT
Q: I received a warning during OVA import saying that the OVA file did not pass OVF specification
conformance or virtual hardware compliance checks.
A: We are aware of this warning, and it is safe to click "Retry" and import the OVA file as is.
PROBLEMS DEPLOYING AN OVA DECOY ON ESXI
Q: I receive an error message when trying to deploy an OVA decoy on ESXi.
A: You may be using an older version of ESXi. MazeRunner OVA decoys are compatible with ESXi version 5.1
and higher, so if you are using an older version, you will need to update your ESXi.