me-tun manual e - media engineering · user`s manual me-tun file: me-tun manual e.doc media...
TRANSCRIPT
ME-TUN A Professional FM Tuner
USER‘S MANUAL
ME-TUN Manual E; january 2005
e-mail: [email protected] web: www.mediaengineering.com
www.me-tun.com
www.fm-spy.com
MEDIA ENGINEERING Markus Stocker ∗ Professional Broadcasting Systems ∗ Rainstr. 15 CH-8104 WEININGEN (ZH) ∗ Switzerland ∗ Phone: +41 1 750 66 88 ∗ Fax: +41 1 750 66 91
[email protected] ∗ www.mediaengineering.com ∗ www.me-tun.com ∗ www.fm-spy.com

USER`S MANUAL ME-TUN
File: ME-TUN Manual E.DOC MEDIA ENGINEERING page 2/29
MEDIA ENGINEERING wants to thank you for selecting this MEDIA ENGINEERING product. For optimum performance and installation we recommend to read the following instructions carefully. In case of difficulties please contact one of our distributors or the manufacturing company.
Manufacturers address: MEDIA ENGINEERING Markus Stocker Rainstrasse 15 CH - 8104 WEININGEN (ZH) Switzerland Phone : +41-1-750-66-88 Fax : +41-1-750-66-91 E-mail : [email protected] Web : www.mediaengineering.com
The information in this documentation is subject to change. While every effort has been made to eliminate errors, MEDIA ENGINEERING disclaims liability for errors or for difficulties arising from interpretation of the information contained herein.
MEDIA ENGINEERING makes no representations or warranties whatsoever with respect to the content of this document and specifically disclaims any implied warranties of merchantability or fitness for any particular purpose. MEDIA ENGINEERING reserves the right to make alterations as technical progress may warrant at the discretion of MEDIA ENGINEERING. MEDIA ENGINEERING has no obligation to notify any person or entity of any changes and/or revisions to this publication. MEDIA ENGINEERING reserves the right to change materials and specifications without notice.
COPYRIGHT © MEDIA ENGINEERING All information contained in this documentation is the property of MEDIA ENGINEERING and is proprietary to MEDIA ENGINEERING and a trade secret of MEDIA ENGINEERING. No part of this publication may be copied, reproduced, transmitted, stored in a retrieval system, or translated into any language, in any form or by any means without the prior written consent of MEDIA ENGINEERING, Markus Stocker, CH-8104 Weiningen (ZH), Switzerland, [email protected]
USER`S MANUAL ME-TUN
File: ME-TUN Manual E.DOC MEDIA ENGINEERING page 3/29
MEDIA ENGINEERING Markus Stocker Phone : +41 1 750 66 88 Rainstrasse 15 Fax : +41 1 750 66 91 CH - 8104 WEININGEN (ZH) E-mail : [email protected] Switzerland
EC Declaration of Conformity
MEDIA ENGINEERING Markus Stocker, located in Rainstrasse 15, CH-8104 WEININGEN (ZH), Switzerland, hereby declare under our full responsibility that the product designated by "Professional FM Tuner ME-TUN" consisting of one 19”/1RU rack mountable device in its original metal housing conforms to the following standards: Standards used: EN 55022 : 1998 + A1 : 2000 EN 55024 : 1998 + A1 : 2001 FCC PART 15 Test center: EMC-TESTCENTER ZÜRICH AG Schaffhauserstrasse 580 CH-8052 ZÜRICH www.emc-testcenter.com Test report: EMC 094 / 02 dated 30/12/2002 All conformity tests have been made when the product is installed according to professional practice in a Recording or Broadcasting studio or similar environment. This product must not be used outside the specified environment. Weiningen: january, 10th, 2002 _____________________________ Markus Stocker President & CEO MEDIA ENGINEERING

USER`S MANUAL ME-TUN
File: ME-TUN Manual E.DOC MEDIA ENGINEERING page 4/29
CONTENT
A. INSTALLATION INSTRUCTIONS.................................................................................... 5
A.1. SAFETY CONDITIONS ................................................................................................. 5 A.1.1. ELECTROMAGNETICAL INTERFERENCE............................................................ 6 A.1.2. ENVIRONMENT TEMPERATURE .......................................................................... 6 A.1.3. CAUTION WITH THE MAINS CABLE ..................................................................... 6 A.1.4. DO NOT REMOVE COVER..................................................................................... 6
A.2. INSTALLATION PROCEDURE..................................................................................... 7
A.3. SETTING THE SAMPLING RATE FOR THE DIGITAL AUDIO OUTPUT .................... 8
A.4. CABLING..................................................................................................................... 11
B. OPERATING INSTRUCTIONS....................................................................................... 12
B.1. BASIC OPERATIONS ................................................................................................. 12 B.1.1. STARTUP SEQUENCE......................................................................................... 12 B.1.2. LIT UP KEYS......................................................................................................... 12 B.1.3. THE INITIAL STATE.............................................................................................. 13 B.1.4. TUNING IN TO A SPECIFIC FREQUENCY.......................................................... 14 B.1.5. SAVING A PRESET .............................................................................................. 15 B.1.6. LOADING A PRESET............................................................................................ 16 B.1.7. SETTING THE INFO MODE.................................................................................. 17 B.1.8. HEADPHONES VOLUME CONTROL................................................................... 18
B.2. EXTENDED OPERATIONS......................................................................................... 19 B.2.1. MENU FUNCTIONS .............................................................................................. 19 B.2.2. STEPPING THROUGH PRESETS........................................................................ 20 B.2.3. FINE TUNING........................................................................................................ 21 B.2.4. LOCKING THE TUNER ......................................................................................... 22 B.2.5. SCANNING THE FM CHANNELS......................................................................... 23 B.2.6. SELECTING THE ANTENNA INPUT .................................................................... 25
C. PINOUT OF 25 PIN D-TYPE CONNECTOR ON THE REAR SIDE ............................... 26
D. EXAMPLE OF HOW TO USE THE AUXILIARY INTERFACE....................................... 27
E. SUMMARY OF KEYBOARD COMMANDS.................................................................... 28
F. TECHNICAL SPECIFICATIONS..................................................................................... 29
USER`S MANUAL ME-TUN
File: ME-TUN Manual E.DOC MEDIA ENGINEERING page 5/29
A.1. SAFETY CONDITIONS
After removing any housing parts and electronic assemblies it’s possible to get access to live parts. It‘s essential to ensure that the subsequent safety rules are strictly observed:
Servicing of electronic equipment must be performed by qualified personnel only.
Before removing covers the equipment has to be switched off and the mains cable unplugged.
When the equipment is open power supply capacitors have to be discharged with the help of a suitable resistor.
When the equipment is open components, that carry havy electrical loads, such as power transistors and resistors as well as solenoid coils should not be touched before a cooling off interval, as a precaution to avoid burns.
During servicing unprotected and operating equipment never touch bare wires or circuitry.
During servicing unprotected and operating equipment use insulated tools only.
During servicing unprotected and operating equipment never touch metal semiconductor cases because they may carry high voltages.
For removing and installing electronic components, please follow the recommandations concerning the handling of MOS components.
A. INSTALLATION INSTRUCTIONS
USER`S MANUAL ME-TUN
File: ME-TUN Manual E.DOC MEDIA ENGINEERING page 6/29
A.1.1. ELECTROMAGNETICAL INTERFERENCE
In case the ME-TUN is installed and operated in a strongly electromagnetical disturbed
environment, signals of interferences can occur during reception of the FM Band.
A.1.2. ENVIRONMENT TEMPERATURE
Preferably install the equipment in a dry location with approximately 20 centigrades (room
temperature) of ambient temperature. The ambient temperature has a large influence on the
contrast of the LCD display.
A.1.3. CAUTION WITH THE MAINS CABLE
Always seize the mains cable at the plug. Do not pull on the cable and never touch the
mains cable with wet hands, since this can cause a short-circuit or an electrical shock. Do
not place equipment or a furniture on the mains cable. A damaged mains cable can cause
fire or an electrical shock. Therefore examine the mains cable occasionally. Should it be
damaged, get in contact with your next customer service in order to replace the cable.
A.1.4. DO NOT REMOVE COVER
To prevent electric shock, do not remove the cover. There are no user serviceable parts
inside the ME-TUN. Refer servicing to qualified service personnel only.
USER`S MANUAL ME-TUN
File: ME-TUN Manual E.DOC MEDIA ENGINEERING page 7/29
A.2. INSTALLATION PROCEDURE Place the ME-TUN professional FM tuner in a horizontal position, and do not place anything
heavy on it. Never bring a magnet or magnetized objects near the tuner, because such will
adversely affect the performance of the ME-TUN.
Should it be necessary to change the sampling rate of the digital audio output to another
value than the factory set 48kHz please refer to chapter A3.
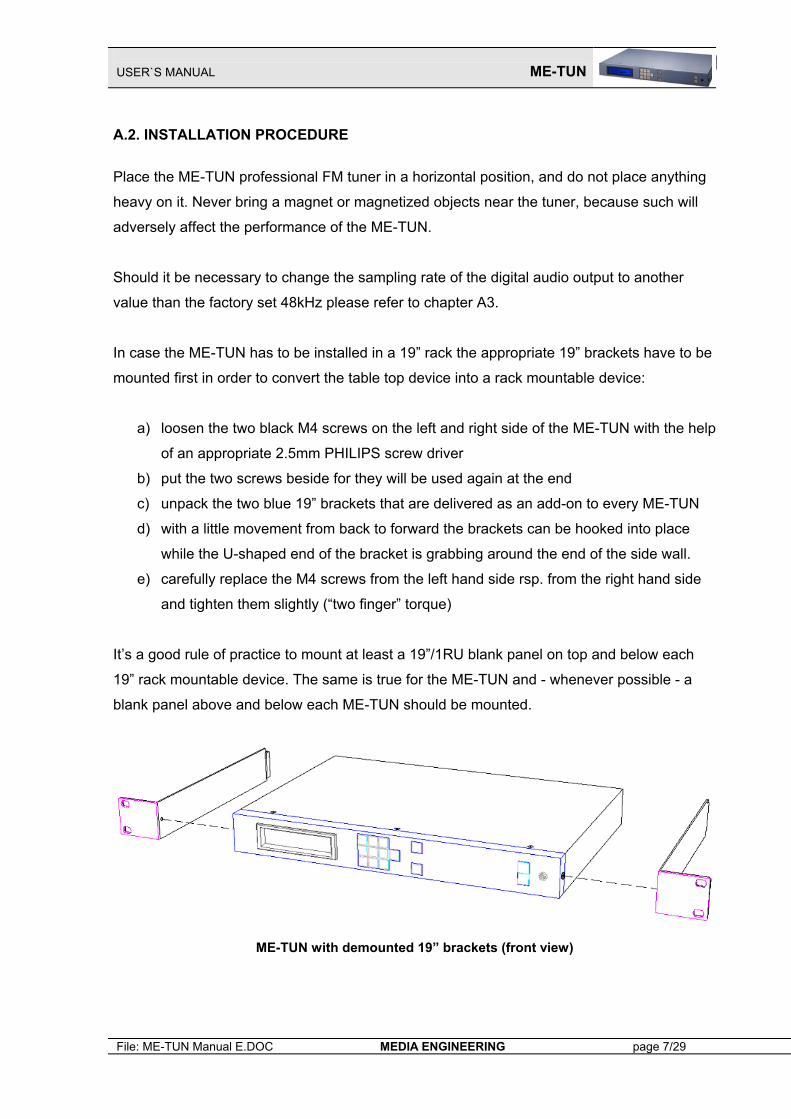
In case the ME-TUN has to be installed in a 19” rack the appropriate 19” brackets have to be
mounted first in order to convert the table top device into a rack mountable device:
a) loosen the two black M4 screws on the left and right side of the ME-TUN with the help
of an appropriate 2.5mm PHILIPS screw driver
b) put the two screws beside for they will be used again at the end
c) unpack the two blue 19” brackets that are delivered as an add-on to every ME-TUN
d) with a little movement from back to forward the brackets can be hooked into place
while the U-shaped end of the bracket is grabbing around the end of the side wall.
e) carefully replace the M4 screws from the left hand side rsp. from the right hand side
and tighten them slightly (“two finger” torque)
It’s a good rule of practice to mount at least a 19”/1RU blank panel on top and below each
19” rack mountable device. The same is true for the ME-TUN and - whenever possible - a
blank panel above and below each ME-TUN should be mounted.
ME-TUN with demounted 19” brackets (front view)
USER`S MANUAL ME-TUN
File: ME-TUN Manual E.DOC MEDIA ENGINEERING page 8/29
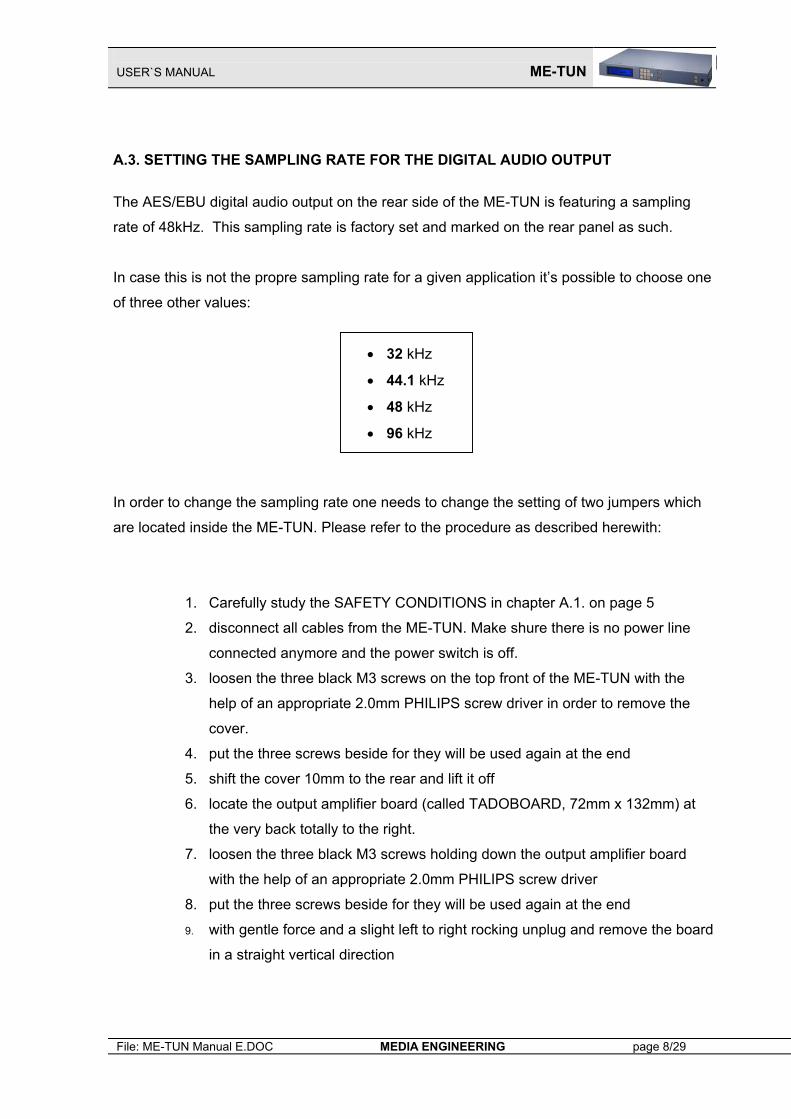
A.3. SETTING THE SAMPLING RATE FOR THE DIGITAL AUDIO OUTPUT The AES/EBU digital audio output on the rear side of the ME-TUN is featuring a sampling
rate of 48kHz. This sampling rate is factory set and marked on the rear panel as such.
In case this is not the propre sampling rate for a given application it’s possible to choose one
of three other values:
• 32 kHz
• 44.1 kHz
• 48 kHz
• 96 kHz
In order to change the sampling rate one needs to change the setting of two jumpers which
are located inside the ME-TUN. Please refer to the procedure as described herewith:
1. Carefully study the SAFETY CONDITIONS in chapter A.1. on page 5
2. disconnect all cables from the ME-TUN. Make shure there is no power line
connected anymore and the power switch is off.
3. loosen the three black M3 screws on the top front of the ME-TUN with the
help of an appropriate 2.0mm PHILIPS screw driver in order to remove the
cover.
4. put the three screws beside for they will be used again at the end
5. shift the cover 10mm to the rear and lift it off
6. locate the output amplifier board (called TADOBOARD, 72mm x 132mm) at
the very back totally to the right.
7. loosen the three black M3 screws holding down the output amplifier board
with the help of an appropriate 2.0mm PHILIPS screw driver
8. put the three screws beside for they will be used again at the end
9. with gentle force and a slight left to right rocking unplug and remove the board
in a straight vertical direction
USER`S MANUAL ME-TUN
File: ME-TUN Manual E.DOC MEDIA ENGINEERING page 9/29
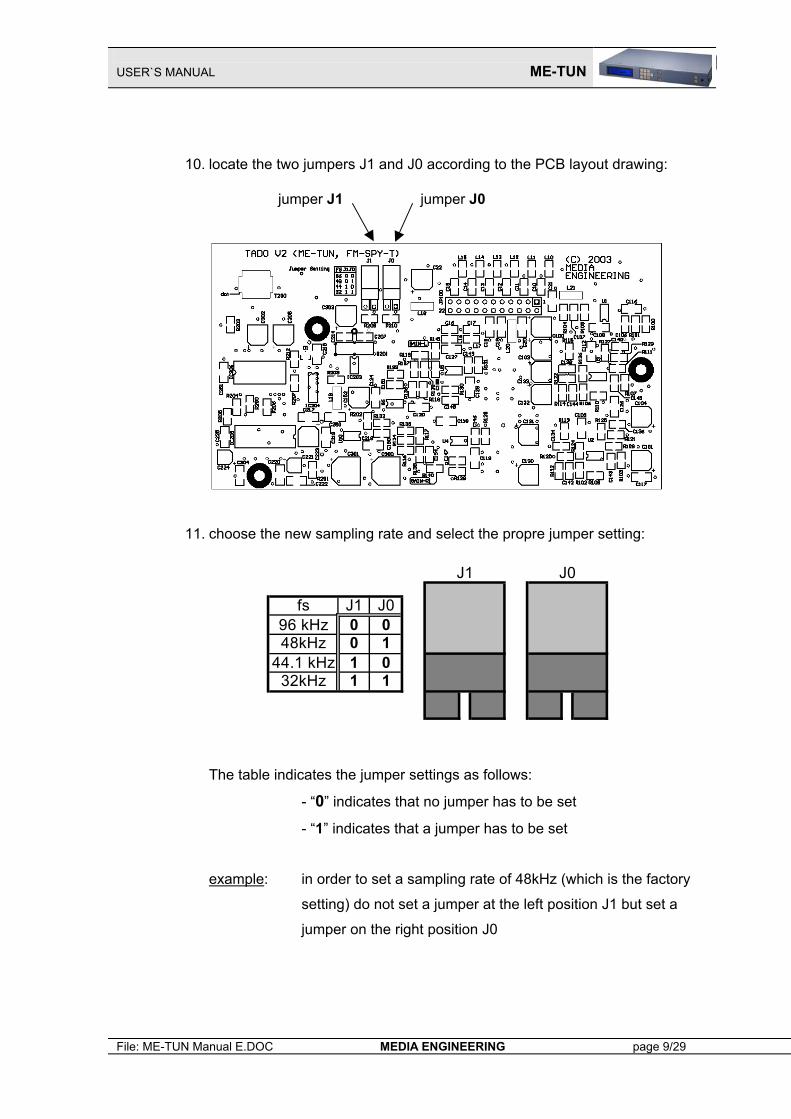
10. locate the two jumpers J1 and J0 according to the PCB layout drawing:
jumper J1 jumper J0
11. choose the new sampling rate and select the propre jumper setting:
fs J1 J096 kHz 0 048kHz 0 1
44.1 kHz 1 032kHz 1 1
J1 J0
The table indicates the jumper settings as follows:
- “0” indicates that no jumper has to be set
- “1” indicates that a jumper has to be set
example: in order to set a sampling rate of 48kHz (which is the factory
setting) do not set a jumper at the left position J1 but set a
jumper on the right position J0
USER`S MANUAL ME-TUN
File: ME-TUN Manual E.DOC MEDIA ENGINEERING page 10/29
12. put the output amplifier board back into the ME-TUN. Make shure the 22pin
connector fits right into the socket underneath the cutout in the metallic
shielding. The board is placed perfectly if there shows up an air gap between
the board and the side wall of the ME-TUN of approximately 0.5mm
13. put in place the three black M3 screws in order to hold down the output
amplifier board. Make shure the propre screws with the half spherical head
are used
14. tighten the crews slightly (“two finger” torque) with the help of an appropriate
2.0mm PHILIPS screw driver. DO NOT USE STRENGTH.
15. replace the cover of the ME-TUN in a vertical motion so that there remains
an air gap of approximately 10mm in the front section
16. shift the cover 10mm into the front direction in order to allow the bended
shielding at the back grabing the U shaped rear side.
17. put in place the three black M3 screws in order to hold down the cover. Make
shure the propre screws are used so that they can be lowered into the cover
in order to achieve a totally flat surface.
18. reinstall the ME-TUN.
19. check your application with the new setting of the sampling rate. If it doesn’t
work properly one of the following problems might have occurred:
the output amplifier boards 22pin connector is not properly
connected to the socket and there is not a 0.5mm air gap on
the right side of the board. Solution: go back to point 11.
the jumper setting is wrong. Solution: go back to point 10 and
make shure that a “0” indicates no jumper but a “1” indicates
a jumper. J1 is the left and J0 is the right jumper.
the jumper setting is not matching the features of your external
device (e.g. a mixing console). Solution: check if your external
device is able to handle one of the four selectable sampling
rates and then choose one of these.
USER`S MANUAL ME-TUN
File: ME-TUN Manual E.DOC MEDIA ENGINEERING page 11/29
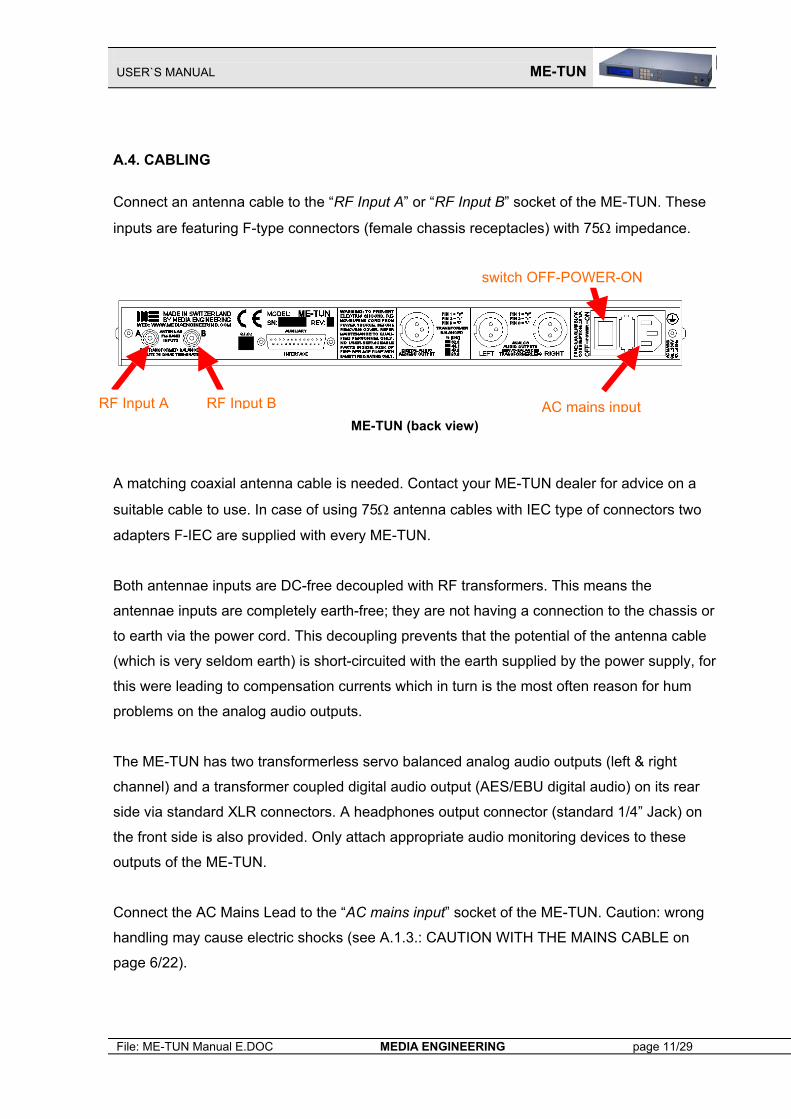
A.4. CABLING Connect an antenna cable to the “RF Input A” or “RF Input B” socket of the ME-TUN. These
inputs are featuring F-type connectors (female chassis receptacles) with 75Ω impedance.
ME-TUN (back view)
A matching coaxial antenna cable is needed. Contact your ME-TUN dealer for advice on a
suitable cable to use. In case of using 75Ω antenna cables with IEC type of connectors two
adapters F-IEC are supplied with every ME-TUN.
Both antennae inputs are DC-free decoupled with RF transformers. This means the
antennae inputs are completely earth-free; they are not having a connection to the chassis or
to earth via the power cord. This decoupling prevents that the potential of the antenna cable
(which is very seldom earth) is short-circuited with the earth supplied by the power supply, for
this were leading to compensation currents which in turn is the most often reason for hum
problems on the analog audio outputs.
The ME-TUN has two transformerless servo balanced analog audio outputs (left & right
channel) and a transformer coupled digital audio output (AES/EBU digital audio) on its rear
side via standard XLR connectors. A headphones output connector (standard 1/4” Jack) on
the front side is also provided. Only attach appropriate audio monitoring devices to these
outputs of the ME-TUN.
Connect the AC Mains Lead to the “AC mains input” socket of the ME-TUN. Caution: wrong
handling may cause electric shocks (see A.1.3.: CAUTION WITH THE MAINS CABLE on
page 6/22).
RF Input A AC mains input RF Input B
switch OFF-POWER-ON
USER`S MANUAL ME-TUN
File: ME-TUN Manual E.DOC MEDIA ENGINEERING page 12/29
B.1. BASIC OPERATIONS B.1.1. STARTUP SEQUENCE
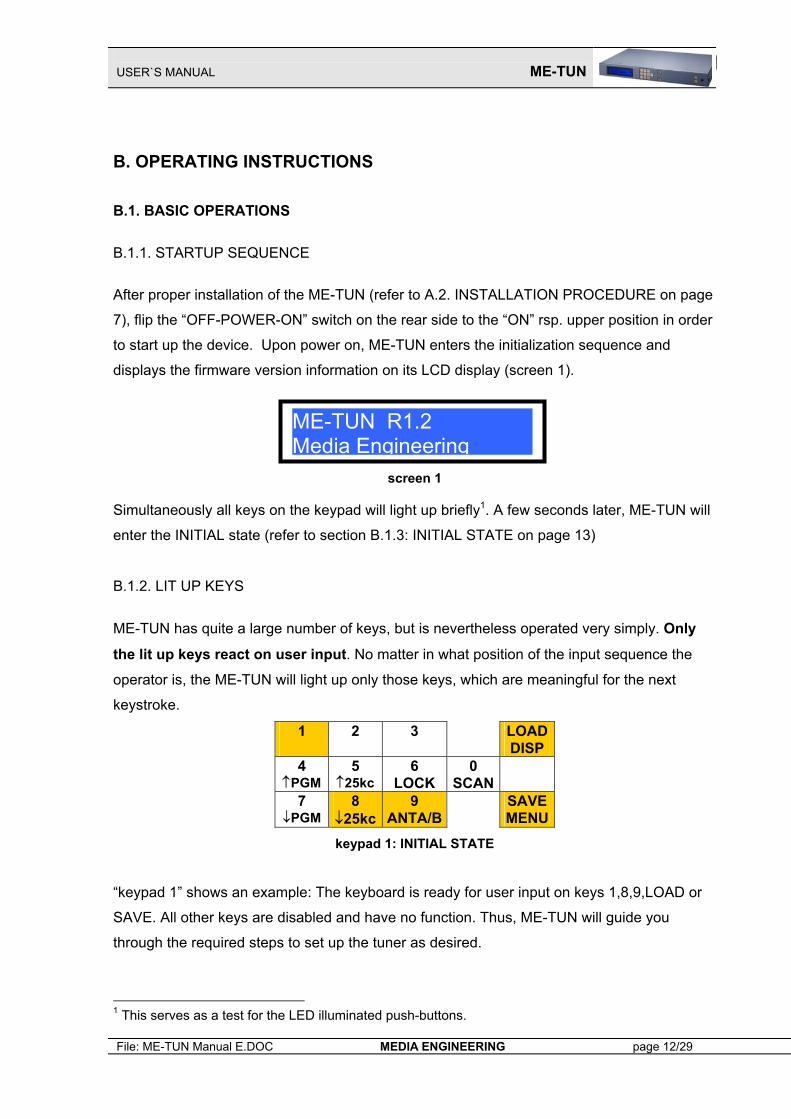
After proper installation of the ME-TUN (refer to A.2. INSTALLATION PROCEDURE on page
7), flip the “OFF-POWER-ON” switch on the rear side to the “ON” rsp. upper position in order
to start up the device. Upon power on, ME-TUN enters the initialization sequence and
displays the firmware version information on its LCD display (screen 1).
screen 1
Simultaneously all keys on the keypad will light up briefly1. A few seconds later, ME-TUN will
enter the INITIAL state (refer to section B.1.3: INITIAL STATE on page 13)
B.1.2. LIT UP KEYS
ME-TUN has quite a large number of keys, but is nevertheless operated very simply. Only
the lit up keys react on user input. No matter in what position of the input sequence the
operator is, the ME-TUN will light up only those keys, which are meaningful for the next
keystroke.
1
2
3 LOADDISP
4 ↑PGM
5 ↑25kc
6 LOCK
0 SCAN
7 ↓PGM
8 ↓25kc
9 ANTA/B
SAVEMENU
keypad 1: INITIAL STATE
“keypad 1” shows an example: The keyboard is ready for user input on keys 1,8,9,LOAD or
SAVE. All other keys are disabled and have no function. Thus, ME-TUN will guide you
through the required steps to set up the tuner as desired.
1 This serves as a test for the LED illuminated push-buttons.
B. OPERATING INSTRUCTIONS
ME-TUN R1.2 Media Engineering
USER`S MANUAL ME-TUN
File: ME-TUN Manual E.DOC MEDIA ENGINEERING page 13/29
B.1.3. THE INITIAL STATE
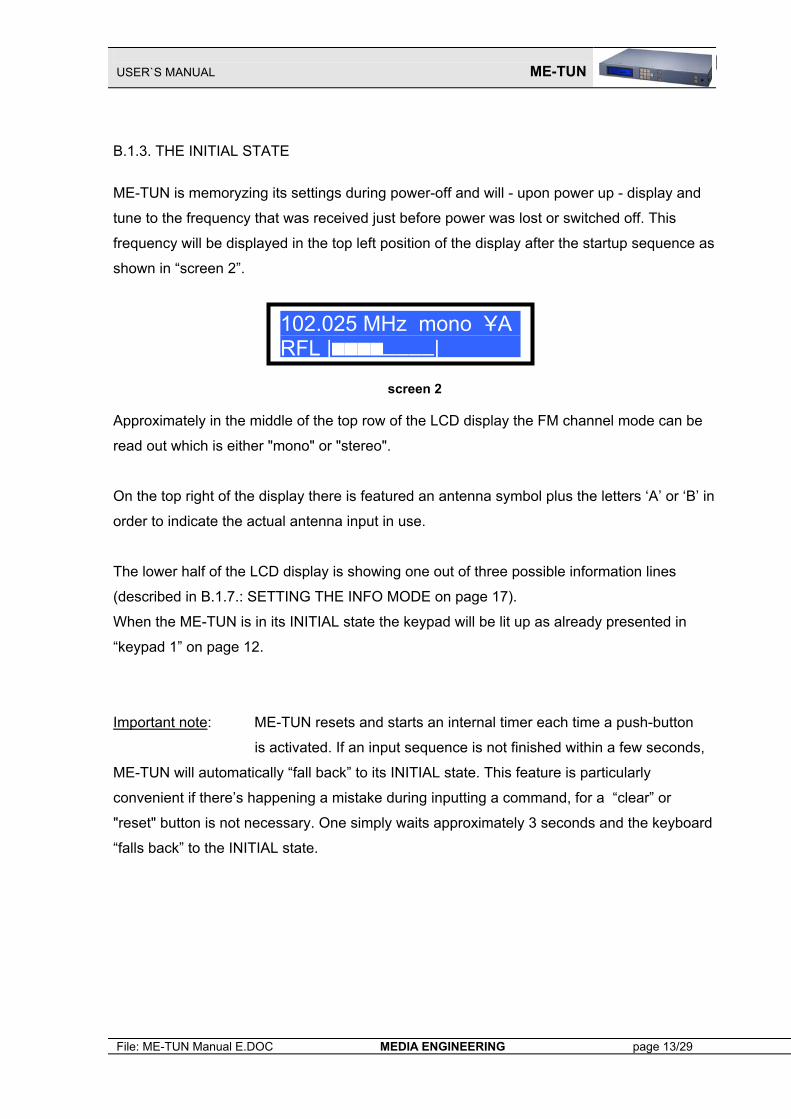
ME-TUN is memoryzing its settings during power-off and will - upon power up - display and
tune to the frequency that was received just before power was lost or switched off. This
frequency will be displayed in the top left position of the display after the startup sequence as
shown in “screen 2”.
screen 2
Approximately in the middle of the top row of the LCD display the FM channel mode can be
read out which is either "mono" or "stereo".
On the top right of the display there is featured an antenna symbol plus the letters ‘A’ or ‘B’ in
order to indicate the actual antenna input in use.
The lower half of the LCD display is showing one out of three possible information lines
(described in B.1.7.: SETTING THE INFO MODE on page 17).
When the ME-TUN is in its INITIAL state the keypad will be lit up as already presented in
“keypad 1” on page 12.
Important note: ME-TUN resets and starts an internal timer each time a push-button
is activated. If an input sequence is not finished within a few seconds,
ME-TUN will automatically “fall back” to its INITIAL state. This feature is particularly
convenient if there’s happening a mistake during inputting a command, for a “clear” or
"reset" button is not necessary. One simply waits approximately 3 seconds and the keyboard
“falls back” to the INITIAL state.
102.025 MHz mono ҰARFL ||
USER`S MANUAL ME-TUN
File: ME-TUN Manual E.DOC MEDIA ENGINEERING page 14/29
B.1.4. TUNING IN TO A SPECIFIC FREQUENCY
When the tuner is powered up and waits in the INITIAL state (refer to section B.1.3: INITIAL
STATE on page 13), the desired frequency, e.g. 103.250 MHz, may be inputted directly.
There is no need to step through menu functions in order to get to a tuning menu. Under the
condition, that the antenna input in use is already set properly (otherwise refer to B.2.6.:
SELECTING THE ANTENNA INPUT on page 25) one can tune to any frequency within the
entire FM band starting from the INITIAL state in predefined steps of 25kHz.
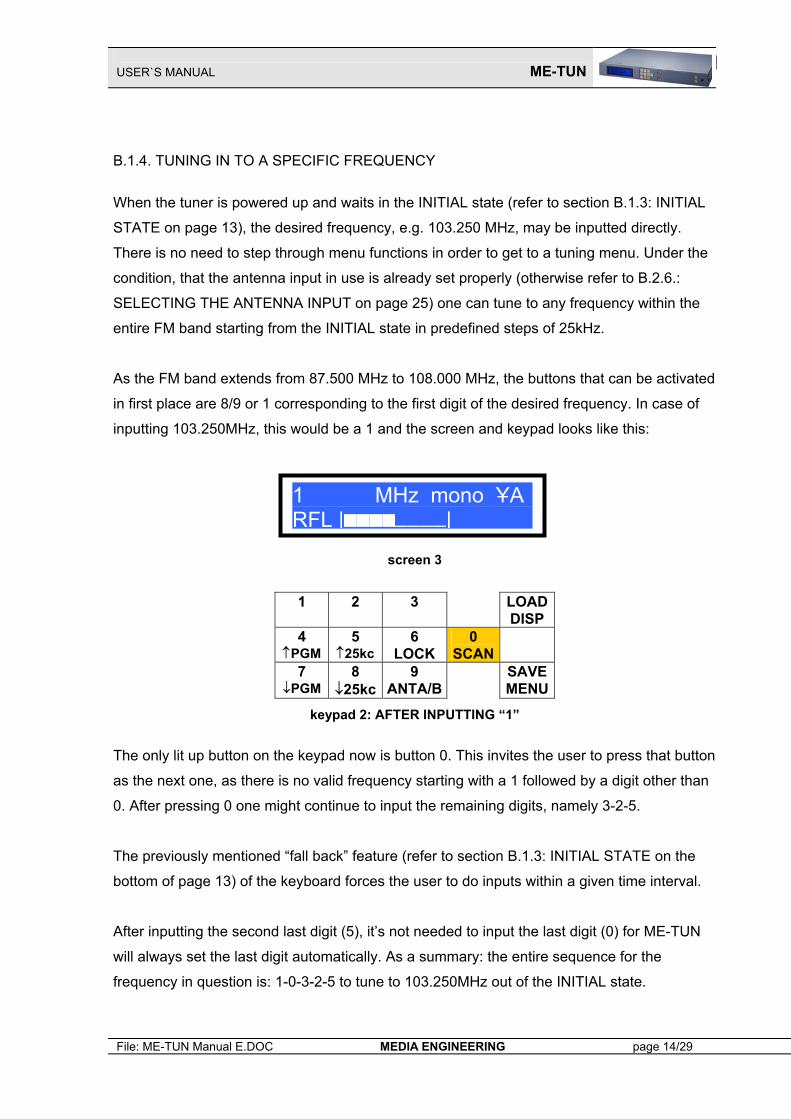
As the FM band extends from 87.500 MHz to 108.000 MHz, the buttons that can be activated
in first place are 8/9 or 1 corresponding to the first digit of the desired frequency. In case of
inputting 103.250MHz, this would be a 1 and the screen and keypad looks like this:
screen 3
1
2
3 LOADDISP
4 ↑PGM
5 ↑25kc
6 LOCK
0 SCAN
7 ↓PGM
8 ↓25kc
9 ANTA/B
SAVEMENU
keypad 2: AFTER INPUTTING “1”
The only lit up button on the keypad now is button 0. This invites the user to press that button
as the next one, as there is no valid frequency starting with a 1 followed by a digit other than
0. After pressing 0 one might continue to input the remaining digits, namely 3-2-5.
The previously mentioned “fall back” feature (refer to section B.1.3: INITIAL STATE on the
bottom of page 13) of the keyboard forces the user to do inputs within a given time interval.
After inputting the second last digit (5), it’s not needed to input the last digit (0) for ME-TUN
will always set the last digit automatically. As a summary: the entire sequence for the
frequency in question is: 1-0-3-2-5 to tune to 103.250MHz out of the INITIAL state.
1 MHz mono ҰARFL ||
USER`S MANUAL ME-TUN
File: ME-TUN Manual E.DOC MEDIA ENGINEERING page 15/29
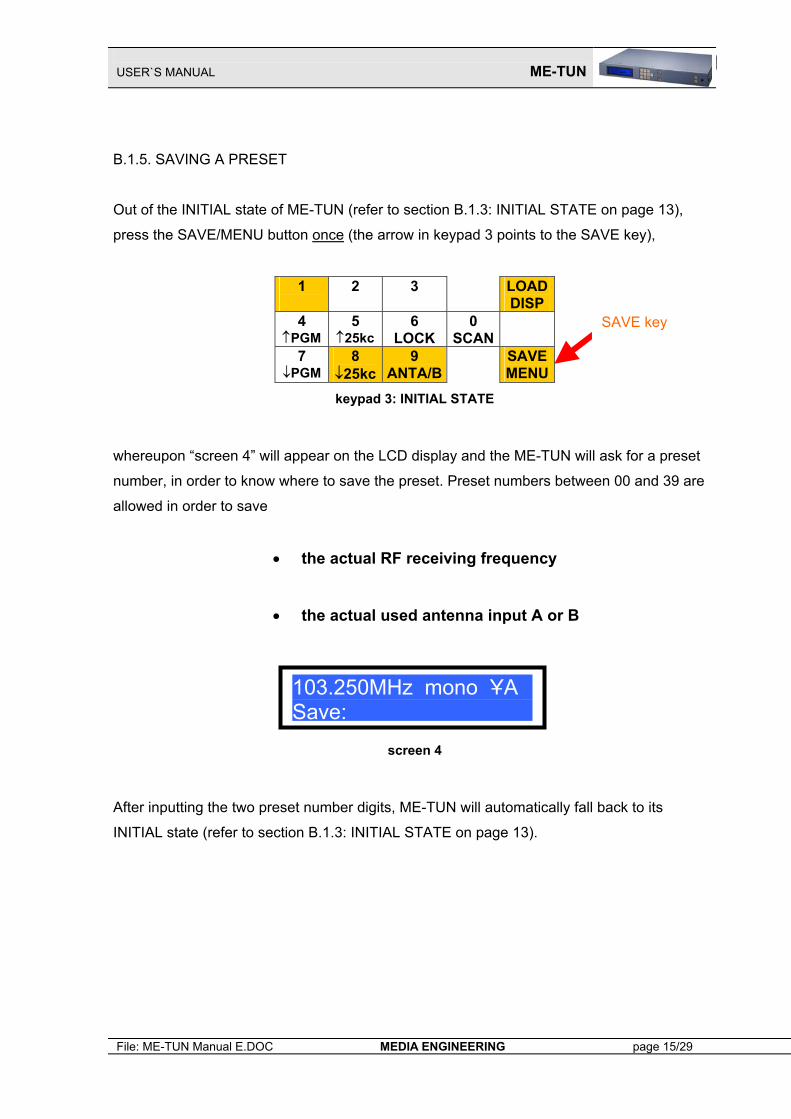
B.1.5. SAVING A PRESET
Out of the INITIAL state of ME-TUN (refer to section B.1.3: INITIAL STATE on page 13),
press the SAVE/MENU button once (the arrow in keypad 3 points to the SAVE key),
1
2
3 LOADDISP
4 ↑PGM
5 ↑25kc
6 LOCK
0 SCAN
7 ↓PGM
8 ↓25kc
9 ANTA/B
SAVEMENU
keypad 3: INITIAL STATE
whereupon “screen 4” will appear on the LCD display and the ME-TUN will ask for a preset
number, in order to know where to save the preset. Preset numbers between 00 and 39 are
allowed in order to save
• the actual RF receiving frequency
• the actual used antenna input A or B
screen 4
After inputting the two preset number digits, ME-TUN will automatically fall back to its
INITIAL state (refer to section B.1.3: INITIAL STATE on page 13).
103.250MHz mono ҰA Save:
SAVE key
USER`S MANUAL ME-TUN
File: ME-TUN Manual E.DOC MEDIA ENGINEERING page 16/29
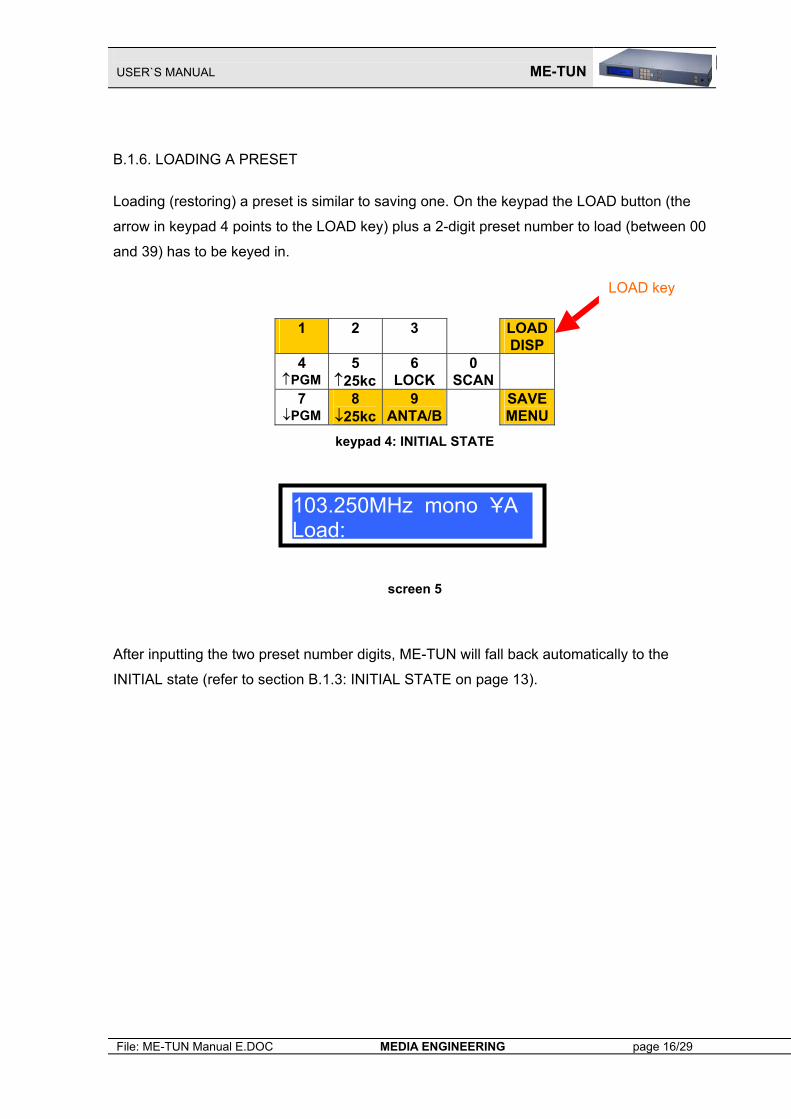
B.1.6. LOADING A PRESET
Loading (restoring) a preset is similar to saving one. On the keypad the LOAD button (the
arrow in keypad 4 points to the LOAD key) plus a 2-digit preset number to load (between 00
and 39) has to be keyed in.
1
2
3 LOADDISP
4 ↑PGM
5 ↑25kc
6 LOCK
0 SCAN
7 ↓PGM
8 ↓25kc
9 ANTA/B
SAVEMENU
keypad 4: INITIAL STATE
screen 5
After inputting the two preset number digits, ME-TUN will fall back automatically to the
INITIAL state (refer to section B.1.3: INITIAL STATE on page 13).
103.250MHz mono ҰA Load:
LOAD key
USER`S MANUAL ME-TUN
File: ME-TUN Manual E.DOC MEDIA ENGINEERING page 17/29
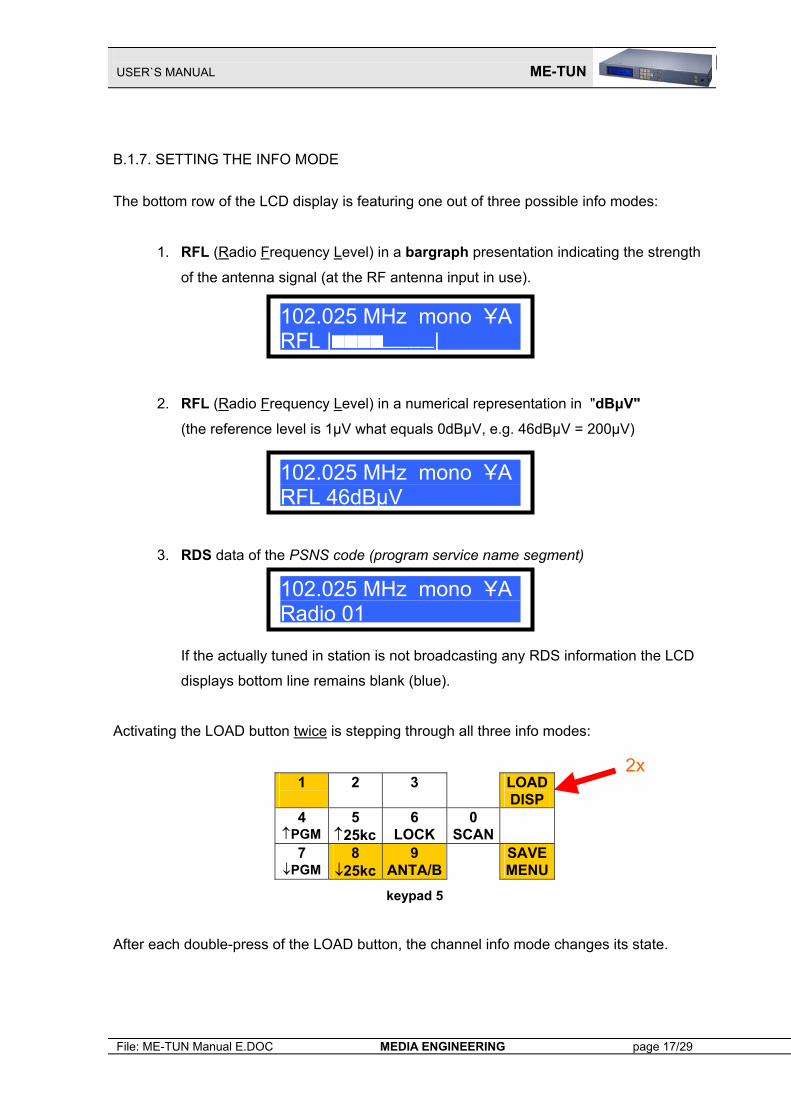
B.1.7. SETTING THE INFO MODE
The bottom row of the LCD display is featuring one out of three possible info modes:
1. RFL (Radio Frequency Level) in a bargraph presentation indicating the strength
of the antenna signal (at the RF antenna input in use).
2. RFL (Radio Frequency Level) in a numerical representation in "dBµV"
(the reference level is 1µV what equals 0dBµV, e.g. 46dBµV = 200µV)
3. RDS data of the PSNS code (program service name segment)
If the actually tuned in station is not broadcasting any RDS information the LCD
displays bottom line remains blank (blue).
Activating the LOAD button twice is stepping through all three info modes:
1
2
3 LOADDISP
4 ↑PGM
5 ↑25kc
6 LOCK
0 SCAN
7 ↓PGM
8 ↓25kc
9 ANTA/B
SAVEMENU
keypad 5
After each double-press of the LOAD button, the channel info mode changes its state.
102.025 MHz mono ҰARFL ||
102.025 MHz mono ҰARFL 46dBµV
102.025 MHz mono ҰARadio 01
2x
USER`S MANUAL ME-TUN
File: ME-TUN Manual E.DOC MEDIA ENGINEERING page 18/29
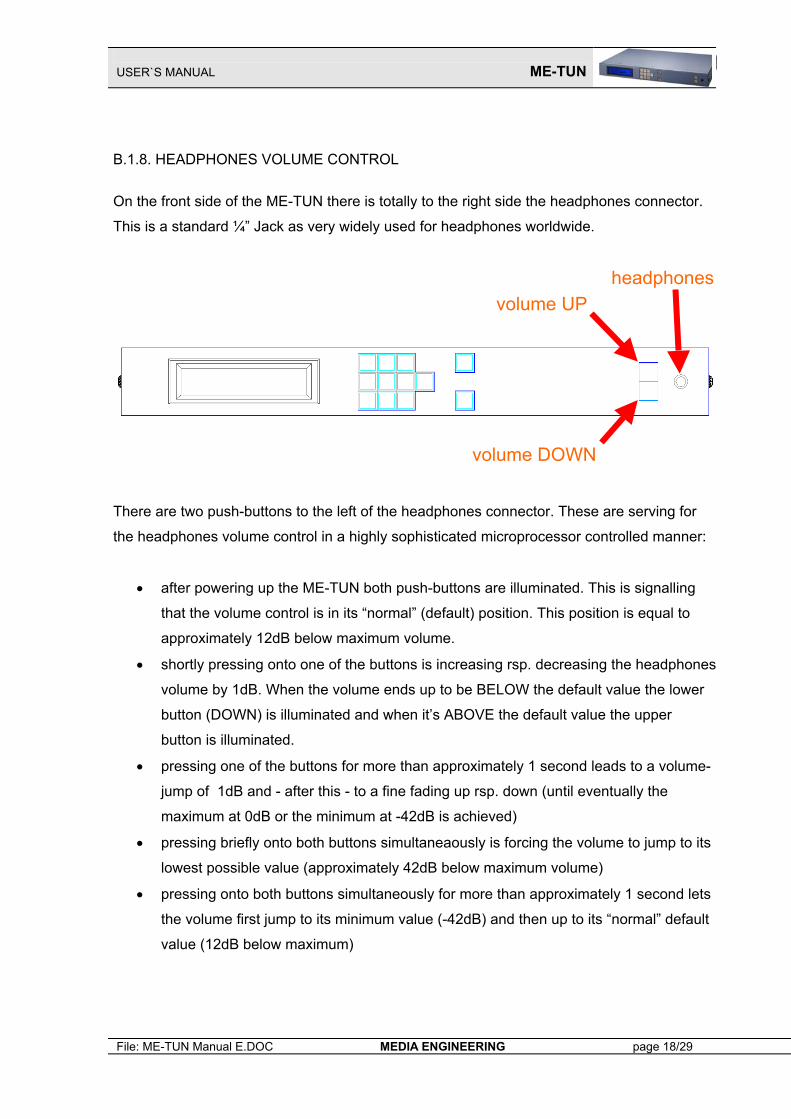
B.1.8. HEADPHONES VOLUME CONTROL
On the front side of the ME-TUN there is totally to the right side the headphones connector.
This is a standard ¼” Jack as very widely used for headphones worldwide.
There are two push-buttons to the left of the headphones connector. These are serving for
the headphones volume control in a highly sophisticated microprocessor controlled manner:
• after powering up the ME-TUN both push-buttons are illuminated. This is signalling
that the volume control is in its “normal” (default) position. This position is equal to
approximately 12dB below maximum volume.
• shortly pressing onto one of the buttons is increasing rsp. decreasing the headphones
volume by 1dB. When the volume ends up to be BELOW the default value the lower
button (DOWN) is illuminated and when it’s ABOVE the default value the upper
button is illuminated.
• pressing one of the buttons for more than approximately 1 second leads to a volume-
jump of 1dB and - after this - to a fine fading up rsp. down (until eventually the
maximum at 0dB or the minimum at -42dB is achieved)
• pressing briefly onto both buttons simultaneaously is forcing the volume to jump to its
lowest possible value (approximately 42dB below maximum volume)
• pressing onto both buttons simultaneously for more than approximately 1 second lets
the volume first jump to its minimum value (-42dB) and then up to its “normal” default
value (12dB below maximum)
volume UP
volume DOWN
headphones
USER`S MANUAL ME-TUN
File: ME-TUN Manual E.DOC MEDIA ENGINEERING page 19/29
B.2. EXTENDED OPERATIONS B.2.1. MENU FUNCTIONS
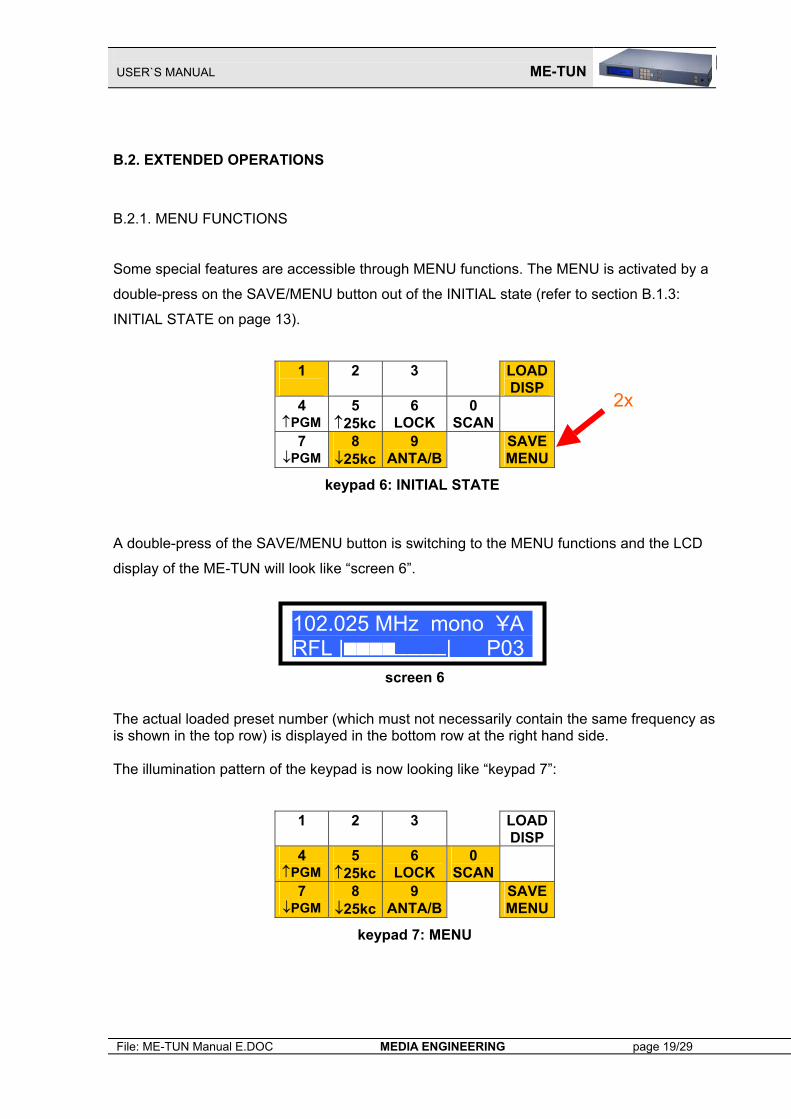
Some special features are accessible through MENU functions. The MENU is activated by a
double-press on the SAVE/MENU button out of the INITIAL state (refer to section B.1.3:
INITIAL STATE on page 13).
1
2
3 LOADDISP
4 ↑PGM
5 ↑25kc
6 LOCK
0 SCAN
7 ↓PGM
8 ↓25kc
9 ANTA/B
SAVEMENU
keypad 6: INITIAL STATE
A double-press of the SAVE/MENU button is switching to the MENU functions and the LCD
display of the ME-TUN will look like “screen 6”.
screen 6 The actual loaded preset number (which must not necessarily contain the same frequency as is shown in the top row) is displayed in the bottom row at the right hand side. The illumination pattern of the keypad is now looking like “keypad 7”:
1
2
3 LOADDISP
4 ↑PGM
5 ↑25kc
6 LOCK
0 SCAN
7 ↓PGM
8 ↓25kc
9 ANTA/B
SAVEMENU
keypad 7: MENU
2x
102.025 MHz mono ҰARFL || P03
USER`S MANUAL ME-TUN
File: ME-TUN Manual E.DOC MEDIA ENGINEERING page 20/29
During using MENU functions the automatic “fall back to INITIAL state” feature of the ME-
TUN is still active. After a certain time without any user input, ME-TUN will quit the MENU
state and fall back to the INITIAL state (refer to section B.1.3: INITIAL STATE on page 13).
When pressing the SAVE key from the MENU state, ME-TUN will be switched back to
INITIAL state, too.
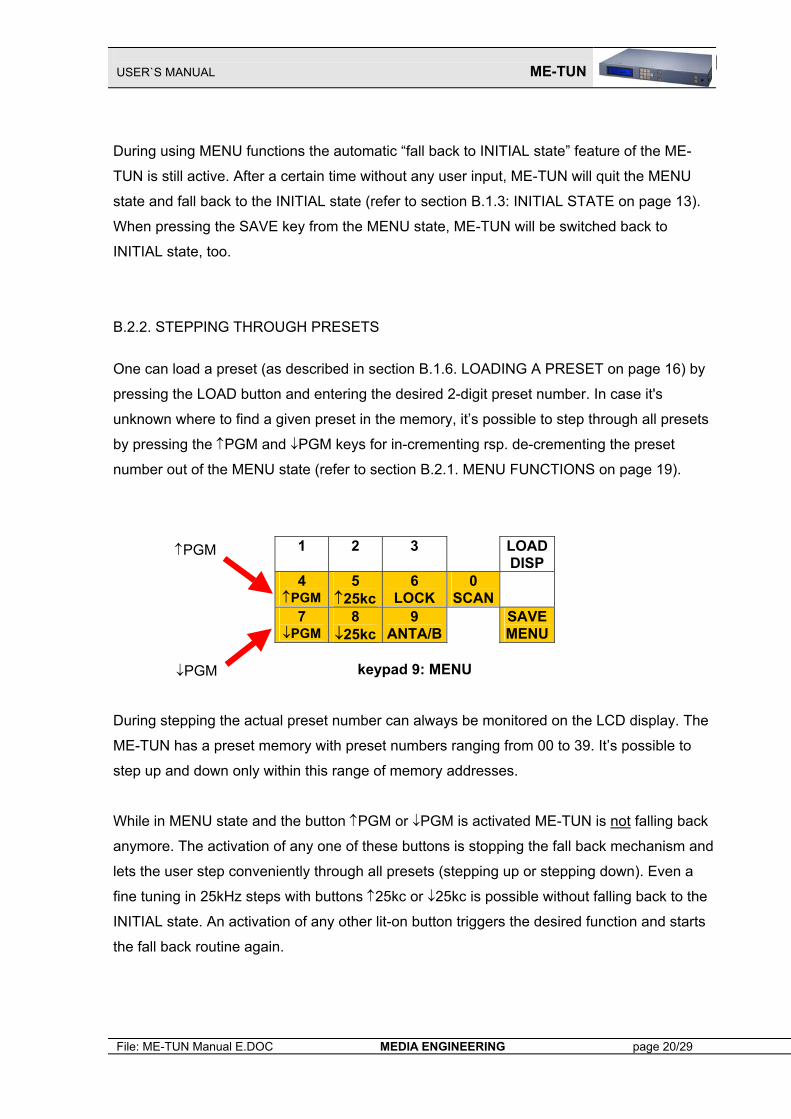
B.2.2. STEPPING THROUGH PRESETS
One can load a preset (as described in section B.1.6. LOADING A PRESET on page 16) by
pressing the LOAD button and entering the desired 2-digit preset number. In case it's
unknown where to find a given preset in the memory, it’s possible to step through all presets
by pressing the ↑PGM and ↓PGM keys for in-crementing rsp. de-crementing the preset
number out of the MENU state (refer to section B.2.1. MENU FUNCTIONS on page 19).
1
2
3 LOADDISP
4 ↑PGM
5 ↑25kc
6 LOCK
0 SCAN
7 ↓PGM
8 ↓25kc
9 ANTA/B
SAVEMENU
keypad 9: MENU
During stepping the actual preset number can always be monitored on the LCD display. The
ME-TUN has a preset memory with preset numbers ranging from 00 to 39. It’s possible to
step up and down only within this range of memory addresses.
While in MENU state and the button ↑PGM or ↓PGM is activated ME-TUN is not falling back
anymore. The activation of any one of these buttons is stopping the fall back mechanism and
lets the user step conveniently through all presets (stepping up or stepping down). Even a
fine tuning in 25kHz steps with buttons ↑25kc or ↓25kc is possible without falling back to the
INITIAL state. An activation of any other lit-on button triggers the desired function and starts
the fall back routine again.
↓PGM
↑PGM
USER`S MANUAL ME-TUN
File: ME-TUN Manual E.DOC MEDIA ENGINEERING page 21/29
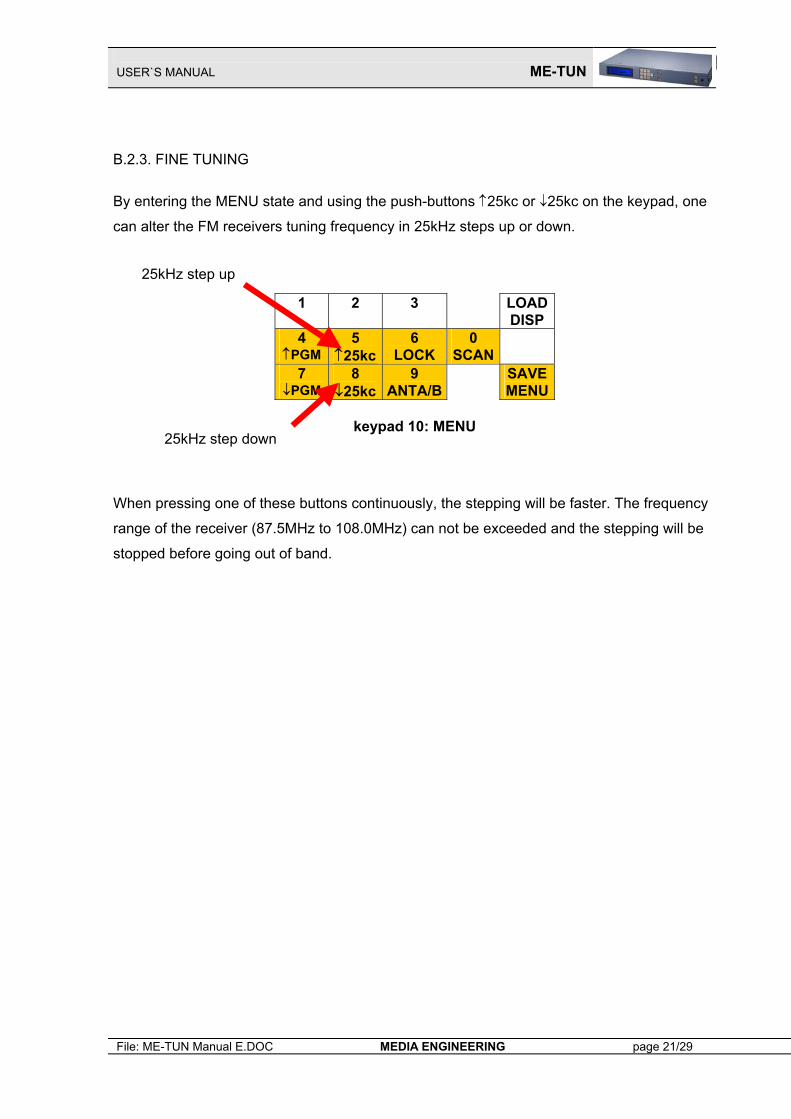
B.2.3. FINE TUNING
By entering the MENU state and using the push-buttons ↑25kc or ↓25kc on the keypad, one
can alter the FM receivers tuning frequency in 25kHz steps up or down.
1
2
3 LOADDISP
4 ↑PGM
5 ↑25kc
6 LOCK
0 SCAN
7 ↓PGM
8 ↓25kc
9 ANTA/B
SAVEMENU
keypad 10: MENU
When pressing one of these buttons continuously, the stepping will be faster. The frequency
range of the receiver (87.5MHz to 108.0MHz) can not be exceeded and the stepping will be
stopped before going out of band.
25kHz step up
25kHz step down
USER`S MANUAL ME-TUN
File: ME-TUN Manual E.DOC MEDIA ENGINEERING page 22/29
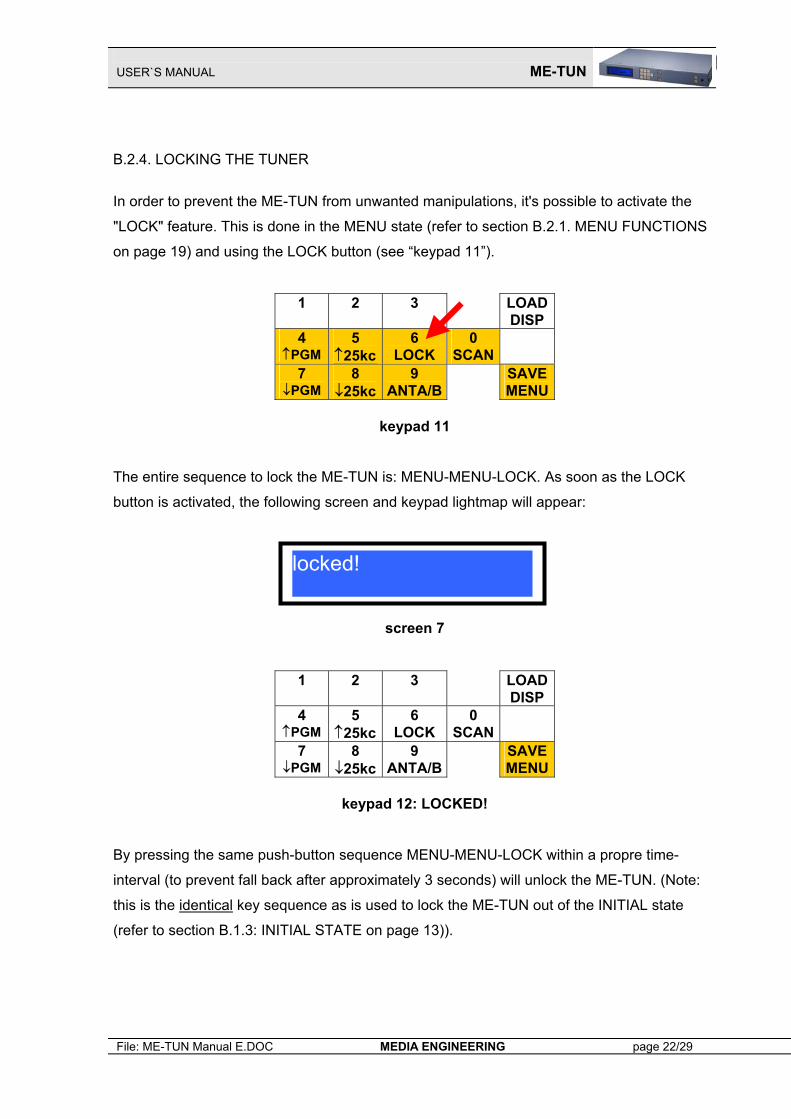
B.2.4. LOCKING THE TUNER
In order to prevent the ME-TUN from unwanted manipulations, it's possible to activate the
"LOCK" feature. This is done in the MENU state (refer to section B.2.1. MENU FUNCTIONS
on page 19) and using the LOCK button (see “keypad 11”).
1
2
3 LOADDISP
4 ↑PGM
5 ↑25kc
6 LOCK
0 SCAN
7 ↓PGM
8 ↓25kc
9 ANTA/B
SAVEMENU
keypad 11
The entire sequence to lock the ME-TUN is: MENU-MENU-LOCK. As soon as the LOCK
button is activated, the following screen and keypad lightmap will appear:
screen 7
1
2
3 LOADDISP
4 ↑PGM
5 ↑25kc
6 LOCK
0 SCAN
7 ↓PGM
8 ↓25kc
9 ANTA/B
SAVEMENU
keypad 12: LOCKED!
By pressing the same push-button sequence MENU-MENU-LOCK within a propre time-
interval (to prevent fall back after approximately 3 seconds) will unlock the ME-TUN. (Note:
this is the identical key sequence as is used to lock the ME-TUN out of the INITIAL state
(refer to section B.1.3: INITIAL STATE on page 13)).
locked!
USER`S MANUAL ME-TUN
File: ME-TUN Manual E.DOC MEDIA ENGINEERING page 23/29
B.2.5. SCANNING THE FM CHANNELS
The automatic FM channel scanning function of the ME-TUN is a useful feature when the
device has been installed in a new location with entirely different radio sound broadcasting
stations as at the previous location. When enabling the automatic scanning function, ME-
TUN scans the FM frequency band from 108.000MHz downwards to 87.500MHz and stores
all channels with strong enough RF levels (the threshold is set to 50dBµV) to its internal
memory.
The channels are stored in a reverse order to the internal memory: The first channel ME-
TUN finds will be saved to program number 39, the second one to program number 38 and
so on. As the user of ME-TUN will normally have his favourite channels stored in the first few
preset positions (e.g. preset 00 to preset 08), the scanning function will not overwrite the user
channel setup when storing all channels which were found during scanning to the last
positions in memory.
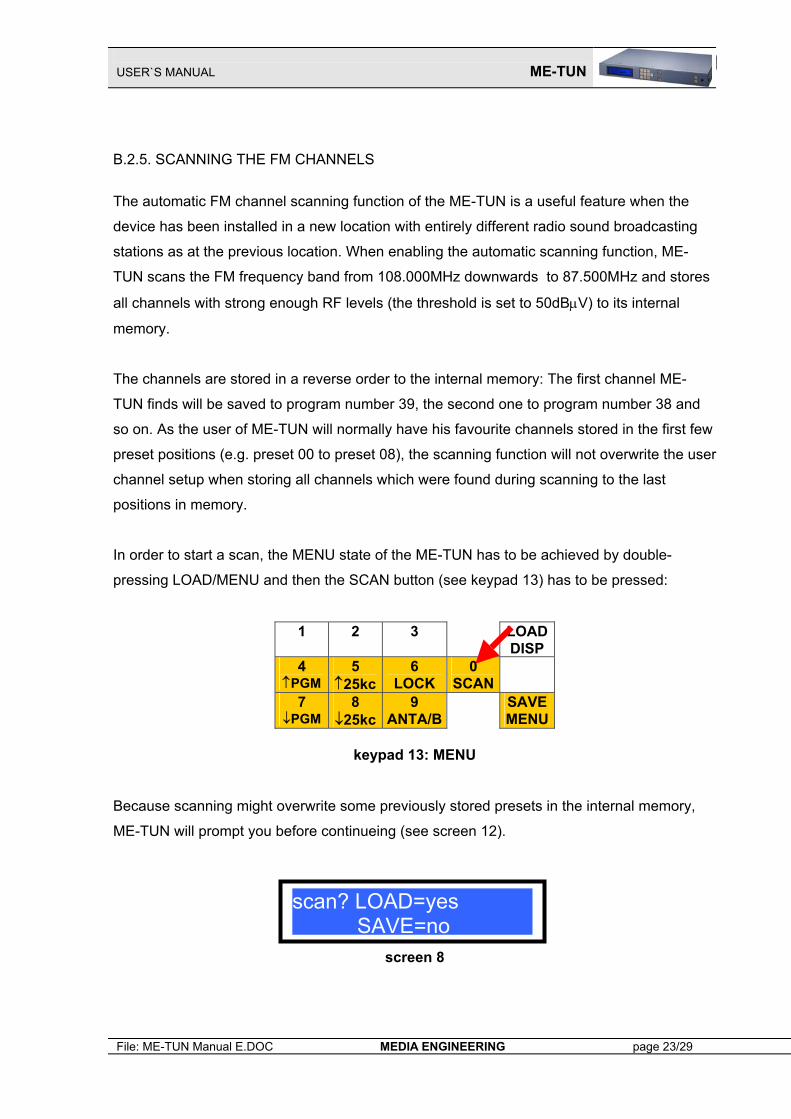
In order to start a scan, the MENU state of the ME-TUN has to be achieved by double-
pressing LOAD/MENU and then the SCAN button (see keypad 13) has to be pressed:
1
2
3 LOADDISP
4 ↑PGM
5 ↑25kc
6 LOCK
0 SCAN
7 ↓PGM
8 ↓25kc
9 ANTA/B
SAVEMENU
keypad 13: MENU
Because scanning might overwrite some previously stored presets in the internal memory,
ME-TUN will prompt you before continueing (see screen 12).
screen 8
scan? LOAD=yes SAVE=no
USER`S MANUAL ME-TUN
File: ME-TUN Manual E.DOC MEDIA ENGINEERING page 24/29
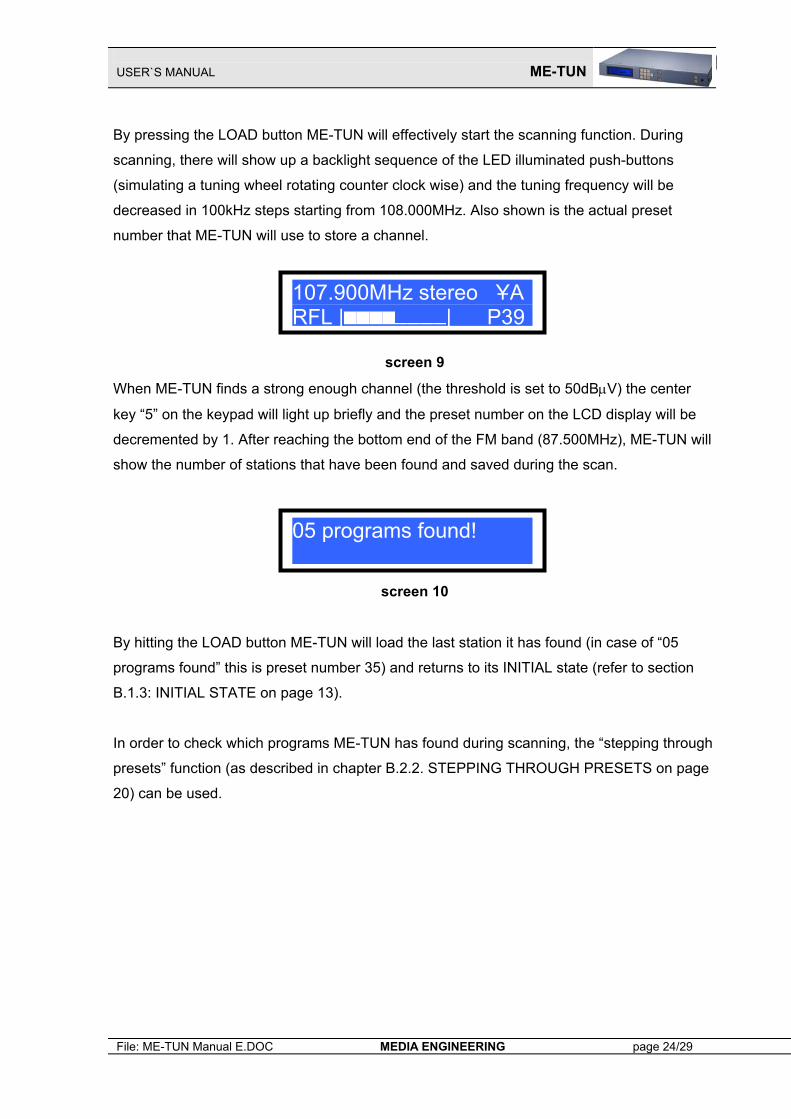
By pressing the LOAD button ME-TUN will effectively start the scanning function. During
scanning, there will show up a backlight sequence of the LED illuminated push-buttons
(simulating a tuning wheel rotating counter clock wise) and the tuning frequency will be
decreased in 100kHz steps starting from 108.000MHz. Also shown is the actual preset
number that ME-TUN will use to store a channel.
screen 9
When ME-TUN finds a strong enough channel (the threshold is set to 50dBµV) the center
key “5” on the keypad will light up briefly and the preset number on the LCD display will be
decremented by 1. After reaching the bottom end of the FM band (87.500MHz), ME-TUN will
show the number of stations that have been found and saved during the scan.
screen 10
By hitting the LOAD button ME-TUN will load the last station it has found (in case of “05
programs found” this is preset number 35) and returns to its INITIAL state (refer to section
B.1.3: INITIAL STATE on page 13).
In order to check which programs ME-TUN has found during scanning, the “stepping through
presets” function (as described in chapter B.2.2. STEPPING THROUGH PRESETS on page
20) can be used.
107.900MHz stereo ҰARFL || P39
05 programs found!
USER`S MANUAL ME-TUN
File: ME-TUN Manual E.DOC MEDIA ENGINEERING page 25/29
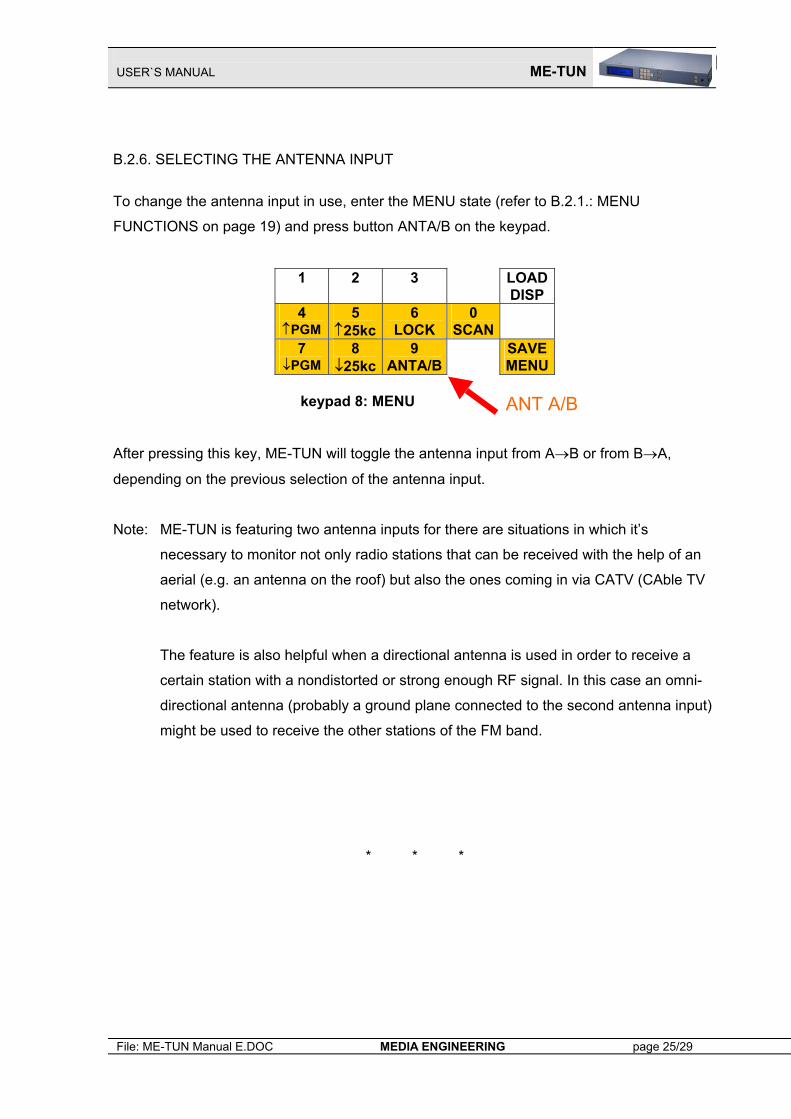
B.2.6. SELECTING THE ANTENNA INPUT
To change the antenna input in use, enter the MENU state (refer to B.2.1.: MENU
FUNCTIONS on page 19) and press button ANTA/B on the keypad.
1
2
3 LOADDISP
4 ↑PGM
5 ↑25kc
6 LOCK
0 SCAN
7 ↓PGM
8 ↓25kc
9 ANTA/B
SAVEMENU
keypad 8: MENU
After pressing this key, ME-TUN will toggle the antenna input from A→B or from B→A,
depending on the previous selection of the antenna input.
Note: ME-TUN is featuring two antenna inputs for there are situations in which it’s
necessary to monitor not only radio stations that can be received with the help of an
aerial (e.g. an antenna on the roof) but also the ones coming in via CATV (CAble TV
network).
The feature is also helpful when a directional antenna is used in order to receive a
certain station with a nondistorted or strong enough RF signal. In this case an omni-
directional antenna (probably a ground plane connected to the second antenna input)
might be used to receive the other stations of the FM band.
* * *
ANT A/B
USER`S MANUAL ME-TUN
File: ME-TUN Manual E.DOC MEDIA ENGINEERING page 26/29
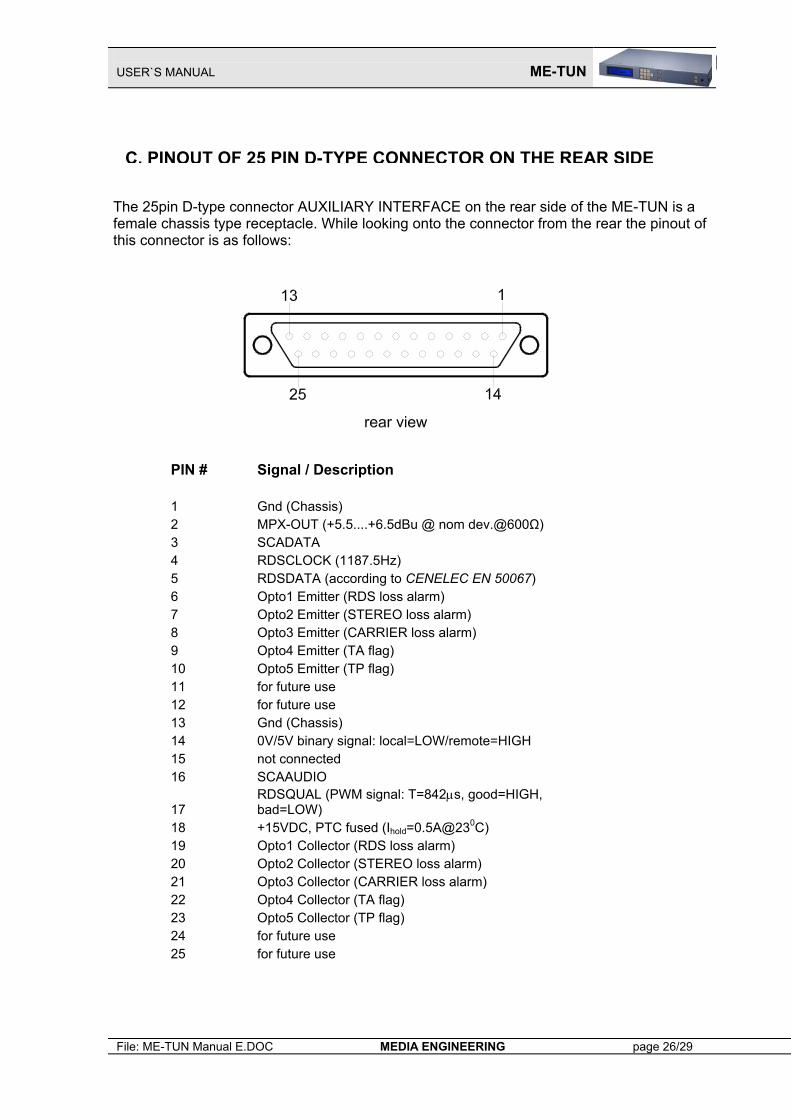
The 25pin D-type connector AUXILIARY INTERFACE on the rear side of the ME-TUN is a female chassis type receptacle. While looking onto the connector from the rear the pinout of this connector is as follows:
PIN # Signal / Description 1 Gnd (Chassis) 2 MPX-OUT (+5.5....+6.5dBu @ nom dev.@600Ω) 3 SCADATA 4 RDSCLOCK (1187.5Hz) 5 RDSDATA (according to CENELEC EN 50067) 6 Opto1 Emitter (RDS loss alarm) 7 Opto2 Emitter (STEREO loss alarm) 8 Opto3 Emitter (CARRIER loss alarm) 9 Opto4 Emitter (TA flag) 10 Opto5 Emitter (TP flag) 11 for future use 12 for future use 13 Gnd (Chassis) 14 0V/5V binary signal: local=LOW/remote=HIGH 15 not connected 16 SCAAUDIO
17 RDSQUAL (PWM signal: T=842µs, good=HIGH, bad=LOW)
18 +15VDC, PTC fused (Ihold=0.5A@230C) 19 Opto1 Collector (RDS loss alarm) 20 Opto2 Collector (STEREO loss alarm) 21 Opto3 Collector (CARRIER loss alarm) 22 Opto4 Collector (TA flag) 23 Opto5 Collector (TP flag) 24 for future use 25 for future use
C. PINOUT OF 25 PIN D-TYPE CONNECTOR ON THE REAR SIDE
USER`S MANUAL ME-TUN
File: ME-TUN Manual E.DOC MEDIA ENGINEERING page 27/29
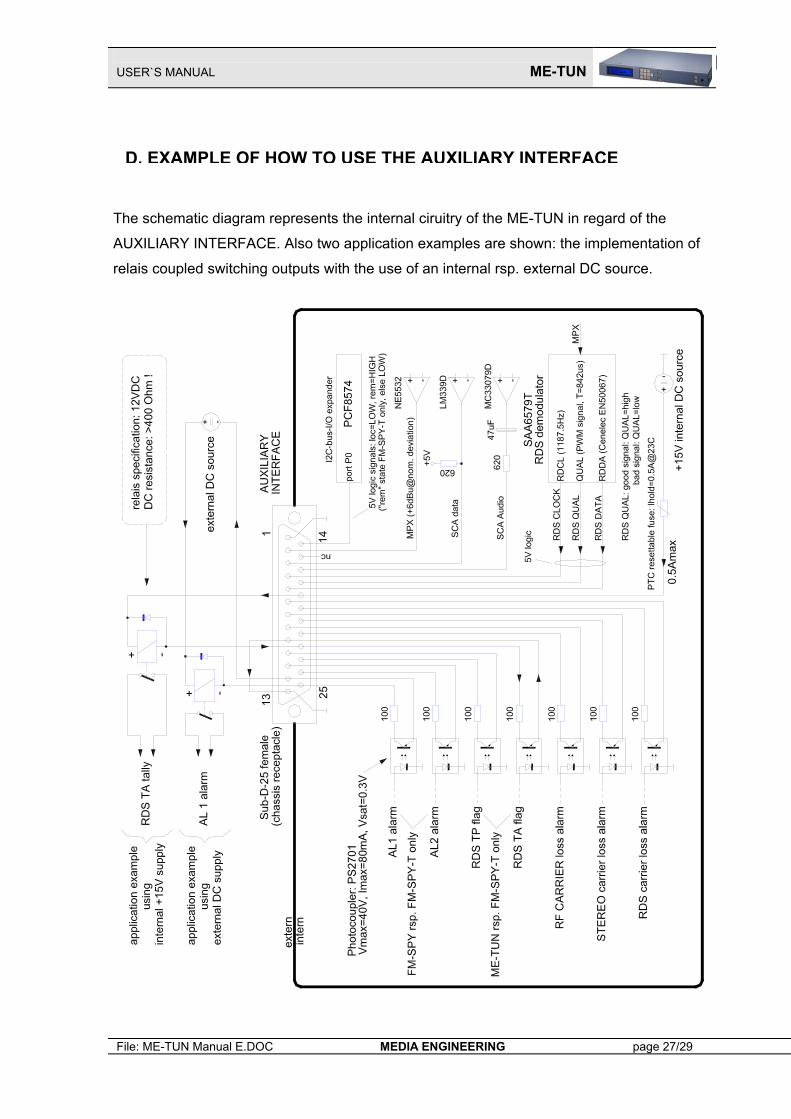
The schematic diagram represents the internal ciruitry of the ME-TUN in regard of the
AUXILIARY INTERFACE. Also two application examples are shown: the implementation of
relais coupled switching outputs with the use of an internal rsp. external DC source.
D. EXAMPLE OF HOW TO USE THE AUXILIARY INTERFACE
USER`S MANUAL ME-TUN
File: ME-TUN Manual E.DOC MEDIA ENGINEERING page 28/29
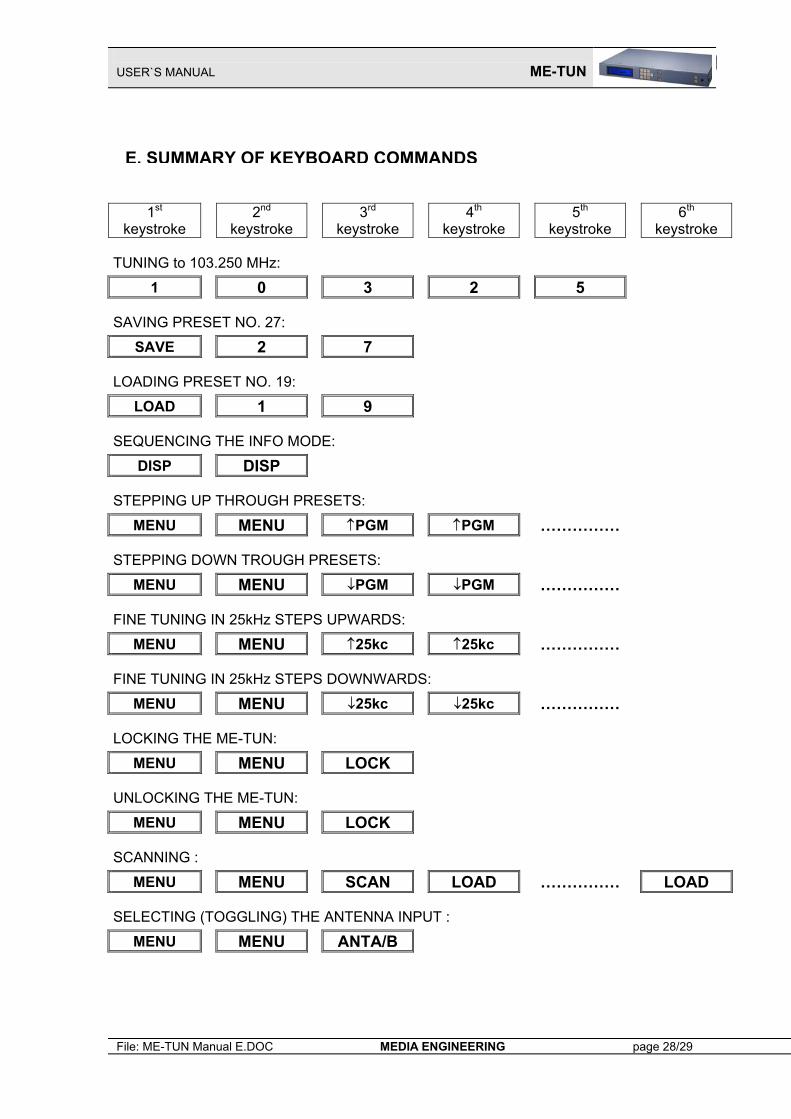
1st keystroke 2nd
keystroke 3rd keystroke
4th keystroke
5th keystroke 6th
keystroke
TUNING to 103.250 MHz:
1 0 3 2 5
SAVING PRESET NO. 27:
SAVE 2 7
LOADING PRESET NO. 19:
LOAD 1 9
SEQUENCING THE INFO MODE:
DISP DISP
STEPPING UP THROUGH PRESETS:
MENU MENU ↑PGM ↑PGM ……………
STEPPING DOWN TROUGH PRESETS:
MENU MENU ↓PGM ↓PGM ……………
FINE TUNING IN 25kHz STEPS UPWARDS:
MENU MENU ↑25kc ↑25kc ……………
FINE TUNING IN 25kHz STEPS DOWNWARDS:
MENU MENU ↓25kc ↓25kc ……………
LOCKING THE ME-TUN:
MENU MENU LOCK
UNLOCKING THE ME-TUN:
MENU MENU LOCK
SCANNING :
MENU MENU SCAN LOAD …………… LOAD
SELECTING (TOGGLING) THE ANTENNA INPUT :
MENU MENU ANTA/B
E. SUMMARY OF KEYBOARD COMMANDS
USER`S MANUAL ME-TUN
File: ME-TUN Manual E.DOC MEDIA ENGINEERING page 29/29
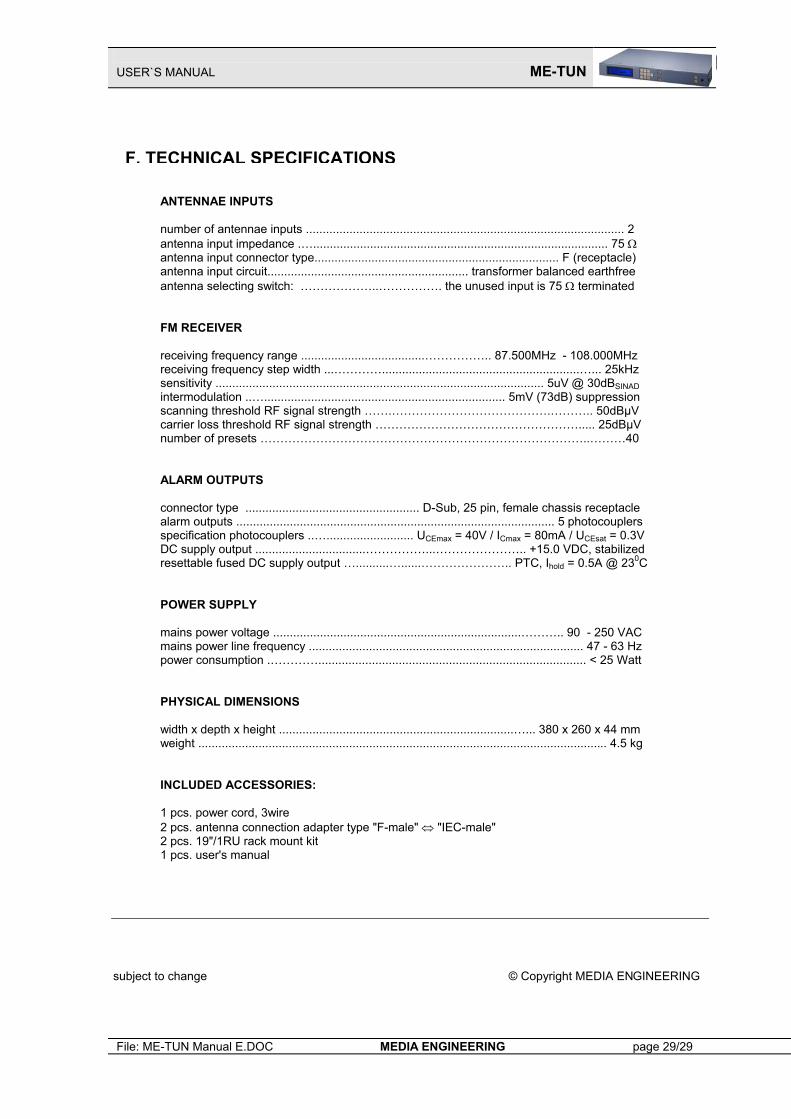
ANTENNAE INPUTS number of antennae inputs ............................................................................................... 2 antenna input impedance .…........................................................................................ 75 Ω antenna input connector type......................................................................... F (receptacle) antenna input circuit............................................................ transformer balanced earthfree antenna selecting switch: ………………..……………. the unused input is 75 Ω terminated FM RECEIVER receiving frequency range .....................................…………….. 87.500MHz - 108.000MHz receiving frequency step width ...…………...........................................................…... 25kHz sensitivity .................................................................................................. 5uV @ 30dBSINAD intermodulation ..…........................................................................ 5mV (73dB) suppression scanning threshold RF signal strength …….………………………………….……….. 50dBµV carrier loss threshold RF signal strength ……………………………………………..... 25dBµV number of presets ………………………………………………………………………..………40 ALARM OUTPUTS connector type .................................................... D-Sub, 25 pin, female chassis receptacle alarm outputs ............................................................................................... 5 photocouplers specification photocouplers ..….......................... UCEmax = 40V / ICmax = 80mA / UCEsat = 0.3V DC supply output .................................……………...………………….. +15.0 VDC, stabilized resettable fused DC supply output …..........…......………………….. PTC, Ihold = 0.5A @ 230C POWER SUPPLY mains power voltage ..........................................................................……….. 90 - 250 VAC mains power line frequency .................................................................................. 47 - 63 Hz power consumption .…………................................................................................ < 25 Watt PHYSICAL DIMENSIONS width x depth x height ......................................................................…... 380 x 260 x 44 mm weight .......................................................................................................................... 4.5 kg INCLUDED ACCESSORIES: 1 pcs. power cord, 3wire 2 pcs. antenna connection adapter type "F-male" ⇔ "IEC-male" 2 pcs. 19"/1RU rack mount kit 1 pcs. user's manual
subject to change © Copyright MEDIA ENGINEERING
F. TECHNICAL SPECIFICATIONS