media41767 celerra support demo how to fail over and fail back a vdm replication
DESCRIPTION
Centera docsTRANSCRIPT

How to Fail Over and Fail Back a VDM
Replication
Celerra® Support Demo Companion Booklet
Celerra Network Server 5.6
P/N 300-010-380, Rev A01
Copyright © 2010 EMC Corporat ion. Al l Rights Reserved.

How to Fai l Over and Fai l Back a VDM Repl icat ion
2

How to Fai l Over and Fai l Back a VDM Repl icat ion
Introduction In this video, you’ll learn how to fail over and fail back in a VDM CIFS environment. A VDM environment consists of file systems and the VDM that holds the CIFS environmental information, such as the shares database, Kerberos information, and CIFS server configuration. The VDM provides the infrastructure to share file systems to users.
The failover operation stops any data transfer in process and changes the destination VDM state from mounted to loaded (read/write) so it can serve as the new source object. When the original source Data Mover becomes reachable, the source VDM is changed to a mounted state (read-only).
When the source site becomes available, the replications sessions are failed back and returned to their original roles.
In this demo, the source Celerra® located in Boston has experienced a disaster and is unavailable. In response to this potential disaster scenario, we will use Celerra Replicator™ (V2) to perform a failover of replication sessions to the destination Celerra located at the DR recovery site in Los Angeles.
We’ll failover the VDM replication session first and then the file system mounted to the VDM. In a disaster, since Celerra Replicator is an asynchronous solution, there might be some data loss if all the data is not transferred to the destination site prior to issuing the failover.
3

How to Fai l Over and Fai l Back a VDM Repl icat ion
Environment Before we get started, we will have had to have:
� Created and started replication sessions for the VDM and the file system
� Set up a network interface on the destination with the same name as the network interface on the source
� Created CIFS server and shares within VDMs
� Started the CIFS service on the destination Data Mover
� Set up DNS for the destination Data Mover
In addition, we’ll need to know the name of the replication sessions for the VDM and its file system.
So let’s get started.
4

How to Fai l Over and Fai l Back a VDM Repl icat ion
Determine the file system mounted to the VDM We’ll start by determining what file system is mounted to the source VDM (marketing_vdm):
1. We begin by logging in to Celerra Manager for the source Celerra in Boston. The IP address (10.241.169.150) is shown at the top of the left pane in Celerra Manager.
2. We’ll select File Systems from the left pane. On the File Systems page, we can see that there is one file system named fs1 mounted to marketing_vdm. The page also shows that there is a replication session associated with the file system and that it is named fs_rep1.
Determine the network interface name used by the source VDM Before we fail over the replication session, we need to ensure that the network interfaces configured on both the destination and source Celerras are available and are named identically. If the network interface names are not exactly the same on the CIFS servers, the VDM environment cannot be rebuilt at the destination and the failover operation fails.
So, let’s identify the network interface name for the CIFS server used by the source VDM, marketing_vdm.
5

How to Fai l Over and Fai l Back a VDM Repl icat ion
To do this, first we need to determine the CIFS Server used by the VDM, obtain the Interface IP address, and then find its associated IP address:
1. We’ll select CIFS from the left pane.
2. On the CIFS page, we’ll select the CIFS Server tab.
3. From the Show CIFS Servers drop down list, we’ll select marketing_vdm to view only the CIFS Servers used by that VDM. We can see our CIFS server is called MARKETING and the Interface IP is 10.241.169.151.
Next, we need the interface name for this IP address.
4. We’ll select Network from the left pane.
5. On the Network page, we’ll select the Interfaces tab.
6. We’ll scroll through the list of IP addresses of the network interfaces for this Celerra to find the network interface name associated with IP 10.241.169.151. We find it is cge1_marketing.
6

How to Fai l Over and Fai l Back a VDM Repl icat ion
Verify the network interface name on the destination Now, let’s verify that a network interface exists with the same exact name (cge1_marketing) on the destination Celerra:
1. We’ll open Celerra Manager for the destination Celerra in Los Angeles (10.241.183.100). Again we can see the IP address at the top of the left pane in Celerra Manager.
2. We’ll select Network from the left pane, click the Interfaces tab, and verify that cge1_marketing is listed in the Name field.
If we didn’t see cge1_marketing listed, we would need to create it. Otherwise, the failover operation will fail.
7

How to Fai l Over and Fai l Back a VDM Repl icat ion
Show replication sessions for the VDM Now, let’s take a look at the replication sessions established for the VDM environment:
1. We’ll open the Celerra Manager for the source Celerra in Boston and select Replications from the left pane.
2. On the Replications page we can see that there is one replication session listed for the VDM, vdm_rep1, and another session for the file system, fs_rep1.
8

How to Fai l Over and Fai l Back a VDM Repl icat ion
The replication session for the VDM is responsible for synchronizing the complete CIFS working environment at the source with the destination VDM replica. The replication session for the file system is responsible for synchronizing the file system data associated with the CIFS Server at the source with the destination file system replica.
Lost communication with replication source side For the purpose of demonstration, we’ve disabled the network interface used by the replication sessions to simulate a communication failure between the Boston and Los Angeles Celerras. This event makes the source Celerra unavailable for data processing.
Let’s take a quick look at the status of the replication sessions:
1. We’ll open Celerra Manager for the destination Celerra in Los Angeles (10.241.183.100).
2. We’ll select Replications from the left pane. On the Replications page, in the Status column, we see that there is a loss of network communication for both sessions.
9

How to Fai l Over and Fai l Back a VDM Repl icat ion
Fail over the VDM replication session Now, we’re ready to begin the failover. We’ll start by failing over the VDM replication session first to allow the destination Celerra in Los Angeles to rebuild the CIFS environment so users can access the file systems:
1. From the Replications page, we’ll highlight the VDM replication session (vdm_rep1) on the list, and click the Failover button at the bottom of the page.
2. We’ll click OK to confirm.
10
How to Fai l Over and Fai l Back a VDM Repl icat ion
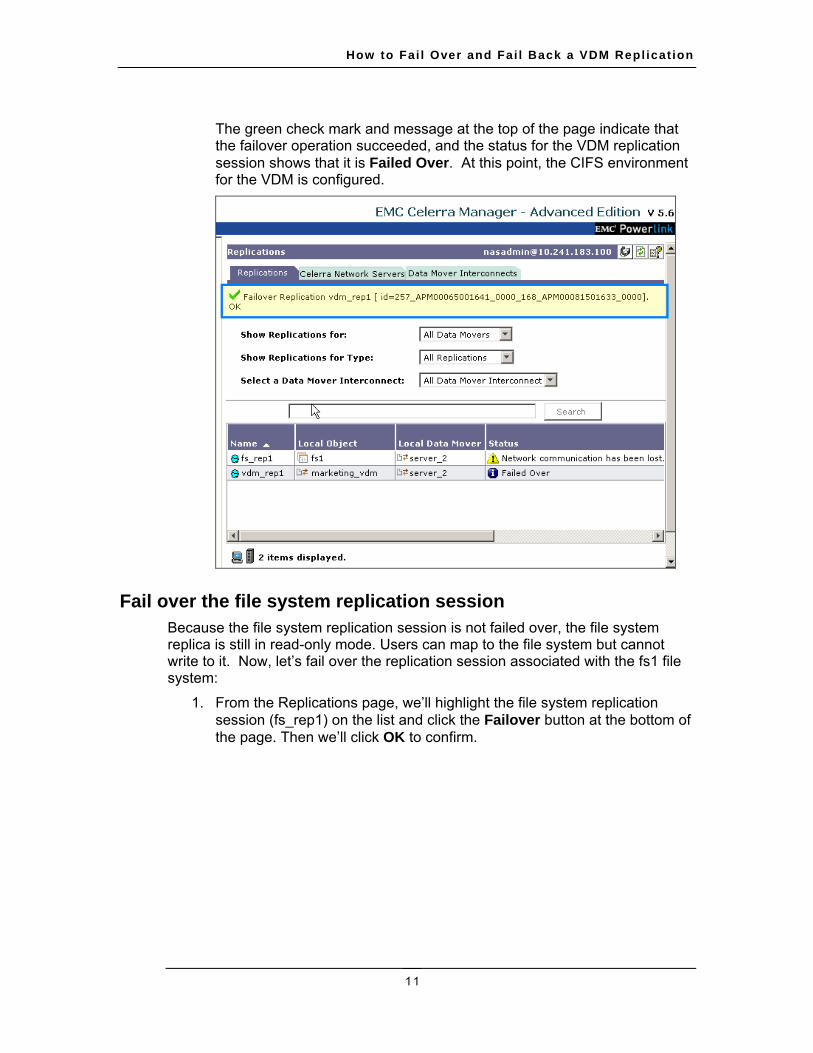
The green check mark and message at the top of the page indicate that the failover operation succeeded, and the status for the VDM replication session shows that it is Failed Over. At this point, the CIFS environment for the VDM is configured.
Fail over the file system replication session Because the file system replication session is not failed over, the file system replica is still in read-only mode. Users can map to the file system but cannot write to it. Now, let’s fail over the replication session associated with the fs1 file system:
1. From the Replications page, we’ll highlight the file system replication session (fs_rep1) on the list and click the Failover button at the bottom of the page. Then we’ll click OK to confirm.
11

How to Fai l Over and Fai l Back a VDM Repl icat ion
Again, the green check mark and message at the top of the page indicates that the fail over operation succeeded, and the status for the file system replication session shows that it is Failed Over.
Now, users can access the file system and write to it. At this point, the VDM environment has successfully failed over to the destination Celerra in Los Angeles.
12

How to Fai l Over and Fai l Back a VDM Repl icat ion
Fail back the VDM environment to the source Celerra After we have determined that the source Celerra in Boston is back up and operational, we’ll want to fail back the replication sessions in our VDM environment. This involves restarting the flow of replication so that both sides of the replication sessions are synchronized.
Check the status of the replication sessions
We’ll begin by checking the status of the replication sessions from the source Celerra perspective:
1. We’ll open Celerra Manager for the source Celerra in Boston (10.241.169.150).
On the Replications page, we can see that both sessions have a status of Failed Over.
13

How to Fai l Over and Fai l Back a VDM Repl icat ion
Restart the VDM and file system replication sessions
Now we want to restart the sessions so that the new data, which was generated during the time the original destination Celerra was managing the VDM environment, will be synchronized with the VDM and file system on the source Celerra:
1. So we’ll open Celerra Manager for the destination Celerra in Los Angeles (10.241.183.100.)
2. On the Replications page, we’ll select the VDM replication session entry and click the Start button.
3. On the Start Replication page, we’re going to leave most of the default values since we don’t want to make any changes to the replication configuration. We do want to make sure we select the Discard Changes on Destination Since Last Copy checkbox.
Since the failover, the VDM in Los Angeles was used as the source object and contains the most up-to-date data. So, we’ll want to overwrite the original source object with the new data when we restart the replication session. This means some data on the original source VDM may be lost because the source and destination Celerras were not fully synchronized prior to the loss in network communication.
14

How to Fai l Over and Fai l Back a VDM Repl icat ion
4. When we’re finished, we’ll click OK, and then click OK again on the confirmation page.
Now that the VDM replication session has been successfully started, we want to do the same for the file system replication session.
5. On the Replications page, we’ll select the file system replication session and click the Start button.
15

How to Fai l Over and Fai l Back a VDM Repl icat ion
6. On the Start Replication page, again we’ll select the Discard Changes on Destination Since Last Copy checkbox and leave all other values the same.
16

How to Fai l Over and Fai l Back a VDM Repl icat ion
When we’re finished, we’ll click OK, and then click OK again on the confirmation page.
17
How to Fai l Over and Fai l Back a VDM Repl icat ion
Reverse the VDM and file system replication sessions
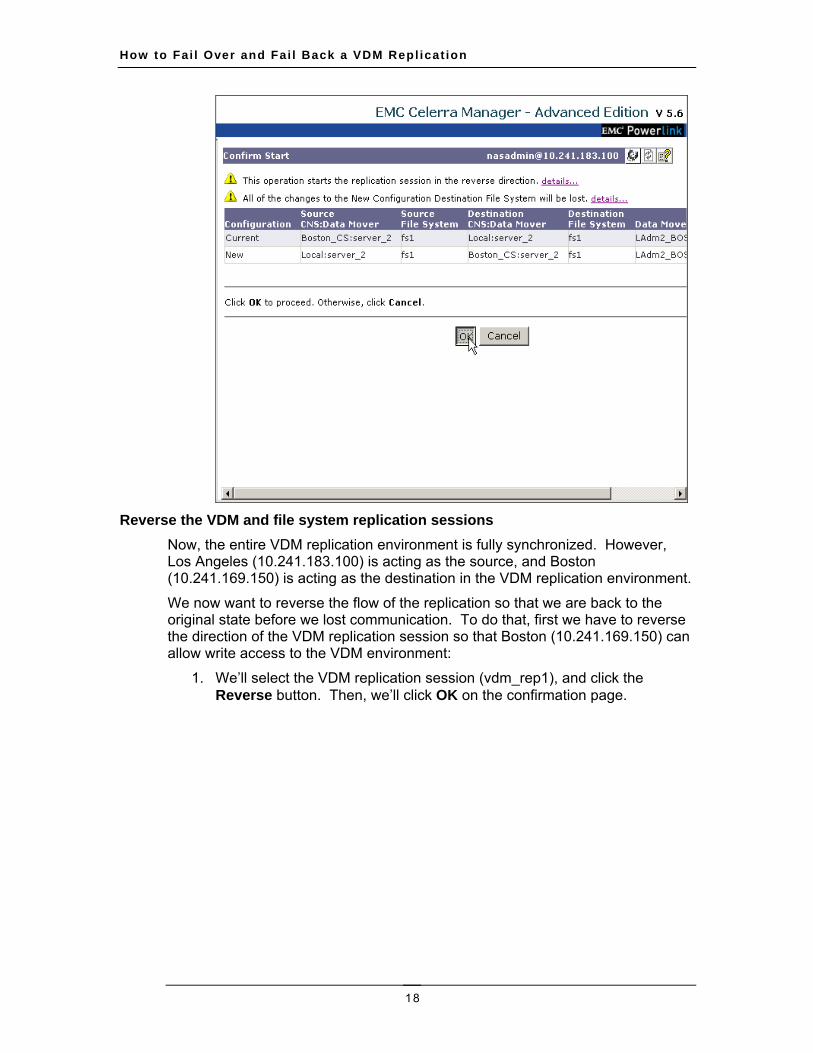
Now, the entire VDM replication environment is fully synchronized. However, Los Angeles (10.241.183.100) is acting as the source, and Boston (10.241.169.150) is acting as the destination in the VDM replication environment.
We now want to reverse the flow of the replication so that we are back to the original state before we lost communication. To do that, first we have to reverse the direction of the VDM replication session so that Boston (10.241.169.150) can allow write access to the VDM environment:
1. We’ll select the VDM replication session (vdm_rep1), and click the Reverse button. Then, we’ll click OK on the confirmation page.
18

How to Fai l Over and Fai l Back a VDM Repl icat ion
The green check mark and message at the top of the page indicate that the reverse operation completed successfully.
19

How to Fai l Over and Fai l Back a VDM Repl icat ion
Now, we’ll the reverse the direction of the file system replication.
2. We’ll select the file system replication (fs_rep1), and click the Reverse button. Then, we’ll click OK to confirm.
20

How to Fai l Over and Fai l Back a VDM Repl icat ion
Now the VDM environment has failed back to the original replication configuration with the source Celerra in Boston and the destination Celerra in Los Angeles.
21

How to Fai l Over and Fai l Back a VDM Repl icat ion
If you would like to learn more about managing replication sessions or you want more information about Celerra Replicator, click the Help button at the top right of the Celerra Manager.
22

How to Fai l Over and Fai l Back a VDM Repl icat ion
Summary In this video, you have learned how to fail over a VDM environment when the source Celerra is down. You also learned how to fail back a VDM environment to the original source Celerra after the system is back up and operational.
Additional resources Specific information related to this video can be found in the following technical modules:
� Using EMC Celerra Replicator (V2)
� Configuring and Managing CIFS on Celerra
There may be additional related material available on Powerlink®. Go to Support > Technical Documentation and Advisories > Hardware/Platforms Documentation > Celerra Network Server.
23

How to Fai l Over and Fai l Back a VDM Repl icat ion
24
Copyright © 2010 EMC Corporation. All rights reserved.
EMC believes the information in this publication is accurate as of its publication date. The information is subject to change without notice.
THE INFORMATION IN THIS PUBLICATION IS PROVIDED “AS IS.” EMC CORPORATION MAKES NO REPRESENTATIONS OR WARRANTIES OF ANY KIND WITH RESPECT TO THE INFORMATION IN THIS PUBLICATION, AND SPECIFICALLY DISCLAIMS IMPLIED WARRANTIES OF MERCHANTABILITY OR FITNESS FOR A PARTICULAR PURPOSE.
Use, copying, and distribution of any EMC software described in this publication requires an applicable software license.
For the most up-to-date regulatory document for your product line, go to the Technical Documentation and Advisories section on EMC Powerlink.
For the most up-to-date listing of EMC product names, see EMC Corporation Trademarks on EMC.com.
All other trademarks used herein are the property of their respective owners.