megger bite battery testers - aikencolon.com · megger bite battery testers ... section 6.0 report...
TRANSCRIPT

BITE / POWER DB
AVTM82318 REV 1 April 17, 2012 Page 1
Power DB LITE Operation
with the
Megger BITE Battery Testers
www.actoolsupply.com
www.actoolsupply.com

BITE / POWER DB
AVTM82318 REV 1 April 17, 2012 Page 2
INDEX
SECTION DESCRIPTION PAGE
Section 1.0 Power DB Overview 3 Section 2.0 Power DB LITE Operations 5 Section 3.0 Configuring Communications, Select a Form, Site &
String Data 7
Section 4.0 Transferring Data from a BITE2/2P Receiver 12 Section 5.0 Transferring Data from a BITE3 21 Section 6.0 Report Generation 29 Section 6.1 Opening a Report 29 Section 6.2 Manually Entering Site Information 32 Section 6.3 Manually Entering Limits 33 Section 6.4 Manually Entering String Data 34 Section 6.5 Manually Entering Charger Data 35 Section 6.6 Creating Charts 36
Section 6.6.1 Bar Charts 37 Section 6.6.2 Show Symbols 37 Section 6.6.3 Show Limits 38 Section 6.7 Calculating Baseline Data 39 Section 6.8 Inputting a New Battery Baseline Value 40 Section 6.9 Viewing Baseline Data 42 Section 7.0 Entering New Battery Cell Data 43 Section 7.1 Entering New Warning & Alarm Limit Values 46 Section 7.2 Selecting a New Battery Cell 49 Section 8.0 Inputting a Company Logo 51 Section 9.0 Transferring Setup Data to the BITE3 53 Section 10.0 Importing a ProActiv Database 55
www.actoolsupply.com
www.actoolsupply.com

BITE / POWER DB
AVTM82318 REV 1 April 17, 2012 Page 3
SECTION 1.0: POWER DB OVERVIEW
Power DB is a PC based Megger instrument interfacing software, that operates with multiple Megger units, including Megger’s line of Battery Testing Instrumentation. Power DB will operate with the BITE2, BITE2P, BITE3, DMA Hydrometer, Torkel and BVM voltage monitors.
There are 3 versions of the Power DB software, Power DB LITE, Power DB Advanced and Power DB Pro. Power DB LITE comes with the BITE2, BITE2P and the BITE3 at no additional charge. The Power DB Advanced and Pro versions are ordered separately and have associated charges with them.
The Power DB LITE software allows operator to communicate with the BITE2, BITE2P and BITE3 as well as import data, configure the units, import Hydrometer data, create reports and charts, configure the reports and charts, configure battery data as well as import pre-existing ProActiv Databases. The following table illustrates the differences between the different versions of Power DB.
COMPARISON GUIDE PowerDB Edition
ONBOARD LITE ADVANCED PRO
Runs in a hardened embedded environment
Navigate with arrow and enter keys (no mouse)
Manage data files with internal drive and USB drive
Uses a subset of PowerDB Pro forms applicable to your instrument
Files can import into PowerDB Pro
Relay/Breaker/Recloser curve library
Completed forms are saved as files to your computer
associates current test data with historical results
Control Megger instruments and download test data
Control non-Megger instruments
280+ industry standard test forms are provided
www.actoolsupply.com
www.actoolsupply.com

BITE / POWER DB
AVTM82318 REV 1 April 17, 2012 Page 4
advanced Relay Form
Trend historical results for asset for predictive failure analysis
Trend historical results for asset against other similar assets
Database functionality to manage data for all electrical equipment
One step report generation
Summarize noted comments and/or deficiencies
Trigger work order and maintenance schedules
Synchronize results from field to master database
Synchronize results with other testers
Form editor allows test sheets to be created or customized
Import data from other software packages
Maintain calibration data for test instruments
www.actoolsupply.com
www.actoolsupply.com

BITE / POWER DB
AVTM82318 REV 1 April 17, 2012 Page 5
SECTION 2.0: POWER DB LITE OPERATIONS
When the Power DB LITE program is executed the following Wizard shall open.
With the Wizard open the operator can select the desired instrument to interface with, by clicking on the appropriate button or they can choose to open a report by clicking on the “Open Existing Results File” button or they can chose to close the Wizard by clicking on the “Cancel” button.
If the operator selects an instrument to interface with the Wizard will then guide the operator through the communications configuration process.
For the purpose of this document it is going to be assumed that the Wizard has been closed and the software is operating from the main home screen as shown on the following page.
www.actoolsupply.com
www.actoolsupply.com

BITE / POWER DB
AVTM82318 REV 1 April 17, 2012 Page 6
www.actoolsupply.com
www.actoolsupply.com

BITE / POWER DB
AVTM82318 REV 1 April 17, 2012 Page 7
SECTION 3.0: CONFIGURING COMMUNICATIONS, SELECT A FORM, SITE & STRING DATA
To configure the BITE2 or BITE3 communication configuration click on TOOLS in the main menu bar then click on INSTRUMENT SETUP.
This will re-open the Wizard as shown below.
Select the desired BITE instrument by clicking on the associated button. This will open the communications configuration screen, as shown below.
www.actoolsupply.com
www.actoolsupply.com

BITE / POWER DB
AVTM82318 REV 1 April 17, 2012 Page 8
Select the proper serial port that the unit will be connected to. If you are unsure of the serial port you will be using then click on the DEVICE MANAGER button. This will open the computers device manager screen as shown below.
www.actoolsupply.com
www.actoolsupply.com

BITE / POWER DB
AVTM82318 REV 1 April 17, 2012 Page 9
In order to locate the proper serial port, scroll down to PORTS as shown below. Click on the PLUS button next to “Ports” in order to drop down the menu and view the communication ports.
Once you know the port you are connecting to then close the device manager screen and enter that port number in the instrument communications configuration screen of the Power DB LITE software, then click OK.
The following screen shall open.
www.actoolsupply.com
www.actoolsupply.com

BITE / POWER DB
AVTM82318 REV 1 April 17, 2012 Page 10
This is the communications configuration screen for the Hydrometer. Select the proper serial port that the Hydrometer will be connected to. (Typically, it is the same port the BITE unit is connecting to) If you are unsure of the serial port you will be using then click on the DEVICE MANAGER button and locate the appropriate port.
Once the proper port number has been entered click on OK then the following message will appear.
If you want to IMPORT DATA from the BITE unit then click on YES and follow the instructions as shown on the screen.
If you do not want to SELECT A FORM to view the data in or UPLOAD SITE & STRING DATA to a BITE3 then click on NO and the Wizard shall open the following screen.
www.actoolsupply.com
www.actoolsupply.com

BITE / POWER DB
AVTM82318 REV 1 April 17, 2012 Page 11
This screen will allow the operator to select the desired form they wish to use to view the battery test data. In addition this screen will allow the user the option to upload a Customer Site and String to the BITE3.
To SELECT A FORM, click on the desired form (10750 – BATTERY IMP/COND TEST for the BITE units) and then click OK. This form will now open and the user can select the desired test file to view in this form.
To UPLOAD SITE & STRING DATA to a BITE3, click on SEND STRING TO BITE3 then click on OK. The following screen shall open.
Enter the site and string data then click on the SEND TO BITE3 button.
www.actoolsupply.com
www.actoolsupply.com

BITE / POWER DB
AVTM82318 REV 1 April 17, 2012 Page 12
SECTION 4.0: TRANSFERRING DATA FROM A BITE2/2P RECEIVER
Open PowerDB LITE. (The following screen shall appear)
Click on BITE2. (The following screen shall appear)
www.actoolsupply.com
www.actoolsupply.com

BITE / POWER DB
AVTM82318 REV 1 April 17, 2012 Page 13
Select COM Port that the unit is connected to then click OK. (The following screen shall appear)
(NOTE: If you are unsure what COM port the unit will be connected to then click on DEVICE MANAGER and scroll down to COM Ports. Expand the COM Port section and you will be able to see what the COM port designations are.)
Select COM Port for Hydrometer then click OK. (The following screen shall appear)
(NOTE: If you are not using a hydrometer then just click OK to proceed.)
www.actoolsupply.com
www.actoolsupply.com

BITE / POWER DB
AVTM82318 REV 1 April 17, 2012 Page 14
Click YES on the “Do you want to import data from a BITE2” screen. (The following BITE2 data transfer Wizard screen shall appear)
Connect the BITE2 receiver to the COM port you selected.
Power Up the BITE2 receiver by pressing the Power ON key on the receiver.
The message “TRANSMIT DATA (Y/N)?” should appear on the BITE2 Receiver display.
www.actoolsupply.com
www.actoolsupply.com

BITE / POWER DB
AVTM82318 REV 1 April 17, 2012 Page 15
Click NEXT in the PowerDB software.
(NOTE: Read steps 9, 10 and 11 before proceeding. The software will time out if too much time lapses between these steps.)
Select “Y” on the BITE2 receiver by pressing the UP arrow key on the BITE2 receiver. (The following shall be displayed on the BITE2 receiver)
Select “EBITE / PC” on the BITE2 receiver by pressing the UP arrow key on the BITE2 receiver. (The following shall be displayed on the BITE2 receiver)
www.actoolsupply.com
www.actoolsupply.com

BITE / POWER DB
AVTM82318 REV 1 April 17, 2012 Page 16
Select “PC” on the BITE2 receiver by pressing the DOWN arrow key on the BITE2 receiver. (The receiver shall now start transferring the data to the PC)
When the data transmission is complete the following screen shall be displayed. This screen shall allow you to select the data path you wish to save the transmitted data to.
www.actoolsupply.com
www.actoolsupply.com

BITE / POWER DB
AVTM82318 REV 1 April 17, 2012 Page 17
If you wish to save the data to a different path then the one displayed then click on the BROWSE button and select the desired path.
(NOTE: The default data path is displayed. If you are not saving the data to a different path just click on NEXT to proceed.)
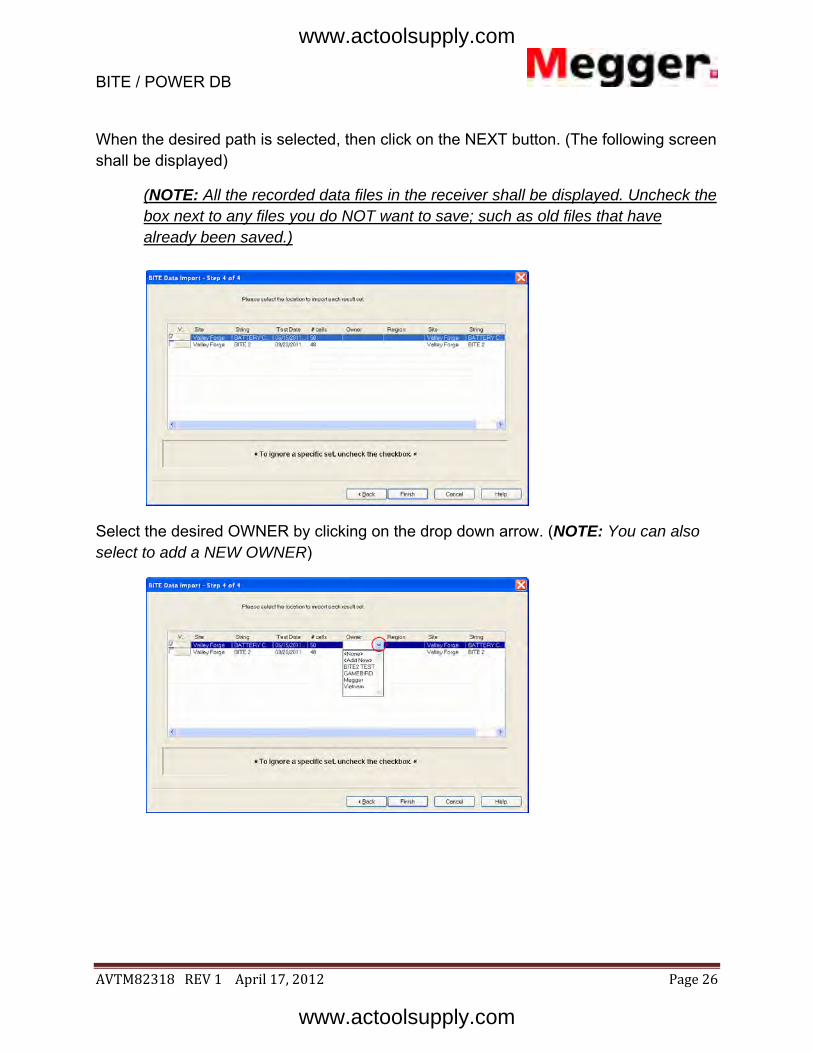
When the desired path is selected, then click on the NEXT button. (The following screen shall be displayed)
(NOTE: All the recorded data files in the receiver shall be displayed. Uncheck the box next to any files you do NOT want to save; such as old files that have already been saved.)
www.actoolsupply.com
www.actoolsupply.com

BITE / POWER DB
AVTM82318 REV 1 April 17, 2012 Page 18
Select the desired OWNER by clicking on the drop down arrow. (NOTE: You can also select to add a NEW OWNER)
Select the desired REGION by clicking on the drop down arrow. (NOTE: You can also select to add a NEW REGION)
www.actoolsupply.com
www.actoolsupply.com

BITE / POWER DB
AVTM82318 REV 1 April 17, 2012 Page 19
Select the desired SITE by clicking on the drop down arrow. (NOTE: You can also select to add a NEW SITE)
Select the desired STRING by clicking on the drop down arrow. (NOTE: You can also select to add a NEW STRING)
www.actoolsupply.com
www.actoolsupply.com
BITE / POWER DB
AVTM82318 REV 1 April 17, 2012 Page 20
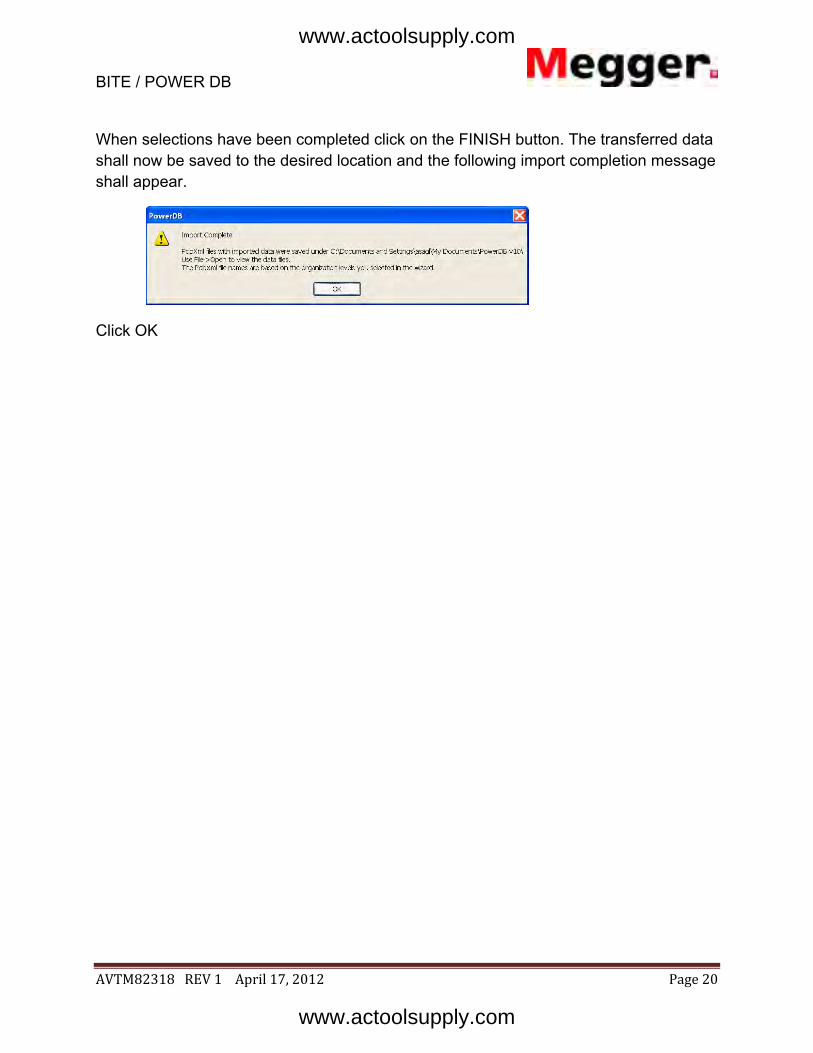
When selections have been completed click on the FINISH button. The transferred data shall now be saved to the desired location and the following import completion message shall appear.
Click OK
www.actoolsupply.com
www.actoolsupply.com

BITE / POWER DB
AVTM82318 REV 1 April 17, 2012 Page 21
SECTION 5.0: TRANSFERRING DATA FROM A BITE3
Open PowerDB LITE. (The following screen shall appear)
Click on BITE3. (The following screen shall appear)
www.actoolsupply.com
www.actoolsupply.com

BITE / POWER DB
AVTM82318 REV 1 April 17, 2012 Page 22
Select COM Port that the unit is connected to then click OK. (The following screen shall appear)
(NOTE: If you are unsure what COM port the unit will be connected to then click on DEVICE MANAGER and scroll down to COM Ports. Expand the COM Port section and you will be able to see what the COM port designations are.)
Select COM Port for Hydrometer then click OK. (The following screen shall appear)
(NOTE: If you are not using a hydrometer then just click OK to proceed.)
www.actoolsupply.com
www.actoolsupply.com
BITE / POWER DB
AVTM82318 REV 1 April 17, 2012 Page 23
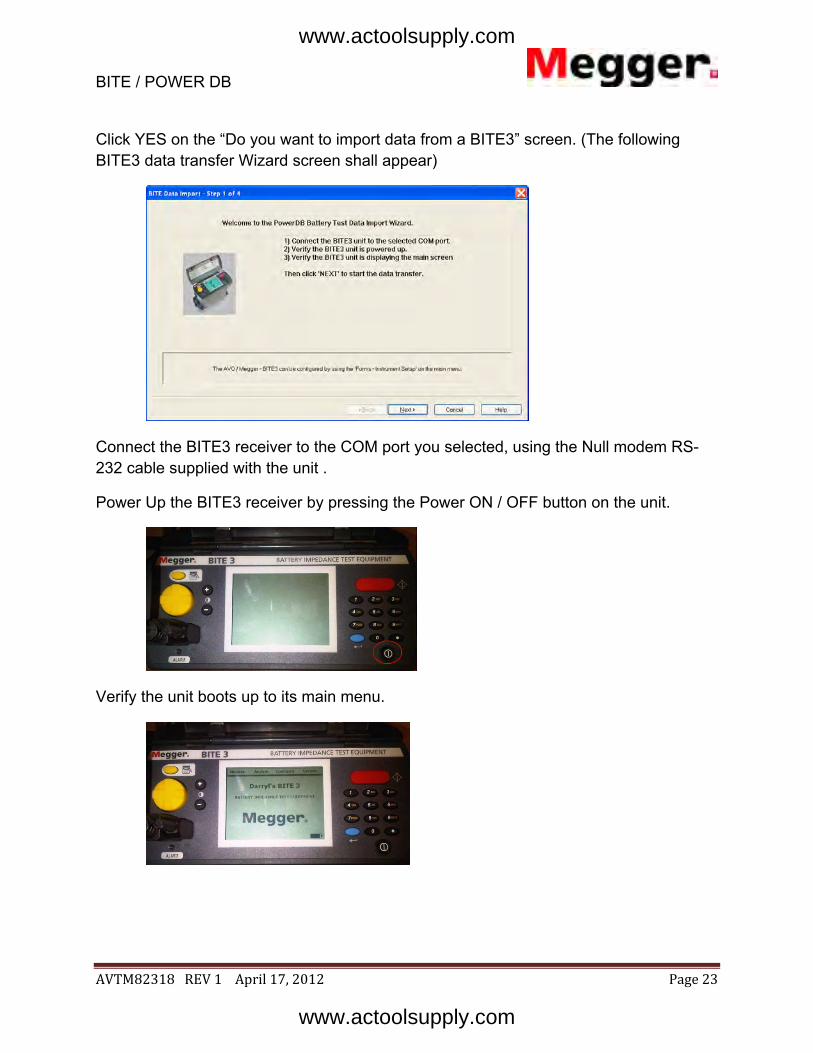
Click YES on the “Do you want to import data from a BITE3” screen. (The following BITE3 data transfer Wizard screen shall appear)
Connect the BITE3 receiver to the COM port you selected, using the Null modem RS-232 cable supplied with the unit .
Power Up the BITE3 receiver by pressing the Power ON / OFF button on the unit.
Verify the unit boots up to its main menu.
www.actoolsupply.com
www.actoolsupply.com

BITE / POWER DB
AVTM82318 REV 1 April 17, 2012 Page 24
Click NEXT in the PowerDB software.
Power DB LITE will now display all the data files recorded in the BITE3 unit.
Select the data files you wish to download by checking the box next to them. When complete click the NEXT button.
The data shall now transfer from the BITE3 to the Power DB LITE software.
www.actoolsupply.com
www.actoolsupply.com

BITE / POWER DB
AVTM82318 REV 1 April 17, 2012 Page 25
When the data transmission is complete the following screen shall be displayed. This screen shall allow you to select the data path you wish to save the transmitted data to.
If you wish to save the data to a different path then the one displayed then click on the BROWSE button and select the desired path.
(NOTE: The default data path is displayed. If you are not saving the data to a different path just click on NEXT to proceed.)
www.actoolsupply.com
www.actoolsupply.com
BITE / POWER DB
AVTM82318 REV 1 April 17, 2012 Page 26
When the desired path is selected, then click on the NEXT button. (The following screen shall be displayed)
(NOTE: All the recorded data files in the receiver shall be displayed. Uncheck the box next to any files you do NOT want to save; such as old files that have already been saved.)
Select the desired OWNER by clicking on the drop down arrow. (NOTE: You can also select to add a NEW OWNER)
www.actoolsupply.com
www.actoolsupply.com

BITE / POWER DB
AVTM82318 REV 1 April 17, 2012 Page 27
Select the desired REGION by clicking on the drop down arrow. (NOTE: You can also select to add a NEW REGION)
Select the desired SITE by clicking on the drop down arrow. (NOTE: You can also select to add a NEW SITE)
www.actoolsupply.com
www.actoolsupply.com

BITE / POWER DB
AVTM82318 REV 1 April 17, 2012 Page 28
Select the desired STRING by clicking on the drop down arrow. (NOTE: You can also select to add a NEW STRING)
When selections have been completed click on the FINISH button. The transferred data shall now be saved to the desired location and the following import completion message shall appear.
Click OK
www.actoolsupply.com
www.actoolsupply.com

BITE / POWER DB
AVTM82318 REV 1 April 17, 2012 Page 29
SECTION 6.0: REPORT GENERATION SECTION 6.1: OPENING A REPORT To open a report either click on FILE in the main menu bar then on OPEN or click on OPEN EXISTING RESULTS FILE in the Wizard.
The following window shall open.
www.actoolsupply.com
www.actoolsupply.com

BITE / POWER DB
AVTM82318 REV 1 April 17, 2012 Page 30
Select the desired file to open then click on OPEN. The following screen will open.
Select the desired test to open then click on OPEN. The report will now open, as shown in the example below.
www.actoolsupply.com
www.actoolsupply.com

BITE / POWER DB
AVTM82318 REV 1 April 17, 2012 Page 31
www.actoolsupply.com
www.actoolsupply.com

BITE / POWER DB
AVTM82318 REV 1 April 17, 2012 Page 32
SECTION 6.2: MANUALLY ENTERING SITE INFORMATION
SITE data can be entered manually in the below section of the report. Simply click on the desired field and enter the data. When the report is closed it will prompt you to save the changes. Select YES to save the data you entered and any changes you made.
www.actoolsupply.com
www.actoolsupply.com

BITE / POWER DB
AVTM82318 REV 1 April 17, 2012 Page 33
SECTION 6.3: MANUALLY ENTERING LIMITS LIMIT data can be entered manually in the below section of the report. This data will be actively used by the reports to calculate voltage limits, variation limits, deviation limits, percent change limits and strap limits. Simply click on the desired field and enter the data. When the report is closed it will prompt you to save the changes. Select YES to save the data you entered and any changes you made.
www.actoolsupply.com
www.actoolsupply.com

BITE / POWER DB
AVTM82318 REV 1 April 17, 2012 Page 34
SECTION 6.4: MANUALLY ENTERING STRING DATA STRING data can be entered manually in the below section of the report. Simply click on the desired field and enter the data. When the report is closed it will prompt you to save the changes. Select YES to save the data you entered and any changes you made.
www.actoolsupply.com
www.actoolsupply.com

BITE / POWER DB
AVTM82318 REV 1 April 17, 2012 Page 35
SECTION 6.5: MANUALLY ENTERING CHARGER DATA CHARGER data can be entered manually in the below section of the report. Simply click on the desired field and enter the data. When the report is closed it will prompt you to save the changes. Select YES to save the data you entered and any changes you made.
www.actoolsupply.com
www.actoolsupply.com

BITE / POWER DB
AVTM82318 REV 1 April 17, 2012 Page 36
SECTION 6.6: CREATING CHARTS To add a chart to the report simply right click on any background section of the report and the following window should open.
Click on SELECT CHARTS and the following Window should open.
All the available charts are displayed on the right side of the window under CHART. To view a chart in the report simply click on the display box in front of the chart. If the check is present then the chart will be displayed in the report.
www.actoolsupply.com
www.actoolsupply.com
BITE / POWER DB
AVTM82318 REV 1 April 17, 2012 Page 37
There are several options the operator can select to customize the charts in the report.
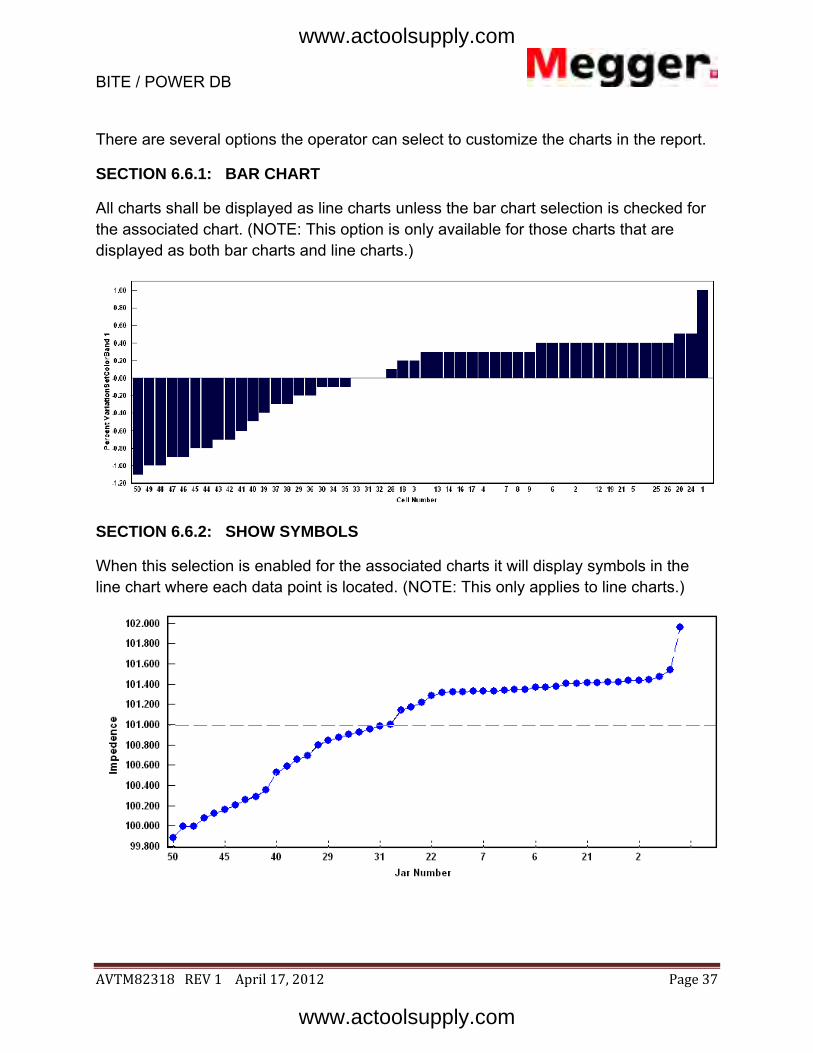
SECTION 6.6.1: BAR CHART
All charts shall be displayed as line charts unless the bar chart selection is checked for the associated chart. (NOTE: This option is only available for those charts that are displayed as both bar charts and line charts.)
SECTION 6.6.2: SHOW SYMBOLS
When this selection is enabled for the associated charts it will display symbols in the line chart where each data point is located. (NOTE: This only applies to line charts.)
www.actoolsupply.com
www.actoolsupply.com

BITE / POWER DB
AVTM82318 REV 1 April 17, 2012 Page 38
SECTION 6.6.3: SHOW LIMITS
When this selection is enabled for the associated charts it will display warning limits and alarm limits in the chart. (NOTE: These limit values in the report are the ones used by the charts.)
www.actoolsupply.com
www.actoolsupply.com

BITE / POWER DB
AVTM82318 REV 1 April 17, 2012 Page 39
SECTION 6.7: CALCULATING BASELINE DATA
Create a battery report. (It is recommended to use data from a new string that has completed formation.)
Click on USE THIS TEST AS THE BASELINE
www.actoolsupply.com
www.actoolsupply.com

BITE / POWER DB
AVTM82318 REV 1 April 17, 2012 Page 40
The new baseline value shall now be displayed. (This value is calculated by averaging all the cells together then discarding any cells values that are more that 5% from the average. Then the average is recalculated. This process id continued until all the cell values used are within 5% of the calculated average. This value is now the baseline value.)
SECTION 6.8: INPUTTING A NEW BATTERY BASELINE VALUE
Create a battery report.
www.actoolsupply.com
www.actoolsupply.com

BITE / POWER DB
AVTM82318 REV 1 April 17, 2012 Page 41
Click cell “1”. (The Cell Information Window will now open)
Click on CELL MODEL. (The Battery Model Window will now open)
Enter the new baseline value
www.actoolsupply.com
www.actoolsupply.com
BITE / POWER DB
AVTM82318 REV 1 April 17, 2012 Page 42
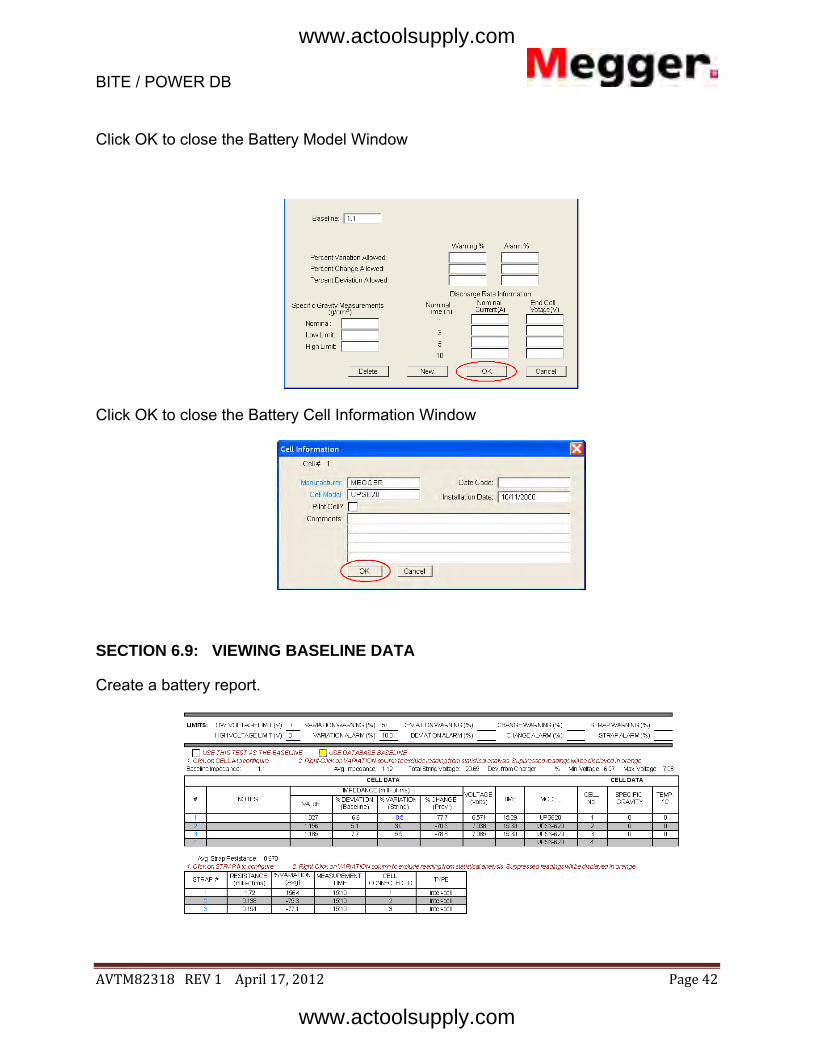
Click OK to close the Battery Model Window
Click OK to close the Battery Cell Information Window
SECTION 6.9: VIEWING BASELINE DATA
Create a battery report.
www.actoolsupply.com
www.actoolsupply.com

BITE / POWER DB
AVTM82318 REV 1 April 17, 2012 Page 43
Click on USE DATABASE BASELINE
Baseline value shall now be displayed using the baseline value entered in the Battery Cell Information Window.
www.actoolsupply.com
www.actoolsupply.com

BITE / POWER DB
AVTM82318 REV 1 April 17, 2012 Page 44
SECTION 7.0: ENTERING NEW BATTERY CELL DATA
Create the battery report.
Click cell “1”. (The Cell Information Window will now open)
Click on CELL MODEL. (The Battery Model Window will now open)
www.actoolsupply.com
www.actoolsupply.com
BITE / POWER DB
AVTM82318 REV 1 April 17, 2012 Page 45
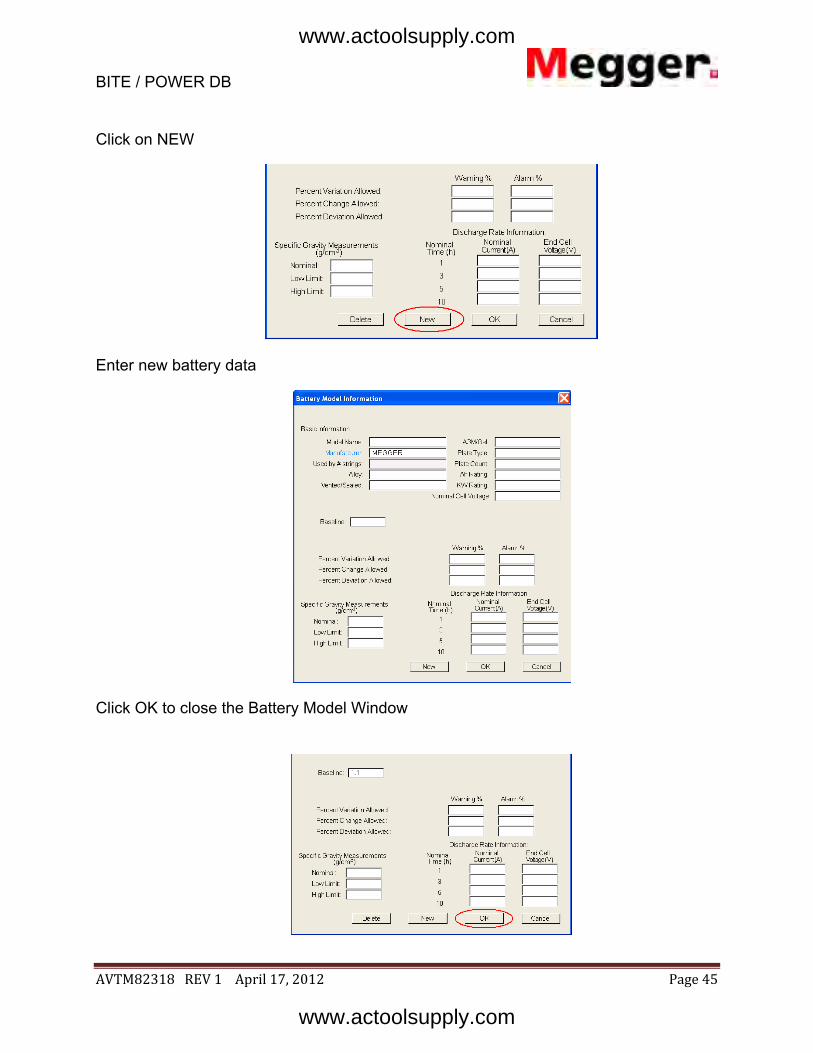
Click on NEW
Enter new battery data
Click OK to close the Battery Model Window
www.actoolsupply.com
www.actoolsupply.com

BITE / POWER DB
AVTM82318 REV 1 April 17, 2012 Page 46
Click OK to close the Battery Cell Information Window
SECTION 7.1: ENTERING NEW WARNING & ALARM LIMIT VALUES
Create the battery report.
www.actoolsupply.com
www.actoolsupply.com

BITE / POWER DB
AVTM82318 REV 1 April 17, 2012 Page 47
Click cell “1”. (The Cell Information Window will now open)
Click in the Cell Model Field
Select the desired battery
www.actoolsupply.com
www.actoolsupply.com

BITE / POWER DB
AVTM82318 REV 1 April 17, 2012 Page 48
Click on CELL MODEL
Enter new warning and alarm values
Click OK to close the Battery Model Window
www.actoolsupply.com
www.actoolsupply.com

BITE / POWER DB
AVTM82318 REV 1 April 17, 2012 Page 49
Click OK to close the Battery Cell Information Window
SECTION 7.2: SELECTING A NEW BATTERY CELL
Create a battery report.
Click cell “1”. (The Cell Information Window will now open)
www.actoolsupply.com
www.actoolsupply.com

BITE / POWER DB
AVTM82318 REV 1 April 17, 2012 Page 50
Click in the Cell Model Field
Select the desired battery
Click OK to close the Battery Cell Information Window
www.actoolsupply.com
www.actoolsupply.com

BITE / POWER DB
AVTM82318 REV 1 April 17, 2012 Page 51
SECTION 8.0: INPUTTING A COMPANY LOGO
To input a company logo into a report first click on TOOLS in the main menu bar, then click on OPTIONS.
The Options window will now open. This window will allow the operator to insert logos on both sides of the report, right or left. Simply click on the BROWSE button for the logo location you are interested in.
www.actoolsupply.com
www.actoolsupply.com

BITE / POWER DB
AVTM82318 REV 1 April 17, 2012 Page 52
A standard Windows OPEN screen will be displayed. Navigate to the location of the bitmap you wish to use. Select the desired bitmap and then click on OPEN.
The software will return to the OPTIONS screen. Simply click on OK to apply the logo.
NOTE: It will be necessary to close and re-open the report in order to view the logo.
www.actoolsupply.com
www.actoolsupply.com

BITE / POWER DB
AVTM82318 REV 1 April 17, 2012 Page 53
SECTION 9.0: TRANSFERRING SETUP DATA TO THE BITE3
To transfer setup data to the BITE 3 instrument via software click on TOOLS then select INSTRUMENT SETUP.
Click on BITE 3 button.
www.actoolsupply.com
www.actoolsupply.com

BITE / POWER DB
AVTM82318 REV 1 April 17, 2012 Page 54
Select the correct settings for the COM PORT in use and click on ADVANCE button.
The following INFORMATION AND SETTINGS Window shall open.
Input the desired data under the “Bite 3 Settings” Section.
Turn on the BITE 3 instrument, wait until unit has completed boot up and click on the UPDATE button.
www.actoolsupply.com
www.actoolsupply.com

BITE / POWER DB
AVTM82318 REV 1 April 17, 2012 Page 55
SECTION 10.0: IMPORTING A PROACTIVE DATABASE
Click on FILE / IMPORT / IMPORT PROACTIV DATA
The following screen will open. Click on the ProActiv Database BROWSE button as shown.
www.actoolsupply.com
www.actoolsupply.com

BITE / POWER DB
AVTM82318 REV 1 April 17, 2012 Page 56
The following screen will open. Navigate to your database location and then select your desired database. When complete click on OPEN.
The following screen will open. Click on the PowerDB Database BROWSE button as shown.
www.actoolsupply.com
www.actoolsupply.com

BITE / POWER DB
AVTM82318 REV 1 April 17, 2012 Page 57
The following screen will open. Navigate to the folder you wish to copy the database to. (The default folder is MY DOCUMENTS / POWERDB) When complete click on the OK button.
The following screen will open. Click on the IMPORT button to start the import.
www.actoolsupply.com
www.actoolsupply.com

BITE / POWER DB
AVTM82318 REV 1 April 17, 2012 Page 58
The following screen will open, showing the import status in the lower left. When it reads Import Complete then click on the CLOSE button.
The following message will be displayed. Click on OK.
www.actoolsupply.com
www.actoolsupply.com