memphis light gas and water division’s isupplier user · pdf filetraining guide page i...
TRANSCRIPT
Training Guide
Page i
Memphis Light Gas and Water Division’s
iSupplier User Guide
Scope:
In order to conduct business with Memphis Light Gas and Water Division, a user guide
has been developed to outline steps for suppliers to utilize throughout the eProcurement
system. The eProcurement system allows suppliers to have access to two (2) applications:
iSupplier Portal Full Access and Sourcing Supplier. The training guide will cover how
to engage with both applications.
The iSupplier Portal Full Access application allows suppliers to access purchase order,
shipment, receipt, invoice (for Purchasing area purchase orders only), and payment
history. Additionally, it allows suppliers to manage their supplier record with pertinent
business information, such as address and contact information.
The Sourcing Supplier application allows suppliers to respond to open requests for
quotations and view the status of past request for quotation responses.
Accessing the iSupplier Portal:
In order to access the MLGW iSupplier Portal system, you must have an internet account
and be logged on to the internet in order to access the iSupplier Portal Full Access or
Sourcing Supplier. Note: Using Internet Explorer version 10 or newer is the minimum
requirement.
Logging into the Supplier portal
There are two (2) log-in options:
1. Existing Supplier Registration (currently have an existing account assigned for the
iSupplier Portal. Suppliers will have a log-in and password)
A. Enter the following link into an open web browser in the address field:
https://suppliers.mlgw.org/. Enter your account log-in and password and
select Login. 2. New Supplier Registration (currently do not have an existing account assigned for the
iSupplier Portal.) A. Click the attached link to be directed to the registration web browser: New
Supplier Registration. This link can also be found on the MLGW Procurement
and Contracts Management website located at www.mlgw.com/bids.
Complete the requested information to receive an account log-in and
password.

Training Guide
Page ii
Special Note:
The MLGW Bid Online Notification Service will continue to be available for suppliers
to view uploaded RFQs. Suppliers must be registered to view RFQs.
To respond to an RFQ, suppliers must be registered in the iSupplier Portal and request an
invite via [email protected] to be able to quote within the iSupplier Portal.

Training Guide
Page iii
Table of Contents iSupplier Portal..............................................................................................................1
Setting Up Supplier Users ..................................................................................................... 1 PI-453 Registering Supplier Users .................................................................................................... 1 PI-454 Inviting Supplier Users .......................................................................................................... 6
Viewing/Creating Request For Quote "RFQ" and Submitting Change Request ............... 9 Viewing and Responding to a Request for Quotes "RFQ" ................................................................ 10 Submitting a Change Request ......................................................................................................... 26
Viewing Invoice and Payment Information ........................................................................ 29 Submitting Invoices ........................................................................................................................ 30 Viewing Payment Information ........................................................................................................ 38
Managing Supplier Profile Management ........................................................................... 42 Managing Address Book................................................................................................................. 42 Creating an Address Site ................................................................................................................. 58 Adding Additional Contacts ............................................................................................................ 62 Adding Business Classifications ..................................................................................................... 65 Adding Products and Services (NIGP Code) ................................................................................... 68 Adding Banking Details .................................................................................................................. 71

Training Guide
Page 1
iSupplier Portal
iSupplier Portal
Oracle iSupplier...
Upon completion of this course, you will be able to:
• Set up Supplier Users
Setting Up Supplier Users
Setting Up Supplier Users
Supplier users...
Upon completion of this lesson, you will be able to:
• Register supplier users
• Invite supplier users
PI-453 Registering Supplier Users
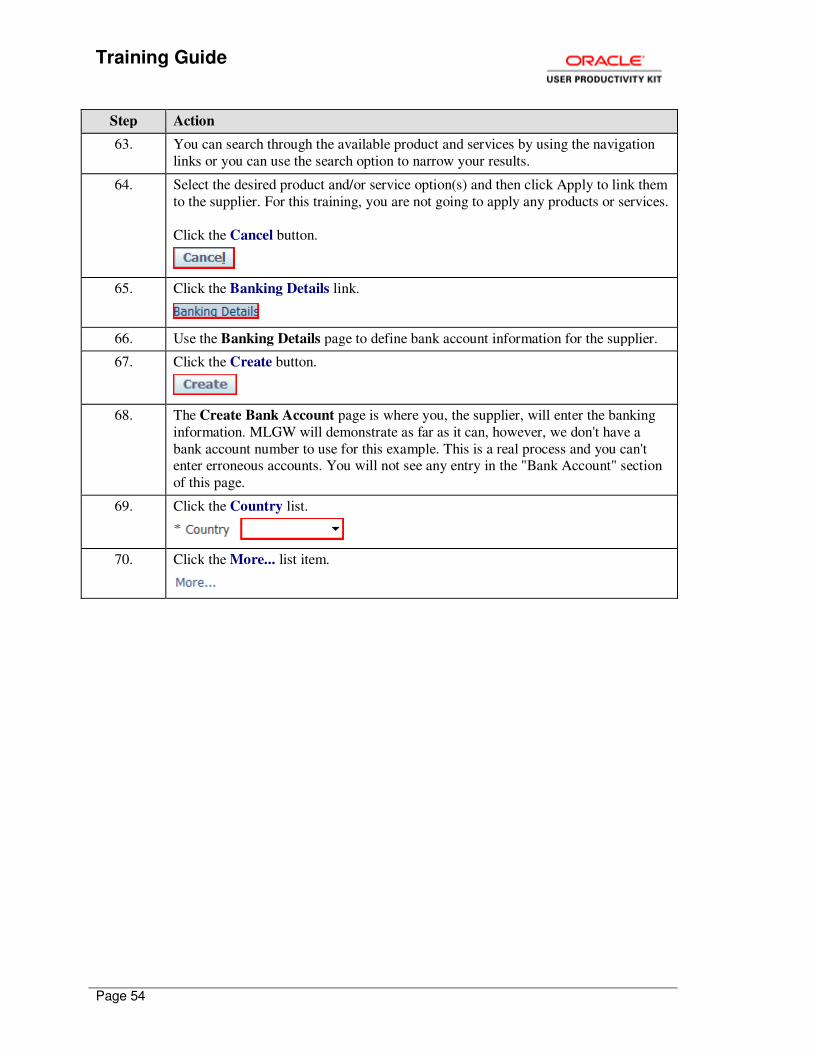
Registering Supplier Users
Training Guide
Page 2
Once the supplier company has been set up in Oracle, you can register supplier users for the supplier in the Oracle iSupplier Portal.
In this topic, you will register a supplier user.
For technical help, please contact the MLGW Service Desk at 901-729-8416 or by email at [email protected].
Procedure
The purpose of this topic is to show you how to register supplier users.
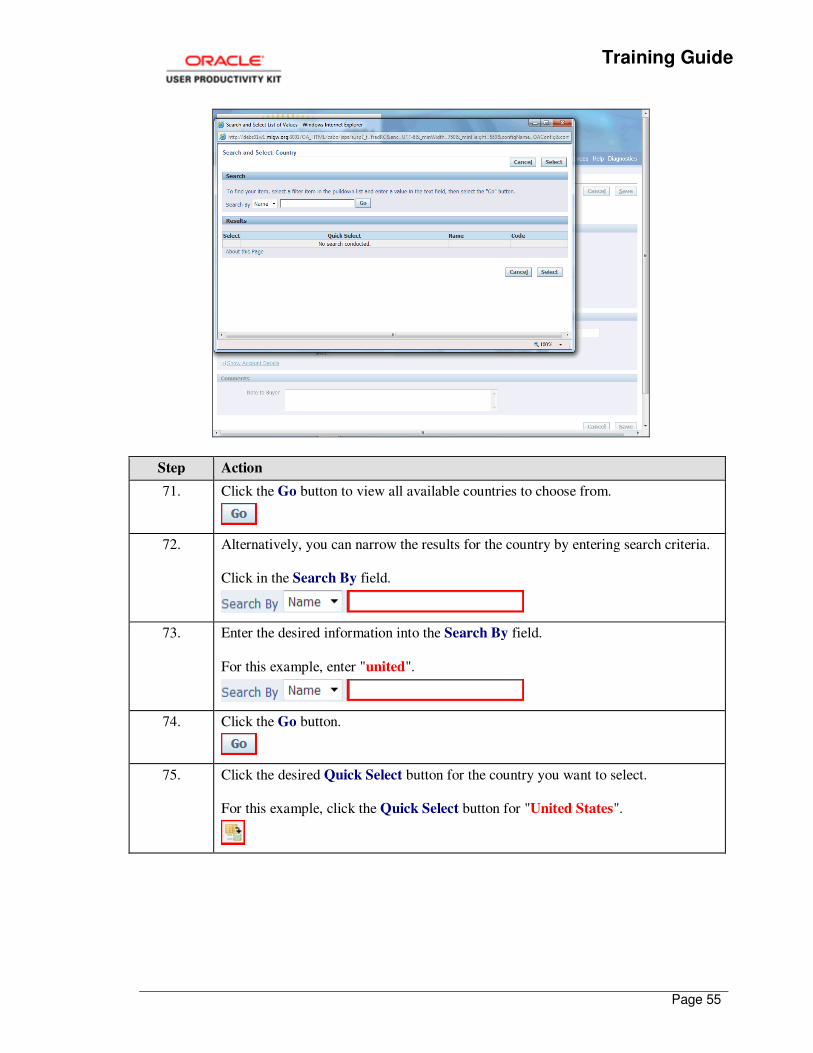
In this topic, you will learn the following: 1. How to register supplier users.
SIMULATION NAVIGATION: To exit the simulation, press the Esc key. If you want to go
back a screen, click on Actions > Previous Step in the top right-hand corner of the text bubble.
Step Action
1. Begin by navigating to the Register a Supplier User page.
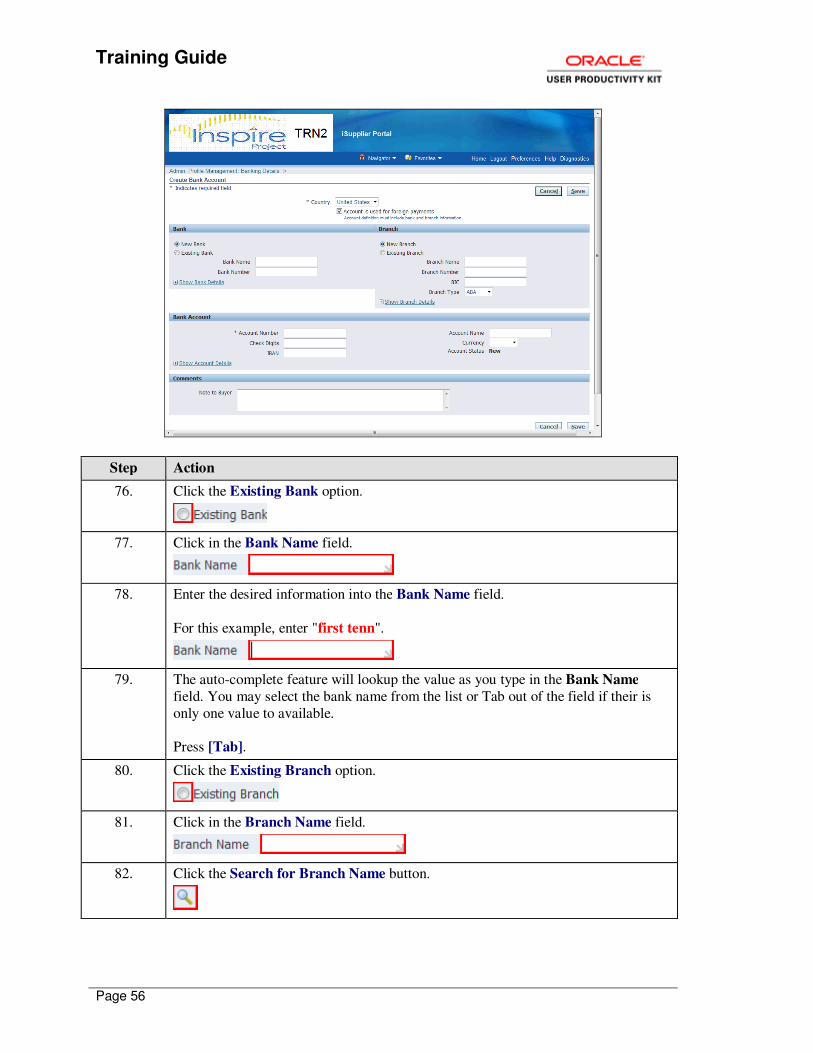
Click the Purchasing Super User link.
2. Scroll down the page.
Click the scrollbar.
Training Guide
Page 3
Step Action
3. Click the Register Supplier User link in the Supply Base: Supplier User
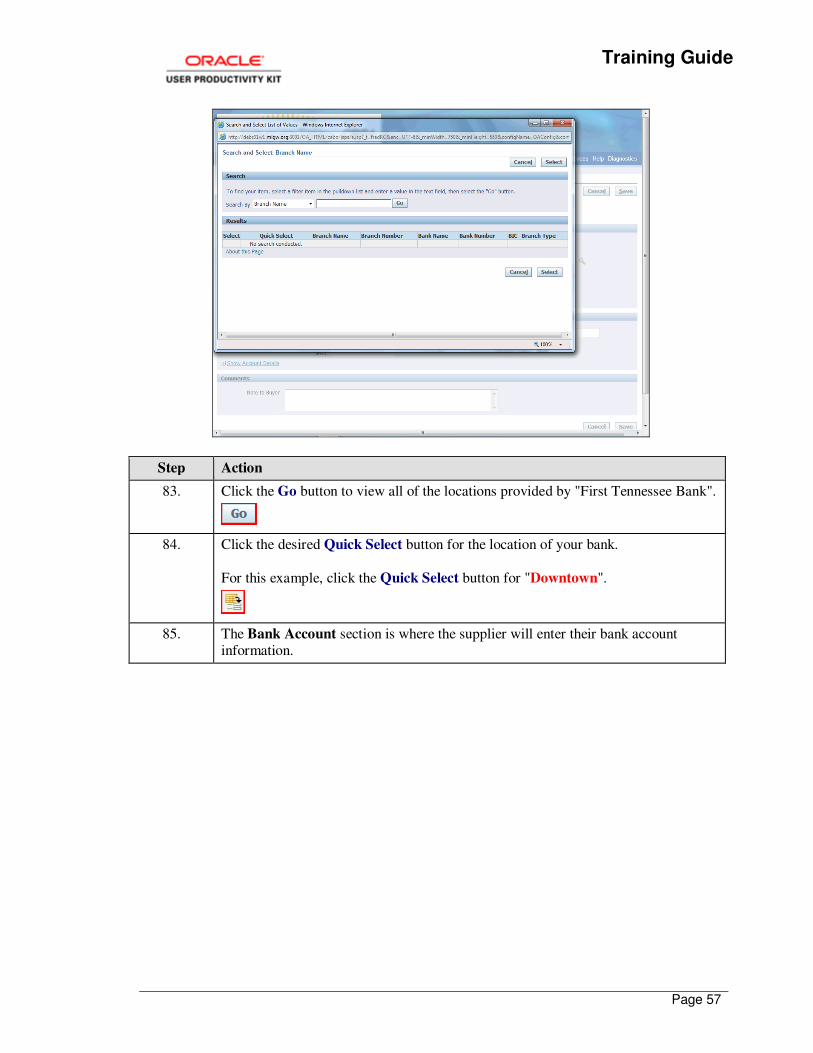
Management: Supplier User Creation section.
4. Use the Register a Supplier User page to define new supplier user information and register the new user.
Step Action
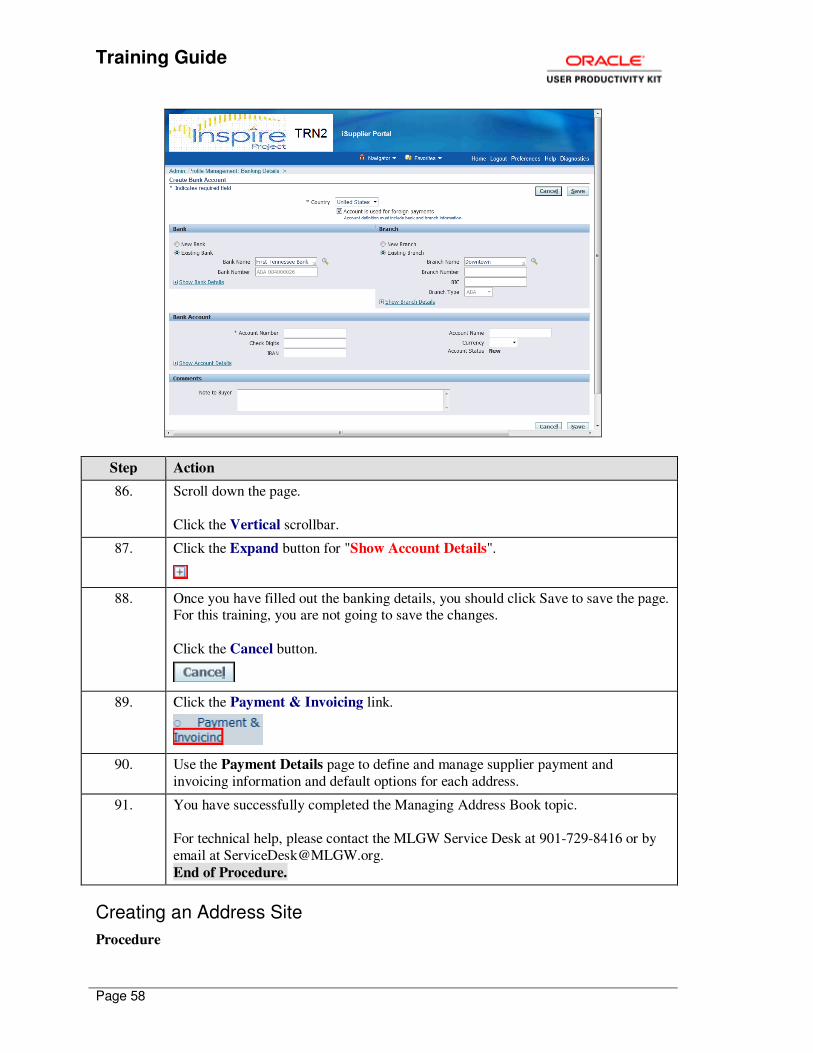
5. Click in the Supplier Name field.
6. Enter the desired information into the Supplier Name field.
For this example, enter "Tyler's Time Share".
7. Click the desired Supplier Name link.
For this example, click "Tyler's Time Share".
8. Click in the Email field.
Training Guide
Page 4
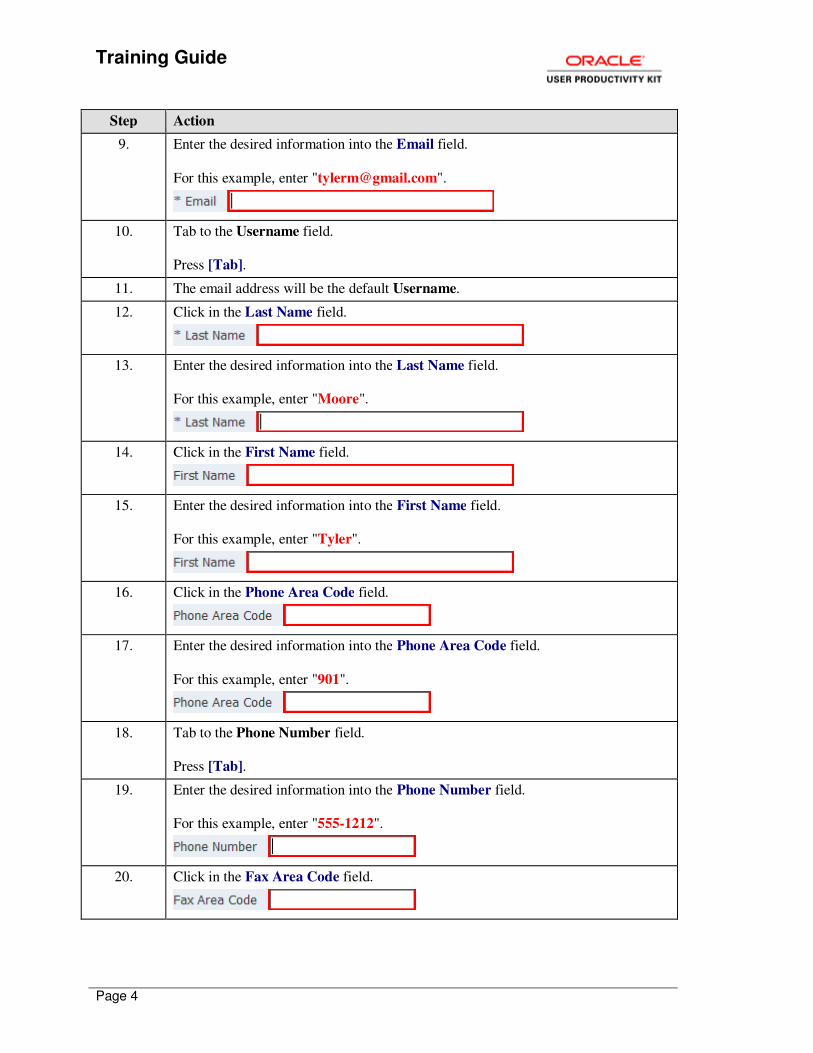
Step Action
9. Enter the desired information into the Email field.
For this example, enter "[email protected]".
10. Tab to the Username field.
Press [Tab].
11. The email address will be the default Username.
12. Click in the Last Name field.
13. Enter the desired information into the Last Name field.
For this example, enter "Moore".
14. Click in the First Name field.
15. Enter the desired information into the First Name field.
For this example, enter "Tyler".
16. Click in the Phone Area Code field.
17. Enter the desired information into the Phone Area Code field.
For this example, enter "901".
18. Tab to the Phone Number field.
Press [Tab].
19. Enter the desired information into the Phone Number field.
For this example, enter "555-1212".
20. Click in the Fax Area Code field.
Training Guide
Page 5
Step Action
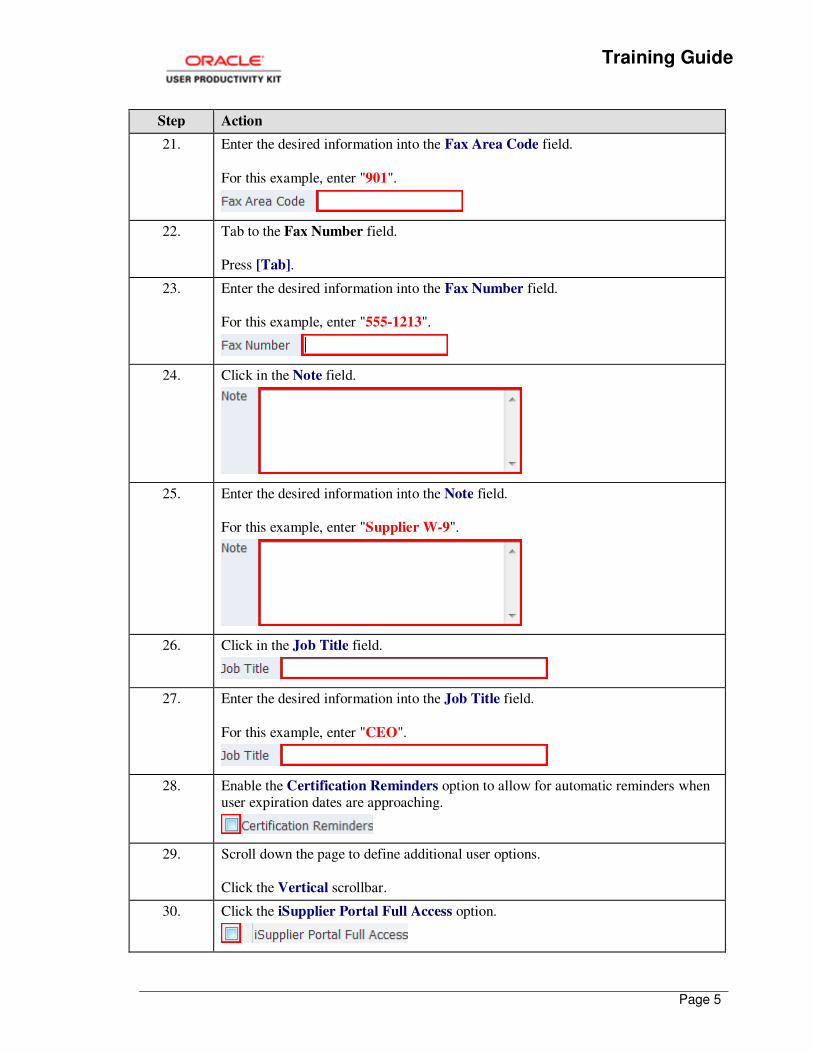
21. Enter the desired information into the Fax Area Code field.
For this example, enter "901".
22. Tab to the Fax Number field.
Press [Tab].
23. Enter the desired information into the Fax Number field.
For this example, enter "555-1213".
24. Click in the Note field.
25. Enter the desired information into the Note field.
For this example, enter "Supplier W-9".
26. Click in the Job Title field.
27. Enter the desired information into the Job Title field.
For this example, enter "CEO".
28. Enable the Certification Reminders option to allow for automatic reminders when user expiration dates are approaching.
29. Scroll down the page to define additional user options.
Click the Vertical scrollbar.
30. Click the iSupplier Portal Full Access option.
Training Guide
Page 6
Step Action
31. Click the Sourcing Supplier option.
32. Click the Vertical scrollbar.
33. After you click Register, you will receive a confirmation message.
Click the Register button.
34. The confirmation message will indicate the if the supplier user was created
successfully or if any errors were encountered. In this case, the supplier user was
created successfully.
35. You have successfully completed the Registering Supplier Users topic.
For technical help, please contact the MLGW Service Desk at 901-729-8416 or by
email at [email protected].
End of Procedure.
PI-454 Inviting Supplier Users
Inviting Supplier Users
Buyers have the option to register supplier users for a supplier or invite the supplier user to complete the registration form.
In this topic, you will invite a supplier user.
For technical help, please contact the MLGW Service Desk at 901-729-8416 or by email at [email protected].
Procedure
The purpose of this topic is to show you how to invite supplier users.
In this topic, you will learn the following: 1. How to invite supplier users.
SIMULATION NAVIGATION: To exit the simulation, press the Esc key. If you want to go
back a screen, click on Actions > Previous Step in the top right-hand corner of the text bubble.
Training Guide
Page 7
Step Action
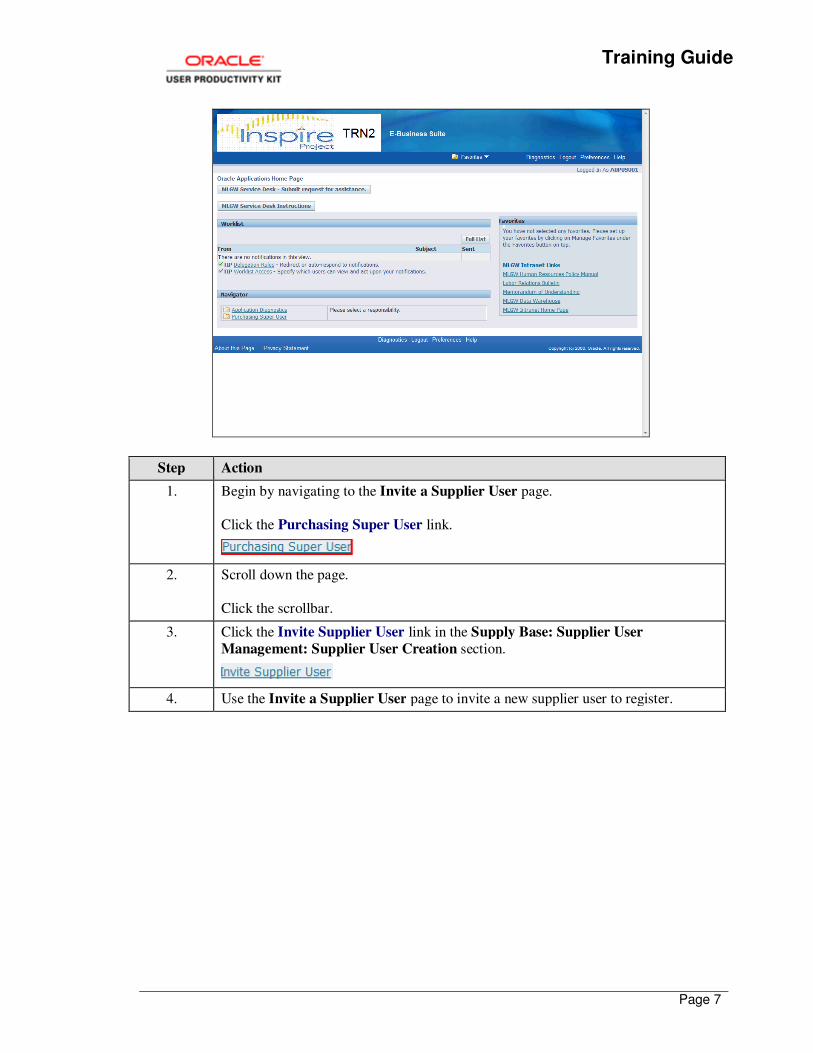
1. Begin by navigating to the Invite a Supplier User page.
Click the Purchasing Super User link.
2. Scroll down the page.
Click the scrollbar.
3. Click the Invite Supplier User link in the Supply Base: Supplier User
Management: Supplier User Creation section.
4. Use the Invite a Supplier User page to invite a new supplier user to register.

Training Guide
Page 8
Step Action
5. Click in the Supplier Name field.
6. Enter the desired information into the Supplier Name field.
For this example, enter "cole classic car".
7. Tab to the Supplier Number field.
Press [Tab].
8. Notice the Supplier Number auto-populates based on the Supplier Name that was
entered.
9. Click in the Email Address field.
10. Enter the desired information into the Email Address field for the supplier user you
want to invite.
For this example, enter "[email protected]".
Training Guide
Page 9
Step Action
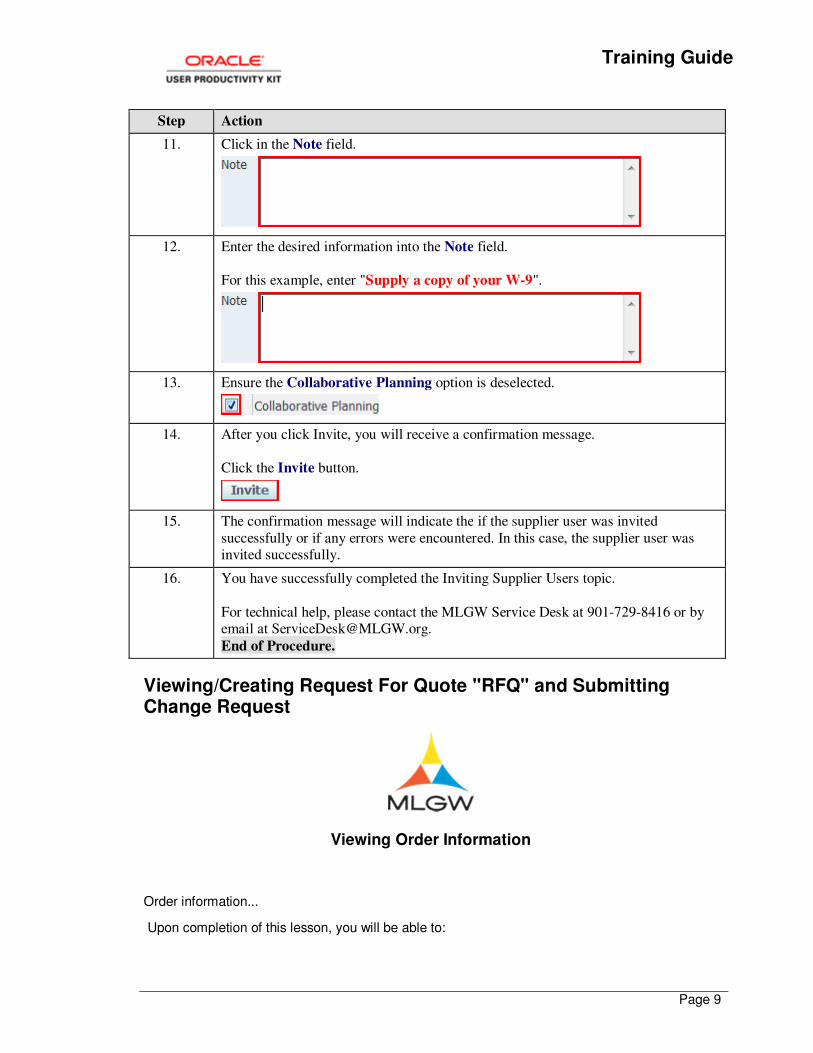
11. Click in the Note field.
12. Enter the desired information into the Note field.
For this example, enter "Supply a copy of your W-9".
13. Ensure the Collaborative Planning option is deselected.
14. After you click Invite, you will receive a confirmation message.
Click the Invite button.
15. The confirmation message will indicate the if the supplier user was invited
successfully or if any errors were encountered. In this case, the supplier user was invited successfully.
16. You have successfully completed the Inviting Supplier Users topic.
For technical help, please contact the MLGW Service Desk at 901-729-8416 or by email at [email protected].
End of Procedure.
Viewing/Creating Request For Quote "RFQ" and Submitting Change Request
Viewing Order Information
Order information...
Upon completion of this lesson, you will be able to:
Training Guide
Page 10
• Submit a change request
Viewing and Responding to a Request for Quotes "RFQ"
Viewing Request for Quotes "RFQ"
Once a supplier receives an invitation to participate in the negotiation, they can submit a quote/bid for items listed in the Approved Product List (APL).
In this topic, you will view a RFQ and submit a quote/bid.
For technical help, please contact the MLGW Service Desk at 901-729-8416 or by email at [email protected].
Procedure
The purpose of this topic is to show you how to view request for quotes "RFQ" and submit a quote/bid.
In this topic, you will learn the following: 1. How to view RFQs.
2. How to submit a quote/bid.
SIMULATION NAVIGATION: To exit the simulation, press the Esc key. If you want to go
back a screen, click on Actions > Previous Step in the top right-hand corner of the text bubble.
Training Guide
Page 11
Step Action
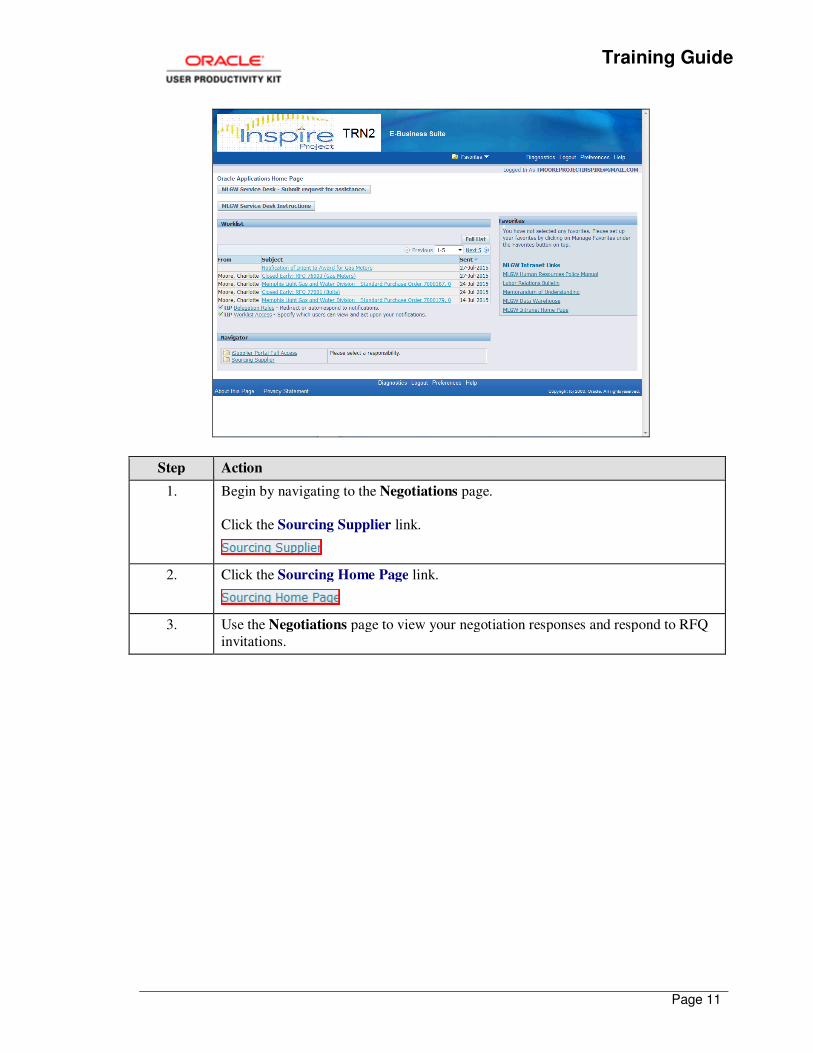
1. Begin by navigating to the Negotiations page.
Click the Sourcing Supplier link.
2. Click the Sourcing Home Page link.
3. Use the Negotiations page to view your negotiation responses and respond to RFQ
invitations.
Training Guide
Page 12
Step Action
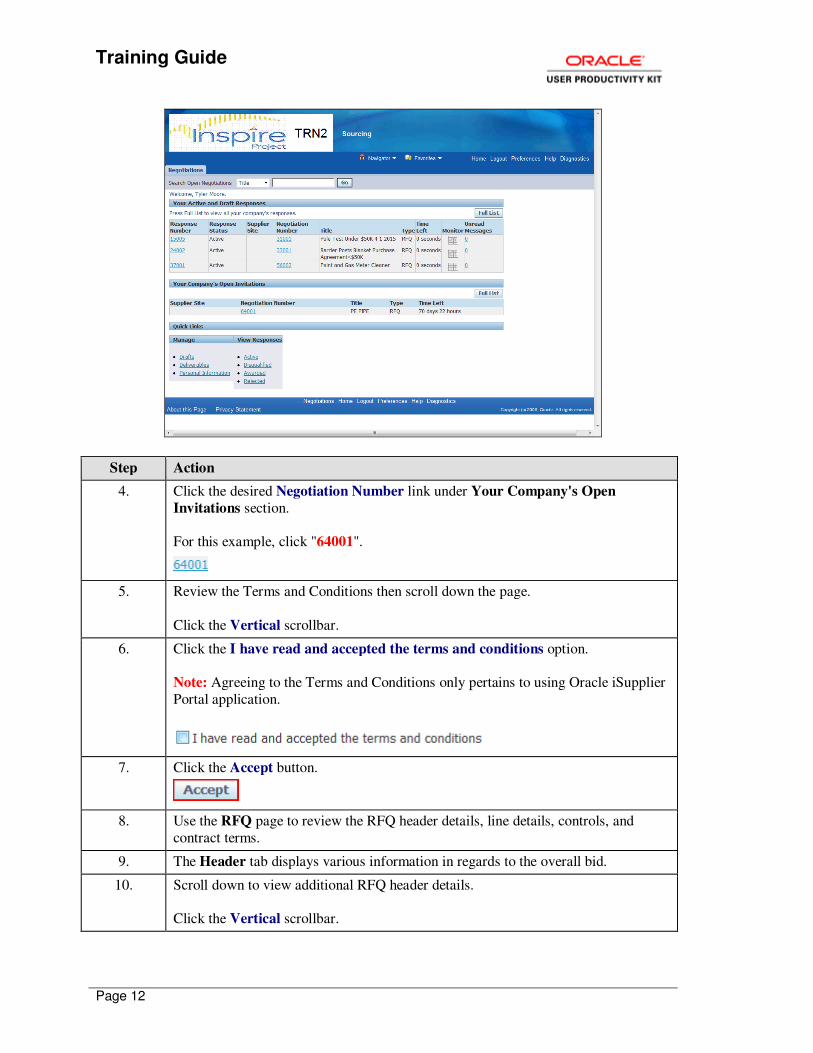
4. Click the desired Negotiation Number link under Your Company's Open
Invitations section.
For this example, click "64001".
5. Review the Terms and Conditions then scroll down the page.
Click the Vertical scrollbar.
6. Click the I have read and accepted the terms and conditions option.
Note: Agreeing to the Terms and Conditions only pertains to using Oracle iSupplier
Portal application.
7. Click the Accept button.
8. Use the RFQ page to review the RFQ header details, line details, controls, and
contract terms.
9. The Header tab displays various information in regards to the overall bid.
10. Scroll down to view additional RFQ header details.
Click the Vertical scrollbar.
Training Guide
Page 13
Step Action
11. Scroll back to the top the page.
Click the Vertical scrollbar.
12. Click the Lines tab.
13. Click the desired Line link (blue colored) to view the line details.
For this example, click "TUBING 5/8"OD POLYETHYL...".
14. The approved products listed are the products MLGW has approved for purchase.
MLGW can only purchase what is listed as approved.
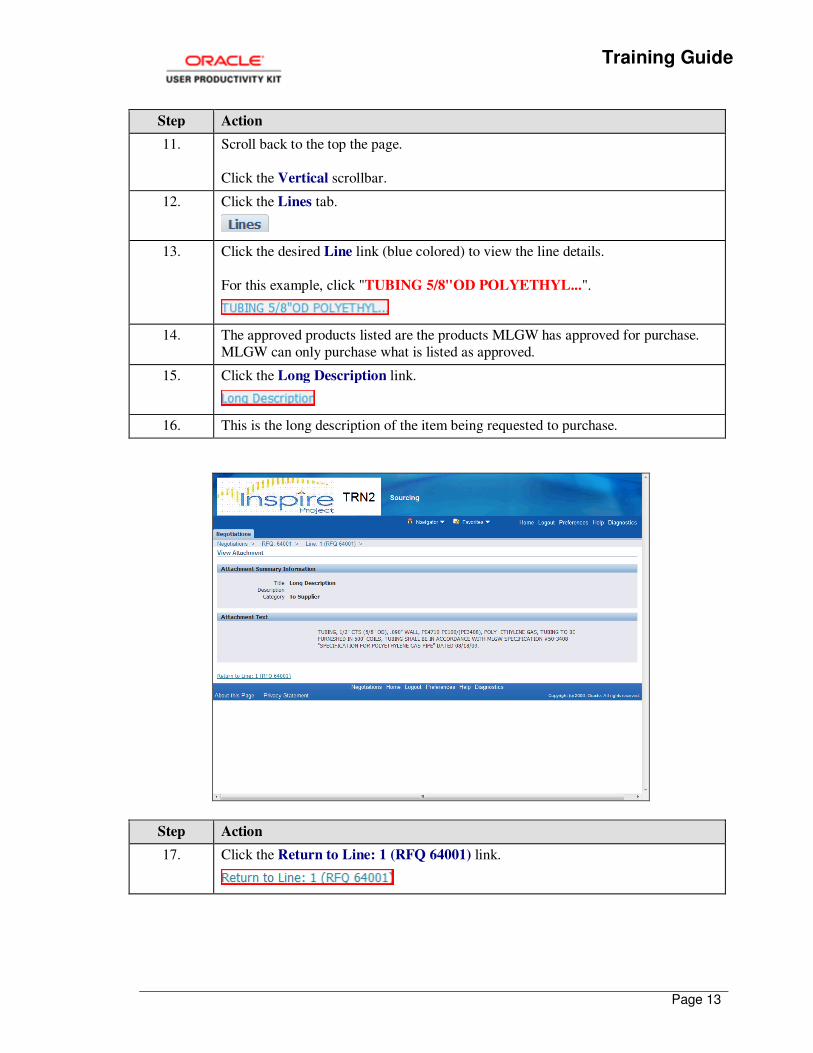
15. Click the Long Description link.
16. This is the long description of the item being requested to purchase.
Step Action
17. Click the Return to Line: 1 (RFQ 64001) link.
Training Guide
Page 14
Step Action
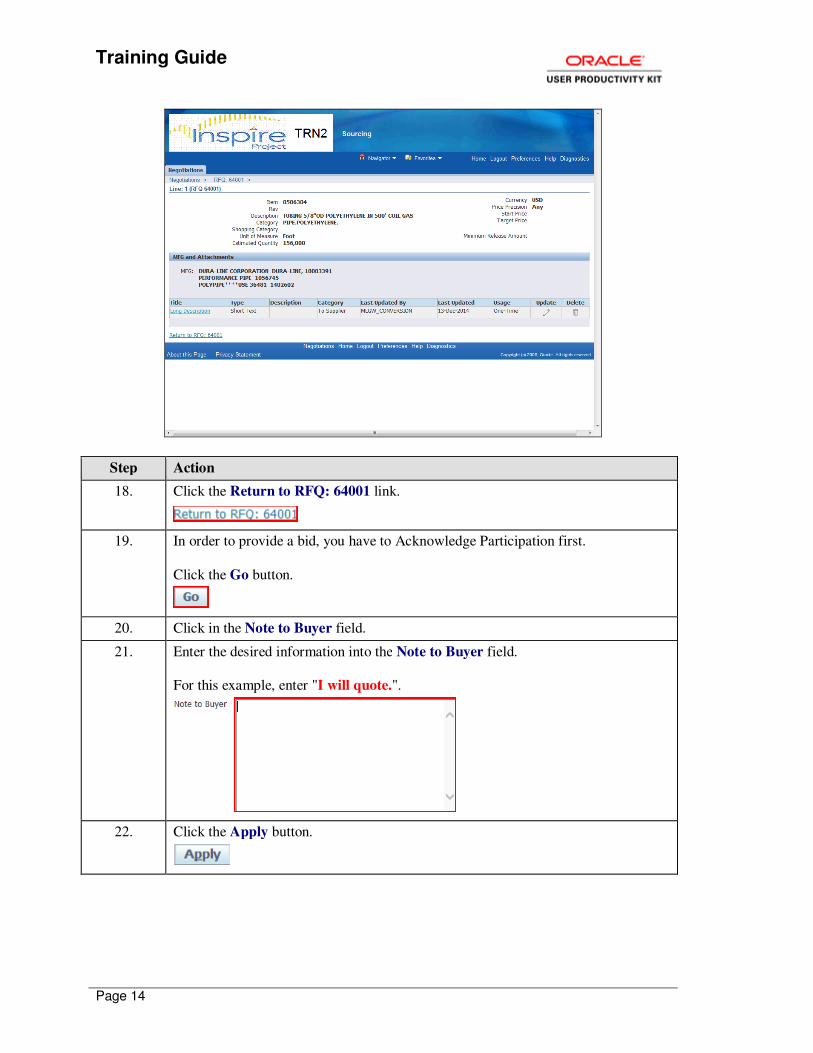
18. Click the Return to RFQ: 64001 link.
19. In order to provide a bid, you have to Acknowledge Participation first.
Click the Go button.
20. Click in the Note to Buyer field.
21. Enter the desired information into the Note to Buyer field.
For this example, enter "I will quote.".
22. Click the Apply button.
Training Guide
Page 15
Step Action
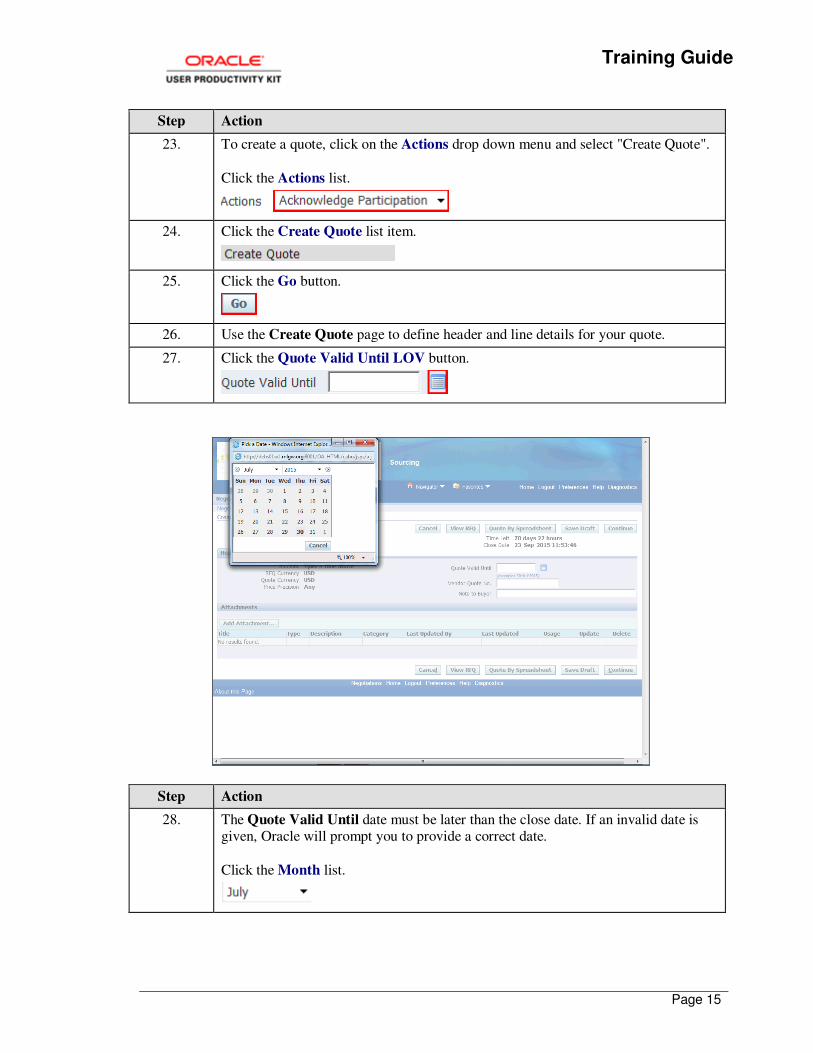
23. To create a quote, click on the Actions drop down menu and select "Create Quote".
Click the Actions list.
24. Click the Create Quote list item.
25. Click the Go button.
26. Use the Create Quote page to define header and line details for your quote.
27. Click the Quote Valid Until LOV button.
Step Action
28. The Quote Valid Until date must be later than the close date. If an invalid date is given, Oracle will prompt you to provide a correct date.
Click the Month list.
Training Guide
Page 16
Step Action
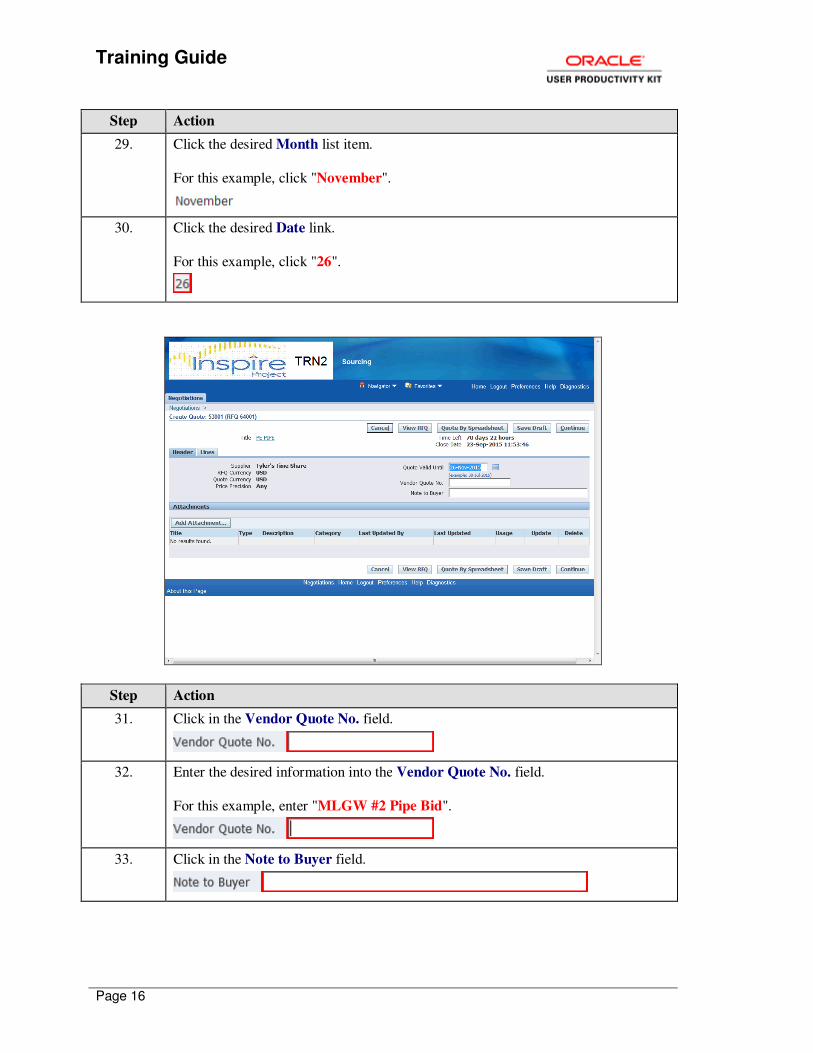
29. Click the desired Month list item.
For this example, click "November".
30. Click the desired Date link.
For this example, click "26".
Step Action
31. Click in the Vendor Quote No. field.
32. Enter the desired information into the Vendor Quote No. field.
For this example, enter "MLGW #2 Pipe Bid".
33. Click in the Note to Buyer field.
Training Guide
Page 17
Step Action
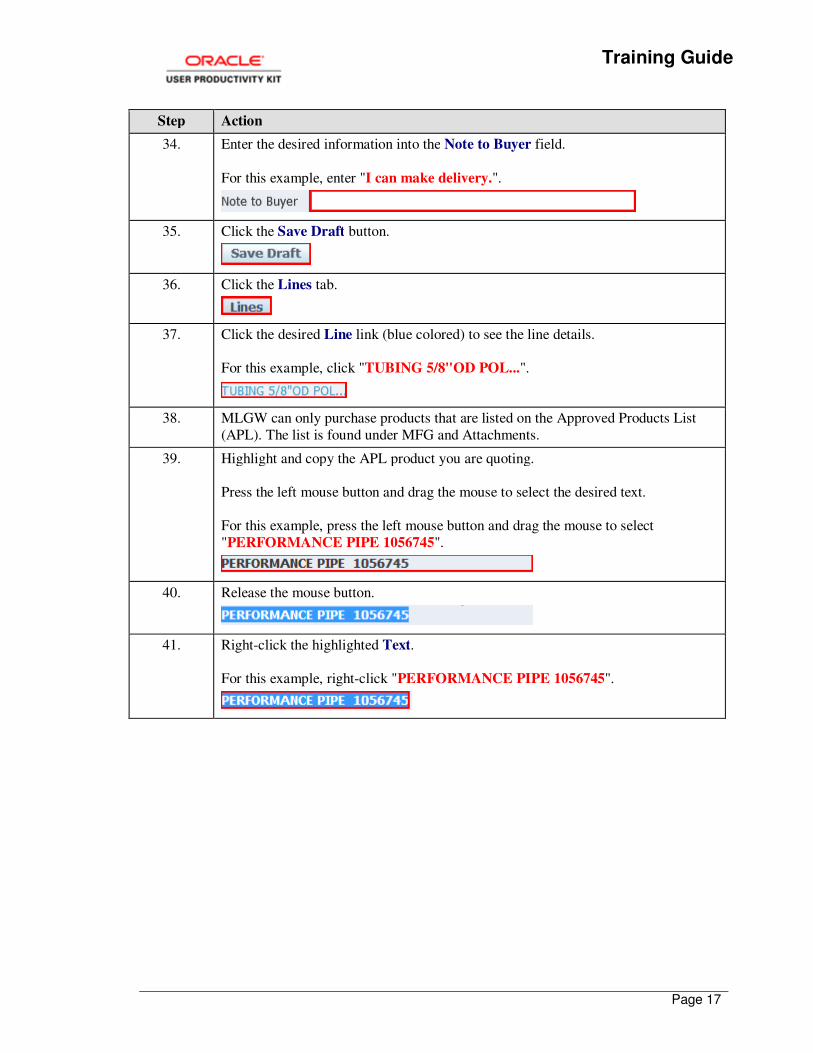
34. Enter the desired information into the Note to Buyer field.
For this example, enter "I can make delivery.".
35. Click the Save Draft button.
36. Click the Lines tab.
37. Click the desired Line link (blue colored) to see the line details.
For this example, click "TUBING 5/8"OD POL...".
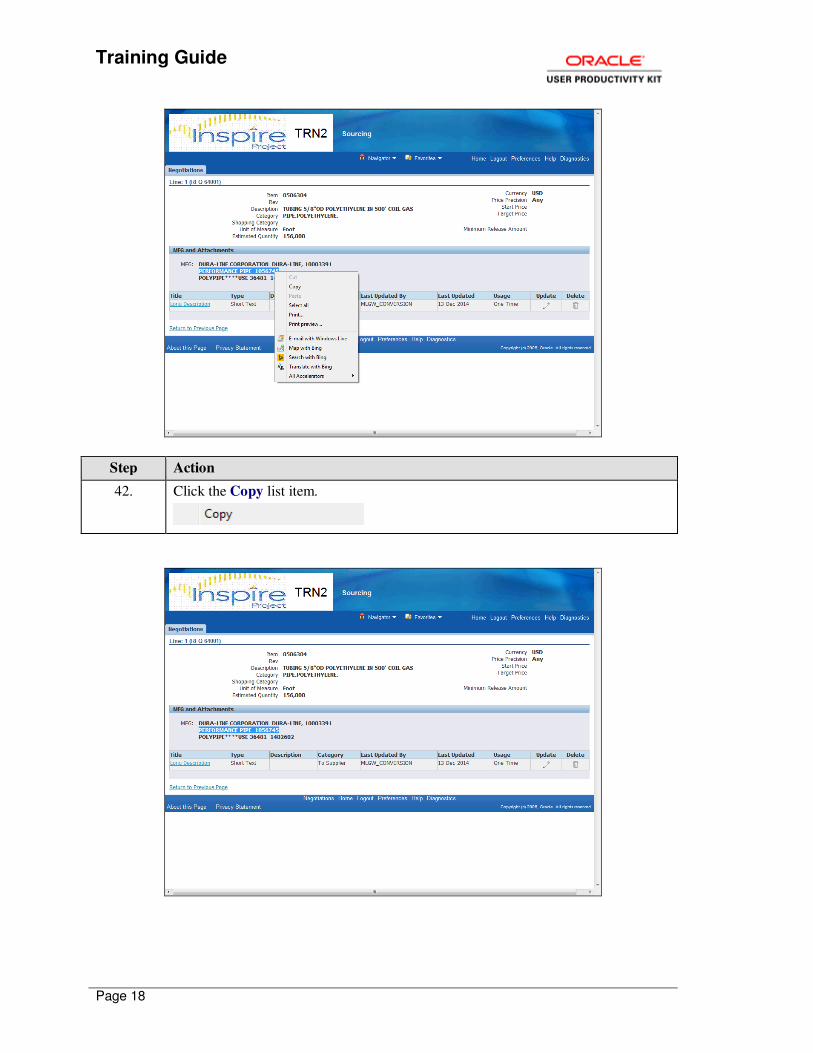
38. MLGW can only purchase products that are listed on the Approved Products List
(APL). The list is found under MFG and Attachments.
39. Highlight and copy the APL product you are quoting.
Press the left mouse button and drag the mouse to select the desired text.
For this example, press the left mouse button and drag the mouse to select
"PERFORMANCE PIPE 1056745".
40. Release the mouse button.
41. Right-click the highlighted Text.
For this example, right-click "PERFORMANCE PIPE 1056745".
Training Guide
Page 18
Step Action
42. Click the Copy list item.
Training Guide
Page 19
Step Action
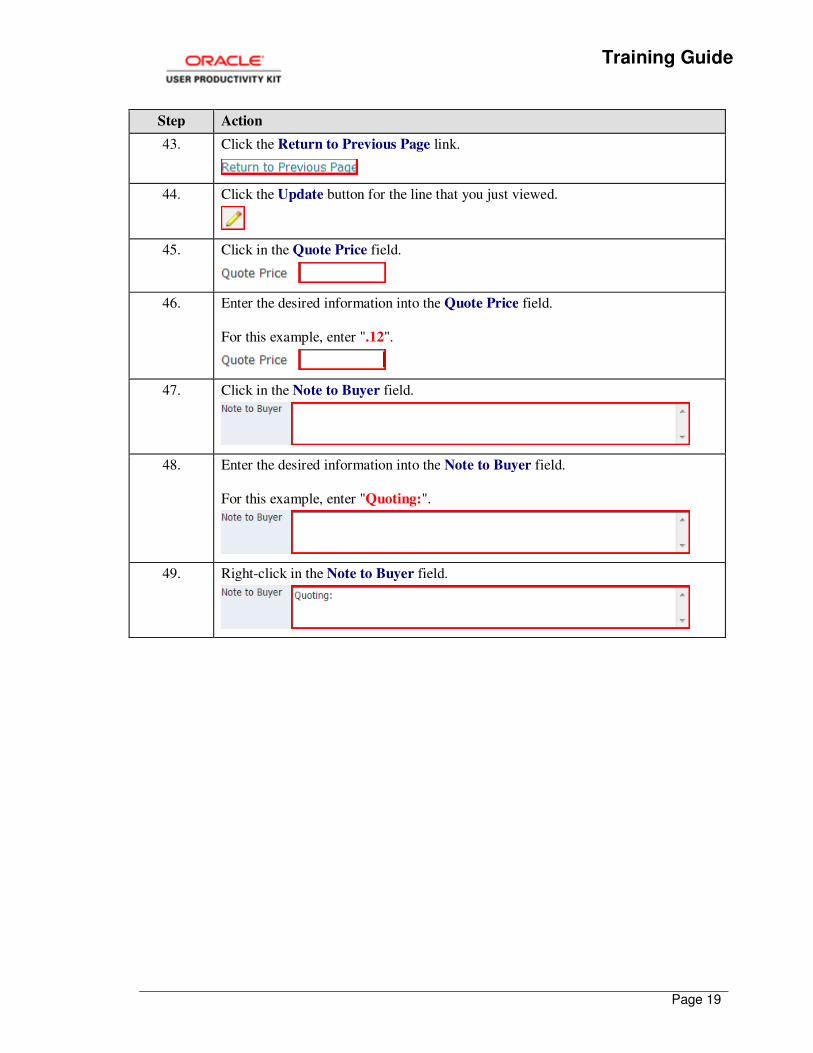
43. Click the Return to Previous Page link.
44. Click the Update button for the line that you just viewed.
45. Click in the Quote Price field.
46. Enter the desired information into the Quote Price field.
For this example, enter ".12".
47. Click in the Note to Buyer field.
48. Enter the desired information into the Note to Buyer field.
For this example, enter "Quoting:".
49. Right-click in the Note to Buyer field.
Training Guide
Page 20
Step Action
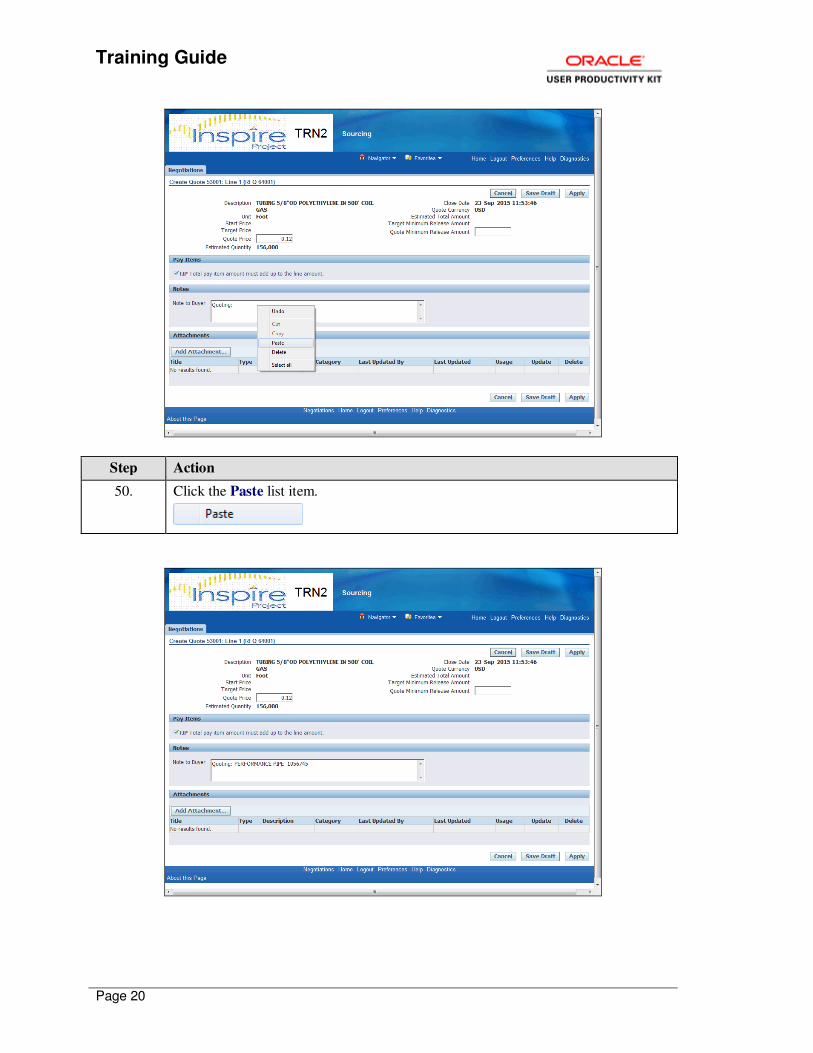
50. Click the Paste list item.
Training Guide
Page 21
Step Action
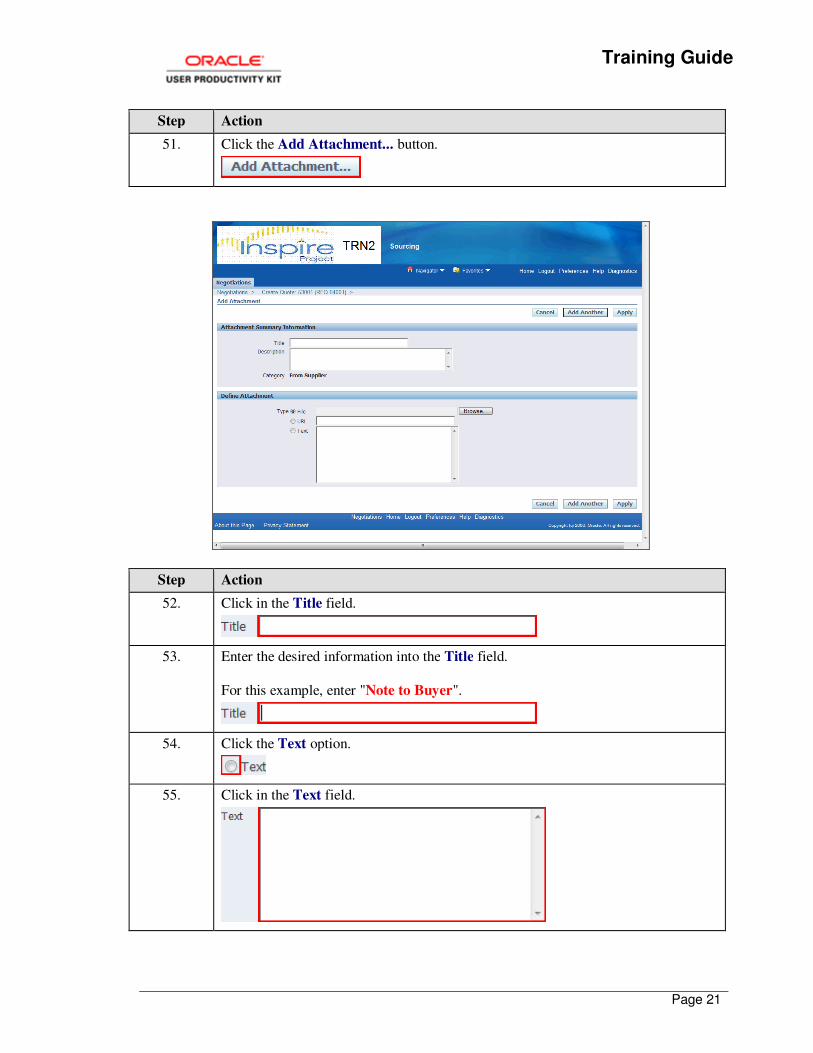
51. Click the Add Attachment... button.
Step Action
52. Click in the Title field.
53. Enter the desired information into the Title field.
For this example, enter "Note to Buyer".
54. Click the Text option.
55. Click in the Text field.
Training Guide
Page 22
Step Action
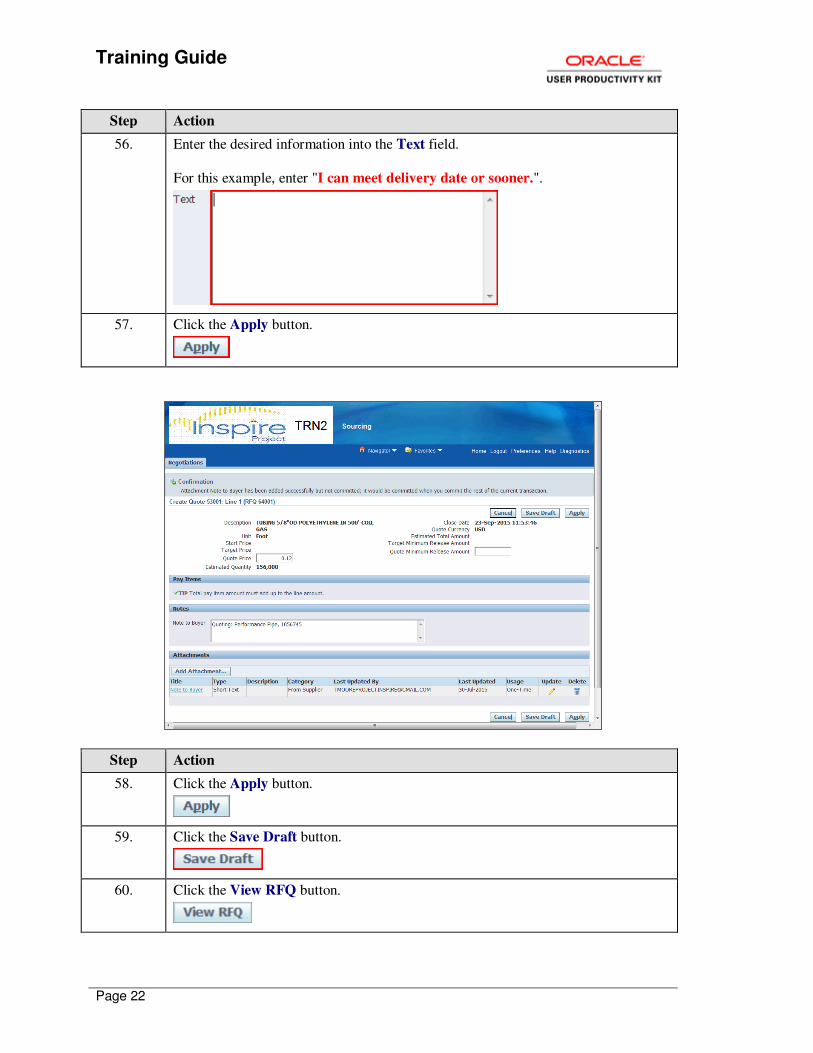
56. Enter the desired information into the Text field.
For this example, enter "I can meet delivery date or sooner.".
57. Click the Apply button.
Step Action
58. Click the Apply button.
59. Click the Save Draft button.
60. Click the View RFQ button.
Training Guide
Page 23
Step Action
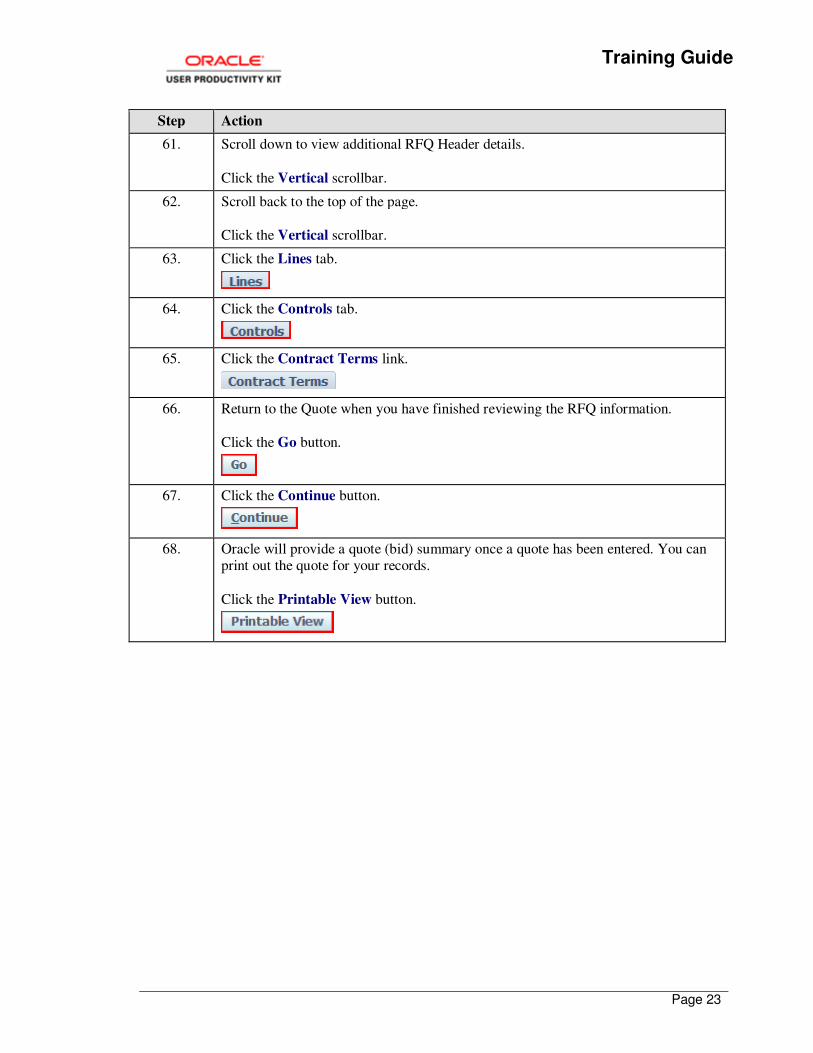
61. Scroll down to view additional RFQ Header details.
Click the Vertical scrollbar.
62. Scroll back to the top of the page.
Click the Vertical scrollbar.
63. Click the Lines tab.
64. Click the Controls tab.
65. Click the Contract Terms link.
66. Return to the Quote when you have finished reviewing the RFQ information.
Click the Go button.
67. Click the Continue button.
68. Oracle will provide a quote (bid) summary once a quote has been entered. You can print out the quote for your records.
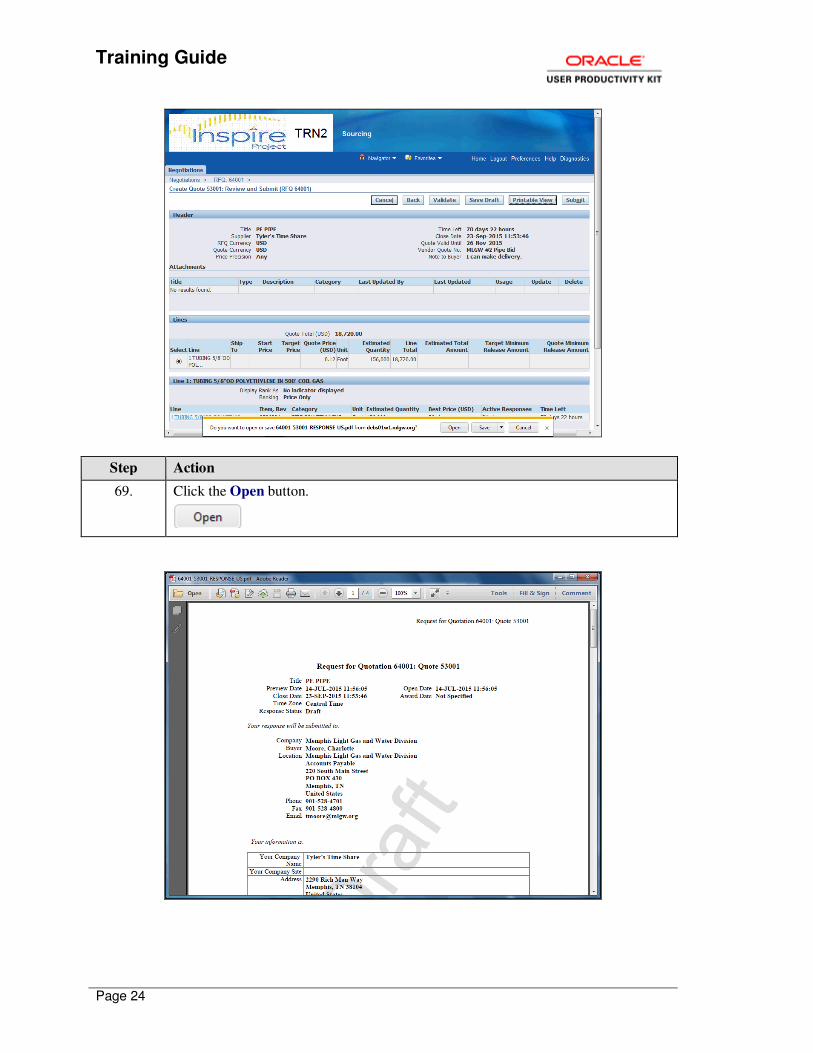
Click the Printable View button.
Training Guide
Page 24
Step Action
69. Click the Open button.
Training Guide
Page 25
Step Action
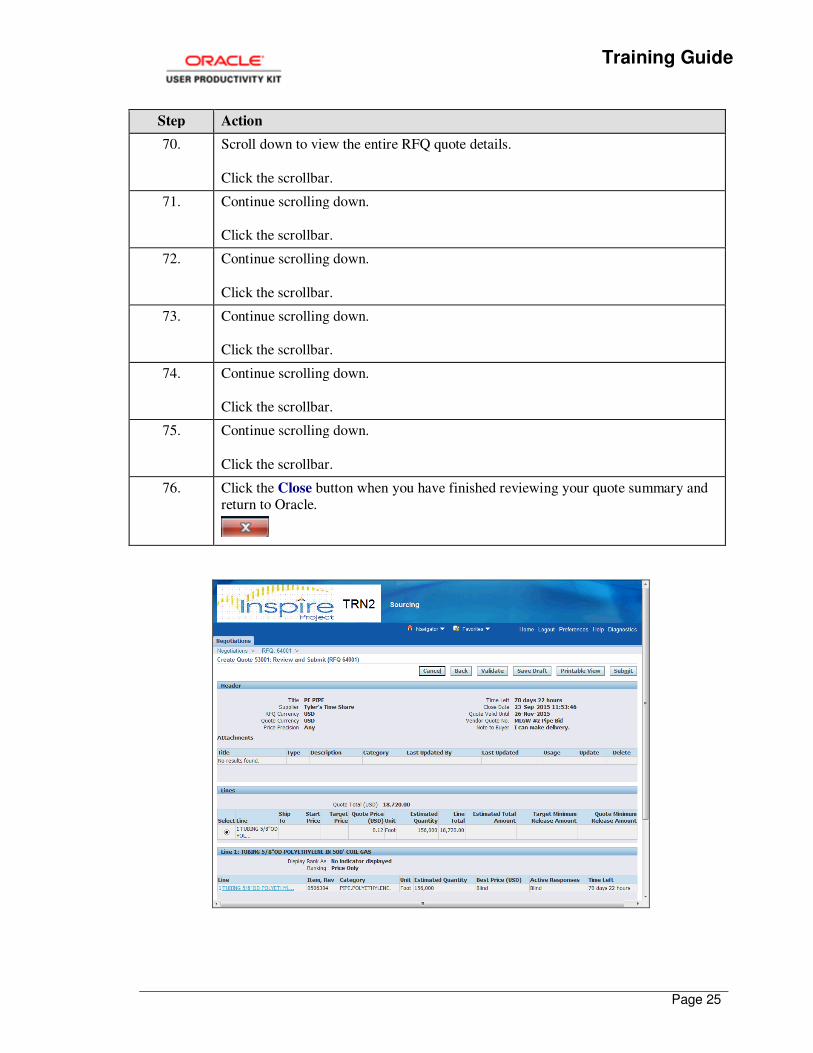
70. Scroll down to view the entire RFQ quote details.
Click the scrollbar.
71. Continue scrolling down.
Click the scrollbar.
72. Continue scrolling down.
Click the scrollbar.
73. Continue scrolling down.
Click the scrollbar.
74. Continue scrolling down.
Click the scrollbar.
75. Continue scrolling down.
Click the scrollbar.
76. Click the Close button when you have finished reviewing your quote summary and return to Oracle.
Training Guide
Page 26
Step Action
77. Click the Validate button to ensure there are no errors on your quote.
78. Click the Submit button.
79. You will receive a confirmation message stating that your quote was submitted
successfully to MLGW.
Click the Return to Sourcing Home Page link to return to the Negotiations page.
80. You have successfully completed the Viewing Request for Quotes (RFQ) topic.
For technical help, please contact the MLGW Service Desk at 901-729-8416 or by
email at [email protected].
End of Procedure.
Submitting a Change Request
Submitting a Change Request
Oracle iSupplier enables you to make changes to purchase orders that still have an "Open" status.
In this topic, you will submit a change request for a PO.
For technical help, please contact the MLGW Service Desk at 901-729-8416 or by email at [email protected].
Procedure
The purpose of this topic is to show you how to submit a change request.
In this topic, you will learn the following: 1. How to submit a change request.
SIMULATION NAVIGATION: To exit the simulation, press the Esc key. If you want to go
back a screen, click on Actions > Previous Step in the top right-hand corner of the text bubble.

Training Guide
Page 27
Step Action
1. Begin by navigating to the iSupplier Home page.
Click the iSupplier Portal Full Access link.
2. Use the iSupplier Home page to review and drill down to your notifications, purchase orders, and/or PO shipment information.

Training Guide
Page 28
Step Action
3. Click the desired PO Number link.
For this example, click "7000178".
4. Use the Standard Purchase Order page to review general PO information, drill down to order details, or make change requests.
5. Ensure "Request Change" is selected as the Action.
Click the Go button.
6. Scroll down to view the PO Details section.
Click the Vertical scrollbar.
7. Double-click the current value in the Price field.
8. Press [Backspace].
9. Enter the desired information into the Price field.
For this example, enter "55".
10. Scroll to the right to view additional PO details.
Click the Horizontal scrollbar.
Training Guide
Page 29
Step Action
11. Click in the Reason field.
12. Enter the desired information into the Reason field.
For this example, enter "Quoted wrong price".
13. Click the Submit button.
14. Click the Return to Purchase Order Summary link.
15. Use the Purchase Orders page to view, manage, and/or drill down to purchase
order details.
16. Click the PO Number link that you just made changes to.
For this example, click "7000178".
17. Scroll down to view the PO Details section.
Click the Vertical scrollbar.
18. Click the Expand button to show additional PO line details.
19. Scroll down to view additional PO Details.
Click the Vertical scrollbar.
20. The changes you made are indicated with the green star.
21. Click the Return to Orders: Purchase Orders link to return to the Purchase Orders page.
22. You have successfully completed the Submitting a Change Request topic.
For technical help, please contact the MLGW Service Desk at 901-729-8416 or by
email at [email protected].
End of Procedure.
Viewing Invoice and Payment Information
Training Guide
Page 30
Viewing Invoice and Payment Information
Invoice and payment information...
Upon completion of this lesson, you will be able to:
• View payment information
Submitting Invoices
Submitting Invoices
Oracle iSupplier enables you to submit invoices for a PO or multiple POs. Use the Finance tab to create invoices or review previous invoices and payment information.
In this topic, you will submit an invoice for a PO.
For technical help, please contact the MLGW Service Desk at 901-729-8416 or by email at [email protected].
Procedure
There are two separate processes to pay invoices:
1. The Contract Department requires all invoices be submitted to the end users managing the
contract for payment.
2. The Purchasing Department utilizes the iSupplier Portal to pay invoices.
The purpose of this topic is to show you how to submit invoices using the iSupplier Portal.
In this topic, you will learn the following: 1. How to submit invoices.
SIMULATION NAVIGATION: To exit the simulation, press the Esc key. If you want to go
back a screen, click on Actions > Previous Step in the top right-hand corner of the text bubble.

Training Guide
Page 31
Step Action
1. Begin by navigating to the iSupplier Home page.
Click the iSupplier Portal Full Access link.
2. Use the iSupplier Home page to review and drill down to your notifications, purchase orders, and/or PO shipment information.
Training Guide
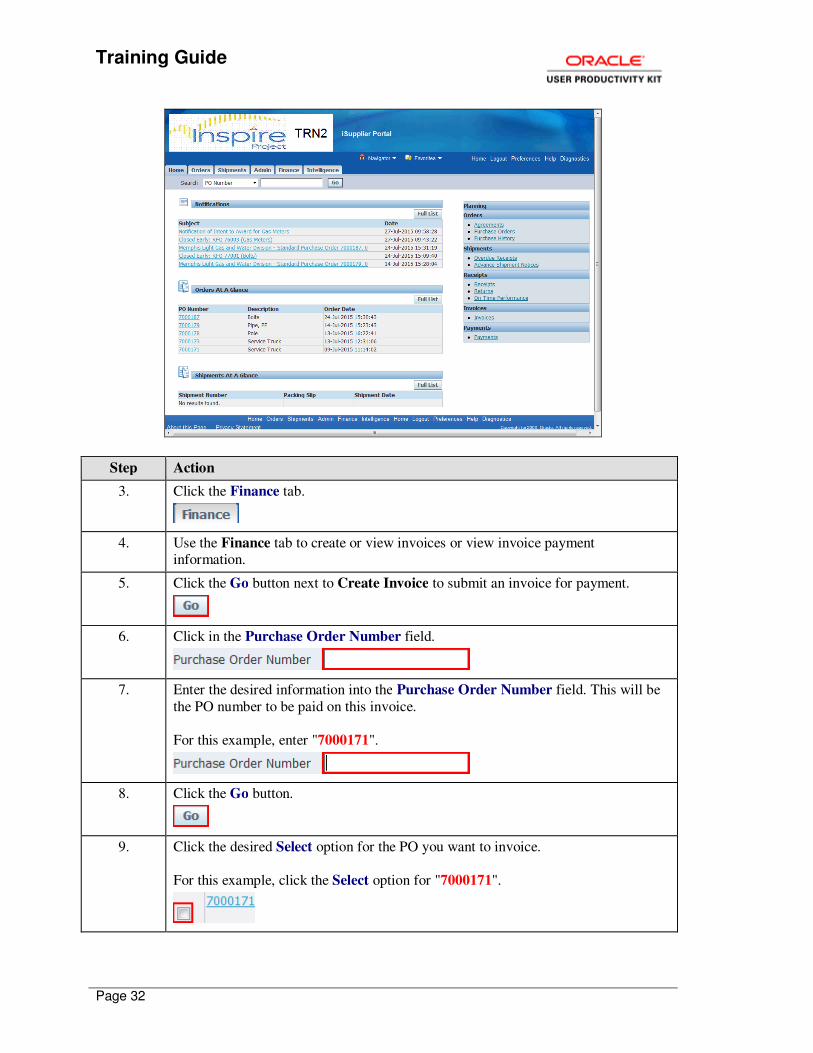
Page 32
Step Action
3. Click the Finance tab.
4. Use the Finance tab to create or view invoices or view invoice payment information.
5. Click the Go button next to Create Invoice to submit an invoice for payment.
6. Click in the Purchase Order Number field.
7. Enter the desired information into the Purchase Order Number field. This will be
the PO number to be paid on this invoice.
For this example, enter "7000171".
8. Click the Go button.
9. Click the desired Select option for the PO you want to invoice.
For this example, click the Select option for "7000171".
Training Guide
Page 33
Step Action
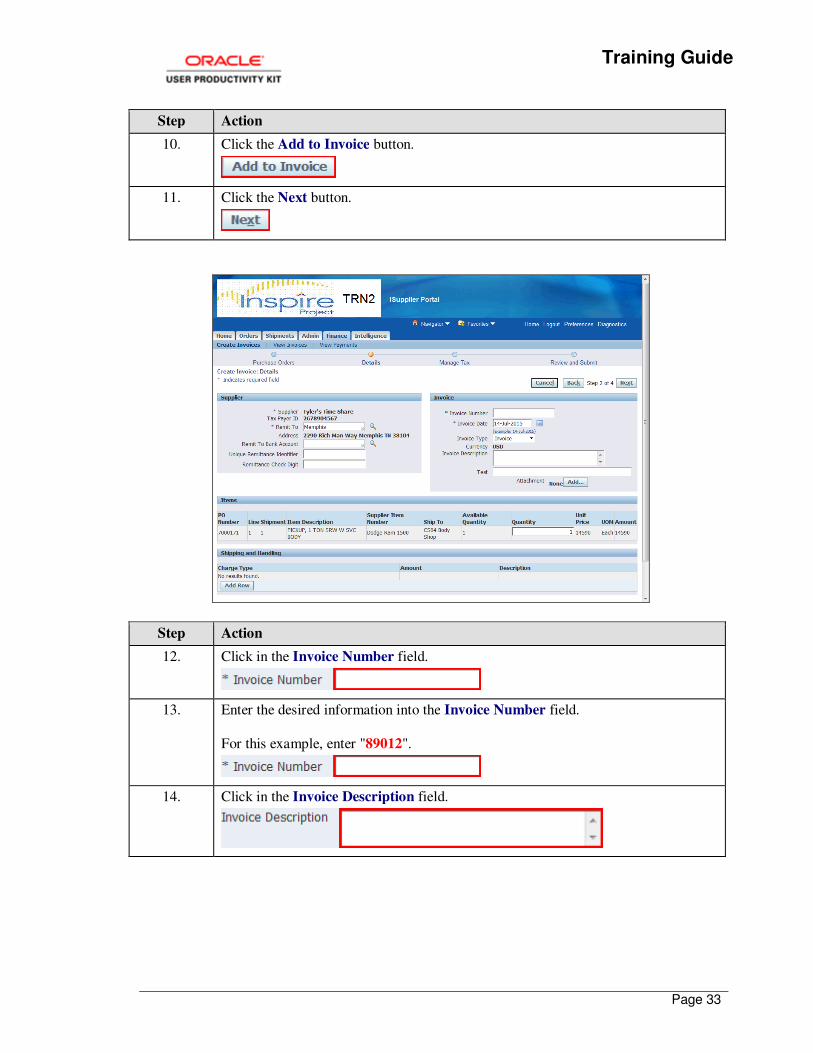
10. Click the Add to Invoice button.
11. Click the Next button.
Step Action
12. Click in the Invoice Number field.
13. Enter the desired information into the Invoice Number field.
For this example, enter "89012".
14. Click in the Invoice Description field.
Training Guide
Page 34
Step Action
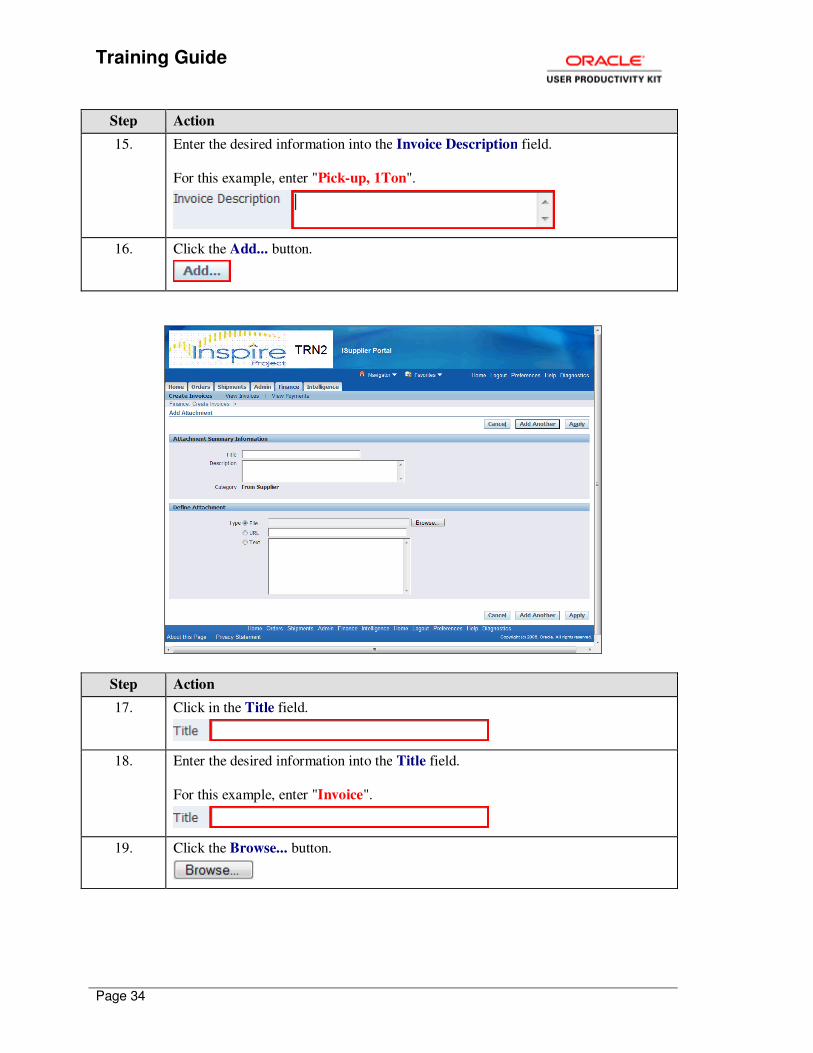
15. Enter the desired information into the Invoice Description field.
For this example, enter "Pick-up, 1Ton".
16. Click the Add... button.
Step Action
17. Click in the Title field.
18. Enter the desired information into the Title field.
For this example, enter "Invoice".
19. Click the Browse... button.
Training Guide
Page 35
Step Action
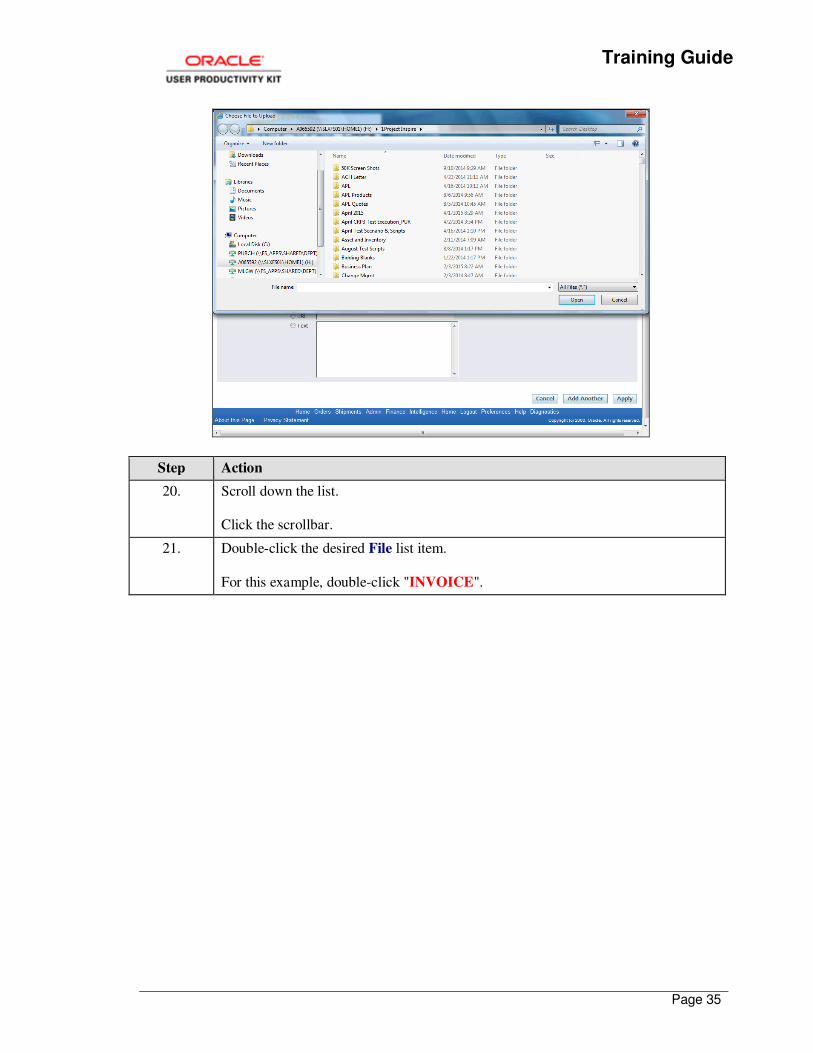
20. Scroll down the list.
Click the scrollbar.
21. Double-click the desired File list item.
For this example, double-click "INVOICE".
Training Guide
Page 36
Step Action
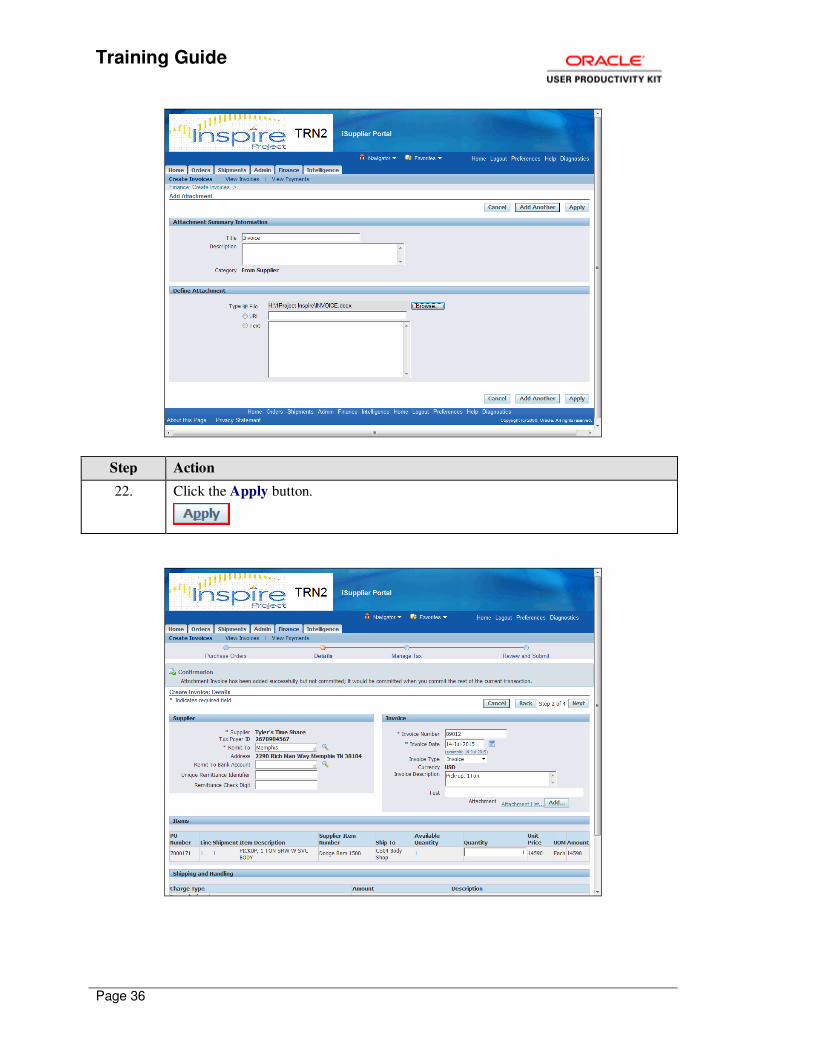
22. Click the Apply button.
Training Guide
Page 37
Step Action
23. Scroll down to view additional the invoice details.
Click the scrollbar.
24. Click the Next button.
Step Action
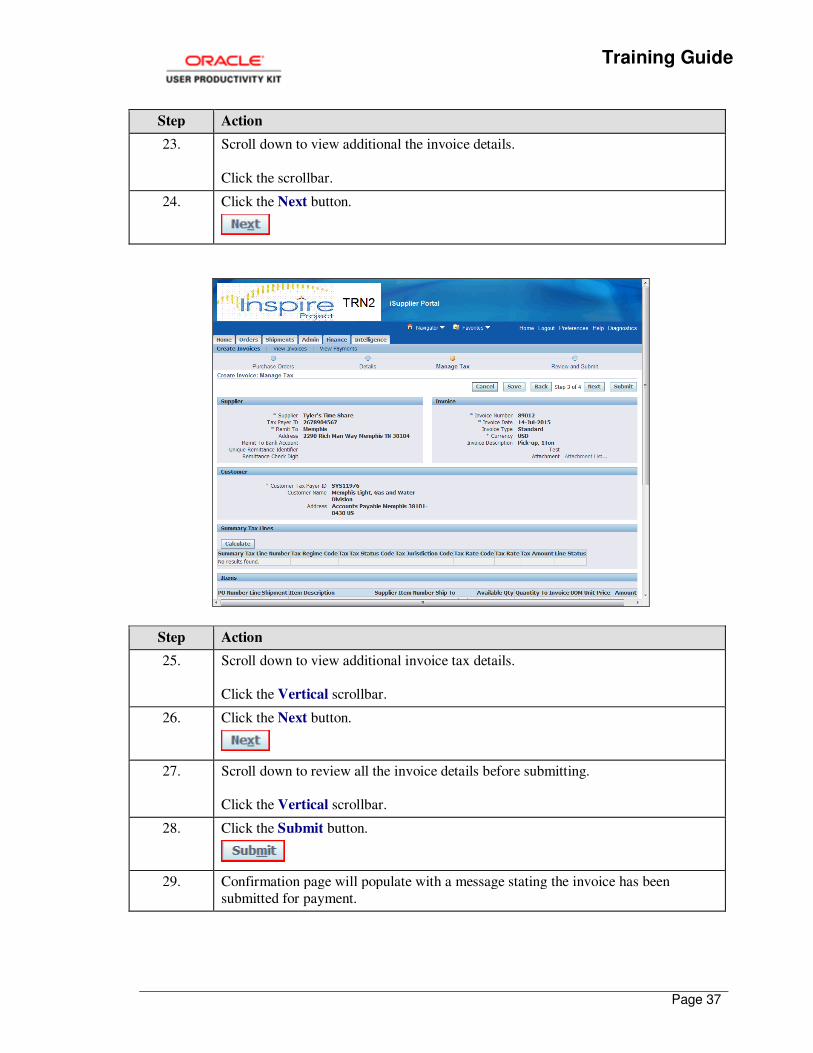
25. Scroll down to view additional invoice tax details.
Click the Vertical scrollbar.
26. Click the Next button.
27. Scroll down to review all the invoice details before submitting.
Click the Vertical scrollbar.
28. Click the Submit button.
29. Confirmation page will populate with a message stating the invoice has been
submitted for payment.
Training Guide
Page 38
Step Action
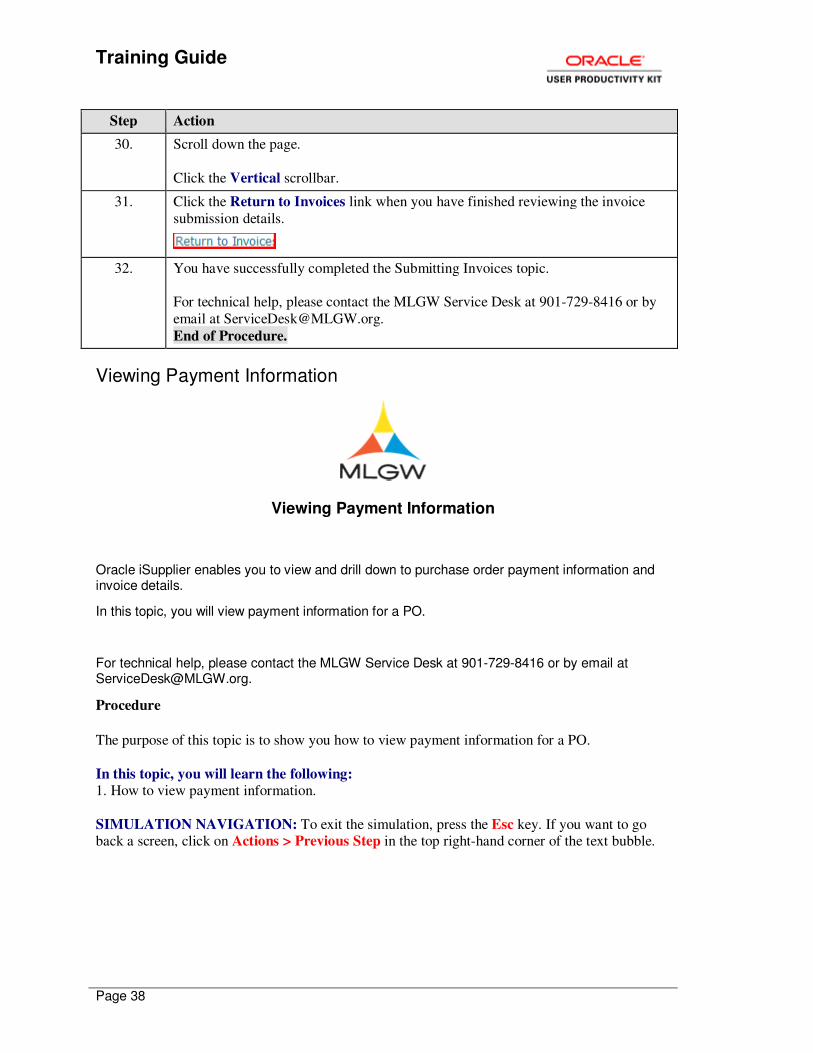
30. Scroll down the page.
Click the Vertical scrollbar.
31. Click the Return to Invoices link when you have finished reviewing the invoice
submission details.
32. You have successfully completed the Submitting Invoices topic.
For technical help, please contact the MLGW Service Desk at 901-729-8416 or by
email at [email protected].
End of Procedure.
Viewing Payment Information
Viewing Payment Information
Oracle iSupplier enables you to view and drill down to purchase order payment information and invoice details.
In this topic, you will view payment information for a PO.
For technical help, please contact the MLGW Service Desk at 901-729-8416 or by email at [email protected].
Procedure
The purpose of this topic is to show you how to view payment information for a PO.
In this topic, you will learn the following: 1. How to view payment information.
SIMULATION NAVIGATION: To exit the simulation, press the Esc key. If you want to go back a screen, click on Actions > Previous Step in the top right-hand corner of the text bubble.

Training Guide
Page 39
Step Action
1. Begin by navigating to the iSupplier Home page.
Click the iSupplier Portal Full Access link.
2. Use the iSupplier Home page to review and drill down to your notifcations, purchase orders, and/or PO shipment information.
Training Guide
Page 40
Step Action
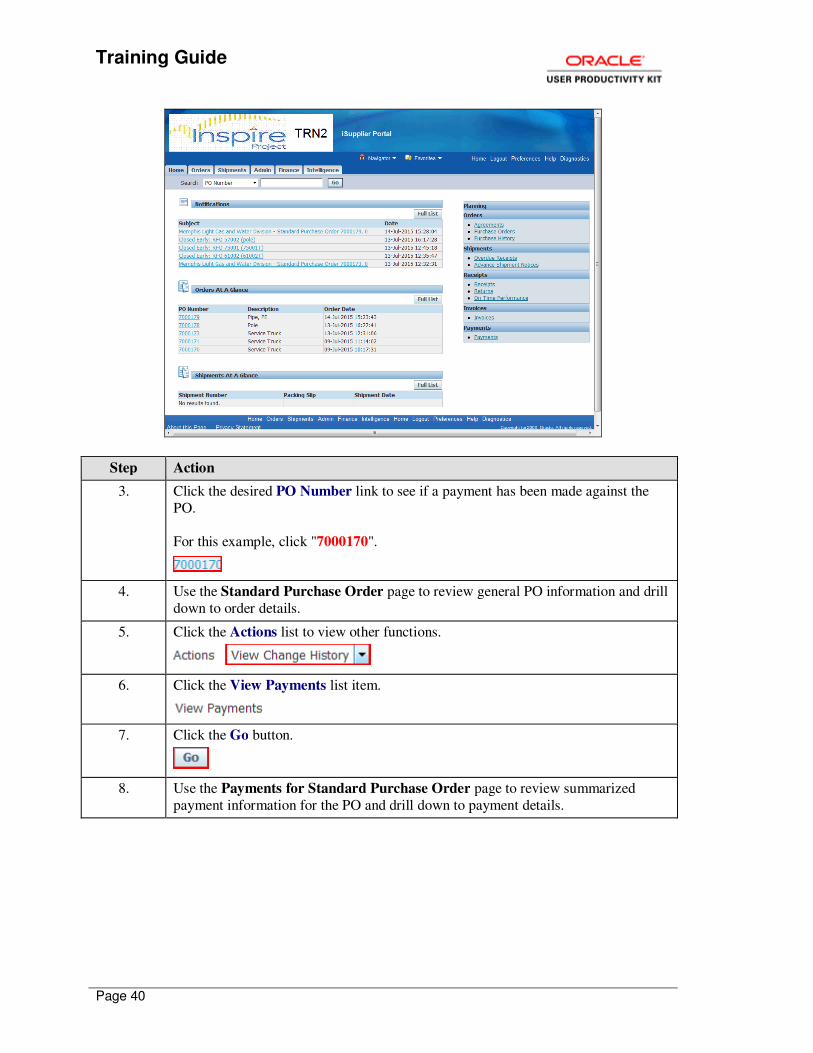
3. Click the desired PO Number link to see if a payment has been made against the
PO.
For this example, click "7000170".
4. Use the Standard Purchase Order page to review general PO information and drill
down to order details.
5. Click the Actions list to view other functions.
6. Click the View Payments list item.
7. Click the Go button.
8. Use the Payments for Standard Purchase Order page to review summarized
payment information for the PO and drill down to payment details.

Training Guide
Page 41
Step Action
9. Click the desired Payment link. This is the payment number, i.e. check number.
For this example, click "100063".
10. Use the Payment page to review the payment details for the PO and/or drill down to invoice or PO details corresponding to the payment.
11. Click the desired Invoice link. This is the invoice number from the supplier to
MLGW.
For this example, click "29000".
12. Use the Standard Invoice page to review the invoice information corresponding to
the payment.
13. The Invoice Lines tab provides the description, quantity, price, PO number, line number, PO shipment number, buyer, and the receipt number.
14. Click the Scheduled Payments tab.
15. The Scheduled Payments tab provides the invoice due date, amount due, remaining balance, payment status, and method of payment.
16. Click the Hold Reasons tab.
Training Guide
Page 42
Step Action
17. If MLGW placed a hold on a PO, the reason would be stated under the Hold
Reasons tab.
18. Click the Return to Payment Details link to return to the Payment page.
19. Click the Return to View Payments link to return to the Payments for Standard Purchase Order page.
20. Click the Return to View Order Details link to return to the Standard Purchase Order page.
21. You have successfully completed the Viewing Payment Information topic.
For technical help, please contact the MLGW Service Desk at 901-729-8416 or by
email at [email protected].
End of Procedure.
Managing Supplier Profile Management
Managing Supplier Profile Management
Supplier profile management...
Upon completion of this lesson, you will be able to:
• Manage address book
Managing Address Book
Managing Address Book
Training Guide
Page 43
Use the iSupplier Portal to view, add, or update supplier business profile information such as address book, contacts, company classifications, etc.
In this topic, you will manage/update the address book.
For technical help, please contact the MLGW Service Desk at 901-729-8416 or by email at [email protected].
Procedure
The purpose of this topic is to show you how to manage address books.
In this topic, you will learn the following: 1. How to manage address books.
SIMULATION NAVIGATION: To exit the simulation, press the Esc key. If you want to go
back a screen, click on Actions > Previous Step in the top right-hand corner of the text bubble.
Step Action
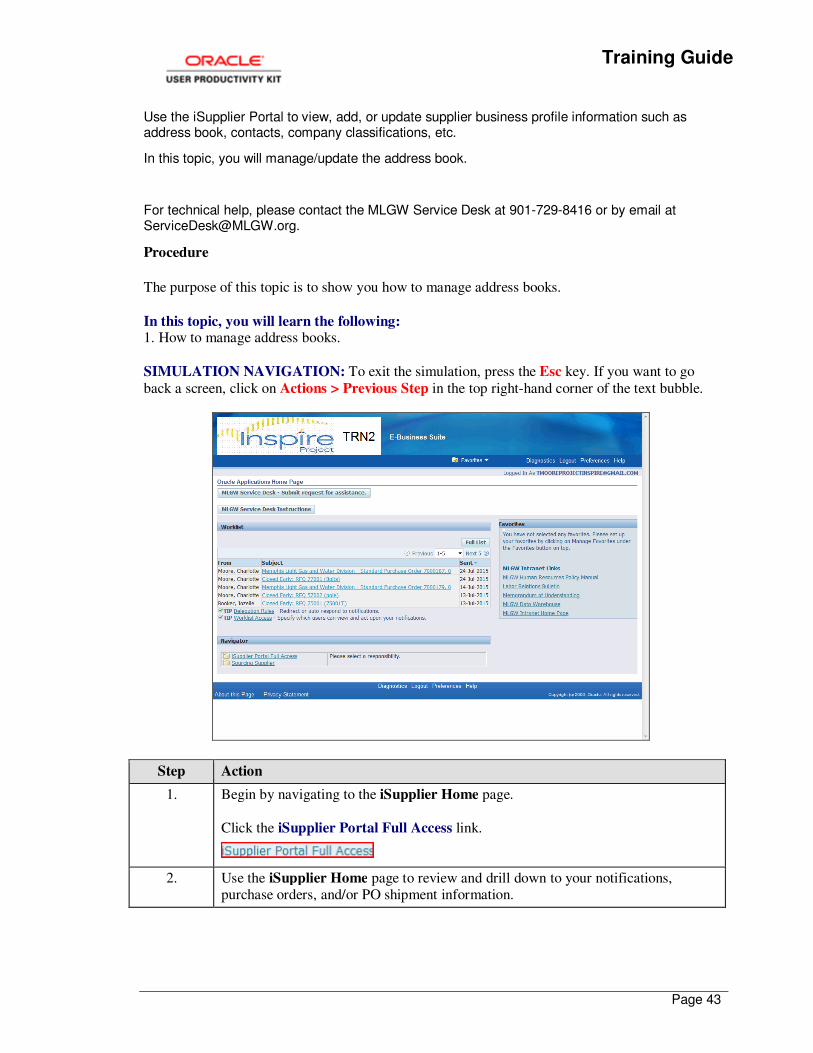
1. Begin by navigating to the iSupplier Home page.
Click the iSupplier Portal Full Access link.
2. Use the iSupplier Home page to review and drill down to your notifications, purchase orders, and/or PO shipment information.
Training Guide
Page 44
Step Action
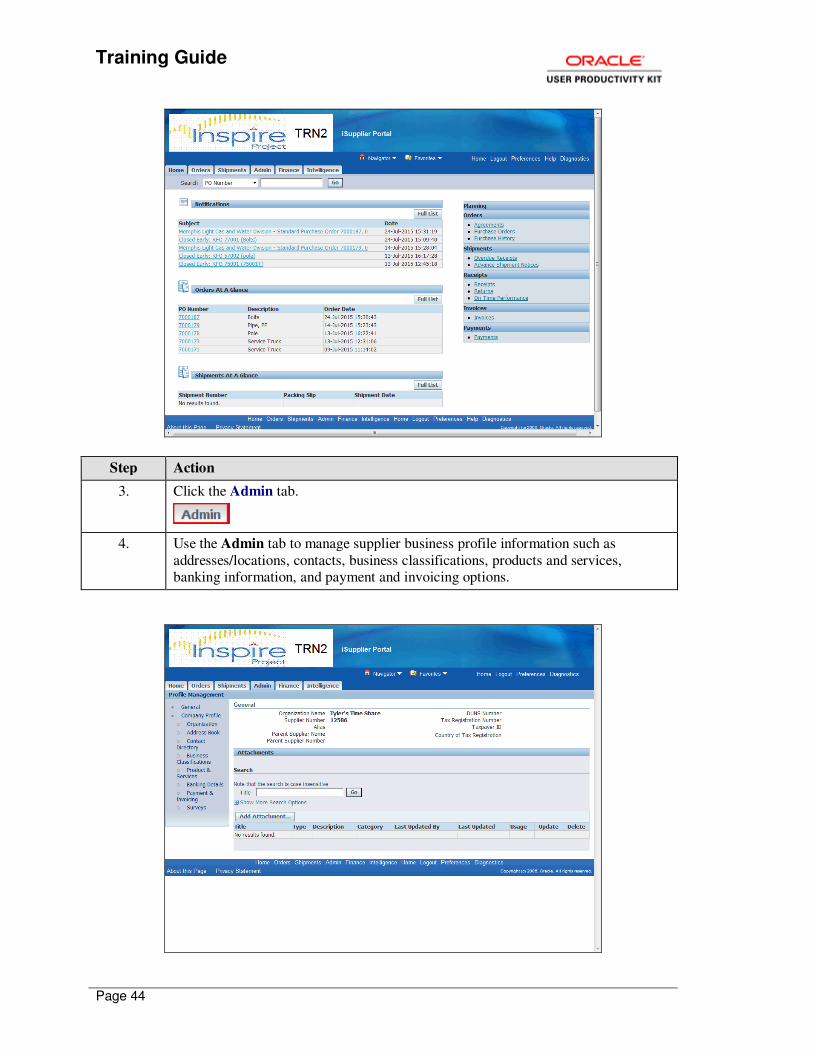
3. Click the Admin tab.
4. Use the Admin tab to manage supplier business profile information such as
addresses/locations, contacts, business classifications, products and services, banking information, and payment and invoicing options.
Training Guide
Page 45
Step Action
5. Click the Organization link.
6. Use the Organization page to define general supplier organization information.
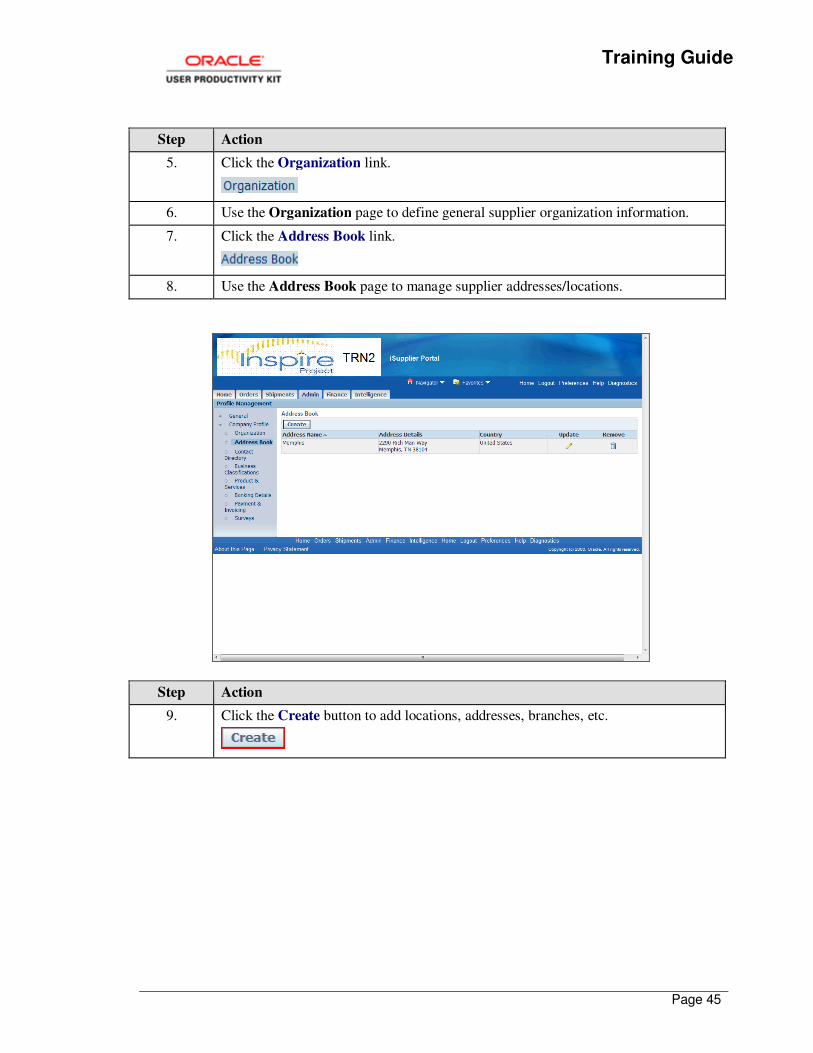
7. Click the Address Book link.
8. Use the Address Book page to manage supplier addresses/locations.
Step Action
9. Click the Create button to add locations, addresses, branches, etc.
Training Guide
Page 46
Step Action
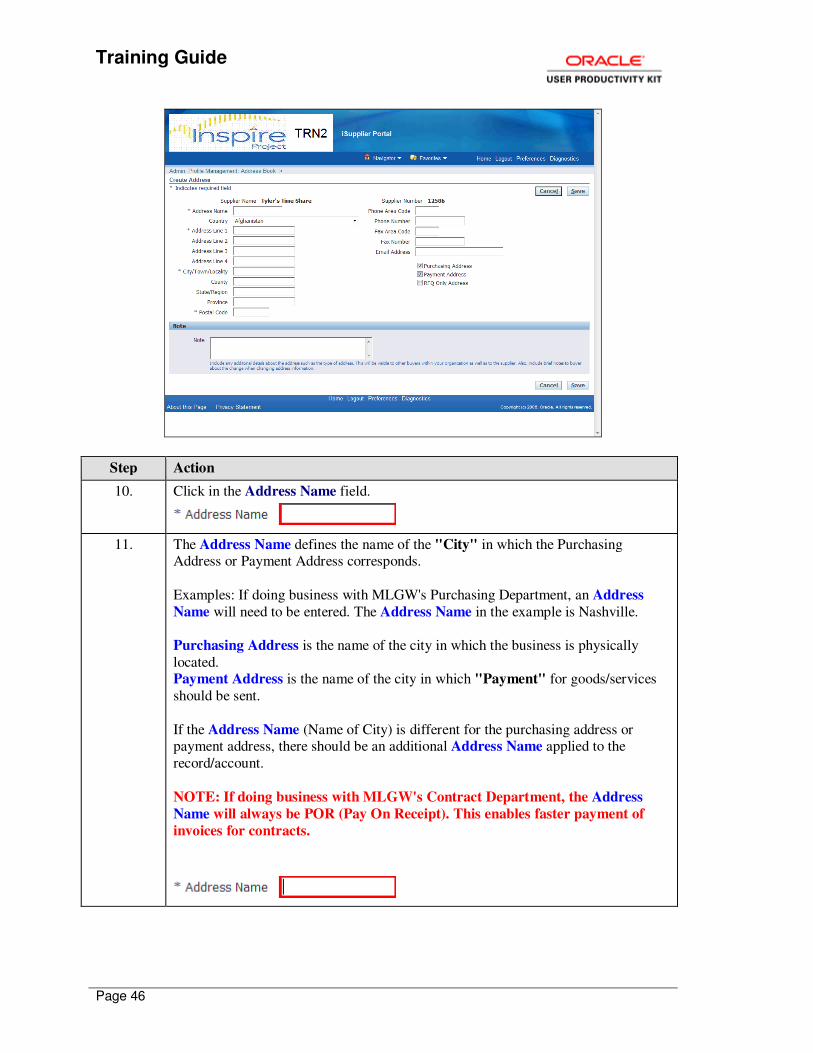
10. Click in the Address Name field.
11. The Address Name defines the name of the "City" in which the Purchasing Address or Payment Address corresponds.
Examples: If doing business with MLGW's Purchasing Department, an Address
Name will need to be entered. The Address Name in the example is Nashville.
Purchasing Address is the name of the city in which the business is physically
located. Payment Address is the name of the city in which "Payment" for goods/services
should be sent.
If the Address Name (Name of City) is different for the purchasing address or payment address, there should be an additional Address Name applied to the
record/account.
NOTE: If doing business with MLGW's Contract Department, the Address
Name will always be POR (Pay On Receipt). This enables faster payment of
invoices for contracts.
Training Guide
Page 47
Step Action
12. Click the Country list.
13. Scroll down the list.
Click the scrollbar.
14. Click the desired Country list item.
For this example, click "United States".
15. Click in the Address Line 1 field.
16. Enter the desired information into the Address Line 1 field.
For this example, enter "6785 Royalty Way".
17. Click in the City/Town/Locality field.
18. Enter the desired information into the City/Town/Locality field.
For this example, enter "Nashville".
19. Click in the Postal Code field.
20. Enter the desired information into the Postal Code field.
For this example, enter "37865".
21. You can enter additional address information, phone numbers, and/or fax numbers if
desired.
Click the Save button.
22. Click the Contact Directory link.
23. Use the Contact Directory page to view and update existing supplier contact
information or create a new supplier contact.
Training Guide
Page 48
Step Action
24. Click the Create button to add a contact person.
25. All of the fields can be completed if desired.
Click in the First Name field.
26. Enter the desired information into the First Name field.
For this example, enter "Cole".
27. Click in the Last Name field.
28. Enter the desired information into the Last Name field.
For this example, enter "Moore".
29. Click in the Contact Email field.
30. Enter the desired information into the Contact Email field.
For this example, enter "[email protected]".
31. Click the Save button.
32. Click the Business Classifications link.
33. Use the Business Classification page to define any applicable business classifications for the supplier. You should complete all certifications that apply.
Training Guide
Page 49
Step Action
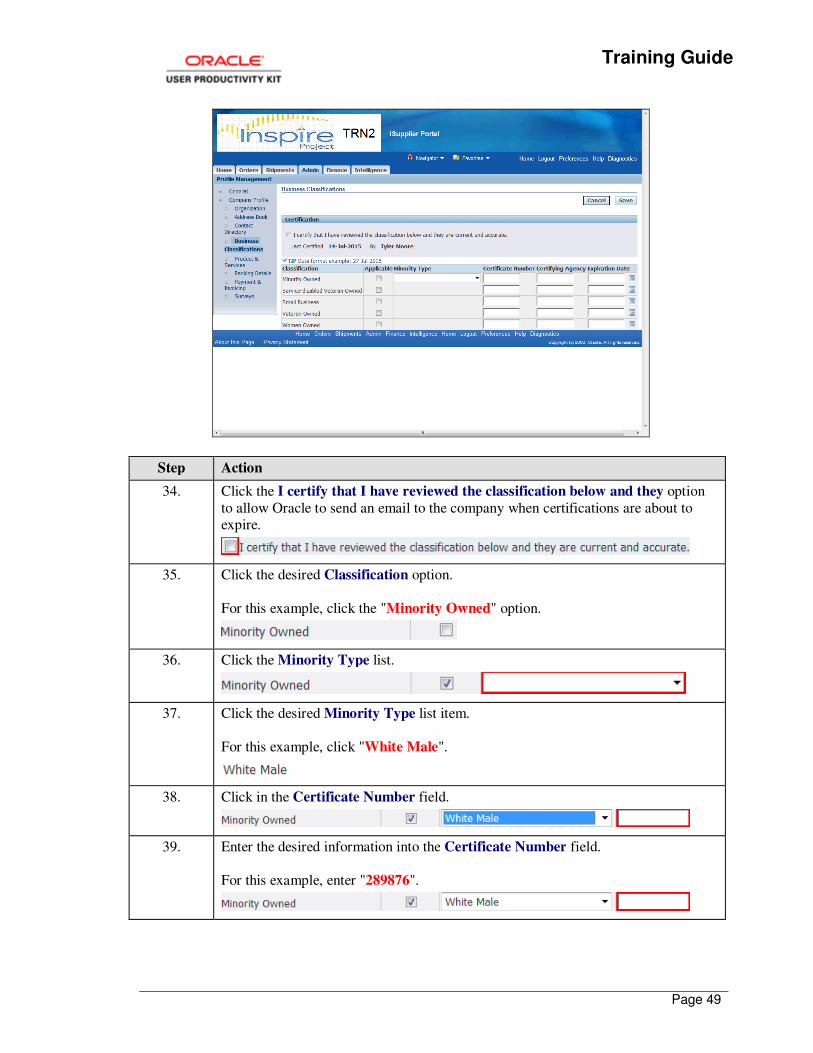
34. Click the I certify that I have reviewed the classification below and they option
to allow Oracle to send an email to the company when certifications are about to expire.
35. Click the desired Classification option.
For this example, click the "Minority Owned" option.
36. Click the Minority Type list.
37. Click the desired Minority Type list item.
For this example, click "White Male".
38. Click in the Certificate Number field.
39. Enter the desired information into the Certificate Number field.
For this example, enter "289876".
Training Guide
Page 50
Step Action
40. Tab to the Certifying Agency field.
Press [Tab].
41. Enter the desired information into the Certifying Agency field.
For this example, enter "mmbc".
42. Tab to the Expiration Date field.
Press [Tab].
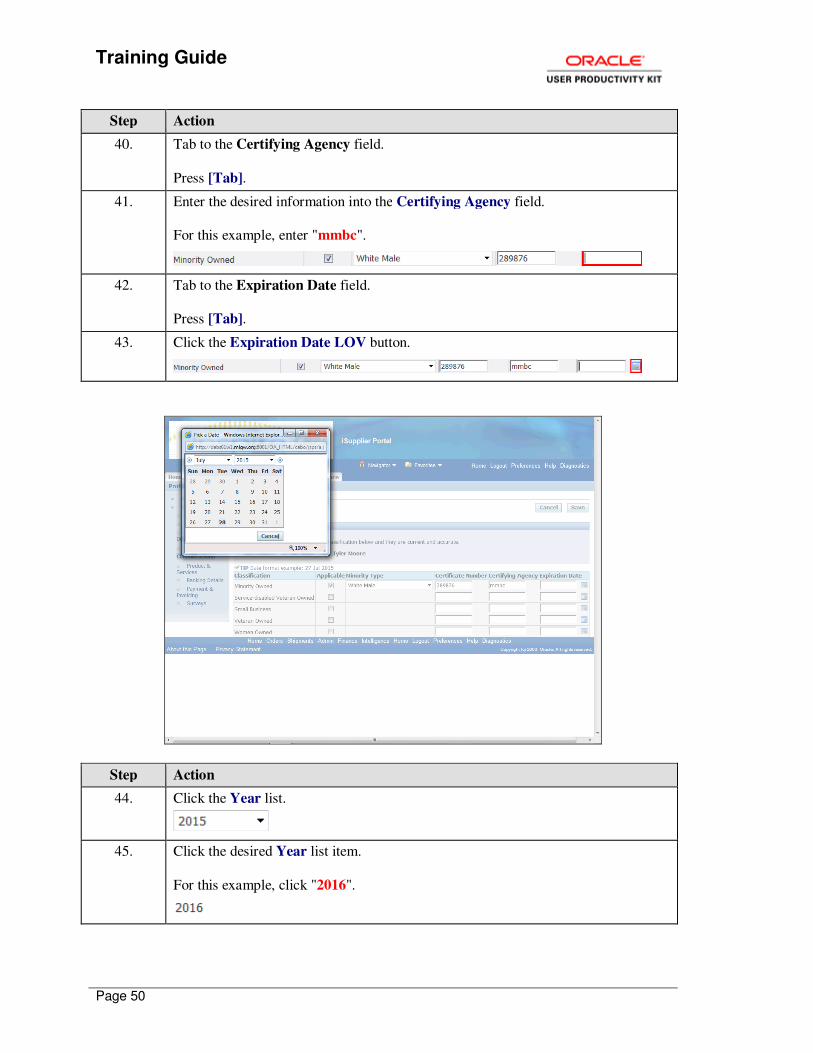
43. Click the Expiration Date LOV button.
Step Action
44. Click the Year list.
45. Click the desired Year list item.
For this example, click "2016".
Training Guide
Page 51
Step Action
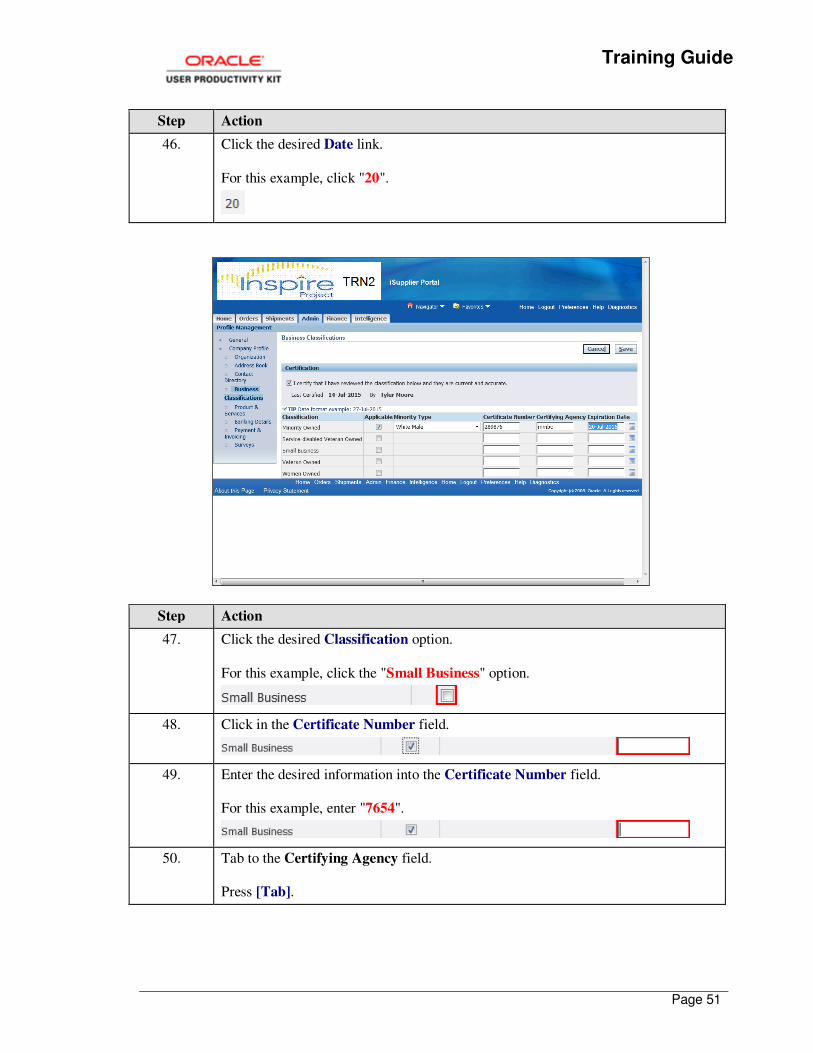
46. Click the desired Date link.
For this example, click "20".
Step Action
47. Click the desired Classification option.
For this example, click the "Small Business" option.
48. Click in the Certificate Number field.
49. Enter the desired information into the Certificate Number field.
For this example, enter "7654".
50. Tab to the Certifying Agency field.
Press [Tab].
Training Guide
Page 52
Step Action
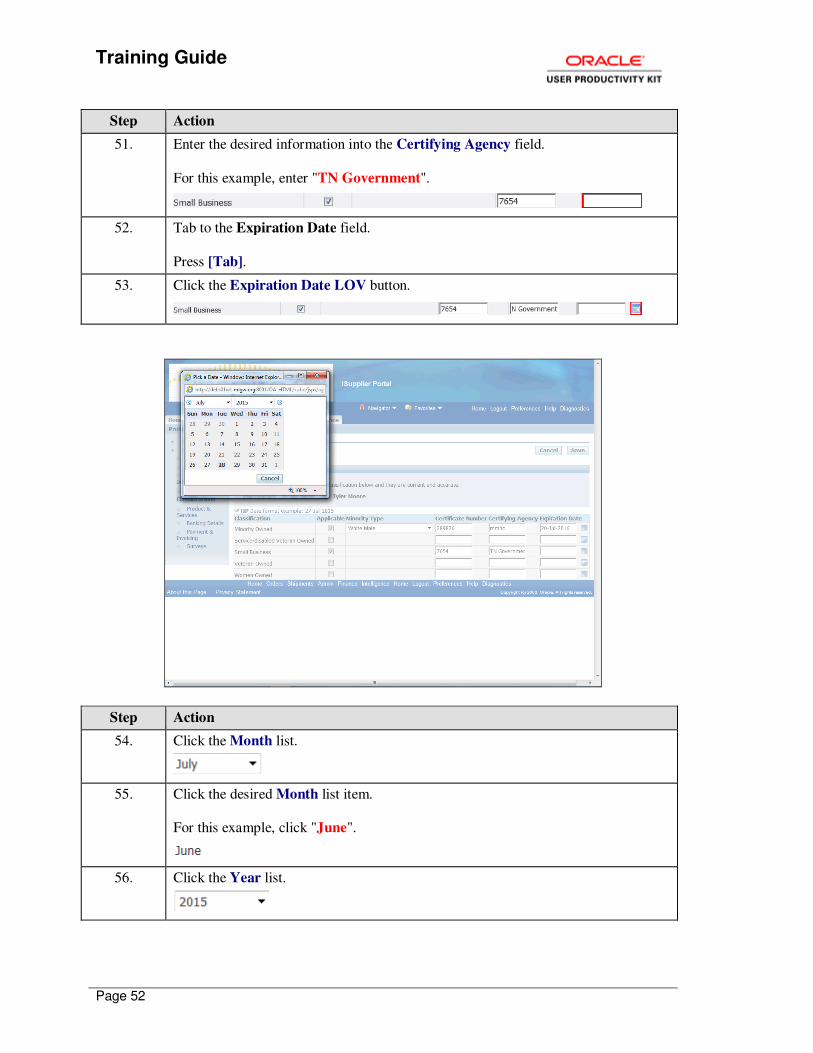
51. Enter the desired information into the Certifying Agency field.
For this example, enter "TN Government".
52. Tab to the Expiration Date field.
Press [Tab].
53. Click the Expiration Date LOV button.
Step Action
54. Click the Month list.
55. Click the desired Month list item.
For this example, click "June".
56. Click the Year list.
Training Guide
Page 53
Step Action
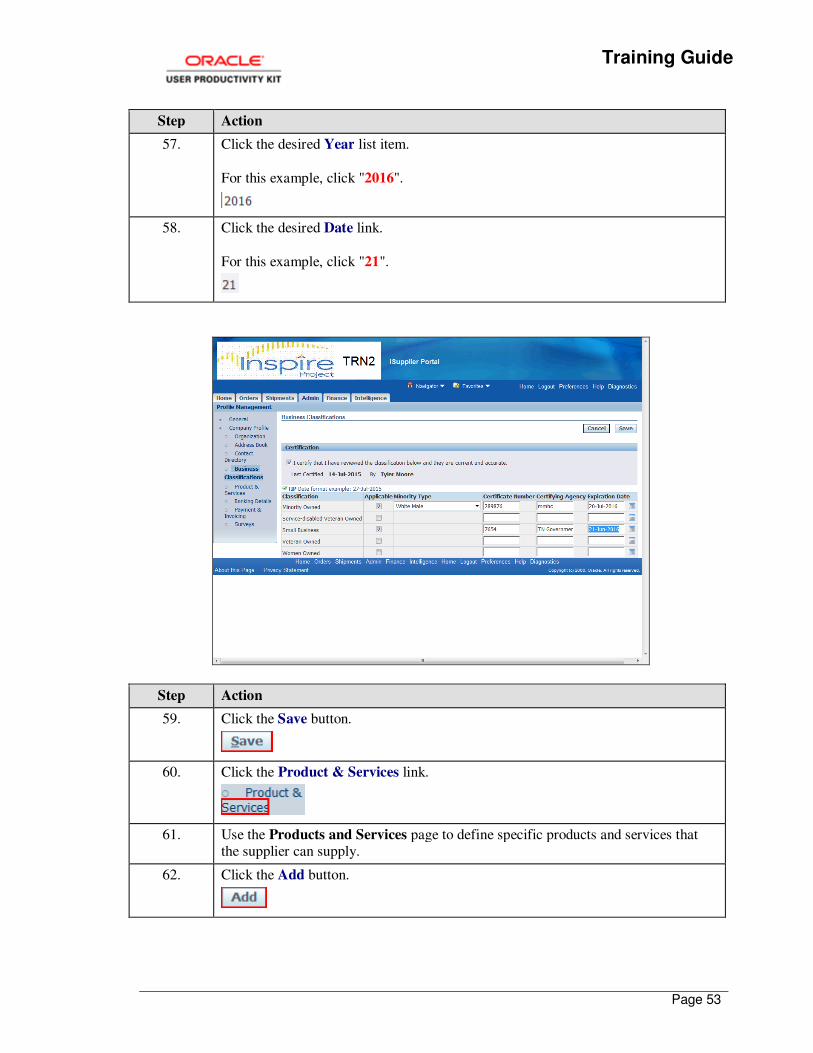
57. Click the desired Year list item.
For this example, click "2016".
58. Click the desired Date link.
For this example, click "21".
Step Action
59. Click the Save button.
60. Click the Product & Services link.
61. Use the Products and Services page to define specific products and services that the supplier can supply.
62. Click the Add button.
Training Guide
Page 54
Step Action
63. You can search through the available product and services by using the navigation
links or you can use the search option to narrow your results.
64. Select the desired product and/or service option(s) and then click Apply to link them
to the supplier. For this training, you are not going to apply any products or services.
Click the Cancel button.
65. Click the Banking Details link.
66. Use the Banking Details page to define bank account information for the supplier.
67. Click the Create button.
68. The Create Bank Account page is where you, the supplier, will enter the banking
information. MLGW will demonstrate as far as it can, however, we don't have a
bank account number to use for this example. This is a real process and you can't enter erroneous accounts. You will not see any entry in the "Bank Account" section
of this page.
69. Click the Country list.
70. Click the More... list item.
Training Guide
Page 55
Step Action
71. Click the Go button to view all available countries to choose from.
72. Alternatively, you can narrow the results for the country by entering search criteria.
Click in the Search By field.
73. Enter the desired information into the Search By field.
For this example, enter "united".
74. Click the Go button.
75. Click the desired Quick Select button for the country you want to select.
For this example, click the Quick Select button for "United States".
Training Guide
Page 56
Step Action
76. Click the Existing Bank option.
77. Click in the Bank Name field.
78. Enter the desired information into the Bank Name field.
For this example, enter "first tenn".
79. The auto-complete feature will lookup the value as you type in the Bank Name
field. You may select the bank name from the list or Tab out of the field if their is
only one value to available.
Press [Tab].
80. Click the Existing Branch option.
81. Click in the Branch Name field.
82. Click the Search for Branch Name button.
Training Guide
Page 57
Step Action
83. Click the Go button to view all of the locations provided by "First Tennessee Bank".
84. Click the desired Quick Select button for the location of your bank.
For this example, click the Quick Select button for "Downtown".
85. The Bank Account section is where the supplier will enter their bank account information.
Training Guide
Page 58
Step Action
86. Scroll down the page.
Click the Vertical scrollbar.
87. Click the Expand button for "Show Account Details".
88. Once you have filled out the banking details, you should click Save to save the page. For this training, you are not going to save the changes.
Click the Cancel button.
89. Click the Payment & Invoicing link.
90. Use the Payment Details page to define and manage supplier payment and
invoicing information and default options for each address.
91. You have successfully completed the Managing Address Book topic.
For technical help, please contact the MLGW Service Desk at 901-729-8416 or by
email at [email protected].
End of Procedure.
Creating an Address Site
Procedure
Training Guide
Page 59
Step Action
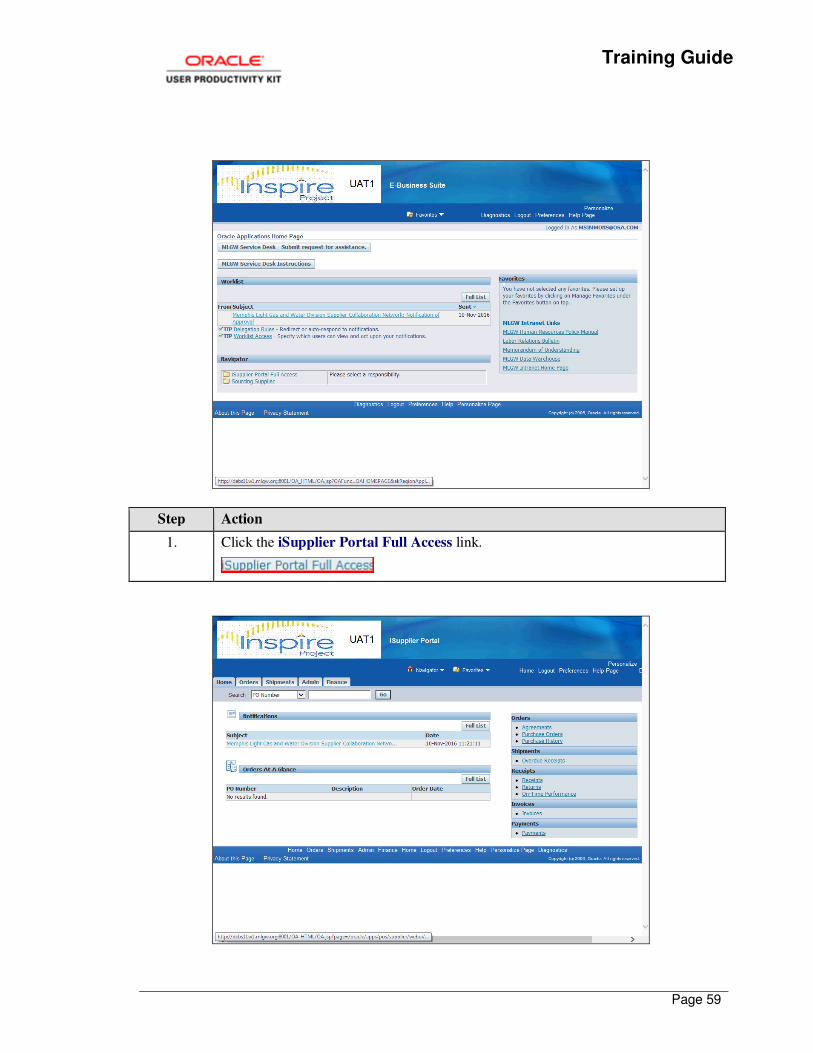
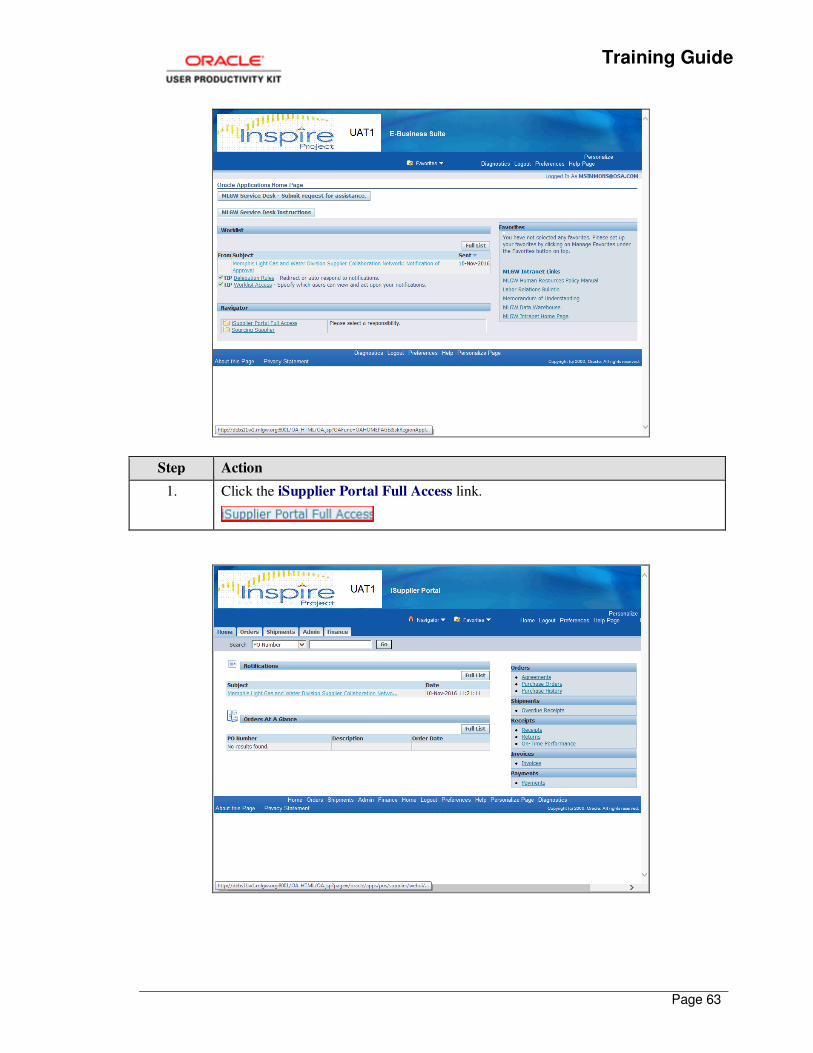
1. Click the iSupplier Portal Full Access link.
Training Guide
Page 60
Step Action
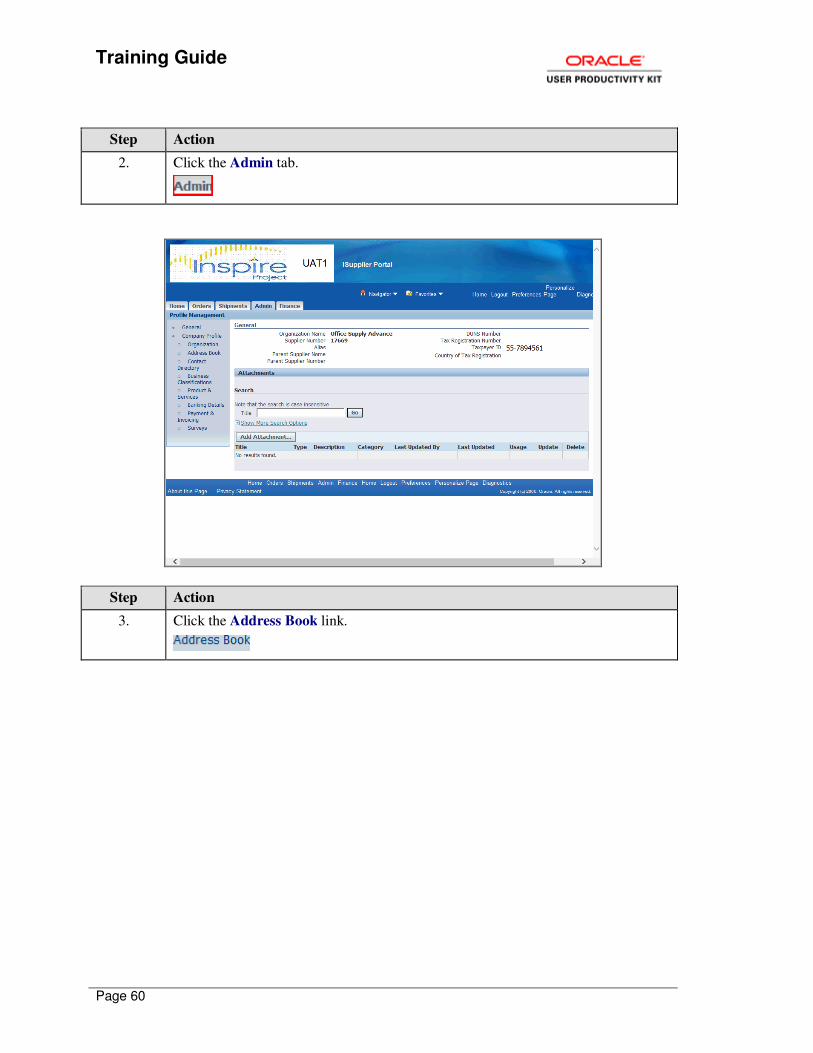
2. Click the Admin tab.
Step Action
3. Click the Address Book link.
Training Guide
Page 61
Step Action
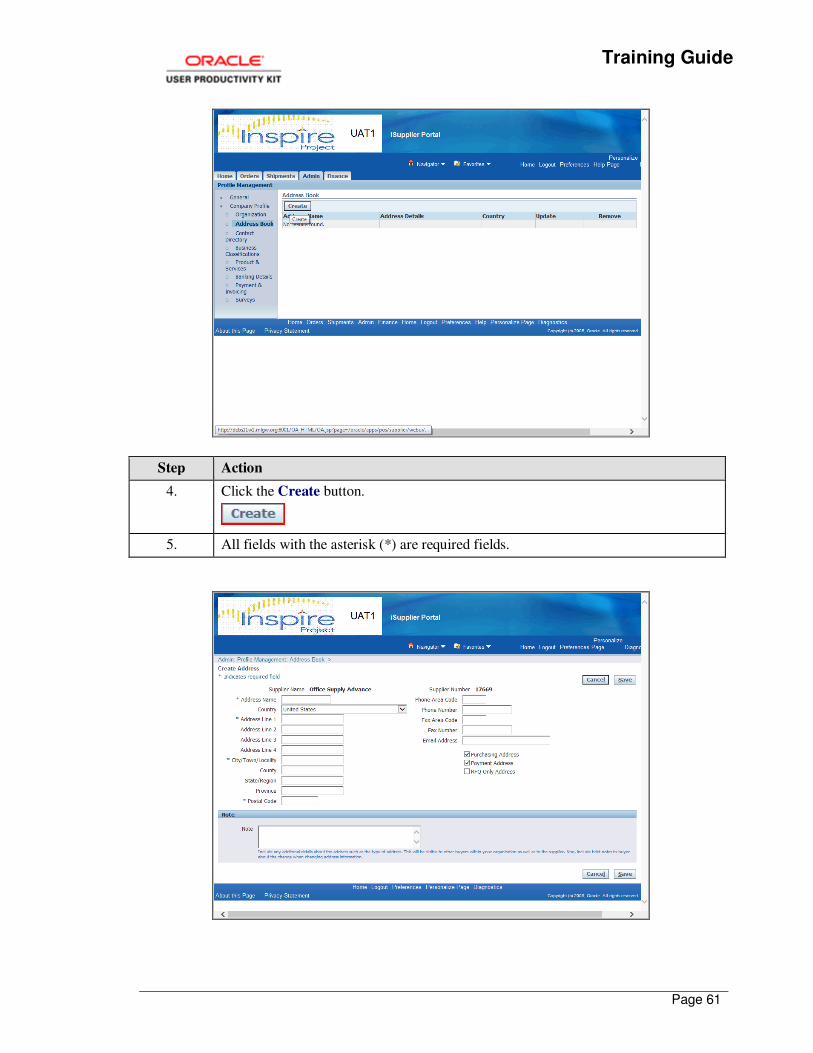
4. Click the Create button.
5. All fields with the asterisk (*) are required fields.
Training Guide
Page 62
Step Action
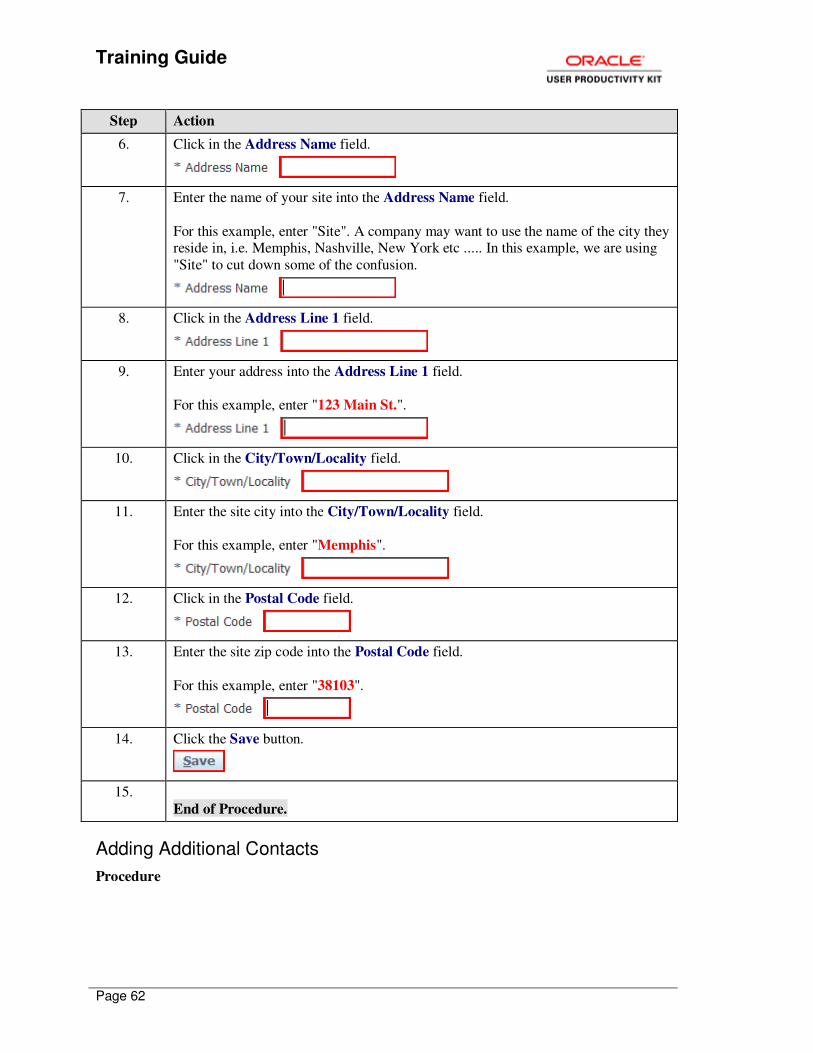
6. Click in the Address Name field.
7. Enter the name of your site into the Address Name field.
For this example, enter "Site". A company may want to use the name of the city they reside in, i.e. Memphis, Nashville, New York etc ..... In this example, we are using
"Site" to cut down some of the confusion.
8. Click in the Address Line 1 field.
9. Enter your address into the Address Line 1 field.
For this example, enter "123 Main St.".
10. Click in the City/Town/Locality field.
11. Enter the site city into the City/Town/Locality field.
For this example, enter "Memphis".
12. Click in the Postal Code field.
13. Enter the site zip code into the Postal Code field.
For this example, enter "38103".
14. Click the Save button.
15.
End of Procedure.
Adding Additional Contacts
Procedure
Training Guide
Page 63
Step Action
1. Click the iSupplier Portal Full Access link.

Training Guide
Page 64
Step Action
2. Click the Admin tab.
Step Action
3. Click the Contact Directory link.
4. Click the Create button.
5. All fields with the asterisk (*) are the required fields.
6. Click in the First Name field.
7. Enter the contact's first name into the First Name field.
For this example, enter "Tim".
8. Click in the Last Name field.
Training Guide
Page 65
Step Action
9. Enter the contact's last name into the Last Name field.
Enter "Parker".
10. Click the Save button.
11.
End of Procedure.
Adding Business Classifications
Procedure
Step Action
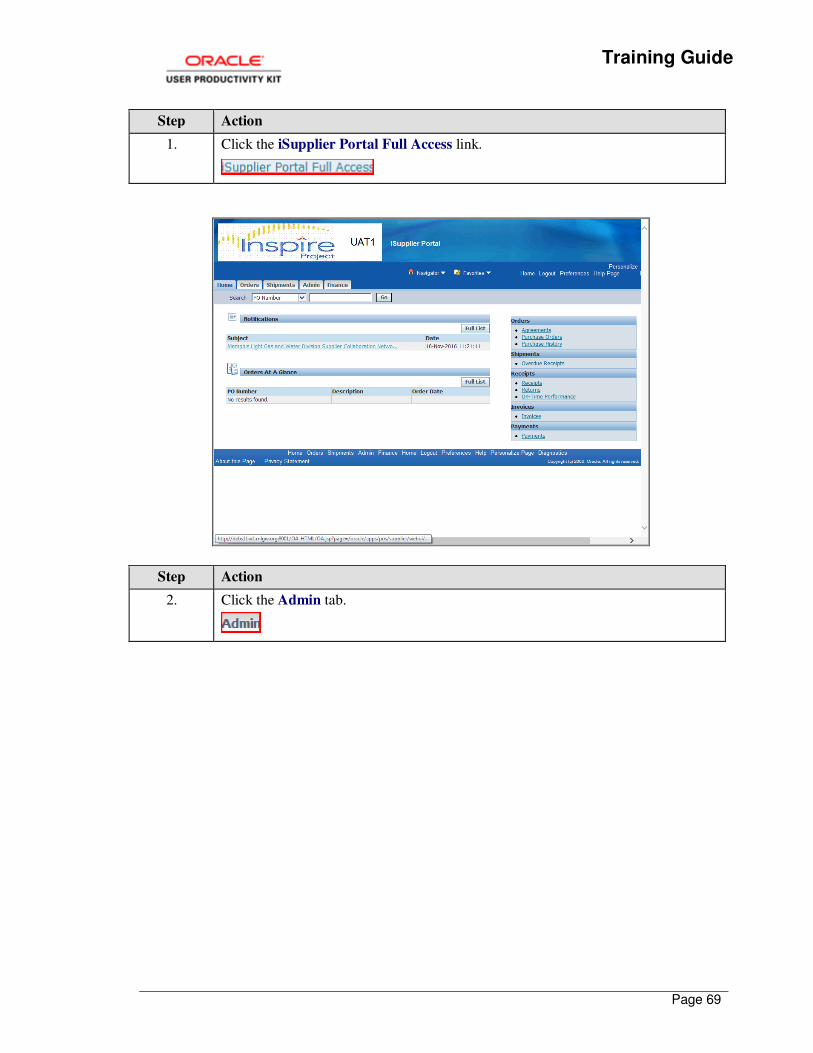
1. Click the iSupplier Portal Full Access link.
Training Guide
Page 66
Step Action
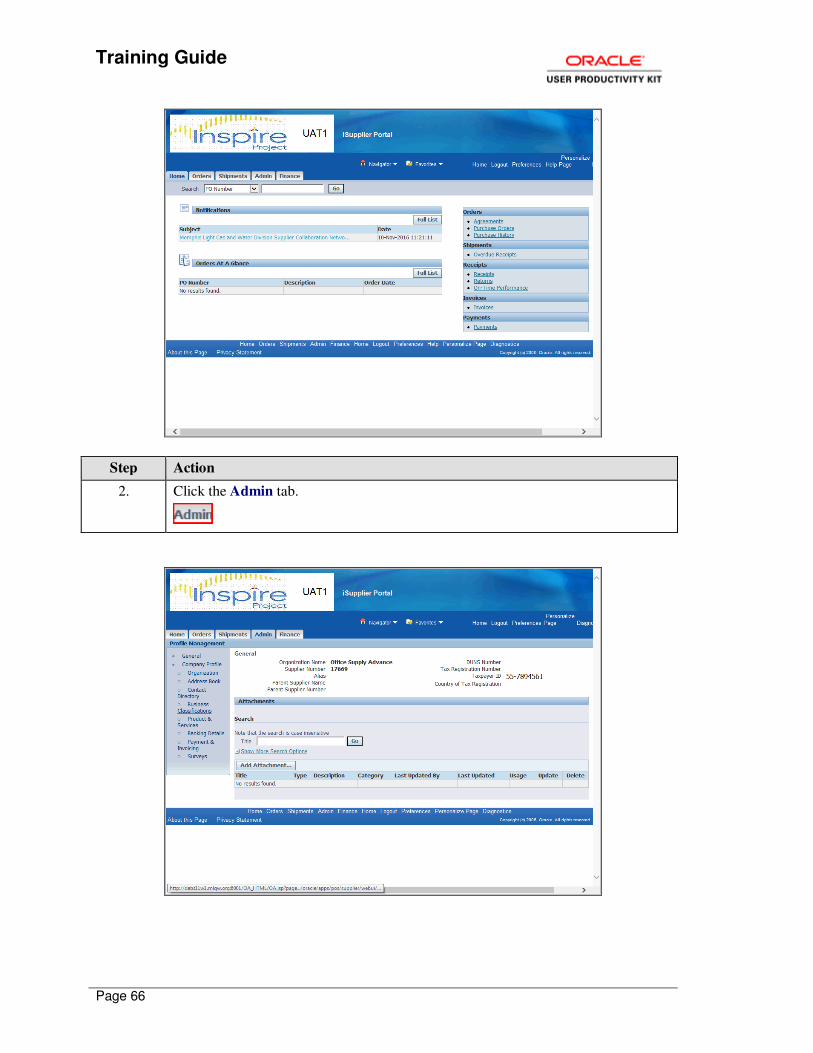
2. Click the Admin tab.
Training Guide
Page 67
Step Action
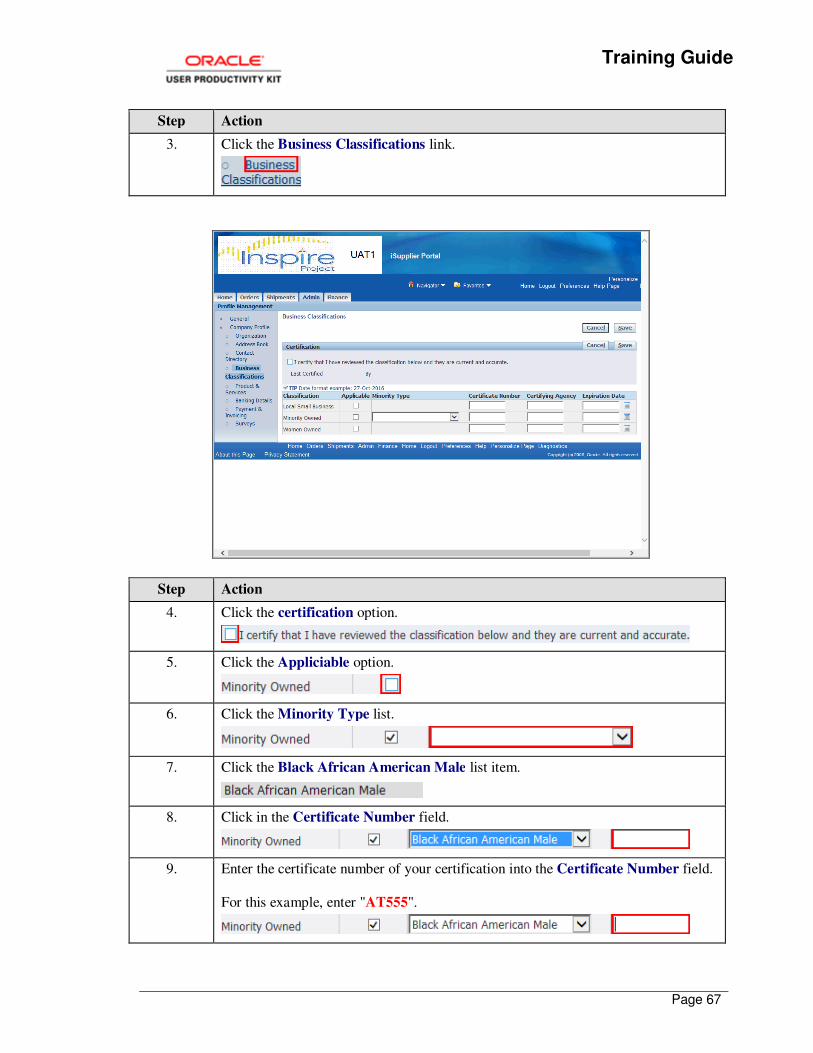
3. Click the Business Classifications link.
Step Action
4. Click the certification option.
5. Click the Appliciable option.
6. Click the Minority Type list.
7. Click the Black African American Male list item.
8. Click in the Certificate Number field.
9. Enter the certificate number of your certification into the Certificate Number field.
For this example, enter "AT555".

Training Guide
Page 68
Step Action
10. Click in the Certifying Agency field.
11. Enter the name of the certifying agency into the Certifying Agency field.
For this example, enter "NMSDC".
12. Click in the Expiration Date field.
13. Enter the certification expiration date into the Expiration Date field.
For this example, enter "31-OCT-2026".
14. Click the Save button.
15.
End of Procedure.
Adding Products and Services (NIGP Code)
Procedure
Training Guide
Page 69
Step Action
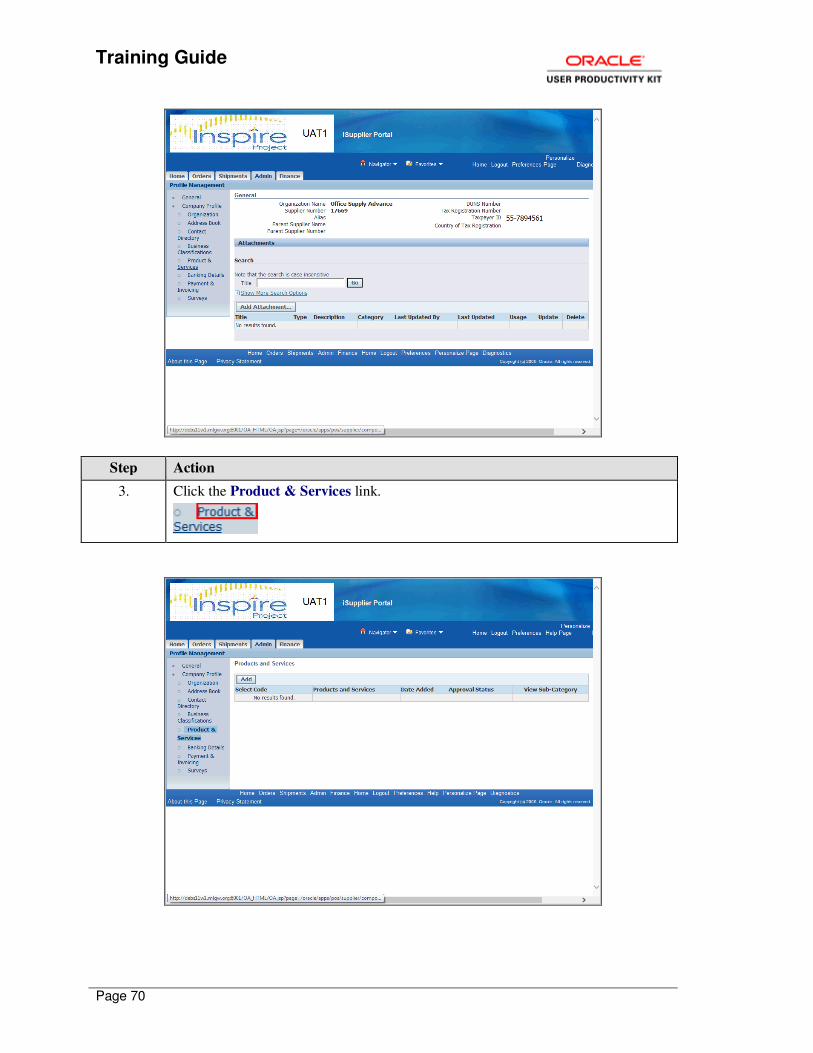
1. Click the iSupplier Portal Full Access link.
Step Action
2. Click the Admin tab.
Training Guide
Page 70
Step Action
3. Click the Product & Services link.
Training Guide
Page 71
Step Action
4. Click the Add button.
5. Click the Search for Specific Product & Service option.
6. Click in the Description field.
7. Enter the description of the product or service that you provide into
the Description field.
For this example, enter "FURNITURE".
8. Click the Go button.
9. Click the FURNITURE: OFFICE option.
10. Click the Apply button.
11.
End of Procedure.
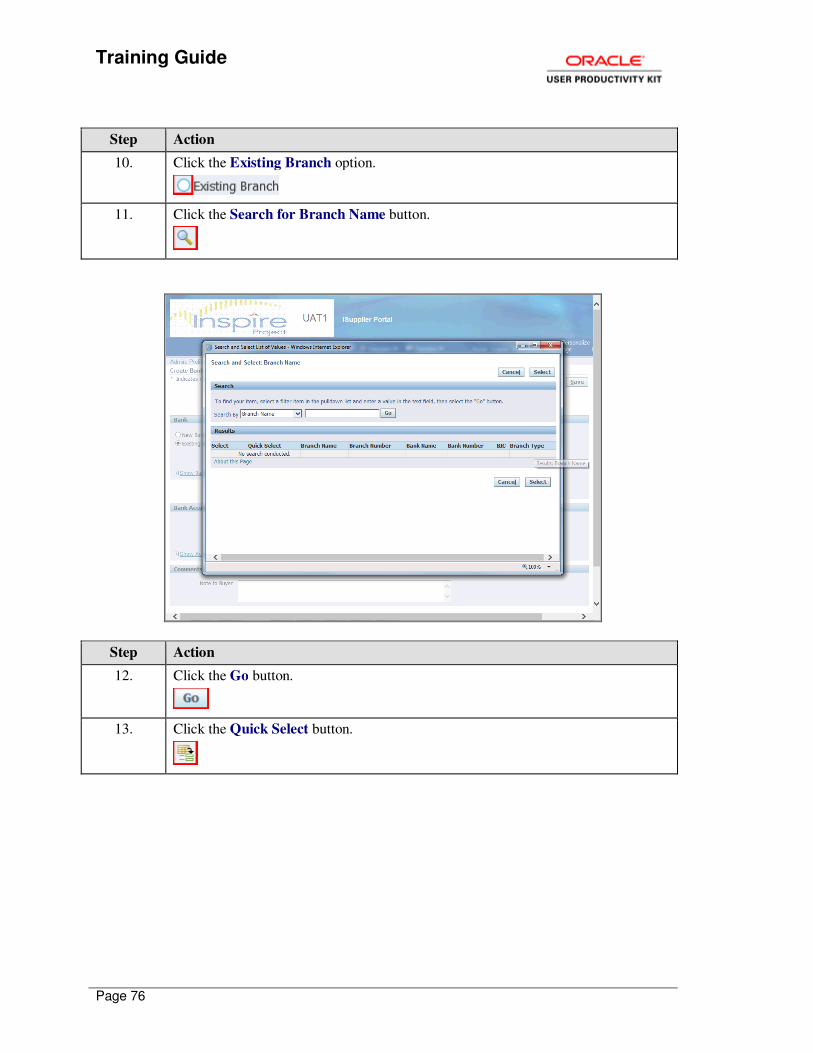
Adding Banking Details
Procedure
Training Guide
Page 72
Step Action
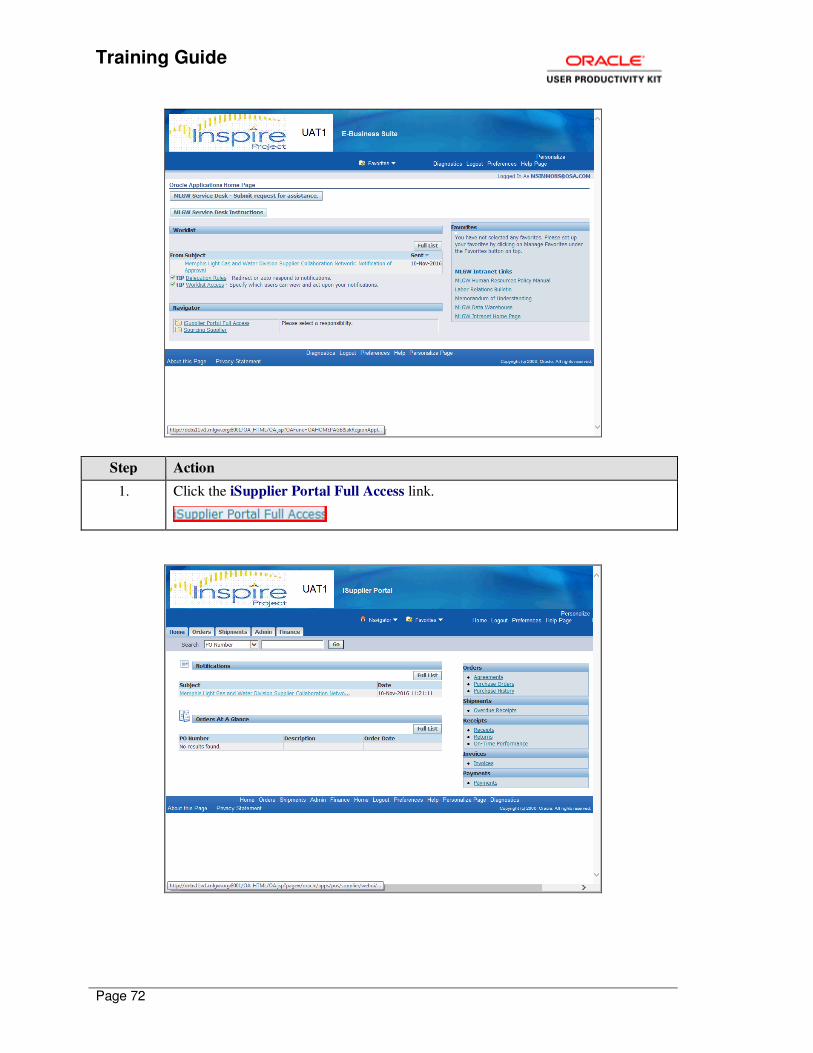
1. Click the iSupplier Portal Full Access link.
Training Guide
Page 73
Step Action
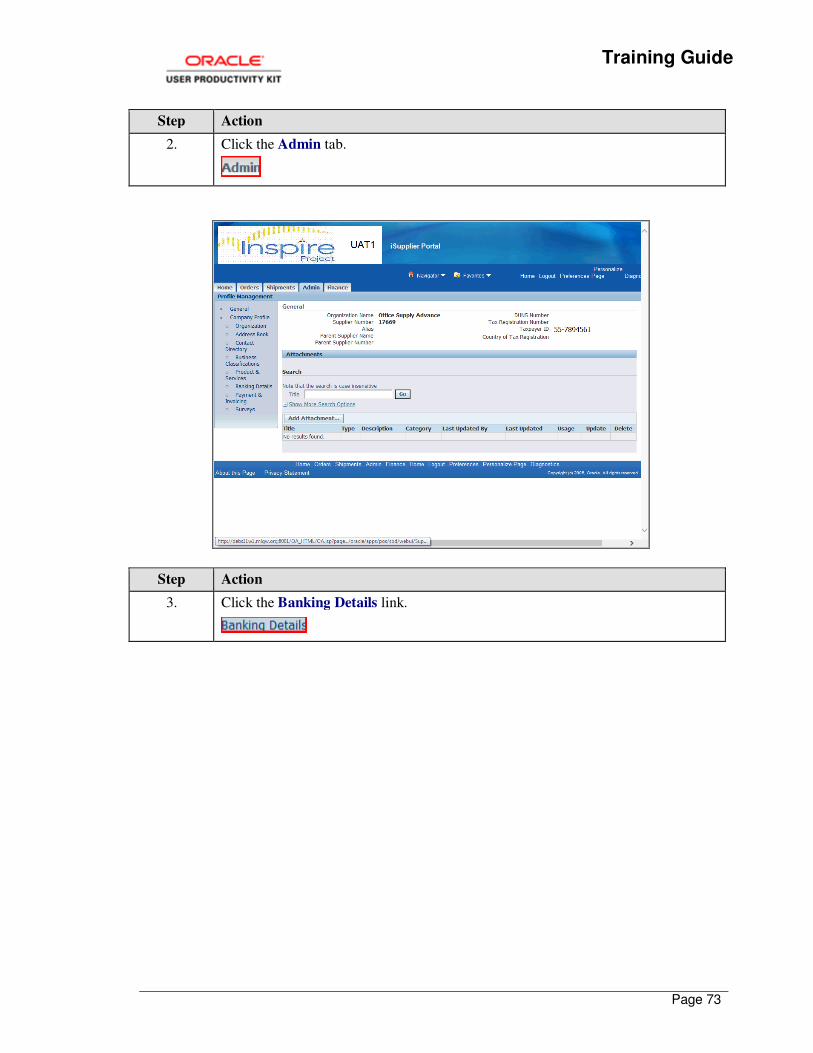
2. Click the Admin tab.
Step Action
3. Click the Banking Details link.
Training Guide
Page 74
Step Action
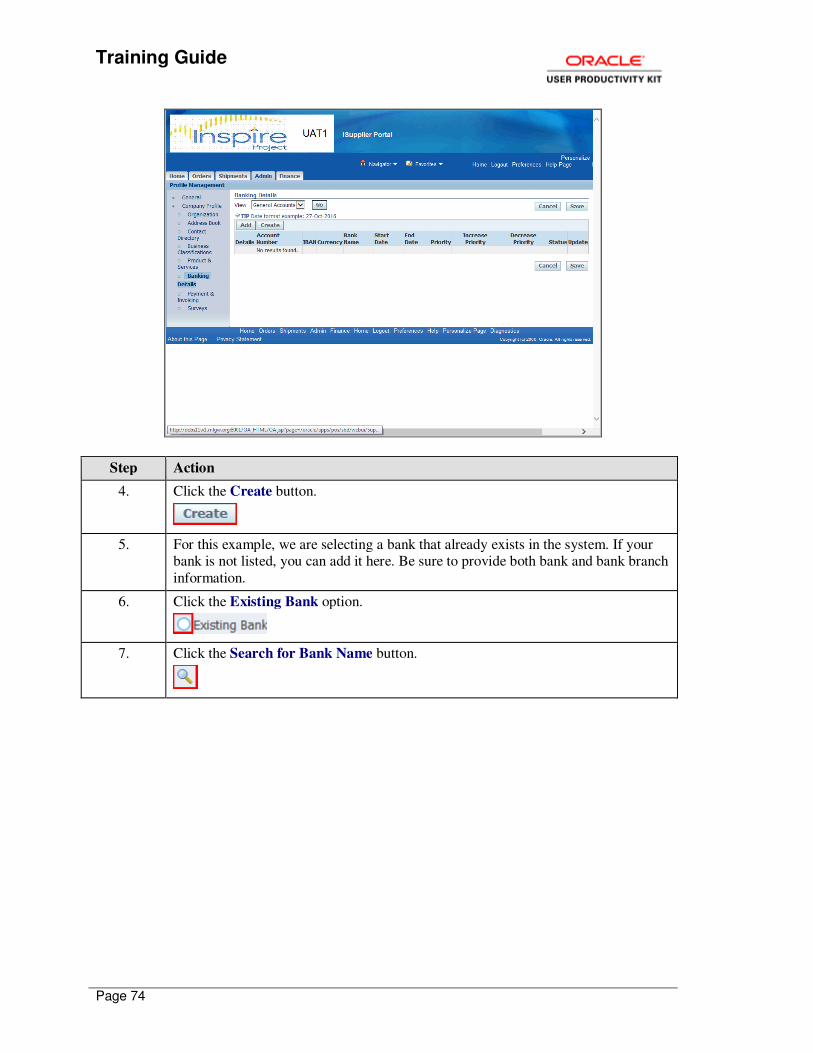
4. Click the Create button.
5. For this example, we are selecting a bank that already exists in the system. If your bank is not listed, you can add it here. Be sure to provide both bank and bank branch
information.
6. Click the Existing Bank option.
7. Click the Search for Bank Name button.
Training Guide
Page 75
Step Action
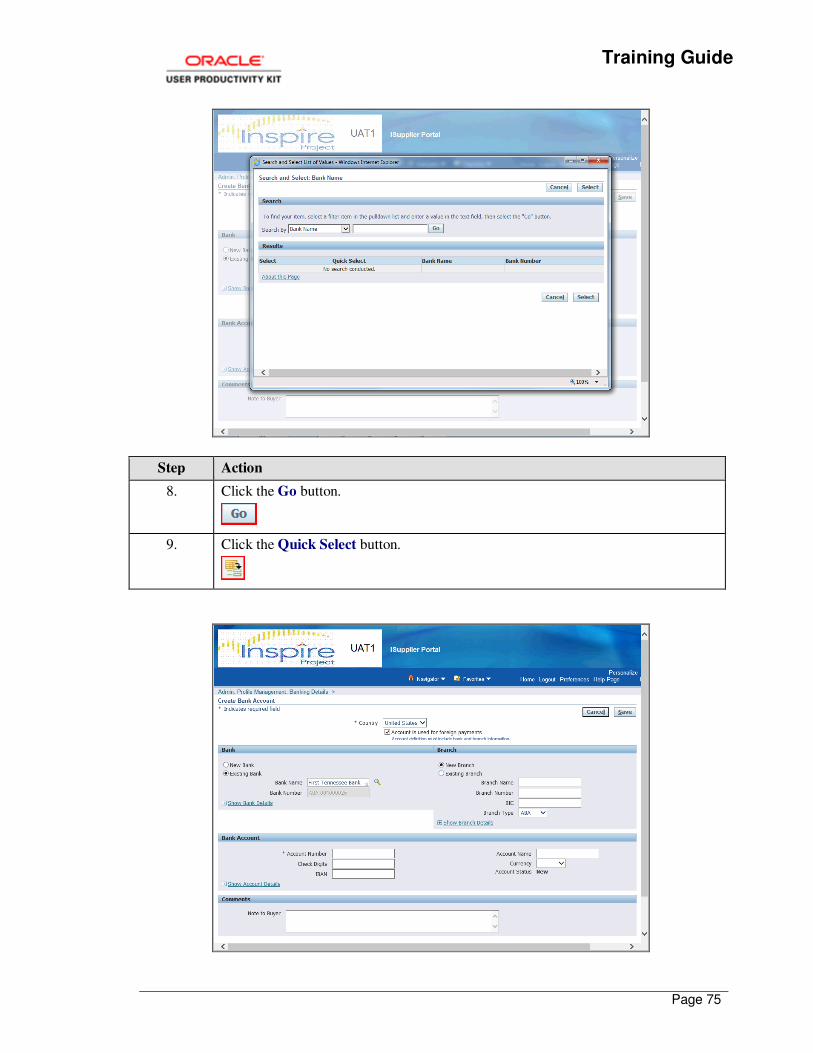
8. Click the Go button.
9. Click the Quick Select button.
Training Guide
Page 76
Step Action
10. Click the Existing Branch option.
11. Click the Search for Branch Name button.
Step Action
12. Click the Go button.
13. Click the Quick Select button.
Training Guide
Page 77
Step Action
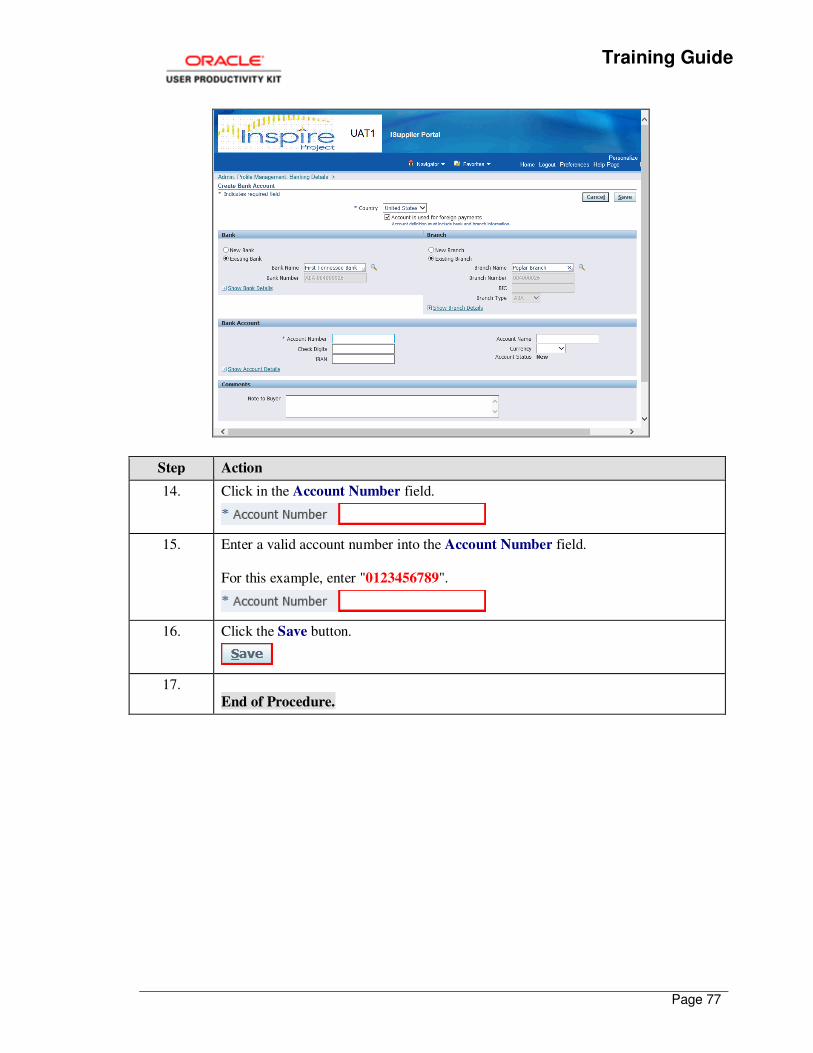
14. Click in the Account Number field.
15. Enter a valid account number into the Account Number field.
For this example, enter "0123456789".
16. Click the Save button.
17.
End of Procedure.