merchant user manual - reports.secureexchange.net · heartland connect merchant user manual...
TRANSCRIPT

Heartland Connect Merchant User Manual
Visit us at: http://www.heartlandpaymentsystems.com or call (888)963-3600
Merchant User Manual

Heartland Connect Merchant User Manual
Heartland Payment Systems™ Rev 3/15/2013 ii
Table of Contents
TABLE OF CONTENTS ............................................................................................................................ II
INTRODUCTION ........................................................................................................................................ 1
OVERVIEW .................................................................................................................................................. 1 TRANSACTIONS .......................................................................................................................................... 1
Credit Card Transactions ..................................................................................................................... 1 PIN Debit Transactions ........................................................................................................................ 1 Check transactions ................................................................................................................................ 1 Recurring Billing .................................................................................................................................. 2
REPORTING ................................................................................................................................................. 2 Current Batch ....................................................................................................................................... 2 Closed Batches ...................................................................................................................................... 2 Recurring Billing .................................................................................................................................. 2 Find Transactions ................................................................................................................................. 2
SYSTEM REQUIREMENTS ............................................................................................................................ 3 Hardware .............................................................................................................................................. 3 Software ................................................................................................................................................ 3 Peripherals ............................................................................................................................................ 3
CONNECT BASICS ..................................................................................................................................... 4
OVERVIEW .................................................................................................................................................. 4 GETTING STARTED WITH CONNECT ............................................................................................................ 4 LOGGING IN ................................................................................................................................................ 4
License Agreement ................................................................................................................................ 5 Change Password ................................................................................................................................. 6
THE MAIN MENU ........................................................................................................................................ 7 SCREEN TABS ............................................................................................................................................. 9 NAVIGATION .............................................................................................................................................. 9
Using the Mouse ................................................................................................................................... 9 Using the Keyboard .............................................................................................................................. 9
GETTING HELP ......................................................................................................................................... 10
PROCESSING CREDIT CARD TRANSACTIONS ............................................................................... 11
OVERVIEW ................................................................................................................................................ 11 IMPORTANT SECURITY NOTE: ................................................................................................................... 11 SALE TRANSACTION ................................................................................................................................. 12
Sale Receipt ......................................................................................................................................... 14 PRE-AUTH TRANSACTION ........................................................................................................................ 15
PreAuth Receipt .................................................................................................................................. 17 CREDIT CARD RETURN TRANSACTION ..................................................................................................... 18
Return Receipt ..................................................................................................................................... 20 FORCE AUTH TRANSACTION..................................................................................................................... 21
Force Auth Receipt ............................................................................................................................. 24 VERIFY TRANSACTION ............................................................................................................................. 25 ADJUSTMENT TRANSACTION .................................................................................................................... 27
Adjustment Receipt .............................................................................................................................. 29 VOID TRANSACTION ................................................................................................................................. 30 CREDIT CARD FIELD DESCRIPTIONS ......................................................................................................... 32 CREDIT CARD TRANSACTION RECEIPT FIELD DESCRIPTIONS ................................................................... 34 CVV INFORMATION ................................................................................................................................. 35
VISA CVV2 .......................................................................................................................................... 35 MasterCard CVC2 .............................................................................................................................. 35 Discover CID ...................................................................................................................................... 35

Heartland Connect Merchant User Manual
Heartland Payment Systems™ Rev 3/15/2013 iii
American Express CID ....................................................................................................................... 36
PROCESSING DEBIT CARD TRANSACTIONS .................................................................................. 37
OVERVIEW ................................................................................................................................................ 37 DEBIT SALE TRANSACTION ...................................................................................................................... 37
Debit Sale Receipt ............................................................................................................................... 39 DEBIT CARD RETURN TRANSACTION ....................................................................................................... 40
Debit Return Receipt ........................................................................................................................... 42 DEBIT CARD FIELD DESCRIPTIONS ........................................................................................................... 43 DEBIT CARD TRANSACTION RECEIPT FIELD DESCRIPTIONS ..................................................................... 44
PROCESSING EBT CARD TRANSACTIONS ...................................................................................... 45
OVERVIEW ................................................................................................................................................ 45 FOOD STAMP SALE TRANSACTION ........................................................................................................... 45
Food Stamp Sale Receipt .................................................................................................................... 47 CASH BENEFIT SALE TRANSACTION ......................................................................................................... 48 FOOD STAMP VOUCHER TRANSACTION .................................................................................................... 49 FOOD STAMP RETURN TRANSACTION ...................................................................................................... 50 BALANCE INQUIRY TRANSACTION ........................................................................................................... 51 EBT CARD FIELD DESCRIPTIONS ............................................................................................................. 52 EBT CARD TRANSACTION RECEIPT FIELD DESCRIPTIONS........................................................................ 53
GETI CHECK TRANSACTION PROCESSING ................................................................................... 54
OVERVIEW ................................................................................................................................................ 54 CHECK SALE TRANSACTION ..................................................................................................................... 54
Check Sale Receipt .............................................................................................................................. 57 CHECK VERIFY TRANSACTION ................................................................................................................. 58
Check Verify Receipt ........................................................................................................................... 60 CHECK VOID TRANSACTION ..................................................................................................................... 61
TRANSMODUS CHECK TRANSACTION PROCESSING ................................................................. 63
OVERVIEW ................................................................................................................................................ 63 CHECK SALE TRANSACTION ..................................................................................................................... 63
Check Sale Receipt .............................................................................................................................. 65 CHECK TRANSACTION FIELD DESCRIPTIONS ............................................................................................ 66 CHECK TRANSACTION RECEIPT FIELD DESCRIPTIONS .............................................................................. 67
PROCESSING CASH TRANSACTIONS ............................................................................................... 68
OVERVIEW ................................................................................................................................................ 68 CASH TENDER TRANSACTION ................................................................................................................... 68
Cash Tender Receipt ........................................................................................................................... 69 CASH RETURN TRANSACTION .................................................................................................................. 70
Cash Return Receipt ........................................................................................................................... 71 CASH FIELD DESCRIPTIONS ...................................................................................................................... 72 CASH TRANSACTION RECEIPT FIELD DESCRIPTIONS ................................................................................ 73
PROCESSING RECURRING BILLING TRANSACTIONS ................................................................ 74
OVERVIEW ................................................................................................................................................ 74 ADD A CUSTOMER .................................................................................................................................... 74
Credit Card Information ..................................................................................................................... 76 Recurring Billing Receipt ............................................................................................................................... 78
Check/ACH Information ..................................................................................................................... 79 Recurring Check Billing Receipt .................................................................................................................... 81
Contract Information .......................................................................................................................... 82 VIEW CUSTOMERS .................................................................................................................................... 85 VIEW CONTRACTS .................................................................................................................................... 87

Heartland Connect Merchant User Manual
Heartland Payment Systems™ Rev 3/15/2013 iv
RECURRING BILLING REPORT ................................................................................................................... 89 RECURRING BILLING EXPIRATION REPORT .............................................................................................. 90
FIND TRANSACTIONS ............................................................................................................................ 91
OVERVIEW ................................................................................................................................................ 91 FIND TRANSACTIONS ................................................................................................................................ 91
REPORTING .............................................................................................................................................. 93
OVERVIEW ................................................................................................................................................ 93 TRANSACTION SUMMARY AND DETAIL REPORTS ..................................................................................... 93
Summary Report ................................................................................................................................. 93 Detail Report ....................................................................................................................................... 95
EXPORTING REPORTS ............................................................................................................................... 97 EXPORTING ............................................................................................................................................... 97
XML Sample ........................................................................................................................................ 98 Tab Delimited Sample ......................................................................................................................... 98 PDF Sample ........................................................................................................................................ 98 Excel Sample ....................................................................................................................................... 98
BATCH REVIEW ........................................................................................................................................ 99 Current Batch Summary ..................................................................................................................... 99 Previous Batch Summary ...................................................................................................................100
END OF DAY SETTLEMENT ................................................................................................................101
BATCH UPLOAD.......................................................................................................................................102 BATCH IMPORT ........................................................................................................................................102
Batch Upload Format Example .........................................................................................................102
CONNECT SETUP ...................................................................................................................................108
SECURITY SETUP .....................................................................................................................................108 ADD NEW USER.......................................................................................................................................110 FIND AND EDIT USERS .............................................................................................................................111 CHANGE PASSWORD ................................................................................................................................113 RECEIPT SETUP ........................................................................................................................................114
DEVICE SETUP ........................................................................................................................................115
OVERVIEW ...............................................................................................................................................115 CARD READER SETUP ..............................................................................................................................115
Serial Card Reader Setup in Heartland Connect ...............................................................................115 PIN PAD SETUP .......................................................................................................................................117
PIN Pad Setup in Heartland Connect ................................................................................................118 MINI MICR READER SETUP ....................................................................................................................120
Mini MICR Setup in Heartland Connect ............................................................................................121 MICR IMAGER SETUP .............................................................................................................................122
MICR Imager Setup in Heartland Connect ........................................................................................123 CHECK READER CONTROL DOWNLOAD ..................................................................................................125 INSTALL CHECK READER ACTIVEX CONTROLS ......................................................................................127 USB TO SERIAL CONVERTER SETUP (WINDOWS XP) ..............................................................................127 USB TO SERIAL INSTALLATION VERIFICATION (WINDOWS XP) .............................................................130 USB TO SERIAL CONVERTER SETUP (WINDOWS VISTA) .........................................................................132 USB TO SERIAL INSTALLATION VERIFICATION (WINDOWS VISTA) .........................................................133 USB TO SERIAL CONVERTER PIN PAD SETTINGS ....................................................................................135 USB TO SERIAL CONVERTER MINI MICR READER SETTINGS .................................................................136 WINDOWS 7 & VISTA DRIVERS ..............................................................................................................137 USB TO SERIAL CONVERTER MICR IMAGER SETTINGS ..........................................................................138 EPSON PRINTER DRIVERS INSTALLATION (WINDOWS XP) ......................................................................139 EPSON PRINTER DRIVERS INSTALLATION (WINDOWS VISTA) .................................................................144

Heartland Connect Merchant User Manual
Heartland Payment Systems™ Rev 3/15/2013 v
EPSON PRINTER SETUP IN HEARTLAND CONNECT ...................................................................................149 Epson Printer Page and Margins Setup .............................................................................................150
STAR PRINTER SETUP ..............................................................................................................................151 STAR PRINTER DRIVERS INSTALLATION (WINDOWS XP) ........................................................................153 STAR PRINTER DRIVERS INSTALLATION (WINDOWS VISTA FROM CD) ...................................................157 STAR PRINTER DRIVERS INSTALLATION (WINDOWS VISTA .ZIP FILE) ....................................................162 STAR PRINTER SETUP IN HEARTLAND CONNECT .....................................................................................165
Star Printer Properties ......................................................................................................................165 Star Printer Second Copy Printing Setup ..........................................................................................166 Star Printer Receipt Printing Orientation Setup ................................................................................166 Star Printer Print Test .......................................................................................................................166
INSTALL ACTIVEX CONTROLS .................................................................................................................167 CHECK YOUR COM PORT (WINDOWS XP) .............................................................................................169 CHECK YOUR COM PORT (WINDOWS VISTA) .........................................................................................171 TROUBLESHOOTING .................................................................................................................................172
INDEX ........................................................................................................................................................174

Heartland Connect Merchant User Manual
Heartland Payment Systems™ Rev 3/15/2013 1
Introduction Welcome and thank you for choosing Heartland Connect as your payment solution!
Overview
Heartland Connect is a “virtual terminal” that can process credit, debit, and EBT cards across a secure internet connection. Additionally, Connect provides easy-to-use reporting. Heartland Connect is not a shopping cart, like other virtual terminals, but does offer some great benefits:
Secure online transactions
Auto close (Batch Settlement)
Recurring billing
Level 2- B2B ( Use of business and corporate credit cards)
Unlimited users with one Merchant ID
Security levels to restrict user functionality
Simple navigation
Easy Setup
Versatile reporting
Credit and debit card acceptance
EBT acceptance
Check acceptance
Cash Accounting
Transactions Credit Card Transactions
Sale, Pre-Auth, Return, Force Auth and Adjustment transactions
Magnetic stripe reader swipe of the card or key enter the card PIN Debit Transactions
Sale and return transactions
A PIN pad and card reader are needed to complete a PIN debit sale as PIN debit sales cannot be hand keyed
Check transactions
Sale, verify and void
Key entered or attach a check reader for verification or verification with electronic check conversion

Heartland Connect Merchant User Manual
Heartland Payment Systems™ Rev 3/15/2013 2
eCheck transactions verified against a national negative check database
Enter customer information in the event of NSF, such as driver’s license number, date of birth and SSN
Recurring Billing
Recurring payment via an anniversary event
Setting up a customer record for customers that charge frequently but with different amounts, with payment types and at different times
Multiple payment types for a single customer – multiple types of credit cards and as well as ACH
Reporting Current Batch
Displays a summary of the current batch – a total of all card types
Export the current batch transactions to XML, Tab Delimited, Excel or PDF
Sort the current batch by customer ID, reference #, invoice #, customer name, payment type, user and others
View specific transactions within the current batch to reprint the transaction receipt, void the transaction or perform a new charge to that card
Closed Batches
Reference closed batches
Export to Excel, PDF, Tab Delimited or XML
Issue a Return Recurring Billing
View all customer accounts, a specific account or a range of accounts, based on payment type, billing date range or amount
Sort by transaction status which includes approved billings, all billings or other
Search for credit cards that are about to expire Find Transactions
Find specific transactions to perform voids, refunds, force auth complete and adjustment transactions.

Heartland Connect Merchant User Manual
Heartland Payment Systems™ Rev 3/15/2013 3
System Requirements Hardware
PC with Internet Connectivity
Keyboard
Mouse
Monitor Software
Internet Explorer (IE) 6.0 or higher
o Firefox and Safari are NOT supported browsers
Windows XP, Vista, & Windows 7 Peripherals
Card Readers USB with keyboard emulation
Serial port card reader
Heartland E3 Card Reader
Pin Pad VeriFone 1000SE
Check readers Magtek Mini MICR
Magtek MICR Image
Receipt Printers Epson Receipt Printer
Star Receipt Printer
Heartland Connect Merchant User Manual
Heartland Payment Systems™ Rev 3/15/2013 4
Connect Basics
Overview
This chapter provides basic information about Heartland Connect, such as Logging In, the Main Menu, and basic navigation.
Getting Started with Connect
Before you start using Heartland Connect, make sure you’ve correctly set up the system to work with your hardware. See Device Setup beginning on page 115 for more information about setting up devices. After you finish with setup, you can use Heartland Connect on any Internet connection. Just navigate to:
https://reports.secureexchange.net/admin/login.aspx
Note: Heartland Connect uses the secure HTTP (HTTPS) protocol. Make sure you include the https:// when you type the web address. Connect will not run on an unsecured connection.
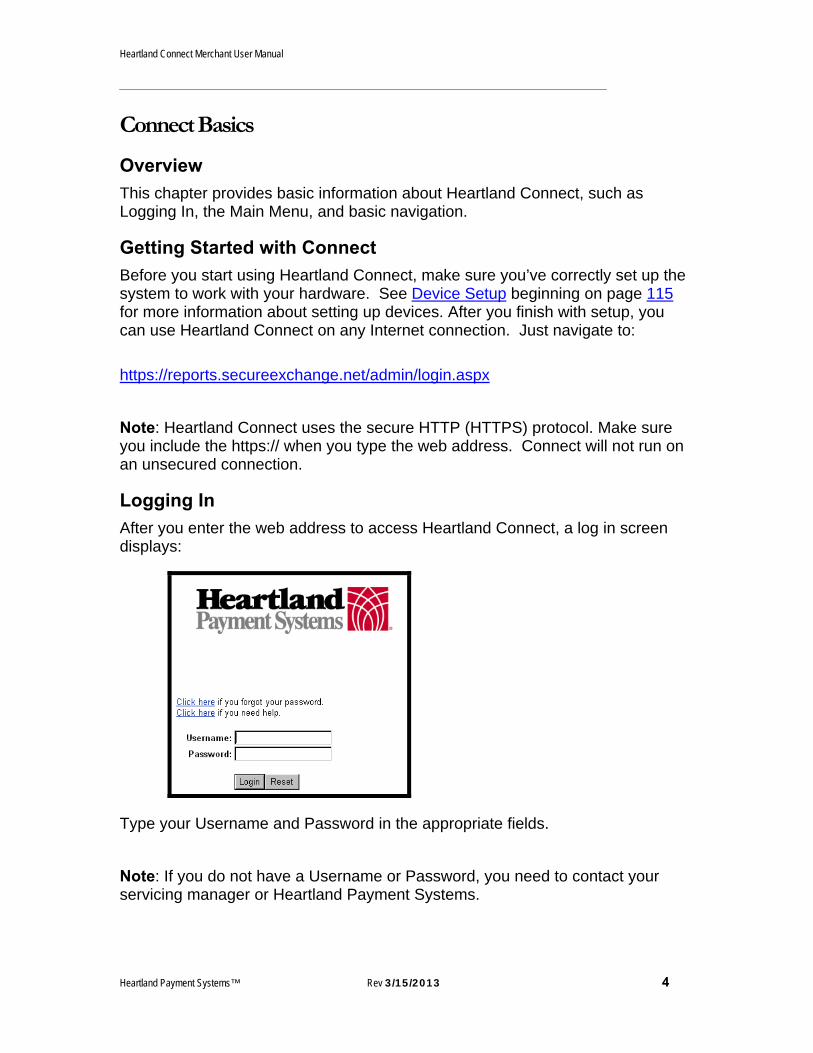
Logging In
After you enter the web address to access Heartland Connect, a log in screen displays:
Type your Username and Password in the appropriate fields.
Note: If you do not have a Username or Password, you need to contact your servicing manager or Heartland Payment Systems.

Heartland Connect Merchant User Manual
Heartland Payment Systems™ Rev 3/15/2013 5
License Agreement
The first time you log in, the License Agreement displays:
Read the End-User License carefully and then click Accept. The User Settings screen displays for you to change your password.

Heartland Connect Merchant User Manual
Heartland Payment Systems™ Rev 3/15/2013 6
Change Password
To comply with industry standards, Heartland Connect requires “strong passwords.” The password must be a minimum of 8 characters and include at least 1 digit (0-9), 1 lower case letter (a-z), and 1 upper case letter (A-Z). You must use alphanumeric characters; special characters (!@#$%^&*) are not permitted.
To change your password, do the following, enter your Current Password, New Password, and then Verify New Password. Click Change Password.
Heartland Connect Merchant User Manual
Heartland Payment Systems™ Rev 3/15/2013 7
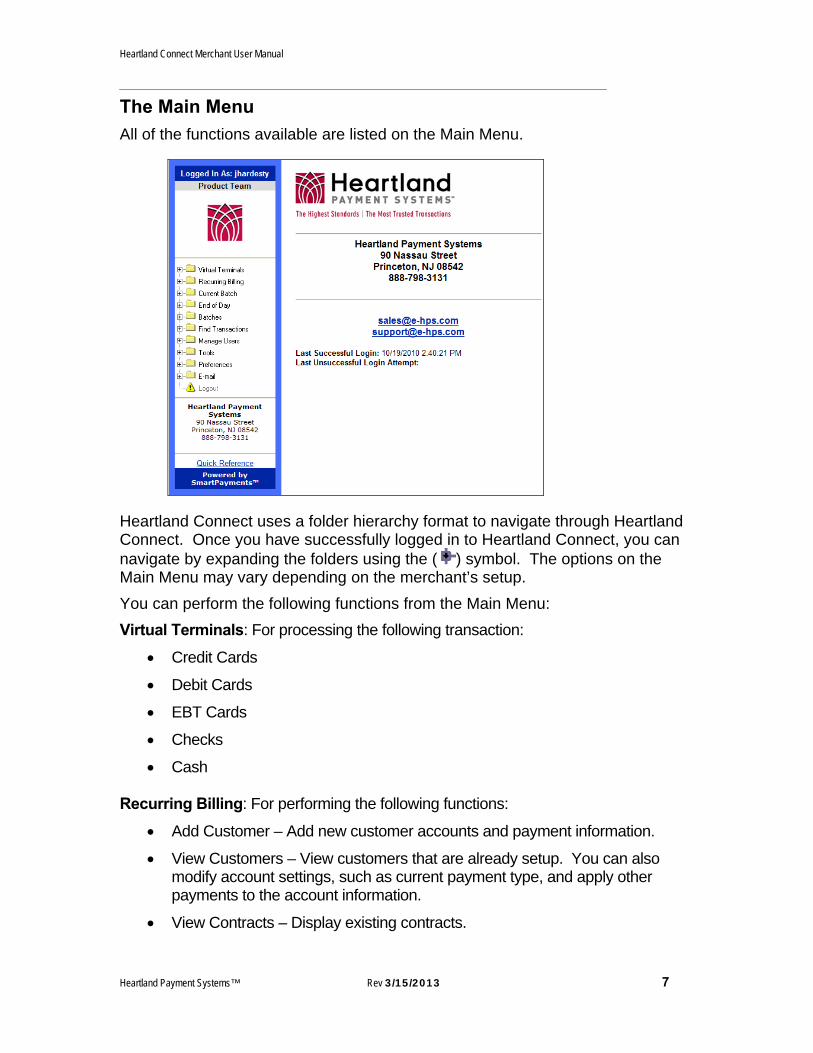
The Main Menu
All of the functions available are listed on the Main Menu.
Heartland Connect uses a folder hierarchy format to navigate through Heartland Connect. Once you have successfully logged in to Heartland Connect, you can navigate by expanding the folders using the ( ) symbol. The options on the Main Menu may vary depending on the merchant’s setup.
You can perform the following functions from the Main Menu:
Virtual Terminals: For processing the following transaction:
Credit Cards
Debit Cards
EBT Cards
Checks
Cash
Recurring Billing: For performing the following functions:
Add Customer – Add new customer accounts and payment information.
View Customers – View customers that are already setup. You can also modify account settings, such as current payment type, and apply other payments to the account information.
View Contracts – Display existing contracts.

Heartland Connect Merchant User Manual
Heartland Payment Systems™ Rev 3/15/2013 8
Billing Report – Report showing account numbers and amounts of existing recurring billing accounts that are set up.
Expiration Report – Report showing all customers (Customer ID optional) where a contract is billed with a card that has / will expire in the specified time frame.
Current Batch – For displaying information for transactions in the current unsettled batch and for the various card types (credit and debit cards, etc)
Summary – An overview of the current batch.
Credit – Credit summary
Debit – Debit summary
End of Day: For displaying Batch Total information for Checks, Credit/Debit. Also used to submit the batch for settlement if auto close is not set up.
Batches: For running reports on batches that were previously closed. You can view transactions as far back as the first transaction that was processed on Heartland Connect.
Find Transactions: For locating transactions for returns, capturing pre-authorizations, voids, and adjustments.
Manage Users: For adding, changing or deleting Users or Employee logins.
Tools: For manually uploading a batch from an Excel type format.
Preferences: For setting up devices, granting access, modifying passwords, and setting security.
Email: For contacting Heartland for support.
Logout: For exiting Heartland Connect.

Heartland Connect Merchant User Manual
Heartland Payment Systems™ Rev 3/15/2013 9
Screen Tabs
From the Main Menu, you can access additional navigation options with the tabs arranged on the top of the screen.
Navigation
You can use your mouse to navigate through Heartland Connect. You can access all of Heartland Connect’s functions by selecting menu titles or screen tabs.
To enter information into Heartland Connect, use the mouse to select the desired field and your keyboard to enter data. On screens with multiple fields, use the Tab key on your keyboard to move to the next field.
Using the Mouse
To select options with the mouse, simply click on the desired menu title or screen tab. To select a field, click on the field. If the field is a drop-down menu, a list of available options displays. Use the mouse to select the desired option.
Using the Keyboard
Use your keyboard to enter data into a field you have selected with the mouse. You can also use the Tab key to select the next field on the screen instead of using the mouse.

Heartland Connect Merchant User Manual
Heartland Payment Systems™ Rev 3/15/2013 10
Getting Help
You can reach Heartland Technical Support at the following address:
Or call our 24 hr support center at 888-963-3600 for any assistance.

Heartland Connect Merchant User Manual
Heartland Payment Systems™ Rev 3/15/2013 11
Processing Credit Card Transactions
Overview
This chapter explains how to process credit card transactions in Heartland Connect. Heartland Connect supports a card reader attached to the PC or manually keying the account number.
You can run the following credit card transactions
Sale
Pre-Auth
Return (Refund)
Force Auth
Verify
Find
Adjustment
Void
Important Security Note: Heartland Payment Systems has been made aware of an industry-wide increase in fraudulent credits posted by criminals who take over the credentials of a merchant’s virtual terminal account. As a result, Heartland has implemented a minor – but important – process change: Effective, January 11, 2011, all merchants are required to enter a PNRef number to process returns on credit card transactions through Heartland Connect. This helps you, the merchant, ensure your compliance with Heartland’s Merchant Processing Agreement as well as card brand regulations that prohibit merchants from processing a credit (refund) without a matching debit (sale). This regulation helps deter inside fraud (such as employees illegally giving credits to their own cards or their friends’ cards) and outside fraud (such as cardholders getting inappropriate credits). This notification can be seen on the main login page of Heartland Connect.

Heartland Connect Merchant User Manual
Heartland Payment Systems™ Rev 3/15/2013 12
Sale Transaction
Use the credit card sale when a customer uses a credit card as payment for goods or services. Heartland Connect records the card information and dollar amount and transmits this information to Heartland Payments. Heartland contacts the credit card issuer, receives an authorization, and displays an approval.
Note: If you are a healthcare provider, please ensure that patient demographic information is not stored as this would violate the health insurance privacy and portability act (HIPAA).
To enter a sale, follow these steps:
1. From the Main Menu, click Virtual Terminals.
2. Select Credit.
3. Enter information into the required fields. See Credit Card Field Descriptions on page 32 for more information. Actual fields that display may vary depending on the merchant setup.
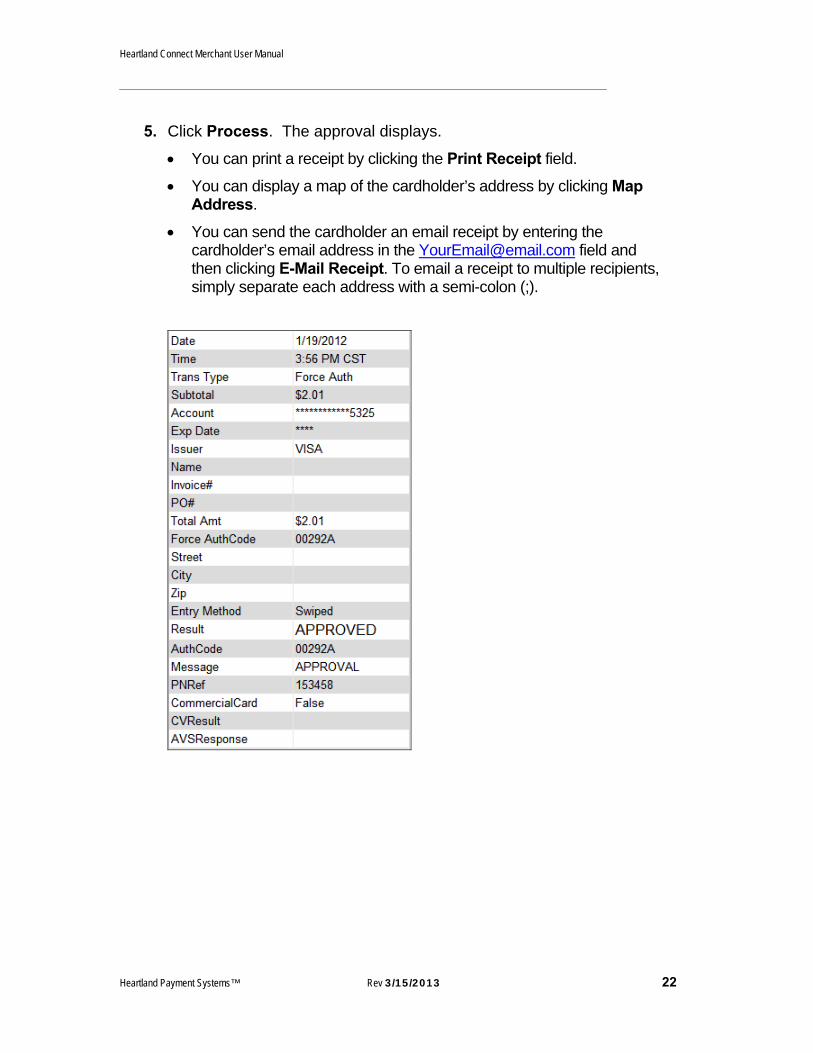
4. Click Process. The approval displays.
You can print a receipt by clicking the Print Receipt field.
You can display a map of the cardholder’s address by clicking Map Address.
You can send the cardholder an email receipt by entering the cardholder’s email address in the [email protected] field and then clicking E-Mail Receipt. To email a receipt to multiple recipients, simply separate each address with a semi-colon (;).

Heartland Connect Merchant User Manual
Heartland Payment Systems™ Rev 3/15/2013 13
*Note: Your Business Name will appear in the Subject Line of these emails.
See Credit Card Field Descriptions on page 32 for definitions of these fields.

Heartland Connect Merchant User Manual
Heartland Payment Systems™ Rev 3/15/2013 14
Sale Receipt
See Credit Card Transaction Receipt Field Descriptions on page 34 for definitions of the fields on this receipt.

Heartland Connect Merchant User Manual
Heartland Payment Systems™ Rev 3/15/2013 15
Pre-Auth Transaction
Use the pre-auth transaction when the final amount of the purchase is not known. Connect authorizes an estimated amount. When the final amount is known, use the Force Auth Transaction described on page 21 to enter the final amount of the transaction. Pre-auths are not settled.
Note: If you are a healthcare provider, please ensure that patient demographic information is not stored as this would violate the health insurance privacy and portability act (HIPAA).
To enter a pre-auth, follow these steps:
1. From the Main Menu, select Virtual Terminals.
2. Select Credit.
3. Select PreAuth.
Enter information into the required fields. See Credit Card Field Descriptions on page 32 for more information. Actual fields that display may vary depending on the merchant setup.
4. Click Process. The approval displays.
You can print a receipt by clicking the Print Receipt field.
You can send the cardholder an email receipt by entering the cardholder’s email address in the [email protected] field and then clicking E-Mail Receipt. To email a receipt to multiple recipients, simply separate each address with a semi-colon (;).

Heartland Connect Merchant User Manual
Heartland Payment Systems™ Rev 3/15/2013 16
*Note: Your Business Name will appear in the Subject Line of these emails.
See Credit Card Field Descriptions on page 32 for definitions of these fields.

Heartland Connect Merchant User Manual
Heartland Payment Systems™ Rev 3/15/2013 17
PreAuth Receipt
See Credit Card Transaction Receipt Field Descriptions on page 34 for definitions of the fields on this receipt.

Heartland Connect Merchant User Manual
Heartland Payment Systems™ Rev 3/15/2013 18
Credit Card Return Transaction
Use a return to refund the customer’s credit card for returned items. Heartland Connect records the card information and dollar amount and transmits this information to Heartland Payments. Heartland contacts the credit card issuer, receives an authorization, and displays an approval.
Note: If you are a healthcare provider, please ensure that patient demographic information is not stored as this would violate the health insurance privacy and portability act (HIPAA).
1. From the Main Menu, select Virtual Terminals.
2. Select Credit.
3. Select Return.
4. Enter information into the required fields. See Credit Card Field Descriptions on page 32 for more information. Actual fields that display may vary depending on the merchant setup.
5. Click Process. The approval displays.
You can print a receipt by clicking the Print Receipt field.
You can send the cardholder an email receipt by entering the cardholder’s email address in the [email protected] field and then clicking E-Mail Receipt. To email a receipt to multiple recipients, simply separate each address with a semi-colon (;).

Heartland Connect Merchant User Manual
Heartland Payment Systems™ Rev 3/15/2013 19
*Note: Your Business Name will appear in the Subject Line of these emails.
See Credit Card Field Descriptions on page 32 for definitions of these fields.

Heartland Connect Merchant User Manual
Heartland Payment Systems™ Rev 3/15/2013 20
Return Receipt
See Credit Card Transaction Receipt Field Descriptions on page 34 for definitions of the fields on this receipt.

Heartland Connect Merchant User Manual
Heartland Payment Systems™ Rev 3/15/2013 21
Force Auth Transaction
Use the force auth transaction when you are unable to submit a transaction to Heartland for authorization. This usually occurs when there is a downtime condition and you had to authorize the transaction over the phone using voice authorization or you are completing a pre-auth. The force auth transaction adds the transaction to the batch for settlement. You have to have the approval code for a force auth.
Note: If you are a healthcare provider, please ensure that patient demographic information is not stored as this would violate the health insurance privacy and portability act (HIPAA).
To enter a force auth, follow these steps:
1. From the Main Menu, select Virtual Terminals.
2. Select Credit.
3. Select ForceAuth.
4. Enter information into the required fields. See Credit Card Field Descriptions on page 32 for more information. Actual fields that display may vary depending on the merchant setup.
Heartland Connect Merchant User Manual
Heartland Payment Systems™ Rev 3/15/2013 22
5. Click Process. The approval displays.
You can print a receipt by clicking the Print Receipt field.
You can display a map of the cardholder’s address by clicking Map Address.
You can send the cardholder an email receipt by entering the cardholder’s email address in the [email protected] field and then clicking E-Mail Receipt. To email a receipt to multiple recipients, simply separate each address with a semi-colon (;).

Heartland Connect Merchant User Manual
Heartland Payment Systems™ Rev 3/15/2013 23
*Note: Your Business Name will appear in the Subject Line of these emails.
See Credit Card Field Descriptions on page 32 for definitions of these fields.

Heartland Connect Merchant User Manual
Heartland Payment Systems™ Rev 3/15/2013 24
Force Auth Receipt
See Credit Card Transaction Receipt Field Descriptions on page 34 for definitions of the fields on this receipt.
Heartland Connect Merchant User Manual
Heartland Payment Systems™ Rev 3/15/2013 25
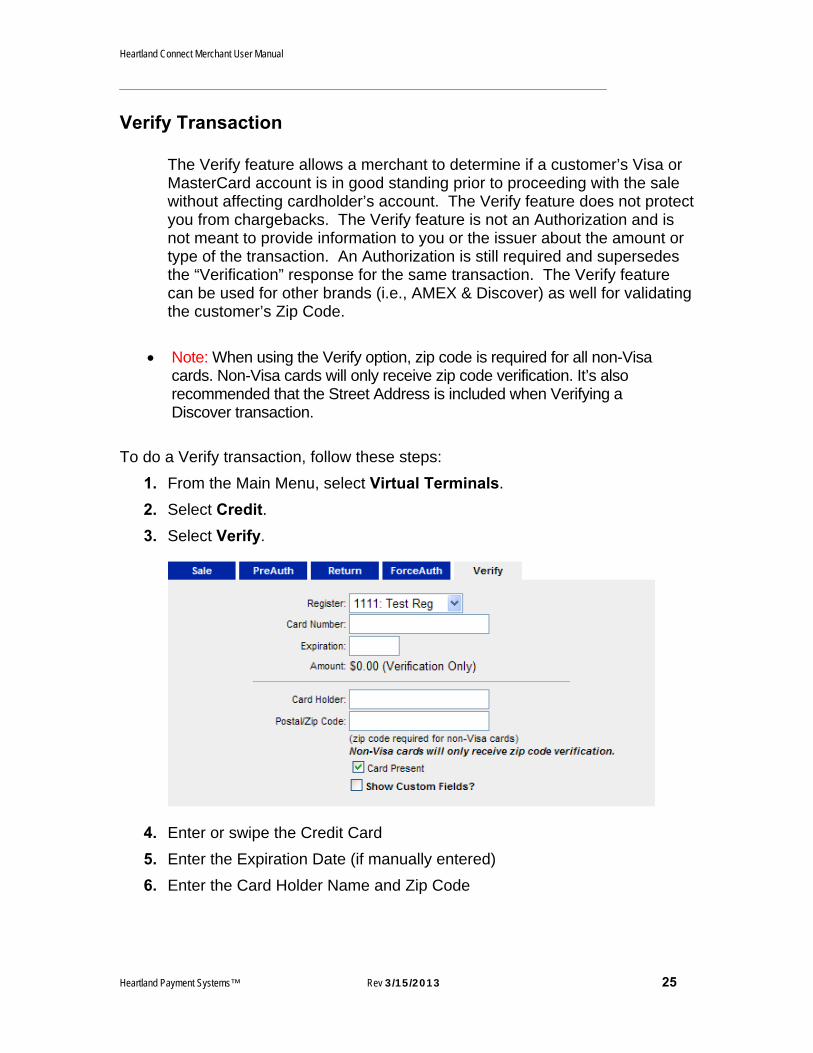
Verify Transaction The Verify feature allows a merchant to determine if a customer’s Visa or MasterCard account is in good standing prior to proceeding with the sale without affecting cardholder’s account. The Verify feature does not protect you from chargebacks. The Verify feature is not an Authorization and is not meant to provide information to you or the issuer about the amount or type of the transaction. An Authorization is still required and supersedes the “Verification” response for the same transaction. The Verify feature can be used for other brands (i.e., AMEX & Discover) as well for validating the customer’s Zip Code.
Note: When using the Verify option, zip code is required for all non-Visa cards. Non-Visa cards will only receive zip code verification. It’s also recommended that the Street Address is included when Verifying a Discover transaction.
To do a Verify transaction, follow these steps:
1. From the Main Menu, select Virtual Terminals.
2. Select Credit.
3. Select Verify.
4. Enter or swipe the Credit Card
5. Enter the Expiration Date (if manually entered)
6. Enter the Card Holder Name and Zip Code

Heartland Connect Merchant User Manual
Heartland Payment Systems™ Rev 3/15/2013 26
Note: if the card is a non-Visa and non-MasterCard, then the Zip Code is required. Also, Non-Visa cards will only receive zip code verification
7. Click Process. The result displays.

Heartland Connect Merchant User Manual
Heartland Payment Systems™ Rev 3/15/2013 27
Adjustment Transaction
Use the adjustment transaction in restaurants to add or change the tip amount on a previously authorized transaction. Heartland Connect uses the PNRef number of the original transaction for adjustments.
Note: If you don’t know the PNRef number for the transaction, you can use the Find function to locate it. See Find Transactions on page 91 for more information on finding transactions.
To do an adjustment, follow these steps:
8. From the Main Menu, select Virtual Terminals.
9. Select Credit.
10. Select Adjustment.
11. Enter the PNRef of the original transaction. This can be found on the receipt in the Transaction # field.
12. Enter the new Tip Amount.
13. Click Process. The approval displays.
You can print a receipt by clicking the Print Receipt field.
You can send the cardholder an email receipt by entering the cardholder’s email address in the [email protected] field and then clicking E-Mail Receipt. To email a receipt to multiple recipients, simply separate each address with a semi-colon (;).

Heartland Connect Merchant User Manual
Heartland Payment Systems™ Rev 3/15/2013 28
*Note: Your Business Name will appear in the Subject Line of these emails.

Heartland Connect Merchant User Manual
Heartland Payment Systems™ Rev 3/15/2013 29
Adjustment Receipt
See Credit Card Transaction Receipt Field Descriptions on page 34 for definitions of the fields on this receipt.

Heartland Connect Merchant User Manual
Heartland Payment Systems™ Rev 3/15/2013 30
Void Transaction
Use a void to cancel a transaction stored in an open batch. For transactions in a closed batch, see Credit Card Return Transaction on page 18.
Note: You have to find the original transaction before you can void it. See Find Transactions on page 91 for more information on finding transactions.
To perform a void, follow these steps:
1. From the Credit Transactions find window, click on the Ref # (PNRef) of the transaction you want to void.
2. Heartland Connect displays more information so you can verify that it is the correct transaction to void.
Heartland Connect Merchant User Manual
Heartland Payment Systems™ Rev 3/15/2013 31
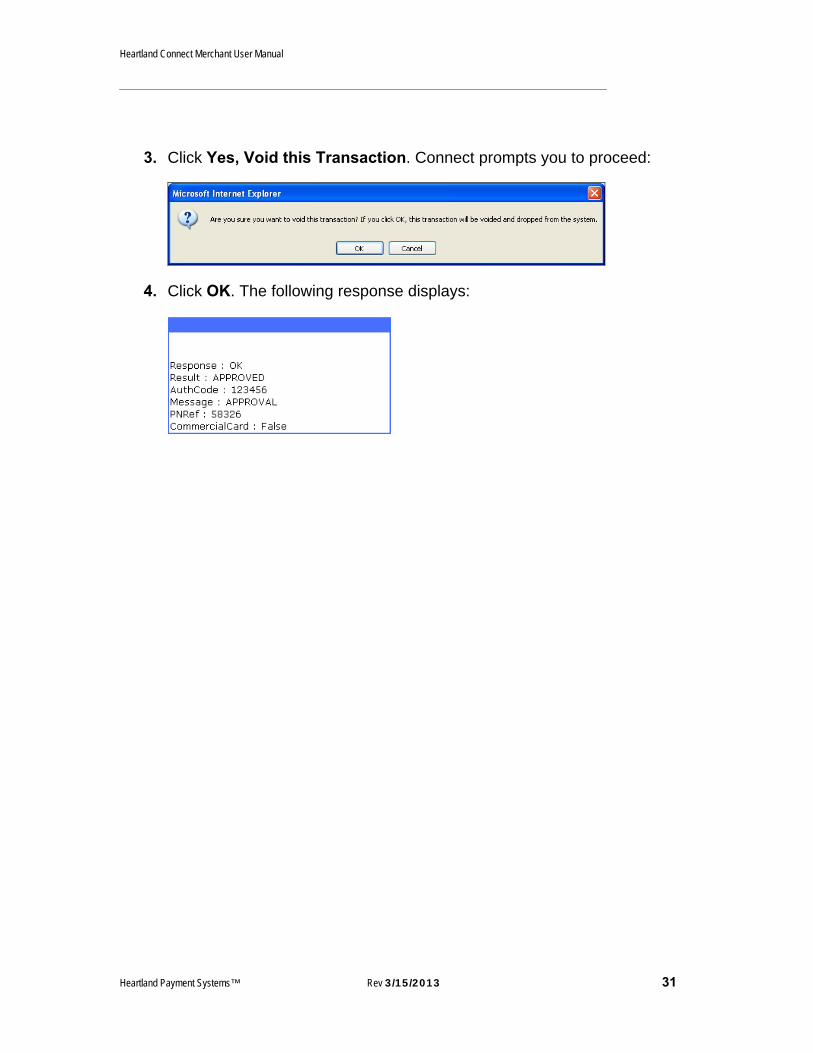
3. Click Yes, Void this Transaction. Connect prompts you to proceed:
4. Click OK. The following response displays:

Heartland Connect Merchant User Manual
Heartland Payment Systems™ Rev 3/15/2013 32
Credit Card Field Descriptions Field Action
Card Number Swipe the card through a reader or manually enter the card number. Heartland Connect displays the card type.
Expiration Date(MMYY)
For manually entered transactions, enter the expiration date in MMYY format.
Subtotal Enter the sale amount.
Tax Amount If applicable, enter the tax amount.
Tip Amount If applicable, enter the tip amount.
Convenience Fee If applicable, enter any convenience amount.
Shipping Amount If applicable, enter the shipping amount.
Total Amount Total amount displays.
Customer ID Enter the customer ID.
Card Holder For manually keyed transactions, enter the name of the cardholder.
Street Enter the customer’s street address.
City Enter the customer’s city.
Postal/Zip Code Enter the customer’s zip code.
CV2 Enter the 3-digit security code on the back of the card or 4-digit code on the front of the card. See CVV Information on page 35 for more information.
CV Presence If applicable, select the reason the CV2 code is not provided:
Not Submitted Illegible Not Present
Invoice # If applicable, enter the Invoice number.
PO # If applicable, enter the PO number.
Force Duplicate This option allows you to submit a transaction with the same card number and amount as a previously entered transaction within an hour of the original transaction. If this option is not selected, transactions with the same card number and amount ran in the hour period will decline. If the same card number but different amount is processed, the card will approve.
Card Present Indicate by checking the box if the card is present at the point of sale.
Auth Code For force auth transactions, enter the approval code received from the voice center.

Heartland Connect Merchant User Manual
Heartland Payment Systems™ Rev 3/15/2013 33
Field Action
PNRef This number uniquely identifies each transaction. Use this number to perform voids, adjustments, refunds, and reprints. This number is the same as the Transaction # on the receipts.
Description This is where you can key a brief description of the product or services that were provided. *Not applicable for merchants in Health Care Industry

Heartland Connect Merchant User Manual
Heartland Payment Systems™ Rev 3/15/2013 34
Credit Card Transaction Receipt Field Descriptions Field Description
Merchant Information
Merchant’s name, street address, city, state, and zip code.
Date and Time The date and time of the transaction.
Trans Type Type of transaction: Sale, Force Auth, etc.
Customer ID Customer number (if provided)
Transaction # The PNRef number that uniquely identifies the transaction.
Name The customer’s name. (if provided)
Account Last 4 digits of the card account number.
Exp Date Xs for the expiration date.
Card Type Type of card, VISA, MasterCard, Amex, etc.
Street Address The customer’s street address. (if provided)
Zip The customer’s zip code. (if provided)
Entry Swiped or Manual.
Invoice # Invoice number. (if provided)
PO # Purchase order number. (if provided)
AuthCode Authorization number.
Result APPROVED or DECLINED.
Message APPROVAL or DECLINE.
Batch Num Batch number.
User ID User that processed the question
Description Description of goods or services. (if provided)
Sale Tax Amt Sales tax. (if provided)
Shipping Amount Shipping amount. (if provided) Tip Amt Tip amount. (if provided)
Convenience Fee Convenience fee. (if provided)
Total Amt Total amount.
Message Agreement message to pay for the goods or services.
Signature Customer signature line.

Heartland Connect Merchant User Manual
Heartland Payment Systems™ Rev 3/15/2013 35
CVV Information
Visa, MasterCard, American Express and Discover use this code to try to reduce fraud in Card Not Present transactions. It shows that the person using the card has physical possession of the credit card.
VISA CVV2
The CVV2 (Card Verification Value) is the last three digits after the credit card number on the back of the card in the signature area.
MasterCard CVC2
The CVC2 (Card Validation Code) is the last three digits after the credit card number on the back of the card in the signature area.
Discover CID
The CID (Card Identification) is the last three digits after the credit card number on the back of the card in the signature area.

Heartland Connect Merchant User Manual
Heartland Payment Systems™ Rev 3/15/2013 36
American Express CID
The American Express CID (Card Identification) is the four digits printed on the front of the card, above and to the right of the embossed credit card number.

Heartland Connect Merchant User Manual
Heartland Payment Systems™ Rev 3/15/2013 37
Processing Debit Card Transactions
Overview
This chapter explains how to process debit card transactions in Heartland Connect. For debit, the merchant must have a card reader and a PIN Pad attached to the PC.
You can run the following debit card transactions
Sale
Return (Refund)
Note: Please contact your Heartland relationship manager if you wish to do PIN-Base Debit transactions.
Debit Sale Transaction
Use the debit card sale when a customer uses a debit card as payment for goods or services. Heartland Connect records the card information and dollar amount, the customer enters his/her PIN on the PIN Pad, the Connect transmits this information to Heartland Payments. Heartland contacts the card issuer, receives an authorization, and displays an approval.
Note: If you are in the Health Care industry, please ensure you do not enter or store protected health information.
To enter a sale, follow these steps:
1. From the Main Menu, select Virtual Terminals.
2. Select Debit.
3. Slide the card through the card reader. Connect fills in the information for the Card Number, Expiration Date and Card Holder fields. Enter information into the remaining fields. See Debit Card Field Descriptions page 43 for more information. Actual fields that display may vary depending on the merchant setup.

Heartland Connect Merchant User Manual
Heartland Payment Systems™ Rev 3/15/2013 38
4. Click Process.
5. Connect prompts for the customer to enter his/her PIN on the PIN Pad:
6. Have the customer enter his/her PIN and press enter on the PIN Pad. The approval displays.
You can print a receipt by clicking the Print Receipt field.
You can send the cardholder an email receipt by entering the cardholder’s email address in the [email protected] field and then clicking E-Mail Receipt. To email a receipt to multiple recipients, simply separate each address with a semi-colon (;).
*Note: Your Business Name will appear in the Subject Line of these emails.
See Debit Card Field Descriptions page 43 for more information.

Heartland Connect Merchant User Manual
Heartland Payment Systems™ Rev 3/15/2013 39
Debit Sale Receipt
See Debit Card Transaction Receipt Field Descriptions on page 44 for definitions of the fields on this receipt.

Heartland Connect Merchant User Manual
Heartland Payment Systems™ Rev 3/15/2013 40
Debit Card Return Transaction
Use a return to refund the customer’s debit card for returned items. Heartland Connect records the card information and dollar amount, the customer enters his/her PIN on the PIN Pad, and Connect transmits this information to Heartland Payments. Heartland contacts the card issuer, receives an authorization, and displays an approval.
Note: If you are in the Health Care industry, please ensure you do not enter or store protected health information.
1. From the Main Menu, select Virtual Terminals.
2. Select Debit.
3. Select Return.
4. Slide the card through the card reader. Connect fills in the information for the Card Number, Expiration Date and Card Holder fields. Enter information into the remaining fields. See Debit Card Field Descriptions page 43 for more information. Actual fields that display may vary depending on the merchant setup.
5. Click Process.
6. Connect prompts for the customer to enter his/her PIN on the PIN Pad:
7. Have the customer enter his/her PIN and press enter on the PIN Pad. The approval displays.
You can print a receipt by clicking the Print Receipt field.
You can send the cardholder an email receipt by entering the cardholder’s email address in the [email protected] field and then clicking E-Mail Receipt. To email a receipt to multiple recipients, simply separate each address with a semi-colon (;).

Heartland Connect Merchant User Manual
Heartland Payment Systems™ Rev 3/15/2013 41
*Note: Your Business Name will appear in the Subject Line of these emails.
See Debit Card Field Descriptions page 43 for more information.

Heartland Connect Merchant User Manual
Heartland Payment Systems™ Rev 3/15/2013 42
Debit Return Receipt
See Debit Card Transaction Receipt Field Descriptions on page 44 for definitions of the fields on this receipt.

Heartland Connect Merchant User Manual
Heartland Payment Systems™ Rev 3/15/2013 43
Debit Card Field Descriptions Field Description
Card Number Swipe the cardholder’s debit card.
Expiration Date(MMYY)
Displays the expiration date in MMYY format.
Card Holder Displays the name of the cardholder.
Amount Enter the amount of the sale.
Tip Amount If applicable, enter the tip amount.
Cash Back Amount
If applicable, enter cash back amount.
Total Amount Total amount displays.
Invoice Number If applicable, enter the invoice #.
Customer ID If applicable, enter the customer’s ID.
Force Duplicate This option allows you to submit a transaction with the same card number and amount as a previously entered transaction within an hour of the original transaction. If this option is not selected, transactions with the same card number and amount ran in the hour period will decline. If the same card number but different amount is processed, the card will approve.
PNRef This number uniquely identifies each transaction. Use this number to perform voids, adjustments, refunds, and reprints. This number is the same as the Transaction # on the receipts.

Heartland Connect Merchant User Manual
Heartland Payment Systems™ Rev 3/15/2013 44
Debit Card Transaction Receipt Field Descriptions Field Description
Merchant Information
Merchant’s name, street address, city, state, and zip code.
Date and Time The date and time of the transaction.
Trans Type Type of transaction performed.
Transaction # The PNRef number that uniquely identifies the transaction.
Name The customer’s name.
Account Last 4 digits of the card account number.
Exp Date Xs for the expiration date.
Card Type DEBIT.
Entry Swiped.
Invoice # Invoice number.
AuthCode Authorization number assigned by the cardholder’s issuing bank.
Result Displays whether the transaction was APPROVED or DECLINED.
Message Additional information returned by the host regarding the transaction.
Batch Num The batch number.
Description The line that allows the merchant to describe the type of goods or services purchased. (Merchandise, Groceries, etc.).
Tip Amt The tip amount for the transaction.
Cash Back The cash back amount for the transaction.
Subtotal The amount of the sale.
Total Amt Total amount of the transaction.
Message A message indicating agreement to pay for the goods or services.
Receipt Legend Indicates whether the receipt is the cardholder copy or the merchant copy.

Heartland Connect Merchant User Manual
Heartland Payment Systems™ Rev 3/15/2013 45
Processing EBT Card Transactions
Overview
This chapter explains how to process EBT card transactions in Heartland Connect. For EBT, the merchant must have a card reader and a PIN Pad attached to the PC.
You can run the following debit card transactions
Food Stamp Sale
Cash Benefit Sale
Food Stamp Voucher
Food Stamp Return
Balance Inquiry
Note: Please contact your Heartland relationship manager if you wish to do EBT transactions.
Food Stamp Sale Transaction
Use the food stamp sale when a customer uses an EBT card as payment for food. Heartland Connect records the card information and dollar amount, the customer enters his/her PIN on the PIN Pad, and Connect transmits this information to Heartland Payments. Heartland contacts the card issuer, receives an authorization, and displays an approval.
To enter a food stamp sale, follow these steps:
1. From the Main Menu, select Virtual Terminals.
2. Select EBT.
3. Slide the card through the card reader. Connect fills in the information for the Card Number, Expiration Date and Card Holder fields. Enter information into the remaining fields. See EBT Card Field Descriptions on page 52 for more information. Actual fields that display may vary depending on the merchant setup.
4. Click Process.
5. Connect prompts for the customer to enter his/her PIN on the PIN Pad:

Heartland Connect Merchant User Manual
Heartland Payment Systems™ Rev 3/15/2013 46
6. Have the customer enter his/her PIN and press enter on the PIN Pad. The approval displays. You can print a receipt by clicking the Print Receipt field.
See EBT Card Field Descriptions on page 52 for more information.

Heartland Connect Merchant User Manual
Heartland Payment Systems™ Rev 3/15/2013 47
Food Stamp Sale Receipt
See EBT Card Transaction Receipt Field Descriptions on page 53 for definitions of the fields on this receipt.

Heartland Connect Merchant User Manual
Heartland Payment Systems™ Rev 3/15/2013 48
Cash Benefit Sale Transaction
Use a cash benefit sale when a customer uses an EBT card to purchase items at retailers and receive cash-back. Heartland Connect records the card information and dollar amount, the customer enters his/her PIN in the PIN Pad and Connect transmits this information to Heartland Payments. Heartland contacts the card issuer, receives an authorization, and displays an approval.
1. From the Main Menu, select Virtual Terminals.
2. Select EBT.
3. Select Cash Benefit.
4. Slide the card through the card reader. Connect fills in the information for the Card Number, Expiration Date and Card Holder fields. Enter information into the remaining fields. See EBT Card Field Descriptions on page 52 for more information. Actual fields that display may vary depending on the merchant setup.
5. Click Process.
6. Connect prompts for the customer to enter his/her PIN on the PIN Pad:
7. Have the customer enter his/her PIN and press enter on the PIN Pad. The approval displays. You can print a receipt by clicking the Print Receipt field. See the Food Stamp Sale Transaction beginning on page 45 for more information on the approval screen and the Food Stamp Sale Receipt on page 47 for a sample of a receipt.

Heartland Connect Merchant User Manual
Heartland Payment Systems™ Rev 3/15/2013 49
Food Stamp Voucher Transaction
Use a food stamp voucher when a food stamp sale could not be submitted to Heartland for authorization, usually because the transaction had to be authorized over the phone using voice authorization. The food stamp voucher transaction adds the voice-authorized transaction to the batch. This transaction requires the approval code and voucher number.
1. From the Main Menu, select Virtual Terminals.
2. Select EBT.
3. Select Food Stamp Voucher.
4. Enter the required information. See EBT Card Field Descriptions on page 52 for more information. Actual fields that display may vary depending on the merchant setup.
5. Click Process.
6. You can print a receipt by clicking the Print Receipt field. See the Food Stamp Sale Transaction beginning on page 45 for more information on the approval screen and the Food Stamp Sale Receipt on page 47 for a sample of a receipt.

Heartland Connect Merchant User Manual
Heartland Payment Systems™ Rev 3/15/2013 50
Food Stamp Return Transaction
Use a food stamp return to refund credit to the customer for returned items.
1. From the Main Menu, select Virtual Terminals.
2. Select EBT.
3. Select Food Stamp Return.
4. Slide the card through the card reader. Connect fills in the information for the Card Number, Expiration Date and Card Holder fields. Enter information into the remaining fields. See EBT Card Field Descriptions on page 52 for more information. Actual fields that display may vary depending on the merchant setup.
5. Click Process.
6. Connect prompts for the customer to enter his/her PIN on the PIN Pad:
7. Have the customer enter his/her PIN and press enter on the PIN Pad. The approval displays. You can print a receipt by clicking the Print Receipt field. See the Food Stamp Sale Transaction beginning on page 45 for more information on the approval screen and the Food Stamp Sale Receipt on page 47 for a sample of a receipt.

Heartland Connect Merchant User Manual
Heartland Payment Systems™ Rev 3/15/2013 51
Balance Inquiry Transaction
Use a balance inquiry when a customer wants to know the balance of his/her food stamps/cash benefits.
1. From the Main Menu, select Virtual Terminals.
2. Select EBT.
3. Select Balance Inquiry.
4. Slide the card through the card reader.
5. Click Process.
6. Connect prompts for the customer to enter his/her PIN on the PIN Pad:
7. Have the customer enter his/her PIN and press enter on the PIN Pad. The approval displays. You can print a receipt by clicking the Print Receipt field. See the Food Stamp Sale Transaction beginning on page 45 for more information on the approval screen and the Food Stamp Sale Receipt on page 47 for a sample of a receipt.

Heartland Connect Merchant User Manual
Heartland Payment Systems™ Rev 3/15/2013 52
EBT Card Field Descriptions Field Action
Card Number Swipe the card through the reader or enter the card account number manually.
Expiration Date(MMYY)
For manually keyed transactions, enter the expiration date in MMYY format.
Auth Code Enter the approval code for Food Stamp Vouchers.
Voucher Number Enter the voucher number for Food Stamp Vouchers.
Card Holder Enter the name of the cardholder if the card is not swiped.
Amount Enter sale amount.
Cash Back Amount
If applicable, enter cash back amount.
Total Amount Total amount displays.
Invoice Number If applicable, enter the Invoice number.
Force Duplicate This option allows you to submit a transaction with the same card number and amount as a previously entered transaction within an hour of the original transaction. If this option is not selected, transactions with the same card number and amount ran in the hour period will decline. If the same card number but different amount is processed, the card will approve.
PNRef This number uniquely identifies each transaction. Use this number to perform voids, adjustments, refunds, and reprints. This number is the same as the Transaction # on the receipts.

Heartland Connect Merchant User Manual
Heartland Payment Systems™ Rev 3/15/2013 53
EBT Card Transaction Receipt Field Descriptions Field Description
Merchant Information
Merchant’s name, street address, city, state, and zip code.
Date and Time Date and time of the transaction.
Trans Type Type of transaction.
Transaction # PNRef number that uniquely identifies the transaction.
Name Customer’s name.
Account Last 4 digits of the card account number.
Exp Date Xs for the expiration date.
Card Type Type of card used.
Entry How card number was entered.
Invoice # The invoice number for the order.
AuthCode Authorization number.
Result APPROVED or DECLINED.
Message Message about transaction.
Batch Num Batch number.
Description The line that allows the merchant to describe the type of goods or services purchased. (Merchandise, Groceries, etc.).
Total Amt Total amount of the sale.
Message Agreement message to pay for the goods or services.
Signature Customer signature line.
Receipt Legend Cardholder copy or the Merchant copy.

Heartland Connect Merchant User Manual
Heartland Payment Systems™ Rev 3/15/2013 54
GETI Check Transaction Processing
Overview
This chapter explains how to process check transactions in Heartland Connect. Heartland Connect supports a check reader attached to the PC or manually keying the checking account number.
You can run the following check transactions:
Check Sale
Check Verify
Check Void
Note: Please contact your Heartland Relationship Manager if you wish to do Check transactions.
Check Sale Transaction
Use the check sale when a customer uses a check as payment for goods or services. Heartland Connect records the check information and dollar amount and transmits this information to Heartland Payments. Heartland contacts the check company, receives an authorization, and displays an approval.
To enter a sale, follow these steps:
1. From the Main Menu, select Virtual Terminals.
2. Select Checks.

Heartland Connect Merchant User Manual
Heartland Payment Systems™ Rev 3/15/2013 55
3. Enter information into the required fields. See Check Transaction Receipt Field Descriptions on page 67 for more information.
4. Click Process. The approval displays.
You can print a receipt by clicking the Print Receipt field.
You can send the cardholder an email receipt by entering the cardholder’s email address in the [email protected] field and then clicking E-Mail Receipt. To email a receipt to multiple recipients, simply separate each address with a semi-colon (;).

Heartland Connect Merchant User Manual
Heartland Payment Systems™ Rev 3/15/2013 56
*Note: Your Business Name will appear in the Subject Line of these emails.
See Check Transaction Receipt Field Descriptions on page 67 for definitions of the fields on this screen.

Heartland Connect Merchant User Manual
Heartland Payment Systems™ Rev 3/15/2013 57
Check Sale Receipt
See Check Transaction Receipt Field Descriptions on page 67 for definitions of the fields on this receipt.

Heartland Connect Merchant User Manual
Heartland Payment Systems™ Rev 3/15/2013 58
Check Verify Transaction
Use the check verify when a customer uses a credit card as payment for goods or services and you wish to “verify” that the check is good. Verification differs from check sale in that the check company verifies that the checking account is not on a negative list but doesn’t guarantee payment if the check bounces. Heartland Connect records the card information and dollar amount and transmits this information to Heartland Payments. Heartland contacts the credit card issuer, receives an authorization, and displays an approval.
To enter a sale, follow these steps:
1. From the Main Menu, select Virtual Terminals.
2. Select Checks.
3. Select Verify.
4. Enter information into the required fields. See Check Transaction Receipt Field Descriptions on page 67 for more information.
5. Click Process. The approval displays.
You can print a receipt by clicking the Print Receipt field.
You can send the cardholder an email receipt by entering the cardholder’s email address in the [email protected] field and then clicking E-Mail Receipt. To email a receipt to multiple recipients, simply separate each address with a semi-colon (;).

Heartland Connect Merchant User Manual
Heartland Payment Systems™ Rev 3/15/2013 59
*Note: Your Business Name will appear in the Subject Line of these emails.
See Check Transaction Receipt Field Descriptions on page 67 for definitions of the fields on this screen.

Heartland Connect Merchant User Manual
Heartland Payment Systems™ Rev 3/15/2013 60
Check Verify Receipt
See Check Transaction Receipt Field Descriptions on page 67 for definitions of the fields on this receipt.
Heartland Connect Merchant User Manual
Heartland Payment Systems™ Rev 3/15/2013 61
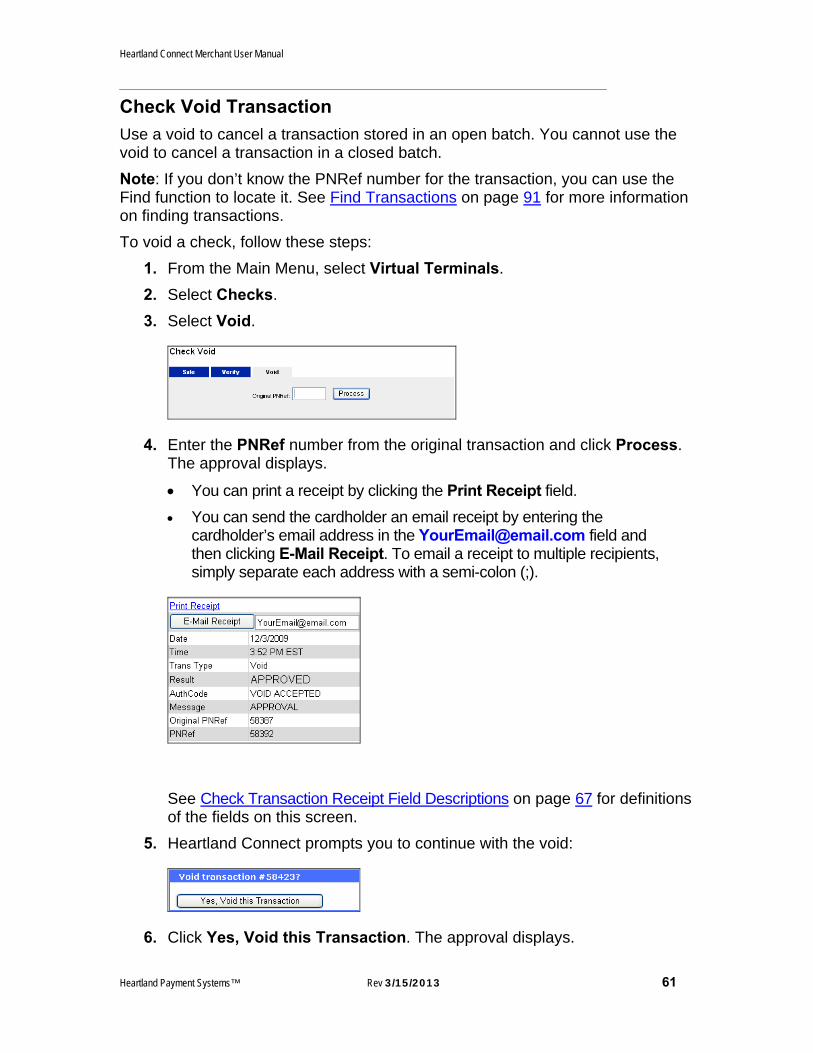
Check Void Transaction
Use a void to cancel a transaction stored in an open batch. You cannot use the void to cancel a transaction in a closed batch.
Note: If you don’t know the PNRef number for the transaction, you can use the Find function to locate it. See Find Transactions on page 91 for more information on finding transactions.
To void a check, follow these steps:
1. From the Main Menu, select Virtual Terminals.
2. Select Checks.
3. Select Void.
4. Enter the PNRef number from the original transaction and click Process. The approval displays.
You can print a receipt by clicking the Print Receipt field.
You can send the cardholder an email receipt by entering the cardholder’s email address in the [email protected] field and then clicking E-Mail Receipt. To email a receipt to multiple recipients, simply separate each address with a semi-colon (;).
See Check Transaction Receipt Field Descriptions on page 67 for definitions of the fields on this screen.
5. Heartland Connect prompts you to continue with the void:
6. Click Yes, Void this Transaction. The approval displays.

Heartland Connect Merchant User Manual
Heartland Payment Systems™ Rev 3/15/2013 62

Heartland Connect Merchant User Manual
Heartland Payment Systems™ Rev 3/15/2013 63
Transmodus Check Transaction Processing
Overview
This chapter explains how to process Transmodus check transactions in Heartland Connect. Heartland Connect supports manually keying the checking account number only with Transmodus interface.
You can run the following check transactions:
Check Sale
Check Verify
Check Void (Must be done thru Heartland Check Management website)
Note: Please contact your Heartland Relationship Manager if you wish to do Check transactions.
Check Sale Transaction
Use the check sale when a customer uses a check as payment for goods or services. Heartland Connect records the check information and dollar amount and transmits this information to Heartland Payments. Heartland contacts the check company, receives an authorization, and displays an approval.
To enter a sale, follow these steps:
1. From the Main Menu, select Virtual Terminals.

Heartland Connect Merchant User Manual
Heartland Payment Systems™ Rev 3/15/2013 64
2. Select Checks.
3. Enter information into the required fields.
4. Click Process. The approval displays.
You can print a receipt by clicking the Print Receipt field.
Heartland Connect Merchant User Manual
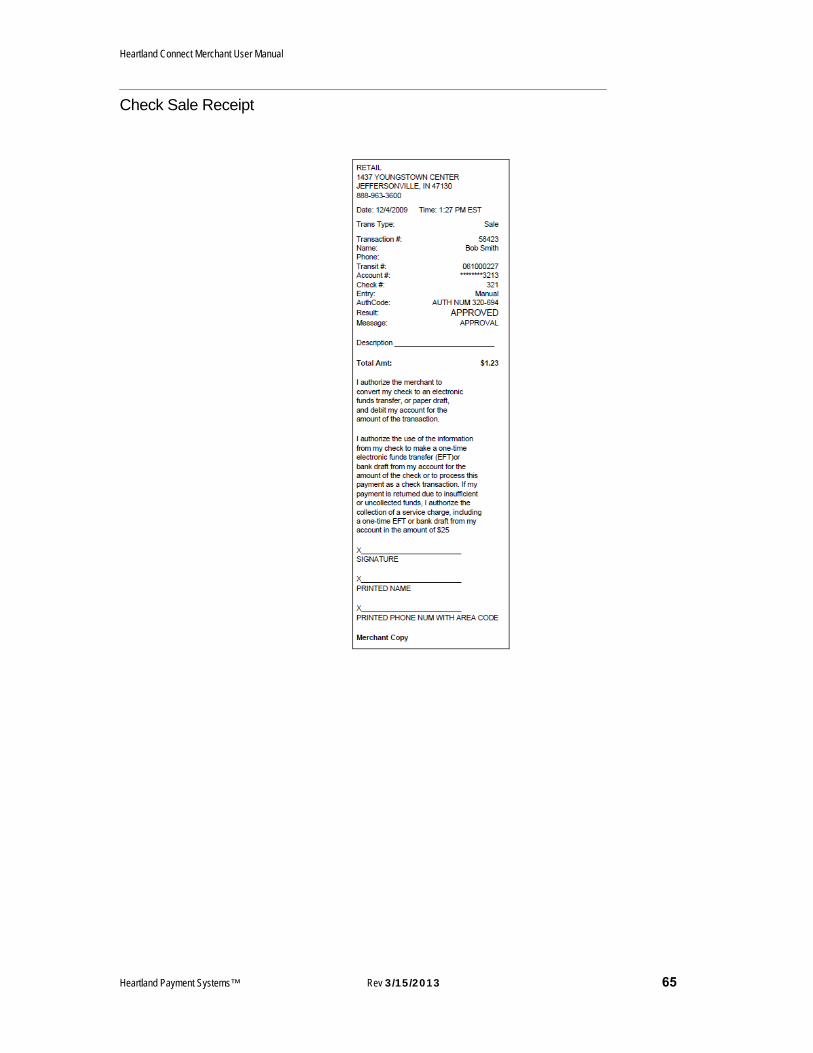
Heartland Payment Systems™ Rev 3/15/2013 65
Check Sale Receipt

Heartland Connect Merchant User Manual
Heartland Payment Systems™ Rev 3/15/2013 66
Check Transaction Field Descriptions
Field Action
Name Name as it it appears on the check.
Check Number Check number.
Amount (US $) Enter sale amount.
Bank Routing/Transit
Bank routing or transit number.
Account Number Customer’s account number
Customer ID Customer’s identification number.
Invoice Number If applicable, the invoice number.
Social Security Number
Customer’s Social Security number.
Date of Birth Customer’s date of birth.
Driver’s License Number
Customer’s driver’s license number.
Account Type Checking or Savings.
Check Type Personal or Business.
Phone Number Customer’s primary phone number.
Email Customer’s email address.
Street Address Customer’s street address.
City Customer’s city.
State Customer’s state.
Postal (Zip) Code
Customer’s postal or zip code.
Additional ID1 Additional ID number.
Additional ID1 Type
Type of additional ID, Passport, Military ID, Bar-Coded ID.

Heartland Connect Merchant User Manual
Heartland Payment Systems™ Rev 3/15/2013 67
Check Transaction Receipt Field Descriptions
Field Description
Merchant Information
Merchant’s name, street address, city, state, and zip code.
Date and Time The date and time of the transaction.
Trans Type Type of transaction performed.
Transaction # The PNRef number that uniquely identifies the transaction.
Name The customer’s name.
Phone The customer’s phone number.
Transit # Banking route or transit number.
Account # Account number. Masked for security purposes.
Check # Check number.
Entry Method used to enter check/ACH transaction information: Scanned or Manual.
AuthCode Authorization number assigned by the check host.
Result Displays whether the transaction was APPROVED or DECLINED.
Message APPROVAL or DECLINE.
Description The line that allows the merchant to describe the type of goods or services purchased. (Merchandise, Groceries, etc.).
Total Amt Total amount of the transaction.
Agreement Message
Agreement message to pay for the goods or services.
Signature Signature line.
Printed Name Customer’s name.
Printed Phone Num with Area Code
Customer’s phone number.
Receipt Legend Indicates whether the receipt is the cardholder copy or the merchant copy.

Heartland Connect Merchant User Manual
Heartland Payment Systems™ Rev 3/15/2013 68
Processing Cash Transactions
Overview
This chapter explains how to process cash transactions in Heartland Connect.
You can run the following cash transactions
Sale
Return (Refund)
Cash Tender Transaction
Use the cash tender sale when a customer uses cash as payment for goods or services. Heartland Connect records the transaction information for reporting purposes
To enter a cash sale, follow these steps:
1. From the Main Menu, select Virtual Terminals.
2. Select Cash.
3. Enter information into the required fields. See Cash Field Descriptions on page 72 for more information.
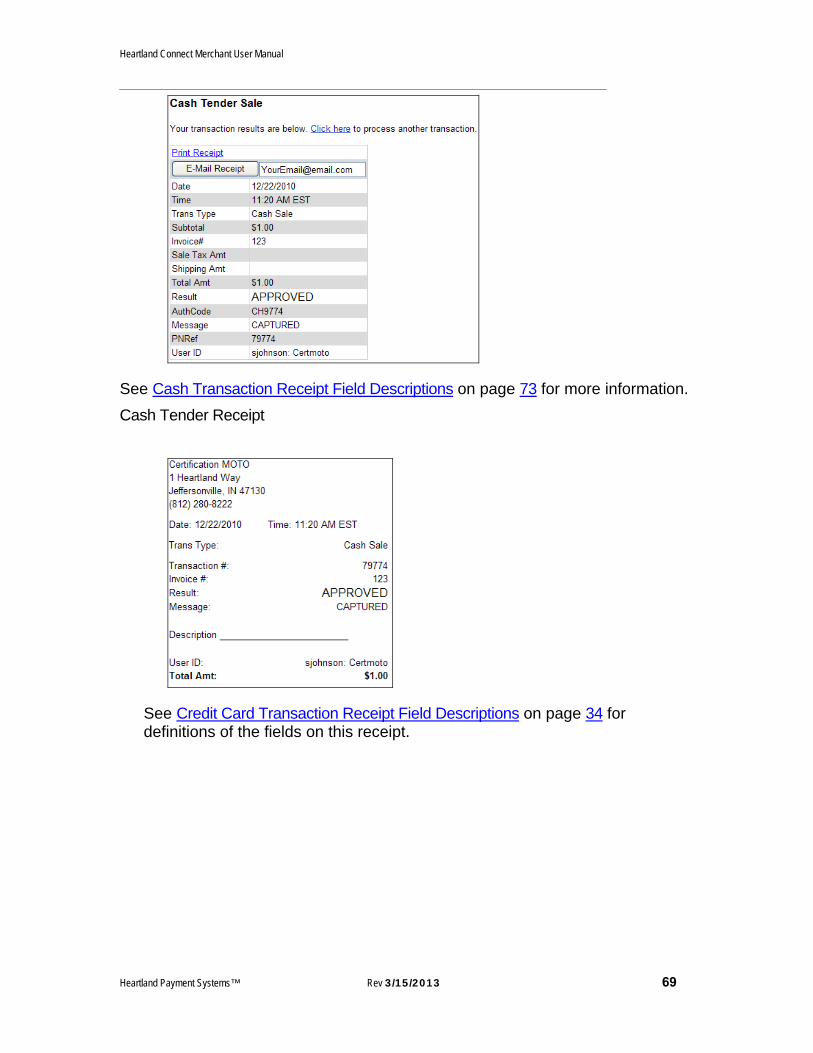
4. Click Process. The approval displays.
You can print a receipt by clicking the Print Receipt field.
You can send the cardholder an email receipt by entering the cardholder’s email address in the [email protected] field and then clicking E-Mail Receipt. To email a receipt to multiple recipients, simply separate each address with a semi-colon (;).
Heartland Connect Merchant User Manual
Heartland Payment Systems™ Rev 3/15/2013 69
See Cash Transaction Receipt Field Descriptions on page 73 for more information.
Cash Tender Receipt
See Credit Card Transaction Receipt Field Descriptions on page 34 for definitions of the fields on this receipt.

Heartland Connect Merchant User Manual
Heartland Payment Systems™ Rev 3/15/2013 70
Cash Return Transaction
Use the cash return for returned items. Heartland Connect records the transaction information for reporting purposes.
To enter a cash return, follow these steps:
1. From the Main Menu, select Virtual Terminals.
2. Click Cash.
3. Click Cash Return:
4. Enter information into the required fields. See Cash Field Descriptions on page 72 for more information.
5. Click Process. The approval displays.
You can print a receipt by clicking the Print Receipt field.
You can send the cardholder an email receipt by entering the cardholder’s email address in the [email protected] field and then clicking E-Mail Receipt. To email a receipt to multiple recipients, simply separate each address with a semi-colon (;).
See Cash Field Descriptions on page 72 for more information.
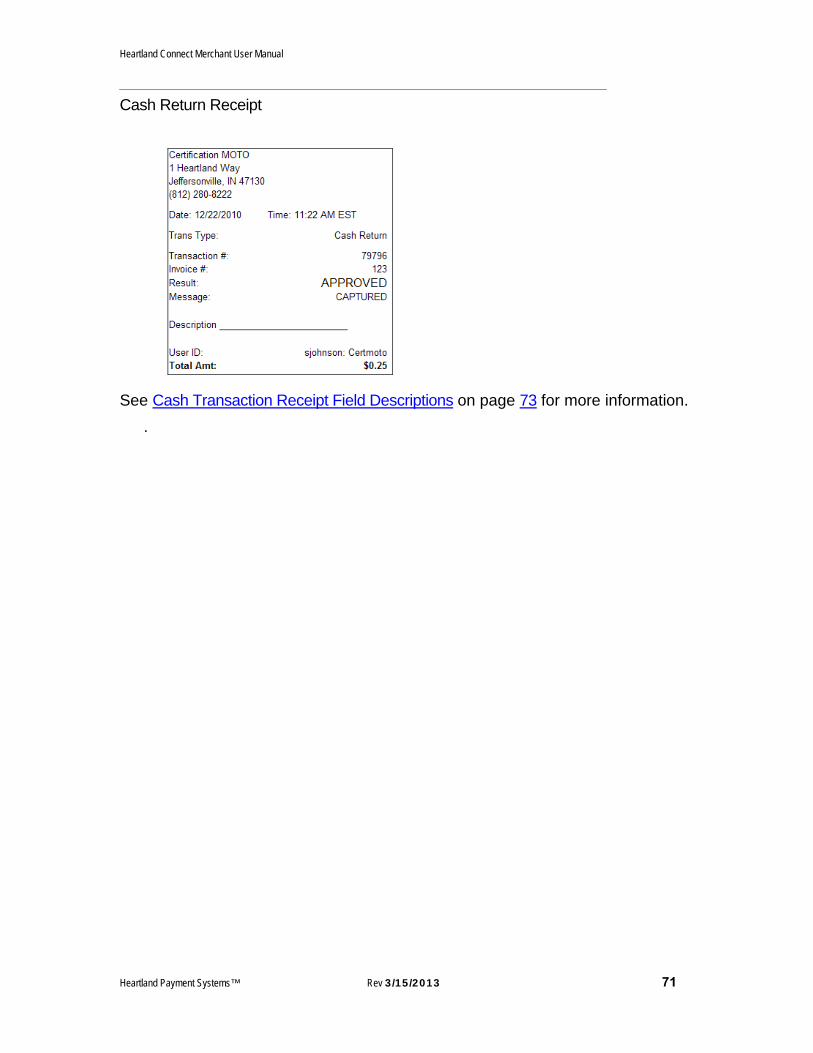
Heartland Connect Merchant User Manual
Heartland Payment Systems™ Rev 3/15/2013 71
Cash Return Receipt
See Cash Transaction Receipt Field Descriptions on page 73 for more information.
.

Heartland Connect Merchant User Manual
Heartland Payment Systems™ Rev 3/15/2013 72
Cash Field Descriptions Field Action
Date Transaction date.
Time Transaction time.
Subtotal Enter sale amount.
Tax Amount If applicable, enter tax amount.
Tip Amount If applicable, enter tip amount.
Shipping Amount If applicable, enter shipping amount.
Total Amount Total amount displays.
Invoice # If applicable, enter the invoice number.
User ID User who processed the transaction

Heartland Connect Merchant User Manual
Heartland Payment Systems™ Rev 3/15/2013 73
Cash Transaction Receipt Field Descriptions Field Description
Merchant Information
Merchant’s name, street address, city, state, and zip code.
Date and Time The date and time of the transaction.
Trans Type Type of transaction: Sale, Credit.
Transaction # The PNRef number that uniquely identifies the transaction.
Invoice # Invoice number.
Result APPROVED or DECLINED.
Message CAPTURED.
Description Description of goods or services.
Total Amt Total amount.
User ID User who processed the transaction

Heartland Connect Merchant User Manual
Heartland Payment Systems™ Rev 3/15/2013 74
Processing Recurring Billing Transactions
Overview
Recurring billing is used to bill a cardholder or check holder periodically for expenses. With recurring billing, you can do the following:
Add customer
View customers
View Contracts
Recurring Billing Reports
Recurring ACH is only used if you are set up for the ACH check service program. This is a “checkless” processing technique in which merchants receive payment for products or services directly from their customers’ accounts. The customers are required to provide their checking account information in order to set up recurring ACH.
Note: If you are in the Health Care industry, please ensure you do not enter or store protected health information.
To setup recurring billing or recurring ACH, follow the steps below:
Add a Customer
To add a customer, follow these steps:
1. From the Main Menu, select Recurring Billing.
2. Select Add Customer.

Heartland Connect Merchant User Manual
Heartland Payment Systems™ Rev 3/15/2013 75
Field Action
Customer ID Unique ID to identify the customer.
First Name Customer’s first name.
Last Name Customer’s last name.
Company Name of the customer’s company. *Not Applicable for Health Care industries. Field will be disabled
Title Customer’s title. *Not Applicable for Health Care industries. Field will be disabled
Department Department at the customer’s site. *Not Applicable for Health Care industries. Field will be disabled
Email Customer’s email address.
Daytime Phone Customer’s daytime phone number.
Evening Phone Customer’s evening phone number.
Mobile Phone Customer’s mobile phone number.
Fax Customer’s fax number.
Status Active or Inactive.
Address Line 1-3 Enter up to 3 lines of address information.
City, State, Province, Postal (Zip) Code
City, state, and zip or postal code.
Country Use the drop-down box to select the country. Note: If you are a healthcare provider, please ensure that patient demographic information is not stored as this would violate HIPAA.
3. Click Add Customer. The Primary Contact screen displays:

Heartland Connect Merchant User Manual
Heartland Payment Systems™ Rev 3/15/2013 76
Credit Card Information
To add credit card information, do the following:
1. From the Primary Contact screen, select Add Credit Card or ACH.
2. Select Credit Card.
3. Enter the credit card information and enter the address information. You can also choose the ‘Copy Address From Customer’ feature and that will carry over the address that you inputted during the Customer Setup step.
4. You can use the Verify tab to verify that a Visa card is valid prior to proceeding with the Credit Card information. You can utilize this tab for other entitlements (MasterCard, AMEX & Discover) as well for validating the customers Zip Code.
o Note: When using the Verify option, zip code is required for all non-Visa cards. Non-Visa cards will only receive zip code verification.
5. To use the payment information for a later time, click Save Payment Info to return to the Primary Contact screen. If you want to charge the customer right now, select Charge Now.
6. If you selected Charge Now, enter the amount:

Heartland Connect Merchant User Manual
Heartland Payment Systems™ Rev 3/15/2013 77
7. Click Charge & Save Payment Info.
8. The approval displays.
You can print a receipt by clicking the Print Receipt field.
You can display a map of the cardholder’s address by clicking Map Address.
You can send the cardholder an email receipt by entering the cardholder’s email address in the [email protected] field and then clicking E-Mail Receipt. To email a receipt to multiple recipients, simply separate each address with a semi-colon (;).
See Credit Card Field Descriptions on page 32 for definitions of the fields on the approval screen.

Heartland Connect Merchant User Manual
Heartland Payment Systems™ Rev 3/15/2013 78
Recurring Billing Receipt
See Credit Card Transaction Receipt Field Descriptions on page 34 for definitions of the fields on this receipt.

Heartland Connect Merchant User Manual
Heartland Payment Systems™ Rev 3/15/2013 79
Check/ACH Information
To add check/ACH information, do the following:
1. From the Primary Contact screen, click Add Credit Card or ACH.
2. Select ACH.
3. Enter the Name, Banking Routing/Transit, Account Numbers, and Address. Indicate the Type of Account and add the Driver’s License and Social Security Numbers.
o Note: To quickly insert the Customer Information, you may choose the ‘Copy Address From Customer’ option and that will bring over the Name, State, Zip Code, Street Address and City from the Customer Setup section.
4. To use the payment information for a later time, click Save Payment Info to return to the Primary Contact screen. If you want to charge the customer right now, select Charge Now.
5. If you selected Charge Now, enter the amount:
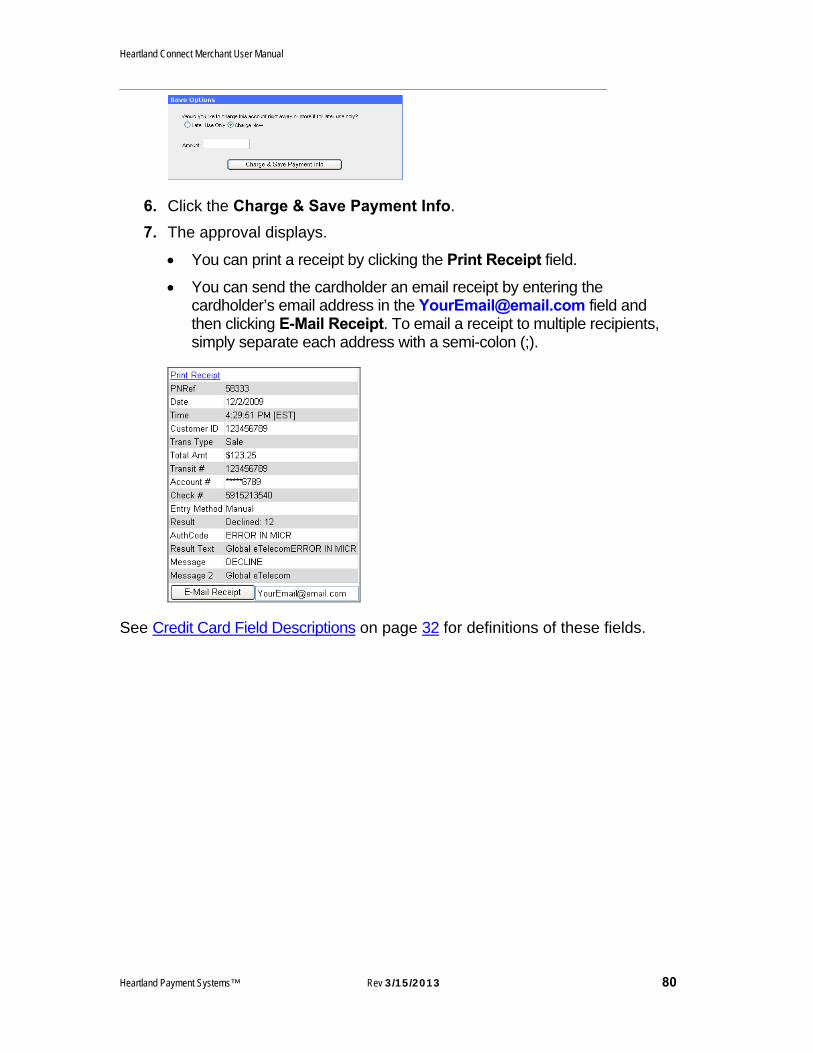
Heartland Connect Merchant User Manual
Heartland Payment Systems™ Rev 3/15/2013 80
6. Click the Charge & Save Payment Info.
7. The approval displays.
You can print a receipt by clicking the Print Receipt field.
You can send the cardholder an email receipt by entering the cardholder’s email address in the [email protected] field and then clicking E-Mail Receipt. To email a receipt to multiple recipients, simply separate each address with a semi-colon (;).
See Credit Card Field Descriptions on page 32 for definitions of these fields.

Heartland Connect Merchant User Manual
Heartland Payment Systems™ Rev 3/15/2013 81
Recurring Check Billing Receipt
See Check Transaction Receipt Field Descriptions on page 67 for definitions of the fields on this receipt.

Heartland Connect Merchant User Manual
Heartland Payment Systems™ Rev 3/15/2013 82
Contract Information
To add contract information, follow these steps:
1. From the Primary Contact screen, select Add Contract. The following screen displays:
Field Action
Contract ID Unique ID to identify this contract.
Contract Name Name of the contract.
Start Date Use the calendar option to select a start date for the contract.
Number of Payments
This option will only appear if the “Have Connect automatically calculate…” option is flagged. Once flagged, the recurring billing program will allow you to input the number of payments that you want to accept from the customer.
End Date Use the calendar option to select an end date for the contract.
Subtotal The amount of the contract.
Tax The tax amount for the contract.

Heartland Connect Merchant User Manual
Heartland Payment Systems™ Rev 3/15/2013 83
Field Action
Amount Due Each Payment (Read Only)
The total amount of the contract.
Status Active or Inactive.
Which Account should be Billed for this Contract?
Use the drop-down box to select which account to bill for this contract.
Add New Credit Card or ACH Info
Select to add new payment information for this contract.
Execute this Contract
From the drop-down list, select how often this contract should be executed.
If a transaction is ever declined . . .
Indicate how many times Heartland Connect should attempt to reprocess declined transactions for this contract. A zero (0) means do not reprocess.
Would you like to receive a confirmation e-mail . . .
Indicate if you would like to send an email for approved transactions. The email used is what was provided to Heartland for when the Merchant account was setup within Heartland Connect
Would you like to receive a confirmation e-mail . . .
Indicate if you would like to send an email for declined transactions. The email used is what was provided to Heartland for when the Merchant account was setup within Heartland Connect
Would you like transaction receipts to be E-mailed to the customer?
Indicate if and when you would like to send an email to the customer for transactions.
2. If you chose to have Connect automatically calculate the End Date based on the Number of Payments entered, then once you choose “Add Contract”, a verification screen will appear and will display the End Date. You will have the option to edit the Number of Payments and Recalculate the End Date or Accept and Continue.

Heartland Connect Merchant User Manual
Heartland Payment Systems™ Rev 3/15/2013 84
3. Click Add Contract. The following screen displays:
*Note: Here you can Print a Contract or Print the entitlement Card Payment Info. This is for your convenience if you wish to utilize these features

Heartland Connect Merchant User Manual
Heartland Payment Systems™ Rev 3/15/2013 85
View Customers
To view recurring billing customers, follow these steps:
1. From the Main Menu, select Recurring Billing.
2. Select View Customers. The Find Customers screen displays:
3. In the Search By field, use the drop-down box to select how you want to search:
4. Depending on your search criterion, enter the value in the Search Value field.
5. Select Active Customers, Inactive Customers or All Customers.
6. Click Find Customer(s).

Heartland Connect Merchant User Manual
Heartland Payment Systems™ Rev 3/15/2013 86
7. Click the Customer ID of the customer you want. The selected customer displays.
*Note: Here you can Print a Contract or Print the entitlement Card Payment Info. This is for your convenience if you wish to utilize these features
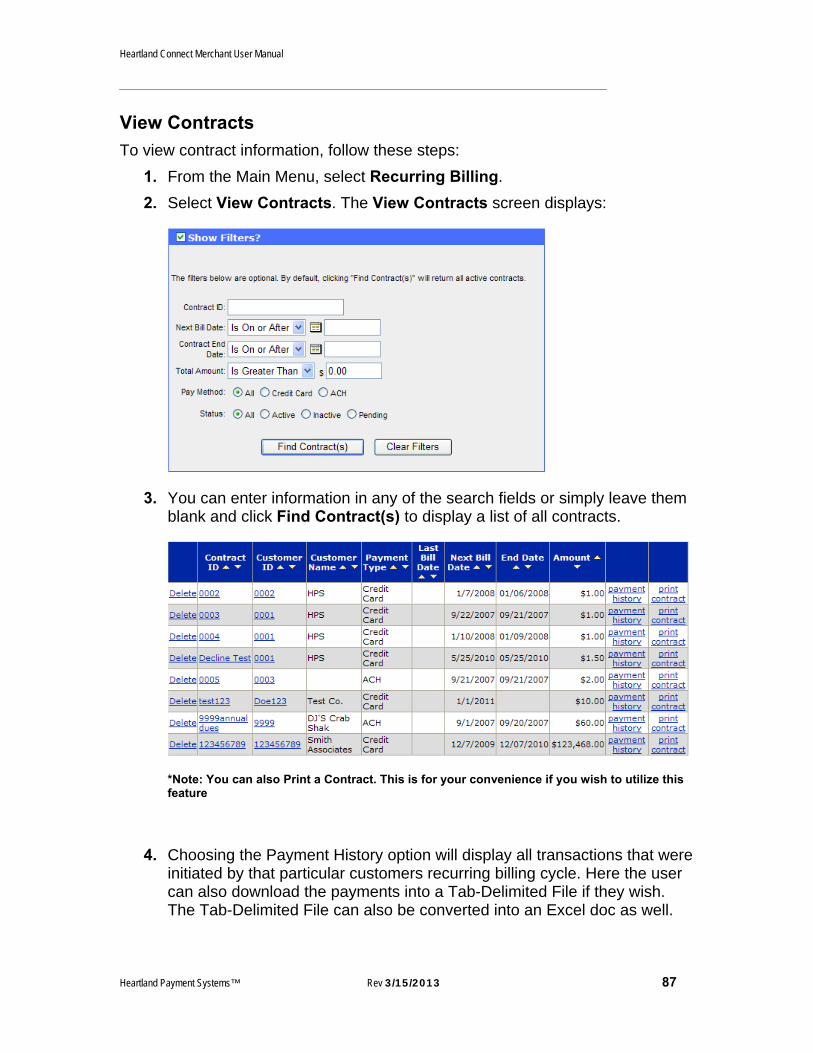
Heartland Connect Merchant User Manual
Heartland Payment Systems™ Rev 3/15/2013 87
View Contracts
To view contract information, follow these steps:
1. From the Main Menu, select Recurring Billing.
2. Select View Contracts. The View Contracts screen displays:
3. You can enter information in any of the search fields or simply leave them blank and click Find Contract(s) to display a list of all contracts.
*Note: You can also Print a Contract. This is for your convenience if you wish to utilize this feature
4. Choosing the Payment History option will display all transactions that were initiated by that particular customers recurring billing cycle. Here the user can also download the payments into a Tab-Delimited File if they wish. The Tab-Delimited File can also be converted into an Excel doc as well.

Heartland Connect Merchant User Manual
Heartland Payment Systems™ Rev 3/15/2013 88
5. Click the Contract ID of the contract you want. The selected contract displays.

Heartland Connect Merchant User Manual
Heartland Payment Systems™ Rev 3/15/2013 89
Recurring Billing Report
The recurring billing report lists all the recurring billings you have done.
To view the Recurring Billing Report:
1. From the Main Menu, select Recurring Billing.
2. Select Billing Report.
Field Action
Transaction Status
Choose All, Approved, or Other.
Customer ID Enter the customer ID for a report on a specific customer.
Billed Amount, $ Choose Is Equal To, Is Greater Than, or Is Less Than and the billed amount.
Date Range, From
Choose All, Month-to-Day, Previous Month, Last 30 Days, Last 60 Days, Last 90 Days, or Year-to-Day. Type in the range of dates in MM/DD/YYYY format.
Pay Method Choose All, Credit Card, or ACH.
3. Click Find Billing(s).

Heartland Connect Merchant User Manual
Heartland Payment Systems™ Rev 3/15/2013 90
Recurring Billing Expiration Report
The expiration report lists all customers whose credit cards will expire in a specified timeframe. The report will show all customers (Customer ID optional) where a contract is billed with a card that has/will expire in the specific time frame. This report will only pull data back from customers that have a Contract associated to them.
To create this report, follow the steps:
1. From the Main Menu, select Recurring Billing.
2. Select Expiration Report.
Field Action
Customer ID Enter the customer ID for a report on a specific customer.
Expiration Dates (MMYY), From
Choose Current Month or Next Month and the expiration date range in MMYY.
Status Choose All, Active, Inactive, or Pending.
3. Click Find Expired Items.

Heartland Connect Merchant User Manual
Heartland Payment Systems™ Rev 3/15/2013 91
Find Transactions
Overview
This chapter explains how to find in a batch do can do the following transactions:
Void
Refund
Repeat Sale
Adjustment
Find Transactions
To use the find function, follow these steps:
1. From the Main Menu, select Find Transactions.
2. Depending on the type of transaction you are trying to find, select Credit, Debit, EBT, Check, or Cash.
3. You can narrow your search in a number of ways or you can simply leave the fields blank to see all transactions.
You can select a pre-defined date range from the Date Range drop-down list.
You can modify Start Date and End Date.
You can use the calendar to select a particular date. Or, use the ≤ or ≥ links in the month bar to switch the month, and click on any date link in the calendar for a particular date.

Heartland Connect Merchant User Manual
Heartland Payment Systems™ Rev 3/15/2013 92
4. Fill in the transaction information for the rest of the filter fields. The less information you enter, the more matches you will get.
Choose a Transaction Type (Trx Type) from the drop-down list.
Choose the option to Exclude Void transactions or not (by default, this box is checked).
Choose a card Payment Type from the drop-down list.
Choose a Status from the drop-down list.
5. Click Submit.
Field Description
Ref # The reference number (PNRef) assigned to each transaction.
Customer ID Identifies a customer.
Inv # Invoice number associated with the transaction.
Date The date and time the transaction was processed.
Result The response. APPROVED, DECLINED, etc.
Payment Type Card type. VISA, MASTERCARD, AMEX, etc.
Account Type Card type. VISA, MASTERCARD, AMEX, etc.
Account # Last 4 digits of the card account number.
Name The customer’s name.
Type Type of transaction. Sale, ForceCapture, Credit, Void, etc.
Status Status. APPROVAL, etc.
Approval Code Approval Code from Heartland.
Auth Amt The dollar amount.
Capture Amt The amount captured for settlement.
Tip Amt The tip amount.
User The name of the user who processed the transaction.
Register The register number used for the transaction.
PO Num # The PO number.
Description If entered, the Description Name entered at the time of sale will appear.

Heartland Connect Merchant User Manual
Heartland Payment Systems™ Rev 3/15/2013 93
Reporting
Overview
This chapter explains how to display and print summary and detail reports:
Card Type Summary or Detail report
Payment Type Summary or Detail report
Date Range Summary or Detail report
User Summary or Detail report
Full receipts review/reprint
Individual transactions review/repeat/reprint receipt
Current batch
Previous batch
Transaction Summary and Detail Reports
You can print summary and detail reports.
Summary Report
To print a summary report, follow these steps:
1. From the Main Menu, select Find Transactions.
2. Select Summary.
3. You can narrow the range for the report in a number of ways or you can simply leave the fields blank to see all transactions.
You can select a pre-defined date range from the Date Range drop-down list.
You can modify Start Date and End Date.

Heartland Connect Merchant User Manual
Heartland Payment Systems™ Rev 3/15/2013 94
You can use the calendar to select a particular date. Or, use the ≤ or ≥ links in the month bar to switch the month, and click on any date link in the calendar for a particular date.
You can choose by the User who entered the transaction.
You choose by the Register.
4. Click Submit.
For each payment type (Credit, Check, Debit, EBT), the report shows activity by transaction type (Auth, Credit, Sale, etc.), as well as settlement information.
Field Description
Card Type Card type.
Sale Count Total number of sales for each tender type.
Sale Amount Total amount of sales for each tender type.
Return Count Total number of returns for each tender type.
Return Amount Total amount of returns for each tender type.
Total Amount Net amount (sales – returns) for each tender type.
Trans Type Transaction type.
Trans Count Total number of transactions for each transaction type.
Amount Dollar amount of a sale.
Auth Amount Dollar amount of an approval or authorization request.
Tip Amount Dollar amount of tips.
Capture Amount Captured amount.

Heartland Connect Merchant User Manual
Heartland Payment Systems™ Rev 3/15/2013 95
Field Description
Settle Count Total number settled for each transaction type.
Settle Amount Total settled amount for each transaction type.
5. To print this report, use print button or click File – Print in the browser.
Detail Report
To run a Detail Report, follow these steps:
1. From the Main Menu, select Find Transactions.
2. Select Credit, Debit, EBT, Check or Cash.
3. You can narrow the range for the report in a number of ways or you can simply leave the fields blank to see all transactions.
You can select a pre-defined date range from the Date Range drop-down list.
You can modify Start Date and End Date.
You can use the calendar to select a particular date. Or, use the ≤ or ≥ links in the month bar to switch the month, and click on any date link in the calendar for a particular date.
4. You can also use the filter fields to narrow the report or leave them blank for all transactions.
5. Click Submit.

Heartland Connect Merchant User Manual
Heartland Payment Systems™ Rev 3/15/2013 96
Field Description
Ref # The reference number (PNRef).
Customer ID Customer ID.
Inv # Invoice number.
Date Transaction date.
Result Response (APPROVED, DECLINED, etc.).
Payment Type VISA, AMEX, EBT, etc.
Account Type VISA, AMEX, EBT, etc.
Account # Last 4 digits of the account number.
Transit # Routing/Transit Number.
Check # Check number.
Name Customer’s name.
Type Sale, Authorization, Credit, etc.
Amt Check amount.
Status APPROVAL
Approval Code Approval or error code.
Auth Amt Authorization amount.
Capture Amt Captured amount.
Tip Amt Tip amount.
User User that processed the transaction.
Register Register number.
PO Num # Customer’s PO number.
Description If entered, the Description Name entered at the time of sale will appear.
6. To print this report, use print button or click File and Print in the browser.
7. Click the Ref # field (PNRef) to display additional information about a transaction.

Heartland Connect Merchant User Manual
Heartland Payment Systems™ Rev 3/15/2013 97
Exporting Reports
You can export your detail report to several formats:
XML
Tab Delimited
Excel
Exporting
To export a report, follow these steps:
1. Run a Detail Report. See Detail Report on page 95 for more information.
2. Select the desired format from the Report Format drop down box.
3. Click Download.
4. Click Open to view the file immediately, or click Save to save the report.

Heartland Connect Merchant User Manual
Heartland Payment Systems™ Rev 3/15/2013 98
XML Sample
Tab Delimited Sample
PDF Sample
Excel Sample

Heartland Connect Merchant User Manual
Heartland Payment Systems™ Rev 3/15/2013 99
Batch Review
You can review summary information for the current and previous batches.
Current Batch Summary
To print a summary report of the current batch, follow these steps:
1. From the Main Menu, select Current Batch.
2. Select Summary.
Field Description
Payment Type Payment types.
Deposit Amt Total amount of sales for each payment type.
Deposit Qty Total number of sales for each payment type.
Return Amt Total amount of returns for each payment type.
Return Qty Total number of returns for each payment type.
Net Amt The net amount (sales – returns) for each payment type.
Net Qty The net quantity (sales – returns) for each payment type.
3. To print this report, use print button or click File and Print in the browser.

Heartland Connect Merchant User Manual
Heartland Payment Systems™ Rev 3/15/2013 100
Previous Batch Summary
To print summary report on the previous batch, follow these steps:
1. From the Main Menu, select Current Batch.
2. Select Host Batch Info.
3. Select the batch. Enter 0 (zero) for the current batch or 1 for the previous batch in the Batch Sequence Number field.
4. Click Submit.
Field Description
Tender Type Payment types.
Sale Count Total number of sales for each tender type.
Sale Amount Total amount of sales for each tender type.
Return Count Total number of returns for each tender type.
Return Amount Total amount of returns for each tender type.
Total Count Total number of sales and returns for each tender type.
Total Amount Net amount (sales – returns) for each tender type.
5. To print this report, use print button or click File and Print in the browser.

Heartland Connect Merchant User Manual
Heartland Payment Systems™ Rev 3/15/2013 101
End of Day Settlement You should settle the batch daily. There are two different settlement methods:
Auto close: Heartland Connect automatically closes the batch at a pre-arranged time.
Manual: The merchant manually settles the batch.
To settle the batch manually, follow these steps:
1. From the Main Menu, select End of Day.
2. Select CC/DBT.
3. Click Close Batch.

Heartland Connect Merchant User Manual
Heartland Payment Systems™ Rev 3/15/2013 102
Batch Upload
To upload a batch file, follow these steps:
1. From the Main Menu, select Tools.
2. Select Batch Upload.
3. Select the file type from the drop-down box. Tab Delimited is the default.
Note: As the warning indicates, once you upload a batch file, changes in reports may not change immediately because the host processes batch files every hour on the hour.
4. Click Browse to find and upload the file.
5. Click Upload.
Batch Import You can manually upload a batch from an excel file, known as Tab Delimited. The purpose of this function is to import the file into Heartland Connect so you can upload it to Heartland.
Note: The maximum number of transactions in any batch upload is limited to 990 transactions that are uploaded for settlement and deposit.
Batch Upload Format Example The following example is for a Batch Upload using Excel.
Note: If the file is already in tab delimited format, skip to the notepad section and continue.
These are the fields for uploading to Heartland Connect. Note the required fields column.

Heartland Connect Merchant User Manual
Heartland Payment Systems™ Rev 3/15/2013 103
1. Format the cells in Excel as follows:
A. Text B. Text C. Text. D. Number, 2 Decimal places E. Text F. Text G. Text H. Text I. Text J. Number, 2 Decimal places K. Text L. Text M. Text N. Text O. Text P. Text
The following example shows the Excel spreadsheet:
2. Click Save As.

Heartland Connect Merchant User Manual
Heartland Payment Systems™ Rev 3/15/2013 104
3. Select location to save file. Select Tab Delimited as the Save as type..
4. Click Save.
5. Click OK.

Heartland Connect Merchant User Manual
Heartland Payment Systems™ Rev 3/15/2013 105
6. Click YES. This saves the file in notepad in tab delimitated format.
7. From the main menu in Heartland Connect, select Tools.
8. Select Batch Upload.

Heartland Connect Merchant User Manual
Heartland Payment Systems™ Rev 3/15/2013 106
9. Select Tab Delimited in File Format
10. Click Browse and locate the file you want to upload.
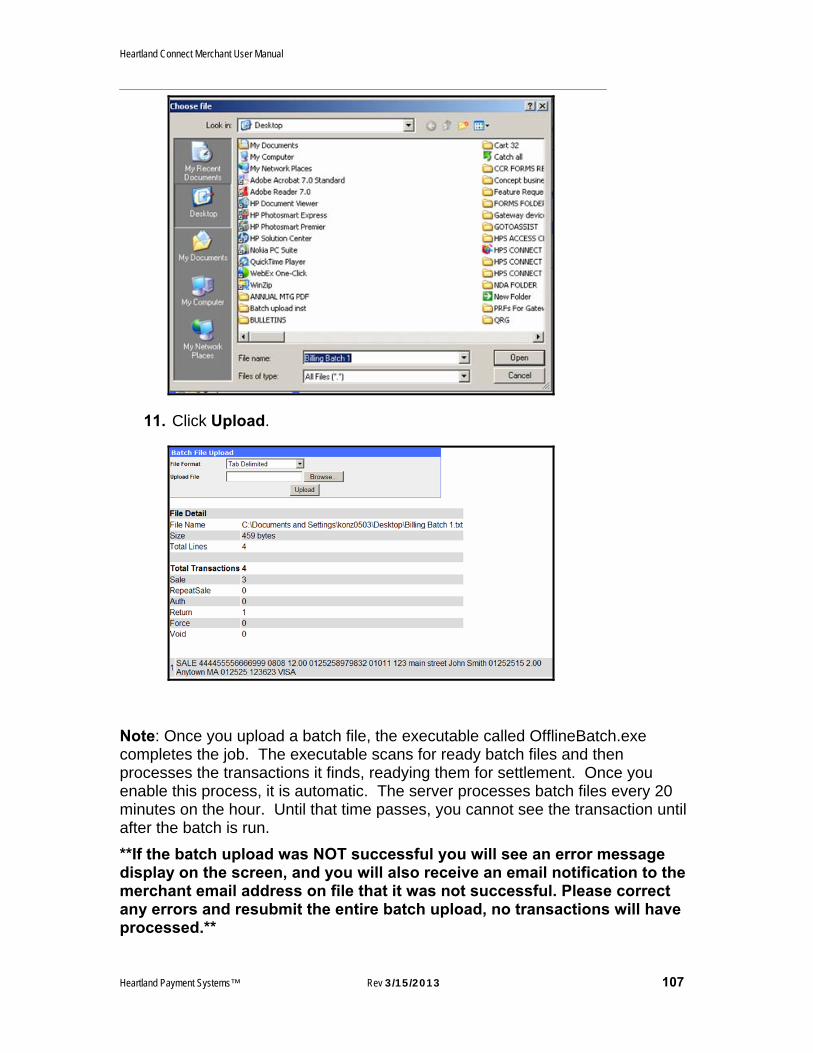
Heartland Connect Merchant User Manual
Heartland Payment Systems™ Rev 3/15/2013 107
11. Click Upload.
Note: Once you upload a batch file, the executable called OfflineBatch.exe completes the job. The executable scans for ready batch files and then processes the transactions it finds, readying them for settlement. Once you enable this process, it is automatic. The server processes batch files every 20 minutes on the hour. Until that time passes, you cannot see the transaction until after the batch is run.
**If the batch upload was NOT successful you will see an error message display on the screen, and you will also receive an email notification to the merchant email address on file that it was not successful. Please correct any errors and resubmit the entire batch upload, no transactions will have processed.**

Heartland Connect Merchant User Manual
Heartland Payment Systems™ Rev 3/15/2013 108
Connect Setup This chapter explains how to set up Connect for the following functions:
Security
Add New User
Find and Edit Users
Change Password
Receipts Setup
Security Setup
Heartland Connect allows merchants to set up security for each function. There are four different security levels, with Level 1 allowing the least access and level 4 the most access. Level 1 functions are for clerks and level 4 are for supervisory staff. As an example, if a user is setup with Level 3 access, they can perform tasks of a user that has 1, 2 and 2 security level access. Level 4 access users can perform all tasks listed in the Security Settings.
To set up security, follow these steps:
1. From the Main Menu, select Preferences.
2. Select Security.

Heartland Connect Merchant User Manual
Heartland Payment Systems™ Rev 3/15/2013 109
3. Use the drop-down box next to each item to select the proper security level required for users to access this function. 1 is the lowest (least access) and 4 is the highest (most access).
Security Settings Description
Sale User can perform a basic Sale transaction
Return User can perform a Return/Refund transaction
Pre-Auth User can perform a Pre-Authorization transaction
Force-Auth User can perform a Force-Authorization (aka Post Auth) transaction
Activate User can activate a Gift Card (if applicable)
Deactivate User can inactivate a Gift Card (if applicable)
Redeem User can Redeem a Gift Card (if applicable)
Refund User can Refund a Gift Card (if applicable)
Reload User can Reload a Gift Card (if applicable)
Void User can Void a transaction
Adjustment User can adjust the transaction amount (typically used in restaurant settings)
Inquiry User can Inquiry a Gift Card for balance (if applicable)
Reports User can view Reports within Connect
End-of-Day User can manually settle the current batch
User Admin Users can access the Manage Users folder
Change Security
User can change the Security Settings
Tools User can access the Tools folder, which houses the Batch Upload option and Receipt Templates
Preferences User can access the Preference folder, which houses the ability to setup devices, change the password and modify security settings

Heartland Connect Merchant User Manual
Heartland Payment Systems™ Rev 3/15/2013 110
Current Batch User can view the Current Batch within Connect
Batches User can view previously settled batches
Add New User
Each person requires a separate login. To add a new user, follow these steps:
1. From the Main Menu, select Manage Users.
2. Select Add.
Field Action
User Name User’s name.
Security Level User’s security level. This user will only have access to functions that you assigned to this level in Security Setup on page 108.
System Level You cannot change this field.
First Name User’s first name.
Last Name User’s last name.
Phone Number User’s phone number.
Email Address User’s email address.
Street Address 1 First line of user’s street address.
Street Address 2 Second line of user’s street address.
City User’s city.
State Select the state from the drop-down list.
Province User’s province, if applicable.
Postal Code User’s postal code.
Country Select the user’s country from the drop-down list.
Time Zone Use the drop-down list to select the user’s country.

Heartland Connect Merchant User Manual
Heartland Payment Systems™ Rev 3/15/2013 111
3. Click Save User.
Find and Edit Users
To find a user, follow these steps:
1. From the Main Menu, select Manage Users.
2. Select Find/Edit.
3. You can enter as much or as little information as you want. Click Find.
4. You can use the and arrows under each column name to sort the list. To manage the user, click User Name.

Heartland Connect Merchant User Manual
Heartland Payment Systems™ Rev 3/15/2013 112
5. To edit this user, click Edit User.
6. Make any changes and click Save User. See Add New User on page 110 for more information.

Heartland Connect Merchant User Manual
Heartland Payment Systems™ Rev 3/15/2013 113
Change Password
New users have to change their password the first time they login. To change the user password, follow these steps:
1. From the Main Menu, select Preferences.
2. Select Password.
3. Enter your Current Password, New Password, and then Verify New Password. For compliance, use strong passwords: it must be a minimum of 8 characters and include at least one digit (0-9), one lower case letter (a-z) and one upper case letter (A-Z). Only alphanumeric characters are allowed and your password must not contain any special characters.
4. Click Change Password.

Heartland Connect Merchant User Manual
Heartland Payment Systems™ Rev 3/15/2013 114
Receipt Setup
To create a message for printing on receipts, follow these steps:
1. From the Main Menu, select Tools.
2. Select Receipt Templates.
3. Enter the message for receipts. Click Save.

Heartland Connect Merchant User Manual
Heartland Payment Systems™ Rev 3/15/2013 115
Device Setup
Overview
This chapter describes how to set up a card swipe, PIN Pad, check readers, and printers.
Card Reader Setup
Heartland Connect supports any card reader that can attach to the computer, USB, serial, or keyboard wedge. The USB and Wedge card readers require no special setup; Windows automatically recognizes these and installs the software to make them work. The only card reader that requires special setup is the serial.
To install the USB card reader, simply plug the cable into any available USB slot on your PC. Once Heartland Connect identifies the device, you can start to use it.
Displayed is a MagTek Card Reader (USB)
Displayed is a Heartland E3 Card Reader (USB)
The serial card reader plugs into the serial port on your PC. If your PC does not have a serial port, you will need to use a USB to Serial Convertor. See USB to Serial Converter Setup (Windows XP) on page 127 for more information for the Windows XP operating system or USB to Serial Converter Setup (Windows Vista on page 132 for the Vista operating system.
Serial Card Reader Setup in Heartland Connect
To set up a serial card reader in connect, follow these steps:
Note: USB card readers do not require and special setup. Just plug and play
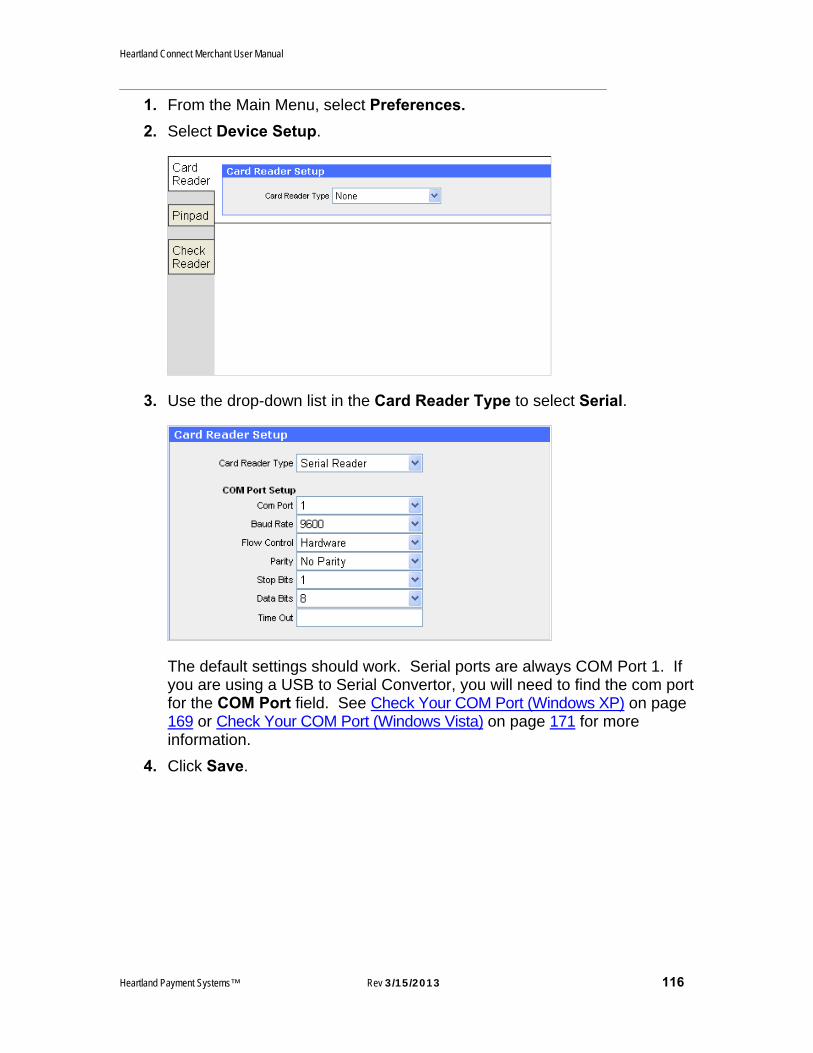
Heartland Connect Merchant User Manual
Heartland Payment Systems™ Rev 3/15/2013 116
1. From the Main Menu, select Preferences.
2. Select Device Setup.
3. Use the drop-down list in the Card Reader Type to select Serial.
The default settings should work. Serial ports are always COM Port 1. If you are using a USB to Serial Convertor, you will need to find the com port for the COM Port field. See Check Your COM Port (Windows XP) on page 169 or Check Your COM Port (Windows Vista) on page 171 for more information.
4. Click Save.

Heartland Connect Merchant User Manual
Heartland Payment Systems™ Rev 3/15/2013 117
PIN Pad Setup
Heartland Connect supports the Verifone 1000SE PIN Pad.
Note: If you do not have a serial port on your PC, you will need to use the USB to Serial Converter. See USB to Serial Converter Setup (Windows XP) on page 127 for instructions for Windows XP or USB to Serial Converter Setup (Windows Vista) on page 132 for Windows Vista. Also see USB to Serial Converter PIN Pad Settings on page 135 for the settings to use for the USB to Serial Converter with the PIN Pad.
1. Connect the Pin Pad 1000se to the Serial to Pin Pad 1000se Connector.
2. Connect the Serial to the Pin Pad 1000se Connector to the Power Adaptor.
3. Connect the Power Adaptor to a power source.
4. Connect the Serial Connector to the Serial Port on back of PC.
Locate Serial Port on PC
Pin Pad 1000se
Power Adaptor for Serial to Pin Pad 1000se
Serial to Pin Pad 1000se Connector (1)
(2)
(3)
(4)

Heartland Connect Merchant User Manual
Heartland Payment Systems™ Rev 3/15/2013 118
PIN Pad Setup in Heartland Connect
To set up the PIN Pad in Connect, these steps:
1. From the Main Menu, select Preferences.
2. Select Device Setup.
3. Select Pinpad.
4. Use the drop-down list in the Pinpad Type field to select Verifone 1000.
5. Select DUKPT.
6. Use the drop-down list in the Flow Control field to select Software. The setup window should look like this:

Heartland Connect Merchant User Manual
Heartland Payment Systems™ Rev 3/15/2013 119
7. If you are using a USB to Serial Convertor, you will need to find the com port for the COM Port field. See Check Your COM Port (Windows XP) on page 169 or Check Your COM Port (Windows Vista) on page 171 for more information. Also see USB to Serial Converter PIN Pad Settings on page 135 for the settings to use for the USB to Serial Converter with the PIN Pad. When you are done, click Save.

Heartland Connect Merchant User Manual
Heartland Payment Systems™ Rev 3/15/2013 120
Mini MICR Reader Setup
The Mini MICR Reader reads the magnetic ink on a check for the bank routing and checking account information. This information identifies the check writer’s bank account. A MICR reader can be used with the eBronze program through GETI check services.
Caution
Do not place the MICR Reader or MICR Imager within 6 inches of a computer monitor or power supply. These devices may cause undesirable interference with the check reading operation.
1. Connect the Connector Cable to the Mini MICR.
2. Connect the serial end of the Connector Cable to your PC
3. If you are using the USB to Serial Converter, connect the serial end of the Connector Cable to the convertor cable and the other end of the convertor cable to USB port on your PC.
4. Connect the Power Cord to a power outlet.
Important
If the Mini MICR Check Reader was purchased from Heartland, it comes configured to work with GETI Check Services. For information on other card services, contact Heartland Payment Systems.

Heartland Connect Merchant User Manual
Heartland Payment Systems™ Rev 3/15/2013 121
Mini MICR Setup in Heartland Connect
To set up the Mini MICR in Connect, these steps:
1. From the Main Menu, select Preferences.
2. Select Device Setup.
3. Select Check Reader.
4. Use the drop-down list in the Check Reader Type field to select Serial Reader.
5. The default settings should work. If you are using a USB to Serial adapter, you will need to find the com port for the COM Port field. See Check Your COM Port (Windows XP) on page 169 or Check Your COM Port (Windows Vista) on page 171 for more information. Also see USB to Serial Converter Mini MICR Reader Settings on page 136 for the settings to use for the USB to Serial Converter with the Mini MICR Reader. When you are done, click Save.

Heartland Connect Merchant User Manual
Heartland Payment Systems™ Rev 3/15/2013 122
MICR Imager Setup
The MICR Imager records a digital image of the check. The image can then be used as the ‘substitute check’ and further assist in the collection process should the check bounce. A check imager is required to be used with the eSilver program through GETI check services.
1. Connect the Connector Cable to the MICR Imager
2. Connect the Serial End of the Connector to the PC.
3. If you are using the USB to Serial Converter, connect the serial end of the Connector Cable to the convertor cable and the other end of the convertor cable to USB port on your PC.
4. Connect the Power Cord to power outlet.
IMPORTANT:
The MICR Image device must be configured before use.
(Example of Serial Connection)

Heartland Connect Merchant User Manual
Heartland Payment Systems™ Rev 3/15/2013 123
MICR Imager Setup in Heartland Connect
To set up the MICR Imager in Connect, these steps:
1. From the Main Menu, select Preferences.
2. Select Device Setup.
3. Select Check Reader.
4. Use the drop-down list in the Check Reader Type field to select Magtek MICR Imager and use the following settings:
6. If you are using a USB to Serial Convertor, you will need to find the com port for the COM Port field. See Check Your COM Port (Windows XP) on page 169 or Check Your COM Port (Windows Vista) on page 171 for more information. Also see Windows 7 & Vista Drivers
7. The Windows 7 and Vista Drivers for Heartland Connects supported hardware (Serial-to-USB cable, Epson and Star Printers) can be found in the Drivers tab of Device Setup which is housed under the Preferences folder.
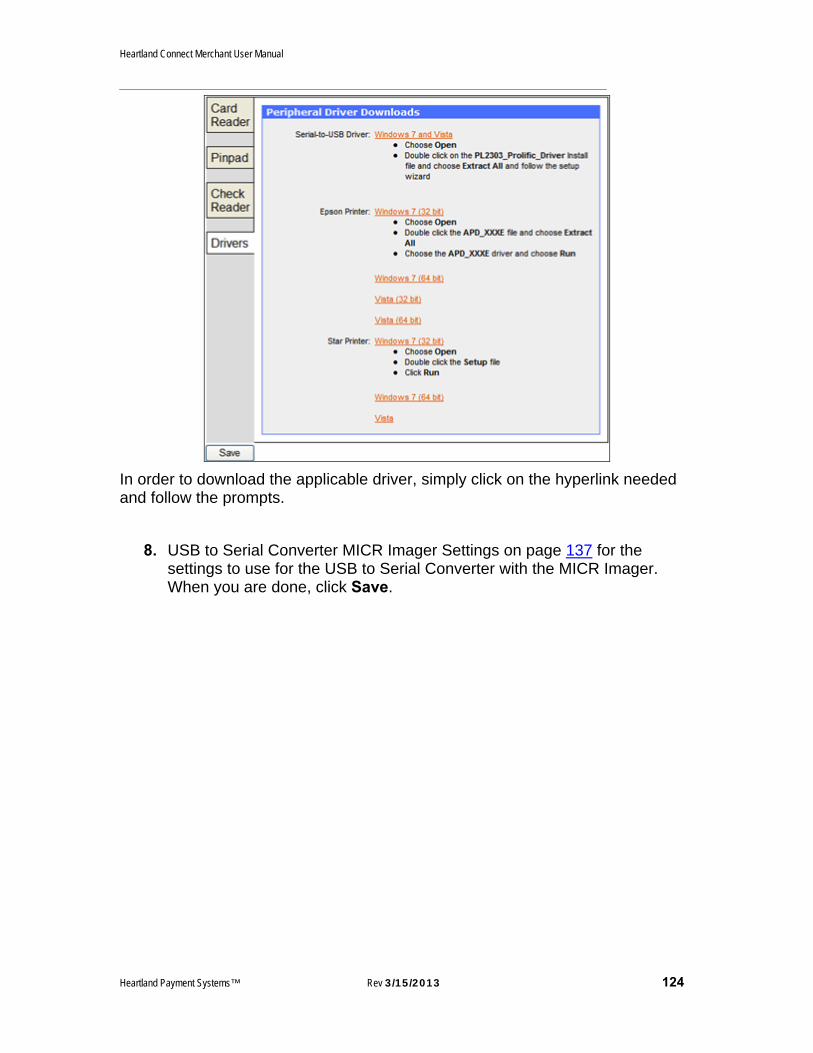
Heartland Connect Merchant User Manual
Heartland Payment Systems™ Rev 3/15/2013 124
In order to download the applicable driver, simply click on the hyperlink needed and follow the prompts.
8. USB to Serial Converter MICR Imager Settings on page 137 for the settings to use for the USB to Serial Converter with the MICR Imager. When you are done, click Save.

Heartland Connect Merchant User Manual
Heartland Payment Systems™ Rev 3/15/2013 125
Check Reader Control Download
The check readers require special software before they will work with Heartland Connect. To install this software, follow these steps:
1. After you select the type of check reader installed, click Download Check Reader Control. The following window displays:
2. Click Save or Run.
3. Download setup.exe file.
4. Run setup.exe.

Heartland Connect Merchant User Manual
Heartland Payment Systems™ Rev 3/15/2013 126
5. Click Next.
6. Click Install.
7. Click Finish. Your Check Card Reader is now installed.

Heartland Connect Merchant User Manual
Heartland Payment Systems™ Rev 3/15/2013 127
Install Check Reader ActiveX Controls
In order for the check reader to work correctly with Internet Explorer, you have to install special ActiveX controls. The first check transaction you do, Heartland Connect prompts you to install the ActiveX control. Click Install. You are now ready to perform a transaction.
USB to Serial Converter Setup (Windows XP)
The USB-to-Serial Convertor is required for merchants who do not have a serial port on their PC and are using a device that has a serial port. The following instructions detail how to install the USB to Serial Convertor in Windows XP.
To install the USB Serial Converter in Windows XP, do the following:
1. Plug the USB to Serial Converter into an available USB port.
2. The Found New Hardware Wizard displays and prompts you to connect to Windows Update to search for software.
3. Select No, not this time. Click Next. The wizard prompts for installation information.

Heartland Connect Merchant User Manual
Heartland Payment Systems™ Rev 3/15/2013 128
4. Select Install from a list or specific location (Advanced). Click Next.

Heartland Connect Merchant User Manual
Heartland Payment Systems™ Rev 3/15/2013 129
5. The wizard prompts for search and installation options.
Select Search removable media (floppy, CD-ROM…). Click Next.

Heartland Connect Merchant User Manual
Heartland Payment Systems™ Rev 3/15/2013 130
6. The software is installed and the wizard displays an installation complete message.
Click Finish to complete installation of the USB Serial Converter.
USB to Serial Installation Verification (Windows XP)
Note: The parameters for the port setting differ depending on the device. Therefore, the settings have to match the settings required for the device. See the settings for the device you are setting up.
To verify installation and setup, do the following:
1. From the Start menu, select Control Panel.
2. If the Control Panel is in Category view, click Switch to Classic View in Windows XP or Classic View in Windows Vista.
3. Select System.

Heartland Connect Merchant User Manual
Heartland Payment Systems™ Rev 3/15/2013 131
4. Select the Hardware tab and then select Device Manager.
5. Click the + next to Ports (COM & LPT) to expand the list. The Prolific USB-to-Serial Comm Port should display.
6. Note the port number (COM5 in the example) because you will need it to install your peripherals. Right-click on Prolific USB to Serial Com Port and select Properties.
7. Select Port Settings.

Heartland Connect Merchant User Manual
Heartland Payment Systems™ Rev 3/15/2013 132
USB to Serial Converter Setup (Windows Vista)
The USB to Serial Converter is required for merchants who do not have a serial port on their PC and are using a device that has a serial port. The following instructions detail how to install the USB to Serial Converter in Windows Visa.
To install the USB to Serial Converter, do the following:
1. Plug the USB to Serial Converter into an available USB port.
2. Select Locate and install driver software (recommended).

Heartland Connect Merchant User Manual
Heartland Payment Systems™ Rev 3/15/2013 133
3. Insert the mini CD you received with the converter. Windows begins copy the necessary files:
4. When displays a message that the installation is complete.
5. Click Close.
USB to Serial Installation Verification (Windows Vista)
Note: The parameters for the port setting differ depending on the device. Therefore, the settings have to match the settings required for the device.
To verify the installation and setup, do the following:
1. From the desktop, right-click on Computer. Click Properties.
2. Click Device Manager in the Tasks panel.

Heartland Connect Merchant User Manual
Heartland Payment Systems™ Rev 3/15/2013 134
3. Click the + next to Ports (COM & LPT) to expand the list.
4. Note the port number (COM5 in the example) because you will need it to install your peripherals. Right-click on Prolific USB-to-Serial Com Port and select Properties.
5. Select Port Settings.
8. Use the following settings for the fields on this screen:
Bits per second: 9600
Data bits: 8
Parity: None
Stop bits: 1
Flow control: None
6. Click OK.
7. Exit the Device Manager and Control Panel.

Heartland Connect Merchant User Manual
Heartland Payment Systems™ Rev 3/15/2013 135
USB to Serial Converter PIN Pad Settings
Use the following settings if you are using the USB to Serial Converter for the PIN Pad.
Use the following settings for the fields on this screen:
Bits per second: 1200
Data bits: 7
Parity: Even
Stop bits: 1
Flow control: None

Heartland Connect Merchant User Manual
Heartland Payment Systems™ Rev 3/15/2013 136
USB to Serial Converter Mini MICR Reader Settings
Use the following settings if you are using the USB to Serial Converter for the Mini MICR Reader.
Use the following settings for the fields on this screen:
Bits per second: 9600
Data bits: 8
Parity: None
Stop bits: 1
Flow control: None

Heartland Connect Merchant User Manual
Heartland Payment Systems™ Rev 3/15/2013 137
Windows 7 & Vista Drivers
The Windows 7 and Vista Drivers for Heartland Connects supported hardware (Serial-to-USB cable, Epson and Star Printers) can be found in the Drivers tab of Device Setup which is housed under the Preferences folder.
In order to download the applicable driver, simply click on the hyperlink needed and follow the prompts.

Heartland Connect Merchant User Manual
Heartland Payment Systems™ Rev 3/15/2013 138
USB to Serial Converter MICR Imager Settings
Use the following settings if you are using the USB to Serial Converter for the MICR Imager.
Use the following settings for the fields on this screen:
Bits per second: 115200
Data bits: 8
Parity: None
Stop bits: 1
Flow control: None
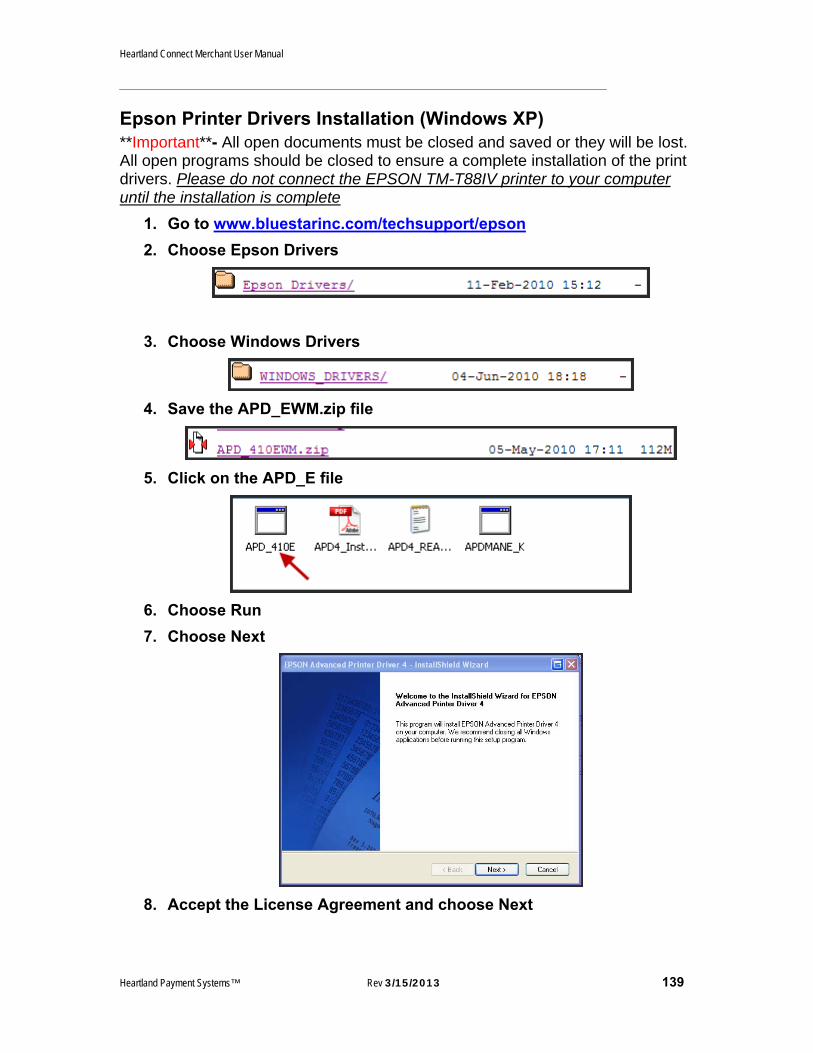
Heartland Connect Merchant User Manual
Heartland Payment Systems™ Rev 3/15/2013 139
Epson Printer Drivers Installation (Windows XP) **Important**- All open documents must be closed and saved or they will be lost. All open programs should be closed to ensure a complete installation of the print drivers. Please do not connect the EPSON TM-T88IV printer to your computer until the installation is complete
1. Go to www.bluestarinc.com/techsupport/epson
2. Choose Epson Drivers
3. Choose Windows Drivers
4. Save the APD_EWM.zip file
5. Click on the APD_E file
6. Choose Run
7. Choose Next
8. Accept the License Agreement and choose Next

Heartland Connect Merchant User Manual
Heartland Payment Systems™ Rev 3/15/2013 140
9. Choose Standard setup and Next
10. Choose ‘Add’ when the Printer Configuration appears

Heartland Connect Merchant User Manual
Heartland Payment Systems™ Rev 3/15/2013 141
11. Choose EPSON TM-T88IV Receipt and a Port Type of Create a USB Port and choose Next
12. The TM-T88IV printer should now show in your available printers. Now choose Next
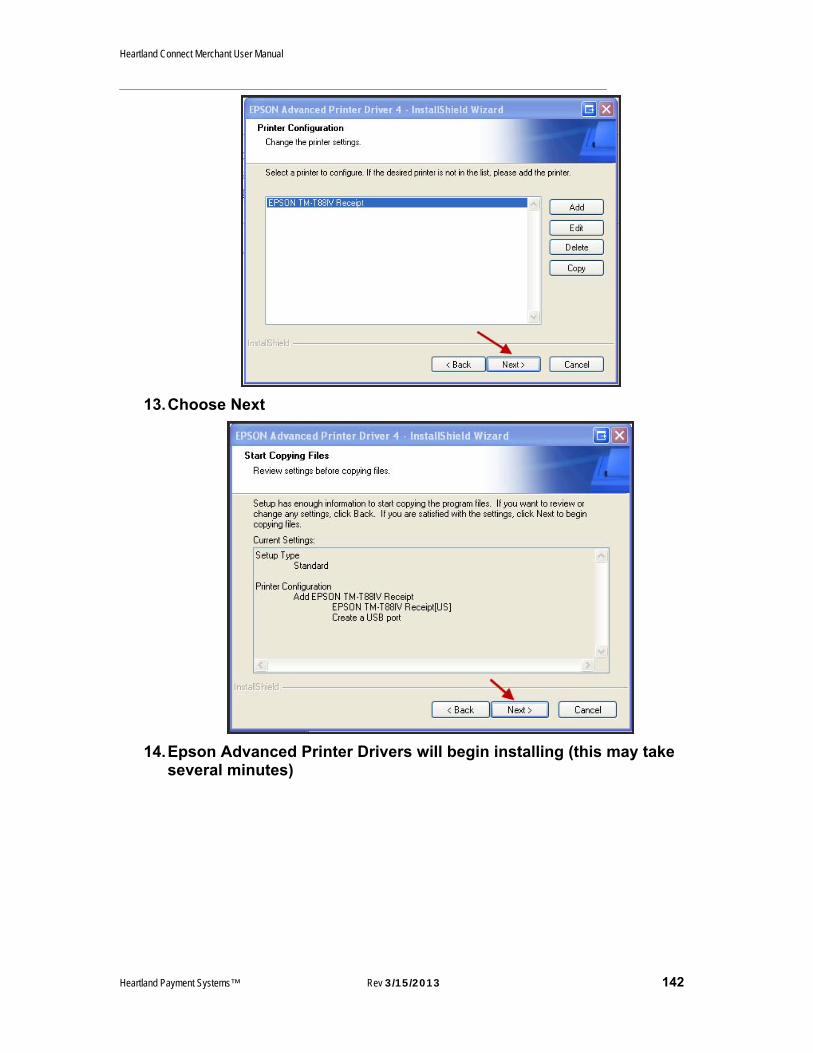
Heartland Connect Merchant User Manual
Heartland Payment Systems™ Rev 3/15/2013 142
13. Choose Next
14. Epson Advanced Printer Drivers will begin installing (this may take several minutes)

Heartland Connect Merchant User Manual
Heartland Payment Systems™ Rev 3/15/2013 143
15. Once the drivers are installed, choose Finish
16. Restart the PC

Heartland Connect Merchant User Manual
Heartland Payment Systems™ Rev 3/15/2013 144
Epson Printer Drivers Installation (Windows Vista) **Important**- All open documents must be closed and saved or they will be lost. All open programs should be closed to ensure a complete installation of the print drivers. Please do not connect the EPSON TM-T88IV printer to your computer until the installation disk has completed the install and your computer is re-started.
1. Insert the CD in the CD Rom and click Next.
2. Select I accept the terms of the license agreement and click Next.

Heartland Connect Merchant User Manual
Heartland Payment Systems™ Rev 3/15/2013 145
3. Select Standard and click Next.
4. Click Add.

Heartland Connect Merchant User Manual
Heartland Payment Systems™ Rev 3/15/2013 146
5. Make the following selections and click Next.
Select driver: Epson TM T88IV Receipt
Printer name: Epson TM T88IV Receipt
Port Type: Epson TM T88IV Receipt
Set as Default Printer: Create a USB port
6. Click Next.

Heartland Connect Merchant User Manual
Heartland Payment Systems™ Rev 3/15/2013 147
7. Click Next.
8. Files are copied.

Heartland Connect Merchant User Manual
Heartland Payment Systems™ Rev 3/15/2013 148
9. Click Finish.
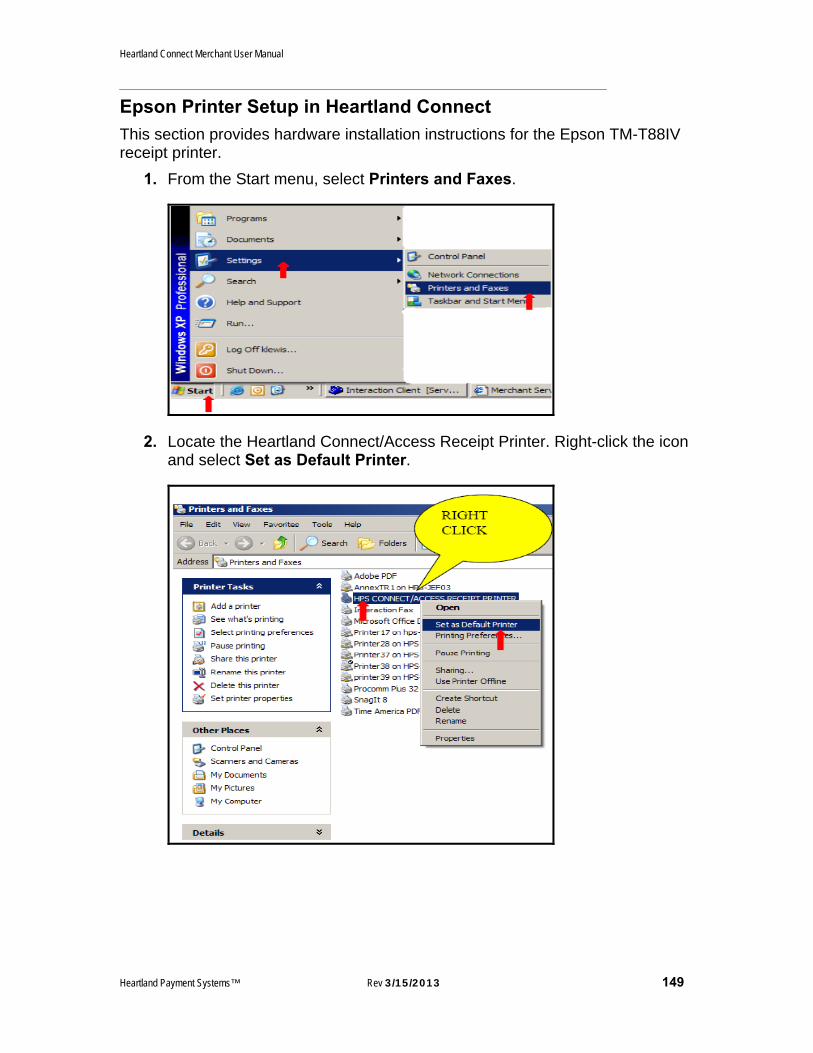
Heartland Connect Merchant User Manual
Heartland Payment Systems™ Rev 3/15/2013 149
Epson Printer Setup in Heartland Connect
This section provides hardware installation instructions for the Epson TM-T88IV receipt printer.
1. From the Start menu, select Printers and Faxes.
2. Locate the Heartland Connect/Access Receipt Printer. Right-click the icon and select Set as Default Printer.

Heartland Connect Merchant User Manual
Heartland Payment Systems™ Rev 3/15/2013 150
Epson Printer Page and Margins Setup
1. From the Heartland Connect Internet Explorer main screen, select File and Page Setup.
2. Make the following selections and click OK:
Paper Size: Roll Paper 80 * 297 mm
Header and Footer fields blank.
Margin Fields are zero (0).
Receipt printing is now ready for Heartland Connect.

Heartland Connect Merchant User Manual
Heartland Payment Systems™ Rev 3/15/2013 151
Star Printer Setup
The Star TSP100 USB Receipt Printer is a versatile, innovative receipt printer. It supports Microsoft Vista and has the ability to auto-cut receipts. This receipt printer also comes with software that allows it to add images to receipts.
1. Make sure the printer is turned off.
2. Connect the USB Cable to the printer. Do not connect it to the computer at this time.
3. Connect the required peripheral cable between the printer’s peripheral connector and your computer. The peripheral cable must meet the requirements shown in the manufacturer’s documentation. (The USB Cable is supplied with printer.)
4. Load the roll paper. Be sure to use roll paper that matches the printer’s specification.
5. Push on the cover open lever and open the printer’s cover.
6. Properly orient the paper roll according the following figure.
7. Set the roll paper slot into the roll paper groove and then pull the leading edge of the paper toward the front of the printer, leaving some excess to hang over the front of the printer.
Cover Open Lever
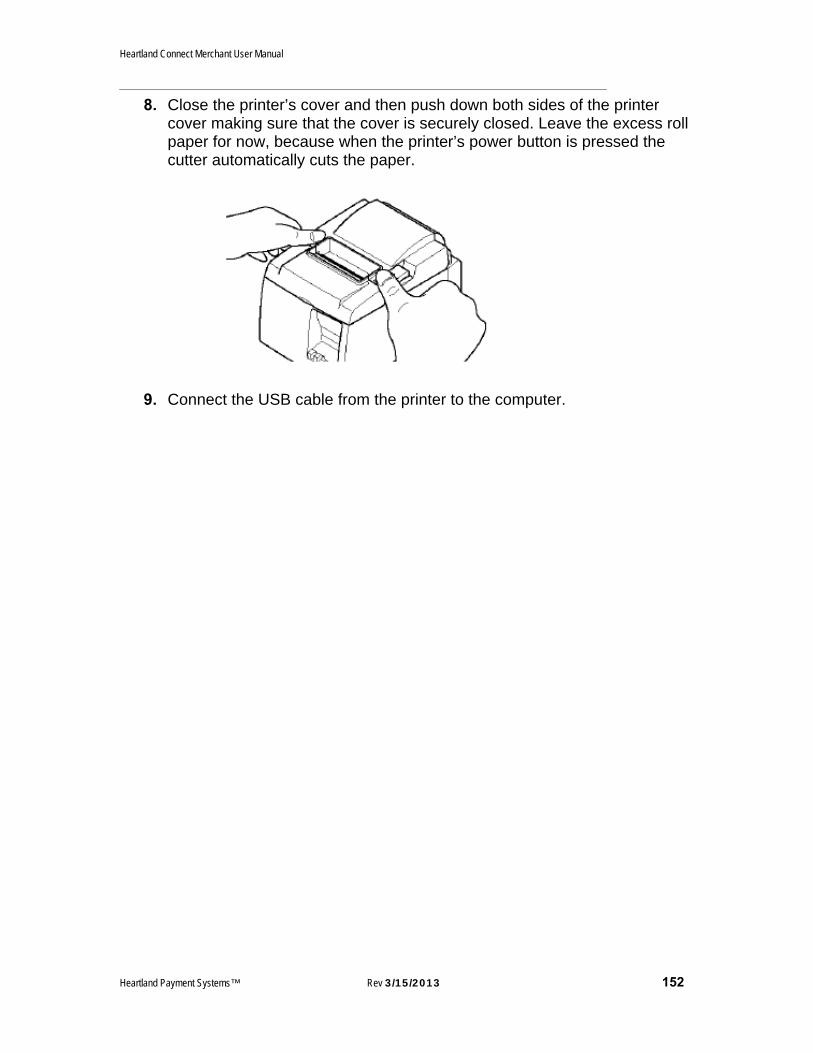
Heartland Connect Merchant User Manual
Heartland Payment Systems™ Rev 3/15/2013 152
8. Close the printer’s cover and then push down both sides of the printer cover making sure that the cover is securely closed. Leave the excess roll paper for now, because when the printer’s power button is pressed the cutter automatically cuts the paper.
9. Connect the USB cable from the printer to the computer.

Heartland Connect Merchant User Manual
Heartland Payment Systems™ Rev 3/15/2013 153
Star Printer Drivers Installation (Windows XP) NOTE: A Windows dialog may display on your computer if the printer is powered up.
1. Insert the supplied CD-ROM (Drivers and Utilities for Windows) into the computer’s CD-ROM drive. The InstallShied Wizard displays.
2. Click Next. The TSP100 Setup window displays.
3. Click Next. The next TSP100 Setup window displays.

Heartland Connect Merchant User Manual
Heartland Payment Systems™ Rev 3/15/2013 154
4. Enter your name and the name of the organization. Click Next. The next TSP100 Setup window displays.
5. Select Typical. Click Next. The next TSP100 Setup window displays.

Heartland Connect Merchant User Manual
Heartland Payment Systems™ Rev 3/15/2013 155
6. Click Install. The software installs.
7. Click Finish.
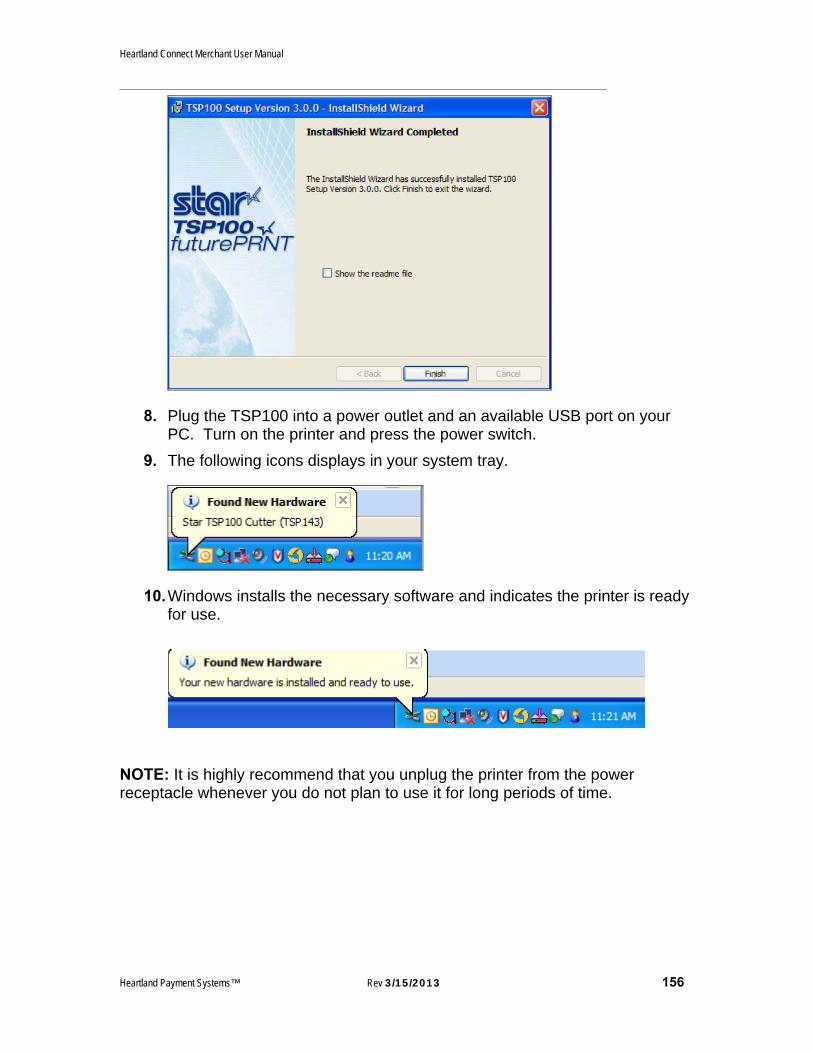
Heartland Connect Merchant User Manual
Heartland Payment Systems™ Rev 3/15/2013 156
8. Plug the TSP100 into a power outlet and an available USB port on your PC. Turn on the printer and press the power switch.
9. The following icons displays in your system tray.
10. Windows installs the necessary software and indicates the printer is ready for use.
NOTE: It is highly recommend that you unplug the printer from the power receptacle whenever you do not plan to use it for long periods of time.
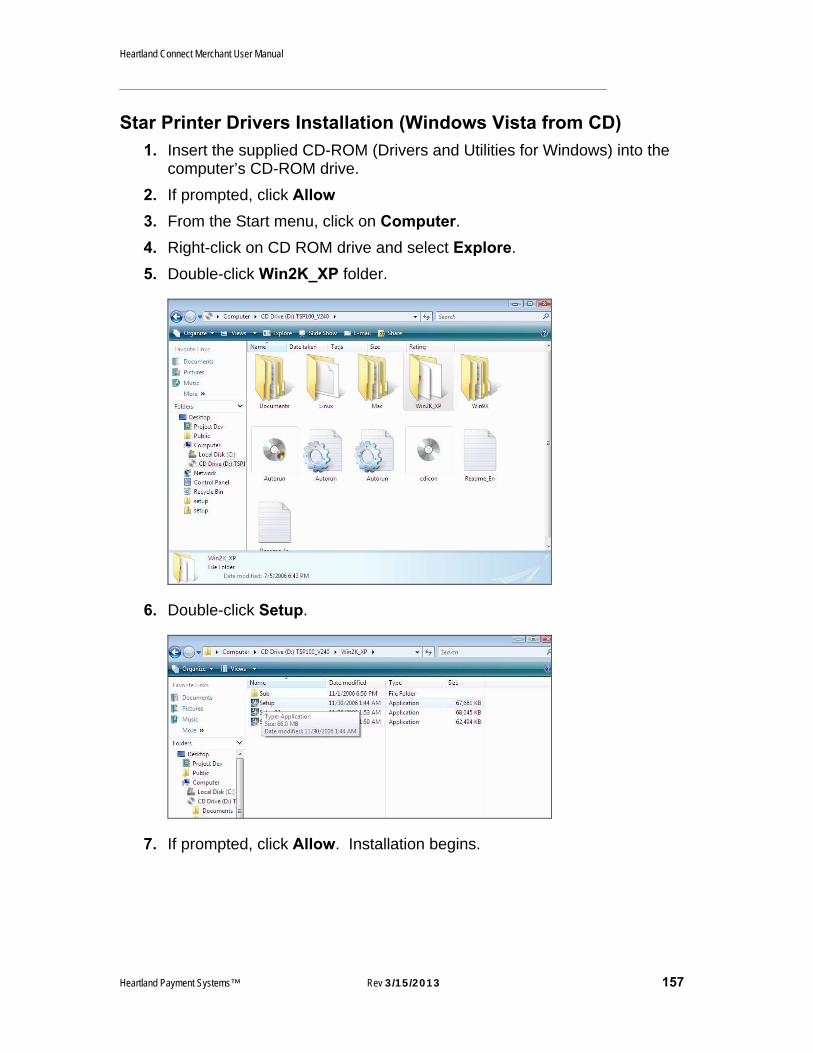
Heartland Connect Merchant User Manual
Heartland Payment Systems™ Rev 3/15/2013 157
Star Printer Drivers Installation (Windows Vista from CD) 1. Insert the supplied CD-ROM (Drivers and Utilities for Windows) into the
computer’s CD-ROM drive.
2. If prompted, click Allow
3. From the Start menu, click on Computer.
4. Right-click on CD ROM drive and select Explore.
5. Double-click Win2K_XP folder.
6. Double-click Setup.
7. If prompted, click Allow. Installation begins.

Heartland Connect Merchant User Manual
Heartland Payment Systems™ Rev 3/15/2013 158
8. The TSP100 Setup window displays.
Click Next. The next setup screen displays:

Heartland Connect Merchant User Manual
Heartland Payment Systems™ Rev 3/15/2013 159
9. Enter your name and the name of the organization. Click Next. The next TSP100 Setup window displays.
10. Select Typical. Click Next. The next TSP100 Setup window displays.

Heartland Connect Merchant User Manual
Heartland Payment Systems™ Rev 3/15/2013 160
11. Click Install. The next TSP100 Setup window displays.
12. Click Finish.
13. Plug the TSP100 into a power outlet and an available USB port on your PC. Turn on the printer and press the power switch.
14. The following icons displays in your system tray.

Heartland Connect Merchant User Manual
Heartland Payment Systems™ Rev 3/15/2013 161
15. Windows installs the necessary software and indicates the printer is ready for use.

Heartland Connect Merchant User Manual
Heartland Payment Systems™ Rev 3/15/2013 162
Star Printer Drivers Installation (Windows Vista .Zip File)
You can download the printer drivers for the Star printer from the Internet and then install them on your PC. Follow these steps:
1. Plug printer into USB port
2. Click on the following link:
http://www.starmicronics.com/uploads/download%20files/TSP100%20Vista%20Support%20driver%203.0.zip
3. The File Download window displays. Click Open.
4. Click Extract all files at the top of the page.
5. Click Extract.

Heartland Connect Merchant User Manual
Heartland Payment Systems™ Rev 3/15/2013 163
6. Extraction begins.
7. Double-click setup.
8. Click Run.

Heartland Connect Merchant User Manual
Heartland Payment Systems™ Rev 3/15/2013 164
9. Click Continue. See Star Printer Drivers Installation (Windows Vista from CD) on page 157 for more instructions.
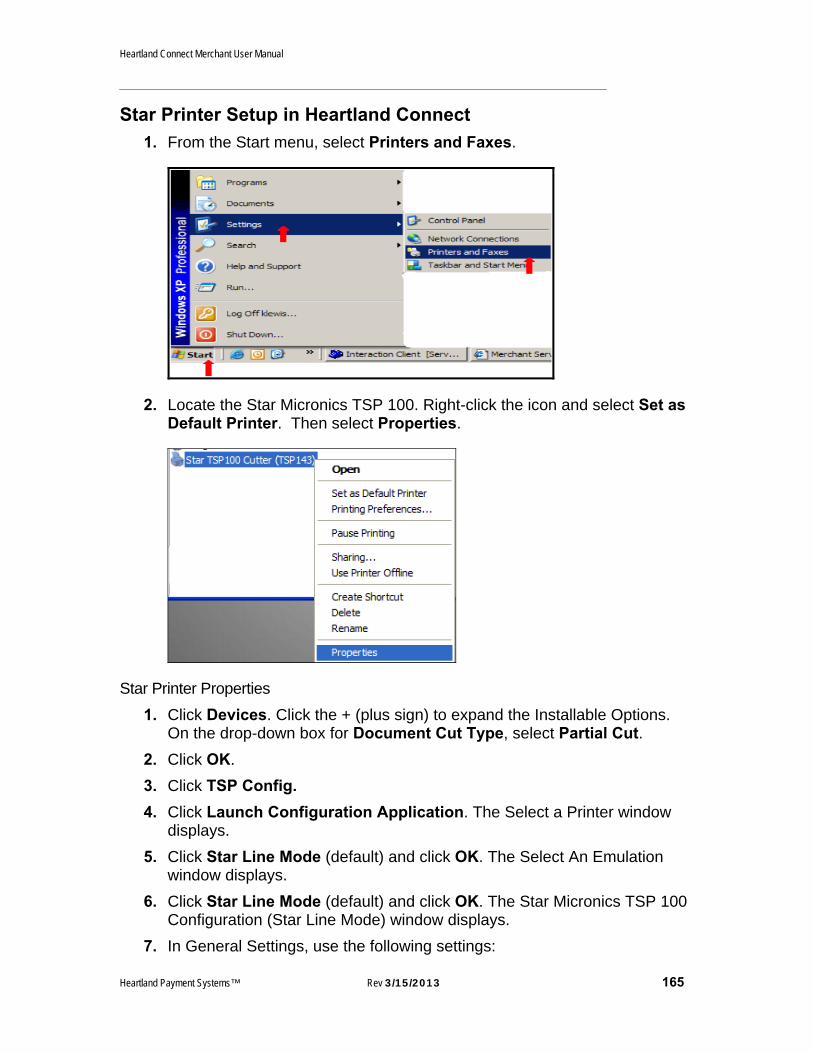
Heartland Connect Merchant User Manual
Heartland Payment Systems™ Rev 3/15/2013 165
Star Printer Setup in Heartland Connect
1. From the Start menu, select Printers and Faxes.
2. Locate the Star Micronics TSP 100. Right-click the icon and select Set as Default Printer. Then select Properties.
Star Printer Properties
1. Click Devices. Click the + (plus sign) to expand the Installable Options. On the drop-down box for Document Cut Type, select Partial Cut.
2. Click OK.
3. Click TSP Config.
4. Click Launch Configuration Application. The Select a Printer window displays.
5. Click Star Line Mode (default) and click OK. The Select An Emulation window displays.
6. Click Star Line Mode (default) and click OK. The Star Micronics TSP 100 Configuration (Star Line Mode) window displays.
7. In General Settings, use the following settings:

Heartland Connect Merchant User Manual
Heartland Payment Systems™ Rev 3/15/2013 166
Zero Style: Standard (0) or Slashed Ø)
Line Spacing: 4mm adds 1 mm line between each line of characters: 3 mm omits any line spacing.
Print Width: 72mm uses 4 mm left and right margins on 80 mm roll paper; 51mm uses 3.5 mm left and right margins on 58 mm roll paper.
8. Click Apply Changes.
Star Printer Second Copy Printing Setup
If applicable to your application setup- second copy printing of receipt:
1. Click on Journal in the list of choices displayed at the left of the window.
2. Click on the First Copy tab and then check the Automatic Multiple Copies and Enable boxes. This step created an original and now you need to copy that original.
3. Click on the Second Copy tab and then check the Enable box.
4. Click the Apply Changes button and then continue with the next step or click the Close button.
Star Printer Receipt Printing Orientation Setup
If applicable to your printer’s orientation (wall mounted/vertical printing position) and desired; setup vertical printing.
1. Click on Vertical Mount in the list of choices displayed at the left of the window.
2. Check the Enable Vertical Mount Mode (reverse printing) box.
3. Click the Apply Changes button and then the Close button.
Note: You do not need to set up the margins in Heartland Connect if you already set them up. Star Printer Print Test
1. Turn off the printer.
2. Press and hold down on the FEED button and then turn on the printer. The printer will run the test print according to the Ver. No., DIP switch settings, and character order.
3. After the printer starts printing, release the FEED button. After a test the printer returns to normal mode.
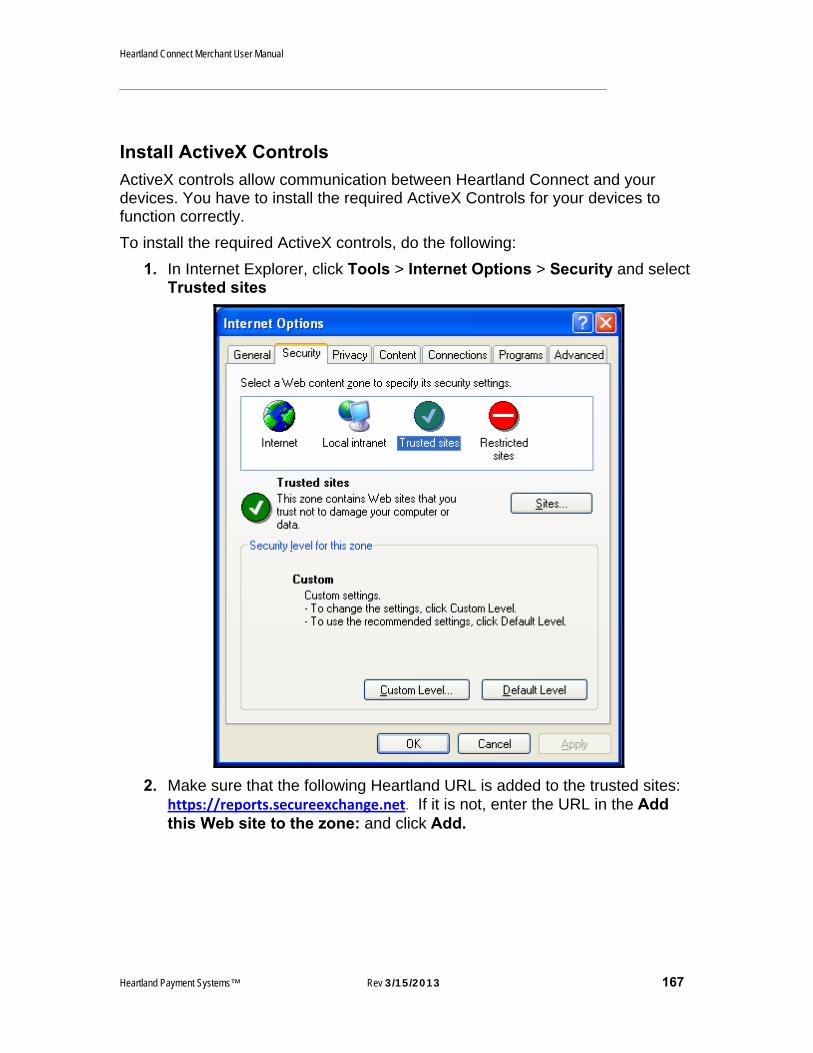
Heartland Connect Merchant User Manual
Heartland Payment Systems™ Rev 3/15/2013 167
Install ActiveX Controls
ActiveX controls allow communication between Heartland Connect and your devices. You have to install the required ActiveX Controls for your devices to function correctly.
To install the required ActiveX controls, do the following:
1. In Internet Explorer, click Tools > Internet Options > Security and select Trusted sites
2. Make sure that the following Heartland URL is added to the trusted sites: https://reports.secureexchange.net. If it is not, enter the URL in the Add this Web site to the zone: and click Add.
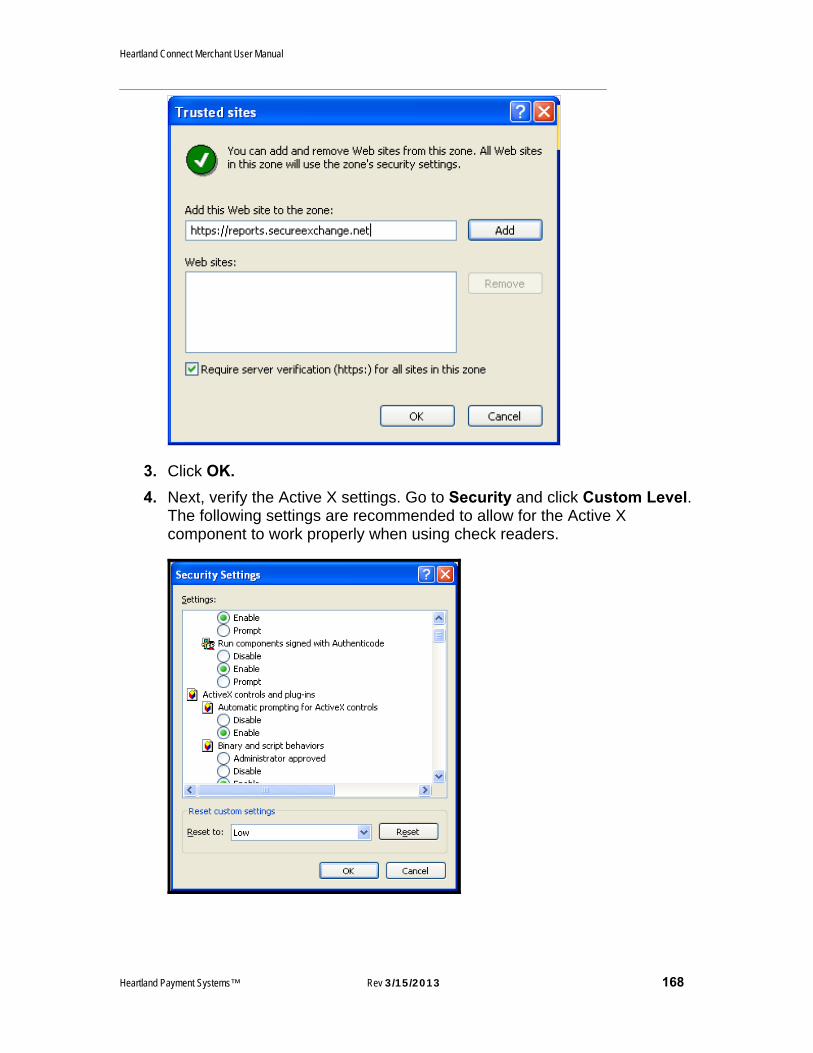
Heartland Connect Merchant User Manual
Heartland Payment Systems™ Rev 3/15/2013 168
3. Click OK.
4. Next, verify the Active X settings. Go to Security and click Custom Level. The following settings are recommended to allow for the Active X component to work properly when using check readers.
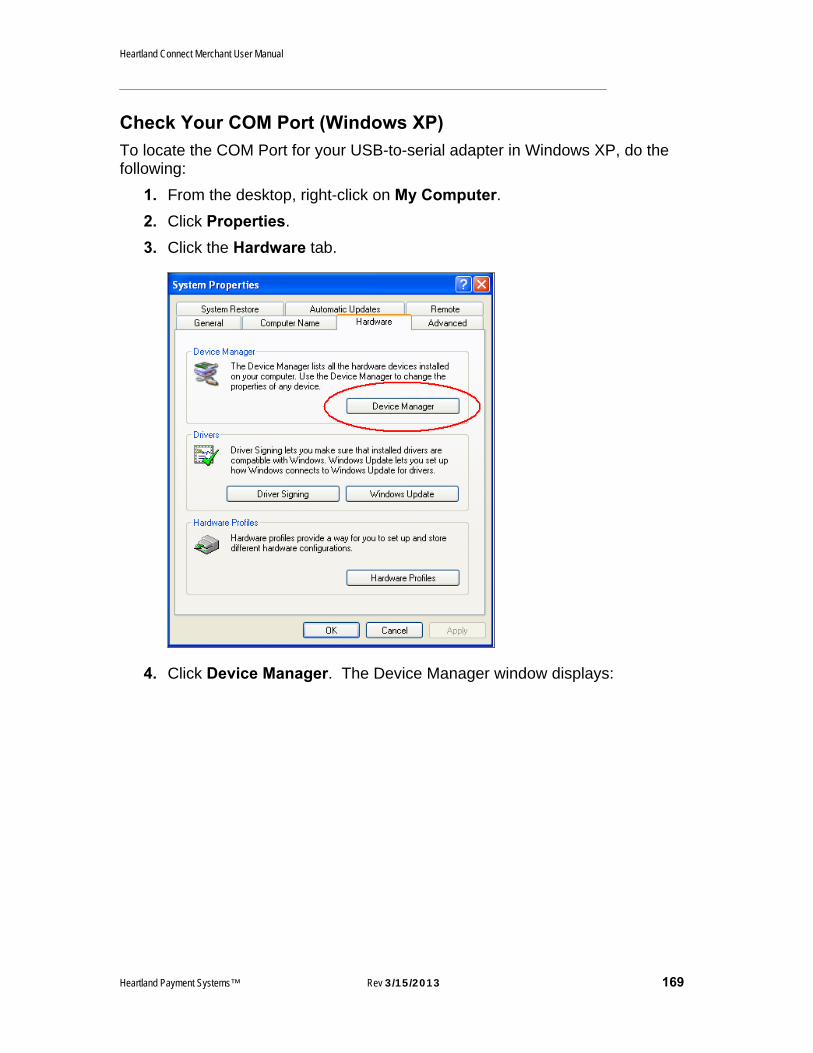
Heartland Connect Merchant User Manual
Heartland Payment Systems™ Rev 3/15/2013 169
Check Your COM Port (Windows XP)
To locate the COM Port for your USB-to-serial adapter in Windows XP, do the following:
1. From the desktop, right-click on My Computer.
2. Click Properties.
3. Click the Hardware tab.
4. Click Device Manager. The Device Manager window displays:

Heartland Connect Merchant User Manual
Heartland Payment Systems™ Rev 3/15/2013 170
5. Click the + sign next to Ports (COM & LPT).
6. Write down the COM port in parenthesis next to USB Serial Port (in the example above, COM3).

Heartland Connect Merchant User Manual
Heartland Payment Systems™ Rev 3/15/2013 171
Check Your COM Port (Windows Vista)
To locate the COM Port for your USB-to-serial adapter in Windows Vista, do the following:
1. From the desktop, right-click on My Computer.
2. Click Properties.
3. Click the Device Manager in the Tasks panel.
The Device Manager window displays:
4. Click the + sign next to Ports (COM & LPT).
5. Write down the COM port in parenthesis next to USB Serial Port (in the example above, COM3).

Heartland Connect Merchant User Manual
Heartland Payment Systems™ Rev 3/15/2013 172
Troubleshooting
When processing a transaction I receive the following error message: An error occurred while attempting to process this transaction. Object reference not set to an instance of an object.
o This occurs when a special character is entered within the Virtual Terminal that Connect is unable to process. Remove all indications of a special character and attempt to re-process the transaction
When processing a transaction I receive the following error message: An error occurred while attempting to process this transaction. Value cannot be null. Parameter name: String.
o This is an issue with the file build and requiring Level II date and tax information for commercial cards. Please contact your Regional Servicing Team for assistance.
When processing a transaction I receive the following error message: DECLINE-1005. Transactions not allowed by merchant
o This indicates that you do not allow a repeat sale from being processed. To enable repeat sales, please contact your Regional Servicing Team
When processing a transaction I receive the following error message: An error occurred while attempting to process this transaction. Object referenced not set to an instance of an object
o This error message indicates that a special character, such as the ‘&’ symbol is being used in the Description field. Remove and replace with ‘and’ (for example) and reattempt the transaction
When processing a transaction I receive the following error message: Unable to process: Card Number is truncated
o This is caused by an invalid card number being stored on a profile in recurring billing. Contact your customer to confirm the correct card number.
When processing a transaction I receive the following error message: Layout Indicator Error.
o This is due to the browsers compatibility mode being disabled. To fix, click on the compatibility mode icon located to the right of browsers search bar.
When attempting to print a receipt, I receive the following error: Internet Explorer has modified this page to help prevent cross-site scripting
o You may need to switch your IE settings. Follow these steps to fix this Cross-Site Scripting error: Select TOOLS

Heartland Connect Merchant User Manual
Heartland Payment Systems™ Rev 3/15/2013 173
Select INTERNET OPTIONS and locate the SECURITY tab Scroll down and click the CUSTOM LEVEL button Scroll down to DISPLAY MIXED CONTENT and select
ENABLE Scroll down and find the ENABLE XSS Filter and choose
DISABLE Click OK and restart the browser
When processing a transaction I receive the following error message: Declined: 1013; Error_Chec.
o This is due to a special character being placed in one of the processing fields. Remove the special character in order for the transaction to process

Heartland Connect Merchant User Manual
Heartland Payment Systems™ Rev 3/15/2013 174
Index A
ActiveX Setup, 151 Add Contract, 73 Add Customer, 65 Add User, 99
B Basics
Change Password, 6 Getting Help, 9 Getting Started, 4 License Agreement, 5 Logging In, 4 Main Menu, 7 Navigation, 9 Tabs, 9
Batch Import, 92 Batch Upload, 92 Batch Upload Example, 92
C Card Reader Setup, 104 Cash Return Transaction, 61 Cash Return Transaction Receipt, 62 Cash Tender Transaction, 59 Cash Tender Transaction Receipt, 60 Cash Transactions
Cash Tender, 59 Cash Tender Receipt, 60 Overview, 59 Receipt Field Descriptions, 64 Return, 61 Return Receipt, 62 Transaction Field Descriptions, 63
Change Password, 6 Check COM Port in Windows Vista, 155 Check COM Port in Windows XP, 153 Check Reader ActiveX Controls Setup, 115 Check Reader Control Download, 113 Check Sale Transaction, 49 Check Sale Transaction Receipt, 51 Check Transactions
Overview, 49 Receipt Field Descriptions, 58 Sale, 49 Sale Receipt, 51 Transaction Field Descriptions, 57 Verify, 52 Verify Receipt, 54 Void, 55
Check Verify Transaction, 52 Check Verify Transaction Receipt, 54 Check Void Transaction, 55 Check/ACH Info, 70 Connect Basics
Overview, 4 Credit Card Adjustment Transaction, 23 Credit Card Adjustment Transaction Receipt, 24 Credit Card Force Auth Transaction, 20 Credit Card Force Auth Transaction Receipt, 22 Credit Card Info, 67 Credit Card Pre-Auth Transaction, 14 Credit Card Pre-Auth Transaction Receipt, 16 Credit Card Return Transaction, 17 Credit Card Return Transaction Receipt, 19 Credit Card Sale Transaction, 11 Credit Card Sale Transaction Receipt, 13 Credit Card Transactions
Adjust, 23 Adjustment Receipt, 24 CVV Information, 30 Entering, 10 Force Auth, 20 Force Auth Receipt, 22 Pre-Auth, 14 Pre-Auth Receipt, 16 Receipt Field Descriptions, 29 Return, 17 Return Receipt, 19 Sale, 11 Sale Receipt, 13 Transaction Field Descriptions, 27 Void, 25
Credit Card Void Transaction, 25 Current Batch Summary Reports, 89 CVV Information, 30
American Express CID, 31 Discover CID, 30 MasterCard CVC2, 30 VISA CVV2, 30
D Debit Card Return Transaction, 35 Debit Card Return Transaction Receipt, 37 Debit Card Sale Transaction, 32 Debit Card Sale Transaction Receipt, 34 Debit Card Transactions
Overview, 32 Receipt Field Descriptions, 39 Return, 35 Return Receipt, 37 Sale, 32 Sale Receipt, 34 Transaction Field Descriptions, 38
Detail Report, 85 Device Setup
Card Reader, 104 Check Reader ActiveX Setup, 115 Check Reader Control Download, 113 MICR Imager, 111 MICR Imager in Connect, 112 Mini MICR, 109

Heartland Connect Merchant User Manual
Heartland Payment Systems™ Rev 3/15/2013 175
Mini MICR in Connect, 110 Overview, 104 PIN Pad, 106 PIN Pad in Connect, 107
E EBT Balance Inquiry Transaction, 46 EBT Card Transactions
Overview, 40 EBT Cash Benefit Sale Transaction, 43 EBT Food Stamp Return Transaction, 45 EBT Food Stamp Sale Transaction, 40 EBT Food Stamp Sale Transaction Receipt, 42 EBT Food Stamp Voucher Transaction, 44 EBT Transactions
Balance Inquiry, 46 Cash Benefit Sale, 43 Food Stamp Return, 45 Food Stamp Sale, 40 Food Stamp Sale Receipt, 42 Food Stamp Voucher, 44 Receipt Field Descriptions, 48 Transaction Field Descriptions, 47
End of Day Settlement Batch Import, 92 Batch Upload, 92 Batch Upload Example, 92 Manual Settlement, 91 Overview, 91
Entering Credit Card Transactions Overview, 10
Epson Printer Drivers Installation in Windows Vista, 128 Installation in Windows XP, 126
Epson Printer Page and Margins Setup, 134 Epson Printer Setup in Connect, 133 Excel Format, 88 Exporting Reports, 87
Excel Format, 88 PDF Format, 88 Tab Delimited Format, 88 XML Format, 88
F Find and Edit User, 100 Find Transactions
Overview, 81 Find Transactions, 81
G Getting Help, 9 Getting Started, 4
I Introduction, 1
Overview, 1 Reporting, 2
System Requirements, 3 Transactions, 1
K Keyboard
Navigation, 9
L License Agreement, 5 Logging In, 4
M Main Menu, 7 Manual Settlement, 91 MICR Imager Setup, 111, 112 MICR Imager USB to Serial Converter Settings, 125 Mini MICR Reader USB to Serial Converter Settings,
124 Mini MICR Setup, 109, 110 Mouse
Navigation, 9
N Navigation, 9
Keyboard, 9 Mouse, 9
P Password
Change, 102 PDF Format, 88 PIN Pad Setup, 106 PIN Pad Setup in Connect, 107 PIN Pad USB to Serial Converter Settings, 123 Post Authorization Transaction
When to Use, 14 Previous Batch Summary Reports, 90
R Receipt
Setup, 103 Receipt Fields
Account Number, 29, 39, 48, 58 Agreement Message, 58 Authorization Code, 29, 39, 48, 58 Batch Number, 29, 39, 48 Card Type, 29, 39, 48 Cardholder Signature, 29, 48 Cash Back, 39 Check Number, 58 Convenience Fee, 29 Customer ID, 29 Date and Time, 29, 39, 48, 58, 64 Description, 29, 39, 48, 58, 64 Entry Method, 58

Heartland Connect Merchant User Manual
Heartland Payment Systems™ Rev 3/15/2013 176
Expiration Date, 29, 39, 48 Invoice Number, 29, 39, 48, 64 Merchant Information, 29, 39, 48, 58, 64 Message, 29, 39, 48, 58, 64 Name, 29, 39, 48, 58 Name on Check, 58 Phone, 58 Phone Number, 58 PO Number, 29 Receipt Copy, 29, 39, 48 Receipt Legend, 58 Result, 29, 39, 48, 58, 64 Routing/Transit Number, 58 Sale Tax Amount, 29 Shipping Amount, 29 Signature, 58 Street Address, 29 Subtotal, 39 Tip Amount, 29, 39 Total Amount, 29, 39, 48, 58, 64 Transaction Entry Method, 29, 39, 48 Transaction Number, 29, 39, 48, 58, 64 Transaction Type, 29, 39, 48, 58, 64 Zip Code, 29
Receipts Cash Return Transaction, 62 Cash Tender Transaction, 60 Check Sale Transaction, 51 Check Verify Transaction, 54 Credit Card Adjustment Transaction, 24 Credit Card Force Auth Transaction, 22 Credit Card Pre-Auth Transaction, 16 Credit Card Return Transaction, 19 Credit Card Sale Transaction, 13 Debit Card Return Transaction, 37 Debit Card Sale Transaction, 34 EBT Food Stamp Sale Transaction, 42 Recurring Billing Check Billing Transaction, 72 Recurring Billing Transaction, 69
Recurring Billing Check Billing Receipt, 72 Recurring Billing Transaction Receipt, 69 Recurring Billing Transactions
Add Contract, 73 Add Customer, 65 Check/ACH Info, 70 Credit Card Info, 67 Expiration Report, 80 Overview, 65 Report, 79 View Contracts, 77 View Customers, 75
Reporting Current Batch Summary, 89 Detail Report, 85 Exporting Reports, 87 Overview, 83 Previous Batch Summary, 90 Summary and Detail Reports, 83 Summary Report, 83
Reporting Fields Account Number, 86 Account Type, 86
Amount, 84, 86 Approval Code, 86 Auth Amount, 86 Authorization Amount, 84 Capture Amount, 84 Capture Amt, 86 Card Type, 84 Check Number, 86 Customer ID, 86 Date, 86 Deposit Amt, 89 Deposit Quantity, 89 Invoice Number, 86 Name, 86 Net Amount, 89 Net Quantity, 89 Payment Type, 86, 89 PO Number, 86 Reference Number, 86 Register, 86 Results, 86 Return Amount, 84, 90 Return Amt, 89 Return Count, 84, 90 Return Quantity, 89 Routing/Transit Number, 86 Sale Amount, 84, 90 Sale Count, 84, 90 Settlement Amount, 85 Settlement Count, 85 Status, 86 Tender Type, 90 Tip Amount, 84, 86 Total Amount, 84, 90 Total Count, 90 Transaction Count, 84 Transaction Type, 84 Type, 86 User, 86
S Screen Tabs, 9 Security
Setup, 98 Setting Up Devices, 104 Setup, 98
ActiveX, 151 Add User, 99 Change Password, 102 Check COM Ports in Windows Vista, 155 Check COM Ports in Windows XP, 153 Epson Printer Drivers in Windows XP, 126 Epson Printer Page and Margins Setup, 134 Epson Printer Setup in Connect, 133 Find and Edit User, 100 Install Epson Printer Drivers in Windows Vista,
128 Install Star Printer Drivers in Windows Vista, 141 Install Star Printer Drivers in Windows Vista from
Zip File, 146 Install Star Printer Drivers in Windows XP, 137

Heartland Connect Merchant User Manual
Heartland Payment Systems™ Rev 3/15/2013 177
Install USB to Serial Adapter in Windows XP, 115 Install USB to Serial Converter in Windows Vista,
120 Overview, 98 Receipt, 103 Security, 98 Star Printer Print Test, 150 Star Printer Properties, 149 Star Printer Receipt Orientation Setup, 150 Star Printer Second Copy Printing Setup, 150 Star Printer Setup, 135 Star Printer Setup in Connect, 149 USB to Serial Converter for MICR Imager, 125 USB to Serial Converter for Mini MICR Reader,
124 USB to Serial Converter for PIN Pad, 123 USB to Serial Converter Verification in Windows
Vista, 121 USB to Serial Converter Verification in Windows
XP, 118 Setup Fields
City, 99 Country, 99 Email Address, 99 First Name, 99 Last Name, 99 Phone Number, 99 Postal Code, 99 Province, 99 Security Level, 99 State, 99 Street Address 1, 99 Street Address 2, 99 System Level, 99 Time Zone, 99 User Name, 99
Star Printer Drivers Installation in Windows Vista, 141 Installation in Windows Vista from Zip File, 146 Installation in Windows XP, 137
Star Printer Print Test, 150 Star Printer Properties, 149 Star Printer Receipt Orientation Setup, 150 Star Printer Second Copy Printing Setup, 150 Star Printer Setup, 135 Star Printer Setup in Connect, 149 Summary and Detail Reports, 83 Summary Report, 83 System Requirements
Hardware, 3 Peripherals, 3 Software, 3
T Tab Delimited Format, 88 Transaction Active/Inactive, 73 Transaction Fields
Account Number, 57, 82 Account Type, 57, 82 Active/Inactive, 66 Add Credit Card, 73
Address Information, 66 Amount, 38, 47, 57 Approval Code, 82 Auth Amount, 82 Authorization Code, 27, 47 Bank Routing/Transit Number, 57 Bill Contract, 73 Billed Amount, 79 Capture Amount, 82 Card Holder, 27, 38, 47 Card Number, 27, 38, 47 Card Present, 27 Cash Back Amount, 38, 47 Check Number, 57 Check Type, 57 City, 27, 57 Company, 66 Confirmation, 74 Contract ID, 73 Contract Name, 73 Convenience Fee, 27 Country, 66 Customer ID, 27, 38, 66, 80, 82 Customer ID, 79 CV Presence, 27 CV2, 27 Date, 82 Date, 63 Date of Birth, 57 Date Range, 79 Daytime Phone, 66 Department, 66 Driver’s License Number, 57 Email, 57, 66 End Date, 73 Evening Phone, 66 Execute this Contract, 73 Expiration Date, 27, 38, 47 Expiration Dates, 80 Fax, 66 First Name, 66 Force Duplicate, 27, 38, 47 ID Number, 57 ID Type, 57 Invoice Number, 27, 38, 47, 57, 63, 82 Last Name, 66 Mobile Phone, 66 Name, 82 Name on Account, 57 Payment Declined, 73 Payment Method, 79 Payment Type, 82 Phone Number), 57 PNRef, 28, 38, 47 PO Number, 27, 82 Reference Number, 82 Register, 82 Result, 82 Shipping Amount, 63 Shipping Amount, 27 Social Security Number, 57 Start Date, 73

Heartland Connect Merchant User Manual
Heartland Payment Systems™ Rev 3/15/2013 178
State, 57 Status, 80, 82 Status, 79 Street Address, 27, 57 Subtotal, 27, 63, 73 Tax Amount, 27, 63, 73 Time, 63 Tip Amount, 27, 38, 63, 82 Title, 66 Total Amount, 27, 38, 47, 63, 73 Type, 82 User, 82 Voucher Number, 47 Zip Code, 27, 57, 66
U USB to Serial Adapter
Installation in Windows XP, 115 USB to Serial Converter
Installation in Windows VistaXP, 120 Verification in Windows Vista, 121 Verification in Windows XP, 118
V View Contracts, 77 View Customers, 75
X XML Format, 88