mercy remote access instructions · ©2008 mercy medical center 1320 mercy dr. nw canton, ohio...
TRANSCRIPT

©2008 Mercy Medical Center
1320 Mercy Dr. NW
Canton, Ohio 44708
Helpdesk: 330.489.1275
Mercy’s Remote Access Instructions
~~~~~~~~~~~~~~ Section A – Windows 2000 / XP ~~~~~~~~~~~~~~
I. Install Meditech . . . . . . . . . . . . . . . . . . . . . . . . . . . . . . . A1
II. Install VPN Client . . . . . . . . . . . . . . . . . . . . . . . . . . . . . A3
III. Sign on to PACS Gateway from VPN . . . . . . . . . . . . . A7
IV. Sign on to Meditech from VPN . . . . . . . . . . . . . . . . . . A10
V. Install Nursing Flowsheet / Smartboard . . . . . . . . . . A10
VI. Accessing MercyNet / Email from VPN . . . . . . . . . . . A11
VII. Install OB Link . . . . . . . . . . . . . . . . . . . . . . . . . . . . . . . A12
VIII. Sign on to OB Link from VPN . . . . . . . . . . . . . . . . . . A14
IX. Disconnect from VPN . . . . . . . . . . . . . . . . . . . . . . . . . . A14
X. Install Meditech on the Web . . . . . . . . . . . . . . . . . . . . A15
XI. Print from Meditech . . . . . . . . . . . . . . . . . . . . . . . . . . . A21
~~~~~~~~~~~~~~~ Section B – Windows Vista ~~~~~~~~~~~~~~~ Use previous section for Meditech, iSite, MercyNet, OBLink installations
I. Install & Sign on to VPN Client . . . . . . . . . . . . . . . . . . B1
II. Disconnect from VPN . . . . . . . . . . . . . . . . . . . . . . . . . . B6
III. Install Meditech on the Web . . . . . . . . . . . . . . . . . . . . . B6
~~~~~~~~~~~~~~~~~ Section C – Macintosh ~~~~~~~~~~~~~~~~~
I. Install VPN Client . . . . . . . . . . . . . . . . . . . . . . . . . . . . . C1
II. Install Terminal Services . . . . . . . . . . . . . . . . . . . . . . . C5
III. Sign on to VPN . . . . . . . . . . . . . . . . . . . . . . . . . . . . . . . . C6
IV. Access Meditech & PACS . . . . . . . . . . . . . . . . . . . . . . . C6
V. Uninstall VPN . . . . . . . . . . . . . . . . . . . . . . . . . . . . . . . . C7

Section A
Windows 2000/XP
† † † † Section A – Windows 2000 / XP † † † †
A1
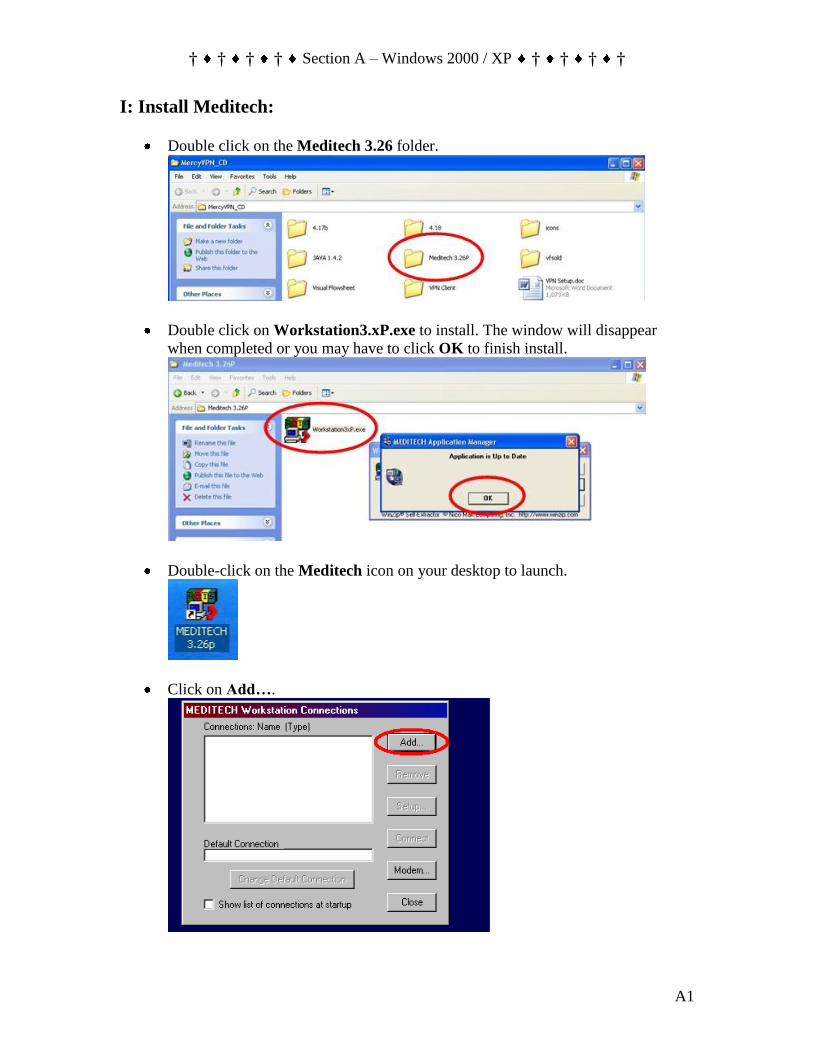
I: Install Meditech:
Double click on the Meditech 3.26 folder.
Double click on Workstation3.xP.exe to install. The window will disappear
when completed or you may have to click OK to finish install.
Double-click on the Meditech icon on your desktop to launch.
Click on Add….

† † † † Section A – Windows 2000 / XP † † † †
A2
Type Meditech and then click in the circle to the left side of telnet. This will put
a dot in that circle. Click OK.
At the bottom of the screen in the Host Name/IP Address, type 10.48.192.17.
In the Telnet Port, type 23 and then hit OK.
Click Change Default Connection and then click Close.

† † † † Section A – Windows 2000 / XP † † † †
A3
II: Install VPN Client:
Double click on the XP folder then the VPN Client folder.
Double click on Setup.exe.
Click Next.

† † † † Section A – Windows 2000 / XP † † † †
A4
Click Yes.
Click Next.

† † † † Section A – Windows 2000 / XP † † † †
A5
Click Next.
The installation will begin.
You will receive the following error message. Click Yes.
Wait for the installation to complete.

† † † † Section A – Windows 2000 / XP † † † †
A6
Make sure “Yes, I want to restart my computer now.” is selected and click Finish.
When the computer comes back up to the screen with your icons:
o Click Start
o Click Programs
o Click Cisco Systems VPN Client
Right-click VPN Client.

† † † † Section A – Windows 2000 / XP † † † †
A7
Click Send to and then click Desktop (create shortcut).
This will create a “lock” icon on your desktop.
III: Sign on to PACS Gateway from VPN:
NOTE: To be able to properly diagnose and accurately view PACS images, be sure
that you graphics card’s color quality is set to at least 24bits before continuing.
512MB+ memory & 1 Ghz+ processor recommended.
Double click on the yellow lock icon on your desktop. Be sure that CSAUHPACS
is highlighted and click the Connect button in the top left hand corner.
Sign on to the program using:
o The first 6 letters of your last name (or your whole last name if it is 6
characters or less), your first initial, and your middle initial.
o This should be all one word: example: johnsoma (for Matt Alan Johnson)
o Enter your network password.
The yellow lock will minimize.
Double click Internet Explorer.
Click on the address bar at the top of Internet Explorer.
Type http://10.45.15.93/ids5web/start/american/index.html

† † † † Section A – Windows 2000 / XP † † † †
A8
An Information Bar will appear at the top of the screen in yellow. A pop-up will
inform you that the Information Bar has appeared. Click OK.
Click on the Information Bar at the top of the screen. Then click Install ActiveX
Control…
Click Install to install the setup file.

† † † † Section A – Windows 2000 / XP † † † †
A9
Click Install again.
Wait for setup to finish.
Create a shortcut on your desktop:
o Right-click on a blank area of your desktop (where all the icons are
located on the main screen)
o Click New Shortcut
o Type http://10.45.15.93/ids5web/start/american/index.html and click Next.
o Type PACS Gateway and click Finish.
Change your first time password:
o Log on to PACS Gateway using the following information:
Username = same as your Meditech sign-on
Password = mercy
o Click Cancel to close out of the Search box.
o Go to the File menu.
o Click Change Password.
o Type mercy as your old password and then type your new password

† † † † Section A – Windows 2000 / XP † † † †
A10
IV: Sign on to Meditech from VPN:
Double click on the yellow lock icon on your desktop. Be sure that CSAUHPACS
is highlighted and click the Connect button in the top left hand corner.
Sign on to the program using:
o The first 6 letters of your last name (or your whole last name if it is 6
characters or less), your first initial, and your middle initial.
o This should be all one word: example: johnsoma (for Matt Alan Johnson)
o Enter your Network Password.
Double clicking the Meditech icon will bring you to this screen.
F9 for lookup then select 2 for Mercy.
Then continue by entering your Meditech sign on and password.
V: Install Nursing Flowsheet / Smartboard:
Double click on your CD-ROM from My Computer.
o Double click on the Smartboard folder to install Smartboard.
If installing Smartboard it must be installed before the Flowsheet.
o Double click on the Visual Flowsheet folder to install Visual Flowsheet.
Double click on Setup in each folder to begin the respective installs.

† † † † Section A – Windows 2000 / XP † † † †
A11
Enter through the install program, accepting all the defaults to install.
VI: Accessing MercyNet / Email from VPN:
Double click on the yellow lock icon on your desktop. Be sure that CSAUHPACS
is highlighted and click the Connect button in the top left hand corner.
Sign on to the program using:
o The first 6 letters of your last name (or your whole last name if it is 6
characters or less), your first initial, and your middle initial.
o This should be all one word: example: johnsoma (for Matt Alan Johnson)
o Enter your Network Password.
Start Internet Explorer and type in “mercynet” as the address and hit enter.
Click the link in the center column entitled “Email – Mercy”.

† † † † Section A – Windows 2000 / XP † † † †
A12
If you are not logged in automatically; enter your network username and
password to launch the outlook web application. If needed, put “csauh\” before
your username, i.e. csauh\username.
When you are done, close your browser window to logoff of your e-mail.
VII: Install OB Link:
First we must install Java. Double click on the Java 1.5.0_13 folder.
Double click on jre-1_5_0_13-windows-i586-p.exe.

† † † † Section A – Windows 2000 / XP † † † †
A13
Click Run, if asked.
Click Typical Setup and the Accept button.
Wait as the setup program installs Java. Click Finish to complete the install.
† † † † Section A – Windows 2000 / XP † † † †
A14
VIII: Sign on to OB Link from VPN:
Double click on the yellow lock icon on your desktop. Be sure that CSAUHPACS
is highlighted and click the Connect button in the top left hand corner.
Sign on to the program using:
o The first 6 letters of your last name (or your whole last name if it is 6
characters or less), your first initial, and your middle initial.
o This should be all one word: example: johnsoma (for Matt Alan Johnson)
Once connected double click Internet Explorer.
To set up shortcut to Mercy’s OB Link (only do this the first time you sign on):
o Type https://10.45.17.28 and hit enter.
o When the page displays, click on Favorites at the top of the page.
o Click Add to Favorites.
o Name it OB Link.
To sign on to OB Link (after you set it up in Favorites the first time):
o Click on Favorites.
o Click on the OB Link shortcut name.
Log into the OB program using your Mercy sign-on information.
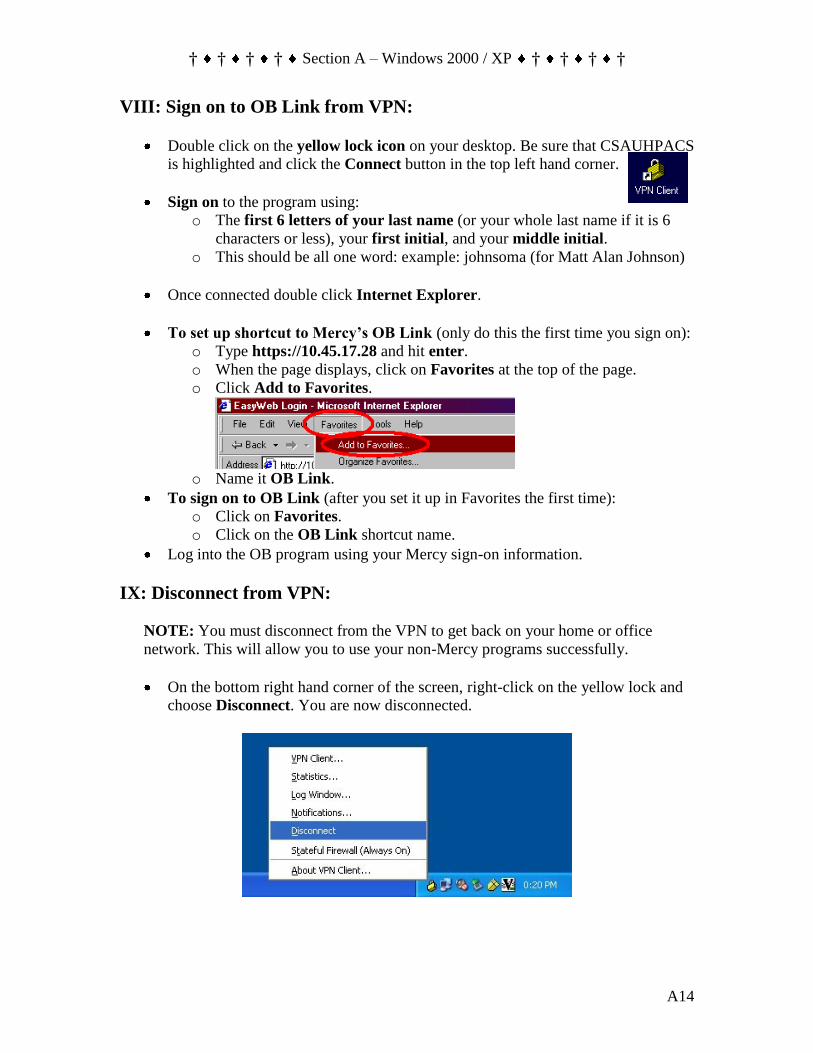
IX: Disconnect from VPN:
NOTE: You must disconnect from the VPN to get back on your home or office
network. This will allow you to use your non-Mercy programs successfully.
On the bottom right hand corner of the screen, right-click on the yellow lock and
choose Disconnect. You are now disconnected.

† † † † Section A – Windows 2000 / XP † † † †
A15
Alternatively, launch the VPN Client again by double-clicking the lock on your
desktop and choose Disconnect.
X: Install Meditech on the Web:
NOTE: You must be an administrator on your PC. Call your office IT personnel to
verify that you are an administrator before continuing.
To connect you must disable your firewall. To disable the Windows firewall,
right-click Network Neighborhood or Network Places and go to Properties.
Right-click your Local Area Connection and go to Properties.
Click the Advanced tab and then the Settings button.

† † † † Section A – Windows 2000 / XP † † † †
A16
Choose Off at the bottom then click OK.
If you cannot turn your firewall off: If your firewall cannot be turned off due to
policy restrictions, you must allow an exception to three Meditech programs.
Click the Exceptions tab from the above window and then click Add Program.
Click Browse to add the following programs:
o “C:\Program Files\Meditech\Print\VMagicPPII.exe”
o “C:\Program Files\Meditech\Station325A\T.exe”
o “C:\Program Files\FCG\FirstWorks\FirstConnect\Client\tunnel.exe”
If you already have Meditech on your system: we must set it up to allow
multiple connections. Skip this step if you don’t have any other versions of
Meditech on your system.
o Start Meditech by double-clicking the shortcut on the desktop.
o Click Options at the top of the window, then click Connections.

† † † † Section A – Windows 2000 / XP † † † †
A17
o Check show list of connections at startup and then click close.
o Close out of Meditech.
Open Internet Explorer and click on the Tools (1) button, and then click Internet
Options (2).
IE 6 IE 7
† † † † Section A – Windows 2000 / XP † † † †
A18
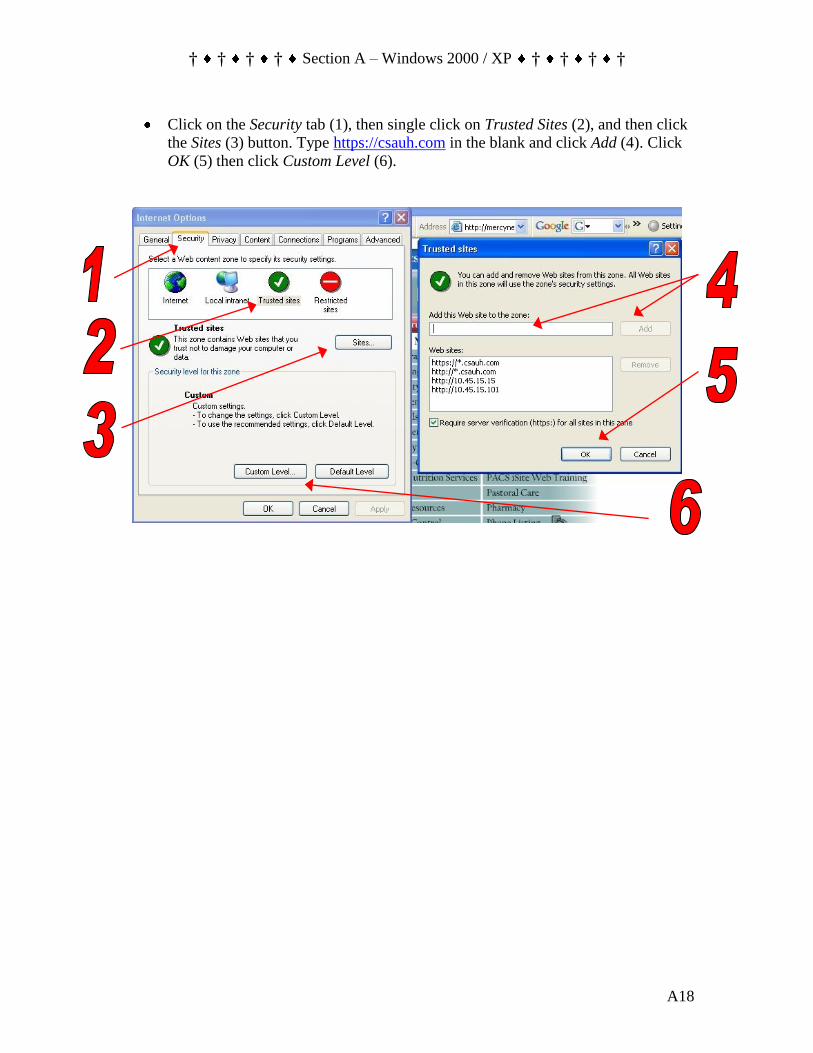
Click on the Security tab (1), then single click on Trusted Sites (2), and then click
the Sites (3) button. Type https://csauh.com in the blank and click Add (4). Click
OK (5) then click Custom Level (6).

† † † † Section A – Windows 2000 / XP † † † †
A19
At the bottom choose Low (1) from the drop down list. Then click Reset (2).
Choose the Yes button to confirm your change.
Click OK to save your changes. Click OK again to save your settings.
To setup a shortcut to Meditech on the Web (only do this the first time):
o Type https://meditech.csauh.com/firstconnect
o When the page displays, click on Favorites at the top of the page.
o Click Add to Favorites.
o Name it Mercy on the Web.
Click Favorites then Mercy on the Web to launch the website.
Always click the first link, MEDITECH_325A

† † † † Section A – Windows 2000 / XP † † † †
A20
Click YES to run the ActiveX control.
If a Meditech Workstation Connections window pops up, click FCGConfig and
click connect.
When a blue bar appears, hit the F9 key and type 2 and hit Enter for Mercy.
† † † † Section A – Windows 2000 / XP † † † †
A21
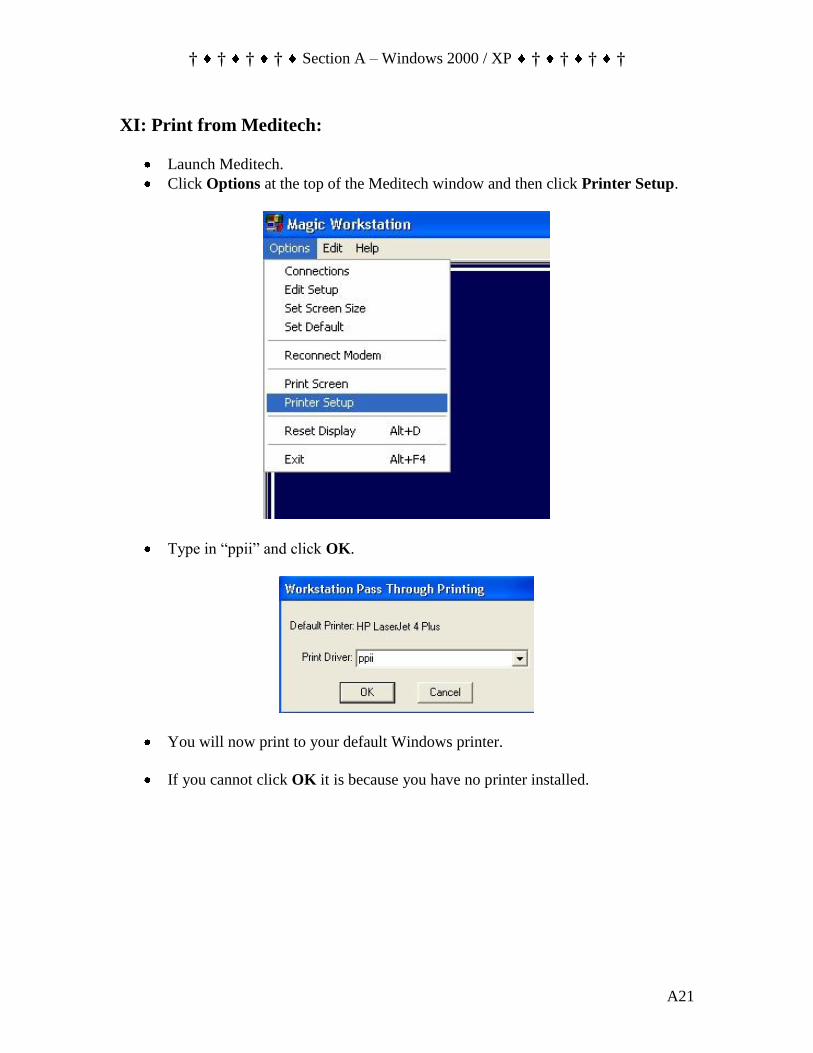
XI: Print from Meditech:
Launch Meditech.
Click Options at the top of the Meditech window and then click Printer Setup.
Type in “ppii” and click OK.
You will now print to your default Windows printer.
If you cannot click OK it is because you have no printer installed.

Section B
Windows Vista

° ° ° ° Section B – Windows Vista ° ° ° °
B1
I: Install & Sign on to VPN Client:
From the CD, open the Vista folder and then the VPN Client 5.0 Vista folder.
Double-click the Windows Installer vpnclient_setup.
Click Next at the welcome screen.

° ° ° ° Section B – Windows Vista ° ° ° °
B2
Click the Accept button then click Next.
Click Next.

° ° ° ° Section B – Windows Vista ° ° ° °
B3
Click Next.
Installation Successful. Click Finish.
You must restart before using the VPN. Click Yes.

° ° ° ° Section B – Windows Vista ° ° ° °
B4
To create a VPN shortcut; Click your Start Button in the bottom left-hand corner.
Click All Programs.
Double-click Cisco Systems VPN Client.
Right-click VPN Client and choose Send > Desktop (as shortcut).

° ° ° ° Section B – Windows Vista ° ° ° °
B5
Double-click VPN Client on your desktop.
Choose Connect.
Enter your Mercy Username and Password.
If you see the continue/banner message then you are on the Mercy VPN.

° ° ° ° Section B – Windows Vista ° ° ° °
B6
II: Disconnect from VPN:
On the bottom right hand corner of the screen, right-click on the yellow lock and
choose Disconnect. You are now disconnected.
Alternatively, launch the VPN Client again by double-clicking the lock on your
desktop and choose Disconnect.
III: Install Meditech on the Web:
NOTE: You must be an administrator on your PC. Call your office IT personnel to
verify that you are an administrator before continuing.
To connect you must disable your firewall. Click on the Start button and then
Network.

° ° ° ° Section B – Windows Vista ° ° ° °
B7
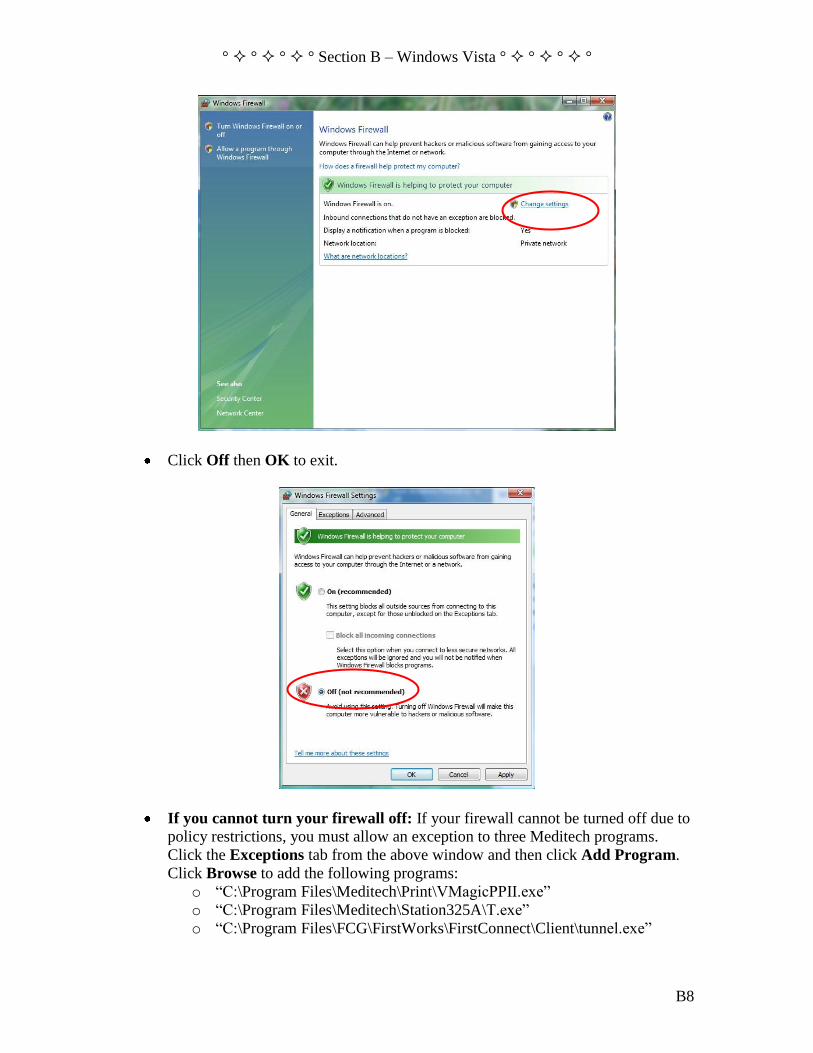
Click Windows Firewall in the bottom left-hand corner.
Click Change Settings. If a prompt comes up choose Yes to continue.
° ° ° ° Section B – Windows Vista ° ° ° °
B8
Click Off then OK to exit.
If you cannot turn your firewall off: If your firewall cannot be turned off due to
policy restrictions, you must allow an exception to three Meditech programs.
Click the Exceptions tab from the above window and then click Add Program.
Click Browse to add the following programs:
o “C:\Program Files\Meditech\Print\VMagicPPII.exe”
o “C:\Program Files\Meditech\Station325A\T.exe”
o “C:\Program Files\FCG\FirstWorks\FirstConnect\Client\tunnel.exe”

° ° ° ° Section B – Windows Vista ° ° ° °
B9
If you already have Meditech on your system: we must set Meditech up to
allow multiple connections. If you use Meditech for other hospitals, or want to
use our VPN and Meditech on the Web, then do not skip this step.
o Start Meditech by double-clicking the shortcut on the desktop.
o Click Options at the top of the window, then click Connections.
o Put a check at Show list of connections at startup and then click close.
o Close out of Meditech.
We must turn off UAC for Meditech on the Web to Install. Click your Start /
Windows button and go to Control Panel.

° ° ° ° Section B – Windows Vista ° ° ° °
B10
Click Classic View then click User Accounts.
Click Turn User Account Control on or off. Click Yes at the popup.

° ° ° ° Section B – Windows Vista ° ° ° °
B11
Uncheck Use User Account Control (UAC) and click OK. Click Yes if another
prompt pops up.
Click Restart Now and wait for PC to restart before continuing.
Open Internet Explorer and click on the Tools (1) button, and then click Internet
Options (2).

° ° ° ° Section B – Windows Vista ° ° ° °
B12
Click on the Security tab (1), then single click on Trusted Sites (2), and then click
the Sites (3) button. Type https://csauh.com in the blank and click Add (4). Click
OK (5) then click Custom Level (6).

° ° ° ° Section B – Windows Vista ° ° ° °
B13
At the bottom choose Low (1) from the drop down list. Then click Reset (2).
Choose the Yes button to confirm your change.
Click OK to save your changes. Click OK again to save your settings.
To setup a shortcut to Meditech on the Web (only do this the first time):
o Type https://meditech.csauh.com/firstconnect and hit enter.
o When the page displays, click on Favorites at the top of the page.
o Click Add to Favorites.
o Name it Mercy on the Web.
Click Favorites then Mercy on the Web to launch the website.
Always click the first link, MEDITECH_325A

° ° ° ° Section B – Windows Vista ° ° ° °
B14
Click YES to run the ActiveX control. If you get additional pop ups, click Yes.
If a Meditech Workstation Connections window pops up, click FCGConfig and
click connect.
When a blue bar appears, hit the F9 key and type 2 and hit Enter for Mercy.

Section C
Mac OS X 10.2+

* * * * * * * * * * * * Section C – Macintosh * * * * * * * * * * * *
C1
I: Install VPN Client:
NOTE: You will need an administrator password to complete the VPN install. Also
note Leopard’s built-in VPN client cannot be used to connect to the Mercy network.
Open the CD, go into the MAC folder and choose the VpnClient folder that
corresponds to your operating system version.
Double-click the .dmg file to mount.
Double-click the Cisco VPN Client folder on the desktop and then double-click
Cisco VPN Client.mpkg to begin installation.

* * * * * * * * * * * * Section C – Macintosh * * * * * * * * * * * *
C2
Click Continue to install.
Click Continue when the license is displayed.
Click Agree to accept the license.
* * * * * * * * * * * * Section C – Macintosh * * * * * * * * * * * *
C3
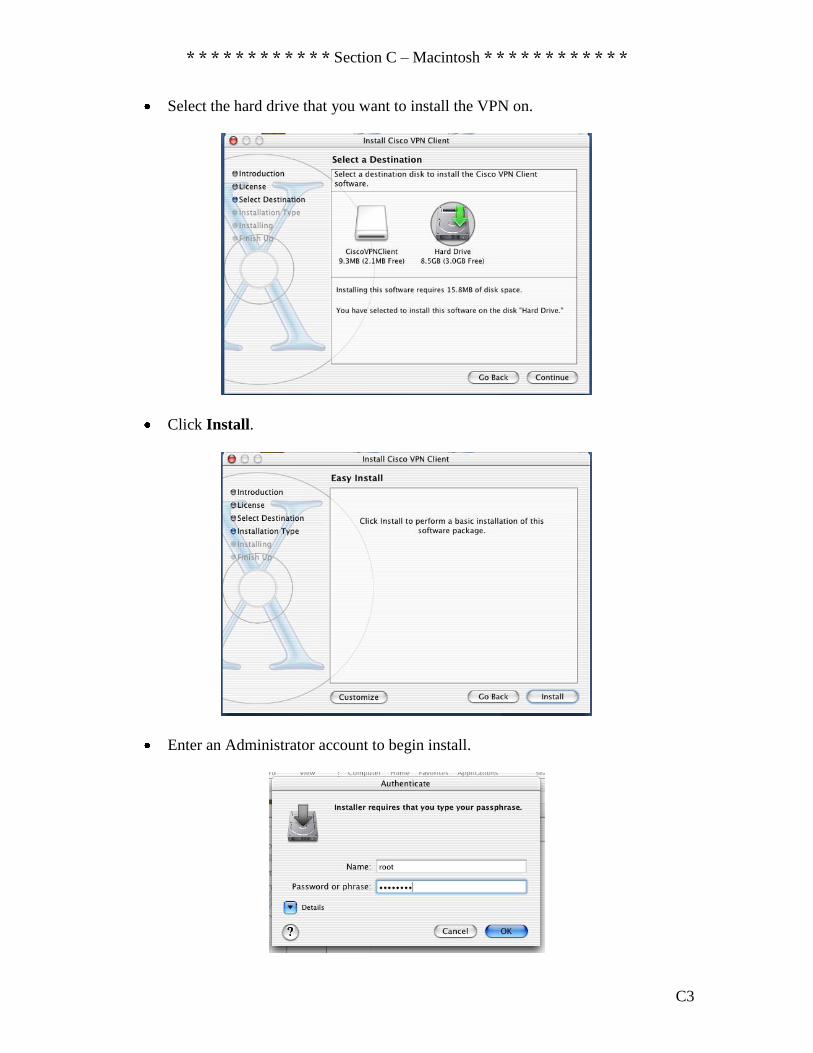
Select the hard drive that you want to install the VPN on.
Click Install.
Enter an Administrator account to begin install.

* * * * * * * * * * * * Section C – Macintosh * * * * * * * * * * * *
C4
Wait for software to finish and click close.
Old versions of the application require a restart. Do so if prompted.
Open the Applications folder and drag VPNClient to your dock.
Click VPNClient from your dock to open the application.
If you have an entry for utmem, highlight it and click delete. Click delete to
confirm the deletion.

* * * * * * * * * * * * Section C – Macintosh * * * * * * * * * * * *
C5
Click Import.
Find the CSAUHPACS.pcf file on the CD in the MAC folder. Highlight the file
and click Open.
The VPNClient window should now have a connection entry for CSAUHPACS.
The VPN has been installed successfully.
II: Install Terminal Services:
Open the CD and go into the MAC folder.
Open the Microsoft RDP 10.2 or later folder.
Double-click the RDC103EN.dmg.
If the above file doesn’t work: There are three files of the same program in this
folder and are here for compatibility. Double-click the file that works with your
OS. If you do not know, go down the line double-clicking each one until one
installs / mounts.
A Remote Desktop Connection folder pops up. Click and drag the icon to the
Applications folder.
From your Applications folder, open the Remote Desktop Connection folder.
Drag the Remote Desktop Connection application to your dock.
Installation is complete.

* * * * * * * * * * * * Section C – Macintosh * * * * * * * * * * * *
C6
III: Sign on to VPN:
Click VPNClient from your dock and click Connect in the VPN Client Window.
Enter your username and password at the popup.
If you get the continue message then you have successfully connected to the VPN.
IV: Access Meditech & PACS:
NOTE: You will not be able to print from Meditech and you will not be able to view
PACS images at full quality.
Sign on to the VPN using the instructions from the previous section.
Once on the VPN, click Remote Desktop Connection from the dock.
Enter MercyTrm02 as the server and click Connect.
Enter your username and password and make sure the domain is CSAUH. Click
OK.
A desktop will appear.
Open Meditech as usual from the desktop shortcut.
If you need iSite PACS you may find it on MercyNet or you can open Internet
Explorer and type in the address of http://10.45.15.15. Save it as one of your
favorites and you will be able to access it everytime you sign on.

* * * * * * * * * * * * Section C – Macintosh * * * * * * * * * * * *
C7
V: Uninstall VPN:
NOTE: You need an administrator password to complete the following steps.
Log in to the machine with an administrator account.
Open a terminal window (Hard drive, then Applications, then Utilities, then
Terminal).
Type in the following command and then press enter: /usr/local/bin/vpn_uninstall
o If you get an error type: sudo usr/local/bin/vpn_uninstall
If you are asked for a password then type in the administrator or root password.
When prompted to remove the VPN client, type yes.
When prompted to remove all existing files and certificates, type yes.