metabones smart adapter · 4 aperture window aperture ring breech lock ef mount index dot (red)...
TRANSCRIPT

1
Metabones
Smart Adapter
(EF-FZ Mount) Model: MB_EF-FZ-BM1
Operation Manual Version 1.0

2
Table of Contents 1 ) Parts Nomenclature ........................................................................ 3
2 ) Adapter Firmware ........................................................................... 5 2.1 Updating firmware of Smart Adapter ................................ 5
2.1.1 Preparation .................................................................................. 5 2.1.2 Version check using Metabones App ................................ 6 2.1.3 Firmware Update procedure ............................................... 6
3 ) Lens Attachment ............................................................................... 8
4 ) Iris ...................................................................................................... 12 4.1 Iris display ............................................................................... 12 4.2 Changing iris manually ........................................................ 12 4.3 Changing iris automatically ............................................... 13 4.4 Iris lock ..................................................................................... 14
5 ) Assignable Button ......................................................................... 15

3
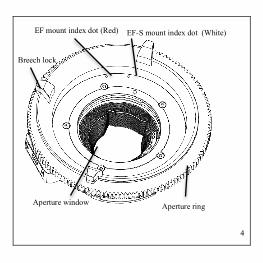
1) Parts Nomenclature
FN1 button
FN2 button
IRIS switch IRIS switch
EF-S mount index dot
4
Aperture window Aperture ring
Breech lock
EF mount index dot (Red) EF-S mount index dot (White)

5
2) Adapter Firmware
This user manual is applicable to adapter firmware 6.40 and camera firmware 5.00 or above.
2.1 Updating firmware of Smart Adapter
2.1.1 Preparation
• You must have a micro USB 2.0 cable.
• Use a Mac with OSX 10.9 or above, or a Windows PC with Open GL 2.0 (all recent PCs support Open GL 2.0). Note: Metabones App may not run properly on OSX with two or more monitors connected. If you encounter difficulties disconnect one of the monitors.
• Download Metabones App from www.metabones.com. The same Metabones App updates all Metabones products.

6
2.1.2 Version check using Metabones App
1. Run Metabones App.
2. Attach micro USB 2.0 cable without pushing any buttons on the Smart Adapter.
3. Version number is displayed. If “OK” is displayed the adapter firmware is up-to-date. Otherwise, follow instructions on screen to update firmware.
4. Note: Metabones App does not make any network connections to check for the latest adapter firmware.
2.1.3 Firmware Update procedure
5. Run Metabones App.
6. Attach micro USB 2.0 cable while holding down both FN1 and FN2 buttons on the Smart Adapter simultaneously.

7
7. Metabones App will detect the adapter and display the “Update” button.
8. Click “Update”.

8
3) Lens Attachment
1. Under “Camera” menu, find “Lens Interface”. (Precise location of menu items may vary from camera to camera.)
2. Configure “Setting” to “Type C”.
3. Always turn off camera before detaching/attaching Smart Adapter or EF mount lens.

9
4. Rotate FZ mount ring fully counter-clockwise.

10
5. Align index pin of Smart Adapter with FZ mount and rotate FZ mount ring clockwise to lock the Smart Adapter.
6. Rotate EF mount ring fully clockwise.

11
7. Align red index dot of Smart Adapter with red index dot of an EF mount lens (or white index dot of Smart Adapter with white index dot of an EF-S mount lens) and rotate EF mount ring fully counter-clockwise to secure the lens.
8. Turn on the camera's power.

12
4) Iris
4.1 Iris display
Many EF mount lenses do not use T-stops for changing iris, but F-stop instead. Only the F-stop is displayed on the monitor. Apertures slower than f/32 are displayed as 'C' and apertures faster than f/1.4 are displayed as f/1.4.
4.2 Changing iris manually
1. Set IRIS switch on Smart Adapter to 'M' (manual) position.
2. Rotate the aperture ring of the Smart Adapter to change iris.

13
4.3 Changing iris automatically
1. Under “User Menu”, find “Base Setting”. (Precise location of menu items may vary from camera to camera.)
“Shooting Mode” needs to be set to “Custom”. The “Cine EI” setting will disable the auto exposure function.
2. S&Q Motion feature needs to be turned off or auto exposure function will be disabled.
3. Set IRIS switch on Smart Adapter to 'A' (auto) position.
4. EF mount lenses adjust iris in 1/8 stop increments which may result in visible changes in exposure in the footage.
5. Experiment with the settings under the “Auto Exposure” menu. Consult the user manual of your camera for details.
14
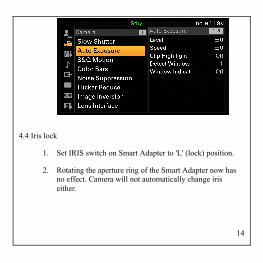
4.4 Iris lock
1. Set IRIS switch on Smart Adapter to 'L' (lock) position.
2. Rotating the aperture ring of the Smart Adapter now has no effect. Camera will not automatically change iris either.
15
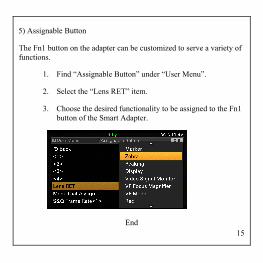
5) Assignable Button
The Fn1 button on the adapter can be customized to serve a variety of functions.
1. Find “Assignable Button” under “User Menu”.
2. Select the “Lens RET” item.
3. Choose the desired functionality to be assigned to the Fn1 button of the Smart Adapter.
End