metal crafts geriatrics)
TRANSCRIPT

8/3/2019 Metal Crafts Geriatrics)
http://slidepdf.com/reader/full/metal-crafts-geriatrics 1/19
Metal Sign Crafts
Instructions
Things You'll Need
y W ood plank
y M easuring tape
y S aw
y Iron-on edge banding
y Iron
y S tain/polyurethane
y P aint sponge
y M etal foil
y H ousehold shears
y Newspapers
y Letter/number stencils
y S traight edge
y S tylus
y A crylic paint
y A rtist's brushes
y Ex terior polyurethane
y W aterproof construction adhesive
y S crew-eye hooks
y S hooks
y S mall chain
1.
o 1

8/3/2019 Metal Crafts Geriatrics)
http://slidepdf.com/reader/full/metal-crafts-geriatrics 2/19
C ut a 1/2-inch-thick wood board to fit the desired size of your metal sign. C ut strips of iron-on edgebanding for each raw edge of the wood board. A pply the edge-banding with a hot iron according to thepackage instructions.
o 2
S tain the wood board on the front, back and sides with a stain product that has polyurethane alreadyblended into the mi x . You'll be covering the front of the wood board with metal, but a layer of stain/polyurethane beneath the metal will help protect the wood from retaining moisture. A lways applystain in the direction of the wood grain. A llow the stain to dry.
o 3
C ut a section of metal foil to fit the front of your wood sign. P lace the metal on top of a stack of newspapers. Newspapers provide a firm surface that will allow the metal to give as you engrave thesign.
o 4
Tape letter, word or image stencils onto the metal sheet. A straight edge will help keep the letters andnumbers straight.
o 5
Trace the open outline of the stencils with a blunt object or a stylus. P ress down hard enough into themetal for it to indent.
o 6
P aint the indented letters, numbers and images on your metal sign with acrylic paint. Select a bold colorthat will contrast sharply with the color of the metal. A llow the paint to dry. A pply a coat of e x teriorpolyurethane over the painted surface for protection. Let the polyurethane dry.
o 7
A ttach the metal sign to the face of the wood board with waterproof construction adhesive. If you want,you can also attach the metal to the wood with decorative nails for visual effect.
o 8
Insert two small screw-eye hooks into the wood on the back of your metal sign. P lace the hooks 2 inchesfrom the outside edge of each side. A ttach a length of chain to the screw-eye hooks with a small S hookso you can hang your metal sign.

8/3/2019 Metal Crafts Geriatrics)
http://slidepdf.com/reader/full/metal-crafts-geriatrics 3/19
Craft Metal Book Markers
Instructions
Things You'll Need
y 20-gauge metal, 2 inches by 3 inches
y R uler
y O il pencil
y D rill
y 1/1 6 -inch drill bit
y S afety glasses/goggles
y S croll saw
y 1/1 6 -inch metal scroll-saw blade
y Needle files
1.
o 1
M easure and mark a 1-inch-by-2 inch rectangle on the metal using the oil pencil. Turn the rectangle so
the 1-inch ends are horizontal.D
raw a U-shape.M
ake the bottom part of the U-shape 1/8
inch from thebottom of the rectangle. S tart the side lines 1/ 8 inch from one 2-inch edge and ending 1/ 8 inch from theother 2-inch edge. M ake the side lines 1 1/2 inches.
o 2
O n the left corner on the top of the U, draw a 1/ 8 -inch line horizontally toward the right side of therectangle. O n the right corner on the top of the U, draw a 1/ 8 -inch line horizontally toward the left sideof the rectangle. These two marks are the top of a block-style U.
o 3
S tarting on the left top mark of the block-style U, mark a 1 3 / 8 -inch line straight down the side. R epeaton the right side. A 1/ 8 -inch space should be between the outside and inside of the U-shape.
o 4
D raw a straight line connecting the two lines, making the inside of the block-style U. A 1/ 8 -inch voidshould be between the outer and inner lines.

8/3/2019 Metal Crafts Geriatrics)
http://slidepdf.com/reader/full/metal-crafts-geriatrics 4/19
8/3/2019 Metal Crafts Geriatrics)
http://slidepdf.com/reader/full/metal-crafts-geriatrics 5/19

8/3/2019 Metal Crafts Geriatrics)
http://slidepdf.com/reader/full/metal-crafts-geriatrics 6/19
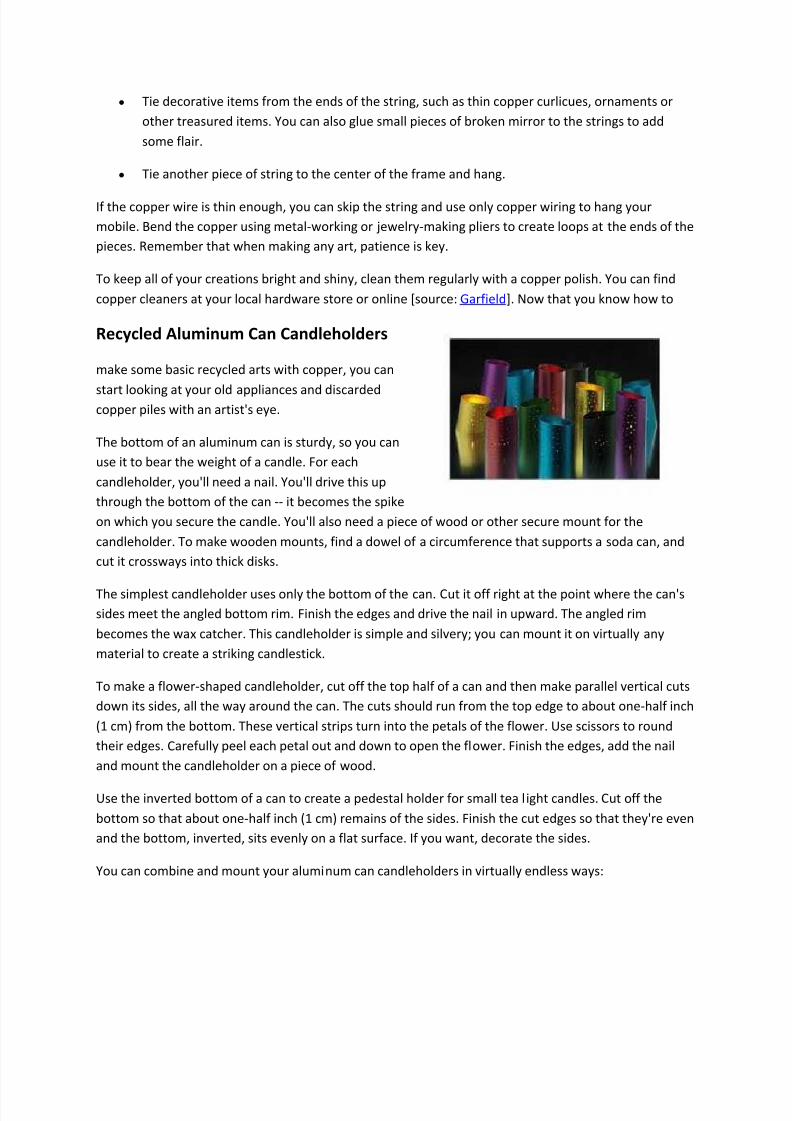
y C ut an arc from the side of a much larger tin can. Finish the edges so that it stands as a rainbow-style bridge. A rrange candleholders along it at varying heights.
y A ffix nine candleholders to a piece of reclaimed wood to create an eco-conscious menorah.
y C luster flower-style candleholders in the middle of the dinner table as a centerpiece.
y Instead of flattening out some of your cans, use the natural curve of the aluminum to createornate decorative curlicues and scrolls.
Tin Can Pen Holder Things You'll Need
y Tin soup can
y H ot glue gun and sticks
y Felt
y Scissors
y Small craft pompoms
y Buttons
y Felt cut-outs
y W ooden bo x
y Fine grade sandpaper
y D ecorative paper
y D ecoupage or diluted white glue
y P late
y Foam brush
Instructions:
y 1
Plug in the hot glue gun to warm it up. Insert a glue stick.
y 2

8/3/2019 Metal Crafts Geriatrics)
http://slidepdf.com/reader/full/metal-crafts-geriatrics 7/19
A pply hot glue all around the outside of the empty tin can.
y 3
Press a piece of felt onto the glue, wrapping the felt around the can. Do not press too hard;
excess pressure causes the glue to seep through the felt. A
llow the glue to dry. Trim off theexcess felt with scissors.
y 4
A pply hot glue to the back of buttons, small craft pompoms and felt cut-outs. Press the itemsonto the felt on the can. Hold each item in place for 10 seconds to allow the glue time to setup. Let all the glue dry before using.
Recycled Tin Can Storage Containers
Tin C an S torage C ontainers tin cans in assortedsizeswallpaper remnants, scrapbook paper, gift wrappaper or fabricwooden coat rack, or a piece of wood that is longenough to hang all your cansribbon2 part epo x y glueacrylic craft painttwo 1-1/2" saw tooth picture hangerscraft glue
Instructions:
First, take the labels off the cans carefully; these labels will be your templates.
W ash and dry the cans thoroughly. I used a big tomato puree can for the middle canister, corn and stringbean cans to the right and left, while the smaller cans held tomato sauce and mushrooms.
Take your label templates and trace them onto wall paper, paper, or favric - whatever you want to useto cover the cans. I used assorted wallpaper remnants. C ut out each traced template and glue aroundyour cans. Let dry.
W hile the cans are drying, you can sand the piece of wood and wipe off any wood dust. P aint the wood
8/3/2019 Metal Crafts Geriatrics)
http://slidepdf.com/reader/full/metal-crafts-geriatrics 8/19
in your choice of colors and let dry.
You can seal the wood that you painted with a spray or brush on sealer. I didn't because I might want tochange the colors from time to time.
H ammer the hangers on the back of your wood, one on each side.
For each can, I glued a matching ribbon around the lip of the can, with each end meeting in the front. Ithen made a matching ribbon bow and glued that on to cover the first ribbon ends.
I tried to screw the cans on the wood, but I couldn't do it for the life of me, so I used my old faithful - my2 part epo x y. I swear by this stuff. I just mi x ed the two parts as directed and glued the can to the wood.
Now when glue has dried, hang your new art supply storage unite on the back of the door or wall whereyou need it to go. I love catch alls, and these keep dangerous items safely away from my little guy.
Suggestion:
If you are able to purchase the coat rack as I have used, I was thinking that you can glue clothespins onthe pegs and then you can use the clothespins to hang craft instructions or even items that need drying.
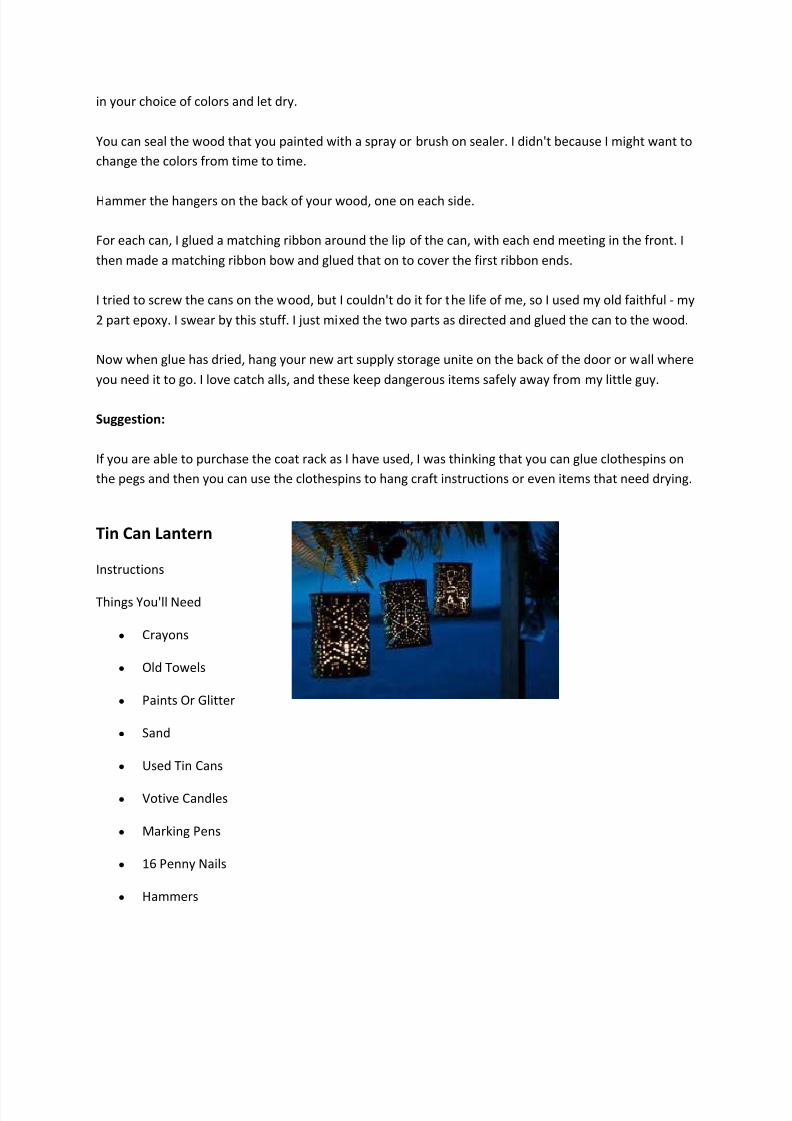
Tin Can Lantern
Instructions
Things You'll Need
y C rayons
y O ld Towels
y P aints O r Glitter
y S and
y Used Tin C ans
y Votive C andles
y M arking P ens
y 16 P enny Nails
y H ammers

8/3/2019 Metal Crafts Geriatrics)
http://slidepdf.com/reader/full/metal-crafts-geriatrics 9/19
y S afety Goggles
1.
o 1
C lean any size empty tin can.
o 2
Fill can with water and place in freezer until water is frozen.
o 3
D raw designs on frozen can with a marker or crayon.
o 4
Lay can in middle of large bath towel.
o 5
R oll each end of the towel toward can to form a barrier that will guard against slipping.
o 6
W ear safety glasses.
o 7
Use a large nail and hammer to poke holes in can following your design.
o 8
P lace finished frozen can in sink to thaw.
o 9
P lace 1 to 2 inches of sand in bottom of can.
o 10
Insert votive or other candle into sand.
o 11
Light candle.

8/3/2019 Metal Crafts Geriatrics)
http://slidepdf.com/reader/full/metal-crafts-geriatrics 10/19
Can Flower Pot
Instructions
Things You'll Need
y Tin cans
y Towel
y H ammer and nail
y D ecorations (paint, buttons, beads, glitter, ribbon, etc.)
y C raft supplies (hot glue, ready-joint compound, protective outdoor varnish, etc.)
y P otting soil
y Flowers
1.
o 1
C ollect your tin cans for your flower pot project. V irtually any old tin can will work; however, keep inmind that small cans are only appropriate for single flowers or cacti. If you are planing on planting deeprooting flowers or groups of flowers, search for larger coffee cans.
o 2
C ut the lid cleanly from the can and wash the inside well, drying completely with a towel. Use a hammerand nail to poke a few drainage holes in the bottom of the can.
o 3
D ecorate the can anyway your choose. You can paint the can and then protect it from the elementsusing outdoor varnish or use hot glue and craft items, such as buttons, seashells, glitter, ribbon andmore. For an e x tra special touch, create can flower pot mosaics using broken glass or time and attachingthem to the can with ready-joint compound.
o 4
A llow your decorations to dry completely before filling with soil and planting your flowers. Yourhandmade can flower pots can be used outdoors if protected with outdoor varnish or indoors for adecorative addition to your home.

8/3/2019 Metal Crafts Geriatrics)
http://slidepdf.com/reader/full/metal-crafts-geriatrics 11/19
Homemade Metal Ornaments Instructions
Things You'll Need
y Lightweight work gloves
y A luminum beverage cans
y H ousehold scissors
y C ookie cutters
y Ballpoint pen
y S teel wool
y D rill and 1/ 3 2-inch bit
y R uler
y P rimer spray paint
y A crylic enamel paint
y P aintbrush
y Embroidery floss
1.
o 1
P ut on the gloves. P ierce the side of an aluminum metal beverage can, just below the top rim,using the tip of household scissors. C ontinue to cut around the can's rim to remove the top. P ierce theside of the can just above the bottom and remove it in the same way. You now have a tube. C ut fromone end of the tube to the other to open the can.
o
2O pen the cut tube and lay it flat with the logo side up on your work surface. It is now a rectangle
shape. Loosely roll from one short end to the other to reverse the natural curl. Unroll the metal. It willnow lay flat.
o 3
8/3/2019 Metal Crafts Geriatrics)
http://slidepdf.com/reader/full/metal-crafts-geriatrics 12/19
Lay the metal rectangle with the logo side up. P lace a cookie cutter of your choice on therectangle. Trace around the cookie cutter using a ballpoint pen. C ut out the traced shape using thescissors.
o 4
S and both sides of the shape using steel wool. This will rough up the smooth surface, giving it atooth for the paint to adhere to. The steel wool will also remove any pen marks.
o 5
D rill a hole through the the shape, 1/ 4 -inch from the top edge, using a 1/ 3 2-inch drill bit.
o 6
S pray both sides of the shape in a well-ventilated area using a primer paint.
o 7
P aint the ornament using acrylic enamel paint.
o 8
C ut an 8 -inch length of embroidery floss. Thread the floss through the hole. Bring the endstogether and tie in an overhand knot 1 inch from the end.
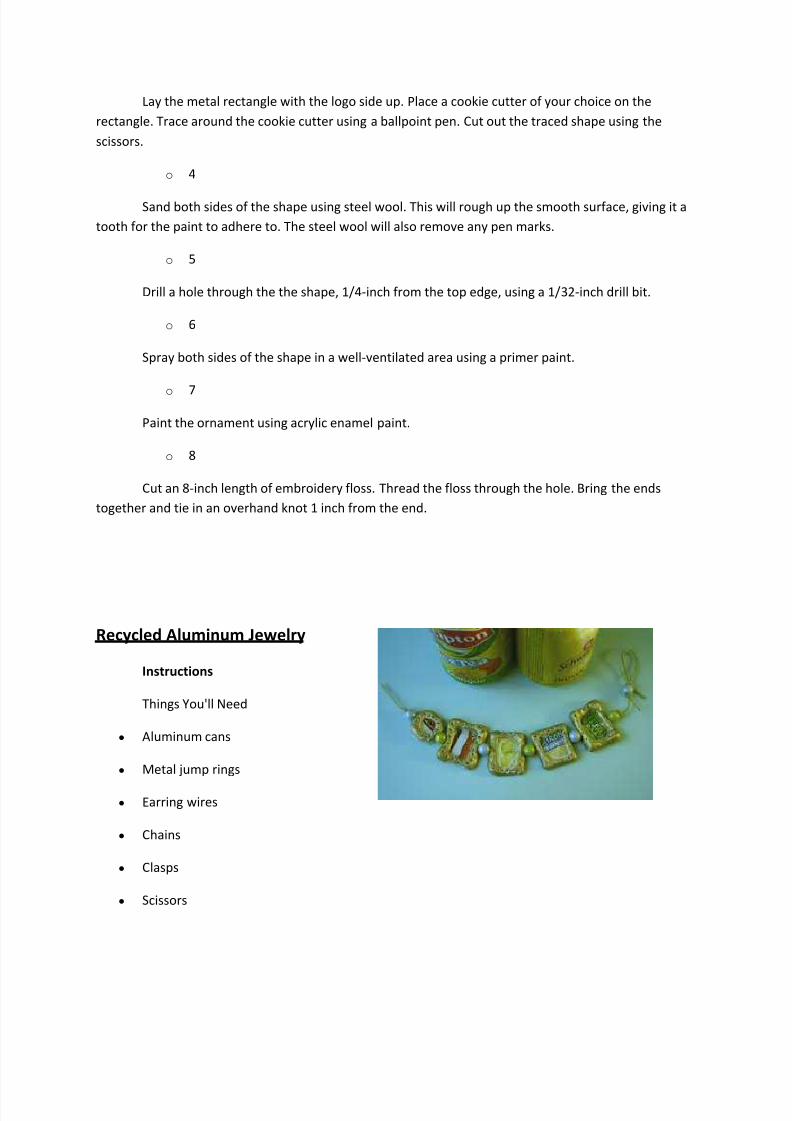
Recycled Aluminum Jewelry
Instructions
Things You'll Need
y A luminum cans
y M etal jump rings
y Earring wires
y C hains
y C lasps
y S cissors

8/3/2019 Metal Crafts Geriatrics)
http://slidepdf.com/reader/full/metal-crafts-geriatrics 13/19
y Tin snips
y C an opener
y H eavy paper
y P encil
y H ammer
y Nail
y S andpaper
y P liers
y Leather-coated mallet
y D ish soap
y W ater
1.
o 1
R emove the tops and bottoms of aluminum cans using a can opener or scissors, depending onthe thickness of the aluminum. Note that soda cans are easy to cut with scissors, while produce cansrequire a can opener and tin snips.
o 2
Thoroughly wash the cans inside and out with warm, soapy water. P eel off their labels.
o 3
C ut in a straight line vertically down the side of a can using tin snips or scissors.
o 4
Unroll the can on a worktable. S trike it with a leather-coated mallet until it lays flat and you
have a flat, smooth square of metal.
o 5
D etermine whether you wish to make earrings, a pendant or charms, or a bracelet. D rawtemplates of the shapes of the earrings, pendant or charms, or individual bracelet links on a heavy pieceof paper with a pencil. For e x ample, you may want circles, ovals, squares, heart shapes or triangles. C utout the templates with scissors.

8/3/2019 Metal Crafts Geriatrics)
http://slidepdf.com/reader/full/metal-crafts-geriatrics 14/19
o 6
P osition the templates on the blank inside of the flattened can and trace around them in pencil.C ut out the shapes with scissors.
o 7
H ammer a single nail into the place on each aluminum shape where you want to create a hole.P ull out the nail. Use the holes to connect the shapes to earring wires or to metal jump rings, which willconnect the aluminum shapes to chains if they are pendants or charms, or to each other as individuallinks of a bracelet.
o 8
S and around the edges of each aluminum shape to soften any sharpness. R ub sandpaper in andaround each nail hole.
o 9
M ake earrings by opening the small rings at the base of a pair of earring wires with pliers. S lipthe holes of your aluminum shapes onto the rings. C lose the rings with pliers.
o 10
Fashion pendants and charms by opening jump rings with pliers and sliding them through theholes in your aluminum shapes. H ook the jump rings onto the links of a chain and close them. O r, closethe jump rings and push a chain, ribbon or cord through them.
o 11
C reate bracelets by joining several individual aluminum shapes with jump rings. M ake a hole atboth ends of one aluminum shape. O pen jump rings with pliers. S lip them through the holes in thealuminum shapes to link the shapes together. Use jump rings to attach a clasp to the bracelet.
Copper Ornaments
Things You'll Need
y 5 mil copper craft foil
y D esign template
y M arker
y Sharp shears
y A wl

8/3/2019 Metal Crafts Geriatrics)
http://slidepdf.com/reader/full/metal-crafts-geriatrics 15/19
y Thin ribbon/2 4 -gauge copper wire
y W ood block
y H ammer
y Nails
y Tape
y Newspaper
y D uct tape
y Ball peen hammer
Instructions:
y 1
Trace a design for the ornament onto a 5 mil sheet of copper foil. You can make ornaments tohang on a holiday tree, from wind chimes or from garden stakes as plant identification tags.
y 2
C ut out the ornament design using sharp household shears.
y 3
P uncture a hole through the top of the copper ornament with an awl. M ake a hanger using thinribbon or 2 4 -gauge copper wire.
Punched Copper Ornaments
y 1
Trace and cut out the desired ornament designs from 5 mil copperfoil. Nail the copper ornament design onto a wooden block; place the nailhole in the desired locations for the ornament hanger.
y 2
Tape a printed design on top of the copper ornament. Tape theperimeter of the copper ornament securely to the wooden block.
y 3
H ammer a finishing nail through the outline of the printed design and through the copper. Leaveat least 1/ 4 -inch of space between each hole puncture. The hole punches create the design on the

8/3/2019 Metal Crafts Geriatrics)
http://slidepdf.com/reader/full/metal-crafts-geriatrics 16/19
copper ornament. You can use this same technique to create other punch copper crafts such as cabinetdoor inserts or wall art.
y 4
R emove the paper design and remove the ornament from the wood block. Insert a ribbon orwire hanger through the hole at the top of the punched copper ornament.
Hammered Copper Ornaments
y 1
C reate copper ornaments by tracing and cutting designsfrom 5 mil copper craft foil.
y 2
C over a wood block with at least a 1/2-inch thick layer of newspaper. Tape the copper ornament onto the newspaper with
duct tape or packing tape.
y 3
S trike the copper ornament repeatedly with a ball peen hammer. The rounded end of thehammer creates indentations in the copper. The newspaper provides a cushion that allows the metal todent with each blow. C over the surface of the ornament with the hammer indentations.
y 4
P uncture a hanger-hole through the top of the copper ornament with a nail or an awl. R emovethe tape to release the copper ornament. Insert a ribbon or wire hanger.
Fantastic Candle Holder Out of an Old Tin Can
you will need:
-C lean can with label removed
-O ld towel-H ammer-Large nail-Galvanized wire-P liers
S teps to M ake Lanterns:

8/3/2019 Metal Crafts Geriatrics)
http://slidepdf.com/reader/full/metal-crafts-geriatrics 17/19
1. First get the label off the can by soaking in hot sudsy water. Then fill the can full of water andplace in your freezer until the water has frozen solid, usually overnight. Then in the morning, place anold towel on a firm counter surface. Lay the tin can (which is now full of solid ice) on its side on thetowel.
2. D etermine, either in your mind or mark on the can, the design you want to place on the can.You don't have to get fancy, you can put simple shapes such as crosses and spirals. The important thingis that you have holes all the way around the can. A s you do this, hold the point of the nail vertically onthe can and hammer with several hard hits. The ice will support the sides of the can and prevent themfrom bending and you should be able to make a clean hole. C ontinue making holes in the can until youhave rotated all the way around it. W hile you are doing the holes, make sure you make three holesalong the top of the can, preferably evenly spaced. These are the holes you will use to secure your wirehanger.
3 . W hen you're finished making your design on the can, let the can thaw. To make the hanger,cut three lengths of wire, each at least 12 inches long. P ush one end of the wire through a hole in thetop of the can, bend the end back up and twist the wire around itself to secure it. D o this with all threewires.
4 . Gather the loose ends of all 3 wires together at the top and twist them together, then bendthe twisted trio into a large hook so it looks like the top of a wire hanger. Then secure your candle in thecan. You can use a match to heat the base of the candle so that it just barely starts to melt then press itinto the bottom of the can so that it will stick. O r, if you have a hot glue gun, you can glue the candle in.A nother option is to put sand in the bottom of the can and let that support your candle.
The can will work well as a nice lantern. If you want, you can always paint the can, but that
won't affect the lantern effect. W hen the candle is lit, the nail holes shine out like stars and a glowemerges from the top of the can. The cans look beautiful hanging in trees around the garden on asummers night. The can protects the candle from the wind and the candles will burn for hours.
Make your own Outdoor pinwheelsThings You'll Need
y 1 empty aluminum can
y 1 plastic bottle cap
y R azor scissors
y R azor in razor holder

8/3/2019 Metal Crafts Geriatrics)
http://slidepdf.com/reader/full/metal-crafts-geriatrics 18/19
y 1 nail
y 12 to 20 inches heavy string
y H ammer
y 1, 1/2-inch square wooden post, 2 4 inches long
1. M ake a S unburst P inwheel from R ecyclable M aterial
o 1
Use a razor blade in a sturdy holder
Use your razor blade and carefully cut off the top of an aluminum can. S lice down the entire sideof the can without and stopping when you are 1/2 inch from the bottom using your razor scissors.
o 2
R emove the top of an aluminum can
P osition your scissors about 1/ 4 to 1/2 inch from your cut at the top of the can and make an
identical cut that leaves a narrow strip.C
ontinue all the way around the can using this method.W
henfinished, lay your strips out flat with the bottom. You will have a sunburst look.
o 3
Use a hammer and nail to make a hole
Use your hammer and one nail to make a hole in the center of the can's bottom. A lso make a
hole in the center of the bottle cap.o 4
A ny type of long wooden stick will work

8/3/2019 Metal Crafts Geriatrics)
http://slidepdf.com/reader/full/metal-crafts-geriatrics 19/19
W eave one end of your string through the hole in your aluminum can and tie a large knot so thestring cannot slide through. W eave your string through the bottle cap so it lies loose against thealuminum can. P osition your wooden stick so the bottle cap rests against the top edge. Secure yourstring to the wooden