metal-filled · metals in salt water inherit high chloride (salt), levels over time. after...
TRANSCRIPT
User's Guide/Specifications
Metal-Filled
Epoxy Repair
Systems
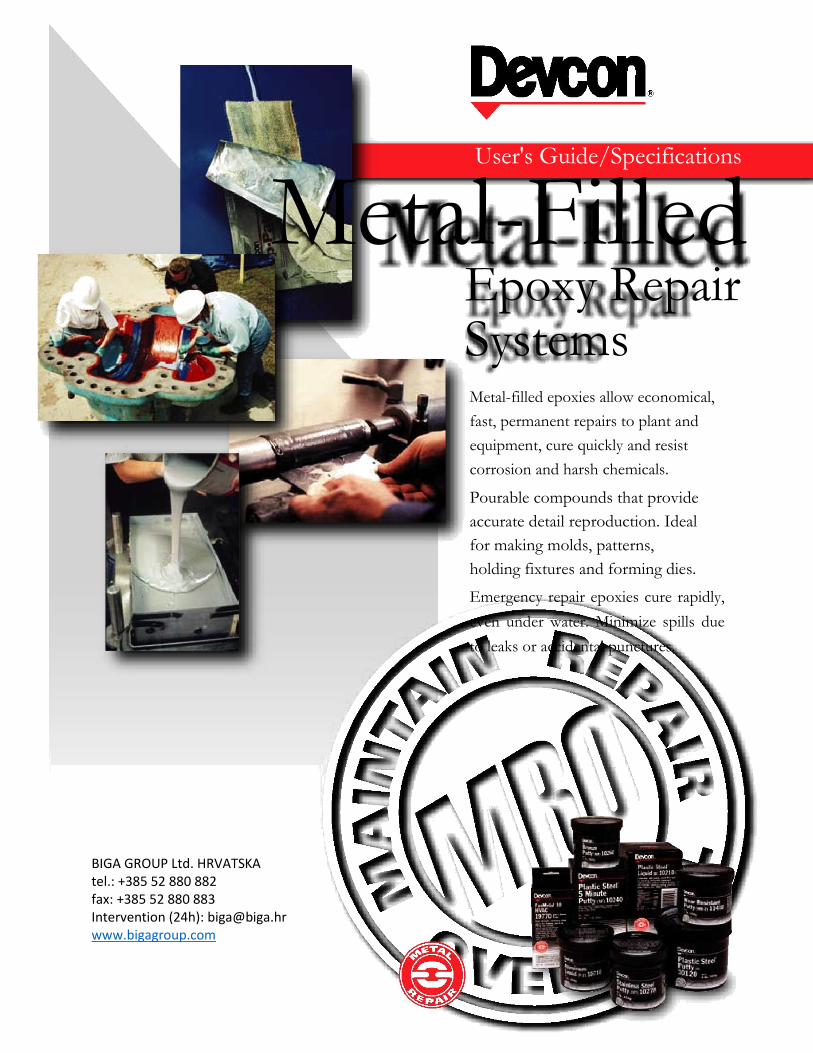
Metal-filled epoxies allow economical,
fast, permanent repairs to plant and
equipment, cure quickly and resist
corrosion and harsh chemicals.
Pourable compounds that provide
accurate detail reproduction. Ideal
for making molds, patterns,
holding fixtures and forming dies.
Emergency repair epoxies cure rapidly,
even under water. Minimize spills due
to leaks or accidental punctures.
BIGA GROUP Ltd. HRVATSKA tel.: +385 52 880 882 fax: +385 52 880 883 Intervention (24h): [email protected] www.bigagroup.com

Table of Contents PAGE
Surface Preparation 3
Metal Rebuilding & Precision Machining 4
Shaft Repair 5
Keyway Repair 6
Metal Surface Repair 7
Heat Exchanger Repair 8
Pump Repair 9
Physical & Chemical Properties Guide 10
Application Guide & Ordering Information 11
2.
Surface Preparation
Successful application is largely
due to proper surface preparation. Lack of proper surface preparation can
cause premature failure of any repair.
Surface conditions will vary from
job to job, and the following guidelines will help in the preparation of most substrates.
Un-prepared
surface
Prepared
surface
Questions? Contact Devcon Technical Services: 800-933-8266 www.devcon.com

CLEAN SURFACE PREPARATION 1. Degrease area with Devcon® Cleaner Blend 300 #19510. 2. Remove all surface contamination (paint, rust, and grime) from
surface by abrasive blasting, sanding, filing, coarse grinding wheel (60 grit or coarser), a needle gun, or high velocity water blasting with abrasive medium, or other mechanical means.
3. The blasting medium should be angular grit such as silicone carbide, Black Beauty, or aluminum oxide. A .003 to .005 mil profile should be attained. The medium Black Beauty (size 1240 medium grade) will produce this grade.
5. Degrease again with Cleaner Blend 300 #19510 to wash away any remaining blasting medium.
6. Immediately apply epoxy to a dry, rough surface to avoid oxidation
or flash rusting. If this is not practical, apply a general coating of
Devcon® FL-10 Primer #15980 to protect surfaces. This will stop
further rusting for up to 30 days under ideal storage conditions.
DEGREASING NOTE: With surfaces immersed in oil, there is always the possibility that
oil absorbed into the metal surface (such as pump shafts or
bearing housings) will cause an adhesion problem after curing. 1. Repeated applications of Devcon® Cleaner Blend 300
#19510 will help "pull-out" the oil from the surface. 2. Also, heating the part with a heat gun, or by putting the
part in an oven, will force the oil out of the pores. 3. Allow part to cool and clean again with Cleaner Blend 300 #19510. CHLORIDE CONTAMINATION: Metals in salt water inherit high chloride (salt), levels over time. After blasting, test for chloride contamination as these salts act as a release agent and will disbond most coatings. WET SURFACE PREPARATION 1. The general procedure concerning any surfaces to be repaired is
"IT MUST BE DRY". (An exception is when you use Devcon's
Underwater Repair Putty UW #11800.
See the Underwater Repairs below) 2. Stop all leaks or seepage, using one or more of the following methods:
A. Shut off the flow or pressure. B. Fit a wooden peg or sheet metal screw into the hole to stop the flow. C. Stuff with wax, cork, plumbers caulk, Mortite, or a cloth into the opening to stop the flow.
3. If the leak is caused by corrosion, the side wall might be weak. Open the orifice until good metal is exposed and the wall is thick enough to be plugged.
4. Remove surface condensation, "sweating", and dampness by using a hot air gun or similar device.
5. Continue surface preparation (following steps in CLEAN
SURFACE PREPARATION above).
UNDERWATER REPAIRS Use Devcon's Underwater Repair Putty UW #11800 to make these repairs. It bonds and cures underwater. Surfaces underwater require preparation. 1. Remove all dirt, flaking paint, barnacles, algae and
seaweed from the substrate. 2. Wipe area with clean cloth to remove film. 3. Abrade surface if possible by mechanical means, file,
pressured water, grit blasting or chemicals. ALUMINUM REPAIRS Oxidation of aluminum surfaces reduce the adhesion of an epoxy,
and must be removed before using Devcon's Aluminum Putty (F)
# 10610 or Aluminum Liquid (F-2) # 10710. 1. Remove by mechanical means, such as grit
blasting, or by chemical means. 2. Continue surface preparation (following steps in CLEAN
SURFACE PREPARATION above).
Questions? Contact Devcon Technical Services: 800-933-8266 www.devcon.com
3.

Metal Rebuilding & Precision Machining
SHAFTS generally have two types of
repair areas: the shaft itself and the
keyways machined into the shaft. Wear is
caused by vibration, rubbing, abrasive
contaminants moving over the area,
and fretting corrosion. KEYWAYS become worn through
constant pressure from starting and
stopping and become ineffective. METAL SURFACE repairs are often
used to restore the integrity of the metal,
and are relied upon to rebuild metal
surfaces that are worn or missing. HEAT EXCHANGER repairs are
required where galvanic corrosion occurs
between the dissimilar metals of the
tubes and tube sheet, and are accelerated
by the wet conditions inside the cylinder. PUMP wear and abrasion caused by
cavitation, improper shaft and/or
impeller balance can be repaired
saving you thousands of dollars. Hydraulic Rams that become
rough and gouged tend to leak oil.
Questions? Contact Devcon Technical Services: 800-933-8266 www.devcon.com
4.

1/8" Dovetail
Worn bearing shaft
Figure 1
Figure 2
Figure 3
Figure 4
Figure 5
Figure 6
Shaft Repair Shaft, bushing, sleeve, seal and bearing areas are excellent candidates for repair. Follow the guidelines previously described for SURFACE PREPARATION. NOTE: Use Titanium Putty # 10760 for shaft repair as its compression
strength is the highest (18,800 psi) in the Devcon® product line. 1. Most important is to "smooth undercut" the shaft by using a
lathe (Figure 1), unless the worn area already meets the undercut depth. A usual guideline for machining depth is:
SHAFT SIZE UNDERCUT BY 1/2" - 1" 1/16" 1" - 3" 1/8"
2. Dovetailing the ends of the worn area would make the application lock into place and help prevent the epoxy from being sheared or forced out of the threaded area (Figure 2).
3. Machine a "threaded" pattern over the repair area to increase surface
area (Figure 3). The larger the shaft size, the deeper the groove. The
smaller the shaft size, the shallower the depth and closer together.
4. With shaft turning at a very slow speed, apply the epoxy
over the area. Using a putty knife or plastic spatula, force the epoxy into the threads. Use enough epoxy to fill out above the diameter of the shaft (Figure 4).
5. Before machining (Figure 5), allow the epoxy to cure at least
4 hours at room temperature. NOTE: To speed up the curing process, apply a hot air gun or heat
lamp to repair area. Machine the shaft using these guidelines:
Lathe speed: 150 ft/min Feed rate: Rough: .020 in./rev
Finishing: .010 in./rev Top Rake: 6 degrees (+/- 2) Side/Front clearances: 8 (+/- 2) Cut: Dry Tools: Carbide bits
6. Finish by polishing using 400-650 emery paper WET. A 25-50
micron finish can be achieved using this method (Figure 6). NOTE: To repair a shaft worn by mechanical packing is not practical.
The frictional heat developed by the packing will soften the epoxy.
Questions? Contact Devcon Technical Services: 800-933-8266 www.devcon.com
5.

Figure 1
Figure 2
Figure 3
Figure 4
Figure 5
Figure 6
Keyway Repair
One of the more simple repairs to perform,
saves time and money, and will get your
equipment up and running quickly.
First, follow the guidelines previously described for SURFACE PREPARATION. 1. Roughen the surface by any mechanical means to
develop a good surface profile is acceptable (Figure 1). 2. Clean and degrease the entire area according to guidelines described
in DEGREASING in the Surface Preparation section (Figure 2).
3. Apply a thin layer of Devcon's Release Agent #19600 to the key
itself and let dry. Then apply a small amount of Release Agent
#19600 to any area where you do not want the epoxy to bond to. (Figure 3).
4. Mix a sufficient amount of Titanium Putty #10760 to do the repair job. Apply Titanium Putty #10760 to the keyway area with a putty knife or plastic spatula. Build up a thicker area on the side walls than on the bottom so as not to raise the key up and ensure a close tolerance fit (Figure 4).
5. Scrape away excess material from the sides of the keyway (Figure 5).
6. Immediately align the shaft on the hub for proper alignment.
You may leave the coupling assembled as you previously coated everything with Release Agent #19600 (Figure 6).
Questions? Contact Devcon Technical Services: 800-933-8266 www.devcon.com
6.

Figure 1
Figure 2
Figure 3
Figure 4
Figure 5
Metal Surface Repair
Use Devcon® metal filled epoxies for general repairs to cracks in pump casings, valve bodies, tanks, bearing housings, and gear boxes. Follow the guidelines previously described for SURFACE PREPARATION. NOTE: Use Titanium Putty #10760 for all metal surface repairs. If short "downtime" is necessary, use Plastic Steel® 5 Minute® (SF) #10240, or FasMetal™ #10780 to get equipment back into service in 3 hours. 1. Drill holes, 1/8" larger than crack at each end, or multiple holes if
crack is over 5 inches long, to relieve further cracking (Figure 1).
2. Use drill or edge grinder with an abrasive to make a "V" groove along
crack to increase surface area for application of epoxy. Degrease the
grooved area to remove any contamination (Figure 2).
3. With putty knife or spatula force the epoxy into the crack and
completely fill the "V" groove. Overlap approximately 1" on
each side of the crack to ensure adhesion (Figure 3).
4. Embed a piece of reinforcing mesh (fiberglass, nylon or
wire screening) onto top of epoxy pressing in until epoxy oozes through mesh (Figure 4).
5. Apply another coat (1/16" - 1/4") over the mesh, smooth and
"feather" out the edges for a good finish. Use a heat gun or heat lamp to speed up curing. (Figure 5).
NOTE: Damaged parts due to metal fatigue or stress cracks should be
replaced. You cannot repair metal where the integrity of the metals are in question.
Questions? Contact Devcon Technical Services: 800-933-8266 www.devcon.com
7.

Figure 1
Figure 2
Figure 3
Figure 4
Figure 5&6
Figure 7
Figure 8
Figure 9
Heat Exchanger Repair Heat exchangers, chillers and condensers are
subject to heavy corrosive damage. If not
protected from corrosion, this can lead to
complete destruction of the equipment.
1. SURFACE PREPARATION. Remove end plates and
baffles (if any). Clean/degrease tube sheet before blasting. Insert
rubber stoppers into the ends of the tubes. It is critical that you
use the right size stoppers. The stoppers should protrude above
the end of the tube, no more than 1/32" to 1/16". NOTE: Condenser tubes are not always flush with the tube
sheet face. If not flush, find a stopper that is flush with the end of the tube when inserted (Figure 1).
2. Worn tube sheet faces may be eroded 1/32" to 1/8" from the
edges of the tubes. It is important to find stoppers that are flush with the tubes. The best way to install stoppers is to push each one snug by hand (Figure 2).
3. Once the stoppers are installed, sandblast the entire sheet face.
For detailed procedures, follow the CLEANING section of the
Surface Preparation Guide. The stoppers will protect the tubes
from becoming worn or rounded. After blasting, blow out the debris
from the sheet using air. Next, follow the section DEGREASING of
the Surface Preparation Guide (Figure 3).
4. Prepare baffle plates and end plates of the tube sheet. Blast plates to a SSPC5 as a guideline. (Figure 4).
5. Mix Devcon's Brushable Ceramic Red #11760, and coat the tube
sheet, reaching all the sandblasted areas. Wait 3-16 hours and recoat
with Brushable Ceramic Blue #11765. The 2-coat system helps
detect any "holidays" or misses between coats (Figure 5).
6. If tubes extend more than 1/8" from tube sheet, it may be necessary to build the tube sheet up to the tube level. If so, first coat the sheet with Brushable Ceramic Red # 11760 to wet out (prime) for the next coat. Trowel on Ceramic Repair Putty #11700 bringing surface up "flush" with tubes. Finish with coat of Brushable Ceramic Blue #11765 (Figure 6).
7. Coat inlet areas, baffle plate, and end covers. Do not apply epoxy to
baffle plate holder tracks, as this will cause difficulty putting back the
plates. Remember, tolerances are closer now (Figure 7).
8. Wait at least 16-20 hours before removing stoppers. Use a packing puller or pliers to pull out all the rubber stoppers. If in good condition, they may be used again (Figure 8).
9. Use a conical grinding bit to smooth the edges where
epoxy meets the tube to allow better flow (Figure 9). NOTE: Be sure not to coat machined surfaces that are
gasket areas. After torquing down on these areas, you risk the chance of "chipping" the coating. To rebuild machined surfaces, Titanium Putty is recommended. Questions? Contact Devcon Technical Services: 800-933-8266 www.devcon.com
8.

Figure 2
Figure 4
Figure 6
Figure 8
Figure 1
Figure 3
Figure 5
Figure 7
Pump Repair Pump repairs are very practical as replacement can cost thousands of dollars. Here is how to repair pump volute areas and impellers Follow the guidelines previously described for SURFACE PREPARATION. 1. Since worn areas are usually "pitted", and the substrate is
usually porous, surface preparation is vital. A good 3-5 mil
sandblasting profile is needed for best adhesion (Figure 1).
2. Thoroughly degrease the area to remove any residual abrasive medium lodged in pore of material (Figure 2).
3. Fill all gouges, greater than 1/8" in worn areas, with mixed
Titanium Putty # 10760 or Ceramic Repair Putty #11700 compound. Use spatula or putty knife to smooth the surface. A simple technique is to wet your hand and gently rub the palm over the epoxy in a circular motion (Figure 3).
4. Next, topcoat the entire volute area with Devcon's Brushable
Ceramic #11760 or #11765. Multiple coats are for a "Pin hole" free finish. This creates a 15-25 mil chemical resistant coating to protect the interior of the casing (Figure 4).
5. For worn impeller blades, follow the same surface
preparation as for pump casing. Check for and clean off any chloride contamination, as salts react as a release agent and can prevent epoxy from bonding to surface (Figure 5).
6. Next, rebuild the missing metal from the blades by welding a 3/8",
rod for a "leading edge", and then tack weld expandable metal from
the leading edge to the existing metal surface for reinforcement (Figure 6).
7. Now, fill the missing metal areas with Ceramic Repair putty
#11700, applying small amounts at a time, to "wet in" the epoxy
and prevent air pockets, being sure to push epoxy through until it
oozes out the other side. Smooth over final coating as described in
step 3 to improve the pumps flow. Plastic forms can be used to
support the epoxy while curing (Figure7).
8. Finally, apply Brushable Ceramic Red # 11760 for the first finish coat
for a 15-20 ml thickness to smooth out rough pits in the casting. Within
3-16 hours, apply a coat of Brushable Ceramic Blue # 11765 to cover
any unfilled areas from the first coat (Figure 8).
NOTE: Stainless steel impellers require different preparation or
coating. Please, consult the factory or a local Devcon Technical Representative for further details. Always remember, in coating pump impellers and casings, to be aware of
your clearances inside the volute area. This is critical, as the dimension
inside this area restricts the amount of coating you can apply. If clearances are acceptable, Devcon also makes a group of large
ceramic beaded products to coat and protect pump volutes from
severe abrasion from pumping high solid and abrasive materials.
Questions? Contact Devcon Technical Services: 800-933-8266 www.devcon.com
9.

Typical Physical Properties
by We
ig h t Hardener) by Vo l
u me Hardener ) with Ha rde ne r )
in M in u te s
Number
ratio
and
ratio
and
Viscosity
Volume . F
(Re
sin
(Resin
lb
Life
S tock
(cp s)
/
Size Mix
Mix 3 .
Pot 75
Specific (in @
GENERAL REPAIR EPOXIES
Plastic Steel®
Putty (A) 10110 1lb. 9.00:1 2.50:1 Putty 11.9 45
Plastic Steel®
Liquid (B) 10210 1lb. 9.00:1 3.00:1 15/25000 13.1 45
Plastic Steel®
5 Minute®
(SF) 10240 1lb. 1.70:1 1.00:1 Putty 12.2 5
Aluminum Putty (F) 10610 1lb. 9.00:1 4.00:1 Putty 17.5 60
HVAC Repair Putty 19770 6.5oz. 0.90:1 1.00:1 40000 16.1 60
Aluminum Liquid (F-2) 10710 1lb. 9.00:1 5.00:1 15/25000 17.5 75
Stainless Steel®
Putty (ST) 10270 1lb. 11.00:1 3.75:1 Putty 12.4 58
Bronze Putty (BR) 10260 1lb. 9.00:1 3.00:1 Putty 12.4 35
Wear Resistant Putty (WR-2) 11410 1lb. 9.00:1 4.00:1 Putty 13.9 60
PRECISION REPAIR EPOXIES
Titanium Putty 10760 1lb. 3:1 3:1 Putty 11.7 21
Brushable Ceramic - Red, Blue 11760,11765 1lb. 5.60:1 3.40:1 32000 16.5 40
- White 11770 1lb. 8.50:1 5.60:1 40000 16.5 21
Ceramic Repair Putty 11700 3lb. 7.00:1 4.3:1 Putty 16.4 25
Fasmetal™ 10780 .75lb. 1.00:1 1.00:1 Putty 15.5 4
EMERGENCY REPAIR PRODUCTS
Underwater Repair Putty (UW) 11800 1lb. 1.40:1 1.00:1 Putty 17 45
Zip Patch™ 11500 1 Patch - - 17000 24.1 5
Magic Bond™ Epoxy Putty Stick 11600 4oz. - 1.00:1 Putty 15.3 20
Expansion
6]) 177
Te n sion
- C
5 ]) F [x10
( ASTM 3 ])
volts/
mil)
2566)
D2
2 4 0)
Sh e a r -
.
Stre
ngth
[x10
Th er ma l
x10
in .
in
1002) in
C o n d u ct i vi t y
.
638 )
695 )
79
0)
Elas
ticity
x
Str en g th
Co nst an
t
sq
638 C
Te n sile
Strength
. •
D
.
Str en g th
in 3
Har dnes s
AST
M
-
. tem p
of 696
•cm
149
15 0) Shrinkag e
A
ST
M
lb th ic k
D D
Compr essi ve (psi
D D D
/
F)
D
D D . D
Oper ating
Adhesive (psi
A
ST
M
A
ST
M
AST
M
F le xu ra l
A
ST
M
Modulus
A
ST
M
Coefficient
Th er ma l
• cm/sec
D ie l e ctr i c
Diele ct ri c
1/4"
Te n sile
(AST
M
(AS
TM
(AST
M
in
(S
hor
e
.
Cured
(m ax
(psi
(psi
(psi
[cal
Cure
/
.
Coverage at (in
48 250 2800 3220 8260 5600 8.5 48 1.37 67.5 30 .0006 85
52 250 2800 4900 10,200 7480 8.5 38 1.39 67.5 30 .0006 85
49 200 2026 3100 10,400 7680 7.5 34 2.65 35.0 30 .0090 66
70 250 2600 3680 8420 6760 8.0 29 1.73 21.4 100 .0008 85
64 250 2500 3720 8420 6260 7.8 29 1.73 21.4 100 .0008 85
70 250 2700 5000 9820 3540 7.5 50 1.58 8.60 100 .0009 85
50 250 2385 3340 8400 5280 8.0 34 1.23 75.0 30 .0010 85
50 250 2680 2640 8540 6180 8.0 33 1.57 75.0 25 .0010 85
56 250 2200 4300 9840 6560 7.5 32 1.67 6.30 400 .0005 85
47 350 2000 4000 18800 7700 9.5 22 1.95 44.8 56 .0010 87
66 350 2000 3800 15200 8000 9.0 19 1.92 38.7 382 .0020 90
66 350 2000 3800 15200 8000 9.0 19 1.92 38.7 382 .0020 87
66 350 2000 3900 12700 6475 9.0 17 1.88 41.0 370 .0022 90
72 250 2000 3145 12700 7700 8.5 32 2.04 18.6 370 .0093 90
68 250 2685 2760 5625 4990 7.5 18 1.41 8.60 150 .0020 82
- 200 2400 10100 - 19000 2.9 64 1.71 43.5 250 .0010 75
48 250 700 2540 12000 4280 7.0 21 1.24 28.1 300 .0030 70
Chemical Resistance
ACID ALCOHOL KETONE ALKALINE HYDROCARBON CHLORINATED SALT
20 % 20 %
40 % HYDROCARBON
hyd ro xide
hyd ro xide
10
%
20 %
10 %
10 %
phosphate
20 %
1
0
%
36 %
10 %
50 %
ketone
hyd ro xide
hyd ro xide hyd ro xide
(un leaded)
te tr a ch lo r i d e ch lo r id
e
- trichloroethane
su l fa te carbon
ate
( d ilu te
) ( g la cia l)
Hyd roc hloric Hyd roc hloric
10 %
50 %
Isopropanol
ethy
l
s
pirit
s
Acetic Acetic
Su lfu r ic Su lfu r ic
10 % 50 %
P hosphoric
P hosphoric
M et ha nol Acetone M e th yl A mm onium Potas
sium
B e n z e n e G a s o l i n e K ero se ne Toluen Xylene Carbo
n
Aluminum
Trisodi
um
Nitric Nitric
Potas
sium So d iu m So d iu m M in e r a l Methyle
ne P er chlo roeth ylen e 1 , 1,1 So d iu m So d iu m GENERAL REPAIR EPOXIES
Plastic Steel®
Putty (A) U U V U V U F U F U U U U U V V V V V F V V V F F V U V V V V V V
Plastic Steel®
Liquid (B) U U V U V U F U F U U U U U V V V V V F V V V F F V U V V V V V V
Plastic Steel®
5 Minute®
(SF) U U F U F U F U F U U U U U F F U F U F V V V F F U U F F F F F F
Stainless Steel®
Putty (ST) U U F U F U F U F U U U U U V V V V V V V V V V V V U V V V V V V
HVAC Repair Putty U U V U V U F U F U U U U U U U U U U F V V V F F V U V V V V V V
Aluminum Putty (F) U U V U V U F U F U U U U U U U U U U F V V V F F V U V V V V V V
Aluminum Liquid (F-2) U U V U V U F U F U U U U U F F F F F F V V V F F V U V V V V V V
Bronze Putty (BR) U U U U U U U U U U U U U U V V V V V V V V V V V V U V V V V V V
Wear Resistant Putty (WR-2) U U F U F U F U F U U U U U V V V V V V V V V F F F U F F V V V V
PRECISION REPAIR EPOXIES
Titanium Putty U U E F E F V F F F E E U U E E E E E E E E E E E V U E E E E E E
Brushable Ceramic U U E F E F V F F F E E U U E E E E E E E E E E E V U E E E E E E
Ceramic Repair Putty U U E F E F V F F F E E U U E E E E E E E E E E E V U E E E E E E
Fasmetal™ U U F U F U F U F U U U U U F F U F U F V V V F F U U F F F F F F
EMERGENCY REPAIR PRODUCTS
Zip Patch™ U U V V V V F F F F U U F F U U U U U U U U U U U U U U U F F F F
Underwater Repair Putty (UW) U U F U F U F U F U U U U U V V V V V V V V V V V V U V V V V V V
Magic Bond™ Epoxy Putty Stick U U F U F U F U F U U U U U F F U F U F V V V F F U U F F F F F F
KEY: E = Excellent
V = Very Good F = Fair U = Unsatisfactory
CURE: 7 days @ 75F IMMERSION: 30 days @ 75F
MISC.
1
0
% brine
h y p o c h lo r it e
ch lo r id e
So d iu m
oil
Cutt
ing
oil
B eer Wine Corn
V V V V V
V V V V V
F U U V V
V V V V V
V V V V V
V V V V V
V V V V V
V V V V V
V F F V V
E E E E E
E E E E E
E E E E E
F U U V V
F F U F F
V V F V V
F U U V V
10.
Questions? Contact Devcon Technical Services: 800-933-8266 www.devcon.com

METAL /EQUIPMENT REPAIR Acid Resistant Coating Casting Repair Chemical Resistant Coatings Chocking, Leveling Compound Coating (Impact, Abrasion) Condenser Tube Sheet Coating Corrosion Resistant Coating Cyclones Epoxy (Fast-Cure Repairs) Fans/Exhauster Fan Blades Holding Fixtures (Making Molds) Hopper (Rebuild and Coat) Leaks (Drums, Pipes, Tanks) Lining Coal Chutes Machinable Repair Material Meat & Poultry Plants Pipe Elbow Coatings/Linings Pulverizers/Mills Pump Repairs-Slurry Pump Repairs-Water Rebuild Worn Threads, Keyways, Metal Repairing Engine Blocks Shaft Repairs Tank Linings Tank Repairs (Hole) Valve Rebuild/Repairs Wet/Damp Surface Bonding FLOOR REPAIR Acid Resistant Coating Anchoring Bolts in Concrete Anti-Skid (Floors, Ramps, Docks) Chemical Containment Coatings Chocking Equipment Coatings (Impact, Abrasion) Expansion Joints Floors (Hole Filling & Patching) Leveling Equipment Leveling Floors Meat & Poultry Plants Metal Coatings Warehouse Floor Coatings Wet/Damp Surface Coatings RUBBER REPAIR Casting Molds, Rubber Parts Conveyor Belt Repair Coatings (Chutes, Hoppers) Coating (Impact, Abrasion) Expansion/Control Joints Feeder Bowl Coating Gaskets Holding Fixtures Metal Coatings Moldmaking Noise Reduction Coating Potting Compounds Rubber Roll Repair Re-jacketing Electrical Cable
Pl asti c
St eel
®
( A )
T e
mp
.
Putty (F)
High
Putty Ceramic
H
ig
h
Pu
tty Putty
Bond™
™
Rep
air
™
Aluminu m
Guard
Brushable
Guard L o a d ,
Titanium
Ceramic
Magic Wear
Wear
Fi n e
L o a d , Wear
Alum . F2
Alum . F2
Comb o
B
B
Pu
tty
Steel
®
Steel
®
Surface
Pl asti c
Pl asti c
W et
Usage Selector Guide
MRO
70
00
A R
Non VO
C Non
V OC
Sealer
6500 7000
C
Grout
Co at ™ P atch™
P atch™
F
Q u ar t z ™
Coat™ Co at ™ Coat
™
Pour
Grip™
Ep o x y
Floor Ultra Deep Ep o x y Ep o x y Ep o x y Floo
r
Floo
r
Pe
rf .
P utty L iq u id
Brushable
Repair
K i t
L iq u id
L iq u id
35)
-35)
P utty
Hig
h
Cure
Fast Cure
Belt -
® 80
®
® Fast ®
®
Cas
t F R
®
® 80 ® 94
Se
al (T Se
al
(T- 36)
Flexane
Flexane
Flexane Flexane
Flexane
Flexane
Flexane
Flexane
&
& S
eal
(T
Cable
E dge
E dge
&
DISCLAIMER: Devcon makes no warranties, expressed or implied, including warranties of merchantability or fitness for a particular purpose. Under no circumstances shall Devcon be liable for incidental, consequential, or other damages from alleged negligence, breach of warranty, strict liability, tort, contract, or any other theory, arising out of the use or handling of these products.
Questions? Contact Devcon Technical Services: 800-933-8266 www.devcon.com
11. Devcon, Permatex, Epoxy Coat, Fasmetal, Flexane, Floor Grip, Floor Patch, FloorSavers, Magic Bond, Plastic Steel, Stainless Steel,
Wear Guard, Ultra Quartz and Zip Patch are registered trademarks of Illinois Tool Works, Inc. ©2007 ITW Devcon All rights reserved.

Look to Devcon® and Permatex®
for all your maintenance needs.
FloorSavers® Threadlockers Rubber Repair Gasketing
Wear Resistance Thread Sealing Metal Repair Anti-Seize
For more information on this and our entire line of OEM and MRO products, please call:
1-800-933-8266 or visit our website: www.devcon.com
30 Endicott St.
Danvers, MA 01923 800-933-8266
www.devcon.com