meter device interface module general procedures · 1 meter device interface module general...
TRANSCRIPT

1
Meter Device Interface Module General Procedures
This is an optional module that may be purchased from Banyon Data Systems. This module allows your Banyon Data WinUB (utility billing software) to send or receive customer meter information to or from a meter reading device. A sampling of meter devices (profiles) supported, include:
HD Waterworks (SENSUS)
EQUINOX NEPTUNE (Schlumberger)
DATAMATIC BADGER ITRON
HERSEY METER TECHNOLOGY - ORION
DAKOTA SUPPLY GROUP AQUAHAWK
BEACON and many more…..
Each type of device may be edited and changed for your organizations specific field information needs. For more information on this module please contact:
BANYON DATA SYSTEMS, INC. 350 W BURNSVILLE PKWY BURNSVILLE, MN 55337
(800) 229-1130

2
Contents
ACCESSING THE METER DEVICE MODULE ............................................................. 3
SETUP ................................................................................................................................ 3
Meter Device Interface Screen ............................................................................................ 3
Meter Device Profile ........................................................................................................... 4
Send/Receive................................................................................................................... 8
Adding new records to the send/receive tabs:............................................................... 10
Service List Tab ............................................................................................................ 11
Options Tab ................................................................................................................... 12
SEND AND RECEIVE READINGS ............................................................................... 13

3
ACCESSING THE METER DEVICE MODULE
1. Click for More Options in the upper right corner of the Utility Billing Account
Screen 2. Highlight Transfers on the menu. 3. Left click on Meter Device.
SETUP
Meter Device Interface Screen
Note: Generally, all metered services will use the same meter device setup.
The most common profiles for meter device setup are already in the Banyon System. You can add more if you need. Click on the Meter Device down arrow, left click on your meter device from the list. Click on the setup button to customize your meter device. The default setup for the device you selected on the previous screen will be displayed for you. Since this is the standard setup for that specific device, everything should already be in place for you. If you need to customize this further, continue with the following steps. It is up to you to make sure that the setup is what you want and need. (See example of Meter Device Profile Screen)

4
Meter Device Profile
This is the Meter Device Profile screen. The following information and definitions pertain to this screen. The information is best described by breaking down the window into four different quadrants: The top left quadrant, the top right quadrant, the lower left quadrant and the lower right quadrant. We will start with the upper left quadrant. Top left quadrant
Location of Transfer Files: This is the location where the meter device vendor's route management software stores the transfer files. Send File Name/ Receive File Name: These are the transfer file names. Send file is the file sent to the meter device management software. Receive file is the file received from the meter device management software to Banyon Utility Billing. Maximum Records to Transfer: Check with your meter device vendor to determine if there is a maximum number of records the device can store. If so, input here. If not, leave defaulted to 9999999. To Device Multiply Reads By/From Device Multiply Reads By: We recommend readings stored in the device match the format on the customer accounts. There are three typical situations to determine if you need to adjust these fields.
Situation One: Everything matches up. Then you are done. There is no special setup.

5
Situation Two: Everything Global. This means that all accounts require the same multiplier to make the handheld readings match the meter readings. An example would be: All readings are entered in thousand gallon units (ie: 3000=3000). But the handheld sends the readings in single gallon units (ie: 3000=3). Since this is the same for all accounts, you would adjust the setup field as follows: To Device Multiply Reads By to .001, to strip off the three zeros to the handheld. And you would adjust the setup field. From Device Multiply Reads By to 1000, to add those zeros back on as it comes back from the handheld. Situation Three: This can be confusing. Some Device Vendors call this example "Test Circles." This means that you have a variety of significant digits on meter readings in the Banyon Data Software. For example: one customer may read in 1000's, another may read in 100's, yet another may read in 10's and so on. To handle this situation, the device multiplier on the customer's account must be entered to reflect that account's particular situation. To find this field, pull up the customer's account. Go into the Meter tab. Click on the meter you need to change. Once in the Account Meter screen, click on the Device tab and fill in the Device Multiplier field with the appropriate number. (See screen below)
Generally you would have a combination of situation 2 and 3. 99% of your customers will need the same device multiplier but customers with larger meter sizes will have a different multiplier. To handle this set the global multiplier on the meter device setup screen described in situation 2 to take care of the majority of your customers. Then set the individual device multiplier on the few customers with different meter sizes.
Account Meter Screen
Lookup Meter By: This is how the Banyon Data software locates the account to put the meter reading in that is coming from the handheld. Warning: The most common lookup is Account + Service. Do not change this without talking to a Banyon Data employee first. Now we will move onto the definitions for the upper right quadrant. Please note that if you are

6
not sure what to do, leave them unchecked! Top right quadrant
Backwards Compatible: This is for Banyon Data customers that converted from our DOS AUB to WinUB. This is because the Account Number and the Service Number fields have been expanded from 5 to 8 and 2 to 3 digits respectively. So if the handheld is accustomed to the previous 5 and 2 setup, you can use this feature until your setup in the handheld software is changed to match the 8 and 3 digit format in the WinUB. Update When Zero: Some cities consider a zero reading from the handheld to be a real reading. Check this only if you consider a zero read to be real. If you do not read an entire book, you do not want to check this box. If you are not sure, leave it unchecked. To Device….. Sets multiplier to device and meters for all accounts. From Device….. Sets multiplier from device and meters to the Banyon Data program.

7
Lower right quadrant
Display: This defaults to Account Record. This displays the information in the table to the left for the Send and Receive tabs only. If you have a meter device that requires the other listed options, select those and input appropriate information. File Header: If your meter device requires file headers, check this box. Cycle Header: If your meter device requires cycle header, check this box Book Header: If your meter device requires book headers, check this box. Account Header: If your meter device requires account headers, check this box. The options of Meter, Probe, Reading, Radio, and wand are for Banyon Data internal use. Please call for assistance if you require these selections. Account Footer: If your meter device requires account footers, check this box. Book Footer: If your meter device requires book footers, check this box. Cycle Footer: If your meter device requires cycle footers, check this box. Filer Footer: If your meter device requires file footers, check this box. *Check with your meter device vendor to see if your device software requires headers and footers. If you are not sure---leave the boxes unchecked.
8
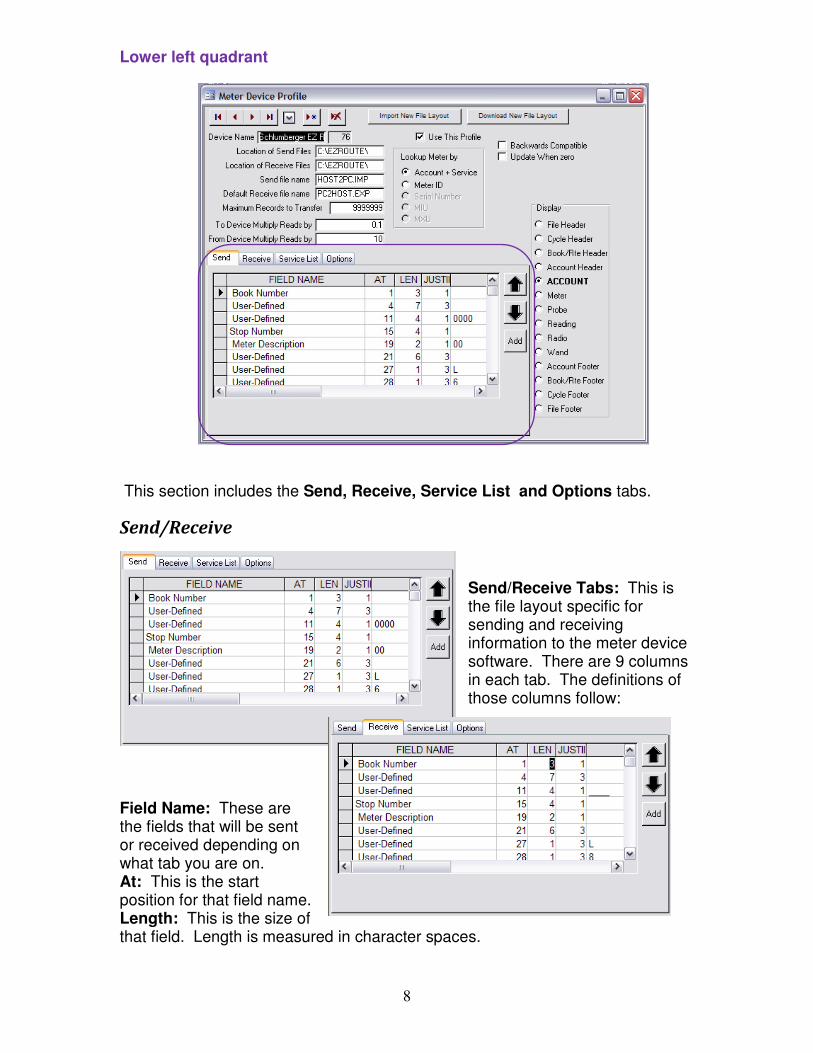
Lower left quadrant
This section includes the Send, Receive, Service List and Options tabs.
Send/Receive
Send/Receive Tabs: This is the file layout specific for sending and receiving information to the meter device software. There are 9 columns in each tab. The definitions of those columns follow:
Field Name: These are the fields that will be sent or received depending on what tab you are on. At: This is the start position for that field name. Length: This is the size of that field. Length is measured in character spaces.

9
Justify: This field is used to set up the alignment of the field information. These alignments are established by putting in one of the following numbers.
1=Justify the information to the left 2=Justify the information to the right 3=No justification 4=Justify the information to the center.
Constant: Fill in here anything you'd like to transfer to/from the meter device permanently in this position. (Only works for the “User-defined field name”) Comment: More descriptive term for whatever that constant or field is . Fill Character: What replaces blanks in the field itself. Fill: Tells whether or not to use the fill character. Use either -1, 0, 1, 2.
0 = Do not use the fill character. -1or 1 = Use the fill character-fill from left. 2 = Use the fill character-fill from right.
Type: If the type column appears in the table, ignore it. This column is for Banyon Data System's use only.
To the immediate right of the tables you will see three
buttons. The buttons with the black arrows on them transfer the
current fields up or down in the file layout. To move a field up and down in the table, that row must be highlighted. Once moved, the position in the file and the At column will
automatically be updated in the table. The Add button is used to insert new records into the table. Once you click on the Add button, the Meter Device Add Fields window will pop up. In this window you will see a list of available fields that can be transferred. (See screen picture on next page) To insert new records: you can either have them inserted at the end of the list in the table or after the current selected record. To insert after current record: For example, if you want to insert something after the Bill Name Field, you would first highlight the entire row for that field name by clicking on the left most gray box for the record you want under the Send or Receive tab. (See example above.) Next, click on the Add button. Select the field you with to insert from the list on the left. (See example on next page) Click on the radio button that says After Current Selected Record. This can be found under the Insert New Record heading. Click on the button with the big arrow pointing to the left to add. Click on the Finished button when done. This will insert the new field name after the Bill Name Field.

10
Adding new records to the send/receive tabs:
To add new record to bottom of the table list: Click on the Add button, make sure the radio button is defaulted to At Bottom of List under the Insert New Records heading.
Select the item you wish to add from the list, click on the button with the big arrow pointing to the left on it, and then click on the Finished button. This will insert the new record at the bottom of the table. More than one field can be added at once by using the Shift + click or the Ctrl + click.

11
Service List Tab
Service List Tab: This tab displays the list of services that can be transferred. Only metered services and usage only services are displayed.
Any service you want to transfer should be moved to the right hand box using the arrow buttons located in between the two white fields. The button with one arrow pointing to the right moves one record over at a time. The button with the double arrows pointing to the right moves all the records at the same time. To move one record at a time, highlight the item first in the left hand box by clicking on it, then click on the button with the one arrow pointing to the right. You can also use ctrl-click and shift-click to select multiple services at once.

12
Options Tab
Only Numbers in Dates (no slashes): Some meter devices won't accept anything other than numbers for the dates. Slashes and dashes are unacceptable. Check this box if this is true for your device. Use 2 digit service numbers: This feature makes it possible to maintain backwards compatibility between two digit versus three digit service numbers, but it won't work in all cases. Call support to see if this feature will work for you. Update Meter ID: This feature allows you to read in the meter reading file from your meter device and whatever data is in the Meter ID position in that file will be read into Utility Billing and will replace whatever is in that field currently in the Utility Billing. Caution: Checking this box could result in losing vital data. Call support if you are unsure. This feature is set to automatically reset to unchecked after the receive process. Xfer by Book + Stop: Check this box ONLY if you are sending partial books. (Banyon does not recommend this) Allow Decimals in HiLow for Demand: Check this box if you want to allow for decimal place in the high and low limits sent to the meter device. Rename Receive File after Load: will rename the file by adding 00 to 99 to prevent overwriting with multiple devices. High/Low Limits: select the form that should be sent to the meter device. When finished, close the Meter Device Profile window by clicking on the X in the top right corner. Close the Meter Device Interface window. Do a backup in Backup/Restore to save the setup.

13
SEND AND RECEIVE READINGS
Once your setup is complete, you will then be able to transfer meter readings. 1. Right Click on the Account Screen Desktop. 2. Select Transfers. 3. Select Meter Device. 4. Make sure your device name is displayed in the Meter Device field at the top. 5. To Send: Click on the Send Button. This sends account info to the device.
To Receive: Click on the file name you want to load into Utility Billing. Make sure you look at the file date and size to ensure you are loading the correct file. Click on the Receive Button. This brings the readings into Utility Billing from the meter device.