micro focus arcsight kafka flexconnector
TRANSCRIPT

Micro Focus SecurityArcSight Kafka FlexConnector
FlexConnector
Configuration Guide
Document Release Date: April 27, 2021Software Release Date: April 27, 2021

Legal NoticesMicro Focus The Lawn22-30 Old Bath RoadNewbury, Berkshire RG14 1QNUK
https://www.microfocus.com
Copyright Notice© Copyright 2021 Micro Focus or one of its affiliates
Confidential computer software. Valid license from Micro Focus required for possession, use or copying. The information contained herein is subject to change without notice.
The only warranties for Micro Focus products and services are set forth in the express warranty statements accompanying such products and services. Nothing herein should be construed as constituting an additional warranty. Micro Focus shall not be liable for technical or editorial errors or omissions contained herein.
No portion of this product's documentation may be reproduced or transmitted in any form or by any means, electronic or mechanical, including photocopying, recording, or information storage and retrieval systems, for any purpose other than the purchaser's internal use, without the express written permission of Micro Focus.
Notwithstanding anything to the contrary in your license agreement for Micro Focus ArcSight software, you may reverse engineer and modify certain open source components of the software in accordance with the license terms for those particular components. See below for the applicable terms.
U.S. Governmental Rights. For purposes of your license to Micro Focus ArcSight software, “commercial computer software” is defined at FAR 2.101. If acquired by or on behalf of a civilian agency, the U.S. Government acquires this commercial computer software and/or commercial computer software documentation and other technical data subject to the terms of the Agreement as specified in 48 C.F.R. 12.212 (Computer Software) and 12.211 (Technical Data) of the Federal Acquisition Regulation (“FAR”) and its successors. If acquired by or on behalf of any agency within the Department of Defense (“DOD”), the U.S. Government acquires this commercial computer software and/or commercial computer software documentation subject to the terms of the Agreement as specified in 48 C.F.R. 227.7202-3 of the DOD FAR Supplement (“DFARS”) and its successors. This U.S. Government Rights Section 18.11 is in lieu of, and supersedes, any other FAR, DFARS, or other clause or provision that addresses government rights in computer software or technical data.
Trademark NoticesAdobe™ is a trademark of Adobe Systems Incorporated.
Microsoft® and Windows® are U.S. registered trademarks of Microsoft Corporation.
UNIX® is a registered trademark of The Open Group.
Documentation UpdatesThe title page of this document contains the following identifying information:
l Software Version number
l Document Release Date, which changes each time the document is updated
l Software Release Date, which indicates the release date of this version of the software
To check for recent updates or to verify that you are using the most recent edition of a document, go to:
https://www.microfocus.com/support-and-services/documentation
Configuration Guide
Micro Focus Kafka FlexConnector () Page 2 of 16

Support
Phone A list of phone numbers is available on the Technical Support Page: https://softwaresupport.softwaregrp.com/support-contact-information
Support Web Site https://softwaresupport.softwaregrp.com/
ArcSight Product Documentation https://community.softwaregrp.com/t5/ArcSight-Product-Documentation/ct-p/productdocs
Contact Information
Revision HistoryDate Description
11/23/2020 Added support to Azure Monitor Event Hub.
07/24/2019 First edition of this guide
Configuration Guide
Micro Focus Kafka FlexConnector () Page 3 of 16
ContentsOverview 5
Understanding Kafka 5
SSL encryption and authentication 6To enable SSL encryption and authentication: 6To SSL for inter-broker communication: 7
Understanding Event Hubs for Kafka 8
Shared Access Signature (SAS) 8
Creating Flex Parsers 9
Overriding Parser Files 9
Preparing to Install the FlexConnector 10Add JSON Parser 10Set Global Parameters (Optional) 10Connector Setup 12Select a Destination and Complete Installation 13Advanced Parameters 14
Send Documentation Feedback 16
Page 4 of 16

OverviewThe Arcsight Kafka FlexConnector helps you subscribe and collect events from a topic of a Kafka server or Azure Event Hubs. Topics only contain a specific event types.
This version supports the following event types:
l JSON
l CEF
l REGEX
l SYSLOG
l KEY-VALUE.
This is a FlexConnector so you need create your personal parsers before setting up the connector.
Note: The connector consumes only data that is serialized using the correct serializers, because the corresponding deserializers are not configurable.
l To serialize data, use the following serializers:
o Key serializer: org.apache.kafka.common.serialization.StringSerializer
o Value serializer: org.apache.kafka.common.serialization.BytesSerializer
l To deserialize data, the Kafka FlexConnector uses the following deserializers:
o Key deserializer: org.apache.kafka.common.serialization.StringDeserializer
o Value deserializer: org.apache.kafka.common.serialization.BytesDeserializer
Understanding KafkaApache Kafka is a distributed publish-subscribe messaging system and a robust queue that handles a high volume of data and enables you to pass messages from one end-point to another.
Kafka is suitable for both offline and online message consumption.
Kafka messages are persisted on the disk and replicated within the cluster to prevent data loss. it is built on top of the ZooKeeper synchronization service and it integrates very well with Apache \Storm and Spark for real-time streaming data analysis.
The following diagram illustrates the main terminologies and the table describes the diagram components in detail. A topic is configured into three partitions.
l Partition 1 has two offset factors 0 and 1.
l Partition 2 has four offset factors 0, 1, 2, and 3.
l Partition 3 has one offset factor 0.
Overview Page 5 of 16

The Id of the replica is same as the Id of the server that hosts it.
Assume, you want to install 3 Kafka Flex Connectors to parse data of a topic, you need to increase the partitions of your Kafka server.
For more information about Apache Kafka, see Configuring Apache Kafka in Windows or Linux Platforms
SSL encryption and authentication
About
The Arcsight Kafka FlexConnector provides secure connection to Kafka servers.
Procedure
To enable SSL encryption and authentication: 1. Configure the truststore, keystore, and password in the server.properties file of every
broker.
2. Passwords are directly stored in the broker configuration file, so restrict the access to these files via file system permissionsssl.truststore.location=/var/private/ssl/kafka.server.truststore.jks
ssl.truststore.password=test1234
Configuration Guide
SSL encryption and authentication Page 6 of 16

ssl.keystore.location=/var/private/ssl/kafka.server.keystore.jks
ssl.keystore.password=test1234
ssl.key.password=test1234
Note: ssl.truststore.password is optional but highly recommended. If a password is not set, access to the truststore is still available, but integrity checking is disabled.
To SSL for inter-broker communication: 1. Add the following propert to the broker properties file ( it is PLAINTEXT by default).
security.inter.broker.protocol=SSL
2. Configure the Apache Kafka® broker ports which listen to client and inter-broker SSL connections. Configure the listeners and the advertised.listeners, in case the value is different.listeners=SSL://kafka1:9093
advertised.listeners=SSL://0.0.0.0:9093
3. Configure the PLAINTEXT ports if:
l SSL is not enabled for inter-broker communication.
l Some clients connecting to the cluster do not use SSL.listeners=PLAINTEXT://kafka1:9092,SSL://kafka1:9093
advertised.listeners=PLAINTEXT://0.0.0.0:9092,SSL://0.0.0.0:9093
Note : advertised.host.name and advertised.port configure a single PLAINTEXT port are incompatible with secure protocols. Use advertised.listeners instead.
4. To enable the broker to authenticate clients (2-way authentication), you need to configure all the brokers for client authentication. We recommend setting this value to required.ssl.client.auth=required
Note: Do not use requested as it creates a false sense of security.
Important: If any of the SASL authentication mechanisms are enabled on a given listener, the SSL client authentication is disabled, even if ssl.client.auth=required is previously configured. The broker will only authenticate clients via SASL on that listener.
Configuration Guide
To SSL for inter-broker communication: Page 7 of 16

Understanding Event Hubs for KafkaEvent Hubs provide a Kafka endpoint that can be used by your Kafka based applications as an alternative to run Kafka clusters. Event Hubs support Apache Kafka protocol 1.0 and later, and work with other Kafka applications like MirrorMaker.
The Event Hubs for Kafka feature provides a protocol head on top of Azure Event Hubs which is binary compatible with Kafka versions 1.0 and later for both reading from and writing to Kafka topics.
The Kafka endpoint can be used from applications with just a minimal configuration change:
l Update the connection string in the configurations to point to the Kafka endpoint exposed by your event hub instead of pointing to a Kafka cluster and start streaming events from the applications that use the Kafka protocol into Event Hubs.
This integration also supports frameworks like Kafka Connect, which is currently in preview.
Every time events are published or consumed from Event Hubs for Kafka, your clients are trying to access the Event Hubs resources. Ensure that the resources are accessed with an authorized entity. When using Apache Kafka protocol with your clients, set the configuration for authentication and encryption using the SASL mechanisms. Event Hubs for Kafka require the TLS-encryption (as all data in transit with Event Hubs is TLS encrypted). This can be done by specifying the SASL_SSL option in the configuration file.
The Arcsight Kafka FlexConnector uses Shared Access Signature (SAS) to authorize access to secure resources.
For more information, see the Azure Documentation.
Shared Access Signature (SAS)Event Hubs also provide the Shared Access Signatures (SAS) for delegated access to Event Hubs for Kafka resources. Authorizing access with an OAuth 2.0 token-based mechanism provides superior security and ease of use over SAS. The built-in roles can also eliminate the need for ACL-based authorization, which has to be maintained and managed by the user.
This feature can be used with your Kafka clients by specifying the SASL_SSL for the protocol and PLAIN for the mechanism, as shown in the following example:
bootstrap.servers=NAMESPACENAME.servicebus.windows.net:9093
security.protocol=SASL_SSL
sasl.mechanism=PLAIN
Configuration Guide
Understanding Event Hubs for Kafka Page 8 of 16

sasl.jaas.config=org.apache.kafka.common.security.plain.PlainLoginModule required username="$ConnectionString" password="{YOUR.EVENTHUBS.CONNECTION.STRING}";
Note : When using SAS authentication with Kafka clients, established connections are not disconnected after the SAS key is regenerated.
Creating Flex Parsers To create a flex Parser, see the ArcSight FlexConnector Developer's Guide
Overriding Parser FilesTo override parser files:
1. Stop the connector and navigate to the path
<connector_home>/current/users/agent/fcp/connectorname_log>,
for example<connector_home>/current/users/agent/fcp/cisco_syslog>
The following files should be found under the location:cisco_syslog.subagent.sdkrfilereader.properties
cisco_sdsyslog.subagent.sdkrfilereader.properties
As well as an "extra processor" parser required for main-level REGEX type agents:cisco_sdsyslog.sdkkeyvaluefilereader.properties
2. In order to override these files, create the sub-folder structure and the required file(s) under<connector_home>/current/users/agent/fcp/cisco_syslog
3. Make sure the override only includes the changes or additions to the base /shipped parser.
4. Start the connector.
5. To confirm the override was successful, go to the agent.out.wrapper.log file look for the "An over-ride file was found and loaded" note.
Note: The Override file should be created with the same file name and under the same folder location and replaced without affecting or making changes in the agent.properties file.
Configuration Guide
Creating Flex Parsers Page 9 of 16

Preparing to Install the FlexConnectorBefore installing the FlexConnector, be sure the following are available:
l Local access to the machine where the FlexConnector is to be installed
l Vendor login credentials (user name and password). During the configuration, you are redirected to the vendor’s login page, where you will log into the vendor’s application using your vendor credentials. After you log into the vendor application, the connector can access and collect vendor log data.
Unless specified otherwise at the beginning of this guide, this connector can be installed on all ArcSight supported platforms; for the complete list, see the SmartConnector Platform Support document, available from the Micro Focus SSO and Protect 724 sites.
Note: On the Linux platform, if you are logged in as root and use Firefox, some versions of the browser can cause the browser launched by the connector during configuration not to open. If you see this issue, try configuring the connector as a non- root user. If you configure the connector as a non-root user, however, you cannot run the connector as a service.
Add JSON Parser 1. Before configuring the connector, you must exit the wizard to make your JSON parser
available to the connector. Click Cancel to exit the wizard.
2. Copy your JSON parser file into the $ARCSIGHT_HOME\current\user\agent\flexagent directory. See "Create a JSON Parser File" for details on creating the JSON parser file.
3. Execute runagentsetup from $ARCSIGHT_HOME\current\bin to return to the wizard.
Continue with "Advanced Parameters" if you want to change the settings of the Kakfa Server. Otherwise, continue with "Configure Connector Parameters."
Set Global Parameters (Optional)If you choose to perform any of the operations shown in the following table, do so before adding your connector. After installing core software, you can set the following parameters:
Configuration Guide
Preparing to Install the FlexConnector Page 10 of 16
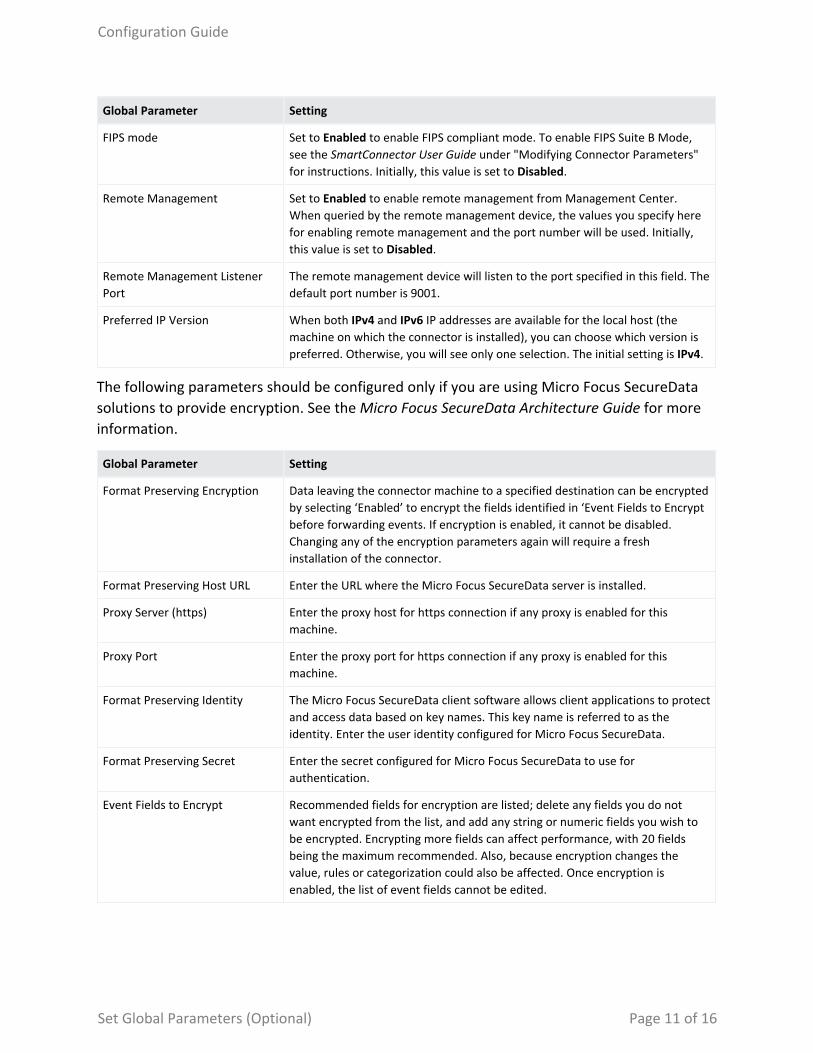
Global Parameter Setting
FIPS mode Set to Enabled to enable FIPS compliant mode. To enable FIPS Suite B Mode, see the SmartConnector User Guide under "Modifying Connector Parameters" for instructions. Initially, this value is set to Disabled.
Remote Management Set to Enabled to enable remote management from Management Center. When queried by the remote management device, the values you specify here for enabling remote management and the port number will be used. Initially, this value is set to Disabled.
Remote Management Listener Port
The remote management device will listen to the port specified in this field. The default port number is 9001.
Preferred IP Version When both IPv4 and IPv6 IP addresses are available for the local host (the machine on which the connector is installed), you can choose which version is preferred. Otherwise, you will see only one selection. The initial setting is IPv4.
The following parameters should be configured only if you are using Micro Focus SecureData solutions to provide encryption. See the Micro Focus SecureData Architecture Guide for more information.
Global Parameter Setting
Format Preserving Encryption Data leaving the connector machine to a specified destination can be encrypted by selecting ‘Enabled’ to encrypt the fields identified in ‘Event Fields to Encrypt before forwarding events. If encryption is enabled, it cannot be disabled. Changing any of the encryption parameters again will require a fresh installation of the connector.
Format Preserving Host URL Enter the URL where the Micro Focus SecureData server is installed.
Proxy Server (https) Enter the proxy host for https connection if any proxy is enabled for this machine.
Proxy Port Enter the proxy port for https connection if any proxy is enabled for this machine.
Format Preserving Identity The Micro Focus SecureData client software allows client applications to protect and access data based on key names. This key name is referred to as the identity. Enter the user identity configured for Micro Focus SecureData.
Format Preserving Secret Enter the secret configured for Micro Focus SecureData to use for authentication.
Event Fields to Encrypt Recommended fields for encryption are listed; delete any fields you do not want encrypted from the list, and add any string or numeric fields you wish to be encrypted. Encrypting more fields can affect performance, with 20 fields being the maximum recommended. Also, because encryption changes the value, rules or categorization could also be affected. Once encryption is enabled, the list of event fields cannot be edited.
Configuration Guide
Set Global Parameters (Optional) Page 11 of 16

After making your selections, click Next. A summary screen is displayed. Review the summary of your selections and click Next. Click Continue to return to the "Add a Connector" window. Continue the installation procedure with "Configure Connector Parameters".
Connector SetupConfigure Connector Parameters
1. Select Add a Connector and click Next.
2. Select ArcSight FlexConnector Kafka and click Next.
Parameter Setting
Log Unparsed Events Log unparsed events on the log folder and only use it for regex and syslog content types.
Source Type Select Kafka to read data from a Kafka topic.
Select Azure Event Hub to read data from an Azure Event hub.
Host:Port(s) Host and port of the Kafka server
Azure Event Hub Connection String
Connection String in the Azure Event Hub
Topics Topic name of the Kafka server
Content Type Add 5 supported event types: JSON, CEF, SYSLOG, REGEX, and KEY-VALUE.
Configuration File Name Prefix Enter the name of the parser file once you have ensured the parser file has been copied into the $ARCSIGHT_HOME\current\user\agent\flexagent\syslog directory for SYSLOG parser or $ARCSIGHT_HOME\current\user\agent\flexagent directory for the remaining event types.
For example: for $ARCSIGHT_HOME\current\user\agent\flexagent\ google.jsonparser.properties. You can enter the prefix google, and the connector assumes the file name is google.jsonparser.properties and resides in $ARCSIGHT_ HOME\current\user\agent\flexagent.
For more information, see https://community.microfocus.com/t5/ArcSight-Connectors/ArcSight-FlexConnector-Developer-s-Guide/ta-p/1584874
Use SSL/TLS Set the value to True if the Kafka server requires it for encrypted data.
SSL/TLS Trust Store file Add file path of the SSL/TLS Trust Store file.
SSL/TLS Trust Store password Add the SSL/TLS Trust Store password of the store file above.
Use SSL/TLS Authentication Set the value to True if the Kafka server requires it for authentication. You also need to enable the Use SSL/TLS parameter.
Configuration Guide
Connector Setup Page 12 of 16

Parameter Setting
SSL/TLS Key Store file Add the file path of theSSL/TLS Key Store file.
SSL/TLS Key Store pass Add the SSL/TLS Key Store password.
SSL/TLS Key password Add the SSL/TLS Key password.
Select a Destination and Complete Installation 1. Make sure ArcSight Manager (encrypted) is selected and click Next. For information about
this and other destinations listed, see the ArcSight SmartConnector User Guide and the Administrator's Guide for your ArcSight product.
2. Enter the Manager Host Name, Manager Port, and a valid ArcSight User Name and Password. This is the same user name and password you created during the ArcSight Manager installation. Click Next.
3. Enter a name for the connector and provide other information identifying the connector's use in your environment. Click Next; the connector starts the registration process.
4. The certificate import window for the ESM Manager is displayed. Select Import the certificate to the connector from destination and click Next. The certificate is imported and the Add Connector Summary window is displayed. If you select Do not import the certificate to connector from destination, then the connector installation will end.
5. Review the Add Connector Summary and click Next. If the summary is incorrect, click Previous to make changes.
6. The wizard now prompts you to choose whether you want to run the connector as a stand-alone process or as a service. If you choose to run the connector as a stand-alone process, skip step 7. If you choose to run the connector as a service, the wizard prompts you to define service parameters.
7. Enter values for Service Internal Name and Service Display Name and select Yes or No for Start the service automatically. The Install Service Summary window is displayed when you click Next.
8. Click Next.
To complete the installation, choose Exit and click Next.
Note: Save any work on your computer or desktop and shut down any other running applications (including the ArcSight Console, if it is running), then shut down the system.
Complete any tasks needed in "Parameter Modifications to Optimize Connector Performance", then continue with the "Run the SmartConnector".
For connector upgrade or uninstall instructions, see the SmartConnector User Guide.
Configuration Guide
Select a Destination and Complete Installation Page 13 of 16

Advanced ParametersIf you choose to perform any of the operations shown in the following table, do so before adding your connector. After installing core software, you can set the following parameters:
Parameter Setting
bootstrap.servers Host-IP
group.id Use for multiple connectors in a Kafka topic.
max.poll.records The maximum number of records returned in a single call to a poll( ). Default value is 500 (maximum).
auto.commit.interval.ms The frequency in milliseconds in which the consumer offsets are auto-committed to Kafka if the enable.auto.commit value is set to True: 5000 miliseconds.
reconnect.backoff.ms The base waiting time, before attempting to reconnect to a given host. It avoids repeatedly connecting to a host in a tight loop. This backoff applies to all client connection attempts to a broker: 50 times
retry.backoff.ms The amount of waiting time before attempting to retry a failed request to a given topic partition. It avoids repeatedly sending requests in a tight loop under some failure scenarios: 100 times.
request.timeout.ms It controls the maximum amount of waiting time for a request response. If the response is not received before the timeout elapses, the client resends or fails the request (if the connection attempts have reached the limit: 30000 milliseconds.
client.id An id string to pass to the server when making requests. It tracks the request source beyond just ip/port, by allowing a logical application name to be included on the server-side login request. For tracking: arcsight
heartbeat.interval.ms The expected time between heartbeats to the consumer coordinator when using Kafka's group management facilities. Heartbeats are used to ensure that the consumer's session stays active and facilitates rebalancing when new consumers join or leave the group. The value must be set lower than session.timeout.ms and higher than 1/3 of that value. It can be adjusted even lower to control the expected time for normal rebalances.
Configuration Guide
Advanced Parameters Page 14 of 16

Parameter Setting
connections.max.idle.ms
(Idle connections timeout)
The server socket processor threads close the connections that appear idle for more than 600000 ms.
auto.offset.reset It can be executed when there is not an initial offset in Kafka or if the current offset does not exist in the server anymore.
disable.activemq The values can be:
True: Disable ActiveMQ
False: Enable ActiveMQ
Configuration Guide
Advanced Parameters Page 15 of 16

Send Documentation FeedbackIf you have comments about this document, you can contact the documentation team by email. If an email client is configured on this computer, click the link above and an email window opens with the following information in the subject line:
Feedback on Configuration Guide (Kafka FlexConnector )
Just add your feedback to the email and click send.
If no email client is available, copy the information above to a new message in a web mail client, and send your feedback to [email protected].
We appreciate your feedback!
Send Documentation Feedback Page 16 of 16