microcontroller workshop - tokushima u
TRANSCRIPT

Microcontroller WorkshopBuild your own products
The University of Tokushima
Akinori Tsuji
Contact Information:
2-1, Minamijyosanjima-cho, Tokushima 770-8506, Japan
TEL/FAX: +81-88-656-7485
E-mail::[email protected]
March 3, 2012: DraftMarch 21, 2012: Release
Mar 3, 2012, The University of Tokushima, Akinori Tsuji

Mar 3, 2012, The University of Tokushima, Akinori Tsuji
Agenda
1. Why the microcontrollers
2. How to start
3. How it works
4. ProgrammingI/O Port, A/D Converter, Timer, Interrupt, Serial Communication
5. Sensors and ActuatorLight, Touch, Temperature, Motor
6. Building a Robot (* if possible)
Mar 3, 2012, The University of Tokushima, Akinori Tsuji
Day 1
Estimate: 2 hours
Set up development environment
2012/3/21(Wed) 10:00—12:00

1. Why the Microcontrollers
Mar 3, 2012, The University of Tokushima, Akinori Tsuji
A microcontroller is everywhere around you, but everyone does not notice them

SS
Mar 3, 2012, The University of Tokushima, Akinori Tsuji
1.1 Motivation
Easy to make a prototype
Get a lot of knowledge
Make original products
Build your own instruments
Many applications
Full scratch
Realize your idea
Useful for the research
InexpensiveKnow how products work
Interface to the natureScientific approach
Embedded system programming
Fusion of software and hardware
and much more
Study Electrical and Electronics
Invent new one
Long‐life technology
A microcontroller covers a lot of fields and applications, use your imaginative power
Essential of our life

Mar 3, 2012, The University of Tokushima, Akinori Tsuji
1.2 Inside of the Products
Digital TV
Portable Game Machine Digital Video Camera
Mini Projector
Courtesy of NikkeiBP
We open and found it !
Blu‐ray Recorder

Mar 3, 2012, The University of Tokushima, Akinori Tsuji
1.3 Embedded System
Software
HardwareDevelopment board includes;‐Microcontroller and other ICs‐ Programmer, is a tool for writing program
Development tools for microcontroller include;‐ Cross Compiler, Linker, Assembler,‐ Debugger
GUI applications, Operating SystemAPIs, Libraries, Drivers
Abstraction Level
You are here
An Embedded System includes the aspect of hardware and software
Barrier
HIGH
LOW
Embedded System

Mar 3, 2012, The University of Tokushima, Akinori Tsuji
2. How to start
A microcontroller does not have so much resources to develop on itself
→ Cross compile
Build a program
send
Microcontroller
I need but …

Mar 3, 2012, The University of Tokushima, Akinori Tsuji
2.1 Development Tools
Software
Hardware
Abstraction Level
Arduino (IDE)
Processing
AVR Studio (Cross Compiler, Assembler, Linker)
TeraTerm
Development Board (Compatible with Arduino)
Firmware
Development ToolsHIGH
LOW

Mar 3, 2012, The University of Tokushima, Akinori Tsuji
2.2 Setup the development tools
Download and install development tools:
AVR Studio 4 and AVR Toolchain is a development environment‐ http://www.atmel.com/tools/AVRSTUDIO4.aspxAVR Writer is to write a program (USBasp) of a microcontroller‐ USBasp WriterTera Term is to communicate with a microcontroller‐ http://sourceforge.jp/projects/ttssh2/releases/Arduino is software for easy to program on a microcontroller ‐ http://arduino.cc/hu/Main/Software/Processing is software for easy to develop a GUI interface‐ http://www.processing.org/download/
These are free software without warranty

Mar 3, 2012, The University of Tokushima, Akinori Tsuji
2.2.1 Install AVR Studio & Toolchain
1. Double click “avr‐toolchain‐installer‐3.3.0.710‐win32.x86.exe”2. Follow the installation wizard3. Double click on “AVRStudio4Setup.exe”4. Follow the installation wizard

Mar 3, 2012, The University of Tokushima, Akinori Tsuji
2.2.2 Install TeraTerm
1. Double Click on “teraterm‐4.7.3.exe”2. Choose language English3. Follow the installation wizard

Mar 3, 2012, The University of Tokushima, Akinori Tsuji
2.2.3 Install Arduino
1. Extract the archive “arduino‐1.0‐windows.zip”2. Move arduino‐1.0 to C:¥3. Make a short cut of C:¥arduino‐1.0¥arduino.exe‐ Right click on arduino.exe‐ Create a shortcut
4. Move the short cut file to the Desktopand rename “arduino”

Mar 3, 2012, The University of Tokushima, Akinori Tsuji
2.2.4 Install Processing
1. Extract the archive “processing‐1.5.1.zip”2. Move processing‐1.5.1 to C:¥3. Make a short cut of C:¥processing‐1.5.1¥processing.exe‐ Right click on processing.exe‐ Create a shortcut
4. Move the short cut file to the Desktopand rename “processing”

Mar 3, 2012, The University of Tokushima, Akinori Tsuji
2.3 Setup the development board
Bread board: ‐ Rapid prototyping‐ Solderless
Development board:‐Compatible with Arduino, ‐Programmer
Courtesy of Akizukidenshi

Mar 3, 2012, The University of Tokushima, Akinori Tsuji
2.3.1 Development Board
DC Power Supply
Socket for Microcontroller
+5VRegulator
USB Host Interface
Crystal 16MHz
ResetSwitch
ICSPConnector
Pin socket connected to Microcontroller
Status LEDs (Power & Serial)
LED(Pin13)

Mar 3, 2012, The University of Tokushima, Akinori Tsuji
2.3.1 Development Board (continued)
Courtesy of Akizukidenshi

Mar 3, 2012, The University of Tokushima, Akinori Tsuji
2.3.2 Power Supplies
From PC via the USB Port (USB)MAX: 500mA
From Adapter or Battery (EXT)
Short Pin to change power source, EXT or USB
Mar 3, 2012, The University of Tokushima, Akinori Tsuji
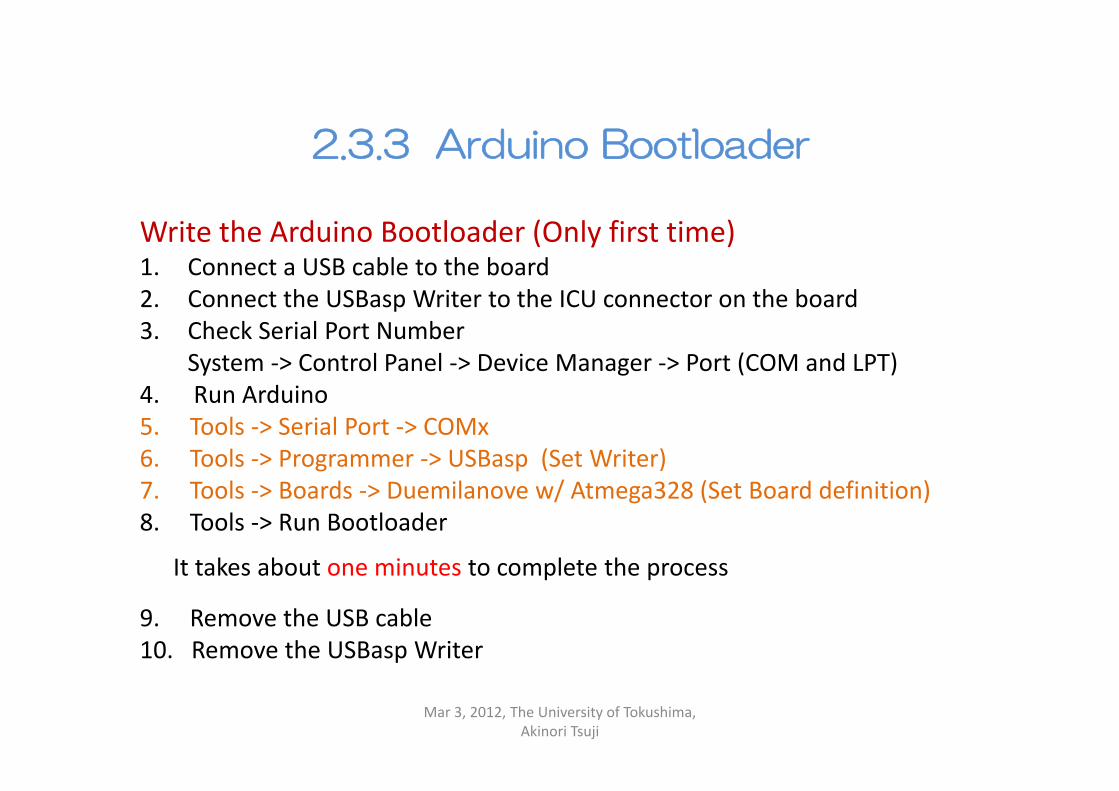
2.3.3 Arduino Bootloader
Write the Arduino Bootloader (Only first time)1. Connect a USB cable to the board2. Connect the USBasp Writer to the ICU connector on the board3. Check Serial Port Number
System ‐> Control Panel ‐> Device Manager ‐> Port (COM and LPT)4. Run Arduino5. Tools ‐> Serial Port ‐> COMx6. Tools ‐> Programmer ‐> USBasp (Set Writer)7. Tools ‐> Boards ‐> Duemilanove w/ Atmega328 (Set Board definition)8. Tools ‐> Run Bootloader
9. Remove the USB cable10. Remove the USBasp Writer
It takes about one minutes to complete the process

Mar 3, 2012, The University of Tokushima, Akinori Tsuji
2.3.4 Board Test (1/5)
Run a test program, Blink a LED on the board1. Run Arduino2. File ‐> Examples ‐> 1:Basics ‐> Blink

Mar 3, 2012, The University of Tokushima, Akinori Tsuji
2.3.4 Board Test (2/5)
3. Click on the Verify Icon to compile the program
Source code called sketch
Status window

Mar 3, 2012, The University of Tokushima, Akinori Tsuji
2.3.4 Board Test (3/5)
4. Click on the Upload Icon to load the program to the microcontroller
5. Check the status window

Mar 3, 2012, The University of Tokushima, Akinori Tsuji
2.3.4 Board Test (4/5)
LED connected to Pin(13) is Blinking

Mar 3, 2012, The University of Tokushima, Akinori Tsuji
2.3.4 Board Test (5/5)
1. File ‐> Save As2. Save as Project name:
Blink (*1)
(*1) Project is saved to under the MyDocuments¥Arduino¥Blink folderSource code is saved as Blink.ino in the Blink folderIf you want to delete the project, just remove the Blink folder
Save Project

Mar 3, 2012, The University of Tokushima, Akinori Tsujie
2.4 Parts
Resistor Ceramic capacitor
Aluminum capacitor
LED
Diode
Inductor
Potentiometer Coil
Courtesy of Akizukidenshi

Mar 3, 2012, The University of Tokushima, Akinori Tsujie
2.4 Parts (continued)
P channelMOS‐FET
OperationalAmplifier
Switch
TransistorNPN
TransistorPNP
Push Switch
N ChannelMOS‐FET
Courtesy of Akizukidenshi
Crystal

Mar 3, 2012, The University of Tokushima, Akinori Tsujie
2.4.1 Label of Parts
Resistor
Ceramic capacitor
Potentiometer
Courtesy of Akizukidenshi
105 = 1.0 uF104 = 0.1 uF103 = 10000 pF102 = 1000 pF101 = 100 pF10 = 10 pF
1st 2nd 3rd BandBlack 0 0 x 1Brown 1 1 x 10Red 2 2 x 100Orange 3 3 x 1000 (k)Yellow 4 4 x 10000Green 5 5 x 100000Blue 6 6 x 1000000 (M) Violet 7 7 …Gray 8 8 White 9 9Silver/Gold 10%/5% (Tolerance)
Example) ResistorBrown Black Red1 0 x 100 = 1000 Ω = 1 kΩ1st 2nd 3rd
Example) Potentiometer1 0 3 = 10 x 10^3 = 10kΩ1st 2nd 3rd
Example) Capacitor2 2 42 2 x 10^4 = 220000 pF = 2.2 μF
Mar 3, 2012, The University of Tokushima, Akinori Tsuji
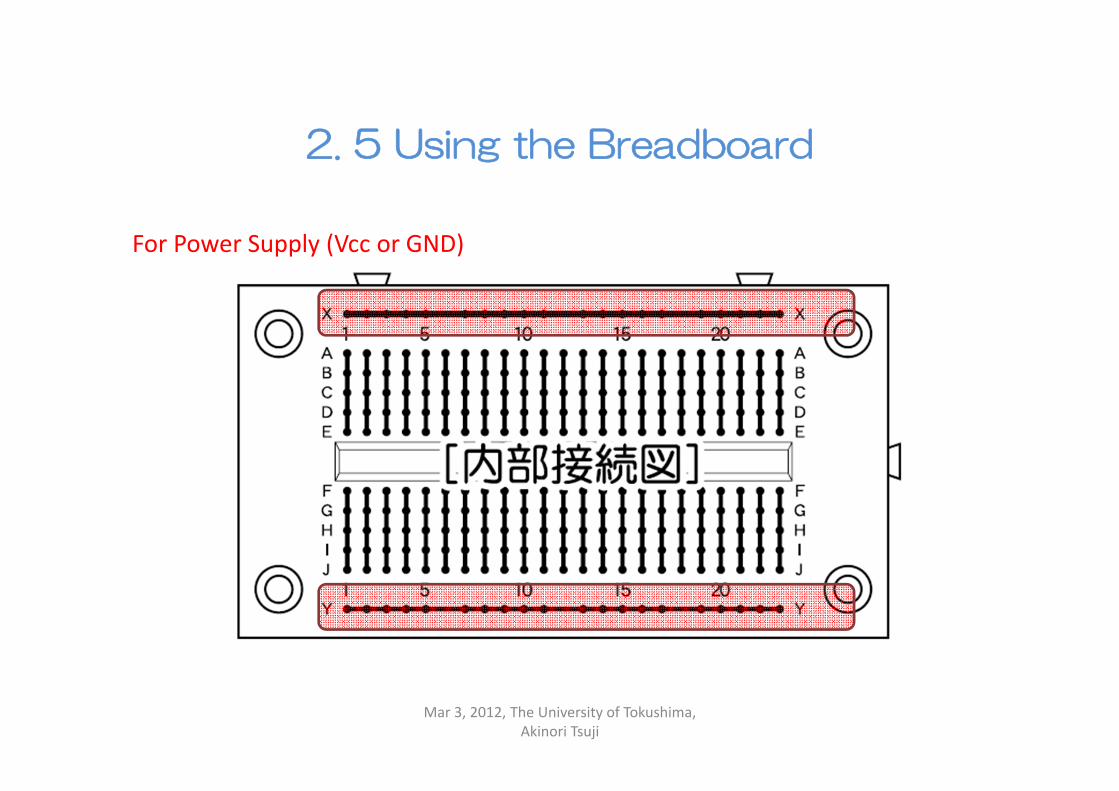
2. 5 Using the Breadboard
For Power Supply (Vcc or GND)

Mar 3, 2012, The University of Tokushima, Akinori Tsuji
2.5.1 Schematic
Schematic
Vf
If
Ohm’s Law
V = R x IV : Voltage [V]R : Resistor [Ω]I : Current [A]
Vcc = VR1 + VfVR1 = R1 x If
Vcc = 5V, If = 10 mA, Vf=2.1VR1 = ?
Vcc
VR1
Ex) LED circuit
Typical Vf voltage:Red, Green, Yellow LED1.7V – 2.1V
Blue, White LED3V – 3.4V

Mar 3, 2012, The University of Tokushima, Akinori Tsuji
2.5.2 LED power supply from Arduino
Long lead

Mar 3, 2012, The University of Tokushima, Akinori Tsuji
Day 2
Estimate: 2 hours
Programming the Microcontroller 1
2012/3/22(Wed) 10:00—12:00

Mar 3, 2012, The University of Tokushima, Akinori Tsuji
Agenda
1. How it works- Specification, Arduino, Pin Assignment,
Work Flow
2. Embedded System Programming- Polling, Polling and Interrupt, Interrupt- Peripherals- Data Types
3. I/O Port

Mar 3, 2012, The University of Tokushima, Akinori Tsuji
1 How it works
Block diagramPin assignment
Courtesy of Atmel Corp.

Mar 3, 2012, The University of Tokushima, Akinori Tsuji
1.1 Specification
Atmel, AVR Atmega 328PROM: 32kBRAM: 2kBEEPROM: 1kBFrequency: 16 MHzPower supply: 5V (or 3.3V)28 pin PDIP packageFunction: Digital I/O x9, 8‐Bit Timer x2, 16‐Bit Timer x1, PWM Channel x6, 10‐Bit ADC x5,Serial UART x1, SPI x1

Mar 3, 2012, The University of Tokushima, Akinori Tsuji
Arduino development environment‐ has started developing in Italy‐ easy to use for beginners, no need software or electronics experience‐ C / C++ language‐ IDE (Integrated Development Environment)‐ APIs
1.2 Arduino

Mar 3, 2012, The University of Tokushima, Akinori Tsuji
1.3 Pin Assignment for Arduino
RESET+3.3V+5VGNDGNDVIN
012345
AnalogInput
AREF (Analog Reference)GND
131211 (PWM)10 (PWM)9 (PWM)876 (PWM)5 (PWM)43 (PWM)210
DigitalIn/Out
SCLSDA
TXRX
SCKMISOMOSISSPower
Supply
(Ex. Int)(Ex. Int)

Mar 3, 2012, The University of Tokushima, Akinori Tsuji
1.4 Work Flow
1. Make a circuit on the bread board
2. Connect a circuit to the development board by wire
3. Programming on the PC4. Connect a USB cable to the PC (Power Supply)5 Upload a program to the microcontroller
Note: DO NOT SHORT +5V and GND
Note: DO NOT SUPPLY POWER

Mar 3, 2012, The University of Tokushima, Akinori Tsuji
2 Embedded System Programming
Initialize Peripherals
Infinite loop
Polling function
Interrupt function
Basic structure
Interrupt requested from internal orexternal hardware
setup()
loop()
Polling Interrupt
MCU has to do an interrupt functionImmediately even if a polling functionIs not finished.

Mar 3, 2012, The University of Tokushima, Akinori Tsuji
2.1 Polling
Time
Task
Pollingwithout Interrupt
int main(){init(); // initializes a hardware
setup(); // setup your sketch’s function
while (1) { // do the task foreverloop(); // Task, polling function
}// no terminate, no return
}

Mar 3, 2012, The University of Tokushima, Akinori Tsuji
2.2 Polling and Interrupt
Task
Time
Interrupt Service Routine (ISR)
Polling with Interrupt
Interrupt occurred
int main(){init(); // initializes a hardware
setup(); // setup your sketch’s function
while (1) { // do the task foreverloop(); // Task, polling function
}// no terminate, no return
}
void isr() {// interrupt service routine
}

Mar 3, 2012, The University of Tokushima, Akinori Tsuji
2.3 Interrupt
Time
Only Interrupt
ISR
Interrupt occurred
int main(){init(); // initializes a hardware
setup(); // setup an interrupt routine
while (1); // sleep, no task// no terminate, no return
}
void isr() { // awake by an interrupt request// interrupt service routine
}

Mar 3, 2012, The University of Tokushima, Akinori Tsuji
2.4 Peripherals
I/O A/D Timer Ext. Interrupt USART SPI/I2C
Microprocessor
Drivers
APIs
Application (Arduino)

Mar 3, 2012, The University of Tokushima, Akinori Tsuji
2.5 Data tyeps
Not available orCompiler emulationto take a time to calculate

Mar 3, 2012, The University of Tokushima, Akinori Tsuji
3 I/O port
Microcontroller
Output
Input
I/O Port = Digital Input / Output porthas Direction, Input or Output. handles 0 or 1, Voltage level: High or Low level
H
L
H
L
Digital Value Voltage Level Voltage
1 H +5V/+3.3V (Vcc)
0 L 0V
0 1 0 1 0
0 1 0 1 0

Mar 3, 2012, The University of Tokushima, Akinori Tsuji
LAB1: I/O Port (Output)
void setup() { // Initialize peripherals// initialize the digital pin as an output.// Pin 13 has an LED connected on the boardpinMode(13, OUTPUT); }
void loop() { // Infinite loopdigitalWrite(13, HIGH); // set the LED ondelay(1000); // wait for a seconddigitalWrite(13, LOW); // set the LED offdelay(1000); // wait for a second}
Polling function
Blink: Blink the LED, Pin(13) is connected to the LEDon the board
On board LED

Mar 3, 2012, The University of Tokushima, Akinori Tsuji
LAB2: I/O Port (Output)
BlinkPin13: Declare the pin assignment
const int ledPin = 13;
void setup() { // Initialize peripheralspinMode(ledPin, OUTPUT); }
void loop() { // Infinite loopdigitalWrite(ledPin, HIGH); // set the LED ondelay(1000); // wait for a seconddigitalWrite(ledPin, LOW); // set the LED offdelay(1000); // wait for a second}
On board LED
Source

Mar 3, 2012, The University of Tokushima, Akinori Tsuji
LAB3: I/O Port (Output)
const int ledPin = 12;
void setup() { // Initialize peripheralspinMode(ledPin, OUTPUT); }
void loop() { // Infinite loopdigitalWrite(ledPin, LOW); // set the LED ondelay(1000); // wait for a seconddigitalWrite(ledPin, HIGH); // set the LED offdelay(1000); // wait for a second}
Polling function
BlinkPin12: Make an LED circuit on the boardConnect the circuit to the Pin(12)
Sink

Mar 3, 2012, The University of Tokushima, Akinori Tsuji
LAB4: I/O Port (Output)
const int ledPin = 12;
void setup() { // Initialize peripheralspinMode(ledPin, OUTPUT); }void loop() { // Infinite loopblink(1000);
}void blink(int ms) {digitalWrite(ledPin, LOW); // set the LED ondelay(ms); // wait for a seconddigitalWrite(ledPin, HIGH); // set the LED offdelay(ms); // wait for a second}
BlinkFunc: Use a function
Sink
Using a function and a declarationis to keep portability, easy to modify, and well understand the code

Mar 3, 2012, The University of Tokushima, Akinori Tsuji
LAB5: I/O Port (Input)
Example) Push switch and LED

Mar 3, 2012, The University of Tokushima, Akinori Tsuji
Push Switch
1 2
3 4
Schematic Parts
Use DiagonalPins
Switch state Voltage Level Digital Value
ON LOW 0
OFF HIGH 1

Mar 3, 2012, The University of Tokushima, Akinori Tsuji
Sample Code
const int switchPin = 12;const int ledPin = 13;
void setup() {pinMode(switchPin, INPUT); // digital pin as an inputpinMode(ledPin, OUTPUT); // digital pin as an output}
void loop() {if (digitalRead(switchPin) == LOW) {digitalWrite(ledPin, HIGH); // set the LED on
} else {digitalWrite(ledPin, LOW); // set the LED off
}}
PushSwitch: Push switch and LED

Mar 3, 2012, The University of Tokushima, Akinori Tsuji
LAB6: I/O Port (Input and Output)
const int switchPin = 12;const int ledPin = 13;
void setup() {pinMode(switchPin, INPUT); // digital pin as an inputpinMode(ledPin, OUTPUT); // digital pin as an output}
void loop() {static int ms = 1000;if (digitalRead(switchPin) == LOW) {blink(ms); // set the LED onms ‐= 50;if (ms == 0) ms = 1000;
}}
BlinkSwitch: While a switch is pushed, blinking faster

Mar 3, 2012, The University of Tokushima, Akinori Tsuji
I/O Port
ProgramSwitch LED

Mar 3, 2012, The University of Tokushima, Akinori Tsuji
Day 3
Estimate: 2 hours
Programming the Microcontroller 2
2012/3/29(Thu) 10:00—12:00

Mar 3, 2012, The University of Tokushima, Akinori Tsuji
Agenda
1. A/D Converter
2. Timer Interrupt
3. External Interrupt
4. Serial Communication

Mar 3, 2012, The University of Tokushima, Akinori Tsuji
1 A/D converter
Microcontroller
10‐Bit Analog to Digital ConverterAnalog signal, 0 to 5 V, converts digital value 0 to 1023(2^10‐1)
A/D Converter
0V
5V
0
1023
sampling

Mar 3, 2012, The University of Tokushima, Akinori Tsuji
1.1 Resolution
Analog signal, 0 to 5 V, converts digital value 0 to 1023(2^10‐1)
0V
5V
Voltage・・・
4.88mV = 5.0V / 1024
float vol = 5.0 * ain / 1024;
Time

Mar 3, 2012, The University of Tokushima, Akinori Tsuji
1.2 Sampling Frequency
A/D converter: sampled an analog signal followed the sampling frequency
0V
5V
Voltage
Time
TsSampling Frequency fs = ?
fs >= 2 ff: maximum frequency containing in the analog signal

Mar 3, 2012, The University of Tokushima, Akinori Tsuji
1.2 Sampling Frequency
A/D converter: sampled an analog signal followed the sampling frequency
0V
5V
Voltage
Time
Ts
fs >= 2 ff: maximum frequency containing in the analog signal

Mar 3, 2012, The University of Tokushima, Akinori Tsuji
1.2 Sampling Frequency
A/D converter: sampled an analog signal followed the sampling frequency
0V
5V
Voltage
Time
Ts
fs >= 2 ff: maximum frequency containing in the analog signal

Mar 3, 2012, The University of Tokushima, Akinori Tsuji
LAB1 A/D converter
Example) Potentiometer

Mar 3, 2012, The University of Tokushima, Akinori Tsuji
Potentiometer
ccout
out
cc
VRR
RV
iRViRRV
21
2
2
21 )(
Circuit diagram
outV

Mar 3, 2012, The University of Tokushima, Akinori Tsuji
LAB1: LED and Potentiometer
SensorIn: Turn on/off the LED depends on the voltage of a potentiometerconst int potPin = A0; // select the analog input pin for the potentiometerconst int ledPin = 13; // select the pin for the LED
void setup() {pinMode(ledPin, OUTPUT); // declare the ledPin as an OUTPUT:}
void loop() {int potValue = 0; // variable to store the value coming from the sensor
potValue = analogRead(potPin); // read the value from the sensor:digitalWrite(ledPin, HIGH); // turn the ledPin ondelay(potValue); // stop the program for <potValue> milliseconds:digitalWrite(ledPin, LOW); // turn the ledPin off: delay(potValue); // stop the program for <potValue> milliseconds:}

Mar 3, 2012, The University of Tokushima, Akinori Tsuji
LAB2: LED and Potentiometer
SensorIn: Turn on the LED more than 2.5Vconst int potPin = A0; // select the analog input pin for the potentiometerconst int ledPin = 13; // select the pin for the LED
void setup() {pinMode(ledPin, OUTPUT); // declare the ledPin as an OUTPUT:}
void loop() {int potValue = 0; // variable to store the value coming from the sensor
potValue = analogRead(potPin); // read the value from the sensor:if (potValue >= 512) {digitalWrite(ledPin, HIGH); // turn the ledPin on
} else {digitalWrite(ledPin, LOW); // turn the ledPin off:
}}
float vol = 5.0 * ain / 1024;

Mar 3, 2012, The University of Tokushima, Akinori Tsuji
2 Timer Interrupt
None Timer
Time
ISR
ISR
ISR
ISR
delay(ms)
Time
Timer Interrupt
for(i=0;i<N;i++;);
T
T
T
T ?
ISR is called every T second

Mar 3, 2012, The University of Tokushima, Akinori Tsuji
MSTimer2 Library
1. Extract the archive “MsTimer2.zip”.
2. Move MsTimer2 folder toC:¥arduino‐1.0¥libraries3. Run Arduino4. File ‐> Examlpes ‐>MsTimer2 ‐> FlashLed

Mar 3, 2012, The University of Tokushima, Akinori Tsuji
LAB3: Timer Interrupt
#include <MsTimer2.h>const int ledPin = 13;
// ISR: Interrupt service routinevoid flash() {static boolean output = HIGH;digitalWrite(ledPin, output);output = !output; // toggle the LED}void setup() {pinMode(ledPin, OUTPUT);
MsTimer2::set(500, flash); // 500ms period, attach an interrupt service routineMsTimer2::start(); // Timer starts}void loop() {// Nothing to do}
500ms 500ms
1.0 s
500ms
LED
TimerInt: Turn on and off the LED every 500 ms

Mar 3, 2012, The University of Tokushima, Akinori Tsuji
3 External Interrupt
Time
Interrupt Service Routine (ISR)
Polling with Interrupt
Interrupt occurred
attachInterrupt(interrupt,function,[LOW,CHANGE,RISING,FALLING]);
interrupt‐ 0 for the pin(1)‐ 1 for the pin(2)
function:‐ the name of the Interrupt service routine
conditions:‐ LOW, CHANGE, RISING, FALLING

Mar 3, 2012, The University of Tokushima, Akinori Tsuji
Falling Edge
3.1 External Interrupt
Rising Edge
Change
Low

Mar 3, 2012, The University of Tokushima, Akinori Tsuji
LAB4: External Interrupt
const int ledPin = 13;const int intPin0 = 2; // interrupt 0, pin(2)volatile int state = LOW;void setup(){pinMode(ledPin, OUTPUT);digitalWrite(intPin0, HIGH); // set HIGH statepinMode(intPin0, INPUT);attachInterrupt(0, isrSwitch, FALLING); // switch pin on interrupt 0 (pin 2)}void loop() {digitalWrite(ledPin, state);}void isrSwitch() {state = !state; // NO delay function in the interrupt function}
ExternalInt: Toggle the LED when the switch has pushed
Falling Edge

Mar 3, 2012, The University of Tokushima, Akinori Tsuji
4 Serial Communication
Receive/Transmit some characters between the PC and the microcontroller
Build a program
transmit
Microcontroller
receieve
UART = Universal Asynchronous Receiver Transmitter
How much speed?
Mar 3, 2012, The University of Tokushima, Akinori Tsuji
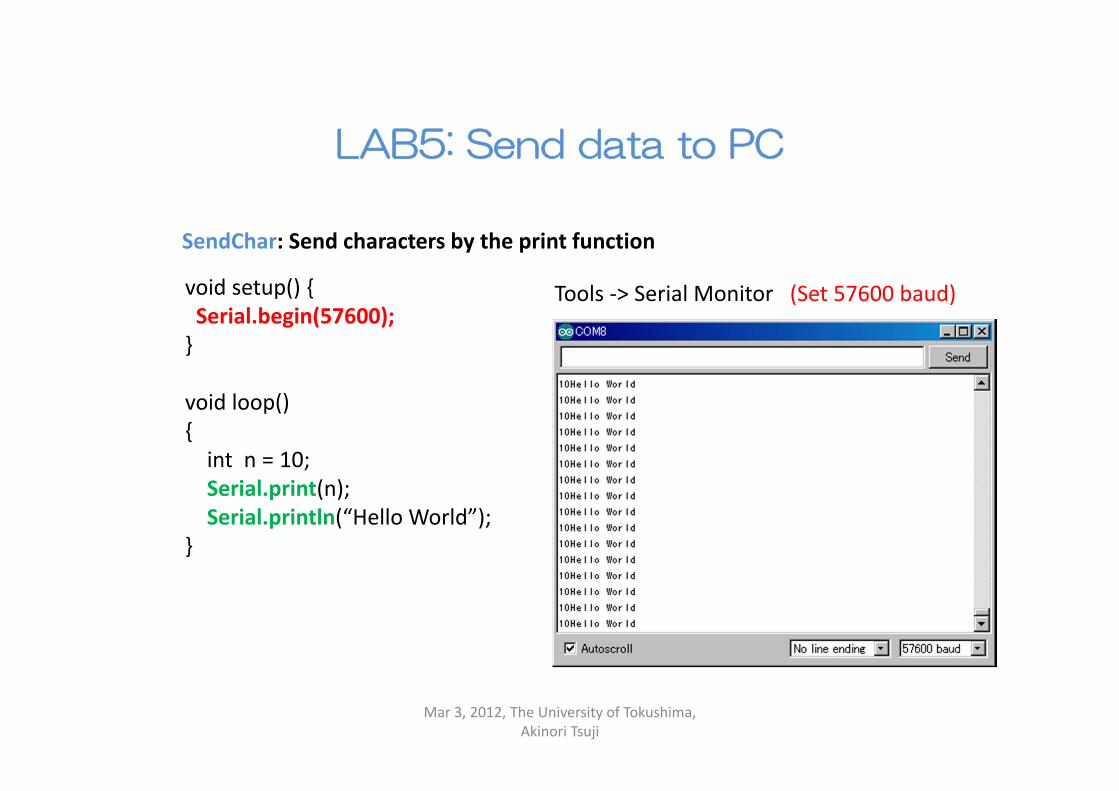
LAB5: Send data to PC
void setup() {Serial.begin(57600);}
void loop(){int n = 10;Serial.print(n);Serial.println(“Hello World”);
}
Tools ‐> Serial Monitor (Set 57600 baud)
SendChar: Send characters by the print function

Mar 3, 2012, The University of Tokushima, Akinori Tsuji
LAB6: Receive data from PC
const int ledPin = 13;
void setup() {Serial.begin(57600);pinMode(ledPin, OUTPUT);}
void loop(){// Check if at least one character is availableif (Serial.available()) {
char ch = Serial.read(); // read one characterblink(500); // blink LEDSerial.println(ch); // loop back the character
}}
RcvChar: Blink the LED when MCU received a character
Tools ‐> Serial MonitorEnter characters and click on the “Send” Button

Mar 3, 2012, The University of Tokushima, Akinori Tsuji
Data Acquisition
DataAcq: Read the output voltage of a potentiometerconst int sensorPin = A0; // select the input pin for the potentiometer
void setup() {Serial.begin(57600);}
void loop() {int sensorValue ; // variable to store the value coming from the sensor
sensorValue = analogRead(sensorPin); // read the value from the sensor:float volt = sensorValue * 5.0 / 1024; // converts to the voltageSerial.println(volt);}

Mar 3, 2012, The University of Tokushima, Akinori Tsuji
1. Run TeraTerm2. Choose Port COMxx: USB Serial Port and Click OK
3. Setup ‐> Serial Port
4. Setup the Port as the following setting
5. Data is coming from the microcontroller

Mar 3, 2012, The University of Tokushima, Akinori Tsuji
1. Get data from sensors
2. File ‐> log
3. Save as CSV file <filename>.csv andClick on the Save
4. Data logging is started
5. Stop logging by click on the Pause

Mar 3, 2012, The University of Tokushima, Akinori Tsuji
Example) Characteristics of the potentiometer
6. Open a log file by Excel and plot the graph

Mar 3, 2012, The University of Tokushima, Akinori Tsuji
Day 4
Estimate: 2 hours
Sensors and Actuators
2012/4/2(Mon) 10:00—12:00

Mar 3, 2012, The University of Tokushima, Akinori Tsuji
1 Sensors and Actuators
Physical Phenomena
Touch
Temperature Light
ForceHumidity
Orientation
AltitudeSound
Measured by Sensors

Mar 3, 2012, The University of Tokushima, Akinori Tsuji
Filter (Analog or Digital)
Sensor
Voltage orCurrent
A/D ConverterSignal Conditioner
Micro controller
Analog Filter composedby operational amplifier
Digital Filter
Analog Digital
Voltage

Mar 3, 2012, The University of Tokushima, Akinori Tsuji
Datasheet
Device nameFeaturesApplicationsPackagesPin AssignmentAbsolute Maximum RatingsCharacteristicsBlock DiagramTiming ChartSamle CircuitNotes

Mar 3, 2012, The University of Tokushima, Akinori Tsuji
2 Temperature Sensor
National Semiconductor LM60BIZOutput: AnalogOperating Voltage: DC 2.7V – 10VMeasurement Temperature: ‐25 deg. ‐‐ +125 deg.
6.25 mV / deg.Torrelance: ±2 deg. (@ 25 deg.) +Vs Vout GND

Mar 3, 2012, The University of Tokushima, Akinori Tsuji
2.1 Measure the temperature
Voltage:Vo = +6.25mV * T + 424 mV6.25 mV * T = Vo – 424 mV
Temperature:T = (Vo – 424 mV) / 6.25 mV
Analog Value:Vo = ain * 5.0 / 1024 (V)
= ain * 5000.0 / 1024 (mV)

Mar 3, 2012, The University of Tokushima, Akinori Tsuji
const int analogInPin = A0; // Analog input pin that the temperature sensor is connectedint sensorValue = 0; // value read from the temperature sensor
void setup() {// initialize serial communications at 57600 bps:Serial.begin(57600); }
void loop() {sensorValue = analogRead(analogInPin); float Vo = sensorValue * 5000.0 / 1024; // converts to Voltage (mV)float T = (Vo ‐ 424) / 6.25; // converts the temperature (Centigrade Degree)
Serial.println(T); // print the results to the serial monitor:
delay(10); // wait 10 miliseconds for the AD converter to settle after the last reading}
Sample Code
TempMeas: Read the output voltage of the temperature sensor

Mar 3, 2012, The University of Tokushima, Akinori Tsuji
0
5
10
15
20
25
30
35
40
45
50
1 4 7 10 13 16 19 22 25 28 31 34 37 40 43 46 49 52 55 58 61 64 67 70 73 76 79 82 85 88 91 94 97 100
103
106
109
112
115
118
121
124
127
130
Temperature (No filter)
LM60
Measurement Result

Mar 3, 2012, The University of Tokushima, Akinori Tsuji
const int analogInPin = A0; // Analog input pin that the temperature sensor is connectedconst int N = 16; // Sample number for average filterint sensorValue = 0; // value read from the temperaturevoid setup() {Serial.begin(57600); }void loop() {float T;T = 0.0;for (int i=0; i<N; i++) {sensorValue = analogRead(analogInPin); float Vo = sensorValue * 5000.0 / 1024;Vo = (Vo ‐ 424) / 6.25;T += Vo;delay(10);}Serial.println(T / N);delay(500);}
Sample Code (with filter)
Average filter
TempMeasWithFilter: Read the output voltage of the temperature sensor

Mar 3, 2012, The University of Tokushima, Akinori Tsuji
0
5
10
15
20
25
30
35
40
45
50
1 5 9 13 17 21 25 29 33 37 41 45 49 53 57 61 65 69 73 77 81 85 89 93 97 101105109113117121125129133137
Temperature (N = 16)
LM60
Measurement Result (With Filter)

Mar 3, 2012, The University of Tokushima, Akinori Tsuji
3 Light Sensor
Photo TransistorJRC NJL7502Peak Sensitivity 560 nmOptical Current 33 uA
Collector
Emitter
Long lead
PackageVout = 100k * IoptIopt = Vout * 10 [μV]
Vout
Iopt

Mar 3, 2012, The University of Tokushima, Akinori Tsuji
3.1 Illuminance
C
E20uA
?

Mar 3, 2012, The University of Tokushima, Akinori Tsuji
int sensorPin = A0; // select the input pin for the potentiometer
void setup() {Serial.begin(57600);}
void loop() {int sensorValue ; // variable to store the value coming from the sensor
sensorValue = analogRead(sensorPin); // read the value from the sensor:float volt = sensorValue * 5.0 / 1024; // converts to the voltageSerial.println(volt);delay(50);}
Sample Code
PhotoTrans: Read the output voltage of the temperature sensor
Example) in the roomVoltage output is Vout =1 [V], then photo current is Iopt=10[uA]. From the photo current & illuminance graph, get the 60 [lx].

Mar 3, 2012, The University of Tokushima, Akinori Tsuji
Refrective Object SensorLetex Technology Corp. LBR127‐HDDCut‐off Visible Wavelenght: λ = 840 nmInput:Forward Voltage: Vf = 1.2 – 1.5VView Angle: 35 Deg. (2θ ½) (If = 20mA)Output:Voltage (C‐E sat.): Vce = 0.4 V (Ic=2mA, Ib=0.1mA)
4 Photo Interrupter
1
2
4
3
5.1k330

Mar 3, 2012, The University of Tokushima, Akinori Tsuji
5 PSD Sensor
PSD (Position Sensitive Devices) SensorSharp Measuring Sensor GP2Y0A21YKOutput: AnalogDetecting Distance: 10 cm – 80 cmOperating Voltage: DC 4.5 V – 5.5 V
Vo GND Vcc(+5V)
Light Emitter Light Detector

Mar 3, 2012, The University of Tokushima, Akinori Tsuji
5.1 Timing Chart
To get a correct output you must wait at least 38.3 ms + 9.6 ms + 5.0 ms = 52.9msafter power up

Mar 3, 2012, The University of Tokushima, Akinori Tsuji
Sample Code
const int analogInPin = A0; // Analog input pin that the potentiometer is attached to
int sensorValue = 0; // value read from the pot
void setup() {// initialize serial communications at 57600 bps:Serial.begin(57600); delay(52);}
void loop() {sensorValue = analogRead(analogInPin);
float dist = 220000 / (sensorValue * 5.0 ‐ 200); // converts to distance (mm)
Serial.println(dist);delay(10);}

Mar 3, 2012, The University of Tokushima, Akinori Tsuji
0
100
200
300
400
500
600
700
800
900
1 20 39 58 77 96 115
134
153
172
191
210
229
248
267
286
305
324
343
362
381
400
419
438
457
476
495
514
533
552
571
590
609
628
647
666
685
704
723
742
Distance (mm)
GP2Y0A21YK
Measurement ResultDistance (m
m)

Mar 3, 2012, The University of Tokushima, Akinori Tsuji
6 Servo Motor
Servo Motor: GWS PICO/STD/FWeight: 5.4 gTorque: 0.7 kgSpeed: 0.12 sec / 60 degreesSize: 22.8 x 9.5 x 16.5 mm
Vin +5V GNDPin9
Pin Assignment

Mar 3, 2012, The University of Tokushima, Akinori Tsuji
6.1 Servo Motor
Courtesy of Embedded Robotics
0.7ms
1.7ms
1.2ms
f = 50 Hz (T = 20ms)
STOP
Forward
Backward
‐45 deg.
0 deg.
+45 deg.

Mar 3, 2012, The University of Tokushima, Akinori Tsuji
#include <Servo.h> Servo myservo; // create servo object to control a servo int val; // variable to set the servo (0‐‐179)void setup() { myservo.attach(9); // attaches the servo on pin 9 to the servo object } void loop() { val = 90; // center 90 degreemyservo.write(val); // sets the servo positiondelay(15); // waits for the servo to get theredelay(1000);val = 30; // left ‐60 degreemyservo.write(val); // sets the servo position according to the scaled value delay(15); // waits for the servo to get there delay(1000);val = 150; // right +60 degreemyservo.write(val); // sets the servo position according to the scaled value delay(15); // waits for the servo to get there delay(1000);}
Sample Code

Mar 3, 2012, The University of Tokushima, Akinori Tsuji
Measurement Result

Mar 3, 2012, The University of Tokushima, Akinori Tsuji
7 LCD
LCD SC162BNumber of Characters: 16 Character x 2 linesDrive Method: 1/5 bias, 1 / 16 dutyOperating Voltage: 4.5V – 5.5VBack Light: LED
Pin 1 2 3 4 5 6 7 8 9 10 11 12 Pin assignment Arduino Pin1 Vss (GND)2 Vdd (+5V)4 RS D125 R/W(GND)6 E D1111 DB4 D512 DB5 D413 DB6 D314 DB7 D2
LiquidCrystal(rs, enable, d4, d5, d6, d7)

Mar 3, 2012, The University of Tokushima, Akinori Tsuji
7.1 Timing Chart

Mar 3, 2012, The University of Tokushima, Akinori Tsuji
Sample Code
#include <LiquidCrystal.h>
// initialize the library with the numbers of the interface pinsLiquidCrystal lcd(12, 11, 5, 4, 3, 2); // RS, E, D4, D5, D6, D7
void setup() {// set up the LCD's number of columns and rows: lcd.begin(16, 2);// Print a message to the LCD.lcd.print("hello, world!");}
void loop() {// set the cursor to column 0, line 1// (note: line 1 is the second row, since counting begins with 0):lcd.setCursor(0, 1);// print the number of seconds since reset:lcd.print(millis()/1000);}

Mar 3, 2012, The University of Tokushima, Akinori Tsuji
8. Small Robot
Arduino Board
Distance Sensor
Photo Interrupter
Servo Motor
Battery Box