microsof t excel 2010 - pryorcdn.azureedge.net · microsof t ® learn how to: work with object...
TRANSCRIPT
M I C R O S O F T ®
L E A R N H O W T O :
� Work with object properties and methods
� Attach code to buttons
� Use variables, expressions, and procedures
� Identify coding errors
� Create decision and loop structures
� Add user forms to worksheets
� Use debugging tools
V B A PROGR A M M I NG
Excel® 2010
E N S U R I N G Y O U R S U C C E S S I N T H E C L A S S R O O M
y Hands-on learning through real-world activities.
y Clear, concise, and consistent instructions.
y Time-tested instructional design.
y Comprehensive teaching tools.
E x c e l 2 0 1 0 : VBA Programming Student Manual
Excel 2010: VBA Programming Chief Executive Officer, Axzo Press: Ken Wasnock
Series Designer and COO: Adam A. Wilcox
Vice President, Operations: Josh Pincus
Director of Publishing Systems Development: Dan Quackenbush
Writer: Don Tremblay
Copyeditor: Catherine Oliver
Keytester: Cliff Coryea
COPYRIGHT © 2011 Axzo Press. All rights reserved.
No part of this work may be reproduced, transcribed, or used in any form or by any means⎯graphic, electronic, or mechanical, including photocopying, recording, taping, Web distribution, or information storage and retrieval systems⎯without the prior written permission of the publisher.
Trademarks ILT Series is a trademark of Axzo Press.
Some of the product names and company names used in this book have been used for identification purposes only and may be trademarks or registered trademarks of their respective manufacturers and sellers.
Disclaimer We reserve the right to revise this publication and make changes from time to time in its content without notice.
Student Manual ISBN 10: 1-4260-2921-7 ISBN 13: 978-1-4260-2921-9
Printed in the United States of America
1 2 3 4 5 GL 06 05 04 03
www.logicaloperations.comFor more information, go to
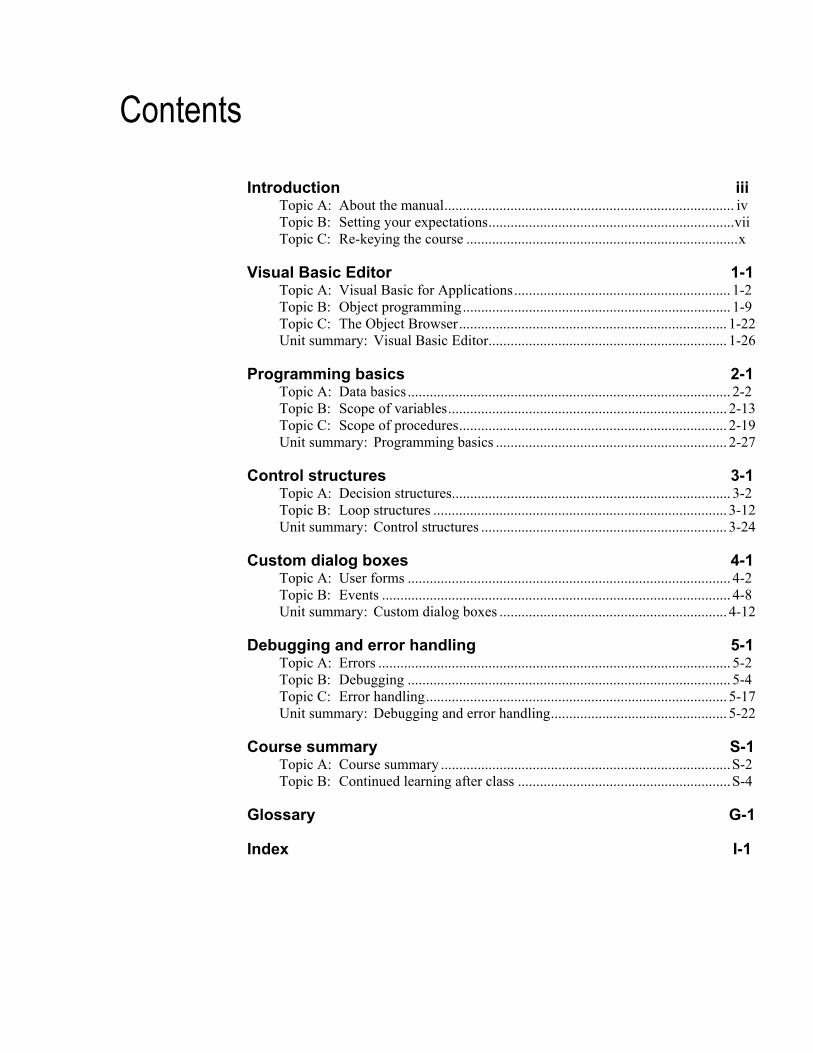
Contents
Introduction iii Topic A: About the manual ............................................................................... iv Topic B: Setting your expectations ................................................................... vii Topic C: Re-keying the course .......................................................................... x
Visual Basic Editor 1-1 Topic A: Visual Basic for Applications ........................................................... 1-2 Topic B: Object programming ......................................................................... 1-9 Topic C: The Object Browser ......................................................................... 1-22 Unit summary: Visual Basic Editor ................................................................. 1-26
Programming basics 2-1 Topic A: Data basics ........................................................................................ 2-2 Topic B: Scope of variables ............................................................................ 2-13 Topic C: Scope of procedures ......................................................................... 2-19 Unit summary: Programming basics ............................................................... 2-27
Control structures 3-1 Topic A: Decision structures............................................................................ 3-2 Topic B: Loop structures ................................................................................ 3-12 Unit summary: Control structures ................................................................... 3-24
Custom dialog boxes 4-1 Topic A: User forms ........................................................................................ 4-2 Topic B: Events ............................................................................................... 4-8 Unit summary: Custom dialog boxes .............................................................. 4-12
Debugging and error handling 5-1 Topic A: Errors ................................................................................................ 5-2 Topic B: Debugging ........................................................................................ 5-4 Topic C: Error handling .................................................................................. 5-17 Unit summary: Debugging and error handling ................................................ 5-22
Course summary S-1 Topic A: Course summary ............................................................................... S-2 Topic B: Continued learning after class .......................................................... S-4
Glossary G-1
Index I-1

ii Excel 2010: VBA Programming
iii
Introduction
After reading this introduction, you will know how to:
A Use ILT Series manuals in general.
B Use prerequisites, a target student description, course objectives, and a skills inventory to properly set your expectations for the course.
C Re-key this course after class.
iv Excel 2010: VBA Programming
Topic A: About the manual
ILT Series philosophy Our manuals facilitate your learning by providing structured interaction with the software itself. While we provide text to explain difficult concepts, the hands-on activities are the focus of our courses. By paying close attention as your instructor leads you through these activities, you will learn the skills and concepts effectively.
We believe strongly in the instructor-led class. During class, focus on your instructor. Our manuals are designed and written to facilitate your interaction with your instructor, and not to call attention to manuals themselves.
We believe in the basic approach of setting expectations, delivering instruction, and providing summary and review afterwards. For this reason, lessons begin with objectives and end with summaries. We also provide overall course objectives and a course summary to provide both an introduction to and closure on the entire course.
Manual components The manuals contain these major components:
• Table of contents
• Introduction
• Units
• Course summary
• Glossary
• Index
Each element is described below.
Table of contents
The table of contents acts as a learning roadmap.
Introduction
The introduction contains information about our training philosophy and our manual components, features, and conventions. It contains target student, prerequisite, objective, and setup information for the specific course.
Units
Units are the largest structural component of the course content. A unit begins with a title page that lists objectives for each major subdivision, or topic, within the unit. Within each topic, conceptual and explanatory information alternates with hands-on activities. Units conclude with a summary comprising one paragraph for each topic, and an independent practice activity that gives you an opportunity to practice the skills you’ve learned.
The conceptual information takes the form of text paragraphs, exhibits, lists, and tables. The activities are structured in two columns, one telling you what to do, the other providing explanations, descriptions, and graphics.
Introduction v
Course summary
This section provides a text summary of the entire course. It is useful for providing closure at the end of the course. The course summary also indicates the next course in this series, if there is one, and lists additional resources you might find useful as you continue to learn about the software.
Glossary
The glossary provides definitions for all of the key terms used in this course.
Index
The index at the end of this manual makes it easy for you to find information about a particular software component, feature, or concept.
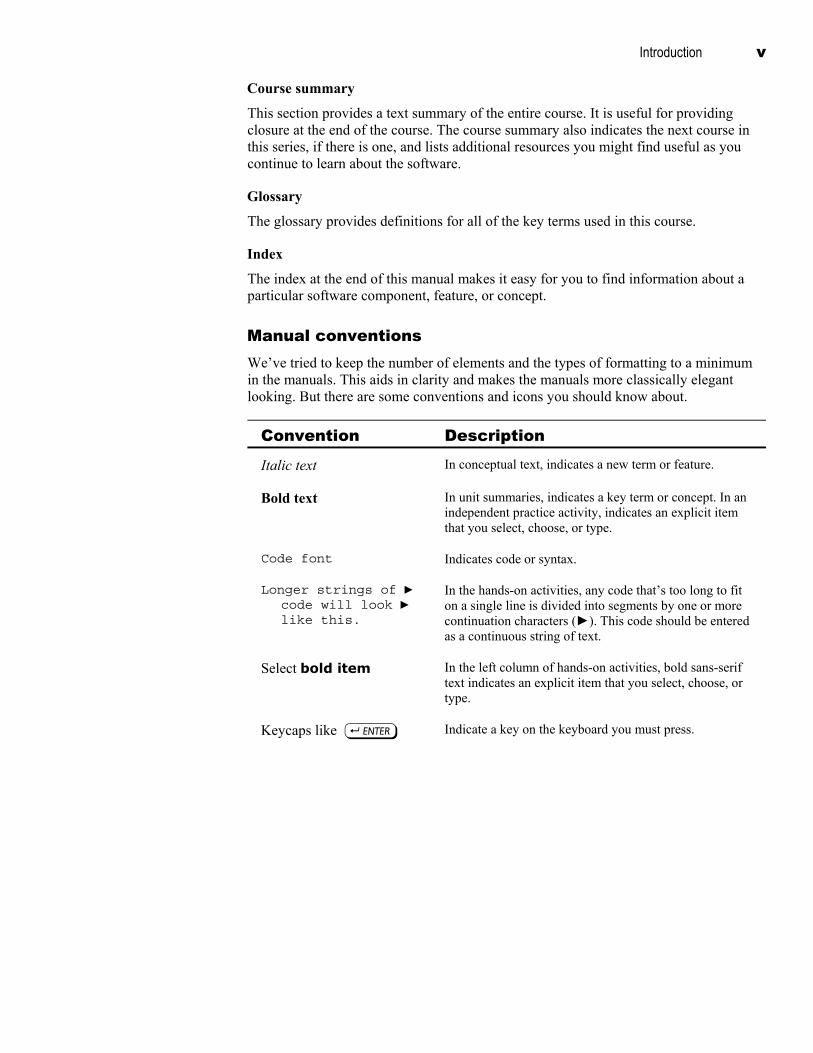
Manual conventions We’ve tried to keep the number of elements and the types of formatting to a minimum in the manuals. This aids in clarity and makes the manuals more classically elegant looking. But there are some conventions and icons you should know about.
Convention Description Italic text In conceptual text, indicates a new term or feature.
Bold text In unit summaries, indicates a key term or concept. In an independent practice activity, indicates an explicit item that you select, choose, or type.
Code font Indicates code or syntax.
Longer strings of ► code will look ► like this.
In the hands-on activities, any code that’s too long to fit on a single line is divided into segments by one or more continuation characters (►). This code should be entered as a continuous string of text.
Select bold item In the left column of hands-on activities, bold sans-serif text indicates an explicit item that you select, choose, or type.
Keycaps like e Indicate a key on the keyboard you must press.
vi Excel 2010: VBA Programming
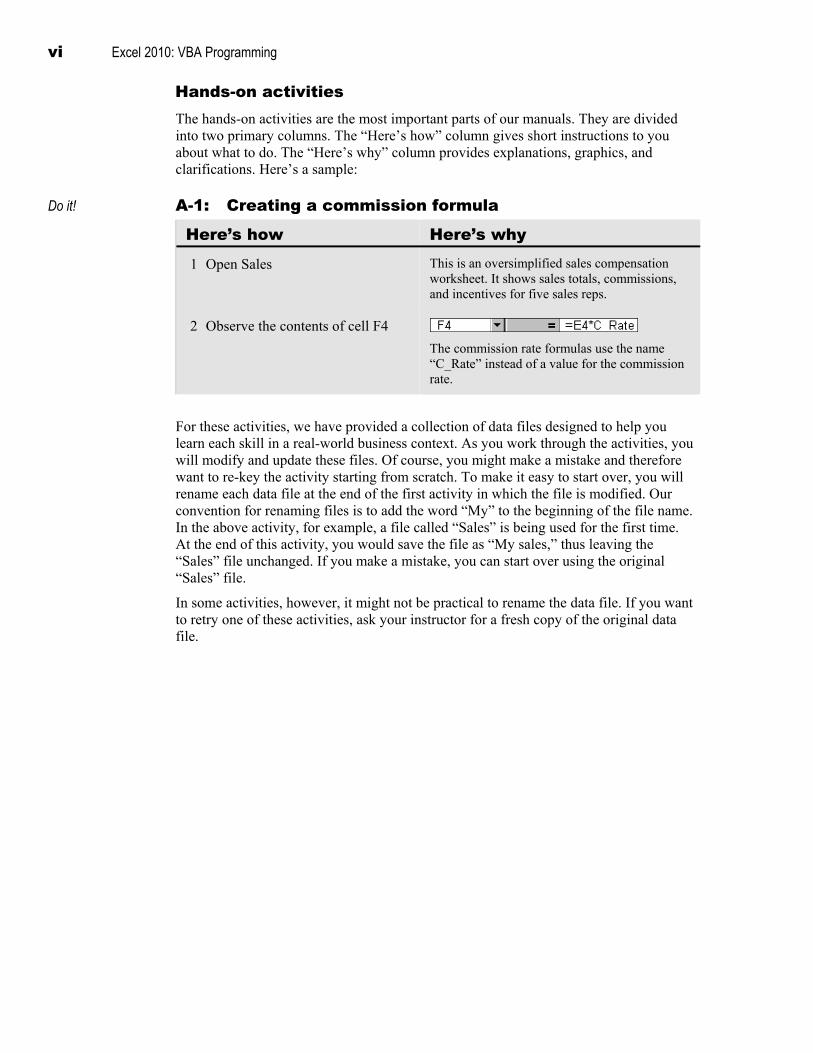
Hands-on activities The hands-on activities are the most important parts of our manuals. They are divided into two primary columns. The “Here’s how” column gives short instructions to you about what to do. The “Here’s why” column provides explanations, graphics, and clarifications. Here’s a sample:
Do it! A-1: Creating a commission formula
Here’s how Here’s why 1 Open Sales This is an oversimplified sales compensation
worksheet. It shows sales totals, commissions, and incentives for five sales reps.
2 Observe the contents of cell F4
The commission rate formulas use the name “C_Rate” instead of a value for the commission rate.
For these activities, we have provided a collection of data files designed to help you learn each skill in a real-world business context. As you work through the activities, you will modify and update these files. Of course, you might make a mistake and therefore want to re-key the activity starting from scratch. To make it easy to start over, you will rename each data file at the end of the first activity in which the file is modified. Our convention for renaming files is to add the word “My” to the beginning of the file name. In the above activity, for example, a file called “Sales” is being used for the first time. At the end of this activity, you would save the file as “My sales,” thus leaving the “Sales” file unchanged. If you make a mistake, you can start over using the original “Sales” file.
In some activities, however, it might not be practical to rename the data file. If you want to retry one of these activities, ask your instructor for a fresh copy of the original data file.
Introduction vii
Topic B: Setting your expectations Properly setting your expectations is essential to your success. This topic will help you do that by providing:
• Prerequisites for this course
• A description of the target student
• A list of the objectives for the course
• A skills assessment for the course
Course prerequisites Before taking this course, you should be familiar with personal computers and the use of a keyboard and a mouse. Furthermore, this course assumes that you’ve completed the following courses or have equivalent experience:
• Windows 7: Basic, Windows Vista: Basic, or Windows XP: Basic
• Excel 2010: Advanced
Target student The target student for this course should be familiar with Microsoft Office Excel 2010 and the process of creating macros. You will get the most out of this course if your goal is to become proficient in using Visual Basic for Applications (VBA) to create procedures for controlling the behavior and appearance of an Excel worksheet; create procedures that run in response to specific events; create user forms to accept or display data; validate the data entry in user forms; and debug and handle errors in code.
Course objectives These overall course objectives will give you an idea about what to expect from the course. It is also possible that they will help you see that this course is not the right one for you. If you think you either lack the prerequisite knowledge or already know most of the subject matter to be covered, you should let your instructor know that you think you are misplaced in the class.
After completing this course, you will know how to:
• Use VBA terminology and start Visual Basic Editor (VBE), save workbooks in a macro-enabled file format, work with object properties and methods, attach code to events and buttons, and use the Object Browser to get information about objects.
• Use variables with various data types, manipulate data by using expressions, get input from the user, declare and use variables with the correct scope, declare and use procedures with the correct scope, create Sub and Function procedures, and call one procedure from another.
• Use decision structures to create procedures that execute code based on specific conditions, and use loop structures to execute specific code repeatedly.
• Add a user form to your project and add controls to the user form, handle events attached to controls in a user form, and validate the data entry in the controls.
• Identify compile-time, runtime, and logical errors in code, use the debugging tools, and write error-handling code to trap errors.
viii Excel 2010: VBA Programming
Skills inventory Use the following form to gauge your skill level entering the class. For each skill listed, rate your familiarity from 1 to 5, with five being the most familiar. This is not a test. Rather, it is intended to provide you with an idea of where you’re starting from at the beginning of class. If you’re wholly unfamiliar with all the skills, you might not be ready for the class. If you think you already understand all of the skills, you might need to move on to the next course in the series. In either case, you should let your instructor know as soon as possible.
Skill 1 2 3 4 5
Using Visual Basic for Applications (VBA) terminology and starting Visual Basic Editor (VBE)
Saving a workbook in a macro-enabled Excel 2010 file format
Changing object properties by using the Properties window and by using code
Using a method
Associating VBA code with an event, and executing VBA code by using a button
Opening the Object Browser and using its search feature
Understanding the different data types in VBA
Declaring variables implicitly and explicitly
Using expressions and the Cells object
Using the MsgBox and InputBox interaction functions
Understanding and using the different scopes of variables
Understanding and using the different scopes of procedures
Creating and calling a Sub procedure
Creating and calling a Function procedure
Using the If…Then, If…Then…Else, and If…Then…ElseIf control structures
Using the Select Case statement
Using the For…Next and For Each…Next loops
Using the Do While…loop
Adding a user form to a project and adding controls to that user form
Introduction ix
Skill 1 2 3 4 5
Attaching an event handler to controls and using event handlers to validate data
Understanding the different types of errors
Understanding the various debugging tools available in VBA
Setting a breakpoint
Adding a watch expression
Stepping through code
Deleting a watch expression
Using the Immediate window and the Locals window
Handling errors by using the On Error GoTo and On Error Resume Next statements
x Excel 2010: VBA Programming
Topic C: Re-keying the course If you have the proper hardware and software, you can re-key this course after class. This section explains what you’ll need in order to do so and how to do it.
Hardware requirements Your personal computer should have:
• A keyboard and a mouse
• 1 GHz processor (or faster)
• 1 GB RAM (or higher)
• 2 GB of available hard disk space after operating system install
• CD or DVD drive
• A monitor at 1024 × 768 or higher resolution
Software requirements You will also need the following software:
• Microsoft Windows 7
• Microsoft Office 2010 (minimally, you can install only Excel)
Network requirements The following network components and connectivity are also required for re-keying this course:
• Internet access, for the following purposes:
– Updating the Windows operating system and Microsoft Office 2010
Introduction xi
Setup instructions to re-key the course Before you re-key the course, you will need to perform the following steps.
1 Use Windows Update to install all available critical updates and service packs.
2 With flat-panel displays, we recommend using the panel’s native resolution for best results. Color depth/quality should be set to High (24 bit) or higher.
Please note that your display settings or resolution may differ from the author’s, so your screens might not exactly match the screenshots in this manual.
3 If you have the data disc that came with this manual, locate the Student Data folder on it and copy it to your Windows desktop.
If you don’t have the data disc, you can download the Student Data files for the course: a Connect to http://downloads.logicaloperations.com. b Enter the course title or search by part to locate this course. c Click the course title to display a list of available downloads.
Note: Data Files are located under the Instructor Edition of the course. d Click the link(s) for downloading the Student Data files. e Create a folder named Student Data on the desktop of your computer. f Double-click the downloaded zip file(s) and drag the contents into the
Student Data folder.

xii Excel 2010: VBA Programming
1–1
U n i t 1 Visual Basic Editor
Unit time: 60 minutes
Complete this unit, and you’ll know how to:
A Use Visual Basic for Applications terminology and start Visual Basic Editor.
B Work with object properties and methods and attach code to events and buttons.
C Use the Object Browser to get information about objects.

1–2 Excel 2010: VBA Programming
Topic A: Visual Basic for Applications Explanation VBA programming gives you a measure of control and functionality that you can’t quite
get with other options like macros. For example, you might want to display a dialog box asking a user to enter specific data for a worksheet. Maybe you want to perform a decision-based task, such as displaying a message when a user activates a worksheet. You can do these things, and more, by programming in Visual Basic for Applications (VBA).
VBA is a programming language that’s part of the Microsoft Office suite. You can use VBA to create programs that work within Microsoft Office applications, such as Microsoft Excel and Microsoft Word. VBA is based on the concept of object-oriented programming (OOP), in which all the elements of a program are considered to be objects.
VBA makes decision-based tasks easier because its code can execute automatically in response to an action. For example, to ensure the integrity of your data, you can write VBA code to accept certain values and to prompt the user to enter values if mandatory fields were skipped.
VBA terminology Using VBA, you can directly access objects to control and manipulate the behavior of the application. However, before you start coding in VBA, you need to be familiar with some key terms associated with it.
The following table describes some of these terms:
Term Description
Object Any element of an application with specific characteristics and behavior. An object is a component that combines code and data. For example, workbooks, worksheets, ranges, and charts are all objects.
Property A characteristic or named attribute of an object. For example, Name and StandardWidth are properties of the Worksheet object.
Method A behavior or action that’s performed by an object. For example, Calculate is a method that updates the values in a Worksheet object containing formulas.
Procedure A named sequence of instructions for performing a specific task. For example, you can create a procedure to save the changes made before closing a workbook.
Comment A line of text within a procedure, which you use to describe each line of code or the entire procedure. Comments always start with an apostrophe.
Module A file in which you can write and edit procedures and other VBA codes.
Visual Basic Editor 1–3
Collection and container objects
Objects can be either collection objects or container objects. A collection object is a set of related objects having the same properties. For example, the Worksheets collection object represents all the worksheets in a workbook.
A container object contains one or more objects, which might or might not be related. For example, Workbook is a container object that contains the Worksheet objects. The outermost container object is the Application object, which contains all other Excel objects, such as Worksheets and Workbooks.
VBA and macros
Macros that you create and record using the Excel interface are written by Excel, using VBA code. But there’s a difference between macros and VBA procedures that you write from scratch. A macro performs a set of instructions and then stops. For this reason, macros are very useful for automating repetitive tasks.
However, a macro follows a single execution path. A procedure written in VBA code can evaluate conditions, make decisions based on those conditions, and then alter the flow of execution.
Do it! A-1: Discussing VBA
Questions and answers 1 What’s the main advantage of VBA compared to macros?
2 Lets say you want to purchase a car. You can select a yellow, red, or black one. Identify the object and its property in this case.
3 What’s a procedure?
4 You want a worksheet name to change automatically when text is entered in a specific cell. Would you record a macro or use VBA? Why?
1–4 Excel 2010: VBA Programming
Macro-enabled formats Explanation Excel 2007 and 2010 workbooks can be saved in either of two file formats: one that
prevents macros and other VBA code from being preserved when a file is saved, and one that allows VBA code to be saved in the file.
The default file format uses the file extension .xlsx. When a workbook file is saved in this format, macros and other VBA code are stripped out of the file. To retain VBA code when a workbook is saved, the file must be saved in the macro-enabled format, which uses the file extension .xlsm. Although this format extends the functionality of the workbook, it can also create security concerns because a workbook could contain malicious VBA code that executes unexpectedly and with unpleasant results.
For the purposes of this course, most data files are already saved in the macro-enabled format, and the security levels in Excel are set to allow macro execution and to accept the folders containing the student data files as trusted locations. In most cases, however, you should never open a macro-enabled workbook unless you’re sure of its source.
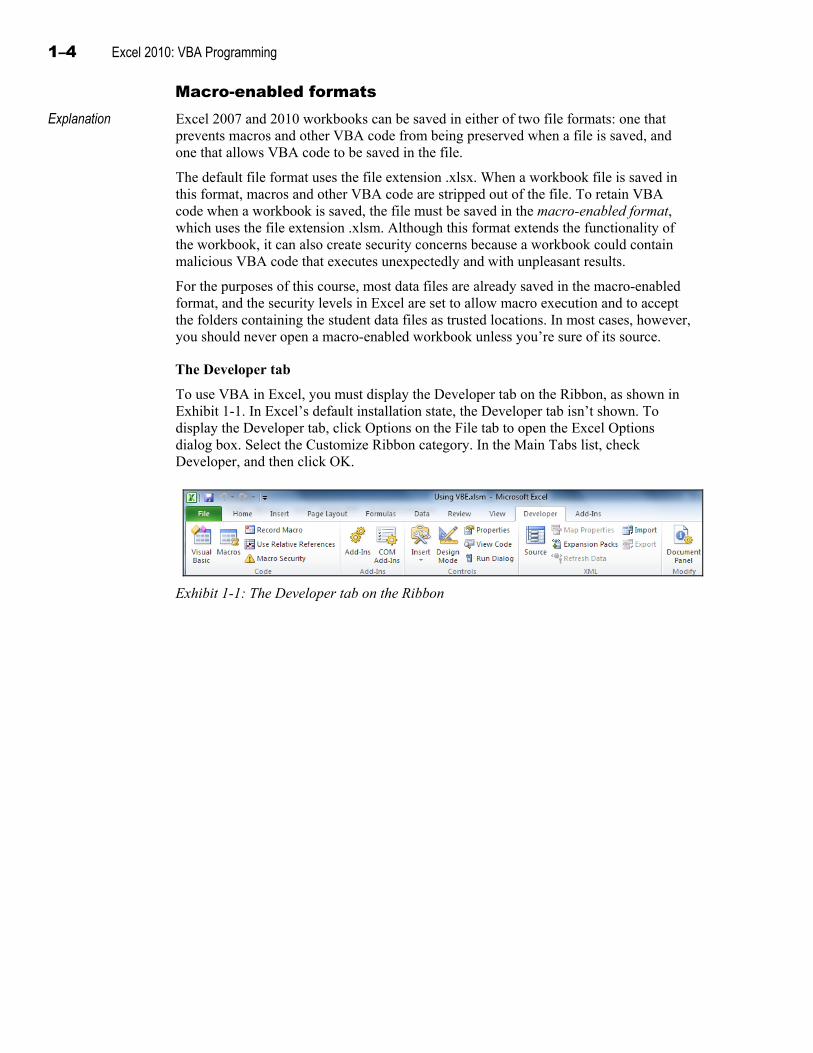
The Developer tab
To use VBA in Excel, you must display the Developer tab on the Ribbon, as shown in Exhibit 1-1. In Excel’s default installation state, the Developer tab isn’t shown. To display the Developer tab, click Options on the File tab to open the Excel Options dialog box. Select the Customize Ribbon category. In the Main Tabs list, check Developer, and then click OK.
Exhibit 1-1: The Developer tab on the Ribbon
Visual Basic Editor 1–5
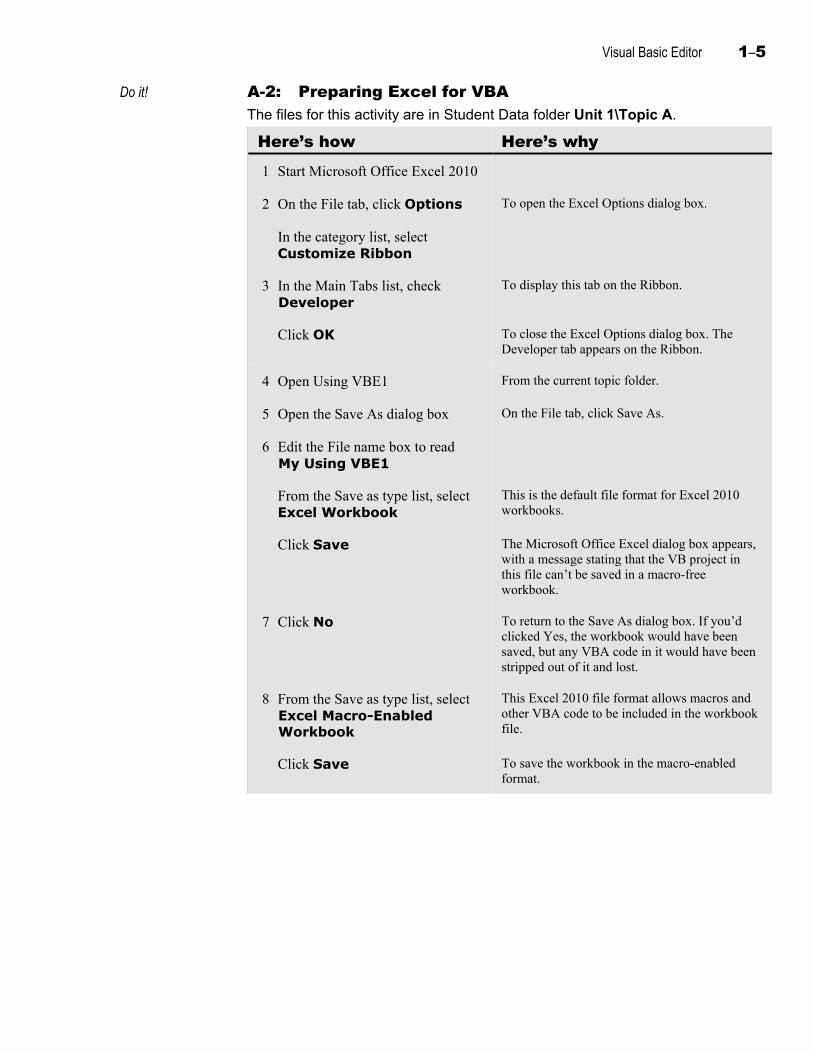
Do it! A-2: Preparing Excel for VBA The files for this activity are in Student Data folder Unit 1\Topic A.
Here’s how Here’s why 1 Start Microsoft Office Excel 2010
2 On the File tab, click Options To open the Excel Options dialog box.
In the category list, select Customize Ribbon
3 In the Main Tabs list, check Developer
To display this tab on the Ribbon.
Click OK To close the Excel Options dialog box. The Developer tab appears on the Ribbon.
4 Open Using VBE1 From the current topic folder.
5 Open the Save As dialog box On the File tab, click Save As.
6 Edit the File name box to read My Using VBE1
From the Save as type list, select Excel Workbook
This is the default file format for Excel 2010 workbooks.
Click Save The Microsoft Office Excel dialog box appears, with a message stating that the VB project in this file can’t be saved in a macro-free workbook.
7 Click No To return to the Save As dialog box. If you’d clicked Yes, the workbook would have been saved, but any VBA code in it would have been stripped out of it and lost.
8 From the Save as type list, select Excel Macro-Enabled Workbook
This Excel 2010 file format allows macros and other VBA code to be included in the workbook file.
Click Save To save the workbook in the macro-enabled format.
1–6 Excel 2010: VBA Programming
Visual Basic Editor Explanation You use Visual Basic Editor (VBE) to create and edit VBA code. VBE provides tools
that help you create procedures and manipulate the properties and methods of an object. You can open VBE through any Microsoft Office application.
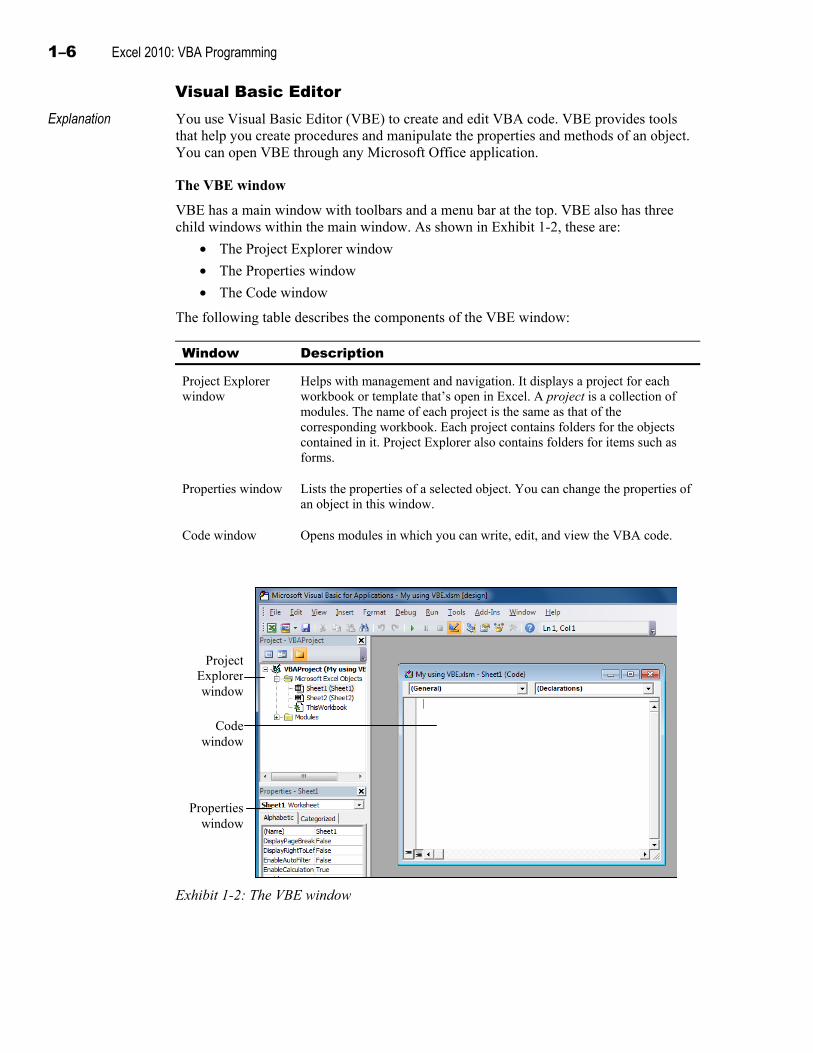
The VBE window
VBE has a main window with toolbars and a menu bar at the top. VBE also has three child windows within the main window. As shown in Exhibit 1-2, these are:
• The Project Explorer window
• The Properties window
• The Code window
The following table describes the components of the VBE window:
Window Description
Project Explorer window
Helps with management and navigation. It displays a project for each workbook or template that’s open in Excel. A project is a collection of modules. The name of each project is the same as that of the corresponding workbook. Each project contains folders for the objects contained in it. Project Explorer also contains folders for items such as forms.
Properties window Lists the properties of a selected object. You can change the properties of an object in this window.
Code window Opens modules in which you can write, edit, and view the VBA code.
ProjectExplorerwindow
Codewindow
Properties window
Exhibit 1-2: The VBE window

Visual Basic Editor 1–7
Do it! A-3: Examining the VBE window
Here’s how Here’s why 1 Click the Developer tab On the Ribbon.
Click Visual Basic (In the Code group.) To open the Visual Basic Editor window. It contains the Project Explorer and the Properties window.
2 Observe the Project Explorer
It displays the project name. This is the current project, and “My using VBE” is the active workbook. The Project Explorer displays a folder containing Excel objects and another folder, named Modules.
Observe the folder list The Microsoft Excel Objects folder contains three objects. Sheet1and Sheet2 are the Worksheet objects, and ThisWorkbook is the Workbook object. The Workbook object is the container object that contains the two Worksheet objects.
3 Double-click Sheet1 (Sheet1) To open the Code window for Sheet1, as shown in Exhibit 1-2. This is where you enter code to create a procedure.
4 Choose View, Properties Window
(If necessary.) To open the Properties window.
Observe the Properties window It shows the properties of the selected object, Sheet1.
5 Make the Project Explorer wide enough so you can see the whole project name
Drag the right edge to the right.
1–8 Excel 2010: VBA Programming
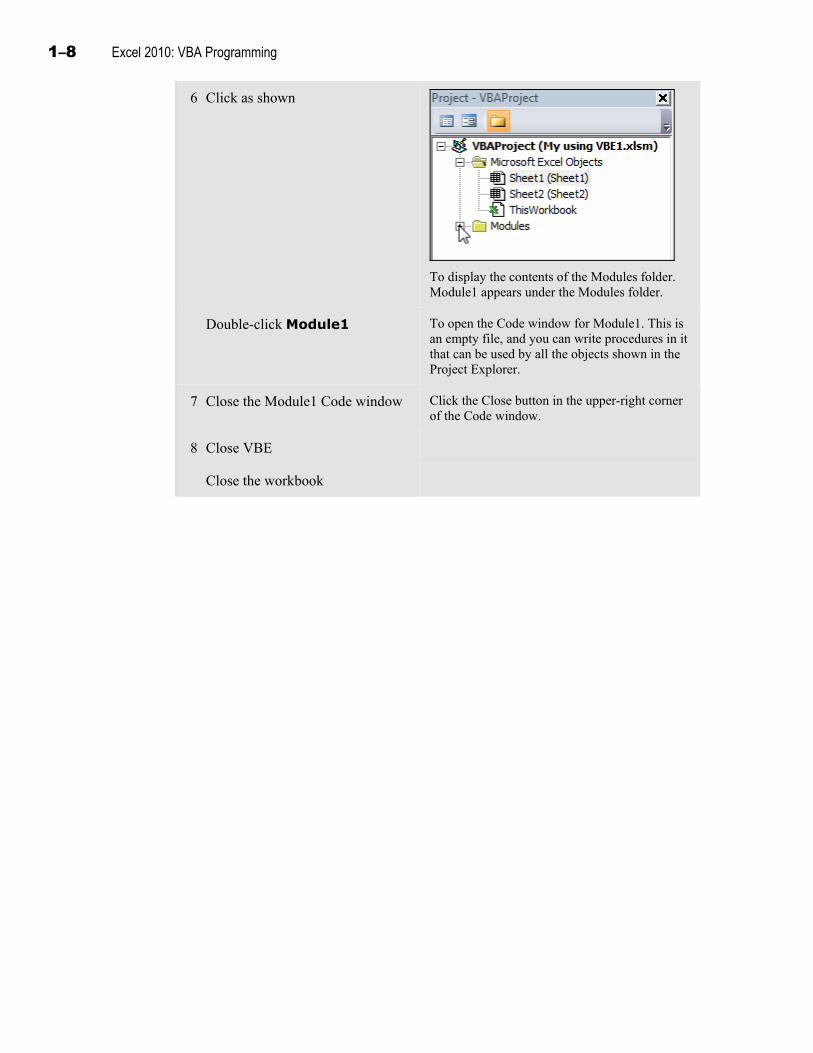
6 Click as shown
To display the contents of the Modules folder. Module1 appears under the Modules folder.
Double-click Module1 To open the Code window for Module1. This is an empty file, and you can write procedures in it that can be used by all the objects shown in the Project Explorer.
7 Close the Module1 Code window Click the Close button in the upper-right corner of the Code window.
8 Close VBE
Close the workbook

Visual Basic Editor 1–9
Topic B: Object programming Explanation Objects in Excel have certain properties, methods, and events. Properties determine the
appearance and other attributes of an object. For example, the Worksheet object has a property called StandardWidth, which determines the width of the cells in a worksheet.
Methods are built-in procedures that you use to perform specific actions on an object. An example is the Clear method of the Worksheets object, which clears the contents of all cells in a worksheet.
Events are actions—such as a mouse click, a double-click, or the opening or closing of a workbook—performed by a user on an object. Most of the objects in VBA have events associated with them. For example, a Worksheet object has an event called Activate. This event is triggered when a user activates (clicks or selects) a worksheet.
You can modify the properties and methods of an object and attach events to it to change its appearance, its behavior, and the action it performs, respectively. You can also use Excel objects to create procedures that perform complex tasks rather than simply repeating recorded actions.
The Properties window You can control the behavior and appearance of an object by changing its properties in the Properties window. The Properties window displays the name of the object, its properties, and the current value of the properties, as shown in Exhibit 1-3. The name of the selected object appears in the Object list. This window has two tabs: Alphabetic and Categorized. The Alphabetic tab displays the property names alphabetically, and the Categorized tab displays the properties grouped on the basis of the tasks they perform.
Object list
Property names Property values
Exhibit 1-3: The Properties window
1–10 Excel 2010: VBA Programming
Examples used in activities
The activities in this course use procedures that perform simple tasks. Many of these tasks would be easier to perform with a few clicks of the mouse or by using the features of an Excel worksheet. The purpose of these activities is to illustrate VBA code concepts, using simple examples so that you can learn the VBA language.
After you’ve learned VBA, you can use these concepts to develop your own procedures to perform more complicated tasks. For example, you can write a procedure that searches for and replaces data in all of the worksheets in a workbook, instead of just the current worksheet. Or you can create a user input form to guide users through data entry on a form so that they receive a prompt if they enter the wrong type of data. The possibilities of what you can do with Excel VBA are limited only by your imagination.
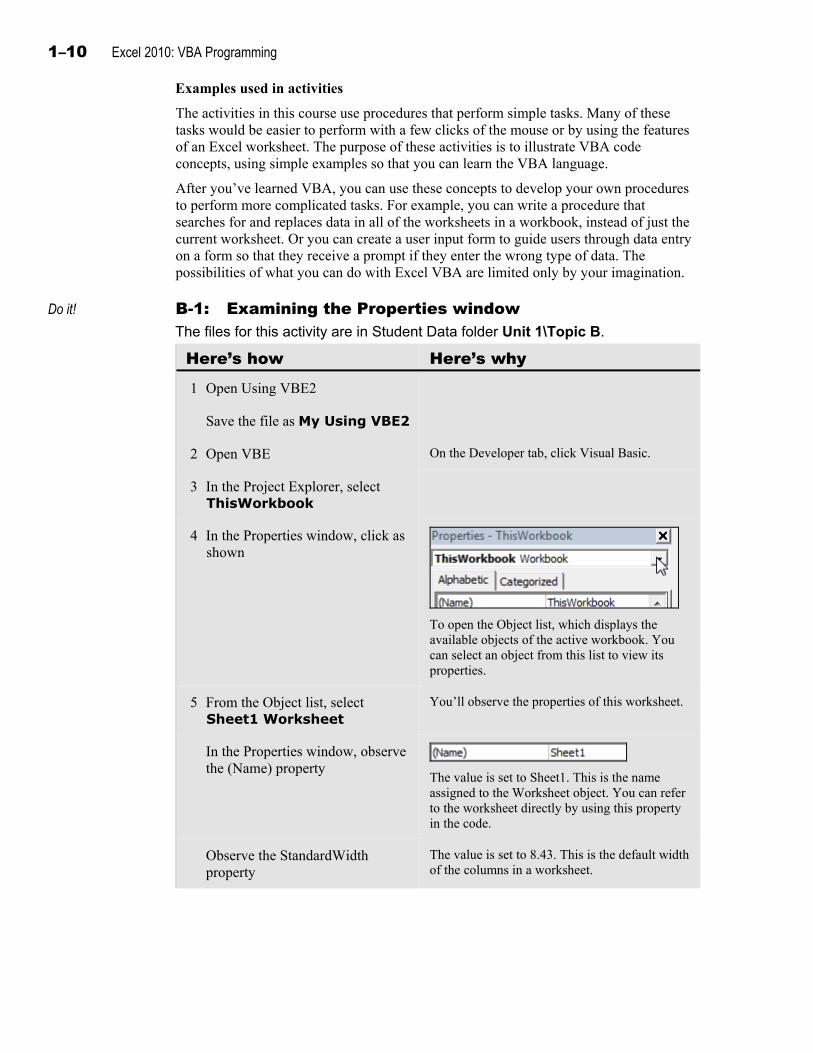
Do it! B-1: Examining the Properties window The files for this activity are in Student Data folder Unit 1\Topic B.
Here’s how Here’s why 1 Open Using VBE2
Save the file as My Using VBE2
2 Open VBE On the Developer tab, click Visual Basic.
3 In the Project Explorer, select ThisWorkbook
4 In the Properties window, click as shown
To open the Object list, which displays the available objects of the active workbook. You can select an object from this list to view its properties.
5 From the Object list, select Sheet1 Worksheet
You’ll observe the properties of this worksheet.
In the Properties window, observe the (Name) property
The value is set to Sheet1. This is the name assigned to the Worksheet object. You can refer to the worksheet directly by using this property in the code.
Observe the StandardWidth property
The value is set to 8.43. This is the default width of the columns in a worksheet.
Visual Basic Editor 1–11
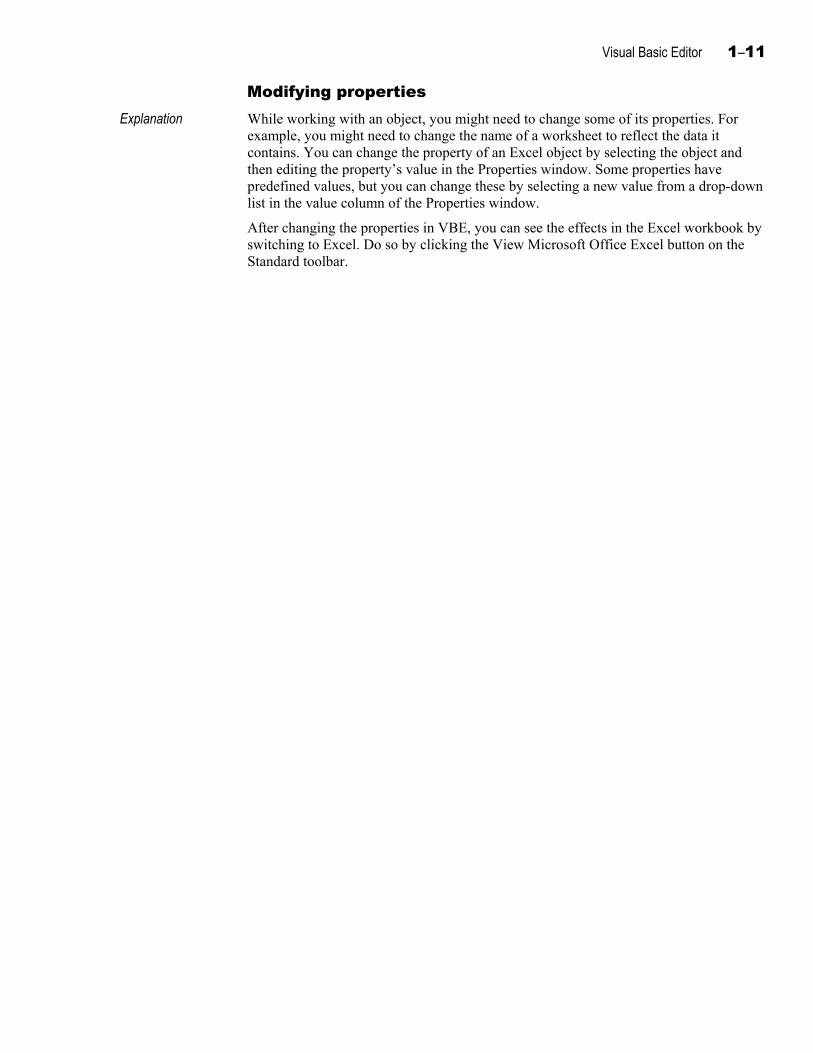
Modifying properties Explanation While working with an object, you might need to change some of its properties. For
example, you might need to change the name of a worksheet to reflect the data it contains. You can change the property of an Excel object by selecting the object and then editing the property’s value in the Properties window. Some properties have predefined values, but you can change these by selecting a new value from a drop-down list in the value column of the Properties window.
After changing the properties in VBE, you can see the effects in the Excel workbook by switching to Excel. Do so by clicking the View Microsoft Office Excel button on the Standard toolbar.
1–12 Excel 2010: VBA Programming
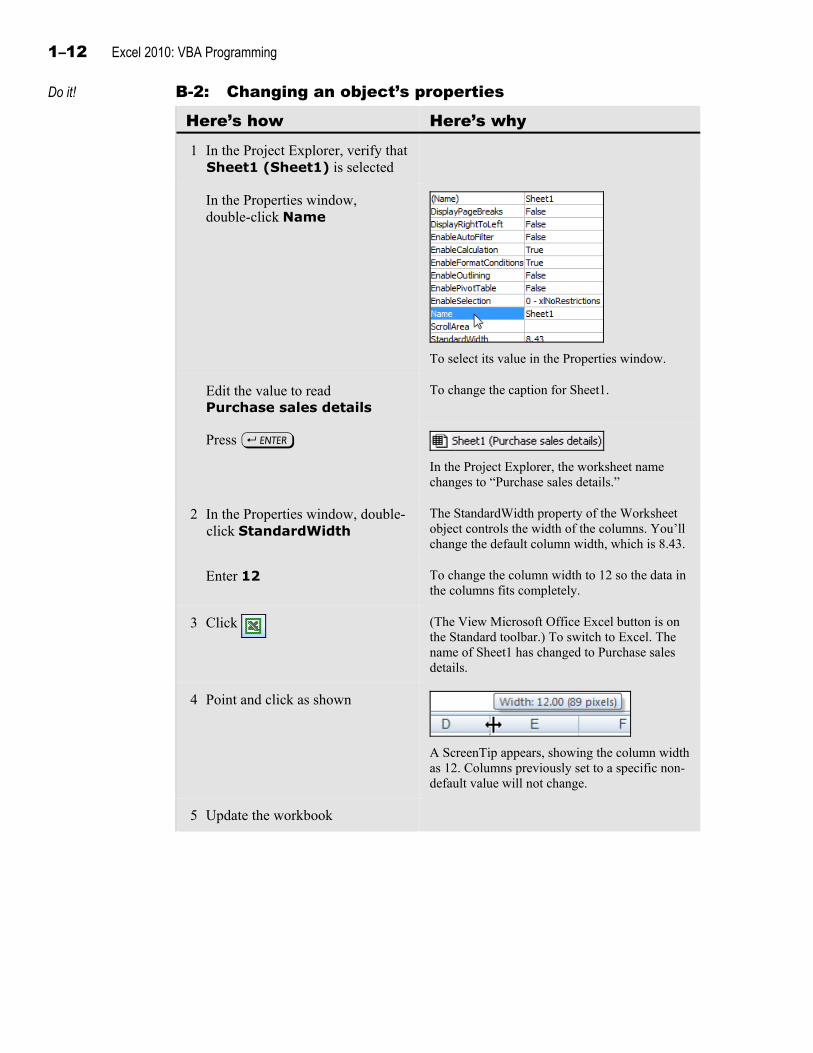
Do it! B-2: Changing an object’s properties
Here’s how Here’s why 1 In the Project Explorer, verify that
Sheet1 (Sheet1) is selected
In the Properties window, double-click Name
To select its value in the Properties window.
Edit the value to read Purchase sales details
To change the caption for Sheet1.
Press e
In the Project Explorer, the worksheet name changes to “Purchase sales details.”
2 In the Properties window, double-click StandardWidth
The StandardWidth property of the Worksheet object controls the width of the columns. You’ll change the default column width, which is 8.43.
Enter 12 To change the column width to 12 so the data in the columns fits completely.
3 Click (The View Microsoft Office Excel button is on the Standard toolbar.) To switch to Excel. The name of Sheet1 has changed to Purchase sales details.
4 Point and click as shown
A ScreenTip appears, showing the column width as 12. Columns previously set to a specific non-default value will not change.
5 Update the workbook
Visual Basic Editor 1–13
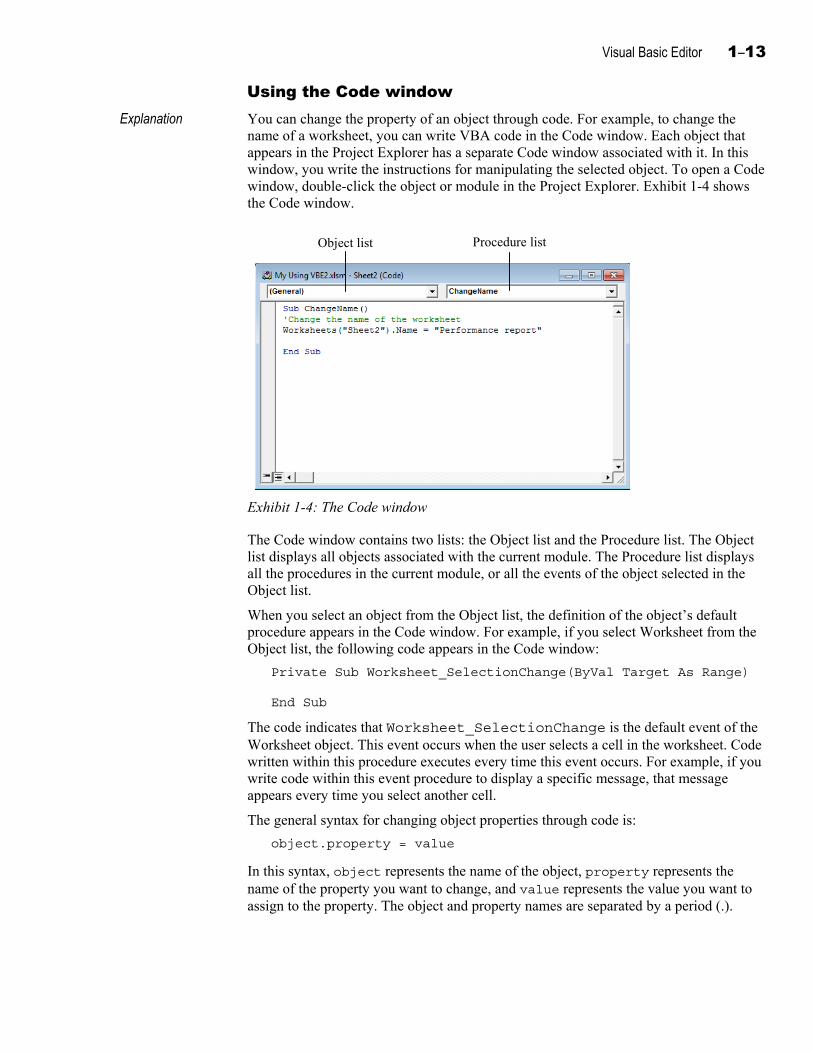
Using the Code window Explanation You can change the property of an object through code. For example, to change the
name of a worksheet, you can write VBA code in the Code window. Each object that appears in the Project Explorer has a separate Code window associated with it. In this window, you write the instructions for manipulating the selected object. To open a Code window, double-click the object or module in the Project Explorer. Exhibit 1-4 shows the Code window.
Object list Procedure list
Exhibit 1-4: The Code window
The Code window contains two lists: the Object list and the Procedure list. The Object list displays all objects associated with the current module. The Procedure list displays all the procedures in the current module, or all the events of the object selected in the Object list.
When you select an object from the Object list, the definition of the object’s default procedure appears in the Code window. For example, if you select Worksheet from the Object list, the following code appears in the Code window:
Private Sub Worksheet_SelectionChange(ByVal Target As Range) End Sub
The code indicates that Worksheet_SelectionChange is the default event of the Worksheet object. This event occurs when the user selects a cell in the worksheet. Code written within this procedure executes every time this event occurs. For example, if you write code within this event procedure to display a specific message, that message appears every time you select another cell.
The general syntax for changing object properties through code is:
object.property = value
In this syntax, object represents the name of the object, property represents the name of the property you want to change, and value represents the value you want to assign to the property. The object and property names are separated by a period (.).
1–14 Excel 2010: VBA Programming
For example, to change the name of a worksheet, the code is as follows:
Worksheets("Sheet1").Name = "MyWorksheet"
In this example, Worksheets is a collection object, and Sheet1 is the name of a specific worksheet. The Name property of the worksheet, Sheet1, is set to MyWorksheet.
When you enter code in the Code window, you see that some sections of that code are displayed in different colors. Each text color has a different meaning. The default text colors are described in the following table:
Color Description
Blue Indicates keywords that are reserved by VBA.
Black Indicates normal VBA code.
Red Indicates errors in code or indicates the procedures that didn’t execute as intended.
Green Indicates comments, which you create by starting a line with an apostrophe. Comments are ignored when you execute a program. You can use comments to explain your code to other users.
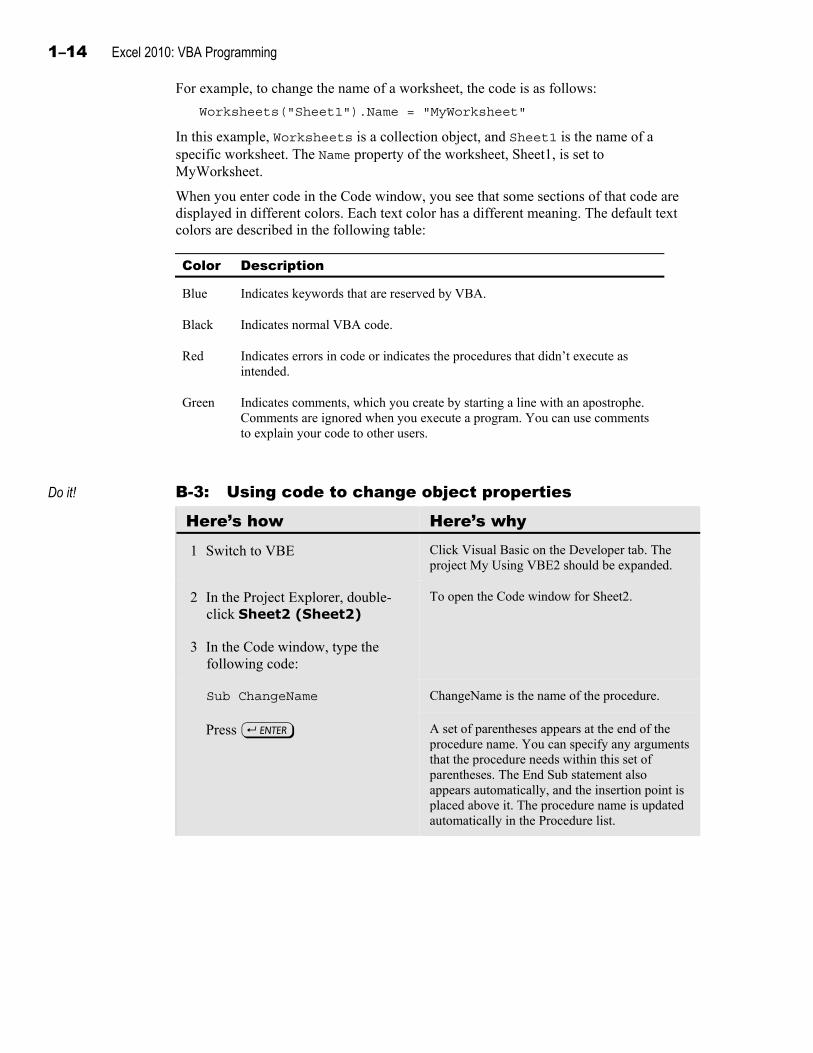
Do it! B-3: Using code to change object properties
Here’s how Here’s why 1 Switch to VBE Click Visual Basic on the Developer tab. The
project My Using VBE2 should be expanded.
2 In the Project Explorer, double-click Sheet2 (Sheet2)
To open the Code window for Sheet2.
3 In the Code window, type the following code:
Sub ChangeName
ChangeName is the name of the procedure.
Press e A set of parentheses appears at the end of the procedure name. You can specify any arguments that the procedure needs within this set of parentheses. The End Sub statement also appears automatically, and the insertion point is placed above it. The procedure name is updated automatically in the Procedure list.
Visual Basic Editor 1–15
4 Type the following code:
'Change the name of the worksheet
VBA treats this as a comment line because it starts with an apostrophe. This line explains the function of the next statement.
Press e To move to the next line. The color of the comment line you entered changes to green.
5 Enter the following code:
Worksheets("Sheet2").Name = "Performance report"
(Widen the code window, if necessary.) Worksheets are collections of objects, and Sheet2 is the caption for the worksheet. A period separates the object name from the property. The text specified within quotes is assigned to the property. This code will rename the worksheet, Sheet2, as Performance report.
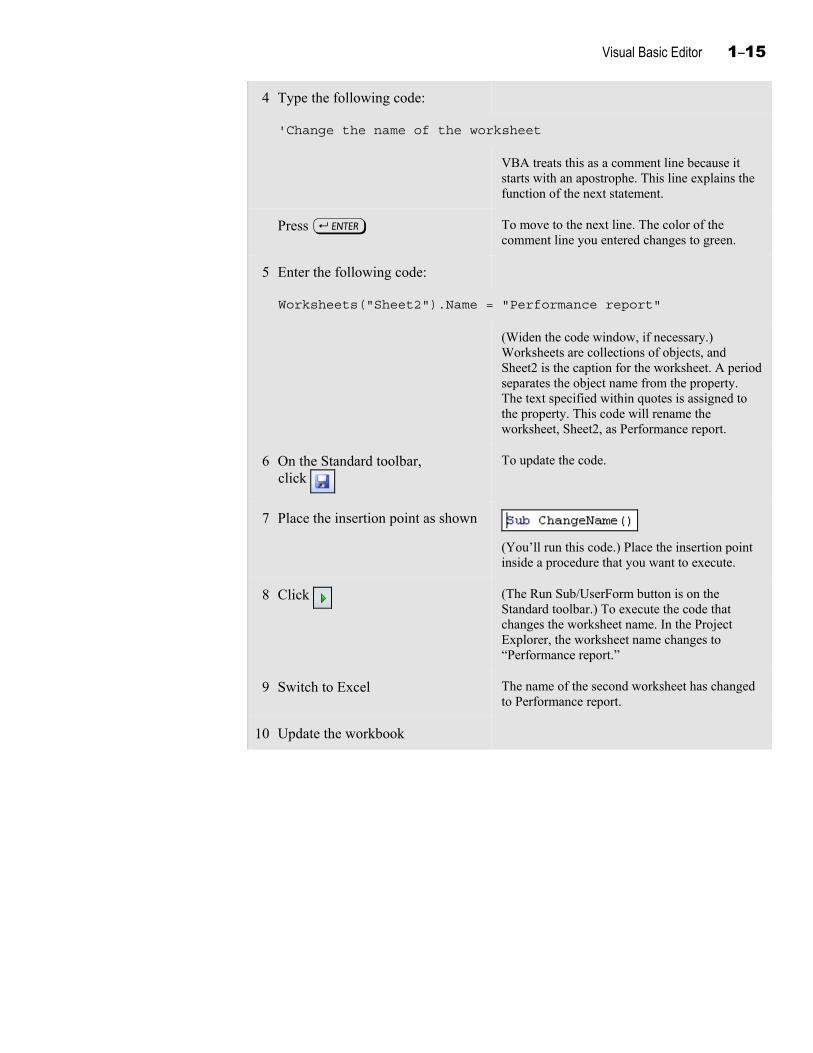
6 On the Standard toolbar, click
To update the code.
7 Place the insertion point as shown
(You’ll run this code.) Place the insertion point inside a procedure that you want to execute.
8 Click (The Run Sub/UserForm button is on the Standard toolbar.) To execute the code that changes the worksheet name. In the Project Explorer, the worksheet name changes to “Performance report.”
9 Switch to Excel The name of the second worksheet has changed to Performance report.
10 Update the workbook
1–16 Excel 2010: VBA Programming
Using methods Explanation Every object can perform certain actions, and actions are defined by methods. Some
methods need a value as input to complete their actions. For example, the Open method of the Workbook object takes a file name as input so it knows specifically which workbook to open. This input value is called an argument. An argument is a variable, constant, or expression that provides additional information to a method so that it can execute properly.
A method in VBA code uses the following syntax:
object.method argument1, argument2, argument3
For example, to protect the Sheet1 worksheet with the password “MyPassword,” you can use the following code:
Sheet1.Protect "MyPassword"
In the above code, MyPassword is the argument of the Protect method of the Worksheet object Sheet1.
Do it! B-4: Using a method
Here’s how Here’s why 1 Switch to VBE
You’ll write a procedure that uses an object method to protect this worksheet.
2 In the Project Explorer, verify that Sheet2 (Performance report) is selected
3 In the Code window, place the insertion point below End Sub
You’ll add a new procedure.
4 Enter Sub Protectsheet A line separating the two procedures appears in the Code window, and an End Sub statement appears.
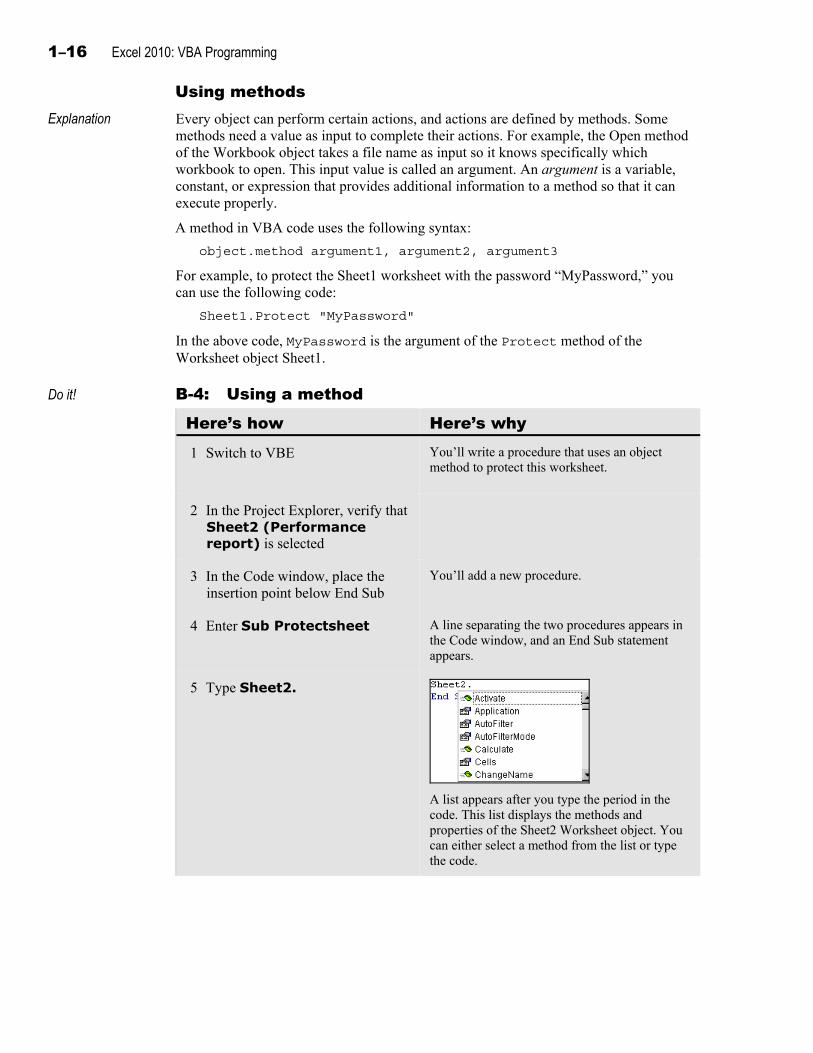
5 Type Sheet2.
A list appears after you type the period in the code. This list displays the methods and properties of the Sheet2 Worksheet object. You can either select a method from the list or type the code.
Visual Basic Editor 1–17
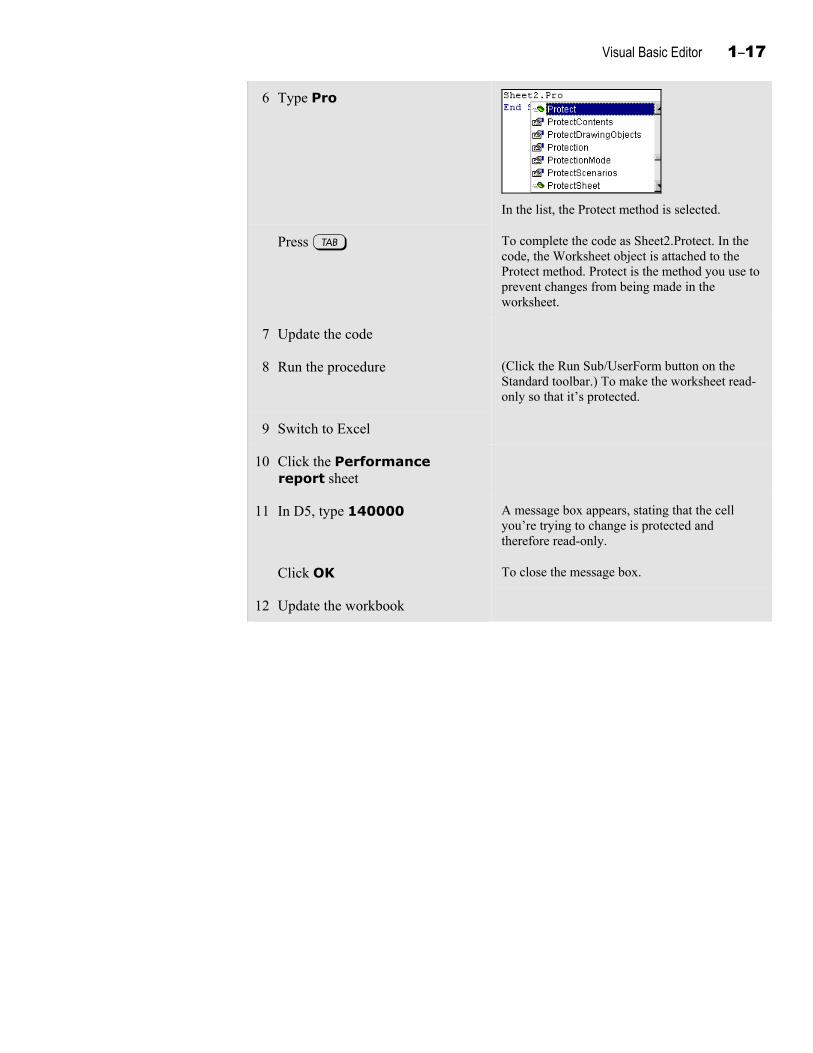
6 Type Pro
In the list, the Protect method is selected.
Press t To complete the code as Sheet2.Protect. In the code, the Worksheet object is attached to the Protect method. Protect is the method you use to prevent changes from being made in the worksheet.
7 Update the code
8 Run the procedure (Click the Run Sub/UserForm button on the Standard toolbar.) To make the worksheet read-only so that it’s protected.
9 Switch to Excel
10 Click the Performance report sheet
11 In D5, type 140000 A message box appears, stating that the cell you’re trying to change is protected and therefore read-only.
Click OK To close the message box.
12 Update the workbook
1–18 Excel 2010: VBA Programming
Using events Explanation A procedure can run in response to a specific user action. You specify such a scenario
by associating the code with an event of an object. This association is the result of an event procedure.
An event procedure is code that’s executed when an event occurs. For example, you can write code for the Activate event of a worksheet to display a message stating that you can’t change the data in the worksheet. This procedure executes when a user activates the worksheet.
Note that not all objects have events. For example, the Border object doesn’t have any events.
To program an event, double-click the object to open its Code window. Select an event from the Procedure list and enter the code you want. The code runs automatically when a user triggers the event for the object.
Do it! B-5: Associating VBA code with an event
Here’s how Here’s why 1 Switch to VBE You’ll write an event procedure for the Activate
event of a worksheet to display a message box when the worksheet is activated.
2 In the Project Explorer, verify that Sheet2 (Performance report) is selected
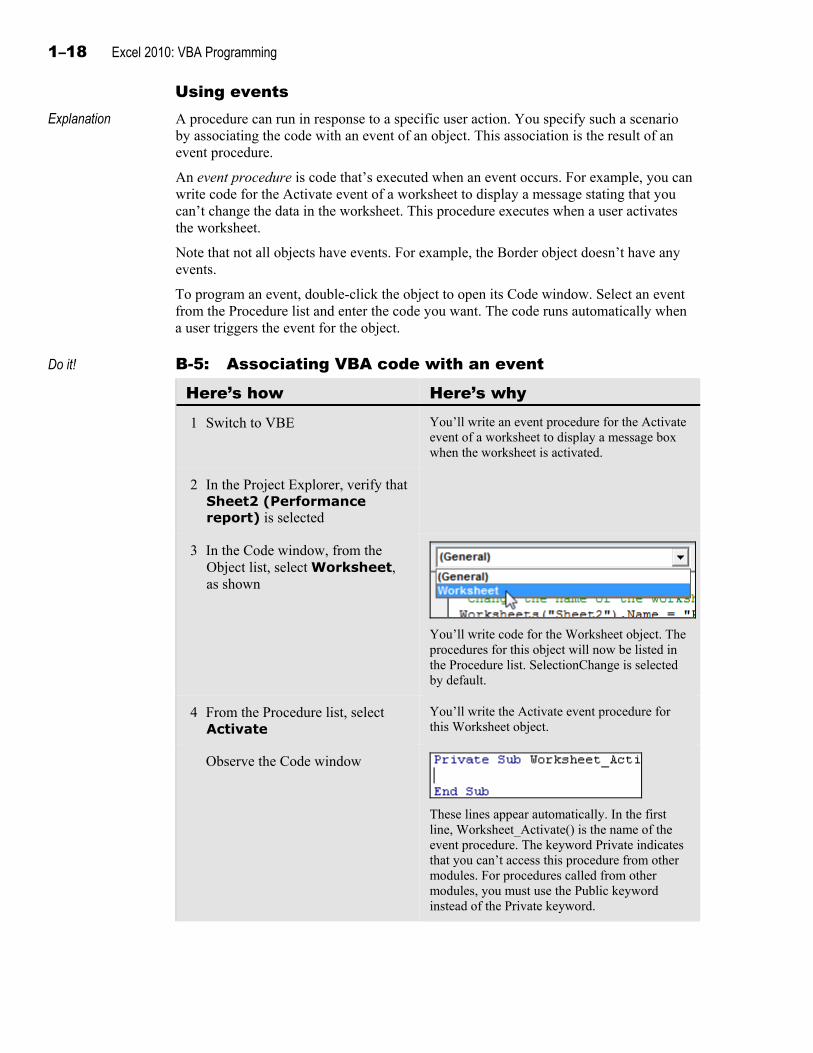
3 In the Code window, from the Object list, select Worksheet, as shown
You’ll write code for the Worksheet object. The procedures for this object will now be listed in the Procedure list. SelectionChange is selected by default.
4 From the Procedure list, select Activate
You’ll write the Activate event procedure for this Worksheet object.
Observe the Code window
These lines appear automatically. In the first line, Worksheet_Activate() is the name of the event procedure. The keyword Private indicates that you can’t access this procedure from other modules. For procedures called from other modules, you must use the Public keyword instead of the Private keyword.
Visual Basic Editor 1–19
5 Enter the following code:
MsgBox ("Protected worksheet. You cannot edit this data.")
This code will display a message box with the specified text.
6 Delete the procedure Worksheet_SelectionChange
(If necessary.) It’s usually created automatically when you select the Worksheet object.
7 Update the code
8 Switch to Excel
Activate the Purchase sales details sheet
The Performance report sheet is already active, so you’ll need to select another worksheet and then switch to the Performance report sheet again to trigger its Activate event.
Activate the Performance report sheet
To test the sheet’s Activate event. A message box appears, stating that you can’t edit the data in this protected sheet. This is the message box you specified in the Activate event of the sheet.
9 Click OK To close the message box.
10 Update the workbook
1–20 Excel 2010: VBA Programming
Using buttons Explanation You might find it inconvenient to switch to VBE every time you want to run a
procedure. To address this, you can add a button to the Quick Access toolbar and associate the button with a specific procedure. You can then click the button to run the code.
To add a new procedure as a button on the Quick Access toolbar:
1 Create a VBA procedure.
2 Click the button on the right side of the Quick Access toolbar and choose More Commands. The Excel Options dialog box appears.
3 From the “Choose commands from” list, select Macros.
4 In the list box, select the desired VBA code.
5 Click Add.
6 Click OK.
Do it! B-6: Executing VBA code by using a button
Here’s how Here’s why 1 Switch to VBE You’ll create VBA code that sums two nearby
cells and moves down a row. Then you’ll place a button for this code on the Quick Access toolbar.
Activate the Code window for Sheet1
In the Project Explorer, double-click Sheet1 (Purchase sales details).
2 Enter the following code:
Sub Mult() 'Multiplies two cells to the left, then moves down ActiveCell.FormulaR1C1 = "=PRODUCT(RC[-2]:RC[-1])" ActiveCell.Offset(1, 0).Range("A1").Select
(The End Sub statement appears automatically.) This code calculates the product of the two values to the left of the active cell, and then moves the insertion point down to the next cell in the column.
3 Update the code
4 Switch to Excel You’ll place a button for this procedure on the Quick Access toolbar.
5 To the right of the Quick Access toolbar, click
To open the Customize Quick Access Toolbar menu.
Choose More Commands… To open the Excel Options dialog box with the Customize page displayed.
Visual Basic Editor 1–21
6 From the “Choose commands from” list, select Macros
A list of macros and other VBA code procedures appears in the list box below the drop-down list.
Select Sheet1.Mult
Click Add To move the procedure to the list box on the right.
Click OK To close the Excel Options dialog box.
7 Observe the Quick Access toolbar A new button appears on the right side.
Point to the button
A ScreenTip displays the name of the procedure as the name for the button.
8 Activate the Purchase sales details sheet
Select E5
9 On the Quick Access toolbar, click the Sheet1.Mult button
To calculate the total purchase. The total purchase amount, $32,640, appears in E5. The Formula bar shows the formula for calculating the total purchase.
10 Copy the formula to E6:E12 Select E5 and use the fill handle.
11 Update the workbook
Close VBE and the workbook
1–22 Excel 2010: VBA Programming
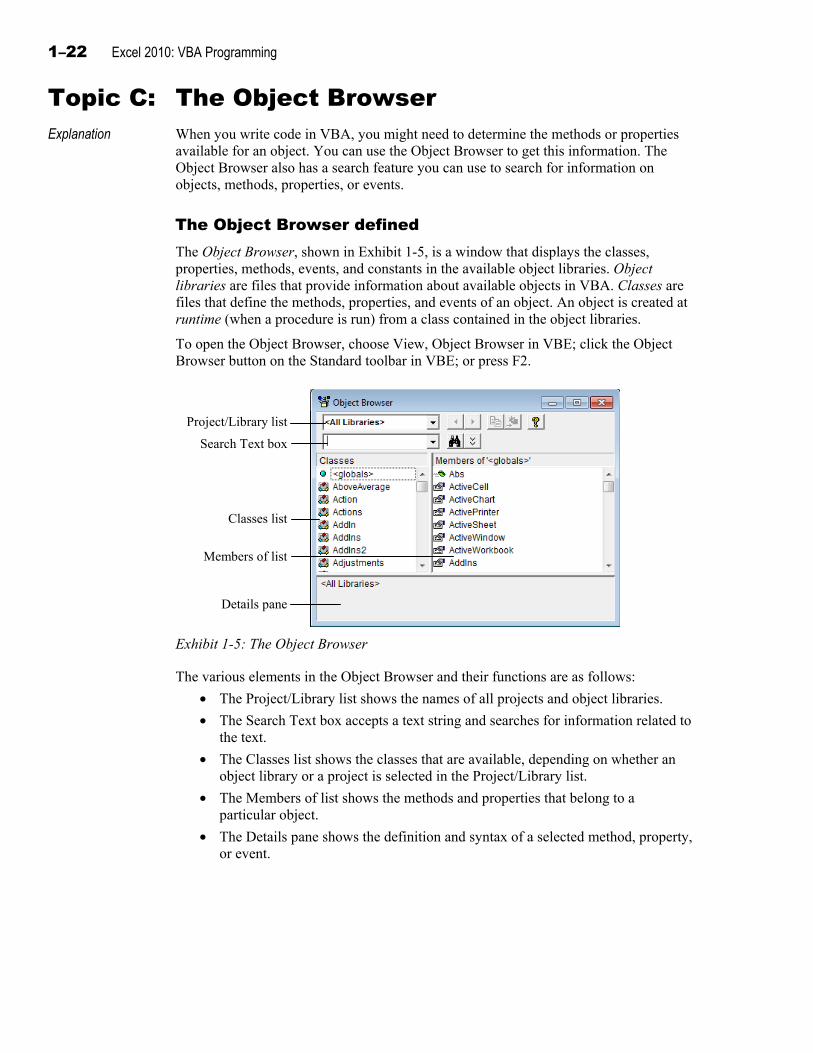
Topic C: The Object Browser Explanation When you write code in VBA, you might need to determine the methods or properties
available for an object. You can use the Object Browser to get this information. The Object Browser also has a search feature you can use to search for information on objects, methods, properties, or events.
The Object Browser defined The Object Browser, shown in Exhibit 1-5, is a window that displays the classes, properties, methods, events, and constants in the available object libraries. Object libraries are files that provide information about available objects in VBA. Classes are files that define the methods, properties, and events of an object. An object is created at runtime (when a procedure is run) from a class contained in the object libraries.
To open the Object Browser, choose View, Object Browser in VBE; click the Object Browser button on the Standard toolbar in VBE; or press F2.
Search Text box
Project/Library list
Classes list
Members of list
Details pane
Exhibit 1-5: The Object Browser
The various elements in the Object Browser and their functions are as follows:
• The Project/Library list shows the names of all projects and object libraries.
• The Search Text box accepts a text string and searches for information related to the text.
• The Classes list shows the classes that are available, depending on whether an object library or a project is selected in the Project/Library list.
• The Members of list shows the methods and properties that belong to a particular object.
• The Details pane shows the definition and syntax of a selected method, property, or event.
Visual Basic Editor 1–23
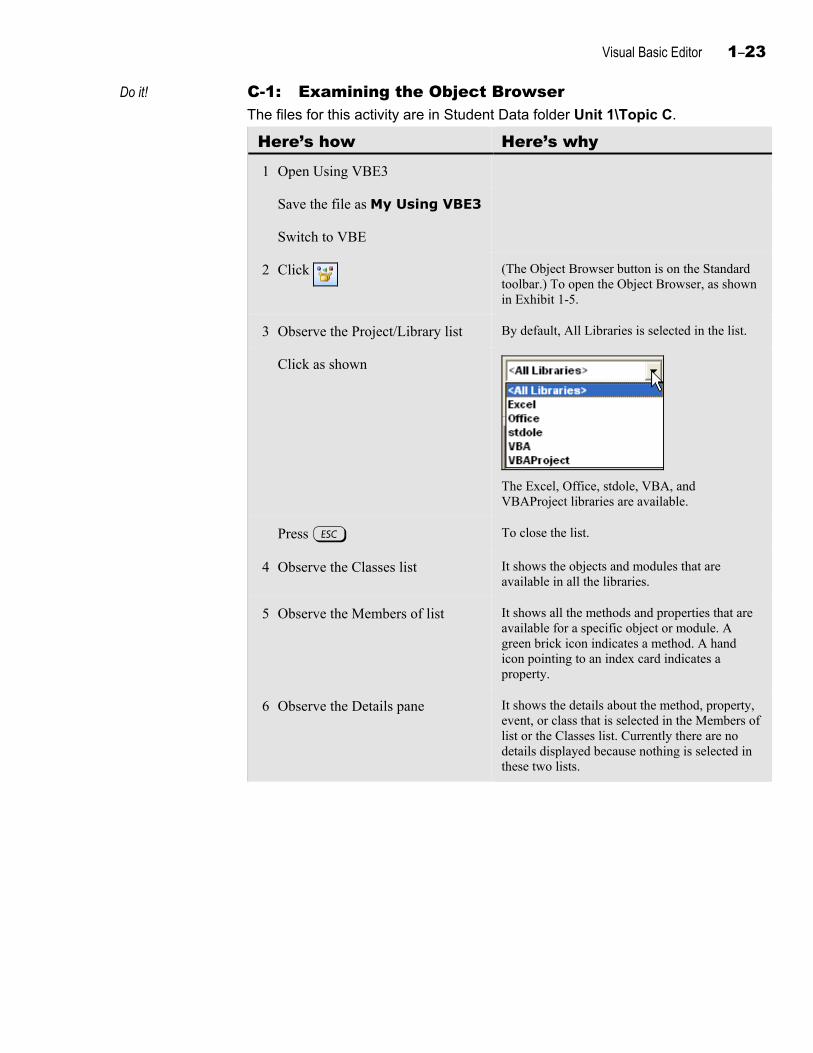
Do it! C-1: Examining the Object Browser The files for this activity are in Student Data folder Unit 1\Topic C.
Here’s how Here’s why 1 Open Using VBE3
Save the file as My Using VBE3
Switch to VBE
2 Click (The Object Browser button is on the Standard toolbar.) To open the Object Browser, as shown in Exhibit 1-5.
3 Observe the Project/Library list By default, All Libraries is selected in the list.
Click as shown
The Excel, Office, stdole, VBA, and VBAProject libraries are available.
Press g To close the list.
4 Observe the Classes list It shows the objects and modules that are available in all the libraries.
5 Observe the Members of list It shows all the methods and properties that are available for a specific object or module. A green brick icon indicates a method. A hand icon pointing to an index card indicates a property.
6 Observe the Details pane It shows the details about the method, property, event, or class that is selected in the Members of list or the Classes list. Currently there are no details displayed because nothing is selected in these two lists.
1–24 Excel 2010: VBA Programming
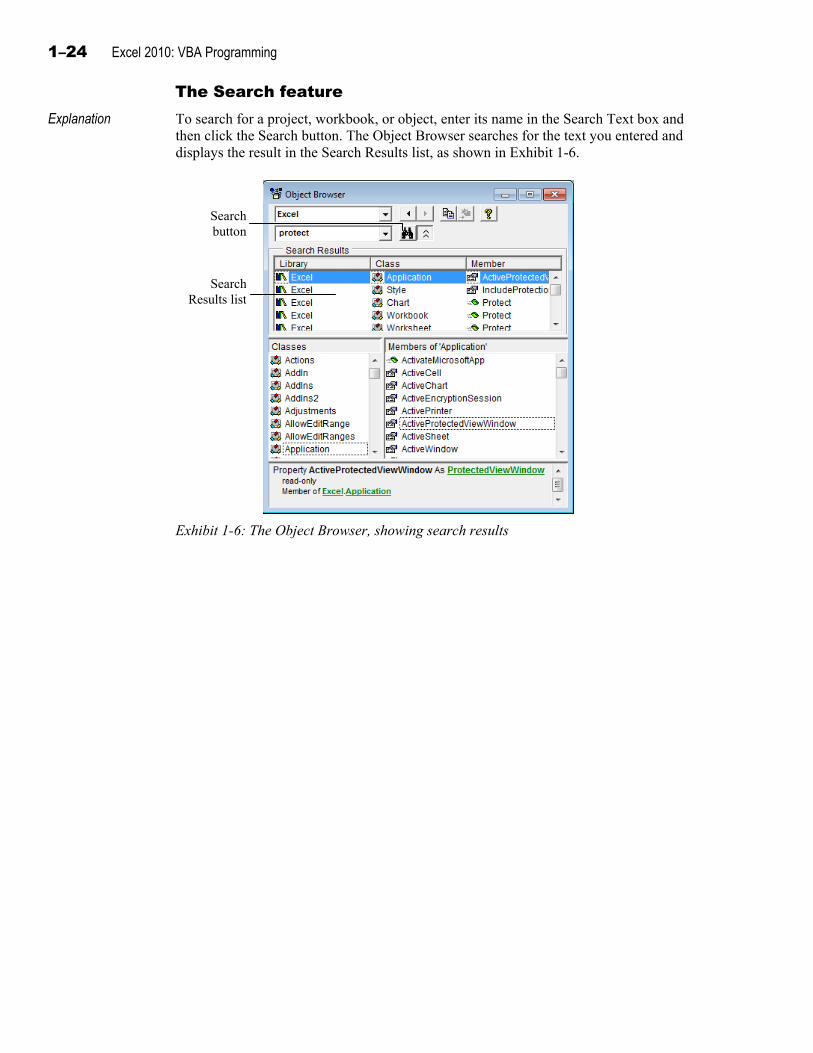
The Search feature Explanation To search for a project, workbook, or object, enter its name in the Search Text box and
then click the Search button. The Object Browser searches for the text you entered and displays the result in the Search Results list, as shown in Exhibit 1-6.
SearchResults list
Search button
Exhibit 1-6: The Object Browser, showing search results
Visual Basic Editor 1–25
Do it! C-2: Searching in the Object Browser
Here’s how Here’s why 1 From the Project/Library list,
select Excel To display all the Excel objects and modules that are available in VBE.
2 In the Search Text box, type protect
You’ll search for information on the Protect method.
3 Click To start the search. The Search Results list shows the library, class, and member names for all objects that match the search text.
In the Search Results box, select the first option
(ActiveProtectedViewWindow, as shown in Exhibit 1-6.) The Details pane displays the method’s name, syntax, and arguments. It also displays the name of the library to which the object belongs.
4 Close the Object Browser
5 Close VBE
6 Update and close the workbook
1–26 Excel 2010: VBA Programming
Unit summary: Visual Basic Editor Topic A In this topic, you learned that Visual Basic for Applications (VBA) is a programming
language that’s part of Microsoft Office applications, such as Excel. You learned that you use VBA to manipulate objects and the properties and methods associated with these objects. You also learned how to start Visual Basic Editor (VBE) and how to identify the Project Explorer, the Properties window, and the Code window.
Topic B In this topic, you learned how to modify properties and use methods in the Code window. You also learned how to associate code with an event by using an event procedure. In addition, you learned how to execute code by using a button on the Quick Access toolbar.
Topic C In this topic, you learned how to use the Object Browser. You also learned how to locate objects and how to find information about their properties and methods.
Independent practice activity In this activity, you’ll identify the components of the VBE window. Next, you’ll modify a property, insert and run a procedure, and attach a procedure to an object.
The files for this activity are in Student Data folder Unit 1\Unit summary.
1 Open Practice sales report.
2 Save the workbook as My Practice sales report.
3 Start VBE. In the VBE window, identify the Project Explorer, the Properties window, and the Code window.
4 Use the Properties window to change the Name property of Sheet1 to Sales analysis.
5 Insert a procedure called ProtectSheet and use it to protect the Sales analysis worksheet. (Hint: Use the Protect method.)
6 Update the code and then run the procedure. Switch to Excel and test whether the worksheet is protected.
7 Close VBE.
8 Close the message box and the workbook.
Visual Basic Editor 1–27
Review questions 1 What’s VBA?
Visual Basic for Applications is a programming language that you can use to customize Microsoft Office applications such as Excel.
2 What’s VBE?
The Visual Basic Editor is the application in which you create and modify VBA procedures.
3 What’s the name for a characteristic or named attribute of an object?
A Object
B Property
C Method
D Procedure
4 What do you call a named sequence of instructions for performing a specific task?
A Object
B Property
C Method
D Procedure
5 How do you launch Visual Basic in Excel?
a Display the Developer tab on the Ribbon by using the Excel Options dialog box.
b On the Developer tab, click Visual Basic.
6 What’s the Project Explorer in VBE?
It’s a window that displays a project for each workbook or template that’s open in Excel.
7 What are methods?
Built-in procedures that perform an action on an object.
8 What are events?
Actions, such as a mouse click, performed by a user or by an object.
9 What does the Code window do?
The Code window holds the code for procedures you write that can change the property of an object.
10 What’s the general syntax for changing properties through code?
object.propery = value
11 How can you run a VBA procedure without first launching Visual Basic?
Assign the procedure to a button on the Quick Access toolbar so that it can be run from within Excel.
12 What’s the name of the window that displays classes, properties, methods, events, and constants in the object libraries?
The Object Browser.

1–28 Excel 2010: VBA Programming

2–1
U n i t 2 Programming basics
Unit time: 80 minutes
Complete this unit, and you’ll know how to:
A Use the variables of relevant data types, manipulate data by using expressions, and get input from the user.
B Declare and use variables of the correct scope.
C Declare and use procedures of the correct scope, create Sub and Function procedures, and call one procedure from another.
2–2 Excel 2010: VBA Programming
Topic A: Data basics Explanation Programs receive data as input, process the data, and generate output. For example, you
provide two numbers to a calculator program as input and specify the action, such as addition, to be performed on them. The program generates the sum as the output.
You can think about data in terms of variables and data types. A variable is a temporary value stored in memory during VBA processing. Variables are defined by a name and a data type. The name identifies the area in memory where the value is stored. The data type determines the kind of data stored. Excel’s interaction functions can input data and display output. Input data can be processed using expressions.
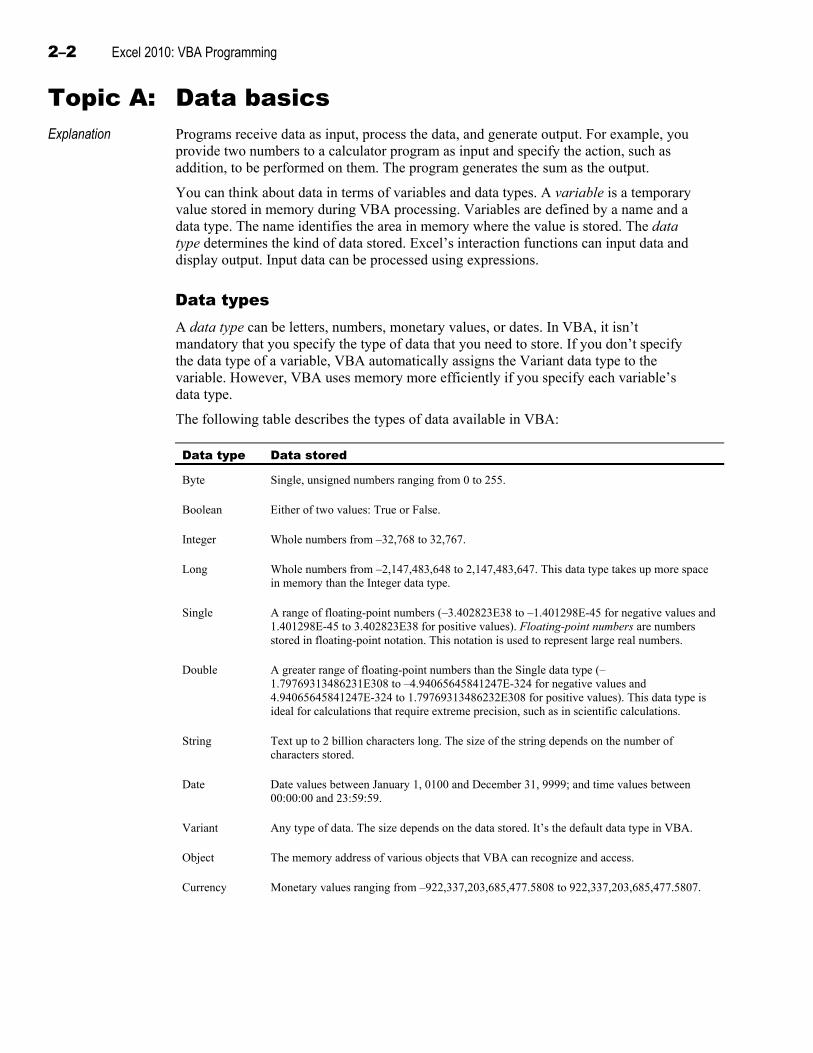
Data types A data type can be letters, numbers, monetary values, or dates. In VBA, it isn’t mandatory that you specify the type of data that you need to store. If you don’t specify the data type of a variable, VBA automatically assigns the Variant data type to the variable. However, VBA uses memory more efficiently if you specify each variable’s data type.
The following table describes the types of data available in VBA:
Data type Data stored
Byte Single, unsigned numbers ranging from 0 to 255.
Boolean Either of two values: True or False.
Integer Whole numbers from –32,768 to 32,767.
Long Whole numbers from –2,147,483,648 to 2,147,483,647. This data type takes up more space in memory than the Integer data type.
Single A range of floating-point numbers (–3.402823E38 to –1.401298E-45 for negative values and 1.401298E-45 to 3.402823E38 for positive values). Floating-point numbers are numbers stored in floating-point notation. This notation is used to represent large real numbers.
Double A greater range of floating-point numbers than the Single data type (–1.79769313486231E308 to –4.94065645841247E-324 for negative values and 4.94065645841247E-324 to 1.79769313486232E308 for positive values). This data type is ideal for calculations that require extreme precision, such as in scientific calculations.
String Text up to 2 billion characters long. The size of the string depends on the number of characters stored.
Date Date values between January 1, 0100 and December 31, 9999; and time values between 00:00:00 and 23:59:59.
Variant Any type of data. The size depends on the data stored. It’s the default data type in VBA.
Object The memory address of various objects that VBA can recognize and access.
Currency Monetary values ranging from –922,337,203,685,477.5808 to 922,337,203,685,477.5807.
Programming basics 2–3
Do it! A-1: Discussing data types and variables
Exercises 1 Which data type should you use to store customer names? Why?
2 Which data type should you use to store the order date for a product? Why?
3 Which data type would you use to store the number of working days in a year? Why?
4 Which data type should you use for storing the net profit of a company? Why?
5 Which data type should you use when you don’t know the type of data to be stored? Why?
6 Suppose that you need to store high-precision values for scientific calculations. Which data type would you use?
A String
B Integer
C Double
D Long
2–4 Excel 2010: VBA Programming
Variables Explanation You use variables in VBA code to store data. A variable is a named location in the
computer’s memory where data is stored. For example, in a procedure that calculates a commission value, you would create a variable to contain that value. You could then copy the value to a cell, present it to the user, or use it in calculations by specifying the variable name.
The process of defining a variable and its data type is called declaration. In VBA, you can declare variables either implicitly or explicitly.
Implicit declaration
You can use a variable without declaring it. This process is called implicit declaration. Consider the following code:
Answer = 100 + 100
In the code, Answer is a variable that holds the sum of two numbers. VBA creates the variable because you used it. Notice that you haven’t specified the data type of the variable. When you use a variable without declaring it first, its data type is automatically set to Variant. This simplifies the process of creating procedures, because you don’t need to spend time declaring variables. But implicit declarations can cause coding errors. For example, if you misspell an implicitly declared variable in another place in the code, the code runs, but it doesn’t yield the expected result because VBA interprets the misspelled word as a new variable. Consider the following code:
MsgBox (Anwser)
This code doesn’t display 200 (the value of Answer) because the variable is misspelled and VBA treats Anwser as a different variable.
Another disadvantage is that the automatic assigning of the Variant data type reserves a lot of storage space for this variable. In this example, it’s a waste of space because only an integer, requiring comparatively little space, needs to be stored. Declaring Answer as an Integer data type makes much more efficient use of memory.
Explicit declaration
Explicit declarations control the type of data and help to prevent errors. In an explicit declaration, you have to declare the variable before using it in the code. It’s a good practice to declare all the variables you might use. By doing so, you assign data types for the variables and make your code easier for other people to understand. You can declare variables either at the beginning of each procedure or at the top of the Code window.
You can make sure that you explicitly declare all the variables in a procedure or module by using the following statement at the beginning of each module:
Option Explicit
If you use the Option Explicit statement, VBA generates an error if you use a variable without declaring it. You can also ensure explicit declaration in all your modules by choosing Tools, Options and checking Require Variable Declaration on the Editor tab of the Options dialog box.

Programming basics 2–5
You declare variables explicitly by using the Dim keyword. The general syntax is as follows:
Dim <variable_name> As <data type>
Variable names must begin with a letter, followed by letters or numbers. Names can’t be more than 255 characters long or be the same name as any VBA keyword. For example, you can’t declare a variable with the name End because End is a keyword in VBA.
Variable names aren’t case-sensitive; however, VBA is case-preservative. This means that even if you use a different case for a variable name within the code, the variable name’s case changes automatically to match the case in the variable’s declaration. For example, if you declare a variable as NetProfit, and you use neTProfit elsewhere in the code, VBA automatically changes neTProfit to NetProfit.
The following example declares a variable called EmployeeName with the String data type:
Dim EmployeeName As String
When you type the keyword As, the VBA editor displays a list of data types from which you can choose. This ensures that you enter only a correct data type.
You can declare more than one variable in a single statement by using commas to separate the variables. For example, to declare two variables, Amount and EmployeeName, in a single line, you’d use this code:
Dim Amount As Double, EmployeeName As String
In the syntax, Amount is a variable with the Double data type, and EmployeeName is a variable with the String data type.
Constants
A constant is a named item that retains a specified value throughout the execution of a program (as opposed to a variable, which can have its value changed during execution). Tax rates, commission rates, and scientific constants are good examples of data for which a constant can be used. You declare a constant by using the keyword Const, which has the following syntax:
Const <constant_name> = <value>
The type of constant is determined by the value to which you set it. In the following example, the data type for SalesTax would be Single:
Const SalesTax = 0.08
2–6 Excel 2010: VBA Programming
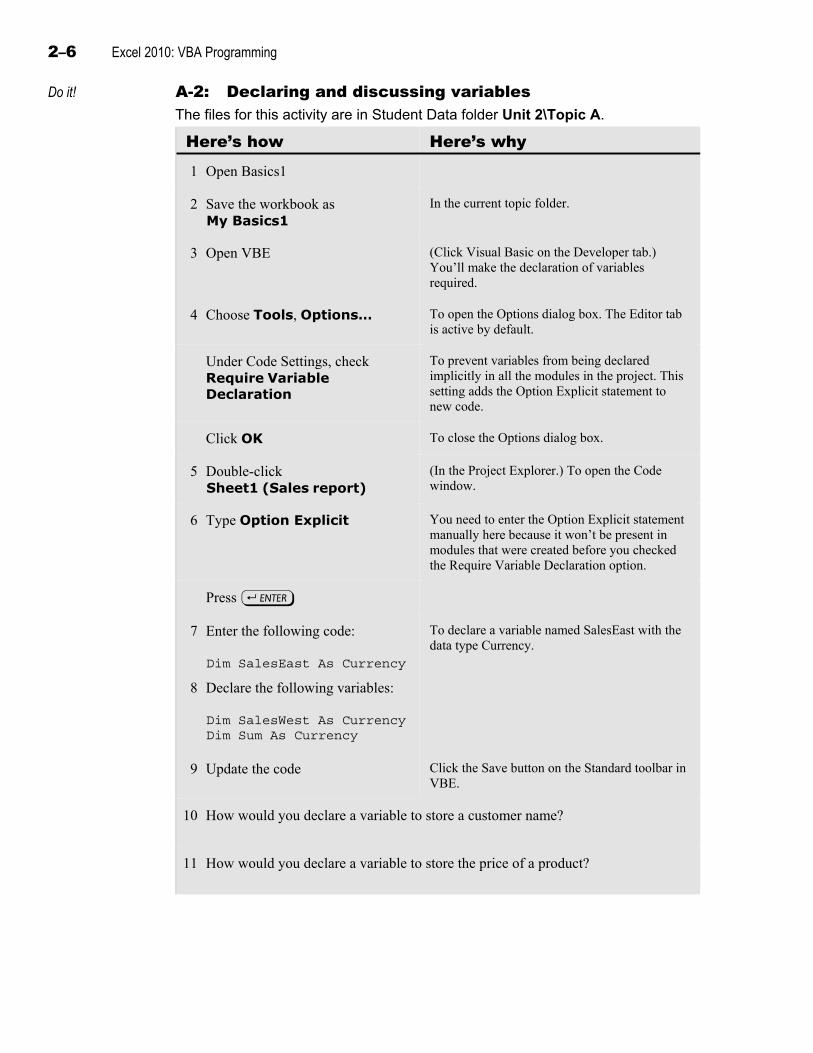
Do it! A-2: Declaring and discussing variables The files for this activity are in Student Data folder Unit 2\Topic A.
Here’s how Here’s why 1 Open Basics1
2 Save the workbook as My Basics1
In the current topic folder.
3 Open VBE (Click Visual Basic on the Developer tab.) You’ll make the declaration of variables required.
4 Choose Tools, Options… To open the Options dialog box. The Editor tab is active by default.
Under Code Settings, check Require Variable Declaration
To prevent variables from being declared implicitly in all the modules in the project. This setting adds the Option Explicit statement to new code.
Click OK To close the Options dialog box.
5 Double-click Sheet1 (Sales report)
(In the Project Explorer.) To open the Code window.
6 Type Option Explicit You need to enter the Option Explicit statement manually here because it won’t be present in modules that were created before you checked the Require Variable Declaration option.
Press e
7 Enter the following code:
Dim SalesEast As Currency
To declare a variable named SalesEast with the data type Currency.
8 Declare the following variables:
Dim SalesWest As Currency Dim Sum As Currency
9 Update the code Click the Save button on the Standard toolbar in VBE.
10 How would you declare a variable to store a customer name?
11 How would you declare a variable to store the price of a product?
Programming basics 2–7
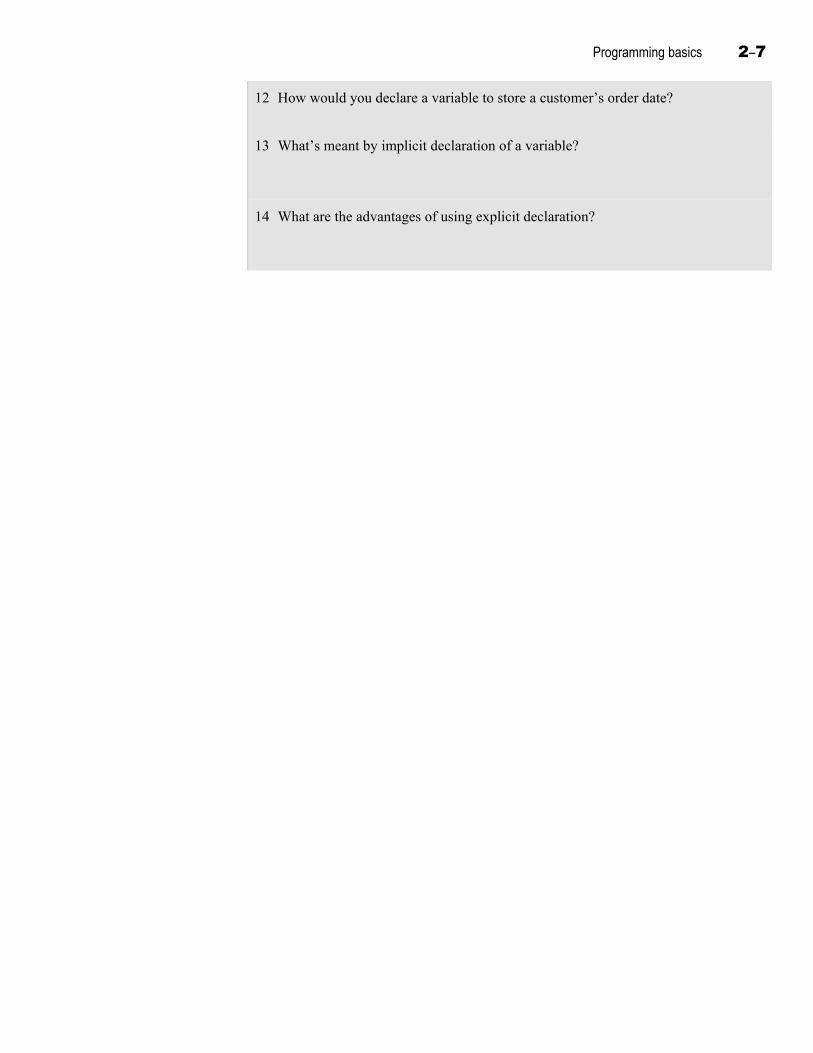
12 How would you declare a variable to store a customer’s order date?
13 What’s meant by implicit declaration of a variable?
14 What are the advantages of using explicit declaration?
2–8 Excel 2010: VBA Programming
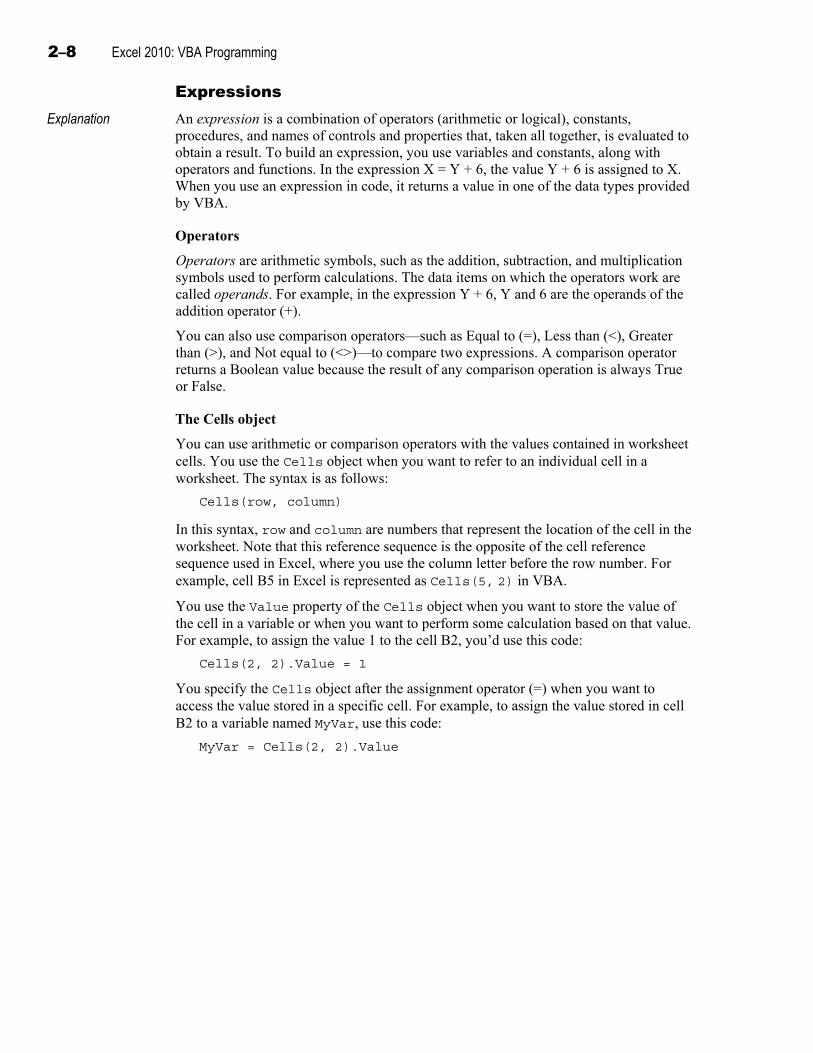
Expressions Explanation
An expression is a combination of operators (arithmetic or logical), constants, procedures, and names of controls and properties that, taken all together, is evaluated to obtain a result. To build an expression, you use variables and constants, along with operators and functions. In the expression X = Y + 6, the value Y + 6 is assigned to X. When you use an expression in code, it returns a value in one of the data types provided by VBA.
Operators
Operators are arithmetic symbols, such as the addition, subtraction, and multiplication symbols used to perform calculations. The data items on which the operators work are called operands. For example, in the expression Y + 6, Y and 6 are the operands of the addition operator (+).
You can also use comparison operators—such as Equal to (=), Less than (<), Greater than (>), and Not equal to (<>)—to compare two expressions. A comparison operator returns a Boolean value because the result of any comparison operation is always True or False.
The Cells object
You can use arithmetic or comparison operators with the values contained in worksheet cells. You use the Cells object when you want to refer to an individual cell in a worksheet. The syntax is as follows:
Cells(row, column)
In this syntax, row and column are numbers that represent the location of the cell in the worksheet. Note that this reference sequence is the opposite of the cell reference sequence used in Excel, where you use the column letter before the row number. For example, cell B5 in Excel is represented as Cells(5, 2) in VBA.
You use the Value property of the Cells object when you want to store the value of the cell in a variable or when you want to perform some calculation based on that value. For example, to assign the value 1 to the cell B2, you’d use this code:
Cells(2, 2).Value = 1
You specify the Cells object after the assignment operator (=) when you want to access the value stored in a specific cell. For example, to assign the value stored in cell B2 to a variable named MyVar, use this code:
MyVar = Cells(2, 2).Value
Programming basics 2–9
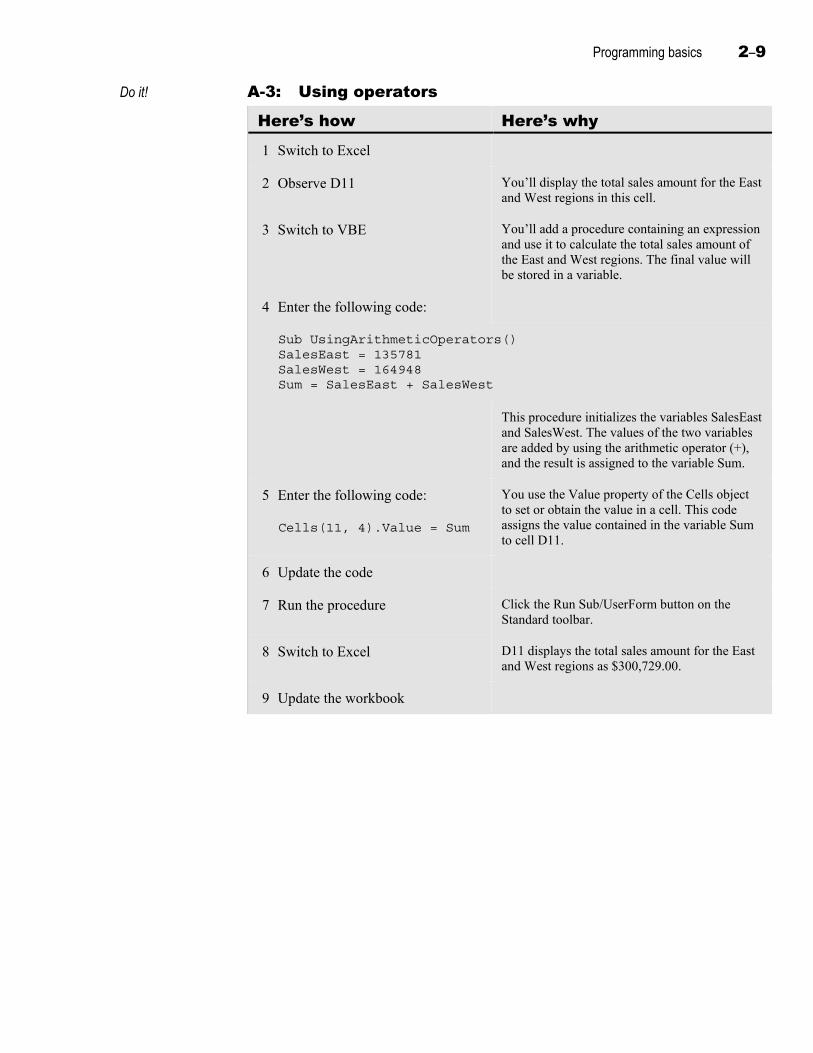
Do it! A-3: Using operators
Here’s how Here’s why 1 Switch to Excel
2 Observe D11 You’ll display the total sales amount for the East and West regions in this cell.
3 Switch to VBE You’ll add a procedure containing an expression and use it to calculate the total sales amount of the East and West regions. The final value will be stored in a variable.
4 Enter the following code:
Sub UsingArithmeticOperators() SalesEast = 135781 SalesWest = 164948 Sum = SalesEast + SalesWest
This procedure initializes the variables SalesEast and SalesWest. The values of the two variables are added by using the arithmetic operator (+), and the result is assigned to the variable Sum.
5 Enter the following code:
Cells(11, 4).Value = Sum
You use the Value property of the Cells object to set or obtain the value in a cell. This code assigns the value contained in the variable Sum to cell D11.
6 Update the code
7 Run the procedure Click the Run Sub/UserForm button on the Standard toolbar.
8 Switch to Excel D11 displays the total sales amount for the East and West regions as $300,729.00.
9 Update the workbook
2–10 Excel 2010: VBA Programming
Functions Explanation You use functions to perform actions, such as displaying information to the user and
obtaining information from the user. Excel provides built-in functions that you can use to manipulate data. Functions always return a result.
User interaction functions
User interaction functions are used to accept user input or display output. The most common user interaction functions are InputBox and MsgBox. You can get information about the other functions available in the Interaction class of the VBA library by using the Object Browser.
The InputBox function gets input from the user. The function displays a message and a text box in which the user can enter data. It has the following syntax:
InputBox ("message_text")
You can store the return value of the InputBox function in a variable. In the following example, the variable EmployeeName is used to store a name that the user enters:
Dim EmployeeName As String EmployeeName = InputBox ("Enter name")
The MsgBox function displays a message box with the specified message and an OK button. The general syntax for MsgBox is similar to that of InputBox:
MsgBox ("message_text", [Buttons, Title, helpfile, context])
The various arguments of the MsgBox function are:
• message_text specifies the text to be displayed in the message box.
• Buttons specifies the command buttons you want to display in the message box. For example, you can specify vbYesNo or vbOKCancel to display Yes and No command buttons or OK and Cancel command buttons, respectively. A list of options for the Buttons argument appears automatically when you write code for the MsgBox function.
• Title specifies the title of the message box.
• helpfile specifies the help file that should be displayed if the user clicks the Help button. This argument is required only if you use the vbMsgBoxHelpButton constant as the Buttons argument.
• context specifies a number, called the context number, assigned to the help topic that needs to be displayed.
In the syntax, all the arguments specified within square brackets ([]) are optional. The MsgBox function executes properly even if you don’t provide values for optional arguments.
Concatenating text
The MsgBox function displays text along with the value stored in a variable. To combine the values of variables with text, you can use the ampersand (&) concatenation operator. The general syntax for using the ampersand is:
MsgBox ("message_text" & <variable_name>)
For example, to display the message “The amount is,” along with the value that’s stored in the variable Amount, use this code:
MsgBox ("The amount is: " & Amount)

Programming basics 2–11
Do it! A-4: Using interaction functions
Here’s how Here’s why 1 Switch to VBE You’ll use the interaction functions to accept
input and display the output.
2 Place the insertion point as shown
3 Enter the following code:
Sub UsingFunctions() SalesEast = InputBox("Enter the total sales in the East► region") SalesWest = InputBox("Enter the total sales in the West► region") Sum = SalesEast + SalesWest
To specify the InputBox function that will prompt the user for input. The variables, SalesEast and SalesWest, store the user input.
4 Enter the following code:
MsgBox("Total sales for the East and West regions: $" & Sum)
The MsgBox function displays the specified message and the sum of the values. The message and the variable name are combined by using the & operator to form one sentence.
5 Update the code
6 Run the procedure The application switches to Excel. An input box appears, prompting you to enter the sales amount for the East region.
7 In the Microsoft Excel input box, type 135781
Click OK Another input box appears, prompting you for the sales amount for the West region.
2–12 Excel 2010: VBA Programming
8 In the Microsoft Excel input box, type 164948
Click OK A message box appears, displaying the total sales for the East and West regions as $300729.
Click OK To close the message box. The application automatically switches back to VBE.
9 Close VBE
Close the workbook
Programming basics 2–13
Topic B: Scope of variables Explanation A value or a variable can be accessed by more than one procedure. For this to happen,
you must declare that variable with an appropriate scope. The scope defines where the variable can be used, such as in a procedure or in a module. The accessibility, or scope, is determined by the way you declare the variable. In the Code window, you can declare variables with a procedure-, module-, or public-level scope.
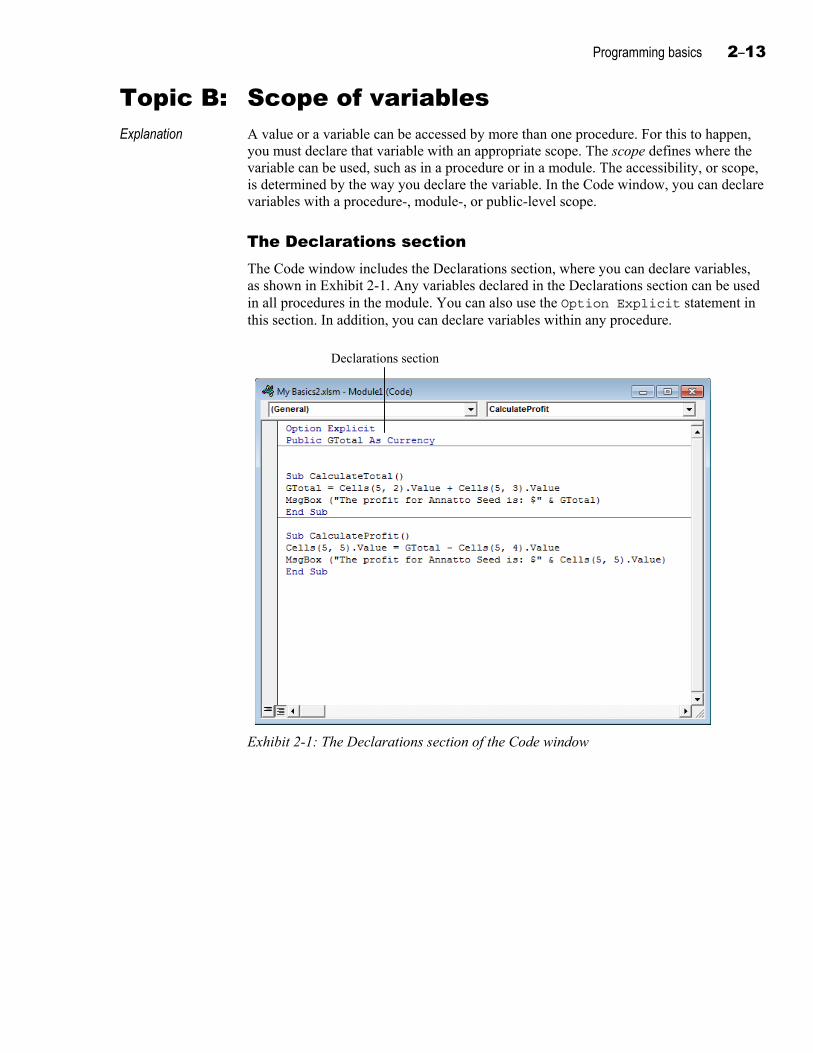
The Declarations section The Code window includes the Declarations section, where you can declare variables, as shown in Exhibit 2-1. Any variables declared in the Declarations section can be used in all procedures in the module. You can also use the Option Explicit statement in this section. In addition, you can declare variables within any procedure.
Declarations section
Exhibit 2-1: The Declarations section of the Code window
2–14 Excel 2010: VBA Programming
Types of scope There are three types of scope available in VBA. The scope of a variable is determined by the way you declare it. VBA offers the following levels of scope:
• Procedure-level — When you declare a variable in a procedure, the variable is called a local variable and is said to have a procedure scope. A procedure-level variable is available only within the procedure in which it’s declared. A local variable is specific to the procedure and can’t be accessed from outside the procedure. This means that you can’t access a variable declared in one procedure from another procedure.
• Private module-level — When you declare a variable in the Declarations section of a module by using the Dim or Private keyword, the variable is called a private module-level variable. This variable is available to all procedures in the module. A private module-level variable is available only within the module in which it is declared. This variable is specific to the module and can’t be accessed from another module.
• Public module-level — When you declare a variable in the Declarations section of a module by using the keyword Public, the variable is called a public module-level variable. You declare public variables when you need to access variables from procedures in various modules. A public module-level variable might be used by all of the procedures in all of the modules.
Programming basics 2–15
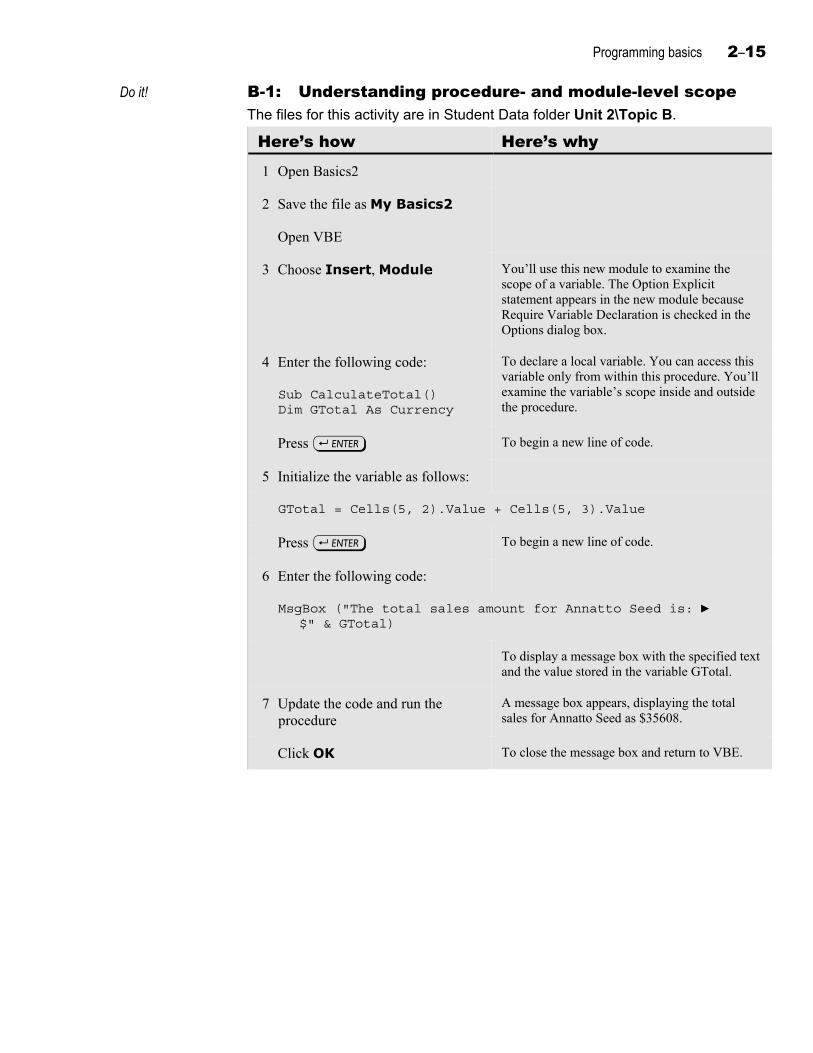
Do it! B-1: Understanding procedure- and module-level scope The files for this activity are in Student Data folder Unit 2\Topic B.
Here’s how Here’s why 1 Open Basics2
2 Save the file as My Basics2
Open VBE
3 Choose Insert, Module You’ll use this new module to examine the scope of a variable. The Option Explicit statement appears in the new module because Require Variable Declaration is checked in the Options dialog box.
4 Enter the following code:
Sub CalculateTotal() Dim GTotal As Currency
To declare a local variable. You can access this variable only from within this procedure. You’ll examine the variable’s scope inside and outside the procedure.
Press e To begin a new line of code.
5 Initialize the variable as follows:
GTotal = Cells(5, 2).Value + Cells(5, 3).Value
Press e To begin a new line of code.
6 Enter the following code:
MsgBox ("The total sales amount for Annatto Seed is: ► $" & GTotal)
To display a message box with the specified text and the value stored in the variable GTotal.
7 Update the code and run the procedure
A message box appears, displaying the total sales for Annatto Seed as $35608.
Click OK To close the message box and return to VBE.
2–16 Excel 2010: VBA Programming
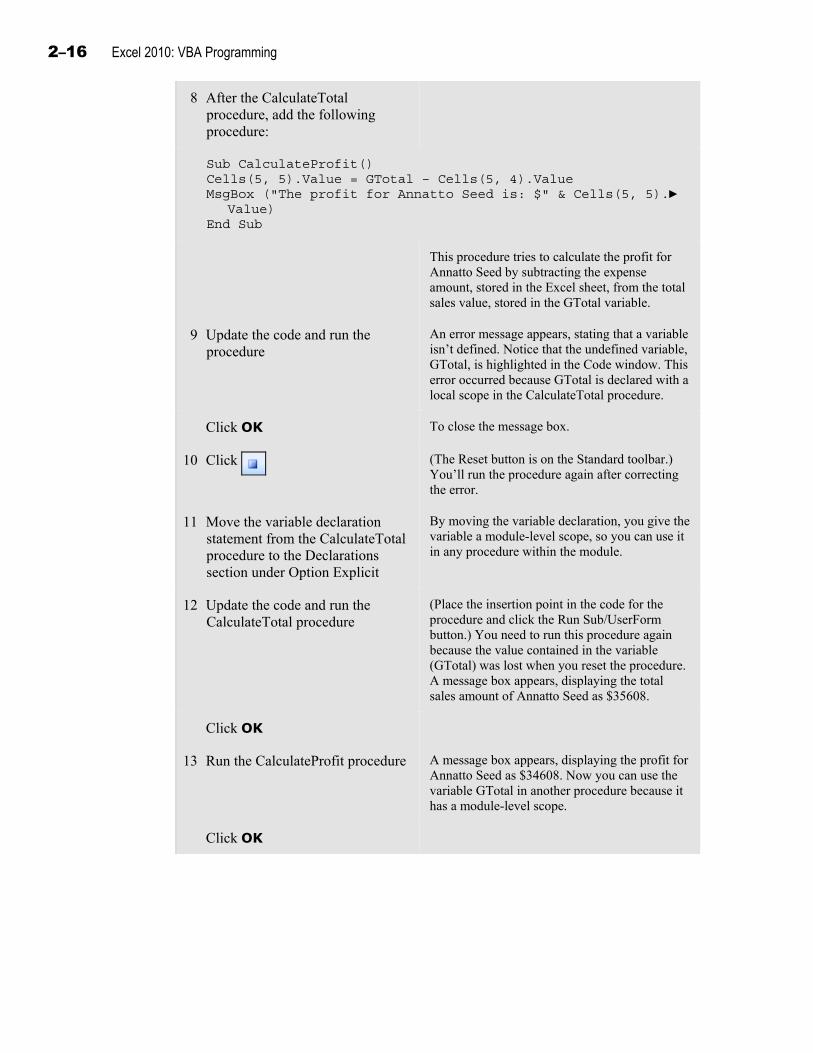
8 After the CalculateTotal procedure, add the following procedure:
Sub CalculateProfit() Cells(5, 5).Value = GTotal – Cells(5, 4).Value MsgBox ("The profit for Annatto Seed is: $" & Cells(5, 5).► Value) End Sub
This procedure tries to calculate the profit for Annatto Seed by subtracting the expense amount, stored in the Excel sheet, from the total sales value, stored in the GTotal variable.
9 Update the code and run the procedure
An error message appears, stating that a variable isn’t defined. Notice that the undefined variable, GTotal, is highlighted in the Code window. This error occurred because GTotal is declared with a local scope in the CalculateTotal procedure.
Click OK To close the message box.
10 Click (The Reset button is on the Standard toolbar.) You’ll run the procedure again after correcting the error.
11 Move the variable declaration statement from the CalculateTotal procedure to the Declarations section under Option Explicit
By moving the variable declaration, you give the variable a module-level scope, so you can use it in any procedure within the module.
12 Update the code and run the CalculateTotal procedure
(Place the insertion point in the code for the procedure and click the Run Sub/UserForm button.) You need to run this procedure again because the value contained in the variable (GTotal) was lost when you reset the procedure. A message box appears, displaying the total sales amount of Annatto Seed as $35608.
Click OK
13 Run the CalculateProfit procedure A message box appears, displaying the profit for Annatto Seed as $34608. Now you can use the variable GTotal in another procedure because it has a module-level scope.
Click OK

Programming basics 2–17
Public scope Explanation You declare a variable with a public scope when you need to access the variable from
procedures in various modules. A variable that’s declared by using the keyword Dim in the Declarations section has a private scope by default. To declare a variable with a public scope, you use the keyword Public. The syntax is as follows:
Public <variable_name> As <data type>
In the syntax:
• Public <variableName> declares a variable with a public scope so that you can access it from procedures in various modules.
• As <data type> specifies the data type for the variable.
Do it! B-2: Understanding public scope
Here’s how Here’s why 1 Open the Code window for the
Examining_code module (In the Project Explorer, in the Modules folder, double-click Examining_code.) You’ll add a procedure in this module.
2 In the Declarations section, declare the variable as follows:
Dim Profit As Currency
To define the variable with the private module-level scope. By default, all variables declared in the Declarations section with a Dim statement are considered private.
3 After the Main procedure, add the following procedure:
Sub CalculateTotalAndProfit() GTotal = Cells(6, 2).Value + Cells(6, 3).Value Cells(6, 5).Value = GTotal – Cells(6, 4).Value End Sub
This code will calculate the profit for Anise Seeds and assign the value to the cell E6.
4 Update the code and run the procedure
An error message appears, stating that the variable isn’t defined. This occurred because GTotal is declared with a private scope in another module.
Click OK
5 Reset the procedure Click the Reset button on the Standard toolbar.
6 Activate the Code window for Module1
7 Edit the declaration of the variable GTotal to read:
Public GTotal As Currency
(In the Declarations section.) By declaring a variable with a public scope, you make it accessible from any module in the project.
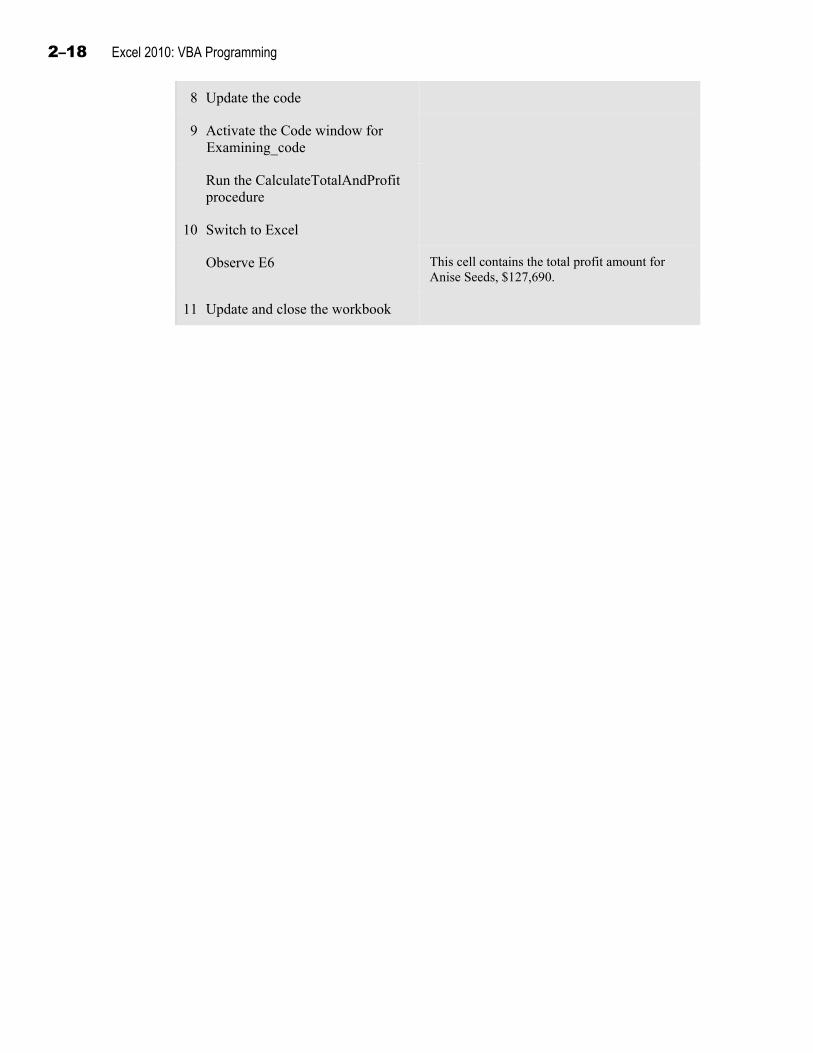
2–18 Excel 2010: VBA Programming
8 Update the code
9 Activate the Code window for Examining_code
Run the CalculateTotalAndProfit procedure
10 Switch to Excel
Observe E6 This cell contains the total profit amount for Anise Seeds, $127,690.
11 Update and close the workbook

Programming basics 2–19
Topic C: Scope of procedures Explanation A procedure that performs a general function, such as multiplying values, can be
included in various modules by specifying a relevant scope. You can also specify a type, such as Sub or Function, for the procedure. A Sub procedure is a unit of code that performs a specific action and doesn’t return a value. A Function procedure is similar to a Sub procedure, except that it can return a value.
Specifying procedure scopes Procedures also have a scope that determines where and how they can be used. The general syntax of a procedure is as follows:
Private/Public Sub <ProcedureName>() <ProcedureBody> End Sub
In the syntax:
• Public indicates that you can use the procedure in various modules. You use the keyword Private instead if you want to use the procedure in only the current module.
• Sub and End Sub identify the beginning and ending of a Sub procedure.
• <ProcedureName> denotes the name of the procedure. You must give a unique name, and it must not be the same as any of the VBA keywords.
• <ProcedureBody> denotes the code for the procedure. A procedure can have one or more statements that are executed sequentially.
When you declare a procedure without specifying a scope, the private scope is assigned by default. You can declare a procedure by directly typing the procedure name in the Code window or by using the Insert, Procedure command. If you use the Insert, Procedure command, the Add Procedure dialog box appears, as shown in Exhibit 2-2. In the Name box, you enter a name for the procedure. You can also specify the type and scope of the procedure. By default, the Sub type and Public scope are selected.
Exhibit 2-2: The Add Procedure dialog box
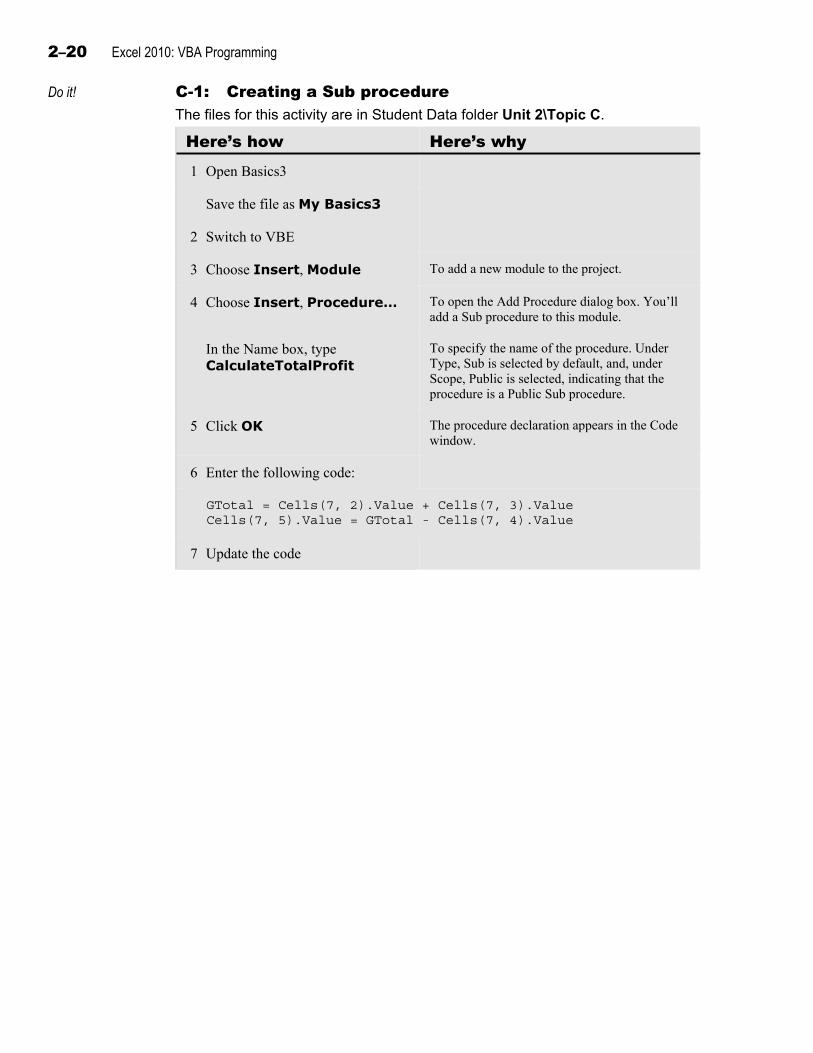
2–20 Excel 2010: VBA Programming
Do it! C-1: Creating a Sub procedure The files for this activity are in Student Data folder Unit 2\Topic C.
Here’s how Here’s why 1 Open Basics3
Save the file as My Basics3
2 Switch to VBE
3 Choose Insert, Module To add a new module to the project.
4 Choose Insert, Procedure… To open the Add Procedure dialog box. You’ll add a Sub procedure to this module.
In the Name box, type CalculateTotalProfit
To specify the name of the procedure. Under Type, Sub is selected by default, and, under Scope, Public is selected, indicating that the procedure is a Public Sub procedure.
5 Click OK The procedure declaration appears in the Code window.
6 Enter the following code:
GTotal = Cells(7, 2).Value + Cells(7, 3).Value Cells(7, 5).Value = GTotal - Cells(7, 4).Value
7 Update the code

Programming basics 2–21
Calling Sub procedures Explanation To create a Public Sub procedure that’s available globally, you need to create it with the
Public keyword. To call a procedure, you use the keyword Call followed by the name of the procedure that you want to execute. The procedure that calls another procedure is known as the calling procedure, and the procedure that’s being called is known as the called procedure. For example, in Exhibit 2-3, the procedure Main calls the procedure CalculateProfit. Here, Main is the calling procedure and CalculateProfit is the called procedure. When you call procedures in this manner, you need to pay special attention to the scope of any variables you use.
It isn’t mandatory to use the Call keyword to call a procedure. You can also specify a procedure name without using the keyword.
When you call a procedure, you can pass information to it through arguments. If a procedure doesn’t need an argument, you can use an empty set of parentheses. A called procedure runs and returns the control to the next line in the calling procedure.
Callstatement
Exhibit 2-3: VBA code with a Call statement
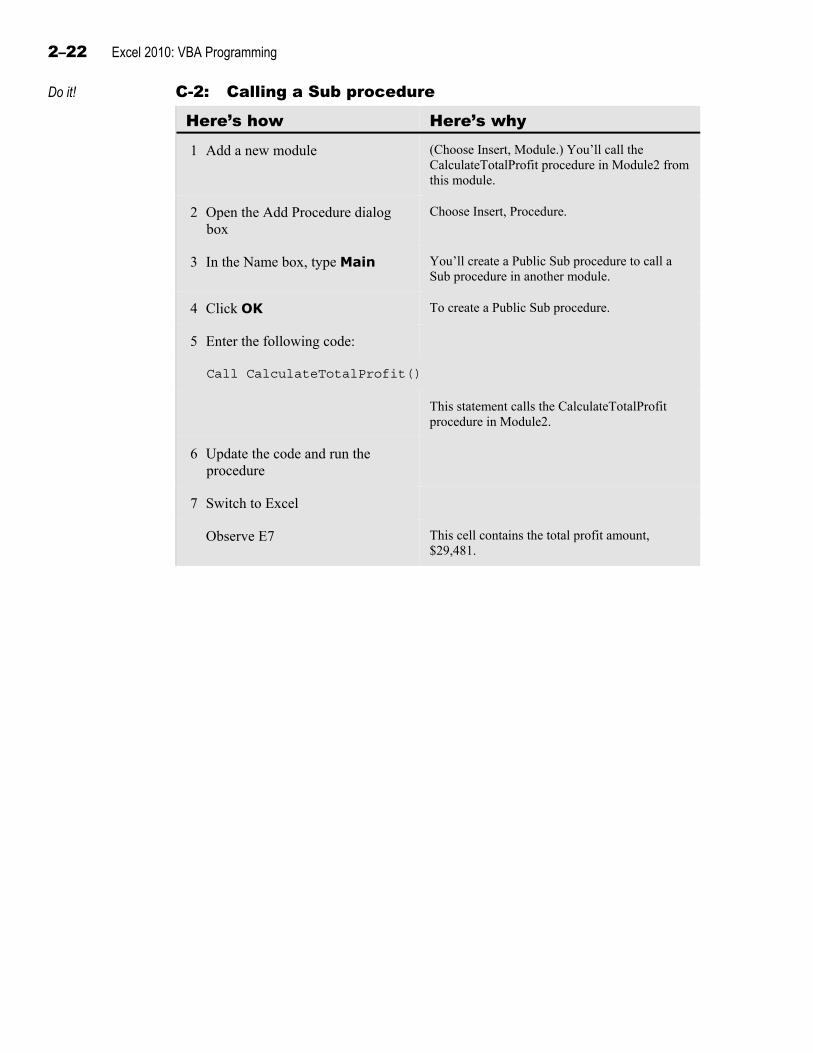
2–22 Excel 2010: VBA Programming
Do it! C-2: Calling a Sub procedure
Here’s how Here’s why 1 Add a new module (Choose Insert, Module.) You’ll call the
CalculateTotalProfit procedure in Module2 from this module.
2 Open the Add Procedure dialog box
Choose Insert, Procedure.
3 In the Name box, type Main You’ll create a Public Sub procedure to call a Sub procedure in another module.
4 Click OK To create a Public Sub procedure.
5 Enter the following code:
Call CalculateTotalProfit()
This statement calls the CalculateTotalProfit procedure in Module2.
6 Update the code and run the procedure
7 Switch to Excel
Observe E7 This cell contains the total profit amount, $29,481.
Programming basics 2–23
Function procedures Explanation Function procedures can return a value, which can then be stored in a variable.
The general syntax to declare a Function procedure is:
Private/Public Function <ProcedureName>() As <data type> <ProcedureBody> End Function
In the syntax:
• Function and End Function identify the beginning and end of a Function procedure.
• Function <ProcedureName> denotes the procedure declaration statement. The procedure name should be unique and cannot be the same as any of the VBA keywords.
• As <data type> specifies the data type for the return value. You need to use the keyword As to specify the data type. When you add a Function procedure to a module, the default return value has the Variant data type if no other data type is declared.
• <ProcedureBody> denotes the code for the procedure. A procedure can have one or more statements that are executed sequentially.
You can also add a Function procedure by using the Add Procedure dialog box and selecting the Function option under Type. The correct declaration of the procedure is automatically added to the module when you click OK.
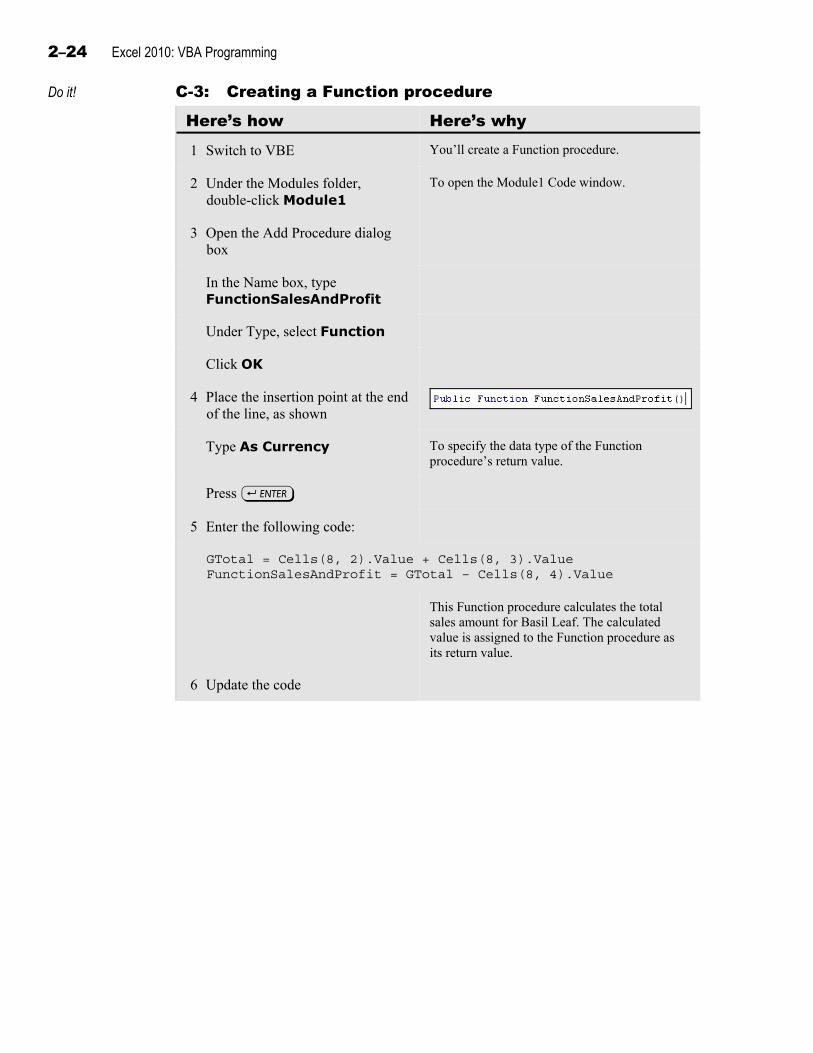
2–24 Excel 2010: VBA Programming
Do it! C-3: Creating a Function procedure
Here’s how Here’s why 1 Switch to VBE You’ll create a Function procedure.
2 Under the Modules folder, double-click Module1
To open the Module1 Code window.
3 Open the Add Procedure dialog box
In the Name box, type FunctionSalesAndProfit
Under Type, select Function
Click OK
4 Place the insertion point at the end of the line, as shown
Type As Currency To specify the data type of the Function procedure’s return value.
Press e
5 Enter the following code:
GTotal = Cells(8, 2).Value + Cells(8, 3).Value FunctionSalesAndProfit = GTotal – Cells(8, 4).Value
This Function procedure calculates the total sales amount for Basil Leaf. The calculated value is assigned to the Function procedure as its return value.
6 Update the code
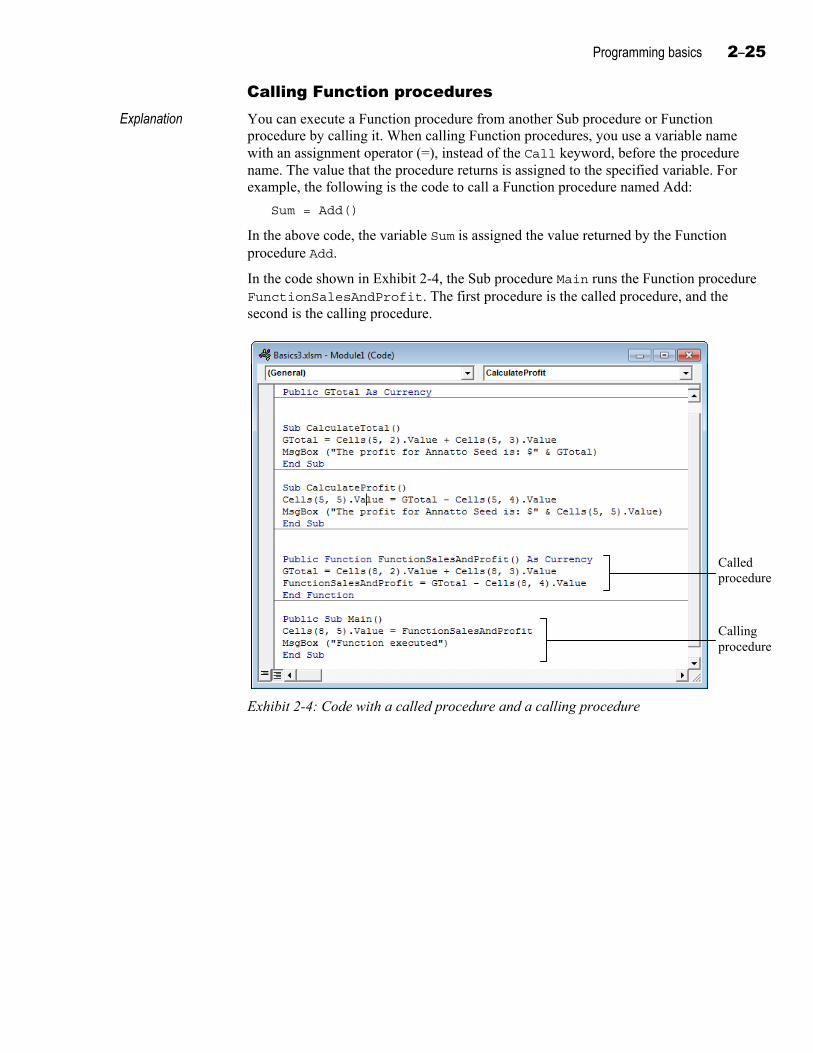
Programming basics 2–25
Calling Function procedures Explanation You can execute a Function procedure from another Sub procedure or Function
procedure by calling it. When calling Function procedures, you use a variable name with an assignment operator (=), instead of the Call keyword, before the procedure name. The value that the procedure returns is assigned to the specified variable. For example, the following is the code to call a Function procedure named Add:
Sum = Add()
In the above code, the variable Sum is assigned the value returned by the Function procedure Add.
In the code shown in Exhibit 2-4, the Sub procedure Main runs the Function procedure FunctionSalesAndProfit. The first procedure is the called procedure, and the second is the calling procedure.
Called procedure
Calling procedure
Exhibit 2-4: Code with a called procedure and a calling procedure
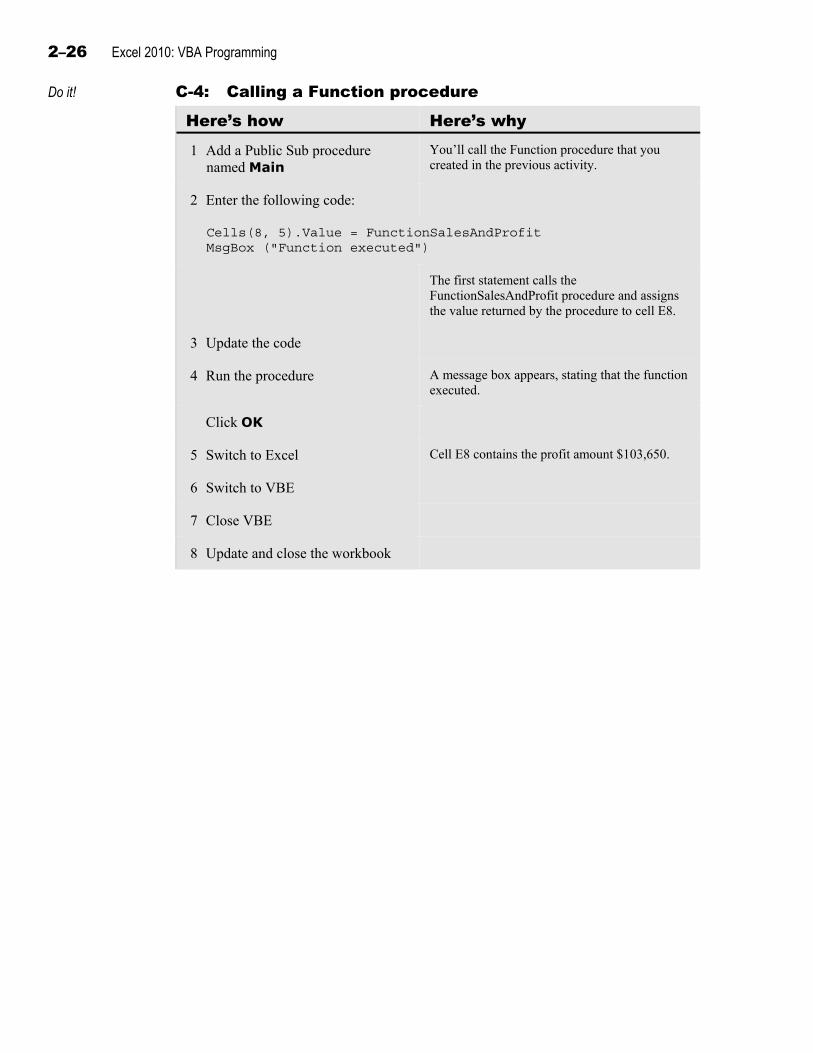
2–26 Excel 2010: VBA Programming
Do it! C-4: Calling a Function procedure
Here’s how Here’s why 1 Add a Public Sub procedure
named Main You’ll call the Function procedure that you created in the previous activity.
2 Enter the following code:
Cells(8, 5).Value = FunctionSalesAndProfit MsgBox ("Function executed")
The first statement calls the FunctionSalesAndProfit procedure and assigns the value returned by the procedure to cell E8.
3 Update the code
4 Run the procedure A message box appears, stating that the function executed.
Click OK
5 Switch to Excel Cell E8 contains the profit amount $103,650.
6 Switch to VBE
7 Close VBE
8 Update and close the workbook
Programming basics 2–27
Unit summary: Programming basics Topic A In this topic, you learned about data types and variables. You learned that variables are
used to store data that you use in a program. You also learned how to use various data types, such as Integer, String, Date, and Currency. Then, you learned about implicit and explicit variable declarations. You learned that you use the Option Explicit statement to ensure explicit declaration. You also learned how to use expressions and operators and how to use interaction functions, such as InputBox and MsgBox.
Topic B In this topic, you learned about the scope of variables. You learned that the scope of a variable determines the extent of its accessibility within a program. Then, you learned about the three levels of scope: procedure-level, private module-level, and public module-level.
Topic C In this topic, you learned about the scope of procedures. You learned how to create Sub and Function procedures and how to call one procedure from another. You learned that a Function procedure can be used when you want to return a value.
Independent practice activity In this activity, you’ll declare variables and create Public Sub procedures with various scopes. Then you’ll insert procedures and functions.
The files for this activity are in Student Data folder Unit 2\Unit summary.
1 Open Sales details.
2 Save the workbook as My sales details.
3 Open VBE.
4 Insert a new module and declare the variables TotalPrice, Price, and SalesTax, all with the Currency data type.
5 Write a Public Sub procedure named DisplaySalesTax that accepts the total price from the user, calculates 8% sales tax, and displays the tax in a message box. (Hint: For this step, the code includes an InputBox and a MsgBox. You need only calculate the sales tax and return that value in the message box; you don’t have to add the sales tax amount with the price.)
6 Update the code and run the procedure. Provide the total price of Cassia as the input value.
7 Write a Public Sub procedure named CalculateSalesAmt to calculate the total price amount, including sales tax. You need to take the total price from cell D4 in the worksheet. (Hint: Use the variable Price to store the price amount from D4, use the variable SalesTax to store the sales tax amount, and use the variable TotalPrice to store the sum of price and sales tax. Don’t run any procedure until you’re instructed to do so. You’ll run this procedure in a later step.)
8 In the same procedure, write code to assign the value in the variable TotalPrice to cell E4.
9 Change the scope of the variables to Public.
10 Insert a new module.
11 Insert a procedure named CallSub and add a statement that calls the procedure CalculateSalesAmt.

2–28 Excel 2010: VBA Programming
12 Update the code and run the CallSub procedure. (Hint: You can check the worksheet to verify that the price, including sales tax, is entered in cell E4.)
13 In Module 2, insert a Function procedure named CalculateSalesTax. Specify the return data type of the Function procedure as Currency.
14 Within the CalculateSalesTax procedure, write code for taking the price amount from cell D5 and calculating the sales tax. The Function procedure should return the sales tax amount to the calling procedure. (Hint: You don’t have to add price to the calculated sales tax amount.)
15 Insert a Sub procedure named CallFunc. Within the procedure, declare the variable ST with the Currency data type. Write a statement to call the procedure CalculateSalesTax. The value returned by the procedure CalculateSalesTax should be assigned to the variable ST.
16 Write code to add the total price amount in cell D5 to the value in ST, and assign the result to cell E5.
17 Update the code and run the CallFunc procedure.
18 Compare your workbook with Exhibit 2-5.
19 Close VBE.
20 Update and close the workbook.
Exhibit 2-5: The My sales details worksheet after Step 15
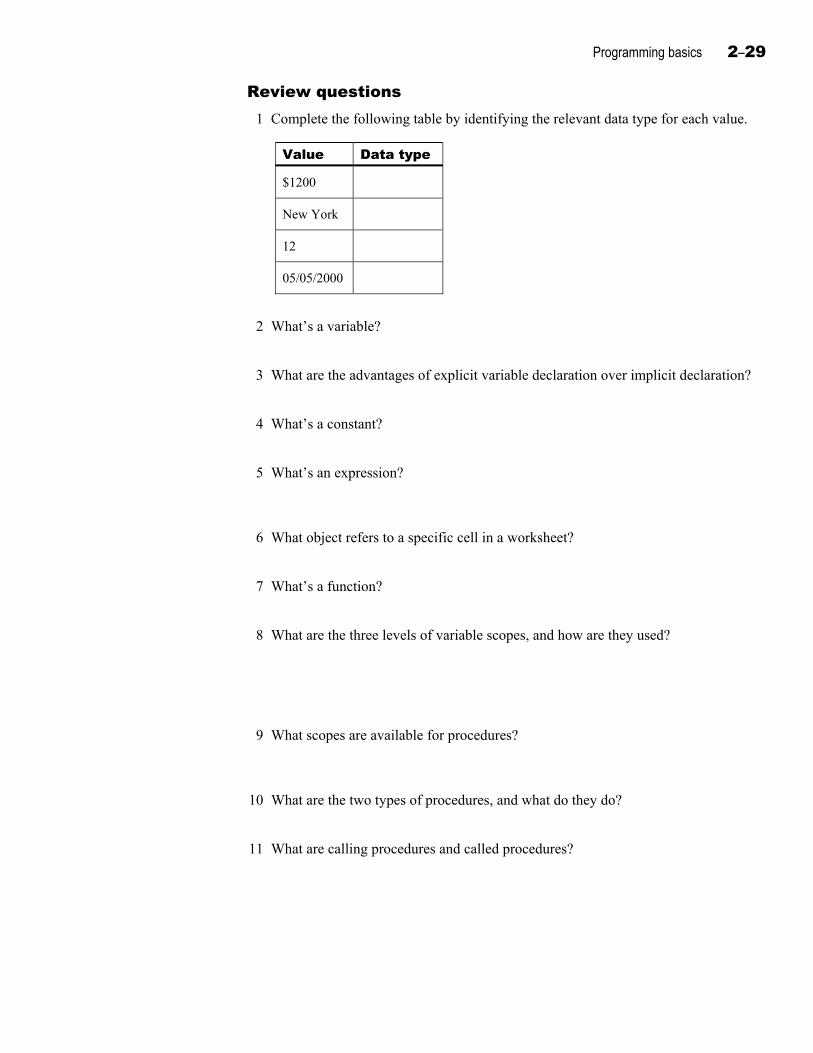
Programming basics 2–29
Review questions 1 Complete the following table by identifying the relevant data type for each value.
Value Data type
$1200
New York
12
05/05/2000
2 What’s a variable?
A named location in memory where data is stored.
3 What are the advantages of explicit variable declaration over implicit declaration?
Explicit declaration helps to prevent errors and can use memory more efficiently.
4 What’s a constant?
A named item that retains a specified value throughout the execution of a program.
5 What’s an expression?
A combination of operators, constants, procedures, controls, and properties that, taken all together, delivers a result.
6 What object refers to a specific cell in a worksheet?
The Cells object.
7 What’s a function?
A function performs actions, such as displaying or obtaining input, and returns a result.
8 What are the three levels of variable scopes, and how are they used?
• Procedure level — Available only within the procedure in which it’s declared.
• Private module-level — Available only to procedures in the current module.
• Public module-level — Available to procedures in various modules.
9 What scopes are available for procedures?
Private procedures can be used only in the current module; public procedures can be used in any module.
10 What are the two types of procedures, and what do they do?
Function procedures can return a value; Sub procedures do not.
11 What are calling procedures and called procedures?
A called procedure is a procedure that’s launched (called) from within another procedure, known as the calling procedure.

2–30 Excel 2010: VBA Programming

3–1
U n i t 3 Control structures
Unit time: 65 minutes
Complete this unit, and you’ll know how to:
A Use decision structures to create procedures that execute code based on specific conditions.
B Use loop structures to execute specific code repeatedly.
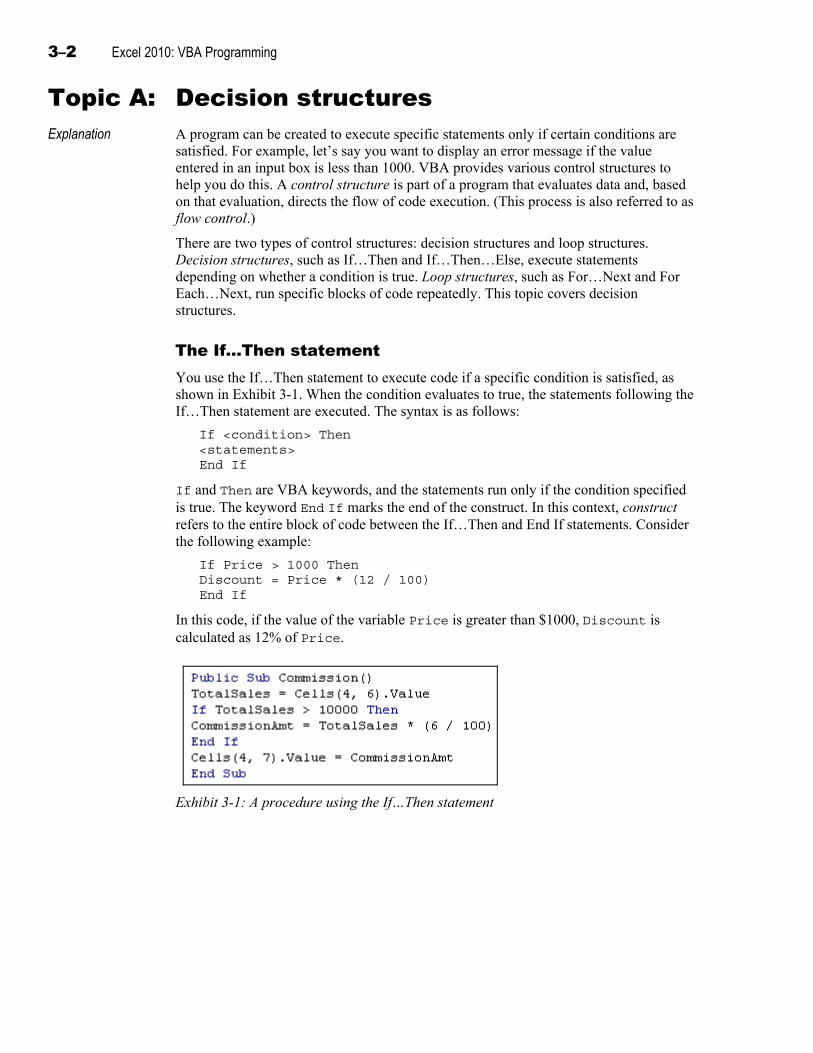
3–2 Excel 2010: VBA Programming
Topic A: Decision structures Explanation A program can be created to execute specific statements only if certain conditions are
satisfied. For example, let’s say you want to display an error message if the value entered in an input box is less than 1000. VBA provides various control structures to help you do this. A control structure is part of a program that evaluates data and, based on that evaluation, directs the flow of code execution. (This process is also referred to as flow control.)
There are two types of control structures: decision structures and loop structures. Decision structures, such as If…Then and If…Then…Else, execute statements depending on whether a condition is true. Loop structures, such as For…Next and For Each…Next, run specific blocks of code repeatedly. This topic covers decision structures.
The If…Then statement You use the If…Then statement to execute code if a specific condition is satisfied, as shown in Exhibit 3-1. When the condition evaluates to true, the statements following the If…Then statement are executed. The syntax is as follows:
If <condition> Then <statements> End If
If and Then are VBA keywords, and the statements run only if the condition specified is true. The keyword End If marks the end of the construct. In this context, construct refers to the entire block of code between the If…Then and End If statements. Consider the following example:
If Price > 1000 Then Discount = Price * (12 / 100) End If
In this code, if the value of the variable Price is greater than $1000, Discount is calculated as 12% of Price.
Exhibit 3-1: A procedure using the If…Then statement
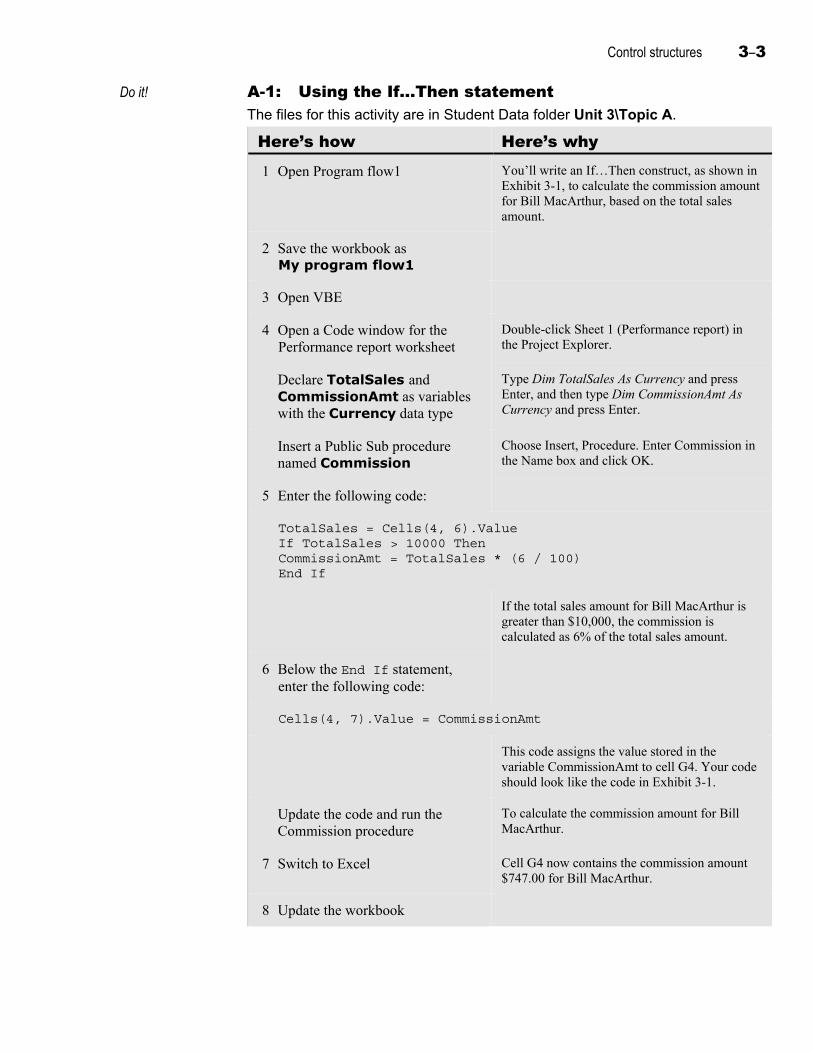
Control structures 3–3
Do it! A-1: Using the If…Then statement The files for this activity are in Student Data folder Unit 3\Topic A.
Here’s how Here’s why 1 Open Program flow1 You’ll write an If…Then construct, as shown in
Exhibit 3-1, to calculate the commission amount for Bill MacArthur, based on the total sales amount.
2 Save the workbook as My program flow1
3 Open VBE
4 Open a Code window for the Performance report worksheet
Double-click Sheet 1 (Performance report) in the Project Explorer.
Declare TotalSales and CommissionAmt as variables with the Currency data type
Type Dim TotalSales As Currency and press Enter, and then type Dim CommissionAmt As Currency and press Enter.
Insert a Public Sub procedure named Commission
Choose Insert, Procedure. Enter Commission in the Name box and click OK.
5 Enter the following code:
TotalSales = Cells(4, 6).Value If TotalSales > 10000 Then CommissionAmt = TotalSales * (6 / 100) End If
If the total sales amount for Bill MacArthur is greater than $10,000, the commission is calculated as 6% of the total sales amount.
6 Below the End If statement, enter the following code:
Cells(4, 7).Value = CommissionAmt
This code assigns the value stored in the variable CommissionAmt to cell G4. Your code should look like the code in Exhibit 3-1.
Update the code and run the Commission procedure
To calculate the commission amount for Bill MacArthur.
7 Switch to Excel Cell G4 now contains the commission amount $747.00 for Bill MacArthur.
8 Update the workbook
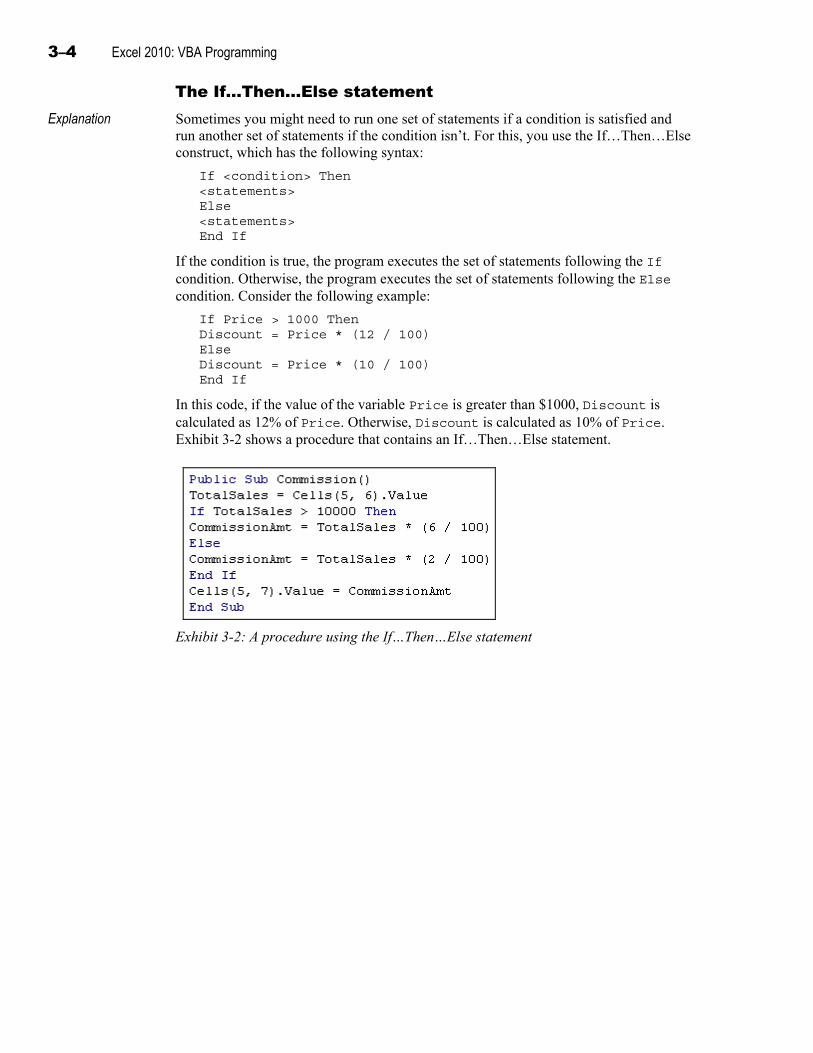
3–4 Excel 2010: VBA Programming
The If…Then…Else statement Explanation Sometimes you might need to run one set of statements if a condition is satisfied and
run another set of statements if the condition isn’t. For this, you use the If…Then…Else construct, which has the following syntax:
If <condition> Then <statements> Else <statements> End If
If the condition is true, the program executes the set of statements following the If condition. Otherwise, the program executes the set of statements following the Else condition. Consider the following example:
If Price > 1000 Then Discount = Price * (12 / 100) Else Discount = Price * (10 / 100) End If
In this code, if the value of the variable Price is greater than $1000, Discount is calculated as 12% of Price. Otherwise, Discount is calculated as 10% of Price. Exhibit 3-2 shows a procedure that contains an If…Then…Else statement.
Exhibit 3-2: A procedure using the If…Then…Else statement
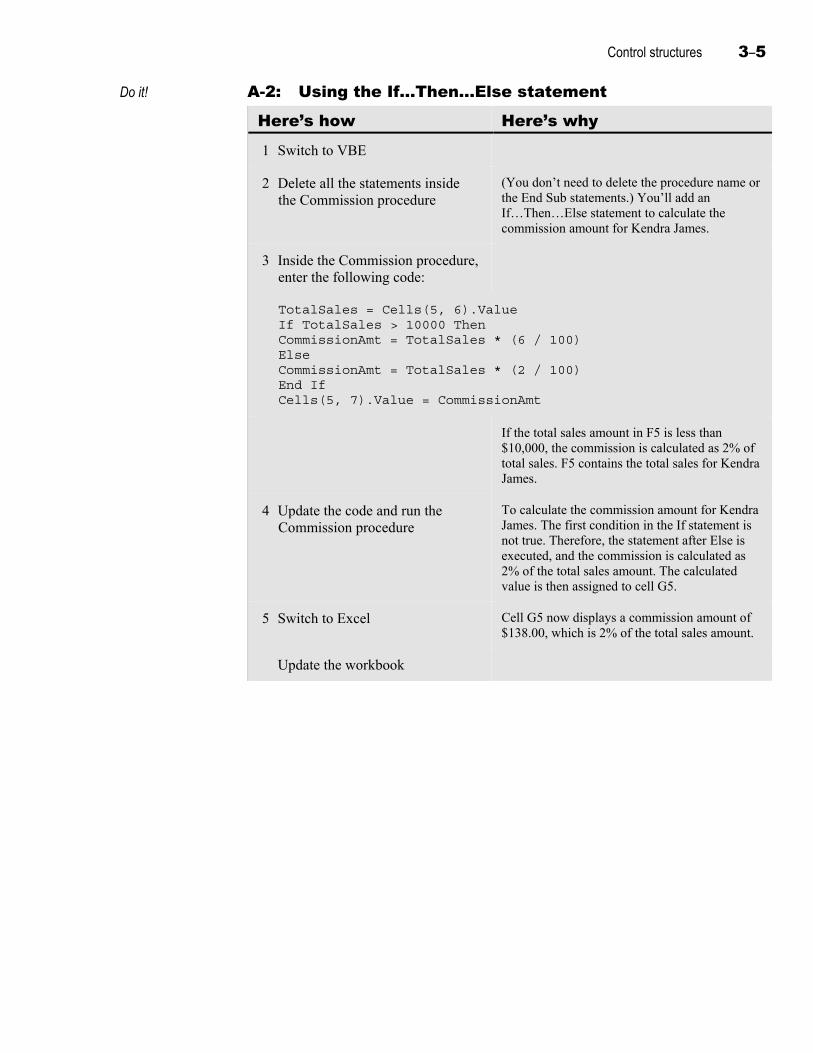
Control structures 3–5
Do it! A-2: Using the If…Then…Else statement
Here’s how Here’s why 1 Switch to VBE
2 Delete all the statements inside the Commission procedure
(You don’t need to delete the procedure name or the End Sub statements.) You’ll add an If…Then…Else statement to calculate the commission amount for Kendra James.
3 Inside the Commission procedure, enter the following code:
TotalSales = Cells(5, 6).Value If TotalSales > 10000 Then CommissionAmt = TotalSales * (6 / 100) Else CommissionAmt = TotalSales * (2 / 100) End If Cells(5, 7).Value = CommissionAmt
If the total sales amount in F5 is less than $10,000, the commission is calculated as 2% of total sales. F5 contains the total sales for Kendra James.
4 Update the code and run the Commission procedure
To calculate the commission amount for Kendra James. The first condition in the If statement is not true. Therefore, the statement after Else is executed, and the commission is calculated as 2% of the total sales amount. The calculated value is then assigned to cell G5.
5 Switch to Excel Cell G5 now displays a commission amount of $138.00, which is 2% of the total sales amount.
Update the workbook
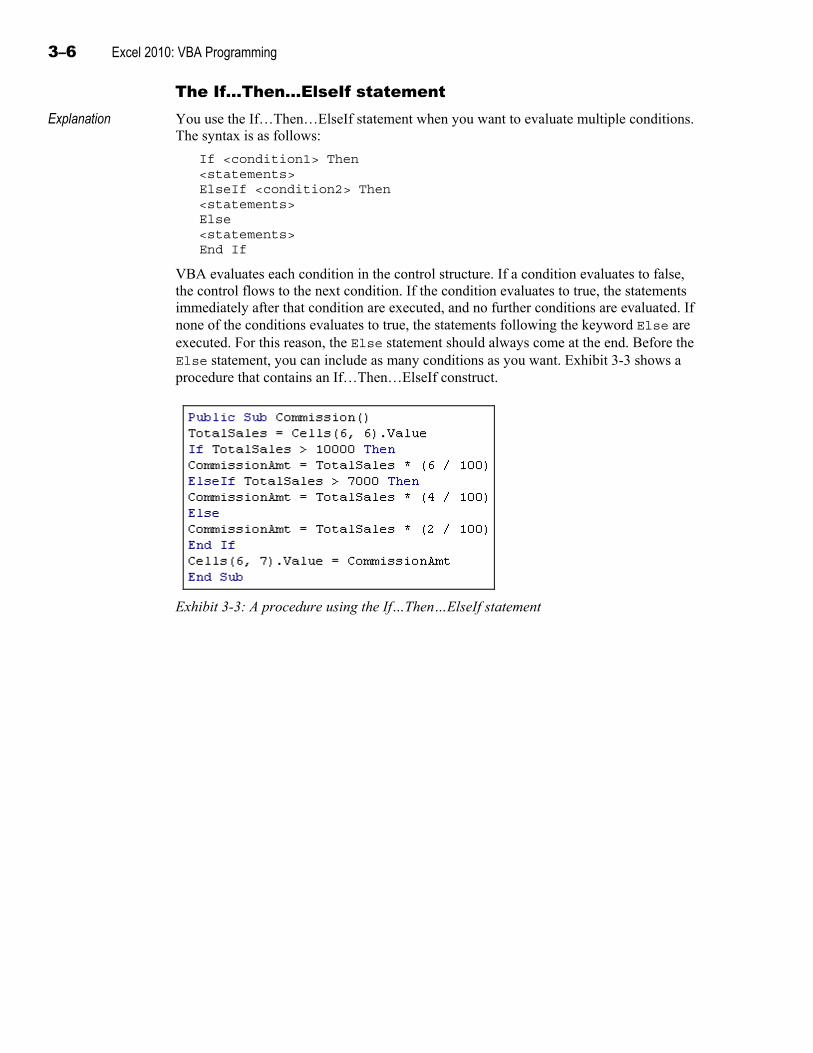
3–6 Excel 2010: VBA Programming
The If…Then…ElseIf statement Explanation You use the If…Then…ElseIf statement when you want to evaluate multiple conditions.
The syntax is as follows:
If <condition1> Then <statements> ElseIf <condition2> Then <statements> Else <statements> End If
VBA evaluates each condition in the control structure. If a condition evaluates to false, the control flows to the next condition. If the condition evaluates to true, the statements immediately after that condition are executed, and no further conditions are evaluated. If none of the conditions evaluates to true, the statements following the keyword Else are executed. For this reason, the Else statement should always come at the end. Before the Else statement, you can include as many conditions as you want. Exhibit 3-3 shows a procedure that contains an If…Then…ElseIf construct.
Exhibit 3-3: A procedure using the If…Then…ElseIf statement
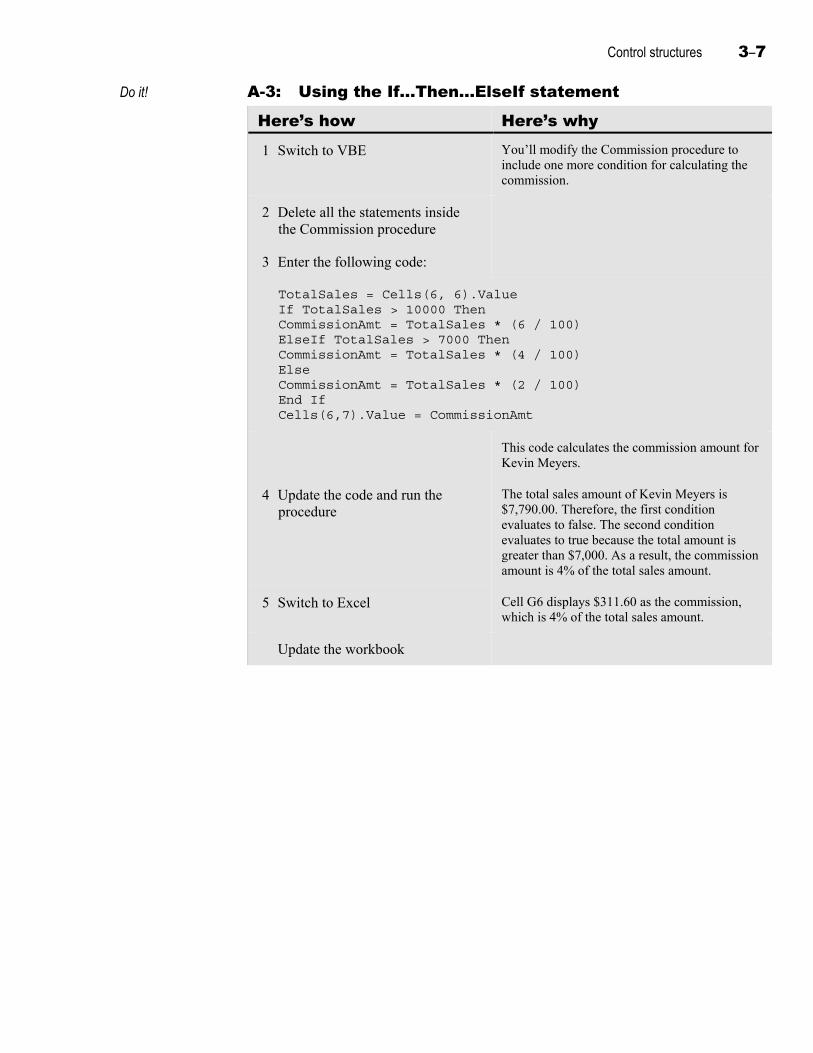
Control structures 3–7
Do it! A-3: Using the If…Then…ElseIf statement
Here’s how Here’s why 1 Switch to VBE You’ll modify the Commission procedure to
include one more condition for calculating the commission.
2 Delete all the statements inside the Commission procedure
3 Enter the following code:
TotalSales = Cells(6, 6).Value If TotalSales > 10000 Then CommissionAmt = TotalSales * (6 / 100) ElseIf TotalSales > 7000 Then CommissionAmt = TotalSales * (4 / 100) Else CommissionAmt = TotalSales * (2 / 100) End If Cells(6,7).Value = CommissionAmt
This code calculates the commission amount for Kevin Meyers.
4 Update the code and run the procedure
The total sales amount of Kevin Meyers is $7,790.00. Therefore, the first condition evaluates to false. The second condition evaluates to true because the total amount is greater than $7,000. As a result, the commission amount is 4% of the total sales amount.
5 Switch to Excel Cell G6 displays $311.60 as the commission, which is 4% of the total sales amount.
Update the workbook
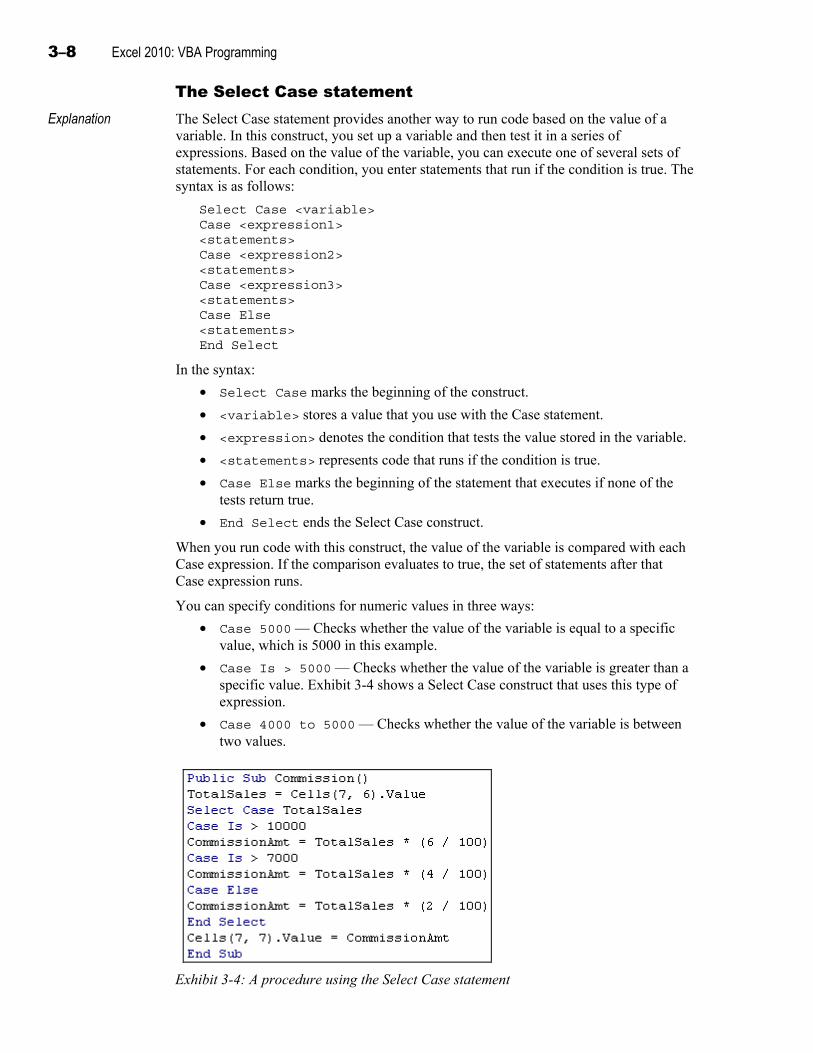
3–8 Excel 2010: VBA Programming
The Select Case statement Explanation The Select Case statement provides another way to run code based on the value of a
variable. In this construct, you set up a variable and then test it in a series of expressions. Based on the value of the variable, you can execute one of several sets of statements. For each condition, you enter statements that run if the condition is true. The syntax is as follows:
Select Case <variable> Case <expression1> <statements> Case <expression2> <statements> Case <expression3> <statements> Case Else <statements> End Select
In the syntax:
• Select Case marks the beginning of the construct.
• <variable> stores a value that you use with the Case statement.
• <expression> denotes the condition that tests the value stored in the variable.
• <statements> represents code that runs if the condition is true.
• Case Else marks the beginning of the statement that executes if none of the tests return true.
• End Select ends the Select Case construct.
When you run code with this construct, the value of the variable is compared with each Case expression. If the comparison evaluates to true, the set of statements after that Case expression runs.
You can specify conditions for numeric values in three ways:
• Case 5000 — Checks whether the value of the variable is equal to a specific value, which is 5000 in this example.
• Case Is > 5000 — Checks whether the value of the variable is greater than a specific value. Exhibit 3-4 shows a Select Case construct that uses this type of expression.
• Case 4000 to 5000 — Checks whether the value of the variable is between two values.
Exhibit 3-4: A procedure using the Select Case statement

Control structures 3–9
After VBA finishes executing the statements in the relevant Case expression, it moves to the End Select statement. If all the Case conditions evaluate to false, the statements following Case Else run. For example, if you want to test the value of an integer variable named Amount, the code is as follows:
Select Case Amount Case Is > 4000 Percentage = 10 Case Is > 3000 Percentage = 5 Case Else Percentage = 3 End Select
In the above code, the value 10 is assigned to the variable Percentage if the value contained in Amount is greater than 4000. If the value in Amount is greater than 3000 but less than 4000, the statements after Case Is > 3000 are executed and the value 5 is assigned to the variable Percentage. If none of the conditions is satisfied, the statements after Case Else are executed. In that case, the value 3 is assigned to Percentage.
You can test the value of a string variable by enclosing the value within double quotation marks (“”). For example, to check whether the value in a string variable is Marketing, the Case statement is:
Case "Marketing"
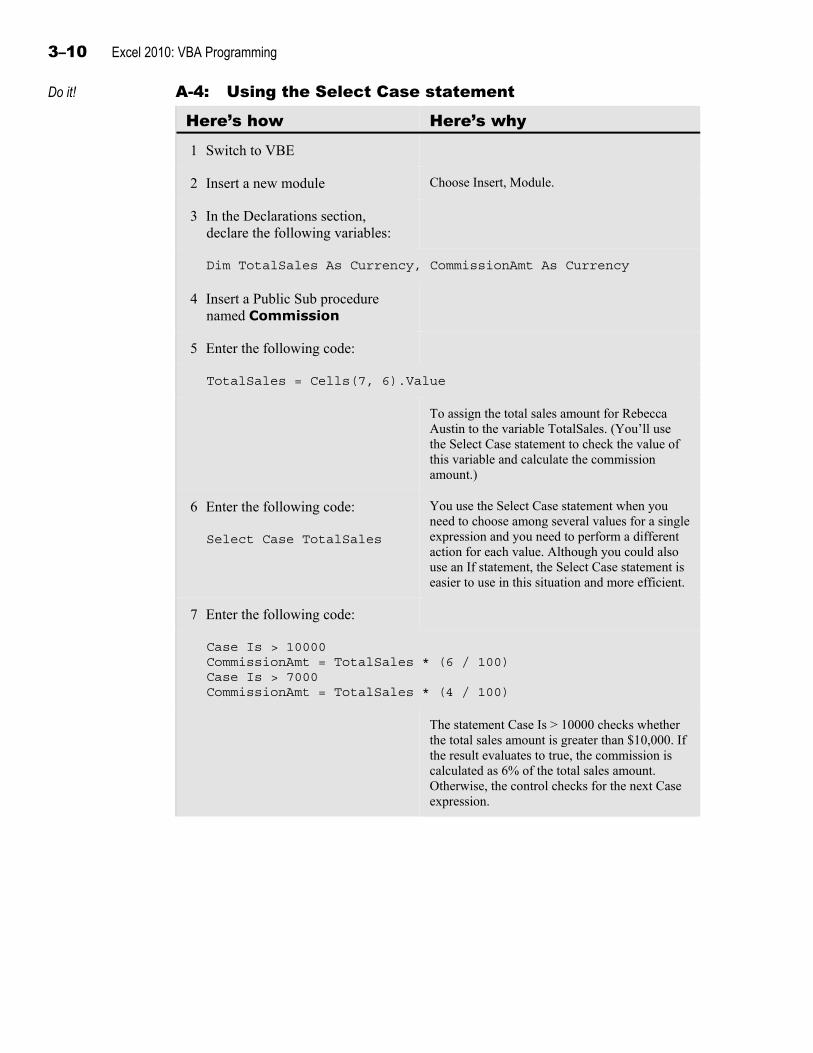
3–10 Excel 2010: VBA Programming
Do it! A-4: Using the Select Case statement
Here’s how Here’s why 1 Switch to VBE
2 Insert a new module Choose Insert, Module.
3 In the Declarations section, declare the following variables:
Dim TotalSales As Currency, CommissionAmt As Currency
4 Insert a Public Sub procedure named Commission
5 Enter the following code:
TotalSales = Cells(7, 6).Value
To assign the total sales amount for Rebecca Austin to the variable TotalSales. (You’ll use the Select Case statement to check the value of this variable and calculate the commission amount.)
6 Enter the following code:
Select Case TotalSales
You use the Select Case statement when you need to choose among several values for a single expression and you need to perform a different action for each value. Although you could also use an If statement, the Select Case statement is easier to use in this situation and more efficient.
7 Enter the following code:
Case Is > 10000 CommissionAmt = TotalSales * (6 / 100) Case Is > 7000 CommissionAmt = TotalSales * (4 / 100)
The statement Case Is > 10000 checks whether the total sales amount is greater than $10,000. If the result evaluates to true, the commission is calculated as 6% of the total sales amount. Otherwise, the control checks for the next Case expression.
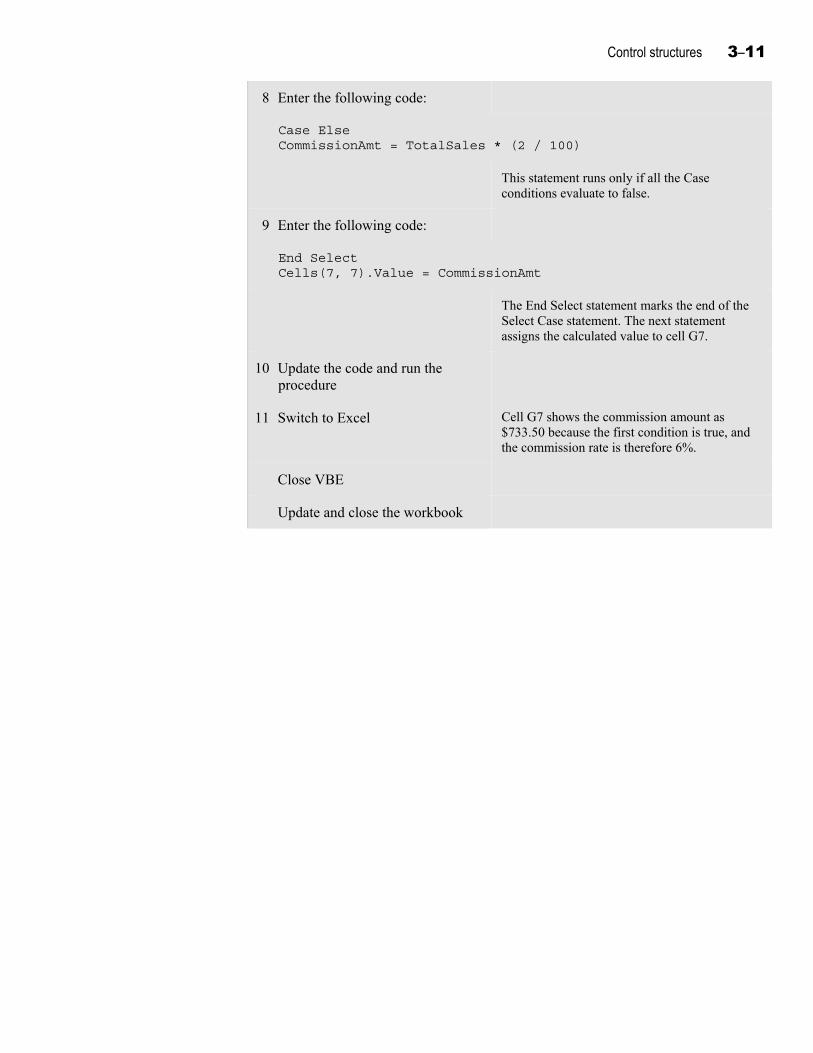
Control structures 3–11
8 Enter the following code:
Case Else CommissionAmt = TotalSales * (2 / 100)
This statement runs only if all the Case conditions evaluate to false.
9 Enter the following code:
End Select Cells(7, 7).Value = CommissionAmt
The End Select statement marks the end of the Select Case statement. The next statement assigns the calculated value to cell G7.
10 Update the code and run the procedure
11 Switch to Excel Cell G7 shows the commission amount as $733.50 because the first condition is true, and the commission rate is therefore 6%.
Close VBE
Update and close the workbook

3–12 Excel 2010: VBA Programming
Topic B: Loop structures Explanation You use loop structures, such as For…Next and For Each…Next, when you want to run
a specific block of code repeatedly. You can use either of two types of loop structures, depending on the number of iterations needed. An iteration is a complete cycle of execution of the statements in a loop. The two types of iteration are:
• Fixed iteration — Runs a set of statements for a predetermined number of times. For example, the For…Next loop uses a fixed iteration.
• Indefinite iteration — Runs a set of statements until a specific condition is met. For example, the Do While…loop uses an indefinite iteration.
The For…Next loop You use the For…Next loop when you want to execute a loop a fixed number of times. The syntax is:
For <counter> = <start> To <end> <statements> Next <counter>
In the syntax:
• <counter> denotes a variable that keeps track of the number of iterations. After each iteration, the value of this variable automatically increases by one.
• <start> represents the initial value of the counter.
• <end> represents the end value of the counter.
• <statements> represents the code that’s executed in each iteration.
• Next increases the value of the counter by one and sends the control to the beginning of the loop.
The following example calculates and displays the sum of the first 10 positive integers:
For Count = 1 To 10 Sum = Sum + Count Next Count MsgBox ("The sum of the first ten positive integers is " & Sum)
In this code, the initial value for the counter variable Count is 1, and the end value is 10. When the loop begins, the variable Sum stores the value 1. When the control moves to the Next Count statement, it increases the value of the counter to 2. In this iteration, 2 is added to the variable Sum to change its value to 3. This loop continues until the value of the counter variable reaches 10. The control then flows out of the loop structure, and a message box displays the sum as 55. Exhibit 3-5 shows a procedure that includes a For…Next loop.
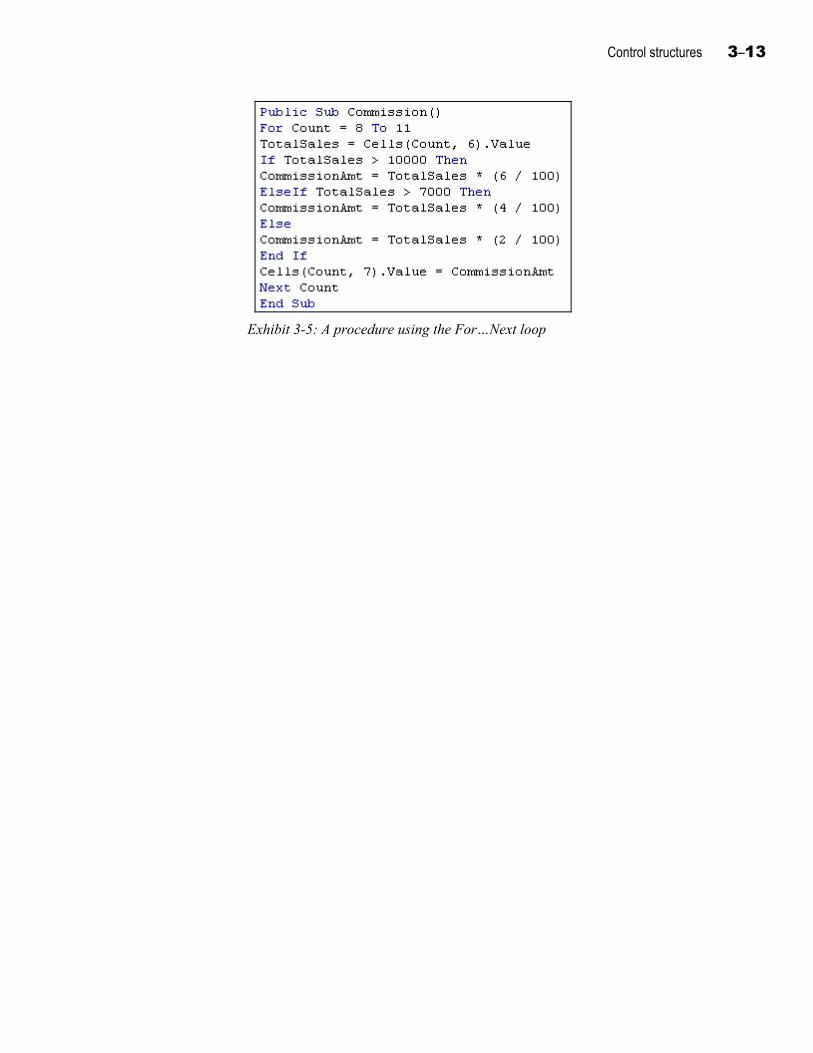
Control structures 3–13
Exhibit 3-5: A procedure using the For…Next loop
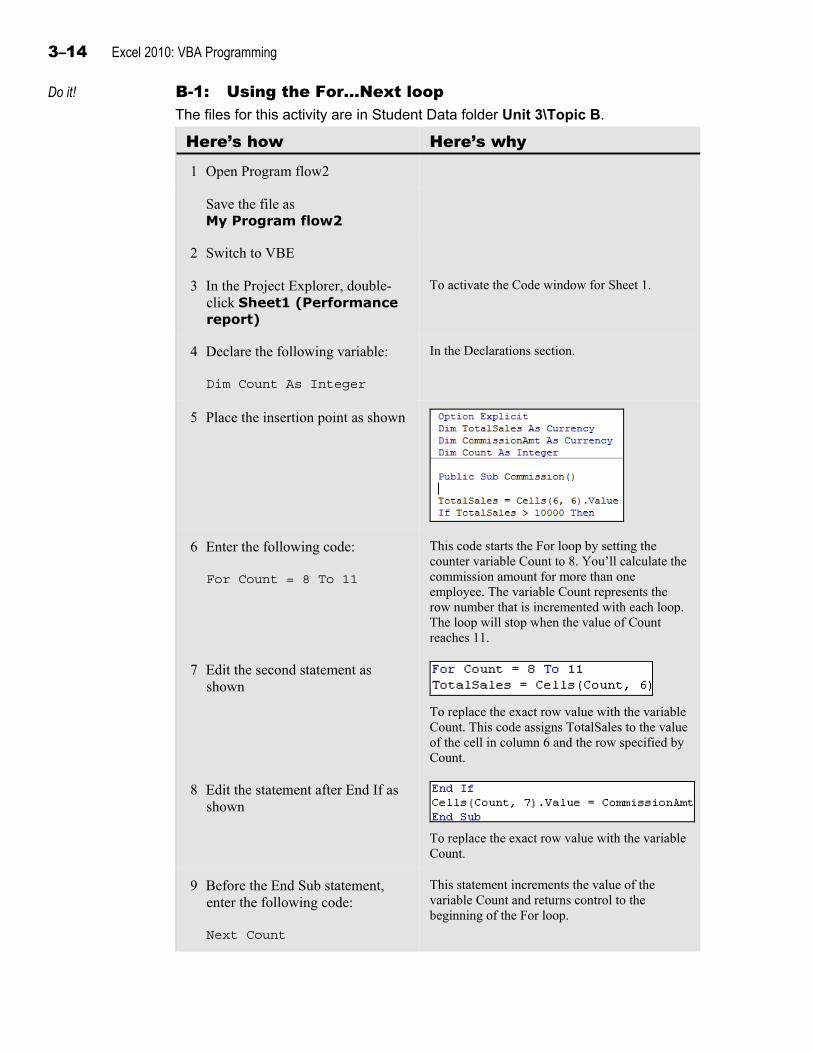
3–14 Excel 2010: VBA Programming
Do it! B-1: Using the For…Next loop The files for this activity are in Student Data folder Unit 3\Topic B.
Here’s how Here’s why 1 Open Program flow2
Save the file as My Program flow2
2 Switch to VBE
3 In the Project Explorer, double-click Sheet1 (Performance report)
To activate the Code window for Sheet 1.
4 Declare the following variable:
Dim Count As Integer
In the Declarations section.
5 Place the insertion point as shown
6 Enter the following code:
For Count = 8 To 11
This code starts the For loop by setting the counter variable Count to 8. You’ll calculate the commission amount for more than one employee. The variable Count represents the row number that is incremented with each loop. The loop will stop when the value of Count reaches 11.
7 Edit the second statement as shown
To replace the exact row value with the variable Count. This code assigns TotalSales to the value of the cell in column 6 and the row specified by Count.
8 Edit the statement after End If as shown
To replace the exact row value with the variable Count.
9 Before the End Sub statement, enter the following code:
Next Count
This statement increments the value of the variable Count and returns control to the beginning of the For loop.

Control structures 3–15
10 Update the code and run the procedure
11 Switch to Excel Cells G8, G9, G10, and G11 now have commission amounts calculated, based on their respective total sales amounts.
Update the workbook
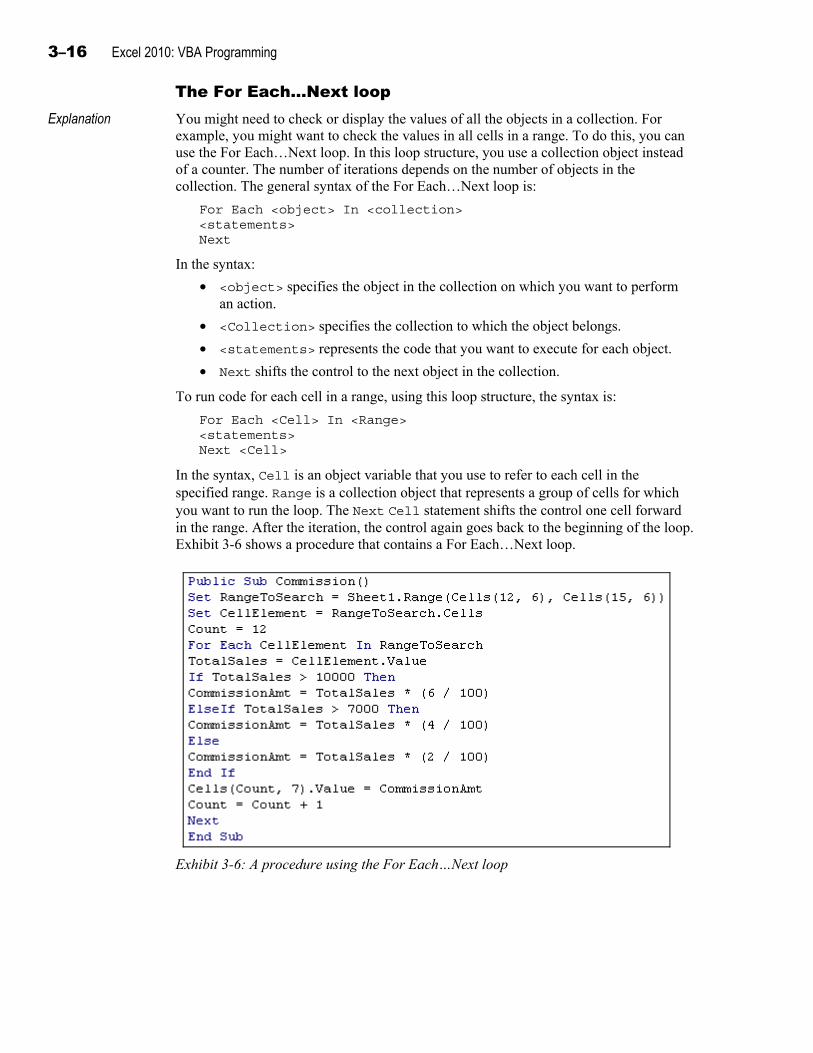
3–16 Excel 2010: VBA Programming
The For Each…Next loop Explanation You might need to check or display the values of all the objects in a collection. For
example, you might want to check the values in all cells in a range. To do this, you can use the For Each…Next loop. In this loop structure, you use a collection object instead of a counter. The number of iterations depends on the number of objects in the collection. The general syntax of the For Each…Next loop is:
For Each <object> In <collection> <statements> Next
In the syntax:
• <object> specifies the object in the collection on which you want to perform an action.
• <Collection> specifies the collection to which the object belongs.
• <statements> represents the code that you want to execute for each object.
• Next shifts the control to the next object in the collection.
To run code for each cell in a range, using this loop structure, the syntax is:
For Each <Cell> In <Range> <statements> Next <Cell>
In the syntax, Cell is an object variable that you use to refer to each cell in the specified range. Range is a collection object that represents a group of cells for which you want to run the loop. The Next Cell statement shifts the control one cell forward in the range. After the iteration, the control again goes back to the beginning of the loop. Exhibit 3-6 shows a procedure that contains a For Each…Next loop.
Exhibit 3-6: A procedure using the For Each…Next loop
Control structures 3–17
Object variables and the Set statement
Object variables store references to VBA objects rather than storing values. Object variables are different from other types of variables. To use an object variable, you need to assign it to a VBA object. You can use the Set statement to do this. For example, the following statement would assign the object variable SalesRange to refer to the range A1:B2 in Sheet1 of the active workbook:
Set SalesRange = Sheet1.Range(Cells(1, 1), Cells(2, 2))
After you assign the variable to a VBA object, you can use that object variable as if it were the object itself. This variable can then access the properties and methods of the object. In this example, SalesRange.Name would access the Name property of the range SalesRange. The code SalesRange.Clear would call the Clear method of the Range object, which clears the contents of the range.

3–18 Excel 2010: VBA Programming
Do it! B-2: Using the For Each…Next loop
Here’s how Here’s why 1 Switch to VBE
2 Declare the following variables:
Dim RangeToSearch As Object, CellElement As Object
(In the Declarations section of the Sheet1 Code window.) You’ll use these object variables to manage the For Each…Next loop in the procedure you’re about to create.
3 Delete all the statements within the Commission procedure
4 Enter the following code:
Set RangeToSearch = Sheet1.Range(Cells(12, 6), Cells(15, 6)) Set CellElement = RangeToSearch.Cells
You use the Set statement to assign an Object variable to a specific object. The range F12:F15 in Sheet1 of the current workbook is assigned to the variable RangeToSearch. The cells that are in the range specified by RangeToSearch are assigned to the variable CellElement.
5 Enter Count = 12 You’ll use the Count variable to assign the commission amount to the Commission column in the sheet. This variable keeps track of which row’s total amount is processed to find the commission amount.
6 Enter the following code:
For Each CellElement In RangeToSearch
This statement runs the code for each cell in the range.
7 Enter the following code:
TotalSales = CellElement.Value
This statement assigns the value of the current cell in the range to the variable TotalSales.
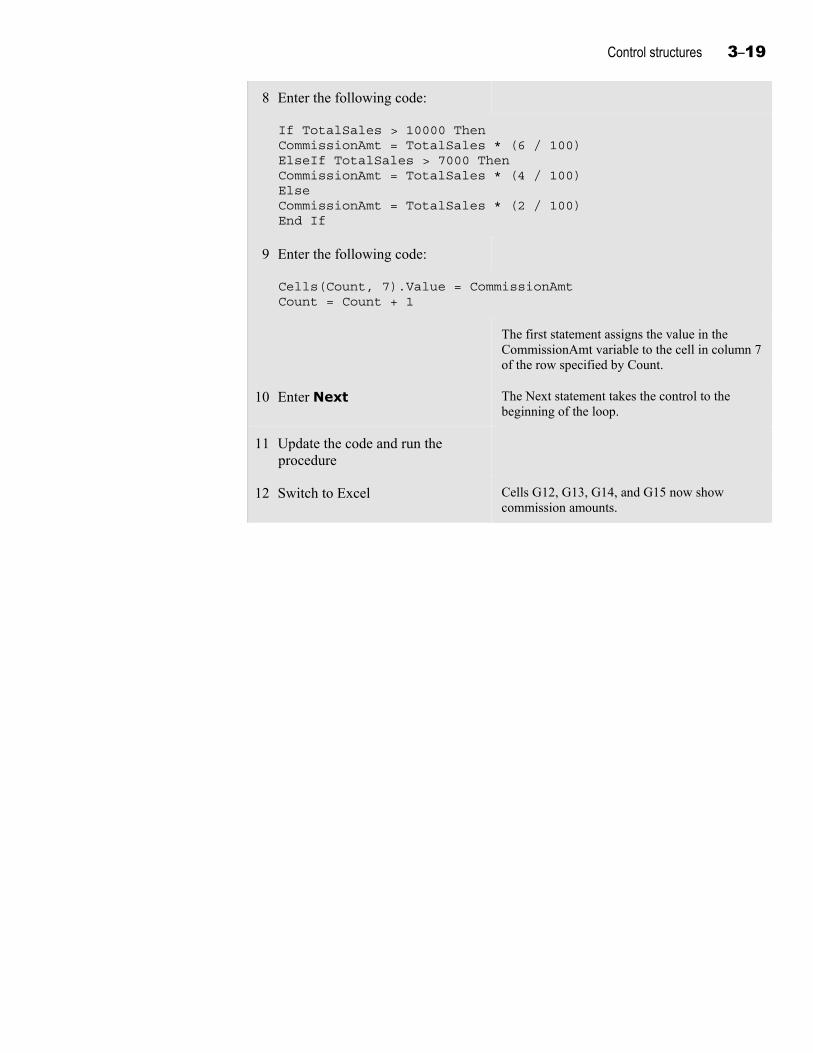
Control structures 3–19
8 Enter the following code:
If TotalSales > 10000 Then CommissionAmt = TotalSales * (6 / 100) ElseIf TotalSales > 7000 Then CommissionAmt = TotalSales * (4 / 100) Else CommissionAmt = TotalSales * (2 / 100) End If
9 Enter the following code:
Cells(Count, 7).Value = CommissionAmt Count = Count + 1
The first statement assigns the value in the CommissionAmt variable to the cell in column 7 of the row specified by Count.
10 Enter Next The Next statement takes the control to the beginning of the loop.
11 Update the code and run the procedure
12 Switch to Excel Cells G12, G13, G14, and G15 now show commission amounts.
3–20 Excel 2010: VBA Programming
Do…Loop statements Explanation You use Do…Loop statements to perform repetitive tasks based on a condition. You
can write a Do…Loop statement with the keywords Until or While.
The Do Until…Loop statement
The Do Until…Loop statement repeatedly executes a block of code until the specified condition evaluates to true. The syntax of the statement is as follows:
Do Until <condition> <statements> Loop
The keyword Do starts the loop. The keyword Until runs the loop until the condition evaluates to false. The keyword Loop takes the control to the beginning of the loop.
You can also use the following syntax for the Do Until…Loop statement:
Do <statements> Loop Until <condition>
In this type of loop, the condition to be tested is specified at the end. It’s evaluated only after the first iteration, and the loop runs at least once.
The Do While…Loop statement
The Do While…Loop statement repeatedly executes a block of code until the specified condition evaluates to true. The syntax of the statement is as follows:
Do While <condition> <statements> Loop
The keyword Do starts the loop, and the keyword While checks the condition. If the condition evaluates to true, the statements inside the loop are executed. The Loop keyword takes the control to the beginning of the loop, where the condition is tested again.
The Do While…Loop statement checks the condition before executing the statements. You need to initialize the variable you use in the condition before the beginning of the loop statement. However, you can also specify the condition at the end, along with the keyword Loop. This syntax ensures that the variable is tested only at the end of each iteration. In this case, the variable needs to be initialized only within the loop construct. Exhibit 3-7 shows a procedure that contains a Do While…Loop statement.
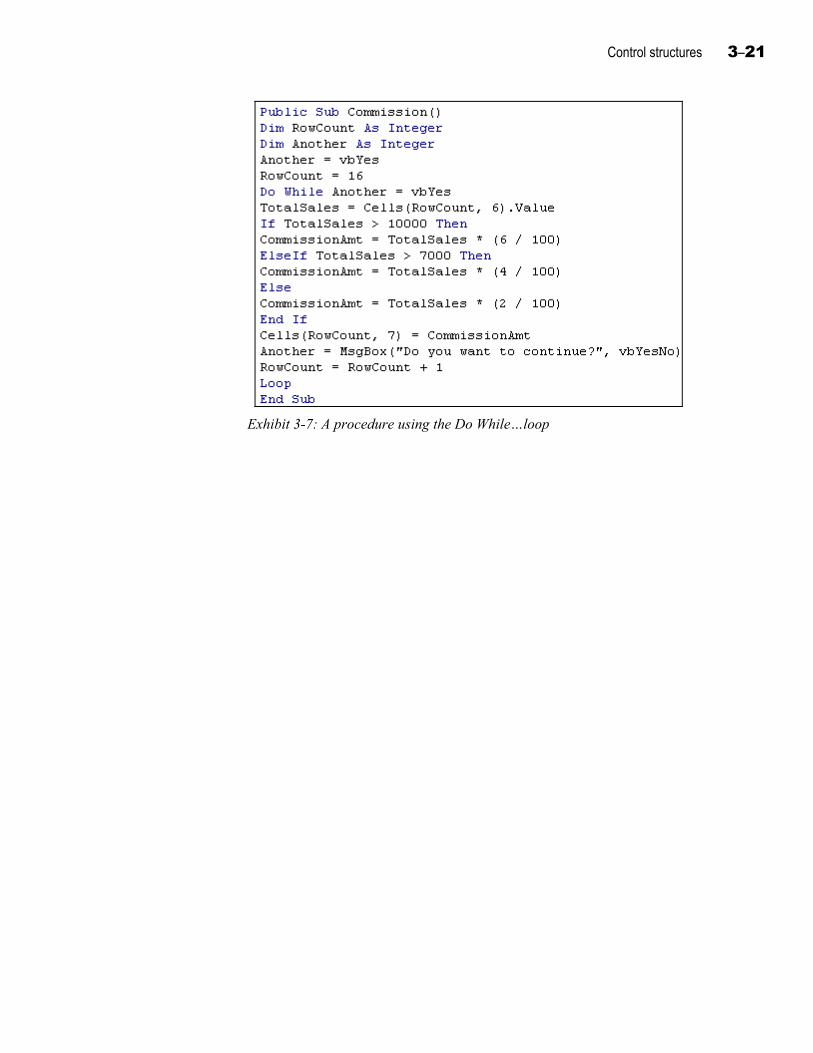
Control structures 3–21
Exhibit 3-7: A procedure using the Do While…loop
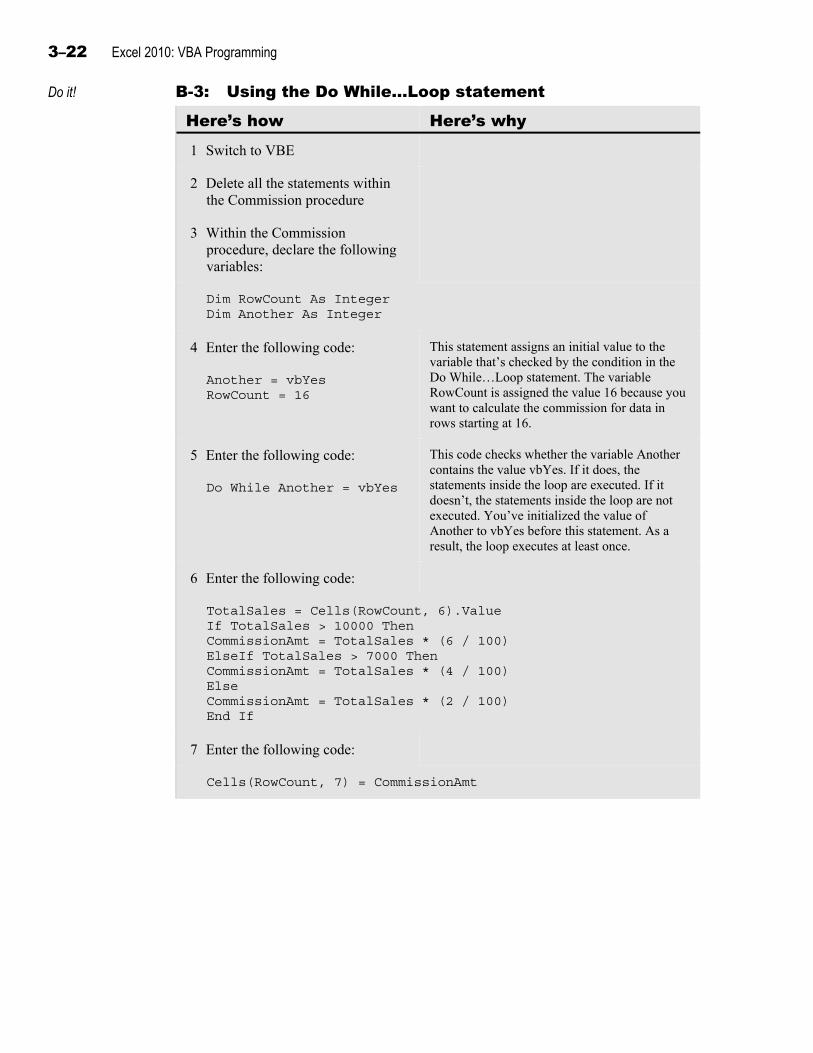
3–22 Excel 2010: VBA Programming
Do it! B-3: Using the Do While…Loop statement
Here’s how Here’s why 1 Switch to VBE
2 Delete all the statements within the Commission procedure
3 Within the Commission procedure, declare the following variables:
Dim RowCount As Integer Dim Another As Integer
4 Enter the following code:
Another = vbYes RowCount = 16
This statement assigns an initial value to the variable that’s checked by the condition in the Do While…Loop statement. The variable RowCount is assigned the value 16 because you want to calculate the commission for data in rows starting at 16.
5 Enter the following code:
Do While Another = vbYes
This code checks whether the variable Another contains the value vbYes. If it does, the statements inside the loop are executed. If it doesn’t, the statements inside the loop are not executed. You’ve initialized the value of Another to vbYes before this statement. As a result, the loop executes at least once.
6 Enter the following code:
TotalSales = Cells(RowCount, 6).Value If TotalSales > 10000 Then CommissionAmt = TotalSales * (6 / 100) ElseIf TotalSales > 7000 Then CommissionAmt = TotalSales * (4 / 100) Else CommissionAmt = TotalSales * (2 / 100) End If
7 Enter the following code:
Cells(RowCount, 7) = CommissionAmt
Control structures 3–23
8 Enter the following code:
Another = MsgBox ("Do you want to calculate the commission ► for the next row?", vbYesNo) RowCount = RowCount + 1 Loop
This code displays a message box asking you to calculate the commission for the next row of data. If you click Yes, the Loop statement repeats the code inside the Do While…Loop statement.
9 Update the code
10 Run the procedure The commission amount for Sandra Lawrence appears in cell G16 in the Excel sheet. A message box appears, asking whether you want to calculate the commission for the next row.
Click Yes The commission amount for Mary Smith appears in cell G17. A message box asks you whether you want to calculate the commission for the next row.
Click Yes The commission amount for Annie Philips appears in G18. The message box also appears.
Click No To close the message box. No more message boxes appear because when you click No, the value in the variable Another changes to vbNo, and the condition for the loop no longer evaluates to true.
11 Close VBE
12 Update and close the workbook
3–24 Excel 2010: VBA Programming
Unit summary: Control structures Topic A In this topic, you learned how to write decision-making code by using various If
statements, such as If…Then, If…Then…Else, and If…Then…ElseIf. You also learned how to use the Select Case construct instead of using multiple If…Then…ElseIf statements.
Topic B In this topic, you learned how to use various types of loop structures to run a block of code repeatedly. You learned how to use For…Next and For Each…Next for a fixed number of iterations. You also learned how to use Do…loops, such as Do Until…Loop and Do While…Loop, when the number of iterations depends on a condition.
Independent practice activity In this activity, you’ll use If statements to create a procedure that calculates one of two different bonus rates depending on an employee’s earnings. Then, you’ll use loop structures to create a procedure that calculates one of several bonus rates for an employee and uses a message box to prompt the user to continue.
The files for this activity are in Student Data folder Unit 3\Unit summary.
1 Open Practice bonus.
2 Save the file as My practice bonus.
3 Open VBE.
4 Write a procedure that obtains earnings from the Earning column in the worksheet, calculates a bonus, and displays it in the corresponding cell in the Bonus column. The bonus should be 15% for employees with earnings more than $100,000, and 10% for employees with earnings less than that. You need to calculate the bonus until the sixteenth row. (Hint: Use If…Then…Else with a For…Next loop.) Compare your procedure to the one shown in Exhibit 3-8. Note that there are many possible variations in procedure code that can return the correct results.
5 Update the code and run the procedure.
6 Create a procedure to calculate and display bonuses for the remaining employees based on the following conditions. (Hint: You need to use a message box to determine whether to continue before calculating the bonus for each employee. Use Select Case with Do While…Loop.)
• If Earning is more than $100,000, the bonus is 15%.
• If Earning is more than $80,000, the bonus is 12%.
• If Earning is less than or equal to $80,000, the bonus is 10%. Compare your procedure to the one shown in Exhibit 3-9. Note that there are many possible variations in procedure code that can return the correct results.
7 Update the code and run the procedure. Calculate the bonuses for the remaining employees.
8 Close VBE.
9 Compare your worksheet with the one in Exhibit 3-10.
10 Update and close the workbook.
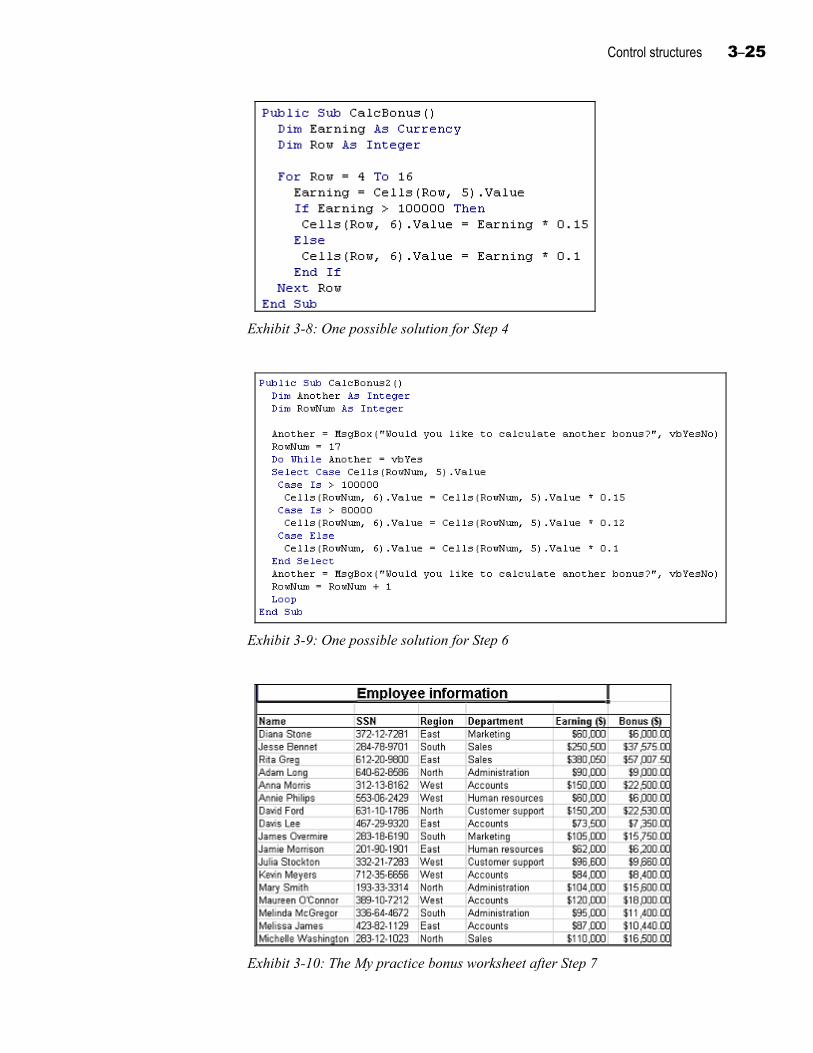
Control structures 3–25
Exhibit 3-8: One possible solution for Step 4
Exhibit 3-9: One possible solution for Step 6
Exhibit 3-10: The My practice bonus worksheet after Step 7

3–26 Excel 2010: VBA Programming
Review questions 1 What’s a control structure?
Part of a program that evaluates data and then directs the execution of code.
2 What does an If…Then statement do?
Executes code only if a specific condition is satisfied.
3 What does the If…Then…Else statement do?
Runs one set of code if a specific condition is satisfied, and another set of code if it isn’t.
4 What does the Select Case statement do?
Evaluates a variable and then runs one of many sets of code, depending on the value of the variable.
5 When do you use a loop structure?
When you want a specific block of code to run repeatedly.
6 What does the Do…Loop statement do?
Runs a block of code repeatedly until a condition is met.
4–1
U n i t 4 Custom dialog boxes
Unit time: 55 minutes
Complete this unit, and you’ll know how to:
A Add a user form to your project and add controls to that user form.
B Handle events attached to controls in a user form and validate the data entered by users.
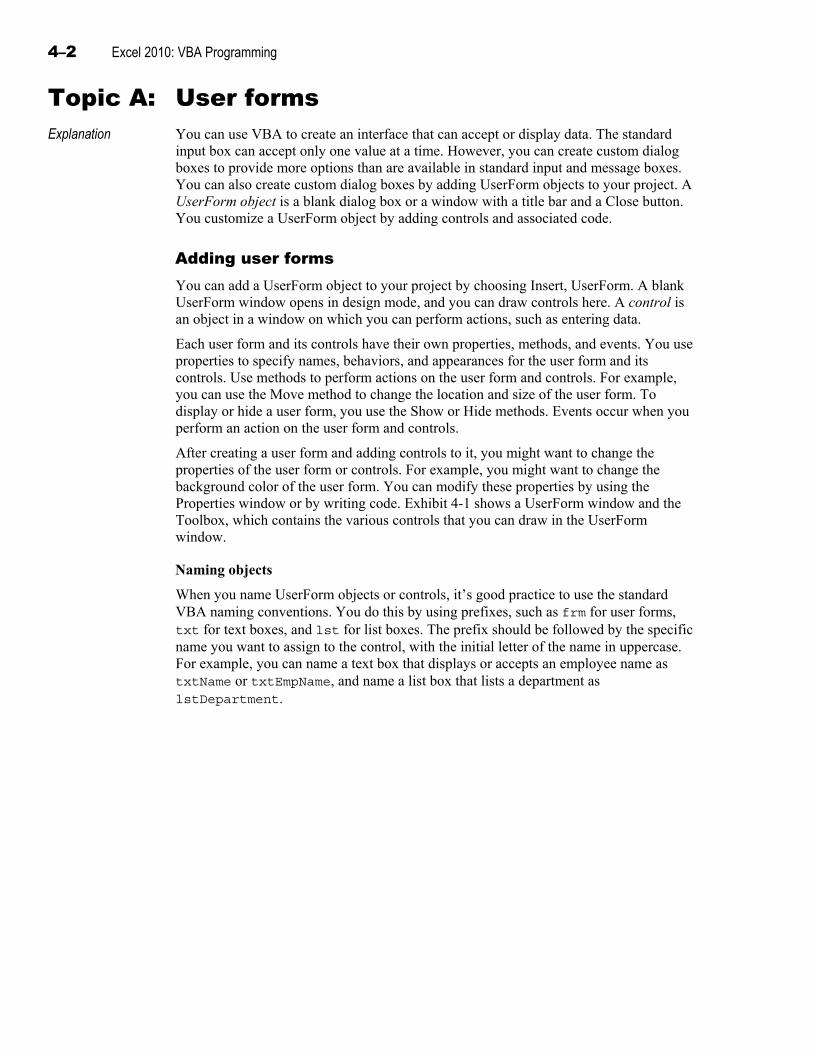
4–2 Excel 2010: VBA Programming
Topic A: User forms Explanation You can use VBA to create an interface that can accept or display data. The standard
input box can accept only one value at a time. However, you can create custom dialog boxes to provide more options than are available in standard input and message boxes. You can also create custom dialog boxes by adding UserForm objects to your project. A UserForm object is a blank dialog box or a window with a title bar and a Close button. You customize a UserForm object by adding controls and associated code.
Adding user forms You can add a UserForm object to your project by choosing Insert, UserForm. A blank UserForm window opens in design mode, and you can draw controls here. A control is an object in a window on which you can perform actions, such as entering data.
Each user form and its controls have their own properties, methods, and events. You use properties to specify names, behaviors, and appearances for the user form and its controls. Use methods to perform actions on the user form and controls. For example, you can use the Move method to change the location and size of the user form. To display or hide a user form, you use the Show or Hide methods. Events occur when you perform an action on the user form and controls.
After creating a user form and adding controls to it, you might want to change the properties of the user form or controls. For example, you might want to change the background color of the user form. You can modify these properties by using the Properties window or by writing code. Exhibit 4-1 shows a UserForm window and the Toolbox, which contains the various controls that you can draw in the UserForm window.
Naming objects
When you name UserForm objects or controls, it’s good practice to use the standard VBA naming conventions. You do this by using prefixes, such as frm for user forms, txt for text boxes, and lst for list boxes. The prefix should be followed by the specific name you want to assign to the control, with the initial letter of the name in uppercase. For example, you can name a text box that displays or accepts an employee name as txtName or txtEmpName, and name a list box that lists a department as lstDepartment.
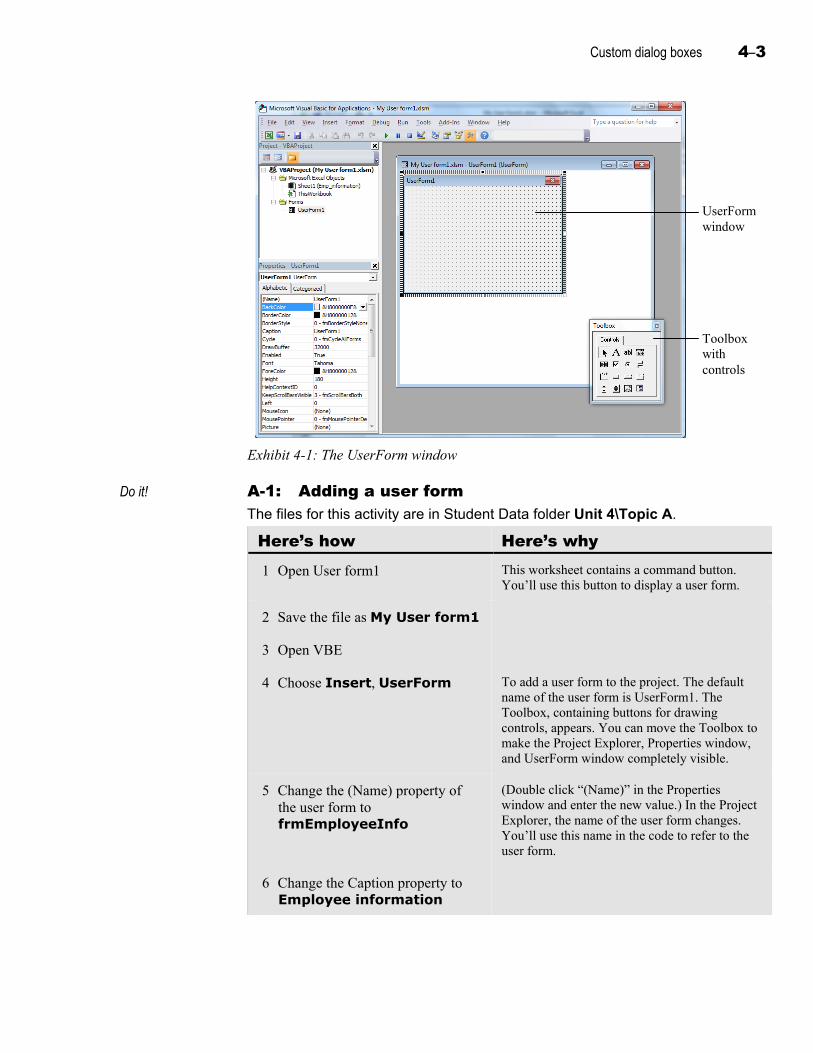
Custom dialog boxes 4–3
UserForm window
Toolbox with controls
Exhibit 4-1: The UserForm window
Do it! A-1: Adding a user form The files for this activity are in Student Data folder Unit 4\Topic A.
Here’s how Here’s why 1 Open User form1 This worksheet contains a command button.
You’ll use this button to display a user form.
2 Save the file as My User form1
3 Open VBE
4 Choose Insert, UserForm To add a user form to the project. The default name of the user form is UserForm1. The Toolbox, containing buttons for drawing controls, appears. You can move the Toolbox to make the Project Explorer, Properties window, and UserForm window completely visible.
5 Change the (Name) property of the user form to frmEmployeeInfo
(Double click “(Name)” in the Properties window and enter the new value.) In the Project Explorer, the name of the user form changes. You’ll use this name in the code to refer to the user form.
6 Change the Caption property to Employee information
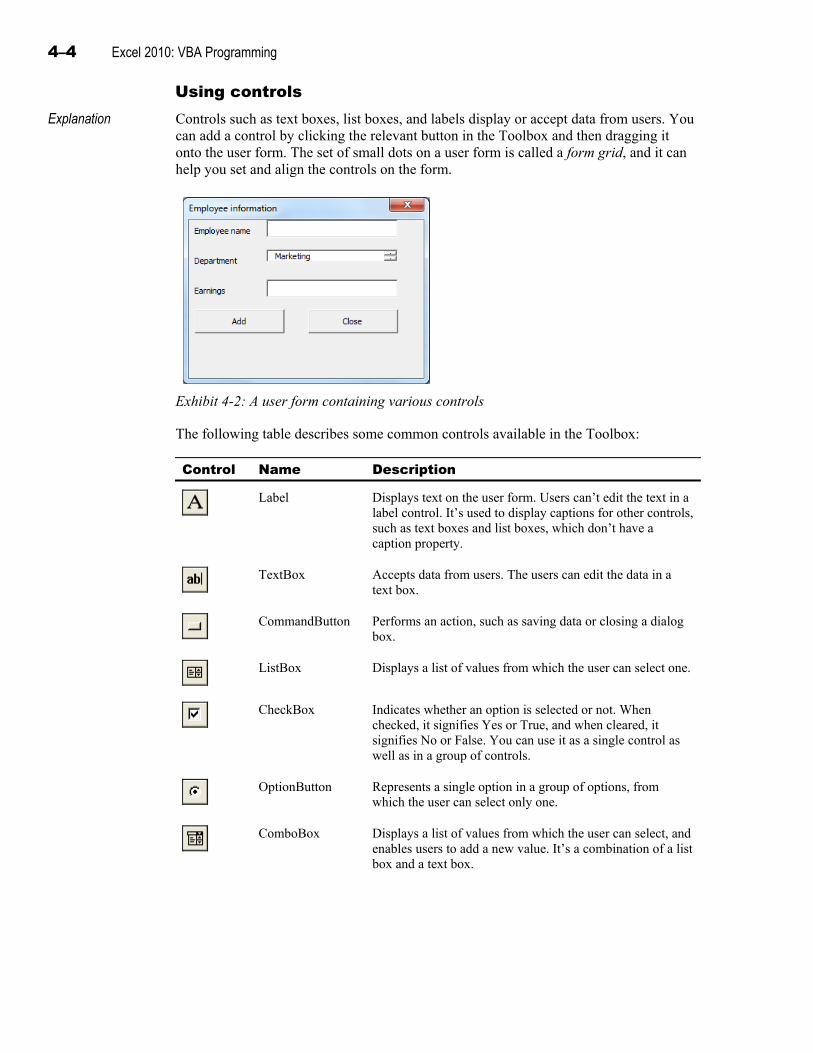
4–4 Excel 2010: VBA Programming
Using controls Explanation Controls such as text boxes, list boxes, and labels display or accept data from users. You
can add a control by clicking the relevant button in the Toolbox and then dragging it onto the user form. The set of small dots on a user form is called a form grid, and it can help you set and align the controls on the form.
Exhibit 4-2: A user form containing various controls
The following table describes some common controls available in the Toolbox:
Control Name Description
Label Displays text on the user form. Users can’t edit the text in a label control. It’s used to display captions for other controls, such as text boxes and list boxes, which don’t have a caption property.
TextBox Accepts data from users. The users can edit the data in a text box.
CommandButton Performs an action, such as saving data or closing a dialog box.
ListBox Displays a list of values from which the user can select one.
CheckBox Indicates whether an option is selected or not. When checked, it signifies Yes or True, and when cleared, it signifies No or False. You can use it as a single control as well as in a group of controls.
OptionButton Represents a single option in a group of options, from which the user can select only one.
ComboBox Displays a list of values from which the user can select, and enables users to add a new value. It’s a combination of a list box and a text box.
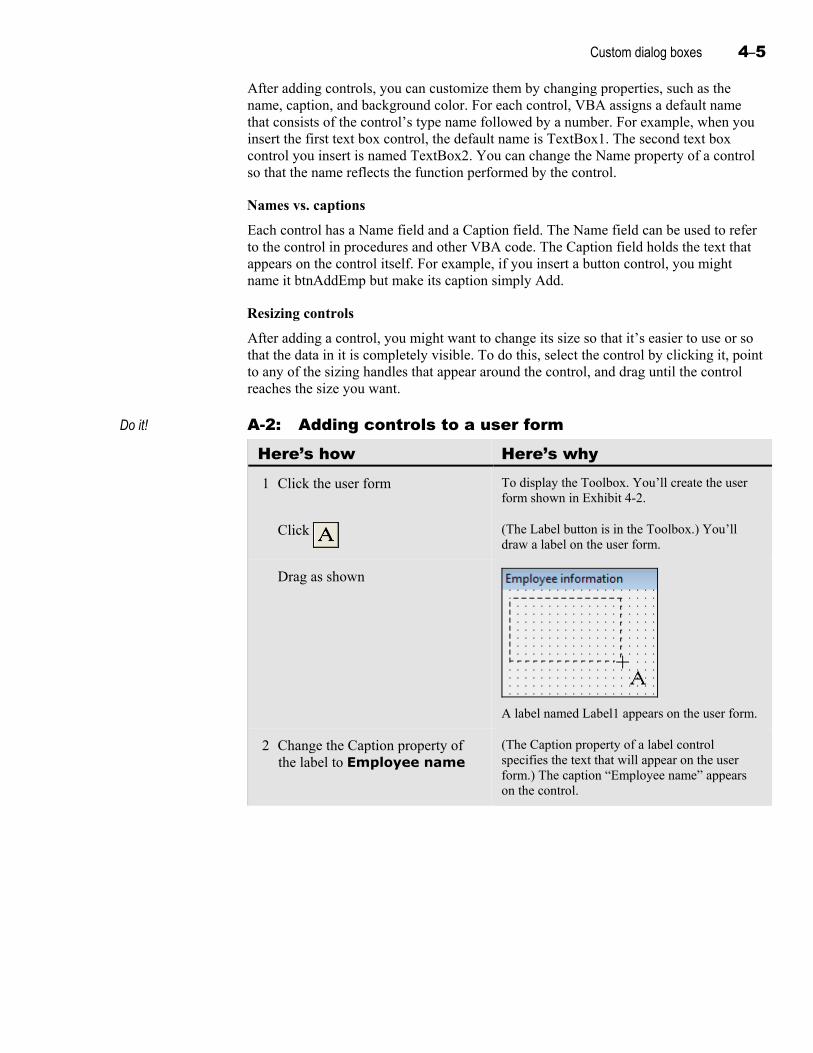
Custom dialog boxes 4–5
After adding controls, you can customize them by changing properties, such as the name, caption, and background color. For each control, VBA assigns a default name that consists of the control’s type name followed by a number. For example, when you insert the first text box control, the default name is TextBox1. The second text box control you insert is named TextBox2. You can change the Name property of a control so that the name reflects the function performed by the control.
Names vs. captions
Each control has a Name field and a Caption field. The Name field can be used to refer to the control in procedures and other VBA code. The Caption field holds the text that appears on the control itself. For example, if you insert a button control, you might name it btnAddEmp but make its caption simply Add.
Resizing controls
After adding a control, you might want to change its size so that it’s easier to use or so that the data in it is completely visible. To do this, select the control by clicking it, point to any of the sizing handles that appear around the control, and drag until the control reaches the size you want.
Do it! A-2: Adding controls to a user form
Here’s how Here’s why 1 Click the user form To display the Toolbox. You’ll create the user
form shown in Exhibit 4-2.
Click (The Label button is in the Toolbox.) You’ll draw a label on the user form.
Drag as shown
A label named Label1 appears on the user form.
2 Change the Caption property of the label to Employee name
(The Caption property of a label control specifies the text that will appear on the user form.) The caption “Employee name” appears on the control.
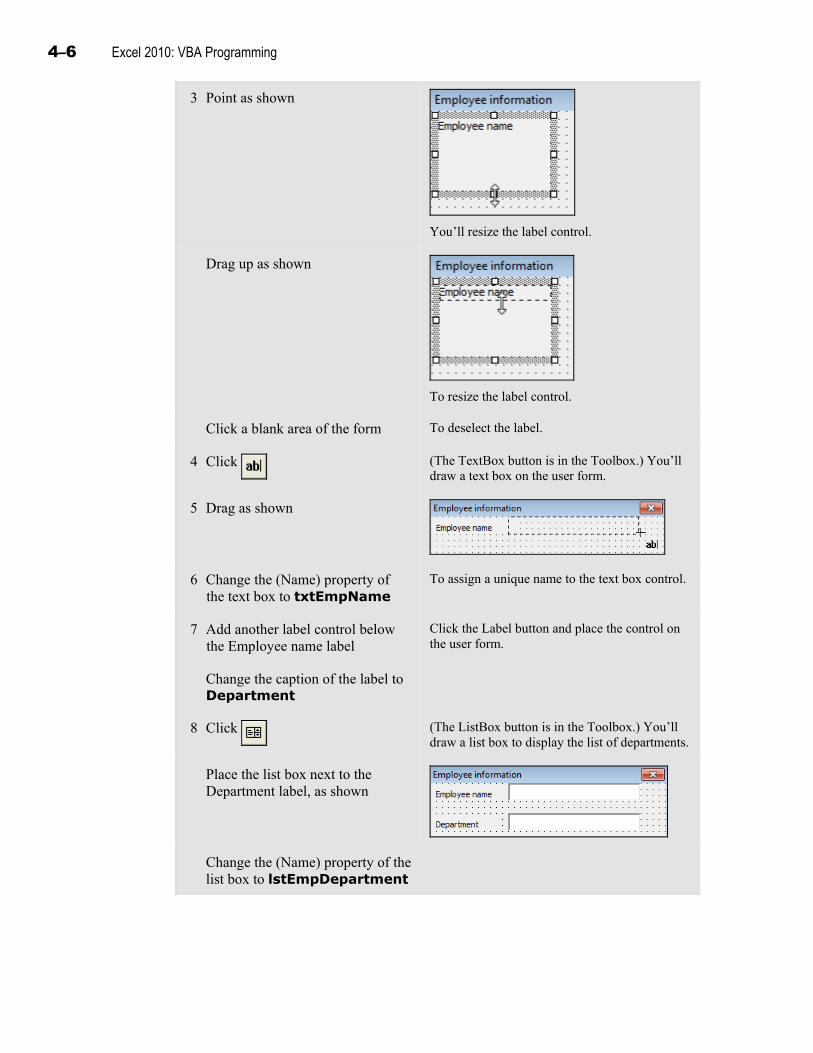
4–6 Excel 2010: VBA Programming
3 Point as shown
You’ll resize the label control.
Drag up as shown
To resize the label control.
Click a blank area of the form To deselect the label.
4 Click (The TextBox button is in the Toolbox.) You’ll draw a text box on the user form.
5 Drag as shown
6 Change the (Name) property of the text box to txtEmpName
To assign a unique name to the text box control.
7 Add another label control below the Employee name label
Click the Label button and place the control on the user form.
Change the caption of the label to Department
8 Click (The ListBox button is in the Toolbox.) You’ll draw a list box to display the list of departments.
Place the list box next to the Department label, as shown
Change the (Name) property of the list box to lstEmpDepartment
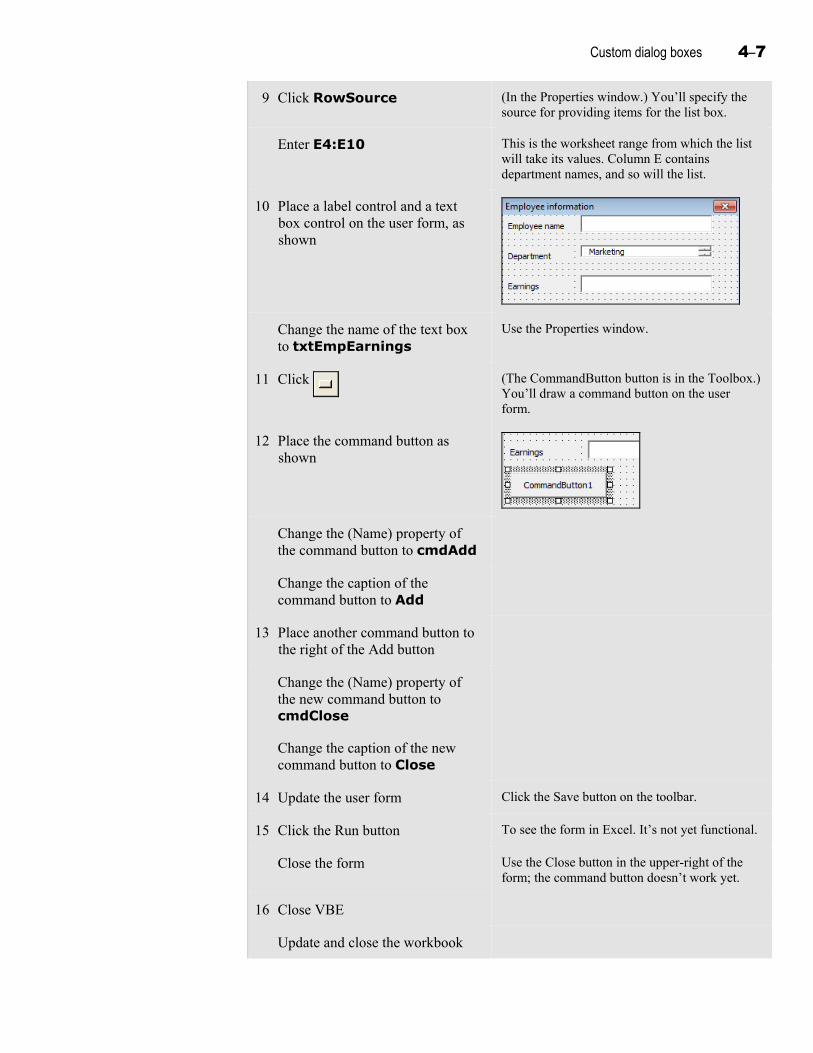
Custom dialog boxes 4–7
9 Click RowSource (In the Properties window.) You’ll specify the source for providing items for the list box.
Enter E4:E10 This is the worksheet range from which the list will take its values. Column E contains department names, and so will the list.
10 Place a label control and a text box control on the user form, as shown
Change the name of the text box to txtEmpEarnings
Use the Properties window.
11 Click (The CommandButton button is in the Toolbox.) You’ll draw a command button on the user form.
12 Place the command button as shown
Change the (Name) property of the command button to cmdAdd
Change the caption of the command button to Add
13 Place another command button to the right of the Add button
Change the (Name) property of the new command button to cmdClose
Change the caption of the new command button to Close
14 Update the user form Click the Save button on the toolbar.
15 Click the Run button To see the form in Excel. It’s not yet functional.
Close the form Use the Close button in the upper-right of the form; the command button doesn’t work yet.
16 Close VBE
Update and close the workbook
4–8 Excel 2010: VBA Programming
Topic B: Events Explanation VBA is based on event-driven programming. In other words, the code doesn’t follow a
predetermined path. Instead, it executes in response to events. For example, the click of a button generates an event. The procedures that are executed when a specific event occurs are called event procedures. Through event procedures, user forms and controls respond to events associated with them.
Event-handling code Both user forms and controls have various events associated with them. You can write procedures that run in response to any or all of these events. To create an event procedure in the Code window, select the object for which you want to create the procedure from the Object list, and then select an event from the Procedure list. VBE creates the Sub procedure name and structure for you.
The following table describes some commonly used events of UserForm objects:
Event Is triggered when a user form…
Activate Becomes active.
Deactivate Becomes inactive.
Click Is clicked anywhere on the form.
DblClick Is double-clicked anywhere on the form.
Initialize Is loaded into memory.
Terminate Is unloaded from memory.
The following table describes some commonly used events of controls:
Event Is triggered when a control…
Change Has its data changed.
Click Is clicked.
DblClick Is double-clicked.
BeforeUpdate Has its value changed through the user interface and is about to lose the focus. Focus is the ability of a control, user form, or window to receive a mouse click or keyboard input.
AfterUpdate Has its value updated through the user form and loses its focus.
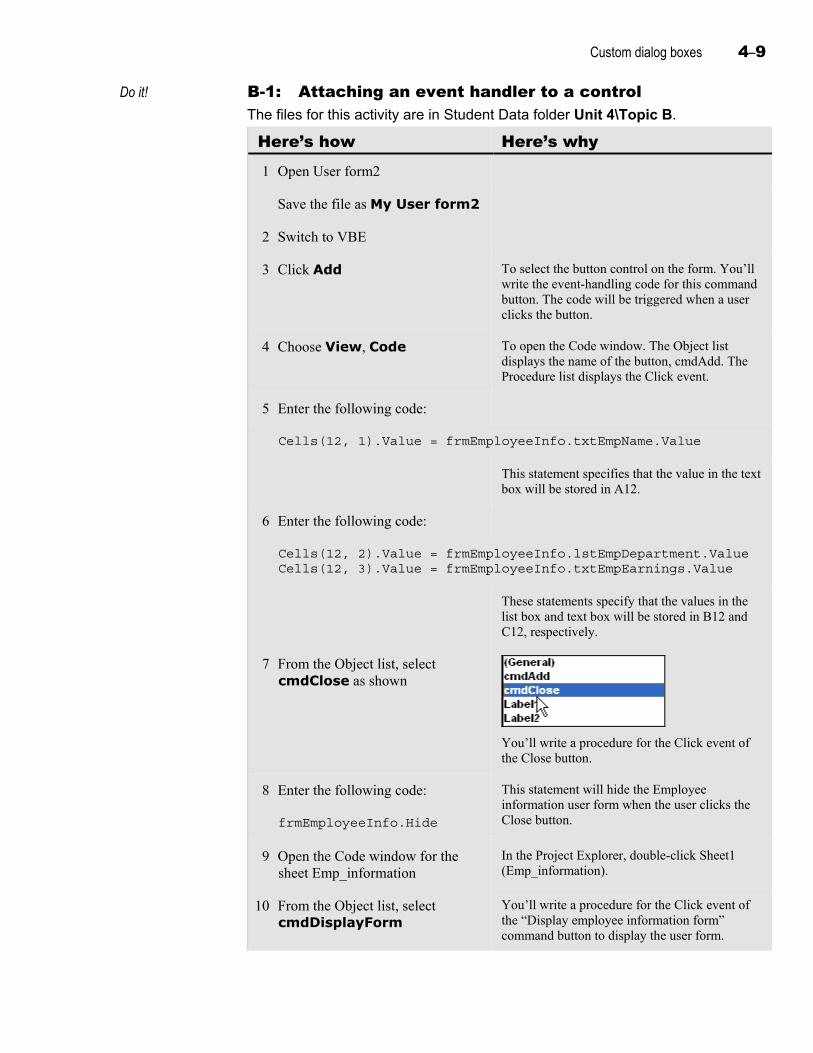
Custom dialog boxes 4–9
Do it! B-1: Attaching an event handler to a control The files for this activity are in Student Data folder Unit 4\Topic B.
Here’s how Here’s why 1 Open User form2
Save the file as My User form2
2 Switch to VBE
3 Click Add To select the button control on the form. You’ll write the event-handling code for this command button. The code will be triggered when a user clicks the button.
4 Choose View, Code To open the Code window. The Object list displays the name of the button, cmdAdd. The Procedure list displays the Click event.
5 Enter the following code:
Cells(12, 1).Value = frmEmployeeInfo.txtEmpName.Value
This statement specifies that the value in the text box will be stored in A12.
6 Enter the following code:
Cells(12, 2).Value = frmEmployeeInfo.lstEmpDepartment.Value Cells(12, 3).Value = frmEmployeeInfo.txtEmpEarnings.Value
These statements specify that the values in the list box and text box will be stored in B12 and C12, respectively.
7 From the Object list, select cmdClose as shown
You’ll write a procedure for the Click event of the Close button.
8 Enter the following code:
frmEmployeeInfo.Hide
This statement will hide the Employee information user form when the user clicks the Close button.
9 Open the Code window for the sheet Emp_information
In the Project Explorer, double-click Sheet1 (Emp_information).
10 From the Object list, select cmdDisplayForm
You’ll write a procedure for the Click event of the “Display employee information form” command button to display the user form.
4–10 Excel 2010: VBA Programming
11 Enter the following code:
frmEmployeeInfo.Show
12 Update the code and switch to Excel
13 Click Display employee information form
(In the worksheet.) The Employee information user form appears.
In the Employee name box, type James Overmire
From the Department list, select Human resources
In the Earnings box, type 105000
14 Click Add To enter the information in the Excel worksheet. The values are added in row 12.
15 Click Close To hide the user form.
16 Update the workbook
Data validation Explanation A user might enter incorrect data in a user form or forget to enter data altogether. To
prevent this, you can validate the data entered in a user form and then notify the user if the data is incorrect. You can do this by associating procedures with events such as AfterUpdate and Change.
Do it! B-2: Validating data by using event handlers
Here’s how Here’s why 1 Switch to VBE
2 In the Project Explorer, double-click frmEmployeeInfo
To display the Employee information user form.
3 Select the txtEmpEarnings text box
4 Open the Code window Double-click the text box.
In the Code window, from the Procedure list, select AfterUpdate
You’ll write code for the AfterUpdate event of the txtEmpEarnings control. This event occurs as soon as you enter data in the text box and press Enter to shift focus to the next control.
Custom dialog boxes 4–11
5 Enter the following code:
If Val(txtEmpEarnings.Value) <= 0 Then MsgBox("Earnings cannot be zero") txtEmpName.Value = "" lstEmpDepartment.Value = "Marketing" txtEmpEarnings.Value = "" End If
The Val function takes a string value as an argument and returns only the numbers contained in the string. If the argument specified contains no numbers, the function returns zero. The If…Then statement checks the value in the text box and displays the message box if the value is zero. The statement also clears the text boxes and sets the value in the list box to Marketing.
6 Update the code and switch to Excel
7 Click Display employee information form
8 In the Employee name box, type Julia Stockton
From the Department list, select Customer support
In the Earnings box, type 0 Zero.
Click Add A message box appears, stating that earnings can’t be zero.
Click OK To close the message box. The values you entered are cleared, and the list box returns to Marketing.
9 In the Employee name box, type Julia Stockton
From the Department list, select Customer support
In the Earnings box, type 96600
10 Click Add To add the information to the worksheet.
11 Close the user form Click the Close button.
Update and close the workbook
4–12 Excel 2010: VBA Programming
Unit summary: Custom dialog boxes Topic A In this topic, you learned how to create a custom dialog box by creating a UserForm
object and adding controls, such as text boxes, labels, and command buttons. You learned that a UserForm window is a blank window or dialog box, which you can customize to display information or accept data from users. You also learned how to add controls to a user form by using the Toolbox. Additionally, you learned how to resize the controls.
Topic B In this topic, you learned how to add event-handling code, which runs in response to an event. You learned that an event is any action performed by the user on the user form or the controls in it. You also learned how to attach events, such as AfterUpdate and BeforeUpdate, to controls for validating data entry in a user form.
Independent practice activity In this activity, you’ll create a user form and place controls on it. Then, you’ll attach a Click event to the button that adds data to the worksheet when the button is clicked.
The files for this activity are in Student Data folder Unit 4\Unit summary.
1 Open Practice sales information.
2 Save the workbook as My Practice sales information.
3 Open VBE.
4 Insert a UserForm object. Name the user form frmSales and change the caption to Sales information.
5 Draw controls on the user form, as shown in Exhibit 4-3. Name the text boxes txtProduct, txt2009, and txt2010.
6 Place an Add button on the user form, name it cmdAdd, and change the caption to Add. For the Click event, create a procedure that adds the data in the user form to row 17 of the active worksheet. The procedure has to calculate the difference between the two sales figures before it enters the correct value in cell D17. (Hint: Refer to Exhibit 4-4.)
7 Add a Close button. Then, to the Click event of the Close command button, add a procedure to hide the user form.
8 In the worksheet, add a procedure to show the user form; add this procedure to the Click event of the “Display sales information form” command button. (Hint: In the Project Explorer, double-click Sheet1 to open the Sheet1 (Code) window. From the Object list, select cmdDisplayForm, and from the Procedure list, select Click. Then enter the appropriate code to show the form, as shown in Exhibit 4-5.)
9 Update the code and switch to Excel.
10 Click the worksheet’s “Display sales information form” command button.
11 Add a new product, Cinnamon, with sales of 13,600 for the year 2009 and sales of 15,750 for 2010.
12 Close the Sales information user form.
13 Update and close the workbook. Close VBE.
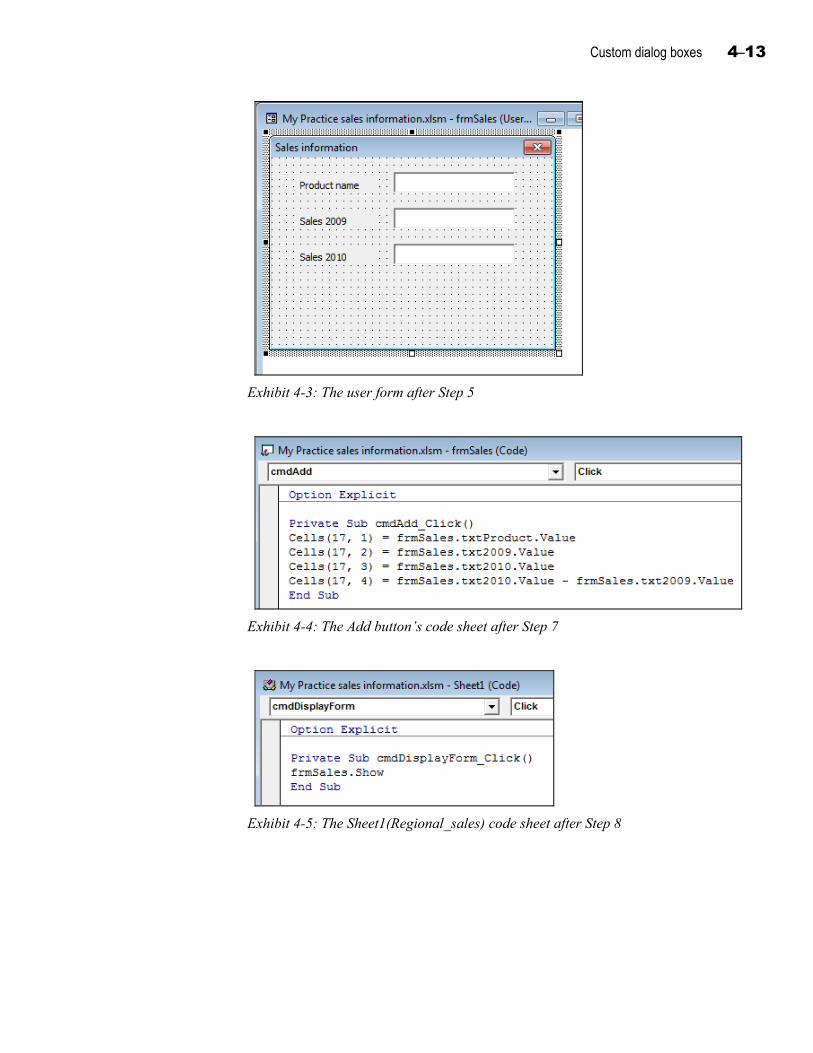
Custom dialog boxes 4–13
Exhibit 4-3: The user form after Step 5
Exhibit 4-4: The Add button’s code sheet after Step 7
Exhibit 4-5: The Sheet1(Regional_sales) code sheet after Step 8
4–14 Excel 2010: VBA Programming
Review questions 1 How can you create a custom dialog box in Excel?
Create a UserForm object and add controls to it.
2 Which of the following isn’t the name of a control you can add to forms in VBA?
A TextBox
B CommandButton
C RadioButton
D CheckBox
3 List some common events associated with UserForm objects.
Activate, Deactivate, Click, DblClick, Initialize, Terminate.
4 List some common events associated with controls.
Change, Click, DblClick, BeforeUpdate, AfterUpdate.
5 Your company switched over to a new ordering system, and you want to make sure that old product numbers are no longer used. How can you do that?
Attach events to controls for validating data entry in forms, and notify the user if the data is incorrect.
5–1
U n i t 5 Debugging and error handling
Unit time: 60 minutes
Complete this unit, and you’ll know how to:
A Identify compile-time, runtime, and logical errors in code.
B Use the debugging tools.
C Write error-handling code to trap errors.
5–2 Excel 2010: VBA Programming
Topic A: Errors Explanation A program might produce an incorrect result or stop executing prematurely. This can be
caused by a mistake in the code, called an error or a bug. Errors occur if a statement in the code attempts to perform an invalid operation. For example, a program statement that uses an incorrectly spelled variable generates an error. VBA provides tools, such as breakpoints and the Watch window, to locate these errors. VBA error messages provide options to correct the error, refer to the help system, or halt execution of the program.
Error types There are three types of programming errors: compile-time, runtime, and logical. The following table describes each type of error:
Error Description
Compile-time Results when incorrect syntax is used. This type of error is also referred to as a syntax error. For example, if a closing parenthesis, a quotation mark, or an End If statement is missing, a compile-time error occurs and the code execution stops.
Runtime Results when VBA can’t evaluate a statement. The execution of code stops at the line in which the error occurred. For example, if a statement attempts to divide a number by zero or if a date variable is assigned a text value, a runtime error occurs and the code execution stops immediately.
Logical Results when the code compiles successfully and runs without producing an error message but doesn’t produce the intended result. Logical errors are sometimes difficult to detect. For example, if you type a minus (-) sign instead of a plus (+) sign in an addition statement, the code executes but returns an incorrect result.
Debugging and error handling 5–3
Do it! A-1: Discussing the types of errors
Exercises 1 What’s an error?
2 What are the three types of errors?
3 Identify the error in the following code:
Sub CalculateBonus() Dim Bonus As Currency, Earnings As Currency Earnings = InputBox ("Enter earnings") If Earnings > 40000 Then Bonus = Earnings * (12/100) MsgBox ("The bonus is" & Bonus) End Sub
4 Identify the error in the following code, which calculates the bonus as 6% of the sales amount:
Sub Bonus() Dim BonusAmt As Currency, SalesAmt As Currency BonusAmt = SalesAmt + (6/100) MsgBox ("Bonus is" & BonusAmt) End Sub
5 Identify the error in the following code:
Sub Bonus() Dim BonusAmt As Currency, SalesAmt As Currency BonusAmt = SalesAmt * (6 / 0) MsgBox ("Bonus is" & BonusAmt) End Sub
5–4 Excel 2010: VBA Programming
Topic B: Debugging Explanation To have an error-free application, you need to trace and correct errors. This process is
called debugging. To debug your code, you can use the tools that are provided on the Debug toolbar.
The debugging tools The debugging tools help you trace the execution of a program and view the values of variables and expressions. The following table describes the debugging tools available in VBA:
Tool Used to…
Breakpoint Pause the execution of code at a specified statement. You can insert a breakpoint in the first line of a code segment that you suspect to be the cause of the error. You can then monitor the execution of the code.
Watch window Monitor values of specified variables and expressions while the code is running.
Immediate window Test output by assigning different values to variables or expressions.
Locals window Monitor all the declared variables of the procedure currently running.
Do it! B-1: Discussing debugging tools
Questions and answers 1 What’s debugging?
2 What tools can you use to debug code?
3 Which debugging tool would you use if you suspected an error in a specific section of code?
4 What’s the difference between the Watch window and the Locals window?
5 Which debugging tool would you use to change variable values while the code is running?

Debugging and error handling 5–5
Break mode and breakpoints Explanation When a runtime error is detected in VBA, the program execution pauses temporarily
and the program enters break mode. At this point, the line of code that caused the error is highlighted in yellow so you can trace and debug the error. While in break mode, you can also examine the values of variables and properties by pointing to them.
You can also manually set a breakpoint in code so that the execution pauses at a specific point, as shown in Exhibit 5-1. When the execution reaches the breakpoint, VBA switches to break mode automatically. Breakpoints are temporary markers and aren’t saved with the code.
To insert or remove a breakpoint, place the insertion point in the code where you want to insert the breakpoint, and do any of the following:
• Choose Debug, Toggle Breakpoint.
• Press F9.
• Click the Toggle Breakpoint button on the Debug toolbar.
You can also click the Margin Indicator bar adjacent to the code to insert or remove the breakpoint.
Exhibit 5-1: A manually inserted breakpoint
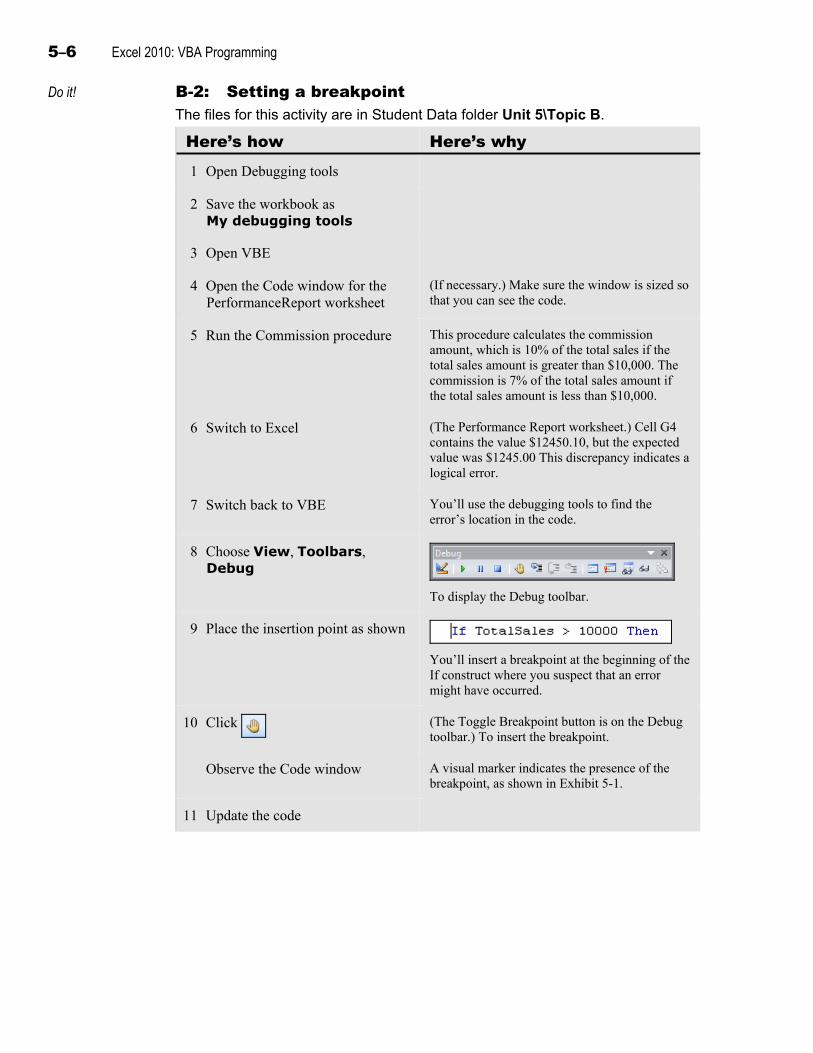
5–6 Excel 2010: VBA Programming
Do it! B-2: Setting a breakpoint The files for this activity are in Student Data folder Unit 5\Topic B.
Here’s how Here’s why 1 Open Debugging tools
2 Save the workbook as My debugging tools
3 Open VBE
4 Open the Code window for the PerformanceReport worksheet
(If necessary.) Make sure the window is sized so that you can see the code.
5 Run the Commission procedure This procedure calculates the commission amount, which is 10% of the total sales if the total sales amount is greater than $10,000. The commission is 7% of the total sales amount if the total sales amount is less than $10,000.
6 Switch to Excel (The Performance Report worksheet.) Cell G4 contains the value $12450.10, but the expected value was $1245.00 This discrepancy indicates a logical error.
7 Switch back to VBE You’ll use the debugging tools to find the error’s location in the code.
8 Choose View, Toolbars, Debug
To display the Debug toolbar.
9 Place the insertion point as shown
You’ll insert a breakpoint at the beginning of the If construct where you suspect that an error might have occurred.
10 Click (The Toggle Breakpoint button is on the Debug toolbar.) To insert the breakpoint.
Observe the Code window A visual marker indicates the presence of the breakpoint, as shown in Exhibit 5-1.
11 Update the code

Debugging and error handling 5–7
Watch expressions Explanation Some errors might not be traceable to a single statement. With logical errors, for
example, it’s difficult to find which line of code is causing the error. In such cases, you need to monitor the behavior of variables or expressions throughout a procedure. Each variable or expression that you monitor is called a watch expression.
You can define watch expressions either at design time or in break mode. VBA automatically monitors and displays these expressions in the Watch window, which appears when code enters break mode. You can also manually open the Watch window by choosing View, Watch Window or by clicking the Watch Window button on the Debug toolbar.
To add a watch expression:
1 Choose Debug, Add Watch to open the Add Watch dialog box, shown in Exhibit 5-2.
2 In the Expression box, type an expression or a variable name.
3 Under Context, specify the procedure and module names for the current project. This information is important when you have variables of the same name but with different scopes.
4 Click OK to open the Watch window.
Exhibit 5-2: The Add Watch dialog box
5–8 Excel 2010: VBA Programming
Do it! B-3: Adding a watch expression
Here’s how Here’s why 1 Choose Debug, Add Watch… To open the Add Watch dialog box, shown in
Exhibit 5-2.
2 In the Expression box, type TotalSales
(If necessary.) You’ll watch the value of this variable change as the procedure executes. You can then trace exactly where in the code the incorrect value, 12450.10, occurs. Under Context, in the Procedure list, Commission is selected; in the Module list, Sheet1 is selected. You’ll watch the variable TotalSales as it’s modified in the Commission procedure.
Click OK To open the Watch window. It displays the specified variable, permitting you to monitor the value stored in it.
3 Open the Add Watch dialog box Choose Debug, Add Watch.
Add the watch expression CommissionAmt
Type the variable name in the Expression box and click OK.
4 Update the code
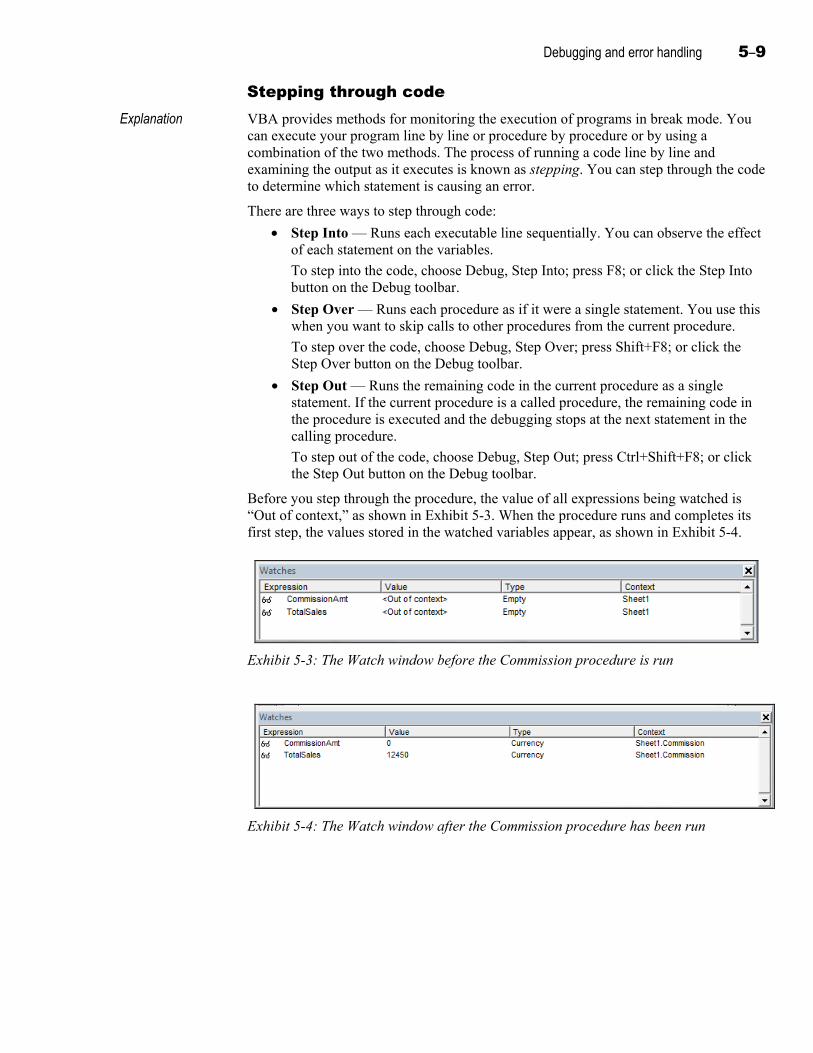
Debugging and error handling 5–9
Stepping through code Explanation VBA provides methods for monitoring the execution of programs in break mode. You
can execute your program line by line or procedure by procedure or by using a combination of the two methods. The process of running a code line by line and examining the output as it executes is known as stepping. You can step through the code to determine which statement is causing an error.
There are three ways to step through code:
• Step Into — Runs each executable line sequentially. You can observe the effect of each statement on the variables.
To step into the code, choose Debug, Step Into; press F8; or click the Step Into button on the Debug toolbar.
• Step Over — Runs each procedure as if it were a single statement. You use this when you want to skip calls to other procedures from the current procedure.
To step over the code, choose Debug, Step Over; press Shift+F8; or click the Step Over button on the Debug toolbar.
• Step Out — Runs the remaining code in the current procedure as a single statement. If the current procedure is a called procedure, the remaining code in the procedure is executed and the debugging stops at the next statement in the calling procedure.
To step out of the code, choose Debug, Step Out; press Ctrl+Shift+F8; or click the Step Out button on the Debug toolbar.
Before you step through the procedure, the value of all expressions being watched is “Out of context,” as shown in Exhibit 5-3. When the procedure runs and completes its first step, the values stored in the watched variables appear, as shown in Exhibit 5-4.
Exhibit 5-3: The Watch window before the Commission procedure is run
Exhibit 5-4: The Watch window after the Commission procedure has been run
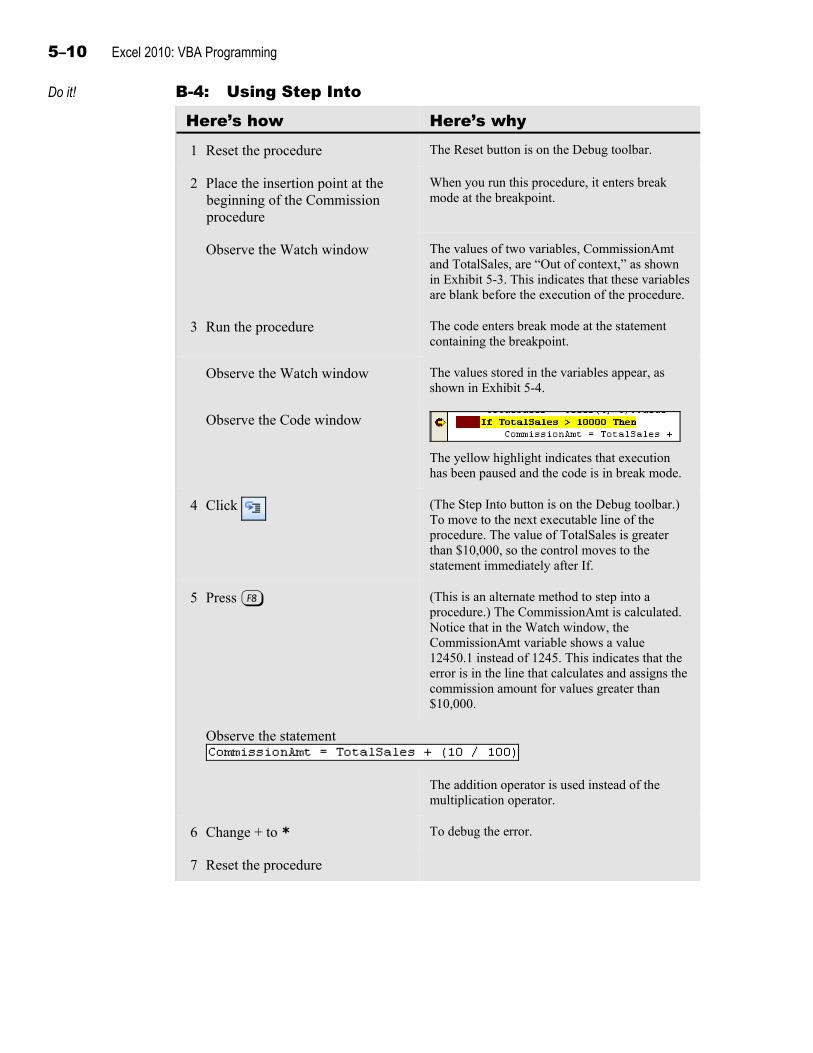
5–10 Excel 2010: VBA Programming
Do it! B-4: Using Step Into
Here’s how Here’s why 1 Reset the procedure The Reset button is on the Debug toolbar.
2 Place the insertion point at the beginning of the Commission procedure
When you run this procedure, it enters break mode at the breakpoint.
Observe the Watch window The values of two variables, CommissionAmt and TotalSales, are “Out of context,” as shown in Exhibit 5-3. This indicates that these variables are blank before the execution of the procedure.
3 Run the procedure The code enters break mode at the statement containing the breakpoint.
Observe the Watch window The values stored in the variables appear, as shown in Exhibit 5-4.
Observe the Code window
The yellow highlight indicates that execution has been paused and the code is in break mode.
4 Click (The Step Into button is on the Debug toolbar.) To move to the next executable line of the procedure. The value of TotalSales is greater than $10,000, so the control moves to the statement immediately after If.
5 Press * (This is an alternate method to step into a procedure.) The CommissionAmt is calculated. Notice that in the Watch window, the CommissionAmt variable shows a value 12450.1 instead of 1245. This indicates that the error is in the line that calculates and assigns the commission amount for values greater than $10,000.
Observe the statement
The addition operator is used instead of the multiplication operator.
6 Change + to * To debug the error.
7 Reset the procedure
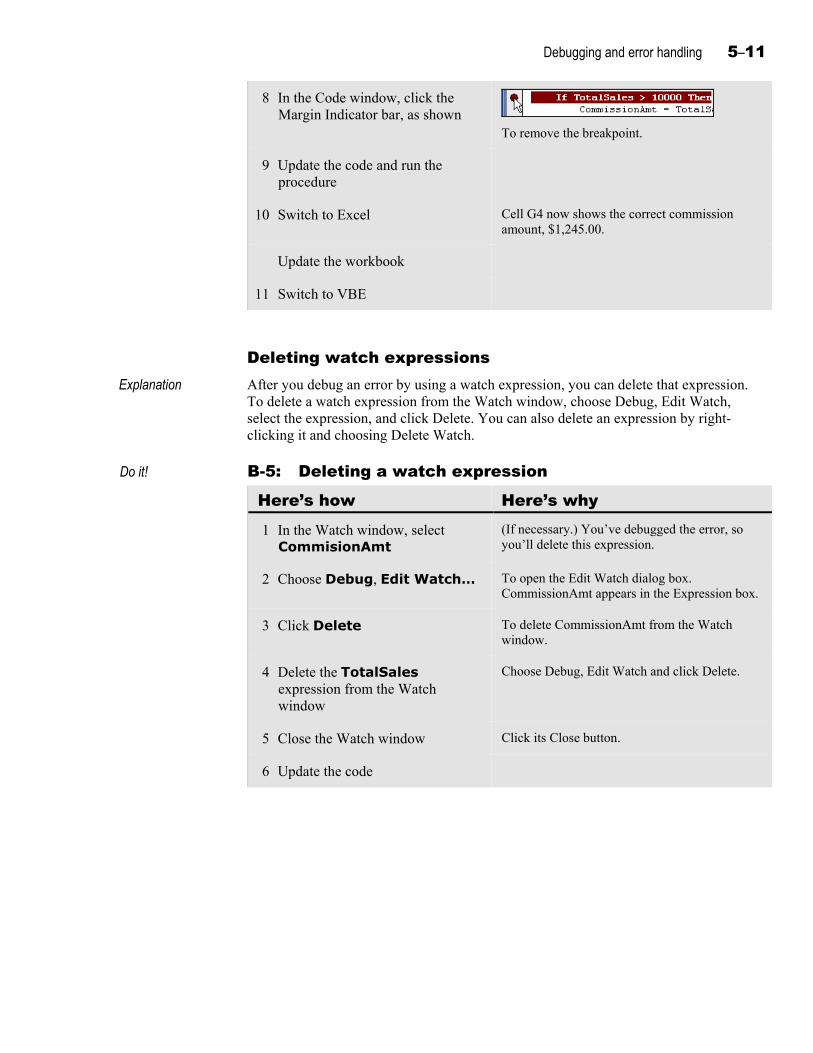
Debugging and error handling 5–11
8 In the Code window, click the Margin Indicator bar, as shown
To remove the breakpoint.
9 Update the code and run the procedure
10 Switch to Excel Cell G4 now shows the correct commission amount, $1,245.00.
Update the workbook
11 Switch to VBE
Deleting watch expressions Explanation
After you debug an error by using a watch expression, you can delete that expression. To delete a watch expression from the Watch window, choose Debug, Edit Watch, select the expression, and click Delete. You can also delete an expression by right-clicking it and choosing Delete Watch.
Do it! B-5: Deleting a watch expression
Here’s how Here’s why 1 In the Watch window, select
CommisionAmt (If necessary.) You’ve debugged the error, so you’ll delete this expression.
2 Choose Debug, Edit Watch… To open the Edit Watch dialog box. CommissionAmt appears in the Expression box.
3 Click Delete To delete CommissionAmt from the Watch window.
4 Delete the TotalSales expression from the Watch window
Choose Debug, Edit Watch and click Delete.
5 Close the Watch window Click its Close button.
6 Update the code
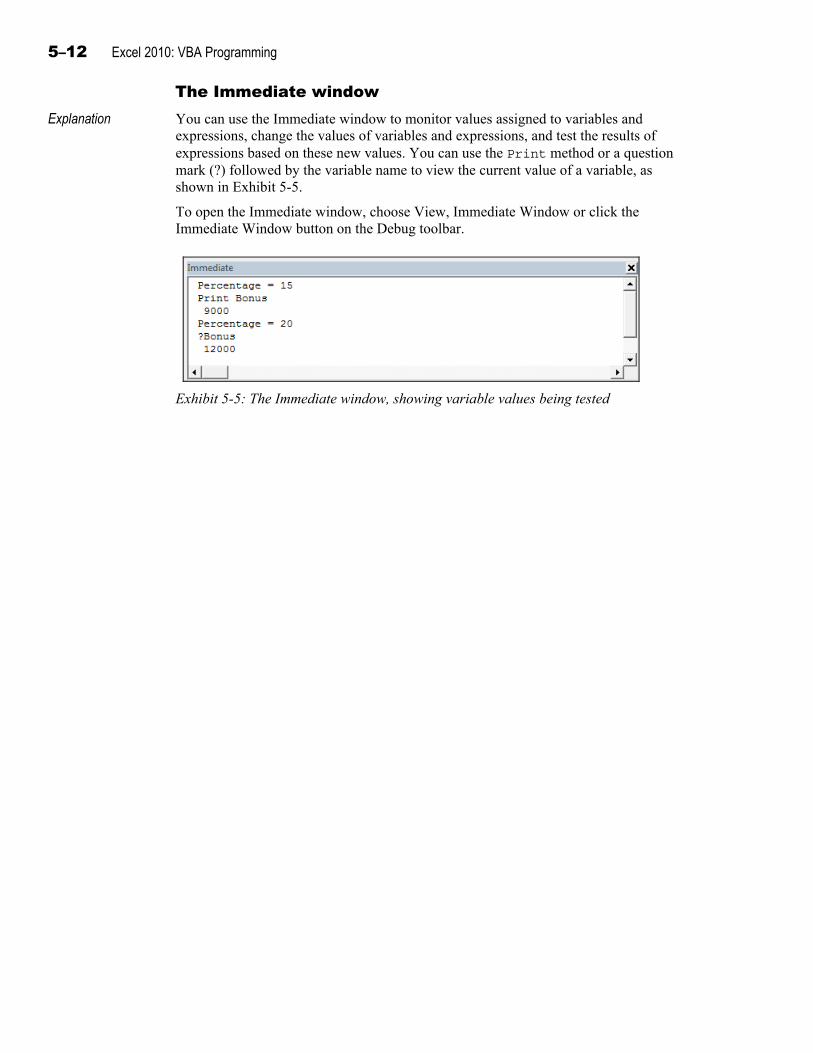
5–12 Excel 2010: VBA Programming
The Immediate window Explanation You can use the Immediate window to monitor values assigned to variables and
expressions, change the values of variables and expressions, and test the results of expressions based on these new values. You can use the Print method or a question mark (?) followed by the variable name to view the current value of a variable, as shown in Exhibit 5-5.
To open the Immediate window, choose View, Immediate Window or click the Immediate Window button on the Debug toolbar.
Exhibit 5-5: The Immediate window, showing variable values being tested
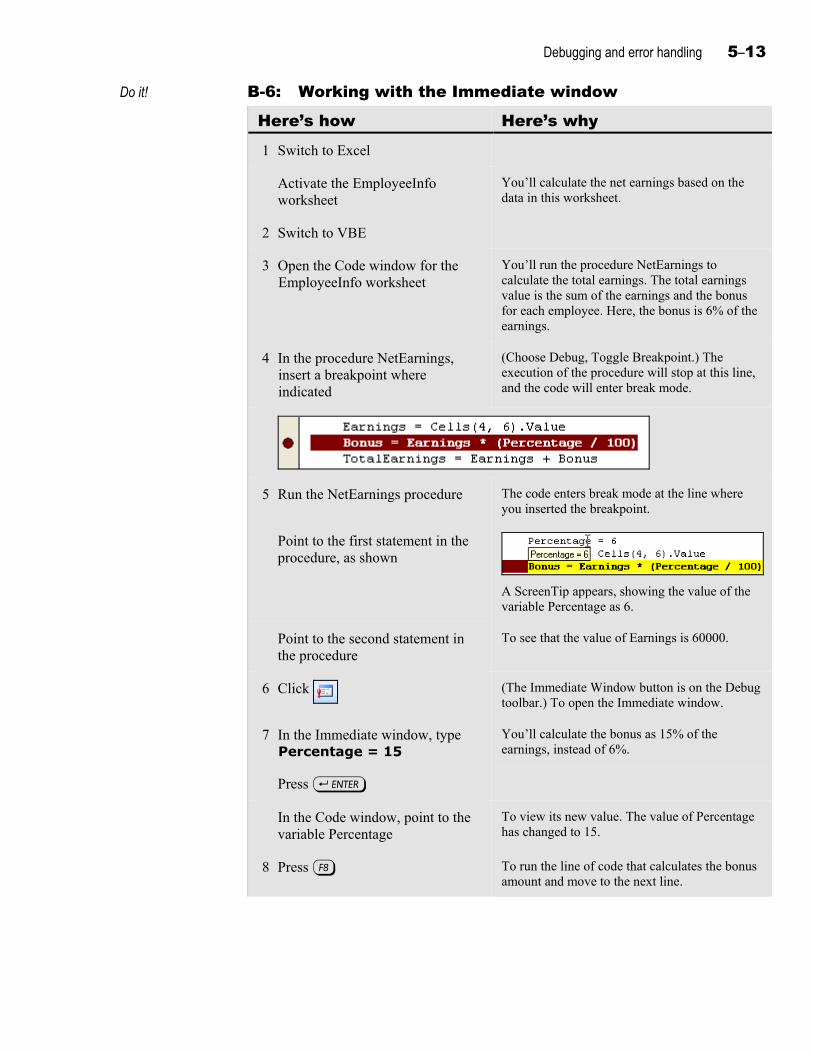
Debugging and error handling 5–13
Do it! B-6: Working with the Immediate window
Here’s how Here’s why 1 Switch to Excel
Activate the EmployeeInfo worksheet
You’ll calculate the net earnings based on the data in this worksheet.
2 Switch to VBE
3 Open the Code window for the EmployeeInfo worksheet
You’ll run the procedure NetEarnings to calculate the total earnings. The total earnings value is the sum of the earnings and the bonus for each employee. Here, the bonus is 6% of the earnings.
4 In the procedure NetEarnings, insert a breakpoint where indicated
(Choose Debug, Toggle Breakpoint.) The execution of the procedure will stop at this line, and the code will enter break mode.
5 Run the NetEarnings procedure The code enters break mode at the line where you inserted the breakpoint.
Point to the first statement in the procedure, as shown
A ScreenTip appears, showing the value of the variable Percentage as 6.
Point to the second statement in the procedure
To see that the value of Earnings is 60000.
6 Click (The Immediate Window button is on the Debug toolbar.) To open the Immediate window.
7 In the Immediate window, type Percentage = 15
You’ll calculate the bonus as 15% of the earnings, instead of 6%.
Press e
In the Code window, point to the variable Percentage
To view its new value. The value of Percentage has changed to 15.
8 Press * To run the line of code that calculates the bonus amount and move to the next line.
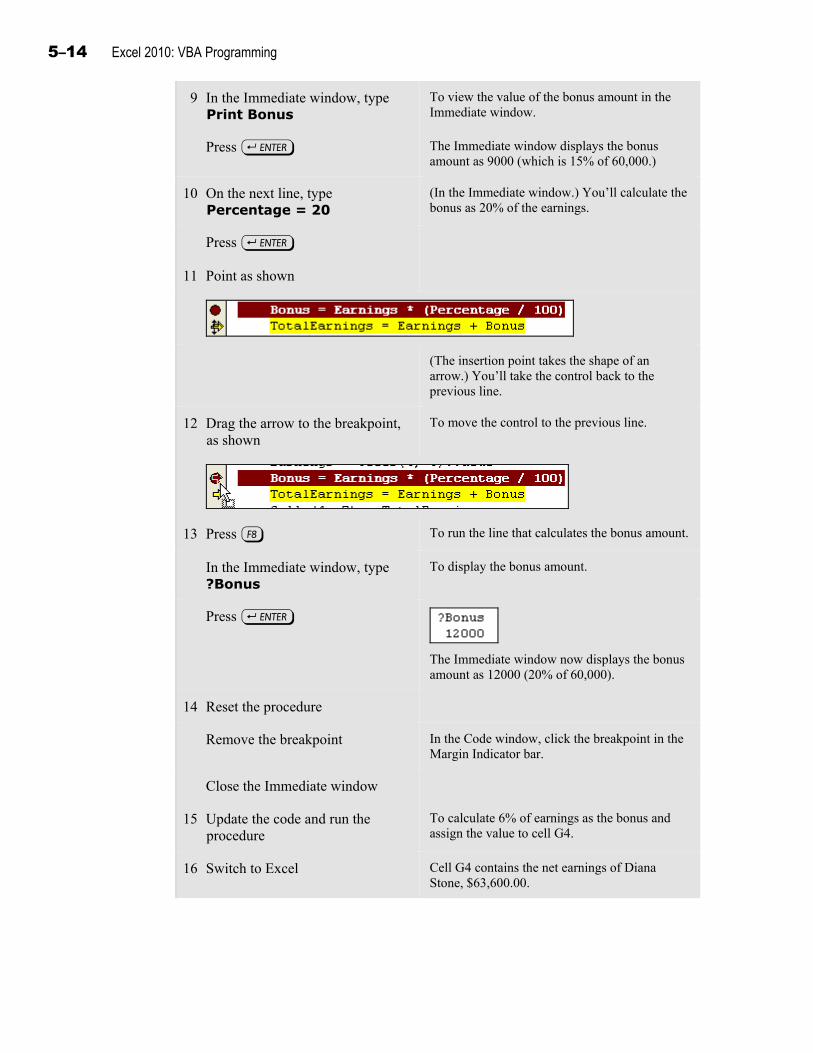
5–14 Excel 2010: VBA Programming
9 In the Immediate window, type Print Bonus
To view the value of the bonus amount in the Immediate window.
Press e The Immediate window displays the bonus amount as 9000 (which is 15% of 60,000.)
10 On the next line, type Percentage = 20
(In the Immediate window.) You’ll calculate the bonus as 20% of the earnings.
Press e
11 Point as shown
(The insertion point takes the shape of an arrow.) You’ll take the control back to the previous line.
12 Drag the arrow to the breakpoint, as shown
To move the control to the previous line.
13 Press * To run the line that calculates the bonus amount.
In the Immediate window, type ?Bonus
To display the bonus amount.
Press e
The Immediate window now displays the bonus amount as 12000 (20% of 60,000).
14 Reset the procedure
Remove the breakpoint In the Code window, click the breakpoint in the Margin Indicator bar.
Close the Immediate window
15 Update the code and run the procedure
To calculate 6% of earnings as the bonus and assign the value to cell G4.
16 Switch to Excel Cell G4 contains the net earnings of Diana Stone, $63,600.00.
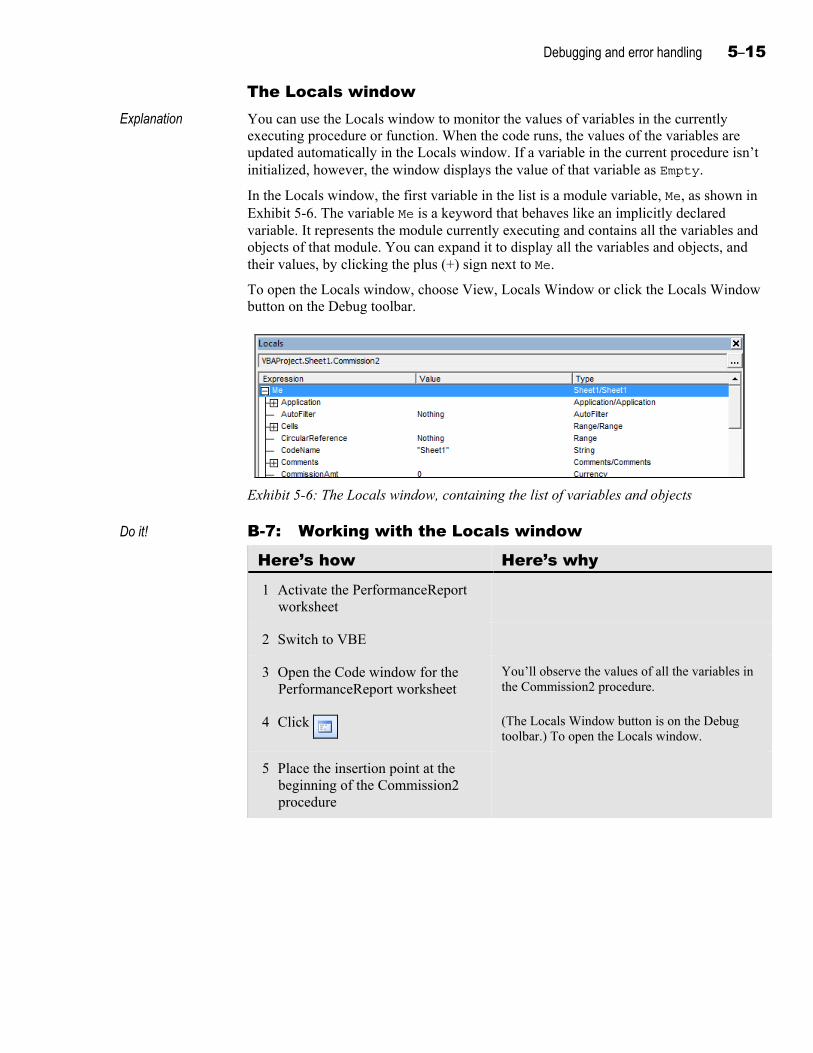
Debugging and error handling 5–15
The Locals window Explanation You can use the Locals window to monitor the values of variables in the currently
executing procedure or function. When the code runs, the values of the variables are updated automatically in the Locals window. If a variable in the current procedure isn’t initialized, however, the window displays the value of that variable as Empty.
In the Locals window, the first variable in the list is a module variable, Me, as shown in Exhibit 5-6. The variable Me is a keyword that behaves like an implicitly declared variable. It represents the module currently executing and contains all the variables and objects of that module. You can expand it to display all the variables and objects, and their values, by clicking the plus (+) sign next to Me.
To open the Locals window, choose View, Locals Window or click the Locals Window button on the Debug toolbar.
Exhibit 5-6: The Locals window, containing the list of variables and objects
Do it! B-7: Working with the Locals window
Here’s how Here’s why 1 Activate the PerformanceReport
worksheet
2 Switch to VBE
3 Open the Code window for the PerformanceReport worksheet
You’ll observe the values of all the variables in the Commission2 procedure.
4 Click (The Locals Window button is on the Debug toolbar.) To open the Locals window.
5 Place the insertion point at the beginning of the Commission2 procedure
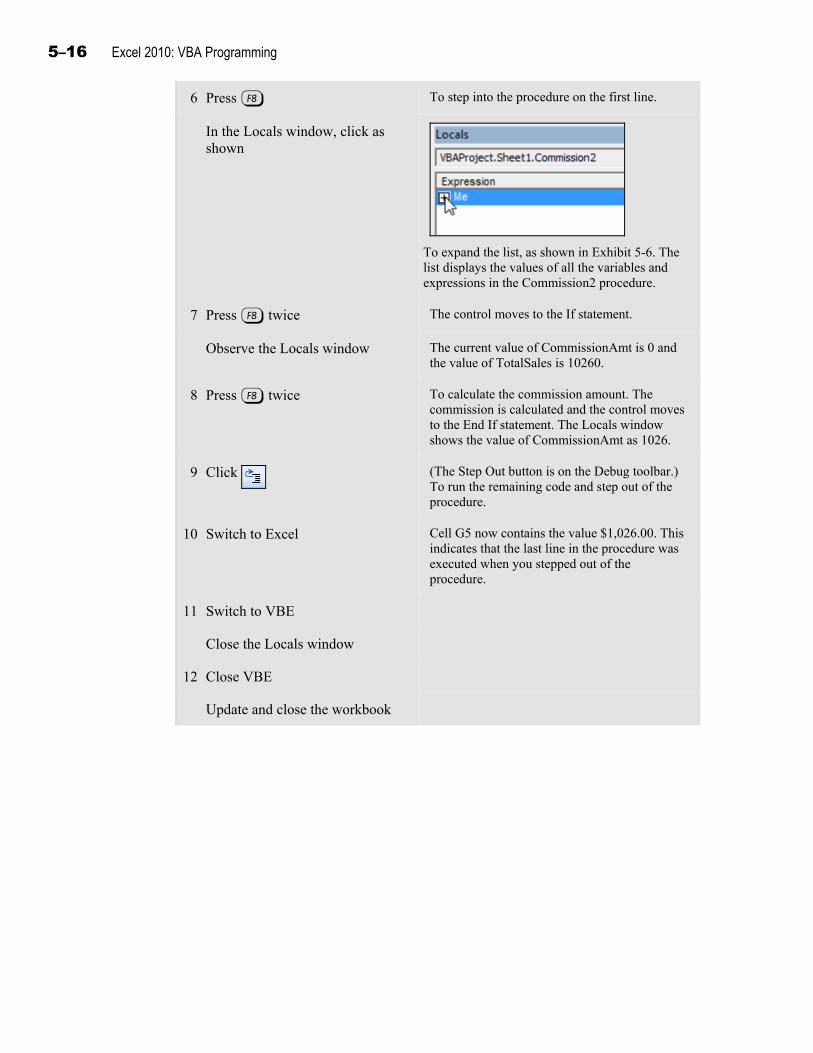
5–16 Excel 2010: VBA Programming
6 Press * To step into the procedure on the first line.
In the Locals window, click as shown
To expand the list, as shown in Exhibit 5-6. The list displays the values of all the variables and expressions in the Commission2 procedure.
7 Press * twice The control moves to the If statement.
Observe the Locals window The current value of CommissionAmt is 0 and the value of TotalSales is 10260.
8 Press * twice To calculate the commission amount. The commission is calculated and the control moves to the End If statement. The Locals window shows the value of CommissionAmt as 1026.
9 Click (The Step Out button is on the Debug toolbar.) To run the remaining code and step out of the procedure.
10 Switch to Excel Cell G5 now contains the value $1,026.00. This indicates that the last line in the procedure was executed when you stepped out of the procedure.
11 Switch to VBE
Close the Locals window
12 Close VBE
Update and close the workbook
Debugging and error handling 5–17
Topic C: Error handling Explanation When a runtime error occurs, code execution stops abruptly and can result in the loss of
data. This occurs because procedures can’t handle errors on their own. VBA provides the capability to identify, trace, and handle errors by using code. This process is called error handling. Whenever an error occurs, the program searches for error-handling statements that transfer control to an error handler. An error handler is the code that you write to respond to an error. A label indicates the beginning of an error handler. To handle runtime errors, you can use an On Error statement, such as On Error GoTo or On Error Resume Next.
The On Error GoTo statement You use the On Error statement to trap runtime errors. You also need to write statements that run after the error has been trapped. The GoTo statement passes the control flow to the error-handling code by using the name of the error-handling code as a line label. For example, consider the following code:
On Error GoTo CheckError <statements> Exit Sub/Exit Function CheckError: MsgBox ("An error occurred while processing data")
When an error occurs in the code above, the On Error GoTo CheckError statement passes control to the error-handling code labeled CheckError. You define a line label by using a colon (:) with a specific name. A label name should start with a letter and can be followed by letters or numbers. For example, to define a label named CheckError and then display a message box when an error occurs, you can use the following code:
CheckError: MsgBox ("An error occurred while processing the data")
You should place the error-handling statements after the Exit Sub or Exit Function statement. The Exit Sub and Exit Function statements stop the execution of a Sub or Function procedure, respectively. The Exit Sub or Exit Function statement is required because the error-handling code can’t be executed if no errors occur. The Exit Sub and Exit Function statements ensure that if no errors occur, the procedure is exited before the error-handling code runs.
The On Error GoTo statement should be placed at the beginning of a procedure. The label, with its following statements, should be placed at the end of a procedure. For example, consider the following code:
Private Sub prcCalculate() On Error GoTo CheckError Divide = Num1/Num2 MsgBox (Divide) Exit Sub CheckError: MsgBox ("An error occurred while processing the data") End Sub
If an error occurs in the example above, control transfers to the error handler, CheckError, specified by the On Error GoTo statement. If no runtime error occurs, VBA ignores the On Error GoTo statement and the error-handling code.
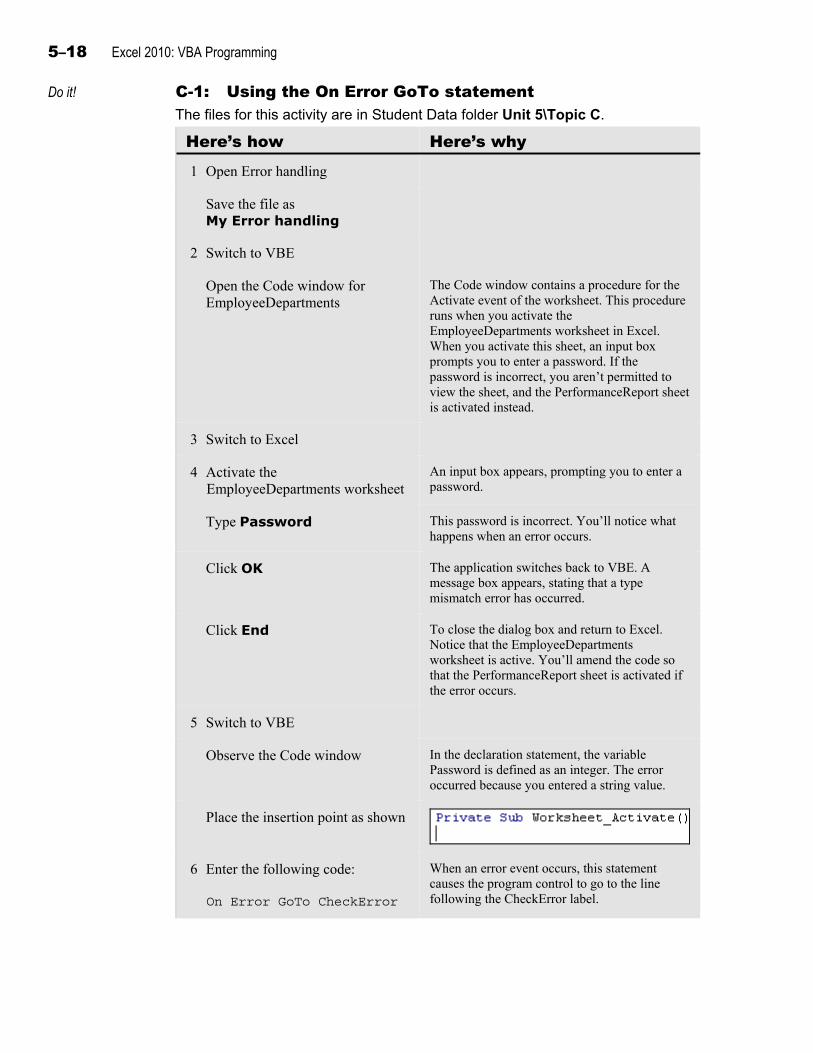
5–18 Excel 2010: VBA Programming
Do it! C-1: Using the On Error GoTo statement The files for this activity are in Student Data folder Unit 5\Topic C.
Here’s how Here’s why 1 Open Error handling
Save the file as My Error handling
2 Switch to VBE
Open the Code window for EmployeeDepartments
The Code window contains a procedure for the Activate event of the worksheet. This procedure runs when you activate the EmployeeDepartments worksheet in Excel. When you activate this sheet, an input box prompts you to enter a password. If the password is incorrect, you aren’t permitted to view the sheet, and the PerformanceReport sheet is activated instead.
3 Switch to Excel
4 Activate the EmployeeDepartments worksheet
An input box appears, prompting you to enter a password.
Type Password This password is incorrect. You’ll notice what happens when an error occurs.
Click OK The application switches back to VBE. A message box appears, stating that a type mismatch error has occurred.
Click End To close the dialog box and return to Excel. Notice that the EmployeeDepartments worksheet is active. You’ll amend the code so that the PerformanceReport sheet is activated if the error occurs.
5 Switch to VBE
Observe the Code window In the declaration statement, the variable Password is defined as an integer. The error occurred because you entered a string value.
Place the insertion point as shown
6 Enter the following code:
On Error GoTo CheckError
When an error event occurs, this statement causes the program control to go to the line following the CheckError label.
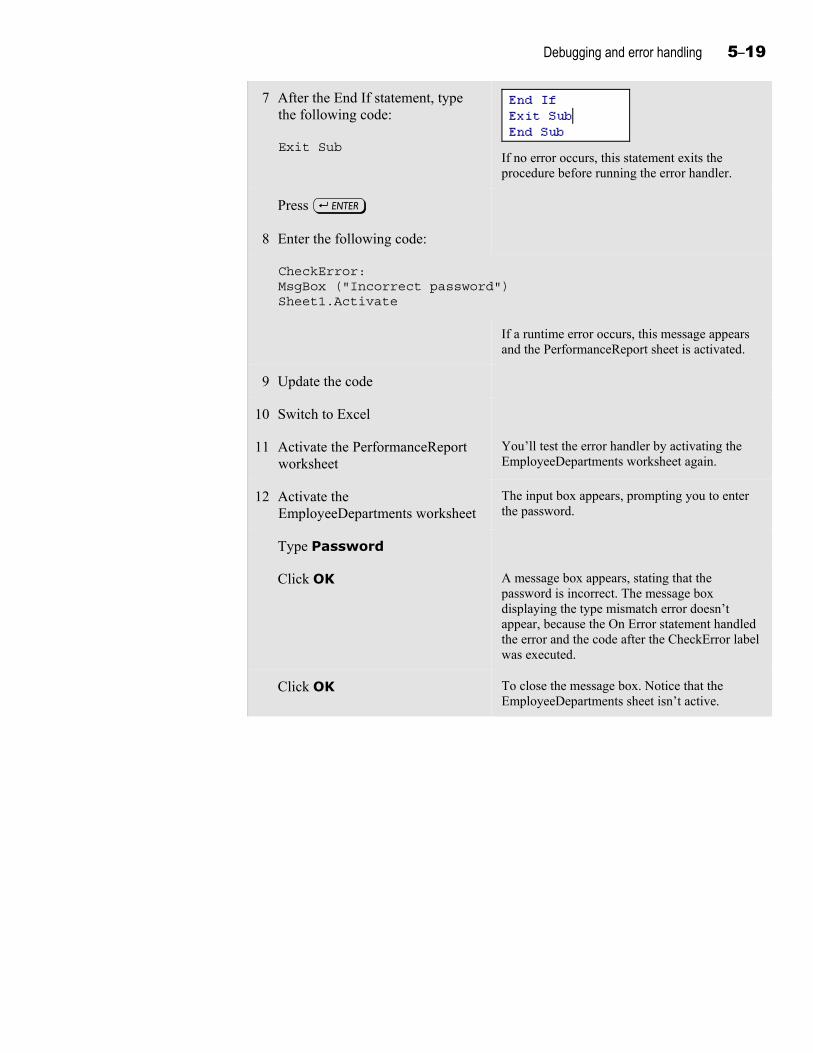
Debugging and error handling 5–19
7 After the End If statement, type the following code:
Exit Sub
If no error occurs, this statement exits the procedure before running the error handler.
Press e
8 Enter the following code:
CheckError: MsgBox ("Incorrect password") Sheet1.Activate
If a runtime error occurs, this message appears and the PerformanceReport sheet is activated.
9 Update the code
10 Switch to Excel
11 Activate the PerformanceReport worksheet
You’ll test the error handler by activating the EmployeeDepartments worksheet again.
12 Activate the EmployeeDepartments worksheet
The input box appears, prompting you to enter the password.
Type Password
Click OK A message box appears, stating that the password is incorrect. The message box displaying the type mismatch error doesn’t appear, because the On Error statement handled the error and the code after the CheckError label was executed.
Click OK To close the message box. Notice that the EmployeeDepartments sheet isn’t active.
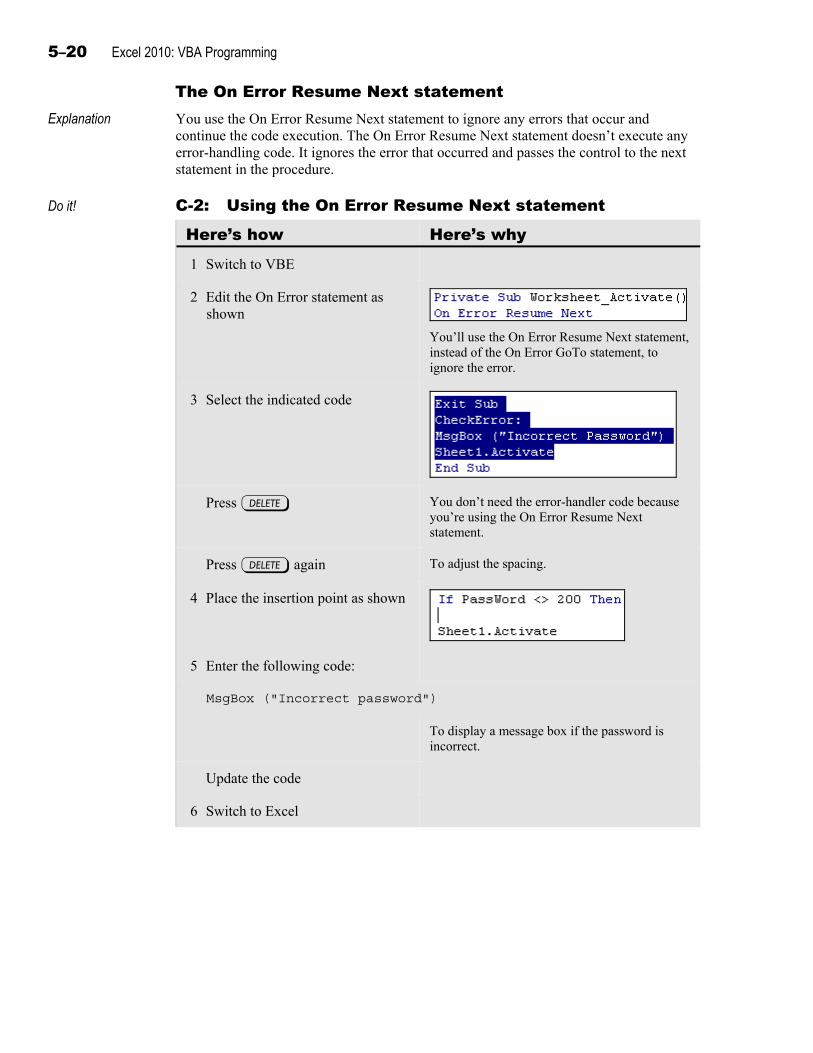
5–20 Excel 2010: VBA Programming
The On Error Resume Next statement Explanation You use the On Error Resume Next statement to ignore any errors that occur and
continue the code execution. The On Error Resume Next statement doesn’t execute any error-handling code. It ignores the error that occurred and passes the control to the next statement in the procedure.
Do it! C-2: Using the On Error Resume Next statement
Here’s how Here’s why 1 Switch to VBE
2 Edit the On Error statement as shown
You’ll use the On Error Resume Next statement, instead of the On Error GoTo statement, to ignore the error.
3 Select the indicated code
Press d You don’t need the error-handler code because you’re using the On Error Resume Next statement.
Press d again To adjust the spacing.
4 Place the insertion point as shown
5 Enter the following code:
MsgBox ("Incorrect password")
To display a message box if the password is incorrect.
Update the code
6 Switch to Excel
Debugging and error handling 5–21
7 Activate the EmployeeDepartments worksheet
The input box appears, prompting you to enter a password.
Type Password
Click OK To test the On Error Resume Next statement. A message box appears, stating that the password is incorrect. The statement containing the MsgBox function was executed even though an error occurred.
Click OK To close the message box and return to the PerformanceReport sheet.
8 Activate the EmployeeDepartments sheet
The input box appears. You’ll now provide the correct password.
Type 200
Click OK The sheet EmployeeDepartments is active.
9 Switch to VBE
10 Close VBE
Update and close the workbook
5–22 Excel 2010: VBA Programming
Unit summary: Debugging and error handling Topic A In this topic, you learned how to trace the various types of errors: compile-time,
runtime, and logical errors. You learned that compile-time errors occur because of incorrect syntax or missing keywords, that runtime errors occur during the execution of code, and that logical errors don’t interrupt the execution of code but produce an incorrect result.
Topic B In this topic, you learned about the debugging tools provided by VBE, such as breakpoints, the Watch window, the Immediate window, and the Locals window. You learned that you can use a breakpoint to pause the code execution at a specific statement. You also learned how to resolve errors by adding a Watch expression and by stepping into code. You learned that you can use the Immediate window to test the result of different variable values while in break mode. In addition, you learned that you can use the Locals window to monitor the values of all the variables of the procedure currently running.
Topic C In this topic, you learned how to use the On Error GoTo and On Error Resume Next statements to trap and handle errors. You learned that the On Error GoTo statement uses a line label to specify a block of code to be executed in case of a code error. You also learned that the On Error Resume Next statement ignores errors and continues the execution of the next statement in the procedure.
Independent practice activity In this activity, you’ll use debugging tools, such as breakpoints and windows, to trace errors in a procedure. Then you’ll add error-handling code to the procedure.
The files for this activity are in Student Data folder Unit 5\Unit summary.
1 Open Practice products.
2 Save the workbook as My practice products.
3 Open VBE.
4 Outlander Spices wants to monitor the current stock status of products by subtracting the value of the quantity sold from the available quantity. Run the procedure CalculateStock in Sheet1 (Products) to calculate the stock after sale. Switch to Excel and examine the result. Identify the errors, if any.
5 Debug the code and run it again.
6 In the procedure AverageCommission, add error-handling code labeled CheckTotalSales. The code should display an error message if the number for the total sales entered is zero. (Hint: You won’t get the error message if you enter zero for the quarterly sales.)
7 Update the code and run the procedure. Test the code by entering zero for total sales.
8 Close VBE.
9 Update and close the workbook.
10 Close Excel.
Debugging and error handling 5–23
Review questions 1 True or false? Logical errors interrupt the execution of code.
False; the code executes, but the output is incorrect.
2 When does a program enter break mode? [Choose all that apply.]
A When a runtime error is detected
B When you press the Pause/Break key on your keyboard
C When you’ve manually set a breakpoint
D When a logical error occurs
3 True or false? Breakpoints you insert are saved with the code.
False. Breakpoints are temporary markers.
4 When is a Watch window displayed?
When the program enters break mode; when you choose View, Watch Window; or when you click the Watch Window button on the Debug toolbar.
5 You want to step through your code, running each executable line sequentially to observe the effect of each statement. Which method would you use?
Step Into. (The Step Over method runs each procedure as if it were a single statement. The Step Out method runs remaining code in the current procedure as a single statement.)
6 If you want to change the values of some variables and test the results, what tool can you use?
The Immediate window.
7 If you want to monitor all the variables in the procedure that’s running, what tool can you use?
The Locals window.
8 If you want to monitor just certain variables or expressions in your code while it’s running, what debugging tool can you use?
The Watch window. You use the Add Watch dialog box to specify which variables and expressions you want to monitor and to specify the procedure and module names for the current project.
9 You use the On Error statement to trap runtime errors. You also need to write statements that run after the error is trapped. Which statements can you use, and what does each statement do?
Use the On Error GoTo statement (to pass the control flow to the error-handling code), or use the On Error Resume Next statement (to ignore any errors that occur and continue the code execution).

5–24 Excel 2010: VBA Programming
S–1
Course summary
This summary contains information to help you bring the course to a successful conclusion. Using this information, you will be able to:
A Use the summary text to reinforce what you’ve learned in class.
B Determine the next courses in this series (if any), as well as any other resources that might help you continue to learn about Excel 2010.
S–2 Excel 2010: VBA Programming
Topic A: Course summary Use the following summary text to reinforce what you’ve learned in class.
Unit summaries
Unit 1
In this unit, you learned that Visual Basic for Applications (VBA) is a programming language that’s a part of Microsoft Office applications, such as Excel. Then, you displayed the Developer tab on the Ribbon and learned about various Excel file formats. Next, you learned you can use VBA to manipulate objects and the properties and methods associated with those objects. You also learned how to start Visual Basic Editor (VBE) and identify the Project Explorer, the Properties window, and the Code window. Then you used the Code window to modify properties and use methods. You associated code with an event by using an event procedure. In addition, you learned how to execute code by using a button. Finally, you used the Object Browser to locate objects and to find information about their properties and methods.
Unit 2
In this unit, you learned that variables are used to store the data used in a program. You also learned how to use various data types, such as Integer, String, Date, and Currency. Then, you learned about implicit and explicit variable declaration, and you used the Option Explicit statement to ensure explicit declaration. You also used expressions and operators, and you used interaction functions, such as InputBox and MsgBox. Then, you learned that the scope of a variable determines the extent of its accessibility within a program, and you learned about the three levels of scope. Finally, you learned about the scope of procedures, created Sub and Function procedures, and called one procedure from another. Finally, you learned that a Function procedure can be used when you want to return a value.
Unit 3
In this unit, you learned how to write decision-making code by using various If statements, such as If…Then, If…Then…Else, and If…Then…ElseIf. You also learned how to use the Select Case construct instead of using multiple If…Then…ElseIf statements. Then, you used various types of loop structures. You used loop structures to run a block of code repeatedly, and you used For…Next and For Each…Next for a fixed number of iterations. Finally, you used the Do Until…Loop and Do While…Loop statements to create loops in which the number of iterations depends on a condition.
Unit 4
In this unit, you learned how to create custom dialog boxes by creating a UserForm object and adding controls to it. You also resized the controls. Then, you learned how to add event-handling code, which runs in response to an event. You learned that an event is any action performed by the user on the user form or the controls in it. You also learned how to attach events, such as AfterUpdate and BeforeUpdate, to controls for validating data entry in a user form.
Course summary S–3
Unit 5
In this unit, you learned how to trace various types of errors. You learned that compile-time errors occur because of incorrect syntax or missing keywords, that runtime errors occur during the execution of code, and that logical errors don’t interrupt the execution of code but produce incorrect output. Then, you learned about the debugging tools provided by VBE. You used a breakpoint to pause the code execution at a specific statement. You resolved errors by adding a Watch expression and by Stepping Into code. You then used the Immediate window to test the result of different variable values in break mode, and you used the Locals window to monitor the values of all the variables of the procedure currently running. Next, you learned how to trap and handle errors. You learned that the On Error GoTo statement specifies a block of code to be executed in case of a code error. You also learned that the On Error Resume Next statement ignores errors and continues the execution of the next statement in the procedure.
S–4 Excel 2010: VBA Programming
Topic B: Continued learning after class It is difficult to learn how to use any software or programming language effectively in a single day. To get the most out of this class, you should begin working with Excel 2010 and VBA to perform real tasks as soon as possible. We also offer resources for continued learning.
Next courses in this series This is the last course in this series.
Other resources For more information, visit www.axzopress.com.
G–1
Glossary
Argument A variable, constant, or expression that provides
additional information to a method so that it can execute properly.
Bug A mistake in VBA code that prevents the code
from returning the desired result.
Called procedure A procedure that’s called (executed) from within
another procedure.
Calling procedure A procedure that calls (executes) another
procedure.
Classes Files that define the methods, properties, and
events associated with an object.
Collection object A set of related objects in VBA that have the same
properties.
Constant A named item that retains a specified value
throughout the execution of a program (as opposed to a variable, which can have its value changed during execution).
Container object An object that contains one or more other objects,
which might or might not be related.
Control An object that performs actions, such as entering
data, in a UserForm object. A checkbox is a control.
Control structure A part of a program that evaluates data and then
directs the flow of code execution based on that evaluation.
Data type The property of a variable that determines the kind
of data that it stores, such as string or integer.
Debugging The process of tracing and correcting errors in
VBA code.
Decision structure A control structure, such as an If…Then statement,
that executes code based on conditions.
Declaration The definition of a variable’s name and data type.
Error A mistake in VBA code that prevents the code
from returning the desired result.
Error handler VBA code that’s written to react to errors in a
VBA procedure.
Error handling The ability of VBA to identify, trace, and react to
errors during the execution of a VBA procedure.
Event procedure VBA code that executes in response to an event,
such as a mouse click.
Explicit declaration The definition of a variable in a separate statement
that precedes the procedure in which it’s used.
Expression A combination of operators, constants, procedures,
controls, and properties that’s evaluated to return a result.
Function procedure Code that performs a specific action, after which it
might or might not return a value.
Functions VBA code that performs actions, such as input or
display.
Implicit declaration The definition of a variable by simply using it in
code. Implicitly defined variables are automatically assigned the Variant data type.
Iteration A complete cycle of execution of the statements in
a loop structure.
Loop structure A control structure, such as a For…Next statement,
that executes code repeatedly, subject to conditions.
Macro-enabled format For Excel 2007/2010, the file format that has the
extension .xlsm and allows macros and other VBA code to be preserved when a workbook is saved.
G–2 Excel 2010: VBA Programming
Method A built-in procedure that can perform a specific
action on a VBA object.
Object Browser A window in VBE that displays the classes,
properties, methods, events, and constants in the available object libraries.
Object libraries Files that provide stored information about VBA
objects.
Object variable A variable that stores a reference to a VBA object
instead of to a value.
Object-oriented programming A programming concept in which all of the
elements in a program, including the data and functions, are considered self-contained entities called objects.
Operands Data items on which arithmetic operators work.
Operators Arithmetic symbols, such as + for addition.
Properties The characteristics that determine the appearance
and attributes of a VBA object.
Range In VBA, a collection object that represents a group
of cells on which a loop structure executes.
Scope The arena within VBA in which a variable or
procedure is defined and in which it can be used.
Stepping The process of executing VBA code one line at a
time and examining the output, as part of debugging.
Sub procedure Code that performs a specific action but doesn’t
return a value.
UserForm object A dialog box or a window that has a title bar and a
Close button and can hold form controls and labels.
Variable A value that’s temporarily stored in memory during
the execution of a VBA procedure.
VBA Visual Basic for Applications, a subset of Visual
Basic that’s used to extend the functionality of Microsoft Office applications.
VBE Visual Basic Editor, the programming environment
within an Office application in which VBA procedures are created and modified.
Watch expression A variable or expression that’s monitored in a
Watch window while the programmer debugs the VBA code.
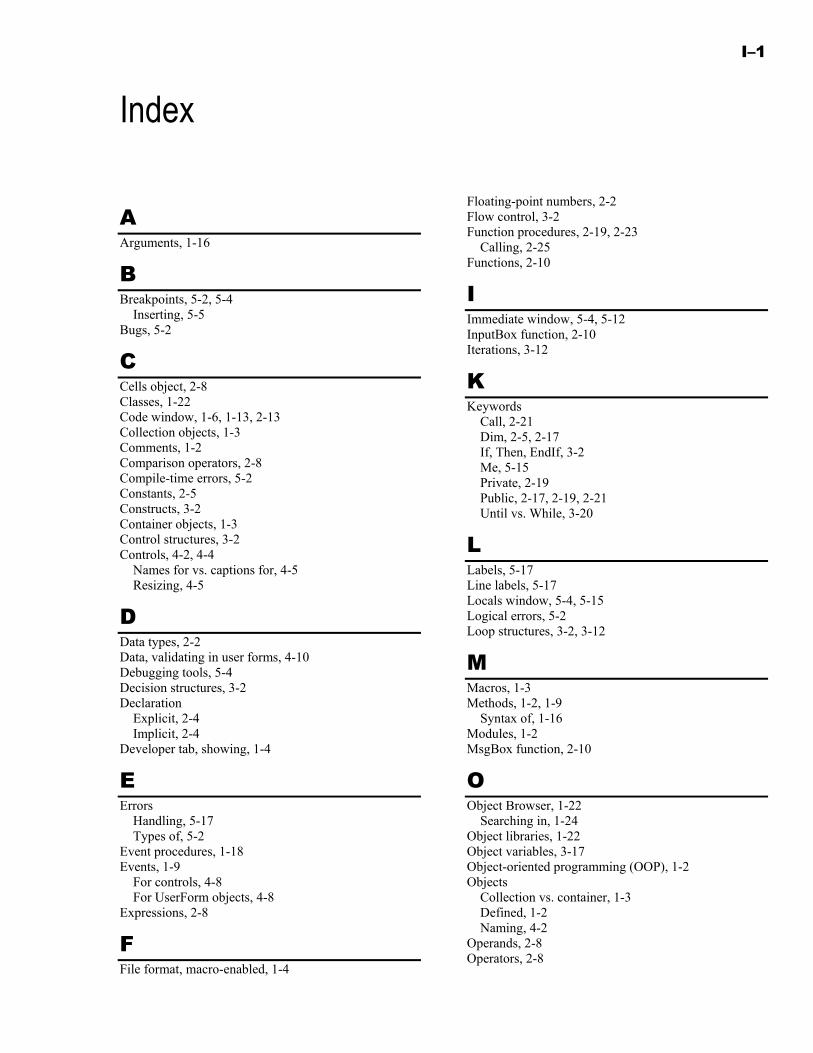
I–1
Index
A Arguments, 1-16
B Breakpoints, 5-2, 5-4
Inserting, 5-5 Bugs, 5-2
C Cells object, 2-8 Classes, 1-22 Code window, 1-6, 1-13, 2-13 Collection objects, 1-3 Comments, 1-2 Comparison operators, 2-8 Compile-time errors, 5-2 Constants, 2-5 Constructs, 3-2 Container objects, 1-3 Control structures, 3-2 Controls, 4-2, 4-4
Names for vs. captions for, 4-5 Resizing, 4-5
D Data types, 2-2 Data, validating in user forms, 4-10 Debugging tools, 5-4 Decision structures, 3-2 Declaration
Explicit, 2-4 Implicit, 2-4
Developer tab, showing, 1-4
E Errors
Handling, 5-17 Types of, 5-2
Event procedures, 1-18 Events, 1-9
For controls, 4-8 For UserForm objects, 4-8
Expressions, 2-8
F File format, macro-enabled, 1-4
Floating-point numbers, 2-2 Flow control, 3-2 Function procedures, 2-19, 2-23
Calling, 2-25 Functions, 2-10
I Immediate window, 5-4, 5-12 InputBox function, 2-10 Iterations, 3-12
K Keywords
Call, 2-21 Dim, 2-5, 2-17 If, Then, EndIf, 3-2 Me, 5-15 Private, 2-19 Public, 2-17, 2-19, 2-21 Until vs. While, 3-20
L Labels, 5-17 Line labels, 5-17 Locals window, 5-4, 5-15 Logical errors, 5-2 Loop structures, 3-2, 3-12
M Macros, 1-3 Methods, 1-2, 1-9
Syntax of, 1-16 Modules, 1-2 MsgBox function, 2-10
O Object Browser, 1-22
Searching in, 1-24 Object libraries, 1-22 Object variables, 3-17 Object-oriented programming (OOP), 1-2 Objects
Collection vs. container, 1-3 Defined, 1-2 Naming, 4-2
Operands, 2-8 Operators, 2-8
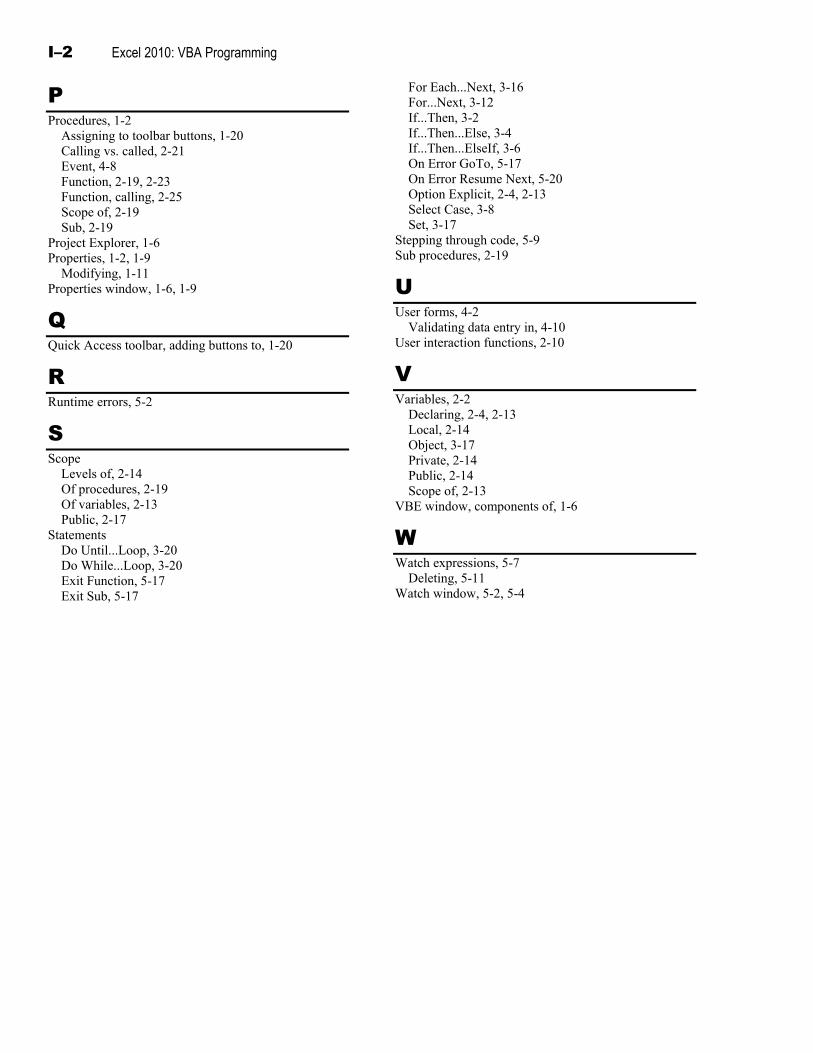
I–2 Excel 2010: VBA Programming
P Procedures, 1-2
Assigning to toolbar buttons, 1-20 Calling vs. called, 2-21 Event, 4-8 Function, 2-19, 2-23 Function, calling, 2-25 Scope of, 2-19 Sub, 2-19
Project Explorer, 1-6 Properties, 1-2, 1-9
Modifying, 1-11 Properties window, 1-6, 1-9
Q Quick Access toolbar, adding buttons to, 1-20
R Runtime errors, 5-2
S Scope
Levels of, 2-14 Of procedures, 2-19 Of variables, 2-13 Public, 2-17
Statements Do Until...Loop, 3-20 Do While...Loop, 3-20 Exit Function, 5-17 Exit Sub, 5-17
For Each...Next, 3-16 For...Next, 3-12 If...Then, 3-2 If...Then...Else, 3-4 If...Then...ElseIf, 3-6 On Error GoTo, 5-17 On Error Resume Next, 5-20 Option Explicit, 2-4, 2-13 Select Case, 3-8 Set, 3-17
Stepping through code, 5-9 Sub procedures, 2-19
U User forms, 4-2
Validating data entry in, 4-10 User interaction functions, 2-10
V Variables, 2-2
Declaring, 2-4, 2-13 Local, 2-14 Object, 3-17 Private, 2-14 Public, 2-14 Scope of, 2-13
VBE window, components of, 1-6
W Watch expressions, 5-7
Deleting, 5-11 Watch window, 5-2, 5-4

Visio 2010Basic
MICROSOFT
Managing Certificates
• Install a CA Hierarchy
• Enroll Certificates
• Secure Network Traffic by Using
Certificates
• Renew Certificates
Managing Certificates
• Install a CA Hierarchy
• Enroll Certificates
• Secure Network Traffic by Using
Certificates
• Renew Certificates
ILT series
TO LEARN MORE ABOUT THE ILT SERIES, VISIT US AT WWW LOGICALOPERATIONS.COM.
AX1426029217
9 781426 029219
ISBN-13 978-1-4260-2921-9ISBN-10 1-4260-2921-7
90000