microsoft 1databases and database objects: an introductionweb.cse.ohio-state.edu/cse1111/electronic...
TRANSCRIPT

Microsoft Access 2010
ObjectivesYou will have mastered the material in this chapter when you can:
Design a database to satisfy a • collection of requirements
Describe the features of the Access • window
Create a database•
Create tables in Datasheet and • Design views
Add records to a table•
Close a database•
Open a database•
Print the contents of a table•
Create and use a query•
Create and use a form•
Create and print custom reports•
Modify a report in Layout view•
Databases and Database Objects: An Introduction
1
1439078475_CH1_FINAL2.indd 11439078475_CH1_FINAL2.indd 1 6/30/10 2:17:40 PM6/30/10 2:17:40 PM
Property of Cengage Learning

Microsoft Access 2010
AC 2
Databases and Database Objects: An Introduction1IntroductionThe term database describes a collection of data organized in a manner that allows access, retrieval, and use of that data. Microsoft Access 2010, usually referred to as simply Access, is a database management system. A database management system, such as Access, is software that allows you to use a computer to create a database; add, change, and delete data in the database; ask and answer questions concerning the data in the database; and create forms and reports using the data in the database.
The process of developing a database that communicates specifi c information requires careful analysis and planning. As a starting point, establish why the database is needed. Once the purpose is determined, analyze the intended users of the database and their unique needs. Then, gather information about the topic and decide what to include in the database. Finally, determine the database design and style that will be most success-ful at delivering the message. Details of these guidelines are provided in Appendix A. In addition, each project in this book provides practical applications of these planning considerations.
Project Planning Guidelines
Project — Database CreationCamashaly Design Group is a small company that provides custom marketing solutions for the service, nonprofi t, and retail sectors. Alyssa Morgan, Camden Scott, and Ashton James started the business after they graduated from a local university. The three owners, all computer graphics design majors and business minors, worked on a service learning project during college that produced a Web site for a nonprofi t organization. Alyssa, Camden, and Ashton worked well together. Upon researching the local area for competing businesses, they decided to form their own company. The company specializes in designing and main-taining Web sites and using social networking Web sites for online marketing. They also conduct market research and develop printed media. Camashaly already has received one award for its design work. Camashaly is also recognized for its efforts in providing work opportunities to individuals who want fl exible schedules and to student interns.
Camashaly uses business analysts to work collaboratively with clients. Business analysts are employees who translate business requirements into marketing specifi cations and serve as the interface between clients and Camashaly. Business analysts are paid a base salary and can earn incentive pay for maintaining and expanding client relationships.
Camashaly charges a one-time fee for Web site development. Clients can pay for Web site maintenance by contracting for a specifi ed number of hours or can pay for main-tenance on an hour-by-hour basis. Other fees vary depending on the specifi c scope of work.
To ensure that operations run smoothly, Camashaly organizes data on its clients and business analysts in a database managed by Access. In this way, Camashaly keeps its data current and accurate while the owners can analyze the data for trends and produce a variety of useful reports. In this chapter, you will create the Camashaly database.
BTWsFor a complete list of the BTWs found in the margins of this book, visit the Access 2010 BTW Web page (scsite.com/ac2010/btw).
BTW
1439078475_CH1_FINAL2.indd 21439078475_CH1_FINAL2.indd 2 6/30/10 2:17:42 PM6/30/10 2:17:42 PM
Property of Cengage Learning

Microsoft Access 2010
AC 3
In a relational database such as those maintained by Access, a database consists of a collection of tables, each of which contains information on a specifi c subject. Figure 1 – 1 shows the database for Camashaly Design. It consists of two tables: the Client table (Figure 1 – 1a) contains information about the clients to whom Camashaly provides services, and the Business Analyst table (Figure 1 – 1b) contains information about the business analysts to whom these clients are assigned.
Figure 1–1
The rows in the tables are called records. A record contains information about a given person, product, or event. A row in the Client table, for example, contains informa-tion about a specifi c client, such as the client’s name, address information, and other data.
The columns in the tables are called fi elds. A field contains a specifi c piece of infor-mation within a record. In the Client table, for example, the fourth fi eld, City, contains the name of the city where the client is located.
The fi rst fi eld in the Client table is CL #, which is an abbreviation for Client Number. Camashaly Design assigns each client a client number. As is common to the way in which many organizations format client numbers, Camashaly Design calls it a number, although it actually contains letters. The Camashaly client numbers consist of two uppercase letters followed by a two-digit number.
The client numbers are unique; that is, no two clients are assigned the same number. Such a fi eld can be used as a unique identifi er. A unique identifi er, as its name suggests, is a way of uniquely identifying each record in the database. A given client number will
caption for Client Number fi eld
fi elds
BA # (Business Analyst Number) is 11
records
BA # (Business Analyst Number) for Cordelia Kerry is 11
caption for Business Analyst Number fi eld
(a) Client table
(b) Business Analyst table
1439078475_CH1_FINAL2.indd 31439078475_CH1_FINAL2.indd 3 6/30/10 2:17:42 PM6/30/10 2:17:42 PM
Property of Cengage Learning

AC 4 Access Chapter 1 Databases and Database Objects: An Introduction
appear only in a single record in the table. Only one record exists, for example, in which the client number is BB32. A unique identifi er also is called a primary key. Thus, the Client Number fi eld is the primary key for the Client table.
The next eight fi elds in the Client table are Client Name, Street, City, State, Postal Code, Amount Paid, Current Due, and Hrs YTD, which is an abbreviation for Contract Hours YTD. YTD is an abbreviation for year to date. The Amount Paid column contains the amount that the client has paid Camashaly Design YTD prior to the current period. The Current Due column contains the amount due to Camashaly for the current period. The Hrs YTD column contains the number of hours the client has contracted for Web site maintenance so far this year. For example, client BB32 is Babbage CPA Firm. The address is 464 Linnell in Austin, South Carolina. The postal code is 28796. The client has paid $1,500.00 for services so far this year. The amount due for the current period is $500.00. The client has contracted for 5.00 hours of Web site maintenance.
Camashaly assigns a single business analyst to work with each client. The last column in the Client table, BA #, which is an abbreviation for Business Analyst Number, gives the number of the client’s business analyst.
The fi rst fi eld in the Business Analyst table is also BA #, an abbreviation for Business Analyst Number. The business analyst numbers are unique, so the Business Analyst Number fi eld is the primary key of the Business Analyst table.
The other fi elds in the Business Analyst table are Last Name, First Name, Street, City, State, Postal Code, Salary YTD, and Incentive YTD. The Salary YTD fi eld gives the salary paid to the analyst thus far this year. The Incentive YTD gives the incentive for which the analyst qualifi ed thus far this year. For example, business analyst 14 is Manuel Martinez. His address is 3125 Steel in Kyle, South Carolina. The Postal Code is 28797. So far this year, he has been paid $3,100.00 in salary. He has earned $2,430.00 in incentive pay.
The business analyst number appears in both the Client table and the Business Analyst table, and relates clients and business analysts. For example, in the Client table, you see that the business analyst number for client Babbage CPA Firm is 14. To fi nd the name of this business analyst, look for the row in the Business Analyst table that contains 14 in the BA # column. After you have found it, you know the client is assigned to Manuel Martinez. To fi nd all the clients assigned to Cordelia Kerry, you would fi rst look in the Business Analyst table to fi nd that her number is 11. You would then look through the Client table for all the clients that contain 11 in the BA # column. Her clients are BA53 (Bavant Animal Hospital), BC76 (Buda Community Clinic), GF56 (Granger Foundation), KG04 (Kyle Grocery Cooperative), and SL77 (Smarter Law Associates).
The last business analyst in the Business Analyst table, Jeff Scott, has not been assigned any clients yet; therefore, his business analyst number, 35, does not appear on any row in the Client table.
OverviewAs you read this chapter, you will learn how to create the database shown in Figure 1 – 1
by performing these general tasks:
Design the database.• Create a new blank database.• Create a table and add the records.• Preview and print the contents of a table.• Create a second table and import the records.• Create a simple query.• Create a simple form.• Create and modify a report.•
1439078475_CH1_FINAL2.indd 41439078475_CH1_FINAL2.indd 4 6/30/10 2:17:49 PM6/30/10 2:17:49 PM
Property of Cengage Learning

Databases and Database Objects: An Introduction Access Chapter 1 AC 5
Acc
ess
Ch
apte
r 1
Database Design GuidelinesDatabase design refers to the arrangement of data into tables and fi elds. In the example in this chapter, the design is specifi ed, but in many cases, you will have to determine the design based on what you want the system to accomplish.
When designing a database to satisfy a given set of requirements, the actions you take and the decisions you make will determine the tables and fi elds that will be included in the database. As you create a database, such as the one shown in Figure 1–1 on page AC 3, you should follow these general guidelines:
1. Identify the tables. Examine the requirements for the database to identify the main objects that are involved. There will be a table for each object you identify.
In one database, for example, the main objects might be departments and employees. Thus, there would be two tables: one for departments and the other for employees. In another database, the main objects might be clients and business analysts. In this case, there also would be two tables: one for clients and the other for business analysts. In still another database, the main objects might be books, publishers, and authors. This database would require three tables: one for books, a second for publishers, and a third for authors.
2. Determine the primary keys. Recall that the primary key is the unique identifi er for records in the table. For each table, determine the unique identifi er. In a Department table, for example, the unique identifi er might be the Department Code. For a Book table, the unique identifi er might be the ISBN.
3. Determine the additional fi elds. The primary key will be a fi eld or combination of fi elds in a table. A table typically will contain many additional fi elds, each of which contains a type of data. Examine the project requirements to determine these additional fi elds. For example, in an Employee table, the additional fi elds might include such fi elds as Employee Name, Street Address, City, State, Postal Code, Date Hired, Salary, and so on.
4. Determine relationships between the tables. Examine the list of tables you have created to see which tables are related. When you determine that two tables are related, include matching fi elds in the two tables. For example, in a database containing employees and departments, there is a relationship between the two tables because one department can have many employees assigned to it. Department Code could be the matching fi eld in the two tables.
5. Determine data types for the fi elds. For each fi eld, determine the type of data the fi eld can contain. One fi eld, for example, might contain only numbers. Another fi eld might contain currency amounts, while a third fi eld might contain only dates. Some fi elds contain text data, meaning any combination of letters, numbers, and special characters (!, ;, ‘, &, and so on). For example, in an Employee table, the Date Hired fi eld would contain dates, the Salary fi eld would contain currency amounts, and the Hours Worked fi eld would contain numbers. The other fi elds in the Employee table would contain text data, such as Employee Name and Department Code.
6. Identify and remove any unwanted redundancy. Redundancy is the storing of a piece of data in more than one place. Redundancy usually, but not always, causes problems, such as wasted space, diffi culties with update, and possible data inconsistency. Examine each table you have created to see if it contains redundancy and, if so, determine whether the redundancy causes the problems described. If it does, remove the redundancy by splitting the table into two tables. For example, you might have a single table of employees. In addition to typical employee data (name, address, earnings, and so on), the table might contain Department Number and Department Name. If so, the Department Name could repeat multiple times. Every employee whose department number is 12, for example, would have the same department name. It would be better to split the table into two tables: one for Employees and one for Department. In the Department table, the Department Name is stored only once.
7. Determine a storage location for the database. The database you have designed will be stored in a single fi le. You need to determine a location in which to store the fi le.
8. Determine additional properties for fi elds. Before creating the database, determine any other properties you should specify for the fi elds. These could include a fi eld size, which is
Plan Ahead
(continued)
1439078475_CH1_FINAL2.indd 51439078475_CH1_FINAL2.indd 5 6/30/10 2:17:49 PM6/30/10 2:17:49 PM
Property of Cengage Learning

AC 6 Access Chapter 1 Databases and Database Objects: An Introduction
Designing a DatabaseThis section illustrates the database design process by showing how you would design the database for Camashaly Design from a set of requirements. In this section, you will use commonly accepted shorthand to represent the tables and fi elds that make up the database as well as the primary keys for the tables. For each table, you give the name of the table followed by a set of parentheses. Within the parentheses is a list of the fi elds in the table separated by columns. You underline the primary key. For example,
Product (Product Code, Description, On Hand, Price)represents a table called Product. The Product table contains four fi elds: Product Code, Description, On Hand, and Price. The Product Code fi eld is the primary key.
Database RequirementsThe Camashaly Design database must maintain information on both clients and
business analysts. The business currently keeps this data in two Word tables and two Excel workbooks, as shown in Figure 1 – 2. They use Word tables for address information and Excel workbooks for fi nancial information.
the maximum number of characters that can be stored in the fi eld. If you want something other than the fi eld name to appear at the top of a column (such as an abbreviation), you can change the caption to the desired heading. You also can add a description, which is a message that appears on the screen concerning a fi eld whenever the fi eld is selected.
9. Determine the best method for distributing the database objects. The traditional method of distributing database objects uses a printer to produce a hard copy of a table or report on paper. You also can distribute the table as an electronic image that mirrors the original table’s appearance.
When necessary, more specifi c details concerning the above guidelines are presented at appropriate points in the chapter. The chapter also will identify the actions performed and decisions made regarding these guidelines during the creation of the database shown in Figure 1–1 on page AC 3.
(continued)Plan Ahead
Client Number
Client Name Street City State Postal Code
BA53 Bavant Animal Hospital 134 Main Burles NC 28817
BB32 Babbage CPA Firm 464 Linnell Austin SC 28796
BC76 Buda Community Clinic 867 Ridge Buda NC 27032
CJ29 Catering by Jenna 123 Second Granger NC 27036
GA74 Grant Antiques 78 Catawba Georgetown NC 28794
GF56 Granger Foundation 65 Simpson Granger NC 27036
HC10 Hendley County Hospital 216 Rivard Austin SC 28796
KD21 KAL Design Studio 116 Pine Georgetown NC 28794
KG04 Kyle Grocery Cooperative 421 First Kyle SC 28798
ME14 Mike’s Electronic Stop 234 Gilham Georgetown NC 28794
PJ34 Patricia Jean Florist 345 Magee Kyle SC 28798
SL77 Smarter Law Associates 764 Main Burles NC 28817
TB17 The Bikeshop 346 Austin Buda NC 27032
WE05 Walburg Energy Alternatives 12 Polk Walburg NC 28819
WS01 Woody Sporting Goods 578 Central Walburg NC 28819
Figure 1–2 (a) Client Address Information (Word Table)
Determining Database RequirementsThe determination of database requirements is part of a process known as systems analysis. A systems analyst examines existing and proposed documents, and examines organizational policies to determine exactly the type of data needs the database must support.
BTW
1439078475_CH1_FINAL2.indd 61439078475_CH1_FINAL2.indd 6 6/30/10 2:17:49 PM6/30/10 2:17:49 PM
Property of Cengage Learning

Databases and Database Objects: An Introduction Access Chapter 1 AC 7
Acc
ess
Ch
apte
r 1
Business Analyst Number
Last Name First Name Street City State Postal Code
11 Kerry Cordelia 251 Painter Georgetown NC 28794
14 Martinez Manuel 3125 Steel Kyle SC 28797
27 Liu Jan 265 Marble Byron SC 28795
35 Scott Jeff 1925 Pine Georgetown NC 28794
For clients, Camashaly needs to maintain address data. It currently keeps this address data in a Word table (Figure 1 – 2a). It also maintains fi nancial data for each client. This includes the amount paid, current amount due, and contract hours YTD for the client. It keeps these amounts, along with the client name and number, in the Excel workbook shown in Figure 1 – 2b.
Camashaly keeps business analyst address data in a Word table, as shown in Figure 1 – 2c. Just as with clients, it keeps fi nancial data for business analysts, including their salary YTD and incentive YTD, in a separate Excel workbook, as shown in Figure 1 – 2d.
Finally, it keeps track of which clients are assigned to which business analysts. Each client is assigned to a single business analyst, but each business analyst might be assigned many clients. Currently, for example, clients BA53 (Bavant Animal Hospital), BC76 (Buda Community Clinic), GF56 (Granger Foundation), KG04 (Kyle Grocery Cooperative), and SL77 (Smarter Law Associates) are assigned to business analyst 11 (Cordelia Kerry). Clients BB32 (Babbage CPA Firm), GA74 (Grant Antiques), KD21 (KAL Design Studio), WE05 (Walburg Energy Alternatives), and WS01 (Woody Sporting Goods) are assigned to business analyst 14 (Manuel Martinez). Clients CJ29 (Catering by Jenna), HC10 (Hendley County Hospital), ME14 (Mike’s Electronic Stop), PJ34 (Patricia Jean Florist), and TB17 (The Bikeshop) are assigned to business analyst 27 (Jan Liu). Camashaly has an additional business analyst, Jeff Scott, whose number has been assigned as 35, but who has not yet been assigned any clients.
Figure 1–2 (b) Client Financial Information (Excel Worksheet)
Figure 1–2 (c) Business Analyst Address Information (Word Table)
Figure 1–2 (d) Business Analyst Financial Information (Excel Worksheet)
Additional Data for CamashalyThere are many other types of data that Camashaly could include in a database. For example, they might keep all employee information in a database as well as information on client contracts and an inventory of hardware and software.
BTW
1439078475_CH1_FINAL2.indd 71439078475_CH1_FINAL2.indd 7 6/30/10 2:17:49 PM6/30/10 2:17:49 PM
Property of Cengage Learning

AC 8 Access Chapter 1 Databases and Database Objects: An Introduction
Naming Tables and FieldsIn designing your database, you must name the tables and fi elds. Thus, before
beginning the design process, you must understand the rules Access applies to table and fi eld names. These rules are:
1. Names can be up to 64 characters in length.2. Names can contain letters, digits, and spaces, as well as most of the punctuation
symbols.3. Names cannot contain periods (.), exclamation points (!), accent graves ( `), or
square brackets ([ ]).4. The same name cannot be used for two different fi elds in the same table.
The approach to naming tables and fi elds used in this text is to begin the names with an uppercase letter and to use lowercase for the other letters. In multiple-word names, each word begins with an uppercase letter, and there is a space between words (for example, Client Number). You should know that other approaches exist, all of which are acceptable in Access. Some people omit the space (ClientNumber). Still others use an underscore in place of the space (Client_Number). Finally, some use an underscore in place of a space, but use the same case for all letters (CLIENT_NUMBER or client_number).
Identifying the TablesNow that you know the rules for naming tables and fi elds, you are ready to begin the
design process. The fi rst step is to identify the main objects involved in the requirements. For the Camashaly Design database, the main objects are clients and business analysts. This leads to two tables, which you must name. Reasonable names for these two tables are:
ClientBusiness Analyst
Determining the Primary KeysThe next step is to identify the fi elds that will be the unique identifi ers, or primary
keys. Client numbers uniquely identify clients, and business analyst numbers uniquely identify business analysts. Thus, the primary key for the Client table is the client number, and the primary key for the Business Analyst table is the business analyst number. Reasonable names for these fi elds would be Client Number and Business Analyst Number, respectively. Adding these primary keys to the tables gives:
Client (Client Number)Business Analyst (Business Analyst Number)
Determining Additional FieldsAfter identifying the primary keys, you need to determine and name the additional
fi elds. In addition to the client number, the Client Address Information shown in Figure 1 – 2a on page AC 6 contains the client name, street, city, state, and postal code. These would be fi elds in the Client table. The Client Financial Information shown in Figure 1 – 2b also contains the client number and client name, which are already included in the Client table. The fi nancial information also contains the amount paid, current due, and contract hours YTD. Adding the amount paid, current due, and contract hours YTD fi elds to those already identifi ed in the Client table and assigning reasonable names gives:
Client (Client Number, Client Name, Street, City, State, Postal Code, Amount Paid, Current Due, Contract Hours YTD)
Naming FilesThe following characters cannot be used in a fi le name: question mark ( ? ), quotation mark ( “ ), slash ( / ), backslash ( \ ), colon ( : ), asterisk ( * ), vertical bar ( | ), greater than symbol ( > ), and less than symbol ( < ).
BTW
Naming FieldsAccess 2010 has a number of reserved words, words that have a special meaning to Access. You cannot use these reserved words as fi eld names. For example, Name is a reserved word and could not be used in the Client table to describe a client’s name. For a complete list of reserved words in Access 2010, consult Access Help.
BTW
1439078475_CH1_FINAL2.indd 81439078475_CH1_FINAL2.indd 8 6/30/10 2:17:51 PM6/30/10 2:17:51 PM
Property of Cengage Learning

Databases and Database Objects: An Introduction Access Chapter 1 AC 9
Acc
ess
Ch
apte
r 1
Similarly, examining the Business Analyst Address Information in Figure 1 – 2c adds the last name, fi rst name, street, city, state, and postal code fi elds to the Business Analyst table. In addition to the business analyst number, last name, and fi rst name, the Business Analyst Financial Information in Figure 1 – 2d would add the salary YTD and Incentive YTD. Adding these fi elds to the Business Analyst table and assigning reasonable names gives:
Business Analyst (Business Analyst Number, Last Name, First Name, Street, City, State, Postal Code, Salary YTD, Incentive YTD)
Determining and Implementing Relationships Between the Tables
Determine relationships between the tables.The most common type of relationship you will encounter between tables is the one-to-many relationship. This means that each row in the fi rst table may be associated with many rows in the second table, but each row in the second table is associated with only one row in the fi rst. The fi rst table is called the “one” table and the second is called the “many” table. For example, there may be a relationship between departments and employees, in which each department can have many employees, but each employee is assigned to only one department. In this rela-tionship, there would be two tables, Department and Employee. The Department table would be the “one” table in the relationship. The Employee table would be the “many” table.
To determine relationships between tables, you can follow these general guidelines:
Identify the “one” table.•
Identify the “many” table.•
Include the primary key from the “one” table as a fi eld in the “many” table.•
Plan Ahead
According to the requirements, each client has one business analyst, but each business analyst can have many clients. Thus, the Business Analyst table is the “one” table, and the Client table is the “many” table. To implement this one-to-many relationship between business analysts and clients, add the Business Analyst Number fi eld (the primary key of the Business Analyst table) to the Client table. This produces:
Client (Client Number, Client Name, Street, City, State, Postal Code, Amount Paid, Current Due, Contract Hours YTD, Business Analyst Number)
Business Analyst (Business Analyst Number, Last Name, First Name, Street, City,State, Postal Code, Salary YTD, Incentive YTD)
Determining Data Types for the FieldsEach fi eld has a data type. This indicates the type of data that can be stored in the
fi eld. Three of the most commonly used data types are:
1. Text — The fi eld can contain any characters. A maximum number of 255 characters is allowed in a fi eld whose data type is Text.
2. Number — The fi eld can contain only numbers. The numbers either can be positive or negative. Fields are assigned this type so they can be used in arithmetic operations. Fields that contain numbers but will not be used for arithmetic operations (such as postal codes) usually are assigned a data type of Text.
3. Currency — The fi eld can contain only monetary data. The values will appear with currency symbols, such as dollar signs, commas, and decimal points, and with two digits following the decimal point. Like numeric fi elds, you can use currency fi elds in arithmetic operations. Access assigns a size to currency fi elds automatically.
Database Design Language (DBDL)DBDL is a commonly accepted shorthand representation for showing the structure of a relational database. You write the name of the table and then within parentheses you list all the columns in the table. If the columns continue beyond one line, indent the subsequent lines.
BTW
1439078475_CH1_FINAL2.indd 91439078475_CH1_FINAL2.indd 9 6/30/10 2:17:51 PM6/30/10 2:17:51 PM
Property of Cengage Learning
AC 10 Access Chapter 1 Databases and Database Objects: An Introduction
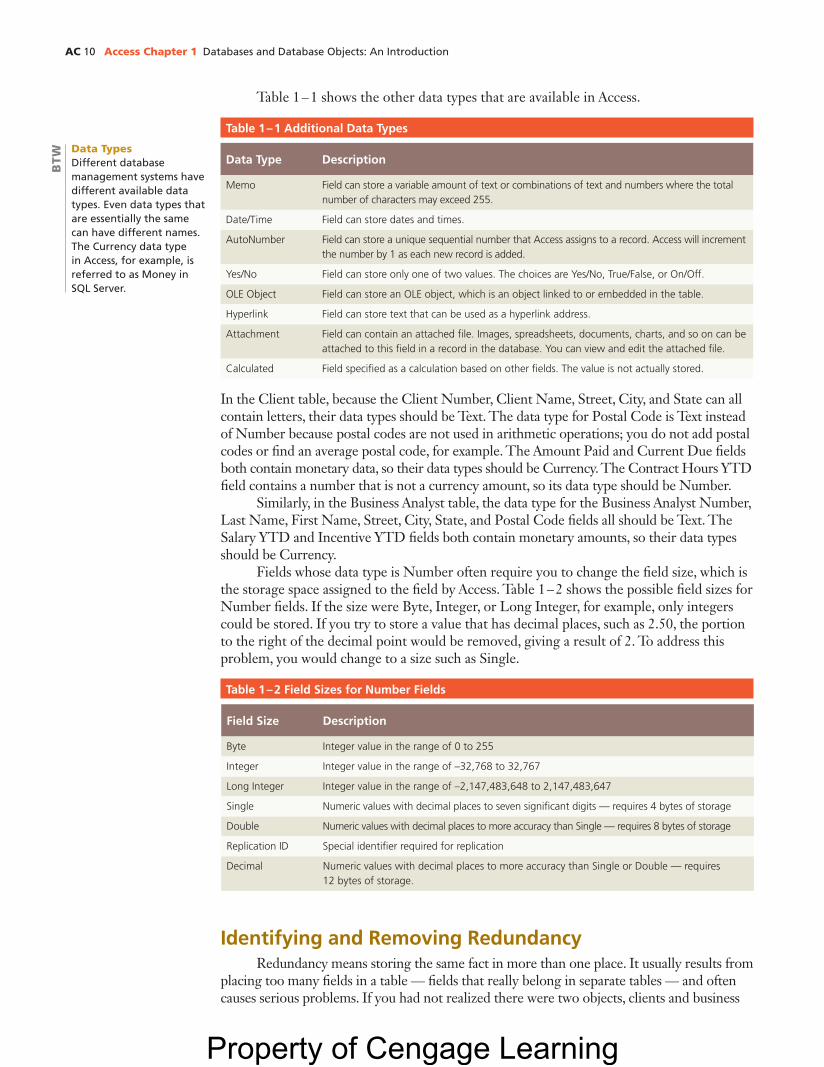
Table 1 – 1 shows the other data types that are available in Access.
Table 1 – 1 Additional Data Types
Data Type Description
Memo Field can store a variable amount of text or combinations of text and numbers where the total number of characters may exceed 255.
Date/Time Field can store dates and times.
AutoNumber Field can store a unique sequential number that Access assigns to a record. Access will increment the number by 1 as each new record is added.
Yes/No Field can store only one of two values. The choices are Yes/No, True/False, or On/Off.
OLE Object Field can store an OLE object, which is an object linked to or embedded in the table.
Hyperlink Field can store text that can be used as a hyperlink address.
Attachment Field can contain an attached fi le. Images, spreadsheets, documents, charts, and so on can be attached to this fi eld in a record in the database. You can view and edit the attached fi le.
Calculated Field specifi ed as a calculation based on other fi elds. The value is not actually stored.
In the Client table, because the Client Number, Client Name, Street, City, and State can all contain letters, their data types should be Text. The data type for Postal Code is Text instead of Number because postal codes are not used in arithmetic operations; you do not add postal codes or fi nd an average postal code, for example. The Amount Paid and Current Due fi elds both contain monetary data, so their data types should be Currency. The Contract Hours YTD fi eld contains a number that is not a currency amount, so its data type should be Number.
Similarly, in the Business Analyst table, the data type for the Business Analyst Number, Last Name, First Name, Street, City, State, and Postal Code fi elds all should be Text. The Salary YTD and Incentive YTD fi elds both contain monetary amounts, so their data types should be Currency.
Fields whose data type is Number often require you to change the fi eld size, which is the storage space assigned to the fi eld by Access. Table 1 – 2 shows the possible fi eld sizes for Number fi elds. If the size were Byte, Integer, or Long Integer, for example, only integers could be stored. If you try to store a value that has decimal places, such as 2.50, the portion to the right of the decimal point would be removed, giving a result of 2. To address this problem, you would change to a size such as Single.
Table 1 – 2 Field Sizes for Number Fields
Field Size Description
Byte Integer value in the range of 0 to 255
Integer Integer value in the range of –32,768 to 32,767
Long Integer Integer value in the range of –2,147,483,648 to 2,147,483,647
Single Numeric values with decimal places to seven signifi cant digits — requires 4 bytes of storage
Double Numeric values with decimal places to more accuracy than Single — requires 8 bytes of storage
Replication ID Special identifi er required for replication
Decimal Numeric values with decimal places to more accuracy than Single or Double — requires 12 bytes of storage.
Identifying and Removing RedundancyRedundancy means storing the same fact in more than one place. It usually results from
placing too many fi elds in a table — fi elds that really belong in separate tables — and often causes serious problems. If you had not realized there were two objects, clients and business
Data TypesDifferent database management systems have different available data types. Even data types that are essentially the same can have different names. The Currency data type in Access, for example, is referred to as Money in SQL Server.
BTW
1439078475_CH1_FINAL2.indd 101439078475_CH1_FINAL2.indd 10 6/30/10 2:17:51 PM6/30/10 2:17:51 PM
Property of Cengage Learning

Databases and Database Objects: An Introduction Access Chapter 1 AC 11
Acc
ess
Ch
apte
r 1
analysts, for example, you might have placed all the data in a single Client table. Figure 1 – 3 shows an example of a table that includes both client and business analyst information. Notice that the data for a given business analyst (number, name, address, and so on) occurs on more than one record. The data for analyst 11, Cordelia Kerry, is repeated in the fi gure.
Storing this data on multiple records is an example of redundancy, which causes several problems, including:
1. Wasted storage space. The name of business analyst 11, Cordelia Kerry, for example, should be stored only once. Storing this fact several times is wasteful.
2. More diffi cult database updates. If, for example, Cordelia Kerry’s name is spelled wrong and needs to be changed in the database, her name would need to be changed in several different places.
3. A possibility of inconsistent data. Nothing prohibits the business analyst’s last name from being Kerry on client BA53’s record and Bronson on client BC76’s record. The data would be inconsistent. In both cases, the business analyst number is 11, but the last names are different.
The solution to the problem is to place the redundant data in a separate table, one in which the data no longer will be redundant. If, for example, you place the data for business ana-lysts in a separate table (Figure 1 – 4), the data for each business analyst will appear only once.
Client Number
Client Name Street ... Business Analyst Number
Last Name
First Name
...
BA53 Bavant Animal Hospital
134 Main ... 11 Kerry Cordelia ...
BB32 Babbage CPA Firm 464 Linnell ... 14 Martinez Manuel ...
BC76 Buda Community Clinic
867 Ridge ... 11 Kerry Cordelia ...
... ... ... ... ... ... ... ...
Client Table
Figure 1–3
name of business analyst 11 appears more than once
business analyst numbers are 11
Client Number Client Name Street ... Business Analyst Number
BA53 Bavant Animal Hospital 134 Main ... 11
BB32 Babbage CPA Firm 464 Linnell ... 14
BC76 Buda Community Clinic 867 Ridge ... 11
... ... ... ... ...
Client Table
business analyst numbers are 11
Business Analyst Number
Last Name First Name ...
11 Kerry Cordelia ...
14 Martinez Manuel ...
... ... ... ...
Business Analyst Table
name of business analyst 11 appears only once
Figure 1–4
1439078475_CH1_FINAL2.indd 111439078475_CH1_FINAL2.indd 11 6/30/10 2:17:51 PM6/30/10 2:17:51 PM
Property of Cengage Learning

AC 12 Access Chapter 1 Databases and Database Objects: An Introduction
Notice that you need to have the business analyst number in both tables. Without it, there would be no way to tell which business analyst is associated with which client. The remain-ing business analyst data, however, was removed from the Client table and placed in the Business Analyst table. This new arrangement corrects the problems of redundancy in the following ways:
1. Because the data for each business analyst is stored only once, space is not wasted.2. Changing the name of a business analyst is easy. You have only to change one row
in the Business Analyst table.3. Because the data for a business analyst is stored only once, inconsistent data can-
not occur. Designing to omit redundancy will help you to produce good and valid database designs.
You should always examine your design to see if it contains redundancy. If it does, you should decide whether you need to remove the redundancy by creating a separate table.
If you examine your design, you’ll see that there is one area of redundancy (see the data in Figure 1 – 1 on page AC 3). Cities and states are both repeated. Every client whose postal code is 28794, for example, has Georgetown as the city and NC as the state. To remove this redundancy, you would create a table whose primary key is Postal Code and that contains City and State as additional fi elds. City and State would be removed from the Client table. Having City, State, and Postal Code in a table is very common, however, and usually you would not take such action. No other redundancy exists in your tables.
To Start Access
If you are using a computer to step through the project in this chapter and you want your screens to match the fi gures in this book, you should change your screen’s resolution to 1024 × 768. For information about how to change a computer’s resolution, refer to the Offi ce 2010 and Windows 7 chapter at the beginning of this book.
The following steps, which assume Windows 7 is running, start Access based on a typical installation. You may need to ask your instructor how to start Access for your computer. For a detailed example of the procedure summarized below, refer to the Offi ce 2010 and Windows 7 chapter.
Click the Start button on the Windows 7 taskbar to display the Start menu.
Type Microsoft Access as the search text in the ‘Search programs and fi les’ text box and watch the search results appear on the Start menu.
Click Microsoft Access 2010 in the search results on the Start menu to start Access and display the Backstage view for Access.
If the Access window is not maximized, click the Maximize button next to the Close button on its title bar to maximize the window.
1
2
3
4
Postal CodesSome organizations with customers throughout the country have a separate table of postal codes, cities, and states. When placing an order, you typically are asked for your postal code (or ZIP code), rather than city, state, and postal code. You then are asked to confi rm that the city and state correspond to that postal code.
BTW
For an introduction to Windows 7 and instruction about how to perform basic Windows 7 tasks, read the Offi ce 2010 and Windows 7 chap-ter at the beginning of this book, where you can learn how to resize windows, change screen resolu-tion, create folders, move and rename fi les, use Windows Help, and much more.
1439078475_CH1_FINAL2.indd 121439078475_CH1_FINAL2.indd 12 6/30/10 2:17:52 PM6/30/10 2:17:52 PM
Property of Cengage Learning

Databases and Database Objects: An Introduction Access Chapter 1 AC 13
Acc
ess
Ch
apte
r 1
Creating a DatabaseIn Access, all the tables, reports, forms, and queries that you create are stored in a single fi le called a database. Thus, you fi rst must create the database to hold the tables, reports, forms, and queries. You can use either the Blank database option or a template to create a new database. If you already know the tables and fi elds you want in your database, you would use the Blank database option. If not, you can use a template. Templates can guide you by suggesting some commonly used databases.
Determine a storage location for the database.When creating a database, you must decide which storage medium to use.
If you always work on the same computer and have no need to transport your database to a different location, then your computer’s hard drive will suffi ce as a storage location. It is a good idea, however, to save a backup copy of your database on a separate medium in case the fi le becomes corrupted or the computer’s hard drive fails.
If you plan to work on your database in various locations or on multiple computers, then you can consider saving your projects on a portable medium, such as a USB fl ash drive or CD. The projects in this book are stored on a USB fl ash drive, which saves fi les quickly and reliably and can be reused. CDs are easily portable and serve as good backups for the fi nal versions of projects because they generally can save fi les only one time.
Plan Ahead
For an introduction to Offi ce 2010 and instruction about how to perform basic tasks in Offi ce 2010 pro-grams, read the Offi ce 2010 and Windows 7 chapter at the begin-ning of this book, where you can learn how to start a pro-gram, use the Ribbon, save a fi le, open a fi le, quit a program, use Help, and much more.
To Create a Database
Because you already know the tables and fi elds you want in the Camashaly Design database, you would use the Blank database option rather than using a template. The following steps assume you already have created folders for storing your fi les, for example, a CIS 101 folder (for your class) that contains an Access folder (for your assignments). Thus, these steps save the document in the Access folder in the CIS 101 folder on a USB fl ash drive using the fi le name, Camashaly Design. For a detailed example of the proce-dure summarized below, refer to the Offi ce 2010 and Windows 7 chapter at the beginning of this book.
With a USB fl ash drive connected to one of the computer’s USB ports, ensure the New tab is selected in the Backstage view and that Blank database is selected in the New gallery.
Click the Browse button in the right pane of the New gallery to display the File New Database dialog box.
Type Camashaly Design in the File New Database dialog box to change the fi le name. Do not press the ENTER key after typing the fi le name.
Navigate to the desired save location (in this case, the Access folder in the CIS 101 folder [or your class folder] on the USB fl ash drive).
Click the OK button, which returns you to the New gallery. (Your screen may show Camashaly Design.accdb.)
Click the Create button in the right pane of the New gallery to create the database on the selected drive with the entered fi le name (Figure 1–5).
1
2
3
4
5
6
Q&AsFor a complete list of the Q&As found in many of the step-by-step sequences in this book, visit the Access 2010 Q&A Web page (scsite.com/ac2010/qa).
BTW
1439078475_CH1_FINAL2.indd 131439078475_CH1_FINAL2.indd 13 6/30/10 2:17:52 PM6/30/10 2:17:52 PM
Property of Cengage Learning

AC 14 Access Chapter 1 Databases and Database Objects: An Introduction
TO CREATE A DATABASE USING A TEMPLATE
Ideally, you will design your own database, create a blank database, and then create the tables you have determined that your database should contain. If you are not sure what database design you will need, you could use a template. Templates can guide you by sug-gesting some commonly used databases. To create a database using a template, you would use the following steps.
1. After starting Access, be sure the Backstage view is open. If it is not, click File on the Ribbon to open it.
2. Click the New tab if it is not already selected.3. Click Sample templates to display a list of templates stored locally or search Microsoft
Offi ce online for additional templates.4. Click the template you want to use.5. Enter a fi le name (or accept the suggested fi le name) and select a location for the
database.6. Click the Create button to create the database or the Download button to download
the database and create the database, if necessary.
The title bar for my Navigation Pane contains All Tables rather than All Access Objects, as in the fi gure. Is that a problem?
It is not a problem. The title bar indicates how the Navigation Pane is organized. You can carry out the steps in the text with either organization. To make your screens match the ones in the text, click the Navigation Pane arrow and then click Object Type.
I do not have the Search bar that appears on the fi gure. Is that a problem?
It is not a problem. If your Navigation Pane does not display a Search bar and you want your screens to match the ones in the text, right-click the Navigation Pane title bar arrow to display a shortcut menu, and then click Search Bar.
Q&
AQ
&A
Figure 1–5
Access automatically creates a default table
Navigation Pane arrow
Status bar View buttons
Datasheet View button is selected
table appears in Datasheet view (rows and columns in the table appear in a grid)
object tab
Navigation Pane title bar (yours might contain All Tables)
Navigation Pane
title bar Close buttonAccess work area
with one object (Table 1) open
database name is Camashaly Design
Maximize button changed to a Restore Down button because window is maximized
Available TemplatesThe Blank web database button on the New tab in the Backstage view allows you to create a database that you can publish to a SharePoint server running Access Services. Access 2010 also includes fi ve Web-based templates. To display previously used templates, click the My templates button.
BTW
1439078475_CH1_FINAL2.indd 141439078475_CH1_FINAL2.indd 14 6/30/10 2:17:53 PM6/30/10 2:17:53 PM
Property of Cengage Learning

Databases and Database Objects: An Introduction Access Chapter 1 AC 15
Acc
ess
Ch
apte
r 1
The Access WindowThe Access window consists of a variety of components to make your work more efficient and documents more professional. These include the Navigation Pane, Access work area, Ribbon, shortcut menus, and Quick Access Toolbar. Some of these components are common to other Microsoft Office 2010 programs; others are unique to Access.
Navigation Pane and Access Work AreaYou work on objects such as tables, forms, and reports in the Access work area.
In the work area in Figure 1 – 5, a single table, Table1, is open in the work area. Object tabs for the open objects appear at the top of the work area. If you have multiple objects open at the same time, you can select one of the open objects by clicking its tab. To the left of the work area is the Navigation Pane. The Navigation Pane contains a list of all the objects in the database. You use this pane to open an object. You also can customize the way objects are displayed in the Navigation Pane.
The Status bar, located at the bottom of the Access window, presents information about the database object, the progress of current tasks, and the status of certain com-mands and keys; it also provides controls for viewing the object. As you type text or per-form certain commands, various indicators may appear on the Status bar. The left edge of the Status bar in Figure 1 – 5 shows that the table object is open in Datasheet view. Toward the right edge are View buttons, which you can use to change the view that currently is displayed.
Creating a TableTo create a table, you must describe the structure of the table to Access. That is, you must describe all the fi elds that make up the table and their characteristics. You must also indicate the primary key.
In Access, you can use two different views to create a table: Datasheet view and Design view. In Datasheet view, the data in the table is presented in rows and columns, similar to a spreadsheet. Although the main reason to use Datasheet view is to add or update records in a table, you can also use it to create a table or to later modify its structure. The other view, Design view, is only used to create a table or to modify the structure of the table.
As you might expect, Design view has more functionality for creating a table than Datasheet view. That is, there are certain actions that can only be performed in Design view. If creating your table requires such actions, you must use Design view. If not, you can choose either view. In this chapter, you will create the fi rst table, the Business Analyst table, in Datasheet view. You will create the second table, the Client table, in Design view.
Whichever view you choose to use, before creating the table, you need to determine the names and data types of the fi elds that will make up the table. You already have deter-mined the types for the Camashaly fi elds. You also need to determine additional properties for the fi elds.
The Ribbon and Screen ResolutionAccess may change how the groups and buttons within the groups appear on the Ribbon, depending on the computer’s screen resolution. Thus, your Ribbon may look different from the ones in this book if you are using a screen resolution other than 1024 3 768.
BTW
1439078475_CH1_FINAL2.indd 151439078475_CH1_FINAL2.indd 15 6/30/10 2:17:57 PM6/30/10 2:17:57 PM
Property of Cengage Learning

AC 16 Access Chapter 1 Databases and Database Objects: An Introduction
To Modify the Primary Key
When you fi rst create your database, Access automatically creates a table for you. You can immediately begin defi ning the fi elds. If, for any reason, you do not have this table or inadvertently delete it, you can create the table by clicking Create on the Ribbon and then clicking the Table button (Create tab | Tables group). In either case, you are ready to defi ne the fi elds.
Determine additional properties for fi elds.
Determine if a special caption is warranted.• Normally, the fi eld name will appear as the label for a fi eld on a form or report and as the column name in Datasheet view. If you would rather have a different name appear, you can change the fi eld’s caption to the desired name. One common use of captions is to shorten the column heading. If the data in a column is considerably shorter than the column heading, you could change the cap-tion to a shorter heading. This would enable you to reduce the width of the column and yet still be able to see the entire column heading.
Determine if a special description is warranted.• Determine whether to include a description that would appear in the Status bar whenever the fi eld is selected.
Determine fi eld sizes.• For Text fi elds, determine the fi eld size; that is, the maximum num-ber of characters that can be entered in the fi eld. Users will be prohibited from entering a value that has more characters than the fi eld size.
Determine formats.• Determine whether the data in the fi eld should be formatted in any particular way. You could, for example, specify that a number fi eld is to be formatted with precisely two decimal places.
Plan Ahead
The results of these decisions for the fi elds in the Business Analyst table are shown in Table 1 – 3. The table also shows the data types and fi eld sizes of the fi elds as well as any special properties that need to be changed. The Business Analyst Number fi eld has a caption of BA #, enabling the width of the Business Analyst Number column to be reduced in the datasheet.
Table 1 – 3 Structure of Business Analyst Table
Field Name Data Type Field Size Description
Business Analyst Number Text 2 Primary KeyDescription: Business Analyst NumberCaption: BA #
Last Name Text 15
First Name Text 15
Street Text 15
City Text 15
State Text 2
Postal Code Text 5
Salary YTD Currency
Incentive YTD Currency
Naming TablesDatabase users typically have their own guidelines for naming tables. Some use the singular version of the object being described while others use the prefi x tbl with a table name. This book uses the singular version of the object (Client, Business Analyst) but adds the word Table to the name for the Business Analyst table to illustrate another possible approach. Including the word Table can assist visually impaired users when viewing the Navigation Pane.
BTW
1439078475_CH1_FINAL2.indd 161439078475_CH1_FINAL2.indd 16 6/30/10 2:17:57 PM6/30/10 2:17:57 PM
Property of Cengage Learning

Databases and Database Objects: An Introduction Access Chapter 1 AC 17
Acc
ess
Ch
apte
r 1
The following steps defi ne the fi rst fi eld, the Business Analyst Number fi eld, which is the primary key. Access has already created a primary key fi eld, which it has named ID. Thus, the steps will change the name, data type, and other properties of this fi eld to match the Business Analyst fi eld in Table 1 – 3.
Right-click the column • heading for the ID fi eld to display a shortcut menu (Figure 1–6).
Why does my shortcut menu look different?
You right-clicked within the column instead of right-clicking the column heading.
1
Note: To help you locate screen elements that are referenced in the step instructions, such as buttons and commands, this book uses red boxes to point to these screen elements.
Q&
A
Figure 1–6
2Click Rename Field on • the shortcut menu to highlight the current name.
Type • Business Analyst Number to assign a name to the new fi eld.
Click the white space • immediately below the fi eld name to complete the addition of the fi eld (Figure 1–7).
table appears in list of tables
shortcut menu
selected table
ID fi eld column heading
Rename Field command
Figure 1–7
data type is currently AutoNumber Formatting group
name changed to Business Analyst Number (portion of name does not appear)
Fields tab
position to click
Why doesn’t the whole name appear?
The default column size is not large enough for Business Analyst Number to appear in its entirety. You will address this issue in later steps.
Q&
A
1439078475_CH1_FINAL2.indd 171439078475_CH1_FINAL2.indd 17 6/30/10 2:17:57 PM6/30/10 2:17:57 PM
Property of Cengage Learning

AC 18 Access Chapter 1 Databases and Database Objects: An Introduction
5Click the Field Size text box (Table • Tools Fields tab | Properties group) to select the current fi eld size, use either the DELETE or BACKSPACE keys to erase the current fi eld size, and then type 2 as the new fi eld size.
Click the Name & Caption button • (Table Tools Fields tab | Properties group) to display the Enter Field Properties dialog box.
Click the Caption text box (Enter • Field Properties dialog box), and then type BA # as the caption.
Click the Description text box, and then type • Unique identifier of business analyst as the description (Figure 1 – 10).
3Because the data type needs to • be changed from AutoNumber to Text, click the Data Type box arrow (Table Tools Fields tab | Formatting group) to display a menu of available data types (Figure 1–8).
4Click Text to select the data type for • the fi eld (Figure 1–9).
Figure 1–9
data type changed to Text
Properties group
Name & Caption button
Field Size text box
Figure 1–10
Enter Field Properties dialog box
description changed
OK button
caption changed
6Click the OK button (Enter Field • Properties dialog box) to change the caption and description (Figure 1 – 11).
Figure 1–11
description of BusinessAnalyst Number fi eld
captionchanged
Figure 1–8
menu of available data types
Text data type
Data Type box arrow
1439078475_CH1_FINAL2.indd 181439078475_CH1_FINAL2.indd 18 6/30/10 2:18:00 PM6/30/10 2:18:00 PM
Property of Cengage Learning

Databases and Database Objects: An Introduction Access Chapter 1 AC 19
Acc
ess
Ch
apte
r 1
To Defi ne the Remaining Fields in a Table
To defi ne an additional fi eld, you click the Click to Add column heading, select the data type, and then type the fi eld name. This is different from the process you used to modify the ID fi eld, which was an existing fi eld. The following steps defi ne the remaining fi elds shown in Table 1–3 on page AC 16.
Figure 1–12
1Click the Click to Add column • heading to display a menu of available data types (Figure 1–12).
Why don’t I rename the fi eld like I renamed the ID fi eld?
The ID fi eld was an existing fi eld, created automatically by Access. For a new fi eld, you need to click the Click to Add heading.
Q&
A
menu of available data types
position to click for next fi eld
Text data type
2Click Text in the menu of available data • types to select the Text data type.
Type Last Name to enter a • fi eld name.
Click the white space below the fi eld • name to complete the change of the name. Click the white space a second time to select the fi eld (Figure 1 – 13).
I realized after I entered the fi eld name that I selected the wrong data type. How can I correct it?
Click the Data Type box arrow and then select the correct type.
I inadvertently clicked the white space before entering the fi eld name. How can I correct the name?
Right-click the fi eld name, click Rename Field on the shortcut menu, and then type the new name.
Q&
AQ
&A
Figure 1–13
data type forsecond fi eld
name of second fi eld
fi eld size
position for next fi eld
3Change the fi eld size to 15 just as • you changed the fi eld size of the Business Analyst Number fi eld.
Using the same technique, add the • remaining fi elds in the Business Analyst table. For the First Name, Street, City, State, and Postal Code fi elds, the Text data type is correct, but you will need to change the fi eld size to match Table 1–3. For the Salary YTD and Incentive YTD fi elds, you need to change the data type to Currency. Before defi ning the Incentive YTD fi eld, you may need to click the right scroll arrow to bring the column for the fi eld to the screen (Figure 1–14). Figure 1–14
format automatically set to Currency
data type changed to Currency
fi elds entered
right scroll arrow
1439078475_CH1_FINAL2.indd 191439078475_CH1_FINAL2.indd 19 6/30/10 2:18:04 PM6/30/10 2:18:04 PM
Property of Cengage Learning

AC 20 Access Chapter 1 Databases and Database Objects: An Introduction
Making Changes to the StructureWhen creating a table, check the entries carefully to ensure they are correct. If you
discover a mistake while still typing the entry, you can correct the error by repeatedly press-ing the backspace key until the incorrect characters are removed. Then, type the correct characters. If you do not discover a mistake until later, you can use the following techniques to make the necessary changes to the structure:
To undo your most recent change, click the Undo button on the Quick Access Toolbar. • If there is nothing that Access can undo, this button will be dim, and clicking it will have no effect.To delete a fi eld, right-click the column heading for the fi eld (the position containing • the fi eld name), and then click Delete Field on the shortcut menu.To change the name of a fi eld, right-click the column heading for the fi eld, click • Rename Field on the shortcut menu, and then type the desired fi eld name.To insert a fi eld as the last fi eld, click the Click to Add column heading, click the • appropriate data type on the menu of available data types, type the desired fi eld name, and, if necessary, change the fi eld size.To insert a fi eld between existing fi elds, right-click the column heading for the fi eld • that will follow the new fi eld, and then click Insert Field on the shortcut menu. Right-click the column heading for the fi eld, click Rename Field on the shortcut menu, and then type the desired fi eld name. To move a fi eld, click the column heading for the fi eld to be moved to select the fi eld, • and then drag the fi eld to the desired position.As an alternative to these steps, you may want to start over. To do so, click the
Close button for the table, and then click the No button in the Microsoft Access dialog box. Click Create on the Ribbon and then click the Table button to create a table. You then can repeat the process you used earlier to define the fields in the table.
4If you have an additional record between the fi eld names and the asterisk, click the record • selector (the box at the beginning of the record), press the DELETE key, and then click the Yes button when Access asks you if you want to delete the record.
Why does Currency appear twice?
The second Currency is the format, which indicates how the data will be displayed. For the Currency data type, Access automatically sets the format to Currency, which is usually what you would want. You could change it to something else, if desired, by clicking the arrow and selecting the desired format.
I have an extra row between the row containing the fi eld names and the row that begins with the asterisk. What happened? Is this a problem? If so, how do I fi x it?
You inadvertently added a record to the table by pressing some key. Even pressing the SPACEBAR would add a record. You now have a record you do not want. To fi x it, you need to delete the record, which you will do in Step 4.
Q&
AQ
&A
Currency SymbolsTo show the symbol for the Euro ( € ) instead of the dollar sign, change the Format property for the fi eld whose data type is currency. To change the default symbols for currency, change the settings in the operating system using the control panel.
BTW
1439078475_CH1_FINAL2.indd 201439078475_CH1_FINAL2.indd 20 6/30/10 2:18:10 PM6/30/10 2:18:10 PM
Property of Cengage Learning

Databases and Database Objects: An Introduction Access Chapter 1 AC 21
Acc
ess
Ch
apte
r 1
1Click the Save button on the Quick • Access Toolbar to display the Save As dialog box (Figure 1–15).
To Save a Table
The Business Analyst table structure now is complete. The fi nal step is to save the table within the database. As part of the process, you will give the table a name. The following steps save the table, giving it the name, Business Analyst Table.
Figure 1–15
Quick Access Toolbar
Save As dialog box
Save button
position to enter table name
OK button
2Type • Business Analyst Table to change the name to be assigned to the table.
Click the OK button • (Save As dialog box) to save the table (Figure 1–16).
Figure 1–16
Views group
table name changed
View button arrow
To View the Table in Design View
Even when creating a table in Datasheet view, Design view can be helpful. You should view the fi elds, data types, and properties to ensure you have entered them correctly. This viewing is easier to do in Design view. It is also easier to determine the primary key in Design view. The following steps view the structure of the Business Analyst Table in Design view so that you can verify the design is correct.
1. Click File on the Ribbon, click Save in the Backstage view
2. Right-click tab for table, click Save on shortcut menu
3. Press CTRL+S
Other Ways
1439078475_CH1_FINAL2.indd 211439078475_CH1_FINAL2.indd 21 6/30/10 2:18:10 PM6/30/10 2:18:10 PM
Property of Cengage Learning

AC 22 Access Chapter 1 Databases and Database Objects: An Introduction
Checking the Structure in Design ViewYou should use Design view to carefully check the entries you have made. In
Figure 1–18, for example, you can see that the Business Analyst Number fi eld is the primary key of the Business Analyst Table by the key symbol in front of the fi eld name. If your table does not have a key symbol, you can click the Primary Key button (Table Tools Design tab | Tools group) to designate the fi eld as the primary key. You also can check that the data type, the description, the fi eld size, and the caption are all correct.
For the other fi elds, you can see the fi eld name, data type, and description without taking any special action. To see the fi eld size and/or caption for a fi eld, click the fi eld’s row selector, the small box that precedes the fi eld. Clicking the row selector for the Last Name fi eld, for example, displays the fi eld properties for the fi eld (Figure 1–19). You then can check to see that the fi eld size is correct. In addition, if the fi eld has a caption, you can check to see if that is correct as well. If you fi nd any mistakes, you can make the necessary corrections on this screen. When you have fi nished, you would click the Save button to save your changes.
2Click Design View on the View • button menu to view the table in Design view (Figure 1–18).
Figure 1–18
fi eld namesdata types
Primary Key button
key symbol indicates Business Analyst Number fi eld is the primary key
Tools group descriptions
Design view
caption
fi eld size
fi eld properties (characteristics of fi elds that can be changed)
1. Click Design View button on Status bar
Other Ways
1Click the View button arrow (Table • Tools Fields tab | Views group) to display the View button menu (Figure 1–17).
Could I just click the View button rather than the arrow?
Yes. Clicking the button is equivalent to clicking the command represented by the icon currently appearing on the button. Because the icon on the button in Figure 1–17 is the icon for Design view, clicking the button would display the table in Design view. If you are uncertain, you can always click the arrow and select from the menu.
Q&
A
View button menu
View button icons
View button arrow
Design View command
Figure 1–17
1439078475_CH1_FINAL2.indd 221439078475_CH1_FINAL2.indd 22 6/30/10 2:18:12 PM6/30/10 2:18:12 PM
Property of Cengage Learning

Databases and Database Objects: An Introduction Access Chapter 1 AC 23
Acc
ess
Ch
apte
r 1
To Close the Table
Once you are sure that your entries are correct and you have saved your changes, you can close the table.
Click the Close button • for the Business Analyst Table to close the table (Figure 1 – 19).
1
To Add Records to a Table
Creating a table by building the structure and saving the table is the fi rst step in a two-step process. The second step is to add records to the table. To add records to a table, the table must be open. When making changes to tables, you work in Datasheet view. In Datasheet view, the table is represented as a collection of rows and columns called a datasheet.
You often add records in phases. For example, you might not have enough time to add all the records in one session. The following steps open the Business Analyst Table in Datasheet view and then add the fi rst two records in the Business Analyst Table (Figure 1–20).
Figure 1–20
Figure 1–19
Last Name fi eld selected
row selector for Last Name fi eld
Close button for Business Analyst Table
fi eld size for Last Name fi eld
Right-click the Business • Analyst Table in the Navigation Pane to display the shortcut menu (Figure 1–21).
1
Figure 1–21
shortcut menu
Shutter Bar Open/Close Button
Open command
1. Right-click tab for table, click Close on shortcut menu
Other Ways
1439078475_CH1_FINAL2.indd 231439078475_CH1_FINAL2.indd 23 6/30/10 2:18:14 PM6/30/10 2:18:14 PM
Property of Cengage Learning

AC 24 Access Chapter 1 Databases and Database Objects: An Introduction
Click Open on the • shortcut menu to open the table in Datasheet view.
What if I want to return to Design view?
You can open Design view by clicking Design View on the shortcut menu.
Click the Shutter Bar • Open/Close Button to close the Navigation Pane (Figure 1–22).
2
Q&
A
Shutter Bar Open/Close Button opens Navigation Pane if it is currently closed
record selector (box that, when clicked, selects the entire record) currently positioned on fi rst record
Figure 1–22
positioned on record 1 out of 1
position to enter business analyst number on fi rst record
Datasheet view
3Click the BA # fi eld if • necessary to display an insertion point, and type 11 to enter the fi rst business analyst number (Figure 1–23).
Figure 1–23
business analyst number on fi rst record
Access creates row for a new record
pencil icon in the record selector column indicates that the record is being edited but changes to the record are not saved yet
4Press the • TAB key to move to the next fi eld.
Enter the last name, • fi rst name, street, city, state, and postal code by typing the following entries, pressing the TAB key after each one: Kerry as the last name, Cordelia as the fi rst name, 251 Painter as the street, Georgetown as the city, NC as the state, and 28794 as the postal code.
Type • 3200 in the Salary YTD fi eld (Figure 1–24). Figure 1–24
Do I need to type a dollar sign?
You do not need to type dollar signs or commas. In addition, because the digits to the right of the decimal point are both zeros, you do not need to type either the decimal point or the zeros.
Q&
A
last name entered
fi rst name entered
street entered
city entered
state entered
salary YTD in process of being entered
postal code entered
Salary YTD fi eld still selected
1439078475_CH1_FINAL2.indd 241439078475_CH1_FINAL2.indd 24 6/30/10 2:18:16 PM6/30/10 2:18:16 PM
Property of Cengage Learning

Databases and Database Objects: An Introduction Access Chapter 1 AC 25
Acc
ess
Ch
apte
r 1
Making Changes to the DataAs you enter data, check your entries carefully to ensure they are correct. If you
make a mistake and discover it before you press the tab key, correct it by pressing the backspace key until the incorrect characters are removed, and then type the correct characters. If you do not discover a mistake until later, you can use the following tech-niques to make the necessary corrections to the data:
To undo your most recent change, click the Undo button on the Quick Access Toolbar. • If there is nothing that Access can undo, this button will be dimmed, and clicking it will have no effect.To add a record, click the New (blank) record button, click the position for the Business • Analyst Number fi eld on the fi rst open record, and then add the record. Do not worry about it being in the correct position in the table. Access will reposition the record based on the primary key, in this case, the Business Analyst Number.
5Press the • TAB key to complete the entry for the fi eld.
Type • 3450 in the Incentive YTD fi eld, and then press the TAB key to complete the entry of the fi rst record (Figure 1–25).
How and when do I save the record?
As soon as you have entered or modifi ed a record and moved to another record, the original record is saved. This is different from other applications. The rows enteredin an Excel worksheet, for example, are not saved until the entire worksheet is saved.
6Use the techniques • shown in Steps 3 through 5 to enter the data for the second record (Figure 1–26).
I Experiment
Click the Salary YTD • fi eld on either of the records. Be sure the Table Tools Fields tab is selected. Click the Format box arrow and then click each of the formats in the Format box menu to see the effect on the values in the Salary YTD fi eld. When fi nished, click Currency in the Format box menu.
Figure 1–25
Figure 1–26
Q&
A
position to enter business analyst number on second record
currently positioned on record 2 out of 2
fi rst record entered and saved
Business Analyst Number fi eld selected
record selector
second record entered and saved
Close button for Business Analyst Table
Adding RecordsYou can add records in any order. When you close a table and re-open it, the records will be in order by primary key.
BTW
1439078475_CH1_FINAL2.indd 251439078475_CH1_FINAL2.indd 25 6/30/10 2:18:21 PM6/30/10 2:18:21 PM
Property of Cengage Learning

AC 26 Access Chapter 1 Databases and Database Objects: An Introduction
To delete a record, click the record selector, shown in Figure 1–26, for the record to • be deleted. Then press the delete key to delete the record, and click the Yes button when Access asks you to verify that you do indeed want to delete the record.To change the contents of one or more fi elds in a record, the record must be on the • screen. If it is not, use any appropriate technique, such as the up arrow and down arrow keys or the vertical scroll bar, to move to it. If the fi eld you want to correct is not visible on the screen, use the horizontal scroll bar along the bottom of the screen to shift all the fi elds until the one you want appears. If the value in the fi eld is cur-rently highlighted, you can simply type the new value. If you would rather edit the existing value, you must have an insertion point in the fi eld. You can place the inser-tion point by clicking in the fi eld or by pressing f2. You then can use the arrow keys, the delete key, and the backspace key for making the correction. You also can use the insert key to switch between Insert and Overtype mode. When you have made the change, press the tab key to move to the next fi eld.If you cannot determine how to correct the data, you may fi nd that you are “stuck”
on the record, in which case Access neither allows you to move to another record nor allows you to close the table until you have made the correction. If you encounter this situation, simply press the esc key. Pressing the esc key will remove from the screen the record you are trying to add. You then can move to any other record, close the table, or take any other action you desire.
To Close a Table
Now that you have created and saved the Business Analyst Table, you can close it. The following step closes the table.
1 Click the Close button for the Business Analyst Table, shown in Figure 1–26, to close the table (Figure 1–27).
Figure 1–27
clicking Shutter Bar Open/Close Button opens the Navigation Pane
table no longer appears
Close button
To Quit Access
The following steps quit Access. For a detailed example of the procedure summarized below, refer to the Offi ce 2010 and Windows 7 chapter at the beginning of this book.
Click the Close button on the right side of the title bar to quit Access.
If a Microsoft Access dialog box appears, click the Save button to save any changes made to the object since the last save.
1
2
Break Point: If you wish to take a break, this is a good place to do so. To resume at a later time, continue following the steps from this location forward.
1439078475_CH1_FINAL2.indd 261439078475_CH1_FINAL2.indd 26 6/30/10 2:18:23 PM6/30/10 2:18:23 PM
Property of Cengage Learning

Databases and Database Objects: An Introduction Access Chapter 1 AC 27
Acc
ess
Ch
apte
r 1
To Start Access
To Open a Database from Access
Earlier in this chapter, you saved your database on a USB fl ash drive using the fi le name, Camashaly Design. The following steps open the Camashaly Design database from the Access folder in the CIS 101 folder on the USB fl ash drive. For a detailed example of the procedure summarized below, refer to the Offi ce 2010 and Windows 7 chapter at the beginning of this book.
Click the Start button on the Windows 7 taskbar to display the Start menu.
Type Microsoft Access as the search text in the ‘Search programs and fi les’ text box and watch the search results appear on the Start menu.
Click Microsoft Access 2010 in the search results on the Start menu to start Access.
1
2
3
With your USB fl ash drive connected to one of the computer’s USB ports, click File on the Ribbon to open the Backstage view, if necessary.
Click Open in the Backstage view to display the Open dialog box.
Navigate to the location of the fi le to be opened (in this case, the USB fl ash drive, then to the CIS 101 folder [or your class folder], and then to the Access folder).
Click Camashaly Design to select the fi le to be opened.
Click the Open button (Open dialog box) to open the selected fi le and display the opened database in the Access window.
If a Security Warning appears, click the Enable Content button (Figure 1 – 28).
1
2
3
4
5
6
When would I not want to enable the content?
You would want to disable the content if you suspected that your database might contain harmful content or damaging macros. Because you are the one who created the database and no one else has used it, you should have no such suspicions.
Q&
A
Figure 1–28
Camashaly Design database is currently open
Security Warning
message indicates that some content has been disabled due to security settings
Enable Content button
Starting Access and Opening a DatabaseOnce you have created and later closed a database, you will need to open it in the future in order to use it. Opening a database requires that Access is running on your computer.
1. Click File on the Ribbon, click Recent in the Backstage view, click fi le name
Other Ways
Organizing Files and FoldersYou should organize and store fi les in folders so that you easily can fi nd the fi les later. For a discussion of folders and detailed examples of creating folders, refer to the Offi ce 2010 and Windows 7 chapter at the beginning of this book.
BTW
1439078475_CH1_FINAL2.indd 271439078475_CH1_FINAL2.indd 27 6/30/10 2:18:24 PM6/30/10 2:18:24 PM
Property of Cengage Learning

AC 28 Access Chapter 1 Databases and Database Objects: An Introduction
Figure 1–30
To Add Additional Records to a Table
You can add records to a table that already contains data using a process almost identical to that used to add records to an empty table. The only difference is that you place the insertion point after the last record before you enter the addi-tional data. To do so, use the Navigation buttons, which are buttons used to move within a table, found near the lower-left corner of the screen when a table is open. The purpose of each of the Navigation buttons is described in Table 1–4.
Table 1 – 4 Navigation Buttons in Datasheet View
Button Purpose
First record Moves to the fi rst record in the table
Previous record Moves to the previous record
Next record Moves to the next record
Last record Moves to the last record in the table
New (blank) record Moves to the end of the table to a position for entering a new record
The following steps add the remaining records (Figure 1–29) to the Business Analyst table.
Figure 1–291
If the Navigation • Pane is closed, click the Shutter Bar Open/Close Button, shown in Figure 1–27, to open the Navigation Pane (Figure 1–30).
2Right-click the Business • Analyst table in the Navigation Pane to display a shortcut menu.
Click Open on the short-• cut menu to open the table in Datasheet view.
Close the Navigation • Pane by clicking the Shutter Bar Open/Close Button (Figure 1–31).
Figure 1–31
New (blank) record button
First record button
navigation buttons
Next record button
Previous record button
Business Analyst table
Navigation Pane appears
Business Analyst Number fi eld on fi rst record currently selected
currently positioned on record 1 out of 2 Last record
button
Shutter Bar Open/Close Button
1439078475_CH1_FINAL2.indd 281439078475_CH1_FINAL2.indd 28 6/30/10 2:18:24 PM6/30/10 2:18:24 PM
Property of Cengage Learning

Databases and Database Objects: An Introduction Access Chapter 1 AC 29
Acc
ess
Ch
apte
r 1
3Click the New (blank) record button • to move to a position to enter a new record (Figure 1–32).
Could you just click the Business Analyst Number (BA #) on the fi rst open record and then add the record?
Yes, but it’s a good habit to use the New (blank) Record button. Once a table contains more records than will fi t on the screen, it is easier to click the New (blank) record button. Figure 1–32
Q&
A
position to type business analyst number for new record
Business Analyst Number fi eld on third record currently selected
To Resize Columns in a Datasheet
Access assigns default column sizes, which do not always allow all the data in the fi eld to appear. In some cases, the data might appear but not the entire fi eld name. You can correct this problem by resizing the column (changing its size) in the datasheet. In some instances, you may want to reduce the size of a column. The State fi eld, for example, is short enough that it does not require all the space on the screen that is allotted to it. Changing a column width changes the layout, or design, of a table.
The following steps resize the columns in the Business Analyst table and save the changes to the layout.
4Add the records shown in Figure 1–29, • using the same techniques you used to add the fi rst two records (Figure 1–33).
1. Click New button (Home tab | Records group)
2. Press CTRL+PLUS SIGN (+)
Other Ways
Figure 1–33
Figure 1–34
1Point to the right boundary of • the fi eld selector for the Business Analyst (BA #) fi eld (Figure 1–34) so that the mouse pointer becomes a two-headed arrow.
Close button for Business Analyst Table
mouse pointer shape indicates you can resize column by dragging or by double-clicking to best fi t the data
all records added
1439078475_CH1_FINAL2.indd 291439078475_CH1_FINAL2.indd 29 6/30/10 2:18:27 PM6/30/10 2:18:27 PM
Property of Cengage Learning

AC 30 Access Chapter 1 Databases and Database Objects: An Introduction
2Double-click the right boundary of • the fi eld selector to resize the fi eld so that it best fi ts the data.
Use the same technique to resize • all the other fi elds to best fi t the data (Figure 1–35).
Save the changes to the layout by • clicking the Save button on the Quick Access Toolbar (Figure 1–35).
Click the table’s Close button (shown • in Figure 1–33) to the table.
What if I closed the table without saving the layout changes?
You would be asked if you want to save the changes.
Figure 1–35
Save button
columns resized
1. Right-click fi eld name, click Field Width
Other Ways
Previewing and Printing the Contents of a TableWhen working with a database, you often will need to print a copy of the table contents. Figure 1–36 shows a printed copy of the contents of the Business Analyst table. (Yours may look slightly different, depending on your printer.) Because the Business Analyst table is substantially wider than the screen, it also will be wider than the normal printed page in portrait orientation. Portrait orientation means the printout is across the width of the page. Landscape orientation means the printout is across the height of the page. Thus, to
3
Q&
A
Determine the best method for distributing the database objects.The traditional method of distributing database objects uses a printer to produce a hard copy of a table. A hard copy or printout is information that exists on a physical medium such as paper. For users who can receive fax documents, you can elect to print a hard copy on a remote fax machine. Hard copies can be useful for the following reasons:
Many people prefer proofreading a hard copy of a document rather than viewing it on • the screen to check for errors and readability.
Hard copies can serve as reference material if your storage medium is lost or becomes • corrupted and you need to re-create the document.
Instead of distributing a hard copy, users can choose to distribute the document as an electronic image that mirrors the original document’s appearance. The electronic image of the document can be e-mailed, posted on a Web site, or copied to a portable medium such as a USB fl ash drive. Two popular electronic image formats, sometimes called fi xed formats, are PDF by Adobe Systems and XPS by Microsoft. In Access, you can create PDF and XPS fi les through the External Data tab on the Ribbon. Electronic images of documents, such as PDF and XPS, can be useful for the following reasons.
Users can view electronic images of documents without the software that created the • original document (i.e., Access). Specifi cally, to view a PDF fi le, you use a program called Acrobat Reader, which can be downloaded free from Adobe’s Web site. Similarly, to view an XPS fi le, you use a program called an XPS Viewer, which is included in the latest versions of Windows and Internet Explorer.
Sending electronic documents saves paper and printer supplies. Society encourages users • to contribute to green computing, which involves reducing the environmental waste generated when using a computer.
Plan Ahead
Changing PrintersTo change the default printer that appears in the Print dialog box, click File on the Ribbon, click the Print tab in the Backstage view, click Print in the Print gallery, then click the Name box arrow and select the desired printer.
BTW
1439078475_CH1_FINAL2.indd 301439078475_CH1_FINAL2.indd 30 6/30/10 2:18:30 PM6/30/10 2:18:30 PM
Property of Cengage Learning

Databases and Database Objects: An Introduction Access Chapter 1 AC 31
Acc
ess
Ch
apte
r 1
Click the Print Preview button in the Print • gallery to display a preview of what the table will look like when printed.
Close the Navigation Pane to free up • more of the screen for the preview (Figure 1–38).
I can’t read the table. Can I magnify a portion of the table?
Yes. Point the mouse pointer, whose shape will change to a magnifying glass, at the portion of the table that you want to magnify, and then click. You can return the view of the table to the one shown in the fi gure by clicking a second time.
Figure 1 – 36
print the wide database table, you might prefer to use landscape orientation. A convenient way to change to landscape orientation is to preview what the printed copy will look like by using Print Preview. This allows you to determine whether landscape orientation is necessary and, if it is, to change the orientation easily to landscape. In addition, you also can use Print Preview to determine whether any adjustments are necessary to the page margins.
If the Navigation Pane is closed, • open the Navigation Pane by clicking the Shutter Bar Open/Close Button.
Be sure the Business Analyst table • is selected.
Why do I have to be sure the Business Analyst table is selected? It is the only object in the database.
When the database contains only one object, you don’t have to worry about selecting the object. Ensuring that the correct object is selected is a good habit to form, however, to make sure that the object you print is the one you want.
Click File on the Ribbon to open the Backstage view.•
Click the Print tab in the Backstage view to display the Print gallery (Figure 1–37).•
To Preview and Print the Contents of a Table
The following steps use Print Preview to preview and then print the contents of the Business Analyst table.
Figure 1–37
1
Q&
A
Print tab
Quick Print button (print immediately)
Print gallery
Print button (before printing, display a dialog box giving a variety of printing options)
2
Q&
A
Figure 1–38
approximate position to click to magnify upper-right portion of the table
preview of table
Print Preview button
1439078475_CH1_FINAL2.indd 311439078475_CH1_FINAL2.indd 31 6/30/10 2:18:31 PM6/30/10 2:18:31 PM
Property of Cengage Learning

AC 32 Access Chapter 1 Databases and Database Objects: An Introduction
3Click the mouse pointer in the • position shown in Figure 1–38 to magnify the upper-right section of the table (Figure 1–39).
My table was already magnifi ed in a different area. How can I see the area shown in the fi gure?
One way is to use the scroll bars to move to the desired portion of the table. You also can click the mouse pointer anywhere in the table to produce a screen like the one in Figure 1–38, and then click in the location shown in the fi gure.
Q&
A
4Click the Landscape button to • change to landscape orientation (Figure 1– 40).
Click the Print button (Print Preview • tab | Print group) to display the Print dialog box.
Click the OK button (Print dialog • box) to print the table.
When the printer stops, retrieve the • hard copy of the Business Analyst Table.
Click the Close Print Preview button • (Print Preview tab | Close Preview group) to close the Print Preview window.
1. Press CTRL+P, click OK button (Print dialog box)
Other Ways
Figure 1–39
Landscape button
last fi eld shown in portrait orientation is Postal Code
table has been magnifi ed
Page Layout group
clicking magnifying glass mouse pointer a second time shows entire table
Figure 1–40
Close Print Preview button
Print button
Close Preview group
all fi elds currently appear
orientation changed to landscape
Creating Additional TablesThe Camashaly Design database contains two tables, the Business Analyst table and the Client table. You still need to create the Client table and add records to it. You created the Business Analyst table in Datasheet view. You will create the Client table in Design view.
Recall that the fi elds for the Client table are Client Number, Client Name, Street, City, State, Postal Code, Amount Paid, Current Due, Contract Hours YTD, and Business Analyst Number. The details that must be entered for these fi elds are shown in Table 1–5. The Client Number is the primary key. The Client Number fi eld and the Business Analyst Number fi elds have both descriptions and captions. The Contract Hours YTD has a caption.
Because the values in the Contract Hours YTD fi eld have decimal places, only Single, Double, or Decimal would be possible fi eld size choices. (See Table 1–2 on Page AC 10 for a description of the possible fi eld sizes for Number fi elds.) The difference between these choices concerns the amount of accuracy. Double is more accurate than Single, for example,
portrait orientation currently selected
Print Preview contextual tab
1439078475_CH1_FINAL2.indd 321439078475_CH1_FINAL2.indd 32 6/30/10 2:18:34 PM6/30/10 2:18:34 PM
Property of Cengage Learning

Databases and Database Objects: An Introduction Access Chapter 1 AC 33
Acc
ess
Ch
apte
r 1
but requires more storage space. Because the rates are only two decimal places, Single is a perfectly acceptable choice.
In addition to changing the fi eld size for the Contract Hours YTD, you will also change the format to Fixed (a fi xed number of decimal places) and the number of decimal places to 2.
Table 1 – 5 Structure of Client Table
Field Name Data Type Field Size Notes
Client Number Text 4 Primary KeyDescription: Client Number (two uppercase letters followed by 2-digit number)Caption: CL #
Client Name Text 30
Street Text 15
City Text 15
State Text 2
Postal Code Text 5
Amount Paid Currency
Current Due Currency
Contract Hours YTD Number Single Caption: Hrs YTDFormat: FixedDecimal Places: 2
Business Analyst Number Text 2 Caption: BA #Description: Business Analyst Number (number of business analyst for client)
To Create a Table in Design View
The next step in creating the table is to defi ne the fi elds by specifying the required details in Design view. You will make entries in the Field Name, Data Type, and Description columns and enter additional information in the Field Properties box in the lower portion of the Table window. As you defi ne the fi elds, the row selector (Figure 1–19 on page AC 23) indicates the fi eld you currently are describing. Clicking the row selector selects the entire row. It is positioned on the fi rst fi eld, indicating Access is ready for you to enter the name of the fi rst fi eld in the Field Name column.
The following steps use Design view to defi ne the fi elds in the table.
1Open the Navigation Pane.•
Click Create on the Ribbon to display • the Create tab (Figure 1– 41).
Figure 1–41
Table Design button
Create tab
Tables group
1439078475_CH1_FINAL2.indd 331439078475_CH1_FINAL2.indd 33 6/30/10 2:18:36 PM6/30/10 2:18:36 PM
Property of Cengage Learning

AC 34 Access Chapter 1 Databases and Database Objects: An Introduction
2Click the Table Design button (Create • tab | Tables group) to create a new table in Design view (Figure 1– 42).
Could I save the table now so I can assign it the name I want, rather than Table1?
You certainly could. Be aware, however, that you will still need to save it again once you have added all your fi elds.
3Type • Client Number (the name of the fi rst fi eld) in the Field Name column and then press the TAB key to accept the fi eld name and move to the Data Type column (Figure 1– 43).
Figure 1–43
Figure 1–42
Q&
A
column to enter data types
Design view
column to enter descriptions
column to enter fi eld names
Primary Key button
Tools group
fi eld name entered
Text data type selected
4Click the Primary Key button (Table • Tools Design tab | Tools group) to designate the Client Number fi eld as the primary key (Figure 1 – 44).
Figure 1–44
key symbol indicates that Client Number is the primary key
Field Properties pane
Field Size text box
Caption text box
position to enter description
1439078475_CH1_FINAL2.indd 341439078475_CH1_FINAL2.indd 34 6/30/10 2:18:37 PM6/30/10 2:18:37 PM
Property of Cengage Learning

Databases and Database Objects: An Introduction Access Chapter 1 AC 35
Acc
ess
Ch
apte
r 1
5Press the • TAB key to move to the Description column, and then type Client Number (two uppercase letters followed by a two-digit number) as the description.
Click the Field Size text box in the Field • Properties pane to produce an insertion point, use either the BACKSPACE or DELETE key as necessary to erase the current entry (255), and then type 4 to change the fi eld size.
Click the Caption text box to produce an • insertion point, and then type CL # to enter a caption (Figure 1– 45).
Figure 1–45
description enteredposition to enter second fi eld name
fi eld size changed
caption entered
6Click the Field Name column on the • second row to produce an insertion point and then make the entries for the Client Name fi eld.
Use the techniques illustrated in • Steps 1 through 5 to make the entries for the remaining fi elds in the Client table structure, shown in Table 1– 5 on page AC 33, up through and including the name of the Amount Paid fi eld.
Click the Data Type box arrow to • display a menu of available data types (Figure 1– 46).
Figure 1–46
Amount Paid fi eld
menu of available data types
Data Type box arrow
Currency data type
7Click Currency to select the data type.•
Enter the Current Due fi eld and • select the Currency data type.
Enter the Contract Hours YTD fi eld • and select the Number data type (Figure 1– 47).
Figure 1–47
Contract Hours YTD fi eld selected fi eld properties for
Contract Hours YTD fi eld
Number data type selected
Field Size box
1439078475_CH1_FINAL2.indd 351439078475_CH1_FINAL2.indd 35 6/30/10 2:18:42 PM6/30/10 2:18:42 PM
Property of Cengage Learning

AC 36 Access Chapter 1 Databases and Database Objects: An Introduction
Click Fixed to select • fi xed as the format.
Click the Decimal • Places box to display the Decimal Places box arrow.
Click the Decimal • Places box arrow to enter the number of decimal places.
Click 2 to select 2 • as the number of decimal places.
Click the Caption text • box to produce an insertion point, and then type Hrs YTD to enter a caption(Figure 1– 50).
Click the Field Size box • to display the Field Size box arrow.
Click the Field Size box • arrow to display the Field Size box menu (Figure 1– 48).
What would happen if I left the fi eld size set to Integer?
If the fi eld size is Integer, no decimal places can be stored. Thus a value of 2.50 would be stored as 2. If you enter your hours and none of the values have decimal places, probably you did not change the fi eld size.
8
Q&
A
Figure 1–48
9Click Single to select • single precision as the fi eld size.
Click the Format box • to display the Format box arrow.
Click the Format box • arrow to display the Format box menu (Figure 1– 49).
10
Field Size box menu
Single fi eld size
Field Size box arrow
Figure 1–49
FixedFormat box arrow
Format box
Single (single precision) selected as the fi eld size
Format box menu
Figure 1–50
Fixed format selected
caption changed
2 decimal places selected
1439078475_CH1_FINAL2.indd 361439078475_CH1_FINAL2.indd 36 6/30/10 2:18:48 PM6/30/10 2:18:48 PM
Property of Cengage Learning

Databases and Database Objects: An Introduction Access Chapter 1 AC 37
Acc
ess
Ch
apte
r 1
Correcting Errors in the StructureWhen creating a table, check the entries carefully to ensure they are correct. If you
make a mistake and discover it before you press the tab key, you can correct the error by repeatedly pressing the backspace key until the incorrect characters are removed. Then, type the correct characters. If you do not discover a mistake until later, you can click the entry, type the correct value, and then press the enter key. You can use the following techniques to make changes to the structure:
If you accidentally add an extra fi eld to the structure, select the fi eld by clicking the • row selector (the leftmost column on the row that contains the fi eld to be deleted). Once you have selected the fi eld, press the delete key. This will remove the fi eld from the structure.If you forget to include a fi eld, select the fi eld that will follow the fi eld you want to • add by clicking the row selector, and then press the insert key. The remaining fi elds move down one row, making room for the missing fi eld. Make the entries for the new fi eld in the usual manner.If you made the wrong fi eld a primary key fi eld, click the correct primary key entry for • the fi eld and then click the Primary Key button (Table Tools Design tab | Tools group).To move a fi eld, click the row selector for the fi eld to be moved to select the fi eld, • and then drag the fi eld to the desired position.As an alternative to these steps, you may want to start over. To do so, click the Close
button for the window containing the table, and then click the No button in the Microsoft Access dialog box. Click Create on the Ribbon and then click the Table Design button to create a table. You then can repeat the process you used earlier to defi ne the fi elds in the table.
Figure 1–51
11Enter the Business • Analyst Number fi eld from Table 1– 5. Be sure to change the description, fi eld size, and caption to the ones shown in the table.
Click the Save button • on the Quick Access Toolbar to display the Save As dialog box, type Client as the name of the table, and then click the OK button (Save As dialog box) to save the table (Figure 1– 51).
1. Press F6 to move between the upper pane and the lower pane in the Table Design window
Other Ways
Save button
Close button for Client table
Business Analyst Number fi eld
name changed to Client
description entered
fi eld size changed
caption entered
Client table appears in Navigation Pane
AutoCorrect FeatureThe AutoCorrect feature of Access corrects common mistakes when entering text in a cell. AutoCorrect corrects two capital letters by changing the second letter to lowercase and capitalizes the fi rst letter in the names of days. It also corrects more than 400 commonly misspelled words.
BTW
Other AutoCorrect OptionsUsing the Offi ce AutoCorrect feature, you can create entries that will replace abbreviations with spelled-out names and phrases automatically. To specify AutoCorrect rules, click File to open the Backstage view, click Options, and then click Proofi ng in the Access Options dialog box.
BTW
1439078475_CH1_FINAL2.indd 371439078475_CH1_FINAL2.indd 37 6/30/10 2:18:53 PM6/30/10 2:18:53 PM
Property of Cengage Learning

AC 38 Access Chapter 1 Databases and Database Objects: An Introduction
Importing Data from Other Applications to AccessNow that you have created the Client table, you could add the records to it just as you did with the Business Analyst table. Access provides an alternative, however, that is available because Camashaly Design has already stored the necessary data in an Excel workbook (Figure 1–52). The data is stored in the form of an Excel list; that is, the fi rst row contains column headings describing the data in each of the columns, and the remaining rows con-tain the data. Camashaly can import the data, which means to make a copy of the data in a table in the Access database.
When importing data, you have two choices. You can create a new table, in which case the column headings in the worksheet become the fi eld names in the table. Access will attempt to assign appropriate data types. You would need to review the data types, adjust fi eld sizes, captions, descriptions, and formats after the data was imported. The other option is to add the records to an existing table. This method is appropriate if you have already created the table, provided the column headings in the worksheet match the fi eld names in the table, as they do in the case of the Client table.
To Import an Excel Worksheet
To import the data in the Camashaly Client Data workbook, you use the Import Spreadsheet Wizard to place the rows from an Excel worksheet into an existing table. The following steps import the Camashaly Client Data Excel workbook, which is provided as a data fi le. See the inside back cover of this book for instructions on download-ing the Data Files for Students, or contact your instructor for more information about accessing the required fi les.
Figure 1–52
To Close the Table
Now that you have completed and saved the Client table, you can close it. The following step closes the table.
Click the Close button for the Client table (see Figure 1–51) to close the table.1
The process of importing into an Access database uses a wizard. Specifi cally, if the data is imported from an Excel worksheet, the process will use the Import Spreadsheet Wizard. The wizard takes you through some basic steps, asking a few simple questions. After you have answered the questions, the wizard will import or link the data.
1439078475_CH1_FINAL2.indd 381439078475_CH1_FINAL2.indd 38 6/30/10 2:18:56 PM6/30/10 2:18:56 PM
Property of Cengage Learning

Databases and Database Objects: An Introduction Access Chapter 1 AC 39
Acc
ess
Ch
apte
r 1
1Click External Data on • the Ribbon to display the External Data tab (Figure 1–53).
Figure 1–53
XML File button (import from XML fi le)
Text File button (import from text fi le)External Data tab
Access button (import from Access database)
Import & Link group
Excel button (import from Excel workbook)
2Click the Excel button (External Data tab | Import & Link group) to display the Get External • Data – Excel Spreadsheet dialog box.
Click the Browse button (Get External Data – Excel Spreadsheet dialog box) to display the File • Open dialog box.
Navigate to the USB fl ash drive (or the location of your data fi les).•
Double-click your USB fl ash drive, and then click Camashaly Client Data to select the fi le to be • opened.
Click the Open button (File Open dialog box), which will return you to the Get External Data • dialog box with the Camashaly Client Data workbook selected.
Click the option • button to append a copy of records to a table (Figure 1–54).
What happens if I select the option button to import records into a new table?
Instead of the records being added to an existing table, they will be placed in a new table. Access will assign all the data types. You would then need to ensure they are correct. You also would need to change any fi eld sizes, descriptions, captions, formats, or number of decimal places to the ones you want. Figure 1–54
3
Q&
A
Get External Data - Excel Spreadsheet dialog box
drive F: selected (yours might be different)
Camashaly Client Data workbook selected
option button to link table to the workbook data
Browse buttonoption button to import data into a new table
option button to import data into an existing table
1439078475_CH1_FINAL2.indd 391439078475_CH1_FINAL2.indd 39 6/30/10 2:18:57 PM6/30/10 2:18:57 PM
Property of Cengage Learning

AC 40 Access Chapter 1 Databases and Database Objects: An Introduction
5Click the OK button • to move to the next Import Spreadsheet Wizard screen (Figure 1–56).
The First Row Contains Column Headings check box is checked, but it is dimmed. What if I want to remove the check mark?
When you are appending records to an existing table, the fi rst row must contain column headings. If instead you were creating a new table, the fi rst row might not contain column headings. In that case, you would have control over this check box.
Figure 1–56
Q&
A
Import Spreadsheet Wizard dialog box
First Row Contains Column Headings check box (should be checked)
Next button
data in worksheet
4Click the arrow to • produce a menu of available tables.
Click the Client • table to select the table to which a copy of the records will be appended (Figure 1–55).
Figure 1–55
Client table selected
arrow to produce menu of available tables
OK button
1439078475_CH1_FINAL2.indd 401439078475_CH1_FINAL2.indd 40 6/30/10 2:19:00 PM6/30/10 2:19:00 PM
Property of Cengage Learning

Databases and Database Objects: An Introduction Access Chapter 1 AC 41
Acc
ess
Ch
apte
r 1
6Click the Next button • to move to the next Import Spreadsheet Wizard screen (Figure 1–57).
What happens if I later realize I have selected the wrong table?
If you have not yet clicked the Finish button, you can click the Back button to return to the screen where you selected the table, and then select the correct table.
Q&
A
Figure 1–57
7Because the table • name is correct, click the Finish button to import the data (Figure 1–58).
I got an error message that stated that a particular fi eld did not exist in the Client table. What did I do wrong? How do I fi x it?
When you created the table, you did not name that particular fi eld correctly. Open the table in Design view and change the fi eld name to the correct name. Check other fi eld names as well. When you are done, save and close the table. Then, repeat the import process.
Figure 1–58
name of table that will receive the records
message indicates that the import process is complete
check box to save import steps
Close button
Finish button
8Because you will not save the import steps, click the Close button.• When would I save the import steps?
If you think you might need to repeat these steps in the future, you can save time by saving the steps.
Q&
AQ
&A
1. Right-click table in Navigation Pane, click Import on shortcut menu.
Other Ways
1439078475_CH1_FINAL2.indd 411439078475_CH1_FINAL2.indd 41 6/30/10 2:19:03 PM6/30/10 2:19:03 PM
Property of Cengage Learning

AC 42 Access Chapter 1 Databases and Database Objects: An Introduction
Additional Database ObjectsA computerized database such as Access contains many types of objects. Tables are the objects you use to store and manipulate data. Access supports other important types of objects as well; each of these objects has a specifi c purpose that assists in maximizing the benefi ts of a database. Through queries (questions), Access makes it possible to ask complex questions concerning the data in the database and then receive instant answers. Access also allows the user to produce attractive and useful forms for viewing and updating data. Additionally, Access includes report creation tools that make it easy to produce sophisticated reports for presenting data.
To Resize Columns in a Datasheet
You can resize the columns in the datasheet for the Client table just as you resized the columns in the datasheet for the Business Analyst table. The following steps resize the columns in the Client table to best fi t the data.
Figure 1–59
columns resized
Save button
Close button for Client table
right boundary fi eld selector
Break Point: If you wish to take a break, this is a good place to do so. You can quit Access now. To resume at a later time, start Access, open the database called Camashaly Design, and continue following the steps from this location forward.
Open the Client table in Datasheet view and then close the Navigation Pane.
Double-click the right boundary of the fi eld selectors of each of the fi elds to resize the columns so that they best fi t the data.
Save the changes to the layout by clicking the Save button on the Quick Access Toolbar (Figure 1–59).
Close the table.
1
2
3
4
Resizing ColumnsTo resize all columns in a datasheet to best fi t simultaneously, select the column heading for the fi rst column, hold down the SHIFT key and select the last column in the datasheet. Then, double-click the right boundary of any fi eld selector.
BTW
1439078475_CH1_FINAL2.indd 421439078475_CH1_FINAL2.indd 42 6/30/10 2:19:05 PM6/30/10 2:19:05 PM
Property of Cengage Learning

Databases and Database Objects: An Introduction Access Chapter 1 AC 43
Acc
ess
Ch
apte
r 1
1If the Navigation Pane is closed, click • the Shutter Bar Open/Close Button to open the Navigation Pane.
Be sure the Client table is selected.•
Click Create on the Ribbon to display • the Create tab.
Click the Query Wizard button • (Create tab | Queries group) to display the New Query dialog box (Figure 1–60).
Figure 1–60
Query Wizard button
2Be sure Simple Query Wizard is • selected, and then click the OK button (New Query dialog box) to display the Simple Query Wizard dialog box (Figure 1–61).
What would happen if the Business Analyst Table were selected instead of the Client table?
The list of available fi elds would contain fi elds from the Business Analyst Table rather than the Client table.
If the list contained Business Analyst Table fi elds, how could I make it contain Client table fi elds?
Click the arrow in the Tables/Queries box and then click the Client table in the list that appears.
Figure 1–61
Q&
AQ
&A
Simple Query Wizard dialog box
fi elds listed are in the Client table
Add All Fields button moves all fi elds to list of selected fi elds
Add Field button moves highlighted fi eld to list of selected fi elds
Remove Field button moves highlighted fi elds in list of selected fi elds back to list of available fi elds
available fi eldsselected fi elds (currently there are none)
Queries group
Remove All Fields button moves all fi elds back to list of available fi elds
To Use the Simple Query Wizard to Create a Query
Queries are simply questions, the answers to which are in the database. Access contains a powerful query feature that helps you fi nd the answers to a wide variety of questions. Once you have examined the question you want to ask to determine the fi elds involved in the question, you can begin creating the query. If there are no restrictions involved in the query, nor any special order or calculations, you can use the Simple Query Wizard.
The following steps use the Simple Query Wizard to create a query that Camashaly Design might use to obtain fi nancial information on its clients. The query displays the number, name, amount paid, current due, contract hours YTD, and business analyst number of all clients.
additional query wizards
1439078475_CH1_FINAL2.indd 431439078475_CH1_FINAL2.indd 43 6/30/10 2:19:06 PM6/30/10 2:19:06 PM
Property of Cengage Learning

AC 44 Access Chapter 1 Databases and Database Objects: An Introduction
5
4
Click the Next button to move to the • next screen.
Ensure the title of the query is Client • Query (Figure 1–64).
Click the Next button to move to the • next screen.
Ensure that the Detail (shows every • fi eld of every record) option button is selected (Figure 1–63).
What is the difference between Detail and Summary?
Detail shows all the records and fi elds. Summary only shows computations (for example, the total amount paid).
Q&
A
Figure 1–63
Figure 1–64
Detail option button selected
Summary option button
Next button
name of query
option button to open the query should be selected Finish
button
3With the Client Number fi eld • selected, click the Add Field button to add the fi eld to the query.
With the Client Name fi eld selected, • click the Add Field button a second time to add the fi eld.
Click the Amount Paid fi eld, and • then click the Add Field button to add the fi eld.
In a similar fashion, add the Current • Due, Contract Hours YTD, and Business Analyst Number fi elds (Figure 1–62).
Figure 1–62
selected fi elds
Next button
1439078475_CH1_FINAL2.indd 441439078475_CH1_FINAL2.indd 44 6/30/10 2:19:08 PM6/30/10 2:19:08 PM
Property of Cengage Learning

Databases and Database Objects: An Introduction Access Chapter 1 AC 45
Acc
ess
Ch
apte
r 1
Using QueriesAfter you have created and saved a query, Access stores it as a database object and
makes it available for use in a variety of ways:
To view the results of the query, open it by right-clicking the query in the Navigation • Pane and clicking Open on the shortcut menu.To print the results with the query open, click File on the Ribbon, click the Print tab, • and then click either Print or Quick Print.If you want to change the design of the query, right-click the query in the • Navigation Pane and then click Design View on the shortcut menu to open the query in Design view.To print the query without fi rst opening it, be sure the query is selected in the • Navigation Pane and click File on the Ribbon, click the Print tab, and then click either Print or Quick Print.You can switch between views of a query using the View button (Home tab |
Views group). Clicking the arrow in the bottom of the button produces the View but-ton menu. You then click the desired view in the menu. The two query views you will use in this chapter are Datasheet view (see the results) and Design view (change the design). You also can click the top part of the View button, in which case, you will switch to the view identifi ed by the icon on the button. In the fi gure, the button con-tains the icon for Design view, so clicking the button would change to Design view. For the most part, the icon on the button represents the view you want, so you can usually simply click the button.
6Click the Finish button • to create the query (Figure 1–65).
Click the Close button • for the Client Query to remove the query results from the screen.
If I want to use this query in the future, do I need to save the query?
Normally you would. The one exception is a query created by the wizard. The wizard automatically saves the query it creates.
Q&
A
Figure 1–65
newly created query
included fi elds
Close button for Client Query
1439078475_CH1_FINAL2.indd 451439078475_CH1_FINAL2.indd 45 6/30/10 2:19:10 PM6/30/10 2:19:10 PM
Property of Cengage Learning

AC 46 Access Chapter 1 Databases and Database Objects: An Introduction
To Use a Criterion in a Query
After you have determined the fi elds to be included in a query, you will determine whether there are any restrictions on the records that are to be included. For example, you might only want to include those clients whose business analyst number is 14. In such a case, you need to enter the 14 as a criterion, which is a condition that the records to be included must satisfy. To do so, you will open the query in Design view, enter the criterion below the appropriate fi eld, and then view the results of the query. The following steps enter a criterion to include only the clients of business analyst 14 and then view the query results.
Figure 1–66
1Right-click the • Client Query in the Navigation Pane to produce a shortcut menu (Figure 1–66).
2Click Design View • on the shortcut menu to open the query in Design view (Figure 1–67).
Figure 1–67
clicking the Open command opens the query in Datasheet view and displays the query results
Client Query clicking the Design View command opens the query in Design view so you can make modifi cations
shortcut menu
Client query open in Design view
fi eld list
Criteria row
included fi elds
design grid
position to enter criterion for Business Analyst Number fi eld
1439078475_CH1_FINAL2.indd 461439078475_CH1_FINAL2.indd 46 6/30/10 2:19:12 PM6/30/10 2:19:12 PM
Property of Cengage Learning

Databases and Database Objects: An Introduction Access Chapter 1 AC 47
Acc
ess
Ch
apte
r 1
3
4
5
Click the Criteria row • in the Business Analyst Number column of the grid, and then type 14 as the criterion (Figure 1–68).
The Business Analyst Number fi eld is a text fi eld. Do I need to enclose the value for a text fi eld in quotation marks?
You could, but it is not necessary, because Access inserts the quotation marks for you automatically.
Click the View button • to display the query results in Datasheet view (Figure 1–69).
Could I click the View button arrow and then click Datasheet view?
Yes, if the icon representing the view you want appears on the View button; however, it is easier just to click the button.
Click the Close button for the Client Query to close the query.•
When asked if you want to save your changes, click the No button.• If I saved the query, what would happen the next time I ran the query?
You would see only clients of business analyst 14.
Could I save the query with another name?
Yes. To save the query with another name, click File on the Ribbon, click Save Object As, enter a new fi le name in the Save As dialog box and click OK (Save As dialog box).
Q&
AQ
&A
Q&
AQ
&A
1. Click Run button (Query Tools Design tab | Results group)
2. Click Datasheet View button on Status bar
Other Ways
Figure 1–68
View button (icon indicates clicking button would change to Datasheet view)
Results group
View button arrow (clicking produces list of available views)
criterion (business analyst number must be 14)
Figure 1–69
query results
business analyst numbers are all 14
Close button for Client Query
1439078475_CH1_FINAL2.indd 471439078475_CH1_FINAL2.indd 47 6/30/10 2:19:14 PM6/30/10 2:19:14 PM
Property of Cengage Learning

AC 48 Access Chapter 1 Databases and Database Objects: An Introduction
To Print the Results of a Query
The following steps print the results of a saved query.
Figure 1–70
With the Client Query selected in the Navigation Pane, click File on the Ribbon to open the Backstage view.
Click the Print tab in the Backstage view to display the Print gallery.
Click the Quick Print button to print the query.
1
2
3
Creating and Using FormsIn Datasheet view, you can view many records at once. If there are many fi elds,
however, only some of the fi elds in each record might be visible at a time. In Form view, where data is displayed in a form on the screen, you usually can see all the fi elds, but only for one record.
To Create a Form
Like a paper form, a form in a database is a formatted document with fi elds that contain data. Forms allow you to view and maintain data. Forms also can be used to print data, but reports are more commonly used for that purpose. The simplest type of form in Access is one that includes all the fi elds in a table stacked one above the other. The following steps create a form, use the form to view records, and then save the form.
1Select the Client table • in the Navigation Pane.
If necessary, click • Create on the Ribbon to display the Create tab (Figure 1–70).
Forms group
Form button
1439078475_CH1_FINAL2.indd 481439078475_CH1_FINAL2.indd 48 6/30/10 2:19:17 PM6/30/10 2:19:17 PM
Property of Cengage Learning

Databases and Database Objects: An Introduction Access Chapter 1 AC 49
Acc
ess
Ch
apte
r 1
2
3
Click the Form • button (Create tab |Forms group) to create a simple form (Figure 1–71).
A Field list appeared on my screen. What should I do?
Click the Add Existing Fields button (Form Layout Tools Design tab | Tools group) to remove the Field list from the screen.
If the form appears in • Layout view, click the Form View button on the Access Status bar to display the form in Form view.
How can I recognize Layout view?
Access identifi es Layout view in three ways. The left side of the Status bar will contain the words Layout View; there will be shading around the outside of the selected fi eld in the form; and the Layout View button will be selected on the right side of the Status bar.
Click the Next Record • button three times to move to record 4 (Figure 1–72).
Q&
AQ
&A
Figure 1–71
Figure 1–72
form Add Existing Fields button
Tools group
form appears in Layout view
form appears in Form view
fourth record appears in form
Next Record button
1439078475_CH1_FINAL2.indd 491439078475_CH1_FINAL2.indd 49 6/30/10 2:19:18 PM6/30/10 2:19:18 PM
Property of Cengage Learning

AC 50 Access Chapter 1 Databases and Database Objects: An Introduction
Using a FormAfter you have saved a form, you can use it at anytime by right-clicking the form in
the Navigation Pane and then clicking Open in the shortcut menu. In addition to viewing data in the form, you can also use it to enter or update data, a process that is very similar to updating data using a datasheet. If you plan to use the form to enter or revise data, you must ensure you are viewing the form in Form view.
4
5
Click the Save button • on the Quick Access Toolbar to display the Save As dialog box (Figure 1–73).
Type • Client Form as the form name, and then click the OK button to save the form.
Click the Close button for the form to close the form.•
Did I have to click the Next Record button before saving?
No. The only reason you were asked to click the button was so that you could experience navigation within the form.
Q&
A
Figure 1–73
1. Click View button (Form Layout Tools Design tab | Views group)
Other Ways
Save button
Save As dialog box
position to enter form name
OK button
1439078475_CH1_FINAL2.indd 501439078475_CH1_FINAL2.indd 50 6/30/10 2:19:21 PM6/30/10 2:19:21 PM
Property of Cengage Learning

Databases and Database Objects: An Introduction Access Chapter 1 AC 51
Acc
ess
Ch
apte
r 1
Creating and Printing ReportsCamashaly Design wants to create the Client Financial Report shown in
Figure 1 – 74. Just as you can create a form containing all fi elds by clicking a single button, you can click a button to create a report containing all the fi elds. Doing so will not match the report shown in Figure 1 – 74, however, which does not contain all the fi elds. Some of the column headings are different. In addition, some of the headings in the report in Figure 1 – 74 are split over multiple lines, whereas the ones in the report created by clicking the button will not be split. Fortunately, you can later modify the report design to make it precisely match the fi gure. To do so, you use Layout view for the report.
Break Point: If you wish to take a break, this is a good place to do so. You can quit Access now. To resume at a later time, start Access, open the database called Camashaly Design, and continue following the steps from this location forward.
Client Financial Report Thursday, April 12, 2012
5:17:00 PM
Client Number
Client Name Amount Paid Current Due Hrs YTD Business Analyst Number
BA53 Bavant Animal Hospital $0.00 $7,500.00 0.00 11
BB32 Babbage CPA Firm $1,500.00 $500.00 5.00 14
BC76 Buda Community Clinic $2,500.00 $750.00 2.50 11
CJ29 Catering by Jenna $3,000.00 $1,000.00 15.50 27
GA74 Grant An�ques $5,500.00 $3,200.00 34.50 14
GF56 Granger Founda�on $0.00 $6,500.00 0.00 11
HC10 Hendley County Hospital $3,100.00 $1,200.00 12.00 27
KD21 KAL Design Studio $6,000.00 $3,200.00 30.50 14
KG04 Kyle Grocery Coopera�ve $3,200.00 $0.00 5.00 11
ME14 Mike's Electronic Stop $2,500.00 $1,500.00 8.50 27
PJ34 Patricia Jean Florist $0.00 $5,200.00 0.00 27
SL77 Smarter Law Associates $3,800.00 $0.00 10.50 11
TB17 The Bikeshop $2,750.00 $1,200.00 14.00 27
WE05 Walburg Energy Alterna�ves $4,500.00 $1,450.00 19.50 14
WS01 Woody Spor�ng Goods $2,250.00 $1,600.00 18.50 14
$40,600.00 176.00$34,800.00
Figure 1–74
1439078475_CH1_FINAL2.indd 511439078475_CH1_FINAL2.indd 51 6/30/10 2:19:22 PM6/30/10 2:19:22 PM
Property of Cengage Learning

AC 52 Access Chapter 1 Databases and Database Objects: An Introduction
Click the Report • button (Create tab | Reports group) to create the report (Figure 1 – 76).
Why is the report title Client?
Access automatically assigns the name of the table or query as the title. It also automatically includes the date. You can change either of these later.
Q&
A
Be sure the Client • table is selected in the Navigation Pane.
Click Create on the • Ribbon to display the Create tab (Figure 1 – 75).
Why do I need to select the Client table prior to clicking Create on the Ribbon?
You don’t need to select it at that point. You do need to select it prior to clicking the Report button at the next step because Access will include all the fi elds in whichever table or query is currently selected.
Q&
A
2
1
Figure 1–75
Create tab
Report button
Reports group
Client table selected
Figure 1–76
newly created report
report title is Client
To Create a Report
You will fi rst create a report containing all fi elds. The following steps create and save the initial report. They also modify the report title.
1439078475_CH1_FINAL2.indd 521439078475_CH1_FINAL2.indd 52 6/30/10 2:19:22 PM6/30/10 2:19:22 PM
Property of Cengage Learning

Databases and Database Objects: An Introduction Access Chapter 1 AC 53
Acc
ess
Ch
apte
r 1
Click the Save • button on the Quick Access Toolbar to display the Save As dialog box and then type Client Financial Report as the name of the report (Figure 1 – 77).
3
Figure 1–77
Save button
OK button
Save As dialog box
name of report
4
5 Figure 1–78
Click the OK button • (Save As dialog box) to save the report (Figure 1 – 78).
The name of the report changed. Why didn’t the report title also change?
The report title just happens to begin with the same name as the report. If you change the name of the report, Access will not change the report title. You can change it at any time to any title you like.
Q&
A
Using Layout View in a ReportWhen working with a report in Access, there are four different ways to view the
report. They are Report view, Print Preview, Layout view, and Design view. Report view shows the report on the screen. Print Preview shows the report as it will appear when printed. Layout view is similar to Report view in that it shows the report on the screen, but it also allows you to make changes to the report. It is usually the easiest way to make such changes. Design view also allows you to make changes, but it does not show you the actual report. It is most useful when the changes you need to make are especially complex. In this chapter, you will use Layout view to modify the report.
name of report has been changed
report title was not changed
report appears in Navigation Pane
Close button for report
Close the report by clicking its Close button.•
1439078475_CH1_FINAL2.indd 531439078475_CH1_FINAL2.indd 53 6/30/10 2:19:25 PM6/30/10 2:19:25 PM
Property of Cengage Learning

AC 54 Access Chapter 1 Databases and Database Objects: An Introduction
Press the • SPACEBAR to insert a space and then type Financial Report to complete the title.
Click the column • heading for the Street fi eld to select it.
Hold the • SHIFT key down and then click the column headings for the City fi eld, the State fi eld, and the Postal Code fi elds to select multiple column headings.
What happens if I don’t hold the SHIFT key down?
As soon as you click the column heading, it will be the only one that is selected. To select multiple objects, you need to hold the SHIFT key down for every object after the fi rst one.
Q&
A
Right-click Client Financial Report in • the Navigation Pane, and then click Layout View on the shortcut menu to open the report in Layout view.
If a Field list appears, click the Add • Existing Fields button (Report Layout Tools Design tab | Tools group) to remove the Field list from the screen.
Close the Navigation Pane.•
Click the report title once to select it.•
Click the report title a second time • to produce an insertion point (Figure 1 – 79).
I clicked at a different position in the title and my insertion point is in the middle of Client. How do I produce an insertion point at the position shown in the fi gure?
You can use the RIGHT ARROW key to move the insertion point to the position in the fi gure or you can click the desired position.
Q&
A
To Modify Column Headings and Resize Columns
To make the report match the one in Figure 1 – 74, you need to change the title, remove some columns, modify the column headings, and also resize the columns. The following steps use Layout view to make the necessary modifi cations to the report.
1
2
Figure 1–79
insertion point
Figure 1–80
title selected
Select Column button
Navigation Pane closed
Rows & Columns group
title changed
Arrange tab
column headings selected
1439078475_CH1_FINAL2.indd 541439078475_CH1_FINAL2.indd 54 6/30/10 2:19:27 PM6/30/10 2:19:27 PM
Property of Cengage Learning

Databases and Database Objects: An Introduction Access Chapter 1 AC 55
Acc
ess
Ch
apte
r 1
Use the • DELETE or BACKSPACE keys as necessary to erase the current entry and then type Client Number as the new entry.
Click the heading for the Business • Analyst Number fi eld twice, erase the current entry, and then type Business Analyst Number as the new entry.
Click the Client Number fi eld • heading to select it, point to the lower boundary of the heading for the Client Number fi eld so that the mouse pointer changes to a two-headed arrow and then drag the lower boundary to the approximate position shown in Figure 1 – 82 to expand the column headings.
Click the Select Column button • (Report Layout Tools Arrange tab | Rows & Columns group) to select the entire columns corresponding to the column headings you selected in the previous step.
Press the • DELETE key to delete the columns.
Click the column heading for the • Client Number fi eld twice, once to select it and the second time to produce an insertion point (Figure 1 – 81).
I inadvertently selected the wrong fi eld. What should I do?
Click somewhere outside the various fi elds to deselect the one you have selected. Then, click the Client Number fi eld twice.
Q&
A
3
4
Figure 1–81
Figure 1–82
insertion point in column heading for Client Number fi eld
column heading currently contains caption for Client Number fi eld
Street, City, State, and Postal Code columns have been removed remaining columns
automatically shifted to the left
column heading changed
column heading changed
mouse pointer shape indicates you can resize column headings by dragging
I selected the wrong collection of objects. What should I do?
You can click somewhere else on the report so that the objects you want are not selected, and then begin the process again. Alternatively, you can repeatedly click the Undo button on the Quick Access Toolbar to undo your selections. Once you have done so, you can select the objects you want.
Click Arrange on the Ribbon to display the Arrange tab (Figure 1 – 80).•
Q&
A
Do I have to be exact?
No. If you are in a slightly different position, your report would look a little different from the one in the fi gure, but the difference would not be signifi cant.
Q&
A
Select Column button
1439078475_CH1_FINAL2.indd 551439078475_CH1_FINAL2.indd 55 6/30/10 2:19:30 PM6/30/10 2:19:30 PM
Property of Cengage Learning

AC 56 Access Chapter 1 Databases and Database Objects: An Introduction
Using the same technique, resize the • other columns to the sizes shown in Figure 1 – 84.
Point to the right boundary of the • heading for the Client Number fi eld so that the mouse pointer changes to a two-headed arrow and then drag the right boundary to the approximate position shown in Figure 1 – 83 to reduce the width of the column.
Do I have to be exact?
No. Again, if you are in a slightly different position, the difference between your report and the one in the fi gure would not be signifi cant.
Q&
A
Figure 1–83
Figure 1–84
5
6
because column width is reduced, heading splits over two lines
heading split over three lines
column widths changed
mouse pointer shape indicates you can resize column headings by dragging
Amount Paid fi eld heading
1439078475_CH1_FINAL2.indd 561439078475_CH1_FINAL2.indd 56 6/30/10 2:19:32 PM6/30/10 2:19:32 PM
Property of Cengage Learning

Databases and Database Objects: An Introduction Access Chapter 1 AC 57
Acc
ess
Ch
apte
r 1
To Add Totals to a Report
The report in Figure 1 – 74 contains totals for the Amount Paid, Current Due, and Hrs YTD columns. You can use Layout view to add these totals. The following steps use Layout view to include totals for these three columns.
1
2
Click the Amount Paid • fi eld heading (shown in Figure 1 – 84) to select the fi eld.
Do I have to click the heading? Could I click the fi eld on one of the records?
You do not have to click the heading. You also could click the Amount Paid fi eld on any record.
Click Design on the • Ribbon to display the Design tab.
Click the Totals button • (Report Layout Tools Design tab | Grouping & Totals group) to display the list of available calculations (Figure 1 – 85).
Q&
A
Figure 1–85
Grouping & Totals group
Totals menu
Amount Paid column heading selected
Totals button Design tab
Sum command
Click Sum to calculate • the sum of the amount of paid values.
Is Sum the same as Total?
Yes.
Using the same • technique, add totals for the Current Due and Hrs YTD columns.
Scroll down to the • bottom of the report to verify that the totals are included. If necessary, expand the size of the total controls so they appear completely.
Click the Page number • to select it and then drag it to the approximate position shown in Figure 1 – 86.
Q&
A
pointer shape indicates you can move object by dragging
page number selected and moved
Figure 1–86
totals included
indication of right edge of available space
Save button
1439078475_CH1_FINAL2.indd 571439078475_CH1_FINAL2.indd 57 6/30/10 2:19:34 PM6/30/10 2:19:34 PM
Property of Cengage Learning

AC 58 Access Chapter 1 Databases and Database Objects: An Introduction
Database PropertiesAccess helps you organize and identify your databases by using database properties, which are the details about a fi le. Database properties, also known as metadata, can include such information as the fi le’s author, title, or subject. Keywords are words or phrases that further describe the database. For example, a class name or database topic can describe the fi le’s purpose or content.
Five different types of document properties exist, but the more common ones used in this book are standard and automatically updated properties. Standard properties are associated with all Microsoft Offi ce documents and include author, title, and subject. Automatically updated properties include fi le system properties, such as the date you create or change a fi le, and statistics, such as the fi le size.
Why did I need to move the page number?
The dotted line near the right-hand edge of the screen indicates the right-hand border of the available space on the printed page, based on whatever margins and orientation are currently selected. A portion of the page number extends beyond this border. By moving the page number, it no longer extends beyond the border.
Click the Save button on the Quick Access Toolbar to save your changes to the report layout.•
Close the report.•
Q&
A
3
To Print a Report
The following steps print the report.
With the Client Financial Report selected in the Navigation Pane, click File on the Ribbon to open the Backstage view.
Click the Print tab in the Backstage view to display the Print gallery.
Click the Quick Print button to print the report.
1
2
3
How can I print multiple copies of my report?
Click File on the Ribbon to open the Backstage view. Click the Print tab, click Print in the Print gallery to display the Print dialog box, increase the number in the Number of Copies box, and then click the OK button (Print dialog box).
How can I print a range of pages rather than printing the whole report?
Click File on the Ribbon to open the Backstage view. Click the Print tab, click Print in the Print gallery to display the Print dialog box, click the Pages option button in the Print Range area, enter the desired page range, and then click the OK button (Print dialog box).
Q&
AQ
&A
Tabbed Documents Versus Overlapping WindowsBy default, Access 2010 displays database objects in tabbed documents instead of overlapping windows. If your database is in overlapping windows mode, click File on the Ribbon, click Options in the Backstage view, click Current Database in the Access Options dialog box, and select the Display Document Tabs check box and the Tabbed Documents option button.
BTW
1439078475_CH1_FINAL2.indd 581439078475_CH1_FINAL2.indd 58 6/30/10 2:19:37 PM6/30/10 2:19:37 PM
Property of Cengage Learning

Databases and Database Objects: An Introduction Access Chapter 1 AC 59
Acc
ess
Ch
apte
r 1
To Change Database Properties
The Database Properties dialog box contains areas where you can view and enter database properties. You can view and change information in this dialog box at anytime while you are working on your database. It is a good idea to add your name and class name as database properties. You also can add keywords that further describe your database. The following steps use the Properties dialog box to change database properties.
1Click File on • the Ribbon to open the Backstage view.
If necessary, click • the Info tab in the Backstage view to display the Information gallery (Figure 1–87).
How do I close the Backstage view?
Click File on the Ribbon or click the preview of the document in the Information gallery to return to the Access database window.
Figure 1–87
View and edit database properties link
Info gallery
File tab
Info tab
2Click the ‘View and edit • database properties’ link in the right pane of the Info gallery to display the Camashaly Design.accdb Properties dialog box (Figure 1–88).
Why are some of the database properties in my Properties dialog box already fi lled in?
The person who installed Microsoft Offi ce 2010 on your computer or network may have set or customized the properties.
Q&
A
Camashaly Design.accdb Properties dialog box
course number and section will be typed in Subject text box
student name will be typed in Author text box
key words will be typed in Keywords text box
Figure 1–88
Q&
A
1439078475_CH1_FINAL2.indd 591439078475_CH1_FINAL2.indd 59 6/30/10 2:19:37 PM6/30/10 2:19:37 PM
Property of Cengage Learning

AC 60 Access Chapter 1 Databases and Database Objects: An Introduction
If necessary, click the Summary tab.•
Click the Subject text box, if necessary • delete any existing text, and then type CIS 101, Section 20 as the Subject property.
Click the Author text box and then • type Trevor Wilkins as the Author property. If a name already is displayed in the Author text box, delete it before typing the new name.
Click the Keywords text box, if • necessary delete any existing text, and then type online marketing, Web site design as the Keywords property (Figure 1–89).
What types of properties does Access collect automatically?
Access records such details as when the database was created, when it was last modifi ed, total editing time, and the various objects contained in the database.
Click the OK button to save your changes and remove the Camashaly Design.accdb• Properties dialog box from the screen.
3
Figure 1–89
Q&
A
course and section entered
student name entered
keywords entered
OK button
4
To Quit Access
The following steps quit Access.
Click the Close button on the right side of the title bar to quit Access.
If a Microsoft Access dialog box appears, click the Save button to save any changes made to the object since the last save.
1
2
Special Database OperationsThe special operations involved in maintaining a database are backup, recovery, compacting a database, and repairing a database.
Backup and RecoveryIt is possible to damage or destroy a database. Users can enter data that is incorrect;
programs that are updating the database can end abnormally during an update; a hardware problem can occur; and so on. After any such event has occurred, the database may contain invalid data. It even might be totally destroyed.
1439078475_CH1_FINAL2.indd 601439078475_CH1_FINAL2.indd 60 6/30/10 2:19:39 PM6/30/10 2:19:39 PM
Property of Cengage Learning

Databases and Database Objects: An Introduction Access Chapter 1 AC 61
Acc
ess
Ch
apte
r 1
Obviously, you cannot allow a situation in which data has been damaged or destroyed to go uncorrected. You must somehow return the database to a correct state. This process is called recovery; that is, you recover the database.
The simplest approach to recovery involves periodically making a copy of the database (called a backup copy or a save copy). This is referred to as backing up the database. If a problem occurs, you correct the problem by copying this backup copy over the actual database, often referred to as the live database.
To back up the database that is currently open, you use the Back Up Database command on the Save & Publish tab in the Backstage view. In the process, Access suggests a name that is a combination of the database name and the current date. For example, if you back up the Camashaly Design database on April 20, 2012, Access will suggest the name, Camashaly Design_2012-04-20. You can change this name if you desire, although it is a good idea to use this name. By doing so, it will be easy to distinguish between all the backup copies you have made to determine which is the most recent. In addition, if you discover that a critical problem occurred on April 18, 2012, you may want to go back to the most recent backup before April 18. If, for example, the database was not backed up on April 17 but was backed up on April 16, you would use Camashaly Design_2012-04-16.
TO BACK UP A DATABASE
You would use the following steps to back up a database to a fi le on a hard disk or high-capacity removable disk.
1. Open the database to be backed up.2. Click File on the Ribbon to open the Backstage view, and then click the Save & Publish tab.3. With Save Database As selected in the File Types area, click Back Up Database in the
Save Database As area, and then click the Save As button.4. Selected the desired location in the Save As box. If you do not want the name Access
has suggested, enter the desired name in the File name text box.5. Click the Save button to back up the database.
Access creates a backup copy with the desired name in the desired location. Should you ever need to recover the database using this backup copy, you can simply copy it over the live version.
Compacting and Repairing a DatabaseAs you add more data to a database, it naturally grows larger. When you delete an
object (records, tables, forms, or queries), the space previously occupied by the object does not become available for additional objects. Instead, the additional objects are given new space; that is, space that was not already allocated. To remove this wasted space from the database, you must compact the database. The same option that compacts the database also repairs problems that might have occurred in the database.
TO COMPACT AND REPAIR A DATABASE
You would use the following steps to compact and repair a database.
1. Open the database to be compacted.2. Click File on the Ribbon to open the Backstage view, and then, if necessary, select the
Info tab.3. Click the Compact & Repair Database button in the Information gallery to compact
and repair the database.The database now is the compacted form of the original.
1439078475_CH1_FINAL2.indd 611439078475_CH1_FINAL2.indd 61 6/30/10 2:19:40 PM6/30/10 2:19:40 PM
Property of Cengage Learning

AC 62 Access Chapter 1 Databases and Database Objects: An Introduction
Additional OperationsAdditional special operations include opening another database, closing a database
without exiting Access, and saving a database with another name. They also include delet-ing a table (or other object) as well as renaming an object. Finally, you can change proper-ties of a table or other object, such as the object’s description.
When you open another database, Access will automatically close the database that previously was open. Before deleting or renaming an object, you should ensure that the object has no dependent objects; that is, other objects that depend on the object you want to delete.
TO OPEN ANOTHER DATABASE
To open another database, you would use the following steps.
1. Click File on the Ribbon to open the Backstage view.2. Click Open.3. Select the database to be opened.4. Click the Open button.
TO CLOSE A DATABASE WITHOUT EXITING ACCESS
You would use the following steps to close a database without quitting Access.
1. Click File on the Ribbon to open the Backstage view.2. Click Close Database.
TO SAVE A DATABASE WITH ANOTHER NAME
To save a database with another name, you would use the following steps.
1. Click File on the Ribbon to open the Backstage view, and then select the Save & Publish tab.
2. With Save Database As selected in the File Types area and Access Database selected in the Save Database As area, click the Save As button.
3. Enter a name and select a location for the new version.4. Click the Save button.
TO DELETE A TABLE OR OTHER OBJECT IN THE DATABASE
You would use the following steps to delete a database object.
1. Right-click the object in the Navigation Pane.2. Click Delete on the shortcut menu.3. Click the Yes button in the Microsoft Access dialog box.
TO RENAME AN OBJECT IN THE DATABASE
You would use the following steps to rename a database object.
1. Right-click the object in the Navigation Pane.2. Click Rename on the shortcut menu.3. Type the new name and press the enter key.
Access HelpAt any time while using Access, you can fi nd answers to questions and display information about various topics through Help. Used properly, this form of assistance can increase your productivity and reduce your frustrations by minimizing the time you spend learning how to use Access. For instruction about Access Help and exercises that will help you gain confi dence in using it, read the Offi ce 2010 and Windows 7 chapter at the beginning of this book.
BTW
Certifi cationThe Microsoft Offi ce Specialist (MOS) program provides an opportunity for you to obtain a valuable industry credential — proof that you have the Access 2010 skills required by employers. For more information, visit the Access 2010 Certifi cation Web page (scsite.com/ac2010/cert).
BTW
Quick ReferenceFor a table that lists how to complete the tasks covered in this book using the mouse, Ribbon, shortcut menu, and keyboard, see the Quick Reference Summary at the back of this book, or visit the Access 2010 Quick Reference Web page (scsite.com/ac2010/qr).
BTW
1439078475_CH1_FINAL2.indd 621439078475_CH1_FINAL2.indd 62 6/30/10 2:19:40 PM6/30/10 2:19:40 PM
Property of Cengage Learning

Databases and Database Objects: An Introduction Access Chapter 1 AC 63
Acc
ess
Ch
apte
r 1
Chapter SummaryIn this chapter you have learned to design a database, create an Access database, create tables and add records to them, print the contents of tables, create queries, create forms, and create reports. You also have learned how to change database properties. The items listed below include all the new Access skills you have learned in this chapter.
1. Start Access (AC 12) 2. Create a Database (AC 13) 3. Create a Database Using a Template (AC 14) 4. Modify the Primary Key (AC 16) 5. Defi ne the Remaining Fields in a Table (AC 19) 6. Save a Table (AC 21) 7. View the Table in Design View (AC 21) 8. Close the Table (AC 23) 9. Add Records to a Table (AC 23) 10. Quit Access (AC 26) 11. Open a Database from Access (AC 27) 12. Add Additional Records to a Table (AC 28) 13. Resize Columns in a Datasheet (AC 29) 14. Preview and Print the Contents of a
Table (AC 31) 15. Create a Table in Design View (AC 33) 16. Import an Excel Worksheet (AC 38) 17. Use the Simple Query Wizard to Create a
Query (AC 43)
18. Use a Criterion in a Query (AC 46) 19. Print the Results of a Query (AC 48) 20. Create a Form (AC 48) 21. Create a Report (AC 52) 22. Modify Column Headings and Resize Columns
(AC 54) 23. Add Totals to a Report (AC 57) 24. Change Database Properties (AC 59) 25. Back Up a Database (AC 61) 26. Compact and Repair a Database (AC 61) 27. Open Another Database (AC 62) 28. Close a Database without Exiting Access (AC 62) 29. Save a Database with Another Name (AC 62) 30. Delete a Table or Other Object in the Database
(AC 62) 31. Rename an Object in the Database (AC 62)
If you have a SAM 2010 user profi le, your instructor may have assigned an autogradable version of this assignment. If so, log into the SAM 2010 Web site at www.cengage.com/sam2010 to download the instruction and start fi les.
Learn It Online
Test your knowledge of chapter content and key terms.
Instructions: To complete the Learn It Online exercises, start your browser, click the Address bar, and then enter the Web address scsite.com/ac2010/learn. When the Access 2010 Learn It Online page is displayed, click the link for the exercise you want to complete and then read the instructions.
Chapter Reinforcement TF, MC, and SAA series of true/false, multiple choice, and short answer questions that test your knowledge of the chapter content.
Flash CardsAn interactive learning environment where you identify chapter key terms associated with displayed defi nitions.
Practice TestA series of multiple choice questions that test your knowledge of chapter content and key terms.
Who Wants To Be a Computer Genius?An interactive game that challenges your knowledge of chapter content in the style of a television quiz show.
Wheel of TermsAn interactive game that challenges your knowledge of chapter key terms in the style of the television show Wheel of Fortune.
Crossword Puzzle ChallengeA crossword puzzle that challenges your knowledge of key terms presented in the chapter.
1439078475_CH1_FINAL2.indd 631439078475_CH1_FINAL2.indd 63 6/30/10 2:19:40 PM6/30/10 2:19:40 PM
Property of Cengage Learning

AC 64 Access Chapter 1 Databases and Database Objects: An IntroductionS
TU
DE
NT
AS
SIG
NM
EN
TS
Apply Your Knowledge
Reinforce the skills and apply the concepts you learned in this chapter.
Adding a Caption, Creating a Query, Creating a Form, and Creating a ReportInstructions: Start Access. Open the Babbage CPA Firm database. See the inside back cover of this book for instructions for downloading the Data Files for Students, or see your instructor for informa-tion on accessing the fi les required in this book.
The Babbage CPA Firm employs bookkeepers who maintain the books for those clients who need bookkeeping services. The Babbage CPA Firm has a database that keeps track of its bookkeepers and clients. Each client is assigned to a single bookkeeper, but each bookkeeper may be assigned many clients. The database has two tables. The Client table contains data on the clients who use the book-keeping services of the Babbage CPA Firm. The Bookkeeper table contains data on the bookkeepers employed by Babbage CPA Firm.
Perform the following tasks:
1. Open the Bookkeeper table in Design view and add BKR # as the caption for Bookkeeper Number. Save the changes to the table.
2. Open the Bookkeeper table in Datasheet view and resize all columns to best fi t the data. Save the changes to the layout of the table.
3. Use the Simple Query Wizard to create a query for the Client table that contains the Client Number, Client Name, Amount Paid, and Balance Due. Use the name, Client Query, for the query.
4. Create a simple form for the Bookkeeper table. Use the name, Bookkeeper, for the form.
5. Close the Bookkeeper form.
6. Create the report shown in Figure 1–90 for the Client table. The report includes totals for both the Amount Paid and Balance Due fi elds. Be sure the totals appear completely. You might need to expand the size of the controls. Move the page number so that it is within the margins.
7. Compact the database.
8. Back up the database.
9. Change the database properties, as specifi ed by your instructor. Submit the revised database in the format specifi ed by your instructor.
Figure 1–90
1439078475_CH1_FINAL2.indd 641439078475_CH1_FINAL2.indd 64 6/30/10 2:19:42 PM6/30/10 2:19:42 PM
Property of Cengage Learning

Databases and Database Objects: An Introduction Access Chapter 1 AC 65
Acc
ess
Ch
apte
r 1
STU
DE
NT
AS
SIG
NM
EN
TS
Extend Your Knowledge
Extend the skills you learned in this chapter and experiment with new skills. You may need to use Help to complete the assignment.
Using a Database Template to Create a Students DatabaseInstructions: Access includes a number of templates that you can use to create a beginning database that can be modifi ed to meet your specifi c needs. You will create a Students database using the Students template. The database includes sample tables, queries, forms, and reports. You will change the database and create the Student Birthdays Query, shown in Figure 1–91.
Perform the following tasks:
1. Start Access.
2. With a USB fl ash drive connected to one of the computer’s USB ports, ensure the New tab is selected in the Backstage view and select Sample templates in the New gallery.
3. Select the Students template and create a new database on your USB drive with the fi le name, Students.
4. Close the Student List form and change the organization of the Navigation Pane to Tables and Related Views .
5. Delete the Student Details form.
6. Use the Query Wizard to create the query shown in Figure 1 – 91. Save the query as Student Birthdays Query.
7. Open the Student Phone List in Layout view and use the tools on the Format tab to make the Student Phone List title bold and change the font size to 24. Delete the control containing the time.
8. Save your changes to the report.
9. Compact the database.
10. Change the database properties, as specifi ed by your instructor. Submit the revised database in the format specifi ed by your instructor.
Figure 1–91
1439078475_CH1_FINAL2.indd 651439078475_CH1_FINAL2.indd 65 6/30/10 2:19:45 PM6/30/10 2:19:45 PM
Property of Cengage Learning

AC 66 Access Chapter 1 Databases and Database Objects: An IntroductionS
TU
DE
NT
AS
SIG
NM
EN
TS
In the Lab
Design, create, modify, and/or use a database using the guidelines, concepts, and skills presented in this chapter. Labs are listed in order of increasing diffi culty.
Lab 1: Creating Objects for the ECO Clothesline DatabaseProblem: ECO Clothesline is a local company that designs and manufactures eco-friendly casual wear, yoga clothing, and fi tness apparel. All clothes are made from earth-friendly fabrics, such as bamboo, hemp, organic cotton, and natural silk. The company recently decided to store its customer and sales rep data in a database. Each customer is assigned to a single sales rep, but each sales rep may be assigned many customers. The database and the Customer table have been created, but there is no data in the Customer table. The Sales Rep table has not been created. The company plans to import the Customer data from an Excel workbook, shown in Figure 1–93a. The other Excel workbook (Figure 1–93b) contains information on the sales representatives that ECO employs. ECO would like to fi nish storing this data in a database and has asked for your help.Instructions: Perform the following tasks: Start Access and open the ECO Clothesline database. See the inside back cover of this book for instructions for downloading the Data Files for Students, or see your instructor for information on accessing the fi les required in this book. 1. Import the Lab 1-1 Customer Data workbook into the Customer table.
2. Add the captions Cust # to the Customer Number fi eld and SR # to the Sales Rep Number fi eld in the Customer table and save the changes.
3. Open the Customer table in Datasheet view and resize the columns to best fi t the data. Save the changes to the layout of the table.
4. Use Datasheet view to create a table in which to store the data related to sales reps. Use the name Sales Rep for the table. The fi elds and the data for the Sales Rep table are shown in Figure 1–93b.
Make It Right
Analyze a database and correct all errors and/or improve the design.
Correcting Errors in the Table StructureInstructions: Start Access. Open the Beach Rentals database. See the inside back cover of this book for instructions for downloading the Data Files for Students, or see your instructor for information on accessing the fi les required in this book.
Beach Rentals is a database containing information on rental properties available at a beach resort. The Rentals table shown in Figure 1–92 contains a number of errors in the table structure. You are to correct these errors before any additional records can be added to the table. The Rental Code fi eld is a Text fi eld that contains a maximum of three characters. The fi eld Address was omitted from the table. The Address fi eld is a Text fi eld with a maximum of 20 characters. It should appear after Rental Code. Only whole numbers should be allowed in the Bedrooms and Bathrooms fi elds. The column heading Weakly Rental is misspelled, and the fi eld should contain monetary values. The Distance fi eld represents the walking distance from the beach; the fi eld should display two decimal places. The table name should be Rental Units, not Rentals.
Change the database properties, as specifi ed by your instructor. Submit the revised database in the format specifi ed by your instructor.
Figure 1–92
1439078475_CH1_FINAL2.indd 661439078475_CH1_FINAL2.indd 66 6/30/10 2:19:47 PM6/30/10 2:19:47 PM
Property of Cengage Learning
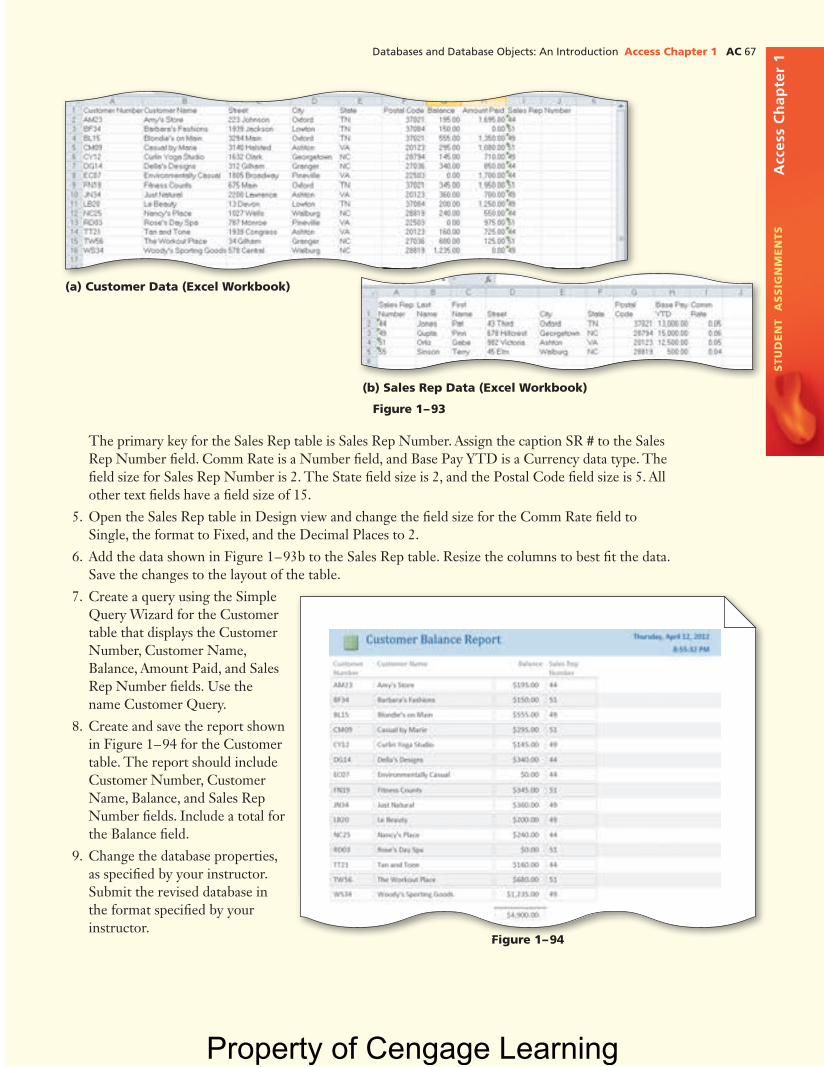
Databases and Database Objects: An Introduction Access Chapter 1 AC 67
Acc
ess
Ch
apte
r 1
STU
DE
NT
AS
SIG
NM
EN
TS
(a) Customer Data (Excel Workbook)
(b) Sales Rep Data (Excel Workbook)
Figure 1–93
The primary key for the Sales Rep table is Sales Rep Number. Assign the caption SR # to the Sales Rep Number fi eld. Comm Rate is a Number fi eld, and Base Pay YTD is a Currency data type. The fi eld size for Sales Rep Number is 2. The State fi eld size is 2, and the Postal Code fi eld size is 5. All other text fi elds have a fi eld size of 15.
5. Open the Sales Rep table in Design view and change the fi eld size for the Comm Rate fi eld to Single, the format to Fixed, and the Decimal Places to 2.
6. Add the data shown in Figure 1–93b to the Sales Rep table. Resize the columns to best fi t the data. Save the changes to the layout of the table.
7. Create a query using the Simple Query Wizard for the Customer table that displays the Customer Number, Customer Name, Balance, Amount Paid, and Sales Rep Number fi elds. Use the name Customer Query.
8. Create and save the report shown in Figure 1–94 for the Customer table. The report should include Customer Number, Customer Name, Balance, and Sales Rep Number fi elds. Include a total for the Balance fi eld.
9. Change the database properties, as specifi ed by your instructor. Submit the revised database in the format specifi ed by your instructor.
Figure 1–94Figure 1 94
1439078475_CH1_FINAL2.indd 671439078475_CH1_FINAL2.indd 67 6/30/10 2:19:48 PM6/30/10 2:19:48 PM
Property of Cengage Learning

AC 68 Access Chapter 1 Databases and Database Objects: An IntroductionS
TU
DE
NT
AS
SIG
NM
EN
TS
In the Lab
Lab 2: Creating the Walburg Energy Alternatives DatabaseProblem: Walburg Energy Alternatives is a nonprofi t organization that promotes the use of energy alternatives such as solar power and wind power. The organization provides a variety of services and funds itself through donations. Recently, the organization decided to sell a small number of items in its education center to help fund programs. The store purchases the items from vendors that deal in energy-saving products. Currently, the information about the items and vendors is stored in the Excel workbook shown in Figure 1–95. Each item is assigned to a single vendor, but each vendor may be assigned many items. You volunteer part-time at the store, and the store manager has asked you to create a database that will store the item and vendor information. You have already determined that you need two tables in which to store the information: an Item table and a Vendor table.
Instructions: Perform the following tasks: 1. Design a new database in which to store all the objects related to the items for sale. Call the database
Walburg Energy Alternatives.
2. Use the information shown in the Excel workbook in Figure 1–95 to determine the primary keys and determine additional fi elds. Then, determine the relationships between tables, the data types, and the fi eld sizes.
3. Create the Item table using the information shown in Figure 1–95.
4. Create the Vendor table using the information shown in Figure 1–95. Be sure that the fi eld size for the Vendor Code in the Item table is identical to the fi eld size for the Vendor Code in the Vendor table. Add the caption, Phone, for the Telephone Number fi eld.
Figure 1–95
1439078475_CH1_FINAL2.indd 681439078475_CH1_FINAL2.indd 68 6/30/10 2:19:50 PM6/30/10 2:19:50 PM
Property of Cengage Learning

Databases and Database Objects: An Introduction Access Chapter 1 AC 69
Acc
ess
Ch
apte
r 1
STU
DE
NT
AS
SIG
NM
EN
TS
5. Add the appropriate data to the Item table. Resize the columns to best fi t the data and save the changes to the layout.
6. Add the appropriate data to the Vendor table. Resize the columns to best fi t the data and save the changes to the layout.
7. Create a query for the Item table. Include the Item Number, Description, Cost, Selling Price, and Vendor Code in the query. Save the query as Item Query.
8. Open the Item Query and add a criterion to limit retrieval to those items supplied by Scryps Distributors. Save the query as Item-Scryps Query.
9. Create a simple form for the Item table. Use the name, Item, for the form.
10. Create the report shown in Figure 1–96 for the Item table. Do not add any totals.
11. Change the database properties, as specifi ed by your instructor. Submit the database in the format specifi ed by your instructor.
Figure 1–96Figure 1 96
1439078475_CH1_FINAL2.indd 691439078475_CH1_FINAL2.indd 69 6/30/10 2:19:52 PM6/30/10 2:19:52 PM
Property of Cengage Learning

AC 70 Access Chapter 1 Databases and Database Objects: An IntroductionS
TU
DE
NT
AS
SIG
NM
EN
TS
When you have completed the database design, create the database, create the tables, and add the data to the appropriate tables. Be sure to determine the correct data types and fi eld sizes.
Finally, prepare the Client Query shown in Figure 1–98 and the Client Status Report shown in Figure 1–99. The report does not include totals. Change the database properties, as specifi ed by your instructor. Submit the database in the format specifi ed by your instructor.
In the Lab
Lab 3: Creating the Philamar Training DatabaseProblem: Philamar Training provides business processes and information technology training to various companies and organizations. Philamar employs trainers who work with individual companies to determine training needs and then conduct the training. Currently, Philamar keeps data on clients and trainers in two Word documents and two Excel workbooks. Philamar also keeps track of which clients are assigned to which trainers. Each client is assigned to a single trainer, but each trainer might be assigned many clients. Currently, clients BS27, FI28, and MC28 are assigned to trainer 42, Belinda Perry. Clients CE16, CP27, FL93, HN83, and TE26 are assigned to trainer 48, Michael Stevens. Clients EU28 and PS82 are assigned to trainer 53, Manuel Gonzalez. Philamar has an additional trainer, Marty Danville, who has been assigned trainer number 67, but who has not yet been assigned any clients.
Instructions: Using the data shown in Figure 1 – 97 and the information in the previous paragraph, design the Philamar Training database. The data shown in Figure 1 – 97 is included in the Data Files for Students in the following fi les: Lab 1-3a.docx, Lab 1-3b.docx, Lab 1-3c.xlsx, and Lab 1-3d.xlsx. Use the database design guidelines in this chapter to help you in the design process.
(a) Client Address Information (Word Table) (c) Client Financial Information (Excel Workbook)
(b) Trainer Address Information (Word Table) (d) Trainer Financial Information (Excel Workbook)
Figure 1–97
1439078475_CH1_FINAL2.indd 701439078475_CH1_FINAL2.indd 70 6/30/10 2:19:54 PM6/30/10 2:19:54 PM
Property of Cengage Learning

Databases and Database Objects: An Introduction Access Chapter 1 AC 71
Acc
ess
Ch
apte
r 1
STU
DE
NT
AS
SIG
NM
EN
TS
Figure 1–98
Figure 1–99
1439078475_CH1_FINAL2.indd 711439078475_CH1_FINAL2.indd 71 6/30/10 2:19:56 PM6/30/10 2:19:56 PM
Property of Cengage Learning

AC 72 Access Chapter 1 Databases and Database Objects: An IntroductionS
TU
DE
NT
AS
SIG
NM
EN
TS
Cases and Places
Apply your creative thinking and problem solving skills to design and implement a solution.
See the inside back cover of this book for instructions for downloading the Data Files for Students, or see your instructor for information on accessing the fi les required in this book.
1: Design and Create an Advertising Database
AcademicYou are a Marketing major currently doing an internship with the Chamber of Commerce in a local city. The Chamber publishes a Newcomer’s Guide that contains advertisements from local businesses. Ad reps contact the businesses to arrange for advertising. Each advertiser is assigned to a single ad rep, but each ad rep may be assigned many advertisers. The Chamber would like your help in creating a database of advertisers and advertising representatives.
Based on the information in the Case 1-1 Chamber of Commerce workbook, use the concepts and techniques presented in this chapter to design and create a database to store the data that the Chamber needs. Submit your assignment in the format specifi ed by your instructor.
2: Design and Create a Consignment Database
PersonalYou are involved in a volunteer organization that provides clothing and school supplies to needy children. Recently, the Board of Directors decided to open a consignment shop as a way to raise addi-tional funds. In a consignment shop, individuals bring in unwanted items, and the shop sells the items. Proceeds are split between the seller and the shop. The database must keep track of the items for sale in the shop as well as maintain data on the sellers. Each item is assigned to a single seller, but each seller may be assigned many items. The Board has asked you to create a database to store information about the consignment items.
Use the concepts and techniques presented in this chapter to design and create a database to store the consignment data. Then create the necessary tables and enter the data from the Case 1-2 Consignment workbook. Create an Available Items Report that lists the item number, description, price, and seller code. Submit your assignment in the format specifi ed by your instructor.
3: Design and Create a Senior Care Database
ProfessionalYou are co-owner of a company, Senior Care, that provides nonmedical services to older adults who need assistance with daily living. Helpers will drive individuals to appointments, do the grocery shop-ping, fi ll prescriptions, help with personal care, and provide companionship. Each client is assigned to a single helper, but each helper may be assigned many clients. The other owners have asked you to create a database of clients and helpers. Use the concepts and techniques presented in this chapter to design and create a database to meet Senior Care needs. Then create the necessary tables and enter the data from the Case 1-3 Senior Care workbook. Create a Client Report that lists each client’s client number, client last name, client fi rst name, balance, and helper number. Submit your assignment in the format specifi ed by your instructor.
1439078475_CH1_FINAL2.indd 721439078475_CH1_FINAL2.indd 72 6/30/10 2:19:59 PM6/30/10 2:19:59 PM
Property of Cengage Learning