microsoft access 2010 beginning
TRANSCRIPT

SAMPLE
Microsoft
Access 2010
Beginning
Written By: Jeff Hutchinson
SAMPLE
Access 2010 Beginning Rev: 1.0 Date: 5/6/2011 Page i
Introduction
Course Description Learn the basics of database design by creating and modifying tables, managing databases,
understanding database relationships, creating and running queries, designing forms and
generating reports. The class engages students in business-oriented case studies addressing
database design, creation, querying and reporting. For a prerequisite, it is helpful to have a
working knowledge of Excel and computers, Excel Beginning is recommended prior to taking
this class.
Course Outline SESSION 1
Chapter 1 - Exploring Access Chapter 2 - Creating Tables
Introduce Field Properties
SESSION 2
Chapter 3 – Modifying Field Properties Chapter 4 - Working With Tables Chapter 5 - Editing Tables SESSION 3
Chapter 6 - Finding And Filtering Data Chapter 7 - Creating Relationships Chapter 8 - Queries, Forms And Reports OPTIONAL
Appendix A - Database Terminology Appendix B - Identify The Key Fields Appendix C - Glossary Appendix D – Answers
Learning Process
All modules in this course will follow these basic steps for learning:
Theoretical discussion of the topic.
Example of a topic in a presentation.
Step-by-step completion of the topic as a class.
Practice to review skills located at the end of the chapter.
Homework is recommended to better understand the concepts.
Highlights in Document Commands, keyboard combinations and specific menu choices are highlighted in bold. These are
the most important text statements in the Step-by-Step and Practice Exercises. For example, the
word “Insert” bolded text (Example: Insert ribbon tab) is the most important statement in the
text string and “Shift F1” is a keyboard command that is highlighted for emphasis.
SAMPLE
Introduction
Page ii Access 2010 Beginning Rev: 1.0 Date: 5/6/2011
About the Author Jeff Hutchinson is a computer instructor teaching a variety of classes around the country. He has
a BS degree from BYU in Computer Aided Engineering and has worked in the Information
Technology field supporting and maintaining computers for many years. He also owned a
computer training and consulting firm in San Francisco, California. After selling his business in
2001, he has continued to work as an independent computer instructor in California and Utah.
Jeff Hutchinson lives in Utah and provides training for the Utah Valley University Community
Education system, offering valuable computer skills for the general knowledge of students, career
development, and career advancement. Understanding the technology and the needs of the
students has been the basis for developing this material. Jeff Hutchinson can be contacted at
[email protected] or (801) 376-6687.
Released Version This documentation is based on Microsoft Access 2010. Access 2010 Beginning UVU The latest
revision of this introductory book is Access 2010 Beginning Rev: 1.0 Date: 5/6/2011
Copyright This material is the sole property of Jeff Hutchinson through his company, Excel Networks. Any
copying, duplication or reproduction of this document must be approved by Jeff Hutchinson in
writing. However, students can use the material in and out of class for personal development and
learning.
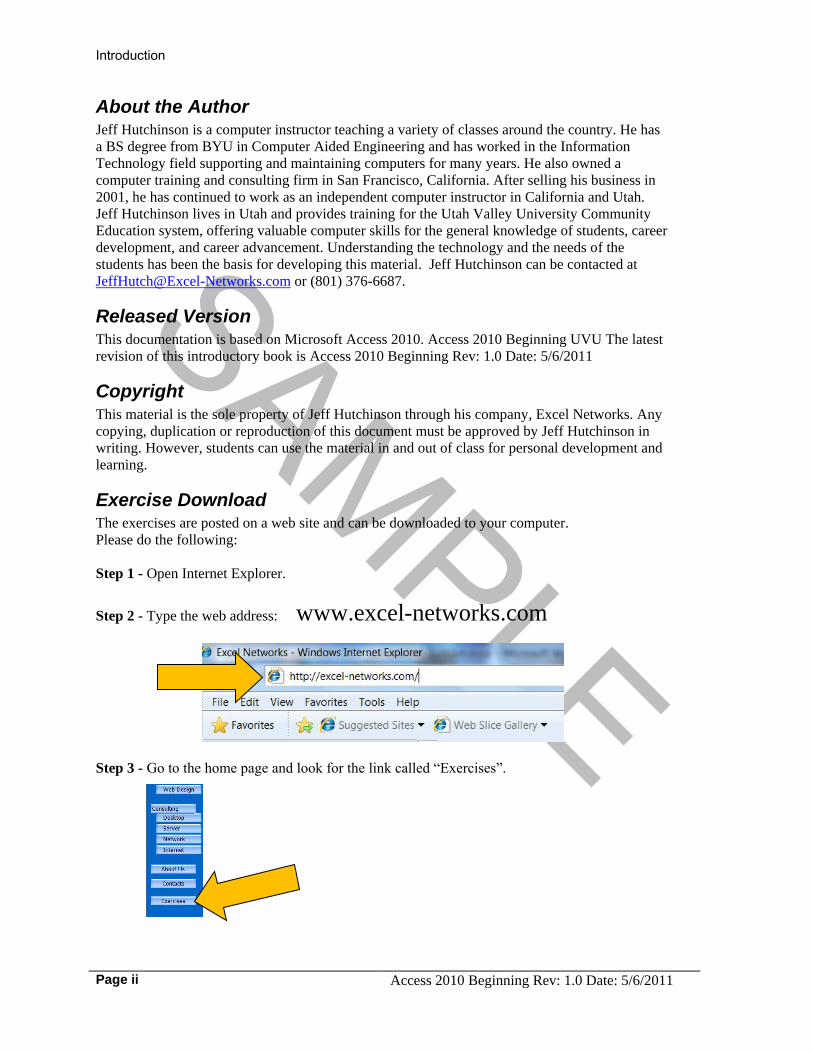
Exercise Download The exercises are posted on a web site and can be downloaded to your computer.
Please do the following:
Step 1 - Open Internet Explorer.
Step 2 - Type the web address: www.excel-networks.com
Step 3 - Go to the home page and look for the link called “Exercises”.

SAMPLE
Access 2010 - Beginning
Access 2010 Beginning Rev: 1.0 Date: 5/6/2011
Page iii
Step 4 - Click in the “Access 2010 Level 1 UVU” download file.
Step 5 - Click the Run button.
Step 6 - Choose the Run button again.
Step 7 - Choose the OK button.
Step 8 - Click the Unzip button.
Step 9 - Choose the OK button.
Step 10 - Choose the Close button.

SAMPLE
Introduction
Page iv Access 2010 Beginning Rev: 1.0 Date: 5/6/2011
Step 11 - The files are now located in the C:\Data folders on your computer.
If there are any questions or problems, you can contact Jeff Hutchinson at

SAMPLE
Access 2010 - Beginning
Access 2010 Beginning Rev: 1.0 Date: 5/6/2011
Page v
Table of Contents
Access 2010 Beginning
INTRODUCTION ...................................................................................................... I
Course Description ................................................................................................... i
Course Outline .......................................................................................................... i
Learning Process ...................................................................................................... i
Highlights in Document ........................................................................................... i
About the Author ..................................................................................................... ii
Released Version ..................................................................................................... ii
Copyright ................................................................................................................. ii
Exercise Download ................................................. Error! Bookmark not defined.
CHAPTER 1 - EXPLORING ACCESS .................................................................... 1
1.1 Using the Interface ............................................................................................. 1
1.2 Opening an Existing Database ............................................................................ 2
1.3 Using the Ribbon & Contextual Tabs ................................................................. 3
1.4 Using Database Objects ...................................................................................... 4
1.5 Using the Navigation Pane ................................................................................. 4
1.6 Opening a Database Object ................................................................................ 5
1.7 Using Tabbed Documents .................................................................................. 6
1.8 Using the Status Bar ........................................................................................... 6
1.9 Using the Options Dialog Box ........................................................................... 7
1.10 Closing and Exiting a Database ........................................................................ 8
Practice 1 - Exploring Access ................................................................................... 9
CHAPTER 2 - CREATING TABLES .................................................................... 11
2.1 Using Database Templates ............................................................................... 11
2.2 Creating a New Database ................................................................................. 12
2.3 Designing Tables .............................................................................................. 12
2.4 Creating a Table in Datasheet View ................................................................. 13
2.5 Creating a Table in Design View ..................................................................... 13
2.6 Adding Field Names ......................................................................................... 14
2.7 Assigning Data Types ....................................................................................... 15
2.8 Adding a Field Description .............................................................................. 17

SAMPLE
Access 2010 - Beginning
Access 2010 Beginning Rev: 1.0 Date: 5/6/2011
Page vii
5.2 Changing the Column Width ............................................................................ 41
5.3 Changing a Font Attribute ................................................................................ 41
5.4 Changing a Cell Effect ..................................................................................... 42
5.5 Using Alternate Background Colors ................................................................. 42
5.6 Selecting a Column ........................................................................................... 43
5.7 Moving a Column ............................................................................................. 43
5.8 Hiding a Column .............................................................................................. 43
5.9 Unhiding a Column .......................................................................................... 43
5.10 Freezing a Column ......................................................................................... 44
Practice 1 - Editing Tables ..................................................................................... 45
CHAPTER 6 - FINDING AND FILTERING DATA ............................................ 47
6.1 Sorting Records ................................................................................................ 47
6.2 Finding Specific Records ................................................................................. 47
6.3 Finding Records using Wildcards..................................................................... 48
6.4 Using Replace ................................................................................................... 49
6.5 Using Filter By Selection ................................................................................. 50
6.6 Applying/Removing a Filter ............................................................................. 51
6.7 Using Filter Excluding Selection ...................................................................... 51
6.8 Using the Search Box ....................................................................................... 51
6.9 Using Quick Filter ............................................................................................ 52
6.10 Using AutoFilter ............................................................................................. 53
Practice 1 - Finding and Filtering Data .................................................................. 54
CHAPTER 7 - CREATING RELATIONSHIPS ................................................... 55
7.1 One-to-One ....................................................................................................... 55
7.2 One-to-Many .................................................................................................... 56
7.3 Many-to-Many .................................................................................................. 57
7.4 Using Related Tables ........................................................................................ 59
7.5 Creating a Relationship between Tables .......................................................... 60
7.6 Orphan records ................................................................................................. 61
7.7 Setting Referential Integrity ............................................................................. 61
7.8 Inner and Outer Join Queries ............................................................................ 62
7.9 Viewing Subdatasheets ..................................................................................... 62
7.10 Deleting a Join Line ........................................................................................ 63
7.11 Printing the ER diagram with Microsoft Access ............................................ 64

SAMPLE
Introduction
Page vi Access 2010 Beginning Rev: 1.0 Date: 5/6/2011
Practice 1 – Create Student Training Database ...................................................... 17
Practice 2 – Create Recipe Database ...................................................................... 17
Practice 3 – Create a Phone List Database ............................................................. 18
CHAPTER 3 – MODIFYING FIELD PROPERTIES .......................................... 19
3.1 Using Field Properties ...................................................................................... 19
3.2 Limiting Field Size ........................................................................................... 20
3.3 Setting Number Formats ................................................................................... 21
3.4 Setting Date/Time Formats ............................................................................... 22
3.5 Setting Yes/No Formats ................................................................................... 23
3.6 Setting Default Values ...................................................................................... 24
3.7 Setting Validation Rules ................................................................................... 25
3.8 Creating an Input Mask - Wizard ..................................................................... 26
3.9 Creating an Input Mask Manually .................................................................... 27
3.10 Creating a Custom Input Mask ....................................................................... 28
3.11 Typing a Lookup List ..................................................................................... 29
3.12 Modifying Lookup Properties ........................................................................ 30
3.13 Setting a Primary Key .................................................................................... 31
3.14 Using Multi-valued Fields .............................................................................. 32
3.15 Saving a New Table ........................................................................................ 33
Practice 1 - Setting Field Properties ....................................................................... 33
CHAPTER 4 - WORKING WITH TABLES ......................................................... 35
4.1 Using Datasheet View ...................................................................................... 35
4.2 Navigating Fields in Tables .............................................................................. 35
4.3 Using Field Templates ...................................................................................... 35
4.4 Adding Records ................................................................................................ 36
4.5 Moving through Records .................................................................................. 36
4.6 Selecting Records ............................................................................................. 37
4.7 Editing Records ................................................................................................ 37
4.8 Saving Records ................................................................................................. 38
4.9 Deleting Records .............................................................................................. 38
4.10 Displaying a Totals Row in a Table ............................................................... 39
Practice 1 - Working with Tables ........................................................................... 40
CHAPTER 5 - EDITING TABLES ......................................................................... 41
5.1 Changing the Row Height ................................................................................ 41

SAMPLE
Introduction
Page viii Access 2010 Beginning Rev: 1.0 Date: 5/6/2011
Practice 1 - Creating Relationships ........................................................................ 65
CHAPTER 8 - QUERIES, FORMS AND REPORTS ........................................... 67
8.1 Using Queries and Recordsets .......................................................................... 67
8.2 Using the Simple Query Wizard ....................................................................... 67
8.3 Creating a Query in Design View ..................................................................... 68
8.4 Using Forms ..................................................................................................... 69
8.5 Using the Form Button ..................................................................................... 69
8.6 Adding a Record using a Form ......................................................................... 69
8.7 Using Reports ................................................................................................... 70
8.8 Using the Report Button ................................................................................... 70
8.9 Using Print Preview - Reports .......................................................................... 71
Practice 1 - Using Simple Queries .......................................................................... 72
Practice 2 - Creating Basic Forms .......................................................................... 73
Practice 3 - Creating Basic Reports ........................................................................ 73
Practice 4 - Setting Field Properties ....................................................................... 75
APPENDIX A - DATABASE TERMINOLOGY ................................................... 77
A.1 Fundamentals of database terminology ........................................................... 77
A.2 Create an Entity Relationship Diagram ........................................................... 82
A.3 Naming Conventions ....................................................................................... 84
A.4 Use Prefixes ..................................................................................................... 85
A.5 No Spaces Allowed ......................................................................................... 85
A.6 Are Naming Conventions Case Sensitive? ...................................................... 85
A.7 Other Considerations ....................................................................................... 86
Practice 1 - Database Terms .................................................................................. 87
Practice 2 – Naming Prefixes ................................................................................. 88
Practice 3 – Naming Conventions .......................................................................... 88
Practice 4 – The Problem with Spaces ................................................................... 88
APPENDIX B - IDENTIFY THE KEY FIELDS ................................................... 93
B.1 Key Types ........................................................................................................ 93
B.2 Frequently Asked Questions about Key .......................................................... 93
B.3 Identifying the Keys on your Worksheet ......................................................... 94
B.4 Make Adjustments to the Worksheet ............................................................... 95
B.5 Identifying Key Fields and Making Adjustments ............................................ 95

SAMPLE
Access 2010 - Beginning
Access 2010 Beginning Rev: 1.0 Date: 5/6/2011
Page ix
APPENDIX C - GLOSSARY ................................................................................. 101
APPENDIX D – ANSWERS .................................................................................. 105
INDEX ...................................................................................................................... 108

SAMPLE

SAMPLE
Page 1
Chapter 1 - Exploring Access A database is any collection of information organized into a group. The information
should be organized in a way that allows for easy retrieval. For example, a telephone
book is a non-computerized database of information. It is organized in alphabetical
order and includes information such as names, addresses, and telephone numbers.
Other examples of non-computerized databases include address books and inventory
lists.
Electronic databases can be maintained on a computer. Computerized databases allow
you to manipulate large amounts of data quickly and easily. They simplify tasks such
as searching for specific data, organizing and sorting data, and making corrections or
changes to data.
In Microsoft Access 2010, the database information is stored in data tables. Every data
table has a structure that provides for the collection, organization, storage, and
retrieval of data. These tables of information are contained in a database file. Each
database file can have numerous data tables.
A data table consists of fields and records. Fields are categories of information. For
example, in an address table, you may maintain names, addresses, cities, states, and
zip codes. Each of these categories is a field in the address database.
The set of fields containing the data for a single entry is called a record. For example,
Charles Hardy, 1234 Main St., Bridgeville, NY, 11012 is a record in the address data
table. Each piece of information in the record is stored in a field and is referred to as a
field value. NY is the field value for the State field in this particular record. An
address table would most likely consist of a number of records, and the data values for
each record would be stored in the appropriate fields.
Access is a relational database application. A relational database contains a large
amount of data that is split into numerous tables; each table should include only the
information pertinent to one subject, such as Customer, Orders, or Items. As a
result, each table is smaller; more manageable; and, in turn, more efficient. These
tables can then be joined together to make them related. When tables are related, you
can access information from any field in any related table, eliminating the need to add
the same information to more than one table. In addition, you can create reports,
forms, and queries from data stored in any related table.
You can get help on an Access task or feature by using the Microsoft Office Help
button, where you can search both online and offline sources to provide assistance and
training, and answer your questions about Office products.
1.1 Using the Interface When you open Access the name of the application appears in the title bar at the top
of the window.
Access opens with the Getting Started task pane. From here you can open an existing
database, or create a new database. In addition you can search for help using the
Microsoft Access Help button.

SAMPLE
Chapter 1 – Exploring Access
Page 2
Many of the objects in the Access window display brief descriptions called
ScreenTips that pop up whenever you point to them.
The Access Interface
1.2 Opening an Existing Database An Access database is a collection of information organized into a number of objects
including tables, queries, forms, reports, pages, macros and modules.
When you want to work with an Access database, you must first load the database file
into memory. This process enables you to open all the tables or other objects within
that database.
You can view or edit an existing database by opening it from disk. You do not need to
remember the file name because the Open dialog box displays a list of folders and
files in the current drive and folder. You can select the desired database file from the
list, or you can type the name of the database you want to open.
If the database resides in a different drive or folder, you can use the Folders or
Favorite Links list to select the correct location. The folders and files residing in the
selected location appear in the box to the right of the Folders list. If necessary, you
can resize the Open dialog box.
While the Open button opens the selected database, the Open list provides additional
options. For instance, if you want to protect the original version of a database from
modifications, you can open a copy of a database or open the database as read-only.
The Files of type list in the Open dialog box enables you to open files created in other
programs. For instance, you can open a file created in Excel in Access.
SAMPLE
Access 2010 - Beginning
Page 3
The Views button at the top of the Open dialog box allows you to change views. You
can choose to have files displayed as icons or a list.
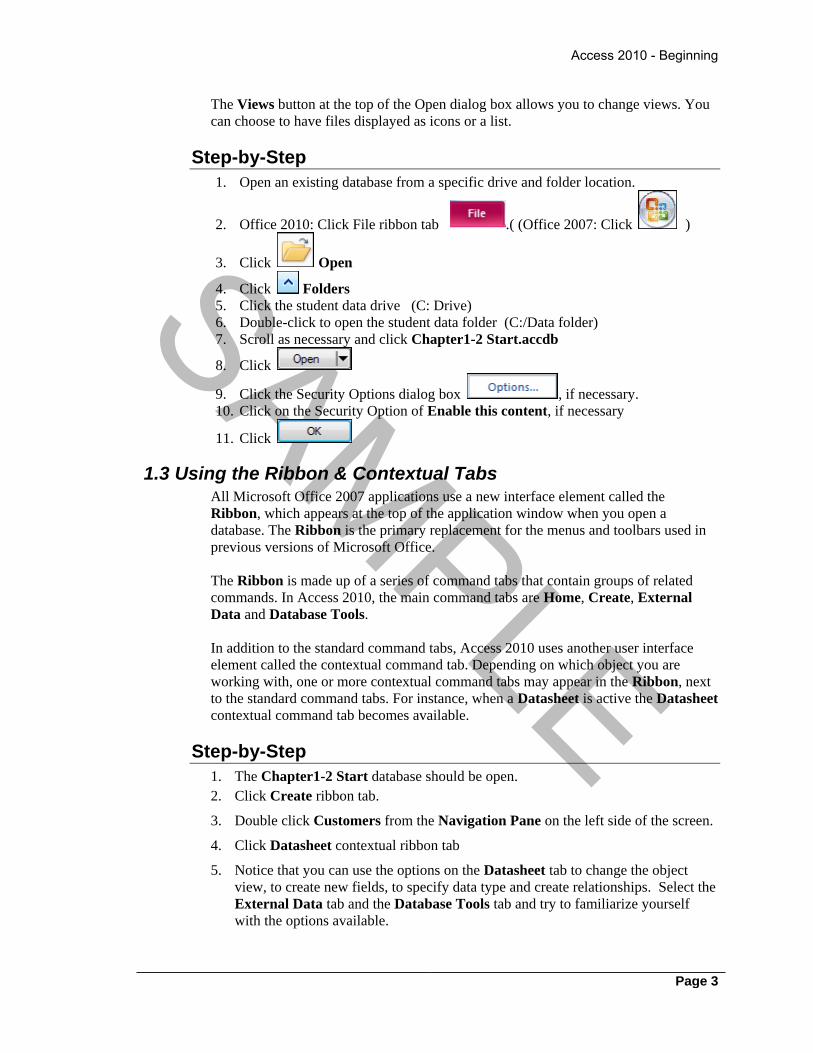
Step-by-Step
1. Open an existing database from a specific drive and folder location.
2. Office 2010: Click File ribbon tab .( (Office 2007: Click )
3. Click Open
4. Click Folders
5. Click the student data drive (C: Drive)
6. Double-click to open the student data folder (C:/Data folder)
7. Scroll as necessary and click Chapter1-2 Start.accdb
8. Click
9. Click the Security Options dialog box , if necessary.
10. Click on the Security Option of Enable this content, if necessary
11. Click
1.3 Using the Ribbon & Contextual Tabs All Microsoft Office 2007 applications use a new interface element called the
Ribbon, which appears at the top of the application window when you open a
database. The Ribbon is the primary replacement for the menus and toolbars used in
previous versions of Microsoft Office.
The Ribbon is made up of a series of command tabs that contain groups of related
commands. In Access 2010, the main command tabs are Home, Create, External
Data and Database Tools.
In addition to the standard command tabs, Access 2010 uses another user interface
element called the contextual command tab. Depending on which object you are
working with, one or more contextual command tabs may appear in the Ribbon, next
to the standard command tabs. For instance, when a Datasheet is active the Datasheet
contextual command tab becomes available.
Step-by-Step
1. The Chapter1-2 Start database should be open.
2. Click Create ribbon tab.
3. Double click Customers from the Navigation Pane on the left side of the screen.
4. Click Datasheet contextual ribbon tab
5. Notice that you can use the options on the Datasheet tab to change the object
view, to create new fields, to specify data type and create relationships. Select the
External Data tab and the Database Tools tab and try to familiarize yourself
with the options available.

SAMPLE
Chapter 1 – Exploring Access
Page 4
1.4 Using Database Objects An Access database file can contain objects such as tables, queries, forms, reports,
macros, and modules. Database objects are created to input, edit, retrieve, display, and
print data. You can include up to six different object types in an Access database. A
description of each of these object types is listed in the following table:
Object Type Object Purpose
Table This object type defines the structure of an Access
database. Tables display multiple records in rows and
columns. Information in these records can be entered,
edited, stored, and retrieved.
Query A way of requesting selected information from a
table. When you run a query, a selected set of records,
called the recordset, appears. You can then edit or
print the recordset.
Form A screen display you can create to show selected
fields in a record. Forms allow you to enter, view, and
edit data. You can use a form as an alternative to
displaying data in rows and columns.
Report A design for printed data. Reports can include lists
and mailing labels, as well as database reports.
Reports can also perform mathematical operations
and calculate summaries.
Macro A stored set of Access commands that can be repeated
as a unit to automate database functions.
Module This object type stores Visual Basic for Applications
Edition programming code that can be used to further
customize and enhance database functions.
When you open a database, all objects in the database are grouped under one of the
object types listed in the preceding table. The object types Table, Query, Form, and
Report, along with their corresponding objects, appear in the Navigation Pane.
1.5 Using the Navigation Pane When you open a database or create a new one, the names of your objects appear in
the Navigation Pane on the left side of the application window. It replaces the
database window from earlier versions of Access and can also be used instead of
switchboards, the screens previously used to navigate around a database.
The Navigation Pane displays tables, queries, forms and reports in filtered lists. You
can change the objects included in the list by clicking the list header and selecting the
category or group of objects you want to display. A number of predefined categories
are available, and it is possible to filter the groups within categories in various ways.
Selecting the Queries object type displays all query objects in the database and
selecting the Forms object type displays all the form objects.

SAMPLE
Access 2010 - Beginning
Page 5
The Navigation Pane
Step-by-Step
Use the Navigation Pane to select an object type.
1. Click the arrow in the Navigation pane header
2. Click Tables object type
3. Click the Forms object type and the Reports object type to display their object
lists. Then, click the All Access Objects in the program to redisplay all Access
objects.
1.6 Opening a Database Object You can open a database object to view the data stored in it. The view in which the
data appears depends on the type of object you open. Tables and queries appear in
Datasheet view. Forms appear in Form view. Reports display the data in Print
preview. Macros and modules run programs attached to the object.
Step-by-Step
Open a database object.
If necessary, display the Tables object list in the Navigation Pane.
1. Double click Customers, if necessary
2. Click the Close button on the Customers Table window title bar to close the
Customers table.
3. Display the Forms object list. Select the Orders Entry Form object, if
necessary, and then double-click it to display the form in Form view. Close the
Orders Entry Form window.
4. Display the Reports object list to display the Orders Report object in Print
preview. Close the Orders Report window without saving changes, if prompted.

SAMPLE
Chapter 1 – Exploring Access
Page 6
1.7 Using Tabbed Documents In Access 2010 you can display database objects in tabbed documents instead of
overlapping windows. Using tabbed documents helps to keep open objects visible and
accessible. New databases in Access 2010 display tabbed documents by default;
databases created in earlier versions use overlapping windows by default. You can
enable or disable tabbed documents using Access Options.
When you open an object, it appears in a single pane as a tabbed document. Opening
further objects will create additional tabbed documents in the application window. To
move among the objects you simply click the tabs at the top of the documents.
Tabbed documents
Step-by-Step
1. If necessary, select All Access Objects in the Navigation Pane.
2. Double-click Customers
3. Double-click Items
4. Double-click Data Entry Form
5. Double-click Orders Report
6. Select the Close button on the active object tab.
7. The object tab closes.
8. Notice that the active object tab is orange in color and the tab title is displayed in
bold type.
1.8 Using the Status Bar As with previous versions of Access, you can display a status bar at the bottom of the
application window which displays status messages and progress indicators.
In Access 2010, the status bar has two other standard functions: you can change the
view of the active window using the controls on the right of the status bar, and if you
are viewing an object that supports variable zoom, a report for instance, you can zoom
in and out using the slider on the right of the status bar.

SAMPLE
Access 2010 - Beginning
Page 7
Step-by-Step
1. If necessary, open the Customers table.
2. If the buttons are not available Right-Click on the status bar to turn the buttons on.
3. Click the Design View button on the status bar.
4. Click the Datasheet View button on the status bar.
5. You can use the buttons on the status bar to view the Pivot Table View and Pivot
Chart View.
1.9 Using the Options Dialog Box There may be times when you want to make changes to the way items appear in the
application window or Datasheet. For example, you may want to change the display
of recently-used documents on the Getting Started task pane from four documents to
more or less than that.
The Access Options dialog box allows you to make interface changes as well as many
other types of changes in the way Access works. You can alter the way error and
spelling checks are performed, how tables and queries appear, and how the keyboard
performs to name a few. The Access Options dialog box plays an integral part in
allowing you to customize Access based on your personal needs.
The Access Options dialog box
Step-by-Step
1. Use the Access Options dialog box.
2. Office 2010: Click the File ribbon tab .(Office 2007: click the Office
button

SAMPLE
Chapter 1 – Exploring Access
Page 8
3. Office 2010: Click Options .(Office 2007: Click Access options
)
4. Click the Current Database option, if necessary
5. Click Display Status Bar to deselect it
6. Select the Datasheet option, select the Font color list under Default colors and
select a dark blue color from the palette . Then, select the Background color list
and select a light blue color from the palette. You may be prompted to close and
re-open the database in order for the changes to take effect.
7. Click
8. Notice that the status bar no longer appears.
9. Open the Customers table and notice the changes to the display.
10. Close the Customers table.
11. Open the Access Options dialog box and select the Display Status Bar option on
the Current Database page. Then, display the Datasheet page and change the
default font color in the Font color option to Black and the background color in
the Background color list to White. Select OK to close the Options dialog box.
1.10 Closing and Exiting a Database It is important to remember that you cannot have more than one database open at a
time. When you have finished working on a database, you can close it using the
Office button.
If a database object has been modified but not saved, an Access dialog box will
prompt you to save the changes before closing.
Step-by-Step
1. Close a database.
2. Office 2010: Click the File ribbon tab .(Access 2007: Click the Office
button )
3. Click to close the database
4. Office 2010: Click the File ribbon tab .(Access 2007: Click the Office
button )
5. Select the Exit Access button .

SAMPLE
Access 2010 - Beginning
Page 9
Practice 1 - Exploring Access 1. Start Access, if necessary.
2. Open Chapter1 Practice1.accdb.
3. Add the Print Preview button to the Quick Access Toolbar.
4. Open the Navigation Pane, if necessary.
5. Select the Queries, Forms, and Reports object types to view the objects in each;
then, select Access All Objects.
6. Open all the tables.
7. Use Access Options to change the Background color.
8. Resize the Navigation Pane so that it is half its original width.
9. Hide the Navigation Pane.
10. Open the Trainer report.
11. Use the slider on the Status Bar to zoom in.
12. Close the Trainer report.
13. Use Close All to close the remaining open objects.
14. Reset your usage data, return the background color to white, and remove the Print
Preview button from the Quick Access Toolbar.
15. Close the database.

SAMPLE
SAMPLE
Page 11
Chapter 2 - Creating Tables
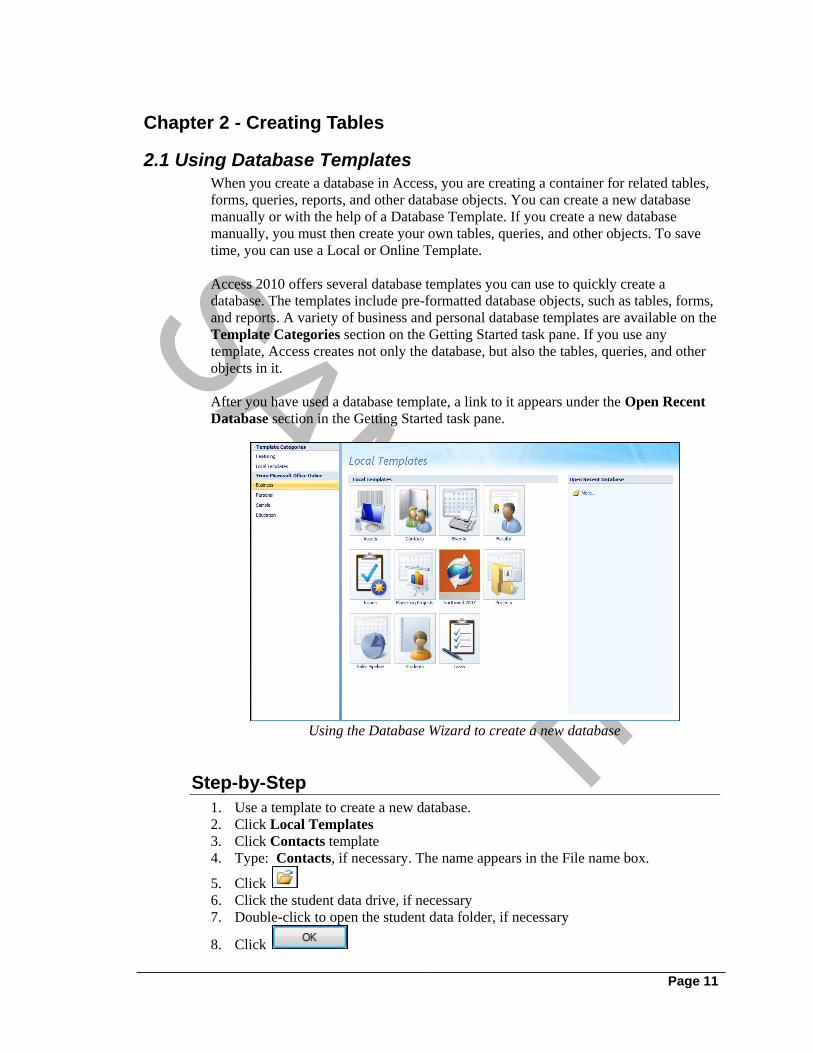
2.1 Using Database Templates When you create a database in Access, you are creating a container for related tables,
forms, queries, reports, and other database objects. You can create a new database
manually or with the help of a Database Template. If you create a new database
manually, you must then create your own tables, queries, and other objects. To save
time, you can use a Local or Online Template.
Access 2010 offers several database templates you can use to quickly create a
database. The templates include pre-formatted database objects, such as tables, forms,
and reports. A variety of business and personal database templates are available on the
Template Categories section on the Getting Started task pane. If you use any
template, Access creates not only the database, but also the tables, queries, and other
objects in it.
After you have used a database template, a link to it appears under the Open Recent
Database section in the Getting Started task pane.
Using the Database Wizard to create a new database
Step-by-Step
1. Use a template to create a new database.
2. Click Local Templates
3. Click Contacts template
4. Type: Contacts, if necessary. The name appears in the File name box.
5. Click
6. Click the student data drive, if necessary
7. Double-click to open the student data folder, if necessary
8. Click
SAMPLE
Chapter 2 – Creating Tables
Page 12
9. Click
10. Open the Navigation Pane, if necessary
11. When you open the Navigation Pane, it is a good idea to select Show All, in order
to display all the objects in the database. You can double-click any object in the
Navigation Pane to open it. You can now enter data directly into the new
database, or modify it to meet your needs.
12. Close the Database.
2.2 Creating a New Database You can create a new database in Access without using a template; however, you must
then create the tables, queries, and other objects in the database.
When you create a new database, you must specify the desired file name, as well as
where you want to store the database file.
After you have created the database, the Database window opens. The Ribbon
command buttons allow you to open objects, modify the design of existing objects,
and create new objects. The Navigation Pane bar in the Database window allows you
to access the following object types: Tables, Queries, Forms, and Reports.
Step-by-Step
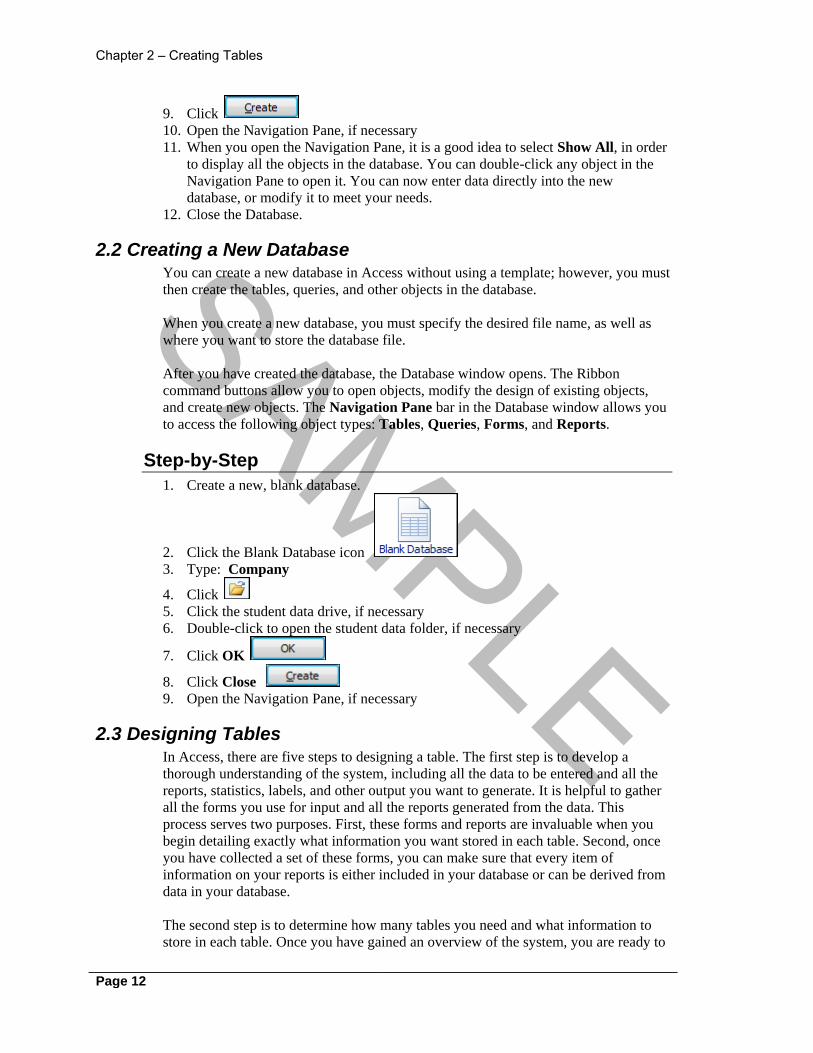
1. Create a new, blank database.
2. Click the Blank Database icon
3. Type: Company
4. Click
5. Click the student data drive, if necessary
6. Double-click to open the student data folder, if necessary
7. Click OK
8. Click Close
9. Open the Navigation Pane, if necessary
2.3 Designing Tables In Access, there are five steps to designing a table. The first step is to develop a
thorough understanding of the system, including all the data to be entered and all the
reports, statistics, labels, and other output you want to generate. It is helpful to gather
all the forms you use for input and all the reports generated from the data. This
process serves two purposes. First, these forms and reports are invaluable when you
begin detailing exactly what information you want stored in each table. Second, once
you have collected a set of these forms, you can make sure that every item of
information on your reports is either included in your database or can be derived from
data in your database.
The second step is to determine how many tables you need and what information to
store in each table. Once you have gained an overview of the system, you are ready to

SAMPLE
Access 2010 - Beginning
Page 13
begin designing your database. The most important decision you must make before
you begin creating tables is how many tables you want the database to include.
The third step is to design the tables by selecting the fields you want to include, the
type of data you want to store in each field, and the size of the fields. Once you have
developed an overview of your application and a list of tables, you can make a
preliminary list of fields, based on the categories of information that each table will
include. You can refine the list by considering the following: if the data is to be sorted
or selected, it should be in a separate field; if the data is to be calculated from other
fields, you do not need to store it in its own field; and, if the table is to be linked to
another table, both tables should contain common fields.
The fourth step is to create the table structures by defining the name, data type, and
size of the fields.
The fifth and final step is to enter sample data. This step is important because it helps
you determine whether or not the table fields are the correct size and if all the
necessary fields have been included. You can then modify the tables as necessary.
2.4 Creating a Table in Datasheet View When you create a new table, you can use either Datasheet or Design view, use table
templates, import data from another data source, or link to data in another data source.
Datasheet view displays a grid of rows and columns. Field names are entered as
column headings.
A table in Datasheet view
Step-by-Step
1. If necessary, display the Tables object list in the Navigation Pane.
2. Click the Create ribbon tab
3. Click the Table icon
4. Notice that the Datasheet Tab automatically appears on the ribbon when a
datasheet is displayed.
5. The new table appears in the Table object list in the Navigation Pane.
6. Close the table without saving.
2.5 Creating a Table in Design View You can also create a table in Design view. When you create a table in Design view,
you have more control over the database design.
SAMPLE
Chapter 2 – Creating Tables
Page 14
The Design view window is split into two panes. The upper pane displays a design
grid. You can use the rows and columns in this design grid to enter the field names,
data types, and field descriptions for each field in the table. The small box to the left
of each field name is the row selector. A black triangle in the row selector indicates
the current field.
The lower pane displays the properties of the selected field. A property is a
characteristic of a field, such as the number of characters a field can contain. Access
automatically assigns default field properties, which you can modify as desired.
Step-by-Step
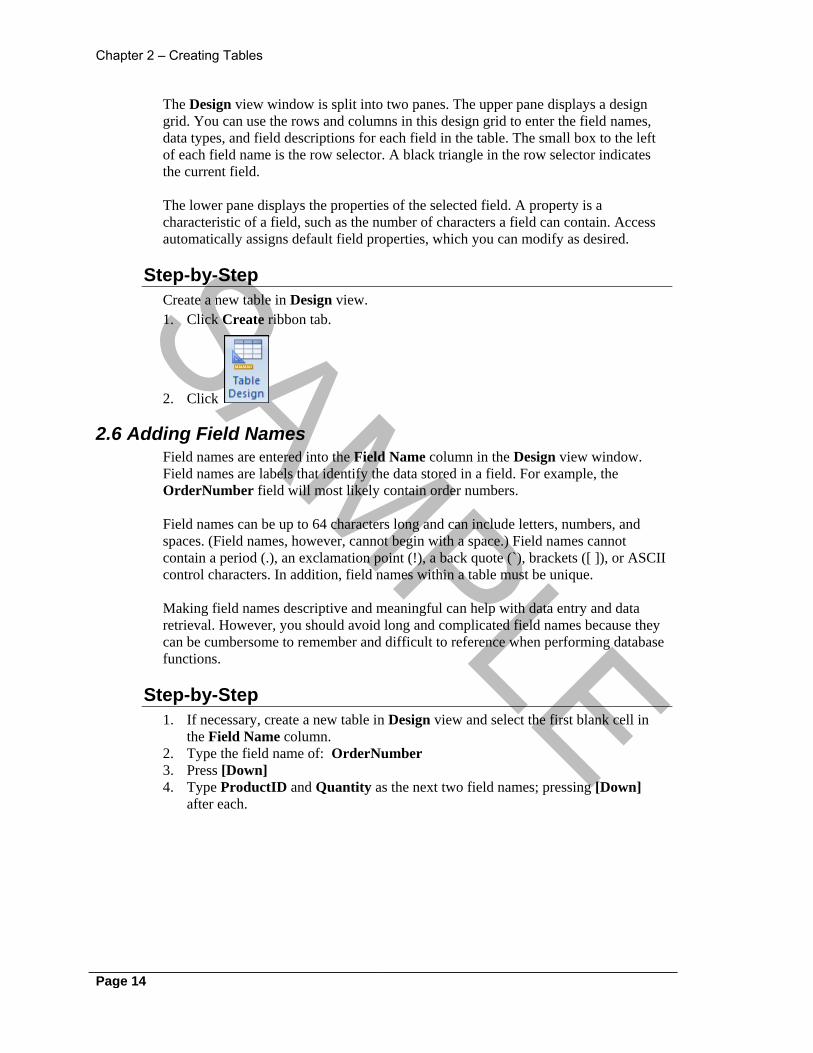
Create a new table in Design view.
1. Click Create ribbon tab.
2. Click
2.6 Adding Field Names Field names are entered into the Field Name column in the Design view window.
Field names are labels that identify the data stored in a field. For example, the
OrderNumber field will most likely contain order numbers.
Field names can be up to 64 characters long and can include letters, numbers, and
spaces. (Field names, however, cannot begin with a space.) Field names cannot
contain a period (.), an exclamation point (!), a back quote (`), brackets ([ ]), or ASCII
control characters. In addition, field names within a table must be unique.
Making field names descriptive and meaningful can help with data entry and data
retrieval. However, you should avoid long and complicated field names because they
can be cumbersome to remember and difficult to reference when performing database
functions.
Step-by-Step
1. If necessary, create a new table in Design view and select the first blank cell in
the Field Name column.
2. Type the field name of: OrderNumber
3. Press [Down]
4. Type ProductID and Quantity as the next two field names; pressing [Down]
after each.

SAMPLE
Access 2010 - Beginning
Page 15
2.7 Assigning Data Types The field data type tells Access what kind of values you plan to store in a field and
how much storage space to set aside for the field. Although you can change a data
type after a field contains data, doing so may erase some or all of the information in
the field.
The following table describes the available data types:
Data Type Description
Text Text is the default data type; a text field can contain
any combination of letters, numbers, punctuation
marks, and spaces. The default width is 50 characters
and the maximum length is 255 characters.
Memo A memo field is similar to a text field, except that a
memo field can contain up to 65,535 characters. You
can use memo fields for notes or long descriptions in a
database.
Number A number field can contain only numeric characters, a
comma (used as a thousand separator), a period (used
as a decimal point), and a hyphen (used as a negative
number sign). You should use a number field only
when you want to perform calculations using the field
values. For example, even though zip codes and
telephone numbers consist of numeric characters, you
would not use them in calculations; therefore, they
should be entered in text rather than number fields.
Date/Time The Date/Time data type is used for dates and/or times.
Access automatically validates all entries to ensure that
they are valid dates and/or times. For example, Access
will not allow you to enter 2/31/99 because February
does not have 31 days. Date/Time fields are useful in
performing calculations on dates and times.
Currency The Currency data type is similar to the Number data
type and can be used in calculations. However, the
values in a currency field can have a maximum of four
decimal places and automatically appear with dollar
signs and thousands separators (commas). You should
use currency fields whenever possible because they use
fixed point calculation, which is faster than the floating
point calculation used in number fields.
AutoNumber The AutoNumber data type allows Access to
automatically assign a unique number (consecutively
from 1) to each record in the database. You cannot
manually enter a value into an AutoNumbered field or
change a number Access has assigned to a record. You
use this data type when you want a unique
identification number for each record.

SAMPLE
Chapter 2 – Creating Tables
Page 16
Data Type Description
Yes/No A Yes/No data type is used to signify one of two
conditions, Yes or No. You use a yes/no field when
only two possibilities (i.e., True or False) exist for a
field value.
OLE object The OLE object data type allows you to either embed
an object created in another Windows application or
create a link to such an object. You use an OLE object
data type for graphics, spreadsheets, or sound files.
Hyperlink A Hyperlink data type is used to store a link to
anywhere you choose. The link could go to an Internet
page, a Word document on an intranet, or even a form
in the current database. A hyperlink field can contain a
description, an address, and a sub-address [separated by
number signs (#)], as well as up to 2,048 characters;
only the address, however, is mandatory.
Lookup
Wizard
The Lookup Wizard data type allows you to create a
lookup field. A lookup field displays a list of values
that are either stored in another table or created by you.
A lookup field allows you to choose values from a list
during data entry, thereby reducing repetitive typing
and eliminating typing errors.
Assigning a data type
Step-by-Step
1. Click in the Data Type column for the Quantity field
2. Click the down arrow
3. Click Number

SAMPLE
Access 2010 - Beginning
Page 17
2.8 Adding a Field Description You can use the Description column in the design grid to enter a description for each
field. The description appears on the status bar when the field is accessed on a form.
You can enter brief comments as to the purpose of the field or the data that should be
stored in it.
Step-by-Step
1. Continue using the Company Database.
2. Click in the Description column for the OrderNumber field
3. Type the description of: Enter the order number
4. Type the following description for the ProductID field: Enter the catalog
number of the item.
5. Close COMPANY.ACCDB.
Practice 1 – Create Student Training Database
1. Use the Students Local Template to create a database. Name the database Student1 and save
it to the student data folder.
2. Use the Navigation Pane to display objects by type, then select All Access Objects.
3. Open the Students table.
4. After you have viewed the table, close it. Then, close the Student database as well.
5. Create a blank database named Training and save it to the student data folder.
6. Create a new table in Design view.
7. Add the following fields and their corresponding data types to the table:
Field Name Data Type
ProjectID Text
ClientID Text
CourseName Text
StartDate Date/Time
EndDate Date/Time
TrainerInitials Text
Cost Number
8. Enter the following description for the ProjectID field: Enter the ProjectID assigned by
Marketing..
9. Set the ProjectID field as the primary key.
10. Save the table as Project.
11. Close the database.
Practice 2 – Create Recipe Database
1. This will be a single table database and will contain the fields necessary to organize your
recipes.
2. Possible fields are RecipeID, Description, Ingredients, serving size, etc.

SAMPLE
Chapter 2 – Creating Tables
Page 18
Practice 3 – Create a Phone List Database
1. This will be a single table database and will contain the fields necessary to organize your
phone and addresses.
2. Possible fields are ID, Name, Home Phone, Cell Phone, Address, etc.

SAMPLE
Access 2010 Beginning Rev 1 10/31/2010 Page 19
Chapter 3 – Modifying field properties
3.1 Using Field Properties Each field has a set of properties that control the way it stores, handles, and displays
data. Since forms and reports you create use the fields in your tables, setting field
properties in the early stages of building a database can save you time later on; you
will have less design work to do in later stages if you set the desired field properties
before you create any forms and reports.
You normally set field properties when you create a table in Design view. If you have
created and saved a table using default field properties, you can open the table in
Design view to change its property settings.
The properties available in the Field Properties pane depend on the data type
assigned to the selected field. Some of the property types you can set are listed in the
following table:
Property type Description
Field Size Limits a Text field to a specific number of
characters; limits a Number field to a specific
type of number
Format Controls the way values appear in Datasheet
view
Decimal Places Available for Number and Currency fields only,
determines how many decimal places will appear
in the field; this property type has no effect on
Number fields using the General format
Input Mask Creates a pattern for data entered into the field
(such as adding hyphens within a telephone
number)
Caption Creates a label other than the field name; the
caption will appear in the table and on forms and
reports
Default Value Specifies the value you want to appear in the
selected field in all new records
Validation Rule Forces data entered into the selected field to meet
a specified requirement; for example, you can
specify that the Credit Limit field not be over
$10,000
Validation Text Creates an error message to appear when the data
entered violates a validation rule
Required Specifies that the field cannot be left empty

SAMPLE
Chapter 3 – Modifying the Field Properties
Page 20
Property type Description
Allow Zero Length Determines whether or not you can enter
quotation marks (“ ”) in a Text, Memo or
Hyperlink field to indicate that there is no data
for that field
Indexed Speeds up retrieval of data in a field; all primary
key fields are automatically indexed
3.2 Limiting Field Size Setting a field size limits the number of characters or the type of characters you can
enter into a field. After typing the maximum number of characters allowed, further
keystrokes are not permitted. The Field Size property is available only for Text,
Number, and AutoNumber data types; all other data types have default sizes that are
set automatically.
For a Text field, the field size is the maximum number of characters you want to
allow in the field, up to the maximum of 255 characters allowed by Access. For a
Number field, you can select one of the following Field Size options:
Field Size Size Range Decimal Places
Byte 0 to 255 (no fractions) None; data is
rounded
Integer -32768 to 32767 (no fractions) None; data is
rounded
Long Integer -2,147,483,648 to
2,147,483,647 (no fractions)
None; data is
rounded
Single -3.4x1038 to 3.4x1038 Up to 7
Double -1.797x10308 to 1.797x10308 Up to 15
Replication ID Globally unique identifier Not available
Decimal -1028 to 1028 Up to 28
For an AutoNumber field, only the Long Integer and Replication ID options are
available.
Step-by-Step
1. From the Student Data directory, open Chapter3-2 Start.Accdb.
2. Open the Customers table in Design view.
3. Scroll as necessary and click in the Credit Limit field
4. Click the General ribbon tab, if necessary
5. Click in the Field Size box
6. Click Field Size
7. Click Double
8. Save the changes to the table.
9. Change the size of the Postal Code field to 8.
SAMPLE
Access 2010 - Beginning
Page 21
10. Save the table; a Microsoft Office Access warning box will warn you that some
data may be lost. Since there are currently no entries in that field with more than
seven characters, you can select Yes. If there had been more than eight characters
in any existing record, the extra characters would have been deleted.
11. Close the Customers table.
3.3 Setting Number Formats The Format property affects how data appears in Datasheet view, not how it is stored
in the table nor how it is used in calculations. If a Number data type field is formatted
with 0 decimal places, for example, a value of 1.5 would appear as 2 in the datasheet;
if the value is multiplied by 2 in a calculation, however, the answer would be 3, not 4.
The available formats for fields with Number data types are listed in the following
table:
Format Description
General Number Displays a number exactly as it is entered; this is
the default format
Currency Displays a dollar sign, a thousands separator, and
two decimal places; the defaults for this format are
determined by the system settings
Euro Displays a euro sign, a thousands separator, and
two decimal places; the defaults for this format are
determined by the system settings
Fixed Displays at least one digit and is rounded to the
default number of decimal places; the defaults for
this format are determined by the system settings
Standard Displays a thousands separator and is rounded to
the default number of decimal places; the defaults
for this format are determined by the system
settings
Percent Multiplies the number by 100, displays a percent
sign (%), and is rounded to the default number of
decimal places; the defaults for this format are
determined by the system settings
Scientific Expresses numbers in standard scientific notation
(as multiples of exponents of 10)
SAMPLE
Chapter 3 – Modifying the Field Properties
Page 22
Selecting a number format
Step-by-Step
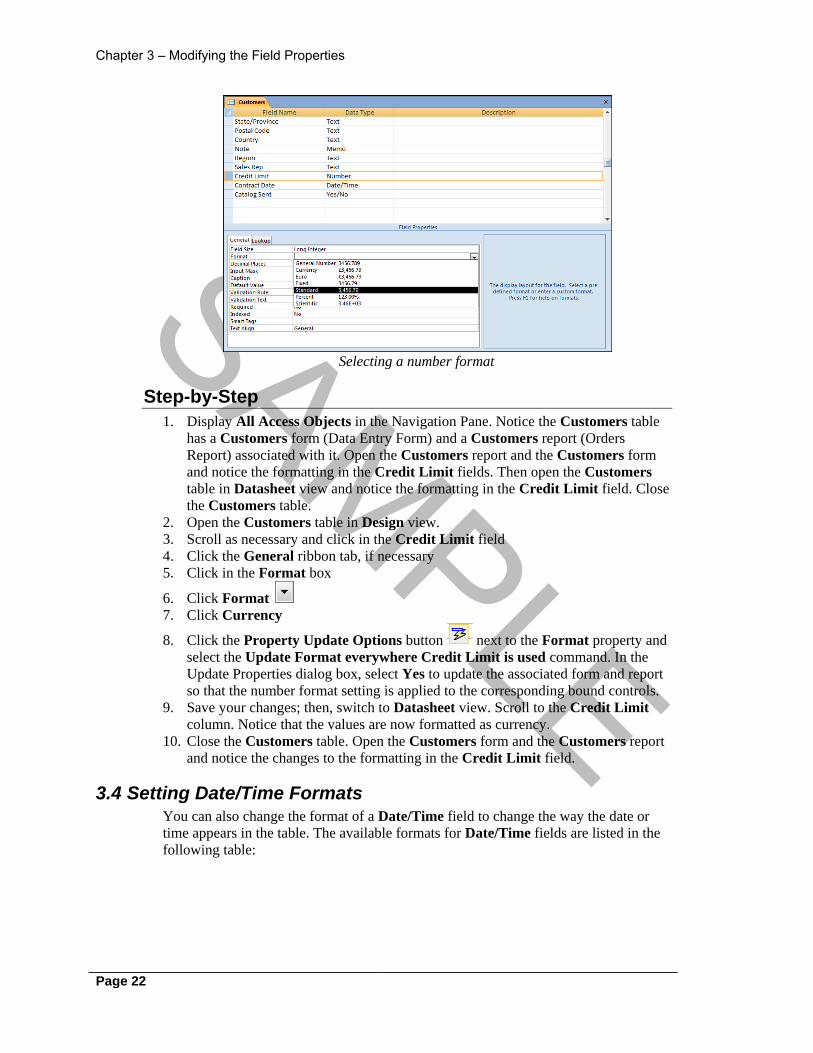
1. Display All Access Objects in the Navigation Pane. Notice the Customers table
has a Customers form (Data Entry Form) and a Customers report (Orders
Report) associated with it. Open the Customers report and the Customers form
and notice the formatting in the Credit Limit fields. Then open the Customers
table in Datasheet view and notice the formatting in the Credit Limit field. Close
the Customers table.
2. Open the Customers table in Design view.
3. Scroll as necessary and click in the Credit Limit field
4. Click the General ribbon tab, if necessary
5. Click in the Format box
6. Click Format
7. Click Currency
8. Click the Property Update Options button next to the Format property and
select the Update Format everywhere Credit Limit is used command. In the
Update Properties dialog box, select Yes to update the associated form and report
so that the number format setting is applied to the corresponding bound controls.
9. Save your changes; then, switch to Datasheet view. Scroll to the Credit Limit
column. Notice that the values are now formatted as currency.
10. Close the Customers table. Open the Customers form and the Customers report
and notice the changes to the formatting in the Credit Limit field.
3.4 Setting Date/Time Formats You can also change the format of a Date/Time field to change the way the date or
time appears in the table. The available formats for Date/Time fields are listed in the
following table:

SAMPLE
Access 2010 - Beginning
Page 23
Format Description
General Date The default format; if the value is only a date, no time
appears; if the value is only a time, no date appears
Long Date The day and month names are spelled out (e.g.,
Tuesday, July 4, 1995)
Medium Date The month name is abbreviated, and the name of the
day is omitted (e.g., 04-Jul-95)
Short Date The date appears as numbers separated by slashes
(e.g., 7/4/95)
Long Time The time is displayed as hours, minutes, and seconds,
separated by colons, and followed by an AM or a PM
indicator (e.g., 6:30:15 PM)
Medium Time The time is displayed the same as in the Long Time
format, except that no seconds appear (e.g., 06:15
PM)
Short Time The time is displayed as hours and minutes, separated
by a colon, in 24-hour clock format (e.g., 18:30)
Step-by-Step
1. Open the Customers table in Design view.
2. Scroll as necessary and click in the Contract Date field
3. Click the General tab, if necessary
4. Click in the Format box
5. Click Format
6. Click Medium Date
7. Save the table and switch to Datasheet view. Scroll as necessary to the Contract
Date field; notice its format.
8. Switch back to Design view.
3.5 Setting Yes/No Formats A Yes/No field is limited to either a positive or a negative response and can be
displayed as a text box, a check box, or a combo box. You select the display of the
field on the Lookup page in the Field Properties pane.
If the Yes/No field displays its values in a text box, you can select one of three
Yes/No data type formats: True/False, Yes/No, and On/Off. Regardless of the format
selected, the positive responses of True, Yes, and On are equivalent, just as the
negative responses of False, No, and Off are equivalent. Consequently, if the Yes/No
field is set to the True/False format and a user enters Yes, Access automatically
converts it to True.
When a Yes/No field displays a check box, a selected check box indicates a positive
response and a deselected check box indicates a negative response. The check box is
the default setting for a Yes/No field.
SAMPLE
Chapter 3 – Modifying the Field Properties
Page 24
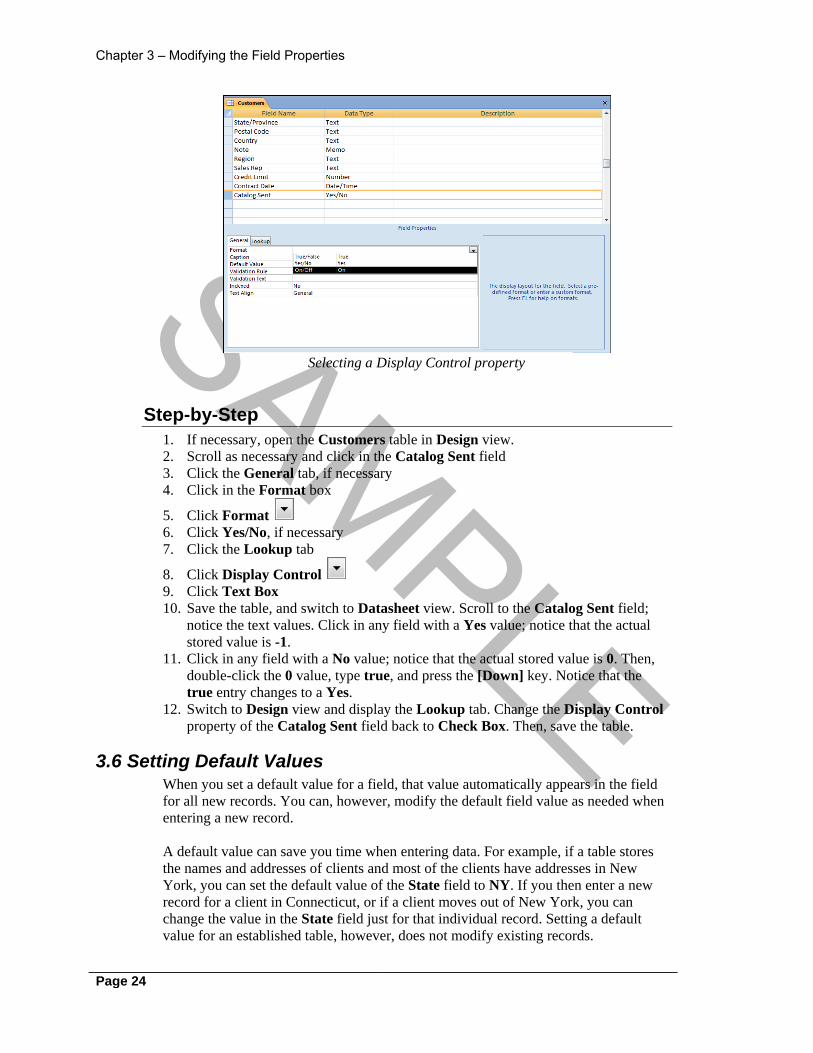
Selecting a Display Control property
Step-by-Step
1. If necessary, open the Customers table in Design view.
2. Scroll as necessary and click in the Catalog Sent field
3. Click the General tab, if necessary
4. Click in the Format box
5. Click Format
6. Click Yes/No, if necessary
7. Click the Lookup tab
8. Click Display Control
9. Click Text Box
10. Save the table, and switch to Datasheet view. Scroll to the Catalog Sent field;
notice the text values. Click in any field with a Yes value; notice that the actual
stored value is -1.
11. Click in any field with a No value; notice that the actual stored value is 0. Then,
double-click the 0 value, type true, and press the [Down] key. Notice that the
true entry changes to a Yes.
12. Switch to Design view and display the Lookup tab. Change the Display Control
property of the Catalog Sent field back to Check Box. Then, save the table.
3.6 Setting Default Values When you set a default value for a field, that value automatically appears in the field
for all new records. You can, however, modify the default field value as needed when
entering a new record.
A default value can save you time when entering data. For example, if a table stores
the names and addresses of clients and most of the clients have addresses in New
York, you can set the default value of the State field to NY. If you then enter a new
record for a client in Connecticut, or if a client moves out of New York, you can
change the value in the State field just for that individual record. Setting a default
value for an established table, however, does not modify existing records.

SAMPLE
Access 2010 - Beginning
Page 25
You can set a default value by entering the desired value or expression in the Default
Value box. An expression consists of operators (i.e., =, +, -, *, /) and/or values.
If you create a default value for a Text field, the default text must be enclosed in
quotation marks (" "); for example, "Net 30". Values for Date fields must be
enclosed in number signs (#); for example, #1/15/95#. If you do not enter the number
signs, however, Access will automatically enter them.
Step-by-Step
1. If necessary, open the Customers table in Design view.
2. Scroll as necessary and click in the Catalog Sent field
3. Click the General tab
4. Click in the Default Value box
5. Type yes
6. Press [Enter]
7. Save the table and switch to Datasheet view. Scroll to display the Catalog Sent
column in the new record row; notice that the Catalog Sent field for the new
record is checked.
8. Then, switch back to Design view.
3.7 Setting Validation Rules Databases can contain incorrect information due to data entry errors. One method of
controlling the accuracy of data is to impose restrictions on the values entered into a
field.
You can impose restrictions on data entered into your table by creating validation
rules in the Validation Rule box of one or more fields. When you enter data into a
new record or modify data in an existing record, Access checks each field for existing
validation rules. If an entry does not meet the conditions of the corresponding
validation rule, a warning box notifies you of the error. When you set a validation
rule, you use the Validation Text box to specify the text you want to appear in the
warning box.
Setting a validation rule is different from setting the data type or field size properties.
Access uses data type and field size properties to determine that the correct type of
data is being entered. Validation rules are more specific in their restrictions. For
example, you can create a validation rule to ensure that numbers entered in a
particular field are between 500 and 1000.

SAMPLE
Chapter 3 – Modifying the Field Properties
Page 26
Creating a validation rule with validation text
Step-by-Step
1. If necessary, open the Customers table in Design view.
2. Scroll as necessary and click in the Credit Limit field
3. Click the General tab, if necessary
4. Click in the Validation Rule box
5. Type <=10000
6. Click in the Validation Text box
7. Type The Credit Limit may not exceed $10,000.
8. Save the table; a Microsoft Office Access warning box informs you that data
integrity rules have been changed. Select Yes.
9. Switch back to Datasheet view. Create a new record; scroll as necessary, enter
15000 in the Credit Limit field, and press [Enter]. Select OK.
10. Press [Esc] twice to delete the new record and switch back to Design view.
3.8 Creating an Input Mask - Wizard Input masks control how data is entered into a table, as well as the format in which it
is stored. You can use an input mask to control how many characters are entered into a
field; define each individual character as numeric, text, or either; and specify each
individual character as mandatory or optional, as well as add literal characters to
format the entry. Since the input mask controls the values users can enter into a field,
it often makes data entry easier.
You can create an input mask by entering the criteria directly into the Input Mask
box. However, it is often easier to use the Input Mask Wizard to set the property for
you. The Input Mask Wizard offers several predefined input masks for items such as
dates and times, ZIP codes, telephone numbers, etc. In addition, you can modify any
predefined input mask to meet your needs.
Step-by-Step
1. If necessary, open the Customers table in Design view.
2. Scroll as necessary and click in the Phone Number field
3. Click the General tab, if necessary

SAMPLE
Access 2010 - Beginning
Page 27
4. Click in the Input Mask box
5. Click the Build button
6. Click Phone Number, if necessary
7. Click
8. Click Placeholder character
9. Click _
10. Click
11. Click Without the symbols in the mask, like this:, if necessary
12. Click
13. Click
14. Save the table and switch to Datasheet view. Create a new record and tab to the
Phone Number field; type 12345678910; notice that the input mask controls how
the number is entered, as well as how it is formatted.
15. Press [Esc] twice to delete the new record and close the Customers table.
3.9 Creating an Input Mask Manually An input mask controls what values you can enter in a field, as well as how the data
will appear. Although it is usually easier to use the Input Mask Wizard, you may need
to create an input mask that is not included in the list of predefined masks in the Input
Mask Wizard. Access allows you to create an input mask by entering criteria directly
into the Input Mask box.
When you create an input mask manually, you use special characters to define it.
These special characters act as placeholders, controlling the type of character that can
be entered into each position, as well as which characters are required. For example,
the (999) 000-0000 input mask allows you to enter only digits, and the area code is not
required; consequently, both ( ) 555-6545 and (804) 555-6545 are valid entries for this
input mask.
The following table defines some of the special characters that can be used in an input
mask. To define a literal character, enter any character other than one of those shown
in the table. If you want to define a character listed in the table as a literal character,
you must precede that character with a backslash (\).
Character Description
0 A required numeric entry (0-9); plus and minus signs are
not allowed
9 An optional numeric entry (0-9) or space; plus and minus
signs are not allowed
# An optional numeric entry (0-9) or space; plus and minus
signs are allowed
L A required alphabetic entry (A-Z)
? An optional alphabetic entry (A-Z)
A A required alphabetic (A-Z) or numeric (0-9) entry

SAMPLE
Chapter 3 – Modifying the Field Properties
Page 28
Character Description
a An optional alphabetic (A-Z) or numeric (0-9) entry
& Any character or space; entry required
C Any character or space; entry optional
< Causes all characters that follow to be converted to
lowercase
> Causes all characters that follow to be converted to
uppercase
! Enters the input mask from right to left, instead of from
left to right
\ Causes the character that follows to be displayed as a
literal character
Step-by-Step
1. If necessary, open the Reps table in Design view.
2. Click in the INITIALS field, if necessary
3. Click the General tab, if necessary
4. Click in the Input Mask box
5. Type >LLL
6. Save the changes to the table and switch to Datasheet view. Create a new record,
select the INITIALS field (if necessary), type abc, and press [Enter]; notice that
the completed entry is formatted as all caps.
7. Press [Esc] to delete the new record and close the Reps table.
3.10 Creating a Custom Input Mask The Input Mask Wizard provides a list of predefined input masks. If you frequently
use an input mask that is not included with the predefined masks in the Input Mask
Wizard, however, you may want to create a custom input mask. You may want to use
an input mask, for example, to ensure that product numbers are always correctly
entered.
You can create and save a custom input mask in the Input Mask Wizard, where it is
available to tables and forms at any time. In this way, you will only need to create a
custom input mask once.
Step-by-Step
1. Open the Items table in Design view.
2. Click in the Product ID field, if necessary
3. Click the General tab, if necessary
4. Click in the Input Mask box
5. Click the Build button
6. Click
7. Click
8. Type Product Number
9. Press [Tab]

SAMPLE
Access 2010 - Beginning
Page 29
10. Type !00-0000
11. Press [Tab]
12. Type _
13. Press [Tab]
14. Type 346278
15. Click
16. Scroll as necessary and click Product Number
17. Click
18. Save the changes to the table and switch to Datasheet view. Create a new record,
type 153434 into the Product ID field, and press [Enter]; notice the custom input
mask.
19. Press [Esc] to delete the new record and close the Items table.
3.11 Typing a Lookup List You can increase data accuracy by adding a lookup field to a table. The user can then
select the desired value from the lookup list, rather than having to type it. The values
in a lookup list are usually stored in a field in a different table. If you want the initials
of the sales representative to appear in the Sales Rep field of the Customer table, for
example, you can create a lookup to the Initials field in the Reps table. If the desired
data is not stored elsewhere, you can type the lookup list values.
The Lookup Wizard creates a combo box field for the lookup list; a combo box field
displays a drop-down list that displays all of the available data values. By default, a
lookup field does not limit input to values on the lookup list; the user can type an
entry not on the list if desired. However, you can limit a field to only those values on
the lookup list.
A lookup list can contain multiple columns. If you are typing a new list of values, you
can designate the number of columns desired and then type the desired values into
each column. In addition, you can add a second field to a lookup list. For example, if
you are creating a lookup list in the Customer table, you can add both the Initials and
the Last Name fields from the Reps table to the lookup list.
Using the Lookup Wizard

SAMPLE
Chapter 3 – Modifying the Field Properties
Page 30
Step-by-Step
1. Open the Orders table in Design view.
2. Click in the Data Type column of the Shipping Method field
3. Click Data Type arrow Text
4. Click Lookup Wizard...
5. Check the button: I will type in the values that I want.
6. Click
7. Type the number of columns of 2
8. Press [Tab]
9. Type 1
10. Type the following values into the lookup list, pressing the [Tab] key to move to
the next column or row as needed:
Col1 Col2
1 UPS
2 DHL
3 FedEx
4 US Mail
5 Emery
11. Click
12. Click Col1, if necessary
13. Click
14. Click
15. Save the table and switch to Datasheet view.
16. Select the Shipping Method field for the first record; then, select 1 UPS from the
lookup list. Press [Down], type 1 into the Shipping Method field of the second
record, and press [Down] again.
17. For the third record, type 2 and press [Down].
18. For the fourth record, type 3 and press [Enter].
19. Switch back to Design view.
3.12 Modifying Lookup Properties You can use the Lookup page in the Field Properties pane to modify the properties
of a lookup list.
If the lookup list was manually typed, you can use the Row Source property to edit it
or add to it. Column values are separated by semi-colons (;) and text entries are
enclosed in quotation marks (").
The Bound Column property indicates which lookup column is used to store field
values. For instance, if the lookup list consists of two columns, and column 1 is the
bound column, the data in column 1 will be stored in the lookup field.
Although you may want the values in the bound column to be stored in the field, they
may be confusing and uninformative to the user; the descriptive text in an unbound
field may have more meaning. You can suppress the display of the bound column and

SAMPLE
Access 2010 - Beginning
Page 31
display only the descriptive text in the unbound column of a lookup list by changing
the width of the bound column to zero (0”) in the Column Width box.
By default, a lookup field allows the user to add data values to the lookup list simply
by typing them into the field. You can limit data entry to just those values on the
lookup list by selecting Yes in the Limit to List box; the default value of No allows
free entry.
Step-by-Step
1. If necessary, open the Orders table in Design view.
2. Click in the Shipping Method field, if necessary
3. Click the Lookup tab, if necessary
4. Click in the Column Widths box
5. Change the text in the Column Widths property to 0";1". Then, change the
Limit To List property to Yes.
6. Save the table and switch to Datasheet view. Notice that all entries in the
Shipping Method field now display the text values. Select the next record in
which the Shipping Method field is blank and select Emery from the lookup list.
Press [Down], type the letter u, and press [Down] again. Notice that Access
completes the entry.
7. Type Post Office, and press [Down]; a Microsoft Office Access message box
informs you that the text entered is not on the list. Select OK and press [Esc]
twice.
8. Although text values appear in the field, the data actually stored in it is the
numeric values in the bound column. Right-click any field in the Shipping
Method column, select Text Filters, then select Equals..., type UPS, and press
[Enter]. Notice that no records are found; even though UPS appears in several
fields in the datasheet, it is not the actual data stored in the field. Click the Toggle
Filter button on the Home tab to display all records.
9. Now right-click any field in the Shipping Method column, select Text Filters,
then select Equals..., type 1, and press [Enter]. The filter now works, because
you filtered for data actually stored in the field. Click the Toggle Filter button to
display all records.
10. Save the Orders table.
3.13 Setting a Primary Key Access works most efficiently if you specify a primary key for each table. The
primary key is a field or group of fields that uniquely identifies each record in the
table. Therefore, the value of the key field, or the combined values of a group of key
fields, must not be found in more than one record. Consequently, a LastName field
would be a poor primary field, because several records may have the same last name;
it would not, therefore, be unique.
There are several advantages to setting a primary key. First, the primary key is
automatically indexed, which makes information retrieval faster. Second, when you
open a table, the records are automatically sorted in order by the primary key. Finally,
a primary key prevents the entry of duplicate data because Access does not allow
duplicates in the primary key field.

SAMPLE
Chapter 3 – Modifying the Field Properties
Page 32
Step-by-Step
Set a field as the primary key.
1. Click OrderNumber in the Field Name column
2. Click
3. Close the database.
3.14 Using Multi-valued Fields In Access 2010 it is possible to create a field that holds multiple values. This can be
used to store a multiple valued selection from a list of choices, but only when the list
of choices is relatively small. For example, if you are tracking issues, and the same
issue is reported by multiple clients, you can create a lookup list to enter that data.
When the combo box is selected, you can select or deselect check boxes to indicate
your choices. The selections are then stored in the multi-valued field, and are
separated by commas when displayed.
In Access 2010, you can use the Lookup Wizard to create a multi-valued field. The
Lookup Wizard takes you through the steps needed to create a lookup list. It
automatically sets the appropriate field properties and creates relationships where
necessary.
Step-by-Step
1. From the Student Data directory, open Chapter3-14 Start.Accdb.
2. Open the Items table in Design view, if necessary.
3. Type Color in the Field Name column
4. Click the mouse pointer in the data type column
5. Click and select Lookup Wizard
6. Click I will type in the values I want
7. Click
8. Type 1, if necessary
9. Press [Tab]
10. Type Green
11. Type the following values in the lookup list, pressing the [Tab] key to move to
the next row as needed:
Blue
Black
White
12. Click
13. Type Color, if necessary
14. Click Allow Multiple Values

SAMPLE
Access 2010 - Beginning
Page 33
15. Click
16. Click
17. Click on the Status Bar
18. Notice that when you click in a record in the Color Column, an arrow appears.
When you select the arrow, a lookup list appears. When you select the check
boxes next to the required values, and click OK, the desired values appear in the
field, separated by commas.
19. Close Chapter3-14 Start.Accdb.
3.15 Saving a New Table After you have designed the fields for a table, you must save the table before you can
add any data. When you save a new table, you should give it a name that describes the
records it stores. You can use up to 64 characters, including spaces. These characters
can include letters, numbers, and spaces. They cannot contain a period (.), an
exclamation point (!), a back quote (`), brackets ([]), or ASCII control characters.
Step-by-Step
1. Click
2. Type Line Items
3. Click
4. Close the Design view window. Notice that the table appears in the Navigation Pane.
5. Close the database.
Practice 1 - Setting Field Properties 1. Open Chapter3 Practice 1.accdb.
2. Open the Payment table in Design view.
3. Set the Format property for the Payment Date field to Short Date.
4. Set the Format property for the Amount Paid field to Currency.
5. Set a validation rule for the Amount Paid field, so that it can only contain values
greater than ten dollars. (Hint: Type >10.) Then, enter the following validation text:
The amount paid must be greater than ten dollars.
6. Set the Format property for the Recorded field to Yes/No.
7. Set a default value of “CHECK” for the Type of Payment field.
8. Switch to Datasheet view, saving the changes. Select Yes to any Microsoft Office
Access warning boxes. Notice the formats of the Payment Date and Amount Paid
fields. Scroll to the new record row; notice that the default value of CHECK appears
in the Type of Payment field. Create a new record with a Project ID of 11, a
Payment Date of 4/1/03, and an Amount Paid of 5. Select OK when prompted with
the validation text and replace the 5 with 25 in the Amount Paid field. Then, close
the Payment table.
9. Open the Reps table in Design view.
10. Select the Initials field and create the following input mask: >LL. (This mask will
require the data to be two letters and will automatically format them as uppercase.)
11. Switch to Datasheet view, saving the changes. Then, add the following new record:
Initials
pj

SAMPLE
Chapter 3 – Modifying the Field Properties
Page 34
(Notice that Access automatically capitalizes the entry in the Initials field.)
12. Switch to Design view and use the Input Mask Wizard to apply the Phone Number
mask to the Home Phone field. Then, save the table.
13. Select the Zip field and open the Input Mask Wizard. Add a new input mask named
Short Zip. (Hint: Use the Edit List button and create a new mask using the New
Record button.) Type the following input mask: !00000 with a sample data zip code
of 11111. Then, apply the Short Zip input mask to the Zip field.
14. Switch to Datasheet view, saving the changes. Tab to the Zip field for the first
record row and type 12345. Notice the input mask.
15. Tab to the Home Phone field, type 1234567890, and press [Enter]; notice that the
phone number is automatically formatted according to the input mask. Close the
Reps table.
16. Open the Project table in Design view. Create a new field below the Trainer Initials
field; name it Sales Rep and make it a lookup field. (Hint: Select Lookup Wizard
from the Data Type list.) Select the option to type in the values. Then, type the
following values for the lookup column: PJ, RJ, KM, and SH. Finish the Lookup
Wizard.
17. Switch to Datasheet view, saving the changes. Add the following values to the Sales
Rep column for the first four records:
Project ID Sales Rep
1 RJ
2 SH
3 PJ
4 KM
18. Switch back to Design view. Add a new sales representative to the Sales Rep value
list by typing ;"JW" after the last entry in the Row Source box. Then, change the
value in the List Rows box to 5. (Hint: Use the Lookup tab.)
19. Switch to Datasheet view, saving the changes. Select the first empty Sales Rep field
(in the Project ID 5 row) and select JW from the drop-down list.
20. Close the Project table.
21. Close the database file.

SAMPLE
Page 35
Chapter 4 - Working with Tables
4.1 Using Datasheet View When you open a table, it appears in Datasheet view by default. Datasheet view is
useful when you want to enter, edit, or delete records.
In Datasheet view, the table data is arranged in rows and columns, with the columns
representing the table fields and the rows the individual records. Multiple records
appear in the table. The small box at the far left of each row is the record selector; a
black triangle in the record selector indicates the current record.
4.2 Navigating Fields in Tables In Datasheet view, you can use the mouse or the keyboard to move through the fields
and records. If there are too many fields to display on screen at the same time, the
window scrolls automatically as you move to the right or left.
As you enter or edit data, you can use the [Tab] or [Enter] keys to move from field to
field. You can also use the [Right] and [Left] arrow keys to navigate across fields.
These keys are helpful because they allow you to keep your hands on the keyboard at
all times, rather than having to switch back and forth from the keyboard to the mouse.
However, the mouse is useful if you want to skip certain fields. You simply click in
the field where you want to enter or edit data.
The [Up] and [Down] arrow keys allow you to move from record to record. In
addition, the navigation toolbar at the bottom of the datasheet allows you to select the
first, last, next, or previous record, as well as specify a particular record you want to
view.
4.3 Using Field Templates Access 2010 has a number of predefined fields that can be used when creating a table.
The Field Templates task pane displays fields listed in categories, which you can drag
and drop onto a table opened in Datasheet view. The field template defines the field
name, data type, format and a number of field properties.
Step-by-Step
1. From the Student Data directory, open Chapter4-3 Start.accdb.
2. Open the Customers table in Datasheet view.
3. Click Datasheet ribbon tab.
4. Click New Field Located in the Fields & Columns group.
5. Click E-mail Address field.
6. Drag E-mail Address onto the Datasheet between the Fax Number and Address
fields
7. Release the mouse button

SAMPLE
Chapter 4 - Working with Tables
Page 36
4.4 Adding Records A blank row follows the last record in an existing table. This blank row, the new
record row, displays an asterisk (*) in the record selector. As soon as you begin
entering data into the new record row, the asterisk in the record selector changes to a
pencil to indicate that the record is being entered or edited, and Access creates another
new record row below it.
If there is no data in the table, only the new record row appears. It does not display an
asterisk, however; rather, it displays the black triangle that indicates the current
record.
When you enter data into a row, the amount of characters you can enter is limited by
the size of the field. The field size, however, can actually be larger than the column
width in Datasheet view; if the field size is larger than the column width, the text
scrolls as you type.
After you have typed the desired information into a field, you can press the [Enter] or
[Tab] key to save the record and move the insertion point to the next field.
Adding records in Datasheet view
Step-by-Step
1. Open the Items table in Datasheet view, if necessary.
2. Click in the Product ID field of the first row, if necessary
3. Type: 10-1437
4. Press [Enter]
5. Add the following records to the table, pressing [Enter] after each field:
ProductID Product Description Unit Price
10-1437 shoes, soccer 65.75
10-2562 skates, hockey 98.50
10-3827 shoes, baseball 97.81
6. Close the Datasheet view window.
4.5 Moving through Records If there are more records in a table than can be displayed in Datasheet view, a vertical
scroll bar appears. You can use this scroll bar to view additional records.
Access also provides a navigation toolbar at the bottom of the datasheet that can be
used to select the first, last, next, or previous record in the datasheet, as well as to
specify a particular record you want to view.

SAMPLE
Access 2010 - Beginning
Page 37
Step-by-Step
1. Open the Items 2 table in Datasheet view.
2. Click icon to move to the last record in the database.
3. Click icon to move to the first record in the database.
4. Click icon to move to the next record in the database.
5. Click icon to move to the previous record in the database.
4.6 Selecting Records When you select any field in a record, that record becomes the active record. The
current record is indicated by a change in color in the record selector. You can then
edit any field in the record as desired.
Selecting a record is different than making a record active. To select a record, you
must select the entire row. Selecting a record is useful when you want to delete or
copy it. For example, if you want to add a record containing almost identical
information as the current record, you can select the current record, copy it, paste it
into a new record, and then edit it as needed.
Step-by-Step
1. If necessary, open the Items 2 table in Datasheet view.
2. Click in the 10-8137 field. The field is selected and the record sellecor changes
color.
3. Point to the left of the 11-8771 field. A solid, black, right-pointing arrow appears.
4. Click to the left of the 11-8771 field. The entire row is selected.
4.7 Editing Records You can edit records at any time. You cannot edit an AutoNumber field, however,
because Access automatically generates the data in it.
When you use the keyboard to access a field, the entire field is selected, and you can
replace all data simply by typing new data. This is select mode. Access also allows
you to edit individual characters within a field. To do this, you must switch to edit
mode. In edit mode, the insertion point appears in the field. You can click in a field to
access edit mode.
While you are editing a record, a pencil appears in its record selector. The following
table describes various keystrokes you can use to edit records:
Keystroke Description
[Up] Selects the same field in the previous record.
[Down] Selects the same field in the next record.
[Right] In select mode, selects the next field; in edit
mode, moves one character to the right.
[Left] In select mode, selects the previous field; in
edit mode, moves one character to the left.
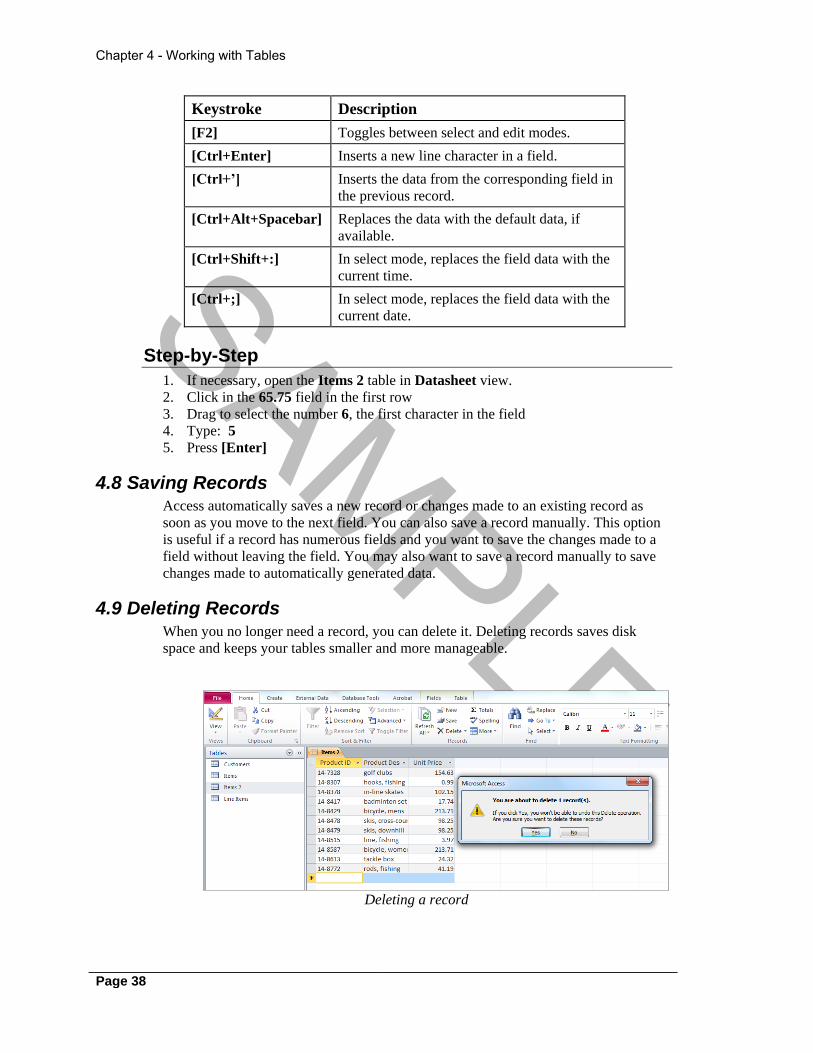
SAMPLE
Chapter 4 - Working with Tables
Page 38
Keystroke Description
[F2] Toggles between select and edit modes.
[Ctrl+Enter] Inserts a new line character in a field.
[Ctrl+’] Inserts the data from the corresponding field in
the previous record.
[Ctrl+Alt+Spacebar] Replaces the data with the default data, if
available.
[Ctrl+Shift+:] In select mode, replaces the field data with the
current time.
[Ctrl+;] In select mode, replaces the field data with the
current date.
Step-by-Step
1. If necessary, open the Items 2 table in Datasheet view.
2. Click in the 65.75 field in the first row
3. Drag to select the number 6, the first character in the field
4. Type: 5
5. Press [Enter]
4.8 Saving Records Access automatically saves a new record or changes made to an existing record as
soon as you move to the next field. You can also save a record manually. This option
is useful if a record has numerous fields and you want to save the changes made to a
field without leaving the field. You may also want to save a record manually to save
changes made to automatically generated data.
4.9 Deleting Records When you no longer need a record, you can delete it. Deleting records saves disk
space and keeps your tables smaller and more manageable.
Deleting a record

SAMPLE
Access 2010 - Beginning
Page 39
Step-by-Step
1. If necessary, open the Items 2 table in Datasheet view.
2. Scroll as necessary and click the record selector of the last record
3. Press [Delete]
4. Click
5. Close the Items 2 table.
4.10 Displaying a Totals Row in a Table Access 2010 has a new feature that allows you to add a totals row to a Datasheet.
This can be used to count the number of items in a column, calculate a sum, average,
or find the maximum or minimum value. (These are all examples of aggregate
functions).
A Totals Row in a table
Step-by-Step
1. Open the Items 2 table in datasheet view.
2. Click Home
3. Click
4. Click in the Unit Price field in the Total row
5. Click the down arrow
6. Click Sum
7. Notice that you can clear the totals row by clicking the Totals button in the
Records section of the Home tab again.
8. Close the database.

SAMPLE
Chapter 4 - Working with Tables
Page 40
Practice 1 - Working with Tables 1. Open Chapter4 Practice1.accdb.
2. Open the Project table in Datasheet view.
3. Add the following records to the table:
Project
ID
Client ID Course
Name
Start
Date
End
Date
Trainer
Initials
Cost
1001 ABBOTT PCBASICS 1/5/04 1/5/04 JA 75
1002 AQUA WINDOWS 1/9/04 1/9/04 EA 75
1003 CONCORD WORD 1/16/04 1/17/04 DF 200
4. Close the Project table.
5. Open the Project2 table in Datasheet view.
6. Move to the second record.
7. In the second record, change the start date to 1/10/04 and the end date to 1/11/04.
8. Save the record.
9. Select the fourth record.
10. Delete the fourth record.
11. Add a totals row to calculate the total cost.
12. Close the table without saving and then close the database.

SAMPLE
Page 101
Appendix C - Glossary
Atomic
A value that can’t be split into smaller meaningful values.
Boyce-Codd normal form
A rule that states that all non-key fields in regular tables and validation table should be
dependent on either the primary key or a candidate key.
Candidate Key
A field or group of fields that uniquely identifies a record. A table can have many
candidate keys.
Child table
A table that is on the many side of a one-to-many relationship.
Control
Objects inside forms and reports that hold data and calculations.
Data Normalization
A process of making a database conform to a list of standards called “normal forms” that
help prevent problems (anomalies) and ensure the integrity of the database.
Data type
A field property that determines the type of information that can be stored in the field.
Database Integrity
The state or quality of a database when it follows the rules of data normalization to
ensure that the database gives accurate information and prevents database anomalies.
Database
The group of tables.
Dependent field
A field whose value is determined by the value of another field.
Determinant field
The opposite of a dependent field; a field whose value determines the value in another
field.
Entity Relationship Diagram
A diagram that shows the relationships between the entities (tables) in a Relational
Database Management System.
Field List Worksheet
A spreadsheet like list of information about fields, their data types, controls, etc.

SAMPLE
Appendix C - Glossary
Page 102
Field
A column of values.
First normal form
A rule that states that all fields should be atomic, and unique.
Flat-file Database
A database with only one table.
Foreign Key
A field that is the primary key in another table.
Form
A way to view, on screen, the data from a table or query.
Fourth normal form
A rule that states that a table should not have multiple independent one-to-many
relationships.
Functional dependency
The state that exists when the value in one field is determined by the value in another
field.
Inner-join query
A query based on multiple tables, that shows only the records in one table that have
corresponding records in the second table.
Junction tables
A table that has a multi-field primary key. The junction table’s purpose is to provides a
link between tables that have a many-to-many relationship.
Many-to-many relationship
A relationship between two tables such that many records in one table have many records
in the second table.
Multi-field Primary Key
A primary key composed of multiple fields.
Multi-valued dependencies
A state that exists when the values of many fields in one record are determined by the
value of another field, but the dependent fields are not related to each other.
Naming convention prefix
Three lower-case characters, placed at the beginning of an objects name, that identifies
object’s type.
Naming convention
A systematic way of naming objects.

SAMPLE
Access 2010 – Beginning
Page 103
Non-key field
A field that is not the primary key, nor part of a multi-field primary key.
Normal Form
A standard that helps prevent problems (anomalies) and ensure the integrity of the
database.
One-to-many relationship
A relationship between two tables such that a record in one table has many corresponding
records in the second table.
One-to-one relationship
A relationship between two tables such that a record in one table has only one
corresponding record in the second table.
Orphan record
A record in a child table that has no corresponding records in the parent table.
Outer-join query
A query based on multiple tables, that allows you to see all the records from one table,
and only the corresponding records from the related table.
Parent table
A table that is on the one side of a one-to-many relationship.
Primary Key
A field or group of fields that uniquely identifies a record, and is used in table
relationships. Each table can have only one primary key.
Query
A question the database program can answer.
Record
A row of data about a single item.
Referential Integrity
An optional feature of a relationship that prevents orphan records.
Regular table
A table that holds the main pieces of information in your database.
Relational Database Management System
A database program, such as Microsoft Access, that uses a relational database model to
let users view, print and manipulate data.
Relational Database
A database with a group of tables that are related to each other by key fields.

SAMPLE
Appendix C - Glossary
Page 104
Repeating group
A group of values or fields that appear many times in one record.
Report
A way to view, on paper, the data from a table or query.
Second normal form
A rule that states that all non-key fields in a junction table should be dependent on the
entire primary key.
Sub-form
A form inside another form.
Sub-report
A report inside another report.
Table
The group of records.
Third normal form
A rule that states that all non-key fields in regular tables and validation tables should be
dependent on the primary key.
Transitive dependency
The state that exists when a non-key field is dependent on another non-key, non-
candidate key field.
Validation table
A table with only one or two fields that promotes data integrity by providing values to a
drop down menu.
Value
A single piece of data.

SAMPLE
Page 105
Appendix D – Answers For each definition on the right, write the number of the appropriate term on the left.
Term Definition
1 Database 4 A column of values.
2 Table 15 A database program, such as Microsoft Access, that uses a
relational database model to let users view, print and manipulate
data.
3 Record 14 A database with a group of tables that are related to each other by
key fields.
4 Field 13 A database with only one table.
5 Value 17 A diagram that shows the relationships between the entities
(tables) in a Relational Database Management System.
6 Atomic 9 A form inside another form.
7 Query 11 A report inside another report.
8 Form 3 A row of data about a single item.
9 Sub-form 7 A saved question the database program can answer.
10 Report 5 A single piece of data.
11 Sub-report 16 A spreadsheet like list of information about fields, their data types,
controls, etc.
12 Control 6 A value that can’t be split into smaller meaningful values.
13 Flat-file Database 10 A way to view, on paper, the data from a table or query.
14 Relational Database 8 A way to view, on screen, the data from a table or query.
15 Relational Database
Management System
12 Objects inside forms and reports that hold data and calculations.
16 Field List Worksheet 2 The group of records.
17 Entity Relationship
Diagram
19 The state or quality of a database when it follows the rules of data
normalization to ensure that the database gives accurate
information and prevents database anomalies.
18 Data Normalization 1 The group of tables
19 Database Integrity 20 A field or group of fields that uniquely identifies a record, and is
used in table relationships.
20 Primary Key 21 A field whose value determines the value in another field
21 Determinant 18 A process of making a database conform to a list of standards
called “normal forms” that help prevent anomalies and ensure the
integrity of the database.
22 Dependent 22 A field whose value is determined by the value of another field.

SAMPLE
Appendix D – Answers
Page 106
Place a one next to the primary keys. Place an (infinity sign) next to each foreign key.
Draw a line between each primary key and its foreign key.
In the space provided list the name of the child table of the following parent tables. Also list the name of the foreign key (the field that links to the parent’s primary key).
Parent Table Child Table Foreign Key
tblReps tblCustomers tblOrders
SalesRep SalesRep
tblCustomers tblOrders CustomerNumber
tblOrders tjnOrderLineItems OrderNumber
tblProducts tjnOrderLineItems ProductID

SAMPLE
Access 2010 - Beginning
Page 107
Answer the following questions about the relationships.
What type of relationships exists between the sales representative and their first name?
* 1 to 1
_ 1 to Many _ Many to Many
A sales representative can have many customers but a customer can have only one sales representative. What kind of relationship is this?
_ 1 to 1
* 1 to Many
_ Many to Many
What kind of relationship exists between the customer and the orders?
_ 1 to 1
* 1 to Many
_ Many to Many
One product can be sold on many orders. One order can have many products on it. What kind of relationships exists between the orders and the products?
_ 1 to 1
_ 1 to Many
* Many to Many
What kind of relationship exists between the products and the line items? _ 1 to 1
* 1 to Many
_ Many to Many
What kind of relationship exists between the orders and the line items? _ 1 to 1
* 1 to Many
_ Many to Many
Listed below are prefixes we will use in this class. See if you can fill in the type of object represented?
Prefix Object Type
frm form
mcr macro
mod module
qry query
rpt report
tbl table
Identify which choice is the best name to use for each of the following objects:
Objec
t
Type
Choice #
1
Choice #
2
Choice #
3
Choice #
4
Table TblCustomers TBLCUSTOMERS
tblCustomers Customers
Quer
y
Top ten Customers
Qrytoptencustomers
QRYTOPTENCUSTOMERS
qryTopTenCustomers
Form Products frm Products frmProducts FRMPRODUCTS
Repor
t
RptEmployeeList
rptEmployeeList EmployeeList Employee List Report
Text
Field
First Name First name firstname FirstName

SAMPLE
Page 108
Index
Access
getting help with, 1
Access Options
using, 7
anomalies, 58, 84, 87, 105
atomic, 77, 78
Cell effects
changing, 42
Column width
changing, 41
Columns
freezing, 44
hiding, 43
moving, 43
selecting, 43
unhiding, 43
Contextual command tabs, 3
controls, 80, 81, 87, 105
Data
replacing, 49
data normalization, 84, 87, 105
data type, 81, 87, 93, 94, 95, 99, 105
data types, 81, 87, 105
Data types
assigning, 15
AutoNumber, 15
Currency, 15
Date/Time, 15
Hyperlink, 16
Lookup Wizard, 16
Memo, 15
Number, 15
OLE object, 16
Text, 15
Yes/No, 16
Database
closing, 8
open existing, 2, 3
Database objects
object type, 4
opening, 5
Database template, 11
Databases, 1
creating new, 12
relational, 1
Datasheet view
using, 35
Date/Time formats
setting, 22
Default values
setting, 24
Design view
creating a query, 68
creating tables, 14
using, 14
Field descriptions
adding, 17
field names, 85, 86, 88, 91
Field names
adding, 14
Field properties
creating an input mask, 26, 27
limiting the field size, 20
lookup list, 30, 31
property types, 19
setting date/time formats, 22, 23
setting default values, 24, 25
setting validation rules/text, 25, 26
setting yes/no formats, 23, 24
using, 19
Field templates, 35
Fields, 1
multi-valued, 32
navigating, 35
Filter By Selection, 50
Filter Excluding Selection, 51
Filtering
AutoFilter, 53
quick filters, 52
Filters
applying, 51
Filter By Selection, 50
Filter Excluding Selection, 51
removing, 51
Find
finding specific records, 47
using wildcards, 48
Font attributes
changing, 41
foreign key, 57, 58, 78, 83, 93, 94, 95, 96,
97, 99, 106
Forms, 69

SAMPLE
Page 109
adding a record, 69
columnar, 69
creating with the form button, 69
datasheet, 69
justified, 69
PivotChart, 69
PivotTable, 69
tabular, 69
Input mask
creating, 26
creating custom, 28
Input Mask Wizard, 26, 28
integrity, 56, 59, 84, 87, 105
Interface
using, 1
Join lines
deleting, 63
Lookup field
creating, 29, 30
properties, 30
Lookup list
creating, 29
Lookup properties
modifying, 30
Lookup Wizard
creating a list, 29
many-to-many, 57, 58
naming convention, 85
Navigation Pane, 4, 5
Number formats
setting, 21
one-to-many, 56, 57, 58, 94
one-to-one, 55, 56, 57
primary key, 57, 58, 78, 83, 93, 94, 95, 96,
99, 106
Primary keys
setting, 31, 32
Print preview, 71
Queries, 67
creating in Design view, 68
Simple Query Wizard, 67
Records, 1
adding, 36
deleting, 38
editing, 37
finding specific, 47
moving through, 36
replacing data, 49
saving, 38
selecting, 37
sorting, 47
Recordsets, 67
Referential integrity
setting, 61
Relationships
creating between tables, 60
deleting join lines, 63
many-to-many, 60
one-to-many, 59
one-to-one, 60
setting referential integrity, 61
using related tables, 59
window, 60
Replace, 49
Reports
columnar, 70
creating, 70
creating with the Report button, 70
tabular, 70
viewing, 71
Ribbon
using, 3
Row height
changing, 41
Search Box
using, 51
Simple Query Wizard, 67
Status bar, 6
Subdatasheets
viewing, 62
Tabbed documents
using, 6
Tables, 1
adding field descriptions, 17
adding field names, 14
adding records, 36
alternate background color, 42
assigning data types, 15
changing cell effects, 42
changing font attributes, 41
changing the column width, 41
changing the row height, 41
datasheet view, 13
deleting join lines, 63
deleting records, 38
design view, 13, 14
designing, 12
editing records, 37
freezing columns, 44
hiding columns, 43
joining, 60
moving columns, 43

SAMPLE
Page 110
moving through records, 36, 37
navigating, 36
navigating fields, 35
related, 59
relating, 1
saving new, 33
saving records, 38
selecting columns, 43
selecting records, 37
setting a primary key, 31, 32
totals row, 39
unhiding columns, 43
using Datasheet view, 35
using Design view, 14
viewing subdatasheets, 62
Validation rules/text
setting, 25
Wildcards
using, 48
Wizards
Input Mask, 28
worksheet, 82, 94, 95, 96, 97, 98
Yes/No formats
setting, 23

SAMPLE
Page 111