microsoft access 2010: part 1 summary...
TRANSCRIPT

Access 2010 Part 1 (v2 rev 8/7/2013)
©2013 JWalk Professional Services Page 1
M I C R O S O F T A C C E S S 2 0 1 0 : P A R T 1
G E T T I N G T O K N O W A C C E S S
Michael J. Walk ALC Instructor
[email protected] www.jwalkonline.org/main
@MichaelJWalk
SUMMARY
Getting to know access:
what is access and how
to make a database and
its parts.
Learn what Microsoft
Access can do, what's the
difference between
Access and Excel, and
how to build a database
to enter, store, retrieve,
and report out your data.
Prerequisites: basic
understanding of the
Windows environment
and interface (my
computer; save vs. save
as; Start Menu;
cut/copy/paste, etc.)

Access 2010 Part 1 (v2 rev 8/7/2013)
©2013 JWalk Professional Services Page 2
TABLE OF CONTENTS
Summary .................................................................................................................................................................................... 1 How to Use This Handout..................................................................................................................................................... 3
Click Paths ............................................................................................................................................................................. 3 Keyboard Directions ......................................................................................................................................................... 3
What is Access?......................................................................................................................................................................... 3 How is Access Different from Excel? ............................................................................................................................... 4 Overview of Access Database Objects ............................................................................................................................. 5
Table ........................................................................................................................................................................................ 5 Query ....................................................................................................................................................................................... 7 Form......................................................................................................................................................................................... 7 Report ..................................................................................................................................................................................... 8
Object Views .............................................................................................................................................................................. 9 Designing a Database ........................................................................................................................................................... 10
Example Database Planning ......................................................................................................................................... 12
Creating a New Database .................................................................................................................................................... 13
Creating the Database File ............................................................................................................................................ 13 Creating a New Table ...................................................................................................................................................... 13
Controlling User Input (Creating an Input Mask) ........................................................................................... 16 Creating a Dropdown Box (Lookup Wizard…) ................................................................................................ 18 Table Data Types .......................................................................................................................................................... 22 Navigating a Table ....................................................................................................................................................... 23
Importing a Table from Excel ...................................................................................................................................... 23 Creating a Form ................................................................................................................................................................. 26 Making a Query ................................................................................................................................................................. 27 Creating a Report.............................................................................................................................................................. 31
Input Mask Syntax and Examples ................................................................................................................................... 33 Gopher Wood, Ltd. Database ............................................................................................................................................ 34 ASSIGNMENT 1: ..................................................................................................................................................................... 35 ASSIGNMENT 2: Creating a Form ................................................................................................................................... 36 ASSIGNMENT 3: Creating a Query .................................................................................................................................. 36 ASSIGNMENT 4: Create a Report .................................................................................................................................... 36

Access 2010 Part 1 (v2 rev 8/7/2013)
©2013 JWalk Professional Services Page 3
HOW TO USE THIS HANDOUT
This handout serves as a point of reference for your workshop. However, you may also use the handout after the class is over to help you remember how to perform some of the tasks covered during the workshop.
CLICK PATHS
Throughout this handout, you will be given directions to perform a series of mouse clicks—also called a “click path.” For instance, to save a change to an Access object, you should click on the File tab in the ribbon, then click on Save. In this handout, that click path is displayed using a bold font for the words to click on connected by a single right-pointing arrow ():
File Save In some cases, you must find the correct section of the ribbon before clicking on an icon or button. In these cases, the ribbon section will be highlighted in gray, for example:
External Data Import & Link Excel In this example, Import & Link is a ribbon section.
KEYBOARD DIRECTIONS
You also will be given directions to press certain keys on your keyboard. There are two kinds of key press sequences: (1) simultaneous and (2) sequential.
1) Simultaneous key presses refers to keys you have to hold down together to perform a task. Simultaneous key presses are displayed using the plus sign (+) between the keys to be pressed typed in caps. For example, the find box is opened by pressing CTRL + F. CTRL stands for the control key. ALT stands for the alternate key. WIN stands for the windows key (only applies to PCs with windows keys).
2) Sequential key presses refers to keys you have to press in sequence (one after the other—it is not necessary to hold them down). Sequential key presses are displayed using a pipe character (|) between the keys to be pressed typed in caps. For example, one way to save your file under a new file name is to type ALT, then F, then A. This would be displayed as: ALT | F | A.
If you like keyboard shortcuts, Microsoft Office has provided a very robust listing of them at: http://office.microsoft.com/en-us/access-help/keyboard-shortcuts-for-access-HP010341802.aspx. I provide a lot in this workshop, but their list exhaustive.
WHAT IS ACCESS?

Access 2010 Part 1 (v2 rev 8/7/2013)
©2013 JWalk Professional Services Page 4
To begin, you must understand what Access is used for. Access is a powerful tool for handling large amounts of data and for handling data workflows and relationships. For example, if run your own consulting firm, you might need to keep a list of employees (current and past), a list of clients and their information, what projects are being worked on by what employees for what client, etc. Access allows you to do all that without needing to know how to write computer code. Basically speaking, Access allows you to:
1) Store large amounts of structured information 2) Interact with that information (add to it, analyze it, sort it, aggregate it) 3) Report on that information (create charts, summary reports, descriptive statistical analyses) 4) Control that information (use the info to process workflows, etc.)
Access allows us to perform these tasks through use of 6 different database object types (depicted below). The purpose of each object is different (this will be discussed in the section Database Objects). In Access, you can have multiple tables, multiple queries, etc., (each with their own, unique names) all stored inside a single database file. (See Figure 1.)
FIGURE 1. DEPICTION OF ACCESS DATABASE FILE AND OBJECT TYPES.
Access can connect to tables in many different database formats/vendors, including SQL databases, Oracle, and others as well as hosting the data using Access database tables.
HOW IS ACCESS DIFFERENT FROM EXCEL?
Excel (or a similar program) allows you to store a lot of information, but it is not especially good at allowing you to interact with that information. You could store a list of employees, a list of clients, and a list of projects all in Excel with ease. But, it would be difficult to create a print out in Excel that allows you to see the history of each employee, including all clients the employee interacted with
Access Database
File
*.accdb
Tables
Queries
Forms
Reports
Macros
Modules

Access 2010 Part 1 (v2 rev 8/7/2013)
©2013 JWalk Professional Services Page 5
and the total revenue brought in per employee. Even if you created such a printout in Excel, what would happen if a new piece of data was entered? You’d have to do everything again. Access is a “live” data manager. That is, it allows you to work with changing data sets with ease. When new records are added, Access can automatically add them to your analyses and reports without you having to redefine a data range or anything. Here’s a list of the main differences between Excel and Access:
Property Excel Access1
Maximum # of rows 1,048,576 per sheet ∞ (2 GB is maximum size of an .accdb file; for linked tables, max size is determined by computer capacity)
Maximum # of columns per sheet / table
16,384 256
Maximum # of tables / sheets Determined by computer capacity
2 GB of data
Changes to data in tables are saved automatically?
No Yes
Allows you to create native reports?
No Yes
Allows you to connect tables of data together? (Relational data)
No Yes
Can multiple users work in the file at the same time?
No Yes
Provides forms for data entry
No Yes
Good for “proof of concept” and short-term solution building
Yes No
OVERVIEW OF ACCESS DATABASE OBJECTS
TABLE
A table is the basic tool for keeping information in a database. Access can hold multiple tables, each with its own name. Usually, a single table is used for each class or group of information. A grocery store might have several tables, including ones for: Customers, Employees, Products, Vendors, and Orders.
1) Purpose: store data (ONLY TABLES STORE DATA) 2) Description: a table is composed of rows and columns (see Figure 2).
a. Record: a row (a unique case, observation, transaction, etc.) b. Field: a column (a unique data category that is collected for all records)
1 For other cool facts about the limits and specifications regarding Access 2010, visit http://office.microsoft.com/en-us/access-help/access-2010-specifications-HA010341462.aspx

Access 2010 Part 1 (v2 rev 8/7/2013)
©2013 JWalk Professional Services Page 6
c. For example, if you have a table of customers, each customer would be on a new record. Each customer record would have data stored in fields. For example, for each customer record, you may have their name, address, city, state, zip code, etc.
3) Naming rules: tables and queries cannot share names 4) Primary Key: the primary key is a field in a table that holds each record’s unique identifier.
In Figure 2, the primary key is labeled CustID. Each customer is assigned a unique customer identification number. This number allows the store to track this customer’s purchases, etc. (We’ll learn how to select a primary key later.) Examples of other primary keys include:
a. Social security number b. Bank account number c. Bank routing number d. Employee ID number e. UPC
FIGURE 2. SCREENSHOT OF A TABLE
Fields
Rec
ord
s

Access 2010 Part 1 (v2 rev 8/7/2013)
©2013 JWalk Professional Services Page 7
QUERY
A query is a standardized “question”—a data extraction and/or manipulation. Queries extract data from another data source—usually a table. However, queries can also extract data from other queries. Queries DO NOT contain their own data—only tables do. (See Figure 3.) 1) Main purpose(s):
a) Retrieve (specific) data b) Manipulate data (delete, update, re-calculate) c) Summarize / analyze data
2) Description: A query is designed to retrieve data from other table(s) that meet your criteria. Queries can be VERY specific, for example: if you had a table of customers, you could design a query to show all customers that: (assuming all necessary fields are part of the table) a) Became customers in the last 12 months (except for December) b) Have purchased at least $100 of products c) Live in Pennsylvania (but not in Philadelphia)
3) Naming rules: No table and query can have the same name.
FIGURE 3. SCREENSHOT OF QUERY RESULTS.
FORM
A method of viewing a table or a query one record at a time. You can enter new records, search for specific records, etc. with a form. The form itself does not contain any actual data…just the skeleton to display the data.
1) Main purpose(s): a) Data entry / data viewing b) User control (help your database user “get around”)
2) Description: Forms come in many shapes, sizes, and layouts. They are great ways to allow users to enter data into your database (easier than typing data into a table), because, in a form, you can view just one record at a time.
3) Naming rules: No forms can share a name; however, a form can have the same name as a query or table.

Access 2010 Part 1 (v2 rev 8/7/2013)
©2013 JWalk Professional Services Page 8
FIGURE 4. SCREENSHOT OF A FORM.
REPORT
A report allows you to view and/or print the information contained in a table in a way that is nicely formatted and can be sorted and grouped. 1) Purpose: Creates a “printable” presentation of data and increases data readability through
groups, sorts, and summaries. 2) Description: Reports can be used in many different ways. Their main function is to take a bunch
of data contained in a table or query, and display that data in a viewer- and printer-friendly way. For example, if you have a table of customers, you might want to view that table like an address book, with customers grouped together by first letter of last name (see Figure 5 for an example).
3) Naming rules: No two reports can have the same name; however, a report can share its name with a table, query, and/or form.

Access 2010 Part 1 (v2 rev 8/7/2013)
©2013 JWalk Professional Services Page 9
FIGURE 5. SCREENSHOT OF A REPORT.
OBJECT VIEWS
In Access, you need to be able to edit the design of object (e.g., add fields to a table) and to view the data contained in that design. To accomplish this, Access provides us with different “views,” or ways to view an object. You switch object views from Home View.
FIGURE 6. VIEW SWITCHING BUTTON IN THE RIBBON.

Access 2010 Part 1 (v2 rev 8/7/2013)
©2013 JWalk Professional Services Page 10
The table below presents the different object views available.
Object “Active” View Design View?
Layout View?
PivotTable/Chart View
Other Special Views
Table Datasheet View Yes No Yes Query Datasheet View Yes No Yes SQL view Form Form View Yes Yes No Report Report View Yes Yes No
1) Datasheet View a) View the data contained in tables and queries—multiple records are visible. This looks like
an Excel spreadsheet. 2) Form View
a) View the data displayed in the form and/or use the form’s controls to navigate the database. 3) Report View
a) View the data displayed on the report 4) Design View
a) Allows you to make detailed changes to the object design. It is the most complex yet most robust view for making changes to the way your objects function.
b) In design view, it is difficult to see how your object will be displayed, because you cannot see the data and how your design change will impact the overall appearance of the object.
5) Layout View a) Allows you to view the data in your object while you are trying to change the object’s layout.
6) Pivot Table / Pivot Chart View a) Allows you to create Pivot Tables/Charts based on data contained in a table or query.
7) SQL View a) Applies only to queries; SQL stands for structured query language. SQL view for a query
simply shows the query’s design using SQL syntax rather than a graphical interface. This is similar to showing the “code” that makes up a webpage.
DESIGNING A DATABASE
Just a proviso: people can get Ph.D.’s in database design and spend years learning how to make databases. You only get this workshop. So, let’s cover just some basic concepts and pointers about designing a database. 1) Imagine your workflows: Before you make your first table, sit down and think about you want
your database to do. a) What data are you going to want to get out of the database? b) How long will the database be running? Long enough to make some records old and not
useful? Will it be in use longer than you may be? c) How do you want the data to go in to your database? d) How many database users will there be? And what is their level of expertise?
2) Once you have assessed what you want your database to do, begin designing your tables in Excel or Word (or on paper). a) Tables usually fall into one of two categories: (1) reference and (2) transactional

Access 2010 Part 1 (v2 rev 8/7/2013)
©2013 JWalk Professional Services Page 11
b) Reference tables are those that hold relatively static information that you intend to use to feed into your transactional tables. For example, look at the section, Example Database Planning, below. The company, Gopher Wood, Ltd., has planned three tables: i) Reference Tables
(1) Customers: stores information about individual customers, including their names, contact information, and whether or not the customers are active
(2) Products: stores information about the different products the company sells, including how much each product costs, how many are currently in stock, and where each product is stored.
ii) Transactional Table: (1) Orders: stores information about what customers bought what products when.
c) When planning what fields to have in your tables, a couple rules of thumb apply: i) Specificity is better: it is usually better to have more fields than less so you can store
more specific types on information. It is easier to piece fields together to form a whole value than it is to try to extract parts of a field. For example, you could store a customer name using any of these field sets: (1) Name (2) First Name; Last Name (3) First Name; Middle Initial; Last Name; Suffix (THE BEST ONE) The third option is the best, because it allows you to easily use any portion of the customer’s name individually, and it better organizes the different components of a name. Imagine trying to create a form letter that uses the customer’s first name if you would only have the field, Name. It would be very difficult.
ii) More is better: have a field idea, but not sure if it will be useful? If you have an idea, you probably want to keep it. Some commonly overlooked but quite useful fields: (1) An active field: if your database is going to be running for a while, some of the
information in it might expire. Customers or employees might leave, products might be discontinued, etc. So, do you want to delete them from your database, making historical record keeping inaccurate? Or, should you make them as inactive?
(2) A date entered field. It is often helpful for auditing and chronological analyses to have a field the records when a record was first added to your table.
d) Specify the primary key for each table. Except in certain cases where your table only have one field of non-duplicated values, make sure you add a field that will serve as the table’s primary key (the unique identifier for each record in the table). Usually, this is called ID or some variant thereof.
e) I also recommend creating some “test” tables in Excel using the fields you have specified during planning to give yourself an idea of how the data will look based on your current plan.
3) The last step is to begin planning the user interface – what forms, reports, and queries will you need to make your database user-friendly and to get information into usable displays and interfaces.

Access 2010 Part 1 (v2 rev 8/7/2013)
©2013 JWalk Professional Services Page 12
EXAMPLE DATABASE PLANNING
Gopher Wood, Ltd. Objective: We want to create a database in order to keep track of our customers, products, and orders. Basically, we want to be able to know what customers have bought what products when, and we want to be able to contact our customers, look up products, and view individual orders. Tables and Fields:
Reference Tables Transactional Table
Examples of Each Table: Customers
CustID FirstName LastName BusPhone Discount Active
1 Vanessa Hudgens (555)458-1994 N Y
2 John Bunyan (555)210-4795 Y Y
Products
ProdID Description Cost RetailPrice QtyOnHand BinLocation
5 Deck Beam $5.75 $10.99 10 A3
6 Plywood $2.53 $7.89 5 B10
Orders
OrderID Date CustID Total Shipped PayMethod
1045 12/17/2007 1 $1253.48 Y Cash
1046 06/15/2008 2 $652.23 N DSCVR
Customers CustID (primary key) FirstName LastName BusPhone Discount Active
Orders
OrderID (primary key) Date
CustID
Total Shipped PayMethod
Products ProdID (primary key)
Description Cost
RetailPrice QtyOnHand
BinLocation

Access 2010 Part 1 (v2 rev 8/7/2013)
©2013 JWalk Professional Services Page 13
CREATING A NEW DATABASE
CREATING THE DATABASE FILE
When you open Access, you will see a window allowing you to use templates or make a Blank Database.
1) Click on Blank Database 2) At the far right of your screen, you can provide a new database name and use the folder icon to
choose where to save your new database. Name this database, Access Part 1. 3) Click Create
CREATING A NEW TABLE
Once you create your database file, Access will provide you with a starter table. We don’t want that table, so close it by clicking on the small x at the far right below the menu. (Note: the red x in the upper right will completely close Access, not just the unwanted table.)
Name your new database here

Access 2010 Part 1 (v2 rev 8/7/2013)
©2013 JWalk Professional Services Page 14
FIGURE 7. CLOSING THE INITIAL TABLE: WHEN ACCESS CREATES A NEW BLANK DATABASE, IT GIVES YOU A TABLE BY DEFAULT. WE WANT TO START OUR OWN, SO CLOSE THE NEW TABLE.
There are two different ways to create a table: (1) Table Design or (2) Table. We are going to start learning by using the design method, which will require us to specify field names and properties before entering data.
FIGURE 8. STARTING A NEW TABLE BY CLICKING ON TABLE DESIGN.
1) Create Tables Table Design. This will give you a new blank table in design view. 2) Type your field names2 into the column labeled Field Name. (We’ll change the data types and
other properties later.) Use the list of fields in the Customers table located on page 34.
2 A couple rules about field names: they have to start with a number or letter (no symbols/spaces). They can contain spaces, numbers, and certain symbols. However, exclamation points, square brackets, periods, and

Access 2010 Part 1 (v2 rev 8/7/2013)
©2013 JWalk Professional Services Page 15
3) Setting appropriate data types and properties. This step in VERY IMPORTANT. Access needs to
know what kind of date (dates, numbers, text, etc.) you are trying to store inside each field. The section Table Data Types (page 22) contains a description of each available data type.
Field Data Type Why Special Properties to Set
CustID AutoNumber We want a number to be automatically assigned to each customer when added to the table.
None
FirstName Text Text is used for text that is less than 255 characters.
None
LastName Text Same as FirstName None BusPhone Text Even though a phone number might
seem like a “number,” it is really just a collection of characters. Also, phone numbers usually include non-numerical characters like parentheses and hyphens.
Set Input Mask using Input Mask wizard for Phone Number.
Address Text Same as FirstName None City Text Same as FirstName None State Lookup
Wizard… We are going to create a drop-down box of available states for the user to pick from.
Lookup properties: Limit to List = Yes Allow Value List Edits =
No Zip Text Same as BusPhone Set Input Mask using Input
Mask wizard for Zip Code Discount Lookup
Wizard… Our company only has a pre-selected set of discount values (0%, 5%, 10%, and 15%).
Lookup properties: Limit to List = Yes Allow Value List Edits =
No Active Yes/No This field can have only two possible None
many other symbols are reserved for Access syntax. Pick a capitalization and spacing scheme and stick with it. I usually use the rule: capitalize the first letter of each word, no spaces.

Access 2010 Part 1 (v2 rev 8/7/2013)
©2013 JWalk Professional Services Page 16
Field Data Type Why Special Properties to Set
values: Yes or No. Access has the Yes/No data type especially for this kind of field.
CustDate Date/Time Any field that contains dates and/or times NEEDS to be a Date/Time data type so that Access can treat it appropriately. Want to group by months? Want to sort dates in reverse chronological order? Then, you need the field to be a Date/Time.
Set Input Mask using wizard for Short Date. Choose Format = Short Date
When you’re done, the design view should look like this:
4) Save the table by pressing CTRL + S or clicking on the diskette icon in the upper left corner of
the screen. Type the table’s name in the box: Customers.
CONTROLLING USER INPUT (CREATING AN INPUT MASK)
Note: Before using the Input Mask Wizard, you will have to save your table. Remember, an input mask is a way that Access helps us to format data (i.e., add necessary symbols, etc.) so we don’t have to type them in ourselves. Also, an input mask helps ensure data format integrity—forcing database users to type in data in the format we want. The following example shows you how to set the input mask for the BusPhone field in the customer table. A similar process should be followed for other input masks. 1) Make sure you click on the design view row that has the field you want to add the mask to. 2) Place the cursor in the box next to input mask in the field properties

Access 2010 Part 1 (v2 rev 8/7/2013)
©2013 JWalk Professional Services Page 17
3) A small gray box with three dots “…” will appear to the right. (See Figure 9.)
FIGURE 9. LOCATION OF INPUT MASK WIZARD BUTTON.
4) Click on this, it will open the input mask wizard.
FIGURE 10. SCREENSHOT OF INPUT MASK WIZARD.
5) Select the Phone Number mask, and click Next >. 6) Click Next > through the next screen unless you want a different character to be displayed as
the placeholder (i.e., the character that the users sees where there are “blanks” to be filed in).
Input mask wizard

Access 2010 Part 1 (v2 rev 8/7/2013)
©2013 JWalk Professional Services Page 18
7) You then can choose to either save the symbols added by the mask or not (see Figure 11). I recommend saving them, because it keeps the special formatting in the raw data during exports. Click Next >.
FIGURE 11. SCREENSHOT OF OPTION TO SAVE SYMBOLS OR NOT.
8) Click Finish. 9) You should see some syntax (special characters) added to the Input Mask property of whatever
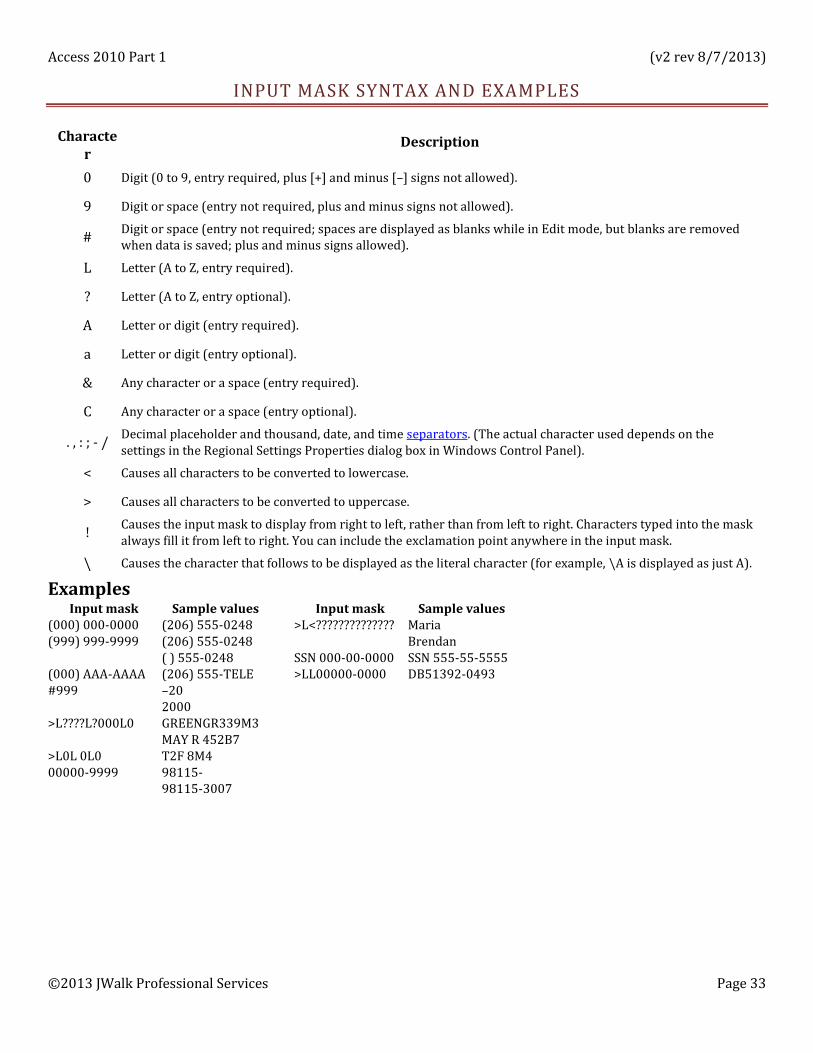
field you were editing. NOTE: See Input Mask Syntax and Examples on page 33 for other accepted syntax to make custom input masks.
CREATING A DROPDOWN BOX (LOOKUP WIZARD…)
Note: Before using the Lookup Wizard, you will have to save your table. The following example shows you how to create a drop-down box of states based on existing table of states that has already been imported from Excel. (The process to import data from Excel is covered on page 23.) 1) Make sure you click on the design view row that has the field you want to add the mask to. (For
this example, click in the State field.) 2) In the Data Type column, choose Lookup Wizard… (See Figure 12.)

Access 2010 Part 1 (v2 rev 8/7/2013)
©2013 JWalk Professional Services Page 19
FIGURE 12. CHOOSING THE LOOKUP WIZARD IN THE DATA TYPE DROP DOWN BOX.
3) You have the option of looking up values from some other table or typing in the values yourself. Select I want the lookup field to get the values from another table or query3. Click Next >.
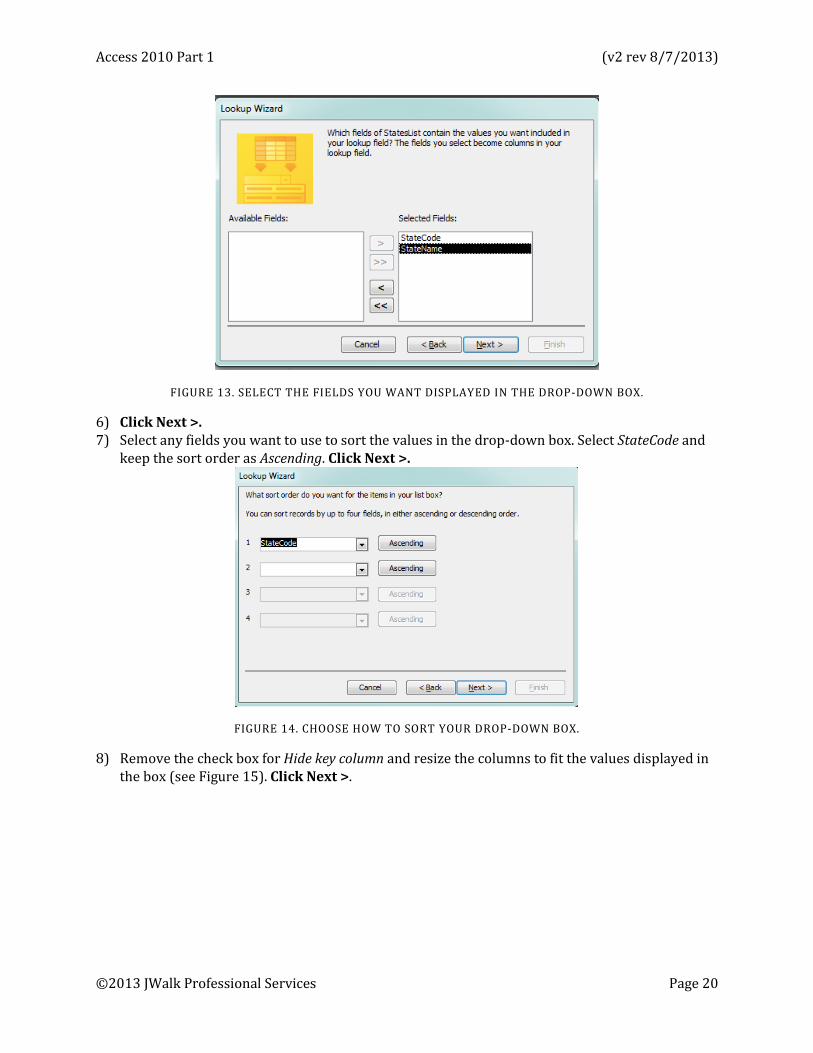
4) Select the table StatesList as your data source and click Next >. 5) Determine which fields you want to be displayed in the drop-down box. To move the two fields,
StateCode and StateName from the Available Fields box to the Selected Fields box (see Figure 13), either: a) Double-click on each field individually OR b) Click on one field, then click on the single arrow button (>). Repeat those steps for the next
field. OR c) Click on the double-arrow button4 (>>).
3 Typing in the values yourself works when you have a small set of values (no more than 5). But, is far less useful than creating a separate table that stores the values for your drop-down box. 4 The double-arrow button moves ALL fields.
Access 2010 Part 1 (v2 rev 8/7/2013)
©2013 JWalk Professional Services Page 20
FIGURE 13. SELECT THE FIELDS YOU WANT DISPLAYED IN THE DROP-DOWN BOX.
6) Click Next >. 7) Select any fields you want to use to sort the values in the drop-down box. Select StateCode and
keep the sort order as Ascending. Click Next >.
FIGURE 14. CHOOSE HOW TO SORT YOUR DROP-DOWN BOX.
8) Remove the check box for Hide key column and resize the columns to fit the values displayed in the box (see Figure 15). Click Next >.

Access 2010 Part 1 (v2 rev 8/7/2013)
©2013 JWalk Professional Services Page 21
FIGURE 15. ADJUST DROP-DOWN COLUMN WIDTHS AND ALLOW KEY COLUMN TO BE SHOWN.
9) When asked, chose the field StateCode as the value to be stored in your database. Click Next >. 10) Click Finish. 11) Next, you need to switch to the Lookup tab for the field properties and change the value for the
Limit to List property to Yes. (Also, make sure that Allow Value List Edits = No.) (See Figure 16.)
FIGURE 16. FINALIZING DROP-DOWN BOX PROPERTIES.

Access 2010 Part 1 (v2 rev 8/7/2013)
©2013 JWalk Professional Services Page 22
TABLE DATA TYPES
a) Text: letters/symbols/numbers (aka: strings) that DO NOT require any calculations. The MAX is 255 characters, but you can and SHOULD set a more appropriate maximum length (we’ll talk about doing that later).
b) Memo: lengthy text and/or numbers…for longer, more descriptive fields. For example, perhaps a comment or description field. (max 65,535 characters)
c) Number: any number that is strictly seen as a number; ones you will perhaps be doing calculations with. There are many different sub-types of numbers that you can set with a field size.
d) Date/Time: Dates and times come in many different formats that you can choose from (e.g., 12/17/1982 or 12-17-82 or Dec. 17, 1982, etc.).
e) Currency: Any field that will be handling monetary values. Can accept up to 15 digits to left of decimal and 4 to the right.
f) Autonumber: Automatic numbering… every record is assigned a unique ascending number. i) Once a record is added, the Autonumber CANNOT BE CHANGED. ii) Typically used as a primary key.
g) Yes/No: for fields that have only two values… the possibilities are as follows: i) Yes/No, True/False, or On/Off
(1) These are very handy when you only want two possible answers. h) OLE object: An external file of some type (pictures, word documents, etc.) i) Hyperlink: a link to take you to a web page or to send an email. If the data type is set as
hyperlink, whatever you type in the cell e.g., www.ubalt.edu will be automatically converted to a link; if you click on the link, it will take you to the web page. i) IF YOU WANT TO MAKE THE LINK OPEN AN EMAIL TO THAT PERSON, you must
preface the email address with the words mailto: and then type the email address (no spaces). This will convert the hyperlink to a mailing link.
j) Attachment: You can attach images, spreadsheet files, documents, charts, and other types of supported files to the records in your database, much like you attach files to e-mail messages. You can also view and edit attached files, depending on how the database designer sets up the Attachment field. Attachment fields provide greater flexibility than OLE Object fields, and they use storage space more efficiently because they don't create a bitmap image of the original file.
k) Lookup Wizard: these data types are similar to a yes/no where the options are limited, but, with look-up wizards, you can have more than 2 options to choose from.
2) Properties of Autonumber Data type: a) Field size: type of number! b) New values: do we want the field to simply count records as they are added? Or do we want
to generate a string of random numbers? c) Format: how the number is displayed. Usually, we leave this blank unless we have particular
reason to change it. d) Caption: is what Access will display when we make a report or form from the tabled data.
10) Properties of the Text Data type: a) Field size: (length of the field) how many characters allowed. b) Input mask: input masks are ways to add formatting to data that typically is displayed in a
particular way. For example, phone numbers are usually displayed like (410) 837-5299, social security numbers, zip codes, passwords, and time/dates.

Access 2010 Part 1 (v2 rev 8/7/2013)
©2013 JWalk Professional Services Page 23
c) Default Value: The value that will be displayed in the field unless it is changed by you. d) Validation rule: these are used to set restrictions on what is typed in a cell. e) Validation text: is the message you use to alert people using your database that they data
they entered in the cell does not meet the validation rule. f) Required: ONLY SET TO YES IF THE FIELD MUST HAVE SOME FORM OF INFORMATION IN
IT FOR EVERY RECORD. g) Allow zero length: if set to Yes, then you can type “” in the cell and, even if it is a REQUIRED
field, Access will allow you to continue.
NAVIGATING A TABLE
1) Tab (also right arrow) = move to next field 2) Shift + Tab (also left arrow) = move to previous field 3) Page down/up = move to last/first record 4) Jump records arrows at bottom…
IMPORTING A TABLE FROM EXCEL
You can import Excel worksheets into Access tables. For example, we will import an Excel worksheet that contains a list of states so we can easily create a drop-down box to be used in customers’ addresses.
1) External Data Excel Import & Link 2) Use the Browse button to locate the file state_table.xlsx. Once found, either double-click on the
file, or single-click Open.
FIGURE 17. SCREENSHOT OF THE EXCEL IMPORT DIALOG BOX.

Access 2010 Part 1 (v2 rev 8/7/2013)
©2013 JWalk Professional Services Page 24
3) Make sure that Import the source data… is selected5. 4) Click OK. 5) Check First Row Contains Field Names. Then Next >.
FIGURE 18. FIRST ROW CONTAINS FIELD NAMES BOX.
6) Ensure the data types are correct for each field by clicking in the field in the sheet display and checking the Field Name and Data Type properties above. In this case, both fields’ data types should be set to Text. Next >.
5 Importing the table makes a copy of the Excel sheet and its data and places that copy into an Access table. Linking creates a live connection between the Excel sheet and the Access table; if the Excel sheet changes, so does the Access table.

Access 2010 Part 1 (v2 rev 8/7/2013)
©2013 JWalk Professional Services Page 25
FIGURE 19. SPECIFY FIELD PROPERTIES BOX.
7) Determine whether you want to ADD a primary key field, SELECT the primary key from an existing field, or allow there to be NO primary key. In this case, we will select the StateCode field as the primary key. Next >.
FIGURE 20. SELECT THE PRIMARY KEY.
8) Change the imported table name to StatesList. Then Finish.

Access 2010 Part 1 (v2 rev 8/7/2013)
©2013 JWalk Professional Services Page 26
FIGURE 21. FINISH YOUR IMPORT BY RENAMING THE TABLE.
CREATING A FORM
There are several ways to create a form; the easiest is using the “AutoForm” method. This method is good for creating a simple form that displays all fields for one table. No bells, no whistles. 1) Single click on the table you want to use as the source data for your form (Customers). 2) Create Forms Form 3) This will create a form called Customers and will place that form in Layout View (the view that
allows you to adjust the layout of form controls while also seeing data in the form). (See Figure 22.) Save your form by pressing CTRL + S.

Access 2010 Part 1 (v2 rev 8/7/2013)
©2013 JWalk Professional Services Page 27
FIGURE 22. SIMPLE AUTOFORM FOR CUSTOMERS TABLE IN LAYOUT VIEW.
4) You can adjust the width of all controls at a time by hovering your mouse over the right border of any control, click and drag to the left or right.
5) To switch to Form View to do data entry, click on Design Views [Form Icon] Now, on the form, we see exactly the same records that are in our table, but we see each one by itself. You can see which record you are looking at by paying attention to the Record info at the bottom of the form. 6) How would we enter a new record??? * 7) Edit the Layout of a Form
a) We need to switch to Layout View. b) You can see that every field on the form has a box where the data is actually and a caption
or label. c) There are many different ways to adjust form layouts. Play around with the different menu
options, dragging and dropping, etc.
CREATING A QUERY
A query is special type of table that presents records that match a certain set of user-specific criteria, for example: All customers with last names beginning with the letter N. 1) Create Queries Query Design

Access 2010 Part 1 (v2 rev 8/7/2013)
©2013 JWalk Professional Services Page 28
FIGURE 23. SCREENSHOT OF HOW TO BEGIN DESIGNING A QUERY.
2) Select and add the tables from which the Query is to obtain its records, then close the Add Table dialog box. You can add table(s) to your Query by double-clicking on the table you want to add OR by clicking on the table and then clicking Add. Then, when done adding desired table(s), Close.

Access 2010 Part 1 (v2 rev 8/7/2013)
©2013 JWalk Professional Services Page 29
FIGURE 24. ADDING TABLES TO A QUERY DESIGN.
3) In the top half of the query design window (i.e., the gray area), you will see a small box containing field names (this box represents the table(s) for the query).
4) The bottom half of the query design window contains a white grid (called the Design Grid). Determine the fields you want to use in your query, and then add them to the Design Grid. The easiest way to add fields is to double-click on each one—they will automatically fill out the design grid from left to right. (You can also drag-and-drop the fields.)
5) For example, if you wanted your query to display the first name, last name, and phone number of all active customers, then you would need to add the following fields: a) FirstName b) LastName c) BusPhone d) Active

Access 2010 Part 1 (v2 rev 8/7/2013)
©2013 JWalk Professional Services Page 30
FIGURE 25. EXAMPLE OF A SIMPLE QUERY DESIGN.
6) Save the query 7) If you run the query now, you will obtain the first name, last name, phone number, and
customer status of all customers in your customer table. To run the query, either Design Results [Datasheet View Icon] OR Design Results Run.
ADDING BASIC CRITERIA
Criteria are added to queries to limit the query results to just show the records that contain certain values. For instance, let’s edit our query to show only the active customers. 1) In query design view, find the row at the bottom half that says Criteria. 2) You should type the criteria of the query in the cell in the column that contains the field upon
which you wish to place a restriction. 3) Type Yes in the criteria for the Active field. 4) Run the query. Multiple Criteria 1) To place multiple criteria on the query,
simply add criteria in the Criteria row in desired query columns.
2) Note: All criteria in the same row are equivalent to an AND statement (e.g., all
Additional Criteria Syntax Examples
1) <1/1/2000 = before Jan. 1, 2000 2) >1/1/2000 = after Jan. 1, 2000 3) <>50 = not equal to 50 4) Like “*MD*” = contains MD 5) Like “P*” = begins with P

Access 2010 Part 1 (v2 rev 8/7/2013)
©2013 JWalk Professional Services Page 31
customers before 2000 and not from Baltimore would have <1/1/2000 and Not Baltimore in the year and city fields, respectively—with both in the same row. Criteria in different rows are treated as OR statements (e.g., all customers before 2000 or are not from Baltimore).
CREATING A REPORT
1) Create Reports Report Wizard 2) Select the table from which you wish to obtain the data for the report 3) Select the fields you’ll want displayed in the report 4) Select any grouping fields (e.g., you may want to group by first letter of Last Name)
FIGURE 26. ADDING GROUPING LEVELS TO A REPORT.
5) Select any fields by which you want to sort the report (e.g., LastName) 6) Pick a layout 7) Give the report a name 8) Preview your report
a) Make sure that all field name and field values are displayed correctly (i.e., nothing is covered up or too short to display all the information)
b) If needed: switch to layout view to edit the layout of your report
ADDING SUMMARY STATISTICS TO YOUR REPORT
You can add the Sum¸ Count, or other summary statistic to fields displayed on your report.
1) Switch to Report Layout View.

Access 2010 Part 1 (v2 rev 8/7/2013)
©2013 JWalk Professional Services Page 32
2) Right-click on the field you wish to “total” / summarize. Note, you can Count any field that contains values. (See example in Figure 27.)
a. Then Total LastName b. Count Records
FIGURE 27. EXAMPLE OF ADDING SUMMARY STATISTICS TO A REPORT.
Access 2010 Part 1 (v2 rev 8/7/2013)
©2013 JWalk Professional Services Page 33
INPUT MASK SYNTAX AND EXAMPLES
Character
Description
0 Digit (0 to 9, entry required, plus [+] and minus [–] signs not allowed).
9 Digit or space (entry not required, plus and minus signs not allowed).
# Digit or space (entry not required; spaces are displayed as blanks while in Edit mode, but blanks are removed when data is saved; plus and minus signs allowed).
L Letter (A to Z, entry required).
? Letter (A to Z, entry optional).
A Letter or digit (entry required).
a Letter or digit (entry optional).
& Any character or a space (entry required).
C Any character or a space (entry optional).
. , : ; - / Decimal placeholder and thousand, date, and time separators. (The actual character used depends on the settings in the Regional Settings Properties dialog box in Windows Control Panel).
< Causes all characters to be converted to lowercase.
> Causes all characters to be converted to uppercase.
! Causes the input mask to display from right to left, rather than from left to right. Characters typed into the mask always fill it from left to right. You can include the exclamation point anywhere in the input mask.
\ Causes the character that follows to be displayed as the literal character (for example, \A is displayed as just A).
Examples Input mask Sample values Input mask Sample values
(000) 000-0000 (206) 555-0248 >L<?????????????? Maria (999) 999-9999 (206) 555-0248 Brendan ( ) 555-0248 SSN 000-00-0000 SSN 555-55-5555 (000) AAA-AAAA (206) 555-TELE >LL00000-0000 DB51392-0493 #999 –20 2000 >L????L?000L0 GREENGR339M3 MAY R 452B7 >L0L 0L0 T2F 8M4 00000-9999 98115- 98115-3007

Access 2010 Part 1 (v2 rev 8/7/2013)
©2013 JWalk Professional Services Page 34
GOPHER WOOD, LTD. DATABASE
Example 1: Customers Table
Customers
CustID FirstName
LastName BusPhone
Address City
State Zip
Discount Active CustDate
Data: 1 Jeffrey Loggins 410-837-5299 5248 Walnut Ln Baltimore, MD 21201 15% discount Active customer Customer since 01/05/1998 4 Frodo Baggins 111-333-4444 156 Baggend Way The Shire, MD 22647 10% discount Active customer Customer since 09/28/2000 7 Sandy Shores 987-451-1347 2 Ocean Drive Ocean City, MD 26798 No discount Active customer Customer since 07/06/2004
2 Petra Nelvoff 571-892-5879 12 Hickory St Chicago, IL 54892 5% discount Active customer Customer since 02/14/2001 5 Jeff Dufrain 534-986-7122 768 Shawshank Plz Perdition, PA 14844 10% discount Not active customer Customer since 03/01/1999 8 April Showers 632-698-4588 78 Mayflower St Bloomsburg, PA 17815 15% discount Active customer Customer since 12/05/1999
3 Micha Kormach 844-124-6659 9756 Midway Ave Pittsburg, PA 18768 No discount Not active customer Customer since 10/11/1983 6 Sarah Mealy 389-471-6565 111 Calvary Ct Millville, IL 57846 5% discount Not active customer Customer since 06/17/2002 9 Charles Equine 778-454-1819 Tight Calf Circle Frostburg, MD 26457 5% discount Not active customer Customer since 05/31/1991

Access 2010 Part 1 (v2 rev 8/7/2013)
©2013 JWalk Professional Services Page 35
ASSIGNMENT 1:
You need to design a table that captures the following information:
Students Table First Name Last Name Address
City State Zip Code
Date of Birth Academic Major Currently Enrolled?
Requirements:
ADD a field to be the Primary Key
All data types MUST be appropriate
2 Input Masks (you figure out which ones)
1 Lookup Wizard
1 Yes/No
Add 1 validation rule
Enter in the data for the following students
John Smythe 1101 Plank Street
Baltimore, MD 21204 11/2/1986
Business major Currently enrolled
Carrie Underwood
236 American Idol Way Baltimore, MD 21222
7/7/1980 Drama major
Currently enrolled
Simon Grumpy 2006 Angry Avenue
Essex, MD 21268 6/14/1972
Drama major Not enrolled currently
Paris Hyatt 34 Prison Road
Glen Burnie, MD 21044 8/20/1988
Psychology major Currently enrolled
Joey Triviani
306 Friends Street Baltimore, MD 21202
3/14/1980 Drama major
Currently Enrolled
Lord Baltimore 1000 Preston St
Baltimore, MD 21201 1/27/1990
Psychology major Currently enrolled
Dorothy Ozman 365 Brick Road Way Towson, MD 21208
11/4/1989 Psychology major Currently enrolled
Martin O’Malley
214 Governor’s Highway Essex, MD 21268
3/19/1964 Business major
Currently enrolled

Access 2010 Part 1 (v2 rev 8/7/2013)
©2013 JWalk Professional Services Page 36
ASSIGNMENT 2: CREATING A FORM
a) Use Customers table b) Make a form to use with the customer table c) You must include ALL fields from the table d) Pick a layout (either tabular or justified) and style that you like e) When you’ve made the form, make sure that all the fields and captions are visible and the
correct size. f) Add two more customers (#5 and #6) to the table using the form (get them from Practice 1:
Customers Table) g) When finished, leave your form visible; raise your hand for me to look at it.
ASSIGNMENT 3: CREATING A QUERY
a) Return to the Students table b) Create a query to display:
a. Name b. Address c. City d. State e. Zip Code f. Enrollment Status
c) Only display those students who are currently enrolled and NOT from Baltimore d) Save your query with an appropriate name e) When finished, leave query results on screen and raise your hand so I can check them
ASSIGNMENT 4: CREATE A REPORT
a) Go to Customers table b) Create a report for all customers, showing
o Name o Phone o City o State o Discount o Customer Status
c) Group the report by o Customer status, then by o State
d) Sort report by name e) Choose any style and layout you desire. f) When finished, verify that the report appears correctly, that all fields are displayed and
none are cut off, and then raise your hand for me to come look at it.